How-To Geek
How to autoplay and loop a google slides presentation.
Play your presentation without touching a thing.

Quick Links
Set up autoplay and loop when presenting, set up autoplay and loop when publishing to the web.
If you don't want to worry about clicking through your slideshow, you can set up Google Slides to play your presentation automatically. Plus, you can have the slideshow loop, so it starts over at the beginning when it ends.
You might be playing your slideshow at a kiosk, during a conference, or publishing it to the web. These are the ideal times to use AutoPlay and Loop in Google Slides . You can automatically present the show and choose the timing between slides. Then, restart the presentation at the beginning each time it ends.
If you plan to start the slideshow and then let it play, you can set up AutoPlay and Loop , or simply one or the other.
Related: How to Loop a PowerPoint Presentation
Start the presentation by clicking "Slideshow" at the top of Google Slides. You can also use the arrow to pick either "Presenter View" or "Start From Beginning" per your preference.
When the slideshow opens, display the Presenter Toolbar by hovering your cursor over the bottom left corner of the presentation.
Click the three dots on the right of the Presenter Toolbar, then move to AutoPlay. You'll see a pop-out menu that lets you select the advance timing for the slides. You can pick from every second up to every minute.
If you also want to loop the slideshow, select "Loop" at the bottom of the pop-out menu.
When you finish, click "Play" to automatically play your presentation.
To stop the slideshow, simply click on a slide. You can then resume AutoPlay from the Presenter Toolbar by selecting "Play" again.
Maybe you plan to publish your slideshow to the web or embed it on a website rather than play it locally. You can set up AutoPlay and Loop as part of the publish settings.
Related: How to Share a Google Docs, Sheets, or Slides File as a Web Page
Go to File > Publish to the Web in the menu.
Choose either "Link" or "Embed" per your intent. Then use the Auto-Advance Slides drop-down box to choose the timing for the slides. Here again, you can pick from every second up to every minute.
To loop the slideshow, check the box for Restart the Slideshow After the Last Slide.
You can then mark the checkbox for Start Slideshow as Soon as the Player loads if you like, so that the viewer doesn't have to take any action to begin the presentation.
When you finish, click "Publish" and confirm to obtain the link or embed code for the slideshow.
To share a Google Slides presentation that doesn't require you to walk viewers through it, remember these steps to automatically play and loop the slideshow.
How to Make Google Slides Loop (Even Without Publishing)
Learn how to make Google Slides presentations loop automatically, even without publishing them for others to view.
Since Google Slides is available for free, it doesn't have as many features as you may be used to in more powerful tools, like the desktop version of PowerPoint.
As a result, you might wonder how to loop a Google Slides presentation or make it play automatically. Thankfully, this is possible and not difficult to do. We'll show you how to make Google Slides loop, even without publishing the presentation.
How to Loop Google Slides Presentations Without Publishing
To loop a Google Slides presentation, first set up a new slideshow in Google Slides or open an existing one. Our guide to making a Google Slides presentation for college serves as a good intro if you need help.
When you're ready to run the slides on a loop, click the Slideshow button at the top-right to start playing your slides. With the slideshow showing, move your mouse to the bottom-left corner of the presentation screen to show the toolbar. On the toolbar, click the three-dot menu and expand the Auto-play item. Then on this menu, click the Loop option at the bottom to enable presentation looping.
Also on this menu, you'll need to choose the timing for your slides so that they play automatically. These range from short options like Every second or Every 2 seconds to Every 30 seconds or Every minute at the longest. Choose what timing makes sense based on your presentation type.
Once you've selected these options to loop and automatically advance your Google Slides presentation, click the Play button (on the same menu) to begin the slideshow. This will play your slides automatically, at your chosen speed, looping them until you click the Pause button on the same Auto-play menu.
Looping presentations continuously like this is great anytime you want to keep content cycling without your input. Try it for kiosks or to show photos at parties. Make sure to use the Enter/Exit full screen option as appropriate, too.
How to Publish a Looping Google Slides Presentation
If you want to send a Google Slides presentation to someone and have it loop automatically, that's possible too. This was previously the only way to repeat Google Slides slideshows before the above method was added. It still comes in handy if you want someone else's feedback before you give a presentation online, for instance.
To share a presentation that loops automatically, you need to publish your Google Slides presentation to the web . To do so, select File > Share > Publish to web at the top-left corner of the Slides interface.
When you do, you'll have a few options to configure. Select Link (unless you want to Embed it somewhere), then set the Auto-advance slides dropdown box to your preference. The available timings here are the same as with the above method; the default is three seconds, but you can choose from as little as one second or as long as a minute between slides.
Check Restart the slideshow after the last slide and it will continually loop until the recipient closes it. For best results, enable Start slideshow as soon as the player loads as well, so they don't have to start it manually.
Once you click Publish , you'll get a link that you can share with people anywhere you'd like. If you ever change your mind, expand the Published content & settings section and click Stop publishing , and people won't be able to view it with the link anymore.
Don't miss out on Google Slides' Presenter view to make your talk more engaging , either.
Looping Google Slides, Made Simple
Now you know how to loop Google Slides slideshows easily, with whatever timing you prefer. Whether you want to publish your slideshow or not, repeating a slideshow just takes a few clicks.
This isn't the only trick that Google Slides is hiding, either. Check out a lot more tips that help you create eye-catching documents across the Google Docs suite.
How to Make Google Slides Play Automatically (5 Steps)
 2")
Playing your Google Slides automatically can be a great way to enhance your presentations. Whether you want to create a seamless slideshow or set up a display, autoplay takes the effort out of manually advancing slides.
In this guide, we’ll walk through the steps to make Google Slides play automatically using both presentation mode and web publishing.
Enable Autoplay in Presentation Mode
The easiest way to autoplay your slides is directly within Google Slides using presentation mode. Here’s how:
1. Open Google Slides Presentation
First, open the Google Slides presentation you want to autoplay in your browser.
2. Switch to Slideshow Mode
In the top right corner, click on “Slideshow” to switch to fullscreen presentation mode.
3. Open Settings Menu
In the bottom left corner of the slideshow, click on the three dot icon to open the slideshow settings menu.
4. Select Autoplay
In the menu, choose the “Autoplay” option. A popup will appear allowing you to configure autoplay settings.
5. Set Timing and Looping
Use the slider or dropdown to select how long each slide displays for before automatically advancing. Enable looping if you want the presentation to start again from the beginning after the last slide.
6. Start Presentation
Click the “Play” button to start autoplay! The slides will now advance automatically based on the duration you set.
Autoplay Settings When Publishing
You can also configure Google Slides to autoplay when publishing your presentation to the web.
1. Open Publish Dialog
In your Google Slides menu, go to File > Publish to the web. The publish dialog box will open.
2. Choose Link or Embed
Select whether you want a direct link to your slides or embed code to display them on a web page.
3. Set Auto-Advance Duration
Use the “Auto-advance slides” dropdown to choose a duration for slides to display before advancing automatically.
4. Enable Looping
Check the box next to “Loop playback” if you want your slides to start over from the beginning after the last slide plays.
5. Publish Slideshow
Click the “Publish” button. Your slides are now ready to autoplay for anyone with the provided link or embed code!
Customize Additional Playback Options
A few other playback settings to consider for an enhanced automatic slideshow:
- Start slideshow automatically on open
- Hide controls and prevent manual navigation
- Optimize performance for smoother playback
Explore the options when publishing or presenting to customize the experience further.
Embed Videos That Autoplay
You can also embed videos set to autoplay when their slide appears:
- Insert video onto slide
- Right click > Format options
- Check Autoplay when presenting
- Video will play automatically!
Enabling your Google Slides to play on their own takes just a few clicks. Use presentation mode for live shows or publish to the web for self-running displays.
Autoplay makes it easy to deliver presentations without manual work or the risk of forgetting to advance slides. Take advantage of these options to amplify your next slideshow!
About The Author
Vegaslide staff, related posts.

How to Add Page Numbers in Google Slides

How to Upload PowerPoint File to Google Slides

How to Present Google Slides While You Offline

How to Draw Using Scribble Tool on Google Slides

How to add a timer to google slides
It is important to know how to add a timer to google slides while creating presentations this article explains the same.
Sanskar Tiwari

Related Blogs
How to summarize blog posts text into visual slideshows, how to create concise presentations from lengthy articles: a step-by-step guide, how to quickly summarize meeting agendas for ppt presentations, how to group different objects together in google slides, how to convert selected text to capitals in google slides, how to convert pdf report to powerpoint presentation, how to convert pdf lecture notes to powerpoint, how to extract webinar highlights from youtube to powerpoint for quick references, how to create language learning materials by converting youtube videos to powerpoint slides, stunning presentations in seconds with ai.
Install MagicSlides app now and start creating beautiful presentations. It's free!

~1M Installs, rated 4.5/5 ⭐️ by 424 reviews
- Start the presentation and see your notes in Presenter view Article
- Add speaker notes to your slides Article
- Rehearse and time the delivery of a presentation Article
- Record a slide show with narration and slide timings Article
- Print your PowerPoint slides, handouts, or notes Article
- Create a self-running presentation Article

Create a self-running presentation
You can use a self-running presentation to run unattended in a booth or kiosk at a trade show or convention, or you can save it as a video and send it to a client.

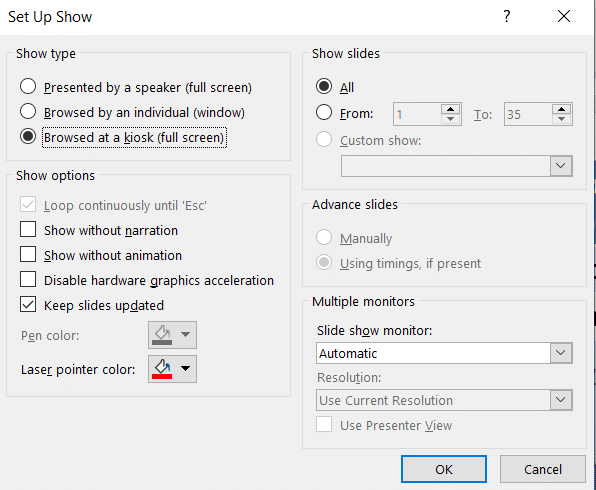
On the Slide Show tab, select Set Up Slide Show .
Under Show type , pick one of the following:
Presented by a speaker (full screen) Allows the people watching your slide show to have control over when they advance the slides.
Browsed by an individual (window) Presents your slide show in a window, where control over advancing the slides is not available to the people watching.
Browsed at a kiosk (full screen) Loops your slide show until the person watching presses Esc.

Rehearse and record slide timings
When you choose the following show types: Presented by a speaker (full screen) or Browsed at a kiosk (full screen) , you’ll want to rehearse and record timings for effects and slides.
On the Slide Show tab, select Rehearse Timings .
Note: The presentation timer begins immediately when you click Rehearse Timings .
The Rehearsal toolbar appears and the Slide Time box begins timing the presentation.

Figure: The Rehearsal toolbar
While timing your presentation, you can do one or more of the following on the Rehearsal toolbar:
To move to the next slide, click Next .
To temporarily stop recording the time, click Pause .
To restart recording the time after pausing, click Pause .
To set an exact length of time for a slide to appear, type the length of time in the Slide Time box.
To restart recording the time for the current slide, click Repeat .
After you set the time for the last slide, a message box displays the total time for the presentation and prompts you to do one of the following:
To keep the recorded slide timings, click Yes .
To discard the recorded slide timings, click No .
Slide Sorter view appears and displays the time of each slide in your presentation.
Add narration or sound
To record a narration, your computer requires a sound card and a microphone, and a microphone connector if the microphone is not a part of your computer.
On the Slide Show tab, in the Set Up group, click the arrow on the Record Slide Show button.

Select one of the following:
Start Recording from Beginning
Start Recording from Current Slide
In the Record Slide Show dialog box, select the Narrations and laser pointer check box, and if appropriate, select or deselect the Slide and animation timings check box.
Click Start Recording .
To pause the narration, in the Recording shortcut menu in Slide Show view, click Pause . And to resume your narration, click Resume Recording .

To end your slide show recording, right-click the slide, and then click End Show .
The recorded slide show timings are automatically saved and the slide show appears in Slide Sorter view with timings beneath each slide.
You can record a narration before you run a presentation, or you can record it during the presentation and include audience comments. If you do not want narration throughout your entire presentation, you can record separate sounds or comments on selected slides or objects. For more details, see Record a slide show with narration and slide timings .
Browsed by an individual (window) Presents your slide show in a window, where control over advancing the slides is available to the people watching.
Browsed at a kiosk (full screen) Loops your slide show until the person watching presses Esc. (Selecting this option automatically selects the Loop continuously until 'Esc' check box and causes your slide show to run in a loop.)

A Rehearsal toolbar appears, and the Slide Time box begins timing the presentation. The toolbar includes a timer, a pause/play button, and Repeat button
To restart recording the time after pausing, click Play .

On the view tab, you can then switch to Slide Sorter view to see the time allotted for each slide in your presentation.
Set up slide transitions
If you want a slide show to run automatically at a kiosk, you can control when and how the slides advance. To do this, you can apply the same transition to all slides in the presentation and set the transition to automatically advance after a certain time interval.
On the Transitions tab, click the transition that you want.

Do the following on the Transitions tab:
To set the amount of time that each slide is displayed, select After and enter the number of seconds you want.
To set the duration of each transition between slides, enter the amount of time in the Duration box.
Click Apply to All .

Export a presentation to video
You can export a presentation as a movie file. See Save a presentation as a movie file for more details.

Need more help?
Want more options.
Explore subscription benefits, browse training courses, learn how to secure your device, and more.

Microsoft 365 subscription benefits

Microsoft 365 training

Microsoft security

Accessibility center
Communities help you ask and answer questions, give feedback, and hear from experts with rich knowledge.

Ask the Microsoft Community

Microsoft Tech Community

Windows Insiders
Microsoft 365 Insiders
Was this information helpful?
Thank you for your feedback.

Cloud Storage

Custom Business Email

Video and voice conferencing

Shared Calendars

Word Processing

Spreadsheets
Presentation Builder

Survey builder

Google Workspace
An integrated suit of secure, cloud-native collaboration and productivity apps powered by Google AI.
Tell impactful stories, with Google Slides
Create, present, and collaborate on online presentations in real-time and from any device.
- For my personal use
- For work or my business

Jeffery Clark
T h i s c h a r t h e l p s b r i d g i n g t h e s t o r y !

E s t i m a t e d b u d g e t

Make beautiful presentations, together
Stay in sync in your slides, with easy sharing and real-time editing. Use comments and assign action items to build your ideas together.

Present slideshows with confidence
With easy-to-use presenter view, speaker notes, and live captions, Slides makes presenting your ideas a breeze. You can even present to Google Meet video calls directly from Slides.

Seamlessly connect to your other Google apps
Slides is thoughtfully connected to other Google apps you love, saving you time. Embed charts from Google Sheets or reply to comments directly from Gmail. You can even search the web and Google Drive for relevant content and images directly from Slides.

Extend collaboration and intelligence to PowerPoint files
Easily edit Microsoft PowerPoint presentations online without converting them, and layer on Slides’ enhanced collaborative and assistive features like comments, action items, and Smart Compose.

Work on fresh content
With Slides, everyone’s working on the latest version of a presentation. And with edits automatically saved in version history, it’s easy to track or undo changes.

Make slides faster, with built-in intelligence
Assistive features like Smart Compose and autocorrect help you build slides faster with fewer errors.

Stay productive, even offline
You can access, create, and edit Slides even without an internet connection, helping you stay productive from anywhere.
Security, compliance, and privacy

Secure by default
We use industry-leading security measures to keep your data safe, including advanced malware protections. Slides is also cloud-native, eliminating the need for local files and minimizing risk to your devices.
Encryption in transit and at rest
All files uploaded to Google Drive or created in Slides are encrypted in transit and at rest.
Compliance to support regulatory requirements
Our products, including Slides, regularly undergo independent verification of their security, privacy, and compliance controls .
Private by design
Slides adheres to the same robust privacy commitments and data protections as the rest of Google Cloud’s enterprise services .

You control your data.
We never use your slides content for ad purposes., we never sell your personal information to third parties., find the plan that’s right for you, google slides is a part of google workspace.
Every plan includes

Collaborate from anywhere, on any device
Access, create, and edit your presentations wherever you are — from any mobile device, tablet, or computer — even when offline.

Get a head start with templates
Choose from a variety of presentations, reports, and other professionally-designed templates to kick things off quickly..

Photo Album

Book Report

Visit the Slides Template Gallery for more.
Ready to get started?
Self running presentation: How to create your own
Two steps to create your own self running presentation.
Perfect for conferences, trade shows, or even holding slides at your webinar. Self running slides catch people’s attention. If you already have a presentation that will work for this, here are two simple steps to turn it into a self running presentation.
Note: you will be making some changes to the presentation, so before you start save out a new version of your presentation. That way you will still have the original version for when you’re presenting live.

Step 1: Create Automatic Timings
When you are presenting, you will want to have control over when the next animation or slide transition happens, so your presentation will most likely be set up so that you need to click the mouse to continue.
However, at a kiosk you will want the presentation animation and slides to advance automatically, so that people passing by your stand will be able to read and follow the slides. There are many ways to set up the timings for a presentation so that they run automatically, but the simplest and quickest is to use “rehearse timings”:
- On the top ribbon, click Slide Show and Rehearse Timings
- Click each time you want to proceed to the next animation/slide
- Once you’ve finished the slides, PowerPoint will prompt you to save the new slide timings
Step 2: Loop Presentation
At a kiosk, you will want the presentation to loop back to the beginning again once finished. To do this:
- On the top ribbon, click Slide Show and Set Up Slide Show
- Select Loop continuously until ‘Esc .’
The video below (from our Vimeo channel ) shows these two steps in action. At Presented, we have lots of experience creating kiosk presentations, so get in touch if you want us to help you create something really eye-catching that will draw people to your stand. For more tips on setting up a killer exhibition stand , take a look at this guest blog.
Related Articles

How to create clean PowerPoint slides
One of the simplest ways to transform your presentations from heart-sink to happy is to keep your slides clean of unnecessary words and data. TIP 1: Make one, simple statement on each slide and use the remaining “space” for a visual that explains and clarifies. And that’s it. No more tips.

Why you shouldn’t read from your PowerPoint slides
A classic mistake presenters make, is to pack their slides full of words, which they then read to the audience. Unless your audience is very young indeed, they can read for themselves. Reading to them can be seen as annoying and slightly insulting.

Make the most of your presentation hand-out!
The best way for your presentation to support your spoken words, is through one short message per slide and a relevant, supporting visual. Your narrative can then bring the presentation to life using the terminology and examples which your audience relate to.

How to make presentations more visual… and why you should
If you can make presentations more visual – your audience will thank you Our senses are “on” all the time. Touch, taste, hearing, sight and smell: the five senses through […]

Can flexible working increase productivity?
The current office environment – typically getting to the office at 9am, staying til 5.30pm, working in an open-plan office, and spending most of the day sitting still – is about the least productive environment we could possibly create. That’s according to scientific research…

Get your PowerPoint visuals right: get creative!
Visuals are powerful - get them right! The danger, if you use an irrelevant or inappropriate visual, is that it will distract and confuse – basically doing more harm than good. Rather than adding depth and clarity, the wrong visual could send your audience wandering off on a completely unrelated trains of thought.

How many slides is best for a presentation?
If you need advice on how many slides you should have in your deck. Think about it from an engagement point of view. Audiences would rather see 30 light slides that you move through quickly (keeping things more interesting for them), than 10 slides that are chock full of data and that don't seem to ever move on... Don't fear the count. Fear what's on them!

How much do people remember from a presentation?
There have been various studies conducted on this, and the most generous results we’ve seen are as follows: Immediately after the presentation, the audience remembered 50% of what was said By the next day, the audience remembered 25% A week later, the audience remembered just 10%
 10")
Using stories in PowerPoint boosts memory (part 1 of 2)
Structure your PowerPoint presentations with stories and your audience is more likely to follow, understand and remember your message – and they’re more likely to enjoy it too!
 11")
Harness the power of Stories in presentations to help audiences recall your presentation (part 2 of 2)
Start your presentation with a story about how a certain problem is relevant. Ideally this is a problem that affects your audience, this way you grab attention and engage with emotions immediately. Using further anecdotes and stories throughout brings each point more vividly to life.

How do you make PowerPoint more visual?
If your presentation is full of slides packed with bullet points and blocks of text, your audience’s attention will drift and you risk losing them, perhaps for good. A picture is worth a thousand words. So we must make PowerPoint more visual. Visual information is 3 times easier to remember than spoken info.
How to avoid giving a boring presentation!
Here's the lowdown on how to avoid giving a boring presentation... Most of us have attended a boring presentation, and if we are truly honest many of us will have also given a boring presentation at some point in our careers! Read our Top 8 Tips for advice on how to avoid a boring presentation.
Discover what our expert Powerpoint Design Agency can do for you
Fill in this form or call us +44 (0)800 246 1373 (freephone from UK).
9 Google Slides features we wish PowerPoint had
- Written by: Natty Watton-Moore
- Categories: Google Slides , Presentation technology
- Comments: 1

Microsoft PowerPoint is often considered the gold standard of presentation software. It’s been around the longest, has heaps of useful features, and is perhaps the most widely used. But that doesn’t mean it can’t learn a thing or two from other players in the field. At BrightCarbon we also love using Google Slides. It has an intuitive interface that makes it incredibly easy to use, and whilst it isn’t as feature-heavy as PowerPoint, regular updates mean it’s slowly catching up! Google Slides benefits from being a browser-based application, and has some unique features that we think are pretty impressive. So we’ve whittled down our 9 favourite Google Slides features that we think Microsoft could take on board!
Curate a personalised font library with access to 800+ Google Fonts
Using Google Slides means you can access and make use of the entire Google Fonts library . This means you can choose from over 800 fonts and bring some variety to your presentation projects. What’s more, you can access the entire Google Fonts library from within Google Slides. Simply click the Fonts drop down in the toolbar, and select More fonts… right at the top. This opens a new window containing all the Google Fonts.

From here, you can click any font to add it to your Google Slides drop down list. You’ll know that it’s selected when the font name turns blue, and has a small blue tick to the left.

You can also deselect any fonts that you don’t want to appear in the drop down list. This is a super handy feature, and essentially means you can curate your own custom font list, so that only the fonts you want to see appear when you click the drop down Fonts menu. Once you’re happy with your selection, click the OK button to the bottom left. You can go back and change up your font selection at any time!
Audience Q&A
Google Slides features a nifty built-in feature called Audience Q&A, which allows presentation audiences to ask questions virtually, by simply following a link and posting questions either anonymously or under their email address.

The tool provides an opportunity for audience members to ask questions they may be too nervous to ask out loud, and also gives the presenter time to read through the questions – perhaps during a break – and formulate answers properly before responding.

Audience Q&A is a great opportunity to make your presentation more engaging and interactive for participants. To learn how to use this feature, head to the ‘ Presenting your work ’ section of our Google Slides guide.
(Note: Whilst question and answer features aren’t a standard PowerPoint feature, there are a number of add-ins you can download to interact with your audience. We’ve reviewed one such add-in – Mentimeter .)
Sync slides across multiple decks
With Google Slides, you can sync slides across multiple decks. This means that if you make updates to a specific slide in a specific deck, the changes will be updated across other synced slides that may sit in different decks. This is particularly handy if, for example, you have a slide containing data that you need to update regularly. Instead of going into each deck that contains that slide and editing them manually, you can update just the original slide and sync across multiple decks in one go.
To do this, follow these simple instructions:
In the slide pane, right click the slide thumbnail for the slide you want to use in multiple presentations and select Copy . Now open the presentation you want to paste the slide into, right click into the slide pane bar, and select Paste . At this point a small white box will appear in the top left corner of the slide, entitled Link options . Click Link slides .

Now a link button will appear on the slide, giving you the option to Unlink the slide or to Open Source , for if you wanted to view the original slide. If you then changed the content on the original slide (for example, adding a new title) the linked slide will now give you an extra option, Update . If you click Update , the new title from the original slide will be applied to the linked slide, too.
Publish to web
Slides has an easy-to-use publishing feature that helps you share your Slides deck across the web. It’s particularly useful if you want to share your deck with somebody who doesn’t have a Google account, or if your presentation is self-running. With Publish to web , people can simply click the link you share with them and watch your presentation run from start to finish.

For more on using the Publish to web feature and creating a self-running presentation, head to the ‘Presenting your work’ section of our Ultimate Guide to Google Slides .
Editing and playing GIFs
Options for editing GIFs are far more advanced in Google Slides than in PowerPoint. You can crop a GIF, recolour it, resize it, and much more without losing quality or hindering its ability to play.

Both desktop and online versions of PowerPoint support GIF playback, though only in present mode. A cool Google Slides feature is that GIFs will play outside of present mode, while you are editing them. This gives greater visibility over the changes you are making, and a better ability to preview how your work will look as you edit your slide.
Easy access to other apps via side panel
If you’re a fan of Google’s other G Suite apps, the built-in side panel may help boost your productivity. The side panel provides easy access to other Google apps, such as Calendar, Keep, and Tasks. Having the ability to launch these apps in the same window as your Slides deck – rather than in a separate tab – means that you can stay on top of multiple workloads at once, without getting distracted from your presentation. With Google Keep, you can even pull your saved Keep notes straight onto your slide via the side panel!
Add images from more places
Both Google Slides and PowerPoint have functionality for adding images. However, Google Slides features a lot more options. In PowerPoint online, you can only add images from desktop, Bing, or OneDrive. In Google Slides there are options to add images from desktop, Google Images, Google Drive, Google Photos, or directly from your camera. Granted, some of these features require you to already use some of Google’s tools, but being able to add images directly from a camera device is surely a useful feature.

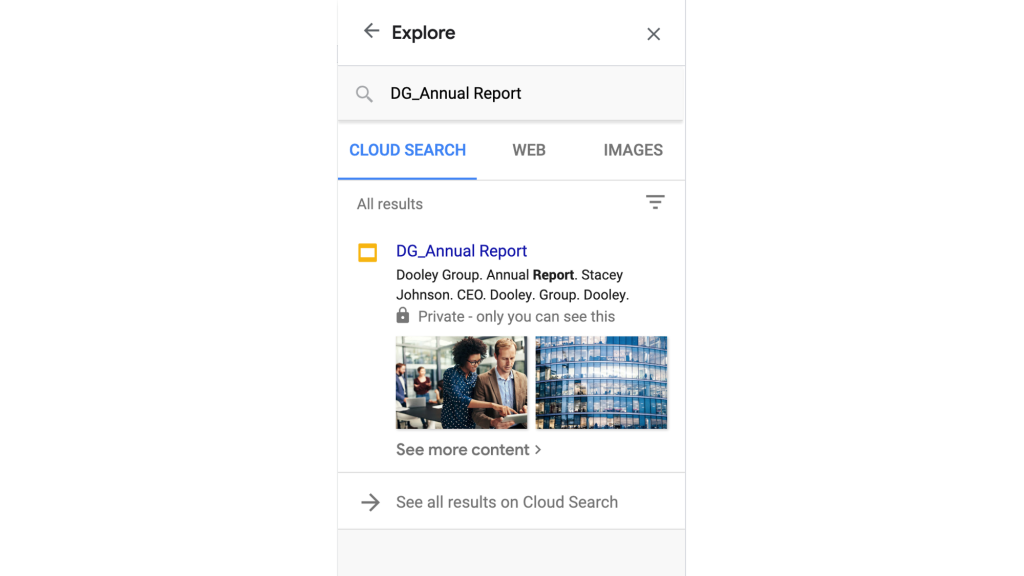
Explore is a handy little feature that’s built into Slides and some other G Suite apps, like Docs and Sheets. It sits in the bottom right corner of the screen, and once clicked launches a search feature that lets you browse the web, Google Images, and your own drive files to find the content you need. Similar to the side panel (mentioned earlier) the Explore button lets you do more from within one single tab, meaning you’re less likely to need to leave Slides to find the different assets and resources you need to build your presentation.
Voice type speaker notes

When you are ready, click the microphone icons and begin speaking. You’ll see your words appear as text in the Speaker notes bar . This feature works best when speaking clearly into a good microphone or headset.

Final thoughts
Whilst the Google Slides features listed here (aside from the amazing collaboration functionality) aren’t exactly game changing, they go a long way to making Slides a more intuitive and accessible tool. This is why we think Microsoft should take a leaf out of Google’s book, and adopt some of the features that make it a more connected, easy-to-use app! If you want to learn more about how to get the most out of Google Slides, check out our comprehensive guide .

Natty Watton-Moore
Principal consultant, related articles, editable map for google slides.
- Google Slides
- Comments: 11
We really struggled not being able to add customisable maps to Google Slides, so we made our own. And if, like us, you're looking for a way to add editable maps to Google Slides, we’ve made our map available for you to download and use as well!

Presentation design agency for Google Slides?
If you’re using Google Slides to create an important presentation, you may be considering employing a presentation design agency to help bring your content to life. Is employing an agency really worth the effort when Slides is so easy to use?

Google Slides top keyboard shortcuts
- Google Slides / Presentation technology
- Comments: 5
We’ve compiled a list of the most used - and most useful - keyboard shortcuts for Google Slides, so you can create amazing presentations that are quicker, smarter and slicker than ever before!

Thankyou for these. Learnt alot. I can only use google slides as no access to Ms office yet. This has really helped my knowledge.
Leave a Reply Cancel reply
Save my name and email in this browser for the next time I comment.
Join the BrightCarbon mailing list for monthly invites and resources
Email doesn’t do justice to how thrilled I am with this work - it’s beyond all expectations so a huge, huge, thanks!!! Luke Kershaw SquareTrade

Create Self-Running Presentations
If you need to convey an effective message that will stick in your audience’s minds when you’re not around, you need to consider a self-running PowerPoint presentation! This will immediately grab your customers’ attention, say at a trade fair stand or on a display screen in your company foyer.
There are a few things to bear in mind when creating a self-running presentation, though. Try not to overload it with content, endless bullet points, tables and diagrams. Pictures, graphics and clear statements are much more suitable for this format. There is incredible potential in this medium, done well. PowerPoint is a great way to create self-running presentations; below, we show you just how easy it is!
Where Self-Running Presentations Work Best
Presentations running on a continuous loop are particularly useful for presenting information or product demos in waiting rooms, at airports, in some shops, at exhibition stands or in company foyers.
Self-running presentations are also good for employee training and reaching remote clients.
The common thread is that you don’t need a presenter with such presentations. This allows you to visualize the information you want to create images and strengthen your brand in the viewer’s mind. You can tailor your presentation towards individuals, or use them at private occasions like birthday parties or weddings. This modern feature allows you to reach new audiences and is simple to set up.
What’s the Advantage of a Self-Running PowerPoint Presentation?
A really well-crafted PowerPoint presentation successfully drives a story forward. It can create a suspenseful arc, triggering enthusiasm in the audience, or, just as effectively, provide a soothing, calming effect.
If you’re a dentist looking for something for your waiting room, you’ll probably be going for the latter. Always keep your intended audience in mind, and create your presentation to appeal to them. The idea is that a self-running presentation creates a connection between your company and the audience.
Your core message can be conveyed to viewers visually, in an endless loop. This means that you don’t have to do a thing while it’s running. You can start or stop it with a single keystroke.
So What Is a Self-Running Presentation?
Basically it means that you don’t have to be around to give the presentation. You can let it run on a continuous loop, say on a screen in your foyer, or at a trade fair. Obviously you need to take security precautions if you do; setting a password and locking the keyboard are the basics.
Or you can get an individual to start it on their own, then either click through each slide when they’re done with it (useful for training purposes), or sit back and watch the presentation unfold.
How Do I Create a Self-Running Presentation?
Just follow these simple steps:
- Under the Slide Show tab, click on Set Up Slide Show .
- You’ll see three options under Show type :
– Presented by a speaker (full screen)
– Browsed by an individual (window)
– Browsed at a kiosk (full screen)

If you want to give viewers the option to scroll through the slides themselves (e.g. for employee training), choose the first option. If you want your presentation to be in a window, with the viewer just sitting back and watching, choose the second.
Setting up Autoplay
If you want your presentation to run continuously, choose the third option; this automatically greys out Loop Continuously Until Esc. Confirm by clicking the OK button. You can set the timing and slide transitions in the next step.
Set Up Transitions for Your Self-Running Presentation
To allow your presentation to run smoothly, uncheck the On Mouse Click option under the Transitions tab.
Then click on the After button and set the duration. You can either set the duration of each slide individually, or select Apply To All if you want your slides to change at regular intervals.

Adding Sound
If you want to record a narration, you’ll need a computer with an integrated sound card and microphone. You could use an external mike if the option exists to connect one.

Under the Slide Show tab, click the Record Slide Show button. Select one of the options, depending on whether you want to start recording at the beginning of the presentation or create a recording for the current slide only. Then click Start Recording .
Click End Show and Save File once you’re done recording. Your self-running presentation is now ready to send to clients, train your employees, or advertise your presence at the next trade show!
To Save Your Self-Running Presentation as a Video
First save your presentation as a PowerPoint file. Under the File , click Save . Then, still in the File tab, click Export .
Now click the Create Video button. On the right side of the screen you will now see a drop-down menus (Full HD 1080p, Ultra HD 4K, etc.). Select the video quality you want. Once you have made your selection, you have the option to Use Recorded Timings and Narrations . You can uncheck this if you want; the default display duration is 5 seconds, but this is easily changed
Now all you have to do is click the Create Video button. Finally, choose your video’s file format. Once you’ve chosen, simply click Save again and your video is ready to go!
If you don’t know which video format to use, this guide may help:
- Ultra HD (4K) has a resolution of 3,840 x 2,160 pixels and is the maximum file size (suitable for large monitors and screens).
- Full HD (1080p) has a resolution of 1,920 x 1,080 pixels and – a large file size (suitable for computer and HD screens).
- HD (720p) has a resolution of 1,280 x 720 pixels – a medium file size (suitable for Internet and DVD).
- Standard (480p) has a resolution of 852 x 480 pixels and is the smallest file size (suitable for portable devices)
Share this post
- share
- save

Design Thinking: Problem Solving with a Difference

Why Corporate Mission Statements Are So Important

7 Tips & Learnings from the Apple Keynote
Search for: Search Button
Make a self-running or kiosk display in PowerPoint
PowerPoint can show slides on a screen as a high-tech signboard, using a self-running presentation known as Kiosk display. Here’s how to do it plus all the settings and tricks available.
We’ve all seen screens displaying information on a series of slides – maybe in a shop or conference. Maybe as a prelude or postscript to a presentation. These days it’s easy to setup a laptop with an external screen almost anywhere to make a high-tech signboard.
At a party or celebration you can use Powerpoint to display photos (with or without captions) of the guest of honor.
There’s various ways to do it but the main one is PowerPoint. Many of us have PowerPoint but never use it because we think of it as being for speeches. In fact there’s plenty of other uses.
PowerPoint Kiosk mode
At its basic level, PowerPoint’s Kiosk mode is merely a different way to display a presentation. Instead of clicking to move between slides, PowerPoint will automatically display the slides going in an infinite loop … until someone presses Escape.
Go to the Slide Show tab, Set up Slide Show … it’s a PowerPoint dialog that hasn’t changed for many years/versions.
Choose ‘ Browsed at a kiosk (full screen) ‘ and click OK.
That’s as far as most people go in explaining Kiosk mode but, as usual with Office, there’s a lot more going on and Office-Watch.com is here to help.
Browsed by Individual
The Browsed by individual (window) option lets someone use a mouse or keyboard to move through the slides at their own pace. In this case the slides can change automatically (if no human intervention) or only when asked – see the Advance slide options on the Set Up Show dialog.
To make the self-guided presentation more accessible, you should add action buttons (forward / back etc) to the slide master so the buttons appear on all slides. Make the mouse available to users and they can click to their heart’s content.
Show without narration
PowerPoint presentations can have an audio track or narration included. This option lets you let that audio be heard as the slides progress or not. The default is for the narration to be heard (i.e selection unchecked).
Show without animation
Slides can have animations or motions on them – for example bullet points appearing one by one. Check this box if you don’t want the animations – in other words, the slide appears all at once.
Disable hardware graphics acceleration
Usually you’d leave this off, but if there are problems with the display this might help.
Show slides
Show all the slides or just a range from a larger presentation.
Advance slides
In kiosk mode, PowerPoint lets each slide appear for a few seconds unless there’s a slide timing set (at Transitions | Timing | Advance slide | After:
Multiple Monitors
Very useful if you have a second monitor. Use the pull down list to select the screen to display the presentation.
Why won’t the slide/s move?
If your kiosk presentation is stuck on a slide, or the first slide, make sure the Advance Slide timing is set higher than zero at Transitions | Timing | Advance slide | After:
After setting a value (in seconds) click Apply to All to set that as the default display time for all slides.
Sometimes the Advance Slide After: value is set to zero. If that happens PowerPoint will obey the zero timing set and never move past that slide, even though it makes no sense in Kiosk mode.
How to wait longer or shorter on one slide
Some slides deserve more time to read while others you might want to whizz by. After setting the default timing (see ‘Why won’t the slides move?’) go to individual slides and change the Transitions | Timing | Advance slide | After: for that slide only.
You can also select multiple slides from the slide sorter and apply a timing to all the selected slides in one go.
Starting Kiosk Mode
To start a kiosk presentation, just click the Slide Show | From Beginning or From Current Slide buttons.
Stopping Kiosk Mode
Stopping the presentation by just pressing the Escape button. If you don’t want people to do that, hide the keyboard out of sight.
Blocking the ESCape route
There’s always some smartie who will try to bypass the automatic presentation and get access to an unattended computer. To make things more difficult for them, use the No ESCape add-in for PowerPoint 2000-2007. This will disable the Escape key option in Powerpoint. We’ve not found an equivalent for PowerPoint 2010 and beyond.
If you use this add-in make sure you add your own escape route. Add an invisible shape to a slide (probably the last) with the on click action set to End show.
Self running presentation packages
Another option is to create a self-contained PowerPoint Show (.ppsx) that can be run on another computer without additional software.
Simple Self-running Presentations
The simplest self-running presentations are just a collection of photos . You can add captions or headings if you like or just put each photo, full size, on a slide.
A new Kiosk presentation
Aside from the setup mentioned above, there’s nothing special about presentation used in kiosk mode.
You can make a presentation that has just photos – a traditional photo album on the screen. It can be a point of discussion or derision at a party or meeting.
Below is the step-by-step to make a presentation with photos, or … you can use the easy way … PowerPoint Photo Album .
Choose a background color (probably black or white) at Design | Customize | Format Backround. The background is necessary because some images won’t be the same proportions as the screen, leaving edges where the background will appear.
Change the slide layout to one that suit you. For full screen photos, choose ‘Blank’ layout.
Then add your photos. On each new slide click Insert | Picture then adjust the image to fit the slide.
There are ‘photo only’ presentation software programs out there, just search for then. Some have the advantage of working with all the photos in a nominated folder. It’s easy to change the presentation by simply changing the images in that folder. At a pinch, a photo screen saver can be used.
Videos in PowerPoint Kiosk mode
PowerPoint Photo Album
About this author

Office-Watch.com
Office 2021 - all you need to know . Facts & prices for the new Microsoft Office. Do you need it? Office LTSC is the enterprise licence version of Office 2021.
Office 2024 what's known so far plus educated guesses. Microsoft Office upcoming support end date checklist.
Latest from Office Watch
- Translate automatic or manual in Outlook
- Microsoft Mesh makes “magical” online meetings
- Why are Teams and Office divorcing?
- Pivotby – Excel’s new faster PivotTables
- More Excel on the web improvements
- All about editing an incoming Outlook message
- What “Update License” means on Microsoft 365 menus
- Excel’s warning about dates and centuries
- Write Excel formulas fast with free Copilot
- Easter images and icons in Microsoft Office
- Credit Card 💳 symbol in Word, Excel, PowerPoint and Outlook
- Yes, there will be a new version of Microsoft Office
- All about Office 2024 for Windows and Mac (so far)
- In person vs virtual event option coming to Outlook
- Checklists now in Microsoft Word
- Start Grouping in Excel for better looking sheets
- Three more Word features reach the web version
- Web link previews in Word for web
- Turn Excel into an AI / LLM wonder
- Don’t trust any text message
How to Create Self-Running Presentations
by Lydia | Jun 27, 2023 | Presentation Design | 0 comments

While traditional PowerPoint presentations require manual control, self-running presentations offer a convenient solution for engaging audiences without constant intervention. In this guide, we will explore the art of creating self-running PowerPoint presentations. Whether you’re a business professional, educator, or public speaker, these tips and tricks will empower you to deliver seamless and captivating self-running presentations that leave a lasting impression.
A self-running presentation is a PowerPoint slideshow that advances automatically from slide to slide without manual control. This feature allows presenters to focus on delivering their message rather than navigating through each slide. Self-running presentations are ideal for situations where you want your content to be displayed continuously, such as trade shows, exhibition presentations , kiosks, or digital signage.
Preparing the Self-Running Presentation
- On the Slide Show tab , click on Set up Slide Show.

Within this menu, you will find three different choices:
- Presented by a speaker: This initial option necessitates the viewer to manually progress through each slide. This is the default setting commonly used in PowerPoint presentations and is the mode you are likely most accustomed to.
- Browsed by an individual: Opting for this option generates a slideshow where the viewer lacks control over slide advancement. It functions as an autoplay feature, although the viewer must still initiate the presentation by pressing the Play button.
- Browsed at a kiosk: Upon selecting this option, the slideshow will continuously loop until a viewer presses the escape button. This setting is particularly useful in kiosk or exhibition settings.
- If you prefer to restrict viewer control over the slideshow’s start and stop, choose the Browsed at a kiosk option. This selection automatically activates the “Loop Continuously” feature underneath.

Creating Automatic Timings
During a live presentation, it is common to have control over the timing of animations and slide transitions, requiring manual interaction by clicking the mouse to proceed.
However, in a kiosk setting, it is preferable to have the presentation’s animations and slides advance automatically. This allows passersby to read and follow the content without the need to manually operate it.
- Go to the Slide Show tab and select Rehearse Timings .

Adding Recordings
Moreover, you can utilise your self-running PowerPoint slideshow in a kiosk scenario where your presence may not be constant. If you wish to incorporate a voiceover providing commentary or explanations for your slides, you have the option to record yourself, and your presentation will automatically integrate the recorded audio.
- On the Slide Show tab and select Record .

- If you want that all narration and slide transitions are included in your presentation, ensure that Play Narrations and Use Timings are checked.
- If you wish to create a sequence of slides without any accompanying audio, make sure to uncheck the Play Narrations option.
Before recording your presentation, here are some quick tips to ensure a smooth and professional result:
- Practise and Rehearse : Familiarise yourself with the content and flow of your presentation. Practice delivering it smoothly to enhance your confidence and minimise any potential mistakes during recording.
- Check Audio and Equipment : Test your microphone or audio recording device to ensure clear sound quality. Make sure your equipment is functioning properly and positioned correctly for optimal audio capture.
- Clear Background Noise : Choose a quiet location for recording to minimise background noise. Turn off any potential sources of disturbance such as fans, phones, or notifications that could interfere with the audio.
- Visuals and Slides : Review your slides for any formatting issues, typos, or inconsistencies. Ensure that your visuals are clear, visually appealing, and properly aligned. Double-check that all content is readable and appropriately sized.
- Script or Outline : Consider having a script or outline handy to guide you during the recording. This can help maintain a smooth flow and ensure you cover all key points effectively.
Why are Self-Running Presentations Advantageous
Self-Running Presentations offer several advantages that make them highly beneficial in various scenarios. Here are three reasons why self-running presentations are helpful:
- Convenience and Efficiency. Self-running presentations eliminate the need for manual control, allowing presenters to focus on other aspects of their event or engage with their audience directly. By automating the presentation, you can save time, streamline your workflow, and ensure a seamless experience for your viewers.
- Consistency in Delivery. With self-running presentations, you can ensure consistent delivery of your content. Each slide transitions at the pre-determined timing, eliminating the potential for human error or inconsistencies in manually clicking through slides. This guarantees that your message is conveyed in a structured and uniform manner, enhancing the professionalism and impact of your presentation.
- Enhanced Audience Engagement. Self-running presentations can captivate and engage your audience more effectively. By carefully timing slide transitions, incorporating captivating visuals, and utilizing subtle animations, you can create an immersive experience that holds the attention of your viewers. Additionally, the absence of manual intervention reduces distractions, enabling your audience to focus solely on the content being presented. This heightened engagement can lead to better retention of information and a more memorable experience for your viewers.
- Automated Information Display . Self-running presentations are ideal for scenarios where information needs to be continuously displayed or updated. For example, in exhibitions or trade shows, self-running presentations can serve as an interactive information hub that showcases products, services, or key messages.
In conclusion, mastering the art of creating self-running presentations empowers you to deliver captivating content without the need for constant manual control. By following the steps outlined in this guide and incorporating the provided tips and tricks, you can create engaging slideshows that leave a lasting impact on your audience. Remember, a well-executed self-running presentation not only saves time but also showcases your professionalism and expertise in delivering compelling visual narratives.
Recent Posts
- 8 PowerPoint Alternatives in 2023
- What is a Pecha Kucha Presentation?
- Successful Pitch Deck Examples
- How to Add, Record, and Edit Audio in PowerPoint
- Comprehensive Guide to Converting PowerPoint Presentations
Recent Comments
- December 2023
- October 2023
- September 2023
- February 2023
- October 2019
- Interactive Presentation
- Presentation Design
- Entries feed
- Comments feed
- WordPress.org
Privacy Overview

Loop your PPT to Run it Automatically | Perfect Kiosk Solution
By: Author Shrot Katewa
Okay, so you have this big event coming up and you need to showcase a company profile of your organisation at a kiosk. You have the company presentation but you are wondering, “How the heck am I going to turn my PPT into a self running presentation that runs in a loop automatically?”
Don’t worry, this is exactly what we are going to learn today. Plus, we share some of the most useful and important tips that you should remember while displaying a PowerPoint presentation for a kiosk. This will ensure that you have a presentation that almost always runs like a video!
But first, can you loop a PowerPoint presentation? Yes, you can definitely loop a PowerPoint presentation. To do this, we’ll need to make all our slides auto advance from to the next slide using the “Transition” tab, and then switching our PPT to the kiosk display mode in PowerPoint such that it runs automatically in a loop.
Let’s learn a bit more about it.
How to Loop your PowerPoint Presentation?
In order to ensure that the presentation plays in a loop, we will have to carry out this procedure in two steps. The first thing that you need to do is to make sure that your presentation shows the next slide automatically when put it slide show mode. Once you have done this, the next step would be to ensure that your presentation jumps back to the first slide when it is done displaying all the slides in your PPT. Doing so will make sure that your presentation continuously keeps playing in a loop.
It is not important to follow steps 1 and 2 in the same order as mentioned below. This means you can also complete step 2 first and then complete step 1. However, it is important that you carry out both the steps in order to achieve the desired result. So, let’s look at both the steps in detail below –
Step 1 – Make a presentation self-running
One of the key steps to ensure that your presentation runs in a loop automatically, is to make sure that it is self-running. The last thing that you would want to do is to manually click to proceed to the next slide for the whole day!
Making your presentation self-running is pretty simple.

Simply open the presentation that you would like to convert into a automatically running PPT. Click on any one slide from the presentation. Go to the “Transition” tab and click on it.

As a next step, make sure you uncheck the “on mouse click” box, and select the “After” option by clicking on the check box. This will ensure that your presentation now shows the next slide after a certain number of seconds rather than a mouse/keyboard click.
Once you have done that, just input the number of seconds that you would like PowerPoint to spend on each slide. I recommend putting a value in the range of 3-5 seconds based on my prior experience. However, I would also suggest that you do a bit of trial and error before finalising the exact number of seconds that work for your presentation.
Once you have identified exactly how many seconds you would like PowerPoint to spend on each slide, make sure to click on “Apply to All”. This will ensure that the transition setting of this slide is applied to every single slide in your presentation.
Note – If you have different transitions setting already set up for each slide, then, instead of clicking on “Apply to All”, make sure that you have selected all the slides by clicking on any one slide in the slide view section and then pressing “Ctrl +A” (or Command + A for Mac).
Step 2 – Loop your PPT by putting it in Kiosk Mode
Once you have made sure that your presentation is self-running, the next step to make sure that your presentation runs in loop.
Just like the first step, this is also quite easy. Let’s have a look –

First, you need to click on the “Slide Show” option in the Menu Bar. On the ribbon, you need to then click on “Set Up Slide Show”. What this option does is allows you to set up how you would like to PowerPoint to play your slide show when running in full screen (or slide show mode).

When you click on the Set Up Slide Show option, a window with multiple options will pop-up on the screen. Under the “Show Options”, identify and select “Loop continuously until Esc”. This basically means that once this option is selected, PowerPoint will loop your slide until you press the “Esc” or the Escape key on your keyboard.
You might also notice the “Browsed at a Kiosk” option under the “Show Type” option on the same pop-up window. This option also does exactly the same thing of looping the PowerPoint slides continuously. Thus, you could also select this option.
Next, just click “Okay” to confirm. Your slides will now loop endlessly automatically until the escape button is pressed on the keyboard. You can try and check if the presentation runs as desired by putting the presentation in slide show mode. The shortcut for that is Shift + Command + Return key on your keyboard for Mac users and F5 for Windows users (Shift + F5 for slide show from current slide)
Can I Loop a Presentation with a Video in it?
That is a great question that many of you might have especially when there is a supporting video or a testimonial or a product review that you want your audience coming to the kiosk to notice.
You can definitely make a PowerPoint presentation run in a loop even when you have a video in the presentation. However, you need to make sure that the video is not on YouTube or any other external location, it needs to be added on the PowerPoint slide.
You can add the video to your PowerPoint presentation by clicking on “Insert”, then selecting “Video” on the insert ribbon. PowerPoint will then ask you to browse to the location of your video file. Do that, select the video from your local hard disk, and click “Okay”. You should have the video inserted on your slide. Alternatively, you can also copy the video from a from the folder in which the video is located, open the target slide on which you need the video to be embedded, and paste it.
Things to keep in mind while looping a presentation with a video file –
- Make sure that the video is present on the local computer hard disk and not as an online resource
- Ensure that the slide on which the video has been added also has self-running enabled as explained in “Step – 1” above.
Can I loop just a few Specific Slides of a PPT Presentation?
There might be times when you don’t want to run the complete PowerPoint presentation a loop. Instead, you just want to repeat just a few slides from the presentation. So, can this be done? Absolutely Yes!
Putting a few specific slides in a loop is as easy as looping the complete presentation. The process is similar to the two steps mentioned above.
However, do keep a few things to keep in mind –
- Only consecutive slides can loop – When putting a few specific slides in a loop instead of the complete presentation, the slides in question should all be together. This means, you could choose to put slides 1, 2, 3 & 4 or slides 4, 5, 6, 7 & 8 because they are all consecutive slides. However, slides 2, 5, 7, 9 can’t be put in a loop as they are not consecutive slides. To solve this problem, you can create a copy of all the slides that you want to loop at the end of presentation, and put them in a loop.
- Apply Step 1 & 2 to only specific slides – Before beginning the steps 1 & 2 mentioned above, make sure that you have selected the specific slides that you wish to loop and not the complete presentation.
- DO NOT click “Apply to All” after step 1 – Ensure that you DO NOT click on “Apply to All” at the end of step 1 as this will make sure that the transition settings that you have selected will be applied to all your slides.
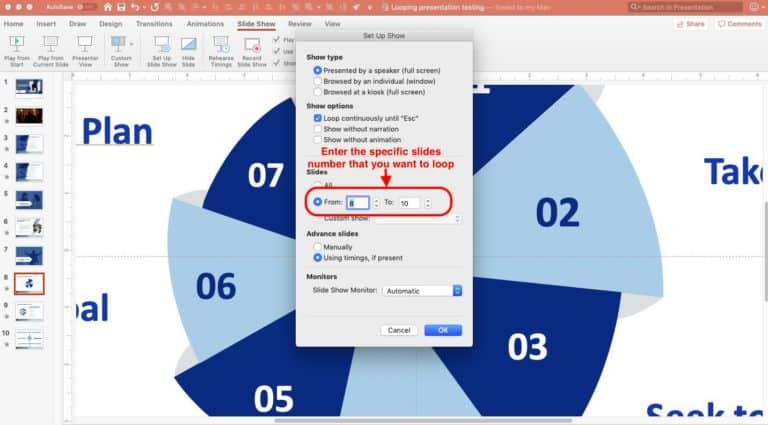
At the end of step 2, after you have selected “Loop continuously until Esc” and right before clicking OK, make sure to enter the specific slide numbers that you would like PowerPoint to loop. Remember – the slides that you want to loop should be consecutive slides.
What are Some Other Uses of a Presentation running in a Loop?
Making your PowerPoint presentation run automatically in a loop can be useful in situations more than one. The most obvious need to run a presentation continuously is when you are at a kiosk (for e.g. at an event representing your company). But there are some often other times when you feel the need to loop a presentation. I’m sharing some of the other situations when you might need to loop a PowerPoint presentation below –
1. At a Marketing Roadshow –
There are times when your company decides to generate awareness about a new product they are going to launch. One of the methods deployed is to hire a vehicle (with or without an open back), play some visuals accompanied with some audio and distribute a one page flyer to its potential customers. The marketing effort can be more detailed at times, however, the visual that often supports such a campaign can often be a presentation that needs to run continuously without interruption.
2. At a Sales Centre –
Another great use case for a continuous looping presentation. When you visit a sales centre/showroom of a company – a real estate company or even a vehicle showroom, you may notice a presentation playing in such an office. This is often because the customers who walk in may have questions about the product or offering and having a beautiful looping presentation can grab the attention of a customer.
3. Reception/Cafeteria of a company –
Often, various companies use a looping presentation to share more information about the company to its visitors or employees. You may notice a presentation that plays in a loop at the company reception giving information about the company or even at your cafeteria telling you about a new employee initiative taken up by the company. These are all great examples where a presentation running automatically in a loop can be useful.
Running a PowerPoint presentation in a loop continuously is simply and super helpful. My hope is that by reading this blog post, you now know how to loop your PPT and are ready for the next event!
Our goal on this blog is to create content that helps YOU create fantastic presentations; especially if you have never been a designer. We’ve started our blog with non-designers in mind , and we have got some amazing content on our site to help YOU design better.
If you have any topics in mind that you would want us to write about, be sure to drop us a comment below. In case you need us to work with you and improve the design of your presentation, write to us on [email protected] . Our team will be happy to help you with your requirements.
Lastly, your contribution can make this world a better place for presentations! All you have to do is simply share this blog in your network and help other fellow non-designers with their designs!
- Help Center
- Get started
- Learn by product
- Learn by role & industry
- Hybrid workplace tips
- Gen AI tips
- Productivity tips
- Business tutorials
- Switch from Microsoft & others
- Support & accessibility
- Google Workspace
- Privacy Policy
- Terms of Service
- Submit feedback
- What's new?
- Get started Welcome Get ready to switch What to do on your first day Your first week & beyond Cheat sheets & reference guides Open Google Workspace apps
- Learn by product Calendar Chat Chrome browser Docs Drive Gemini Gmail Meet Sheets Slides Managed teams Mobile & device setup All products
- Learn by role & industry Administrative assistants Digital marketing Finance Healthcare Human resources Law practices Manufacturing Media & entertainment Nonprofits Professional services Project management Research & development Retail Sales & marketing Technical support UX design Visual design Web development
- Hybrid workplace tips Hybrid work training & help Use Meet Companion mode Stay connected when working remotely Work from home Work with remote teams Plan & hold meetings from anywhere Hold large remote events Work with non-Google Workspace users
- Gen AI tips Generative AI training & help Get started with Gemini Gemini cheat sheet Role-specific prompts & use cases Tips for writing prompts for Gemini Gemini usage limits Learn about generative AI
- Productivity tips Set up business meetings Discuss topics with your team Brainstorm with colleagues Improve communication Make video conference calls Create great presentations Create strong proposals Onboard team members Optimize your inbox Analyze data Clean up data Go paperless
- Business tutorials Use generative AI at work Plan & manage a project Plan & hold meetings from anywhere Hold large remote events Stay connected when working remotely Collaborate with decision makers Share a final document Free up storage space Plan a project with external clients Delegate work when you're OOO Get up to speed after time off Additional training resources
- Switch from Microsoft & others Switch from Microsoft Switch from Slack Switch from Zoom, Skype, or Webex Switch from Box, Dropbox, or C:\ drive Switch from HCL Notes
- Support & accessibility Support for users Support for administrators Accessibility Save or customize Learning Center guides
Bring your best ideas to life with Gemini for Google Workspace. Get tips & real-life use cases for using gen AI at work .
Get started with Slides in Google Workspace
Create your first presentation in slides.
On this page
Create or import a presentation, add slides to your presentation.
- Update your presentation
Want advanced Google Workspace features for your business?
Try Google Workspace today!
Create your presentation
- Open the Slides home screen at Google Slides .
You can also create new presentations from the URL https://slides.google.com/create .
Import and convert an existing presentation
Converting your file from another program creates a copy of your original file in a Docs, Sheets, or Slides format. You can then edit the file in your browser.
If you have existing files, you can import and convert them to Docs, Sheets, or Slides.
- Go to Drive .
- Choose the file you want to import from your computer to add it to Drive.
Have a Microsoft file?
If you've already stored Microsoft files in Drive, you can also update them without converting them .
Add a slide with the same layout as the current slide
- On your computer, open a presentation in Google Slides .
Add a slide with a different layout
- Choose a slide.
Add a slide with your organization's branding
- At right, click the template you want to use.
Note: The Templates option appears only if your administrator makes organization-branded slides available.
Update your presentation
Choose a theme and layout.
When you first create a presentation, you can choose a theme for your slides. A theme is a preset group of colors, fonts, background, and layouts. Your presentation's layout is the way your text and images are arranged on a slide.
Change your presentation's theme
- On the right, click the theme you want.
Change the layout of your presentation
- Select a slide.
- At the top, click Layout .
- Choose the layout you want to use.
Arrange slides
Move slide —Drag the slide to a different position in the presentation. To move several slides at once, Ctrl+click multiple slides before dragging them.
Delete slide —Right-click the slide and select Delete .
Duplicate slide —Right-click the slide in the sidebar and select Duplicate slide .
Add pictures, text, speaker notes, and more
Rename your presentation —Click Untitled presentation and enter a new name.
Add videos, shapes, charts, and more —Click Insert to add videos, shapes, charts, slide numbers, and other features to your presentation. You can also move, delete, or re-size these inserted features.
Add speaker notes —Use speaker notes to keep track of your talking points for each slide. In the presentation editor, speaker notes appear beneath the current slide. When you present your slides, your speaker notes show in a separate window.
Google, Google Workspace, and related marks and logos are trademarks of Google LLC. All other company and product names are trademarks of the companies with which they are associated.
Was this helpful?
Learn how to print Learning Center guides, save them as PDFs, or customize them for your organization.
PowerPoint Tips Blog
Helping you with presenting, PowerPoint, and speaking
How to create a self-running presentation
October 28, 2012 by Ellen Finkelstein 9 Comments
We usually think of PowerPoint as being used by a live presenter who stands in front of a live audience. But PowerPoint can be used in other ways:
- PowerPoint is often used an an elearning tool. In this situation, the learner controls the presentation.
- PowerPoint is also used as a marketing tool to give to potential clients. In this situation, the presentation often runs itself.
Add narration
Usually, this type of presentation is narrated. You can use PowerPoint’s narration feature (see “ Secrets for successfully narrating a presentation “) or insert audio files that you recorded separately on each slide. (Choose Insert> Audio or Sound from File.)
- If you want the presentation to advance automatically from slide to slide, typical of a marketing presentation that you send to others, add slide timing. On the Transitions tab, in the Timing group, set a time under the Advance Slide section after the After label. If you click the up arrow, each click will increase the slide timing by 1 second. A setting of 00:03.00 advances the slide after 3 seconds. For a more advanced technique, see my post, “ Create a video effect .”
- If you want the viewer to control when the slides change, you can just let the person click or add hyperlinks for navigation. You can use the provided Action buttons because they have Next and Previous buttons that most people instantly understand.
Add navigation for people to move through your presentation
Here are the steps for adding an Action button to the next slide:
- Go to Home tab> Shapes> Action buttons and choose the one you want, such as the right-facing arrow Next button. The Action Settings dialog box automatically opens.
- On the Mouse Click tab, the Hyperlink To option is selected and set to Next Slide. If you want, you can change this, but it usually works well.
- Format the Next button any way you want.
- Go into Slide Show view and test your button. Note that clicking off the button will also get you to the next slide.
You can add navigation to the previous slide and the first slide as well. You can even put action buttons on the Slide Master.
Disable clicking to advance slides
If you don’t want users to be able to click from slide to slide but only to use the navigation, you can turn off mouse clicking to go to the next slide. Here are the steps:
- Go into Slide Sorter view (View> Slide Sorter).
- Select all of the slides.
- In PowerPoint 2010 and 2013, click the Transitions tab. (In PowerPoint 2007, click the Animations tab. In PowerPoint 2003, choose Slide Show> Slide Transition.) In the Advance Slide section, uncheck the On Mouse Click checkbox. (This is where you would add slide timing if you want the slides to advance automatically after a specific amount of time.)
Another thing you can do to disable clicking is to set the presentation to run in kiosk mode. This mode is specifically meant for self-running presentations (running in a kiosk or computer at a trade show or company lobby, for example). Go to Slide Show> Set Up Slide Show (or Set Up Show). In the Set Up Show dialog box, under Show Type, choose Browsed at a Kiosk (full screen) and click OK.
Save the presentation as a show
Finally, you can save the presentation as a “show. This simply means that the presentation opens immediately in Slide Show view. Choose File (or Application button)> Save As. (In PowerPoint 2013, you then have to choose your location.) In the Save As dialog box, click the Save as Type drop-down list and choose PowerPoint Show (.ppsx or .pps). Note that a savvy user will know how to change the presentation name’s extension from .ppsx to .pptx and get access to the presentation, so don’t think of this as a measure to secure your content from being edited.
Related posts:
- Create a looping introduction
- Create a looping ending for your PowerPoint presentation
- Create a tabbed presentation for longer presentations with lots of topics
- Use timing, animation, or sound in a presentation with hyperlinks
9 Leave a Reply
I am not sure about licking the transition tab in the second step 3

Thanks for catching that error — fixed!

[…] Browsed at a kiosk (full screen): If you choose this option, Slide Show is full screen but you can NOT click from slide to slide. So, how does the viewer navigate through the presentation? You can create automatic timing so that the viewer doesn’t have to navigate or you can create action buttons or other hyperlinked objects that allow navigation. Such a presentation can be called a self-running presentation. I explain the concept in my post, “How to create a self-running presentation.” […]

Hi Ellen! This is a nice post. There is one point I think you could have done better for viewers. Just add some images to the post to show people how to do that.
Personally, I find it’s more effective to give a tutorial with walk-through pictures of video, so it’s clear for readers or viewers, and it’s gonna be easy to follow.

Thank you for helping me in self-running PPT

Hi, I have set up a PowerPoint to run in Kiosk mode and have hosted the file on a website, but the presentation is not automatically advancing. Can anyone advise?
You don’t say how you’re trying to host the file on a website. Also, are timings set for the slides? These might help: http://www.ellenfinkelstein.com/pptblog/store-your-presentation-in-the-cloud-for-embedding-collaboration-or-marketing/ http://www.ellenfinkelstein.com/pptblog/why-you-need-to-get-your-presentations-on-the-internet-and-how/
Thanks for your reply.
Here is is: http://www.theroute-finance.com/finance-private-debt-platform-presentation/
[…] Browsed at a kiosk (full screen): If you choose this option, Slide Show is full screen but you can NOT click from slide to slide. So, how does the viewer navigate through the presentation? You can create automatic timing so that the viewer doesn’t have to navigate or you can create action buttons or other hyperlinked objects that allow navigation. Such a presentation can be called a self-running presentation. I explain the concept in my post, “How to create a self-running presentation.” […]
Got any suggestions?
We want to hear from you! Send us a message and help improve Slidesgo
Top searches
Trending searches

infertility
30 templates

linguistics
89 templates

15 templates

28 templates

public health
35 templates

holy spirit
38 templates
Types of Running
Types of running presentation, free google slides theme and powerpoint template.
Striving for fitness? This Google Slides and PowerPoint template is here to guide you! Centered on educating about various types of running, it sheds light on choosing the best running style: be it marathon, sprint, or trail. It helps tailor individual needs while providing advice on essential equipment. With its juxtaposition of pink and purple, fully editable visuals and graphs, your audience's understanding of the subject matter will sprint to the finish line. Discover the perfect all-in-one fitness presentation companion!
Features of this template
- 100% editable and easy to modify
- 35 different slides to impress your audience
- Contains easy-to-edit graphics such as graphs, maps, tables, timelines and mockups
- Includes 500+ icons and Flaticon’s extension for customizing your slides
- Designed to be used in Google Slides and Microsoft PowerPoint
- 16:9 widescreen format suitable for all types of screens
- Includes information about fonts, colors, and credits of the resources used
How can I use the template?
Am I free to use the templates?
How to attribute?
Attribution required If you are a free user, you must attribute Slidesgo by keeping the slide where the credits appear. How to attribute?
Related posts on our blog.

How to Add, Duplicate, Move, Delete or Hide Slides in Google Slides

How to Change Layouts in PowerPoint

How to Change the Slide Size in Google Slides
Related presentations.

Premium template
Unlock this template and gain unlimited access

IMAGES
VIDEO
COMMENTS
Go to File > Publish to the Web in the menu. Choose either "Link" or "Embed" per your intent. Then use the Auto-Advance Slides drop-down box to choose the timing for the slides. Here again, you can pick from every second up to every minute. To loop the slideshow, check the box for Restart the Slideshow After the Last Slide.
Step 1: Open the Presenter Mode in Google Slides. First, go to the "Present" mode in Google Slides. After opening the slide, click on the "Present" button located on the top right corner of the screen or press "Ctrl+F5".This will open the slide in "Present" mode. Step 2: Click on the Gear Icon.
With the slideshow showing, move your mouse to the bottom-left corner of the presentation screen to show the toolbar. On the toolbar, click the three-dot menu and expand the Auto-play item. Then on this menu, click the Loop option at the bottom to enable presentation looping. Also on this menu, you'll need to choose the timing for your slides ...
Learn how to automatically play your Google Slides presentations, as well as how to loop your presentations quickly and easily. | Playlist: https://www.youtu...
Step 1: Open your Google Slides presentation. First, open the Google Slides presentation you want to autoplay in your browser or the Google Slides app. You can create a new presentation or use an existing one. Step 2: Start the presentation mode. In the top right corner of the window, click on the "Present" button to enter the presentation ...
Enabling your Google Slides to play on their own takes just a few clicks. Use presentation mode for live shows or publish to the web for self-running displays. Autoplay makes it easy to deliver presentations without manual work or the risk of forgetting to advance slides. Take advantage of these options to amplify your next slideshow!
In Google Slides, you can achieve this by setting up auto-advance slides with just a few simple steps. Whether you're giving a timed pitch, a self-running kiosk display, or a seamless photo slideshow, this feature can enhance your presentations. In this blog post, we'll guide you through the process in four easy steps.
You can use a self-running presentation to run unattended in a booth or kiosk at a trade show or convention, or you can save it as a video and send it to a client. On the Slide Show tab, select Set Up Slide Show. Presented by a speaker (full screen) Allows the people watching your slide show to have control over when they advance the slides.
This videos shows the autoplay feature that lets you create self-running presentations for trade shows, retail displays, and more. You can set your presentat...
Use Google Slides to create online slideshows. Make beautiful presentations together with secure sharing in real-time and from any device.
There are many ways to set up the timings for a presentation so that they run automatically, but the simplest and quickest is to use "rehearse timings": On the top ribbon, click Slide Show and Rehearse Timings. Click each time you want to proceed to the next animation/slide. Once you've finished the slides, PowerPoint will prompt you to ...
About Press Copyright Contact us Creators Advertise Developers Terms Privacy Policy & Safety How YouTube works Test new features NFL Sunday Ticket Press Copyright ...
For more on using the Publish to web feature and creating a self-running presentation, head to the 'Presenting your work' section of our Ultimate Guide to Google Slides. Editing and playing GIFs. Options for editing GIFs are far more advanced in Google Slides than in PowerPoint.
To Save Your Self-Running Presentation as a Video. First save your presentation as a PowerPoint file. Under the File, click Save. Then, still in the File tab, click Export. Now click the Create Video button. On the right side of the screen you will now see a drop-down menus (Full HD 1080p, Ultra HD 4K, etc.). Select the video quality you want.
Self running presentation packages. Another option is to create a self-contained PowerPoint Show (.ppsx) that can be run on another computer without additional software. Simple Self-running Presentations. The simplest self-running presentations are just a collection of photos. You can add captions or headings if you like or just put each photo ...
Whether you're a business professional, educator, or public speaker, these tips and tricks will empower you to deliver seamless and captivating self-running presentations that leave a lasting impression. A self-running presentation is a PowerPoint slideshow that advances automatically from slide to slide without manual control.
Download this template and tell them about the benefits of daily running and how they can combine different intensity intervals until they feel more comfortable. And detail all your training routines with the help of the different slide styles available in this modern presentation!
Free Running Powerpoint Templates And Google Slides Themes. Designing an eyecatching presentation template is time-consuming. Download the following free and ready-to-use Running powerpoint templates and Google slides themes for the upcoming presentation. You only need to change text, logo or colors on the professional PPT templates.
Step 2 - Loop your PPT by putting it in Kiosk Mode. Once you have made sure that your presentation is self-running, the next step to make sure that your presentation runs in loop. Just like the first step, this is also quite easy. Let's have a look -. First, you need to click on the "Slide Show" option in the Menu Bar.
Rename your presentation—Click Untitled presentation and enter a new name.. Add images—Click Insert Image to add images from your computer, the web, Google Drive, and more. You can also move, delete, or resize images. Add text—Click Insert Text box to add new text boxes. Then, click a text box to enter text. You can move, delete, or re-size text boxes.
Go to Slide Show> Set Up Slide Show (or Set Up Show). In the Set Up Show dialog box, under Show Type, choose Browsed at a Kiosk (full screen) and click OK. Save the presentation as a show. Finally, you can save the presentation as a "show. This simply means that the presentation opens immediately in Slide Show view.
This Google Slides and PowerPoint template is here to guide you! Centered on educating about various types of running, it sheds light on choosing the best running style: be it marathon, sprint, or trail. It helps tailor individual needs while providing advice on essential equipment. With its juxtaposition of pink and purple, fully editable ...
SlidesCarnival templates have all the elements you need to effectively communicate your message and impress your audience. Download your presentation as a PowerPoint template or use it online as a Google Slides theme. 100% free, no registration or download limits. Get these running templates to create energetic and dynamic presentations that ...