
Powerpoint Assist
Tips for Powerpoint by Regina Griffin

How To Full Screen In PowerPoint
Want to make a lasting impact with your PowerPoint presentations?
Engage your audience by utilizing the full-screen mode.
In this tutorial by Regina Griffin, a teacher from Oregon, US, we will explore what full screen mode is, how it enhances presentations, and the simple steps to enter and exit full-screen mode.
Discover keyboard shortcuts and learn how to use the “Presenter View” feature to elevate your presentation.
Dive in and take your PowerPoint skills to the next level!
Key Takeaways:
- Full-screen mode in PowerPoint helps in delivering a more professional and engaging presentation.
- To enter full-screen mode, open your presentation, click on the “Slide Show” tab, and select “From Beginning” or “From Current Slide”.
- To exit full-screen mode, press the “Esc” key or click on the “Exit” button in the bottom right corner.
What is Full Screen in PowerPoint?
Full Screen in PowerPoint refers to the display mode where the presentation covers the entire screen, maximizing visibility for the audience.
Utilizing the Full-Screen view in PowerPoint can significantly elevate the impact of your presentation. By eliminating any distractions and focusing solely on the content, you ensure that your message is delivered clearly and effectively. This mode is particularly helpful in large auditoriums or online settings, where every pixel counts in engaging your viewers.
Transition effects, animations, and slide content appear sharper and more impressive in Full-Screen mode , capturing your audience’s attention effortlessly. It also provides a seamless way to navigate through your slides, enhancing the flow of your delivery.
How Does Full-Screen Mode Help in Presentations?
Full-screen mode in PowerPoint aids presentations by eliminating distractions, focusing attention on the content, and providing a seamless viewing experience for the audience.
When presented in Full Screen Mode , the entire screen is utilized, ensuring that all eyes in the room are fixed on your slides and that your message is delivered clearly without any interference. By immersing the audience in the presentation, you create a more engaging atmosphere that captivates their interest and enhances information retention. The elimination of external elements like toolbars and taskbars allows the content to take center stage, emphasizing key points and graphics for better comprehension.
How to Enter Full-Screen Mode in PowerPoint?
Entering Full-Screen Mode in PowerPoint is a straightforward process that involves accessing the display settings to optimize the presentation viewing experience.
To begin, open your PowerPoint presentation and navigate to the Slide Show tab located in the top menu bar. From there, click on the Set Up Slide Show option to access the various display settings. Within the Set Up Show dialog box, under the Show type section, select the Presented by a speaker(full screen) option to ensure the presentation fills the entire screen.
Next, you can choose whether you want the presentation to start from the Beginning or the Current Slide . You can also specify additional options such as looping the presentation and enabling narration. Once you have set your preferences, click OK to apply the changes.
Step 1: Open the PowerPoint Presentation
To begin entering Full-Screen Mode in PowerPoint, open the desired presentation file on your device.
Once you have launched the PowerPoint software and accessed the file containing your slides, you are ready to move forward in presenting your work effectively. This initial step paves the way for a seamless transition into Full Screen Mode, optimizing your viewing experience and engaging your audience. By following these simple instructions, you are setting the stage for a polished and professional presentation that captivates your viewers. Remember, meticulous preparation and mastery of PowerPoint’s features are key to delivering impactful slideshows.
Step 2: Click on the ‘Slide Show’ Tab
After opening the presentation, navigate to the ‘Slide Show’ tab located on the PowerPoint taskbar to access presentation settings.
To prepare your presentation for Full-Screen view, the next step involves interacting with the Slide Show tab on the PowerPoint taskbar. This tab contains various options and settings specifically designed for your presentation’s display mode. By accessing the Slide Show tab, you can customize how your slides will be presented in Full Screen Mode, ensuring that your audience experiences a seamless and engaging presentation. From setting up slide transitions to rehearsing timings, this tab is essential for optimizing your presentation’s visual impact and flow.
Step 3: Select ‘From Beginning’ or ‘From Current Slide’
Choose whether to start the presentation from the beginning of the current slide by selecting the appropriate option to proceed with Full Screen Mode in PowerPoint.
When opting to start your slideshow From the Beginning , PowerPoint will initiate the presentation sequence from the very first slide, offering viewers a structured introduction to the content.
Conversely, electing to commence the slideshow From the Current Slide will begin at the slide you currently have open, ideal for situations where you need to pick up mid-presentation.
This decision can significantly impact the flow of your presentation, determining how smoothly the transitions between slides occur and how the timing is managed throughout your PowerPoint presentation.
How to Exit Full-Screen Mode in PowerPoint?
Exiting Full-Screen Mode in PowerPoint can be done swiftly using either the ‘Esc’ key on the keyboard or by clicking on the ‘Exit’ button located in the bottom right corner of the screen.
When in Full-Screen Mode during a PowerPoint presentation, the ‘Esc’ key serves as a quick and reliable way to exit and return to the normal view. This keyboard shortcut is intuitive and widely known, making it a popular choice for presenters aiming to seamlessly transition between views.
Alternatively, for those who prefer a visual cue, the ‘Exit’ button provides an on-screen control that can be easily accessed. By simply clicking on this button located strategically in the bottom right corner, users can smoothly exit Full-Screen Mode with minimal interruption to the flow of their presentation.
Option 1: Press the ‘Esc’ Key
To exit Full-Screen Mode in PowerPoint quickly, press the ‘Esc’ key on your keyboard to return to the regular view.
The ‘Esc’ key, typically located in the top-left corner of your keyboard, holds the functionality of exiting Full-Screen Mode across various applications, including PowerPoint. When you are in Full Screen Mode, simply tapping this key will revert your display to the standard editing interface, allowing you to continue your presentation or slide editing.
Option 2: Click on the ‘Exit’ Button in the Bottom Right Corner
Alternatively, to exit Full-Screen Mode, locate and click on the ‘Exit’ button positioned in the bottom right corner of the screen to transition back to the standard PowerPoint view.
This visual cue is strategically placed to offer users a straightforward way to exit the immersive full-screen experience. By interacting with this button, users can seamlessly return to the familiar PowerPoint interface, complete with all necessary slide controls and user interface elements. The ‘Exit’ button acts as a bridge between the immersive presentation mode and the standard editing or viewing mode, providing a seamless transition for users navigating through the presentation.
What are the Keyboard Shortcuts for Full Screen in PowerPoint?
Utilizing keyboard shortcuts in PowerPoint streamlines the process of entering and exiting Full-Screen Mode, with ‘F5’ to enter and ‘Esc’ to exit being the primary shortcuts for seamless navigation.
When presenting a PowerPoint slideshow, quick access to Full Screen Mode enhances the overall audience experience and minimizes distractions for the presenter. Plus ‘F5’ and ‘Esc’, other essential shortcuts include pressing ‘Ctrl+F’ to toggle Full-Screen Mode and using ‘Ctrl+S’ for Speaker Notes view. These shortcuts not only improve efficiency but also allow presenters to control the flow of their presentations effortlessly. By mastering these shortcuts, presenters can focus more on delivering engaging content rather than navigating through the software interface.
Enter Full-Screen Mode: F5
To enter Full-Screen Mode swiftly in PowerPoint, press the ‘F5’ key on your keyboard to initiate the presentation in a full-screen display.
Once you press the ‘F5’ key, PowerPoint seamlessly transitions your presentation to full-screen mode, eliminating any distractions and ensuring a focused audience experience. This shortcut is exceptionally useful during live presentations, allowing you to instantly engage with your content without the need for manual adjustments.
The ‘F5’ key not only maximizes your slides but also activates interactive features like animations, transitions, and embedded media to showcase your presentation dynamically. It serves as a fundamental tool for presenters looking to enhance the visual impact and overall professionalism of their slides.
Exit Full-Screen Mode: Esc
Exiting Full-Screen Mode in PowerPoint can be accomplished by pressing the ‘Esc’ key on your keyboard, providing a prompt return to the standard presentation view.
This handy keyboard shortcut offers presenters a quick and efficient way to exit the immersive Screen Mode, enabling them to seamlessly transition back to the regular PowerPoint interface without any interruptions. By simply hitting the ‘Esc’ key, speakers regain control over their slideshow, allowing them to end the presentation smoothly and smoothly resume commanding the visuals onscreen. This feature enables users to swiftly navigate through their slides and interact with the audience while effortlessly switching between Full Screen and regular display modes, enhancing the overall presentation experience.
How to Use the ‘Presenter View’ in Full Screen Mode?
Leveraging the Presenter View feature in Full Screen Mode enhances the presenter’s experience by providing additional tools, notes, and control options on a separate monitor for improved presentation management.
Presenter View allows presenters to see the current slide, the next slide, their notes, a timer, and even a zoom slider on a separate screen while the audience views only the slides. This feature is particularly beneficial for speakers who want to maintain eye contact with the audience while also having access to helpful tools.
To activate ‘Presenter View,’ go to the ‘Slide Show’ tab, check the box for ‘Use Presenter View,’ and click ‘Start Slide Show.’ Ensure that you have multiple monitors connected for this feature to work effectively. Once in ‘Presenter View,’ you can easily navigate through slides, make annotations, and keep track of time without disrupting the flow of your presentation.
Step 1: Connect a Second Monitor
To enable Presenter View functionality in Full Screen Mode, connect a secondary monitor or projector to the device to access the extended display for presenter tools and notes.
Once the secondary display is connected, open your presentation software and enter Full-Screen Mode. This will automatically activate the Presenter View, allowing you to view your slides privately on your device while displaying the presentation to the audience on the extended screen. This setup is crucial for speakers who want to keep track of the upcoming slides, read speaker notes discreetly, and access handy tools without interrupting the flow of the presentation.
Once the secondary monitor is connected, navigate to the ‘Slide Show’ tab in PowerPoint to access the ‘Presenter View’ option for enhanced presentation control and management.
Upon reaching the ‘Slide Show’ tab, look for the ‘Monitors’ group where you will spot the ‘Presenter View’ button. Click on it to initiate this feature, designed to offer presenters a comprehensive view of their presentation layout, tools, and speaker notes. Presenter View allows you to project slides for the audience while keeping notes and upcoming slides visible to the speaker. This ensures a smooth flow of the presentation, aiding in better timing and engagement with the audience.
Step 3: Select ‘Presenter View’ Option
Choose the ‘Presenter View’ option from the available settings to activate the feature and access presenter notes, slide controls, and additional tools for seamless presentation delivery in Full Screen Mode.
Once you have selected the ‘Presenter View’ mode, you will be able to see your speaker notes privately while the audience views only the slides. This setting allows you to stay on track with your content without losing connection with your viewers. You can easily navigate through your slides using the slide controls provided in the ‘Presenter View’, ensuring a smooth flow of your presentation. You can take advantage of the additional tools such as virtual laser pointers and annotation features to emphasize key points and engage your audience effectively.
Mastering Full-Screen Mode in PowerPoint enables presenters to deliver engaging and visually immersive presentations that captivate audiences and convey information effectively.
By utilizing Full-Screen Mode, presenters can eliminate distractions and focus the audience’s attention solely on the content being presented. This results in a more immersive and impactful experience for viewers, enhancing overall engagement. Effective slide controls and display settings play a crucial role in navigating the presentation smoothly, ensuring a seamless flow and professional delivery. The ability to effortlessly switch between slides, manage animations, and adjust settings on the fly contributes significantly to the presenter’s performance and confidence on stage.
Frequently Asked Questions
1. how do i fully screen a powerpoint presentation, to full-screen your powerpoint presentation, simply press the f5 key on your keyboard or click the “slide show” tab at the top of the screen and select “from beginning” or “from current slide.”, 2. can i fully screen a powerpoint presentation on a mac, yes, on a mac, you can full-screen a powerpoint presentation by pressing the command+enter keys on your keyboard or by clicking the green “full screen” button in the top left corner of the screen., 3. what if i want to exit full-screen mode during a powerpoint presentation, to exit full-screen mode during a powerpoint presentation, simply press the esc key on your keyboard or right-click on the slide and select “end show.”, 4. how do i control the slides while in full-screen mode, to control the slides while in full-screen mode, use the arrow keys on your keyboard or click the left and right arrows at the bottom of the screen., 5. can i use presenter view while in full-screen mode, yes, you can use presenter view while in full-screen mode. press the alt+f5 keys on your keyboard or click the “slide show” tab and select “presenter view.”, 6. what if my slides are not filling up the entire screen in full-screen mode, if your slides are not filling up the entire screen in full-screen mode, click the “slide show” tab and select “set up slide show.” then, under “multiple monitors,” select “all” and click “ok.” this should fill your slides to the entire screen during full-screen mode., similar posts, how to add images into your text in powerpoint.
Are you looking to enhance your PowerPoint presentations with engaging visuals? Adding images to your slides can significantly improve the visual appeal, effectively convey information, and keep your audience engaged. In this tutorial by Regina Griffin, a teacher from Oregon, US, you will learn how to add images into your text in PowerPoint from various…
How To Record A Presentation In PowerPoint With Video
Want to learn how to record a presentation in PowerPoint with video? Whether you want to share your presentation with absentees, create a video tutorial, or simply revisit your content, recording your presentation can be a valuable tool. In this article, we will guide you through the process step-by-step, from setting up your presentation to…
How To Format A Shape In PowerPoint
Are you looking to enhance your PowerPoint presentations with eye-catching shapes and designs? We will explore the basic shapes available in PowerPoint, such as rectangles, circles, triangles, and lines. Learn how to add, resize, rotate, change colors, and add effects to shapes. Discover how to group, align, distribute, and Format A Shape to create a…
How To Keep The Same Design Idea In PowerPoint
Are you struggling to maintain consistency in your PowerPoint design? We discuss the importance of consistency in PowerPoint design and how it enhances the overall impact of your presentation. Discover the key elements to consider when choosing a design idea and tips for maintaining consistency throughout your slides. Learn how to apply the same design…
How To Embed A YouTube Video In PowerPoint For Mac
In today’s digital age, presentations have become an essential part of communication. To make your PowerPoint presentations more engaging and dynamic, embedding YouTube video In PowerPoint For Mac can be a game-changer. Not only does it allow for easy access to videos during your presentation, but it also adds variety to your content. In this…
How To Make An Infographic In PowerPoint
Are you looking to create eye-catching infographics but unsure where to start? We will explore the world of infographics, why they are so effective, and the different types you can create. We will then dive into a step-by-step guide on how to design your infographic using Powerpoint. From choosing layouts and adding charts to incorporating…
Free All-in-One Office Suite with PDF Editor
Edit Word, Excel, and PPT for FREE.
Read, edit, and convert PDFs with the powerful PDF toolkit.
Microsoft-like interface, easy to use.
Windows • MacOS • Linux • iOS • Android

- Articles of PPT
How to Make PowerPoint Full Screen (Step by Step)
Making your PowerPoint presentation full screen is a simple but effective way to create a focused and engaging experience for your audience. By maximizing content visibility and eliminating distractions, you can ensure that your message is received loud and clear.
Whether you're a seasoned presenter or a beginner, this article will walk you through the steps of making your PowerPoint full screen, so you can deliver a polished and professional presentation with ease.
Part1: How to Make PowerPoint Full Screen Easily
Creating a PowerPoint presentation in full-screen mode is a simple process, and I'll provide a step-by-step tutorial below.
Step 1: Open Your PowerPoint Presentation
Launch Microsoft PowerPoint and open the presentation you want to view in full-screen mode.

Step 2 : Enter SlideShow Mode
To enter full-screen mode, you can use any of these methods:
Click on the "Slide Show" tab in the ribbon at the top of the window and then click "From Beginning."
Press the F5 key on your keyboard.
Alternatively, you can press the Shift + F5 keys to start the slide show from the current slide.

Step 3: Navigate Through Your Presentation
While in full-screen mode, you can use various methods to navigate through your slides:
Click your mouse or press the Spacebar or Enter key to advance to the next slide.
Press the Backspace or Left Arrow key to go back to the previous slide.
Use the keyboard's number keys to jump to a specific slide. For example, press "3" to go to slide 3.
Step 4 : End the Slide Show
To exit full-screen mode and return to normal editing mode, you can:
Press the Esc key on your keyboard.
Right-click anywhere on the screen and select "End Show."

And that's it! Your PowerPoint presentation should now be in full-screen mode, and you can easily navigate through your slides using the provided methods.
Part2: How to Make PowerPoint Full Screen on Projector
Making a PowerPoint presentation full screen on a projector is a common requirement for meetings and presentations. Below, I'll provide a step-by-step tutorial on how to achieve this.
Step 1: Connect Your Projector
Connect your projector to your computer using the appropriate cables (HDMI, VGA, etc.). Ensure that both the projector and your computer are powered on.
Step 2: Configure Display Settings
Right-click on your desktop and select "Display settings."
In the Display settings window, you'll see two displays - your computer screen and the projector (or second display).

Make sure the "Multiple displays" dropdown menu is set to "Duplicate" or "Second screen only" depending on your preference. "Duplicate" will mirror your computer screen on the projector, while "Second screen only" will use the projector as the main display.

Step 3 : Open Your PowerPoint Presentation
Launch Microsoft PowerPoint and open the presentation you want to display.
Step 4 : Enter SlideShow Mode
Step 5 : Navigate Through Your Presentation
While in full-screen mode, you can navigate through your slides as explained in Part 1 of this tutorial.
Step 6 : End the Slide Show
By following these steps, you should be able to make your PowerPoint presentation full screen on a projector.
Part3: The Shortcut Key for Starting the Slideshow
Here are the shortcut keys for starting a PowerPoint slideshow from both the beginning and the current slide on both Windows and macOS:
F5: Start the slideshow from the beginning.
Shift + F5: Start the slideshow from the current slide.
Play Slideshow from Beginning:
Shift + Command + Return: Start the slideshow from the beginning.
Fn + Shift + F5: Start the slideshow from the beginning.
Play Slideshow from Current Slide:
Shift + Command + Return: Start the slideshow from the current slide.
These shortcut keys allow you to quickly initiate a PowerPoint slideshow, whether you want to begin from the start or the current slide, and they work on both Windows and macOS platforms.
Part4: Best Alternative — WPS Office

Microsoft Office has been the market leader in office productivity software for decades, offering robust applications such as Word, Excel, and PowerPoint. However, with the rise of cloud-based solutions and the increasing demand for cost-effective options, free alternatives like WPS Office have gained popularity.
Why should you choose WPS Office as an alternative to Microsoft Office?
Here are the answer:.
● Free to use Word, Excel, and PPT. Powerful PDF toolkit
● Rich template store, which contains various free and paid templates for Word, PPT, and Excel
● Rich functions
● The light weight of the product is only 200M, and it occupies a small amount of computer memory. It is suitable for Win7, 10, and 11
● The MAC version of WPS Office is very powerful. Microsoft office ignores the experience of mac users, which can be made up by wps office
● Support online documents (WPS AirPage), multi-person collaborative editing
● WPS office also supports Linux systems, Android, and ios systems. To use WPS office products on different systems, you only need to log in to the same account, and all files can be synchronized
Creating a PowerPoint-like presentation with WPS Office and utilizing features like image-based storytelling, progressive image reveal, comparison slides, and virtual tours is a great way to engage your audience. Here's a step-by-step tutorial on how to make PowerPoint-style presentations with WPS Office:
Step 1 : Open WPS Presentation and creating a New Presentation

Step 2: Create Your Presentation
Create your presentation in WPS Presentation, including your slides, images, and content. You can use the features like image-based storytelling, progressive image reveal, comparison slides, and virtual tour to enhance your presentation as per your requirements.
Image-Based Storytelling
To create image-based storytelling slides:
Insert images into your slides that correspond to different parts of your story.

Add text, captions, or descriptions to explain the images.

Use transitions and animations to make the storytelling engaging.

Progressive Image Reveal
To create slides with progressive image reveals:
Add your main image to the slide.

Duplicate the slide.

On the duplicated slide, use an object (e.g., a shape) to cover part of the image.
Add animations to the object (e.g., "Appear" animation) and set delays for each slide to reveal the image progressively.

Comparison Slides
To create comparison slides:
Use tables or split your slide into multiple sections to show comparisons side by side.

Add text and graphics to highlight the differences or similarities between the elements you're comparing.

Step 3 : Save Your Presentation
After creating your presentation, make sure to save your work to avoid losing any changes. Click on 'File' in the top menu, then select 'Save' or 'Save As' to save your presentation file.

Step 4: Full Screen Mode
To view your presentation in full-screen mode:
Click on the "Slide Show" option in the top menu.
Select "From Beginning" to start the presentation from the beginning.

Step 5: Press "Esc" on your keyboard to exit full-screen mode.
You feel WPS Office is the best choice for you and want to download? Don’t worry, below is step by step how to download WPS Office:
Step 1: Visit the WPS Office website: wps.com .
Step 2: Click “ Free Download” button

Step 3: Select the place you want to save WPS Office -> Save

Step 4: Double click on the WPS Office file in your Download file, click “Run” and follow the on-screen instructions to install

Step 5: After complete, you can enjoy all the power of WPS Office
Use Word, Excel, and PPT for FREE, No Ads.
Edit PDF files with the powerful PDF toolkit.
Microsoft-like interface. Easy to learn. 100% Compatibility.
Boost your productivity with WPS's abundant free Word, Excel, PPT, and CV templates.
Frequently Asked Questions (FAQs)
Q: how to use the presenter view in powerpoint.
A: To use the presenter view in PowerPoint, follow these steps:
Connect your computer to a projector or external display.
Start your PowerPoint presentation.
Click the "Slide Show" tab in the PowerPoint ribbon.
Click "Presenter View."
The presenter view will display on your computer screen, showing the current slide, the next slide, speaker notes, and presentation controls.
Use this view to control your presentation while the audience sees only the slide.
Q: How can I resize an image while keeping the aspect ratio the same?
A: To resize an image while maintaining the aspect ratio in PowerPoint, follow these steps:
Select the image you want to resize.
Click and drag one of the corner handles of the image while holding down the Shift key on your keyboard.
This will resize the image proportionally, ensuring that the aspect ratio remains the same.
Q: How do I insert a page number in a WPS presentation?
A: To insert a page number in a WPS Presentation, follow these steps:
Click the "Insert" tab in the WPS Presentation toolbar.
Select "Page Number."
Choose the desired page number format and location (e.g., top or bottom of the slide).
The page number will be inserted into your presentation.
The article "How to Make PowerPoint Full Screen" provides a step-by-step guide for easily entering full-screen mode in PowerPoint, facilitating seamless presentations. Notably, WPS Office offers a robust alternative for creating PowerPoint presentations, with features such as image-based storytelling and progressive image reveal.With WPS Office, users can make their presentations captivating and engaging by following simple steps for entering full-screen mode. Download WPS Office now.
- 1. 3 Easy Ways to Record Your Screen on Windows 10
- 2. 3 Best Free Screen Recorders for Mac (in 2024)
- 3. How to Screen Record Using WPS Office: A Comprehensive Guide
- 4. Top 5 Free Screen Recording Software for Windows
- 5. Full Form Of CV: Curriculum Vitae | How to Make a Professional CV
- 6. Best Screen Recorders for Linux System (A Complete Guide)

15 years of office industry experience, tech lover and copywriter. Follow me for product reviews, comparisons, and recommendations for new apps and software.
- Slidesgo School
- PowerPoint Tutorials
How to Use the Presentation Modes and the Screen Recording Features in PowerPoint

After designing all the slides for your presentation, the next and last step is presenting in front of your audience. In this new Slidesgo School tutorial, you’ll see how the presenter view works and how you can record your presentation .
Presentation Modes
Presentation modes — set up slide show, presentation modes — record slide show.
- There are different presentation modes in PowerPoint, besides the one you can find at the bottom of the screen.
- To access the presentation modes, go to the Slide Show tab.
- The first two options allow you to start the presentation from the beginning or from the currently selected slide.

- If you choose Present Online, an URL will be generated, which you can then share with your potential online viewers. After clicking this button, a new window will open, displaying info about the Microsoft Office online presentation service and a checkbox to enable remote download for your online audience. To enjoy this service, you need an Office 365 account. When you’re ready, click Connect to generate the URL.
- If you choose Custom Slide Show, you can select which slides to display in your presentation. First, create a new custom slide show and select the slides that you want to display. Then, click Add, enter the name of the presentation and click OK. This new custom presentation will appear on the list. Select it and click Show to begin the presentation.
- In the Set Up group you’ll find options to set up the presentation, hide slides, rehearse your presentation and even record it.
- Click Set Up Slide Show to adjust several settings regarding your presentation. You’ll find more information in the next section of this tutorial .
- If you click Hide Slide, the selected slide won’t show up during your presentation. Hidden slides will appear faded out on the list and their numbers will be crossed out.
- If you click Record Slide Show, you’ll be able to record your presentation from the beginning or from the current slide. We’ll go into detail in the last section of this tutorial.
- There are several checkboxes regarding whether to play narrations, use timings and show media controls.

- In the Monitors group you can choose which screen to display your presentation.
- The last group, Captions & Subtitles, is only available in Office 365. You’ll find options to enable subtitles, which will be generated out of your speech (so you’ll need to have a mic). There are settings to change the language and the position of the subtitles.
- Open your presentation in PowerPoint.
- Go to the Slide Show tab.
- In the Set Up group, click Set Up Slide Show. A new window will open, where you’ll find several options.
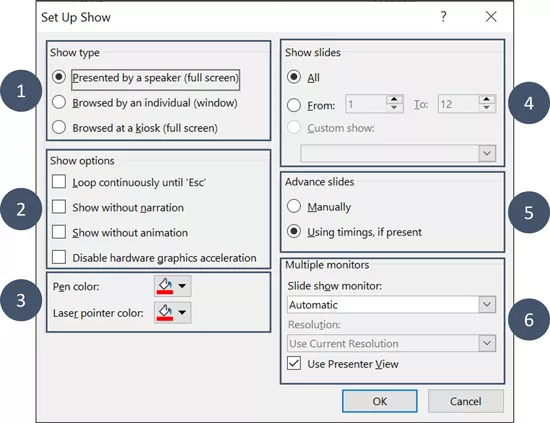
- In the top-left corner, under “Show type”, you can choose whether the presentation will be in fullscreen with speaker notes, windowed, or in fullscreen without speaker notes or the menu bar.

- Under “Show options” you can choose whether to show the presentation without narration or animations, or disable the hardware graphics acceleration (for better performance). You can also set the pen and laser pointer color.

- Under “Show slides”, you can choose which slides to show in your presentation. You can select all of them, a specific range or a custom slideshow.
- There are other settings to determine how to advance slides (manually or using timings), what the resolution will be and whether to use the presenter view.
- Click Record Slide Show. From the drop-down menu, select From the Current Slide or From the Beginning.
- A new window will open, along with the presentation in fullscreen mode. At the top-left you’ll find a button to start recording.
Do you find this article useful?
Related tutorials.

How to Use the Presenter View in Google Slides
Google Slides, like PowerPoint, has different presentation modes that can come in handy when you’re presenting and you want your slideshow to look smooth. Whether you’re looking for slides only, speaker notes or the Q&A feature, in this new Google Slides tutorial, you’ll learn about these and their respective settings. Ready? Then let’s explore the presenter view!

How to Download Google Slides Templates
When preparing a presentation, many people start panicking because they realize how much time it will take to edit each and every slide. Creating them from scratch, filling them in, looking for pictures, moving the elements...How stressful! But there is a solution that saves you a lot of time. We're sure that you've browsed the internet for templates, or basically, pre-established designs and elements, that can be downloaded for free and can be edited to your liking. Are we right? Then, we have some good news for you!

Discover our collection of printable templates
With the advance of technology, printing has become something that is no longer a necessity. Smartphones have made the paper format less and less frequent, but there are still certain cases in which having physical resources is much more convenient. Whether it's for taking notes, handing out assignments, making worksheets or handing out business cards or invitations, it's necessary to print your customized designs.From now on, in every Slidesgo printable presentation that you download, you will find the instructions for printing on the third slide. Depending on the style, colors or format of each presentation, we will tell you if you can...

How to Add Superscript and Subscript in Google Slides
Let’s take the most famous formula: E=mc^2, Einstein’s relativity equation. It wouldn’t be the same if it was E=mc2, right? Okay, yes, some people write it like that because it’s very famous and it won’t be misunderstood. But technically… It can! This is where the sophistication of superscript or subscript enters the room! Do you know how to write them in equations, copyright brands or even footnotes in your presentations? Let’s figure out how.
How to Make PowerPoint Slide Appear Fullscreen

In some cases, you might notice a huge black area on the sides of the PowerPoint slide when being presented. Those big gaps are the result of the incompatibility on either slides or projector (presentation monitor).
To fix that on PowerPoint, you can adjust the slide size according to the screen need. That way, the slide will appear fullscreen and not leaving any gap on its sides.
NOTE: The following guide is based on PowerPoint 365 version 1902. However, the overall interfaces should be similar to other versions, so you can follow this guide with ease.
How to make PowerPoint slides fullscreen
In this guide, you will learn how to change the aspect ratio of PowerPoint slides to fit into the projector screen. By default, Microsoft PowerPoint has 4:3 and 16:9, changing one into another may require addition work to ensure the slide’s look and design. It’s good to have a duplicate PPT file just in case you messed up after changing the size.
1. Go to the Design tab.

2. Click on Slide Size , and select either Standard (4:3 ) or Widescreen (16:) . Select the one that matches your projector screen.

3. For example, my PowerPoint slide is 4:3, then I changed that into 16:9. There are huge gaps on both sides that need to be filled.

4. Redesign your slide so it looks fit on the new aspect ratio configuration. This may take some minutes to finish.

5. Click on Slide Show to see how it would appear.

6. The slide will be fullscreen, leaving no blank area when presented.

The guide above is based on screenshots from the 3 Steps Colorful PowerPoint Template . You can download this template for free.
Changing aspect ratio is like moving your stuff into a new room. Even though the shape is similar, the total space will definitely affect how you organize your stuff.
You can also change the projector aspect ratio
Some projectors have a feature that lets you change the screen size and aspect ratio based on your requirements. So, it will practically make your PowerPoint slide look fullscreen without having to modify its slide size and design.
Sadly, I can’t provide you any details regarding this method. Please refer to the user manual book to see how to adjust the projector aspect ratio.
In my experiences, audiences don’t care
The only person that notices the blank area on the PowerPoint slide is no one except the presenter itself. From the perspective of the audience, they don’t care so many details regarding the design, especially if it won’t affect the material you presented.
So, as long as the blank screen gap isn’t too big and your slide design is good enough, you should be fine.
After all, there are many factors that make your slide did not appear fullscreen. It can be the projector, its settings, the screen, or PowerPoint configurations. We can’t control all of that at once, but at least we can control how audiences perceive us.
How do I make a PowerPoint presentation full screen?
To make a PowerPoint presentation full screen, follow these steps:
1. Click on the “Slide Show” tab in the PowerPoint menu. 2. In the “Start Slide Show” group, click on the “From Beginning” or “From Current Slide” option. 3. Alternatively, you can press the F5 key on your keyboard to start the presentation from the beginning or Shift + F5 to start from the current slide. 4. Your PowerPoint presentation will now be displayed in full screen mode.
How do I make a PowerPoint slide fit the whole page?
To make a PowerPoint slide fit the whole page, go to the “Design” tab, click “Slide Size”, and select “Custom Slide Size”. You can then adjust the width and height to fit your needs.
What is the PowerPoint view that displays the slides in full screen mode?
The PowerPoint view that displays the slides in full screen mode is called “Slide Show” mode.
Why is my PowerPoint slide not in the middle of the screen?
If your PowerPoint slide is not in the middle of the screen, it could be due to an object that has been dragged off the slide and into the “space” on the left. Zooming out can help you find and adjust this object
About The Author
Related posts.

How to Email a Presentation Made in PowerPoint 2010

PowerPoint XP: The PowerPoint Window

How to Change the Slide Size in PowerPoint for Better Presentations

How to Zoom in PowerPoint Slide When Presenting

- Help Center
- Google Docs Editors
- Privacy Policy
- Terms of Service
- Submit feedback
- Present or print slides
Present slides
Want advanced Google Workspace features for your business?
Try Google Workspace today!
You can present Google Slides so they show on a full screen.
View a presentation
To present a full-screen presentation in Google Slides:
- Open a presentation in Google Slides .
- From the current slide, the presentation will become full screen. To change slides, use the arrow keys on your keyboard or click the arrows at the bottom of the presentation.
- To exit full-screen, press the Esc key.
Present with notes, auto-advance slides & more
View a presentation with speaker notes.
- Click Presenter view .
- Click Speaker notes .
Advance slides automatically
- You present your presentation.
- Someone clicks on a link to your published presentation.
- Someone views your published presentation that's embedded in a website.
Advance slides automatically while you present
- Open a presentation in Google Slides.
- Choose how quickly to advance your slides.
Advance slides automatically for a published presentation
- If you use Google Slides through work or school, you can only share the link with people within your organization.
- After you publish your presentation, anyone with the link will be able to see your presentation.
- Choose Link or Embed .
- Under "Auto-advance slides," choose how much time you want to add between slides.
Stop publishing
Highlight & annotate as you present.
When you present, you can use a pen tool to draw or make annotations. Annotations stay during your presentation, but disappear after you end your slideshow.
Use the pen tool during a slideshow
- On your browser, open a presentation in Google Slides .
- To draw or annotate, click and drag on your slide.
Other actions while presenting
When you present, you can choose more options from the toolbar at the bottom of the presentation window:
- Select slides to present from a list
- Open "Presenter" view
- Turn on laser pointer
- Print the presentation
- Download the presentation in PDF or PPTX format
PC keyboard shortcuts
Mac keyboard shortcuts, chrome keyboard shortcuts, need more help, try these next steps:.
Using Google products, like Google Docs, at work or school? Try powerful tips, tutorials, and templates. Learn to work on Office files without installing Office, create dynamic project plans and team calendars, auto-organize your inbox, and more.
- All Templates
- Infographics
How To Make Powerpoint Full Screen? A Complete Guide With Pictures
- October 4, 2023
While presenting a PowerPoint presentation, the slides do not appear full screen and often leave blank spaces. Though the full screen does not add any extra value, it embellishes the overall appearance of your presentation. The presentation appears most defined and crisp in full screen.
So, how to make PowerPoint Fullscreen? Users will get different slide size options by clicking the Slide Size tab. The Widescreen (16:9) option made my PowerPoint slide Fullscreen. Users must explore the options and see which makes their slide Fullscreen.
Follow the steps stated below to get a detailed idea of keeping the slides fullscreen in PowerPoint presentations.
How To Make Powerpoint Full Screen? Step-by-Step Guide
Well, there are two methods you can use to keep the slides full-screen while presenting them. You can follow any of the processes and get full-screen slides.
[Note: I have attached demo pictures. The tasks are done in PowerPoint 2013. You can follow the steps in any PowerPoint version. The interface is quite the same for all the versions. ]
Method 1: Setting the Aspect Ratio
There is a default aspect ratio setting for the PowerPoint slide. In this process, we will adjust the aspect ratio as per the device so that no blank space appears.
- Step 1: Open the PowerPoint
First, Launch the PowerPoint app and create your slides. To launch, press the “ Window ” key and search for PowerPoint. Click the PowerPoint Icon to open the software.
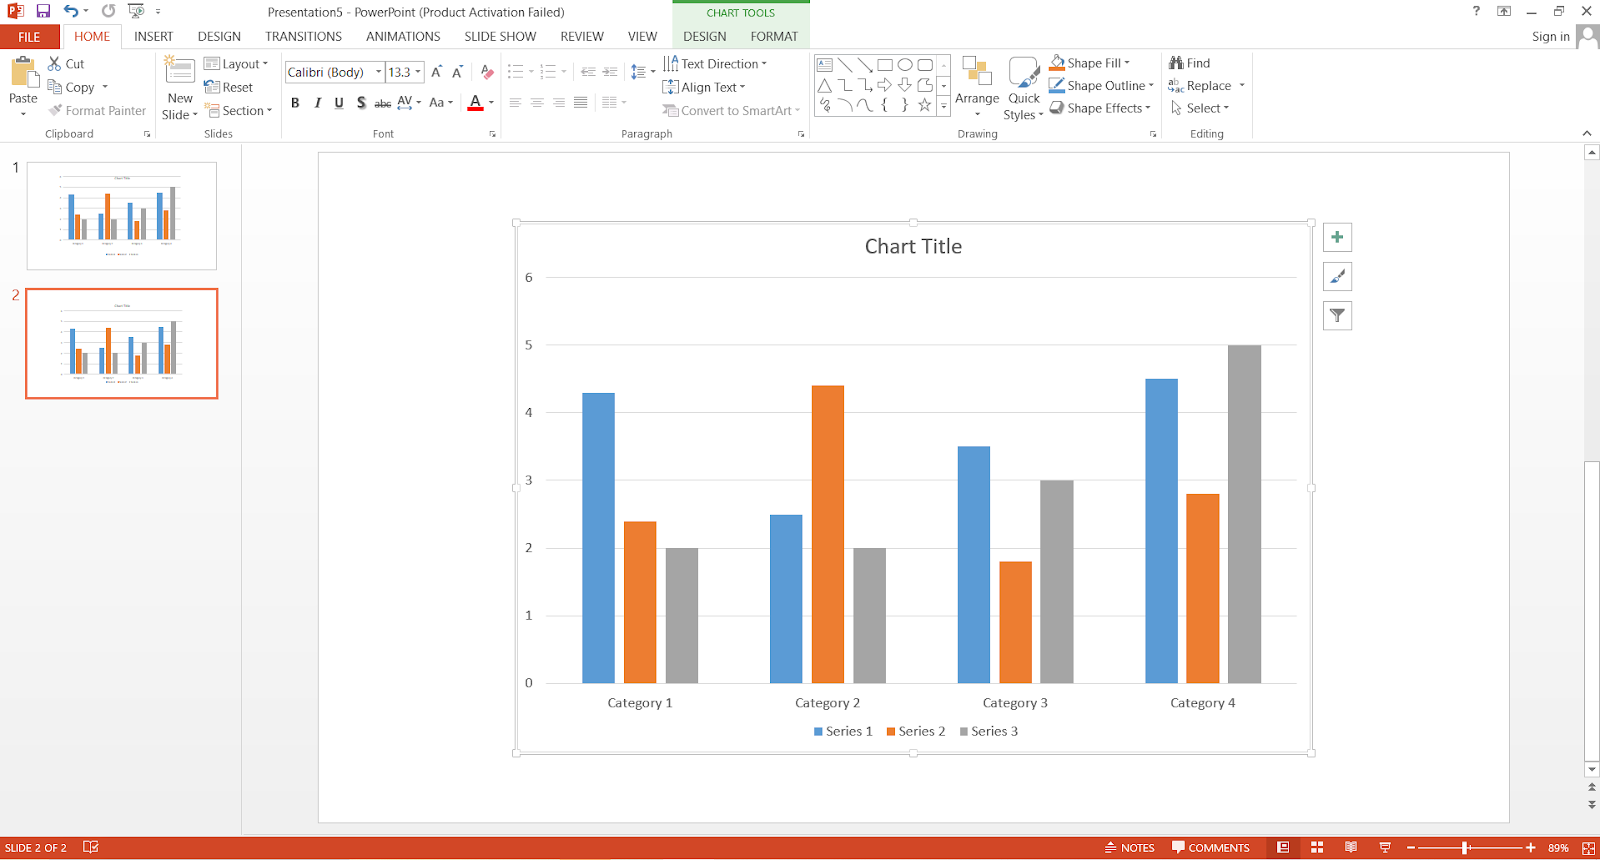
Picture: A normal PowerPoint Slide
- Step 2: Open The Design Tab
Now, go to the design tab and click it. Once you click the design tab, you will see a toolbar named slide size .

Picture: Design and Slide Size tab
- Step 3: Go for the Slide Size Option
Click the slide size option. Upon clicking, you will see three options: Standard (4:3), Widescreen (16:9), and Custom Slide Size .

Picture: Slide Size Options
- Step 4: Click the Options to Determine which keep the Slides Full Screen
Click any options (4:3 or 16:9) and then go to the toolbar below called Slide Show . Click the slide show button and see if the slide appears Full Screen.
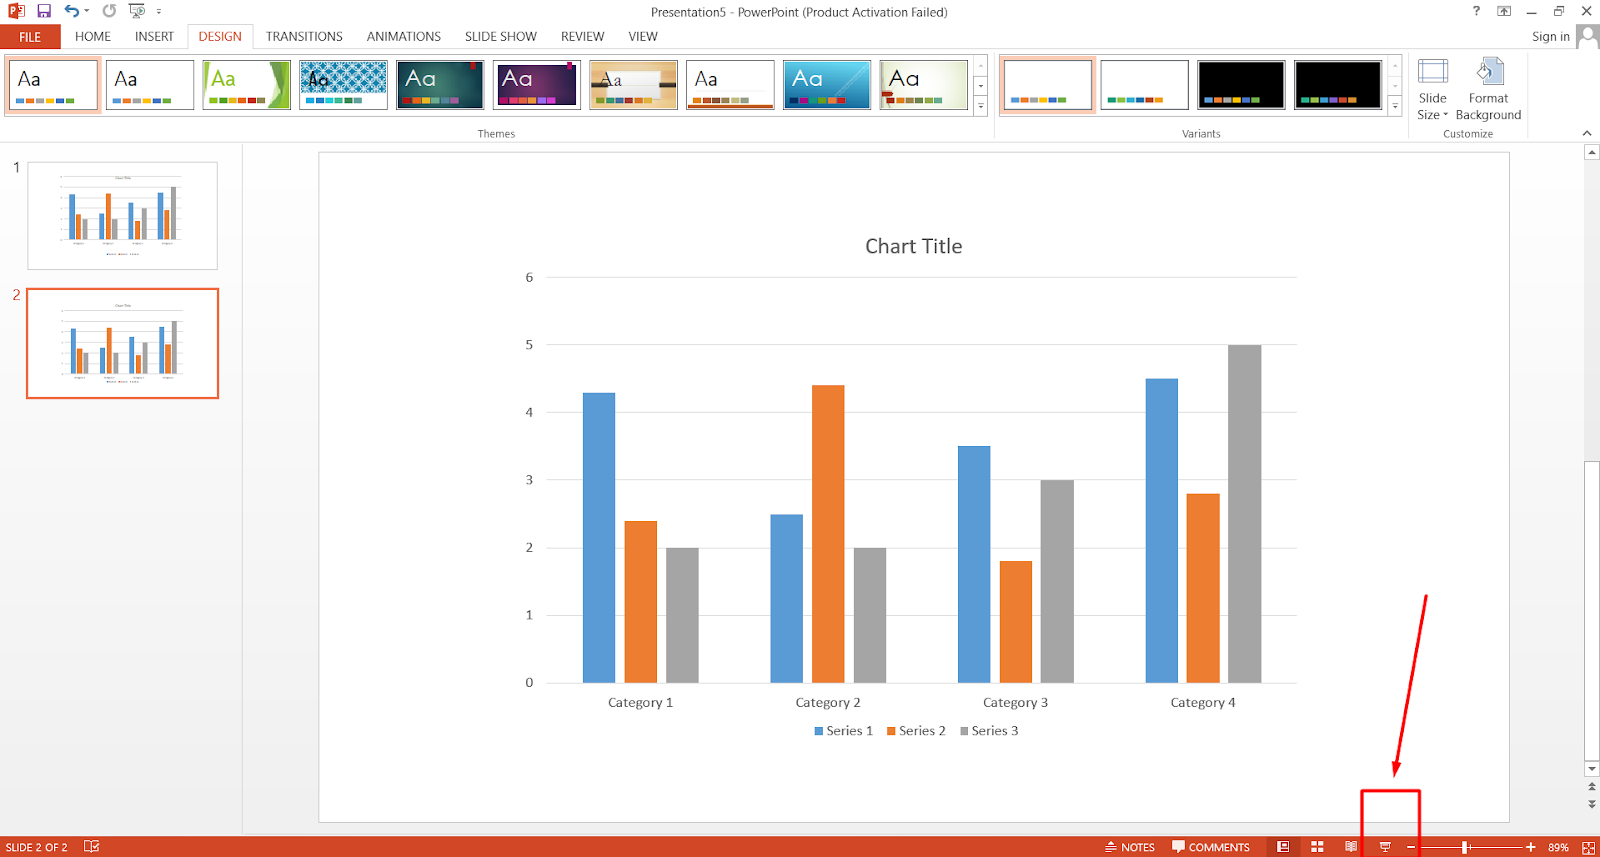
Picture: The Slide Show Tab
- Step 5: The Widescreen (16:9) Worked for me
On my device, when I click the Standard (4:3) size, there remain blank spaces, and the slide does not appear full-screen. But when I click the Widescreen (16:9) option, the slide does appear full-screen.
Picture: Upon clicking the Standard (4:3) size, there remain black spaces
Picture: Upon Clicking the Widescreen (16:9), there remain no blank spaces
- Step 6: If Nothing Makes Your Slide Full Screen, Go For Custom Slide Size
You must determine which size creates a full-screen appearance on your device and determine the size accordingly. You can also customize the slide size through the Custom Slide Size . When I clicked the Widescreen option, the slide size was: width: 10.333 inches, height: 7.5 inches.
- Step 7: Now, Return Back
Double-click or press ESC to return from the full screen.
You can follow the YouTube link below for a better understanding:
Method 2: Through the Slide Master Option
Apart from the aspect ratio setting, there is another way that we will discuss in the following steps.
- Step 1: Find The View Option
Click the View option from the toolbar.
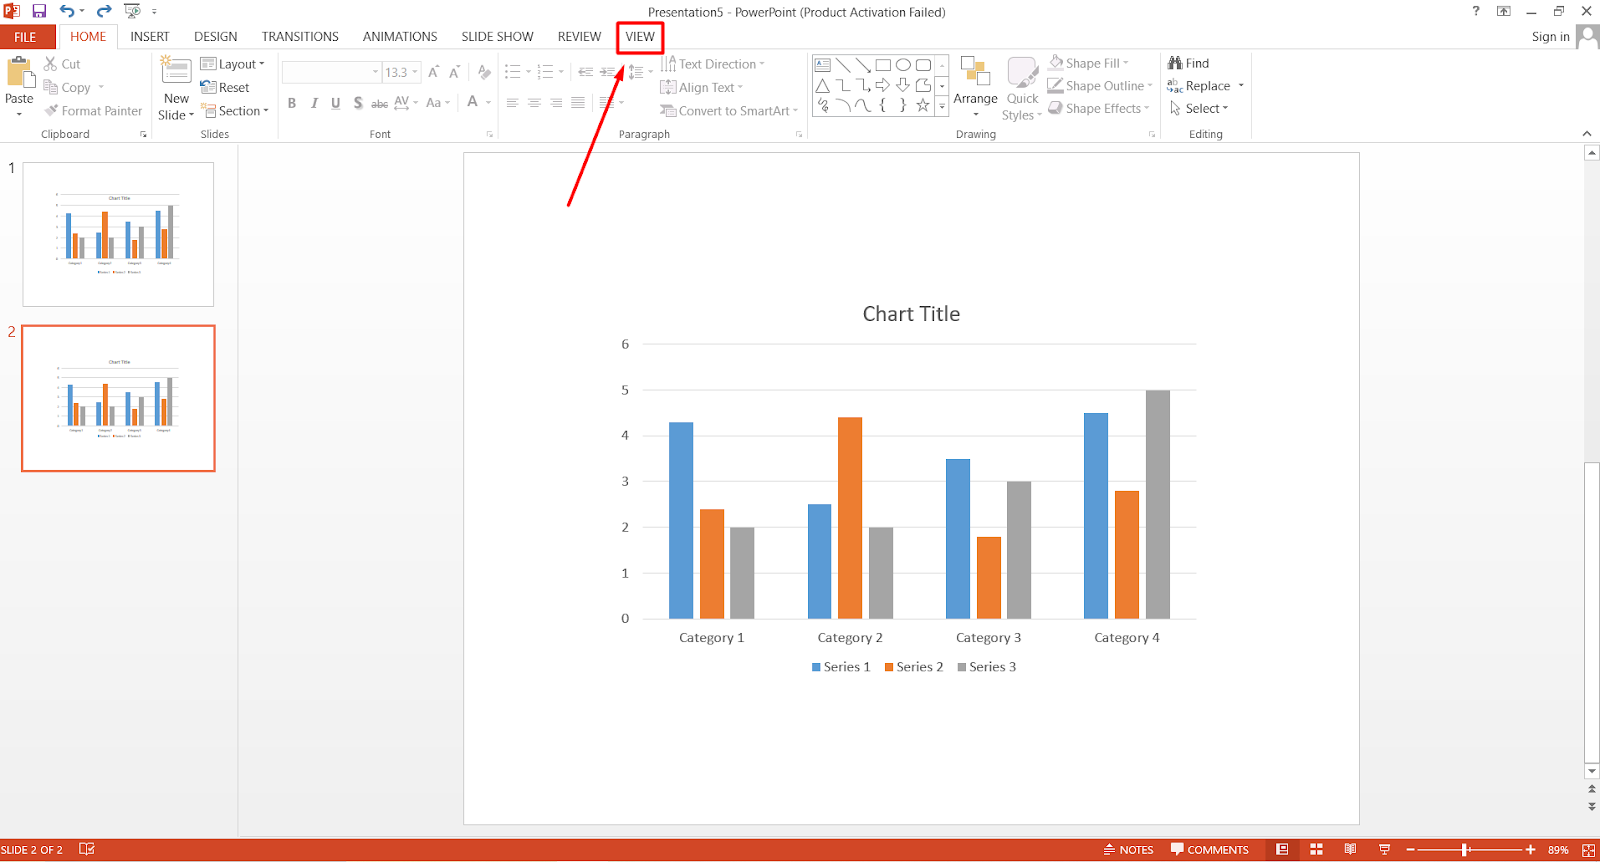
Picture: View option
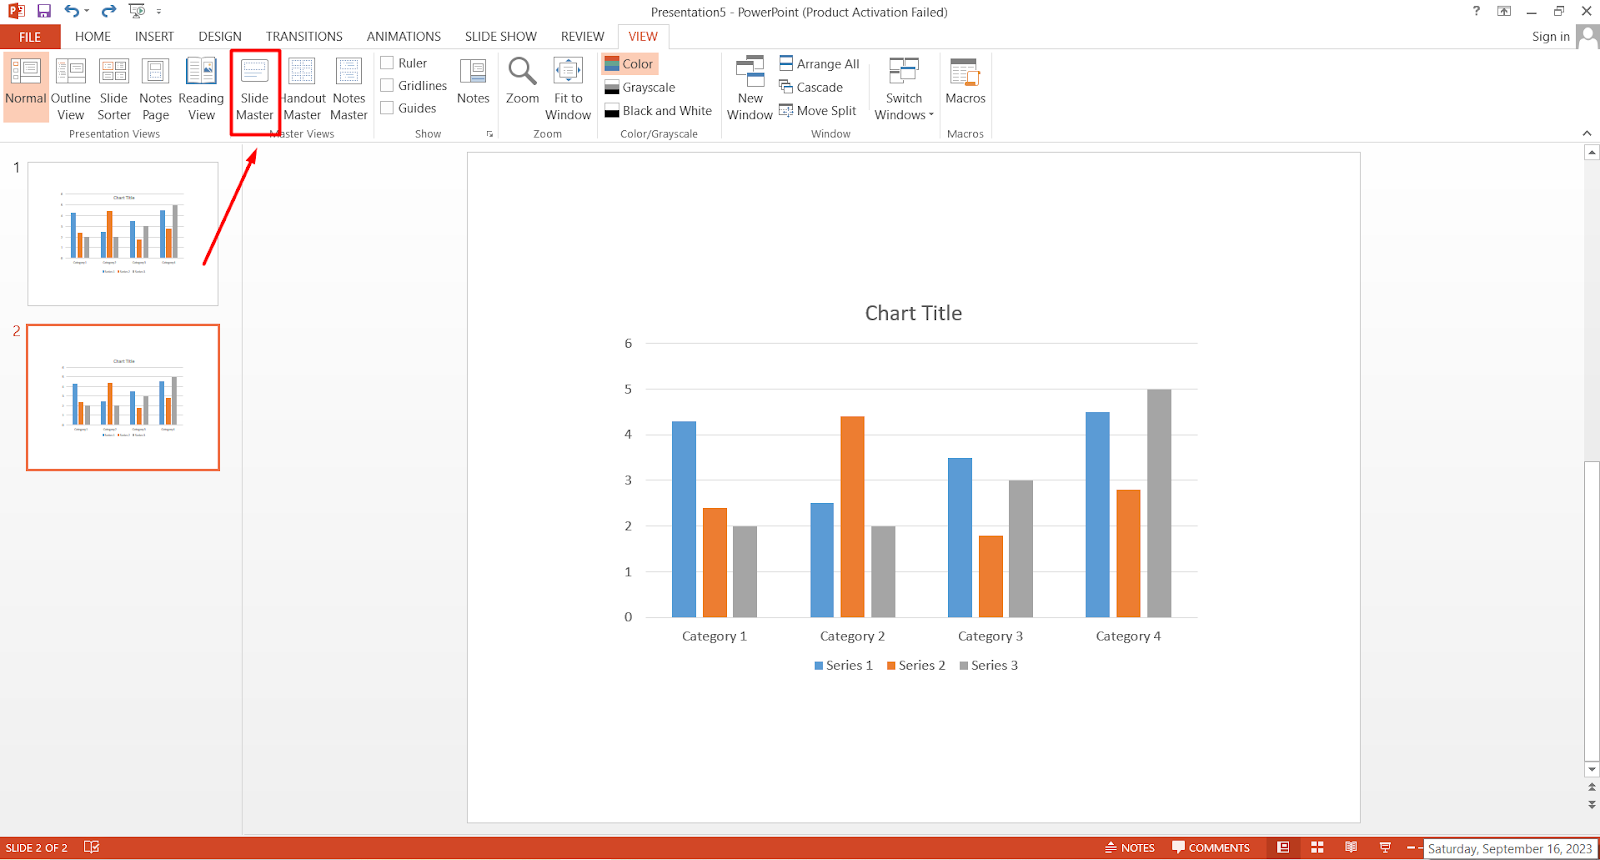
- Step 2: Click View Option and Look for the Slide Master
When you click the View option, you will see an option named Slide Master . Click on the option.
Picture: Slide Master option
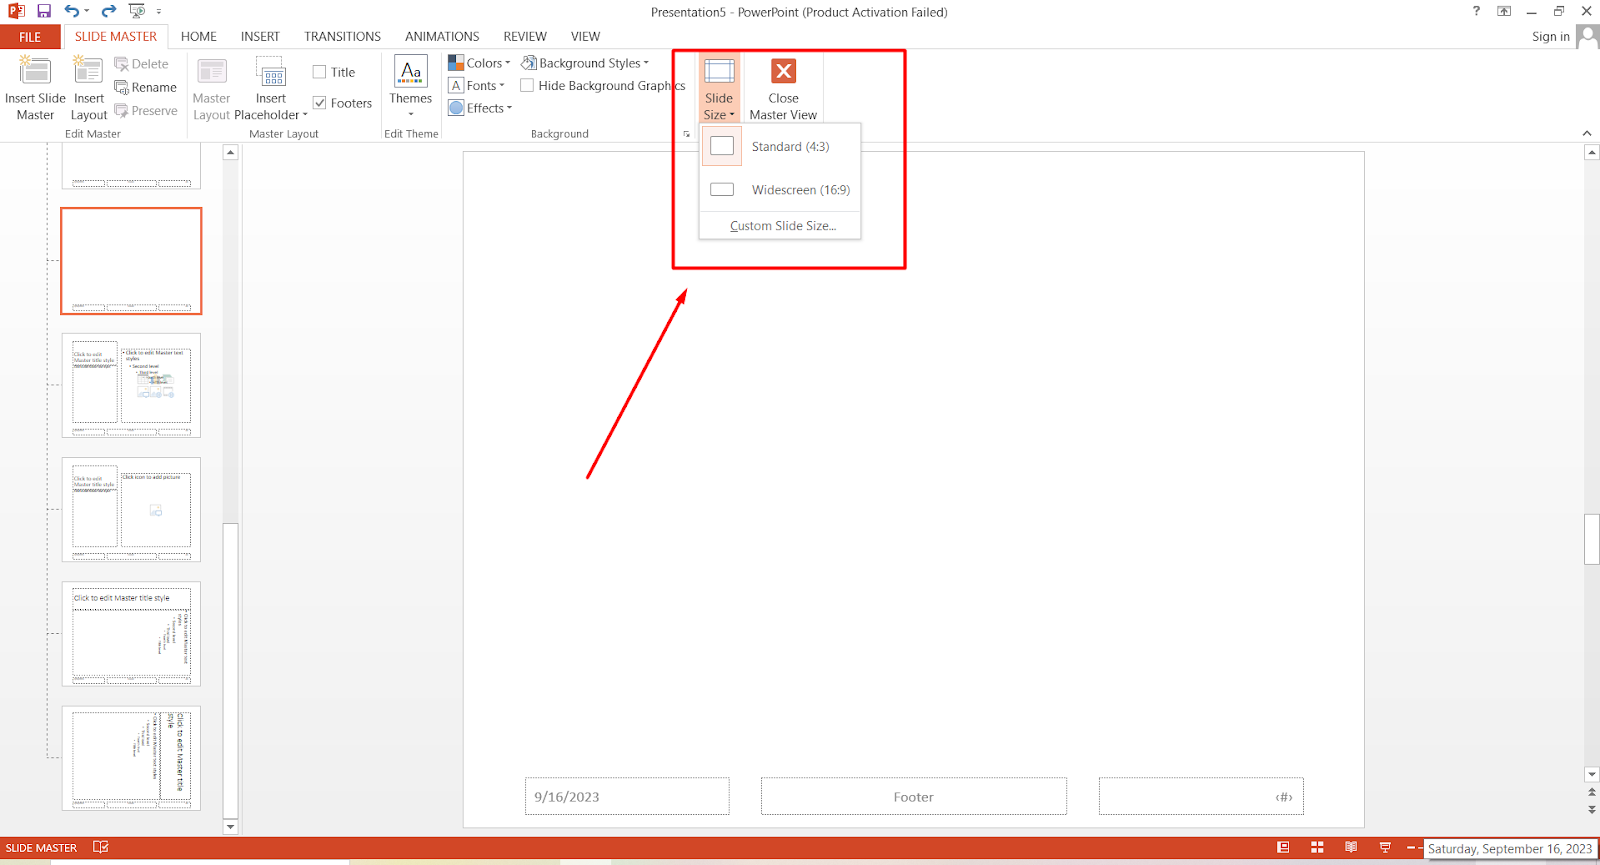
- Step 3: Find the Slide Size Option
Now, click the Slide Master, and another option will refer to Slide Size .

Picture: Slide Size
- Step 4: Explore The Slide Size Options
Again, when you click on the slide size , there will be three options: Standard (4:3), Widescreen (16:9), and Custom Slide Size. You will get the full-screen view if you choose the Widescreen (16:9) option. You have to select a suitable option for your device.
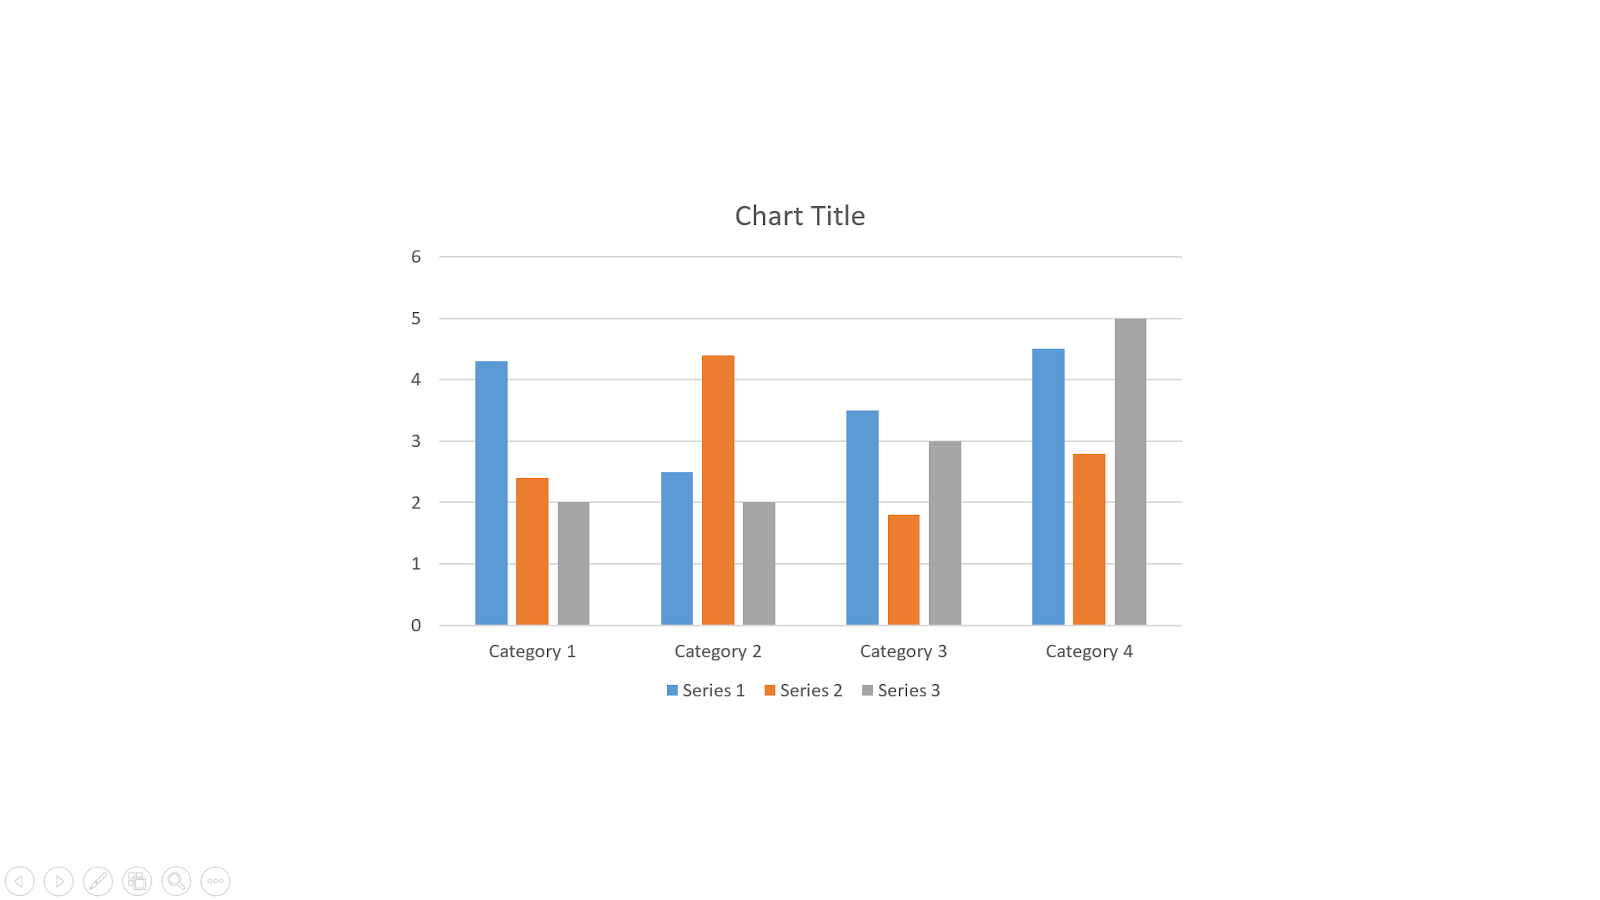
Picture: The slide appeared full screen upon choosing the Widescreen (16:9) option.
- Step 5: Return To Your Home Page
[Note: To see whether the slide appears full screen, click a taskbar placed below in the screen, named Slide Show.]

Picture: Slide show option
The audience does not care whether you are in a windowed or full screen while presenting. Yet the full-screen mode has some perks of its own. First things first, the full-screen mode looks way more satisfying and presentable.
You can open two windows side by side, where there will be a full-screen presentation in one window. And in another window, you can keep your notes. This way, your notes remain unshared.
Leave a Reply Cancel reply
Your email address will not be published. Required fields are marked *
Save my name, email, and website in this browser for the next time I comment.

- Login / Register
Username or email address *
Password *
Lost your password? Remember me
No account yet?
Critical PowerPoint Shortcuts – Claim Your FREE Training Module and Get Your Time Back!
How to Present a PowerPoint Slideshow (w/ Shortcuts)
- PowerPoint Tutorials
- Shortcuts & Hacks
- May 11, 2019
There are a variety of ways to start a PowerPoint presention, depending on:
- Where you start your presentation (from beginning or from current)
- Which PowerPoint view you prefer to present in (Slide Show view or Presenter view)
- How comfortable you are with keyboard shortcuts
Why would Microsoft include so many ways to present a presentation? My guess is that everyone learns PowerPoint differently, and has personal presentation styles. The more options you have, the easier your life will be as there will always be a way to start your presentation the way you want to (or jump back into it when you need to).
See all the options below and find the method that works best for you and let the slide show begin !
NOTE: If you are running two presentations side-by-side, each presentation needs to be started as it’s own slide show. To see how to set up two PowerPoint presentations to run side-by-side like this before you start your slide show, read my guide here .
Table of Contents
Start slide show from beginning.

To start a slideshow from the beginning of your presentation using the ribbon, simply.
- Navigate to the Slide Show tab
- Select From Beginning
Selecting From Beginning starts your presentation from the very first non-hidden slide in your presentation, regardless of which slide you are currently inside of your deck.

You can also start your slide from the beginning of your presentation by hitting the Slideshow From Beginning keyboard shortcut, F5 .
Regardless of which method you use, this is the classic way to start your presentation in full screen from your first title slide (regardless of where you are in your slide deck).
Let the slide show begin!
NOTE: To expand your knowledge and learn how to use PowerPoint’s FREE and HIDDEN built-in laser pointer to point things out during your presentation, read my guide here .
Take your PPT skills to the next level
Start slide show from current.

To begin your slide show from the slide you are currently on using the ribbon, simply
- Navigate to the Slide Show tab
- Select From Current Slide
Selecting From Current Slide starts your slide show from whatever slide you are currently on, even if the slide is hidden.

You can also start your slide from the current slide you are on by hitting the Shift+F5 keyboard shortcut.
Because it’s often easiest to catch errors when building your slides in this full screen mode, I highly recommend learning the Shift+F5 shortcut and using it frequently as you build your slides to spot them for errors.

If you don’t want to bother learning the From Current Slide shortcut, you can also start your slideshow by clicking the Slide Show icon at the bottom of your screen.
This is a fantastic way to spot check your slides as you are building them. On top of that, it’s a fast and uncomplicated way to re-start your presentation from where you left off after demoing something on screen.
Start a mini-slide show in PowerPoint
You can also use the following hidden PowerPoint shortcut to run a mini slide show over the top of your current deck.

To run a mini slide show, simply:
- Hold down the Alt key on your keyboard
- With your mouse, click the Slide Show icon
Doing so starts a small slide show of your presentation that you can see below, from the current slide you are on.

Presenter View
The Presenter View is an alternate way to run your presentation in PowerPoint. In this view, your slides are projected on screen, and the details of your presentation are displayed on your computer as pictured below.

The presenter view includes your next (non-hidden) slides that is coming up, your current slide projected on screen, how long you’ve been talking and your speaker notes.

To launch the Presenter View from the beginning of your presentation using your Ribbon, simply:
- Navigate to the Slide Show tab
- Hold down the Alt key on your keyboard
- Click From Beginning
Holding down the Alt key and clicking From Beginning , the Presenter View will launch from the very first (non-hidden) slide in your presentation.

You can also launch the presenter view from the beginning of your presentation at any time by clicking Alt + F5 on your keyboard.
Start Presenter View in PowerPoint From Current Slide

Did you know that you can access different views in PowerPoint by adding keys as you click commands in the PowerPoint ribbon?
To start the Presenter view from your current slide using your Ribbon, simply:
- Hold down the Alt key on your keyboard
- Click From Current Slide
Holding the Alt key and clicking From Current Slide launches the Presenter View from your current slide. So, this is another way you can quickly practice your presentation, see your speaker notes and see what’s coming up next.
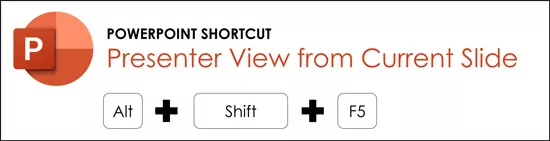
You can also launch the Presenter View from the beginning of your presentation at any time by hitting Alt+F5 on your keyboard.
Showing and Hiding Presenter View
Regardless of which view you start your PowerPoint slide show; you can switch between the two different slide show views without exiting presentation.

To switch between the two slideshow views (while giving your presentation), simply:
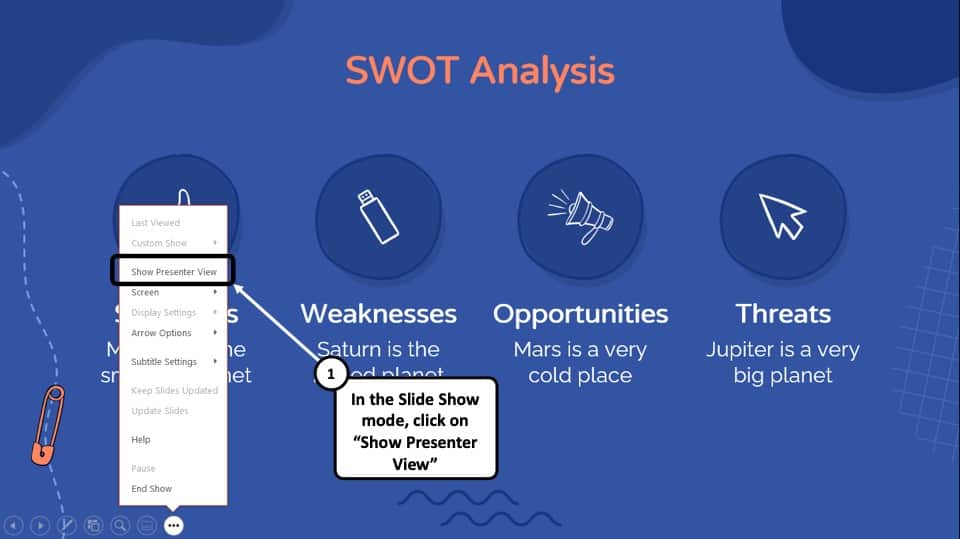
- Right-click your slide in whichever presentation view you are currently in
- Select either Show Presenter View or Hide Presenter View
When would you use a feature like this during a presentation? One example is if you want to view your notes without leaving the slide show mode.
NOTE: The letter r for both Show Presenter View and Hide Presenter View is underlined. This means that it is a keyboard shortcut. So, if you want to quickly flip between these two presentation views, you can simply right-click your slide and hit the letter r on your keyboard. Doing so automatically switches the view you are in.
Controlling how your presentation runs
Another way to control how your presentation runs (including the default laser pointer and pen color), is the Set Up Slide Show dialog box.

To open the Set Up Slide Show dialog box, simply:
- Select the Set Up Slide Show command
Doing so, opens all your PowerPoint slide show settings and options as pictured below.
Inside the slide show settings dialog box, you can select:
- How your presentation runs (full screen, window or in kiosk mode).
- Your default pen and laser pointer color options ( see our laser pointer article here ).
- Which slide you want start from, or which slides you want to show. You can also setup a custom show here.
- How your slides progress (manually or using slide timings).
- Which of your computer monitors (or screens) your slide show runs on.
The Set Up Slide Show dialog box is also the secret to running multiple presentations at the same time in PowerPoint. To expand your knowledge and learn how to set this up, read our guide here .
Setup Slide Show SECRET Shortcut

To use the SECRET shortcut to open the Set Up Slide Show dialog box, simply:
- Hold down the Shift key on your keyboard
- With your mouse, click the Reading View icon at the bottom of your screen
This is useful when you need to quickly cycle through lots of PowerPoint presentations and change how those presentations run. Instead of wasting time clicking through the Ribbon, simply hold the Shift key and click the Reading View icon. This is also a friendly conversation starter with a fellow PowerPoint enthusiast at Happy Hour.
NOTE: The color of your Reading View icon might be different than in the picture above, as it is dependent on the Office Theme you selected for PowerPoint.
How to exit a PowerPoint presentation early?

Regardless of how you start your full screen presentation, you can end your presentation at any time by hitting the Esc key on your keyboard.
Hitting Esc immediately takes you out of the PowerPoint presentation mode and back to the normal editing view of your slides, on whatever slide you were last presenting.
Here is how you can use a combination of all the different keyboard shortcuts to spot check and practice your presentation in full screen before you finalize your presentation.
- Hit F5 on your keyboard to start your presentation in full screen from the very first slide in your presentation. You can then use your arrow keys to advance, spot checking your slides for errors.
- When you find an error, simply hit Esc key to return to the normal PowerPoint editing view to fix your slide.
- When you are done, hit Shift + F5 to return the full screen presentation mode from the slide you just updated. You can then continue spot checking your presentation (without having to start over from the beginning).
In this way you can quickly work your way through your slides and practice your presentation, fixing and adjusting your content as you go.
Understanding how to run your presentations is CRITICAL to the success of your presentation. Not only in presenting them live, but also in knowing how to spot check your slides as you build them.
I personally find it easiest to spot check your slides and quickly fix errors by running your presentation in slide show mode (or full screen). The last place you want to discover an error is during your presentation.
Using the commands and shortcuts above, you can quickly start, exit and step back into your slide show. Once you have these commands and features down, you will also look like a whiz during your presentations.
If you enjoyed the depth of this article, you will love our other PowerPoint training courses and free resources. To learn more, visit us here .
🔒 Unlock the PowerPoint Shortcuts Trusted by Industry Leaders KKR, American Express, HSBC, and More!
Join over 114,880 professionals from diverse fields including consulting, investment banking, advertising, marketing, sales, and business development who have supercharged their PowerPoint game with our proven methods.
✅ Customize compelling presentations effortlessly.
✅ Master time-saving techniques for faster deck creation.
✅ Boost your career prospects with top-notch PowerPoint skills.
Get FREE access to the Critical PowerPoint Shortcuts module of our premium training course by entering your name and email below.
DISCLAIMER: PC Users Only!
We respect your privacy and will keep your info safe and confidential.
Related Articles
About the author.

Popular Tutorials
- How to Strikethrough Text (l̶i̶k̶e̶ ̶t̶h̶i̶s̶) in Word, Excel & PowerPoint
- How to Make Animated Fireworks in PowerPoint (Step-by-Step)
- Strikethrough Shortcut (l̶i̶k̶e̶ ̶t̶h̶i̶s̶) for Word, Excel & PowerPoint
- How to Create a Flash Card Memory Game in PowerPoint (Like Jeopardy)
- Keyboard Shortcuts Not Working: Solved
PowerPoint Tutorial Categories
- Strategies & Opinions
- Presentation Design
- Pictures, Icons, Videos, Etc.
- New Features
- Miscellaneous
- Charts & Data Viz
We help busy professionals save hours and gain peace of mind, with corporate workshops, self-paced courses and tutorials for PowerPoint and Word.
Work With Us
- Corporate Training
- Presentation & Template Design
- Courses & Downloads
- PowerPoint Articles
- Word Articles
- Productivity Resources
Find a Tutorial
- Free Training
- For Businesses
We help busy office workers save hours and gain peace of mind, with tips, training and tutorials for Microsoft PowerPoint and Word.
Master Critical PowerPoint Shortcuts – Secure Your FREE Training Module and Save Valuable Time!
⌛ Master time-saving expert techniques.
🔥 Create powerful presentations.
🚀 Propel your career to new heights.
We value your privacy – we keep your info safe.
Discover PowerPoint Hacks Loved by Industry Giants - KKR, AmEx, HSBC!
Over 114,880 professionals in finance, marketing and sales have revolutionized their PPT skills with our proven methods.
Gain FREE access to a full module of our premium PowerPoint training program – Get started today!
We hate spam too and promise to keep your information safe.
You are currently viewing a placeholder content from Facebook . To access the actual content, click the button below. Please note that doing so will share data with third-party providers.

- Get started with computers
- Learn Microsoft Office
- Apply for a job
- Improve my work skills
- Design nice-looking docs
- Getting Started
- Smartphones & Tablets
- Typing Tutorial
- Online Learning
- Basic Internet Skills
- Online Safety
- Social Media
- Zoom Basics
- Google Docs
- Google Sheets
- Career Planning
- Resume Writing
- Cover Letters
- Job Search and Networking
- Business Communication
- Entrepreneurship 101
- Careers without College
- Job Hunt for Today
- 3D Printing
- Freelancing 101
- Personal Finance
- Sharing Economy
- Decision-Making
- Graphic Design
- Photography
- Image Editing
- Learning WordPress
- Language Learning
- Critical Thinking
- For Educators
- Translations
- Staff Picks
- English expand_more expand_less
PowerPoint 2013 - Presenting Your Slide Show
Powerpoint 2013 -, presenting your slide show, powerpoint 2013 presenting your slide show.

PowerPoint 2013: Presenting Your Slide Show
Lesson 13: presenting your slide show.
/en/powerpoint2013/printing/content/
Introduction
Once your slide show is complete, you'll need to learn how to present it to an audience. PowerPoint offers several tools and features to help make your presentation smooth, engaging, and professional.
Optional: Download our practice presentation .
Presenting a slide show
Before you present your slide show, you'll need to think about the type of equipment that will be available for your presentation. Many presenters use projectors during presentations, so you might want to consider using one as well. This allows you to control and preview slides on one monitor while presenting them to an audience on another screen.
To start a slide show:

You can also click the Play Slide Show command at the bottom of the PowerPoint window to begin a presentation from the current slide.

Click the Slide Show tab on the Ribbon to access even more options. From here, you can start the presentation from the current slide and access advanced presentation options .

To advance and reverse slides:
- You can advance to the next slide by clicking your mouse or pressing the spacebar on your keyboard. Alternatively, you can use or arrow keys on your keyboard to move forward or backward through the presentation.
You can also hover your mouse over the bottom-left and click the arrows to move forward or backward.

To stop a slide show:

The presentation will also end after the last slide . You can click the mouse or press the spacebar to return to Normal view.

Presentation tools and features
PowerPoint provides convenient tools you can use while presenting your slide show. For example, you can change your mouse pointer to a pen or highlighter to draw attention to items in your slides. In addition, you can jump around to slides in your presentation or access other programs from your taskbar if needed.
To access drawing tools:
Your mouse pointer can act as pen or highlighter to draw attention to items in your slides.
- Locate and select the Pen Tools button in the bottom-left corner.

You can also use the laser pointer feature to draw attention to certain parts of your slide. Unlike the pen and highlighter, the laser pointer will not leave markings on your slides. To use the laser pointer, select it from the Pen Tools, or press and hold the Ctrl key and the left mouse button.

To erase ink markings:

When you end a slide show, you'll also have the option to Keep or Discard any ink annotations made during your presentation. If you keep ink markings, they'll appear as objects on your slides in Normal view.

To skip to a nonadjacent slide:
You can jump to slides out of order if needed.

- The selected slide will appear.
To show the taskbar:
Sometimes you may need to access the Internet or other files and programs on your computer during your presentation. PowerPoint allows you to access your taskbar without ending the presentation.
- Locate and select the Slide Options button in the bottom-left corner.

Slide options
You can also access any of the menu items above by right-clicking anywhere on the screen during your slide show.

Presenter view
If you're presenting your slide show with a second display—like a projector—you can use Presenter view . Presenter view gives you access to a special set of controls on your screen that the audience won't see, allowing you to easily reference slide notes , preview the upcoming slide , and much more.
To access Presenter view:

Click the buttons in the interactive below to learn more about using Presenter view.

End Slide Show
Click here to end the presentation.
Display Settings
From here, you can customize your d isplay settings , including the option to duplicate—or mirror—the slide show on two screens and swap the monitors if Presenter view is appearing on the wrong screen.
Show Taskbar
Click here to show the taskbar and access other programs without closing the presentation.
Here, you can see how long you've been giving the presentation. You can also pause and restart the timer if necessary.
Current Slide
This is the current slide being shown to the audience.
Slide Options
Here, you can access the same slide options you would find in normal presentation mode, including the Pen Tools and See All Slides buttons.
Advance and Reverse Slides
Use the arrows to move forward and backward through your presentation.
Here, you'll see any speaker notes for the current slide. You can use the Increase and Decrease buttons below to make the notes larger or smaller.
Here, you can preview the next slide that will appear in the presentation.
Slide show setup options
PowerPoint has various options for setting up and playing a slide show. For example, you can set up an unattended presentation that can be displayed at a kiosk and make your slide show repeat with continuous looping.
To access slide show setup options:

- The Set Up Show dialog box will appear. From here, you can select the desired options for your presentation.
Click the buttons in the interactive below to learn about various options for setting up and playing a slide show.

Here, you can choose a show type .
Show Options
Here, you choose playback settings and disable certain features if desired.
Show Slides
Here, you can choose which slides you want to show during the presentation. All is selected by default, but you can choose to show only certain slides or use any custom shows you have created from your original presentation.
Advance Slides
If you have set timings in your slide show, they will play automatically. However, if you want to disable the timings and control the slides yourself, select Manually .
Multiple Monitors
If you have more than one monitor, you can choose which one to display the slide show on. It's usually best to leave this setting on Automatic .
To advance slides automatically, you'll need to customize the slide timing on the Transitions tab. Review our lesson on Applying Transitions to learn how.

- Open an existing PowerPoint presentation . If you want, you can use our practice presentation .
- Practice playing a slide show and navigating through the slides.
- Change your mouse pointer to a pen or highlighter , and try marking a slide. If you are using the example, add markings to the chart on slide 8.
- Try using Presenter view .
- Open the Set Up Show dialog box, and try modifying the options.
/en/powerpoint2013/lists/content/
View Options in PowerPoint – A Complete Beginner’s Guide!
By: Author Shrot Katewa

There are many different types of presentations view available in PowerPoint including Normal View, Outline View, Presenter View, and Slide Show View to name a few. All these views serve different purposes and it is important to know how to use them appropriately to get the most out of PowerPoint!
In this article, we will talk about what each type of view does in PowerPoint and how to access them so that you can choose the best for your needs! So, let’s get started!
[ A Quick Note Before We Begin – for this article, I will be using one of the presentation templates from Envato Elements . With Envato Elements, you get access to thousands of presentation designs with unlimited downloads so you never run out of options again. Plus, you get free previews so you know exactly what you’re getting before buying! It is also very affordable. Check out their pricing here ]
1. What are the Different Type of View Options Available in PowerPoint?
Microsoft PowerPoint is equipped with a variety of Slide View options that can be used for different purposes.
These are the different view options available in PowerPoint –
- Normal View
- Slide Sorter View
- Notes Page View
- Reading View
- Outline View
- Slide Show View
- Presenter View
- Slide Master View
2. How to Access the Different View Modes in PowerPoint?
To access the different view modes in PowerPoint, you have to click on the ‘View’ tab in the ribbon. The 2-step process is described below.
Step-1: Click on the ‘View’ tab
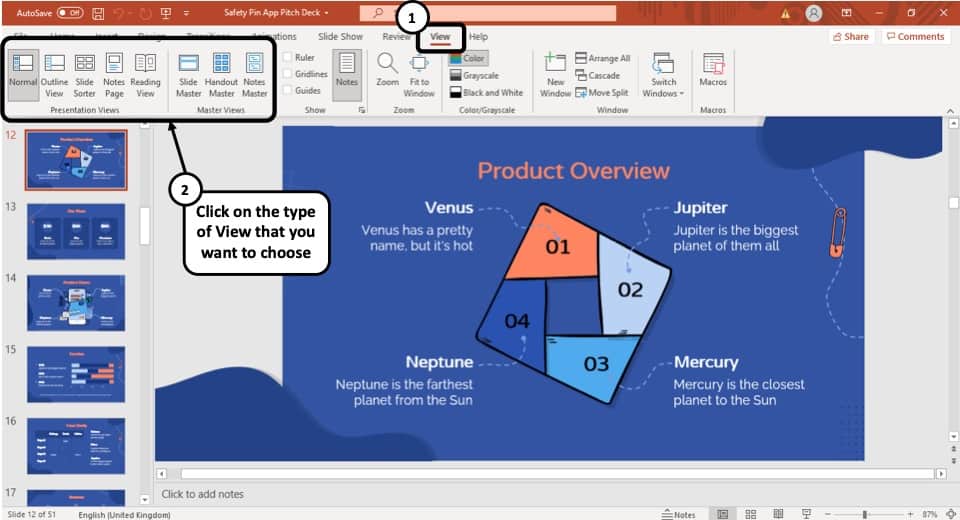
At first, select the ‘View’ tab, which is the second to last tab in the ribbon section of your PowerPoint Window.
Step-2: Select your preferred ‘View Mode’
Once you have access to the ‘View’ tab, you can select your preferred view mode such as the Outline View , Slide Sorter view, Slide Master view, etc. from the Presentation View section or the Master View section. (as shown in the image in step 1)
3. What is the Purpose of Various View Modes in PowerPoint?
Each view mode in PowerPoint has its own purpose. Let’s go through the purposes of the different slide view options one by one below –
1. Normal View
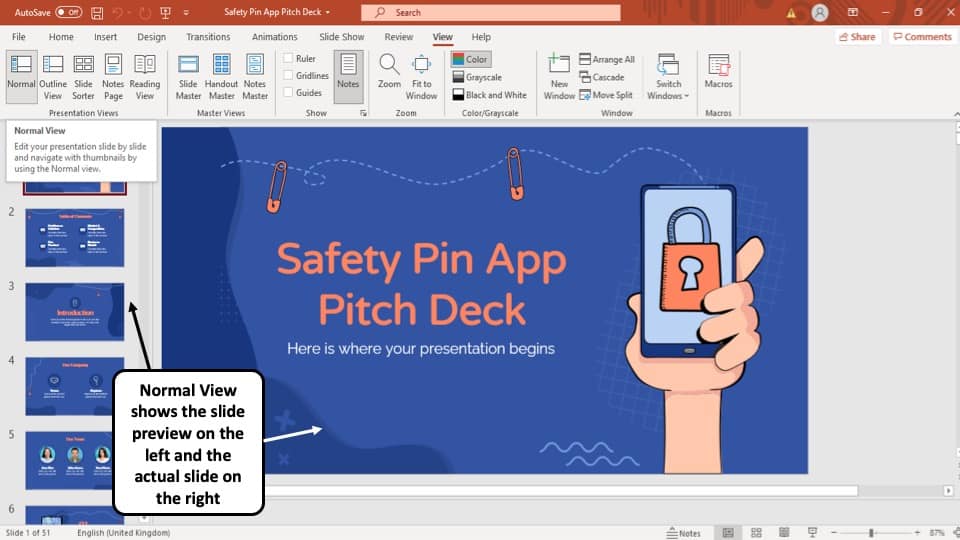
The ‘Normal View’ option is the first option in the ‘Presentation Views’ section of the ‘View’ tab. It is the most commonly used viewing option and is also the default slide view for PowerPoint.
The slides appear on the left of the PowerPoint window in the ‘Slide Navigation’ bar. Thumbnails of the slide are represented as boxes in the ‘Slide Navigation’ bar with its consecutive serial number to the left of it.
The main function of normal view mode in PowerPoint is to navigate through slides in a vertical grid while allowing you to add, design, or edit the slides while getting a preview of the slides on the left.
2. Slide Sorter View
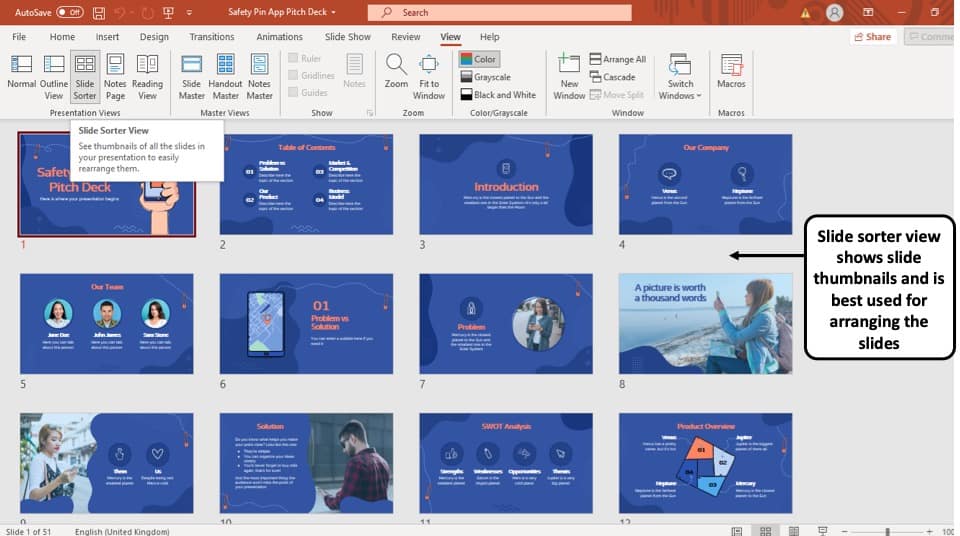
The ‘Slide Sorter’ option gives you an overview of all the slides in your PowerPoint presentation.
The slides are represented as thumbnails as a grid of boxes arranged side by side. The serial number of the slide is given on the bottom left corner of the slide thumbnail.
This option serves the purpose of viewing the slides together in one window making it easier to rearrange and organize them in a quick fashion.
3. Notes Page View

The ‘Notes Page View’ option gives you the view of each slide and its speaker notes in one page.
In this view, the slides appear at the top and the speaker notes are given on the bottom of the two sections. The serial number of the slide is not shown in this view. You can also edit speaker notes from here.
The main purpose of the notes page view in PowerPoint is to preview what each page will look like before you print the slides with speaker notes.
4. Reading View:
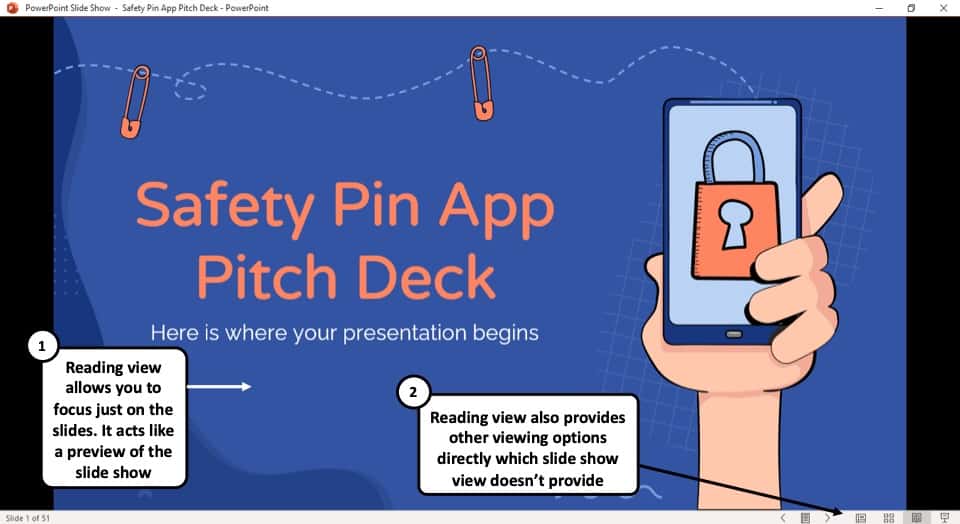
The Reading View option allows you to view your PowerPoint presentation without going into Full Screen mode. All the transitions and animations can be seen in this view. The serial number of the slide is given at the bottom right corner of the window.
It is used to preview the slide and review the slides with full focus. This mode also makes other view options easily accessible, which is not the case in ‘Slide Show’ mode where the presentation is shown in the full screen, and the options are not visible on screen.
The reading mode is actually more useful for word documents, as it allows the reader to focus just on the text. In my opinion, it adds little value to a PowerPoint presentation.
5. Outline View:
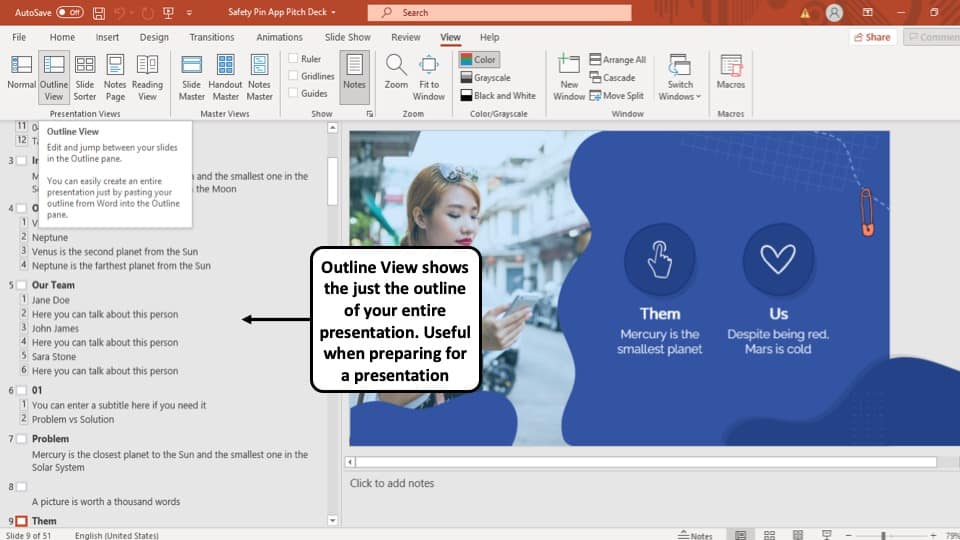
The ‘Outline View’ shows you the entire outline of your PowerPoint presentation in the ‘Slide Navigation’ bar.
In this view, there is no thumbnail of the presentation. Instead, there is an outline of all the data present in that slide. The serial number of the slide is at the left followed by a small white box that represents a slide and then the outline of that slide.
You can also create an entire slide in the pane of this view by copy and pasting data from Microsoft Word. However, you will have to design the slide separately once the data has been added to each slide.
6. Slide Show View:

The Slide Show View is the view that your audiences are going to see. This view shows each slide of your PowerPoint presentation in full screen.
All the transitions, animation, and multimedia files in your PowerPoint presentation are played here. Consecutive slides can be accessed using the direction keys on your keyboard or by clicking once on the slide.
7. Presenter View:
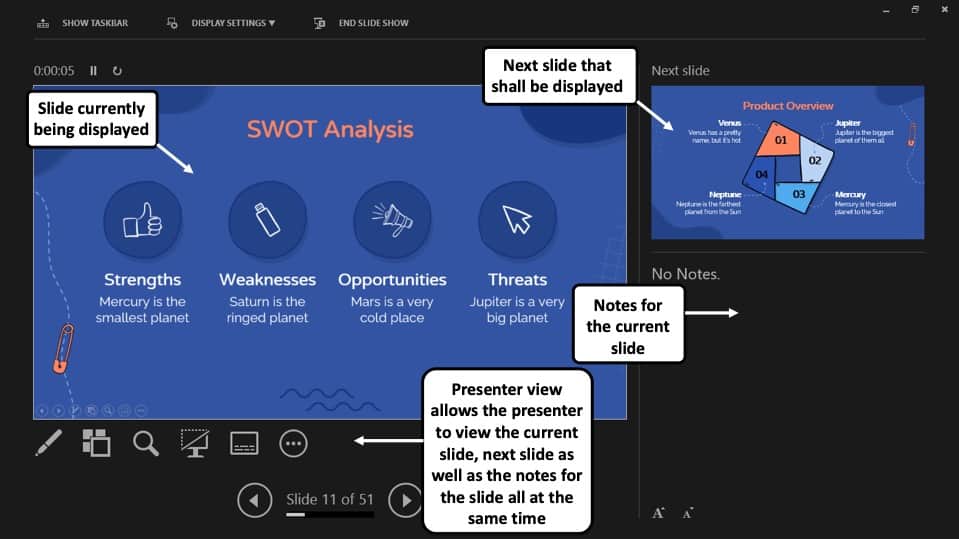
This is the view that you as a presenter are going to see while the audience is seeing the ‘Slide Show’ view.
Although you can give a presentation even in the slide show view, but it is always recommend to deliver the presentation using the “Presenter View” mode in PowerPoint as it provides you with additional features and benefits!
This view mode in PowerPoint will split the screen in multiple windows. The window on the left represents the current slide that is being displayed (the one that is visible to your audience).
The window in the top right section indicates the next slide in the queue. Whereas, the notes section displays the notes or key points made by each slide. Both, the notes section as well as the next slides window are only visible to the presenter and not to the audience!
The purpose of the “ Presenter View ” is to give the presenter all the aids to be prepared for the next slide and highlight the key points to be made on the current slide while delivering the presentation.
8. Slide Master View:
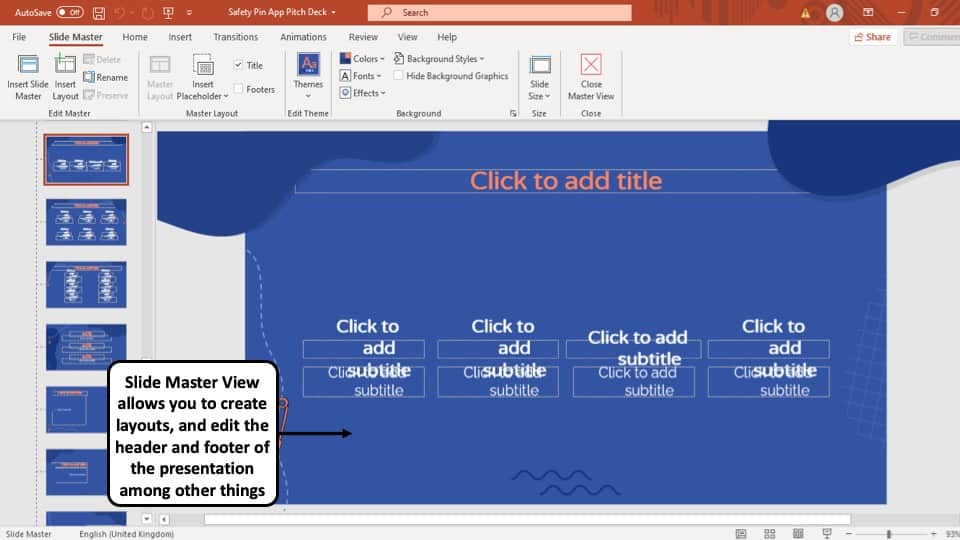
This view gives you a view of all the layouts used on the slides of your PowerPoint presentation.
The ‘ Slide Master View ’ option allows you to edit all the aspects of the layouts in your presentation such as fonts, background, color, and pretty much everything you can think of.
You can edit all the slide layouts of the presentation. Furthermore, you can also edit the header and footer of the presentation using the “ Slide Master View ” in PowerPoint.
4. How to Open the Presenter View in PowerPoint?
There are 2 different ways you can enter into Presenter View in PowerPoint –
- Using Slide Show View
- Using the short cut key i.e. Alt+F5
If you are using the Office 365 version of PowerPoint , you can actually directly access the “Presenter View” in the View section. Simply click on “View”. Then, click on “Presenter View”
Let’s look at both the methods quickly –
Method 1 – Using the Slide Show View
Step-1: Click on the ‘Slide Show’ button at the bottom right corner of the screen
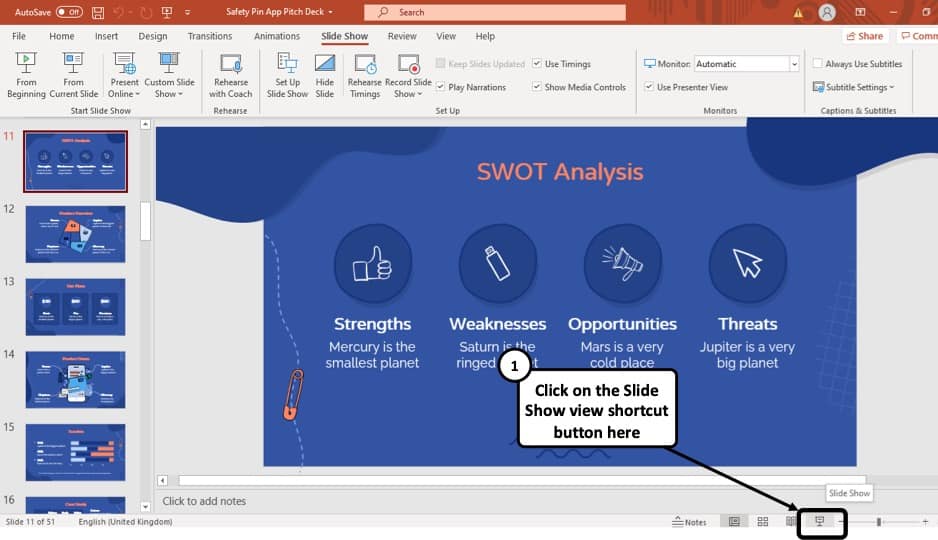
At first, you have to click on the ‘Slide Show’ button that looks like a projector screen which is located at the bottom right corner of your PowerPoint window. (as indicated in the image above)
Step-2: Right-click and choose “Show Presenter View”
Once you are in the ‘Slide Show’ mode, using your mouse right-click anywhere on the screen. From the menu that appears, choose the “ Show Presenter View ” option
Method 2 – Using the Keyboard Shortcut
Alternatively, you can press ‘ Alt + F5 ’ on your keyboard and that will immediately open the ‘Presenter View’ mode.
The keyboard shortcut to open the “Presenter View” in PowerPoint on Mac is “Option+Enter” key.
5. How to Change PowerPoint Back to Normal View?
To change your PowerPoint back to ‘Normal View’ from ‘Slide Show’ mode, ‘Presenter View’ option or the ‘Reading View’ option, all you have to do is simply press the ‘ESC’ button on the keyboard of your computer. This will take you back to Normal View.
If you are using any other view apart from these 3 view modes in PowerPoint, you need to do the following –
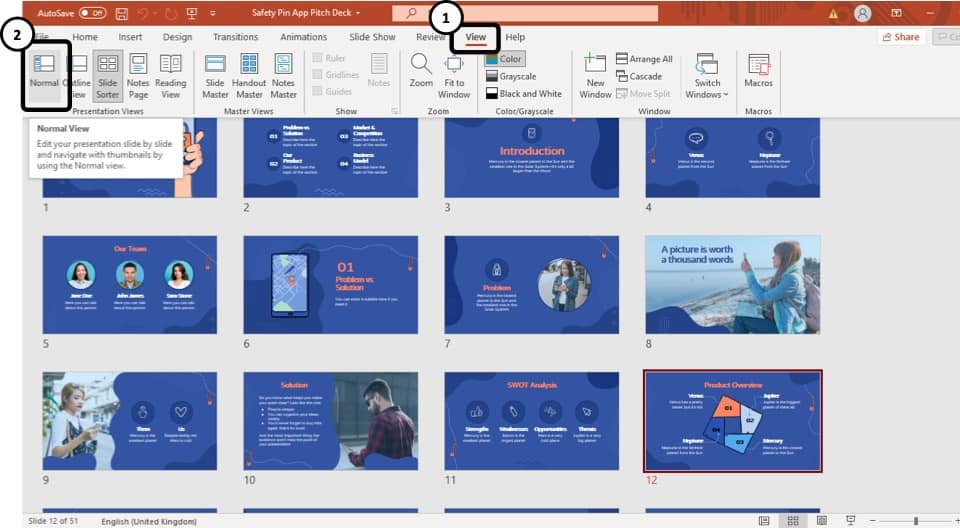
If you are in a different viewing option, such as ‘Slide Sorter’ option, or the ‘Reading View’ option then you have to select the ‘Normal View’ option from the ‘View’ tab instead of the ‘Slide Sorter’ option or the different slide view option you are currently on.
More PowerPoint Related Topics
- How to Crop a Picture in PowerPoint? [Complete Step-by-Step Tutorial!]
- How to Give a Presentation on Zoom? A Helpful Resource!
- What is a Presentation Clicker? [And How to Use it!]
- How to Convert a PowerPoint to PDF? [A Simple Guide!]
- PowerPoint vs Google Slides: Which is Better? [ULTIMATE Test!]
- How to Change Bullet Style in PowerPoint? A Complete Guide
Credit to Pressahotkey (via Freepik) for the featured image of this article
Stack Exchange Network
Stack Exchange network consists of 183 Q&A communities including Stack Overflow , the largest, most trusted online community for developers to learn, share their knowledge, and build their careers.
Q&A for work
Connect and share knowledge within a single location that is structured and easy to search.
How can I edit a presentation while in presentation mode?
I'm looking for a way to present to a live audience and incorporate their input into my presentation. With a "static" presentation, you have to keep taking down, editing, and then re-presenting the slide deck. I'm looking for a way to incorporate and save changes directly into the live presentation.
I use Keynote and PowerPoint, so a method to accomplish this with either would be ideal. But I am open to a solution that requires something else.
- microsoft-powerpoint
- presentations
- iwork-keynote
- I would gladly take a hack for PowerPoint or Keynote. That would be the preferred method – Max Phillips Jan 10, 2017 at 21:46
- Would a PDF with fillable forms meet your requirements? It's not clear what sort of input you want to accept. If it's just text, then running a PDF reader in full-screen mode might do what you want. – AFH Jan 10, 2017 at 22:19
- There is no hack. This behavior has been "normal" in Powerpoint at least for quite a while. 99% of people present by duplicating their screen (same thing on projector and their computer) but if you extend your display to the projector Powerpoint by default uses a different mode that has a special view on the computer display an the full-screen slide on the projecting display. And... you can edit in real time, while presenting, with live updates to the slides. – music2myear Jan 10, 2017 at 23:00
3 Answers 3
For Windows:
PowerPoint has had this capability for quite some time. The key is to NOT duplicate your computer screen with the presenting screen ( TV, projector, other screen, etc. I'll use "projector" in this how-to for simplicity purposes. ) The only requirement is that you have some screen besides the projector.
With a Windows computer, when you connect to a projector use the Win + P command and choose the Extend the display. This means that your computer screen and the projector will show different things. You can also do this in Display Settings if you're more familiar with that.
PowerPoint has some intelligence to determine which screen is a projector and which is not, but if you need more control over which screen the presentation is on and which one will be your control screen, in the Slide Show tab you'll find Set Up Slide Show, which includes settings for this.
Another thing to keep in mind is that Presenter View (also an option in the Slide Show tab) can make things a little more difficult, but not much. When using Presenter Mode, the default behavior is for the Presenter Mode window to go full-screen, and you cannot edit in Presenter Mode. However, resizing the Presenter Mode window should allow you to easily bring up the main PowerPoint window, which is where the magic will happen.
So, all that aside, the meat of the solution:
Just edit the darn thing. That's all it takes.
With the presentation running happily away on the projector and the main PowerPoint window up on your computer screen, you can edit as much as you please and your edits will be reflected in real-time in the presentation itself ( Note: I've known about the Presenter Mode and running presentations on multiple monitors for years, but am only testing the specifics of editing in PowerPoint 2016. I do not know how the behavior is different in previous versions. ).
I don't know. I could not find specific documentation of this ability/feature for either Keynote or PowerPoint for Mac. While in Windows the Presenter view can be resized, some suggest this is not an option in Office for Mac.
One work around would be to use the Freeze capability of most projectors to freeze the current image on the screen, then exit the presentation on the computer, edit the slideshow, begin it at that slide again, and then unfreeze the projector image.
- I'm pretty familiar with extended desktop. It's what I work in most of the time. Is this procedure the same on Mac? And what version of PowerPoint are you using? – Max Phillips Jan 11, 2017 at 16:26
- Macs an Keynote have generally encouraged people to use the extended desktop, so I'm not surprised you're more familiar with that mode. Unfortunately, I do not have the ability to test on an Apple computer. I tested this while writing the answer on Office 2016, which is the same version available for Mac. – music2myear Jan 11, 2017 at 16:38
- I just can't figure out how to resize the Presenter Mode window. If I play the show without presenter view it takes over the PowerPoint module, there is no window behind it. – Max Phillips Jan 11, 2017 at 16:44
- Interesting. I know the feature isn't new (or limited) to 2016 because of the answers to this question from 3 years ago: superuser.com/questions/681019/… – music2myear Jan 11, 2017 at 17:04
- I'm trying to find documentation on the Mac versions. – music2myear Jan 11, 2017 at 17:04
For Mac using PowerPoint 16:
Open the presentation you want to show. On the Mac menu bar go to window and click New Window.

This will pop out a duplicate PowerPoint presentation. Drag one of them to the second monitor and run it under setup option: "Browsed by an individual (window)"

You can now edit and add slides on the fly in the window that remains on your main desktop without interrupting the presentation. You can even edit the slide that you are currently showing on the screen and it will update automatically as you change it.
- TIL. Sweet. I'm glad you were able to figure it out. Feel free to mark this as the answer, but I'd also recommend modifying your original question to indicate you're talking about Mac OS, which would help clarify why my answer was not the best. – music2myear Jan 11, 2017 at 23:11
- I want to give credit it where it's deserved. I wasn't trying to steal it. Just wanted to make sure that it was out there for people to find. – Max Phillips Jan 12, 2017 at 4:43
- No worries. We're about the best answers, and sometimes details such as the OS you're limited to help make sure answers that sound like they may have multiple possible answers can be narrowed down to the right one. – music2myear Jan 15, 2017 at 19:23
Windows 7 x64 using PowerPoint 2016
When using two screens make sure to uncheck "Use Presenter View" and start your slideshow

On Screen 1 you will be able to edit text on the fly and even add slides.
On Screen 2 you will see updates in real-time. If a slide is added in Screen 1 then you will need to activate Screen 2 and press the left or right arrows respectively.
You must log in to answer this question.
Not the answer you're looking for browse other questions tagged microsoft-powerpoint presentations iwork-keynote ..
- The Overflow Blog
- Why do only a small percentage of GenAI projects actually make it into...
- Spreading the gospel of Python
- Featured on Meta
- Our Partnership with OpenAI
- What deliverables would you like to see out of a working group?
Hot Network Questions
- Information can't take an s
- Simply Adjusting the Position of Dashed Lines in Nicematrix Package
- Waste Products from Hydrogen Fuel Cells
- Key generation from partially random data
- how much the pickup can influence the 'quality' of a pinch hamonic
- Can there be more than one global maximums of a function?
- What is this Nintendo 64 DD flyswatter game from?
- How can I deal with a player that won't stop adding extras to their character?
- Show don't tell with a blind character
- Order of the "children's card shuffle"
- Does a time varying electric field always generate a Magnetic field?
- Was it only Satan who tormented Job in Job 1:16?
- In the US, does the Social Security benefit calculator assumes you work until the retire age?
- Use l3seq sequence in command requiring \ExplSyntaxOff
- Where does the Mentat, Thufir Hawat, go in Dune Part two?
- Why is my super-capacitor self-discharging so fast?
- Removing Shelf for Electrical Panel Clearance
- Does this sequence ever end?
- What would one use a theory of quantum gravity for?
- Caves and Caverns TV movie?
- Late 1990s to early 2000s movie that involved aliens and meat everywhere
- what is G7-Bᵒ7/C doing in the chord progression
- Can I use a hose clamp to ground a wire to EMT?
- I cleaned the grease off an old floppy drive’s motor; do I need to lubricate it?
Search for: Search Button
PowerPoint presentations in a window not full screen
PowerPoint presentations don’t have to be full-screen, that’s the default and normal way to show a deck, but a window option is also there. A windowed presentation lets you display the slides in other software like virtual cameras or desktop capture.
Go to Slide Show | Setup Slide show and choose ‘Browsed by an individual (window)’.

The options are the same in PowerPoint for Windows or Mac.
Start the slide show (Slide Show | From Beginning or From Current Slide) as usual except now it appears in a resizable window.
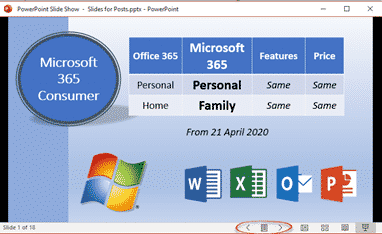
Windowed presentation controls
There are back and forward slide buttons on the bottom status bar (see above).
Click on the icon between those two buttons to see some more options.

The same options appear if you right-click in the presentation while windowed.
- Next / Previous
- Go to Slide – choose a slide from the flyout list.
- Go to Section – for decks in Sections
- Zoom In / Zoom Out
- Print Preview and Print
- Edit Slides
- Full Screen
It would be really nice if Presenter View could appear in a second window – but alas it’s not an option. That would let the use control the presentation properly while the slides appear in another window (which could be visible via a third-party tool).
Switching Full Screen and window slide show
Starting from a windowed presentation means you can switch between Full Screen and the window presentation without showing the entire PowerPoint menus etc. It’s a little neater and more professional.
Go to Full Screen from the menu option.
In Full Screen mode press Escape to return to the windowed presentation.
Why use a windowed PowerPoint presentation?
Having the slides in a resizable window gives you options not available when the deck is taking up the whole screen.
Perhaps you’re demonstrating some software? Have the presentation in one window and the software in another? See A better Side-by-Side document view for Windows and Mac to see how to use windows controls in Windows or Split View on a Mac.
A windowed presentation can be selected as an input option for a virtual camera or other service which lets you choose to display a selected running program. Full screen PowerPoint can’t be selected but the same slide can be chosen from a windowed presentation.
Blur and Virtual Background choices for any online meeting
Clever tricks with Zoom
Adding Virtual Background or blurred video to Teams
About this author

Office-Watch.com
Office 2021 - all you need to know . Facts & prices for the new Microsoft Office. Do you need it? Office LTSC is the enterprise licence version of Office 2021.
Office 2024 what's known so far plus educated guesses. Microsoft Office upcoming support end date checklist.
Latest from Office Watch
- Introducing Reading Coach to enhance Reading Fluency with AI
- Immersive Reader in Word for Windows, Mac and iPad
- Presenter Coach makes for better PowerPoint presentations
- Word changes a Paste Text option
- Paste Text Only gets a Word shortcut and confusion
- Try a faster Microsoft 365 secure login
- Use free Copilot to summarize Word documents
- Ear 👂 symbol in Word, Excel, PowerPoint and Outlook
- Great image Resize options now in Windows
- Making pictures smaller - some more options.
- Use the Force with your PowerPoint & online backgrounds
- Star Wars look in Word and PowerPoint
- Happy Star Wars Day - with Microsoft Office
- How to save an Outlook attachment without knowing it
- Two ways to pay for Copilot with Microsoft Office
- PowerPoint trim video reaches the web
- PowerPoint video audio compression tricks and traps
- What is ‘grounding’ in Copilot?
- Import EML MSG and OFT files with Outlook (new)
- The Outlook setting everyone should check

Contribute to the Microsoft 365 and Office forum! Click here to learn more 💡
April 9, 2024
Contribute to the Microsoft 365 and Office forum!
Click here to learn more 💡
PowerPoint Forum Top Contributors: Steve Rindsberg - John Korchok - Bob Jones AKA: CyberTaz ✅
May 10, 2024
PowerPoint Forum Top Contributors:
Steve Rindsberg - John Korchok - Bob Jones AKA: CyberTaz ✅
- Search the community and support articles
- Microsoft 365 and Office
- Search Community member
Ask a new question
Using PowerPoint online in a non-full screen presentation mode
For reasons that are not important here, I need to be able to use PowerPoint online to make a presentation in presentation mode, but I do not want it to be full screen, because I need to be able to manipulate the presentation window to allow another window to be on top of it.
This is easy to do in the desktop application using the "Browsed by an individual" set up for the presentation, but PowerPoint online (at least the version I have) does not have that option.
I have found that after the presentation starts in full screen mode I can implement the command "Exit Full Screen", either by going to a browser menu that pops up at the top of the screen, or by pressing control-command-F. Here is the funny and frustrating part. When I do this, only SOMETIMES does it go into a non-full screen presentation mode that satisfies my need. Other times it just stops the presentation.
This happens in Chrome and Firefox browsers. Safari is not an option because it lacks another feature I need.
Any ideas on how to get PowerPoint online in a non-full screen presentation mode consistently?
Report abuse
Reported content has been submitted
I'm on a PC right now but this might be workable on a Mac
Open online in edit mode and resize the window
Run the show which will open full screen
CTRL T to open a new Tab (adjust for Mac)
Switch back to the show Tab
48 people found this reply helpful
Was this reply helpful? Yes No
Sorry this didn't help.
Great! Thanks for your feedback.
How satisfied are you with this reply?
Thanks for your feedback, it helps us improve the site.
Thanks for your feedback.
Replies (3)
Question info.
- Norsk Bokmål
- Ελληνικά
- Русский
- עברית
- العربية
- ไทย
- 한국어
- 中文(简体)
- 中文(繁體)
- 日本語
Deliver your presentation
Note: This article has done its job, and will be retiring soon. To prevent "Page not found" woes, we're removing links we know about. If you've created links to this page, please remove them, and together we'll keep the web connected.
To deliver your presentation, you can play your slide show in full screen view or use presenter view. When you play a slide show with two displays connected, your audience sees the full screen slide show on one screen while you see the presenter view on the other by default. If you prefer to play the slide show in full screen view on both displays, you must change the setting before you start the slide show so that the slide show is mirrored.
Note: Presenter view helps you manage your slides while you present by tracking how much time has elapsed, which slide is up next, and by displaying notes that only you can see (while also allowing you to take meeting notes as you present). For more information about using presenter view, see Start the presentation and see your notes in Presenter view .
Play a slide show
Open the presentation that you want to play as a slide show.
Do one of the following:
Note: You can also play a slide show by clicking the same options on the Slide Show tab.
Move through the slide show
To see a list of keyboard shortcuts that you can use to move through slides and manage the slide show, hold down CONTROL while you click the mouse, and then click Help .
To end the slide show when you finish presenting, press ESC .
Set how your slide show is projected on two displays
When you play a slide show with two displays connected, your audience sees the full screen slide show on one screen while you see the presenter view on the other by default. If you prefer to play the slide show in full screen view on both displays, you must change the setting before you start the slide show so that the slide show is mirrored.
Draw on slides during a presentation
Use keyboard shortcuts to deliver PowerPoint presentations

Need more help?
Want more options.
Explore subscription benefits, browse training courses, learn how to secure your device, and more.

Microsoft 365 subscription benefits

Microsoft 365 training

Microsoft security

Accessibility center
Communities help you ask and answer questions, give feedback, and hear from experts with rich knowledge.

Ask the Microsoft Community

Microsoft Tech Community

Windows Insiders
Microsoft 365 Insiders
Was this information helpful?
Thank you for your feedback.

May 9, 2024
Teams enhancements to the Presenter window while screensharing
Teams Public Preview team
- Add our blog to your RSS feed reader" href="/rss/blog.xml" data-bi-name="RSS Subscription" data-bi-id="rss_feed" data-bi-bhvr="120" data-bi-socchn="RSSSubscription" title="Microsoft 365 Insider Blog RSS" target="blank" class="d-inline-block">
Hi, Microsoft 365 insiders! We’re excited to announce new enhancements to the Presenter window you can use while screensharing.
Have you ever wanted to see what’s happening in a meeting when you’re sharing your screen? Now you can with the new Presenter window. It shows up to four meeting participants, both video and audio, as well as active speakers, raised hands, reactions, and a preview of shared content.
Meeting notifications are also easier to see, appearing in the center of your screen so you can act on them.
These enhancements help you stay aware of what’s happening in your meeting and make it easier to engage with other attendees while you’re screensharing. You can also manage actions in your meeting such as lowering raised hands and muting participants.
How it works
- Join a Teams meeting.

- If you’re sharing your screen or window and have your camera turned on, you can expand the self-video tile at the bottom of the presenter window by clicking the arrow button. After it’s expanded, you can minimize the self-video tile again to free up space on the shared screen.
- If you’re using presenter modes while sharing your screen, the self-video tile gives you the option to change the presenter layout during the screen share.
Availability
To use this feature, you must be a member of the Teams Public Preview or Microsoft 365 Targeted release and use the new Teams client for Windows or macOS. Other meeting participants aren’t required to be members of the Teams Public Preview.
To enable your Teams client for the Public Preview, IT administrators must enable Show preview features in their update policy. Learn more
For Targeted release, global admins can go to the Microsoft 365 admin center and give access to a select set of individuals or the entire organization. Learn more
Feedback
We want to hear from you! Select Settings and more > Help in the top right corner of the Teams app, and then select either Give feedback or Suggest a feature to share your thoughts about this feature.
Sorry, JavaScript must be enabled to use this app.
IMAGES
VIDEO
COMMENTS
Full-screen mode in PowerPoint helps in delivering a more professional and engaging presentation. To enter full-screen mode, open your presentation, click on the "Slide Show" tab, and select "From Beginning" or "From Current Slide". To exit full-screen mode, press the "Esc" key or click on the "Exit" button in the bottom ...
To do this. Press. Start a presentation from the beginning. F5. Start a presentation from the current slide. Shift+F5. Start the presentation in Presenter View. Alt+F5. Perform the next animation or advance to the next slide.
Launch Microsoft PowerPoint and open the presentation you want to view in full-screen mode. Open Powerpoint. Step 2: Enter SlideShow Mode. To enter full-screen mode, you can use any of these methods: Click on the "Slide Show" tab in the ribbon at the top of the window and then click "From Beginning." Press the F5 key on your keyboard.
First, create a new custom slide show and select the slides that you want to display. Then, click Add, enter the name of the presentation and click OK. This new custom presentation will appear on the list. Select it and click Show to begin the presentation. Defining a custom slide show.
Slide Show view occupies the full computer screen, exactly the way your presentation will look on a big screen when your audience sees it. Presenter view. To get to Presenter view, in Slide Show view, in the lower left corner of the screen, click , and then click Show Presenter View (as shown below).
In the "Start Slide Show" group, click on the "From Beginning" or "From Current Slide" option. 3. Alternatively, you can press the F5 key on your keyboard to start the presentation from the beginning or Shift + F5 to start from the current slide. 4. Your PowerPoint presentation will now be displayed in full screen mode.
To present a full-screen presentation in Google Slides: Open a presentation in Google Slides. In the top right, click Slideshow . For best results, present with Google Chrome. From the current slide, the presentation will become full screen. To change slides, use the arrow keys on your keyboard or click the arrows at the bottom of the presentation.
Click the PowerPoint Icon to open the software. Picture: A normal PowerPoint Slide. Step 2: Open The Design Tab. Now, go to the design tab and click it. Once you click the design tab, you will see a toolbar named slide size . Picture: Design and Slide Size tab. Step 3: Go for the Slide Size Option.
How your presentation runs (full screen, window or in kiosk mode). Your default pen and laser pointer color options (see our laser pointer article here). Which slide you want start from, or which slides you want to show. You can also setup a custom show here. How your slides progress (manually or using slide timings).
The presentation will appear in full-screen mode. Clicking the Start From Beginning command. You can also click the Play Slide Show command at the bottom of the PowerPoint window to begin a presentation from the current slide. Clicking the Play Slide Show command.
Learn how to fill screen with powerpoint slide show. Computer with wider screen has this problem frequently.This video will show simple trick to change it.
Figure 1: Slide Show view. To access Slide Show view in PowerPoint 365 for Windows, you can choose any of these options: Click the Slide Show button on the Status Bar to play the presentation from the active slide (highlighted in red within Figure 2 ). Figure 2: Slide Show button on the Status Bar. To exit Slide Show view, just press the Esc key.
Set a video to play full screen. In Normal view, select the video that you want to play full screen. On the ribbon, on the Playback tab, in the Video Options group, select Play Full Screen. (If you inserted a video file from YouTube or another web site, the full screen option may be unavailable. To work around this limitation, you would first ...
To access the different view modes in PowerPoint, you have to click on the 'View' tab in the ribbon. The 2-step process is described below. Step-1: Click on the 'View' tab. At first, select the 'View' tab, which is the second to last tab in the ribbon section of your PowerPoint Window. Step-2: Select your preferred 'View Mode'.
Keep reading to find out more about using Presenter View in PowerPoint and the best features to try out.. Turn On PowerPoint Presenter View. In PowerPoint for macOS, simply click on Presenter View on the Slide Show tab to kick off the presentation in Presenter view. Turn on Presenter View by clicking on Presenter View on the Slide Show tab.. You'll see the Presenter View interface on one screen.
5. For Mac using PowerPoint 16: Open the presentation you want to show. On the Mac menu bar go to window and click New Window. This will pop out a duplicate PowerPoint presentation. Drag one of them to the second monitor and run it under setup option: "Browsed by an individual (window)"
This Tech Tuesday video shows teachers how to share Google Slides files with their students in full-screen presenter mode. You'll learn how to publish your f...
Start presenting. On the Slide Show tab, in the Start Slide Show group, select From Beginning. Now, if you are working with PowerPoint on a single monitor and you want to display Presenter view, in Slide Show view, on the control bar at the bottom left, select , and then Show Presenter View.
Starting from a windowed presentation means you can switch between Full Screen and the window presentation without showing the entire PowerPoint menus etc. It's a little neater and more professional. Go to Full Screen from the menu option. In Full Screen mode press Escape to return to the windowed presentation.
On the General tab under Application, select Turn on new meeting experience. Then close Settings (select the X). Restart Teams application. C. To focus and Full screen mode: During Teams meeting > click on more option button (…) > Select Focus or full screen mode, it helps to maximize your screen. Screenshot for your reference:
JS. JSRWilson. Replied on September 22, 2020. Report abuse. I'm on a PC right now but this might be workable on a Mac. Open online in edit mode and resize the window. Run the show which will open full screen. CTRL T to open a new Tab (adjust for Mac) Switch back to the show Tab.
Run PowerPoint in safe mode. 1] Maximize PowerPoint from your taskbar ... If your PowerPoint presentation is showing on the wrong screen, your primary display monitor is likely to be wrongly ...
On the Playback tab, in the Video Options group, from the Start list, select an option: Option. When the video plays during a slide show. Automatically. The video plays automatically when the slide appears. On Click or When Clicked On. The video only plays when you click within the video frame. In Click Sequence.
Prior to GPT-4o, you could use Voice Mode to talk to ChatGPT with latencies of 2.8 seconds (GPT-3.5) and 5.4 seconds (GPT-4) on average. To achieve this, Voice Mode is a pipeline of three separate models: one simple model transcribes audio to text, GPT-3.5 or GPT-4 takes in text and outputs text, and a third simple model converts that text back to audio.
To deliver your presentation, you can play your slide show in full screen view or use presenter view. When you play a slide show with two displays connected, your audience sees the full screen slide show on one screen while you see the presenter view on the other by default. If you prefer to play the slide show in full screen view on both ...
Select Share > Screen or Window, and notice that the new Presenter window appears, showing up to 4 participants and that you can move the Presenter window around on your screen or minimize or maximize the window. If you're sharing your screen or window and have your camera turned on, you can expand the self-video tile at the bottom of the ...