History of the Microscope
How the light microscope evolved.
- Famous Inventions
- Famous Inventors
- Patents & Trademarks
- Invention Timelines
- Computers & The Internet
- American History
- African American History
- African History
- Ancient History and Culture
- Asian History
- European History
- Latin American History
- Medieval & Renaissance History
- Military History
- The 20th Century
- Women's History
During that historic period known as the Renaissance, after the "dark" Middle Ages , there occurred the inventions of printing , gunpowder and the mariner's compass , followed by the discovery of America. Equally remarkable was the invention of the light microscope: an instrument that enables the human eye, by means of a lens or combinations of lenses, to observe enlarged images of tiny objects. It made visible the fascinating details of worlds within worlds.

Invention of Glass Lenses
Long before, in the hazy unrecorded past, someone picked up a piece of transparent crystal thicker in the middle than at the edges, looked through it, and discovered that it made things look larger. Someone also found that such a crystal would focus the sun's rays and set fire to a piece of parchment or cloth. Magnifiers and "burning glasses" or "magnifying glasses" are mentioned in the writings of Seneca and Pliny the Elder, Roman philosophers during the first century A. D., but apparently they were not used much until the invention of spectacles , toward the end of the 13th century. They were named lenses because they are shaped like the seeds of a lentil.
The earliest simple microscope was merely a tube with a plate for the object at one end and, at the other, a lens which gave a magnification less than ten diameters -- ten times the actual size. These excited general wonder when used to view fleas or tiny creeping things and so were dubbed "flea glasses."
Birth of the Light Microscope
About 1590, two Dutch spectacle makers, Zaccharias Janssen and his son Hans, while experimenting with several lenses in a tube, discovered that nearby objects appeared greatly enlarged. That was the forerunner of the compound microscope and of the telescope . In 1609, Galileo , father of modern physics and astronomy, heard of these early experiments, worked out the principles of lenses, and made a much better instrument with a focusing device.
Anton van Leeuwenhoek (1632-1723)
The father of microscopy, Anton van Leeuwenhoek of Holland, started as an apprentice in a dry goods store where magnifying glasses were used to count the threads in cloth. He taught himself new methods for grinding and polishing tiny lenses of great curvature which gave magnifications up to 270 diameters, the finest known at that time. These led to the building of his microscopes and the biological discoveries for which he is famous. He was the first to see and describe bacteria, yeast plants, the teeming life in a drop of water, and the circulation of blood corpuscles in capillaries. During a long life, he used his lenses to make pioneer studies on an extraordinary variety of things, both living and non-living and reported his findings in over a hundred letters to the Royal Society of England and the French Academy.
Robert Hooke
Robert Hooke , the English father of microscopy, re-confirmed Anton van Leeuwenhoek's discoveries of the existence of tiny living organisms in a drop of water. Hooke made a copy of Leeuwenhoek's light microscope and then improved upon his design.
Charles A. Spencer
Later, few major improvements were made until the middle of the 19th century. Then several European countries began to manufacture fine optical equipment but none finer than the marvelous instruments built by the American, Charles A. Spencer, and the industry he founded. Present day instruments, changed but little, give magnifications up to 1250 diameters with ordinary light and up to 5000 with blue light.
Beyond the Light Microscope
A light microscope, even one with perfect lenses and perfect illumination, simply cannot be used to distinguish objects that are smaller than half the wavelength of light. White light has an average wavelength of 0.55 micrometers, half of which is 0.275 micrometers. (One micrometer is a thousandth of a millimeter, and there are about 25,000 micrometers to an inch. Micrometers are also called microns.) Any two lines that are closer together than 0.275 micrometers will be seen as a single line, and any object with a diameter smaller than 0.275 micrometers will be invisible or, at best, show up as a blur. To see tiny particles under a microscope, scientists must bypass light altogether and use a different sort of "illumination," one with a shorter wavelength.
The Electron Microscope
The introduction of the electron microscope in the 1930's filled the bill. Co-invented by Germans, Max Knoll, and Ernst Ruska in 1931, Ernst Ruska was awarded half of the Nobel Prize for Physics in 1986 for his invention. (The other half of the Nobel Prize was divided between Heinrich Rohrer and Gerd Binnig for the STM .)
In this kind of microscope, electrons are speeded up in a vacuum until their wavelength is extremely short, only one hundred-thousandth that of white light. Beams of these fast-moving electrons are focused on a cell sample and are absorbed or scattered by the cell's parts so as to form an image on an electron-sensitive photographic plate.
Power of the Electron Microscope
If pushed to the limit, electron microscopes can make it possible to view objects as small as the diameter of an atom. Most electron microscopes used to study biological material can "see" down to about 10 angstroms--an incredible feat, for although this does not make atoms visible, it does allow researchers to distinguish individual molecules of biological importance. In effect, it can magnify objects up to 1 million times. Nevertheless, all electron microscopes suffer from a serious drawback. Since no living specimen can survive under their high vacuum, they cannot show the ever-changing movements that characterize a living cell.
Light Microscope Vs Electron Microscope
Using an instrument the size of his palm, Anton van Leeuwenhoek was able to study the movements of one-celled organisms. Modern descendants of van Leeuwenhoek's light microscope can be over 6 feet tall, but they continue to be indispensable to cell biologists because, unlike electron microscopes, light microscopes enable the user to see living cells in action. The primary challenge for light microscopists since van Leeuwenhoek's time has been to enhance the contrast between pale cells and their paler surroundings so that cell structures and movement can be seen more easily. To do this they have devised ingenious strategies involving video cameras, polarized light, digitizing computers, and other techniques that are yielding vast improvements, in contrast, fueling a renaissance in light microscopy.
- History of Microscopes
- Biography of Antonie van Leeuwenhoek, Father of Microbiology
- Introduction to the Electron Microscope
- Robert Hooke Biography (1635 - 1703)
- Who Invented the Scanning Tunneling Microscope?
- Hans Lippershey: Telescope and Microscope Inventor
- Biography of Robert Hooke, the Man Who Discovered Cells
- Parts of the Microscope Printables
- The History of the Telescope and Binoculars
- Inventions Using Nanotechnology
- 17th Century Timeline, 1600 Through 1699
- An Introduction to Gravitational Lensing
- The Basics of Telescopes
- What Is Cell Biology?
- Introduction to Holography
- Definition of Angstrom in Physics and Chemistry
The Evolution of the Microscope
The first compound microscopes date to 1590, but it was the Dutch Antony Van Leeuwenhoek in the mid-seventeenth century who first used them to make discoveries.

When the microscope was first invented, it was a novelty item. Early examples were called flea or fly glasses, since they magnified those small insects to what seemed a great size at the time. But scientists didn’t readily take to the new technology.

Biologist Clara Sue Ball examines why “ the early history of the compound microscope reveals a curious lack of interest among scientists in the possibilities of the new instrument.”
The first compound microscopes date to 1590. These devices use more than one lens , a step above most single magnifying lenses or glasses. The actual inventor is contested because there were several people at work on them, but father and son team Hans and Zacharias Jensen are usually credited.
The word “microscope” first appeared in print in 1625. And yet, as Ball writes, no “truly scientific use was made of the microscope” until 1661, when Marcello Malpighi discovered capillaries in the dried lung of a frog. His work would have been impossible without a microscope. Robert Hooke’s famous book Micrographia of 1665, with its sumptuous illustrations of tiny things, confirmed the importance of the new technology for observation.
It was the Dutch Antony Van Leeuwenhoek who used the microscope to start making discoveries, not just bigger pictures of things. The tradesman turned to crafting his own lenses, which had up to 300X magnification, a huge jump in power from most previous devices, the best of which were in the 20-30 x life-size range. His curiosity was large, too. He is credited with discovering bacteria, protists, nematodes, and spermatozoa, among other things. He examined and drew the “animalcules” (from the Latin for “little animals”) of his own semen after sex. (Mrs. van Leeuwenhoek’s opinion that famous event does not seem to have been reported.)
About the plaque on his teeth, van Leeuwenhoek noted that the bacteria was “very prettily a-moving” in the spittle, one type going “like a pike does through the water.”
So some seventy years separated the invention of the microscope and “any systematic work of great and lasting scientific value.” Ball attributes this to the primitiveness of the early microscopes, which were very hard to use. Perhaps more importantly, she argues that the developing biological sciences, especially botany and anatomy—which would later benefit so much from magnification—were not advanced enough to realize “the significance of the observations made.”
Had people been ready, would the technology have been pushed harder? It’s notable that van Leeuwenhoek was utterly unknown: he had no training in natural philosophy/natural history, as the sciences were then called. The “father of microbiology” was completely self-taught. In the context of a rich Dutch glass-making tradition, he perfected his own lenses, grinding and polishing them himself. His microscopes weren’t even the compound type used by others; they were single lens devices, basically extraordinary magnifying glasses. He never published a book; the record of his work is in his correspondence with the Royal Society.
Compound microscopes eventually surpassed van Leeuwenhoek’s devices. And by the 1850s, they were both standard scientific equipment in labs and a pedagogical-entertainment standby in middle class Victorian homes, where the animalcules took on a life of their own .
JSTOR is a digital library for scholars, researchers, and students. JSTOR Daily readers can access the original research behind our articles for free on JSTOR.
Get Our Newsletter
Get your fix of JSTOR Daily’s best stories in your inbox each Thursday.
Privacy Policy Contact Us You may unsubscribe at any time by clicking on the provided link on any marketing message.
More Stories

- Making Implicit Racism

Renewable Energy and Settler Colonialism

Surprising Discovery Challenges Key Principle of Modern Cosmology

The ABCs of Lithium
Recent posts.
- Scaffolding a Research Project with JSTOR
- The Diverse Shamanisms of South America
- Time in a Box
- K-cuisine in Malaysia: Are Locals Biting?
Support JSTOR Daily
Sign up for our weekly newsletter.
NOTIFICATIONS
History of microscopy – timeline.
- + Create new collection
Microscopes let us view an invisible world – the objects around us that are too small to be seen with the naked eye. This timeline provides a look at some of the key advances in microscopy.
~710 BC – Nimrud lens
The Nimrud lens – a piece of rock crystal – may have been used as a magnifying glass or as a burning-glass to start fires by concentrating sunlight. It is later unearthed by Austen Henry Layard at the Assyrian palace of Nimrud in modern-day Iraq.
~1000 AD – Reading stone
The first vision aid, called a reading stone, is invented. It is a glass sphere placed on top of text, which it magnifies to aid readability.
~1021 AD – Book of Optics
Muslim scholar Ibn al-Haytham writes his Book of Optics . It eventually transforms how light and vision are understood.

Cover page for Book of Optics
This is a seven-volume treatise on optics and other fields of study by the medieval Arab scholar Ibn al-Haytham, (965– c. 1040 AD).
1284 – First eye glasses
Salvino D’Armate is credited with inventing the first wearable eye glasses.
1590 – Early microscope
Zacharias Janssen and his son Hans place multiple lenses in a tube. They observe that viewed objects in front of the tube appear greatly enlarged. This is a forerunner of the compound microscope and the telescope.
1609 – Compound microscope
Galileo Galilei develops a compound microscope with a convex and a concave lens.
1625 – First use of term ‘microscope’
Giovanni Faber coins the name ‘microscope’ for Galileo Galilei’s compound microscope.
1665 – First use of term ‘cells’
English physicist Robert Hooke publishes Micrographia , in which he coins the term ‘cells’ when describing tissue. The book includes drawings of hairs on a nettle and the honeycomb structure of cork. He uses a simple, single-lens microscope illuminated by a candle.
Discovering cells
Nobel prize winner, Sir Paul Nurse, explains how the invention of the microscope lead Robert Hooke to produce the first recorded observations of cells.
1676 – Living cells first seen
Antonie van Leeuwenhoek builds a simple microscope with one lens to examine blood, yeast and insects. He is the first to describe cells and bacteria. He invents new methods for making lenses that allow for magnifications of up to 270 times.

Antonie van Leeuwenhoek
Portrait of Antonie van Leeuwenhoek (1632–1723) by Jan Verkolje.
1830 – Spherical aberration solved
Joseph Jackson Lister reduces spherical aberration (which produces imperfect images) by using several weak lenses together at certain distances to give good magnification without blurring the image.
1874 – Abbe equation
Ernst Abbe writes a mathematical formula that correlates resolving power to the wavelength of light. Abbe’s formula makes it possible to calculate the theoretical maximum resolution of a microscope.
1931 – Transmission electron microscope
Ernst Ruska and Max Knoll design and build the first transmission electron microscope (TEM), based on an idea of Leo Szilard. The electron microscope depends on electrons, not light, to view an object. Modern TEMs can visualise objects as small as the diameter of an atom.

Cells viewed with the TEM
Transmission electron microscope image of a human leukocyte (also known as a white blood cell), showing the Golgi apparatus, which is a structure involved in protein transport in the cytoplasm of the cell.
1932 – Phase contrast microscope
Frits Zernike develops phase contrast illumination, which allows the imaging of transparent samples. By using interference rather than absorption of light, transparent samples, such as cells, can be imaged without having to use staining techniques.
1942 – Scanning electron microscope
Ernst Ruska builds the first scanning electron microscope (SEM), which transmits a beam of electrons across the surface of a specimen.
1957 – Confocal imaging principle
Marvin Minsky patents the principle of confocal imaging. Using a scanning point of light, confocal microscopy gives slightly higher resolution than conventional light microscopy and makes it easier to view ‘virtual slices’ through a thick specimen.
1962 – Green fluorescent protein (GFP) discovered
Osamu Shimomura, Frank Johnson and Yo Saiga discover green fluorescent protein (GFP) in the jellyfish Aequorea victoria . GFP fluoresces bright green when exposed to blue light.
1972 – First CAT scanner
Godfrey Hounsfield and Allan Cormack develop the computerised axial tomography (CAT) scanner. With the help of a computer, the device combines many X-ray images to generate cross-sectional views as well as three-dimensional images of internal organs and structures.
1973 – Electron backscatter patterns observed
John Venables and CJ Harland observe electron backscatter patterns (EBSP) in the scanning electron microscope. EBSP provide quantitative microstructural information about the crystallographic nature of metals, minerals, semiconductors and ceramics.
1978 – Confocal laser scanning microscope
Thomas and Christoph Cremer develop the first practical confocal laser scanning microscope, which scans an object using a focused laser beam.
1981 – Scanning tunnelling microscope
Gerd Binnig and Heinrich Rohrer invent the scanning tunnelling microscope (STM). The STM ‘sees’ by measuring interactions between atoms, rather than by using light or electrons. It can visualise individual atoms within materials.
Scanning tunnelling microscopes
Prof Richard Haverkamp explains how a scanning tunnelling microscope works, accompanied by views of the device in use.
1986 – Nobel Prize for microscopy
The Nobel Prize in Physics is awarded jointly to Ernst Ruska (for his work on the electron microscope) and to Gerd Binnig and Heinrich Rohrer (for the scanning tunnelling microscope).
1992 – Green fluorescent protein (GFP) cloned
Douglas Prasher reports the cloning of GFP. This opens the way to widespread use of GFP and its derivatives as labels for fluorescence microscopy (particularly confocal laser scanning fluorescence microscopy).
Making neurons glow
Dr Rebecca Campbell (University of Otago) discusses the importance of fluorescent molecules in confocal laser scanning fluorescence microscopy (‘confocal microscopy’) of cells. She explains how green fluorescent protein (GFP) from jellyfish can be used to make specific neurons glow green.
1993–1996 – Super-resolution microscopy
Stefan Hell pioneers a new optical microscope technology that allows the capture of images with a higher resolution than was previously thought possible. This results in a wide array of high-resolution optical methodologies, collectively termed super-resolution microscopy.
2010 – Atoms of a virus seen
Researchers at UCLA use a cryoelectron microscope to see the atoms of a virus.
2014 – Chemistry Nobel prize for super microscopes
Nobel Prize in Chemistry awarded to Eric Betzig, Stefan Hell and William Moerner for the development of super-resolved fluorescence microscopy which allows microscopes to now ‘see’ matter smaller than 0.2 micrometres.
Related content
Find out more about the diverse types of electron microscopes in use today in Types of electron microscope .
See our newsletters here .
Would you like to take a short survey?
This survey will open in a new tab and you can fill it out after your visit to the site.
Study at Cambridge
About the university, research at cambridge.
- Undergraduate courses
- Events and open days
- Fees and finance
- Postgraduate courses
- How to apply
- Postgraduate events
- Fees and funding
- International students
- Continuing education
- Executive and professional education
- Courses in education
- How the University and Colleges work
- Term dates and calendars
- Visiting the University
- Annual reports
- Equality and diversity
- A global university
- Public engagement
- Give to Cambridge
- For Cambridge students
- For our researchers
- Business and enterprise
- Colleges & departments
- Email & phone search
- Museums & collections
- Microscopes
- Visit us overview
- Access Information
- Group visits
- What's on overview
- Events overview
- Exhibitions and Displays overview
- Robert S. Whipple and the Founding of the Whipple Museum
- Astronomy and Empire
- Case Studies
- About Us overview
- Foundations of the Museum
- History of the Building
- Supporting Teaching and Research
- Get Involved
- Supporting the Museum
- Learning overview
- Educational Sessions overview
- Special Collections overview
- Image Requests overview
- Image Reproduction
- Ordering and payment
- Terms and Conditions
- Search the Collections Database
- Explore overview
- Acoustics overview
- Historical Notes: a Brief Chronicle of the Tuning Fork
- Ernst Chladni: Physicist, Musician and Musical Instrument Maker
- Lissajous Tuning Forks: the Standardisation of Musical Sound
- Herman von Helmholtz overview
- Helmholtz Resonators: Tools for the Analysis of Sound
- Helmholtz's Apparatus for the Synthesis of Sound
- Rudolph Koenig: the Pursuit of Acoustic Perfection overview
- Koenig's Apparatus for the Analysis of Sound
- Trombone de Koenig
- Parabolic Sound Mirrors
- Stroh's Automatic Phonograph
- Wheatstone's Symphonium
- Astronomy overview
- A Medieval Astrolabe overview
- The Parts of an Astrolabe
- Astronomical Compendia
- Two Telescopes
- The 'Grand' Orrery
- A Projecting Planetarium
- Armillary Spheres and Teaching Astronomy
- The King's Astronomer
- A Ship-Shaped Sundial
- Short's Telescope
- The 'Incomparable' Mr. Sutton overview
- The Sutton-Type Quadrant
- Art and Astronomy: Cornelius Varley overview
- The Graphic Telescope and Varley's Artwork
- Maps of the Heavens overview
- Images of Stereographic Projections
- The Gunter Quadrant and Practical Knowledge
- Glass Monograph
- Astronomy and Empire overview
- The Stolen Quadrant
- Astronomy at Sea
- Navigational Arts
- Encounter and Exchange
- Science in the Field overview
- Survey Instruments in India
- The Sun Worshippers overview
- Eclipse Teamwork
- Forgotten Instruments from an Eclipse Expedition
- Famine and Astronomy
- Local knowledge overview
- Copycat sundials?
- Pundits and The Great Game
- Instrument Breakage and Repair
- Charles Piazzi Smyth and His Imperial Measures
- Calculating Devices overview
- A Brief History of Calculating Devices
- John Napier's Calculating Tools
- Slide Rules overview
- Specialist Slide Rules
- A Universal Slide Rule?
- Mechanical Calculation
- Charles Babbage's Difference Engine
- Pocket Calculating Devices
- The EDSAC and Computing in Cambridge
- Handheld Electronic Calculators overview
- Pocket Programming
- The Aesthetics of Calculation
- Frogs overview
- Frog-plates overview
- Projecting the Wonder of Life
- Seeing Life Through the Microscope
- Ziegler's Wax Models overview
- Frog Models, Artisans, and Academic Controversy
- Techniques of Observing and Modelling
- Frogs in the Classroom
- Frogs and Animal Electricity
- Frogs and Physiological Instruments in 20th Century Cambridge
- Frogs in the Foster Collection
- Globes overview
- A Brief History of Globes
- An Immobile Globe
- Dissectable Paper Globes
- A Jigsaw Puzzle Globe
- Japanese Star Globe
- Pocket-sized Globes
- A Celebration of Navigation
- A Geographical Lottery Game
- An Early Italian Globe?
- Identifying Stars at Sea
- Portable 'Umbrella' Globe
- A Spanish 'Encyglobedia'
- Meteorology overview
- What is Meteorology?
- Barometers overview
- Types of Barometer
- Design Concerns and Solutions
- Early Thermometers and Temperature Scales overview
- Thermometer Designs
- Measuring Air Humidity
- Weather Forecasting
- Cloud Studies
- Mapping Weather and Modern Meteorology
- Microscopes overview
- A Brief History of the Microscope
- Parts of the Microscope
- Charles Darwin's Microscopes
- Fish and Frogs
- Three Microscope Makers overview
- John Cuff and the 'New-Constructed' Microscope
- George Lindsay's Royal Microscope
- Benjamin Martin and Microscope Compendia
- Public Shows
- Faraday's Slide
- Measuring the Microscopic
- A Dutch Pioneer overview
- Leeuwenhoek Replicas
- Mayall's Microscope Reproductions
- The Problems with Lenses
- Amici & Robinson
- Cambridge Botanists
- Microphotographs
- Elcock: Scientist or Craftsman?
- Models overview
- A Japanese Earthquake Model
- Geological Models
- Geometric Models
- Knitted Interpenetrating Surfaces
- Modelling Chemistry overview
- Types of Molecular Models
- Glass Models of Fungi
- Dr. Auzoux's Models overview
- Inside Auzoux's Models
- Human Models
- Animal Models
- Plant Models
- Foetus Models
- Wave Machines overview
- Wave Theory
- Thomas Young's Wave Experiments
- Whipple Museum
- Three Microscope Makers
- A Dutch Pioneer
- Calculating Devices
- Meteorology
.")
The microscope was invented at the end of the 16th century. Its early history is not fully understood, partly because a large number of relevant documents were destroyed during the Second World War. On the other hand, we do know a lot about how the instrument was used, and what people thought of it; this is the kind of information presented in this section.
"For what a better, fitter, gift Could be in this world's Aged Luciosity? To help our Blindness so as to devize a pair of new & Artificial eyes."
Henry Power, In Commendation of ye Microscope, 1661
Earliest history

The 17th century saw the microscope put to its first serious use; a number of natural philosophers set about exploring the microscopic world. Henry Power's poem captures the optimism about its potential. After the 1665 publication of Robert Hooke's book Micrographia, and the work of natural philosophers on the continent, the only problem that seemed to stand in the way of the further use of the microscope was the fear that it had shown all that it was possible to see of the microscopic world. From this early period the Whipple Museum has two microscopes, one of them English, the other Italian (Image 1).
The 18th century
In the 1740s a number of books were published that seemed to give the microscope new direction. Before this there was a perceived decline in the use of the instrument. 'Perceived', both then and now, because the relatively high production and use of the microscope did not match the relatively low number of important discoveries. Two optical problems stood in the way of further development: spherical and chromatic aberration.
Rather than concentrate on these problems, the articles here covering the 18th century deal with the ways in which the microscope was manufactured and sold; the way in which it was used in public demonstrations; and the various ways in which the instrument's design was altered to meet the needs of its users. The work of 'natural philosophers', many of whom were fascinated with the microscopic world, provides enormous amounts of historical material, and allows us to try to understand the 18th century on its own terms.
The 19th century

Again, the 19th century saw technical developments that are well represented at the Whipple Museum. Earlier design alterations had made microscope manipulation easier, but now optical improvements that increased the magnification and resolving power of microscopes led to many discoveries. Moreover, the problems of spherical and chromatic aberration were solved before 1830. With the specialisation of science into different disciplines, the microscope found a number of different homes. Biology, palaeontology (the stody of fossils), medicine, geology, and host of other subjects all included the use of the microscope, though usually through the work of only a handful of 'microscopists'.
Aside from one of the first achromatically and spherically corrected microscopes ever made, the Whipple has several microscopes with interesting associations: Charles Darwin's large compound microscope, Giovanni Battista Amici's reflecting microscope, and some pieces associated with John Stevens Henslow are the highlights here. In each case we can take the microscope and its history as a way of understanding the scientists who used it, allowing us to see them at work, and engaged in the practice of science.
The 20th century
Of all the periods in the history of the microscope this is the least researched. There is certainly a huge amount of material that is not yet properly understood, either in terms of its importance or its place in the history of modern science (Image 2). The museum has a number of recent microscopes.
Next Article: the parts of the microscope
Opening times.
Please note that our lift is currently out of action and we do not have a step-free entrance.
Our maintenance unit is dealing with this urgently, and we hope to resolve within the next two weeks.
We are open five days a week, 12.30 - 16:30.
Monday 12.30 - 16:30
Tuesday 12.30 - 16:30
Wednesday 12.30 - 16:30
Thursday 12.30 - 16:30
Friday 12.30 - 16:30
We hope to see you soon!
Forthcoming events
- 24 May ' 24 Uncomfortable Science Tour
- 21 Jun ' 24 Uncomfortable Science Tour
- 26 Jul ' 24 Uncomfortable Science Tour
- 16 Aug ' 24 Uncomfortable Science Tour
View all events
Support the Museum
- Buy Whipple-related products
- Buy Whipple Museum publications
- Donate online
Links to Catalogue Records
- Wh.0844, compound microscope, campani type
University of Cambridge Museums
© 2024 University of Cambridge
- Contact the University
- Accessibility
- Freedom of information
- Privacy policy and cookies
- Statement on Modern Slavery
- Terms and conditions
- University A-Z
- Undergraduate
- Postgraduate
- Research news
- About research at Cambridge
- Spotlight on...

- school Campus Bookshelves
- menu_book Bookshelves
- perm_media Learning Objects
- login Login
- how_to_reg Request Instructor Account
- hub Instructor Commons
- Download Page (PDF)
- Download Full Book (PDF)
- Periodic Table
- Physics Constants
- Scientific Calculator
- Reference & Cite
- Tools expand_more
- Readability
selected template will load here
This action is not available.
3.1: Introduction to the Microscope
- Last updated
- Save as PDF
- Page ID 52269
Learning Outcomes
- Review the principles of light microscopy and identify the major parts of the microscope.
- Learn how to use the microscope to view slides of several different cell types, including the use of the oil immersion lens to view bacterial cells.
Early Microscopy
The first microscope was developed in 1590 by Dutch lens grinders Hans and Zacharias Jansen. In 1667, Robert Hooke described the microscopic appearance of cork and used the term cell to describe the compartments he observed. Anton van Leeuwenhoek was the first person to observe living cells under the microscope in 1675—he described many types of cells, including bacteria. Since then more sophisticated and powerful scopes have been developed that allow for higher magnification and clearer images.
Microscopy is used by scientists and health care professionals for many purposes, including diagnosis of infectious diseases, identification of microorganisms (microscopic organisms) in environmental samples (including food and water), and determination of the effect of pathogenic (disease-causing) microbes on human cells. This exercise will familiarize you with the microscopes we will be using to look at various types of microorganisms throughout the semester.
The Light Microscope
What does it mean to be microscopic? Objects are said to be microscopic when they are too small to be seen with the unaided eye—they need to be magnified (enlarged) for the human eye to be able to see them. This includes human cells and many other types of cells that you will be studying in this class. The microscope you will be using uses visible light and two sets of lenses to produce a magnified image. The total magnification will depend on which objective lens you are using—the highest magnification possible on these microscopes is typically 1000X—meaning that objects appear 1000X larger than they actually are.
Resolution vs. Magnification
Magnification refers to the process of making an object appear larger than it is; whereas resolution is the ability to see objects clearly enough to tell two distinct objects apart. Although it is possible to magnify above 1000X, a higher magnification would result in a blurry image. (Think about magnifying a digital photograph beyond the point where you can see the image clearly). This is due to the limitations of visible light (details that are smaller than the wavelength of light used cannot be resolved).
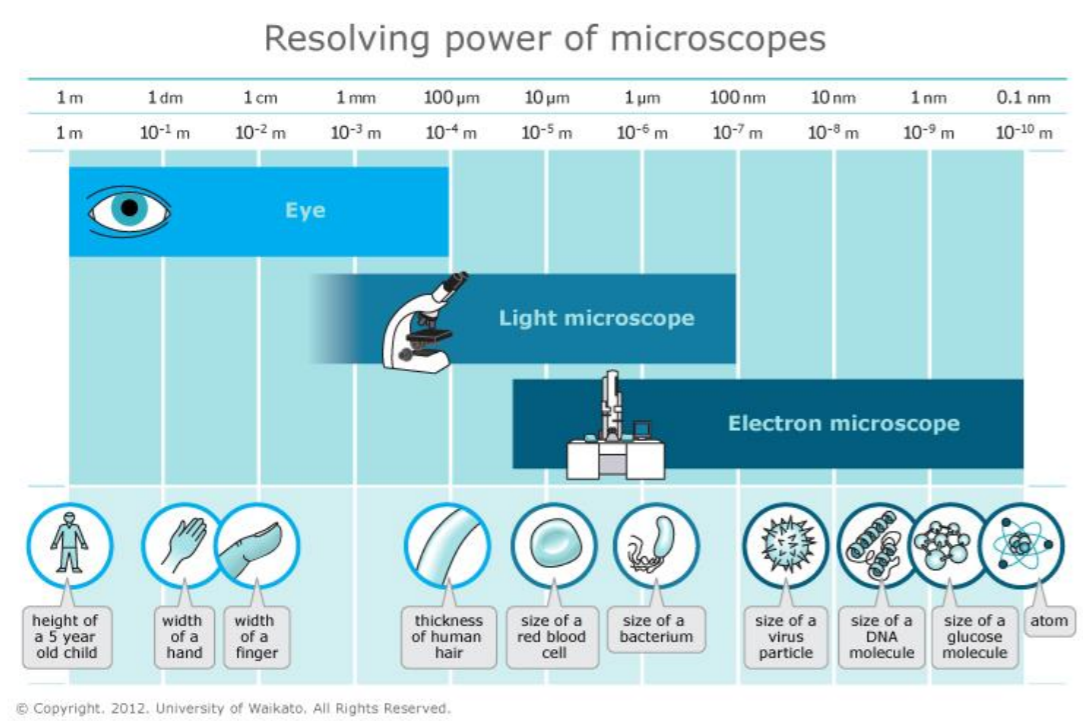
The limit of resolution of the human eye is about 0.1 mm, or 100 microns (see Table 1 for metric review). Objects that are smaller than this cannot be seen clearly without magnification. Since most cells are much smaller than 100 microns, we need to use microscopes to see them.
The limit of resolution of a standard brightfield light microscope , also called the resolving power, is ~0.2 µm, or 200 nm. Biologists typically use microscopes to view all types of cells, including plant cells, animal cells, protozoa, algae, fungi, and bacteria. The nucleus and chloroplasts of eukaryotic cells can also be seen—however smaller organelles and viruses are beyond the limit of resolution of the light microscope (see Figure 1).
Resolution is the ability of the lenses to distinguish between two adjacent objects as distinct and separate.
A compound light microscope has a maximum resolution of 0.2 µm, this means it can distinguish between two points ≥ 0.2 µm, any objects closer than 0.2um will be seen as 1 object. Shorter wavelengths of light provide greater resolution. This is why we often have a blue filter over our light source in the microscope, it helps to increase resolution since its wavelength is the shortest in the visible light spectrum. Without resolution, no matter how much the image is magnified, the amount of observable detail is fixed, and regardless of how much you increase the size of the image, no more detail can be seen. At this point, you will have reached the limit of resolution or the resolving power of the lens. This property of the lens is fixed by the design and construction of the lens. To change the resolution, a different lens is often the only answer.
.png?revision=1&size=bestfit&width=1021&height=680 "history of microscope assignment")
The microscope is one of the microbiologist's greatest tools. It allows for the visualization of small particles, including microbes, which individually are too small to be seen with the human eye. With the help of proper illumination, a microscope can magnify a specimen and optically resolve fine detail. This introduction to microscopy will include an explanation of features and adjustments of a compound brightfield light microscope, which magnifies images using a two lens system.
Before reading the following discussion of the theory of the microscope, please familiarize yourself with the names of the microscope parts shown in Figure 2 and their function.
1. Eyepiece/Ocular lens: Lens in which the final magnification occurs. Often is at 10X magnification, but can be different.
2. Revolving nose piece : Holds multiple objective lenses in place. The base of the nose piece can rotate, allowing each of the lens to be rotated into alignment with the ocular lens.
3. Objective lenses : Initial magnification of your specimen occurs here. Most brightfield light microscopes have 3 objective lenses seated into the resolving nose piece base.
4. Coarse focusing knob : larger of the two knobs, the coarse adjustment knob moves the stage up or down to bring the specimen into focus. It is very sensitive, even small partial rotation of this knob can bring about a big change in the vertical movement of the stage. ONLY use coarse focusing at the beginning with the 4X, 10X low powered objectives in place. If you use it with the higher powered objectives, it can damage the objective if you crash the lens through your glass specimen slide.
5. Fine focusing knob: smaller of the two knobs, the fine adjustment knob brings the specimen into sharp focus under low power and is used for all focusing when using high power lenses such as the 100x oil immersion lens.
6/9. Stage & Mechanical stage : The horizontal surface where you place the slide specimen is called the stage. The slide is held in place by spring loaded clips and moved around the stage by turning the geared knobs on the mechanical stage . The mechanical stage has two perpendicular scales that can be used to record the position of an object on a slide, useful to quickly relocate an object.
7. Illuminator : contains the light source, a lamp made either of an incandescent tungsten-halogen bulb or an LED. There is normally a switch to turn on/off or a rheostat located on the side that you can use to adjust the brightness of the light.
8. Diaphragm and Condenser : the diaphragm controls the amount of light passing from the illuminator through the bottom of the slide, there is a small lever used to achieve the optimal lighting. The condenser is a lens system that focuses the light coming up from the illuminator onto objects on the slide.

Figure 2: Brightfield light microscope used in a Microbiology lab (Lumen)
The Optical System . The optical system of a compound microscope consists of two lens systems: one found in the objective(s) lens(es) (Fig. 2, part 3); the other in the ocular (eyepiece) (Fig. 2 part 1). The objective lens system is found attached to a rotating nosepiece (Fig. 2, part 2). A microscope usually has three or four objectives that differ in their magnification and resolving power. Magnification is the apparent increase in size of an object. Resolving power is the term used to indicate the ability to distinguish two objects as separate. The most familiar example of resolving power is that of car headlights at night: at a long distance away, the headlights appear as one light; as the car approaches, the light becomes oblong, then barbell-shaped, and finally it becomes resolved into two separate lights. Both resolution and magnification are necessary in microscopy in order to give an apparently larger, finely detailed object to view.
Look at the engravings on the objective lenses and note both the magnification (for example: 10X, 40X, 100X) and the resolution given as N.A. = numerical aperture, from which the limit of resolution can be calculated:
limit of resolution = wavelength
2 X numerical aperture
At a wavelength of 550 nm (0.55µm), the 100X objective lens with a N.A. of 1.25 has a resolving power of 0.22 µm. Visible light has of wavelength from about 400-750 nanometers (nm). Since the limit of resolution decreases at the shorter wavelengths, microscopes are usually fitted with a blue filter. The resolving power of the lens separates the details of the specimen, and the magnification increases the apparent size of these details so that they are visible to the human eye. Without both resolution and magnification, you would either see nothing (good resolution, no magnification) or a big blur (poor resolution, good magnification).
The objective lens system produces an image of the specimen, which is then further magnified by the ocular lens (eyepiece). The magnification of this lens is engraved on the ocular. The total magnification of the microscope is determined by the combination of the magnification of the objective lens and ocular lens that is in use, that is:
Total magnification = objective lens X ocular lens (eyepiece)
For example, with a 10X objective lens and a 10X ocular, the total magnification of the microscope is 100X. If the objective lens is changed to a 20X objective, then the total magnification is now 200X, whereas if a 10X objective is used with a 12.5X ocular lens, the total magnification is now 125X. The use of objective and ocular lenses with different magnifications allows greater flexibility when using the compound microscope. Due to the size of most bacteria (ranges widely from ~1um to over 100um), generally we require the use of the 100x oil immersion lens with a 10x ocular lense to view bacteria in a standard brightfield light microscope.
The Illumination System. The objective and ocular lens systems can only perform well under optimal illumination conditions. To achieve these conditions, the light from the light source (bulb) must be centered on the specimen. (In most inexpensive microscopes, the manufacturer adjusts this centering. In more versatile microscopes, the centering becomes more critical and is a function performed by the operator.) The parallel light rays from the light source are focused on the specimen by the condenser lens system (see Fig. 2) The condenser can move up and down to affect this focus. Finally, the amount of light entering the condenser lens system is adjusted using the condenser diaphragm. It is critical that the amount of light be appropriate for the size of the objective lens receiving the light. This is important to give sufficient light, while minimizing glare from stray light, which could otherwise reduce image detail. The higher the magnification and resolving power of the lens, the more light is needed to view the specimen.
Objective lenses used for observing very small objects such as bacteria are almost always oil immersion lenses . With an oil immersion lens, a drop of oil is placed between the specimen and the objective lens so that the image light passes through the oil. Without the oil, light passing through the glass microscope slide and specimen would be refracted (bent) when it entered the air between the slide and the objective lens. This refracted light might still be able to contribute to the image of the specimen if the objective lens is large. However, at the higher magnification, the objective lens is small, so is unable to capture this light. The loss of this light leads to loss of image detail. Therefore, at higher magnifications, the area between the slide and the lens is modified to have the same (or nearly the same) refracting qualities (refractive index) as the glass and specimen by the addition of immersion oil. Watch this NC BioNetwork video ( https://youtu.be/-0EvnroWpVc ) on oil immersion. For more information, read this article ( https://www.microscopeworld.com/t-us...rsion_oil.aspx ).
To use an oil immersion lens, place a drop of oil on top of the dried specimen on the slide and carefully focus the microscope so that the objective lens is immersed in the oil. Any lens, which requires oil, is marked "oil" or "oil immersion." Conversely, any lens not marked "oil" should NOT be used with oil and is generally not sealed against oil seeping into and ruining the objective.
Watch this Video on how to use a Microscope, filmed at NC State Microbiology labs:
Video 1: Introduction to the Microscope (6:26)
microorganism, magnification, resolution, working distance, parfocal, parcentric, prokaryotic, eukaryotic, bacillus, coccus, spirillum, spirochete, morphology, bacterial arrangements, depth of field, field of view, taxonomic classification
References:
- Contributed by Joan Petersen & Susan McLaughli : Associate Professors (Biological Sciences and Geology) at Queensborough Community College
- Lumen Learning: Figure 3: Brightfield light microscope https://courses.lumenlearning.com/mi...of-microscopy/
If you're seeing this message, it means we're having trouble loading external resources on our website.
If you're behind a web filter, please make sure that the domains *.kastatic.org and *.kasandbox.org are unblocked.
To log in and use all the features of Khan Academy, please enable JavaScript in your browser.
Biology library
Course: biology library > unit 8.
- Scale of cells
- Cell theory
- Intro to cells
- Introduction to cells
Introduction
Microscopes and lenses.
- Magnification is a measure of how much larger a microscope (or set of lenses within a microscope) causes an object to appear. For instance, the light microscopes typically used in high schools and colleges magnify up to about 400 times actual size. So, something that was 1 mm wide in real life would be 400 mm wide in the microscope image.
- The resolution of a microscope or lens is the smallest distance by which two points can be separated and still be distinguished as separate objects. The smaller this value, the higher the resolving power of the microscope and the better the clarity and detail of the image. If two bacterial cells were very close together on a slide, they might look like a single, blurry dot on a microscope with low resolving power, but could be told apart as separate on a microscope with high resolving power. What determines resolving power? High-quality microscopes tend to have higher resolving power than cheap ones simply because they are more carefully made and work better. However, resolving power is ultimately limited not by microscope machining quality, but by the physical properties of light. If two structures are separated by a distance less than half the wavelength of the light used for imaging, they cannot be distinguished from each other by conventional light microscopy 2 . This phenomenon is called the diffraction barrier. Electron microscopy (discussed below) gets around this problem by using beams of electrons, which have much shorter wavelengths than light. Also, some recently developed super-resolution microscopy techniques, have allowed the collection (or, more typically, reconstruction) of light microscopy images whose resolution is beyond the diffraction barrier 2 , 3 .
Light microscopes
Electron microscopes, attribution:, works cited:.
- Lathrop, K. (n.d.). Light microscopes. In Ms. Lathrop’s science classes . http://infohost.nmt.edu/~klathrop/Microscopes.htm .
- Silfies, J. S., Schwartz, S. A., and Davidson, M. W. (2013). The diffraction barrier in optical microscopy. In MicroscopyU . Retrieved from https://www.microscopyu.com/articles/superresolution/diffractionbarrier.html .
- Super-resolution microscopy. (2015, August 8). Retrieved August 9, 2015 from Wikipedia: https://en.wikipedia.org/wiki/Super-resolution_microscopy .
- Paddock, S. W., Fellers, T. J., and Davidson, M. W. (2015). Confocal microscopy: Basic concepts. In MicroscopyU . Retrieved from http://www.microscopyu.com/articles/confocal/confocalintrobasics.html .
- Transmission electron microscopy. (2016, May 7). Retrieved May 29, 2016 from Wikipedia: https://en.wikipedia.org/wiki/Transmission_electron_microscopy .
Additional references:
Want to join the conversation.
- Upvote Button navigates to signup page
- Downvote Button navigates to signup page
- Flag Button navigates to signup page


- Learning Centre
The History of Microscopy – Lesson 1
Microscopes are very complex pieces of equipment that most often required in-depth knowledge and expertise to be able to take full advantage of its potential. Current microscopy takes full advantage of the laws of optics and physics foundations. Nevertheless, microscopes have evolved from the spirit and geniality of individuals, which, had the tenacity to “hand” build the first micro-scopes. The invention of the microscope opened the door to a previously unknown world, with massive impacts on our understanding of life, nature and on human overall health and wellbeing.
In this seminar, Álvaro Tavares (Álvaro Tavares Lab, Center Biomedical Research – Universidade do Algarve) will give an overview of the history of microscopy and simultaneously introduce some concepts in optics that are important for understanding microscopes, its components how it affects the resulting image.
Learning Objectives:
- Gain an overview of history of microscopy.
- Recognize differences between simple and compound microscope.
- Understand basic concepts in optics and light that are key in microscopy.
Questions Answered:
- What is the difference between simple and compound microscopes?
- What is refraction?
- What is the source of optical aberration in microscope objectives?
Find out more about our other microscopy training sessions offered through Andor's Complete Microscopy Training Course .
Next Lesson: Microscopy School Lesson 2 - Transmitted Light Microscopy
Hello, everyone. I'm Alvaro Tavares. And on this presentation, I will explain some of the details on optics that are on the base of microscopy, and I will try to simultaneously give you some details of the history of microscopy and how microscopes were developed, in this case just visible light microscopy.
Before jumping into the details of microscopy, and I'm sure you're all aware of this, but I would like just to remind you that with the way we see that allows us to see in the world and everything that matters to us, we are completely dependent on this optical system that it's our eye, the human eye. And the light will pass through the pupil, and it will be focused by the lens on the retina. That is where the image will be formed. And when the light rays that are emitted come from the object that we observe and the way the lens work, and we're not going into the details, they will focus on the retina, but the image will be seen upside down.
For the purpose of our talk, of this talk, this is not really important. But when building a microscope and if we want to create an image that truly reflects the position of the object being seen, this can be one important detail. And, of course, as I'm aware, you all know that the light that allows us to see the rays of light, they behave like waves, and such detail is represented in here. Light has a wave-like behavior. The visible spectrum, we can only see waves let us say that go range from around 7 nanometers to 400 nanometers wavelength. So that means that shorter wavelengths rays, we actually cannot see them or longer wavelength rays, we don't see them either. They can be detected with the proper apparatus, but our eyes can only distinguish. Our detector is only sensible, the retina, to waves with these wavelengths.
And this leads me to tell you about some of the properties of light that are important to understand what I want to say on the next slide. So, of course, you're all aware of some of the properties of light like the three that are represented in this cartoon. So, an incident light on any object can be absorbed fully by the object, and there's no light going through, can pass through the object in case the object is transparent to that wavelength. So it's not opaque. It will be transparent to some wavelengths, or the light can be reflected. In fact, this is an important detail because the reflection of light over the object is what allows us to see colors in the different objects.
So, basically, if all the light was reflected by an object, we would see the object as being white. If everything was absorbed by the object, all the wavelengths, we would see it as black. And white light, so light from the sun, as you also are aware let us say if it has the seven colors of the rainbow, when the incident light hits an object, in this case, a leaf, we see as our perception of the object the color of the object is the wavelength that is reflected. So in this case, this leaf would absorb all the or most of the rays except the green. It's the green that is being reflected. So, the observer would have notion of this object as being green.
One important property of light for the purposes of our talk is the phenomena that we call refraction. So refraction of light basically consists on the change in direction that the light suffers when moves from a medium to another medium where it moves at a different speed. So as an example, the light reflected from this fish moves through water, and when it reaches the boundary between water and air, it will be refracted at a certain angle. So the fishermen will have the perception that the fish is at this position, while, in fact, the real position of the fish is a different one. So, this is a phenomenon that we observe every day more often than we care to think.
For example, if you look into a glass of water with a straw inside, it will look as if the straw is broken at some point at the boundary, when, in fact, we all know that it's not the truth. The refraction happens only when at the boundary. It will be determined, the angle that the light and the direction the angle created from the movement of light is dependent on the wavelengths. It's dependent on the direction the light hits the surface. And we can actually see a good example in here, where white light is coming incident on this prism, and it's refracted in a certain direction, and then it, again, finds another border, and it changes again on the opposite direction. So this is an important detail that I will be referring to through the rest of my talk, which is the refraction of light.
A consequence of the refraction of light and that refraction differs to different rays according to the wavelength of these rays is if we have a mixture of rays of different wavelengths like in white light that are constituted with the different colors of the spectrum that we can see when this complex mixture of colors hits the surface of the crystal. So, each ray will be refracted to a different angle, and it will be refracted again when it hits the second surface, so when it changes from here to glass and again from glass to here. So there will be a refraction. And we can increase this side, and, of course, if we do so, we can disperse, we can separate the different colors that constitute the original ray of light. And we observe this usually also when you look through glasses and with water, or in nature, the rainbow is nothing more than the suspension of light caused by drops of water that are in the air.
So these characteristics of light, in particular of refraction, is in a sense what makes a lens work. And as you can see in here, if we have an object that we want to observe, the light that is transmitted that moves in the direction of the eye, when it reaches a lens, and this is a simple lens that we will talk about different types of lenses in the future, so light is refracted, and it will reach, in fact, the second lens, lens of the eye. And it will be focused on the retina of the observer. But because of this refraction of light, there's a phenomena where the image is, in fact, amplified because the image that forms in here it's again as if the light ray was coming from this position and from this position. So the image that the eye is forming in the retina is, in fact, a virtual image of this side. So there was some degree of amplification of the images. This will depend, again, on the size of the lens and the distance that we have between the lens and the object. But basically, this is the function of a retina taking into consideration these properties of light I just mentioned to you about.
So taking these properties into consideration, the refraction of the light rays when they move from one medium to another medium, and the angle of the surface, we can have the double convex lenses. That's the one we've been talking about. But, in fact, many other types of lenses can be made that will diverge light, that will disperse light in different ways, and according to their own wavelengths, this dispersion can be higher or lower. So we can have lenses this way, also that they are only convecting one side and plane on another side. They can be concave. So each one of these lenses will allow us to do different diversions, let us say, to the light rays, and how can all these be used for us to build the microscope.
In fact, people have always been fascinated by the properties of translucent crystals and glass since ancient times. And they learned how to use these properties of the crystals to amplify images, especially very small objects that they wanted to observe. So the use of reading stones, as it says, it's quite old. It's even before Christ. So people would use small pieces of glass or crystals that they would find to help them in this case it's more advanced to read. And later on, when the manufacturer of glass was profession, people would use what we call reading stones that can amplify quite well the letters of a text to be used. And they were in use up until quite late until we were capable of doing proper lenses to read.
The use of those stones were also adapted to create reading lenses. So reading lenses have been used ever since man knows glass. But the first person to actually describe the characteristic, how to make a convex lens and using it for the building up of a reading lens was Ibn al-Haytham in 1021, so an Arab, in the "Book of Optics," the first book really dedicated to optics and influenced enormously the construction of nice lenses to be used in reading lenses. Only later on with the use of better construction of glass, people were able of doing spectacles that would help people to read. They were notoriously difficult to keep in the face. Only much later on technology allowed to do the spectacles that we now use. But spectacles the way they are represented on this figure were first developed in Italy around the 13th century. And they used in the beginning quartz because the optical glass was not yet very good.
So for professional reasons, many people needed to look very closely to objects like tissue makers that were making fabrics like in Holland, they really needed to observe up and close the tissues being manufactured to observe the quality. But this is not so easily done because our eye has severe limitations. Objects that are very close to the eye cannot have their images brought to focus on the retina. The accepted minimal conventional viewing distance is around 10 inches or 25 centimeters, So, these lenses were being used, the primitive lenses were being used to help to see these fabrics. So, it's not a surprise that in Holland eyeglass makers started to play around with lenses to help the merchants to observe the tissues they were manufacturing. And, in fact, Zacharias Janssen in 1590 were the first ones. This is disputable, but apparently, they were the first ones to manufacture the first compound microscope. So the difference between a compound microscope and a simple microscope is the compound has more than one lens. It has multiple lenses inside the tube. And they were capable of doing the first compound microscopes that you...some replica is in here in this picture. They could actually amplify images up to three times when it was fully closed, or they could be elongated, and then at that stage, it would amplify an image up to 10 times.
It's interesting to notice that the way a compound microscope function is by successive amplification. So you can see here the objective lens will amplify the image of the object, and it will create a virtual image inside the compound microscope. And then the eyepiece or the ocular, as we nowadays call it, will focus this virtual image into the eye of the observer. So, the observer will have the notion that it's looking at a much larger image while in fact, the object is small. So, in fact, it will help amplifies.
So the compound microscope is based on this principle, but it suffers from a series of problems to work that we will discuss in a bit. Nevertheless, it is interesting to notice that the principle of the compound microscope and of the telescope is basically the same. What it changes is the focal distance from the object. Like Galileo was interested in developing telescopes. He was also very much involved in developing the microscope. So there's a lot of similarities between the two objects. And, in fact, the way light is reflected and refracted inside is in a lot of ways very, very similar.
So the first records we have of observation of use of a compound microscope for scientific purposes are from Marcello Malpighi, an Italian professor that was, in fact, considered the father of embryology and histology. So he described many, many, many structures of the human body and the animals, and he also observed wood. And he was an extremely curious person, making observation and using an extremely simple compound microscope. So these compounds microscopes are difficult to focus on the sample and in particular because the sample is difficult to illuminate. So most samples were not transparent, and the light had to reach the sample either using glasses, candles. It was one of the major problems. Nevertheless, using such a compound, Malpighi was capable of describing in detail many anatomical structures. And in here are some images of one of his publishing, the lungs. You can see the structure of the lungs and the representation of the tissue, and in particular, you can see the detail of the structure of capillaries and what we nowadays know it will be cells.
Also making use of these simple compound microscope, another giant in microscopy, is Robert Hooke who was later the President of the Royal Society in London. And using also simple compound microscopes, and you can see the system to illuminate the sample, he made many observations. He observed insects, and he described many structures. He really became famous because he coined the term cell, and it was published in his famous book called "Micrographia." And in that book, you could read that when he was observing slices of cork that he noticed that everything was perforated and porous, and those pores he called cells, a term that stayed up until today.
Nevertheless, science hasn't really caught up the use of microscopes up until Van Leeuwenhoek described his own work. So Leeuwenhoek is incorrectly called the inventor of the microscope when he created this simple microscope that we see on the image on the right. There were already many others using compound microscopes or even simple microscope. But Leeuwenhoek was very creative using a microscope to observe samples that are positioned in here, and he was very careful describing his own observations. And with a microscope like this, he could attain a magnification of about 275 times. And he submitted his work for publishing in the Royal Society of the time with Robert Hooke.
So the earliest microscopes that were really used to describe cells among them are the Leeuwenhoek that has this very simple structure. So this is a concave lens in here and a convex lens in here. And the sample would be positioned right at the tip of this needle, and then two different screws you can see in here, this one and this one, will allow the user to position the sample more into focus or less into focus with this microscope.
Not only that, Leeuwenhoek, because he was very curious, he dedicated his time to see samples of water from different pools, from different tissues. So he was the one who really described bacteria. And he found out that in a simple drop of water, there was a lot of living microorganisms that we couldn't see. He also observed the blood cells. He also described the sperm cells. So he was elected because of all of these discoveries a full member of the Royal Society in 1690. And as you can see from these images and in particular from this one, you can see this is not a really simple microscope to use. It's not so simple to do observations and to then draw cartoons out of them.
Nevertheless, they have a great advantage over the compound microscope of the time, which was they were easy to position according to the source of light. So you could use more intense light, more or less intense light. And this was good enough for these early observations. And because of these observations, there was an enormous interest in this microscopic world, and it was at this time then many people decided to start, "Okay. This is something worth studying." And a lot of other researchers started to try to develop a good microscope.
And in here, we can see another good example of the observations registered by Van Leeuwenhoek in the year of 1717, in this case, a spinal cord of the cow described with great detail. And the observations of Leeuwenhoek then really were a big success to let us say at the time, and many, many, many other people decided to start trying to use microscopes to make observations on anatomical structure or start using them to observe smaller things, in particular, what were these small animals that were described in the water pools.
Nevertheless, there were severe limitations to these microscopes, either the simple ones, either the compound microscopes. They were several problems, mainly because the quality of the lenses were not that good. And, in fact, one of the major problems was what we cannot see here in the image of this horse. It's the chromatic aberration. So chromatic aberration is derived from the fraction of light that we've seen a few slides back. And it's the dispersion of the colors that depends on wavelengths of the light ray and of the medium being traverse. So maybe we can see this better on the next slide.
So as we spoke before, refraction of light is the change in direction that light suffers when changes from a medium to another medium where its speed is different, so traveling through air, then through glass, and then through air again. Every time there's a frontier between the two mediums, light changes its direction. And this angle that it suffers, the angle that the implemented is due to the angle of the surface itself being traversed, it depends on the wavelength of the ray that its incident. So when we have light coming through one of the lens that one of the sides it's plane and the other one is convex, what you can see is each ray can be refracted in a slightly different angle. So they're not all refracted the same way. So, instead of focusing, all the rays are not focusing on the same spot. So this is the focus spot of a perfect lens. If the lens is perfectly well made, all the rays will focus on one area, and in this case, this is the most common effect of the different rays, they don't all focus on the same spot. And every single ray of these is the same wavelength. So this is what we call spherical aberration, and it needs to be corrected for us to have a clear image.
A different aberration from this that I just described, the spherical aberration, is what we call chromatic aberration because these rays can be all blue-ray. We will have the dispersion of rays. Instead of focusing in one spot, they dispersed. But imagine that the incident light was composed of three different wavelengths, so the blue, the green, and the red. So each single one of these rays will have each one a spherical aberration. All the colors will suffer an aberration different from the other ones. So this is what we call chromatic aberration, and it can be corrected.
So, the way to correct this was, in fact, discovered by Chester Hall in the year of 1730s when he made the observation that newly made glass or flint glass dispersed the colors in a way different from old glass. It was a characteristic of the glass. So he tried it out to make different lenses, and he designed a system that uses a concave lens and a convex lens close to each other in a way that we can focus the incident rays on a single spot on a focus point. So this is a correction. It's a way to correct chromatic aberration.
But while Chester Hall had an empirical solution, so he tried out different types of glasses and curvatures to make his lens to correct the chromatic aberration, Joseph Lister solved the problem of spherical aberration using pure mathematics. So he published his discovery in 1830. And this has allowed the construction of lenses that are capable of correcting the spherical aberration that we were just mentioning. So this allowed the manufacturers to design lenses already prepared to correct spherical aberration. The advances in the quality of lenses and the microscopes that were being used allowed many people to start working on this new field of science, which is to analyze this life, small organisms that were living in drops of water in every pond, river, that people could see and it was unimaginable before. So Sédillot in the year of 1878 was the first one to create the word microbe, to use the word microbe as referring to these small organisms that basically means in ancient Greek mikrobios, which means the short-lived, and they have such an importance in our lives as we know nowadays.
It almost sounds like...that everything that had to be defined in optical microscopy was made in the 19th century, but, in fact, to other giants in microscopy, Ernst Abbe and Carl Zeiss, a name that is familiar to everyone, they did seminal work in the construction of microscopes and in defining some of the rules to use microscopes. But perhaps I should start by saying that Abbe, the law of Abbe, determined one important factor which is, "What's the maximum resolving distance that we can attain on the microscope?"
So resolving two points is, "What's the minimal distance between two objects when I'm observing them on a microscope? What's the minimal distance that I can distinguish in them as two different objects?" And Abbe was capable of saying that it's directly... The distance between the two points is directly proportional to the wavelength that we're using. So, the smaller the wavelength of the incident light, the smaller the distance, the two points, that I can see and resolve under the microscope.
To better explain what I'm trying to say is...it's better to show you this as an example. So two objects that are close like these two objects, I can see them, I can distinguish them as separate entities only if they are a certain distance apart. As we approach them one to another, at some point, we will have the perception that we cannot say if this is just one object or two objects or three objects that are so close that I cannot distinguish them. So the incident light that I use to observe these objects is what...the wavelengths of that light is what will allow me to distinguish a separate object that if they are really close. So Abbe's law basically established a limit to what it's possible for me to observe because we know the wavelength of the minimum light ray that I can see with my own eyes. So below that, I will not be capable of resolving two objects under a light microscope.
And why is that? Why is there a limit to the resolving power? What's the physics behind all this? So the physics is there's another characteristic of light that we haven't mentioned before yet, which is that light diffracts around corners. So when we make waves of light pass through one small aperture, a hole in this wall, light will bend around this corner and around this corner. The larger the opening it is, the less we observe this effect. This is the characteristic that allows us, if this was a sound wave and we were sitting in here, we would still be capable of listening to the sound because the wave of sound will bend around the corner. This is the phenomena that happens. So, obviously, this diffraction depends on the wavelength, and it depends on the size of this hole that...this aperture that we have in here. It's present in our everyday light. All waves suffer this phenomena. Even large waves as you can see in this aerial picture of sand in a harbor where you can see these barriers that prevent the water waves coming, and the effect is easily observed on the sand caused by these waves.
So what are the implications? The implications is as the wave passes through an opening like in here...imagine if this could be one lens and light coming through the lens. So when the light bends around the corners of the lens, it will diffract and will create a pattern, a diffraction pattern. To the observer, this diffraction pattern is seen in here as small white circles. Of course, as I told you before, the different wavelengths, so blue and green, they will diffract differently. So as you can see, not only we see circles of light, but you also see some chromatic aberration in these circles.
The first person to describe the reason of these circles of light was George Airy in the year of 1835. And the presence of these circles of light limits enormously the resolving power of a microscope because the circles of light will superimpose. So we can see two different objects perfectly resolved, and you can see these two are not resolved. So they are below the resolution of the microscope. And these circles of light now usually we refer to them as Airy discs due to the name of George Airy, which was the first person.
So just to summarize. So our capacity of seeing two objects as separated instead of one single object. This is what we call the resolving power of our microscope or the resolving power of our eyes. And according to Abbe's law, he said, according to law, we will never be capable of separating two points if they are so close that the distance is less than half of the wavelength of the light that we're using to see the object. So, this is the minimum distance between two objects that allows us to separate them.
So one way that we can use to try to minimize this effect as you can see in this image, again, where we...I'm just showing you, again, the refraction that light suffers when it passes from one medium to another medium. If we are looking to an object that is covered by a coverslip, and this is the lens of our microscope, so when light passes through our object to be seen when it reaches the glass, the light can be refracted, when it passes from the glass to air, it will be refracted again, when it passes from here to the first glass in the lens, it will be refracted again, and then when it comes out of the glass, it's refracted again. Every time light changes, this will cause problems in our image.
So ideally, we wouldn't have the difference in these mediums. So light ideally would pass all these mediums. They would have the same refractive index, let us say. And one way to solve this problem is instead of having between our coverslip, our sample, and the objective length of the microscope, we can use an oil that has a refractive index similar to this glass and to this glass. So with the appropriate choice of an oil because the refractive index of all these three layers is the same, the light will go through them without changing direction. And these would increase the quality of our image.
The importance of choosing an oil with a refractive index...adequate is perfectly demonstrated in this movie where you can see that this oil that has the refractive index of the glass cup inside, it will make it appear as if nothing is in there. So basically, there's no contrast. The light is not refracted when it changes from the medium, in this case, the oil to the glass. So the light will continue its pass without changing direction, and without changing direction, it looks as if there's nothing in there, as if it's fully transparent and fully...the medium is just one. So the choice of an appropriate oil when looking into sample an optical microscopy is a crucial detail that is often not taken into consideration.
So, Abbe and Zeiss were obviously aware of the importance of the oil, and they developed an oil immersion system in order to take into account these refractive characteristics of light. So they developed oils that match the refractive index of the glass that were used to make the lenses and the slides and the coverslips. And with such a system, the first Zeiss microscopes, 150 years ago almost with the lenses with a maximum of 1.4 numerical aperture, it could be...the system would allow us to resolve two points that were distanced by just 0.2 microns apart, which is according to the Abbe's law, the maximum theoretical resolution on a visible light microscope. And this is something that fascinates me, how they could do it, how could they predict this such a long time ago and on the primordium of the light microscopes. In practice nowadays, we can actually go a bit further in resolution, but some tricks have to be used, some mathematical tricks or other systems that is not on the scope of this talk. But by using a light microscope, this resolution cannot be broken by direct observation.
The important thing was well, not everything was yet perfect, although we could have that power of resolution. Lenses had to be improved, and they continued to be improved for a long time especially in order to correct the different aberrations, chromatic aberrations, spherical aberration. And depending on the color that we were looking at, we would have different problems. I told you before. So we already had the description of the chromatic lenses that corrected the blue and red. But then Otto Schott was the first one to describe lenses that are optimized to correct blue, green, and red lights, so capable of correcting the three different wavelengths as in focusing them all at the same point. As you can see, the lens starts to be complex. They have to be perfectly adjusted. And constructing manufacturing lenses without any aberration was an art, but nowadays, when you look into the lens of a microscope, they will have written something like this depending on the scope you're using. They will have apochromatic, plan-apochromatic. They will have different names according to the corrections that the lens is capable of doing.
In fact, modern lenses are incredibly complex on the inside, and they have several movable parts to correct different types of aberration. So a single plan apo lens as shown here can have as many as 11 lens elements on the inside. So there are multiple types of lenses with different elements, each one designed for specific applications, and they do different type of corrections. I've included this table for you to appreciate that the achromat type of lens, it corrects a spherical aberration for one color and chromatic aberrations for two colors. And you can see the plan acro it's capable of doing the same thing, but it corrects also the field curvature that I had no time here to mention to you.
And, of course, lenses that are the most expensive and do the most corrections are the plan apochromatic that you see in here. They're capable of correcting three, four colors, both spherical aberration and also in the chromatic aberrations. But lenses are incredibly complex, but you will have another seminar, another class that will cover this topic. Just to remind that these different aberrations that light can suffer and go through glass, they were all described by the beginning of the late 19th century, and they've been trying to be corrected by the manufacturers ever since.
One of the problems that light can create to us...to the observer is because the wave, they are not incident on the sample all with the same angle of rotation like you can see in here. They can come in different types of rotations. And Sénarmont also in the 9th century was capable of appreciating that problem and created the polarizer that basically is capable of cutting most wavelengths except the ones that came in the same direction. This is better seen in this slide. So just to try to explain what I'm trying to say. So in here, let's imagine that we have light rays that come only from two different directions, one in vertical represented in orange, and one in blue represented...and one horizontal coming represented in blue.
And the polarizer filter basically what it does is it only allows the wavelengths to pass through these slots, and the blue rays are prevented from passing. So, all the light that passes from the polarizer, the wavelengths, it's all in the same direction. Is this so important? In fact, it is. So we have here an image taken on a pool, and yet the same image taken without polarizer and with polarizer is completely different in the sense that the degree of detail we can get with the polarizer it's much higher than without polarizer. So, of course, this is due to the characteristics I've told you before, the reflection, the incident of the angle, and the refraction of light. So with the polarizer, we can filter most of the undesired and bizarre angles of light, and we can just focus on one single type of light being reflected from the pool, and it allows a better resolution of all the details.
In the beginning of the 19th century, William Wollaston made a huge contribution to optical microscopy when he created the Wollaston prism that basically is an optical device that manipulates polarized light and separates the light into separate outgoing beams that will be polarized according to the optical axis of the right angle of the prisms. This sounds a bit complicated, although it's simplified in here. And the main thing is the outgoing light the beams diverge has two rays that will pass through the sample at a very close adjacent point around 0.2, and because of this, they will experience different optical past lengths because of the refractive index or thickness of the sample at the site. And it will also cause a change of phase in one of the rays relative to the other due to the delay experienced by the wave in the more optical dense material. How can we visualize this?
In order to help you visualize, I will also take advantage of the contribution made by George Nomarski that developed further the Wollaston prism. And the contribution of these two individuals nowadays is what we call the differential interference contrast. And as you can see to visualize what's happening is a transparent sample that otherwise have no contrast like in here in the bright field with the DIC or the differential interference contrast, we can enhance the contrast on a sample that it's otherwise not colored, no contrast added to it.
So basically, we can obtain this image because of the splitted polarized light into the two beams that we can further see in this representation. So, the incident light, the beam is splitted in two rays. It will focus into two adjacent points. As soon as the difference in the material like, for example, a membrane that it's very close. So one of the beams can pass through the membrane. The other one can pass through the medium immediately adjacent to the membrane. And this is what allows us to obtain those images without using contrast or chromophores or any other stain to give color to our sample.
So basically, in this presentation, what I've been telling you is how microscopes were developed in the beginning but just the simple microscopes. So I didn't told you about one of forensics or the other techniques. We just talked about bright field microscopy, where you don't use any stains. We just illuminate the samples, and it's very difficult through bright field to obtain structural details because, usually, the samples lack contrast. Anyway, knowing these characteristics of the light, we can observe these structural details if we manipulate the light in such a way that we can see phase differences, and we could further do it if we stain the component.
But the main effects that we used of the light, so diffraction, refraction, reflection, can actually produce quite a good level of contrast and detail in our samples. So, furthermore, we should have a good notion of all...these characteristics of light is just a summary of the characteristics I was using today of the light. There's more that we have no time to talk about. By using the absorption of light, refraction, diffraction, and dispersion, we can have some very good detail on our samples. On the other hand, there's a limit to what we can resolve and to what we can see just by using direct light in our sample. So I'm referring obviously to Abbe's law that I talked a bit before. That doesn't mean that we cannot magnify our samples more and more either by using mathematical tricks, let us say. But the oldest way to have a higher magnification was instead of changing the light, we cannot see it, we can use waves that have a very small wavelength like a beam of electrons.
So, in 1927, Louis de Broglie invented basically the electron microscope because electrons like photons can behave like waves, the electron microscope that has the canon of electrons. And we have a schematic here on the right of the slide. So this is actually the scheme of an optical microscope where we have a light source, we have lenses, we have our sample, we have further lenses to amplify the image, and then a detector, or it could be our own eyes.
An electron microscope, instead of having a light source, it has an electron beam that will send the electrons through our sample. Instead of lens made of glass, we have magnetic lens that will focus the beam on the sample, and then the beam will be detected by a sensor, a camera, a fluorescent plate, but never with our own eyes. So this is actually the limitation of the electron microscope, although it can amplify, it can magnify as you can see here much more than an optical device. But we cannot actually observe directly the sample with our eyes, and most important of all, because of the high energy of the beam, the samples are never alive. So we cannot look into live samples, and the samples must be fixed. In order to have a high-resolution image like the one seen in here, a photo taken with an electron microscope, to have such a high degree of detail, we have to sacrifice something, and that something usually is we never observe live samples.
I hope you have enjoyed this small presentation with some basic details of the optics that we use to build simple microscopes along with a little bit of the history of microscopy.
Date: September 2020
Author: Dr Álvaro Tavares
Category: Webinar
Related Products
Suggested reading, get in touch and ask a question today.
- Select an option
- Afghanistan
- Antigua and Barbuda
- Bahamas, The
- Bosnia and Herzegovina
- Burkina Faso
- Central African Republic
- Congo (Democratic Republic)
- Czech Republic
- Dominican Republic
- El Salvador
- Equatorial Guinea
- Gambia, The
- Guinea-Bissau
- Ivory Coast
- Liechtenstein
- Marshall Islands
- Netherlands
- New Zealand
- North Korea
- Papua New Guinea
- Philippines
- Sao Tome and Principe
- Saudi Arabia
- Sierra Leone
- Solomon Islands
- South Africa
- South Korea
- South Sudan
- St Kitts and Nevis
- Switzerland
- Trinidad and Tobago
- Turkmenistan
- United Arab Emirates
- United Kingdom
- United States
- Vatican City
- Connecticut
- District of Columbia
- Massachusetts
- Mississippi
- New Hampshire
- North Carolina
- North Dakota
- Pennsylvania
- Rhode Island
- South Carolina
- South Dakota
- West Virginia
- Select a Province/Territory
- British Columbia
- New Brunswick
- Newfoundland and Labrador
- Northwest Territories
- Nova Scotia
- Prince Edward Island
- Saskatchewan
- Life Science Research
- Physical Science Research
- OEM / Manufacturing
- Select at least one option
- Bio/Clinical Spectroscopy
- Cell and Tissues
- Chemical Catalysis
- Core Imaging Facility
- Developmental Biology
- Diseases and Immunology
- Fluid and Plasma Dynamics
- Medical - Clinical
- Metals, Alloys, Composites and Ceramics
- Microbiology
- Nanomaterials, Metals, Alloys, Composites and Ceramics
- Neuroscience
- Quantum Optics
- Semi Conductors, Microelectronics and Data Storage
- Life Science - Other
- Physical Science - Other
- I don't know
Related assets
Dragonfly 600 integrates super-resolution solutions compatible with confocal, widefield or TIRF. Furthermore, it incorporates the newly developed High Power Laser Engine (HLE) and…
Dragonfly 600
No related papers, you have successfully logged out..
- Copyright Statement
- Modern Slavery
- Gender Pay Report
- Regulatory Information
- Terms & Conditions
© Oxford Instruments 2024
History of The Microscope
Thank you for visiting nature.com. You are using a browser version with limited support for CSS. To obtain the best experience, we recommend you use a more up to date browser (or turn off compatibility mode in Internet Explorer). In the meantime, to ensure continued support, we are displaying the site without styles and JavaScript.
- View all journals
- Explore content
- About the journal
- Publish with us
- Sign up for alerts
- Books Received
- Published: 18 February 1933
The History of the Microscope: Compiled from Original Instruments and Documents, up to the Introduction of the Achromatic Microscope
- ROBERT S. WHIPPLE
Nature volume 131 , pages 219–221 ( 1933 ) Cite this article
235 Accesses
1 Citations
3 Altmetric
Metrics details
THE story of the development of any scientific instrument is an interesting one, but this is especially so when the result of the development is so universally known and used as the microscope.
The History of the Microscope: Compiled from Original Instruments and Documents, up to the Introduction of the Achromatic Microscope.
By Dr. Reginald S. Clay Thomas H. Court. Pp. xiv + 266. (London: Charles Griffin and Co., Ltd., 1932.) 30 s . net.
This is a preview of subscription content, access via your institution
Access options
Subscribe to this journal
Receive 51 print issues and online access
185,98 € per year
only 3,65 € per issue
Buy this article
- Purchase on Springer Link
- Instant access to full article PDF
Prices may be subject to local taxes which are calculated during checkout
You can also search for this author in PubMed Google Scholar
Rights and permissions
Reprints and permissions
About this article
Cite this article.
WHIPPLE, R. The History of the Microscope: Compiled from Original Instruments and Documents, up to the Introduction of the Achromatic Microscope . Nature 131 , 219–221 (1933). https://doi.org/10.1038/131219a0
Download citation
Issue Date : 18 February 1933
DOI : https://doi.org/10.1038/131219a0
Share this article
Anyone you share the following link with will be able to read this content:
Sorry, a shareable link is not currently available for this article.
Provided by the Springer Nature SharedIt content-sharing initiative
This article is cited by
The reckoning of chromosomal instability: past, present, future.
- Andrew Lynch
- Shermineh Bradford
- Mark E. Burkard
Chromosome Research (2024)
Quick links
- Explore articles by subject
- Guide to authors
- Editorial policies
Sign up for the Nature Briefing newsletter — what matters in science, free to your inbox daily.

IMAGES
VIDEO
COMMENTS
The most familiar type of microscope is the optical, or light, microscope, in which glass lenses are used to form the image. Optical microscopes can be simple, consisting of a single lens, or compound, consisting of several optical components in line. The hand magnifying glass can magnify about 3 to 20×. Single-lensed simple microscopes can ...
Read More. History of Microscopes. By Mary Bellis. The father of microscopy, Anton van Leeuwenhoek of Holland, started as an apprentice in a dry goods store where magnifying glasses were used to count the threads in cloth. He taught himself new methods for grinding and polishing tiny lenses of great curvature which gave magnifications up to 270 ...
3 minutes. The icon indicates free access to the linked research on JSTOR. When the microscope was first invented, it was a novelty item. Early examples were called flea or fly glasses, since they magnified those small insects to what seemed a great size at the time. But scientists didn't readily take to the new technology.
The microscope was one of the most significant inventions of the Scientific Revolution, opening up completely new and miniaturised worlds.The first microscopes were invented in the first quarter of the 17th century in the Netherlands, but soon scientists across Europe were using the instrument to make new and often bewildering discoveries in the fields of botany, entomology, and anatomy.
1676 - Living cells first seen. Antonie van Leeuwenhoek builds a simple microscope with one lens to examine blood, yeast and insects. He is the first to describe cells and bacteria. He invents new methods for making lenses that allow for magnifications of up to 270 times.
History of Microscope. In the 1 st Century AD, the Romans invented the glass and used them to magnify objects.; In the early 14 th Century AD, eyeglasses were made by Italian spectacle makers.; In 1590, two Dutch spectacle makers, Hans, and Zacharias Jansen created the first microscope. It was a simple tube with 2 lenses system and had 9X magnification.
The microscope was invented at the end of the 16th century. Its early history is not fully understood, partly because a large number of relevant documents were destroyed during the Second World War. On the other hand, we do know a lot about how the instrument was used, and what people thought of it; this is the kind of information presented in ...
Introduction to the Microscope Microscope History • Circa 1000AD - The first vision aid was invented (inventor unknown) called a reading stone. It was a glass sphere that magnified when laid on top of reading materials. • Circa 1284 - Italian, Salvino D'Armate is credited with inventing the first wearable eye glasses. • 1590 - Two Dutch eye glass makers, Zaccharias Janssen and son ...
Scanning electron microscope image of pollen (false colors) Microscopic examination in a biochemical laboratory. Microscopy is the technical field of using microscopes to view objects and areas of objects that cannot be seen with the naked eye (objects that are not within the resolution range of the normal eye). There are three well-known branches of microscopy: optical, electron, and scanning ...
1.1 Timeline of Optical Microscope Development. The invention of the microscope (ca.1600) and its improvements over a period of 400 years has resulted in great advances in our understanding of the microscopic world as well as extremely important advances in biology and medicine. The opti-cal microscope, a device that in many cases was used as ...
The microscope is a vital tool for studying microorganisms, but it requires proper use and care. This webpage provides an introduction to the microscope, its parts, and its functions, as well as some tips and exercises for practicing microscopy skills. Learn how to prepare and observe specimens, adjust the settings, and calculate magnification with this interactive resource from Biology ...
Lesson 1 from Andor Microscopy School
Magnification is a measure of how much larger a microscope (or set of lenses within a microscope) causes an object to appear. For instance, the light microscopes typically used in high schools and colleges magnify up to about 400 times actual size. So, something that was 1 mm wide in real life would be 400 mm wide in the microscope image.
The History of Microscopy - Lesson 1. Microscopes are very complex pieces of equipment that most often required in-depth knowledge and expertise to be able to take full advantage of its potential. Current microscopy takes full advantage of the laws of optics and physics foundations. Nevertheless, microscopes have evolved from the spirit and ...
Assignment: Go to pictoral history link and select when finished reading instructions. Choose a microscope from one of the time periods that you think is neat. Pretend that when you click on the picture of the chosen microscope that you will be transported back into time.
1931 - Max Knoll and Ernst Ruska construct the first electron microscope. 1933 - Ruska builds the first electron microscope that exceeds the resolution of the light microscope. It has an accelerating voltage of 75 kV. 1934 - First electron micrograph of a biological sample. long-leaved sundew fixed with osmium.
History of the Microscope. Founders of Microscopy. Significant Contributions. Microscope Development. Nikon Microscope History. Microscopy Main Page. Microscope Parts. Magnification. Microscope Types.
Introduction. The history of medical science is intricately linked to the history of microscopy. 1 What a ride it has been! The historian, Rupert Hall, stated: "scientific biology without any kind of microscope is almost inconceivable." 2 In fact, while microscopes are inanimate instruments with specific optical dimensions, their design was associated with a wide range of evolving theories ...
History. 1990. TLDR. Evidence is produced that refutes the expressed opinions that microscopes of that period were considered useless for scientific studies, microscope images were considered unreliable by the scientific community, and the microscope was simply unappreciated as a research tool until the middle of the nineteenth century. Expand.
THE story of the development of any scientific instrument is an interesting one, but this is especially so when the result of the development is so universally known and used as the microscope.
Hand out the "History of the Microscope" articles to the students. As a class, read them out loud together. After each paragraph, review the content in a different way. Review options might include: Write a sentence for the beginning, middle, and end of the story. TRANSITION: These are all important parts of the story.
Hook/Engage: Hand out the "History of the Microscope" articles to the students. As a class, read them out loud together. After each paragraph, review the content in a different way. Review options might include: Write a sentence for the beginning, middle, and end of the story. TRANSITION: These are all important parts of the story.
An electron microscope is defined as the type of microscope in which the source of illumination is the beam of accelerated electrons. It is a special type of microscope with a high resolution of images as the images can be magnified in nanometers. There are two types of electron microscopes: The transmission electron microscope (TEM)