How-To Geek
How to autoplay and loop a google slides presentation.
Play your presentation without touching a thing.

Quick Links
Set up autoplay and loop when presenting, set up autoplay and loop when publishing to the web.
If you don't want to worry about clicking through your slideshow, you can set up Google Slides to play your presentation automatically. Plus, you can have the slideshow loop, so it starts over at the beginning when it ends.
You might be playing your slideshow at a kiosk, during a conference, or publishing it to the web. These are the ideal times to use AutoPlay and Loop in Google Slides . You can automatically present the show and choose the timing between slides. Then, restart the presentation at the beginning each time it ends.
If you plan to start the slideshow and then let it play, you can set up AutoPlay and Loop , or simply one or the other.
Related: How to Loop a PowerPoint Presentation
Start the presentation by clicking "Slideshow" at the top of Google Slides. You can also use the arrow to pick either "Presenter View" or "Start From Beginning" per your preference.
When the slideshow opens, display the Presenter Toolbar by hovering your cursor over the bottom left corner of the presentation.
Click the three dots on the right of the Presenter Toolbar, then move to AutoPlay. You'll see a pop-out menu that lets you select the advance timing for the slides. You can pick from every second up to every minute.
If you also want to loop the slideshow, select "Loop" at the bottom of the pop-out menu.
When you finish, click "Play" to automatically play your presentation.
To stop the slideshow, simply click on a slide. You can then resume AutoPlay from the Presenter Toolbar by selecting "Play" again.
Maybe you plan to publish your slideshow to the web or embed it on a website rather than play it locally. You can set up AutoPlay and Loop as part of the publish settings.
Related: How to Share a Google Docs, Sheets, or Slides File as a Web Page
Go to File > Publish to the Web in the menu.
Choose either "Link" or "Embed" per your intent. Then use the Auto-Advance Slides drop-down box to choose the timing for the slides. Here again, you can pick from every second up to every minute.
To loop the slideshow, check the box for Restart the Slideshow After the Last Slide.
You can then mark the checkbox for Start Slideshow as Soon as the Player loads if you like, so that the viewer doesn't have to take any action to begin the presentation.
When you finish, click "Publish" and confirm to obtain the link or embed code for the slideshow.
To share a Google Slides presentation that doesn't require you to walk viewers through it, remember these steps to automatically play and loop the slideshow.
How to Make Google Slides Autoplay (Easy Guide)

When presenting with Google Slides, you might prefer an automatic playback for your slides. Fortunately, setting Google Slides to autoplay is simple. This article outlines two easy methods to enable autoplay for your presentation.
Quick Steps to Autoplay Google Slides:
- Open Google Slide.
- Click “Slideshow” or “CTRL+F5” .
- Hover bottom left for menu (⋮).
- Select “Auto-play” and set duration.
While the “Slideshow” method is a popular way to autoplay Google Slides, it’s worth noting that there are other methods and steps you can explore to fine-tune your presentation experience. Keep reading for a more in-depth tutorial on how to make Google Slides autoplay.
Step 1: Click on Slideshow
Step 2: find the menu, step 3: press on autoplay, step 4: set the time for autoplay, step 1: open “publish to the web”, step 2: select “start slideshow”, step 3: copy and share the link, step 1: open the slide that contains the video, step 2: check the autoplay box, autoplay google slides from slideshow.
The initial approach to autoplay your Google Slides involves the “Slideshow” feature. Let’s delve into how to set your slides to autoplay using this method:

First, open the Google Slide you want to autoplay. Then find and press the “Slideshow” option in the top-right of the screen. Alternatively, you can also press “CTRL+F5” to start the slideshow.
Once you’re in the slideshow, you need to bring up the menu bar. To do this, move your cursor to the bottom left of the screen. Now you will see the page number and the menu icon (⋮) beside it .

Clicking the menu icon reveals a pop-up menu with the Autoplay feature. Select “Auto-play” from the options presented.

Once you press Autoplay, a new pop-up menu will appear on the screen. Here you can set how long each slide should play before advancing to the next one. After selecting the duration, press “Play” to start the autoplay.

Method 2: Autoplay from “Publish to the web”
Another way to set your Google Slides to autoplay is through the “Publish to the web” feature. This method is somewhat more straightforward than the first and offers the added benefit of sharing your presentation via a link.
Begin by opening your Google Slide presentation. Navigate to “File” and then select “Publish to the web” from the available options.

Under the “Link” tab, choose “Start slideshow as soon as the player loads.” This ensures the slideshow begins immediately when the link is accessed. Additionally, you can dictate the duration each slide displays before moving to the next using the “Auto-advance slides” setting .

Once you’ve configured the settings, click “Publish” . This action produces a link you can distribute to others. When this link is accessed, the slideshow initiates on its own.

You have two available methods to autoplay your Google Slides presentation. Based on your requirements, opt for either method to enhance the appeal and engagement of your presentation.
How to Autoplay Videos in Google Slides
You can also autoplay videos on Google Slides . Let’s see how to do this:
First, open the slide that contains the video you want to autoplay. Then left-click on the video to open the drop-down menu . Press “ Format Options” from the drop-down list.

Once the “Format Options” menu pops up, locate and select the “Play (on click)” checkbox. Then, choose “Play (automatically)” from the “Video playback” options.

This activates the autoplay function for your video. Consequently, each time the slide is accessed, the video will commence playback on its own.
In summary, there are two methods to autoplay your Google Slides. Regardless of your choice, ensure your presentation is fully loaded and prepared before pressing play – a loading screen during your pitch is a definite no-no!
Related Posts:
")
How to Autoplay and Loop Google Slides? [Complete Guide!]
By: Author Shrot Katewa
![How to Autoplay and Loop Google Slides? [Complete Guide!]](https://artofpresentations.com/wp-content/uploads/2021/03/Featured-Image-Loop-Your-Google-Slides-Presentation.jpg "can a google slides presentation play automatically")
Making your presentation slides autoplay can be really helpful especially when you want to setup the presentation during an event! That way, you can completely focus on delivering a presentation rather than worrying about clicks to change the slide! But, you may wonder whether you can make Google Slides autoplay?
You can auto-advance slides in Google Slides by clicking on “Present” in the top right corner of your screen. Then, move your cursor and you will see a menu bar. Click on the “Gear” icon. Select “Auto-advance” and choose a time delay. You can also use the “publish to web” feature to Autoplay slides.
But, that’s just the crux of it. In this article, I am going to explain to you how you can set up autoplay in Google Slides in a complete step-by-step manner! Plus, I will also share with you tips on how you can loop videos using Google Slides!
So, without any further delay, let’s get started!
A Quick Note Before We Begin – if you want to make jaw-dropping presentations, I would recommend using one of these Presentation Designs . The best part is – it is only $16.5 a month, but you get to download and use as many presentation designs as you like! I personally use it from time-to-time, and it makes my task of making beautiful presentations really quick and easy!
How to Get Google Slides to Autoplay?
Google Slide is full of useful features that give users the ability to create professional-quality presentation slides. One of those features is “Autoplay.”
To know how to use this feature in Google Slides, follow the step-by-step guide given below:
Step 1: Open Publish to the Web Option
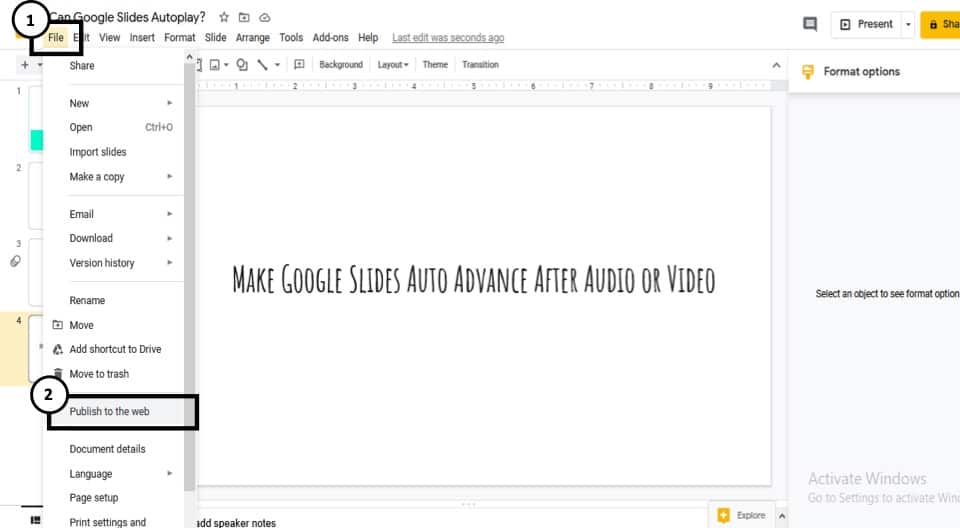
First, open the presentation slides file into Google Slides. Once the file is open, click on “File” located on the top left corner of the screen. From the dropdown menu, select the “Publish to the web” option.
Step 2: Click on Link
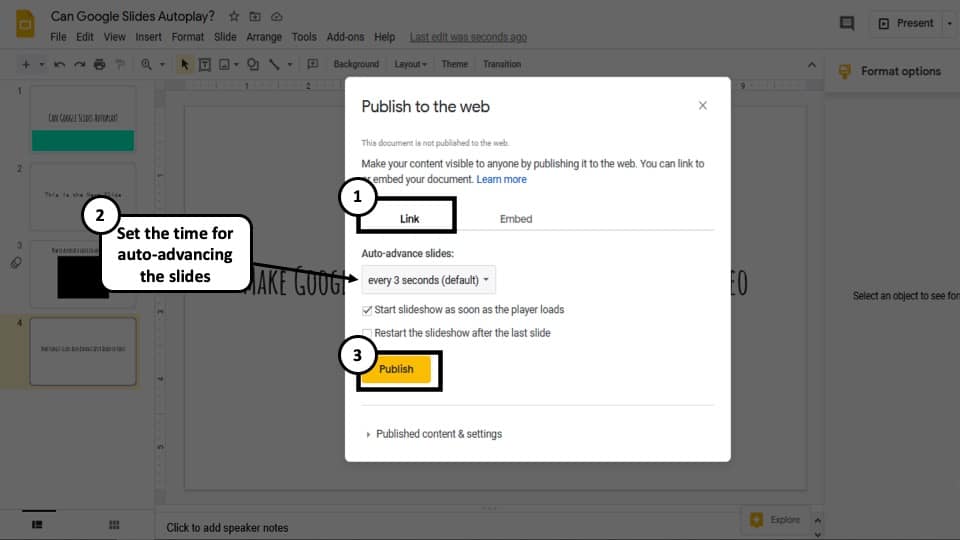
This will open a new dialogue box. From there, select “Link” or “Embed”. If you select the “Link”, it will only give you the option to set the time delay. By selecting “Embed” you will be able to set the slide size as well as the time delay between the slides.
Step 3: Set the Time for Auto Advancing Slides
Now select the time delay between each slide. You can set 1, 2, 3, 5, 10, 15, 30, or 60 seconds as time delay in Google Slides. Check the “Start your slideshow as soon as the presentation loads” option.
Step 4: Publish Your Presentation
Finally, click on “Publish.” This will give you a link to access your slide if you chose “Link” in step 2.
Step 5: Copy the Link and Share
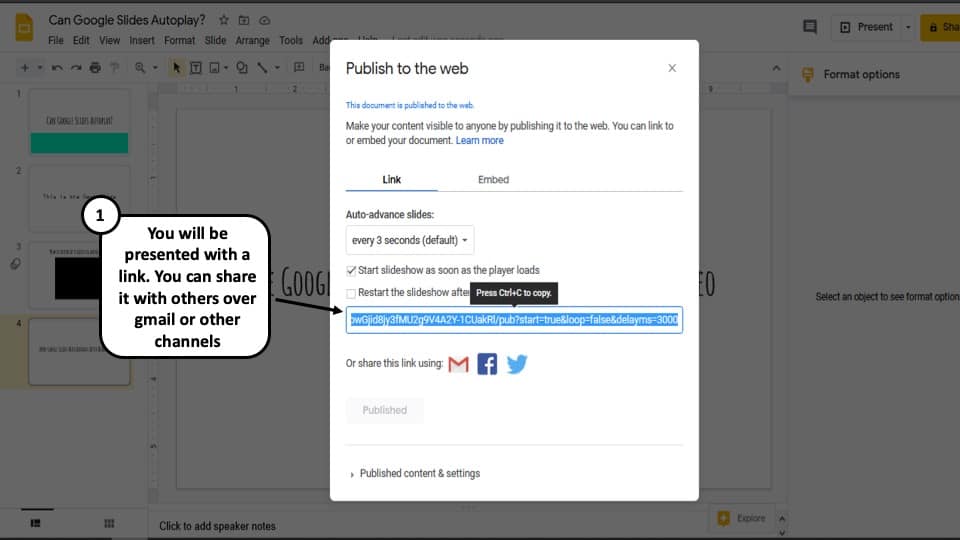
Just make sure to copy and share the link with your audience. Whenever someone uses this link to open your presentation slide, it will start playing as soon as they open it.
If you choose “Embed” in step 2, it will give you an embed code. This is useful if you want to publish your presentation on a website. Whenever someone visits that site, the presentation slides will start playing automatically.
But, what if you don’t want to share the Google Slides presentation with others and instead want to do this to your own presentation? Let’s learn how to do that in the next section.
How to Make Google Slides Auto-Advance without Publishing?
You can also make your google slides auto advance without publishing it to the web! Google added this feature recently to Google Slides.
Here’s how to auto-advance slides in Google Slides without publishing it to the web –
Step 1 – Enter the Presenter Mode in Google Slides

You need to first enter in the presenter mode in Google Slides. To do that, simply click on the “ Present ” option from the top-right corner of your Google Slides screen or press “ Ctrl+F5 “.
Step 2 – Set Your Slides to Auto Advance
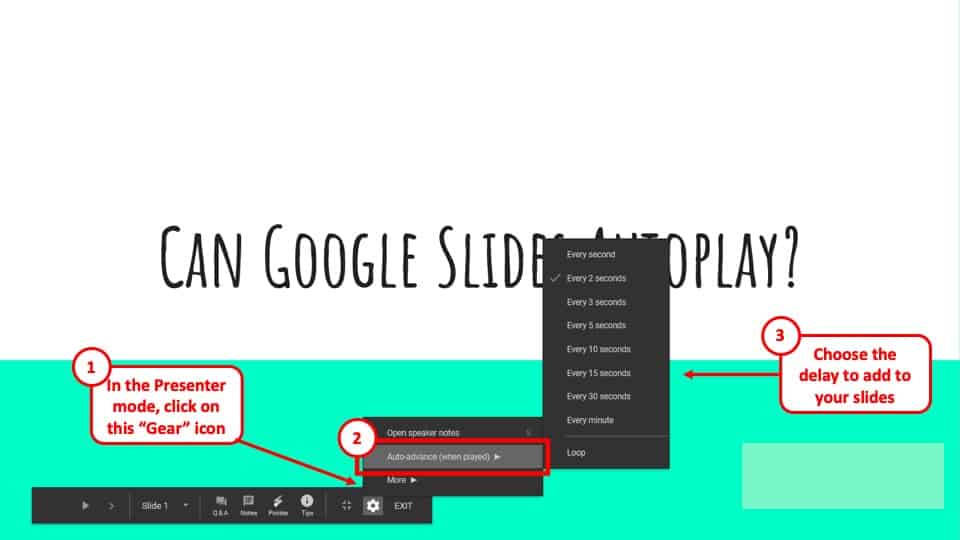
When your presentation enters the full-screen mode, simply click on the gear icon on the options menu at the bottom of the screen. A drop-down menu will pop open. Click on the “ Auto-advance when played ” option. Finally, choose the delay timing for each slide for auto-advance.
How to Loop Google Slides?
You can loop your Google Slides presentation while auto-advancing your slides in both the methods mentioned above.
Let’s look at the 1st method first (when publishing to the web)
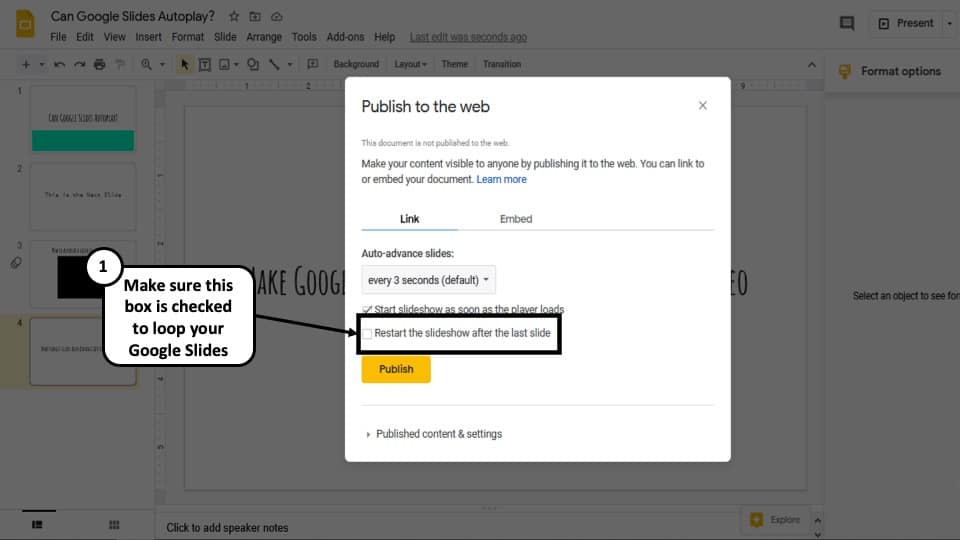
You will just have to check the “ Restart the slideshow after the last slide ” option as well while generating a link to publish to the web. The rest of the steps shall remain the same as before. By doing so, you will be able to loop your Google Slides.
Now, you can also loop your Google Slides presentation without publishing your presentation to the web. Here’s how to do this –

In the presenter mode, simply click on the “ Gear ” icon. Next, click on the “ Auto-advance ” option. In the next menu, click on “ Loop “.
Both the above methods can help you loop your Google Slides presentation.
How to Autoplay a Video in Google Slides?
On top of auto-playing your Google Slides, you can also autoplay the videos that are embedded in the slide. To do that, follow the steps given below:
Step 1: Add a Video to Your Google Slides
Open the presentation slide file in “Normal View” in Google Slides. Add a video to your Google Slides presentation. If you are unsure of how to do that, then check out this guide on how to add a video to Google Slides .
Step 2: Open Format Options for the Video
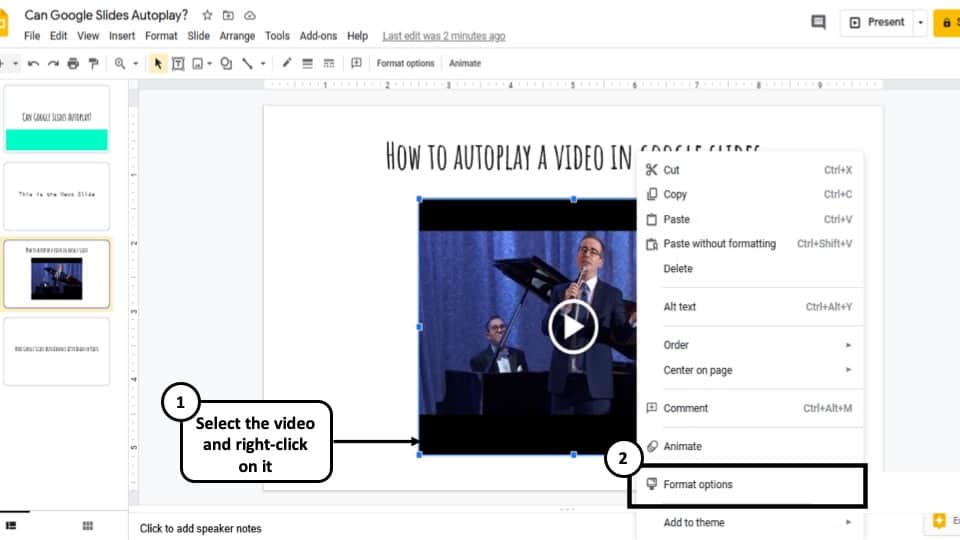
Now select the video, right-click on it and select “Format option”. Or you can also select “Format” from the menu bar located on the top of the screen. From the dropdown menu select “Format option”. This will open a new panel on the right side of the screen.
Step 3: Set Video Playback to Play Automatically
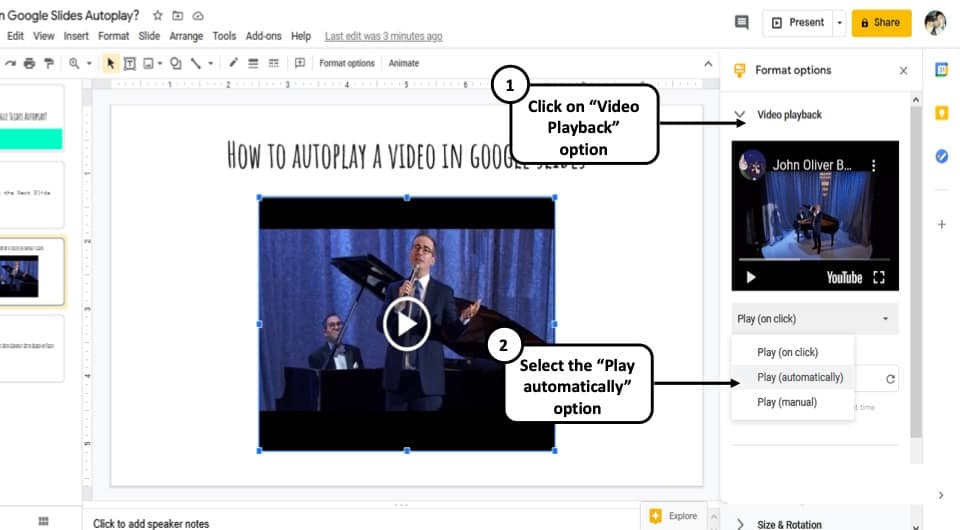
From the format options panel on the right of your screen, click on “Video playback” and select “Play (automatically)”.
That’s all you have to do. Now whenever you open this slide in the “Present” mode, the video will start playing automatically.
Can You Loop a Video in Google Slides?
Google Slides allows you to loop a video as well in addition to setting it to play automatically!
To loop a video on Google Slides, follow the steps given below:
Step 1: Open Presenter Mode in Google Slides
Open the slide into “Present” mode in Google Slides.
Step 2: Loop the Video
Right-click on the embedded video and select “Loop”. And that’s it.
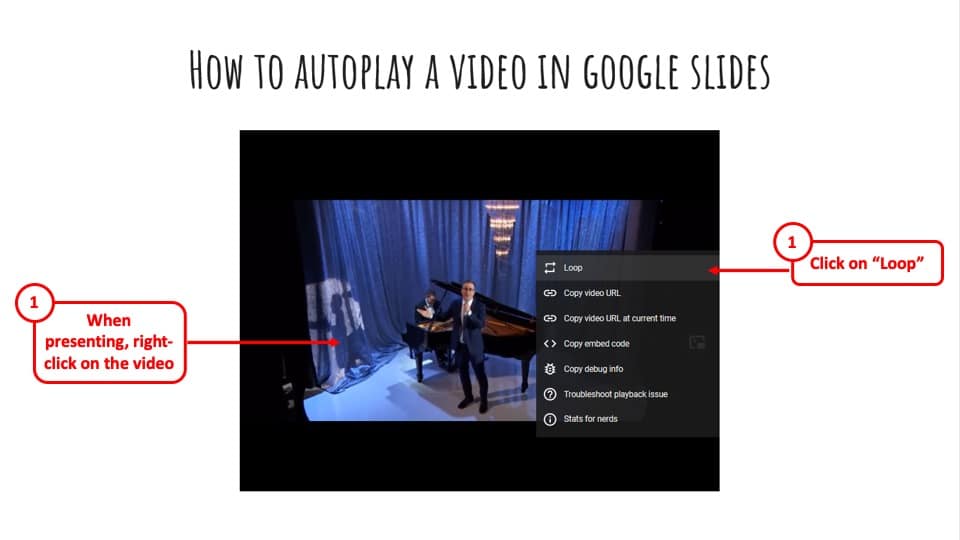
Note: This is more of a video player setting rather than a Google Slides feature. As a result, you will have to do it manually every time you want to play a video on loop. On top of that, it will not work on YouTube videos if you set it to show only a portion of the entire video. So, it’s not really useful for anyone.
Make Google Slides Auto Advance After Audio or Video
To make Google Slides move to the next slide automatically after playing audio or video, you can use the “Auto-advance” feature. To know how to use this feature in Google Slides, follow the step-by-step guide given below:
Step 1: Open the Presenter Mode in Google Slides
First, go to the “Present” mode in Google Slides. After opening the slide, click on the “Present” button located on the top right corner of the screen or press “Ctrl+F5”.This will open the slide in “Present” mode.
Step 2: Click on the Gear Icon
Once you are in the “Present” mode, click on the grey “⚙ (gear)” icon located at the bottom of the screen. This will open the settings menu.
Step 3: Select Auto-advance Option
From the settings menu, select “Auto-advance (when played)” and select a time that you think suitable for you.
Step 4: Add the Autoplay Time Delay
Once you are done setting up the autoplay time, press the play icon located at the bottom left corner of the screen. Now your slides will keep moving automatically after a video or audio is played.
Note – The only drawback to this method is that this process will activate auto-advance settings for all the slides in Google Slides and not just the slide that contains the video or audio. At the time of writing this article, there is no such option that exists yet.
How to Set a Time for Auto Advance in Google Slides?
You can set a specific time delay for auto-advance in Google Slides. You can do that by following the same steps that are used to make Google Slides auto-advance after playing a video or audio. Currently, the time increments in Google Slides include 1, 2, 3, 4, 10, 15, 30, or 60 seconds.
Remember – One thing to keep in mind, the time delay that you’ve set will be applied to all your slides. And this might not be enough for some slides as they will need a longer time to present.
In that case, you can duplicate those slides twice or as many times as you like depending on your needs. This will give you enough time to deliver your message to the audience properly.
How to Stop Google Slides from Auto Advancing?
It is really annoying when the slides automatically advance to the next one when you click by mistake while giving a presentation in the “Present Mode”. When the slides auto-advance (especially when you didn’t do it on purpose), it not only looks unprofessional but also breaks the flow of your presentation!
Although, there is no direct way in Google Slides that you can use to prevent that. But don’t worry, there is a way that you can use to stop your slides from auto-advancing. Take a look at the steps given below:
Step 1: Open the Google Slides Presentation
Open the slides in the “Normal” view.
Step 2: Insert a Rectangle Shape
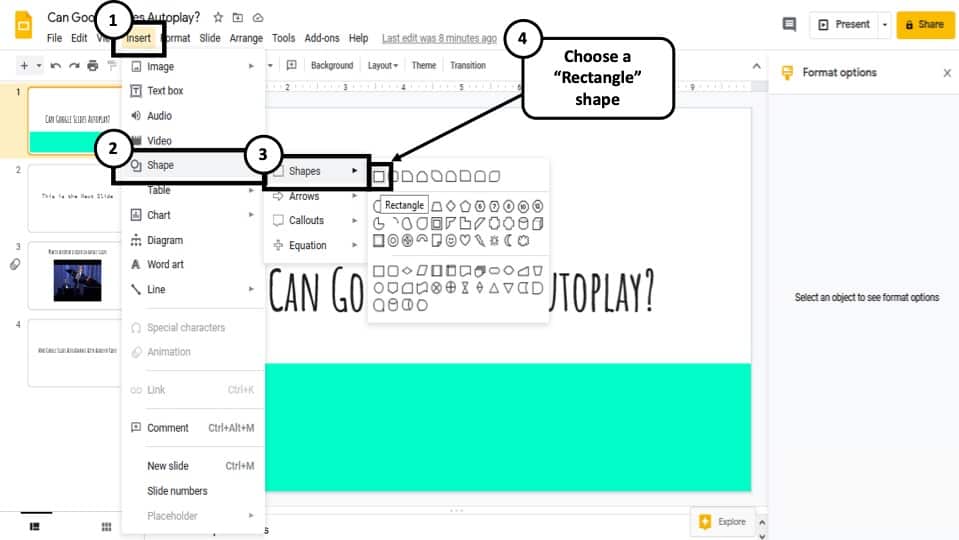
Now inset a box shape in the slide. To do that, click “insert>Shape>Shapes” and then select the box. Make the box as big as the size of the slide.
Step 3: Add a Link to the Rectangle Shape
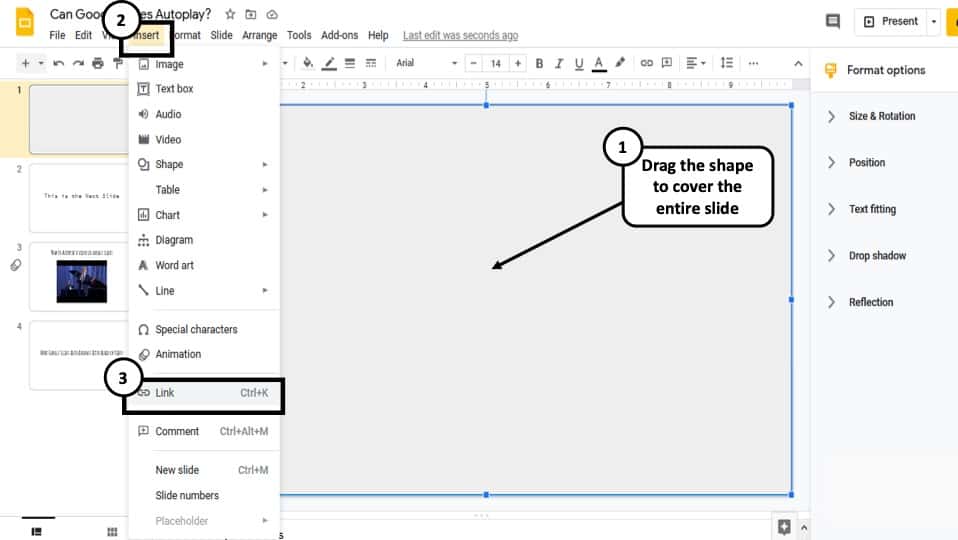
Link the box to the corresponding slide by selecting the box and then clicking “Insert>Link” from the main menu located on the top of the screen.
Step 4: Link the Shape to the Corresponding Slide
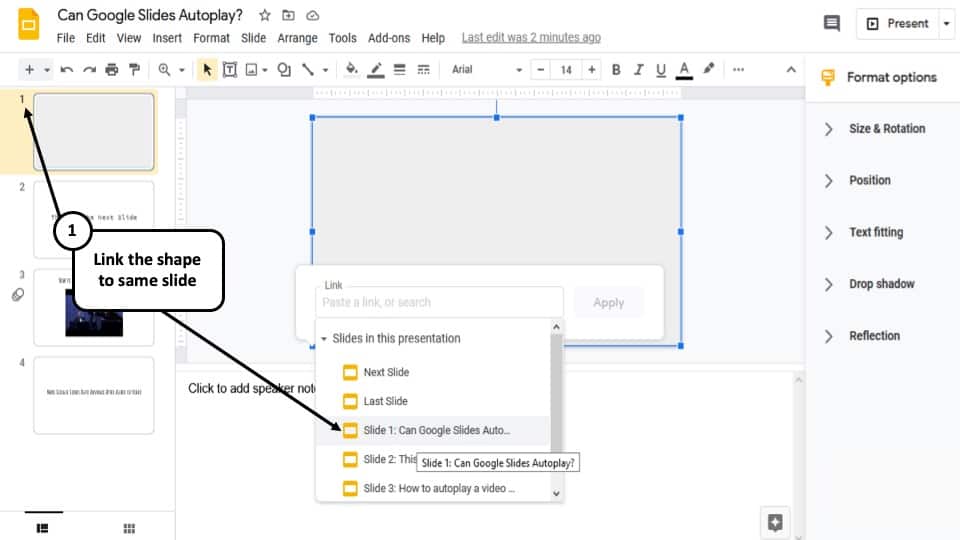
Now choose the slide you want to link it to and hit “Apply”. It will always have to be the slide that is containing the box. So, in the above example, the rectangle shape has been added to slide 1. Thus, the shape needs to be linked to slide 1.
Similarly, if you are adding a shape on the 2nd slide, then link it to slide 2, and so forth.
Interesting Fact: Linking a rectangle to the same slide ensures that even if we click on the slide somewhere in the “Present” mode, Google Slides will reference it back to the same slide; thereby preventing auto-advance to the next slide by mistake.
Step 5: Send the Shape to Back
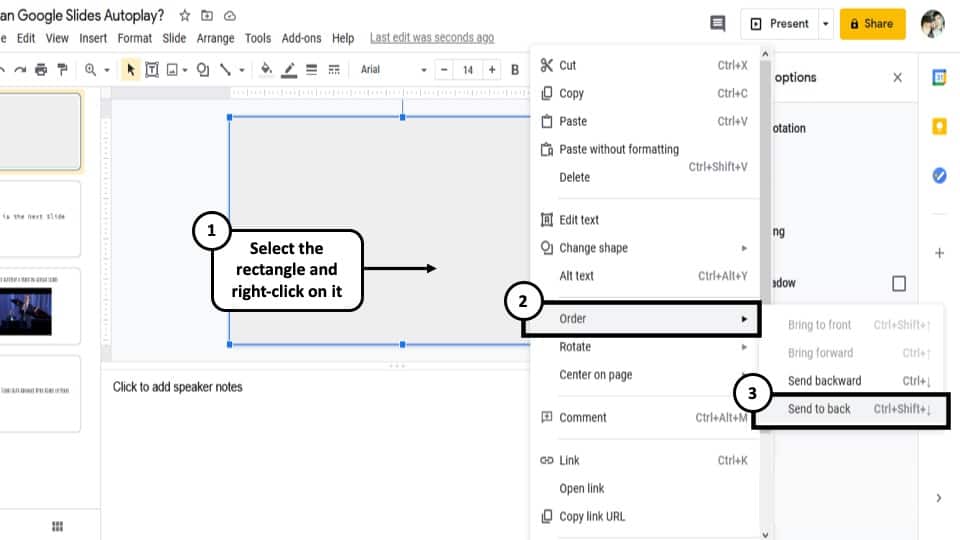
Select the box and right-click on it and select “Order”. Then, click on “Send to back.”
Step 6: Link all Other Elements to the Same Slide
Now select all other text boxes and elements present on that slide that are not working as buttons and link them to that corresponding slide just as we did in step 4.
Step 7: Change the Shape Fill Color to White
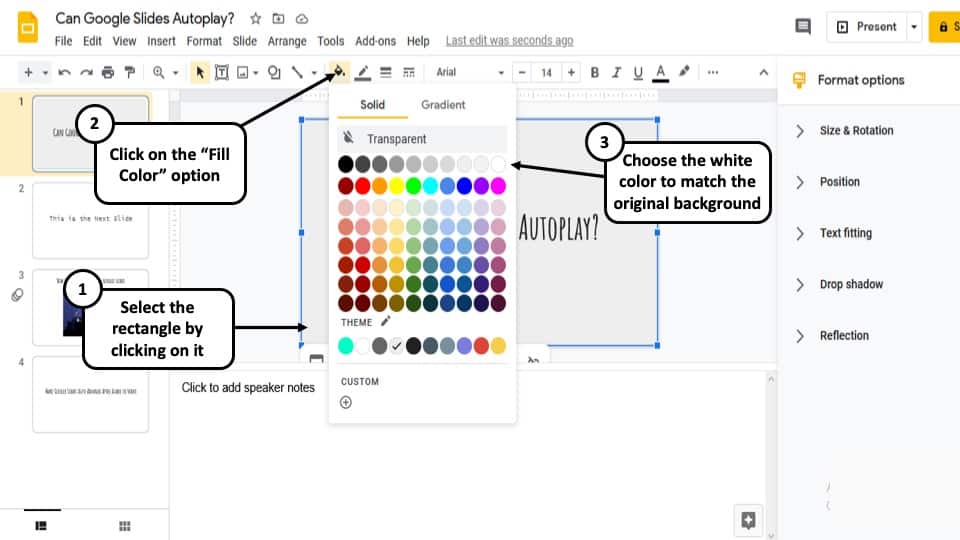
Now select the box again, select the “Fill color” option and click on transparent.
Step 8: Repeat the Procedure for All Your Slides!
Now repeat the procedures from step 2 to step 7 for all the remaining slides. Once, you are done, your slides will not auto-advance even if you click anywhere in the slide by mistake.
More Related Topics
- How to Fix Almost Anything on Google Slides! [A Comprehensive Troubleshooting Guide]
- Do Presentation Clickers Work with Google Slides? [Interesting Read!]
- How to Curve Text in Google Slides? Always Use THIS Trick!
- How to Use the Eyedropper Tool in Google Slides? [Even When This Tool Doesn’t Exist!]
- 17 Pros and Cons of Google Slides! [Should You Even Use it?]
- How to Give a Presentation on Zoom? [Step-by-Step Guide!]
Credit to Cookie_Studio for the Featured Image of this article
- GTA 5 Cheats
- Print on a Chromebook
- Nothing Phone 2 Review
- Best YouTube TV Alternatives
- Asus ROG Ally vs. Steam Deck
- Gameshare on Nintendo Switch
How to autoplay and loop Google Slides
Many presentations are designed to autoplay, advancing from slide to slide without manual intervention and then looping when they are finished. It’s an easy way to set up a marketing slideshow, for example, or show a series of photos designed to play throughout the day.
How to autoplay Google Slides
What does loop audio mean in google slides, what you need.
Desktop PC, laptop, or tablet with Google Slides access
If you’re using Google Slides, the slide creator that's part of Google's free suite , you can set up this autoplay action whenever you are ready. Here’s the most effective way to do it, along with how to get the results that you need.
Don’t worry about autoplay options until the slideshow is complete. When you are finished and everything looks like it's in place, you’re ready to publish the slideshow in a format that can be easily used in a variety of situations.
Step 1: Open your completed slideshow in Google Slides. Select File in the upper left.
Step 2: Select Publish to the web .
- How to change margins in Google Docs
- How to draw on Google Docs to add doodles, sketches, and more
- How to do hanging indent on Google Docs
Step 3: A new window will open with your publishing options. First, note the top tabs to switch between Link and Embed . Choosing to publish as a link is a very versatile option that allows you to paste the link into an email, message, notes app , or whatever else you want so that it will always be available. The Embed option is designed to provide code for embedding the slideshow on a webpage. That’s not as a common, so we’ll stick with Link for now.
Step 4: Now find the section that says Auto-advance slides . Click on this menu, and you’ll be able to see options for advancing slides from every one second to every minute, with the default set to three seconds. Three seconds is actually quite fast for the average slide, especially if there are words to read or other kinds of content to absorb, but the time spent on slides still depends on the type of slideshow. For this example, we’re bumping up the wait time to five seconds.
Step 5: Find the two options bellow the Auto-advance section: they are Start slideshow as soon as the player loads and Restart the slideshow after the last slide . These are your looping options. Make sure both are enabled so that the slideshow takes care of itself.
Step 6: Now you are finished. Select Publish , and you’ll get a link you can copy or share using social media. All you – or someone else – has to do is open the link, and the slideshow will now do the rest. Keep in mind, the automatic timer is set when the slideshow is published and can no longer be changed. If you decide you want a different timer on the slides, you’ll have to publish a new version.
This is a separate audio option available in Google Slides to loop a particular section of audio over and over so it doesn’t stop – maybe if you want to include a little music in the background, for example. It may take a little tinkering to get looping audio just right. We have a full guide on how to add audio to Google Slides and customize it.
Finally, if you’d like to add a bit more customization to your slides, you can draw on them, too! Here’s how to do it .
Editors' Recommendations
- How to change theme colors in Google Slides
- How to delete a file from Google Drive on desktop and mobile
- How to delete files on a Chromebook
- How to get Android apps on a Chromebook
- How to delete Google Chrome on Windows and Mac
- How-To Guides

Welcome to the world of Chromebooks! These budget-friendly laptops are a great middle-ground between mobile devices like smartphones and tablets, and more robust laptops and desktop PCs. There’s a bit of a learning curve to these Google-powered machines though, even down to how you’ll operate trackpad clicks. For instance, we’re sure you’re familiar with how to perform a right-click in Windows or macOS. You can also right-click on a Chromebook, but probably not the way you’re used to.
Google Drive is an excellent cloud storage platform for individuals and teams. You can use Drive to upload, share, and collaborate on just about everything, from docs to spreadsheets, images, and videos. Best of all, every Google Account receives 15GB of free storage. So what’s the best way to start moving files around? You should probably start by creating some folders in Google Drive, and load them up with content.
Whether for personal preference or as a requirement for the APA or MLA writing style, we’ll show you how to double-space in Google Docs.
The nice part about this format in Google Docs is that you can apply it to the entire document or only selected blocks of text. Plus, you can double-space in Google Docs on the web and in the mobile app.
How to Make Google Slides Loop (Even Without Publishing)
Learn how to make Google Slides presentations loop automatically, even without publishing them for others to view.
Since Google Slides is available for free, it doesn't have as many features as you may be used to in more powerful tools, like the desktop version of PowerPoint.
As a result, you might wonder how to loop a Google Slides presentation or make it play automatically. Thankfully, this is possible and not difficult to do. We'll show you how to make Google Slides loop, even without publishing the presentation.
How to Loop Google Slides Presentations Without Publishing
To loop a Google Slides presentation, first set up a new slideshow in Google Slides or open an existing one. Our guide to making a Google Slides presentation for college serves as a good intro if you need help.
When you're ready to run the slides on a loop, click the Slideshow button at the top-right to start playing your slides. With the slideshow showing, move your mouse to the bottom-left corner of the presentation screen to show the toolbar. On the toolbar, click the three-dot menu and expand the Auto-play item. Then on this menu, click the Loop option at the bottom to enable presentation looping.
Also on this menu, you'll need to choose the timing for your slides so that they play automatically. These range from short options like Every second or Every 2 seconds to Every 30 seconds or Every minute at the longest. Choose what timing makes sense based on your presentation type.
Once you've selected these options to loop and automatically advance your Google Slides presentation, click the Play button (on the same menu) to begin the slideshow. This will play your slides automatically, at your chosen speed, looping them until you click the Pause button on the same Auto-play menu.
Looping presentations continuously like this is great anytime you want to keep content cycling without your input. Try it for kiosks or to show photos at parties. Make sure to use the Enter/Exit full screen option as appropriate, too.
How to Publish a Looping Google Slides Presentation
If you want to send a Google Slides presentation to someone and have it loop automatically, that's possible too. This was previously the only way to repeat Google Slides slideshows before the above method was added. It still comes in handy if you want someone else's feedback before you give a presentation online, for instance.
To share a presentation that loops automatically, you need to publish your Google Slides presentation to the web . To do so, select File > Share > Publish to web at the top-left corner of the Slides interface.
When you do, you'll have a few options to configure. Select Link (unless you want to Embed it somewhere), then set the Auto-advance slides dropdown box to your preference. The available timings here are the same as with the above method; the default is three seconds, but you can choose from as little as one second or as long as a minute between slides.
Check Restart the slideshow after the last slide and it will continually loop until the recipient closes it. For best results, enable Start slideshow as soon as the player loads as well, so they don't have to start it manually.
Once you click Publish , you'll get a link that you can share with people anywhere you'd like. If you ever change your mind, expand the Published content & settings section and click Stop publishing , and people won't be able to view it with the link anymore.
Don't miss out on Google Slides' Presenter view to make your talk more engaging , either.
Looping Google Slides, Made Simple
Now you know how to loop Google Slides slideshows easily, with whatever timing you prefer. Whether you want to publish your slideshow or not, repeating a slideshow just takes a few clicks.
This isn't the only trick that Google Slides is hiding, either. Check out a lot more tips that help you create eye-catching documents across the Google Docs suite.
Home Blog Google Slides Tutorials How to Make Google Slides Play Automatically
How to Make Google Slides Play Automatically

Once you are done editing your Google Slides templates , you might want Google Slides auto-advance or play your presentation in a loop when presenting your slides or sharing them online. Below are a few easy steps that you can take to loop Google Slides when presenting your slide deck or publishing it online.
How to Make Google Slides Play on a Loop
To set your Google Slides presentation to loop, switch to Slideshow mode. You can either click Slideshow from the top menu or use the arrow key to start the presentation in Presenter View or from the first slide.

Once in Slideshow mode, click the three dots at the bottom and select Auto-play . You can select Loop to play the slideshow continuously and even select a time for playing the slideshow using a specific time frame (e.g., every minute).

How to Play Google Slides on Loop when Publishing Slide Deck
It is also possible to play Google Slides presentations in a loop when published online. This is regardless of whether you share them via a direct link or use an embed code to embed your slide deck online. To get started, go to F ile -> Share -> Publish to web to publish your presentation online.

The Link tab can be used to generate a direct link where you can choose a time to loop your slides. You can also enable playing the slideshow when the player loads and restart it after the last slide.

The Embed tab enables picking a size for your slide deck and the time to loop your slides. Similar to the options in the Link tab, you can start the slideshow as soon as the player loads and restart from the first slide when the slideshow ends.

Final Words
Google Slides slideshows can be looped when played in Slideshow mode, shared as a direct link, or when embedded online. You can pick a time to replay the slideshow based on your requirements. It might be worth previewing the loop to ensure that your slides aren’t playing too quickly and that you can create the desired impact for your audience by looping your slides.

Like this article? Please share
Google Slides, Presentation Tips Filed under Google Slides Tutorials
Related Articles

Filed under Google Slides Tutorials • May 3rd, 2024
How to Work with Google Slides Version History
Go back to previous changes or check who edited your presentation. Learn how to work with Google Slides Version History here.

Filed under Google Slides Tutorials • April 29th, 2024
Best Google Slides Add-Ons
Optimize your Google Slides experience by installing the best Google Slides add-ons available in the market. Full list with photos.

Filed under Google Slides Tutorials • April 26th, 2024
How to Print Multiple Slides on One Page in Google Slides
Discover how to print multiple slides on one page in Google Slides to optimize your presentation handouts.
Leave a Reply
How To Make Google Slides Play on a Loop [Step-by-Step Guide]
- Last updated June 23, 2023
In this article, we’ll discuss two methods of how to make Google Slides play on a loop. These methods can be useful if you want to showcase promotional content at a public event or provide an informational guide at self-service stations.
To make Google Slides auto-loop, click the “ Slideshow ” button at the top-right of your screen. Next, click the vertical three-dot icon in the bottom-left corner of the slide. Select “ Auto-play ” and choose your slide interval. Finally, check the “ Loop ” option and click “ Play .”
While the above method works, other ways exist to make your Google Slides auto-loop. Continue reading as we discuss them in detail below.
Table of Contents
How To Make Google Slides Play on a Loop When Presenting
Using this method, you can directly loop a Google Slide presentation in slideshow mode. However, note that you have to set it up every time you want to run your slides.
Here’s how to do it:
- Go to slides.google.com and open your presentation.
- Click the “ Slideshow ” button in the upper-right corner of your screen.
- Alternatively, you can press Ctrl + F5 for Windows (or Command + Enter for Mac) on your keyboard to begin presenting.

- Click the vertical three-dot icon on the bottom-left corner of your screen.
- Choose “ Auto-play ” from the options that are displayed.
- Configure your preferred slideshow interval (this is set to “ Every 2 seconds ” by default).
- Click the “ Loop ” option and make sure that it has a checkmark on its left side.
- Finally, click “ Play ” to start the looped presentation.

Related : How To Make Google Slides Play Automatically (Easy)
How To Loop Google Slides When Publishing to the Web
To make your Google Slides auto-advance, you can also choose to publish it on the web. There are two ways you can do the publishing:
- Publishing through a link : This creates a unique URL that you can share with others. When someone clicks on the link, they can view your presentation in their web browser.
- Publishing through an embed code : You can add this code to your website. When someone visits your website, they will see your presentation displayed on the page.
Here’s how to make Google Slides play automatically by publishing to the web:
- Open your presentation and go to the “ File ” menu.
- Click on “ Share ,” then “ Publish to web ” from the drop-down menu.

- To publish your slides under the “ Link ” tab:
- Select your preferred interval from the drop-down menu under “ Auto-advance slides .”
- Ensure to check the box for “ Restart the slideshow after the last slide ” to enable looping.
- Optional : Check the box for “ Start slideshow as soon as the player loads ” for auto-play.

- To generate an embed code for your published presentation:
- Switch to the “ Embed ” tab.
- Choose your preferred slide size.
- Select your slide intervals.
- Check the box for “ Restart the slideshow after the last slide .”

- Once you have configured the settings, click the “ Publish ” button.

How To Play Google Slides on a Loop Using the Mobile App
As of this writing, you cannot loop a presentation in the mobile app version of Google Slides. However, if you still want to make your slides play on a loop using your smartphone, you can try the following workaround:
- Open the Google Slides mobile app on your phone.
- Locate your presentation and tap the vertical three-dot icon in the lower-right corner.

- From the displayed options, tap “ Copy link .”

- Open your phone’s web browser and paste the link you just copied into the address bar.
- Tap the vertical three-dot icon on the lower left corner of your screen and choose “ Auto-play .”

- Select your preferred interval and tap the “ Loop ” option to make sure it’s checked.
- Tap “ Play ” to start the looped presentation.

How To Loop Videos in Google Slides
Besides making your Google Slides presentation play continuously, you might also need to loop the videos in your slides. This can be useful when you want to emphasize key points in a video clip and make it play multiple times. Here’s how to loop videos in Google Slides:
- Open your presentation and click the “ Slideshow ” button located in the upper-right corner of your screen.
- Navigate to the specific slide that contains the video that you want to loop.
- Play the video, then right-click on it.
- Choose “ Loop ” from the options being displayed and toggle it on.

Related : How To Add a Video to Google Slides [Complete Guide]
Frequently Asked Questions
Can i loop slides without auto-advance.
No, a loop won’t work without the slides automatically advancing to the next one. Even if you didn’t select a time interval within the auto-play settings but enabled the Loop option, the slides would still auto-advance to perform the loop.
Can I Set My Auto-Advance and Loop Preferences before Presenting?
Yes, you can set your auto-advance and loop options by publishing your presentation to the web. To do this, simply follow the steps below:
- Go to “ File ” > “ Share ” > “ Publish to the web .”
- Set your desired auto-advance interval preferences.
- Check the box for “ Restart the slideshow after the last slide ” to enable looping.
- Click the “ Publish ” button.
Final Thoughts
Making your presentations play on a loop can be handy when you want to display promotional content at public events and trade shows. If you need to access this feature, simply follow this guide on how to make Google Slides play on a loop, and you’re good to go.
Do you want ready-to-use sheets and documents? Check out our premium templates today and get them at 50% off by using the code “SSP.”
Get Premium Templates
- How To Add Audio to Google Slides (Simple Guide)
- How To Add Google Slides Transitions & Animations [Guide]
- How To Add Fonts to Google Slides [Complete Guide]
Most Popular Posts

How To Highlight Duplicates in Google Sheets

How to Make Multiple Selection in Drop-down Lists in Google Sheets

Google Sheets Currency Conversion: The Easy Method
A 2024 guide to google sheets date picker, related posts.
- Sumit Bansal
- May 2, 2024
How to Insert a Google Sheets Hyperlink in 5 Seconds
- Chris Daniel
- April 15, 2024
How to Import Stock Prices into Google Sheets
- April 2, 2024
How to Calculate Age in Google Sheets (2 Easy Methods)
- February 21, 2024
Thanks for visiting! We’re happy to answer your spreadsheet questions. We specialize in formulas for Google Sheets, our own spreadsheet templates, and time-saving Excel tips.
Note that we’re supported by our audience. When you purchase through links on our site, we may earn commission at no extra cost to you.
Like what we do? Share this article!
How to Get Google Slides to Play Automatically: A Step-by-Step Guide
Want to make your Google Slides presentation play automatically? It’s easier than you might think! In just a few simple steps, you can set your slides to advance on their own, giving you a hands-free presentation that’s perfect for trade shows, information kiosks, or any situation where you want your slides to loop continuously without manual intervention.
Step by Step Tutorial for Setting up Google Slides to Play Automatically
Before we dive into the specifics, it’s important to understand that setting up Google Slides to play automatically involves tweaking the presentation settings to advance slides at a set interval. This can be a great way to ensure your presentation flows smoothly without the need for manual control.
Step 1: Open your presentation in Google Slides
After logging into your Google account, navigate to your presentation within Google Slides.
Opening your presentation is the first and most important step. Make sure you have editing access to the presentation you want to set to play automatically.
Step 2: Click on ‘Slide’ in the menu
Locate the ‘Slide’ option in the top menu bar and click on it.
This step will give you access to various slide-specific settings, including the ability to set up automatic transitions.
Step 3: Select ‘Change transition…’
From the ‘Slide’ dropdown menu, click on ‘Change transition…’
This option will open a sidebar where you can adjust the transition settings for your slides.
Step 4: Set up the transition timing
In the transition sidebar, set the timing for how long you want each slide to be displayed.
You can set a specific time for each slide or apply the same timing to all slides for consistency.
Step 5: Check the ‘On click’ and ‘After’ boxes
Make sure both the ‘On click’ and ‘After’ boxes are checked to allow automatic advancement of slides.
By checking both boxes, you’re telling Google Slides to move to the next slide either when clicked or after the set amount of time has passed.
Step 6: Apply to all slides
Click ‘Apply to all slides’ to ensure all slides in the presentation use the transition timing you’ve set.
Applying the timing to all slides ensures a uniform transition throughout your presentation.
After completing these steps, your Google Slides presentation will play automatically, advancing from slide to slide based on the timing you set. This allows for a seamless, hands-free presentation that keeps your audience engaged without the need for manual slide changes.
Tips for Getting Google Slides to Play Automatically
- Make sure your internet connection is stable to avoid any interruptions during your presentation.
- Test the timing of your slides beforehand to find the perfect pace for your audience.
- Consider adding transitions or animations to make automatic slide advancement more visually appealing.
- Use high-quality images and legible text to ensure your content is clear and engaging.
- Remember to save your presentation after setting it up to play automatically.
Frequently Asked Questions
How do i loop my google slides presentation.
In the ‘Publish to the web’ settings, check the option to ‘Restart the slideshow after the last slide’ to loop your presentation.
Can I set different timings for each slide?
Yes, you can customize the timing for each slide individually if needed.
Will my presentation play automatically if I share it with others?
As long as the recipient opens the presentation in ‘Present’ mode, it will play automatically based on your settings.
Can I add audio to my slides that will play automatically?
Yes, you can insert audio files into your slides that will play automatically along with the slide transitions.
Is it possible to set Google Slides to play automatically on mobile devices?
Yes, automatic playback works on mobile devices as long as they have the Google Slides app installed.
- Open your presentation in Google Slides.
- Click on ‘Slide’ in the menu.
- Select ‘Change transition…’
- Set up the transition timing.
- Check the ‘On click’ and ‘After’ boxes.
- Apply to all slides.
Setting up Google Slides to play automatically is a fantastic way to deliver a smooth, professional presentation without the need for manual control. Whether you’re presenting at a conference, setting up a display at a trade show, or just want to keep your audience’s attention, automatic playback is the way to go. By following the steps outlined in this article, you’ll be able to set your slides to advance on their own, providing a hands-free experience for both you and your viewers. And with our handy tips, you’ll ensure your presentation is not only automatic but also engaging and impactful. Remember, practice makes perfect, so test out your timing and transitions to make sure everything runs smoothly. Happy presenting!

Kermit Matthews is a freelance writer based in Philadelphia, Pennsylvania with more than a decade of experience writing technology guides. He has a Bachelor’s and Master’s degree in Computer Science and has spent much of his professional career in IT management.
He specializes in writing content about iPhones, Android devices, Microsoft Office, and many other popular applications and devices.
Read his full bio here .
Share this:
- Click to share on Twitter (Opens in new window)
- Click to share on Facebook (Opens in new window)
- Click to email a link to a friend (Opens in new window)
- Click to share on LinkedIn (Opens in new window)
- Click to share on Reddit (Opens in new window)
- Click to share on Pinterest (Opens in new window)
- Click to share on Tumblr (Opens in new window)
Related posts:
- How to Hide a Slide in Google Slides
- How to Duplicate a Slide on Google Slides
- How to make Google Slides automatically transition: A step-by-step guide
- How to Change Slide Dimensions in Google Slides
- How to Delete a Slide on Google Slides
- How to Delete Multiple Slides in Google Slides
- How to Number Slides in Google Slides
- How to Import Slides in Google Slides: A Step-by-Step Guide
- How to Put Canva Slides into Google Slides: A Step-by-Step Guide
- How to Make Columns in Google Slides
- How to Make Transitions on Google Slides: Step-by-Step Guide
- How to Put YouTube Videos in Google Slides
- Importing Keynote Presentations to Google Slides: A Step-by-Step Guide
- How to Change Font on Google Slides Text Box
- How to Insert Videos in Google Docs
- How to Increase the Transparency of an Image in Google Slides
- How to Insert Audio into Google Slides: A Step-by-Step Guide
- How to Copy Image from Google Slides
- How to Print Two Slides Per Page in Google Slides
- How to Download a Single Slide as a Picture in Google Slides
How to Set a Video to Autoplay in Google Slides: A Step-by-Step Guide
Setting a video to autoplay in Google Slides is a breeze. All it takes is inserting your video, accessing the video options, and selecting the autoplay feature. Once you’ve done that, your video will start playing automatically as soon as you navigate to the slide it’s on. Simple, right?
After you’ve set your video to autoplay, it will enhance your presentation by playing seamlessly without the need for manual intervention. This ensures a smooth flow and keeps your audience engaged.
Introduction
Imagine you’re in the middle of a significant presentation. You’ve reached the slide where your video is supposed to play. But instead of smoothly transitioning into your video, you’re fumbling to click the play button. The momentum is lost, and so is the attention of your audience. Frustrating, isn’t it? Well, it doesn’t have to be that way. Google Slides has an awesome feature that allows you to set videos to autoplay, ensuring a seamless flow in your presentation.
Autoplaying videos in presentations can be a game-changer, especially if you’re looking to create a dynamic and engaging experience for your audience. It’s particularly useful for educators, marketers, or anyone who frequently uses multimedia in their slideshows. With autoplay, videos can serve as powerful introductions, transitions, or conclusions to various segments of your presentation. It’s a simple yet effective way to keep your audience hooked.
Step by Step Tutorial: Setting Autoplay for Videos in Google Slides
Before we dive into the steps, let’s clarify what we’re about to achieve. Following these instructions will enable your video to start playing automatically during your presentation, without the need to click play.
Step 1: Insert your video into the slide
Insert the video you want to autoplay onto the desired slide.
When you’re inserting a video into Google Slides, you have a few options. You can upload a video from your computer, use a YouTube link, or choose one that’s already stored in your Google Drive. Make sure the video is appropriately positioned and resized on your slide for optimal viewing.
Step 2: Access video options
Right-click on the video and select “Video options” from the dropdown menu.
In the video options dialogue box, you have several settings that you can tweak. Here’s where you’ll find the autoplay option, along with other settings like mute audio and specific start and end times for the video.
Step 3: Select the autoplay feature
In the video options, check the box next to “Autoplay when presenting.”
This step is crucial because it’s what makes the magic happen. By checking this box, you’re telling Google Slides to start playing the video automatically when the slide with the video comes up during your presentation.
Additional Information
While setting a video to autoplay in Google Slides is straightforward, there are a few additional things you might want to keep in mind. For instance, if you’re using a YouTube video, make sure it’s not set to private or unlisted, as that will prevent it from playing in your presentation.
It’s also a good idea to test your presentation beforehand to ensure everything runs smoothly. Remember, autoplay works best when it’s part of a well-designed slide that complements the video content. Be mindful of how the video fits into the overall narrative of your presentation.
- Insert your video into the slide.
- Access video options by right-clicking on the video.
- Select the autoplay feature in the video options.
Frequently Asked Questions
Can i set videos to autoplay if they’re not from youtube.
Yes, as long as the video is supported by Google Slides, you can set it to autoplay regardless of its source.
Will my video autoplay when sharing the presentation link?
The autoplay feature only works in presentation mode. If you’re sharing the slides in view mode, the video won’t autoplay.
Can I set a specific time for my video to start autoplaying?
Yes, in the video options, you can set the exact start and end times for your video.
What if I want to stop the video from autoplaying?
You can uncheck the autoplay option in the video options at any time before presenting.
Can the video still be played manually if autoplay is enabled?
Yes, you can still click to play or pause the video during your presentation even if autoplay is enabled.
Setting a video to autoplay in Google Slides is a small but mighty feature that can elevate your presentations from good to great. It allows for a more polished delivery and keeps your audience engaged with multimedia content.
Remember, like any tool, it’s most effective when used thoughtfully and in moderation. So go ahead, give your presentation that extra edge with autoplay videos and watch your audience’s engagement soar!

Matt Jacobs has been working as an IT consultant for small businesses since receiving his Master’s degree in 2003. While he still does some consulting work, his primary focus now is on creating technology support content for SupportYourTech.com.
His work can be found on many websites and focuses on topics such as Microsoft Office, Apple devices, Android devices, Photoshop, and more.
Share this:
- Click to share on Twitter (Opens in new window)
- Click to share on Facebook (Opens in new window)
Related Posts
- How to Make Google Slides Vertical (5 Quick Steps)
- How to Add a New Slide in Google Slides: A Step-by-Step Guide
- How to Add a Hyperlink on Google Slides
- How to Delete Multiple Slides in Google Slides: A Step-by-Step Guide
- How to Put Embedded Youtube Video in Powerpoint 2010: A Step-by-Step Guide
- How to Print 4 Slides Per Page in Google Slides: A Step-by-Step Guide
- How to Insert a Google Slides Page Number: Step-by-Step Guide
- How to Delete a Slide in Powerpoint 2010: Step-by-Step Guide
- How to Hide a Slide in Powerpoint 2010: A Step-by-Step Guide
- Can You Print a Google Slide?
- How to Do a Powerpoint Google Slides Presentation Conversion
- How to Rotate a Powerpoint Slide Presentation
- How to Save a Slide from Google Slides as a Picture: A Step-by-Step Guide
- How to Download a Google Slides Presentation as a Powerpoint File
- How to Embed a YouTube Video in Powerpoint 2013: A Step-by-Step Guide
- Can You Save a Powerpoint as a Video in Powerpoint 2013? Find Out Here!
- How to Add Page Numbers in Powerpoint 2010: A Step-by-Step Guide
- How to Bring an Image to the Front in Google Slides
- How to Show Speaker Notes in Google Slides: A Step-by-Step Guide
- How to Make a Powerpoint Slide Vertical in Powerpoint 2013: A Step-by-Step Guide
Get Our Free Newsletter
How-to guides and tech deals
You may opt out at any time. Read our Privacy Policy
- PC & Mobile
- Google Slides
How to Automatically Play Audio in Google Slides
Evan Gower With over a decade of experience in digital publishing. Evan leads our team with a keen eye for emerging tech trends. Read more May 24, 2022
Google Slides is an excellent platform for creating presentations and engaging your audience. While it is a powerful tool, one of the most significant issues users might encounter is that Google Slides does not support audio files.
Fortunately, there are a few things you can do to work around the issue and add some music to make your presentation even better.
Read on for detailed step-by-step explanations on adding your favorite songs to Google Slides presentations.
How to Add Audio to a Google Slides Presentation
Before looking at how to play audio files automatically, let’s first go over how you can add audio to your Google Slides presentations in the first place.
Note: This section explains how to add audio to individual slides and does not play through an entire slideshow.
There are two ways to add audio to slides in your presentation: online music streaming services or YouTube.
Method 1: Add a Link to a Slide from an Online Music File
You can add music to Google Slides presentations quickly and easily by adding a link to a track you want to hear in the slide’s background. You can add music from any online service, including SoundCloud, Spotify, and Grooveshark.
Here is how to do it:
- Create a new Google Slides presentation in your browser and find the slide to which you want to add the music.

- Open your browser, go to your preferred music streaming service, find the song you want to add, and copy the link.
- Open the slide again and paste the link into your created text box.

If you don’t want the link displayed in the text box, or if it’s just an eyesore, you can place an image over it to make it invisible. Here is how to do it:

- Find the photo or image you want to add to your slide. Click on it and hit “Select.”

After doing that, the link will become invisible and can be activated only when you click the image.
Adding Music from YouTube to a Google Slides Presentation
You can also add music from YouTube to your presentation by adding a link, as explained above, but the other method is to add a YouTube video directly to your slide. You should try it with shorter music videos to underscore a point or introduce new ideas. The video will play until you advance to the next slide.
Here’s how it’s done:

- Use the “arrow tool” to resize the video to the smallest size possible and place it where you want.
- Play the video by clicking on it.
This method offers a quick and easy way to add music to your presentation, and since YouTube has a wide selection, you should have no trouble finding the perfect music for your slideshow.
We’ve learned how to add music to a Google Slide presentation that executes manually, but what about when you want to play audio automatically? The autoplay option can activate a video or a song on a single slide or the whole presentation. You can set that by doing the following:
Single Slide Autoplay

Entire Presentation Autoplay
Unfortunately, there is no genuine way to play audio through an entire presentation like you can with each slide individually, even though that was a workaround. Regardless, two options exist for playing audio continuously through your entire slideshow production.
- For manual audio control: Open a new tab with the audio source and play it when ready. The audio will be heard while the presentation is running. If you have sound effects in your production, those will still be audible along with the audio source in the other tab.
- For automatic audio control: Open a new tab with your audio source just like the manual audio option above, except you’ll also need to record the slideshow while the audio is playing. This can be done using a Chrome extension like Screencastify , which will simultaneously record the video and the audio from the other tab.
Final Thoughts
Now that you know how to add music to your slides, you can use your creativity to impact the auditorium profoundly. Choosing the right song for a presentation can make all the difference in how people perceive it. With a bit of practice, you will quickly become a master presenter.
Do you have any other tips for creating a fantastic Google Slides presentation? Let us know in the comments!
Related Posts

Disclaimer: Some pages on this site may include an affiliate link. This does not effect our editorial in any way.

Lee Stanton September 29, 2023
Lee Stanton September 27, 2023
Lee Stanton September 14, 2023
Send To Someone
Missing device.
Please enable JavaScript to submit this form.

How to Make Google Slides Automatically Transition in 2 Steps
Loved the read? Please share or comment, and we'll deliver even better content!
- Step 1: Select and customize transitions for individual slides or apply a single transition to all slides, adjusting style and speed.
- Step 2: During a live presentation, enable automatic transitions using the Auto-Play feature and set the desired time interval.
- For published presentations, use the Auto-advance slides option to set transition timing, with additional settings for automatic-start, loop, and sharing via a link.
In this article, I’ll show you two simple steps to enable automatic transitions in your Google Slides presentations.
Let’s get started!
Quick Navigation
Step 1: Customizing Transitions for Each Slide
Method 1 – use the auto-play feature during your presentation, method 2 – advance slides automatically in a published presentation , conclusion .
The first thing you will have to do is pick one of the seven transition styles and apply them to your slide. This is where you get to have a little fun adding interesting transitions to your project.
Follow the steps below on exactly how to achieve this:
Step 1: You will obviously need slides to apply the transitions to, so the first step is to create your Google Slides.

Step 2: Next, decide the slide you want to work on and select it, click the tab labeled Slide at the top, and choose Transition .

Step 3: Select the dropdown menu labeled None . A list of transition types will appear in a dropdown list, these will include: Dissolve , Fade , Slide from Right , Slide from Left , Flip , Cube , and Gallery .

Step 4: Select the transition type that you find suits your presentation the best.
Step 5: You will now be presented with a slider with different speed settings, these range between Slow , Medium , and Fast . Drag the slider from left to right until you land on the ideal speed.

You have now assigned a specific transition to your Google Slide, if you want to have different transitions for each of your slides then simply repeat this step with every slide.
During this process, you will notice a button that reads “ Apply to all slides ”. If you’d rather have all of your slides use the exact same transition, all you have to do is select your desired style and click this button.
If you are manually selecting each slide individually, make sure not to hit this button by mistake, as it will apply to every slide and you will have to start the process from the beginning.
Step 2: Enabling Automatic Slide Transitions
While this step is as easy as the previous one, there are two methods in which this can be completed. We will review both now:
Step 1: Look in the Google Slides ribbon menu, in the top-right corner you should see a button titled “ Slideshow ”, select it to begin the presentation. You can also press Ctrl + F5 to achieve the same result.
Step 2: Place your cursor in the bottom-left corner of your screen, and a small menu should appear.

Step 3: Press the three-dot icon and then select Auto-Play .

Step 4: You will now be asked to select the time which will elapse between each slide, this will range from every second to every minute . Select your desired time and press play to start your presentation.
If you would like your presentation to automatically restart after reaching the final slide, select Loop , which will also be located in the Auto-Play popup list.

This method will require you to choose the Auto-advance slides option when you publish your Google Slides file.
Keep in mind, when you choose to publish your presentation you will make it available to anyone who has the link.
Follow the steps below:
Step 1: Click on the File dropdown menu in the top left-hand corner, select Share, and then Publish to Web .

Step 2: Under the Link tab, you will have a section labeled Auto-advance slides . Here you will have to select the duration of time for the pause between slides.
During this step, you also have two other important options you might want to take advantage of.
The first one is “ Start slideshow as soon as the player loads ”, this will automatically start your presentation once opened.
The second is “ Restart the slideshow after the last slide ”. This works the same as the Loop function we reviewed earlier in the article. Select this feature if you want your slideshow to restart once it’s finished.

Step 3: Next you will want to click Publish , then click OK on the notification box to publish your Google Slides file.

You will be provided a link which you can copy to your clipboard and send to anyone you would like to share your presentation with.

Anyone who accesses this link will be brought directly to your project and it should look something similar to the example below.
It may be necessary to press the “ Play ” button in order to start the presentation, but after that, your slides should change on their own automatically, in relation to your presets.

If you were hoping to get the presentation’s custom HTML code to embed the slideshow into a website, you can find a link to this under the “ Embed ” tab.

Once you have completed your slideshow and you are ready to add a little extra professionalism and jazz to the presentation, having your slides transition automatically is the next viable step.
In this article, we covered how easy it is to add this feature to your project, in two simple steps!
You will impress both your friends and coworkers and soon enough they will be asking you for help with their projects as well.
Do you know of any other methods that we didn’t cover in this article? Any faster methods? Please leave how you accomplished this in the comments below.

Jon Huber is an editor and technical writer who has been a freelancer since 2020. Since the beginning of his writing career, he has consistently written online articles in the tech, sports, and recreation genres. Recently, he has concentrated on scriptwriting for cartoons and puppet shows.

Hai Huynh, an Electrical & Electronics Engineering graduate from Ho Chi Minh City University of Technology , is a passionate technical editor . He discovered his love for technology when he started playing Pokemon on a Gameboy as a child. Now, he writes and edits technical articles, focusing on smart TVs and streaming devices, to help readers solve problems.
- How To Effortlessly Use FaceTime on Your Apple TV for Bigger and Better Calls
- How to Change Your TP-Link Router Password: 2 Proven Ways
- How To Reprogram Roku Remote Buttons Easily
Related posts:
- How to Control Google Slides from Your Phone (iPhone, Android)
- How to Save Google Slides To a Flash Drive (USB) Step by Step
- How to Use an Epson Projector Remote to Change Slides (Google Slides, PowerPoint)?
- How To Make PowerPoint Full Screen on Any Projector In 3 Simple Steps
One Comment
i want the first few slides to auto transition and loop but once I am ready to begin, I want to transition the slides individually. Is this possible?
Leave a Reply Cancel reply
Your email address will not be published. Required fields are marked *
Save my name, email, and website in this browser for the next time I comment.
Genuine software, legally FREE - no cracking required!
Edit Word, Excel, and PPT effortlessly
Read, edit, and convert PDFs with the powerful PDF toolkit.
Microsoft-like interface, easy to use.
Windows • MacOS • Linux • iOS • Android

- Articles of Office solution
How to Make Google Slides Play Automatically - A Step-By-Step Guide
Step into the world of seamless presentations! Ever wished your Google Slides could play automatically? Dive into our guide designed with you in mind. Uncover the simplicity of autoplay and gain insights from our hands-on experience. Let's transform your presentations together!
Part 1: Why Make Your Presentation Play Automatically?
In the dynamic realm of presentations, incorporating automatic playback in Google Slides offers numerous advantages that significantly enhance the overall experience. Here's why you should consider making your presentation play automatically:
Seamless Engagement: Automatic playback ensures a seamless and continuous flow of information, preventing interruptions that can arise when manually advancing slides. This contributes to a more engaging and immersive experience for your audience.
Narrative Cohesion: Automated slides allow you to craft a cohesive narrative without the need for constant manual intervention. This is especially valuable when conveying a story, illustrating a process, or guiding your audience through a logical sequence of ideas.
Professionalism: The polished, professional look achieved with automatic playback reflects positively on your presentation skills. It demonstrates a mastery of the material and adds a touch of sophistication to your delivery, leaving a lasting impression on your audience.
Time Efficiency: Automating your presentation saves time during delivery, allowing you to focus on your content and interaction with the audience. This is particularly beneficial in situations where time is limited, ensuring that you make the most of the allotted presentation time.
Visual Appeal: Automatic transitions between slides contribute to the visual appeal of your presentation. Smooth transitions create a visually pleasing experience that captures the attention of your audience and adds a layer of professionalism to your slides.
Part 2: Easy Steps to Make Your Google Slides Play Automatically
When presenting:.
Step 1: Initiate Presentation: Start your presentation by clicking "Slideshow" at the top of Google Slides. Alternatively, use the arrow to choose "Presenter View" or "Start From Beginning" based on your preference.
Step 2: Activate AutoPlay:
Hover over the bottom left corner to display the Presenter Toolbar during the slideshow. Click the three dots on the right, navigate to AutoPlay, and select the desired advance timing (from every second to every minute). To loop the slideshow, choose "Loop" at the bottom of the menu.
Step 3: Commence AutoPlay:
Click "Play" to commence automatic playback. To halt the slideshow, click on a slide. Resume AutoPlay from the Presenter Toolbar by selecting "Play" again.
When Publishing Slide Deck:
Step 1: Access Publishing Settings:
Navigate to File > Share> Publish to the Web in the menu.
Step 2: Configure AutoPlay for Web:
Choose either "Link" or "Embed" based on your intention. Use the Auto-Advance Slides drop-down box to set timing (from every second to every minute). To loop the slideshow, check "Restart the Slideshow After the Last Slide." Optionally, mark "Start Slideshow as Soon as the Player loads" for seamless viewer experience.
Step 3: Publish Your Slideshow:
Click "Publish" and confirm to obtain the link or embed code. Share the link or code to showcase your Google Slides presentation with automatic playback and looping, eliminating the need for manual navigation.
Part 3: Best Excellent Alternative to Google Slides - WPS Presentation
WPS Presentation stands out as a versatile and free PowerPoint editor designed for effortless slide creation, editing, saving, and sharing. Offering seamless compatibility with Microsoft Office, it empowers users to handle presentations effortlessly across multiple platforms, including PC Windows, Mac, Linux, Android, and iOS devices.
Features of WPS Presentation:
Rich Template Store: Access a diverse range of professionally designed templates to enhance your presentations and streamline content creation.
Lightweight Design: Experience a responsive and user-friendly interface without compromising on functionality. WPS Presentation ensures a smooth and efficient editing experience.
Support for Online Documents: Seamlessly integrate with online documents, fostering collaboration and accessibility from various devices. WPS Presentation adapts to the modern workflow.
Safe and Stable: Trust in the stability and security of WPS Presentation. Your work is safeguarded, allowing you to focus on content creation without concerns about data integrity.
Suitable Users: WPS Presentation caters to a broad spectrum of users, making it an ideal choice for:
Professionals seeking a reliable PowerPoint alternative.
Collaborative teams requiring a platform with seamless online document support.
Individuals who prioritize a lightweight yet feature-rich presentation editor.
Anyone looking for cross-platform compatibility, ensuring accessibility on diverse devices.
How to Download WPS Office
Step 1: Visit the Official WPS Office Website
Open your preferred browser and navigate to the official WPS Office website.
Step 2: Access the Free Download Section
On the homepage, locate and click the prominent "Free Download" button.
Step 3: Run the Setup File
Once the download is complete, run the setup file.
Follow the on-screen instructions provided for a seamless installation process.
How to Make Slides Play Automatically in WPS Presentations
Step 1: Open the Document in WPS Office:
Launch WPS Office and use it to open your presentation document.
Step 2: Navigate to the Slide Show Tab:
Click on the "Slide Show" tab in the menu.
Step 3: Access Set Up Show Options:
Within the Slide Show tab, locate the "Set Up Show" drop-down button.
set up slide show
Step 4: Choose Auto Option:
Click on the drop-down button and select the "Auto" option from the available choices.
Step 5: Initiate Auto Playback:
Further, click on the "Slide Show from Current" button.
All slides will now play automatically, providing a seamless and engaging presentation experience.
Make Your Presentation Excellent - WPS Template
Elevate your presentations with WPS Templates, designed to enhance creativity and efficiency. Here are the key characteristics of WPS templates and a guide to download and utilize them effectively:
Characteristics of WPS Templates:
Diversity: WPS offers a vast collection of templates spanning various themes, ensuring there's a perfect fit for every presentation need.
Professional Design: Benefit from professionally designed templates that add a polished and sophisticated look to your slides, regardless of your design expertise.
Ease of Use: WPS templates are user-friendly, allowing both beginners and experienced users to customize and adapt them effortlessly.
Time-Saving: Streamline your presentation creation process with pre-designed templates, saving valuable time while maintaining a high standard of visual appeal.
Versatility: From business reports to creative pitches, WPS templates cater to a diverse range of presentation styles and purposes.
How to download template from WPS Template
Access the WPS Template Website:
Visit the official WPS Template website to explore the diverse collection.
Step 1: Explore Templates: Browse through the available template or use the search bar to locate a specific one that suits your needs.
Step 2: Select Your Template: Click on the template you wish to download, previewing its design and layout.
Step 3: Download the Template: Once you've chosen your template, click on the "Download" button.
Step 4: Save to Your Device: The template will be swiftly downloaded to your device, ready for customization in WPS Presentation.
1. Can I use the Google Slides Autoplay feature without turning on the full screen?
Unfortunately, Google Slides does not support looping or auto-playing presentations in editing mode. Autoplay is a feature exclusive to the slideshow, accessible only in full-screen mode.
2. Can I revert to manual control during a presentation if needed?
Yes, you have the flexibility to switch to manual control at any point during a presentation. Simply use the keyboard or mouse to advance slides as necessary.
3. Can I customize the transition speed between slides in Google Slides Autoplay?
Yes, you can customize the transition speed between slides in Google Slides Autoplay. This allows you to tailor the pacing of your presentation to best suit your content and audience engagement preferences.
In this comprehensive guide, we unfolded the art of making Google Slides play automatically, emphasizing the transformative potential of WPS Office. From the importance of autoplay to practical steps and the allure of WPS Presentation, elevate your presentations with newfound simplicity and creativity. Transform your slides, captivate your audience, and embrace a new era of presentation excellence with WPS Office!
- 1. How to hide slides in Google Slides?
- 2. How Fix PowerPoint Cannot Play Media - Best Guide
- 3. How to Make Excel Cells Expand to Fit Text Automatically (3 Easy Ways)
- 4. How to Make Columns in Google Slides: A Step-by-Step Guide
- 5. How to Get Audio to Play Automatically on PowerPoint
- 6. How to Select Multiple Slides in Google Slides (Easy & Fast)

15 years of office industry experience, tech lover and copywriter. Follow me for product reviews, comparisons, and recommendations for new apps and software.

5 Better Alternatives To Google Slides
I f you're looking to create a compelling presentation to showcase a new idea or persuade others, Google Slides may be the first option that comes to mind. But with few built-in templates, basic themes, and a limited graphics collection, you'll likely have a hard time making your presentation stand out against others.
If you want to make your presentation truly stand out, there are several alternatives to Google Slides that offer extra perks and features to give your presentations an edge. While Google focuses on integrating Slides with its other work-based apps like Sheets and Docs, other presentation apps focus more on design elements, transitions, and themes to help you convey your brand or personal image throughout your presentation.
We've tested these Google Slide alternatives to give you an idea of other available options to deliver impactful presentations. If you're looking for a way to make boring information more fun and engaging, here are the best presentation apps to replace Google Slides.
Read more: Major Graphics Card Brands Ranked Worst To Best
Microsoft PowerPoint
There's a reason so many businesses around the globe use Microsoft PowerPoint. Building its reputation as the go-to option for delivering high-quality presentations, the software generated $100 million in annual sales only three years after its initial release in 1990.
Microsoft PowerPoint may be Google Slides' largest competitor, but there are plenty of unique features that can add an extra flourish to your slides. PowerPoint excels in its impressive library of custom animations and slide transitions, which are fairly limited in Google Slides. Another unique feature is its AI-powered Designer tool. This provides professional design schemes that mirror the words used in your slides. For instance, if your title slide is named "Basketball Team 2024," Designer will automatically suggest pictures and slide layouts associated with basketball.
As PowerPoint has been in development longer than Google Slides, it naturally offers more nuanced features if you're looking for something specific. For example, you can save individual slides as an image file (using .png or .jpeg formats) or as a separate presentation file. There's also a large library of free PowerPoint templates designed to speed up your workflow. Moreover, PowerPoint integrates seamlessly with Microsoft Teams with its PowerPoint Live function, allowing you to easily share your presentation with your co-workers.
Prezi offers an innovative approach to showing presentations with its unique canvas feature. Unlike traditional presentation software, Prezi lets you zoom and pan around a flexible canvas. The canvas may feel distant to something of a presentation program, but there is still some linear order provided thanks to the Timeline view.
Finding ways to visualize data is one of the biggest challenges when dealing with presentation software. Prezi resolves this struggle with the help of its Story Blocks: a series of infographics available in multiple designs to visually represent data. You can easily edit infographics and even add animations to individual shapes. This can help add a story to your presentation and help you emphasize key points.
To further enhance your presentation visually, Prezi offers several topic path settings, which let you change how Prezi transitions from one topic to another. These options include subtopics, which are super helpful for breaking large chunks of information down. If you're looking for a unique, modern approach to presenting information, Prezi is a top pick.
If you're looking to create a professional presentation to convince potential clients about your business idea, Slidebean is a popular choice among professionals with plenty of customization options. One of the issues with Google Slides is its fairly limited template library, which is filled mostly with basic designs. Slidebean offers a better alternative with a broad selection of innovative templates split into categories for convenience.
The app's user interface is easy to navigate so that you can create slides in less time. Each slide has a dedicated Design and Outline tab. You can use the Outline tab to quickly edit the information on each slide without being distracted by all the visual elements. Another productivity-enhancing feature is the ability to generate a presentation theme from your website. Simply enter your URL, and Slidebean will automatically apply the theming to your presentation.
Slidebean is another presentation app to take advantage of AI. Using the Auto-Design feature, you can generate recommended slide layouts based on your existing content. It also features AI text suggestions designed to suit different industries. Overall, Slidebean offers a quicker, more efficient method for creating stunning presentations compared to Google Slides.
Canva is a well-known app among graphic designers, but it's also capable of making stunning presentations. The app also has mobile editions, so you can easily create and edit presentations on your Android phone , iOS device, or tablet. As long as you have an internet connection, you can modify your designs wherever you are.
To get started, head to Canva's online presentation maker . Canva offers a vast range of templates categorized by topic, which easily surpasses the simple templates in Google Slides . While some of the templates are only available to Canva Pro members, there is an ample amount of free templates to help you get started. You'll also find a large selection of stock photos, shapes, and illustrations to create beautiful customized slides.
Because Canva is built for graphic designers, you can access several features to give your presentation consistent theming. These include color palettes, font sets, and even a brand kit that allows you to add your company's fonts (available to Pro members only). One time-saving feature is Canva's Uploads tab, which lets you access recently uploaded media files. This offers a convenient way to copy content between different presentations.
Visme is a powerful visual design tool able to create videos, infographics, and presentations. One of the perks of using Visme is the company's free educational content, which offers advice on how to create impactful content to boost your brand. After signing up, the company also asks whether you're using Visme for your business, education purposes, or personal use to offer personalized tips.
In terms of charts and graphs, Visme offers some of the most impressive features we've seen from a presentation app, so you can effortlessly convey important statistics. From the Data tab, you can access dozens of graph styles to visually represent your data. Then, simply double-click a chart inside your presentation to edit the values instantly in a simple table format.
Another area that Visme excels in is collaboration. You can either generate a link to publish your presentation on the web or share your presentation privately with others. For each team member, you can choose who can view, edit, and comment slides for a seamless workflow. There's also a Slack integration that lets you receive messages whenever changes are made to your presentation. Visme is free for all users, with limited features available in its premium plans.
Read the original article on SlashGear .

How to Set Up an Automatic Slideshow in PowerPoint
Last updated on May 6th, 2024
Presentations are a fundamental aspect of professional and educational communication, offering a structured way to share information and ideas. However, manually navigating through slides can interrupt the flow of a presentation and distract the audience. By setting up your PowerPoint slides to transition automatically, you can deliver a smoother, more professional presentation. This guide will walk you through the process of configuring your PowerPoint presentation to run automatically, allowing you to focus more on your delivery and less on the mechanics of slide transitions.
Preparation: Optimizing Your Slide Deck
Before diving into the technical setup, it’s essential to ensure that your slide deck is well-prepared for automatic transitions. Here are some key points to consider:
- Content Layout: Make sure that each slide is uncluttered and the content is easy to digest. Since slides will advance automatically, your audience needs enough time to absorb the information on each slide.
- Consistency: Keep the style and timing consistent across slides to maintain a cohesive flow throughout the presentation.
Now, let’s see best practices for automatic slide transitions in PowerPoint and how to make PowerPoint slides change automatically.
Setting Up Your Automatic Slideshow
Here’s a step-by-step guide to making your PowerPoint slides advance automatically:
Step 1: Open Your PowerPoint Presentation
Launch Microsoft PowerPoint and open the presentation you want to set up for automatic playback.
Step 2: Configure the Timing for Each Slide
Configure the timing on each slide, and uncheck On Mouse Click. This will let PowerPoint know how many seconds to wait on each slide when you run the presentation automatically. Here is how to edit timing for each PowerPoint slide.

Step 3: Navigate to the Slide Show Tab and Select Set Up Slide Show
Click on the “Slide Show” tab located in the menu bar at the top of the screen. This tab contains various settings that control how your presentation is displayed.
Find and click on “Set Up Slide Show”. This opens a dialog box with various options for running your presentation and will let you setup your slideshow options in PowerPoint .
Step 4: Configure Slide Advancement
In the “Set Up Show” dialog box, look for the “Advance slides” section. Here, you have two main options:
- Manually: Which requires mouse clicks to advance slides.
- Automatically after: Check this option to automatically advance the slides in a PowerPoint presentation.

Step 5: Save Your Settings
After setting the desired duration for each slide, click “OK” to save your changes and close the dialog box.
Now, you can start your slideshow and it will consider the timing options configured on each slide, start advancing your slides with these timinig settings.
Additional Features and Tips
Here are some tips for setting up a self-running PowerPoint slideshow.
Integrating Multimedia
If your presentation includes videos or audio, ensure they are set to play automatically when their respective slides come up. This can be configured in the “Animations” tab by setting the media to “Start Automatically”.
For presentations that need to run continuously, such as at a display booth or in a public space, use the “Browsed at a kiosk” mode. This option, found in the same “Set Up Show” dialog box, makes the presentation loop continuously.
Handling Animations
If your slides contain animations, set them to start “With Previous” or “After Previous” to ensure they align correctly with your automatic slide transitions.
Troubleshooting Common Issues
If you encounter issues with timing or playback:
- Recheck Timing: Ensure the timings set for each slide and animation are appropriate.
- Test Run: Always do a full test run of your presentation to catch any inconsistencies or technical glitches.
Automating your PowerPoint slideshow can significantly enhance the professionalism of your presentation, allowing you to maintain a seamless flow and engage your audience more effectively. By following the steps outlined in this guide, you’ll be well-equipped to set up your presentation for automatic transitions, making your delivery smoother and more impactful.
To restart the slideshow automatically, go to Setup Slideshow and Loop continuously until Esc.
While most versions of PowerPoint support automatic playback, it’s a good idea to check your specific version for any variations in the setup process.
Yes, you can override the automatic settings by using the arrow keys or the mouse to advance or go back to slides during the presentation.
Yes, you can control the duration for each slide. The duration can be adjusted for each slide individually from Transitions tab, allowing you to tailor the flow of your presentation to match the content and audience engagement.
Leave a Comment Cancel reply
Your email address will not be published. Required fields are marked *
Save my name, email, and website in this browser for the next time I comment.
Sign up to our newsletter
We will send you our curated collections to your email weekly. No spam, promise!
IMAGES
VIDEO
COMMENTS
You can pick from every second up to every minute. If you also want to loop the slideshow, select "Loop" at the bottom of the pop-out menu. When you finish, click "Play" to automatically play your presentation. To stop the slideshow, simply click on a slide. You can then resume AutoPlay from the Presenter Toolbar by selecting "Play" again.
When presenting with Google Slides, you might prefer an automatic playback for your slides. Fortunately, setting Google Slides to autoplay is simple. This article outlines two easy methods to enable autoplay for your presentation. Quick Steps to Autoplay Google Slides: Open Google Slide. Click "Slideshow" or "CTRL+F5". Hover bottom left ...
However, you can configure Google Slides to play videos automatically. Here's how: Click the layout that contains the video you want to play automatically. Right-click the video and select Format options from the context menu. Expand the Video playback option. Click the drop-down icon next to Play (on click) and select Play (automatically).
Step 1: Open the Presenter Mode in Google Slides. First, go to the "Present" mode in Google Slides. After opening the slide, click on the "Present" button located on the top right corner of the screen or press "Ctrl+F5".This will open the slide in "Present" mode. Step 2: Click on the Gear Icon.
Step 1: Open your completed slideshow in Google Slides. Select File in the upper left. Image used with permission by copyright holder. Step 2: Select Publish to the web. Image used with permission ...
Learn how to automatically play your Google Slides presentations, as well as how to loop your presentations quickly and easily. | Playlist: https://www.youtu...
To make Google Slides play automatically, you can select "Slideshow" in the top-right corner of your screen. Move your cursor to the menu bar and click on the "three dots" icon. Select "Auto-play" and choose a time delay. You can also select the "Publish to web feature" to make your presentation play automatically (more on that ...
Step 1: Open your Google Slides presentation. Open the presentation you want to set to play automatically. Once you have your presentation open, make sure all your slides are in the order you want them to appear in. This is because once the presentation starts playing automatically, it will go through the slides in the order they are arranged ...
When you're ready to run the slides on a loop, click the Slideshow button at the top-right to start playing your slides. With the slideshow showing, move your mouse to the bottom-left corner of the presentation screen to show the toolbar. On the toolbar, click the three-dot menu and expand the Auto-play item.
To set your Google Slides presentation to loop, switch to Slideshow mode. You can either click Slideshow from the top menu or use the arrow key to start the presentation in Presenter View or from the first slide. Once in Slideshow mode, click the three dots at the bottom and select Auto-play. You can select Loop to play the slideshow ...
In this video I will show you one easy way how to use autoplay, autoloop, or automatic advance in Google Slides. You will learn how to make your slides swit...
Follow these steps: Open the Normal View of your Google Slides project. Right-click the video. Select Format options from the dropdown menu. Select Video playback. Check Autoplay when presenting ...
To make Google Slides auto-loop, click the " Slideshow " button at the top-right of your screen. Next, click the vertical three-dot icon in the bottom-left corner of the slide. Select " Auto-play " and choose your slide interval. Finally, check the " Loop " option and click " Play .". While the above method works, other ways ...
Step 1: Open your presentation in Google Slides. After logging into your Google account, navigate to your presentation within Google Slides. Opening your presentation is the first and most important step. Make sure you have editing access to the presentation you want to set to play automatically. Step 2: Click on 'Slide' in the menu
Presenting in a team meeting with Google Slides, but don't want to manually change each slide when it's time? In this episode of The Suite Life, Laura Mae Ma...
Hit the Slideshow button in the top right corner of the screen. Move your cursor to the bottom left corner of the slide. Click the three-dot menu next to the slide number. Move your cursor to the ...
To set up an auto-play to your Google Slides presentation, all you need to do is: Open your Google Slides final presentation. Navigate and click "Slideshow" mode in the top-right corner of your Google Slides. Once in "Slideshow mode," drag your cursor to the bottom left corner part of your presentation, then click the three-dot menu.
Step 1: Insert your video into the slide. Insert the video you want to autoplay onto the desired slide. When you're inserting a video into Google Slides, you have a few options. You can upload a video from your computer, use a YouTube link, or choose one that's already stored in your Google Drive. Make sure the video is appropriately ...
Single Slide Autoplay. Insert the audio file into the slide you want. Right-click on the video and look for format options in the menu. The Video playback option will become visible on the left ...
2. Once in " ️ Slideshow" mode, move thine cursor to the screen's bottom left the exhibit the toolbar.. 3. On the toolbar, click on the three-way dots, then select "Autoplay" from to pop-up menu.. 4. With the "Autoplay" menu, select how long you'd prefer your dias to perform automatically and then click " ️ Play" to play yours slideshow.
Step 1: Select and customize transitions for individual slides or apply a single transition to all slides, adjusting style and speed. Step 2: During a live presentation, enable automatic transitions using the Auto-Play feature and set the desired time interval. For published presentations, use the Auto-advance slides option to set transition ...
This video shows how to make Google Slides play automatically. There can be a variety of reasons why you might want your Google Slides to play automatically ...
Step 1: Open the Document in WPS Office: Launch WPS Office and use it to open your presentation document. Step 2: Navigate to the Slide Show Tab: Click on the "Slide Show" tab in the menu. Step 3: Access Set Up Show Options: Within the Slide Show tab, locate the "Set Up Show" drop-down button. set up slide show.
Create the Jeopardy game board. You'll first make the game board with the categories and score. Create a table in Google Slides with the subjects in the top row and the scoring system in the ...
For example, you can save individual slides as an image file (using .png or .jpeg formats) or as a separate presentation file. There's also a large library of free PowerPoint templates designed to ...
If your presentation includes videos or audio, ensure they are set to play automatically when their respective slides come up. This can be configured in the "Animations" tab by setting the media to "Start Automatically". Kiosk Mode. For presentations that need to run continuously, such as at a display booth or in a public space, use the ...