

How to Upload Google Resources on Schoology
One of my most asked questions is if Glitter in Third digital Google Drive resources work on Schoology.
Guess what? You can use Google resources on Schoology!
I am going to show you how – PLUS I will show you how to assign these resources to your students !
I originally learned how to upload Google Slides to these various educational apps from the very talented Danielle Knight ( you can check out her TPT store here !).
Below, I will show you the steps that you will take to assign Google resources on Schoology .
Don’t forget to click here to get the FREE reading graphic organizers for Google Drive sent immediately to your inbox!
First, go to Resources to connect your Google Drive to your Schoology account.

Under Apps , find Google Drive .
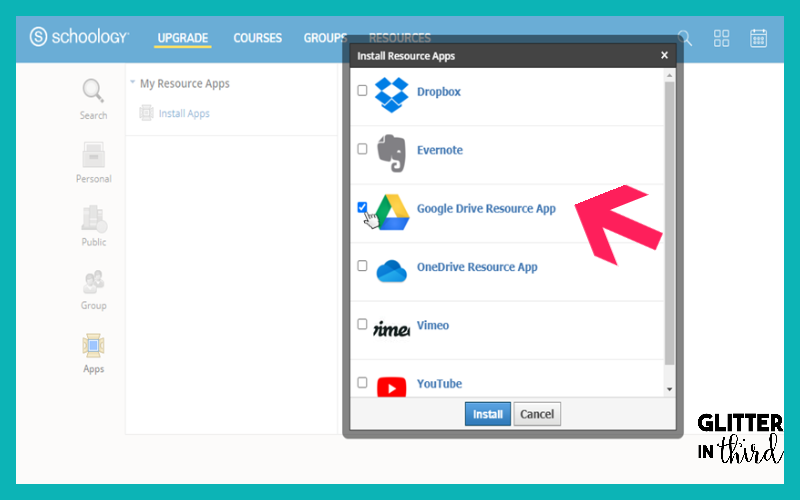
Click connect and sign in to your Google Drive.
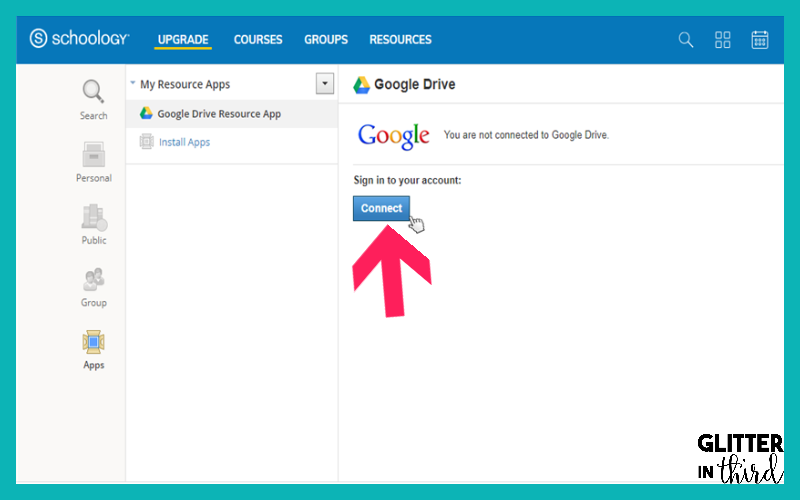
Now your Google Drive is connected to Schoology.
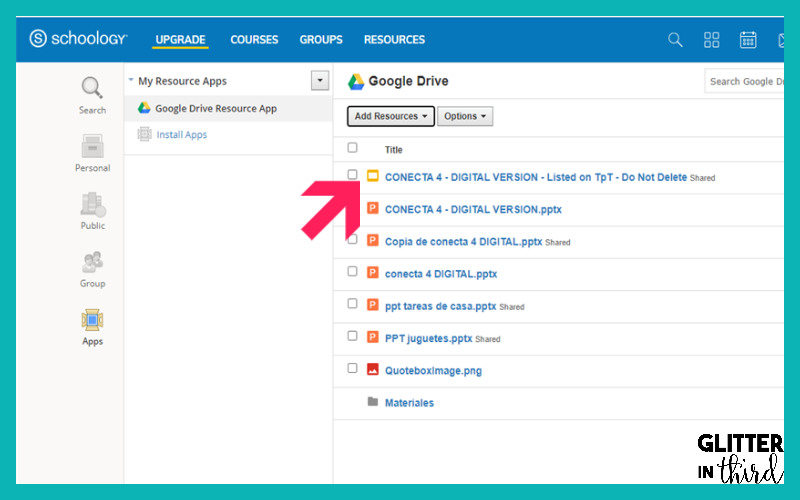
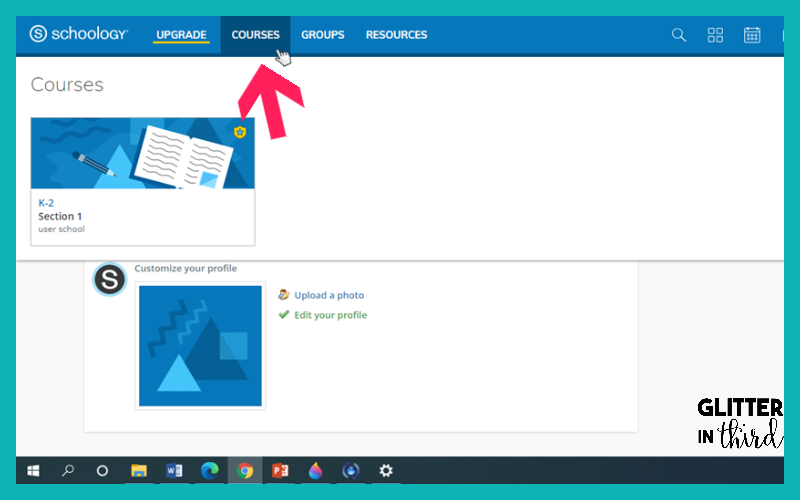
To assign, go to ‘ Courses ‘
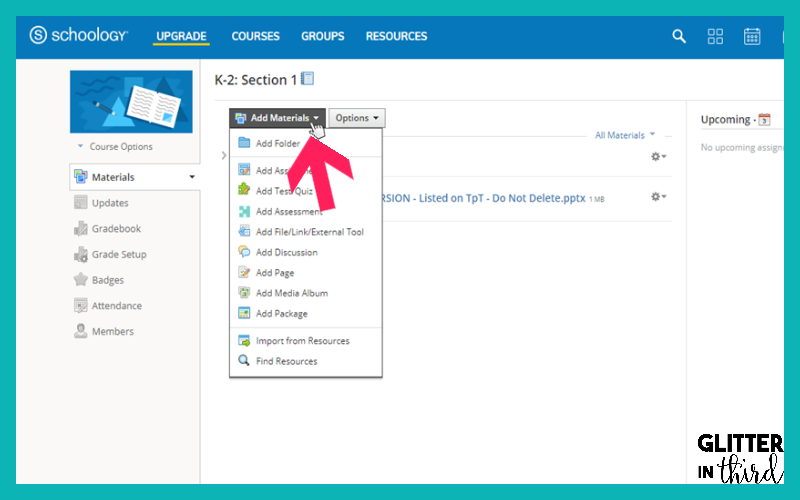
Find ‘ Add materials ‘
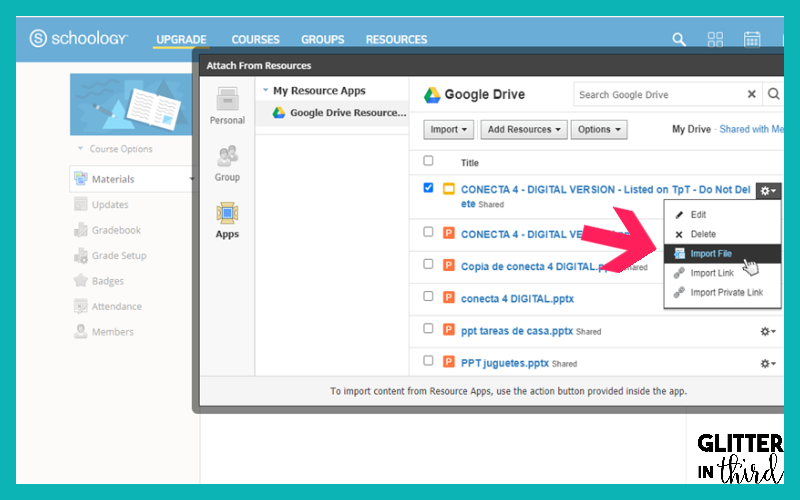
Go to ‘ Import File ‘
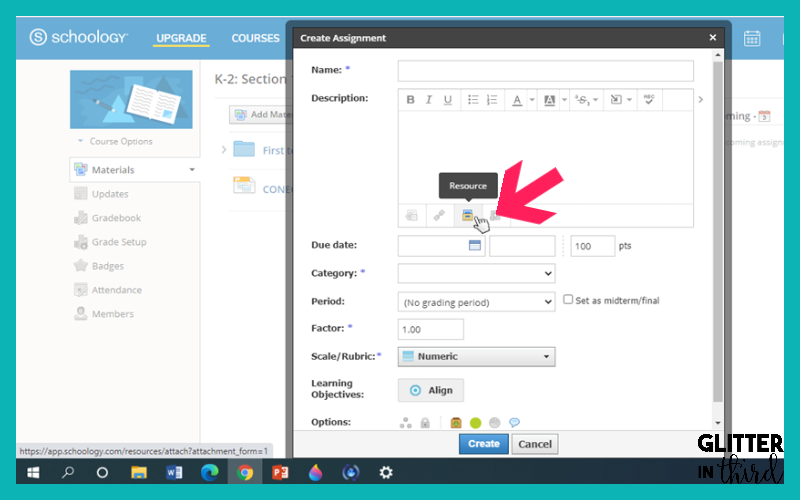
Click ‘ Resource ‘
Add the Google Drive assignment.
Ta-Da – you did it!
Need more distance learning activities to use on Schoology?

Glitter in Third on TPT has hundreds of distance learning Google Drive activities to use on Schoology, including:
- 3rd Grade Math for Google
- Grammar for Google
- Health for Google
- Reading for Google
If you are looking for something specific, feel free to email me at [email protected]. I’d love to give you recommendations and help you find the perfect resource for your needs and students using Google Drive on Schoology.
Need more digital ideas for Google Drive?
You may be interested in my other blog posts , including:
- Distance learning back to school activities you’ll LOVE
- How to create the perfect distance learning lessons
- Using Google Classroom for distance learning
Did you download the Reading Google Drive graphic organizers yet?

Click here to get the FREE reading graphic organizers for Google Drive sent immediately to your inbox!
Pin for later


glitterinthird

COPYRIGHT © 2024 · Terms and Conditions
Cookie Notice
Privacy overview.
Google Schoology Integration - Embedding Google Slides

- Schoology Learning
Troubleshooting the Google Drive Assignments App
Q: error message: we're not able to connect to your google account.

If you're having trouble connecting your Google account to your Schoology account while using our Google Drive Assignment app, follow the steps below.
If you encounter this error the first time you attempt to authorize, it may be because your Google domain has offline access disabled.
If you have previously logged in to the Schoology Google Drive Assignment app, first log into the Google account you have previously used to access the app, and then follow these steps:
- In your Google account, click the grid in the upper-right.
- Select My Account.
- Under Sign In and Security, click Connected Apps and Sites.
- Under Apps connected to your account, open Manage Apps.
- Select Schoology.
- Click Remove.
Now, go back to Schoology, and connect again:
- In your course, click Add Materials.
- Select Add Assignment.
- Launch the Google Drive Assignment app.
- Connect to your Google account.
Q: Error Message: We're sorry but we are unable to load your document or No login information was received
These messages indicate that your browser is blocking third-party cookies. To enable third-party cookies in different browsers:
In Google Chrome
- Navigate to: chrome://settings/content/cookies
- Turn off Block third-party cookies .
- Navigate to: about:preferences#privacy
- Under History select Use custom settings for history.
- Select Accept cookies from sites and set it to Always .
Depending on the security settings on your device, third-party cookies may need to be enabled on a system-wide level.
Q: Error Message: We had some trouble opening your document. Try again by reloading the page
If refreshing the page does not resolve the issue, you may need to force a log out of your Google account and reconnect. Use the Can't see your document? Click here. link in the top right corner of the document to perform this action.
Q: Error Message: {"errors":{"detail":"Failed to retrieve provider email for current user","source":{"exception":"Exception"}}}

This error indicates the person attempting to access the assignment is neither the document owner nor the student. This is typically seen when a co-teacher is attempting to access the assignment. See Q: Can my co-teacher and I both grade student work submitted via Google Drive Assignments?
Q: Error Message: An error has occurred

If you're having trouble connecting to your Google account when attempting to create a Google Drive Assignment, it may be because a Google access token expired or you previously revoked access to the Schoology Google Drive Assignment app directly within Google. Follow the steps below to reconnect to your account:
- Within your course, click Add Materials and select Add Assignment .
- Under Assign From App, select Google Drive Assignments .
- Within the Add Assignment From Google Drive Assignments modal, click Options, and select Account Settings .
- Select Log Out , and confirm.
- Select Connect .
- Log back into your Google account.
- Files from your Google Drive should now be available.
Q: Does the app require a Consumer Key and Shared Secret?
No, although the Configuration button does display when installing the app, it does not require a consumer key and shared secret to install.
Q: Can I attach multiple documents to an assignment?
You can only attach one item from Google Drive to each assignment.
Q: Can I edit an assignment after it has been created with the Google Drive Assignments app?
You can edit all parts of the assignment (Due Date, Category, Possible Points, etc.) except the Google attachment. If you need to change the assignment to attach a different Google file, you must delete the assignment and create a new one.
Q: Can the instructor make changes within the Google doc after attaching it to an assignment?
Yes, as long as students have not generated their copy yet by clicking My Document in the assignment . Once a student opens their copy of the document, any changes the instructor makes to the original are not reflected in copies created prior to the edits. Edits to the master file only affect subsequent student copies.
Q: Can I create assignments using the Google Drive Assignments app in Resources?
No, the Google Drive Assignments app is only available in courses. By saving an assignment with a Google Drive attachment to your personal or Group Resources, a template is saved of the basic Schoology info. You'll need to copy the template back into a course to reattach the Google file.
Q: Can I copy assignments created with the Google Drive Assignments app?
Unfortunately, no. Google Drive assignments are not portable. Because we are leveraging Google’s permission-sharing capabilities, the Google Drive assignment can only be shared with the teacher who created the assignment and the students who open it, as per the course roster in which the assignment was originally created for. Therefore, when you copy a Google Drive assignment to another course, the Google file does not come with it. Only the Schoology assignment information (title, description, etc.) is retained. You can attach the Google file to the copy of the assignment in the destination course.
Q: I have all my assignments created for the courses I teach and import them from Resources every time we start a new grading period. Can I edit my existing assignments to use the Google Drive Assignments app?
Yes. Click the gear icon, select Edit , then add Google files via the Google Drive Assignments app.
Q: What happens if I delete the Schoology folders and/or my students' files from Google Drive?
We caution strongly against this. Since Google is ultimately a separate system, we do not have a way to retrieve this work if you delete it. If you delete the top-level Schoology folder or the course-level folder, a new folder will be created the next time you create a new Google assignment in your course and a student generates a copy from that new assignment.
However, we cannot retrieve the deleted files. Once student copies are deleted, there is no way to re-connect those files to the Schoology integration.
We suggest being especially careful not to delete the folders–the higher up you go in the folder structure, the more student work you are potentially affecting.
Q: How do I delete an assignment that was added using the Google Drive Assignments app?
To permanently remove an assignment from the student's Google Drive, you must delete the assignment from your Google Drive and Schoology.
From the Google Drive document, click the Trash icon to delete the assignment.
Once you remove the assignment from your Google Drive and Schoology, students will no longer be able to view or access the document.
Q: Can my co-teacher and I both grade student work submitted via the Google Drive Assignments app?
Unfortunately, no. Because we are leveraging Google’s permission-sharing capabilities, at this time, all student copies are only shared with the teacher who created the assignment and the student who opens it. All other visitors to the course, whether co-teachers, admins, advisors, will not be able to see the submission.
As a workaround, the course admin who created the assignment can share to any co-teachers and other faculty directly from Google Drive. All student copies are organized into Google Drive folders by course and assignment. This way, the primary teacher may push out all assignments to students in Schoology and share submissions directly from Google Drive via the folder with all student work to the co-teacher. The co-teacher can then view the assignments through Schoology or directly in Google Drive.
Q: Can parents view Google Drive Assignment submissions?
Unfortunately, no. Because we are leveraging Google’s permission-sharing capabilities, at this time, all student copies are only shared with the teacher who created the assignment and the student who opens it. All other visitors to the course, whether parents, co-teachers, advisors, will not be able to see the submission. Parents will see an "Access Denied" error message when attempting to access the assignment.
Q: I have content across multiple Google accounts – can I use both of them?
We caution against this. We recommend that one Google account be used to create all Google Drive assignments for the entire section.
If you have created Google Drive assignments with one Google account, and then you log out of the app, your students will no longer be able to access the existing assignments via Schoology. When this occurs, students will see the error message: We had some trouble opening your document. Try again by reloading the page.

To resolve this error, the teacher who created the assignments must log in to the Google Drive Assignments app with the original Google account.
Q: I have multiple Schoology accounts and want to connect the same Gmail account to both. Can I do that?
Q: i'm trying to embed an image into a google file when viewing it in schoology, and i keep getting a blank screen..
This is a Google limitation. When you embed a Google doc, it is embedded in an iframe and you can't access some of the Google menu options. This issue is specific to any of the menu items that actually use an iframe themselves–such as the Insert Image menu–because Google prevents displaying an iframe-within-an-iframe. Schoology has no control over this.
Q: My student can't remember which Google account they used to connect to the app and access their assignment.
You can help them out by navigating to your Google Drive, and going to an assignment they’ve worked on previously ( Schoology Google Drive Assignments > your course-level folder > assignment>level folder ) and identify one of their previously completed assignments. Access the Share settings for that document–each file belongs to you (the instructor) and is then shared with the student, so the other email address in the share settings that is not your email address is the one that the student used to connect to the app.
Q: I can't see the document when I open the app. What should I do?
Sometimes, errors can occur for students and instructors trying to view a Google document because:
- A student attempts to view a file and discovers they no longer have access. A Google account and/or privileges had previously given them access to the file, but now they are using a different Google account and cannot access it.
- A student or instructor attempts to view a file and discovers they no longer have access. They are logged into Schoology but are not actually logged into a Google account.
These errors can be resolved by logging out of the Google Drive Assignments app and logging back in. Schoology has added a link to make this process easier. To learn more about this link, see our article on Reconnecting the Google Drive Assignments App with Force Logout.
Q: Can a student make changes to a submitted document?
When a student has completed their work on a Google Drive assignment, the student can submit the item by clicking the Submit button on the top right of the modal.
The student is able to Unsubmit the assignment prior to the due date or grading. If the due date has not yet passed, the student will see the ability to unsubmit in the top right of the modal with the message, "The assignment has not yet been graded." This way, the student can revise if they are receiving ongoing feedback prior to grading.

Once the assignment is submitted, the student may only unsubmit if the due date has not yet passed. If the due date has passed, the user will see the message below:

Please note, these errors can depend on your browser setup.
If this problem persists, please contact our support.

Paperless Is Not a Pedagogy
Alice keeler, schoology: make collaborative google slides.

Canva – How to Turn Your Selfie into a Sticker: A Fun and Easy Guide

Using Redstone in Minecraft Education Edition: A Beginner’s Guide

Create a Rotating Student Work Slideshow

Make ONE Google Slides for ALL the Students
Unfortunately, the default when adding Google documents to Schoology is to “Make a copy for each student.” I personally try to avoid this like the plague. Using digital tools allows us to rethink what processes we are doing and take advantage of what tech allows us to do DIFFERENTLY. [tweet]My general rule of thumb is that I only assign individual copies of something to students 20% or less.[/tweet] Stop assigning yourself paperwork!
See below for a template for Schoology users to create collaborative Google Slides.
Avoid Assigning Yourself Paperwork
Look at John Hattie’s research (visible-learning.org) and you will see that cooperative tasks, classroom discussion, and actionable feedback are at the top of the list of what is effective for learning. One way to accomplish this is to share ONE Google Slides with your students and give them edit access. Every student on the SAME ONE Google Slides.
[tweet]I would rather hit myself in the head with a brick than open up 30 Google Docs.[/tweet]
Google Classroom makes it easy to share one Google Slides.
- Control T – New Tab
- Type slides.new
- Press Enter
- Name the Google Slides
- Close the Slides
- Go back to Google Classroom
- Create an Assignment
- Click the Drive icon
- Find the slides you just made
- Change from “Students can view file” to “Students can edit file”
This instantly gives all students in the class collaborative edit access. Extra bonus, it does NOT change the sharing permissions to anyone can edit, it changes it so the STUDENTS can edit. Each student is explicitly shared on the Google Slides with edit access. This ensures that any edits a student makes are documented in the version history with their name rather than an anonymous animal.
Collaborative Slides in Schoology
To share collaborative Google Slides with students in Schoology you need to create the Google Slides, click on the share button, change the access to “anyone with the link can edit” or paste your class roster to share the slides with all of your students. Copy the link. Create an assignment in Schoology and paste the link to the editable Google Slides.
Make Slides Add-on
It is hard to remember to change the sharing settings on a document before sharing it with students. I created a template that will do this for you.
alicekeeler.com/makeslides
Make a copy of the Google Sheets spreadsheet. You can reuse this over and over again so you only need to paste your class roster once. Suggestion to rename your spreadsheet to something meaningful like “Period 2 Collaborative Slides Maker.”
Paste Email Addresses
In column A you will need to paste the email addresses of your students. The names column is optional (and honestly superfluous right now).
Make Slides Menu
Next to the Help menu is a custom “Make Slides” menu. It can take a couple of minutes depending on your Internet speed for the menu to show up.

Choose “Make Slides.” You will be prompted for what you want to name your collaborative Google Slides.
You will need to authorize the Add-on. The warning is letting you know that no one at Google has officially reviewed my code and you need to make sure you trust me before authorizing. You are ONLY allowing yourself access to your files and email.
Automatically a new Google Slides will be created in your Google Drive. Each email address on your spreadsheet in column A will be added as an editor to the Google Slides. You will receive an email with the link to the Google Slides and a list of who the slides were shared with.

Copy the Link
From the pop up box confirming the creation of the Slides or from the email, copy the link to the collaborative Google Slides. Add this link to a Schoology assignment.
Use the SAME spreadsheet over and over again each time you want to create collaborative Google Slides. My recommendation is to at least once a day have students collaborate on the same Google Slides. Could be a warm up, a quick check for understanding, anything you would do on whiteboards, anything students would write on a Google Doc.
What Can You NOT Do with Collaborative Google Slides
If you can do it on whiteboards or paper you can use collaborative Google Slides. With rare exception, pretty much all of your assignments where you use individual Google Docs can be done with collaborative Google Slides.
This gives you ONE document to open rather than 30. It allows for easy review of student work while they are working. Take advantage of collaboration and ask students to “Make another student better” by going to another slide and leaving a feedback comment that goes beyond “Good job” but rather gives a genuine critique and suggestion.
Bonus: Google Slides is multi-media! You and the students can add images and video. Try using the Insert menu to add video feedback from Google Drive. I like to drag my Bitmoji from the Chrome extension to student work in Google Slides for feedback.
Collaborative Google Slides makes it easy to share student work with the class and discuss. Simply press the Present button.

Students Can Submit Their Slide URL
The URL for each slide in Google Slides is unique. Students can copy the link from their slide and submit to Schoology. Alternatively they can use the File menu and “Download as PNG” to submit the picture of their slide as evidence of their work.
Get Your Kids Tweeting: #OnEdSschat by @JCasaTodd
Optional Edit Access
The Make Slides Add-on explicitly shares the Slides with each student on your roster (that you pasted onto the spreadsheet). No one else can access. If you would like to ALSO change the sharing permissions of the Google Slides to “Anyone with the link can edit” use the second menu option “Anyone can edit Slides.”

Google Slides: Add a Placeholder
Recent Teacher Tech Blog Posts

Teacher Burnout is Real (and It’s Okay to Not Be Okay)

Tech Tips for End of Year Digital Cleanup
Free Customized Guardian Contact Tracker- Google AppSheet

10 Ways Teachers Can Unleash the Power of Appsheet

CTRL L: Leveling Up Student-Centered Learning with a Simple Shortcut
Leave a reply cancel reply.
You must be logged in to post a comment.
This site uses Akismet to reduce spam. Learn how your comment data is processed .
© 2024 All Rights Reserved.

Jake Miller
#EduGIF Guy. Speaker. Tech Integration Specialist. Google Apps for Edu Trainer. Nerd. #EduDuctTape Podcast Host.
Embedding Google Docs in Schoology “Pages”
Pages are a nice Materials option in Schoology. They give a teacher the ability to include more flexible learning content and are awesome in blended courses.
Sometimes you may want to add an already created Google Doc (or slides, sheet, etc.) along with some text content in a page. Below is how you can do that (note that if you want just the doc without other content before or after it, you’d follow a different process). First is an animated GIF, followed by the step-by-step instructions.
- (inside Resources > Apps)
- Create your Google Doc
- Go to Materials Page in your Schoology Course
- Click Add Materials
- Click Add Page
- Click the Insert Content Button
- Select the Google Drive Resource App
- Click the checkbox by the file you want to add
- Click Insert > Embed.
- Add text or other content before or after the doc if you’d like.
Published by

Jake is the host of the Educational Duct Tape podcast, the #EduGIF Guy, a Tech Integration Coach, speaker, Former STEM, Math & Science Teacher, and a presenter. View all posts by Jake Miller
Join the Mailing List
Search the blog.
Input your search keywords and press Enter.

Alyssa Teaches
an Upper Elementary Blog
How to Share Google Slides with Your Students

Google Slides™ activities are one of my top go-to technology tools for the classroom. I love that they save automatically as students work and that they live in the cloud. My students love them for their interactive features as well as being able to easily collaborate with other students.
Google Slides are especially handy to use if you are doing virtual teaching, work in a 1:1 classroom, or are a homeschooler.
So how do you share Google Slides with students? Read on for a quick tutorial!
Sharing Options for Google Slides
However you share the slides, you have to first decide what permissions to allow. There are three sharing options :
- students will view your file
- students will view and edit your file
- students will get their own copies of the file
I choose view-only if it’s something my students don’t need to edit or work in. The second option is great if you want students to work on a collaborative class project. If you want to assess each student’s work, you’ll probably want to pick the last option.
Assign Slides through Google Classroom
Sharing slides right in Google Classroom is my preferred method.

- Open Google Classroom.
- Click the Classwork tab at the top.
- Click Create and then Assignment.*
- Type the title.
- Click Add and then Google Drive. Select the Google Slides file you want to assign. Click Insert.
- Choose how you want to share the file (view, edit, or make a copy).
- Add any additional information (like a due date, number of points, rubric, or selecting particular students).
- Click Assign and then Assign or Schedule.

*When you click Create, you can choose Material instead of Assignment if you want to share slides without assigning them to students.
Email a Link
- Open the file.
- Click Share.
- Type individual names or the name of a group. Click the Editor tab and select the role (viewer, commenter, or editor).
- Click Send.

Alternatively, you can just grab a link to copy and paste:
- In the Get Link tab, choose how you want to share the file (view, edit, or make a copy).
- Click Copy Link.
- Paste the link in an email or other secure environment.
Email Google Slides as an Attachment
Another option is to send the Google Slides as an email attachment.

- Click File and then Email. Click Email as attachment.
- Type the name(s).
- If you have slides you don’t want to share with students (like teacher directions, answer keys, or content you haven’t taught yet), just move or delete those slides before sharing the file.
- I recommend making a copy of your original file and sharing that one with students, especially if you want to make modifications to it.
- If you assign a file through Google Classroom, filling out the Topic will help keep your stream organized.
- Many LMSs (like Canvas and Schoology) allow you to share Google Slides as well. Just change the permissions and share the links and you’re good to go!
- Students can share their Slides back with you for assessment and easy feedback !
I hope this quick tutorial gives you an idea of how to share Google Slides activities with your students! What else do you want to know about using Google Slides in the classroom? Let me know in the comments!

Related posts

8 Spiral Review Activities for Distance Learning

6 Easy Ways to Give Students Feedback Online

7 Google Earth Activities for Upper Elementary Students
15 comments.

If you make a choice board and link a google slide interactive activity, then for the choice board select make one for all students… will the link also be made for all students so that they have their own?

At the end of the link you post in the choice board, change the end of the url address from /edit to /copy and it will require the student to make a copy that is their own. It will not automatically share it with you though, they will have to do that.

Hello, I would like the kiddos to be able to look at each others slide shows. How can they view completed slide shows? We have 28 third graders and would like to give them the option to view and assess 3-5 individual slide shows. I would like to be able to do this within google classroom.

Hi Christine! They can share their slideshows using the same processes outlined in this post. If you assign groups, they can just enter those students’ names in the sharing window. They should pop up easily since you are all in the same organization. I’d just remind them to not change the settings to edit. Another option is for them to share their work back with you and for you to send out the links, but that’s more work. I hope that helps!

Hi Alyssa, thank you so much for your great tuto. I created a Google slide to make my students learn. So I created Classwork an a new Assignment.* Then a went to my Google Drive to select the Google Slides file I want to assign. Click Insert. I choose ‘make a copy for each student’ because I want to share the file and I want every single student to work on the slide. So I can see if everyone is doing well. I wonder if that is the proper way to do. Kind regards from Luxembourg Jean-Paul
That’s right! And then they can share their Slides back with you. 🙂 I hope they enjoy it!

Is there anyway to share Google Slides that students can do work on in Outschool? I’m trying to figure out how to do that without Google Classroom.. Thanks for your help!
I’m afraid I don’t have any experience using Outschool. If you have students’ email addresses, you can share a link with them. Another option would be to create a force-copy code and then use a URL shortener, and send them that link. Good luck!

Make a copy is not showing up as a choice, only view or edit. What do I do?
Hi Trish! Are you in GC or sharing straight from slides? If you’re sharing right in Slides, they’ve changed it a bit since I wrote this post. You can copy the link and then change the end of the link to /copy (delete /edit and everything after it). I hope that helps!

This happens to me sometimes, but it’s a problem with G Classroom I think. What I do is delete the assignment and create it again. It usually works and shows me the three options the second time around.

Hi there. I assigned Google Slides as outlined above with each student getting their own copy. They are showing up very small and hard to see. Is there a way to make the screen where they can add their own text big enough to actually read without it blurring?
Hi there! I’m not sure what might be going on, as it depends on your device. Google Slides does have a zoom option and I hope that can help!

Thank you. This was helpful. I’m wondering if there is a way to share a slideshow in Google classroom that will open up in the slideshow. So students don’t have to start the slideshow. I want to have students open it already in presentation mode on the first slide.
Great question! I haven’t played with that, but I found some things to try here: https://www.simpleslides.co/blog/how-to-make-google-slides-play-automatically
Leave a Reply Cancel Reply
Join the mailing list for tips, ideas, and freebies.
- Mentor Teacher
- Organization
- Social Studies
- Teacher Tips
- Virginia Studies
- Help Center
- Assignments
- Privacy Policy
- Terms of Service
- Submit feedback
Set up Assignments in Schoology or another LMS
This article is for admins.
Note : To set up Assignments in Canvas, go here instead .
To set up Assignments in your learning management system (LMS), you need to:
- Generate a Learning Tools Interoperability (LTI) key and a secret code in the Assignments admin console .
- Use the generated LTI key and secret code to set up Assignments as an LTI tool in your LMS.
Set up Assignments in Schoology
- Go to the Assignments admin console .

- Sign in to Schoology as an administrator.
- Go to the Schoology Apps Center.
- Click the Google Assignments app .

- Click School Apps to return to your Organization Apps.

Set up Assignments in other LMSs
- Save or copy the LTI key and secret code. You’ll need them for Step 2. Tip : To keep your key and secret handy, don’t click Done until you complete Step 2.
- Set up Assignments in Blackboard
- Set up Assignments in D2L/Brightspace
- Set up Assignments in Moodle
- Set up Assignments in Sakai
- Set up Assignments in other LMSs
Need more help?
Try these next steps:.
IMAGES
VIDEO
COMMENTS
Click Submit Assignment. Within the Upload window, select Resources. Click Apps, and then Google Drive Resource App. Search for your document using the search bar. Check the box to the left of the item you wish to upload to the assignment. Click Import and select Import File.
In this two-minute tutorial, learn how students submit work to assignments in Schoology. Learn how to upload files, write an original post, attach files fro...
This video will show you how to find Google Slides assignments on Schoology and how to open them. The video will also show how to submit an Google Slides ass...
About Press Copyright Contact us Creators Advertise Developers Terms Privacy Policy & Safety How YouTube works Test new features NFL Sunday Ticket Press Copyright ...
To use Google Drive Assignments, the teacher must first add the app. Here's how: In Schoology, click the Apps button (the 4-squares in the top of the Schoology screen). Click App Center. Select Google Drive Assignment. Click Install LTI App. Select the courses/sections to which you would like to add the app. You will be asked to click " I ...
Under Submission Type, select External Tool click Find. Click Google Assignments, which will open a popup window. If this is your first time using Assignments in the course, confirm your Google Account. Select Create assignment. Under Title, enter a name for the assignment. Under Files, click Attach and select files. Click Create.
Below, I will show you the steps that you will take to assign Google resources on Schoology. Don't forget to click here to get the FREE reading graphic organizers for Google Drive sent immediately to your inbox! Step 1. First, go to Resources to connect your Google Drive to your Schoology account.
Choose 'Google Drive Resource App'. 7. If you have not linked your Google account, you will need to link it. Please click on this link to see directions on how to link your account: SAU19 Knowledge Base - Linking Student Google Accounts in Schoology 8. Click on the gear next to the Google Slide you want to embed and select 'Import Embed'.
1. Open a Google Chrome Browser Window. 2. Sign into Google. 3. On top of your page is a little icon with 9 boxes, click on it and select "Drive". 4. On the left side of the page is a "Create" Button which is where you create new Google Documents and Forms, and next to that is an up arrow.
This video will show you how to submit an assignment using your device's camera to take a picture. Submit an Assignment by Creating an Audio File or Video Recording. ... Google Slides and Google Docs from Schoology into a separate tab or window. Submit an Assignment by Uploading a File.
Learn how to assign Google Slides into your Schoology account! In this video, I show you how to assign Google Slides from my 4th Grade Math Notebook into Sch...
You can use Assignments with any learning management system (LMS) that supports LTI 1.1 or higher, such as Schoology, Blackboard, Moodle, Brightspace/D2L, and Sakai. For these LMSs, we only provide support through the Assignments Help Community at this time. Related articles. Set up Assignments in Schoology; Set up Assignments in Blackboard
Next to Select your LMS, click the Down arrow Schoology Generate. Under Consumer key and Shared secret, copy the codes. Tip: Keep this window open until you finish the setup in Schoology. Step 2: Add Assignments to a course. Sign in to Schoology and find the Assignments app. Click Install LTI App. Open a course.
Follow the steps below to reconnect to your account: Within your course, click Add Materials and select Add Assignment. Under Assign From App, select Google Drive Assignments. Within the Add Assignment From Google Drive Assignments modal, click Options, and select Account Settings. Select Log Out, and confirm.
To share collaborative Google Slides with students in Schoology you need to create the Google Slides, click on the share button, change the access to "anyone with the link can edit" or paste your class roster to share the slides with all of your students. Copy the link. Create an assignment in Schoology and paste the link to the editable ...
This instructional video was created for GCHS students on how to complete a Google Slides Assignment in Schoology.
Assignments is an add-on application for learning management systems (LMSs) to help you distribute, analyze, and grade student work with Google Workspace for Education. For file submissions, Assignments make Google Docs, Google Sheets, Google Slides, and Google Drive compatible with your LMS. You can use Assignments to save time distributing ...
Create your Google Doc. Go to Materials Page in your Schoology Course. Click Add Materials. Click Add Page. Click the Insert Content Button. Select the Google Drive Resource App. Click the checkbox by the file you want to add. Click Insert > Embed. Add text or other content before or after the doc if you'd like.
Click Create and then Assignment.*. Type the title. Click Add and then Google Drive. Select the Google Slides file you want to assign. Click Insert. Choose how you want to share the file (view, edit, or make a copy). Add any additional information (like a due date, number of points, rubric, or selecting particular students).
This video shows how to embed Google Slides into a Schoology Page.
PowerBuddy for Learning. PowerBuddy for Learning is the personal assistant for teaching and learning. PowerBuddy makes educators' lives easier by helping them easily create high-quality assignments and instructional content. Students benefit from an always-available personalized assistant to support them in the way they choose to learn.
Sign in to Schoology as an administrator. Go to the Schoology Apps Center. Click the Google Assignments app.; Click Install LTI app I agree.; Click Add to organization. You see your Organization Apps. Next to Google Assignments, click Configure.; In the Consumer key and Shared secret fields, enter or paste the key and secret generated in Step 1, above, click Save settings.