HCI Bench Network Troubleshooting

Published by vnoob on november 26, 2018.

Note: I first wrote this a month or two ago, so it is possible a newer version of HCIBench has fixed some of these issues.

This is definitely not an exhaustive troubleshooting guide HCIBench for networking….however I did want to provide a couple of tips that might save you some time…..they definitely would have helped me.

The first of which to be aware of is to just be aware of this button in the HCIBench gui.

clip_image001

If this box isn’t checked, all of the “helper” VMs that HCIBench spins up will try to get their IP via DHCP. This itself isn’t that crazy as the tooltip that appears for this option pretty much states that. The thing to be aware of is how often you are running HCIBench or even doing a validation before a test. Each time HCIBench is doing a validation or a test, it is pulling an IP from your DHCP.

Just after a couple of runs, I had 12 new ip leases in DHCP. If one is not careful it can quickly fill up your DHCP pool(I wasn’t careful). Then someone would need to figure out why suddenly HCIBench was no longer able to grab IPs…..

Now the second thing and issue I ran into is:

clip_image002

Huh, looks familiar.

With the option selected, HCI bench becomes its own DHCP server and statically assigns the Ips to the “helper” vms as it sees fit.

I am sure for a decent number of people this is not an issue, but it can be if your HCIBench is configured like this:

clip_image003

From above, you see that the DNS server is on a 192.168.1 subnet and the regular address of the HCIBench server is on a 10.10.1 subnet. Nothing too crazy right?

Well I found that when I did this, during Validation HCIBench would lose all connectivity and fail Validation…and be unavailable for several minutes afterward.

Really annoying, well after some troubleshooting and some digging I found a comment on the HCIBench website that is a workaround to this very issue. I will let Mick Kelleher’s comment do the explaining.

clip_image004

Long story short, depending on how you set your ip config for HCIBench, if you also have the option checked from above, HCIBench may freak out and not know what to do.

Fortunately Mick also provided the workaround above.

After utilizing the work around, we see the helper VMs get an IP on a completely different subnet and my Validation and test was able to complete successfully.

clip_image005

Hopefully this helps someone out there 🙂

Share this:

Leave a reply cancel reply, related posts, change vmtools upgrade policy with ansible.

For any familiar with PowerCLI, this is one of the first scripts someone may learn. It is just long enough to need more than one-liner, but short enough to feel like you don’t need to Read more…

hcibench ip assignment failed

Running Ansible Playbooks against vSphere

Normally I frequently use Powershell when it comes to vSphere automation, but lately, I have been wanting to develop tools and scripts that are user-friendly and easily reusable. With those objectives in mind, it is Read more…

Tanzu Homelab: Deploy Tanzu

Now for the moment of truth, it is time to deploy Tanzu. Assuming all the prerequisites are configured correct, this is actually a pretty straightforward process. Start by going to Workload Management, this is under Read more…

https://cliffcahill.com

Converged and hyper converged infrastructure.

hcibench ip assignment failed

Deploying and Configuring HCI Bench

One of the tools I use to benchmark our VxRail clusters is HCI Bench. I am going to give a quick overview of how to deploy and configure the product.

You will need

1 – HCI Bench OVA   – https://labs.vmware.com/flings/hcibench

2 – VDBench Tool  – http://www.oracle.com/technetwork/server-storage/vdbench-downloads-1901681.html – This will require an Oracle account to download

For additional reference I recommend

1 – HCI User Guide – https://download3.vmware.com/software/vmw-tools/hcibench/HCIBench_User_Guide_1.6.5.pdf

Once you have downloaded your hcibench.ova deploy using the vSphere WebClient.  I have attempted this in the past with the HTML5 Client but it failed.

Right Click and Deploy OVF – Select hcibench.ova file, name your VM and select Datacenter when you want to deploy. Click next and then choose which host to run the VM on.
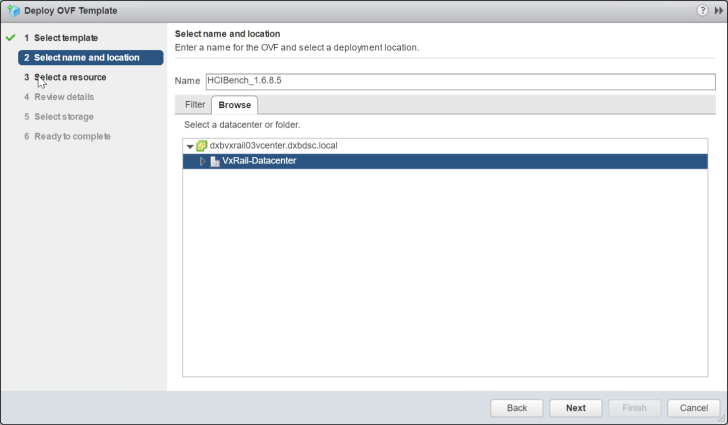
OVF1

Review the template/ova details and click next.
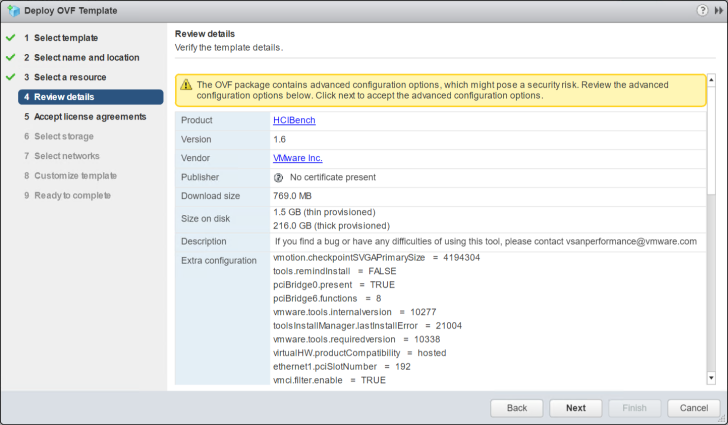
OVF2

Accept the License agreement to continue. Note there are two separate agreements to be accepted.
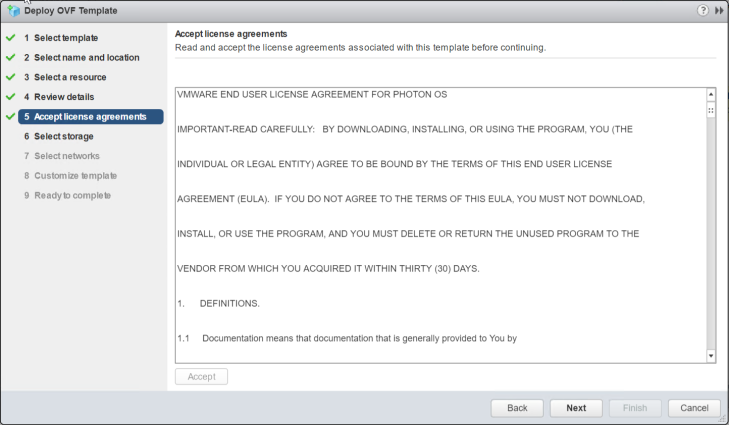
OVF3

Select which Port group should be associated with each nic.

1 – VM Network – Select the port group where you worker VMs will be deployed – These VM will generate the IOPs/Workload based on a profile that you later provide. This can be an untagged portgoup on your VDS with no gateway required.

2 – Management Network – This is the Portgroup that you will later use to access the HCI Bench UI (User  Interface) in order to configure the VM
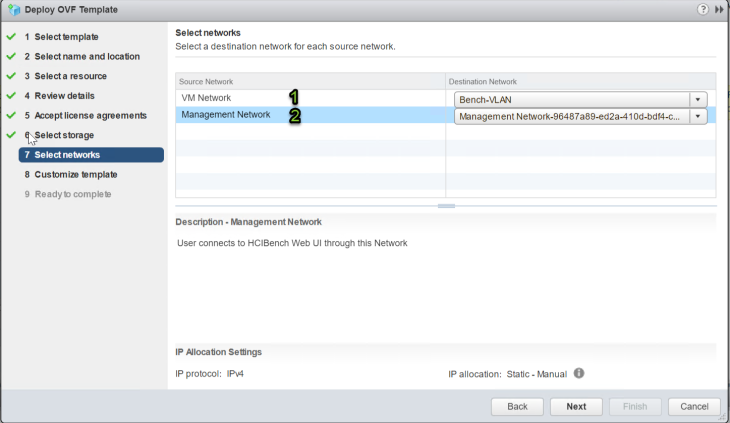
OVF5

Set the UI IP Information. Make sure your DNS is reachable and working. As part of the validation process, it will check your DNS info. Ensure that your set Management Network Type to Static – otherwise, it will attempt to set an IP address via DHCP
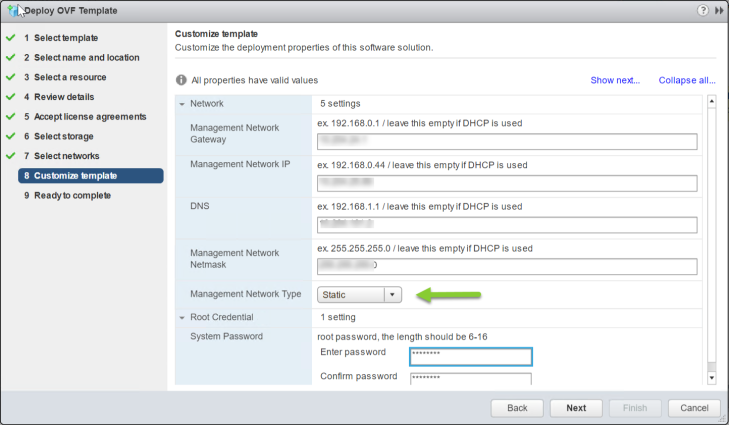
OVF6.png

Click next and Finish to start your deployment. Once deployment is is complete connect to your HCI Bench using https://ipaddress:8443

  • Username: root
  • Password: System Password that you set in the OVA deployment wizard
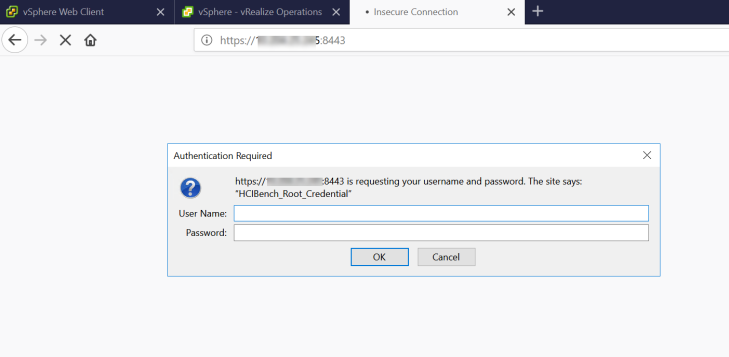
Step 11

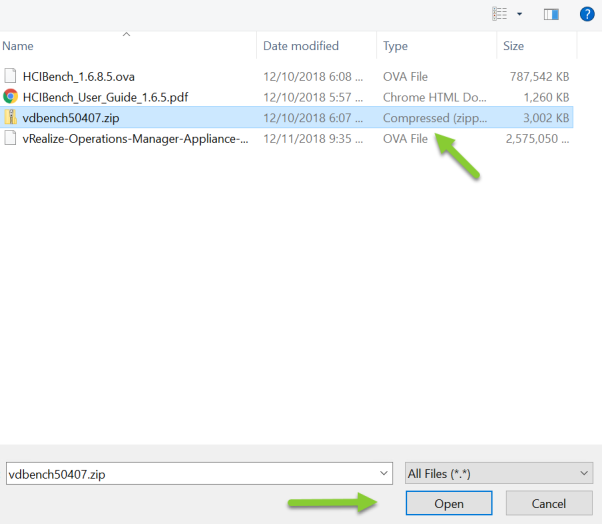
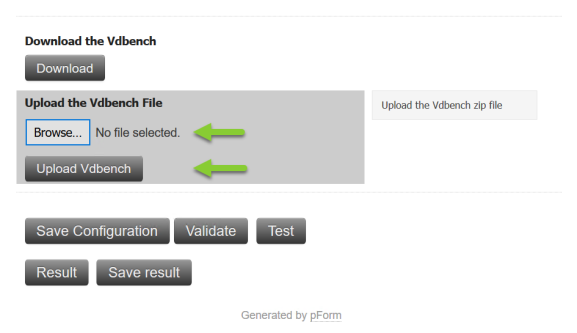
The first step is to upload the VDBench Tool  “vdbenchxxxx.zip file”. – For this, you will need to scroll down to the end of the form. Click on Browse
Step 12

Click on the file and select Open

Step 13

This Select the Upload VDBench button. (It will only take a few seconds)

Once the upload is complete you will need to fill out the form to allow HCI Bench to connect to vCenter in order to deploy the worker VMS.

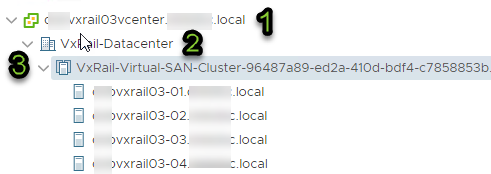
The information you will need is from your vCenter instance is.

  • vCenter Username:
  • vCenter Password:
  • vCenter Datacenter
  • vSAn Cluster Name:
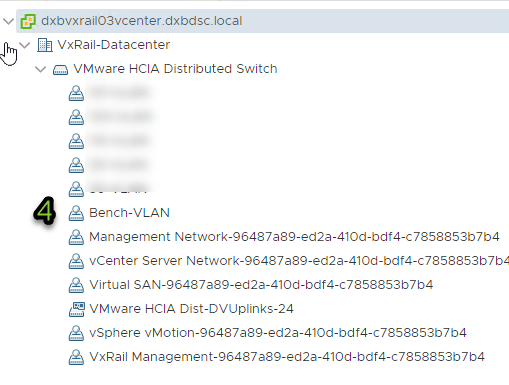
  • Port Group (Port Group where the working VMs will be deployed):
  • vSan Datastore Name

Hosts and Cluster View
required1

Network View

required3.png

Storage View

required2.png

Below is the full HCI Bench configuration page. I have used the numbering scheme as above to help identify where the information gets plugged into the UI.

HCI Bench Options

  • vCenter Hostname or IP address
  • Datacenter name within vCenter
  • Cluster Name within your Data Center
  • Port Group where your deploy your Worker VMs
  • vSan Datastore name where to deploy the worker VMs
  • Unless you want to use a DHCP server to assign your worker VMs you should Tick this box.
  • It will statically assign an IP address based on this drop down selection. Ensure range does not clash with an existing network to avoid any IP duplicates.0
  • Here you can select to target individual hosts if required. If you tick this box you need to give host details.
  • Number of Total  Worker VMs that will be deployed on the Cluster you have selected
  • The number of VMDKs / Data Disks per worker VM.
  • The size of each VMDKs / Data disks per worker VM
  •   Generate Parameter file . I will do a separate post on this at a later date. But know that you need to configure a parameter file prior to saving or validating the information entered. If you create a new parameter file you will need to click the refresh option for that file to show in the drop down. This field is empty for a fresh install of HCI Bench
  • The Length of time to run the test in seconds.  Note that any value enter here will overwrite any time value that is configured in the parameter file

Save Configuration   – You need to make sure to save any changes you make to this form or else the values will not update on the configuration file

Validate – Once you have entered the relevant information you should validate the information prior to running the test. This will ensure all the data has been entered correctly and connectivity between the worker VMs is running smoothly.

Validate

The Validation Log can be followed here at this URL:

ipaddress/hcibench_logs/prevalidation/pre-validation.log

Test –  Will start the test using the profile and time scale that you set in the options

Share this:

' src=

Published by Cliff Cahill

View all posts by Cliff Cahill

One thought on “ Deploying and Configuring HCI Bench ”

  • Pingback: HCI Bench Parameter File – https://cliffcahill.com

Leave a comment Cancel reply

hcibench ip assignment failed

  • Already have a WordPress.com account? Log in now.
  • Subscribe Subscribed
  • Copy shortlink
  • Report this content
  • View post in Reader
  • Manage subscriptions
  • Collapse this bar

CormacHogan.com

Storage, Virtualization, Container Orchestration

Getting started with HCIbench, the benchmark for hyper-converged infrastructure

benchmark

Please note that this blog post is not about discussing the results, as these will vary from environment to environment due to the open nature of VSAN’s HCL. This blog is more of a primer to assist the reader in getting started with HCIbench.

Step 1 – Deploy the OVA

To get started, you deploy a single HCIbench appliance called Auto-Perf-Tool . There’s nothing special about the appliance itself. It comes as an OVA, and if you’ve deployed an OVA appliance before, then this is no different. You provide the usual information such as where to place the appliance. For those of you wishing to test VSAN performance, you’ll be deploying this appliance to a VSAN datastore most likely.

Step 2 – Point a browser at the appliance, and add vSphere environment info

The next step is to open the console and populate some information on the appliance, such as a root password and some network details. This is even easier if you use DHCP. When this information is provided, the appliance completes its boot process. At this point, you open a browser and point it to the IP Address of the appliance and port 8080, and you are now presented with a template/form to populate. The first section of the form looks for information such as the vCenter server and credentials, data center, cluster name, network, datastore, etc. Note that in the current version, the VM Network must be on a standard vSwitch. You cannot use a distributed switch (DVS) portgroup this time. The network defaults to “VM Network” and datastore defaults to “VSAN datastore” automatically if these are not provided:

hcibench setup 1

[Update: 21-Oct-2015] Ensure that the Datastore Name field is populated in the most recent appliance. Although it is shown as not being required, in the latest release we support multi-datastores deployments so this field must be specified, even if it is the VSAN datatstore that is being tested. If you do not add this, the benchmark will fail with “A required parameter is NULL, please re-check your configuration file !”

Step 3 – Add host and benchmark VM info

The next section is about the hosts, and the VMs that are going to run the benchmark. You add a list of ESXi hosts (the hosts that are participating in the VSAN Cluster), one line at a time, and then supply information about the VM workload, including number of VMs you wish to deploy, number of disks and size of disks. In this example, I have 4 hosts so I will deploy 8 VMs, each with 4 disks, and each disk 10GB in size. These VMs will be distributed across all hosts in the cluster, leveraging the distributed nature of VSAN’s compute and storage.

hcibench setup 2

Once this is done, users need to provide access to the vdbench tool. Due to licensing issues, we are not allowed to distribute the vdbench benchmarking tool, so it needs to be downloaded from Oracle if you do not have it already. There is a link provided to the Oracle website to down the vdbench zip file, but you will need to have an account on Oracle’s site to access it. Once the vdbench zip file has been downloaded locally, you must then uploaded to the appliance. The next part of the setup is to generate a vdbench parameter file, which has information such as I/O size, R/W ratio and whether the I/O should be random or sequential in nature. You should also state how long you want the test to run (3600 seconds = 1 hour below), as well as whether you want to dd the storage first (initialize it). Finally, decide if you want the benchmark VMs cleaned up once the test completes. Save the configuration. To make sure that everything is OK, run the validate test. This will verify that all the configuration parameters are correct, and will state whether it is OK to start the test.

hcibench setup 3

Click on the Test button to start the benchmark. The tool next deploys a bunch of VMs as per the configuration, each of which will run an instance of vdbench.

1. List of VMs

You can now click on the results button, and navigate via the browser to where the results are stored. There is a text file for each VM which contains a lot of information regarding IOPS, Latency and Throughput information. Here is an example of such a results output taken from my environment:

hcibench result txt

If things are not going right for some reason, there are 4 places to check.

  • Has the vdbench zip file uploaded to the appliance successfully? It should be found in /opt/output/vdbench-source . If something isn’t correct, you can always delete it, refresh the browser and upload a new version.
  • Has the vdbench parameter file been created correctly? It should be located in the /opt/automation/vdbench-param-files . the name varies based on what configuration options are chosen. If it doesn’t look correct, you can always delete it and generate a new one.
  • Has the complete configuration file, including vCenter and Host information been created correctly? It should be location in /opt/automation/conf and is called perf-conf.yaml . If it doesn’t look correct, you can delete it an recreate a new one.
  • Finally, the logs of the performance test runs are located in /opt/automation/logs . If the tests are behaving, and you cannot see why from the messages in the browser, this is a good place to look.

Where do I get the bits?

  • [Update: 8/23/16] Here is a link to the latest HCIbench appliance OVA .
  • The user guide can be downloaded by clicking here.

Happy benchmarking!

  • Click to share on Pocket (Opens in new window)
  • Click to share on Facebook (Opens in new window)
  • Click to share on Twitter (Opens in new window)
  • Click to share on Reddit (Opens in new window)
  • Click to share on WhatsApp (Opens in new window)
  • Click to share on Pinterest (Opens in new window)
  • Click to share on Telegram (Opens in new window)
  • Click to share on LinkedIn (Opens in new window)
  • Click to share on Tumblr (Opens in new window)
  • Click to email a link to a friend (Opens in new window)

' src=

Published by Cormac

View all posts by Cormac

50 Replies to “Getting started with HCIbench, the benchmark for hyper-converged infrastructure”

Hi Cormac, I’m just wondering if this tool can used to compare different HCI solutions? Having a look at the User Guide you linked to, it seems very VSAN specific (uses VSAN Observer, asks for VSAN cluster info, etc). It would be great to have a cross-vendor HCI testing tool that customers can spin up during POCs.

My understanding is that it can be used for other HCI platforms and storage types. The request for a cluster is vSphere specific – its just that in the case of VSAN, it is also the VSAN cluster. But this could be a generic cluster which does not have VSAN enabled. It also produces the vdbench output, so that can be used as a way to compare different solutions.

I have a hybrid array I am trying to run One of the volume as a VSAN data store . Is it required for me to check if they (their controller) support pass through ? I am suspecting that to be the reason why I am seeing my array LUNs as ineligible disks ? i made sure my LUN is formatted as VMDK

Any devices used for the VSAN datastore must be local. You will not be able to use LUNs/Volumes from an external array.

@cormac , Thanks, Are you aware of any similar tool which acts as a wrapper to VDI bench , But still can be used to run IOs to non VSAN disks like iscsi vmdk datastores ?

There is the I/O Analyzer fling – https://labs.vmware.com/flings/io-analyzer

Hi cormac , Thanks . Do you have any pointers to a medium scale VDI VSCSI trace that I can replay and test on the IO Analyzer ? Thanks in advance .

I don’t have anything like that – sorry.

This looks like an excellent tool, but I don’t see the VM’s deploy. My validation completes successfully, but my log for *-vm-deploy.log returns:

Expected Datastore but got Datacenter at “”

I have a distributed switch, so I’m not deploying to the host directly. I see the perf-test-vms folder create and delete successfully however. Any tips on what might be wrong?

You cannot use a DVS with this version.

Can you create a VM network on a standard vSwitch on each of the hosts and try again.

We just had the fix for that, please re-download the ova and try it again.

Thanks, Chen

I need to perform testing of EMC VNX storage system through VMware environment. I have three different Workload profiles.

Is it possible within vdbench parameter file to define these three concurrent Wokrload profiles, or I need to deploy three HCIbench appliances each with different vdbench parametar file (reflecting each Workload profiles)?

Is it possible to perform testing using same VMware hosts (lets say 4 Vmware hosts, with 10 VM machines for each HCIbench?

Is it possilble to define multiple Data Stores where testing will be performed?

Danail, Please see my answers inline.

C.W. => HCIBench can handle multiple vdbench param files, and will test them one by one if you select “USE ALL” of “select a vdbench parameter file”

C.W. => if i understand your question correctly, are you asking if HCIBench could be deployed on the Cluster which will be tested against? For this question, the answer is yes.

C.W. => Yes, our latest version supports multi-datastore deployment, but the number of vm should be splitted evenly(e.g. if you specify 3 datastores, the number of vms must be 3*N)

Just upgrade my previous version of HCIBench appliance with the latest one and now I can’t validate any configuration anymore 🙁 It tells me that a required parameter is null and that I have to check my configuration file. All mandatory fields are filled correctly but validation is not possible. When I try to run the test, it last a few seconds before it tells me that they’re finished but without any results. @Chen Wei : Any workaround for this ? Need this tool working because currently validating vSAN 6.1 proof of concept in order to show my customer the real value of the product

Check the log files highlighted at the end of the post. It should tell you what the problem is hopefully. Did you use any double quotes or other special characters anywhere in any of the fields? If so, remove them.

Thx for ur reply. I did not use any double quotes or others special characters in any of the fields.

I found this in the all-in-one-testing.log :

/opt/automation/lib/deploy-vms.rb:29:in `’: undefined method `count’ for nil:NilClass (NoMethodError) /opt/automation/lib/vdbench-io-test.rb:22:in `’: undefined method `each’ for nil:NilClass (NoMethodError)

A ruby related error ?

Check the configuration files, both the yaml one and the vdbench one. Make sure that all the entries look correct.

perf-conf.yaml checked. No errors in it for me. What is the vdbench configuration file that ur talking about ? Is it in /opt/automation/conf ?

Not quite – they are in /opt/automation/vdbench-param-files. See the troublehsooting section above. If you still don’t have a solution, email [email protected] (this help email is in the guide iirc)

Thx Cormac. I’ll send an email to vsanperformance 😉 I’ll keep u update to the issue

[email protected] is not a valid email address 🙁 Got a delivery error message on it. Another contact ? Thx Cormac

It looks like it is case sensitive – try [email protected] instead

I’ve deployed the HCIBench tool and everything seems to be working, validation completes successfully, 10 VM’s are deployed etc, however when it deploys the VM’s they do not boot into an OS they just sit there waiting on PXE boot, in the web GUI the progress bar does not get past “deployment started”. Is the OS not on the 8GB drive that’s deployed as part of ovf ?

Yes – that doesn’t sound right. Please email [email protected] for assistance.

Could you try to redo the testing? That happened might because of deployment was interrupted.

Thanks for the prompt response guys. I’ve redeployed the tool and I’m getting further than before. The test now runs but completes after 10 or so seconds even though I have set the test to run for 6000 seconds. When I look at the results file VMs, IOPS, TPUT & LAT are 0.

Did you see the vms being deployed? Could you check the logs in /opt/automation/logs? let me know if you need a troubleshooting by sending the email to [email protected] .

Yes it’s all working now, it was a problem with the DHCP server.

Hi, I’ve a lab test with 3 identical ESXi 5.5 U2a hosts A,B,C.

The Auto Perf Tools work fine on host A and B but not on host C.

I deep analyze the trouble checking inside the VM using a gparted iso bootable distribution. I’ve found that when the rvc-perf-vm deploy the vdbech-vm on server C the first vmdk disk exists but it is empty (no partition, no OS’s).

The conseguence of that is the VM don’t find bootable.

I look at log but I don’t have found any usefull information;

[root@rvc-perf-vm logs]# cat all-in-one-testing.log [root@rvc-perf-vm logs]# cat host-dcesx30.sanita.vi-vm-deploy.log 2015-10-28 15:53:47 -0700: Creating 1 VMs… 2015-10-28 15:53:47 -0700: Creating 1 VMs in batch 0… networks: VM Network-1284 = vmlaboratoriovm vdbench-1446072826-serverC-storage-0-1 DEBUG: Timeout: 300 Iteration 1: Trying to get host’s IP address … % Total % Received % Xferd Average Speed Time Time Time Current Dload Upload Total Spent Left Speed 0 1042M 0 81638 0 0 1295 0 9d 18h 0:01:03 9d 18h 1040 curl: (23) Failed writing body (282 != 16384) Iteration 1: Trying to access nfcLease.info.entity … HttpNfcLeaseComplete succeeded Adding 10 disks ReconfigVM vdbench-1446072826-serverC-storage-0-1: success Added device disk-1000-1 ReconfigVM vdbench-1446072826-serverC-storage-0-1: success Added device disk-1000-2 ReconfigVM vdbench-1446072826-serverC-storage-0-1: success Added device disk-1000-3 ReconfigVM vdbench-1446072826-serverC-storage-0-1: success Added device disk-1000-4 ReconfigVM vdbench-1446072826-serverC-storage-0-1: success Added device disk-1000-5 ReconfigVM vdbench-1446072826-serverC-storage-0-1: success Added device disk-1000-6 ReconfigVM vdbench-1446072826-serverC-storage-0-1: success Added device disk-1000-8 ReconfigVM vdbench-1446072826-serverC-storage-0-1: success Added device disk-1000-9 ReconfigVM vdbench-1446072826-serverC-storage-0-1: success Added device disk-1000-10 ReconfigVM vdbench-1446072826-serverC-storage-0-1: success Added device disk-1000-11 Powering on VMs … PowerOnVM vdbench-1446072826-serverC-storage-0-1: success Waiting for VMs to boot … [root@rvc-perf-vm logs]# cat test-status.log Deployment Started.

Can you help me?

Hi, I’ve solved in the old way, I’ve rebooted the hosts without change anything and now it works. Great tools!

I have deployed the HCIbench OVA to an EVO RAIL cluster and I’m experiencing some issues when it starts the deployment of the guest VMs.

The problem is with the naming convention used for the Vdbench Guest VMs. When it start the deployment of the VMs, it appends the name of the datastore to the Guest VMs. However, in an EVO:RAIL deployment, the VSAN datastore has a long name (e.g: MARVIN-Virtual-SAN-Cluster-f990015d-8dc2-4869-ab88-1b04f3d3773f). Because of the long name, it fails with error message “is invalid or exceeds the maximum number of characters permitted.”

Here one example of a VM name and error when deploying to an EVO:RAIL VSAN datastore: “‘vdbench-vc-1446661119-MARVIN-Virtual-SAN-Datastore-f990015d-8dc2-4869-ab88-1b…’ is invalid or exceeds the maximum number of characters permitted.”

Thanks, Jose

I will let the developers know.

Is that possible to modify the name of vsan datastore with a shorter name? if not, please get into the HCIBench console and modify the file: /opt/automation/lib/deploy-vms.rb

please find and change the vdbench-vc-#{time_var}-#{datastore} to vdbench- #{datastore}.

the #{datastore} pattern is used for identifying where the vms are to support multi-datastores deployment.

Feel free to contact me directly by email if you have any further issues: [email protected]

Thanks Chen and Cormac! This is a great tool! I thought about changing the datastore name, but didn’t want to change the EVO:RAIL default setup. Changing the file “deploy-vms.rb” did the trick.

I’ll let you know if I find any other issue.

I tried to send you an email directly to [email protected] but the message is being rejected.

After the change, VMs were deployed correctly and workload executed, but the results show 0 in all the counters. Is there any reason why the results are 0 ?

/results/results20151104101655/vdb-10vmdk-10ws-4k-70rdpct-0randompct-1446758335-res.txt

Datastore: MARVIN-Virtual-SAN-Datastore-f990015d-8dc2-4869-ab88-1b04f3d3773f VMs = 0 IOPS = 0.00 IO/s TPUT = 0.00 MB/s LAT = 0.00 ms =============================

This was an issue with one of the earlier releases. Are you using the most recent version from the link provided Jose?

Could you verify if there are vdbench results files in the directory “/results/results20151104101655/vdb-10vmdk-10ws-4k-70rdpct-0randompct-1446758335”? If they are there, means the testing is finished successfully, could you let me know the results files name?

Yes, the reults files for each VM are there and they have the vdbench results. However, the *-res.txt” file for every workload has “0” for the metrics.

/results/results20151107181133

(this is the file that has 0 as results) results20151107181133/vdb-4vmdk-20ws-8k-55rdpct-80randompct-1446949193-res.txt

results/results20151107181133/vdb-4vmdk-20ws-8k-55rdpct-80randompct-1446949193/

here one of the VM’s output:

results/results20151107181133/vdb-4vmdk-20ws-8k-55rdpct-80randompct-1446949193/vdbench-1446948711-1.txt

Just add some info here, I did a test in a non-VSAN datastore, and the “-.res.txt” has the total values correct for each workload. Apparently the problem is when running workloads in a VSAN datastore.

the vdbench result file for each individual vm should be named as “vdbench-vc-TIMESTAMP-DATASTORE_NAME-[1…n].txt”, since the files you have doesn’t contain the Datastore_name, calculation script was not able to find those files.

my suggestion: 1. in the file /opt/automation/lib/deploy-vms.rb, you should have the #{datastore} showed up in where you modified last time. 2. Modify the file name in /opt/output/results/results20151107181133/vdb-4vmdk-20ws-8k-55rdpct-80randompct-1446949193/ to vdbench-DATASTORE_NAME-[1…n].txt, and run “/opt/automation/vdb-process-long.sh /opt/output/results/results20151107181133/vdb-4vmdk-20ws-8k-55rdpct-80randompct-1446949193 DATASTORE_NAME”, if the result doesn’t look right, use /opt/automation/vdb-process-short.sh instead.

let me know if you need further assistance.

thanks, Chen

I have a couple of questions, it woudl be great if you could help me with it

Can we change the disk format of the vdbench test VMs. As of now it is think provisioned lazied zero , how can we make it as thin provisioned or think provisoned eager zeroes.

How can we change the vdbench test VMs, CPU and memory. ? Do we have to edit /opt/output/vm-template/perf-ubuntu-vdbench.ovf

Yes, you can use thin provision by comment out the line 871 of /root/rvc/lib/rvc/modules/vsantest/perf.rb

Yes, you have to modify that file to change cpu and ram.

Thanks Chen, It works .. Regards ~Anil

Is it possible to change the storage policy being used for the worker VMs?

We’re using VSAN 5.5 currently and the worker VMs don’t pick up any storage policy when they are deployed so they have the default settings (n+1, stripe width of 1 etc). We’d like to compare different settings such as stripe width so this would be a useful feature if possible.

Cheers Andy

I’m not sure if there is an easy way to do this. One way is to modify the default policy before each test, and then set it back afterwards. Unfortunately, this can only be done via esxcli in VSAN 5.5 iirc.KB 2073795 has information on how to do this.

Thanks Cormac. I thought it would be along those lines but hadn’t seen that KB before so this will help me out if the test results mean we want to change the default policy.

Doesn’t look to be a huge job to modify the default policy before each test though.

Thanks again.

Hi Everyone, I have successfully deployed the hcibench appliance. The test validation succeeds. However, when I start the test. I get one of two results.

1. The test shows Completed immediately. Then I see the worker VMs deploy and sit at a OS not found screen.

2. Test Starts. Deployment started begins and halts around 40% complete. The worker VMs are deployed from the template and power on. But no further progress is made on the test (I cancel after an hour or so)

The documentation and this website reference [email protected] as a potential contact for help with the tool, but any emails to that addressed are bounced.

I think the VM network on which the VMs are deployed needs DHCP

I’m trying to use HCIbench and I’ve followed the documentation- everything seems to be configured correctly, but when I click, “test,” it creates all of the VMs, powers them on for a few seconds, powers them off, and then deletes them. The results look something like this:

Datastore: vsanDatastore VMs = 0 IOPS = 0.00 IO/s TPUT = 0.00 MB/s LAT = 0.00 ms ============================= Any thoughts on what might be going on? Thank you.

Check through the log files highlighted in the article Vincent. It should give you a bit of a clue as to why this is failing. You also need to have DHCP configured for the vdbench VMs to deploy – is this available?

Comments are closed.

StorageReview.com

In the Lab: VMware HCIbench Hands On

VMware's VSAN group recently announced a free storage performance testing tool for Hyperconverged Infrastructure (HCI), the HCI benchmark or HCIbench . While stressing traditional arrays with I/O or bandwidth tests is fairly well understood, applying synthetic tests to HCI gear requires a careful approach and a steep learning curve. With traditional storage infrastructure you setup your I/O generator of choice with a given workload profile, point it to some LUNs and let it rip. Hyperconverged testing requires a large-scale approach where many VMs (often 10-64) simultaneously apply that workload across multiple vDisks, at the same time… not to mention collecting all of that data when the task finishes. This type of approach is needed to adequately stress the platform and move closer, although not equal to, a real-world production setting. As you might imagine this is hard for experienced reviewers to accomplish and can be impossible for many end-users to complete in a reasonable time frame. VMware’s HCIbench helps make this testing process much easier and lets anyone who can deploy a pre-built VM test as well as an independent reviewer test HCI better.

Before VMware launched this tool and shared it with us, we had some growing pains while we worked towards scaling up our own tools to measure the performance of VSAN and other HCI platforms. Currently we use FIO from Windows and Linux systems (some physical and others VMs) where we point it to a local or remote (iSCSI, SMB, CIFS) volume and kick off a singular workload. With an SSD, SAN or NAS, you target the physical storage device, or multiple LUNs to stress a dual-controller platform and can effectively stress it from a central point. One script will kick this off, which for an example we've included a snippet of one of our FIO parameters below:

fio.exe –filename=\\.\PhysicalDrive1:\\.\PhysicalDrive2:\\.\PhysicalDrive3:\\.\PhysicalDrive4 –thread –direct=1 –rw=randrw –refill_buffers –norandommap –randrepeat=0  –ioengine=windowsaio –bs=4k –rwmixread=100  –iodepth=16 –numjobs=16 –time_based –runtime=60 –group_reporting –name=4ktest –output=4ktest.out

The reviewer or tester needs to be able to correctly modify the script between tests to hit the correct device, apply the correct load, not to mention have multiple scripts for different block-size workloads. Then add in the scripts inside scripts (need to loop for preconditioning or multiple loads!), modify them for powershell or bash and you can see how this quickly spirals out of control. To make all of this worse, you need to have more custom-written scripts to parse your benchmark-generated output files to graph and compare differences. As a reviewer, we need to have these in our toolbox and use them daily. It generally takes months or years to get a good set of tools, know their strengths, but also understand their weaknesses. A customer evaluating a new storage platform generally doesn't test storage for a living and would be quickly overwhelmed by all of this. HCIbench uses the same tools trusted by independent-reviewers and makes it easy for anyone to use them.

HCIbench simplifies hyperconverged testing. Instead of running standard testing tools with lots of scripted setup and gathering lots of data, HCIbench automatically deploys multiple VMs running Vdbench across your cluster. While the tool is initially aimed at HCI market segments, it works just as well on traditional clusters powered by shared storage. The kicker in all of this is VMware isn’t pushing their own proprietary tool at the market or their own workload profiles. Instead they’ve opted to use the already known and trusted vdbench as the workload generator, give the customer or tester the ability to use their own test profiles and put a GUI around it to better compare and contract results. The level of reporting detail is impressive, since it not only covers the workload profiles, but ties into the hypervisor, pulling in those stats to see the cluster-wide impact of tests as they operate.

hcibench ip assignment failed

Using HCIbench is pretty easy as far as testing goes. You download the pre-built Auto-Perf-Tool OVA and deploy it into your VMware environment. Once powered it will take you through a few steps to assign itself an IP address through your DHCP, or one can be assigned to it. After that is complete you move your attention to your web browser.

hcibench ip assignment failed

The configuration page is where you enter in all the important bits for your testing environment, so the tool can automatically deploy its generated VMs.

hcibench ip assignment failed

After you scroll down, there are areas to change the default deployment details. In the Vdbench Guest VM Specification area you are able to address how the tool deploys on your gear. Four our 4-node VSAN platform we started with a number of 16 VMs and kept to the default number of data disks (10) and the default size of the data disk (10GB). With 16VMs, that gives us a 1600GB footprint on our cluster, letting us measure the performance of VMs sitting well inside flash. Increasing those values, either through VM, vdisk count, or vdisk size lets you push those limits to measure how things react to pushing outside of flash and into your spinning media tier, or in the case of all-flash arrays into the slower read-centric flash tier. For an end-user this is incredibly important, since many vendor-driven results show best case performance, not performance as your working dataset grows.

hcibench ip assignment failed

Next up you can upload, select or build your own vdbench parameter file. For four-corners testing to measure peak I/O and peak bandwidth we like to use 4K random read and write, as well as a large-block sequential value for read and write bandwidth. For a mixed workload, 8K random 70% read 30% write works pretty well to compare to industry-reported figures. To make this super-easy, we’ve created all 5 of these workload profiles and offered them up for download. These help create a starting point and will be profiles we use in reviews going forward that leverage this tool. Want to copy our tests? Download the tool, apply these profiles and compare the full reporting stats.

StorageReview's HCIbench Workload Profiles

  • 4K Random 100% read
  • 4K Random 100% write
  • 8K Random 70% read / 30% write
  • 32K Sequential 100% read
  • 32K Sequential 100% write

Once your workload is defined, scroll down and select any other settings you want to use. The VMDK Warm Up parameter is helpful to fill the newly created vDisks before testing. We’ve also added the “warmup” command into our shared workload files to further help precondition the workload so hot-data is migrated into flash. Testing duration is best kept to longer times for a cleaner result. If you want to try out a few runs, start at 900 or 1800 seconds. For a more formal run go for 6 hours (21600 seconds) or longer. The checkbox for Clean up the VMs should be checked as well, since this will let HCIbench create and deploy the VMs and delete them off your storage once the test completes. At the very bottom you will notice you need to download the Vdbench binary and upload the complete ZIP file for the tool to function. There are restrictions on distributing the tool in the Oracle EULA, meaning you need to download it yourself. Click the download link to take you to the Oracle site and download the vdbench50403.zip and upload that file still zipped in the prompt. Lastly, save your configuration, validate it to make sure you didn’t leave anything out and start the test. Once completed the you can review the results.

hcibench ip assignment failed

The results page drops you into a basic HTML file viewer.

hcibench ip assignment failed

The first file presented is the very basic summary of the results. In our case with the VSAN workload we hit 114k IOPS with an 8K 70/30 workload with an average latency of 2ms and a throughput of 984MB/s. This is generated from the vdbench output files pulled from all of the VMs deployed on the environment. Users can go through those files if they wish to see second-by-second reported stats.

hcibench ip assignment failed

Moving into the iotest folder, click on the “stats.html” file.

hcibench ip assignment failed

This brings up every and almost any detail you can think of in a nice GUI with automatically-generated charts.

hcibench ip assignment failed

You can even drill into helpful stats like how much data was pushed over your vmknic on each host and all of its associated information.

VMware has gone to impressive lengths to make synthetic HCI testing an easier process for an end-user in a POC or even a reviewer like myself. It removes the difficulty or confusion with deploying synthetic workloads across a shared storage environment and gives you more generated details than you can shake a stick at. It also shortens the testing time needed to compare to systems effectively, increasing your chances of making a better educated decision during your POC window. At the end of the day it’s a wrapper around the open-source tool vdbench, an I/O generator known and trusted by the community, meaning there is less concern that VMware is up to shenanigans. There are limitations to this tool, since it can’t replicate an application workload or a working production environment. Those are additional tools that can be added to the comparison though, where this one offers a good starting point.

VMware HCIbench Page

Sign up for the StorageReview newsletter

hcibench ip assignment failed

Kevin OBrien

Inside the StorageReview Lab evaluating products and working with industry leaders to develop new testing environments. At home I'm raising a family.

Pure Storage Files Paperwork For Proposed IPO

Gartner issues apology for pure storage’s wildly inaccurate sales data.

  • Consumer Reviews
  • Enterprise Reviews
  • Leaderboard
  • Storage Reference Guide
  • StorageReview.com Sweepstakes Rules and Regulations

You are using an outdated browser. Please upgrade your browser to improve your experience.

HCIBench stands for Hyper-converged Infrastructure Benchmark. It is an automation wrapper around open source benchmark tools that automates proof-of-concept performance testing across a cluster. The tool fully automates the end-to-end process of deploying test virtual machines, coordinating workload runs, aggregating test results, performance analysis, and collecting necessary data for troubleshooting purposes.

The HCIBench 2.6.0 OVA file can be downloaded from VMware Fling. You can find more information about it on the VMware Fling site .

For the purpose of this installation, you download and configure HCIBench 2.6.0 in order to verify network connectivity and test vSAN performance. You will be able to estimate whether your platform is performing within the expected range of parameters. Running this tool can also help you identify configuration issues.

Deploying the HCIBench Virtual Machine

In vCenter select your cluster and right click to choose Deploy OVF Template .

Under Select an OVF Template , select URL , enter the following and click Next . If you have already downloaded the OVA, select Local file instead and point to your downloaded OVA file.

Accept the source verification.

Select the datacenter, choose a name for the virtual machine, and click Next .

Select the cluster and click Next . The template will start downloading.

Review the details and click Next .

Read and accept the license agreements and click Next .

Select the vSAN datastore and click Next .

Choose the gp-virtual-external port group for Management Network , and gp-virtual-internal for VM Network .

hcibench ip assignment failed

Under Customize Template , settings are displayed for DHCP by default. If you are not using DHCP, enter the static IP network information for the gp-virtual-external network.

hcibench ip assignment failed

Set the root password for the virtual machine and click Next .

Verify the configuration and click Finish .

hcibench ip assignment failed

The HCIBench virtual machine will be deployed. You can check its progress under the Recent Tasks tab on the VMware vSphere client.

Using HCIBench

Once deployment is complete, power on the virtual machine. When the IP address has appeared in vCenter, open the HCIBench UI in your browser by accessing https://IPADDRESS:8443.

Enter the root username and password you configured earlier and start configuring HCIBench.

  • Enter vCenter hostname or IP address.
  • Enter vCenter username as [email protected] .
  • Enter vCenter Password as the password you configured for [email protected] .
  • Enter the datacenter name.
  • Enter the cluster name.
  • The Resource Pool name field can remain blank. If using one, make sure that the resource pool exists.
  • Leave the VM Folder Name as OPTIONAL.
  • Enter the network name as gp-virtual-internal .
  • Enable You Don't Have DHCP? , then select Customize from the drop-down menu.
  • Enter the datastore name.
  • Enter the storage policy as the one you configured in Setting Up VMware vSphere Storage .
  • Set Starting IP Address/Subnet Size to 192.168.10.1/24 .
  • Enable Clear Read/Write Cache Before Each Test Case .
  • Enter the ESXi host user name and password. This needs to be the same for all hosts.
  • Disable Easy Run .
  • Enable Reuse VMs If Possible .

hcibench ip assignment failed

Scroll down the page and configure the following:

  • Select FIO for Benchmarking Tool.
  • Set Number of VMs to the number of primary segments planned for your environment.
  • Set Number of CPUs to 4 .
  • Set Number of Data Disk to 8 .
  • Set the Size of RAM in GBs to 8 .
  • Set Size of Data Disk in GiB to 100 .

Under Testing Configuration , you create and run three different tests: Write , Long Write and Read . Note that these must be created and run one at a time, and then deleted before creating a new one.

Enter a Test Name that is meaningful.

Under Select a Workload Parameter File , click Add and use the corresponding values for each test type:

Click Submit and OK .

Click the Refresh button next to Select a Workload Parameter File and select the one you just created from the dropdown menu.

For Prepare Virtual Disk Before Testing set to ZERO for the first run to initialize storage. Consecutive runs can be set to NONE as it will shorten the test duration.

Leave Testing Duration (Seconds) as OPTIONAL .

Disable Delete VM After Testing .

hcibench ip assignment failed

Click Save Config .

Click Validate Config .

  • If the tests fail, amend the highlighted errors, save, and validate your configuration again.
  • If your configuration is correct, the tests will pass and you can begin the test.

Click Start Test .

Once the test is complete you can review the results .

In order to run a different test, you should first remove the current parameter file:

  • Next to Select a Workload Parameter File , select the current file and click Delete .
  • Go back to Step 4 and use the table above to create another test with the corresponding settings.

Reviewing the Results

Once the test completes, click on Review Result , access the directory with the test name and open the provided PDF report file to display a breakdown of the different parameters that the test has measured.

You are now ready to start setting up and deploying a Greenplum Database cluster in your VMware vSphere environment. Verify that you have enabled VMware vSphere DRS again and proceed to Deploying the Greenplum Virtual Appliance to deploy the Greenplum Virtual Appliance VM which you will use to run the Greenplum Virtual Operator to provision the Greenplum Database virtual machines.

hcibench ip assignment failed

the Sky is the Limit

hcibench ip assignment failed

Measure vSAN performance with HCIBench

One of the basic ideas behind the introduction of hyperconvergent systems such as vSAN was high data throughput with the lowest possible latencies. This is achieved by short paths to the storage medium (without SAN fabric infrastructure) and the use of fast flash media as cache. If one wants to push such a system to its limits, it requires standardized tests that put considerable load on the cluster.

VMware has provided a benchmark appliance called HCIBench especially for vSAN, but also for classic server storage clusters. The Fling from the VMware lab is freely available and very easy to install.

Download the latest OVA for HCIBench from VMware Flings and deploy it onto the vSAN cluster.

hcibench ip assignment failed

The wizard will guide us through the entire installation and basic configuration. First we point to the path of our previously downloaded OVA file.

hcibench ip assignment failed

Enter a name for the appliance VM and select a destination folder.

hcibench ip assignment failed

The next step is to select the cluster. This does not necessarily have to be the cluster to be tested.

hcibench ip assignment failed

Steps 4 and 5 are a summary of the settings so far and the acceptance of the License Agreement. In step 6, a datastore must be selected for the appliance. Again, it is not necessarily the datastore whose performance we want to assess.

hcibench ip assignment failed

During deployment, the original network of the VM must be mapped to the current one of the test environment. Default is “VM Network”.

hcibench ip assignment failed

Finally, two important settings have to be configured on the template. The IP/DNS settings and the root password of the appliance. If a DHCP server is available in the subnet, we can leave the settings on DHCP and only need to set the root password.

hcibench ip assignment failed

The appliance is deployed after a setting summary and then powered on. Once the boot process is complete, we can connect to the HCIBench web interface. In my example, I had made use of DHCP and now have to determine the assigned IP address first. VMtools will display the current IP address in vSphere-Client.

hcibench ip assignment failed

Open the GUI by pointing a browser to https://<HCIBench-IP>:8443

hcibench ip assignment failed

Leave a Reply Cancel reply

Your email address will not be published. Required fields are marked *

Save my name, email, and website in this browser for the next time I comment.

Mit der Nutzung dieses Formulars erklärst Du Dich mit der Speicherung und Verarbeitung deiner Daten durch diese Website einverstanden. // By using this form You agree to have your personal data stored by this site. *

Search code, repositories, users, issues, pull requests...

Provide feedback.

We read every piece of feedback, and take your input very seriously.

Saved searches

Use saved searches to filter your results more quickly.

To see all available qualifiers, see our documentation .

  • Notifications

hcibench ip assignment failed

Introducing HCIbench: A Free Storage Performance Testing Tool For Hyperconverged

hcibench ip assignment failed

Our own experience is that there are big differences in how a given hardware configuration will perform, depending on whose hyperconverged software stack you’re using.

If performance is important to you, you should know what you’re getting before you buy.

With regards to VSAN, we’ve been continually publishing the results of our own internal testing, and done so with enough detail so that someone could reproduce the results if desired (scroll to the bottom of this page for a sampling).  We’ve also supported independent reviewers such as StorageReview.com to share their own unbiased results.

That being said, we’d like to do more — much more.

Wouldn’t it be great if anyone could easily do their own head-to-head testing?

To help customers make better informed choices, we’re introducing a free new tool that makes storage performance testing on hyperconverged clusters much, much easier.

We call it HCIbench , as in “hyperconverged infrastructure benchmark”.  It’s essentially an automation wrapper around the popular and proven Vdbench open source benchmark tool that makes it far easier to automate testing across a hyperconverged cluster.

The people who’ve tried it tell us that it’s a huge step forward in simplicity and repeatability.   Easier testing = more testing + better testing.

Why Testing Hyperconverged Is Harder Than It Looks

Doing performance testing on familiar external storage arrays can be relatively straightforward.  Set up a workload or two — and crank it up.  Once you have all the hardware bits, these are not hard tests to configure and run.

In the real world, most clusters are crammed full with hundreds of busy VMs, each driving their own storage traffic.  And that’s exactly what you want to test, if possible.

But it’s not as simple as it sounds.

Doing this “busy cluster” testing using standard tools (e.g. Vdbench, FIO, IOmeter, etc.) usually means a lot of scripted setup, and a lot of data gathering.

It’s unnecessarily complex, it burns time, and mistakes inevitably happen.

If you’re not familiar with Vdbench , you should be.  It’s a great go-to tool for testing storage performance with many useful features.  We’ve built HCIbench on top of it to make it especially easy to use when testing hyperconverged storage performance.

The people who’ve tried HCIbench so far really like it — they tell us it has dramatically sped up their testing efforts.  That means more tests can be run in whatever time you have available — and ending up with more useful results.  Vdbench is already open source, we intend to make HCIbench available via open source as soon as we can.

Highly recommended.

How To Get A Copy

Installation and setup is relatively straightforward.  In a matter of minutes, you’ll be running your own cluster-scale storage performance tests.

And, if you’re somewhat new to storage performance testing, I’ve written a quick do-it-yourself primer here .

Have Questions?  Need Help?  Want To Publish Your Findings?

If you have questions or need help with the tool, please leave a note in the VSAN community forum here .  Or email us at [email protected]

If you want to publish your VSAN findings, we certainly encourage that — but please do respect our EULA and submit your testing configuration and methodology to [email protected] prior to publishing.  We’ll do our best to get back to you quickly.

Note: we won’t approve publishing results on unsupported hardware or software configurations for obvious reasons.

Happy testing!

For your convenience, a partial list of published VSAN performance results appears below:

VSAN 6 Performance White Paper Synthetic Test Results JetStress Test Results Dell FX2 DVDstore Results Oracle on VSAN 6 VMmark Results (internal testing) LoginVSI (VDI) Results Multiple Microsoft Workloads StorageReview.com Results Pricing Comparison

Related Articles

hcibench ip assignment failed

Wrap up of VMware vSAN at VMware Explore 2023

hcibench ip assignment failed

Tech Zone Blog Updates Highlight: Exploring the Latest Innovation in VMware vSAN  

hcibench ip assignment failed

Top Ten VMware Explore Storage Sessions

hcibench ip assignment failed

  • VMware Technology Network
  • Cloud & SDDC
  • VMware vSAN Discussions
  • Re: HCIBench - ERROR: Cluster inter-connectivity ...
  • Subscribe to RSS Feed
  • Mark Topic as New
  • Mark Topic as Read
  • Float this Topic for Current User
  • Printer Friendly Page

stcurran

  • Mark as New
  • Report Inappropriate Content

HCIBench - ERROR: Cluster inter-connectivity validation failed

  • All forum topics
  • Previous Topic

TheBobkin

IMAGES

  1. Getting started with HCIbench, the benchmark for hyper-converged

    hcibench ip assignment failed

  2. Using HCIBench to performance test vSphere 6.5 and vSAN 6.6

    hcibench ip assignment failed

  3. Getting started with HCIbench, the benchmark for hyper-converged

    hcibench ip assignment failed

  4. HCIBench_2.3.1部署_VSAN_测试工具-CSDN博客

    hcibench ip assignment failed

  5. Solved: hcibench: vm deployment fails

    hcibench ip assignment failed

  6. Getting started with HCIbench, the benchmark for hyper-converged

    hcibench ip assignment failed

VIDEO

  1. NPTEL IOT WEEK 4 ASSIGNMENT ANSWERS

  2. Pakistani Media reaction on Virat Kohli poor performance

  3. DJI QUICK TRANSFER SOLUTION

  4. NPTEL ASSIGNMENT WEEK

  5. HX Installer IP Configuration by Budi Ezeddin

  6. How to Activate SBI Credit CARD for Online Transaction?

COMMENTS

  1. HCIbench

    I've deployed the HCIbench ova on my VSAN, following the instructions in the User Guide. I logged into the web interface and setup a test, generated a parameter file, downloaded / uploaded vdbench, saved the config, and successfully validated the config. But the test fails with IP errors: Deployment Started. IP Assignment Failed, Deleting VMs ...

  2. HCI Bench Network Troubleshooting

    The first of which to be aware of is to just be aware of this button in the HCIBench gui. If this box isn't checked, all of the "helper" VMs that HCIBench spins up will try to get their IP via DHCP. This itself isn't that crazy as the tooltip that appears for this option pretty much states that. The thing to be aware of is how often you ...

  3. Use HCIBench Like a Pro

    If you are using HCIBench to provide DHCP service and VMs fail to get IP addresses, meaning you have "Enable DHCP Service on the Network" checked, there are several things you need to check, follow these steps: The status of DHCP service - run "ifconfig eth1 up; service dhcp start" and check "systemctl status dhcp".

  4. HCIBench: can't find VMs IPs

    Starting in version 1.6.5, we (Chen) changed the way that the HCIBench DHCP [checkbox] behaved in order to simplify air-gapped deployments, which we do a lot during vSAN Proof of Concepts. So instead of using DHCP, HCIBench will deploy VMs with static IPs assigned from the appliance.

  5. Deploying and Configuring HCI Bench

    Once you have downloaded your hcibench.ova deploy using the vSphere WebClient. I have attempted this in the past with the HTML5 Client but it failed. Right Click and Deploy OVF - Select hcibench.ova file, name your VM and select Datacenter when you want to deploy. Click next and then choose which host to run the VM on.

  6. Resources for troubleshooting VMware HCIBench

    From HCIBench insure you can ping the host by IPs. This step validates: Switching; Routing (N.B. If hcibench and the ESX hosts are on different subnets.) IP assignment; ACL (N.B. Only confirms ICMP.) N.B. If this test fails, there are configuration issues with the underlying network.

  7. PDF HCIBench User Manual

    HCIBench can assign static IP address. To accomplish this, the HIench source network "V M Network" must be mapped to the same network as the guest VM (See Figure 2). • The vSphere environment where the tool is deployed can access the vSAN Cluster environment to be tested. • Network Environment: o HCIBench Management Network:

  8. PDF HCIBench User Guide

    After deployment, you can navigate to https://HCIBench_IP:8443/ to start configuration and kick off the test. Before accessing the configuration page, the root user ID and password must be used to authenticate to prevent unauthorized access to HCIBench. There are three main sections in this configuration file: • vSphere Environment Information

  9. Using HCI Bench to Performance Test vSAN

    I have chosen static and filled in the detail as per below. I have a Windows DHCP Server on my network which will issue IP Addresses to the worker VMs. Note: I added the IP Address of the HCIBench appliance into my DNS Server; Click Next and check all the details; The OVF should deploy. If you get a failure with the message. "The OVF failed ...

  10. PDF HCIBench User Guide

    If Enable DHCP Service on the Network parameter is checked, HCIBench will start DHCP service on the VLAN which the "Private Network" mapped on. NOTE: From HCIBench 1.6.5, we stop providing DHCP service from HCIBench and use Static IP instead. By checking Set Static IP for Vdbench Client VMs, HCIBench will pick up one available IP

  11. GitHub

    The network that will be used by the Guest VM is defined on all the hosts in the cluster. If a DHCP service is available, the Guest VM can obtain their network configurations from the DHCP server. If the network does not have DHCP service or an insufficient number of IP addresses HCIBench can assign static IP address.

  12. PDF HCIBench User Guide 2.8

    HCIBench can assign static IP address. To accomplish this, the HIench source network "V M Network" must be mapped to the same network as the guest VM (Fig. 2) • The vSphere environment where the tool is deployed can access the vSAN Cluster environment to be tested Figure 2. Source Networks Tool Installation 1.

  13. Getting started with HCIbench, the benchmark for hyper-converged

    Please note that this blog post is not about discussing the results, as these will vary from environment to environment due to the open nature of VSAN's HCL. This blog is more of a primer to assist the reader in getting started with HCIbench. Step 1 - Deploy the OVA. To get started, you deploy a single HCIbench appliance called Auto-Perf ...

  14. Using HCIBench to performance test vSphere 6.5 and vSAN 6.6

    DHCP is required for all the Vdbench worker VMs that HCIBench will produce so if you don't have DHCP on this network, you will need to check this box so it will assign addresses for you. As before, a Windows DHCP server is available to use on the network. Next enter the Datastore name of the datastore you want HCIBench to test

  15. In the Lab: VMware HCIbench Hands On

    VMware's HCIbench helps make this testing process much easier and lets anyone who can deploy a pre-built VM test as well as an independent reviewer test HCI better. VMware's VSAN group recently announced a free storage performance testing tool for Hyperconverged Infrastructure (HCI), the HCI benchmark or HCIbench.

  16. Validating VMware vSphere Setup Performance with HCIBench

    If you are not using DHCP, enter the static IP network information for the gp-virtual-external network. Set the root password for the virtual machine and click Next. Verify the configuration and click Finish. The HCIBench virtual machine will be deployed. You can check its progress under the Recent Tasks tab on the VMware vSphere client. Using ...

  17. hcibench: vm deployment fails

    I have deployed the latest HCIbench appliance. Everything seems to be working, vm are deployed and I can ping them, however every time I launch a test I have a vm deployment fails message. I connected the public NIC and use a fixed ip, not using the private NIC as I have a DHCP on that vlan. I tried using different parameter files with no ...

  18. Testing HCIBench v2.2.1 with vCenter and vSAN 6.7U3

    Select Storage. Select Networks. Map the "Management Network" to the network through which the HCIBench will be accessed. If the network prepared for Guest VM does not have the DHCP service, map the "VM Network" to the same network; otherwise, ignore the "VM Network.

  19. Measure vSAN performance with HCIBench

    Once the boot process is complete, we can connect to the HCIBench web interface. In my example, I had made use of DHCP and now have to determine the assigned IP address first. VMtools will display the current IP address in vSphere-Client. Open the GUI by pointing a browser to https://<HCIBench-IP>:8443

  20. Introducing HCIBench 1.6

    HCIBench Authentication: Once the deployment is complete, you can access the configuration page by visiting this URL. HTTP://HCIBENCH_IP:8080. In previous versions, no authentication was necessary to access the configuration page. In version 1.6, the root user ID and password must be used to authenticate to prevent unauthorized access to HCIBench.

  21. HCIBench

    HCIBench aims to simplify and accelerate customer POC performance testing in a consistent and controlled way. The tool fully automates the end-to-end process of deploying test VMs, coordinating workload runs, aggregating test results, performance analysis and collecting necessary data for troubleshooting purposes.

  22. Introducing HCIbench: A Free Storage Performance Testing Tool For

    HCIbench makes this task far simpler — it asks you to specify your desired testing parameters (size of working set, IO profile, number of VMs and VMDKs, etc.) and then spawns multiple instances of Vdbench on multiple servers. After the test run is done, it conveniently gathers all the results in one place for easy review — and resets itself ...

  23. HCIBench

    I've noticed in the hcitvm logs it looks as though they are trying to communicate over IP V6 not v4. is it possible to change that. 08-03-2023 07:24 AM. @stcurran , If you are not actively using IPv6 on that vmk adapter then it can be disabled: Activate or Deactivate IPv6 Support on a Host. Set Up IPv6 on an ESXi Host.