📒 FREE FOCUS ASSESSMENT : All-New → Get Started!
Capture Your Ideas : Learn Ulysses → Brand New Course!
💌 NEW: Calm Inbox : Less Email, More Focus → Get Access
📒 NEW: 2023 Digital Planner : Made for iPad → Yes, Please!
FREE! Plan Your Ideal Week : Bonus Workshop + Planner → Get the Workshop
NEW! All the Things : Productivity Course → Check it Out
Productivity Workshop : The 4-Part Flywheel → GET ACCESS!
Bundle Up and Save : 25% discount on all app courses → Learn More
Simplify Your Time Management : New Course → Finally!
🧠 To Obsidian and Beyond : All-New Course → GET ACCESS

A Beginner’s Guide to PowerPoint on the iPad

This is the third in our series of articles about Microsoft Office for the iPad, and the results so far have been decidedly mixed. We found Word to be surprisingly powerful and a good alternative to the desktop version for all but the most hardcore word processors out there. Excel was more of a let down with lots more functionality missing, including many elements that would be notable to even light spreadsheet users. We’re happy to report that PowerPoint is much closer to Word than Excel, and even more than either of those apps, you could use PowerPoint perfectly well on your iPad and never touch the desktop version. In fact, some of the design decisions Microsoft have made might even make you put together better presentations than if you had the complete desktop app at your disposal.

Our Must-Have, Most Used Productivity Apps
We spend an inordinate amount of time sorting through hundreds of apps to find the very best. We put together a short list of our must-have, most-used apps for increasing productivity.
PowerPoint for iOS is free from the App Store and allows you to view PowerPoint files from anywhere. If you want to edit or create presentations from the iPad though, you’re going to need to subscribe to Office 365 , which runs $6.99/month or $70/year for individuals on up to 5 devices. An Office 365 subscription comes with the full Microsoft Office suite of apps as well was 1TB of OneDrive storage, so there is quite a bit of value there.
Whether this is a fair price is a matter we can only leave to you, but the software package on offer, and especially the 1TB of cloud storage that works across iOS, Android, macOS, Windows, and Linux, makes this a pretty compelling subscription in our eyes.
Of note, Microsoft only requires iPads over 10.1” to pay up to get editing functionality. If you have a 9.7” iPad, iPad Mini, or even an iPhone, then you can use the full version of PowerPoint (and all other Office apps) without an Office 365 subscription. Apparently productivity starts at 10.1” in Microsoft’s world — not that we’re complaining.
Out of the Box Experience
If you start with PowerPoint on the iPad and want to begin building presentations from scratch, the iPad version gives you everything you need to start creating right away.

There are 25 built-in templates you can start with. While not all of them are great, ones like Parcel, Celestial, Ion, and Mesh are all really nice templates that you can use to create professional-looking presentations. Some of them are more fun and offer a more distinct look, but for many people, simplicity is king and the options here are more than capable of making you look good at your next speaking gig.
As you would expect, each of these 25 templates have an assortment of slide types so you can move between titles, lists, and giant images with a consistent experience for your audience.
And if you were worried about getting your content into these slides, fear not because PowerPoint for iPad has tons of tools around adding animations to elements on your slides, transitions between slides, drawing on and marking up content, and adding things like tables, images, icons, and videos into your slides.
Basically, if you work entirely from the iPad, you’ll have more than enough control over everything to put together a presentation that you can be proud of.
Adding Some Flair
PowerPoint has quite a few tools for customizing the feel of your presentations, and while I’d contend that adding too many effects and transitions to a slide deck can be detrimental, these can of course be used well and the fact that so much is here should allow most people to create exactly what they want.

There are 35 ways you can have items on a slide appear or disappear and 17 different ways you can emphasize specific elements on a slide. And if you like transitions, there are a sweeping 49 options for how you move from one slide to another. Should you use all of these? God no. Does this level of flexibility enable a bunch of cool one-off effects? Oh yes!
And then there are a bunch of different drawing tools you can use to add a little panache. Similar to most markup apps you know and love , there are several drawing tools like pencils, markers, and highlighters, as well as a cool cosmic pen that is just fun. You can make this animate into the slide so you can have custom-looking animations that call out something specific on your slides.
Another thing I really like is a feature called Design Ideas. This is found under the Design tab and you can use it on any slide in your presentation. PowerPoint will look at the content of the slide and give you a few suggestions for alternative styling. For example, I had a basic bulleted list and it suggested this nicer layout for a short list:

One of the things I love about how this is set up in the PowerPoint UI is that none of these effects are visible from the main tabs you’ll use when creating your slides. This breaks up the workflow between content and style. You’ll likely find yourself putting together all your content together across however many slides you need and then going back through it all to add whatever animations and transitions you think you need. Again, since the content of a slide deck is far more important than the flair on top of it, this behavioral encouragement is spot on.
Collaboration
As with Microsoft’s other Office apps, the collaboration features from the desktop and web versions are here and they work great. You can work in real time with anyone else whom you’ve shared the document. You can see their edits in real time and they’ll see yours, no matter the platform they are on.
Comments are supported as well, and you or others can leave comments on certain points of the presentation, and there is even version control so you can go back to potentially dozens of versions of the presentation and restore them (or save them as a new copy).
Giving Your Presentation
The presentation itself is the whole reason for making a slide deck — that experience is rock solid — but might be limited compared to what you have on the desktop.
First off, you can present a presentation you created on the iPad on any device that runs PowerPoint, but if you want to present from an iPad, the easiest way to do so is to plug into the screen you are going to be using via a DisplayPort/HDMI/DVI cable that uses Lightning or USB-C (depending on your iPad). After you’re connected to an external display, you’ll see your slides in all their glory on the external display and the presenter view will appear on the iPad itself.
If you happen to be somewhere that has an AirPlay compatible screen (most likely through an Apple TV), then you can also mirror your screen to the AirPlay device and you’ll get the same effect where the slides show on the AirPlay receiver and the presenter view shows on the iPad.

Whether using wired or wireless connections for the presentation, you can always tap and hold on your iPad screen to bring up a virtual laser pointer to point out whatever you want to highlight on a particular slide. It’s actually pretty slick and more useful than I expected it to be.
PowerPoint as a Good iOS Citizen

Unlike some other companies who take forever to support iOS’s latest and greatest features, Microsoft has done a pretty decent job of keeping up with the times. Using PowerPoint in late 2019 feels like using an app built to use most of iOS’s (and iPadOS’s) latest features.
Pretty much all the main contenders are here: drag and drop works well and lets you drag in your own media straight from things like Files, Photos, or even Safari and drop them into your slides with ease. The UI for this is rather limited, and you don’t quite know what will happen when you drop something like a photo onto a slide, but you can of course resize and reorient objects once they’re on the slide.
PowerPoint also supports split screen, which is very useful for this sort of app as it allows you to have your research on one side of the iPad and your presentation on the other. I constantly find myself bouncing back and forth when putting together a PowerPoint presentation, and this would be a near deal-breaker for me personally.
The one major iPadOS feature this doesn’t currently support is multi-window. iPadOS 13 enabled apps to have multiple documents open at once and PowerPoint does not support this at all. This is a less egregious omission since most people tend to work on one presentation at a time, but sometimes you might want to reference another presentation that you’ve created or are comparing your slides to ones someone else made.
Overall, PowerPoint strikes a good balance of being unmistakably Microsoft without feeling like a Windows app on the iPad.
Apple Keynote and Google Slides

While PowerPoint is the undisputed standard for presentations, the options from Apple and Google are also compelling and have the distinct advantage of each being completely free. Without getting too much into the weeds here, the short overviews of each of these competitors are:
Apple Keynote lets you more easily create great-looking slides with modern, elegant templates. The app also feels more finely tuned to iPadOS’s UI is a very smooth experience from start to finish. Collaboration is a big issue though if you are not working with others on iPads or Macs. And even if you are, the collaborative editing capabilities are far less robust than what Microsoft has in PowerPoint.
Google Slides is a very minimal presentation tool, but it gets the job done. If your needs are very basic and you value a cloud-based solution with great real-time collaborate editing, then Slides can serve your needs very well. But if you want to have a little more style in your deck, then you’re going to be left wanting here. It’s not the end of the world, but it’s certainly not the best in class.
In short, if you value compatibility and collaboration, PowerPoint is the clear winner. If you value great design in your slides and a delightful iPadOS experience, Keynote is king. And if you just want what is on the web and included in your Google account, then Slides will be okay for you, but you’re probably not going to fall in love with it.
Ultimately, many of us don’t have a choice in the apps we use to give presentations. These usually happen at work and the company has some standard in place for creating presentations, so the choice has been made for you already. If you have any say at all in what presentation software to use, then we think PowerPoint is a great way to make them on the iPad.

With a rich set of tools to make everything from basic to wild and flashy presentations possible, it’s bolstered by a robust set of collaboration features as well as the simple fact that it’s the de-facto standard across most of the business world. You’ll probably have little-to-no friction in making this work for you and your business.
If you are working solo or there really isn’t any need to use one app or another, then Keynote is a very compelling alternative, and is the feather in iWork’s cap. it’s an excellent app that makes is dead simple to create professional-looking presentations with very little effort. Oh yeah, and it’s completely free! Not everyone will love this, but it’s definitely something to consider using if you’re not totally sold on PowerPoint.
Can You Make a Powerpoint on iPad? Here’s How To Do It
Are you familiar with Microsoft PowerPoint on your laptop or desktop computer, but don’t know how to use it on your iPad? You’re not alone.
With the popularity of tablets and iPads, many people are looking to make the switch and take advantage of the portability of their device.
In this article, we’ll guide you through the steps to create a presentation on your iPad.
We’ll cover topics such as what Microsoft PowerPoint for iPad is, how to add text, images, charts, and other elements, and how to navigate between slides.
With this knowledge, you’ll be able to create a presentation on your iPad with ease.
So let’s get started!
Table of Contents
Short Answer
Yes, you can make a PowerPoint on an iPad.
You can use the Microsoft PowerPoint app for iOS, which is available on the App Store.
You can also create and edit presentations online with PowerPoint for the web.
If you have an Office 365 subscription, you can also use the desktop version of PowerPoint on an iPad with the Office app.
What is Microsoft PowerPoint for iPad?
Microsoft PowerPoint for iPad is an app designed by Microsoft to allow users to create and present their PowerPoint presentations on an Apple iPad.
It is a powerful and easy-to-use tool that allows users to create professional-looking presentations with the help of the iPads touchscreen and Apple Pencil.
The app also offers a wide range of features that make it easy to create engaging and visually appealing presentations.
With the Microsoft PowerPoint for iPad app, users can easily create a new presentation, add text, images, charts, and other elements to their slides.
The app also allows users to use the iPads touchscreen to navigate between slides and add shapes, arrows, and other elements to their presentation.
Additionally, the app allows users to use the Apple Pencil to draw directly on the slides.
The app also offers other features such as the ability to share presentations with others, or present them on a larger screen with AirPlay.
Additionally, the iPads portability and HD display make it the perfect device for creating and sharing presentations with ease.
With its powerful features and easy-to-use interface, Microsoft PowerPoint for iPad is the perfect tool for creating professional-looking presentations on the go.
How to Create a Presentation on iPad
Creating a presentation on an iPad is an easy and convenient way to share information with others.
With the help of Microsoft PowerPoint for iPad apps, you can create a presentation, add text, images, charts, and more to create a professional-looking presentation.
With the iPad’s portability and HD display, you can create and share presentations with ease.
The first step in creating a presentation on an iPad is to download the Microsoft PowerPoint app.
Once you have downloaded the app, you can open it and begin creating your presentation.
You can add text, images, charts, and more to create a professional-looking presentation.
Additionally, you can use the Apple Pencil to draw directly on the slides, as well as use the iPads touchscreen to navigate between slides and add shapes, arrows, and other elements to your presentation.
Once you have added all of the necessary elements to your presentation, you can preview it on your iPad before sharing it with others.
You can also use the iPads AirDrop feature to quickly and easily share your presentation with others.
Additionally, you can use the PowerPoint app to collaborate with others on the presentation remotely.
Finally, you can export your presentation to a variety of formats, such as PDF, PowerPoint, and more.
This allows you to share your presentation with a variety of audiences, from colleagues to clients.
With the iPads portability and HD display, you can create and share presentations with ease.
In conclusion, creating a presentation on an iPad is easy and convenient.
With the help of Microsoft PowerPoint for iPad apps, you can create a professional-looking presentation with ease.
Additionally, you can use the iPads AirDrop feature to quickly and easily share your presentation with others, as well as export it to a variety of formats.
Adding Text, Images, and Charts to the Presentation
Adding text, images, and charts to your PowerPoint presentation on an iPad is a great way to make it look professional and engaging.
With the Microsoft PowerPoint for iPad apps, you can easily add text to your slides by simply tapping on the slide and typing in the text you want to include.
You can also use the iPads built-in dictation feature to quickly add text to your slides, or you can use the iPads on-screen keyboard to type out your text.
In addition to text, you can also add images and charts to your presentation.
You can upload images from your iPads photo library or from an online source, such as Google Images, to add to your presentation.
Similarly, you can also add charts to your presentation by using the chart feature in the PowerPoint app.
This feature allows you to quickly create bar, line, and pie charts from data you enter, as well as customize the chart to fit your presentation.
Finally, if you have an Apple Pencil, you can use it to draw directly on the slides.
This allows you to add arrows, shapes, and other elements to your presentation that would be difficult to add with the mouse or touchscreen.
With the Apple Pencil, you can quickly add any elements you need to make your presentation look professional and engaging.
Using the Apple Pencil to Draw on the Slides
Using the Apple Pencil to draw on PowerPoint slides is a great way to add a personal touch and creative flair to presentations.
With the Apple Pencil, users can draw directly onto slides with precision and detail, as well as directly write text and add shapes.
The Apple Pencil is also pressure-sensitive, meaning that it can be used to draw lightly or heavily depending on the desired effect.
It is also possible to use the Apple Pencil to erase, adjust, and move objects on the slides, allowing for easy editing of the presentation.
Additionally, the Apple Pencil can be used to easily add diagrams and other graphical elements, such as arrows and circles, to the slides.
With the Apple Pencil, slides can be quickly and easily designed to look professional and eye-catching.
Navigating Between Slides on the iPad
Navigating between slides on an iPad is made easy with its multitouch display and intuitive interface.
With a few taps, you can quickly move between slides in your presentation.
To navigate between slides, simply tap the left and right arrows in the bottom left corner of the PowerPoint for iPad app.
This will move you through the presentation slides sequentially, making it easy to review and edit your slides.
Additionally, you can select a specific slide from the Slide Navigator, which can be accessed by tapping the three dots icon in the bottom left corner of the PowerPoint app.
This will open up a list of all your slides, allowing you to quickly jump to a specific slide with just a tap.
Additionally, you can use the Apple Pencil to draw directly on the slides, as well as use the iPads touchscreen to quickly move between slides.
With the iPad’s portability and HD display, you can create and share presentations with ease, making it a great tool for creating professional presentations.
Adding Shapes, Arrows, and Other Elements
Adding shapes, arrows, and other elements to a PowerPoint presentation on an iPad is very easy to do.
With the iPads touchscreen, you can quickly and easily add a variety of shapes, arrows, lines, and other elements to your presentation.
You can use the Apple pencil to draw directly on the slides, allowing you to add intricate details to the presentation quickly and easily.
Additionally, you can use the iPads built-in shape tools to add rectangles, circles, and other shapes to the presentation.
Sharing the Presentation on iPad
Sharing a presentation on iPad is a breeze.
With the help of Microsoft PowerPoint for iPad apps, you can easily share your presentation with others from anywhere in the world.
You can share presentations in a variety of formats, including PDF, PowerPoint, and HTML.
Additionally, you can share your presentation as a read-only or a full-editable version, which allows others to make changes to the presentation if necessary.
The PowerPoint for iPad app allows you to easily send your presentation in an email, post it on social media, or even share it with a link.
If you have an Office 365 subscription, you can save your presentation to OneDrive and access it from any device with an internet connection.
You can also share your presentation with others directly from the iPad, with the ability to add notes and comments while the presentation is being shared.
The iPad also has a variety of other features that can help you share your presentation.
You can use AirPlay to mirror the contents of your iPad onto a larger display, such as a television or projector.
This feature allows you to present your presentation to a large group of people without having to carry a laptop with you.
Additionally, you can use an HDMI or VGA adapter to connect your iPad directly to a projector or monitor.
Finally, you can also share your presentation with others using a variety of cloud-based services, such as Dropbox, Google Drive, and iCloud.
With these cloud services, you can easily store and share your presentation without having to worry about copying it onto a USB drive or sending it through email.
These services also make it easy to collaborate on a presentation, as multiple users can access the same presentation and make changes and additions to it.
By leveraging the power of the iPad and the features of the Microsoft PowerPoint for iPad apps, you can easily create and share a presentation with ease.
Whether you’re giving a presentation to a large group of people or collaborating on a project with colleagues, the iPad provides an easy and efficient way to create and share presentations.
Final Thoughts
Making a PowerPoint presentation on an iPad is now easier than ever with Microsoft PowerPoint for iPad.
With its portability and HD display, you can create professional-looking presentations on the go and share them with ease.
Now that you know how to make a PowerPoint on iPad, why not give it a try? You’ll be surprised at what your creative mind can come up with.
James Wilson
James Wilson has extensive knowledge in the information technology industry.His second love, besides dealing with computers, is smart home technology. He is continually updating information to better comprehend this problem and has a deep understanding of the apartment’s support system.
Recent Posts
Is Airtable a Public Company? Unveiling the Truth
No, Airtable is not a public company. As of now, Airtable is a private company that has raised funds from various investors but has not gone through an initial public offering (IPO) to be listed on...
How to Make Money with Airtable: Top Strategies and Success Stories
To make money with Airtable, you can offer consulting services to businesses looking to optimize their workflows through the platform. You can also create and sell templates or automation scripts...
Can I do a PowerPoint presentation using an iPad?
By: Author Shrot Katewa

I love my iPad, and If you are like me, you would want to carry it wherever you go. It is compact, light and allows me to get things done that can’t be done using my phone due to its small size! In fact, it is so convenient that it makes me wonder if I could replace my laptop with an iPad even for my client meetings?
But, can I create a PowerPoint presentation using an iPad? Yes, you can create a PowerPoint presentation using an iPad. In fact, iPad has a bunch of different apps that allow you to run PowerPoint presentations on it. iPad’s built-in Keynote presentation software also allows you to view the PPT files. You can also install Microsoft PowerPoint to run, edit and create a PowerPoint presentations from scratch on iPad just as you run it on a laptop!
Running a PowerPoint presentation on your iPad is actually a lot easier than you think. There are, however, a few things you should be aware of. Let’s get into the details of the workings of a PowerPoint presentation on an iPad.
How to put a PowerPoint presentation on an iPad?
Sometimes, you may already have a PPT file that was shared by your colleague or a client. However, many a times, it is you who has to create a PowerPoint presentation that dazzles your audience! Creating a presentation that holds our audiences’ attention is hard. We wrote a post that covers the steps that you should be taking while creating a PowerPoint presentation. We’ve broken it down to a step-by-step process that is designed to help you with creating a presentation. (Link – www.owlscape.in/what-are-the-steps-to-create-a-powerpoint-presentation )
If you have already created a presentation using a laptop or any other computer, you’ll first need to transfer it to your iPad. There are multiple ways you could do this. I would like to share my top 3 favourite method as they are free, doesn’t take too much time, and are easy to carry out as it doesn’t require any technical expertise.
1. Transfer the PPT file to your iPad using your email
This is probably the easiest of all the three options. In all likelihood, you may already have received a PPT file from your colleagues through an email. In this case, all you need to do is simply open your email account on your iPad, click on the email that contains the PowerPoint file, and download it.
2. Transfer the PPT file to your iPad using a cloud storage service
Another quick and easy option is using a cloud storage services. There are plenty of cloud storage services such as Google Drive, Dropbox, and even iCloud. Most of these services offer at least a few GBs of free data storage. Simply upload your PPT file from your computer. Then, login to your cloud storage service on your iPad and download the PPT file on your iPad.
3. Transfer the PPT file to your iPad using WhatsApp
https://www.youtube.com/watch?v=kHShrP6cR88
Video on how to login to WhatsApp on your iPad
Another great way to download the file directly to your iPad is by using WhatsApp. While WhatsApp is a great way to stay in touch with you friends, it is also great to share files. You can ask your colleague to send the file to you over WhatsApp. All you need to do is simply log in to your WhatsApp account on your iPad, open your colleague’s chat message, and download the file.
What is the best app for PowerPoint presentation on iPad?
In our experience, Microsoft PowerPoint is by far one of the best apps to work with PPT presentations on iPad. You can easily download and use, and if you have an Office365 subscription, it allows you access to additional functionalities which come in handy especially if you plan to edit files on-the-go on your iPad. PowerPoint presentation has been the brainchild of Microsoft, and it has been the leader by a long stretch when it comes to the presentation software.
With Microsoft PowerPoint, not only do you resolve the compatibility issues of the PPT files with software, you also get an interface you are familiar with. You can be absolutely sure that PPT file will look exactly as it is intended to when using Microsoft PowerPoint on iPad.
You can download the Microsoft PowerPoint app for your iPad from the App Store.
Is Microsoft PowerPoint app FREE for iPad?

Microsoft PowerPoint app is FREE to download and use on an iPad. Microsoft realise that the future of technology is more towards smartphones and tablets. Thus, they have a strong focus on providing access to user files on-the-go. Although you can edit PowerPoint presentations on-the-go, if you wish to get advanced functionalities, you may want to get an Office365 subscription. Having said that, most of your basic editing needs are covered in the base version of the app.
Are there any other apps for PowerPoint presentation on iPad?
Absolutely! There are several other applications that you can use to open and edit a PowerPoint presentation on iPad. All the other applications have their pros and cons. We have listed down the top 3 alternatives to Microsoft PowerPoint on iPad. They are in no order to preference.
Keynote is the native software that offers an office suite on Mac and iOS devices including iPad. It has been built from the ground up for iPad and iPhone devices. Needless to say, it is one of the most powerful software when working with presentations.
While Keynote allows you to view, open and edit a PowerPoint file, the overall functionalities are different. We’ve also seen that the look and feel of the PPT file does change when using it on Keynote. However, the changes are not major and if you are only planning to view the major contents of the PPT file on your iPad, Keynote is effective.
2. Google Slides
The best part about Google Slides is that it allows real-time collaboration on projects with its online office suite. This is great especially when your team is not based in the same location as you are.
Google Slides is also compatible with PPT files. It allows you or open, view and edit PowerPoint files on your iPad. Google Slides is FREE . All you need is a Google account to start using it.
3. WPS Office

Image credit – Mr. Phone
WPS stands for Writer (W), Presentation (P), Spreadsheets (S). It is our favourite alternative to Microsoft Office suite. It has been designed with Microsoft Office users in mind. Thus, the look and feel of WPS Office has striking similarities to that of MIcrosoft Office. For all the Microsoft Office users, WPS Office makes you surprisingly feel just at home.
If you are looking to a cheaper/free alternative to Microsoft Office suite that looks and feels just like MS Office, in our experience WPS Office by far the best option for you. It was designed with Microsoft Office users in mind. It was originally launched for Windows, however, WPS Office suite 2019 version has been expanded to both Linux and Mac users as well.
WPS Office is now also available for Mac and iOS users. You can download WPS Office directly from the App Store or visit the download section on their website . WPS Office is FREE to use although simply signing up for an account with them gives you access to premium feature for 1 year.
What equipment will I need to do a PowerPoint presentation using an iPad?
What makes the iPad really powerful is that it allows you to connect to a projector and project the presentation on a bigger screen. This comes in really handy as this negates the need to carry any laptop. Alternatively, if you consider laptop to be your first choice, instead of carrying an additional spare laptop, you can keep an iPad device as a backup just in case your laptop fails to work.
https://www.youtube.com/watch?v=y0Z6VGNlxbc
Video on how you can connect your iPad to a projector
There are multiple ways to connect your iPad to a Projector. Two of the most common ways are –
- HDMI connection
- VGA connection
For both the connections, you will need to buy an additional connector cable that allows you to connect the two devices.
Our personal preference is to use the VGA connector. Main reason for this is the fact that a VGA connector allows the sound to be played from the iPad itself as opposed to a HDMI connector. In an HDMI connection for an iPad, the sound is played through your projector. Another reason for preference of a VGA connector over an HDMI connector is that it is more widely available as a default connection option to the projector in most corporate offices. However, connector preference comes down to a personal choice.
So, is it worth it???
We started this article wondering whether we could do a PowerPoint presentation using an iPad, and whether we could carry an iPad to our meetings instead of a laptop. With the availability of Microsoft PowerPoint application for iPad and several other alternatives to open a PPT file on iPad, as well as the possibility to connect the iPad to a projector, we can safely conclude that an iPad can be used as a replacement to a laptop while meeting clients!
Psst… please share!
If you enjoyed reading the article, please leave us a comment below and share this with you network. This acts as a great motivation for us to keep creating useful content for your folks!
- Skip to primary navigation
- Skip to main content

8 Things I’ve Learned Using an iPad for Presentations
I love using my iPad for travel to conferences, and not just because it’s so lightweight and its battery lasts all day. For one thing, with the LTE version I’m not beholden to conference Wi-Fi; while some conferences have good connectivity, I never want to count on it. With the iPad I can nearly always get online.
But the iPad isn’t convenient only for attending conferences. It’s a good tool for presentations, too-or at least an excellent backup for a dedicated computer. I can easily be ready to present if I have a last-minute computer replacement.
Still, I had some things to learn the hard way about using an iPad for presentations. Perhaps I can save you a few steps.
The Basics of Getting Started
Learn the differences between “desktop” keynote and the ipad version.
While I present nearly exclusively from an iPad, I usually build my initial presentation on a Mac. I build all of my presentations in Keynote, and store them in iCloud. I can (and do) make tweaks to a presentation on-site via the iPad version of Keynote, but it always feels as though I’m slightly fighting with the software.
Keynote supports a customizable presenter display in both versions. On the Mac desktop version, you can pick three ways to give yourself that during-the-talk cheat sheet, instructing it to show you the current slide, next slide, and presenter notes. On the iPad, the presenter display options only give you a “two out of three” option, between current slide, next slide, and presenter notes. I begrudgingly pick Next Slide and Presenter Notes, and then I hope the venue has a confidence monitor that shows me what’s on the projector behind me.
Some folks prefer to use Powerpoint or Google Slides. This distills down to religion, and I can confidently state that those people are wrong. Both tools offer iPad versions as well, but I’m not well versed in them. Deckset doesn’t offer an iPad version, and I’ve not had much patience for the swath of custom JavaScript-based presentation tools that render Markdown inside of browsers. I want to like them, but I can’t quite get there yet. As a result, use Keynote; you’ll be happier. As an added bonus, the presentations live in iCloud; with a bit of notice you can grab a copy on someone’s Mac, iPhone, or iPad and be back in business should calamity befall your iPad.
Do be aware that this means that if your presentation requires a demo in a terminal or a web browser, you either get to do some awkward transitions—or accept that presenting from an iPad isn’t right for this talk. I still haven’t found a good way to give my “Terrible Ideas in Git” talk from an iPad due to its live demos…
Invest in a presentation remote
A presentation remote is a necessity, unless you enjoy being trapped behind the podium. I treated myself to a little luxury with the Logitech Spotlight .
This device does it all. It speaks its own wireless protocol via a USB-A dongle that plugs into most laptops, but the Spotlight also speaks Bluetooth with a great range. Its battery charges using a built-in USB-C port that hides behind the dongle, and a single charge lasts for months.
I freely accept that most folks find the idea of paying $129 for a single-purpose device a bit nutty. Those folks generally don’t give double-digit numbers of presentations a year. A word of caution: Don’t leave it behind at the podium after your talk. It’s expensive enough to buy the first time. Please don’t ask me how I know.
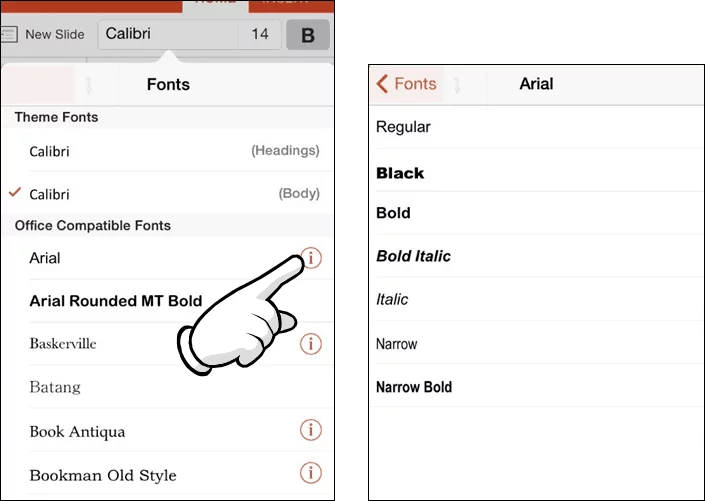
Pay attention to fonts and typefaces
I have a condition I jokingly refer to as “typeface blindness.” I can’t tell the difference between most fonts unless I stare at them and actively work out what I’m seeing. I’m told this is atypical, and whenever I forget this fact I get reminded on Twitter. “Well, that’s the fifth talk so far today that uses Helvetica (the system default)” always makes me facepalm. As a result, I make it a point to not use system default fonts.
Contrary to what many folks believe, you can use custom fonts on iOS, but the process is a bit arcane. Do yourself a favor and drop the $2 for AnyFont . This magic app streamlines an otherwise incredibly painful process.
Lessons I’ve Learned
I’m conservative here; while you can save money by buying third party adapters, I find that minimizing the risk of screwing up a presentation in front of 400 people is worth the extortionate rate that Apple charges for first party adapters. You’ll want both HDMI and VGA adapters. Both of these are available in Lightning and USB-C flavors, depending upon which generation of iPad you’re using. Note that this is less of a concern with USB-C than it is with Lightning adapters—just make certain you test all of your adapters before you leave home.
Save time; don’t bother looking for DVI adapters. The iPad officially doesn’t support it, Apple doesn’t sell them for Lightning, and I’ve only ever encountered it on the speaking circuit once. Your test a few hours before your talk will validate that you’ll be okay.
You can never be too rich, too thin, or have a big enough battery pack
Grab a beefy battery pack, and you can go days without finding a power outlet. You don’t want to discover that the podium power strip is full, the extension cord is a trip hazard, or that you don’t have the right adapter for the country you’re in when it’s time to give a talk. Having a battery pack that can borderline jump-start a car means you’re fine so long as your iPad battery level is anywhere about roughly 3%. (Too much lower and the tablet won’t boot at all.)
I like Anker products for this, but your mileage may vary. I soundly endorse finding reputable brands. Saving a few bucks on chargers, cables, or batteries that (a) plug into a very expensive electronic device and (b) have a propensity to include “sets the building on fire” in their list of failure modes just never seemed worth the trade-off to me.
Note: If you need to give away something at a booth, don’t use branded USB battery packs or chargers, as swag. At best, they’re cheap and feel flimsy. At worst, something with your logo on it started a fire.
Spend extra for an LTE connection
You can tether your iPad to a mobile device or ride on conference Wi-Fi. However, if you’re presenting frequently it’s worth the extra money to get an iPad version that can speak to the cell networks. Suddenly you no longer care what the conference Wi-Fi password is, whether you remembered to charge your phone, or if the captive portal login page is going to expire and pop up again mid-presentation.
Speaking of which…
Before the presentation, turn on both “Do Not Disturb” and “Airplane Mode”
In presentation mode, Keynote swears that it blocks pop-ups, reminders, incoming calls, and other distractions. To its credit, I’ve never seen it do otherwise.
That said, I always enable Do Not Disturb on my iPad. I put the device in airplane mode. And only then do I plug in the projector. Perhaps I’m paranoid, but you’re also not seeing horrible screenshots from my talks that feature embarrassing notifications, either.
Update nothing before your presentation
If a new iOS version or a Keynote update comes out the same week as your presentation, fine. But resist the upgrade. It can wait a day.
There have been enough regressions in software over the years that I’m extremely hesitant to trust that everything will “just work” an hour before I go on stage.
These are the sometimes-hard-won lessons I’ve learned after spending a year giving talks solely from an iPad.

Corey is the Chief Cloud Economist at The Duckbill Group, where he specializes in helping companies improve their AWS bills by making them smaller and less horrifying. He also hosts the "Screaming in the Cloud" and "AWS Morning Brief" podcasts; and curates "Last Week in AWS," a weekly newsletter summarizing the latest in AWS news, blogs, and tools, sprinkled with snark and thoughtful analysis in roughly equal measure.
More Posts from Corey

Changing of the Guard: “AWS Appoints Matt Garman as CEO”
This morning’s announcement that Adam Selipsky would be stepping down as AWS CEO, with longtime Amazonian Matt Garman stepping into the role, feels like a natural correction. Garman has long been seen as the heir apparent to AWS’s leadership. When Selipsky was named CEO in the last succession, my initial reaction was a baffled, “I’m sorry, who?”

AWS’s (de)Generative AI Blunder
AWS has been very publicly insecure about the perception that it’s lagging behind in the Generative AI space for the past year. Unfortunately, rather than setting those perceptions to rest, AWS’s GenAI extravaganza at re:Invent 2023 seemed to prove them true. Of the 22 GenAI-related announcements, half of them are still in preview. Many were […]

Generative AI Builds a re:Invent Scavenger Hunt
Let’s begin with the tl;dr: At this year’s re:Invent, I’m hosting a photo scavenger hunt with significant prizes for “most items found” and “most creative entry.” Sign up through my webapp at findme.lastweekinaws.com. The rest of this post details how I built this app.
Get the newsletter!
Stay up to date on the latest AWS news, opinions, and tools, all lovingly sprinkled with a bit of snark.
- PowerPoint for iPad: 10 top tips
Want to host or create presentations on your iPad? We've got handy tricks to help you get going

Despite a phalanx of competitors emerging in recent years, PowerPoint remains the industry standard for delivering presentations, and the emergence of the iPad app cements its position in the boardroom.
However, the iPad app is a different beast from the desktop software, and has its own strengths and weaknesses. Our top 10 tips will show you how to get the most from PowerPoint on the iPad.
1. Create on the PC, refine on the iPad
If at all possible, avoid creating presentations on the iPad itself. The iPad app has only 20 presentation templates to choose from, compared to the thousands available to download from the PC and Mac version, and some of those 20 are mundane. Any template that you download on the PC/Mac is editable on the iPad, even if it's not one of those preloaded in the app.

If you do decide to create a presentation on the tablet, be wary of the same fonts issue that afflicts the Microsoft Word app. If you choose iOS fonts, they won't be displayed properly when you open the presentation on the PC, and you may experience problems with text running out of boxes or wrapping around images erratically.
2. Beam the presentation wirelessly
The iPad is better suited to delivering, rather than creating, presentations. You can beam your presentation wirelessly to a big display or projector using Apple's AirPlay technology, and use the iPad to flick through slides and more.
Get the ITPro. daily newsletter
Receive our latest news, industry updates, featured resources and more. Sign up today to receive our FREE report on AI cyber crime & security - newly updated for 2024.
To do this, you'll either need an Apple TV or Mac (2011 onwards) connected to your large display, or a PC running AirPlay compatible software such as AirServer (www.airserver.com). Both iPad and the receiving Apple TV/Mac/PC must be connected to the same Wi-Fi network.

Once connected, you can mirror the iPad's display on the big screen, but when you open your presentation on the iPad you should put it into Presenter View, by clicking the Slide Show tab and selecting the relevant option. Now your iPad will display any presenter notes you've made and forthcoming slides, while the viewers of the big screen display will only see the presentation itself.
If you hold your finger down on the main window showing the current slide, you'll activate the virtual laser pointer, allowing you to highlight key points on the slide. The pen tools in the top right of the screen let you draw on or use a highlighter pen on your slides.
3. Learn the gestures
You'll need to be familiar with a few gesture controls to get the most out of PowerPoint for iPad, some of which aren't obvious.
For example, if you're in full-screen slideshow view activated by pressing the Play button in the top right-hand corner you can use a closed pinch gesture to return to the editing view, which is quicker than tapping at the top of the screen and selecting End Slide Show.

If you want to move a slide to a new position in the deck, simply tap on its thumbnail in the edit view and drag it to the desired position.
4. Importing old-format presentations
PowerPoint for iPad can work with presentations created in either the latest Office formats (.pptx files) or the older PowerPoint 97-2003 formats (.ppt and .pps). However, any files opened in the older formats will need to be converted to .pptx before you can edit them. PowerPoint for iPad will give you the option to convert the old-style presentations when you first open them.

5. Transferring Keynote presentations
Given that PowerPoint for iPad only launched earlier this year, it's likely that you might have some presentations stored in Apple's own presentation app, Keynote. The good news is you can import these into PowerPoint without much hassle.
Open the presentation in Keynote, then click the icon showing a page with an up arrow and select Open in Another App. Choose the PowerPoint format from the pop-up that appears, and after Keynote has crunched through the slides select the Choose App button and Open in PowerPoint. Once it's opened in PowerPoint, you'll need to save a copy if you want to edit the slides.

The bad news is that some of Keynote's slide transitions, animations and fonts won't be carried across perfectly into PowerPoint, so make sure to review and edit your slideshow (if necessary) before presenting to an audience.
You can also go the other way, and import slideshows created in the PowerPoint app to Keynote. The easiest way to do this is to open the presentation in PowerPoint, click the little person and + sign icon in the top-right corner and email a copy of the presentation to yourself.
Open the Mail app, download the attachment, then hold down on the attachment's icon and select Open in PowerPoint. You'll once again find that many transitions, animations and fonts don't survive the move, however.
Current page: PowerPoint for iPad: 10 top tips

Barry Collins is an experienced IT journalist who specialises in Windows, Mac, broadband and more. He's a former editor of PC Pro magazine, and has contributed to many national newspapers, magazines and websites in a career that has spanned over 20 years. You may have seen Barry as a tech pundit on television and radio, including BBC Newsnight, the Chris Evans Show and ITN News at Ten.
VMware discloses flaws in Workstation and Fusion Pro products after making them free for personal use
Slack refutes claims that customer data is used to train AI models
Dell Technologies World 2024: All the news and announcements live
Most Popular

Nine steps to proactively manage data privacy and protection

How to stay ahead of ever-changing cybersecurity risks in banking

O'Reilly: Learning and operating Presto

AI governance for responsible transparent and explainable AI workflows
- 2 Slack refutes claims that customer data is used to train AI models
- 3 Dell Technologies World 2024: All the news and announcements live
- 4 Labour teases AI strategy plans ahead of 2024 general election
- 5 FBI seizes BreachForums infrastructure — but successor sites are already popping up
Critical PowerPoint Shortcuts – Claim Your FREE Training Module and Get Your Time Back!
PowerPoint for iPad: A Visual Guide
- PowerPoint Tutorials
- Miscellaneous
- October 29, 2017
In this first ever visual guide for the iPad version of Microsoft PowerPoint (iPad PPT), we show you step-by-step how to use the app, as well as all of the nitty gritty details behind it that you likely don’t know.
We highlight those “little hiccups” that will drive you up the wall (it’s still not the same experience as your desktop version), and we’ve done our best to show you the workarounds, if and when they exist.
Make sure to note the orange boxes we’ve sprinkled through the guide with pro tips and tricks based on years of experience building PowerPoint presentations…ignore them at your own peril
We will do our best to keep this guide up to date with each new Microsoft update. If you see something that we’ve missed, PLEASE let us know and we’ll do our best to update this guide ASAP.
Don’t have the PowerPoint app on your iPad yet? Download it by clicking here .
Things that go well with your iPad
Here are some useful resources for working with PowerPoint for the iPad:
Microsoft apps for the iPad
If you want to edit or display your Microsoft documents in their native environments on your iPad or iPhone, you’ll need to download the Microsoft PowerPoint, Word, Excel, OneNote, and OneDrive apps on your iPad and iPhone through the iTunes store. Find them here .
Microsoft Office 365
Get automatic upgrades and unlimited storage by signing up for the Microsoft 365 subscription model. Check out the latest of version of Microsoft Office here .
Lightning to VGA adapter
If you’re giving presentations with your iPad, don’t assume the meeting room will have the right adapters for you. So make sure you always bring one with you. I like apple’s adapters as they’re sleek and are 100% compatible with your device.
Bluetooth speaker
Again, if you’re giving a presentation in a meeting room and need to play music/video, be aware that your ipad’s speakers will probably not be strong enough to fill the whole room. This super compact wireless speaker hooks up incredibly easily to your ipad or iphone with no software or app necessary, and provides really high quality sound for the price.
iPhone/iPad stand
Although the iphone and ipad are designed to be light and portable, carrying them around throughout a presentation, especially if you’re moving around a room, can be a bit cumbersome. Keep your device upright and in front of you with this no-frills stand. It will fit just about any device.
Disclosure: please note that some of the links below are affiliate links, and at no additional cost to you, we will earn a commission if you decide to make a purchase. Please understand that we have experience with all of these companies, and we recommend them because they are helpful and useful, not because of the small commissions we make if you decide to buy something. Please do not spend any money on these products unless you feel you need them or that they will help you achieve your goals.
FINALLY…PowerPoint on our tablet! Down with the laptop and the desktop! Not so fast…
Although it is EXCITING to finally have PowerPoint on the iPad….there are MANY more versions to come before it can replace the desktop PowerPoint environment.
Until then, PowerPoint on your iPad is best thought of as an “extension” of the desktop experience, not as a replacement.
Yes, with each new PowerPoint for iPad update, you do get some new features, but the vast majority of REAL work that you do in PowerPoint (in our humble opinion) should still be done on your desktop.
Why? Because it’s just plain faster!
Yes, we are biased…we live, die and breath shortcuts on our keyboard AND we use LOTS of tips and tricks that haven’t come onto the iPad (yet)….so it’s okay to disagree with us.
With all that said, this is a GREAT step forward and we are PSYCHED for all the future updates and the new Office 2015.
We hope this guides helps make PowerPoint on your iPad a little bit, if not A LOT, easier for you to figure out.
This guide is organized according to the different Views in the app, and then according to each element within those Views. You can access all of these pieces using the tables of contents bar on the left.
If you want a fast way to find a command, simply hit Ctrl + F on your keyboard to search this page.
Account Settings
In this section, we look at the different things you can do in the Account Settings, such as signing out, signing in, and how to add multiple OneDrive accounts. To do any of these, you’ll have to go into the File View. In the top left hand corner, you have your Account Settings icon (with or without your account picture).

Signing out

Pro Tip: Instead of signing out of your account, you can add multiple OneDrive services to the same account so that you can access your business and personal files.
If you accidentally get signed out, here’s a step-by-step guide for how to sign back into your account. To sign into your account, follow these 4 steps (click to open gallery & instructions):
Microsoft Account: Sign in with the account you use for OneDrive, Xbox, LIVE, Outlook.com or other Microsoft services.
Organizational Account: Sign in with the account provided by your work, school or university.
Adding a service
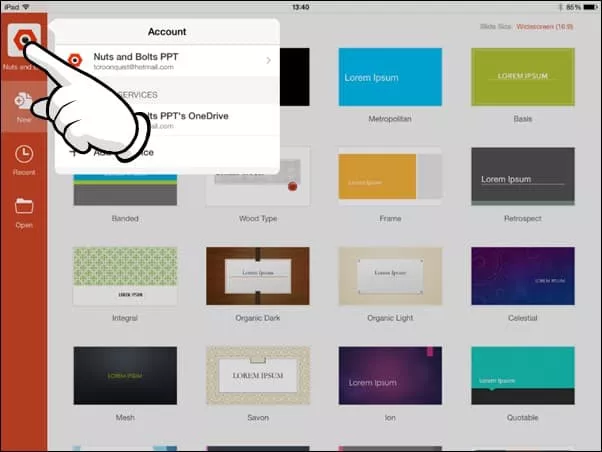
Pro Tip: Your Office 365 account starts with a OneDrive service attached to it (whether or not you have anything in it). If you have multiple OneDrive accounts, you can add them to your account (home or office accounts), allowing you to access those files directly on your iPad.
Note: Only Microsoft OneDrive, SharePoint, and Dropbox are currently supported on Office for iPad.
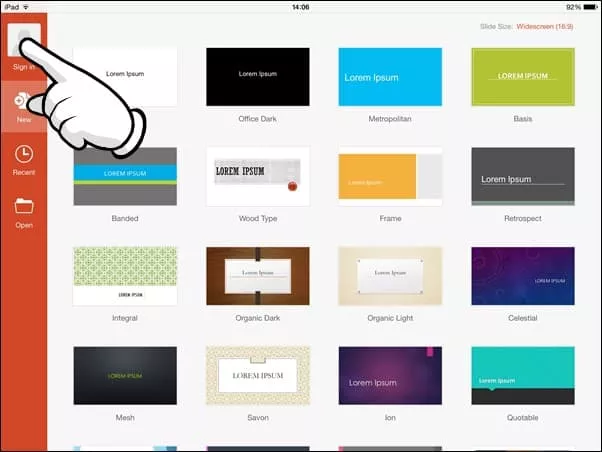
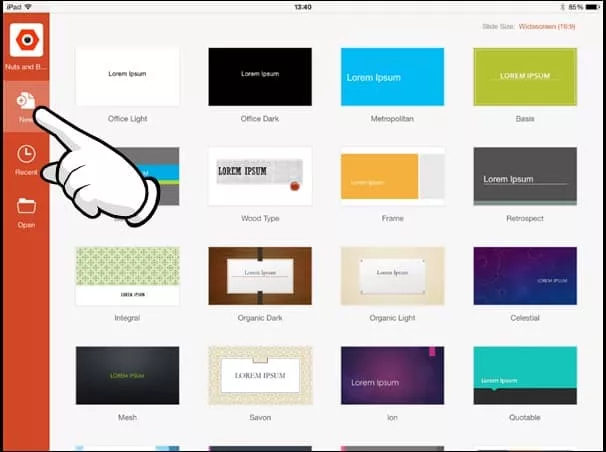
In this section, you will learn how to create a new file/presentation, from scratch, as well as some key tips to keep in mind. To create a new presentation, follow these 2 steps (click to open gallery & instructions):

Recent files
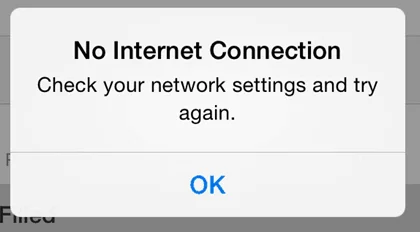
- If you have an internet connection, the most recent version of the file will be downloaded from your OneDrive and will open on your iPad.
- If you do not have an internet connection BUT have previously opened the document on your iPad before, the document will open, but it will not reflect any recent changes made to the version on your OneDrive (if you’ve made any changes from your desktop).
- If you do not have an internet connection and have never opened the document before on your iPad. You will receive a ‘No Internet Connection’ dialog box (below).
- Email as Link: Creates a “View Only” link or a “View and Edit” link of your file and launches the Mail App.
- Email as Attachment: Attaches the presentation to an email, the recipient can open and edit the document natively.
- Copy Link: Creates a “View Only” link or a “View and Edit” link of your file that you can paste into other documents or emails.
Move to Cloud: Allows you to move a presentation stored locally on your iPad onto your OneDrive. This option is only available when working with a file that is stored locally on your iPad.
Remove from Recent: Removes a file from this Recent menu here on your iPad AND on your desktop. This is not the same as deleting a file, it merely removes it from the Recent files list. To delete a file, you’ll have to go into Properties in the Open menu.
Discard Changes: Still not really clear what this does. If you figure it out, let us know.
Properties: Shows you additional properties about your file including filename, location, type, size, author, created, last modified, modified by and company.
Note: You can only create links for files stored on your OneDrive. If you have a locally stored file that you want to share a link to, you first need to move it to your OneDrive before you can create and share a link.
Note: You cannot edit any of these properties from your iPad, you must do so from your desktop version of PowerPoint. However, there are work arounds that will allow you to change the file name from your iPad. To see how that works, check out the section on renaming and duplicating your files.
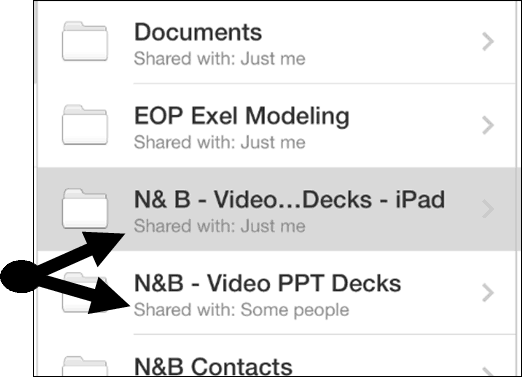
Sharing: Below the file name, you can see if the document is being shared with anyone else.
Reloading Your Files: If you don’t see a file that you have recently saved to the OneDrive, push and drag down with your finger to reload the file menu. Sometimes there is some lag time depending on the speed of your internet connection.
- To Pin a file: Simply select a non-colored pin
- To Unpin a file: Simply reselect the colored pin

Pro Tip: Keep in mind that pinned documents’ names do not update in this recent list if you change their file name. If you try and open a pinned file that has been renamed, you will receive an error message. So if you pin files and rename them, you will need to do some pin-maintenance either on your iPad or desktop version of PowerPoint.
The ‘Open’ area of the File View is where you will find all of the documents on your OneDrive services, as well as those saved on your iPad. So in this section, we’ll cover how to go about opening your files, as well as some EXTREMELY handy Pro Tips about sharing your documents and editing their properties.

- Email as Link: Creates a “View Only” link or a “View and Edit” link of your file and launches the Mail App.
- Email as Attachment: Attaches the presentation to an email, the recipient can open and edit the document natively.
- Copy Link: Creates a “View Only” link or a “View and Edit” link of your file that you can paste into other documents or emails.
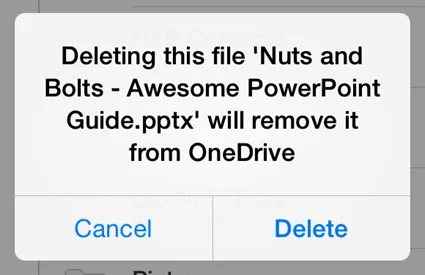
Delete: This is the only place where you can delete files from your different OneDrive accounts or from your iPad.
Properties: Shows you additional properties about your file, including: filename, location, type, size, author, created, last modified, modified by and company.
The Normal View

Navigation buttons

1. Back Button

The undo and redo commands are the iPad keyboard of the CTRL + Z and CTRL + Y keyboard shortcuts on the desktop version of PowerPoint. Similar to the desktop version, you are given 15 commands in both directions, you can undo undo up to 15 actions, or redo 15 actions.
Note: The Navigation Bar is fixed as is. You currently cannot add other commands to it like you can on a Windows based version of PowerPoint with the Quick Access Toolbar. We hope to see this updated in a later version!
4. Autosave
The AutoSave command controls whether or not changes to your presentation are automatically saved and synced with OneDrive. By default, PowerPoint for your iPad is set to AutoSave, which occurs:
- Periodically as you are working within your presentation
- Immediately when you hit the back button to return to the file menu view
Don’t make the same mistake I made – save your presentation!

This might sound obvious, but before closing PowerPoint on your iPad, hit the Back Button to return to the file menu view to ensure that the latest edits to your presentation are saved.
If you close the PowerPoint app by double-clicking the Apple button and swiping up (thus closing the app), you can lose the latest changes to your presentation…not fun!
So to ensure you save your latest changes, hit the button BEFORE closing the PowerPoint app.

If you choose this mode, to save your presentation, you need to either:
- Open the file menu and hit the green save button
- Hit the back button to return to file menu view to launch the Save dialog box
The Name command allows you to edit the name of a newly created AND unsaved PowerPoint presentation. As 90% of the presentations you work on your iPad will not be newly created or unsaved, this option will likely always be greyed out.
For example, if you create a new presentation on your iPad and have not saved it, the name command option is available. That said, as soon as you save the file with a name, this option becomes greyed out (forever).
How do you rename a file on your iPad?
To rename a presentation (or other office file) on your iPad, you either have to:
#1: Duplicate the presentation and save it with a new name. This will create a brand new document, so if you don’t want the older document, you will need to navigate to where it is saved on your iPad, or on your OneDrive and delete it. Painful, I know!
#2: Use the OneDrive app to rename your document (see our blog post on how to rename files in your OneDrive app).
6. Duplicate
The duplicate command creates a new copy of your current presentation and takes you to the File Menu View to rename your presentation (the same is true for the other Microsoft Office apps on your iPad). This is the Save As equivalent, or F12 keyboard shortcut on your desktop version of PowerPoint.
Note: Duplicating a presentation will not overwrite the original presentation, it will only create a new presentation with the new name you give it.
How to move my Presentation from OneDrive to my iPad:
To move a file from OneDrive to your iPad, you need to open the file, duplicate it and then select your iPad as the storage device. There is currently not a “move to iPad” command like there is a “move to cloud” command.
Note: Files stored on your iPad open faster than their OneDrive equivalents as they do not need to download the latest version.

The restore command gives you a options for reverting back to an earlier version of your PowerPoint presentation.
You can either:
- Back to the original you started with: Revert back to when it was last opened (PowerPoint will give you the specific time that it was opened). Doing so you get a warning indicating at what time the file was opened, so you get a sense of how far back you are going. Note: If this option is greyed out, it means there is currently nothing to revert back to.
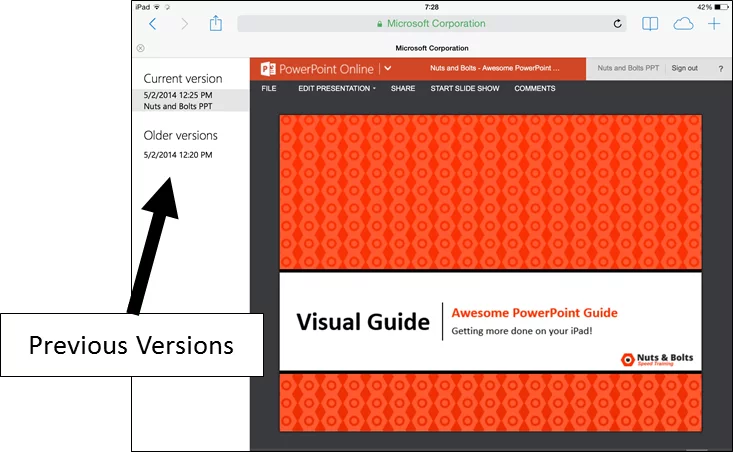
- Back to an online saved version of your presentation: Can revert back to an online saved version of your presentation. This option assumes that the file is saved on OneDrive and that you have an internet connection. Selecting this option launches safari and takes you to OneDrive. Log in with your Microsoft account and you will see all of the previous versions of your file by date on the left (assuming you have some) and allows you to revert back to that specific date.
9. Properties
Shows you the properties of your PowerPoint presentation including:
- Last modified
- Modified by
Note: File Properties (other than Name) are only editable on the desktop version of PowerPoint. To modify a presentation’s name, you can duplicate the presentation and save it as a new name, or use the OneDrive app for PowerPoint to edit the presentation’s name on your OneDrive. To learn more about this, check out our article on using the OneDrive App .
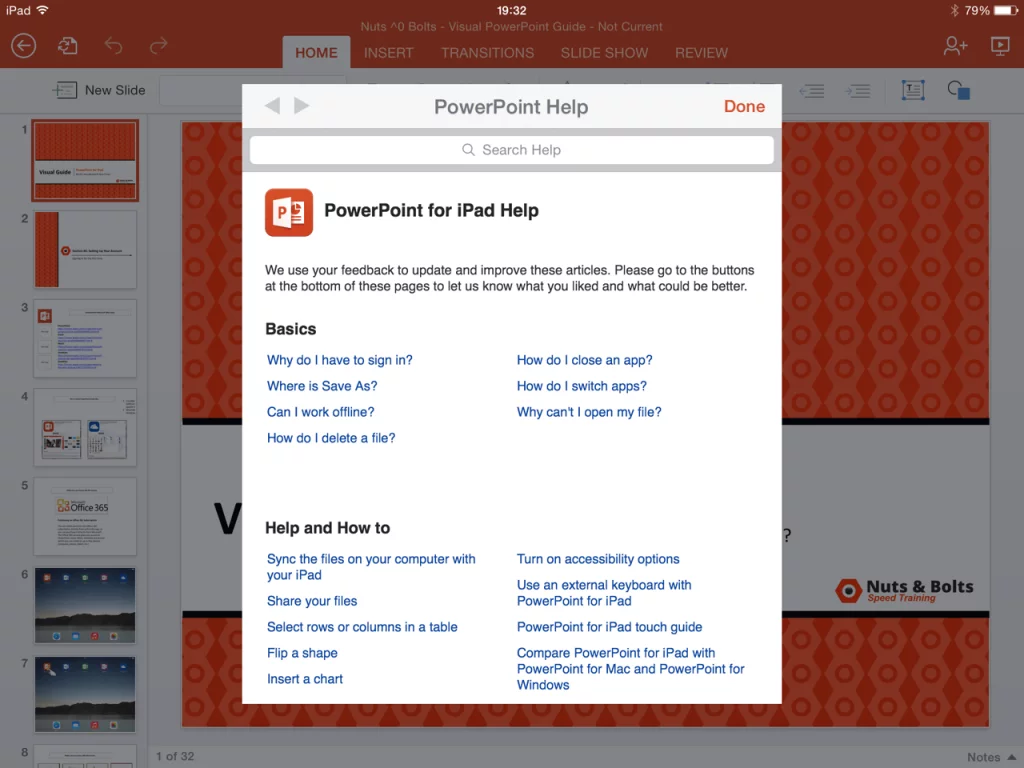
The Help and Support button launches basic help, support and tutorials for PowerPoint on your iPad. This menu is not extensive, but does offer solutions to simple questions you might have.
Note: You do need an internet connection to launch this dialog box.
The Home tab
1. New slide

This opens the PowerPoint slide gallery and allows you to pick from the available layouts within your presentation.
The five slide layouts shown in the picture are the standard layouts we use at Nuts & Bolts Speed Training for 99% of all of our PowerPoint presentations, you might have more or less slides layouts depending on your setup.
The Price of iPad Portability
Limited to Inserting Slides Only: You are limited to inserting slides layouts on your iPad. The Slide Master View is currently unavailable for PowerPoint on your iPad.
Changing a Slide’s Layout: You are limited to inserting new slides on your iPad, you cannot push a layout onto an existing slide.
To move an existing slide onto an new layout, you either need to wait until you are on your desktop version of PowerPoint, or insert a new slide layout, and copy and paste the different objects onto the new slide layout….kind of sucks, but that’s the price of portability.
2. Font styles
Copying and Pasting Style: If you are simply trying to match the font style of an object, it is often faster to copy and paste the font style you are trying to match, rather than identifying the font style, and then changing the font elsewhere
Microsoft Account: Sign in with the account you use for OneDrive, Xbox, LIVE, Outlook.com or other Microsoft services.
3. Font size

The font size dropdown in PowerPoint for iPad gives you three different ways to change the font size of your text:
#1 Pre-set Sizes: Select a preset size in the dropdown menu
#2 Clicker: You can use the plus and minus signs to select a font size
#3 Manually: You can double-tab the number between the plus sign and minus sign, and manually type in your desired font size
4. Bold / italics / underline
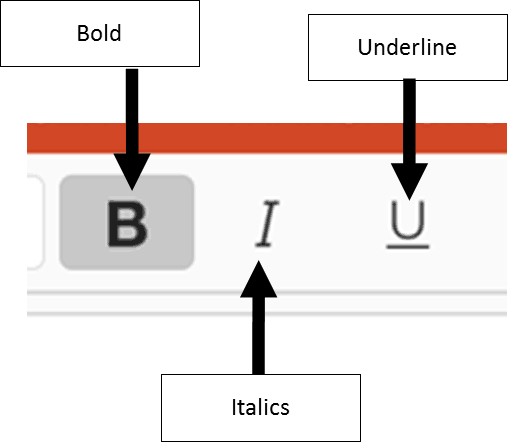
- Bold: Creates bold text for highlighting information, often used in titles.
- Italics: Creates italicized text for highlighting information, often used in subtitles and quotes.
- Underline : Creates an underline text for highlight information, often used in titles and subtitles.
Note: There is no way to make a double underline in PowerPoint for your iPad. Pro Tip: Don’t overdo it
If everything is important, nothing is important. Use text highlighting sparingly to better emphasize your points.
5. Formatting

- Strikethrough: Creates a strikethrough effect to emphasize that something should be removed
- Subscript & Superscript : Creates the -25% offset subscript and +30% offset superscript formatting. These are typically used in formulas, mathematical expressions and specifications for chemicals and isotopes

Includes the basic theme colors for your PowerPoint presentation, and their resulting gradients (which you cannot manually set).
Automatic: The automatic color is determined by the “Windows Text” color set in Control Panel Display Appearance. Changing this color will affect text color in all Windows applications.
Editing Your Presentation’s Theme: Currently you are not allowed to change or edit your PowerPoint presentation’s theme on your iPad. All theme editing or updating must be done on your desktop version of PowerPoint.
Setting Your Presentation’s Defaults on Your Desktop: You can set the default formatting for your objects on your desktop version of PowerPoint and those defaults will carry over into PowerPoint for your iPad.
6b. More colors

#1 More Colors: Selecting more colors gives you a dialog box with standard colors to choose from.
#2 Recent Colors: If you use the Custom Color option to create your own colors within your presentation, this second row of recent colors populates.
#3 Custom Color: Allows you to select your own color from a color grid (which is not very useful as you cannot get a precise color).
Advanced Color Formatting: Currently there are no options to input RGB or HSL codes to create specific custom colors or apply transparencies in PowerPoint for your iPad. The eyedropper tool is also not available.
To copy a custom color style (font color, shape fill or shape outline) into your recent colors to reuse somewhere else, see our blog post on using custom colors in PowerPoint on your iPad. 7. Text styles

Includes standard WordArt styles you can apply to highlight your message.
Style Note: WordArt is often distracting and hard to read and should be used sparingly if at all. See the example of Aqua, Accent 1, Reflection below the font styles gallery I created.
Note: You do not have the Text Fill, Text Outline and Text Effect options that you have on your desktop version of PowerPoint. You are currently limited to these 20 styles.
Left / Center / Right / Justify: Dictates the horizontal text alignment for text within a given PowerPoint object.
Top / Middle / Bottom: Dictates vertical text alignment for text within a given PowerPoint object.
Horizontal / Rotate Clockwise / Rotate Counterclockwise / Stacked: Dictates the rotation of your text within a given PowerPoint object. See next page for examples of each.
Columns: Controls how many columns of text are within an object. This is often used for objects with lots of text to visually break up the text.
Note: Notice that the alignment drop down stays open so that you can make multiple selections at the same time while working in your presentation…very handy!

Allows you to select bullet and numbers options for your lists in PowerPoint, but there are number of limitations that you should be aware of:
Limitation #1 : The Ruler – As you cannot access the ruler in PowerPoint for your iPad, you are stuck with the default bullet and numbering tab spacing
Limitation #2: Custom Bullets – You cannot create custom bullets like you can on your desktop version. That said, custom bullets and numbering created on the desktop version of PowerPoint does carry over into PowerPoint for your iPad, but you are not allowed to use it outside of the shape that it is currently set in.
Limitation #3: Numbers Start at 1 – All numbers on the iPad start at 1. You cannot adjust the starting number.
10. List level increase / list level decrease

Decrease List Level: SHIFT + TAB equivalent on the desktop version of PowerPoint. Moves a bullet or numbering backwards one indent level
Increase List Level: TAB equivalent on the desktop version of PowerPoint. Moves a bullet or numbering forward one indent level.
11. Text box
Inserts a text box into the middle of your PowerPoint slide.
Note: All inserted objects always start in the middle of your slide. There is currently no setting to manually place/draw your objects in after you have selected them.
12. Shapes gallery

Opens the shapes gallery and allows you to pick a shape to insert into the middle of your PowerPoint slide.
Shapes Always Default to the Center of Your Slide: Whenever you insert an object, it always defaults to the center of your slide.
You will need to manually drag it around and position it. To make sure your shapes are the same size, either copy and paste an existing shape on your slide, or line it up next to your shape, and resize it using your SmartGuides.
The Insert tab
Inserting a table immediately gives you a default 3 by 3 table in the center of your PowerPoint slide and opens the Table Tab on the Ribbon. See Table Tab for Table Options.
3. Pictures

Selecting pictures opens the Photo Gallery. Currently, you are only allowed to insert pictures that are stored locally on your iPad (in your Camera Roll, Photo Streams, etc.).
If you have company pictures on your computer that you want to access on your iPad, you can share those pictures wireless through the iCloud service so that you can access them in PowerPoint on your iPad.
Check out Apple’s step-by-step walk-through of the iCloud service .

Opens the shapes gallery and adds the Shape Tab on the Ribbon.
Default Your Shapes on Your Desktop: To avoid clumsy formatting in PowerPoint for your iPad, I highly recommend setting default formatting on the desktop version of PowerPoint for your specific decks as it carries over onto your iPad.
To set the default formatting on your desktop version of PowerPoint, simply right-click the shape you want to default the formatting for, and in the right-click menu, select set as default shape (line or text box, depending on what you are defaulting).
5. Text boxes

Inserts a text box into the middle of your PowerPoint slide and opens the Shapes tab on the Ribbon.
Pro Tip: Insert rectangles instead of text boxes to avoid the default “resize shape to fit text” setting. All text boxes start with this default setting and there is no way to un-select or change this formatting option in PowerPoint for your iPad.
The Transitions tab
1. Transition effect
Represents the 39 different types of transitions you can apply to your PowerPoint slides on your iPad.

32 of the 39 transition effects have effect options associated with them which changes the direction of the transition. These variations are often from left to right, or from top to bottom. For the style effects to be active, a transition with effects has to first be applied to a slide.
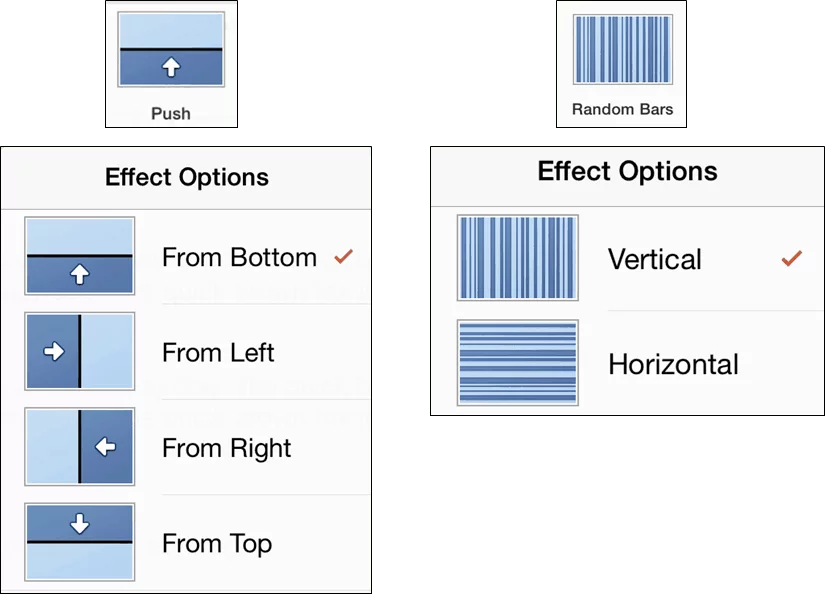
To change the effect options, simply select the alternative transition effect you would like for your slide.
Style Note: As transitions are often distracting when giving a presentation, I highly recommend using them sparingly (if at all) within your presentations.

Previewing a Transition: To preview your transition, hit the “from current” icon in the upper right hand corner of your screen to start the presentation form the current slide. Once in presentation mode, swipe right once to move to the previous slide, and then swipe left to preview the transition you just set for your slide.
Transitions without effects:
- The Flash, Curtains

3. Apply to all styles

The Review tab
1. Show comments

Allows you to turn comments on or off in your PowerPoint presentation. Comments appear either in the upper left hand corner of the slide, or on the specific objects they have been added to.
Note: Comments can be only be viewed on the iPad, there is currently no support for editing, adding or removing comments from a presentation.

2. Previous

Cycles backwards to the previous com ment within your presentation, starting from your current slide

The Picture tab
1. Picture styles
Represents the 28 different preset picture styles you can apply to your pictures in PowerPoint.

2. Picture shadows
Represents the 23 different preset picture shadows you can apply to your pictures in PowerPoint.

4. Re-order
All objects on a PowerPoint slide exist in a stacking or layering order based on when they were inserted onto the slide.

- Bring Forward: Brings an object forward, one layer.
- Bring to Front: Brings an object to the front layer of all the other objects on the slide
- Send Backward: Sends an object backwards one layer.
- Send to Back: Sends an object all the way to the back layer behind all the other objects on the slide.
Pro Tip 2: The Bring to Front and Send to Back commands are the fastest and easiest commands to use, as you know exactly where your objects will go. Best practice is to use these first, and then readjust any other objects that you want behind or in front of your other objects.
Note: More than one object has to be present on the slide for this command to be active.
The Shapes tab

1. Text Styles

The Text Styles gallery includes the 20 standard WordArt text styles that you can use to bring emphasis to or highlight the text within your presentation.
Are text styles worth using? Typically not, but it really depends on what you are trying to accomplish.
For example, for corporate presentations, WordArt is distracting and hard to read and should be used sparingly, if at all. That said, if you are using PowerPoint as a medium for creating a poster or a graphic for a website, the WordArt text styles could be useful.
Missing Text Styles Options: In PowerPoint for your iPad, the Text Fill, Text Outline and Text Effect formatting options are not available, you can currently only play with these options on your desktop version of PowerPoint.
2. Shape Styles

The Shapes Styles represent the 42 different default shape formatting styles you can apply to your shapes in PowerPoint. Now although these are tempting to use, keep in mind that anyone who has PowerPoint has access to these shape styles, so simply using these default formatting styles will result in a very default looking PowerPoint presentation.
Can I change the default shapes styles in the gallery? Yes, the shape styles are dictated by your PowerPoint theme settings, so manipulating or building a corporate theme will change these default formatting styles.
3. Shape fill
Allows you to change the shape outline color in PowerPoint.

- Bring Forward: Brings an object forward, one layer
- Bring to Front: Brings an object to the front layer of all the other objects on the slide
- Send Backward: Sends an object backwards one layer
- Send to Back: Sends an object all the way to the back layer behind all the other objects on the slide

The Table tab
- Single tap a table: Get the standard object edit menu.
- Double tap a cell within a table: Get the table specific edit menu.
- Cut: Cuts the text out of the selected cell.
- Copy: Copies the text in the selected cell.
- Paste: Pastes in your last copied text or object. Note that you cannot copy and paste formatting between tables.
- Clear: Clears the contents of the cell.
- Delete: Opens an additional menu allowing you to either delete the column or row you are currently in.
- Insert: Allows you to insert a column to the left of the current cell, or a row above your current cell.
- AutoFit: Collapses the column width to fit the text within it.

- Header Row: Formats the first row in your table as a header row
- Total Row: Formats the last row in your table as a total
- Banded Row: Adds a rotating fill color to the horizontal rows of your table
- First Column: Highlights the first column in a table
- Last Column: Highlights the last column in a table
- Banded Columns: Adds a rotating fill color to the vertical columns of your table

Note: As you make table selections, the style gallery will populate with a live preview of those options for the different table styles.
2. Table styles

From a formatting perspective, I highly recommend starting with a pre-formatted table style that gets you closest to your end result, and then manually tweaking the table from there.
Lists the different default table styles you can apply to your tables in PowerPoint.
Note: The Styles Options (discussed above) that you have selected, will be shown within the Table Styles Gallery making it easier to pick the default style that get you closest to your end goal.
Style Note: Use the formatting / highlighting sparing to increase the effectiveness of your table.
Tapping the fill colors opens the theme colors drop down, which you can use to manually override any of the Table Styles you have already applied to your table.

Pro Tip: To reverse the banding of your rows or columns, first, manually format the first row or column with a fill color, and then toggle on or off the header row option or the first column option.
Note: You are not able to change the outline weights or colors of a table or cells within a table in PowerPoint on your iPad. All table border formatting will have to wait until you are on your desktop of PowerPoint.
Gives you options to insert rows above or below the current cell you have selected within your table, or columns to the left or right of the current cell you have selected.

How can I insert multiple rows or columns at the same time? To insert multiple rows or columns within your table, first select multiple rows or columns within your table. With multiple rows or columns selected, when you click insert, the same number of rows or columns will be added to your table.
Deletes the row, column or table that you currently have selected.

How do I AutoFit multiple columns at the same time? First select the individual columns (or the entire table) before selecting AutoFit.
7. Alignment

The Text Alignment command changes the horizontal text alignment (Left, Center, Right) or the vertical text alignment (Top, Middle, Bottom) of a cell within the selected cell in your table (similar to using the Text Alignment tool on your shapes or other PowerPoint objects).
The Reorder command allows you to change the layering of the objects on your PowerPoint Slide. All objects on your slide exist in a stacking or layering order (one on top of the other) based on when they were inserted on to the slide.
- Bring Forward: Brings an object forward, one layer
- Bring to Front: Brings an object to the front layer of all the other objects on the slide
- Send Backward: Sends an object backward one layer
- Send to Back: Sends an object all the way to the back layer behind all the other objects on the slide

Pro Tip: When using the reorder command on a busy PowerPoint slide with lots of objects, the Bring to Front and Send to Back commands are the fastest and easiest to use, as you know exactly where your objects will end up.
Why is the reorder command grayed out? More than one PowerPoint object has to be present on your slide for the Reorder command to be active.
The Notes pane
1. Opening the Notes pane To open the Notes Pane, tap in the lower right-hand corner of your screen where it says ‘Notes’.

How do I best use the Notes pane on your iPad? I find the notes pane useful for quickly reviewing notes prior to your presentation, as the automatic full screen mode makes it easy to both review the notes for a particulate slide, and see the thumbnail of that particular slide, outlined in orange on the left side of the screen. The notes pane will also conveniently stay open on your iPad until you manually close it.
2. Closing the Notes pane
To close the Notes Pane in PowerPoint on your iPad, simply click the notes icon in in the upper right-hand corner of the slide, and you will return to the Normal View of your presentation.

Share & Slide Show View
These are the options for sharing your documents:
- Email as Link: Creates a “View Only” link or a “View and Edit” link of your file and launches the Mail App.
- Email as Attachment: Attaches the presentation to an email, the recipient can open and edit the document natively.
- Copy Link: Creates a “View Only” link or a “View and Edit” link of your file that you can paste into other documents or emails.
The Slide Show icon starts your presentation in slide show mode starting form the current slide. Besides running your presentation, this is great for spot checking your content and for reviewing any transitions you have applied as there is no “live preview” for them on your iPad.
The Slide Show icon is the equivalent of hitting the F5 keyboard shortcut on your desktop version of PowerPoint.
Help us keep this article updated
We hope you’ve found this PowerPoint for iPad guide helpful.
If you’ve see something that we’ve missed, PLEASE let us know and we’ll do our best to update this guide ASAP.
Oh, and we hope you’ve paid special attention to the pro tips and tricks we’ve sprinkled through the guide to help you avoid major errors, or to help you troubleshoot issues.
What’s next?
Related articles.
- What is a broken link chart in PowerPoint (and how to fix it)?
- Bar chart trick: Right aligning categories (PPT, Word, and Excel)
- PowerPoint settings: program level vs. presentation level
- What is a linked Excel chart in PowerPoint?
- Set Up Slide Show: Customize how your PPT presentations run
About The Author

Popular Tutorials
- How to Strikethrough Text (l̶i̶k̶e̶ ̶t̶h̶i̶s̶) in Word, Excel & PowerPoint
- How to Make Animated Fireworks in PowerPoint (Step-by-Step)
- Strikethrough Shortcut (l̶i̶k̶e̶ ̶t̶h̶i̶s̶) for Word, Excel & PowerPoint
- How to Create a Flash Card Memory Game in PowerPoint (Like Jeopardy)
- Keyboard Shortcuts Not Working: Solved
PowerPoint Tutorial Categories
- Strategies & Opinions
- Shortcuts & Hacks
- Presentation Design
- Pictures, Icons, Videos, Etc.
- New Features
- Charts & Data Viz
We help busy professionals save hours and gain peace of mind, with corporate workshops, self-paced courses and tutorials for PowerPoint and Word.
Work With Us
- Corporate Training
- Presentation & Template Design
- Courses & Downloads
- PowerPoint Articles
- Word Articles
- Productivity Resources
Find a Tutorial
- Free Training
- For Businesses
We help busy office workers save hours and gain peace of mind, with tips, training and tutorials for Microsoft PowerPoint and Word.
Master Critical PowerPoint Shortcuts – Secure Your FREE Training Module and Save Valuable Time!
⌛ Master time-saving expert techniques.
🔥 Create powerful presentations.
🚀 Propel your career to new heights.
We value your privacy – we keep your info safe.
Discover PowerPoint Hacks Loved by Industry Giants - KKR, AmEx, HSBC!
Over 114,880 professionals in finance, marketing and sales have revolutionized their PPT skills with our proven methods.
Gain FREE access to a full module of our premium PowerPoint training program – Get started today!
We hate spam too and promise to keep your information safe.
You are currently viewing a placeholder content from Facebook . To access the actual content, click the button below. Please note that doing so will share data with third-party providers.
- Presentation creation
- PowerPoint templates
- Presentation training
- Print design
- Pitch deck example
- PPT Template example
- Investor deck example
- Product deck example
- Presentation services
- Infographic design
- Pitch decks
- Investor presentations
- Marketing presentations
- Conference presentations
- Finance presentations
- Product presentations
- CPD presentations
- Training overview
- Virtual presentation skills training
- PowerPoint template training
- Storytelling training
- Our showreel
- Charity presentation example
- Conference presentation example
- CPD presentation example
- Investor deck example – Seed stage
- Investor deck example – Series C
- Marketing presentation example
- PowerPoint template example
- Product presentation example
Blog / Presentation Delivery / PowerPoint on iPad

PowerPoint on iPad: create presentations anytime, anywhere.
Multi-tasking at its finest: update, amend or even create a PowerPoint presentation on the go with PowerPoint’s mobile app for iPad.
The “digital revolution” has transformed the way we live our lives. We expect global connectivity at our fingertips, no matter where we are or what time it is. The use and development of mobile technology continues to grow in response to this demand. With new technology comes flexibility and the power to respond rapidly to any situation, not only in our personal lives, but in the workplace as well.
Flexible and mobile working isn’t just a differentiator for companies now, it’s a necessity. Modern businesses are feeling the pull from both clients and employees to embrace this new world of work, and stay relevant, regardless of the industry. While this doesn’t only include mobile technology, it is a significant element of this change.
Professionals who find themselves continuously on the go, travelling from place to place and covering all corners of the globe, can’t be weighed down by inflexible technology. Apple’s iPad was created for just this reason. To give people all the connectivity and functionality of a desktop, on the move. And the PowerPoint for iPad app has opened up a world of mobile possibilities for those people who rely on presentations to share their big ideas.

Can you really create a PowerPoint presentation on iPad?
Yes. But that doesn’t mean you should. Let’s make this clear: the PowerPoint for iPad app is a distilled version of the desktop app. Apple has streamlined the functions down to those deemed most important. As well as this, controlling placement, size and direction of elements to the exact pixel is just going to be a lot harder with a touchscreen than with a mouse. You may not have complete control, or the full suite of tools and options, but you can create a PowerPoint presentation that most clients will think looks pretty good. Especially, if you follow our design tips .
We understand that the world of work can be unpredictable. Sometimes, you get a call from that dream client and you just have to drop everything and head for the nearest airport. We also understand that, regardless of how much time you have to prepare for a presentation, 24% of you still don’t start building until there’s less than a week left. You guys eat danger for breakfast.
If this sounds like you, PowerPoint for iPad may save your butt. You can jump on that plane, hand luggage only, get your iPad out and start building. By the time you land, you’ll have a persuasive presentation that will fool your potential client into thinking you’ve been prepping for months. And, in a way, you have by being an avid Buffalo 7 blog reader, naturally.

What if I’m in the 76%?
Firstly, congratulations: you’re our kind of person. Secondly, PowerPoint for iPad is still an effective tool to have in your arsenal.
Clients can be fickle creatures, constantly updating and changing their demands. And they don’t care for your travel schedule, they expect you to be adaptable to their needs. Even if you’ve created the perfect presentation, weeks in advance, what if they throw you a curveball at the last minute? If all you’ve come armed with is a USB, you’re in trouble.
However, if you’ve got your trusty iPad, with the PowerPoint app installed, and your presentation uploaded to iCloud , you can update the PowerPoint to reflect their change of heart.
PowerPoint for iPad is great for delivery
There are numerous unknowns to navigate when it comes to relying on someone else’s tech to deliver your presentation. Perhaps it won’t be powerful enough to run your animations smoothly, even though you’ve reduced the file size right down . Or they won’t have the font installed , and your beautiful slides end up looking like a headache-inducing letter orgy. Or their screen configuration might leave your brand yellow looking like a sickly green. No matter how detailed you go with the tech spec questions in advance, there’s always a chance something will go wrong.
By taking your own iPad to present your slides, you remove all these issues. Ok, this won’t work if you’re presenting to a massive room, but in a small group, iPad presentations can be more effective than a traditional stand and deliver method.
PowerPoint has an option under the Slide Show tab, titled Set Up Slide Show . Under Show type: select Browsed at kiosk (full screen) . This ‘kiosk mode’ allows users to interact with your presentation, similar to a website.
If you set your presentation up with kiosk mode in mind, you can create a fully-interactive experience for your meeting. This means that you can pass control over to the client, and they can navigate around the slides however they want. Not only will this prove you know your stuff, being able to adapt your script to match the slide they move to, but it will also open up a conversation rather than a monologue.
To use kiosk mode, you need to make sure all your slides have hyperlinked navigation and all your animations are automated, as there’s no ‘click’ function.
If you’ve got the budget, and the space in your suitcase, you could even set the same presentation up on multiple iPads and let everyone in the room have a go.
Use your iPad as the controller for your presentation
If you are delivering your presentation to a large crowd, you can still control your slides from your iPad. The old-school way to do this is by physically connecting your iPad to the big screen using VGA or HDMI. Alternatively, if the presentation screen is set up with AirPlay, you can project your slides wirelessly.
If you’re using your iPad as a means to control your slides, it’s best practice to set Auto-lock to Never , so it doesn’t go to sleep mid-presentation.

Sold. What do I need to know?
There are so many iPads on the market, and they all have the capability to utilise the PowerPoint for iPad app. However, if you want a decent screen size and good power, you’re going to be looking at iPad Pro for the best results, and ease of use.
The PowerPoint for iPad app is free to install and, if you just want to view presentations, that’s all you’ll need. However, if you want the option to create and edit your presentations on your iPad, you’ll need an Office 365 subscription .
How do I get my PowerPoint presentation on my iPad?
If you don’t have iCloud, there are other ways you can get your mitts on the presentation you so-lovingly crafted on your PC or Mac.
You can use your OneDrive account:
- Upload your chosen presentation to your OneDrive account from your computer.
- On the iPad, sign in to your Microsoft account in PowerPoint.
- Select Open , then OneDrive and drag down the pane to refresh.
- Select your file and it will download onto the iPad. How long this takes is dependent on file size and wi-fi connection.
Or you can use iTunes:
- Plug the iPad into the computer and open iTunes.
- Select the iPad in the top navigation and then go to Apps in the drop-down menu.
- Scroll down to the bottom, where you will find a list of apps that you can add files to.
- Select PowerPoint on the left.
- You can add files through the iTunes buttons, or drag and drop a file into the space from your computer.
- Once it has completed copying the file, eject the iPad and you will be able to open the file through the PowerPoint app.
Great, now I know this is an option, I’ll just go back to sleep until it’s time for my flight.
We can’t fight human nature. If you want to use PowerPoint for iPad to create all your presentations moving forward, you do you. We’re only here to advise. How you choose to use this fountain of knowledge is your call.
LIKE WHAT YOU'VE READ? WHY NOT share
Work Can wait
Put off writing that email just a little longer. Send your incoming calls to voicemail. Put your feet up, grab a brew and explore more presentation insight in the Buffalo 7 Library
How to Play a PowerPoint Presentation on an iPad: A Step-by-Step Guide
Playing a PowerPoint presentation on an iPad is simple and straightforward. Just ensure you have the Microsoft PowerPoint app installed, and you’re good to go. You’ll be presenting in no time!
After following the steps, your PowerPoint presentation will be up and running on your iPad. Whether it’s for a business meeting or a classroom presentation, you’ll be able to engage your audience effectively.
Step by Step Tutorial on How to Play a PowerPoint Presentation on an iPad
Playing a PowerPoint presentation on an iPad involves a few simple steps that will get your slides up and ready for viewing. Let’s dive in!
Step 1: Download the PowerPoint app
First thing’s first – download the PowerPoint app from the Apple App Store.
The PowerPoint app is free to download but may require a Microsoft Office 365 subscription for full functionality. Make sure you’re signed in to your Microsoft account after downloading the app.
Step 2: Open the app and find your presentation
Open the app and locate the presentation you want to play.
You can access your presentations from cloud storage services like OneDrive or Dropbox, or you can transfer files directly to your iPad using iTunes or email.
Step 3: Open your presentation
Once you’ve found your presentation, tap to open it.
Your PowerPoint slides will appear just as they would on a computer. At this point, you can make any last-minute edits or go straight to presenting.
Step 4: Play your presentation
To start your presentation, tap the “Play” icon.
Your iPad will switch to presentation mode, displaying your slides full-screen. Swipe left or right to navigate through the slides.
Step 5: Use additional features as needed
Take advantage of PowerPoint’s features like highlighting or drawing on slides during your presentation.
These features can be accessed by tapping the pen icon on the screen. They add an interactive element to your presentation and can help emphasize key points.
Tips for Playing a PowerPoint Presentation on an iPad
- Make sure your iPad is charged or plugged in; you don’t want it dying mid-presentation!
- Familiarize yourself with the app’s interface before the presentation to avoid any hiccups.
- Use a stylus for more precise highlighting or drawing on slides.
- If you’re presenting to a group, connect your iPad to a larger screen using AirPlay or an adapter.
- Practice navigating through your slides on the iPad to ensure a smooth presentation.
Frequently Asked Questions
Can i edit my powerpoint presentation on the ipad.
Yes, the PowerPoint app allows you to edit presentations directly on your iPad.
Can I play a presentation without an internet connection?
Yes, once the presentation is downloaded to your device, you do not need an internet connection to play it.
Can I use my iPad as a remote for the presentation?
Yes, with the right setup, you can use your iPad as a remote control to navigate through your slides.
Are animations and transitions supported on the iPad?
Most animations and transitions in PowerPoint are supported on the iPad app.
Can I add notes to my presentation on the iPad?
Yes, you can add and view presenter notes in the PowerPoint iPad app.
- Download the PowerPoint app from the Apple App Store.
- Open the app and locate your presentation.
- Open your presentation.
- Play your presentation using the “Play” icon.
- Use additional features like highlighting or drawing as needed.
Playing a PowerPoint presentation on an iPad is a breeze once you know the steps. With the portability and convenience of the iPad, you’re no longer tethered to your laptop for presentations. The ability to edit on the go, use interactive features, and present without a hitch makes the iPad a powerful tool for anyone needing to share information visually.
Remember to download the PowerPoint app, familiarize yourself with its features, and practice beforehand to ensure your presentation goes smoothly. And don’t forget, a well-charged iPad is a happy iPad! So, the next time you need to play a PowerPoint presentation, consider using your iPad and impress your audience with your tech-savviness.

Matthew Burleigh has been writing tech tutorials since 2008. His writing has appeared on dozens of different websites and been read over 50 million times.
After receiving his Bachelor’s and Master’s degrees in Computer Science he spent several years working in IT management for small businesses. However, he now works full time writing content online and creating websites.
His main writing topics include iPhones, Microsoft Office, Google Apps, Android, and Photoshop, but he has also written about many other tech topics as well.
Read his full bio here.
Share this:
Join our free newsletter.
Featured guides and deals
You may opt out at any time. Read our Privacy Policy
Related posts:
- How to Save Powerpoint as PDF with Notes
- Can I Convert My Powerpoint to Google Slides?
- How to Drag Slides From One PowerPoint to Another: A Step-by-Step Guide
- How to Make a Powerpoint Slide Vertical in Powerpoint 2013
- How to Set Time for Slides in Powerpoint
- Can You Create a PowerPoint on an iPad? Here’s How!
- How to Insert Slides from Another Presentation in Powerpoint 2010
- How to Check Word Count on Powerpoint 2010
- How to Unhide a Slide in Powerpoint 2013
- How to Loop a Slideshow on Powerpoint 2013
- How to Change the Font on All Slides in Google Slides
- How to Change Hyperlink Color in Powerpoint 2010 (An Easy 5 Step Guide)
- How to Use a Mac With PowerPoint: A Step-by-Step Guide
- How to Email a PowerPoint Slideshow: A Step-by-Step Guide
- How to Download a Google Slides Presentation as a Powerpoint File
- How Is Microsoft PowerPoint Used in Business: A Comprehensive Guide
- How to Convert a PowerPoint to Word and Edit with Ease
- How to Insert Check Mark in Powerpoint for Office 365
- How to Prepare a PowerPoint Presentation for Job Interview Success
- How to Delete Multiple Slides in Google Slides
Detailed Guide on Running PowerPoint Presentation on iPad/iPhone

If you are working in an office, sooner or later you may have to create a presentation to show to your boss or work colleagues. However, the case that you lose your USB stick or USB drive cannot be detected by your laptop will lead you to an unwanted scenario. To avoid this, you can back up or save your PowerPoint presentations on iPad or iPhone as the chance of misplacing them is a lot less likely. What’s more, you may directly play the presentation on your iPad and present it on a bigger screen with great ease. Aside from that, controlling your presentation on iPad is much easier than browsing it on your laptop. Below are the steps you can follow to do presentation on your iPad.

How to Play PowerPoint Presentation on iPad/iPhone
After creating your presentation, you may use the tools below to save and play PowerPoint on your iPad or iPhone. Here we take iPad as an example to show you the detailed steps.
Step 1: Use AirMore App and Import the Files to Your iPad
AirMore is an online-based application which enables you to take full management of your Android and Apple devices on your PC. It allows you to transfer your files between mobile and the computer. This app is 100% free of charge and it is the first app you need for iPad PowerPoint presentation. Here’s how to move your presentation to your iPad with it.
- Download the application on your iPad by clicking the button below.
- Visit AirMore website and simply click the blue button found on the lower part of the first page.
- Next, set iPad and computer connected to the same network. Link your iPad with PC by simply clicking the “Radar” tab so that the web will detect your iPad. Click on the iPad’s avatar and tap “Accept” on your device to confirm the connection. You may also scan the QR code using the iPad’s camera as another way of connecting.
- Once connected, go to “Documents” tab and then click “Import” button on the upper part of the interface to browse your PPT files and then click “OK” to save PowerPoint presentations on iPad.

The PowerPoint is now saved on your device and ready to be used anytime you want. However, the next issue you have is how you may share it with others since it is saved on your iPad. This leads you to the next helpful tool.
Step 2: Use ApowerMirror to Show Your Presentation
After you go to the classroom or office with your iPad, you can display your iPad’s screen on the computer using ApowerMirror. This is a mirroring app which allows you to mirror the screen of your device on a bigger screen such as a laptop’s or PC’s screen. Through this app, you’ll be able to show the presentation to everybody while running PowerPoint presentation on iPad. Here is what you need to do.
- Download ApowerMirror on the computer and launch it. Download
- Scroll up the Control Center on your iPad and then tap “AirPlay Mirroring”.
- Choose the computer you want to connect to.

The presentation is now being mirrored on the computer’s screen. Note that aside from mirroring, you may also take a screenshot and record the screen of your iPad using this app. And you can utilize the “Whiteboard” function to draw on your displayed phone screen.
Step 3: Get a Projector
Lastly, you need a projector and connect the computer to it. You may now start using iPad for PowerPoint presentations.
That is how to make a presentation with your iPad employing AirMore and ApowerMirror app. You may now easily discuss everything with your audience without going back and forth on the computer. And accessing your presentation directly on iPad makes your work much easier.
Related posts:
- Detailed Guide on How to Control PowerPoint from iPhone
- 6 Best Presentation Apps
- How to Make a Video Presentation
- How to Recover PowerPoint Files from a PC
Leave a Comment
Comment (1).
Related articles
- Best Ways to Mirror Windows 10 to TV
- How to Watch Quibi on Computer
- How to Fix Microsoft Teams Screen Sharing not Working Issue
- Press Release
- Android topics
- Game topics
- Phone Transfer
- Tips and Resources
- Data Recovery
- Alternative applications
- Apple Watch
- Accessories
- Digital Magazine – Subscribe
- Digital Magazine – Info
- Smart Answers
- 11th-gen iPad
- New AirPods
- Best Mac antivirus
- Best Mac VPN
When you purchase through links in our articles, we may earn a small commission. This doesn't affect our editorial independence .
Presenting with the iPad

Get it together
Apple’s $10 Keynote for iOS ( ) can import presentations made in Microsoft PowerPoint ( ) or in Keynote for OS X ( ), but in both cases you’re likely to lose a great deal during the import process. Say goodbye to some fonts, transitions, and builds that aren’t available on the iPad, plus audio and more. (Presenter notes are supported, however, whether created on the iPad or imported from a PowerPoint or Keynote for Mac presentation.) Therefore, when feasible, create your presentation directly on the iPad.
If you do use Keynote on a Mac, be sure to read Apple’s Best practices for creating a presentation on a Mac for use on an iPad , which guides you in selecting compatible templates, fonts, and other features. Once you’ve created your presentation, you need to move it to your iPad. Although the iOS version of Keynote supports iCloud’s Documents in the Cloud feature, which automatically syncs documents on all your iOS devices with Apple’s servers, the Mac version of Keynote still lacks integrated support for this feature. ( OS X 10.8 Mountain Lion will have access to iCloud’s Documents in the Cloud.)
Instead, you must log in to your iCloud account in a Web browser at www.icloud.com , click the iWork icon, click Keynote, and then drag your Keynote document into the browser window. After it uploads, the document will appear automatically in Keynote on your iOS device—but keep in mind that this process doesn’t eliminate the compatibility issues I mentioned a moment ago.
If you don’t use iCloud, another way to move the presentation onto your iPad is to open iTunes, select your iPad, click on the Apps tab, and select Keynote. Drag your presentation to the Keynote Documents list. Then open Keynote on your iPad, go to the Document Manager (if it’s not already visible), tap the folder icon in the upper-right corner, and then tap your presentation. Or, if you want the convenience of cloud-based syncing without iCloud, a service called DropDAV ($5 per month) enables Keynote users to connect to Dropbox ( ) via WebDAV.
One note: If you’ve already created a presentation in PowerPoint, also take a look at SlideShark , a free iPad app for viewing and displaying PowerPoint presentations. It’s not perfect, but it does a better job supporting PowerPoint documents than any other iPad app I’ve seen.
Use an external display
If your audience is very small—perhaps you’re showing your portfolio to a potential client or giving your boss a quick demo—you could show your presentation on the iPad itself, albeit without the presenter notes. But you’re more likely to prefer using a projector or other display.
Plug it in One way to do this is to plug a video adapter into your iPad’s Dock connector, and then connect that to your display. You’ll get the best results (and the highest resolution) using a display or projector with either the $39 Apple Digital AV Adapter (for displays with HDMI inputs) or the $29 Apple VGA Adapter (for displays with VGA inputs).
If you’re connecting to a television with neither HDMI nor VGA inputs, you can instead use the $39 Apple Component AV Cable or the $39 Apple Composite AV Cable , as appropriate, although both offer lower resolution than the Digital AV and VGA adapters. Although this wired approach works just fine, it’s difficult to hold your iPad while giving a presentation without the video cable falling out—I speak from personal experience.
Mirror a newer iPad With an iPad 2 or later, either the Digital AV or VGA adapter lets your iPad mirror everything from its internal screen onto the external display, which may be useful if you want your presentation to include demonstrations of other iPad apps or content that’s not within Keynote itself. However, note that on the original iPad, where mirroring is unavailable, Keynote itself produces no external video signal until you tap the Play button (which is probably what you want anyway).
If you prefer to roam across the stage holding your iPad while you speak, you can beam your presentation’s audio and video wirelessly using AirPlay mirroring—provided you have an iPad 2 or later running at least iOS 5. To pull off this trick, you’ll need an AirPlay receiver connected to the projector or display and on the same Wi-Fi network as your iPad. Apple’s $99 Apple TV ( ) can serve this purpose, if you happen to have one handy. Alternatively, assuming a Mac or PC is available, you can install either of two similar utilities: AirServer (Mac version, $15; Windows version, $8) or Squirrels’ Reflection (Mac only, $15). Either of these apps can turn a computer into an AirPlay receiver, no Apple TV required. They even support displaying screens from multiple iOS devices at the same time. Note that the PC version of AirServer currently lacks audio support, but the developer says it’s “coming soon.”
Once your AirPlay receiver is set up, you can mirror your iPad’s display by double-pressing the Home button, swiping the multitasking bar toward the right, and tapping the AirPlay button. Tap the name of the device you want to use for mirroring and then set the Mirroring switch to On.

Control the presentation
Once you tap Play, you can use your iPad to control the presentation as well as provide presenter notes for yourself (a cheat sheet, if you will) that the audience won’t see. To change what’s on the iPad’s screen when using an external display, tap the Layouts icon and then one of the follow buttons: Current (the current build of the slide as shown on the external display), Next (the next build, which may or may not be the next slide), Current and Next (current and next builds side by side), or Current and Notes (current build and any accompanying presenter notes). This final layout is the only one to display presenter notes, but you can supplement it by tapping the button in the upper left corner to display a list of slide thumbnails, which can aid in navigation (tap a thumbnail to jump directly to that slide).

To advance to the next build or slide, tap once anywhere, or swipe toward the left. To go back, swipe toward the right. A nice extra in Keynote for the iPad is a “laser pointer”: Touch and hold on the iPad’s screen to show a red dot, which moves with your finger on the main display. Lift your finger and the dot disappears. This is useful when you want to call attention to a particular area of a slide. To end the presentation (and turn off Keynote’s video output), tap the Close icon.

If your iPad is physically connected to your display—or if you want to be able to move around during your presentation without carrying the iPad with you—you can download Apple’s Keynote Remote app ($1) on your iPhone or iPod touch. Follow the instructions to pair Keynote Remote with your iPad using Wi-Fi or Bluetooth, and then your iPhone or iPod touch becomes a remote control for Keynote on your iPad, complete with previews of your slides.
Senior contributor Joe Kissell is the senior editor of TidBits and the author of the ebook Take Control of Working with Your iPad .
[Editor’s note: This story has been updated to include information about iCloud, AirPlay, and the third-generation iPad.]
iPad 2 family
Can You Create a PowerPoint on an iPad?
- Small Business
- Business Communications & Etiquette
- Presentations
- ')" data-event="social share" data-info="Pinterest" aria-label="Share on Pinterest">
- ')" data-event="social share" data-info="Reddit" aria-label="Share on Reddit">
- ')" data-event="social share" data-info="Flipboard" aria-label="Share on Flipboard">
How to Transfer a PowerPoint Presentation From a MacBook to an iPad
How to delete a registry entry to reconfigure office powerpoint, how to edit documents on an ipad.
- How to Sync Notes Between an IPad & an Android Device
- What App Is Comparable to Excel for an Apple iPad?
Apple's iPad is capable a wide range of tasks, including building presentations for Microsoft's PowerPoint presentation software. To create a compelling PowerPoint presentation, you'll need an editing app that can handle the format. Apple offers an in-house developed app to fill this need: Keynote for iOS. Based on Apple's OS X Keynote presentation software, this app can build, edit and view PowerPoint presentations, as well as a number of other formats like Apple's KEY presentation format.
Keynote Features
Keynote for iOS is compatible with all iOS platforms, including the iPad. Keynote for iOS enables you to build fully-featured PowerPoint-compatible presentations, including pictures, videos and sound. It also features over 30 transitions and effects for both objects and text to help give your presentations some panache. The program was designed with multi-touch interfaces in mind and so features many tools that play into this interface like one-touch edits and rulers to guide image placement. Keynote for iOS also has a number of chart and graphing tools to enhance the presentation of data.
PowerPoint Compatibility
Keynote not only makes presentations in its proprietary KEY format but also in the widely used Microsoft PowerPoint PPT format. These presentations can be viewed on PowerPoint-compatible software on any platform, making Keynote a useful app if you need to compose a presentation on the go. Keynote can also import PowerPoint presentations and edit them, although some data like fonts and transitions not available on the iPad or in Keynote may be lost.
ICloud and Sharing With Keynote
With support for iCloud in Keynote for iOS, the presentation file is pushed to all iCloud-enabled devices set to receive. Updates made to the files are also pushed to other devices, with changes saved automatically as you work to preserve your progress should something go awry. Keynote also features numerous sharing options to help distribute your presentation to everyone who needs it. A link can be shared via email, iTunes, WebDAV and AirDrop.
Keynote Drawbacks
Keynote for iOS isn't a perfect app for PowerPoint creation or editing. Any formatting details not available on Keynote for iOS or the iPad, like fonts, transitions or other effects, won't carry over during importing and editing. While Keynote has a good set of features, this lack of compatibility with other features in the OS X version of Keynote and PowerPoint leaves the app somewhat limited.
Alternatives
If Keynote isn't a viable or appealing option, there are a few other PowerPoint builders available for the iPad. Macworld lists Documents To Go Premium, Office 2 HD, Polaris Office, Quickoffice Pro HD and Smart Office 2 as viable third-party alternatives. Macworld also lists a virtual copy of Microsoft PowerPoint as an option, by using a cloud-based Windows server from an app like CloudOn, Nivio or OnLive desktop. You can also connect to a virtual version of the PowerPoint-compatible OpenOffice.org in a similar fashion through AlwaysOnPC Personal Cloud Desktop.
- Apple: Keynote for iOS
- Macworld: Editing PowerPoint Documents on an iPad
Related Articles
How to play a powerpoint presentation on an ipad, what is the ppsx format, how to read powerpoints on the iphone 4, does the ipad run mac office, what are benefits of powerpoint, can you do spreadsheets on an ipad, how to attach documents to email on an ipad, what is an ms excel chart, how to draw a graph in ms word, most popular.
- 1 How to Play a PowerPoint Presentation on an iPad
- 2 What Is the PPSX Format?
- 3 How to Read PowerPoints on the iPhone 4
- 4 Does the iPad Run Mac Office?
How to Write on PowerPoint Slides on an iPad
In this blog article, we‘ll explain how you can write on PowerPoint slides on your iPad instead of having to print them out.
No matter if you’re at school, university or at the office, PowerPoint presentations are ubiquitous.
Students, in particular, will receive lecture slides in form of PowerPoint presentations from their professors, often uploaded to a shared cloud storage or available for download through an intranet. If you want to take notes on PowerPoint slides, there used to be two options:
- Printing out hundreds of pages and having to deal with the downsides of managing analog paper, or
- Saving the PowerPoint file as PDF and using comment fields to add notes, which is highly inflexible and makes it almost impossible to review them later.
Now, with the iPad and Apple Pencil, you have far more options.
With GoodNotes , annotating PowerPoint presentations right on the iPad is fast and convenient. You can highlight key points, write directly on top of slides, and even insert other images or diagrams.
What’s more, importing slides into GoodNotes is as easy as pie. Here’s how you can do it.
Sending PowerPoint presentations to GoodNotes from other apps
- Start by opening the PowerPoint presentation you want to annotate on your iPad in another app or in your browser.

2. Next, look for the Share Icon and tap on it
3. In the list of apps, you should see a button with the GoodNotes app icon. reading “Copy to GoodNotes” or “Open in GoodNotes”.

4. If you tap that button, GoodNotes should then open automatically!

Now, you can freely highlight, annotate, and write all over your PowerPoint slides.
Hint: If you already opened an existing document in GoodNotes, you can choose to add the presentation before or after the open page – or even append it to the end. This works great for keeping all your notes on a particular subject together in a single notebook.
Read more: Check out our guide to Digital Planner stickers .
Importing PowerPoint presentations from within GoodNotes
Tap the New … icon (large plus icon) in the Documents tab and choose Import, then tap a file to start the import!
The Files app conveniently keeps all cloud storages (like Google Drive, Dropbox, OneDrive, Box, and more) in one interface, and you can always add another cloud storage to Files.
Hint: Adding a PowerPoint slide to an existing notebook also works from within GoodNotes. Tap the + button in the toolbar and choose “Import”.
As you can see, it is easy and fast to annotate PowerPoint slides on the iPad. We hope that this tip helps you to be better organized and to keep your important information in a single place.
Get GoodNotes to Annotate your PowerPoint slides
GoodNotes is one of the most popular note-taking apps for handwritten notes on the iPad, and functions as a PDF reader and PowerPoint slide annotator as well! With GoodNotes you can:
- Take handwritten notes and search them afterwards
- Annotate your PDF or PowerPoint lecture slides or articles
- Easily organize your notes into notebooks, folders, and keep everything synced across your iPad, Mac, and iPhone
Get GoodNotes today, and start taking more effective notes .
More From Forbes
Apple ios 17.5 major iphone software release: should you upgrade.
- Share to Facebook
- Share to Twitter
- Share to Linkedin
The latest iPhone software update is now live, landing on Monday, May 13. Normally, I’d have posted this analysis of how the new release has been received sooner but, as we’ll see, there’s already been one curious effect for some users, who have complained that long-deleted photos have been popping back into view.
Apple iOS 17.5.
May 19 update. This post was first published on May 16, 2024.
Please note I’ll be updating this post in a week, on Thursday, May 23, with a final thought on whether you should upgrade.
The zombie photo issue discussed below is becoming more complicated. As you’ll read, it concerns photos which users have deleted suddenly coming back to life and appearing again in users’ photo streams. As reported by MacRumors , issues have now been reported by iPad users as well as iPhone and one Redditor has found a particularly stinging example of it. They had wiped their iPad in September 2023 and then sold it to a friend. That friend updated to iPadOS 17.5 this week and begin to see old photos reappear. Well, it’s lucky that the buyer was a friend or the seller might never have known about the issue.
So, what’s going on? Well, Apple still hasn’t made any comment, so we don’t know. However, what we do know about electronic storage is that when you delete a file, photo or other item, in most cases the data is not overwritten, rather the connection to that data is cut. As the storage fills up it would in the end overwrite that section when it’s needed.
It seems likely that those photos which are reappearing now were ones where the data wasn’t overwritten and somehow the new software, perhaps in an indexation procedure, has revived them.
What’s more concerning about the new report is that photos belonging to one user are now showing up on a device which now belongs to someone else, with a separate Apple ID.
Trump Prosecutor Fani Willis Easily Wins Her Democratic Primary While Judge In Georgia Case Reelected
Matt damon movie dud falls off netflix top 10 global chart after 1 week, how the thunder can become championship favorites by next season.
All that said, my interim verdict is still to upgrade (with final comments to follow on Thursday, May 23). At best, you’ll see no evidence of this issue, and it’s certainly not yet clear that it’s widespread. At worst, you may see photos you don’t want and have to delete them again. If you bought your iPhone or iPad second-hand, be on the look out for unexpected images but, again, the chances seem at this stage to be slim.
Who Is It For And How Do You Get It?
As with other iOS 17 releases, it’s compatible with all iPhones launched in 2018 or later. To wit: iPhone XS, iPhone XR, plus all models of the following series: iPhone 11, iPhone 12, iPhone 13, iPhone 14 and the latest iPhone 15. It also includes the iPhone SE second-and third-generation phones. If you have automatic updates turned on, it’ll arrive in due course, but you will likely get it sooner if you click on the Settings app, then opt for General, then Software Update.
What It’s About
There are new features in this update. As is becoming increasingly the case, there are some changes which only apply to users in the European Union, in this case making it possible to download apps to the iPhone from the web.
For all users, as the notes from Apple point out, there are improvements to tracking notifications, so that if someone puts a compatible Bluetooth tracker in your bag, for instance, unbeknown to you, you’ll be told. Previously this applied only to hidden AirTags. There are also new offline features for News+, including games, though these are not available everywhere yet.
Apple iOS 17.5 Security
There are 15 security vulnerabilities fixed in this update, of varying levels of seriousness. As fellow Forbes contributor Kate O’Flaherty explains here , these include an issue with the heart of the iPhone OS, called the Kernel, and a vulnerability in Voice Control.
Initial Reactions
At first, reactions were positive to this upgrade with one user saying “all in all, fantastic performance from iOS 17.5,” though there were also multiple mentions of issues with battery life. And then, out of nowhere, came reports of photographs being raised from the dead. Multiple users have commented in the last hours of images deleted months or even years ago reappearing. The reason is still not clear, though it could be that the photos weren’t properly deleted from the device (through an earlier bug) and some process in the new update, such as re-indexing, perhaps, which revealed them anew.
Apple iOS 17.5 Initial Verdict: Upgrade
The security fixes are the reason to suggest upgrading straight away. True, there’s the curious bug that has seen some photos reappear, but it’s not clear that it’s widespread. It’s certainly worth watching out for but it’s not that valuable photographs are being deleted, quite the reverse. But despite this, the seriousness of the security vulnerabilities makes this an urgent fix.

- Editorial Standards
- Reprints & Permissions
Join The Conversation
One Community. Many Voices. Create a free account to share your thoughts.
Forbes Community Guidelines
Our community is about connecting people through open and thoughtful conversations. We want our readers to share their views and exchange ideas and facts in a safe space.
In order to do so, please follow the posting rules in our site's Terms of Service. We've summarized some of those key rules below. Simply put, keep it civil.
Your post will be rejected if we notice that it seems to contain:
- False or intentionally out-of-context or misleading information
- Insults, profanity, incoherent, obscene or inflammatory language or threats of any kind
- Attacks on the identity of other commenters or the article's author
- Content that otherwise violates our site's terms.
User accounts will be blocked if we notice or believe that users are engaged in:
- Continuous attempts to re-post comments that have been previously moderated/rejected
- Racist, sexist, homophobic or other discriminatory comments
- Attempts or tactics that put the site security at risk
- Actions that otherwise violate our site's terms.
So, how can you be a power user?
- Stay on topic and share your insights
- Feel free to be clear and thoughtful to get your point across
- ‘Like’ or ‘Dislike’ to show your point of view.
- Protect your community.
- Use the report tool to alert us when someone breaks the rules.
Thanks for reading our community guidelines. Please read the full list of posting rules found in our site's Terms of Service.
- Draft and add content
- Rewrite text
- Chat with Copilot
- Create a summary
- Copilot in Word on mobile devices
- Frequently asked questions
- Create a new presentation
- Add a slide or image
- Summarize your presentation
- Organize your presentation
- Use your organization's branding
- Copilot in PowerPoint for mobile devices
- Draft an Outlook email message
- Summarize an email thread
- Suggested drafts in Outlook
- Email coaching
- Get started with Copilot in Excel
- Identify insights
- Highlight, sort, and filter your data
- Generate formula columns
- Summarize your OneNote notes
- Create a to-do list and tasks
- Create project plans in OneNote

Create a new presentation with Copilot in PowerPoint
Note: This feature is available to customers with a Copilot for Microsoft 365 license or Copilot Pro license.
Create a new presentation in PowerPoint.

Select Send . Copilot will draft a presentation for you!
Edit the presentation to suit your needs, ask Copilot to add a slide , or start over with a new presentation and refine your prompt to include more specifics. For example, "Create a presentation about hybrid meeting best practices that includes examples for team building.”
Create a presentation with a template
Note: This feature is only available to customers with a Copilot for Microsoft 365 (work) license. It is not currently available to customers with a Copilot Pro (home) license.
Copilot can use your existing themes and templates to create a presentation. Learn more about making your presentations look great with Copilot in PowerPoint .

Enter your prompt or select Create presentation from file to create a first draft of your presentation using your theme or template.

Edit the presentation to suit your needs, ask Copilot to add a slide , organize your presentation, or add images.
Create a presentation from a file with Copilot
Note: This feature is only available to customers with a Copilot for Microsoft 365 (work) license. It is not currently available to customers with a Copilot Pro (home) license.

With Copilot in PowerPoint, you can create a presentation from an existing Word document. Point Copilot in PowerPoint to your Word document, and it will generate slides, apply layouts, create speaker notes, and choose a theme for you.

Select the Word document you want from the picker that appears. If you don't see the document you want, start typing any part of the filename to search for it.
Note: If the file picker doesn't appear type a front slash (/) to cause it to pop up.
Best practices when creating a presentation from a Word document
Leverage word styles to help copilot understand the structure of your document.
By using Styles in Word to organize your document, Copilot will better understand your document structure and how to break it up into slides of a presentation. Structure your content under Titles and Headers when appropriate and Copilot will do its best to generate a presentation for you.
Include images that are relevant to your presentation
When creating a presentation, Copilot will try to incorporate the images in your Word document. If you have images that you would like to be brought over to your presentation, be sure to include them in your Word document.
Start with your organization’s template
If your organization uses a standard template, start with this file before creating a presentation with Copilot. Starting with a template will let Copilot know that you would like to retain the presentation’s theme and design. Copilot will use existing layouts to build a presentation for you. Learn more about Making your presentations look great with Copilot in PowerPoint .
Tip: Copilot works best with Word documents that are less than 24 MB.
Welcome to Copilot in PowerPoint
Frequently Asked Questions about Copilot in PowerPoint
Where can I get Microsoft Copilot?
Copilot Lab - Start your Copilot journey

Need more help?
Want more options.
Explore subscription benefits, browse training courses, learn how to secure your device, and more.

Microsoft 365 subscription benefits

Microsoft 365 training

Microsoft security

Accessibility center
Communities help you ask and answer questions, give feedback, and hear from experts with rich knowledge.

Ask the Microsoft Community

Microsoft Tech Community

Windows Insiders
Microsoft 365 Insiders
Find solutions to common problems or get help from a support agent.

Online support
Was this information helpful?
Thank you for your feedback.
How-To Geek
6 ways to create more interactive powerpoint presentations.
Engage your audience with cool, actionable features.
Quick Links
- Add a QR code
- Embed Microsoft Forms (Education or Business Only)
- Embed a Live Web Page
- Add Links and Menus
- Add Clickable Images to Give More Info
- Add a Countdown Timer
We've all been to a presentation where the speaker bores you to death with a mundane PowerPoint presentation. Actually, the speaker could have kept you much more engaged by adding some interactive features to their slideshow. Let's look into some of these options.
1. Add a QR code
Adding a QR code can be particularly useful if you want to direct your audience to an online form, website, or video.
Some websites have in-built ways to create a QR code. For example, on Microsoft Forms , when you click "Collect Responses," you'll see the QR code option via the icon highlighted in the screenshot below. You can either right-click the QR code to copy and paste it into your presentation, or click "Download" to add it to your device gallery to insert the QR code as a picture.
In fact, you can easily add a QR code to take your viewer to any website. On Microsoft Edge, right-click anywhere on a web page where there isn't already a link, and left-click "Create QR Code For This Page."
You can also create QR codes in other browsers, such as Chrome.
You can then copy or download the QR code to use wherever you like in your presentation.
2. Embed Microsoft Forms (Education or Business Only)
If you plan to send your PPT presentation to others—for example, if you're a trainer sending step-by-step instruction presentation, a teacher sending an independent learning task to your students, or a campaigner for your local councilor sending a persuasive PPT to constituents—you might want to embed a quiz, questionnaire, pole, or feedback survey in your presentation.
In PowerPoint, open the "Insert" tab on the ribbon, and in the Forms group, click "Forms". If you cannot see this option, you can add new buttons to the ribbon .
As at April 2024, this feature is only available for those using their work or school account. We're using a Microsoft 365 Personal account in the screenshot below, which is why the Forms icon is grayed out.
Then, a sidebar will appear on the right-hand side of your screen, where you can either choose a form you have already created or opt to craft a new form.
Now, you can share your PPT presentation with others , who can click the fields and submit their responses when they view the presentation.
3. Embed a Live Web Page
You could always screenshot a web page and paste that into your PPT, but that's not a very interactive addition to your presentation. Instead, you can embed a live web page into your PPT so that people with access to your presentation can interact actively with its contents.
To do this, we will need to add an add-in to our PPT account .
Add-ins are not always reliable or secure. Before installing an add-in to your Microsoft account, check that the author is a reputable company, and type the add-in's name into a search engine to read reviews and other users' experiences.
To embed a web page, add the Web Viewer add-in ( this is an add-in created by Microsoft ).
Go to the relevant slide and open the Web Viewer add-in. Then, copy and paste the secure URL into the field box, and remove https:// from the start of the address. In our example, we will add a selector wheel to our slide. Click "Preview" to see a sample of the web page's appearance in your presentation.
This is how ours will look.
When you or someone with access to your presentation views the slideshow, this web page will be live and interactive.
4. Add Links and Menus
As well as moving from one slide to the next through a keyboard action or mouse click, you can create links within your presentation to direct the audience to specific locations.
To create a link, right-click the outline of the clickable object, and click "Link."
In the Insert Hyperlink dialog box, click "Place In This Document," choose the landing destination, and click "OK."
What's more, to make it clear that an object is clickable, you can use action buttons. Open the "Insert" tab on the ribbon, click "Shape," and then choose an appropriate action button. Usefully, PPT will automatically prompt you to add a link to these shapes.
You might also want a menu that displays on every slide. Once you have created the menu, add the links using the method outlined above. Then, select all the items, press Ctrl+C (copy), and then use Ctrl+V to paste them in your other slides.
5. Add Clickable Images to Give More Info
Through PowerPoint's animations, you can give your viewer the power to choose what they see and when they see it. This works nicely whether you're planning to send your presentation to others to run through independently or whether you're presenting in front of a group and want your audience to decide which action they want to take.
Start by creating the objects that will be clickable (trigger) and the items that will appear (pop-up).
Then, select all the pop-ups together. When you click "Animations" on the ribbon and choose an appropriate animation for the effect you want to achieve, this will be applied to all objects you have selected.
The next step is to rename the triggers in your presentation. To do this, open the "Home" tab, and in the Editing group, click "Select", and then "Selection Pane."
With the Selection Pane open, select each trigger on your slide individually, and rename them in the Selection Pane, so that they can be easily linked to in the next step.
Finally, go back to the first pop-up. Open the "Animations" tab, and in the Advanced Animation group, click the "Trigger" drop-down arrow. Then, you can set the item to appear when a trigger is clicked in your presentation.
If you want your item to disappear when the trigger is clicked again, select the pop-up, click "Add Animation" in the Advanced Animation group, choose an Exit animation, and follow the same step to link that animation to the trigger button.
6. Add a Countdown Timer
A great way to get your audience to engage with your PPT presentation is to keep them on edge by adding a countdown timer. Whether you're leading a presentation and want to let your audience stop to discuss a topic, or running an online quiz with time-limit questions, having a countdown timer means your audience will keep their eye on your slide throughout.
To do this, you need to animate text boxes or shapes containing your countdown numbers. Choose and format a shape and type the highest number that your countdown clock will need. In our case, we're creating a 10-second timer.
Now, with your shape selected, open the "Animations" tab on the ribbon and click the animation drop-down arrow. Then, in the Exit menu, click "Disappear."
Open the Animation Pane, and click the drop-down arrow next to the animation you've just added. From there, choose "Timing."
Make sure "On Click" is selected in the Start menu, and change the Delay option to "1 second," before clicking "OK."
Then, with this shape still selected, press Ctrl+C (copy), and then Ctrl+V (paste). In the second box, type 9 . With the Animation Pane still open and this second shape selected, click the drop-down arrow and choose "Timing" again. Change the Start option to "After Previous," and make sure the Delay option is 1 second. Then, click "OK."
We can now use this second shape as our template, as when we copy and paste it again, the animations will also duplicate. With this second shape selected, press Ctrl+C and Ctrl+V, type 8 into the box, and continue to do the same until you get to 0 .
Next, remove the animations from the "0" box, as you don't want this to disappear. To do this, click the shape, and in the Animation Pane drop-down, click "Remove."
You now need to layer them in order. Right-click the box containing number 1, and click "Bring To Front." You will now see that box on the top. Do the same with the other numbers in ascending order.
Finally, you need to align the objects together. Click anywhere on your slide and press Ctrl+A. Then, in the Home tab on the ribbon, click "Arrange." First click "Align Center," and then bring the menu up again, so that you can click "Align Middle."
Press Ctrl+A again to select your timer, and you can then move your timer or copy and paste it elsewhere.
Press F5 to see the presentation in action, and when you get to the slide containing the timer, click anywhere on the slide to see your countdown timer in action!
Now that your PPT presentation is more interactive, make sure you've avoided these eight common presentational mistakes before you present your slides.
- Mobile Site
- Staff Directory
- Advertise with Ars
Filter by topic
- Biz & IT
- Gaming & Culture
Front page layout
Overkill —
M4 ipad pro review: well, now you’re just showing off, this tablet offers much more than you’ll actually need..
Samuel Axon - May 13, 2024 9:01 pm UTC

The new iPad Pro is a technical marvel, with one of the best screens I’ve ever seen, performance that few other machines can touch, and a new, thinner design that no one expected.
It’s a prime example of Apple flexing its engineering and design muscles for all to see. Since it marks the company’s first foray into OLED beyond the iPhone or Watch, and the first time a new M-series chip has debuted on something other than a Mac, it comes across as a tech demo for where the company is headed beyond just tablets.
Still, it remains unclear why most people would spend one, two, or even three thousand dollars on a tablet that, despite its amazing hardware, does less than a comparably priced laptop—or at least does it a little more awkwardly, even if it's impressively quick and has a gorgeous screen.
Specifications
There are some notable design changes in the 2024 iPad Pro, but really, it’s all about the specs—and it’s a more notable specs jump than usual in a couple of areas.
First up, there’s the M4 chip. The previous iPad Pro had an M2 chip, and the latest Mac chip is the M3, so not only did the iPad Pro jump two whole generations, but this is the first time it has debuted the newest iteration of Apple Silicon. (Previously, new M-series chips launched on the Mac first and came to the iPad Pro a few months later.)
Using second-generation 3 nm tech, the M4’s top configuration has a 10-core CPU, a 10-core GPU, and a 16-core NPU. In that configuration, the 10-core CPU has four performance cores and six efficiency cores.
A lower configuration of the M4 has just nine CPU cores—three performance and six efficiency. Which one you get is tied to how much storage you buy. 256GB and 512GB models get nine CPU cores, while 1TB and 2TB get 10. Additionally, the two smaller storage sizes have 8GB of RAM to the larger ones’ 16GB.
This isn’t the first time Apple has tied RAM to storage configurations, but doing that with CPU cores is new for the iPad. Fortunately, the company is upfront about all this in its specs sheet, whereas the RAM differentiation wasn’t always clear to buyers in the past. (Both configurations claim 120GB/s memory bandwidth, though.)

Regardless of the specific configuration, the M4 promises substantially better CPU and GPU performance than the M2, and it supports hardware-accelerated ray-tracing via Metal, which some games and applications can take advantage of if developers put in the work to make it happen. (It looked great in a demo of Diablo Immortal I saw, but it’s unclear how often we’ll actually see it in the wild.)
Apple claims 1.5x faster CPU performance than the M2 and up to 4x faster graphics performance specifically on applications that involve new features like ray-tracing or hardware-accelerated mesh shading. It hasn't made any specific GPU performance claims beyond those narrow cases.
Further Reading
Some neat machine-learning features are already possible on the M4—you can generate audio tracks using certain instruments in your Logic Pro projects, apply tons of image optimizations to photos with just a click or two, and so on.
reader comments
Channel ars technica.
Apple unveils stunning new iPad Pro with the world’s most advanced display, M4 chip, and Apple Pencil Pro

Thinnest Apple Product Ever

World’s Most Advanced Display

Only Possible with M4

Outrageously Powerful Device for AI
Pro Cameras

Pro Connectivity
Apple Pencil Pro

All-New Magic Keyboard and Smart Folio
Powerful iPadOS Features

Logic Pro for iPad 2

Final Cut Pro for iPad 2

iPad Pro and the Environment
- Customers can order the new iPad Pro with M4 starting today, May 7, at apple.com/store , and in the Apple Store app in 29 countries and regions, including the U.S., with availability in stores beginning Wednesday, May 15.
- The new 11-inch and 13-inch iPad Pro will be available in silver and space black finishes in 256GB, 512GB, 1TB, and 2TB configurations.
- The 11-inch iPad Pro starts at $999 (U.S.) for the Wi-Fi model, and $1,199 (U.S.) for the Wi-Fi + Cellular model. The 13-inch iPad Pro starts at $1,299 (U.S.) for the Wi-Fi model, and $1,499 (U.S.) for the Wi-Fi + Cellular model. Additional technical specifications, including nano-texture glass options, are available at apple.com/store .
- For education, the new 11-inch iPad Pro is available for $899 (U.S.) and the 13-inch iPad Pro is $1,199 (U.S.). Education pricing is available to current and newly accepted college students and their parents, as well as faculty, staff, and home-school teachers of all grade levels. For more information, visit apple.com/us-hed/shop .
- The new Apple Pencil Pro is compatible with the new iPad Pro. It is available for $129 (U.S.). For education, Apple Pencil Pro is available for $119 (U.S.).
- Apple Pencil (USB-C) is compatible with the new iPad Pro. It is available for $79 (U.S.) and $69 (U.S.) for education.
- The new Magic Keyboard is compatible with the new iPad Pro. It is available in black and white finishes. The new 11-inch Magic Keyboard is available for $299 (U.S.) and the new 13-inch Magic Keyboard is available for $349 (U.S.), with layouts for over 30 languages. For education, the 11-inch Magic Keyboard is available for $279 (U.S.) and the 13-inch Magic Keyboard is available for $329 (U.S.).
- The new Smart Folio is available for $79 (U.S.) in black, white, and denim finishes for the new 11-inch iPad Pro and $99 (U.S.) for the new 13-inch iPad Pro.
- Logic Pro for iPad 2 is available on May 13 as a free update for existing users, and for new users, it is available on the App Store for $4.99 (U.S.) per month, or $49 (U.S.) per year, with a one-month free trial. Logic Pro for iPad 2 requires iPadOS 17.4 or later. For more information, visit apple.com/logic-pro-for-ipad .
- Final Cut Pro for iPad 2 will be available later this spring on the App Store for $4.99 (U.S.) per month, or $49 (U.S.) per year, with a one-month free trial.
- Apple offers great ways to save on the latest iPad. Customers can trade in their current iPad and get credit toward a new one by visiting the Apple Store online , the Apple Store app, or an Apple Store location. To see what their device is worth, and for terms and conditions, customers can visit apple.com/shop/trade-in .
- Customers in the U.S. who shop at Apple using Apple Card can pay monthly at 0 percent APR when they choose to check out with Apple Card Monthly Installments, and they’ll get 3 percent Daily Cash back — all upfront.
Text of this article
May 7, 2024
PRESS RELEASE
Featuring a new thin and light design, breakthrough Ultra Retina XDR display, and outrageously fast M4 performance with powerful AI capabilities, the new iPad Pro takes a huge leap forward
CUPERTINO, CALIFORNIA Apple today unveiled the groundbreaking new iPad Pro in a stunningly thin and light design, taking portability and performance to the next level. Available in silver and space black finishes, the new iPad Pro comes in two sizes: an expansive 13-inch model and a super-portable 11-inch model. Both sizes feature the world’s most advanced display — a new breakthrough Ultra Retina XDR display with state-of-the-art tandem OLED technology — providing a remarkable visual experience. The new iPad Pro is made possible with the new M4 chip, the next generation of Apple silicon, which delivers a huge leap in performance and capabilities. M4 features an entirely new display engine to enable the precision, color, and brightness of the Ultra Retina XDR display. With a new CPU, a next-generation GPU that builds upon the GPU architecture debuted on M3, and the most powerful Neural Engine yet, the new iPad Pro is an outrageously powerful device for artificial intelligence. The versatility and advanced capabilities of iPad Pro are also enhanced with all-new accessories. Apple Pencil Pro brings powerful new interactions that take the pencil experience even further, and a new thinner, lighter Magic Keyboard is packed with incredible features. The new iPad Pro, Apple Pencil Pro, and Magic Keyboard are available to order starting today, with availability in stores beginning Wednesday, May 15.
“iPad Pro empowers a broad set of pros and is perfect for anyone who wants the ultimate iPad experience — with its combination of the world’s best displays, extraordinary performance of our latest M-series chips, and advanced accessories — all in a portable design. Today, we’re taking it even further with the new, stunningly thin and light iPad Pro, our biggest update ever to iPad Pro,” said John Ternus, Apple’s senior vice president of Hardware Engineering. “With the breakthrough Ultra Retina XDR display, the next-level performance of M4, incredible AI capabilities, and support for the all-new Apple Pencil Pro and Magic Keyboard, there’s no device like the new iPad Pro.”
The new iPad Pro — the thinnest Apple product ever — features a stunningly thin and light design, taking portability to a whole new level. The 11-inch model is just 5.3 mm thin, and the 13-inch model is even thinner at a striking 5.1 mm, while both models are just as strong as the previous design. The 11-inch model weighs less than a pound, and the 13-inch model is nearly a quarter pound lighter than its predecessor — allowing pro users to extend their workflows in new ways and in more places. The new iPad Pro is available in two gorgeous finishes — silver and space black — both with 100 percent recycled aluminum enclosures.
The new iPad Pro debuts the Ultra Retina XDR, the world’s most advanced display, to provide an even more remarkable visual experience. The Ultra Retina XDR display features state-of-the-art tandem OLED technology that uses two OLED panels and combines the light from both to provide phenomenal full-screen brightness. The new iPad Pro supports an incredible 1000 nits of full-screen brightness for SDR and HDR content, and 1600 nits peak for HDR. No other device of its kind delivers this level of extreme dynamic range. Tandem OLED technology enables sub-millisecond control over the color and luminance of each pixel, taking XDR precision further than ever. Specular highlights in photos and video appear even brighter, and there’s more detail in shadows and low light than ever before on iPad — all while delivering even more responsiveness to content in motion. For pro users working in high-end, color-managed workflows or challenging lighting conditions, a new nano-texture glass option comes to iPad Pro for the first time. 1 Nano-texture glass is precisely etched at a nanometer scale, maintaining image quality and contrast while scattering ambient light for reduced glare. With its breakthrough tandem OLED technology, extreme brightness, incredibly precise contrast, brilliant colors, and nano-texture glass option, the new Ultra Retina XDR display is the world’s most advanced display, giving iPad Pro customers an unparalleled viewing experience.
The incredibly thin and light design and game-changing display of the new iPad Pro is only possible with M4, the next generation of Apple silicon that delivers a huge leap in performance. M4 is built on second-generation 3-nanometer technology that’s even more power efficient, which is perfect for the design of the new iPad Pro. With an entirely new display engine, M4 introduces pioneering technology for the stunning precision, color, and brightness of the Ultra Retina XDR display. The new CPU offers up to four performance cores and now six efficiency cores, 2 with next-generation machine learning (ML) accelerators, to deliver up to 1.5x faster CPU performance over M2 in the previous-generation iPad Pro. 3 M4 builds on the GPU architecture of M3 — the 10-core GPU includes powerful features like Dynamic Caching, and hardware-accelerated mesh shading and ray tracing, which come to iPad for the first time. Coupled with higher unified memory bandwidth, pro rendering apps like Octane will see up to 4x faster performance than M2. 3 M4 also delivers tremendous gains and industry-leading performance per watt. Compared to M2, M4 can deliver the same performance using just half the power, and compared to the latest PC chip in a thin and light laptop, M4 can deliver the same performance using just a quarter of the power. 4 A new advanced Media Engine includes support for AV1 decode, providing more power-efficient playback of high-resolution video experiences from streaming services.
The new iPad Pro with M4 features Apple’s most powerful Neural Engine ever, capable of 38 trillion operations per second, which is 60x faster than Apple’s first Neural Engine in the A11 Bionic chip. Combined with next-generation ML accelerators in the CPU, a high-performance GPU, more memory bandwidth, and intelligent features and powerful developer frameworks in iPadOS, the Neural Engine makes the new iPad Pro an outrageously powerful device for AI. With iPad Pro with M4, users can perform AI-enabled tasks even faster, like easily isolate a subject from its background in 4K video with just a tap with Scene Removal Mask in Final Cut Pro. With this advanced level of performance, the Neural Engine in M4 is more powerful than any neural processing unit in any AI PC today.
iPadOS also has advanced frameworks like Core ML that make it easy for developers to tap into the Neural Engine to deliver phenomenal AI features locally, including running powerful diffusion and generative AI models, with great performance on device. iPad Pro also supports cloud-based solutions, enabling users to run powerful productivity and creative apps that tap into the power of AI, such as Copilot for Microsoft 365 and Adobe Firefly.
The updated camera system on the new iPad Pro delivers even more versatility, and with its rich audio from four studio-quality mics, users can shoot, edit, and share all on one device. The 12MP back camera captures vibrant Smart HDR images and video with even better color, improved textures, and detail in low light. It also now features a new adaptive True Tone flash that makes document scanning on the new iPad Pro better than ever. Using AI, the new iPad Pro automatically identifies documents right in the Camera app, and if a shadow is in the way, it instantly takes multiple photos with the new adaptive flash, stitching the scan together for a dramatically better scan.
On the front, the TrueDepth camera system moves to the landscape location on the new iPad Pro. The Ultra Wide 12MP camera with Center Stage makes the experience of video conferencing in landscape orientation even better, especially when iPad is attached to a Magic Keyboard or Smart Folio.
iPad Pro includes a high-performance USB-C connector with support for Thunderbolt 3 and USB 4, delivering fast wired connectivity — up to 40Gb/s. Thunderbolt supports an extensive ecosystem of high-performance accessories, including external displays like the Pro Display XDR at its full 6K resolution, and external storage, all connected using high-performance cables and docks. iPad Pro supports Wi-Fi 6E for super-fast Wi-Fi connections for pro workflows on the go. Wi-Fi + Cellular models with 5G allow users to access their files, communicate with colleagues, and back up their data in a snap while on the go. Cellular models of the new iPad Pro are activated with eSIM, a more secure alternative to a physical SIM card, allowing users to quickly connect and transfer their existing plans digitally, and store multiple cellular plans on a single device. Customers can easily get connected to wireless data plans on the new iPad Pro in over 190 countries and regions around the world without needing to get a physical SIM card from a local carrier.
Apple Pencil Pro features even more magical capabilities and powerful new interactions that take the Apple Pencil experience even further. A new sensor in the barrel can sense a user’s squeeze, bringing up a tool palette to quickly switch tools, line weights, and colors, all without interrupting the creative process. A custom haptic engine delivers a light tap that provides confirmation when users squeeze, use double-tap, or snap to a Smart Shape for a remarkably intuitive experience. A gyroscope allows users to roll Apple Pencil Pro for precise control of the tool they’re using. Rotating the barrel changes the orientation of shaped pen and brush tools, just like pen and paper. And with Apple Pencil hover, users can visualize the exact orientation of a tool before making a mark.
With these advanced features, Apple Pencil Pro allows users to bring their ideas to life in entirely new ways, and developers can also create their own custom interactions. Apple Pencil Pro brings support for Find My for the first time to Apple Pencil, helping users locate Apple Pencil Pro if misplaced. It pairs, charges, and is stored on the side of iPad Pro through a new magnetic interface. iPad Pro also supports Apple Pencil (USB-C), ideal for note taking, sketching, annotating, journaling, and more, at an incredible value.
Designed for the new iPad Pro, an all-new thinner and lighter Magic Keyboard makes it more portable and versatile than ever. The new Magic Keyboard opens to the magical floating design that customers love, and now includes a function row for access to features like screen brightness and volume controls. It also has a gorgeous aluminum palm rest and larger trackpad that’s even more responsive with haptic feedback, so the entire experience feels just like using a MacBook. The new Magic Keyboard attaches magnetically, and the Smart Connector immediately connects power and data without the need for Bluetooth. The machined aluminum hinge also includes a USB-C connector for charging. The new Magic Keyboard comes in two colors that perfectly complement the new iPad Pro: black with a space black aluminum palm rest, and white with a silver aluminum palm rest.
The new Smart Folio for iPad Pro attaches magnetically and now supports multiple viewing angles for greater flexibility. Available in black, white, and denim, it complements the colors of the new iPad Pro.
iPadOS is packed with features that push the boundaries of what’s possible on iPad. With Reference Mode, iPadOS can precisely match color requirements of the Ultra Retina XDR display for tasks in which accurate colors and consistent image quality are critical — including review and approve, color grading, and compositing. Stage Manager enables users to work with multiple overlapping windows in a single view, resize windows, tap to switch between apps, and more. With full external display support of up to 6K, iPad Pro users can also extend their workflow, as well as use the built-in camera on an external display for enhanced video conferencing. Users can take advantage of the powerful AI capabilities in iPad Pro and intelligent features in iPadOS, including Visual Look Up, Subject Lift, Live Text, or Live Captions and Personal Voice for accessibility.
With iPadOS 17 , users can customize the Lock Screen to make it more personal — taking advantage of the larger display on iPad — and interactive widgets take glanceable information further with the ability to get tasks done right in the moment with just a tap. The Notes app gives users new ways to organize, read, annotate, and collaborate on PDFs, and working with PDFs is also easier with AutoFill, which intelligently identifies and fills fields in forms.
Logic Pro for iPad 2 , available starting Monday, May 13, introduces incredible studio assistant features that augment the music-making process and provide artists help right when they need it — all while ensuring they maintain full creative control. These features include Session Players, which expand on popular Drummer capabilities in Logic to include a new Bass Player and Keyboard Player; ChromaGlow, to instantly add warmth to tracks; and Stem Splitter, to extract and work with individual parts of a single audio recording.
Final Cut Pro for iPad 2 , available later this spring, introduces Live Multicam, a new feature that transforms iPad into a mobile production studio, allowing users to view and control up to four connected iPhone and iPad devices wirelessly. 5 To support Live Multicam, an all-new capture app also comes to iPad and iPhone, Final Cut Camera, 6 giving users control over options like white balance, ISO, and shutter speed, along with monitoring tools like overexposure indicators and focus peaking. Final Cut Camera works as a standalone capture app or with Live Multicam. Final Cut Pro for iPad 2 also allows users to create or open projects from external storage, giving editors even more flexibility, and offers new content options. 7
The new iPad Pro is designed with the environment in mind, including 100 percent recycled aluminum in the enclosure, 100 percent recycled rare earth elements in all magnets, and 100 percent recycled gold plating and tin soldering in multiple printed circuit boards. The new iPad Pro meets Apple’s high standards for energy efficiency, and is free of mercury, brominated flame retardants, and PVC. The packaging is 100 percent fiber-based, bringing Apple closer to its goal to remove plastic from all packaging by 2025.
Today, Apple is carbon neutral for global corporate operations, and by 2030, plans to be carbon neutral across the entire manufacturing supply chain and life cycle of every product.
Pricing and Availability
- Nano-texture glass is an option on the 1TB and 2TB configurations of the 11-inch and 13-inch iPad Pro models.
- iPad Pro models with 256GB or 512GB storage feature the Apple M4 chip with a 9‑core CPU. iPad Pro models with 1TB or 2TB storage feature the Apple M4 chip with a 10‑core CPU.
- Testing was conducted by Apple in March and April 2024. See apple.com/ipad-pro for more information.
- Testing was conducted by Apple in March and April 2024 using preproduction 13-inch iPad Pro (M4) units with a 10-core CPU and 16GB of RAM. Performance was measured using select industry‑standard benchmarks. PC laptop chip performance data is from testing ASUS Zenbook 14 OLED (UX3405MA) with Core Ultra 7 155H and 32GB of RAM. Performance tests are conducted using specific computer systems and reflect the approximate performance of iPad Pro.
- Final Cut Pro for iPad 2 is compatible with iPad models with the M1 chip or later, and Logic Pro for iPad 2 will be available on iPad models with the A12 Bionic chip or later.
- Final Cut Camera is compatible with iPhone X S and later with iOS 17.4 or later, and iPad models compatible with iPadOS 17.4 or later.
- External project support requires iPadOS 17.5 or later.
Press Contacts
Tara Courtney
Apple Media Helpline
Images in this article
Keynote User Guide for iPad
- What’s new in Keynote 14.0
- Intro to Keynote
- Intro to images, charts, and other objects
- Create a presentation
- Choose how to navigate your presentation
- Open a presentation
- Save and name a presentation
- Find a presentation
- Print a presentation
- Prevent accidental editing
- Undo or redo changes
- Quick navigation
- Change the working view
- Customize the toolbar
- Copy text and objects between apps
- Basic touchscreen gestures
- Use Apple Pencil with Keynote
- Create a presentation using VoiceOver
- Add or delete slides
- Reorder slides
- Group or ungroup slides
- Skip or unskip a slide
- Change the slide size
- Change a slide background
- Add a border around a slide
- Show or hide text placeholders
- Show or hide slide numbers
- Apply a slide layout
- Add and edit slide layouts
- Change a theme
- Add an image
- Add an image gallery
- Edit an image
- Add and edit a shape
- Combine or break apart shapes
- Save a shape to the shapes library
- Add and align text inside a shape
- Add 3D objects
- Add lines and arrows
- Add and edit drawings
- Add video and audio
- Record video and audio
- Edit video and audio
- Add live video
- Set the movie and image formats
- Position and align objects
- Use alignment guides
- Place objects inside a text box or shape
- Layer, group, and lock objects
- Change object transparency
- Fill shapes and text boxes with color or an image
- Add a border to an object
- Add a caption or title
- Add a reflection or shadow
- Use object styles
- Resize, rotate, and flip objects
- Add linked objects to make your presentation interactive
- Select text
- Copy and paste text
- Format a presentation for another language
- Use phonetic guides
- Use bidirectional text
- Use vertical text
- Change the look of text
- Use text styles
- Change text capitalization
- Add drop caps
- Make characters superscript or subscript
- Format fractions automatically
- Format dashes and quotation marks
- Format Chinese, Japanese, or Korean text
- Set tab stops
- Format text into columns
- Adjust line spacing
- Format lists
- Add mathematical equations
- Add borders and rules (lines) to separate text
- Add or delete a table
- Select tables, cells, rows, and columns
- Add or remove rows and columns
- Move rows and columns
- Resize rows and columns
- Merge or unmerge cells
- Change the look of table text
- Show, hide, or edit a table title
- Change table gridlines and colors
- Use table styles
- Resize, move, or lock a table
- Add and edit cell content
- Format dates, currency, and more
- Highlight cells conditionally
- Format tables for bidirectional text
- Alphabetize or sort table data
- Add or delete a chart
- Change a chart from one type to another
- Modify chart data
- Move, resize, and rotate a chart
- Change the look of data series
- Add a legend, gridlines, and other markings
- Change the look of chart text and labels
- Add a chart border and background
- Use chart styles
- Animate objects onto and off a slide
- Animate objects on a slide
- Change build order and timing
- Add transitions
- Present on your iPad
- Present on a separate display
- Present on iPad over the internet
- Use a remote
- Make a presentation advance automatically
- Play a slideshow with multiple presenters
- Add and view presenter notes
- Rehearse on your device
- Play a recorded presentation
- Check spelling
- Look up words
- Find and replace text
- Replace text automatically
- Set your author name for comments
- Highlight text
- Add and print comments
- Send a presentation
- Intro to collaboration
- Invite others to collaborate
- Collaborate on a shared presentation
- See the latest activity in a shared presentation
- Change a shared presentation’s settings
- Stop sharing a presentation
- Shared folders and collaboration
- Use Box to collaborate
- Create an animated GIF
- Post your presentation in a blog
- Use iCloud Drive with Keynote
- Export to PowerPoint or another file format
- Restore an earlier version of a presentation
- Move a presentation
- Delete a presentation
- Password-protect a presentation
- Create and manage custom themes
- Transfer files with AirDrop
- Transfer presentations with Handoff
- Transfer presentations with the Finder
- Keyboard shortcuts
- Keyboard shortcut symbols
Use a remote to control a Keynote presentation
You can use your iPad as a remote control to play a presentation on a Mac or on another device. This setup is especially useful when iPad is connected to an external display . If you’re playing a presentation on your iPad, you can control the presentation using your iPhone (or its companion Watch), or another iPad as a remote control.
Important: To use an iPhone or iPad with iOS 14 or iPadOS 14 as a remote, Keynote needs permission to connect to other devices on your local network. Go to Settings > Privacy > Local Network, then turn on Keynote.
Set up iPad as a remote control for a presentation on a Mac
The Mac and the iPad need to have Keynote installed and have Wi-Fi turned on.
Open Keynote on the iPad that you want to use as a remote.
The device displays the Set Up Remote screen.
Note: Tap OK if you’re asked to allow Keynote to find and connect to devices on your local network.
Open Keynote on the Mac, then choose Keynote > Settings (or Preferences in macOS 12 or earlier) from the Keynote menu at the top of your screen.
Click Remotes at the top of the Settings window, then select Enable.
Click Link next to the device you want to use as a remote.
A four-digit code appears on the Mac and on the device.
Verify that the four-digit codes match, click Confirm, then close Keynote Settings.
After the devices are linked, you can control the presentation from the remote device.
Set up iPad as a remote control for a presentation on another device
The remote control device and the presentation device need to have Keynote installed and have Wi-Fi turned on.
Open Keynote on iPad.
Open the presentation on the device where you will play it.
Tap Link next to the device you want to use as a remote.
A four-digit code appears on both devices.
Verify that the four-digit codes match, then tap Confirm.
Use iPad as a remote control
You must first set up iPad to be a remote control, as described in the previous task.
Play the presentation on a Mac, iPhone, or iPad.
Do one of the following:
Note: Handoff must be set up on the Mac and iPhone, and the presentation you want to control must be saved in iCloud Drive .
To control the presentation, do any of the following:
Advance to the next slide or build: Tap the slide, or swipe left across the slide.
Return to the previous slide: Swipe right across the slide.
Skip to a specific slide: Tap the slide number in the upper-left corner, then tap the slide you want to display.
To change what you see on your remote device as you’re presenting, do any of the following:
Switch between a timer or current time display: Tap the time or timer at the top of the screen.
Set up another device as a remote control for iPad
Open Keynote on the device that you want to use as a remote.
Verify that the four-digit codes match, tap Confirm, then tap Done.
After the devices are linked, you can control the presentation from the remote.
Use another device as a remote control for iPad
The other device must be set up as a remote control, as described in the previous task.
Open your presentation on iPad.
Use Apple Watch as a remote control
You must first set up iPhone to be a remote control for iPad, as described above, and Keynote must be installed on Apple Watch and its companion iPhone. To install Keynote on Apple Watch, update the companion iPhone to the latest version of Keynote. Then on Apple Watch, confirm the Keynote installation.
Important: For best results, set Apple Watch to wake and display Keynote when you raise your wrist during the presentation. On Apple Watch, go to Settings, tap General, tap Activate on Wrist Raise, and turn on Wrist Raise. Then tap Last Used App (swipe up to see it).
Open the presentation on iPad.
If you followed the directions in the introduction to this task, Keynote appears whenever you raise your wrist to control the presentation from Apple Watch.
To close Keynote on Apple Watch, press the Digital Crown.
Highlight on a slide from a remote control device
When you use Keynote Remote to control a presentation from iPhone or iPad, you can draw on your device to emphasize information on the slide. The drawing appears on the device that’s playing your presentation.

Set up iPhone or iPad as a remote.
Play the presentation on a Mac or another device.
Do any of the following:
Draw with a color: Tap a color, then draw with your finger on the slide.
Use the laser pointer: Tap the laser pointer, then move your finger around the slide; the laser pointer follows your movements.
Return to the previous slide or advance a slide: Tap the left or right arrow on the slide.
Hide the drawing tools: Tap Done.
Change the presentation devices linked to a remote control device
Open Keynote on the iPhone or iPad you use as a remote.
Tap Devices, then do any of the following:

Add another presentation device: Tap Add a Device, then follow the onscreen instructions.
Switch to a different presentation device: Tap a different device name, then tap Done.
Remove a presentation device: Swipe right across the name of the device, then tap Delete.
Unlink a remote control from a presentation device
Open Keynote on the device you use to show the presentation.
If you don’t want to use any remote, but you don’t want to unlink devices you already linked, you can turn off Enable Remotes. Turn on Enable Remotes when you want to use a device again.
Unlink a remote control from a Mac
Open Keynote on your Mac.
Choose Keynote > Settings (or Preferences in macOS 12 or earlier) from the Keynote menu at the top of your screen.
Click Remotes at the top of the settings window, then do one of the following:
Permanently unlink a remote: Click Unlink next to a device.
Temporarily unlink all linked remote: Deselect Enable so the device remains linked but isn’t functional as a remote. Reselect Enable when you want to use it again.
Keynote Remote uses Multipeer Connectivity, which allows newer iOS devices, iPadOS devices, and Mac computers that have the latest version of Keynote to connect over Wi-Fi whenever they’re in close proximity, even when they aren’t on the same Wi-Fi network. If you have difficulty using Keynote Remote with older devices or Mac computers over Wi-Fi, try adding them to the same Wi-Fi network.
Note: The old Keynote Remote app previously available from the App Store is no longer supported.
- What is ChatGPT?
- How to Use Google Gemini
The 5 best things you can do with Copilot Pro right now

Copilot Pro is Microsoft’s AI subscription service that costs $20 per month for individuals and is integrated into the brand’s Microsoft 365 suite. The paid service offers unique features to Microsoft users, provides faster and more consistent AI performance with priority access to the GPT-4 and GPT-4 Turbo large language models (LLM) during peak times, and also brings the AI technology to the brand’s most popular PC applications — and that’s where things get really interesting.
Create custom GPTs
Dalle-3 access in microsoft designer, make powerpoint presentations from text prompts, create graphs and visuals through text prompts, have copilot write for you directly in word.
Here are some of the best features on Copilot Pro and how they work.
One of the most interesting features of Copilot Pro is that you can build your own custom GPT within the AI service, meaning you can create and edit a unique chatbot to do your bidding. You can create your chatbot as a personal trainer, a chef, a language tutor, a language adviser, or a career coach, among many other personalized ideas. You can do so by accessing the Microsoft Copilot GPT Builder at copilot.microsoft.com and signing in using your Microsoft account (such as outlook.com).
Follow the setup steps included there to get started building your custom GPT. Because it is a GPT environment, you essentially need only to input the text parameters of your chatbot to begin training it. There are also instructions on how to edit the GPT, if needed. For the best results, complete the steps in the Microsoft Edge browser.
Because Copilot Pro is a paid service, it benefits from OpenAI’s latest DALL-E 3 image model, which can generate images from more elaborate text descriptions or generate from other images. It also has upgraded editing abilities. Much of the image generation for the brand’s AI subscription service takes place within the Microsoft Designer tool.
Within Copilot Pro, you can generate up to 100 images per day and have the option to create images in either landscape or square. This is a massive upgrade in comparison to the free version, which allows 15 generations per day and square images only.
A very fascinating part of Microsoft’s Copilot Pro is you can use the brand’s AI service in conjunction with other popular programs, such as the Microsoft 365 suite. The Copilot Pro chatbot and icon are integrated into all of these apps, including Word, Excel, PowerPoint, OneNote, and Outlook. Typically, you must have a separate Microsoft 365 subscription to access Microsoft Copilot Pro features in tandem with the apps of that service on PCs. However, to access the features without having to invest in a Microsoft 365 subscription, you can use Microsoft 365 apps through the web apps at no extra cost.
Creating presentations in Microsoft PowerPoint is a popular productivity option in the Microsoft 365 suite. Adding Copilot Pro makes the function as simple as typing a sentence. Once you’re in PowerPoint, you go to the Home tab to open the drop-down menu. This reveals the Copilot button in the upper-right corner. Click it to open the Copilot menu on the right side of the PowerPoint window.
Click Create a Presentation, type your prompt, and it will begin to generate the slides of your presentation. You can add a slide, ask questions prompts, and edit the text of your prompt to improve your presentation. You also have access to the Microsoft Designer tab in the drop-down menu, which gives you creative options for your slide within PowerPoint, since you can’t use prompts to make creative edits within Copilot. There is also the Copilot Labs section for generating ideas.
Excel is an extremely useful app for professionals who need to crunch numbers and simplify statistics. Copilot Pro can calculate, analyze, and present your figures and graphs in a manner that is easy to decipher. Once in Excel, you can access the Copilot button in the upper-right corner of the drop-down menu. If you are using Excel online, you may see a notice that says it only works with Excel table, but all of the AI functionalities are actually still intact.
If you have a file with some figures, you can highlight some text and Copilot Pro will give you some prompt ideas (such as show formula suggestions, highlight filter, sort data, and bold the first column) that you can select and will make up the entirety of your prompt once you’re done. These details will not only be the information but the look and feel of your results.
Select Ask for Insights and Excel will generate the tables and graphs with all of your data laid out. Select another insight or All insights for a more complete look at your information. Alternatively, you can enter a prompt in Copilot Pro with the parameters you desire.
Word is one of the most used apps in the Microsoft 365 suite and Copilot Pro introduces several automated features into the word processors. Before even launching Copilot Pro within Microsoft Pro, you can highlight blocks of text within Word and a Copilot icon will appear on the left of the text, indicating that it can be edited by the chatbot. Right-click the highlighted text with your mouse and you can select the options, rewrite with Copilot, or visualize as a table. It will do those functions in the text area without having to execute a prompt.
You can also access the Copilot button in the upper-right corner of the drop-down menu and use it whether you have a blank document or you’re working with an existing document.
You can type your prompt directly into Copilot Pro to generate whatever result you need, or you can get assistance via a host of assistant tabs and quick options, including write about, ask a question, and summarize this document. Summarize this document, for example, will roll out text in a bullet point format and pull credits from the source document that you can refer back to later. For further assistance in prompt generation, you can select more prompts and access Copilot Labs.
Editors' Recommendations
- Whatever you do, don’t buy the Asus ROG Ally right now
- All the Copilot updates announced at Build 2024
- Sorry, Microsoft — I don’t want Copilot+ reading my DMs yet
- Microsoft just kicked off a new era of PCs with Copilot+
- Whatever you do, don’t buy a Windows laptop right now
- Artificial Intelligence

The Vision Pro is a great piece of technology that's built specifically to fit into Apple’s ecosystem, but there are plenty of other great VR headsets to choose from. Many cost less while offering similar experiences. A few even challenge Apple head-on, matching and exceeding the Vision Pro's advanced technology.
Here are five headsets you should buy instead of the Vision Pro and why you might like them better than Apple's spatial computer. Meta Quest 3
The AI bots are going nuts again. Microsoft Copilot -- a rebranded version of Bing Chat -- is getting stuck in some old ways by providing strange, uncanny, and sometimes downright unsettling responses. And it all has to do with emojis.
A post on the ChatGPT subreddit is currently making the rounds with a specific prompt about emojis. The post itself, as well as the hundreds of comments below, show different variations of Copilot providing unhinged responses to the prompt. I assumed they were fake -- it wouldn't be the first time we've seen similar photos -- so imagine my surprise when the prompt produced similarly unsettling responses for me.
Got your eye on a shiny new MacBook Air? We can’t blame you, they're fantastic laptops. But before you pull the trigger, you should consider holding off for a few more weeks.
At some point in March, Apple is expected to unveil a new generation of the MacBook Air, either at an event or via a press release. This forthcoming laptop will reportedly come loaded with Apple’s new M3 chip, giving the MacBook Air a notable performance boost.
COMMENTS
Pricing. PowerPoint for iOS is free from the App Store and allows you to view PowerPoint files from anywhere. If you want to edit or create presentations from the iPad though, you're going to need to subscribe to Office 365, which runs $6.99/month or $70/year for individuals on up to 5 devices. An Office 365 subscription comes with the full ...
With the iPads portability and HD display, you can create and share presentations with ease. Sharing the Presentation on iPad. Sharing a presentation on iPad is a breeze. With the help of Microsoft PowerPoint for iPad apps, you can easily share your presentation with others from anywhere in the world.
With an iPad, you can work on your presentations from anywhere, whether it's a coffee shop or on a train. There's no need to carry around a bulky laptop. Touch Screen Interface: The touch screen interface of the iPad makes it simple to manipulate objects and text within your PowerPoint. It feels more hands-on, which can be quite intuitive.
In this case, all you need to do is simply open your email account on your iPad, click on the email that contains the PowerPoint file, and download it. 2. Transfer the PPT file to your iPad using a cloud storage service. Another quick and easy option is using a cloud storage services. There are plenty of cloud storage services such as Google ...
Still, I had some things to learn the hard way about using an iPad for presentations. Perhaps I can save you a few steps. The Basics of Getting Started Learn the differences between "desktop" Keynote and the iPad version. While I present nearly exclusively from an iPad, I usually build my initial presentation on a Mac. I build all of my ...
Outline your presentation. Easier. With outline view for iPhone and iPad, quickly jot down your thoughts, restructure ideas, and move concepts from slide to slide. Then switch to slide view and start designing. You can also work on presentations stored on iCloud or Box using a PC. Start using Keynote at iCloud.com.
This video is a tutorial for Microsoft PowerPoint for the iPad. The iOS version of PowerPoint is surprisingly powerful with many desktop features found in th...
Intro to Keynote on iPad. You can use Keynote to create beautiful and engaging presentations with fun animations, interesting transitions, and professional polish. To create a Keynote presentation, you always start with a theme, then modify it however you want. Slides in a theme include placeholder images and text styled as headlines and body ...
To play the presentation, tap , then tap a slide to go to the next slide. To end the presentation, pinch closed anywhere on the screen. For more ways to show a presentation, see Play a presentation on your iPhone or iPad. To close the presentation, tap in the top-left corner of the screen. Closing the presentation doesn't quit Keynote.
Our top 10 tips will show you how to get the most from PowerPoint on the iPad. 1. Create on the PC, refine on the iPad. If at all possible, avoid creating presentations on the iPad itself. The iPad app has only 20 presentation templates to choose from, compared to the thousands available to download from the PC and Mac version, and some of ...
PowerPoint for iPad: A Visual Guide. October 29, 2017. In this first ever visual guide for the iPad version of Microsoft PowerPoint (iPad PPT), we show you step-by-step how to use the app, as well as all of the nitty gritty details behind it that you likely don't know. We highlight those "little hiccups" that will drive you up the wall ...
Select the iPad in the top navigation and then go to Apps in the drop-down menu. Scroll down to the bottom, where you will find a list of apps that you can add files to. Select PowerPoint on the left. You can add files through the iTunes buttons, or drag and drop a file into the space from your computer.
Make sure you're signed in to your Microsoft account after downloading the app. Step 2: Open the app and find your presentation. Open the app and locate the presentation you want to play. You can access your presentations from cloud storage services like OneDrive or Dropbox, or you can transfer files directly to your iPad using iTunes or email.
Design and edit slides. Create professional slide layouts with PowerPoint Designer. Add pictures or videos. Video and audio file formats supported in PowerPoint. Add animation effects to your presentation. Delete a slide. Apply a slide layout.
Download. Scroll up the Control Center on your iPad and then tap "AirPlay Mirroring". Choose the computer you want to connect to. The presentation is now being mirrored on the computer's screen. Note that aside from mirroring, you may also take a screenshot and record the screen of your iPad using this app. And you can utilize the ...
If you don't use iCloud, another way to move the presentation onto your iPad is to open iTunes, select your iPad, click on the Apps tab, and select Keynote. Drag your presentation to the Keynote ...
Apple's iPad is capable a wide range of tasks, including building presentations for Microsoft's PowerPoint presentation software. To create a compelling PowerPoint presentation, you'll need an ...
Present on your iPad. In the slide navigator, tap to select the slide you want to begin with, then tap . To advance through the presentation, do any of the following: Go to the next slide: Tap the slide. Go back a slide or reset the builds on the slide: Swipe right. Avoid the left edge of the screen as you swipe, so the slide navigator doesn ...
You tap the File button to print in PowerPoint for iPad. Watch this video to learn how. At this time, you can only print to an AirPrint compatible printer. Run a slideshow in PowerPoint for iPad. (You are here!) There are some special finger gestures you can use to advance, go back, and end a slideshow. You can even use a laser pointer and ink ...
With GoodNotes, annotating PowerPoint presentations right on the iPad is fast and convenient. You can highlight key points, write directly on top of slides, and even insert other images or diagrams. What's more, importing slides into GoodNotes is as easy as pie. Here's how you can do it. Sending PowerPoint presentations to GoodNotes from ...
In PowerPoint, go to the slide you wish to begin presenting. Tap the Play button. From the top right of the screen, slide your finger down. The Control Center appears. Tap and hold the Record button to show Screen Recording options. Tap the microphone button to turn on the microphone.
The latest iPhone software update is now live, landing on Monday, May 13. Normally, I'd have posted this analysis of how the new release has been received sooner but, as we'll see, there's ...
With Copilot in PowerPoint, you can create a presentation from an existing Word document. Point Copilot in PowerPoint to your Word document, and it will generate slides, apply layouts, create speaker notes, and choose a theme for you. Create a new presentation in PowerPoint.
Engage your audience with cool, actionable features. 2. Embed Microsoft Forms (Education or Business Only) If you plan to send your PPT presentation to others—for example, if you're a trainer sending step-by-step instruction presentation, a teacher sending an independent learning task to your students, or a campaigner for your local councilor sending a persuasive PPT to constituents—you ...
reader comments 449. The new iPad Pro is a technical marvel, with one of the best screens I've ever seen, performance that few other machines can touch, and a new, thinner design that no one ...
CUPERTINO, CALIFORNIA Apple today unveiled the groundbreaking new iPad Pro in a stunningly thin and light design, taking portability and performance to the next level. Available in silver and space black finishes, the new iPad Pro comes in two sizes: an expansive 13-inch model and a super-portable 11-inch model. Both sizes feature the world's most advanced display — a new breakthrough ...
GPT-4o is our newest flagship model that provides GPT-4-level intelligence but is much faster and improves on its capabilities across text, voice, and vision. Today, GPT-4o is much better than any existing model at understanding and discussing the images you share. For example, you can now take a picture of a menu in a different language and talk to GPT-4o to translate it, learn about the food ...
To show your presentation on a separate screen, connect your device to an external display, a projector, or Apple TV with AirPlay. The presentation plays on the connected screen, and the presenter display shows on your device. You can set the presenter display to show presenter notes, a timer, or a preview of the next slide.
To control the presentation, do any of the following: Advance to the next slide or build: Tap the slide, or swipe left across the slide. Return to the previous slide: Swipe right across the slide. Skip to a specific slide: Tap the slide number in the upper-left corner, then tap the slide you want to display. Stop playing the presentation: Tap . To change what you see on your remote device as ...
Best iPad Deals; Best Tablet Deals ... and it will begin to generate the slides of your presentation. You can add a slide, ask questions prompts, and edit the text of your prompt to improve your ...