
Working with Day Book Report
Display Day Book
The Day Book lists all transactions made in a particular day and by default displays the last voucher entry date of a regular voucher. It could also be set up to list all the transactions made over a certain period. Transactions include all financial vouchers, reversing and memorandum journals as well as inventory vouchers.
In Tally.ERP 9, the Day Book is by default displayed for the current date (as on the last date of voucher entry). However, you may specify the required period, as per your requirements.
To view the Day Book ,
Go to Gateway of Tally > Display > Daybook
- Press F2: Period on the button bar or press the key Alt+F2
- Specify the required period
The Day Book for a specified period will display as shown :
To view Day Book for a particular voucher type, you can press F4: Chg Vch button from the button bar
Select the required Voucher Type to display. The screen is displayed as shown:

Get Govt. Certified Secure Assured Job Interview
Government certificate
Lifetime Valid
Job Support
Industry Recognized
Level Up Your Job Skills Now!
Get industry recognized certification – contact us.
View and Print Voucher wise Reports in Day Book of Tally ERP 9
Reporting is an important part which is automatically prepared by the Tally. ERP 9 software. Did you know you can easily view and print voucher wise reports in day book of Tally ERP 9? You can not only view, print, email but also export voucher wise reports from day book in Tally.ERP 9. Most of the person have to use day book to view or print day wise and voucher wise transaction of specific period.
Must Read: How to use Import or Export in Tally
By default last date of entries are shown by the day book in Tally.ERP 9, but if you want to view all entries of specific period then you can use Alt+F2 (To change the period) option.
If you have updated version of Tally.ERP 9 then you can easily get the benefit of different interesting features. Tally.ERP 9 is widely used in different countries due to his interesting and useful features. Professional version allows you to use sms feature , change default company to load itself , search particular amount wise report and many more in Tally.ERP 9. If you want to get better control during working on the Tally.ERP 9 software then you must have to know about the shortcut keys of Tally.ERP 9. These shortcut keys reduce your working time and increase the working speed on the Tally.ERP 9 software.
The Day Book displays all the transaction made in a specific date and by default displays all the entries which is made in last voucher entry date. You can easily change or set the period to view or print all the entries which is made in different vouchers. Most of the professional person want to know how many entries are done in different vouchers with in a single day. In that situation you must have to take help of Day book in Tally.ERP 9.
How to View and Print Voucher wise Reports in Day Book of Tally ERP 9
To view and print voucher wise report in day book of Tally ERP 9 you must have to take few given simple steps.

Step 1: Open an existing company in which you have number of records.
Step 2: If you want to view and print voucher wise reports from day book in Tally ERP 9 then first active the day book in your active company. To active or view the day book go to the Gateway of Tally (GOT) > Dispaly > Daybook . Press Alt+F2 Tally shortcut key to set or change the period.
Step 3: You can check entire voucher wise list of specific period is shown at your screen. Now you can easily extract day wise voucher entries by pressing the F4 key to change the voucher . Select any specific voucher from the list which entries you want to view or print and press enter key.
Must Read: How to set voucher number manually in Tally ERP 9
Now, you can view and print voucher wise reports in Day Book of Tally ERP 9. You can also export day wise report in ASCII, Excel, HTML, JPEG, PDF or XML formats. I hope this guide is useful for all those novice users who want to learn Tally.ERP 9 and want to become a professional Tally user. If you have any suggestion regarding this guide then please write us your suggestion regarding this guide in the comment box. Thanks to all.
Leave a Reply Cancel reply
Thanks to leave a comment. Please note that all comments are moderated according to our comment policy and your email address will NOT be published. Please Do NOT use keywords in the name field. Lets have a meaningful conversation.
- Product Help
- Release Notes
Business Dashboards
- CEO Dashboard
- CFO Dashboard
- Sales Dashboard
- Outstanding Dashboard
- Accounting Dashboard
- Expense Dashboard
- Purchase Dashboard
Financial Reports
- Sales Register
- Purchase Register
- Bills Receivable
- Bills Payable
- Balance Sheet
- Trial Balance
- Credit Note Register
- Sales Order Book
- Debtors Group Wise Outstanding
- Debit Note Register
- Purchase Order Book
- Group Summary
- Cost Category Summary
- Group Vouchers
- Negative Stock
- Negative Ledger
- Profit and Loss Statement
- Cash Flow Statement
- Cash and Bank Summary
- Ratio Analysis
- Stock Summary
- Stock Summary with Profit
- Stock Category Summary
- Godown Summary
- Purchase Bill Pending
- Sales Bill Pending
Data Analyze
- Consolidated Sales
- Debtor Analyze
- Creditor Analyze
Custom Apps
- Profit Loss dashboard
- Cost Centre Dashboard
- Customer Dashboard
- Salesperson Performance
- Product Performance
- Sales by Region
- Inventory dashboard
- Invoice Performance
- Finance Dashboard
Day Book report in Tally
The Day Book lists all transactions made in a particular day and by default displays the last voucher entry date of a regular voucher. It could also be set up to list all the transactions made over a certain period. Transactions include all financial vouchers, reversing and memorandum journals as well as inventory voucher

Day Book Reports in TallyGraphs
View the list of transactions completed on the day using TallyGraphs and get an idea of the day.

Key Highlights
- Company-wise Invoice Details
- Cost centre wise details
- Salesperson wise details
More Details
Dashboard for Day Book
Using this Custom App, you can track the Cost centre-wise Ledger Summary. This report enables you to view your Ledger wise summary along with voucher types.
- Cost centre wise ledger summary
- Ledger group-wise summary
- Voucher type-wise ledger summary

Get started with TallyGraphs today
Transform your Tally.ERP 9, TallyPrime data to visually, meaningfully
Get Started
{{#message}}{{{message}}}{{/message}}{{^message}}Your submission failed. The server responded with {{status_text}} (code {{status_code}}). Please contact the developer of this form processor to improve this message. Learn More {{/message}}
{{#message}}{{{message}}}{{/message}}{{^message}}It appears your submission was successful. Even though the server responded OK, it is possible the submission was not processed. Please contact the developer of this form processor to improve this message. Learn More {{/message}}
Submitting…
Search Knowledge Base Articles
Day book in tallyprime.
The Day Book is an account book in which a day’s entries or transactions are captured. TallyPrime stays true to the traditional Day Book used by businesses for manual book-keeping, while bringing in a host of powerful features.
You can modify the Day Book in TallyPrime to view only one kind of transaction (for example, the purchases of the day), or search for any transaction irrespective of the date. You can also select multiple transactions at once and cancel, delete, or remove the entries from the Day Book. Similarly, you can verify your transactions, and account for any missing entries by adding, inserting, or duplicating entries.
View Day Book in TallyPrime
Visit the Day Book in TallyPrime to see all your transactions that were recorded on a particular day. By default, this day is set to the Current Date displayed in Gateway of Tally .

If you want to add more details, such as narration and cost centre, you have to enable these options by pressing F12 (Configure) from the Day Book .
Filter Day Book by Type of Transaction
In the Day Book in TallyPrime, you can see not only the transactions of the day but also a single kind of transaction. For example, you may want to see all the Receipts. You can easily change the view of the Day Book to see all the Receipts recorded for the day.
Search for a Transaction Within Your Books
If your business has hundreds or thousands of transactions, it can get difficult if you are trying to find a particular transaction. Here is how Day Book will help you find it easily.
Let us assume that you had disbursed some money for the maintenance of your office, but you are unable to find more details about this. You feel that you might have added a note in the narration of the transaction.
No problem! You can use the Range feature to locate this transaction.
- Select Voucher in the Type of Information field.
- Select Narration in the having field.
- Select containing in the Range of Information field.
- Enter ‘repair’ in the last field, if you think that you might have used this word in the narration.
Is this the transaction you were looking for? May be it is!
Add, Insert, or Duplicate a Transaction
In this section
Add a transaction
Insert a transaction, duplicate a transaction.
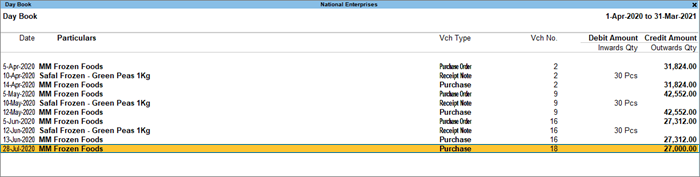
You can add a voucher from the Day Book in TallyPrime to account for a missing entry. For example, let us assume that a representative from one of your parties (MM Frozen Foods) comes to your office and requests for a payment of Rs 27,000.
Using the Range feature, search for transactions involving MM Frozen Foods.
You can see a few related transactions, but cannot find the entry amounting to Rs 27,000.
Now you can add a purchase entry directly and hand over the payment.
Select one of the relevant entries that appeared in the Day Book, and press Alt+A to add a new transaction
Enter the necessary details and save the transaction.
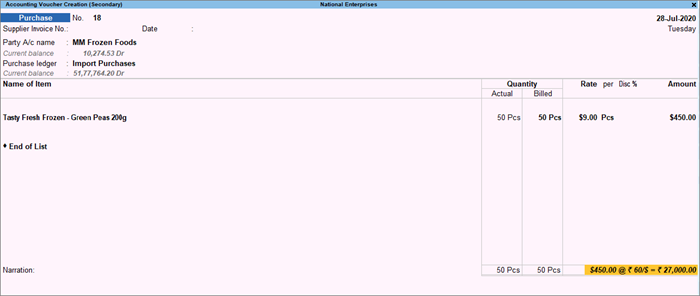
Now you can see the entry for Rs 27,000 against MM Frozen Foods in the Day Book.
If you want to add a missing transaction in a particular sequence or position, then you can insert it in the Day Book.
Let us take a scenario where you discover that two entries of the same amount had been passed on the same day. You think that they might be duplicates, so you delete one of the entries.
However, your data entry operator points out that they were unique entries.
Now, how can you retrieve the original entry with the same voucher number and position? Easy. You can insert this entry. The voucher number and position will be restored.
Select the entry above which you want to insert the transaction, and press Alt+I . Enter the relevant details and save the transaction.
Now you can see both the entries on the specified date in the Day Book, with the original voucher numbers and amounts.
You can also choose to add the transaction instead of inserting it, but the sequence or position of the entry might not be the same.
You can duplicate a voucher in the Day Book to easily account for a recurring transaction.
Let us take a scenario where your business has a deal with Confident Traders to purchase for a consignment of biscuits every month.
You have passed a purchase entry for August. Now you can easily repeat this transaction each month. Just select the existing entry and press Alt+2 (Period).
You can see that all the details of the selected voucher are duplicated. You can update the required details, such as Voucher Date, Supplier Invoice No., and Invoice Date, and save the transaction.
Now you can see the latest entry against Confident Traders in the Day Book, for the month of September.

Similarly, you can duplicate the vouchers for the upcoming months.
Delete, Cancel, or Remove a Transaction
Delete a transaction, cancel a transaction, remove a transaction, restore entries.
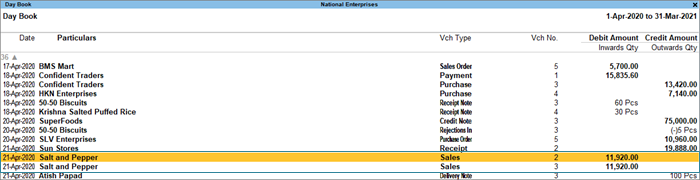
In the Day Book, you can easily delete vouchers that are no longer relevant. Let us take a scenario where you discover that the same transaction was recorded twice against Sun Stores, probably by two different data entry operators.

Select either of the entries, and press Alt+D to delete it from your books.
What do you do when an order is cancelled, but an entry has already been passed? Simple! You can just cancel the corresponding voucher, instead of deleting it. The benefit is that voucher numbering will not be affected, as the same voucher number will not be available for reuse. It will be assigned in your books to the cancelled voucher.
Let us take a scenario where S.M. Traders had placed an order, and you had recorded a corresponding sales entry. The goods are packed and ready to be shipped. However, a representative from the purchase department of S.M. Traders calls your office and cancels the purchase at the last minute.
Now how do you cancel the transaction?
Select the relevant entry in the Day Book and press Alt+X to cancel.

You can see that the entry has been cancelled, with the original voucher number intact.

Did you know that you can temporarily hide entries from the Day Book, without deleting it from your books?
Let us assume that you want to view the transactions for the day without the entries against Sunday to Monday , which happens to be a sister concern of your business.
Press F4 (Voucher Type) > Sales . You can view all the sales transactions of the day.
Select the entries against Sunday to Monday , and press Ctrl+R to remove the entries.
- To restore the last entry that was hidden, press Ctrl+U . Similarly, you can keep pressing Ctrl+U to undo the last but one entry. The entries will be restored in the order in which they were hidden.
- To restore all the hidden entries, press Alt+U .
Data Representation in Day Book in TallyPrime
- Alter Vouchers
Change period
Change company, change report context, view profitability, view columnar report.
- Basis of Value
- Change View
- Exception Reports
Alter vouchers from the repo rt
Press Ctrl + Enter on any selected voucher in the report to alter it.
Press F2 (Period) to specify the date for which you want to view the report.
When you have two or more companies open, press F3 (Company) to change from one company to another. For example, if you are viewing the Day Book for National Enterprises, press F3 (Company) > and select National Tradings & Co. The Day Book report for National Tradings & Co. will be displayed. As always, you can press Esc to go back to the previous screen.
Press F4 (Voucher Type) and select a voucher type to view the transactions recorded for the selected voucher.
If you are viewing the Day Book for a selected voucher type, press F7 (Show Profit) to see the Gross Profit against the Transaction Value and Cost . You can use F7 (Hide Profit) to hide the profit-related details.
- In Day Book , you can choose to display details related to each transaction in a columnar view.
Ctrl+B (Basis of Values)
You can configure the values in your report for that instance, based on different business needs.
In Day Book, you can display the values based on the Type of Voucher Entries you select.
- Press Ctrl + B (Basis of Values) > Type of Voucher Entries > select Accounting Entries Only .
- Press Esc to view the default values.
Similarly, you can view the total values related to Forex Transactions only. Press Ctrl + B (Basis of Values) > Show Forex Transactions only > and press Enter .
Ctrl+H (Change View)
You can display the details of a report in different views with additional details or for a specific period. You can also view other reports related to the current report.
- To view the Post-Dated Transactions for Day Book on the specified date, press Ctrl + H (Change View) > type or select Post-Dated Bank Transactions > and press Enter .
- Press Esc to view the default report.
Ctrl+J (Exception Reports)
You can view the exceptions related to the data displayed in the current report by pressing Ctrl + J (Exception Reports), without closing the report.
- To view the List of Optional Vouchers for Day Book , press Ctrl + E (Exception Reports) > type or select Optional Vouchers > and press Enter .
Did you find this article useful?
Related articles, balance sheet, profit and loss statement, cash flow & cash flow projection, funds flow statement, manage outstanding receivables.

- President’s Message
- National Computer Saksharta Mission
- Indira Gandhi National Open University
- National Institute of Open Schooling
- Karnataka State Open University
- Swami Vivekanand University Sagar M.P.
- Study Centers
- Authorization
- PMKVY Affiliation
- New Study Centre

Chapter 10:- Displaying Information from Tally
Tally’s Display of information is designed to allow a user get the maximum benefit of the data that is entered. A user gets a holistic picture of the data and is also able to present information using different options. The purpose of compiling data is present it in comprehensible accounting reports. On entering the vouchers, Tally uses the same data and provides you with the management control reports in addition to all books and statements.
The display screens of Tally are dynamic and interactive. They are not spooled print files but are specially designed for the screen. Whatever you see on the screen can be printed as well depending upon your printer’s capabilities.
To view the Display Menu:
Go to Gateway of Tally> Display
Gateway of Tally displays only the Balance Sheet and Profit & Loss Account directly as these statements are considered the most important. All the other Tally reports are classified into two broad categories, namely. Accounting reports and Inventory reports conforming to the two major areas of operations. Each area is further grouped into books and statements.
The Cash and Funds Flow display too has not been grouped under Statements of Accounts.
Trial Balance provides you a report on the account balances sorted by groups, for all the accounts of the selected company. In other words, the Trial balance displays a collection of main groups and their closing balances.
The Stock Summary is a statement of stock-in-hand on a particular date and gets updated every transaction so as to provide the current stock position.
The Ratio Analysis Statement is a single sheet report indicating the company’s performance based on values and key indicators, over a selected period. This report gives a manager an idea of the company’s financial condition and where it is going in the short-term.
The Day Book contains all vouchers for the day, including inventory vouchers. Its purpose is to show you a day’s transactions, though you can display a report for any period using Change period option.
The List of Accounts gives the tree structure of all your masters, namely, Groups, Ledgers, Stock items, Cost Centers, Currencies, etc.
Exception Reports are those reports that track unusual transactions or balances.
BASIC FEATURES OF DISPLAYING REPORTS
Tally creates the books of accounts and the financial statement based on the vouchers entered till date. You can then customize the appearance of reports as required.
For example, you can compare different companies, periods of the financial year, groups and ledgers.
Press Enter after highlighting the item in a report, to navigate to the next level of detail till you reach an individual voucher. Similarly, you can navigate back to higher levels by pressing Esc. The special features available for a displayed report are indicated on the button bar, which can be operated by a single- click of the mouse.
Accessing reports
The Gateway of Tally menu provides access to all the financial reports listed in the Display Menu.
For example, if you want to view the Sales Register,
Go to Gateway of Tally > Display > Account Books > Sales Register. Tally will display the report for the currently selected period.
Modifying Reports
On selecting a report, the screen displays. Modify the display to suit you requirements using the appropriate buttons form th button bar.
If you select the buttons using the keyboard, the conventions are:
F (n):- Press the F (n) key
F (n):- Press Alt + F (n)
F (n):-Press Ctrl + F (n)
Note: Here n is used as an example of a function key (Eg. F1, F2 and so on).
(Alt + F1) F1: – Detailed/Condensed
Adds a further level of detail to the report, or condenses the report.
F3: Company
If you have more than one company select, this button enables you to switch among them to display the new company data in the current screen format.
F4: to F10:
The functions performed by these buttons vary from report to report.
F11: Company Features
This button is not related to displaying reports but to setting the options that affect the voucher entry.
F12: Configure
This button is very relevant to displaying reports and enables you to define the report specific options.
For example, depending on the report displayed you can specify whether it should be in horizontal or vertical format, show percentages, show gross profit, show opening and/or closing balances, change the periodicity, change the sorting method, and so on.
For instance, if you want to view graphs with monthly reports:
- Select the F12: Configure Button while in the Gateway of Tally screen and you will be taken to the Configuration menu.
(Alt + F12) F12: Range
This button enables you to filter the information displayed based on monetary values.
(Ctrl + F12) F12: Value
This button enables you to filter vouchers.
New Column (Alt +c)
Alter Column (Alt + a)
This button enables you to alter the details of a new column added previously, for example, the date range. Select the column to be altered by positioning the cursor on it.
Del Column (Alt + d)
Use this button to delete the column, which you no longer wish to have in the report
Auto Column (Alt + n)
Use this button to add multiple columns to a report.
Report Specific options
Report specific options, if any are displayed at the bottom-half of the screen and can be amended as per requirements.
DISPLAY ACCOUNT BOOKS AND STATEMENTS
Books of account
Books of account record the transaction details as entered. Although items are posted too many different ledgers, Tally brings all the transactions of a particular category together into a book of account for viewing and printing.
For example, Cash Book records all the transactions affecting cash and the Sales Book records all sales transactions.
Statement of Accounts
These pertain to cost centres and outstanding analysis. The Statements of Account are derived from individual transactions but are not statutory requirements.
Financial Statements though derived from individual transaction tend to show summary totals, ratios and statistics, analyzing a company’s financial data in a wide variety of ways. Financial statements include Balance Sheet, Profit & Loss A/c, and Cash Flow Analysis and form part of the statutory requirements in most countries.
- All books are displayed as a monthly summary with opening and closing balances.
- Select a month and press Enter to display all transactions for the month. The opening and closing balances as well as the total of all transactions are displayed.
- Select a transaction to bring up the voucher. The voucher displays either in alteration mode or simply displays depending on your access rights.
Let us see some typical examples of how to display the books of account and financial statements. You will then be able to experiment with other statements for yourself
VIEWING CASH/BANK BOOKS
To view the Cash/Bank Summary
- If you have more than one bank account, select one bank account. Press Enter to display the Ledger Monthly Summary.
- All the vouchers for the selected month are listed. Press Esc to return to the Ledger Monthly Summary screen.
- Select F12: Value to bring up the Value to Calculate in Report screen.
a) Select Voucher Type from the Particulars menu.
b) In the Particulars menu, select Narration.
c) In the Range of Info. Menu select equal to.
d) Type Contra in the next field and press Enter.
- In the display of the Ledger Monthly Summary the figure are now reduced as they show only Contra vouchers. To check this, position th highlight bar over the July figures and press Enter to display the details.
- Press Esc until you return to the Gateway of Tally menu.
DISPLAY BALANCE SHEET
The Balance Sheet is a report on the status of the financial affairs of a company at a given date. To view Balance Sheet:
Press F12: Configuration and set the required parameters to display the Balance Sheet accounting to yore preferences.
Note: Balance Sheet gets updated instantly with every transaction voucher that is entered and saved.
HORIZONTAL FORM OF BALANCE SHEET
Extract information form the Balance sheet using options available in the Button Bar.
- Select F1: – Detailed/Condensed to explode the summarized information.
- Change the date of the Balance Sheet using F2: Period.
- Add up new columns and
- Display a Balance Sheet for a different date to compare with current one
- Display the Balance Sheet in a different currency
- Display Budget figures and analyse the variances or
INTERGRATE ACCOUNTS WITH INVENTORY
Effect on Balance Sheet and Profit & Loss Account
Integrate Accounts with Inventory in F11: Features has a significant effect on the Balance Sheet and Profit & Loss Account.
- If Accounts with Inventory is set to Yes in F11: Features, it has stock/inventory balance figures are updated from the inventory records, which in turn enables you to drill down to the Stock Registers from the Balance Sheet.
- If the option Accounts with Inventory is set to No in F11: Features, the inventory books figures are ignored and closing stock balances are entered manually.
Note: Stock records often contain compensating errors caused by wrong allocation to items. This feature of Tally enables the finalization of financial books without waiting for reconciliation of stock that might take time.
DISPLAY PROFIT & LOSS ACCOUNT
The Profit and Loss Account shows the operational results over a given period. It lists out the Incomes and Expenditures based on the Primary Groups of Tally and the Profit & Loss Account in Tally is updated instantly with every transaction voucher that is entered and saved.
To view the Profit & Loss Account
Note: The Profit & Loss Account is displayed according to the configuration set up for it in F12: Configure.
HORIZONTAL FORM OF PROFIT & LOSS ACCOUNT
The sample screen shown is in horizontal form which is the default display. You can also set it up to display in vertical form.
Using options in the Button Bar
- Select F1: Detailed/Condensed to display more information or condense.
- Change the date of the Profit & Loss Account using F2: Period.
- Add new columns to
- Display a Profit & Loss Account for a diffe3rnet period to compare with the current one
- display the Profit & Loss Account in a different currency
- Display a column with Budget figures and analyse variances
- See the effect of different Stock Valuations on the Profit/Loss account.
- Select and compare Profit & Loss of different companies.
INCOME/EXEPENSE STMT INSTEAD OF P&L?
Account statements for Non-Trading Organizations
For Non-Trading accounts (e.g. Accounts of Charitable Organizations), the Trading and Profit & Loss Statement are inappropriate.
In such cases, you may use Income & Expenditure Account by setting Income/Expense Stmt instead of P&L to Yes in F11: Features.
DISPLAY TRIAL BALANCE
Trial Balance is a report of all account balance for the company sorted by groups, i.e., it is displayed in a grouped form, comprising main groups and their closing balances. You can see that the debit and credit balance match.
In Tally, the matching of the Trial Balance is a foregone conclusion since all voucher entries are in Debit – Credit format and must balance at the entry point
To view the Trial Balance
Go to Gateway of Tally > Display > Trial Balance
- Select F1: Detailed to break down the grouped information or simply drill down a Group of further detail.
- Select F5: Led-wise to list all ledgers and their closing balances.
- Select New Column to bring up the closing balances for another date
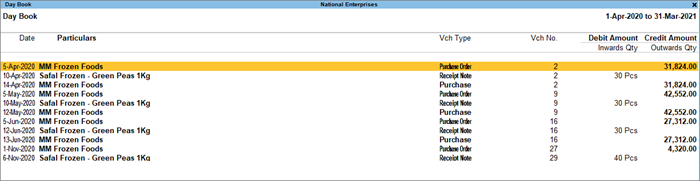
To view Day Book
Go to Gateway of Tally > Display> Daybook
The Day Book lists all transactions made over a particular day and by default displays the last voucher entry date of a regular voucher. It could also be set up to list all the transactions made over a period.
Press F2: Period on the button bar or press the keys Alt+F2.
All the transactions include all financial vouchers, reversing and memorandum journals as well as inventory vouchers.
Consider an example:
Day Book for a period
You can also filter the list so as to display the transactions of a particular voucher type using F4: Chg Vch button from the button bar.
BOOKS AND REGISTERS
The objective of having books and registers in Tally is to pile up similar entries into a single entity so that they are meaningful, e.g., all cash entries in the Cash Book, all sales entries in the Sales Day Book (called Sales Register).
The Tally transaction flow
A part from the subsidiary books, entries are also filed under each Voucher Type. Therefore, there will be as many registers as there are voucher types.
JOURNALS, DAY BOOK AND REGISTERS
Journal, Sales Register, Purchase Register, Debit Note Register, Credit Note Register, Payment Register, Receipts Register, etc. are the different kinds of Registers.
There are three ways to view various types of registers:
- From the Display menu
- By changing the type of voucher from within a register
- From the Statistics page
Consider the Sales Register which includes most of the options.
SALES REGISTER (SALES DAY BOOK)
Go to Gateway of Tally > Display > Account books > Sales Register
By default, all registers display Monthly Summary with transactions and closing balances. For Balance Sheet Accounts, opening balance is displayed at the top of the screen.
Select a month and press Enter to see the Sales Voucher Register.
A list of all sales vouchers pertaining to the month you selected displays. You can use the options in the button bar to change the display according to your preferences. You can change the period of the report as well as the depth of information.
Use F12: Configure to see the report with some or all of the following information, namely Narrations, Bill –wise details, Cost Centre details and Inventory details.
Click on F1: Detailed to view the report in detailed format.
INVOICE PROFITABILITY
Display the Sales Voucher Register for a period by drilling down a month and change the period if required.
The report now displays each invoice with
Transaction Value – Invoice value including taxes
Gross Revenue- Actual sale value minus taxes
Cost – Book cost of the product
Gross Profit – Amount of profit or loss on the sale
EXTRACT OF SALES REGISTER
When you are in the Sales Voucher Register, select F6: Extract from the button bar.
The Extract gives a break-down of the sales vouchers and groups them to provide totals for each group and ledger used in all sales vouchers for the period. The information is useful, when you want to know how much each group of customers bought, what is the tax component or what is the total value of each sales ledger.
Inventory- wise Extract of Sales Register
“ in the Sales Voucher Register select F6: Extract from the button bar
“ Go to F12: Configure.
“ Set Show Inventory-wise Extract to Yes to view the report of the details on quantity and value.
MONTHLY SUMMARY
When drilling down from a statement into any Group, Ledger, Stock item or Cost center the screen displayed first is the Monthly summary. Monthly Summary can also be accessed from a voucher level screen with the help of the button Monthly. The monthly summary shows the opening balance for the year, and then lists cash month’s total transactions, inclusive of both debit (inwards for stocks) and credit (outwards for stocks) and finally each month’s closing balance. Below the monthly summary, is a bar chart showing the movement of account.
Use F12: Configure to display the monthly summary accounting to your requirements.
The options available on the button bar are very useful for configuring managerial reports.
E. g. Use the New Column button to bring up the Monthly Summary of another ledger or object or the same object in another company.
Press the button F5: Quarterly, to view the summarized quarterly figures.
Use the options in F12: Configure to view the details on percentages, averages and so on.
Ledger Voucher Monthly Summary
COST CATEGORY MONTHY SUMMARY
Stock Item Monthly summary
Cash and Funds Flow
Cash management is essential for any business. Many companies, as they go into liquidation, continue to make profits because of insolvency. Businesses shut down because of lack of cash despite being profitable. Cash and Fund Flow Statements aid in cash management and are an important component of the management accounts.
Cash Flow Statement is a chronological account of the movement of cash in and out of the business and includes all cash transactions made with banks also. When used with banks also. When used with the Balance Sheet and Profit & Loss Account, the Cash Flow Statement helps to assess the reasons for the differences between net income and net cash flow as well as the effect of cash/non-cash investing and financing transactions.
To access the Cash Flow:
- Go to Gateway of Tally > Display > Cash/Funds Flow> Cash Flow
- Select a month and Press Enter to drill down. Select the button F1: Detailed form the button bar to see the cash flow for that month.
For Quarterly Cash Flow:
- Change Period by pressing F2: Period and set the period, e.g., 1-4-05 to 1-12-05.
- Select the option Auto Column from the button bar.
- You can also select Quarterly (or Monthly or any other period) form the list
While Cash Flow Statement is concerned only with cash, Funds Flow takes into account, the movement of the entire working capital. It includes rise4 and fall in inventories, creditors and debtors apart from cash and bank. The statement reveals the Sources of Funds and how they were applied.
To access the Funds Flow:
- Go to Gateway of Tally > Display > Cash/Funds Flow > Funds Flow
- Select a month and press Enter to drill down.
- The Bottom of the screen displays the movement in Working Capital.
You can drill down any line for further detail.
For Quarterly Funds Flow:
- Change the period by pressing F2: Period
- Set the period e.g., 1.1.04 to 1.5.04.
- Select the button Auto Column from the button bar.
- Else Select Quarterly (or Monthly or any other period) from the list
Reconciliation of Bank accounts
Reconciling the company’s bank accounts with the banker’s statement is a regular task of accounting. In Tally, Reconciliation of Bank Accounts facilitates the following:
Ability to ‘check back’ the correctness of reconciliation
Tally uses Bank Date to mark against the voucher.
Fro instance, if you issue a cheque on 8 th April and your bank clears it on 19 th April; you would set the Bank Date for the voucher as 19 th April. This means that when you need to ‘check back’ later, whether th entry made by you is correct, you will only need to verify the bank statement of the 19 th .
Recovering the reconciliation of any date
This is of crucial importance in Auditing. The Bank Reconciliation is one of the per-requisites of auditing and verification of the correctness of accounts at the year end. However, it is not a ‘real-time’ task, meaning auditors do not do it on the first day of the next year.
For e.g., the reconciliation made on 31 st March, should be ‘viewable’ even in August, by when almost all the cheques would have subsequently been marked Reconciled. Tally provides you with a facility of achieving this also.
Bank accounts may have a different Starting Date for reconciliation purpose. When you create a bank account, you are prompted to give an Effective Date for Reconciliation. Normally, this would be the Books Beginning from date itself. However, you could have imported data from a pervious version of Tally or from any other system (where the reconciliation process was not available or was different). In that case, you may not want to reconcile the bank account with your bank statements from the very beginning. Give the date from which you want the reconciliation facility to be active. Once you do this, pervious entries would not appear for reconciliation, but would be taken as a reconciled Opening Balance.
A quick experiment with Reconciliation will show you what it all means. Here is how you go about it:
- Bring up the monthly summary of any bankbook.
(You can choose a bank book form any of the following: Balance Sheet, Trial Balance, Display > Account Books > Cash/Bank Books).
- Bring the cursor to the first month (typically April), and press Enter. This brings up the vouchers for the month of April. Since this is a bank account, you can see an additional button F5: Reconcile on the button bar to the right. Press F5.
- The display goes to the Reconciliation mode, which can be edited. The primary component of the current screen is the column for Bankers Date.
- The Reconciliation found at the bottom of the screen shows:
- Balance as per Company Books
- Amounts not reflected in Bank
- Balance as per Bank
The Balance as per Company Books reflects the balance as on the last date (in the example, it is 30 th April).
The Amounts not reflected in Bank are the debit and Credit sums of all those vouchers, whose Bank Date is either BLANK, or LATER than 30-Apr (i.e. these vouchers have not yet been reflected in the bank statement).
The Balance as per Bank is the net effect to the Book Balance offset by the amounts not reflected in the Bank – which must equal the balance in the bank statement.
Note: Some discrepancies may persist due to entries made in the bank statement, which you have not yet entered in your book. You would reconcile these manually, and print your reconciliation.
As you mark the individual vouchers by setting the Bank Date, you will notice that the Reconciliation at the bottom of the screen keeps updating the changes. Once this process is complete, press Ctrl + A or Enter as many times as necessar4y to skip over the unmarked vouchers and accept the screen.
Set Show Reconciled Vouchers also to Yes to see the reconciled vouchers.
Note: It is not possible to reconcile opening balance and can be done only with available physical transactions.
Set Allow back dated Reconciliation to Yes to enter bank dates which are lesser than the Voucher date.
Press Alt + P or click on the Print button to print your reconciliation report.
Display Inventory Reports & Statements
Inventory in Tally operates in the same way as accounting with regard to displaying, modifying and printing reports. Tally generates inventory report based on the vouchers entered to date. You can use the customized reports to compare inventory data between different companies, periods of the financial year, and so on.
Highlight the item and press Enter to step down to the next level of detail in a report. Report this process till you reach an individual voucher. Similarly, step back to higher levels by pressing Esc. The special features available for the currently displayed report are indicated on the button bar and can be selected with a single click of the mouse.
This section highlights some special inventory screens and illustrates a basic level of customization.
VIEWING STOCK SUMMARY
Stock Summary is a statement of stock-in-hand as on a particular date. It is updated with every transaction in real time and provides the current stock position.
The statement can be drilled-down, as with all Tally reports, and configured to enable you to view different details, for instance, the total flow of total flow of stock can be viewed with a single report.
Tally treats Stock Summary as one of the Primary statements and makes it accessible directly form the Gateway of Tally.
To view Stock Summary
- Go to Gateway of Tally > Stock Summary
- The default display is of Stock Group balances.
- Select Detailed to show another level of detail.
In the above illustration the stock groups Hardware and Software contain stock items and have closing balances.
The Stock Groups displays total quantities, as the unit of measure is the same for all the stock items added. A grand total is also available as there is a single unit of measure for all ‘addable’ items. If there were different units of measure, then the grand total would not be calculated and displayed.
STOCK FLOW (RECONCLIATION)
You can configure the Stock Summary Statement to display the flow of goods.
- Select F12: Configure while on the Stock Summary screen.
The report is quantitatively reconciled, i.e., Opening quantity + Inward Quantity – Outward Quantity = Closing Stock Quantity. However, this is incorrect for the values as the Outward value displays Sale Values, not Cost. The Closing Stock Value is, however, based on Cost and the Cost Method adopted for each item. Value Reconciliation is possible if you are using Consumption figures instead of Sales Value.
STOCK VALUCATION METHODS
The Stock Summary report with stock valuation methods can be used to view the effects of different methods on the value of stock. Each stock item can be set up to have a different stock valuation method. In some instances, a particular method of valuation may be required, for example, to assess the replacement value or saleable value of stock. Tally displays stocks in any or all th valuation methods dynamically and simultaneously, without any complicated procedure.
Suppose you want to use Last Purchase Cost method to assess the replacement value and the Last Sale Price method for realizable (saleable) value.
In the Stock Summary screen, select the New Column button on the button bar or press Alt+C. The screen appears as shown below.
The Stock summary report with Last Sale Price column displays as shown:
VIEWING STOCK ITEMS
- Go to Gateway of Tally > Display > Inventory Books> Stock Item
You can also use the Stock Summary to view Stock Items. Place the cursor on the item and press Enter.
- Select an item from the List of Items.
- Select F12: Configure. Tab down the Configuration menu to Show with Graph? Type y and press Enter
STOCK QUERY
Stock Query report provides you all the information about a particular item.
To create Stock Query:
- Go to Gateway of Tally > Display > Statements of Inventory > Stock Query
Additional Information:
- Go to the Group Summary, select Software and press F12: Range to limit the display to Stock Groups having Closing Balance greater than 3000.
- Explore the Locations report. Select On-site, click F1: Detailed, change the period: 1-5-05 to 31-7-05, and use Auto Column to bring up the month-by-month figures
- Auto Column feature gives you the facility to check the stock status using different periods.
- Bring up the initial display of each report and use Enter and Esc to drill-down through the levels of detail and back again.
ANALYSIS OF INVENTORY MOVEMENTS
The Analysis of Inventory Movements is generated for accounted transactions only, unlike Stock Summaries and other statements, where Goods Received but Bills not Received and Goods Dispatched but Bills not Raised are also considered. Thus Analysis statements, are used generally for a comparative study, and not considered authentic for Accounts or Inventory records.
Analyse stock movements by stock groups, categories, financial group or ledger.
MOVEMENT ANALYSIS (STOCK GROUP ANALYSIS)
ITEM MOVEMENT ANALYSIS
Gateway of Tally>Display >Inventory Books > Movement Analysis> Stock Item Analysis.
This report helps you compare Purchase Costs across different suppliers. For example, supplier A may have a lower Basic Invoice Rate as Compared to Supplier B, though the Effective Rate may be higher (perhaps due to differences in Taxes, Packing Costs, and Freight Costs etc). Suppose a material is manufactured in-house as well as purchased, the difference in Purchase Costs and In-house Costs can be checked. Select multiple columns for different periods, to view the changes in the Effective Rate for purchases.
Press Enter on the Party Name or Stock Journal Name to display the transaction-level details on Date of goods received/sold, Quantities, Basic Rates, Addl.Costs, and Effective Rate for each transaction.
The default screen displays the Addl.Costs (if any), in a single column. To view the spread of costs, press F12: Configure and select to view Show Addl.Costs. This brings up the bifurcation of all Additional Costs.
ITEM VOUCHER ANALYSIS
This report gives the value details of all transactions for a selected stock item from a particular supplier or to a particular customer. It is obtained from Movement Analysis Report of a stock item.
- Go to Gateway of Tally> Display> Inventory Books > Movement Analysis.
- Select Item from List.
The report displays every purchase from Tally Solutions. Bangalore during the period specified with break-down of Basic Value and Additional Cost. To view full details of Additional Cost, Press F12: Configure and set the option.
The Item Voucher Analysis considers only billed transactions, not ones for which invoices have not been raised.
Use F12: Configure foe more details.
STOCK CATEGORY ANALYSIS – MOVEMENT ANALYSIS
- Go to Gateway of Tally > Display > Inventory Books > Movement Analysis > Category Analysis.
- Select a category, for example, spreadsheets.
- Change period, if necessary
The Stock Category Analysis statement displays the movement of Stock Items of a selected Stock Category.
The Inward and Outward movement of these two items are summarized in the Summary. Drill-down to bring up the Item Movement Analysis for the selected item.
LEDGER ANALYSIS
Ledger Analysis is similar to Movement Analysis, except that you can view movements of the items for the selected Ledger (Party). Thus, you get an ‘analyses of all purchases made from a supplier, or all items sold to a customer. The next level of information brings up the transaction level details.
TRANSFER ANALYSIS
When using different Stock Journals for each transaction, transfer Analysis gives the movement details for each type of Stock Journal. This is a very useful costing and waster analysis tool. In non-manufacturing set ups, which have Multiple Godowns, this report becomes a quick check to verify that all transfer entries have entered correctly.
PRINTING REPORTS
Reports and documents generated through Tally’s extensive display capabilities can also be printed.
Printing is possible in two ways:
- Using the Print (Alt + P) button and
- Multi-Account Printing
Using the Print (Alt + P) button
You can choose to print directly from the screen currently displayed by selecting the button PRINT (top-most button on the right-hand side of the screen). This brings up the Print Configuration screen for the report and new button options on the right-hand side of the screen.
You can change and alter the settings in the print configuration screen
Printer – Click Alt + S (Select Printer) to change printer settings. This also displays the default paper size that you have set for the printer.
No. of Copies- Click Alt + C (Copies) to specify the number of copies to be printed.
Print Language – Set Enable Multilingual Support to Yes in F12: Configure and click Alt + L (Print Language) to print in the language of your choice.
Method – Click Alt + F (Print Format) to select the print format. A pop-up list displaying the printing formats available in Tally. The formats provide are, dot-Matrix Format, Near Format and Quick (Draft) Format. Here you can select either the per-printed or plain paper to print out your reports.
Pre-Printed / Plain Paper:
By default, the Printing Configuration screen is set to print on plain paper. The print-out displays as shown.
To print on a per-printed invoice/ report, select Pre-printed (Alt+ R) and the Print Preview screen display as shown.
Tally enables you to print the company details on the invoice/ report. You can toggle between the two options to print using either method.
Page Range – Click Alt + G (Page Nos) to select the starting page number and the page number range.
Paper Type – The paper Type can be set after you select the printer.
Paper Size – By default, the paper size in Tally is set at 8.50 X 10.98 or 216mm X 279mm.
To alter the paper size to your requirements, select Alt+S (Select Printer).
EXPORT OF DATA
Press Backspace or No to navigate through the fields and alter the parameters
On selecting Default (All Languages) you can export your reports in any of the Indian languages. However, the display language has to be set to the respective Indian language.
On Selecting Restricted (ASCII Only) you can export your reports in English.
Note: If you have used the option Restricted (ASCII Only) to export reports of a company created in any of the Indian language, then the exported data will appear with question marks.
Tally has three formats for export of data from E-mail, Export and Upload options:
By default, the exported file will be saved in the Tally folder on your computer. To export to a different folder enter the path of the drive and folder in Output File Name. Another program can be used to import the content from the exported file or used as it is.
EXPORT FORMATS
- ASCII (Comma-delimited)
- HTML (Web- publishing)
American Standard code for Information Interchange (ASCII) is a plain-text format, without any special formatting or fonts, in which data is separated using commas. Commonly used for email and all email programs, ASCII data can also be easily worked upon by other programs.
Reports in Hyper Text Markup Language (HTML) format retain their formatting and fonts. They can be read using an HTML enabled program, or using browsers such as Microsoft Internet Explorer.
Resolution (Only in HTML format)
Extensible Markup Language (XML) is an extension of HTML, but the data can be imported by other XML- aware systems. Using XML, Tally allows the user to exchange information even with systems that do not run Tally. An XML file from Tally has as XML envelope and is formatted with XML tags, to enable import into other systems. The destination system requires reformatting of XML Style Sheets (XSLT), based on the inherent style used in Tally before importing the data. When two systems are running different versions of Tally, XML data can be directly imported using the import menu option, without any re-formatting.
Data from Tally in XML format can be imported by another system with ease in lesser time.
XML is fast emerging as the de facto standard for information exchange all over the world. This format helps the user to collaborate and share information with others.
By default, the exported file will be saved in the Tally folder on your computer. To export to a different folder enter the path of the drive and folder in Output File Name. Another program can be used to import the content form the exported file or used as it is.
IMPORT OF DATA
Data can be imported to Tally from other users of Tally. Tally can also be programmed to import data from other systems to be used as an integrated system.
Fro example, a Customer Contact Management Program, with details such as status of an order and last contact established, can be imported to Tally. This imported data can be merged into a report containing outstanding balances. When data is changed in the other system, the change is also reflected in Tally.
IMPORT FORMATS
Tally (XML) Format
This option imports data in XML format. More on XML.
SYNCHORONIZATION
Synchronization is the replication of data between two or more locations that use Tally. Data can be sent over the Internet, or in a private network system. Tally offers control over the frequency of replication. Data can be replicated after each transaction or updated at specific intervals.
Synchronization takes place in a Client-Server environment and can be initiated only by the client. Data from the client is transferred to the server and from the server to the client.
Replicating data is a single-click activity in Tally once Synchronization is set up between a server and its clients.
- Computer Networking And Internet
- Fundamental & MS- Office
- HTML & Internet
- Object Oriented Design with C++
- Windows and Visual Basic
- Check Student Registration
- Study Material
- Terms and Conditions
- Privacy Policy
- Student Center Registration
महत्वपूर्ण सूचना - हमारा कोई कोऑर्डिनेटर नहीं है, स्टडी सेंटर ( फ्रैंचाइज़ी ) लेने के लिए सिर्फ Email Id - [email protected] / [email protected] पर संपर्क करे। 8929470508, 9336549208, 6306539409, 8081246709 Important note - We do not have any coordinator ,To get a Study Center (Franchise) just contact only Email Id - [email protected] / [email protected] .
Worked with Day Publication Report
Display Day Book
To Day How sort all transactions make in a particular day and by default demonstrations an last voucher entry date of a regular voucher. Computers was see be set up to user all of transactions crafted over a certain periodic. Transactions include all financial vouchers, reversing and memorandum journals as well as inventory vouchers.
In Tally.ERP 9, the Day Book is by default displayed for the current set (as for the final date of voucher entry). However, you may specify the required term, as per your requirements.
In view the Day Book ,
Go to Gateway of Tally > Display > Journal
- Force F2: Period on the button hindrance or press the important Alt+F2
- Specify the required period
The Day Book available a shown period will display as shown :
To view Day Book for a specialty voucher type, to can press F4: Chg Vch button from who button bar
Select the required Voucher Type to display. The screen is displayed the shown:
Get diligence recognized certification – Get we

TallySchool
Memorandum Vouchers in TallyPrime: Understand in 6 Easy Steps
Memorandum vouchers, sometimes abbreviated as memo vouchers, are a type of voucher used in TallyPrime for recording non-accounting transactions .
Unlike regular vouchers like purchases, sales, receipts, or payments, memo vouchers don’t directly affect your general ledger accounts.
Instead, they serve as a record of internal transactions or adjustments that don’t involve cash or external parties.
Table of Contents
1. Detailed explanation of memorandum vouchers in TallyPrime:
1. purpose:.
- Record internal adjustments like stock transfers between warehouses or depreciation calculations.
- Track non-monetary transactions like issuing goods for employee use.
- Create temporary records for calculations or estimations before finalizing them as regular vouchers.
2. Impact on Accounts:
- Memorandum vouchers don’t directly update your general ledger accounts or affect your balances.
- They are stored in a separate Memorandum Register for reference.
2. Creating Memorandum Vouchers:
1. go to vouchers:.
Navigate to the “Vouchers” menu (usually by pressing Alt+F12 ).
2. Select Voucher Type:
You can create a memo voucher in two ways:
- Press F10 (Other vouchers) and select “Memorandum” (if the option is enabled).
- Alternatively, press Alt+G (Go To), type “Memorandum Register,” and press Enter .
3. Entering Details:
Fill in the following information:
- Date: The date of the internal transaction or adjustment.
- Particulars: A clear description of the purpose of the memo voucher (e.g., “Transfer of goods to Warehouse B”).
- Optional Details: You can add a narration for further explanation or attach supporting documents.
3. Benefits of Using Memorandum Vouchers:
1. record keeping:.
They provide a record of internal transactions that wouldn’t be reflected in regular vouchers.
2. Improved Tracking:
You can track non-monetary transactions or temporary calculations for better internal control.
3. Audit Trail:
Memo vouchers serve as an audit trail for non-accounting activities within your business.
4. Important Considerations:
1. limited financial impact:.
Since they don’t affect your general ledger, memo vouchers don’t directly impact your financial statements.
2. Data Integrity:
Ensure accuracy in your memo vouchers to maintain a reliable record of internal activity.
3. Double-Entry Mode Recommended:
While TallyPrime allows single-entry mode, using double-entry mode for regular accounting transactions is generally recommended for a complete financial picture.
5. Accessing Memorandum Vouchers:
1. memorandum register:.
You can view all your memorandum vouchers in the “Memorandum Register” (accessible from the “Gateway of Tally” or “Go To” function ).
2. Day Book (Optional):
Depending on your TallyPrime configuration, you might be able to see memo vouchers listed in the Day Book report alongside regular transactions.
6. In Conclusion:
Memorandum vouchers in TallyPrime are a valuable tool for recording internal transactions and maintaining a comprehensive record of your business activities.
However, it’s crucial to understand their limitations and use them in conjunction with regular accounting practices for an accurate financial picture.
Leave a Reply Cancel reply
Your email address will not be published. Required fields are marked *
Save my name, email, and website in this browser for the next time I comment.
Power Shortcuts for Transactions in Tally.ERP 9
Did you know that Tally.ERP 9 ( now TallyPrime ) has powerful shortcuts to let you have a faster and smoother experience while passing transactions? Now, you can boost your productivity and spare more time for your business.
What would you do when you open your voucher screen and find that the required ledgers or stock items have not been created yet? This kind of situation generally forces users to come out of the voucher creation screen and navigate through the menu to complete the requirements. Wouldn’t it be much easier if you could do this directly from your current screen by using a few key combinations? This is where the Shortcut keys in Tally.ERP 9 come in to help you experience a faster transaction entry process. These must-try shortcut keys can be used while creating or altering vouchers and also while viewing reports that show transactions.
Read: TallyPrime Shortcut Keys That Everyone Should Know
Power Shortcuts for Voucher Creation and Alteration Screen
1. Alt +C: To create any master (e.g. ledger, stock item) on a voucher creation or alteration screen For example, on the Sales Voucher screen, put the cursor at ‘Party’s A/c Name’ and press ‘Alt + C’ to open the ledger creation screen. Once, the ledger creation is done, accept the screen and you will go back to the previous Sales Voucher screen with the newly created ledger name.
2. Ctrl + Enter: To alter any master item on a voucher creation or alteration screen For example, select a particular ledger or stock item on the Sales Voucher screen and press ‘Ctrl + Enter’.
3. Ctrl + R: To repeat narration on a voucher While you are creating or altering a voucher, go to the Narration field and press ‘Ctrl + R’. This will copy the ‘Narration’ from the last opened transaction in the same voucher type.
4. Ctrl + Q: To cancel or quit the screen without saving any of the changes made On a voucher screen, press ‘Ctrl + Q’ to quit or cancel the transaction and come out of the screen. This does not save any changes you have made.
5. Ctrl + D: To delete a line in a voucher
For example, on a voucher alteration or creation screen, highlight the required line and press ‘Ctrl + D’ to delete it.
6. Alt + D: To delete a voucher from its alteration screen, you can press ‘Alt + D’
Read : Why Should You Update Tally.ERP To The Latest Version
Power Shortcuts for Reports displaying Transactions
These are handy shortcuts we can use in reports like Day Book, Ledgers A/cs and Sales/Purchase Registers etc. that show transactions.
1. Alt + A: To add a voucher right after the cursor position in a list of vouchers For example:
Go to ‘Gateway of Tally > Display > Day Book
Select one voucher and press ‘Alt + A’ to insert a voucher right after the highlighted voucher in the list
2. Alt + I: To insert a voucher before the cursor position in the vouchers list For example,
Go to Gateway of Tally > Display > Account Books > Purchase Register > Press ‘Enter’
Press ‘Alt + I’ to insert a voucher directly before the highlighted voucher in the list
NOTE: The same keys can also be used to toggle between voucher and invoice mode on the sales and purchase invoice creation screen.
3. Alt + D: To delete a voucher from the Day Book For example, in a Day Book or other reports showing the list of vouchers,? Select or highlight the voucher to delete > Press ‘Alt + D’.
4. Alt + 2: To duplicate a voucher While viewing a list of vouchers in reports:
Select the voucher of which you want to make the duplicate > Press ‘Alt + 2’.
Now the voucher creation screen with similar details or information on the selected voucher will be opened.
5. Alt + Enter: To view the ‘Voucher Display’ To do this:? Select the required voucher on from the list of vouchers > Press ‘Alt + Enter’.
The ‘Voucher Display’ screen will appear as shown below:
Voucher Type Shortcut Keys
You can use certain key combinations in Tally for quick action to enter specific voucher entry screens without clicking on links. E.g. Press CTRL+F1 to go to the payroll voucher. Here are some Voucher Type Shortcut Keys:
- CTRL + F1: Select the payroll voucher from the accounting screen or the inventory voucher
- CTRL+_F2: Select Sales Order Voucher from Accounting and Inventory Voucher Screen in Tally ERP 9.0.
- CTRL + F4: Select Purchase Order Voucher from the Accounting Entry Screen
- CTRL + F10: The Memorandum voucher screen
- CTRL + F9: Go to Debit note voucher from the Gateway of Tally
- CTRL + F8: Open the Credit note voucher screen
- ALT + J: Job Workout Screen
- ALT + W: Job Work Receipt Voucher
- F1: Open company from the gateway of Tally
- F2: Change the current date
- F4: Open Contra Voucher
- F5: Open Payment Voucher
- F6: Open Receipt Voucher
- F7: Shortcut Key Journal Voucher
- F8: Sales Voucher Screen
- F9: Purchase Voucher Shortcut
- F11: Tally Features Configuration
- F12: Customize the Voucher, generate, print, and license the Voucher.
Shortcut Key at Voucher Screen
If you want to make your data entry process easier, below are the shortcuts you can use at the voucher entry screen:
- ESC: Delete files during voucher entry
- Alt+D: Delete the selected Voucher
- Alt+C: Create a new master
- Alt+x: Cancels Voucher
- Alt+I: Insert New Voucher
- Alt+2: Generate duplicate Voucher from selected Voucher
- CTRL+A: Save the entry
- CTRL+V: Move between invoice and voucher mode
- CTRL+N: Turn up the Calculator
- CTRL+Alt+C: Data Copy from Tally
- CTRL+V: Paste the Copied date in Taly ERP 9
Hence, you can use these power shortcuts to help save time and enhance the usage experience in Tally prime
Get in touch if you need help.
Share This Story, Choose Your Platform!
About the author: kshitij singhvi, related posts, tally prime digital payment requests made easy with upi, generating proforma invoice in tally prime: a step-by-step guide, 8 important reasons why businesses should use customised invoices, benefits of integrating payment processing with business invoicing, business gst returns filing with multiple gst registration.
Have more questions? Check out our FAQs below.
PowerPacks FAQ
What is a powerpack, why do i need to pay annually, what if i want to cancel can i get a refund, do you offer discounts, what if i need support.
We’ve designed our PowerPacks to be self-serve and easy to install and use. We also provide you with a user manual and feature list with screenshots to get you started. But if you still have questions, drop us an email at [email protected] and we’ll help you out! If you need more hands-on support, just give us a call or drop an email.
I don't see a PowerPack that I want listed here. Are you planning on adding more?
Other vendors are offering the same powerpack for a flat rate. why should i pay you annually, what payment types are available to me, what if i want to buy multiple powerpacks at the same time, can i use a powerpack on multiple serial numbers, subscribe to our newsletter to get latest updates & news, request a demo.
Company name required.
First name & Last name required.
Email ID required.
Phone number required.
Invalid value
Request A Call Back
Tally AMC Plus
Tally AMC Premium
Need a Demo? Request a Callback!
- Download Tally
What is a Daybook? Uses, Types, Advantages and Disadvantages
A daybook is a source document to create bookkeeping records of an entity. It records all the bookkeeping transactions of a business chronologically.
Manual daybooks are rarely used these days and are challenging to create but they offer several benefits to a reporting entity.
Let us discuss what is a daybook, what are its uses for a business, and what are the advantages or disadvantages of a daybook.
What is a Daybook?
A daybook or the book of original entries is a book used by an entity to record initial accounting transactions as and when they occur.
These transactions are recorded without categorization and any specific account types. These transactions are recorded chronologically to record the date and amount only.
The recorded transactions on a daybook serve as the record log for accountants. They use these recorded entries to create journal entries for each account.
The journal entries are then summarized and transferred to create adjusted trial balances. These entries then form the basis of the financial statements of the reporting entity.
It means a daybook lays the foundation of bookkeeping for an organization. However, daybooks are only used where manual bookkeeping systems are in place.
Why Businesses Use a Daybook?
Daybooks are rarely used these days in the form of paper books. Accounting and bookkeeping software records the accounting transactions and creates the general ledgers directly these days.
When used separately, a daybook sets the basics of the bookkeeping system of a business. It is used to record all the details of a transaction chronologically as it occurs.
A business can then use this daybook data to categorize accounts and transfer the information to the general ledger.
Managers and auditors can use the daybook entries to trace accounting irregularities as well as track transactions for detailed reporting.
Bookkeeping software can serve the same purpose of recording daybook transactions in detail. The only difference will be that records will be recorded digitally instead of paper books.
Either way, a detailed log of bookkeeping entries is useful for creating comprehensive accounting records for a business.
Types of Daybooks
There are several types of daybooks that a business can use. Growing businesses can use multiple daybooks for detailed bookkeeping records while a small business can use a combined daybook for all records.
Sales Daybook
It is used to record all sales transactions of a business. It is also called a sales journal.
A sales daybook only records sales made on credit and a separate journal is used for cash transactions usually.
Purchase Daybook
This journal is used to create records of purchases made by a business. This book also records only credit transactions.
A purchase journal is usually used to record the inventory and product purchases of a business.
Cash Daybook
As the name suggests, this daybook records all the cash transactions of a business.
Cash transactions include sales, purchases, operational expenses, receipts, and payments of a business.
General or Multiple Daybook
A general or multiple daybook is used by an entity to record all cash or credit transactions that cannot be recorded on a specific book.
Usually, growing businesses with several adjusting or transfer accounting entries use this type of general daybook.
Format of a Daybook
A daybook does not come with a specific format or template. A reporting entity can customize the columns and add or delete information as needed.
The most commonly used components of a daybook include the following.
Transaction Date
A daybook is a chronological record of bookkeeping entries. Therefore, the first column is always for the transaction date entries.
Reference Number
A reference number for each transaction is recorded in the second column. It makes tracking of bookkeeping entries easier.
Transaction Details
This is a detailed column where all transaction details are recorded. These details may include the classification of accounts, credit or cash identifier, and any other instructions relevant to the transaction for both parties.
Counter Party
In this column, the name of the counterparty is recorded. These are usually supplier names to identify transactions easily.
This column includes the gross or net amount of the transaction. If there are tax or other frequent adjustments, a daybook may contain two columns for gross and net amounts.
Ledger Account Reference
This column can be created to record ledger account references. It makes the classification of raw entries into journal entries easier.
Tax/Charges/Adjustments
This is an additional column that can be used to record additional entries like taxes, charges, premiums, and accounting adjustments before recording the net amount of each transaction.
General Ledger vs. Daybook
A general ledger is not a type of daybook in accounting systems, it is a separate book that contains the master record of all accounts.
A daybook is the collection of raw data or bookkeeping transactions of an entity. It does not specify entries into accounts and only records them by date.
A general ledger is a collection of summarized accounts used by an entity in a bookkeeping system. These accounts are processed from the general journals created from daybooks.
It means a general ledger derives information from a daybook indirectly through journals and adjusted trial balance records.
Advantages of Using a Daybook
The use of a manual daybook is diminishing, however, it offers several benefits to a business.
- It creates a comprehensive record book of a business by recording all transactions.
- It sets the foundation of bookkeeping records like journals, general ledgers, and financial statements.
- A chronological record makes it easier to categorize transactions.
- Managers and auditors can use daybooks to trace accounting errors and also fetch valuable information to create detailed financial reports.
Disadvantages of Using a Daybook
Whether used in the manual or digital format, a daybook comes with some limitations too.
- Recording every transaction in a daybook is a time-consuming activity.
- Transferring and categorization of bookkeeping data from daybooks to general ledgers is a tedious task.
- Tracing and tracking transactions in a bulky record book is a challenging task.
- It’s challenging to achieve accuracy and consistency with manual daybooks.
Related Posts:
- What is the Difference Between an Unadjusted Trial…
- What is Special Journal?
- General Journal Vs Special Journal
- What is Cash Receipt Journal?

- TallyPrime Server
- Developer Reference
- Tally.ERP 9
Purchase of Goods and Services
In your business, you might need to purchase goods or services to fulfill the demands of your customers. You may make a simple cash purchase or purchase on credit. For each purchase transaction, you will need to keep a record of the items you bought, payments made, goods returned, and so on. TallyPrime provides you the facility to perform all such actions and much more, effortlessly. Moreover, you can view reports at any time to know about all the purchases made in your business and compare them against the sales performance.
Generate purchase bills : Record a cash bill or invoice when you make an instant payment to the supplier, using cash or any other mode like a cheque or credit/debit card. If it is a purchase on credit, record a credit purchase by using the supplier ledger. There are also situations when you want your supplier to deliver goods to a specific location that is different from your billing address. Similarly, you can record the transaction in various voucher modes as required like Item Invoice or Accounting Invoice, and so on. TallyPrime handles all your requirement to record the purchase of goods and services with party details , dispatch details, and more.
Record additional charges, discounts, and free items : Your purchase transaction may include additional expenses, such as transportation charges, insurance, and taxes. If your supplier has given discounts on your purchases, you will need to record the discounts in your invoices as well. Similarly, if you have received free items or samples from your supplier, all of these can be recorded and tracked in TallyPrime.
Reports : In TallyPrime, you can track all your purchase of goods and services using different reports, such as Purchase Register, Day Book, and so on. You can view your purchases across different periods, filter the data for specific details, configure the reports to view more purchase-related details, and more.
Record Purchase of Goods or Services
- Press Alt + G (Go To) > Create Voucher > press F9 (Purchase). Alternatively, Gateway of Tally > Vouchers > press F9 (Purchase).
- Press Ctrl + H (Change Mode) to select the required voucher mode ( Item Invoice , in this case).
- Supplier Invoice No. and Date : The invoice number and date should be the same as given in the corresponding sales bill.
- Party A/c name : Select Cash or Ban k for cash purchases. For credit purchases, select the supplier ledger. As in other transactions, you can create the item or ledger on the fly by pressing Alt + C .
- Receipt Details : Enter receipt details like receipt doc no., bill of landing, destination, and so on, if needed.
You may want to maintain specific details about your suppliers, such as address with landmark, alternative contact number, and so on, in the invoices. In such cases, you can create party ledgers with the required details. In the Suppliers field of Party Details screen, select the required ledger.
- Purchase ledger : Select the common purchase ledger created under Purchase Accounts . If you do not see this field on the screen, press F12 (Configure) and set Select common Ledger Account for Item Allocation to Yes . In Accounting Invoice , you can select the purchase ledger under Particulars .
- Provide the stock item or service details. As in other transactions, you can create the item or ledger on the fly by pressing Alt+C . In Item Invoice, select the stock item and enter the Quantity . The Rate will be auto-filled, if available for the stock item. However, you may choose to enter the Rate or Amount . In Accounting Invoice, select the service ledger and enter the Amount .
- Select additional ledgers, like transportation charges, insurance, or discount, if any.
- Press Alt + P (Print) > press Enter on Current .
- Press F12 (Configure) to view the Print Configuration screen and configure the invoice, if needed.
- Press P (Print) to print.
Use Less Paper Space for Printing
- In the Purchase invoice, press Alt + P (Print) > press Enter on Current .
This option will appear only when: The Country selected for the company is India . The company is enabled for GST/VAT/TDS/TCS. The service tax and excise features are disabled.
- Press Esc to return to the Voucher Printing screen. Henceforth, all the purchase invoices you print will continue to have the same print size, until you change the option in F12 (Configure) for invoice printing.
As the above invoice is printed by enabling the option Optimise printing to save paper , all the stock items are appearing on a single page. If this option was set to No , the same information would have been printed on two pages.
Specify Separate Supplier and Consignee Details
- In the Party Details screen of the purchase invoice, press F12 (Configure) > set Provide separate Buyer and Consignee details to Yes . Henceforth, you can add both the consignee and supplier details in every purchase invoice, until you change the option in F12 (Configure) of the invoice.
- Accept the screen. As always, you can press Ctrl+A to save.
When you print the invoice, the consignee’s name and address where the supplier will deliver the consignment or goods will be printed.
Purchase of Items with Discount
In your business, it may be common for you to receive discounts on the purchase of goods and services. You may receive discounts from the supplier on the total item amount or on each item amount separately. Using TallyPrime, you can record all such discounts with or without using the discount ledger. You can also record the item-level discounts as either indirect incomes or rate discounts.
In this section
Purchase with a discount on the total item amount
Purchase with trade discount.
- In the Purchase voucher, after you have selected the stock items, press Enter twice to skip one line. Alternatively, press Enter > Spacebar > and select End of List . This takes you to the next line in the screen where you can now select the discount ledger. In Accounting Invoice , you can simply select the discount ledger after entering the purchase details.
- Select the ledger for discounts created under Indirect Incomes .
- Enter the discount percentage (%) under Rate as a negative number (in minus, for example, -10%). TallyPrime applies the discount to the total item amount and displays the discount Amount against the selected discount ledger. Alternatively, you can enter the Amount .
TallyPrime calculates the invoice total by subtracting the discount from the total amount for the items.
Henceforth, when you select the discount ledger, the discount will be applied to the total amount after including any additional charges, until you change the option in F12 (Configure) of the invoice.
While making a purchase of goods and services, based on your business terms with your supplier, you may get discounts on certain items depending on the quantity or supply. To record a purchase with such trade discounts in TallyPrime, you can show the discount percentage against the quantity of the item. Also, you have the flexibility to enter the discount percentage or amount for each item and book the total discount as indirect income in your purchase invoice.
For example, say you have purchased 100 pcs of Item A from a supplier. The standard buying price for this item is Rs. 100 each. Since this was a bulk purchase of 100 pcs, your supplier offered a discount of 10% on the item rate.
You can record this discount received in two ways:
- You can enter the discount % along with the item. The total item amount will appear as Rs. 9,000 for all 100 pcs of Item A. Here, as the item amount is changed to Rs. 9,000, this amount will be booked as a purchase.
- You can create a discount ledger for 10% as an indirect income and use it to calculate the total discount. That means, your per-item rate will show Rs. 100 and therefore Rs. 10,000 for all 100 pcs. The discount received for 100 pcs of the item will appear as Rs. 1,000, and the total payable at the end of the voucher will appear as Rs. 9,000.
Enter the discount percentage against each item – without using the ledger account
Enter discount percentage and amount on item rates – using the ledger account.
- Enter the remaining details and accept the screen. As always, you can press Ctrl + A to save. The discounted item amount appears against each item.
- In the purchase invoice, press F12 (Configure) > set Provide Cash/Trade Discount to Yes . If you do not see this option, set Show more configurations to Yes . If the option does not appear, press F11 (Features) > enable the statutory options (GST or VAT) applicable to your business.
- After you have entered the Amount of the stock item, in the Discount field, enter the discount percentage that you have received for that item. This automatically calculates the discount and displays the amount in the next field. Alternatively, press Enter to leave the first field blank and enter the discount amount in the next field.
- Enter the remaining details and accept the screen. As always, you can press Ctrl+A to save.
The total discount amount appears against the selected discount ledger. This amount is the sum of the discounts displayed under each stock item.
Purchase Import Invoice Entry – Case Study
In a case of imports, stock items are purchased from a foreign country in another currency, for example, US Dollar. The expenses incurred to bring the stock item to the production unit will be in local currency.
In this scenario, the supplier’s bill amount should not include expenses incurred within the country. However, the item value should include such expenses to arrive at the actual cost.
For example, here is the invoice received from the supplier.
Expenses incurred for procuring the material:
- Custom Duty – Rs.15,000.00
- Clearing and forwarding charges – Rs.20,000.00
- Freight Charges – Rs.10,000.00
Amount payable to the foreign supplier is $3250.00, considering the currency exchange rate of Rs. 73/$. Also, the above expenses need to be appropriated to the item cost.
Let us create the masters and transaction in TallyPrime
Create Groups
- Press Alt+G (Go To) > Create Master > Group . Alternatively, Gateway of Tally > Create > Group .
- Create Import Expenses group under Direct Expenses . Set the option Method to allocate when used in purchase invoice to Appropriate by Value .
- Create Import Expenses Payable group under Current Liabilities . Set the option Method to allocate when used in purchase invoice to Not Applicable .
Create Ledgers
- Press Alt+G (Go To) > Create Master > Ledger . Alternatively, Gateway of Tally > Create > Ledger .
- Under Sundry Creditors group, create 2 ledgers – Foreign Supplier and Freight Forwarders .
- Under Import Expenses group, create 3 ledgers – Customs Duty , Clearing and Forwarding Charges , and Freight Charges – Import .
- Under Import Expenses Payable group, create 3 ledgers – Customs Duty Payable , Clearing and Forwarding Charges Payable , and Freight Charges – Import Payable .
- Under Purchase Accounts group, create Purchase – Import
Create Stock Items
- Press Alt+G (Go To) > Create Master > Stock Item . Alternatively, Gateway of Tally > Create > Stock Item .
- Create Item A and Item B with unit of measurement set to Nos .
Record a purchase invoice
- Accept the invoice. You can press Ctrl+A to accept.
- Press Page Up key to open the invoice in alteration mode.
Check the Stock Summary
Press Alt+G (Go To) > type or select Stock Summary > and press Enter .
Record the vouchers for additional expenses
- Customs duty payment Debit: Custom Duty Payable – 15,000 Credit: Cash – 15,000
- Clearing and forwarding journal voucher Debit: Clearing and Forwarding Charges Payable – 20,000 Credit: Freight Forwarders – 20,000
- Freight payment voucher Debit: Freight Charges – Import Payable – 10,000 Credit: Cash – 10,000
This is how you can record a Purchase Invoice for importing goods in TallyPrime.
Purchase of Free items
In some business cases, when you make a purchase, you might receive a few items for free from the supplier. For example, if you had placed an order for 12 pieces of an item, the supplier might have billed you for only 10 pcs and given the remaining 2 pcs without any additional cost. Alternatively, the supplier might have billed you for all 12 pieces and sent 2 additional pieces of the same item or a different item as samples. TallyPrime provides you the flexibility to record such purchases in two different ways. You can account for free items with transparency and mention the actual quantity and billed quantity of stock items. Also, you can create a purchase voucher without mentioning the rate and amount of the free item but only the quantity.
- Account for free items using Actual and Billed quantities
Account for free items using zero-valued transaction
Accoun t for free items using actual and billed quantities.
- Enter the remaining details and accept the screen. As always, you can press Ctrl + A to save.
The total amount calculated is based on the billed quantity; however, the items supplied to you are based on the actual quantity, which includes the free items.
- Press Alt + G (Go To) > Alter Master > Voucher Type > select Purchase > and press Enter . Alternatively, Gateway of Tally > Alter > Voucher Type > select Purchase > and press Enter .
- Set the option Allow zero-valued transactions to Yes . Henceforth, you can enter stock items without entering the Rate (zero value) in every purchase invoice.
- In the purchase invoice, provide details of the items – Quantity , Rate , and Amount – that you have been billed for.
The invoice generated displays the billed items with the Amount details, along with the total quantity received from the supplier.
TallyPrime also provides you the flexibility to record purchase transactions only for zero-valued items, such as free items or samples received from suppliers.
Purchase of Fixed Assets
- Press Ctrl + H (Change Mode) and select Accounting Invoice .
- In Party A/C name, select the supplier’s ledger.
- Provide Narration , if needed, and accept the screen. As always, you can press Ctrl + A to save.
This value will appear on the Balance Sheet .
You can record the same transaction in voucher mode, as per your business needs.
- Open the purchase voucher screen, and press Ctrl+H (Change Mode) to select the required voucher mode ( As Voucher , in this case).
Reports | Know Your Purchases
For any business, it is very important to get real-time updates on the day-to-day purchase of goods and services to take decisions regarding upcoming movements in trade. This also helps in keeping track of stock availability. Tracking purchases day-wise, month-wise, or for any period provides insights on the overall purchase, returns if any, payment dues, and so on. TallyPrime provides different reports to get purchase-related data to analyze and make informed decisions for the business.
Purchase Register
- Press Alt + G (Go To) > type or select Day Book . Alternatively, Gateway of Tally > Display More Reports > Day Book . By default, this report displays all the transactions as of the Current Date displayed on the Gateway of Tally screen.
- Press F2 (Date) to change the date.
This report lists all the purchase transactions recorded on the selected date. For more information, refer to the topic Day Book .
- Press Alt + G (Go To) > type or select Purchase Register . Alternatively, Gateway of Tally > Display More Reports > Account Books > Purchase Register .
View Edit Log for Purchases
You may be making changes to your purchase voucher for various reasons. You may have ordered some quantity of a product and then you may want to change for which you need to change the purchase voucher recorded for your supplier. Similarly, you may record a purchase order and then you may need to cancel it because your supplier cannot supply the product. To make such changes, you will be performing an activity in the voucher that would lead to the creation of an Edit Log, if you are using TallyPrime Edit Log or TallyPrime Release 2.1 and its successors.
To know how to view Edit Log, refer to View Edit Log for Transactions section in the Accounting Entry in TallyPrime topic.
Related Topics
- Purchase Process in TallyPrime
- How to Record Debit Note for Purchase Returns and…
- How to Manage Buying and Selling Prices in TallyPrime
- How to Record Purchase Order and Receipt in TallyPrime
- How to Record Sales of Goods and Services in TallyPrime
Post a Comment Cancel reply
Save my name, email, and website in this browser for the next time I comment.

Please wait while you are redirected to the right page...
Forgot ID/Password?
Reset password.
IMAGES
VIDEO
COMMENTS
To view the Day Book. 1. Go to Gateway of Tally > Display > Daybook . The Day Book will appear as shown below: 2. Click F2: Period to change the period for which the Day Book is displayed. 3. Click F4: Change Vouch to view Day Book for a particular voucher type. 4.
The Day Book will display as shown below: Click F2: Period to change the period for which the Day Book is displayed. To view Day Book for a particular voucher type, you can press F4: Chg Vch button from the button bar Select the required Voucher Type to display. The screen is displayed as shown below: To view the Post-dated Transactions report ...
5. Using the Day Book with Journal Vouchers: The Day Book offers functionalities related to journal vouchers: 1. Filtering: You can filter the Day Book report to display only journal vouchers by using the "Type of Voucher entries" option in the report configuration. This allows you to focus solely on adjustment entries for analysis. Adding ...
To view the Day Book, Go to Gateway of Tally > Display > Daybook. Press F2: Period on the button bar or press the key Alt+F2. Specify the required period. The Day Book for a specified period will display as shown : To view Day Book for a particular voucher type, you can press F4: Chg Vch button from the button bar.
Step 1: Open an existing company in which you have number of records. Step 2: If you want to view and print voucher wise reports from day book in Tally ERP 9 then first active the day book in your active company. To active or view the day book go to the Gateway of Tally (GOT) > Dispaly > Daybook. Press Alt+F2 Tally shortcut key to set or change ...
To view the Day Book. 1. Go to Gateway of Tally > Display More Reports > Daybook . The Day Book will appear as shown below: 419. 2. Click Alt+F2: Period to change the period for which the Day Book is displayed. 3. Click F4: Change Vouch to view Day Book for a particular voucher type. 420. 4. Select the required Voucher Type to display. 5.
Day Book report in Tally. The Day Book lists all transactions made in a particular day and by default displays the last voucher entry date of a regular voucher. It could also be set up to list all the transactions made over a certain period. Transactions include all financial vouchers, reversing and memorandum journals as well as inventory voucher.
Day Book in TallyPrime. Day Book in TallyPrime is an account book in which a day's entries or transactions are captured. TallyPrime stays true to the traditional Day Book used by businesses for manual bookkeeping while bringing in a host of powerful features like viewing the profitability of sales, inserting a voucher right from the report into the books, viewing only a particular type of ...
If you are viewing the Day Book for a selected voucher type, press F7 (Show Profit) to see the Gross Profit against the Transaction Value and Cost. You can use F7 (Hide Profit) to hide the profit-related details. View Columnar report. In Day Book, you can choose to display details related to each transaction in a columnar view.
To view the Day Book. 1. Go to Gateway of Tally > Display > Daybook . The Day Book will appear as shown below: 2. Click F2: Period to change the period for which the Day Book is displayed. 3. Click F4: Change Vouch to view Day Book for a particular voucher type. 4. Select the required Voucher Type to display. 5.
Here you might find an option to include memorandum vouchers in the Day Book report. 2. Alternative Approach: If the configuration option isn't readily available, you can always access memorandum vouchers through the dedicated Memorandum Register: 1. Gateway of Tally: Open the Gateway (usually by pressing Alt+F12). 2. Display:
There are several ways to access the Day Book: Gateway of Tally > Day Book (Alt+G) Go To (Alt+G) > type or select Day Book > Enter. Reports > Accounting Reports > Day Book. 2. Navigation and Filtering: By default, the Day Book shows transactions for the current date. You can change the date range using the calendar icon near the top.
DAY BOOK. To view Day Book. Go to Gateway of Tally > Display> Daybook. The Day Book lists all transactions made over a particular day and by default displays the last voucher entry date of a regular voucher. It could also be set up to list all the transactions made over a period. Press F2: Period on the button bar or press the keys Alt+F2.
2. Click Alt+F2: Period to change the period for which the Day Book is displayed. 3. Click F4: Change Vouch to view Day Book for a particular voucher type. 4. Select the required Voucher Type to display. 5. Click Ctrl+H : Change View to view the Post-dated Bank Transactions report for the specified period.
In Tally.ERP 9, the Day Book is by default displayed for the current set (as for the final date of voucher entry). However, you may specify the required term, as per your requirements. In view the Day Book, Go to Gateway of Tally > Display > Journal. Force F2: Period on the button hindrance or press the important Alt+F2; Specify the required period
It also helps in providing more accurate financial reports. View Day Book is useful for users to manage their accounts and track their financial performance. Benefits of Recording Transactions in the View Day Book. The view includes the voucher information, party ledger details, ledger account balances, stock details, and other pertinent details.
2. Day Book (Optional): Depending on your TallyPrime configuration, you might be able to see memo vouchers listed in the Day Book report alongside regular transactions. 6. In Conclusion: Memorandum vouchers in TallyPrime are a valuable tool for recording internal transactions and maintaining a comprehensive record of your business activities.
CTRL+A: Save the entry. CTRL+V: Move between invoice and voucher mode. CTRL+N: Turn up the Calculator. CTRL+Alt+C: Data Copy from Tally. CTRL+V: Paste the Copied date in Taly ERP 9. Hence, you can use these power shortcuts to help save time and enhance the usage experience in Tally prime. Get in touch if you need help.
In this Hindi tutorial of TallyPrime, you will learn about Day Book. Here you will learn how to find entries in Tally, what the range option is in Tally Prim...
To view the Day Book. 1. Go to Gateway of Tally > Display > Daybook. The Day Book will appear as shown below: 2. Click F2: Period to change the period for which the Day Book is displayed. 3. Click F4: Change Vouch to view Day Book for a particular voucher type. 4. Select the required Voucher Type to display. The screen appears as shown below:
Print Cheque after saving voucher. Contra Vouchers in Day Book. To view entered Contra vouchers, you can go to Day Book. Day Book is a report to view transactions recorded in the Day. Press Alt+G (Go To) > type or select Day Book > and press Enter. Alternatively, Gateway of Tally > Day Book. If you want to change the date, press F2 (Date).
A daybook or the book of original entries is a book used by an entity to record initial accounting transactions as and when they occur. These transactions are recorded without categorization and any specific account types. These transactions are recorded chronologically to record the date and amount only. The recorded transactions on a daybook ...
Alternatively, Gateway of Tally > Display More Reports > Day Book. By default, this report displays all the transactions as of the Current Date displayed on the Gateway of Tally screen. To view the purchases recorded on any given day: Press F2 (Date) to change the date. Press F4 (Voucher Type) > select Purchase. This report lists all the ...