- Slidesgo School
- Google Slides Tutorials

How to Add a Video in Google Slides

In this new Slidesgo School tutorial, you’ll learn how to add a video to your presentations , be it from YouTube or from your own computer . You’ll also find out what format options Google Slides has to offer regarding videos.
How to Embed a YouTube Video
How to insert a video, how to cut and edit a video.
- Open your presentation in Google Slides and select the slide where you want to add the video.
- Click Insert → Video. A new window will open.
- On the first tab, Search, you can look for the YouTube video you want to add to the presentation. Once located, click Select to add it to the slide. You can now adjust its size to your liking.
- If you have the URL of the video, click the By URL tab and paste it in the text field. You’ll see a preview of the video. If it’s correct, click Select to add the video to the slide. Place it whenever you like and adapt it according to your needs.
- Please note that you can’t crop a video in Google Slides, so you’ll need to play around with the rest of the graphic elements to have a coherent design.
- To insert a video that isn’t from YouTube, it must be stored in your Google Drive account.
- Access Google Drive.
- Drag the video to Google Drive or click New → Upload files. Locate the file in your computer and upload it to Google Drive.
- Click Insert → Video. A new window will open. On the Google Drive tab you’ll see all your videos stored in or shared with your Google Drive account. Choose the video you want to upload and click Select. The video will be added to the slide, and now you can adjust it to your liking.
- Select the video that you’ve added to the presentation.
- Go to the toolbar and click Format options. As an alternative, right-click the video → Format options. You can also click Format → Format options. A new panel will open on the right side of the screen.
- Click the Video playback drop-down arrow to see the options. You can set the start and the end time, trimming the video accordingly. There are two boxes below. Check the first one to enable autoplay when presenting, and the second one to mute the audio.
- The rest of the tabs on the Format options panel contain settings to adjust the size and position of the video, and you can also add a drop shadow to it.
- Within the Size and rotation tab, you can modify the width and height values for the video. There’s also an option to lock the aspect ratio in case you want to keep the video proportions.
- Within the Position tab, you can set exactly where you want to place the video, taking the top-left corner or the center of the video as reference. To move the video, you’ll need to modify the values of the X and Y axes.
- The last tab, Drop shadow, contains a box, which you can check to add a drop shadow. If you click the drop-down arrow, you’ll find options to modify the color and the behavior of the shadow (angle, transparency, distance and blur).
Do you find this article useful?
Related tutorials.

How to print PowerPoint notes
Crafting an impactful PowerPoint slideshow and delivering a captivating presentation are distinct skills. The first focuses on designing appealing visuals to convey a clear message, while the second involves employing effective presentation techniques to ensure the audience grasps the idea. The content of this article will help you with the latter part of this process, guiding future presenters on how to print PowerPoint with speaker notes to enhance your presentations success and effectiveness.

Discover Our Online Presentation Software for Free
We have great news for you today! If you’ve been a Slidesgo fan for years (or months, or weeks, or days, or mere hours, we welcome everyone!), you’ll probably know for now that our templates are available mostly in two formats: for use in Google Slides and PowerPoint.Google Slides is a free tool, since you only need a Google account in order to use it. PowerPoint, on the other hand, is part of the Microsoft Office suite, so it’s not a free program, but that didn’t stop it from being one of the most popular options in the world!What if we...

Webinar: Presentation Audit
With more than 15,000 templates released on Slidesgo and a user base composed of millions of people, we estimate that the total number of presentations created adds up to… um, a lot! Our team of professional designers work very hard to provide you with editable slides so that the only thing you need to do is, well, customize the elements to your liking. Starting from any given template, the results may vary a lot depending on the person who edited the contents.Have you ever wondered “Is my presentation good enough?” and wished that an expert on presentations looked at your template...

How to Change Slides Orientation in Google Slides
A change of perspective is always good! Do you want your public to look at your slides in a new way? Changing slides orientation will do the work. In this tutorial you’re going to learn how to go from horizontal slides, to vertical ones (and vice versa!).
- Help Center
- Google Docs Editors
- Privacy Policy
- Terms of Service
- Submit feedback
- Google Slides
Use slides recording in Google Slides
You can only record your presentations in Google Chrome Browsers. However, you can view, share, and delete recordings from any browser.
Record a slideshow
- There's a 30-minute limit to every recording.
- Information about Slides recordings isn't available in Revision History.
- If you exceed your Drive Storage quota, you can’t create more recordings.
- You must have edit access to the slides in order to create a new recording.
- To open your presentation, go to Google Slides .
- To start over, pause and click Re-record .
- To save your recording, pause and click Save to Drive .
Find your recording
- On your computer, go to Google Slides .
- Open the presentation where you created the recording.
- Select your recording from the list that appears.
Tip: Recordings are saved into a My Drive folder called Slides recordings.
Share your recording
Recordings can be shared to collaborators on the document immediately after creation.
- To share your recording, click the title of the recording from the list.
- The video in the full-screen player layout appears.
- Select the user, audience, or URL visibility rules.
Tip : Alternatively, you can share a recording like you would share any file in Drive. Learn how to share files from Google Drive .
Remove a recording
- If you created the recording, you also have the option to move the recording file in Drive to Trash. If the recording in Drive isn't moved to Trash, the recording stays visible in Drive to anyone with access.
- If you didn't create the recording, it's still visible in the creator's Drive and anyone to with access.
Use external device
You can use a microphone or camera that isn't built into your computer, such as a USB-based external camera or wireless earbuds.
To get started, set up your camera or microphone device like you would normally use it with your computer.
- Open your presentation.
- When the recording studio opens, at the bottom toolbar, click Settings .
- If your external microphone or camera is available, it's listed in the dropdown of devices available to use while recording.
Troubleshoot camera & microphone
When you create a Slides recording for the first time, it asks for a series of permissions to use the camera and microphone of your computer.
Tip: Camera and microphone access isn't required to start recording.
If you decide not to grant access to your camera or microphone, you can change it later.
- On your computer, open Chrome.
- chrome://settings/content/microphone
- chrome://settings/content/camera
- Adjust the settings to grant access.
Need more help?
Try these next steps:.
Using Google products, like Google Docs, at work or school? Try powerful tips, tutorials, and templates. Learn to work on Office files without installing Office, create dynamic project plans and team calendars, auto-organize your inbox, and more.
TechRepublic
Account information.

Share with Your Friends
How to Record a Video Presentation With Google Slides
Your email has been sent

Google Slides now lets you record a presentation with inset video from your webcam. Each recording may be a maximum of 30 minutes long. No longer do you need to turn to a third-party tool or web meeting app, such as Google Meet , to record a presentation. Instead, you can start and finish the task with nothing more than Google Slides on a laptop.
As of March 2024, slide recordings may be made by customers who use Google Workspace Business Standard or Plus; Enterprise Starter, Essentials, Essentials Plus, Standard or Plus; and Education Plus editions.
How to make a basic slide recording in Google Slides
To create a slide recording, you’ll need to use Google Chrome on a computer that has a camera and microphone.
- Go to Google Slides and open your presentation.
- Select the Rec button in the upper right area, then select the Record new video button ( Figure A ).
The system will switch to the screen recording interface, with recording controls displayed below your slides. By default, the system will display your inset (picture-in-picture) video in medium size in the lower right corner of a slide, since this portion of a slide is often empty.

- Optionally, before you start recording, you might adjust three settings:

- Modify the size of the inset video frame. Select the size icon, found to the right of the video inset location icon, then choose either a small, medium or large video frame size.
- Open speaker notes with the button found to the immediate left of the back slide (<) icon. This will display speaker notes for your reference while recording. (Ideally, you would not need to refer to speaker notes, so that you could instead look directly at the camera as you record.)
- When you are ready to record, select the large red button at the bottom of the screen.
- If prompted, you may need to allow access ( Figure C ) to the tab, along with the camera and microphone. For example, when recording on a Chromebook, you may be prompted to “Allow docs.google.com to see this tab?” and “Also allow tab audio.” Select Allow, if prompted.

In a few cases, you may need to visit the following links in Chrome to adjust permissions for:
- Camera: chrome://settings/content/camera.
- Microphone: chrome://settings/content/microphone.
- A brief countdown should display (i.e., 3, 2, 1), then your recording will begin. Record your video, advancing your slides as desired.
- To pause recording, press the large red button at the bottom of the screen.
- Once paused, you may select from two options ( Figure D ):

After you select Save to Drive, wait a bit until the system indicates the file has been saved. If you leave or close the tab too soon, you may lose your recording.
How to select inset video shapes and sizes
On any slide, you may use the Insert | Speaker spotlight option ( Figure E ), then select a shaped video frame. This inserts a frame where the speaker video will display on that slide. You may reposition or resize the frame: Select the shape, and then drag-and-drop it to move it to a different place on your slide, or select a corner and drag it to resize it.

When you insert a speaker spotlight shape, that supplants the position and size you might have selected on a basic recording. In other words, the speaker’s video will display in one of the corners or the center, and in the small, medium or large shape chosen with the settings — unless you’ve inserted a speaker spotlight shape on a page ( Figure F ). Use the speaker spotlight option to convey the most polished professional effect, since it allows precise control over the shape, size and location of a video frame.

How to play, share and manage slide recordings
You may access slide recordings within Google Slides on a computer. However, unlike recording, which requires you to use Google Chrome, you may access and play existing recordings within Google Slides on a variety of modern browsers. For example, the following steps all work when you use Google Slides within either Google Chrome or Apple’s Safari browser.
To access recordings associated with a Google Slides presentation, follow these steps.
- Select the Rec button in the upper right area. The recordings you’ve made of the presentations will display. Importantly, the system shows both the date and duration of each recording.
- To view, share or download a recording, click anywhere on the playback icon or title of the recording ( Figure G ). It should open in a new tab. Within this tab, you might:
- Select the Play icon in the center of the video image to play the recording.
- Select the Share button in the upper right corner of the screen to modify access settings and give other people access to the file.
- Select the Download icon in the down arrow above a tray icon in the upper right area of the screen to download the file.

- Select the three dot menu to the right of a listed recording to:
- Rename a file something other than the default recording title.
- Remove a previously made recording you no longer need.
- Copy link and obtain the Google Drive URL for the recorded file.
All Google Slides recordings are stored in a Slides recordings folder on Google Drive. The recordings are saved as .webm files, which is a widely supported web video format. You may easily open and play .webm files on both Apple and Android mobile phones. Any recordings you make using Google Slides should be easy to view on almost any device.
Does the ability to record a presentation within Google Slides streamline your workflow? What sorts of video presentations will you create with this new capability? Mention or message me on X ( @awolber ) to let me know how you use screen recording within Google Slides.
Subscribe to the Google Weekly Newsletter
Learn how to get the most out of Google Docs, Google Cloud Platform, Google Apps, Chrome OS, and all the other Google products used in business environments. Delivered Fridays
- How to share video with Google Sites
- How to present Google Slides in Google Meet
- Prezi announces Google Slides integration
- Google Meet: A cheat sheet to the app and platform features
- Google Meet: 3 presenter controls for smoother presentations
- Best software for businesses and end users

Create a TechRepublic Account
Get the web's best business technology news, tutorials, reviews, trends, and analysis—in your inbox. Let's start with the basics.
* - indicates required fields
Sign in to TechRepublic
Lost your password? Request a new password
Reset Password
Please enter your email adress. You will receive an email message with instructions on how to reset your password.
Check your email for a password reset link. If you didn't receive an email don't forgot to check your spam folder, otherwise contact support .
Welcome. Tell us a little bit about you.
This will help us provide you with customized content.
Want to receive more TechRepublic news?
You're all set.
Thanks for signing up! Keep an eye out for a confirmation email from our team. To ensure any newsletters you subscribed to hit your inbox, make sure to add [email protected] to your contacts list.
How to Add a Video to Google Slides: A Step-by-Step Guide
Adding a video to Google Slides is a breeze once you know the right steps. Simply go to the slide where you want the video, click on ‘Insert’ from the menu, select ‘Video’ and then choose where you want to upload your video from. You can search YouTube, use a URL, or upload a video from your Google Drive. After you’ve selected your video, click ‘Select’ and adjust the video on your slide to your liking. And voilà! Your presentation just leveled up with a cool video.
Step by Step Tutorial: How to Add a Video to Google Slides
Before diving into the steps, let’s clarify what we’re aiming for. By the end of this tutorial, you should be able to insert any video into your Google Slides presentation, making it more engaging and interactive.
Step 1: Open your Google Slides presentation
Open the Google Slides presentation where you want to add the video. This is your starting point. Make sure you’re logged into your Google account and have the presentation open.
Step 2: Go to the slide where you want the video
Navigate to the specific slide where you want the video to appear. Think of this like setting the stage for your video’s grand entrance.
Step 3: Click on ‘Insert’ in the menu
Click on ‘Insert’ from the top menu in Google Slides. This is where the magic starts to happen. ‘Insert’ is your gateway to adding all sorts of content to your slides.
Step 4: Select ‘Video’
Choose the ‘Video’ option from the dropdown menu. This will open a new window where you can choose your video source.
Step 5: Choose your video source
Select from where you want to add the video – YouTube, by URL, or Google Drive. Each option has its benefits, so choose the one that best fits your needs.
Step 6: Select your video
Search for a YouTube video, paste a URL, or choose a video from your Google Drive and click ‘Select’. This is the moment where you pick the star of your slide. Make sure it’s relevant and adds value to your presentation.
Step 7: Adjust the video on your slide
Resize and move the video around on your slide to fit your design. You’re the director here – position your video for the best visual impact.
Once you complete these steps, your video will be embedded in your slide, ready to play during your presentation. It’s a simple process that can make your slides more dynamic and engaging.
Tips for Adding a Video to Google Slides
- Check the video’s permissions before adding it to ensure your audience can view it.
- Use short, relevant videos to keep your audience’s attention.
- Preview the video in presentation mode to make sure it plays correctly.
- Consider the video’s volume and whether it will be appropriate for your presentation setting.
- Remember that you’ll need an internet connection to play YouTube videos during your presentation.
Frequently Asked Questions
Can i add a video to google slides from my computer.
Yes, you can upload a video from your computer to your Google Drive and then insert it into your Google Slides presentation.
Will the video play automatically when I reach the slide?
You can set the video to play automatically by clicking on it and selecting ‘Format options’, then toggling ‘Auto-play when presenting’.
Can I trim the video in Google Slides?
Google Slides doesn’t currently offer a feature to trim videos, but you can set the start and end times under ‘Format options’.
What video file types can I add to Google Slides?
Google Slides supports most video file types, including .mp4 and .mov, as long as they are uploaded to Google Drive.
Can the audience hear the audio from the video?
Yes, the audio will play as long as your computer’s sound is on and the volume is up.
- Open your Google Slides presentation.
- Go to the slide where you want the video.
- Click on ‘Insert’ in the menu.
- Select ‘Video’.
- Choose your video source.
- Select your video.
- Adjust the video on your slide.
Adding a video to your Google Slides presentation can truly transform it from a static slideshow to a dynamic, multimedia experience. It’s a fantastic way to illustrate points, provide examples, or simply break up the monotony of text and images. Whether you’re looking to add a quick clip or a longer, more informative video, the process is straightforward and user-friendly. Just remember to keep your audience in mind when selecting videos; the content should always be relevant and add value to your presentation.
With the rise of virtual presentations and remote work, mastering Google Slides and its video capabilities has never been more important. It’s a skill that will undoubtedly enhance your presentations and keep your audience engaged. And who knows, your video-enhanced slides might just be the thing that makes your presentation stand out in a sea of bullet points and pie charts.
So, why not give it a try? Follow the steps above, and you’ll be embedding videos into your Google Slides like a pro in no time. And remember, practice makes perfect. The more you work with multimedia in your presentations, the more seamless and effective your incorporation of videos will become. Happy presenting!

Matthew Burleigh has been writing tech tutorials since 2008. His writing has appeared on dozens of different websites and been read over 50 million times.
After receiving his Bachelor’s and Master’s degrees in Computer Science he spent several years working in IT management for small businesses. However, he now works full time writing content online and creating websites.
His main writing topics include iPhones, Microsoft Office, Google Apps, Android, and Photoshop, but he has also written about many other tech topics as well.
Read his full bio here.
Share this:
Join our free newsletter.
Featured guides and deals
You may opt out at any time. Read our Privacy Policy
Related posts:
- Can I Convert My Powerpoint to Google Slides?
- How to Set Time for Slides in Powerpoint
- How to Change the Font on All Slides in Google Slides
- How to Delete Multiple Slides in Google Slides
- How to Drag Slides From One PowerPoint to Another: A Step-by-Step Guide
- How to Add Page Numbers in Powerpoint 2010
- How to Add a Border to a Picture in Google Slides
- How to Save a Slide from Google Slides as a Picture
- How to Add Videos to Google Docs: Step-by-Step Tutorial
- How to Unhide a Slide in Powerpoint 2013
- How to Add Bullet Points in Google Slides
- How to Make a New Slide in Google Docs: A Step-by-Step Guide
- How to Insert a Google Slides Page Number
- How to Insert Text Box in Google Docs
- How to Insert Slide Number PowerPoint: The Ultimate 2024 Guide
- How to Delete a Slide in Powerpoint 2010
- How to Rotate a Slide in PowerPoint: A Step-by-Step Guide
- How to Show Speaker Notes in Google Slides
- How to Do Vertical & Horizontal Slides in PowerPoint: A Step-by-Step Guide
- How to Create a PowerPoint Presentation Step by Step: 2024 Guide
Home Blog Google Slides Tutorials How to Add a Video to Google Slides
How to Add a Video to Google Slides

Embedding videos in presentations effectively summarize lengthy and complex topics in minutes. Popular presentation platforms like PowerPoint provide video embedding options to help cater to this essential need, and Google Slides is no exception.
How to Add a YouTube Video to Google Slides
YouTube is the most frequently used video streaming platform for embedding videos in presentations. There are two different methods by which you can embed a YouTube video in a Google Slides Theme .
To insert a Video in Google Slides, go to Insert > Video.

Search and Add a Video from YouTube
A dialog box will appear with three options to embed a video. The first option enables searching and adding videos directly from YouTube. Add the video title or relevant keywords, click the video thumbnail, followed by Select to add it to your current slide.

Insert Video from YouTube via URL
The URL tab is the second method to embed a YouTube video in Google Slides. While the Search tab also enables adding videos via URL, it is mainly meant to search and add relevant videos from YouTube, whereas the URL tab enables adding a video from a specific URL.

Once the YouTube video is added to Google Slides, you can adjust the video playback settings from the right sidebar to automatically trigger the video to play on click or allow it to be played manually.

Other customization options include the ability to mute audio, start the video from a specific point (e.g., after 10 seconds), add the size, rotation, and position of the video, and to a add drop shadow effect.

To preview the video, run it as a slideshow or click on it directly from within the slide deck to play and preview it.

How to Add a Video to Google Slides from Google Drive
If you need to add a video to your slides that is not on YouTube, it can be added via Google Drive. If there are multiple videos, you might want to place them in a single folder according to a naming convention for ease of identification. To add a video from Google Drive to Google Slides, open your Google Drive account, go to a folder or directly select New > File Upload .

Once the video file is uploaded, make sure you remove the restrictions, especially if you need to share the presentation. To do this, right-click on the uploaded video and select Share .

Go to the slide in Google Slides where you intend to add the Google Drive video and select Insert > Video .

Remove restrictions and make the video viewable via the sharing link.

Go to the Google Drive tab , click the video thumbnail, and select insert the video.

Once the video is added, you can adjust the playback options, size, rotation, position, and drop shadow. Videos embedded from Google Drive can take a while before they become available for playback. The rendering time would depend upon the size and length of the video.

Troubleshooting
Fix error 150 in google slides.
To tackle the error “Unable to play video: Error 150” with YouTube videos in Google Slides, start by checking the video’s privacy settings on YouTube to ensure it’s not set to private or has restrictions that could block playback. If the video is accessible, the next step is to clear your browser’s cache and cookies, as accumulated data might be causing playback issues. Verify your internet connection’s stability and speed, as these factors are crucial for seamless video streaming. If the problem persists, try re-embedding the YouTube video link into your Google Slides presentation. Occasionally, reinserting the video link can resolve the underlying glitch responsible for the error, ensuring smooth video playback in your presentation.
Conclusions
In this article, we have explained how to insert videos in Google Slides, but if you use PowerPoint, we recommend reading our article on how to embed a YouTube video in PowerPoint to make your presentations more engaging. Google Slides allows the embedding of videos from YouTube and Google Drive. However, copyright-protected videos cannot be embedded from YouTube, and the rendering time for a video uploaded to Google Drive can be significantly high. If you’re uploading videos to Google Drive, make sure you upload them in advance to allow enough time for them to be ready for playback by the time you begin your presentation.

Like this article? Please share
Google Slides, Presentation Ideas, Presentation Tips Filed under Google Slides Tutorials
Related Articles

Filed under Google Slides Tutorials • April 19th, 2024
How to Find Trash on Google Slides
Don’t worry if you accidently delete a presentation file. Learn how to find trash on Google Slides with this guide.

Filed under Google Slides Tutorials , PowerPoint Tutorials • April 17th, 2024
Google Slides vs. PowerPoint: A Detailed Comparison
Contrast and pick with presentation software suits your best. Check our guide on how the Google Slides vs. PowerPoint eternal debate.

Filed under Business • April 10th, 2024
Discovering Coaching Presentation Tools
Discover the best PPT templates to use as coaching presentation tools with this article. Tools explained + examples.
Leave a Reply
Create shareable video presentations in Google Slides
What’s changing.

Who’s impacted
Why it’s important , additional details , getting started .
- Admins : There is no admin control for this feature.
- End users : Visit the Help Center to learn more about recording a slideshow, finding your recording, sharing your recording, removing a recording and more . Please note that recording-creation is only accessible using Google Chrome on your Desktop. Recordings cannot be created on mobile devices and are not accessible from the Slides mobile app. However, you can find and view your recording using the Drive mobile app.
Rollout pace
- Rapid Release domains : Extended rollout (potentially longer than 15 days for feature visibility) starting on January 2, 2024
- Scheduled Release domains: Gradual rollout (up to 15 days for feature visibility) starting on February 1, 2024
Availability
- Available to Google Workspace Business Standard, Business Plus, Enterprise Starter, Enterprise Essentials, Enterprise Essentials Plus, Enterprise Standard, Enterprise Plus and Education Plus
Resources
- Google Help: Use slides recording in Google Slides
Filter by product
- Accessibility
- Admin console
- Cloud Search
- Directory Sync
- Drive for desktop
- Education Edition
- G Suite for Education
- G Suite for Government
- Google Apps Script
- Google Calendar
- Google Chat
- Google Classroom
- Google Cloud Directory Sync
- Google Docs
- Google Drawings
- Google Drive
- Google Forms
- Google Hangouts
- Google Keep
- Google Maps
- Google Meet
- Google Meet Hard
- Google Meet Hardware
- Google Photos
- Google Sheets
- Google Sites
- Google Slides
- Google Tasks
- Google Vault
- Google Voice
- Google Workspace
- Google Workspace Add-ons
- Google Workspace for Education
- Google Workspace Marketplace
- Google Workspace Migrate
- Marketplace
- Microsoft Exchange
- Microsoft Outlook
- Premier Edition
- Rapid Release
- Rapid Releases
- Scheduled Release
- Security and Compliance
- Weekly Recap
- What's New
Filter by date
Subscribe by feed, subscribe by email, localized google workspace updates, useful links, join the official community for google workspace administrators.
In the Google Cloud Community, connect with Googlers and other Google Workspace admins like yourself. Participate in product discussions, check out the Community Articles, and learn tips and tricks that will make your work and life easier. Be the first to know what's happening with Google Workspace.
______________
Learn about more Google Workspace launches
On the “What’s new in Google Workspace?” Help Center page, learn about new products and features launching in Google Workspace, including smaller changes that haven’t been announced on the Google Workspace Updates blog.
- PRO Courses Guides New Tech Help Pro Expert Videos About wikiHow Pro Upgrade Sign In
- EXPLORE Tech Help Pro About Us Random Article Quizzes Request a New Article Community Dashboard This Or That Game Popular Categories Arts and Entertainment Artwork Books Movies Computers and Electronics Computers Phone Skills Technology Hacks Health Men's Health Mental Health Women's Health Relationships Dating Love Relationship Issues Hobbies and Crafts Crafts Drawing Games Education & Communication Communication Skills Personal Development Studying Personal Care and Style Fashion Hair Care Personal Hygiene Youth Personal Care School Stuff Dating All Categories Arts and Entertainment Finance and Business Home and Garden Relationship Quizzes Cars & Other Vehicles Food and Entertaining Personal Care and Style Sports and Fitness Computers and Electronics Health Pets and Animals Travel Education & Communication Hobbies and Crafts Philosophy and Religion Work World Family Life Holidays and Traditions Relationships Youth
- Browse Articles
- Learn Something New
- Quizzes Hot
- This Or That Game New
- Train Your Brain
- Explore More
- Support wikiHow
- About wikiHow
- Log in / Sign up
- Computers and Electronics
- Website Application Instructions
- Google Applications
7 Easy Steps to Add Videos to Google Slides
Last Updated: January 2, 2024 Fact Checked
This article was co-authored by wikiHow staff writer, Rain Kengly . Rain Kengly is a wikiHow Technology Writer. As a storytelling enthusiast with a penchant for technology, they hope to create long-lasting connections with readers from all around the globe. Rain graduated from San Francisco State University with a BA in Cinema. This article has been fact-checked, ensuring the accuracy of any cited facts and confirming the authority of its sources. This article has been viewed 66,504 times. Learn more...
If you're using Google Slides on a computer browser, you can easily insert videos using the "Insert" menu. You can put videos from YouTube, Google Drive, or a non-YouTube video from a different website. Here's how to add videos to Google Slides on your desktop computer.
Things You Should Know
- To add videos to a Google Slides presentation, click "Insert" → "Video" → copy and paste a link or search YouTube.
- You can also click "Google Drive" to browse and insert a video from your Drive.
- While you can't add videos on the Google Slides app, you can still insert images and photos.

- If you aren't already logged in, click Sign in to do so now or create an account .
- This feature isn't available on the mobile version of Google Slides. However, you can still add photos on the app.

- You can also search for YouTube videos directly in the field; just enter some keywords. [1] X Research source
- Alternatively, click Google Drive to insert a video file saved to your Drive . Select a file, and then click Insert .

- If you want a specific part of the video to play, enter the Start and End time.
- Click and drag the video to move it to a different location.
- Click and drag a corner to resize the video.
Community Q&A
You Might Also Like

- ↑ https://support.google.com/docs/answer/97447?hl=en&co=GENIE.Platform%3DDesktop&oco=1
About This Article

- Send fan mail to authors
Is this article up to date?

Featured Articles

Trending Articles

Watch Articles

- Terms of Use
- Privacy Policy
- Do Not Sell or Share My Info
- Not Selling Info
Keep up with tech in just 5 minutes a week!
- 9 Free Online Earth Day Games for Kids
- The Best Gadgets for The Beach or Pool
How to Embed Video in Google Slides
Insert a video from YouTube or your computer
:max_bytes(150000):strip_icc():format(webp)/Lifewire_Jerri-Ledford_webOG-2e65eb56f97e413284c155dade245eeb.jpg "video presentation on google slides")
- Western Kentucky University
- Gulf Coast Community College
What to Know
- Click a slide, select Insert > Video , and select the location of the video, Choose Google Drive , By URL , or use the YouTube search bar.
- Then, choose a video and click Select to insert.
- Right-click an embedded video and select Format options to edit the size, placement, and playback options.
Adding a video to the web version of Google Slides is an effective visual way to share data and information. Here's how to add a video to Google Slides from Google Drive , YouTube , and outside sources, like your computer hard drive.
How to Embed a YouTube Video in Google Slides
YouTube is the best known place to find all manner of videos. You may even have a YouTube channel where you upload your own videos. Because YouTube is a Google company, adding videos to your slides from the service is pretty straight forward.
In your presentation you may have a place defined for a video or you may need to create one. When you're ready, click the slide where you want the video and then click Insert > Video .
The Insert Video dialog box appears and by default, it options to a YouTube search. Type your search term and click the magnifying glass to search for the video you want to add.
Alternatively, if you know the URL for the YouTube video you want to add, you can select By URL and then paste the URL into the provided text box.
Once you've located the video that you want to embed in Google Slides, click Select and the video will be inserted into your slide. You can then click and drag it into the desired position.
Once you have you video in the slide, you can use the blue bounding box to resize the video frame, or if you need to clip the video or change other options, you can right-click on the video and select Format options .
The Format options toolbar will open on the right side of the page. There you can change your Start at and End at times for the video. If you place a checkmark in the box next to Autoplay when presenting the video will automatically play when the slide opens during a presentation.
You can also select Mute audio to have the audio from the slide automatically muted when it plays.
In addition to these options, you also have options for Size & Rotation , Position , and Drop shadow . Use these options to adjust the appearance of the video on your slide.
How to Add a Video to Slides from Google Drive
Adding videos to your Google Slides presentation from Google Drive is only slightly different from adding a YouTube Video. It starts the same, but the difference is in where you find the video.
Click the slide where you want the video and then click Insert > Video .
In the Insert video dialog box that opens, select Google Drive .
Navigate to the location of the desired video in Google Drive. You have options for:
- My Drive : This is where you'll find files that you've created in or uploaded to Google Drive.
- Shared drives : This option is for drives that are shared with other people. For example, if you have a family shared drive that a relative uploaded a video to, you'll find it here.
- Shared with me : While it might seem like this is the same a shared drive, it's not. This is where you'll find files that belong to someone else who has shared them with you (the file only, not the whole drive).
- Recent : If you've recently opened the video that you want to embed in your Google Slides presentation, it will probably show up here.
Once you've located your video, choose it and then click Select to add the video to your presentation.
How to Add Video to Google Slides from an Outside Source
If you want to add a video to Google Slides from your hard drive or from somewhere else on the web, you won't be able to directly add it to Google Slides. You'll have to first upload or add the file to Google Drive, and then use the steps above to add the video to your presentation.
You also cannot add video to Google Slides using a URL for a site other YouTube. If the video you want to use lives on another site, you'll first need to get it into Google Drive (which could mean downloading it to your hard drive and then uploading it to Google Drive) before you can use it.
If you're adding videos from the web or that belong to someone else to your presentations, make sure you have the appropriate permissions for use. Using someone else's video without their permission could be grounds for legal action against you.
Get the Latest Tech News Delivered Every Day
- How to Add Audio to Google Slides
- How to Link Slides in Google Slides
- How to Use Google Duet in Slides
- How to Do a Hanging Indent in Google Slides
- How to Add Music to Google Slides
- How to Insert a GIF Into Google Slides
- How to Make an Image Transparent in Google Slides
- The 8 Best Google Drive Add-ons for 2024
- How to Make Google Slides Portrait
- How to Share a YouTube Video at a Specific Start Time
- Embed YouTube Videos in PowerPoint 2010
- What Is a GIF?
- How to Create a Google Docs Form
- How to Create a Microsoft Sway Presentation
- How to Download YouTube Videos on Your Android Device
- How to Group Objects in Google Slides

Cloud Storage

Custom Business Email

Video and voice conferencing

Shared Calendars

Word Processing

Spreadsheets
Presentation Builder

Survey builder

Google Workspace
An integrated suit of secure, cloud-native collaboration and productivity apps powered by Google AI.
Tell impactful stories, with Google Slides
Create, present, and collaborate on online presentations in real-time and from any device.
- For my personal use
- For work or my business

Jeffery Clark
T h i s c h a r t h e l p s b r i d g i n g t h e s t o r y !

E s t i m a t e d b u d g e t

Make beautiful presentations, together
Stay in sync in your slides, with easy sharing and real-time editing. Use comments and assign action items to build your ideas together.

Present slideshows with confidence
With easy-to-use presenter view, speaker notes, and live captions, Slides makes presenting your ideas a breeze. You can even present to Google Meet video calls directly from Slides.

Seamlessly connect to your other Google apps
Slides is thoughtfully connected to other Google apps you love, saving you time. Embed charts from Google Sheets or reply to comments directly from Gmail. You can even search the web and Google Drive for relevant content and images directly from Slides.

Extend collaboration and intelligence to PowerPoint files
Easily edit Microsoft PowerPoint presentations online without converting them, and layer on Slides’ enhanced collaborative and assistive features like comments, action items, and Smart Compose.

Work on fresh content
With Slides, everyone’s working on the latest version of a presentation. And with edits automatically saved in version history, it’s easy to track or undo changes.

Make slides faster, with built-in intelligence
Assistive features like Smart Compose and autocorrect help you build slides faster with fewer errors.

Stay productive, even offline
You can access, create, and edit Slides even without an internet connection, helping you stay productive from anywhere.
Security, compliance, and privacy

Secure by default
We use industry-leading security measures to keep your data safe, including advanced malware protections. Slides is also cloud-native, eliminating the need for local files and minimizing risk to your devices.
Encryption in transit and at rest
All files uploaded to Google Drive or created in Slides are encrypted in transit and at rest.
Compliance to support regulatory requirements
Our products, including Slides, regularly undergo independent verification of their security, privacy, and compliance controls .
Private by design
Slides adheres to the same robust privacy commitments and data protections as the rest of Google Cloud’s enterprise services .

You control your data.
We never use your slides content for ad purposes., we never sell your personal information to third parties., find the plan that’s right for you, google slides is a part of google workspace.
Every plan includes

Collaborate from anywhere, on any device
Access, create, and edit your presentations wherever you are — from any mobile device, tablet, or computer — even when offline.

Get a head start with templates
Choose from a variety of presentations, reports, and other professionally-designed templates to kick things off quickly..

Photo Album

Book Report

Visit the Slides Template Gallery for more.
Ready to get started?
How to Turn Google Slides Into a Video [4 Easy Ways]
- Last updated June 5, 2023
Google Slides is a great presentation tool that offers a lot of features like auto-play and object and slide animations. However, one feature it’s lacking is the ability to convert the slides into a video.
Converting your PowerPoint to video is a great way to preserve and share your presentation, especially if you’re doing it for an online class. Unlike PowerPoint, Google Slides doesn’t allow you to export the slides as video.
However, it is possible to do it, and in this tutorial, we’ll show you how to turn Google Slides into a video in 4 different ways.
Table of Contents
How to Convert Google Slides to Video
Here’s how to save a Google Slides presentation as a video:
- Use the keyboard shortcut Win + G to open the screen recorder settings
- Click on the mic icon to unmute and be able to record the sound.
- Open your Google Slides presentation in a web browser.
- Adjust the browser window size to fit the desired video dimensions.
- Click Slideshow and go into Presentation mode.
- Use the keyboard shortcut Win + Alt + R to start the screen recording.
Make sure that the mic is not muted so that you can record sound.
- Start your presentation by going through each slide as you would during a regular presentation.
- Click the Square icon to stop the screen recording.
- Go to your file explorer to access the video.
How to Turn Google Slides Into a Video
In this tutorial, we’ll be showing you 4 methods for how to make Google Slides into a video:
- Using the screen recorder
- Exporting to Powerpoint
- Using the Creator Studio add-on
- Using a video editor
Method 1: Using the Screen Recorder
For the first method, you can use a screen recorder to convert your Google Slides into a video. Most devices come with an inbuilt screen recorder, and you can access this in the Start Window or by using the keyboard shortcut Win + Alt + R for Windows.
You can also record sound with your screen recorder, but you might need to set it up first. If you want to turn your Google Slides presentation into a video using screen recording, follow these steps::
Step 1: Use the keyboard shortcut Win + G to open the screen recorder settings
Step 2: Click on the mic icon to unmute and be able to record the sound.
Step 3: Open your Google Slides presentation in a web browser.

Step 4: Adjust the browser window size to fit the desired video dimensions.
Step 5: Click Slideshow and choose Start from the beginning to go into Presentation mode.

Step 6: Use the keyboard shortcut Win + Alt + R to start the screen recording.

Step 7: Start your presentation by going through each slide as you would during a regular presentation.
Step 8: Once you have finished recording the entire presentation, Click the Square icon to stop the screen recording.

Step 9: Go to your file explorer to access the video. Usually, after stopping the recording, a green bar will appear that should take you to the video, but if you miss this, you can go to your file explorers and open the video. You’ll most likely find the video in the folder named Captures .
Make sure to speak clearly and confidently, providing narration or explanations as you go through the slides. Use the screen recording software’s editing capabilities to trim the video, remove any unwanted sections, or make any necessary adjustments.
Once you’re done editing, you can export the edited video in your preferred video formats , such as MP4.
Method 2: Using Powerpoint
Unlike Google Sheets, Microsoft Powerpoint can actually export a presentation as a video , so if you have your presentation in Google Slides, you can convert it to Powerpoint and then export it as a video.
Here’s how to turn a Google Slide into a video using Powerpoint:
Step 1: Open your Google Slides presentation in your web browser.
Step 2: Go to File > Download and choose Microsoft Powerpoint .

Step 3: Open Microsoft PowerPoint on your computer.
Step 4: Go to the File > Open and locate the file on your PC.
Step 5: Once the file is open, go to File > Export .

Step 6: Set the video setting, then click Create Video .

Step 7: Specify the file name, location, and format for your video.
Step 8: Click Save to start the conversion process.
Step 9: Once you’re done, you can use a video editor to add voiceover to the video.
Related: how to convert PowerPoint to Google Slides
Method 3: Using the Creator Studio Add-On
The Creator Studio add-on is a powerful tool designed to enhance your experience with Google Slides.
Follow the steps below to download Google Slides as video:
Step 1: Go to Extensions > Add-ons.
Step 2: Click Get add-ons.

Step 3: Type Creator Studio in the Google marketplace window to search.

Step 4: Click Install .

Step 5: Allow permissions for Creator Studio by signing in to your Google account.

Step 6: Go to Extensions.
Step 7: Click on Creator Studio and choose Create Video.

Step 8: Input the setting for the video, and if you have pre-recorded audio, you can add it by choosing the option Video with audio .

Step 9: Click Go .
Step 10: Once the video has been rendered, click the download icon to download it to your device.

Voila! You now have your Google Slide converted into a video on your device. However, keep in mind that the option for Video with Audio is a paid-for option and will be unavailable once the trial period ends.
Method 4: Using a Video Editor
This method will require you to download your Google Slides as images. You can use any editor you’re familiar with or have access to. Some good video editors include Adobe, Da Vinci, and Shotcut.
You can download any one of these video editor tools
Here’s how to make a video with Google Slides using a video editor:
Step 1: Go to File > Download.
Step 2: Choose either the JPEG image or Png image format.

Step 3 : Choose the file location and save. You can also create a new folder for the images.

Step 4: Repeat the process for all the other Slides.
Step 5: Record the voice-over for the presentation using your device’s recorder and save the file.
Step 6: Open your video editor. In this tutorial, we’ll be using Shotcut.
Step 7: Import your images into the video editor. In Shotcut, you can simply drag and drop the image files.

Step 8: Import your audio into the video editor.

Step 9: Align the images and the audio. You can also play around with effects and transitions.
Step 10: Export the video.

Although this method is probably longer than the other methods and may require some editing skills, it’s also more customizable, and you can play with things like transitions between your slides and effects depending on the video editor you’re using.
Frequently Asked Questions
How to turn a google slides into a video with voiceover.
To save Google Slides as video:
- Use the keyboard shortcut Win + G to open the screen recorder settings.
What Is the Best Way to Convert Google Slides Into a Video?
The best way to turn Google Slides into video is by using the screen recorder. You can start your presentation as usual and turn on the screen recorder to record the whole presentation on your screen. Make sure to turn on the mic so that the screen recorder can record your voice as well.
This method is easier than exporting the slides and adding the audio later. However, the quality might not be the greatest.
Can a Google Slides Presentation Be Used as a Video File?
Not directly, but with some manipulation, yes, Google Slides presentations can be used as video files. While Google Slides does not have a direct built-in feature to export presentations as video files, you can still convert your Google Slides into video format using the other methods listed in this article.
Wrapping Up
Converting Google Slides into videos expands your options for sharing and presenting your content dynamically.
It also allows you to preserve your presentation and share it on Youtube and other places. In this tutorial, we’ve shown you how to turn Google Slide into a video in 4 different ways.
You can experiment with different effects, transitions, and visual enhancements to create compelling videos that capture your audience’s attention.
If you enjoyed this tutorial on how to turn Google Slides into a video, you should also check out our premium templates that can save you a ton of time and energy. Remember to use the code SSP at checkout to save 50%.
Get Premium Templates
- How To Add a Video in Google Slides
- Is Google Slides or PowerPoint Better?
- Learn How to Draw on Google Slides in 2 Minutes (Too Easy)
- How to Make Google Slides Vertical
- How to Make a Shape Transparent in Google Slides
- How To Add a Video to Google Docs [3 Easy Methods]
Most Popular Posts

How To Highlight Duplicates in Google Sheets

How to Make Multiple Selection in Drop-down Lists in Google Sheets

Google Sheets Currency Conversion: The Easy Method
A 2024 guide to google sheets date picker, related posts.
How to Insert a Google Sheets Hyperlink in 5 Seconds
- Chris Daniel
- April 15, 2024
How to Import Stock Prices into Google Sheets
- April 2, 2024
How to Calculate Age in Google Sheets (2 Easy Methods)
- Sumit Bansal
- February 21, 2024
How to Hide Gridlines in Google Sheets
- February 14, 2024
Thanks for visiting! We’re happy to answer your spreadsheet questions. We specialize in formulas for Google Sheets, our own spreadsheet templates, and time-saving Excel tips.
Note that we’re supported by our audience. When you purchase through links on our site, we may earn commission at no extra cost to you.
Like what we do? Share this article!
- Affiliate Disclaimer
- Privacy Policy
- Terms & Conditions
eLearning Desk
Your Online Learning Guide
How to Record a Google Slides Presentation (with Audio & Video)

Whether you’re teaching an online class or having an important meeting, recording your Google Slides presentation can come in handy later for your or your students’ reference.
Stay with us as we break down how to record a Google Slides presentation with audio and video using free software.
- 1.1 Step #1: Ensure You Have the Required Resources
- 1.2 Step #2: Install Required Software
- 1.3 Step #3: Run the Tool
- 1.4 Step #4: Set Up Your Presentation
- 1.5 Step #5: Prepare to Record
- 1.6 Step #6: Start Recording
- 2.1 Related posts:
How to Record a Google Slides Presentation (with Audio & Video)
Before you can begin recording your Google Slides presentation, you will need a few things:
Step #1: Ensure You Have the Required Resources
- A microphone (you can use your laptop’s mic or wear a headset)
- Recording software (we touch on this in the coming section)
- A Google account
Step #2: Install Required Software
There are several software tools available online for free that you can use to record a Google Slides presentation. For the sake of ease and clarity, we use Apowersoft, a free tool that you can download from CNET .
After downloading the executable, double click on it to run it and complete the wizard to install.

We recommend using this tool because it is 100% free to use and does not limit how much of your presentation you can record.
While an earlier version of the tool did not add a watermark to recorded videos, in the new version, you will have to sign up with Apowersoft to record videos without a watermark.
It’s important to remember that the basic tool does not offer any editing features. In other words, you will need to record your presentation in one take or use another editing program to piece together the clips of your presentation.
If you’re a teacher, we recommend recording short videos since they’re convenient to make and also easier for students to watch.
Step #3: Run the Tool
When you launch Apowersoft Free Screen Recorder, it will show you the region you can record with the tool right away.

You can change the region the tool will record by moving the recording area around by clicking and dragging the button in the middle. You can alter the bounds of the recording area by simply dragging the bounds as you please.
Alternatively, you can click on the “Full Screen” icon on the panel on the bottom. Since you need to record a Google Slides presentation, this is the button you want to click.
It’s also important to set up the tool correctly before proceeding to the next steps. If you look at the Apowersoft recorder’s panel, you will find video and audio options next to the record button on the left.

Ensure that the tool is set to record your screen and not your webcam and that the tool is recording audio from the correct microphone.
Note that if there is a video in your slideshow, you will need to record the sound from your computer.
Remember that choosing to record the system’s sounds also means that your computer’s error sounds (“bing”) and all other system sounds may also be recorded.
Step #4: Set Up Your Presentation
Before you can start recording, navigate to slides.google.com and find your presentation. Next, click on the “Slideshow” button in the top right corner. This will display the presentation in full-screen mode.

It’s important to ensure that your slides on Google slides load completely before you start recording. If all the slides aren’t fully loaded, the transitions from slide to slide may look choppy in your recording.
Step #5: Prepare to Record
When both the recording tool and your presentation are ready, you can hit the record button on the panel. Clicking the button will make a popup appear. If you have logged into your Apowersoft account, it will record without a watermark.
You will also see the hotkeys you can use to control the recording in the popup.

If you hit the “OK” button, a 3-second countdown timer will appear before the tool starts recording. If you don’t want the Apowersoft recorder’s panel to appear in your recording, like in the following image:

You will need to navigate to the options menu by clicking on the three dots button on the right side of the panel.
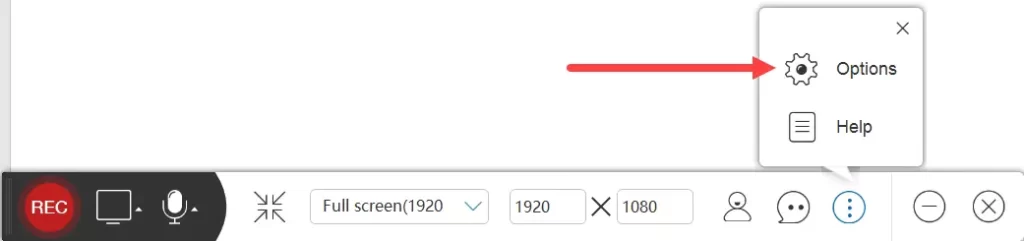
You can then toggle the “Show recording toolbar” option off from the options menu.

You can also change several other settings from this menu, including the recording format and the “Record” and “Stop Recording” keyboard shortcuts.
Step #6: Start Recording
Navigate to your slideshow window and click the “Rec” button. The tool will start recording after the countdown. You can go through the slides by pressing the right and left buttons.
One of the most useful features of this tool is that it allows you to pause recording at certain points if you need a moment to proceed to your next talking point.
If you’ve left the recording panel enabled, you can use it to pause the recording whenever you want.
Alternatively, you can press Ctrl-Alt-F3 to pause the recording. After you’ve caught up with the talking points or taken a moment to focus, you can press Ctrl-Alt-F1 to start the recording again.
After you finish recording the slideshow, press Ctrl-Alt-F2 to stop recording. The tool will then automatically start playing the video you recorded, and you can go through it.
You can use the handles on the extreme left and right of the player to trim the beginning and end of the video.
However, we suggest that you do not do any trimming with this software since it sometimes ruins the recording by not trimming at the correct point.
If you’re satisfied with the recording, click on the “Save” button on the bottom right to save the video.
A menu with a default name for the recording and the folder where it’ll be saved will open up.
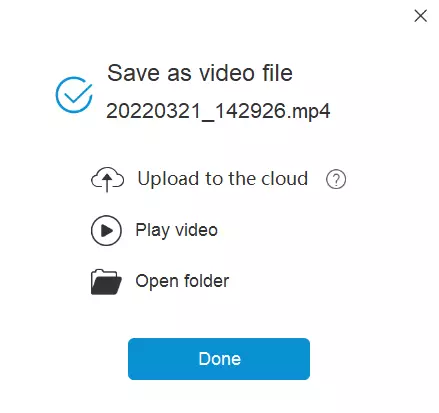
You can rename the file from this menu without any hassle. You can also select where you want to save the video from the “Open Folder” button.
If you’ve signed up with Apowersoft, they will offer you free cloud storage to save your videos. You can upload the video directly to the cloud storage by clicking on the “Upload to the cloud” button in the Save menu.
Alternatively, you can upload the video you recorded straight to YouTube, Vimeo, Google Drive, or Dropbox by clicking the “Cloud” button instead of the “Save” button.
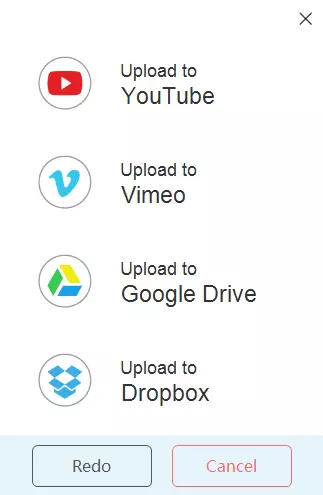
If you are a teacher, saving the video to Google Drive may be the right way to go. You can easily share the video with your students by making the video sharable and sending them the link to the file.
How to Convert Google Slides to PowerPoint in Simple Steps
While there are many ways to record a Google Slides presentation, using the Apowersoft free video recorder is one of the easiest ways to go about it.
The software is quite intuitive, and you should be able to figure out what buttons perform which function without expressly reading through this guide.
That being said, learning all the functions before you begin using the tool is an excellent way to ensure you get the most out of the tool and make a solid recording for your future reference or for your students.
Related posts:
- 10 Top Disadvantages of Online Classes
- 15 Huge Benefits of Online Classes
- The Role of Operating Systems
By Maverick
This is Maverick. During Covid-19 Pandemic, A School Teacher turned into an online Instructor. Here I Share How you can build your own Online School and offers eLearning to your Students. I'm trying to make the eLearning Desk a resource for Students as well as for Teachers.
Related Post
10 ways to use a document camera for online learning, 10 best free drawing apps for students and digital artists 2024, 10 best wireless microphone for teachers in 2024.
How-To Geek
How to convert google slides to a video or gif.
Share your Google Slides with ease with these quick tips.
Quick Links
Convert using powerpoint, capture with your screen recording tool, use a google slides add-on.
While it's easy to share Google Slides using a link or publishing it to the web , you may want a single non-editable file that you can share privately. By converting the slideshow to a video or GIF, your visitors can watch it as you intended. Here are three methods to try.
Microsoft PowerPoint offers both video and GIF exporting . So, if you have PowerPoint, you can open the Google Slides presentation in it and create the video or GIF from there.
Related: How to Convert Google Slides to PowerPoint
Open your Google Slides presentation and go to File > Download. Select "Microsoft PowerPoint (.pptx)" in the pop-out menu.
Head to your downloads folder and click or double-click the file to open it in PowerPoint.
Go to File > Export. Then, choose "Create a Video" or "Create an Animated GIF."
If you pick a video, you can then use the drop-down boxes to choose the quality and whether you want to include recorded timings and narrations. You can also set the duration per slide. Click "Create Video."
If you pick a GIF, you can choose the quality, make the background transparent, set the duration per slide, and include only specific slides if you like. Click "Create GIF."
For both video and GIF, you'll then be prompted to choose a location, optionally change the name, and click "Export" when you finish. Then, grab your video or GIF and share it where you please.
If you have a screen recording tool, such as Game Bar on Windows , the Screenshot Utility on Mac , or a third-party application, you can capture your slideshow as it plays. Then, save the video file to share or turn it into a GIF using an online tool.
Related: How to Screen Record on Your Mac
Get your screen recording tool ready and select the Slideshow drop-down box at the top of Google Slides and pick "Start From beginning."
To ensure you don't see your mouse cursor in the recording when advancing through the slides, you can set it to automatically play.
When the presentation appears in full-screen mode, click the three dots on the right of the floating toolbar, move to Auto-Play, and choose the time per slide.
Then, start capturing with your screen recording tool and stop when the slideshow finishes. You can then edit or share your video.
Additionally, you can use a file converter to obtain a different video file format or turn the video into a GIF. You can use a few free online tools including Cloud Convert , Convertio , or Zamzar .
One other way to convert Google Slides to a video or GIF is with an add-on. There are a few Google Slides add-ons that you can try if you search the Google Workspace Marketplace.
One that works well and allows you to create a video or a GIF for up to five slides for free is Slides to Video .
Related: Everything You Need to Know About Google Chrome's Profile Switcher
Slides to Video works using Google Chrome with the same Google account as Google Slides. If you use a different browser, there are other add-ons such as Video and GIF From Slides and Creator Studio that each offer a free trial.
Once you install the add-on, open your presentation and go to Add-Ons in the menu. Move your cursor to Slides to Video and pick "Create Video" in the pop-out menu.
When the sidebar opens, you can choose a duration per slide or a default for all slides at the top. Then, use the Choose Your Export Type drop-down box to pick "MP4" or "GIF." Click "Create Video."
You'll see the progress as your video or GIF is created. When complete, you'll receive an email to your Gmail account and will also see a link in the sidebar to download the file.
Until Google Slides provides the export option to create a video or GIF, these workarounds can help you get the job done.
For more, learn how to add a YouTube video or how to add other types of videos and customize the playback in Google Slides.
IMAGES
VIDEO
COMMENTS
Upload. Open your presentation in Google Slides and select the slide where you want to add the video. Click Insert → Video. A new window will open. On the Google Drive tab you'll see all your videos stored in or shared with your Google Drive account. Choose the video you want to upload and click Select. The video will be added to the slide ...
You must have edit access to the slides in order to create a new recording. To open your presentation, go to Google Slides. To record your slideshow, in the top right, click Rec Record new video. To start recording, in the middle, click the red record button. To start over, pause and click Re-record. To save your recording, pause and click Save ...
Learn how to add video clips in your Google Slides with just a few simple steps, you can also decide which parts to play in your presentation. Learn more → h...
Make your selections, and you're all set. In moments, you've captured a full audio and video recording of your new Google Slides presentation deck. 4. Export and Share a Google Slides Video Recording. You've just learned how to record a video on Google Slides! As you can see, it's easy to capture a recording.
Go to Google Slides and open your presentation. Select the Rec button in the upper right area, then select the Record new video button ( Figure A ). The system will switch to the screen recording ...
Adding videos can be a great way to spice up a presentation. You can search for videos that are already on YouTube, or you can upload video files to your Goo...
Select the video on your slide and then click "Format Options" from the toolbar or right-click the video and pick "Format Options" from the shortcut menu. This opens the sidebar on the right. Expand the Video Playback section. The first option you can adjust is how to play the video. The default option is Play (On Click) which means the video ...
Open your Google Slides presentation. Go to the slide where you want the video. Click on 'Insert' in the menu. Select 'Video'. Choose your video source. Select your video. Adjust the video on your slide. Conclusion. Adding a video to your Google Slides presentation can truly transform it from a static slideshow to a dynamic, multimedia ...
Start the embed process by accessing Google Slides in a web browser and launching your presentation. Select the slide in which you want to embed your video, then from the menu bar at the top, select Insert > Video. On the "Insert Video" window, from the tab list at the top, select the "Google Drive" tab. In the "Google Drive" tab, find and ...
To do this, right-click on the uploaded video and select Share. Go to the slide in Google Slides where you intend to add the Google Drive video and select Insert > Video. Remove restrictions and make the video viewable via the sharing link. Go to the Google Drive tab, click the video thumbnail, and select insert the video.
In this video you will learn how to record video and video feedback without ever leaving the Google Slides editor.Using the Extension 'Record to Slides' you ...
We're introducing slides recordings, a new Google Slides feature that lets you easily record yourself presenting, and then share the presentation with others to view when it works for them. From webinars, to employee trainings, to lessons for your classroom, slides recordings help you effortlessly record visual and engaging presentations ...
Select a file, and then click Insert. 6. Select the video and click Insert. The video will be inserted into your slide. 7. Adjust the video (optional). Once the video is inserted into the slides, you can adjust its video playback, position, size, and rotation, and even add alt text.
Insert a video from YouTube or your computer. Click a slide, select Insert > Video, and select the location of the video, Choose Google Drive, By URL, or use the YouTube search bar. Then, choose a video and click Select to insert. Right-click an embedded video and select Format options to edit the size, placement, and playback options.
Present slideshows with confidence. With easy-to-use presenter view, speaker notes, and live captions, Slides makes presenting your ideas a breeze. You can even present to Google Meet video calls ...
Click the "Embed" </> icon. Click the "Copy" button to copy the embed code. Open your Google Slides presentation and select the slide where you want to embed the video. Click on the "Insert" menu and select "Video.". In the "Insert video" window, click on the "By URL" tab. Paste the copied Vimeo embed code into the box ...
Step 1: Use the keyboard shortcut Win + G to open the screen recorder settings. Step 2: Click on the mic icon to unmute and be able to record the sound. Step 3: Open your Google Slides presentation in a web browser. Step 4: Adjust the browser window size to fit the desired video dimensions.
The recording functionality, accessible from the new "Record" button in the main toolbar, will open a new screen where you can start a recording of the presentation. You can change slides at your own pace and turn your microphone and camera on and off at any point. Google said in the blog post, "This feature helps you share more engaging video ...
How to Record a Google Slides Presentation (with Audio & Video) Before you can begin recording your Google Slides presentation, you will need a few things: Step #1: Ensure You Have the Required Resources. A microphone (you can use your laptop's mic or wear a headset) Recording software (we touch on this in the coming section) A Google account
Bring your presentations to life in Google Slides with enhancements like videos, animations, smooth transitions, and more. Get started with templates Choose from an array of high-quality pre-designed templates with different layouts, images, colors, and fonts.
Open your Google Slides presentation and go to File > Download. Select "Microsoft PowerPoint (.pptx)" in the pop-out menu. Head to your downloads folder and click or double-click the file to open it in PowerPoint. Go to File > Export. Then, choose "Create a Video" or "Create an Animated GIF." If you pick a video, you can then use the drop-down ...
This Google Slides tutorial for beginners is a complete crash course, taking you by the hand and showing you step by step how to make some amazing and mesmer...
Click Export and then click Create a Video. Follow the on-screen prompts to choose your video settings, such as the quality and resolution of the final file. Click Create Video to save the video ...