How-To Geek
How to make a microsoft powerpoint presentation read-only.
You can set your PowerPoint presentation to "read-only" to discourage others from making edits to your content. Here's how.
If you want to discourage others from making edits to your Microsoft PowerPoint presentation or let them know the file you sent is the final version, you can do so by making it read-only. Here's how it's done.
While making your PowerPoint presentation read-only is a good deterrent from having others edit your content, it's easy to unlock a read-only presentation . It's by no means un-editable.
Open the presentation that you want to make read-only, then click the "File" tab.
Next, in the left-hand pane, select "Info."
You'll now see a "Protect Presentation" section, which lets you (to an extent) protect against any editing of your presentation. Click "Protect Presentation."
Once selected, a drop-down menu will appear with these four options:
- Always Open Read-Only: This asks the reader to opt-in to edit the presentation. This prevents accidental edits.
- Encrypt with Password: This password protects your presentation.
- Add a Digital Signature: This adds an invisible digital signature to your presentation.
- Mark as Final: This lets the reader know that this is the final version of the presentation.
All of these options are good for protecting the integrity of your Microsoft PowerPoint, but the two we'll need here to make the presentation read-only are (1) Always Open Read-Only and (2) Mark as Final.
Selecting either option will prevent the reader from editing the presentation--unless they opt-in to do so.
If you chose the Always Open Read-Only option, the reader will see this message when opening the presentation:
"To prevent accidental changes, the author has set this file to open as read-only."
If you chose the Mark as Final option, the reader will see this message:
"An author has marked this presentation as final to discourage editing."
In either case, your Microsoft PowerPoint presentation is now set to read-only. However, in both cases, all the reader has to do to edit the presentation is click the "Edit Anyway" button.

Is Your PowerPoint Read-Only? Here’s How to Edit and Save it!
By: Author Shrot Katewa

Are you trying to open a PowerPoint presentation that sadly opens up as a read-only file? If the answer is yes, then you are not alone! This isn’t a pleasant situation for anyone, however, there are many complications and reasons behind why this happens. On a larger note, the solution to this problem is fairly simple.
To edit your PowerPoint read-only file, simply click on the “Edit Anyway” button on the horizontal yellow bar under the ribbon. You can also click on the “File” tab. Then, click on “Info”. Next, locate and click on “Protect Presentation”, and finally click on “Mark as Final”.
Interestingly, one of the reasons why your presentation shows as read-only is because of an in-built feature within PowerPoint! (We’ll get to the details of that in a bit). So, this is not something that you need to fear. We just need to be a bit more informed on how to fix it!
So, in this article, I will be sharing with you the details of why a PowerPoint file shows “Read-only”, and what can you do to save the file and make it editable. Let’s get started!
A Quick Note Before We Begin – if you want to make jaw-dropping presentations, I would recommend using one of these Presentation Designs . The best part is – it is only $16.5 a month, but you get to download and use as many presentation designs as you like! I personally use it from time-to-time, and it makes my task of making beautiful presentations really quick and easy!
Why is My PowerPoint Read-Only?
One of the most common reasons for PowerPoint to become a read-only file as when it has been done so intentionally. Why would anyone want to do this intentionally?
1. “Mark as Final” Feature is Enabled
Well, it turns out, PowerPoint actually provides a built-in feature known as “Mark as Final”. This feature turns the PowerPoint file into “Read-Only” mode . The “Mark as Final” feature of PowerPoint is designed to let the readers know that the version of the presentation that they are viewing is the final version and no changes are to be made to that version!
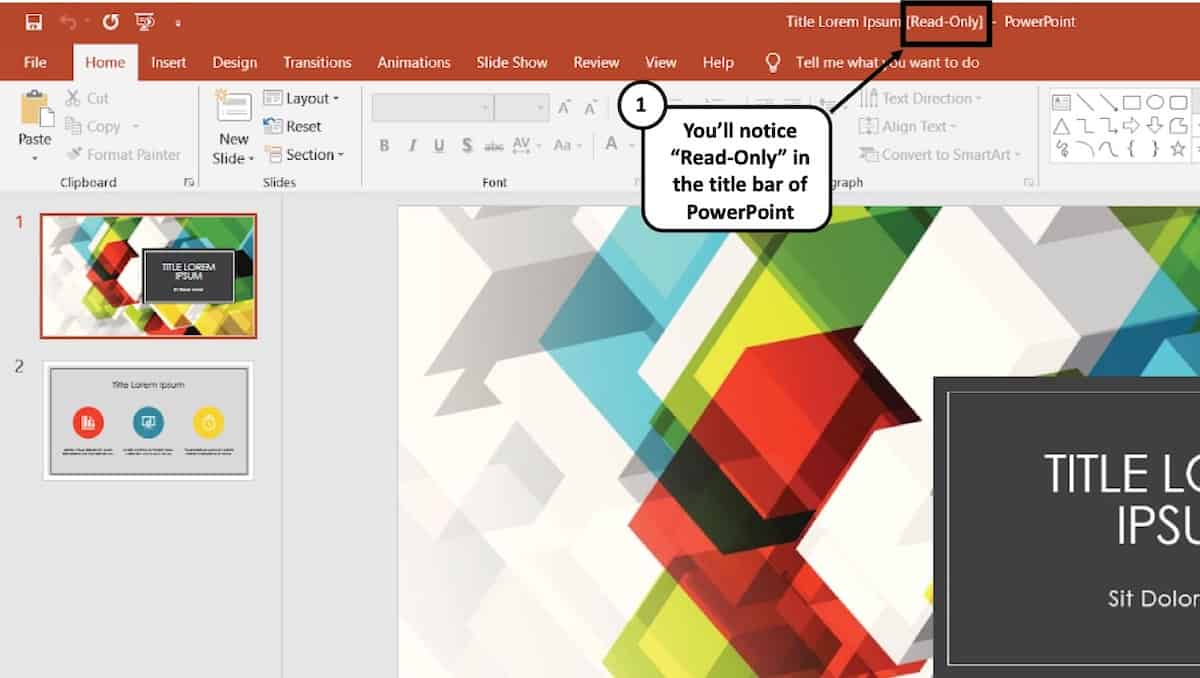
Thus, even though such a presentation can be opened by viewers, they will see a “Read-Only” prompt both at the top of the PowerPoint application where the title appears (otherwise known as the title bar), and a yellow strip just below the ribbons with a button that says “Edit Anyway”.
Obviously, there are other ways to prevent your viewers from editing your PowerPoint file which is more fool-proof. More on that later in the article.
2. PowerPoint has just Recovered from a Crash
Another common reason for PowerPoint to get into “Read-Only” mode is when your PowerPoint may have recovered from a crash . Irrespective of whether the PowerPoint application was abruptly closed intentionally or unintentionally when a presentation file was open, PowerPoint may open the file in “Read-Only” mode when restarted.
PowerPoint automatically marks the previous saved version as the final version of the file and opens it up in the read-only mode.
3. Same PPT file is Opened Twice at the Same time!
Lastly, PowerPoint may also convert a presentation into “Read-Only” mode when two presentations that have the same name are opened at the same time. Alternatively, the file may also become read-only when the same file has been opened twice by mistake.
This can happen especially when PowerPoint takes some time to respond to the user’s first request to open a presentation file leading to the user double-clicking on the same file twice. Although there are checks and balances in place to avoid this issue, nevertheless, such issues can still take place.
Furthermore, if you have perhaps saved a presentation file that has the same name in two different locations on your computer, and you open both of them together, PowerPoint can sometimes open the file that has been opened later in read-only mode.
How to Unlock Read-Only in PowerPoint?
As annoying as it may seem, it is quite easy to unlock the read-only mode from PowerPoint!
Here’s how to exit from the “Read-Only” mode in PowerPoint –
- Open the “Read-Only” PowerPoint (PPT) file.
- At the top part just below the ribbon options, you’ll see a long yellow banner.
- Hover your mouse towards the banner and click on the option “Edit Anyway”.
You will now be able to edit the PowerPoint file as you usually would.
Furthermore, make sure that you haven’t opened the same file twice by chance. If so, try to close one or both the files and re-open the presentation once again.
Why Does Read-Only Keep Coming Back in PowerPoint?
One of the key reasons why your PowerPoint file may become read-only every time you open it is because the “Mark as Final” feature has been enabled in the settings. As long as this feature has been enabled, your PowerPoint file may keep reopening as a read-only file from time to time.
Let us understand how to turn off read-only mode in PowerPoint so that you don’t have to deal with this issue.
How to Turn Off Read-Only Mode in PowerPoint?
Even though clicking on “Edit Anyway” as described above will fix the issue, however, if the presentation has been marked as final by the original author, it may continue to show the read-only mode sometimes.
In order to fix that issue, you will need to take a slightly longer route. Here’s a step-by-step process to turn off read-only mode in PowerPoint.
1. Start by opening your “read-only” PowerPoint presentation.
2. Hover to the top menu and then click on the tab named ‘File’. Then click on Info.
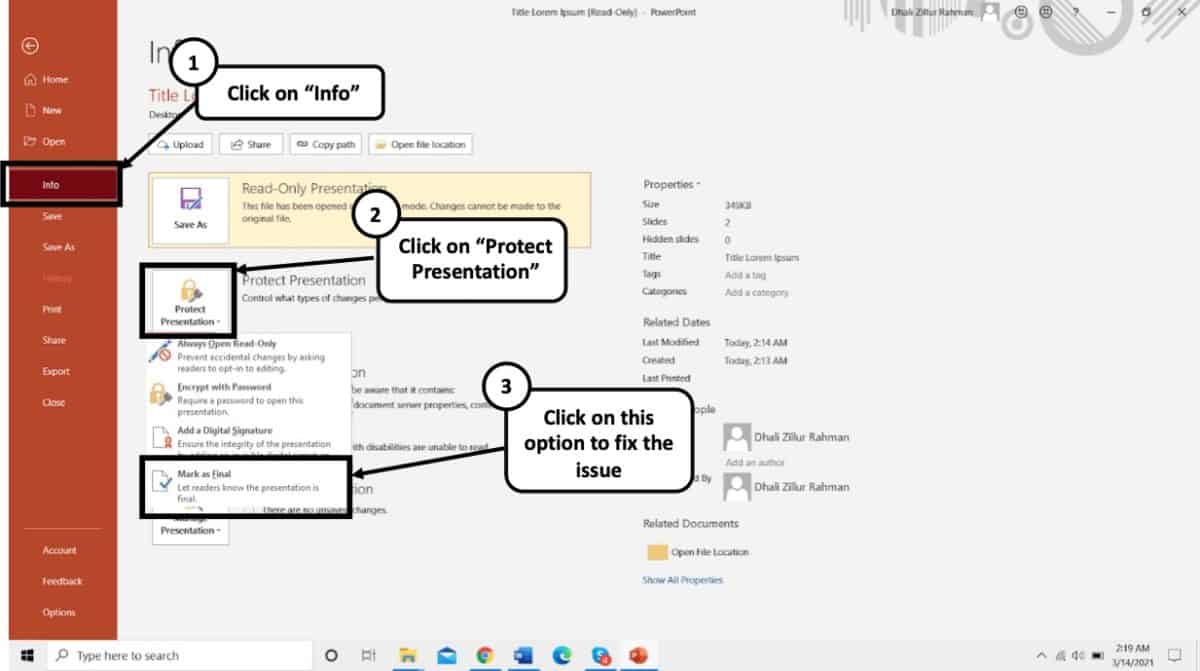
3. There will be a ‘Protect Presentation’ option in clear yellow.
4. You might come across a dialog box telling you “The presentation has been marked as final to discourage any editing.”
5. To undo this feature, simply click on Protect Presentation. A menu will appear, click on the ‘Mark as Final’ to fully unlock the desired presentation.
After doing this you will see that the Read-Only suffix from your PPT file’s name will be gone and you would be able to freely edit further.
How to Edit a Read-Only PowerPoint File?
After you have done removing the read-only feature from your PowerPoint, you can simply edit texts, add animations, images and use features with absolute free will. Just getting through the read-only barrier is the only thing that you need to know to get started with editing.
Interestingly, you can also get out of the read-only mode in PowerPoint by saving the file with a different name. This will not only allow you to get rid of the read-only mode but also allow you to save a copy of the edits that you may have made while the file was in the read-only mode.
Let’s learn how to save a read-only presentation file.
How to Save a Read-Only PowerPoint File?
Saving a PowerPoint file that is in a read-only mode is rather quite simple. Although you don’t need to enable “Edit Anyway”, doing so would be recommended. The next step is really saving a file in a different location on your computer with either the same name or under a different name.
Here’s how you can save a read-only PowerPoint presentation –
- Click on the “File” tab.
- Click on “Save As” from the option provided on the left part of your screen.
- Navigate to a folder location where you want to save the file. Feel free to change the name of the file if needed.
- Click “Save”.
- Lastly, browse to the specific folder where you saved the PowerPoint file. Open it and check to see if the “Read-Only” mode has been removed.
Why Does Every PowerPoint File Open in Read-Only Mode?
As we have learned so far, one of the key reasons for PowerPoint to open a presentation file in read-only mode is when it has been “Marked as Final” by the author of the file. By now, you’ve also learned how to get rid of this problem.
However, the “Mark as Final” feature should only restrict the specific file shared by a particular author . It typically shouldn’t make all your PowerPoint files “Read-Only”.
If this is the case for you, the problem may be slightly different. Let’s understand this a bit further.
Sometimes, t he file or the folder in which the PowerPoint presentation has been saved itself becomes read-only due to a glitch in the operating system . There are several reasons why this could happen. I won’t go into details of each of those reasons. However, it is important for us to understand how to make this file or folder editable.
Here’s what you could do to remove the read-only from a particular presentation file –
- Navigate to the folder in which the file has been saved, and locate the file.
- Right-click on the file and select “Properties” from the window the just opens up.
- A new window will open up. Click on the “General” tab. Next, clear the check-box from the “Read-Only” attribute option.
- Finally, click “OK” and save your changes.
This should solve the problem. If it still doesn’t fix the issue, you may want to check whether the folder in which the PowerPoint file has been saved has the editable rights to it and is not marked as read-only.
If the folder is also being marked as read-only, you will need to remove the “Read-Only” attributes from the folder first. Here’s an article that can help you remove the read-only attribute from a folder in Windows.
How to Prevent PowerPoint from Being Edited?
There are quite a few different ways in which you can lock a PowerPoint file or prevent it from being edited. Here are some of the options that you can choose from –
- Save a PowerPoint File as Read-Only
- Password protect your PowerPoint file.
- Convert a PowerPoint file into a PowerPoint Show File (PPSX)
- Convert a PowerPoint file into a PDF file
- Convert a PowerPoint file into a Video
Let’s look at some of these methods in detail –
Method 1 – Save a PowerPoint File as Read-Only
To get this done, simply do the opposite of turning off the read-only mode. Here’s a step-by-step process to save a PowerPoint file as Read-Only:
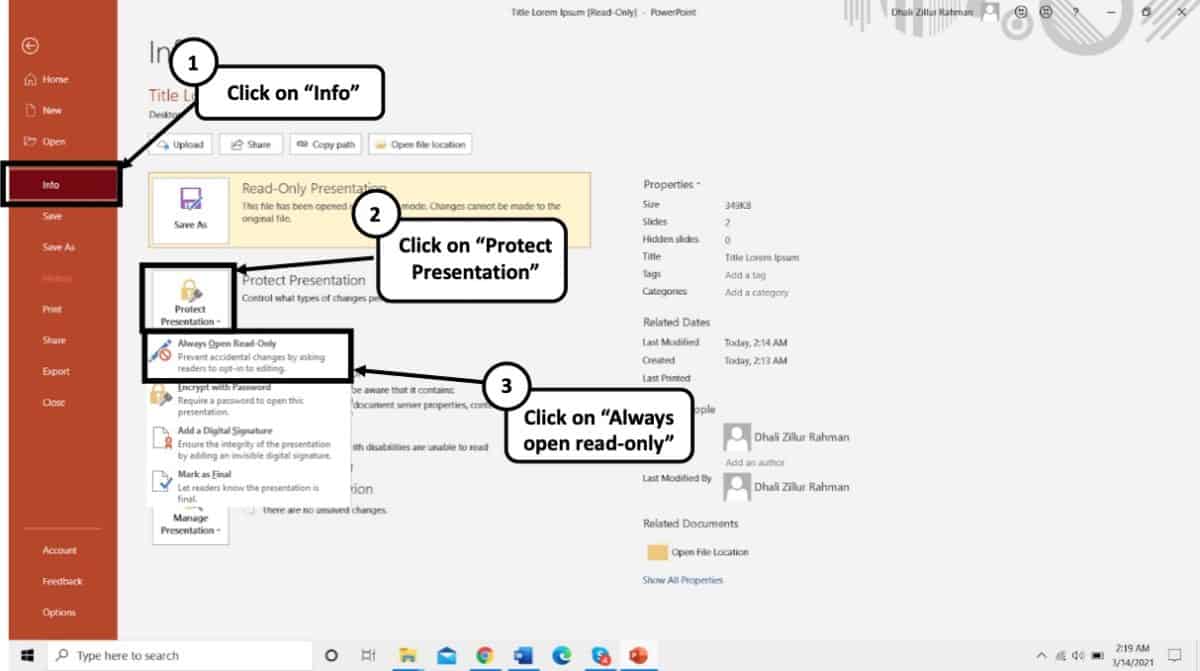
- Open the desired PowerPoint presentation, and click on the “ File ” tab.
- Next, click on the “ Info ” tab from the options presented on the left part of the screen.
- Select the “ Protect Presentation ” option.
- From the dropdown, select “ Always Open Read-Only “.
- Finally, save the file by pressing Ctrl+S.
Your presentation file will now be opened as a read-only file.
Method 2 – Password Protect your PowerPoint presentation
If your colleagues or students haven’t been very familiar with your polite way of discouraging any edits on your final PowerPoint file, then the best option for you is to simply encrypt your presentation file using a password protection feature.
Here’s what you need to do to password protect your PowerPoint presentation –
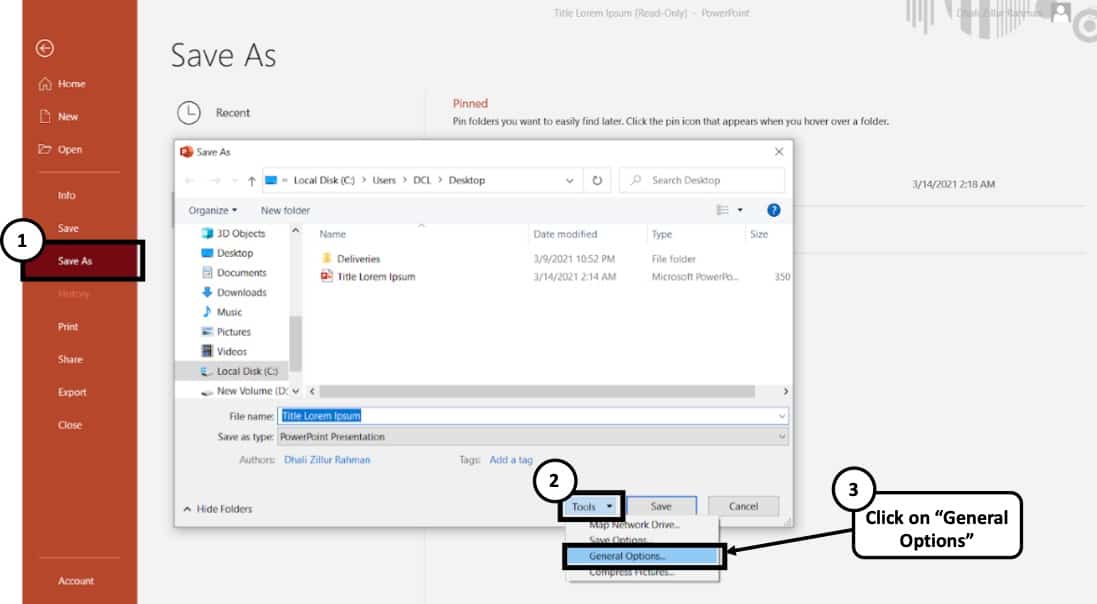
- Open your desired presentation and select the File tab and then click on “ Save As ”.
- At the bottom of the “Save As” dialogue box, a “ Tools ” option will appear.
- Click on “ General Options ”.
- The box marked as “ Password to Modify ” can be used to type in the desired password you wish to set.
- After setting up your password and re-entering it for further verification, simply click “ OK ”
Similarly, you can also enable password protection from the “ Info ” tab. To do that, click on the “ File ” tab first. Then, click the “ Info ” tab. Next, click on “ Protect Presentation “, and finally from the dropdown, click on “ Encrypt with Password “. You will then be asked to set a password. Simply re-enter the same password and click “ OK “.
While encrypting the PowerPoint file with a password, you will be presented with 2 options – either to restrict access to the PowerPoint file or to restrict modifying the presentation file. Choose the latter as this will allow your audience to at least view the presentation file without editing it.
Method 3 – Convert PowerPoint presentation as a PPSX file
Another method of preventing a PowerPoint presentation from being editing is to convert it into a PowerPoint show file or a PPSX file format. Doing so will directly open the presentation file in a PowerPoint Slide Show mode thereby restricting the editing capabilities of an individual for such a file.
Here’s how to convert a PowerPoint presentation to a PowerPoint Show file (PPSX file)
- Click on the “ File ” tab.
- Then, click on “ Save As ” from the panel on the left part of your screen.
- On the new window that pops-up, click on the “ Save As Type ” option.
- From the dropdown, scroll down and locate the “ PowerPoint Show ” file type option.
- Navigate to the desired location and rename the file if needed.
- Click on “ Save “.
Method 4 – Convert PowerPoint Presentation into a PDF File
Another alternative method is to share a PDF version of the presentation instead of the PPT file. All you need to do is convert the file to the PDF file format. To do that, you can follow the below steps –
- Then, click on “ Export ” from the panel on the left part of your screen.
- On the new window that pops-up, click on the “ Create PDF ” option.
You will now notice that there is a PDF file added to the folder in which you saved the file. Make sure that you share this PDF file instead of the PPT presentation.
Method 5 – Convert PowerPoint File into a Video
Last, but not the least, you can also convert your presentation into a video. Although the use of this method is more suited for creating videos using PowerPoint, however, you can also use this method to ensure that you are able to prevent your viewers from editing it.
Here’s how to convert a PowerPoint file into a video –
- On the new window that pops-up, click on the “ MPEG/MP4 ” option.
How to Remove Restricted Access in PowerPoint?
PowerPoint also provides you with an option to remove access restrictions that the original author may have put in place.
To remove the restricted access setting in your file, simply follow the below steps:
- Next, click on the “Info” tab.
- Then, click on “Protect Presentation” and change the permissions which have been applied.
Unselecting the previous options will remove the existing restrictions.
It is important to note that if the file is password-protected, you will need the password to change the permissions of the file. Without the original password, you won’t be able to unlock the permission protections.
More Related Topics
- Change the Style of Your Bullet Points and Stand-out from the Crowd!
- 7 EASY Tips to Always Make your Presentations Attractive! (Even if You are a Beginner)
- How to Reduce the Size of Your PowerPoint File? The Perfect Method!
- Auto Create Your PowerPoint Slides using Design Ideas Feature!
- Main Features of PowerPoint! [I bet You DIDN’T Know These]
Credit to Cookie_Studio for the featured image of this article.
How to Make a Microsoft PowerPoint Presentation Read-only

Sharing a PowerPoint presentation with others is common practice in business settings. However, you may not want recipients to edit or change your carefully crafted presentation. Making a PowerPoint presentation read-only prevents unauthorized changes while still allowing viewers to see the content.
There are a few simple ways to make a PowerPoint presentation read-only, both built into PowerPoint itself and using other Microsoft services. Read on to learn how to lock down your presentation and protect it from unwanted alterations.
Mark the Presentation as Final in PowerPoint
The easiest way to make a PowerPoint presentation read-only is to mark it as final right within PowerPoint. Here are the steps:
- Open the PowerPoint presentation you want to make read-only.
- Click on the “File” tab.
- Select “Info” on the left side of the menu.
- Click on “Protect Presentation” and choose “Mark as Final” from the drop-down menu.
Marking a presentation as final sets it to read-only mode within PowerPoint. Other users will be able to view the presentation but will be prevented from making changes.
There is also an option to select “Always Open Read-Only” which prompts users to actively choose to edit the presentation rather than opening it in editing mode by default.
The main downside of this method is users can still override the read-only status by clicking “Edit Anyway.” So it discourages edits but does not completely prevent them.
Set File Permissions in SharePoint or OneDrive
If you store your PowerPoint presentation in SharePoint or OneDrive, you can restrict editing permissions through those platforms. Here’s how:
- Upload or save your PowerPoint file to OneDrive or a SharePoint document library.
- Right click on the file and select “Manage Access.”
- For each person you share with, change their access from “Can Edit” to “Can View.”
With editing rights revoked at the platform level, users will only be able to view or download the presentation in SharePoint or OneDrive. To enable co-authoring abilities again, you can restore edit access.
Save as PDF
Another way to effectively make a PowerPoint presentation read-only is to export or save it as a PDF. PDF files are inherently non-editable documents.
Simply open your presentation in PowerPoint and select “File > Export > Create PDF/XPS.” The presentation will save as a PDF, after which you can share or distribute the new non-editable version.
If you want recipients to still be able to view the PowerPoint and its animations/transitions, you can also save it as a PowerPoint Show (.ppsx) from the “Save As” menu. This format runs the slideshow without the editing interface.
Set a Read-Only File Attribute
For Windows users, you can make a PowerPoint presentation read-only by adjusting file attributes rather than relying on PowerPoint settings.
- Locate your PowerPoint file in File Explorer.
- Right click, select “Properties”, and click the Attributes tab.
- Check the box next to “Read-only.”
- Click “OK” to save the changes.
Now Windows will treat the file as read-only system-wide, blocking any program from opening it in an editable mode. You can repeat these steps to remove the read-only status later on.
Use DRM Software
If you need to share presentations with highly sensitive information, consider using digital rights management (DRM) software. DRM tools like Microsoft Azure Rights Management let you encrypt files, set detailed usage permissions, and revoke access remotely.
While the methods above discourage or hinder editing, DRM solutions like Microsoft’s provide complete protection of intellectual property. Explore enterprise-grade DRM tools if unauthorized changes to a shared presentation could cause harm.
Preventing unintended modifications to a PowerPoint presentation ensures your original version remains intact. The techniques covered in this article, from marking as final to adjusting file attributes, make it simple to keep your presentation read-only and guarded from unwanted changes.
Choose the read-only method that aligns with your use case, whether it’s quick sharing inside your organization or distributing sensitive materials with partners. Just remember edits can still happen if recipients override some read-only settings within PowerPoint itself. For true restrictions, rely on platform permissions, file formats like PDF, or robust DRM systems.
About The Author
Vegaslide staff, related posts.

How to Insert Superscript in PowerPoint

How to Flip Shape in PowerPoint

How to Hide Text Until Clicked in PowerPoint

How to Create a Hyperlink in PowerPoint 2010

- Passper WinSenior
- Passper for Excel Online Functions
- Passper for Word Online Functions
- Passper for PowerPoint
- Passper for PDF
- Passper for RAR
- Passper for ZIP
Top 5 Methods to Make PowerPoint Read Only
There are a lot of reasons why you would want to make a PowerPoint document read-only. But perhaps the most important one is to keep someone else from making changes on the document. PowerPoint presentations are often sensitive and just a small change can cause the whole presentation to lose meaning. Therefore, it would make sense to make the document read-only as soon as it is done to prevent accidental changes that can alter the whole concept of the presentation. You may also want to protect the content of the presentation and the easiest way to do that would be to make it harder to edit the presentation.
Whatever your reasons for making your PowerPoint presentation read-only, this article will share with you numerous ways you can do that. We will also take the time to share with you the easiest way to unlock a read-only PowerPoint presentation.
Part 1. How to Make PowerPoint Read Only
The following are just some of the ways you can make a PowerPoint presentation read only.
1. Set Presentations to Read Only
2. set password to modify presentation, 3. burn powerpoint to cd/dvd, 4. convert powerpoint to read-only video, 5. set restrict access.
One of the easiest ways to make your presentation read only is to mark it as "Final". This is a feature available in MS Office that is used to let other users know that you have completed all edits on the document. Here's how to do it;
Step 1: Open the document you want to protect and then click on "File".
Step 2: Click on "Info" and then select "Protect Presentation". Step 3: In the options on the drop-down menu, click on "Mark as Final".

Step 4: Click "OK" in the dialogue box that appears and click "OK" again to confirm.
The next time you open the document, you will see a yellow "Marked as Final" message at the top. If you want to edit the document, simply click on "Edit Anyway" to restore your editing privileges.

You can also choose to set a password to restrict modification of the document. Here's how to do that;
Step 1: Open the presentation and then click on "File > Save As".
Step 2: Click on "Tools" at the bottom of the "Save As" dialogue box and then click on "General Options".
Step 3: In the box marked "Password to Modify", type in the password you would like to use and then click "OK". Reenter the password and then click "OK".

Step 4: Click "Save" to save the PowerPoint presentation and the next time someone tries to edit the document, they will be required to enter the password.
Another really easy way to make a PowerPoint not read only is to burn the file onto CD/DVD. There are a lot of programs that can help you do that and since storage media like CD/DVD is read-only, you are assured of the safety of the data on the presentation. It is also much easier to playback the presentation when it is on CD/DVD.

In the same way, you can also convert your PowerPoint presentation into read-only video. This will not just make it impossible for others to edit the content on the presentation, but it will also make it easier to distribute the presentation.
There are a lot of tools that can help you convert the PowerPoint presentation to video, including screen recorders like Adobe Captivate and Camtasia Studio or Quick Time Movie and Windows Movie Maker.

You may also be able to prevent others from editing the presentation if you use the "Restrict Access" option. The following is how to do that;
Step 1: Open the document and then click on "File".
Step 2: Click on "Info > Protect Document" and from then choose "Restrict Access" from the dropdown menu.

This option will allow people to open and read the document but they will be unable to print, edit or copy any of the content on the presentation.
Part 2. How to Unlock a Read Only PowerPoint
What if you find yourself unable to edit a read only PowerPoint presentation? If someone has sent you an incomplete presentation that has restrictions, the best way to lift these restrictions and edit the document is to use Passper for PowerPoint . This is a password recovery tool that makes it very easy for you to unlock any presentation and lift any restrictions placed on the document. The following are some of the program's features;
Check 2,900,000 passwords /S: It has one of the fastest password recovery rates in the market because it can check up to 2,900,000 passwords per second.
4 Attack Modes Available: 4 different attack modes are used to make it easier to recover the password in the shortest time possible. The fact that it has a database of millions of frequently used passwords is just an added bonus.
Remove Edit Restrictions: It can remove any editing restrictions on the presentation within 2 seconds in a single click.
It is compatible with all versions of MS Office and 100% safe to use. None of the data on the program will be lost or damaged in any way during the recovery process.
Free Download Buy Now
Follow these simple steps to use Passper for PowerPoint to unlock a read-only presentation.
Step 1: Download and install Passper for PowerPoint on your computer and then launch the program. In the main window, click on "Remove Restrictions".

Step 2: Import the presentation into the program and then click on "Remove".

In a few seconds all editing restrictions will be lifted from the document, allowing you to edit the presentation any way you want.
How to Recover PowerPoint Presentation if You Can't Open the File
If you are unable to open the presentation because it is password protected and you don't have the password, Passper for PowerPoint can also help you easily recover the password and use it to open the presentation. Here's how to do that;
Step 1: Open Passper for PowerPoint and choose "Recover Passwords" in the main window.

Step 2: Add the protected presentation into the program and then select a recovery method to use. Click "Recover".

Step 3: The program will immediately begin the process of recovering the password. When the process is complete, the password will be displayed on the screen. You can use it to unlock the document.

Make PowerPoint read only is a simple, yet highly effective technique to help you prevent accidental edits on your presentation and also keep the content safe. But sometimes this well-meaning feature can keep you locked out of your own document. If you find yourself unable to access the PowerPoint presentation or unable to edit it, Passper for PowerPoint presents the best solution to help you recover the password or lift restrictions thanks to its faster recovery speeds, more attack methods and higher recovery rates.
Related Articles:
- Top 9 PowerPoint Password Recovery Software That Unlock Your PowerPoint
- 6 Free Ways to Lock PowerPoint from Editing
- [Updated] 4 Methods to Unlock Read-Only PowerPoint

By Ronnie Barnes to PowerPoint
Posted on Mar 17, 2023 ( Updated: Mar 17, 2023)
Ronnie Barnes, a blogger with more than 5-year experience in writing tips about password recovery for Windows and office files.
Log in / Sign up
Don't have an account? Sign up --> Forgot Password? --> -->
Already have an account? Log in
Reset Password
How to Make PowerPoint Read Only: A Comprehensive Guide
In today's fast-paced digital world, PowerPoint presentations are indispensable tools for communication and collaboration. However, maintaining the integrity of your content, especially when sharing it with others, is crucial. This article explores the essential steps to make a PowerPoint presentation read-only, ensuring that your work remains unaltered and secure. Additionally, we will introduce the innovative features of Smallppt.com's AI PowerPoint Generator, enhancing your presentation experience.
1. The Significance of Read-Only Presentations
Understanding the significance of read-only presentations is fundamental. By making your PowerPoint files read-only, you preserve the original content, safeguarding it from unintended modifications, thereby ensuring the accuracy and integrity of your message.

2. How to Create a Read-Only PowerPoint Presentation
Step 1: Open Your Presentation
Begin by opening your PowerPoint file on your computer.
Step 2: Save the Presentation
Click on the "File" tab, then select "Save As." Choose the destination where you want to save your presentation. Before clicking "Save," locate the "Tools" button and click on "General Options."
Step 3: Mark as Read-Only
In the "General Options" window, check the box that says "Read-only recommended." This prompts users to open the presentation as read-only, discouraging them from making changes. Click "OK" to confirm your selection.
Step 4: Password Protection (Optional)
For an additional layer of security, you can set a password to modify the presentation. This ensures that only authorized individuals can make changes.
Step 5: Test the Read-Only Presentation
Before sharing your presentation, test it to ensure it opens as read-only. Close the file and reopen it to confirm that viewers won't be able to edit the content.

3. Introducing Smallppt.com's AI PowerPoint Generator
Smallppt.com offers a cutting-edge AI PowerPoint Generator that revolutionizes the way you create presentations. This innovative tool leverages artificial intelligence to enhance your content:
- Automated Content Creation: Generate compelling PowerPoint slides with AI-driven content creation, saving you valuable time and effort.
- Smart Design Templates: Access a vast library of professionally designed templates tailored to various themes and industries, ensuring visually appealing presentations.
- Intelligent Suggestions: Receive intelligent suggestions for slide layouts, content placement, and design elements, optimizing the overall presentation flow.
- Language Enhancement: Improve the clarity and coherence of your content with AI-powered language enhancement, making your message more impactful.
Incorporating Smallppt.com's AI PowerPoint Generator into your workflow empowers you to create impressive presentations effortlessly, enhancing your productivity and communication effectiveness.
Creating read-only PowerPoint presentations is essential for preserving your content's integrity. By following the outlined steps, you can secure your presentations from unauthorized modifications. Additionally, embracing Smallppt.com's AI PowerPoint Generator enriches your presentation creation process, ensuring your content is not only secure but also visually engaging and impactful.

Q1: Can I remove the read-only status from a presentation created with Smallppt.com's AI PowerPoint Generator?
Yes, you can remove the read-only status by accessing the presentation's settings and unchecking the "Read-only recommended" option.
Q2: Does Smallppt.com's AI PowerPoint Generator support multiple languages?
Yes, Smallppt.com's AI PowerPoint Generator supports various languages, catering to a global user base.
Q3: Can I customize the design templates provided by Smallppt.com?
Absolutely, you can customize the design templates according to your preferences, ensuring your presentations align with your brand identity.
Q4: Is the AI-generated content unique and plagiarism-free?
Yes, the content generated by Smallppt.com's AI PowerPoint Generator is unique and plagiarism-free, providing you with original and high-quality material for your presentations.
Q5: Does Smallppt.com offer customer support for technical assistance?
Yes, Smallppt.com provides dedicated customer support to assist users with any technical queries or challenges they might encounter during the presentation creation process.
Title/Email address/Description is not null!
How to make a Microsoft PowerPoint presentation read-only

If you want to discourage others from making modifications to your Microsoft PowerPoint presentation or let them know that the file you submitted is the final version, you can do it by making it read-only. This is how you do it.
Note: Although making your PowerPoint presentation read-only is a good deterrent for others to edit your content, easy to unlock a read-only presentation. It is in no way non-editable.
Open the presentation that you want to be read-only, then click on the tab “File”.

Next, in the left panel, select “Information”.

You will now see a section “Protect presentation”, what makes it possible (until a certain point) protect yourself against any editing of your presentation. Click on “Protect presentation”.

Once selected, a drop-down menu will appear with these four options:
- Always open read-only: This asks the reader to choose to edit the presentation. This prevents accidental edits.
- Encrypt with password: This password protects your presentation.
- Add a digital signature: This adds an invisible digital signature to your presentation.
- Mark as final: This enables the reader to know that this is the final version of the presentation..

All of these options are good for protecting the integrity of your Microsoft PowerPoint., but the two we will need here to make the presentation read-only are (1) Always open read-only and (2) Mark as final.
Choosing any of the alternatives will prevent the reader from editing the presentation, unless you choose to.
If you choose the Always open read-only option, the reader will see this message when opening the presentation:
“To avoid accidental changes, the author has set this file to open as read-only”.

If you choose the Mark as final option, the reader will see this message:
“An author has marked this presentation as final to discourage editing”.

Whatever the case, your Microsoft PowerPoint presentation is now set to read-only. Despite this, in both cases, all the reader has to do to edit the presentation is click the button “Edit anyway”.
Related posts
- How to insert and format a table in Microsoft PowerPoint
- How to create a custom presentation in Microsoft PowerPoint
- How to remove the background from a picture in Microsoft PowerPoint
- How to make a picture transparent in Microsoft PowerPoint
Recent posts

Good practices in software maintenance

Stay protected from stealthy viruses that can hide in system files

All you need to know about UX UI

The 5 Top Web Application Security Practices You Should Know

How to add a Microsoft Teams chat link to your email signature

How to start a terminal window in Ubuntu Linux
Subscribe to our newsletter.
We will not send you SPAM mail. We hate it as much as you.
Systems always at the Peak
- Password Tools For Windows Password Genius Windows Password Genius Windows 10 Password Genius Windows 7 Password Genius RAR Password Genius ZIP Password Genius SQL Password Genius Chrome Password Genius WiFi Password Genius For Office Office Password Genius Word Password Genius Excel Password Genius PowerPoint Password Genius Access Password Genius Outlook Password Genius Outlook Email Password Genius PDF Password Genius For Removing Office Password Remover Word Password Remover Excel Password Remover Workbook Unprotect Genius PowerPoint Unprotect Genius Word Unprotect Genius
- More Utilities Data Recovery BitGenius Word Repair Genius Excel Repair Genius PowerPoint Repair Genius Office Repair Genius Photo Data Genius Android Data Genius BitLocker Tools BitLocker Genius for Mac BitLocker Genius for Windows More Tools Product Key Finder SafeUSB Genius ISO Genius All Products
- Support Support Center FAQ & Contact Resource Center How-to Articles Blog Blog, News & Guides
3 Methods to Make a MS PowerPoint 2010 Presentation Read Only
By Achilles Hill | Last Updated January 03, 2024
"I made a presentation for the school teaching and my students asked me to share it with them. I do not want them to edit the content and change the format. How do I make the MS PowerPoint 2010 presentation read only? Is there any reliable way?" .
For the Microsoft users who want to protect PowerPoint presentation from editing and modifying, they can make a presentation created with MS PowerPoint 2010 read only in three methods.
- Method 1: Mark the PowerPoint Presentation as Final Version
Method 2: Restrict Editing with the Password
Method 3: save the presentation with modify password, how to make a powerpoint presentation read only.
In the following, we use Microsoft PowerPoint 2010 to show you the process to make a PowerPoint presentation read only.
If you want to make the PowerPoint presentation protected, Mark as Final is the first option that let readers know the content is final and make it read-only. In this way, you turn off the typing, inserting and other editing features on the final content version.
Step 1: Open File > Info > Protect Presentation .
Step 2: Click Protect Presentation and get several options.
Step 3: Click Mark as Final and get the warning box from Microsoft PowerPoint. Click OK to continue.

After that, when others open this presentation, they will see a yellow alert on the top. If they want to edit the content, they can click Edit Anyway to modify the text and layout. Therefore, it is not a safe option to protect the presentation.

This option is chosen by most people to make the MS PowerPoint 2010 presentation read only. You can add restrict permission to remove others' ability to edit, copy and print the presentation.
Step 1: Access File > Info > Protect Presentation .
Step 2: Click Protect Presentation and select Restrict Access from Restrict Permission by People option.
Step 3: Set a password to protect the presentation.

For the MS PowerPoint 2010/2013/2016 presentation, they can also add the modify password to protect the content from editing.
Step 1: Click File > Save As .

Step 2: In the Save As interface, besides setting the file name and type to save, you are also provided tools to set general options. Right click Tools button and select General Options from the drop-down menu.

Step 3: Set your password to modify the presentation. After that, click the OK button to end this process.

For the question showing in the beginning, the answer should be the latter two methods which enable users to set the modify password in security settings. In this way, users can distribute a PPT (*ppt and.*pptx) as a read only document with password.
Related Links:
- How to Remove Restriction to Unprotect PowerPoint Presentation without Password
- How to Unlock PPT Presentation with Modify or Open Password
- How to Edit Encrypted and Read Only PowerPoint 2016 Presentation
- How to Add a Watermark on PowerPoint Presentation
iSunshare is dedicated to providing the best service for Windows, Mac, Android users who are in demand for password recovery and data recovery.
Copyright © 2024 iSunshare Studio All Rights Reserved.
- PRO Courses Guides New Tech Help Pro Expert Videos About wikiHow Pro Upgrade Sign In
- EDIT Edit this Article
- EXPLORE Tech Help Pro About Us Random Article Quizzes Request a New Article Community Dashboard This Or That Game Popular Categories Arts and Entertainment Artwork Books Movies Computers and Electronics Computers Phone Skills Technology Hacks Health Men's Health Mental Health Women's Health Relationships Dating Love Relationship Issues Hobbies and Crafts Crafts Drawing Games Education & Communication Communication Skills Personal Development Studying Personal Care and Style Fashion Hair Care Personal Hygiene Youth Personal Care School Stuff Dating All Categories Arts and Entertainment Finance and Business Home and Garden Relationship Quizzes Cars & Other Vehicles Food and Entertaining Personal Care and Style Sports and Fitness Computers and Electronics Health Pets and Animals Travel Education & Communication Hobbies and Crafts Philosophy and Religion Work World Family Life Holidays and Traditions Relationships Youth
- Browse Articles
- Learn Something New
- Quizzes Hot
- This Or That Game New
- Train Your Brain
- Explore More
- Support wikiHow
- About wikiHow
- Log in / Sign up
- Computers and Electronics
- Presentation Software
- PowerPoint Presentations
How to Unlock a Read Only PowerPoint Presentation (in 4 Steps)
Last Updated: December 29, 2021
This article was co-authored by wikiHow staff writer, Darlene Antonelli, MA . Darlene Antonelli is a Technology Writer and Editor for wikiHow. Darlene has experience teaching college courses, writing technology-related articles, and working hands-on in the technology field. She earned an MA in Writing from Rowan University in 2012 and wrote her thesis on online communities and the personalities curated in such communities. This article has been viewed 19,702 times. Learn more...
If you see text in a banner that warns you the file is read-only, the original author marked it as final and discourages editing. This wikiHow will teach you how to unlock a read-only PowerPoint manually. Otherwise, you can click Edit Anyway within the banner.

- A menu will drop down from the lock icon.

- The "Read-Only" text is gone from the title and the yellow banner will disappear, which means you can edit the PowerPoint. [1] X Research source
- To return the file to read-only, repeat the process to select "Mark as Final."
Expert Q&A
You might also like.

- ↑ https://www.howtogeek.com/437502/how-to-unlock-read-only-powerpoint-presentations/
About This Article

1. Open the PowerPoint project. 2. Click the File tab. 3. Click Protect Presentation. 4. Click Mark as Final . Did this summary help you? Yes No
- Send fan mail to authors
Is this article up to date?

Featured Articles

Trending Articles

Watch Articles

- Terms of Use
- Privacy Policy
- Do Not Sell or Share My Info
- Not Selling Info
wikiHow Tech Help:
Tech troubles got you down? We've got the tips you need
- Presentation
Why is my PowerPoint read only, and how make it read only?

- January 19, 2023

Table of Contents
Why is my PowerPoint read only?
You can make your Microsoft PowerPoint presentation read only file to deter others from editing it or to let them know that the final version is what you sent. When a presentation is protected or read-only, features such as the Poll Everywhere activity are disabled. To present your activities, you might need to alter the file’s permissions or trust it differently manually. This is how to make a read-only presentation.
Why is my PowerPoint presentation open as read-only?
It is possible that files are opened as read-only when you open them. This may be for security reasons, like when you open files from the internet. Other times it could be because of a setting that can’t be changed. These are some situations where files open read-only. There are steps that you can take to fix it.
You may like: How To Change The Hyperlink Color In PowerPoint?
Your antivirus causes them to open read only.
Antivirus programs can protect you against potentially dangerous files by opening them only read-only. Also, to adjust these settings, you may need to consult your antivirus provider. BitDefender has information on how to add application exclusions.
“Mark as Final” feature is enabled
It turns out that PowerPoint has a built-in feature called “Mark as Final”. This feature converts the PowerPoint file to “Read-Only”. PowerPoint’s “Mark as Final” feature is intended to inform the reader that the PowerPoint presentation they are currently viewing is the final one and that no changes can be made!
Even though viewers can open such a presentation, they will see a prompt that says “Read-Only”, at the top of PowerPoint where the title appears.
There are many ways your viewers can edit your PowerPoint file. These methods are more foolproof. We’ll get to that in a moment.
Are file properties set to read only?
Right-click on the PowerPoint file to view its properties and choose Properties . You can check the Read-only attribute and uncheck it by clicking OK .
PowerPoint just recovered from a crash
PowerPoint can also go into “Read-Only mode” after a crash . PowerPoint can open a file in “Ready-Only” mode if it is accidentally closed abruptly or intentionally.
PowerPoint automatically marks the last saved version as the final file version and opens it in the read-only state.
This content is protected view
Files downloaded from the internet or from other unsafe places can contain viruses, trojans, and other malware that could cause damage to your computer. This frequently happens with attachments to emails or files that you have downloaded. A protected view is used to open files in potentially dangerous locations. Protected view allows you to view files and its contents while decreasing the risk.
The same PPT file can be opened twice at the same time
PowerPoint can also change a presentation to “Read-Only” mode if two presentations with the same name are open at the same moment. Alternately, the file can be made read-only if it is accidentally opened twice.
This is especially true if PowerPoint takes a while to respond to the first request for a presentation file. If this happens, the user may end up double-clicking the same file twice. Despite the fact that there are safeguards to prevent this from happening, it can still happen.
Is OneDrive fully loaded?
If you have too much space on OneDrive, the file will not be able to be saved. You can check your free space on OneDrive by clicking the OneDrive icon in the notification center and choosing Manage storage , or you can go to http://onedrive.live.com , sign in, and note the amount of used space in the lower left of the screen.
Is the Office active?
You could be in read-only Reduced Functionality Mode if Office isn’t activated or expired.
Make a PowerPoint Presentation Read Only
You can’t edit the presentation if read-only is turned on in Microsoft PowerPoint. This means that you should not make any changes to the presentation until you are done with it. You can make a PowerPoint presentation read-only by following these steps:
- Your PowerPoint presentation is now open.
- Select and click the File button at the top.
- Select Info from the bar to the left.
- Click Protect Presentation .
You’ll find four options in the pull-down menu:
- Always open Read-Only and informs readers that the selected PowerPoint file is read only, and should not be edited.
- Mark as Final informs readers that this is the final copy of this file.
- Use a Password to encrypt files.
- Add Digital Signature activates the function and adds an invisible signature that ensures the integrity of the presentation.
Only two options will make your PowerPoint presentation unreadable: Always Open Read Only or Mark it as Final.
If Always Open Read-Only has been selected, everyone who opens the presentation will be notified that the author has made it safe to do so. Files marked as Final will also display the message “An author has marked the presentation as final to discourage editing.”
NOTE: If you don’t want anyone altering your presentation, the best option is to choose “Encrypt with Password” from the Protect Presentation menu. This option, as you probably know, means that no one can read or edit the file without your Password. This is the best way to secure your document.
Password for Modifying Presentation
To prevent others from altering the document, you can also set a password. Here are the steps to accomplish this.
1: Open the presentation, then click “File > Save as.”
2: Click “Tools” at the bottom of the “Save As” dialog box, and then click “General Options.”
3: Type the Password you want to use in the box marked “Password To M; modify” and click “OK.” Enter the Password again and click “OK.”
4: Click “Save” to save the PowerPoint presentation. The next time someone attempts to edit the document, they will need to enter the Password.
Convert PowerPoint into Read-Only Video
You can also convert your PowerPoint presentation to read-only video in the same manner. This will make it difficult for others to modify the presentation’s content and make it easier to distribute it.
You can convert PowerPoint presentations to video with many tools, such as screen recorders like Adobe Captivate or Camtasia Studio, Quick Time Movie Maker, and Windows Movie Maker.
Restrict Access
You can also restrict access to the presentation so that others cannot edit it. Here’s how you do it:
- Open the document, then click “File.”
- Click “Info > Protect Document” then “Restrict Access” in the dropdown menu.

Presentation design services :
With our presentation design services , we can help you create an amazing visual representation of your business. They are designed by professional strategists and designers who understand how important it is to have visuals that communicate clearly and effectively while still being aesthetically pleasing. They’re also created using the most up-to-date data so they won’t become obsolete quickly like other types of marketing material might be.

- Graphic Design , UI-UX
How to Become a Motion Graphic Designer?

A Brief Overview of Lean UX

UX Strategy and Its Components
you'r more than welcome
7 days a week, 9:30 AM – 5:30 PM
contact info
[email protected] +351910923549
- LB07129, Jebel Ali Freezone, Dubai, UAE
Got a Project?
We’re a team of creatives who are excited about unique ideas and help companies to create amazing identity by offering wide range of digital services
© 2021 All rights reserved.
Be the first one who knows about updates!
enter your email address 📩
Welcome to the club 🎉.
From now on, Temis will inform you of its most valuable content and offers. You can also subscribe to this list at the moment. We will also protect your privacy

Contribute to the Microsoft 365 and Office forum! Click here to learn more 💡
April 9, 2024
Contribute to the Microsoft 365 and Office forum!
Click here to learn more 💡
- Search the community and support articles
- Microsoft 365 and Office
- Search Community member
Ask a new question
PowerPoint: How do I edit on web when it says "Read only"?
Our company has purchased and installed custom fonts that we're wanting to use in our PowerPoint presentations.
We've been editing documents in the desktop PowerPoint app with the new fonts, but then when we go to open up the web version, we get a message that says "READ ONLY: This presentation contains read-only embedded fonts. To edit it, use the app".
Is there a way to allow editing on the web version? Our IT department confirmed with us that editing PowerPoint documents in the desktop app with custom fonts will then translate to web where we can continue to edit, but now it doesn't appear to be the case.
Thank you, any help would be appreciated.
Report abuse
- Microsoft Agent |
Hi KS_TA_21,
I go through the post carefully, I am sorry to say that Embed fonts and Custom fonts are not supported in PowerPoint for the web now, so you may get the error when working with such files. I am really sorry for the inconvenience and would suggest you post feedback on how to improve the feature in PowerPoint for the web by PowerPoint for the web>Help>Feedback. Your feedback will promote the developer team of PowerPoint to develop the feature! Thanks for your efforts and understanding!
Best Regards,
1 person found this reply helpful
Was this reply helpful? Yes No
Sorry this didn't help.
Great! Thanks for your feedback.
How satisfied are you with this reply?
Thanks for your feedback, it helps us improve the site.
Thanks for your feedback.
Replies (1)
Question info.
- For business
- Norsk Bokmål
- Ελληνικά
- Русский
- עברית
- العربية
- ไทย
- 한국어
- 中文(简体)
- 中文(繁體)
- 日本語
How to Unlock Read Only PowerPoint Presentations
- Small Business
- Business Communications & Etiquette
- Presentations
- ')" data-event="social share" data-info="Pinterest" aria-label="Share on Pinterest">
- ')" data-event="social share" data-info="Reddit" aria-label="Share on Reddit">
- ')" data-event="social share" data-info="Flipboard" aria-label="Share on Flipboard">
How to Convert a PowerPoint to an RTF
Can i turn off 4g on iphone 5, how to automatically text wrap in powerpoint 2007.
- How to Convert PowerPoint Presentations to an HTML Format
- How to Open a Word for Mac Document in Microsoft Word for PC
Microsoft PowerPoint's "Mark as Final" feature makes your business presentation read-only to prevent accidental changes. It is typically enabled prior to distribution so your workers, clients or business partners are assured a final, unaltered version of your PowerPoint presentation. Marking the presentation as final also reminds you of its completed status. If you later decide to make changes, removing the Mark as Final setting will permit you to edit the presentation.
Open the read-only PowerPoint presentation and click the "File" tab.
Click "Info" from the left pane.
Click "Protect Presentation" and select "Mark as Final." This acts as a toggle selection. If the presentation was read-only, it will now be editable, and if it was not protected, the Mark as Final option is now enabled.
Press "Ctrl-S" to save the presentation with the Mark as Final feature disabled.
- Microsoft Office: Remove Mark As Final From a Presentation
- The Mark as Final feature is not a security measure. Anyone with access to the file can disable this option.
C. Taylor embarked on a professional writing career in 2009 and frequently writes about technology, science, business, finance, martial arts and the great outdoors. He writes for both online and offline publications, including the Journal of Asian Martial Arts, Samsung, Radio Shack, Motley Fool, Chron, Synonym and more. He received a Master of Science degree in wildlife biology from Clemson University and a Bachelor of Arts in biological sciences at College of Charleston. He also holds minors in statistics, physics and visual arts.
Related Articles
How to make powerpoint uneditable, how to mark a document as final in microsoft word, does powerpoint have an option that would allow someone to open & print but not allow them to edit, how to rotate a slide in powerpoint, how to alphabetize last names in excel, how to display a ruler on powerpoint 2007, how to: powerpoint looping presentations, how to wrap text in microsoft excel 2003, how to read-only on a network in excel, most popular.
- 1 How to Make PowerPoint Uneditable
- 2 How to Mark a Document as Final in Microsoft Word
- 3 Does PowerPoint Have an Option That Would Allow Someone to Open & Print but Not Allow Them to Edit?
- 4 How to Rotate a Slide in PowerPoint
ITLD’s Top 5: Tips for Making PowerPoints Accessible
Apr 5, 2024
When creating a PowerPoint presentation for your students, you want to be proactive in ensuring that your course content is accessible for all. The Accessibility Checker is a valuable resource to rely on not only as you are creating your presentation, but to utilize for suggestions in making the presentations more accessible. By making your PowerPoint presentations accessible, you are optimizing the information for all users. Below are five accessibility considerations to be mindful of when developing your PowerPoint presentation.
1: Establish a logical slide reading order.
When creating a PowerPoint presentation, it is critical to develop the content of each slide in a logical reading order. A screen reader reads the slide’s contents in the order in which they were added to the slide. This may be different from the order in which they appear. When you are developing the contents, you can check their order to assure that the screen reader understands them. For step-by-step instructions on how to check the reading order of your slides, visit Make Slides easier to read by using the Reading Order pane on the Microsoft Support page.
2: Add alternative text to images.
Adding images to PowerPoint is a way to make your presentation more interesting and engaging. However, you want to make sure that your images have alternative text to ensure that individuals with visual disabilities understand the pictures or other graphical content. Alternative (Alt) text is essential for making images accessible to all users, particularly to those who can’t see them. The Accessibility Checker is a great way to locate missing alt text.
3: Use contrasting colors for text and backgrounds.
When developing your PowerPoint presentation, you must use sufficient contrast for them. In your presentation’s design, you want to ensure there is sufficient contrast between the background and the text color schemes, including black and white. As you create your presentation, look for text that is hard to read or differentiate from the background. A stronger contrast between the background and the text makes it more visible for individuals with low vision or colorblindness to read the content. The Accessibility Checker can locate insufficient color contrast.
4: Develop PowerPoints using accessible Master Slides.
Developing a PowerPoint Presentation using a Master Slide has a great benefit. It allows you to create a unique template that is unlike the others. Master Slides control the overall appearance, like the design and formatting. When any changes are made to the Master Slide in the presentation, the changes will be applied to each slide layout. Using a Master Slide can also ensure that you are developing your slides to be accessibility friendly for all users. When developing your Master Slide, keep these suggestions in mind to make the slide accessible:
Default fonts, colors, and sizes
- Use sans serif or similar font styles.
- Remember that color is not the only means of sharing information. Review each slide in your presentation for instances of color-coding. The Grayscale setting can help to search for this. Color is also important for contrast between the text and the background.
- A larger font size makes content more accessible for users. Sans serif fonts sized 20 or greater create a more accessible slide.
Transitions and animations
- Transitions and animations should be used sparingly in a PowerPoint presentation. They can be distracting to viewers and difficult for assistive technologies to use.
- Transitions can be used if they are under 3 seconds long.
- Avoid using endless animations.
- There are no specific guidelines for either transitions or animations. However, be aware of your audience.
- The simpler, the better.
5: Choose media wisely.
When selecting media for PPT Presentations, be sure to choose the media wisely. You want to make sure the videos are accessible to individuals who have a hearing or vision impairment. Remember to include the following in any added media to a PPT Presentation:
- Subtitles: captioning used to translate or transcribe the dialogue of the media from one language to another. This can include alternative audio tracks.
- Closed captions: subtitles of content in the same language. Closed captions will also describe music and sound effects that occur throughout the media.
- Video description: an audio narrated description of the video’s key visual elements. The descriptions are inserted into natural pauses within the program’s dialogue. This is beneficial for those who have a vision impairment.
Additional Resources
Penn State Accessibility
PowerPoint Accessibility Tips (PSU Accessibility)
Make your Power Point presentations accessible to people with disabilities (Microsoft Support)
Search for: Search Button
- Share a link to a specific PowerPoint slide
There’s a way to link someone to view a specific slide in a PowerPoint presentaion which is a lot faster than hunting through a big slide deck.
Requirements
Link to this slide, check the share permissions, sharing settings, edit / view only / no download, or there’s another way ….
Providing a direct link to a specific part of your slideshow not only streamlines the process of receiving feedback but also enables them to locate the content you want them to review more efficiently.
PowerPoint simplifies the process with its “Link to This Slide” feature, generating a direct link that opens the file at the specific slide in your presentation.
The presentation has to be saved in cloud storage that the receiver/s can also access it. If the presentation isn’t already saved online, modern Office will help you do that.
Launch PowerPoint presentation stored on your local drive. Next, navigate to the specific slide you wish to share. Then, right-click on the desired slide and a shortcut menu pops up. From this menu, select the option “Link To This Slide” to generate a direct link to the chosen slide within your presentation.

Selecting “Share Link To This Slide,” will prompt you to upload your presentation to OneDrive to allow sharing.

Office just dumps the file into your OneDrive account, you’ll probably want to choose a specific folder instead.
Once the presentation is saved in a cloud location, you can share it or a slide. Do that from PowerPoint on the web or modern PowerPoint for Windows/Mac. Click on the slide in the slide navigator and select the “Link To This Slide” option.

The system generates a direct link that is ready to be shared but before you copy , check what permissions you’re giving to access the presentation and to whom.
Under the link is a short note to indicate the sharing settings for the current link. Click on Settings to change or verify the sharing. Or select the copy option, and you’ll receive a notification confirming that the link has been copied.

For more specific access privileges, go to the Settings option to customize permissions for reviewers or audience. You can choose with whom you want to share your files. This typically involves setting access permissions or sharing settings with user or user groups.
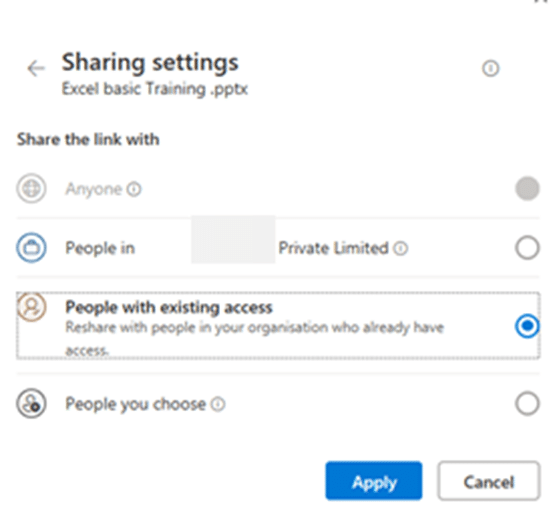
The sharing settings can include any of the following options, depending on the type of account (personal, business etc).
“Anyone With The Link Can Edit.” – permits anyone with access to the link to edit the slide’s content. This functionality facilitates effective collaboration and sharing among teams or groups. Opting for this setting grants editing privileges to anyone possessing the link.
“People in the Organization – accessible by the organization with the privileges to access the link.
“People you choose – selectively available.
Customize the access privileges more from the More Settings option, where you can define specific permissions, such as editing, viewing, and downloading for reviewers or audience.
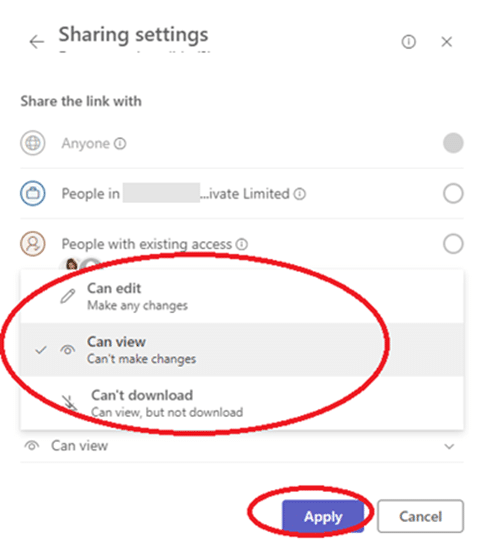
Finalize the process by clicking on the “Apply” button ensuring that the changes take effect according to your preferences.
Once you’ve configured the access privileges and applied the changes, you can proceed to share the link via email to the intended audience. Simply copy the link generated by the sharing feature and paste it into your email or other message.

At risk of stating the obvious, there’s another way to share a single slide with ‘read only’ access.

Take a screen shot of the slide and paste it into an email or message.
Using Designer for more eye-catching PowerPoint slides PowerPoint Cameo puts your video selfie into a slide Reuse slides in PowerPoint, the good and the annoying
About this author

Mayurakshi Mohapatra
Office 2021 - all you need to know . Facts & prices for the new Microsoft Office. Do you need it? Office LTSC is the enterprise licence version of Office 2021.
Office 2024 what's known so far plus educated guesses. Microsoft Office upcoming support end date checklist.
Latest from Office Watch
- Coin 🪙 emoji in Word, Excel, PowerPoint and Outlook
- Translate automatic or manual in Outlook
- Microsoft Mesh makes “magical” online meetings
- Why are Teams and Office divorcing?
- Pivotby – Excel’s new faster PivotTables
- More Excel on the web improvements
- All about editing an incoming Outlook message
- What “Update License” means on Microsoft 365 menus
- Excel’s warning about dates and centuries
- Write Excel formulas fast with free Copilot
- Easter images and icons in Microsoft Office
- Credit Card 💳 symbol in Word, Excel, PowerPoint and Outlook
- Yes, there will be a new version of Microsoft Office
- All about Office 2024 for Windows and Mac (so far)
- In person vs virtual event option coming to Outlook
- Checklists now in Microsoft Word
- Start Grouping in Excel for better looking sheets
- Three more Word features reach the web version
- Web link previews in Word for web

How to Record Customized Camera Feeds With Cameo in PowerPoint
T he widespread adoption of remote work and virtual meetings has led many people and organizations to realize they don't have to be physically present in the same conference room to make presentations. In fact, you don't even need to conduct them live.
However, recording your PowerPoint slides with your face on them requires technical know-how and third-party apps like OBS. This makes recording presentations a bit difficult and discourages people from doing it.
Thankfully, Microsoft has addressed this issue in PowerPoint 365 with the Cameo feature. Here's what it is and how to use it.
What Is Cameo in PowerPoint?
Cameo is a PowerPoint feature that lets you add your webcam or any other camera feed into your presentation. This makes it easier to present virtually, as your audience can see you from within your slides.
Previously, you needed a third-party app like OBS to overlay yourself on your presentation. You can also use a green screen overlay in Capcut or other similar apps to achieve the same effect. However, this takes a lot of effort and know-how.
But with this feature, you can do it from inside PowerPoint with just a few clicks. Here's how to insert a cameo into your slides.
- Go to Insert > Cameo .
- After clicking on Cameo, PowerPoint will insert a placeholder object on your current slide and open the Camera Format tab.
- You can edit the object as you wish, much like any other shape on PowerPoint. You can also click on the options in the Designer pane on the right side of the screen to help you work faster.
- Once you're happy with its placement on your slide, click on the Preview button to see your live video.
With that, you can start presenting your PowerPoint slides via screen sharing while still keeping yourself on the screen.
How to Record Your PowerPoint Presentation With Cameo
You can also insert a cameo from Record > Cameo . Clicking on this will bring you to the same menu tab and insert a placeholder object for your video. However, even if you didn't set up Cameo beforehand, you can insert it directly while recording your presentation. Here's how:
- Go to Record > From Beginning or Record > From Current Slide .
- In the recording screen, click on the Camera icon at the top. This will insert a round object containing your video in your slides' lower-right-hand section.
- Click on the Red icon to start recording your presentation.
- Go through your presentation as usual. For more information, check out our guide on turning your presentations into videos .
- Once you've finished, click the Red icon again to stop recording.
- Click Export to go to the Export to video screen .
- Change the File Name as needed, then click Browse to select the location where you will save your recorded video.
- Once done, click Export Video .
With that, you don't have to spend much effort to add your video feed to your PowerPoint presentation recording. However, the app only places your video at one location across every slide; it might cover some of your content. That's why it's better to use the Cameo feature when you're building or editing your PowerPoint presentation.
If you're unhappy with your recording, press the Retake Video on the left of the record icon. You can pick between On Current Slide or On All Slides .
What You Need to Record Customized Camera Feeds
You need a webcam and a Microsoft 365 account to record your customized camera feed. Furthermore, you cannot use Cameo or record presentations in the PowerPoint web app. You need to download and install it on your computer to use these features.
The Cameo feature is already available on Microsoft PowerPoint 365 in Windows and Mac. However, recording your presentation with Cameo is only available on Windows. As of the time of writing, this feature isn't available for the main PowerPoint 365 for Mac version.
If you're running macOS, you must be a Microsoft 365 Insider to get this feature. However, since the Cameo recording feature is already announced in the Microsoft 365 Insider blog , we hope it will be available in the mainstream PowerPoint for Mac version in a few months.
Recording Your Presentations Is Now Much Easier
The Cameo feature has made presenting PowerPoint slides in video calls easier. And with the recording function, you no longer need a third-party app to put your video over your presentation.
You can integrate it into each slide, allowing you to control where you are on your screen. And you also save a lot of time and effort, as you can record and save your presentation as a video from within Microsoft PowerPoint.

Make changes to a read-only presentation
If you want to reuse some of the slides in a read-only presentation, you can download a copy to your computer and make changes to the copy.
On the File tab, click Save As .
Click Download .

Pick the steps below for your browser to save and open the file.
Google Chrome displays the file name at the bottom left corner of the PowerPoint for the web task bar.
To open the downloaded file, click the down-arrow, and then click Open .

Internet Explorer
If you are prompted, click Save as .

In the Save As box, pick where you want to save your presentation.
In the File name box, give your file a name (if you haven’t already), and then click Save .

To open your downloaded file, go to the file folder where you saved it.
Under What should Firefox do with this file? , click Save file , and then click OK .

Need more help?
Want more options.
Explore subscription benefits, browse training courses, learn how to secure your device, and more.

Microsoft 365 subscription benefits

Microsoft 365 training

Microsoft security

Accessibility center
Communities help you ask and answer questions, give feedback, and hear from experts with rich knowledge.

Ask the Microsoft Community

Microsoft Tech Community

Windows Insiders
Microsoft 365 Insiders
Was this information helpful?
Thank you for your feedback.
IMAGES
VIDEO
COMMENTS
It's by no means un-editable. Open the presentation that you want to make read-only, then click the "File" tab. Next, in the left-hand pane, select "Info." You'll now see a "Protect Presentation" section, which lets you (to an extent) protect against any editing of your presentation. Click "Protect Presentation."
4] Select Always Open Read-Only. In order to set your presentation to Read-Only, you must click on Always Open Read-Only from the dropdown menu, and right away, the changes will take effect. Now ...
Open the desired PowerPoint presentation, and click on the " File " tab. Next, click on the " Info " tab from the options presented on the left part of the screen. Select the " Protect Presentation " option. From the dropdown, select " Always Open Read-Only ". Finally, save the file by pressing Ctrl+S.
In PowerPoint for the web, click the Share tab. Under Share, click Get a link. Under View only, click Create. Tip: Click Shorten to decrease the length of the URL that you share with others. Right-click the URL and click Copy. Under Share, click Send email. Enter the email address in the To box. Paste the URL in the message box, and click Share.
To make a PowerPoint Presentation read-only: Open your Powerpoint presentation. Choose File at the top left. Select Info on the bar on the left. Click Protect Presentation. In the pull-down menu ...
Here are the steps: Open the PowerPoint presentation you want to make read-only. Click on the "File" tab. Select "Info" on the left side of the menu. Click on "Protect Presentation" and choose "Mark as Final" from the drop-down menu. Marking a presentation as final sets it to read-only mode within PowerPoint.
PowerPoint for the web. If you want to reuse some of the slides in a read-only presentation, you can download a copy to your computer and make changes to the copy. On the File tab, click Save As. Click Download. Pick the steps below for your browser to save and open the file.
Select File > Info. Select Protect Presentation, point to Restrict Access, and then select Restricted Access. In the Permission dialog box, select Restrict permission to this presentation, and then select More Options. Under Additional permissions for users, select the This presentation expires on check box, and then enter a date.
Here's how to do it; Step 1: Open the document you want to protect and then click on "File". Step 2: Click on "Info" and then select "Protect Presentation". Step 3: In the options on the drop-down menu, click on "Mark as Final". Step 4: Click "OK" in the dialogue box that appears and click "OK" again to confirm.
How to Create a Read-Only PowerPoint Presentation. Step 1: Open Your Presentation. Begin by opening your PowerPoint file on your computer. Step 2: Save the Presentation. Click on the "File" tab, then select "Save As." Choose the destination where you want to save your presentation. Before clicking "Save," locate the "Tools" button and click on ...
Once selected, a drop-down menu will appear with these four options: Always open read-only: This asks the reader to choose to edit the presentation. This prevents accidental edits. Encrypt with password: This password protects your presentation. Add a digital signature: This adds an invisible digital signature to your presentation. Mark as final: This enables the reader to know that this is ...
This option is chosen by most people to make the MS PowerPoint 2010 presentation read only. You can add restrict permission to remove others' ability to edit, copy and print the presentation. Step 1: Access File > Info > Protect Presentation. Step 2: Click Protect Presentation and select Restrict Access from Restrict Permission by People option.
-In today's tutorial, we will teach you how to save PowerPoint as read only.Open PowerPoint presentation you need. Click on ´File´ at the top left corner of ...
2. Click the File tab. You'll see this in the editing ribbon above the document space with Animations and Home . 3. Click Protect Presentation. You'll see this with an icon of a lock to the right of the Info menu. A menu will drop down from the lock icon. 4. Click Mark as Final.
1: Open the presentation, then click "File > Save as.". 2: Click "Tools" at the bottom of the "Save As" dialog box, and then click "General Options.". 3: Type the Password you want to use in the box marked "Password To M; modify" and click "OK.". Enter the Password again and click "OK.".
Here are the steps. Open your PowerPoint presentation. Click on File > click on Info. Then click on Protect presentation. Select Always Open Read-Only. Now save your file by doing Ctrl + S. When you open your presentation above the presentation you will see it is marked as Read Only. As I said, the presentation is still editable by the person ...
Hi, Our company has purchased and installed custom fonts that we're wanting to use in our PowerPoint presentations. We've been editing documents in the desktop PowerPoint app with the new fonts, but then when we go to open up the web version, we get a message that says "READ ONLY: This presentation contains read-only embedded fonts.To edit it, use the app".
Open the read-only PowerPoint presentation and click the "File" tab. 2. Click "Info" from the left pane. 3. Click "Protect Presentation" and select "Mark as Final." This acts as a toggle selection.
In PowerPoint for the web, click the Share tab. Under Share, click Get a link. Under View only, click Create. Tip: Click Shorten to decrease the length of the URL that you share with others. Right-click the URL and click Copy. Under Share, click Send email. Enter the email address in the To box. Paste the URL in the message box, and click Share.
2: Add alternative text to images. Adding images to PowerPoint is a way to make your presentation more interesting and engaging. However, you want to make sure that your images have alternative text to ensure that individuals with visual disabilities understand the pictures or other graphical content. Alternative (Alt) text is essential for ...
Learn how to use PowerPoint better, from setting up your slide designs to working with text, images, video, charts, multi-media, and more. Discover how to work with PowerPoint's core presentation tools to make great presentations quickly, while maximizing your presentation design workflow. If you only have a few minutes to spare, then be sure ...
Launch PowerPoint presentation stored on your local drive. Next, navigate to the specific slide you wish to share. Then, right-click on the desired slide and a shortcut menu pops up. From this menu, select the option "Link To This Slide" to generate a direct link to the chosen slide within your presentation.
PowerPoint for the web. If you want to reuse some of the slides in a read-only presentation, you can download a copy to your computer and make changes to the copy. On the File tab, click Save As. Click Download. Pick the steps below for your browser to save and open the file.
Here's how: Go to Record > From Beginning or Record > From Current Slide. In the recording screen, click on the Camera icon at the top. This will insert a round object containing your video in ...
PowerPoint for the web. If you want to reuse some of the slides in a read-only presentation, you can download a copy to your computer and make changes to the copy. On the File tab, click Save As. Click Download. Pick the steps below for your browser to save and open the file.