Critical PowerPoint Shortcuts – Claim Your FREE Training Module and Get Your Time Back!

How to Narrate a PowerPoint Presentation (Step-by-Step)
- PowerPoint Tutorials
- Shortcuts & Hacks
- October 29, 2019
In this article you’ll learn how to narrate a PowerPoint, with either just your voice or using the new video narration feature.
Firstly, there are two different tools you can use to narrate your PowerPoint slides.

#1: Record Audio is the legacy PowerPoint narration tool. Although this tool doesn’t have as many features, it is faster to open and use, and is handy if you want to drop a voice note on a slide.
Features of this tool include:
- Voice narration only
- Adds narration to one slide at a time only
#2: Record Slide Show is the NEWEST (and best) narration tool in PowerPoint, giving you two different types of narration options plus a variety of other options.
The features here are:
- Voice narration
- Video narration (so your audience can also see your face)
- Allows you to narrate an entire presentation in one sitting
- Automatically sets slide timings for you if you later want to convert PowerPoint into a video
And before you get lost in either tool, let’s cover a few things which will help you out (trust me).
Narration definition in PowerPoint

In PowerPoint, narration simply means recording your presentation as you walk someone through it, so that you can easily share the whole thing with someone else.
On top of that, if you get creative, you can use your narrated PowerPoint files to:
- Share your presentation with team members around the world
- Create a library of best practices for your company
- Build training materials for new hires
1. You don’t need fancy recording equipment
Don’t let fancy equipment or a professional recording studio hold you back from narrating your presentation. For most situations, using the built-in microphone on your personal computer is enough.
For example, if you are doing something relatively informal, such as walking a colleague through something in PowerPoint, the quality of your audio doesn’t need to be extremely high.
If you are creating training materials or giving an important presentation, I recommend getting a decent USB microphone (you can see a list of top rated microphones here ).
That’s because they will help remove any background noise.
2. Find a quiet space and tell people you are recording
Regardless of the quality of your microphone, I recommend finding the quietest place possible to record your narration and let everyone know not to bother you.
When evaluating a quiet place, here are some things to be careful of and to spot check:
- Noisy air conditioners or refrigerators
- Street noise (cars, planes or pedestrians)
- Loud background office or cafe noise
- Cell phones, doorbells or other pinging noises
- Your kids playing in the background
For instance – imagine you are in the middle of narrating your presentation. All of a sudden a colleague knocks on your door or the doorbell rings, and you’re interrupted. It’s not the end of the world, but it will throw you off and likely annoy you.
In addition, if there is too much background noise (like a running air conditioner), the noise can be very distracting to whoever is watching the recording.
3. Check your microphone
The last thing you want to do is walk through your entire presentation, and then discover that your microphone wasn’t working.
Therefore, before narrating your PowerPoint, I recommend double-checking your recording equipment every time before you hit record. This includes ensuring that your equipment is properly plugged in (it happens).

- Right-click the speaker icon in the task bar (lower right-hand corner of your desktop)
- Select Open Sound settings
- Choose your Input device
- Click on Troubleshoot under T est and troubleshoot
Note: If you don’t see the audio bar filling up with color as you talk, that means that your input device is either not selected or not properly connected.
- Connect all your audio and video equipment to your computer
- Restart your computer: Start, Power, Restart
#1. Record audio (audio narration only)
While this is the legacy narration tool in PowerPoint, I want to cover it first.
That’s because even if you decide not to use it to narrate your PowerPoint presentation, it is extremely useful for dropping voice notes on your slides.
When used this way, you can quickly capture your thoughts and ideas about a slide without having to get bogged down editing or building it out on the spot.
Below I’ve detailed how to use this tool to narrate PowerPoint slides.
1. Open the Record Sound dialog box

To open the Record Sound dialog box, simply:
- Navigate to the Insert tab
- Open the Audio drop down
- Select Record Audio
Keep in mind that you can only narrate one slide at a time using this tool. Hence why it’s great for dropping voice notes on a slide, one by one.
2. Record your audio narration

Inside the Record Sound dialog box you can narrate your PowerPoint slide. Simply:
- Type in a Name for your Audio Clip
- Select the Record button (the red dot) to begin narrating
- Click Stop (the square) to stop your narration
- Hit Play (the triangle) to listen to your narration
- Click OK to save the narration to your slide
As a result, you will see a little audio object added to your slide that you can move around and resize if you like.

The audio file can also be played (simply click on the play icon) in both the Normal View and Slide Show View of your presentation.
In this way, you can work your way through your presentation, adding voice notes to your PowerPoint slides that you or your colleagues can play back from within your presentation.
To learn all about adding music to PowerPoint and how to loop your audio files, read our article here .
3. Playing your PowerPoint narration
By default, your audio file will be set to play In Click Sequence (explained below).
That means it will be added at the end of any animation sequences, trigger actions, etc.. If you don’t have any of these on your slide, it will automatically play when you to to advance to the next slide.
All you need to do is advance your slide (click, hit the space bar or arrow keys, etc.) and it will play.

To change when your audio file plays, simply:
- Select your Audio file
- Navigate to the Playback tab
- Open the Start drop down
- Choose either In Click Sequence , Automatically or When Click On
In Click Sequence means that your audio file plays as part of the click sequence of actions that happen on your slide. This includes animated sequences, trigger actions, and videos, all of which you can set in the Animations Pane.
If you do not have any sequences set up on your slide, your audio file will play right before you advance to the next slide in your presentation.
Automatically means your audio file plays as soon as you get to that slide in your presentation, instead of playing right before you advance to the next slide.
When Clicked On means your audio file will only play if someone clicks on it during the presentation in Slide Show mode. For example, you can use this option for a piece of audio that you may not have the time to play, allowing you to choose in the moment whether to play it or not.
4. Delete or overwrite a previous narration file
To delete an audio file narration, simply select the object on your slide and hit Delete on your keyboard.
If you want to overwrite or change an existing narration, simply use the Record Audio dialog box again (as described above). Doing so will overwrite the existing audio file on your slide.
Warning: Two narration audio files cannot exist on a slide at the same time. That means that if you narrate a PowerPoint slide a second time, the first recorded file will be overwritten.
To be clear, that means you will need to start over – from scratch – for the individual slide where you want to change the narration.
While you can trim an audio file in PowerPoint, you cannot split apart or merge different audio files like you could if you used dedicated audio editing software.
#2. Record Slide Show (audio + video narration)
The Record Slide Show command is the NEWEST and BEST way to narrate a PowerPoint presentation for a few reasons, including:
- Record both audio and/or video narrations
- Narrate your entire presentation in one sitting (you are not limited to creating slide-by-slide narrations)
- You can use the pen, highlighter and laser pointer commands and have them captured in your narration too
- The tool allows you to pause and restart your recording
- All your slide timings are automatically recorded, allowing you to use them to turn your PowerPoint presentation into a video (see how to do that here )
In short, unless you have a really good reason not to use the Record Slide Show command to narrate your presentation, this is what you should be using.
As you will see below, there are a lot more settings you can toggle on and off, but don’t let this stop your from recording your presentation.
1. Open the Record Slide Show dialog box

To open the Record Slide Show dialog box, simply:
- Navigate to the Slide Show tab
- Open the Record Slide Show command
- Choose Record from Beginning
If you simply click the Record Slide Show command in the Ribbon (instead of opening up the drop down) it will begin recording from the current slide.
Wait a couple of seconds, and the Record Slide Show commands will load, and you can start narrating your presentation.
2. Record your slide show narration
There are a lot more options you can choose from in the Slide Show dialog box that that I will explain below, but recording your narration is still pretty easy and straight forward

To start recording your slide show narration, simply:
- Choose your Camera and/or Microphone
- Make sure your Camera and/or Microphone is turned on
- Use the Record , Stop and Replay commands to start and stop your narrations
- Use the Arrow (or use your arrow keys) to advance to the next slide
Once you start recording, you get the option to pause the recording. This allows you to pause and collect your thoughts whenever you need to, and continue narrating your presentation when you are ready.

When you are finished, the individual video and/or audio file narrations are added to the lower right-hand corners of each individual slide, as you can see below.

As you can see in the picture above, your audio and video narrations are recorded and saved on a slide-by-slide basis. That means you can review and record narrations on any slide within your presentation.
Warning: You can only have one narration file per slide.
If you re-record an audio or video narration, it automatically overwrites any previous narrations you had on that slide.
The only way to have two different narration files on the same slide, is to record one with the Record Slide Show dialog box, and record the second with the Record Audio command.
3. Set your narration to Play
Your Record Slide Show narrations are set to play Automatically .
That means that whenever you run your presentation (from beginning or from current), your audio and/or video narration will automatically play.

To change when your audio or video narration plays, simply:
- Select the Narration file on your slide
- Choose either In Click Sequence , Automatically or When Clicked On
4. Record Slide Show options

Record (or hit R) to start recording your narration.
Pause (or hit I) to pause your narration and collect your thoughts. This button only displays once you’ve started recording.
Stop (or hit S) to end your narration. If you hit Record again, your new narration will overwrite the existing one.
If you want to stop narrating your current slide before starting on the next one, don’t use the Stop button. Instead, simply navigate to your next slide using your arrow keys or the forward arrow on screen.
Replay to replay your narration for the current slide. This button only becomes active after you have recorded a narration for that slide.
B. Speaker Notes options

Notes (or hit N) to open or close your speaker notes for that slide. The Notes window is fairly small and you cannot resize it very well.
Your action of opening and closing the speaker notes pane will not show up in your recorded narration.
Font Size commands increase and decrease the font size of your speaker notes so that you can see them better.
In my opinion the speaker notes pane is too small and not flexible enough for reviewing lots of speaker notes.
To learn how to print your speaker notes in PowerPoint, read our guide here .
C. Clear Recordings options

Clear Recordings allows you to clear your previous recording on either the current slide or on all the slides in your presentation.
You can also overwrite your recording and slide timings by simply recording over the top of your narrations.
Note: Using Clear Recordings removes both your slide timings and narrations.
That means that if you want to remove your narrations but keep your slide timings, you will want to clear recordings outside of the Record Slide Show dialog box. See how to clear timings and narrations below.
D. Input options: Camera and Microphone

Microphone allows you to choose which microphone you want to record with. So if you are using a microphone other than your computer’s built-in one, this is where you want to select your microphone before you begin recording your narration.
Camera allows you to choose which camera or webcam you want to use if you are recording video narrations. If you are using a camera other than your computer’s built-in one, this is where you want to select it before you begin your narration.
E. Advance Slide options

Next Slide advances the click sequence of your presentation, the same way hitting the right arrow key or clicking your slide with your mouse does.
If you have animated sequences or music that is supposed to play, clicking forwards will trigger those sequences, and eventually advance you to the next slide.
Previous Slide moves you back one slide in your presentation, but it is only available to you when you are not recording.
That’s because re-recording a narration automatically overwrites the previous narration. So once you start your recording, you can only move forward in your presentation.
F. On / Off: Camera and microphone

Microphone (on/off) turns your selected microphone on or off. You can turn your microphone off and still click through your presentation if you want to mute your sound in the recording.
Camera (on/off) turns your selected camera on or off. This allows you to add or remove video recording in your narration.
Camera Preview displays what your camera is recording during your narration. If seeing yourself onscreen while you narrate your presentation bothers you, simply turn camera preview off.

G. Ink options: Eraser, Pen and Highlighter

The Pen (Ctrl + P), Highlighter (Ctrl + I), and Eraser (Ctrl + E) allow you to draw and highlight things on your slides during your presentation.
To change the color of your ink, simply click on one of the colors at the bottom of your screen.
Anything that you draw on your slides during your narration will be recorded as you draw them. That means that someone watching the recording will see you draw on the slide, as you narrate your presentation.
H. Slide Timings options

Slide Timings show you how long you have spent on each slide, and which slide you are on within your presentation.
Therefore, if you are converting your PowerPoint presentation into a video, these slide timings determine how long you spend on each slide.
To learn all about how to convert PowerPoint to video, read our guide here .
I. Close / Minimize options

Close / Minimize allows you to close out of (or minimize) the Record Slide Show app.
Use the Close icon (the x) to exit out of the Record Slide Show dialog box and return to the Normal View of your presentation. You can also hit the Esc key on your keyboard to close out of the dialog box.
#3. How to clear your Timings and Narrations

To clear your Timings and Narrations from the Normal View of PowerPoint, simply:
- Open the Slide Show tab
- Open the Record Slide Show drop down
- Select Clear
- Choose the Timings or Narrations you want to clear
If the Clear command is grayed out when you open the Record Slide Show drop down, that means that you do not have any Narrations or Timings (same as for transitions) set for your presentation.
Clear Timing on Current Slide removes the set transition timing for the current slide.
Clear Timings on All Slides removes the set transition timings on all the slides within your presentation.
Clear Narration on Current Slides removes any voice or video narration you’ve recorded on the current slide.
Clear Narration on All Slides removes any voice or video narrations from your entire presentation.
Note: You can also clear the Timings and Narrations for your slides at the same time from inside the Record Slide Show dialog box.

Inside the dialog box, simply click the X and choose to Clear Recordings on Current or Clear Recordings on All .
#4. How to compress your PowerPoint narrations

Adding audio and video narrations to PowerPoint significantly increases the size of your presentation as you can see in the picture above.
Therefore, I recommend compressing your file after you’re done recording narrations.
After narrating your PowerPoint, you can compress your audio and video narrations. To do that, simply:
- Navigate to the File tab
- Select the Info group
- Open the Compress Media drop-down
- Choose a compression quality
PowerPoint automatically uses the Full HD (1080p) when recording your voice and video. So if you are tight for space, you will need to choose either the HD (720p) or Standard (480p) options .
To learn a variety of other ways you can reduce your PowerPoint file size, read our compression guide here .
That’s how to narrate a PowerPoint, and the different options you have using the Record Audio and Record Slide Show options.
If you have the latest version of PowerPoint, I highly recommend using the Record Slide Show option as it gives you the most options to work with.
Just keep in mind that narrating your PowerPoint with audio and video can greatly increase the size of your presentation. Therefore, you may end up needing to consider compress it.
If you enjoyed this article, you can learn more about how to improve your PowerPoint skills by visiting us here
What’s Next?
Related articles, about the author.

Popular Tutorials
- How to Strikethrough Text (l̶i̶k̶e̶ ̶t̶h̶i̶s̶) in Word, Excel & PowerPoint
- How to Make Animated Fireworks in PowerPoint (Step-by-Step)
- Strikethrough Shortcut (l̶i̶k̶e̶ ̶t̶h̶i̶s̶) for Word, Excel & PowerPoint
- How to Create a Flash Card Memory Game in PowerPoint (Like Jeopardy)
- Keyboard Shortcuts Not Working: Solved
PowerPoint Tutorial Categories
- Strategies & Opinions
- Presentation Design
- Pictures, Icons, Videos, Etc.
- New Features
- Miscellaneous
- Charts & Data Viz
We help busy professionals save hours and gain peace of mind, with corporate workshops, self-paced courses and tutorials for PowerPoint and Word.
Work With Us
- Corporate Training
- Presentation & Template Design
- Courses & Downloads
- PowerPoint Articles
- Word Articles
- Productivity Resources
Find a Tutorial
- Free Training
- For Businesses
We help busy office workers save hours and gain peace of mind, with tips, training and tutorials for Microsoft PowerPoint and Word.
Master Critical PowerPoint Shortcuts – Secure Your FREE Training Module and Save Valuable Time!
⌛ Master time-saving expert techniques.
🔥 Create powerful presentations.
🚀 Propel your career to new heights.
We value your privacy – we keep your info safe.
Discover PowerPoint Hacks Loved by Industry Giants - KKR, AmEx, HSBC!
Over 114,880 professionals in finance, marketing and sales have revolutionized their PPT skills with our proven methods.
Gain FREE access to a full module of our premium PowerPoint training program – Get started today!
We hate spam too and promise to keep your information safe.
You are currently viewing a placeholder content from Facebook . To access the actual content, click the button below. Please note that doing so will share data with third-party providers.
Home Blog PowerPoint Tutorials How to Narrate a PowerPoint Presentation
How to Narrate a PowerPoint Presentation
Similar to doing a commentary to videos, you can also add narrations to your PowerPoint Presentation . It’s an interactive way to provide information to your audience instead of letting them read all points on the slide, with the added value that helps people with visual impairments.
This guide will cover how to create a narrated PowerPoint presentation using Microsoft PowerPoint on Windows.

System Setup
Before going straight to narrating a PowerPoint presentation, make sure that you’re in a quiet environment and free from unnecessary background sound. Noises from air conditioners, fans, street noise, and people nearby can be heard on the narration recording, leading you to start over again. Investing in soundproofing foam for better sound insulation is an expenditure that pays itself over time, you won’t regret such action.
Another factor to look out for is checking if your computer’s microphone is working properly. To double-check the microphone on Windows, follow these steps:
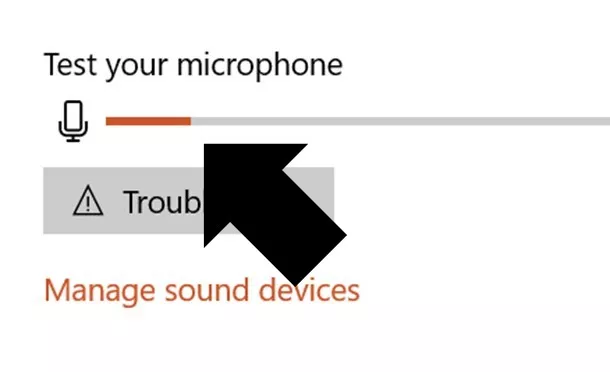
- Go to the Start menu and select Settings > System > Sound .
- Under Input , make sure that it is set on your computer’s default microphone .

3. Also, try speaking near the microphone and check if the audio bar is moving (under Test your microphone ).

4. If you’re experiencing mic problems, click the Troubleshoot button and follow the on-screen steps. Then, restart your computer and see if the mic issue is solved.

Finally, and as extra caution, be sure to properly place your microphone in the scenario that you use an external microphone (not a handset). Dynamic microphones, thanks to their affordable price, are an option these days for many users, but they do count with a “recordable” side: this means that according to their polar curve, there is a side on the microphone that will record sound in proximity to it, and there’s a side that won’t capture sound at all. Refer to the manufacturer specs prior to blaming any potential issue. In this link , you can find more information about different microphones and their accessories to ensure the best result.
Method #1: Narrate a PowerPoint Presentation (Audio-Only)
This first method to narrate a PowerPoint presentation is ideal to add audio narration to those already-made presentations.
- Open your PowerPoint presentation, navigate to the Insert tab, and click the Audio dropdown icon.

2. You can add audio using two ways; if your audio is pre-recorded and saved on your computer, select the Audio Browser option and select the narration recording. Whereas if you want to record a new narration, click Record Audio .

Note : You can only narrate one slide at a time using the Record Audio option, which makes it suitable for narrating key points.
3. After clicking Record Audio, a new window will appear on the right side of the screen.

4. To record, click the red button; the audio bar will begin moving as you start narrating.

5. To stop the recording, click the Stop button. You can listen to the narration right after by selecting the Play icon.

6. If you want to start over, click the Discard button.

7. When it’s ready, you can add it to the slide by clicking the Insert button.

8. A white audio icon will appear on the slide. You can adjust the icon by selecting it and dragging one of the points on the border. You can also see the play, forward, backward, and volume icons on the playback bar.
9. To set the timing of when the audio will play, go to the Playback tab and find the Start option ( Play icon with lightning ). By default, this will be set to In Click Sequence , but you can also change it to Automatically , or When Clicked On .

- In Click Sequence – The audio will play based on the click actions or animations that are set in the slide. You can adjust this by going to the Animation Panel . If you don’t have any animations on the slide, the narration will play before you advance to the next slide.
- Automatically – The audio will play as soon as you arrive on the slide.
- When Clicked On – The narration will only play once the audio icon is clicked on Slide Show mode . This works great for audio that’s only optional to listen to.

Method #2: Record SlideShow
The second method to narrate PowerPoint presentations may seem more taxing, but it can be done when creating the assets to include in the presentation.
1. Navigate to the SlideShow tab and select the Record SlideShow icon. This will let you record the presentation from the beginning.

2. The Record SlideShow window will soon appear. Here are its parts:
- On the top bar, you’ll see the recording duration, the trash, record, and pause buttons. You can also toggle the camera and microphone by clicking their icons on the right edge of the bar.

To blur your background on the camera, click the Camera dropdown menu and select Blur Background .

- Below, you’ll see the current and next slide previews. You can also add notes under the Next slide preview. You can adjust the font of the notes by clicking the buttons on the bottom-left.
- If you want to move to the next slide or go to the previous one, use the arrow buttons below the Current slide preview.
- To create illustrations or drawings, use the drawing tools that are beside the forward and previous buttons.
- You’ll see all slide thumbnails on the bottom of the screen.
Note : To know more about keyboard shortcuts on the Record SlideShow window, open the Tips button by clicking it.

3. To record the entire presentation, make sure that the camera and microphone features are switched on. Then, press the Record button when you’re ready.
4. You can choose to pause the recording by pressing the Pause button.

5. To stop the recording, click the Stop button. You can check the narration by pressing the Play button; once you want to delete it, click the Trash button.

6. Once it’s ready, select End Show . You can see the narration on each slide, indicated on the slide thumbnails .

7. To set the timing of when the narration video will play, select the narration thumbnail on the bottom-right of the slide and go to the Playback tab.

8. Similar to the first method, navigate to the Start options. By default, the timing is set to Automatic . You can also change this to In Click Sequence , or When Clicked On .

9. To clear timings and narrations on all slides, go to the SlideShow tab and select the Record SlideShow dropdown arrow.

10. Under the Clear options, you can choose if you want to Clear Timings on Current/All Slides or Clear Narrations on Current/All Slides .
Final Thoughts
Adding narration to your PowerPoint presentations is a great strategy to keep your audience engaged . You can use these methods to point out the brief points on each slide, besides letting your audience read the content on the slide.
Keep in mind that narrating is not an alternative to inserting videos into your PowerPoint presentations since they target different objectives from a content perspective.

Like this article? Please share
PowerPoint Tips, PowerPoint Tools Filed under PowerPoint Tutorials
Related Articles

Filed under PowerPoint Tutorials • April 16th, 2024
How to Insert an Equation in PowerPoint
Learn how to create easy-to-understand science slides by mastering how to insert an equation in PowerPoint. Step-by-step guide.

Filed under PowerPoint Tutorials • April 9th, 2024
How to Remove Notes from PowerPoint
Make alternative versions of your presentation files by learning how to remove notes from PowerPoint. Step-by-step guide with screeshots.

Filed under PowerPoint Tutorials • April 2nd, 2024
How to Round Corners in PowerPoint
Learn how to add rounded corners to shapes and images in PowerPoint. Elevate your presentations with sleek designs. Expert tips and step-by-step guides.
Leave a Reply
How to Record a PowerPoint Presentation with Narration
Can be helpful in creating a dramatic narrative
Microsoft PowerPoint has a built-in recording tool that allows you to narrate your presentations using recorded audio. You can export and share recorded presentations as video files.
This tutorial covers everything about recording PowerPoint presentations on Windows and Mac computers.

Record PowerPoint Presentation with Narration
Open the PowerPoint file/presentation you want to record and follow the steps below.
Record PowerPoint Presentation on Windows
- Select the slide you want to start recording from on the slide thumbnail pane.

- Head to the Record tab on the ribbon and select the Record button to start recording from the current/selected slide.

To record from the first slide, select the down-facing arrow icon below the Record button and select From Beginning .

You can also record a presentation from the Slide Show tab. Select Slide Show on the ribbon and select Record , From Current Slide , or From Beginning .

That’ll open PowerPoint’s presentation recorder in a fullscreen window.
- Select the Record icon and start speaking after the three seconds countdown.

PowerPoint records the presentation window and captures your voice and webcam feed as you navigate the slides. Select the left-facing and right-facing arrows to move to the previous and next slides in the presentation.
Record PowerPoint Presentation in macOS
- Open the Slide Show tab and select Record Slide Show .

- Select the Record button on the toolbar to start recording your narration.

Use your keyboard arrow keys to move back and forth between slides. Press N or Space Bar to move to the next slide or animation in the presentation. Press P or Backspace to return to the previous slide or animation.
Select Tips in the top-left corner for more keyboard shortcuts and other presentation tips.

Note: The narration tool doesn’t record slide transitions. When moving between slides, wait for the destination slide to appear on the screen before speaking.
PowerPoint Recorder Control/Settings
You’ll find a handful of controls and options on the recording tool. We’ll show you how to use these controls to include voiceovers or audio recordings in your presentation.

Using Presentation Pointer Tools
PowerPoint provides several tools to mark up your slides when narrating your presentation. There’s a pen tool, eraser, laser pointer, and highlighter.
With the Pen tool, you can draw on slides during narration/recording. Press Ctrl + P (Windows) or Command + P (Mac) to use the pen tool. You can also select the Pen icon to convert the pointer to a pen.

The Laser pointer tool converts your cursor to an onscreen laser. Use the laser pointer to draw attention to something on a slide/presentation.
Press Ctrl + L (Windows) or Command + L (Mac) to use the laser pointer. There’s also a Laser pointer icon on the toolbar.

Pressing Ctrl + I (or selecting the Highlighter tool ) converts your cursor to a highlighter.

Use the Eraser tool to remove inks and highlight from slides. Select the Eraser icon or press Ctrl + E and select the ink to erase.

On macOS, select the Erase Pen icon (or press E ) to erase all drawings and highlights on the slide.

You can change the pointer tools ink from the color selection boxes. However, one major limitation is that you can’t change the size of these pointer tools.
Pause and Resume Your Recording
In Windows, press I on your keyboard or select the Pause button in the top-left corner to pause your recording.

Press I again or select the Record icon to resume the recording.

If you use a Mac, select the Pause icon in the top toolbar to pause the recording.

Unmute or Mute Microphone
Check that your microphone is unmuted before recording. Select the microphone icon in the bottom-right corner to mute or unmute your mic.

PowerPoint for Windows allows you to mute and unmute your microphone in real time while recording video/audio narrations. The macOS version of PowerPoint only lets you configure your camera and microphone settings before recording.
Switch Microphone or Camera
Want to record your presentation with an external microphone or camera? Press Ctrl + M or select the audio/camera settings icon in the top-right corner and choose your preferred microphone/camera.

In macOS, select the microphone icon to mute or unmute your microphone. Select the arrow-down icon next to the microphone or camcorder icons to switch input devices.

Enable and Disable Camera
The recorder displays your camera or webcam feed in the bottom-right corner of the presentation slides.
Select the camcorder icon to remove your webcam feed from the recording. Select the icon again to display your webcam feed in the presentation.

You can also use the Ctrl + K keyboard shortcut on Windows computers to enable or disable your camera.
On Mac computers, you’ll find the video control icon on the top toolbar.

Note: The recording tool greys out the camcorder icon if your microphone is turned off.
Enable or Disable Camera Preview
PowerPoint allows you to disable the camera preview without turning off your camera or webcam.
Press Ctrl + J (Windows) or select the Camera Preview icon in the bottom-right corner to disable or enable the camera preview.

End a Recording
Press S on your Windows keyboard or select the Stop icon to end the recording.

Replay or Preview Your Recording
When you end a narration, press V on your keyboard or select Replay to preview or watch the recording.

The recorded narration will include all pen inks, highlights, and laser pointer gestures made during the presentation.
You can also preview/replay the narration outside the recording tool. Open the Slide Show tab and choose to watch the playback From Beginning or From Current Slide .

PowerPoint allows you to preview the playback on individual slides. A speaker/audio icon appears in the bottom-right of PowerPoint slides with narrations.
Choose the slide you want to preview, hover your cursor on the speaker icon in the bottom-right corner, and select Play .

Delete Current Narration/Recording
Did you spot an error when previewing your presentation? Want to delete the current narration and start from scratch?
Select the Clear existing recordings icon and choose whether to Clear Recordings on Current Slide or Clear Recordings on All Slides .

On Mac, select the Bin icon to delete the entire narration/recording.

Close the Narration Tool
Select the X icon on the title bar to close the presentation narration tool and return to Powerpoint.

Select End Show in the top-left corner to close the recording tool on a Mac computer.

Delete Narrations from Slides
Want to delete the narration or timing on an individual slide or the entire presentation? Select the slide with the narration you want to delete and follow the steps below.
- Open the Record tab and select the down-facing arrow below the Record icon.
- Select Clear and choose to clear timing or narration on current or all slides.

Export Recorded or Narrated Presentation
You can export a narrated PowerPoint presentation as a video file. The video output includes ink strokes, recorded audio/video, laser pointer gestures, and webcam/camera recording.
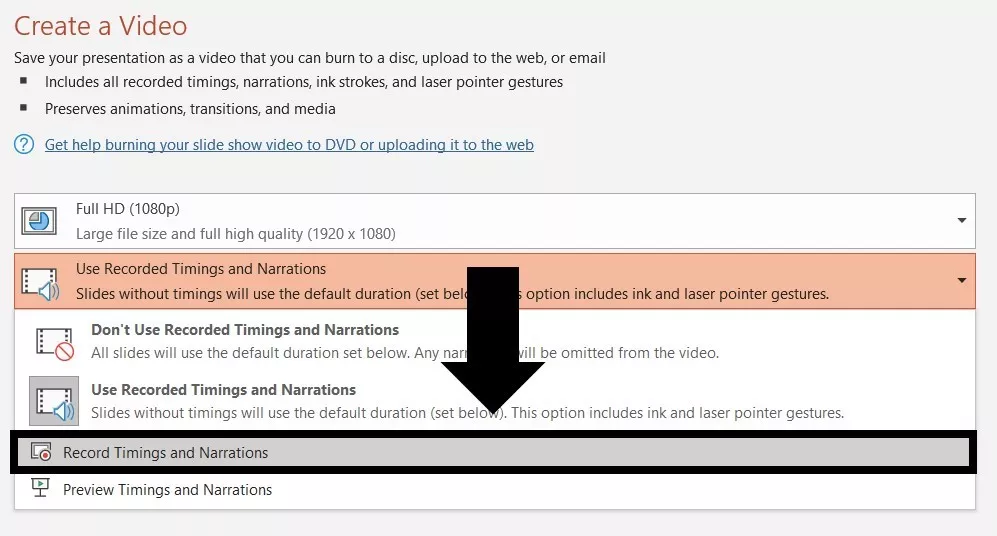
- Open the Record tab and select Export to Video .

Alternatively, open the File menu, select Export on the sidebar, and select Create a Video .

- Choose the quality of the video export in the first drop-down box—Ultra HD (4K), Full HD (1080p), HD (720p), Standard (480p).

- Choose Use Recorded Timings and Narrations in the next drop-down box and select Create Video .

- Give the recorded presentation a file name and select Save .

Narrate Your PowerPoint Presentations
The Microsoft PowerPoint web app doesn’t have a recording tool. As a result, you can only record presentations with narrations using PowerPoint for Windows or Mac.
You might meet issues recording a slide show if you use an outdated version of PowerPoint. Also, the recording tool on older versions of PowerPoint has a different interface and lacks some controls. Update PowerPoint and restart your computer if you cannot record a slide show.

Sodiq has written thousands of tutorials, guides, and explainers over the past 4 years to help people solve problems with Android, iOS, Mac, and Windows devices. He also enjoys reviewing consumer tech products (smartphones, smart home devices, accessories, etc.) and binge-watching comedy series in his spare time. Read Sodiq's Full Bio
Read More Posts:

Leave a Reply
Your email address will not be published. Required fields are marked *
How to Narrate a PowerPoint Presentation (And Record Your Voice)
For a presentation that you aren’t actually giving in person, you can narrate it within PowerPoint, recording your voice so that others can play it back when they watch the presentation.
It’s a nifty trick that popular with slide shows and presentations on networks such as SlideShare, YouTube, and even individual websites. And it can even help you when rehearsing your presentation as well.
Here’s how to narrate a PowerPoint presentation by recording your voice, in a few quick steps!
How Does Unlimited PowerPoint Templates Sound?
Download thousands of PowerPoint templates, and many other design elements, with a monthly Envato Elements membership. It starts at $16 per month, and gives you unlimited access to a growing library of over 2,000,000 presentation templates, fonts, photos, graphics, and more.

Ciri Template

Maximus Template

BeMind Minimal Template
Explore PowerPoint Templates
Create and Design Your Presentation
The first step to preparing a narrated or recorded PowerPoint presentation is to design the presentation and refine the content. During this step you may even want to think about how you will script the presentation so that you are designing with a flow in mind.
Make sure to include any specific transitions you want to use from slide to slide, and don’t forget to read our guide on how to design a professional presentation for tips and pointers.
Prepare for Recording
Before recording a narration, it is advised to write out a script and check your computer microphone to ensure that the sound is correct and that recordings will be at an appropriate volume. You can do this with a short test recording.
Now it is time to record the narration. You can record narration for all slides or select slides.
Open your presentation and navigate to the Slide Show tab.

If you are recording narration for all of the slides, you are ready. If you plan to record a voiceover for only some of the slides, you want to hide the slides you won’t have a recording for.
You can do this by selecting the slides you don’t want to include, right- or ctrl-click and then Hide Slide.

The other option is to create a custom show. From the menu select Custom Show > Custom Slide Show > use the + to add slides. You will need to know which slide numbers you want for this option because you can’t see previews.
Record the Narration

Now you are ready to record. (Good luck!)
In the Slide Show tab, click the Record Slide Show Button from the first slide in your presentation.

Recording starts automatically. (You’ll notice the screen shifts into full presentation mode.) As you record the narration, you can use the navigation tools on the screen to advance slides. This will override any previous timing settings so that slides advance in tandem with your voice narration.
When you are finished, click End and you will be prompted to save the recording. Only one recording can be saved at a time. A new recording will override any previously saved recorded narrations.
You can preview the recording using the start button.
Helpful Keyboard Shortcuts
Using keyboard shortcuts during recording can make it a little easier.
Some shortcuts you might use include:
- Click, spacebar or right arrow: Advance to the next slide
- Delete or left arrow: Go back one slide
- B: Toggle to black screen
- Esc: End slide show recording
Choose a Playback Option

Finally, you’ll want to determine how the presentation will be played back for users.
Click on Set Up Slide Show from the menu and make your selections from the options on the screen. Then you can save or export to a desired file format.
A PowerPoint presentation with a narrated recording can be a useful tool to help get your information in front of more people. All you need to do it is a quiet room to record and a microphone attached to your computer.
Don’t forget to take a look at our full PowerPoint templates guide , or our collection of the best PowerPoint templates for your next project!
How to Narrate a PowerPoint: A Step-by-Step Guide

Adding narration to your PowerPoint presentations can make them more dynamic, engaging, and accessible. Whether you are creating a presentation for work, school, or personal use, narration allows you to provide additional context and explanation beyond what simple slides with bullet points can offer.
Follow this step-by-step guide to learn how to record narration for your PowerPoint slides.
Prepare Your Presentation
Before narrating your presentation, make sure your PowerPoint slides are complete. Outline the key points you want to cover on each slide. You don’t want to be creating slides or making major revisions while recording your narration.
Some tips for preparing your presentation:
- Organize your content logically into a slide deck
- Use concise bullet points instead of lengthy paragraphs
- Ensure visuals complement your narrative
- Check for spelling/grammar errors beforehand
Set Up Your Equipment
To record high-quality narration, you will need:
- USB microphones provide great sound quality
- Headset microphones filter out ambient noise
- Laptop microphones suffice for informal presentations
- Avoid echo-y rooms or noisy backgrounds
- Record when you have privacy
- Using PowerPoint online does not support narration
Record Your Narration
Once your slides and equipment are ready, it’s time to record!
On Windows:
- Open your presentation and click on the Slide Show tab
- Click on Record Slide Show > Record from Beginning
- Click the round, red Record button and begin narrating when prompted
- Advance slides and pause recording between slides
- Press Esc or click the square Stop button when finished
- Click on the Slideshow menu > Record Slideshow
- Select recording options > click Start Recording
- Follow steps 3-5 above
Rehearse your script to ensure smooth narration. Remember to speak slowly and clearly.
Save and Share
After recording, save your presentation to preserve the narration:
- File > Save As > Choose file type .pptx
- Upload to Microsoft Stream or YouTube
- Save as MP4 video
- Share link to PowerPoint file
Add captions or subtitles to maximize accessibility.
Tips for Great Narration
Follow these tips for compelling PowerPoint narration:
- Engage listeners : Use vocal variety and evoke emotions
- Pace speech : Allow time for key points to sink in
- Avoid filler words : Omit “ums”, “likes”, etc. during editing
- Use slide notes : Add a script to Notes section of each slide
- Edit mistakes : Rerecord slides or edit out minor errors
- Practice makes perfect : Rehearse many times prior to recording
With this easy guide, you can start narrating your PowerPoint presentations like a pro. Narration makes content more interesting, memorable, and inclusive.
About The Author
Vegaslide staff, related posts.

How to Change the Page Size in PowerPoint 2010

How to Make PowerPoint Read Aloud

How to Add Hyperlinks to PowerPoint Presentations

How to Add Picture in PowerPoint

How-To Geek
How to record voiceover narration in powerpoint.
If you're not able to physically present your slideshow, record a voiceover narration to make sure no points are missed.
Quick Links
Preparation, record a voiceover for your presentation.
If you’re sending out your presentation instead of giving it in front of an audience, but you feel adding a vocal explanation would better help to deliver the message, record a voiceover narration. Here’s how to do it.
Before you begin your PowerPoint narration, you’ll need to make sure you’ve made the proper preparations.
Set Up Your Mic
First, you’ll need a microphone. Most modern computers have a built-in microphone that gets the job done, but investing in a USB microphone will increase the audio quality of the narration by quite a bit.
The built-in microphone will be set as your input device by default, so if you plan on using it for the PowerPoint narration, you don’t need to take any additional steps in setting it up. However, if you plan to use a USB microphone for the narration, be sure to set it as the input device.
To do this on Windows, right-click the volume icon found on the right of the taskbar. In the menu that appears, select “Open Sound Settings.”
The “Sound Settings” window will appear. Here, scroll down to the “Input” section and click the box under “Choose your input device.”
If you’re using a USB microphone, it will appear here. Select it to set it as the input device.
The steps for Mac users are extremely similar. The only difference is you should go to "System Settings" and select "Sound" instead of right-clicking the volume icon like on Windows. From there, the steps are the same.
Take Notes and Rehearse
With your mic set up, you’re ready to start recording, right? Well, not quite. While you may not be physically standing in front of the audience delivering this presentation, you still need to treat it as though you are. This means going through the basics---taking notes and rehearsing your delivery.
One thing you can do to help you record a successful narration is to write out a script. As with a live presentation, though, you don’t want to sound like you’re reading straight from your notecards. Practice reading through the script a few times so that it sounds natural and fluid.
Once you’re confident in your delivery, it’s time to start recording.
Open the PowerPoint presentation in which you would like to record a voiceover narration. Head over to the “Slide Show” tab and, in the “Set Up” group, select “Record Slide Show.” Once selected, a drop-down menu will appear. Here, you can choose to start the narration from the beginning or from the current slide. If you choose to start recording from the current slide, make sure that you’re on the slide you’d like to start recording from.
Related: How to Record Your Screen with Microsoft PowerPoint
In this example, we’ll choose “Record from Beginning.”
Now, you’ll be in full-screen mode. You’ll notice a few extra tools appear, including a record button at the top-left corner of the screen. When you’re ready to start recording, click this button.
When you select the record button, a countdown timer will appear, giving you a three-second delay between clicking the button and starting your recording.
You can now start recording your voiceover narration! Continue through the presentation by clicking the right arrow to go to the next slide.
You can pause the recording at any time by pressing the pause button in the top-left corner of the window. The recording will automatically end when you make it to the last slide. Alternatively, you can press the stop button, also located at the top-left corner of the screen.
If you want to play your narration back, you can select the replay button.
A speaker icon will appear at the bottom-right corner of each slide that has a recorded narration. You can also play your narration back on each slide by hovering over the icon and pressing the play button.
If you’re not satisfied with the narration, simply repeat these steps to re-record.
How To Add Audio Narration To a Powerpoint Presentation
Useful way to create stand-alone content
PowerPoint is an app that enables you to create and deliver an engaging presentation to an audience. But what if the audience is not in the same room or you are sending it as a link or attachment?
This is why adding audio narration to PowerPoint slides timings is helpful and useful. You can record the narration from inside your presentation so that it plays while viewers watch. Adding voice-over narration to your Powerpoint presentation or video will turn it into evergreen stand-alone content.

This article will discuss how to add audio narration to a Powerpoint presentation for Windows 10.
Test Your Default Microphone
The first thing you will need is a working microphone. Most computers today come with a built-in microphone. If you plan to use your computer default microphone, you don’t have to take additional steps to add a microphone.
However, you do want to make sure it’s working and loud enough to hear. To set your default microphone, test it to make sure it’s working. To customize the properties, follow the steps below.
- Start by typing Settings in the search bar.
- Click on System > Sound .

- Look under Input for options to configure your microphone. Click the dropdown menu under Choose your input device to assign your default microphone.
- If you only have one microphone, there is nothing to select. To open additional microphone settings, click on Device properties > Additional device settings .

- Enable or disable speaker and access audio driver information under the General tab.
- The Listen tab enables you to allow or deny your mic to listen to the speakers.
- Adjust the microphone volume and balance settings under Levels .
- Change the default sample rate and bit depth under the Advanced tab.
- If enabled on your computer, Spatial sound can enhance the audio experience.
To test your microphone, go back to the Input section. If it’s not working, you can use the Troubleshoot button to try to resolve the issue.

Install a USB Microphone
- To enable your microphone , first, plug in the USB microphone to your computer. Then right-click on the volume icon on the taskbar.
- Click on Sounds .

- Under the Recording tab, choose the microphone you want to set up and click Configure .
- Under Configure your Speech Recognition experience , click on Set up microphone .

- When the setup wizard starts, choose the type of microphone you are installing and click Next.

- The next screen you see will provide tips for using your microphone and some text to read to test your settings.
- Follow the instructions from the wizard and test the microphone to make sure it is working correctly.
Set USB Microphone As Input Device To Use
If you want to use the external USB microphone you just set up to record your narration, you need to set it as the input device.
- Right-click on the volume icon on the right side of the taskbar and click on Open Sound settings.

- From the Sound Settings window, scroll down to Input and tick the box under Choose your input device .
- Select your USB microphone as the input device.
Rehearse & Take Notes
Now that your microphone is set up and tested, instead of jumping right in and starting to record, take the time to practice what you are going to say.
Take notes, write out a script, and rehearse the timings to save time, minimize errors, and ensure that your audio sounds fluid and natural.
Now you are ready to start recording.
Turn On the Recording Tab (Office 365)
- To turn on the Recording tab, navigate to File , click Options > Customize Ribbon > Recording > OK .

How To Record An Audio Narration For One Slide
The easiest way to add audio to your PowerPoint presentation is to record one slide at a time.
- Start by selecting the slide where you want to add the audio.
- Navigate to Insert > Audio > Record Audio .

- Choose a name for your voiceover and replace Recorded Sound with the name.

- To start your recording, click the button with the red dot. Read from your script and click the stop button when finished.
- The stop button is the middle square and will be highlighted in red while you are recording.

- To hear your recording, press the play button. If you like how it sounds and want to keep it, click OK .

- You can also hear the audio by clicking on the embedded audio icon on your slide. It will open a bar underneath where you can play your audio.
- You will now have a visible audio icon on your slide. To hide this icon for your final presentation, click on it.
- Click Playback in the top bar navigation, and tick off Hide During Show .

Record An Audio Narration For An Entire Slideshow (Office 365)
- Click on Recording from the top navigation, and then Record Slide Show .

- Choose either Record from Current Slide or Record from Beginning . The slideshow will open in the Recording window.

- There are buttons on the top left for recording, pausing, stopping, and playing. Click on the red, round button to start recording. There will be a three-second countdown for you to get ready.
- The slide you are recording will show up in the main pane of the window. To advance to the next slide, use the arrow on the right side of the window. To move to a previous slide, use the arrow on the left. Powerpoint with Office 365 will automatically record the time you spend talking on each slide. This includes any animations you have set up.
- Use the buttons on the bottom right-hand side of the screen to toggle your microphone, camera, and camera preview on or off. If you choose to re-record part or all your narration, Powerpoint will erase the old version to enable you to record again.
- When you finish recording, click on the square button at the top left-hand corner of the recording window.

- The timings for each slide will show up in the Slide Sorter view. To see your timings, click on View > Slide Sorter .

- See the timings under the slides from the Slide Sorter view in the image below.

Preview Your Slide Show
- To preview your slideshow with your narration, animations, and timings (set up before you started recording), click Slide Show from the top bar navigation. Make sure you are on the Home tab.
- Choose From Beginning or From Current Slide .

- To hear the audio for a single slide, go to Norma l view, click on the sound icon and click Play . Note that recorded animations won’t show up when previewing from a single slide.

Manually Set Slide Timings
- You can also manually set your slide timings to sync with your narrations. To do so, select the slide from Normal View and then click on Transitions .
- From the Timing group , select the After check box under Advance Slide .

- Enter how long you want the slide to stay on the screen before moving onto the next. Do this for every slide you want to use manual timings.
Publish Your Presentation For Sharing
You can save your presentation as a Powerpoint Show (.ppsx) or a video to share it with others. When a viewer opens a slideshow file, it will immediately open in slideshow mode.
To save your presentation, go to File , Save As and select the format from the dropdown menu.

If your presentation is huge and you want to send it as an email attachment, you might need to compress the file. A better option is to upload it to Dropbox, OneDrive, or Google Drive, and send the link to the desired recipients.
Related Posts
- How to Make a Checklist in Excel
- 15 PowerPoint Tips & Tricks To Improve Your Presentations
- How to Group Worksheets in Excel
- How to Create a Flowchart in Word and Excel
- How to Use Mail Merge in Word to Create Letters, Labels, and Envelopes

David has a background in small business and lives in Australia. He is a WordPress and Ubuntu Developer who enjoys design, CSS and tech tool integration. Read David's Full Bio
Leave a Reply
Your email address will not be published. Required fields are marked *
- WordPress Tutorials
- Graphic Design
- Presentations
- Shopify Knowledge Base
- Theme Collections
How to Narrate a PowerPoint Presentation: PPT Tutorial
Best methods for doing voiceover in powerpoint, how to add voiceover to separate slides, step-by-step guide on how to narrate a powerpoint presentation, bonus: best powerpoint templates for your presentation.
- Closing Thoughts
How to narrate a powerpoint? Let's learn!
Delivering a presentation to an audience doesn’t always require your attendance. The viewers may be in different rooms, cities, countries, and continents but still have the opportunity to learn the pitch deck. This is when recording voiceover narration enters the game. You are now able to apply your recorded comments right into your PowerPoint presentation ensuring that the viewers don’t miss the point of the message. What’s even better, you set the slide timing during audio record so that they remain synced.

In this walkthrough, you’ll learn how to narrate a PowerPoint presentation and what tools you’ll need to start capturing voiceover narration. Read our expert guide further if you want to improve your next slide show.
Surely, making a sound recording in a professionally-equipped studio is what everyone dreams about. But, if you have no opportunity to record the voiceover in the studio, it doesn’t mean that you cannot make a high-quality PPT narration. Consider a few practices that will help you significantly enhance the quality of your voiceover narration.
- Write down a plan for your recorded comments. For this, leverage a section for speaker notes in PowerPoint or print the script to keep the process on track.
- Get an affordable USB microphone to use instead of the one built into your laptop or PC. Take a look at Samson Go Mic or any other that you like.
- Make sure to exclude any background noise: disable noisy devices and close the door to prevent any distractions.
Although there may be other methods for a successful narration record, these three are enough to get you started.

Before considering how to narrate a PowerPoint presentation, let’s start with adding the audio to just a few selected slides by following the next steps.
Open PowerPoint and locate the “Insert” tab on the ribbon. On the right-hand side, you will see the Audio button, but before pressing the button, make sure that you’ve already selected the microphone in the system settings.

In the drop-down menu, choose “Audio on My PC” if you’ve already recorded the voiceover or “Record Audio” option in case you want to narrate right in your PowerPoint file. When selecting the second option, you’ll see a popup window telling you when you should press the red button, record the audio inside PowerPoint, and then place it on the slide.

Now that you know how to add audio to separate slides without timings for the whole pitch, it is logical to next consider the method of adding the voiceover to the entire presentation. But before we start, once again, make sure that your mic is turned on and ready to record.

- Open PowerPoint and set View to Normal. Start from the very first slide of the presentation to narrate the entire project.

Once done, you are ready to send a pitch to viewers with your voice-over narration integrated. When the viewers make the presentation play, the recorded audio will play on the timings you’ve recently set up.
As a pleasant bonus, we are glad to present you with three top-rated PowerPoint templates for your most engaging presentations. Equipped with all the necessary elements, they allow for arranging professional-looking pitches in the blink of an eye. So, let’s take a closer look at them.

Infographic Pack - Presentation Asset v2.1 PowerPoint Template

This is one of the fullest infographic packs you’ve ever seen for your pitch deck or any other kind of presentation. The elements included in the pack are all fully-editable, so it won’t be challenging to edit and customize the pitch. Among other features available at your disposal, consider the following:
- 23k+ total and 11k+ unique slides
- 30 categories in one pack
- Drag-n-drop placeholder
- More than 8k icons
- 45 color variations and more
Business Infographic Presentation - PowerPoint Template

If you’ve become bored with the default PowerPoint templates, it’s high time to opt for a custom, modern-looking one. For instance, check out the Zero PPT template for business and corporate projects. It can be used for annual reports as well as business meetings and conferences, or briefs on the company’s achievements. No matter what you use the template for, it will provide endless opportunities with the following elements available onboard:
- 200+ multipurpose, clean, and creative slides
- Custom animation for every single element
- 3D infographics
- 7 color schemes including light and dark backgrounds
- Normal and widescreen mode
Planner Presentation PowerPoint Template

Another PowerPoint template rated high according to users’ reviews refers to the Planner business template. It is the perfect solution for everyone who chooses minimalism when it comes to creating a pitch. With clean lines and shapes, the presenter can easily focus on content and highlight the most essential information. For hassle-free and fast customization, Planner provides:
- Over 6k total slides
- 16 premade colors along with 90 color themes
- Slide Master on board
- Versatile content comprising company overview, various infographics, data charts, etc.
- More than 6500 icons
Closing Thoughts: how to narrate a powerpoint
Narrating a PowerPoint presentation is effective and helpful, especially if you don’t have an opportunity to be in the same room in front of your audience. Adding voice over narration to your pitch and converting it to a video presentation saves you when you need to send an important report, etc.
This tutorial aims to prove that doing voiceover in PowerPoint is simple and doesn’t require any technical knowledge, with the possible exception of having some public speaking skills. To record audio and add it to a pitch deck, there’s no need to get costly equipment or spend money on a professional recording studio. All you need is a microphone, script of the records, and quiet space. And of course, a custom-made template to make your presentation jazzy and professional-looking. With all that available, you have no chance of ruining your presentation.
21 Easy Tips To Create A Powerful Presentation For Your Business [Free Ebook]
By clicking the button you agree to the Privacy Policy and Terms and Conditions .
The Magnificent 50 Free PowerPoint Templates
How to Make the Audience React? 10 Rules of a Successful PowerPoint Presentation
25 Business PowerPoint Presentation Templates
How to Use PowerPoint Pictures in a Smart Way?

Self-taught copywriter specialized in web design, marketing, and traveling. Graduated with a degree in German and English translation. Obsessed with guides, listings, and long-read blog posts. Open for new information and strives to explore more undisclosed subjects. Social Media Accounts: Fb , Twitter , LinkedIn .
Get more to your email
Subscribe to our newsletter and access exclusive content and offers available only to MonsterPost subscribers.

Related Posts
Best digital products award 2023 – honored by templatemonster, making a successful presentation: how to print google slides with notes, 15 clever color combinations that make your presentation professional, leave a reply cancel reply.
You must be logged in to post a comment.
Creating Narrated PowerPoint Presentations
Audio narration can be recorded to accompany Microsoft PowerPoint slides to create a self-contained multimedia presentation. All of the tools for recording and editing your narration are contained within PowerPoint. You will require a microphone.
On this page:
- Watch our recorded workshop
- Important tips before you start
- Reducing the file size of presentations
PowerPoint for macOS
Watch our recorded workshops.
Relevant pre-recorded video workshops available on our YouTube channel:
- How to Create Narrated PowerPoint Presentations (Windows) (~10 min)
- How to Create Narrated PowerPoint Presentations (macOS) (~15 min)
Important Tips Before You Start
- Some features in the Windows version of PowerPoint are unavailable in the macOS version.
- The browser version of Office 365 does not include the Record Slide Show option. You will need to download and run Office 365 locally to record narrated presentations.
- Instructional Technologies and Media Services (ITMS) provides best practices for video and audio recording .
- Finalize your slides before you start recording.
- Add a script by using slide notes to improve accessibility and provide a copy of your narration in text form.
- The Centre for Teaching Excellence provides an Accessibility Checklist for PowerPoint .
- Presentations with audio and other embedded media can result in larger file sizes. Follow the instructions provided to reduce file size (Windows only).
PowerPoint for Windows
In this section:
- Recording narration for PowerPoint presentations
- Removing recordings from PowerPoint presentations
- Saving narrated PowerPoint presentations
- Adding live captioning (subtitles) to PowerPoint presentations
- Using PowerPoint to screen record third-party applications
- Reducing the file size of your presentation
Recording Narration for PowerPoint Presentations
Once you have created your slides and set up any animations, go to the Slide Show tab, click Record Slide Show , and select either:
The browser version of Office 365 does not include the Record Slide Show option. You will need to download and run Office 365 locally to record narrated presentations.
- Record from Beginning to begin recording from the beginning of the presentation or,
- Record from Current Slide to begin recording from the slide you are currently on.
If you’ve previously recorded narrations/timings that you’d like to clear, you can select Clear and choose one of the options there.

The Record Slide Show view will open.
- To begin recording, click the red record button in the top left corner of the screen.
- Record your narration, click to proceed to the next animation/slide or use the arrows on the side to go to the next animation/slide.

To view your notes while recording a slide show, click on the Notes button in the top-middle of the screen. Your notes will appear there along with the option to adjust the font size of your notes.

You can also use the pen and highlighter tools to indicate things on your slides. These will appear in time with your narration when they were recorded.

You can also change your cursor to a laser pointer by right-clicking on either the pen or highlight tool, selecting Pointer Options, and then Laser Pointer.

To temporarily change your cursor to the laser pointer press and hold the Ctrl key and then click and drag the left mouse button.
Below is a short video of potential uses for the inking (pen/highlighter) tools.
Microsoft PowerPoint. Used with permission from Microsoft.
Browser does not support script.
Audio won't record when slide transitions happen so let this play first before you start speaking.
While your narration is being recorded the record button will change into a pause button. You can use this to temporarily pause your recording, then click the record button again when you want to continue with your narration.

- Use the Stop button to end your narration.
- Use the Replay button to review you recording.
Once you reach the end of the slideshow you will see a blank, black slide and a note at the bottom to saying “ End of slide show. Click to exit .” Click to end your recording.
Learn how to Turn your mouse into a laser pointer for presentations
Removing Recordings from PowerPoint Presentations
The best way to remove your narration and timings is to go to the slide show tab, click on Record Slide Show , select Clear and choose one of the available options:
- Clear Timing on Current Slide - to delete timings on the current slide.
- Clear Timings on All Slides - to delete timings from all slides at once.
- Clear Narration on Current Slide - to delete narration on the current slide.
- Clear Narration on All Slides - to delete narration on all slides at once.

Markings made with the pen/highlighter tool are considered narrations and will be deleted with the Clear Narrations option. Animations are considered timings and will be deleted using the Clear Timing option.
You can also remove the narration by
- deleting the sound icon on each slide, or
- from within the Record Slide Show view, using the Clear option.

Clearing recordings from current/all slides deletes narrations, animation timings, and markings made with the pen/highlighter tool.
Saving Narrated PowerPoint Presentations
Select File > Save As .
Select where you'd like to save your presentation to.
Under Save as type , select the dropdown arrow and then select PowerPoint Presentation (*.pptx) . (Do NOT save as older .ppt format otherwise you will lose the audio recording)
Select Save .
You can export presentations to Video Format (*.mp4), and select Internet Delivery or Low Quality settings for optimal performance. If you choose to provide the video format of your presentation we recommend that you also provide native PowerPoint Presentation (*.pptx) for accessiblility purposes.
Adding Live Captioning (Subtitles) to PowerPoint Presentations
PowerPoint allow you to present with real-time, automatic subtitles. Unfortunately, there is currently no saved record of the subtitles. However, a video recording of the presentations (with live subtitles) can be made.
Setting up Subtitles
On the Slide Show ribbon tab, check Always Use Subtitles and select Subtitle Settings . Select your Spoken Language, Subtitle Language (PowerPoint will auto translate if you choose a different subtitle language), and placement of the subtitles (default is Bottom (Overlaid).

More information on how to use subtitles:
- Present with real-time, automatic captions or subtitles in PowerPoint
- Video: Live captions & subtitles
Recording Subtitled Presentations
Once you have completed the steps above to turn on subtitles, you will need to create a screen recording to record your subtitled presentation.
On the Insert tab, select Screen Recording .

When you click Screen Recording , your PowerPoint window may minimise itself, click on it on the Windows taskbar to reopen.
Click Select Area and select the area you want to record.

- PowerPoint automatically records the audio and the mouse pointer, so by default those options are selected on the control dock. To turn them off, deselect Audio (Windows logo key+Shift+U) and Record Pointer (Windows logo key+Shift+O).
Go to the Slide Show tab of the ribbon and select From Beginning (or From Current Slide if you only want to record from your current slide).

Ensure the correct Slide Show view is within the area you’ve selected.
Click Record (Windows logo key+Shift+R).

Unless you pin the Control Dock to the screen, it will slide up into the margin while you record. To make the unpinned Control Dock reappear, point the mouse cursor at the top of the screen.
To control your recording:
- Click Pause to temporarily stop the recording (Windows logo key+Shift+R).
- Click Record to resume recording (Windows logo key+Shift+R).
- Click Stop to end your recording (Windows logo key+Shift+Q) (shown below).
Narrate your slideshow as you click through the slides, your subtitles will be automatically generated and appear on the screen as you narrate.
When you are finished recording, you can save your presentation: File > Save . The recording will be embedded on the slide where you started the recording.
To save the recording itself as a separate file on your computer, right-click the picture on the slide that represents the recording and select Save Media as . In the Save Media As dialog box, specify a file name and folder location, then click Save . This will save your presentation as a video file (mp4).
Right clicking on the recording will also give you additional options to trim and style your video. These options appear either above or below the context menu.

For additional information, see Record your screen in PowerPoint .
Using PowerPoint to Screen Record Third-Party Applications
PowerPoint can be used to create screen recordings of other third-party applications on your computer. For more information, see Using Microsoft PowerPoint for Screen Recording .
Reducing the File Size of Presentations
This feature is available in PowerPoint for Windows, but not on PowerPoint for Mac or PowerPoint for the web.
To reduce file size and improve playback performance you can compress your media files.
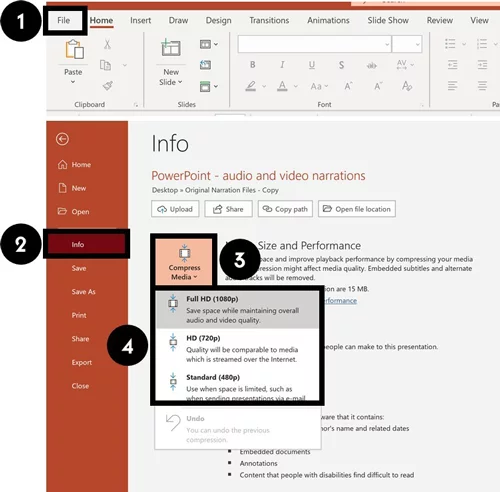
In a presentation with media (audio/video) files, go to the File tab, select Info and then Compress Media in the Multimedia Size and Performance section.
Specify the quality of the video by clicking on the Compress Media button and selecting one of the options.

- Full HD (1080p) Save space while maintaining overall audio and video quality.
- HD (720p) Quality will be comparable to media which is streamed over the Internet.
- Standard (480p) Use when space is limited, such as when you are sending presentations via e-mail.
Once you select one of the options above, a new Compress Media dialogue will pop-up to show you the compressions progress. Once it's complete, click Close to close the dialogue.
For additional information, see Compress your media files .
While PowerPoint for macOS is a great option for basic slide narration, it should be noted that several features available in the Windows version are not included in the macOS version. If you desire these rich features, it is possible to install PowerPoint for Windows using Parallels , which University of Waterloo staff may purchase at a discounted rate through IST OnTheHub .
Setting Up To Record
Recording slide audio.
- Preparing Your Narrated PowerPoint for Playback
Test and Save Your Presentation for Distribution
When accessing all Slide Show views, recording starts automatically. Press the Pause button to stop recording, or the Restart button to begin again. Some settings must be modified as indicated with a (*) before you Prepare Your Narrated PowerPoint For Playback .
Your presentation’s slides should be complete (you should avoid making further edits beyond this point). Before you begin recording, for each slide set up the following:
- Uncheck On Mouse Click
- Check After , and insert 2 seconds
- Click Apply To All
- Uncheck Play Narrations*
- Uncheck Use Timings*
- Select Presenter View from the options, then for each slide, add your recording script to each slide in the Slide Notes box.
- If you haven't already, add your slide notes (script) to each slide in the Click to add notes area.
The browser version of Office 365 does not include the Record Slide Show option. You will need to download and run Office 365 locally to record narrated presentations.
Select the Slide Show tab, then:
- In the upper right corner, hit the Pause button to stop recording, then the Reset button to begin recording at the beginning.
- Record each slide individually to minimize mistakes and avoid having to re-record your entire presentation.
- When you have completed recording each slide, select End Show , then select Yes to open the dialog box prompting you to save your narration.
If you select No when prompted to save your narration after selecting End Show , all of your work will be lost.

Preparing Your Narrated PowerPoint For Playback
Some settings must be modified from when you were Setting Up to Record as indicated with a (*) in order for your audio to play back during presentation view.
Each slide now contains a Speaker Icon in the lower left corner of each slide. Review each slide of your presentation and
- Check Play Narrations*
- Check Use Timings*
- Select the Speaker Icon, then from the Playback tab (appears only after you have selected the Speaker Icon ).
- Select Start > Automatically
- Check Play Across Slides
- Check Hide During Show
- Repeat these steps for each slide.
This process enables your audio narration to play back automatically as your presentation advances.

- From the Slide Show tab, select Play from Start .
- Once you are satisfied with your presentation, Save your file as a PowerPoint Presentation (*.pptx) . (Do NOT save as older .ppt format otherwise you will lose the audio recording)
You can export presentations to Video Format (*.mp4), and select Internet Delivery or Low Quality settings for optimal performance. Our instructions on converting and compressing videos for web delivery detail how you might also use a media compression tool like Miro or Handbrake to reduce the size of your MP4. If you choose to provide the video format of your presentation we recommend that you also provide native PowerPoint Presentation (*.pptx) for accessiblility purposes.

NB. All screenshots of PowerPoint used with permission from Microsoft.

Turn your presentation into a video
When you make a recording of a presentation, all its elements (narration, animation, pointer movements, timings, and so on) are saved in the presentation itself. In essence, the presentation becomes a video that your audience can watch in PowerPoint.
So you have two options for turning your presentation into a video that's ready to view:
Save/export your presentation to a video file format (.mp4 or .wmv).
Save your presentation as a PowerPoint Show (.ppsx) file. (A PowerPoint Show appears full-screen in Slide Show, ready to view immediately.)
Save as a video file
After you've created your slides and recorded any timing and narrations and laser pointer gestures that you want to include, you're ready to create a video file.

On the File menu, select Save to ensure all your recent work has been saved in PowerPoint presentation format (.pptx).
Select File > Export > Create a Video . (Or, on the Recording tab of the ribbon, select Export to Video .)
In the first drop-down box under the Create a Video heading, select the video quality you want, which pertains to the resolution of the finished video. The higher the video quality, the larger the file size. (You may want to test them to determine which one meets your needs.)
* The Ultra HD (4K) option is only available if you're using Windows 10 or later.
The second drop-down box under the Create a Video heading tells whether your presentation includes narration and timings. (You may switch this setting if you like.)
If you haven't recorded timed narration, by default the value is Don't Use Recorded Timings and Narrations .
The default time spent on each slide is 5 seconds. You can change that timing in the Seconds to spend on each slide box. To the right of the box, select the up arrow to increase the duration, or select the down arrow to decrease the duration.
If you have recorded a timed narration, by default the value is Use Recorded Timings and Narrations .
Select Create Video .
In the File name box, enter a file name for the video, browse for the folder that will contain this file, and then select Save .
In the Save as type box, choose either MPEG-4 Video or Windows Media Video .
You can track the progress of the video creation by looking at the status bar at the bottom of your screen. The video creation process can take up to several hours depending on the length of the video and the complexity of the presentation.
Tip: For a long video, you can set it up to be created overnight. That way, it’ll be ready for you the following morning.
To play your newly-created video, go to the designated folder location, and then double-click the file.
Save as a PowerPoint Show
When someone opens a PowerPoint Show file, it appears full-screen in Slide Show, rather than in edit mode. The viewer begins watching the presentation immediately.
On the File menu, select Save As .
Choose the folder location where you want to store your PowerPoint Show file.
In the Save as type box, choose PowerPoint Show (*.ppsx) .

Select Save .
Why turn your presentation into a video?
When you want to give a high-fidelity version of your presentation to colleagues or customers (either as an e-mail attachment, published to the web, on a CD or DVD), save it and let it play as a video.
You can save your presentation as either an MPEG-4 video file (.mp4) or a .wmv file. Both formats are widely supported and can be streamed over the internet.
Some tips to remember when recording your presentation as a video:
You can record and time voice narration and laser pointer movements in your video.
You can control the size of the multimedia file and the quality of your video.
You can include animations and transitions in your movie.
Viewers do not need to have PowerPoint installed on their computers to watch it.
If your presentation contains an embedded video, the video will play correctly without your needing to control it.
Depending on the content of your presentation, creating a video may take some time. Lengthy presentations and presentations with animations, transitions, and media content will likely take longer to create. Fortunately, you can continue to use PowerPoint while the video is being created
What parts of a presentation won't be included in a video?
The following items won't be included in a video that you create using PowerPoint:
Media inserted in previous versions of PowerPoint. To include these, you can convert or upgrade the media object.
For example, if you inserted the media using PowerPoint 2007, it will be linked and it will play in the presentation. However, when you export the file as a video, the linked media will be dropped. You can convert the file to the new file format (select the File tab, and under Info , select Convert ), or you can right-click the media object and then select it to upgrade; it will embed the file and export it correctly.
QuickTime media (unless you have a third-party QuickTime codec named ffdShow installed and you have optimized for compatibility)
OLE/ActiveX controls
What to do with your video after creating it
After you create a video, you can share it with others by using the following methods:
Email your presentation to others
Save to a file share or other location
Upload it to your organization's Microsoft Stream video-sharing site , as described in the next section, "Save to a video-sharing site."
Save to the Microsoft video-sharing site
After you've created the video file, you can upload it to a video-sharing site. Microsoft Stream is an enterprise video service where people in an organization can upload, view, and share videos. Microsoft 365 business or education subscribers have access to this service from within PowerPoint for Microsoft 365.
Select File > Export , and then select Publish to Microsoft Stream .

Type a title and a description for the video.
Set other options, including whether you want others in your organization to have permission to see the video:

Select the Publish button.
The upload process can take several minutes, depending on the length of the video. A status bar at the bottom of the PowerPoint window tracks the progress, and PowerPoint shows a message when the upload is finished:

Select the message to go directly to the video playback page on Microsoft Stream.
For more information about this service, begin reading with What is Microsoft Stream? It includes information about Office 365 Video vs. Microsoft Stream.
1 The Ultra HD (4K) option is only available if you're using Windows 10 or later. 2 In PowerPoint 2016, the Ultra HD (4K) option isn't available in the Volume License edition.
When someone opens a PowerPoint Show file, it appears full-screen in Slide Show, rather than in edit mode. The viewer begins watching the presentation immediately.
Burn your presentation to a disc

Need more help?
Want more options.
Explore subscription benefits, browse training courses, learn how to secure your device, and more.

Microsoft 365 subscription benefits

Microsoft 365 training

Microsoft security

Accessibility center
Communities help you ask and answer questions, give feedback, and hear from experts with rich knowledge.

Ask the Microsoft Community

Microsoft Tech Community

Windows Insiders
Microsoft 365 Insiders
Find solutions to common problems or get help from a support agent.

Online support
Was this information helpful?
Thank you for your feedback.
IMAGES
VIDEO
COMMENTS
Record your audio narration. Inside the Record Sound dialog box you can narrate your PowerPoint slide. Simply: Type in a Name for your Audio Clip. Select the Record button (the red dot) to begin narrating. Click Stop (the square) to stop your narration. Hit Play (the triangle) to listen to your narration.
Method #2: Record SlideShow. The second method to narrate PowerPoint presentations may seem more taxing, but it can be done when creating the assets to include in the presentation. 1. Navigate to the SlideShow tab and select the Record SlideShow icon. This will let you record the presentation from the beginning.
In the Options dialog box, click the Customize Ribbon tab on the left. Then, in the right-hand box that lists the available ribbon tabs, select the Recording check box. Click OK. To get ready to record, select Record on either the Recording tab or the Slide Show tab of the ribbon.
Choose the slide that you want to start narrating on. From the Slide Show Tab, Click Record Slide Show. To finish recording, press the same button or the ESC key. When you record slide show narration, you can record audio for a particular slide or an entire presentation. Even if you only record slide show audio for one slide, it can ...
Press Record in PowerPoint. To record narrations in PowerPoint, start off by finding the Slide Show tab on PowerPoint's ribbon. Click on the Slide Show tab to change the available options. On the Slide Show tab, click Record to start the recording process.
Access the Record Slide Show Dialogue Box. Click on the slide show tab and then the Record Slide Show button. You see two options when you click on the command; select the record from the beginning. Note - If you click on the record slide show and not on the drop-down, it will start recording from the current slide. b).
Near the upper right corner of the PowerPoint window, select Record. Choose from two options. When you're ready, select the round, red Record button, wait for the countdown, then start speaking. To record from a specific slide, go to it, and then select Record. Note: Narration isn't recorded while the transition between slides happens, so pause ...
Select the Record button on the toolbar to start recording your narration. Use your keyboard arrow keys to move back and forth between slides. Press N or Space Bar to move to the next slide or animation in the presentation. Press P or Backspace to return to the previous slide or animation.
Open your presentation and navigate to the Slide Show tab. If you are recording narration for all of the slides, you are ready. If you plan to record a voiceover for only some of the slides, you want to hide the slides you won't have a recording for. You can do this by selecting the slides you don't want to include, right- or ctrl-click and ...
How to Narrate PowerPoint Slides. If you have a microphone and camera then you can record voice narration and video capture with your slides. This tutorial will demonstrate the slide narration interface, as well as how to save the presentation as a PowerPoint show or video. Sean Nufer.
On Windows: Open your presentation and click on the Slide Show tab. Click on Record Slide Show > Record from Beginning. Click the round, red Record button and begin narrating when prompted. Advance slides and pause recording between slides. Press Esc or click the square Stop button when finished. On Mac:
With the microphone, PowerPoint, and narration prepared, you can start your recording. Begin by opening your chosen PowerPoint presentation. Select the Slide Show tab, and then click on Record Slide Show, under the Set Up group. A drop-down menu will appear with the options Record from Current Slide and Record From Beginning.
Open the PowerPoint presentation in which you would like to record a voiceover narration. Head over to the "Slide Show" tab and, in the "Set Up" group, select "Record Slide Show.". Once selected, a drop-down menu will appear. Here, you can choose to start the narration from the beginning or from the current slide.
Start by selecting the slide where you want to add the audio. Navigate to Insert > Audio > Record Audio. Choose a name for your voiceover and replace Recorded Sound with the name. To start your recording, click the button with the red dot. Read from your script and click the stop button when finished.
Audio narration can be recorded to accompany Microsoft PowerPoint slides to create a self-contained multimedia presentation. Narrated PowerPoint is an option...
In this video I explain what Narration in PowerPoint is, and why you;d want to use it (if you're a teacher it's especially useful). I then go on to show you ...
Open PowerPoint and set View to Normal. Start from the very first slide of the presentation to narrate the entire project. Navigate to Slide Show > Record Slide Show > Record from Current Slide. Once done, a new window will pop up with two options: a) slide and animation timings; b) narrations, ink, and laser pointer.
Creating PowerPoint Presentations with Audio Narration 4 • Briefly summarize the highlights of the presentation. • If this is a continuation of another presentation, let the students know that it is the second, third, etc. part of the topic presentation. Speaking • Relax! Make sure you are in a comfortable and quiet environment.
Saving Narrated PowerPoint Presentations. Select File > Save As. Select where you'd like to save your presentation to. Under Save as type, select the dropdown arrow and then select PowerPoint Presentation (*.pptx). (Do NOT save as older .ppt format otherwise you will lose the audio recording) Select Save .
On the File menu, select Save to ensure all your recent work has been saved in PowerPoint presentation format (.pptx). Select File > Export > Create a Video. (Or, on the Recording tab of the ribbon, select Export to Video .) In the first drop-down box under the Create a Video heading, select the video quality you want, which pertains to the ...
Learn how to record a PowerPoint presentation with added narration step-by-step. I will go over how to do this by simply using the built-in PowerPoint tools ...
Have your students present like a pro!Tell your story with confidence with slide-by-slide notes only viewable by you. Easily translate your slides into the p...