- Slidesgo School
- Google Slides Tutorials

How to Add a Video in Google Slides

In this new Slidesgo School tutorial, you’ll learn how to add a video to your presentations , be it from YouTube or from your own computer . You’ll also find out what format options Google Slides has to offer regarding videos.
How to Embed a YouTube Video
How to insert a video, how to cut and edit a video.
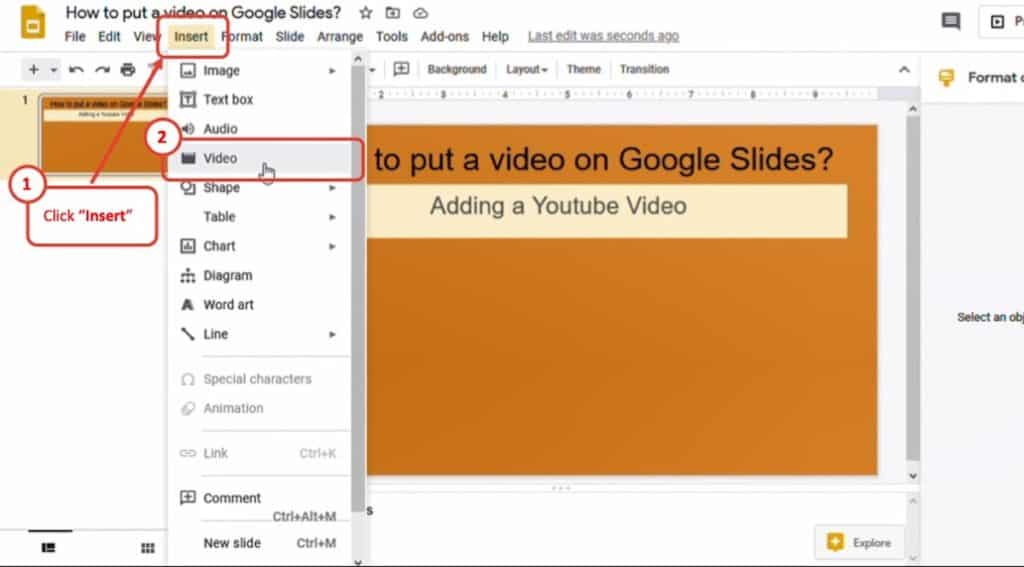
- Open your presentation in Google Slides and select the slide where you want to add the video.
- Click Insert → Video. A new window will open.
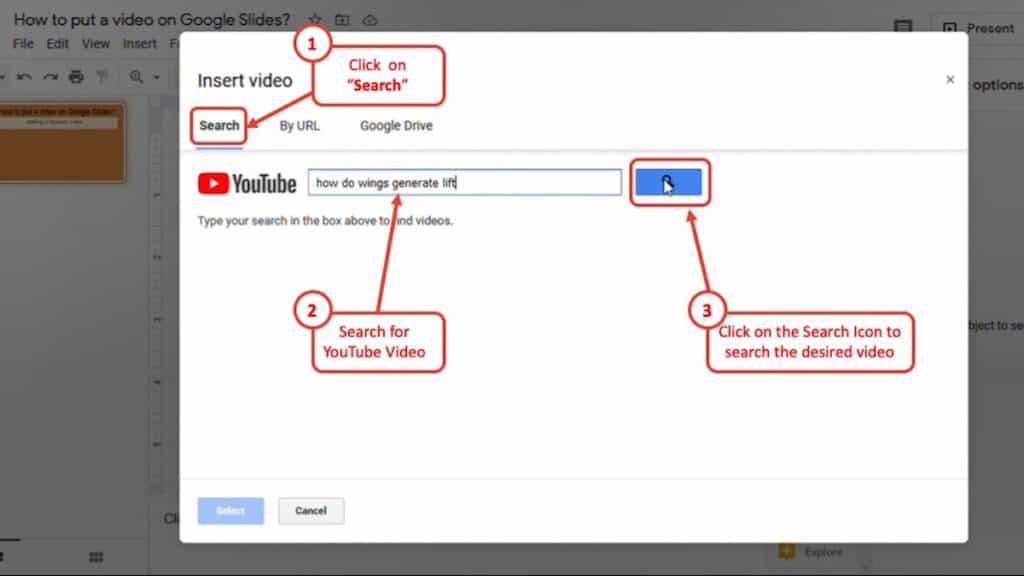
- On the first tab, Search, you can look for the YouTube video you want to add to the presentation. Once located, click Select to add it to the slide. You can now adjust its size to your liking.
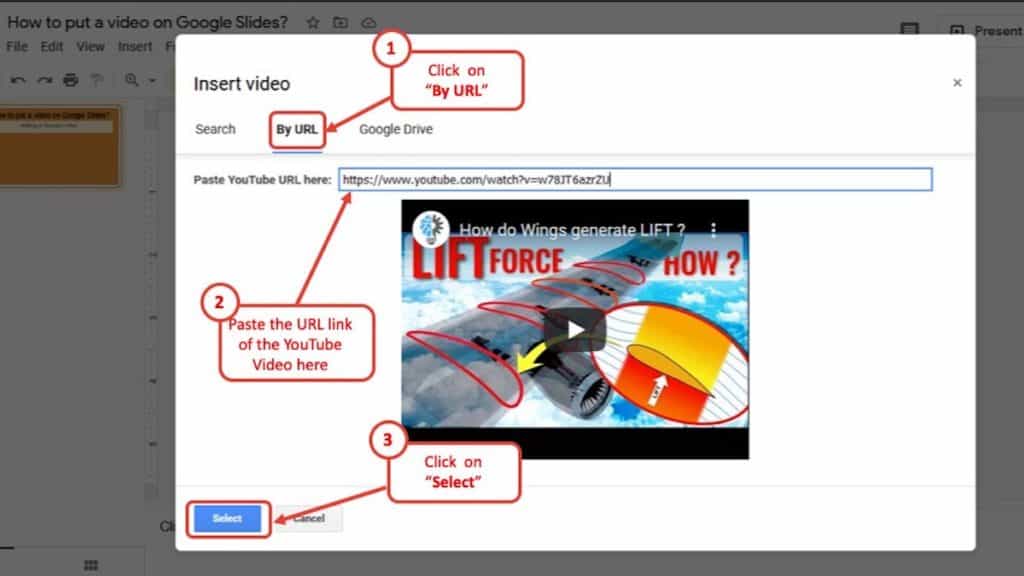
- If you have the URL of the video, click the By URL tab and paste it in the text field. You’ll see a preview of the video. If it’s correct, click Select to add the video to the slide. Place it whenever you like and adapt it according to your needs.
- Please note that you can’t crop a video in Google Slides, so you’ll need to play around with the rest of the graphic elements to have a coherent design.
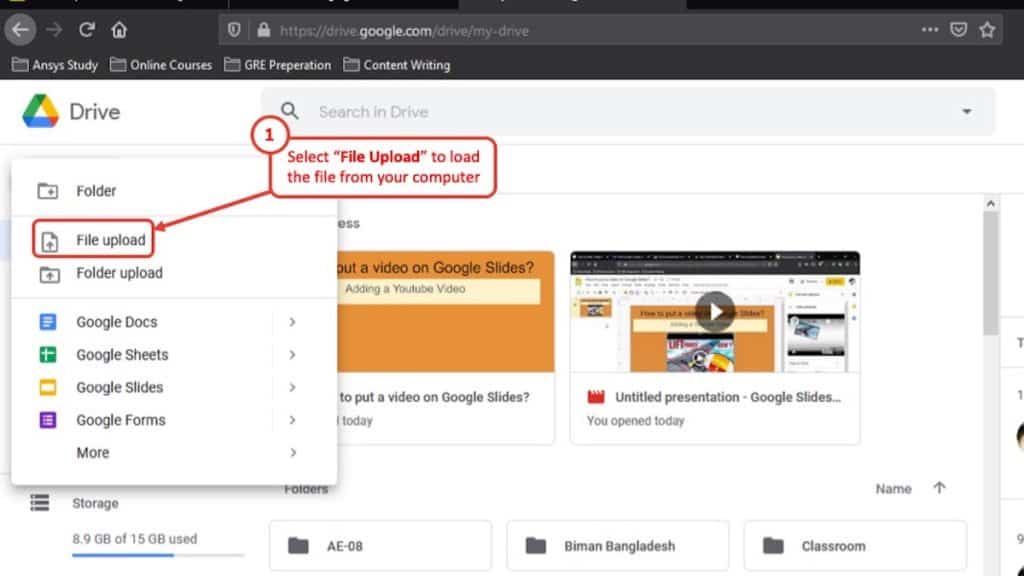
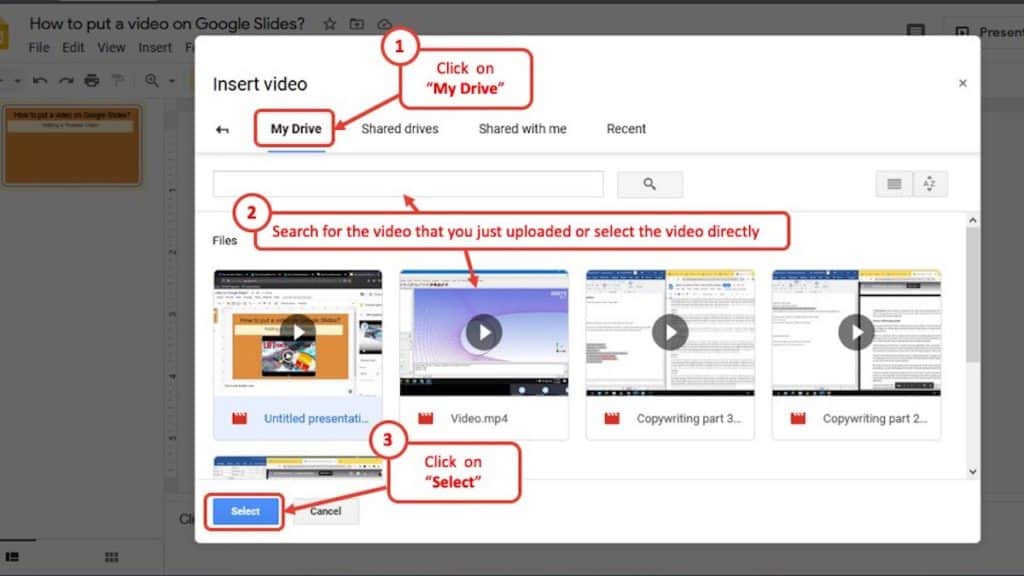
- To insert a video that isn’t from YouTube, it must be stored in your Google Drive account.
- Access Google Drive.
- Drag the video to Google Drive or click New → Upload files. Locate the file in your computer and upload it to Google Drive.
- Click Insert → Video. A new window will open. On the Google Drive tab you’ll see all your videos stored in or shared with your Google Drive account. Choose the video you want to upload and click Select. The video will be added to the slide, and now you can adjust it to your liking.
- Select the video that you’ve added to the presentation.
- Go to the toolbar and click Format options. As an alternative, right-click the video → Format options. You can also click Format → Format options. A new panel will open on the right side of the screen.
- Click the Video playback drop-down arrow to see the options. You can set the start and the end time, trimming the video accordingly. There are two boxes below. Check the first one to enable autoplay when presenting, and the second one to mute the audio.
- The rest of the tabs on the Format options panel contain settings to adjust the size and position of the video, and you can also add a drop shadow to it.
- Within the Size and rotation tab, you can modify the width and height values for the video. There’s also an option to lock the aspect ratio in case you want to keep the video proportions.
- Within the Position tab, you can set exactly where you want to place the video, taking the top-left corner or the center of the video as reference. To move the video, you’ll need to modify the values of the X and Y axes.
- The last tab, Drop shadow, contains a box, which you can check to add a drop shadow. If you click the drop-down arrow, you’ll find options to modify the color and the behavior of the shadow (angle, transparency, distance and blur).
Do you find this article useful?
Related tutorials.

How to print PowerPoint notes
Crafting an impactful PowerPoint slideshow and delivering a captivating presentation are distinct skills. The first focuses on designing appealing visuals to convey a clear message, while the second involves employing effective presentation techniques to ensure the audience grasps the idea. The content of this article will help you with the latter part of this process, guiding future presenters on how to print PowerPoint with speaker notes to enhance your presentations success and effectiveness.

Discover Our Online Presentation Software for Free
We have great news for you today! If you’ve been a Slidesgo fan for years (or months, or weeks, or days, or mere hours, we welcome everyone!), you’ll probably know for now that our templates are available mostly in two formats: for use in Google Slides and PowerPoint.Google Slides is a free tool, since you only need a Google account in order to use it. PowerPoint, on the other hand, is part of the Microsoft Office suite, so it’s not a free program, but that didn’t stop it from being one of the most popular options in the world!What if we...

Webinar: Presentation Audit
With more than 15,000 templates released on Slidesgo and a user base composed of millions of people, we estimate that the total number of presentations created adds up to… um, a lot! Our team of professional designers work very hard to provide you with editable slides so that the only thing you need to do is, well, customize the elements to your liking. Starting from any given template, the results may vary a lot depending on the person who edited the contents.Have you ever wondered “Is my presentation good enough?” and wished that an expert on presentations looked at your template...

How to Change Slides Orientation in Google Slides
A change of perspective is always good! Do you want your public to look at your slides in a new way? Changing slides orientation will do the work. In this tutorial you’re going to learn how to go from horizontal slides, to vertical ones (and vice versa!).

Cloud Storage

Custom Business Email

Video and voice conferencing

Shared Calendars

Word Processing

Spreadsheets
Presentation Builder

Survey builder

Google Workspace
An integrated suit of secure, cloud-native collaboration and productivity apps powered by Google AI.
Tell impactful stories, with Google Slides
Create, present, and collaborate on online presentations in real-time and from any device.
- For my personal use
- For work or my business

Jeffery Clark
T h i s c h a r t h e l p s b r i d g i n g t h e s t o r y !

E s t i m a t e d b u d g e t

Make beautiful presentations, together
Stay in sync in your slides, with easy sharing and real-time editing. Use comments and assign action items to build your ideas together.

Present slideshows with confidence
With easy-to-use presenter view, speaker notes, and live captions, Slides makes presenting your ideas a breeze. You can even present to Google Meet video calls directly from Slides.

Seamlessly connect to your other Google apps
Slides is thoughtfully connected to other Google apps you love, saving you time. Embed charts from Google Sheets or reply to comments directly from Gmail. You can even search the web and Google Drive for relevant content and images directly from Slides.

Extend collaboration and intelligence to PowerPoint files
Easily edit Microsoft PowerPoint presentations online without converting them, and layer on Slides’ enhanced collaborative and assistive features like comments, action items, and Smart Compose.

Work on fresh content
With Slides, everyone’s working on the latest version of a presentation. And with edits automatically saved in version history, it’s easy to track or undo changes.

Make slides faster, with built-in intelligence
Assistive features like Smart Compose and autocorrect help you build slides faster with fewer errors.

Stay productive, even offline
You can access, create, and edit Slides even without an internet connection, helping you stay productive from anywhere.
Security, compliance, and privacy

Secure by default
We use industry-leading security measures to keep your data safe, including advanced malware protections. Slides is also cloud-native, eliminating the need for local files and minimizing risk to your devices.
Encryption in transit and at rest
All files uploaded to Google Drive or created in Slides are encrypted in transit and at rest.
Compliance to support regulatory requirements
Our products, including Slides, regularly undergo independent verification of their security, privacy, and compliance controls .
Private by design
Slides adheres to the same robust privacy commitments and data protections as the rest of Google Cloud’s enterprise services .

You control your data.
We never use your slides content for ad purposes., we never sell your personal information to third parties., find the plan that’s right for you, google slides is a part of google workspace.
Every plan includes

Collaborate from anywhere, on any device
Access, create, and edit your presentations wherever you are — from any mobile device, tablet, or computer — even when offline.

Get a head start with templates
Choose from a variety of presentations, reports, and other professionally-designed templates to kick things off quickly..

Photo Album

Book Report

Visit the Slides Template Gallery for more.
Ready to get started?
How to Add a Video to Google Slides: A Step-by-Step Guide
Adding a video to Google Slides is a breeze once you know the right steps. Simply go to the slide where you want the video, click on ‘Insert’ from the menu, select ‘Video’ and then choose where you want to upload your video from. You can search YouTube, use a URL, or upload a video from your Google Drive. After you’ve selected your video, click ‘Select’ and adjust the video on your slide to your liking. And voilà! Your presentation just leveled up with a cool video.
Step by Step Tutorial: How to Add a Video to Google Slides
Before diving into the steps, let’s clarify what we’re aiming for. By the end of this tutorial, you should be able to insert any video into your Google Slides presentation, making it more engaging and interactive.
Step 1: Open your Google Slides presentation
Open the Google Slides presentation where you want to add the video. This is your starting point. Make sure you’re logged into your Google account and have the presentation open.
Step 2: Go to the slide where you want the video
Navigate to the specific slide where you want the video to appear. Think of this like setting the stage for your video’s grand entrance.
Step 3: Click on ‘Insert’ in the menu
Click on ‘Insert’ from the top menu in Google Slides. This is where the magic starts to happen. ‘Insert’ is your gateway to adding all sorts of content to your slides.
Step 4: Select ‘Video’
Choose the ‘Video’ option from the dropdown menu. This will open a new window where you can choose your video source.
Step 5: Choose your video source
Select from where you want to add the video – YouTube, by URL, or Google Drive. Each option has its benefits, so choose the one that best fits your needs.
Step 6: Select your video
Search for a YouTube video, paste a URL, or choose a video from your Google Drive and click ‘Select’. This is the moment where you pick the star of your slide. Make sure it’s relevant and adds value to your presentation.
Step 7: Adjust the video on your slide
Resize and move the video around on your slide to fit your design. You’re the director here – position your video for the best visual impact.
Once you complete these steps, your video will be embedded in your slide, ready to play during your presentation. It’s a simple process that can make your slides more dynamic and engaging.
Tips for Adding a Video to Google Slides
- Check the video’s permissions before adding it to ensure your audience can view it.
- Use short, relevant videos to keep your audience’s attention.
- Preview the video in presentation mode to make sure it plays correctly.
- Consider the video’s volume and whether it will be appropriate for your presentation setting.
- Remember that you’ll need an internet connection to play YouTube videos during your presentation.
Frequently Asked Questions
Can i add a video to google slides from my computer.
Yes, you can upload a video from your computer to your Google Drive and then insert it into your Google Slides presentation.
Will the video play automatically when I reach the slide?
You can set the video to play automatically by clicking on it and selecting ‘Format options’, then toggling ‘Auto-play when presenting’.
Can I trim the video in Google Slides?
Google Slides doesn’t currently offer a feature to trim videos, but you can set the start and end times under ‘Format options’.
What video file types can I add to Google Slides?
Google Slides supports most video file types, including .mp4 and .mov, as long as they are uploaded to Google Drive.
Can the audience hear the audio from the video?
Yes, the audio will play as long as your computer’s sound is on and the volume is up.
- Open your Google Slides presentation.
- Go to the slide where you want the video.
- Click on ‘Insert’ in the menu.
- Select ‘Video’.
- Choose your video source.
- Select your video.
- Adjust the video on your slide.
Adding a video to your Google Slides presentation can truly transform it from a static slideshow to a dynamic, multimedia experience. It’s a fantastic way to illustrate points, provide examples, or simply break up the monotony of text and images. Whether you’re looking to add a quick clip or a longer, more informative video, the process is straightforward and user-friendly. Just remember to keep your audience in mind when selecting videos; the content should always be relevant and add value to your presentation.
With the rise of virtual presentations and remote work, mastering Google Slides and its video capabilities has never been more important. It’s a skill that will undoubtedly enhance your presentations and keep your audience engaged. And who knows, your video-enhanced slides might just be the thing that makes your presentation stand out in a sea of bullet points and pie charts.
So, why not give it a try? Follow the steps above, and you’ll be embedding videos into your Google Slides like a pro in no time. And remember, practice makes perfect. The more you work with multimedia in your presentations, the more seamless and effective your incorporation of videos will become. Happy presenting!

Matthew Burleigh has been writing tech tutorials since 2008. His writing has appeared on dozens of different websites and been read over 50 million times.
After receiving his Bachelor’s and Master’s degrees in Computer Science he spent several years working in IT management for small businesses. However, he now works full time writing content online and creating websites.
His main writing topics include iPhones, Microsoft Office, Google Apps, Android, and Photoshop, but he has also written about many other tech topics as well.
Read his full bio here.
Share this:
Join our free newsletter.
Featured guides and deals
You may opt out at any time. Read our Privacy Policy
Related posts:
- Can I Convert My Powerpoint to Google Slides?
- How to Set Time for Slides in Powerpoint
- How to Change the Font on All Slides in Google Slides
- How to Delete Multiple Slides in Google Slides
- How to Drag Slides From One PowerPoint to Another: A Step-by-Step Guide
- How to Add Page Numbers in Powerpoint 2010
- How to Add a Border to a Picture in Google Slides
- How to Save a Slide from Google Slides as a Picture
- How to Add Videos to Google Docs: Step-by-Step Tutorial
- How to Unhide a Slide in Powerpoint 2013
- How to Add Bullet Points in Google Slides
- How to Make a New Slide in Google Docs: A Step-by-Step Guide
- How to Insert a Google Slides Page Number
- How to Insert Text Box in Google Docs
- How to Insert Slide Number PowerPoint: The Ultimate 2024 Guide
- How to Delete a Slide in Powerpoint 2010
- How to Rotate a Slide in PowerPoint: A Step-by-Step Guide
- How to Show Speaker Notes in Google Slides
- How to Do Vertical & Horizontal Slides in PowerPoint: A Step-by-Step Guide
- How to Create a PowerPoint Presentation Step by Step: 2024 Guide
- PRO Courses Guides New Tech Help Pro Expert Videos About wikiHow Pro Upgrade Sign In
- EXPLORE Tech Help Pro About Us Random Article Quizzes Request a New Article Community Dashboard This Or That Game Popular Categories Arts and Entertainment Artwork Books Movies Computers and Electronics Computers Phone Skills Technology Hacks Health Men's Health Mental Health Women's Health Relationships Dating Love Relationship Issues Hobbies and Crafts Crafts Drawing Games Education & Communication Communication Skills Personal Development Studying Personal Care and Style Fashion Hair Care Personal Hygiene Youth Personal Care School Stuff Dating All Categories Arts and Entertainment Finance and Business Home and Garden Relationship Quizzes Cars & Other Vehicles Food and Entertaining Personal Care and Style Sports and Fitness Computers and Electronics Health Pets and Animals Travel Education & Communication Hobbies and Crafts Philosophy and Religion Work World Family Life Holidays and Traditions Relationships Youth
- Browse Articles
- Learn Something New
- Quizzes Hot
- This Or That Game New
- Train Your Brain
- Explore More
- Support wikiHow
- About wikiHow
- Log in / Sign up
- Computers and Electronics
- Website Application Instructions
- Google Applications
7 Easy Steps to Add Videos to Google Slides
Last Updated: January 2, 2024 Fact Checked
This article was co-authored by wikiHow staff writer, Rain Kengly . Rain Kengly is a wikiHow Technology Writer. As a storytelling enthusiast with a penchant for technology, they hope to create long-lasting connections with readers from all around the globe. Rain graduated from San Francisco State University with a BA in Cinema. This article has been fact-checked, ensuring the accuracy of any cited facts and confirming the authority of its sources. This article has been viewed 66,635 times. Learn more...
If you're using Google Slides on a computer browser, you can easily insert videos using the "Insert" menu. You can put videos from YouTube, Google Drive, or a non-YouTube video from a different website. Here's how to add videos to Google Slides on your desktop computer.
Things You Should Know
- To add videos to a Google Slides presentation, click "Insert" → "Video" → copy and paste a link or search YouTube.
- You can also click "Google Drive" to browse and insert a video from your Drive.
- While you can't add videos on the Google Slides app, you can still insert images and photos.

- If you aren't already logged in, click Sign in to do so now or create an account .
- This feature isn't available on the mobile version of Google Slides. However, you can still add photos on the app.

- You can also search for YouTube videos directly in the field; just enter some keywords. [1] X Research source
- Alternatively, click Google Drive to insert a video file saved to your Drive . Select a file, and then click Insert .

- If you want a specific part of the video to play, enter the Start and End time.
- Click and drag the video to move it to a different location.
- Click and drag a corner to resize the video.
Community Q&A
You Might Also Like

- ↑ https://support.google.com/docs/answer/97447?hl=en&co=GENIE.Platform%3DDesktop&oco=1
About This Article

- Send fan mail to authors
Is this article up to date?

Featured Articles

Trending Articles

Watch Articles

- Terms of Use
- Privacy Policy
- Do Not Sell or Share My Info
- Not Selling Info
Keep up with tech in just 5 minutes a week!
How to add a video to your Google Slides presentation from YouTube or Google Drive
- You can add a video to Google Slides from YouTube, or by uploading from Google Drive.
- For YouTube videos, you can use a search function or paste the exact URL.
- You can edit a video in Google slides using the formatting options provided.
If a picture is worth a thousand words, a video must be worth at least a million. Whatever the case may be, sometimes a video is needed to illustrate a point during a presentation. If you're presenting using Google Slides, adding a video is a fairly straightforward process. Here's everything you need to know.
How to add a video in Google Slides
You can add a video in Google Slides from YouTube or Google Drive.
From YouTube search
1. Go to slides.google.com and open an existing presentation or create a new one.
2. Click Insert , then select Video from the drop-down menu.
3. In the Search tab , type in keywords or the exact title of the video you want to embed in the search bar. Click the magnifying glass icon or press the Enter key .
4. Click the video you want to embed, then click Select .
5. Drag the video to change its position on the slide, and resize the video as necessary using the blue points on the sides and corners.
By YouTube URL
2. Click Insert, then select Video from the drop-down menu.
3. In the By URL tab , paste the URL of the YouTube video you want to embed in the search bar. A preview of the video will appear in the window. Click Select .
4. Drag the video to change its position on the slide, and resize the video as necessary using the blue points on the sides and corners.
From Google Drive
3. In the Google Drive tab , select a video from your Drive using the various tabs and search function.
How to play a video during a Google Slides presentation
By default, Google Slides will play videos when you advance the slide it's on. So, to start a video, simply press any key, click the mouse, or use a remote clicker. To change this, follow the steps below:
1. Click on the video to select it.
2. In the Format options tab on the right side, click Play under Video Playback to reveal a drop-down menu.
- Play (on click) plays the video when you click to advance the slide. This is the default option.
- Play (automatically) plays the video, no clicks required
- Play (manual) plays the video when you click on the embedded video.
How to cut and edit a video in Google Slides
2. In the Format options tab on the right side, click Video playback . Here, you can specify timestamps for when the video starts and ends. There is also an option to mute the audio.
3. In Size & Rotation , you can change the width, height, and angle of the video, as well as rotate it 90 degrees or flip it.
4. In Position , you can set a specific position for a video like top-left and center.
5. In Drop shadow , you can choose a color and set levels for transparency, angle, distance, and blur radius.
- Main content
How to Add a Video to Google Slides [Complete Guide]
- Last updated July 7, 2023
Google Slides is a powerful tool that allows you to create engaging presentations for a variety of purposes. One effective way to enhance your presentations is by adding videos to provide additional context, break up the monotony of text-heavy slides, and capture your audience’s attention.
To insert a video into Google Slides presentations, select the slide, click on the “Insert” menu, and choose “Video.” Next, select the video source, choose your video, and click “Insert.”
To start creating more dynamic and engaging presentations, we walk you through the process of how to add a video to google slides .
Table of Contents
How to Add a Video to Google Slides
People who want to create comprehensive and engaging presentations ought to include videos. Hence, learning how to embed videos in Google Slides is an essential skill. Here’s how to do it:
- First, open your Google Slides presentation and select the slide where you want to add the video.

- Next, click on the “Insert” option in the top menu bar and select “Video.”

- Upon clicking, a prompt will appear. You will then have two options to choose from: “YouTube” and “Google Drive.” Choose the option that applies to your video source.

- If you choose “YouTube,” simply type the video you want into the YouTube search bar and select a video from the results.

- If you choose “Google Drive,” select a video from your Google Drive by either typing the file name on the search bar or accessing the video via “My Drive,” “Shared With Me,” or “Recent.”

- Click on the “Insert” button and the video will automatically appear on your slide.

Related : Looking for more ways to create a great presentation? Discover how to insert Google Sheets into Slides !
What Does “By URL” Mean in Google Slides?
Some Google Slides have a “By URL” option when adding videos. This provides users with more flexibility in terms of where they can source their videos from. With the “By URL” option, users can add videos to their Google Slides presentation from all video hosting platforms, as well as news sites and social media platforms that have embedded videos.
For example, if your video is hosted on Vimeo or Dailymotion, the “By URL” option can be used to add that video to Google Slides presentations. Simply copy the shareable URL for the video and paste it into the “By URL” field (in the Google Slides “Insert Video” dialog box).

Note: When using the “By URL” option, a video needs to be publicly accessible (and not restricted by privacy settings or copyright laws).
H ow to Embed a Vimeo Video in Google Slides
You can also insert videos into Google Slides from Vimeo (if you have the “By URL” option). This is a video streaming and sharing site that offers high-quality configurations for user-uploaded videos.
The process of embedding Vimeo videos into Google Slides presentations is fairly simple:
- Open Vimeo.com in your web browser and log in to your account. If you don’t have an account yet, you’ll need to create one.
- Navigate to the video you want to embed.
- Click on the “Share” button.

- Upon clicking, a pop-up menu will appear. Click the “Embed” </> icon.

- Click the “Copy” button to copy the embed code.

- Open your Google Slides presentation and select the slide where you want to embed the video.

- Click on the “Insert” menu and select “Video.”

- In the “Insert video” window, click on the “By URL” tab.
- Paste the copied Vimeo embed code into the box provided.
- Finally, click on “Insert” to insert the video into your slide.
Once done, the Vimeo video will now be embedded in your Google Slides presentation, and you can adjust the playback settings and other options as desired.
Note: You may need to adjust the size and positioning of the video on your slide to ensure that it fits properly and looks professional.
Format Video Options In Google Slides
When adjusting Format Video Options, video can be adjusted to better fit your presentation needs and enhance your overall message. It’s easy to customize several settings, including:
- Playback settings: Choose whether the video starts automatically when it’s clicked and whether it loops or plays just once.
- Start and end times: Set the specific times you want the video to start and end.
- Volume: Adjust the volume of the video.
- Size and rotation: Adjust the width and height of the video
- Lock aspect ratio: This allows you to maintain the original proportions of a video when you resize it.
- Drop shadow: Add a drop shadow effect to the video.
- Transparency, angle, distance, blur radius: Adjust the appearance of the video.
Related : Learn how to insert images in Google Slides .
What Video Formats Are Supported by Google Slides?
Google Slides supports several video formats that you can play directly in your presentations without the need for additional plugins or software. These compatible video formats include:
Note: Video files uploaded to Google Slides must be 100 MB or less. Otherwise, you may encounter issues when trying to add or play the video in your presentation.
How to Play a Video During a Google Slides Presentation
It isn’t enough to know how to put a video in Google Slides: You also need to know how to play it during presentations. If your video fails to play properly during a presentation, it can be incredibly inconvenient and even embarrassing.
To play a video during a Google Slides presentation, just click the “Play” button in your video.

How to Make Videos Play Automatically in Google Slides
Before you finalize your presentation, ensure that your videos work properly and remove potential technical difficulties. Google Slides has an option to automatically play videos once you have reached the respective slides. Use this feature to deliver a seamless and engaging presentation:
1. Open the slide where you’ve inserted the video.
2. Click on the video and choose the “Format options” button in the top menu. Alternatively, you can press right-click and select “Format options.”

3. Upon clicking, the format options menu will appear on the right side of the screen. In the “Video playback” section, select “Play (automatically).”

4. Adjust any other settings as desired, such as the start and end times.

Once you’ve set the video to auto-play, it should start playing automatically when the slide is displayed in your presentation.
Frequently Asked Questions
How do you put a video from your camera roll onto google slides.
You can’t directly upload a video from your camera roll or your computer into presentation slides. You’ll first need to upload your video to Google Drive:
- Click on the “Insert” menu and select “Video.”
- In the “Insert video” window, select the “Google Drive” tab.
- Select the video you want to insert.
- Click “Insert” to add it to your slide.
How to Embed YouTube Videos in Google Slides
Embedding YouTube videos is easy. Select the slide where you want to insert the video and click “Insert” > “Video.” In the pop-up menu, select the YouTube tab and insert the link to the YouTube video. Hit “Insert,” and the video will be embedded in your presentation.
Conclu sion
By following learning how to add a video to google slides, you’ll be able to improve the layout and content of your presentation and boost the quality of your presentation, resulting in greater engagement and attention.
Want to learn more about GSuite products like Docs and Sheets? With easy access to thousands of high-quality G Suite courses taught by experts, you’ll up your presentation game in no time!
- How to Hide a Slide in Google Slides (in 2 Seconds)
- Learn How to Draw on Google Slides in 2 Minutes (Too Easy)
- How to Add Audio to Google Slides (Simple Guide)
- How to Make Google Slides Vertical in Under 2 Minutes
- How to Delete a Slide on Google Slides [Easy Guide]
- How To Print Multiple Slides on One Page in Google Slides
- How To Add Fonts to Google Slides [Complete Guide]
- How To Make Columns in Google Slides [Easy Step-by-Step Guide]
- How to Know Word Count on Google Slides [1-Minute Guide]
Most Popular Posts

How To Highlight Duplicates in Google Sheets

How to Make Multiple Selection in Drop-down Lists in Google Sheets

Google Sheets Currency Conversion: The Easy Method
A 2024 guide to google sheets date picker, related posts.
How to Insert a Google Sheets Hyperlink in 5 Seconds
- Chris Daniel
- April 15, 2024
How to Import Stock Prices into Google Sheets
- April 2, 2024
How to Calculate Age in Google Sheets (2 Easy Methods)
- Sumit Bansal
- February 21, 2024
How to Hide Gridlines in Google Sheets
- February 14, 2024
Thanks for visiting! We’re happy to answer your spreadsheet questions. We specialize in formulas for Google Sheets, our own spreadsheet templates, and time-saving Excel tips.
Note that we’re supported by our audience. When you purchase through links on our site, we may earn commission at no extra cost to you.
Like what we do? Share this article!
How to Add a Video on Google Slides? A Comprehensive Guide!
By: Author Shrot Katewa

Videos are one of the key elements that can make a presentation very informative and also hold the attention of the audience. Adding a short and relevant clip to your presentation slide can help a lot to deliver your message clearly to the audience. Adding videos in Google Slides presentation is quite easy. Let’s understand how to do that!
To add a video on Google Slides, click on the “Insert” menu. Then, from the dropdown, click “Video”. You can then choose the source of your video file. You can add a video from YouTube, a web link, or from a local computer by adding the video to your own Google Drive account!
There are multiple other ways you can add a video to your Google Slides presentation. In this article, I am going to explain how to add a video on Google slides whether it is from your computer or smartphone, from YouTube, or from some other platform. So, let’s get started!
How to Add a Video in Google Slides?
As you may by now be aware, there are several ways to add videos in Google Slides. You can add videos from YouTube or add a non-YouTube video in your presentation slide.
I am going to walk you through these methods step-by-step so that you can easily understand how you can put a video in your Google Slides presentation.
How to Put a Video on Google Slides from YouTube?
YouTube has been owned by Google since 2006. As a result, it is very easy to integrate YouTube videos in many Google products such as Google Slides. It is the fastest way to put a video in your presentation slides. You can add YouTube videos on Google Slides in two ways.
Method 1 – Searching for YouTube Video through Google Slides
The first method is by searching for the desired YouTube video and adding it to Google Slides directly through the insert function. To do that-
1. First, open the presentation slide you want to put a video on
2. Now, choose the “ Insert ” option from the menu bar on the top.
3. From the dropdown menu, select” Video ”(as indicated in the image above)
4. From there, a YouTube search bar will open. To find the video that you are looking for, type the keywords for that video in the search bar. After typing the keywords in the search bar and clicking on the search icon, you will see instant search results.
5. Now find your desired video from the search results and click on “Select”. The video will appear on your presentation slide.
Method 2 – Using YouTube Video URL
The second method using a YouTube video URL. This method is useful when you have the URL of the YouTube video that you want to put in your presentation slide.
Furthermore, inserting YouTube videos using a URL is the most convenient way to adding a YouTube video to your Google Slides presentation as sometimes, directly searching for the video using method 1 mentioned above doesn’t yield relevant results.
To follow the steps for this method, make sure you open the desired YouTube video in another tab or browser window. Search and open the video in that tab first. Then, copy the link from the address bar of your browser. The link should look something like – “youtube.com/watch?v=…..”
Once you have located the link, copy the link of the YouTube video and then proceed with the following steps –
1. Open the presentation slide to put the video on.
2. Choose “ Insert ” from the top menu bar.
3. From the dropdown menu that appears, click on “ Video “.
4. A new window will open. Choose the “ By URL ” tab.
5. Now paste your desired YouTube video URL in the “Paste YouTube URL Here” bar. It will take some time to load the video depending on the video file size.
6. When the video file loads, press “ Select “. The video file will appear in your presentation slide.
You can drag and drop the video files in your desired position to give the slide a polished look. Google slide also allows some video editing tools inside the application.
You can set the timer from when the video will start or when the video will stop, the size and position of the video player, and some minor customization to the video like transparency, blur radius, etc.
However, you cannot crop the video, but you can drag-drop and adjust the video player size to give your presentation a much cleaner look.
How to Insert a non-YouTube Video in Google Slides?
Other than putting the YouTube videos, one can also add non-YouTube Videos in Google Slides. You can either upload the video in Google Drive or then use the video in your presentation or you can add an outside video source with some extra work.
To insert a non-YouTube video that is stored in a computer, follow these steps –
1. First, upload the video file into Google Drive. To upload the file, go to Google Drive , select “ New> File upload “. Now find the desired video file on your computer and press “ Open “. Wait for a few minutes to upload the video file into Google Drive.
2. Once the file is uploaded, open the presentation slide where you want to put the video on.
3. Click on “ Insert ” from the top menu bar in Google Slides and from the dropdown menu choose “ Video ”.
4. A new window will open. From the new window, select the Google Drive Tab.
5. Now search for the desired video that you uploaded in Google Drive. Find the video and click on “ Select ”.
6. The video will appear on the presentation slide.
As mentioned before, you can use the video editing tools in Google Slides to adjust the positioning of the video player and the timing of the video. You can also select whether the video will play automatically or manually.
How to add a Video from your Phone to Google Slides?
Google Slides are also available on Android and iOS. You can download the Google Slides app from app stores (Play store for Android and Apple App Store for iOS) or use web browsers to use the Google Slides application.
1. From Android Smartphone
There is no direct way to put videos on the Google Slides Android app. But that will not stop you to add a video to your presentation. To put videos on Google Slides using Android Smartphone, follow these steps: –
- First, upload the video into Google Drive if the video is on your smartphone .
- Then copy the Google Drive link of the video . If the video is from YouTube, copy the YouTube URL of that video.
- Find an engaging moment in the video and take a screenshot of it and crop the screenshot image to the appropriate size. This screenshot will act as the thumbnail of your video.
- Open the Google Slides app on your android smartphone .
- Now open the presentation slide that you want to put a video on.
- Press the “+” icon on the top right corner of the screen. From there, select “Image > From photos ”.
- Now, find the screenshot that was taken before and select it. The screenshot will appear in the presentation slide. Drag and drop the screenshot into a suitable position in the slide.
- When you are done with positioning the screenshot, again press “+ ” on the top right corner of the screen and select “Link”.
- Paste the link that was previously copied in the URL bar and press “✓”.
Now whenever you press the screenshot image, you will be directed to the video link.
2. From iPhone
Similar to Android smartphones, there is also no direct way to put videos on Google Slides on iPhone. To put videos on Google Slides using iPhone, follow these steps: –
- First, upload the video into Google Drive if the video is on your iPhone.
- Then copy the Google Drive link of the video. If the video is from YouTube, copy the YouTube URL of that video.
- Open the Google Slides app on your iPhone.
- Press the “ + ” icon on the top right corner of the screen. From there, select “Image > from photos”.
- When you are done with positioning the screenshot, again press “ + ” on the top right corner of the screen and select “Link”.
- Paste the link that was previously copied in the URL bar and press “ ✓ ”.
Now whenever you click on the screenshot image in the presentation slide, you will be directed to the video link.
How to Embed a YouTube Video at a certain time in Google Slides?
When a YouTube video or a video from Google Drive is added to the slide, the entire video will be embedded by default . Now when you are presenting your slide, many among the audience will not have the patience to sit through the entire video in your presentation.
Keeping that in mind, you might want to include only a select part of the video that is brief, relevant to your presentation. You can do that in Google Slides. Once you embed a YouTube video or a video from your Google Drive account, you can pick the time from which the video will start and end.
To start or end a YouTube video at a certain time interval, you should –
- First, add a YouTube video or a video from Google Drive in your presentation slide.
- Once the video is embedded on your slide, select the video just by clicking on it.
- A “ Format options ” tab will open on the right corner of the screen.
- There you can select the time from when the video will start at and when the video will end.
- Just put on your desired time on the “Start at” and “End at” timer boxes on the “Format options” tab.
How to Fix the “Google Slides Video Request Access” Error?
Now, when you are adding a video to your Google Slides presentation, sometimes you may come across a “Request Access” error that either prevents you from adding a video to your presentation or prevents you from playing the video embedded in your presentation.
“Google Slide Video Request Access” error occurs when a user has two different Google Accounts and the video embedded is from one account while the Google Slides presentation has been created using a different account. The error can also occur if you do not have access/permissions to use the embedded video link.
This is a common problem and the solution is also simple. All you have to do is ensure that your to permit the other accounts to access the video that has been embedded.
In order to fix the “Google Slides Video Request” error, follow the below mentioned steps –
- Log in to the account that was used to create the Google Drive video link.
- Open Google Drive and locate the video.
- Right-click on the video and choose “Share”.
- You can fix the “Google Slides Video Request Access” error by adding the account that you are using to access the presentation slide in the search bar. By doing so you are permitting them to access the file. You can also select specific permission whether they can modify the file or just view the file here.
After doing so, you should be able to view the video file without any error. If you access the slide from another account, just make sure that the account has permission to view the video file.
How to Embed a Video in Google Slides with embed code?
Right now, it is not possible to embed a video in Google Slides with embed codes like you can do in the Microsoft PowerPoint application. But Google is continuously improving its Google Slides application. Hopefully, they will add this feature in near future.
How to link a Video to a Picture in Google Slides?
There is no direct way to add a video that is not from YouTube. Linking a video to a picture is a way to add non-YouTube videos on Google Slides. To do that, you need to take some extra steps to incorporate the video on the slide. These steps are-
- First, find an engaging moment in the video and take a screenshot of it. Crop the screenshot image so that it looks like a thumbnail of the video.
- Now, open the presentation slide file in Google Slides.
- Click on the “Insert” option from the top menu bar of Google Slides.
- Now select “Image” from the dropdown menu.
- Find the screenshot that you captured earlier from the video. Add this screenshot to your presentation slide and adjust the position of the screenshot as you see fit.
- Once you are done with the positioning of the screenshot, select the screenshot on the slide and click on “Insert”.
- From the dropdown menu, select “Link” and paste the URL of the video, and press “Apply”.
Once all these steps are completed, clicking on the screenshot image in the presentation slide should open the direct link to the video. You cannot use the video editing tools in Google Slides for videos that are linked to a picture.
You can adjust the picture position but you can’t adjust the time of the video file which is possible for embedded YouTube videos or videos from Google Drive.
Compressing Videos before Adding to Google Slides?
Video compression is done to shrink the size of the video file without harming the video quality significantly. This is a useful method to save some storage space. When you are using a non-YouTube video file in your presentation slide, you have to upload the file into your Google Drive and then embed it to your presentation.
But Google Drive has very limited storage space especially in a free Google Drive account where you have only 15 GB cloud storage space. This is where video compression is very useful. It doesn’t hurt the video quality and at the same time, you can store more videos.
How to Compress Videos?
There are many online and offline video compression software available for desktop, Android, and iOS. Some of the best video compression apps and websites are given below-
1. VideoProc
This is one of the best video compression software for windows and Mac. This is not just a simple video compression software, you can cut, copy, and edit your video in this software also. VideoProc can compress up to 8K resolution video files and up to 90% of the original video size without any significant change in video quality.
VideoProc also offers lots of video and audio encoder formats that are not available in the many popular video compression software.
2. Video Compress (Android)
This is a video compression application for Android smartphones. The main feature of this application is, it is very easy to use. The simplistic user interface allows anyone to compress their video file without any prior knowledge or experience.
Just select the video file that you want to compress, select the desired resolution, desired file size, and file format. This application offers multiple video compression modes and supports almost all video file formats.
3. Media.io Online Uniconverter
This is one of the best online video compressors and it is free. This online video compressor application allows you to compress your video file, shrink the file size, reduce the resolution, and select the desired video file format. All the popular video formats are available here.
You can upload the file directly from your computer or from Google Drive or Dropbox. One downside of this application is that you can only compress video files that are up to 100 MB.
Final Thoughts
Adding a relevant video clip in the presentation slide can make the presentation much more interesting, engaging, and helps a lot in delivering your message clearly. Adding a video on Google Slides is a very simple task.
Hope this article was of some help to you to clear any confusion regarding how to add a video on Google Slides . Have a nice day!
- Help Center
- Google Docs Editors
- Privacy Policy
- Terms of Service
- Submit feedback
- Google Slides
Use slides recording in Google Slides
You can only record your presentations in Google Chrome Browsers. However, you can view, share, and delete recordings from any browser.
Record a slideshow
- There's a 30-minute limit to every recording.
- Information about Slides recordings isn't available in Revision History.
- If you exceed your Drive Storage quota, you can’t create more recordings.
- You must have edit access to the slides in order to create a new recording.
- To open your presentation, go to Google Slides .
- To start over, pause and click Re-record .
- To save your recording, pause and click Save to Drive .
Find your recording
- On your computer, go to Google Slides .
- Open the presentation where you created the recording.
- Select your recording from the list that appears.
Tip: Recordings are saved into a My Drive folder called Slides recordings.
Share your recording
Recordings can be shared to collaborators on the document immediately after creation.
- To share your recording, click the title of the recording from the list.
- The video in the full-screen player layout appears.
- Select the user, audience, or URL visibility rules.
Tip : Alternatively, you can share a recording like you would share any file in Drive. Learn how to share files from Google Drive .
Remove a recording
- If you created the recording, you also have the option to move the recording file in Drive to Trash. If the recording in Drive isn't moved to Trash, the recording stays visible in Drive to anyone with access.
- If you didn't create the recording, it's still visible in the creator's Drive and anyone to with access.
Use external device
You can use a microphone or camera that isn't built into your computer, such as a USB-based external camera or wireless earbuds.
To get started, set up your camera or microphone device like you would normally use it with your computer.
- Open your presentation.
- When the recording studio opens, at the bottom toolbar, click Settings .
- If your external microphone or camera is available, it's listed in the dropdown of devices available to use while recording.
Troubleshoot camera & microphone
When you create a Slides recording for the first time, it asks for a series of permissions to use the camera and microphone of your computer.
Tip: Camera and microphone access isn't required to start recording.
If you decide not to grant access to your camera or microphone, you can change it later.
- On your computer, open Chrome.
- chrome://settings/content/microphone
- chrome://settings/content/camera
- Adjust the settings to grant access.
Need more help?
Try these next steps:.
Using Google products, like Google Docs, at work or school? Try powerful tips, tutorials, and templates. Learn to work on Office files without installing Office, create dynamic project plans and team calendars, auto-organize your inbox, and more.
Create shareable video presentations in Google Slides
What’s changing.

Who’s impacted
Why it’s important , additional details , getting started .
- Admins : There is no admin control for this feature.
- End users : Visit the Help Center to learn more about recording a slideshow, finding your recording, sharing your recording, removing a recording and more . Please note that recording-creation is only accessible using Google Chrome on your Desktop. Recordings cannot be created on mobile devices and are not accessible from the Slides mobile app. However, you can find and view your recording using the Drive mobile app.
Rollout pace
- Rapid Release domains : Extended rollout (potentially longer than 15 days for feature visibility) starting on January 2, 2024
- Scheduled Release domains: Gradual rollout (up to 15 days for feature visibility) starting on February 1, 2024
Availability
- Available to Google Workspace Business Standard, Business Plus, Enterprise Starter, Enterprise Essentials, Enterprise Essentials Plus, Enterprise Standard, Enterprise Plus and Education Plus
Resources
- Google Help: Use slides recording in Google Slides
Filter by product
- Accessibility
- Admin console
- Cloud Search
- Directory Sync
- Drive for desktop
- Education Edition
- G Suite for Education
- G Suite for Government
- Google Apps Script
- Google Calendar
- Google Chat
- Google Classroom
- Google Cloud Directory Sync
- Google Docs
- Google Drawings
- Google Drive
- Google Forms
- Google Hangouts
- Google Keep
- Google Maps
- Google Meet
- Google Meet Hard
- Google Meet Hardware
- Google Photos
- Google Sheets
- Google Sites
- Google Slides
- Google Tasks
- Google Vault
- Google Voice
- Google Workspace
- Google Workspace Add-ons
- Google Workspace for Education
- Google Workspace Marketplace
- Google Workspace Migrate
- Marketplace
- Microsoft Exchange
- Microsoft Outlook
- Premier Edition
- Rapid Release
- Rapid Releases
- Scheduled Release
- Security and Compliance
- Weekly Recap
- What's New
Filter by date
Subscribe by feed, subscribe by email, localized google workspace updates, useful links, join the official community for google workspace administrators.
In the Google Cloud Community, connect with Googlers and other Google Workspace admins like yourself. Participate in product discussions, check out the Community Articles, and learn tips and tricks that will make your work and life easier. Be the first to know what's happening with Google Workspace.
______________
Learn about more Google Workspace launches
On the “What’s new in Google Workspace?” Help Center page, learn about new products and features launching in Google Workspace, including smaller changes that haven’t been announced on the Google Workspace Updates blog.
Make attention-worthy videos faster and better | Join us for a live VEED demo
How to apply code, 🇺🇦 ukrainians can now use all subtitle and translation features for free. use code 'ukraine', how to put, edit and loop a video in google slides (super quick).
Want to learn how to put a video in your Google Slides presentation? Here's how to do just that!

Want to learn how to put a video in your Google Slides presentation?
At VEED , an easy-to-use, yet powerful, video editor, we know the power of embedding a good video in your Google Slides presentation. According to recent research, only a shocking 4% of professionals put videos in their presentations.
This means that 96% are missing out on an effective medium to catch people’s attention and create a powerful presentation.
Want to stand out? Here’s the perfect tutorial for you!
You’ll learn:
- How to put a video in Google Slides in a super quick and easy way.
- How do you let someone access a video on Google Slides?
- How to edit a video embedded In Google Slides
- Google Slides video loop - a quick way to loop your videos for Google Slides
How To Embed A Video In Google Slides In A Super Quick And Easy Way
1. go to your google slides presentation, 2. go to the slide to embed your video in, 3. in the top menu bar, go to insert > video.

4a. Enter the link from YouTube and select the video

4b. Or use a video from Google Drive
Alternatively, you can also embed a video in Google Slides from your Google Drive folders.
Warning : Make sure that all of your editors can access this video from Google Drive. Otherwise, only the original creator will be able to play the video in the presentation (and not the editors).

5. Present your Google Slides with the video!

And voilà, there you have it. You’ve just embedded a video in your Google Slides presentation!
How Do You Let Someone Access A Video On Google Slides?

People who are allowed to edit your Google Slides presentation might not have access to the embedded video from your Google Drive.
Note : If this is the case, they won’t be able to play it during the presentation.
This is because your video has restricted access (ie only you can access it).
To make the embedded Google Drive video accessible to your editors, do the following steps:
- Go to your Google Drive
- Right click on the video added in Google Slides
- Click Share.
You can either share the embedded video:
- To anyone with the link

- With only the editors involved (enter their emails).

Then, your editors will be able to play the video while presenting the whole thing!
How To Edit A Video Embedded In Google Slides
You’ve just learned how to put a video in your Google Slides presentation. But now, it’s time to learn how to edit it for a quick formatting fix or two.
Note : Google Slides has very, very , very basic video editing capabilities (because it’s meant for presentations).
Use VEED’s easy-to-use, yet super powerful, video editor if you want to trim your video, add text, automatically add subtitles and other cool features.
1. In the top menu bar go to Format> Format Options

2. Video playback options

Here are the rudimentary video playback options with Google Slides. They’re quite easy to understand:
- Start at ... End at : These denote at which points the embedded video starts to play and ends.
Here’s an example: Let’s say that you have a four-minute video but you only want it to play between 00:10 to 00:40.
Enter these values, so when you play this video embedded in your Google Slides presentation, it will start at 00:10 and stop playing at 00:40.
- Auto-play when presenting . With this is ticked, your video will automatically start when you get to this slide in your Google Slides presentation.
- Mute audio : Ticking this will mute your audio while the video’s playing.
3. Size and rotation options
You can either drag the ends of your video (upon clicking on it) to change its size and position.
Tick the Lock aspect ratio box, so that you can change the size of your video without changing the overall shape.
4. Position options

First off, you can drag the video you’ve embedded in Google Slides to change its location.
But if you want to change the coordinates numerically, you can alter the X and Y values to place your video anywhere in the Slide.
Don’t know what the From Center/Top left is all about? They’re basically base point references:
- From Center. If you put X:0 and Y:0, this puts your video in the center of the slide.

- From Top left. If you put X:0 and Y:0, this puts your embedded video in the top-left corner of the slide.

5. How to loop the basic way
If you want to loop the video, simply right click on the embedded video and select Loop.

Here’s a big BUT: When your video ends, it doesn’t actually automatically loop, and you’ll have to do that yourself by clicking on the video. It’s not really useful for anyone.
Google Slides Loop Video - The Best and Easiest Way
Now, here is the right way to loop your Google Slides video with VEED’s easy-to-use free video editor.
1) Go to VEED and upload the Google Slides video you want to loop
Note: If you want to save your project and start new ones, you can sign up for free .

You can upload from:
- Your local files
- YouTube video (just enter the link)
- Your webcam
2. Click on Add Video button and upload the video to loop again

The Add video button is located above the timeline, to the left. Upload the video the same number of times that you want the clip to loop. Place it next to the other video to merge both clips seamlessly.
3a is for those who want to save the video they want to loop as an MP4 video file.
3b. leave the video file as it is.
Alternatively, you can also just save the video as a GIF . In this case, you won’t need to upload the same video clip over and over again because GIFs loop on their own.
4. Download the video you’ve just looped and put the video in Google Slides!
Hit Export, wait for the video to render, and download it as an MP4 video or as a GIF. And you’re done! Just go to Google Slides and put the looped video in.
Create And Edit Beautiful Video Presentations Using VEED!
In this tutorial, you’ve learned all that there is to know about embedding videos in Google Slides.
Of course, VEED is so much more than a video looper. You can also create short and beautiful videos for your Google Slides presentations. You can add text to your video , merge , trim and split your videos, add an audiogram , and so on.
For more tutorials and helpful guides on how to make amazing videos to engage with your audience, subscribe to us on YouTube and Instagram .
Alec Wilcock

One-click video editing, online.
Frequently asked questions, more from veed.

How to do the bottle cap challenge

Podcasting 101: Everything you need to name, ideate, record, edit, and promote a podcast

15 Best AI Tools in 2024 (The Only List You’ll Need)
Related tools, free online video editor.
/Video%20Editor.png "video presentation in google slides")
How to Record a Presentation on Google Slides
Do you want an easy way to record a Google Slides Presentation as a video to share later with your teammates? Once you have the Zight screen recorder, the process is easy and fast.
Article Last Updated: April 23, 2024

What Is a Google Slides Presentation?
What do you need to record google slides presentations, how to record a presentation on google slides with zight: step-by-step guide, faqs on how to record a presentation on google slides.
Here’s an interesting statistic: 91% of people believe a well-designed slide deck can increase your confidence as a presenter. The first step to creating a good presentation is to choose the best software, and then record the presentation in HD.
Tell you what? You can create slides with Google Slides, then use the Zight screen recording software to present and narrate your slides to your audience. This has many benefits, including saving your presentation for future collaboration or asynchronous communication , which, in many ways, has more benefits than synchronous communication in a digital and remote workspace.
Read on as we tell you how to create this presentation from scratch, in just a few steps!
Google Slides is a free web-based presentation software provided by Google as part of the Google Drive suite. You can use it on any device with an internet connection, offering various features like an easy-to-use presenter view, speaker notes, live captions, and the ability to present to Google Meet video calls. Plus, your slides can contain text, images, videos, animations, and more to create dynamic content.
While you can present live in a meeting, today’s work landscape teams need to improve communication and productivity with asynchronous video communication . So, when you can’t gather everyone in a Google meeting, you need a way to create and share a presentation with your teams. Your options include recording a Google Slides presentation with narration, just like you create a PowerPoint presentation with Zight .
Here’s what you need:
To record a presentation on Google Slides, you will need a few things:
- A device with an internet connection: It’s best to have a computer to make it easy to create and present Google Slides
- A screen recording software like Zight: While Google Slides allows you to present live in a meeting, it won’t record audio or video files to send later. That’s where Zight comes in, allowing you to record and narrate your slides as you present so you can share with attendees at a later time
- An external microphone (optional) to record audio for your presentation. However, you can still use your native microphone on your computer
- A webcam (optional): If you want to show yourself presenting alongside the slides, a webcam will be necessary for recording. To make things easy, you can just use the Zight webcam recorder which will use your native webcam app
- A Google account: You can only access Google Slides with a Google account, so make sure to sign in to be able to create slides
- Google Slides: Before using the screen recording tool , you want to create and add content to the Google slides you will be narrating. More on this below!
Before you start recording, search for Google Slides on your browser, log in to your account and open an untitled presentation.
Alternatively, click File on a current Google Slides presentation page, then New, and Presentation (or from the template gallery to pick a presentation template).
Add content to your slides, using the (+) sign on the upper left-hand side of your Google Slides presentation page (or Ctrl+M) to add new slides. You can also click the dropdown menu next to the (+) sign and choose slides with your ideal layout. Add content to the slides by typing in text, inserting images, videos, shapes, or charts, and customize them with a unique theme and background color.
Once your Google slides are ready, here’s how to start recording:
1. Download Zight
If you don’t have Zight, click the red button below to download.
- Record your screen with audio and webcam
- Annotate with arrows, lines, and blur
- Instantly share with a link or upload to YouTube or Vimeo
Alternatively, search for “Zight” on your web browser and create an account. Then, download the app that’s compatible with your computer. Zight is available for Mac , Windows , and even as a Google Chrome extension .
2. Choose your Screen Recording Preferences
Open your presentation on Google Slides and ensure you can easily navigate to the slides once you’re ready to record.
On the Zight App
Launch the Zight app and click Record.
You’ll find recording options like Full Screen and Select Region, plus the Screen Only or Screen & Cam options. Screen Only is good when you don’t want to use your webcam, while the latter allows you to incorporate your webcam for a personal touch.
Then, select your audio/mic and webcam options, move your webcam overlay to a good space on your screen, and click Start Recording. Wait for the 3-second timer to count down before you go to the Google Slides presentation.
On the Google Chrome Extension
Click on the Zight icon on the upper left of your Google Chrome browser, click Record, and select either Screen Only or Screen & Cam. Then, turn on your microphone and webcam camera.
Next, click Start Recording and choose Entire Screen. After that, select the screen you want to record, and click Share. Click your mouse on any part of the screen to start recording and wait out the 3-second countdown.
The Zight screen recorder software will now be recording your entire screen.
3. Start Narrating Your Google Slides Presentation
On the Google Slides presentation page, click on the dropdown menu next to Slideshow.
Click Presenter View if you are viewing the first Google slide. Alternatively, click Start from the beginning if you are not on the first slide. This will turn your presentation into a full-screen view and you will see that Zight is sharing your screen.
Then, start narrating your Google slides in high video and audio quality.
You can pause and resume your screen recording and restart it to capture moments you may have missed in the beginning. You can also cancel the recording and delete the file to avoid uploading it to the cloud.
4. Annotate Your Presentation
One of the best things about presenting your Google Slides with Zight is that you can annotate the video just as easily as you narrate it.
If you are recording from the Zight app, you can pause the recording and then click the annotations button on the recording menu (the icon looks like a pen).
Once you do, you will see the different annotations you can add to the slides, including a pen, highlighter, arrow, line, ellipse, and rectangle. You can choose a different color for your annotations, even how long the annotation lasts on the final recorded video.
After annotating, resume the recording, rinse and repeat!
5. Finish Recording and Edit Your Video
Once you narrate all your Google slides, click the Finish recording button and wait for the file to upload to the cloud. Zight will also open the file on your default browser where you can edit the video file further.
When the video link opens, click the Edit button, and continue to split and merge sections, trim, crop, filter, and finetune different sections until the presentation is faultless. Click Done to save those settings.
On top of the recording, annotating, and editing of your Google Slides presentation, Zight will also transcribe your video and send the text to your email so you can go through the notes in case you missed something.
You can also add custom branding, and use AI features to generate a video summary and video titles. If you want to share the presentation with global teams, you will also love that you can translate the video file into 50 different languages for seamless communication.
6. Share the Presentation for Asynchronous Communication
To share the presentation, you can send the shareable link to your teams via Slack , Asana , Trello , and other chat boards and productivity software you use at work.
Alternatively, you can embed the video file in an email, or even download it on your computer then upload it on a platform like YouTube to reach a global audience.
7. Collaborate and Track Analytics
The best part about recording your presentation in superior video footage with Zight is how you can save it for collaboration later.
Firstly, you can save the video to a Collection on your Zight dashboard or add it to a Favorites list. This way, the video will be readily available and you can track how many people interact with it, either through comments or reactions to finetune your collaboration and communication strategy.
In addition, this video presentation will always be available on your Zight cloud account, and, as long as you keep it, even your colleagues or recipients can always retrieve it for future reference.
There you have it, an easy way to record your Google Slides presentation using Zight! With this method, you can easily create and share professional-looking recordings of your presentations to a global audience.
If you want to feel more confident before your audience with a well-designed and narrated deck, ensure you have a reliable internet connection before starting the recording. In addition, close any unnecessary tabs or programs on your computer to avoid interruptions. Finally, while Zight may use the native mic on your computer, you can prefer to use a high-quality microphone for better audio clarity.
Most importantly, don’t forget to rehearse and practice your presentation beforehand to ensure a smooth delivery and minimize any mistakes during the recording. With these tips in mind, you can confidently create engaging presentations that will impress your audience.
So why wait? Get Zight today and take your presentations to the next level!
I) Can I Record My Screen in Google Slides?
No. Google Slides does not have a built-in screen recording feature. However, you can use third-party apps like Zight to record your presentation.
II) How do you turn a Google slide into a video?
Since Google Slides does not record the screen and audio (apart from when you’re presenting in a Google meeting), you will need a third-party app to record your screen and turn your slides into a video. Follow the steps mentioned above to record and then export your presentation as a video.
When you record your Google Slides presentation with Zight, you’ll also be able to explain the contents of your slides in high-quality audio for an even better personal touch to what would be a boring presentation without narration.
III) How Do You Create a Presentation on Google Slides?
To create Google slides, follow these steps:
- Go to Google Drive and sign in.
- Click on the “New” button, then select “Google Slides.”
- Choose a template or start with a blank slide.
- Add your content by typing in text, and inserting images, videos, shapes, or charts.
- Customize your slides by changing the theme, background-color
Create & share screenshots, screen recordings, and GIFs with Zight
Get Zight for iOS.
TechRepublic
Account information.

Share with Your Friends
How to Record a Video Presentation With Google Slides
Your email has been sent

Google Slides now lets you record a presentation with inset video from your webcam. Each recording may be a maximum of 30 minutes long. No longer do you need to turn to a third-party tool or web meeting app, such as Google Meet , to record a presentation. Instead, you can start and finish the task with nothing more than Google Slides on a laptop.
As of March 2024, slide recordings may be made by customers who use Google Workspace Business Standard or Plus; Enterprise Starter, Essentials, Essentials Plus, Standard or Plus; and Education Plus editions.
How to make a basic slide recording in Google Slides
To create a slide recording, you’ll need to use Google Chrome on a computer that has a camera and microphone.
- Go to Google Slides and open your presentation.
- Select the Rec button in the upper right area, then select the Record new video button ( Figure A ).
The system will switch to the screen recording interface, with recording controls displayed below your slides. By default, the system will display your inset (picture-in-picture) video in medium size in the lower right corner of a slide, since this portion of a slide is often empty.

- Optionally, before you start recording, you might adjust three settings:

- Modify the size of the inset video frame. Select the size icon, found to the right of the video inset location icon, then choose either a small, medium or large video frame size.
- Open speaker notes with the button found to the immediate left of the back slide (<) icon. This will display speaker notes for your reference while recording. (Ideally, you would not need to refer to speaker notes, so that you could instead look directly at the camera as you record.)
- When you are ready to record, select the large red button at the bottom of the screen.
- If prompted, you may need to allow access ( Figure C ) to the tab, along with the camera and microphone. For example, when recording on a Chromebook, you may be prompted to “Allow docs.google.com to see this tab?” and “Also allow tab audio.” Select Allow, if prompted.

In a few cases, you may need to visit the following links in Chrome to adjust permissions for:
- Camera: chrome://settings/content/camera.
- Microphone: chrome://settings/content/microphone.
- A brief countdown should display (i.e., 3, 2, 1), then your recording will begin. Record your video, advancing your slides as desired.
- To pause recording, press the large red button at the bottom of the screen.
- Once paused, you may select from two options ( Figure D ):

After you select Save to Drive, wait a bit until the system indicates the file has been saved. If you leave or close the tab too soon, you may lose your recording.
How to select inset video shapes and sizes
On any slide, you may use the Insert | Speaker spotlight option ( Figure E ), then select a shaped video frame. This inserts a frame where the speaker video will display on that slide. You may reposition or resize the frame: Select the shape, and then drag-and-drop it to move it to a different place on your slide, or select a corner and drag it to resize it.

When you insert a speaker spotlight shape, that supplants the position and size you might have selected on a basic recording. In other words, the speaker’s video will display in one of the corners or the center, and in the small, medium or large shape chosen with the settings — unless you’ve inserted a speaker spotlight shape on a page ( Figure F ). Use the speaker spotlight option to convey the most polished professional effect, since it allows precise control over the shape, size and location of a video frame.

How to play, share and manage slide recordings
You may access slide recordings within Google Slides on a computer. However, unlike recording, which requires you to use Google Chrome, you may access and play existing recordings within Google Slides on a variety of modern browsers. For example, the following steps all work when you use Google Slides within either Google Chrome or Apple’s Safari browser.
To access recordings associated with a Google Slides presentation, follow these steps.
- Select the Rec button in the upper right area. The recordings you’ve made of the presentations will display. Importantly, the system shows both the date and duration of each recording.
- To view, share or download a recording, click anywhere on the playback icon or title of the recording ( Figure G ). It should open in a new tab. Within this tab, you might:
- Select the Play icon in the center of the video image to play the recording.
- Select the Share button in the upper right corner of the screen to modify access settings and give other people access to the file.
- Select the Download icon in the down arrow above a tray icon in the upper right area of the screen to download the file.

- Select the three dot menu to the right of a listed recording to:
- Rename a file something other than the default recording title.
- Remove a previously made recording you no longer need.
- Copy link and obtain the Google Drive URL for the recorded file.
All Google Slides recordings are stored in a Slides recordings folder on Google Drive. The recordings are saved as .webm files, which is a widely supported web video format. You may easily open and play .webm files on both Apple and Android mobile phones. Any recordings you make using Google Slides should be easy to view on almost any device.
Does the ability to record a presentation within Google Slides streamline your workflow? What sorts of video presentations will you create with this new capability? Mention or message me on X ( @awolber ) to let me know how you use screen recording within Google Slides.
Subscribe to the Google Weekly Newsletter
Learn how to get the most out of Google Docs, Google Cloud Platform, Google Apps, Chrome OS, and all the other Google products used in business environments. Delivered Fridays
- How to share video with Google Sites
- How to present Google Slides in Google Meet
- Prezi announces Google Slides integration
- Google Meet: A cheat sheet to the app and platform features
- Google Meet: 3 presenter controls for smoother presentations
- Best software for businesses and end users

Create a TechRepublic Account
Get the web's best business technology news, tutorials, reviews, trends, and analysis—in your inbox. Let's start with the basics.
* - indicates required fields
Sign in to TechRepublic
Lost your password? Request a new password
Reset Password
Please enter your email adress. You will receive an email message with instructions on how to reset your password.
Check your email for a password reset link. If you didn't receive an email don't forgot to check your spam folder, otherwise contact support .
Welcome. Tell us a little bit about you.
This will help us provide you with customized content.
Want to receive more TechRepublic news?
You're all set.
Thanks for signing up! Keep an eye out for a confirmation email from our team. To ensure any newsletters you subscribed to hit your inbox, make sure to add [email protected] to your contacts list.
Home Blog Google Slides Tutorials Google Slides vs. PowerPoint: A Detailed Comparison
Google Slides vs. PowerPoint: A Detailed Comparison

There was a time when anyone making a slide deck using presentation software was likely to use PowerPoint, with Apple’s Keynote being a close competitor. As time progressed, presentation platforms became available online and through mobile devices. In the initial years of this transition, PowerPoint lagged behind in the wake of online presentation suites and mobile device presentation apps. One of the most obvious competitors then was Google Slides, leading to the debate about Google Slides vs. PowerPoint.
Table of Contents
Importance of Presentation Tools
Google slides and microsoft powerpoint: historical context, accessibility and device compatibility, price comparison, presentation templates, basic editing features, media embedding capabilities, annotation and presentation options, animations and transitions, file conversion capability, collaboration and teamwork capabilities, pros and cons of powerpoint and google slides, case studies: powerpoint and google slides.
Presentations have become a staple for business professionals, teachers, students, and even people in the military. As using computers and mobile devices became easier with the improvement in easy-to-use graphical interfaces, people quickly switched to slide decks, video presentations, remote meetings, and other presentation delivery methods. People no longer needed whiteboards or oral presentations, as the visual aids offered by presentation software were just too good to let go of. This meant that presentation software was continuously improved and adapted for different devices.
Over the years, different presentation software has been accompanied by several accessories, such as presentation remotes and laser pointers. All of these have been virtually replaced in recent years with virtual apps or integrated features within presentation software that allow easy remote switching of slides through mobile devices and the ability to turn a cursor into a laser pointer. Furthermore, add-ins for different presentation platforms have emerged with innovative and ever-increasing options to enhance presentations.
The Rise of PowerPoint as a Presentation Software
Developed by Robert Gaskins and Dennis Austin during the 80s, it was a presentation software developed for Mac computers. Along the way, Gaskins and Austin also employed the help of a third developer, Thomas Rudkin. PowerPoint 1.0 for Mac was released in 1987, and 10,000 copies were sold. Shortly afterward, Microsoft acquired Forethought Inc., the company that made PowerPoint. It took some convincing from colleagues, leading Bill Gates to seriously think about PowerPoint being an effective software.
For a long time, PowerPoint remained the major presentation software for desktop computer users, more precisely, Windows and Mac users.
Emergence of Google Slides as a Viable PowerPoint Competitor
Nearly 20 years after its initial release, things began to change. The Internet had started taking the world by storm, and more people could use desktop computers than ever before. Not to mention, mobile devices started becoming ‘smarter.’ Then, Google launched its Google Docs Suite with an online version of a PowerPoint-like app. This app later became Google Slides. While Google was able to provide free online presentation software that could also enable the opening, editing, and sharing of PowerPoint-compatible files, Microsoft lagged in delivering a similar product. It wasn’t until 2012 that Microsoft PowerPoint came with proper online features. With the introduction of a free version called PowerPoint Online and later integration with Office 365 (now known as Microsoft 365), Microsoft caught up to Google Slides. Furthermore, the two became available for mobile devices, catering to the needs of smartphone users.
Google Slides vs PowerPoint: Feature Comparison
The first thing to consider when it comes to the Google Slides vs. PowerPoint debate is device compatibility. Back in the day, PowerPoint was limited to Windows and Mac computers, whereas Google Slides could mostly be used only through Internet-connected browsers. Much has changed since the launch of the Google Docs Suite, which led to what we now know as Google Slides. This means that both PowerPoint and Google Slides are now more compatible with different devices than ever before.
Microsoft PowerPoint
Microsoft PowerPoint has Windows, Mac, Android, and iOS apps. While Windows Phone is no longer produced, Microsoft released a version back then. Other than apps, PowerPoint is accessible through Internet browsers via the free but limited version called PowerPoint Online and the full-featured Microsoft 365 suite.

Google Slides
Google Slides was initially an online presentation app available via Internet-connected browsers. Later, it produced various apps for Android, iOS, Chrome OS, and Wear OS devices. Furthermore, you can also use Google Slides offline on a desktop computer using the Google Docs Offline Chrome extension. This extension also works with other Chromium-based web browsers like Edge.

Before we discuss the features of both presentation platforms, it is worth discussing the pricing mechanism that Google and Microsoft use for their presentation software.
Microsoft provides a free version of PowerPoint via a Microsoft account that you can use to access an online version. Furthermore, it also comes with OneDrive integration and up to 5Gb of free cloud storage. The full-featured version of PowerPoint has different license types, with an annual recurring fee for personal, family, business, and enterprise use. Microsoft also offers free versions for educational institutions, teachers, and students. The classic 2021 version of PowerPoint is also available for one-time purchase and is called Office Home & Student 2021. However, this is for non-commercial use and is more of a version with limited features.
As of 2024, Microsoft 365 starts at $69.99 for a personal package or around $6 per user per month. Depending on your needs, you can opt for family, business, or enterprise packages.

While Google Slides has been free for users of Google accounts for quite some time, it also comes with premium packages. Unlike the Google Drive-integrated version with 15GB of cloud storage, the paid version of Google Slides comes integrated with Google Workspace, which has various versions for business use and an enterprise package. Google Workspace for Education provides free and discounted versions for educational use.
Unlike the free version of Google’s products, Google Workspace offers advanced security, cloud storage, and custom emails with all Google products like Gmail, Google Sheets, Google Slides, Google Docs, Google Drive, Google Calendar, and others integrated into one suite. Furthermore, it integrates with third-party apps for advanced integration for enterprise use.
Google Workspace can cost $6 per user per month or around $72 annually for a basic package. Other packages for business and enterprise use can cost more depending on the number of users.

Different presentation software has different templates, enabling end users to create customized slide decks to suit their needs. A number of native and third-party templates are available for both platforms.
Microsoft PowerPoint provides hundreds of templates that are accessible directly through its apps and online versions. You can also download PowerPoint templates from Office.com. Furthermore, more third-party developers provide customizable PowerPoint templates than Google Slides. SlideModel alone provides over 50,000 PowerPoint templates with various customizable characters, maps, diagrams, backgrounds, and layouts.

One of the things that Google Slides has lagged in is the provision of templates that are as good as PowerPoint. Not only are there fewer developers making templates for Google Slides, but the quality can also be often lacking. Compare that to the PowerPoint templates available via Office.com and third-party developers, and you will find PowerPoint to be a clear winner in this comparison. Suppose you are a Google Slides user searching for templates that can offer something similar to an experience provided by PowerPoint templates. In that case, you can either use PowerPoint templates in Google Slides or explore these Google Slides templates .

The basic editing features of PowerPoint and Google Slides are quite similar, with a few exceptions. If you are new to presentation making, you might want to first see our articles about how to start and end a presentation .
A glance at the Home tab of the Ribbon menu provides basic editing features, including the fonts, text styles, size, and alignment options. Moreover, you can use this menu or the left sidebar to create, duplicate, add, or hide slides.

Besides the left sidebar, Google Slides provides basic editing features via the Format menu. This menu caters to text, alignment, spacing, and other basic features. The Slide menu has many layout selections, slide duplication, and creation features. Many basic formatting options are also visible from the Google Slides toolbar. What sets apart Google Slides formatting options is mainly the availability of different font families, with fewer editing and enhancement features such as text stylizing options in Google Slides.

Both PowerPoint and Google Slides provide various embedding options to embed content within slides.
PowerPoint via the Insert tab offers options to add pictures from your device and online, including via Bing search stock photos provided by Microsoft. You can also insert illustrations, cutout people, stickers, and cartoon characters provided within the app. PowerPoint also comes with stock icons, shapes, 3D models, symbols, charts, and the ability to add videos and audio to slides. The videos include not only ones from within your device but also online videos and stock videos provided by Microsoft. Unlike past versions, Microsoft has come a long way in offering embedding capability for YouTube videos and other platforms such as Vimeo, SlideShare, Stream, and Flip. Additionally, you can instantly record a screencast and insert it into a PowerPoint slide.
PowerPoint supports MP4, WMV, AVI, MOV, MPEG, and SWF video formats, as well as audio formats such as MP3, WAV, M4A, and WMA.

Google Slides provides shapes, tables, diagrams, charts, and WordArt that is similar but arguably inferior to PowerPoint. The embedding options offered by Google Slides are a close replica of PowerPoint. Available via the Insert menu, you can add images from your device via URL, Google search, your device camera by taking an instant photo, and Google Drive. Similarly, you can insert Audio and videos from YouTube and Google Drive.
Google Slides supports videos from MP4, AVI, MOV, and WMV formats, whereas supported audio file formats include MP3, WAV, and OGG. In terms of embedding capabilities, Google Slides is more geared towards online users, whereas PowerPoint also provides enhanced offline capability to embed videos and reasonable support to embed videos from popular video streaming platforms. Other features, such as making a screencast, require using third-party add-ons for Google Slides.

PowerPoint’s Draw tab and the Pointer options in Slideshow mode (accessible via the right-click menu) can highlight and turn your cursor into an instant laser pointer. You can also move the cursor to the bottom to reveal many of these features in slideshow mode and find options to zoom into text, view slide thumbnails, etc.

Regarding annotation and presentation features, Google Slides lags far behind PowerPoint. The Line and Scribble options are pretty limited, and while you can turn your cursor to a laser pointer or highlight text in Slideshow mode, PowerPoint’s ability to zoom and sort slides and Drawing tools cannot be matched.

When it comes to animations and transitions, PowerPoint’s capability compared to Google Slides has often been overlooked.
The Transitions and Animations tab provides transitions and animations in PowerPoint. Slide switching is a pleasure if you know how to arrange the transitions from the very basic reveal, split, and fade to the advanced Morph transitions. Similarly, PowerPoint animations are divided into four major sections, including animations for Entrance, Emphasis, Exit, and Motion Paths. Motion Paths are the most complex PowerPoint animations, enabling the definition of a path for an animated object.

You can go to Insert -> Animation after selecting an object or Slide -> Transition after selecting a slide to reveal animations and transitions in Google Slides. Unfortunately, both animations and transitions in Google Slides are pretty basic and limited, unlike PowerPoint, which offers basic to advanced transitions and animations. For example, the PowerPoint morph transition can create the illusion of moving objects, and Motion Paths can reveal objects on a set path defined by the user.

Microsoft PowerPoint and Google Slides support file conversion to different formats. However, some conversion options require third-party apps.
PowerPoint supports converting files to PDF, XPS, MPEG 4, WMV, EMF, RTF, SVG, BMP, PNG, JPEG, TIFF, ODP, and other formats. Many file conversion formats in PowerPoint are also native, such as the legacy PPT, PPA, POT, and PPS formats and the new formats PPTX, POTM, PPTM, PPSX, and POTX.

Google Slides provides native file conversion options to download your file as a PPTX, ODP, PDF, TXT, JPEG, PNG, or SVG file. However, to convert Google Slides to video or other formats, you must use third-party add-ons such as Creator Studio.

In the wake of COVID-19 and remote working, the need for collaboration and teamwork, even for presentations, cannot be underestimated. Microsoft 365 and Google Workspace have often tried competing in this niche using various products woven into their presentation software.
The fact that Microsoft doesn’t simply produce a presentation suite but an entire environment, from operating systems to remote meeting apps, gives it quite an advantage. PowerPoint comes integrated with OneDrive, Teams, Loop, Skype, and various other apps you can use to collaborate online. Depending on your Microsoft 365 subscription, some features are limited to enterprise users, particularly for the desktop version of PowerPoint. You can share your files using OneDrive with specific people or by generating a publicly accessible link. Use the online version of PowerPoint to embed a code to share your presentation online.
Collaboration on a Live PowerPoint file can be performed through a browser, the desktop, or the mobile version of PowerPoint. Furthermore, its integration with Microsoft Teams helps integrate PowerPoint natively for remote meetings.

Google Slides initiated online collaboration and sharing long before Microsoft adapted to the concept. The initial version of Google Slides readily provided options such as sharing the file of online cooperation via a direct link that Microsoft later integrated into PowerPoint. Furthermore, you can also use the Publish on the Web option in Google Slides to embed the slides online.
In terms of collaboration, what makes the real difference is the close integration of various Microsoft products with PowerPoint. In contrast, Google Drive and Google Meet have been trying to do the same for Google Slides, with the latter being less popular for remote meetings than Microsoft remote meeting apps such as Teams and Skype.
Unlike Microsoft, Google has struggled to leverage ChromeOS and Android as a primary choice for enterprise use since both operating systems lack the ability and compatible hardware to run heavy apps. Windows or Mac seems to be an obvious choice for end users when it comes to non-linear editing, research, graphic design, and other fields of work that require using resource-intensive apps. This also impacts the preference for Google Slides compared to Microsoft products such as PowerPoint, which integrates with the Microsoft-provided experience.

While much can be said about PowerPoint and Google Slides’ features, let’s examine some of the pros and cons of using both presentation platforms.
Pros of Using Microsoft PowerPoint
Microsoft PowerPoint has a number of handy features that make it a worthy presentation software and live up to its reputation as an industry leader.
Feature Rich
PowerPoint is a feature-rich presentation software with many advanced features to help you edit, create, design, and present your slides with many user-friendly options.
Integration with Microsoft Products
PowerPoint, combined with the overall Microsoft experience, is based on its Windows operating systems, Teams, Skype, OneDrive, and other apps to provide support for PowerPoint.
Offline Access
Unlike Google Slides, which works best online, the offline version of PowerPoint allows users to create and present slides offline without requiring Internet connectivity.
Availability of PowerPoint Templates
You can find PowerPoint templates on any topic imaginable, with countless third-party developers adding free and premium templates daily. This ever-expanding resource is something that presenters can always leverage to make their presentation visually appealing and with easy-to-edit templates.
Advanced Collaboration Features
While PowerPoint was late in providing online collaboration features, the ability to work remotely has been expanding and improving once integrated.
Add-ins and Integration with Third-Party Apps
PowerPoint add-ins and third-party app integration have been seamless and ever-expanding. Not only can you use a wide array of add-ins to further enhance PowerPoint features, but you can also integrate it with various third-party platforms and apps such as Adobe Creative Cloud, Salesforce, LinkedIn, Zapier, Bing Translate, etc.
Integration of AI
In recent years, Microsoft has been quick to integrate AI in PowerPoint. From PowerPoint’s Designer feature and Bing Translation tool to the integration of Copilot, Microsoft has been quickly enabling end users to leverage AI to create and design slides.

Cons of using Microsoft PowerPoint
While PowerPoint has many benefits, end users should also consider a number of cons.
Expensive Cost Structure
PowerPoint can be quite costly, and not everyone will be willing or able to afford a hefty annual recurring fee. The free version and license for noncommercial use have stringent requirements from which few can benefit. The free version of PowerPoint available as PowerPoint online has limited features.
Platform Dependency
While PowerPoint has an online version with ever-increasing features and mobile versions for Android and iOS, it is still more of a desktop app. We can argue that the online version isn’t as smooth as the functionality of the desktop version, and the mobile apps still leave a lot to be desired. Other than the Mac version of PowerPoint, it has been designed to integrate with Microsoft OS and apps, making it somewhat platform-dependent.

Pros of Using Google Slides
Google Slides has various pros as a presentation app for different types of end users.
Cloud-Based and Cross-Platform Accessibility
The promise of Google Slides or Google’s suite was always ease of access through the Internet and cross-platform compatibility. Like other Google products of its kind, Google Slides provides ease of access via the Internet and accessibility regardless of what operating system you are using. Using a modern browser allows you to access and use Google Slides without any platform dependency.
Economical Option for Making Presentations
Using the full-featured PowerPoint can be quite expensive, whereas Google Slides provides all basic features in the free version, with the option to upgrade to Google Workspace for more advanced features. Furthermore, Google Drive comes with 15GB of free cloud storage space compared to the meager 5GB provided by OneDrive. This can be helpful for long-term use for storing presentations online.
Compatibility with PowerPoint Files
If you can’t afford PowerPoint, Google Slides can be the next best thing. It provides compatibility for PowerPoint files, with the option to convert files in various other file formats such as PDF, RTF, ODP, etc. You can even start a presentation using Google Slides and download it as a PowerPoint file for use with PowerPoint. While many other apps also offer such features, the compatibility of Google Slides with PowerPoint files is one of the best you can find.
Integration of Google-Based Apps
Google Slides is integrated with other Google products, including Gmail, Google Drive, Google Meet, Google Forms, and Google Photos. You will find Google Slides quite convenient if you’re used to these products.
Third-Party App Integration
Google Slides integrates with a number of third-party apps such as Adobe Spark, Canva, Lucidchart, Asana, etc. You can access Google Slides add-ons via the Extensions menu. The add-ons available for Google Slides are mainly for online platforms that integrate with Google Slides.

Cons of Using Google Slides
While Google Slides has been a great free alternative to PowerPoint, it does have various limitations.
Limited Features
When it comes to Google Slides vs. PowerPoint, the latter clearly offers more enhanced features that Google Slides has yet to match. Whether it’s the use of advanced transitions and animations, AI, design features, or basic editing and presentation options, PowerPoint wins by a mile.
Weak Offline Support
Google Slides is primarily an online app with weak offline support. Unlike PowerPoint, it is very hard, if not impossible, to create, edit, and present a presentation entirely offline using Google Slides.

Use by the US Military
There have been many instances where PowerPoint stood out as a presentation software and times when it took flak for the phenomenon called death by PowerPoint. The use of PowerPoint by the American military is well documented. The concept came to light amidst criticism of how bad the presentations were. This led to an article in The New York Times titled, ‘We Have Met the Enemy, and He Is PowerPoint’. Eventually, Microsoft intervened and sent in executive communications manager Dave Karle to rectify the problem. However, the case of death by PowerPoint in the US military is attributed not to the presentation software but to how it is inaccurately used to create presentations.
Google Slides has many examples of case studies and events where it has been a regular feature. Google’s annual developer conference, called Google I/O, is famous for featuring presentations on Google Slides. In 2018, Google CEO Sundar Pichai and other senior officials used Google Slides during Google I/O as a part of the major event highlights. Google Slides has often been used in Google I/O events as a presentation platform by Google’s top management and remains the central app for keynote presentations.
While the US military might have a lot to learn about using PowerPoint, presenters at TED Talks often use it with quite some dexterity. PowerPoint and Google Slides have been regular features of TED Talks and are used by different types of presenters to express their ideas and explain various concepts.
While Google Slide provides an economical and easy-to-access alternative to PowerPoint, the latter remains an industry leader with features that Google Slides has yet to catch up to. While Google Slides had an edge in the past regarding online collaboration and sharing features, once PowerPoint became available online, Google struggled to match the features offered by PowerPoint and lacked the support of operating systems and other apps used by businesses that come integrated with PowerPoint.
Windows-based operating systems, including client OS and servers, come integrated in an environment where the Office suite provides powerful support to PowerPoint users in an integrated environment. On the contrary, Google has failed to leverage Android or Chrome OS as a powerful operating system that can do the heavy lifting regarding enterprise-level software integration. Microsoft-based products are an obvious choice, even if some of the organization’s base infrastructure uses other operating systems, such as CentOS or Red Hat, to maintain its servers. This is because Windows is still a famous client operating system and Android and Chrome OS cannot match when running heavy applications for design, development, research, etc.
In conclusion, Google Slides serves as an economical alternative to PowerPoint. The latter is still the industry leader in presentation software and has yet to be dethroned.

Like this article? Please share
Google Slides, Microsoft PowerPoint Filed under Google Slides Tutorials , PowerPoint Tutorials
Related Articles

Filed under Google Slides Tutorials • April 23rd, 2024
How to Align Objects in Google Slides
Optimize your layouts by learning how to align objects in Google Slides presentations. Step-by-step guide with screenshots.

Filed under Google Slides Tutorials • April 19th, 2024
How to Find Trash on Google Slides
Don’t worry if you accidently delete a presentation file. Learn how to find trash on Google Slides with this guide.

Filed under PowerPoint Tutorials • April 16th, 2024
How to Insert an Equation in PowerPoint
Learn how to create easy-to-understand science slides by mastering how to insert an equation in PowerPoint. Step-by-step guide.
Leave a Reply
How-To Geek
How to convert google slides to a video or gif.
Share your Google Slides with ease with these quick tips.
Quick Links
Convert using powerpoint, capture with your screen recording tool, use a google slides add-on.
While it's easy to share Google Slides using a link or publishing it to the web , you may want a single non-editable file that you can share privately. By converting the slideshow to a video or GIF, your visitors can watch it as you intended. Here are three methods to try.
Microsoft PowerPoint offers both video and GIF exporting . So, if you have PowerPoint, you can open the Google Slides presentation in it and create the video or GIF from there.
Related: How to Convert Google Slides to PowerPoint
Open your Google Slides presentation and go to File > Download. Select "Microsoft PowerPoint (.pptx)" in the pop-out menu.
Head to your downloads folder and click or double-click the file to open it in PowerPoint.
Go to File > Export. Then, choose "Create a Video" or "Create an Animated GIF."
If you pick a video, you can then use the drop-down boxes to choose the quality and whether you want to include recorded timings and narrations. You can also set the duration per slide. Click "Create Video."
If you pick a GIF, you can choose the quality, make the background transparent, set the duration per slide, and include only specific slides if you like. Click "Create GIF."
For both video and GIF, you'll then be prompted to choose a location, optionally change the name, and click "Export" when you finish. Then, grab your video or GIF and share it where you please.
If you have a screen recording tool, such as Game Bar on Windows , the Screenshot Utility on Mac , or a third-party application, you can capture your slideshow as it plays. Then, save the video file to share or turn it into a GIF using an online tool.
Related: How to Screen Record on Your Mac
Get your screen recording tool ready and select the Slideshow drop-down box at the top of Google Slides and pick "Start From beginning."
To ensure you don't see your mouse cursor in the recording when advancing through the slides, you can set it to automatically play.
When the presentation appears in full-screen mode, click the three dots on the right of the floating toolbar, move to Auto-Play, and choose the time per slide.
Then, start capturing with your screen recording tool and stop when the slideshow finishes. You can then edit or share your video.
Additionally, you can use a file converter to obtain a different video file format or turn the video into a GIF. You can use a few free online tools including Cloud Convert , Convertio , or Zamzar .
One other way to convert Google Slides to a video or GIF is with an add-on. There are a few Google Slides add-ons that you can try if you search the Google Workspace Marketplace.
One that works well and allows you to create a video or a GIF for up to five slides for free is Slides to Video .
Related: Everything You Need to Know About Google Chrome's Profile Switcher
Slides to Video works using Google Chrome with the same Google account as Google Slides. If you use a different browser, there are other add-ons such as Video and GIF From Slides and Creator Studio that each offer a free trial.
Once you install the add-on, open your presentation and go to Add-Ons in the menu. Move your cursor to Slides to Video and pick "Create Video" in the pop-out menu.
When the sidebar opens, you can choose a duration per slide or a default for all slides at the top. Then, use the Choose Your Export Type drop-down box to pick "MP4" or "GIF." Click "Create Video."
You'll see the progress as your video or GIF is created. When complete, you'll receive an email to your Gmail account and will also see a link in the sidebar to download the file.
Until Google Slides provides the export option to create a video or GIF, these workarounds can help you get the job done.
For more, learn how to add a YouTube video or how to add other types of videos and customize the playback in Google Slides.
Ultimate Guide to Add Audio to Google Slides
- Updated April 22, 2024
- No Comments
Google Slides stands as a cornerstone in the realm of presentation software, offering a dynamic platform for individuals and organizations to communicate ideas effectively. With its intuitive interface and collaborative features, Google Slides empowers users to craft visually stunning presentations that resonate with audiences worldwide. While the power of visuals in conveying information cannot be understated, the integration of audio introduces a new dimension of engagement and immersion.

We’ll delve into the intricacies of adding audio to your Google Slides presentations, unraveling the step-by-step process to unlock the full potential of your content. By seamlessly blending visuals with audio elements, you can elevate your presentations from static slideshows to dynamic experiences that leave a lasting impression on your audience. Join us on this journey as we equip you with the knowledge and tools to create captivating presentations that captivate, inspire, and inform.
Why Should You Add Audio to Your Presentation?
Adding audio to presentations offers a multitude of benefits that can significantly enhance the overall experience for your audience.
Enhanced Comprehension
When delivering a presentation, your audience is tasked with absorbing both verbal and visual information simultaneously, demanding considerable mental effort. Integrating audio into your presentation streamlines this process, allowing your audience to focus their attention solely on your message. Moreover, listening typically requires less cognitive effort than reading, facilitating quicker absorption of information and reducing cognitive load.
Increased Engagement
Carefully selecting background music or sound effects can inject energy and captivate your audience, fostering a more immersive and engaging atmosphere. For instance, incorporating festive music into a presentation about holiday promotions can evoke a sense of excitement and resonate with your audience’s emotions, keeping them invested in your content.
Emotional Resonance
Research indicates that music has a profound impact on our emotional state and memory formation. By integrating music, sound effects, or voice recordings into your presentation, you can evoke a range of emotions, enriching the overall experience for your audience. Whether it’s upbeat music to inspire optimism or gentle melodies to encourage introspection, audio elements can heighten emotional resonance and leave a lasting impression on your audience.
Adding Audio to Google Slides
Whether gearing up for a grand conference or a more intimate sales pitch, integrating audio elements such as background music, voiceovers, or sound effects can infuse your presentation with an extra layer of dynamism and appeal.
Step 1: Audio File Preparation
To start integrating audio into your Google Slides presentation, ensure your audio files are compatible with Google Drive’s supported formats, such as MP3 or WAV. If your file is in a different format, utilize an audio conversion tool to make it compatible.
Step 2: Uploading Audio to Google Drive
- Access Google Drive and log in.
- Initiate the upload process by selecting the “New” button on the left side

- Next, choose “File upload.”

- Locate the desired audio file on your computer, select it, and commence the upload by clicking “Open.”

- Once uploaded, right-click on the file within Google Drive, opt for “Share,” and adjust the sharing settings to “Anyone with the link can view.” This ensures seamless playback when sharing your presentation.

NOTE: When intending to share your Google Slides template presentation with others while ensuring they have access to your audio, it’s essential to grant them separate access to your audio file outside of Google Drive. This can be achieved through your file settings.
Step 3: Audio Insertion in Google Slides
- Open your Google Slides presentation.

- Navigate to the slide where you intend to incorporate the audio.
- Access the “Insert” menu at the top, then choose “Audio.”

- Locate and select your uploaded audio file from Google Drive, then confirm with “Insert”

- A visual indicator, such as an audio icon, will signify the successful insertion of the audio file.

Step 4: Audio Formatting
Google Slides offers simple yet effective tools for formatting your audio. You can customize aspects such as reflection, shadow, volume, and more by selecting the audio icon and adjusting the menu options located on the right side of your screen.
- Select the audio icon on your slide to reveal the format options toolbar.
- Here, tailor playback settings, including “Play” (on click/auto-play/stop on slide change), “Loop audio,” and “Hide audio icon when presenting,” to align with your presentation requirements.

In Google Slides, you have the flexibility to decide how your audio plays during your presentation. You can opt for it to play “on click” or automatically when the slide is presented. If you select automatic playback, you can also choose to hide the icon since it’s unlikely you’ll need it visible during the presentation.
Additionally, you have the ability to adjust the volume of the audio to suit the context of your presentation. For added continuity, you can enable the loop feature, allowing the audio to repeat seamlessly throughout the presentation.
Lastly, by deselecting the “Stop on slide change” option, you ensure that the audio continues to play uninterrupted as you transition between slides.
Step 5: Audio Testing
- After configuring your audio settings, it’s crucial to conduct a thorough test to ensure seamless playback.
- Initiate your presentation by clicking “Present.”
- Navigate to the slide featuring the audio and activate it according to your chosen playback method (e.g., clicking on the icon for “on click” playback).
- Verify that the audio plays correctly and make volume adjustments as necessary.
In editing mode, you can preview and play the audio by hovering over the speaker icon or selecting it and clicking the play button. During presentation mode, simply click on the speaker button to initiate playback, or hover over it and click the play button to start the audio.
Step 6: Presentation Sharing
When sharing your Google Slides presentation, verify that recipients have access to the audio file. Double-check the sharing settings of the audio file in Google Drive to confirm it’s set to “Anyone with the link can view.”
Adding Audio/Music from a URL
You have the option to incorporate music into your Google Slides presentation by linking to a URL or the file’s location on the internet, including platforms like SoundCloud, YouTube Music, Apple Music, or Spotify. However, this method can be somewhat complex.
For the purpose of this guide, we’ll demonstrate how to add audio/music using a link from a SoundCloud file. Ensure you have an internet connection to play the audio during your presentation.
Here’s how to create a slideshow with music:
Step 1: Locate the desired audio/soundtrack
Open SoundCloud in a web browser and navigate to the page containing the soundtrack you wish to use. Before proceeding, verify that the file is not copyrighted, has a Creative Commons license, or is public domain content.
Step 2: Copy the soundtrack’s URL
Select “Copy Link” to copy the URL of the soundtrack from SoundCloud.

Step 3: Insert the URL into your Google Slides presentation
- Choose the slide where you want to insert the URL and access the “Insert” menu from the toolbar. Select “Link”

- Paste the copied URL into the provided text box, then click “Apply.”

- Test the audio playback by entering Slideshow mode. Click on the linked area to open the audio page in a new browser tab or window. Press the “Play” button, then minimize the browser to return to your presentation.

- To halt the audio, return to the web page and click on the “Pause” or “Stop” button.

Adding audio to your Google Slides presentations can elevate the overall impact and engagement of your content that captivates and engages your audience. Whether it’s background music to set the mood, voiceovers to enhance narration, or sound effects to add emphasis, audio elements can elevate the impact of your content and leave a lasting impression on your viewers. By following the steps outlined in this guide, you can seamlessly integrate audio into your presentations and create immersive experiences that resonate with your audience.
Experiment with different audio clips and playback settings to find what works best for your content, and don’t hesitate to unleash your creativity to make your presentations stand out. We value your opinion! Share your thoughts on our guide to adding audio to Google Slides presentations. Did you find the steps easy to follow? How did incorporating audio enhance your presentations? We welcome your feedback to help us improve our content and provide even more valuable resources in the future. Leave your comments below!
Frequently Asked Questions
What audio file formats are supported by Google Slides?
Google Slides supports various audio file formats, including MP3, WAV, AAC, and FLAC. Ensure your audio files are in one of these supported formats to seamlessly integrate them into your presentations.
Can I add audio directly from YouTube to Google Slides?
While Google Slides does not offer a direct feature to add audio from YouTube, you can embed YouTube videos into your presentations. However, if you only need the audio from a YouTube video, you can use third-party tools to extract the audio and then upload it to Google Slides.
How do I loop audio in Google Slides?
To loop audio in Google Slides, simply select the audio file on your slide, go to the format options, and check the “Loop audio” box. This will ensure that the audio continuously repeats throughout the slide.
Why can’t I hear the audio I added to my Google Slides presentation?
If you’re experiencing issues with audio playback in your Google Slides presentation, ensure that your device’s sound is not muted and that the volume is turned up. Additionally, check that the audio file format is supported by Google Slides and that the sharing settings for the audio file allow access to viewers.
Can I hide the audio icon while presenting in Google Slides?
Yes, you can hide the audio icon during a presentation in Google Slides. Simply select the audio icon, go to the format options, and check the “Hide audio icon when presenting” box. This will ensure that the audio icon is not visible to your audience during the presentation.
Is it possible to adjust the volume of the audio in Google Slides?
Yes, you can adjust the volume of the audio in Google Slides. Select the audio icon on your slide, go to the format options, and use the volume slider to adjust the volume level according to your preference.
How do I ensure that everyone can hear the audio in my shared Google Slides presentation?
To ensure that everyone can hear the audio in your shared Google Slides presentation, make sure that the audio file is shared with appropriate viewing permissions. Additionally, provide instructions to viewers on how to enable audio playback in their settings and ensure they have access to a device with speakers or headphones.
- Audio , Google Slides , guide

I am John, a tech enthusiast with a knack for breaking down complex camera, audio, and video technology. My expertise extends to social media and electronic gadgets, and I thrive on making the latest tech trends understandable and exciting for everyone. Sharing my knowledge through engaging content, I aim to connect with fellow tech lovers and novices alike, bringing the fascinating world of technology to life.
Leave a Reply Cancel reply
Your email address will not be published. Required fields are marked *
Table of Contents

Related Posts

Detailed Steps to Combine Audio & Video Files
Whether you’re a professional, a content creator, or just someone looking to make a great video, it’s crucial to combine video with audio smoothly to
![How to Add Audio to Video on YouTube [Step by Step]](https://www.hollyland.com/wp-content/uploads/2024/04/how-to-add-audio-to-video-on-youtube-step-by-step.jpg "video presentation in google slides")
How to Add Audio to Video on YouTube [Step by Step]
Adding audio to your videos on YouTube is not just about enhancing their quality; it’s also about amplifying engagement and leaving a lasting impression on

Detailed Guide to Clean Up Audio in Audacity
When handling audio files, encountering occasional challenges is inevitable, particularly with voice recordings or digitized content originating from analog sources like cassette tapes or vinyl

Can Apple Watch Record Audio?
The Apple Watch, known for its versatility as a wearable gadget, provides various functions like health tracking, communication, and playing media. Among its array of

AI-powered video creation for work
Coming soon to Gemini for Google Workspace.

Curious about Google Vids?
Take a look at our FAQs to learn more.
We’re currently testing this new application with a select group of trusted testers in Google Workspace Labs .
We’ll iterate and refine these experiences through Workspace Labs before making them available to select Gemini for Google Workspace plans.
We’re excited to share our vision for Google Vids via our latest blog here . As we make Google Vids more broadly available, you’ll see a steady drumbeat of launches for these features. Follow the Google Workspace blog to track the latest progress and developments!

5 Better Alternatives To Google Slides
I f you're looking to create a compelling presentation to showcase a new idea or persuade others, Google Slides may be the first option that comes to mind. But with few built-in templates, basic themes, and a limited graphics collection, you'll likely have a hard time making your presentation stand out against others.
If you want to make your presentation truly stand out, there are several alternatives to Google Slides that offer extra perks and features to give your presentations an edge. While Google focuses on integrating Slides with its other work-based apps like Sheets and Docs, other presentation apps focus more on design elements, transitions, and themes to help you convey your brand or personal image throughout your presentation.
We've tested these Google Slide alternatives to give you an idea of other available options to deliver impactful presentations. If you're looking for a way to make boring information more fun and engaging, here are the best presentation apps to replace Google Slides.
Read more: Major Graphics Card Brands Ranked Worst To Best
Microsoft PowerPoint
There's a reason so many businesses around the globe use Microsoft PowerPoint. Building its reputation as the go-to option for delivering high-quality presentations, the software generated $100 million in annual sales only three years after its initial release in 1990.
Microsoft PowerPoint may be Google Slides' largest competitor, but there are plenty of unique features that can add an extra flourish to your slides. PowerPoint excels in its impressive library of custom animations and slide transitions, which are fairly limited in Google Slides. Another unique feature is its AI-powered Designer tool. This provides professional design schemes that mirror the words used in your slides. For instance, if your title slide is named "Basketball Team 2024," Designer will automatically suggest pictures and slide layouts associated with basketball.
As PowerPoint has been in development longer than Google Slides, it naturally offers more nuanced features if you're looking for something specific. For example, you can save individual slides as an image file (using .png or .jpeg formats) or as a separate presentation file. There's also a large library of free PowerPoint templates designed to speed up your workflow. Moreover, PowerPoint integrates seamlessly with Microsoft Teams with its PowerPoint Live function, allowing you to easily share your presentation with your co-workers.
Prezi offers an innovative approach to showing presentations with its unique canvas feature. Unlike traditional presentation software, Prezi lets you zoom and pan around a flexible canvas. The canvas may feel distant to something of a presentation program, but there is still some linear order provided thanks to the Timeline view.
Finding ways to visualize data is one of the biggest challenges when dealing with presentation software. Prezi resolves this struggle with the help of its Story Blocks: a series of infographics available in multiple designs to visually represent data. You can easily edit infographics and even add animations to individual shapes. This can help add a story to your presentation and help you emphasize key points.
To further enhance your presentation visually, Prezi offers several topic path settings, which let you change how Prezi transitions from one topic to another. These options include subtopics, which are super helpful for breaking large chunks of information down. If you're looking for a unique, modern approach to presenting information, Prezi is a top pick.
If you're looking to create a professional presentation to convince potential clients about your business idea, Slidebean is a popular choice among professionals with plenty of customization options. One of the issues with Google Slides is its fairly limited template library, which is filled mostly with basic designs. Slidebean offers a better alternative with a broad selection of innovative templates split into categories for convenience.
The app's user interface is easy to navigate so that you can create slides in less time. Each slide has a dedicated Design and Outline tab. You can use the Outline tab to quickly edit the information on each slide without being distracted by all the visual elements. Another productivity-enhancing feature is the ability to generate a presentation theme from your website. Simply enter your URL, and Slidebean will automatically apply the theming to your presentation.
Slidebean is another presentation app to take advantage of AI. Using the Auto-Design feature, you can generate recommended slide layouts based on your existing content. It also features AI text suggestions designed to suit different industries. Overall, Slidebean offers a quicker, more efficient method for creating stunning presentations compared to Google Slides.
Canva is a well-known app among graphic designers, but it's also capable of making stunning presentations. The app also has mobile editions, so you can easily create and edit presentations on your Android phone , iOS device, or tablet. As long as you have an internet connection, you can modify your designs wherever you are.
To get started, head to Canva's online presentation maker . Canva offers a vast range of templates categorized by topic, which easily surpasses the simple templates in Google Slides . While some of the templates are only available to Canva Pro members, there is an ample amount of free templates to help you get started. You'll also find a large selection of stock photos, shapes, and illustrations to create beautiful customized slides.
Because Canva is built for graphic designers, you can access several features to give your presentation consistent theming. These include color palettes, font sets, and even a brand kit that allows you to add your company's fonts (available to Pro members only). One time-saving feature is Canva's Uploads tab, which lets you access recently uploaded media files. This offers a convenient way to copy content between different presentations.
Visme is a powerful visual design tool able to create videos, infographics, and presentations. One of the perks of using Visme is the company's free educational content, which offers advice on how to create impactful content to boost your brand. After signing up, the company also asks whether you're using Visme for your business, education purposes, or personal use to offer personalized tips.
In terms of charts and graphs, Visme offers some of the most impressive features we've seen from a presentation app, so you can effortlessly convey important statistics. From the Data tab, you can access dozens of graph styles to visually represent your data. Then, simply double-click a chart inside your presentation to edit the values instantly in a simple table format.
Another area that Visme excels in is collaboration. You can either generate a link to publish your presentation on the web or share your presentation privately with others. For each team member, you can choose who can view, edit, and comment slides for a seamless workflow. There's also a Slack integration that lets you receive messages whenever changes are made to your presentation. Visme is free for all users, with limited features available in its premium plans.
Read the original article on SlashGear .

IMAGES
VIDEO
COMMENTS
Upload. Open your presentation in Google Slides and select the slide where you want to add the video. Click Insert → Video. A new window will open. On the Google Drive tab you'll see all your videos stored in or shared with your Google Drive account. Choose the video you want to upload and click Select. The video will be added to the slide ...
Learn how to add video clips in your Google Slides with just a few simple steps, you can also decide which parts to play in your presentation. Learn more → h...
Embed a Video in Google Slides If you've never added a video in your Google Slides presentation, it takes only a few clicks. Go to the slide where you want the video and click Insert > Video from the menu. You can then search for a YouTube video, enter a video's URL, or upload one from Google Drive. Choose the video you want to use and click ...
Present slideshows with confidence. With easy-to-use presenter view, speaker notes, and live captions, Slides makes presenting your ideas a breeze. You can even present to Google Meet video calls ...
Adding videos can be a great way to spice up a presentation. You can search for videos that are already on YouTube, or you can upload video files to your Goo...
Open your Google Slides presentation. Go to the slide where you want the video. Click on 'Insert' in the menu. Select 'Video'. Choose your video source. Select your video. Adjust the video on your slide. Conclusion. Adding a video to your Google Slides presentation can truly transform it from a static slideshow to a dynamic, multimedia ...
Start the embed process by accessing Google Slides in a web browser and launching your presentation. Select the slide in which you want to embed your video, then from the menu bar at the top, select Insert > Video. On the "Insert Video" window, from the tab list at the top, select the "Google Drive" tab. In the "Google Drive" tab, find and ...
To do this, right-click on the uploaded video and select Share. Go to the slide in Google Slides where you intend to add the Google Drive video and select Insert > Video. Remove restrictions and make the video viewable via the sharing link. Go to the Google Drive tab, click the video thumbnail, and select insert the video.
Select a file, and then click Insert. 6. Select the video and click Insert. The video will be inserted into your slide. 7. Adjust the video (optional). Once the video is inserted into the slides, you can adjust its video playback, position, size, and rotation, and even add alt text.
Click Insert, then select Video from the drop-down menu. 3. In the Google Drive tab, select a video from your Drive using the various tabs and search function. 4. Click the video you want to embed ...
Click the "Embed" </> icon. Click the "Copy" button to copy the embed code. Open your Google Slides presentation and select the slide where you want to embed the video. Click on the "Insert" menu and select "Video.". In the "Insert video" window, click on the "By URL" tab. Paste the copied Vimeo embed code into the box ...
Go to YouTube and find the video you want to add, then either select the address bar (or ctrl/cmd+L keyboard shortcut) and copy (ctrl/cmd+C) or right-click on the video and select " copy video URL". Go back to Google Slides and after you've gone to the insert video option in the menu bar, go to the By URL tab.
To upload the file, go to Google Drive, select " New> File upload ". Now find the desired video file on your computer and press " Open ". Wait for a few minutes to upload the video file into Google Drive. 2. Once the file is uploaded, open the presentation slide where you want to put the video on. 3.
You must have edit access to the slides in order to create a new recording. To open your presentation, go to Google Slides. To record your slideshow, in the top right, click Rec Record new video. To start recording, in the middle, click the red record button. To start over, pause and click Re-record. To save your recording, pause and click Save ...
We're introducing slides recordings, a new Google Slides feature that lets you easily record yourself presenting, and then share the presentation with others to view when it works for them. From webinars, to employee trainings, to lessons for your classroom, slides recordings help you effortlessly record visual and engaging presentations ...
Enter these values, so when you play this video embedded in your Google Slides presentation, it will start at 00:10 and stop playing at 00:40. Auto-play when presenting. With this is ticked, your video will automatically start when you get to this slide in your Google Slides presentation.
Make your selections, and you're all set. In moments, you've captured a full audio and video recording of your new Google Slides presentation deck. 4. Export and Share a Google Slides Video Recording. You've just learned how to record a video on Google Slides! As you can see, it's easy to capture a recording.
Bring your presentations to life in Google Slides with enhancements like videos, animations, smooth transitions, and more. Get started with templates Choose from an array of high-quality pre-designed templates with different layouts, images, colors, and fonts.
The recording functionality, accessible from the new "Record" button in the main toolbar, will open a new screen where you can start a recording of the presentation. You can change slides at your own pace and turn your microphone and camera on and off at any point. Google said in the blog post, "This feature helps you share more engaging video ...
This Google Slides tutorial for beginners is a complete crash course, taking you by the hand and showing you step by step how to make some amazing and mesmer...
What Is a Google Slides Presentation? Google Slides is a free web-based presentation software provided by Google as part of the Google Drive suite. You can use it on any device with an internet connection, offering various features like an easy-to-use presenter view, speaker notes, live captions, and the ability to present to Google Meet video ...
Go to Google Slides and open your presentation. Select the Rec button in the upper right area, then select the Record new video button ( Figure A ). The system will switch to the screen recording ...
Regarding annotation and presentation features, Google Slides lags far behind PowerPoint. The Line and Scribble options are pretty limited, and while you can turn your cursor to a laser pointer or highlight text in Slideshow mode, PowerPoint's ability to zoom and sort slides and Drawing tools cannot be matched.
Open your Google Slides presentation and go to File > Download. Select "Microsoft PowerPoint (.pptx)" in the pop-out menu. Head to your downloads folder and click or double-click the file to open it in PowerPoint. Go to File > Export. Then, choose "Create a Video" or "Create an Animated GIF." If you pick a video, you can then use the drop-down ...
Open your Google Slides presentation. Navigate to the slide where you intend to incorporate the audio. Access the "Insert" menu at the top, then choose "Audio.". Locate and select your uploaded audio file from Google Drive, then confirm with "Insert". A visual indicator, such as an audio icon, will signify the successful insertion ...
In this video you will learn how to record video and video feedback without ever leaving the Google Slides editor.Using the Extension 'Record to Slides' you ...
We're excited to share our vision for Google Vids via our latest blog here. As we make Google Vids more broadly available, you'll see a steady drumbeat of launches for these features. Follow the Google Workspace blog to track the latest progress and developments! Create rich video content with Google Vids - a powerful online video editor ...
It also features AI text suggestions designed to suit different industries. Overall, Slidebean offers a quicker, more efficient method for creating stunning presentations compared to Google Slides ...