
How to Open a PowerPoint Presentation? [Complete Guide!]
By: Author Shrot Katewa
![How to Open a PowerPoint Presentation? [Complete Guide!]](https://artofpresentations.com/wp-content/uploads/2021/05/Featured-Image-how-to-Open-a-PowerPoint-Presentation-File.jpg "opening a new presentation in powerpoint")
Knowing how to master the PowerPoint application starts with the basics. If you are just starting out with Microsoft PowerPoint, the first thing you need to know is really how to open a PowerPoint presentation!
To open or view an existing PowerPoint file, double-click on the file from the folder. Alternatively, open the PowerPoint application. Then, click on “File>Open>Browse”, and locate the file on your computer to open it. To open a new presentation file, simply click on “File>New>Blank Presentation”.
The process of opening a PowerPoint presentation is actually quite simple and it only takes a few seconds. So, in this article, first we will take you through the process of opening a presentation step-by-step in a visual manner. Then, I will provide answers to all questions related to opening a PowerPoint presentation!
So, let’s get started!
[A Quick Note Before We Begin – for this article, I will be using one of the presentation templates from Envato Elements . With Envato Elements, you get access to thousands of presentation designs with unlimited downloads so you never run out of options again. Plus, you get free previews so you know exactly what you’re getting before buying! It is also very affordable. Check out their pricing here ]
1. How to Open a PowerPoint Presentation?
There are a couple of different methods in which you can open a PowerPoint file. Both the methods are actually quite easy.
The first method requires the least number of steps. To open or view a PowerPoint presentation simply locate the PowerPoint file on your computer, and double-click on it. You can also right-click on the file, and from the dropdown menu, click on “Open”.
The second method requires you to start the PowerPoint application first.
If you do not see the PowerPoint icon on your desktop or taskbar, just go to the search bar and type ‘PowerPoint’ using your keyboard to find it. After opening the PowerPoint application, all you have to do is select your presentation file to open it. Just follow the steps below:
1a. How to Open a New PowerPoint Presentation?
Follow the steps below to open/create a new PowerPoint Presentation:
Step-1: Click on the “File” Menu button
At the top left side of your Microsoft PowerPoint application, you will find the ‘File’ menu option. The first step is to click on it.
Step-2: Click on “New”, and select the “Blank Presentation” button
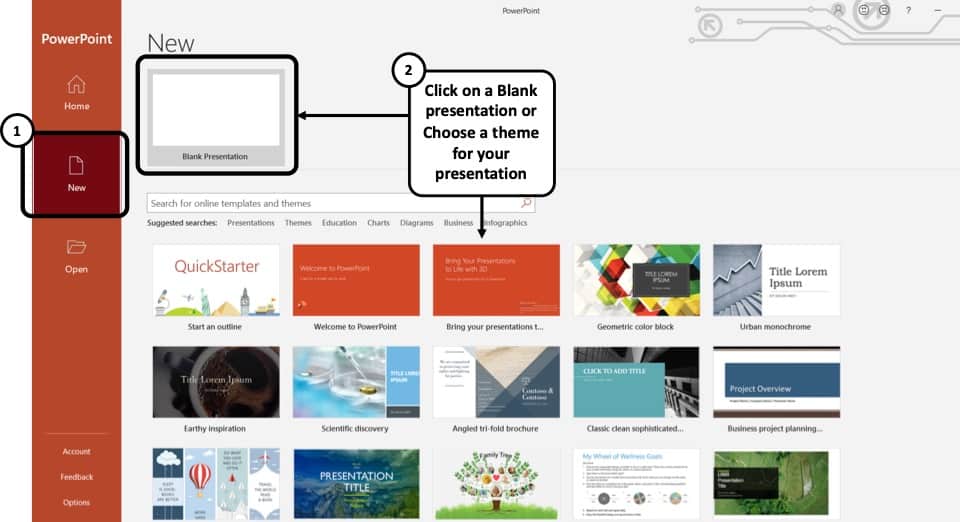
Then, from the PowerPoint Backend view, you need to click on “ New “.
Now on your screen, you will find an option that says ‘Blank Presentation’ for you to click on. A new PowerPoint presentation with a blank slide will be created once you click on it.
You can also choose to click on any of the templates below to go with a pre-made design theme.
1b. How to Open an Existing PowerPoint Presentation?
It is common to have PowerPoint presentation files saved in different folders of your computer. There are two very easy ways to open these existing PowerPoint presentation files.
You can either open an existing PowerPoint file by browsing to the folder it is stored in and double-clicking on the file. Or you can open it from the Microsoft PowerPoint application itself. I’ll discuss both of the ways below:
Opening an existing PowerPoint Presentation file from the file location
Step:-1: Go to the folder your PowerPoint Presentation file is stored in

Open the folder where you had saved your PowerPoint presentation file. It could be on any of your local drives, or if you have recently downloaded the file, it could be on the ‘Downloads’ folder.
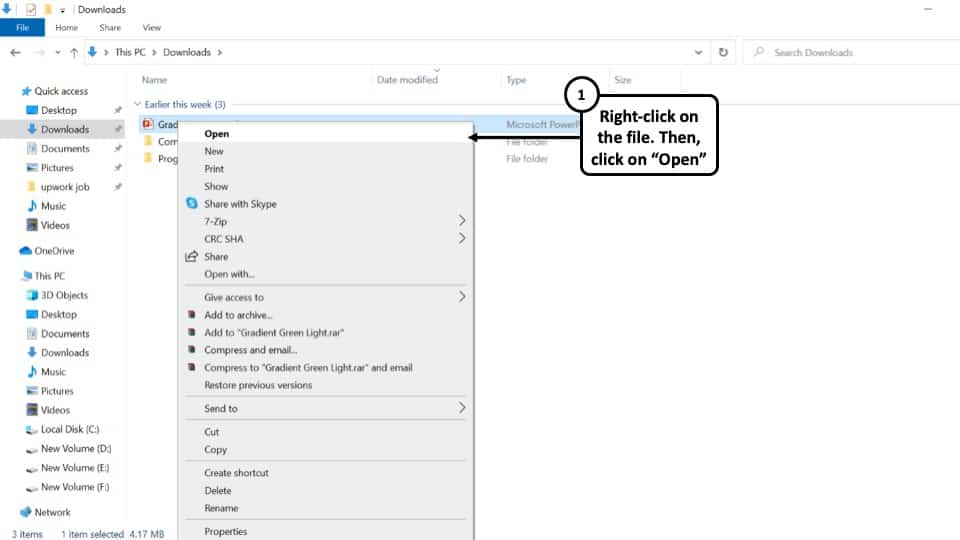
Step-2: Double-click on the PowerPoint Presentation file.
‘ Left click’ on the file twice using your mouse to open it. You can also ‘Right click’ on the file once and from the dropdown menu click on the ‘Open’ option to open the file on your Microsoft PowerPoint application.
Opening an existing PowerPoint Presentation from the Microsoft PowerPoint Application
Step-1: Open the Microsoft PowerPoint application and go to the “File” menu
The first thing you have to do is open the Microsoft PowerPoint application and click on the “ File ” menu option on the top-left corner of the screen.
Step-2: Click on ‘Open’, and then ‘Browse’
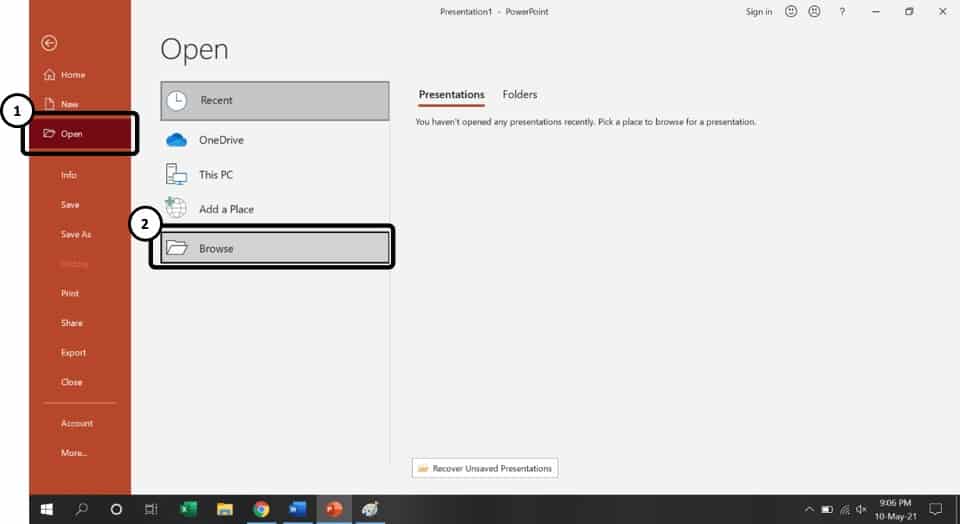
Clicking on the File option will open the background view of PowerPoint. Then, click on “ Open “
In the ‘Open’ tab, you will find all the Presentation files you have used/viewed recently under the ‘Recent’ section. If the file you want to open is not present here, simply click on ‘Browse.’
Step-3: Go to the file location click on it to select it.

After that, a window will pop up using which you can use to choose the file you want to open. Go to the folder containing the PowerPoint presentation file and select it by ‘Left-clicking’ on its name.
Step-4: Click on ‘Open.’
After selecting the file, click on ‘Open’ to get the job done. You can also edit the slides by clicking on ‘Enable Editing.’
You can follow any of the two methods mentioned above to open an existing PowerPoint Presentation file.
1c. Shortcut Key to Open a Presentation in PowerPoint
You can open both a new PowerPoint Presentation as well as an existing PowerPoint file using shortcut keys.
Here are the shortcut keys to open a PowerPoint presentation –
- To open a new PowerPoint presentation – Press “Ctrl+N” (Cmd+N on Mac)
- To open an existing PowerPoint presentation – Press “Ctrl+O” (Cmd+O on Mac)
Remember, in order to use the above shortcut keys, you need to open the PowerPoint application first on your computer.
2. How to Open a PowerPoint Online? (Using OneDrive)
Microsoft PowerPoint can also be saved online. Microsoft actually has integration with its own cloud service called OneDrive. In fact, if you are using Microsoft Office 365 , you also get free cloud storage of up to 1 TB with your account!
When you try to open an online version of a PowerPoint file, you will need to do so using OneDrive. In the following steps, I will show you how to open a PowerPoint Presentation file online using OneDrive:
Step-1: Click on the “File” menu
The first step, as usual, is to click on the “ File ” menu option. This will open the backend view of PowerPoint.
Step-2: Click on “Open” and choose “OneDrive”
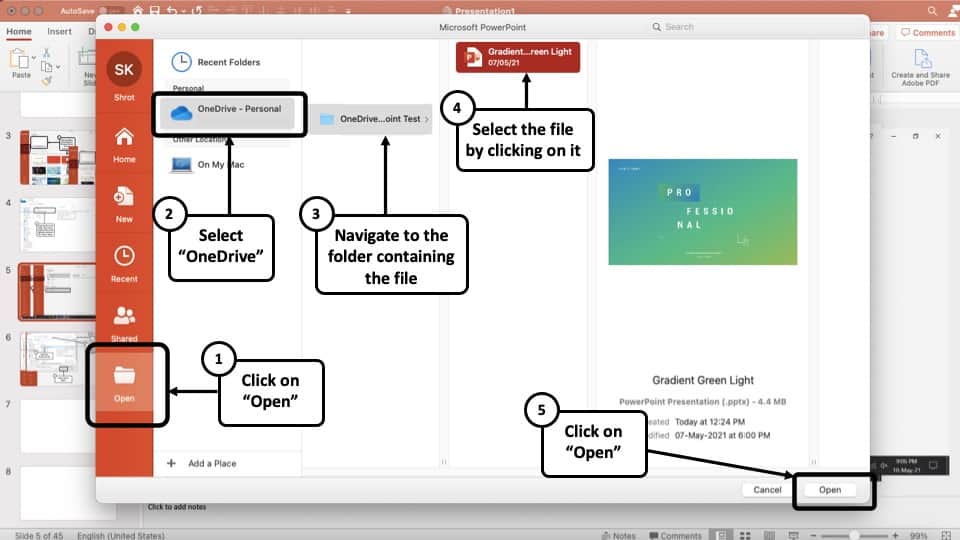
From the backend view, click on the “ Open ” option. Then, click on “ OneDrive “. You may need to login into your OneDrive account. Then, navigate to the respective folder containing the PowerPoint file.
Step-3: Select the File and Click “Open”
Navigate to the designated folder on OneDrive that contains the PowerPoint file. Select it and then click “Open”.
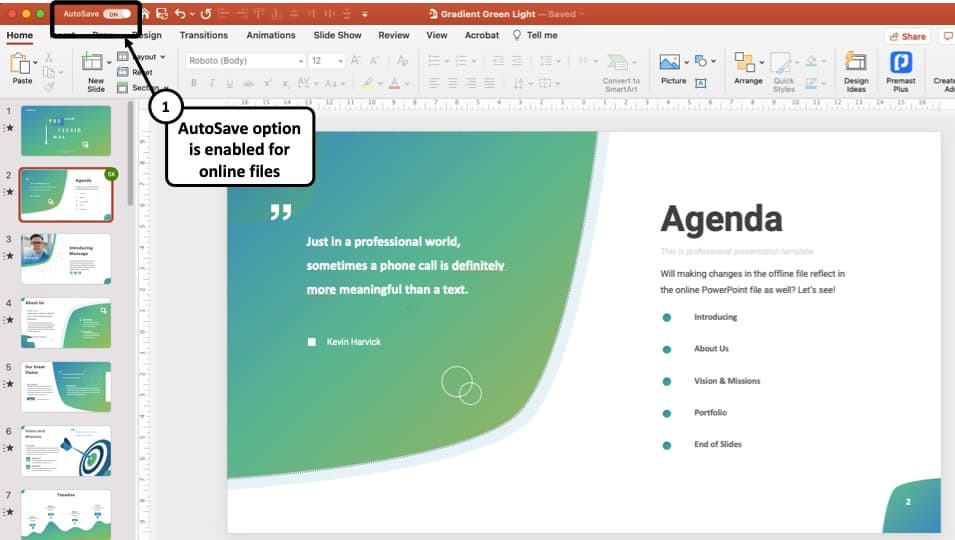
PowerPoint will then download the file for you. Once it opens the online file, you will notice that the “ Autosave ” feature in PowerPoint will be turned on.
This basically means, every time you make a change to the file, it will automatically reflect in the file saved online in OneDrive!
How to Open and View a PowerPoint file in OneDrive?
You can also view the same PowerPoint file using your internet browser. All you need to do open the OneDrive login page and log in to your OneDrive account using your email address and password.
Once you are logged in into your OneDrive account, follow the below mentioned steps –
Step-1: Locate your PowerPoint file and Click on it
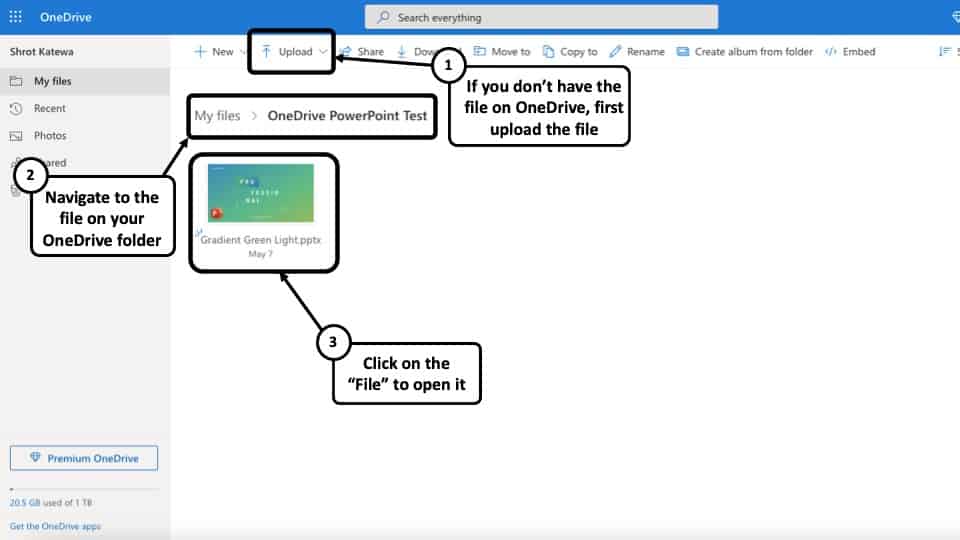
If you already have the file uploaded, then simply navigate to the respective folder, locate the file and click on it.
Step-2: Start Editing the File
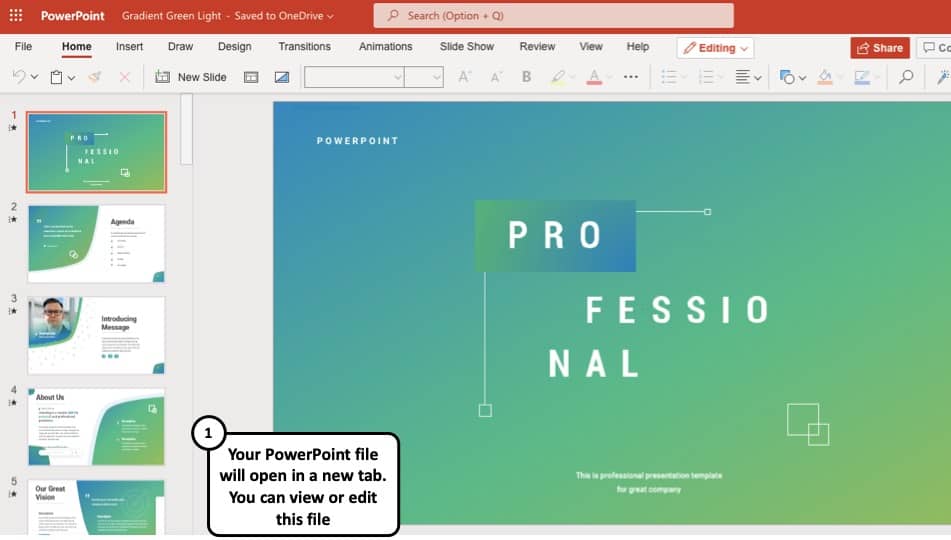
Your file will be opened in a new tab on your browser. You can directly start editing the PowerPoint file online!
The best part is, you don’t even need to have the PowerPoint application installed to edit, open or view a PowerPoint presentation online file!
3. How to Open a PowerPoint Presentation in Google Slides?
Google Slides in one of the most popular online tools out there for creating and opening presentations. You can also use Google Slides to open you PowerPoint Presentation file with just a few clicks. Follow the steps below:
Step-1: Go to Google Slides and click on ‘Open File Picker’ option
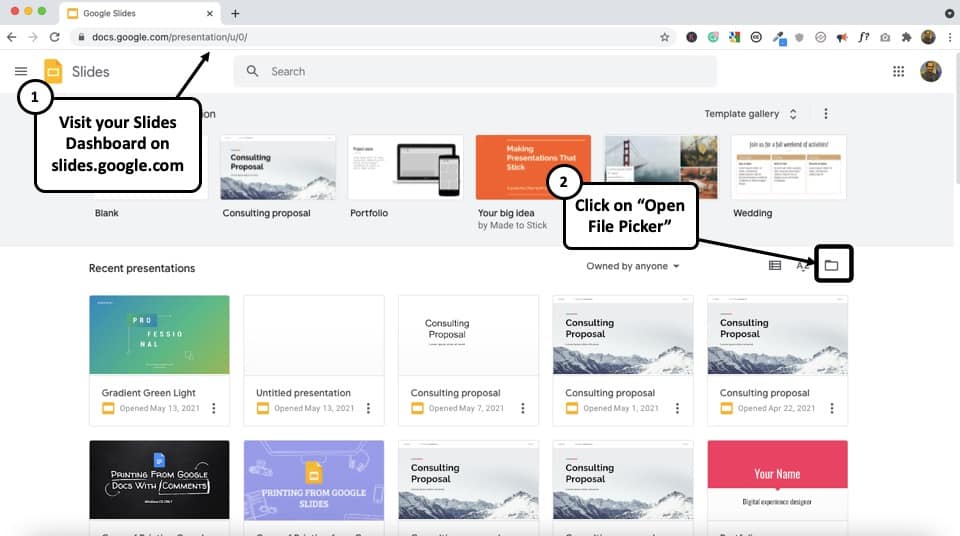
To open a PowerPoint Presentation in Google Slides, the first step is to log in to your Google account and go to Google Slides. Then, click on the “ Open File Picker ” option – the icon that looks like a file folder (see the image above).
Step-2: Go to the ‘upload’ section for uploading the presentation file
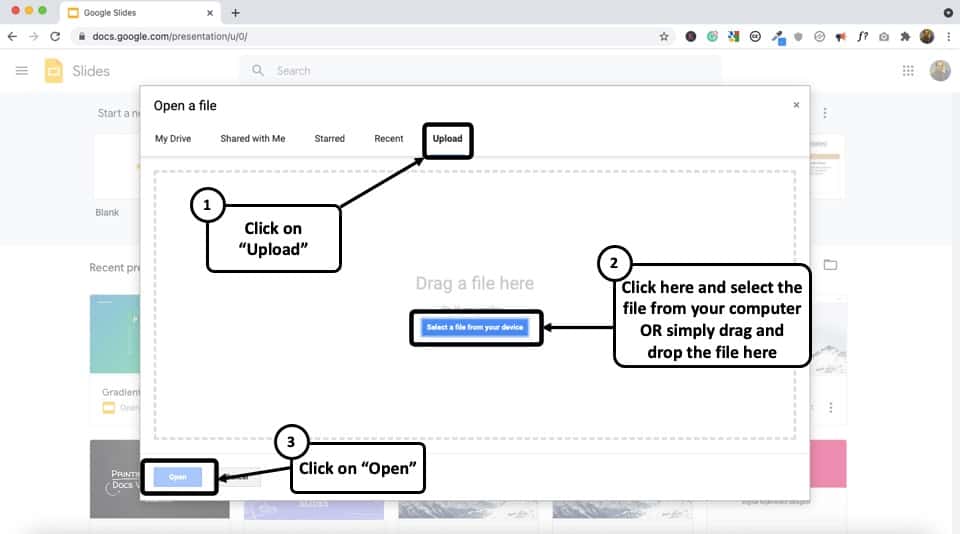
Since Google Slides is cloud-based, the next step is to upload the Presentation file. To do that, from the pop-up window, go to the ‘Upload’ section. Now click on ‘Select a file from your device.’
Step-3: Locate your PowerPoint Presentation file and click on ‘Open.’
From the pop-up window, go to the folder containing the Presentation file and select it. Then click on ‘Open’ to upload the file from your computer. It might take a few seconds to upload and load the Presentation file on Google Slides. That’s it!
4. How to Open a PowerPoint Presentation in Keynote on Mac?
To open a Microsoft PowerPoint Presentation on Apple’s Keynote application, just follow the steps below:
Step-1: Open ‘Keynote’ and locate your PowerPoint Presentation file
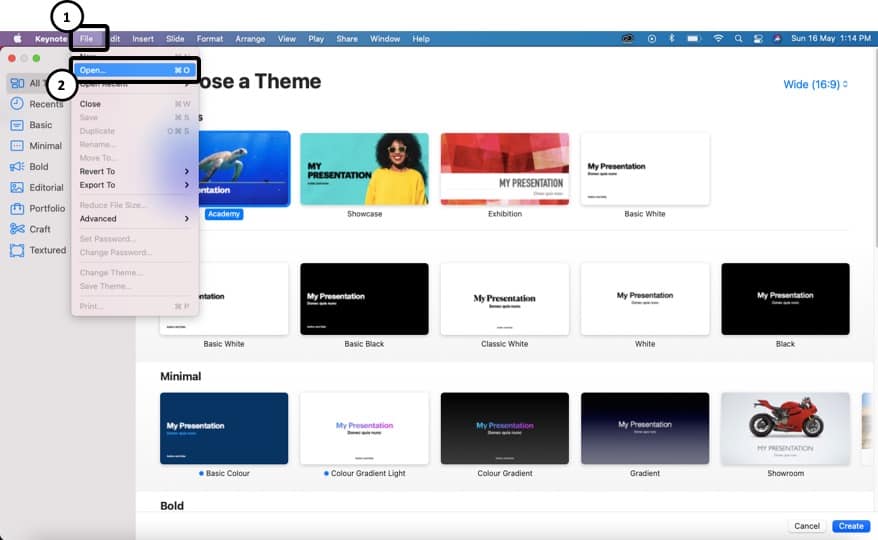
On your Mac Computer open the ‘Keynote’ application. From the window, navigate to the folder containing the PowerPoint Presentation file.
Step-2: Select your Presentation file and click on ‘Open.’
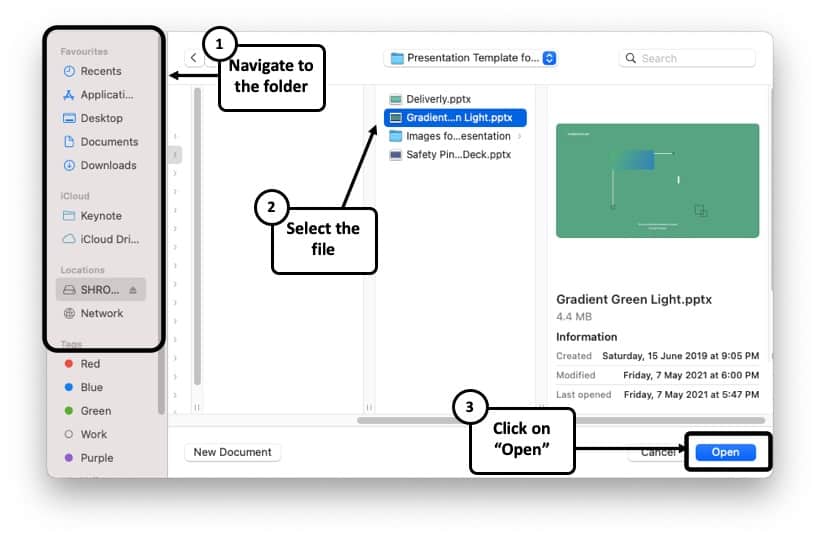
After locating your PowerPoint Presentation file on Keynote, simply click on it to select it. Then click on ‘Open’ to access it. A window might appear stating that some changes were made while importing the file, which is quite normal for highly customized PowerPoint files.
Step-3: View or Edit the PowerPoint file in Keynote

Once the file is opened in Keynote, you can now view or edit the file directly in Keynote just as you would on any other presentation design application!
5. How to Open a PowerPoint Presentation Without PowerPoint?
Incase you do not have PowerPoint installed on your computer or do not have access to PowerPoint, you can still open a PowerPoint presentation file through various means. I’ll be discussing some of the ways to open a PowerPoint Presentation without PowerPoint below:
Method 1 – Using Online Tools
If you don’t have PowerPoint installed on your computer, you can still view a PPT or PPTX file. One of the best ways to view it is using online tools.
Two of the most commonly used FREE online tools are ‘Google Slides’ and ‘One-Drive’ . Both these methods have been discussed previously in this article. Thus, I would recommend going through them once again if you need some help on that.
Method 2 – Using Aspose Slides Viewer
Another method is using the “Aspose Slides Viewer”. Using this online tool, you can open your Presentation files. It supports PPT, PPTX, PPS, and ODT files that are amongst the most common PowerPoint Presentation formats.
Here’s how to use Aspose Slides Viewer tool to open PowerPoint Presentations –
Step-1: Go to Aspose Slides Viewer using an Internet Browser
The first step is to open your Internet Brower and go to: https://products.aspose.app/slides/viewer
Step-2: Click on ‘Drop or upload your file’
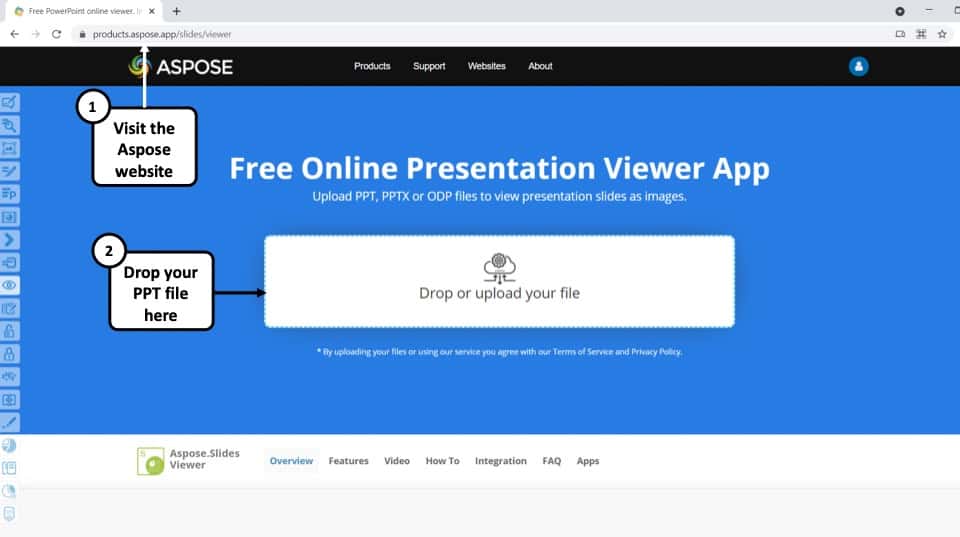
Once the webpage is done loading on your browser, click on ‘ Drop or upload your file.’
Step-3: Locate your file and click on ‘Open’
From the pop-up window, go to the folder containing the PowerPoint Presentation file and select it. Then click on ‘Open’ to upload the file from your computer to Aspose Slides Viewer. Once the upload is finished, you will be able to view the PowerPoint Presentation on your screen.
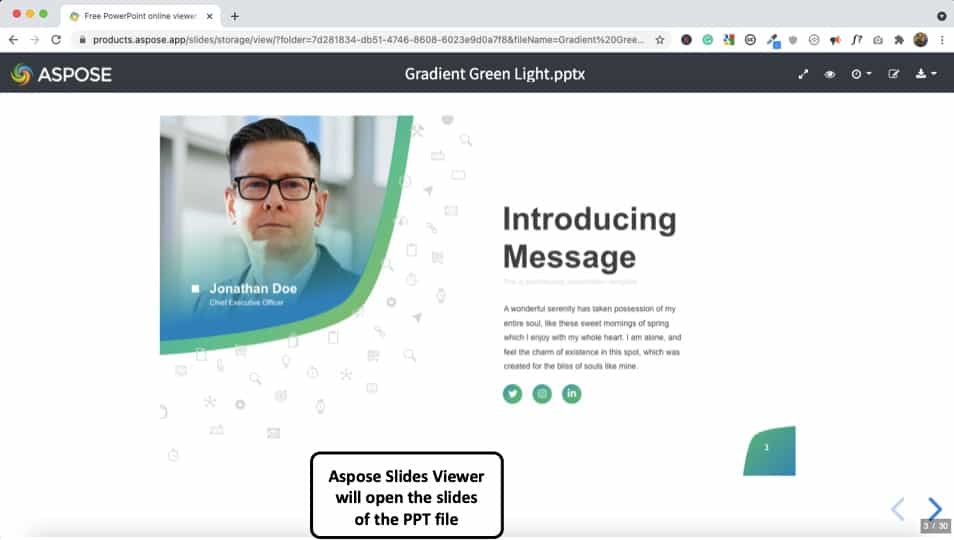
The good part about Aspose Slides Viewer is that it is completely FREE. When viewing the ppt file, it shows a surprisingly accurate representation of the presentation. You can also edit the PPT file. However, the options are quite limited. So, it can be used for basic text editing at the very best!
Method 3 – Using Third-Party Applications
There are a few Third-Party Applications out there, which you can use to Open PowerPoint Presentation files. Two of the most common among them are ‘LibreOffice Impress’ and ‘Kingsoft Presentation Professional.’
LibreOffice supports almost all types of PowerPoint files including PPT, PPTXS, PPTX, PPTS. It allows you to not only open PowerPoint presentations but also make necessary customizations. You can download it for free from here .
Kingsoft Presentation Professional is another standard presentation tool with lots of in-built features. It is quite similar to Microsoft PowerPoint and supports PPT and PPTX files. Download Kingsoft Presentation Professional from here .
6. How to Open PowerPoint in Presentation Mode?
You can directly open your PowerPoint Presentation file in Presentation Mode, instead of having to normally opening it first and then changing the view mode. This might be time saving for some, as you will be able to start your presentation with just a few clicks. Follow the step-by-step guide below to find out the process:
Step-1: Go to the folder which contains your PowerPoint Presentation file
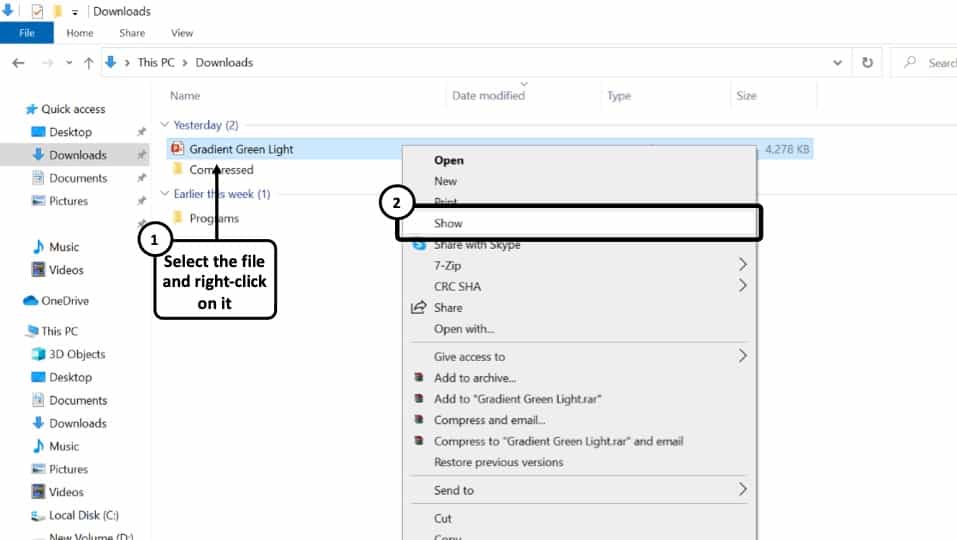
Go to the folder on your computer where you have saved your PowerPoint Presentation file. ‘Right Click’ on the file to open a dropdown menu.
Step-2: Click on ‘Show’
From the dropdown menu, click on the fourth option that says ‘Show.’ This will directly open the PowerPoint file in Presentation Mode.
If you have a “.pps” or “.ppsx” file, you don’t need to right-click on it. These files are designed to be directly open as slideshow!
7. How to Open PowerPoint in Safe Mode?
Opening Microsoft PowerPoint in Safe Mode means opening the application without any add-ons, extensions, or other forms of customizations you might’ve made.
AutoCorrect and a few other features will also not work while in Safe Mode. You can both open the Microsoft PowerPoint application in safe mode or a particular PowerPoint Presentation file.
I’ll be discussing both of them below:
Opening the Microsoft PowerPoint Application in Safe Mode
Step-1: Press ‘Ctrl’ while opening the Microsoft PowerPoint Application
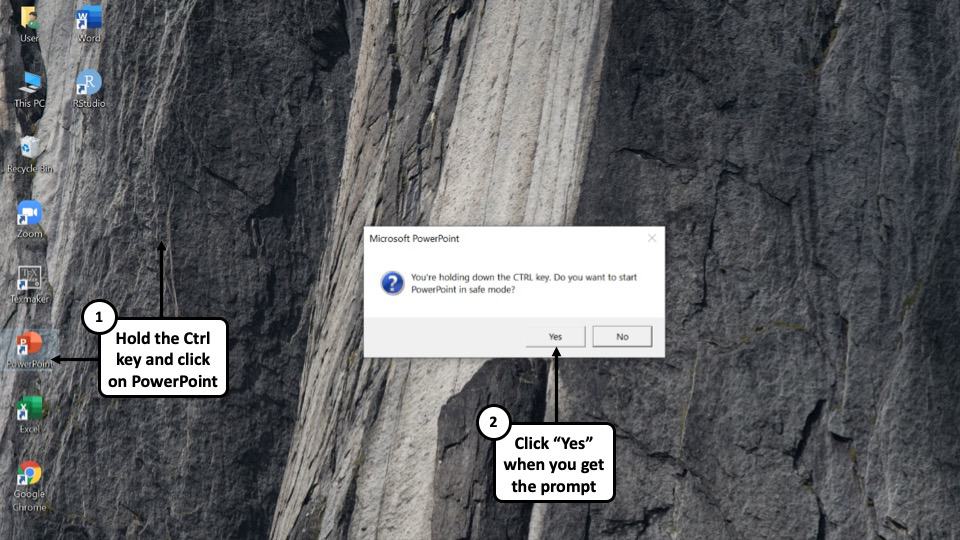
To open the Microsoft PowerPoint application in Safe Mode, hold the ‘Ctrl’ button of your keyboard and ‘Left Click’ on the Microsoft PowerPoint Icon on your taskbar, start-menu, or desktop.
Step-2: Click on ‘Yes’ to enable Safe Mode.
A dialogue box will appear where you will be asked if you want to start Microsoft PowerPoint in Safe Mode or not. Click on ‘Yes’ to open the PowerPoint in Safe Mode.
Opening a specific PowerPoint Presentation on Safe Mode:
To open a specific PowerPoint Presentation file on Safe Mode, follow the steps below:
Step-1: Hold the ‘Ctrl’ Key and click on the PowerPoint file
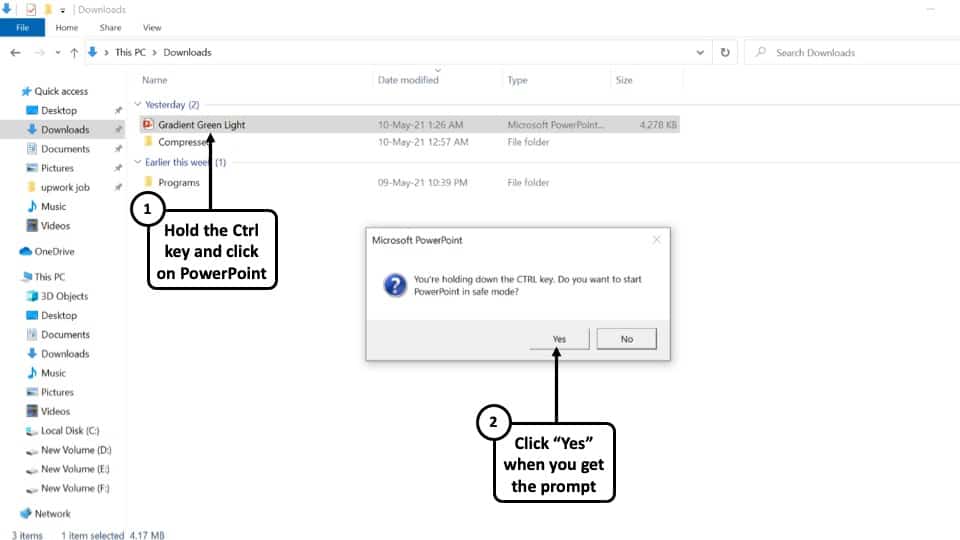
Browse to the folder on your computer where you have you have saved your presentation file. Now, while holding the ‘Ctrl’ button on your keyboard, ‘Left-click’ on the file to open it on Safe Mode. A dialogue box will appear on your screen.
Step-2: Click on ‘Yes’ in the Prompt that opens up
You will now be asked if you want to open this PowerPoint file in Safe Mode. Click on ‘Yes’ to get the job done!
8. How to Open a PowerPoint Presentation on Zoom?
Zoom meetings has now become an integral part of our lives, both in terms of work and education. The global pandemic has forcefully replaced on-stage presentations with virtual ones and Zoom is one of the most popular choices for it.
Related Article – How to Give a Presentation on Zoom? [A Complete Step-by-Step Guide!]
If you want to open a PowerPoint presentation on Zoom, follow the steps mentioned below –
Step-1: Open the PowerPoint presentation on your device
The first step is to open the PowerPoint Presentation file on your computer using Microsoft PowerPoint. You can do that by either ‘ Left-Clicking’ on the file from its location or going to the ‘Open’ tab on Microsoft PowerPoint and selecting the file from the ‘Browse’ option.
I have discussed this in detail on the points above.
Step-2: Open Zoom meeting and click on ‘Share Screen’.
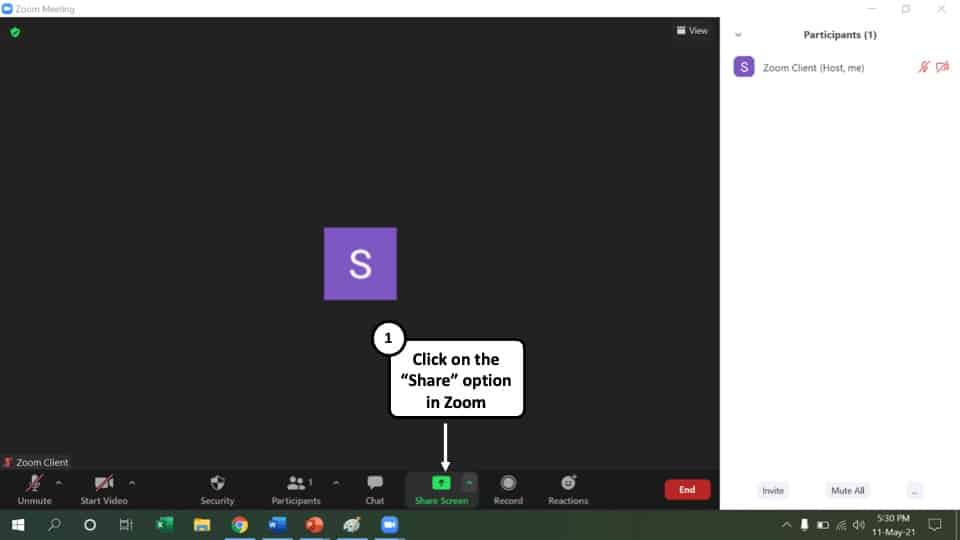
Join or launch a Zoom meeting where you will be sharing your PowerPoint presentation. Click on the option that says ‘Share Screen’ at the bottom.
Step-3: Click on ‘Share’ option
A new window will pop-up where you will find all the applications opened on your computer. Hover your cursor over the ‘ PowerPoint Slide Show’ window and click on it. Now click on the option that says ‘Share’ at the bottom right corner of your screen.
Step-4: Open the PowerPoint presentation in Zoom
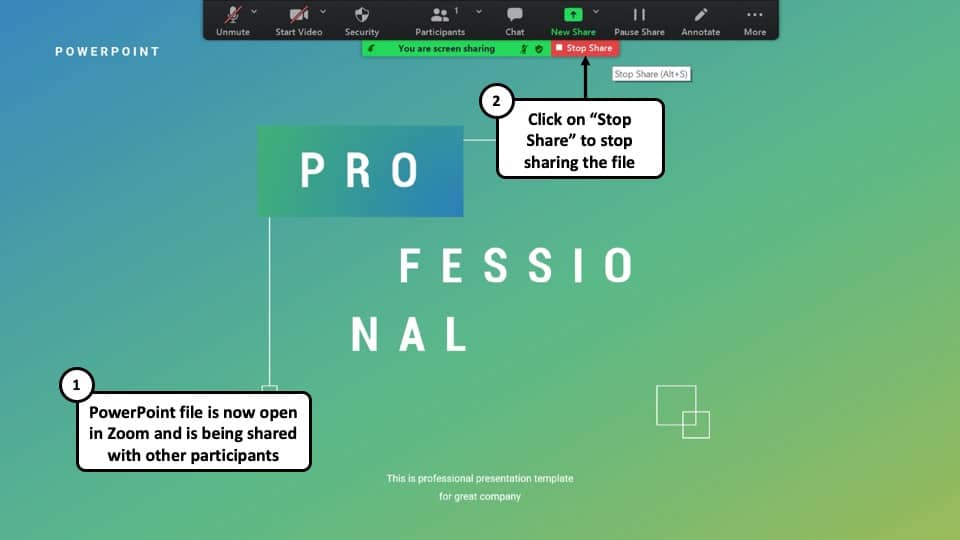
Once you click on ‘Share’ , the PowerPoint presentation file will be opened in Zoom and all the participants in the meeting will be able to view your screen. You can stop sharing your screen by clicking on the option that says ‘Stop Share.’
More PowerPoint Related Topics
- How to Crop a Picture in PowerPoint? [Complete Step-by-Step Tutorial!]
- What is a Presentation Clicker? [And How to Use it!]
- How to Convert a PowerPoint to PDF? [A Simple Guide!]
- PowerPoint vs Google Slides: Which is Better? [ULTIMATE Test!]
- How to Change Bullet Style in PowerPoint? A Complete Guide
Credit to drobotdean (via Freepik) for the featured image of this article
Critical PowerPoint Shortcuts – Claim Your FREE Training Module and Get Your Time Back!
How to Make a PowerPoint Presentation (Step-by-Step)
- PowerPoint Tutorials
- Presentation Design
- January 22, 2024
In this beginner’s guide, you will learn step-by-step how to make a PowerPoint presentation from scratch.
While PowerPoint is designed to be intuitive and accessible, it can be overwhelming if you’ve never gotten any training on it before. As you progress through this guide, you’ll will learn how to move from blank slides to PowerPoint slides that look like these.

Table of Contents
Additionally, as you create your presentation, you’ll also learn tricks for working more efficiently in PowerPoint, including how to:
- Change the slide order
- Reset your layout
- Change the slide dimensions
- Use PowerPoint Designer
- Format text
- Format objects
- Play a presentation (slide show)
With this knowledge under your belt, you’ll be ready to start creating PowerPoint presentations. Moreover, you’ll have taken your skills from beginner to proficient in no time at all. I will also include links to more advanced PowerPoint topics.
Ready to start learning how to make a PowerPoint presentation?
Take your PPT skills to the next level
Start with a blank presentation.
Note: Before you open PowerPoint and start creating your presentation, make sure you’ve collected your thoughts. If you’re going to make your slides compelling, you need to spend some time brainstorming.
For help with this, see our article with tips for nailing your business presentation here .
The first thing you’ll need to do is to open PowerPoint. When you do, you are shown the Start Menu , with the Home tab open.
This is where you can choose either a blank theme (1) or a pre-built theme (2). You can also choose to open an existing presentation (3).
For now, go ahead and click on the Blank Presentation (1) thumbnail.

Doing so launches a brand new and blank presentation for you to work with. Before you start adding content to your presentation, let’s first familiarize ourselves with the PowerPoint interface.
The PowerPoint interface

Here is how the program is laid out:
- The Application Header
- The Ribbon (including the Ribbon tabs)
- The Quick Access Toolbar (either above or below the Ribbon)
- The Slides Pane (slide thumbnails)
The Slide Area
The notes pane.
- The Status Bar (including the View Buttons)
Each one of these areas has options for viewing certain parts of the PowerPoint environment and formatting your presentation.
Below are the important things to know about certain elements of the PowerPoint interface.
The PowerPoint Ribbon

The Ribbon is contextual. That means that it will adapt to what you’re doing in the program.
For example, the Font, Paragraph and Drawing options are greyed out until you select something that has text in it, as in the example below (A).

Furthermore, if you start manipulating certain objects, the Ribbon will display additional tabs, as seen above (B), with more commands and features to help you work with those objects. The following objects have their own additional tabs in the Ribbon which are hidden until you select them:
- Online Pictures
- Screenshots
- Screen Recording
The Slides Pane

This is where you can preview and rearrange all the slides in your presentation.
Right-clicking on a slide in the pane gives you additional options on the slide level that you won’t find on the Ribbon, such as Duplicate Slide , Delete Slide , and Hide Slide .

In addition, you can add sections to your presentation by right-clicking anywhere in this Pane and selecting Add Section . Sections are extremely helpful in large presentations, as they allow you to organize your slides into chunks that you can then rearrange, print or display differently from other slides.

The Slide Area (A) is where you will build out your slides. Anything within the bounds of this area will be visible when you present or print your presentation.
Anything outside of this area (B) will be hidden from view. This means that you can place things here, such as instructions for each slide, without worrying about them being shown to your audience.

The Notes Pane is the space beneath the Slide Area where you can type in the speaker notes for each slide. It’s designed as a fast way to add and edit your slides’ talking points.
To expand your knowledge and learn more about adding, printing, and exporting your PowerPoint speaker notes, read our guide here .
Your speaker notes are visible when you print your slides using the Notes Pages option and when you use the Presenter View . To expand your knowledge and learn the ins and outs of using the Presenter View , read our guide here .

You can resize the Notes Pane by clicking on its edge and dragging it up or down (A). You can also minimize or reopen it by clicking on the Notes button in the Status Bar (B).
Note: Not all text formatting displays in the Notes Pane, even though it will show up when printing your speaker notes. To learn more about printing PowerPoint with notes, read our guide here .
Now that you have a basic grasp of the PowerPoint interface at your disposal, it’s time to make your presentation.
Adding Content to Your PowerPoint Presentation
Notice that in the Slide Area , there are two rectangles with dotted outlines. These are called Placeholders and they’re set on the template in the Slide Master View .
To expand your knowledge and learn how to create a PowerPoint template of your own (which is no small task), read our guide here .

As the prompt text suggests, you can click into each placeholder and start typing text. These types of placeholder prompts are customizable too. That means that if you are using a company template, it might say something different, but the functionality is the same.

Note: For the purposes of this example, I will create a presentation based on the content in the Starbucks 2018 Global Social Impact Report, which is available to the public on their website.
If you type in more text than there is room for, PowerPoint will automatically reduce its font size. You can stop this behavior by clicking on the Autofit Options icon to the left of the placeholder and selecting Stop Fitting Text to this Placeholder .
Next, you can make formatting adjustments to your text by selecting the commands in the Font area and the Paragraph area of the Home tab of the Ribbon.

The Reset Command: If you make any changes to your title and decide you want to go back to how it was originally, you can use the Reset button up in the Home tab .

Insert More Slides into Your Presentation
Now that you have your title slide filled in, it’s time to add more slides. To do that, simply go up to the Home tab and click on New Slide . This inserts a new slide in your presentation right after the one you were on.

You can alternatively hit Ctrl+M on your keyboard to insert a new blank slide in PowerPoint. To learn more about this shortcut, see my guide on using Ctrl+M in PowerPoint .
Instead of clicking the New Slide command, you can also open the New Slide dropdown to see all the slide layouts in your PowerPoint template. Depending on who created your template, your layouts in this dropdown can be radically different.

If you insert a layout and later want to change it to a different layout, you can use the Layout dropdown instead of the New Slide dropdown.
After inserting a few different slide layouts, your presentation might look like the following picture. Don’t worry that it looks blank, next we will start adding content to your presentation.

If you want to follow along exactly with me, your five slides should be as follows:
- Title Slide
- Title and Content
- Section Header
- Two Content
- Picture with Caption
Adding Content to Your Slides
Now let’s go into each slide and start adding our content. You’ll notice some new types of placeholders.

On slide 2 we have a Content Placeholder , which allows you to add any kind of content. That includes:
- A SmartArt graphic,
- A 3D object,
- A picture from the web,
- Or an icon.
To insert text, simply type it in or hit Ctrl+C to Copy and Ctrl+V to Paste from elsewhere. To insert any of the other objects, click on the appropriate icon and follow the steps to insert it.
For my example, I’ll simply type in some text as you can see in the picture below.

Slides 3 and 4 only have text placeholders, so I’ll go ahead and add in my text into each one.

On slide 5 we have a Picture Placeholder . That means that the only elements that can go into it are:
- A picture from the web

To insert a picture into the picture placeholder, simply:
- Click on the Picture icon
- Find a picture on your computer and select it
- Click on Insert
Alternatively, if you already have a picture open somewhere else, you can select the placeholder and paste in (shortcut: Ctrl+V ) the picture. You can also drag the picture in from a file explorer window.

If you do not like the background of the picture you inserted onto your slide, you can remove the background here in PowerPoint. To see how to do this, read my guide here .
Placeholders aren’t the only way to add content to your slides. At any point, you can use the Insert tab to add elements to your slides.
You can use either the Title Only or the Blank slide layout to create slides for content that’s different. For example, a three-layout content slide, or a single picture divider slide, as shown below.

In the first example above, I’ve inserted 6 text boxes, 3 icons, and 3 circles to create this layout. In the second example, I’ve inserted a full-sized picture and then 2 shapes and 2 text boxes.
The Reset Command: Because these slides are built with shapes and text boxes (and not placeholders), hitting the Reset button up in the Home tab won’t do anything.
That is a good thing if you don’t want your layouts to adjust. However, it does mean that it falls on you to make sure everything is aligned and positioned correctly.
For more on how to add and manipulate the different objects in PowerPoint, check out our step-by-step articles here:
- Using graphics in PowerPoint
- Inserting icons onto slides
- Adding pictures to your PowerPoint
- How to embed a video in PowerPoint
- How to add music to your presentation
Using Designer to generate more layouts ideas
If you have Office 365, your version of PowerPoint comes with a new feature called Designer (or Design Ideas). This is a feature that generates slide layout ideas for you. The coolest thing about this feature is that it uses the content you already have.
To use Designer , simply navigate to the Design tab in your Ribbon, and click on Design Ideas .

NOTE: If the PowerPoint Designer is not working for you (it is grey out), see my troubleshooting guide for Designer .
Change the Overall Design (optional)
When you make a PowerPoint presentation, you’ll want to think about the overall design. Now that you have some content in your presentation, you can use the Design tab to change the look and feel of your slides.
For additional help thinking through the design of your presentation, read my guide here .
A. Picking your PowerPoint slide size
If you have PowerPoint 2013 or later, when you create a blank document in PowerPoint, you automatically start with a widescreen layout with a 16:9 ratio. These dimensions are suitable for most presentations as they match the screens of most computers and projectors.
However, you do have the option to change the dimensions.
For example, your presentation might not be presented, but instead converted into a PDF or printed and distributed. In that case, you can easily switch to the standard dimensions with a 4:3 ratio by selecting from the dropdown (A).
You can also choose a custom slide size or change the slide orientation from landscape to portrait in the Custom Slide Size dialog box (B).

To learn all about the different PowerPoint slide sizes, and some of the issues you will face when changing the slide size of a non-blank presentation, read my guide here .
B. Selecting a PowerPoint theme
The next thing you can do is change the theme of your presentation to a pre-built one. For a detailed explanation of what a PowerPoint theme is, and how to best use it, read my article here .
In the beginning of this tutorial, we started with a blank presentation, which uses the default Office theme as you can see in the picture below.

That gives you the most flexibility because it has a blank background and quite simple layouts that work for most presentations. However, it also means that it’s your responsibility to enhance the design.
If you’re comfortable with this, you can stay with the default theme or create your own custom theme ( read my guide here ). But if you would rather not have to think about design, then you can choose a pre-designed theme.
Microsoft provides 46 other pre-built themes, which include slide layouts, color variants and palettes, and fonts. Each one varies quite significantly, so make sure you look through them carefully.
To select a different theme, go to the Design tab in the Ribbon, and click on the dropdown arrow in the Themes section .

For this tutorial, let’s select the Frame theme and then choose the third Variant in the theme. Doing so changes the layout, colors, and fonts of your presentation.

Note: The theme dropdown area is also where you can import or save custom themes. To see my favorite places to find professional PowerPoint templates and themes (and recommendations for why I like them), read my guide here .
C. How to change a slide background in PowerPoint
The next thing to decide is how you want your background to look for the entire presentation. In the Variants area, you can see four background options.

For this example, we want our presentation to have a dark background, so let’s select Style 3. When you do so, you’ll notice that:
- The background color automatically changes across all slides
- The color of the text on most of the slides automatically changes to white so that it’s visible on the dark background
- The colors of the objects on slides #6 and #7 also adjust, in a way we may not want (we’ll likely have to make some manual adjustments to these slides)

Note: If you want to change the slide background for just that one slide, don’t left-click the style. Instead, right-click it and select Apply to Selected Slides .
After you change the background for your entire presentation, you can easily adjust the background for an individual slide.

Inside the Format Background pane, you can see you have the following options:
- Gradient fill
- Picture or texture fill
- Pattern fill
- Hide background
You can explore these options to find the PowerPoint background that best fits your presentation.
D. How to change your color palette in PowerPoint
Another thing you may want to adjust in your presentation, is the color scheme. In the picture below you can see the Theme Colors we are currently using for this presentation.

Each PowerPoint theme comes with its own color palette. By default, the Office theme includes the Office color palette. This affects the colors you are presented with when you format any element within your presentation (text, shapes, SmartArt, etc.).

The good news is that the colors here are easy to change. To switch color palettes, simply:
- Go to the Design tab in the Ribbon
- In the Variants area, click on the dropdown arrow and select Colors
- Select the color palette (or theme colors) you want
You can choose among the pre-built color palettes from Office, or you can customize them to create your own.
As you build your presentation, make sure you use the colors from your theme to format objects. That way, changing the color palette adjusts all the colors in your presentation automatically.
E. How to change your fonts in PowerPoint
Just as we changed the color palette, you can do the same for the fonts.

Each PowerPoint theme comes with its own font combination. By default, the Office theme includes the Office font pairing. This affects the fonts that are automatically assigned to all text in your presentation.

The good news is that the font pairings are easy to change. To switch your Theme Fonts, simply:
- Go to the Design tab in the Ribbon
- Click on the dropdown arrow in the Variants area
- Select Fonts
- Select the font pairing you want
You can choose among the pre-built fonts from Office, or you can customize them to create your own.
If you are working with PowerPoint presentations on both Mac and PC computers, make sure you choose a safe PowerPoint font. To see a list of the safest PowerPoint fonts, read our guide here .
If you receive a PowerPoint presentation and the wrong fonts were used, you can use the Replace Fonts dialog box to change the fonts across your entire presentation. For details, read our guide here .
Adding Animations & Transitions (optional)
The final step to make a PowerPoint presentation compelling, is to consider using animations and transitions. These are by no means necessary to a good presentation, but they may be helpful in your situation.
A. Adding PowerPoint animations
PowerPoint has an incredibly robust animations engine designed to power your creativity. That being said, it’s also easy to get started with basic animations.
Animations are movements that you can apply to individual objects on your slide.

To add a PowerPoint animation to an element of your slide, simply:
- Select the element
- Go to the Animations tab in the Ribbon
- Click on the dropdown arrow to view your options
- Select the animation you want
You can add animations to multiple objects at one time by selecting them all first and then applying the animation.
B. How to preview a PowerPoint animation

There are three ways to preview a PowerPoint animation:
- Click on the Preview button in the Animations tab
- Click on the little star next to the slide
- Play the slide in Slide Show Mode
To learn other ways to run your slide show, see our guide on presenting a PowerPoint slide show with shortcuts .
To adjust the settings of your animations, explore the options in the Effect Options , Advanced Animation and the Timing areas of the Animation tab .

Note: To see how to make objects appear and disappear in your slides by clicking a button, read our guide here .
C. How to manage your animations in PowerPoint

The best way to manage lots of animations on your slide is with the Animation Pane . To open it, simply:
- Navigate to the Animations tab
- Select the Animation Pane
Inside the Animation Pane, you’ll see all of the different animations that have been applied to objects on your slide, with their numbers marked as pictured above.
Note: To see examples of PowerPoint animations that can use in PowerPoint, see our list of PowerPoint animation tutorials here .
D. How to add transitions to your PowerPoint presentation
PowerPoint has an incredibly robust transition engine so that you can dictate how your slides change from one to the other. It is also extremely easy to add transitions to your slides.
In PowerPoint, transitions are the movements (or effects) you see as you move between two slides.

To add a transition to a PowerPoint slide, simply:
- Select the slide
- Go to the Transitions tab in the Ribbon
- In the Transitions to This Slide area, click on the dropdown arrow to view your options
- Select the transition you want
To adjust the settings of the transition, explore the options in the Timing area of the Transitions tab.
You can also add the same transition to multiple slides. To do that, select them in the Slides Pane and apply the transition.
E. How to preview a transition in PowerPoint

There are three ways to preview your PowerPoint transitions (just like your animations):
- Click on the Preview button in the Transitions tab
- Click on the little star beneath the slide number in the thumbnail view
Note: In 2016, PowerPoint added a cool new transition, called Morph. It operates a bit differently from other transitions. For a detailed tutorial on how to use the cool Morph transition, see our step-by-step article here .
Save Your PowerPoint Presentation
After you’ve built your presentation and made all the adjustments to your slides, you’ll want to save your presentation. YOu can do this several different ways.

To save a PowerPoint presentation using your Ribbon, simply:
- Navigate to the File tab
- Select Save As on the left
- Choose where you want to save your presentation
- Name your presentation and/or adjust your file type settings
- Click Save
You can alternatively use the Ctrl+S keyboard shortcut to save your presentation. I recommend using this shortcut frequently as you build your presentation to make sure you don’t lose any of your work.

This is the standard way to save a presentation. However, there may be a situation where you want to save your presentation as a different file type.
To learn how to save your presentation as a PDF, see our guide on converting PowerPoint to a PDF .
How to save your PowerPoint presentation as a template
Once you’ve created a presentation that you like, you may want to turn it into a template. The easiest – but not technically correct – way, is to simply create a copy of your current presentation and then change the content.
But be careful! A PowerPoint template is a special type of document and it has its own parameters and behaviors.
If you’re interested in learning about how to create your own PowerPoint template from scratch, see our guide on how to create a PowerPoint template .
Printing Your PowerPoint Presentation
After finishing your PowerPoint presentation, you may want to print it out on paper. Printing your slides is relatively easy.

To open the Print dialog box, you can either:
- Hit Ctrl+P on your keyboard
- Or go to the Ribbon and click on File and then Print

Inside the Print dialog box, you can choose from the various printing settings:
- Printer: Select a printer to use (or print to PDF or OneNote)
- Slides: Choose which slides you want to print
- Layout: Determine how many slides you want per page (this is where you can print the notes, outline, and handouts)
- Collated or uncollated (learn what collated printing means here )
- Color: Choose to print in color, grayscale or black & white
There are many more options for printing your PowerPoint presentations. Here are links to more in-depth articles:
- How to print multiple slides per page
- How to print your speaker notes in PowerPoint
- How to save PowerPoint as a picture presentation
So that’s how to create a PowerPoint presentation if you are brand new to it. We’ve also included a ton of links to helpful resources to boost your PowerPoint skills further.
When you are creating your presentation, it is critical to first focus on the content (what you are trying to say) before getting lost inserting and playing with elements. The clearer you are on what you want to present, the easier it will be to build it out in PowerPoint.
If you enjoyed this article, you can learn more about our PowerPoint training courses and other presentation resources by visiting us here .
🔒 Unlock the PowerPoint Shortcuts Trusted by Industry Leaders KKR, American Express, HSBC, and More!
Join over 114,880 professionals from diverse fields including consulting, investment banking, advertising, marketing, sales, and business development who have supercharged their PowerPoint game with our proven methods.
✅ Customize compelling presentations effortlessly.
✅ Master time-saving techniques for faster deck creation.
✅ Boost your career prospects with top-notch PowerPoint skills.
Get FREE access to the Critical PowerPoint Shortcuts module of our premium training course by entering your name and email below.
DISCLAIMER: PC Users Only!
We respect your privacy and will keep your info safe and confidential.
About The Author

Popular Tutorials
- How to Strikethrough Text (l̶i̶k̶e̶ ̶t̶h̶i̶s̶) in Word, Excel & PowerPoint
- How to Make Animated Fireworks in PowerPoint (Step-by-Step)
- Strikethrough Shortcut (l̶i̶k̶e̶ ̶t̶h̶i̶s̶) for Word, Excel & PowerPoint
- How to Create a Flash Card Memory Game in PowerPoint (Like Jeopardy)
- Keyboard Shortcuts Not Working: Solved
PowerPoint Tutorial Categories
- Strategies & Opinions
- Shortcuts & Hacks
- Pictures, Icons, Videos, Etc.
- New Features
- Miscellaneous
- Charts & Data Viz
We help busy professionals save hours and gain peace of mind, with corporate workshops, self-paced courses and tutorials for PowerPoint and Word.
Work With Us
- Corporate Training
- Presentation & Template Design
- Courses & Downloads
- PowerPoint Articles
- Word Articles
- Productivity Resources
Find a Tutorial
- Free Training
- For Businesses
We help busy office workers save hours and gain peace of mind, with tips, training and tutorials for Microsoft PowerPoint and Word.
Master Critical PowerPoint Shortcuts – Secure Your FREE Training Module and Save Valuable Time!
⌛ Master time-saving expert techniques.
🔥 Create powerful presentations.
🚀 Propel your career to new heights.
We value your privacy – we keep your info safe.
Discover PowerPoint Hacks Loved by Industry Giants - KKR, AmEx, HSBC!
Over 114,880 professionals in finance, marketing and sales have revolutionized their PPT skills with our proven methods.
Gain FREE access to a full module of our premium PowerPoint training program – Get started today!
We hate spam too and promise to keep your information safe.
You are currently viewing a placeholder content from Facebook . To access the actual content, click the button below. Please note that doing so will share data with third-party providers.
- What is PowerPoint? Video
- Create a presentation Video
- Choose the right view for the task Video
- Add and format text Video

Create a presentation

Create a presentation from scratch, or from a theme. All themes have a palate of colors and fonts designed to work together.
Create a blank presentation
Open PowerPoint.
Select one of the Blank Presentation and start typing.
Note: Microsoft 365 subscribers will find Design Ideas based on the words you type. You can browse and select a new look.
Create a presentation from a theme
Select File > New .
Double-click a theme in the gallery to create a presentation in that theme. Or search for more templates.
Apply or change a slide layout
Apply a template to your presentation
Create and save a PowerPoint template
Get Microsoft presentation templates

Need more help?
Want more options.
Explore subscription benefits, browse training courses, learn how to secure your device, and more.

Microsoft 365 subscription benefits

Microsoft 365 training

Microsoft security

Accessibility center
Communities help you ask and answer questions, give feedback, and hear from experts with rich knowledge.

Ask the Microsoft Community

Microsoft Tech Community

Windows Insiders
Microsoft 365 Insiders
Was this information helpful?
Thank you for your feedback.
- PRO Courses Guides New Tech Help Pro Expert Videos About wikiHow Pro Upgrade Sign In
- EDIT Edit this Article
- EXPLORE Tech Help Pro About Us Random Article Quizzes Request a New Article Community Dashboard This Or That Game Popular Categories Arts and Entertainment Artwork Books Movies Computers and Electronics Computers Phone Skills Technology Hacks Health Men's Health Mental Health Women's Health Relationships Dating Love Relationship Issues Hobbies and Crafts Crafts Drawing Games Education & Communication Communication Skills Personal Development Studying Personal Care and Style Fashion Hair Care Personal Hygiene Youth Personal Care School Stuff Dating All Categories Arts and Entertainment Finance and Business Home and Garden Relationship Quizzes Cars & Other Vehicles Food and Entertaining Personal Care and Style Sports and Fitness Computers and Electronics Health Pets and Animals Travel Education & Communication Hobbies and Crafts Philosophy and Religion Work World Family Life Holidays and Traditions Relationships Youth
- Browse Articles
- Learn Something New
- Quizzes Hot
- This Or That Game
- Train Your Brain
- Explore More
- Support wikiHow
- About wikiHow
- Log in / Sign up
- Computers and Electronics
- Presentation Software
- PowerPoint Presentations
Simple Steps to Make a PowerPoint Presentation
Last Updated: April 28, 2024 Fact Checked
Creating a New PowerPoint
Creating the title slide, adding a new slide, adding content to slides, adding transitions, testing and saving your presentation.
This article was co-authored by wikiHow staff writer, Darlene Antonelli, MA . Darlene Antonelli is a Technology Writer and Editor for wikiHow. Darlene has experience teaching college courses, writing technology-related articles, and working hands-on in the technology field. She earned an MA in Writing from Rowan University in 2012 and wrote her thesis on online communities and the personalities curated in such communities. This article has been fact-checked, ensuring the accuracy of any cited facts and confirming the authority of its sources. This article has been viewed 4,325,339 times. Learn more...
Do you want to have your data in a slide show? If you have Microsoft 365, you can use PowerPoint! PowerPoint is a program that's part of the Microsoft Office suite (which you have to pay for) and is available for both Windows and Mac computers. This wikiHow teaches you how to create your own Microsoft PowerPoint presentation on a computer.
How to Make a PowerPoint Presentation
- Open the PowerPoint app, select a template and theme, then like “Create.”
- Click the text box to add your title and subtitle to create your title slide.
- Click the “Insert” tab, then “New Slide” to add another slide.
- Choose the type of slide you want to add, then add text and pictures.
- Rearrange slides by dragging them up or down in the preview box.
Things You Should Know
- Templates make it easy to create vibrant presentations no matter your skill level.
- When adding photos, you can adjust their sizes by clicking and dragging in or out from their corners.
- You can add animated transitions between slides or to individual elements like bullet points and blocks of text.

- If you don't have a Microsoft Office 365 subscription, you can use the website instead of the desktop app. Go to https://powerpoint.office.com/ to use the website version.
- You can also use the mobile app to make presentations, though it's easier to do this on a computer, which has a larger screen, a mouse, and a keyboard.

- If you don't want to use a template, just click the Blank option in the upper-left side of the page and skip to the next part.

- Skip this step if your selected template has no themes available.

- If you're creating a PowerPoint presentation for which an elaborate title slide has been requested, ignore this step.

- You can change the font and size of text used from the Home tab that's in the orange ribbon at the top of the window.

- You can also just leave this box blank if you like.

- You can also click and drag in or out one of a text box's corners to shrink or enlarge the text box.

- On a Mac, you'll click the Home tab instead. [1] X Research source

- Clicking the white slide-shaped box above this option will result in a new text slide being inserted.

- Title Slide
- Title and Content
- Section Header
- Two Content
- Content with Caption
- Picture with Caption

- Naturally, the title slide should be the first slide in your presentation, meaning that it should be the top slide in the left-hand column.

- Skip this step and the next two steps if your selected slide uses a template that doesn't have text boxes in it.

- Text boxes in PowerPoint will automatically format the bulk of your text for you (e.g., adding bullet points) based on the context of the content itself.
- You can add notes that the Presentation will not include (but you'll still be able to see them on your screen) by clicking Notes at the bottom of the slide.

- You can change the font of the selected text by clicking the current font's name and then clicking your preferred font.
- If you want to change the size of the text, click the numbered drop-down box and then click a larger or smaller number based on whether you want to enlarge or shrink the text.
- You can also change the color, bolding, italicization, underlining, and so on from here.

- Photos in particular can be enlarged or shrunk by clicking and dragging out or in one of their corners.

- Remember to keep slides uncluttered and relatively free of distractions. It's best to keep the amount of text per slide to around 33 words or less. [2] X Research source

- Slide content will animate in the order in which you assign transitions. For example, if you animate a photo on the slide and then animate the title, the photo will appear before the title.
- Make your slideshow progress automatically by setting the speed of every transition to align with your speech as well as setting each slide to Advance . [3] X Trustworthy Source Microsoft Support Technical support and product information from Microsoft. Go to source

- If you need to exit the presentation, press Esc .

- Windows - Click File , click Save , double-click This PC , select a save location, enter a name for your presentation, and click Save .
- Mac - Click File , click Save As... , enter the presentation's name in the "Save As" field, select a save location by clicking the "Where" box and clicking a folder, and click Save .
Community Q&A
- If you save your PowerPoint presentation in .pps format instead of the default .ppt format, double-clicking your PowerPoint presentation file will prompt the presentation to open directly into the slideshow view. Thanks Helpful 5 Not Helpful 0
- If you don't have Microsoft Office, you can still use Apple's Keynote program or Google Slides to create a PowerPoint presentation. Thanks Helpful 0 Not Helpful 0

- Your PowerPoint presentation (or some features in it) may not open in significantly older versions of PowerPoint. Thanks Helpful 1 Not Helpful 2
- Great PowerPoint presentations avoid placing too much text on one slide. Thanks Helpful 0 Not Helpful 0
You Might Also Like

- ↑ https://onedrive.live.com/view.aspx?resid=DBDCE00C929AA5D8!252&ithint=file%2cpptx&app=PowerPoint&authkey=!AH4O9NxcbehqzIg
- ↑ https://www.virtualsalt.com/powerpoint.htm
- ↑ https://support.microsoft.com/en-us/office/set-the-timing-and-speed-of-a-transition-c3c3c66f-4cca-4821-b8b9-7de0f3f6ead1#:~:text=To%20make%20the%20slide%20advance,effect%20on%20the%20slide%20finishes .
About This Article

- Send fan mail to authors
Reader Success Stories
Artis Holland
Sep 22, 2016
Is this article up to date?

Oct 18, 2016
Jul 23, 2016
Margery Niyi
Sep 25, 2017
Jul 21, 2016

Featured Articles

Trending Articles

Watch Articles

- Terms of Use
- Privacy Policy
- Do Not Sell or Share My Info
- Not Selling Info
wikiHow Tech Help Pro:
Level up your tech skills and stay ahead of the curve
Home Blog Presentation Ideas How to Start a Presentation: 5 Strong Opening Slides and 12 Tricks To Test
How to Start a Presentation: 5 Strong Opening Slides and 12 Tricks To Test

Knowing how to start a presentation is crucial: if you fail to capture the audience’s attention right off the bat, your entire presentation will flop. Few listeners will stick with you to the end and retain what you have told.
That is mildly unpleasant when you are doing an in-house presentation in front of your colleagues. But it can become utterly embarrassing when you present in front of larger audiences (e.g., at a conference) or worse – delivering a sales presentation to prospective customers.
Here is how most of us begin a presentation: give an awkward greeting, thank everyone for coming, clear our throats, tap the mic, and humbly start to mumble about our subject. The problem with such an opening performance? It effectively kills and buries even the best messages.
Table of Contents
- The Classic Trick: Open a Presentation with an Introduction
- Open a Presentation with a Hook
- Begin with a Captivating Visual
- Ask a “What if…” Question
- Use the Word “Imagine”
- Leverage The Curiosity Gap
- The Power of Silence
- Facts as Weapons of Communication
- Fact vs. Myths
- The Power of Music
- Physical Activity
- Acknowledging a Person
How to Start a PowerPoint Presentation The Right Way
Let’s say you have all of your presentation slides polished up (in case you don’t, check our quick & effective PowerPoint presentation design tips first). Your presentation has a clear storyline and agenda. Main ideas are broken into bite-sized statements for your slides and complemented with visuals. All you have left is to figure out how you begin presenting.
The best way is to appeal to and invoke certain emotions in your audience – curiosity, surprise, fear, or good old amusements. Also, it is recommended to present your main idea in the first 30 seconds of the presentation. And here’s how it’s done.
1. The Classic Trick: Open a Presentation with an Introduction

When you don’t feel like reinventing the wheel, use a classic trick from the book – start with a quick personal introduction. Don’t want to sound as boring as everyone else with your humble “Hi, I’m John, the head of the Customer Support Department”? Great, because we are all about promoting effective presentation techniques (hint: using a dull welcome slide isn’t one of them).
Here’s how to introduce yourself in a presentation the right way.
a. Use a link-back memory formula
To ace a presentation, you need to connect with your audience. The best way to do so is by throwing in a simple story showing who you are, where you came from, and why your words matter.
The human brain loves a good story, and we are more inclined to listen and retain the information told this way. Besides, when we can relate to the narrator (or story hero), we create an emotional bond with them, and, again – become more receptive, and less skeptical of the information that is about to be delivered.
So here are your presentation introduction lines:
My name is Joanne, and I’m the Head of Marketing at company XYZ. Five years ago I was working as a waitress, earning $10/hour and collecting rejection letters from editors. About ten letters every week landed to my mailbox. You see, I love words, but decent publisher thought mine were good enough. Except for the restaurant owner. I was very good at up-selling and recommending dishes to the customers. My boss even bumped my salary to $15/hour as a token of appreciation for my skill. And this made me realize: I should ditch creative writing and focus on copywriting instead. After loads of trial and error back in the day, I learned how to write persuasive copy. I was no longer getting rejection letters. I was receiving thousands of emails saying that someone just bought another product from our company. My sales copy pages generated over $1,500,000 in revenue over last year. And I want to teach you how to do the same”
b. Test the Stereotype Formula
This one’s simple and effective as well. Introduce yourself by sharing an obvious stereotype about your profession. This cue will help you connect with your audience better, make them chuckle a bit, and set a lighter mood for the speech to follow.
Here’s how you can frame your intro:
“My name is ___, and I am a lead software engineer at our platform [Your Job Title]. And yes, I’m that nerdy type who never liked presenting in front of large groups of people. I would rather stay in my den and write code all day long. [Stereotype]. But hey, since I have mustered enough courage…let’s talk today about the new product features my team is about to release….”
After sharing a quick, self-deprecating line, you transition back to your topic, reinforcing the audience’s attention . Both of these formulas help you set the “mood” for your further presentation, so try using them interchangeably on different occasions.
2. Open a Presentation with a Hook
Wow your audience straight off the bat by sharing something they would not expect to hear. This may be one of the popular first-time presentation tips but don’t rush to discard it.
Because here’s the thing: psychologically , we are more inclined to pay attention whenever presented with an unexpected cue. When we know what will happen next – someone flips the switch, and lights turn on – we don’t really pay much attention to that action.
But when we don’t know what to expect next – e.g., someone flips the switch and a bell starts ringing – we are likely to pay more attention to what will happen next. The same goes for words: everyone loves stories with unpredictable twists. So begin your presentation with a PowerPoint introduction slide or a line that no one expects to hear.
Here are a few hook examples you can swipe:
a. Open with a provocative statement
It creates an instant jolt and makes the audience intrigued to hear what you are about to say next – pedal back, continue with the provocation, or do something else that they will not expect.

“You will live seven and a half minutes longer than you would have otherwise, just because you watched this talk.”
That’s how Jane McGonigal opens one of her TED talks . Shocking and intriguing, right?
b. Ask a rhetorical, thought-provoking question
Seasoned presenters know that one good practice is to ask a question at the beginning of a presentation to increase audience engagement. Rhetorical questions have a great persuasive effect – instead of answering aloud, your audience will silently start musing over it during your presentation. They aroused curiosity and motivated the audience to remain attentive, as they did want to learn your answer to this question.
To reinforce your message throughout the presentation, you can further use the Rhetorical Triangle Concept – a rhetorical approach to building a persuasive argument based on Aristotle’s teachings.
c. Use a bold number, factor stat
A clean slide with some mind-boggling stat makes an undeniably strong impact. Here are a few opening statement examples you can use along with your slide:
- Shock them: “We are effectively wasting over $1.2 billion per year on producing clothes no one will ever purchase”
- Create empathy: “Are you among the 20% of people with undiagnosed ADHD?”
- Call to arms: “58% of marketing budgets are wasted due to poor landing page design. Let’s change this!”
- Spark curiosity: “Did you know that companies who invested in speech recognition have seen a 13% increase in ROI within just 3 years?”
3. Begin with a Captivating Visual
Compelling visuals are the ABC of presentation design – use them strategically to make an interesting statement at the beginning and throughout your presentation. Your first presentation slide can be text-free. Communicate your idea with a visual instead – a photo, a chart, an infographic, or another graphics asset.
Visuals are a powerful medium for communication as our brain needs just 13 milliseconds to render what our eyes see, whereas text comprehension requires more cognitive effort.
Relevant images add additional aesthetic appeal to your deck, bolster the audience’s imagination, and make your key message instantly more memorable.
Here’s an intro slide example. You want to make a strong presentation introduction to global pollution. Use the following slide to reinforce the statement you share:

“Seven of nine snow samples taken on land in Antarctica found chemicals known as PFAs, which are used in industrial products and can harm wildlife”
Source: Reuters
4. Ask a “What if…” Question
The “what if” combo carries massive power. It gives your audience a sense of what will happen if they choose to listen to you and follow your advice. Here are a few presentations with starting sentences + slides to illustrate this option:

Alternatively, you can work your way to this point using different questions:
- Ask the audience about their “Why.” Why are they attending this event, or why do they find this topic relevant?
- Use “How” as your question hook if you plan to introduce a potential solution to a problem.
- If your presentation has a persuasion factor associated, use “When” as a question to trigger the interest of the audience on, for example, when they are planning to take action regarding the topic being presented (if we talk about an inspirational presentation).

5. Use the Word “Imagine”
“Imagine,” “Picture This,” and “Think of” are better word choices for when you plan to begin your presentation with a quick story.
Our brain loves interacting with stories. In fact, a captivating story makes us more collaborative. Scientists have discovered that stories with tension during narrative make us:
- Pay more attention,
- Share emotions with the characters and even mimic the feelings and behaviors of those characters afterward.
That’s why good action movies often feel empowering and make us want to change the world too. By incorporating a good, persuasive story with a relatable hero, you can also create that “bond” with your audience and make them more perceptive to your pitch – donate money to support the cause; explore the solution you are offering, and so on.
6. Leverage The Curiosity Gap
The curiosity gap is another psychological trick frequently used by marketers to solicit more clicks, reads, and other interactions from the audience. In essence, it’s the trick you see behind all those clickbait, Buzzfeed-style headlines:

Not everyone is a fan of such titles. But the truth is – they do the trick and instantly capture attention. The curiosity gap sparks our desire to dig deeper into the matter. We are explicitly told that we don’t know something important, and now we crave to change that. Curiosity is an incredibly strong driving force for action – think Eve, think Pandora’s Box.
So consider incorporating these attention grabbers for your presentation speech to shock the audience. You can open with one, or strategically weave them in the middle of your presentation when you feel like your audience is getting tired and may lose their focus.
Here’s how you can use the curiosity gap during your presentation:
- Start telling a story, pause in the middle, and delay the conclusion of it.
- Withhold the key information (e.g., the best solution to the problem you have described) for a bit – but not for too long, as this can reduce the initial curiosity.
- Introduce an idea or concept and link it with an unexpected outcome or subject – this is the best opening for a presentation tip.
7. The Power of Silence
What would you do if you attended a presentation in which the speaker remains silent for 30 seconds after the presentation starts? Just the presenter, standing in front of the audience, in absolute silence.
Most likely, your mind starts racing with thoughts, expecting something of vital importance to be disclosed. The surprise factor with this effect is for us to acknowledge things we tend to take for granted.
It is a powerful resource to introduce a product or to start an inspirational presentation if followed by a fact.
8. Facts as Weapons of Communication
In some niches, using statistics as the icebreaker is the best method to retain the audience’s interest.
Say your presentation is about climate change. Why not introduce a not-so-common fact, such as the amount of wool that can be produced out of oceanic plastic waste per month? And since you have to base your introduction on facts, research manufacturers that work with Oceanic fabrics from recycled plastic bottles .
Using facts helps to build a better narrative, and also gives leverage to your presentation as you are speaking not just from emotional elements but from actually recorded data backed up by research.
9. Fact vs. Myths
Related to our previous point, we make quite an interesting speech if we contrast a fact vs. a myth in a non-conventional way: using a myth to question a well-accepted fact, then introducing a new point of view or theory, backed on sufficient research, that proves the fact wrong. This technique, when used in niches related to academia, can significantly increase the audience’s interest, and it will highlight your presentation as innovative.
Another approach is to debunk a myth using a fact. This contrast immediately piques interest because it promises to overturn commonly held beliefs, and people naturally find it compelling when their existing knowledge is put to the test. An example of this is when a nutritionist wishes to speak about how to lose weight via diet, and debunks the myth that all carbohydrates are “bad”.
10. The Power of Music
Think about a presentation that discusses the benefits of using alternative therapies to treat anxiety, reducing the need to rely on benzodiazepines. Rather than going technical and introducing facts, the presenter can play a soothing tune and invite the audience to follow an exercise that teaches how to practice breathing meditation . Perhaps, in less than 2 minutes, the presenter can accomplish the goal of exposing the advantages of this practice with a live case study fueled by the proper ambiance (due to the music played in the beginning).
11. Physical Activity
Let’s picture ourselves in an in-company presentation about workspace wellness. For this company, the sedentary lifestyle their employees engage in is a worrying factor, so they brought a personal trainer to coach the employees on a basic flexibility routine they can practice in 5 minutes after a couple of hours of desk time.
“Before we dive in, let’s all stand up for a moment.” This simple instruction breaks the ice and creates a moment of shared experience among the attendees. You could then lead them through a brief stretching routine, saying something like, “Let’s reach up high, and stretch out those muscles that get so tight sitting at our desks all day.” With this action, you’re not just talking about workplace wellness, you’re giving them a direct, personal experience of it.
This approach has several advantages. Firstly, it infuses energy into the room and increases the oxygen flow to the brain, potentially boosting the audience’s concentration and retention. Secondly, it sets a precedent that your presentation is not going to be a standard lecture, but rather an interactive experience. This can raise the level of anticipation for what’s to come, and make the presentation a topic for future conversation between coworkers.
12. Acknowledging a Person
How many times have you heard the phrase: “Before we begin, I’d like to dedicate a few words to …” . The speaker could be referring to a mentor figure, a prominent person in the local community, or a group of people who performed charity work or obtained a prize for their hard work and dedication. Whichever is the reason behind this, acknowledgment is a powerful force to use as a method of starting a presentation. It builds a connection with the audience, it speaks about your values and who you admire, and it can transmit what the conversation is going to be about based on who the acknowledged person is.
Closing Thoughts
Now you know how to start your presentation – you have the opening lines, you have the slides to use, and you can browse even more attractive PowerPoint presentation slides and templates on our website. Also, we recommend you visit our article on how to make a PowerPoint Presentation to get familiarized with the best tactics for professional presentation design and delivery, or if you need to save time preparing your presentation, we highly recommend you check our AI Presentation Maker to pair these concepts with cutting-edge slide design powered by AI.

Like this article? Please share
Curiosity Gap, Opening, Public Speaking, Rhetorical Triangle, Speech, What If Filed under Presentation Ideas
Related Articles

Filed under Presentation Ideas • September 5th, 2023
Persuasive Speech: Actionable Writing Tips and Sample Topics
Business professionals, students, and others can all benefit from learning the principles of persuasive speech. After all, the art of persuasion can be applied to any area of life where getting people to agree with you is important. In this article, we get into the basics of persuasive speaking, persuasive speech writing, and lastly persuasive speech topics.

Filed under Presentation Ideas • August 5th, 2023
How Parkinson’s Law Can Make Your Presentations Better
Sometimes even the best presenters procrastinate their work until the very last moment. And then, suddenly, they get a flow of ideas to complete their slide deck and present like they have been preparing for it for ages. However, doing so has drawbacks, as even professional presenters cannot always elude the side effects of […]

Filed under Presentation Ideas • April 29th, 2022
How to Become Great in Public Speaking: Presenting Best Practices
Public Speaking takes a lot of practice and grit, however, it also requires a method that can help you through your presentation. Explore more about this subject in this blog post.
5 Responses to “How to Start a Presentation: 5 Strong Opening Slides and 12 Tricks To Test”
I love to follow the ideas, it’s good for a freshman
Leave a Reply
Presentations and slideshows are PowerPoint's primary benefit, but if you've never worked with slideshows before, understanding the way presentations work is much different than Word or Excel documents. Presentations work much differently than other Office software. These files use images, labels, sounds and effects to create a slideshow used in meetings and conferences.
Creating a New Presentation
After you open PowerPoint, the opening window is shown where you can choose to create a new presentation or open an existing file already stored on your computer. New files can be created from a template, or you can create a new presentation with no pre-installed images or themes. For this course's examples, we'll use a blank presentation document, which is shown on the opening PowerPoint 2019 main window.

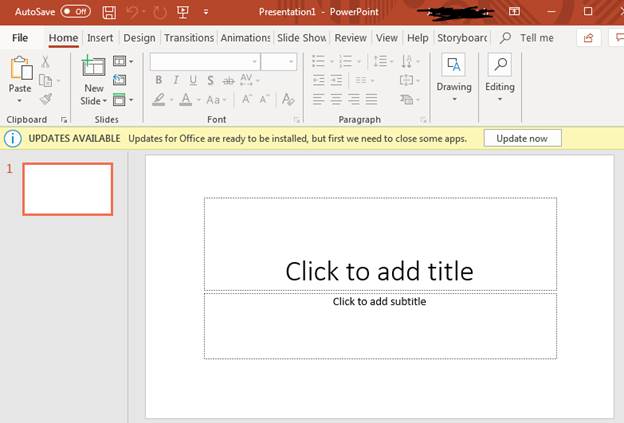
(Blank presentation file with no template theme)
Click the "Blank Presentation" icon and a new file opens in PowerPoint. When a new presentation is created, the first slide is created with two text boxes that can be used in your new file. You can also choose to delete these two text boxes and start with a completely blank slideshow.
(New slideshow presentation)
The left panel shows your slides. This panel lets you see a thumbnail of slides, so you can identify them and get a quick preview of the content contained in the slide. The center window is the current slide you're working on. When you click a slide in the left panel, it becomes the active slide. Since there is only one slide in a new file, it's the only slide active in the above window.
When the file opens, you have a presentation file created but it's not saved yet. Should you close the window now without saving, you lose any file changes.
Save a New File
As you create a presentation and make changes to your file, you must save it for new content to take effect permanently. The top section of a PowerPoint window has a few buttons to quickly save, undo and redo changes.

(Save, undo and redo change buttons)
In the image above, only the first icon is active because it's a new file with no changes to undo or redo. The "Save" icon is a diskette. All Office applications have this quickbar icons to make it easy to quickly save your files.
Make any changes to your file's content and the "Undo" and "Redo" buttons are enabled. The "Undo" button is the arrow icon that faces left (after the "Save" button), and the "Redo" button is the icon where the arrow circles around to the right (the last icon in the list). The "Undo" button deletes the last action that you made in the file. For instance, if you added text to your file, clicking the "Undo" button will remove this text. The "Redo" button is the opposite of the "Undo" button. Clicking the "Redo" button will re-apply your text.
Clicking the "Save" button will open a dialog window where you choose the file name and directory location where you want to save the file. After you save a file, it's now located on your drive, and you can re-open it should you close the file and want to return to it. It also saves your file should you have a power outage and have a computer failure where the machine reboots.
Create a New Slide
PowerPoint 2019 presentations represent the entire slideshow file. One slide is created when you open a new presentation, but you need to create new slides for each topic. The left panel displays a list of slides currently created, and you can create a new slide by right-clicking this panel and selecting "New Slide" from the context menu.
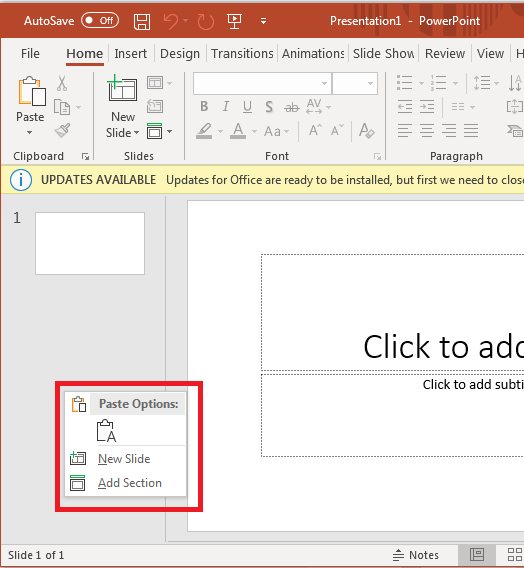
(Context menu to create a new slide or a new section)
After you select "New Slide," a new one displays in the panel. If you have any themes or templates configured, PowerPoint applies background colors and images when the new slide is created.
Large presentations could be dozens of slides, and as you present them to viewers you might want to separate topics into sections. The "Add Section" option will give you a way to link directly to sections of your presentation. By linking to sections, you can jump around your presentation without scrolling and searching for a specific slide.
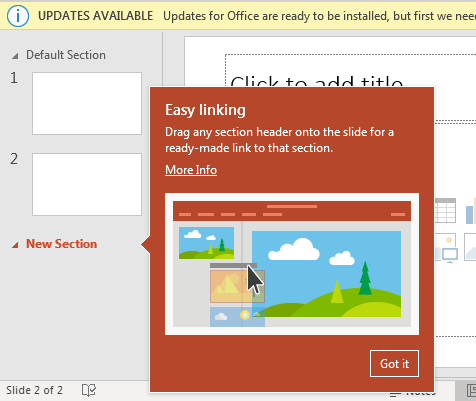
(New section created)
Like the popup tooltip says, you can drag and drop the section link into any slide. When you click the link, PowerPoint scrolls to the section. This tool is especially useful when you have dozens of slides and need to reference back to one during a presentation.
Quick Menu to Insert Objects
When you create a new slide, PowerPoint 2019 uses a template that has a title at the top of the slide where you can add text. The second control has a list of pre-made object insertion options.
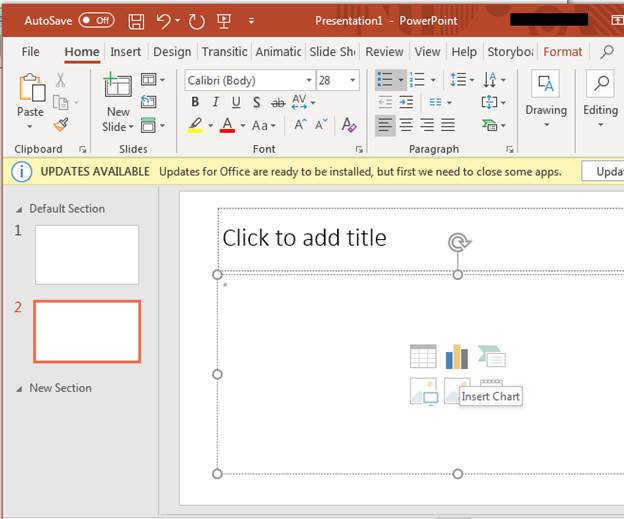
(Insert an object into a slide)
When you hover your mouse over each object, PowerPoint tells you what will be inserted if you click it. In the image above, the mouse is hovering over the second icon in the top row. The tooltip indicates that should you click this button, you will be able to insert a chart. With PowerPoint 2019 slides, you can insert Excel spreadsheets, charts, videos, sounds, graphs, images from your local computer or ones that you've found online.
For this example, click the "Online Image" object. A window opens where you can search for an image online. The search feature uses Microsoft Bing to search for image. Type an image name in the search text box or choose a category. Drill down to the image that you want to use, and then double-click it to add the image to the slide. The image is then inserted into the square that's shown as a dotted line outline.

(Image inserted into a slide)
The image is automatically sized to fit the slide, but you can use the circles surrounding the image to resize it. The arrow at the top of the image can be used to rotate it. If you use the circles in the corners, the image will resize equally both horizontally and vertically. This should be your preferred way to resize the image, because if you resize using the side circles, your image will be skewed, and its quality will be poorly displayed.
Also notice that you can see the image in the left panel. The left preview images can be used to find slides as you scroll through dozens of them. With only two slides, it's easy to identify the right slide with the apple, but when you have dozens of them, it can be time-consuming to search for the right slide using your mouse. Using the panel, you can scroll through dozens of slides much more quickly.
Each new slide that you create is visible in the left panel. Click it and you can see the content in the middle section of the PowerPoint interface. Remember that you can add objects stored on your computer or ones that you find online such as images. By inserting objects, you can create highly effective marketing or sales presentations that can be shown to hundreds of views at a time.

- Course Catalog
- Group Discounts
- Gift Certificates
- For Libraries
- CEU Verification
- Medical Terminology
- Accounting Course
- Writing Basics
- QuickBooks Training
- Proofreading Class
- Sensitivity Training
- Excel Certificate
- Teach Online
- Terms of Service
- Privacy Policy

22 Ways to Open a Presentation

Getting your first presentation slide right can be a tricky task. It sets the tone of your whole presentation, and can make or break you in terms of confidence.
Always alter your presentation openings, depending on your audience. Remember that what might work for you in a boardroom would likely turn a room of millennials into a bored room . But don’t worry. Our advice isn’t to start telling jokes at any available opportunity. Instead, we’ve collated the many various ways you can start a speech, to inspire you to choose a presentation slide that’s right for you, and your audience.
22. Welcome!

Use a welcoming presentation slide when people have come specifically to see you present.
Don’t use this if you’re presenting in the middle of other presentations, or when the audience have already seen something to do with your product or service that day.
21. Use a Physical Object

Bring an object along to your presentation that you think could be useful in your presentation, and start with explaining what it is, and why it is significant.
It could be a red ball, which you promise to toss at people who look like they’re going to fall asleep, or a product which you’re trying to sell. Either way, having an object in your opening is an unusual way of starting a presentation, and can get you some important points when presenting.
Use this if you’re presenting to a lively young audience instead of an opening presentation slide.
20. What If…

A good TED talk tactic. Use an imaginary scenario to get the audience to pay attention, and tickle their own abstract ideas about your subject.
Use this presentation slide if you have a hypothetical focus of your presentation, and you’re looking for input from the audience.
19. Show of Hands

Ask the audience their opinion on something.
Often, this can break the ice between you and the audience, and get you feeling a little more comfortable before you start with your first presentation slide.
18. A Wise Man Once Said… (Or indeed woman!)

Use a famous quote as a point of reference.
This can be a good way to start a presentation if you think the audience need some context before your presentation, and can be an easy way in if you’re about to explain something complicated.
17. A Prelude.

Instead of starting off your presentation with an about me or history slide, try and tell the audience who you are, and what you’re about before you make the presentation.
One short story about what makes you a real person, and why they should listen to you speak can make a big difference in your confidence, and in the audiences’ faith in you.
16. Dramatic Pause…

You don’t need to use a presentation slide to kick off your speech.
Instead, start your presentation with 10 seconds of silence, and a blank powerpoint slide to heighten the audience anticipation.
15. Add some Glitz

Quote a movie or a song in your first presentation slide to build rapport with your audience.
As long as it’s something that most of the audience will know, you’ll have them listening intently right from the get go!
This is especially important to consider when presenting to millenials.
14. A Number.

Open your speech with a statistical presentation slide.
A number can start your presentation right by giving your audience something tangible to understand.
If your presentation includes an interesting statistic, or you have an interesting point inside your presentation, show it off right at the start to keep your audience curious about how you arrived at that fact.
13. Make a Bold Claim

Controversial or elaborate hypotheses are often approached in presentations in an apologetic way, with a build up to the claim.
This is mostly due to nervous presenters to whom the idea of seeming silly at the start of a presentation puts them off using this as a tactic. Don’t be one of them!
12. Thank you

Another effective presentation slide opener is to thank the audience for being there.
Make them feel part of the presentation, and appreciated to get the best reaction from them later in your presentation.
11. Ask a Question

Start by asking your audience a difficult question about the topic to get a feel for the room.
Don’t ask them for a show of hands, but instead just ask them to think about it.
10. State their Problem

If you’re pitching to investors, focus on their problem. Try and relate your product or service to how their lives would be improved on your first presentation slide.
If they’re not the right audience, try and relate it their son, their daughter or their mother. Make it personal.
9. Grab their Attention

Do you have a shocking piece of information you’re going to present? Maybe you have an impressive statistic, or fact which you discovered or achieved.
Lead with something bold and colorful to grab their attention from the start.
8. Make Fun of Yourself

Be humble and approachable right from your first slide if you want to make a fantastic impression.
By showing the audience that you can make fun of yourself, and that you’re honest, you will knock down a little of the fourth wall between you and the people in front of you.
7. Use Curiosity

Using curiosity as a way to grab your audience’s attention is a good way to make you feel some power if you get nervous in presentations. Try something along the lines of: “I have the most exciting job in the world. No really, I do. Everyone I meet says “Wow, how do have the energy to do such a thing every day” , as i shrug, and take the compliment. Can you guess what i do? That’s right. I’m an accountant. ”
6. Look Back

Refer to the past in your first presentation slide, and make a comparison of what humans thought the future would look like related to your presentation topic.
This can be a great way of getting the audience to feel like they already knew something about a difficult subject. It can also help to build connection between you and your audience by relating to a common belief.
5. Look Forward

Open your presentation by referring to the future, and what you hope to achieve with your research, data, or pitch.
This is an impressive first presentation slide if you are trying to convince your audience to believe in something, whether that be a product, or a cause.
4. Use a Foreign Proverb

Using an english proverb might be a bit old hat in this day and age. Unless of course you’re going with the ‘dad joke’ ideal to millenials, in which case, press on!
Instead, use a proverb from a different language. There are some real gems out there, and can impress your audience that you’ve gone to the research trouble.
3. Refer to Current Events

If, on the day you’re due to present you read about an interesting current events story, or news article which links to your presentation, use it as your opening!
Discussing a current events article will show the audience your intellect and also get them understanding you from the get go.
2. Refer to a Historical Event

If you’re presenting something really fantastic, comparing your presentation to something significant in the past can be a good way of building some hype.
Of course, if you’re building something which isn’t that revolutionary, try adapting this opening into a humorous comparison instead, and build some rapport with your audience.
1. Tell a Story

The best way to start a powerpoint presentation is to start is with a story.
A thoughtful story along with a link to your presentation will get you off on the right foot

Get awesome presentation content in your inbox every week
It only takes a click to unsubscribe.
2018 © SlideCamp

- Get started with computers
- Learn Microsoft Office
- Apply for a job
- Improve my work skills
- Design nice-looking docs
- Getting Started
- Smartphones & Tablets
- Typing Tutorial
- Online Learning
- Basic Internet Skills
- Online Safety
- Social Media
- Zoom Basics
- Google Docs
- Google Sheets
- Career Planning
- Resume Writing
- Cover Letters
- Job Search and Networking
- Business Communication
- Entrepreneurship 101
- Careers without College
- Job Hunt for Today
- 3D Printing
- Freelancing 101
- Personal Finance
- Sharing Economy
- Decision-Making
- Graphic Design
- Photography
- Image Editing
- Learning WordPress
- Language Learning
- Critical Thinking
- For Educators
- Translations
- Staff Picks
- English expand_more expand_less
PowerPoint 2016 - Getting Started with PowerPoint
Powerpoint 2016 -, getting started with powerpoint, powerpoint 2016 getting started with powerpoint.

PowerPoint 2016: Getting Started with PowerPoint
Lesson 1: getting started with powerpoint, introduction.
PowerPoint is a presentation program that allows you to create dynamic slide presentations. These presentations can include animation, narration, images, videos, and much more. In this lesson, you'll learn your way around the PowerPoint environment, including the Ribbon , Quick Access Toolbar , and Backstage view .
Watch the video below to learn more about getting started with PowerPoint.
Getting to know PowerPoint
PowerPoint 2016 is similar to PowerPoint 2013 and PowerPoint 2010. If you've previously used these versions, PowerPoint 2016 should feel familiar. But if you are new to PowerPoint or have more experience with older versions, you should first take some time to become familiar with the PowerPoint 2016 interface .
The PowerPoint interface
When you open PowerPoint for the first time, the Start Screen will appear. From here, you'll be able to create a new presentation , choose a template , and access your recently edited presentations . From the Start Screen , locate and select Blank Presentation to access the PowerPoint interface.

Click the buttons in the interactive below to become familiar with the PowerPoint interface.

Quick Access Toolbar
The Quick Access Toolbar lets you access common commands no matter which tab is selected. You can customize the commands depending on your preference.
The Ribbon contains all of the commands you will need to perform common tasks in PowerPoint. It has multiple tabs , each with several groups of commands.
The Tell me box works like a search bar to help you quickly find tools or commands you want to use.
Microsoft Account
From here, you can access your Microsoft account information, view your profile , and switch accounts .
The Ruler is located at the top and to the left of your current slide. It makes it easy to align text and objects on your slide.
Here, you can view and edit the selected slide.
Slide Navigation Pane
The slide navigation pane allows you to view and organize the slides in your presentation.
Slide Number Indicator
Here, you can quickly see the total number of slides in your presentation , as well as which slide you are viewing.
Click Notes to add notes to your current slide. Often called speaker notes , they can help you deliver or prepare for your presentation.
Reviewers can leave comments on any slide. Click Comments to view comments for the current slide.
Slide View Options
There are four ways to view a presentation. Simply click a command to select the desired view.
Zoom Control
Click and drag the slider to use the zoom control . The number to the right of the slider reflects the zoom percentage .
Vertical and Horizontal Scroll Bars
The scroll bars allow you to scroll up and down or side to side. To do this, click and drag the vertical or horizontal scroll bar .
Working with the PowerPoint environment
The Ribbon and Quick Access Toolbar are where you will find the commands to perform common tasks in PowerPoint. Backstage view gives you various options for saving, opening a file, printing, and sharing your document.
PowerPoint uses a tabbed Ribbon system instead of traditional menus. The Ribbon contains multiple tabs , each with several groups of commands . For example, the Font group on the Home tab contains commands for formatting text in your document.

Some groups also have a small arrow in the bottom-right corner that you can click for even more options.

Showing and hiding the Ribbon
The Ribbon is designed to respond to your current task, but you can choose to minimize it if you find that it takes up too much screen space. Click the Ribbon Display Options arrow in the upper-right corner of the Ribbon to display the drop-down menu.

- Auto-hide Ribbon: Auto-hide displays your workbook in full-screen mode and completely hides the Ribbon. To show the Ribbon , click the Expand Ribbon command at the top of screen.
- Show Tabs: This option hides all command groups when they're not in use, but tabs will remain visible. To show the Ribbon , simply click a tab.
- Show Tabs and Commands: This option maximizes the Ribbon. All of the tabs and commands will be visible. This option is selected by default when you open PowerPoint for the first time.
Using the Tell me feature
If you're having trouble finding command you want, the Tell Me feature can help. It works just like a regular search bar: Type what you're looking for, and a list of options will appear. You can then use the command directly from the menu without having to find it on the Ribbon.

The Quick Access Toolbar
Located just above the Ribbon, the Quick Access Toolbar lets you access common commands no matter which tab is selected. By default, it includes the Save , Undo , Redo , and Start From Beginning commands. You can add other commands depending on your preference.
To add commands to the Quick Access Toolbar:

The Ruler, guides, and gridlines
PowerPoint includes several tools to help organize and arrange content on your slides, including the Ruler , guides , and gridlines . These tools make it easier to align objects on your slides. Simply click the check boxes in the Show group on the View tab to show and hide these tools.

Zoom and other view options
PowerPoint has a variety of viewing options that change how your presentation is displayed. You can choose to view your presentation in Normal view, Slide Sorter view, Reading view, or Slide Show view. You can also zoom in and out to make your presentation easier to read.
Switching slide views
Switching between different slide views is easy. Just locate and select the desired slide view command in the bottom-right corner of the PowerPoint window.

To learn more about slide views, see our Managing Slides lesson.
Zooming in and out
To zoom in or out, click and drag the zoom control slider in the bottom-right corner of the PowerPoint window. You can also select the + or - commands to zoom in or out by smaller increments. The number next to the slider displays the current zoom percentage , also called the zoom level .

Backstage view
Backstage view gives you various options for saving, opening, printing, and sharing your presentations. To access Backstage view, click the File tab on the Ribbon .

Click the buttons in the interactive below to learn more about using Backstage view.

Back to PowerPoint
You can use the arrow to close Backstage view and return to PowerPoint.
The Info pane will appear whenever you access Backstage view. It contains information about the current presentation.
From here, you can create a new blank presentation or choose from a large selection of templates .
From here, you can open recent presentations , as well as presentations saved to your OneDrive or on your computer .
Save and Save As
Use Save and Save As to save your presentation to your computer or to your OneDrive .
From the Print pane, you can change the print settings and print your presentation. You can also see a preview of your presentation.
From here, you can invite people to view and collaborate on your presentation. You can also share your presentation by emailing it as an attachment.
You can choose to export your workbook in another format, such as PDF/XPS or PowerPoint 97-2003 .
Click here to close the current presentation.
From the Account pane, you can access your Microsoft accoun t information, modify your theme and background , and sign out of your account.
Here, you can change various PowerPoint options , settings , and language preferences.
You can review our lesson on Understanding OneDrive to learn more about using OneDrive.
- Open PowerPoint 2016 , and create a blank presentation .
- Change the Ribbon Display Options to Show Tabs .
- Click the drop-down arrow next to the Quick Access Toolbar and add New , Quick Print , and Spelling.
- In the Tell me bar , type Shape and press Enter .
- Choose a shape from the menu, and double-click somewhere on your slide.
- Show the Ruler if it is not already visible.
- Zoom the presentation to 120%.

Change the Ribbon Display Options back to Show Tabs and Commands .
/en/powerpoint2016/understanding-onedrive/content/
The 48 best PowerPoint keyboard shortcuts for making great presentations quickly and easily
- There are many PowerPoint keyboard shortcuts that you can use to work faster and more efficiently on the platform.
- You can use a long list of keyboard shortcuts for common tasks, along with PowerPoint's Access Key shortcuts.
- Visit Business Insider's Tech Reference library for more stories .
Microsoft PowerPoint is a complex program with a vast number of features, so it's worth your time to learn all its secrets. Some of these secrets include keyboard shortcuts, which can seriously speed up your workflow.
Not only can keyboard shortcuts save you a lot of time, but knowing important shortcuts when delivering a presentation can help everything run more smoothly.
Here's a guide to the most useful keyboard shortcuts in the Windows 10 version of Microsoft PowerPoint .
Check out the products mentioned in this article:
Windows 10 (from $139.99 at best buy), acer chromebook 15 (from $179.99 at walmart), microsoft office (from $149.99 at best buy), how to use powerpoint's access key shortcuts.
The ribbon at the top of PowerPoint gives you access to virtually all the program's countless features, and you don't need to use your mouse to use it – every ribbon command has its own keyboard shortcut.
To use the ribbon entirely using your keyboard, do this:
1. Press and release Alt. You should see an overlay called Access Keys appear.
2. Press the Access Key indicated to switch to the Ribbon tab you want to use.
3. Press the Access Key for the command you want to use. Some Access Keys are more than one key press – just press the keys in sequence. If there is yet another layer of choices, continue to press the appropriate keys. For example, if you wanted to rehearse the timing of a presentation, you would press Alt and release it, then press S, and then press T.
Every PowerPoint keyboard shortcut you need to know
You can use the ribbon shortcuts to perform virtually any task in PowerPoint, but you might often find the more traditional keyboard shortcuts more convenient to use.
Here are the most important keyboard shortcuts in PowerPoint.
Delivering a presentation
Start a presentation from the beginning: Press F5 to start playing a presentation from the first slide.
Start a presentation from the current slide: Press Shift + F5 to start playing a presentation from whatever slide is currently on screen.
Start a presentation in Presenter View: Press Alt + F5 to start a presentation in Presenter View, which lets you see your notes on the main computer screen while the audience sees only the slides on a separate screen.
Go to the next slide or start the next animation: To advance to the next slide, you have several options. You can press any of these keys: N, Enter, Spacebar, Right Arrow, or Down Arrow.
Go back to the previous slide or animation: To go back to the previous slide, you also have several options. You can press any of these keys: P, Page Up, Left Arrow, or Up Arrow.
Go to the first slide: Press Home to restart the presentation at the first slide.
Go to the last slide: Press End to go directly to the final slide.
Stop or start an automatic presentation: Press S to toggle an automatic, timed presentation between start and stop.
Go to a specific slide: To go to a specific slide within the presentation, enter the slide number followed by Enter, such as 15 + Enter to go to slide number 15.
Open the All Slides dialog box: To see a list of all the slides in your presentation, press Ctrl + S.
End a presentation: Press Esc to exit a presentation.
Toggle between presentation and a blank screen: To temporarily display a blank screen in the middle of a presentation, press B to see a black screen or W to see a white screen.
Start the laser pointer: Press Ctrl + L to change the pointer into a virtual laser dot.
Draw on the presentation with a pen: Press Ctrl + P to change the pointer into a pen that you can use to annotate the screen.
Hide the pointer and navigation controls: Press Ctrl + H to hide the pointer (or laser dot or pen) and the navigation controls.
Erase annotations: Press E to erase any annotations you've made with the pen.
Creating a presentation
Open a presentation: Press Ctrl + O to open an existing PowerPoint presentation.
Create a new presentation: Press Ctrl + N to create a new presentation.
Add a new slide: Press Ctrl + M to add a new slide to a presentation in progress.
Save the presentation: Press Ctrl + S to immediately save a presentation with its current file name.
Save a presentation with a new filename: Press F12 to open the Save As dialog box and save your presentation.
Close a presentation: Press Ctrl + W to close the current presentation. If it hasn't been saved, PowerPoint will give you the opportunity to save it first.
Editing slides
Copy a slide, text, or other object: Press Ctrl + C to copy the selected item, which can be text, a graphic, or even an entire slide.
Cut a slide, text, or other object: Press Ctrl + X to cut the selected item, which can be text, a graphic, or even an entire slide.
Paste a slide, text, or other object: Press Ctrl + V to paste the content of the clipboard at the cursor location.
Delete a selected slide, text, or other object: Select the item you want to remove and then press Delete.
Insert a hyperlink: Select text or object in a slide and then press Ctrl + K to open the Insert Hyperlink dialog box to turn it into a link. If you press Ctrl + K without selecting anything first, then you will need to specify the link text as well.
Go to the next or previous slide: Press Page Down to advance to the next slide; press Page Up to go back to the previous slide.
Change the order of a slide: Press Ctrl + Up Arrow to move the selected slide one position earlier in the presentation; press Ctrl + Down Arrow to move it one later in the presentation.
Move a slide to the start of the presentation: Press Ctrl + Shift + Up Arrow to move the selected slide to the start of the presentation.
Move a slide to the end of the presentation: Press Ctrl + Shift + Down Arrow to move the selected slide to the end of the presentation.
Editing text
Bold: Press Ctrl + B to bold the selected text.
Italics: Press Ctrl + I to italics the selected text.
Underline: Press Ctrl + U to underline the selected text.
Make the font bigger: Press Ctrl + Shift + Right Arrow to increase the size of the selected text a little at a time.
Make the font smaller: Press Ctrl + Shift + Left Arrow to decrease the size of the selected text a little at a time.
Center text: Press Ctrl + E to center the selected paragraph.
Left align text: Press Ctrl + L to left-align the selected paragraph.
Right align text: Press Ctrl + R to right-align the selected paragraph.
Justify text: Press Ctrl + J to justify the selected paragraph. This causes the text to auto-fit to the left and right margins of the slide.
Superscript: Press Ctrl and the Plus sign to turn the selected text into superscript.
Subscript: Press Ctrl + = to turn the selected text into subscript.
Check spelling: Press F7 to run PowerPoint's built-in spell checker.
General tasks
Search within a presentation: Press Ctrl + F to open the Find dialog box, where you can search for specific text within the presentation. You can also search and replace text using this dialog box.
Undo: Press Ctrl + Z to undo your last action.
Redo: Press Ctrl + Y to redo the last action, if possible. If it's not possible for PowerPoint to redo the action, nothing will happen.
Help: Press F1 to open the Help and Support pane.
Cancel: Press Esc to abort any task you don't want to complete. In some cases, you may also need to click "Cancel."
Related coverage from Tech Reference :
How to do a voiceover on a powerpoint presentation and add pre-recorded audio to your slides, how to add a border to slides in powerpoint, and give your slideshow a sleek design, how to change and format the background of your powerpoint slides to custom designs, how to change your language settings in microsoft powerpoint in 3 different ways, how to copy or duplicate a powerpoint slide and put it anywhere in your slideshow.
Insider Inc. receives a commission when you buy through our links.
Watch: Here's how to use Apple's time-saving app that will make your life easier
- Main content
We use essential cookies to make Venngage work. By clicking “Accept All Cookies”, you agree to the storing of cookies on your device to enhance site navigation, analyze site usage, and assist in our marketing efforts.
Manage Cookies
Cookies and similar technologies collect certain information about how you’re using our website. Some of them are essential, and without them you wouldn’t be able to use Venngage. But others are optional, and you get to choose whether we use them or not.
Strictly Necessary Cookies
These cookies are always on, as they’re essential for making Venngage work, and making it safe. Without these cookies, services you’ve asked for can’t be provided.
Show cookie providers
- Google Login
Functionality Cookies
These cookies help us provide enhanced functionality and personalisation, and remember your settings. They may be set by us or by third party providers.
Performance Cookies
These cookies help us analyze how many people are using Venngage, where they come from and how they're using it. If you opt out of these cookies, we can’t get feedback to make Venngage better for you and all our users.
- Google Analytics
Targeting Cookies
These cookies are set by our advertising partners to track your activity and show you relevant Venngage ads on other sites as you browse the internet.
- Google Tag Manager
- Infographics
- Daily Infographics
- Popular Templates
- Accessibility
- Graphic Design
- Graphs and Charts
- Data Visualization
- Human Resources
- Beginner Guides
Blog Education How to Create a PowerPoint Presentation
How to Create a PowerPoint Presentation
Written by: Aditya Rana May 14, 2024

What if I told you PowerPoint was not built for presentations but as a tool to brainstorm ideas? I know it sounds crazy now, but that’s exactly what Microsoft intended in 1987.
Fortunately, professionals saw a better use case — a way to make attention-grabbing presentations that effectively communicates information with employees, clients, and stakeholders.
A well-made (and well-delivered) presentation is key to organizational success as it informs, persuades, and facilitates decision-making.
In this post, I’ll show you how to create a PowerPoint presentation (for a better alternative to PowerPoint, use our Presentation Maker and presentation templates to make more effective slide decks).
Click to jump ahead:
- How to create a PowerPoint presentation
How to create a PowerPoint presentation step-by-step
To create a PowerPoint presentation, follow these steps.
Open PowerPoint
- Create a blank slide
Select a template
- Choose your theme
- Add a header and sub-header
- Add your contact information (optional)
- Insert additional slides
- Add text to each slide
Add images and videos
Insert graphs and charts , add transitions and animations.
- Use presenter notes
- Arrange your slides
- Save your presentation:
- Deliver your presentation
The make a PowerPoint presentation, you first need to open the program.
To do this, click on the Start menu on your desktop and scroll through the list of apps until you find PowerPoint (hint: you can search for it and pin for faster access in the future).
If you’re using a Mac, click the Spotlight search bar on the top right of your screen and type PowerPoint.

Create a blank presentation
In PowerPoint, you can design presentations from scratch for maximum control over layout, color scheme, icons, and graphics.

If you don’t have time or lack design skills to design a presentation from scratch, PowerPoint offers presentation templates for a quick start.
To find presentation templates, click on the New tab on the welcome screen and type in a keyword that relates to the style or theme of your presentation such as “business” or “education”.

Choose a theme
Make sure you pick a template that reflects the theme of your presentation to standardize appearance of slides in terms of fonts, colors, and layout.
To pick a theme for your presentation, consider the audience and the context of the presentation.
For example, a formal theme is apt for business presentations while something more colorful would suit educational presentations like this nature-themed template.

Add a title and subtitle
The title and subtitle of your presentation is crucial to set the right tone and influence engagement.

Here’s how to optimize your presentation title and subtitle.
- Title : A good title is concise (under 10 words) and grabs attention with powerful, action-oriented words or intriguing phrases.
- Subtitle : The subtitle should provide additional information that clarifies or expands on the title.
Add your contact information (optional):
Though not always necessary, adding contact details to presentations is a good strategy when follow-up is anticipated or necessary.
Some types of presentations where you can include contact details include business, academic or research, and sales and marketing presentations.
Typically, contact details should be placed on the last slide of your presentation but you can also add it to your open slide.
Insert slides
If you’re editing a presentation template, you should already have multiple professionally-designed slides ready to edit.
If you want to replicate these slides, go to the Home tab and click New Slide (the top part of the button).
But if you’re creating a presentation from scratch or want to add a slide with a different layout for text, images, and charts, here’s what you need to do.
Go to the Home tab and click on New Slide but this time click the bottom section of the button (small arrow) to see different slide layouts options.

Add text to your slides
Though presentations are generally visual, text is crucial for communicating your message effectively.
To add text to your slides, click on a text placeholder and begin typing. If you need to add a new text box, go to the Insert tab, select Text Box, and then click where you want the text box to appear.
To format text, go to Home tab and look for the Font group. This is where you can change the font style, size and color which is important to ensure your text is attractive and legible.

Tip: Use bullet points and numbered lists to organize your text. Bullet points are great for listing items and making the slide look neat and organized, while numbered lists are ideal for steps or processes.
Here’s a great example of a slide deck that uses bullet points to great effect.

Visuals, such as images, graphs, charts, and graphics make presentations effective and engaging if they are relevant to the topic.
Here’s an example of a presentation that uses graphics to make slides more eye-catching to look at.

Inserting images in PowerPoint is a straightforward process. Simply click on Insert and then select Pictures to either add visuals from your computer or from the web.

PowerPoint also provides basic image formatting options such as resizing, repositioning, and ability to add style and effects such as brightness, contrast, effects, and borders.
You can image formatting options by selecting a visual and selecting the Picture Format option.

Adding charts and graphs to presentations is a great option when you want to present data, whether it be company data or results from a scientific study.
PowerPoint allows you to add several chart types , including common options such bar charts , line graphs , and pie charts .

To insert a chart in PowerPoint, click on Insert and select Chart. You will then be prompted to select a chart type that best suits the data you want to present.

Adding transitions in presentations is a powerful way to control movement between slides and enhance flow of information, maintain audience engagement, and emphasize key points.
When choosing a transition, keep the following points in mind.
- Define your audience: Consider your audience and the context of your presentation. For example, a professional presentation should use subtle transitions like fade or push as they are less distracting.
- What purpose does it serve: Dynamic transitions such as 3D effects make sense when you want to highlight a major point or a shift in topic.
To add a transition between slides, click on the slide you want to apply it to and then click on the Transitions tab. The transition will affect how this slide appears as you move to it from the previous slide.

Besides transitions, you can also add animations to text and objects in your presentation to emphasize key points and keep the audience engaged.
Use presenter notes
Presenter notes allow creators to add information and reminders to slides but keep it hidden from the audience.
To add presenter notes, select the Click To Add Notes option on the bottom of a slide.

Arrange your slides (if needed)
Reordering slides in PowerPoint is straightforward and can be done via a drag-and-drop interface. This makes it easy to structure your presentation to suit your narrative.
Save your presentation
Once you’ve completed your presentation, it’s time to save it for future use. To do this, click on File and select Save As (Ctrl + S if you prefer to fast). If you have already saved the file and are updating it, click Save.
Make sure to use a clear and descriptive name that reflects the content of your presentation.

Deliver your presentation
Delivering a presentation is as important as its content and design. To ensure an engaging delivery, here are some essential tips to consider.
- Maintain eye contact: There’s nothing wrong with using presenter notes but don’t become too reliant on a script.
- Control the pace : Speak clearly and at a moderate pace to ensure the audience has time to absorb the information.
- Use non-verbal cues: Body language can influence how your message is received so make sure to use gestures and movement to make your presentation more dynamic.
Conclusion: Make better presentations using Venngage templates and wow your audience
PowerPoint presentations, though great, are outdated. Everyone has seen the same templates thousands of times which makes it difficult to make presentations engaging.
To spice up your presentations, why not use a Presentation Maker that offers appealing presentation templates that require no design skills to edit. With Venngage, impactful presentations that inform, persuade, and help drive decisions are guaranteed!
Discover popular designs

Infographic maker

Brochure maker

White paper online

Newsletter creator

Flyer maker

Timeline maker

Letterhead maker

Mind map maker

Ebook maker
Contribute to the Microsoft 365 and Office forum! Click here to learn more 💡
April 9, 2024
Contribute to the Microsoft 365 and Office forum!
Click here to learn more 💡
PowerPoint Forum Top Contributors: Steve Rindsberg - John Korchok - Bob Jones AKA: CyberTaz ✅
May 10, 2024
PowerPoint Forum Top Contributors:
Steve Rindsberg - John Korchok - Bob Jones AKA: CyberTaz ✅
- Search the community and support articles
- Microsoft 365 and Office
- Search Community member
Ask a new question
Unable to create new presentations We're unable to create a new presentation at this time. Please try again later.
we just installed the student version of Office on the computer. We received the instructions from the school and got it all downloaded. , it all seemed to be okay until we wanted to start a new document. In Word and Powerpoint (all apps) this came up:
Unable to create new presentations
I have asked the school, but they can't help me. What steps can I take to fix this problem?
Report abuse
Reported content has been submitted
- Microsoft Agent |
Hi Emma (esaln2),
Sorry for the inconvenience caused by this issue, we’ll try our best to help you troubleshoot.
From your post, I understand that you have downloaded and installed Office desktop application from your Office 365 portal and when you try to create a new document in Word or PowerPoint, you receive the error.
I suppose you are getting this error when you create documents in Office online, To create Word or PowerPoint document, do you go to Office 365 portal and select Word or PowerPoint ? And when you click Word or PowerPoint , you must have received the error. Correct? If the mentioned steps are incorrect, please correct me.
Further, please click OneDrive tab on the browser (go to Office 365 portal and sign in with your work or school account), click New and select Word or PowerPoint, check if you can create the document successfully.

In addition, please provide the following information:
- Since you have created your post in Other/unknown category, I not sure about your OS platform. could you please confirm if it is Windows or Mac?
- Please provide us with a screenshot of complete Office Subscriptions page, you can access this page via this link .
- How and where do you create the document?
22 people found this reply helpful
Was this reply helpful? Yes No
Sorry this didn't help.
Great! Thanks for your feedback.
How satisfied are you with this reply?
Thanks for your feedback, it helps us improve the site.
Thanks for your feedback.
Replies (2)
Question info.
- Norsk Bokmål
- Ελληνικά
- Русский
- עברית
- العربية
- ไทย
- 한국어
- 中文(简体)
- 中文(繁體)
- 日本語
How-To Geek
6 ways to create more interactive powerpoint presentations.
Engage your audience with cool, actionable features.
Quick Links
- Add a QR code
- Embed Microsoft Forms (Education or Business Only)
- Embed a Live Web Page
- Add Links and Menus
- Add Clickable Images to Give More Info
- Add a Countdown Timer
We've all been to a presentation where the speaker bores you to death with a mundane PowerPoint presentation. Actually, the speaker could have kept you much more engaged by adding some interactive features to their slideshow. Let's look into some of these options.
1. Add a QR code
Adding a QR code can be particularly useful if you want to direct your audience to an online form, website, or video.
Some websites have in-built ways to create a QR code. For example, on Microsoft Forms , when you click "Collect Responses," you'll see the QR code option via the icon highlighted in the screenshot below. You can either right-click the QR code to copy and paste it into your presentation, or click "Download" to add it to your device gallery to insert the QR code as a picture.
In fact, you can easily add a QR code to take your viewer to any website. On Microsoft Edge, right-click anywhere on a web page where there isn't already a link, and left-click "Create QR Code For This Page."
You can also create QR codes in other browsers, such as Chrome.
You can then copy or download the QR code to use wherever you like in your presentation.
2. Embed Microsoft Forms (Education or Business Only)
If you plan to send your PPT presentation to others—for example, if you're a trainer sending step-by-step instruction presentation, a teacher sending an independent learning task to your students, or a campaigner for your local councilor sending a persuasive PPT to constituents—you might want to embed a quiz, questionnaire, pole, or feedback survey in your presentation.
In PowerPoint, open the "Insert" tab on the ribbon, and in the Forms group, click "Forms". If you cannot see this option, you can add new buttons to the ribbon .
As at April 2024, this feature is only available for those using their work or school account. We're using a Microsoft 365 Personal account in the screenshot below, which is why the Forms icon is grayed out.
Then, a sidebar will appear on the right-hand side of your screen, where you can either choose a form you have already created or opt to craft a new form.
Now, you can share your PPT presentation with others , who can click the fields and submit their responses when they view the presentation.
3. Embed a Live Web Page
You could always screenshot a web page and paste that into your PPT, but that's not a very interactive addition to your presentation. Instead, you can embed a live web page into your PPT so that people with access to your presentation can interact actively with its contents.
To do this, we will need to add an add-in to our PPT account .
Add-ins are not always reliable or secure. Before installing an add-in to your Microsoft account, check that the author is a reputable company, and type the add-in's name into a search engine to read reviews and other users' experiences.
To embed a web page, add the Web Viewer add-in ( this is an add-in created by Microsoft ).
Go to the relevant slide and open the Web Viewer add-in. Then, copy and paste the secure URL into the field box, and remove https:// from the start of the address. In our example, we will add a selector wheel to our slide. Click "Preview" to see a sample of the web page's appearance in your presentation.
This is how ours will look.
When you or someone with access to your presentation views the slideshow, this web page will be live and interactive.
4. Add Links and Menus
As well as moving from one slide to the next through a keyboard action or mouse click, you can create links within your presentation to direct the audience to specific locations.
To create a link, right-click the outline of the clickable object, and click "Link."
In the Insert Hyperlink dialog box, click "Place In This Document," choose the landing destination, and click "OK."
What's more, to make it clear that an object is clickable, you can use action buttons. Open the "Insert" tab on the ribbon, click "Shape," and then choose an appropriate action button. Usefully, PPT will automatically prompt you to add a link to these shapes.
You might also want a menu that displays on every slide. Once you have created the menu, add the links using the method outlined above. Then, select all the items, press Ctrl+C (copy), and then use Ctrl+V to paste them in your other slides.
5. Add Clickable Images to Give More Info
Through PowerPoint's animations, you can give your viewer the power to choose what they see and when they see it. This works nicely whether you're planning to send your presentation to others to run through independently or whether you're presenting in front of a group and want your audience to decide which action they want to take.
Start by creating the objects that will be clickable (trigger) and the items that will appear (pop-up).
Then, select all the pop-ups together. When you click "Animations" on the ribbon and choose an appropriate animation for the effect you want to achieve, this will be applied to all objects you have selected.
The next step is to rename the triggers in your presentation. To do this, open the "Home" tab, and in the Editing group, click "Select", and then "Selection Pane."
With the Selection Pane open, select each trigger on your slide individually, and rename them in the Selection Pane, so that they can be easily linked to in the next step.
Finally, go back to the first pop-up. Open the "Animations" tab, and in the Advanced Animation group, click the "Trigger" drop-down arrow. Then, you can set the item to appear when a trigger is clicked in your presentation.
If you want your item to disappear when the trigger is clicked again, select the pop-up, click "Add Animation" in the Advanced Animation group, choose an Exit animation, and follow the same step to link that animation to the trigger button.
6. Add a Countdown Timer
A great way to get your audience to engage with your PPT presentation is to keep them on edge by adding a countdown timer. Whether you're leading a presentation and want to let your audience stop to discuss a topic, or running an online quiz with time-limit questions, having a countdown timer means your audience will keep their eye on your slide throughout.
To do this, you need to animate text boxes or shapes containing your countdown numbers. Choose and format a shape and type the highest number that your countdown clock will need. In our case, we're creating a 10-second timer.
Now, with your shape selected, open the "Animations" tab on the ribbon and click the animation drop-down arrow. Then, in the Exit menu, click "Disappear."
Open the Animation Pane, and click the drop-down arrow next to the animation you've just added. From there, choose "Timing."
Make sure "On Click" is selected in the Start menu, and change the Delay option to "1 second," before clicking "OK."
Then, with this shape still selected, press Ctrl+C (copy), and then Ctrl+V (paste). In the second box, type 9 . With the Animation Pane still open and this second shape selected, click the drop-down arrow and choose "Timing" again. Change the Start option to "After Previous," and make sure the Delay option is 1 second. Then, click "OK."
We can now use this second shape as our template, as when we copy and paste it again, the animations will also duplicate. With this second shape selected, press Ctrl+C and Ctrl+V, type 8 into the box, and continue to do the same until you get to 0 .
Next, remove the animations from the "0" box, as you don't want this to disappear. To do this, click the shape, and in the Animation Pane drop-down, click "Remove."
You now need to layer them in order. Right-click the box containing number 1, and click "Bring To Front." You will now see that box on the top. Do the same with the other numbers in ascending order.
Finally, you need to align the objects together. Click anywhere on your slide and press Ctrl+A. Then, in the Home tab on the ribbon, click "Arrange." First click "Align Center," and then bring the menu up again, so that you can click "Align Middle."
Press Ctrl+A again to select your timer, and you can then move your timer or copy and paste it elsewhere.
Press F5 to see the presentation in action, and when you get to the slide containing the timer, click anywhere on the slide to see your countdown timer in action!
Now that your PPT presentation is more interactive, make sure you've avoided these eight common presentational mistakes before you present your slides.

Cloud Storage

Custom Business Email

Video and voice conferencing

Shared Calendars

Word Processing

Spreadsheets
Presentation Builder

Survey builder

Google Workspace
An integrated suit of secure, cloud-native collaboration and productivity apps powered by Google AI.
Tell impactful stories, with Google Slides
Create, present, and collaborate on online presentations in real-time and from any device.
- For my personal use
- For work or my business

Jeffery Clark
T h i s c h a r t h e l p s b r i d g i n g t h e s t o r y !

E s t i m a t e d b u d g e t

Make beautiful presentations, together
Stay in sync in your slides, with easy sharing and real-time editing. Use comments and assign action items to build your ideas together.

Present slideshows with confidence
With easy-to-use presenter view, speaker notes, and live captions, Slides makes presenting your ideas a breeze. You can even present to Google Meet video calls directly from Slides.

Seamlessly connect to your other Google apps
Slides is thoughtfully connected to other Google apps you love, saving you time. Embed charts from Google Sheets or reply to comments directly from Gmail. You can even search the web and Google Drive for relevant content and images directly from Slides.

Extend collaboration and intelligence to PowerPoint files
Easily edit Microsoft PowerPoint presentations online without converting them, and layer on Slides’ enhanced collaborative and assistive features like comments, action items, and Smart Compose.

Work on fresh content
With Slides, everyone’s working on the latest version of a presentation. And with edits automatically saved in version history, it’s easy to track or undo changes.

Make slides faster, with built-in intelligence
Assistive features like Smart Compose and autocorrect help you build slides faster with fewer errors.

Stay productive, even offline
You can access, create, and edit Slides even without an internet connection, helping you stay productive from anywhere.
Security, compliance, and privacy

Secure by default
We use industry-leading security measures to keep your data safe, including advanced malware protections. Slides is also cloud-native, eliminating the need for local files and minimizing risk to your devices.
Encryption in transit and at rest
All files uploaded to Google Drive or created in Slides are encrypted in transit and at rest.
Compliance to support regulatory requirements
Our products, including Slides, regularly undergo independent verification of their security, privacy, and compliance controls .
Private by design
Slides adheres to the same robust privacy commitments and data protections as the rest of Google Cloud’s enterprise services .

You control your data.
We never use your slides content for ad purposes., we never sell your personal information to third parties., find the plan that’s right for you, google slides is a part of google workspace.
Every plan includes

Collaborate from anywhere, on any device
Access, create, and edit your presentations wherever you are — from any mobile device, tablet, or computer — even when offline.

Get a head start with templates
Choose from a variety of presentations, reports, and other professionally-designed templates to kick things off quickly..

Photo Album

Book Report

Visit the Slides Template Gallery for more.
Ready to get started?
A simple guide to slideshows
Learn what slideshows are, how they’re used, common features, and how to choose a slideshow maker. Get started creating your own slideshows today with Microsoft PowerPoint.
What is a slideshow?
What are slideshows used for.

Meetings and presentations
Slideshows are most frequently used to create professional presentations for business meetings, conferences, and educational purposes. A slideshow program allows people to organize content, include visuals, and enhance the overall impact of their message.

Visual storytelling
Because slideshows sequentially display engaging visuals, text, and other multimedia, they’re a strong way to tell a cohesive and compelling narrative from start to finish.

Content creation
Slideshows give content creators a versatile and efficient way to organize information, increase visual appeal, and communicate effectively across different contexts.

Photo and video sharing
Slideshow makers are popular for creating photo and video presentations, especially for events like weddings, birthdays, and vacations. People can add transitions, music, and captions to fully bring the photo-sharing experience to life.

Training and tutorials
Slideshows help break down complex information into digestible chunks with the support of visuals and text, making them ideal for instructional materials, tutorials, and training modules.

Collaborative projects
In collaborative settings, teams use slideshow makers to create joint presentations or reports. The best slideshow makers enable multiple contributors to add their content simultaneously, which helps ensure a cohesive and unified presentation.
What are the features of a slideshow creator?
Slideshow creators vary in what they offer but ideally include:
A library of templates, themes, and images.
If you’re not a designer, this feature is huge. Simply browse the options available in your slideshow maker library to create a polished, professionally designed presentation in a flash. Be sure to confirm that access to the library is free and the images are approved for unrestricted usage.
Audio and video compatibility.
Keeping your audience engaged is key to any successful slideshow presentation. To mix things up, being able to add a multimedia element—like a song or a video clip—will help people stay focused and interested.
Presentation tools.
Handy presenter tools go a long way toward making your slideshow experience seamless. For example, straightforward slide navigation, slideshow keyboard shortcuts, pen and highlighter markup, and adjustable resolution settings.
AI assistance.
With AI revolutionizing content creation, using a slideshow maker that has AI capabilities will enhance efficiency and innovation. Depending on the slideshow app you have, creating an entire slideshow could be as easy as a quick prompt, like “Make a presentation about the benefits of sustainable fashion that has 15 slides.”
Animations.
Like audio and video, animations give your audience a bit of sensory surprise that can capture their attention.
Slide transitions.
Add some pizzazz to how you change slides with visual effects like fading, wiping, and zooming.
Screen recording.
Being able to record your screen in a slideshow maker is helpful when giving an instructional talk, software demonstration, and other types of presentations that require visual aids.
A place to put speaker notes.
Having somewhere to jot a few notes down will help remind you of everything you want to cover as you present.
Different viewing options.
Looking at different views—for example, a presenter view, an audience view, and a high-level view of slide order—is useful when organizing your slideshow’s structure and understanding and preparing for what you’ll see versus what your audience will see.
How do I choose the right slideshow maker?
When choosing a slideshow maker, keep the following questions in mind to make sure you get the most for your money:
Is it scalable with your business?
As your organization grows and changes, it’s important to have flexible technology that adapts to new needs. Having certain features—such as cloud-based collaboration, compatibility with other work apps, and a mobile app—will help ensure that no matter how your business changes, the slideshow maker is up to the task. This also applies to pricing plans. Consider choosing a slideshow app that has a subscription plan (so the software is always up to date), volume-based pricing, or enterprise-level pricing.
Does it have a variety of visual elements?
It’s pretty much a given that a slideshow maker will allow you to add images, but think outside the JPEG box—what other visual elements are available to you? Features like preset themes, free templates, SmartArt, a built-in clip art library, shape tools, background styles, 3D models, and charts and graphs provide diverse ways to switch up how a slideshow looks without relying solely on adding your own images.
Is it easy to use?
You could have the most feature-rich slideshow maker on the market, but if it isn’t easy to use, you probably won’t use it. Or you will, but you’ll be frustrated, waste valuable time, and have difficulty convincing people you work with to use it. As you research slideshow makers, look for videos that show the apps’ interfaces in action to help you decide if they’re intuitive and will have a shorter learning curve.
Does it have collaboration and sharing options?
Because making a slideshow is often a collaborative effort, it’s worthwhile to find a slideshow creator that was designed with this in mind. Pick one that offers editing controls and commenting, as well as the ability to work on a slideshow at the same time as someone else. Having a cloud-based slideshow maker will be key here. You’ll not only save yourself time but also keep things simple by not having multiple versions of the same slideshow.
Explore more about slideshows and slideshow makers
Copilot in powerpoint.
Transform how you make slideshows with the versatile AI in Copilot for PowerPoint.
Improve your presenting skills
Practice presenting with an AI speaker coach to get feedback on body language, repetition, and pronunciation.
Six slideshow tips and tricks
Read up on tips about how to finesse your slideshows to give your most confident presentations.
Get free PowerPoint templates
Show your style with PowerPoint templates in more than 40 categories.
How to make a branded slideshow
Create a cohesive visual identity for your brand that goes beyond adding a logo to every slide.
Try a photo album template
Relive your favorite memories with photo album templates designed for all your unforgettable moments.
The benefits of visual aids in slideshows
Discover why using visual aids helps communicate ideas and messaging more effectively.
Slideshows that reach all learners
Explore the different ways that people learn and how to include all learning styles in your presentations.
Frequently asked questions
How do i make a good slideshow.
Making a good slideshow in PowerPoint is easy:
Plan what you’d like to include in your slideshow.
Launch your slideshow creator.
Choose the theme you’d like.
Import media.
Add text, music, and transitions.
Record, save, and share your slideshow.
Learn more about how to make a slideshow .
How do I add music to a slideshow?
To add music to a slideshow, first make sure that you’re using a slideshow maker with music compatibility. In PowerPoint, follow these steps:
Open your PowerPoint presentation and select the slide where you want to add music.
Click on the Insert tab in the ribbon menu.
Click on the Audio button and select Audio on My PC.
Browse to the folder on your computer where the audio file is located and select it.
Click on the Insert button.
How do I record a slideshow?
The steps for recording a slideshow in PowerPoint will vary depending on the version that you own. Get help with slideshow recording based on your version.
What types of files can I add to a slideshow?
File compatibility in PowerPoint includes the use of JPEGs, PNGs, TIFFs, GIFs, PDFs, MP3s, WAVs, MIDIs, MPEG-4 Videos, and Windows Media Videos.
How do I share my slideshow?
To share your PowerPoint slideshow, follow these steps:
Open your presentation and click Share at the top right of your screen.
If your presentation isn't already stored on OneDrive, select where to save your presentation to the cloud.
Choose a permission level, like Anyone with a link , or maybe just people in your company. You can also control if people can edit or just view the doc.
Select Apply.
Enter names and a message.
Select Send.
Follow Microsoft
Governor Newsom Unveils Revised State Budget, Prioritizing Balanced Solutions for a Leaner, More Efficient Government
Published: May 10, 2024
The Budget Proposal — Covering Two Years — Cuts Spending, Makes Government Leaner, and Preserves Core Services Without New Taxes on Hardworking Californians
Watch Governor Newsom’s May Revise presentation here
WHAT YOU NEED TO KNOW: The Governor’s revised budget proposal closes both this year’s remaining $27.6 billion budget shortfall and next year’s projected $28.4 billion deficit while preserving many key services that Californians rely on — including education, housing, health care, and food assistance.
SACRAMENTO – Governor Gavin Newsom today released a May Revision proposal for the 2024-25 fiscal year that ensures the budget is balanced over the next two fiscal years by tightening the state’s belt and stabilizing spending following the tumultuous COVID-19 pandemic, all while preserving key ongoing investments.
Under the Governor’s proposal, the state is projected to achieve a positive operating reserve balance not only in this budget year but also in the next. This “budget year, plus one” proposal is designed to bring longer-term stability to state finances without delay and create an operating surplus in the 2025-26 budget year.
In the years leading up to this May Revision, the Newsom Administration recognized the threats of an uncertain stock market and federal tax deadline delays – setting aside $38 billion in reserves that could be utilized for shortfalls. That has put California in a strong position to maintain fiscal stability.
“Even when revenues were booming, we were preparing for possible downturns by investing in reserves and paying down debts – that’s put us in a position to close budget gaps while protecting core services that Californians depend on. Without raising taxes on Californians, we’re delivering a balanced budget over two years that continues the progress we’ve fought so hard to achieve, from getting folks off the streets to addressing the climate crisis to keeping our communities safe.” – Governor Gavin Newsom
Below are the key takeaways from Governor Newsom’s proposed budget:
A BALANCED BUDGET OVER TWO YEARS. The Governor is solving two years of budget problems in a single budget, tightening the state’s belt to get the budget back to normal after the tumultuous years of the COVID-19 pandemic. By addressing the shortfall for this budget year — and next year — the Governor is eliminating the 2024-25 deficit and eliminating a projected deficit for the 2025-26 budget year that is $27.6 billion (after taking an early budget action) and $28.4 billion respectively.
CUTTING SPENDING, MAKING GOVERNMENT LEANER. Governor Newsom’s revised balanced state budget cuts one-time spending by $19.1 billion and ongoing spending by $13.7 billion through 2025-26. This includes a nearly 8% cut to state operations and a targeted elimination of 10,000 unfilled state positions, improving government efficiency and reducing non-essential spending — without raising taxes on individuals or proposing state worker furloughs. The budget makes California government more efficient, leaner, and modern — saving costs by streamlining procurement, cutting bureaucratic red tape, and reducing redundancies.
PRESERVING CORE SERVICES & SAFETY NETS. The budget maintains service levels for key housing, food, health care, and other assistance programs that Californians rely on while addressing the deficit by pausing the expansion of certain programs and decreasing numerous recent one-time and ongoing investments.
NO NEW TAXES & MORE RAINY DAY SAVINGS. Governor Newsom is balancing the budget by getting state spending under control — cutting costs, not proposing new taxes on hardworking Californians and small businesses — and reducing the reliance on the state’s “Rainy Day” reserves this year.
HOW WE GOT HERE: California’s budget shortfall is rooted in two separate but related developments over the past two years.
- First, the state’s revenue, heavily reliant on personal income taxes including capital gains, surged in 2021 due to a robust stock market but plummeted in 2022 following a market downturn. While the market bounced back by late 2023, the state continued to collect less tax revenue than projected in part due to something called “capital loss carryover,” which allows losses from previous years to reduce how much an individual is taxed.
- Second, the IRS extended the tax filing deadline for most California taxpayers in 2023 following severe winter storms, delaying the revelation of reduced tax receipts. When these receipts were able to eventually be processed, they were 22% below expectations. Without the filing delay, the revenue drop would have been incorporated into last year’s budget and the shortfall this year would be significantly smaller.
CALIFORNIA’S ECONOMY REMAINS STRONG: The Governor’s revised balanced budget sets the state up for continued economic success. California’s economy remains the 5th largest economy in the world and for the first time in years, the state’s population is increasing and tourism spending recently experienced a record high. California is #1 in the nation for new business starts , #1 for access to venture capital funding , and the #1 state for manufacturing , high-tech , and agriculture .
Additional details on the May Revise proposal can be found in this fact sheet and at www.ebudget.ca.gov .
COMMENTS
Create a new presentation. Open PowerPoint. Select Blank presentation, or select one of the themes. Select More themes to view the gallery and search for more. Add a slide. Select the slide you want your new slide to follow. Select Home > New Slide. Select Layout and the you type want from the drop-down.
Step-1: Click on the "File" Menu button. At the top left side of your Microsoft PowerPoint application, you will find the 'File' menu option. The first step is to click on it. Step-2: Click on "New", and select the "Blank Presentation" button. Then, from the PowerPoint Backend view, you need to click on " New ".
PowerPoint files are called presentations. Whenever you start a new project in PowerPoint, you'll need to create a new presentation, which can either be blank or from a template. You'll also need to know how to open an existing presentation. Watch the video below to learn more about creating and opening presentations in PowerPoint.
In this video, you'll learn the basics of creating and opening presentations in PowerPoint 2019, PowerPoint 2016, and Office 365. Visit https://edu.gcfglobal...
Step 2: Create a new document in PowerPoint. Once you check that all the functions are working fine with the software, please open it and go to the File tab. If you've ever used Word or Excel, you'll probably find this Home Menu familiar. In short, this is the main page of PowerPoint, where you can create a new presentation or open an older one.
To do that, simply go up to the Home tab and click on New Slide. This inserts a new slide in your presentation right after the one you were on. You can alternatively hit Ctrl+M on your keyboard to insert a new blank slide in PowerPoint. To learn more about this shortcut, see my guide on using Ctrl+M in PowerPoint.
Create a blank presentation. Open PowerPoint. Select one of the Blank Presentation and start typing. Note: Microsoft 365 subscribers will find Design Ideas based on the words you type. You can browse and select a new look.
Open the PowerPoint app, select a template and theme, then like "Create.". Click the text box to add your title and subtitle to create your title slide. Click the "Insert" tab, then "New Slide" to add another slide. Choose the type of slide you want to add, then add text and pictures. Rearrange slides by dragging them up or down in ...
Financial PowerPoint Template with Calculator by SlideModel. 5. Use the Word "Imagine". "Imagine," "Picture This," and "Think of" are better word choices for when you plan to begin your presentation with a quick story. Our brain loves interacting with stories. In fact, a captivating story makes us more collaborative.
Replacing content in the Soaring template on Envato Elements is straightforward and simplifies creating a presentation introduction. Next, add the content of your presentation onto the slide. Simply, double-click the text on the slide you're currently working on, press CTRL+A to select it all, and delete it.
Using templates. A template is a predesigned presentation you can use to create a new slide show quickly.Templates often include custom formatting and designs, so they can save you a lot of time and effort when starting a new project.. To create a new presentation from a template: Click the File tab to access Backstage view.; Select New.You can click a suggested search to find templates or use ...
Click the "Blank Presentation" icon and a new file opens in PowerPoint. When a new presentation is created, the first slide is created with two text boxes that can be used in your new file. You can also choose to delete these two text boxes and start with a completely blank slideshow. (New slideshow presentation)
15. Add some Glitz. Quote a movie or a song in your first presentation slide to build rapport with your audience. As long as it's something that most of the audience will know, you'll have them listening intently right from the get go! This is especially important to consider when presenting to millenials. 14.
Open PowerPoint 2016, and create a blank presentation. Change the Ribbon Display Options to Show Tabs. Click the drop-down arrow next to the Quick Access Toolbar and add New, Quick Print, and Spelling. In the Tell me bar, type Shape and press Enter. Choose a shape from the menu, and double-click somewhere on your slide.
Open a presentation: Press Ctrl + O to open an existing PowerPoint presentation. Create a new presentation: Press Ctrl + N to create a new presentation. Add a new slide: ...
Open PowerPoint. The make a PowerPoint presentation, you first need to open the program. To do this, click on the Start menu on your desktop and scroll through the list of apps until you find PowerPoint (hint: you can search for it and pin for faster access in the future).
Unable to create new presentations . We're unable to create a new presentation at this time. Please try again later. I have asked the school, but they can't help me. ... click New and select Word or PowerPoint, check if you can create the document successfully. In addition, please provide the following information:
Then, with this shape still selected, press Ctrl+C (copy), and then Ctrl+V (paste). In the second box, type 9. With the Animation Pane still open and this second shape selected, click the drop-down arrow and choose "Timing" again. Change the Start option to "After Previous," and make sure the Delay option is 1 second.
Present slideshows with confidence. With easy-to-use presenter view, speaker notes, and live captions, Slides makes presenting your ideas a breeze. You can even present to Google Meet video calls ...
To add music to a slideshow, first make sure that you're using a slideshow maker with music compatibility. In PowerPoint, follow these steps: Open your PowerPoint presentation and select the slide where you want to add music. Click on the Insert tab in the ribbon menu. Click on the Audio button and select Audio on My PC.
1. Visme. Let's start with the best app for presentations you can use to design your presentation. Visme is a cloud-based graphic design software that allows designers and non-designers alike to create beautiful and professional presentations, infographics, social media graphics and more.
Watch Governor Newsom's May Revise presentation here. WHAT YOU NEED TO KNOW: ... NO NEW TAXES & MORE RAINY DAY SAVINGS. Governor Newsom is balancing the budget by getting state spending under control — cutting costs, not proposing new taxes on hardworking Californians and small businesses — and reducing the reliance on the state's ...