Building and Scaling a Design System in Figma: A Case Study
Building a design system for a multinational company means cataloging every component in meticulous detail. It’s a massive undertaking that calls for both a big-picture view and a focus on specifics. Here’s how one design system team leader accomplished it.


By Abigail Beshkin
Abigail is a veteran of Pratt Institute and Columbia Business School, where she oversaw the design and production team for Columbia Business magazine. Her work has appeared in the New York Times and been heard on NPR.
Determining how to build a design system for a multinational company means cataloging every component and pattern in meticulous detail. It’s a massive undertaking that calls for both a big-picture view and a focus on specifics. Here’s how one design system team leader accomplished it.
When Switzerland-based holding company ABB set out to create a design system , the goal was to knit together a consistent look and feel for hundreds of software products, many of which power the mechanical systems that keep factories, mines, and other industrial sites humming. It was no small task for a company with almost two dozen business units and nearly 150,000 employees around the world. For Abdul Sial , who served as the lead product designer on ABB’s 10-person design system team, scaling the library of components and patterns depended on maintaining openness and transparency, with an emphasis on extensive documentation.
The Role of a Design System Designer
Increasingly, large companies like ABB have teams dedicated exclusively to creating and maintaining design systems. “A design system allows for consistency, going to market in a fair time and not allowing production to get stuck on customizations that are not building value,” says Madrid-based designer Alejandro Velasco . Or, as Alexandre Brito , a designer in Lisbon, Portugal, explains, “Design systems come to provide structure whenever there are many people using the same set of tools. It’s like everyone having the same language.”
If a traditional style guide covers the design basics—fonts and colors, for instance—a design system has a much further reach. “A design system is a mix of a style guide, plus design components, design patterns, code components and, on top of it, documentation,” Sial says. When he worked on ABB’s design system, about 120 designers used it on a regular basis. The effort represented version 4.8 of the system, and the team dubbed it “Design Evolution.”
Design system designers play a different role than those who focus solely on individual products. “You have the bird’s-eye view of all the different products that a company is using,” Sial says.
Working in design operations also calls for communicating with stakeholders throughout a company. “Design system designers have to be social,” says Velasco. “A design system designer has to really like to work and talk with people who have different roles within an organization. They have to be able to distinguish what feedback to include in order to build the design system around the company’s needs.”
The Life Cycle of a Component
Working on ABB’s design system, Sial was guided by one overarching philosophy: “Documentation, documentation, documentation.” For every reusable element on ABB’s websites, mobile screens, or large stand-alone screens, Sial wanted to show what he calls the life cycle of a component. That meant extensive record-keeping for all components and patterns—breadcrumbs, headers, inputs, or buttons, to name just a few. “What are the journeys it went through? What decisions went into it? That way we’re not always recreating everything. Before trying something, you can read and see that someone already tested it,” Sial says.
In his experience, this philosophy is a departure from the typical approach to documentation. In the fast-paced world of product development, for example, documentation is often written at the end of the project or abandoned altogether. But for design systems, Sial says, documentation should be more than an afterthought. “A design system is never done; it needs continuous improvement,” he says. “Design system creators and consumers want to understand the thought processes and decisions in order to keep improving it.”
Documentation is especially important for a design system as large as ABB’s. “With such a large team you have to be able to scale,” he says. “How can we make sure that everybody who joins the team can quickly go to any component and understand how it started, how it was edited, and what version they are using?”
Finding the Right Tool
There are many tools out there for building design systems, including Figma, Sketch, and Adobe XD. Sial experimented with several, trying a mix of design and project management tools before settling on Figma, which offers ample space for documentation.
Sial and his team determined that every component should sit within its own file. “Most of the time, you’re working on one component at a time. If you put all the components in one file, it slows down Figma. By giving each component its own file, it’s quicker to open and you have the whole history and documentation in one place,” he says.
Setting the Hierarchy
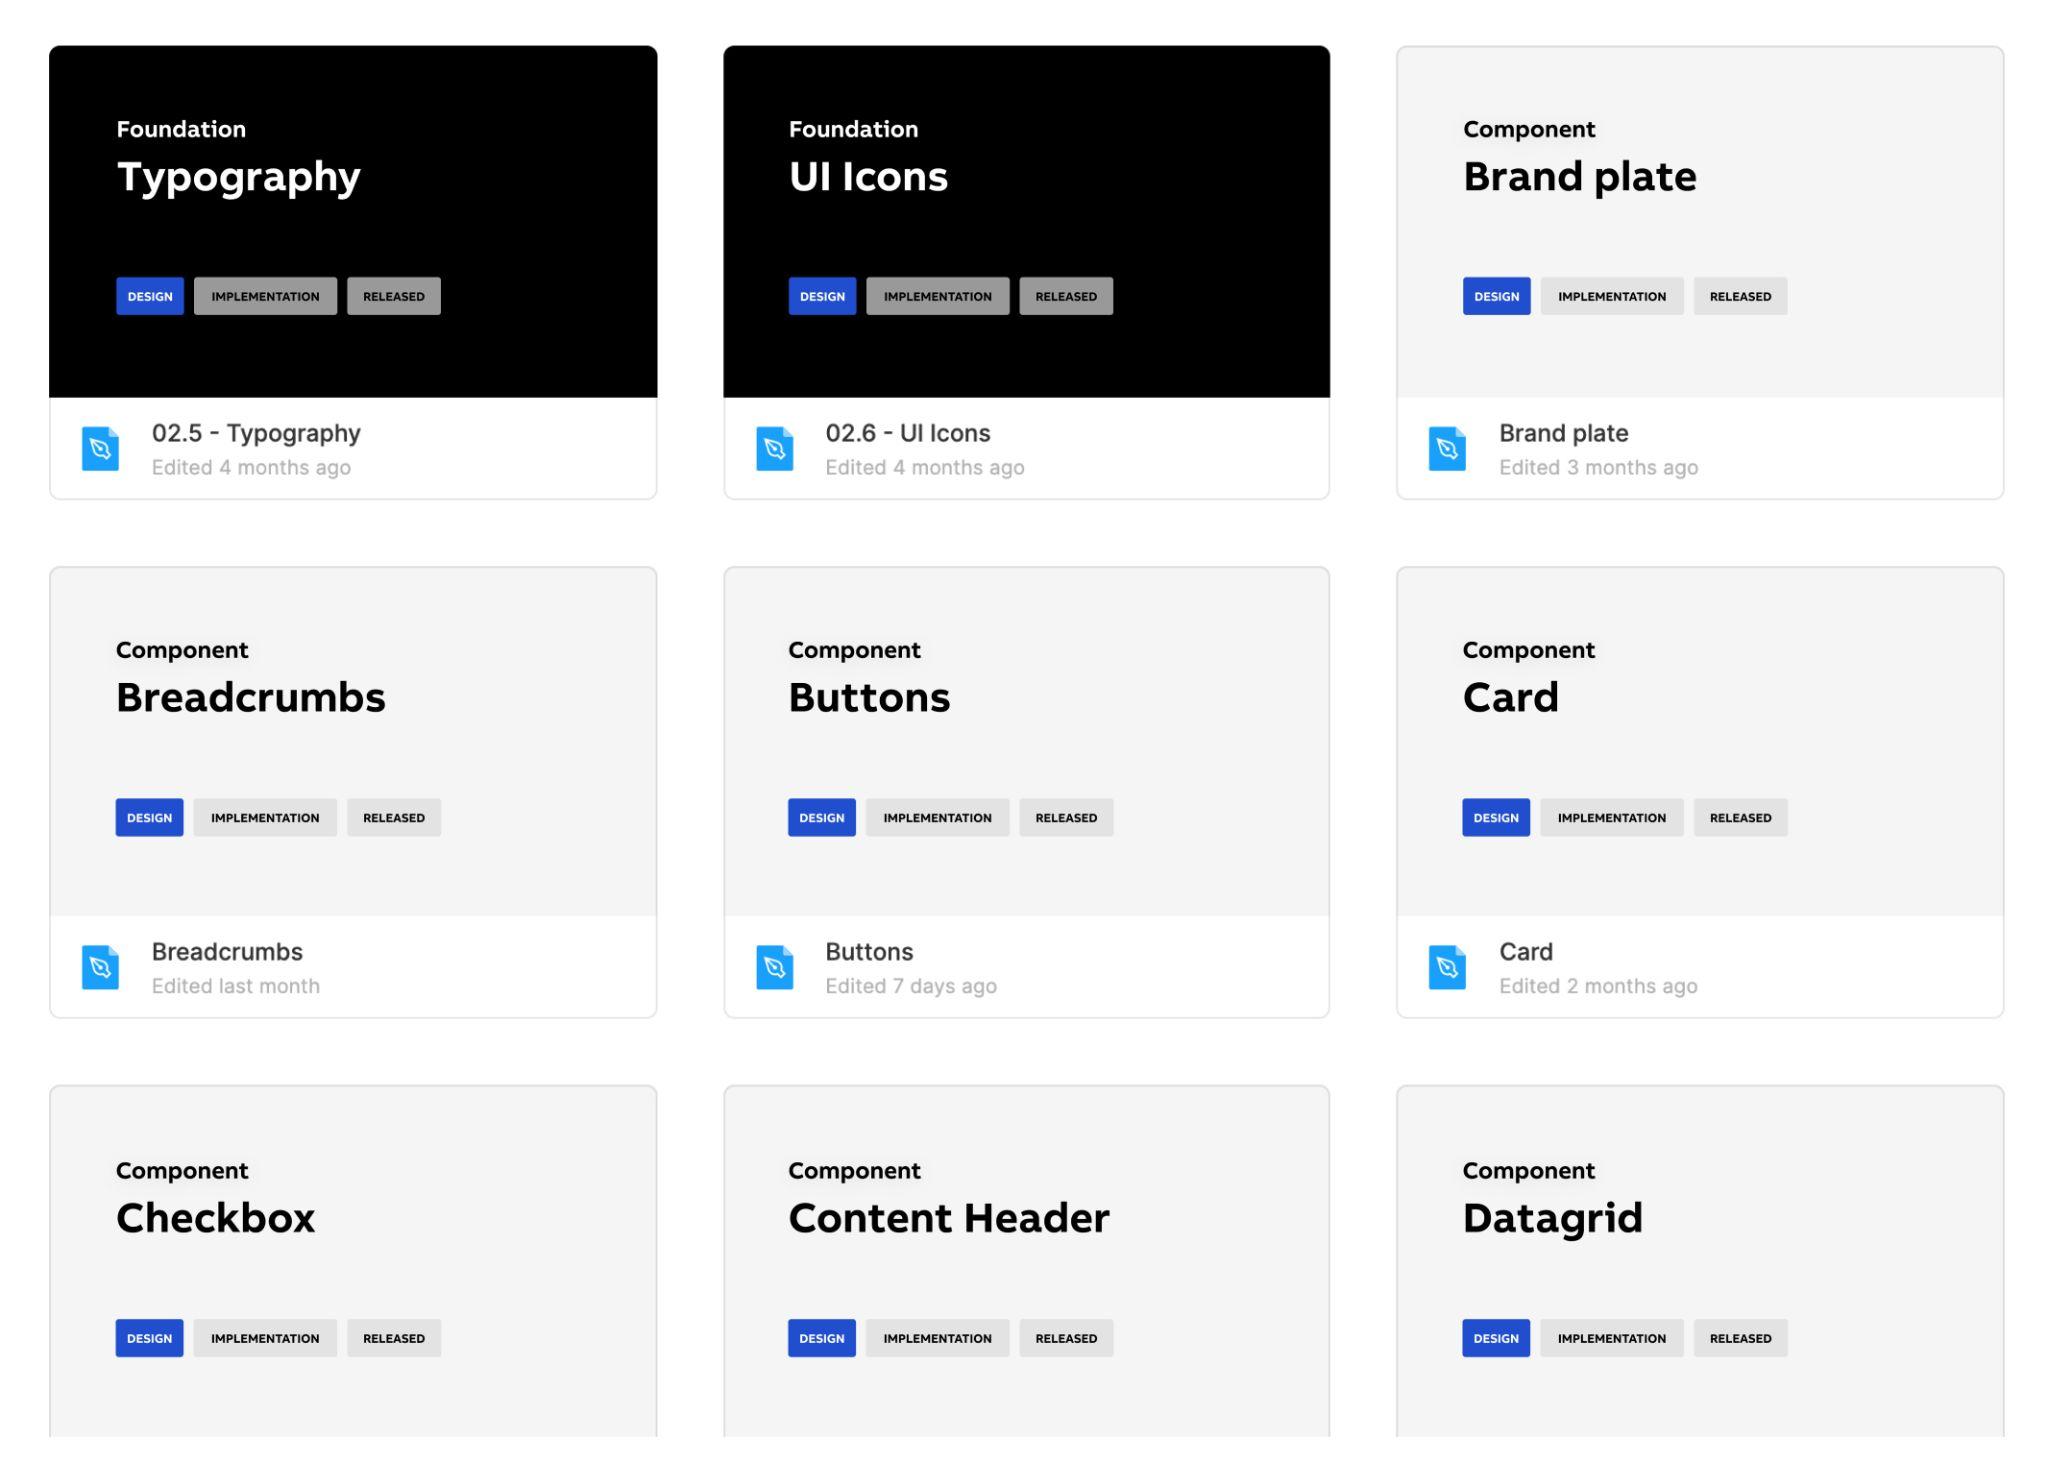
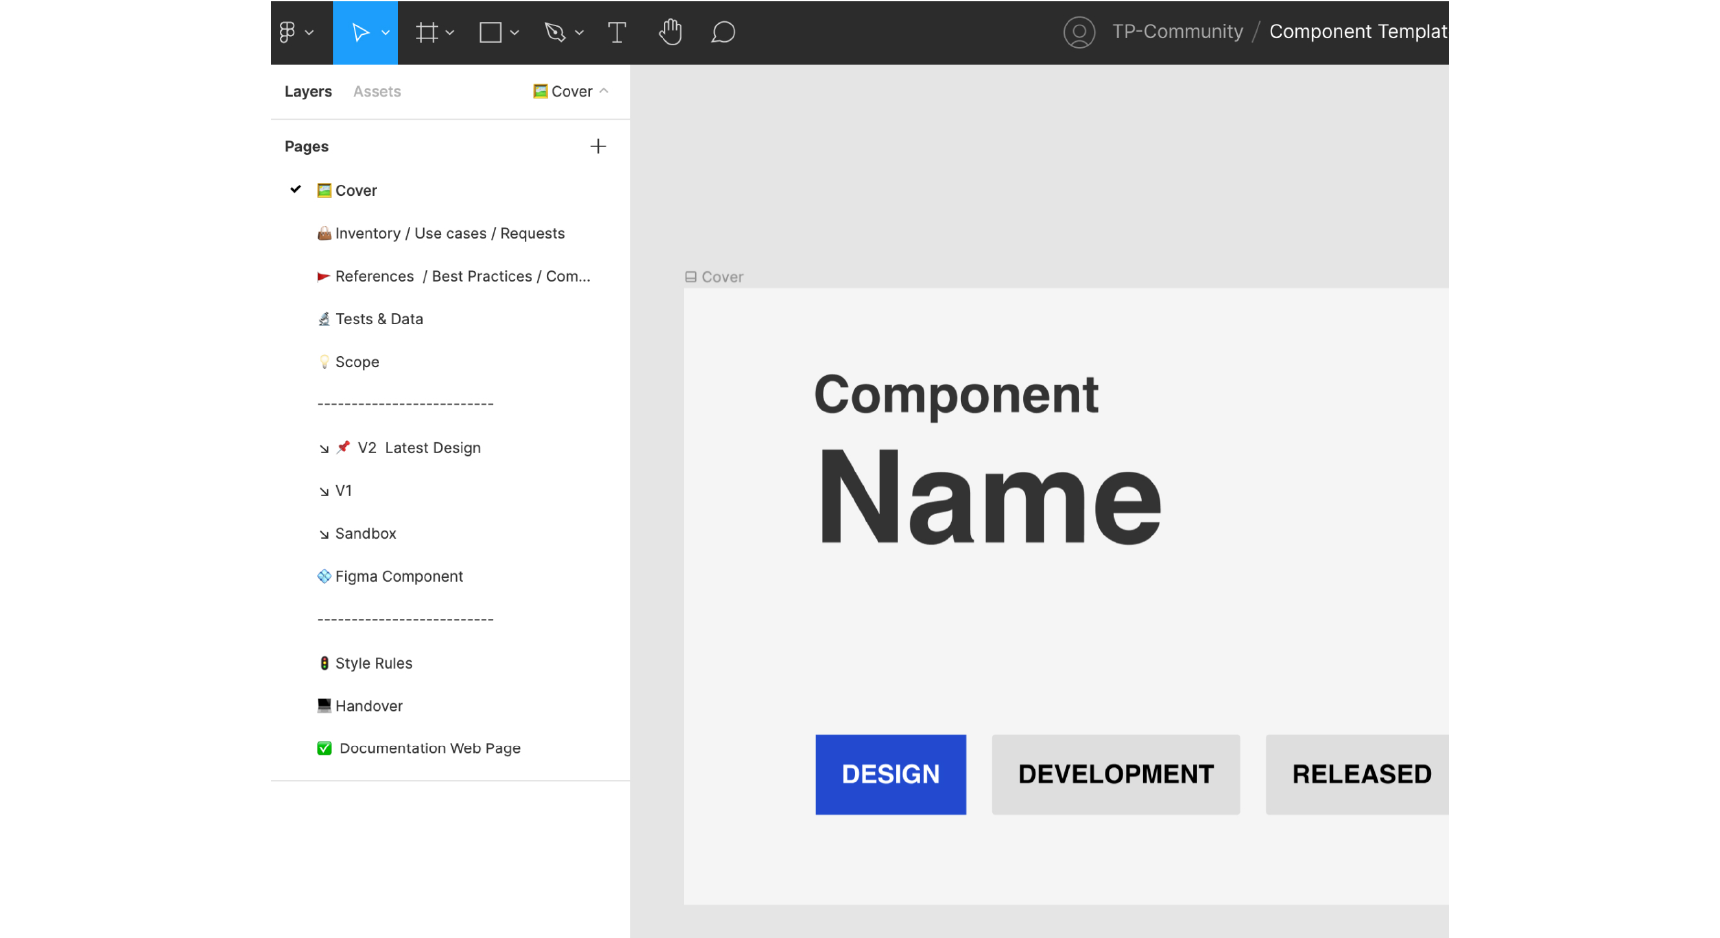
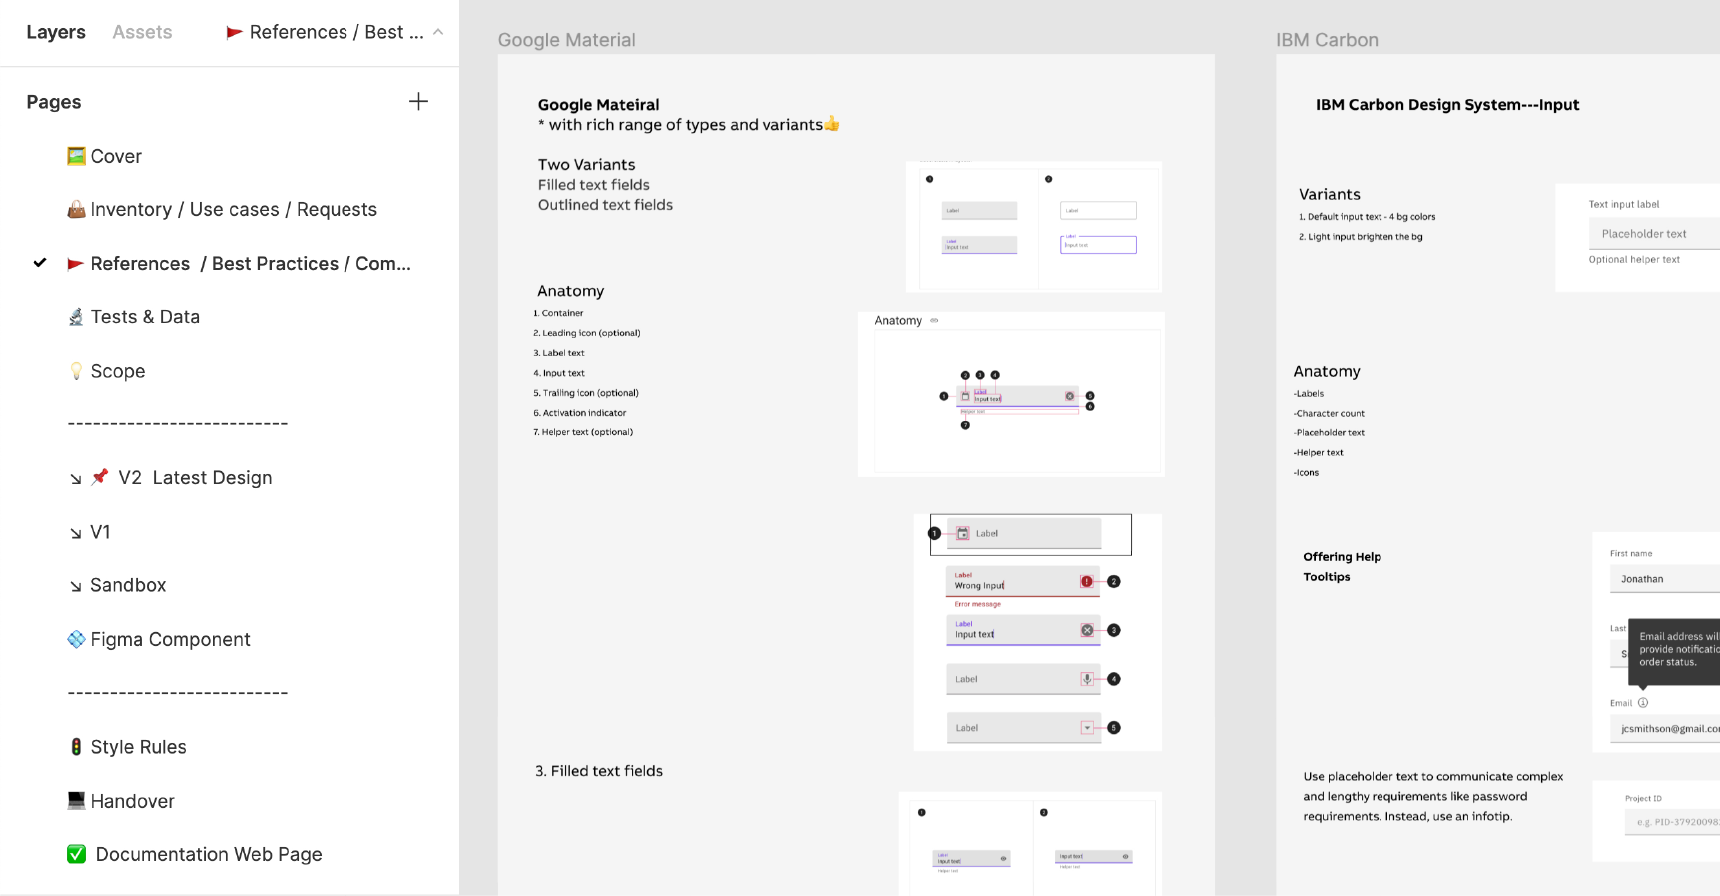
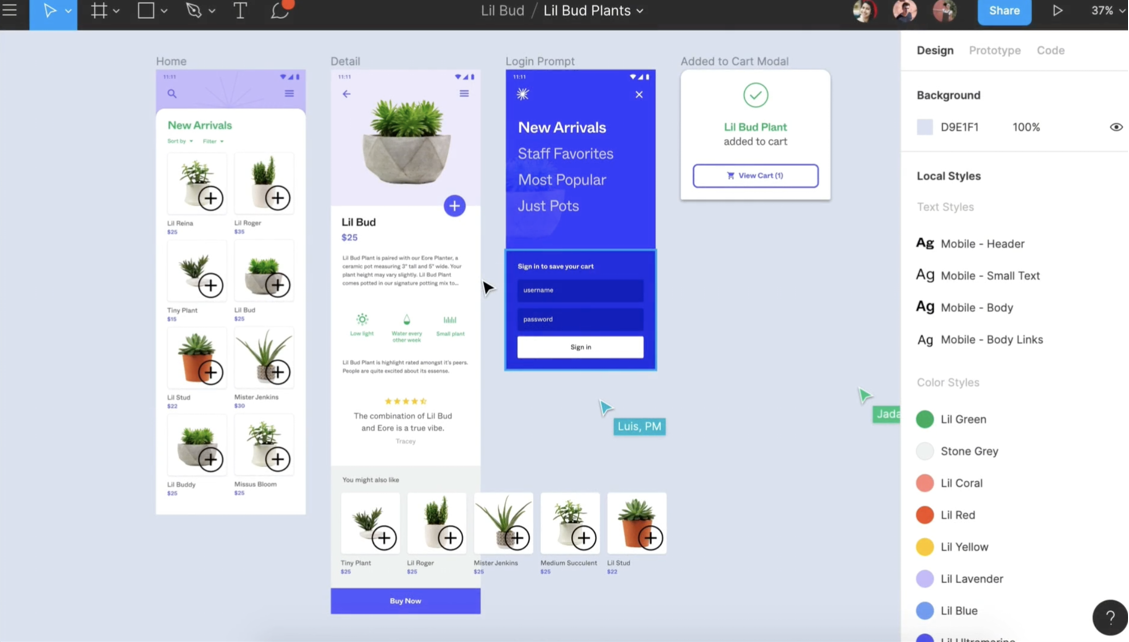
Sial set up the ABB design system so that the file for each component and pattern has the same pages. The images that follow detail what’s on each page.
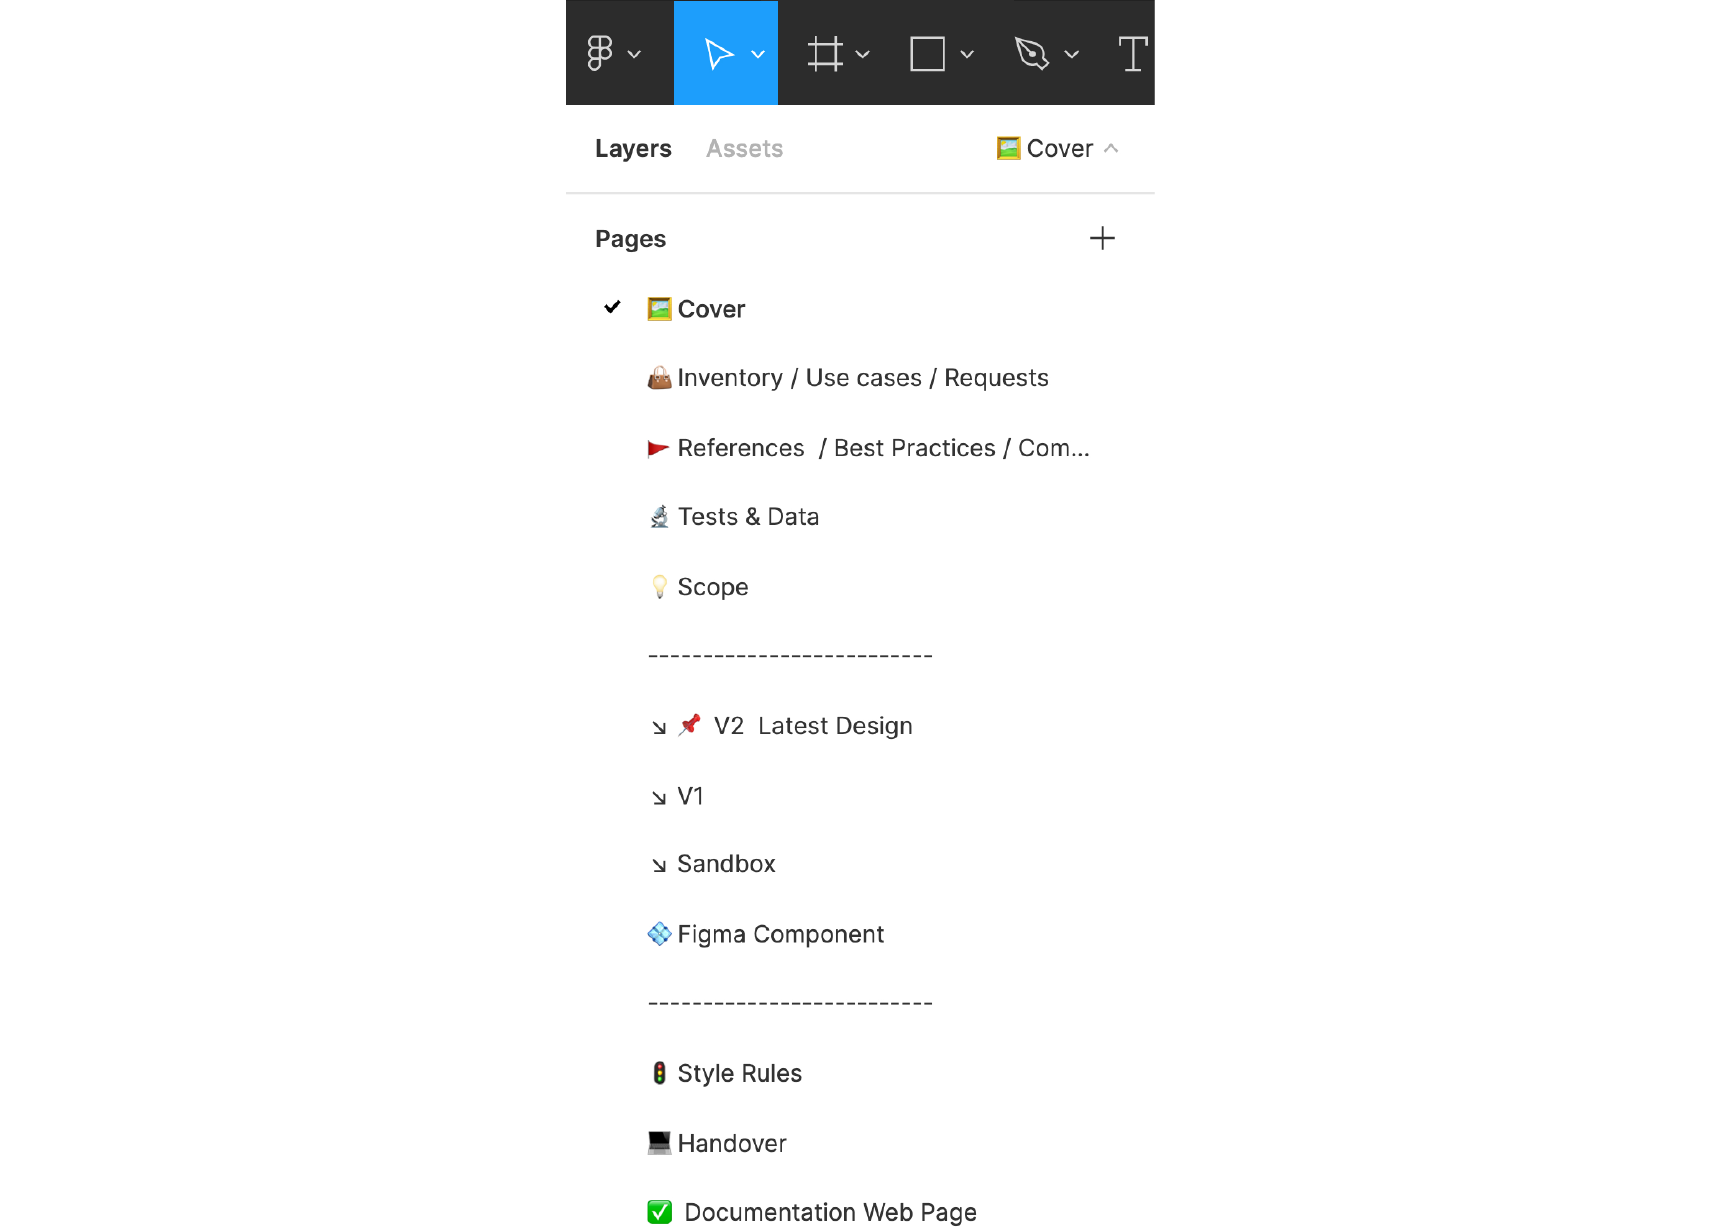
Sial recommends setting up a simple cover page for every component. In Figma, this enables a thumbnail preview of all the components and helps with the browsability of files. In the ABB setup, the cover page includes the component name and what phase it’s in: design, development, or released. The status can be easily updated when the component progresses.
Inventory, Use Cases, and Requests
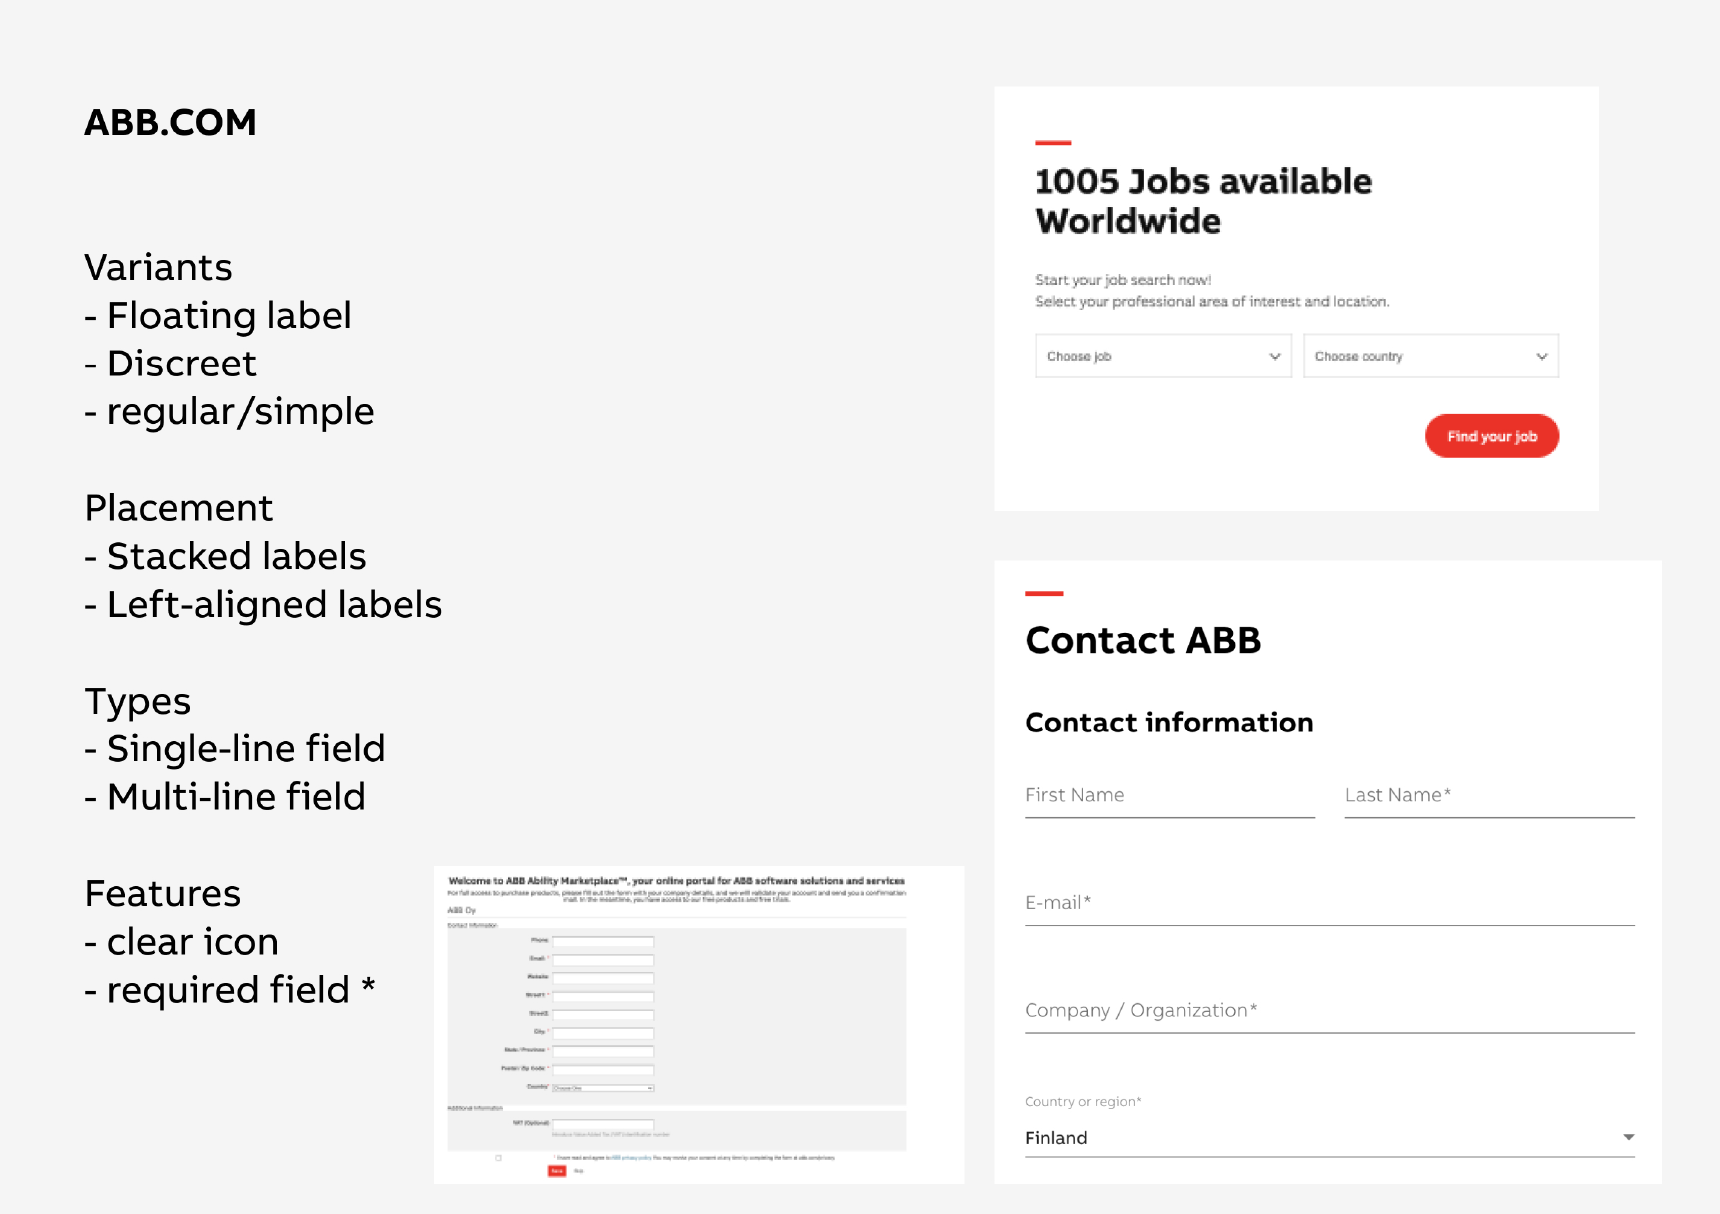
This page contains examples of the numerous ways that a component shows up in a company’s digital product. In the case of a text field component, for instance, the inventory page would show how the text field looks on abb.com compared to how it appears on an iPhone compared to how it shows up on an Android device. “The inventory allows us to understand clearly what’s already there,” says Sial.
This page should also show the ways the component is being used incorrectly. “This allows you to look at your products and see where there are alignments and misalignments,” Sial says. He advises teams launching a design system project to begin by cataloging what already exists. “Start with inventory and it will guide you as you’re creating the design,” he says.
References, Best Practices, and Competitive Analysis
Sial advises creating a section of each component file akin to a vision board, showing how other companies design comparable pieces. “As with anything else, best practice is to perform competitive analysis and see how other people are doing it,” he says. “Observe other products and see their learnings.”
Tests and Data
The test results data page aggregates all the data related to testing a component, including the results of A/B testing and feedback from users and stakeholders. In short, Sial says, “It’s the whole story of a component.” Perhaps the design team tried a new variation two years ago and found it didn’t work? “Maybe we worked on that variation and we discarded it for some reason,” he says. If so, this kind of history can save significant time by making sure that designers don’t try it again.
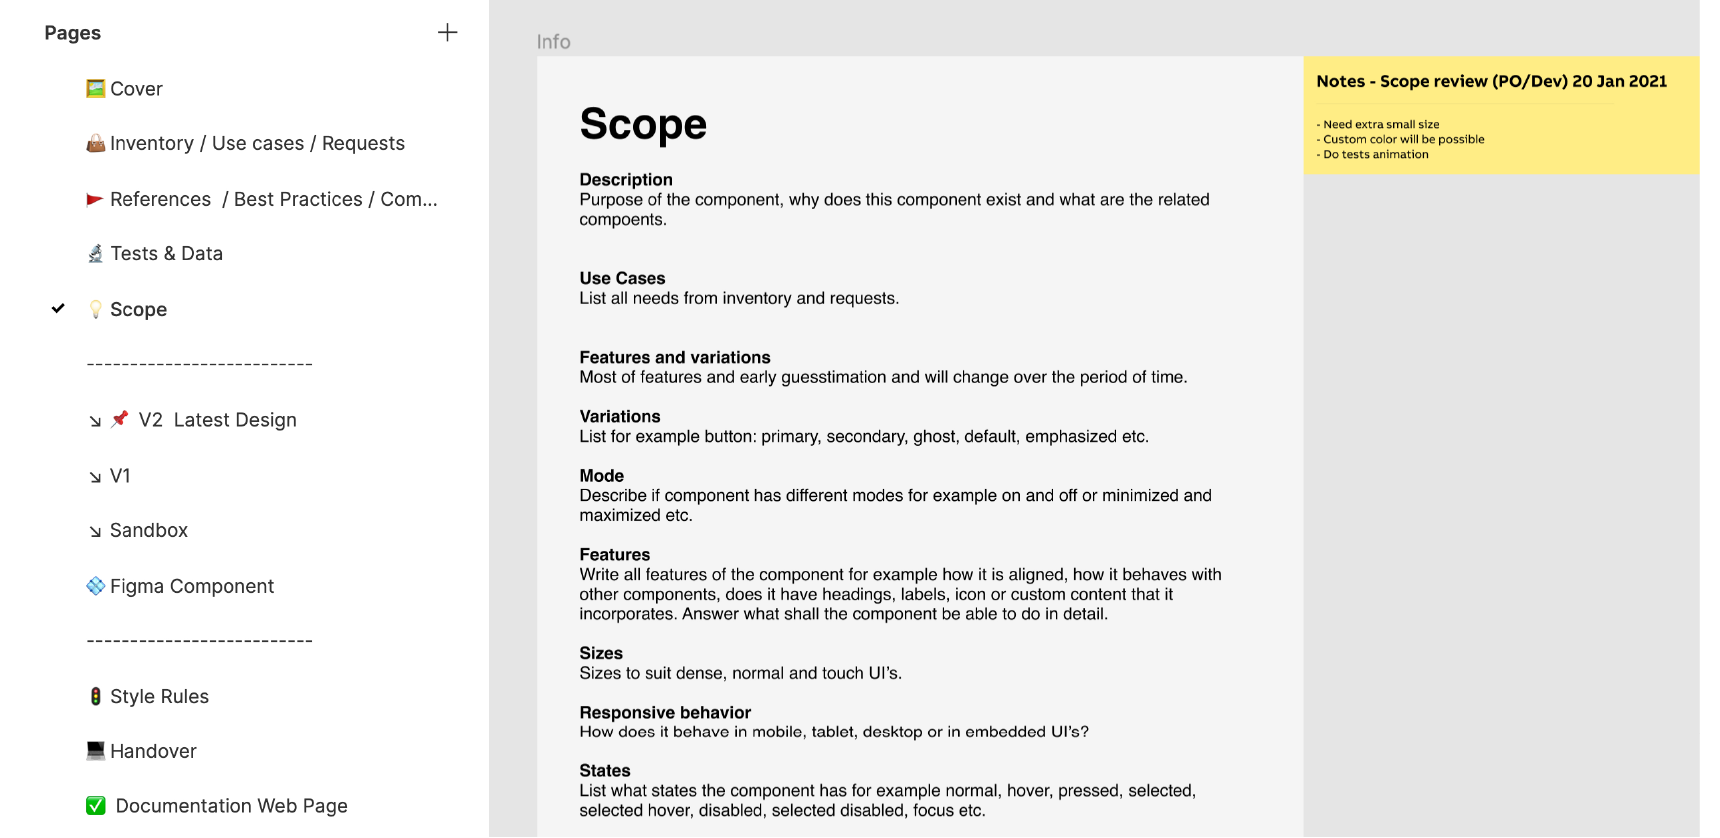
The next page lays out a component’s scope so designers can bring a design to fruition. By the time they arrive at the scope page, Sial says, “You have a story. You understand the inventory of all the products. You know what you need to build and you know the requirements. Now it’s time to write it down and make a brief out of it.” He adds that creating the scope should be a collaborative process with the product owners, developers, and designers.
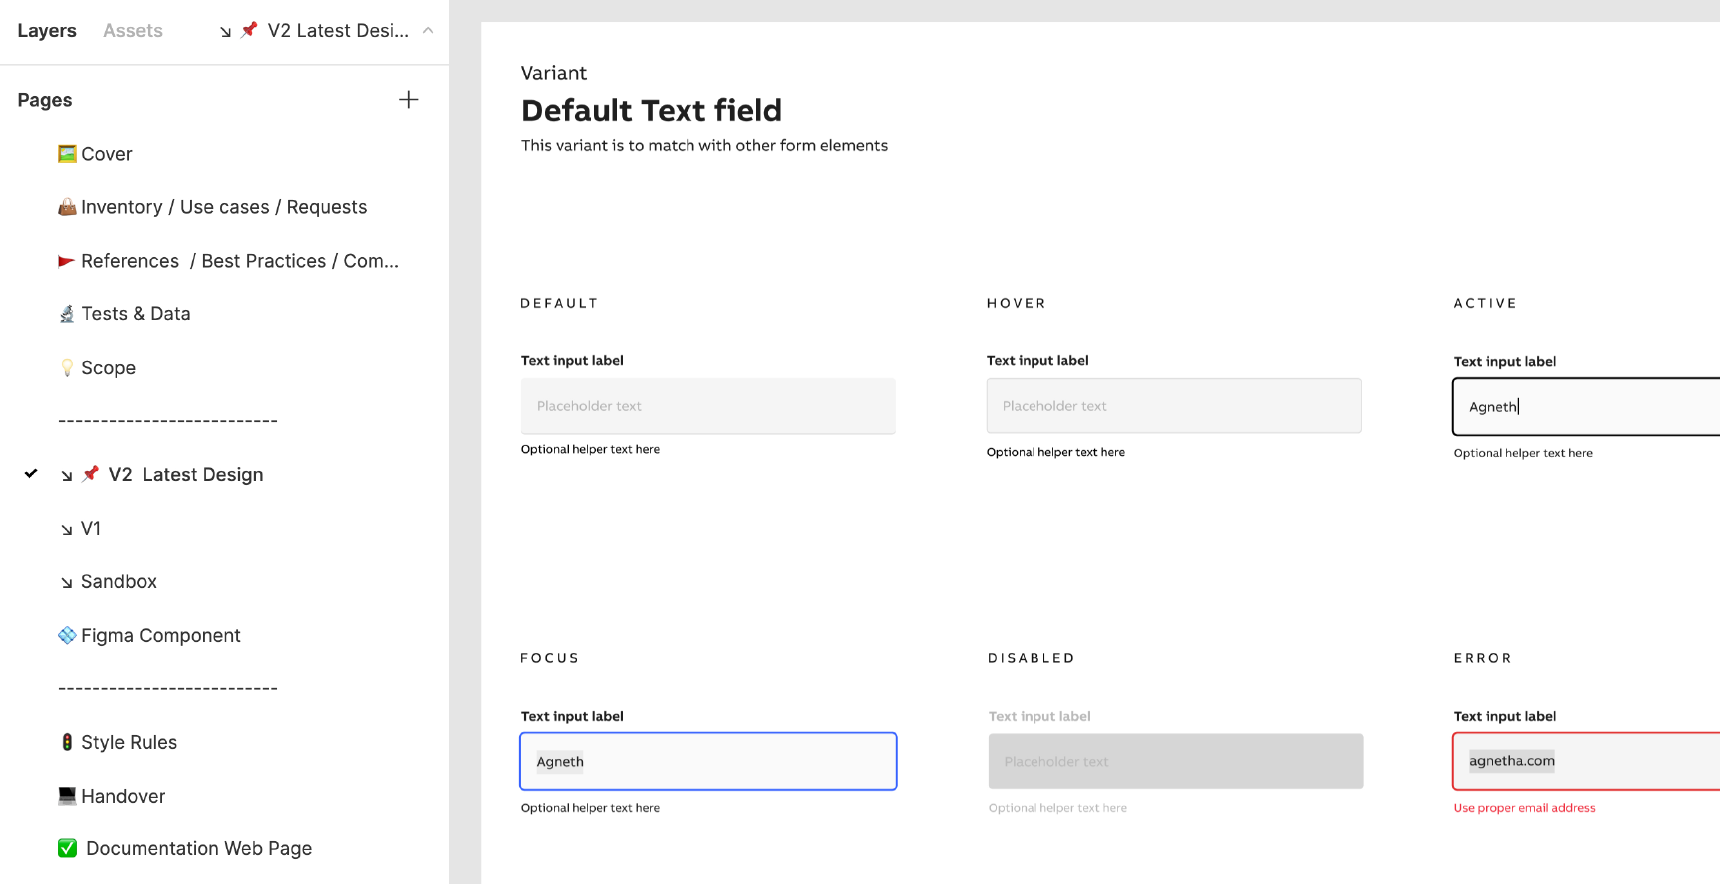
Images of the final versions of the component are found here, with the latest iteration pinned on top. Other designers should be able to review and comment on it.
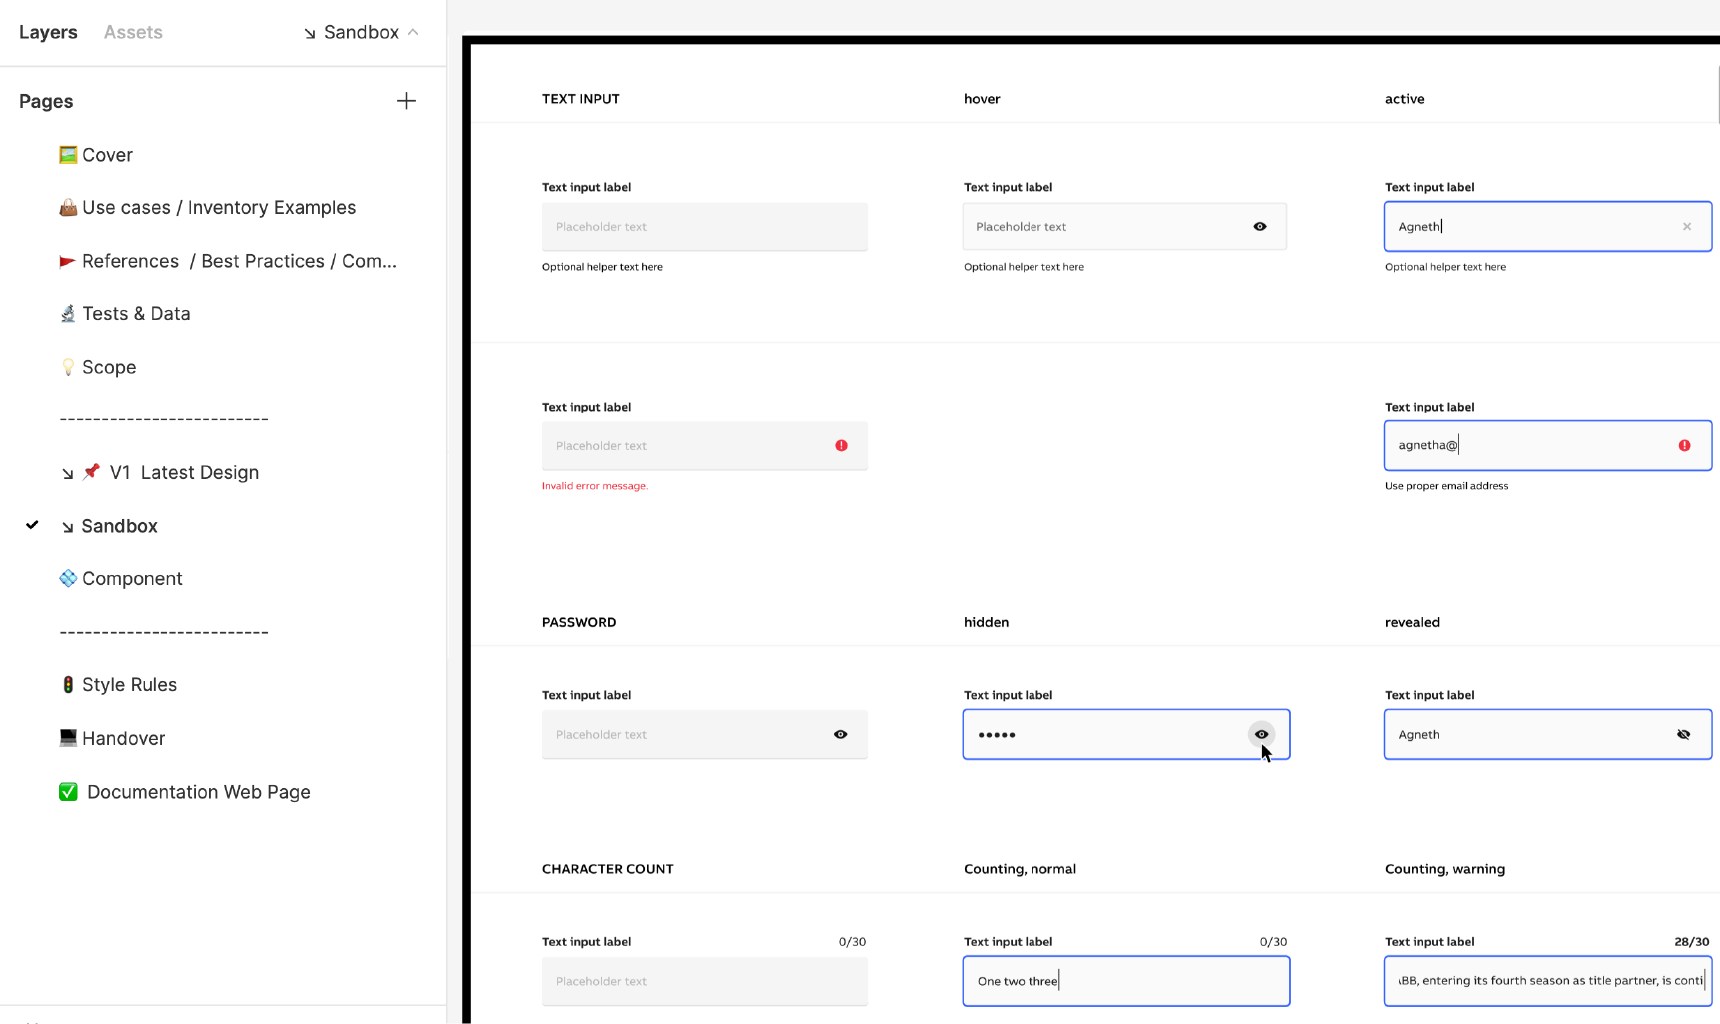
The sandbox enables designers to experiment with different iterations of a component or pattern directly in Figma. “It can be messy, and there’s no standardization,” Sial says. “It’s just a playground where a designer has the freedom to do anything.”
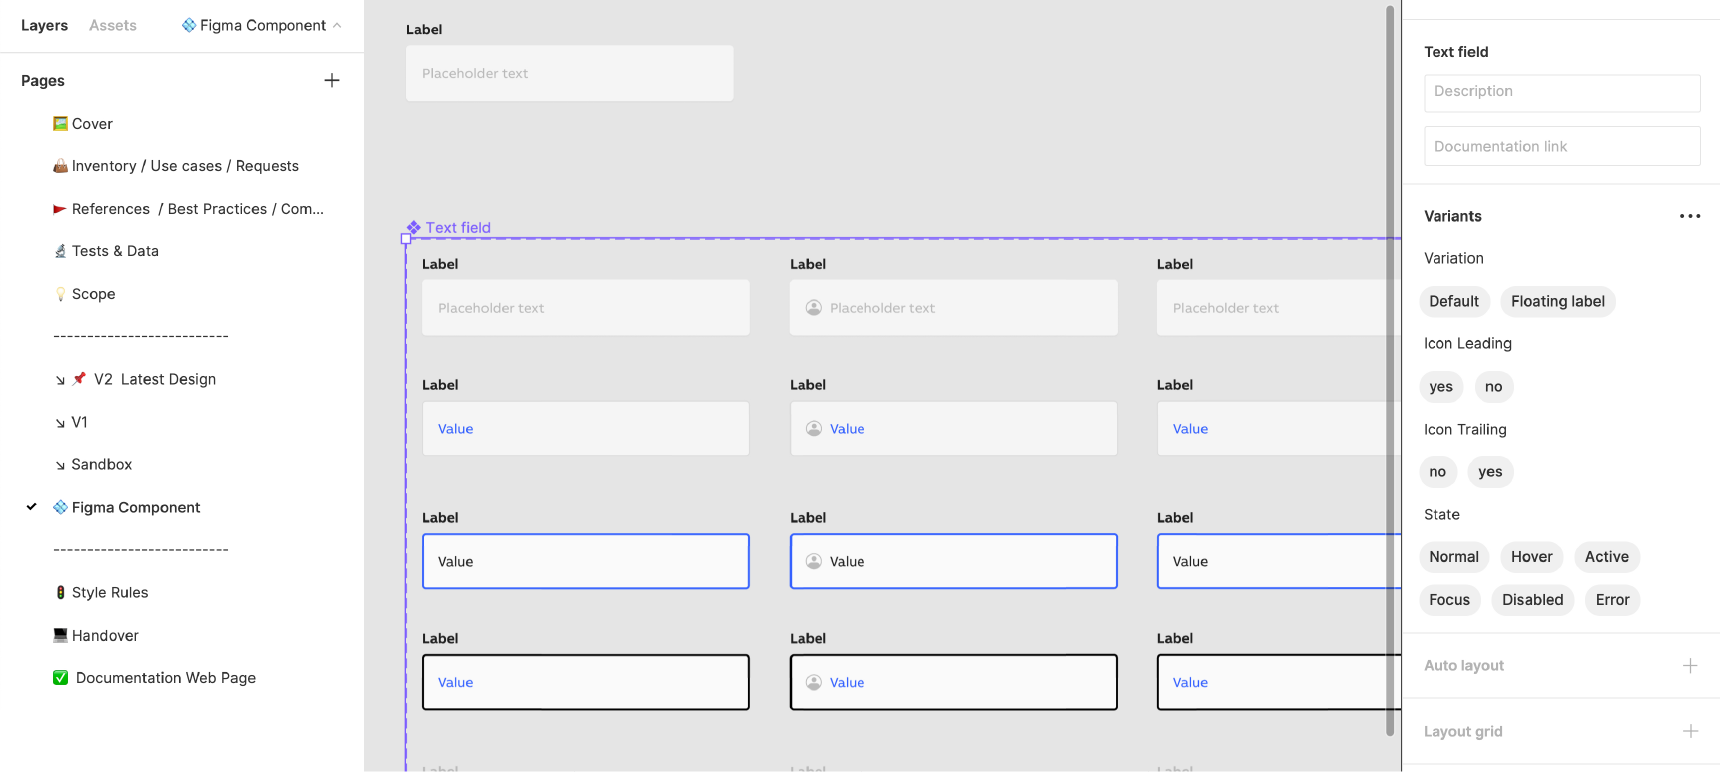
Figma Component
The file also contains a page for the Figma component itself, a UI element that is easily repeatable throughout the design system. The designer can make changes to the component, and that change will populate throughout all the instances of that component across the company, keeping everything consistent. This page will be exported to the Figma design system library, and any individual designer can drag and drop the Figma component into their design. If the design system team needs to make a change to the component, they can make it once and deploy it throughout the company.
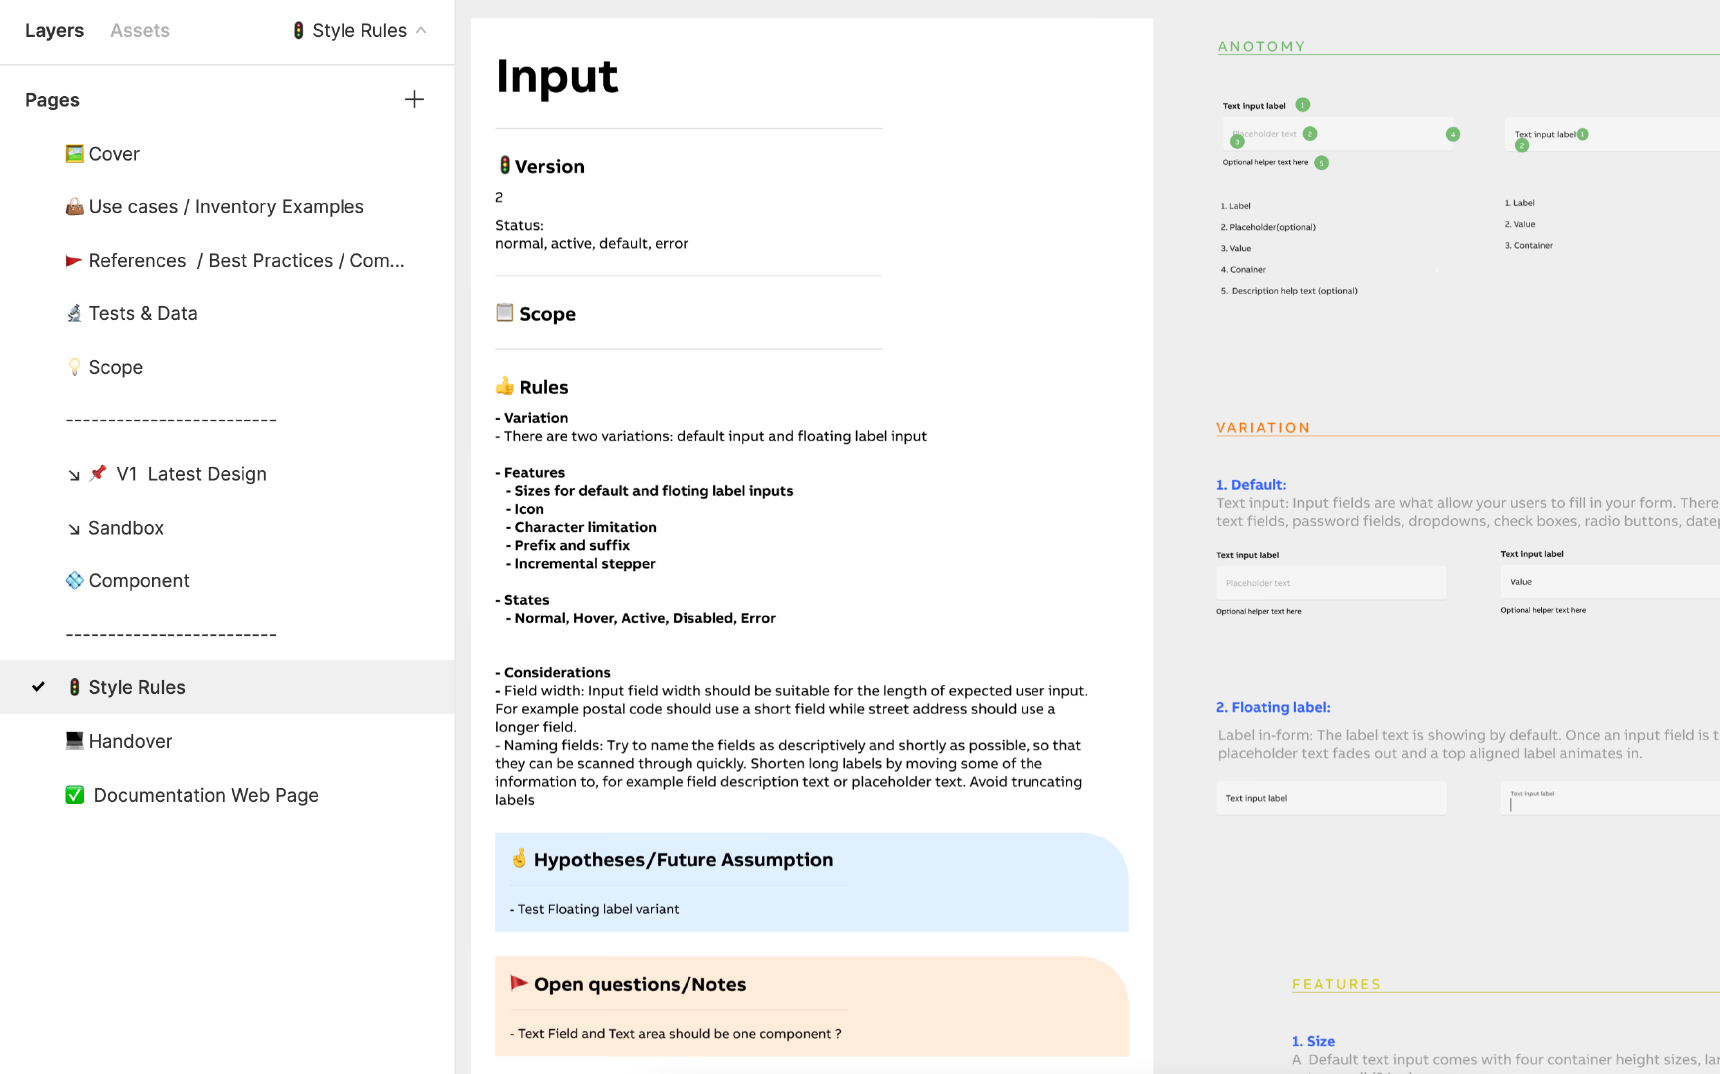
Style Rules
Next, the design system designers and developers create the style rules page, a kind of catch-all for elements that, Sial says, “are not visible in the design.” For example, how will the component render when you scroll down the page? It’s also where the design system team keeps track of unresolved questions or issues. He says he was surprised at how integral this page turned out to be: “At first, we thought this page was not that important, but now we realize we spend most of our time here.”
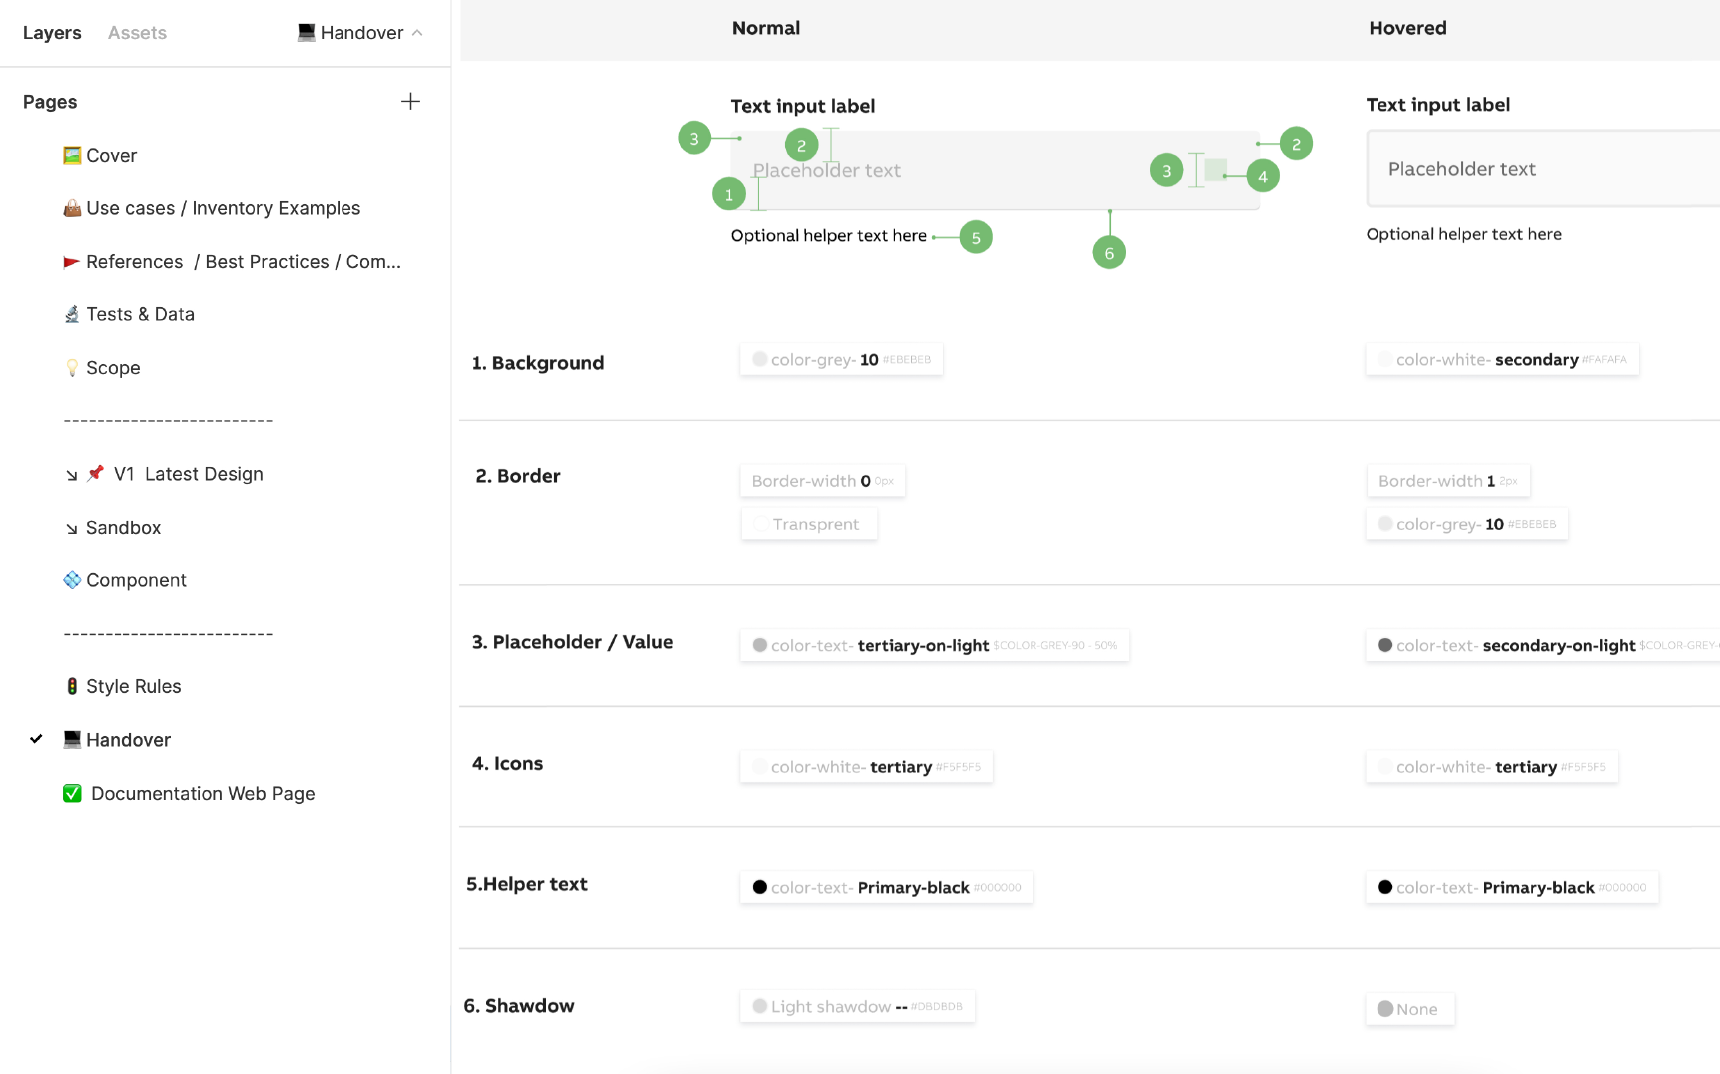
The handover notes are the instructions for developers on writing the code for the component. The handover document begins with the anatomy of the component, then includes its variations.
The ABB system handover documents also include design tokens . Becoming increasingly popular in large-scale design systems such as ABB’s, design tokens are pieces of platform-agnostic style information about UI elements, such as color, typeface, or font size. With design tokens, a designer can change a value—indicate that a call-to-action button should be orange instead of blue, for instance—and that change will populate everywhere the token is used, whether it is on a website, iOS, or Android platform.
Sial also created a Figma token plug-in to expand the scope of tokens designers can create in Figma. “Figma supports colors, typography, shadows, and grid styles,” he says. The plug-in will generate tokens for more variables, such as opacity and border width. It also creates a standardized naming convention, so designers don’t have to keep track of token names manually. “The plug-in bridges the gap between developers and designers. It allows both to work on a single source of truth for design; if one makes a change in one place, that change takes effect everywhere in the design and code,” he says.

Sial stresses that in his system, developers take an active role throughout the creation of a component. “Early on, we would involve our developers when we had something ready to show them,” he says. “Then we realized that’s not working, and now we literally start kickoff sessions with them.”
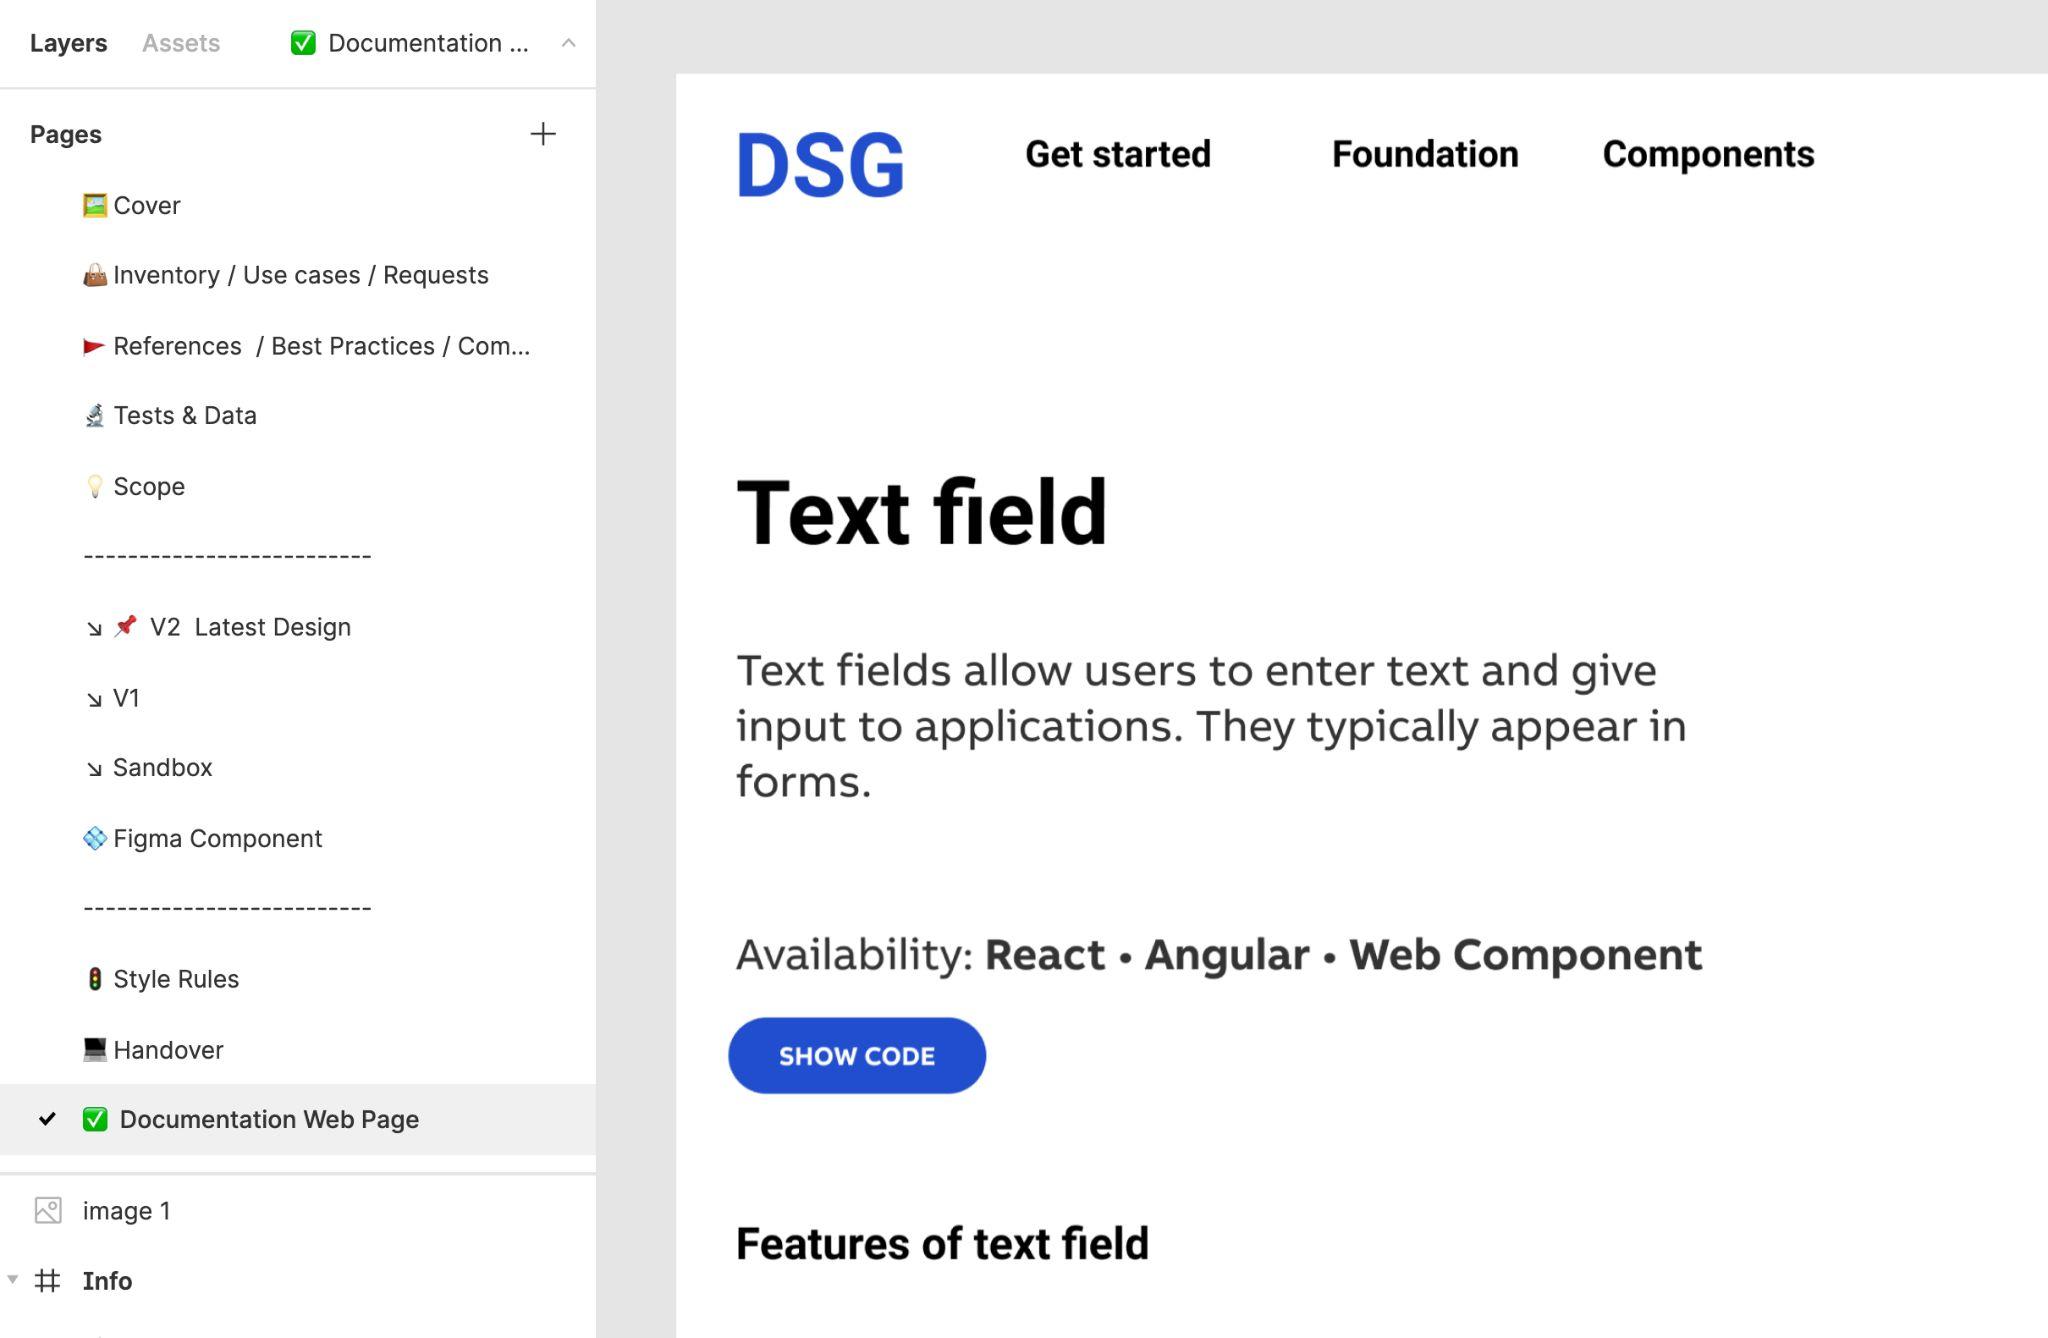
Documentation Webpage
The last page of each file contains a webpage with the final design, showing how the component looks as a finished product. “We create a page that shows how the live example will look so the users, in this case our designers, can see how it will look at the end of the day on a real website,” Sial says.
Collaboration Is Key
The role of a design system designer is multifaceted. As Alejandro Velasco says, “Designing a design system involves so many roles, and if I’m leading that, I’m the glue for the project.”
It’s an enormous undertaking and not necessarily the right move for all companies. Startups, for instance, might do better to begin with an out-of-the-box system such as Google Material Design or the IBM Carbon Design System , rather than dedicating extensive resources to creating one. Still, the time might come when that won’t suffice, says Alexandre Brito: “As soon as you have multiple designers working together, you start to realize that there’s a need for someone to build rules that are more in line with the product or brand you’re building.”
Building a design system takes work and dedication; it also takes collaboration. Sial stresses that involving all stakeholders in the development of ABB’s system throughout the process was a priority. “It was really iterative work with my whole team. It was all about listening to them and we took the time to learn and test it thoroughly and develop this structure,” he says.
Having a structure that includes extensive documentation, including history and best practices, is at the core of the Figma design system. “It’s a success because people can read the documentation all in one place,” Sial says. “They can see everything, starting from the use case to the design and moving on to the handover and the final component page. People can see the whole life cycle of a component.”
You can browse Abdul Sial’s Figma file in its entirety here: Component Template .
Further Reading on the Toptal Blog:
- Saving Product X: A Design Thinking Case Study
- All About Process: Dissecting Case Study Portfolios
- The Benefits of a Design System: Making Better Products, Faster
- Helping AI See Clearly: A Dashboard Design Case Study
- Design Problem Statements: What They Are and How to Frame Them
Understanding the basics
What is a design system.
While a traditional style guide covers the design basics—fonts and colors, for instance—a design system has a much further reach. The design system documentation for Switzerland-based holding company ABB, for example, contains design components, patterns, and code components.
What role does a design system designer play in an organization?
Design system designers play a different role than designers who focus solely on individual products. They tend to have more of a bird’s-eye view of all the products a company is using. They also must interface and communicate with stakeholders throughout a company.
What are some best practices when building a design system?
One approach is to organize it in Figma and give each component and pattern its own file. This design system case study demonstrates one approach: At ABB, each file has several pages with extensive documentation on all the ways the element is used throughout the product and all the iterations it went through. Showing the full life cycle of a component is key to building and scaling a design system.
- DesignProcess
World-class articles, delivered weekly.
Subscription implies consent to our privacy policy
Toptal Designers
- Adobe Creative Suite Experts
- Agile Designers
- AI Designers
- Art Direction Experts
- Augmented Reality Designers
- Axure Experts
- Brand Designers
- Creative Directors
- Dashboard Designers
- Digital Product Designers
- E-commerce Website Designers
- Full-Stack Designers
- Information Architecture Experts
- Interactive Designers
- Mobile App Designers
- Mockup Designers
- Presentation Designers
- Prototype Designers
- SaaS Designers
- Sketch Experts
- Squarespace Designers
- User Flow Designers
- User Research Designers
- Virtual Reality Designers
- Visual Designers
- Wireframing Experts
- View More Freelance Designers
Join the Toptal ® community.
- Buzz Usborne
- Sep 2, 2019
Moving From Sketch To Figma: A Case Study Of Migrating Design Systems
- 10 min read
- Design Systems , Workflow , Tools , Sketch , Figma
- Share on Twitter , LinkedIn
About The Author
Buzz is Principal Designer at Help Scout and formerly Design Lead at Atlassian. He’s headed design teams at Campaign Monitor, Skype and a handful of … More about Buzz ↬
Email Newsletter
Weekly tips on front-end & UX . Trusted by 200,000+ folks.
For the past year, every time I got frustrated with Sketch, a colleague of mine suggested I try Figma . Then, when I wrote an article about building our design system in Sketch , I got a bunch of feedback from people telling me to try Figma. And recently, Linda , our Head of Design at Help Scout, asked me, “Hey Buzz, shouldn’t we be using Figma?”
I couldn’t fight it anymore… I just had to try Figma!
This isn’t a love letter to Figma or a harsh review of Sketch. Instead, it’s a cautionary tale for anyone who is thinking of moving tools. This is the story of how everything panned out, and the specifics of migrating a design system from one platform to another.
Understanding The Cost
The first thing to consider is that there’s a cost involved in switching tools — a consideration not usually factored into the conversation whenever there’s a #designtwitter pile-on. Only one-person teams can afford to change design tools at will; for busy teams, it’s not so easy.
The difficulty for us at Help Scout was the fact that our design system is built as multiple, interdependent Sketch Libraries managed with GitHub. We also have multiple in-flight projects, processes and vast documentation that all depend on Sketch files. And don’t forget the monumental effort involved in training and moving an entire team onto a new tool whilst simultaneously doing actual work!
There’s also a financial cost involved in someone (in this case, that’d be me) taking the time away from business-as-usual work to research and document all this good stuff. Point is, if you work in an established design team, you’ll know that changing tools is about as easy as moving offices.
But that’s how this works. Tools are “sticky” just by virtue of being hard to leave. Suffice to say, this wasn’t going to be a decision we made lightly.
Kicking The Tires
With the understanding that my decision would have an impact on the whole team and organization, I started by spending two full days exploring Figma. I watched videos, I spoke to other designers who use it often and I played with the tool… a lot! Essentially, I explored how easy it would be to move our Sketch components over. A question that came to mind was whether it would be as easy as opening a .sketch file in Figma?
Unsurprisingly, no .
It turns out that Figma and Sketch — while similar in layout and functionality — have some key differences in how they allow components to be overridden. This was the kicker. Figma allows for color, type and effects (shadows, etc.) to be customized by the user, whereas Sketch will only allow pre-determined overrides. Because of the limitations Sketch imposes on overriding components, we’d built our original design system around that — allowing full color, border and style control using a complex system of masks and building-block components.
Over-complicated? Yes. But it worked great for us.
Here’s a simple card symbol in Sketch which was made from five nested symbols that were necessary in order for us to achieve the level of flexibility we required. This is the exact kind of thing that doesn’t import well into Figma.
While this complexity in Sketch allowed us the level of flexibility Figma offers out-the-box, it meant that almost any component imported from Sketch brought an unnecessary level of complexity along with it. In order for us to use Figma, we’d need to rebuild everything from scratch to strip each component down to the essentials.
Decision Time!
Given the above, my initial decision was that although I thought Figma was the better tool, the stronger company, and the safer long-term bet, it was going to be too difficult and costly to switch. Re-building entire libraries is a big job! It was like breaking up before we’d even given it a chance.
“It’s not you, it’s us.”
But as it happens, Figma are Help Scout ’s customers. On hearing our decision to stick with Sketch, our Head of Sales set up a call with the Figma product team — not necessarily to change anyone’s minds, but to share our experiences, more like as friends do. They were understandably cool about the whole thing, but asked whether they could talk to me about my decisions. And that was an opportunity not to be missed!
In the days leading up to my conversation with the Figma team, I decided to jump back into the tool — at the very least to give myself enough understanding to be able to talk with confidence and not look like a total amateur in front of people who knew a lot more in this area than me. By the time I spoke with the team, I was a convert — in just those couple of extra days, I realized how much more productive and collaborative we’d be as a team with these kinds of features at our disposal. The cost of switching hadn’t changed, but my opinion of whether the cost was worth it had. Help Scout’s Head of Design made a compelling point to that effect too: If we feel like we’ll make the switch someday, then why not today ?
So my conversation with Figma ended up being more along the lines of, “Give me some advice on how to make this work,” which they graciously did.
How To Switch
So it’s possible that you might be in the same spot I was; you want to move tools but are faced with the monumental task of rebuilding hundreds of components, styles, and a load of documentation. Well, friend, you’re going to need to take a deliberate and systematic approach to this. Your mileage may vary, but this is how I moved Help Scout’s entire design system to Figma in just a week.
- Split Your Libraries
- Lean Heavily On Styles (+ Documentation)
- Show How Components Extend
- Organize Properly
- Importing vs. Re-Building
- Get Your Team On Board
1. Split Your Libraries
This applies to creating Sketch libraries too, but I strongly suggest splitting design systems into separate sub-libraries that cover different parts of your ecosystem. In our case, we have Core which contains components applicable to any designer (brand assets, illustrations, icons, etc.), then domain-specific documents. This approach makes migration a bit easier to handle when you’re moving things over in organized chunks.
In our case, migrating to Figma involved beginning with the Core elements — which were then used to build out subsequent libraries.
2. Lean Heavily On Styles (+ Documentation)
Figma has “Styles” that work in the same way you’re used to seeing Type Styles working in Sketch, but with the added benefit that these also apply to color and effects. With this in mind, it’s really useful to define all your colors and shared elements in one single library, then document them.
3. Show How Components Extend
Since Figma allows much greater control over how components can be extended, you’ll probably end up with fewer components than you had in Sketch — instead of “ button solid color ” and “ button outlined ,” in Figma you’ll just need “ button ”. Because of this, I found that it was important to document the different ways a component can be extended directly within the library itself.
For example, only one component is required to re-create an entire two-sided chat conversation in Figma. But a new designer would never know what overrides to apply, so it’s important to visually demonstrate whenever it’s possible. Here’s the same component being used in six different ways:
4. Organize Properly
I quickly abandoned trying to replicate the naming structure I had in the original Sketch files because of subtle differences in how Figma’s file system works. Ultimately, the aim is to make sure components are in a logical place and easy to find, and the best way I found to achieve that was to carefully organize my Pages by category (e.g., Forms ), Frames by group classification (e.g., Inputs ) and Components by individual element (e.g., Error ). Being specific about naming makes components super easy to find — especially by people who didn’t originally create them.
5. Importing vs. Re-Building
Phew, I wish I had good news here about the physical act of importing Sketch components (for a lot of things, namely individual elements like icons which you can import from Sketch and it’ll all work out great). However, for more complex components (especially ones that involve masks and nested symbols), you’re better off re-creating the components from scratch . Yes, it’s extremely painful, but on the upside, you’ll get really good at using Figma in a very short time!
My workflow in Figma for re-creating the more complex Sketch components was literally to screenshot then “trace” them in Figma. As ridiculous as this sounds, it turned out to be much faster than importing from Sketch and removing the unnecessary elements. And I’m a little bit ashamed to say that I love this kind of work, but also, turns out that this workflow was more effective.
(But of course, if you’re migrating simpler components like icons, then Figma’s importing capabilities will serve you just fine.)
6. Get Your Team On Board
As a 100% remote team , most things we do at Help Scout are well communicated — this was no different. So while the team was aware of the impending tool switch, it wasn’t until I had finished the design system that they got the nudge.
At this point, I gave a 20-minute demo video explaining Figma, some basics on how to use it, and some of the cool improvements they’ll find to their workflow when using components. This turned out to be a hit and definitely softened the blow for people who were perhaps a little hesitant about the move at first.
7. Go All In
Part of my initial research involved seeing whether we could maintain our design system in Sketch and Figma simultaneously. I’m certain it can be done, but it’s a bit of a stretch for us given our fairly small team size and the fact we have no single person or team dedicated to the upkeep of our libraries. But instead of keeping what we had in place, I decided to go all-in on Figma.
This meant creating and updating all documentation and employee onboarding to reference the new stuff which forced me to address the migration of anything that referenced the old stuff — including existing development processes and designer hand-off. Ultimately, drawing a line in the sand meant that we were all committed to making this a success.
Of course, the Sketch libraries still exist; they’re just no longer documented nor updated. And in terms of migration, in-flight projects continue to use Sketch files (although some designers have chosen to migrate their work to Figma), whereas new projects use Figma. It’s a clean break.
Conclusion: Make A Plan!
It’s hard to conclude an article like this without sounding like I have all the answers — which I most certainly do not. But my advice to anyone switching tools is to take it slow . Put in the research, make a plan of attack, figure out the cost then weigh up whether you’re prepared to pay it — this applies whether you’re moving to Figma, Sketch, InVision Studio, Adobe XD, Framer X or some other trendy new tool I haven’t heard of yet.
For us, time will tell, but I’m still pretty confident we made the right call!
Further Reading
- “ Building Our Sketch Library ,” Michael Fouquet, Hudl
- “ (More) Tips For Building Your Sketch Library ,” Buzz Usborne, Help Scout
- “ What To Expect When Moving From Sketch To Figma ,” Josh Dunsterville, Figma Blog
- Spectrum Figma Community
Smashing Newsletter
Tips on front-end & UX, delivered weekly in your inbox. Just the things you can actually use.
Front-End & UX Workshops, Online
With practical takeaways, live sessions, video recordings and a friendly Q&A.
TypeScript in 50 Lessons
Everything TypeScript, with code walkthroughs and examples. And other printed books.
- Ruby AI for WhatsApp
- WhatsApp Communities
- Event hosting
- Paid membership
- Newsletters
- Content Library
- Chat Integration
- Website building
- For Developers
- For Educators
- For Content Creators
- For Finance
- For Networking
Community Case Study: Figma
Figma is a collaborative, web-based design program created to make advanced design options accessible to everyone who has access to the Internet. As a cloud-based platform, it offers a wide range of tools and features to create beautiful designs, and is favored by teams worldwide especially for collaborative work.
Figma’s emphasis on UX and web-design through collaboration makes it a favorite amongst designers, start-ups, and even larger companies — we use it to design our own web pages right here at Nas.io.
The creative and collaborative features on Figma lend itself to a thriving community. Figma’s online design and team community options encourage collaboration, sharing, and new ways to brainstorm online.
Read on to find out why Figma’s community is one of the coolest places to hang out for professional designers and how you can implement their strategy when building your own brand community.
At a glance
- Figma encourages collaboration and creativity in its community.
- Custom plug-ins and resources are shared freely across users.
- Millions of designers use Figma because of the support of the community.
- Their community forum is active and full of support from artists and designers.
Founded by Ethan Wallace and Thiel Fellow Dylan Field in 2012, Figma has taken off over the past 5 years and is now used by millions of people around the world. It emphasizes teamwork, creativity, and collaboration — a mix which designers and creative businesses have embraced with enthusiasm.
Figma’s community is based on sharing templates and other creatives. They have various categories: Inspiration, Jam Sessions, Design Systems, Virtual Assets, and Developments.
Figma also hosts a community forum for members to ask and answer questions, share inspiration, and discuss design as a whole.
Figma was recently bought out by Adobe for $20 billion in cash and stock.
As creative design is a collaborative process, one of Figma’s strengths is its collaboration tools so teams can work together on the same pages no matter where they are.
The Figma developers have taken this one step further and opened up collaboration across their users, so that anyone with Figma is able to create and share their own designs for others to use.
Figma’s community page offers collaboration and sharing across different categories. These categories use Figma’s base design product for designs like icons, logos, websites, and other designs.
These designs are separated into different categories depending on their function. Categories are further divided into subcategories such as icons, UI templates, or custom plug-ins. Popular designs can be searched for, or discovered on Figma’s trending page.
The community page also offers collaboration for Figma’s brainstorming program, FigJam. FigJam is a virtual whiteboard for teams to brainstorm ideas and discuss options, with a variety of designs and additions such as stickers, colors, and sticky notes to customize their idea flow.
Inspiration
This is where community members can post their work to be viewed by others. These include portfolio templates, UI mock-ups, original designed fonts, widgets, resume templates, and many, many more.
If you can dream it, this community has it. These designs are posted to be free to download by community members, and serve as inspiration for original designs as well as templates you can use personally and professionally.
Jam Sessions
Jam sessions use FigJam, Figma’s software built just for brainstorming with team members. The user interface is intuitive with a ton of options to let your team’s creativity shine during meetings.
FigJam can also be used beyond brainstorming, and is a great option to host workshops or any team event where learning and education is involved.
Design Systems
Figma’s Systems community category is aimed at giving designers a head start with interactive designs such as UI kits and wireframe templates. Community members are free to upload their own systems and system templates for the benefit of others.
Sign up for free today
Virtual Assets
Users design and upload visual assets for other community members. Assets can be anything visual, from icons, illustrations, animations, and so much more.
Development
Users create plugins designed to make navigating Figma easier than ever while streamlining the design process with custom developer tools. This opens up accessibility and the potential of Figma, making it easier to use and giving it more features than would otherwise be available.
It also means that Figma’s community is pushing what is possible on Figma through their community, even beyond feedback.
Community Forum
Figma’s Community Forum is a space for Figma’s users to connect, share, and learn with over 9k active users.

Community members are mostly designers sharing their designs and learnings with each other. Users also help each other use Figma, and provide support and troubleshooting should members run into problems while using the program.
The Community Forum is moderated and secure, giving a safe and educational experience with other designers who use the platform.
Figma’s Community Impact
Figma’s community has allowed it to grow into a brand that was acquired for $20 billion dollars. Its vibrant and active community has created a space where creative teams and those who think outside the box share their ideas and creations with others just like them.
Connecting with like-minded people is at the heart of what makes a good community experience, and Figma’s open sharing policy, along with their rules and guidelines to create a safe space for all, makes this the perfect online space for creative professionals to meet and brainstorm, no matter the field they specialize in.
Figma has been compared to Google Docs for its ease of use and collaboration, a blank canvas where teams can realize their dreams through brainstorming, experimentation, design, and execution.
Lessons For Your Brand
Figma’s open-source policy and emphasis on collaboration means it’s really easy to share and access resources. This encourages community members to participate in the space and to use Figma as a product rather than competitors with more stringent sharing policies.
Hosting a forum so that Figma’s community can offer answer questions creates a supportive environment that further encourages collaboration, but also fosters trust and fellowship among community members.
So, when building your community, think about the product you’re offering and how you can build a community around it. Figma’s focus on designers, their pain points, and consideration of the way creative collaboration works led them to a community-driven approach to fundamental features of Figma as a design product.
Basically, Figma chose one thing and made it really, really good. It’s so good that the people who use creative design programs are choosing it over more established competition like Adobe.
When thinking about your community platform, think of the one thing your product delivers to your users, and the many ways that lead to it. Design is collaborative, so Figma took advantage of that and gave their community the tools to create and share with others.
And they’ve built it so that it’s cloud-based and online, meaning user work is saved to the cloud and it’s easy to access work created by others.
Figma’s community shows just how effective focus and simplicity can be when building a brand, no matter how saturated the industry. It all comes down to how you use that common thread that brings people together.
Want to build your community? Nas.io is the perfect place to start. We have all the tools you need to create an incredible community, just like Figma’s, and all the support your brand needs to start building right now.
You might also like

Join our Newsletter Community
Created by community managers, for community managers.

UX Case study template for Figma
Today’s new freebie was made by Davio White .
A free Figma UX Case Study template which is made of 15 screens, including project overview screen, project timeline, project flowchart, and many more. You can use this template to showcase your experience, your UX design process and your knowledge in the field. it might actually help you get a better job or land new clients. As a bonus, you also get a CV and Invoice template with this.
You may also like

Figma Premium Wireframe UI kit

Administrator - Premium Figma Dashboard UI kit

Atro – Figma Mobile UI kit (Premium)
Check out our new Consent management feature here
- Case Studies
- Book a Demo
How to Create a Figma Template for a Digital Case Study
Digital case studies have become an essential tool for showcasing the effectiveness and success of various projects. These case studies not only provide valuable insights but also serve as a powerful marketing tool for businesses. To create a visually appealing and consistent digital case study, designers often turn to Figma, a popular design tool.
Understanding the Importance of a Figma Template for a Digital Case Study
When it comes to creating a digital case study, using a Figma template can make all the difference. Not only does it offer a range of benefits, but it also ensures that your case study maintains a consistent look and feel throughout. This is crucial for maintaining a professional and polished appearance that will impress your readers.
By utilizing predefined styles, components, and layouts, you can easily create a cohesive visual experience for your audience. Imagine having a case study that seamlessly flows from one section to another, with a consistent design that captivates your readers from start to finish.
The Benefits of Using a Figma Template for Your Digital Case Study
Let's dive deeper into the benefits of using a Figma template for your digital case study. Firstly, it allows for efficient collaboration and teamwork. Gone are the days of working on different sections of the case study individually and then struggling to merge everything together. With Figma's collaboration features, multiple team members can work on different sections simultaneously, saving time and effort.
Imagine the productivity boost when you can easily share your designs with colleagues and gather feedback in real-time. This seamless collaboration ensures that your case study is a collective effort, resulting in a more comprehensive and well-rounded final product.
How a Well-Designed Template Can Enhance the Visual Appeal of Your Case Study
We all know that first impressions matter, and the visual appeal of your digital case study plays a significant role in capturing the attention of your audience. This is where a well-designed Figma template comes into play.
With a clean and professional layout, a Figma template enhances the visual appeal of your case study. It provides a consistent use of typography, color schemes, and spacing that creates a visual hierarchy, guiding readers through the content effortlessly. Imagine your audience being captivated by the seamless flow of your case study, easily navigating from one section to another.
Moreover, a visually appealing template can make your case study memorable and leave a lasting impression on your audience. By utilizing Figma's design tools and features, you can create engaging visuals that effectively communicate your message. Imagine your case study being remembered long after it has been read, with readers eagerly sharing it with others.
Streamlining the Design Process with a Figma Template
Designing a digital case study from scratch can be a time-consuming and tedious process. However, using a Figma template streamlines the design process and allows you to focus on the content itself. Instead of spending hours creating basic elements repeatedly, you can allocate more time to crafting compelling copy and gathering relevant data.
Furthermore, Figma's versatility and flexibility enable you to customize the template to match the unique requirements of your case study. Whether you need to add additional sections or modify existing layouts, Figma provides the tools to easily adapt the template to suit your needs. Imagine having the freedom to tailor your case study to perfection, ensuring that it effectively showcases your work and achievements.
So, the next time you embark on creating a digital case study, consider the benefits of using a Figma template. Not only will it save you time and effort, but it will also enhance the visual appeal of your case study, making it a memorable and impactful piece of work.
Getting Started with Figma for Your Digital Case Study Template
Introduction to figma and its features.
If you are new to Figma, it's essential to familiarize yourself with its features and capabilities. Figma is a cloud-based design tool that allows designers to create, collaborate, and share their work seamlessly. With its intuitive interface and powerful tools, Figma has gained popularity among designers worldwide.
When it comes to designing a digital case study template, Figma provides a plethora of features that can help bring your vision to life. From creating eye-catching layouts to incorporating interactive elements, Figma offers a wide range of tools that cater to your design needs.
One of the standout features of Figma is its cloud-based nature. This means that you can access your projects from anywhere, collaborate with team members in real-time, and share your work with clients or stakeholders effortlessly. With Figma, the days of sending design files back and forth via email are long gone.
Furthermore, Figma's collaborative features allow multiple designers to work on a project simultaneously. This fosters a sense of teamwork and promotes efficient collaboration, making it an ideal tool for design agencies or remote teams.
Setting up Your Figma Account and Workspace
To begin using Figma for your digital case study template, you should first create a Figma account. The registration process is simple and free, allowing you to access Figma's basic features. Once you have created your account, you can set up your workspace by organizing your projects and files efficiently.
When setting up your Figma workspace, it's important to establish a logical structure that suits your design workflow. This involves creating folders to categorize your projects, naming conventions for files, and utilizing Figma's organization features such as project tags and search functionality.
By organizing your workspace effectively, you can save time and improve productivity. Imagine having all your case study templates neatly categorized and easily accessible with just a few clicks. With Figma, this level of organization is achievable.
Exploring the Figma Interface and Tools
Before diving into designing your digital case study template, it's essential to familiarize yourself with Figma's interface and tools. This will enable you to navigate the software effectively, utilize its features to the fullest, and create a visually stunning template.
Upon launching Figma, you'll be greeted with a clean and intuitive interface. The toolbar at the top provides access to various tools and functions, while the left sidebar allows you to switch between different design files and projects. Figma's interface is designed to be user-friendly, making it easy for designers of all skill levels to get started.
As you explore Figma's tools, you'll discover a wide range of options to enhance your case study template. From selecting and manipulating objects to applying gradients, shadows, and other effects, Figma provides a comprehensive set of design tools at your disposal.
Additionally, Figma offers a vast library of pre-built components and design resources. These resources include icons, UI kits, and templates that can save you time and effort in the design process. By leveraging these resources, you can focus on creating unique and engaging case study templates without starting from scratch.
Furthermore, Figma's collaboration features extend to its interface and tools. You can easily invite team members to view or edit your design files, leave comments, and provide feedback directly within Figma. This streamlines the feedback process and ensures that everyone is on the same page when it comes to your digital case study template.
In conclusion, Figma is a powerful design tool that offers a host of features and capabilities for creating stunning digital case study templates. By familiarizing yourself with Figma's interface, exploring its tools, and organizing your workspace efficiently, you can unleash your creativity and bring your design ideas to life.
Designing the Structure and Layout of Your Digital Case Study Template
Defining the sections and content hierarchy for your case study.
When designing the structure and layout of your digital case study template, it's crucial to carefully plan out the sections and prioritize your content. This involves determining the most important information and organizing it in a logical manner. With Figma's components and frames, you can easily create a flexible structure that allows for easy content rearrangement.
Choosing the Right Typography and Color Scheme for Your Template
Typography and color scheme significantly impact the overall visual appeal and readability of your case study. With Figma's extensive library of fonts and color palettes, you can experiment with various combinations to find the perfect match for your brand and content. Consistency in typography and colors throughout your template creates a sense of cohesiveness and professionalism.
Creating Reusable Components and Styles in Figma
Figma's ability to create reusable components and styles is a game-changer when it comes to designing templates. By creating master components, you can easily maintain consistency across different sections and make global changes effortlessly. This saves time and effort, ensuring that your template remains consistent and up to date.
Adding Visual Elements to Your Digital Case Study Template
Incorporating images, illustrations, and icons into your design.
Visual elements such as images, illustrations, and icons play a vital role in enhancing the visual appeal of your digital case study. Figma allows you to import and manipulate these elements seamlessly. Whether you choose to highlight key data points with relevant icons or showcase project images, Figma provides the necessary tools to incorporate these visual elements effectively.
Using Figma's Prototyping Features to Showcase Interactive Elements
Prototyping is an essential part of a digital case study, especially when showcasing interactive elements or user flows. Figma's prototyping features enable you to create interactive prototypes quickly and easily. By linking frames and adding interactive hotspots, you can simulate user interactions and demonstrate the functionality of your design.
Enhancing the User Experience with Animations and Transitions
To take your digital case study to the next level, consider adding animations and transitions using Figma's animation tools. These subtle but effective animations can greatly enhance the user experience by providing a more engaging and dynamic presentation. Use animations strategically to draw attention to important elements and guide users through your case study.
The Importance of Digital Asset Management: Storing Templates in HIVO
In addition to creating a Figma template for your digital case study, it's crucial to consider the importance of digital asset management. Storing your templates in a reliable and secure platform like HIVO helps streamline your design workflow and ensures easy access to your templates when needed.
HIVO is a comprehensive digital asset management platform that allows you to organize, store, and collaborate on your design assets. With its intuitive interface and powerful search functionality, finding and sharing your Figma templates becomes a hassle-free process. Additionally, HIVO provides version control and permissions management, ensuring that your templates remain up to date and accessible to the right people.
In conclusion, creating a Figma template for your digital case study offers numerous advantages. From enhancing the visual appeal to streamlining the design process, Figma empowers designers to create professional and consistent case studies. By following the steps outlined in this article and utilizing Figma's features, you can design an engaging template that effectively communicates your project's success. Don't forget the importance of digital asset management and consider using the HIVO platform to store your valuable templates.
.css-s5s6ko{margin-right:42px;color:#F5F4F3;}@media (max-width: 1120px){.css-s5s6ko{margin-right:12px;}} Join us: Learn how to build a trusted AI strategy to support your company's intelligent transformation, featuring Forrester .css-1ixh9fn{display:inline-block;}@media (max-width: 480px){.css-1ixh9fn{display:block;margin-top:12px;}} .css-1uaoevr-heading-6{font-size:14px;line-height:24px;font-weight:500;-webkit-text-decoration:underline;text-decoration:underline;color:#F5F4F3;}.css-1uaoevr-heading-6:hover{color:#F5F4F3;} .css-ora5nu-heading-6{display:-webkit-box;display:-webkit-flex;display:-ms-flexbox;display:flex;-webkit-align-items:center;-webkit-box-align:center;-ms-flex-align:center;align-items:center;-webkit-box-pack:start;-ms-flex-pack:start;-webkit-justify-content:flex-start;justify-content:flex-start;color:#0D0E10;-webkit-transition:all 0.3s;transition:all 0.3s;position:relative;font-size:16px;line-height:28px;padding:0;font-size:14px;line-height:24px;font-weight:500;-webkit-text-decoration:underline;text-decoration:underline;color:#F5F4F3;}.css-ora5nu-heading-6:hover{border-bottom:0;color:#CD4848;}.css-ora5nu-heading-6:hover path{fill:#CD4848;}.css-ora5nu-heading-6:hover div{border-color:#CD4848;}.css-ora5nu-heading-6:hover div:before{border-left-color:#CD4848;}.css-ora5nu-heading-6:active{border-bottom:0;background-color:#EBE8E8;color:#0D0E10;}.css-ora5nu-heading-6:active path{fill:#0D0E10;}.css-ora5nu-heading-6:active div{border-color:#0D0E10;}.css-ora5nu-heading-6:active div:before{border-left-color:#0D0E10;}.css-ora5nu-heading-6:hover{color:#F5F4F3;} Register now .css-1k6cidy{width:11px;height:11px;margin-left:8px;}.css-1k6cidy path{fill:currentColor;}

Figma’s product team reduced meeting time by 50% with Asana
Reduced meeting time.
Saved time in weekly stand-up meetings by 50%
Accelerated onboarding
Sped up employee onboarding as the company grew to over 100 employees in 2.5 years
Enhanced culture
Built a culture of trust and accountability with cross-functional partners
The company today has over 1 million signups, $82 million in funding, and more than 100 employees, but when Badrul joined, the company looked very different. The team was small and Figma had yet to launch publicly. At the time, they were using JIRA to manage product development, but it was too complex for their workflows and created management overhead as the team and product grew. The teams needed an easy-to-use platform that would scale up and carry them through their public launch and beyond.

My role as a PM involves a lot of alignment, a lot of communication, and a lot of connecting groups of people to make sure they have what they need to make each other successful. We needed a lightweight tool that could scale with us for a while. ”
Finding a lightweight way to manage development backlogs
Badrul wanted to find a flexible and straightforward tool that could manage product and engineering backlogs. But the bigger picture was also crucial. He needed to connect cross-functional teams across the company during large launches when all hands were on deck. This would provide organizational transparency and build accountability through clear plans, responsibilities, and deadlines.
Testing and rolling out Asana
Badrul first tested Asana with just one team, to confirm that it was easier to use than their existing system. He then migrated the entire product and engineering teams’ work from JIRA to Asana, and shared light trainings and documentation with the team to preview the tool. Because of Asana’s flexibility, different teams could use it in the way that best fit their specific needs and workflows.
Asana is our execution engine: do this, build this, test this, update these docs. One of the nicest parts is that one team’s workflow doesn’t have to match another team’s. ”
Building trust through transparency
Visibility is baked into all product and engineering work through Asana. When Figma develops a new feature, they create a product spec document, and the moment the team aligns on it, it’s transferred to an Asana project. To make this faster, they use a project template that includes the typical steps and milestones for the product manager, designer, and engineers involved.

The project board becomes the new source of truth. The tasks and timelines keep everyone aligned and accountable because everyone can see who’s working on what. For broader launches, cross-functional teams also manage tasks and due dates in Asana, and they attach files to capture strategy and other details.
Asana builds trust within and between teams. We know when things are due and who’s going to deliver them, and we hold each other accountable. That trust is critical to a team’s success. ”
As work progresses, Asana becomes a detailed record of action and discussion, which provides a historical artifact for the organization and anyone who needs to understand why a decision was made. This speeds up employee onboarding, helps transition teammates to new roles, and even shortens meetings.
The product and engineering teams have been able to cut down their stand-up meeting time by 50%, saving an hour or two every week, because they no longer need to share status updates about what they’re working on—it’s all in Asana. Instead, the whole meeting is spent solving difficult problems together.
Onboarding new employees is a breeze. People moving between teams is no issue whatsoever. And because communication is centralized, it saves us a ton of overhead. ”
The next frontier: bringing powerful design tools to non-designers
What’s next for Figma? They’ll be moving forward on their vision to make design accessible to more people—who aren’t necessarily professional designers—and help them bring their creativity to life. All the products, features, and resources to make that possible will be managed in Asana. As Figma reaches these new markets, they’ll have a new wave of growth but Asana will be right there scaling up with them.
Read related customer stories

Coupa scales to support customers with Asana

iCHEF supercharge productivity and collaboration with Asana

Spotify teams drive programs forward with Asana

How Zenegy successfully scaled their engineering team by 5X with Asana
Get connected and scale your work
Empower your entire organization to do their best work with Asana.
Featured Topics
Design systems

Engineering
Explore topics.
- Accessibility
- Behind the scenes
- Brainstorming
- Career & education
- Collaboration
- Design thinking
- Diagramming
- Infrastructure
- Localization
- Plugins & tooling
- Product management
- Product updates
- Productivity
- Profiles & interviews
- Prototyping
- Quality & performance
- Social impact
- The Long & Short of It
- Thought leadership
- Tips & inspiration
- Wireframing
How Figma’s databases team lived to tell the scale

Exploring our options
Our unique approach.
- Implementation
- Reflections and the road ahead
Our nine month journey to horizontally shard Figma’s Postgres stack, and the key to unlocking (nearly) infinite scalability.
Vertical partitioning was a relatively easy and very impactful scaling lever that bought us significant runway quickly. It was also a stepping stone on the path to horizontal sharding.
Figma’s database stack has grown almost 100x since 2020. This is a good problem to have because it means our business is expanding, but it also poses some tricky technical challenges. Over the past four years, we’ve made a significant effort to stay ahead of the curve and avoid potential growing pains. In 2020, we were running a single Postgres database hosted on AWS’s largest physical instance, and by the end of 2022, we had built out a distributed architecture with caching, read replicas, and a dozen vertically partitioned databases. We split groups of related tables—like “Figma files” or “Organizations”—into their own vertical partitions, which allowed us to make incremental scaling gains and maintain enough runway to stay ahead of our growth.

Read more about how we reduced potential instability by scaling to multiple databases .
Despite our incremental scaling progress, we always knew that vertical partitioning could only get us so far. Our initial scaling efforts had focused on reducing Postgres CPU utilization. As our fleet grew larger and more heterogeneous, we started to monitor a range of bottlenecks. We used a combination of historical data and load-testing to quantify database scaling limits from CPU and IO to table size and rows written. Identifying these limits was crucial to predicting how much runway we had per shard. We could then prioritize scaling problems before they ballooned into major reliability risks.
The data revealed that some of our tables, containing several terabytes and billions of rows, were becoming too large for a single database. At this size, we began to see reliability impact during Postgres vacuums, which are essential background operations that keep Postgres from running out of transaction IDs and breaking down. Our highest write tables were growing so quickly that we would soon exceed the maximum IO operations per second (IOPS) supported by Amazon’s Relational Database Service (RDS). Vertical partitioning couldn’t save us here because the smallest unit of partitioning is a single table. To keep our databases from toppling, we needed a bigger lever.
Scaffolding for scale
We outlined a number of goals and must-haves to tackle short-term challenges while setting us up for smooth long-term growth. We aimed to:
- Minimize developer impact: We wanted to handle the majority of our complex relational data model supported by our application. Application developers could then focus on building exciting new features in Figma instead of refactoring large parts of our codebase.
- Scale out transparently: As we scale in the future, we don’t want to have to make additional changes at the application layer. This means that after any initial upfront work to make a table compatible, future scale-outs should be transparent to our product teams.
- Skip expensive backfills: We avoided solutions that involve backfilling large tables or every table at Figma. Given the size of our tables and Postgres throughput constraints, these backfills would have taken months.
- Make incremental progress: We identified approaches that could be rolled out incrementally as we de-risked major production changes. This reduced the risk of major outages and allowed the databases team to maintain Figma’s reliability throughout the migration.
- Avoid one-way migrations: We maintained the ability to roll back even after a physical sharding operation is completed. This reduced the risk of being stuck in a bad state when unknown unknowns occur.
- Maintain strong data consistency: We wanted to avoid complex solutions like double-writes that are challenging to implement without taking downtime or compromising on consistency. We also wanted a solution that would allow us to scale out with near-zero downtime.
- Play to our strengths: Since we were operating under tight deadline pressure, whenever possible, we favored approaches that could be rolled out incrementally on our fastest growing tables. We aimed to leverage existing expertise and technology.
There are many popular open source and managed solutions for horizontally sharded databases that are compatible with Postgres or MySQL. During our evaluation, we explored CockroachDB, TiDB, Spanner, and Vitess. However, switching to any of these alternative databases would have required a complex data migration to ensure consistency and reliability across two different database stores. Additionally, over the past few years, we’ve developed a lot of expertise on how to reliably and performantly run RDS Postgres in-house. While migrating, we would have had to rebuild our domain expertise from scratch. Given our very aggressive growth rate, we had only months of runway remaining. De-risking an entirely new storage layer and completing an end-to-end-migration of our most business-critical use cases would have been extremely risky on the necessary timeline. We favored known low-risk solutions over potentially easier options with much higher uncertainty, where we had less control over the outcome.
NoSQL databases are another common scalable-by-default solution that companies adopt as they grow. However, we have a very complex relational data model built on top of our current Postgres architecture and NoSQL APIs don’t offer this kind of versatility. We wanted to keep our engineers focused on shipping great features and building new products instead of rewriting almost our entire backend application; NoSQL wasn’t a viable solution.
Given these tradeoffs, we began to explore building a horizontally sharded solution on top of our existing vertically partitioned RDS Postgres infrastructure. It didn’t make sense for our small team to re-implement a generic horizontally sharded relational database in-house; in doing so, we’d be competing with tools built by the likes of large open source communities or dedicated database vendors. However, because we were tailoring horizontal sharding to Figma’s specific architecture, we could get away with providing a much smaller feature set. For example, we chose not to support atomic cross-shard transactions because we could work around cross-shard transaction failures. We picked a colocation strategy that minimized the changes required at the application layer. This allowed us to support a subset of Postgres that was compatible with the majority of our product logic. We also were able to easily maintain backwards compatibility between sharded and unsharded postgres. If we ran into unknown unknowns , we could easily roll back to unsharded Postgres.
The path to horizontal sharding
Even with these narrower requirements, we knew horizontal sharding would be our largest and most complex database project to date. Luckily, our incremental scaling approach over the past few years bought us the runway to make this investment. In late 2022, we set out to unlock nearly infinite database scalability, and horizontal sharding—the process of breaking up a single table or group of tables and splitting the data across multiple physical database instances—was the key. Once a table is horizontally sharded at the application layer, it can support any number of shards at the physical layer. We can always scale out further by simply running a physical shard split. These operations happen transparently in the background, with minimal downtime and no application level changes required. This capability would allow us to stay ahead of our remaining database scaling bottlenecks, removing one of the last major scaling challenges for Figma. If vertical partitioning let us accelerate to highway speeds, horizontal sharding could remove our speed limits and let us fly.

Horizontal sharding was an order of magnitude more complex than our previous scaling efforts. When a table is split across multiple physical databases, we lose many of the reliability and consistency properties that we take for granted in ACID SQL databases. For example:
- Certain SQL queries become inefficient or impossible to support.
- Application code must be updated to provide enough information to efficiently route queries to the correct shard(s) wherever possible.
- Schema changes must be coordinated across all shards to ensure the databases stay in sync. Foreign keys and globally unique indexes can no longer be enforced by Postgres.
- Transactions now span multiple shards, meaning Postgres can no longer be used to enforce transactionality. It is now possible that writes to some databases will succeed while others fail. Care must be taken to ensure product logic is resilient to these “partial commit failures” (imagine moving a team between two organizations, only to find half their data was missing!).
We knew achieving full horizontal sharding would be a multi-year effort. We needed to de-risk the project as much as possible while delivering incremental value. Our first goal was to shard a relatively simple but very high traffic table in production as soon as possible. This would prove the viability of horizontal sharding while also extending our runway on our most loaded database. We could then continue building additional features as we worked to shard more complex groups of tables. Even the simplest possible feature set was still a significant undertaking. End to end, it took our team roughly nine months to shard our first table.
Our horizontal sharding work built on what many others do, but with some unusual design choices. Here are a few highlights:
- Colos : We horizontally sharded groups of related tables into colocations (which we affectionately call “colos”), which shared the same sharding key and physical sharding layout. This provided a friendly abstraction for developers to interact with horizontally sharded tables.
- Logical sharding: We separated the concept of “logical sharding” at the application layer from “physical sharding” at the Postgres layer. We leveraged views to perform a safer and lower cost logical sharding rollout before we executed a riskier distributed physical failover.
- DBProxy query engine: We built a DBProxy service that intercepts SQL queries generated by our application layer, and dynamically routes queries to various Postgres databases. DBProxy includes a query engine capable of parsing and executing complex horizontally sharded queries. DBProxy also allowed us to implement features like dynamic load-shedding and request hedging.
- Shadow application readiness: We added a “shadow application readiness” framework capable of predicting how live production traffic would behave under different potential sharding keys. This gave product teams a clear picture of what application logic needed to be refactored or removed to prepare the application for horizontal sharding.
- Full logical replication : We avoided having to implement “filtered logical replication” (where only a subset of data is copied to each shard). Instead, we copied over the entire dataset and then only allowed reads/writes to the subset of data belonging to a given shard.
Our sharding implementation
One of the most important decisions in horizontal sharding is which shard key to use. Horizontal sharding adds many data model constraints that revolve around the shard key. For example, most queries need to include the shard key so that the request can be routed to the right shard. Certain database constraints, like foreign keys, only work when the foreign key is the sharding key. The shard key also needs to distribute data evenly across all shards to avoid hotspots that cause reliability issues or impact scalability.
Figma lives in the browser, and many users can collaborate in parallel on the same Figma file. This means that our product is powered by a fairly complex relational data model capturing file metadata, organization metadata, comments, file versions, and more.
We considered using the same sharding key for every table, but there was no single good candidate in our existing data model. To add a unified sharding key, we would have had to create a composite key, add the column to every table’s schema, run expensive backfills to populate it, and then substantially refactor our product logic. Instead, we tailored our approach to Figma’s unique data model and selected a handful of sharding keys like UserID, FileID, or OrgID. Almost every table at Figma could be sharded using one of these keys.
We introduced the concept of colos, which provide a friendly abstraction for product developers: Tables within a colo support cross-table joins and full transactions when restricted to a single sharding key. Most application code already interacted with the database this way, which minimized the work required by application developers to make a table ready for horizontal sharding.

Once we picked our sharding keys, we needed to ensure that there would be an even distribution of data across all backend databases. Unfortunately, many of the sharding keys that we had picked used auto-incrementing or Snowflake timestamp-prefixed IDs. This would have resulted in significant hotspots where a single shard contained the majority of our data. We explored migrating to more randomized IDs, but this required an expensive and time-consuming data migration. Instead, we decided to use the hash of the sharding key for routing. As long as we picked a sufficiently random hash function, we would ensure a uniform distribution of data. One downside of this is that range-scans on shard keys are less efficient, since sequential keys will be hashed to different database shards. However, this query pattern is not common in our codebase, so it was a trade-off we were willing to live with.
The “logical” solution
To de-risk the horizontal sharding rollout, we wanted to isolate the process of preparing a table at the application layer from the physical process of running a shard split. To do this, we separated “logical sharding” from “physical sharding.” We could then decouple the two parts of our migration to implement and de-risk them independently. Logically sharding gave us confidence in our serving stack with a low-risk, percentage-based rollout. Rolling back logical sharding when we found bugs was a simple configuration change. Rolling back a physical shard operation is possible, but it requires more complex coordination to ensure data consistency.
Once a table is logically sharded, all reads and writes will act as if the table is already horizontally sharded. From a reliability, latency, and consistency perspective, we appear to be horizontally sharded, even though the data is still physically located on a single database host. When we are confident that logical sharding is working as expected, we then perform the physical sharding operation. This is the process of copying the data from a single database, sharding it across multiple backends, then re-routing read and write traffic through the new databases.

The query engine that could
To support horizontal sharding, we had to significantly re-architect our backend stack. Initially, our application services talked directly to our connection pooling layer, PGBouncer. However, horizontal sharding required much more sophisticated query parsing, planning, and execution. To support this, we built out a new golang service, DBProxy. DBProxy sits between the application layer and PGBouncer. It includes logic for load-shedding, improved observability, transaction support, database topology management, and a lightweight query engine.

The query engine is the heart of DBProxy. Its main components are:
- A query parser reads SQL sent by the application and transforms it into an Abstract Syntax Tree (AST).
- A logical planner parses the AST and extracts the query type (insert, update, etc) and logical shard IDs from the query plan.
- A physical planner maps the query from logical shard IDs to physical databases. It rewrites queries to execute on the appropriate physical shard.

Think of “scatter-gather” like a database-wide game of hide-and-seek: You send out your query to every shard (scatter), then piece together answers from each (gather). Fun, but overdo it, and your speedy database starts feeling more like a snail, especially with complex queries.
Some queries are relatively easy to implement in a horizontally sharded world. For example, single-shard queries are filtered to a single shard key. Our query engine just needs to extract the shard key and route the query to the appropriate physical database. We can “push down” the complexity of the query execution into Postgres. However, if the query is missing a sharding key, our query engine has to perform a more complex “scatter-gather.” In this case, we need to fan out the query to all shards (the scatter phase) and then aggregate back results (the gather phase). In some cases, like complex aggregations, joins, and nested SQL, this scatter-gather can be very complex to implement . Additionally, having too many scatter-gathers would impact horizontal sharding scalability. Because the queries have to touch every single database, each scatter-gather contributes the same amount of load as it would if the database was unsharded.

If we supported full SQL compatibility, our DBProxy service would have begun to look a lot like the Postgres database query engine. We wanted to simplify our API to minimize DBProxy’s complexity, while also reducing the work required for our application developers, who would have to re-write any unsupported queries. To determine the right subset, we built out a “shadow planning” framework, which allowed users to define potential sharding schemes for their tables and then run shadow the logical planning phase on top of live production traffic. We logged the queries and associated query plans to a Snowflake database, where we could run offline analysis. From this data, we picked a query language that supported the most common 90% of queries, but avoided worst-case complexity in our query engine. For example, all range scan and point queries are allowed, but joins are only allowed when joining two tables in the same colo and the join is on the sharding key.
A view of the future
We then needed to figure out how to encapsulate our logical shards. We explored partitioning the data using separate Postgres databases or Postgres schemas. Unfortunately, this would have required physical data changes when we logically sharded the application, which was just as complex as doing the physical shard split.
Instead, we chose to represent our shards with Postgres views. We could create multiple views per-table, each corresponding to the subset of data in a given shard. This would look like: CREATE VIEW table_shard1 AS SELECT * FROM table WHERE hash(shard_key) >= min_shard_range AND hash(shard_key) < max_shard_range). All reads and writes to the table would be sent through these views.
By creating sharded views on top of our existing unsharded physical databases, we could logically shard before we performed any risky physical reshard operations. Each view is accessed via its own sharded connection pooler service. The connection poolers still point to the unsharded physical instance, which gives the appearance of being sharded. We were able to de-risk the rollout of sharded reads and writes gradually via feature flags in the query engine and roll back at any time within seconds by just rerouting traffic back to the main table. By the time we ran our first reshard, we were confident in the safety of the sharded topology.

Of course, relying on views also introduced added risks. Views add a performance overhead and in some cases could fundamentally change how the Postgres query planner optimizes queries. To validate that approach, we collected a query corpus of sanitized production queries and ran load tests with and without views. We were able to confirm that views would only add a minimal performance overhead in most cases, and less than 10% in the worst cases. We also built out a shadow reads framework which could send all live read traffic through views, comparing the performance and correctness of view versus non-view queries. We were then able to confirm that views were a viable solution with minimal performance impact.
Tackling our topology
To perform query routing, DBProxy has to understand the topology of our tables and physical databases. Because we had separated the concept of logical versus physical sharding, we needed a way to represent these abstractions within our topology. For example, we need to be able to map a table (users) to its shard key (user_id). Similarly, we needed to be able to map a logical shard ID (123) to the appropriate logical and physical databases. With vertical partitioning, we relied on a simple, hard-coded configuration file that mapped tables to their partition. However, as we moved towards horizontal sharding, we required something more sophisticated. Our topology would change dynamically during shard splits and DBProxy needed to quickly update its state to avoid routing requests to the wrong database. Because every change to topology is backwards compatible, these changes are never in the critical path for our site. We built out a database topology that encapsulated our complex horizontal sharding metadata and could deliver real-time updates in under a second.

Having a separate logical and physical topology allowed us to also simplify some of our database management. For example, in our non-production environments, we can keep the same logical topology as production, but serve the data from many fewer physical databases. This saves costs and reduces complexity without having too many changes across environments. The topology library also allowed us to enforce invariants across our topology (e.g. every shard ID should be mapped to exactly one physical database) that were critical to maintaining the correctness of our system as we built out horizontal sharding.
The physical sharding operation
Once a table is ready for sharding, the last step is the physical failover from unsharded to sharded databases. We were able to reuse much of the same logic for horizontal sharding, but there were a few notable differences: Instead of moving data from 1 to 1 database, we were going from 1 to N. We needed to make the failover process resilient to new failure modes where the sharding operation could succeed on only a subset of our databases. Still, many of the riskiest components had already been de-risked during vertical partitioning. We were able to move much faster towards our first physical sharding operation than would have otherwise been possible.
We’ve come a long way
When we started this journey, we knew that horizontal sharding would be a multi-year investment into Figma’s future scalability. We shipped our first horizontally sharded table in September 2023. We successfully failed over with only ten seconds of partial availability on database primaries and no availability impact on replicas. We saw no regressions in latency or availability after sharding. Since then we’ve been tackling relatively simple shards from our highest write rate databases. This year, we’ll shard increasingly complex databases, which have dozens of tables and thousands of code call-sites.
To remove our last scaling limits and truly take flight, we will need to horizontally shard every table at Figma. A fully horizontally sharded world will bring many other benefits: improved reliability, cost savings, and developer velocity. Along the way, we’ll need to solve all of these problems:
- Support for horizontally sharded schema updates
- Globally unique ID generation for horizontally sharded primary keys
- Atomic cross-shard transactions for business critical use-cases
- Distributed globally unique indexes (currently unique indexes are only supported on indexes including the sharding key)
- An ORM model that increases developer velocity and is seamlessly compatible with horizontal sharding
- Fully automated reshard operations that can run shard splits with the click of a button
Once we’ve bought ourselves sufficient runway, we will also reassess our original approach of in-house RDS horizontal sharding. We started this journey 18 months ago with extremely tight timeline pressure. NewSQL stores have continued to evolve and mature. We will finally have bandwidth to reevaluate the tradeoffs of continuing down our current path versus switching to an open source or managed solution.
We’ve made a lot of exciting progress on our horizontal sharding journey, but our challenges are just beginning . Stay tuned for more deep dives into different parts of our horizontal sharding stack. If you’re interested in working on projects like this, please reach out! We’re hiring .
We couldn’t have shipped horizontal sharding without these current and former databases team members: Anna Saplitski, David Harju, Dinesh Garg, Dylan Visher, Erica Kong, Gordon Yoon, Gustavo Mezerhane, Isemi Ekundayo, Josh Bancroft, Junhson Jean-Baptiste, Kevin Lin, Langston Dziko, Maciej Szeszko, Mehant Baid, Ping-Min Lin, Rafael Chacon Vivas, Roman Hernandez, Tim Goh, Tim Liang, and Yiming Li.
We’d also like to thank all of our cross-functional partner teams, especially Amy Winkler, Braden Walker, Esther Wang, Kat Busch, Leslie Tu, Lin Xu, Michael Andrews, Raghav Anand, and Yichao Zhao.
Sammy Steele is the tech lead for Figma’s databases team. She previously worked at Dropbox, where she built out their petabyte-scale metadata storage and search systems.
Subscribe to Figma’s editorial newsletter
By clicking “Submit” you agree to our TOS and Privacy Policy .
Related articles

The growing pains of database architecture
How the Figma infrastructure team reduced potential instability by scaling to multiple databases.

Keeping Figma fast
When a laptop crashed in an empty office, we knew it was time to overhaul our performance testing framework.

Server-side sandboxing: Containers and seccomp
Containers and secure computing mode (seccomp) are sandboxing primitives that offer a lighter weight alternative to virtual machines (VMs). Here we cover the differences between them, and how we use both at Figma to achieve security isolation.
Create and collaborate with Figma
COMMENTS
Explore 1,000+ templates on the Figma community. Explore even more templates, widgets, and plugins—all built by the Figma community. Display your projects and research in an organized and presentable format with free templates to get you started.
Description: Carex is a UX Case Study Template made to help UX Designers create and organize their case study without any struggle. It covers almost all the UX research processes and methods making it easier for designers to build and enhance their projects. The contents in the template are created as easily editable components so that the ...
This design system case study demonstrates one approach: At ABB, each file has several pages with extensive documentation on all the ways the element is used throughout the product and all the iterations it went through. Showing the full life cycle of a component is key to building and scaling a design system.
Building case studies that demonstrates your problem solving skills; Highlighting how you are an exceptional designer; This class is for designers, specifically UX/UI designers, who need to create a portfolio of their work. You'll design your case study project in Figma, an industry standard design tool that's easy and free to use!
In my case, I had access to Figma's component and UI Kits, which saved uptime. The prototype of the solution made in Figma. Step 10: User Testing. Finally, testing the solution with users. For this project, I used Maze as a way to test the idea fast. ... If you like to see more, here is the full case study in my design portfolio: https://www ...
Create a case study for your portfolio; Color, typography, icons and images. ... I am still in the process of going through the video series by Figma and used the first two lessons for the creation of a sticker sheet for my mockup. It is simple but very effective, especially when creating additional screens for the mockup. ...
3. Build out the final case study presentations. Case study slide templates being applied to a Design System presentation. The final case studies certainly varied from the original templates, but ...
Get your copy of the case study presentation template ️ https://anfisign.ck.page/case-study-template-----//TIMESTAMPS0:00 - Intro1:02 - Where can you find...
Aug 8, 2023. I've created a case study portfolio template to provide entry level UX people direction in crafting an effective story to describe the work they've produced. You can access and ...
Figma Case Studies. Browse Figma case studies and success stories to help make the right purchasing decision. 1-15 of 36 results. How Virta Health uses Figma to help patients reverse type 2 diabetes. David Hatch Head of User Experience. Read Case Study. Xfive - Customer Case Study.
Curated by Josh Cusick, the site is a growing repository of freely available Figma kits of design systems — grouped, organized, and searchable. Design Systems For Figma collects design systems from all over the globe, backed by code. Not featured in the collection, but worth looking into as well, is the GOV.UK design system Figma kit. It ...
Switching tools isn't a decision to be taken lightly. Here's a nuts-and-bolts and behind-the-scenes look at how Help Scout migrated design systems from Sketch to Figma — why we made the switch, a step-by-step walkthrough of what it entailed, and what we got out of it — a story that applies to any team considering a large-scale tool ...
Creating a Case Study for Design Portfolio with Figma (2/2)If you are a beginner, developer or designer who wants to improve their design, the best thing is ...
Community Case Study: Figma. 03 Oct 2022. Figma is a collaborative, web-based design program created to make advanced design options accessible to everyone who has access to the Internet. As a cloud-based platform, it offers a wide range of tools and features to create beautiful designs, and is favored by teams worldwide especially for ...
A free Figma UX Case Study template which is made of 15 screens, including project overview screen, project timeline, project flowchart, and many more. You can use this template to showcase your experience, your UX design process and your knowledge in the field. it might actually help you get a better job or land new clients.
The Comprehensive Case Study Template is a thoughtfully designed Figma file created to help you showcase your projects and share your design process with the Figma community. This template is perfect for designers, researchers, and UX professionals who want to present their work in a clear and engaging manner. Key Features:
Review: Analyze and synthesize the results of a usability study • 10 minutes; Review: Refine your high-fidelity portfolio project designs • 10 minutes; Learn more about identifying when a design is complete • 20 minutes; Final designs of the dog walker app in Figma • 10 minutes; Learn more about creating a case study for your portfolio ...
The Benefits of Using a Figma Template for Your Digital Case Study. Let's dive deeper into the benefits of using a Figma template for your digital case study. Firstly, it allows for efficient collaboration and teamwork. Gone are the days of working on different sections of the case study individually and then struggling to merge everything ...
A detailed case study is a designer's greatest opportunity of demonstrating this. Description: This UI/UX Case Study Template will help you to build a stunning & magnetic case study for your portfolio. This case study covers almost all categories of UX research as well as UI design. This Case Study is 100% fully editable so that you can easily ...
Visibility is baked into all product and engineering work through Asana. When Figma develops a new feature, they create a product spec document, and the moment the team aligns on it, it's transferred to an Asana project. To make this faster, they use a project template that includes the typical steps and milestones for the product manager ...
Case studies and portfolio presentations are a pain to make sometimes. Here are some ideas to help you get started! Who's this for? students/professionals who are putting together their case studies! ... This is a Figma Community file. Community is a space for Figma users to share things they create. Get started with a free account → ...
Figma's database stack has grown almost 100x since 2020. This is a good problem to have because it means our business is expanding, but it also poses some tricky technical challenges. Over the past four years, we've made a significant effort to stay ahead of the curve and avoid potential growing pains. In 2020, we were running a single ...