

How to See Your Notes When Presenting in PowerPoint

As a presenter, delivering a seamless and confident presentation is key to making a lasting impression. However, it can be challenging to remember every detail of your presentation, especially if you have a lot of content to cover. Fortunately, with PowerPoint’s Presenter View, you can easily access your notes and confidently deliver your presentation. In this article, we will cover all aspects of using PowerPoint’s Presenter View to enhance your presentation.
Table of Contents
Why You Need to See Your Notes When Presenting in PowerPoint
Presenting without having your notes at hand can be daunting and can affect the quality of your presentation. Whether you are presenting in front of a small group or a large audience, you will need to have access to your notes. This will help you deliver your presentation confidently, as you will have a clear idea of what to say or do next. In addition, having your notes visible can help you stay focused on the topics you want to cover and avoid straying off-topic.
Another reason why it is important to see your notes when presenting in PowerPoint is that it can help you manage your time effectively. By having your notes visible, you can keep track of the time and ensure that you are covering all the important points within the allocated time frame. This can help you avoid rushing through the presentation or running out of time before you have covered all the key points.
Furthermore, having your notes visible can also help you engage with your audience better. When you are confident and well-prepared, you are more likely to make eye contact with your audience and use body language effectively. This can help you build a connection with your audience and keep them engaged throughout the presentation.
How to Access Presenter View in PowerPoint
Before you can access Presenter View, you need to have a PowerPoint presentation open in Slide Show mode. Once your presentation is open, simply click on the ‘Slide Show’ tab and check the box beside ‘Use Presenter View.’ Your screen will then automatically switch to Presenter View, allowing you to see your notes and other helpful controls.
Presenter View is a great tool for giving presentations, as it allows you to see your notes and upcoming slides while your audience only sees the current slide. You can also use Presenter View to zoom in on specific parts of your slide, draw on your slides, and even use a virtual laser pointer to highlight important information. To exit Presenter View, simply press the ‘Esc’ key on your keyboard.
Understanding the Presenter View in PowerPoint
Presenter View is a powerful tool that enables you to manage your presentation effectively. It comprises several elements, including:
- The slide display area, which shows the slide that your audience sees.
- The notes section, which displays any text that you have added as notes or comments.
- The timer, which can help you stay within your allotted time.
- The navigation controls, which let you move forward and backward in your presentation easily.
- The zoom slider, which enables you to zoom in and out of your slides for added detail.
- The laser pointer and highlighter tools, which allow you to emphasize important points on your slides.
Presenter View also allows you to preview upcoming slides, giving you a chance to prepare for the next section of your presentation. This feature can be especially helpful if you need to refer to specific information on a later slide.
In addition, Presenter View provides a way to keep your audience engaged by allowing you to add annotations to your slides. You can draw attention to specific areas of your slide, highlight key points, or even add additional information that may not be included in the slide itself.
Setting Up Presenter View: Step-by-Step Guide
If you want to customize your Presenter View experience, follow these steps:
- On the ‘Slide Show’ tab, click ‘Set Up Slide Show.’
- Under ‘Multiple Monitors,’ select the ‘Use Presenter View’ checkbox.
- If you’re using a single monitor, select the ‘Display slide show on’ option and choose your primary monitor.
- If you’re using dual monitors, select the ‘Display slide show on’ option and choose the monitor that you want to display Presenter View on.
- Customize the Presenter View by selecting the options that you want to use, such as speaker notes, the timer, and the navigation controls.
- Click ‘OK.’ Your Presenter View should now be set up.
It’s important to note that not all versions of PowerPoint have the Presenter View feature. If you don’t see the ‘Use Presenter View’ checkbox under ‘Multiple Monitors,’ it’s likely that your version of PowerPoint doesn’t support this feature. In this case, you may need to upgrade to a newer version or use a different presentation software that offers Presenter View.
How to Customize Presenter View Settings in PowerPoint
If you have specific preferences for Presenter View, you can customize it by following these steps:
- Click the ‘Settings’ button in the Presenter View toolbar.
- Select the options that you want to use, such as the color scheme, font size, and slide size.
- Click ‘Save Changes’ to apply your changes.
Customizing your Presenter View settings can greatly enhance your presentation experience. For example, you can choose to display your notes on one screen while your audience sees only the slides on the other screen. Additionally, you can select the option to display a timer or a clock to help you keep track of time during your presentation. Experiment with different settings to find what works best for you and your audience.
Using Presenter View on Dual Monitor Setup
If you have a dual-monitor setup, you can use Presenter View to present your slides on one screen while managing your notes and tools on the other screen. To do this, simply select the ‘Use Presenter View’ checkbox under ‘Multiple Monitors’ in the ‘Set Up Slide Show’ dialog box. Once you start presenting, the Presenter View screen will appear on the secondary monitor, while the slides will appear on the primary screen.
Presenter View is a great tool for presenters who want to keep their notes and tools hidden from the audience. With Presenter View, you can see your notes, upcoming slides, and a timer, while your audience only sees the current slide. This feature is especially useful for longer presentations, where you may need to refer to your notes or keep track of time.
Another benefit of using Presenter View is that it allows you to easily navigate through your presentation. You can use the arrow keys on your keyboard to move forward or backward through your slides, or you can use the thumbnails on the Presenter View screen to jump to a specific slide. This makes it easy to adjust your presentation on the fly, without having to interrupt the flow of your presentation.
Troubleshooting Common Issues with Presenter View in PowerPoint
If you experience common issues with Presenter View, such as notes not displaying correctly, audio not working, or distorted visuals, try these troubleshooting tips:
- Make sure that your computer meets the minimum system requirements for using Presenter View.
- Check that the correct audio output is selected in the control panel.
- Review your slides and notes to ensure that there are no formatting errors.
- Try closing other open applications to free up system resources.
- Ensure that your computer is updated with all available updates.
- Try reinstalling or repairing PowerPoint to eliminate any software conflicts.
However, if these troubleshooting tips do not resolve your issues, there may be other factors at play. One possible cause of issues with Presenter View is outdated or incompatible drivers for your computer’s graphics card. Check with your computer manufacturer or graphics card manufacturer to see if there are any updates available.
Another potential issue could be related to your computer’s display settings. Make sure that your display settings are optimized for the resolution and aspect ratio of your presentation. You may also want to try adjusting the scaling settings to see if that improves the display of your slides and notes.
Tips and Tricks for Effective Note-taking During Presentation
To get the most out of Presenter View, try these effective note-taking tips:
- Organize your notes by slide or topic to stay on track during the presentation.
- Use bullet points and keywords to keep your notes concise and easy to read.
- Include cues or action words to remind you of any demonstrations, animations, or other interactive elements in your presentation.
- Use the highlighter tool to draw attention to the most critical points.
Enhancing Your Presentation with Presenter View
Presenter View can enhance your presentation in several ways, such as by allowing you to add visual aids and multimedia elements, manage your time effectively, and engage your audience. By using Presenter View, you can keep your presentation on track, highlight key information, and maintain your audience’s attention throughout.
The Importance of Rehearsing Your Presentation with Presenter View
Practicing your presentation with Presenter View can help you become familiar with the interface, identify any errors or issues, and ensure that your presentation will run seamlessly. Use Presenter View during your presentation rehearsal to simulate the actual presentation environment and get a feel for how it works.
Taking Advantage of the Laser Pointer and Highlighter Tools in Presenter View
The laser pointer and highlighter tools are handy for emphasizing key points on your slides and improving audience engagement. To use them, simply press and hold the ‘Ctrl’ key and click the mouse to activate the laser pointer or highlighter. Release the key to deactivate them.
How to Switch Between Slides and Notes during a Presentation
If you need to switch between slides and notes during your presentation, simply click the ‘Notes’ button in the Presenter View toolbar. This will display your notes and allow you to scroll through them as needed.
Utilizing the Timer and Countdown Features of Presenter View
The timer and countdown features are useful for keeping your presentation on track and ensuring that you do not exceed your allotted time. To use them, simply enable the ‘Timer’ feature in the ‘Settings’ section of Presenter View. You can then set the countdown time and choose whether to display it during the presentation or keep it hidden.
Sharing Your Screen Using Presenter View in Microsoft Teams or Zoom Meetings
If you are using Microsoft Teams or Zoom Meetings to deliver your presentation remotely, you can still use Presenter View by sharing your screen. To do this, simply select the ‘Share Screen’ option and choose the ‘Presenter View’ screen. This will allow you to present your slides while keeping your notes and controls visible to you for an uninterrupted presentation experience.
By following the steps and tips outlined in this article, you can use PowerPoint’s Presenter View to deliver a polished and professional presentation that wows your audience. Always remember to rehearse your presentation before the actual day so that you’re comfortable with the tools and settings for Presenter View, and ready to tackle any issue that might arise.
By humans, for humans - Best rated articles:
Excel report templates: build better reports faster, top 9 power bi dashboard examples, excel waterfall charts: how to create one that doesn't suck, beyond ai - discover our handpicked bi resources.
Explore Zebra BI's expert-selected resources combining technology and insight for practical, in-depth BI strategies.

We’ve been experimenting with AI-generated content, and sometimes it gets carried away. Give us a feedback and help us learn and improve! 🤍
Note: This is an experimental AI-generated article. Your help is welcome. Share your feedback with us and help us improve.

17 PowerPoint Presentation Tips to Make More Creative Slideshows [+ Templates]
Published: August 16, 2023
Creating a great PowerPoint presentation is a skill that any professional can benefit from. The problem? It’s really easy to get it wrong. From poor color choices to confusing slides, a bad PowerPoint slideshow can distract from the fantastic content you’re sharing with stakeholders on your team.

That’s why it’s so important to learn how to create a PowerPoint presentation from the ground up, starting with your slides. Even if you’re familiar with PowerPoint, a refresher will help you make a more attractive, professional slideshow. Let’s get started.
How to Make a PowerPoint Presentation
- Presentation Tips
PowerPoint Design
I like to think of Microsoft PowerPoint as a test of basic professional skills. To create a passing presentation, I need to demonstrate design skills, technical literacy, and a sense of personal style.
If the presentation has a problem (like an unintended font, a broken link, or unreadable text), then I’ve probably failed the test. Even if my spoken presentation is well rehearsed, a bad visual experience can ruin it for the audience.
Expertise means nothing without a good PowerPoint presentation to back it up. For starters, grab your collection of free PowerPoint templates below.

10 Free PowerPoint Templates
Download ten free PowerPoint templates for a better presentation.
- Creative templates.
- Data-driven templates.
- Professional templates.
You're all set!
Click this link to access this resource at any time.
Tell us a little about yourself below to gain access today.
No matter your topic, successful PowerPoints depend on three main factors: your command of PowerPoint's design tools, your attention to presentation processes, and your devotion to consistent style. Here are some simple tips to help you start mastering each of those factors, and don't forget to check out the additional resources at the bottom of this post.
A presentation is made up of multiple slides, let's delve deeper into PowerPoint's capabilities.
Getting Started
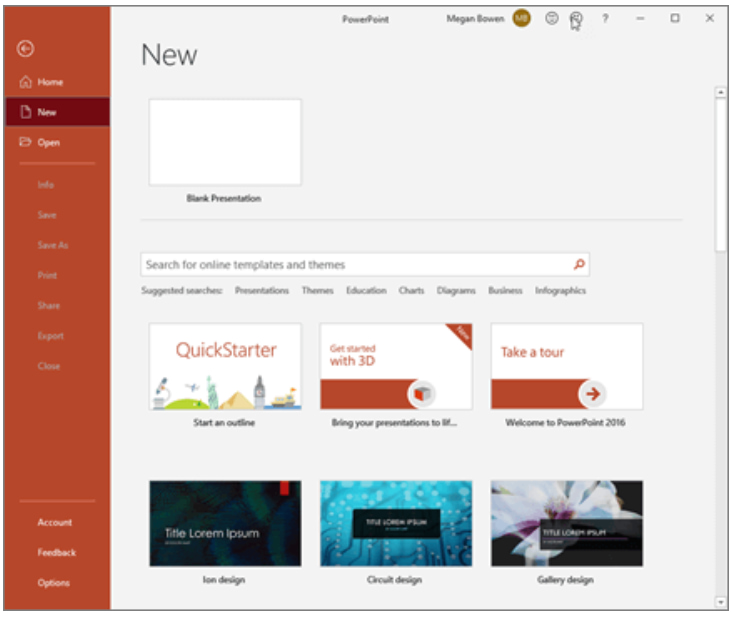
1. open powerpoint and click ‘new.’.
If a page with templates doesn‘t automatically open, go to the top left pane of your screen and click New. If you’ve already created a presentation, select Open then double-click the icon to open the existing file.

That said, you can still use fun and eccentric fonts — in moderation. Offsetting a fun font or large letters with something more professional can create an engaging presentation.
Above all, be sure you're consistent so your presentation looks the same throughout each slide. That way, your audience doesn't become distracted by too many disparate fonts. Check out this example from HubSpot’s company profile templates:
Interested in this presentation template? Download it for free here.
5. Make sure all of your objects are properly aligned.
Having properly aligned objects on your slide is the key to making it look polished and professional. You can manually try to line up your images ... but we all know how that typically works out. You're trying to make sure all of your objects hang out in the middle of your slide, but when you drag them there, it still doesn't look quite right. Get rid of your guessing game and let PowerPoint work its magic with this trick.
Here’s how to align multiple objects:
- Select all objects by holding down Shift and clicking on all of them.
- Select Arrange in the top options bar, then choose Align or Distribute .
- Choose the type of alignment you'd like.
Here’s how to align objects to the slide:
- Select Align to Slide .
- Select Arrange in the top options bar again, then choose Align or Distribute .
6. Use "Format Object" to better control your objects' designs.
Format menus allow you to do fine adjustments that otherwise seem impossible. To do this, right-click on an object and select the Format Object option. Here, you can fine-tune shadows, adjust shape measurements, create reflections, and much more. The menu that will pop up looks like this:
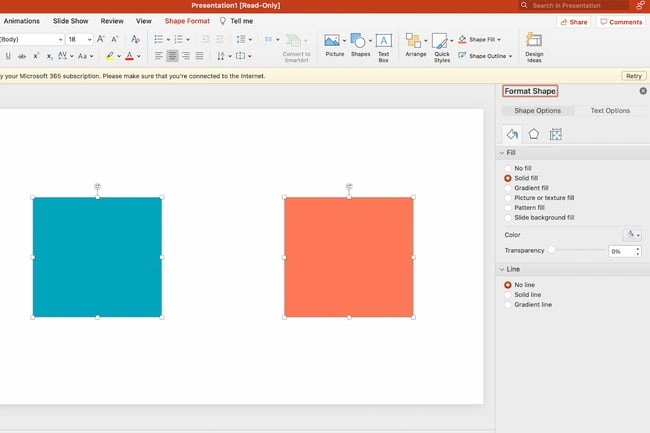
Although the main options can be found on PowerPoint’s format toolbars, look for complete control in the format window menu. Other examples of options available include:
- Adjusting text inside a shape.
- Creating a natural perspective shadow behind an object.
- Recoloring photos manually and with automatic options.
7. Take advantage of PowerPoint's shapes.
Many users don’t realize how flexible PowerPoint’s shape tools have become. In combination with the expanded format options released by Microsoft, the potential for good design with shapes is readily available. PowerPoint provides the user with a bunch of great shape options beyond the traditional rectangle, oval, and rounded rectangle patterns.
Today’s shapes include a highly functional Smart Shapes function, which enables you to create diagrams and flow charts in no time. These tools are especially valuable when you consider that PowerPoint is a visual medium. Paragraphing and bullet lists are boring — you can use shapes to help express your message more clearly.
8. Create custom shapes.
When you create a shape, right click and press Edit Points . By editing points, you can create custom shapes that fit your specific need. For instance, you can reshape arrows to fit the dimensions you like.
Another option is to combine two shapes together. To do so, select the two shapes you’d like to work with, then click Shape Format in the top ribbon. Tap Merge Shapes .
You’ll see a variety of options.
- Combine creates a custom shape that has overlapping portions of the two previous shapes cut out.
- Union makes one completely merged shape.
- Intersect builds a shape of only the overlapping sections of the two previous shapes.
- Subtract cuts out the overlapping portion of one shape from the other.
- Fragment will split your shape into different parts depending on where they overlap.
By using these tools rather than trying to edit points precisely, you can create accurately measured custom shapes.
9. Crop images into custom shapes.
Besides creating custom shapes in your presentation, you can also use PowerPoint to crop existing images into new shapes. Here's how you do that:
- Click on the image and select Picture Format in the options bar.
- Choose Crop , then Crop to Shape , and then choose your desired shape. Ta-da! Custom-shaped photos.
10. Present websites within PowerPoint.
Tradition says that if you want to show a website in a PowerPoint, you should just create a link to the page and prompt a browser to open. For PC users, there’s a better option.
Third party software that integrates fully into PowerPoint’s developer tab can be used to embed a website directly into your PowerPoint using a normal HTML iframe. One of the best tools is LiveWeb , a third-party software that you can install on your PowerPoint program.
By using LiveWeb, you don’t have to interrupt your PowerPoint, and your presentation will remain fluid and natural. Whether you embed a whole webpage or just a YouTube video, this can be a high-quality third party improvement. To install the add-on, simple head to the LiveWeb website and follow the instructions.
Unfortunately, Mac users don’t have a similar option. A good second choice is to take screenshots of the website, link in through a browser, or embed media (such as a YouTube video) by downloading it directly to your computer.
11. Try Using GIFs.
GIFs are looped animated images used to communicate a mood, idea, information, and much more. Users add GIFs to PowerPoints to be funny or quickly demo a process. It's easy to add GIFs to your slides. To do so, simply follow these steps:
- Download and save the GIF you want.
- Go to the slide you want the GIF on.
- Go to the Home tab, and click either Insert or Picture .
- From the Picture drop-down menu, choose Picture from File .
- Navigate to where you saved your GIF and select it. Then, choose Insert .
- It will play automatically the moment you insert it.
PowerPoint Process
12. keep it simple..
PowerPoint is an excellent tool to support your presentation with visual information, graphics, and supplemental points. This means that your PowerPoint should not be your entire presentation. Your slides — no matter how creative and beautiful — shouldn't be the star of the show. Keep your text and images clear and concise, using them only to supplement your message and authority.
If your slides have dense and cluttered information, it will both distract your audience and make it much more likely that you will lose their attention. Nothing in your slides should be superfluous! Keep your presentation persuasive by keeping it clean. There are a few ways to do this:
- Limit bullet points and text.
- Avoid paragraphs and long quotes.
- Maintain "white space" or "negative space".
- Keep percentages, graphs, and data super basic.
13. Embed your font files.
One constant problem presenters have with PowerPoint is that fonts seem to change when presenters move from one computer to another. In reality, the fonts are not changing — the presentation computer just doesn’t have the same font files installed . If you’re using a PC and presenting on a PC, then there is a smooth workaround for this issue.
Here’s the trick: When you save your PowerPoint file (only on a PC), you should click File , then Options, then open up the Save tab. Then, select the Embed fonts in the file check box under Preserve fidelity when sharing this presentation . Now, your presentation will keep the font file and your fonts will not change when you move computers.
The macOS PowerPoint version has a similar function. To embed your fonts on a Mac, do the following:
- Open up your presentation.
- On the top bar, click PowerPoint , then click Preferences .
- Under Output and Sharing , click Save .
- Under Font Embedding , click Embed fonts in the file.
14. Save your slides as a PDF file for backup purposes.
If you’re still scared of your presentation showing up differently when it’s time to present, you should create a PDF version just in case. This is a good option if you’ll be presenting on a different computer. If you also run into an issue where the presenting computer doesn’t have PowerPoint installed, you can also use the system viewer to open up the PDF. No laptop will ever give you trouble with this file type.
The only caveat is that your GIFs, animations, and transitions won’t transfer over. But since the PDF will only work as a backup, not as your primary copy, this should be okay.
To save your presentation as a PDF file, take the following steps:
- Go to File , then click Save as …
- In the pop-up window, click File Format.
- A drop-down menu will appear. Select PDF .
- Click Export .
You can also go to File , then Export , then select PDF from the file format menu.
15. Embed multimedia.
PowerPoint allows you to either link to video/audio files externally or to embed the media directly in your presentation. You should embed these files if you can, but if you use a Mac, you cannot actually embed the video (see note below). For PCs, two great reasons for embedding are:
- Embedding allows you to play media directly in your presentation. It will look much more professional than switching between windows.
- Embedding also means that the file stays within the PowerPoint presentation, so it should play normally without extra work (except on a Mac).
Note: macOS users of PowerPoint should be extra careful about using multimedia files.
If you use PowerPoint for Mac, then you will always need to bring the video and/or audio file with you in the same folder as the PowerPoint presentation. It’s best to only insert video or audio files once the presentation and the containing folder have been saved on a portable drive in their permanent folder. Also, if the presentation will be played on a Windows computer, then Mac users need to make sure their multimedia files are in WMV format. This tip gets a bit complicated, so if you want to use PowerPoint effectively, consider using the same operating system for designing and presenting, no matter what.
16. Bring your own hardware.
Between operating systems, PowerPoint is still a bit jumpy. Even between differing PPT versions, things can change. One way to fix these problems is to make sure that you have the right hardware — so just bring along your own laptop when you're presenting.
If you’re super concerned about the different systems you might have to use, then upload your PowerPoint presentation into Google Slides as a backup option. Google Slides is a cloud-based presentation software that will show up the same way on all operating systems. The only thing you need is an internet connection and a browser.
To import your PowerPoint presentation into Google Slides, take the following steps:
- Navigate to slides.google.com . Make sure you’re signed in to a Google account, preferably your own.
- Under Start a new presentation , click the empty box with a plus sign. This will open up a blank presentation.
- Go to File , then Import slides .
- A dialog box will come up. Tap Upload , then click Select a file from your device .
- Select your presentation and click Open .
- Select the slides you’d like to import. If you want to import all of them, click All in the upper right-hand corner of the dialog box.
- Click Import slides.
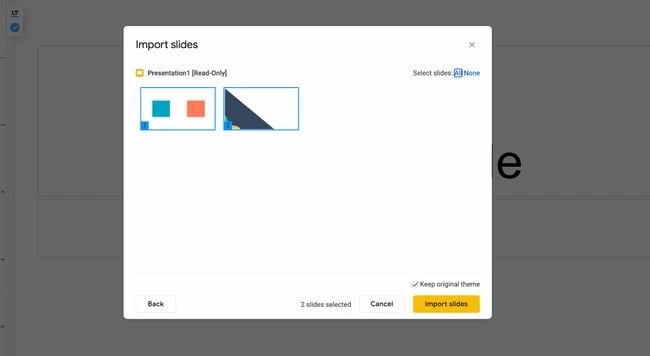
When I tested this out, Google Slides imported everything perfectly, including a shape whose points I had manipulated. This is a good backup option to have if you’ll be presenting across different operating systems.
17. Use Presenter View.
In most presentation situations, there will be both a presenter’s screen and the main projected display for your presentation. PowerPoint has a great tool called Presenter View, which can be found in the Slide Show tab of PowerPoint. Included in the Presenter View is an area for notes, a timer/clock, and a presentation display.
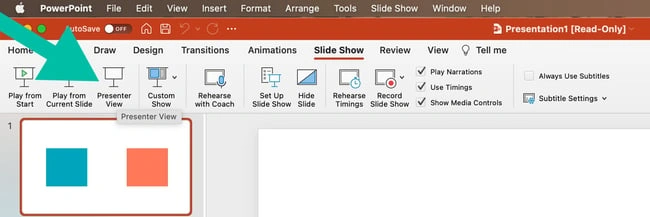
For many presenters, this tool can help unify their spoken presentation and their visual aid. You never want to make the PowerPoint seem like a stack of notes that you’re reading off of. Use the Presenter View option to help create a more natural presentation.
Pro Tip: At the start of the presentation, you should also hit CTRL + H to make the cursor disappear. Hitting the "A" key will bring it back if you need it!
Your Next Great PowerPoint Presentation Starts Here
With style, design, and presentation processes under your belt, you can do a lot more with PowerPoint than just presentations for your clients. PowerPoint and similar slide applications are flexible tools that should not be forgotten. With a great template, you can be on your way to creating presentations that wow your audience.
Editor's note: This post was originally published in September 2013 and has been updated for comprehensiveness.
![display a powerpoint presentation Blog - Beautiful PowerPoint Presentation Template [List-Based]](https://no-cache.hubspot.com/cta/default/53/013286c0-2cc2-45f8-a6db-c71dad0835b8.png)
Don't forget to share this post!
Related articles.
![display a powerpoint presentation How to Write an Ecommerce Business Plan [Examples & Template]](https://blog.hubspot.com/hubfs/ecommerce%20business%20plan.png)
How to Write an Ecommerce Business Plan [Examples & Template]
![display a powerpoint presentation How to Create an Infographic in Under an Hour — the 2024 Guide [+ Free Templates]](https://blog.hubspot.com/hubfs/Make-infographic-hero%20%28598%20%C3%97%20398%20px%29.jpg)
How to Create an Infographic in Under an Hour — the 2024 Guide [+ Free Templates]
![display a powerpoint presentation 20 Great Examples of PowerPoint Presentation Design [+ Templates]](https://blog.hubspot.com/hubfs/powerpoint-presentation-examples.webp)
20 Great Examples of PowerPoint Presentation Design [+ Templates]

Get Buyers to Do What You Want: The Power of Temptation Bundling in Sales

How to Create an Engaging 5-Minute Presentation
![display a powerpoint presentation How to Start a Presentation [+ Examples]](https://blog.hubspot.com/hubfs/how-to-start-presenting.webp)
How to Start a Presentation [+ Examples]

120 Presentation Topic Ideas Help You Hook Your Audience
![display a powerpoint presentation How to Create the Best PowerPoint Presentations [Examples & Templates]](https://blog.hubspot.com/hubfs/Powerpoint%20presentation.jpg)
How to Create the Best PowerPoint Presentations [Examples & Templates]

The Presenter's Guide to Nailing Your Next PowerPoint
![display a powerpoint presentation How to Create a Stunning Presentation Cover Page [+ Examples]](https://blog.hubspot.com/hubfs/presentation-cover-page_3.webp)
How to Create a Stunning Presentation Cover Page [+ Examples]
Marketing software that helps you drive revenue, save time and resources, and measure and optimize your investments — all on one easy-to-use platform
Home Blog PowerPoint Tutorials How to Play a PowerPoint Slideshow on TV
How to Play a PowerPoint Slideshow on TV
PowerPoint presentations are often presented via projectors, where an individual can copy files to a computer which is connected to the projector in the hall. However, sometimes the projector is replaced with a large monitor or TV. There are many ways by which you can connect your computer or mobile device to a TV for presenting your slides. Here are a few simple methods which can be used to answer the age old question that many PowerPoint newbies ask; i.e. how to play a PowerPoint Slideshow on TV.
1. Connect Your Laptop or Mobile Device Using an HDMI Cable
This is the easiest way by which you can play a PowerPoint presentation on TV. In the old days the legacy VGA cable was used for this purpose, which is still usable with even the most modern TVs. However, an HDMI cable gives better quality playback and is easier to use.
In this demo we will show you how to connect a laptop with an LED TV using an HDMI cable. However, there are different mobile devices (e.g. Android and iPad tablets) which also support HDMI to TV connectivity.
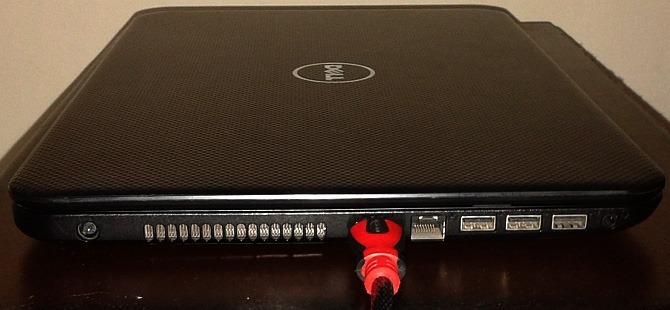
Step 1: Plug in your HDMI cable into your laptop’s HDMI Port (as shown below).
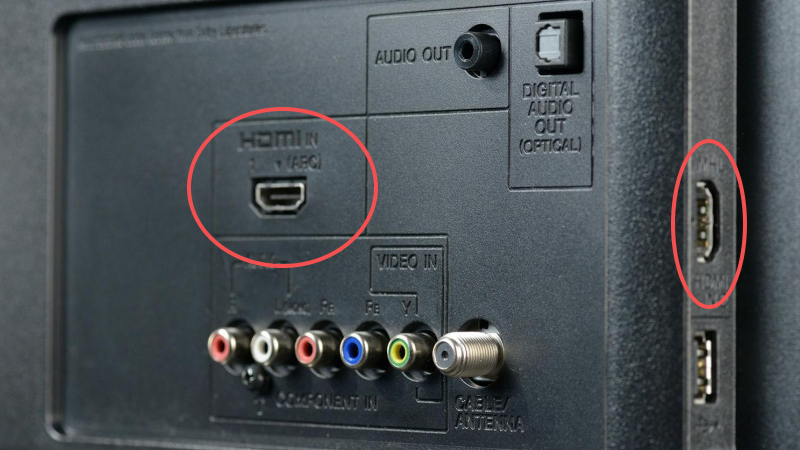
Step 2: Connect the other end of the cable to your TV’s HDMI port. Usually, there are two HDMI ports, one located on the side and the other behind the TV.
Step 3: Switch to ‘HDMI’ from your TV’s Remote. Usually, this option is available from the remote’s Menu button. You might have options like ‘HDMI 1’ and ‘HDMI 2’ appearing on-screen. This is because one of the menu options connects to your first port and the other to the second. The image below shows connectivity with my TV’s second HDMI port. The port numbers might be labeled differently depending upon your TV’s model.
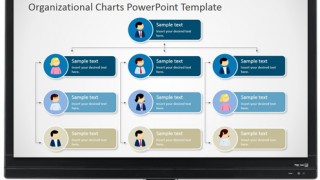
The below image shows the Organizational Charts PowerPoint Template running on an LED TV connected to a laptop via HDMI cable.

2. Play Slides as Image Slideshow or Video from a USB
This is another fine method for playing a PowerPoint slideshow on a TV. However, you will require converting your PowerPoint presentation to a supported format. For example, many TV’s support image formats like JPEG or Video formats like MP4. You can convert your presentation to a video format or export your slides as images and run them as a slideshow on your TV.
To learn how to convert your PowerPoint presentations to image or video format, see our guide about:
How To Save a PowerPoint Slide As a Picture and How To Convert a PowerPoint 2013 Presentation to a HD Video .
3. Convert and Play Your Slides from a DVD Player
You can also convert your PowerPoint files to DVD video format, write it on a DVD and play it using a good old DVD player. While this method is more laborious than the aforementioned, it is a pretty functional method. To get the video format right, follow the instructions given below.
Step 1: Save your PowerPoint to video format. You can refer to our tutorial mentioned above or simply go to File –> Save As –> and save your video to either MP4 or WMV. Unlike older versions, PowerPoint supports both formats.

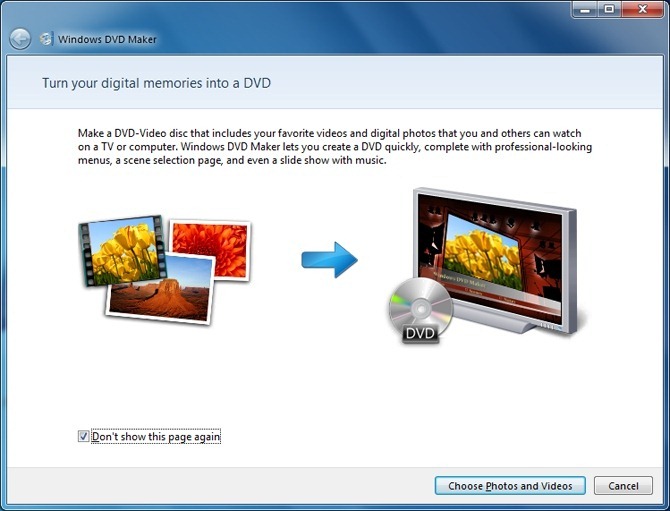
Step 2: Open Windows DVD Maker, and select Choose Photos and Videos .
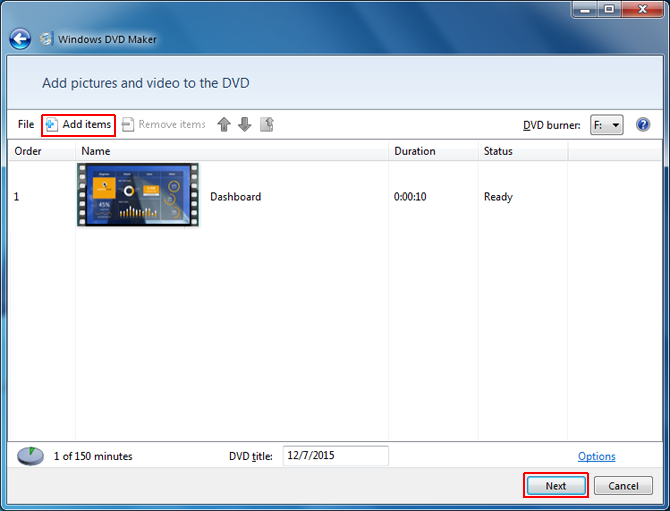
Step 3: Click Add Items and select the converted video file (file converted from PowerPoint to video format). Once the video with your video slides is picked, click Next .
Step 4: Now, customize menus for your DVD according to need, insert a blank DVD to your computer and click Burn .
Note: This process can be used to burn videos and photos to create DVD slideshows using Windows DVD Maker. You can also use another third-party DVD authoring tool for this purpose.
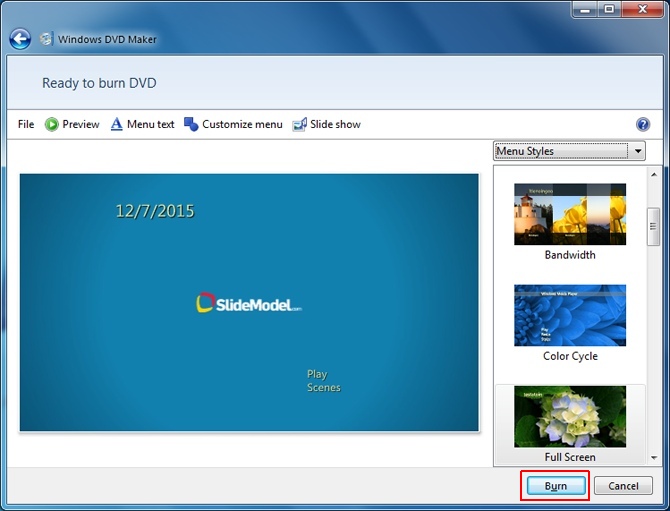
4. Connect to Your TV Using Wi-Fi or Wired Network
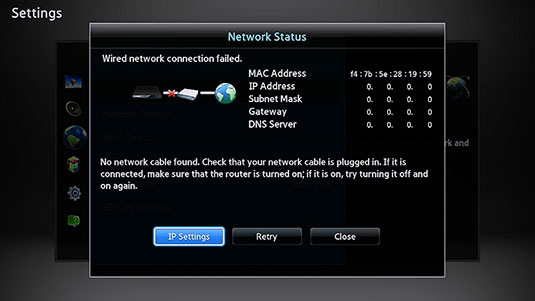
There are various TV models and devices which enable connecting to the Internet. The most common example of this can be found in the form of Smart TVs and Smart TV devices. Depending upon your TV model or the supported digital box you might be using, you can play a video slideshow by converting your PowerPoint presentation to a video format supported by your TV.
The below image shows connectivity settings for a Samsung Smart TV.
Recommended reading: How to embed video in PowerPoint
5. Use a Video Streaming Device
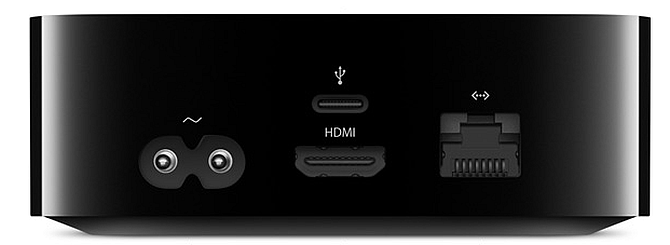
Last but not least, you can use a video streaming device like Roku 3, Apple TV or Google Chromecast to play a slideshow (e.g. one that has been converted to video format). The below image shows connectivity options for Apple TV. The various connectivity options in a video streaming device such as HDMI, USB and Wi-Fi / Ethernet provide ample scope for streaming various file types to your TV. This makes it possible to run an image, video or PPT/PPTX slideshow of your presentation slides (depending upon the mode of connectivity).
Do you know that using a high-quality PowerPoint Template with a connected TV can give you an excellent playback experience? Instead of using templates with dull backgrounds and hazy designs, you can download these Premium PowerPoint Templates to get the best output on your high definition TV or monitor.
Like this article? Please share
HDMI, Microsoft PowerPoint, PowerPoint 2013, PowerPoint 2016, PowerPoint Tips, Presentation Videos, Presentations, Slideshow, TV, Videos, View Presentation Filed under PowerPoint Tutorials
Related Articles
Filed under Google Slides Tutorials , PowerPoint Tutorials • April 17th, 2024
Google Slides vs. PowerPoint: A Detailed Comparison
Contrast and pick with presentation software suits your best. Check our guide on how the Google Slides vs. PowerPoint eternal debate.
Filed under PowerPoint Tutorials • April 16th, 2024
How to Insert an Equation in PowerPoint
Learn how to create easy-to-understand science slides by mastering how to insert an equation in PowerPoint. Step-by-step guide.
Filed under PowerPoint Tutorials • April 9th, 2024
How to Remove Notes from PowerPoint
Make alternative versions of your presentation files by learning how to remove notes from PowerPoint. Step-by-step guide with screeshots.
16 Responses to “How to Play a PowerPoint Slideshow on TV”
Useful article with great options for projecting presentations on TVs. It seems to happen more often than not, that you come across a TVs in meeting rooms at e.g. customer sites. One suggestion is to add the Microsoft Wireless Display Adapter as another option under pt. 5 for Wireless video streaming.
Awesome! Thanks for clearing this up.
I’m still curious if a wireless option exists. PowerPoint From computer to Smart TV via Bluetooth maybe?
Very useful article, i dont ave a laptop at home and was wondering how i could study the power-point presentations using the tv. thanks for the simplicity of the article too, very easy to apply.
So if I have a load of PowerPoint presentations with images, text and links to short film clips which if I plug into a pc at work they play on the interactive whiteboard perfectly. How do I use the same USB stick to play these in my other place of work on the Apple TV monitor?? Can I?
Your interactive whiteboard has probably a computer built-in, possibly even running some form of Windows, that can natively display PPTs as a regular presentation. But a standard monitor can only display a video signal it gets through an input, but cannot process any presentation or other files. And most, if not all, smart TVs, cannot handle PPTs, just like they cannot open Word Docs etc. Only media files file images, and videos.
Been searching for an answer for a while now, how can I play a ppt file on a tv without converting to an mp4 or jpegs?? and without connecting laptop to tv??
I have a Toshiba 50L5200U, and want to play a PowerPoint as a slideshow from a USB on the back of the TV. Is this possible on this model (if I convert the PPT to another format-if so, which one?), and if not, would a Firestick work, to enable me to transmit the powerpoint/slideshow wirelessly?
Thanks in advance!
Hi David. That model of Toshiba TV supports JPG images. You’d try to export the PowerPoint slides to JPG and then save them to the memory stick. It would be possible you need to rename the images to play in order or choose the appropriate sort by filter. This method depends purely on the TV, but if you have a Firestick or Chromecast, you can play the PowerPoint remotely from your computer.
I figured it out! If you export the slides from PPT as jpegs and change the dimensions to 1920×1080 (my laptop automatically made the second part 1081), it will be high-res and full screen when it displays on the TV from your USB. Originally, mine was 1280×720 and I had the same zoom issue, but when I tried to change the ratio in design (on power point), it messed up my formatting and some background colors. By changing the size of the jpegs when saving, there was no distortion and I was able to navigate the slides perfectly.
Hi @Tatyana. Glad to know you could figure it.
WE BOUGHT A HISENSE TV, USING A USB FOR SLIDE SHOWS (UPCOMING EVENTS) NEED TO SET THE TIME FOR THE SLIDE SHOW TO DISPLAY ON THE SCREEN FOR AT LEAST A MINUTE BEFORE THE NEXT SLIDE SHOW?
Please contact [email protected] with your question. Thanks.
Hi i am looking to show a “what’s on’s” at our social club using powerpoint with repeat function on an ordinary flat screen(not smart)tv.can you explain the easiest & cheapest way,i.e. memory stick,chromecast,media box etc.as i need to export images from a laptop. Thanks in advance
Hello, please contact [email protected] . For sure we will be able to help you.
Hello, I need to set up several tv monitors in a building that will loop through powerpoint slides. There is currently no wifi in the building. Can I just export the powerpoints into a movie format (wmv) and play it right from the usb to the monitor?
We’ve done this in the past, just simply exporting the presentation as a “video”. Using the feature File>Export>Create a Video. You can select the appropriate resolution, and generate the video. The video is generated as MP4 which is generally supported by TV’s. We uploaded the file to a pendive and use it in the screen.
Leave a Reply

Contribute to the Windows forum! Click here to learn more 💡
April 9, 2024
Contribute to the Windows forum!
Click here to learn more 💡
Windows 8.1 Top Forum Contributors: Bill Smithers 👍✅
April 17, 2024
Windows 8.1 Top Forum Contributors:
Bill Smithers 👍✅
- Search the community and support articles
- Windows 8.1
- Search Community member
Ask a new question

How to Get Powerpoint to Display on Second Monitor
I have a Surface 3 Pro with an external monitor. It works great for everything except when I run PowerPoint 2013 and try to use presenter mode, the external monitor flashes, then puts the slides under the presenter view on the primary (Surface) monitor! I know this for if I put the presenter view in a window, I can move it and see the slide underneath (see below).
Any ideas how to fix this? The only thing I can do is switch to duplicate mode for the monitor and then I lose presenter mode if I do.
Report abuse
Hello Dave,
I apologize for the inconvenience.
You may try to follow the suggestions mentioned below to change the main monitor.
Once the monitor is setup as the main monitor,change the settings in PowerPoint:
Open PowerPoint > Click on Slide Show tab > uncheck the box 'Use Presenter View' then change the monitor to your desktop in the option 'Show Presentation on' .
If the issue still persist then, try to post your query in office forums and see if that helps. Follow the link below to do the same.
http://answers.microsoft.com/en-us/office
Please feel free to write us back for further assistance and we will be glad to help you ahead.
10 people found this reply helpful
Was this reply helpful? Yes No
Sorry this didn't help.
Great! Thanks for your feedback.
How satisfied are you with this reply?
Thanks for your feedback, it helps us improve the site.
Thanks for your feedback.
Replies (10)
Question info.
- Other Windows apps
- Norsk Bokmål
- Ελληνικά
- Русский
- עברית
- العربية
- ไทย
- 한국어
- 中文(简体)
- 中文(繁體)
- 日本語

- Get started with computers
- Learn Microsoft Office
- Apply for a job
- Improve my work skills
- Design nice-looking docs
- Getting Started
- Smartphones & Tablets
- Typing Tutorial
- Online Learning
- Basic Internet Skills
- Online Safety
- Social Media
- Zoom Basics
- Google Docs
- Google Sheets
- Career Planning
- Resume Writing
- Cover Letters
- Job Search and Networking
- Business Communication
- Entrepreneurship 101
- Careers without College
- Job Hunt for Today
- 3D Printing
- Freelancing 101
- Personal Finance
- Sharing Economy
- Decision-Making
- Graphic Design
- Photography
- Image Editing
- Learning WordPress
- Language Learning
- Critical Thinking
- For Educators
- Translations
- Staff Picks
- English expand_more expand_less
PowerPoint 2016 - Presenting Your Slide Show
Powerpoint 2016 -, presenting your slide show, powerpoint 2016 presenting your slide show.

PowerPoint 2016: Presenting Your Slide Show
Lesson 12: presenting your slide show.
/en/powerpoint2016/printing/content/
Introduction
Once your slide show is complete, you'll need to learn how to present it to an audience. PowerPoint offers several tools and features to help make your presentation smooth, engaging, and professional.
Optional: Download our practice presentation .
Watch the video below to learn more about presenting your slide show.
Presenting a slide show
Before you present your slide show, you'll need to think about the type of equipment that will be available for your presentation. Many presenters use projectors during presentations, so you might want to consider using one as well. This allows you to control and preview slides on one monitor while presenting them to an audience on another screen.
To start a slide show:
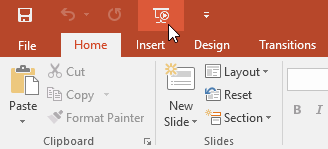
There are several ways you can begin your presentation:
To advance and reverse slides:
You can advance to the next slide by clicking your mouse or pressing the spacebar on your keyboard. Alternatively, you can use or arrow keys on your keyboard to move forward or backward through the presentation.
You can also hover your mouse over the bottom-left and click the arrows to move forward or backward.

To stop a slide show:
You can exit presentation mode by pressing the Esc key on your keyboard. Alternatively, you can click the Slide Show Options button in the bottom-left and select End Show .
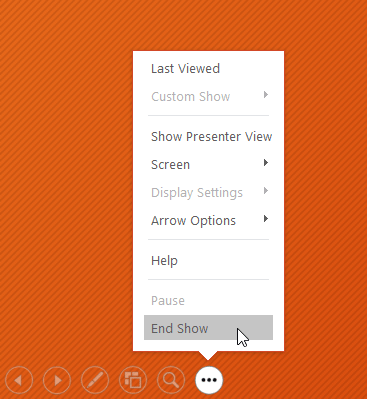
The presentation will also end after the last slide . You can click the mouse or press the spacebar to return to Normal view.

Presentation tools and features
PowerPoint provides convenient tools you can use while presenting your slide show. For example, you can change your mouse pointer to a pen or highlighter to draw attention to items in your slides. In addition, you can jump around to slides in your presentation or access other programs from your taskbar if needed.
To show the taskbar:
Sometimes you may need to access the Internet or other files and programs on your computer during your presentation. PowerPoint allows you to access your taskbar without ending the presentation.
- Locate and select the Slide Options button in the bottom-left corner.
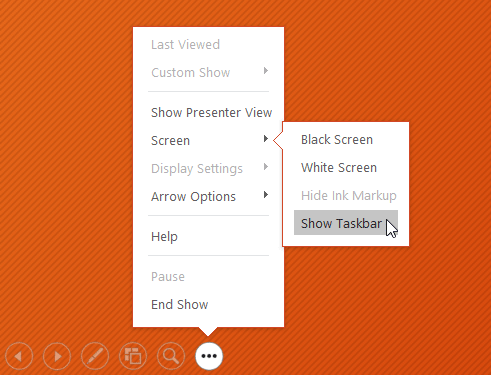
Slide options
You can also access any of the menu items above by right-clicking anywhere on the screen during your slide show.
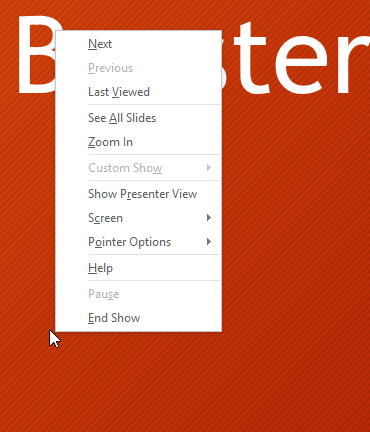
To skip to a nonadjacent slide:
You can jump to slides out of order if needed.

- The selected slide will appear.
To access drawing tools:
Your mouse pointer can act as pen or highlighter to draw attention to items in your slides.
- Locate and select the Pen Tools button in the bottom-left corner.
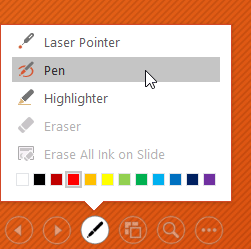
You can also use the laser pointer feature to draw attention to certain parts of your slide. Unlike the pen and highlighter, the laser pointer will not leave markings on your slides. To use the laser pointer, select it from Pen Tools, or press and hold the Ctrl key and the left mouse button.
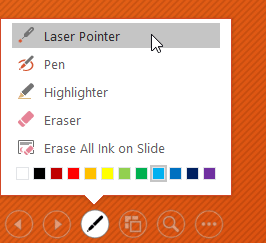
To erase ink markings:
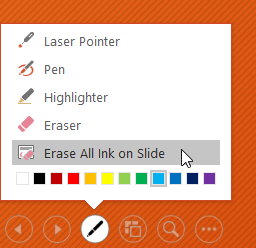
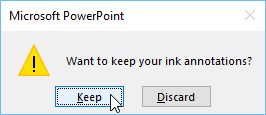
When you end a slide show, you'll also have the option to Keep or Discard any ink annotations made during your presentation. If you keep ink markings, they'll appear as objects on your slides in Normal view.
Presenter view
If you're presenting your slide show with a second display—like a projector—you can use Presenter view . Presenter view gives you access to a special set of controls on your screen that the audience won't see, allowing you to easily reference slide notes , preview the upcoming slide , and much more.
To access Presenter view:
Start your slide show as you normally would, then click the Slide Options button and select Presenter View . Alternatively, you can press Alt+F5 on your keyboard to start the slide show in Presenter view.
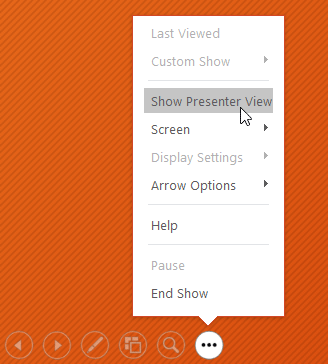
Click the buttons in the interactive below to learn more about using Presenter view.
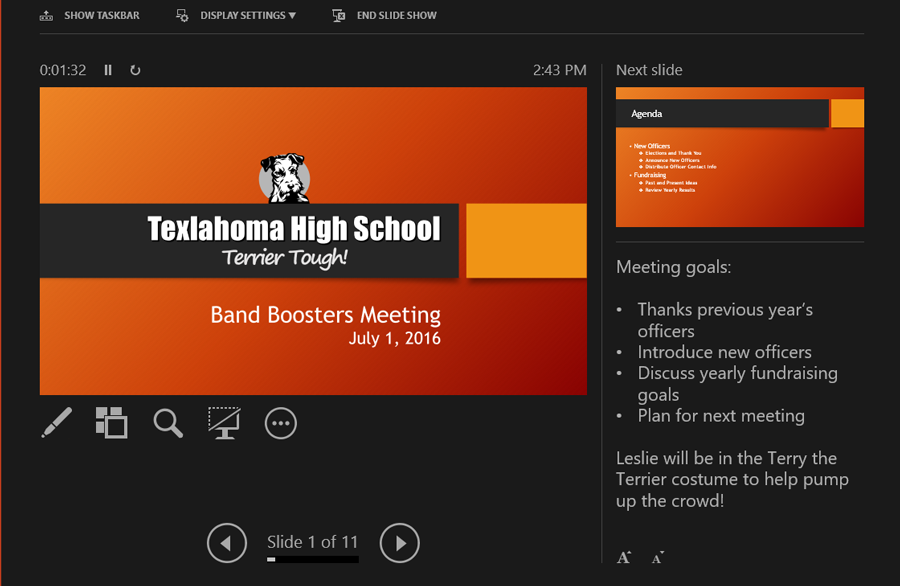
End Slide Show
Click here to end the presentation.
Display Settings
From here, you can customize your d isplay settings , including the option to duplicate—or mirror—the slide show on two screens and swap the monitors if Presenter view is appearing on the wrong screen.
Show Taskbar
Click here to show the taskbar and access other programs without closing the presentation.
Here, you can see how long you've been giving the presentation. You can also pause and restart the timer if necessary.
Current Slide
This is the current slide being shown to the audience.
Slide Options
Here, you can access the same slide options you would find in normal presentation mode, including the Pen Tools and See All Slides buttons.
Advance and Reverse Slides
Use the arrows to move forward and backward through your presentation.
Here, you'll see any speaker notes for the current slide. You can use the Increase and Decrease buttons below to make the notes larger or smaller.
Here, you can preview the next slide that will appear in the presentation.
Slide show setup options
PowerPoint has various options for setting up and playing a slide show. For example, you can set up an unattended presentation that can be displayed at a kiosk and make your slide show repeat with continuous looping.
To access slide show setup options:

- The Set Up Show dialog box will appear. From here, you can select the desired options for your presentation.
Click the buttons in the interactive below to learn about various options for setting up and playing a slide show.
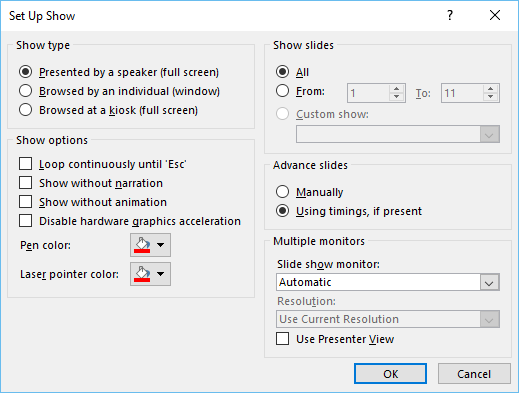
Here, you can choose a show type .
Show Options
Here, you choose playback settings and disable certain features if desired.
Show Slides
Here, you can choose which slides you want to show during the presentation. All is selected by default, but you can choose to show only certain slides or use any custom shows you have created from your original presentation.
Advance Slides
If you have set timings in your slide show, they will play automatically. However, if you want to disable the timings and control the slides yourself, select Manually .
Multiple Monitors
If you have more than one monitor, you can choose which one to display the slide show on. It's usually best to leave this setting on Automatic .
To advance slides automatically, you'll need to customize the slide timing on the Transitions tab. Review our lesson on Applying Transitions to learn how.

- Open our practice presentation .
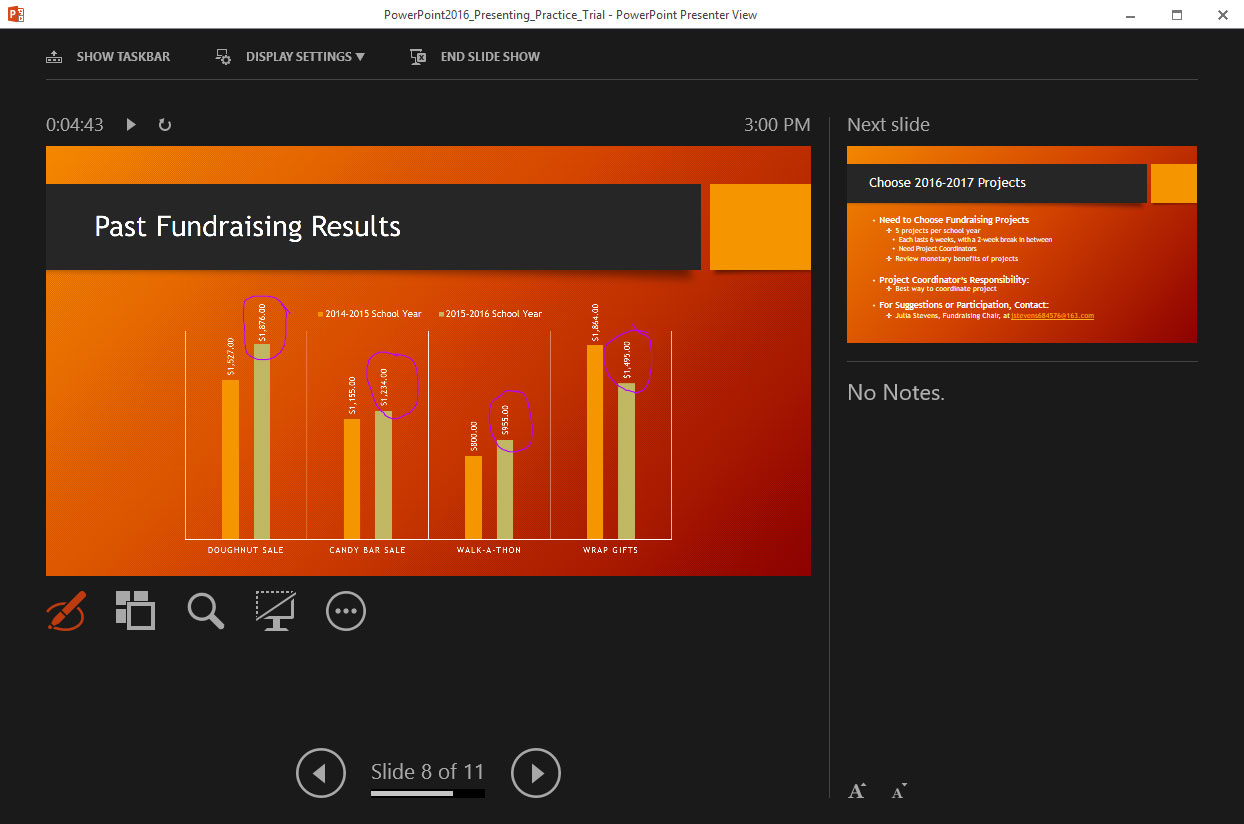
- In the Set Up Slide Show options, change the pen color to purple.
- Start your slideshow, then access Presenter view .
- Advance to slide 8.
- Use the pen tool to circle the fundraising amounts for the 2015-2016 school year. These are the amounts over the green bars.
/en/powerpoint2016/lists/content/

Reinvent productivity with Copilot for Microsoft 365.
Microsoft PowerPoint

Copilot in PowerPoint
Turn your inspiration into stunning presentations. Get it now when you add Copilot Pro or Copilot for Microsoft 365 to your Microsoft 365 subscription.
Turn your inspiration into stunning presentations
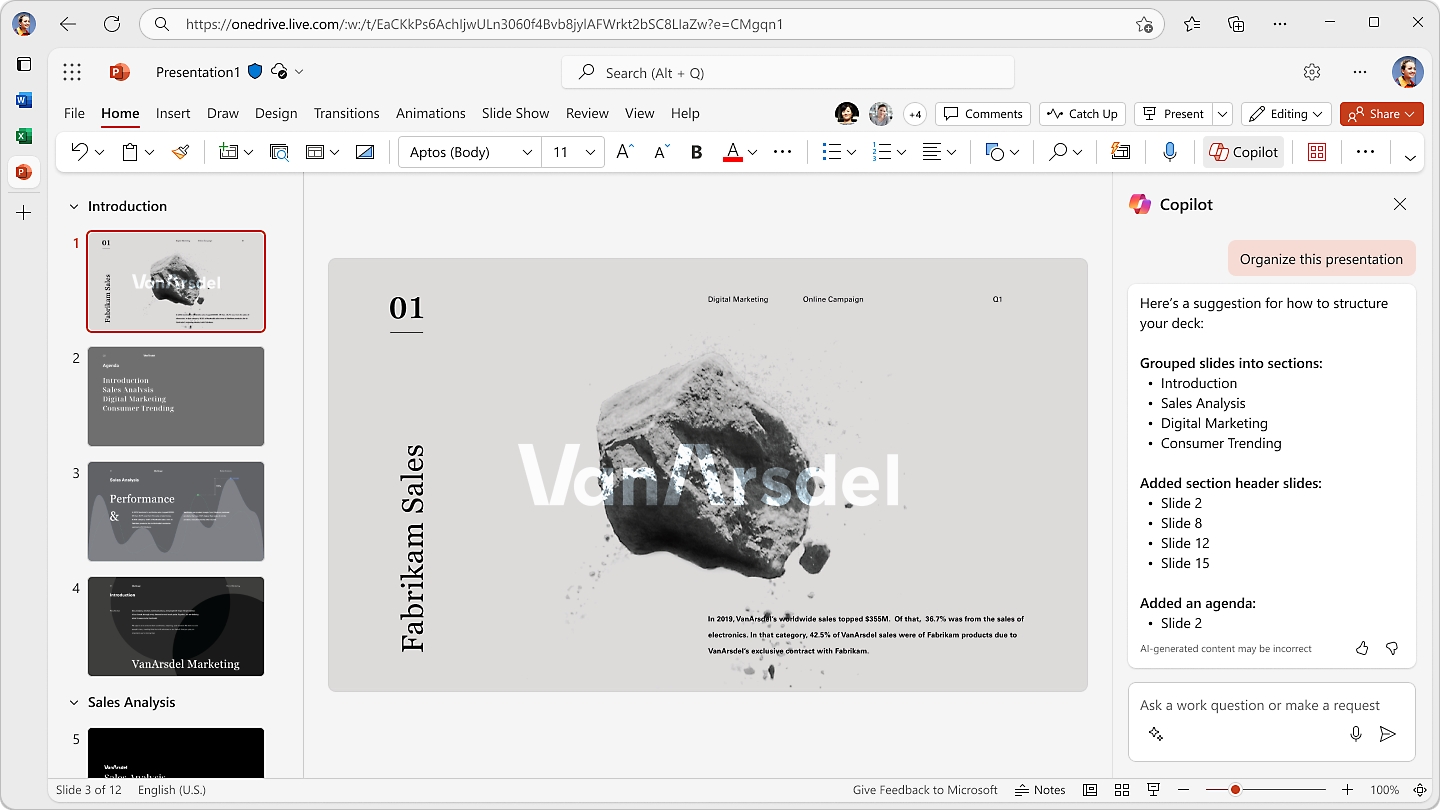
Turn a spark of inspiration into personalized presentations with Copilot in PowerPoint. Copilot will turn existing Word documents into presentations, create new presentations from simple prompts or outlines, or find the best places for impactful imagery—and will help you leave audiences dazzled with skillful storytelling.
Designing slides has never been easier
Create well-designed, impactful slides with the help of Designer and Ideas in PowerPoint.
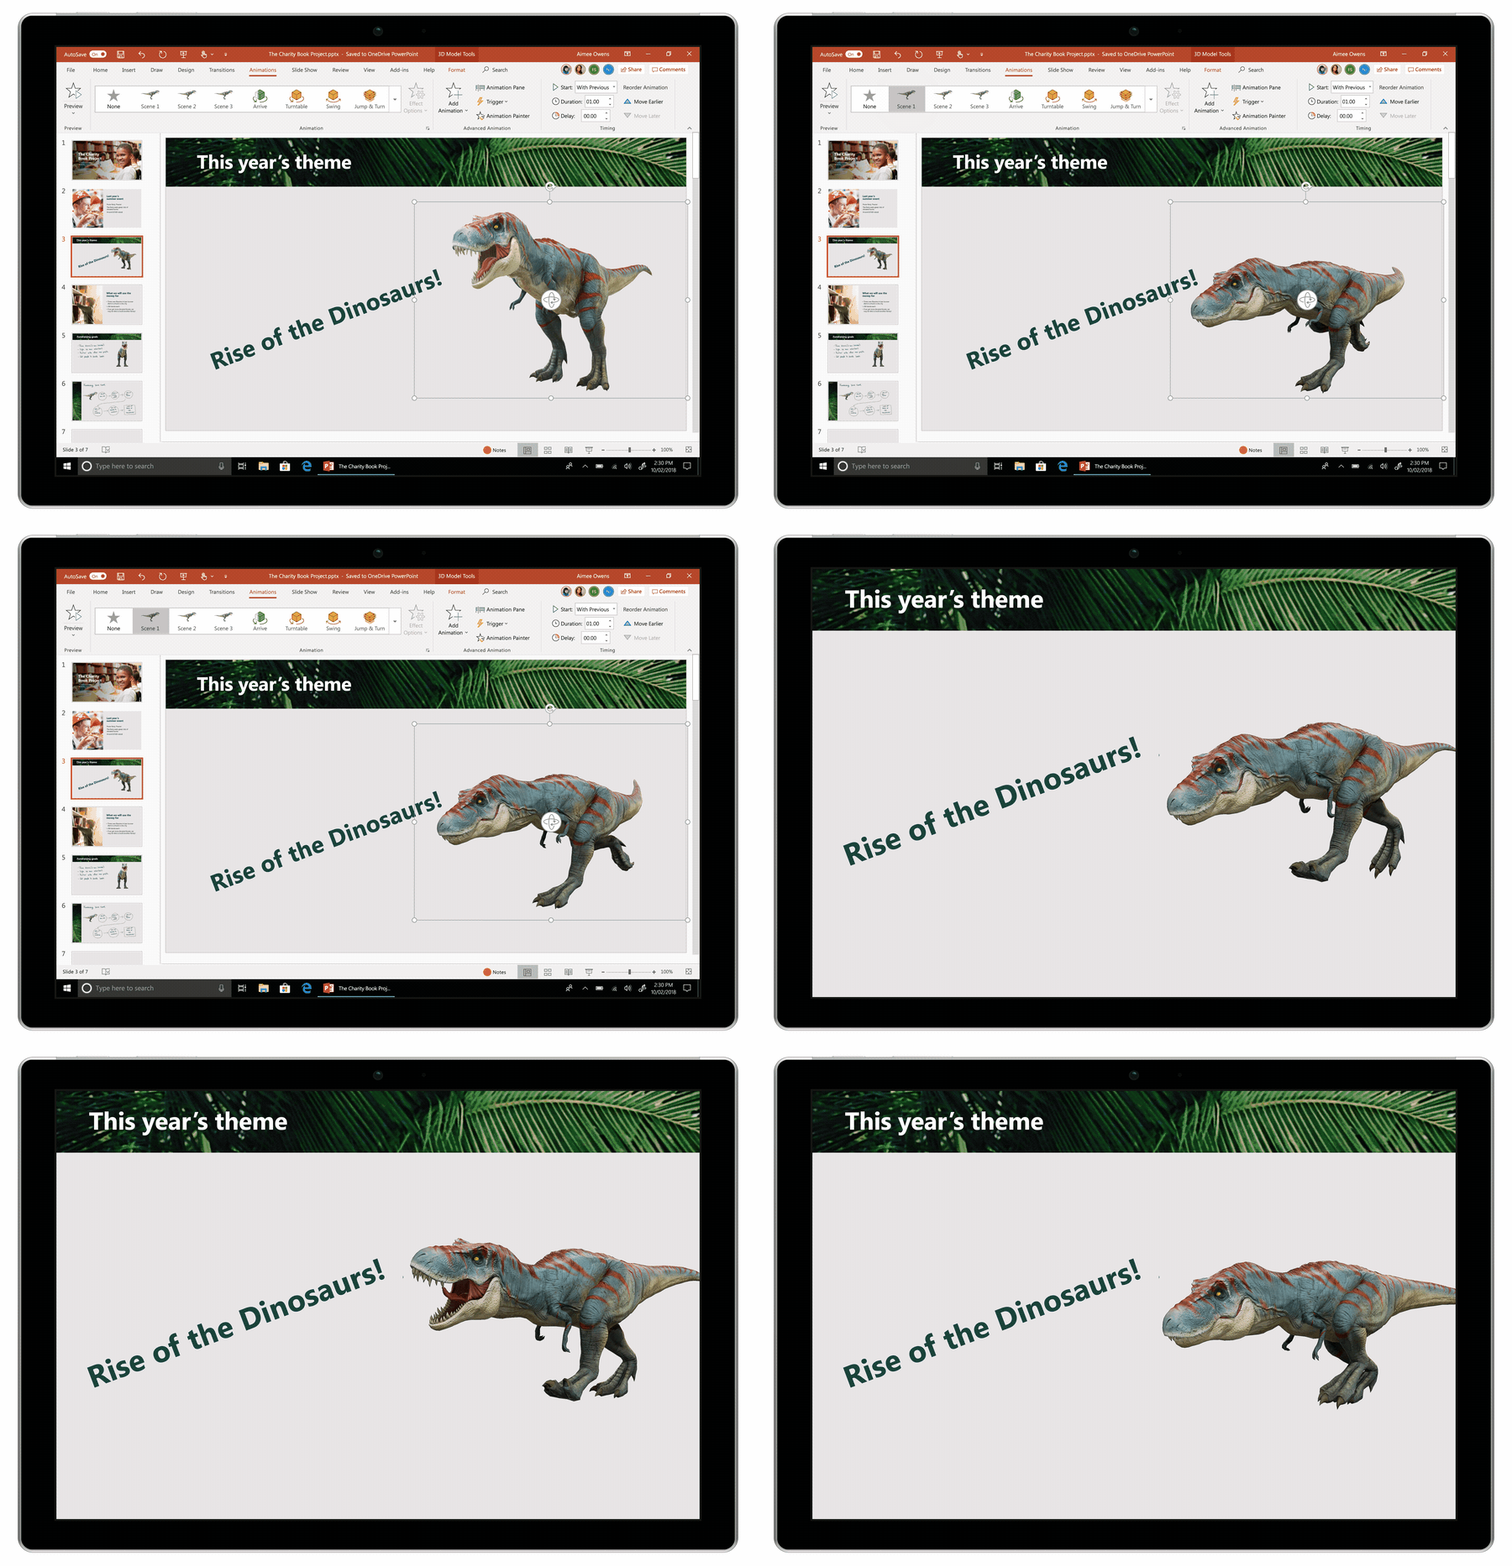
3D isn't just for the movies
Now you can easily insert 3D objects and embedded animations directly into PowerPoint decks from your own files or a library of content.
Interact naturally using voice, touch, and ink
Easily ink onto a slide, then convert handwritten notes into text and make hand-drawn shapes perfect in seconds.
Nail your next presentation
With Presenter Coach, practice your speech and get recommendations on pacing, word choice, and more through the power of AI.

Be on the same page
Always know where you are in the editing process. With the while you were away feature, track recent changes made by others in your decks.
Task management with PowerPoint and Microsoft 365
Tell your story with captivating presentations.
Originally starting from Free now starting from Free
Sharing and real-time collaboration
PowerPoint for the web
Basic templates, fonts, icons, and stickers
Dictation and voice commands
Works on web, iOS, and Android™
5 GB of cloud storage
Microsoft 365 Personal
Originally starting from $6.99 now starting from $6.99
$6.99 $6.99
(Annual subscription–auto renews) 1
PowerPoint for the web and PowerPoint desktop app for offline use
Premium templates, fonts, icons, and stickers with thousands of options to choose from
Dictation, voice commands, and transcription
Advanced spelling and grammar, in-app learning tips, use in 20+ languages, and more
1 TB (1000 GB) of cloud storage
Premium desktop, web, and mobile apps
Advanced security
Ad-free experience
Works on Windows, macOS, iOS, and Android™
Copilot Pro available as an add-on. *
Microsoft 365 Family
Originally starting from $9.99 now starting from $9.99
$9.99 $9.99
One to six people
Up to 6 TB of cloud storage, 1 TB (1000 GB) per person
Premium desktop, web, and mobile apps
Advanced security
Microsoft Powerpoint
One person
Microsoft 365 Apps for business
Originally starting from $8.25 now starting from $8.25
$8.25 $8.25
Available for up to 300 employes
Desktop versions of Word, Excel, PowerPoint, and Outlook
1 TB of cloud storage per user
Anytime phone and web support
Microsoft 365 Business Standard
Originally starting from $12.50 now starting from $12.50
$12.50 $12.50
Everything in Microsoft 365 Apps for business, plus:
Web, and mobile versions of Word, Excel, PowerPoint, and Outlook
Custom business email ([email protected])
Chat, call, and video conference with Microsoft Teams
10+ additional apps for your business needs (Bookings, Planner, Microsoft Forms, and others)
Automatic spam and malware filtering
Webinars with attendee registration and reporting
New: Collaborative workspaces to co-create using Microsoft Loop
New: Video editing and design tools with Clipchamp
Copilot for Microsoft 365 available as an add-on. **
Add Copilot to your Microsoft plan
Achieve more than ever using AI integrated with Word, Excel, PowerPoint, Outlook, and other Microsoft 365 apps.

Get the PowerPoint mobile app
Ready to create great presentations with Microsoft 365?
See more from microsoft powerpoint.
Collaborate on shared projects
Get commonly used Office features and real-time co-authoring capabilities through your browser.
Jumpstart your design
Show your style and professionalism with templates, plus save time. Browse PowerPoint templates in over 40 categories.
Connect with experts
See what’s new and get classic tips and editors' tricks to help you create, edit, and polish presentations like a pro.
Read about slide presentations
6 slide presentation software tips to impress, host large-scale virtual presentations, how to make a slide show, what’s new in powerpoint.
- [1] Once your paid subscription begins, cancelation policies vary based on your status as a new customer, product, and domain selections on Microsoft. Learn more. Cancel your Microsoft 365 subscription any time by going to the Microsoft 365 admin center. When a subscription is canceled, all associated data will be deleted. Learn more about data retention, deletion, and destruction in Microsoft 365 . Microsoft PowerPoint with a Microsoft 365 subscription is the latest version of PowerPoint. Previous versions include PowerPoint 2016, PowerPoint 2013 , PowerPoint 2010 , PowerPoint 2007 , and PowerPoint 2003. iTunes, iPhone, and iPad are registered trademarks of Apple Inc., registered in the U.S. and other countries. Android is a trademark of Google Inc.
- [*] Copilot Pro benefits are currently available on web, Windows, and macOS and iPadOS. A Microsoft 365 Personal or Family subscription is required to access Copilot in select apps, including Word, Excel, PowerPoint, OneNote, and Outlook. Excel features are currently in preview in English only. Microsoft 365 Personal or Family and Copilot Pro are not available in the same transaction and must be purchased in two separate transactions.
- [**] Copilot for Microsoft 365 may not be available for all markets and languages. To purchase, enterprise customers must have a license for Microsoft 365 E3 or E5 or Office 365 E3 or E5, and business customers must have a license for Microsoft 365 Business Standard or Business Premium.
Follow Microsoft 365
How-To Geek
How to add live web pages to a powerpoint presentation.
Have you ever wanted to demonstrate a live website during a PowerPoint presentation? Here's how you can insert a live webpage into a PowerPoint prese
Have you ever wanted to demonstrate a live website during a PowerPoint presentation? Here's how you can insert a live webpage into a PowerPoint presentation so you can show the exact content you're talking about.
No matter what you're giving a presentation about, sometimes it can be useful to show your audience information from the internet. You could always create a screenshot of the webpage you're demonstrating, but chances are the screenshot may be out of date by the time you give your presentation.
A better solution is to use live information from the web in your presentation. By default, PowerPoint doesn't support inserting a live web page, but you can easily do this with the LiveWeb add-in.
Head to the LiveWeb website (link below), and download the correct version for your version of PowerPoint. We selected the 2007/2010 version in this test.
Once it's downloaded, extract the files as normal.
Now, in PowerPoint, open the Options window. In PowerPoint 2010, you can do this by clicking the File button and selecting Options; in PowerPoint 2007, click the Office orb and select Options.
Select Add-Ins on the left side, then select PowerPoint Add-ins from the Manage menu, and click Go.
This will open the PowerPoint Add-ins window. Click Add New to add the LiveWeb addin we downloaded previously.
Browse to the folder where you extracted the LiveWeb addin, and select it.
PowerPoint may warn you that the addon contains a macro. Click Enable Macros to continue.
Now you should see LiveWeb listed in the Add-Ins window, and you're ready to add a live webpage to your PowerPoint presentation.
Using LiveWeb in PowerPoint
Now that LiveWeb is installed, you're ready to insert live internet data in your presentations. From the Insert tab, select Web Page from the LiveWeb section.
This will open a quick Wizard interface that will help you insert a webpage into your presentation.
Enter the website you'd like to visit in the first line, then click the Add button. Make sure to include http:// in front of the website address. Once you've added the website you wish to visit, click Next.
LiveWeb will automatically refresh the web page, but if you want you can uncheck the box. Click Next to continue.
Now choose how much of the slide you want the webpage to cover, and select where you want to position the page. You can always change this later if you like.
Once it's finished, click Finish to return back to PowerPoint.
LiveWeb will let you know it successfully added the web page to your slide.
You'll now see a Windows 98-style logo in your slide, showing where your live webpage will be located.
Feel free to resize or move the webpage section in your slide however you want.
To view the actual web content, you'll need to start a slideshow. Click the slideshow button at the bottom of the window to switch quickly.
Now you'll see a live webpage loaded right inside your PowerPoint presentation. You can markup the slide as you would any other with PowerPoint tools, or you can interact with the website just as you would in a browser.
If you need to change your webpage, click the Edit Page Property button on the Insert tab.
Enter the new website address you want, and finish as before.
You can also add multiple web pages to a presentation if you'd like. You could even make a webpage comparison like we did with screenshots in our first slide. Only difference here is, the web pages are both live, and you could demonstrate how to use them to your audience.
When you save your presentation, you'll need to save it as a Macro-enabled presentation in .pptm format to preserve the web data. Note that you'll be able to view the presentation on another computer only if it has the LiveWeb addon installed. Since it's a free addon, you could keep a copy of it on your flash drive so you could easily install it if you need to show your presentation on another computer.
Whether you're trying to teach a class about computer usage or demonstrate your new website for your company's board members, the LiveWeb addin makes it easy to incorporate live web pages in your presentations. There are many ways you could use this, so let us know how you use live web pages in your presentations to make information come alive!
If you'd like to use live web data in other Office applications, here's how you can Use Online Data in Excel 2010 Spreadsheets .
Download the LiveWeb Add-in for PowerPoint
How To Display Powerpoint On Projector

- How-To Guides
- Tech Setup & Troubleshooting

Introduction
When it comes to delivering presentations and sharing visual content, projectors play a crucial role in ensuring that your audience can see your slides clearly. Whether you are hosting a business meeting, conducting a training session, or giving a lecture, connecting your laptop to a projector can greatly enhance the impact of your presentation.
In this article, we will guide you through the process of connecting your laptop to a projector and displaying your PowerPoint slides effectively. We will cover the necessary steps to ensure a seamless setup, including adjusting the resolution, selecting the appropriate display mode, troubleshooting common issues, and more.
With the increasing popularity of remote work and virtual meetings, knowing how to display PowerPoint on a projector has become even more essential. Even if you are collaborating with colleagues from different locations, the ability to project your slides on a larger screen can make a significant difference in engagement and comprehension.
Whether you have a traditional projector or a modern projector with HDMI or USB-C connectivity, the techniques we will outline in this article can be applied to various projector models and laptop configurations. By following these guidelines, you can ensure that your PowerPoint presentation is flawlessly projected onto the big screen, allowing you to captivate your audience and deliver your message effectively.
So, if you have a presentation coming up and want to make a lasting impression, read on to discover our step-by-step guide on how to display PowerPoint on a projector. Let’s get started!
Connecting the Projector to the Laptop
Before you can start displaying your PowerPoint slides on a projector, you need to establish a connection between the projector and your laptop. Follow these steps to ensure a successful connection:
- Check the ports on your laptop and the projector: Most laptops and projectors have a variety of ports, including HDMI, VGA, and USB-C. Determine which ports are available on both devices.
- Select the appropriate cable: Based on the ports available, choose the corresponding cable to connect your laptop and projector . For example, if both devices have HDMI ports, use an HDMI cable for the connection.
- Power on the projector: Plug in the projector and turn it on. Allow it a few moments to warm up.
- Connect the cable: Take one end of the cable and insert it into the port on your laptop. Then, connect the other end to the corresponding port on the projector.
- Adjust the display settings: Once the connection is established, you may need to adjust the display settings on your laptop. On Windows, right-click on the desktop and select “Display settings.” On macOS, go to “System Preferences” and click on “Displays.” Ensure that the projector is recognized as the secondary display.
- Enable the duplicate or extend display mode: Depending on your preference, you can choose to duplicate your laptop screen on the projector or extend your desktop to have separate displays. Select the appropriate option under the display settings.
- Test the connection: Finally, press the appropriate function key or combination of keys on your laptop to enable the display output to the projector. This key varies depending on the laptop manufacturer but is often labeled with a projector icon. Alternatively, you can navigate to the display settings and manually enable the projector display.
Once you have followed these steps and successfully connected your laptop to the projector, you are now ready to proceed with setting up your PowerPoint slide show. In the next section, we will discuss how to optimize the slide show settings for the projector display.
Setting up the Slide Show
After connecting your laptop to the projector, it’s essential to optimize your PowerPoint slide show settings for the best viewing experience. Follow these steps to ensure that your slides are displayed correctly and engage your audience:
- Open your PowerPoint presentation: Launch PowerPoint and open the file containing your presentation.
- Check the slide layout: Review the slide layout to ensure that your content is organized and visually appealing. Make necessary adjustments to font sizes, colors, and slide backgrounds to enhance readability.
- Set the slide show options: Click on the “Slide Show” tab in the ribbon menu and select “Set Up Slide Show.” Here, choose whether you want to present the slide show on the primary monitor or the secondary monitor (which is the projector in this case).
- Select the appropriate slide show mode: Under the “Set Up Show” dialog box, decide whether you want to present your slides in “Presenter View” (where you can see speaker notes and upcoming slides), “Browsed by an individual” (the default full-screen mode), or “Browsed at a kiosk” (looping presentation).
- Enable slide transitions and animations: To add visual interest to your presentation, incorporate slide transitions and animations. Use them sparingly and purposefully to avoid overwhelming your audience. Go to the “Transitions” tab and select the desired animations and timings.
- Test the slide show: Before the actual presentation, preview the slide show on your laptop to ensure that everything appears as intended. Check for any issues with slide transitions, animations, or formatting that may need adjustments.
By following these steps, you can optimize your PowerPoint slide show for the projector display. Remember to keep your slides visually appealing, concise, and engaging to maintain your audience’s attention. In the next section, we will address how to adjust the resolution settings for the projector.
Adjusting the Resolution
One crucial aspect of displaying PowerPoint on a projector is ensuring that the resolution is optimized for the projector’s capabilities. Follow these steps to adjust the resolution settings on your laptop:
- Right-click on the desktop: On Windows, right-click anywhere on the desktop to access the context menu. On macOS, go to “System Preferences” and select “Displays.”
- Open display settings: In the context menu or the “Displays” section in System Preferences, click on “Display settings” or a similar option.
- Choose the appropriate resolution: In the display settings, you will see a list of available resolutions. Select a resolution that is compatible with your projector’s native resolution. It’s recommended to choose a resolution that matches or closely resembles the native resolution to ensure optimal image quality.
- Apply the changes: Once you have chosen the desired resolution, apply the changes to see them take effect. Your laptop’s screen and the projector display should now be adjusted accordingly.
During the resolution adjustment process, it’s essential to note that the resolution settings may vary depending on your operating system and graphics card. Ensure that you are selecting the appropriate settings for your specific setup.
By adjusting the resolution to match the projector’s capabilities, you can guarantee that your PowerPoint slides are displayed clearly and sharply. A mismatched resolution may result in distorted or blurry images, which can diminish the impact of your presentation.
In the next section, we will discuss the various display modes you can choose from to optimize the projection of your PowerPoint slides.
Choosing the Display Mode
When connecting your laptop to a projector, you have the option to choose from different display modes to ensure the best presentation experience. The display mode you select will determine how your PowerPoint slides are shown on the projector screen. Here are the commonly used display modes:
- Duplicate Display: In this mode, your laptop screen is mirrored onto the projector screen. Whatever is displayed on your laptop’s screen will be duplicated exactly on the projector. This mode is useful when you want to have a reference of your slides on your laptop while presenting.
- Extend Display: Choosing this mode allows you to have separate displays. Your laptop screen will show the presenter view or speaker notes, while the projector screen will display the full-screen slide show. This mode is great for presenters who want to have more control and access to additional information during the presentation.
- Presentation Mode: Some laptops offer a presentation mode, which automatically adjusts the settings for connecting to an external projector. This mode may optimize the screen resolution, audio output, and other settings for a smooth presentation experience. Check if your laptop has this mode available.
To select the display mode that suits your needs, follow these steps:
- Navigate to the display settings: Right-click on the desktop, select “Display settings” on Windows, or go to “System Preferences” and click on “Displays” on macOS.
- Choose the display mode: In the display settings, look for the “Multiple displays” or “Display mode” option. Select the mode that aligns with your preference.
- Apply the changes: Once you have selected the display mode, click on “Apply” or “OK” to save the settings.
By choosing the appropriate display mode, you can customize your presentation experience and make the most out of your PowerPoint slides. Remember, different modes work better for different presentation styles, so consider your specific needs when selecting the mode.
In the next section, we will guide you through the process of displaying PowerPoint on the projector, ensuring that your presentation runs smoothly.
Displaying PowerPoint on the Projector
Now that you have connected your laptop to the projector and adjusted the necessary settings, it’s time to display your PowerPoint slides on the big screen. Follow these steps to ensure a seamless and successful presentation:
- Open your PowerPoint presentation: Launch PowerPoint and open the specific file you want to display. Review your slides to familiarize yourself with the content and flow of the presentation.
- Enter slide show mode: To enter slide show mode, click on the “Slide Show” tab in the ribbon menu and select “From Beginning” or “From Current Slide.” Alternatively, press the “F5” key on your keyboard.
- Start the slide show: Once in slide show mode, your first slide will be displayed on both your laptop screen and the projector screen. Use the arrow keys on your keyboard or the mouse to navigate through the slides.
- Utilize slide show features: During your presentation, take advantage of the various slide show features available in PowerPoint. This includes animations, slide transitions, annotations, and laser pointers. Practice using these features beforehand and incorporate them strategically to enhance your presentation.
- Engage with your audience: As you display your PowerPoint slides on the projector, maintain eye contact with your audience and deliver your content confidently. Use your presenter view or speaker notes on your laptop screen to guide you through your presentation.
- Monitor the projection: Keep an eye on the projected slides to ensure they are displayed correctly on the screen. Occasionally glance at your laptop screen to stay in sync with the slide progression.
- Control the projection: You can pause or resume the presentation at any time by pressing the “Esc” key on your keyboard. This will show the slide thumbnail view, allowing you to make adjustments or navigate to a specific slide if needed.
- End the presentation: Once you have completed your presentation, press “Esc” to exit slide show mode. Take a moment to acknowledge any questions or comments from your audience before concluding the session.
By following these steps and utilizing the available features, you can confidently display your PowerPoint presentation on the projector. Remember to practice beforehand and ensure that your presentation flows smoothly to engage and captivate your audience effectively.
In the next section, we will address some common troubleshooting tips to help you overcome any technical issues that may arise during your presentation.
Troubleshooting Common Issues
While connecting and displaying PowerPoint on a projector, you may encounter some common technical issues. Here are a few troubleshooting tips to help you navigate through these challenges:
- No signal on the projector : If the projector is not receiving a signal from your laptop, check the cable connections and ensure that they are securely plugged in. Try disconnecting and reconnecting the cable, or use a different cable if available. You may also need to adjust the input source settings on the projector.
- No display on the projector screen: If the projector is receiving a signal, but you’re not seeing any display on the projector screen, check the display mode and resolution settings on your laptop. Ensure that the projector is set as the secondary display and that the resolution is compatible with the projector’s native resolution.
- Incompatible slide formats: If your slides contain unsupported media formats or fonts, they may not display properly on the projector. Make sure to use widely compatible file formats and fonts to avoid any compatibility issues.
- Audio not playing on the projector: If you have audio incorporated in your presentation, check the audio output settings on your laptop and the projector. Ensure that the audio is not muted, the volume is sufficiently high, and the correct audio output source is selected.
- Flickering or distorted display: If you notice flickering or distortion on the projected slides, it could be due to issues with the cable connection or the projector’s settings. Try adjusting the cable or changing the resolution settings on your laptop to resolve this issue.
- Power issues with the projector: If the projector is not turning on or experiencing power-related issues, check the power source and connection. Ensure that the power cable is securely plugged in and there is no damage to the cable or the power outlet.
If you encounter any other technical issues, refer to the user manual of your projector or consult with the technical support team for further assistance. It’s always a good idea to test the setup and familiarize yourself with the equipment before the actual presentation to minimize any last-minute surprises.
By being prepared and aware of these common issues and their respective solutions, you can troubleshoot any challenges that arise during your PowerPoint presentation on the projector.
Now that you have learned how to connect, set up, and troubleshoot your PowerPoint presentation on a projector, you are ready to deliver an impactful and visually engaging presentation. In the next section, we will conclude this guide with a summary of the key points covered.
Displaying PowerPoint on a projector can greatly enhance the impact of your presentations, allowing you to engage your audience and deliver your message effectively. By following the steps outlined in this guide, you can ensure a seamless and successful setup, from connecting your laptop to the projector to adjusting the resolution, choosing the display mode, and troubleshooting common issues.
Remember to select the appropriate cable for the connection, adjust the display settings, and choose the desired slide show mode for your presentation style. Utilize the available features in PowerPoint, such as slide transitions, animations, and presenter view, to enhance the visual appeal and delivery of your slides.
If you encounter any technical issues, such as a lack of signal or distorted display, refer to the troubleshooting tips provided to help you overcome these challenges. And always practice your presentation beforehand to familiarize yourself with the equipment and ensure a smooth presentation experience.
Now that you have the knowledge and understanding of how to display PowerPoint on a projector, you can confidently engage your audience, deliver visually appealing presentations, and make a lasting impression. So, go ahead, connect your laptop to a projector, and captivate your audience with your powerful PowerPoint presentations!
Leave a Reply Cancel reply
Your email address will not be published. Required fields are marked *
Save my name, email, and website in this browser for the next time I comment.
- Crowdfunding
- Cryptocurrency
- Digital Banking
- Digital Payments
- Investments
- Console Gaming
- Mobile Gaming
- VR/AR Gaming
- Gadget Usage
- Gaming Tips
- Online Safety
- Software Tutorials
- Tech Setup & Troubleshooting
- Buyer’s Guides
- Comparative Analysis
- Gadget Reviews
- Service Reviews
- Software Reviews
- Mobile Devices
- PCs & Laptops
- Smart Home Gadgets
- Content Creation Tools
- Digital Photography
- Video & Music Streaming
- Online Security
- Online Services
- Web Hosting
- WiFi & Ethernet
- Browsers & Extensions
- Communication Platforms
- Operating Systems
- Productivity Tools
- AI & Machine Learning
- Cybersecurity
- Emerging Tech
- IoT & Smart Devices
- Virtual & Augmented Reality
- Latest News
- AI Developments
- Fintech Updates
- Gaming News
- New Product Launches
- AI Writing How Its Changing the Way We Create Content
- How to Find the Best Midjourney Alternative in 2024 A Guide to AI Anime Generators
Related Post
Ai writing: how it’s changing the way we create content, unleashing young geniuses: how lingokids makes learning a blast, 10 best ai math solvers for instant homework solutions, 10 best ai homework helper tools to get instant homework help, 10 best ai humanizers to humanize ai text with ease, sla network: benefits, advantages, satisfaction of both parties to the contract, related posts.

How To Connect Powerpoint To Projector

How To Use Pico Projector

How To View Slides Without A Projector
How To Split Screen On Projector
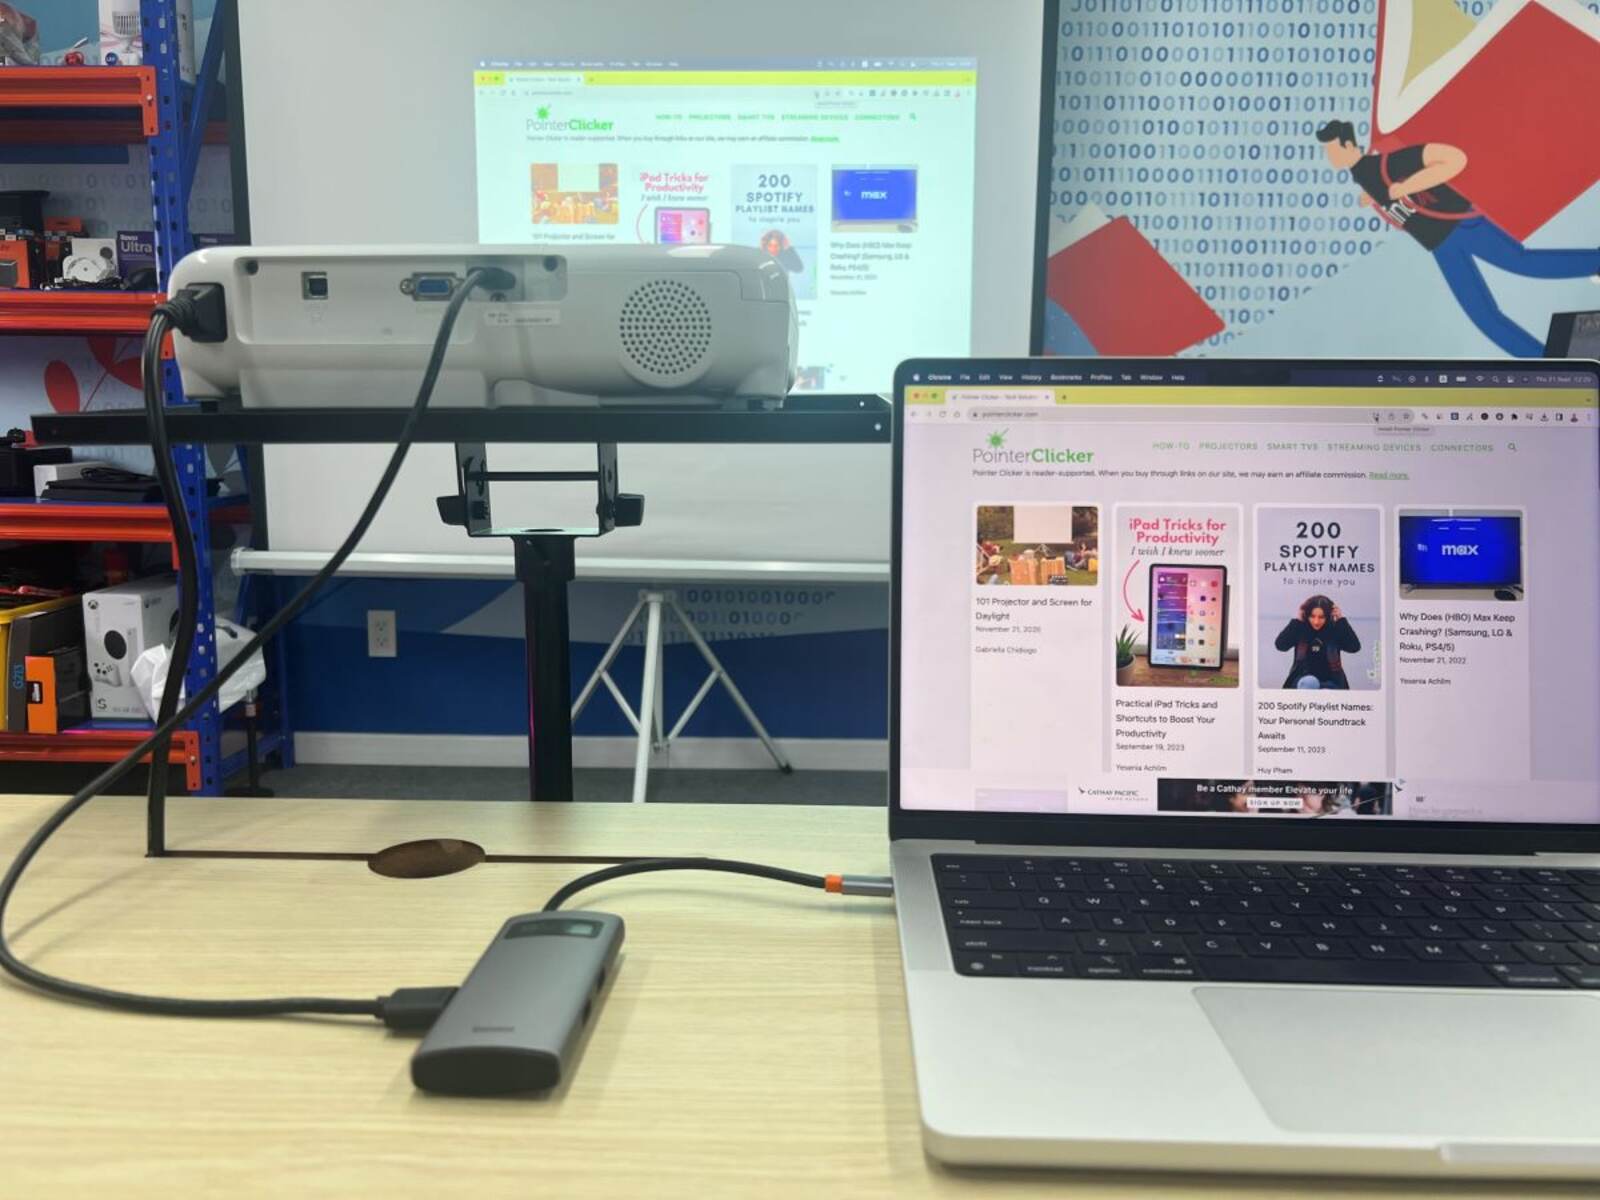
How To Use Projector With Macbook
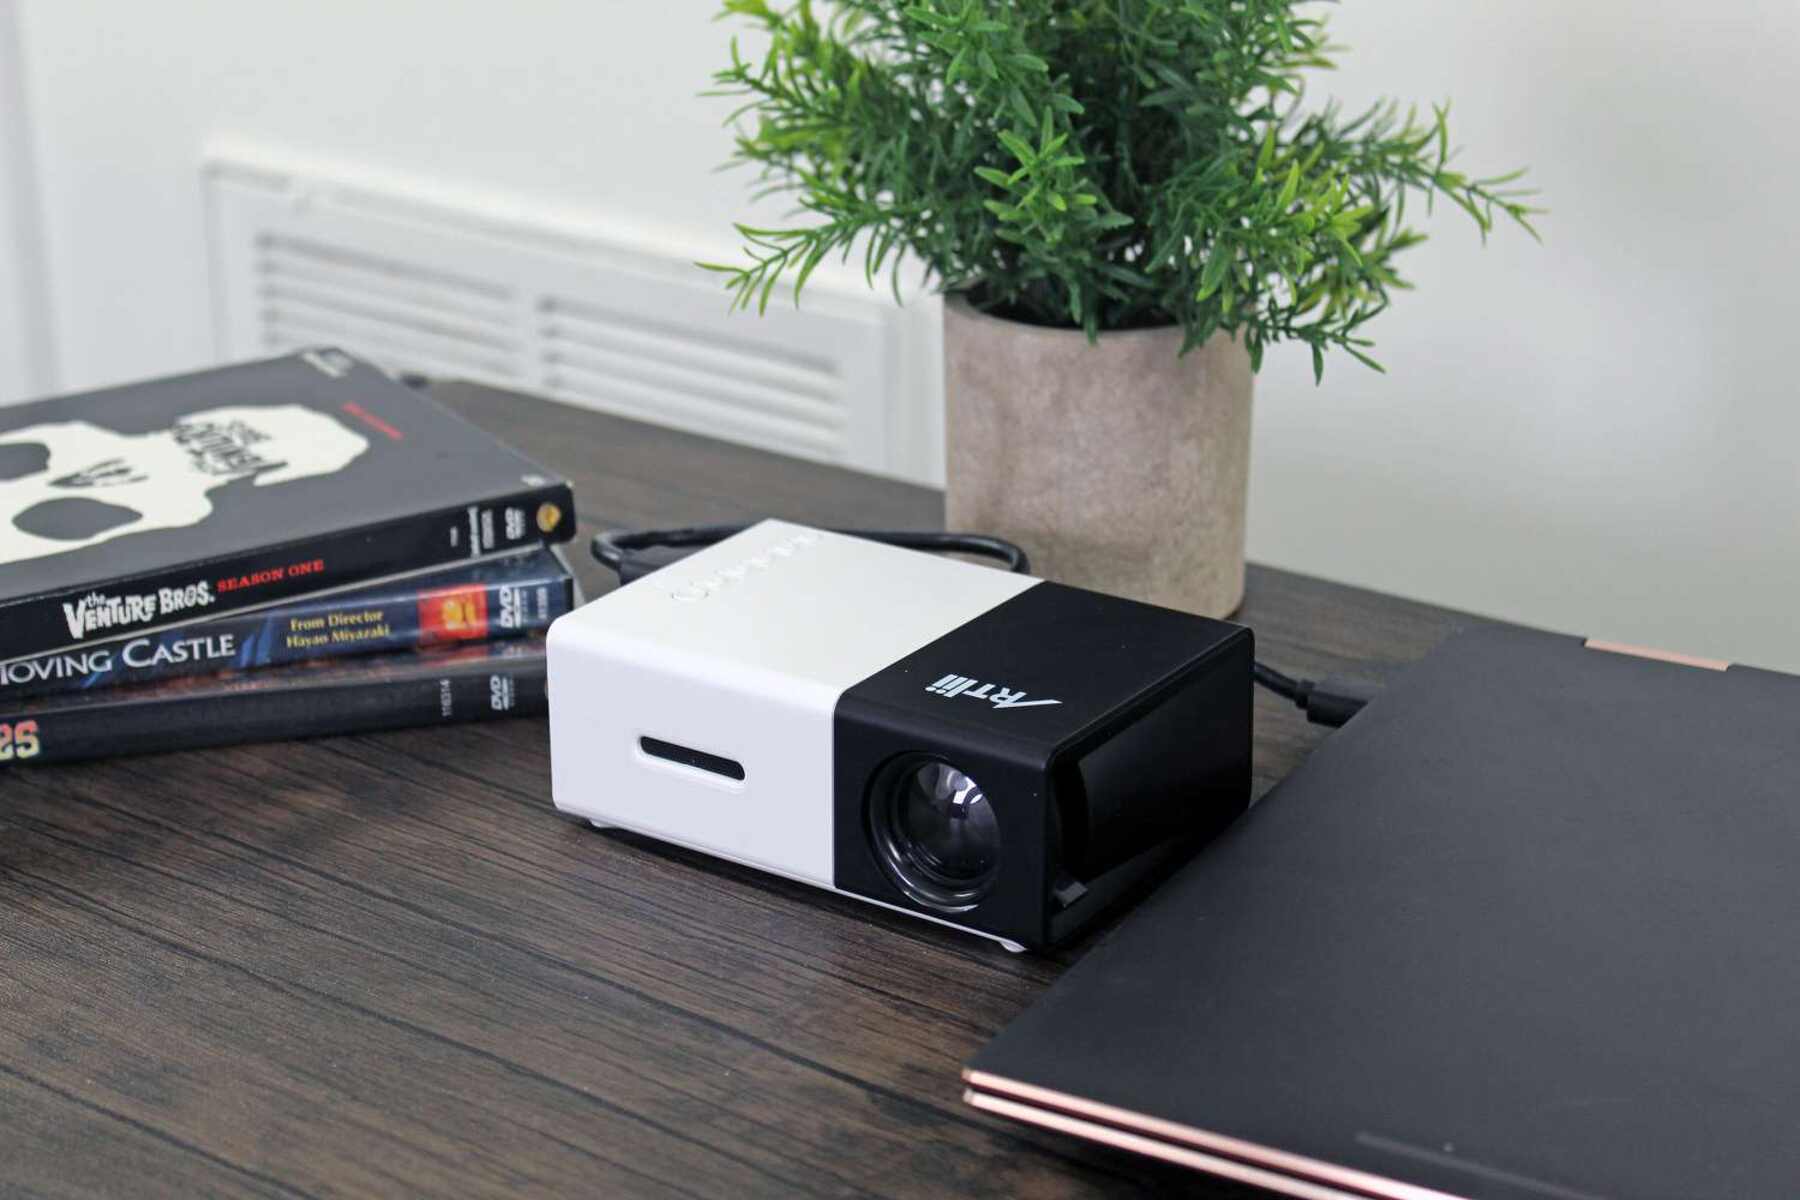
How To Connect Projector To Laptop Using USB
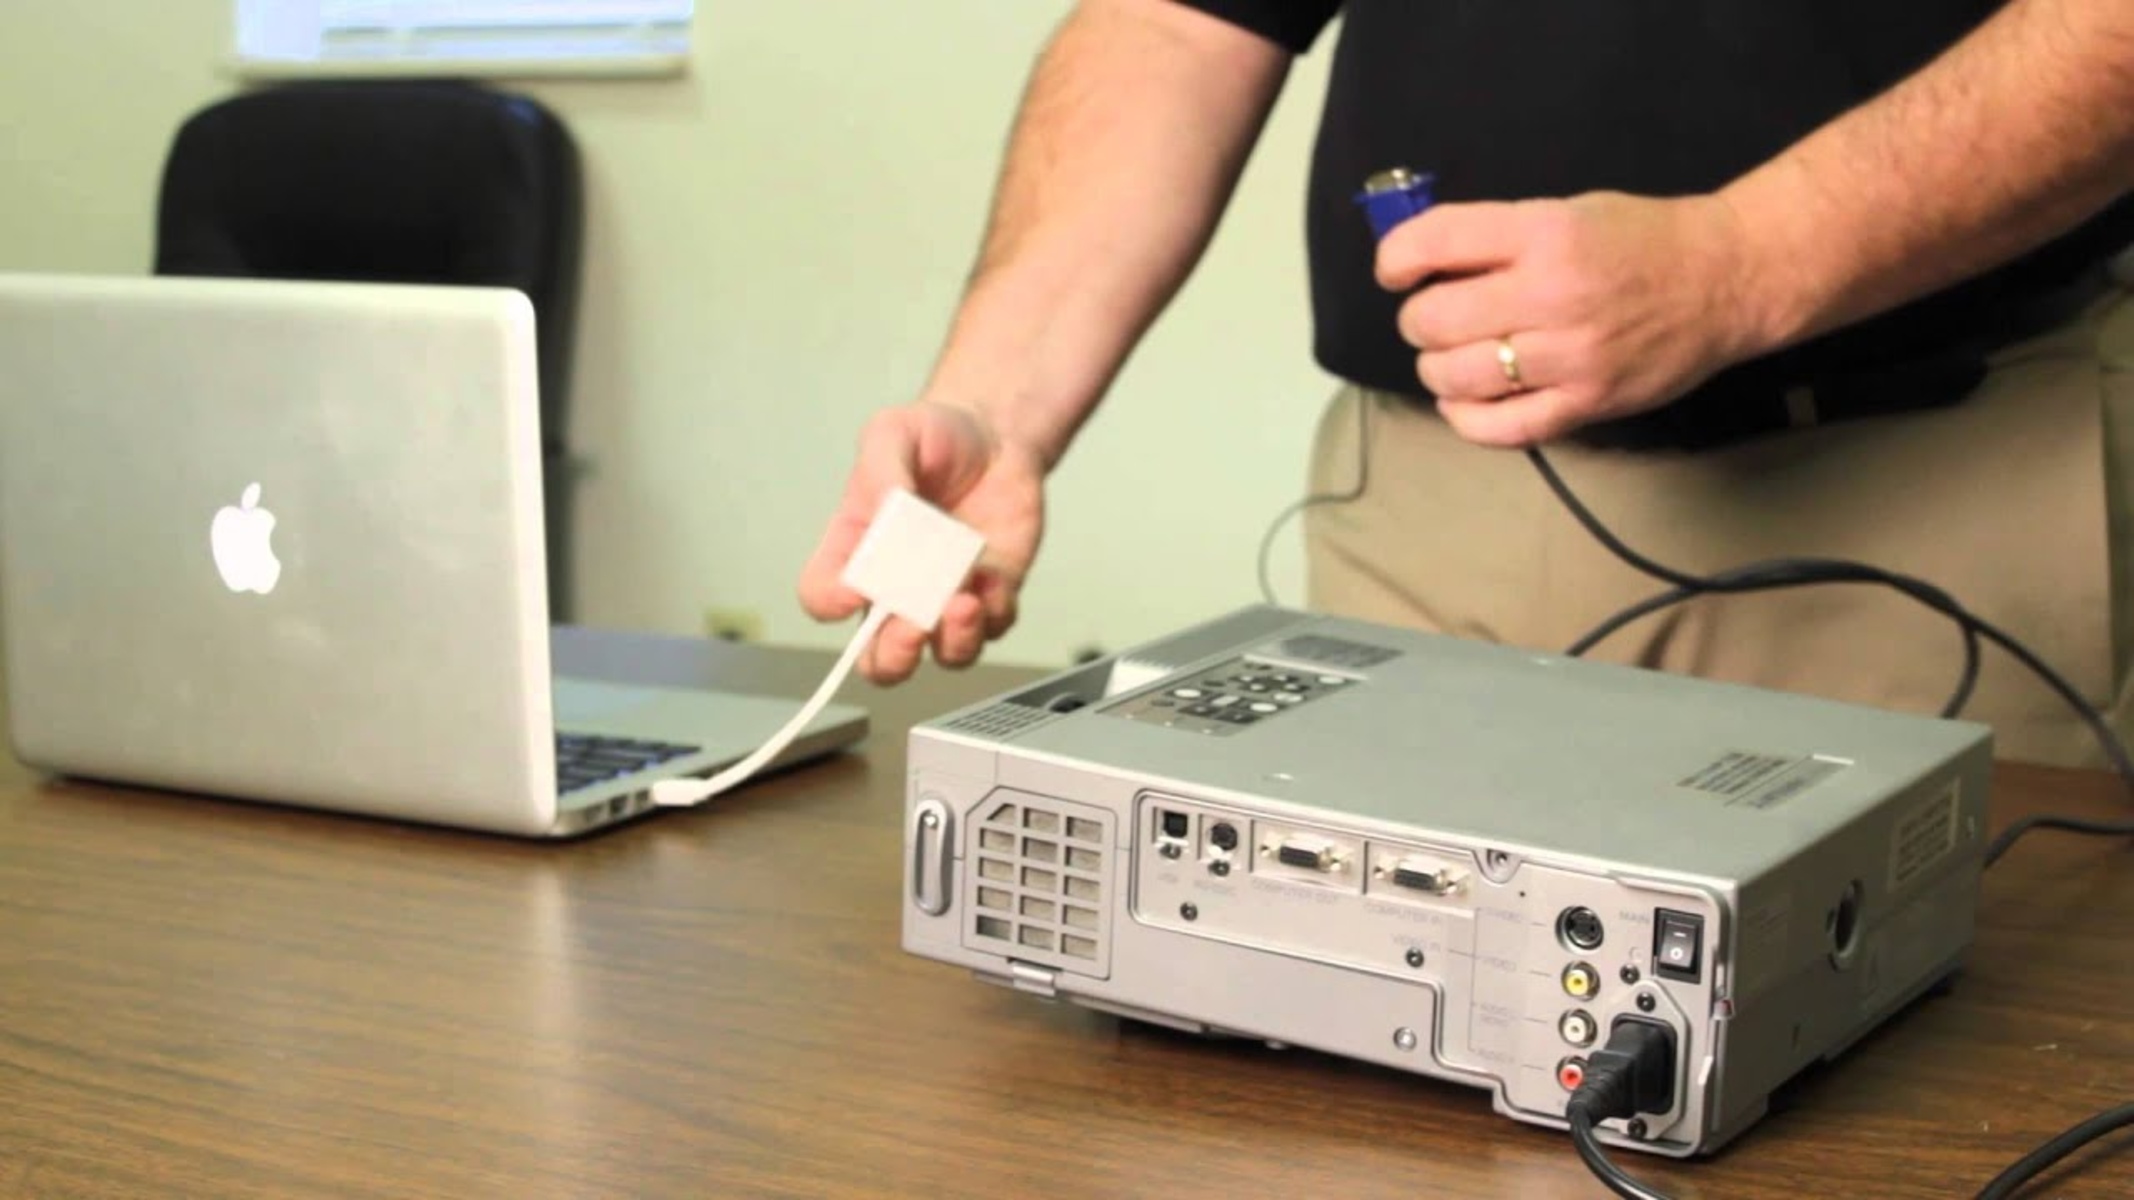
How To Connect Macbook To Projector With HDMI

How To Use Pvo Projector With IPhone
Recent stories.

How to Find the Best Midjourney Alternative in 2024: A Guide to AI Anime Generators

How to Know When it’s the Right Time to Buy Bitcoin

How to Sell Counter-Strike 2 Skins Instantly? A Comprehensive Guide

10 Proven Ways For Online Gamers To Avoid Cyber Attacks And Scams

- Privacy Overview
- Strictly Necessary Cookies
This website uses cookies so that we can provide you with the best user experience possible. Cookie information is stored in your browser and performs functions such as recognising you when you return to our website and helping our team to understand which sections of the website you find most interesting and useful.
Strictly Necessary Cookie should be enabled at all times so that we can save your preferences for cookie settings.
If you disable this cookie, we will not be able to save your preferences. This means that every time you visit this website you will need to enable or disable cookies again.

- SUGGESTED TOPICS
- The Magazine
- Newsletters
- Managing Yourself
- Managing Teams
- Work-life Balance
- The Big Idea
- Data & Visuals
- Reading Lists
- Case Selections
- HBR Learning
- Topic Feeds
- Account Settings
- Email Preferences
How to Make a “Good” Presentation “Great”
- Guy Kawasaki

Remember: Less is more.
A strong presentation is so much more than information pasted onto a series of slides with fancy backgrounds. Whether you’re pitching an idea, reporting market research, or sharing something else, a great presentation can give you a competitive advantage, and be a powerful tool when aiming to persuade, educate, or inspire others. Here are some unique elements that make a presentation stand out.
- Fonts: Sans Serif fonts such as Helvetica or Arial are preferred for their clean lines, which make them easy to digest at various sizes and distances. Limit the number of font styles to two: one for headings and another for body text, to avoid visual confusion or distractions.
- Colors: Colors can evoke emotions and highlight critical points, but their overuse can lead to a cluttered and confusing presentation. A limited palette of two to three main colors, complemented by a simple background, can help you draw attention to key elements without overwhelming the audience.
- Pictures: Pictures can communicate complex ideas quickly and memorably but choosing the right images is key. Images or pictures should be big (perhaps 20-25% of the page), bold, and have a clear purpose that complements the slide’s text.
- Layout: Don’t overcrowd your slides with too much information. When in doubt, adhere to the principle of simplicity, and aim for a clean and uncluttered layout with plenty of white space around text and images. Think phrases and bullets, not sentences.
As an intern or early career professional, chances are that you’ll be tasked with making or giving a presentation in the near future. Whether you’re pitching an idea, reporting market research, or sharing something else, a great presentation can give you a competitive advantage, and be a powerful tool when aiming to persuade, educate, or inspire others.
- Guy Kawasaki is the chief evangelist at Canva and was the former chief evangelist at Apple. Guy is the author of 16 books including Think Remarkable : 9 Paths to Transform Your Life and Make a Difference.
Partner Center
- Create and open Article
- Share and collaborate Article
- Add and format Article
- Design a presentation Article
- Give your presentation Article

Create and open
Create and open a presentation in powerpoint for the web.
Starting in PowerPoint for the web means your files are automatically saved in OneDrive. This lets you share the files with co-workers and start collaborating immediately. And when you need more functionality, you can work on the presentation together in the PowerPoint desktop app and all of your changes will be saved online.
To convert your Google Slides to PowerPoint, go to File > Download > Microsoft PowerPoint (.pptx). Then open the file in PowerPoint. See more at Get started with Sheets .
Create, open, and name a presentation
Go to powerpoint.office.com .

Select New blank presentation , open a Recent file, or select one of the themes .
To name the presentation, select the title at the top and type a name.
If you need to rename the presentation, select the title and retype the name.

Add a slide
Select the slide you want your new slide to follow.
Select Home > New Slide .
Select Layout and the you type want from the drop-down.

When working in PowerPoint for the web, your work is saved every few seconds. You can select File > Save a Copy to create a duplicate copy in another location.
Or choose File > Download As to save a copy to your device.

When you're online, AutoSave is always on and saves your changes as you work. If at any time you lose your Internet connection or turn it off, any pending changes will sync as soon as you’re back online.
Select Tell me what you want to do at the top of the screen.
Type what you want to do.
Select one of the search results.

Need more help?
Want more options.
Explore subscription benefits, browse training courses, learn how to secure your device, and more.

Microsoft 365 subscription benefits

Microsoft 365 training

Microsoft security

Accessibility center
Communities help you ask and answer questions, give feedback, and hear from experts with rich knowledge.

Ask the Microsoft Community

Microsoft Tech Community

Windows Insiders
Microsoft 365 Insiders
Was this information helpful?
Thank you for your feedback.

IMAGES
VIDEO
COMMENTS
Deliver your presentation on two monitors. On the Slide Show tab, in the Set Up group, click Set Up Slide Show. In the Set Up Show dialog box, choose the options that you want, and then click OK. If you choose Automatic, PowerPoint will display speaker notes on the laptop monitor, if available. Otherwise, PowerPoint will display speaker notes ...
Start presenting. On the Slide Show tab, in the Start Slide Show group, select From Beginning. Now, if you are working with PowerPoint on a single monitor and you want to display Presenter view, in Slide Show view, on the control bar at the bottom left, select , and then Show Presenter View.
This feature is like a cockpit for giving presentations. You'll keep all the most important controls front and center while presenting. PowerPoint Presenter View gives you at least four essential tools that make presenting your slideshow more comfortable:. In Presenter View, this display keeps your speaker notes in view to reference while speaking. ...
In this video, you'll learn the basics of presenting your slide show in PowerPoint 2019, PowerPoint 2016, and Office 365. Visit https://edu.gcfglobal.org/en/...
Spacebar or Right Arrow Button: Go to the next slide in the presentation. Left Arrow Button: Go to the previous slide in the presentation. Esc: End the show. W: Hide your current slide and display a white screen. Press the same key again to bring back the slide's content. B: Hide your current slide and display a black screen. Revert back to the ...
A good presentation needs two fonts: a serif and sans-serif. Use one for the headlines and one for body text, lists, and the like. Keep it simple. Veranda, Helvetica, Arial, and even Times New Roman are safe choices. Stick with the classics and it's hard to botch this one too badly.
If you want to customize your Presenter View experience, follow these steps: On the 'Slide Show' tab, click 'Set Up Slide Show.'. Under 'Multiple Monitors,' select the 'Use Presenter View' checkbox. If you're using a single monitor, select the 'Display slide show on' option and choose your primary monitor.
Getting Started. 1. Open PowerPoint and click 'New.'. If a page with templates doesn't automatically open, go to the top left pane of your screen and click New. If you've already created a presentation, select Open then double-click the icon to open the existing file. Image Source.
Step 1: Plug in your HDMI cable into your laptop's HDMI Port (as shown below). Step 2: Connect the other end of the cable to your TV's HDMI port. Usually, there are two HDMI ports, one located on the side and the other behind the TV. Step 3: Switch to 'HDMI' from your TV's Remote.
Open PowerPoint > Click on Slide Show tab > uncheck the box 'Use Presenter View' then change the monitor to your desktop in the option 'Show Presentation on'. If the issue still persist then, try to post your query in office forums and see if that helps. Follow the link below to do the same.
Presentation tools and features. PowerPoint provides convenient tools you can use while presenting your slide show. For example, you can change your mouse pointer to a pen or highlighter to draw attention to items in your slides. In addition, you can jump around to slides in your presentation or access other programs from your taskbar if needed.. To show the taskbar:
3. Choose a data visualization option. One key to data visualization in PowerPoint is being aware of your choices and picking the best one for your needs. This depends on the type of data you're trying to showcase and your story. When showcasing growth over time, you won't use a spider chart but a line chart.
One person. Sharing and real-time collaboration. PowerPoint for the web and PowerPoint desktop app for offline use. Premium templates, fonts, icons, and stickers with thousands of options to choose from. Dictation, voice commands, and transcription. Advanced spelling and grammar, in-app learning tips, use in 20+ languages, and more.
Step 4: Select Presentation Display Orientation. By default PowerPoint always assumes that your presentation will be displayed with a landscape (horizontal) orientation on your TV screen. To specify portrait (vertical) orientation for your PowerPoint presentation select the DESIGN tab and click Slide Size.
In PowerPoint 2010, you can do this by clicking the File button and selecting Options; in PowerPoint 2007, click the Office orb and select Options. Select Add-Ins on the left side, then select PowerPoint Add-ins from the Manage menu, and click Go. This will open the PowerPoint Add-ins window. Click Add New to add the LiveWeb addin we downloaded ...
It's not enough to just copy and paste your data into a presentation slide. Luckily, PowerPoint has a lot of smart data visualization tools! You just need to put in your data, and PowerPoint will work it up for you. 1. Collect your data. First things first, and that is to have all your information ready.
Navigate to the display settings: Right-click on the desktop, select "Display settings" on Windows, or go to "System Preferences" and click on "Displays" on macOS. Choose the display mode: In the display settings, look for the "Multiple displays" or "Display mode" option. Select the mode that aligns with your preference.
When in doubt, adhere to the principle of simplicity, and aim for a clean and uncluttered layout with plenty of white space around text and images. Think phrases and bullets, not sentences. As an ...
And when you need more functionality, you can work on the presentation together in the PowerPoint desktop app and all of your changes will be saved online. To convert your Google Slides to PowerPoint, go to File > Download > Microsoft PowerPoint (.pptx). Then open the file in PowerPoint. See more at Get started with Sheets.