

Insert and update Excel data in PowerPoint
If you are using PowerPoint 2013 or a newer version, you can link data from a saved Excel worksheet to your PowerPoint presentation. That way, if data in the worksheet changes, you can easily update it in your PowerPoint presentation.
Link an entire Excel worksheet to PowerPoint
In PowerPoint, on the Insert tab, click or tap Object .

In the Insert Object dialog box, select Create from file .

Click or tap Browse , and in the Browse box, find the Excel workbook with the data you want to insert and link to.
Before you close the Insert Object box, select Link , and click OK .

Important: The linked object in your presentation displays all the data from the active, top worksheet in the linked Excel workbook. When you save the Excel workbook, make sure the worksheet you want in your presentation is the one you see when you first open the workbook.
Link a section of data in Excel to PowerPoint
In Excel, open the saved workbook with the data you want to insert and link to.
Drag over the area of data you want to link to in PowerPoint, and on the Home tab, click or tap Copy .
In PowerPoint, click the slide where you want to paste the copied worksheet data.
On the Home tab, click the arrow below Paste , and select Paste Special .

In the Paste Special box, click Paste link , and then, under As , select Microsoft Excel Worksheet Object .

Update linked Excel data in PowerPoint
After you've used one of the methods described above to insert linked Excel data into a presentation, then refreshing the presentation to stay up to date with data changes is easy to do:
In PowerPoint, right-click the data and select Update Link .
Copy and paste (unlinked) Excel data in PowerPoint
In this case, the Excel data will not be linked to your PowerPoint presentation. You copy the data from an Excel worksheet and paste it into your presentation. The worksheet does not send automatic updates to PowerPoint.
In Excel, open the workbook with the data you want to copy.
Drag over the area of data you want to copy, and on the Home tab, click or tap Copy .
On the Home tab, in the Clipboard group, click the arrow below Paste .
Under Paste Options , pick one of the following. Move the mouse pointer over each Paste option to see a preview of what it would look like.
Copy an Excel chart to another Office program
Mail merge in PowerPoint

Need more help?
Want more options.
Explore subscription benefits, browse training courses, learn how to secure your device, and more.

Microsoft 365 subscription benefits

Microsoft 365 training

Microsoft security

Accessibility center
Communities help you ask and answer questions, give feedback, and hear from experts with rich knowledge.

Ask the Microsoft Community

Microsoft Tech Community

Windows Insiders
Microsoft 365 Insiders
Was this information helpful?
Thank you for your feedback.
How-To Geek
How to link or embed an excel worksheet in a powerpoint presentation.
Sometimes, you want to include the data on an Excel spreadsheet in a Microsoft PowerPoint presentation.
Quick Links
What's the difference between linking and embedding, how to link or embed an excel worksheet in microsoft powerpoint.
Sometimes, you want to include the data on an Excel spreadsheet in a Microsoft PowerPoint presentation. There are a couple of ways to do this, depending on whether or not you want to maintain a connection with the source Excel sheet. Let's take a look.
You actually have three options for including a spreadsheet in a PowerPoint presentation. The first is by simply copying that data from the spreadsheet, and then pasting it into the target document. This works okay, but all it really does is convert the data to a simple table in PowerPoint. You can use PowerPoint's basic table formatting tools on it, but you can't use any of Excel's features after the conversion.
While that can be useful sometimes, your other two options---linking and embedding---are much more powerful, and are what we're going to show you how to do in this article. Both are pretty similar, in that you end up inserting an actual Excel spreadsheet in your target presentation. It will look like an Excel sheet, and you can use Excel's tools to manipulate it. The difference comes in how these two options treat their connection to that original Excel spreadsheet:
- If you link an Excel worksheet in a presentation, the target presentation and the original Excel sheet maintain a connection. If you update the Excel file, those updates get automatically reflected in the target presentation.
- If you embed an Excel worksheet in a presentation, that connection is broken. Updating the original Excel sheet does not automatically update the data in the target presentation.
There are advantages to both methods, of course. One advantage of linking a document (other than maintaining the connection) is that it keeps your PowerPoint presentation's file size down, because the data is mostly still stored in the Excel sheet and only displayed in PowerPoint. One disadvantage is that the original spreadsheet file needs to stay in the same location. If it doesn't, you'll have to link it again. And since it relies on the link to the original spreadsheet, it's not so useful if you need to distribute the presentation to people who don't have access to that location.
Embedding that data, on the other hand, increases the size of presentation, because all that Excel data is actually embedded into the PowerPoint file. There are some distinct advantages to embedding, though. For example, if you're distributing that presentation to people who might not have access to the original Excel sheet, or if the presentation needs to show that Excel sheet at a specific point in time (rather than getting updated), embedding (and breaking the connection to the original sheet) makes more sense.
So, with all that in mind, let's take a look at how to link and embed an Excel Sheet in Microsoft PowerPoint.
Linking or embedding an Excel worksheet into a PowerPoint presentation is actually pretty straightforward, and the process for doing either is almost identical. Start by opening both the Excel worksheet and the PowerPoint presentation you want to edit at the same time.
In Excel, select the cells you want to link or embed. If you would like to link or embed the entire worksheet, click on the box at the juncture of the rows and columns in the top left-hand corner to select the whole sheet.
Copy those cells by pressing CTRL+C in Windows or Command+C in macOS. You can also right-click any selected cell, and then choose the "Copy" option on the context menu.
Now, switch to your PowerPoint presentation and click to place the insertion point where you would like the linked or embedded material to go. On Home tab of the Ribbon, click the down arrow beneath the "Paste" button, and then choose the "Paste Special" command from the dropdown menu.
This opens the Paste Special window. And it's here where you'll find the only functional different in the processes of linking or embedding a file.
If you want to embed your spreadsheet, choose the "Paste" option over on the left. If you want to link your spreadsheet, choose the "Paste Link" option instead. Seriously, that's it. This process is otherwise identical.
Whichever option you choose, you'll next select the "Microsoft Excel Worksheet Object" in the box to the right, and then click the "OK" button.
And you'll see your Excel sheet (or the cells you selected) in your PowerPoint presentation.
If you linked the Excel data, you can't edit it directly in PowerPoint, but you can double-click anywhere on it to open the original spreadsheet file. And any updates you make to that original spreadsheet are then reflected in your PowerPoint presentation.
If you embedded the Excel data, you can edit it directly in PowerPoint. Double-click anywhere in the spreadsheet and you'll stay in the same PowerPoint window, but the PowerPoint Ribbon gets replaced by the Excel Ribbon and you can access all the Excel functionality. It's kind of cool.
And when you want to stop editing the spreadsheet and go back to your PowerPoint controls, just click anywhere outside the spreadsheet.
- PRO Courses Guides New Tech Help Pro Expert Videos About wikiHow Pro Upgrade Sign In
- EDIT Edit this Article
- EXPLORE Tech Help Pro About Us Random Article Quizzes Request a New Article Community Dashboard This Or That Game Popular Categories Arts and Entertainment Artwork Books Movies Computers and Electronics Computers Phone Skills Technology Hacks Health Men's Health Mental Health Women's Health Relationships Dating Love Relationship Issues Hobbies and Crafts Crafts Drawing Games Education & Communication Communication Skills Personal Development Studying Personal Care and Style Fashion Hair Care Personal Hygiene Youth Personal Care School Stuff Dating All Categories Arts and Entertainment Finance and Business Home and Garden Relationship Quizzes Cars & Other Vehicles Food and Entertaining Personal Care and Style Sports and Fitness Computers and Electronics Health Pets and Animals Travel Education & Communication Hobbies and Crafts Philosophy and Religion Work World Family Life Holidays and Traditions Relationships Youth
- Browse Articles
- Learn Something New
- Quizzes Hot
- This Or That Game New
- Train Your Brain
- Explore More
- Support wikiHow
- About wikiHow
- Log in / Sign up
- Computers and Electronics
- Microsoft Office
How to Link Excel to PowerPoint
Last Updated: March 29, 2019
wikiHow is a “wiki,” similar to Wikipedia, which means that many of our articles are co-written by multiple authors. To create this article, volunteer authors worked to edit and improve it over time. This article has been viewed 93,270 times. Learn more...
Linking Excel files to a PowerPoint presentation lets you to present and display complex data on a much simpler form that people can understand. This is very handy when you’re conducting business or academic presentations. What’s more is that it also allows you to easily create tables on presentations and conveniently modify the table’s data without editing the presentation itself.
Opening the Files to Link

- If you choose to create a new document to link to a PowerPoint presentation, you need to save it first as an Excel file before you can do any kind of linking.

Linking the Files

- Click on Okay to finish inserting the file.
- The data table on your Excel file should now be displayed on the presentation slide. You can move it anywhere on the presentation and adjust its height and width by clicking and dragging its corner points across the slide.

Expert Q&A
- To link Excel documents to a PowerPoint presentation using older Microsoft Office suite, you need to resave the Excel file to a format that the old PowerPoint program can read. Thanks Helpful 2 Not Helpful 2
- You don’t need to save the Excel file first before the changes made are reflected on the presentation. The inserted object should mirror the change as you edit it. Thanks Helpful 0 Not Helpful 1

You Might Also Like

- http://office.microsoft.com/en-001/powerpoint-help/insert-a-linked-excel-chart-in-powerpoint-2010-HA101776651.aspx
About This Article
- Send fan mail to authors
Is this article up to date?

Featured Articles

Trending Articles

Watch Articles

- Terms of Use
- Privacy Policy
- Do Not Sell or Share My Info
- Not Selling Info
wikiHow Tech Help Pro:
Level up your tech skills and stay ahead of the curve
How to Link Excel Data to Your PowerPoint Presentation
You can easily update your PowerPoint file by linking your Excel spreadsheet data to your presentation. Here's how to do it.
You always want to have the latest data available if you're making a presentation. That way, you can ensure that your slides are accurate and reflect the realities on the ground.
However, there are times when you have to create a presentation as your colleagues are still compiling data. How can you ensure that any change they make in your Excel database reflects in your PowerPoint slide?
This is where the Paste link function comes in. Here's how to use it to ensure you always have the latest database and chart info on your presentation.
Linking Your Excel Data to PowerPoint
To link your Excel table to your presentation, it first must exist. If your colleagues haven't created it yet, you can create a placeholder table you can select and copy and then have your teammates update its content. Once you've made the initial data, follow the steps outlined below.
- Select the table you want to copy over to your presentation.
- Click on Copy or press Ctrl + C ( Command + C for Mac users).
- Open Microsoft Powerpoint .
- Open the file presentation you're working on if you already have one; otherwise, click on Blank Presentation .
- On a blank slide, go to the Home menu ribbon .
- Click on the down arrow under the paste icon .
- Choose Paste Special…
- In the Paste Special window, choose the Paste link radio button.
- Choose Microsoft Excel Worksheet Object .
Once done, you'll see the table you copied from Excel appear on your PowerPoint presentation.
However, you need to access the source Excel file to edit the content or formatting of the table you added. To do so, you can open the file where you saved it; or, you could double-click the table, and it will automatically open the source file.
Related: How to Organize Your Spreadsheets in Excel
Creating a Dynamic Chart
One of the easiest ways to visualize, compare, and analyze data and trends is to use charts. However, if you want to create a chart from the linked Excel table you just created, you must do it from its source file first. Once you've made the chart, you can copy and link it to your PowerPoint file. Here's how to do it.
- Select the chart you create in Excel.
- Go to the slide where you want to place the chart you just copied.
- On the Home menu ribbon , click on the down arrow under the paste icon .
- In the Paste Options , you can either choose Use Destination Theme & Link Data (L) or Keep Source Formatting & Link Data (F) . These are the third and fourth icons, respectively. The first option lets you use the theme you're using for your presentation, while the second one retains the look and feel of your source Excel file.
- Once you've pasted your chart, you can move it around to suit your needs.
Related: How to Create Powerful Graphs and Charts in Microsoft Excel
Updating Your Chart
Unfortunately, if you need to make changes to your chart, you'll have to open its source data in Excel. If you have access to the Excel file, you can just make changes directly, and it should automatically reflect on the PowerPoint chart.
If you don't have the Excel file open, you can right-click on the PowerPoint chart, then choose Edit Data > Edit Data in Excel in the context menu. You can also select Edit Data > Edit Data to open a small window if you only need to make minor changes.
In case the changes you make don't automatically reflect on the PowerPoint chart, you can manually update it. To do so, click on your chart, go to the Chart Design menu ribbon , then click on Refresh Data . This will pull in the latest information from the linked Excel file and update the information displayed on your PowerPoint chart.
Formatting Your Excel-Linked PowerPoint Chart
Unlike your Excel data table, any changes you make to the chart design in Excel will not affect your chart in PowerPoint. For this reason, you have to finalize the design and feel of the chart you're copying from in Excel before copying it over to your presentation.
Alternatively, you can make design changes to your PowerPoint chart independently. That means you can change how your presentation chart looks without affecting the chart you copied from Excel.
To make those changes, click on your chart, then go to the Chart Design menu ribbon . You can choose how the chart feels under Chart Styles . If you think that the current chart type doesn't fit well with your presentation, you can even change it.
Click on Change Chart Type to open a new window. From there, you can pick out any chart type you like in the left column.
Related: How to Make a Line Graph in Excel
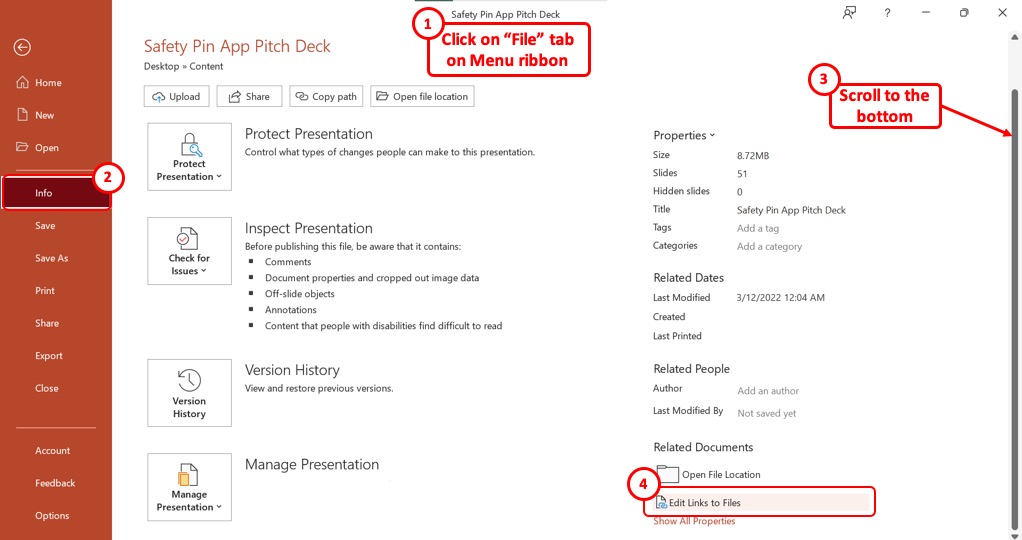
Finding Linked Files
Sometimes, you cannot remember if the tables and charts in your presentation are linked to an Excel file. Or it might be the case that you linked your PowerPoint data to a spreadsheet but can't remember where you saved it.
You can check the PowerPoint file directly if it's linked to any file and where these files are. To do so, click on File in the menu ribbon . In the full-screen menu that opens, go to Info on the left-hand column .
Under the Info window, on the right-hand column, go to Related Documents . Click on Open File Location to see where the linked files are saved.
If you moved the linked Excel files, click on Edit Links to Files . A Links window will appear showing each linked object and the file's location attached to it. The window gives you four choices:
- Update now : Update the object's data to the latest changes in the linked file.
- Open Source : Opens the linked Excel file.
- Change Source… : Opens a File Explorer window to change the linked file.
- Break Link : Removes the link from your presentation.
Always Stay Updated
This nifty feature first appeared in Microsoft Office 2010 and has since been available to all Office users. So, whenever you're making a presentation based on incomplete data, you no longer have to worry about updating it manually in the future.
By copying the Excel information and then pasting it into your presentation as a linked item, you're guaranteed to have the latest data updated into your PowerPoint file automatically.
Simon Sez IT
Online software training and video tutorials for Microsoft, Adobe & more
- Get Started
- Access 2021 Beginners
- Access 2021 Advanced
- Access 2019
- Access 2019 Advanced
- Access 2016
- Microsoft Excel 365 Intermediate
- Excel 365 for Beginners
- The Accountants Excel Toolkit
- Data Analytics in Excel
- Excel 2021 Advanced
- Microsoft 365
- PowerPoint 365 for Beginners
- Microsoft Word 365
- OneNote Desktop and Windows 10
- OneNote 2016
- Outlook 2021
- Outlook 2019
- Outlook 2016
- Outlook 2013
- Outlook 2010
- Introduction to Power Automate
- Power BI Essentials
- Power BI Training
- Power BI Intermediate
- PowerPoint 2021
- PowerPoint 2019
- PowerPoint 2016
- PowerPoint 2013
- Project 2021 Advanced
- Project 2021 Beginners
- Project for the Web
- Project 2019
- Project 2019 Advanced
- Microsoft Publisher 365
- Publisher 2013
- SharePoint Online: The Essential Guide (2023)
- SharePoint Online (2021)
- SharePoint Foundation 2013
- SharePoint Server 2013
- SharePoint Foundation 2010
- Microsoft Teams (2023 Update)
- Macros and VBA for Beginners
- VBA for Excel
- VBA Intermediate Training
- Microsoft Visio 2019
- Microsoft Visio 2010
- Windows 11 Advanced
- Windows 11 (2023 Update)
- Windows 10 (2020 Update)
- Word 2019 Advanced
- Dreamweaver CC
- Dreamweaver CS6
- Dreamweaver CS5
- Dreamweaver CS4
- Adobe Illustrator CC for Beginners
- Adobe InDesign CC for Beginners
- InDesign CS6
- InDesign CS5
- Adobe Photoshop CC Advanced
- Adobe Photoshop CC Intermediate
- Adobe Photoshop CC for Beginners
- Photoshop CS6
- Photoshop CS5
- Photoshop Elements 2022
- Photoshop Elements 2019
- Photoshop Elements 2018
- Photoshop Elements 15
- Photoshop Elements 14
- QuickBooks Desktop 2023
- QuickBooks Desktop Pro 2022
- QuickBooks Pro 2021
- QuickBooks Online Advanced
- QuickBooks Online
- AngularJS Crash Course
- Bootstrap Framework
- HTML/CSS Crash Course
- HTML5 Essentials
- Java for Beginners
- JavaScript for Beginners
- jQuery Crash Course
- MySQL for Beginners
- PHP for Beginners
- Advanced PHP Programming
- Matplotlib, Seaborn, and Plotly Python Libraries for Beginners
- Python Object-Oriented Programming
- Pandas for Beginners
- Introduction to Python
- SQL for Beginners
- SQL Server Integration Services for Beginners
- XML Crash Course
- Alteryx Advanced
- Introduction to Alteryx
- Introduction to Data Visualization and Business Intelligence Principles
- Analytical Methods for Effective Data Analysis
- Introduction to Analytics and Artificial Intelligence
- Financial Risk Management
- Financial Forecasting and Modeling
- Qlik Sense Advanced
- R Programming
- Tableau Desktop Advanced
- Tableau Desktop
- Advanced Agile Scrum
- Agile Scrum Training
- Generative AI and Cybersecurity
- Introduction to ChatGPT
- Artificial Intelligence Intermediate
- Asana for Employees and Managers
- Introduction to Asana
- Effective Communication Tactics for the Modern Workplace
- Introduction to Confluence
- HubSpot CRM for Beginners
- Introduction to Google Drive
- Gmail for Beginners and Pros
- Google Sheets for Beginners
- Getting Started in Jira
- Getting Started in Monday.com
- Cybersecurity Essentials: Stay Safe and Secure Online
- Cybersecurity Awareness Essentials
- Excel Efficiency and Data Management
- Excel Advanced Features and Customization
- Mastering PivotTables
- Microsoft Suite Productivity

How to Link Excel to PowerPoint? 3 Easy Ways
(Note: This tutorial on how to link Excel to PowerPoint is suitable for PowerPoint 2013 and later versions including Office 365 )
One of the most distinguishing features of Microsoft applications is their ability to support cross-platform functionalities. This means that you can import data from one platform to another and update them when the data in the original platform changes.
In addition to the above, Excel usually deals with large amounts of data. You will sometimes need to showcase these data in the form of PowerPoint presentations. When you create slides in PowerPoint, you will have to link the Excel sheet to PowerPoint slides for easy referral.
In this article, I will tell you how to link Excel to PowerPoint in 3 easy ways.
You’ll Learn:
Link an Entire Sheet
Link a section of the excel sheet, using paste special option and linking the data, advantages of linking excel to powerpoint.

Related Reads:
How to Add Notes to PowerPoint? 6 Easy Steps
How to Superscript in PowerPoint? (And Subscript) 3 Easy Ways
How to Save PowerPoint as Video? A Step-by-Step Guide
3 Different Ways to Link Excel to PowerPoint?
When presenting, you will sometimes need to provide a reference to a worksheet in Excel. In such cases, you can link an entire worksheet and open them whenever necessary.
Before we see how to link Excel to PowerPoint, make sure you have saved the Excel workbook from which you have selected the data.
- To link an entire sheet, first, open PowerPoint and navigate to the slide you want to link the sheet.
- Navigate to Insert . Under the Text section, click on Object .

- This opens the Insert Object dialog box. In the dialog box, select the Create from file option.
- Click on Browse . This opens the Browse dialog box. You can now search for the workbook you want to link. Select it and click Open .
- To link the Excel sheet with PowerPoint, check the checkbox for Link and click OK .

- This inserts the Excel workbook in the form of an image. You can double-click on the image to move to the original Excel file.

When you make any changes to the original Excel file, the changes also reflect in PowerPoint.
Note: When you link an entire sheet, make sure the content you want to link is in the default sheet, which pops up when you open the Excel file.
- Usually, any changes you make to the Excel sheet will automatically be reflected in your PowerPoint slide. However, if you find that the PowerPoint slide is not updated, right-click on the content and click on Update Link .

This immediately updates the slide with the data in the linked Excel sheet.
In some cases, you might not need to link the whole Excel sheet. In those cases, you can only link a section of the Excel sheet to the PowerPoint slides.
- To link a section of the worksheet, first, open the Excel file from which you want to import the data. Make sure the Excel workbook is saved before you import data.
- Now, select the data you want to link to the PowerPoint slides.
- We now have to copy the selected data. To copy the data, you can either right-click and click Copy , click on the Copy option from Home, or use the shortcut key Ctrl+C .

- Then, open PowerPoint and navigate to the slide where you want to insert the section of the Excel sheet.
- Navigate to Home . Under the Clipboard section, click on the dropdown from Paste and select Paste Special .

- This opens the Paste Special dialog box.
- Click on the Paste Link radio button. And in the As: section, select Microsoft Excel Worksheet Option .

- This inserts the selected section into the PowerPoint slide.

- You can then use the anchor points to move or resize the section inserted in the PowerPoint slide.
- In case the section inserted into the slide is not updated even after changing the data in Excel, right-click on the inserted section and click on the Update Link .
Another way to link Excel to PowerPoint is by using the Paste Special option and linking the data. This method is similar to the above-mentioned method. However, this method only inserts a section of the sheet and not the whole sheet.
- First, navigate to the Excel sheet and select the content you want to insert.
- Once you have selected the data, right-click and select Copy . Or, use the keyboard shortcut key Ctrl + C.
- After copying the data, open PowerPoint and navigate to the slide you want to insert the section to.
- Now, paste the copied data into the slide. Click on the dropdown from Paste in the Home main menu. Or, you can right-click on the slide and select any of the Paste Options .
- Use Destination Theme & Link Data: When you use this pasting option, PowerPoint copies the data from Excel and pastes the data into the slide with the default theme of the PowerPoint slide.
- Keep Source Formatting & Link Data: When you copy and paste data using this option, PowerPoint pastes the data onto the slide keeping the original format of the chart intact.

Remember that when you use any Paste Special Options which link Excel to PowerPoint, every change you make to the linked Excel sheet will be reflected in the PowerPoint slide.
If you want to change or edit any data, double-clicking on the slide like the above methods will not help you change the data and thereby, change the data in the slide. To change the data, right-click on the chart and select Edit Data .

Note: In some cases, you might not want the changes made to the Excel sheet reflected in the PowerPoint slides. In such cases, you can just copy and paste into the slides without linking them. Use the Paste Special options like Use Destination Theme & Embed Workbook , Keep Source Formatting, or Picture to copy the contents without linking them.
Excel is one of the most popular data-handling tools. On the other hand, PowerPoint is a very effective tool for presentations. To showcase Excel charts or data onto PowerPoint slides, the most sought method is to copy and paste contents from Excel to PowerPoint. However, linking Excel files to your PowerPoint slides has some advantages of its own:
- Linking Excel to PowerPoint makes it easy to update changes made in the Excel file onto the PowerPoint slide. This is very helpful in cases where there are numerous Excel files and you want to insert them into PowerPoint.
- Linking Excel to PowerPoint helps in easy references. That is, you won’t have to search through and navigate between folders to open and refer to the main source file. You can do it easily with just a click of the mouse.
- Linking eliminates the need for formatting every time you copy and paste the chart or data.
Frequently Asked Questions
How do i get the data to automatically update in powerpoint.
When you link Excel to PowerPoint using the methods we discussed, PowerPoint usually updates the data in it every time something changes in Excel. If not, you can right-click on the slide and select Update Link.
What is the easiest method to link Excel to PowerPoint?
Copying the data in Excel and using the Paste Special dialog box to select the Paste Link radio button and choosing the Microsoft Excel Worksheet Option is one of the easiest methods to link Excel to PowerPoint.
What are the ways to link a section of the Excel sheet in PowerPoint?
You can choose to link Excel to PowerPoint by navigating to Insert>Object>Create from file. Select the file you want to use and click on Link. Another way to link Excel to PowerPoint is by copying the data from Excel and pasting them onto PowerPoint using the paste special options like Use Destination Theme & Link Data or Keep Source Formatting & Link Data.
Closing Thoughts
Linking data in Excel to PowerPoint provides a sure way to keep the slides up-to-date without any manual intervention.
In this article, we saw how to link Excel to PowerPoint in 3 easy ways. If you want to link the whole worksheet, use the Object method. If you want to add a section of the sheet, use the Paste Special dialog box or use the Paste Options. Choose the method that suits your purpose the best.
If you need more high-quality PowerPoint guides, please check out our free resources center .

Simon Calder

Chris “Simon” Calder was working as a Project Manager in IT for one of Los Angeles’ most prestigious cultural institutions, LACMA.He taught himself to use Microsoft Project from a giant textbook and hated every moment of it. Online learning was in its infancy then, but he spotted an opportunity and made an online MS Project course - the rest, as they say, is history!
Similar Posts
Learn the QuickBooks Interface in QuickBooks Pro 2017
How to Create Pivot Tables in Microsoft Excel 2013 – Part 1
Excel Bootcamp for Employees (100+ Best Courses)
Using Project 2010 Work Breakdown Structure (WBS) Codes – Part 2
Google Sheets vs Excel—The Ultimate Showdown
The Excel FILTER Function
- Privacy Policy

ADVANCE YOUR CAREER
Gain instant access to 200+ courses. Earn a CERTIFICATE each time you complete a course.
How to Link Excel Data to Your PowerPoint Presentation

Integrating Excel data into your PowerPoint presentations can make them more informative, engaging, and impactful. By linking charts, graphs, and tables from Excel, you can efficiently present complex data sets without tedious manual updates.
This step-by-step guide will teach you how to seamlessly link Excel files to PowerPoint, using native linking features or third-party automation tools.
Why Link Excel Data to PowerPoint
Here are some key benefits of linking Excel data instead of manual copy-pasting:
- Automatically update data – When the source Excel data changes, linked items in PowerPoint can update automatically to reflect new numbers. This saves significant time compared to re-copying content across files.
- Retain formatting – Native linking options retain Excel formatting like colors, fonts, etc. This maintains data visualizations as intended.
- Interactivity – Linked Excel data is live, allowing interactions like sorting and filtering tables during presentations.
- File size – Linking avoids embedding large data files directly into PowerPoint, keeping file size small.
Prepare Your Excel Data
Before linking Excel data, prepare it to ensure a smooth integration:
- Organize data clearly into tables/ranges. Remove clutter and unrelated content.
- Format visualizations like charts to make an impact. Use data labels, titles, etc.
- Save the Excel file to a shared location that PowerPoint can access to link.
Link Entire Excel Sheets
To link a whole sheet:
- In PowerPoint, go to Insert > Object > Create from File .
- Browse and select your Excel file.
- Check Link to create a live connection and click OK .
This inserts the whole sheet as an object you can resize or double click to open the file.
Link Part of an Excel Sheet
To link a specific table or chart from Excel:
- In Excel, select the range/chart and copy it.
- In PowerPoint, select Paste Special > Paste Link .
- Pick Microsoft Excel Worksheet Object and click OK .
This inserts a live range or chart you can update later.
Embed Excel Items
To embed a snapshot instead of linking:
- In Excel, copy the desired table/chart.
- In PowerPoint, select Paste Special > Paste .
This inserts a static copy, independent of the Excel file.
Automate with Linking Tools
Third-party tools like Power-user or UpSlide simplify linking with just one-click exports of Excel charts and tables into PowerPoint. This automates updates and retains formatting.
Update Linked Content
To update linked items in PowerPoint after Excel data changes:
- Select the linked table/chart and go to Format tab.
- Click Refresh Data to pull updated numbers from Excel.
This automatically flows new data without needing to relink content.
Troubleshooting Tips
If linked data isn’t updating correctly:
- Check if Excel is open to another instance blocking access. Close other instances.
- Verify that PowerPoint can access the Excel file location. Move it to a shared folder if needed.
- Open the Excel file directly and review if numbers changed. Linked data can’t update in PowerPoint if source values are the same.
- Relink the content by deleting it in PowerPoint and re-pasting link.
Integrating Excel into PowerPoint is easy with native tools or plugins. Follow these best practices to efficiently present Excel data visually in your presentations.
About The Author
Vegaslide staff, related posts.

How to Use a Video as a Slide’s Background in Microsoft PowerPoint

How to Hide Audio Icon in PowerPoint Slide

How to Copy PDF to PowerPoint
How to Create a Curved Arrow in PowerPoint

Insert a Table in PowerPoint from Excel? [Step-by-Step!]
By: Author Shrot Katewa
![Insert a Table in PowerPoint from Excel? [Step-by-Step!]](https://artofpresentations.com/wp-content/uploads/2022/05/Featured-Image-Insert-table-from-Excel-to-Powerpoint.jpg "excel presentation in power point")
One of the conveniences that PowerPoint presentations provide is the ability to insert tables and make them dynamic in nature from any source, particularly Excel. This allows presenters to continue in the flow of their presentations without having to shuffle through multiple open windows.
To insert a table in PowerPoint from Excel, first, select and copy the table in Excel using the “Ctrl+C” shortcut. Then, open the specific slide in your presentation to paste the table. Use the shortcut “Ctrl+V” to paste the table in PowerPoint.
Does this seem too simple to imagine, doesn’t it? And, it is quite simple! However, to give you a few more options for inserting tables from Excel to PowerPoint, I have listed some methods below. Let’s get started.
1. Adding a Table from Excel to PowerPoint
The “Insert Table” feature in Microsoft PowerPoint allows you to only add new tables to your slide. However, you can add an existing table from a different source like Microsoft Excel also using the methods mentioned below.
To add a table from Excel to PowerPoint, you need to use the “Copy” and “Paste” features.
1.1 Method 1 – Using Copy and Paste (Unlinked)
Using the simple “Paste” feature in Microsoft PowerPoint, you can quickly add an Excel table to your slide without any hyperlinks. To do so, follow these steps.
Step-1: Click on the “Copy” option
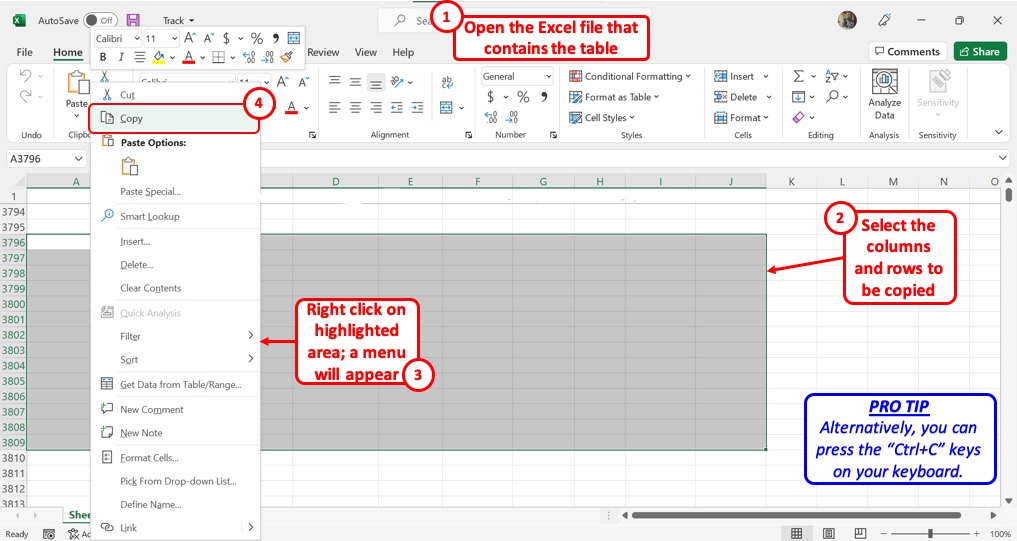
The first step is to open the Microsoft Excel worksheet from where you want to copy the table. Then select the preferred columns and rows to highlight them. “Right Click” on it and click on the “Copy” option. Alternatively, you can press the “Ctrl+C” keys on your keyboard.
Step-2: Click on the “Paste” option
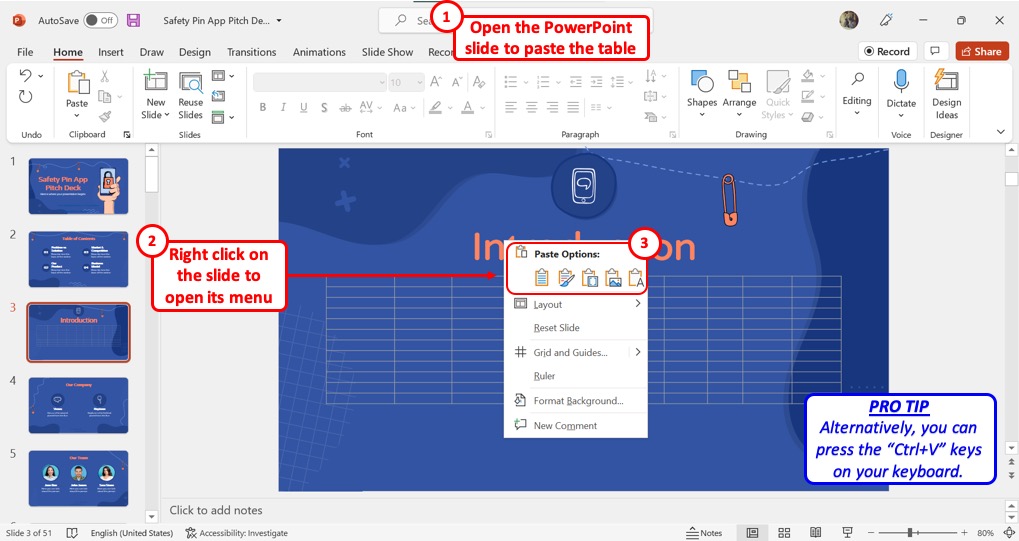
The next step is to “Right Click” on the PowerPoint slide where you want to add the table. In the right-click menu, click on your preferred option under “ Paste Options ” . You can alternatively press the “Ctrl+V” keys on your keyboard to paste the Excel table to your slide.
1.2 Method 2 – Using Paste Special
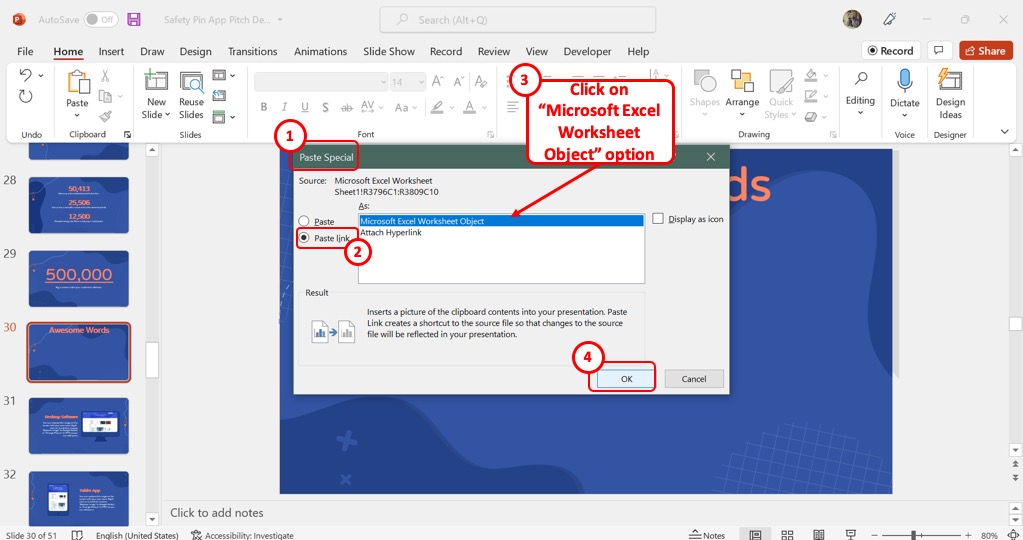
In Microsoft PowerPoint, the “ Paste Special ” dialog box offers options to paste the copied table in different special formats. To paste the Excel table with a hyperlink, follow these steps.
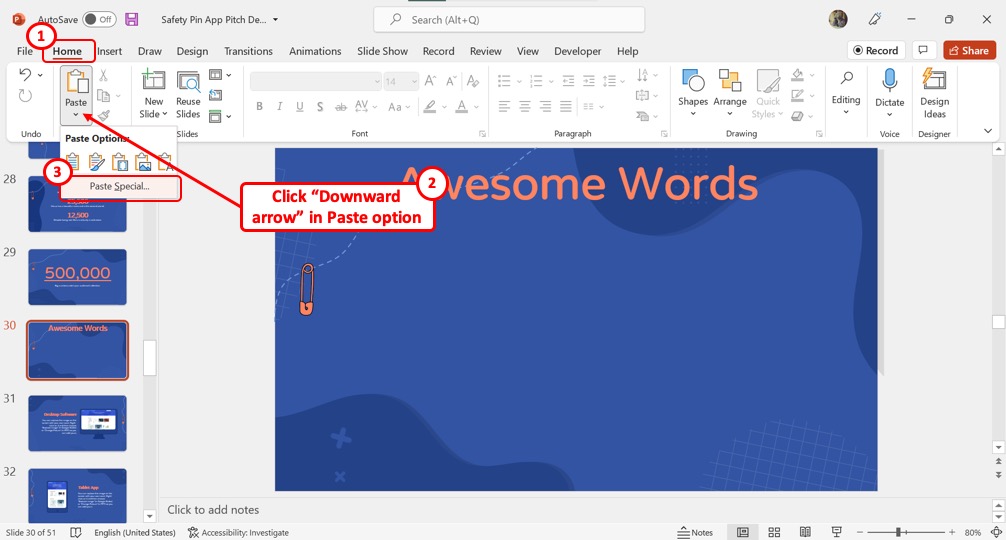
Step-1: Click on the “Paste Special” option
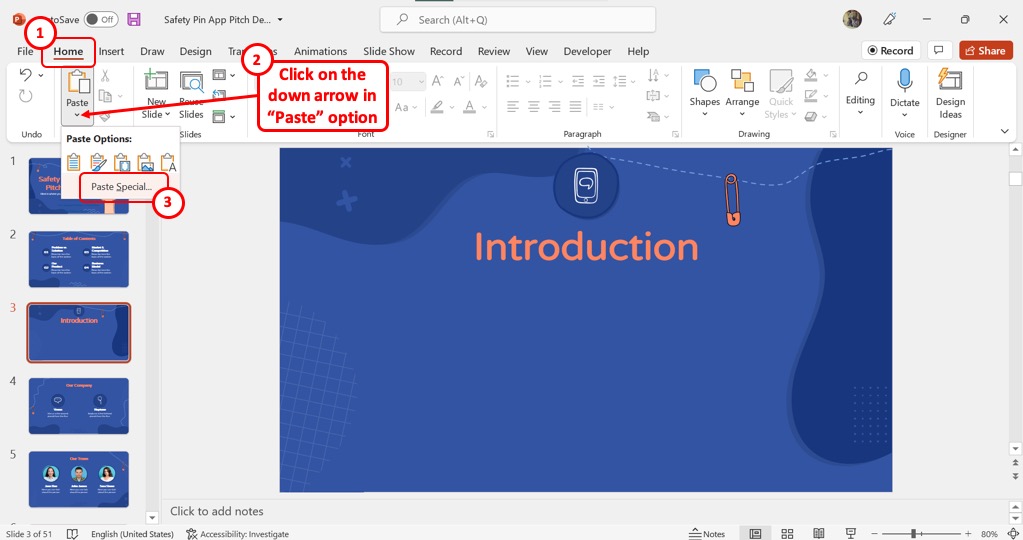
In the “Paste” group of the “Home” tab, click on the down arrow under the “Paste” icon that looks like a clipboard. Then click on the “Paste Special” option from the dropdown menu to launch a dialog.
Step-2: Click on the “Microsoft Excel Worksheet Object” option
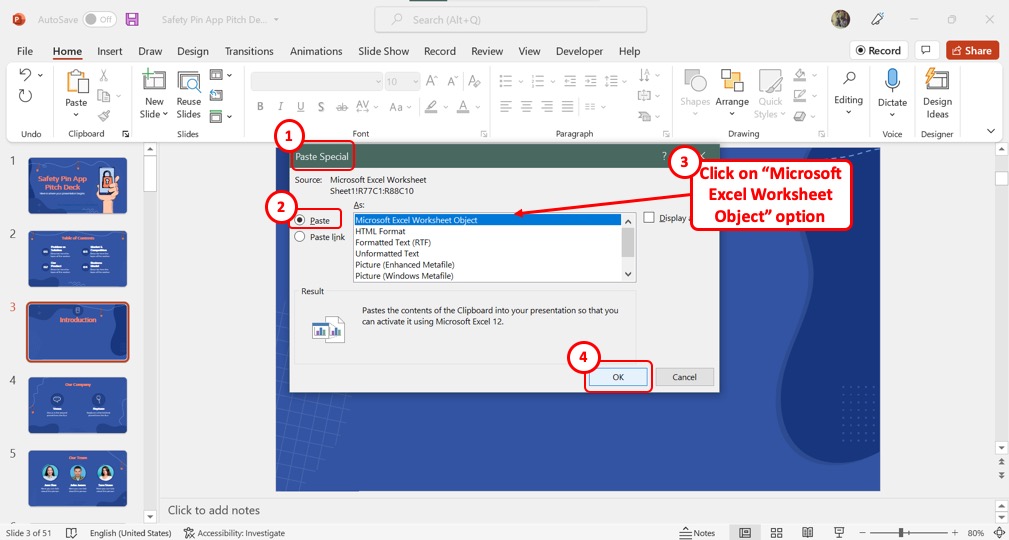
In the “ Paste Special ” dialog box, click on the “Paste” option from the left column. Then in the box in the middle of the dialog box, click on the “Microsoft Excel Worksheet Object” option.
Step-3: Click on the “OK” button Now all you have to do is click on the “OK” button at the bottom of the “Paste Special” dialog box to paste the Excel table in your PowerPoint slide (shown above).
1.3 Method 3 – Using the Insert Object Option (Entire Excel Sheet)
Microsoft PowerPoint also allows you to paste the entire Excel sheet into your presentation slide. For this, you have to use the “ Insert ” tab. Follow the 4 steps below:
Step-1: Click on the “Insert” tab
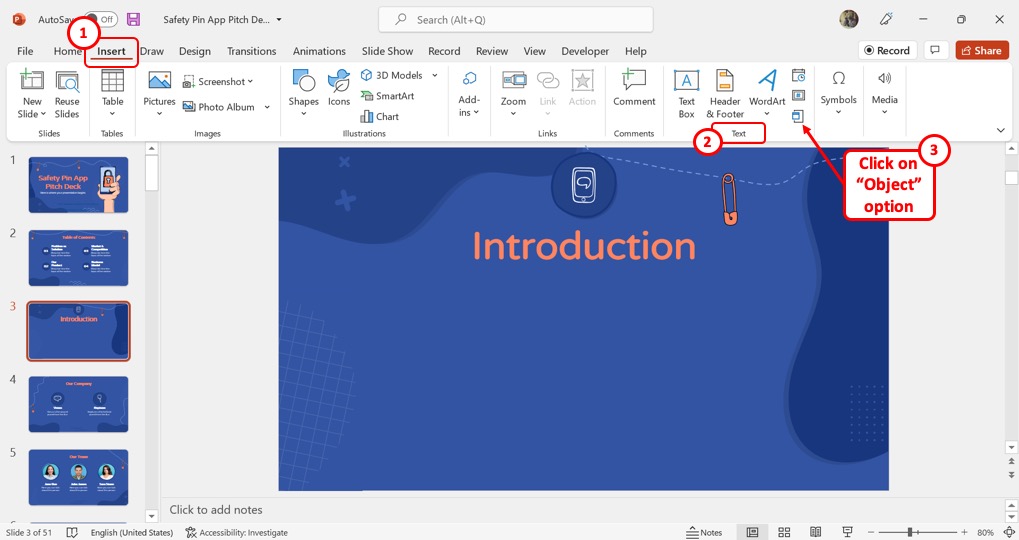
In the menu ribbon located at the top of the screen, click on the “Insert” tab. Under the “Insert” tab, click on the “Object” option which is the last icon in the “Text” group.
Step-2: Click on the “Create File” option
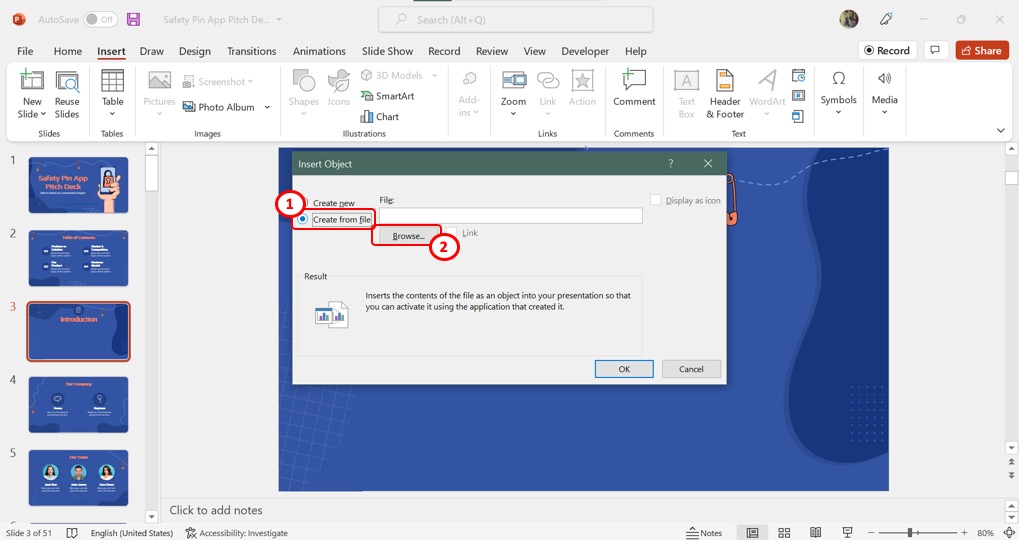
In the left column of the “Insert Object” dialog box, click on the “Create from file” option. Now you can select an Excel sheet to add to the slide.
Step-3: Click on the “Browse” button
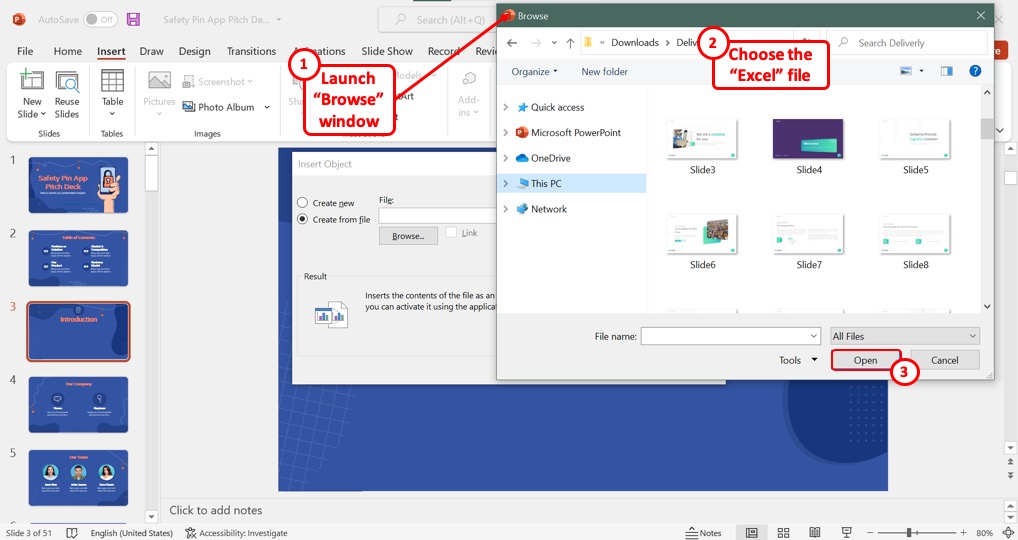
Click on the “Browse” button in the “Insert Object” dialog box to launch the “Browse” window. Select the Excel file and click on the “Open” button at the bottom of the “Browse” window (shown above).
Step-4: Click on the “Link” option
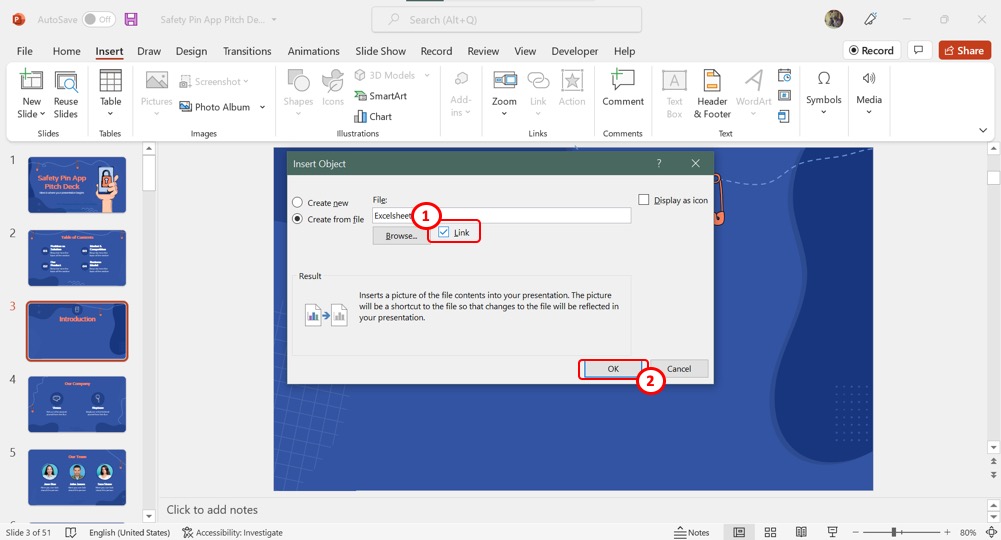
In the “Insert Object” dialog box, click on the “Link” option to hyperlink the Excel table. Click on the “OK” button at the bottom of the dialog box to finish the process.
2. How to Copy Tables from Excel to PowerPoint with Formatting?
When you copy a table from Excel, you can paste it into Microsoft PowerPoint in multiple different formats. For easy editing access, you can use the “Keep Source Formatting” feature.
You can also paste the table as a picture to avoid any accidental edits to the table.
2.1 Method 1 – Using Keep Source Formatting Option
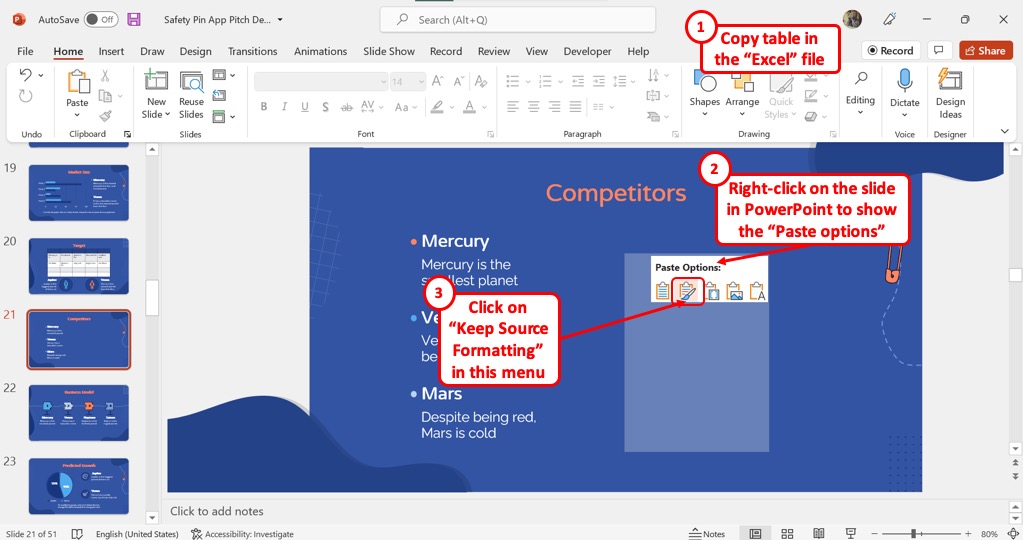
To paste the Excel table as an editable object, you can use the “Keep Source Formatting” option. All you have to do is “Right Click” on the slide and select the “Keep Source Formatting” option under “Paste Options” in the right-click menu. The table in PowerPoint will retain the formatting from Excel.
2.2 Method 2 – Paste as an Image
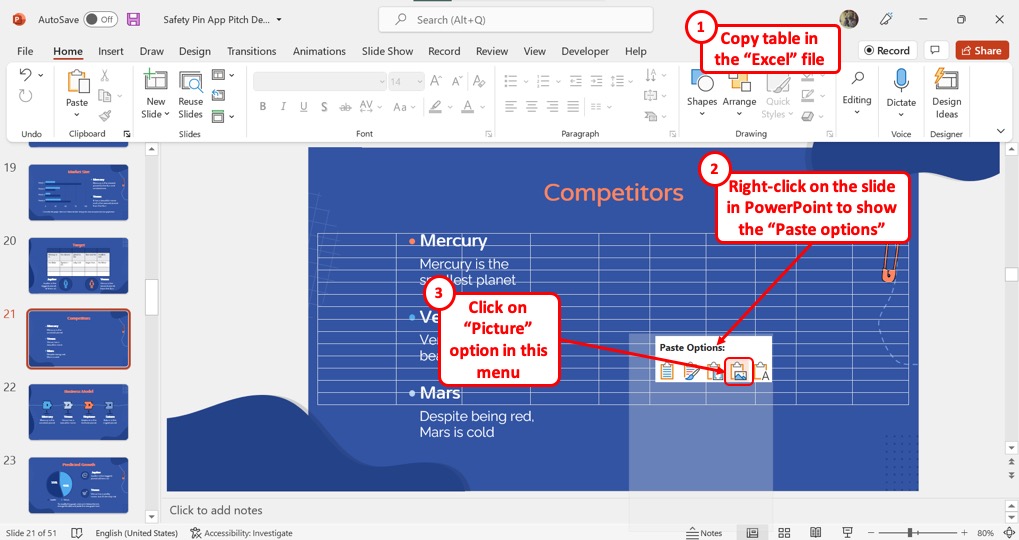
You can paste the Excel table as an image if you do not want any edits to the table. To paste as an image, “Right Click” on the slide and click on the “Picture” option under “Paste Options” in the right-click menu.
3. How to Insert an Excel File into PowerPoint as an Icon?
Instead of pasting a table, you can add an Excel icon in Microsoft PowerPoint. Clicking on the icon during the presentation will lead you to the Excel worksheet. To insert an Excel file as an icon, follow these steps.
Step-1: Copy Table from Excel
Step-2: Click on the “Paste Special” option
In the “ Clipboard ” group of the “Home” tab, click on the down arrow under the “Paste” icon. Then click on the “Paste Special” option from the dropdown menu to launch a dialog.
Step-3: Click on the “Microsoft Excel Worksheet Object” option
Now just click on the “Microsoft Excel Worksheet Object” option in the “Paste Special” dialog box,
Step-4: Click on “Display as icon” The next step is to click on the “Display as icon” option in the right column of the “Paste Special” dialog box. A checkmark will appear beside the option. Now click on the “OK” button at the bottom to insert the Excel file as an icon (shown above).
4. How to Link Existing PowerPoint Table to Excel for Dynamic Data Updates?
In Microsoft PowerPoint 2019 and later versions, you cannot link an Excel worksheet to an existing PowerPoint table. However, any hyperlinked table from Excel in PowerPoint is automatically set for dynamic data updates.
To enable this feature, follow these steps.
In the “Home” menu, click on the down arrow under the “Paste” icon. Then select the “Paste Special” option from the dropdown menu.
Step-3: Click on “Paste Link”
In the left column of the dialog box, click on the “Paste link” option. This will link the table to its Excel source. You can edit the table in either PowerPoint or Excel and find the changes in both files.
Now click on the “Microsoft Excel Worksheet Object” option from the box in the middle of the “Paste Special” dialog box. Then click on the “OK” button to insert the table (as shown above).
5. How to Unlink Table in PowerPoint from Excel?
In PowerPoint, you can remove the hyperlink added to an Excel table. However, you must remove hyperlinks from all objects in the presentation at once. Follow the 2 quick steps.
Step-1: Click on the “File” tab
Click on the “File” tab in the menu ribbon located at the top of the screen. In the left sidebar of the “File” menu, click on the “Info” option.
Step-2: Click on “Edit Links to Files”
Now scroll all the way down to the bottom of the “Info” screen. At the right column, click on the “Edit Links to Files” option to remove all the hyperlinks.
6. How to Embed Excel in PowerPoint?
To embed an Excel sheet into a PowerPoint slide, follow these steps.
Step-1: Click on the “Object” option
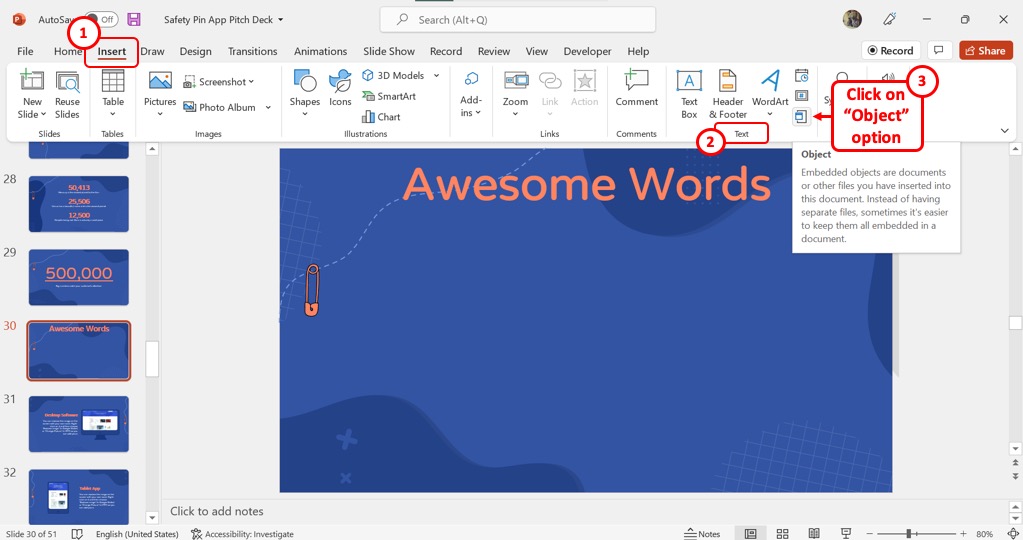
In the menu ribbon located at the top of the screen, click on the “Insert” tab. Then click on the “Object” icon from the “Text” group.
Step-2: Click on “Microsoft Excel Worksheet”
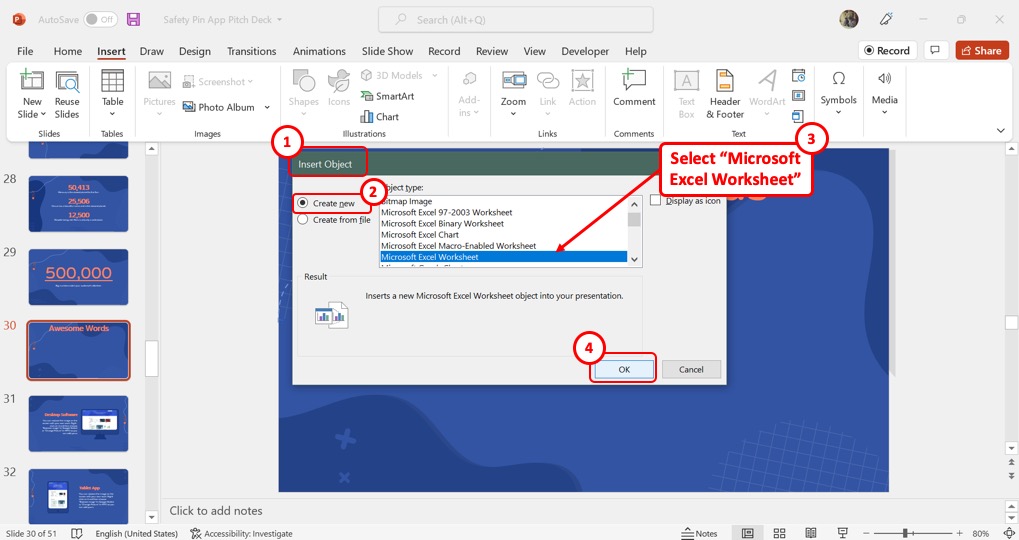
In the “Insert Object” dialog, click on the “Create New” option from the left column. Then select the “Microsoft Excel Worksheet” option from the “Object Type” list. Finally, click on the “OK” button to embed the Excel sheet.
7. How to Insert a Scrollable Table from Excel in PowerPoint?
In Microsoft PowerPoint, all the embedded Excel tables are scrollable. To insert a scrollable table from Excel into your PowerPoint presentation, follow the steps discussed in Section 6. However, to make the table scrollable for your viewers, you will need to access the “Developer” tool.
Here’s a link to a Microsoft Support group addressing what you need to do in order to make your table scrollable. Make sure you check that out.
- DynamicPowerPoint.com
- SignageTube.com
- SplitFlapTV.com

Create PowerPoint Slides from Excel Data
Oct 5, 2019 | Articles
Undoubtedly Microsoft Excel is amongst the best tools for increased productivity in our workplace today. Microsoft Excel helps workers perform their assigned tasks easily. The use of Microsoft Excel has greatly improved productivity in organizations. It offers a quicker way to complete your task effortlessly. Many organizations now sort after Men and Women with good skill in Microsoft Excel.
PowerPoint is another outstanding program that enhances business excellence. PowerPoint offers a clear understanding and interpretation of data. It has a unique display setting that makes the audience appreciate the program, but it is static.
Some persons believe PowerPoint to be superior to Excel and vice versa. But recently, people create PowerPoint from Excel data. Excel is used for computations because it has a lot of data needed for the report. PowerPoint will help enhance the appearance of these reports. So, simply present your result in PowerPoint after all calculations from your Excel.

classic slide
Submit a Comment
Your email address will not be published. Required fields are marked *
Pin It on Pinterest
- StumbleUpon
- Print Friendly
Excel Charts In Powerpoint
Key takeaway:.
- Excel Charts in PowerPoint can be a powerful tool for enhancing presentations: Using Excel Charts in PowerPoint can help to present data in a visually appealing and easy-to-understand manner, making presentations more effective and engaging.
- Inserting Excel Charts in PowerPoint is simple and straightforward: Excel Charts can be easily inserted into PowerPoint using either the copy and paste method or the Excel Object insertion method, both of which are simple to execute and offer flexibility in terms of editing and customization.
- A few best practices can help ensure the best results when using Excel Charts in PowerPoint: Consistency in chart design, choosing appropriate chart types for data, and ensuring data accuracy are all key factors that can help make Excel Charts in PowerPoint more effective and impactful.
Have you ever wanted to use data visuals to make a point in a presentation? Excel Charts in PowerPoint makes it easy for you to create a professional, dynamic presentation that captivates your audience. With a few simple steps, you can turn data into powerful visuals to help bolster your message.
Overview of Excel Charts in PowerPoint
Excel charts are a powerful tool for creating visual representations of data. They can help communicate complex information quickly and effectively. When used in PowerPoint presentations, Excel charts can enhance the overall impact of the presentation and convey the information more clearly.
Here are six key features of using Excel charts in PowerPoint:
- Excel charts are easily customizable in PowerPoint. Users have access to a range of chart styles and formatting options that can be tailored to the specific needs of the presentation.
- Excel charts can be updated easily. Users can update charts directly within PowerPoint and the changes will be reflected in real-time. This saves time and effort, as there is no need to create new charts each time data is updated.
- Excel charts can be animated in PowerPoint. Animation can help to engage the audience and draw attention to important data points.
- Excel charts can be excellently manipulated in PowerPoint. Users can arrange the charts on the slide and resize them as desired to make them stand out or fit in with the overall design of the presentation.
- Excel charts are seamlessly integrated into the PowerPoint presentation. Users can embed the charts directly into the presentation without having to switch between different applications.
- Excel charts allow for data-driven presentation design. Users can create a presentation based on data insights and showcase the data in an easily digestible format using Excel charts.
In addition to these benefits, Excel charts offer a level of flexibility that allows users to create the precise visual representation needed to convey the data effectively.
It’s worth noting that Microsoft first introduced Excel charts in PowerPoint in 1993, and since then, they have become an integral feature of the software. The seamless integration of Excel and PowerPoint has been a core focus of Microsoft, and it is clear that users appreciate the convenience and functionality of using Excel charts in PowerPoint.
Benefits of using Excel Charts in PowerPoint
Excel Charts in PowerPoint: Professional Benefits Explored
Excel Charts in PowerPoint enhance the visual appeal of presentations, and assist in better data comprehension, especially in professional settings.
Advantages of Integrating Excel Charts in PowerPoint
- Excel Charts help in displaying complex data sets in a visually informative and easy-to-understand format.
- Excel Charts keep the data point consistent and ensure accuracy in presentation.
- Excel Charts allow for better presentation customization, including style, colors, and fonts.
- Excel Charts can be easily updated and edited to reflect new data sets.
- Excel Charts offer an efficient and impressive way to present quantitative information.
Unique Details about Excel Charts in PowerPoint Integration
Essentially, incorporating Excel Charts in PowerPoint means more than just inserting data from Excel, but using it as an embedded data sheet in the PowerPoint. Such integration guarantees data consistency and easy update, while allowing formatting changes to be done on both platforms simultaneously.
Suggestions for Enhancing PowerPoint Presentations with Excel Charts
Incorporation of clear and concise titles, axis labels, and legends make it significantly easier for audience comprehension. Similarly, it is essential to select the correct chart type for the data presentation in order to maximize visual impact, and also optimize colors for better visual appeal.
How to Insert Excel Charts in PowerPoint
Want to place Excel charts in PowerPoint? No worries! Copy and paste them , or use the Excel Object in PowerPoint. You’ll be able to add your data quickly and without difficulty. Easy-peasy!
Copying and Pasting Excel Charts in PowerPoint
Selecting and Placing Excel Charts in PowerPoint
To embed and display charts created in Excel within the presentation slides of PowerPoint, users should follow a simple procedure:
- Copy your desired chart from the Excel worksheet by either right-clicking on it or pressing ‘CTRL + C.’
- Then, go to your desired slide location in PowerPoint and select either ‘Paste’ or ‘Paste Special’ options from the ‘Home’ tab.
- Finally, adjust size and formatting options for each specific chart as necessary.
It is important to note that depending on the type of data visualization used to create a chart, adjusting colors or size may be necessary to cater to your audiences needs.
Ensuring clear visual aids can support powerful narratives helps make for more effective presentations. Making sure visuals are large enough for audience members to see and understand ensures that everyone can get the most out of all presentations they attend! When PowerPoint and Excel collide, it’s like the ultimate power couple. Inserting Excel charts into PowerPoint? Piece of cake, even for technologically-challenged individuals.
Inserting Excel Charts using Excel Object in PowerPoint
Inserting Excel Charts in PowerPoint using Excel Object is a seamless way to enhance your presentations with rich data visuals that are easy to update and manipulate. Here’s how you can do it in just 6 simple steps:
- Open both Microsoft Excel and PowerPoint applications.
- Select the chart you want to insert into PowerPoint from your Excel spreadsheet.
- Click on Copy or press Ctrl+C on your keyboard.
- Go to the slide where you want to insert the chart in your PowerPoint presentation.
- Press Ctrl+V on your keyboard
- Right-click and select Paste from the context menu.
- Your chart will now appear in your slides, and you can format it as desired using various design tools available in PowerPoint.
When pasting an Excel chart into a PowerPoint presentation, ensure that both applications are open simultaneously. Make sure there are no confidential data present while copying the charts.
Did you know that Excel charts embedded in PowerPoint presentations were introduced back in 1997 with Microsoft Office? The feature has evolved significantly over time with newer versions of Office offering more advanced visual design tools for charts!
Editing Excel charts in PowerPoint: where you can finally fix all those mistakes you made in your data entry.
Editing Excel Charts in PowerPoint
Make your Excel charts look great in your PowerPoint presentations! To do this, you need to edit them. In this section, we’ll show you how to refine your charts. It’s called “Editing Excel Charts in PowerPoint” .
We will also teach you “Updating Chart Data in PowerPoint from Excel” and “Customizing Chart Elements in PowerPoint” . Match the look and feel of your presentation with these solutions!
Updating Chart Data in PowerPoint from Excel
To update chart data in PowerPoint from Excel, you can edit the charts directly from the presentation.
Follow these 4 simple steps to Update Chart Data in PowerPoint from Excel using Semantic NLP variation:
- On the slide with the chart, click on it to select it.
- In the ribbon menu, choose “ Chart Tools ” and then select “ Design “.
- Click “ Edit Data ” to open up the Excel spreadsheet containing the chart’s data.
- Make necessary changes in the Excel sheet then click outside of the spreadsheet window to automatically update the chart in PowerPoint.
It is worth noting that this method applies equally for bar graphs, pie charts as well as other chart types.
Pro Tip: If you want to make only minor edits or updates like changing labels or numbers on a chart, you can just double-click directly on that part of the visual inside PowerPoint and make those changes there.
Get ready to take your PowerPoint presentation to the next level by giving your charts a makeover that even Cinderella would envy.
Customizing Chart Elements in PowerPoint
Customizing the visual elements of a chart in PowerPoint enables you to create a cohesive and compelling presentation.
Here is a 4-Step Guide to Customizing Chart Elements in PowerPoint :
- Select the chart, go to ‘Chart Tools’ and click on ‘Design.’
- To modify chart elements, click on ‘Add Chart Element’ and select options such as ‘Data Labels,’ ‘Legends,’ or ‘Axis.’
- You can customize colors, shapes, and formatting of various elements through the “Format” tab.
- Ensure that your modifications are saved by right-clicking in the chart area and choosing “Save As Template.”
Of significance, keep in mind that when adding data labels to charts for large datasets, consider using leader lines or remove clutter by only labeling critical values.
Pro Tip: When modifying chart elements in PowerPoint remember that your final goal is to produce engaging graphics that enhance your message. Because who needs boring bullet points when you can visually impress with Excel charts in PowerPoint?
Best Practices for Using Excel Charts in PowerPoint
To smoothly integrate Excel charts in PowerPoint, it’s best to use these tips:
- Make sure a consistent design for the charts .
- Choose the correct chart type for your data .
- Verify that the data in the charts is accurate .
Keep Chart Designs Consistent
Establishing Uniformity in Chart Design
Maintaining a uniform template for the design aspects of Excel charts is crucial when creating presentations using PowerPoint. This helps to achieve consistency and ensures that your charts match the overall look and feel of your presentation. Here are five steps to keep chart designs consistent:
- Establish a standard format: Determine a set of standard formatting guidelines for your charts that meet your organization’s branding requirements.
- Use chart templates: Create templates with predefined designs, color scheme, labels, and data sources so that these can be quickly applied without compromising on visual consistency.
- Follow naming conventions: Use descriptive titles or names for each chart element (axis, title, data series) to easily locate and modify them.
- Reuse elements: Reusing design elements such as colors, fonts, and styles across different charts contributes to uniformity in chart design throughout the presentation.
- Test before sharing: Always check each slide containing the charts before presenting it to ensure that you have achieved consistency in both form and function.
Exemplary Characteristics
It takes time to develop an intuitive understanding of chart design best practices since they involve both technical skills and aesthetic judgement. Ensure that your PowerPoint slides remain aesthetically pleasing while still conveying important information by establishing uniformity in your chart design.
Unexpected Event
Microsoft Excel has been around for almost 30 years. The first version was introduced on September 30th, 1985! Since then, excel has become one of the most commonly used tools across workplaces all over the world.
Don’t be that person who uses a pie chart for everything – it’s like wearing a suit to the beach.
Use Appropriate Chart Types for Data Representation
When creating charts in Excel for use in PowerPoint, it’s critical to choose appropriate chart types that accurately represent the data. This ensures viewers understand the information presented without confusion.
Here is a sample table that shows which chart types are best suited to represent various kinds of data:
It’s important to note that each chart type has unique properties and best suits specific data types. Using the wrong chart type can result in inaccurate or confusing representations of the data.
Every organization should have internal guidelines about how they display data using Excel charts. For instance, some companies may prefer column charts over bar charts for comparison purposes. Therefore, practitioners must adhere to the organization’s standards and select appropriate chart types accordingly.
An illuminating fact is that Joseph Priestley used charts to illustrate scientific data back in 1765 . His graph showed the rise and fall of different gases under controlled conditions. Graphs plotting natural phenomena still use his technique today because it provides an effective way of representing complex information simply and intuitively.
Because nothing says ‘professional’ like a chart with inaccurate data – except maybe a typo in your boss’s name on the PowerPoint slide.
Ensure Data Accuracy in Charts
With the increasing reliance of businesses on data to make decisions, charts are an essential tool in delivering precise insights. Accurate data charting is vital since it provides a structure for proper decision-making. Clear analysis of data can only occur when the correct points are entered into spreadsheets and graphs flawlessly.
Any mistakes in data collection or presentation can severely impact analytical decisions, which could culminate in missed opportunities. Therefore, an imperative would be to ensure that all inputs are consistently checked and double-checked before sharing a graphic representation.
In one instance, planning officers at a leading travel company embarked on designing business plans based on misinformation about customer trends acquired by wrongly inputted spreadsheet formulas. This led to significant revenue loss from underestimation of their target market over some time due to unaltered graphs used for analyses.
Some Facts About Excel Charts in PowerPoint:
- ✅ Excel Charts can be easily added to PowerPoint presentations. (Source: Microsoft)
- ✅ Data in PowerPoint charts can be easily updated in real-time using linked Excel files. (Source: GoSkills)
- ✅ There are several chart types availabe in Excel to choose from, such as Bar, Line, Pie, and Scatter. (Source: Exceljet)
- ✅ Charts in PowerPoint can be customized with colors, font styles, and other design elements to match the presentation theme. (Source: SlideModel)
- ✅ Excel Charts in PowerPoint can help presenters convey complex data in an easy-to-understand format. (Source: BrightCarbon)
FAQs about Excel Charts In Powerpoint
What are excel charts in powerpoint.
Excel Charts in PowerPoint refer to the feature where users can insert charts and tables created in Excel into PowerPoint slides to represent data visually through graphs and charts that help convey information with ease.
How do I insert an Excel Chart into a PowerPoint presentation?
To insert an Excel Chart into a PowerPoint presentation, open the slide where you want to insert the chart and click “Insert” from the ribbon menu. Then, select “Chart” and choose the type of chart you want to insert. From there, select the Excel file that contains the data you want to include in the chart, and drag the selection box to adjust the size of the chart as needed.
How can I update an Excel Chart in PowerPoint?
To update an Excel Chart in PowerPoint, select the chart and then click the “Edit Data” button from the ribbon. This will open the Excel sheet where the chart is located, allowing you to make changes to the data. Once you have made the changes, close the Excel sheet and the changes will be automatically updated in the PowerPoint presentation.
What types of Excel Charts can be inserted into PowerPoint?
Almost all types of charts available in Excel can be inserted into PowerPoint, including line charts, pie charts, bar charts, area charts, scatter charts, and more. The process of inserting each type of chart is slightly different, but the overall steps remain the same.
Can I customize the appearance of an Excel Chart in PowerPoint?
Yes, you can customize various aspects of an Excel Chart in PowerPoint. You can change the chart type, axis labels, color scheme, font style, and more. To customize the chart, select it and then click the “Chart Tools” menu on the ribbon, where you can make your changes.
Can I animate an Excel Chart in PowerPoint?
Yes, you can add animation to an Excel Chart in PowerPoint to make it more engaging and interactive. To do this, select the chart and then click the “Animations” tab on the ribbon. From there, choose the animation effect and timing that you want to apply to the chart.

Try Process AI free
How to add a chart from microsoft excel to a powerpoint presentation.
In the world of presentations, visual aids are important. One such tool is a chart from Microsoft Excel in a PowerPoint presentation. This helps to show complex data in an appealing way, so your audience can understand the key messages quickly.
You can enhance your message by adding charts to PowerPoint . It’s easy! Open both Microsoft Excel and PowerPoint . Select the chart from Excel that you want to use. Then, press “Copy” under the “Home” tab or Ctrl+C.
Switch to your PowerPoint presentation . Put the chart where you want it. Then, press “Paste” under the “Home” tab or Ctrl+V. You’ll see the chart appear in the slide.
Any changes made in Excel will automatically update in PowerPoint too. Right-click the chart in PowerPoint to access formatting options. Choose colors, labels, titles, legends, fonts, and more. This enables you to customize the chart to match your design theme.
Following these steps, you can integrate charts from Microsoft Excel into your PowerPoint presentation without hassle. According to Microsoft, this process ensures data accuracy and dynamism.
Step 1: Exporting the chart from Microsoft Excel
Export your charts from Microsoft Excel to enhance your PowerPoint presentation! Here’s how:
- Open the Excel spreadsheet with the chart you want
- Select the entire chart (including labels and titles)
- Right-click and choose the “Copy” option
- Switch to your PowerPoint presentation
- Right-click where you want to insert the chart and select “Paste”
Remember, any changes made to the chart in Excel won’t be reflected automatically in PowerPoint, so make sure the chart is finalized before exporting.
Adding professionally designed visuals with data to your slides will make a lasting impression on your audience. So go ahead and try it out in your next presentation – they’ll thank you!
Step 2: Opening the PowerPoint presentation
- Achieving seamless integration of an Excel chart in a PowerPoint presentation requires just a few easy steps.
- First, make sure both the Excel file and PowerPoint presentation are saved in a place you can access on your computer.
- Then, open PowerPoint and select the File tab.
- Click Open to access your saved presentations.
- Having a well-organized file structure will also make locating and opening both files simpler.
- Follow these guidelines and you’ll be able to impress your audience with stunning data visualizations!
Step 3: Pasting the chart into the PowerPoint slide
- To paste a chart into PowerPoint, there are some steps to take. Start by opening your Excel file.
- Select the chart you want to add then press Ctrl + C or right-click and choose “Copy”.
- Switch to PowerPoint and go to the slide where you want to paste the chart. Press Ctrl + V or right-click and select “Paste”.
- To adjust size and position, click and drag the edges or corners.
- To customize the chart further, use PowerPoint’s formatting options like changing colors, fonts, or adding titles.
- Remember: pasting a chart from Excel preserves its link with the original data. This means any changes made in Excel will automatically update in your PowerPoint.
- For example, I once had to present sales data in a PowerPoint meeting. By following these steps, I was able to integrate an Excel chart into my slides. The audience was impressed with the clean and professional look which helped them understand the data better.
Step 4: Adjusting the chart in PowerPoint
It’s time to jazz up your PowerPoint chart! Follow these three steps for maximum visual impact.
- Formatting: Select the chart and head to the ‘Chart Tools’ tab. Adjust colors, fonts, and styles to match your presentation theme.
- Resizing and positioning: To resize, click the border and drag the corner handles. Use the ‘Format’ tab for precise measurements. Move the chart by clicking and dragging it.
- Data updates: Link an Excel spreadsheet to your chart by selecting it and clicking ‘Edit Data’. This keeps your data accurate and up-to-date.
Optimizing your chart will help you engage your audience. Amp up your presentation skills – start using these techniques now!
Incorporating Excel charts into PowerPoint presentations is a great way to improve data visualization. To do this, use the “Copy” and “Paste Special” functions. This maintains the formatting and data.
Link your chart to the original Excel file for real-time updates. This ensures your presentation is always up-to-date.
For a streamlined presentation, only select relevant data or portions of the chart.
These steps and tips will help you deliver effective presentations with ease.

No credit card required
Your projects are processes, Take control of them today.
Automatically Create PowerPoint Slides from Excel (3 Easy Ways)
Microsoft Excel is indeed an extremely effective software. We may perform countless operations on a given dataset using Excel’s tools and features. We frequently need to make PowerPoint slides from Excel files. When we have to do it repeatedly, copying information from Excel and making PowerPoint slides is very time-consuming. This article will discuss three unique and easy ways to create PowerPoint slides from Excel files automatically. Therefore, you should go through these 3 easy ways to Automatically Create PowerPoint Slides from Excel.
How to Automatically Create PowerPoint Slides from Excel: 3 Easy Ways
As an illustration, we will explore a sample dataset. The following dataset, for example, has sales representative Names and Areas. We are going to show the Excel data in PowerPoint slides using all 3 of the approaches. Moreover, I will go through the benefits and drawbacks of using these strategies. In addition, I have yet to mention that I have been using the Microsoft Excel 365 version for this article; You are free to choose any other edition that you find most convenient.

1. Automatically Create Slides Using Insert Command in PowerPoint
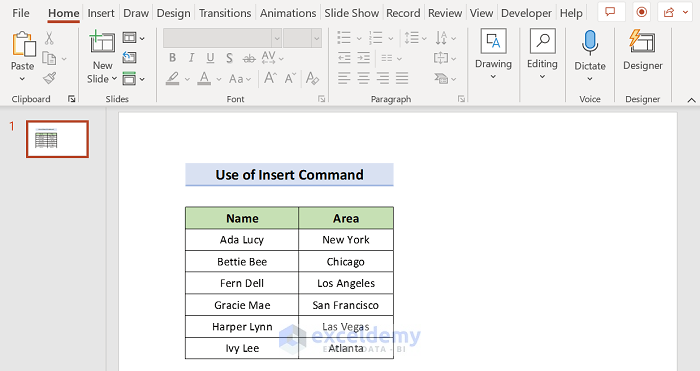
The Insert command is the simplest method. Using this Insert Command, slides are kept up to date immediately after any modifications are made to the Excel file. The issue is that we need to utilize the insert command for each slide. We will insert the Excel object using PowerPoint’s Insert command to automate the procedure. To complete the work, please follow the instructions below.
- First, launch PowerPoint.
- Then, select the Insert tab.
- Next, click Text , and later on the Object option.

- As a result, a new dialog box will pop up at this time, and you must click on Create from file .
- After that, click on Browse to find the Excel document you want to add to your slides.
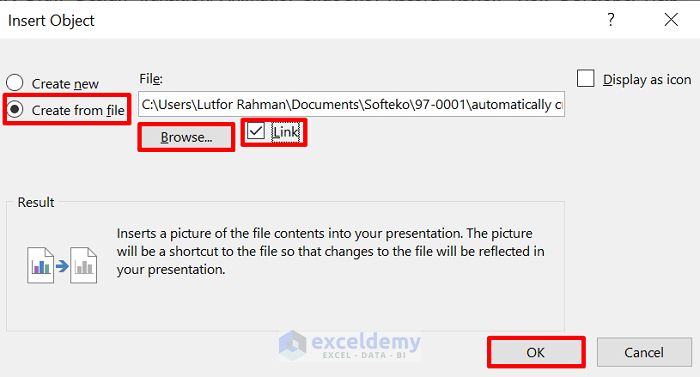
- Consequently, the Insert Object dialog box pops up again, allowing you to check the Link box and click OK .
- Hence, as demonstrated below, it will yield the desired output in MS PowerPoint.
Read More: How to Insert an Excel File into PowerPoint as an Icon
2. Apply Paste Special Feature to Generate Slides from Excel
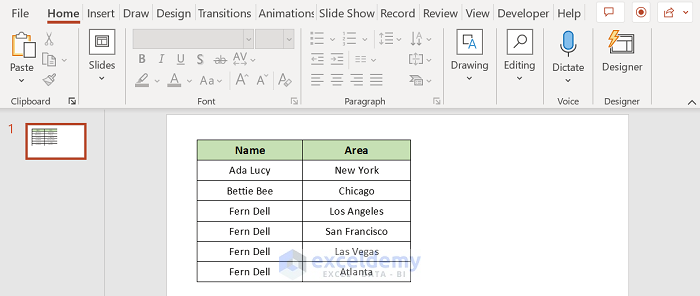
Another interesting way is to use the Paste Special feature. We can make slides in PowerPoint with the specified and selected data from Excel through the paste feature. Here, as the data in the Excel file is updated, the PowerPoint slide is also updated. To do the procedure, follow these instructions.
- First, open Excel’s saved worksheet to insert data.

- Secondly, move the mouse over the portion of the data you wish to link to PowerPoint. Then click on Copy .
- Now, open PowerPoint and click on the slide where you wish to connect the Excel data. Later on, click Paste and Paste Special feature.
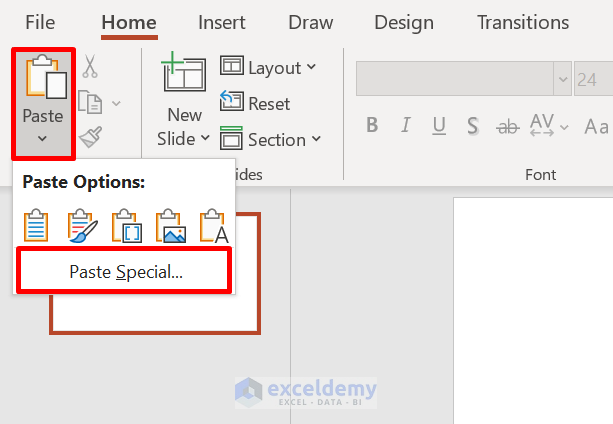
- And a new dialog box appears. Choose the Paste link After that, click As Microsoft Excel Worksheet Object and hit OK .

- As a result, it will return the required output in the PowerPoint slides, as shown below.
Read More: How to Copy Chart from Excel to PowerPoint Without Link
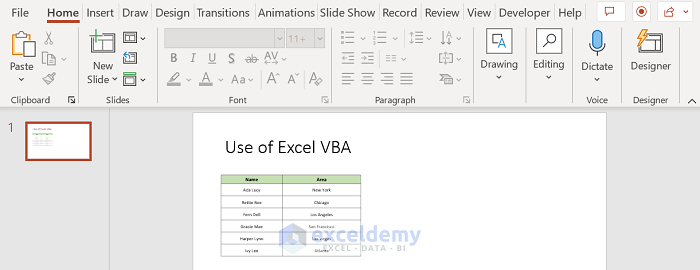
3. Create PowerPoint Slides from Excel Through VBA
There is a unique way of creating PowerPoint Slides automatically using Excel VBA. The only difference between previous methods is that slides are not updated as we change the Excel file. To use the Excel VBA Code, we must add the Microsoft PowerPoint 16.0 Object Library. However, since we are using this approach, we don’t need to create a VBA code for each presentation. Through modification of the code, we can generate dozens of slides.
- First of all, select the active sheet of the workbook to begin.

- Secondly, navigate to Developer and then Visual Basic .
- Later on, select Insert and now click on Module .

- Next, put the following code into the Module box. Remember to change the cell’s range.
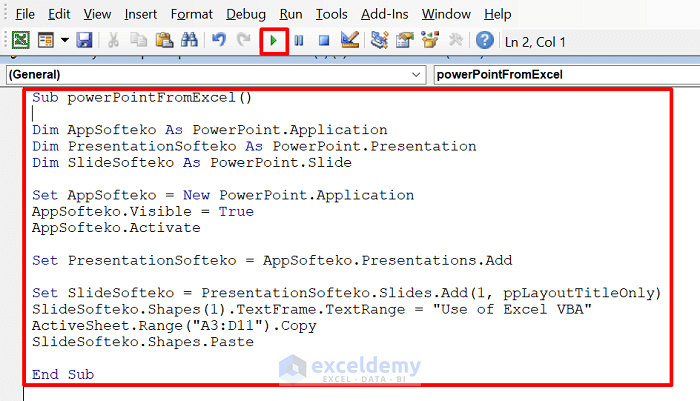
- Finally, click the Run button or press F5 .
- So, this is where the output will go.
To overcome the error, follow these:
Step 1 : Hover over Tools => You will see the References option => Click on References .

As a result, the References – VBAProject window will open.
Step 2 : Check Microsoft PowerPoint 16.0 Object Library => You will see the OK button in the top right corner => Hit OK to resolve the error.

Download Practice Workbook
You can get a free copy of the example workbook that was used during the discussion which was just below here.
You can automatically create PowerPoint slides from Excel from this point forward by using the procedures that we just discussed. Keep using them, and let us know if you come up with any other strategies to get the work done or if you have any new ideas. Remember to post questions, comments, or recommendations in the section below.
Related Articles
- How to Perform Excel to PowerPoint Automation
- How to Link Excel Sheets to PowerPoint
- How to Update Charts in PowerPoint from Excel Automatically
- How to Link Excel Data to PowerPoint Chart
- How to Embed an Excel File in PowerPoint
- [Fixed!] Problems with Embedded Excel Files in PowerPoint
- [Solved] Embedded Excel in PowerPoint Not Showing All Data
- How to Link Powerpoint to Excel for Dynamic Data Updates
- How to Insert Excel Chart into PowerPoint
- How to Copy Table from Excel to Powerpoint with Formatting
<< Go Back to Excel to PowerPoint | Export Data from Excel | Learn Excel
What is ExcelDemy?
Tags: Excel to PowerPoint

Lutfor Rahman Shimanto, BSc, Information Technology, Jahangirnagar University, Bangladesh, has worked with the ExcelDemy project for over a year. He has written 50+ articles and provided solutions of 100+ comments for ExcelDemy. Currently, he works as an Excel & VBA Developer and provides support and solutions in the ExcelDemy Forum. He has solved 100+ ExcelDemy Forum problems. His work and learning interests are in developing various Excel & VBA and Desktop applications. Outside of work, he enjoys Chess... Read Full Bio

Hi and thanks for your post data;
When I use your VBA code I got this error:”user defined type not defined” How can I fix it?
Best Regards

Thanks for reaching out and posting your comment. You are right about the raised error. If you do not add the Microsoft PowerPoint 16.0 Object Library , you must see the User-Defined Type not defined error.
To solve the issue, follow these: Step 1 : Hover over Tools => You will see the References option.
Step 2 : Click on References => In the References – VBAProject window, check Microsoft PowerPoint 16.0 Object Library , and you will see the OK button in the top right corner.
Step 3 : After clicking OK , you will be able to run the code like the following GIF .
Hopefully, the solution will help you overcome your situation. Good luck.
Regards Lutfor Rahman Shimanto
Leave a reply Cancel reply
ExcelDemy is a place where you can learn Excel, and get solutions to your Excel & Excel VBA-related problems, Data Analysis with Excel, etc. We provide tips, how to guide, provide online training, and also provide Excel solutions to your business problems.
Contact | Privacy Policy | TOS
- User Reviews
- List of Services
- Service Pricing

- Create Basic Excel Pivot Tables
- Excel Formulas and Functions
- Excel Charts and SmartArt Graphics
- Advanced Excel Training
- Data Analysis Excel for Beginners

Advanced Excel Exercises with Solutions PDF
How to Use Superscript in PowerPoint: The Ultimate Guide
Elevate your PowerPoint presentations with easy superscript & subscript tricks. Learn to insert, adjust & use special... read more

#ez_toc_widget_sticky--1 .ez-toc-widget-sticky-container ul.ez-toc-widget-sticky-list li.active{ background-color: #ededed; } Steps To Follow
Get Trainings
Advance your Microsoft Excel & Office Skills with the MyExcelOnline Academy!

The Basics of Superscript and Its Uses
Superscripts elevate your presentation from the mundane to the professional, especially in academic and scientific settings. They are the tiny numbers or letters you see slightly above the regular text line, looking somewhat like a bird flying high with your information.
Learn about Excel Formulas with our 101 Advanced Excel Formulas & Functions Examples !
Key Takeaways
- To format text as superscript in PowerPoint , you can utilize the “Font” settings option, allowing you to change text properties through a dialog box.
- For quicker access, you can add superscript and subscript options to the Quick Access Toolbar, ensuring these tools are always visible and readily available.
- Keyboard shortcuts offer a fast and convenient method to toggle superscript or subscript formatting while working on your presentation; these shortcuts vary depending on the operating system but are typically a combination of keys like “Ctrl” plus a specific letter or function key.
Use Cases for Superscript :
- Mathematical equations (E.g., E=mc²).
- Scientific notation (2.998 x 10⁸ for the speed of light).
- Ordinal indicators (1st, 2nd, 3rd).
- Trademark notations (Brand™).

Keyboard Shortcuts for Quick Superscript Formatting
Speed is of the essence when you’re in the flow of creating a presentation. Using keyboard shortcuts can save precious time. For superscript in PowerPoint, the quick and effective shortcut is:
- Superscript Shortcut : Ctrl + Shift + Plus

- First, highlight the text you want to change.
- Use the shortcut.
- Continue typing as normal, or repeat for additional superscript entries.
Table of Contents
Diving Low: Mastering Subscript in PowerPoint
Understanding the role of subscript in presentations.
While superscript takes your text to a higher level, subscript helps to ground your information by placing certain characters slightly below the regular text line. You may notice them behaving like roots keeping the tree of knowledge firmly planted in your slides.
When You’ll Need Subscript :
- Chemical compounds and formulas like H₂O and CO₂.
- Mathematical expressions to denote bases in logarithms (log₄ x).
- Denoting variables in statistical formulas.
By using subscript in your presentations, you might convey complexity and detail with simplicity and clarity.
Understanding the role of subscript isn’t just about knowing where to use it; it’s about knowing why it’s pivotal for comprehension in your audience. It’s not just a design choice—it’s a tool for better communication.
Convenient Methods to Apply Subscript with Ease
Applying subscript in PowerPoint doesn’t have to be a multi-step process. Whether you’re detailing the finer points of chemical molecules or foundational math principles, here’s how you can bring your text down to size in a snap.
Keyboard Shortcut for Subscript :
- Subscript Shortcut : Ctrl + ‘=’

- If shortcuts aren’t your thing, make use of the ‘Subscript’ button located in the ‘Font’ group of the ‘Home’ tab in PowerPoint’s ribbon.

Accessibility Tip : If you use subscript often, consider modifying your Quick Access Toolbar to include the subscript function for even speedier formatting.
Editing Power: Undoing Superscript & Subscript
Mistakes happen: how to undo formatting fast.
Oops! Applied the wrong text effect? Don’t worry; PowerPoint has you covered. If you’ve got a bit too trigger-happy with your formatting, you can quickly step back and rectify any superscript or subscript mishaps.
Quick Undo for Superscript and Subscript :
- Reset Formatting Shortcut : Ctrl + Spacebar
Just select the text that’s been mistakenly formatted and press these keys together to return it to its default state. If your misstep is fresh, Ctrl + Z will become your best friend, allowing you to immediately undo your last action.
Undoing Formatting in Bulk :
- Highlight the segments of text you want to clear formatting from.
- Use either the reset shortcut or the undo function for each segment.
Remember, when it comes to presentation editing, ‘Ctrl + Z’ and ‘Ctrl + Spacebar’ are the magical combos that keep your slides polished and mistake-free.
Keeping Slides Clean: Removing Unwanted Text Effects
Maintaining clarity and readability is key to a powerful PowerPoint presentation . Unwanted text effects can distract and confuse, but thankfully, they can be tidied up with just a few clicks.
How to Remove Superscript or Subscript :
- Select the text with the unwanted effect.
- Navigate to the ‘Font’ group under the ‘Home’ tab.
- Click on the ‘Superscript’ or ‘Subscript’ button to toggle the effect off.

Clean-Up Advice :
- Keep an eye on the text consistency across your slides.
- Regularly review your slides in ‘Slide Sorter’ view to catch any formatting inconsistencies.
- Use ‘Clear All Formatting’ to reset text to the default font and size, ensuring a clean slate.
Remember, sometimes less is more. If superscript or subscript doesn’t serve a clear purpose, it’s best to keep things simple and stick to the standard text. Your slides will thank you for it!
Customization Tips: Adjusting Position of Superscripts & Subscripts
Fine-tune your text: manual adjustments for precision.
For those occasions where you need pinpoint accuracy, PowerPoint allows you to manually adjust the position of your superscripts and subscripts. This is especially handy when you’re dealing with non-standard fonts or particular design requirements that call for a tailor-made touch.
Steps to Manually Adjust Text Position :
- Highlight the superscript or subscript text.
- Click on the ‘Font Dialog Box Launcher’ in the ‘Font’ group under the ‘Home’ tab.
- In the ‘Font’ tab, look for the ‘Effects’ section and find the ‘Offset’ box.
- Enter a positive value to move the text up (for superscripts) or a negative value to move it down (for subscripts).
- Click ‘OK’ to apply the changes.
Handy Tips for Manual Adjustments :
- Small incremental changes can make a significant difference. Start with small values.
- Preview your slide after each adjustment to check for visual alignment.
- Consider consistency. Ensure all similar text elements across your presentation match in positioning.
Remember, it’s not just about making it look good; it’s about creating functional harmony in your design. Manual adjustments can help you achieve that extra layer of customization that sets your slides apart.
Enhancing Readability and Visual Appeal
While superscript and subscript are crucial for accurate information display, they shouldn’t compromise the legibility of your slides. Striking a balance between precision and visual appeal is key.
Tips to Enhance Readability :
- Contrast : Ensure your text stands out against the background. This might mean lightening a dark background or choosing a font color that pops.
- Font size : Even though superscript and subscript text is smaller, make sure it is still readable. Avoid going below 8pt size.
- Simplicity : Use these text effects only when necessary to avoid cluttering your slide.
- Alignment : Keep your text aligned both horizontally and vertically for a clean, professional look.
- Spacing : Give your superscripted or subscripted text breathing room so it doesn’t run into the following text.
Enhancing the visual appeal of your slides doesn’t only make your presentation look better; it makes it more effective. After all, a presentation that’s easy on the eyes is one that keeps your audience engaged.
Advanced PowerPoint Tricks: Special Characters and Symbols
Adding flair to slides with superscript and subscript symbols.
Take your presentations up a notch by incorporating superscript and subscript symbols! These aren’t just for technical jargon—they can add a creative touch and emphasize important details.
How to Insert Superscript and Subscript Symbols :
STEP 1: Navigate to the ‘Insert’ tab.

The addition of special symbols can:
- Clarify meanings (e.g., placing the correct phase symbol in chemical equations).
- Highlight important legal or copyright markings (e.g., ®, ©).
- Add a creative spin or branding element to your presentation (e.g., artistic textual effects).
In essence, these symbols act as the jewelry of your textual content—use them sparingly and they’ll make your slides sparkle!
Beyond Basic Text: Inserting Special Characters
Sometimes your message needs more than just words. Special characters can be the secret sauce that gives your slides that extra zest. Whether it’s mathematical symbols, foreign language letters, or unique icons, PowerPoint lets you go beyond the basic alphabet.
Steps for Inserting Special Characters :
STEP 1: Click on the “Insert” tab.
STEP 2: Go to “Symbol” and then “More Symbols”.
STEP 3: Dive into various fonts and subsets to find a whole world of special characters and symbols.
STEP 4: Click the character you want to add, then click “Insert”.
Why Special Characters Matter :
- Precision : For scientific or mathematical data, accuracy is non-negotiable. Special characters ensure you’re technically correct.
- Cultural Awareness : Including accents and characters from different languages shows respect and attention to detail.
- Engagement : Unusual and fun characters can capture attention and break up text-heavy slides.
By expanding your character repertoire, you’re not just adding to your slides—you’re adding depth to your communication and connection with your audience.
Streamlining the Process: Quick Access Toolbar
Tailoring your toolbar for efficiency.
Becoming a PowerPoint whiz often involves optimizing your workspace for efficiency. Tailoring your Quick Access Toolbar by adding frequently used commands like superscript and subscript can streamline your workflow.
How to Customize Your Quick Access Toolbar :
STEP 1: Right-click on the main PowerPoint ribbon.
STEP 2: Select ‘Customize Quick Access Toolbar’.
STEP 3: In the ‘Choose commands from’ dropdown, select ‘More Commands’.
STEP 4: Scroll through the list, find ‘Superscript’ and ‘Subscript’, and add them.

- Time-Saving : No more digging through menus for every text adjustment.
- Convenience : Your most-used functions are always at the top, just one click away.
- Focus : Spend less time formatting and more on crafting your message.
With your toolbar tailored to your needs, you’ll notice the pace of your slide creation pick up speed, letting you focus on the creative aspects of your presentation instead of the mundane.
FAQs: Superscript & Subscript Simplified
What is the easiest way to apply superscript in powerpoint.
The easiest way to apply superscript in PowerPoint is by using the keyboard shortcut. For Windows, press Ctrl + Shift + + and for Mac, use Command + Shift + + . This instantly formats the selected text as superscript.
Can I add subscript formatting to multiple text elements at once?
Yes, you can add subscript formatting to multiple text elements at once in PowerPoint. Simply highlight all the text elements you want to change and then apply the subscript format either using the Font dialog box or the keyboard shortcut Ctrl + = .
How do I access special superscript and subscript characters?
To access special superscript and subscript characters in PowerPoint, go to the ‘Insert’ tab, click ‘Symbol’, then ‘More Symbols’. Choose ‘Superscripts and Subscripts’ from the ‘Subset’ dropdown. From here, select and insert the special characters you need.
Is there a way to adjust the default position of superscript and subscript in PowerPoint?
PowerPoint doesn’t offer a feature to set a default position for superscript or subscript. However, you can manually adjust each instance’s position by selecting the text and editing the ‘Offset’ value in the ‘Font’ dialog box under ‘Effects’. Repeat as needed for consistency.

John Michaloudis
John Michaloudis is a former accountant and finance analyst at General Electric, a Microsoft MVP since 2020, an Amazon #1 bestselling author of 4 Microsoft Excel books and teacher of Microsoft Excel & Office over at his flagship Academy Online Course .
Related Articles
How to Change Footer in PowerPoint Fast
How to Make Clickable Hyperlinks in PowerPoint Presentations
Text Spill in Excel Made Simple – Step by Step Guide
Get Video Training
Dramatically Reduce Repetition, Stress, and Overtime! Exponentially Increase Your Chances of a Promotion, Pay Raise or New Job! Learn in as little as 5 minutes a day or on your schedule.

- SUGGESTED TOPICS
- The Magazine
- Newsletters
- Managing Yourself
- Managing Teams
- Work-life Balance
- The Big Idea
- Data & Visuals
- Reading Lists
- Case Selections
- HBR Learning
- Topic Feeds
- Account Settings
- Email Preferences
How to Make a “Good” Presentation “Great”
- Guy Kawasaki

Remember: Less is more.
A strong presentation is so much more than information pasted onto a series of slides with fancy backgrounds. Whether you’re pitching an idea, reporting market research, or sharing something else, a great presentation can give you a competitive advantage, and be a powerful tool when aiming to persuade, educate, or inspire others. Here are some unique elements that make a presentation stand out.
- Fonts: Sans Serif fonts such as Helvetica or Arial are preferred for their clean lines, which make them easy to digest at various sizes and distances. Limit the number of font styles to two: one for headings and another for body text, to avoid visual confusion or distractions.
- Colors: Colors can evoke emotions and highlight critical points, but their overuse can lead to a cluttered and confusing presentation. A limited palette of two to three main colors, complemented by a simple background, can help you draw attention to key elements without overwhelming the audience.
- Pictures: Pictures can communicate complex ideas quickly and memorably but choosing the right images is key. Images or pictures should be big (perhaps 20-25% of the page), bold, and have a clear purpose that complements the slide’s text.
- Layout: Don’t overcrowd your slides with too much information. When in doubt, adhere to the principle of simplicity, and aim for a clean and uncluttered layout with plenty of white space around text and images. Think phrases and bullets, not sentences.
As an intern or early career professional, chances are that you’ll be tasked with making or giving a presentation in the near future. Whether you’re pitching an idea, reporting market research, or sharing something else, a great presentation can give you a competitive advantage, and be a powerful tool when aiming to persuade, educate, or inspire others.
- Guy Kawasaki is the chief evangelist at Canva and was the former chief evangelist at Apple. Guy is the author of 16 books including Think Remarkable : 9 Paths to Transform Your Life and Make a Difference.
Partner Center
- All about AI
- Google Bard
- Inflection AI Pi Chatbot
- Anthropic Claude
- Generative AI
- AI Image Generation
- AI Regulation
- AI Research
- Large Language Models (LLM)
- Surface Pro
- Surface Laptop
- Surface Book
- Surface Duo
- Surface Neo
- Surface Studio
- Surface Hub
- Surface Pen
- Surface Headphones
- Surface Earbuds
- About WinBuzzer
- Follow Us: PUSH, Feeds, Social
- Write for Us
- Cookie Policy and Privacy Policy
- Terms of Service
How to Password Protect Excel, Word, PowerPoint, or PDF Files with Microsoft Office
We show you how to password protect Excel, Word, PowerPoint and PDF files in Microsoft Office so that you can keep your documents private.

Table of Contents:
While most of us already have login passwords on our PC, at times it’s necessary to go one step further. As well as encrypting individual files , you can use Microsoft Office to password protect an Excel file Word Document, PDF, and more. When you password-protect documents with modern versions of Office, they’re typically encrypted. This means that anybody who tries to read them that doesn’t have your password will just see random strings of letters and numbers. This persists even if you send the document to another person. Here we show you how to password protect Excel, Word, PowerPoint or PDF files.
How to Password Protect a Word Document, Excel File, or PowerPoint Presentation
Securing your Microsoft Office documents with a password is a straightforward process. This method is applicable to Word, Excel, and PowerPoint files, providing an extra layer of security by encrypting your documents. Follow the steps below to protect your Office documents. We use Word as an example but the exact same steps also work for other Office files.

How to Create a Password Protected PDF File with Microsoft Office
Creating a password-protected PDF file is slightly different from encrypting a Word, Excel, or PowerPoint document. This method involves converting your Office document into a PDF format and then securing it with a password. Here’s how to do it.

FAQ – Frequently Asked Questions About Password-Protection for Documents
Password-protected documents maintain their encryption when stored on cloud services..
The document remains encrypted on the server, requiring the password upon opening, regardless of the cloud storage used. It’s crucial to use strong passwords and enable two-factor authentication (2FA) for your cloud storage account for additional security. Be aware of the cloud provider’s encryption in transit and at rest protocols to ensure comprehensive protection of your documents.
What should I do if a password-protected document needs to be accessed by multiple people?
For documents requiring access by multiple users, set a shared password communicated through a secure medium, ensuring all parties understand the importance of keeping the password confidential. Alternatively, consider using document management or collaboration platforms that offer granular access controls and permissions, allowing for better management of who can view or edit the document without relying on a single shared password.
Besides password protection, what other security measures should I consider for sensitive documents?
In addition to password protecting sensitive documents, consider using encryption solutions that secure the entire document beyond the application level. For highly sensitive information, employ data loss prevention (DLP) policies, secure access management (like 2FA ), and regularly audit access logs. Awareness and training on security best practices among users who will access the documents are also vital in ensuring comprehensive protection.
Can editing restrictions be set on a password-protected Word document?
Yes, Word allows you to apply editing restrictions that let users open but not modify a document. This is done by navigating to the Review tab, selecting Restrict Editing, and choosing the editing restrictions. This feature can be applied in conjunction with or separate from password protection, offering flexibility in how you secure and share documents. Engaging both protections enhances document security, especially in collaborative environments.
How can I tell if a PDF file is encrypted and password protected without opening it?
Various PDF readers and file management tools provide visual cues or properties details indicating encryption. For example, attempting to open the file in a PDF reader will prompt for a password if encrypted. In file properties or details pane, look for security settings or encryption status. Advanced PDF management tools may offer more detailed insights into the encryption level and specifics of the protection applied. Always ensure your PDF viewer or editor is up-to-date for accurate detection and handling of encrypted files.
In addition to password protection, consider utilizing encryption solutions that secure the entire document beyond the application level. Implement data loss prevention (DLP) policies, engage secure access management practices such as two-factor authentication (2FA) , and regularly audit access logs. It’s also crucial to promote awareness and training on security best practices among users with access to the documents to ensure comprehensive protection.
Yes, Word allows users to set editing restrictions on a document, enabling viewers to open but not modify the content. This feature is accessible via the Review tab by selecting Restrict Editing and then specifying the desired editing restrictions. This functionality can synergize with or operate independently from password protection, thus offering flexibility in document security and sharing practices. Utilizing both protections can significantly enhance document protection, particularly in collaborative environments.
Related: How to Remove Password Protection from a PDF

Related: How to Password Protect Excel Files

Related: How to Lock Cells in Excel to Protect Them from Editing

Related: How to Password-Protect a Folder in Windows 11 and Windows 10

- how to password protect a pdf
- how to password protect an excel file
- Microsoft Excel
- Password Protect a PDF
- Password Protect Word Document
- PDF password
- pdf with password
Recent News

Microsoft Announces Establishment of AI Hub in London, Led by AI...

Microsoft to Power Cloud Software Group’s Future with $1.65 Billion Investment
Subscribe to WinBuzzer on Google News


5 Free Alternatives To Microsoft PowerPoint
M icrosoft PowerPoint has always been the default choice for creating professional meeting briefs or fun little project demonstrations in schools. Its inclusion as a free service for students or working professionals makes it a no-brainer to use. However, for the general public, it can get quite expensive to pay for a subscription just to be able to create simple presentation slides. Although you can subscribe to Microsoft's Office Suite and get more bang for your buck, the pricing still doesn't hit the affordable range for most.
Fortunately, completion has been growing, and a sea of strong contenders offer similar services to PowerPoint. After considering feature sets, here are five of the best free alternatives to Microsoft PowerPoint. At the end of the article, you can find a detailed explanation of why we've chosen the services, alongside useful comparisons that may help you make your decision easier.
Read more: The 20 Best Mac Apps That Will Improve Your Apple Experience
When it comes to productivity apps, Zoho makes some of the better ones in the market. Zoho Sheet, for example, is one of the best Microsoft Excel alternatives out there — owing to its extensive product catalog, there is a great way to view and edit presentations. The aptly named Zoho Show lets you design and demonstrate professional-looking slides, all without having to download the program.
Zoho takes a minimal approach to most of its services, and its PowerPoint application is no different. You'll find that most menus are contextually aware of what tasks you're currently performing, which helps keep unnecessary tools out of the way and bring the important ones in focus. There is also a huge library of customizable templates you can choose from, making it easier to kickstart your presentation work.
Zoho Show is completely free to use for individuals and offers unlimited cloud storage. No features are locked behind a paywall, and rest assured, you can fully rely on this online presentation-making tool for all your needs, be it for school or work.
Canva is a service that can easily climb up to becoming everyone's favorite once they start using it. While most applaud it for its graphic designing prowess, there are many other things Canva can do that you probably aren't aware of . Among them is the ability to craft beautiful slides for your presentations and projects.
By creating a free account, you can access thousands of templates on Canva. You can filter these by use case—maybe you need one for a professional business briefing or a casual one explaining why your pet dog is the best canine. There is a whole section of ready-to-use templates dedicated to mobile-friendly viewing as well, which is something you don't usually find to be as accessible with other tools.
Like most presentation apps, Canva lets you collaborate with your team members and work across devices seamlessly. The Canva app for mobile also lets you control your slides remotely during your presentation. Some menus also feature AI-featured tools to add one-click enhancements to your slides -- unfortunately, these are locked behind premium subscription tiers. However, for the cent percent of the population, Canva can be used without spending a dime to meet a plethora of creative needs.
Apple takes great pride in developing in-house solutions to meet every user requirement. While most of its products dominate the competition in popularity, the same cannot be said for Keynote , the company's version of Microsoft PowerPoint. The program was first released in 2003 with macOS Big Sur and has largely remained one of those icons you glance over and forget about.
However, recent versions of Keynote have made it a compelling alternative to PowerPoint. Not only is it pre-installed on every Apple device, including your iPhone, but it also works best with the iPad touchscreen. Keynote has a largely clean and professional approach to the built-in templates, but nothing is stopping you from going creative. Animations are one of Keynote's strongest suits, allowing you to create near cinematic-looking presentations with just a few clicks.
While you can still use Apple Keynote through iCloud on Windows devices, this alternative is clearly meant for people surrounded by the walled garden of Apple technology. It makes use of features like AirDrop, Live Photos, and VoiceOver — all of which are technologies available across Apple devices. Using Apple Keynote is completely free, and the app has easy exporting tools that make working with Microsoft PowerPoint less of a hassle.
WPS Presentation
WPS Office makes some of the best solutions for creating and editing documents on smartphones , but their service offerings extend to Windows, macOS, and even Linux. WPS Presentation is perhaps the closest you'll get to Microsoft PowerPoint in terms of the user interface and how most tools are bundled in familiar locations.
This PowerPoint app offers real-time collaboration where you can invite your team members and work on the same document remotely. Like most collaboration tools, users can leave comments to suggest changes or add information for other people on the team.
WPS Presentation is not the only free product; you can utilize every app in the WPS Office suite. Unlike most competitors, you don't need to download or use a separate mini-app to make presentations. WPS Office has a document editor, PowerPoint creator, spreadsheet manager, and other tools all within its umbrella. Premium plans for this service exist, but they mostly cater to unlocking features for editing PDFs.
Google Slides
As a netizen, you most likely already have a Google account. Not only is it required to make any meaningful use of your Android phone, but popular services that we take for granted, like Gmail and Drive, all fall under Google's umbrella. One such free service that the tech giant has at its disposal is Google Slides . While the barebones UI might seem lackluster at first, Slides has nearly the same level of functionality as Microsoft PowerPoint and can even be supercharged by add-ons.
All of Google's workspace apps, such as Docs, Sheets, and Slides, provide an intuitive way to work in a team. You can add comments, use annotations, and share the presentation with limited access to others. You can use one of the many predesigned Google Slides templates for simple presentations , or browse for templates that cater to specific needs. Being part of a bigger service catalog has its obvious advantages, such as seamless integration with Google Meet, Gmail, and other products from Google that you already use.
We recommend Google Slides to anyone who needs to create and edit PowerPoint presentations on the go and can't be bothered with working in a complicated environment. The service is also available as an app for Android and iOS, and you can export your presentations in a wide range of formats, including PPT, PDF, or PNG for individual slides.
To Pay Or Not To Pay?
You'll notice that all the services we've mentioned on this list are free to use. In fact, you can use Office 365 apps online for free — including PowerPoint, which makes purchasing a standalone subscription to the Microsoft PowerPoint app quite redundant. However, nearly every free alternative here short of Keynote also offers premium plans, but should you consider buying one?
For the vast majority of people who are looking for a robust software to create, edit, and share presentations with — these free options deliver exceptionally well in every aspect. Some apps like Google Slides and Apple Keynote let you work in smaller teams with the free tier as well. Apps like WPS Office and Canva tend to lock new and exciting features like AI tools behind a paywall, and while these are nice to have, you definitely can do without them.
If you're looking for a presentation tool for a company with multiple people, you can scale up using any of the alternatives mentioned on this list. Both Google Workspace and Zoho offer reliable and enterprise-level plans you can upgrade to. For everyone else — enjoy creating and demonstrating your PowerPoint presentations for free.
Read the original article on SlashGear .

Paquete de Office Gratis con Editor de PDF
Editar Word, Excel y PPT de forma GRATUITA.
Leer, editar y convertir PDFs con la potente herramienta de PDF.
Interfaz similar a la de Microsoft, fácil de usar.
Windows • MacOS • Linux • iOS • Android

- Solución de Office
- Office Gratis
Descarga gratuita de Microsoft Word/Excel en PC
Microsoft Word y Microsoft Excel son servicios de pago para todos los usuarios. La última versión, Microsoft 365, requiere una suscripción mensual o anual. Pero, ¿qué pasa si quieres probarlo antes de suscribirte? Además, ¿cómo puedo descargar gratuitamente Microsoft Word y Excel? En este artículo, presentaré detalladamente cómo descargar y usar Microsoft Word , Excel y PowerPoint de forma gratuita. Al mismo tiempo, también recomendaré algunas alternativas gratuitas y fáciles de usar a Microsoft Word y Excel.
Descarga gratuita desde el sitio web oficial de Microsoft
Si tu computadora es una computadora Windows recién comprada, en realidad no necesitas descargar Office específicamente, porque la computadora viene con una suite de Office de fábrica, que contiene Word y Excel.
Y si has reinstalado el sistema o desinstalado la suite de Office que viene con la fábrica, necesitarás comprar Office nuevamente. Office se divide en dos versiones, una es Office 2021 permanente y la otra es la suscripción anual Microsoft 365.
1. Office 2021 es una compra única, que cuesta $249.99 para uso permanente. Sin embargo, no hay opciones de actualización, lo que significa que si planeas actualizar a la próxima versión principal, deberás comprarla al precio completo. Mientras que Microsoft 365 requiere una suscripción mensual o anual que cuesta $6.99 al mes o $69.99 al año, dándote acceso a las últimas actualizaciones. Microsoft 365, el producto estrella de Microsoft Office, también ofrece una prueba gratuita de 1 mes para nuevos usuarios, brindando a los usuarios una gama más amplia de opciones.
2. Microsoft 365 es compatible con computadoras de escritorio, portátiles, tabletas y teléfonos, y es compatible con Windows, incluidos Windows 10, macOS, iOS y Android. Para satisfacer las diferentes necesidades de los grupos de usuarios, Microsoft 365 tiene dos planes de suscripción para elegir: Microsoft 365 Home y Microsoft 365 Business.
Microsoft 365 Home: Los usuarios pueden elegir entre Home y Personal. La edición Family admite hasta 6 personas compartiendo un plan de suscripción, mientras que la edición Personal admite solo a una persona.
Microsoft 365 Business: Una edición para asistentes corporativos con una variedad de servicios basados en planes y precios de suscripción específicos.
Ahora aprendamos cómo descargar gratuitamente Microsoft Word/Microsoft Excel en PC siguiendo las instrucciones.
1. Visita el sitio web oficial de Microsoft Office.
2. Elige pago anual o pago mensual.
3. Haz clic en "Probar gratis durante 1 mes" en la esquina izquierda del sitio web.
Descarga gratuita de Microsoft Office para PC (Windows 10)
4. Haz clic en el botón 'Inicia tu prueba de 1 mes'.
Prueba Microsoft 365 gratis
5. Luego, inicia sesión en tu cuenta de MS o crea una nueva ahora mismo. Se te pedirá que proporciones un método de pago antes de comenzar la prueba gratuita. Recuerda que puedes cancelarlo dentro de los 30 días después del primer cargo.
6. Por último, tanto Microsoft Word como Microsoft Excel , así como PowerPoint , se descargan e instalan en tu PC. Puedes probar y experimentar los servicios considerados de forma gratuita.
La prueba gratuita solo se proporciona para nuevos clientes de Microsoft Office.
Si eres maestro o estudiante en instituciones elegibles, puedes obtener la versión educativa de Microsoft 365 de forma gratuita, que incluye Word, Excel, PowerPoint, OneNote y Microsoft Teams, además de herramientas adicionales para el aula.
Uso gratuito de Microsoft 365 en línea
Microsoft 365 requiere una suscripción para descargar, mientras que Microsoft 365 en línea no lo requiere. Microsoft 365 en línea es la contraparte basada en la nube de la suite tradicional de Microsoft 365, que ofrece a los usuarios la flexibilidad de acceder y colaborar en documentos, hojas de cálculo, presentaciones y más desde cualquier dispositivo con conexión a Internet.
Ve al sitio web oficial de Microsoft 365 en línea , todo lo que tienes que hacer es iniciar sesión o registrarte de forma gratuita. Una vez hecho, puedes disfrutar de la suite completa de herramientas en línea de Microsoft 365, incluyendo Word , Excel, PowerPoint y otras aplicaciones prácticas. Lo genial es que puedes descargar tu trabajo a tu almacenamiento local para compartir fácilmente archivos con otros cuando sea necesario.
Use Word, Excel y PPT de forma GRATUITA, Sin Anuncios.
Edite archivos PDF con el potente conjunto de herramientas PDF.
Interfaz similar a la de Microsoft. Fácil de aprender. 100% compatible.
Aumenta tu productividad con las abundantes plantillas gratuitas de Word, Excel, PPT y CV de WPS.
Descargar alternativa gratuita a Microsoft Word/Excel
Microsoft Word y Excel no son gratuitos. Descargar software pirateado pondrá en riesgo tu computadora. De hecho, hay muchas opciones gratuitas además de la piratería. Incluso si no usas mucho Word o Excel, puedes elegir una herramienta de procesamiento de documentos en línea que sea más popular ahora. Sin más preámbulos, aquí hay algunas buenas alternativas para recomendar.
1. WPS Office
WPS Office debería ser el software más parecido a Microsoft Office en términos de experiencia de usuario. Es completamente gratuito y tiene buena compatibilidad con Microsoft. Es la suite de oficina para computadoras con mayor cuota de mercado, excepto Microsoft Office, y tiene versiones para Windows, Linux, Mac y dispositivos móviles. WPS incluye tres componentes principales: procesamiento de texto, creación de formularios y creación de presentaciones, e incluso tiene un editor de PDF.
Descarga WPS Office Word gratuita para Win7, 10, 11
2. LibreOffice
LibreOffice es una suite de oficina gratuita y de código abierto. Incluye procesadores de texto, hojas de cálculo, programas de presentación, editores de gráficos vectoriales y herramientas de diagramación, programas de gestión de bases de datos y aplicaciones para crear y editar fórmulas matemáticas. Es una muy buena alternativa de código abierto, pero la velocidad de actualización del producto es relativamente lenta.
Sitio web de LibreOffice
G Suite es un conjunto de herramientas de productividad de la suite de oficina de Google. Las herramientas de productividad que incluye, Google Docs, Sheets y Slides, son software gratuito en línea para editar documentos y colaborar que permite que varios usuarios editen el mismo documento juntos. Pero solo está disponible en línea.
Sitio web de G Suite
Preguntas frecuentes
¿puedo descargar una versión crackeada de microsoft office word/excel.
Descargar una versión crackeada o pirateada de Microsoft Office , o cualquier otro software, es ilegal y poco ético. Viola los términos de licencia de Microsoft y puede exponerte a consecuencias legales. Recomiendo encarecidamente obtener software de manera legítima, como comprando una copia con licencia o suscribiéndote a Microsoft 365, para asegurarte de que estás usando una versión legal y segura de Microsoft Office.
¿Es posible descargar Microsoft Office Word/Excel desde un sitio web de terceros?
Descargar Microsoft Office Word y Excel desde sitios web de terceros puede ser arriesgado y generalmente no se recomienda. Aquí hay algunas razones:
Riesgos de seguridad: Los archivos de sitios web de terceros pueden estar modificados o infectados con malware, lo que puede dañar tu computadora y comprometer tus datos.
Problemas de licencia y legales: Descargar Microsoft Office desde fuentes no oficiales a menudo viola los términos de licencia y puede llevar a consecuencias legales.
Falta de actualizaciones y soporte: El software de fuentes no oficiales puede no recibir actualizaciones esenciales y parches, dejando tu sistema vulnerable a amenazas de seguridad.
¿Cómo puedo usar Word y Excel de forma gratuita?
La manera más fácil es descargar un software de oficina gratuito y liviano. Aquí te recomendamos encarecidamente usar WPS Office , ya que es completamente compatible con Microsoft Word y Excel. Además, ofrece otras herramientas útiles como un editor de PDF y un convertidor de formatos de archivo. Es una marca con una historia de desarrollo de 33 años, lo que lo hace completamente seguro y fácil de usar.
Microsoft Word y Excel son buenas opciones, especialmente cuando usamos una PC para el trabajo de oficina, es una ventaja, pero no la única opción, o puedes buscar otras suites de oficina gratuitas como WPS Office. Como herramienta de oficina gratuita multifuncional y rica en funciones, WPS Office integra Writer (Word), Presentation (PowerPoint), Spreadsheet (Excel) y un editor de PDF para software de oficina, lo que puede satisfacer la mayoría de las necesidades del trabajo diario.

Con una maestría en Desarrollo de Software, aporto más de 10 años de experiencia ofreciendo soluciones técnicas y consejos especializados para software de oficina.
IMAGES
VIDEO
COMMENTS
In PowerPoint, on the Insert tab, click or tap Object. In the Insert Object dialog box, select Create from file. Click or tap Browse, and in the Browse box, find the Excel workbook with the data you want to insert and link to. Before you close the Insert Object box, select Link, and click OK. Important: The linked object in your presentation ...
Open the Excel file, then select the range of data (e.g. C4:E14) you want to embed. After that, press CTRL + C on your keyboard to copy this range. Open your PowerPoint slide and navigate to the Home tab if it does not appear. Click on the Paste drop-down option and then click on Paste Special.
Start by opening both the Excel worksheet and the PowerPoint presentation you want to edit at the same time. In Excel, select the cells you want to link or embed. If you would like to link or embed the entire worksheet, click on the box at the juncture of the rows and columns in the top left-hand corner to select the whole sheet.
2. Link Excel Data to PowerPoint. Linking data (icons 3 and 4) keeps your PowerPoint and Excel file in sync. If you change the data for the chart in Excel, you can update the pasted chart in PowerPoint to use the latest data. When PowerPoint and Excel are both open at the same time, this happens automatically for linked data.
1. Choose where you want to insert the Excel file. On the PowerPoint presentation, click on the text field you want to insert an Excel file then click on the Insert tab on the upper-left section of the window to view the Insert toolbar. 2. Click on the Object button.
First, build your table in Excel. Save the file on your computer. Select your table and press "Ctrl + C." Go to your PowerPoint file. Right-click on the slide to see different "Paste Options" (this is another way to paste information from Excel to PowerPoint). Choose the middle option: "Embed," and that's it!
Step-4: Select the Excel file. In the file explorer pop-up window, select the Excel file that you want to embed into the PowerPoint slide. Then click on the "OK" button at the bottom of the window to add the Excel file. Step-5: Click on the "Link" option. In the "Insert Object" dialog box, click on the "Link" option by the ...
Learn how to embed a link directly to Excel data from within a PowerPoint (PPT) presentation. If you are using PowerPoint 2013 or a newer version, you can li...
Once you've made the initial data, follow the steps outlined below. Select the table you want to copy over to your presentation. Click on Copy or press Ctrl + C ( Command + C for Mac users). Open Microsoft Powerpoint . Open the file presentation you're working on if you already have one; otherwise, click on Blank Presentation .
In Excel, select the cells, chart or other object you want to link. Copy the selection (Ctrl+C or right-click Copy) In PowerPoint, right-click and select Paste Special > Paste Link. Select Microsoft Office Graphic Object and click OK. The selection will appear linked into the PowerPoint slide. Now when the source Excel file updates, right-click ...
Select it and click Open. To link the Excel sheet with PowerPoint, check the checkbox for Link and click OK. Select a File and click on Link. This inserts the Excel workbook in the form of an image. You can double-click on the image to move to the original Excel file. The entire sheet is linked.
In this step-by-step tutorial, learn how you can link a Microsoft Excel spreadsheet to a PowerPoint presentation. When you update the table or chart in Excel...
This Microsoft PowerPoint 2016 tutorial shows you how to embed and link MS Excel 365 content into your PowerPoint Presentation Slides. I also show you the di...
Link Entire Excel Sheets. To link a whole sheet: In PowerPoint, go to Insert > Object > Create from File. Browse and select your Excel file. Check Link to create a live connection and click OK. This inserts the whole sheet as an object you can resize or double click to open the file.
To embed an Excel sheet into a PowerPoint slide, follow these steps. Step-1: Click on the "Object" option. In the menu ribbon located at the top of the screen, click on the "Insert" tab. Then click on the "Object" icon from the "Text" group. Step-2: Click on "Microsoft Excel Worksheet".
First, copy the column names to the first rows of the table from your options. The Start filling Data automatically will set to 2. Then click OK to close. The data file automatically copies to the table. Then select all cells that have numeric data, and click on DataPoint and Table again.
When used in PowerPoint presentations, Excel charts can enhance the overall impact of the presentation and convey the information more clearly. Here are six key features of using Excel charts in PowerPoint: Excel charts are easily customizable in PowerPoint. Users have access to a range of chart styles and formatting options that can be ...
To paste a chart into PowerPoint, there are some steps to take. Start by opening your Excel file. Select the chart you want to add then press Ctrl + C or right-click and choose "Copy". Switch to PowerPoint and go to the slide where you want to paste the chart. Press Ctrl + V or right-click and select "Paste".
STEPS: First, launch PowerPoint. Then, select the Insert tab. Next, click Text, and later on the Object option. As a result, a new dialog box will pop up at this time, and you must click on Create from file. After that, click on Browse to find the Excel document you want to add to your slides. Consequently, the Insert Object dialog box pops up ...
9. FORMATTING TEXT TO FORMAT TEXT IN BOLD, TO CHANGE THE FONT STYLE: ITALICS OR UNDERLINE: Select the cell or cells you want to Left-click a cell to select it or drag format. your cursor over the text in the Left-click the drop-down arrow next to formula bar to select it. the Font Style box on the Home tab. Click the Bold, Italics or underline Select a font style from the list. command.
These aren't just for technical jargon—they can add a creative touch and emphasize important details. How to Insert Superscript and Subscript Symbols: STEP 1: Navigate to the 'Insert' tab. STEP 2: Click 'Symbol' > 'More Symbols'. STEP 3: Choose ' (normal text)' from the 'Font' dropdown.
When in doubt, adhere to the principle of simplicity, and aim for a clean and uncluttered layout with plenty of white space around text and images. Think phrases and bullets, not sentences. As an ...
The 3 options for embedding Excel Dashboards and charts in PowerPoint and the downsides of each. 🎓 LEARN MORE in my Excel courses: https://www.myonlinetrain...
Tick 'Encrypt the document with a password'. In the options window, find and tick the checkbox labeled " Encrypt the document with a password ". Click " OK " to move to the next step ...
Select Presentation. In the PowerPoint window that opens, log in using your account. Press Accept on the "Free 5-day pass" section. This lets you use PowerPoint (and Word and Excel) for five days ...
Using Apple Keynote. is completely free, and the app has easy exporting tools that make working with Microsoft PowerPoint less of a hassle. WPS Presentation. WPS Presentation app on different ...
1 likes, 0 comments - gorgeousexcel365April 12, 2024 on : "#PowerPoint morph #PowerPoint presentation #PowerPoint scrolling numbers #PowerPoint slides, #PowerPoint mouse hover, ...
Use Word, Excel y PPT de forma GRATUITA, Sin Anuncios. Edite archivos PDF con el potente conjunto de herramientas PDF. Interfaz similar a la de Microsoft. Fácil de aprender. 100% compatible. Aumenta tu productividad con las abundantes plantillas gratuitas de Word, Excel, PPT y CV de WPS.