Big Timer is a fullscreen countdown timer for workshops, presentations and meetings in your browser
Please go to bigtimer.net in a browser with javascript enabled to use Big Timer.

Do you have Javascript enabled?
Press CMD+Shift+R on a Mac or CTRL+Shift+R on Windows to force-reload the page. If that doesn't help, please clear your browser history for bigtimer.net.:
- Press CMD+Y on a Mac or CTRL-H on Windows
- Search bigtimer in your history
- Select all instances of Big Timer in the search results
- Press the three dots on the right
- Remove the website from Chrome's history
- Press CTRL-H on Windows or, on a Mac, go to History > Show all history
- Right-click
- Click Remove pages
Safari on MacOS
- Press CMD+Y
- Click Delete
Safari on iOS
- Go to your homescreen
- Tap Settings
- Scroll down and tap Safari
- Tap Advanced at the bottom
- Tap Website Data
- Find bigtimer.net
- Swipe left on bigtimer.net , press delete
If you don't see Big Timer in your history, javascript may be disabled in your browser after all.

Create an on-screen timer
You can add an animated on-screen timer or progress bar to make your presentation more interesting. For example, you might want to include a timed quiz at the end of a training with a countdown display. You can use the animation features in PowerPoint to create many different kinds of timers.
If you’re looking for a timer to track how long you’ve been speaking to stay within your allotted time limits, see Start the presentation and see your notes in Presenter view .
Tip: You can also find other types of timers, such as stopwatch timers, at the Office Store or use free slide templates to count down one minute , five minutes , and ten minutes for your audience.
Create a countdown timer
This timer uses a simple but dramatic animation sequence. It shows a countdown in one-second intervals from 5 to 1.
Begin by creating five text boxes with numbers 5 through 1. We will animate these to disappear one at a time, in one-second intervals.

Tip: Create the boxes in order from highest to lowest so it’s easier to animate them in order.
To create text boxes, on the Insert tab, in Text group, click Text box , and draw the text box on your slide. Then add the number. You can copy and paste to duplicate and then edit the new boxes.
Click inside the text rectangle with the number.
On the Animations tab, in the Advanced Animation group, click Add Animation , and go down to Exit . Here, you can select the animation you want, for example Disappear .

Select the rest of the rectangles 4, 3, 2, 1 in order, and apply the same exit animation, Disappear , to each, one at a time.
Click Animations > Animation Pane to show the Animation Pane . The numbering of the rectangles can be a little confusing because PowerPoint is accounting for other objects on the slide. Look at the number to the right, which shows the text in the rectangle.

You want only the first rectangle with the number 5 to start on a click, and you want it to stay on screen for one second before it disappears. You want the other boxes to then each wait one second before disappearing automatically, one by one.
Select Rectangle 5 , and in the Animations > Timing group, leave the settings Start: On Click and Duration: .01 , but set Delay to 01.00 , one second.

Now, in the Animation Pane , select the rest of the rectangles one at a time, from 4 to 1. Again, in the Timing group, set the timing details to: Start: After Previous , Duration: Auto , and Delay: 01:00 .

When you’re done, try it out by going to Slideshow Mode and playing From Current Slide . Click to begin the countdown!
You can preview your animation effects any time. On the Animations tab, in the Preview group, click Preview .
After the countdown, you might want to add an animation, such as a text box that reads Finished! To do this, insert the text box, select it, go to Animations > Advanced Animation > Entrance > Appear . Then, in the Timing group, set Start to After Previous , set Duration to Auto , and set Delay to 00.00 . Notice that this text box also appears in the Animation Pane .
Note: You can just as easily animate shapes to appear or disappear using the different entrance and exit animations in PowerPoint. You can use any interval, but it’s a good idea to set the same delay for each object in the sequence.

Top of Page
How to create a progress bar timer
Another effective way to add a countdown timer is to emulate the appearance of a progress bar.
On the Insert tab, in the Illustrations group, click Shapes , and select a rectangle.

On the slide, click where you want the progress bar, and draw a rectangle with its edge against the left border of the slide.

You can color the bar as you like. Right-click the bar and select Format Shape > Shape Options > Fill > Solid fill .

On the Animations tab, in the Animation group, select Fly In .
Click Effect Options and select From Left .
In the Timing group, set the Duration to the number of seconds you want the progress bar to run, for example, 30 seconds. For Start , select On Click .
Here’s what your settings should look like:

When you’re done, try it out by going to Slideshow Mode and playing From Current Slide . Click to begin the timer. The progress bar should appear to grow from the left side of the screen for 30 seconds and then stop.
Animate text or objects
Add, change, or remove transitions between slides
Set the timing and speed of a transition
Animate pictures, clip art, text, and other objects
Rehearse timings for a slide show
Use slide masters to customize a presentation

Need more help?
Want more options.
Explore subscription benefits, browse training courses, learn how to secure your device, and more.

Microsoft 365 subscription benefits

Microsoft 365 training

Microsoft security

Accessibility center
Communities help you ask and answer questions, give feedback, and hear from experts with rich knowledge.

Ask the Microsoft Community

Microsoft Tech Community

Windows Insiders
Microsoft 365 Insiders
Was this information helpful?
Thank you for your feedback.

CueTimer helps performers and presenters manage their time during events and broadcasts. Create a list of timers and use triggers or shortcuts to progress during the show. Display the countdown on a monitor connected through HDMI, NDI or weblink.

CueTimer for Windows
version 3.0
USER GUIDE PC
- 64-bit Windows 8.1, 10 or 11
- .Net 4.8 or later installed
- v.3.0.0.16 (23. March 2024) – Fixed alignment issues when the timer goes into overtime: the size is automatically adjusted so it keeps the same width. This wasn’t working properly when the timer was displaying mm:ss. – Fixed an issue where the timer list wouldn’t change size when going to fullscreen. – Changed the behavior of the hide feature: When a new timer starts, the timer is still hidden. This is how it also works in the Mac version of CueTimer. In the old version, the start command would always unhide the window. – We changed some internal files to only work in 64 bit, to improve security. This also means that CueTimer now only works with 64-bit versions of Windows. For full version-history, see the changelog .
Downlad version 2.6 for PC
For customers with perpetual CueTImer licence bought before 11. February 2022 Read more
CueTimer for Mac
USER GUIDE MacOS
- CPU: Both Intel and Apple Silicon CPUs are supported natively
- OS-support: 10.14 and beyond (Sonoma, Ventura, Monterey, Big Sur, Catalina, Mojave)
v.3.0 (2) (4. march 2024) – ADDED auto updates and update notification – ADDED option to sum hours into the minutes field to display 70:00 instead of 01:10:00 – CHANGED the NDI library to v .5.6 For full version-history, see the changelog .
Downlad version 2.6 for Mac
Buy and Activate
Starting at $45/year
HOW TO ACTIVATE
- To use the software without restrictions you need to activate the applications with a licence. Licences can be bought from the store.
- We currently offer subscription based licences with yearly payment.
- To activate the application, copy your licence key-code into the activation-field and push OK.
- You can use the software as much as you want in trial-mode. The only restriction is that the applications will close after 10 minutes.
Control your time. Stay on schedule
CueTimer provides the tools to ensure that your event runs on schedule. Get started in just three simple steps:
1. Create the timer-list
Write down your schedule in the app interface, or import spreadsheet data: Cuetimer can open CSV & TSV files, and you can paste directly from Excel and Google Sheets. If you prefer a more dynamic workflow where you set the timings as you go, we support that as well.
2. connect the outputs
CueTimer has multiple options for viewing the timers on any device: if you are connected to an external monitor, just push the “Fullscreen” button. Or send the timer-page to broadcast-devices on your LAN-network through NDI. Remote speakers can stay in sync using our online timer.
3. control the time
The interface is tailored for show-control: Start and stop the timers with ease and edit on the fly. Redundancy and backup is secured with undo/redo and autosave. Companion with Stream Deck gives you extra buttons for the commands, and remote control over the network.
Trusted by leading industry professionals

We ❤️ CueTimer! We use it on our shows to keep everything running in military precision. We particularly enjoy using it in conjunction with Companion to enable us to adjust the timers on the fly, giving us feedback on our adjustments and allowing us to hit essential cue times throughout the day. Whether it’s a live event or a broadcast, you will always see us running CueTimer on our Streamdecks! – Ben Dave, Dot + Diode, Great Britain

I can without exaggeration say that CueTimer has changed my life on show site in many ways.
I really enjoy how much customization is available for the display features like creating a template for repeatable segments. My customers also love the messaging feature. For the cost of a license, laptop and small monitor, it’s definitely a better value proposition over a traditional clock system.
– Craig Trosclair, Corporate Lighting and Audio, USA

We are extremely happy to use CueTimer in our productions. We constantly provide AV production solutions for streams, hybrid events and live events catering to state ministries and high-profile corporate clients, so a flexible stage communication and timing tool like this is invaluable to us in securing the flow of the show.
– Panu Koskinen, ShowTekniikka, Finland

We have installed CueTimer on several Macbook Air and use the tool regularly. The range of functions is very large, the design can be adapted almost as desired and saved as a template. If necessary, the timer can be shared via a link over the Internet, but the software basically works offline, which is a great advantage over other products.
– Simon Anliker, Kilchenmann AG , Switzerland

CueTimer and APS are unbelievable lifesavers when working with corporate AV. It helps speed up my workflows and keeps the events on time. The option to give moderators and event producers a link for timers is a great feature. I’m very happy with the support and customer service. I recommend these tools for anyone who asks about solutions for presentation-switching and timers.
– Truls Skæveland, Eventi AS, Norway

Finding a clock-solution for Lego Masters Norway that was reliable, flexible and easy to work with in a TV setting proved to be a challenge until we came across PresentationTools and their CueTimer software. I would definitely recommend CueTimer as a countdown timer and tool to keep time in a tight program.
– Michael Thunem Berlund, Hilux A/S, Norway
A countdown timer application for physical, virtual & hybrid events
CueTimer can be used for any event that needs precise timings:

Conferences & Seminars
A monitor with a countdown-timer is very useful for someone holding a presentation. With CueTimer it is easy to control this monitor and display the timers for the different speakers that enter the stage. When the time is running out you can make the colours change to notify the speakers.

Streaming & Remote Workflows
CueTimer is well suited for the digital workflow that has evolved during the Covid 19 pandemic. We have added multiple options for viewing the timers that should cover most scenarios: you can feed the video-mixers with HDMI or NDI video, and share a webpage with the timers to remote presenters and crew-members.
Broadcasting & Gameshows
A TV-show needs a production-timer that is reliable, flexible, and easy to use. CueTimer was built to solve this demanding task. To give an example, read more about how CueTimer was used as a countdown-timer for the season one of Lego Masters Norway.
Multiple Output Options – HDMI, NDI & Online Countdowns
With CueTimer you can send the countdown anywhere:
Push the “Fullscreen” button to place the countdown on the external display. With SDI/Fibre extenders the monitor can be placed far away from the computer.
CueTimer has a native NDI -output using the latest NDI 5 framework. This lets you share the countdown as graphics over the local LAN-network.
Create a webpage to share the current countdown and the schedule with a list of future timers. The page will scale automatically for all browser-sizes.
Control with Companion
Companion lets you control different devices over the local network and with Streamdeck hardware-boxes. It is free of charge and more info can be found here. Our Companion module includes buttons for the most important commands, and it has feedback for the current timer with colors that can be set from CueTimer. With our premade presets found in the Companion menu it is easy to drag and drop the buttons where you need them. The Companion module is built on our open API which can be found here.
Customise the style of the fullscreen timer
The HDMI and NDI-output is completely customizable with colors, placement, fonts, and images. You can have a backgound-image for decoration, your company logo for branding, and to notify the speaker that the time is running out, add a blinking border.
Send messages to the presenters
The confidence-monitor with the timer is one of the few places where you can send messages to the presenter without the audience noticing it. Let them know if their microphone needs to be adjusted, if the next speaker is delayed, or use it for questions from the audience.
If you have a big monitor, place the message on the top of the screen along with the other content. Or if you really want to grab the attention of the speaker, give the message flashy colors and make it fill the whole screen.

New in version 2.5: Spreadsheet-import
Now you can import a spreadsheet with a schedule or a rundown into CueTimer. And with the Auto-Schedule feature, you just need to know the start-times, and CueTimer will calculate the durations for you.
- Import CSV and TSV files
- Paste spreadsheet-data
- Link timers with start and end times

Control your licences from the user-dashboard
With a subscription-licence you can create an account on this site where you can monitor your licences, release licences from activated computers, and manage your subscriptions registered to your email-address.
CueTimer Feature Overview
Create a list of timers from our custom spreadsheet
Multiple outptut-options to display the timers on any device:
HDMI fullscreen output. Push the Fullscreen-button do display the timer on the external monitor.
NDI output. Send the timer-window as a native NDI source from CueTimer
Web output. Create a timer-webpage hosted on our server. Here you can also see the schedule with a list of future timers.
Preview windowed-output that is always on top and never reacts to keystrokes. Perfect for Powerpoint.
Use different timer-types: countdown, countup, countdown to time and regular clock.
Add warnings to notify the speaker that the time is running out
Options for what happens when the timer ends: go into overtime, stop the timer, or start the next timer
Change the duration by adding and subtracting minutes or manipulate the speed of the timers.
Customize the countdown-windows with colors, animations and scaling.
Change the style when the timer changes status. For example, when the timer ends, you can make the screen red, and make the countdown blink.
Send messages that is displayed on the timer-outputs. The appearance of the message is fully customisable: place it in the corner, or fill the whole screen.
Native desktop-apps for Mac and Windows that are light on system-resources. Built for demanding live-shows.
Support for multitasking: With native control over the CueTimer-windows, you can display our timers while using other apps.
Undo/Redo & Autosave. We got you covered if you accidentally start the next timer.
Use Stream Deck buttons to control CueTimer through Companion. Then you also get remote-control over the local network.
Support for multiple workflows: The timer-list can be an ordered schedule, or a selection of timer-templates that can be started easily
Import CSV & TSV files with any delimiter
Copy & paste spreadsheet-data into CueTimer
Spreadsheet-import menu where you can sort the columns you want to import
Export the timer-list as a CSV file
Auto-calculate timer-values so that the end of a timer becomes the start of the next. Then you only need the start-times to make a schedule with durations for all the segments.
Start and stop the timers with keyboard-shortcuts or large buttons
OSC messages to and from CueTimer. Trigger other devices when the timer ends, or start and stop timers with OSC commands.
An open API that lets you control CueTimer over the local network through TCP/IP commands. Create your own controller-app, or use the ones already made for you.

CueTimer articles
We have collected a wide collection of articles about CueTimer. Read how keep soundchecks on time in music-festivals, or why we decided to go for an offline desktop-app for live-event timers.

The user-guide is our reference on how to use CueTimer. We have tried to cover all related topics on how to control and configure our countdown-timer app.

Youtube-channel
If you prefer learning by watching instead of reading, then the CueTimer online-tutorial series is for you. Or get tips about how to connect CueTimer to Qlab.
Latest Posts

Unlocking Productivity: CueTimer as Your Ultimate Pomodoro Timer
February 26, 2024

CueTimer 3: New options for viewing timers
February 19, 2024

CueTimer walkthrough: Display and control presentation-timers
January 9, 2024
Subscribe to our Newsletter
Be the first to know about the latest news from PresentationTools
Contact & Follow
Company Invoicing
© PresentationTools A/S 2024
How to Insert a Timer in PowerPoint? [Step-by-Step Guide!]
By: Author Shrot Katewa
![How to Insert a Timer in PowerPoint? [Step-by-Step Guide!]](https://artofpresentations.com/wp-content/uploads/2021/10/Featured-Image-How-to-Insert-a-Timer-in-PowerPoint-optimized.webp "presentation timer and share")
Having a timer in your PowerPoint presentation can be extremely useful. There are many use cases for it for instance when you are conducting a workshop, you may want to insert a timer for break time. Likewise, you can also add a timer before the first slide to let your audience know when the presentation will start!
Whatever the case may be, the important question is – how to insert a timer in PowerPoint?
To insert a timer in PowerPoint, you can use add-ins such as “Easy Timer”, “Breaktime”, or “Slice Timer”. You can also create your own timer using the animation feature within PowerPoint using the “Fly out” or “Wheel” animation depending on the type of timer you want to add in PowerPoint.
In this article, we shall do a deep dive on this subject. I will share with you a few easy suggestions first to add a timer to your PowerPoint presentation. Plus, I will also show you how you can build your own timer later in the article!
So, let’s get started!
1. How to Add a Timer in PowerPoint?
In Microsoft PowerPoint, you can add a countdown timer to a slide either through add-ins or by creating a timer yourself. We shall take a look at the easier process first i.e. using the add-ins.
Then, I will also help you understand how to create your own timer in PowerPoint using animations.
Method 1 – Insert a Timer in PowerPoint Using Add-ins
Using add-ins is the quickest way to insert a timer in a Microsoft PowerPoint slide. These are mostly easy to insert and provide your slides with a professional look.
There are quite a few add-in options for adding a timer to your slides in PowerPoint. I’ve found the following add-ins to be the most effective.
In the Easy Timer add-in, you can access three different types of countdown timers. You can add either the analog clock, the digital clock, or the bar countdown timer to your slide. All you need to do is insert the timer and set your preferred time.
Slice Timer
The Slice Timer add-in has a very clean look and is easy to use. All you have to do is click on the add-in and it will appear in the opened slide. You can put in your preferred duration for the timer.
The Breaktime timer is specifically designed for taking a presentation break. All you have to do is insert the timer in the slide and select your preferred break time. It also allows you to customize the timer background with various design options.
How to Insert a Timer Add-in in PowerPoint?
To insert a timer add-in in PowerPoint, first click on the “Insert” tab. Then, from the ribbon, click on “Add-in”. From the dropdown, click on “Get Add-in”. A new window will pop up. Search for “timer” using the search bar. Finally, click on “Add” to install the add-in to your PowerPoint.
The complete process is described in a step-by-step process below –
Step-1: Click on the “Insert” menu
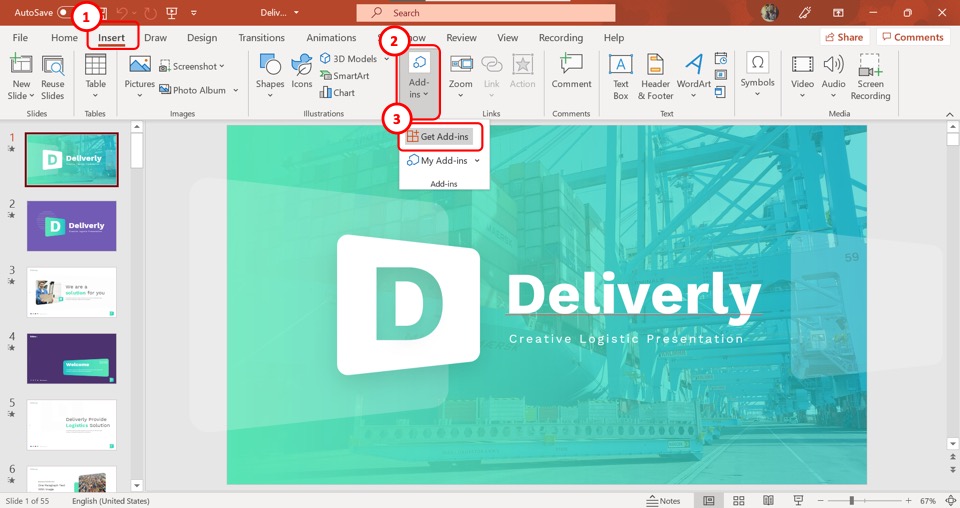
The first step is to open the “Insert” menu. To do so, click on the “Insert” tab in the menu ribbon located at the top of the screen.
Step-2: Click on “Get Add-ins”
In the “Insert” menu, click on the “Add-ins” button to open a dropdown menu. Click on the “Get Add-ins” option. This will open a dialogue box.
Step-3: Click on the “Search box”
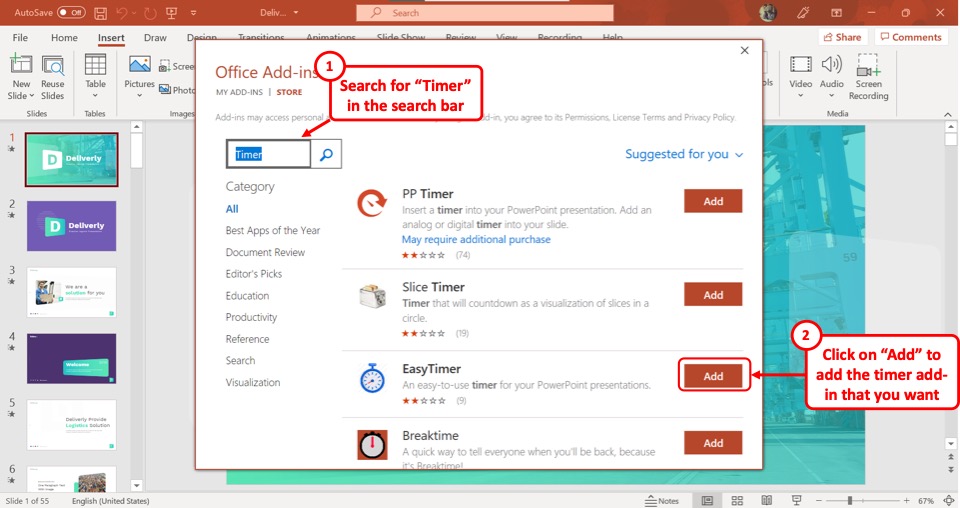
In the “Office Add-ins” dialogue box, click on the “Search box” on the upper left side. Type in “Timer” and click on the search icon beside the “Search box” .
You can alternatively search for a specific timer by typing in “Slice Timer” , “Easy Timer” , “Breaktime” , etc.
Step-4: Click on the “Add” button
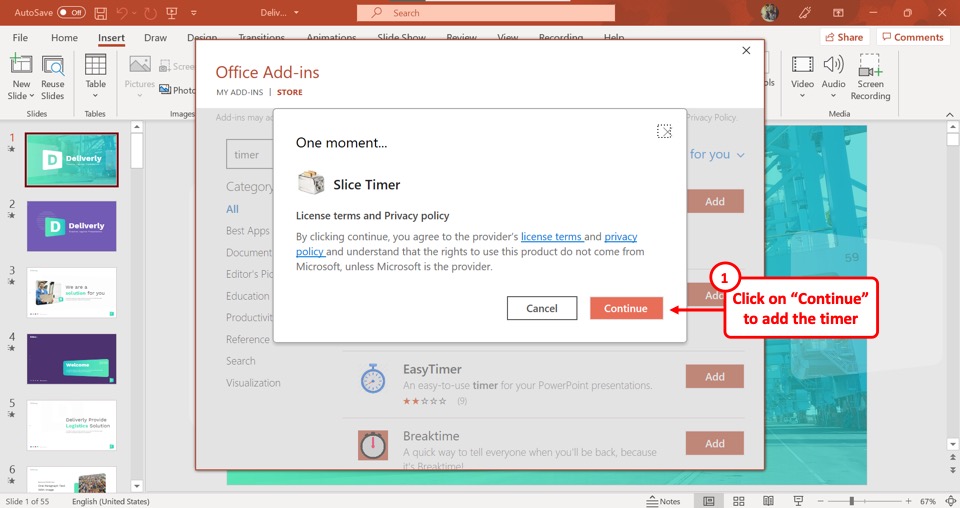
Now you can click on the “Add” button beside your preferred timer. This will prompt another dialogue box.
Click on the “Continue” box to add the timer add-in.
After this, once the process is complete, the add-in will be loaded to your PowerPoint presentation.
How to Insert a Countdown Timer Using an Add-in?
Now that you have installed the timer add-in in PowerPoint, the next step really is to simply insert a timer on your slides.
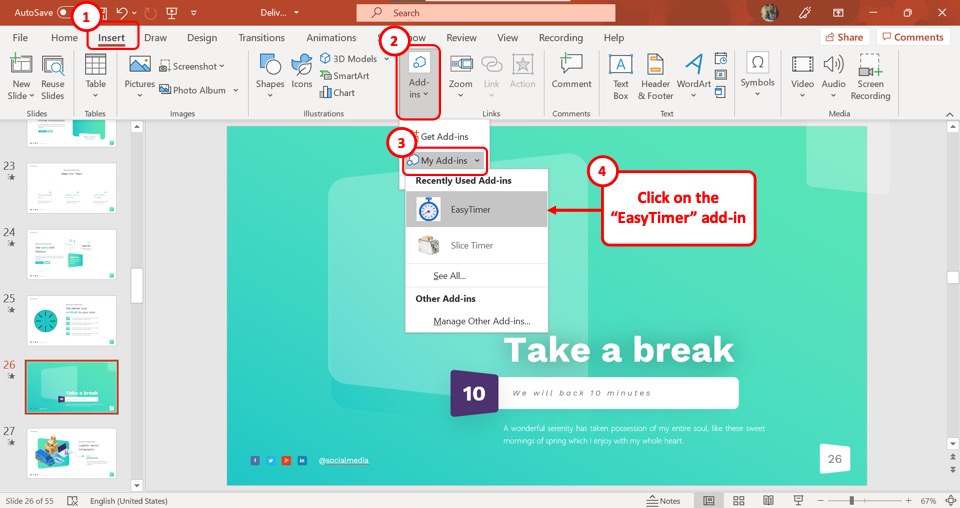
Step-1: Click on the “My Add-ins” option
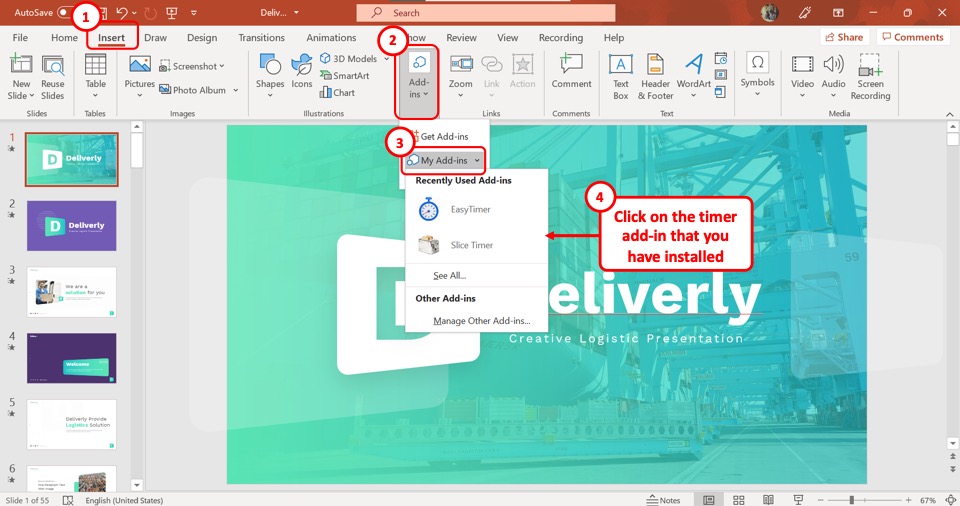
In the “Insert” menu, click on the “Add-ins” option again. Click on the “My Add-ins” option from the dropdown menu.
In the secondary dropdown menu, click on the newly added timer add-in to insert it in the slide.
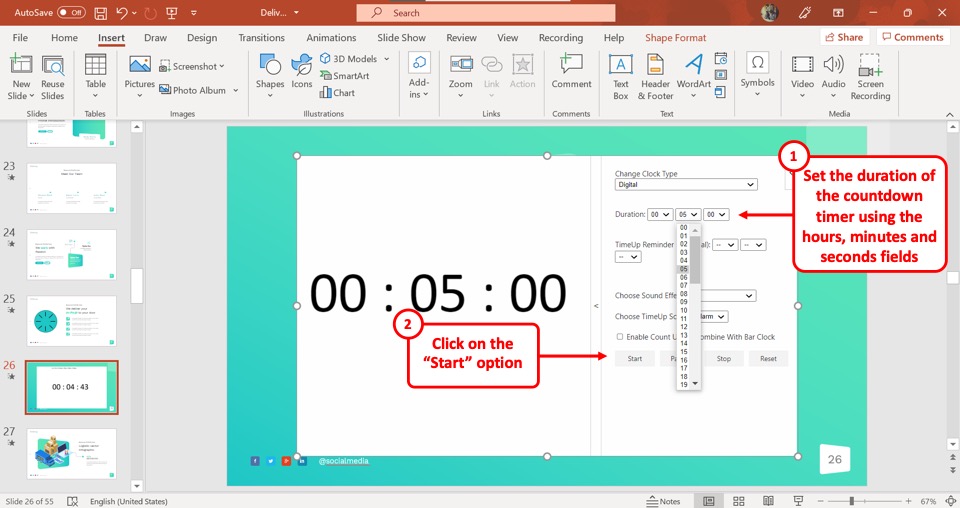
Step-2: Add the duration to the timer
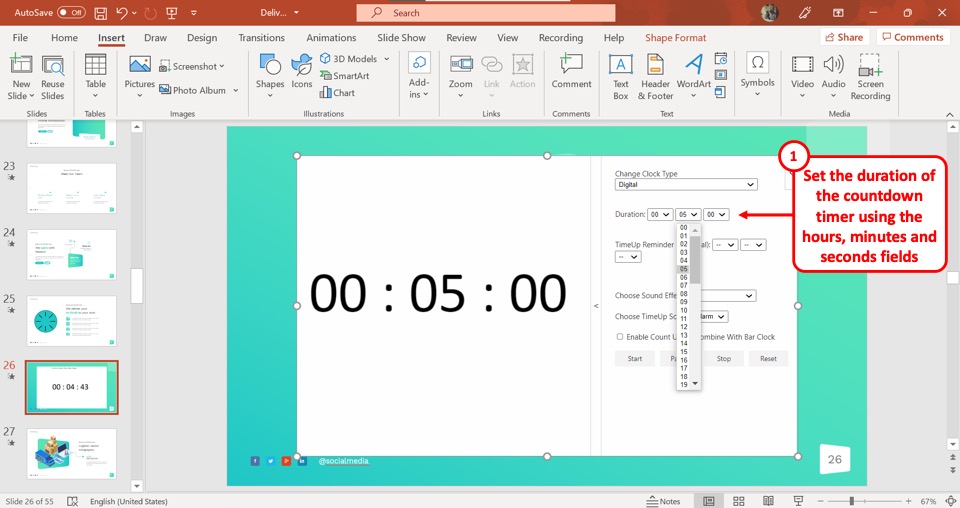
The next step is to simply add the duration that you want to set for the timer!
Remember, most timer add-ins will have a separate field for hours, minutes, and seconds. So, the right-most field is usually for seconds.
To add a 5-minute timer, click on the middle field, and from the dropdown, click on “5”. Finally, click on “ Start “.
And that’s it! You will see the timer doing a reverse counting from 5 minutes!
2. How to Create Your Own PowerPoint Timer?
In Microsoft PowerPoint, you can also make your own timer, apart from inserting a timer from Add-ins.
To create a custom timer in PowerPoint, first, insert a bar shape on the slide. Then, using the “Fly Out” animation, set the bar shape to disappear from the slide slowly. Adjust the duration of the animation to match the duration of your timer for the best effect.
You can insert a shape from the “Shapes” option and use the “Animation” menu to turn the shape into a “Bar Countdown Timer” or a “Clock Countdown Timer” .
2.1 Method 1 – Bar Countdown Timer
Here’s what a typical bar countdown timer looks like –
Let’s make a similar bar countdown timer which is easier than the above slide to create. Follow the easy steps mentioned below.
Step-1: Click on the “Shapes” option
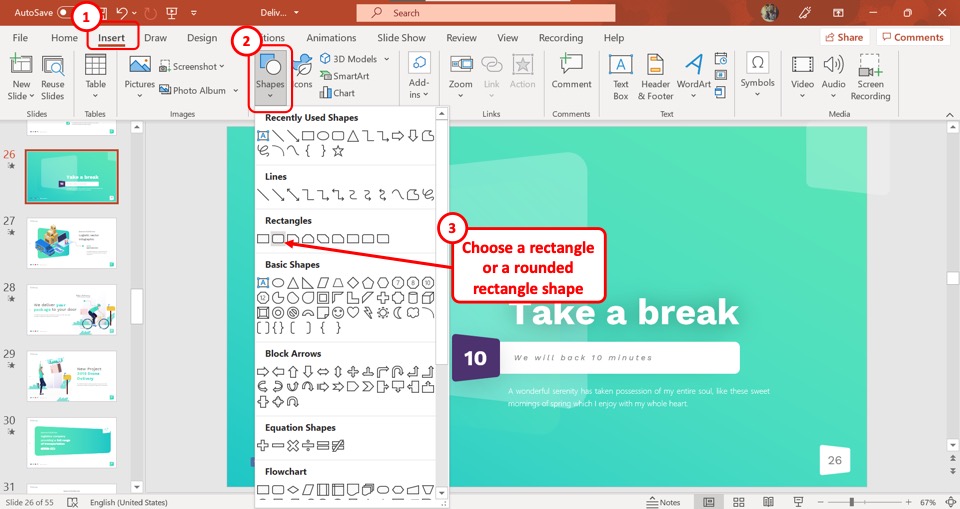
The first step is to click on the “Insert” tab in the menu ribbon located at the top of the screen. Then click on the “Shapes” option to open a dropdown menu and select a shape under the “Rectangles” option.
Draw the rectangle bar touching the border of the slide on both sides.
Step-2: Remove the Shape Outline
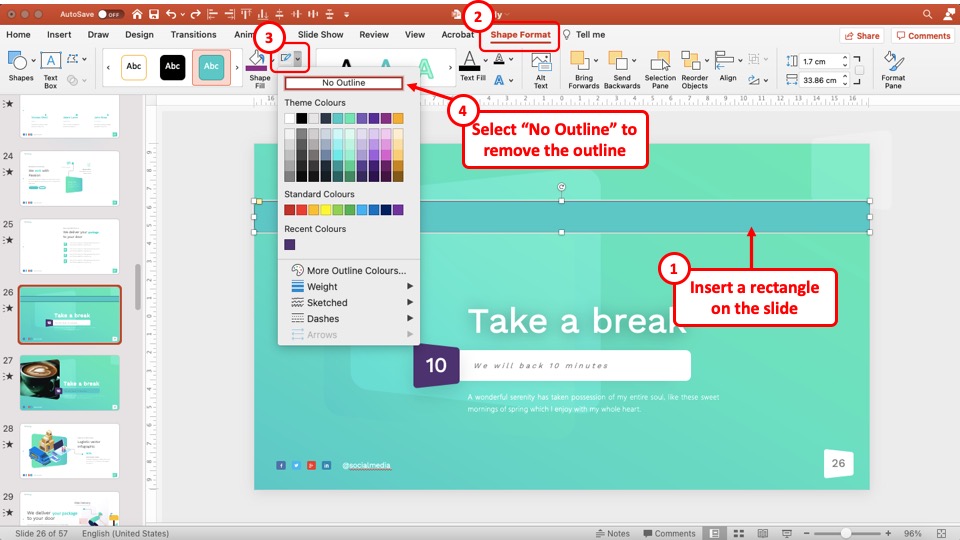
Once you have inserted the shape, you need to format the shape first.
Select the shape. Then, the “ Shape Format ” tab will appear on the top. Click on it. Next, click on the shape outline option (as indicated in the image above).
From the dropdown, click on the “ No Outline ” option. This will remove the outline of the shape.
Step-3: Change the Shape Color to White
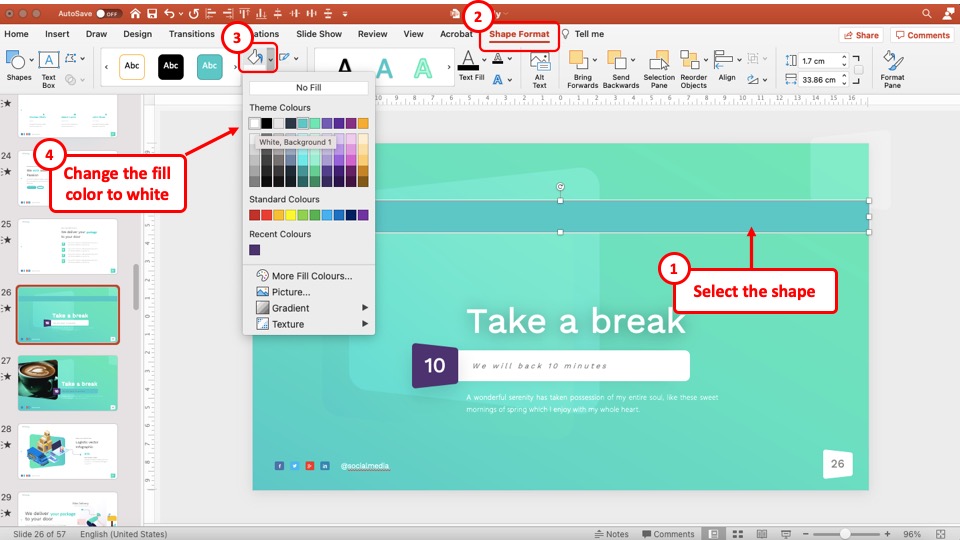
The next step is to change the shape color to a different color than the background. In this case, since I have a teal background, I’d change the color of the shape to white.
To do that, click on the shape, and open the “ Shape Format ” tab. Then, click on the “ Fill Color ” option, and from the dropdown, click on the “ White ” color.
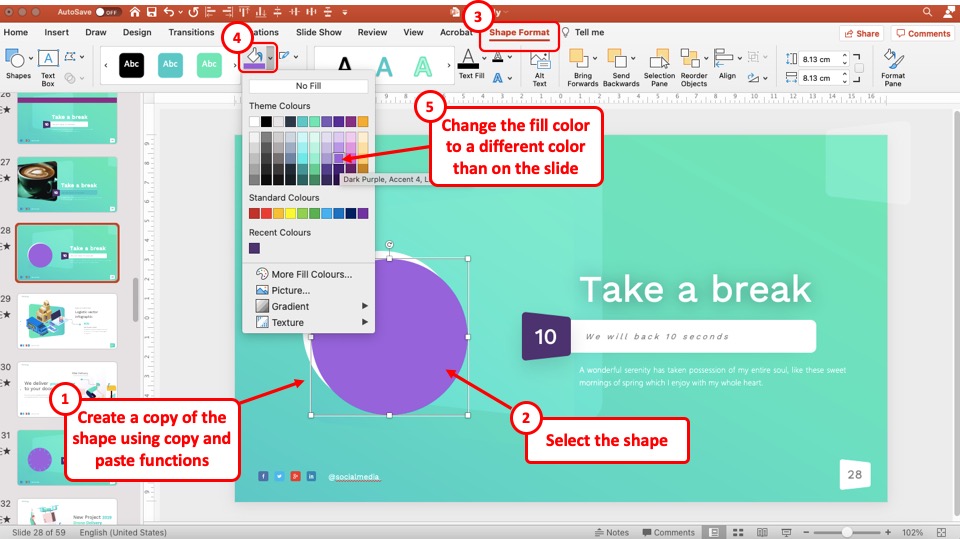
Step-4: Create a Copy of the Shape and Change the Shape Color
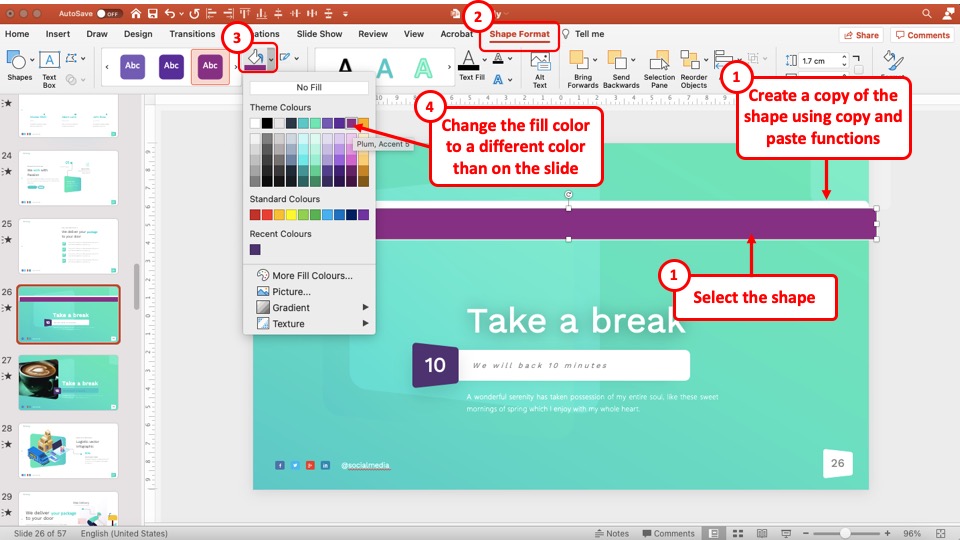
In this next step, we shall create a copy of the shape and change the color of this shape to something other than white and the slide background.
To create a copy of the curved rectangle, click on the shape. Then, copy and paste the shape on the slide using the Ctrl+C (for copy) and Ctrl+V (for paste) shortcuts.
Once the copy is created, select the second shape by clicking on it. Then, click on the “ Shape Format ” tab. From the ribbon, click on the “ Fill Color ” option.
From the color dropdown that appears, choose a color other than white and that of the slide background.
Step-5: Align the Shapes Together
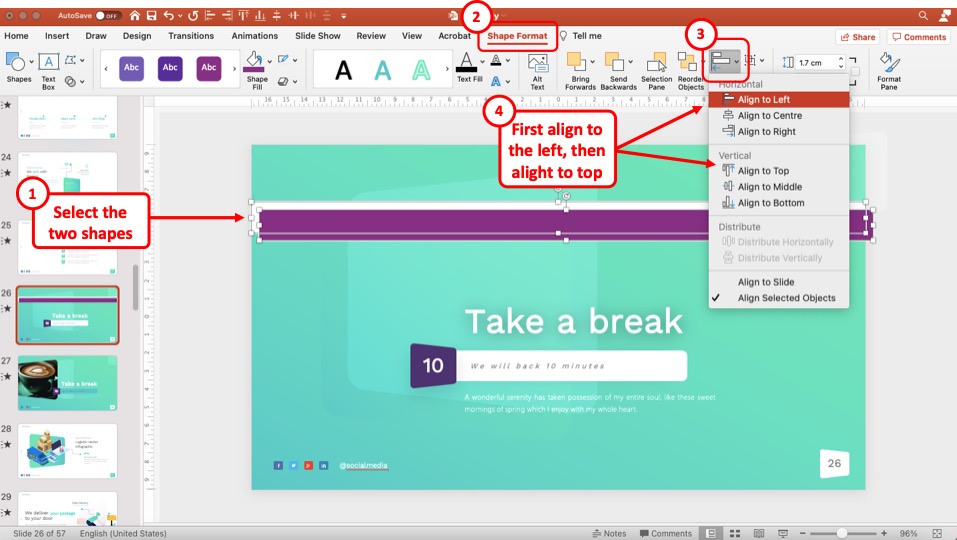
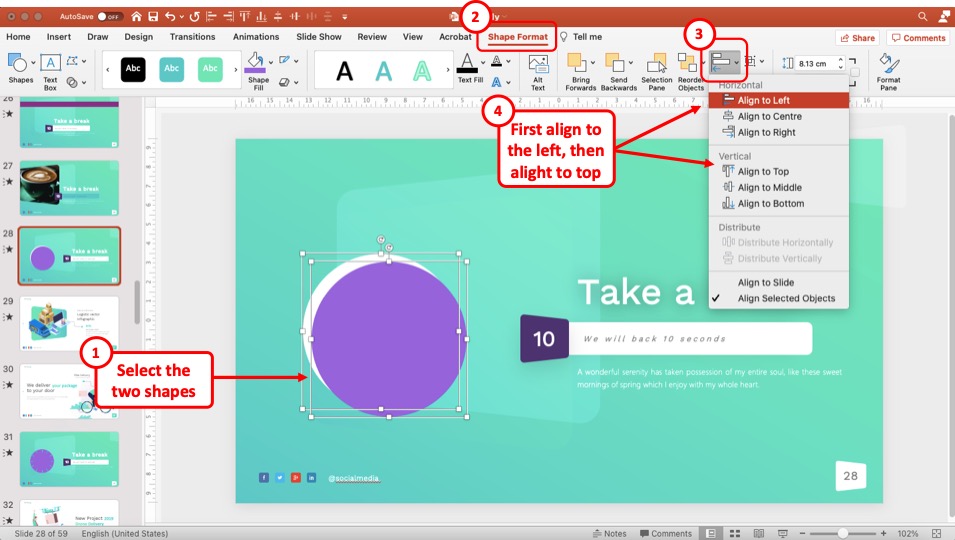
The next step is to make sure that the two shapes align on top of each other. We shall use the align tool in PowerPoint to accomplish this.
First, select the two shapes together by holding the “ Ctrl ” key on your keyboard, and clicking once on both the shapes one by one.
Then, click on the “ Shape Format ” tab. From the “ Align ” option, first, click on the “ Align to Left ” option. Then, click on the “ Align ” tab once again, and from the dropdown, choose the “ Align to Top ” option this time!
You will notice that both the shapes are now overlapping with the colored shape on top of the white one.
Step-6: Click on the “Animations” menu
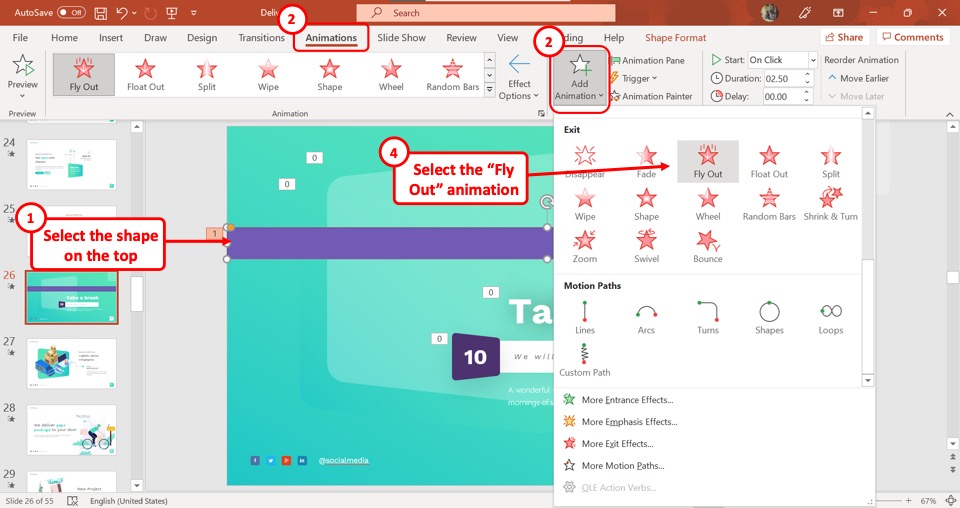
Now we shall add the animations. To do that, first, make sure that only the colored shape on the top is selected.
Then, click on the “Animations” option in the menu ribbon. In the “Animations” menu, click on the “Add Animations” option.
After that, click on the “Fly Out” option under the “Exit” animation section from the dropdown menu.
Step-7: Click on the “Effects” option
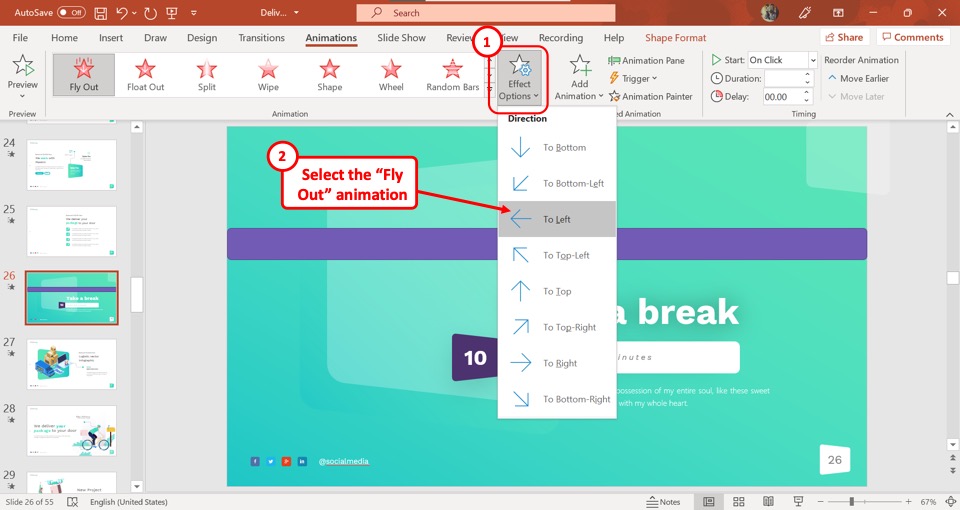
The next step is to click on the “Effects” option in the “Animations” menu. In the dropdown menu under the “Effects” option, click on the “To Left” option.
This will apply the fly out animation effect to the shape and it will fly out towards the left part of the slide.
Step-8: Select your preferred duration
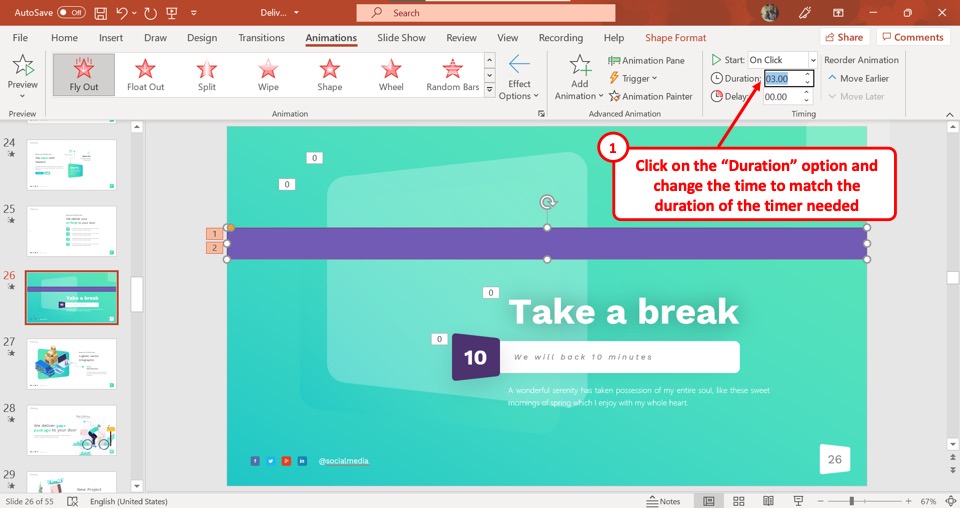
Now all you have to do is click on the “Duration” box in the “Timing” section. Enter the duration of the animation.
Remember – the duration of the animation should be the same as the length of the timer. Type in your preferred time for the timer. It will now appear as a “Bar Countdown Timer” in the “Slide Show” view.
Here’s a quick preview of how this bar countdown timer looks –
2.2 Method 2 – Clock Countdown Timer
You can also add a clock countdown timer in the Microsoft PowerPoint slide. Here’s what it shall look like –
Now let us understand how to build this clock-shaped circular countdown timer in a step-by-step manner.
Here’s what we need to do –
Step-1: Click on “Shapes”
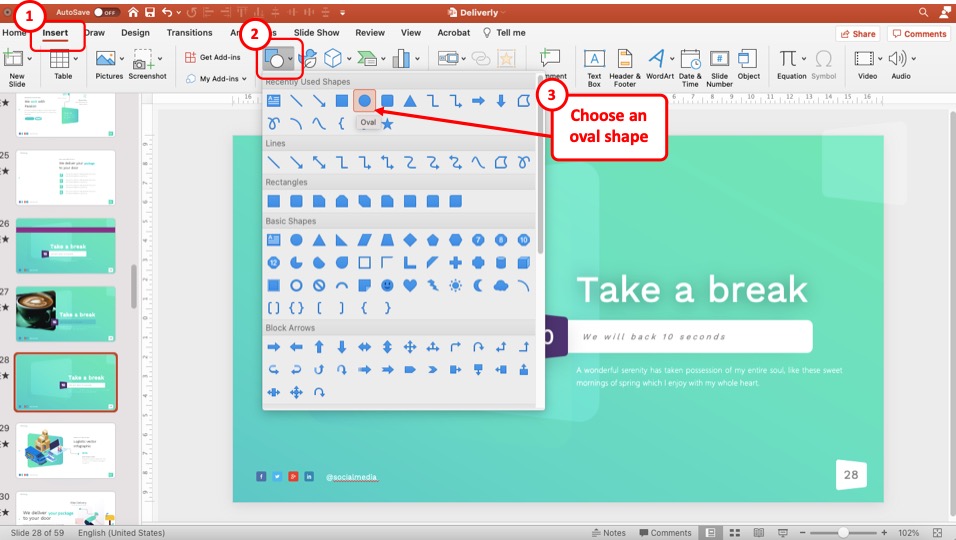
The first step is to create a clock shape. Click on the “Insert” menu from the menu ribbon. Then click on the “Shapes” option and select the “Oval” shape from the “Basic Shapes” section in the dropdown menu.
Then, hold the “Ctrl” key on your keyboard and drag the cursor in one direction. This will help you create a perfect circle on the slide.
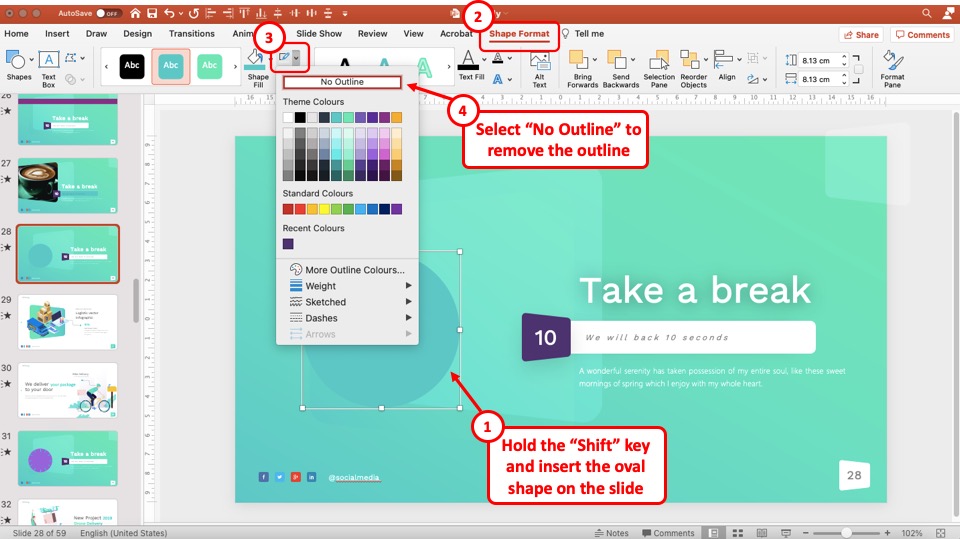
In the next step, you need to remove the outline of the shape.
To remove the shape outline, first, select the shape. Then, click on the “ Shape Format ” tab. Next, click on the “ Shape Outline ” button. Finally, from the dropdown, click on the “ No Outline ” option.
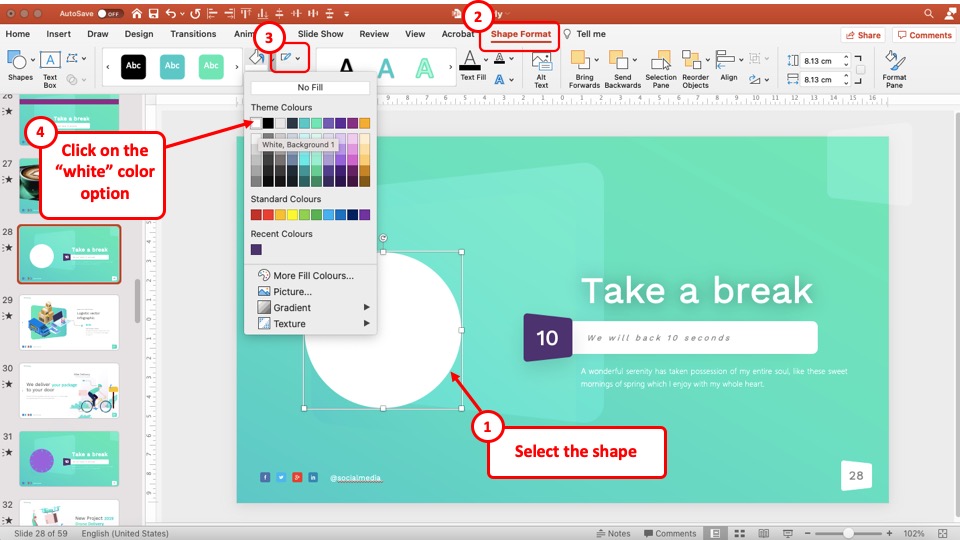
Now, we need to change the shape color to white. Changing the color will help you separate the circle from the background.
To change the color of the shape to white, first, select the shape. Then, click on the “ Shape Format ” tab. Next, click on the “ Fill Color ” option. Finally, from the dropdown, select the color of your choice.
In this case, we shall click on the “ White ” color option.
Step-4: Create a Copy of the Circle and Change the Shape Color
Now, in this step, we shall use the copy and paste functions in PowerPoint to create a copy of the circle that we just created.
Then, change the color of this new circle to something other than that of the slide background and white.
Step-5: Align the Two Circles
Now, we shall align the two circles such that they fit on top of each other.
To do that, hold the “Ctrl” key on your keyboard and select the two circles by clicking on them just once one-by-one.
Then, click on the “ Shape Format ” tab and click on the “ Align ” tool. From the dropdown, first, click on the “ Align to Left ” option. Then, click on the “ Align to Top ” option.
This will ensure that both the circles align properly.
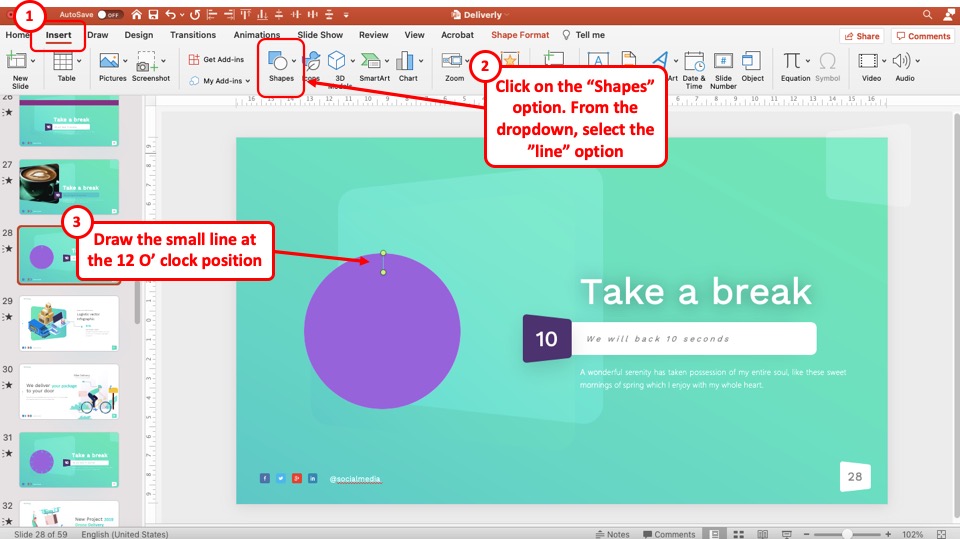
Step-6: Insert a Line
The next step is to click on the “Shapes” option again and click on the “Line” option in the “Lines” section. Then, insert a small line at the 12 o’clock position.
Step-7: Insert more lines
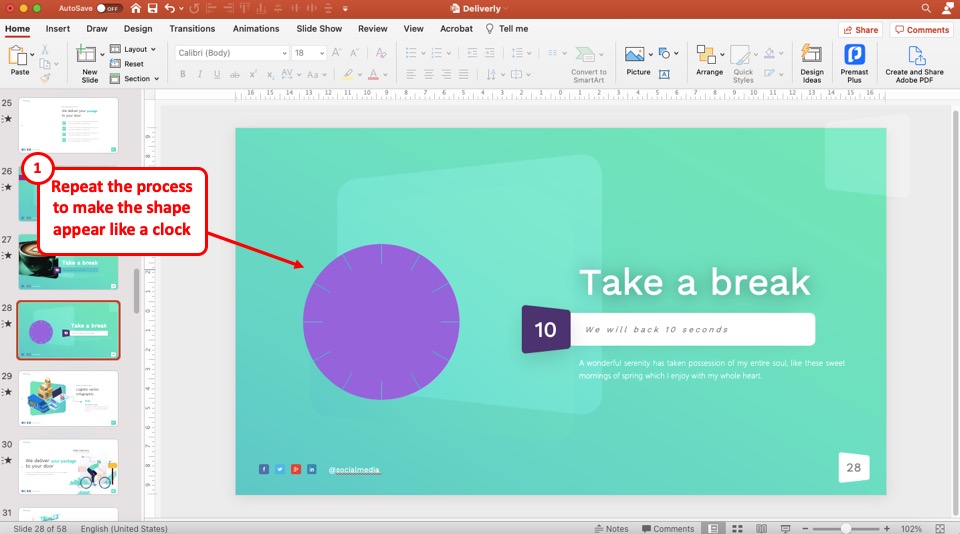
Repeat the process mentioned in step 7 and add more lines such that the lines make the shape appear like a clock.
Step-8: Add the “Wheel” Animation
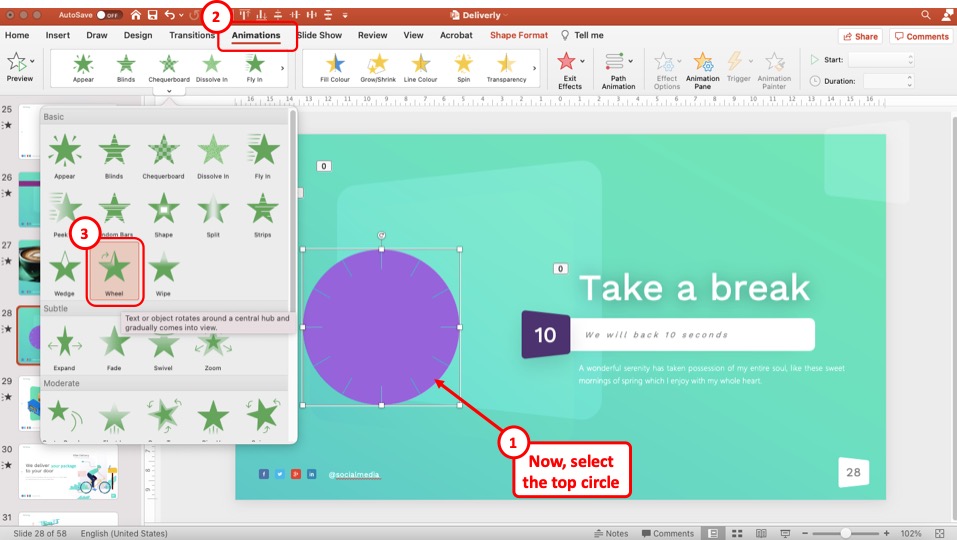
Now, we shall add the animation.
On the slide, first, select the colored circle shape on the top. Click on the “Animations” tab in the menu ribbon.
In the “Animations” menu, click on the “Add Animations” button to open a dropdown menu. From there, click on the “Wheel” option from the “Entrance” section.
Step-9: Set the Animation Duration
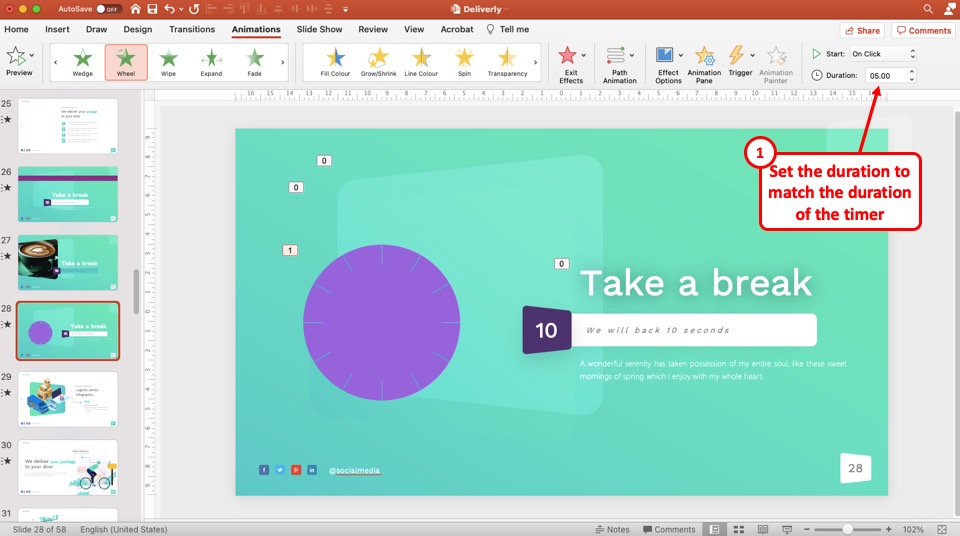
Now all you have to do is click on the “Duration” box in the “Timing” section in the “Animations” menu. In the “Duration” box, type in your preferred time for the clock countdown timer.
3. How to Insert a 5-minute Timer in PowerPoint?
In Microsoft PowerPoint, you can easily set the duration of the timer inserted in a slide. The best and the fastest way to insert a 5-minute timer in PowerPoint is by using an add-in.
Step-1: Click on the “Easy Timer” add-in
In the menu bar at the top of the screen, click on the “Insert” option. Then click on the “Add-ins” option and select “Easy Timer” under the “My Add-ins” option in the dropdown menu. This will insert a timer in the slide.
Step-2: Click on the “Duration” box
In the Easy Timer box in the slide, click on the “Duration” box. Click on the downward-facing arrow in the “Minutes” box and select “05” from the dropdown menu.
Then click on the arrow pointing downwards in the “Seconds” box and select “00” from the dropdown menu. This will be automatically saved.
You can also insert a 5-minute timer in PowerPoint either by using the other add-ins mentioned earlier in this article or by creating your own timer manually. All you have to do is set the duration to 5 minutes.
Credit to Wayhomestudio (on Freepik) for the featured image of this article (further edited).
How It Works
1. set up your timer.

2. Run The Show

3. Keep In Time

4. Let Everybody Else Know


Presentation Timer

About this app
Data safety.

Ratings and reviews

- Flag inappropriate

- Show review history
App support
More by neurondigital.

Presentation Timers

Share this:
- Click to share on Twitter (Opens in new window)
- Click to share on Facebook (Opens in new window)
- Click to share on LinkedIn (Opens in new window)
How-To Geek
6 ways to create more interactive powerpoint presentations.
Engage your audience with cool, actionable features.
Quick Links
- Add a QR code
- Embed Microsoft Forms (Education or Business Only)
- Embed a Live Web Page
- Add Links and Menus
- Add Clickable Images to Give More Info
- Add a Countdown Timer
We've all been to a presentation where the speaker bores you to death with a mundane PowerPoint presentation. Actually, the speaker could have kept you much more engaged by adding some interactive features to their slideshow. Let's look into some of these options.
1. Add a QR code
Adding a QR code can be particularly useful if you want to direct your audience to an online form, website, or video.
Some websites have in-built ways to create a QR code. For example, on Microsoft Forms , when you click "Collect Responses," you'll see the QR code option via the icon highlighted in the screenshot below. You can either right-click the QR code to copy and paste it into your presentation, or click "Download" to add it to your device gallery to insert the QR code as a picture.
In fact, you can easily add a QR code to take your viewer to any website. On Microsoft Edge, right-click anywhere on a web page where there isn't already a link, and left-click "Create QR Code For This Page."
You can also create QR codes in other browsers, such as Chrome.
You can then copy or download the QR code to use wherever you like in your presentation.
2. Embed Microsoft Forms (Education or Business Only)
If you plan to send your PPT presentation to others—for example, if you're a trainer sending step-by-step instruction presentation, a teacher sending an independent learning task to your students, or a campaigner for your local councilor sending a persuasive PPT to constituents—you might want to embed a quiz, questionnaire, pole, or feedback survey in your presentation.
In PowerPoint, open the "Insert" tab on the ribbon, and in the Forms group, click "Forms". If you cannot see this option, you can add new buttons to the ribbon .
As at April 2024, this feature is only available for those using their work or school account. We're using a Microsoft 365 Personal account in the screenshot below, which is why the Forms icon is grayed out.
Then, a sidebar will appear on the right-hand side of your screen, where you can either choose a form you have already created or opt to craft a new form.
Now, you can share your PPT presentation with others , who can click the fields and submit their responses when they view the presentation.
3. Embed a Live Web Page
You could always screenshot a web page and paste that into your PPT, but that's not a very interactive addition to your presentation. Instead, you can embed a live web page into your PPT so that people with access to your presentation can interact actively with its contents.
To do this, we will need to add an add-in to our PPT account .
Add-ins are not always reliable or secure. Before installing an add-in to your Microsoft account, check that the author is a reputable company, and type the add-in's name into a search engine to read reviews and other users' experiences.
To embed a web page, add the Web Viewer add-in ( this is an add-in created by Microsoft ).
Go to the relevant slide and open the Web Viewer add-in. Then, copy and paste the secure URL into the field box, and remove https:// from the start of the address. In our example, we will add a selector wheel to our slide. Click "Preview" to see a sample of the web page's appearance in your presentation.
This is how ours will look.
When you or someone with access to your presentation views the slideshow, this web page will be live and interactive.
4. Add Links and Menus
As well as moving from one slide to the next through a keyboard action or mouse click, you can create links within your presentation to direct the audience to specific locations.
To create a link, right-click the outline of the clickable object, and click "Link."
In the Insert Hyperlink dialog box, click "Place In This Document," choose the landing destination, and click "OK."
What's more, to make it clear that an object is clickable, you can use action buttons. Open the "Insert" tab on the ribbon, click "Shape," and then choose an appropriate action button. Usefully, PPT will automatically prompt you to add a link to these shapes.
You might also want a menu that displays on every slide. Once you have created the menu, add the links using the method outlined above. Then, select all the items, press Ctrl+C (copy), and then use Ctrl+V to paste them in your other slides.
5. Add Clickable Images to Give More Info
Through PowerPoint's animations, you can give your viewer the power to choose what they see and when they see it. This works nicely whether you're planning to send your presentation to others to run through independently or whether you're presenting in front of a group and want your audience to decide which action they want to take.
Start by creating the objects that will be clickable (trigger) and the items that will appear (pop-up).
Then, select all the pop-ups together. When you click "Animations" on the ribbon and choose an appropriate animation for the effect you want to achieve, this will be applied to all objects you have selected.
The next step is to rename the triggers in your presentation. To do this, open the "Home" tab, and in the Editing group, click "Select", and then "Selection Pane."
With the Selection Pane open, select each trigger on your slide individually, and rename them in the Selection Pane, so that they can be easily linked to in the next step.
Finally, go back to the first pop-up. Open the "Animations" tab, and in the Advanced Animation group, click the "Trigger" drop-down arrow. Then, you can set the item to appear when a trigger is clicked in your presentation.
If you want your item to disappear when the trigger is clicked again, select the pop-up, click "Add Animation" in the Advanced Animation group, choose an Exit animation, and follow the same step to link that animation to the trigger button.
6. Add a Countdown Timer
A great way to get your audience to engage with your PPT presentation is to keep them on edge by adding a countdown timer. Whether you're leading a presentation and want to let your audience stop to discuss a topic, or running an online quiz with time-limit questions, having a countdown timer means your audience will keep their eye on your slide throughout.
To do this, you need to animate text boxes or shapes containing your countdown numbers. Choose and format a shape and type the highest number that your countdown clock will need. In our case, we're creating a 10-second timer.
Now, with your shape selected, open the "Animations" tab on the ribbon and click the animation drop-down arrow. Then, in the Exit menu, click "Disappear."
Open the Animation Pane, and click the drop-down arrow next to the animation you've just added. From there, choose "Timing."
Make sure "On Click" is selected in the Start menu, and change the Delay option to "1 second," before clicking "OK."
Then, with this shape still selected, press Ctrl+C (copy), and then Ctrl+V (paste). In the second box, type 9 . With the Animation Pane still open and this second shape selected, click the drop-down arrow and choose "Timing" again. Change the Start option to "After Previous," and make sure the Delay option is 1 second. Then, click "OK."
We can now use this second shape as our template, as when we copy and paste it again, the animations will also duplicate. With this second shape selected, press Ctrl+C and Ctrl+V, type 8 into the box, and continue to do the same until you get to 0 .
Next, remove the animations from the "0" box, as you don't want this to disappear. To do this, click the shape, and in the Animation Pane drop-down, click "Remove."
You now need to layer them in order. Right-click the box containing number 1, and click "Bring To Front." You will now see that box on the top. Do the same with the other numbers in ascending order.
Finally, you need to align the objects together. Click anywhere on your slide and press Ctrl+A. Then, in the Home tab on the ribbon, click "Arrange." First click "Align Center," and then bring the menu up again, so that you can click "Align Middle."
Press Ctrl+A again to select your timer, and you can then move your timer or copy and paste it elsewhere.
Press F5 to see the presentation in action, and when you get to the slide containing the timer, click anywhere on the slide to see your countdown timer in action!
Now that your PPT presentation is more interactive, make sure you've avoided these eight common presentational mistakes before you present your slides.

The Concept of the 4th Wall

During a show, actors might congregate at the front of the stage, looking above the audience's heads, and espouse the beauty they see in the sunset, or wonder whose coming down the drive way, or any number of imaginary scenarios that truly are not there.
But what does this have to do with Speakers?
The Speaker Presentation Timer was created to help break speakers of the habit of checking their watches, calling for the time, or actually commenting on how much time they have left for their presentation.
Why is this important?
When you are presenting, you are providing a service to your audience. You are serving their needs with information and (hopefully) entertainment. Staying in character is just as

important for the speaker as it is for an actor. In the case of your presentation, you are there for them!
However, the minute you check your watch, call out, "How am I doing for time?" or "How much time do I have left?" you not only tell your audience, "I'm doing my job right now!" you also look incredibly unprofessional.

There is a better way
The Pro Speaker Presentation Timer app can be configured so that the phone in your pocket, or the Apple watch (watch app not available for Android) on your wrist will subtly vibrate at certain points within your presentation, reminding you of where you are in your presentation, and where you need to be.
If you're stuck behind a lectern, the screen has been designed to not flood your face with bright light, yet will change colour and offer visual prompts as to where you are in your speech, and how much time is left for each section.
With the Pro Speaker Presentation Timer, you will never again have to do the audience the disservice of breaking the 4th wall. When you're on, You're ON!

Save all Your Speeches
You don't have to start from scratch with each Speech. The Pro Speaker Presentation Timer, allows you to have multiple speech definitions in one app.
At the main screen, users can add, new speeches, or swipe left on any speech to trash, copy or lock the speech. The locking feature ensures you don't accidently muck around with your perfect speech.
Touch the speech title to run or modify the speech.

The Right Section at the Right Time
The play button starts your timer. Game on!
The Section Timers are such a powerhouse for speakers to practice their presentations and to finally give their presentations without actually having to check the time.
Each section can be defined for audio, visual or tactile reminders. Breaking up your speech into sections allows you to practice your openings, your stories and your conclusions--key components to your professional presentations.
Define sections for each component of your presentation, or just the important parts - that's up to you. Default timers are in place automatically with each speech to give you a 5-minute, 2-minute and a times-up warning. Deactivate or activate at will.
Want to program and practice one component of your speech? No Problem

Click the watch icon to sync to your iWatch, live and on the fly.
Design your own flow.
Drilling into the sections allows you to define your notification type (audio, visual, tactile, or a cool mix), allows you to define a duration for each of your sections, and the color of the notification. Then practice just that section by hitting the play button.
However you create, practice or deliver your speeches and presentations, the Pro Speaker Presentation Speech Timer adapts to your needs, your style, and your professionalism.
© 2020. Essential Hospitality Solutions. All Rights Reserved.
- AUD $ 0.00 0 items
Presentation Timer
Presentation Timer is a Windows based program designed to show a counter or clock for theatre or corporate use. It is free to use in both amateur and commercial environments. Feature suggestions and bug reports are welcomed.
- Count-up, count-down or 12/24 hour clock modes
- Settable start, warning and auto-pause times
- Fullscreen, borderless & stay-on-top display options
- Selectable font type and size for main display
- Selectable colours and transparent background options
- Various time display formatting options
- Adjustable time scale in counter modes
- Control window can be minimised to the system tray
- User definable sounds for running and time end events
- All settings are saved to an ini file
- No installation required – ready to run
Contact the author
Please consider a donation (even a small one) if you find this software useful.
Download Version 1.7.0.0 (28/03/2011)
There are hundreds of downloads per week, yet donations are few and far between. 🙁
Getting started
Quick intro.
stagetimer.io is a cloud-based professional speaker timer specifically designed for live and hybrid event productions. It allows you to create multiple timers to keep an entire event, conference, or presentation on time. Any internet-capable device can use it and it works on all screen sizes and orientations.
Key features are:
- Sharable links for the controller, viewer, and agenda
- Import tables from Microsoft Excel or Google Scheets via CSV
- Schedule timers, link them together, and change color when approaching 0:00
- Customizable fonts, colors, and logo
Here’s a quick walkthrough:
How to create a timer
Click the button below to create a timer. You don’t need an account to create a timer. But if you sign up, it saves the timer on your dashboard.
When creating a timer, you will be directed to the controller page. All features and options can be controlled here. The controller page is divided into three sections: dashboard, timers, and messages.

Customize and Share
On the dashboard section, on the left of the page, there is a timer preview that displays the information the viewer will see, transport controls, and the connected devices list.
Here you will be able to customize the timer if you have a paid license. Customization features include custom logo and background, the ability to hide the progress bar, change fonts and adjust the size of timers and messages.

Share access to the timers by clicking on “Share” and choosing the type of access you want to grant to others. The viewer link will display only the timer and the messages to presenters in a fullscreen mode. The controller and moderator links can be shared with the production staff. The moderator link allows the user to see the agenda and send messages to presenters, while the controller link will allow access to running timers and other controls. The agenda link can be shared with staff, presenters, and even other participants or the wider audience.

The timer display will show exactly what the viewer sees. It can display a timer or clock alone, or a combination of two (countdown timer and time of day, for example). Messages shown to presenters will also be seen here as well as the title and the speaker’s name if you choose to display them.

The transport controls allow you to start, stop, reset and advance the timer. Add or subtract time from a running timer by clicking the “-1m” and “+1m” buttons or the arrows beside them for even finer control.

The connected devices list at the bottom of the dashboard section displays all devices and allows you to rename, force-reload and kick out, any user by clicking on the three dots beside the user name.

The central section of the controller page allows you to create, organize and run multiple timers. Here you can define the type of timer, the duration, and even add extra information, if necessary. All fields can be modified by clicking and typing. You can also make all changes by clicking on the settings gear on each timer.

Timers can be reorganized by dragging and dropping, and when linking them, a timer will start automatically once the previous one is finished.
Multiple messages can be created and shown to speakers whenever needed. This feature can be used to remind presenters to wrap up, show questions from the audience, and more.

Check out the documentation pages detailing the use of Stagetimer:
- Detailed documentation of the controller page and all its functions.
- The documentation for the API that you can use to remote control a timer with scripts, macros, or tools like Streamdeck/Companion.
- The system requirements show the supported browser versions.
Additionally, there are detailed how-to guides to use stagetimer.io with Bitfocus Companion and OBS Studio .
Presentation Time Calculator
PT Time Controller
보다 정확하게 측정하고 싶다면, Customize를 이용하세요.
1. If you scroll right or left, it will calculate PT time according to corresponding speed. 2. You can consider your speech speed and the interval of your PPT pages .
140 WPM (Words Per Minute)
* 매우 천천히 설명하는 발표는 330 CPM까지도 내려갑니다.
1. Read your script for 20 seconds using below stopwatch. 2. Enter the script as much as you just read and it will calculate PT time about total script. 3. If you have PPT, enter the number of PPT pages, the interval of PPT pages and the time to view materials.
2021.03.18. Modified