- Start the presentation and see your notes in Presenter view Article
- Add speaker notes to your slides Article
- Rehearse and time the delivery of a presentation Article
- Record a slide show with narration and slide timings Article
- Print your PowerPoint slides, handouts, or notes Article
- Create a self-running presentation Article


Start the presentation and see your notes in Presenter view
Using Presenter view is a great way to view your presentation with speaker notes on one computer (your laptop, for example), while only the slides themselves appear on the screen that your audience sees (like a larger screen you're projecting to).
If you're using a newer version of PowerPoint, just connect the monitors and PowerPoint automatically sets up Presenter View for you.
If Presenter view appears on the wrong screen, you can swap the display quickly .
Turn off Presenter view if you prefer not to use it.

Start presenting
On the Slide Show tab, in the Start Slide Show group, select From Beginning .

Use the controls in Presenter view
To move to the previous or next slide, select Previous or Next .

To view all the slides in your presentation, select See all slides .

Tip: You’ll see thumbnails of all the slides in your presentation (as shown below), making it easy to jump to a specific slide in the show.

To view a detail in your slide up close, select Zoom into slide , and then point to the part you want to see.

For more details on zooming in, see Zoom in to part of a slide .
To point to or write on your slides as you present, select Pen and laser pointer tools .

Press the Esc key when you want to turn off the pen, laser pointer, or highlighter.
To hide or unhide the current slide in your presentation, select Black or unblack slide show .

You can use PowerPoint on your smartphone as a remote control to run your presentation and view your speaker notes. See Using a laser pointer on your smartphone when presenting in PowerPoint for more information, including a brief video.
Swap the Presenter view and Slide view monitors
To manually determine which screen shows your notes in Presenter view and which shows only the slides themselves, on the task bar at the top of Presenter view, select Display Settings , and then select Swap Presenter View and Slide Show .

What the notes look like in Presenter view
Tip: You can add notes either while you’re presenting, directly from Presenter view, or as you’re editing your presentation. For information on how to add speaker notes to your presentation see Add speaker notes to your slides.

The notes appear in a pane on the right. If you need to add or delete something, simply click in the text box to edit it. The text wraps automatically, and a vertical scroll bar appears if necessary. You can change the size of the text in the Notes pane by using the two buttons at the lower left corner of the Notes pane:

To change the size of the panes in Presenter View, point your mouse at the vertical line that separates them, then click and drag.
Tip: If you don't need to see the current slide in Presenter View at all, and would like your notes to be larger, drag that vertical separator line all the way to the left.
Turn off Presenter view
If you want Presenter view turned off while you are showing your presentation to others:
On the Slide Show tab of the ribbon, clear the check box named Use Presenter View .

Keep your slides updated
If you're working with a team of people to create your slide deck it may be that changes are being made to the slides right up to the last minute. Traditionally once you've started your presentation your slides wouldn't update. If you're using PowerPoint for Microsoft 365 you have the option to let your slides be updated by your team even as you're presenting so that you always have the up-to-the-minute changes.
You can turn this on by going to the Slide Show tab of the ribbon, selecting Set Up Slide Show , and checking the box for Keep slides updated .

If you've already started your presentation and you want to make sure that setting is on, you can do that from Presenter view. Select the More slide show options button (which looks like three dots) and on the menu make sure Keep Slides Updated is checked.

Using a laser pointer on your smartphone when presenting in PowerPoint
To start using Presenter view, select Slide Show > Presenter View .

To move to the previous or next slide, select the Previous or Next arrow.

To turn off the pen, laser pointer, or highlighter, press the Esc key.
To make the screen black or to un-black the screen, Press b on the keyboard.

Extend your Mac desktop to the second monitor
On the Apple menu, select System Preferences .
Open the Displays app.
Click the Arrangement tab in the dialog box.
Clear the Mirror Displays check box.
By doing this process, you now have a two-monitor setup. You can present a PowerPoint slide show on one screen while having other applications open on the other screen, keeeping those other apps private to yourself.
To manually determine which screen shows your notes in Presenter view and which shows only the slides themselves, on the task bar at the top left of Presenter view, select Swap Displays .
When your computer is connected to a projector and you start Presenter View, it appears on your computer's screen, while only the slides appear on the projector screen.

The notes appear in a pane on the right:
The text wraps automatically, and a vertical scroll bar appears if necessary.
You can edit the text in the Notes pane.
You can change the size of the text in the Notes pane by using the two buttons at the lower left corner of the Notes pane:

You can adjust the size of the current slide, and notes and next slide panels, by using your mouse to grab and drag the vertical line that separates the two panels.
Turn off Presenter view before a presentation begins
On the PowerPoint menu, select Preferences .
In the PowerPoint Preferences dialog box, under Output and Sharing , click Slide Show .

In the Slide Show dialog box, clear the Always start Presenter View with 2 displays check box.

Close the dialog box.
Turn off Presenter view during a presentation
At the top of the Presentation view window, click Use Slide Show .

This button closes Presenter view. As a result, both your personal computer screen and the projector screen show the slide show.
If you're working with a team of people to create your slide deck it may be that changes are being made to the slides right up to the last minute. Traditionally once you've started your presentation your slides wouldn't update. If you're using PowerPoint for Microsoft 365 for Mac you have the option to let your slides be updated by your team even as you're presenting so that you always have the up-to-the-minute changes.
You can turn this on by going to the Slide Show tab of the ribbon, and checking the box for Keep Slides Updated .

Create a self-running presentation
Record your slide show
Keep slides updated

Need more help?
Want more options.
Explore subscription benefits, browse training courses, learn how to secure your device, and more.

Microsoft 365 subscription benefits

Microsoft 365 training

Microsoft security

Accessibility center
Communities help you ask and answer questions, give feedback, and hear from experts with rich knowledge.

Ask the Microsoft Community

Microsoft Tech Community

Windows Insiders
Microsoft 365 Insiders
Was this information helpful?
Thank you for your feedback.

Powerpoint Assist
Tips for Powerpoint by Regina Griffin
How To View Notes In PowerPoint While Presenting
Are you looking to enhance your presentation skills and engage your audience effectively?
Viewing notes while presenting in PowerPoint can be a game-changer.
We explore the importance of viewing notes during presentations and provide a step-by-step guide on how to do so.
Practical tips on using Presenter View effectively, based on the insightful tutorial by Regina Griffin, a teacher from Oregon, will be shared.
Let’s dive in and elevate your presentation game!
Key Takeaways:
- Viewing notes while presenting helps to stay on track and remember key points.
- Presenter View in PowerPoint allows you to easily navigate through slides with notes and use helpful tools.
- Practice and use visual cues to make the most of the Presenter’s View and deliver a more effective presentation.
Why Is it Important to View Notes While Presenting?
Viewing notes while presenting is crucial for maintaining a coherent presentation that effectively engages the audience and enhances the delivery of key points.
When a presenter refers to their notes during a presentation, it not only helps them stay organized but also ensures that they cover all essential topics. By glancing at their notes, the presenter can remember important details, statistics, or examples, which contributes to better memory retention and recall while speaking. This practice also fosters a natural flow of information, preventing the presenter from missing significant points or becoming sidetracked. Ultimately, effective use of notes paves the way for a polished and engaging delivery that captivates the audience throughout the entire presentation .
Keeps You on Track
Viewing notes helps keep the presenter on track by providing a roadmap of the presentation flow and key elements to cover, ensuring a structured and organized delivery that captivates the audience.
These notes act as a blueprint, allowing the presenter to transition smoothly between different segments of the presentation. By glancing at the screen or referring to their notes, the presenter can seamlessly shift focus from one topic to the next, maintaining the coherence of the overall narrative. Having well-structured notes prevents the presenter from omitting crucial details or jumping between unrelated points, thus guaranteeing that all essential topics are adequately addressed.
Helps You Remember Important Points
Viewing notes in PowerPoint aids in recalling and emphasizing important points that need to be conveyed to the audience, enhancing the presenter’s ability to deliver key messages effectively.
By referring to these notes during the presentation, the speaker can ensure a structured and organized delivery, leading to a more coherent and memorable session for the listeners. Using PowerPoint notes also acts as a guide for the presenter, keeping them on track and preventing the omission of critical details. This method not only serves as a memory aid but also facilitates a smooth flow of the presentation, helping to maintain audience engagement and interest.
Improves Your Delivery
The practice of viewing notes during a presentation enhances the delivery by providing prompts and cues that facilitate seamless transitions between topics, resulting in a more engaging and effective interaction with the audience.
When presenters view their notes, they can ensure that they cover all essential points, maintain a coherent structure, and deliver information. This process helps in avoiding disruptions or forgetting key details, leading to a more polished and professional presentation. By having their notes readily available, speakers can focus on connecting with the audience, maintaining eye contact, and adjusting their delivery to keep listeners interested and involved.
How to View Notes in PowerPoint While Presenting
To view notes in PowerPoint during a presentation, follow these simple steps to enable the presenter to view and seamlessly navigate through slides while accessing your accompanying notes.
Open your PowerPoint presentation that contains the notes you want to view. Then, navigate to the Slide Show tab located in the top menu bar. Click on it to reveal a drop-down menu. From this menu, select the ‘Presenter View’ option to activate the feature that allows you to view your notes while presenting. As you present your slides, you’ll see the current slide, the next slide, a timer, and a section to view your notes. Utilize these tools for a seamless and professional presentation. Happy presenting!
Step 1: Open Your PowerPoint Presentation
Begin by opening your PowerPoint presentation to initiate the process of viewing notes, ensuring that you have access to the slide content and accompanying notes for a seamless presentation experience.
Once you have your PowerPoint software open, navigate to the file menu and select ‘Open’ to locate your desired presentation file on your device. Choose the respective file and click ‘Open’ to load it into PowerPoint. Upon opening the presentation, you will see your slides displayed on the main PowerPoint screen.
Step 2: Click on the ‘Slide Show’ Tab
Next, click on the ‘Slide Show’ tab within PowerPoint to access the necessary settings for viewing your presentation in the desired mode, enabling a smooth transition into the presentation view.
Upon clicking on the ‘Slide Show’ tab, a drop-down menu will appear, offering various options to adjust the presentation settings. One crucial element to focus on is the ‘Set Up Slide Show’ feature, which allows you to define how the slides will be displayed during your presentation. Within this menu, you can choose between ‘Presented by a speaker’ or ‘Browsed by an individual,’ depending on your presentation style and audience. You can also opt to ‘Loop continuously until ‘Esc” or set specific timings for each slide to control the pace of the presentation.
Step 3: Select ‘Set Up Slide Show’
After clicking on the ‘ Slide Show ‘ tab, proceed to select the ‘Set Up Slide Show’ option to configure the presentation settings according to your preferred method of viewing notes and slides.
Upon selecting the ‘Set Up Slide Show’ option, a dialog box will appear with various customization options. Choose between ‘Presented by a speaker’ or ‘Browsed at a kiosk.’ This allows you to control how the slides advance during the presentation.
Next, you can opt for the ‘Show options’ section to decide whether you want to display all slides, specific slides, or a range of slides. Under the ‘Advance slides’ section, you can set timings for slide transitions. Experiment with these settings to find the method that suits your presentation style best.
Step 4: Choose ‘Presenter View’ Option
Opt for the ‘Presenter View’ option after setting up the slide show to enable the presenter view mode, which provides access to presenter-specific features and tools for a more dynamic presentation experience.
Presenter View in PowerPoint unveils a range of capabilities to assist presenters during their delivery. With this mode activated,
speakers can view their upcoming slides, speaker notes, and a timer all in one layout for seamless transitions. It allows for interactions with the slides while the audience sees only the main screen, ensuring a smooth and professional delivery. Presenters can
toggle between slides, embed annotations, and zoom in on certain areas for emphasis. This multi-functional mode enhances engagement and enables presenters to deliver impactful presentations effortlessly.
Step 5: Start Your Slide Show
Commence your slide show presentation in PowerPoint to transition into the presenter view mode, allowing you to view your notes alongside the slides for a more guided and effective delivery.
In the presenter view mode, you have the advantage of discreetly glancing at your notes while the audience sees only the slides being presented. This feature ensures a seamless and professional delivery by providing you with valuable prompts and highlights during your presentation. It’s a practical tool that maximizes your control over the content flow and enhances audience engagement. To initiate this helpful mode, simply click on the ‘Start’ button within PowerPoint.
Step 6: Navigate Through Slides Using Notes
Utilize the notes pane in PowerPoint to navigate through slides while referencing your accompanying notes, ensuring a seamless transition between content delivery and note consultation for an impactful presentation.
When delivering your presentation, having your notes readily available within the notes pane allows you to stay on track without disrupting the flow. This feature not only aids in maintaining a natural and engaging delivery but also enables you to make spontaneous adjustments or dive deeper into specific points as needed. By leveraging the notes pane effectively, you can effortlessly move between slides while keeping your key points in sight. This functionality ensures that you never miss a beat and can deliver your content with confidence and precision.
Step 7: Use Tools in Presenter View (Timer, Pen, etc.)
Leverage the tools available in the presenter view mode of PowerPoint, such as timers, pens, and pointers, to enhance your meeting or presentation delivery with added visual aids and interactive features.
Utilizing these tools can significantly boost the engagement levels of your audience, making your content more dynamic and memorable. The timer feature helps you manage your time effectively, ensuring that you stay on track during your presentation. With the pen tool, you can annotate slides in real-time, emphasizing key points and fostering better understanding among your viewers. The pointer function allows you to direct attention to specific areas of your slide, guiding the audience’s focus and enhancing clarity.
Tips for Using Presenter View Effectively
Enhance your presentation experience by following these valuable tips for utilizing presenter view in PowerPoint effectively, ensuring a seamless and engaging delivery that captivates your audience.
One essential practice is to conduct a thorough pre-presentation rehearsal to familiarize yourself with the software features and transitions within the presenter’s view. This allows you to anticipate any technical glitches and smooth out the flow of your presentation. Make the most of remote controls or handy keyboard shortcuts to navigate through your slides effortlessly, enhancing your overall performance.
Practice Before Your Presentation
Prepare for successful presentations by dedicating time to practice using presenter view in PowerPoint, refining your delivery, and familiarizing yourself with the tools and features available for an impactful presentation.
Engaging in pre-presentation practice sessions utilizing presenter view in PowerPoint can significantly enhance your delivery skills and boost your confidence. By rehearsing your presentation multiple times, you can identify areas that need improvement, perfect your timing, and ensure a seamless flow of information. Utilizing the presenter view allows you to preview upcoming slides, view slide notes, and manage the presentation layout, giving you more control and flexibility during your delivery.
- Refining your presentation style through practice enables you to speak confidently, maintain audience engagement, and effectively convey your message. Utilize this time to adjust your pace, tone, and body language to create a compelling and impactful delivery.
- Optimizing the utilization of available tools, such as animations, transitions, and multimedia elements in PowerPoint, can elevate the visual appeal of your presentation. Familiarize yourself with these features to create visually appealing slides, maintain audience interest, and emphasize key points effectively.
Use a Remote or Keyboard Shortcuts
Optimize your meeting or presentation experience by utilizing a remote control or keyboard shortcuts to navigate through slides seamlessly, allowing for enhanced interaction and fluid transitions during your delivery.
Incorporating such tools in PowerPoint presentations revolutionizes how presenters interact with their content, eliminating the need to be tied to a specific spot for slide changes. By effortlessly moving from one slide to another without disruptions or distractions, the focus remains on the message being conveyed, enhancing audience engagement. Utilizing keyboard shortcuts for commands like starting a slideshow, jumping to a specific slide, or adjusting display settings creates a smooth and professional delivery that captivates your audience. These techniques not only save time but also allow for a more dynamic and interactive presentation experience.
Keep Your Notes Concise
Ensure effective delivery by maintaining concise notes in PowerPoint, focusing on key points and essential information to guide your presentation without overwhelming yourself or the audience with excessive content.
Concise notes are the cornerstone of a successful PowerPoint presentation, allowing presenters to stay on track and deliver their message with clarity and precision. By jotting down key ideas and supporting details, speakers can confidently navigate through their slides, ensuring a smooth flow of information and engaging the audience effectively.
These notes serve as a roadmap, keeping the presenter grounded in the core message and aiding in seamless transitions from one slide to the next. They also help in organizing thoughts, highlighting crucial data, and reinforcing the key takeaways for both the presenter and the viewers.
Use Visual Cues to Help You Remember Important Points
Enhance your presentation delivery by incorporating visual cues such as pointers or laser pointers to emphasize and remember critical points, ensuring a dynamic and engaging interaction with your audience.
Visual cues like pointers or laser pointers can significantly elevate the impact of your presentation, capturing attention effectively and making it easier for your audience to grasp key concepts. By utilizing these tools strategically, you can create a more cohesive narrative flow, guiding your audience’s focus and enhancing overall comprehension.
Pointers are especially useful for highlighting specific areas on slides or on a screen, drawing attention to essential details that might otherwise be missed. Incorporating this visual aid can also help you maintain a smoother delivery, ensuring that your audience stays engaged throughout your presentation.
Mastering the art of utilizing presenter view in PowerPoint can significantly enhance your delivery, engagement, and overall effectiveness in meetings or presentations, ensuring a professional and impactful interaction with your audience.
Presenter view is a powerful tool that allows you to see your presentation notes, upcoming slides, and elapsed time while your audience views only the main screen. This feature not only boosts your confidence but also facilitates smoother transitions and on-the-spot adjustments during your presentation.
Being able to control what your audience sees and what you see simultaneously elevates your performance, enabling you to maintain a seamless flow and deliver your message with clarity and precision.
By harnessing the capabilities of the presenter view, you can effectively manage your content, engage your audience with relevant cues, and maintain a professional and polished demeanor throughout your presentation.
Frequently Asked Questions
1. how do i access speaker notes in powerpoint while presenting.
To view your speaker notes while presenting, simply click on the “Notes” button located at the bottom of the PowerPoint window. This will open a separate window with your notes, which you can resize or move as needed during your presentation.
2. Can I view my speaker notes on a separate screen while presenting?
Yes, you can. To do this, go to the “Slide Show” tab and click on “Set Up Slide Show”. Then, under the “Multiple Monitors” section, select “Presented by a speaker (full screen)” and click “OK”. Your speaker notes will now appear on the secondary screen while presenting.
3. Is there a way to hide my speaker notes from the audience while presenting?
Yes, there is. Simply go to the “Slide Show” tab and check the box next to “Hide Slide”. This will hide your speaker notes from the audience, but they will still be visible to you on your screen.
4. Can I customize the size and font of my speaker notes in PowerPoint?
Yes, you can. To do this, go to the “View” tab and click on “Notes Master”. Here, you can make changes to the font, size, and layout of your speaker notes, which will be applied to all slides in your presentation.
5. Are there any shortcuts for quickly accessing speaker notes during a presentation?
Yes, there are. During a presentation, you can press the “Ctrl” and “P” keys on your keyboard to quickly toggle between your slides and speaker notes.
6. How can I print my speaker notes for reference before a presentation?
To print your speaker notes, go to the “File” tab and click on “Print”. Under the “Settings” section, choose “Full Page Slides” and select “Notes Pages” from the dropdown menu. This will print your slides with the speaker notes below each slide for your reference.
Similar Posts
How to insert under root in powerpoint.
Are you looking to add some mathematical flair to your PowerPoint presentations? Learn how to insert under root in PowerPoint with this easy step-by-step guide. Teacher Regina Griffin from Oregon, US, will show you how to incorporate under-root symbols into your slides to enhance your content. Join Regina as she guides you through the process…
How To Add New Slide In PowerPoint
Are you looking to take your PowerPoint presentations to the next level? Knowing how to add a new slide in PowerPoint is a crucial skill that can enhance your presentation structure, improve the organization of information, and create engaging slides. This step-by-step guide by Oregon-based teacher, Regina Griffin, will teach you how to easily add…
How To Subtract In PowerPoint
Looking to enhance your PowerPoint presentations with some advanced techniques? In this tutorial by teacher Regina Griffin from Oregon, US, we will explore how to subtract text and shapes in PowerPoint. By following simple steps like inserting text boxes, selecting shapes, and using the “Merge Shapes” tool, you can easily create visually appealing presentations. Stay…
How To Insert Pdf In PowerPoint
Do you ever wonder how to make your PowerPoint presentations more engaging and informative? One way to do that is by learning how to insert PDF files into your slides. Follow this step-by-step guide by Regina Griffin, a teacher from Oregon, US, to discover the importance of incorporating PDFs into your presentations. From selecting the…
How To Insert Audio In PowerPoint
Adding audio to your PowerPoint presentation can enhance audience engagement, add variety, and allow for creative expression. In this tutorial by Regina Griffin, a teacher from Oregon, US, you will learn about the different types of audio you can add to your slides, including music, sound effects, and recorded voiceovers. Discover the best practices for…
How To Edit A Slide In PowerPoint
Are you looking to enhance your PowerPoint presentations but not sure where to start? In this comprehensive guide by Oregon-based teacher Regina Griffin, we will explore the importance of knowing how to edit a slide in PowerPoint. From basic functions like adding, deleting, and rearranging slides to advanced techniques such as using the Slide Master…
How to Add Notes to PowerPoint Presentations: A Comprehensive Guide

Sara Wanasek

Presenting a slideshow can be a daunting task, especially when you’re speaking to a large audience. Thankfully, most presentation software comes equipped with the ability to add notes to your slides, making it easier for you to stay on track and deliver a seamless presentation – no full memorization needed.
In this blog, we will explore two different ways that you can to add notes to PowerPoint:
- Presentation notes that you prepare in advance and only you can see or
- Adding live notes to your presentation for your audience to see
By leveraging these techniques, you’ll be able to engage your audience effectively and deliver memorable presentations. Let’s dive in.
How to Add Presenter Notes in PowerPoint
Presenter Notes in PowerPoint are notes that you can view on your screen while you are presenting. Your audience will not see these notes, just you, so you can stay on track, remember important points, and deliver your information clearly and easily. Presenters, here’s everything you need to know to add notes to PowerPoint.
Add Notes in Edit Mode
Notes can be added to any slide in PowerPoint. Follow these steps:
- Start by clicking on the Notes button located beneath each slide. If you don’t see it, click on the View tab at the top of the screen and then click on Notes Page.
- Begin typing your notes for that slide, providing additional details, reminders, or cues to guide your presentation.
- Repeat the process for each slide you want to add notes to.
Once you’ve added your notes, you’re ready to deliver your presentation with confidence!

Present with Notes
Now that your notes are added to your presentation, let’s learn how to use them during the presentation. Do note that to present with the Presenter Notes, you will need to be connected to another screen or projector.
- First, select the Slide Show tab in the PowerPoint ribbon
- In the Set Up section, click the check box for Presenter View
- Enter Presentation Mode! You should see your presentation on one screen (such as your projector) and your notes displayed on the other screen (such as your laptop).
⚠️ If the Presenter view appears on the wrong screen, you can swap this by clicking on the Display Setting on top of the Presenter view screen.

As you move through your slides, your notes will automatically advance with the slides, keeping you right on track.
Print Notes
If you prefer a physical copy of your notes to present with or want to share it with your audience, you can print them from PowerPoint.
To do this go into File → Print → and under Settings , choose Notes Pages . Now, you can Print .
Presenting with notes in your PowerPoint presentation helps you stay on track, maintain confidence, engage your audience, adapt to unexpected situations, and appear professional and organized, ultimately leading to a smoother, more impactful delivery. But what if you want to further explain a concept with notes and annotations during your presentation? You can with annotation tools! →
Add Notes During a Presentation
Need to add notes to aid your presentation and help your audience understand, follow along, and stay engaged? Presenter tools such as annotations are great tools to help your presentation delivery and pace. By interacting with your slide information throughout your presentation, you can encourage active learning and audience participation in the presentation. There are a few ways you can add notes to PowerPoint:
Add Notes to Any Slide
During your presentation, you can add notes in two main ways:
1.You can use PowerPoint’s built-in simple pen and highlighter to add notes to your slide. This is found in the bottom left corner of the screen click on the pen and choose your color to begin drawing.
2. For sightly more advanced pen tools, text boxes, and shapes, you can use the free PowerPoint add-in ClassPoint, to add notes to PowerPoint sides . Once downloaded, ClassPoint , an audience engagement tool, will add a toolbar at the bottom of your presentation screen with these additional annotation & presentation tools .
This gives you different thickness options and color options for the pens , highlighters , shapes , and text boxes on your slide.
Insert Whiteboard Slides
Did you know you can even add a blank whiteboard slide into your PowerPoint presentation while you are presenting? With ClassPoint, it’s true!
Perfect for when you run out of space, want to brainstorm, or have fresh details to convey to the audience.
To add a whiteboard slide to your presentation, click on the Whiteboard icon on the ClassPoint toolbar. From there, choose a template provided, or add your own whiteboard background design . This slide will be opened & inserted right into your presentation and you can begin adding your notes. All annotations added will be saved once you exit out of the presentation mode.
Add disappearing laser ink
With ClassPoint’s presentation toolbar, you can also use the laser pointer to write with disappearing ink!
Although this will not save to your slide, it is a great way to help your audience follow along and make connections to your slide information.
Share Notes
Just like when you printed your Speaker Notes above, you can also share all the notes you added to your PowerPoint slides. Print your presentation, or share it with your audience via a QR code.
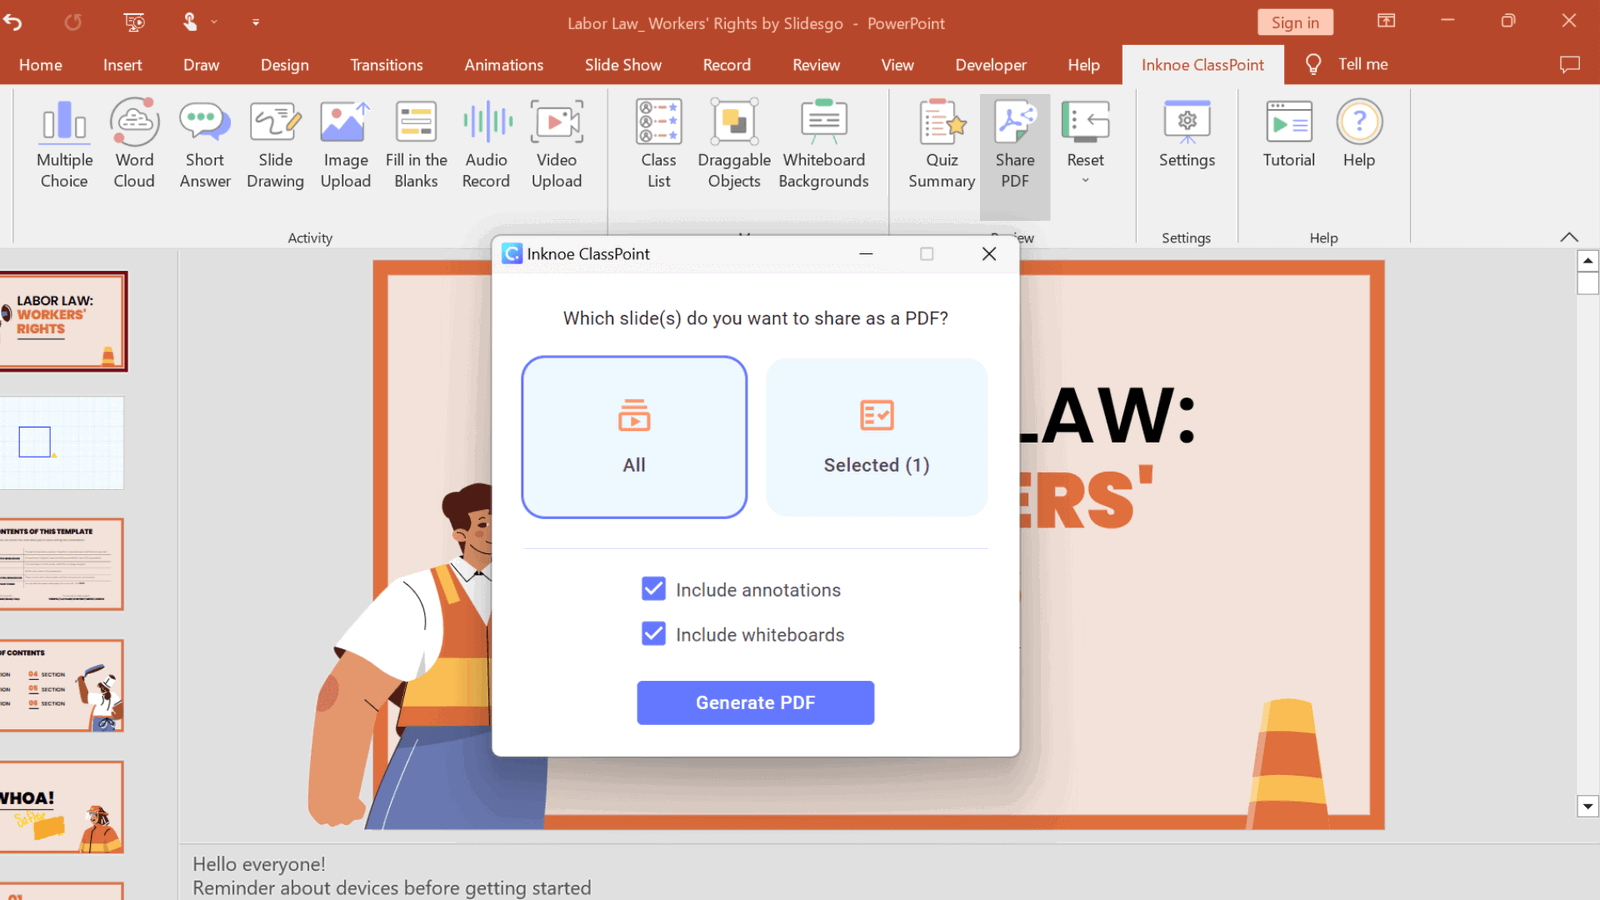
Click on the Share PDF icon on the ClassPoint tab in the PowerPoint ribbon. Select to include the whiteboard and annotations that you made and click Generate . A QR code will appear that your audience can scan to access your PowerPoint slides and see all the notes you have added!
Overall, adding annotations to your PowerPoint presentation is a great way to enhance your message, engage your audience, and make your presentation more effective. So if you haven’t tried it before, why not give it a go and see the difference it can make to your next presentation?
Adding notes to your presentation is a simple but effective way to elevate your overall performance. Whether you’re adding notes in edit mode or during your presentation, PowerPoint offers a variety of tools to help make your presentation a success. Start implementing these strategies with ClassPoint, and watch as your presentations become more engaging and impactful than ever before!
About Sara Wanasek
Try classpoint for free.
All-in-one teaching and student engagement in PowerPoint.
Supercharge your PowerPoint. Start today.
500,000+ people like you use ClassPoint to boost student engagement in PowerPoint presentations.
- Meta Quest 4
- Google Pixel 9
- Google Pixel 8a
- Apple Vision Pro 2
- Nintendo Switch 2
- Samsung Galaxy Ring
- Yellowstone Season 6
- Recall an Email in Outlook
- Stranger Things Season 5
How to add notes to your Microsoft PowerPoint slides
When you present a slideshow, it’s likely that you have more to say than what displays on the slides. You may want to expand on the text you’ve included, or if the slide only contains visuals, explain them further.
Add speaker notes to a slide in PowerPoint
Hide notes while editing a slideshow, view speaker notes during a slideshow.
Luckily, Microsoft PowerPoint provides a built-in feature for speaker notes. This allows you to add notes to each slide and then see them in Presenter View when you start the show.
What You Need
Microsoft PowerPoint
Open your PowerPoint presentation and select the first slide where you want to add notes.
Step 1: Go to the View tab and choose either Normal or Outline View . This allows you to see your slide along with the note you plan to add.
If you’re wondering how to add a note in PowerPoint without changing the view, the short answer is: You can’t. But if you prefer not to use Normal or Outline View, you can check out the Notes Page view in the same section of the ribbon.
While still technically a “view,” this displays your slide and a text box for your note as a printed page, as shown below.
Step 2: Display the Notes panel below the slide if it’s not visible using one of the following:
- Click the Notes button in the Status Bar at the bottom.
- Move your cursor to the bottom of the window. When you see the two-sided arrow, drag up until the panel displays.
- How to add audio or video to Google Slides
- How to change your background in Microsoft Teams
- How to embed a YouTube video in PowerPoint
Step 3: When the panel is empty, you’ll see “Click to Add Notes” within it. Place your cursor in the box and type your note.
Step 4: You can apply simple formatting to your note using the tools on the Home tab or in the floating toolbar. This is handy if you want to add bullet points or emphasize the font with bold, italics, or an underline.
Step 5: If you have a lengthy note within the panel, you’ll see a scrollbar appear on the right so that you can move down and see the entire note. You can also drag up on the panel to enlarge it.
If you want your slide in full view as you're assembling or editing your slideshow, you can hide the presenter notes. This does not delete them; it merely moves the notes panel out of view.
Do one of the following to hide your notes:
- Drag the notes panel downward until it no longer displays.
When it’s time to present your slideshow, you can use Presenter View to see your speaker notes. This allows you to view the notes for each slide on your monitor while presenting the slideshow on another. Your audience will not see your notes.
Step 1: Go to the Slide Show tab. On Windows, check the box for Use Presenter View in the Monitors section of the ribbon. On Mac, click the Presenter View button in the Start Slide Show section.
If you’ve already started the slideshow, you can still turn on Presenter View. Click the Three Dots in the Presenter Toolbar and choose Show Presenter View (Windows) or Use Presenter View (Mac).
Step 2: You’ll then see your notes display on the right side of the screen, with your slide on the left. As you advance each slide, the notes will display accordingly.
Step 3: The text for your note wraps automatically to the next line, and you have a scrollbar to move through those lengthy notes.
To adjust the font size for the notes, use the buttons below the notes panel.
Whether you want to add notes to PowerPoint to talk through your slideshow or simply as references while you assemble your slides, be sure to take advantage of this built-in feature.
For additional ways to work in Microsoft PowerPoint, check out how A.I. can help you create your slideshows .
Editors' Recommendations
- Best Microsoft Office deals: Get Word, PowerPoint, and Excel for free
- How to convert Google Slides to PDF
- How to buy Microsoft Office: all methods, explained
- How to convert a PowerPoint to Google Slides
- How to create a new team in Microsoft Teams
- How-To Guides

PowerPoint makes it easy to give a great presentation thanks to intuitive software that lets anyone craft an eye-catching deck. What's even better, however, is the option to use Presenter View. This lets you leave notes for yourself that can be viewed on your computer screen while everyone else is only seeing your presentation.
Do you have any clue how much power your PC consumes when you’re playing video games? Or how about when it’s just sitting idly? Whether you’re trying to figure out how to cut down on energy costs, or simply want to know how much toil your PC endures when running Abode Creative Suite, you’ll want to learn how to measure your PC’s power draw.
Fortunately, there are several different tools you can use to monitor this important statistic. Some are built right into your operating system, while others will require a separate download. You can also purchase certain external devices to keep tabs on your desktop’s energy output.
Choosing the right font for your presentation is important. While Google Slides has a good selection of fonts, you may want something different. Even though you cannot upload or use a font from your computer in Google Slides, there are ways to get more font choices.
Here's how to get and add fonts in Google Slides:
How to add notes to your Microsoft PowerPoint slides for presentation reminders or editing collaboration
- To add notes to your PowerPoint slides, you'll need to have your presentation set to "Normal" view.
- You can add notes to individual slides through a button using the "Notes" button.
- Presentation notes appear next to your slides on the screen as your slideshow plays, but they can also be printed out with the slides.
- You can add notes to your PowerPoint slides to have you with the editing process or while you're presenting a project.
- Visit Business Insider's Tech Reference library for more stories .
PowerPoint presentation notes are meant to help you remember some of your slideshow's finer details in a quickly accessible format. During a presentation, the notes show up on the screen in Presenter view, but not on the screen of anybody else seeing the slideshow.
If you're presenting in front of a room and can't keep returning to your laptop, you can still use your presenter notes. Just print the slideshow out with the notes. You can also hand these notes out to your audience if you think they'll need them, or the group with whom you're collaborating on the presentation.
Adding presentation notes to your PowerPoint slideshow is easy, you merely have to know where to look. Here's how to do it.
Check out the products mentioned in this article:
Microsoft office (from $149.99 at best buy), apple macbook pro (from $1,299.00 at apple), acer chromebook 15 (from $179.99 at walmart), how to add notes to your powerpoint presentation.
1. Launch your PowerPoint presentation.
2. Go to the "View" tab in the toolbar at the top of the screen.
3. Choose "Normal" view on the far left of the toolbar if it isn't already selected.
4. Click the slide you want to add a note to.
5. At the bottom of the screen, towards the right side and to the left of "Comments," click the button that reads "Notes."
6. Type any notes you want to make in the box and hit the Enter key or click away from the box.
Related coverage from Tech Reference :
How to download and access microsoft powerpoint on your mac computer, how to convert google slides to a powerpoint presentation in 4 easy steps, how to change your language settings in microsoft powerpoint in 3 different ways, how to copy or duplicate a powerpoint slide and put it anywhere in your slideshow, how to change and format the background of your powerpoint slides to custom designs.
Insider Inc. receives a commission when you buy through our links.
Watch: We compared the $1,200 MacBook Air with the $500 Surface Go, and the results were a mess
- Main content
How to Add Notes in PowerPoint?

Table of Contents
Keeping track of everything you want to cover in a presentation can be tough. To avoid cramming too much text onto your slides and to make sure you don’t miss any key points, some presenters use notes or flashcards. Another polished way to present your slides is by using speaker notes in PowerPoint. In this guide, we’ll walk you through how to add these notes in PowerPoint. Let’s dive in.
What are Speaker Notes in PowerPoint ?
Speaker notes in PowerPoint are like handy reminders you can attach to your slides. They’re there for you to reference during your presentation, but the audience won’t see them. Think of them as bullet points or cues to help you remember what to say, explain the visuals on the slide, or mention interesting details you don’t want to crowd the slide with. This way, you can keep your slides focused and use the notes to deliver a well-rounded presentation.
What are the Benefits of Using Speaker Notes?
- Clear Slides : Using speaker notes has several benefits, especially in keeping slides clean by avoiding too much text. With speaker notes, presenters can ensure their slides look neat while still having all the important information handy during the presentation.
- Simplifies the Note-Taking Processes : Speaker notes offer a convenient way to take notes without the hassle of paper or flashcards. This can make presentations smoother and less stressful since presenters won’t have to worry about juggling physical notes.
- Enhances Information Retention : Sometimes, it’s hard to remember everything during a presentation. Speaker notes act as a backup, helping presenters recall key points when needed. By having these notes handy, presenters can stay on track and deliver a more organized presentation.
- Structures Presentation Flow : In complex presentations, it’s easy to lose track of the main points. Speaker notes provide a helpful roadmap, guiding presenters through their slides and ensuring they stay focused on the key message.
- Boosts Presenter Confidence : Having confidence is important when presenting, and speaker notes can help presenters feel more prepared and in control. By reducing the need to fumble with notes or rely on external aids, presenters can appear more confident and authoritative in front of their audience.
How to Add Speaker Notes to PowerPoint?
Adding notes in PowerPoint to accompany your slides is a great way to stay on track during presentations. Here’s how to add them on different platforms:
Windows & macOS
The process for adding speaker notes is very similar on both Windows and macOS:
- Open your PowerPoint presentation.
- Select the slide you want to add notes to. You can do this by clicking on the thumbnail image of the slide in the slide pane on the left.
- Windows: By default, the Notes pane should be visible at the bottom of the PowerPoint window. If it’s hidden, click the Notes button on the taskbar at the bottom of the window.
- macOS: Similar to Windows, the Notes pane is located below the slide. If it’s hidden, click on the Notes tab at the bottom right corner of the window.
- Add your notes: In the Notes pane, click where it says “Click to add notes” and type your information. This can include talking points, additional details you don’t want on the slide itself, or even questions you might anticipate from the audience.
- Formatting your notes (Optional): You can format your notes using the standard text formatting options available. This might include making text bold, italicized, or changing the font size.
PowerPoint for the web offers a slightly different way to add speaker notes:
- Open your presentation in PowerPoint for the web.
- Click on the slide where you want to add notes.
- In the toolbar above the slide, click the “Speaker Notes” icon (it looks like a monitor with a speech bubble).
- A text box will appear below the slide. Type your speaker notes here.
- You can format your notes using the basic formatting options available in the text box.
- To hide the speaker notes , click the “Speaker Notes” icon again.
How to View Speaker Notes in PowerPoint while Presenting?
1. Enter Presenter View:
- Go to the Slide Show tab on the PowerPoint ribbon.
- In the Start Slide Show group, click the down arrow next to From Beginning .
- Select Presenter View from the dropdown menu.
Alternatively:
- You can also press the keyboard shortcut P (or Fn + P on some laptops) to enter Presenter View directly.
2. View Your Notes:
- Once in Presenter View, you will see the current slide you’re presenting on the main screen.
- Below the current slide, you’ll find a pane displaying the speaker notes you’ve added for that particular slide.
- On the right side of the Presenter View window, you’ll see a preview of the next slide in your presentation.
3. Navigate Through Slides:
- Use the arrow keys on your keyboard to navigate through your slides during your presentation.
- The Presenter View window will update accordingly, showing the current slide, your speaker notes, and a preview of the upcoming slide.
Additional Tips:
- You can adjust the size of the notes pane by dragging the divider between the pane and the slide preview.
- If you’re using multiple monitors, you can choose which monitor displays the Presenter View with your notes and which one shows only the slides for the audience. Look for the “Display Settings” button in the Presenter View window to manage this option.
How to Print Speaker Notes in PowerPoint ?
Here are the steps on how to print speaker notes in PowerPoint:
Step 1: Open your presentation and go to the “ File ” tab.
Step 2: Click on “ Print ” in the left-hand sidebar.
Step 3: Under “ Settings ,” you’ll see a dropdown menu next to “ Full Page Slides .” Click the down arrow.
Step 4: In the dropdown menu, choose “ Notes Pages .” This option will show you a preview of your slides with the accompanying speaker notes on the right side.
Step 5: Select your printer and any other printing options you want to adjust (e.g., number of copies).
Step 6 : Click “ Print ” to print your speaker notes.
How to Edit Notes in PowerPoint ?
In the world of PowerPoint, the editing of notes might seem like a minor detail, but its impact on your presentations can be significant. Here’s how you can edit the notes in your PowerPoint presentation:
- Open your presentation and select the slide with the notes you want to edit.
- Make sure you can see the notes beneath the slide. If not, click the “ Notes ” button on the toolbar at the bottom of the screen.
- Click anywhere within the notes area to start editing the content.
- After making your edits, click outside the notes section to save your changes.
How to Hide Notes in PowerPoint ?
Hiding notes in PowerPoint can be useful, especially when you’re showing your screen during a presentation. This way, your audience won’t see any private comments or reminders you’ve written for yourself. Here’s how to hide the notes:
- If you see the notes at the bottom of the screen, click the “Notes” button in the toolbar below. This will collapse the notes section and hide them from view on all slides in the presentation.
Closing Thoughts
Speaker notes are a powerful tool that can transform your presentations from good to great. By using speaker notes, you can keep your slides clear and concise while ensuring you have all the information you need to deliver a confident and informative presentation. Remember to practice using your speaker notes beforehand to ensure a smooth and engaging delivery.
Save Time and Effortlessly Create Presentations with SlidesAI

How to View Notes While Presenting in PowerPoint

Giving a presentation is a great way to convey important information to a group of people. However, it can also be challenging, with many factors that can cause anxiety and stress. One such obstacle is how to view presentation notes while giving your talk. In this article, we’ll explore why it’s important to view notes during a presentation, how to add notes to your PowerPoint slides and the various methods to view these notes while presenting.
Table of Contents
Why Viewing Notes is Important During a Presentation
Viewing your notes during a presentation can help you stay on track and keep your thoughts organized. It can also help you remember important points that you may have forgotten while speaking. Moreover, if you’re using PowerPoint, viewing your notes can give you a chance to emphasize specific points that you’ve prepared in advance, making your delivery smoother and more polished.
Another benefit of viewing your notes during a presentation is that it can help you maintain eye contact with your audience. When you have your notes in front of you, you don’t have to constantly look away to remember what you wanted to say next. This allows you to maintain eye contact with your audience, which can help you build a connection with them and keep them engaged throughout your presentation.
Benefits of Using PowerPoint for Presentations
PowerPoint is a powerful tool that allows you to create and deliver engaging presentations. It features a simple, user-friendly interface that anyone can use, even if you’re not tech-savvy. Moreover, it offers a range of tools like animations, graphics and charts to help you illustrate and convey your message more effectively. PowerPoint also supports the addition of presentation notes, which is a lifesaver for speakers who want to deliver a polished presentation without forgetting key points or ideas.
Another benefit of using PowerPoint for presentations is that it allows you to easily customize and edit your slides. You can change the font, color scheme, and layout of your presentation with just a few clicks. This makes it easy to create a professional-looking presentation that matches your branding or personal style. Additionally, PowerPoint allows you to easily collaborate with others on your presentation. You can share your slides with colleagues or clients, and they can provide feedback or make edits in real-time. This makes it a great tool for team projects or group presentations.
Tips on Preparing Presentation Notes for PowerPoint
When preparing your presentation notes, consider breaking your script into bullet points, to make it easier to read and follow along. Be concise and avoid writing paragraphs, as this will make it harder to scan your notes quickly. Also, consider adding speaker notes to your slides. Speaker notes are hidden text boxes that you can add to your slides, containing extra information or prompts on what to say next. These notes are only visible to you in Presenter View, and they won’t distract your audience from the main content of your presentation.
Another important tip to keep in mind when preparing your presentation notes is to use visuals to enhance your message. This can include images, charts, graphs, or videos that support your key points and help to engage your audience. However, be careful not to overload your slides with too much information or too many visuals, as this can be overwhelming and distracting. Instead, aim for a balance between text and visuals that effectively conveys your message and keeps your audience engaged.
How to Add Notes to Your PowerPoint Slides
Adding notes to your slides is easy. Start by opening your presentation in PowerPoint, click on the “View” tab and select “Normal View” or “Slide Sorter”. Then, select the slide you want to add notes to and click on the “Notes” button at the bottom of the screen. This will open up a panel where you can type your notes.
It’s important to note that the notes you add to your PowerPoint slides are not visible to your audience during the presentation. Instead, they are meant to serve as a reference for the presenter. You can use the notes section to jot down key points, reminders, or additional information that you want to remember to mention during your presentation. Additionally, you can print out your notes to use as a reference while giving your presentation.
How to Access the Notes Pane in PowerPoint
To view the notes you’ve added to your presentation slides, enter “Presenter View”. This is a special mode that lets you see your notes, presentation slides, and a timer, all on the same screen. To enter Presenter View, go to the “Slide Show” tab and click on “Presenter View”. This will open a new window with your presentation on one screen and your notes visible on the other screen. You can scroll through your notes by clicking on the “Notes” button on the right-hand side of the screen.
It’s important to note that the Notes pane in PowerPoint is a great tool for keeping track of important information that you want to share with your audience, but don’t necessarily want to include on your slides. You can use the Notes pane to jot down reminders, key points, or even jokes that you want to tell during your presentation. Just remember to keep your notes concise and easy to read, so that you can quickly glance at them during your presentation without losing your audience’s attention.
How to View Your Notes While Presenting in Presenter View Mode
If you’re using Presenter View mode, by default, your notes will appear in small text boxes on the right side of the screen. To expand the size of the notes so that they’re easier to read, click on the “Notes” button at the bottom of the screen. This will expand the notes text box and allow you to read your notes more easily during your presentation.
However, if you prefer to have your notes displayed in a separate window, you can do so by clicking on the “Display Settings” button in the Presenter View mode. From there, select “Show Presenter View on a separate monitor” and your notes will appear in a separate window on your second monitor.
It’s important to note that if you’re using PowerPoint Online, Presenter View mode is not available. Instead, you can use the “Notes” pane located at the bottom of the screen to view your notes while presenting.
Customizing Your Presenter View Settings for Optimal Note Viewing
You can also customize your Presenter View settings to optimize the appearance of the notes panel. To do this, go to the “Slide Show” tab and click on “Set Up Slide Show”. In the dialog box that appears, select “Presenter View” and check the box next to “Use Presenter View”. This will allow you to adjust the size of the notes panel and make it larger or smaller, depending on your preferences. You can also change the font size and style of your notes to make them more legible.
Another useful feature of Presenter View is the ability to use a laser pointer during your presentation. To activate this feature, simply click on the “Pen and Laser Pointer” button in the Presenter View toolbar. This will allow you to highlight important points on your slides and draw attention to specific areas of your presentation. You can also use the arrow keys on your keyboard to navigate through your slides while in Presenter View, making it easy to move back and forth between your notes and your presentation.
How to Use Presenter View on Multiple Monitors
If you have multiple monitors, you can use Presenter View on one monitor while your audience sees the presentation on another monitor. To do this, go to the “Slide Show” tab and select “Set Up Slide Show”. Then, under “Multiple Displays”, select the option that says “Present on: (monitor number)”. This will allow you to use Presenter View on one monitor while the audience sees the full-screen slide show on another monitor.
It’s important to note that not all computers or projectors support multiple displays. Before attempting to use Presenter View on multiple monitors, make sure that your computer and projector are compatible. Additionally, if you plan on using Presenter View frequently, it may be helpful to invest in a separate monitor for your own use, rather than relying on the projector screen.
Troubleshooting Common Issues When Viewing Notes in PowerPoint
If you experience issues when viewing notes in Presenter View, make sure that your PowerPoint software is up to date. You can also try changing the resolution of your displays or disconnecting and reconnecting your second display. In some cases, you may need to restart your computer to fix issues with Presenter View.
Other Options for Viewing Presentation Notes During a Live Presentation
If you don’t want to use Presenter View or you don’t have access to a second display, there are other ways to view your presentation notes during a live presentation. One option is to print out your notes and use them as a reference during your talk. Another option is to use a mobile device or tablet to view your notes during your presentation. Whatever method you choose, make sure that you have a backup plan in case of technical difficulties.
Best Practices for Utilizing Notes During a PowerPoint Presentation
When using notes during a PowerPoint presentation, be sure to practice your delivery several times. This will help you become more familiar with your presentation and the notes you’ve prepared. Try not to read your notes word for word. Instead, use them as a guide to keep you on track. Speak clearly and use a conversational tone during your talk. And don’t forget to make eye contact with your audience.
Top Mistakes to Avoid While Presenting with PowerPoint and Notes
Some of the most common mistakes that speakers make when presenting with PowerPoint and notes include reading slides word for word, using too much text on slides, not engaging the audience and relying too heavily on website or video links. To avoid these mistakes, keep your slides concise and visually engaging. Use short, punchy sentences to convey your message. Practice your delivery and remember to engage your audience during your presentation.
How to Ensure Successful Delivery of Your Presentation with the Help of Presenter View and Notes
By using Presenter View and notes, you can give a polished, professional presentation that conveys your message with clarity and confidence. Remember to use these tools to practice your delivery, stay on track and emphasize key points. With a little preparation and practice, you can deliver a presentation that will wow your audience and leave a lasting impression.
By humans, for humans - Best rated articles:
Excel report templates: build better reports faster, top 9 power bi dashboard examples, excel waterfall charts: how to create one that doesn't suck, beyond ai - discover our handpicked bi resources.
Explore Zebra BI's expert-selected resources combining technology and insight for practical, in-depth BI strategies.

We’ve been experimenting with AI-generated content, and sometimes it gets carried away. Give us a feedback and help us learn and improve! 🤍
Note: This is an experimental AI-generated article. Your help is welcome. Share your feedback with us and help us improve.

Critical PowerPoint Shortcuts – Claim Your FREE Training Module and Get Your Time Back!
How to Narrate a PowerPoint Presentation (Step-by-Step)
- PowerPoint Tutorials
- Shortcuts & Hacks
- October 29, 2019
In this article you’ll learn how to narrate a PowerPoint, with either just your voice or using the new video narration feature.
Firstly, there are two different tools you can use to narrate your PowerPoint slides.

#1: Record Audio is the legacy PowerPoint narration tool. Although this tool doesn’t have as many features, it is faster to open and use, and is handy if you want to drop a voice note on a slide.
Features of this tool include:
- Voice narration only
- Adds narration to one slide at a time only
#2: Record Slide Show is the NEWEST (and best) narration tool in PowerPoint, giving you two different types of narration options plus a variety of other options.
The features here are:
- Voice narration
- Video narration (so your audience can also see your face)
- Allows you to narrate an entire presentation in one sitting
- Automatically sets slide timings for you if you later want to convert PowerPoint into a video
And before you get lost in either tool, let’s cover a few things which will help you out (trust me).
Narration definition in PowerPoint

In PowerPoint, narration simply means recording your presentation as you walk someone through it, so that you can easily share the whole thing with someone else.
On top of that, if you get creative, you can use your narrated PowerPoint files to:
- Share your presentation with team members around the world
- Create a library of best practices for your company
- Build training materials for new hires
1. You don’t need fancy recording equipment
Don’t let fancy equipment or a professional recording studio hold you back from narrating your presentation. For most situations, using the built-in microphone on your personal computer is enough.
For example, if you are doing something relatively informal, such as walking a colleague through something in PowerPoint, the quality of your audio doesn’t need to be extremely high.
If you are creating training materials or giving an important presentation, I recommend getting a decent USB microphone (you can see a list of top rated microphones here ).
That’s because they will help remove any background noise.
2. Find a quiet space and tell people you are recording
Regardless of the quality of your microphone, I recommend finding the quietest place possible to record your narration and let everyone know not to bother you.
When evaluating a quiet place, here are some things to be careful of and to spot check:
- Noisy air conditioners or refrigerators
- Street noise (cars, planes or pedestrians)
- Loud background office or cafe noise
- Cell phones, doorbells or other pinging noises
- Your kids playing in the background
For instance – imagine you are in the middle of narrating your presentation. All of a sudden a colleague knocks on your door or the doorbell rings, and you’re interrupted. It’s not the end of the world, but it will throw you off and likely annoy you.
In addition, if there is too much background noise (like a running air conditioner), the noise can be very distracting to whoever is watching the recording.
3. Check your microphone
The last thing you want to do is walk through your entire presentation, and then discover that your microphone wasn’t working.
Therefore, before narrating your PowerPoint, I recommend double-checking your recording equipment every time before you hit record. This includes ensuring that your equipment is properly plugged in (it happens).

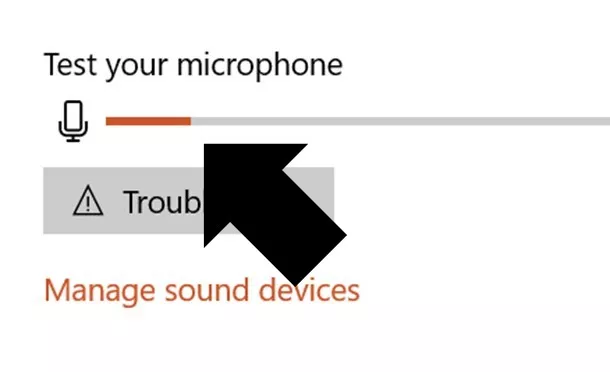
- Right-click the speaker icon in the task bar (lower right-hand corner of your desktop)
- Select Open Sound settings
- Choose your Input device
- Click on Troubleshoot under T est and troubleshoot
Note: If you don’t see the audio bar filling up with color as you talk, that means that your input device is either not selected or not properly connected.
- Connect all your audio and video equipment to your computer
- Restart your computer: Start, Power, Restart
#1. Record audio (audio narration only)
While this is the legacy narration tool in PowerPoint, I want to cover it first.
That’s because even if you decide not to use it to narrate your PowerPoint presentation, it is extremely useful for dropping voice notes on your slides.
When used this way, you can quickly capture your thoughts and ideas about a slide without having to get bogged down editing or building it out on the spot.
Below I’ve detailed how to use this tool to narrate PowerPoint slides.
1. Open the Record Sound dialog box

To open the Record Sound dialog box, simply:
- Navigate to the Insert tab
- Open the Audio drop down
- Select Record Audio
Keep in mind that you can only narrate one slide at a time using this tool. Hence why it’s great for dropping voice notes on a slide, one by one.
2. Record your audio narration

Inside the Record Sound dialog box you can narrate your PowerPoint slide. Simply:
- Type in a Name for your Audio Clip
- Select the Record button (the red dot) to begin narrating
- Click Stop (the square) to stop your narration
- Hit Play (the triangle) to listen to your narration
- Click OK to save the narration to your slide
As a result, you will see a little audio object added to your slide that you can move around and resize if you like.

The audio file can also be played (simply click on the play icon) in both the Normal View and Slide Show View of your presentation.
In this way, you can work your way through your presentation, adding voice notes to your PowerPoint slides that you or your colleagues can play back from within your presentation.
To learn all about adding music to PowerPoint and how to loop your audio files, read our article here .
3. Playing your PowerPoint narration
By default, your audio file will be set to play In Click Sequence (explained below).
That means it will be added at the end of any animation sequences, trigger actions, etc.. If you don’t have any of these on your slide, it will automatically play when you to to advance to the next slide.
All you need to do is advance your slide (click, hit the space bar or arrow keys, etc.) and it will play.

To change when your audio file plays, simply:
- Select your Audio file
- Navigate to the Playback tab
- Open the Start drop down
- Choose either In Click Sequence , Automatically or When Click On
In Click Sequence means that your audio file plays as part of the click sequence of actions that happen on your slide. This includes animated sequences, trigger actions, and videos, all of which you can set in the Animations Pane.
If you do not have any sequences set up on your slide, your audio file will play right before you advance to the next slide in your presentation.
Automatically means your audio file plays as soon as you get to that slide in your presentation, instead of playing right before you advance to the next slide.
When Clicked On means your audio file will only play if someone clicks on it during the presentation in Slide Show mode. For example, you can use this option for a piece of audio that you may not have the time to play, allowing you to choose in the moment whether to play it or not.
4. Delete or overwrite a previous narration file
To delete an audio file narration, simply select the object on your slide and hit Delete on your keyboard.
If you want to overwrite or change an existing narration, simply use the Record Audio dialog box again (as described above). Doing so will overwrite the existing audio file on your slide.
Warning: Two narration audio files cannot exist on a slide at the same time. That means that if you narrate a PowerPoint slide a second time, the first recorded file will be overwritten.
To be clear, that means you will need to start over – from scratch – for the individual slide where you want to change the narration.
While you can trim an audio file in PowerPoint, you cannot split apart or merge different audio files like you could if you used dedicated audio editing software.
#2. Record Slide Show (audio + video narration)
The Record Slide Show command is the NEWEST and BEST way to narrate a PowerPoint presentation for a few reasons, including:
- Record both audio and/or video narrations
- Narrate your entire presentation in one sitting (you are not limited to creating slide-by-slide narrations)
- You can use the pen, highlighter and laser pointer commands and have them captured in your narration too
- The tool allows you to pause and restart your recording
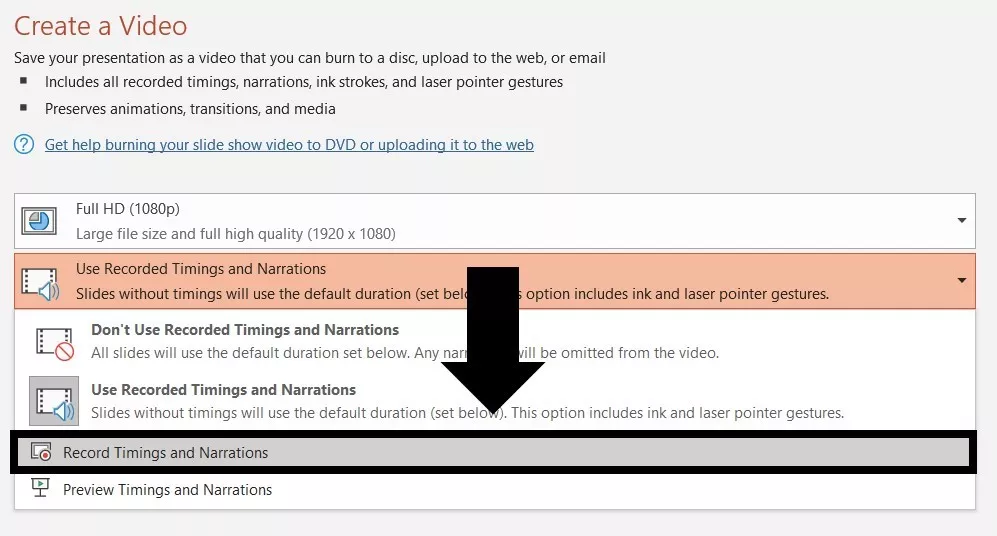
- All your slide timings are automatically recorded, allowing you to use them to turn your PowerPoint presentation into a video (see how to do that here )
In short, unless you have a really good reason not to use the Record Slide Show command to narrate your presentation, this is what you should be using.
As you will see below, there are a lot more settings you can toggle on and off, but don’t let this stop your from recording your presentation.
1. Open the Record Slide Show dialog box

To open the Record Slide Show dialog box, simply:
- Navigate to the Slide Show tab
- Open the Record Slide Show command
- Choose Record from Beginning
If you simply click the Record Slide Show command in the Ribbon (instead of opening up the drop down) it will begin recording from the current slide.
Wait a couple of seconds, and the Record Slide Show commands will load, and you can start narrating your presentation.
2. Record your slide show narration
There are a lot more options you can choose from in the Slide Show dialog box that that I will explain below, but recording your narration is still pretty easy and straight forward

To start recording your slide show narration, simply:
- Choose your Camera and/or Microphone
- Make sure your Camera and/or Microphone is turned on
- Use the Record , Stop and Replay commands to start and stop your narrations
- Use the Arrow (or use your arrow keys) to advance to the next slide
Once you start recording, you get the option to pause the recording. This allows you to pause and collect your thoughts whenever you need to, and continue narrating your presentation when you are ready.

When you are finished, the individual video and/or audio file narrations are added to the lower right-hand corners of each individual slide, as you can see below.

As you can see in the picture above, your audio and video narrations are recorded and saved on a slide-by-slide basis. That means you can review and record narrations on any slide within your presentation.
Warning: You can only have one narration file per slide.
If you re-record an audio or video narration, it automatically overwrites any previous narrations you had on that slide.
The only way to have two different narration files on the same slide, is to record one with the Record Slide Show dialog box, and record the second with the Record Audio command.
3. Set your narration to Play
Your Record Slide Show narrations are set to play Automatically .
That means that whenever you run your presentation (from beginning or from current), your audio and/or video narration will automatically play.

To change when your audio or video narration plays, simply:
- Select the Narration file on your slide
- Choose either In Click Sequence , Automatically or When Clicked On
4. Record Slide Show options

Record (or hit R) to start recording your narration.
Pause (or hit I) to pause your narration and collect your thoughts. This button only displays once you’ve started recording.
Stop (or hit S) to end your narration. If you hit Record again, your new narration will overwrite the existing one.
If you want to stop narrating your current slide before starting on the next one, don’t use the Stop button. Instead, simply navigate to your next slide using your arrow keys or the forward arrow on screen.
Replay to replay your narration for the current slide. This button only becomes active after you have recorded a narration for that slide.
B. Speaker Notes options

Notes (or hit N) to open or close your speaker notes for that slide. The Notes window is fairly small and you cannot resize it very well.
Your action of opening and closing the speaker notes pane will not show up in your recorded narration.
Font Size commands increase and decrease the font size of your speaker notes so that you can see them better.
In my opinion the speaker notes pane is too small and not flexible enough for reviewing lots of speaker notes.
To learn how to print your speaker notes in PowerPoint, read our guide here .
C. Clear Recordings options

Clear Recordings allows you to clear your previous recording on either the current slide or on all the slides in your presentation.
You can also overwrite your recording and slide timings by simply recording over the top of your narrations.
Note: Using Clear Recordings removes both your slide timings and narrations.
That means that if you want to remove your narrations but keep your slide timings, you will want to clear recordings outside of the Record Slide Show dialog box. See how to clear timings and narrations below.
D. Input options: Camera and Microphone

Microphone allows you to choose which microphone you want to record with. So if you are using a microphone other than your computer’s built-in one, this is where you want to select your microphone before you begin recording your narration.
Camera allows you to choose which camera or webcam you want to use if you are recording video narrations. If you are using a camera other than your computer’s built-in one, this is where you want to select it before you begin your narration.
E. Advance Slide options

Next Slide advances the click sequence of your presentation, the same way hitting the right arrow key or clicking your slide with your mouse does.
If you have animated sequences or music that is supposed to play, clicking forwards will trigger those sequences, and eventually advance you to the next slide.
Previous Slide moves you back one slide in your presentation, but it is only available to you when you are not recording.
That’s because re-recording a narration automatically overwrites the previous narration. So once you start your recording, you can only move forward in your presentation.
F. On / Off: Camera and microphone

Microphone (on/off) turns your selected microphone on or off. You can turn your microphone off and still click through your presentation if you want to mute your sound in the recording.
Camera (on/off) turns your selected camera on or off. This allows you to add or remove video recording in your narration.
Camera Preview displays what your camera is recording during your narration. If seeing yourself onscreen while you narrate your presentation bothers you, simply turn camera preview off.

G. Ink options: Eraser, Pen and Highlighter

The Pen (Ctrl + P), Highlighter (Ctrl + I), and Eraser (Ctrl + E) allow you to draw and highlight things on your slides during your presentation.
To change the color of your ink, simply click on one of the colors at the bottom of your screen.
Anything that you draw on your slides during your narration will be recorded as you draw them. That means that someone watching the recording will see you draw on the slide, as you narrate your presentation.
H. Slide Timings options

Slide Timings show you how long you have spent on each slide, and which slide you are on within your presentation.
Therefore, if you are converting your PowerPoint presentation into a video, these slide timings determine how long you spend on each slide.
To learn all about how to convert PowerPoint to video, read our guide here .
I. Close / Minimize options

Close / Minimize allows you to close out of (or minimize) the Record Slide Show app.
Use the Close icon (the x) to exit out of the Record Slide Show dialog box and return to the Normal View of your presentation. You can also hit the Esc key on your keyboard to close out of the dialog box.
#3. How to clear your Timings and Narrations

To clear your Timings and Narrations from the Normal View of PowerPoint, simply:
- Open the Slide Show tab
- Open the Record Slide Show drop down
- Select Clear
- Choose the Timings or Narrations you want to clear
If the Clear command is grayed out when you open the Record Slide Show drop down, that means that you do not have any Narrations or Timings (same as for transitions) set for your presentation.
Clear Timing on Current Slide removes the set transition timing for the current slide.
Clear Timings on All Slides removes the set transition timings on all the slides within your presentation.
Clear Narration on Current Slides removes any voice or video narration you’ve recorded on the current slide.
Clear Narration on All Slides removes any voice or video narrations from your entire presentation.
Note: You can also clear the Timings and Narrations for your slides at the same time from inside the Record Slide Show dialog box.

Inside the dialog box, simply click the X and choose to Clear Recordings on Current or Clear Recordings on All .
#4. How to compress your PowerPoint narrations

Adding audio and video narrations to PowerPoint significantly increases the size of your presentation as you can see in the picture above.
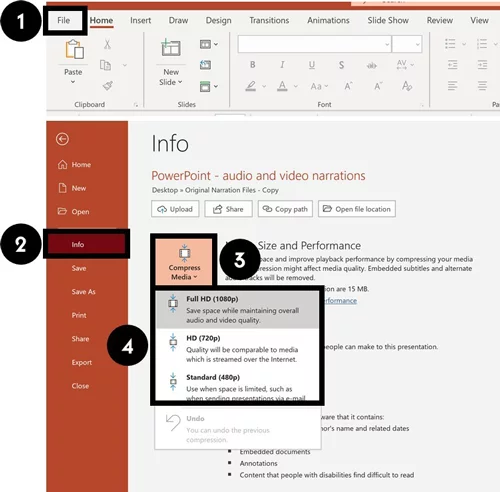
Therefore, I recommend compressing your file after you’re done recording narrations.
After narrating your PowerPoint, you can compress your audio and video narrations. To do that, simply:
- Navigate to the File tab
- Select the Info group
- Open the Compress Media drop-down
- Choose a compression quality
PowerPoint automatically uses the Full HD (1080p) when recording your voice and video. So if you are tight for space, you will need to choose either the HD (720p) or Standard (480p) options .
To learn a variety of other ways you can reduce your PowerPoint file size, read our compression guide here .
That’s how to narrate a PowerPoint, and the different options you have using the Record Audio and Record Slide Show options.
If you have the latest version of PowerPoint, I highly recommend using the Record Slide Show option as it gives you the most options to work with.
Just keep in mind that narrating your PowerPoint with audio and video can greatly increase the size of your presentation. Therefore, you may end up needing to consider compress it.
If you enjoyed this article, you can learn more about how to improve your PowerPoint skills by visiting us here
What’s Next?
Related articles, about the author.

Popular Tutorials
- How to Strikethrough Text (l̶i̶k̶e̶ ̶t̶h̶i̶s̶) in Word, Excel & PowerPoint
- How to Make Animated Fireworks in PowerPoint (Step-by-Step)
- Strikethrough Shortcut (l̶i̶k̶e̶ ̶t̶h̶i̶s̶) for Word, Excel & PowerPoint
- How to Create a Flash Card Memory Game in PowerPoint (Like Jeopardy)
- Keyboard Shortcuts Not Working: Solved
PowerPoint Tutorial Categories
- Strategies & Opinions
- Presentation Design
- Pictures, Icons, Videos, Etc.
- New Features
- Miscellaneous
- Charts & Data Viz
We help busy professionals save hours and gain peace of mind, with corporate workshops, self-paced courses and tutorials for PowerPoint and Word.
Work With Us
- Corporate Training
- Presentation & Template Design
- Courses & Downloads
- PowerPoint Articles
- Word Articles
- Productivity Resources
Find a Tutorial
- Free Training
- For Businesses
We help busy office workers save hours and gain peace of mind, with tips, training and tutorials for Microsoft PowerPoint and Word.
Master Critical PowerPoint Shortcuts – Secure Your FREE Training Module and Save Valuable Time!
⌛ Master time-saving expert techniques.
🔥 Create powerful presentations.
🚀 Propel your career to new heights.
We value your privacy – we keep your info safe.
Discover PowerPoint Hacks Loved by Industry Giants - KKR, AmEx, HSBC!
Over 114,880 professionals in finance, marketing and sales have revolutionized their PPT skills with our proven methods.
Gain FREE access to a full module of our premium PowerPoint training program – Get started today!
We hate spam too and promise to keep your information safe.
You are currently viewing a placeholder content from Facebook . To access the actual content, click the button below. Please note that doing so will share data with third-party providers.
How-To Geek
How to start a powerpoint slideshow.
Let the slideshow begin!
Quick Links
Start a slideshow in powerpoint's desktop app, start a slideshow in powerpoint's web app, start a slideshow in powerpoint's mobile app, key takeaways.
To start a PowerPoint slideshow on your desktop, open your slideshow and click "Start Slide Show" in the "Slide Show" tab. If you're using the web app, select "From Beginning" in the "Slide Show" tab. On mobile, simply tap the Monitor icon at the top of your screen.
There's nothing quite like finishing a presentation after spending hours getting it just right. Now, show off your hard work by starting your Microsoft PowerPoint slideshow on desktop, web, and mobile using the methods below.
Related: How (and Why) to Start Microsoft PowerPoint from the Command Prompt
To play a slideshow in PowerPoint's desktop app, all you have to do is click an option or press a shortcut on your keyboard .
Start the process by opening your presentation with PowerPoint. Then, in the app's ribbon at the top, select the "Slide Show" tab.
In the "Slide Show" tab, from the "Start Slide Show" section, choose "From Beginning" (or press F5). Now your presentation will play from the very first slide.
If you'd like to start the slideshow from your current slide, choose the "From Current Slide" option. Alternatively, press Shift+F5 on your keyboard.
While your presentation is playing, you can perform various tasks, like moving to the next slide or ending the show. You can reveal these options by right-clicking anywhere on the slide.
Alternatively, you can use the following keyboard shortcuts while viewing your slideshow:
- Spacebar or Right Arrow Button: Go to the next slide in the presentation.
- Left Arrow Button: Go to the previous slide in the presentation.
- Esc: End the show.
- W: Hide your current slide and display a white screen. Press the same key again to bring back the slide's content.
- B: Hide your current slide and display a black screen. Revert back to the slide's content by pressing the same button.
- Ctrl+Left Mouse Button: Activate the laser point tool to point at things in your slides.
- Ctrl+P: Launch the pen tool to annotate your slide's content during your show. You can choose if you'd like to keep these annotations when you end the show.
- Ctrl+i: Access the highlighter tool to highlight items in your slides.
If you'd like to jump to a specific slide while presenting, press that slide's number on your keyboard and hit Enter. For example, press 12 and hit Enter to access that slide quickly.
To access the Presenter view, where you can see the upcoming slides and other options, right-click anywhere on your slide and choose "Show Presenter View."
With these options, you can start a slideshow and have it play exactly how you want.
To play a slideshow on the web, launch your preferred web browser and access PowerPoint on the web . Then, open your presentation.
From PowerPoint's ribbon at the top, select the "Slide Show" tab.
In the "Slide Show" tab, start your slideshow from the first slide by clicking the "From Beginning" option. To have your show play from your current slide, choose "From Current Slide."
Your presentation is now playing.
To reveal the options for moving slides, annotating items, and using Presenter Coach , bring your cursor to your screen's bottom-left corner. Then, click the appropriate icon.
Related: How to Practice Your Presentations with PowerPoint's Presenter Coach
To start a slideshow in the PowerPoint mobile app , launch the app on your phone and open your presentation.
On the presentation screen, at the top, tap the Monitor icon to play the slideshow.
Your presentation has now begun.
To move to the next slide, swipe left on your screen. To go to the previous slide, swipe right.
You can reveal PowerPoint's presentation options, like annotation and black screen tools, by tapping at the top of your presentation. Then, choose the option you'd like to use.
And that's it. Happy presenting!
Want to learn a few tips to help you make the best PowerPoint presentations ? If so, check out our guide.
Related: 8 Tips to Make the Best PowerPoint Presentations
Zoom: Screen Sharing Options with PowerPoint and Notes During a Meeting
There are several different ways to share your screen when running a Zoom meeting with slides in PowerPoint or Keynote. This article covers the following topics:
- Windows OS instructions
- Mac OS instructions
- Resizable window in Keynote
- Share individual window in PowerPoint
Sharing your PowerPoint slides only without notes
If you want to share your PowerPoint while using the Presenter View with your notes but only show the slides, the following are steps you could take to do that:
Open your PowerPoint presentation.
In Zoom, click on Share Screen .
Click on the Advanced Tab.
- Select Portion of Screen (Allows you to share just a portion of your screen. When you start sharing, it will display a color rectangle that you can click on and move around and re-size to share just the portion of the screen defined by that rectangle.)
- Click on Share .
For Windows OS in PowerPoint
- Click on the Slide Show tab
- This allows you to display the slides with the notes you prepared in the notes pane.
- Click “Present from Begining under Slide Show”
- This way, only the slides will display to the students.
For Mac OS in PowerPoint
- Click the Slide Show tab
- Click “Presenter View”
- If you have Dual Monitors, there is also an option to Swap Displays if needed.
Other Options
Resizable window in keynote.
Another option is to view the presentation in a resizable window (not full screen).
- Make sure Keynote is updated
- Choose Play>Play Slideshow in Window.
Share Individual Window in Powerpoint
- Choose "Browsed by an individual (window)" and only share that window when you share your screen. This will allow you to have your notes displayed in another document and only show the slides.
Learn more about different ways to share your screen, content, or camera in Zoom .
CONNECT WITH US
Contribute to the Microsoft 365 and Office forum! Click here to learn more 💡
April 9, 2024
Contribute to the Microsoft 365 and Office forum!
Click here to learn more 💡
PowerPoint Top Forum Contributors: Steve Rindsberg - John Korchok 👍✅
April 17, 2024
PowerPoint Top Forum Contributors:
Steve Rindsberg - John Korchok 👍✅
- Search the community and support articles
- Microsoft 365 and Office
- Search Community member
Ask a new question
PowerPoint 2021 showing some notes in Outline View but not all - how to fix?

- Subscribe to RSS feed
Report abuse
Reported content has been submitted
Replies (10)
- Microsoft Agent |
Hello, ToddMaddison
Welcome to Microsoft Community.
Your issue is indeed a bit strange. In general, either all the notes are displayed in Outline view or none of them is visible. It's unlikely that some would appear while others wouldn't. To better understand the reason, could you please share a sample file with us? This way, we can try to reproduce the issue you're facing. You can upload it to any cloud service and share the link with us, such as OneDrive, Google Drive, Mega, Dropbox, or any other platform you prefer. If the file contains any sensitive or confidential information, please make sure to remove it in advance.
Microsoft Community Technical Support
Was this reply helpful? Yes No
Sorry this didn't help.
Great! Thanks for your feedback.
How satisfied are you with this reply?
Thanks for your feedback, it helps us improve the site.
Thanks for your feedback.
Thanks. Here's a sample. I took the original presentation and deleted all but four slides . All slides have presenter notes, but the notes from two of those slides (the first two) do not show up in the outline view. Sample presentation
The notes in PowerPoint are the content at the bottom of the slide page, which will not appear in the outline view on the left-hand side. What you referred to as "notes" is actually the text inside a text box. You can compare the text in the table of contents with the text on the slides, as shown below:

In the outline view, only the content within the text placeholders will be displayed. To view the objects on each slide, you can click on "Home" and then click on "Arrange" on the right side to access the selection pane. You'll notice that the first two slides do not have text placeholders.

To display the content from the body of the slides in outline view, you need to place the text content within text placeholders. This can be done by setting it up in the slide master. If your page formatting is consistent, you can directly set it up in the slide master and use that master when creating new slides:
How to add, edit, or remove a placeholder on a slide layout - Microsoft Support
This is great, thanks! So then I am completely mis-interpreting the use of the Outline view. I THOUGHT the point was to be able to print out "presenter notes" without the slides themselves, but apparently not. Is there no way to do that? I'm frequently presenting in situations where I'm using a remote to advance slides, I'm nowhere near the laptop the presentation is running on so I can't see the presenter notes. I just need the notes because they may have expanded information that doesn't appear on the actual slide, and to make sure I don't miss something about a particular slide. I don't need to see the slide in the notes - it's on the screen at that time. I don't want to print a bunch of pages with graphics I don't need to keep up with the presentation. Usually I just want a page or two of the presenter notes text printed out that I can leave on the podium and refer to as needed without having to continually turn the pages to get to the next one. In the last presentation I did, I uploaded the PPTX to Google Sheets, which has a plug-in one can use to print just the notes, but ONLY to PDF, then I have to convert to text and clean up. Very roundabout. Seems like PPT would have a more direct route.
To view your notes, you need to play the slides in presenter view. Click on Slide Show, check Use Presenter View, and then click From Beginning or From Current Slide to play the slides:

Depending on your needs, click on Swap Presenter View and Slide Show. This will determine which screen the notes are displayed on.

Thanks. Greatly appreciate your help, but that's not what I'm looking for. When I present, I'm often nowhere near the laptop. I like to have a printed set of presenter notes, on the podium with me. Apparently there's no way to do that? Google Sheets has a plug in that provides a work-around, but no such thing for PowerPoint?
- Volunteer Moderator
>> So then I am completely mis-interpreting the use of the Outline view. I THOUGHT the point was to be able to print out "presenter notes" without the slides themselves, but apparently not.
Correct, that's not how Outline view works. >> Is there no way to do that?
Give this a try on a COPY of your existing presentation:
Choose View | Notes Master
Click on the slide placeholder and delete it.
Reposition the text placeholder if you like.
Close the Notes Master view.
Go to View, Notes Pages
You'll have to go through all the notes pages that are already in the presentation and delete the slide image, but the notes pages for any new slides won't include the slide image.
Print Notes Pages instead of Slides and voila.
Thanks. That does seem to produce something close to what I'm looking for, if I then save the result to .rtf format so I get editable text. It takes a bit of manipulation from there - changing the font and size, some cleaning up of bullet points, etc, but the end result is indeed a text document I can print and work from. One small issue - it doesn't print the slide numbers each note comes from. The Google Sheets plugin does that. Not a huge issue, I can just manually type them in, rarely am I doing anything with more than 15-20 slides. Seems odd the lengths that one must go through to get this. I trust I must be one of the only people in the world who uses PowerPoint to present to groups where the presenter is standing in front of the screen, not facing it, often at a podium without the laptop being used to project with in front of them (using a remote....) Odd because that would seem to be a common usage, but I guess I'm just strange....! Thanks all!
If you are prepared to use a little code there is a page on our site which shows how to print out your PPt notes (only the notes) in Word
http://www.pptalchemy.co.uk/PPT2WORD.html
Interesting. Thanks. I'm not afraid of vba (I'm a data analyst during the day - lots of database queries and Excel work...)
Question Info
- Norsk Bokmål
- Ελληνικά
- Русский
- עברית
- العربية
- ไทย
- 한국어
- 中文(简体)
- 中文(繁體)
- 日本語
Your browser is not supported
Sorry but it looks as if your browser is out of date. To get the best experience using our site we recommend that you upgrade or switch browsers.
Find a solution
- Skip to main content
- Skip to navigation
Take our Science Teaching Survey (15 minutes) and shape the future of education! Your insights matter.
- Back to parent navigation item
- Collections
- Sustainability in chemistry
- Simple rules
- Teacher well-being hub
- Women in chemistry
- Global science
- Escape room activities
- Decolonising chemistry teaching
- Teaching science skills
- Post-lockdown teaching support
- Get the print issue
- RSC Education

- More from navigation items
Take our Science Teaching Survey (15 minutes) and shape the future of education!
Exam escape

- No comments
Get your post-16 students to have some fun with this escape room activity – and inadvertently revise while doing so

Source: Adapted from © Shutterstock
Let your students have fun while unlocking key chemistry knowledge
This is a fun, intellectual escape room activity to do with your post-16 students. It’s a simple, but effective revision tool that will help them identify the areas they need to work on in preparation for their final exams.
In addition to the downloadable resources, you will need one set of the multiple-choice sections of the 2017, 2018, 2019, 2022 and 2023 SQA Higher Chemistry past papers per group – these can be either printed or opened on a digital device. You will also need at least one chemistry data booklet per group.
An ideal group size is four students, but this is entirely down to your judgement. If the Wi-Fi in your setting is temperamental, make paper copies of the past papers available to students, or pre-load the papers onto devices.
To make things more exciting, I have a mini jail cell on my desk containing prizes, and I give the winning group the keys. But this is an optional bit of fun.

Download this
Full set of clues and answers, including guidance on common misconceptions, plus instructions for learners. Choose pdf or editable versions.
Resources include:
- Exam escape student sheet as pdf and MS Word
- Exam escape teacher notes as pdf and MS Word
- Exam escape presentation as pdf and MS PowerPoint
How to play
Each puzzle begins with a clue, which is either a general knowledge or chemistry question. The answer to each clue is a number, which corresponds to a multiple-choice question on the past paper noted on the clue card.
First, give each group the first clue: How many pieces of fruit and veg are recommended per day (2019 paper)? With an answer of 5, this leads students to multiple-choice question 5 of the 2019 paper. When students bring you the correct answer for both the clue (5) and the past paper (choice B), give them the second clue. Continue this process until one group of students solves all 16 clues, all 16 past paper questions and are, therefore, the winners!
Why general knowledge first?
Setting the general knowledge clues first encourages all students to participate in the game and play a role in the team from the get-go, regardless of their chemistry knowledge. I have found that this increases students’ confidence and motivates them to try the past paper questions that follow, as they are already caught up in the competitive atmosphere of the classroom.
Past paper questions
The past paper questions from each sub-section are carefully selected to represent either the style of exam questions that frequently appear in past papers, or questions which assess skills that students find hard to apply. Although no practical skills are required in the game, skills and problem-solving questions do feature. The full breakdown of topics covered, including the specific areas assessed and common mistakes or misconceptions can be found in the downloadable resource, teacher notes.
Extend the fun
The simplicity of this resource means you can run it in its entirety or easily shorten it, depending on the class time you have available. If you wish to use it at any point during the year, you can remove clues or questions relating to any topics not yet covered. You can also use this resource as a quirky retrieval introduction for new classes to allow them to self-assess and reflect on how much of the previous year’s knowledge they have retained.
Exam escape student sheet
Exam escape teacher notes, exam escape presentation.

More from Hayley Russell

Make time for time off

Essential advice for applying for your first teaching post

Top tips for lesson planning
- Active learning
- Lesson planning
- Making predictions
- Problem solving
Related articles

Escape the classroom: and try microscale chemistry
2022-03-23T09:31:00Z By Adrian Allan
Escape room puzzles based on simple microscale reactions for students

Escape the classroom: and explore colour change reactions
2020-07-15T13:34:00Z By Adrian Allan
In this escape room article, students explore colour change reactions to reveal hidden codes

Escape the classroom
Be inspired to design an escape room experience for students with these chemistry related puzzles
No comments yet
Only registered users can comment on this article., more from ideas.

Fuel curiosity in science careers
2024-04-17T05:02:00Z By Mustafa Mahmoud
Help foster the next generation of scientists by linking teaching topics to real-world events and career pathways

Use AI to successfully assess students’ understanding
2024-03-20T05:00:00Z By David Paterson
Discover how to quickly and effectively generate multiple choice questions on key chemistry topics

5 ways to successfully teach structure and bonding at 14–16
2024-03-06T10:33:00Z By Kristy Turner
Strengthen students’ grasp of the abstract so they master this tricky topic and effectively tackle exam questions
- Contributors
- Print issue
- Email alerts
Site powered by Webvision Cloud
IMAGES
VIDEO
COMMENTS
Start presenting. On the Slide Show tab, in the Start Slide Show group, select From Beginning. Now, if you are working with PowerPoint on a single monitor and you want to display Presenter view, in Slide Show view, on the control bar at the bottom left, select , and then Show Presenter View.
Launch PowerPoint. Look for Slide Show tab. When found, click it and select From Beginning visible under Start Slide Show group. If you are working with PowerPoint on a single monitor and still ...
Next, in the pane on left, select the slide where you'd like to add speaker notes. Next, click the "Notes" button at the bottom of the window. A small box reading "Tap to Add Notes" will appear beneath the slide. For Mac users, this will say "Click to Add Notes.". Now, simply type the speaker notes for that slide.
Viewing notes while presenting in PowerPoint can be a game-changer. We explore the importance of viewing notes during presentations and provide a step-by-step guide on how to do so. Practical tips on using Presenter View effectively, based on the insightful tutorial by Regina Griffin, a teacher from Oregon, will be shared.
Navigate to the slide on which you wish to start presenting. Select the "Slide Show" tab in the ribbon menu. Check the "Use Presenter View" box. Start your presentation by clicking on "From Beginning" or "From Current Slide.". Your notes will appear on your primary monitor, while the audience will see only the slides on the ...
Start by clicking on the Notes button located beneath each slide. If you don't see it, click on the View tab at the top of the screen and then click on Notes Page. Begin typing your notes for that slide, providing additional details, reminders, or cues to guide your presentation. Repeat the process for each slide you want to add notes to.
Here's how to add notes in PowerPoint: Select a slide you want to add notes to. View the Notes pane located beneath each slide. If it's not visible, you can make it appear by clicking Notes on the bottom taskbar. You will see a blank space with the prompt "Click to add notes."
Click the Notes button in the Status Bar at the bottom. Move your cursor to the bottom of the window. When you see the two-sided arrow, drag up until the panel displays. Step 3: When the panel is ...
Turn On PowerPoint Presenter View. In PowerPoint for macOS, simply click on Presenter View on the Slide Show tab to kick off the presentation in Presenter view. Turn on Presenter View by clicking on Presenter View on the Slide Show tab. You'll see the Presenter View interface on one screen.
There are two ways to add speaker notes in PowerPoint. Method One: Directly edit in slide editing mode (aka Normal View). Click the notes section of the window and begin typing. If the notes are hidden, click the Notes button found in options on the bottom right of the PowerPoint screen. Method Two: Edit your notes in Notes View.
If you want to customize your Presenter View experience, follow these steps: On the 'Slide Show' tab, click 'Set Up Slide Show.'. Under 'Multiple Monitors,' select the 'Use Presenter View' checkbox. If you're using a single monitor, select the 'Display slide show on' option and choose your primary monitor.
4. Click the slide you want to add a note to. 5. At the bottom of the screen, towards the right side and to the left of "Comments," click the button that reads "Notes." 6. Type any notes you want ...
If you want to learn how to loop your slides in PowerPoint, follow these steps: Go to the Slide Show tab and select Set Up Slide Show. When the Set Up Show window appears, go to the Show options group and tick the Loop continuously until 'Esc' option. Don't forget to click OK to apply the new setup!
Hiding notes in PowerPoint can be useful, especially when you're showing your screen during a presentation. This way, your audience won't see any private comments or reminders you've written for yourself. Here's how to hide the notes: Open your PowerPoint presentation. If you see the notes at the bottom of the screen, click the "Notes ...
Step 2: Set up the PowerPoint Slide Show in a window. Set up your PowerPoint file to display the Slide Show in the window it is in instead of in full screen mode. PowerPoint refers to this as the "Browsed by an individual" mode or Reading View. To use this mode, on the Slide Show ribbon, click on the Set Up Slide Show button.
Adding notes to your slides is easy. Start by opening your presentation in PowerPoint, click on the "View" tab and select "Normal View" or "Slide Sorter". Then, select the slide you want to add notes to and click on the "Notes" button at the bottom of the screen. This will open up a panel where you can type your notes.
Record your audio narration. Inside the Record Sound dialog box you can narrate your PowerPoint slide. Simply: Type in a Name for your Audio Clip. Select the Record button (the red dot) to begin narrating. Click Stop (the square) to stop your narration. Hit Play (the triangle) to listen to your narration.
Start a Slideshow in PowerPoint's Web App. To play a slideshow on the web, launch your preferred web browser and access PowerPoint on the web. Then, open your presentation. From PowerPoint's ribbon at the top, select the "Slide Show" tab. In the "Slide Show" tab, start your slideshow from the first slide by clicking the "From Beginning" option.
Open your PowerPoint presentation. In Zoom, click on Share Screen. Click on the Advanced Tab. Select Portion of Screen (Allows you to share just a portion of your screen. When you start sharing, it will display a color rectangle that you can click on and move around and re-size to share just the portion of the screen defined by that rectangle ...
The notes in PowerPoint are the content at the bottom of the slide page, which will not appear in the outline view on the left-hand side. What you referred to as "notes" is actually the text inside a text box. You can compare the text in the table of contents with the text on the slides, as shown below:
Anthropology document from Liberty University, 6 pages, PowerPoint Presentation Assignment: Acculturation and In Intercultural Learning of Missionaries, Their Families, and the Roles of Women in the Christian Mission Courtney Neiswonger Liberty University Participants/Methods Used/Limitations • The participan
Step 2: Set up the PowerPoint Slide Show in a window. Set up your PowerPoint file to display the Slide Show in the window it is in instead of in full screen mode. PowerPoint refers to this as the "Browsed by an individual" mode or Reading View. To use this mode, on the Slide Show ribbon, click on the Set Up Slide Show button.
In this lesson, you will play the role of a land manager for an imaginary watershed. You will listen to community groups that are part of the watershed you help manage. ... Take notes in your science journal or on a piece of paper to help you understand the perspectives of all these groups. ... PowerPoint Presentation Last modified by:
Health-science document from University of Phoenix, 12 pages, HUMAN RESOURCE MANAGEMENT IN THE HEALTHCARE INDUSTRY By: Samantha Wright HCS/341- Human Resources In Health Care Instructor: James Kinner INTRODUCTION In this presentation I will be discussing the roles of human resource management in the healthcare indu
How to play. Each puzzle begins with a clue, which is either a general knowledge or chemistry question. The answer to each clue is a number, which corresponds to a multiple-choice question on the past paper noted on the clue card. First, give each group the first clue: How many pieces of fruit and veg are recommended per day (2019 paper)?