
Power Tip: Controlling Multiple Monitors in Presenter Mode
About this lesson.
Take control of 1 or 2 or 3 multiple monitors in PowerPoint. Learn pro tricks for presenter mode and even editing while “live.” The tutorial shows all three scenarios with live screen views. Plus a bonus on how to set up a conference presentation without a projector.
00:00 Intro 01:16 Controlling 1 Monitor 01:58 Running Presenter View on 1 Monitor 02:22 Controlling 2 Monitors 03:23 Force Presenter View to Chosen Monitor 03:56 Controlling 3 Monitors 05:20 How to Use 3 Monitors While Editing 06:10 Bonus Tip: Running Without a Projector 06:41 Wrap-Up
Subject Microsoft PowerPoint
Software Compatibility All Versions
Course Completed Complete
PDF Files There are not any files associated with this lesson.
TRAINING SERIES VIEW ALL
Remember to subscribe to our YouTube channel by clicking the AUTO SUBSCRIBE! button below
Subscriptions help us create more free video training for YOU!
Mulitple Monitor Transcript
If you are fine with just plugging your projector into your external display port of your laptop and hitting F5 to run your slide show on a big project. And it works every time, then you are good to go. But if you want to take full control of utilizing one or two or even three combinations of monitors or projector systems, then the next five minutes will put you in control.
Hi, this is Les McCarter of Power UP Training, where I take my decades of PowerPoint experience and share it with you for free.
Do subscribe to our YouTube channel to encourage me to make more free training videos for you.
In the next five minutes, I will show you how to take complete control of how PowerPoint interacts with multiple monitors, including tricks of how to get Presenter view to show up on one monitor plus how to control where the project screen show will show up every time! No fumbling on stage in front of your audience. Plus some bonus tips.
Let’s go power up to Taking Control of your multiple monitors.
Let’s start with a single connected monitor and get used to examining the DISPLAY SETTINGS to confirm our configuration.
Make sure you can see your desktop; for me it is one of my ocean photographs.
Right-click the empty desktop and select DISPLAY SETTINGS.
In our 1 monitor scenario, we see NO MENTION display. Take note, as when we return, we will see a screen like this.
So no changes here, lets go ahead and open up PowerPoint with an existing
presentation.
It should come as no surprise that if you launch a slide show, it show up full screen on your single monitor.
But here is a SLICK TRICK of on your keyboard do a ALT+F5 to show the presenter mode on a single monitor to do a practice run on presenting without a two-screen setup. This is just for practice but it is useful. Once again, just ALT-F5 and he PRESENTER MODE pops up instead of the full-screen presentation
Let’s move on to the TWO MONITOR Scenario.
Just like before, I will show my desktop and right click to select DISPLAY SETTINGS.
Here we see that we do have two displays and if we click IDENTIFY, we can match up which one is which in relative relations to each other
Do note that my background is duplicated on all my displays, so I will add some numbers for us to track which is which.
Back to the same PowerPoint Presentation which pops up on monitor 1. and when in SLIDE SHOW view, we can see that the display is set on the default AUTOMATIC. Which to me is just a roll of the dice for which monitor will pop up the slide show and which for the presenter view.
If you don’t like the layout, then just go the PRESENTER VIEW, and click DISPLAY SETTINGS and chooses SWAP PRESENTER VIEW AND SLIDE SHOW to have them jump back and forth.
If you want to take full control, then in SLIDE SHOW view, click the drop down arrow for MONITOR and choose. It may be confusing as you need to know either which is your primary monitor or use the earlier trick to find you DISPLAY number. In our case, we will force the presentation to MONITOR #1
So you can either just swap when live, or elect to choose in advance in SLIDE SHOW and MONITOR.
Now to our last scenario: 3 monitors on one computer. As before, let’s look at our setup by going to our desktop RIGHT CLICKing and choosing DISPLAY SETTINGS
In Windows 10, the monitor numbering is tied to your video card ports, not where they are physically located on your desk. Like a card in the computer game solitaire, you can click and drag the monitor number to match the physical location of each monitor. Also take note, the my monitor #2 is a much smaller resolution monitor as seen in the screen menu, but I am showing it as full screen in this tutorial.
Now let’s check out where the slide show and presenter windows will show up. I will reset the DISPLAY in SLIDE SHOW VIEW back to Automatic and then launch the slide show.
So the actual presentation show is on monitor #2 to the farthest right and the presenter view is on Monitor #3 in the middle and our regular edit NORMAL view is shown on Monitor #1 on the far left.
Now watch what happens when in the presenter windows, I tell it to swap monitors and all it does is swap between monitors #2 and #3, leaving monitors #1 untouched.
So is there any advantage to working on three monitors?
Yes. In my final workflow, while do a last minute quality review, I will have all three views up on my workstation to look at how everything flows both on the big screen slide show and the presenter view. And if I have any corrections, I can do them LIVE on the normal edit view with the results immediately shows.
Watch how I add in a new slide in the normal edit view and insert a photo, with the resulting new slide automatically showing up in both the slide show and in my presenter view.
Wrap Up (New Slide)
Now you have all the need knowledge to take complete control of your PowerPoint presentation monitors.
Here is one extra bonus tip. If you have a tabletop presentation, but no projector, just setup a second monitor to face away from you. Then put your display settings (Windows Key + P for Project) and select DUPLICATE. Now the slide show will be facing you and your tabletop audience.
If this training tutorial was helpful, do subscribe to our channel as subscriptions help greatly to encourage me to share more of my expertise with you for free.
Also if it was helpful, do LIKE and SHARE with others.
If you have a specific PowerPoint tutorial, leave your suggestion in the comments below or any other questions that you might have for me to answer.
Lastly, if you want to see our whole catalog of PowerPoint video tutorials, visit us at our website of Power-UP. TRAINING.
Until next time, go Power Up!
Home » Adoption » Using Dual monitors for presentations
Using Dual monitors for presentations
- June 14, 2020
- Adoption , Microsoft Teams
Due to COVID, I conducted many Dual Monitor Teams Presentations, meetings and live events. Here are the best practices you should know. This will minimize mistakes and eliminate trial and error. Reading time 12 min.

Why Dual Monitor Teams presentations
If you are just going to present a single presentation and do not need any other interaction, you do not need dual monitors.
In simple terms, if you want to share whole desktop and work on other applications without showing them on the shared screen you need a dual monitor.
If you want to jump slides, you need the PowerPoint Presenter View. This view needs a dual monitor. Otherwise it does not make sense.
During long, detailed meetings or sessions, you need to do many things at once…
- Display the desktop, along with a presentation
- Choose the correct slides using the presenter view
- Interact with the meeting participants using the chat window
- Take notes using the meeting app or OneNote or some other tool
- Look at the attendee list and mute participants, admit them if in lobby, remove unwanted participants, stop or enable incoming video
- Switch presentations – in case you have multiple presentations to show. This is a tricky things – see below for details.
- Check bandwidth, upload sample files, create surveys on the fly and so on
- Change slides, open apps and move them between two monitors
All this is possible only with dual monitors. Trying to do all this in a single monitor will show unwanted activities to participants and will distract as well as confuse them.
Dual Monitor Teams Presentations setup
- After attaching the second monitor, press Windows P.
- Choose Extend.
- Choose Identify to see the numbers 1 and 2. Do not assume. Try it. 1 is the primary monitor and 2 is the secondary monitor.
- Decide which is your primary display. By default the laptop screen or the base display is the primary one. But you can change it if required. Click on screen 2 and then choose Make this my primary display. What is the impact of this? Read ahead…
Set Resolution in dual screen
To avoid confusion, set resolution of both monitors to same setting. If bandwidth is limited and if your content can fit, I have found 1600 x 900 to be adequate. Else, use the lowest possible setting for your needs. This way you can optimize bandwidth.
Also remember if your audience has a lower resolution screen or a mobile phone, they cannot see very small font. So it is always better to use a lower resolution to maximize clarity and visibility – especially if you are going to show live demos and not just presentations.
Adjust position of dual screens in Windows Display settings
This is a very important step which is often missed leading to confusion of cursor movement. You have two physical monitors. Usually one laptop screen and one external monitor. Or you may have two monitors as well. In either case, you must tell windows how these two displays are located next to each other – side by side, one on top and one below or whatever is the layout. How do you tell this to Windows? You actually drag the monitor box (1 or 2) in Windows Display settings and move it where it actually is in the real world. Then choose the Apply button.
Suppose you have set it with monitor 2 is above monitor 1 as shown below. Now, when you move the mouse cursor to the top edge of monitor 1, it will appear from the bottom of the monitor 2 and vice versa.
If you do not understand this and set it correctly, you will get confused about how to move the mouse cursor between monitors. If there is mismatch in resolutions – as show below, the mouse cursor will NOT move to monitor 2 if you are in the top right corner of monitor 1. Why? Because the resolution of monitor 1 is more than that of monitor 2. So the mouse cursor will get stuck in top right corner of screen 1 and you will get thoroughly frustrated.

Where to show the taskbar
In Windows – Settings – Taskbar, there are some very important options about Taskbar. If you only want to display a presentation on the second monitor then make sure the taskbar is shown only on the primary screen. Secondary screen does not need a taskbar.

If you want to show some applications other than the presentation on the secondary display, it is better to display the taskbar on the secondary display itself. That way you do not get confused about which application is running where. To enable the taskbar on secondary display, enable the above setting. And then, choose additional settings…

Moving windows from one monitor to another
This should NOT be done by dragging the title bar of windows. That is clumsy and irritates the audience. There is a much simpler and faster way. Remember the shortcut Windows Shift Right arrow or Left arrow . Works instantly.
Presenting on the secondary monitor
First choose PowerPoint – Slide Show tab (menu) – Secondary monitor (monitor name). Also choose the Presenter View option. Now start the presentation.
The presentation will be shown full screen on monitor 2. You will also see the Presenter View on the primary monitor. The presenter view will also occupy the whole screen of monitor 1. This is not ideal because you want to see other windows (Teams for example) on the primary monitor.
I find it useful to split the screen into two parts. Right side is the presenter view and left side is the Teams app where I am conducting the meeting. Here is how to do this… Click on the restore button of the presenter view.
Now press Windows Right arrow. The presenter view will now occupy the right half of the screen. Other open applications will be shown has thumbnails. Choose the one you want on the left side of the screen. Here is Teams on left and presenter view on right.

Now you can use the presenter view to skip slides, change topics and jump to a specific slide without stopping the presentation. Also, while presenting you can chat with participants, open related files or do anything else you need to do – without the audience seeing any of this. Here is how to use the presenter view effectively in dual monitor Teams presentations. To learn more about using Teams watch my 15 minute video .
Switching between two presentations in presenter view
Presenter view is designed for displaying ONE presentation at a time. However, I often need to jump between multiple presentations. This can get very tricky. So here is the correct way to do it.
You start one presentation and the presenter view starts along with it. When you start a second presentation, the presenter view is now shows the second presentation. So far so good.
Now if you want to show another slide from the first presentation.. how do you do it? Logically, you will try one of these two things and unfortunately, both of them don’t work.
- You try to find some way to switch the presentation inside the presenter view itself. This feature does not exist.
- You go to the other presentation, go to the first presentation in edit mode on the primary monitor, find the desired slide and press Shift F5 – present from current slide. This also does not work. It will now show the first presentation on the second monitor but it will show the earlier slide which was being shown when you switched to the second presentation.
The solution
- Go to the main (primary) monitor.
- Look at the taskbar. You should see PowerPoint icon there. Hover the mouse cursor on top of it.
- Assuming you have two presentations open, you should see five thumbnails there. Two presentations, two running presentations and fifth is the Presenter View window.
- Currently the second presentation is loaded into presenter view and it is being presented in the secondary monitor.
- Now, carefully, click on the window which is showing the current slide in the first presentation. This will load the first presentation into the presenter view and show the current slide of the first presentation on second monitor.
- Now using the presenter view, go to whichever slide you want in the first presentation.
- I know this is cumbersome and tricky. But this is the only method which works. Practice it few times and then you can manage it easily.
Using laser pointer inside PowerPoint
While presenting, press the Ctrl L makes the cursor a laser pointer while Esc gets rid of the laser pointer. Simple and effective. Try it out.
How to come back to single monitor view after the presentation is finished
This one should be simple. Just switch off, or disconnect the other monitor and you are back to single monitor (the base PC / Laptop Display).
That is correct. But there is another situation. You want the second monitor to be connected and you want to use only on the second monitor. I use this all the time because my second monitor is big and high resolution and my laptop screen is very small (Surface Pro). In this case, we have to choose Windows P and choose Second Screen Only option.
In this case, there is a problem. If there is a presentation running, and you change to Second Screen only, it will display on the second monitor as expected. But at some point you will stop the presentation – right? At that point, it just comes back to dual monitor mode. And you have to switch it back to Second Screen only again. This you have to do for EACH presentation that is running.
So what is the best practice? First, close all presentations and then switch to the Second Screen Only mode.
Using dual monitor Teams presentations (or for any other tool for that matter) is serious work. Getting used to this is very important. With practice it becomes second nature. But initially, follow the best practices shown here and you will be up and running very quickly.
Related content
- What did I learn today: Adding dual buttons to Quick Access Toolbar
- What did I learn today: Dual SmartArt
- Use multiple desktops in Windows 10 to simplify work
- Using Mouse Efficiently – Part 3
- Teams Live Events Best Practices
- meetings , Online Presentation , online training , PowerPoint , Presentation , Presentation control , Teams
4 Responses
PowerPoint Live should be a big help when it comes to presenting AND seeing the chat/reactions. How do you see PPT Live enhancing your 2020 experiences?
Hi Gaelyn PowerPoint Live is very useful. However, if you have dual monitor set up, you do not need PowerPoint Live. Why? Because you can see presenter view and the Teams meeting window on the other monitor. More importantly, PowerPoint Live is useful if you are going to use only ONE presentation. In my case, I have multiple presentations open and I need the ability to go to any slide in any presentation.
Of course, PowerPoint Live is great for presenting from a single screen. Apart from the benefits for the presenter, it also helps individual attendees see the slide in high contrast mode and translate it in their language.
can the presentation automatically switch to second display after it is shared (wothout dragging or pressing anything on keyboard)
Yes. Go to Slide Show menu (tab) and choose the monitor from dropdown.
Queries | Comments | Suggestions | Wish list Cancel reply
Subscribe to blog.
Email Address
Popular articles
- How to customize annoying Teams Notifications
- Conduct meetings with two monitors
- Teams Live Events Dos and Don’ts
- Conducting Online Conferences using Teams
- Training Vs Adoption
- Who can see my OneDrive files
- Reduce eyestrain using Dark Mode
1100+ in-depth blog articles
Pivot table pro course.
Yes. You use Pivot Tables everyday. Now it is time to find out the real power and nuances. 5.5 hours video, exercises, samples, Q&A.

Excel to Power BI Course
Learn Power BI using the concepts you already know in Excel. Fast transition, in-depth coverage and immediately usable.

- Use Presenter view Video
- Set up your presentation Video
- Deliver your presentation Video

Use Presenter view

With Presenter view, the audience views your slides on a main screen, while you control the show on another screen that only you can see.
View your speaker notes as you deliver your slide show
Draw on or highlight slides during a presentation
Turn your mouse into a laser pointer
Add speaker notes to each slide in a presentation
PowerPoint is all about helping you give great presentations; and the Presenter view is all about helping you use PowerPoint.
Traditionally, the audience faces a screen showing your PowerPoint slides, and you stand in between the audience and screen, and change slides on a computer.
Unless you are a professional presenter, you may also have to juggle paper notes, or attempt to wing it by reading off your slides.
Presenter view lets you take advantage of the dual monitor capability of a computer to separate what the audience sees from the mechanics of running a slideshow.
The audience views your slides on the main screen, while you control the show with the Presenter view on another screen that only you can see.
The Presenter view is like a dashboard that contains in one window everything that you need to run your show.
You have your notes over here.
This monitor shows you what the audience sees minus transitions, effects, and videos.
And this monitor shows you what is coming up next.
You have all your tools here, which you can select out of view of the audience.
And you click here to move forward or back.
There is even a timer that starts when you begin your presentation, and a clock.
By running the Presenter view on a laptop, just below eye level, you can face the audience and never have to look back at the screen.
You can do things like select a Laser Pointer or drawing tool, or use the Slide Navigator to select a different slide.
And only you can see all this behind-the-scenes stuff, so the audience can stay focused on your message.
Presenter view also helps you stay focused.
All the controls are easy to get to in one window with big icons, and a simple design.
So, if you are interested, let's give the Presenter view a try.
In the next video, we'll set up a presentation.

Need more help?
Want more options.
Explore subscription benefits, browse training courses, learn how to secure your device, and more.

Microsoft 365 subscription benefits

Microsoft 365 training

Microsoft security

Accessibility center
Communities help you ask and answer questions, give feedback, and hear from experts with rich knowledge.

Ask the Microsoft Community

Microsoft Tech Community

Windows Insiders
Microsoft 365 Insiders
Was this information helpful?
Thank you for your feedback.
Stack Exchange Network
Stack Exchange network consists of 183 Q&A communities including Stack Overflow , the largest, most trusted online community for developers to learn, share their knowledge, and build their careers.
Q&A for work
Connect and share knowledge within a single location that is structured and easy to search.
With dual-monitors, how can I set up one screen so it won't affect the other?
At work, we have a dual monitor to check-in at. One screen displays a PowerPoint, while the other displays the check-in. Every time a person clicks on the right hand screen to check in, the PowerPoint stops.
How can I set it up so that the PowerPoint continues to play even after somebody clicks on the right screen?
- multiple-monitors
- microsoft-powerpoint
- 1 The details you've provided aren't enough to answer. What operating system do you use? What program is running in the other screen? ... – Máté Juhász Mar 18, 2016 at 12:02
- I'm sorry - I am not that great with computers. The other screen has Google Chrome up on it for check in. As for the operating system, Microsoft Windows I believe. – Haley Mar 18, 2016 at 12:09
- For us to be able to help, we need to know what version of PowerPoint and what the slideshow settings are. Without more details, we will only be guessing. Go Blue! – CharlieRB Mar 18, 2016 at 12:56
- @CharlieRB, it's PowerPoint 2010. Everything listed below is checked off. Each slide changes automatically, but once you even click on the secondary monitor, the powerpoint stops, as if you're clicking on both screens. Love that, go Blue!!! – Haley Mar 18, 2016 at 13:52
- I'm sorry I am so unclear by the way -- I don't really know how to use anything but a Mac – Haley Mar 18, 2016 at 13:54
4 Answers 4
Adjust your slideshow settings to run in a window. To do this, go to Setup Slideshow .

Set it to loop until you press Esc . If you have the choice under multiple monitors to uncheck Show Presenter View and select the monitor you want it shown on (I only have one monitor, so mine is greyed out in the image) . If you do not have a choice for monitor, you will need to drag the window to the monitor you want it showing on.

Click OK , then save your presentation. Now when you run the slideshow, it will be in a window. Maximize the window and open your browser on the other monitor.
Since I only have one monitor resized the window and the presentation played while I am typing this.
On the slide show tab, on monitors, set your monitor to primary monitor, and untick the box underneath it that says use presenter view.
- Can you give specific instructions with one or more screenshots? How is your answer an improvement on the answer given years ago? – Charles Kenyon Mar 4, 2021 at 20:17
Go to slide show menu and select "Set Up Slide Show" under Set Up group.
A Set Up Show window appear, there deselect the check box "Use Presenter View" under Multiple monitors section.
As far as I am concerned...after following all this advice on countless forums I can state categorically that if you have two monitors you cannot stop powerpoint operating on two monitors.
It is a curse
I can only work on a single monitor system as a consequence.
Powerpoint on two monitors is cumbersome, ineffective, confusing and unnecessary.
I have lectured for over 40 years and I do not see the need for it.
- Your answer could be improved with additional supporting information. Please edit to add further details, such as citations or documentation, so that others can confirm that your answer is correct. You can find more information on how to write good answers in the help center . – Community Bot Oct 20, 2022 at 7:04
You must log in to answer this question.
Not the answer you're looking for browse other questions tagged multiple-monitors microsoft-powerpoint ..
- The Overflow Blog
- The reverse mullet model of software engineering
- Reshaping the future of API platforms
- Featured on Meta
- Our Partnership with OpenAI
- Imgur image URL migration: Coming soon to a Stack Exchange site near you!
Hot Network Questions
- Can I provide sunlight many hundred meters below ground or underwater
- A world where some currency loses value when handled would have a deflationary economy. What would the consequences to society be?
- What would be the best way of preparing lasagne in advance?
- Can changelings instantly change their hairstyle?
- What Python libraries are installed with ArcGIS Desktop 10.x
- Implementing a simple byte manipulation encryption
- Writing public libraries: Should I let the consumer of the library enforce thread safety?
- Unity Gain Amplifier Purpose
- How does 別にいいですよ mean "Its doesnt matter" or "I dont mind"?
- Are there any fallacies in Stephen C. Meyer's argument for classical theism from the Big Bang singularity?
- Where is he working?
- If my old device is infected, can my new device get viruses from my social media accounts?
- Troubleshooting why my hammock fell
- Reading the forcecage spell
- What's so special about Frodo?
- Can the absense of something be a cause?
- Why are almost all winglets turned upwards?
- Would this sentence use A or AN before NIA?
- 3 Dimensional Minesweeper
- What is the purpose of these fat copper coils wrapped around … something?
- What happens when you don't pay your property taxes?
- Did Napoleon ever shoot a bookseller?
- What is "the sin that no Christian need pardon"?
- What title should I greet both the professor and the associate professor in an emails?
PowerPoint: Presenter View on Dual Monitors

To disable the presenter view:
- Within PowerPoint, click the [Slide Show] tab.
- Locate the "Monitors" group > Uncheck "Use Presenter View."
- Within the "Monitors" group, click the "Monitor" dropdown menu > Select the specific monitor on which the slideshow should display. (The default option reads "Automatic.")
Share This Post
How to View Notes in PowerPoint While Presenting With One Monitor

Presenting a PowerPoint is a great way to engage and inform an audience, but it can be challenging to keep track of your notes while you’re presenting. Fortunately, PowerPoint includes a feature that allows you to view your speaker notes on one monitor while your audience sees the presentation on another. This makes it much easier to stay on track and deliver your message effectively. In this guide, we’ll take a detailed look at how to view notes in PowerPoint while presenting with one monitor, as well as some tips for getting the most out of this feature.
Table of Contents
Why Viewing Notes While Presenting is Important
When giving a presentation, it’s important to have access to your notes to stay on track and avoid missing important points. Viewing your notes while presenting can also help you remember key details and ensure that you’re delivering the information in an organized and effective manner. This can be especially important if you’re presenting complex or technical information. By having access to your notes, you can make sure you’re covering all the necessary points and answering any questions that might come up.
Another benefit of viewing your notes while presenting is that it can help you feel more confident and prepared. Knowing that you have your notes to refer to can alleviate any anxiety or nervousness you may feel about presenting. It can also give you a sense of security, knowing that you have all the information you need at your fingertips. By feeling more confident and prepared, you’re more likely to deliver a successful presentation that engages your audience and effectively conveys your message.
Understanding the Need for One Monitor
Using Presenter View in PowerPoint allows you to view your notes on your laptop or primary monitor while the audience sees only the presentation on the projected screen, even if you only have one monitor. This feature is particularly useful when you don’t have a dual-monitor setup. Presenter View provides a separate interface for the presenter that includes the current slide, speaker notes, and upcoming slides, ensuring that you can deliver your presentation smoothly without revealing your notes to the audience.
How to Access Notes in PowerPoint
Accessing your notes in PowerPoint while presenting on a single monitor is straightforward with Presenter View. To use Presenter View, start your PowerPoint presentation and go to the “Slide Show” tab in the ribbon menu. Then, check the “Use Presenter View” box. When you start the slideshow, your presentation will appear on the projected screen, while your notes and controls appear on your primary monitor. This allows you to reference your notes discreetly during the presentation.
Step-by-Step Guide to Viewing Notes in PowerPoint
Here’s a step-by-step guide to viewing your notes in PowerPoint using Presenter View:
- Open your PowerPoint presentation.
- Navigate to the slide on which you wish to start presenting.
- Select the “Slide Show” tab in the ribbon menu.
- Check the “Use Presenter View” box.
- Start your presentation by clicking on “From Beginning” or “From Current Slide.”
- Your notes will appear on your primary monitor, while the audience will see only the slides on the presentation screen.
Remember, your audience will not see your notes, allowing you to discreetly reference them during your presentation.
Tips for Presenting With One Monitor
Here are some tips for presenting with one monitor:
- Practice your presentation beforehand to make sure you’re comfortable with the software and know how to access Presenter View.
- Use the Presenter View to keep track of key points and ensure that you’re covering all the necessary information.
- Put your notes in bullet-point format to make them easy to follow and read while presenting.
- Use concise language and avoid excessive text on your slides.
- Maintain eye contact with your audience as much as possible, even when referencing your notes.
How to Customize Your Notes View in PowerPoint
PowerPoint allows you to customize your notes view to suit your preferences. To do so, enter Presenter View and hover over the notes section. You can then adjust the font size and formatting to make your notes easier to read. Additionally, you can rearrange the on-screen elements in Presenter View to suit your presenting style.
Shortcut Keys for Easy Navigation Through Notes
PowerPoint includes a number of keyboard shortcuts that can help you navigate through your presentation easily. Here are some of the most useful ones:
- Use the “N” key or the right arrow to move forward one slide at a time.
- Use the “P” key or the left arrow to move backward one slide at a time.
- Press “Ctrl” + “S” to access the “All Slides” view, where you can select a specific slide to jump to.
Troubleshooting Common Issues When Viewing Notes
If you’re having trouble viewing your notes in PowerPoint using Presenter View, ensure that Presenter View is enabled in the “Slide Show” tab. If the notes are not appearing, try restarting PowerPoint or your computer to resolve any temporary glitches. Additionally, check that your screen resolution and display settings are correctly configured to support Presenter View.
Alternative Methods for Viewing Notes While Presenting
If you prefer not to use Presenter View or encounter difficulties, you can print out your notes and refer to them as needed. Another option is to split your screen, displaying the presentation in a window on one half and a document with your notes on the other half. This method requires you to manually scroll your notes, but it can be a useful alternative.
Best Practices for Using Notes During a Presentation
Here are some best practices for using notes during a presentation:
- Don’t rely too heavily on your notes–practice your presentation beforehand and aim to deliver your message in a natural, conversational tone.
- Use your notes as a guide rather than a script.
- Keep your notes organized and easy to follow.
- Make sure to address any questions or concerns that come up during the presentation.
- Try to engage with your audience and create a rapport with them.
Benefits of Using One Monitor While Presenting
Using one monitor while presenting with Presenter View has several benefits. It allows you to reference your notes discreetly, helps you stay organized and on track, and enables you to maintain better eye contact with your audience. This setup can also simplify your presentation space and reduce the risk of technical issues.
Advanced Techniques for Managing Your Presentation and Notes on One Monitor
As you become more comfortable with Presenter View, you can explore additional features such as the thumbnail strip to preview upcoming slides, the timer to keep track of your speaking duration, and the ability to zoom into a particular slide detail during your presentation.
How to Switch Between Different Views During Presentation Mode
To switch between different views during presentation mode, you can use the following methods:
- To access Presenter View, start your slideshow and press the “Alt” + “F5” keys.
- To exit Presenter View and return to the normal view, press the “Esc” key.
- To black out the screen during the presentation, press the “B” or period key.
How to Control Slides, Animations and Media During the Presentation with One Monitor
During your presentation, you can control slides, animations, and media with the following actions:
- To advance to the next slide or animation, press the right arrow key or click the left mouse button.
- To return to the previous slide or animation, press the left arrow key.
- To play a video or audio file, click on it directly or use the media controls in Presenter View.
- To pause or stop the media, use the media controls in Presenter View.
With these tips and techniques in mind, you should now be well-equipped to view your notes in PowerPoint while presenting with one monitor. Remember to practice beforehand and experiment with different techniques to find the ones that work best for you. With a little bit of preparation and practice, you can deliver a confident and effective presentation that engages and informs your audience.
By humans, for humans - Best rated articles:
Excel report templates: build better reports faster, top 9 power bi dashboard examples, excel waterfall charts: how to create one that doesn't suck, beyond ai - discover our handpicked bi resources.
Explore Zebra BI's expert-selected resources combining technology and insight for practical, in-depth BI strategies.

We’ve been experimenting with AI-generated content, and sometimes it gets carried away. Give us a feedback and help us learn and improve! 🤍
Note: This is an experimental AI-generated article. Your help is welcome. Share your feedback with us and help us improve.

- Skip to primary navigation
- Skip to main content
- Skip to primary sidebar
The Windows Club
TheWindowsClub covers authentic Windows 11, Windows 10 tips, tutorials, how-to's, features, freeware. Created by Anand Khanse, MVP.
PowerPoint keeps opening off screen on Windows 11
This post will show you what to do when your PowerPoint keeps opening off screen on Windows 11/10. Some PowerPoint users have reported that whenever they open the PowerPoint app, it appears outside of the screen.

This issue can be frustrating, as it makes the app unusable. If you are one of the affected users, you don’t have to worry, as we have working solutions to this issue. You can check out the fixes below.
If PowerPoint is opening outside of your monitor screen on Windows 11/10, you can use the below methods to fix the issue:
- Maximize PowerPoint from your taskbar.
- Use the Alt + Spacebar + M hotkey.
- Check if you had dual monitors set up previously.
- Make sure your display settings are correct.
- Run PowerPoint in safe mode.
1] Maximize PowerPoint from your taskbar
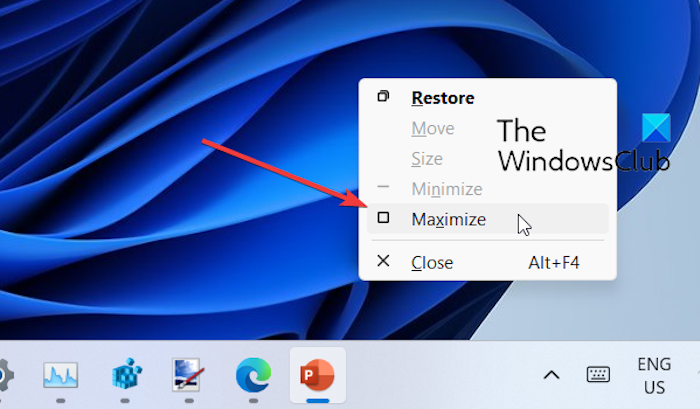
The first thing you can do to fix the issue is to try maximizing the PowerPoint window from your taskbar. To do that, hover your mouse over the PowerPoint icon on your taskbar. Now, right-click on the preview window that appears. From the context menu, select the Restore or Maximize option. This will bring the PowerPoint window back to your screen.
2] Use the Alt + Spacebar + M hotkey
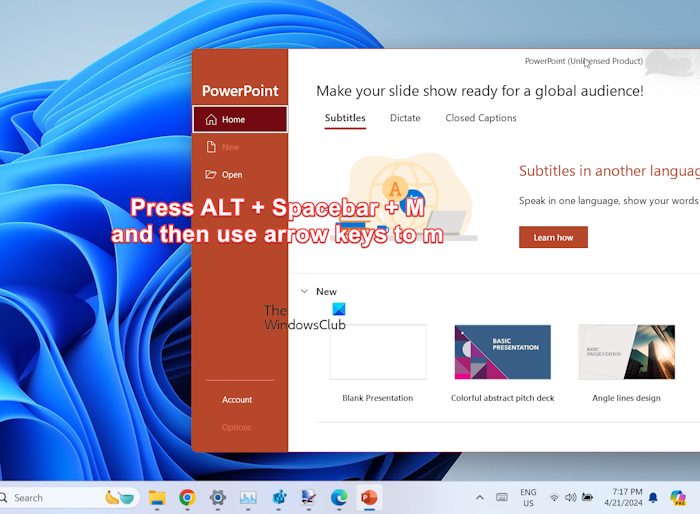
Many users have reported that using the Alt + Spacebar + M hotkey and then the arrow keys helped them fix the issue. You can also try doing the same and see if it helps. Here’s how:
First, hit the Alt + Spacebar + M key combination on your keyboard to activate the Move function.
Once done, use the left arrow key on your keyboard to bring the PowerPoint window towards the center of your screen.
In case the window goes to the extreme left of the screen, press the right arrow key to bring it to the right of the screen and then to the middle of the screen.
When you are done moving the PowerPoint window to the desired position, press the Enter button.
You can now close and then reopen the app and it will open at its last position where you closed the app.
Read: How to stop Video Lag in PowerPoint ?
3] Check if you had dual monitors set up previously
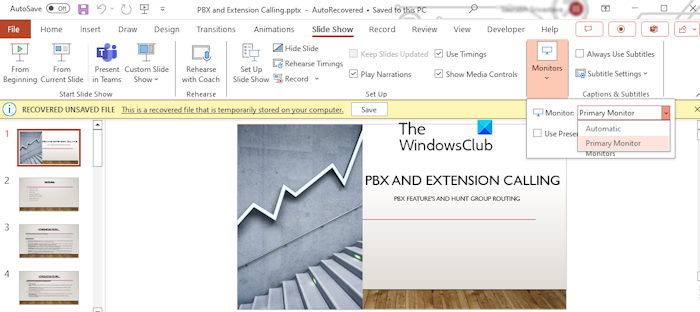
Do you have multiple monitors set up or had one previously? It might be the case that the PowerPoint slideshow is set to open on the wrong monitor and thus this issue is happening. Hence, you can set the correct monitor to open the presentation. To do so, use the following steps:
- In the PowerPoint window, move to the Slide Show tab.
- Now, click on the Monitor dropdown menu button in the Monitors group.
- Next, choose the correct monitor on which you want to display the presentation.
If you have multiple monitors set up correctly, make sure the cables are connected properly so that you can view the app on another screen.
4] Make sure your display settings are correct

Sometimes, this issue can occur if your display settings are incorrect. You can check your display settings and configure them correctly. For that, open Settings using Win+I, go to the System > Display option and check your display resolution, scale, multiple displays, and other settings.
5] Run PowerPoint in safe mode

You can also try opening PowerPoint in safe mode and check whether it opens correctly or not. Here’s how:
- First, close PowerPoint by right-clicking on its icon from the taskbar and choosing the Close window.
- Next, open Run using Win+R and enter the below command in the Open box: powerpnt /safe
- Check if PowerPoint still opens off-screen or if the issue is resolved.
- If the issue is resolved, try reopening the app in normal mode and see if the problem is resolved.
I hope this helps!
Read : How to move a window that is off-screen in Windows
Why is my PowerPoint slide off Centre?
If a slide in your PowerPoint goes off center when editing, it might be due to a rogue object present in the slide. You can try finding the object in the slide by zooming out the slide and dragging the mouse over the white space. Or, you can use the View > Slide Master to find the object. Once located, delete it and the slide will correctly align in the center while editing.
Read: Prevent Laptop from going to Sleep during a Presentation .
Why is my PowerPoint presentation on the wrong screen?
If your PowerPoint presentation is showing on the wrong screen, your primary display monitor is likely to be wrongly configured. Hence, open Settings and go to System > Display > Multiple display option to set the correct primary display monitor. Besides that, it might also be incorrect monitor settings in PowerPoint causing the issue. So, go to the Slide Show tab in PowerPoint and set the correct monitor from the Monitor drop-down menu.
Now read: Stop PowerPoint from extending display when presenting on laptop .
KomalSrivastava@TWC
Komal has done M.Tech in Computer Science & Engineering. She is a keen follower of the Windows ecosystem & a technical writer since the last six years. She loves finding solutions for day-to-day tech problems.

How to Set up Dual Monitors
Dual monitors improve productivity and gaming. Here's how to set them up on Windows and MacOS.

- 10 years writing about technology professionally.

Dual monitor setups are great for productivity and gaming.
If you have a desktop or a laptop you use at a desk, you might have considered a dual-monitor setup. Dual monitors are great for productivity, letting you get the most out of split screens. You can put up a different set of windows on each monitor, which can speed up your work. Some setups also have one monitor set up vertically and the other horizontally, which can be helpful for some workflows.
Dual monitors are great for gaming as well. You can get a wider field of view in a game, or you can have your game on one screen and put up your Discord, OBS and other streaming-related software on the other screen. You can even have game guides open on the second monitor.
We’ve put together this guide on how to set up dual monitors to help you get the best out of your desk setup.
Getting the right hardware for your dual-monitor setup

Using monitor arms will let you adjust your dual monitor setup with ease.
If you’re looking to get dual monitors, it’s likely that you already have a computer, whether it’s a desktop PC, a mini PC like a Mac mini or a laptop. Before you make any purchases, make sure your computer supports dual monitors.
A quick way to check if your PC supports dual monitors is to check the ports on the I/O. If you can see two or more display output ports like HDMI or DisplayPort, or one display output port and at least one USB-C/Thunderbolt port, then chances are that your computer supports dual displays, but you’ll need a supported cable, adapter or hub.
To be sure, check your computer's specifications to verify dual monitor support and the maximum resolutions supported. Although dual-monitor support is common now, there are some outliers. An example is the MacBook Air, which was limited to a single external display until the latest M3 iteration . The MacBook Pro models with base M1, M2 and M3 chips also support only one external display.

The M2 Pro version on top has four Thunderbolt 4 ports, vs. the M2 version below it has only two.
If the specifications say your computer can support two external displays, you can choose from the best monitors on the market. It’s recommended to get two of the same monitors if you want consistency. On the other hand, if you have a smaller budget, you can get a budget monitor under $200 . Make sure to get the right adapter, cable or hub that matches the ports on your computer and monitors.
If you want more movement and adjustability, you can get monitor arms to attach to your desk instead of the bundled stands, provided your monitors support VESA mounts .
Once you have your monitors and all the other necessary hardware set up, you can move on to configuring your dual monitors on your computer’s operating system.
How to close set up dual monitors on Windows
Windows is good at detecting dual monitors automatically and applying the best settings. Microsoft still recommends a few steps to apply specific settings to your dual-monitor setup to match your needs.
1. Connect the two monitors to the appropriate display output ports on your computer and make sure they are powered on.
2. Windows should detect your monitors automatically. Press the Windows logo key + P , and click the best display setup option for you. The Extend these displays option is ideal for a dual-monitor setup.

You can also click More Display settings to open up the Settings app with display options listed.
3. To fine-tune resolution, refresh rates and display scaling, head over to Settings > System > Display .

Clicking on the displays visualized will let you change the settings for that particular monitor.
4. Click each display, typically labeled with numbers 1 and 2, to change the settings for each display. Some settings may be listed under Advanced display .
You can click the Identify button to display the corresponding number on each display, in case you're not sure which display's settings you're adjusting.
How to set up dual monitors on MacOS
Apple has a guide to check which Mac models support which kinds of external monitors via which available ports. Once you have the monitors connected to the right ports, follow the steps below.
1. Choose Apple menu > System Settings , then click Displays in the sidebar to see your displays’ settings, including resolution, brightness and color profile.
2. From the list of displays, select the monitor you want, and click the dropdown next to Use as to set the display mode. You can decide whether to extend or mirror your Mac desktop across multiple monitors.

You can either set monitors to mirror your desktop, or extend it.
3. Change the resolution, refresh rate and other settings as per your preferences, for each monitor.
4. Click the Arrange... button adjacent to the display list to adjust your dual monitor layout. Drag and move your displays to arrange.

You can drag and move displays to change the alignment of your dual monitors.
Once done, you should be able to use your dual monitor setup with your MacBook without any issues.
If you want to improve your desk setup while getting your dual monitors ready, take a look at our roundup of the best home office essentials . We also have a roundup of the best desks you can get, as well as the top standing desks on the market.
Computing Guides
- Best Laptop
- Best Chromebook
- Best Budget Laptop
- Best Cheap Gaming Laptop
- Best 2-in-1 Laptop
- Best Windows Laptop
- Best Macbook
- Best Gaming Laptop
- Best Macbook Deals
- Best Desktop PC
- Best Gaming PC
- Best Monitor Under 200
- Best Desktop Deals
- Best Monitors
- M2 Mac Mini Review
- Best PC Speakers
- Best Printer
- Best External Hard Drive SSD
- Best USB C Hub Docking Station
- Best Keyboard
- Best Webcams
- Best Laptop Backpack
- Best Camera to Buy
- Best Vlogging Camera
- Best Tripod
- Best Waterproof Camera
- Best Action Camera
- Best Camera Bag and Backpack
- Best E-Ink Tablets
- Best iPad Deals
- Best E-Reader
- Best Tablet
- Best Android Tablet
- Best 3D Printer
- Best Budget 3D Printer
- Best 3D Printing Filament
- Best 3D Printer Deals
- Dell Coupon Codes
- Newegg Promo Codes
- HP Coupon Codes
- Microsoft Coupons
- Anker Coupons
- Logitech Promo Codes
- Western Digital Coupons
- Monoprice Promo Codes
- A4C Coupons
- Washington State University
- How Can We Help
- Scheduled Maintenance
- Annual Report
- Introduction
- Technology Systems and Infrastructure Accomplishments
- Technology Support and Services Accomplishments
- Technology Information Security Accomplishments
- Technology Planning and Governance
- Current ITS Projects
- Future ITS Projects
- Completed ITS Projects
- IT Executive Board
- IT Strategic Advisory Committee (ITSAC)
- ITSAC Meeting Minutes
- ITSAC Subcommittees
- Office of the CIO
- Organizational Chart
- Staff Listing
- Employee Excellence
- Conference Rooms
- Informational Series
- Cyber Security Awareness Events
- Employee Recognition Picnic
- Information Security and Operations Center
- Holiday Party and Awards
- Hacktober Winners
- Thank You Reception
- ISNOC Ribbon Cutting
- Project Roadmap
- Chatbot Search
- Okta Directory Integrations
- Pullman DataCenter Migration
- Crimson Service Desk
- Project Overview
- Changing Password
- Policies, Standards & Guidelines
- Spam, Phishing, and Malware
- Services A-Z
- Newsletters
WSU Zoom Newsletter May 2024
As we wrap up the spring 2024 semester, Information Technology Services (ITS) is excited to share the latest edition of WSU’s Zoom newsletter and offer recent updates on important service changes, new videoconferencing features, and relevant resources.
Previous WSU Zoom newsletter editions are now available on our new ITS Newsletters webpage .
In This Edition
New zoom interface arriving may 6.
- Protect Your Meetings from Zoombombing
Automatic Passcode Protection for New Meetings
Zoom version updates now quarterly, new zoom capabilities, expiration rules for your meeting ids and links, digital signage, cloud recordings, thank you for your feedback.
Starting Monday, May 6, WSU Zoom users will be prompted to update their Zoom desktop and mobile apps to the latest version (6.0), per university policy requiring quarterly Zoom application updates .
This update introduces a new look, feel, and functionality to Zoom as the service rebrands to Zoom Workplace. Enhancing familiar features and introducing new capabilities, this release will feature a revamped Zoom interface for a new visual and functional user experience.
Please be aware that WSU’s Zoom environment will not offer all new Zoom Workplace features, and access to Zoom Workplace’s artificial intelligence (AI) features and capabilities will not be available to users at this time.
Learn more about expected changes in Zoom’s version release notes .
Upcoming Interface and Feature Changes Zoom Workplace delivers new features and enhancements to help streamline communications, increase engagement, and improve productivity — all within the Zoom experience users trust and love.
Zoom Workplace Branding
Starting May 6 for WSU users, Zoom will introduce the new Zoom Workplace branding, changing the app’s name on your device(s) and incorporating new design elements visible when joining meetings or using the app.
Multi-Speaker View
Zoom can automatically adapt your video layout to highlight the current and most recent speakers by enlarging their video tiles while keeping other participants in a smaller gallery view.
Learn more about the multi-speaker view .
Multi-Share Capabilities
Share your screen, Zoom Whiteboards, and app windows simultaneously during a meeting, with participants seeing the multi-share as individual tabs within the meeting.
Zoom to release support documentation soon!
Meeting Wallpapers
Hosts can select preset images to serve as the meeting background for all participants in a meeting and adjust how much to blend participant videos with the wallpaper image.
Learn more about meeting wallpapers .
Color Themes
Change the appearance of both the Zoom app and the meeting interface by choosing from Light and Dark themes with additional color theme options including black, blue, green, and red.
Learn more about color themes .
Combined Meeting and Calendar View
Merges the Meetings and Calendar tab (if you connected Zoom to your WSU Outlook calendar) into one tab with a traditional calendar and a new agenda view to easily view upcoming meetings, invites, attendees, attachments, and more.
Personalized In-Meeting Toolbar
The default in-meeting toolbar displays fewer buttons and allows you to customize it by dragging and dropping icons to add, reorganize, or remove feature options during your meeting. Personalizations will sync across desktop experiences.
The toolbar also features new icons for ending and leaving a meeting and icons with updated names, such as “Share” for “Share Screen” and “React” for “Reactions.”
Animated Reaction Emojis
Zoom’s React feature now offers a wider variety of standard emojis. With more dynamic animations, the new Send with Effect option produces animated versions of a participant’s reaction, with emojis appearing and floating up and around a user’s video.
Animated reactions appear for participants with their camera enabled and can be disabled by hosts.
Annotation Tool Changes
Annotation tools that appear when sharing screens offer a new look and feel, including making the options to annotate and magnify a shared screen accessible via a new three-dot icon next to the label of the Share view.
Operating System Compatibility Version 6.0 of Zoom is compatible with numerous operating systems for Windows, Mac, iOS, and more. If you experience issues installing the new Zoom version, please ensure your device meets the minimum operating system requirements.
Supported Operating Systems
Supported operating systems for the new Zoom Workplace release include:
- Windows 10 or higher
- macOS 10.11 or higher
- iOS 13.1 or higher
- iPad 13 or higher
- Android 6.0x or higher
- Linux: Ubuntu 12.04, Mint 17.1, Red Hat Enterprise 8.0, Oracle Linux 8.0, CentOS 8, Fedora 21, OpenSUSE 13.2 or higher
Zoom version 5.17.11 will be the last version available for lower operating systems. Your local IT support team or WSU’s Zoom Services team can assist with any questions or concerns regarding updating Zoom on your device(s).
Protect your Meetings from Zoombombing
Following a recent Zoombombing incident, WSU’s Zoom Services team urges hosts to adopt best practices for securing public and private meetings to reduce the risk of unwanted disruptions.
For any assistance securing your meeting, please email WSU’s Zoom Services team .
Enable Security Measures
Safeguard your Zoom meetings by enabling any of the following security measures that restrict certain in-meeting functionalities or control participant entry.
Manage your meeting security settings via the Zoom web portal .
Enable Waiting Rooms Manually filter unwanted participants in a Waiting Room, with adjustable settings to automatically admit participants with a WSU Zoom account if preferred.
- Learn more about the advantages and drawbacks of the Waiting Room security feature .
Restrict Screen Sharing Lock screen sharing capabilities to prevent an unauthorized participant from sharing their screen at any moment.
- Learn more about the advantages and drawbacks of restricting screen sharing .
Manage Participant Audio or Video Actively manage who can unmute their audio or turn on their camera during a meeting to mitigate disruptions from inappropriate sounds or visuals by participants.
- Learn more about the advantages and drawbacks of managing participant audio or video .
Limit Chat Disruptions Disable chat capabilities to prevent participants from sending unsolicited messages or images and sharing information in private one-on-one chats.
- Learn more about advantages and drawbacks of restricting in-meeting chats .
Disable Whiteboarding and Annotations Restrict participants from drawing or writing on top of, or otherwise altering, the content of a screen share during a meeting.
- Learn more about the advantages and drawbacks of disabling whiteboards and annotations .
Require a Passcode Require participants to have a passcode to join a meeting, ensuring only invited attendees with the private passcode can access the session.
- Learn more about the advantages and drawbacks of enabling passcodes .
Keep Meeting Invites Private
Publicly sharing meeting passcodes or Join URLs embedded in meeting invitations on platforms like social media or websites increases the risk of potential Zoombombing. It is critical to keep these details private to prevent unauthorized meeting access.
Host Public Events with Zoom Webinars
Zoom Webinars offer the best security for virtual events open to the public. Unlike standard Zoom meetings, webinars automatically limit participant microphone and camera access to allow you to maintain a focused, secure meeting environment.
Zoom webinars ensure:
- Attendees join in listen-only mode
- Only the host, co-hosts, and panelists can mute or unmute their own audio and turn on or off their own video
- Hosts or co-hosts can manually unmute one or more attendees
- Participant lists are only visible to hosts, co-hosts, and panelists
- Attendees cannot rename themselves
- Attendee interactions are limited and managed by hosts
Learn more about WSU’s Zoom webinar licensing and expected cost .
Although standard meetings and webinars offer unique — and similar — features, please view a comparison of Zoom meetings and webinars to identify the best solution for any of your events
How to Stop an Active Zoombombing Incident
- All video, audio, in-meeting chat, annotation, screen sharing, and recording will stop, and Breakout Rooms will end. This action allows hosts or co-hosts to work on removing a disruptive participant.
- Learn how to suspend participant activities .
- Hosts should remove a disruptive participant as soon as possible; this will also prevent them from rejoining. If needed, co-hosts or other participants are encouraged to call WSU’s Zoom Services at 509-358-7742 and request the disruptive participant be removed from the meeting.
- Learn how to remove a participant in your meeting .
- Quickly view the meeting security features and disable options that may allow a disruptive participant to share their screen, use the chat, rename themselves, unmute themselves, start their video, annotate over shared content, and more during your meeting.
- Learn how to adjust your in-meeting security .
- Immediately stop any unwanted disruption by ending your meeting. To prevent the Zoombomber from joining your future meetings, schedule a new meeting with a new meeting ID and ensure additional security measures are enabled.
- Hosts are encouraged to report Zoombombing incidents to the Zoom Trust and Safety team or WSU’s Zoom Services team and ensure proper documentation and action is taken for misconduct.
Effective January 2024, passcode protection is now the default security setting for new WSU Zoom meetings.
Transitioning from the previous default security setting of required authentication to passcode protection alleviates issues WSU and non-WSU participants experienced when joining meetings configured with required authentication.
Learn more about meeting security changes
Meetings created after Jan. 18, 2024, are automatically protected with a passcode. However, you retain the ability to enable required authentication or a waiting room as an alternate or additional security option via the WSU Zoom web portal for any meetings scheduled before or after this date.
WSU continues requiring all Zoom meetings to be secured with at least one security option (passcode, required authentication, or waiting rooms) to protect from Zoombombing and help technical support teams respond to calls for assistance.
Learn more about Zoom security settings in this WSU Knowledge Base article .
In response to feedback from our survey, WSU’s Zoom Services team adjusted the schedule for mandatory Zoom updates from monthly to quarterly, with updates now expected on the first Monday of May, August, and November.
University policy requires you to install the latest version of the Zoom app once available to maintain device security against bugs or vulnerabilities, improve application use and functionality, and enhance video and audio quality.
Prepare for mandatory application updates by reviewing relevant Zoom version update information one week ahead of the version release date.
With enhanced login capabilities, improved engagement tool management, and upgraded presentation sharing, Zoom makes it easier to boost productivity and provide more immersive interactions.
New Maximum for Simultaneous Device Logins
WSU Zoom users can now be signed in to Zoom on up to three devices simultaneously: two devices of the same type along with one additional device of a different type.
A common combination that aligns with this update includes remaining signed in to the Zoom app on one smartphone and two computers at the same time.
To maintain this limit, accessing Zoom on a fourth device, or a third device type, will automatically sign you out of the device with your earliest recorded login.
By allowing you to join meetings on your preferred devices without login-related delays, this change significantly improves the accessibility and convenience of the Zoom app.
Access Your Survey Library
With the recent launch of Zoom Surveys, this powerful standalone feature allows you to create and manage a library of surveys, polls, and quizzes available to use (and re-use) in any meeting or webinar.
Increasing productivity, Zoom Surveys allows you to access survey, poll, and quiz tools and view comprehensive results data directly within one personal, centralized library on the Zoom platform.
Quickly review your custom library and share your surveys, polls, and quizzes during your panel, or engage with attendees after a meeting by sharing via links or generating a QR code.
Learn more about Zoom Surveys .
Elevate Your PowerPoint Presentations
Create a more immersive meeting experience by sharing your PowerPoint slides as a Virtual Background.
- With this feature, participants can view your video directly on top of the screen share, and hosts can easily manage the presentation and the video directly from within the meeting controls.
- Set your PowerPoint presentation as your Zoom background .
Offer participants slide control to improve presentation flow.
- Hosts can provide slide control to other participants who present individual portions of the PowerPoint presentation. This feature eliminates the need for the presenter to move the slide forward, allowing for improved control of the slideshow.
- Enable slide control .
View a different screen share interface when connected to a meeting.
- If using dual monitors, share your PowerPoint presentation on one screen while accessing the presenter’s notes on the other. Learn more about slideshow and presenter views for dual monitors .
- If using a single monitor, start your slide show in a window instead of in full-screen mode to easily access meeting features. Learn more about slideshow and presenter views for single monitors .
Zoom sets different expiration rules for different types of meetings.
If you experience an invalid meeting ID error when trying to start your meeting, the meeting ID has likely expired. Learn more about expired or deleted Zoom meetings .
Expiration Rules for All Meeting Types
Instant Meetings If you start a meeting immediately without scheduling or inviting participants beforehand, the meeting ID will expire when the instant meeting ends.
Scheduled, Non-recurring Meetings If you schedule a future one-time meeting, the meeting ID will expire 30 days after the scheduled date.
If you restart the same meeting ID within 30 days, it will remain valid for another 30 days. You can restart the same meeting ID as many times as you would like before it expires.
The meeting link will expire or become invalid when the 30-day period passes.
Recurring Meetings If you schedule a future meeting with multiple occurrences that use the same meeting ID, the meeting ID will expire 365 days after you start the last occurrence meeting.
The meeting link will expire or become invalid when it has not been used for over 365 days.
Webinars If the webinar is not currently in progress, Webinar IDs will expire and be unusable past the webinar’s scheduled end time.
Using WSU’s no-cost Zoom digital signage tools, transform idle screens into dynamic information hubs to create a modern and engaging virtual experience for students, staff, and visitors.
Digital signage enhances open meeting spaces such as conference rooms, offices, study areas, and lobbies by displaying custom visuals, images, videos, and numerous forms of other multimedia content.
Read more about digital signage on Zoom Support .
Free at WSU
With WSU’s videoconferencing license, WSU employees can deploy unlimited digital signage to a Zoom Room or other on-campus device at no additional cost.
Purchasing a display device (i.e., a monitor, screen, TV, tablet, kiosk, or similar device) and any additional hardware that may be required to make a device compatible with digital signage displays are the only expected costs for digital signage.
Please email WSU’s Zoom Services team to gain access to free digital signage tools or if your area currently uses digital signage.
Popular Use Cases
The advanced yet user-friendly technologies of Zoom’s digital signage allow you to display a wide range of content, including images, videos, and websites, in Zoom Rooms and other on-campus spaces.
You can use Zoom digital signage to:
- Create a virtual bullet board for events or ceremonies
- Broadcast public meetings or webinars
- Stream external video platforms like YouTube
- Deliver general announcements or emergency alerts
- Display social media feeds
- Share local news
- Display local weather
- Broadcast live metrics like support wait times
- Engage with daily trivia
- And so much more.
Easy to Set Up and Manage Your Displays
Target your content and messaging to any space by creating and assigning customized digital signage for displays at the room, floor, location, or account level.
Zoom allows you to upload images, videos, or other virtual materials to a centralized content library to make your assets accessible across your entire account or selectively available to specific rooms, floors, or locations for targeted digital signage display.
Create a digital signage playlist to easily deploy images or videos across multiple locations at once. With a playlist, you can wirelessly rotate through multiple images, videos, or forms of media with customized timing intervals. You can also set how long before and after a scheduled meeting your digital signage displays in Zoom Rooms while they are not in use for screen sharing and virtual meetings.
Digital Signage-Only Displays
Departments can create unlimited digital signage-only displays and rooms for free without using or acquiring a Zoom Room.
Digital signage-only rooms require a device (i.e., monitor, screen, or tablet) and separate hardware that will allow you to show content or share your screen on the display device. View a list of Zoom’s suggested equipment for digital signage-only rooms .
The primary purpose of a digital signage-only room is to display digital signage content. A digital signage-only room can join Zoom meetings and webinars as a participant, but it can only receive audio, video, and shared content. Digital signage-only rooms cannot start or host meetings.
Meeting recordings are retained in the Zoom web portal for 365 days for WSU staff and 425 days for Video Conference (VC) instructors. Any cloud recordings exceeding these periods are then automatically deleted.
Download meeting recordings using local storage options to retain videos beyond 365 or 425 days.
Manage Your Cloud Recordings
View, download, or delete your cloud recordings through the WSU Zoom web portal:
- Sign in to wsu.zoom.us with your WSU credentials.
- Click Recordings on the left navigation menu.
- Click the Cloud Recordings tab.
- Select a recording and you will then see options for managing the recording.
Learn more about managing cloud recording in this Zoom support article .
Thank you to everyone who participated in our most recent survey and provided feedback regarding WSU’s Zoom services. Your responses significantly influenced a recent change in university policy that reduces the frequency of version updates to enhance your experience with the videoconferencing application. We are excited to offer additional opportunities in future newsletters for you to share your insights and help improve WSU’s virtual collaboration environment.
Explore the WSU Knowledge Base for additional instructional Zoom guides covering WSU Zoom account access, meeting controls and settings, privacy and security options, and much more.
Please direct questions to WSU’s Zoom Services team via email at [email protected] .
Meet the Team

Travis Williams
Manager, VC Infrastructure and Support
Given my role at WSU, I cultivate a team with expertise and leadership in videoconference delivery and management. My team represents WSU’s distance education and collaborative communication interests. We strive to conduct outstanding support for the WSU community, providing tools and transparent reporting to technical teams across the institution. My goal is for stakeholders who engage my team to have a positive outcome, and also to feel confident the service they rely upon is in the best hands possible.

Brandon Henry
Video Conferencing Specialist
As a video Conferencing specialist, my role is to provide technical support and training to Washington State University Zoom users. I enjoy serving WSU customers because it allows me to help create meaningful connections and facilitate seamless virtual interactions, ultimately improving the user experience and achieving the goal of enhancing collaboration and communication within the WSU community.

Casey O’Leary
As a graduate of WSU myself, I have always enjoyed my experience within the WSU community. Previously, this was as a student and sports fan, but now I’m able to contribute in a professional manner by providing technical support, training, and administration of WSU’s video conferencing service. My goal is to provide the highest level of service within my capacity in ITS, so that we can continue to grow and progress the overall WSU community.
IMAGES
VIDEO
COMMENTS
Deliver your presentation on two monitors. On the Slide Show tab, in the Set Up group, click Set Up Slide Show. In the Set Up Show dialog box, choose the options that you want, and then click OK. If you choose Automatic, PowerPoint will display speaker notes on the laptop monitor, if available. Otherwise, PowerPoint will display speaker notes ...
2] Deliver your presentation on two monitors. Go to ' Slide Show ' tab and under the ' Set Up ' group, click ' Set Up Slide Show '. Next, in the ' Set Up Show ' dialog box, choose ...
Open PowerPoint presentation. Click "Slide Show.". Click "Set Up Show.". Check the box "Show Presenter View" in the dialog box which opens. This opens a navigation panel on the presenter's monitor which allows the presenter to easily manage the multiple screens. Click the monitor you want the slide show presentation to appear on ...
Move the Teams or Zoom window to the screen that will have Presenter View. Start Slide Show mode in PowerPoint. Click the icon in the top right of the Presenter View window to take it out of full screen mode. You may have to resize it if it flows across to the other screen. Now you can access the meeting controls in Teams or Zoom.
Take control of 1 or 2 or 3 multiple monitors in PowerPoint. Learn pro tricks for presenter mode and even editing while "live." The tutorial shows all three ...
Take control of 1 or 2 or 3 multiple monitors in PowerPoint. Learn pro tricks for presenter mode and even editing while "live." The tutorial shows all three scenarios with live screen views. Plus a bonus on how to set up a conference presentation without a projector.
Select the Slide Show tab. Select the Use Presenter View checkbox. Select which monitor to display Presenter View on. Select From Beginning or press F5. In Presenter View, you can: See your current slide, next slide, and speaker notes. Select the arrows next to the slide number to go between slides. Select the pause button or reset button to ...
Set up PowerPoint to use Presenter View and a second screen. ... Start your presentation in Slide Show mode using Presenter View. You should see Presenter View fill your laptop screen. Use the full screen/windowed button to switch to the windowed mode and reduce the size of the Presenter View window so you can see the Teams meeting controls ...
After attaching the second monitor, press Windows P. Choose Extend. Choose Identify to see the numbers 1 and 2. Do not assume. Try it. 1 is the primary monitor and 2 is the secondary monitor. Decide which is your primary display. By default the laptop screen or the base display is the primary one.
View your speaker notes as you deliver your slide show. Draw on or highlight slides during a presentation. Turn your mouse into a laser pointer. Add speaker notes to each slide in a presentation. Training: Presenter view is like a dashboard that contains in one window everything you need to run your slide show. You control the show on a ...
At work, we have a dual monitor to check-in at. One screen displays a PowerPoint, while the other displays the check-in. ... Click OK, then save your presentation. Now when you run the slideshow, it will be in a window. Maximize the window and open your browser on the other monitor. ... Powerpoint on two monitors is cumbersome, ineffective ...
With the Zoom app and PowerPoint on your laptop screen, start the Zoom meeting. The panel of videos should open in a separate window because you are using the dual monitor mode. Drag the videos panel to screen #2. Make sure the Zoom controls are on your laptop screen and drag them there from another screen if needed.
You can disable the presenter view from appearing on the second screen by following the instructions below. To disable the presenter view: Within PowerPoint, click the [Slide Show] tab. Locate the "Monitors" group > Uncheck "Use Presenter View." Within the "Monitors" group, click the "Monitor" dropdown menu > Select the specific monitor on ...
PowerPoint Presenter View was designed for use in a meeting room. Connect your laptop that sits on the table to the projector or TV. Use Presenter View to see your notes while the audience just sees the slides on the large screen. Works great. Until we don't do presentations in meeting rooms.
Navigate to the slide on which you wish to start presenting. Select the "Slide Show" tab in the ribbon menu. Check the "Use Presenter View" box. Start your presentation by clicking on "From Beginning" or "From Current Slide.". Your notes will appear on your primary monitor, while the audience will see only the slides on the ...
Run PowerPoint in safe mode. 1] Maximize PowerPoint from your taskbar ... Check if you had dual monitors set up previously. ... If your PowerPoint presentation is showing on the wrong screen, your ...
Dual monitors are great for productivity, letting you get the most out of split screens. ... From the list of displays, select the monitor you want, and click the dropdown next to Use as to set ...
If using dual monitors, share your PowerPoint presentation on one screen while accessing the presenter's notes on the other. Learn more about slideshow and presenter views for dual monitors . If using a single monitor, start your slide show in a window instead of in full-screen mode to easily access meeting features.