- English (APAC)
- English (Europe)
- English (IN)
- English (MEA)
- Français (CA)
- High Contrast High Contrast Mode
- Contact Sales
- What’s new at D2L

Using Google Tools and D2L’s Brightspace Platform Together
- Jun 15, 2021
If you’re a teacher reading this, chances are high that you’ve either interacted with or heard about Google learning tools or software for educators. Many of you are already familiar with Google Classroom™, Google Drive™, or Google Docs™ and have achieved student success and satisfaction by incorporating them into your teaching and learning.
We’re here to tell you that you can use the Brightspace platform without having to say goodbye to these tools because Brightspace and Google integrate seamlessly in multiple ways! We know that choosing the right online learning tools can be challenging, but we strive to make teaching and learning easier by helping you use the tools you’re already comfortable with, while also exploring new and exciting features in Brightspace.
With this powerful integration, you can discover the best combination of Brightspace and Google for your own teaching and learning circumstances—use what works, leave what doesn’t. Let’s start with a brief overview of a few ways to use Google tools directly within Brightspace.
- 1. Insert files from Google Drive™
Do you love keeping your teaching resources organized in Google Drive™, but (understandably) cringe at the thought of downloading and re-uploading everything to share it with your students? Fortunately, Brightspace integrates with Gmail™ and Google Drive™! That’s right, you can access your email account and stored files without ever having to leave Brightspace.
Conveniently add files from your drive into the Content tool for students to consume as they progress through your class materials. Or, do so in the course Activity Feed when you need to highlight important or time-sensitive information right on your class homepage.
Students can submit work from their own drives, sharing work with teachers quickly and efficiently. They can also add documents into their Portfolio, allowing them to track and share their progress, reflections, and learning experiences.
And if you’re looking for easier access to your Google tools, you can add our Google Workspace widget to your class homepage!
- 2. Stay connected with Google Meet™
Staying connected with your students and building a collaborative digital community is important, especially when face-to-face interactions aren’t an option. You can easily set up a virtual meeting using Google Meet™ directly in Brightspace (in any place that uses Quicklinks!) to promote more engaging conversations with your learners.
For example, you can create and insert a Google Meet meeting into a Brightspace Announcement or an Activity Feed message to provide your students with easy access to virtual meeting links. They’ll be able to view the link and click to join the meeting without having to navigate away from the class homepage. Best of all, you can do all of this with the click of a button.
- 3. Integrate with Google Assignments™
We know that Google Assignments™ are widely used, and Brightspace allows you to create new Google Assignments ™ without leaving the LMS. As a result, your students will be able to access assignments in the Content area of your class (via an LTI link), where they will be sent to a Google interface to view assignment instructions and select a file to submit. Then, enjoy familiar Google features like assessing, grading with rubrics, and viewing plagiarism scores.
As you can see, you can make the Google tools that you know and love even better by integrating them with D2L’s Brightspace learning platform for flexible, personalized learning. For more information on the above integrations, check out this Google integration article in the Brightspace Community.
Written by:
Stay in the know
Educators and training pros get our insights, tips, and best practices delivered monthly
Table of Contents
- Help Center
- Assignments
- Privacy Policy
- Terms of Service
- Submit feedback
- Learning Management System Support >
- Guides for Instructors >
- Assessment and Grading in Brightspace >
Assignments in Brightspace
Create assignments in Brightspace to promote student interaction and learning progress in your class.
Assignments often make up a large portion of student interactions within a course. They can include active learning , group work , formative assessments , culminating projects and much more.
Brightspace’s Assignments tool offers robust features to customize instructions, submissions and assessment type. Tools that complement Assignments include Content, Rubrics, and Grades. As always, ensure any embedded multimedia or attachments are accessible for all students.
For additional support beyond this page, visit Brightspace’s Create an assignment webpage.
On this page:
Preparing an assignment.
There are several considerations to make before creating an assignment. Although assignments can be edited later on, it will be more time efficient to plan ahead.
General Preparation
Before creating an assignment, it is helpful to have some information upfront such as the assignment name, description and point value. If your syllabus is finalized, you may also want to include the due date while creating the new assignment.
Adding a due date to an assignment will enable it to populate in the course schedule.
Advanced Preparation
- Rubrics : Consider how this assignment will be graded. If grading with a rubric, it is best to first create the rubric and then attach it to the assignment.
- Grade Categories : You may want to create weighted categories within the Grades Tool before creating assignments. This will allow you to categorize assignments as they populate the grade book.
- Assignment Category : This category is separate from the grade categories. It serves more as a grouping and organization system. For example, this can be used to categorize items such as homework, presentations or to provide more granular detail.
- Release Conditions : You may choose to limit access to this assignment until a specific date or after completing a prerequisite task such as a quiz or discussion post. Create the first task prior to creating the assignment.
- Group Assignments : In order to assign collaborative assignments, the groups must already be created.
- Special Access: Special access permissions allow you to set different availability dates and times for specific users. For example, you could extend the deadline for users who require remedial help or who are submitting work beyond the original scope of the assignment. Learn more about Special Access.
Where to Build Assignments
There are several ways to develop and access course assignments.
- From an existing module within the Contents tab ( Upload/Create and then New Assignment ).
- From a placeholder using the Course Builder tool .
- From the Assignments tab.
- From the Course Admin page.
For the purposes of this page, we will focus building from the Assignments tab as this pathway provides the most support resources and overall functionality. If you choose a different method, scroll through the parts of this page that are relevant for all assignments.
Creating an Assignment
Use the Assignments tool to create and edit assignments, view student submissions, track the grading progress of an assignment, associate assignments to rubrics and learning outcomes and return submissions with grades and feedback.
How to Create an Assignment
- On the navbar, click Assessments and select Assignments .
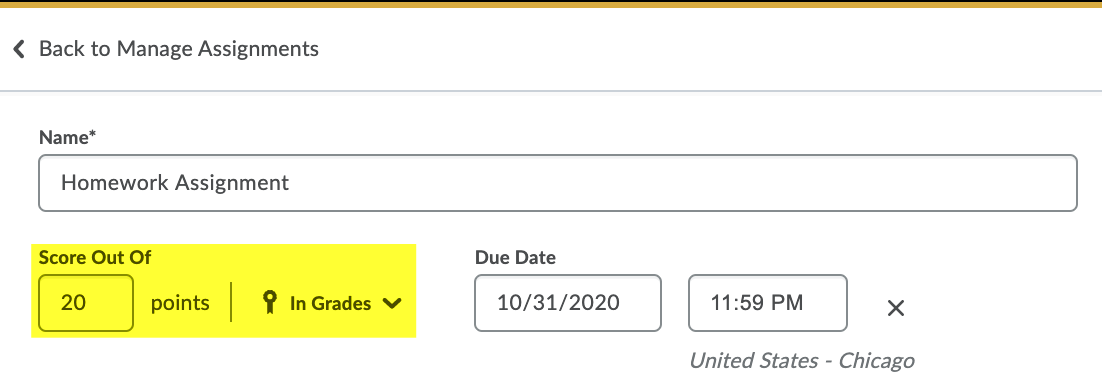
- Name of assignment.
- Grade Out Of to establish establish a numeric point value to the assignment or leave the assignment ungraded.
- In Grade Book option: choose to edit or link to existing grade category or grade item, not put the assignment in the grade book or reset settings to make the assignment ungraded.
- Add a Due Date .
- Add Instructions .
- Upload files , add links , Record Audio or Record Video .
- Set the assignment to be always available or establish a start/end date of visibility.
- Set release condtiions.
- Set special access.
- Set the type of assignment (individual or group),
- Set the category the assignment will be placed under in the grade book,
- Set the submission type (file, text, on paper submission or observed in person).
- Set the submission restrictions (students can upload only one file or an unlimited files).
- Set the type of file that can be uploaded.
- Set a notification email to be sent out when an assignment is submitted.
- Add a rubric.
- Describe which learning objectives this assignment is related to.
- Allow for annotation tools.
- Allow for anonymous marking of assignments.
- Manage Turnitin settings.
- Select Save and Close when you are done with creating the assignment. This will bring you back to the Assignments area. Or select Save to stay on the page and continue working on creating/editing the assignment.
Adding a Grade Out Of automatically adds this item to the grade book. If you have already set up categories in the grade book, you can select the category by clicking the drop-down under Category in Submission & Completion
Editing an Assignment
- On the Assignments main page, you will see a list of all your existing assignments.
- Locate the assignment you want to change and select the chevron icon [⌵] to the right of the assignment's name.
- Here you can edit, copy or delete the assignment. You can also edit the assignment within a module. Please note that this functionality is limited.
Placing Assignments in Modules
- Within the Content tool, locate the module in which you would like students to access the assignment.
- After selecting this module, click Existing Activities , then select Assignments .
- Select the assignment you would like to add, searching by name if necessary.
- Then drag the assignment so that the order/placement within the module is correct.
Adding Restrictions and Rubrics to an Assignment
You may want to set additional conditions to an assignment, such as availability, release conditions, rubrics and/or special access.
Add Restrictions to an Assignment (Video)
Adding Rubrics to Assignments
Before attaching a rubric, ensure it is complete and its status is set to published .
- Create or edit the assignment (see above).
- Locate the Evaluation & Feedback category in the right-hand column and expand the section.
- Select Add Rubric and choose an existing rubric or create a new rubric.
- Click Save and Close.
Using a Rubric
First, select the submission you would like to assess. The rubric will populate on the righthand side of each submission under the Evaluation and Feedback header. Open the associated rubric and select the performance level for each of the criterion. Use the preassigned feedback or customize sections as desired. If the rubric uses points or percentages, the grade will calculate automatically, however, you can manually change category scores, total score and overall score. When finished with the rubric, select Close .
Grading an Assignment
There are several ways to grade in Brightspace. If grading submissions from a single assignment, locate it within the Assignments tool. If grading submissions from several assignments, you can use the Quick Eval tool.
If using the Quick Eval tool, all submissions that need grading will populate here including assignments, quizzes and discussions. Therefore, if you are looking to grade a specific assignment, it will likely be more efficient to do so from the assignment itself within the Assignments tool.
Grade Submissions in Assignments (Video)
Annotating an Assignment
While grading students’ submissions, you can digitally insert notes, highlight text and write directly on the document to give meaningful feedback .
Use Inline Annotation in Brightspace (Video)
Additional Resources
Brightspace Support

Linking your Assignment to the Gradebook
When you create an Assignment in Brightspace, you may want to link it to the Grades tool. This guide will explain how to link your assignment to a grade item that has already been created, as well as provide other important information about associations .
Association or Link – these words are used to describe when an activity in Brightspace ( ex. Assignment, Quiz, Discussion response ) is connected to a Grade item in the Grades tool. When the activity is assessed by the instructor, the grade will automatically transfer into the Brightspace gradebook.
- Link an Assignment to a new Grade Item
Link an Assignment to an existing Grade Item
- Change or remove a gradebook association
What if I don’t want the assignment to affect the final grade?
Created Fall 2020
Link an Assignment to a New Grade Item
Unlike Brightspace’s previous Assignment tool, creating a new assignment will automatically create a grade item unless you manually link it to an existing one.
To do this, give your assignment a point value but do not make a gradebook selection.
- In this example, the gradebook ( Course Admin -> Grades ) already has a Homework Category and two Homework assignment Grade Items .
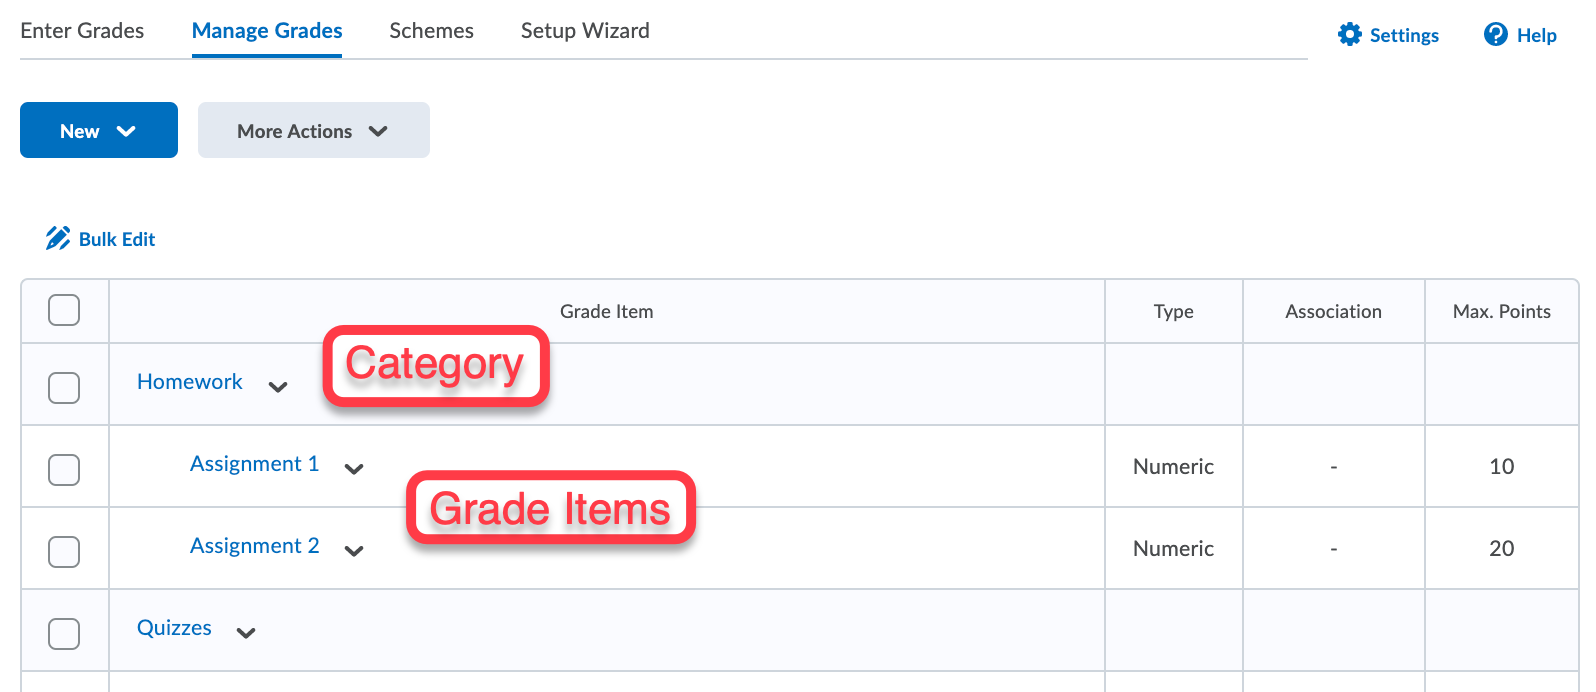
- Now, you should go to the Assignments page. Begin a new assignment, or go to edit your already existing assignment. Give it the same title as your Grade Item , and give it a corresponding point value. These should match your gradebook. In this case, “Assignment 1” is worth 10 points.
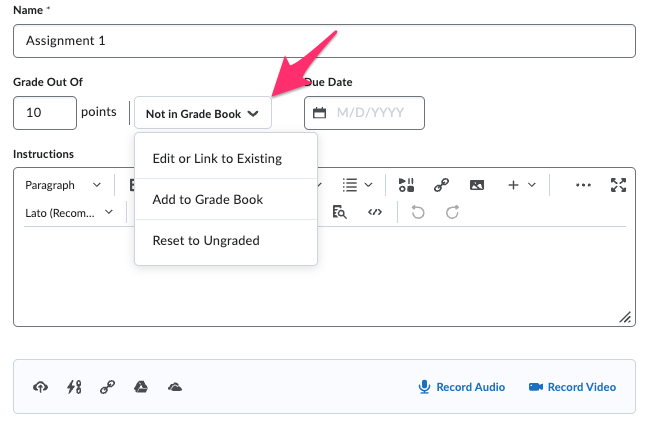
- Click on Not in Gradebook and select Edit or Link to Existing .
- A small window will open asking you to either Create a new grade item or Link to an existing grade item . Choose the Link to an existing grade item option, then select the Grade Item you want to link with your assignment. Make your selections, click OK , and click Save and Close on the Edit Assignment screen. The assignment and Grade Item are now linked.

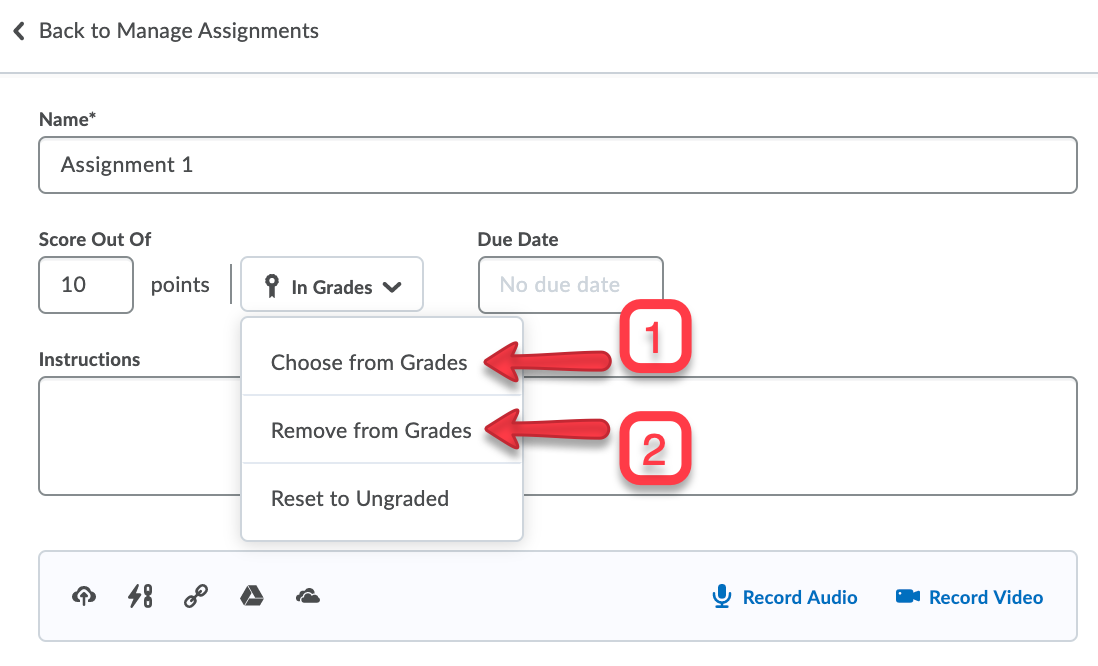
Change or Remove a Gradebook Association
You can change or remove a previous association with the same tool you used before.
- Choose a different Grade Item
- Remove the association, so the assignment is no longer linked to the gradebook at all.
If you want to grade an assignment, but don’t want it included in the final grade there are two options.
- Remove the association from the gradebook as described above. In this case, the student can see their grade in the Assignments area, but not in the gradebook.
- Keep the association, but select Exclude from Final Grade Calculation when editing the Grade Item. Students will see the grade in both the Assignments area and the gradebook.
- Make an ungraded assignment. Students will not receive a grade for their work, but can read any feedback you may have provided.
How do I make assignments visible to learners?
Brightspace , Instructor Help
This article will talk about Assignment Visibility – how to make assignments visible to students.
There are a few points worth noting about Visibility.
1. When creating a new assignment, the Visibility (highlighted in red) is set as hidden by default.
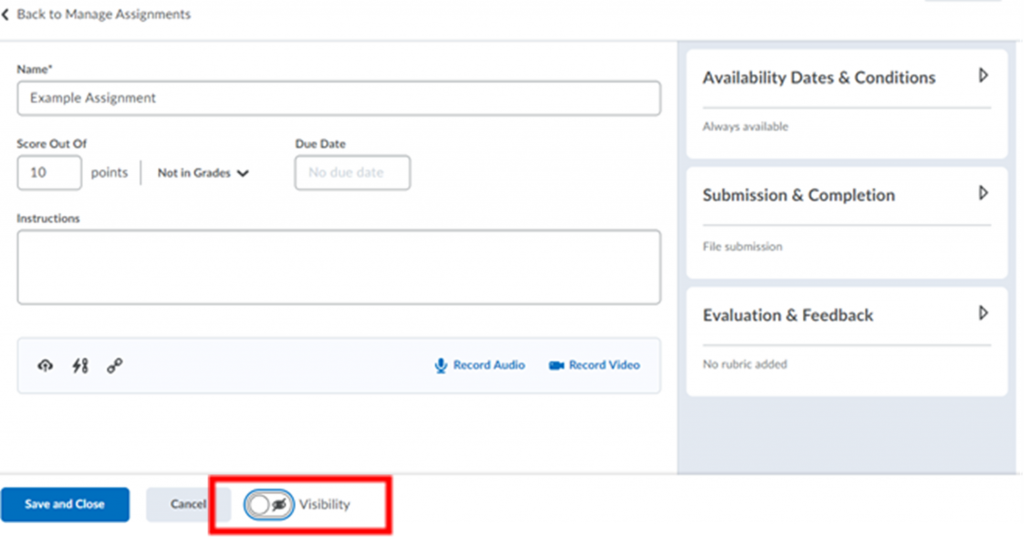
2. The visibility determines whether an assignment is “published,” along with the Start and End Dates chosen by the instructor from the Availability Dates & Conditions setting.

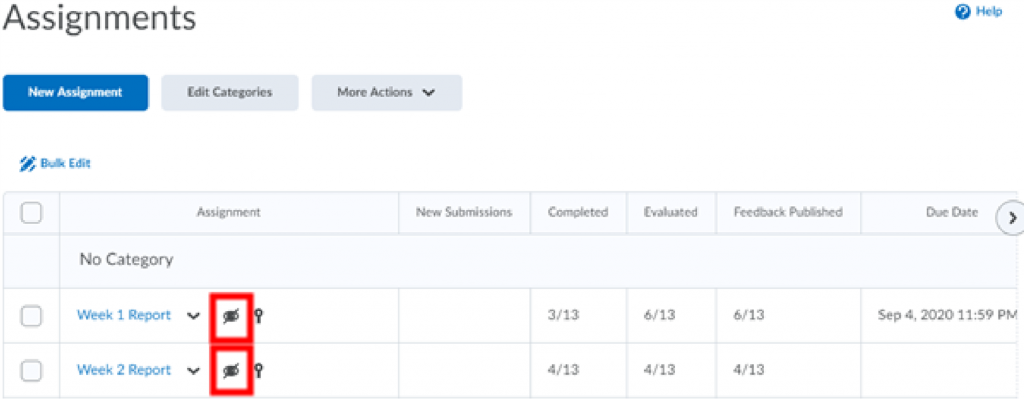
3. An instructor may choose to keep the Visibility as hidden and save the assignment or change it to visible. Below is a list of assignments which are all hidden from learners, and therefore “unpublished.”
4. It is recommended that you only publish assignments when you are sure that they are ready. By doing so, you can avoid any potential confusion and misunderstanding by learners.
To make your assignment visible to students, there are 2 options.
1. After creating a new assignment, if you are sure that it is ready for publishing, simply click on the highlighted button for toggling visibility on or off.
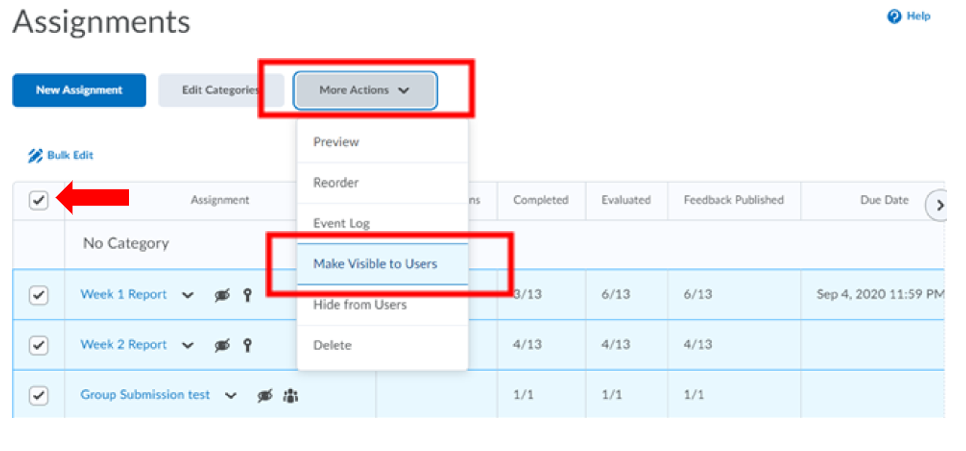
Alternatively, you can make them visible in bulk.
1. To make all these assignments visible, and therefore publish them collectively, select them all by checking the top-most left box in the assignments list.
2. Then select the More Actions menu and click Make Visible to Users .
About this post
This post was last updated:
We acknowledge and respect the Lək̓ʷəŋən (Songhees and Esquimalt) Peoples on whose territory the university stands, and the Lək̓ʷəŋən and W̱SÁNEĆ Peoples whose historical relationships with the land continue to this day.
IMAGES
VIDEO
COMMENTS
In this video, we will explore how to setup and use Google Assignments in Brightspace by D2L. We will look at both teacher and student views of Google Assign...
In this video, we'll cover how to create Google Assignments right within your Brightspace environment as a way to extend the Google Classroom experience into...
For teachers who would like to utilize Brightspace and use Google docs, slides etc., by making one copy per student.
There are several different starting points to create assignments. To create an assignment in the Classic Content Experience. In Content, select the module where you want to create an assignment. Click Upload/Create. Click New Assignment. Figure: The New Assignment option on the Upload/Create menu.
3. Integrate with Google Assignments™ We know that Google Assignments™ are widely used, and Brightspace allows you to create new Google Assignments™ without leaving the LMS. As a result, your students will be able to access assignments in the Content area of your class (via an LTI link), where they will be sent to a Google interface to ...
Click Next. Double check your selection on the next screen then click Copy. Once the assignment is successfully copied, the you will see a message of Copy Complete with a green checkmark. Hopefully you find the assignment tool from Brightspace to be an improvement and that it helps you in your assignment creation.
1. To create a new assignment, select Course Tools > Assignments from the navigation bar. 2. In the Assignments tool, click on New Assignment. The layout of the window you will see next will depend on the type of assignment experience currently set for your course page.
To browse for the file you want to submit, click Add a File. Select the files from your local computer or storage device, a personal locker, a group locker, or Brightspace ePortfolio, and then click Add. Enter any comments you want to submit with the file. Click Submit. You can select Record Audio to add feedback.
This help content & information General Help Center experience. Search. Clear search
Figure: Overview of the Assignments tool interface. When instructors navigate to Assignments, they will see all the assignments created within their course with options for creating new assignments and editing and evaluating previous ones. New Assignment: Create a new assignment. Edit Categories: Create or manage categories for your assignments.
Google Forms can be linked or embedded in a Brightspace assignment. In this video we will see how to do both, what each looks like from the student view and ...
You can create group assignments, observations, file uploads, and more. This guide will walk you through the process of deciding what settings you need to choose when creating your assignment. Everything explained in this guide is found in the Submission and Completion widget of your Assignment creation screen. Created Fall 2021.
Within the Content tool, locate the module in which you would like students to access the assignment. After selecting this module, click Existing Activities, then select Assignments. Select the assignment you would like to add, searching by name if necessary. Then drag the assignment so that the order/placement within the module is correct.
1. To create an assignment using the assignment page, log-in to Brightspace and access the course where you'd like to add an assignment. 2. Locate the course navigation bar, and click the Activities and Assessments. 3. This will generate a drop-down menu. Click on Assignments. 4.
In this case, "Assignment 1" is worth 10 points. Click on Not in Gradebook and select Edit or Link to Existing. A small window will open asking you to either Create a new grade item or Link to an existing grade item. Choose the Link to an existing grade item option, then select the Grade Item you want to link with your assignment.
In this video, I will guide you through how to use Google Assignments in Brightspace as a student. I will go through all of the steps needed to help you navi...
Create an assignment. Provide more efficient, timely, and meaningful grading and feedback. Create and edit assignments, see submission details, view submissions, associate assignments to rubrics and competencies, and return submissions with grades and feedback. On paper and observed in person assignment formats are also available.
Method 2: Using the Assignments Tool. Access the course you would like to work on in Brightspace. From there, go to Course Tools in the blue navigation bar and select Groups. Create a new assignment by clicking the New assignment button. Click the blue "New Assignment" button to start. In the Create/Edit Assignment tool, set up your assignment.
So easy! Follow these steps to prepare your Google Doc assignment for submission to the Brightspace assignments for your course.
Click the Assignments module to enter it. 3. Click Upload / Create to show a list of options. On that list, click New Assignment. 4. Complete the required fields below: Enter a title for your New Assignment. Students will see this title. Enter the total points possible a student can earn for the assignment.
For questions regarding Brightspace, visit https://community.brightspace.com. Create an assignment so learners can easily submit their work. This tutorial sh...
This article will talk about Assignment Visibility - how to make assignments visible to students.. There are a few points worth noting about Visibility. 1. When creating a new assignment, the Visibility (highlighted in red) is set as hidden by default.. 2. The visibility determines whether an assignment is "published," along with the Start and End Dates chosen by the instructor from the ...
Add or edit categories. Navigate to Assignments. On the Assignments page, click Edit Categories. Figure: The Edit Categories option on the Assignments page. Do any of the following: Click Add Category to create a new category. Click the name of an existing category to modify it. Hit Enter, or click outside of the current cell to save your changes.