
Salesforce is closed for new business in your area.

Getting Started with Lead Assignment Rules in Salesforce

Lead Assignment Rules in Salesforce are a powerful tool that allow your GTM (Go-To-Market) teams to automate the process of generating leads and assigning them to the most suitable sales representatives based on specific criteria. Managing and assigning leads becomes key, particularly when dealing with high daily volumes and considering the priority of leads based on various factors. And, as we all know, speed to lead is crucial : if you waste even one minute, your conversion plummets by a shocking 391%.
Ideally, your organization should employ different lead assignment rules tailored to your go-to-market strategies and motions. For instance, the assignment rules for leads generated from a demo request on your website may differ from those for leads obtained through downloading an ebook.
A lead assignment rule consists of a prioritized set of rule entries that dictate how leads are assigned throughout your go-to-market motions, either to a specific user or to a Salesforce Queue. These rules are automatically triggered when leads are created and can also be applied to existing records.
However, there is one significant constraint with Salesforce assignment rules: only one can be active at any given time. This means that as your business scales and you implement multiple business processes, you'll need to consolidate all the complex logic into a single comprehensive assignment rule with multiple rule entries. As you can imagine, managing, maintaining, and updating such an operation can become increasingly challenging over time.
Salesforce Lead Assignment Rules Examples
- Leads from Enterprise Accounts with ARR greater than $200M are assigned to Enterprise SDR Queue.
- Leads from accounts with ARR greater than $50M (and less than $200M) are assigned to Mid Market SDR Queue.
- Leads reaching Nurture Lead Status are directed to SDR 1.
- Irrelevant leads with a ‘gmail.com’ domain are routed to a dummy user and disregarded.
- Distribute leads to reps based on their respective sales territories.
Salesforce Lead Assignment Rules: A step-by-step guide
Here is a step-by-step guide to help you set up Salesforce Lead Assignment Rules in keeping with your business needs and sales strategies.
Step 1: Log in to Salesforce:
Access your Salesforce account using your credentials.
Step 2: Navigate to Setup:
Click on the gear icon in the screen's upper-right corner to access the Setup menu.
Step 3: Access Lead Assignment Rules:
In the Setup menu, search for "Lead Assignment Rules" in the Quick Find box. Click on "Lead Assignment Rules" under the "Leads" section.
Step 4: Create a New Rule:
Click on the "New Lead Assignment Rule" button to create a new rule.
Step 5: Define Rule Entry Criteria:
Enter a suitable name for the rule and specify the rule's entry criteria.
You can decide whether to write a formula or build a prioritized set of rule entry criteria. The logic you define determines the conditions that need to be met for the rule to trigger.
Step 6: Specify Rule Assignments:
Choose the desired assignment method for your leads. Salesforce provides different assignment options, such as assigning leads to Queues or specific users. Select the appropriate option based on your business requirements, and (optionally) choose an email template to be sent to the new owner of the lead.
Step 7: Save and Activate the Rule:
Once you have configured all the necessary settings, click the "Save" button to save the lead assignment rule. After saving, activate the rule to make it operational.
Step 8: Test and Validate:
It is essential to test the rule and ensure that leads are being assigned as expected. Create test leads and verify their assignments based on the defined criteria. Make any necessary adjustments or refinements to the rule if required.
Salesforce editions and permissions for Lead Assignment Rules
After gaining an understanding of how lead assignment rules can benefit your business and determining their suitability, you may wonder, "Do I have the appropriate Salesforce edition?" The short answer is, “Yes.” Salesforce has now made this feature available in every edition.
In terms of user permissions, certain requirements must be met to view and edit lead assignment rules in Salesforce. Users must have the "Manage Leads" permission and the ability to "View Setup and Configuration" in order to access lead assignment rules. For editing purposes, users need the "Customize Application" permission along with either the "Modify All Data" or "Modify Leads" permission. If you are unable to locate this section in Salesforce or encounter difficulties with viewing or editing assignment rules, reach out to your Salesforce administrator to verify that you have the necessary permissions in place.
Assignment rules limits and challenges
Salesforce Lead Assignment Rules, while suitable for small teams with straightforward rules, come with significant limitations that can hinder efficiency for larger teams. These limitations become more apparent as the volume of leads increases and more complex use cases arise.
One major drawback is the stringent limits imposed by Salesforce on the number of rules, entries, and actions allowed per rule. These limits are illustrated in the following table:

However, there are additional factors to consider when utilizing assignment rules in Salesforce. It is crucial to be aware of the following challenges before embarking on building your entire logic using Salesforce's native functionality:
- Limited to Leads and Cases: Assignment rules only apply to the lead and case objects. While this may suffice for simple and initial use cases, it falls short when implementing ABM (Account Based Marketing) strategy or when the need to route Opportunities arises.
- Complex QA and Audit: Salesforce's native functionality lacks versioning or debugging tools, making testing and troubleshooting assignments a laborious task. Additionally, there is no built-in record of why a lead was assigned in a particular way, further complicating the auditing process.
- Limited Assignment Options: When using assignment rules, you can only assign a Lead record to a specific user or a Salesforce Queue. Managing more intricate assignments, such as round-robin distribution, becomes challenging and costly to implement within the confines of assignment rules.
- Single Active Rule: As mentioned previously, Salesforce restricts the use of only one active lead assignment rule at a time. This means that despite having multiple processes with distinct underlying logic, you are forced to consolidate them into a single, busy rule, making management and updates cumbersome.
Considering these challenges, it becomes evident that relying solely on assignment rules may not provide the flexibility and functionality required for more complex lead management scenarios.
How Sweep Simplifies Salesforce Lead Assignment
Although assignment rules in Salesforce offer a powerful solution with a short learning curve, we recognize that the drawbacks can become a significant pain point as businesses grow and the native Salesforce tools may not fully support your team's needs.
To address these challenges, we have developed Sweep's Assignment tool, a visual no-code solution designed to simplify the implementation of assignment logic within Salesforce. This empowers organizations to build their go-to-market motions while maximizing assignment efficiency. The benefits of using Sweep's Assignment capabilities include:
- Assigning any object: From Opportunities to Accounts & Contacts and custom objects, you can apply assignment logic across various Salesforce objects.
- Achieving full visibility: Gain a comprehensive understanding of your business processes and easily track where assignments are taking place.
- Managing round-robin groups: Distribute leads equally among sales representatives using round-robin assignment to ensure fairness, or add weights to better control assignments between reps.
- Simplifying territory management and assignment: Streamline the process of managing territories and assigning leads based on specific territories.
- End-to-end lead routing capabilities: Enhance the lead routing process with advanced features such as Lead Deduplication and Lead-to-Account Matching, ensuring that leads always receive a seamless buying experience.
If you have any questions or would like to learn more about how Sweep Assignment can assist your business as it scales, please don't hesitate to contact me at [email protected]. I would be delighted to show you around or provide further insights into Salesforce Lead Assignment Rules.

Salesforce Lead Assignment Rules: How To Manage The Salesforce Lead
You're busy, and managing leads in Salesforce is a pain. You want to use the system but there's just too many hoops to jump through. This blog post will help you understand how salesforce lead assignment rules work and show you how they can make your life easier when assigning leads in Salesforce.
Lead assignment is a critical function in any sales organization and it has been our experience that many companies are not following these simple rules due to lack of understanding or poor training.
We hope to help you avoid these mistakes by sharing some of the most common mistakes made when assigning leads in Salesforce with you.
What Are Salesforce Lead Assignment Rules
Salesforce lead assignment rules allow a user to specify rules that pick up a specific value from a custom object and assign it to the Contact Manager field of the Lead.
Lead assignment rules are created based on your business requirements, for example: If a prospect fills out an interest form or email marketing survey , you can automatically add their information as Leads in Salesforce, which makes them available for sales reps to follow up with.
Or maybe your company is growing rapidly and you need opportunities to be auto-assigned every time one is updated by an internal team member. In all these cases, lead assignment rules come in handy .
A lead assignment rule can be executed when a custom object record has been created, updated or deleted. It starts with a trigger and ends with an assignment rule.
For example: whenever a user updates the 'Lead Status' field on the 'Opportunity' object, update or delete (depending upon whether Lead Status is set to Closed/Lost or Reopened) the associated Contact record on the 'Cust Team' custom object.
To create this Lead Assignment Rule
- Navigate to Setup
- Leads and click on New Assignment Rule. Give your lead assignment rule a name and select Sub Object as Opportunity then choose Trigger as Updated Opportunity Status.
- Leave Conditions as Blank and click Save.
The moment you save the lead assignment rules, Salesforce creates a picklist of Available Values with two options – Yes and No.
This is because a lead assignment rule can either create or update a record on another object, depending on the condition that you set.
Now, let's say you want to automatically create a new Lead record whenever the 'Lead Status' field on the 'Opportunity' object is set to Closed/Lost. To do this, we'll need to add an Assignment Rule. Select Assignment Rule as New Lead and choose the action as Create.
Under Object Type , select Lead and under Field Name , select Status . Leave Conditions blank and click Save .
You've now created a lead assignment rule that will automatically create a new Lead record whenever the 'Lead Status' field on the 'Opportunity' object is set to Closed/Lost.
But wait, this rule will create Leads for Closed/Lost Opportunities only. What if you also wanted to automatically create a lead whenever the Status is set to Reopened?
Well, all you need to do is add another Assignment Rule and choose both rules as New Lead . Select the action Create under the object Salesforce creates a picklist with three options – Yes , No , and No Match. This signifies that it will either update or create records depending upon its conditions.
To edit an existing assignment rule, follow these steps:
- Navigate to Setup | Customize | Leads | Assignment Rules. The Assignment Rules page displays all of your existing rules together. You can filter this list by selecting a particular object, such as Accounts or Contacts, and then clicking on the Edit button.
- The Rule Details page for the selected rule displays. This page enables you to edit the rule's name, description, and conditions. You can also specify which objects the rule applies to, what type of action to take (such as Create or Update), and which fields on those objects to use.
- When you're finished editing, click Save.
You can also delete a lead assignment rule by following these steps:
- Navigate to Setup | Customize | Leads | Assignment Rules. The Assignment Rules page displays all of your existing rules together. You can filter this list by selecting a particular object, such as Accounts or Contacts, and then clicking on the Delete button.
- The Rule Details page for the selected rule displays . This page provides information about the rule, including the rule's name, description, and conditions.
- Click Delete to remove the rule from Salesforce. There are many different ways to use lead assignment rules in Salesforce. By creating rules that automatically update or create records on other objects, you can save time and ensure that your data is always up-to-date.

The Seven Rules Of Compliance: Salesforce Lead Assignment Policy
Now that we have covered the basics of Lead Assignment Policy, it's time to get into the specifics. Below are the seven rules of compliance for Salesforce Lead Assignment rules:
Rule 1: All leads must be assigned to a user.
This is a basic rule and should go without saying. All leads must be assigned to a user in order for them to be worked. If you're not sure who should receive a lead, consult your company's sales process and procedures.
Rule 2: Leads must be assigned in a timely manner.
Leads should be assigned as soon as they are created in order to ensure that they are worked promptly.
However, there may be cases where a lead expires before it has any activity. In these cases, you can either let the lead expire or reassign it to another user who may work it later on.
Rule 3: A user cannot belong to more than one owner-recipient pair in a single Salesforce organization.
A lead must be owned by one person, but that same lead can be assigned to one or more users within your team using owner-recipient pairs.
However, no single user should appear in multiple owner-recipient relationship fields for different leads in your database. If this happens, then all recipients will receive every opportunity created from every new lead that's assigned to the problematic user!
To avoid this, create a new lead assignment policy with the problematic user excluded. Then, create a new lead assignment policy without the problematic user and re-assign all of your leads to the appropriate users using owner-recipient pairs.
Rule 4: A user cannot be a recipient in more than one owner-recipient pair within a single Salesforce organization.
As shown by Rule 3 above, you can have an owner for a lead as well as multiple recipients on that same lead record. However, no single user should appear as both an owner and a recipient on different leads that are under the same qualifying rules.
If this happens, then all of those leads will route directly to your Salesforce Inbox ! To avoid this, simply create a new lead assignment policy with the problematic user excluded and re-assign all of your leads to the appropriate users using owner-recipient pairs.
Rule 5: A recipient cannot be a member of more than one owner-recipient pair in a single Salesforce organization.
This is another rule that should go without saying, but just like Rules 3 and 4 above, it's important to ensure that you're not setting up multiple recipient relationships for the same user within your Salesforce instance.
To avoid this problem, simply create a new lead assignment policy with the problematic user excluded and re-assign all of your leads to the appropriate users using owner-recipient pairs.
Rule 6: Recipients must own at least one opportunity to be considered valid.
If you're looking for the most basic rule to begin with, this is it. If recipients are not set up to own one or more opportunities, then they won't have any activities in Salesforce automatically created for them when a lead is assigned.
This means that Leads will need to route directly into your Salesforce Inbox until you either create some activities for your team or manually assign the lead back to the original owner.
To avoid this problem, simply create a new lead assignment policy with all of your existing recipients included and re-assign all of your leads accordingly!
Rule 7: You cannot add existing users as recipients if their user records contain fields that are incompatible with assignment policy criteria.
There may be one or more cases where you have users who are already in your system but are not set up to receive leads through your lead assignment policy.
If you try to add these users as recipients for this newly created rule, then their accounts will show up in red because they won't meet the criteria defined in the assignment policy's qualifications field.
To fix this problem, simply create a new lead assignment policy by including existing recipients in your Salesforce instance. Then, re-assign all of your leads accordingly!
What Are The Drawbacks Of Using Salesforce Lead Assignment Rules?
Lead Assignment rules are an extremely powerful tool inside Salesforce. They enable business users to control who can view and respond to leads, while also streamlining workflows and ensuring that important leads aren't being ignored.
However, as with all features in Salesforce, there are several drawbacks or limitations that need to be taken into account when a lead assignment rule is put into use:
- A lead has to meet the criteria of all lead assignment rules assigned to it, which might not always be possible. Imagine a Business Development Manager using a Lead Assignment Rule so they receive all high priority leads from two queues - one for new accounts and one for existing customers. But what if the lead doesn't have an account? In this case both queues would be evaluated, even though the lead should only go to one of them.
- Rules can be time consuming and complex to set up. The business user has to have a good understanding of how the rule works in order to create it.
- Rules can be overridden by other users if they have access to the lead. This means that although the Lead Assignment Rule was supposed to ensure that a specific person received the lead, it could end up going to someone else if they're faster at responding or have more seniority.
Overall, Lead Assignment Rules are an extremely valuable tool for controlling workflows and ensuring that important leads don't fall through the cracks.
However, it's important to be aware of the drawbacks and limitations when using them in order to make sure they're being implemented in the most effective way possible.
Salesforce Lead Assignment Rules are an extremely powerful tool inside Salesforce. They enable business users to control who can view and respond to leads, while also streamlining workflows and ensuring that important leads aren't being ignored.

Himangi Lohar
Get paid for your time, join the marketplace for b2b pitches, meetings, and connections, see cliently in action, start engaging with your prospects, start engaging with your users and clients today, don't miss out, sign up for our newsletter.

Speed Up and Sell More: Salesforce Lead Assignment Rules Best Practices
When a lead comes in, an opportunity should come knocking.
But there’s a lot more under the hood. You need solid lead assignment rules in place, and one key variable to keep in mind.
Time. According to LeadSimple, responding to a lead in the first 5 minutes is 21x more effective.
No surprises here. If you’re a scaling business, you know that responding first to a lead is mission-critical.
If you’re manually triaging leads or waiting for IT to make business-critical changes to your lead assignment rules, it’s not scalable. Nor fast.
As an operations leader, you feel this pain across your entire organization.
Demand teams work hard to generate incoming leads, so it doesn’t make sense to abandon them just because they’re not getting to the right rep in real-time. Your leads, after all, are directly tied to sales revenue.
Automating the process doesn’t solve the problem alone, either. It’s an important piece to speeding up, but not the only piece to the lead assignment puzzle.
You’re inundated with the notion often – speed is everything!
Well, we’re here to tell you:
Respond right is the new respond first.
Shotgun responses don’t help if your lead happens to work for a target enterprise account of yours. You definitely want your Enterprise sales rep, Rachael putting her best foot forward.
Setting the right lead assignment rules also helps with what ‘future you’ couldn’t know ahead of time. Say a lead comes in from a territory that doesn’t have a rep assigned – It’s going to sit in a queue. A potential quality lead slipped through the cracks of time because there’s no accountability or rule in place.
Complex business processes and go-to-market efforts add additional layers of friction. How can you get it right if you’re constantly evolving at scale?
Your lead assignment process could be stunting your growth potential.
It’s time to speed up, starting with smarter lead assignment rules.
Give your operations teams their sanity back, and set your sales reps up for speed-to-lead success.
Go ahead and skip the next section if you’re already aware of the challenges to overcome as a scaling business, and want to get right to Salesforce lead assignment rules for success.
Businesses Quickly Outgrow Native Salesforce Lead Assignment Rules
Asana, a project management platform, was scaling fast.
They were grappling with increasing volumes of leads, lagging response times, and complex assignment rules that became impossible to keep up within Salesforce.
As more leads came in from a variety of sources, and with complex territory assignments and hundreds of sales reps that change frequently, lead assignment became a nightmare to manage in native Salesforce.
That’s because creating and changing lead assignment rules can quickly become very complex:

Only a dozen or so lead assignment rules are implemented here, primarily basic rule sets like location, company size, industry, or lead quality. You can imagine how cluttered your rules would get as you continued to add more criteria.
Asana knew that not having a more sophisticated Salesforce workflow automation process meant they didn’t have the flexibility to adapt at scale.
There were two problems Asana needed to overcome:
1. Complex, evolving go-to-market rules
You wouldn’t want sales reps responding to a lead that’s not in their sales territory. You also wouldn’t want junior reps following up with your largest target accounts.
But it happens.
Typical go-to-market (GTM) models are unique by company and can vary by:
- Named account
- Role or product focus
- Partner channels and more
How a company sets up their go-to-market strategy informs how they need to route or assign leads to reps. SaaS sales teams are regularly selling into different territories, market segments (SMB, mid-market, enterprise), verticals, and industries.
What’s more, lead assignment rules often require changing daily with large enterprise businesses.
Asana, for example, consistently had leads assigned to reps that no longer worked with them.
Imagine juggling complex territory assignment rules and hundreds of sales reps that change frequently?
It can take weeks or months for IT to get involved whenever a Salesforce lead assignment rule needs to be changed:
- IT has to define the required changes, scope them, slot those into a sprint, which may occur weeks or months later
- During the sprint, the team will make the changes, validate them, test them
- Push them from the development environment to the QA environment, and perhaps a staging environment, and then finally into production
Doing things manually, or not at all, is not a scalable alternative.
You can automate to help you move faster, but speed is sidelined when you don’t have the flexibility to adapt to your changing assignment or routing environment.
And it only gets worse as your lead volume climbs.
2. Massive volumes of incoming leads and lagging response times
When too many cars are trying to get to various destinations, traffic jams occur, with some drivers giving up and going somewhere else altogether.
If companies are slow to respond, the chances of those leads sticking around drops with every. passing. minute. Someone else will hop on a plane instead and get facetime sooner.
You need to move faster.
On average, it took companies 42 hours, or almost two days, to respond to a lead .
That’s basically a lifetime:

Dramatics aside, it means most B2B companies are still falling behind and not responding to leads within the five-minute-or-less sweet spot. But it’s there for the taking.
In the past, we had people manage catchall queues, trying to figure out who should own each lead. – Jim Maddison, Veracode
In Xant’s Lead Response Study 2021 of 5.7 million inbound leads at 400 plus companies, they found that 57.1% of first call attempts occurred after more than a week of receiving a lead.
So why are most companies lagging behind? They need to automate and create more adaptable lead assignment rules that actually reflect their go-to-market.
Speed might be serving up the silver platter, but you’re only going to get the deal if you implement effective salesforce lead assignment rules.
Here are some best practices to help set yourself up for success.
Lead Assignment Rules Best Practices For High-Growth Companies
You’ve got massive volumes of incoming leads and ultra-complex go-to-market rules. You’re in the right place.
First things first.
Automate, automate, automate.
Let’s get to that golden window of 5-minutes. Picture Tesla’s “Come to Me” app (it comes to you and eliminates a long trek to your parking spot).
It requires one tap.
Once a lead enters Salesforce, they follow the defined rule roadmap according to lead assignment rules that you set and ultimately land with the correct salesperson in record time.
You’re giving back those precious minutes to your revenue and sales operations teams.
Now about those rules.
Define Your Go-To-Market Rule Baseline
Carving out territories based on geography, segments, verticals, industries, named accounts, or whatever your go-to-market strategy is, is the first step. This is your baseline.
Any lead that falls into a sales rep’s territory should be assigned to them based on these defined rules, but that’s easier said than done. They’re constantly changing based on several factors.
You need to define your criteria
In other words, the set of criteria that you will be implementing – you know the drill. To do so, you ask all the necessary questions:
- Which rep will take on what territories?
- What happens if new reps are hired and old ones leave?
- What happens if someone goes on vacation? Or doesn’t work on Fridays?
- A lead comes in from a partner, where do you want this to go?
The beauty is that the sky is the limit.
But how do you get there with native Salesforce constraints lacking the required sophistication?
We had about 800 or 900 rule criteria. We needed something flexible and something that could change, or help us change as we change our business a year to year. – Jim Maddison, Veracode
The next step:
Create customer rule criteria
Veracode, a security company, had incredibly complex criteria. They had to hire a developer to manually code changes to lead assignment rules. Things changed daily for them, and they grappled with how to adapt.

Ditching the code for the intuitive drag and drop Complete Lead’s interface gave Veracode more flexibility to create assignment rules on the go.

Remember when we said the sky’s the limit?
Implement Nested Flows to Tackle Ultra-Complex Rule Sets
If there were a way to make it easier, you do it right?
Nested flows keep your rules organized.
At a high level, think of it like nesting dolls: each “nested” or child assignment flow sits within a bigger, or parent assignment flow.
These parent-child relationships can span far beyond just one or two levels, giving you the freedom to allow each business unit to oversee their own GTM processes and territories. This is a huge win for Rev Ops organizations looking to simplify and speed up ultra-complex lead management.

Department Managers can even set and keep track of rules for their own set of assignment flows, for different GTM teams and within different nested flows. That means lines are drawn in the sand but teams still have visibility and control of how a lead is tracked for their particular team.
Your business depends on data getting where it needs to go, fast. That’s why no matter how complex, your assignment rules should never feel out of hand.
Leverage Powerful Account-Based Assignment
Account-based strategies should be a cornerstone to your go-to-market strategy, and you want to know that your strategic investments are being implemented successfully.
- In a survey conducted by ITSMA , 87% of B2B marketers said that ABM initiatives outperform their other marketing investments.
- COVID-19 caused companies t o rush to create ABM strategies to respond to an increased need for a strong digital presence.
- 56% of the 800 B2B marketers that LinkedIn surveyed said that they are using ABM. Over 80% said that they plan to increase their ABM budget over the next year.
Use account-based assignment.
Account-based marketing targets specific companies, so setting up account-based rules in your lead flow process allows you to route leads from these target accounts to your most experienced reps quickly and easily.
The rule of thumb is that leads from target accounts need to go to the account rep that owns the account. The account owner has the deepest knowledge of the account and the highest chance to convert. Simply put, account based routing has a positive impact on your bottom line.
With a more robust lead assignment solution to align with their account-based selling and marketing strategies, Alfresco was able to increase their close/won rate by 10%!
Enterprise hierarchy assignment is a no-brainer for account selling.
Imagine if you could automatically visualize all the related customer accounts including subsidiaries, and assign one strategic rep to the parent enterprise account?
You can and you should. Complete Hierarchies gives you the ability to automatically build and visualize complex account hierarchies, so that you’re able to route leads to the right rep no matter how complex the account structure.

Let’s say a new lead comes in from Hulu, but you’ve no idea that it’s a subsidiary of The Walt Disney Company. Chances are the same rep won’t be assigned the account if other go-to-market rules are in place.
Also, you’ve already given a discount to The Walt Disney Company, and this information is not available to the rep who gets the new lead. Account Hierarchies can be a trick up the sleeve when it comes to account-based assignment.
But what happens if a lead comes in and it’s not associated with any account or go-to-market territory?
Set Up A Sophisticated Round Robin
You’re leaving revenue on the table when you let leads sit and die without a timely response.
Native Salesforce just isn’t sophisticated enough to handle more complex round-robin criteria that’s required to keep your leads flowing when they hit a snag. It’s limited and cumbersome to manage – major setbacks when it comes to your speed-to-lead.
For certain territories or situations, you may have multiple reps covering the territory or a catch-all queue for leads that don’t have enough information to assign properly.
In those cases, businesses often have someone dedicated to manually triaging and assigning leads. This is an incredibly time-consuming operational nightmare and a good way to tank your response times.
And with a lack of accountability, reps often cherry-pick the ideal leads and leave others to the crows.
To avoid these assignment pitfalls you need to push leads to a chosen pool of sales reps and evenly distributed to your sales team, giving everyone an equal opportunity to generate a sale. But you also need more flexible options.
Use sophisticated dynamic round-robin assignment to:
- Set sophisticated criteria like rep speciality or languages
- Use availability settings to ensure leads can be responded to immediately (e.g. office hours)
- Automatically notify reps when new leads are pushed through
- Enforce SLAs on response times to make sure leads are responded to as quickly as possible
- Pair with a rep response dashboard that gives you a complete view to help you monitor how fast a rep is following up with their round-robin leads

Weighted round-robin:
Give your best-performing reps more leads, and improve your overall chance at generating more pipeline. Based on:
- Performance
- On their speciality
- Any desired field
If you’ve found that reps have hit their max capacity for being able to manage any more leads, you can cap the number of records assigned to your team members in the round-robin.
Hit a snag? Re-route your leads:
If reps aren’t responding within their SLA, you can reroute the lead and assign it to someone who will respond. This helps prevent further roadblocks and keeps data flowing, even when there’s a bottleneck.
It’s typical for our team to get four to five requests a week to change territories for a user. Onboarding and offboarding now takes just a few minutes to run all our leads back through the system and automatically get reassigned. – Jim Maddison, Veracode
The ultimate speed-to-lead tactic to keep in your back pocket.
Go Beyond Leads, Assign Any Object
Just imagine that feeling you get if you could create assignment flow, beyond leads. It’s a whole new world.
Assign any object
Go beyond leads and create any assignment flow across any object. You can assign any record, update any field, and trigger any action.
It works similarly to the assignment flow you create for leads, so define your goals and determine your set of criteria for each particular object.

No more manual effort!
This presents endless opportunities to customize your assignment flows, resulting in streamlined processes and less manual administrative time spent manually sifting through information.
What Are You Waiting For?

It’s time to speed up and sell more.
Speed is crucial, but there’s so much more than that underpinning your speed-to-lead. You need the flexibility to handle your go-to-market complexity and to keep your leads flowing to the right reps in real time.
When you’re scaling fast, you can’t afford to let good leads slip through the cracks.
Interested in hearing more?
We’re happy to talk you through how you can elevate your lead assignment rules in Salesforce, and dramatically improve your speed-to-lead game. Book a personalized demo with one of our experienced team members today.
Related Posts
- Account Hierarchies
- Account-Based Marketing
- Automated Account Hierarchies
- Lead Management
- Lead Routing
- Lead to Account Matching
- Sales performance
- Territory Management
- The Revenue Optimists

- Complete Hierarchies
- Complete Leads
- Complete Clean
- Complete Influence
- Deduplication
- Relationship Mapping
- Mass Territory Reassignment
- Customer Stories
- Live Group Demos
- ABS Maturity Matrix
- Automate Leads
- Automate Hierarchies
- Speed To Lead
- Automated Hierarchies
- AI for RevOps Guide
- The Essential Territory Planning Guide
- Deal Review Checklist
- RevOps KPI Checklist
- AI Readiness Checklist
- Knowledge Base
Book A Demo
Explore the Buying Group Motion! Start your journey with our Resource Center.
- Intelligent Lead Delivery
- Convert Signals to Revenue
- Enterprise Salesforce Orchestration
- Products Overview Discover modern Revenue Orchestration
- Integrations Connect signals to plays
- Pricing Plans for every company
- Why LeanData
Snowflake Scales Account Based Plays with LeanData Revenue Orchestration

Clockwise Supports PLG Motion with LeanData Revenue Orchestration
- Become a Partner Team up with LeanData
- Technology Partner Directory Discover ISV solutions to fit your needs
- Solutions Partner Directory Connect with our network of authorized Service Integrators
LeanData’s integration with Salesloft allows a user to route prospects to the right reps.
Slack has transformed business communication– it’s the platform where work can happen.
Expertly target and engage high-value accounts when they’re ready to buy.
LeanData’s integration with Outreach allows a user to route prospects to the right reps.
- Learning Center
- Certification
- Tips & Tricks
- Help Center
- About Us Learn more about us and our mission
- Newsroom Keep up with what’s new at LeanData
- Events Stay up to date and network with industry professionals at our upcoming events
- Careers Join the LeanData team
- Contact Us Get your questions answered - contact us now

G2 Recognizes Lead-to-Account Matching and Routing as Newest Tech Category, with LeanData the #1 Vendor
Leandata showcases power of modern revenue orchestration at opsstars 2022, leandata announces winners of the 2022 opsstars awards, what are lead assignment rules in salesforce.
Lead assignment rules are a powerful feature within Salesforce to assist your team’s automation of its lead generation and customer support processes. Assignment rules in Salesforce are used to define to whom your Leads and Cases (customer questions, issues or feedback) are assigned based on any one of a number of specified criteria you determine.
Organizations typically develop lead assignment rules for their GTM processes or flows:
- Rules for inbound Leads
- Rules for website-generated Leads
- Rules for importing Leads from an event
For case assignments, a company might establish one case assignment rule for weekdays and another assignment rule for weekends and holidays.
A lead or case assignment rule often consists of multiple rule entries to specify exactly how leads and cases are assigned throughout your go-to-market teams. For example, related to customer service inquiries, a standard case assignment rule might have multiple entries. Cases with “Type equals Gold” are assigned to the Gold Level service queue, cases with “Type equals Silver” are assigned to the Silver Level service” queue, and so on.
As organizations grow and scale, they operationalize multiple GTM motions: inbound, outbound, account-based, upsell/cross-sell, and hybrid. However, many are limited to having just one rule in Salesforce.
As a work-around, many organizations create one massive lead assignment ruleset. They then wedge all of their rule entries into that one big ruleset, regardless of how many different motions that represents. Over time, Salesforce lead assignment rules can quickly become unmanageable .
This post covers the best practices for Salesforce lead and case assignment rules. The ultimate goal is to fully engaging your hard-won leads and speed up your organization’s time-to-revenue.
How to Define Assignment Rules
Your Salesforce administrator can only have one rule in effect at any particular moment in your go-to-market motions, and that assignment rule is intended to both automate lead generation processes and other customer-facing processes routed through your CRM.
Lead assignment rules specify how leads are assigned to users or queues as they are created manually, captured from your website, or imported via SFDC’s Data Import Wizard.
Case assignment rules determine how cases are assigned to users or put into queues as they are created, either manually or through the use of Web-to-Case, Email-to-Case, On-Demand Email-to-Case, the Self-Service portal, the Customer Portal, Outlook, or other data generation applications.
Criteria for Lead Assignment Rules
Okay, so you’ve decided that lead assignment rules in Salesforce make sense for your revenue operations team – now what?
Well, first, you’ll need to determine the edition of your Salesforce instance. Lead assignment rules are available in the Group, Essentials, Professional, Enterprise, Performance, Unlimited, and Developer Editions of SFDC. Case assignment rules, conversely, are available only in the Professional, Enterprise, Performance, Unlimited, and Developer editions.
With regard to User Permissions, to view assignment rules, you’ll need View Setup and Configuration permissions. However, to create or change assignment rules, you’ll need Customize Application. If you are not your organization’s Salesforce administrator, you should check with them before attempting to head off on your own.

How to Create Salesforce Lead Assignment Rules
Creating lead and case assignment rules in Salesforce is a relatively straightforward process.
- Login to Salesforce and select Setup in the upper right corner of the horizontal navigation bar.
- In the Setup search box , type “assignment rules” and then select either Lead Assignment Rules or Case Assignment Rules.
- Select New to create a new assignment rule.
- In the Rule Name box, type a name and specify whether it should be active for leads or cases created manually and by those created automatically by web and email. When done, click Save .
- Click open your newly created rule and select New in the Rule Entries to specify your rule criteria.
- Step 1 in the “Enter the rule entry” window requires you to enter an Order for your new rule (the Order is the order in which the entry is processed, like a queue).
- In Step 2, you determine whether your new rule is based on meeting a set of criteria or a formula. In the Run this rule if the dropdown box, select either “criteria are met” or “formula evaluates to true.”
- Lastly, in Step 3, select the user or queue to whom your rule will assign your new lead or case (use the lookup feature to find specific users or a queue). After completing Step 3, select Save .
Why Are Your Salesforce Lead Assignment Rules Not Working?
If you discover your lead or case assignment rules are not working, here are a few tips to quickly troubleshoot the root cause.
First, check to ensure the assignment rule is active. Remember, only one case or lead assignment rule can be active at one time. Secondly, ensure the record is assigned to the correct user or queue.
Make certain to select the checkbox Assign using active assignment rule . In support of this step, enable field History tracking on case or lead owner, as well as add object History (case or lead) in your page layout.
One common problem is overlapping rule entries, or rule entries in the wrong order. With dozens of rule entries, many will overlap, causing records to get assigned unpredictably. For example, if entry #1 assigns California leads to John, and entry #2 assigns Demo Request leads to Jane, then John might wonder why he’s receiving Demo Requests leads who are supposed to go to Jane.
Assignment Rule Examples
The image, below, shows sample rule entries being entered into Salesforce for a variety of “what if” situations:
- Junk leads containing “test” are sent to an unassigned queue
- Demo requests are routed directly to SDR 3
- Leads at accounts with over $100 million in annual revenue are routed to AE 1
- Leads in certain states are sent to their respective representatives

How LeanData Simplifies Salesforce Lead Assignment
Creating lead and assignment rules in Salesforce is relatively straightforward. However, as your GTM motions become more and more complex, it becomes necessary to populate that one rule with multiple defining rule entries. As you grow and scale, your rule threatens to become unwieldy. Then these problems arise:
- Difficulty in both comprehending and managing
- Poor visibility, making it difficult to troubleshoot and validate
- Restrictions allowing only the criteria on the routed record

LeanData’s lead routing flow and assignment solution is a native Salesforce application that allows users to create flows in an easy-to-understand visual graph. Its visible representation of an organization’s desired lead flow affords many benefits to users, including:
- Easier ability to visualize and understand complex flows
- Real-time visibility of the routing of leads and the ability to quickly troubleshoot and make adjustments
- At-a-glance ability to use information on matched records for routing decisions and actions

Assignment rules in Salesforce are a relatively easy-to-learn feature that can be very quickly implemented, delivering a flexible and powerful logic to your CRM processes. Automating your lead and customer processes will accelerate your GTM motions and deliver your organization a sustainable competitive advantage.
For more best practices, read the eBook, “ Best Practices for a Winning B2B Marketing Data Strategy .”
- lead assignment rules
- lead assignment rules salesforce

Ray Hartjen
Ray Hartjen is an experienced writer for the tech industry and published author. You can connect with Ray on both LinkedIn & Twitter .
More Related Content

How to Automate Lead Routing in Salesforce
How assignment rules work in Salesforce When leads come into your Salesforce instance, a rep needs to reach out to...

Salesforce Lead-to-Account Matching, the Easy Way
Salesforce lead-to-account matching is an important consideration in better aligning Sales with Marketing and increasing the efficiency and productivity of...

10 Best Lead Assignment Tools for Revenue Teams (2024)
Lead assignment tools optimize sales processes by building efficiency into lead distribution. Here are the top 10 lead assignment tools worth investigating.
About 5 mins
Learning Objectives
Manage and nurture leads, sales pipe and lead routing, summing it up.
- Challenge +100 points
Manage Leads
After completing this unit, you’ll be able to:
- Discuss ways to manage and nurture leads.
- Describe sales pipe and lead routing.
Imagine for a moment that you’ve managed to round up a substantial number of qualified and working leads. Things are looking up, and everyone has high hopes! But, what do you do with them?
Lead Management
Lead management is what happens after lead generation: It’s a bridge between marketing and sales. It’s a process that starts with identifying leads, qualifying them, and then with working them as sales opportunities.
In lead management, your job is to help people learn more about your product or service, about industry trends, and about successful customers they can relate to and be inspired by. Engaging and educating prospective customers is at the core of lead management and nurturing.
Lead Nurturing
Lead nurturing refers to the specific actions that give your new relationship what it needs to prosper. Some leads want regular emails, some want quick responses on social media, and others want to call you up and have a conversation about what you offer.
Focus on the nurturing tactics your customers like best—developing an effective lead nurturing strategy pays off. Companies that excel at lead nurturing generate more sales-ready leads at lower cost and boast more sales reps making quota than companies that struggle with nurturing.
Lead Management Software
Lead management software helps companies generate new leads and keep track of who they are, how to reach them, and how they were found in the first place.
This software captures information at the lead’s point of contact with your organization—such as a landing page visit, white paper download, or email open. Based on the lead’s action, they’re automatically scored and the software suggests a next action. Collecting data about how leads and customers are interacting with your brand online allows you to create one-to-one customer journeys and helps your salespeople focus on qualified sales leads while you send other leads on automated nurturing journeys.
All your hard work generating, qualifying, and nurturing leads pays off in the sales pipeline. When you fill your pipeline with quality leads, you help your sales team actively close deals and generate revenue. Surf’s up!
Scoring and Grading
As soon as leads enter the marketing funnel, you should start qualifying them to see which ones are worth additional time and effort. Lead scoring and grading technology can automatically calculate a lead’s value to your company (score) and likelihood of becoming an active customer (grade).
Lead scoring is based on a prospect’s activities, such as the number of pages viewed and forms completed. These activities indicate their level of interest. Lead grading is based on key factors pertaining to individual prospects, such as their location, industry, or company size.
Using lead scoring and grading together helps ensure that only high-quality leads are shared with your sales team—which optimizes their time by allowing them to reach out to the right lead at the right time.
Routing Leads
Once your sales pipeline is full of high-quality leads, you need to route them to your sales team. Lead routing is about assigning each lead to the sales rep best suited to guide them through a successful transaction. This can mean distributing leads by geographic territory, by deal size, or by products or services. This helps marketers streamline leads for sales, eliminating the need to comb through leads and guess which ones are right.
Of course, different sales organizations distribute leads in different ways. However you choose to share leads with sales teams, lead management software can help by creating fixed assignment rules based on lead qualification criteria and generating automated reports on pipeline status and sales team performance.
Everyone wants to do better business, and being able to meet customers’ expectations before they’re ready to buy a product or service can yield great rewards. To do so, you’ll want to master inbound marketing basics, understand the various types of lead classifications, and capably manage those leads.
Get started today by learning more about how to generate leads with marketing automation at the link in this unit’s resources. A transformative relationship with your customers is just a few clicks away!
- Salesforce: 3 Key Tips for Optimizing Your Landing Page for Lead Generation
- Trailhead: Lead Nurturing Campaigns
- Salesforce: Generate More Leads with Marketing Automation (Sign-Up Required)
- Get personalized recommendations for your career goals
- Practice your skills with hands-on challenges and quizzes
- Track and share your progress with employers
- Connect to mentorship and career opportunities
- Get Started
How to create a round robin lead assignment rule in Salesforce
If you manage a sales team who are working with new inbound leads and you want to equally divide these, this is for you!

Craig Maxwell
Building repeatable revenue engines by combining excellent people, processes, and technologies. 🚀
First off, what even is a round robin? In Salesforce CRM terms it refers to a method of evenly assigning leads to users within a team in a series or sequence.
When would I need this?
For example, you have 5 SDRs (Sales Development Representatives) working with new inbound leads and as a Salesforce administrator, you want to equally divide these between the team.
“A round robin rule allows you to equally distribute new lead records without having to manually assign them using a rotation as shown below"
Lead number (1) goes to SDR 1 Lead number (2) goes to SDR 2 Lead number (3) goes to SDR 3 Lead number (4) goes to SDR 4 Lead number (5) goes to SDR 5 Lead number (6) goes to SDR 1 Notice the rotation here? ☝ Lead number (7) goes to SDR 2 Lead number (8) goes to SDR 3
And so on...
To achieve this in Salesforce you need to create 2 custom fields on the lead object, an auto number field and a formula field.
Read on and we’ll walk you through how to create and use these to automatically distribute leads and have your sales team thinking you’re some kind of magical Salesforce wizard... 🧙
To create the new fields go to Setup > Object Manager > Lead > Fields & Relationships and select New and choose the data type 'Auto Number' and hit 'Next'.

Creating the auto number field:
On Step 2 add in the following options:
Field Label: Lead Number Display Format: {0} Starting Number: 1 Field Name: Lead_Number

Building out the Lead Number options:
A unique number will now be assigned to this field for each new lead record created in a sequence.
Auto number fields are not editable by users, as new records are created this number will increase, the first lead '1', the next '2', and so on.
You may also see a checkbox to tells Salesforce to 'Generate Auto Number for existing records'.
If you need to assign existing records a number go ahead and check this box, leaving this unchecked will result in only new lead records moving forward will being assigned a number and routed.
Next you will need to create a new formula field that will take the auto number generated by Salesforce and assign it with sequential value that falls within a range you specify (It is this formula that makes the round robin rotation possible).
Create a new formula field with the following options:
Field Label: Round Robin ID Field Name: Round_Robin_ID Formula Return Type: Number Options: Decimal Places = 0
Click 'Next'

Creating the Round Robin ID field:
Select the 'Advanced Formula' tab and in the formula editor type in the following:
MOD(VALUE({!Lead_Number__c}) ,3) +1

Advanced Formula Settings:
This MOD function takes the "Lead Number" created earlier and applies a bit of math to only return a number within a specified range.
The '3' in this case means that it will only return the numbers 1, 2, or 3. If you were to change the '3' in the MOD formula here to '5' you’ll get a result of either 1, 2, 3, 4, or 5 as your Round Robin ID.
“Now that we have a method to tag each lead with sequential Round Robin IDs, we can use this ID to create a Salesforce Lead Assignment Rule."
Type 'Lead Assignment Rules' into the quick find search in setup and navigate to 'Lead Assignment Rules' and select 'New'.
Give your new rule a name, tick the "Active" checkbox and click “Save”.

Creating the lead assignment rule:
On the next screen click on the 'Rule Name' for the rule you just created and click the 'New' button.

Lead assignment rule continued:
Sort Order = 1
Object = Lead, Field = Round Robin ID, Operator = 1
Select the users to be assigned the lead and make sure to select an email template so that you are notifying the new owner of a new lead flying their way! 💥
Click 'Save & New' to create repeat these steps creating a rule for each rep that needs to be assigned a lead based on the Round Robin ID.
Bear in mind, the "Sort Order" sets the order in which your rules are evaluated.
To test your new assignment rule, make sure your lead page under 'Layout Properties' has the 'Assign using active assignment rules' checkbox marked as 'Show on edit page.

You can then create a new lead and check the 'Assign using active assignment rule' checkbox before saving to trigger your new assignment rule.

Thanks for reading & please share this if it helps you! 👏
Get started today!
Latest articles, count the number of contacts on an account in salesforce.
How many personas / contacts are identified on each target account and is your team following best practice? We share a great solution to keep track!

What is CRM? 🤔
The average CRM contact moves company every 36 months. If you're not keeping track of these job changes, you could be leaving money on the table.

Lead Assignment: Strategies to Optimize Your Sales Team's Performance

Your marketing team works hard to generate leads for your company.
As a salesperson, it's your job to capitalize on these leads and produce as many paying customers as possible. Thankfully, this burden doesn't rest on your shoulders alone.
In all likelihood, you're one of several sales reps who've been tasked with implementing your department's sales process . This is good news—as long as you have a lead assignment plan in place, of course. If you don't, you and your colleagues will waste time fighting over leads.
In this article, I'll explain what lead assignment is and why it's beneficial. Then I'll share a few best practices you can use to make sure leads are always assigned to the right rep.
What Is Lead Assignment?
Lead assignment , sometimes referred to as lead routing , is the act of distributing leads amongst the sales reps in your organization. It's an important part of lead management.
Here's how the process normally works:
- Your marketing team implements various marketing strategies to drive leads
- Leads enter your CRM of choice and are automatically assigned to specific reps
- Said reps access incoming lead records, then use the information there to connect with, nurture, and eventually sell to the individual leads assigned to them
A strong lead routing process will improve your sales team's productivity , increase the trust your reps have in your organization, and ultimately, result in more sales.
Benefits of Having a Clear, Transparent Lead Routing Process
Effective lead distribution seems simple…
Leads come in, your CRM routes them to certain reps based on the specific lead assignment rules you've created, then each rep works to turn their leads into long-term customers.
Simple? Yes. But the truth is, your lead routing process can make or break your sales department. Get it right, and your sales team will succeed. Get it wrong, and your reps will lose productivity, become distrustful of their superiors, and drive less revenue.
With that in mind, let's explore the benefits of a proper lead assignment in more detail:
Productivity
A rock-solid lead routing workflow will help your sales reps get more done faster.
Think about it: when your reps don't have to fight each other for leads, they'll have more time (and energy!) to spend nurturing prospects . This will almost always result in more deals.
Want to optimize your sales strategies? Uncover the hidden potential of sales productivity tools in our detailed guide.
What about trust? Transparent case assignment rules will help you build it.
How so? When your reps know how the sausage is made, so to speak, they won't ask themselves why so-and-so was assigned X lead and not them. They'll just know.
When your reps trust your organization, they'll enjoy their work more. When they enjoy their work, they'll put in more effort. And when they put in more effort, they'll make more sales. They'll probably stick around for longer, too, which will improve your team's turnover rate.
Lastly, a proper lead assignment process will generate more revenue for your company.
As mentioned earlier, your reps will focus on closing deals , not wrestling leads away from their colleagues. This will allow them to pour more effort into their sales processes, helping them connect with and sell to more customers. More customers generally means more revenue.
I should also mention response time. When leads are automatically assigned to reps, they'll reach out to them faster. Since 78 percent of customers buy from the company that responds to their inquiry first, your team's response time has a huge impact on the revenue it brings in.
Lead Assignment Rules: 5 Ways Top Sales Teams Assign New Leads to Their Team
A strong lead assignment process is essential to the success of your sales department. The question is, how do you distribute leads to reps in a way that's logical and fair?
It's pretty easy: just implement a few lead assignment rules, a.k.a. a set of criteria that determines where and when incoming leads are routed in real-time.
Every CRM software handles this process differently. In Close, for example, you can assign leads manually. You can also assign them automatically based on information such as the location and/or priority of the lead, as well as the qualifications of your reps.
Let's look at the most popular lead assignment rules available to your team:
1. Manual Assignment
The manual assignment rule is exactly what it sounds like: sales reps manually assign leads to themselves in their CRMs. This approach is best when sales reps do their own prospecting .
In Close , sales reps can manually assign themselves leads by simply adding their name to the corresponding custom field inside the Close CRM platform. Or, sales managers can manually assign new leads to their team.
One of the best things about this lead assignment rule is how easy it is to set up.
The downside? It won't work for every team—especially large teams that employ multiple kinds of reps, i.e. sales development reps (SDRs), inside sales reps , account executives, etc.
2. Bulk Assignment
The bulk assignment rule is pretty self-explanatory, too. Leads are uploaded to a CRM, then assigned in bulk to specific users, which allows for peak productivity levels.
In Close, sales managers can bulk assign leads by first creating a "lead owner" column in the document they plan to upload. That way, when said file is integrated into their Close account, leads will automatically be routed to the proper sales rep.
Why should you use this lead assignment role? Because it will save you a ton of time!
Unfortunately, it only works for sales teams that either store leads outside their CRMs (why would you do that?) or purchase leads lists from third-party companies (also not recommended).
3. Round Robin Lead Assignment
The round robin assignment rule will automatically assign leads to specified sales reps in your organization in a circular manner, hence the name "round robin."
In Close, sales managers can implement a round-robin lead assignment process by connecting their Close, Python, and Zapier accounts . Once they do, inbound leads will get sent to their sales reps in order. When the last rep receives a lead, the cycle will start over.
A round-robin lead assignment approach will allow you to automate the lead routing process. Just know that it's more complicated to set up than other lead assignment use cases.
Check out this template to use a round-robin lead assignment approach for your team.
4. Rule-based Assignment
The rule-based assignment process will help you to assign inbound leads to reps based on specific criteria, such as where the lead lives and/or the product/service they're interested in.
In Close, use Smart Views to identify leads that fall within your specified criteria. Then assign them to the most qualified rep on your team.
Rule-based assignments are perfect for global companies that serve customers in many different locations around the world, as it allows them to route leads based on geographical location or time zone, the specialties of their sales reps, and the priority level of their leads.
5. Random Lead Assignment
True to its name, the random lead assignment rule assigns leads to sales rep at random. The best part is, this process happens automatically, so you don't have to worry about it!
In Close, you can also set up Sequences and have a random user assigned to each new lead in that sequence. You can also do this in groups, which means you can separate groups of reps and assign leads randomly within that group.
To randomly assign all leads continuously, sales managers can integrate their Close accounts with Zapier. When this happens, inbound leads will automatically get sent to one of your sales reps, but there won't be any rhyme or reason to the assignments.
Random lead assignment is easier to set up than round robin lead assignment (mentioned above) but will still help you evenly distribute leads across your sales team . When that happens, fewer leads will fall through the cracks, which will help you drive more revenue .
Check out this template to quickly build a random lead assignment approach for your team.
Best Practices for Lead Assignment
There are a bunch of ways to assign leads. No matter which approach you choose, make sure you keep these five best practices in mind. Doing so will help you find more success.
Keep It Simple
First, do your best to simplify your lead assignment rule entries.
Ask yourself, "Do we really need to have 17 criteria to route leads?" Unless you're a mega, enterprise-level organization, the answer is probably no. So why do it?
Trust me, most companies don't need to route the leads that come from LinkedIn and the leads that come from Facebook to different sales reps. There's no point in complicating processes that don't need to be complicated. Sales is already hard enough.
Be Transparent about How Leads Are Assigned
Trust is important in sales. As we discussed earlier, reps that trust their organizations work harder, which almost always translates to more sales and revenue.
Trust is especially important when it comes to lead routing. Your reps need to believe that they get a fair amount of leads. The easiest way to ensure this is to be perfectly transparent about your lead routing processes. That way each rep knows exactly how leads are split up.
If you aren't transparent, your sales reps will question your lead assignment approach, which is less than ideal when most companies pay reps on commission . Basically, your reps might feel like you're "stealing" money from them if they don't understand how leads are divided.
Handle Lead Scoring and Qualification Before Assigning Leads
Next, take care of your lead scoring and qualification procedures before you assign leads.
This will ensure you only send quality prospects to your sales reps, saving them valuable time. One of the worst things you can do in sales is spend an afternoon nurturing a lead that will never buy from you. It's completely unproductive and, honestly, kind of demoralizing.
Fortunately, this isn't that hard to do. Simply use an inbound form to learn more about your leads. Then give each lead a score based on the information you receive. (Note: You can use Close to help automatically score your leads, which will save you boatloads of time.)
Once your leads have been vetted, send them to your reps. Trust me, this simple process will boost team productivity to new heights and help you close way more deals.
Develop a Process to Reassign Leads When Necessary
Guess what—leads can be reassigned to new sales reps if and when necessary.
Maybe a lead is first routed to Dwight. Uh oh, Dwight is on vacation and won't be able to follow up with the lead in a timely manner. No problem, just send that bad boy to Jim instead.
You can do this manually, of course. But I suggest building reassignment rules into your CRM. That way, the tech at your disposal will handle this tedious task for you. Doing so will help your entire team reach the apex of their potential, which is exactly what you want.
Analyze and Optimize Your Lead Assignment Protocols
Last but not least, always look for ways to improve your lead routing approach.
What can you do better? Is there a way to eliminate complexity from your process? Maybe you need to go the opposite way, get a little fancy, and use automation to your advantage. (Just don't get too fancy. Like I said earlier, simple is generally best for lead assignment.)
The point is you might not build the perfect lead routing system on the first try. Even if you do, your sales team might grow in the future. Or adopt a new sales strategy. Either way, you'll want to develop a new process to assign leads. Just to make sure everything works right.
Remember, lead routing isn't a one-time checkbox. You can't set it and forget it. You need to continually analyze your approach and look for ways to optimize it. That's how you win.
Close More Deals with the Right Lead Assignment Process
Lead assignment is critical to the ultimate success of your sales department.
Once you implement a few active assignment rules, your reps will become more productive, trust your organization more, and, most importantly, drive more revenue. Win!
You just need to learn how to create new rules in your CRM of choice. That way the robots can handle the lead distribution process for you, while you focus on other tasks. Win, Win!
If you're a Close user, check out this tutorial . In it, Matt Bonde, one of our esteemed product managers, will show you how to assign leads to an automated sequence. Hello, productivity!
If you're not a Close user, what's stopping you? Sign up for a free 14-day trial today to see everything our platform offers, including its lead assignment capabilities.
START YOUR FREE TRIAL→

More articles from The Close Blog

Discover our latest free sales tools powered by AI
Learn from the sales pros with our free sales guides.

Automation Champion
Automating Salesforce One Click at a Time

Running Lead Assignment Rules From Salesforce Flow
Last Updated on February 14, 2022 by Rakesh Gupta
To understand how to solve the same business use case using Process Builder . Check out this article Getting Started with Process Builder – Part 49 (Running Lead Assignment Rules From Process Builder) .
Big Idea or Enduring Question:
How do you run the lead assignment rule from the Salesforce flow? Lead assignment rules allow us to automatically assign Leads to the appropriate queue or user. A Lead assignment rule consists of multiple rule entries that define the conditions and order for assigning cases. From a Salesforce User interface, a user can trigger assignment rules by simply checking the Assign using the active assignment rules checkbox under the optional section.
The problem arises when you need to insert or update the Leads from Salesforce Flow and wants to trigger assignment rules. Using the Salesforce Flow a Lead will be inserted or updated but the assignment rule will not be triggered as there is no check box to use the organization’s assignment rule or a prompt to assign using the active assignment rule.
Let’s start with a business use case.
Objectives:
After reading this blog post, the reader will be able to:
- Running the lead assignment rules from Salesforce Flow
- Understand @InvocableMethod Annotation
- How to call an Apex method using Salesforce Flow
Business Use Case
Pamela Kline is working as a System administrator at Universal Containers (UC) . She has received a requirement from the management to update the following Lead fields when Lead Source changed to Partner Referra l .
- Status = Working – Contacted
- Rating = Hot
As data changed by the process, she wants to fire the assignment rule as soon as the process updates the lead record.
Automation Champion Approach (I-do):

Guided Practice (We-do):
There are 4 steps to solve Pamela’s business requirement using Salesforce Flow and Apex. We must:
- Setup a lead assignment rule
- Create Apex class & Test class
- Define flow properties for record-triggered flow
- Add a decision element to check the lead source
- Add an assignment element to update status & rating
- Add a scheduled path
- Add a decision element to check if lead source changed
- Add action – call an Apex class to invoke lead assignment rule
Step 1: Setting Up Lead assignment Rule
- Click Setup .
- In the Quick Find box, type Lead Assignment Rules .
- Click on the Lead Assignment Rules | New button .
- Now create an assignment rule, as shown in the following screenshot:

Step 2: Create an Apex class and Test class
Now, we have to understand a new Apex annotation i.e . @InvocableMethod . This annotation lets us use an Apex method as being something that can be called from somewhere other than Apex . The AssignLeadsUsingAssignmentRules class contains a single method that is passing the ids of the Leads whose Lead Source changed to Partner Referral . Create the following class in your organization.
- In the Quick Find box, type Apex Classes .
- Click on the New button .
- Copy code from GitHub and paste it into your Apex Class.
- Click Save.

Step 3.1: Salesforce Flow – Define Flow Properties for Before-Save Flow
- In the Quick Find box, type Flows .
- Select Flows then click on the New Flow .
- How do you want to start building : Freeform
- Object : Lead
- Trigger the Flow When : A record is created or updated
- Condition Requirements: None
- Optimize the Flow For : Fast Field Updates
- Click Done .

Step 3.2: Salesforce Flow – Using Decision Element to Check the Lead Source
Now we will use the Decision element to check the lead source to ensure that it is equal to Partner Referral.
- Under Toolbox , select Element .
- Drag-and-drop Decision element onto the Flow designer.
- Enter a name in the Label field; the API Name will auto-populate.
- Under Outcome Details , enter the Label the API Name will auto-populate.
- Resource: {!$Record.LeadSource}
- Operator: Equals
- Value: Partner Referral
- When to Execute Outcome : Only if the record that triggered the flow to run is updated to meet the condition requirements

Step 3.3: Salesforce Flow – Adding an Assignment Element to Update Rating and Status
- Drag-and-drop the Assignment Element element onto the Flow designer.
- Enter a name in the Label field- the API Name will auto-populate.
- Field: {!$Record.Rating}
- Add Condition
- Field: {!$Record.Status}
- Value: Working – Contacted

- Click Save .
- Enter Flow Label the API Name will auto-populate.
- Click Show Advanced .
- API Version for Running the Flow : 53
- Interview Label : Record-Trigger: Lead Before Save {!$Flow.CurrentDateTime}

Step 4.1: Salesforce Flow – Define Flow Properties for After-Save Flow
- Field : Lead Source
- Operator: Euqals
- Optimize the Flow For : Action and Related Records

Step 4.2: Salesforce Flow – Add Scheduled Paths

- Under SCHEDULED PATHS , click on the New Scheduled Path .
- Under Scheduled Path Details , enter the Label the API Name will auto-populate.
- Time Source : Lead: Last Modified Date
- Offset Number : 1
- Offset Options : Minutes After

Step 4.3: Salesforce Flow – Adding an Action to Call Apex class to Trigger Lead Assignment Rule
- Drag-and-drop the Actions element onto the Flow designer.
- Select the AssignLeadsUsingAssignmentRules Apex class.
- Field: LeadIds
- Value: {!$Record.Id}

- Interview Label : Record-Trigger: Lead After Save {!$Flow.CurrentDateTime}

Proof of Concept
Now onward, if a business user updates the Lead Source to Partner Referral , Process Builder will automatically update Status , Type , and Assign it to the right user or queue based on the lead assignment rule.

Monitor Your Schedule Flow
To monitor Flows that are scheduled, navigate to the following path:
- Navigate to Setup (Gear Icon) | Environments | Monitoring | Time-Based Workflow .

- Use the Delete button to delete the time-based Flow job from the queue.
Formative Assessment:
I want to hear from you! What is one thing you learned from this post? How do you envision applying this new knowledge in the real world? Let me know by Tweeting me at @automationchamp , or find me on LinkedIn.
Submit Query!
Similar Posts

Information Gathering in Flows and Beyond: Enabling Power Users to Conduct Inspections

Easiest Way to Make Screen Component Read Only

Choose Running User for Platform Event-Triggered Flows
9 thoughts on “ running lead assignment rules from salesforce flow ”.
It ran repeatedly, every minute, over and over again. I was getting notification email every minute when testing. I did the same steps as you mentionned, with a record triggered flow containing the apex action.
I found that this ran repeatedly, every minute, over and over again. Was easy to spot because I modified the Apex to include sending the user notification email as well – so I was getting notification email every minute when testing.
When I updated the ‘Time Source’ in the flow scheduled path from ‘Time Source: Lead: Last Modified Date’ to ‘Time Source: When Lead is Created or Updated’ that seems to have solved the problem.
Was curious if you had the same experience or if there was some other nuance happening.
It also looks like you had originally intended to use a decision element in step 4.3 but changed that to flow entry requirements, likely because the scheduled path can’t assess the prior and current values the same way the starting node can.
Thank you for sharing your valuable feedback. I have a quick question for you: When executing the Apex class, do you utilize a Record-triggered Flow or a Scheduled-triggered Flow?
after the apex class fires, noticed the lead owner is assigned to default lead owner, instead of using lead assignment rule. Any clue?
Thank you for an excellent tutorial 🙂 you solved my problem! Very much appreciated
Anyone getting issues with an error on mass updates “Apex error occurred: System.QueryException: List has more than 1 row for assignment to SObject “? if each one is called individually, I don’t understand how there is more than 1 row for assignment. Sometimes I get an email with this error only to see that the trigger actually worked for the specified record so a bit odd. Thanks!
Thank you for the great tutorial. Why add the 1 minute wait? Is that just to take avoid too much synchronous automation? Or is it required for another reason?
You’re right Kevin (to make the process asynchronous).
- Pingback: Getting Started with Process Builder – Part 49 (Running Lead Assignment Rules From Process Builder) - Automation Champion
Leave a Reply Cancel reply
This site uses Akismet to reduce spam. Learn how your comment data is processed .
Discover more from Automation Champion
Subscribe now to keep reading and get access to the full archive.
Type your email…
Continue reading
- May 12, 2020
How I Manage Lead Assignment in Salesforce For a Global Sales Development Team
Part of my role as a Marketing Operations Manager is to manage the lead assignment process within Salesforce for our 25+ Sales Development Representatives from around the world. A crucial piece to our success is getting the leads to the right person without any delay and ensure a smooth handoff from marketing to sales. In this post, I will walk you through exactly how I manage the lead assignment and lead reassignment process within Salesforce and share some lessons learned along the way.
High-level overview of the lead assignment process
- Manage lead assignment for 25+ Sales Developement Representives around the world
- Manage lead assignment for 10+ channel partners around the world
- Leads are only assigned to SDRs or partners (no AEs or ADMs, for example)
- Leads in target countries are scored and given a rating (A-D).
- Leads that meet our MQL rating are assigned to an SDR for follow up
- Leads that do not meet our MQL rating are assigned to a lead queue in Salesforce
Using standard Salesforce lead assignment rules
When the Sales Development team was smaller and the business rules were not as complex, we used the standard Salesforce lead assignment rules . Now, we only use the standard assignment rules to assign leads to channel partners. These assignment rules are only based on Country and are rarely updated.
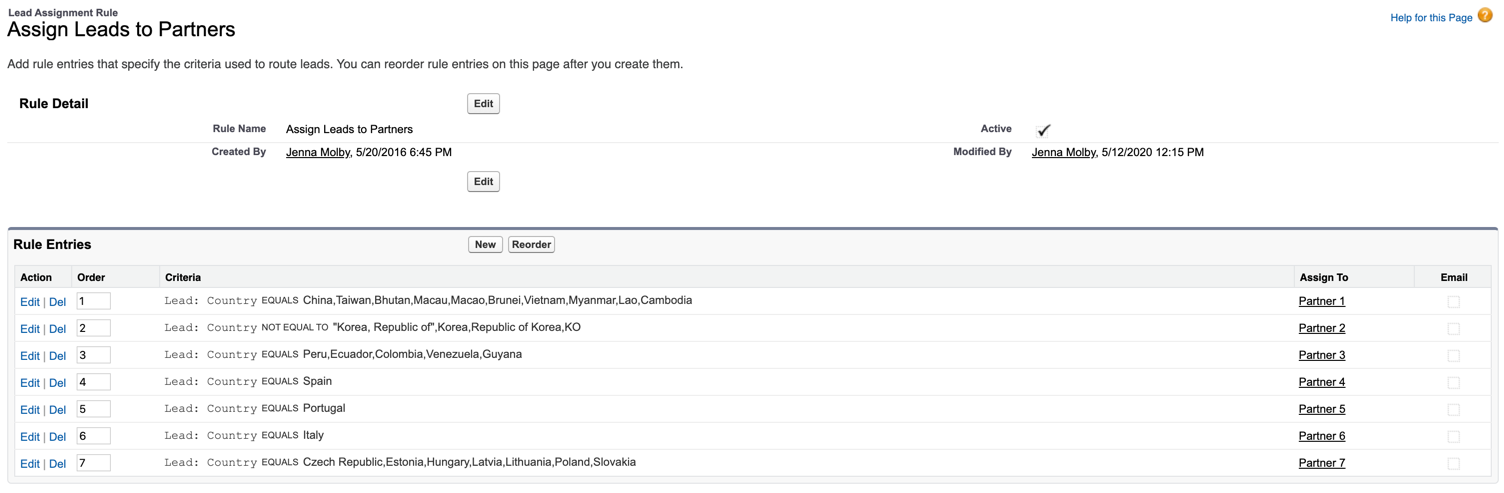
Using advanced lead assignment rules in Salesforce
The lead assignment for the Sales Development team is more complex. Leads are assigned based on a number of different criteria including industry and company size. With 25+ Sales Development Reps, territories constantly shifting and the team growing, using the standard Salesforce lead assignment rules were difficult to manage. We purchased Traction Complete an app available on the Salesforce AppExchange to manage the lead assignment for our SDR team. Not only does Traction Complete give us an easier, more visual way of managing our lead assignment rules, it also gives us the ability to:
- Assign leads via round robin
- Automatically match leads to accounts
- Filter records by advanced criteria (using fields from the leads or matched account)
- Account based lead assignment
- Update fields
- Automatically convert leads from a matched account into a contact
- Auto-merge duplicate leads
The lead assignment process
Here’s a basic overview of what the lead assignment process looks like.
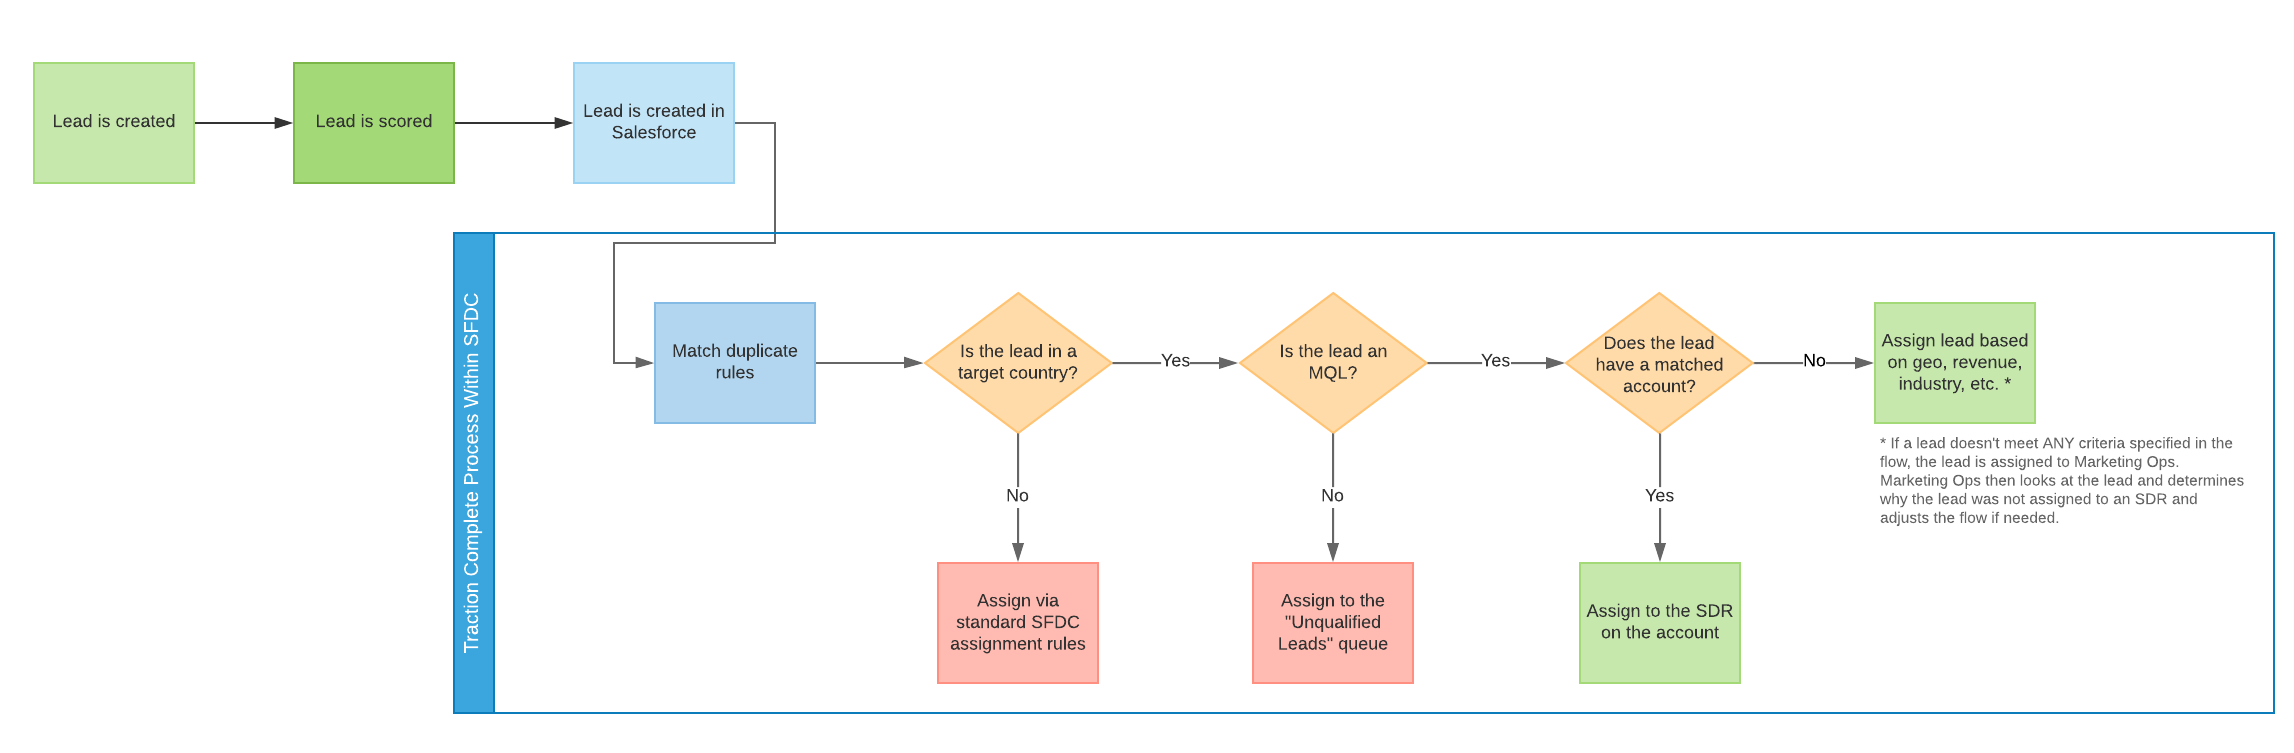
Leads are created in our Marketing Automation platform and are scored. The leads are then synced with Salesforce where the Complete assignment rules run to determine:
- Is the lead in one of our target countries? If the lead is not in one of the target countries, the lead is assigned via the standard Salesforce assignment rules.
- Is the lead an MQL? Leads are only assigned to an SDR once they reach them MQL threshold. If they are not an MQL, they will be assigned to the “Unqualified Leads” queue until they reach the MQL threshold.
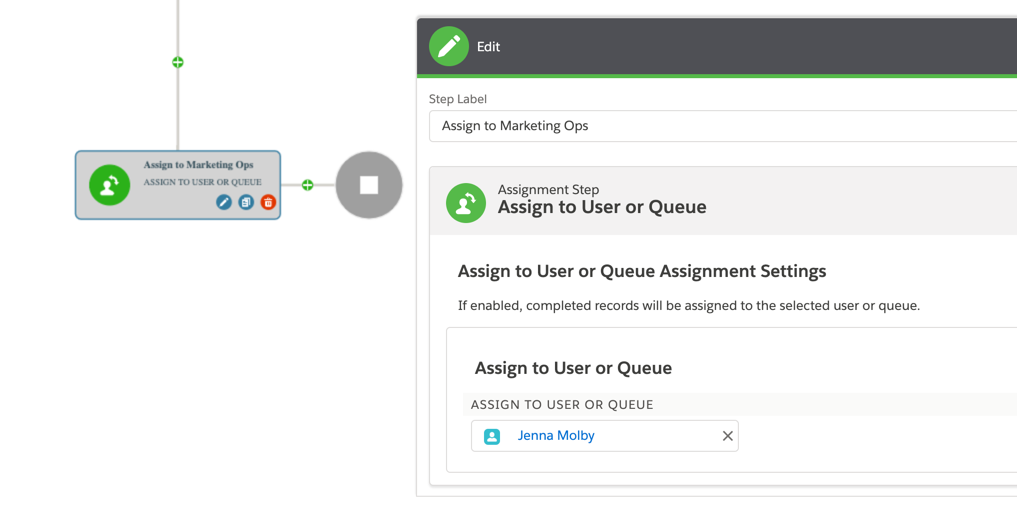
Assigning leads via round robin
We also have the ability to assign leads via round robin. We occasionally use this feature if an SDR is going on vacation for an extended period of time.
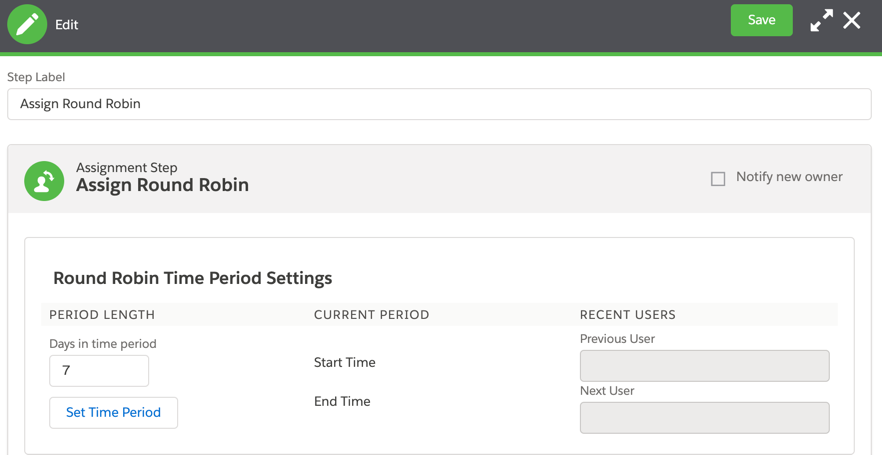
Triggering lead assignment rules when a lead is an MQL
Leads are only assigned once they are marketing qualified. To trigger the lead assignment process in Complete, the checkbox field called “Re-run Traction Complete” must be set to TRUE. To update this field, we have MQL flows set up in our Marketing Automation system to do this automatically.
Here’s what the smart campaign looks like in Marketo to trigger lead assignment when a lead becomes an MQL
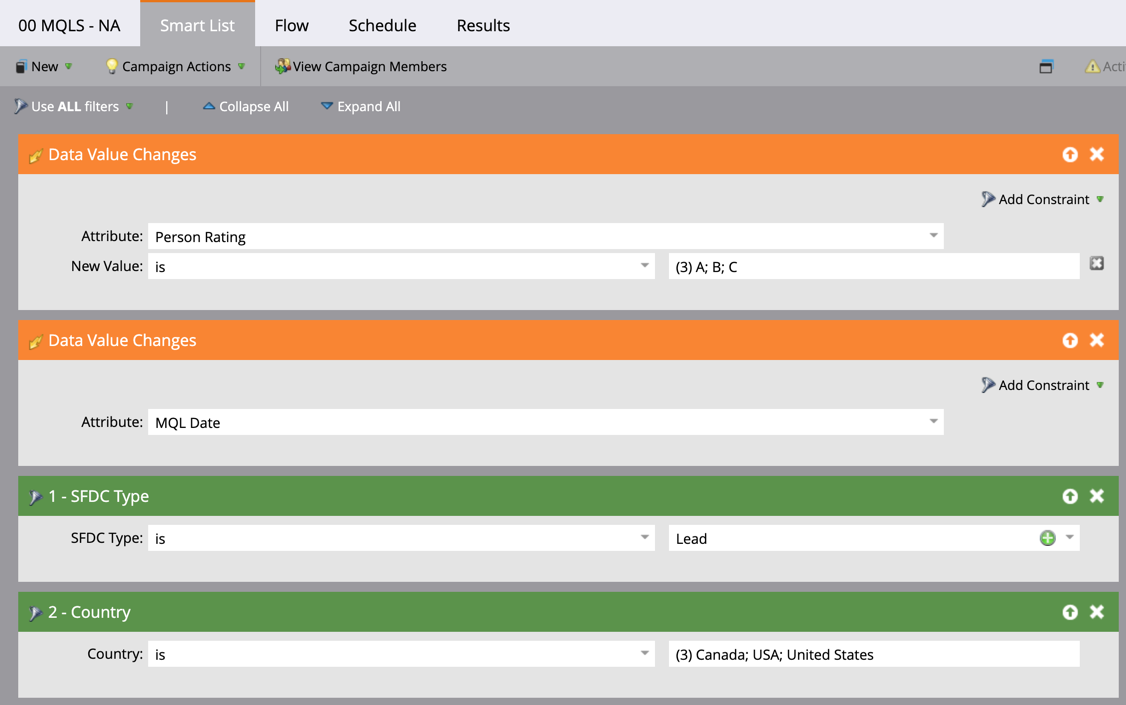
Leads can only run through the smart campaign every 60 days because we do not want leads to continuosly become an MQL if the SDR has had a conversation with them recently.
Here’s what the automation rule looks like in Pardot to trigger lead assignment when a lead becomes an MQL
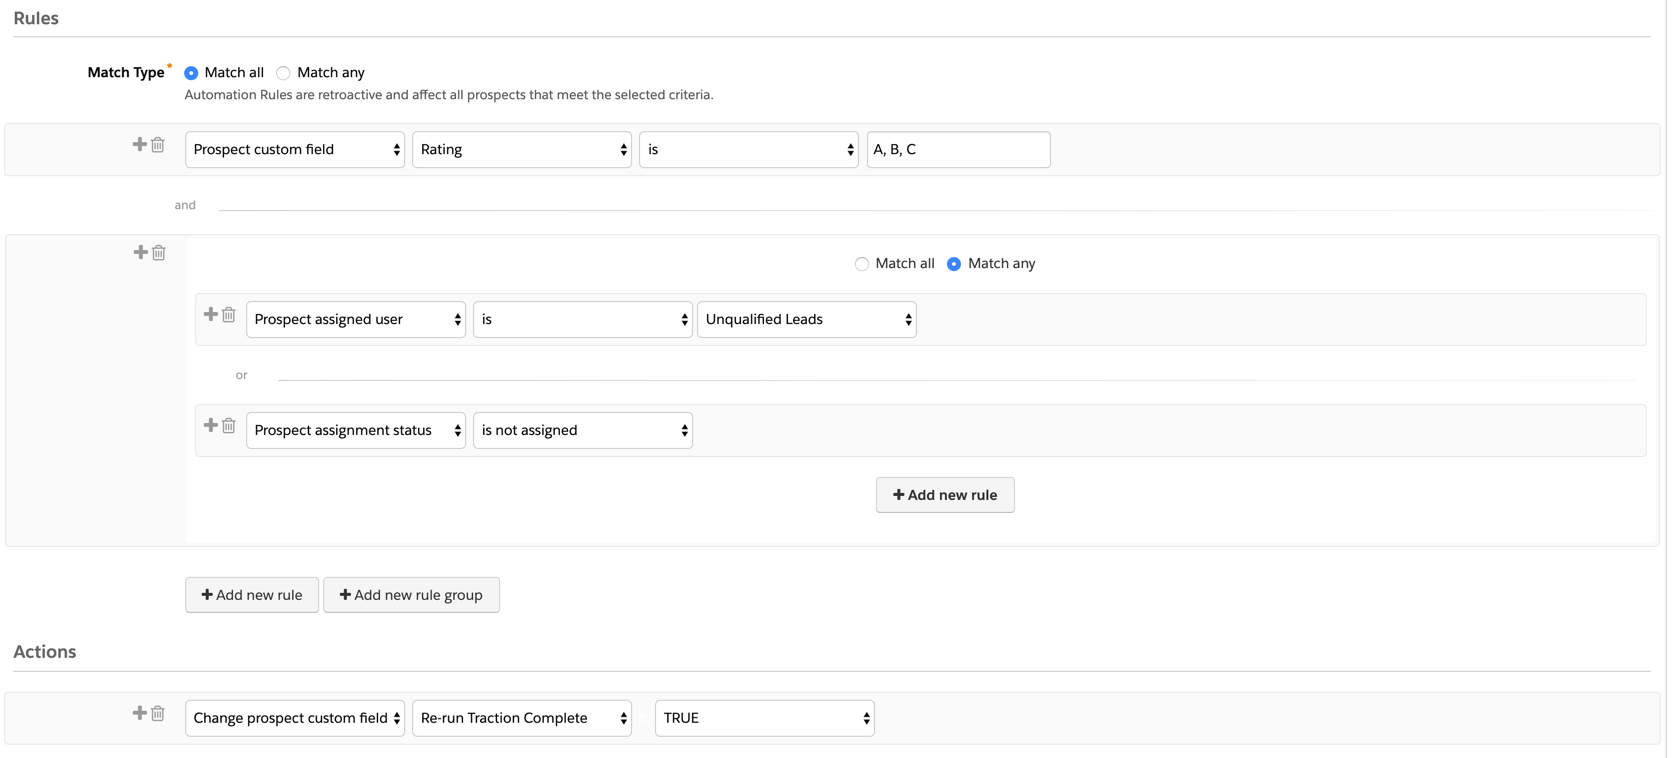
Tips for managing lead assignments
- Limit the number of times a lead can become an MQL . If a lead is considered an MQL more than once, it can impact your conversion rates and skew your reporting. Limiting the number of times a lead can become an MQL can help with this, and it can prevent SDRs from constantly updating the lead to “recycle” or something similar.
- Make sure you have all countries, states and provinces assigned . This might seem obvious, but when you are territory planning, make sure that all states, provinces, and countries you do business in are accounted for. Otherwise, some leads might slip through the cracks and not be assigned to anyone or assigned to the wrong person.
- Determine the criteria for lead reassignment . When should the lead be reassigned? Do you have an SLA the SDR needs to meet before the lead is reassigned to someone else? If you shift territories, does the current SDR get to keep anything they are currently working on? Are there certain leads that should be excluded from reassignment? All these questions are something you should work with your Sales Manager to determine before making any changes in Salesforce.
- Allow SDRs to update lead ownership . Sometimes the lead is assigned to the wrong person, usually due to incorrect demographic data. Allow SDRs to be able to update the lead ownership to the correct person instead of pinging an admin to do it.
- Determine if lead alerts need to be set up . Do SDRs need to be alerted when a lead is assigned to them? If not, then you need to create views where they can easily see leads assigned to them. We use Outreach.io as our Sales Engagement Platform, which allows our SDRs to easily see what leads are assigned to them and need to be actioned on immediately. For that reason, we do not have lead alerts set up for MQLs, but we do have alerts sent out if a high-value form (pricing, contact, etc) is filled out.
- Enable field history tracking for lead owner . Enabling field history tracking for lead owner will allow you to see when lead owner updates occur. This is important for troubleshooting to see if your automated lead assignment process assigned the lead to the incorrect owner, or if someone updated the lead owner manually. It will also allow you to easily reverse owner updates if leads are assigned to someone by mistake.
Lead reassignment due to territory changes
Step 1: update the lead assignment rules in traction complete.
The first step to do a territory change is to update the flow in Traction Complete. This update will only apply to new leads and new MQLs.
Step 2: Pull Salesforce report of the leads that need to be updated
Next, pull a Salesforce report of all the leads that need to be reassigned. The report should at minimum include the fields Lead ID or 18-Digit Lead ID and Re-Run Traction Complete. I also add the following filters to the report:
- Converted = False (to remove any leads that are already converted into contacts)
- Lead Owner contains _______ (to pull leads owned by a specific person)
- Lead Status not equal to Working (to exclude leads that the SDR is already working)
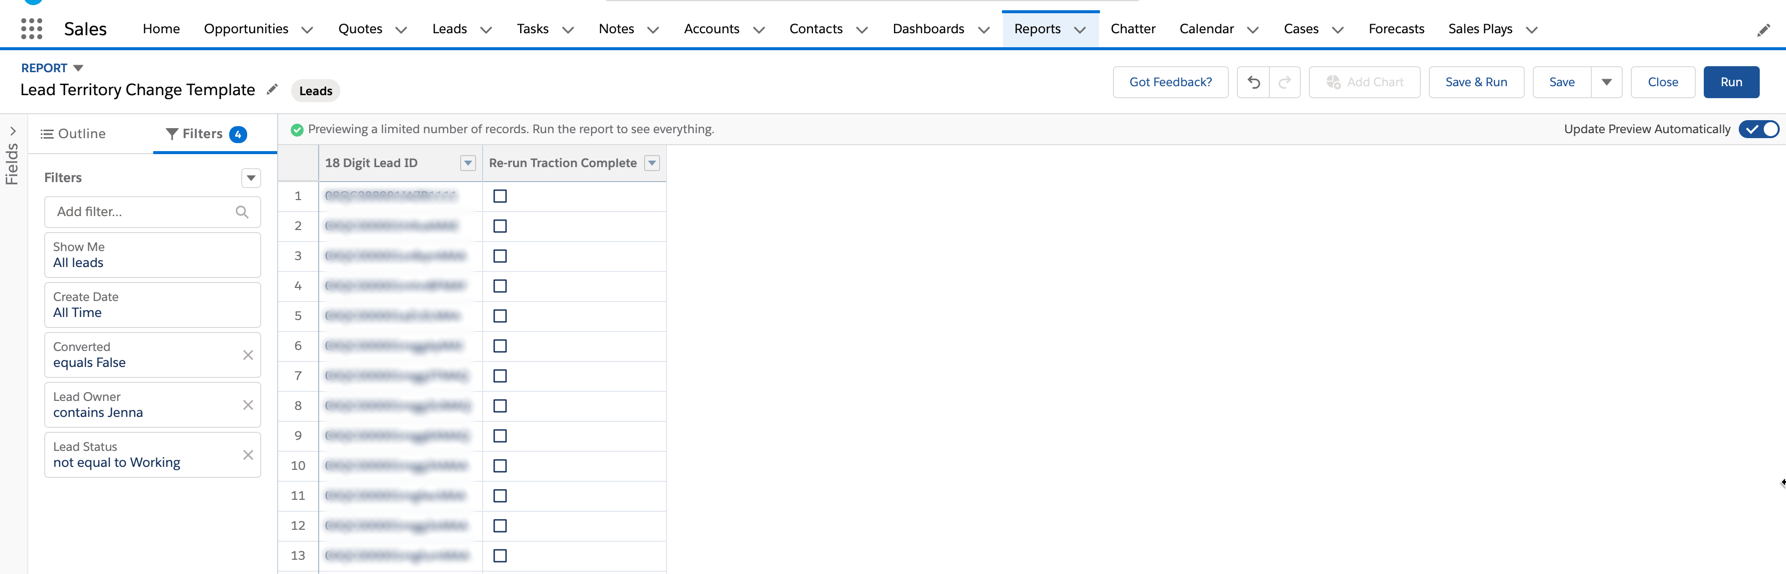
Run the report and export it as a CSV.
Step 3: Update the field “Re-run Traction Complete” to TRUE
Open the file in Excel and set the “Re-run Traction Complete field to TRUE. Save the file.
Step 4: Upload the file to trigger the re-assignment
I use Salesforce Data Loader to upload the CSV into Salesforce.
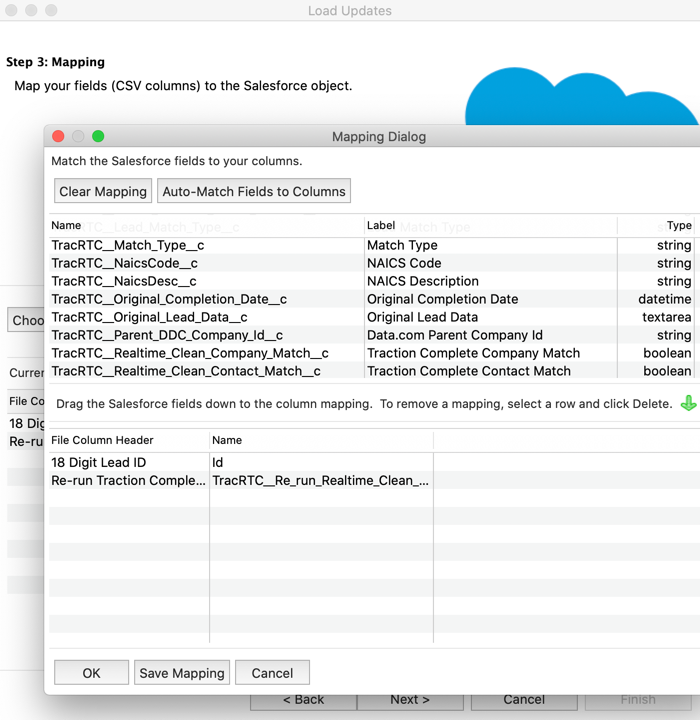
Lessons learned from completing many territory reassignments
- Updating via my Marketing Automation platform is MUCH slower . I used to run data updates to trigger reassignment or lead ownership in Marketo. However, it takes a lot longer to complete then exporting a report in Salesforce and importing it via Data Loader.
- If you use a Sales Automation tool, make sure ownership is updated there as well . We use Outreach.io for our Sales Automation tool. I find that 90% of the time lead ownership is synced from Salesforce to Outreach immediately, but sometimes you need to force the sync.
- Create a “Lead Territory Change Template” report in Salesforce . I have a report saved that I reuse each time I do a territory reassignment. The template includes all the filters that I would typically use as well as all the columns I need.
- Always double check that the lead assignment is correct . Run a report in Salesforce and group by the lead owner to ensure that everything is assigned to the new owner.
- Ensure you don’t have any lead alerts setup . Check your Marketing Automation platform and processes in Salesforce to make sure nothing will trigger an email alert or something similar when the lead owner is updated. You don’t want to trigger hundreds, or maybe even thousands of alerts when a lead is reassigned.
How do you currently manage lead assignment in Salesforce?
- I use the standard lead assignment rules
- I use an app from the AppExchange
- I have my own custom process set up in Salesforce
- I have my own custom process set up in my Marketing Automation System
- Other (specify in comments below)
View Results
Send me a tweet @jennamolby , leave a comment below, or book a Peer Chat .
Leave a Reply Cancel reply
Your email address will not be published. Required fields are marked *
You are a truly rock star! Thank you for sharing a helpful work and tools on lead assignment!
@brandy_chi
Related Posts
7 Tips for Organizing Your Campaigns in Salesforce
- June 2, 2020
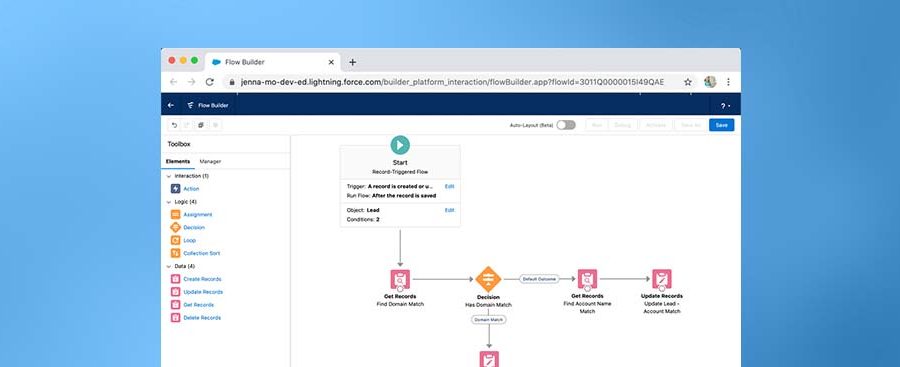
How to Setup Lead to Account Matching in Salesforce Using Flow
- September 27, 2021

7 Noteworthy Features in the Salesforce Spring ’19 Release
- December 17, 2018
Getting Started
Learn through 101 guides and easy solutions.
Dive into the weeds with advanced tips.
New Features
Evolve with the Salesforce platform feature updates.
Get to know our community and join the action.

6 Ways to Manage Lead Assignment in Pardot
- Marketing Automations , Pro Tips
- January 13, 2022
min. reading
Pardot lead assignment routing can trip up even the most experienced sales and marketing teams.
There are so many different ways to assign your prospects within Marketing Cloud Account Engagement (Pardot). Whether you want to manually assign prospects or utilize automation rules or completion actions to assign prospects based on their activity or information, the options can seem overwhelming.
In this post, I’ll dive into 6 different ways to manage lead assignment in Pardot and how to determine what the best option is for you. After all, cultivating interest, inspiring action, and responding to people who raise their hands is why we’re here, right?
Six Pardot Lead Routing Methods
Choosing the right lead management strategy and tools to automate the process is challenging, but it’s super important. Read on to understand what you should know to make the right choice for your organization.
There are multiple ways to assign new leads in Pardot ranging from manual assignments to complex and automated assignments based on lead criteria or activity.
- Assign to User
- Assign Prospect Via Salesforce Active Assignment Rule
- Assign to Group
- Assign to Queue in Salesforce
- Assignment via Prospect list actions
- Assign via advanced lead assignment rules in Salesforce
1. Assign to User
Assigns a prospect to the specified user when the requirements of the rule are fulfilled.
How to use it
Completion action:.
Assign to user can be set up as a completion action for your forms, form handlers, files, custom redirects, emails and page actions, by selecting “Assign to user” and selecting the user’s name from the dropdown
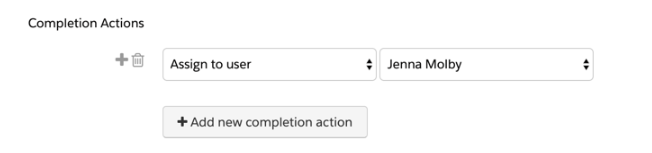
Automation Rule:
Assign prospect to user can be set up as an action within an Automation Rule. This is a great way to assign leads if you have criteria the lead needs to meet before assigning the prospect to Sales.
For example, if you want to only assign leads to sales that meet a certain scoring threshold, use an automation rule.

Engagement Studio Program:
Assign to user can also be set up as an action with an Engagement Studio Program, by selecting add element > action > assign to user .
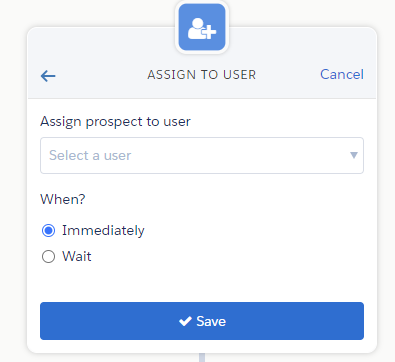
2. Assign Prospect via Salesforce Active Assignment Rule
Pushes a prospect to your Salesforce active assignment rule when the rule’s criteria are met (see more information on this process below). The prospect syncs to Salesforce without an owner.
The assigned user is synced to Pardot when the active assignment rule determines who to assign it to.
To get started, review this Pardot help article: Assigning Prospects
First, you will need an active lead assignment rule setup in Salesforce. This should include all the criteria for your lead assignment as well as a default user to assign the lead to if the lead does not meet any of the criteria.
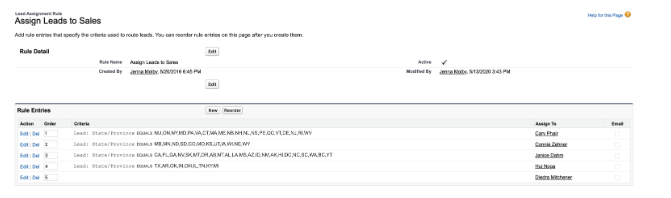
Assign via active Salesforce assignment rules can be set up as a completion action for your forms, form handlers, files, custom redirects, emails and page actions, by selecting “Assign prospect via Salesforce active assignment rule”.

Assign prospect via the Salesforce active assignment rule can be set up as an action within an Automation Rule.

Engagement Studio Program
Assign prospect via Salesforce active assignment rule can also be set up as an action with an Engagement Program, by selecting add element > action > assign prospect via Salesforce active assignment rule .
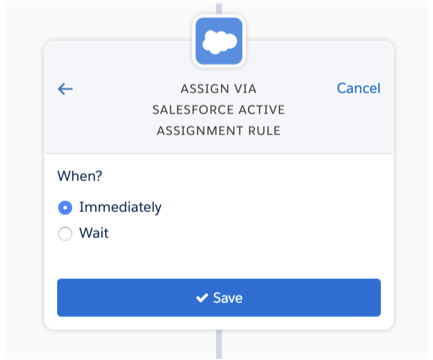
3. Assign to Group
Assigns a prospect to a user in a specific group (round robin lead assignment) when the requirements of the rule are met.
First, create a group in Pardot (Admin > User Management > Groups > Add User Group) .
Navigate to the user you should belong to the group (Admin > User Management > Users) and click Edit Groups . Select the group to add the user.
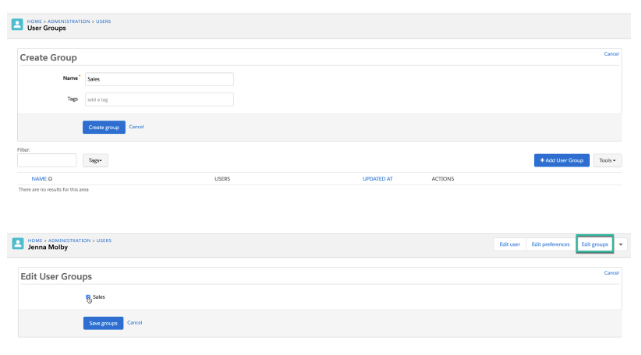
Assign to user can be set up as a completion action for your forms, form handlers, files, custom redirects, emails and page actions, by selecting “Assign to group” and selecting the user’s name from the dropdown

Assign prospect to user in group can be set up as an action within an Automation Rule.

Assign to group can also be set up as an action with an Engagement Program, by selecting add element > action > assign prospect to group .
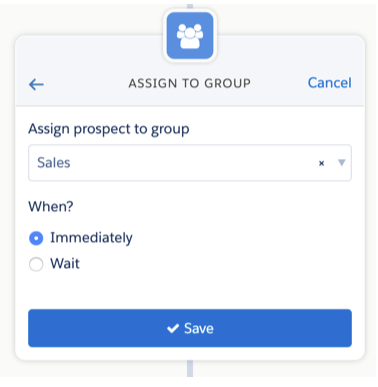
4. Assign to Queue in Salesforce
Assigns a prospect to the Sales Cloud lead queue when the rule’s criteria are met. Prospects assigned to a queue are considered assigned to an owner and aren’t reassigned. You can assign only leads to Sales Cloud lead queues.
First, you must have a lead queue set up in Salesforce.

Assign to queue can be set up as an action within an Automation Rule.
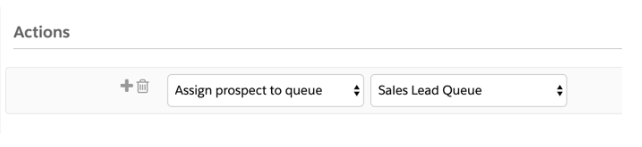
Assign to a queue can also be set up as an action with an Engagement Program, by selecting add element > action > assign to Salesforce queue .
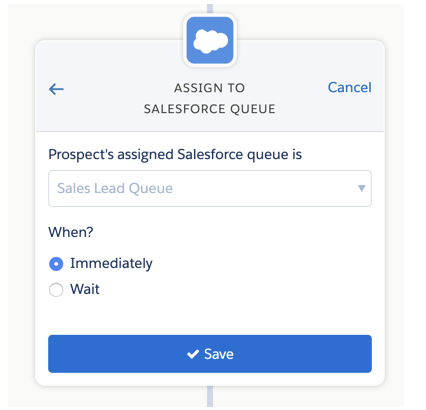
5. Assignment via Prospect list actions
Prospects can be assigned to a User or Group via prospect list actions.
Navigate to the prospect table, select the prospects you want to assign and select one of the options from the drop down menu.

6. Assign via advanced lead assignment rules in Salesforce
If you have more complex business rules, assigning leads via an app on the Salesforce AppExchange might be a good option. Most apps offer a visual way to view lead assignment rules and some advanced functionality, including auto-merging duplicate leads and lead to account matching.
Traction Complete is a good option we’ve used before.
Lead routing in Salesforce
Here are some additional ways Sales Cloud handles lead routing.

Lead assignment rules
In Sales Cloud, you can set up lead assignment rules to automate the assignment of new leads to your sales team or queues based on the specified rule criteria.
The rules will execute and evaluate in the numbered order as leads enter Sales Cloud. Each lead assignment rule consists of multiple rule entries that specify exactly how the leads or cases are assigned. When a lead matches the rule, it will be assigned to the correct person or queue. Only one lead assignment rule can be active at a time.
To get started, review this Salesforce help article: Set Up Assignment Rules
Round-robin lead assignment
The round-robin lead assignment rule in Sales Cloud helps you automate the assignment of new leads in an even way to your sales team or queues.
Here’s how the repeating round robin assignment looks if your sales team for lead assignment has 3 members:
- Lead 1 is assigned to sales person 1
- Lead 2 is assigned to sales person 2
- Lead 3 is assigned to sales person 3
- Lead 4 is assigned to sales person 1
- Lead 5 is assigned to sales person 2
- Lead 6 is assigned to sales person 3
To get started, review this Salesforce help article: Create a Round-Robin Lead Assignment Rule .
Still not sure what lead assignment method is best? Run through this flow chart to see what the recommended option is for you.
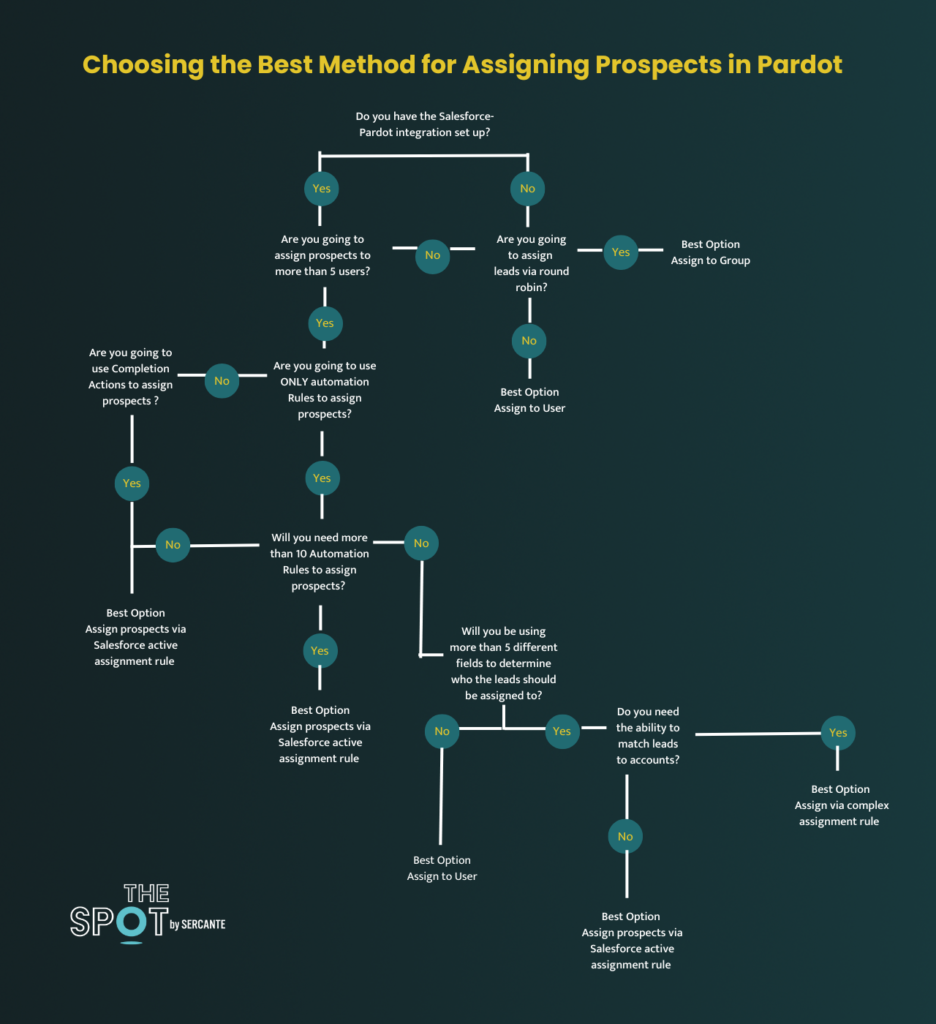
Additional Resources
- Salesforce Lead Assignment Rules Best Practices and Tricks
- Lead Routing in Salesforce
- Trailhead: Qualify and Route Leads to Your Reps
- Trailhead: Grow Your Business with Sales Cloud
- Trailhead: Convert and Assign Leads
- Trailhead: Sell as a Team
- ParDreamin’ on-demand video: Now You See Me, Now You Don’t! Lead Routing Basics for Pardot Admins
- The Three L’s in Pardot: Lists, Location, and Lead Assignment
- 6 Ways to Manage Lead Assignment in Pardot and How to Determine The Best Option
Complex lead routing with third-party tools
Third-party tools enable you to create complex lead routing rules that go beyond out-of-the-box Salesforce and Pardot lead routing features. Different tools serve specific purposes that may be the right fit depending on what you’re trying to accomplish.
Here are the most common ones.
LeanData is a native Salesforce lead matching and routing platform that is easy to use and customize with their visual drag-and-drop interface functionality and complex rule building.

RingLead is a native Salesforce lead routing, data normalization, enrichment, and duplicate managing platform.
DemandTools from Validity is a data management platform to help with importing, assigning, standardizing, manipulating, and the deduplication of your Salesforce data quickly.

Feel the Relief of Knowing Your Leads Are In Good Hands
Think you’re a Pardot lead routing pro now? Still have no idea where to start? Either way, tell us about it in the comments! And reach out to Sercante when you need Pardot consultant expertise for extra help and customization.
Subscribe to The Spot
Community Events

Top 5 Recent Posts

Salesforce Summer ‘24 Highlights: Marketing Cloud Account Engagement
Salesforce Summer ‘24 release notes are out! Let’s dive into the latest features Account...

Salesforce Summer ‘24 Highlights: Marketing Cloud Growth Edition
Even though Marketing Cloud Growth Edition just launched in February, it’s already receiving a...

SMS Mobile Strategy: A Guide to Go From Novice to Pro
If you’re like many, setting up an SMS program is not part of your...

Big Data to Big Impact: Enterprise Segmentation Strategy
In the age of big data, effective audience segmentation strategies are the key to...

Conference Preview: Get Ready for Salesforce Connections 2024
It’s that time of the year again — when marketing, sales, and service professionals...

Jenna is a Marketing Operations leader with over 10 years of experience working with both enterprise organizations and start-ups. She started her career as a consultant, helping B2B and B2C clients get the most out of Marketo, Pardot, Marketing Cloud and Salesforce. She then moved in-house, working with B2B SaaS companies, helping them build their sales and marketing technology stacks and processes from scratch.
Leave Your Comment Cancel Reply
You must be logged in to post a comment.
Related Articles
If you’re like many, setting up an SMS program is not part of your everyday tasks. And if I were a betting woman (I’m not), I’d bet you’ve likely...
In the age of big data, effective audience segmentation strategies are the key to unlocking the full potential of vast datasets available to enterprise-level companies. Join me on a...

How to Copy Account Engagement Assets to Sandbox
As part of the Winter ‘24 release, Account Engagement users gained the ability to copy assets to and from Account Engagement Sandboxes. This allows marketers to test automations and...
Bot Single Post
Martech Resources
Shopping consultants or jobs? Wanna join the action? Here’s everything you need to solve all the marketing technology things.
Consulting Services
Work with certified experts to transform your tech stack.
Training Courses
Develop your Salesforce & Pardot skills from anywhere.
Career Oportunities
Browse jobs working with Salesforce & Pardot.
Community Event
Learn from the only virtual Pardot-focused conference.
Virtual Networking
Connect with people in the Pardashian Slack community.
Quick Links
Get The Spot
The Spot for Pardot newsletter delivers a healthy dose of martech to your inbox — and nothing more.
© 2024 The Spot For Pardot | All Rights Reserved Sercante LLC.4
This website uses cookies to improve your browsing experience. By clicking “Accept,” you consent to the use of all cookies.
You can customize your preferences or learn more about our use of cookies in our Privacy Policy .
This browser is no longer supported.
Upgrade to Microsoft Edge to take advantage of the latest features, security updates, and technical support.
Work assignment overview
- 3 contributors
Work assignment is a feature of Dynamics 365 Sales that automates the assignment of leads, opportunities, and insights to your sales team. Easily create segments to group and prioritize new or updated leads and opportunities. Connect segments to sequences of activities to guide sellers through your sales process. Finally, create rules to automatically assign records to sellers, freeing your time for more productive work.
Work assignment is available in sales accelerator version 9.1.23074.10021 and is rolling out in phases in different regions.
License and role requirements
Prerequisites.
Sales accelerator is configured in your organization .
Work assignment components
Work assignment automation is built around three components: segments , sequences , and assignment rules .
Segments categorize records based on specific criteria, such as location and source. For instance, you might have a segment for leads from trade shows in the United Kingdom.
Sequences are the steps that sellers follow as they progress through the sales journey. Defined sequences help new sellers be more effective faster. They make sure your entire sales team—from the most junior salesperson to veteran sellers—is on the same page.
Segments connect records to sequences. For instance, your sales process might be something like this: "If a lead comes from a trade show in the UK" (segment), always "follow up with an email within three business days" (sequence).
Assignment rules are sets of conditions that automatically assign matching records to sellers or sales teams. You can create assignment rules for opportunities, leads, and insights.
For instance, you might have a rule that assigns all leads from trade shows in the UK to your London sales team.
Can't find the options in your app?
There are three possibilities:
- You don't have the necessary license or role .
- Your administrator hasn't turned on the feature.
- Your organization is using a custom app. Check with your administrator for exact steps. The steps described in this article are specific to the out-of-the-box Sales Hub and Sales Professional apps.
Configure work assignment .
- Get seller insights to improve seller effectiveness
Was this page helpful?
Coming soon: Throughout 2024 we will be phasing out GitHub Issues as the feedback mechanism for content and replacing it with a new feedback system. For more information see: https://aka.ms/ContentUserFeedback .
Submit and view feedback for
Additional resources
- Team Features
Using Privyr with a Team
Introduction.
You can create team accounts in Privyr to coordinate on leads and manage clients across multiple people on your team.
Once you invite your colleagues to your team, you can set up lead assignment rules to automatically assign new leads in a round robin distribution, or leave leads unassigned so that everyone gets an alert and whoever is free can claim and respond to the lead.
You’ll also be able to set permissions for each team member to control the types of clients they have access to view. For example, some team members may be able to view all clients across the team, while others may only have access to view the clients that are assigned to themselves.
Admin accounts have full control over their team and data, and can invite, change permissions, or deactivate team accounts at any time.
Inviting Team Members
You can invite people to your team on Privyr via the following steps:
- On the Mobile App, go to your Account tab > Manage Team

- Clients assigned to themselves : Users will always be able to view and act on clients that are assigned to themselves.
- Clients assigned to others : Allow user to view clients that are assigned to other team members. This also allows the user to assign and/or reassign clients to themselves or their teammates.
- Unassigned Clients : Allow user to view and claim clients that are unassigned (e.g. clients not assigned to anyone yet).
- Allow user to add and edit client groups for the team.
- Allow user to permanently delete clients from the team. This can only be done for clients that are currently assigned to themselves.
- Allow user to add and edit content (messages, files, pages) for the team.
- Allow user to create, edit, and manage team members and their permissions . Note that they won’t be able to edit the Admin Account’s permissions or access.
- Allow user to manage integrations and import/export clients .
- Click on SEND INVITE to send the invitations via email
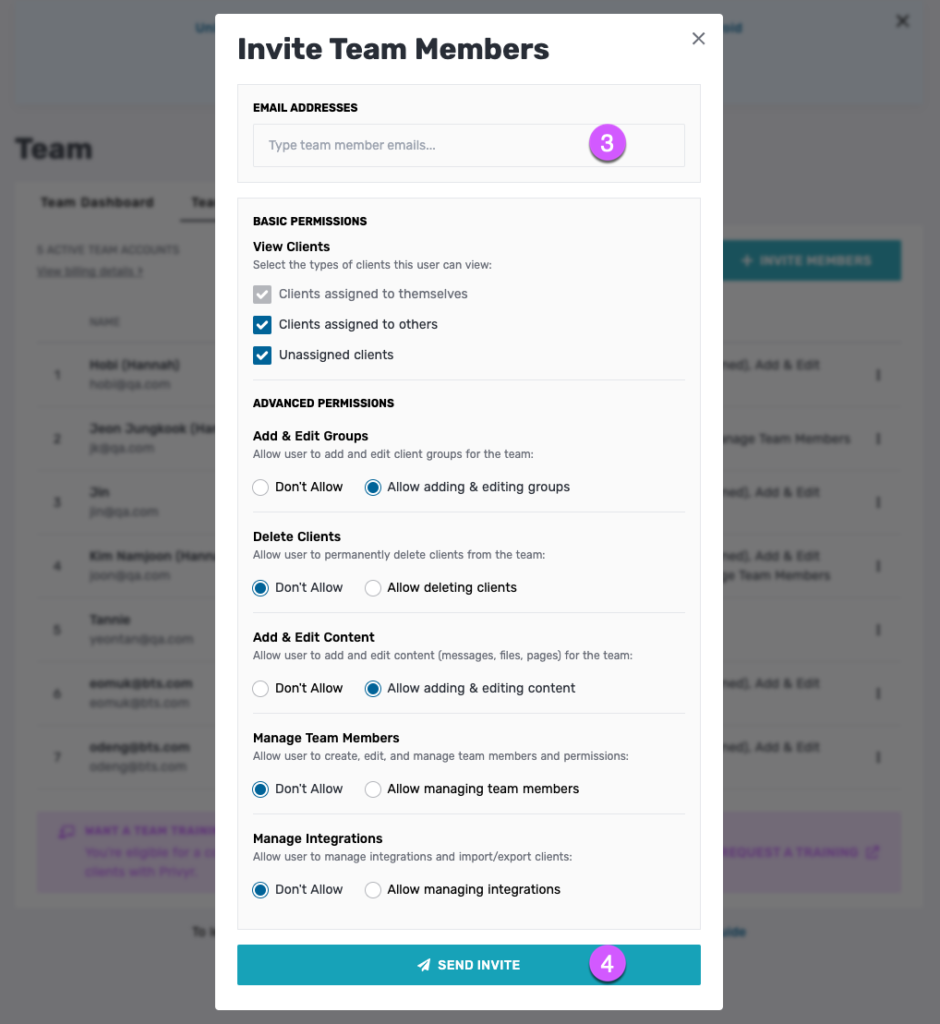
Once you’ve invited your team member(s), they’ll receive an email prompting them to download and log into the Privyr app to activate their account. You can view the status of your invitations on your Team Members dashboard.
- If a user’s status is ‘ Invite Sent ‘, it means they have been sent the invitation email but have not logged in to activate their account yet. You can click the ‘…’ on the right side of the table and choose to Resend Invite or Cancel Invite .
- Once a user has logged in and activated their account, their status will appear as ‘ Active ‘
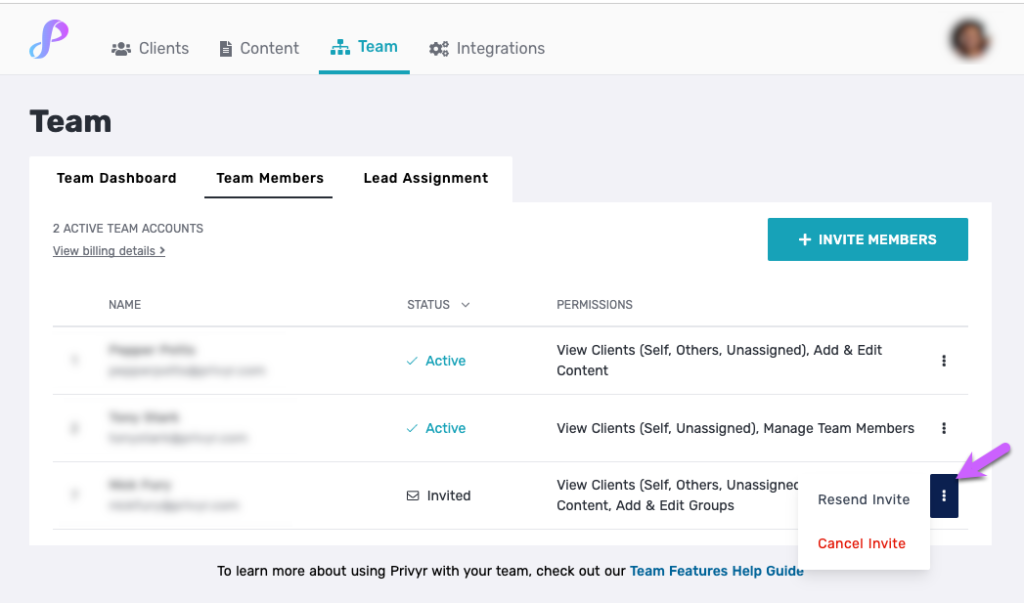
Note that billing for team accounts starts once they have been activated. However, if you’re still on free trial and/or are not subscribed, you won’t be charged for any accounts until your free trial ends and you subscribe to Privyr. View more details under Billing for Team Accounts .
Managing Team Members
Your Team Members tab shows all users on your team, including those that are invited, active, and deactivated. Admin accounts have full control over their team and data, and can invite , change permissions , or deactivate team accounts at any time.
- To invite a new team member , tap on the + INVITE NEW MEMBER button
- If a user’s status is ‘ Invite Sent ‘, it means they’ve been invited via email but have not logged in to activate their account yet. You can click the ‘ … ‘ and choose to Resend Invite or Cancel Invite .
- If a user’s status is ‘ Active ‘, you can click the ‘ … ‘ and choose to Edit Permissions or Deactivate Account .
- If a user’s status is ‘ Deactivated ‘, you can click the ‘ … ‘ and choose to Edit Permissions or Reactivate Account .
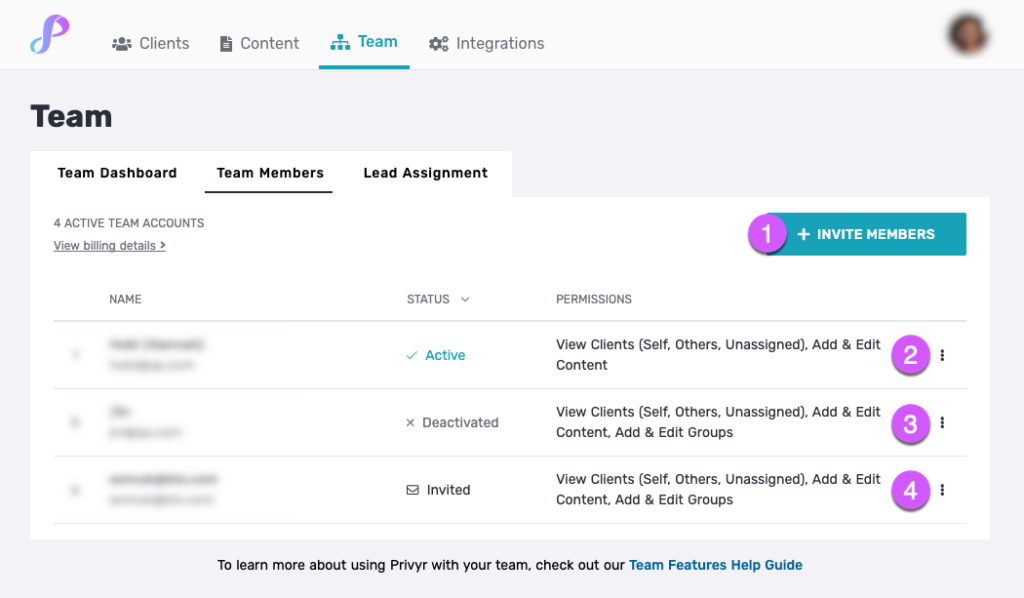
Team Member Permissions
You can view the permissions granted to a team member on your Team Members dashboard, under the PERMISSIONS column (A) . To edit the permissions of a user, click on ‘ … ‘ then ‘ Edit Permissions ‘ (B) .
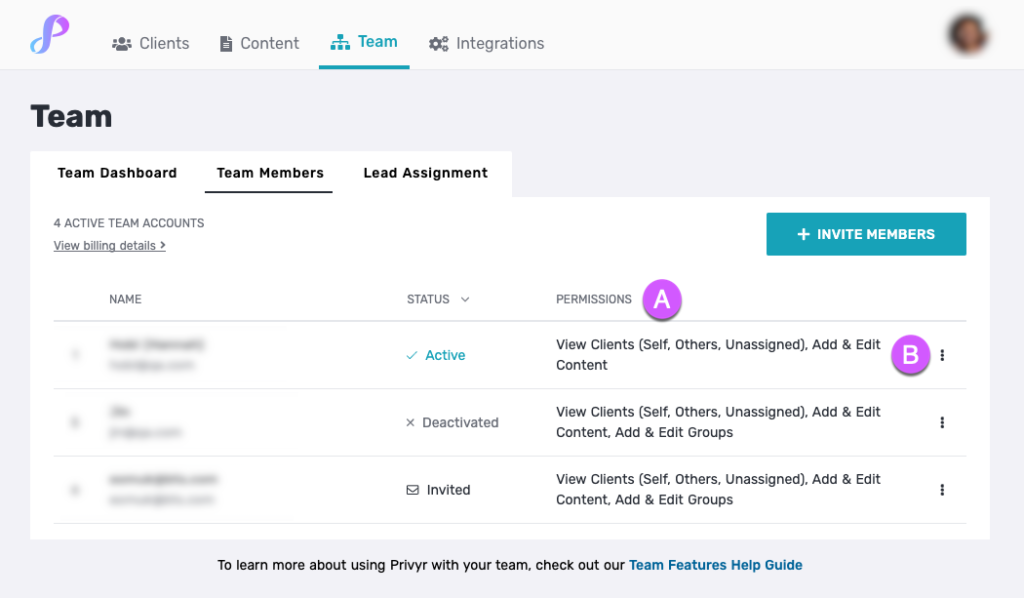
When inviting or editing a team member, you’ll be able to grant or revoke permissions to view and delete certain types of clients, as well as to add and edit Content and Groups.
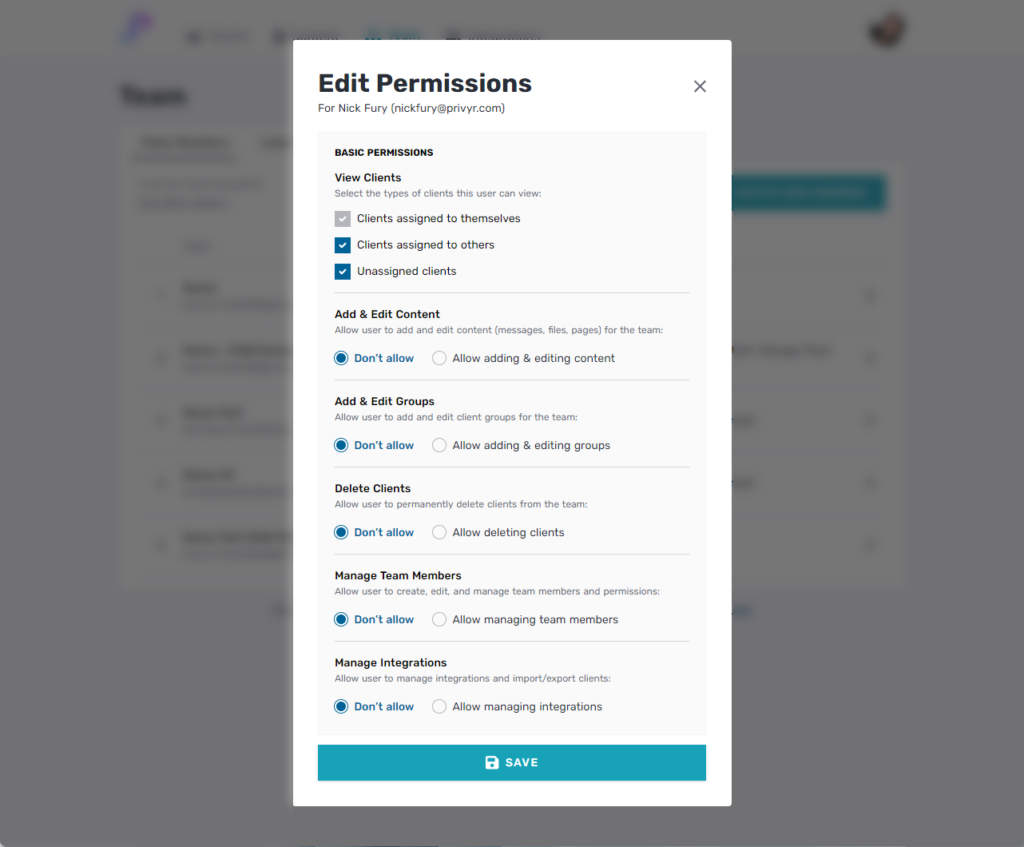
VIEW CLIENTS Team members will always be able to view clients that are assigned to themselves. Depending on their permissions, they may also be able to view clients assigned to other team members, and/or unassigned clients (e.g. clients that aren’t assigned to anyone yet). If a user has permissions to view clients assigned to others and/or unassigned clients, they can access the Team tab to view clients by assignment status, and adjust their Team View Setting to only show certain types of clients in their Privyr app.
CONTACT AND UPDATE CLIENTS A team member will only be able to contact and update clients that are assigned to themselves. Similarly, clients can only be contacted and updated by the team member that is currently assigned to them (even if other team members have permissions to view the client). This ensures that only one team member is acting on a client at a time, preventing accidents where multiple people are trying to contact or update the same client at the same time. If you want to contact or edit a client that is assigned to someone else or unassigned, you’ll need to assign the client to yourself first.
ASSIGN CLIENTS Team members with permissions to view ‘ clients assigned to others ‘ also have the ability to assign and/or reassign clients to themselves or other team members. Team members with permissions to view ‘ unassigned clients ‘ have the ability to claim the client by assigning it to themselves. If a user only has permissions to view clients that are assigned to themselves, they won’t be able to assign, reassign, or claim any clients.
ADD & EDIT CONTENT If a user has permissions to ‘ add & edit content ‘, they’ll be able to create new and edit existing content (messages, files and pages) that can be viewed and used by all members across the team. Note that only the admin will be able to delete content.
ADD & EDIT GROUPS If a user has permissions to ‘ add & edit groups ‘, they’ll be able to create new and edit existing client groups that can be viewed and used by all members across the team. Note that only the admin will be able to delete groups.
DELETE CLIENTS If a user has permissions to ‘ delete clients ‘, they’ll be able to permanently delete clients from the team. However, they can only delete clients that are currently assigned to themselves. If you need to delete a client that is assigned to someone else or unassigned, you’ll need to assign the client to yourself first before deleting.
MANAGE TEAM MEMBERS If a user has permission to ‘ manage team members ’, they’ll be able to add or invite team members, cancel outstanding invitations, activate or deactivate team members, edit permissions for any team members, and manage the team’s lead assignment rules .
However, team members cannot edit the admin account’s permission nor deactivate the admin account.
MANAGE INTEGRATIONS If a user has permission to ‘ manage integrations ’, they’ll be able to configure lead source integrations , manage lead distribution rules , and import or export clients from CSV .
COMMON PERMISSIONS FOR TEAM ACCOUNTS Certain actions are always allowed or disallowed for team member accounts, regardless of their permissions.
All team members are able to add new contacts , access and send content (e.g. files, messages, and pages), and use client groups .
However, only the admin account will be able to delete content and client groups , and manage account billing .
Team Dashboard
The Team Dashboard lets you view key statistics about your team’s performance, such as the number of clients assigned to each teammate, contact rate, average response time, and activities taken. You can access the dashboard by going to Team > Team Dashboard .
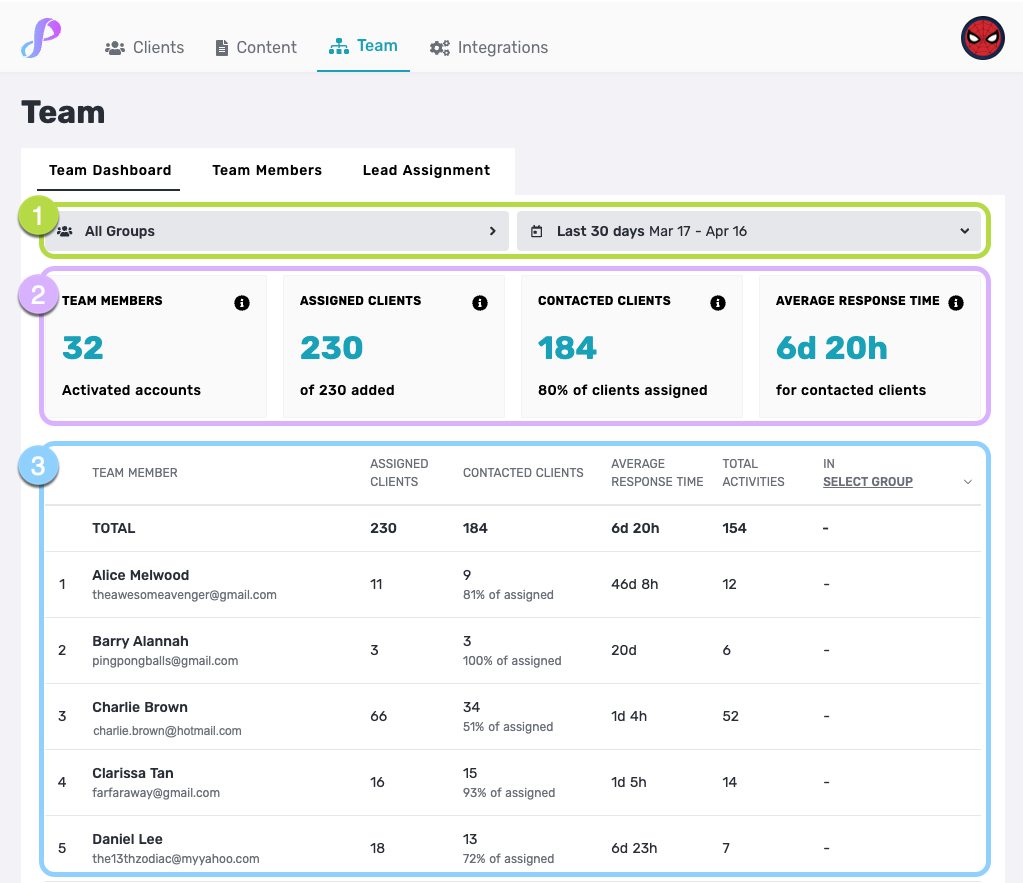
The Team Dashboard contains the following sections:
- For Assigned Clients and Contacted Clients : Filters clients within the selected client group
- For Average Response Time and Total Activities : Filters activities performed on clients within the selected client group
- For Assigned Clients and Contacted Clients : Filters clients added to Privyr within the selected date range
- For Average Response Time and Total Activities : Filters First Responses and activities that were logged within the selected date range
- Team Members: Total team count
- Assigned Clients: Total clients assigned to the team
- Contacted Clients: Total assigned clients that have been contacted (clients without an Uncontacted label )
- Average Response Time: Average time taken for all team members to log a First Response
- Team Member: Name and email address
- Assigned Clients: Number of clients assigned to the member
- Contacted Clients: Number of assigned clients that have been contacted (clients without an Uncontacted label )
- Average Response Time: Average time taken for the member to log a First Response
- Total Activities: Number of timeline activities logged by the member
- In Select Group: Select a group to see the number of Assigned Clients that are in the selected client group
Team View Setting
If a user account has permissions to view clients assigned to others and/or unassigned clients , they can adjust their Team View setting to only show certain types of clients in their Privyr application, via the following steps:
- Go to your Account tab
- Tap on Team View
- Note that the options available for a user will depend on the permissions granted to their account
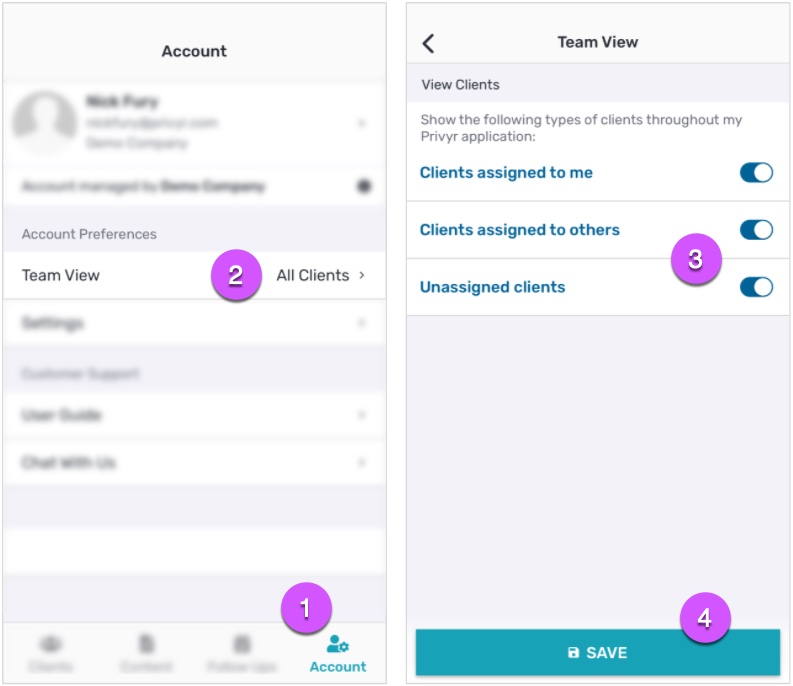
The Team View setting will not be available for accounts that only have access to view clients assigned to themselves, since they don’t have permissions to view any other types of clients.
If a user account has permissions to view clients assigned to others and/or unassigned clients , they’ll be able to access the Team tab in their Privyr app. This lets them quickly view clients that are assigned to themselves, unassigned clients, and clients assigned to each team member (depending on their permissions ).
You can also quickly bulk assign or reassign clients from the teams tab.
- Go to your Clients tab
- Note that this tab won’t be available for accounts that only have access to view clients assigned to themselves
- Tap on Options to quickly select and reassign some/all clients to someone else
Note that the Team tab is not affected by the Team View setting .

Automatic Lead Assignment
You can configure Privyr to automatically assign new leads from your lead sources to your team members, or leave leads as unassigned so that they can be claimed by whoever is available. This lets you control who will receive alerts for new leads, as well as who can view and act on those leads.
Automatic Lead Assignment rules apply to new leads received across all your lead sources , such as your website, Facebook Lead Ads, Google Ad Lead Forms, and other integrations like Zapier. You can also create Advanced Lead Assignment Rules to assign leads based on specific criteria such as by Facebook Page, Facebook Lead Form, or all Facebook Leads.
You can manage your Lead Assignment rules via the following steps:
- Go to your Lead Assignment Dashboard by clicking on Team > Lead Assignment on the Privyr desktop site
- Leave Unassigned will leave all new leads as unassigned. This will send new lead alerts to all team members with permissions to view unassigned clients . The first person to view and claim the lead will be assigned to it.
- Automatically Assign to Team Member(s) will assign leads to selected team members in a round robin distribution, so that each member is assigned a single lead in each round. Only the assigned team member will receive an alert for each new lead.
- You can also change the LEADS/ROUND column to change how many leads each team member should receive per round (up to 5 leads per round).
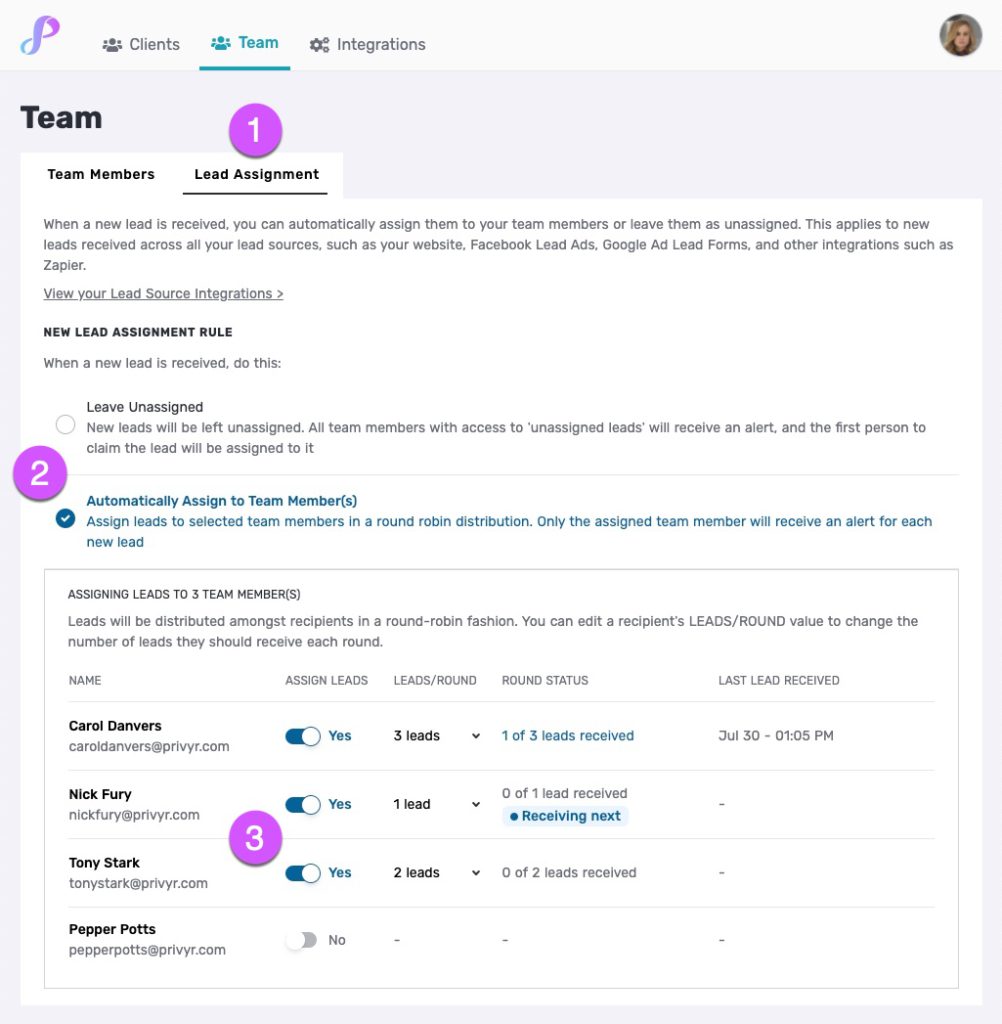
Advanced Lead Assignment Rules
You can create advanced rules to assign leads to team members (or leave them unassigned) based on specific criteria such as by Facebook Page, Facebook Lead Form, all leads from a specific lead source, or custom fields. As an example, you can set up the following rules:
- For leads from Facebook Form X , leave them Unassigned
- For leads from Facebook Page Y , distribute in round robin between Team Members A, B, C
- For all leads from Elementor , assign to Team Member D
- When a lead’s preferred_contact_method matches WhatsApp , assign to Team Member E
- For all other leads , leave them Unassigned
You can create Advanced Lead Assignment rules via the following steps:
- Go to your Lead Assignment Dashboard by clicking on Team > Lead Assignment on the Privyr desktop site.
- Tap on ADD NEW RULE at the bottom of the page.
- Select your Rule Criteria (e.g. by Facebook Page, by Facebook Lead Form, All Facebook Leads, or Custom Fields).
- Configure how you want leads matching this rule to be assigned (e.g. assigned to specific team members, left unassigned).
- Click on CREATE RULE once done. You’ll see your list of rules.
- You can add more rules by tapping on ‘ + Add new rule ’ and following the same process.
- You can view and edit a rule by tapping ‘ … ’ on the right side of the table. You’ll have options to view rule, edit rule, or move the rule up or down.
Note that rules will run in order from top to bottom, and only the first matching rule for each lead will apply. The default rule is always last and will apply to all leads that don’t match any other rules.
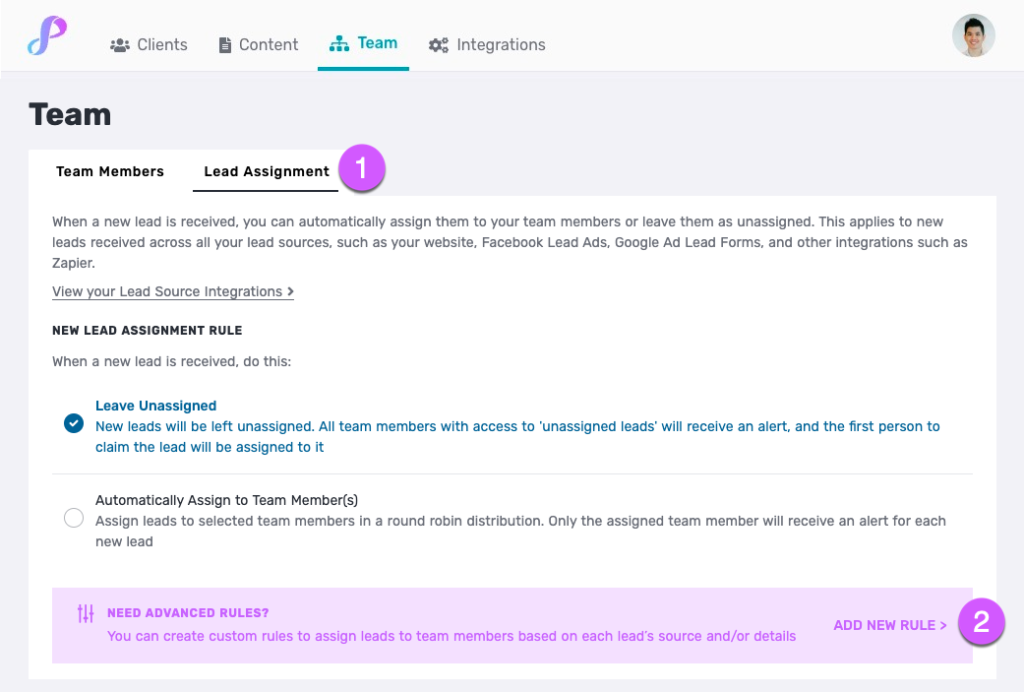
Assigning and Reassigning Clients
If a user account has permissions to view clients assigned to others , they’ll be able to assign clients to anyone else on the team. When client(s) are assigned, the newly assigned team member will receive an alert on their Privyr app to inform them of the newly assigned client(s).
Note that team members can only contact and edit clients that are assigned to themselves, regardless of their permissions. This ensures that only one team member is acting on a client at a time, preventing accidents where multiple people are trying to contact or update the same client at the same time. If you want to contact or edit a client that is assigned to someone else or unassigned, you’ll need to assign the client to yourself first.
REASSIGNING A SINGLE CLIENT
When viewing the client details screen, you’ll be able to reassign the client to someone else via the following steps:
- Tap on Options
- Tap on Reassign Client
- Select a team member to reassign the client to
- Tap on CONFIRM
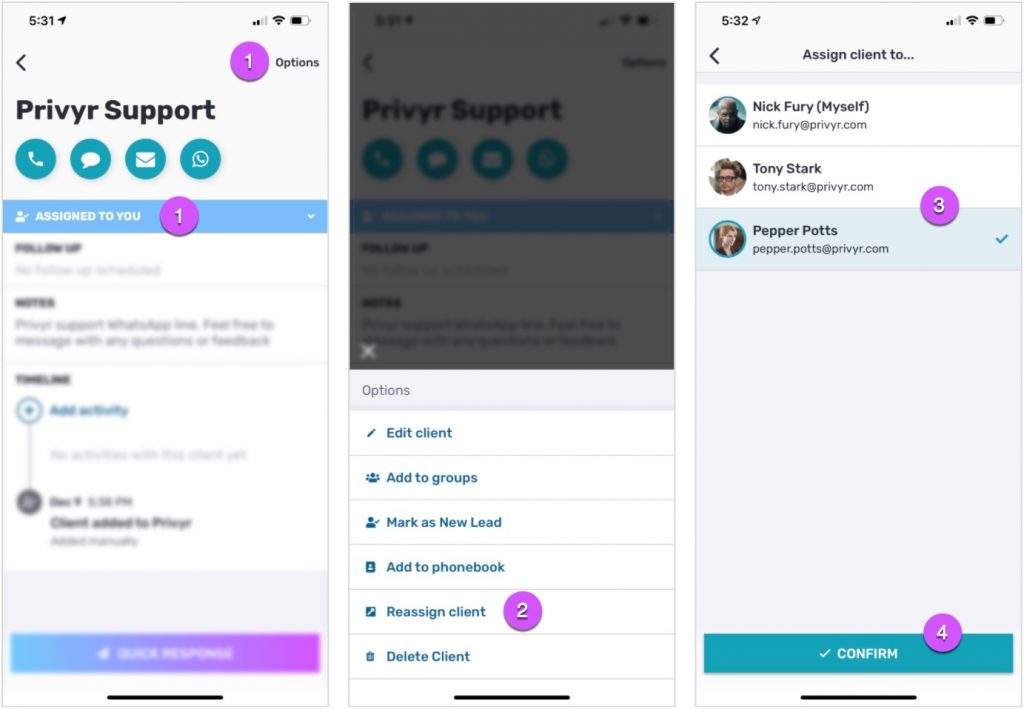
BULK REASSIGNING CLIENTS
You can reassign multiple clients at a time via the Bulk Actions feature on any list of clients. Just tap and hold on a client to trigger multi-select mode, then select the square icon with an arrow , or More Actions > Reassign Clients .
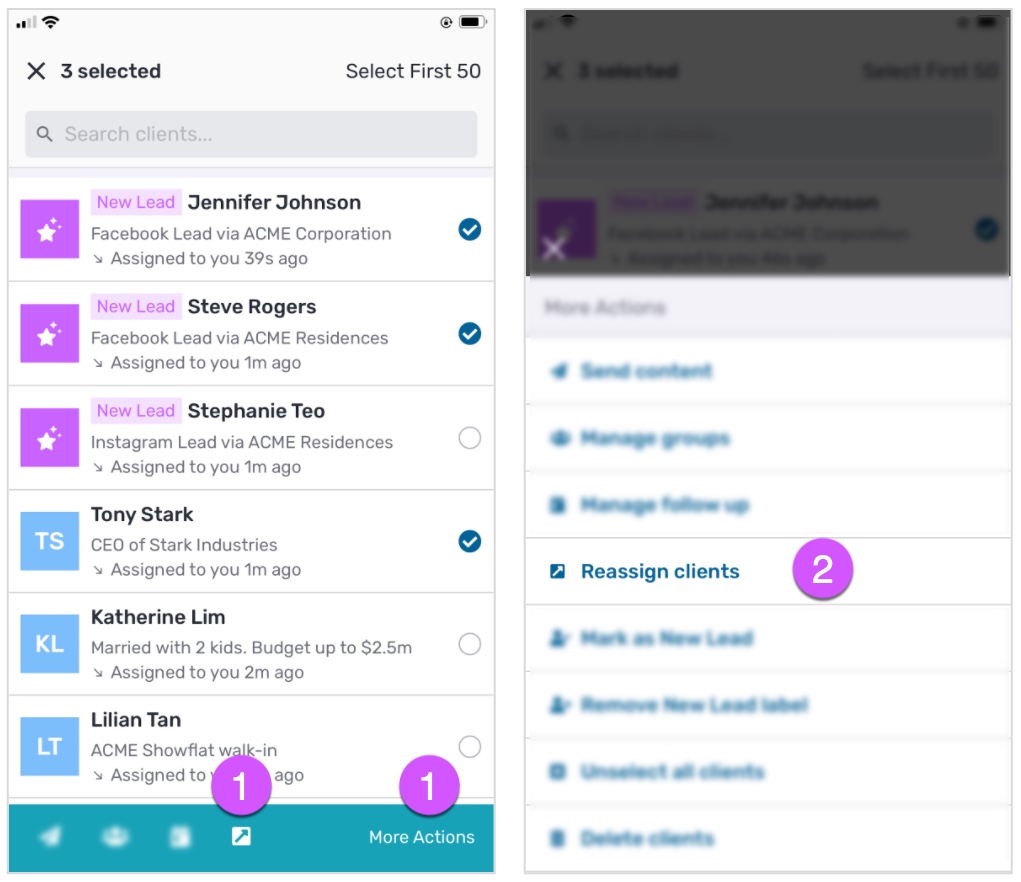
Note that on client lists other than the team tab , you can only select and reassign clients that are currently assigned to yourself.
Alternately, you can quickly bulk assign or reassign clients from your Team tab , even if they aren’t currently assigned to you.
- Go to your Clients tab
- Note that this tab won’t be available for accounts that only have access to view clients assigned to themselves
- Tap on Options
- Tap on Reassign some clients (to manually select which clients to reassign) or Reassign all clients (to reassign all clients to someone else)

Unassigned Clients
If you’ve configured your Lead Assignment rule to Leave Unassigned , all new leads will send new lead alerts to all team members who have permissions to view unassigned clients. The first person to claim the lead will be assigned to it.
If you have permissions to view unassigned clients and configured your Team View settings to show unassigned leads, you’ll see unassigned clients displayed on your client lists in a teal blue colour with the word ‘ Unassigned ‘ in the preview. You can also view all unassigned clients under your Team tab > Unassigned .
When viewing an unassigned client, you’ll have two options:
- CLAIM LEAD will immediately assign the client to yourself
- Assign to will let you assign the client to another team member
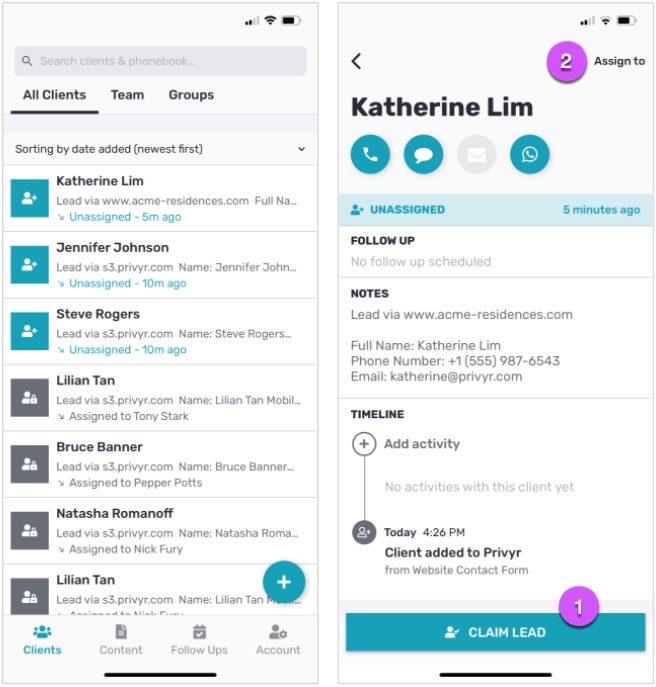
Note that once a lead has been assigned to a team member, it can be reassigned to someone else later on, but can’t be changed back to unassigned.
Deactivating Team Accounts
You can deactivate an account at any time to immediately revoke access and stop payment for that account, via the following steps:
- Go to your Team Members dashboard by clicking on Team > Team Members on the Privyr desktop site
- On the account you wish to deactivate, click on ‘ … ‘ then ‘ Deactivate Account ‘
- Once completed, the account status will be updated to ‘ Deactivated ‘
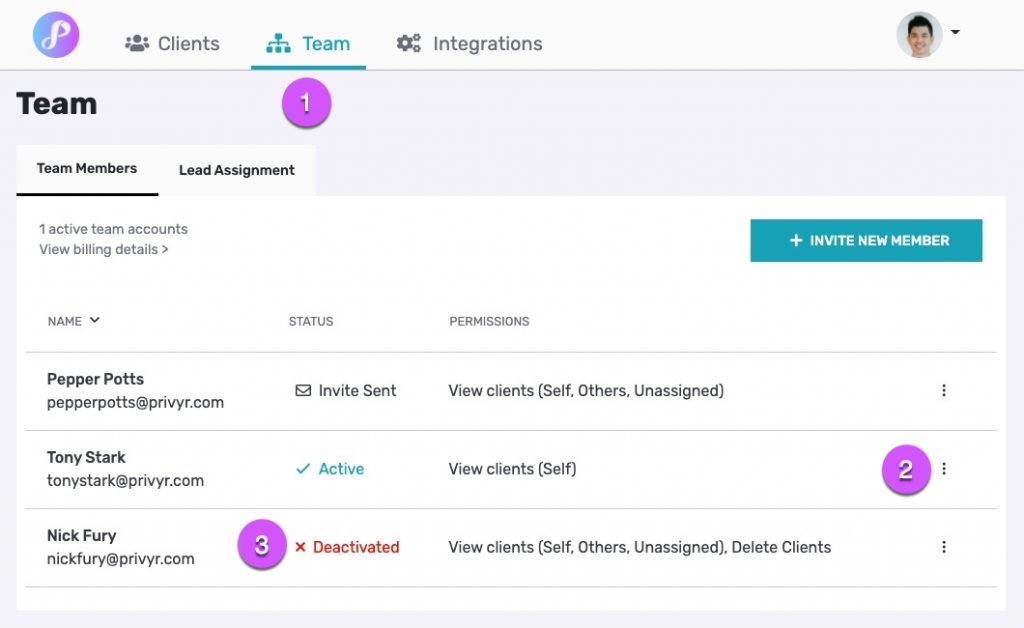
When a user’s account is deactivated, their access will be immediately revoked and they won’t be able to log into Privyr or access any data on the team. Billing for the account will also be immediately stopped.
However, any clients that were assigned to the deactivated user will still be assigned to their account, to ensure no information is lost. You can reassign some or all of these clients to other team members via the Privyr app.
REACTIVATING ACCOUNTS
If you wish to reactivate an account that has been deactivated, simply click on ‘ … ‘ then ‘ Reactivate Account ‘. Once an account is reactivated, it will appear as ‘ Active ‘ on your Team Member dashboard and the user will be able to log into Privyr again. This will also restart billing for their account.
Billing for Team Accounts
Billing for each account starts once a team member logs in for the first time to activate their account, and stops when the account is deactivated. Charges or credits will be pro-rated and added onto your next billing cycle. You can deactivate an account at any time to revoke access and stop billing for that account.
If you are currently on a free trial, you can invite unlimited team accounts and will not be charged for any team accounts unless you purchase a Privyr subscription . Billing does not start until your free trial ends.
Only active team accounts will be charged. You will not get charged for team accounts that have been invited but not yet activated.
You can view your active team accounts and team billing details via the following steps:
- Click on ‘ View Billing Details ‘ to view a full breakdown of the billing for your team
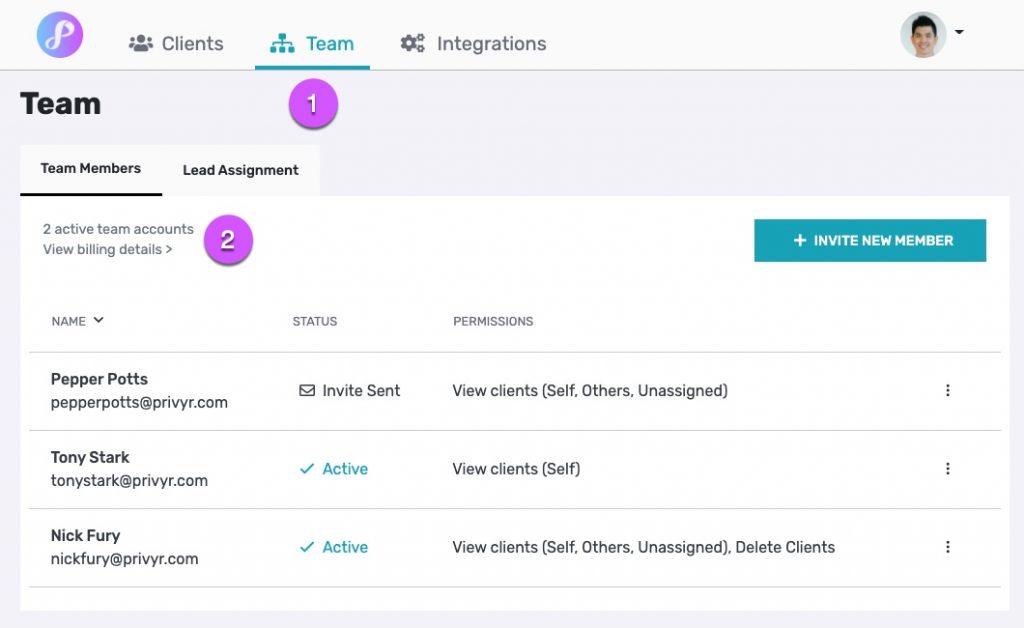
- (855) 776-7763
All Products
Qualaroo Insights
ProProfs.com
- Get Started Free
Do you want to make more sales?
BIGContacts is the #1 contact management software & CRM to close more sales.
Lead Distribution: What Is It & How to Create an Effective Strategy

Customer relationship management experts
The BIGContacts Editorial Team is a diverse group of professionals passionate about customer relationship management. We update you on the latest trends, dive into technical topics, and offer insights to elevate your business.

If you thought generating high-quality leads was the ultimate challenge, you’re both right and wrong.
Right – because low-quality leads mostly end up in the sales bin, which means you do need high-quality leads. And wrong – because generating leads is just the first step to acquiring new customers. What’s more important is nurturing them through skilled sales reps.
And this is where lead distribution comes in.
Without a well-planned lead distribution strategy, assigning prospects to representatives randomly may not always work.
But, with a lead distribution CRM (new to this? Check the video below) and definite strategies, it’s bound to. And that’s what this blog is all about.
What Is Lead Distribution?
Lead distribution is the strategic process of assigning potential clients or ‘leads’ to various sales representatives within your organization.
It ensures that the leads are nurtured by reps who possess the ideal skills, experience, and industry knowledge to effectively convert them into paying customers.
Sounds too complicated? I’ll simplify it with an example.
Imagine you run a software company that caters to both small businesses and large enterprises. A lead from a startup wouldn’t require the same sales approach as one from a Fortune 500 corporation, right? So, by strategically distributing these leads, you equip your reps with the best chance of success.
This process of lead routing to the most suitable sales personnel is lead distribution.
What Is the Lead Distribution Process?
Lead distribution can be divided into several phases. Following a well-planned process is the key to ensuring no leads are assigned to someone without expertise.
Apart from that, you’ll also learn how a CRM software solution helps in the process. Let’s begin.
Phase 1: Lead Capture
It all begins with lead capture. ‘Leads’ or potential customer information is collected through various channels such as websites, social media, live events, inbound calls, lead generation surveys , or marketing campaigns.
But how can you stop these leads from getting scattered everywhere? Spreadsheets? Not really. Get a CRM software solution instead.

And here’s why –
- CRM software acts as a central repository for all lead information.
- It integrates with web forms , email systems, and social media platforms to automatically import lead details into the database, saving you a lot of manual effort.
- Such a software solution also keeps information synchronized and accessible for everyone.
Phase 2: Lead Qualification
Next, each lead is evaluated based on specific criteria to determine their potential value and readiness to purchase. This phase involves:
- Initial Screening: Eliminating irrelevant or low-quality leads that do not meet your basic criteria.
- Scoring Leads: Using a lead scoring system to prioritize leads based on factors like engagement level, demographic information, and buying potential.
Now, let’s discuss how qualifying leads becomes more effortless when you use a CRM system.
A CRM system can automate the lead qualification process by applying scoring rules based on the lead’s actions, such as website visits, downloads, or email engagement. This helps you prioritize leads that show a higher potential for conversion – eventually allowing sales teams to focus their efforts where it counts.
Phase 3: Lead Segmentation
Next, leads are segmented into different categories based on predefined criteria like demographics, behavior, etc. Lead segmentation helps in tailoring the sales approach to the lead’s specific needs and interests.
CRM software harnesses the power of data analytics to segment leads accurately. By analyzing historical data and current interactions, it identifies patterns and trends that inform the segmentation criteria.
Phase 4: Sales Rep Profiling
This is the part where you need to evaluate your sales teams. The best person to do that would be the one in charge (say, a sales or team manager) or automatically through a CRM system.
Some common criteria to look for when profiling sales reps are –
- Geographic Location: Assigning leads to sales reps who handle specific territories.
- Product or Service Expertise: Matching leads with reps who specialize in the product or service the lead is interested in.
- Industry or Sector Knowledge: Aligning leads with reps who have experience in the lead’s industry, ensuring a more tailored sales approach.
Apart from these, self-assessment can also be an effective way to assign leads. Wondering what that means?
For example, many CRMs allow for customizable user fields . Consider creating fields that reps can use to identify leads with their preferred industries, product areas, or communication styles.

Phase 5: Team Communication
The job still isn’t done after you profile sales reps and assign them leads to nurture.
Your representatives must grasp the rationale behind your lead distribution strategy. They should have a clear understanding of the individuals they’ll be engaging with and why they are best suited to handle them.
The best way to maintain transparency here is to have an open communication channel. Using CRM software that offers team communication features is a big bonus.
For example, you should be able to add comments and notes or tag team members. Some tools even let you schedule team meetings and send out email reminders.
What Are Some Common Lead Distribution Strategies?
Using CRM to create a lead assessment and distribution strategy can benefit your sales and marketing team. Let’s discuss some of the key strategies below, as well as the role of CRM software in them.
Round Robin Distribution
This method ensures fairness by distributing leads evenly among available reps. It’s a good starting point for teams with a consistent lead flow and similar rep skillsets.

CRM software automates this process, eliminating manual intervention and ensuring all reps receive an opportunity to work with qualified leads.
Here’s a quick guide on how to set up round-robin distribution in most CRM systems:
- Navigate to the settings or administration section of your CRM.
- Locate the lead distribution or lead routing options.
- Look for a setting labeled “round robin” or “equal distribution.”
Enable this option and define additional parameters, such as whether to include inactive reps or assign leads based on a specific timeframe (e.g., daily or weekly).
Remember, round-robin distribution is a simple but effective strategy. But, as your lead volume grows or your sales team matures, you can graduate to more sophisticated methods like weighted distribution or skills-based routing for a more targeted approach.
Lead Scoring
Many CRMs provide lead-scoring functionalities. Assign points to leads based on various factors that indicate their sales readiness, such as website visits, content downloads, or engagement with marketing campaigns.
Leads with higher scores can be automatically routed to top-performing reps with proven track records, while lower-scoring ones might be directed to nurturing campaigns before rep assignment.
Some of the best practices for lead scoring include –
- Carefully choose lead attributes to ensure the lead score isn’t inflated compared to the prospect’s actual interest
- Have a clear understanding of the buyer’s persona
- Use a CRM system to automate the lead allocation and scoring process and save time
- Leverage reports and analytics to track whether qualified leads are actually translating into converted opportunities
Weighted Distribution
For a more sophisticated approach, use weighted distribution.
Assign weights to reps based on factors like performance history, expertise in specific industries or product areas, or current capacity. Leads are then automatically routed to the rep with the highest weighted score.
This method ensures leads are directed to the reps best suited to convert them, considering both skillset and workload balance.
Skills-Based Routing
This advanced option allows you to define specific skills required for different lead types within your CRM.
For instance, leads requiring technical expertise can be routed to reps with relevant certifications. In contrast, leads seeking a consultative approach can be matched with reps known for their strong communication skills.
The CRM then automatically matches leads with reps possessing the necessary skillset for optimal conversion potential.
Ideally, this process of lead assignment is best for businesses with –
- Specialized Sales Teams: If your sales team caters to diverse industries, product lines, or customer segments, skills-based routing is the best choice.
- Complex Sales Cycles: For intricate sales processes that require a specific approach or technical expertise, skills-based routing guarantees leads are assigned to reps equipped to navigate the complexities of the sale.
- High-Value Leads: When dealing with high-value leads, it’s crucial to maximize the chance of conversion. That is possible when you embrace skills-based routing. As those leads are matched with your most experienced and qualified reps, it boosts the likelihood of a successful outcome.
Geographic Targeting
Of all the lead routing processes above, this one is pretty straightforward. Utilize geo-location features to route leads to reps located in the same region. This can be particularly beneficial for businesses with a geographically dispersed salesforce, fostering stronger relationships with local leads.
So, what you need to do is –
- Divide lead groups based on their geographical regions
- Assign the distribution task to a territory manager for each area
This approach enables consideration of representatives’ familiarity with regional preferences, location-specific requirements, and prevalent personas in each area.
Manual Routing
As the name suggests, ‘manual’ routing or distribution means assigning leads to your sales representatives personally. This gives you more control over how leads are handed out compared to other methods. You can make sure each rep gets the right leads based on certain criteria.
But then, this process is only suitable for startups with a micro team. The most apparent downside is that it takes a lot of time and effort to assign leads manually, especially if you have a big team. It might not be worth it if you have a lot of reps to manage.
Why Is Lead Distribution Important?
Effective lead distribution offers a multitude of benefits for your sales team and bottom line. Let’s explore some key reasons –
- Increased Conversion Rates: Reps with expertise in the lead’s industry can tailor their approach, addressing specific pain points and demonstrating a deeper understanding of their needs – leading to higher conversion rates.
- Improved Sales Efficiency: Strategic lead distribution prevents reps from wasting time on unqualified leads. By focusing on leads most aligned with their skill set, reps can concentrate their efforts and close deals faster.
- Enhanced Rep Satisfaction: When reps consistently receive leads that match their strengths and interests, they feel more engaged and motivated.
- Data-Driven Decision Making: Using a CRM platform for effective lead distribution ensures you have valuable data on lead quality, rep performance, and conversion rates. This data empowers you to identify trends, optimize your strategy, and allocate resources efficiently.

Why Should You Automate Lead Distribution?
Manual lead distribution is time-consuming and prone to human error. That is why it is essential to have a CRM system that automates the process, freeing up your sales team to focus on closing deals.
Additionally, automation ensures –
- Fairness and Transparency: Automated rules eliminate bias and ensure all reps receive an equal opportunity to work with high-quality leads.
- Faster Lead Response Time: Leads are routed immediately, minimizing the window of opportunity for competitors.
- Improved Data Accuracy: Automation minimizes data entry errors, providing you with reliable information for informed decision-making.
- Better Resource Allocation: By automating routine tasks, sales reps can focus their time on what they do best—selling.
- Scalability: As your business grows, the volume of leads can become overwhelming for manual processes. Automation allows you to scale your lead distribution efforts without a corresponding increase in administrative overhead.
Make Lead Distribution Effortless With CRM
Even high-quality leads may not convert if not nurtured properly. 2 of an experienced and skillful sales rep.
It’s needless to say how a CRM system can help not just lead distribution but also generate and nurture them.
Of the many tools I have used over the last few years, BIGContacts is one that I find unique. Especially if you have a small business, you will find its combination of CRM and email marketing helpful.
But no matter which software you choose, test it first to see how it fits into your business workflow. For example, BIGContacts offers a freemium plan, which is great for testing the software. Try it today to cut down the time you spend on distributing leads and focus more on converting them.
Learn More About Lead Distribution
What is lead distribution in a crm.
Lead distribution in a CRM is the automated process of assigning incoming leads to specific sales reps based on pre-defined criteria and lead information. This ensures leads are connected with the reps with the skills, experience, and industry knowledge to best nurture and convert them into paying customers.
How do I allocate leads?
For effective lead allocation, you must strategically assign incoming leads to individual sales reps within your team. Factors considered during lead allocation can include –
- Lead Qualification: Budget size, industry, and decision-making authority within the lead’s company.
- Sales Rep Skills: Expertise in specific products, communication style, and sales methodology.
- Additional Considerations: Rep availability, workload, and geographic location (for regional teams).
CRM software can automate lead allocation based on pre-defined rules, ensuring maximum efficiency.
What’s the difference between lead generation, lead capture, and lead distribution?
The fundamental idea among these three terms is –
- Lead generation is attracting potential customers who show initial interest in your product or service.
- Lead capture is the process of collecting contact information from interested leads.
- Lead distribution assigns these captured leads to the most suitable sales rep for nurturing and conversion.
In all these three stages, a CRM software solution benefits your sales and marketing teams.
What is the difference between manual lead distribution and automated lead distribution?
Manual lead distribution is the process of allocating leads to sales reps manually, one by one. This practice is best for companies having micro teams. But, if you have a medium to large-sized team, it may take a lot of time.
On the other hand, automated lead distribution is the allocation of leads through software solutions. This process is ideal for both small and large teams, as it saves a lot of time allocating leads to sales reps.
Is lead distribution, lead routing, and lead allocation different things?
Lead distribution, routing, and allocation are essentially the same thing. They all refer to the process of assigning qualified leads to the most suitable sales reps within your team. These terms are often used interchangeably.
About the author
Bigcontacts editorial team.
The BIGContacts Editorial Team is a passionate group of CRM experts dedicated to improving your customer relationships with top-notch content. We stay ahead of the curve on trends, tackle technical hurdles, and provide practical tips to boost your business. With our commitment to quality and integrity, you can be confident you're getting the most reliable resources to enhance your contact management and business process automation initiatives.
Popular Posts in This Category

From Chaos to Control: What Is Contact Management & How to Capitalize on It

Unlock the Power of Mass Email CRM: Best Practices, Success Stories & Leading Tools

SugarCRM Vs. Salesforce: Which CRM Software is Best for You?

How Small Businesses Can Leverage the Power of Crowdfunding

CRM vs. Contact Management Software – What’s Right for You?

CRM Integration: A Definitive Guide
Dive into the Summer ’24 Release
As an admin, you can help your organization succeed by staying up to date with the latest Salesforce releases and getting familiar with product enhancements.
Check out the Summer ’24 release notes for a list of new features and available updates.
Did you find this helpful?
Help us enhance your experience.

Set the option 'Assign using active assignment rules' to true, only when a Case or Lead is created
Cookie Consent Manager
General information, required cookies, functional cookies, advertising cookies.
We use three kinds of cookies on our websites: required, functional, and advertising. You can choose whether functional and advertising cookies apply. Click on the different cookie categories to find out more about each category and to change the default settings. Privacy Statement
Required cookies are necessary for basic website functionality. Some examples include: session cookies needed to transmit the website, authentication cookies, and security cookies.
Functional cookies enhance functions, performance, and services on the website. Some examples include: cookies used to analyze site traffic, cookies used for market research, and cookies used to display advertising that is not directed to a particular individual.
Advertising cookies track activity across websites in order to understand a viewer’s interests, and direct them specific marketing. Some examples include: cookies used for remarketing, or interest-based advertising.
Cookie List
- Using Global Human Resources
Examples of Multiple Managers for an Assignment
You must define at least one line manager for an assignment. Optionally, you can add other manager types. Line managers see the line-manager version of a person's spotlight and other restricted worker information.
Other manager types can also see restricted worker information if their roles have the required security access.
Let's see some examples of assignments that need multiple managers.
Matrix Management in an Engineering Company
An engineering company uses a matrix management structure. An engineer reports to the lead engineer for everyday functional guidance and to the operational manager for project assignment and tracking.
In this example, you define the lead engineer as the line manager and the operational manager as the project manager. This is because the lead engineer interacts with the team members every day and evaluates their progress. The project manager's role is restricted to assigning projects and tracking project completion.
Temporary Project Managers in a Service Company
A service company assigns workers to third parties to deliver contracted services. Each worker has a manager whose primary task is to help the worker find their next assignment. The manager is common for all of the worker's assignments. You define this manager as a line manager.
The worker also has a temporary project manager who manages a particular assignment but may not manage all of the worker's assignments. You define the project manager as an additional manager (for example, as a project manager) in relevant assignments.
Managers in a Global Company
A global company is organized functionally and workers report to a functional manager who may be in a different time zone. You define the functional manager as the line manager for the assignment.
For day-to-day administrative purposes, such as approving leave or absence, each worker also has an administrative manager. You define this administrative manager as an additional manager for the assignment.

Tom Sandoval Reflects on How Touring With His Band "Saved Him"
The lead singer admits it was rewarding to go out on stage when "everybody hates you."
Vanderpump Rules After Show - Season 11

Trending on Bravo

James Kennedy Reacts to Ariana Madix's New Relationship Being Accepted More Quickly Than His

Lala Kent Goes Off About Ariana Madix: "I've Been Biting My Tongue"

Frank Tells Dolores Catania He's Going to Propose to His Girlfriend

Jesse Solomon and West Wilson Might Be the Best New Friends in the Summer House
![Katie Maloney Comes to Jo Wenberg's Defense: "[Tom Schwartz] Was Displaying F*ckboy Behavior"](https://www.bravotv.com/sites/bravo/files/styles/partner_promos_desktop/public/media_mpx/thumbnails/bravo-video.nbcuni.com/image/NBCU_Bravo/24/63/VPR_1117_Preview_1.jpg?itok=VTP9Pxbs "Katie Maloney Comes to Jo Wenberg's Defense: \"[Tom Schwartz] Was Displaying F*ckboy Behavior\"")
Katie Maloney Comes to Jo Wenberg's Defense: "[Tom Schwartz] Was Displaying F*ckboy Behavior"

Rachel Fuda Is Confused by Jennifer Fessler's Relationship with Teresa Giudice

Tom Sandoval Calls a Former Castmate a "F*cking Coward"

A RHONJ Producer Reveals What Melissa Gorga Gives Her a Hard Time About

Where Does Lala Kent and Katie Maloney's Friendship Go from Here? "She Is Treating Me Like I'm the Enemy"

Your Tasty First Look at Last Chance Kitchen Season 21

Does Tom Schwartz Feel Any Joy in Seeing Katie Maloney and Ariana Madix Struggle to Open Their Restaurant?

Ciara Miller and Paige DeSorbo Call Kyle Cooke Out for Being “Really Selfish”

The Vanderpump Rules Cast Gears Up for the Season 11 Reunion

Lala Kent Says Katie Maloney's Turned Into Ariana Madix's "Bobblehead"

Lisa Vanderpump Reacts to Dorit and Paul “P.K.” Kemsley’s Separation
![Ariana Madix Doesn't Understand Why Scheana Shay "Thinks She Knows [Sandoval] Better Than I Do"](https://www.bravotv.com/sites/bravo/files/styles/partner_promos_desktop/public/media_mpx/thumbnails/bravo-video.nbcuni.com/image/NBCU_Bravo/678/95/VPR_1115_Preview_2.jpg?itok=Jn9IzNEt "Ariana Madix Doesn't Understand Why Scheana Shay \"Thinks She Knows [Sandoval] Better Than I Do\"")
Ariana Madix Doesn't Understand Why Scheana Shay "Thinks She Knows [Sandoval] Better Than I Do"

Your First Look at the Vanderpump Rules Season 11 After Show

Melissa Gorga Says Jackie Goldschneider and Margaret Josephs Are Enemies
IMAGES
VIDEO
COMMENTS
Salesforce Lead Assignment Rule Example. Here's a quick example: Criteria #1: If State = California, assign to Stacy. Criteria #2: If Country = United Kingdom, assign to Ben. Criteria #3: If Country = France, assign to Lucy. Criteria #4: If Annual Revenue is greater than $500,000,000 USD, assign to "High Roller Queue".
Also known as lead assignment, lead routing is an automated process of distributing inbound leads to the department or sales rep best-equipped to handle that lead. More sophisticated lead routing systems take in consideration a variety of lead assignment rules determined by the company. Normally these rules are based on the sales territory, industry, potential deal size among other variables ...
Assignment Rules. As an admin, you can help your organization succeed by staying up to date with the latest Salesforce releases and getting familiar with product enhancements. Check out the Summer '24 release notes for a list of new features and available updates.
From Setup, enter "Assignment Rules" in the Quick Find box, then select Lead Assignment Rules. Click New. Enter the rule name. (Example: 2023 Standard Lead Rules) Select "Set this as the active lead assignment rule" to activate the rule immediately. Click Save. Click the name of the rule you just created.
In Setup, search for Lead Assignment Rules, and open it. Click New. Name your rule Round Robin Assignment Rule, and click Save. Click to open Round Robin Assignment Rule. In the Rule Entries section, clickNew. In Sort Order, enter 1. Set the rule criteria by choosing Round Robin in the Field dropdown, Equals in the Operator dropdown, and 1 in ...
Lead Assignment Rules in Salesforce are a powerful tool that allow your GTM (Go-To-Market) teams to automate the process of generating leads and assigning them to the most suitable sales representatives based on specific criteria. Managing and assigning leads becomes crucial, particularly when dealing with high daily volumes and considering the priority of leads based on various factors.
To do this, we'll need to add an Assignment Rule. Select Assignment Rule as New Lead and choose the action as Create. Under Object Type , select Lead and under Field Name , select Status . Leave Conditions blank and click Save . You've now created a lead assignment rule that will automatically create a new Lead record whenever the 'Lead Status ...
You need solid lead assignment rules in place, and one key variable to keep in mind. Time. According to LeadSimple, responding to a lead in the first 5 minutes is 21x more effective. No surprises here. If you're a scaling business, you know that responding first to a lead is mission-critical. If you're manually triaging leads or waiting for ...
More complex lead routing rules can account for both. Lead routing rules. Here, we'll discuss 6 of the most common options for lead routing. 1. Lead routing by territory. Territory-based lead routing is a great option for sales teams targeting multiple geographies but have specific reps assigned to specific areas.
How to Create Salesforce Lead Assignment Rules. Creating lead and case assignment rules in Salesforce is a relatively straightforward process. Login to Salesforce and select Setup in the upper right corner of the horizontal navigation bar.; In the Setup search box, type "assignment rules" and then select either Lead Assignment Rules or Case Assignment Rules.
Lead Management. Lead management is what happens after lead generation: It's a bridge between marketing and sales. ... However you choose to share leads with sales teams, lead management software can help by creating fixed assignment rules based on lead qualification criteria and generating automated reports on pipeline status and sales team ...
Lead assignment rule continued: Step 1. Sort Order = 1. Step 2. Object = Lead, Field = Round Robin ID, Operator = 1. Step 3. Select the users to be assigned the lead and make sure to select an email template so that you are notifying the new owner of a new lead flying their way! 💥
A strong lead routing process will improve your sales team's productivity, increase the trust your reps have in your organization, and ultimately, result in more sales.. Benefits of Having a Clear, Transparent Lead Routing Process. Effective lead distribution seems simple… Leads come in, your CRM routes them to certain reps based on the specific lead assignment rules you've created, then ...
Click Setup. In the Quick Find box, type Lead Assignment Rules. Click on the Lead Assignment Rules | New button. Now create an assignment rule, as shown in the following screenshot: Step 2: Create an Apex class and Test class. Now, we have to understand a new Apex annotation i.e. @InvocableMethod.
Creating lead and case assignment rules in Salesforce is a relatively straightforward process. Step 1: After logging in, go to the horizontal navigation bar's upper right corner and choose Setup. Step 2: Type "assignment rules" into the Setup search box, then choose Lead Assignment Rules. Step 3: To add a new assignment rule, select New.
Using advanced lead assignment rules in Salesforce. The lead assignment for the Sales Development team is more complex. Leads are assigned based on a number of different criteria including industry and company size. With 25+ Sales Development Reps, territories constantly shifting and the team growing, using the standard Salesforce lead ...
For lead distribution, use assignment rules to define the criteria by which you want to distribute your leads, such as partner tier, geography, or specialization. From Setup, enter Leads in the Quick Find box, then select Lead Assignment Rules. Create a lead assignment rule, let's call this All Channel Sales Leads.
As an administrator, you can define the lead assignment rules, qualification experience, duplicate detection rules, lead scoring rules, and so on. These settings help your sales team to follow a streamlined process for managing leads. Lead assignment rules: Auto-assign leads to sellers based on certain rules. Lead qualification experience: Give ...
Lead assignment rules help automate initial lead routing, while ETM supports long-term territory management, account reassignment, performance analysis, and organizing complex sales structures.) Built-in lead assignment rules are a solid starting point to automate lead routing .
The Three L's in Pardot: Lists, Location, and Lead Assignment; 6 Ways to Manage Lead Assignment in Pardot and How to Determine The Best Option; Complex lead routing with third-party tools. Third-party tools enable you to create complex lead routing rules that go beyond out-of-the-box Salesforce and Pardot lead routing features.
Prerequisites. Sales accelerator is configured in your organization.. Work assignment components. Work assignment automation is built around three components: segments, sequences, and assignment rules. Segments categorize records based on specific criteria, such as location and source. For instance, you might have a segment for leads from trade shows in the United Kingdom.
Introduction. You can create team accounts in Privyr to coordinate on leads and manage clients across multiple people on your team. Once you invite your colleagues to your team, you can set up lead assignment rules to automatically assign new leads in a round robin distribution, or leave leads unassigned so that everyone gets an alert and whoever is free can claim and respond to the lead.
Lead distribution is the strategic process of assigning potential clients or 'leads' to various sales representatives within your organization. It ensures that the leads are nurtured by reps who possess the ideal skills, experience, and industry knowledge to effectively convert them into paying customers.
7. Click the 'Layout Properties' button on the palette and disable the 'Show on edit page' and 'Select by default' Case Assignment Check-box and click OK, then click Save. 4. Test and confirm that when a user creates a new case/lead, the 'Assign using active assignment rules' checkbox is set to true. Save the case/lead.
The worker also has a temporary project manager who manages a particular assignment but may not manage all of the worker's assignments. You define the project manager as an additional manager (for example, as a project manager) in relevant assignments. Managers in a Global Company. A global company is organized functionally and workers report ...
The World Trade Organisation turns 30 next year, but will have spent more than five years in stasis, owing to American neglect. The IMF is gripped by an identity crisis, caught between a green ...
Read Rule 571-16.16 - [Effective 6/5/2024] Procedures and policies for dock site permits and hoist or slip assignments in dock management areas, Iowa Admin. Code rr. 571-16.16, see flags on bad law, and search Casetext's comprehensive legal database ... For purposes of these dock management area rules, "permittee" means the person(s) to whom ...
Season 11 Digital Series: The lead singer admits it was rewarding to go out on stage when "everybody hates you."