- Skip to primary navigation
- Skip to main content
- Skip to primary sidebar
Teaching Expertise
- Classroom Ideas
- Teacher’s Life
- Deals & Shopping
- Privacy Policy

20 Microsoft Word Activities For Middle School: Writing Exercises, Research, And Art Projects
November 9, 2023 // by Kaitlyn Punzalan
Microsoft Word is an effective tool in the classroom. The platform can assist in student learning, organizing, and the development of 21st-century skills. These skills develop critical thinking, collaboration, communication, and creativity. Microsoft Word helps develop and cultivate these skills in a variety of ways.
Students can use Microsoft Word to explore new content or deepen their understanding of the topic. It can also help students take notes or organize their learning throughout the school year.
Use the lessons, activities, and other ideas listed here to help enhance your students' learning using Microsoft Word.
1. My Life As a Movie
A great beginning of the year lesson is to have students create an autobiography in Microsoft Word. This project gets creative by asking students to create a DVD cover inside of a booklet to share about their life with their peers.
Learn more: Teachers Pay Teachers
2. Name Acrostic
Another great beginning of the year project is an acrostic poem. Students type their name's vertically, then write adjectives that would describe them horizontally. Students can use bold, italics, colors, and shadows to express their personalities. This is a fun and easy activity to have students complete on the first day of school as you can display them throughout the year!
Learn more: Student Web
3. Annotate Digital Texts

Annotating the text, or highlighting and taking notes in the margin, is a literacy skill middle school students should develop. Students can annotate a text digitally in Microsoft Word using the highlight and comment feature. Students can highlight the text using a variety of colors and make digital comments on each of these highlights. This is an extremely valuable tool as it allows students to annotate a variety of texts, not just print!
Learn more: Groovy Post
4. Peer-Review and Writing Feedback

Microsoft Word is a great tool for peer review. Students can collaborate on their writing with their classmates by sharing the document and then using the track changes feature. This allows one student to provide feedback and changes to another student’s writing while allowing the original owner of the writing to keep the original document and see the writing suggestions.
Learn more: Microsoft
5. Resume Writing
Students can practice writing a resume in Microsoft Word. Since Word offers a variety of basic functions, tools, and templates, students can choose a template that would best represent a future career of their choice. This activity provides students with real-world practice and develops an essential skill they will need in the future.
Learn more: Resume Genius
6. Formal Letter Writing
Another amazing writing skill to practice with students is teaching how to write a formal letter. This lost form of communication is still incredibly important for students to learn. Students can learn how to properly format a letter to include the heading, address, body, and signature. Teachers can easily use the templates provided in Microsoft Word to help students learn the proper writing structure for formal letters.
Learn more: Lisa Doe
7. Write a Newspaper
Microsoft Word also has accessible templates to teach students how to write a newspaper article. Students can practice their expository writing skills by creating a newspaper article. This is a great assignment that teaches students real-world writing skills and is fun! Writing prompts could include both fiction and non-fiction and can be embedded in a variety of units.
8. Mini-Book Project

This project takes the idea of a traditional book report to a new level! Students use Word to create a mini-book using colorful templates and tables. This assignment asks students to demonstrate their comprehension of a novel while allowing the students to practice their technology skills as well!
9. Create Flashcards
Microsoft Word offers students a ton of amazing critical learning tools to help study and organize their learning. Students can create flashcards using Microsoft Word to help them study. These flashcards can be saved in OneDrive and students can access them at all times.
Learn more: Andrew Who
10. Digital Planner
Another great way to use Microsoft Word to help students organize is by creating a digital planner. Word offers a variety of planner templates to help students keep track of assignments, homework, and other important dates.
Learn more: Template.net
11. Online Notebook
Microsoft OneNote allows students access to a variety of features to create a digital notebook. Students can take notes, add photos, and include audio and video recordings in their notebooks. This is a great resource for students who attend online school. Teachers can also create OneNote notebooks for their students to allow them to all have the same note-taking experience or basic school report.
Learn more: Microsoft OneNote
12. Make a Family Tree
Students can create a genogram in Microsoft Word to learn more about their families. This project allows students to discover more about their ancestors through the formation of a family tree.
Learn more: It Still Works
13. Create a Word Cloud
Word clouds can be a great way to allow students to demonstrate their overall understanding or summary of a topic. Microsoft Word allows users to create a word cloud using one of the add-on features.
Learn more: The Tech Train
14. Create Digital Art
Microsoft Word allows students to practice their writing skills , but it also has a variety of features for creative expression. Students can create digital art using the drawing tools such as shapes, fill, shading, and other features in Word.
15. Create a Book Cover

This project is another fun deviation away from the traditional book report. Students can use Word to create a book cover connected to the theme of the novel. Using the borders, images, fonts, and colors students can demonstrate their comprehension of a book in a new way!
Learn more: Innovations in Techology
16. Invent an Animal

Students can get creative and invent their own animals. Students can draw the animal using the shapes and images in Microsoft Word. After drawing their own animal, students can use text to describe their animal and make connections to other cross-curricular areas.
Learn more: Innovations in Technology
17. Plan a Vacation
Students can research and budget their own faux vacation. This lesson idea teaches students real-life skills such as organizing and money planning. Students then compile their research in Microsoft Word and create a travel brochure.
18. Progress Monitor Student Work
While Microsoft Word offers a variety of ways to expand student learning, it also has many tools to help teachers. One way teachers can use Microsoft Word is to progress monitor student learning. Using the "activity" feature, teachers can view student progress including the date and time of each activity completed.
Learn more: Foetron Academy
19. Create Handouts
Teachers are always doing their best to individualize the learning for all their students. Microsoft Word is a great way to create handouts that best meet their students' needs no matter the lesson plan.
Learn More: Techwalla
20. Transfer Work Documents to iPad
Many students, teachers, and parents use Apple products, but that does not limit their ability to use Microsoft Word. Documents can be transferred to pages allowing for unlimited access to the resources for any school project.
Learn More: Trusoljahs
- WordPress.org
- Documentation
- Learn WordPress
- Members Newsfeed
20 Microsoft Word Activities for Middle School Students
- Middle School Education
1. Introduction to Microsoft Word: Begin by teaching students the basics of opening and closing documents, along with formatting text and paragraphs. This will give them a solid foundation for using Word in the future.
2. Font Exploration: Allow students to experiment with different fonts, sizes, and colors to create unique and eye-catching designs.
3. Personal Biography: Students can write a brief personal biography or autobiography, practicing their formatting skills, such as headers, bullet points, and indentation.
4. Themed Brochure: Students create a brochure for a fictitious event or destination utilizing images, text boxes, and different formatting options.
5. Creating Tables: Teach students to create tables in Word for organizing data or creating simple charts.
6. Collaborative Storytelling: Assign groups of students to create a shared story using Word’s collaboration feature, adding a sentence or paragraph one at a time.
7. Label Making: Instruct students to design their own labels or stickers using Word’s template library.
8. Interview Questions: Have students create a list of questions for an imaginary interview with their favorite celebrity, then format the document professionally.
9. Newspaper Article Writing: Students write a short newspaper-style article about an event occurring at their school or community.
10. Creative Book Cover Design: Using Word’s formatting tools and images from various sources, students design their own book covers inspired by their favorite stories.
11. Recipe Cards: Students type up and format a family recipe on card-sized documents that can be printed out later in class.
12. Class Newsletter: Assign different sections to groups of students who collaborate on creating a monthly class newsletter using Word templates and features like columns and page breaks.
13. Letter Writing: Teach students the proper format for writing personal letters or business correspondence while using Word’s various font choices and layout options.
14. Poetry Anthology: Have each student type up one of their own poems and combine them all into a professionally formatted anthology using Word.
15. Infographic Creation: Encourage students to create visually appealing infographics with Word’s Shapes, Clip Art, and SmartArt tools.
16. Market Research Survey: Students develop a survey in Word, utilizing tables or checkboxes for data gathering.
17. Reading Log: Have students create and maintain a reading log, documenting the books they’ve read and their thoughts or ratings.
18. Vocabulary Lists: Students can practice new vocabulary by creating weekly word lists complete with definitions, part of speech, and an example sentence.
19. Creating Forms: Teach students how to create fillable forms within Word, incorporating checkboxes, text boxes, drop-down lists, and more.
20. Resume and Cover Letter Tutorial: Provide students with guidance on crafting a resume and cover letter using Microsoft Word templates while cultivating valuable career skills for the future.
Related Articles

Starting at a new school can be an exciting yet nerve-wracking experience…

Introduction: As middle schoolers transition into more independence, it's crucial that they…
1. Unpredictable Growth Spurts: Middle school teachers witness students entering their classrooms…
Pedagogue is a social media network where educators can learn and grow. It's a safe space where they can share advice, strategies, tools, hacks, resources, etc., and work together to improve their teaching skills and the academic performance of the students in their charge.
If you want to collaborate with educators from around the globe, facilitate remote learning, etc., sign up for a free account today and start making connections.
Pedagogue is Free Now, and Free Forever!
- New? Start Here
- Frequently Asked Questions
- Privacy Policy
- Terms of Service
- Registration
Don't you have an account? Register Now! it's really simple and you can start enjoying all the benefits!
We just sent you an Email. Please Open it up to activate your account.
I allow this website to collect and store submitted data.

22 Basic Microsoft Word practice exercises for beginners
- May 23, 2017

Microsoft Word Exercises for Practice: – This article is very important for a basic computer course, for college and school students learning Microsoft Word online and offline. In this, you will get the best ideas on how to learn and practice Microsoft Word. And you can explore the capabilities of Microsoft Word as a business software in this post.
The best way to learn anything is by doing exercises and creating samples of existing materials from experts. It’s ok that you know about Bold, Italic, Page Layout, Insert Menu, View options, etc. but it’s great if you can use such options in creating anything in Microsoft Word.
I mean tools are the same, but the field, seed, and process are changed. So, Can you do that with the same tools? I know farmers do it daily.
So, let’s explore how to learn Microsoft Word. Microsoft Word Exercises ideas that I think every student around the world should practice.
Microsoft Word practice exercises for beginners:
1. create and design admission/enquiry forms etc..
To create this kind of form, you need to use shapes, text boxes, colors, formatting options, tables, and horizontal lines in MS Word. This is a very good exercise to practice because it will give you an idea of how to use such options practically on various official documents that we use in our daily official life.
These days many people do not create forms and charts usually they download them. That makes the forms boring. And often you see similar kinds of formats in forms. But as a student or teacher or small business owner if you learn to create such forms not only do you expand your thinking and creativity but you can also utilize this ability in business and job.
See a sample in the image below.

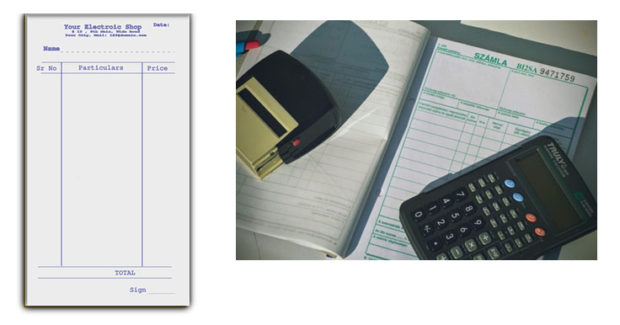
2. Create bills/leaflets/brochures. See the sample below.
Everyone has various designs of bills such as your refrigerator shopping bill, computer bill, electricity bills, and various other kinds of bills. So you can practice in Microsoft Word to create that type of bill format. It’s good for practice in which you will learn the Insert menu option, text adjustment between the table, page size, and text boxes.
3. Design E-book cover pages / Magazine front/ books front/back page using the cover page option in Insert Menu.
This practice is an advance. But try to find the books and magazine cover pages. And try to make it similar in MS Word. Imagine if you’re the designer, how you will design the same content or front page. You will learn while practicing this about the Cover Page option in MS Word or you can design without using that option. The benefit of learning this is about understanding the various practical uses of Microsoft Word in our daily lives.
4. Create Business Cards using Shapes, text, and colors.
People use Adobe Photoshop, Corel Draw, and websites to create business cards nowadays automatically and manually. You can also use that. But it’s about mastering MS Word options and skills. When you create and design anything in Microsoft Word. Your basic computer skills become strong. That helps you in the future when you start working on a Computer or MS Office or MS Word. Also, basic computer skills are very important before doing any degree course in IT. So, Design the business cards similarly you see in the below sample picture.

This is an advanced exercise, but if you do it and create cards then the options you’ve learned during your computer courses in MS Word remain forever in your brain.
Related: Importance of MS Word in Education
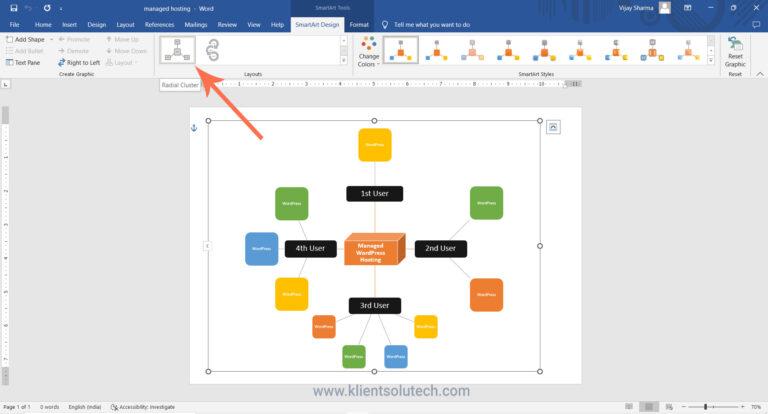
5. Use smart art and create organizational charts and showcase relations:
Smart Art is one of the favorite options in Microsoft Word. Smart art is used to draw diagrams that are used to showcase the content visually that will be easy to understand and manage. As you see below the smart art image Hierarchy Diagram is used to create an organizational chart or structure of the Telecom company.
This is the best method to understand and teach certain things to students, teachers, parents, and companies. You will see such organizational charts in the company’s office and government head offices.

Radial Cluster:
I have created this radial cluster diagram and organizational chart using Smart Art in Microsoft Word to showcase the difference between Managed WordPress Hosting and Shared Hosting” in one of the latest published posts. You can practice and create a similar chart to showcase the relation or useability differences.
Structural Chart:

I hope that you can see (if not zoom in the browser using (Ctrl+ + ) both WordPress hosting and shared hosting smart images that are created in Microsoft Word.
When you practice MS Word Option to create the above diagram or any other, you get many problems. Those problems were not there while you were learning MS Word. These are the problems such as font size adjustment, lines adjustment, etc. colors, shape adjustment, etc. when you use tools or Word applications to communicate your point of view.
So, when you solve these problems by yourself or with the help of your computer course instructor it will be great for your computer knowledge and MS Office skills. Because when you solve the problem you learn very important working lessons in MS Word. This is why you’re learning.
Related: Steps to create a simple business plan using templates in Word App
6. Make book content page or index page
This is another idea in which you need to create an index or content page of the book. In this process, you will learn about the first-line indent, hanging indent, and the perfect use of the ruler bar in Microsoft Word.
And also about a page number, and a hyperlink (if it is an eBook). You can discuss this article with your computer teachers, to allow us or provide us with similar things to practice on.

7. Try to create a similar Header and footer that you’re seeing in the Book
This is the most important option and thousands of students find it difficult to use the header and footer. It’s easier to learn header and footer one time but if you’re not practicing it in various ways or the things such as books header and footer, it’s tough for you to explain it to others.
That’s why I am suggesting you try using the different styles of header and footer. And you will get such an example from the books.

8. Insert the Image into the shape
This is a little easy. But you must know easier things more than difficult things. Because in interviews especially related to IT, people ask easier questions than difficult ones.
So, practicing even on small things is also beneficial. You don’t know when it will be helpful for you in the future.
So, insert an image into the shape. Take and draw a shape from the Illustration menu, place it on a page a little higher in size, and then double-click on the shape. Go to the shape fill option and click on the picture. As an example, you can see the following image.

Related: – Top 10 powerful uses of Microsoft Word.
9. Practice hyperlinking and creating links between Word document texts to D: /, Play songs from Microsoft Word text, and create links between internal and external files.
This is the most important option in Microsoft Word. Most of the processes on the internet contain links. The hyperlink is the starting point in which you learn how things are connected.
It’s also a great option for Web Designers or web designing teachers to teach “How website links work” by using the hyperlink as an example.
As you can see in the image below, I am displaying the connection between the play song text to the location of the song.
Now you need to select the text in which have written the play song and then insert a hyperlink (Ctrl+K) and in the hyperlink address, put the path of the song. After that press, the Ctrl button and click on the blue link, so now any song that you selected will start playing.

Here is my complete article based on the Hyperlink option: – Hyperlink Example within Microsoft Word Document
10. Design a Happy Birthday Message by using Word Art and print it.
I think it’s the easiest thing for you. You can use the Word Art option for this. You can create the best wishes message in MS Word. After that, you can print. And give it to the person. It’s about creating small things at home. This is also a good way to make kids interested in learning the computer.
Also good for students and kids to create fun things and print or give them as a gift to parents. So, they will enjoy your creativity.

11. Create a chart and show the product price comparison between years:
The chart option is very important in Microsoft Word and Excel. However, the use of the chart option and any other option in MS Word depends on the demand for a certain content type.
For example, you’re writing a book or making notes about something in which you have to write and explain the price comparison between 3-4 years. Then you can use the chart for visualizations to analyze the data.
In visual format or the chart, it’s easier for people to understand, what you mean. Also, it gets more views or focus than the content.

So, try to create the chart you’re seeing in the above image.
12. Get the newspaper and see the text-based advertisement and Design
Design and create text or image-based advertisements that you saw in the newspaper. Designing such an advertisement will be a very beneficial role for Microsoft Word students or people learning Advanced Microsoft Word skills. Advertisement designs contain high-quality images, text, and layouts. And these designs are created by experts. When students practice expert material and create similar or better than that.
I think that movement is great for learners and teachers. So, try to create as many as you like. It will make you master MS Word. And I think doing exercises after completing the class topic is the best way to learn MS Word.

13. Take a double-column book or newspaper and design or create a similar paragraph style in the Word document .
Not all often type or create content in a double column. I know computer teachers can teach you such options. But they will not be able to explain the deepest or professional uses of such options for certain reasons.
So, I will suggest that you use the column option and find the newspaper similarly as you see below and create or type the text as you’re seeing in the newspaper. And if you’re having a problem, ask your teachers. So, when your teachers teach you how to do that thing or this thing, it will be great for your knowledge.
14. Create a letterhead or identity card of any company or institution that you have and insert the Watermark with that company name in the document.

You can create an identity card, visiting card or birthday card in MS Word. As you’re seeing below this is an example of cards and letterheads. But you can find such things. And practice your MS Word knowledge in creating an identity card, and letterhead.
This will give you an idea of how to adjust the text in different shapes and areas. Also, this is a good exercise in which you learn after printing, what size you need to adjust on the page. And when you do that, you learn very precious things in MS Word.
In this video tutorial, you will get basic ideas to create a letterhead. You will get ideas to insert letterhead content in the header and footer, you will also learn how you can use watermarks in letterhead, and how to print and adjust content on the page. The video tutorial is in Hindi, but even if you’re not familiar with the Hindi language, you can still learn and watch it for practice ideas:
Step by Step Guide to create printable letterhead in Microsoft Word and Google Docs
15. Decorate a Word document with a page border, and content border, add patterns, and write beautiful text in it.
This is the easiest page layout option, in which you can learn about page borders in MS Word, text borders, color or shading on the page, and pattern.
These options are very beautiful when you’re creating eBooks, making notes, and doing anything that requires the following type of style. See the image below and try to create something similar to this one.

16. Insert Images and Practice on Format Menu and Image Options.
You can use image options and style to decorate, retouch, and adjustment of colors and brightness in MS Word. As you can see, I have created various styles and image effects. These are easy to create.
But to learn more advanced effects later in other professional software, you need to learn and practice such things during your basic computer course.

17. Insert a template or download the new template in Microsoft Word from the Internet and edit those templates with your content.
There are 100+ templates almost for anything in the Microsoft Word Template option. The top benefit of using the template is that if you don’t know how to create or design a certain thing then you can just download the template and replace the existing text with your text. And it’s done.
This is the most important option that you should learn because it’s tough when you don’t know how to design or create anything, so try to practice on 10+ templates and see what it will look like.

Related: Uses and features of Microsoft Word.
18. Practice Typography
Write 10 lines or 10 sentences and then change the font, style, color, and size of each sentence. make each one different from than previous and next..
Fonts are the face of the text. The following image displays various fonts and styles. Just create similarly. During the practice, you will learn which font will be better for the specific text. Just write 10 lines and differentiate each one.

19. Create a Tenant management form in Hindi or your native language.
We use computers or technology mainly for two reasons the one is Innovation and the second is problem-solving. There are various ways of solving problems using computers. Some problems are solved immediately or some take time. For example, you can create an accounts management software to manage business incoming, outgoings, cash flow, balance, and taxes.
Similarly, there are software and mobile apps to manage tenants. I have created this form for my office space owner. He wanted a simple solution that they could follow and manage easily. They are not that much familiar with apps and other digital methods. I told them about digital options. But they want something that can be taken care of easily and also send tenants’ details for police verification when needed.
So we created the following form and this is also an example of immediate problem-solving using a computer and Microsoft Word. Now after printing one copy of this, they can photocopy it as per the number of tenants they want to manage.

So as beginners, you can try to create a similar form by using the Table feature in Microsoft Word. For the best practice 1st create and decide on columns on rough physical paper and the details that you want. You can create a better form than this and I expect that from you.
And for Hindi or your native language, even if you do not have Hindi font or French or Spanish font on your computer or in Microsoft Word. You can use Google Translate for this, convert the word into Hindi or Spanish, and then copy and paste it into the form table column.
20. Practice to design a brochure for an event
When you try creating this brochure design in Microsoft Word, you’ll learn basic and advanced techniques. This includes using image effects, grouping shapes, adding colorful bullets, and creating textures. These skills are valuable, especially if you plan to work with Word or as a virtual assistant. But even as a Word beginner, practicing these exercises is essential for building your Word skills.

Here you can watch a free video tutorial to learn brochure design : Brochure Design Practice in Microsoft Word | Word Exercise for Beginners | Hindi Tutorial
21. Learn and Practice creating business card designs in Microsoft Word
Today, there are plenty of software options available for creating business cards, such as online tools, Adobe InDesign, Corel Draw, Photoshop, Canva, and more. However, making a printable business card may seem straightforward but does involve some technicalities and creative flair.
As a student, it’s beneficial to tackle challenging and intricate design tasks in Microsoft Word, like this business card project. This practice will help you strive for excellence and mastery of Word skills. Consider it your 21st exercise towards becoming a Word expert.
Here you can watch a complete and detailed video tutorial on this: How to Create Modern Business Card Design in MS Word | Step-by-Step Detailed Tutorial
22. Practice to create a professional-looking certificate design
Practicing certificate design and Microsoft Word is essential because it empowers you with valuable digital skills that are increasingly relevant in today’s technology-driven world. By honing your proficiency in Microsoft Word, you not only gain the ability to create professional certificates but also enhance your competence in document formatting, layout design, and image manipulation. These skills have broad applications across various personal and professional tasks, making you more adaptable and capable in a digital environment.
Furthermore, practicing certificate design offers you a practical avenue for skill development while producing tangible outcomes. It allows you to create certificates for courses, achievements, or even for your own business, helping you develop an eye for aesthetics, attention to detail, and the ability to produce polished documents. Overall, this practice not only enhances your digital competence but also provides you with a versatile skill set that can significantly benefit your personal and professional growth.
By creating and practicing below certificate design below, you will be able to explore various design options to create a professional-looking certificate. This is just a sample but along with this design, you can take it’s design to the next level.

If you want to learn how you can do it please follow this step tutorial: How to create a professional-looking certificate design in Word | Step-by-Step Tutorial in Hindi
I think if you practice Microsoft Word by working on these exercises then it will be enough to make you above average among all the students around the world doing basic computer courses or learning Microsoft Word.
Because after learning Microsoft Word, you have to work with professionals or in companies. And almost all official works are related directly and indirectly to the above exercises.
So, this is the best method to learn Microsoft Word by doing exercises. And this is about practical knowledge.
I hope these Microsoft Word Exercises ideas will be helpful for you. To learn more visit: Top 10 Basic and Advanced Microsoft Word skills
How useful was this post?
Click on a star to rate it!
Average rating / 5. Vote count:
No votes so far! Be the first to rate this post.
We are sorry that this post was not useful for you!
Let us improve this post!
Tell us how we can improve this post?

Vijay Sharma
Hi, Welcome to my personal blog, Klient Solutech, where I share insights, strategies, trends, and observations on the dynamic world of Technology, Digital Marketing and Web Development.
Related Posts
Simple process to create engaging presentations in powerpoint.
- November 21, 2023
How to learn Microsoft Office Online at Home
- October 9, 2023
5 Best CRM Software to build intact customer relationships
- July 7, 2023
good practical please send more practical in winword. Thanks
These are good Practical exercises. Please send list of practicals of MS Word in Vocational IT NSQF level-1 subject code-402 class IX
please send a book which covers exercises like this
Great content! Thanks for putting this out there!
This is very nice
I have recently joined a Private Computer classes at the age of 53. Can you guide me through WORD, EXCEL, POWERPOINT & INTERNET
Is it possible for you send step by step Assignments for all the above 4 courses, so that I can evaluate whether I am learning properly or not ?
Hi, That’s a very good concern as a student “whether I am learning properly or not” I think 80% students ignore this. I will contact you by email. Age is not a problem. I expect you have strong reason or specific task or goals to learn all these three + internet in this age. Yes, I can evaluate through giving you assignment and testing it.
Leave a Reply Cancel Reply
Your email address will not be published. Required fields are marked *
Name *
Email *
Save my name, email, and website in this browser for the next time I comment.
Post Comment
- 25 Successful Microsoft Word Projects
- Computer Lessons >>
“Here is the Microsoft Word Lesson Plans Collection You Need – No Matter What Grade You Teach…100% Guaranteed!
Each one of the 25 projects provides a unique learning experience for your students. (Actually, we have included 26 lessons because I didn’t want to leave one of them out 🙂
They’ve also been tested out in classrooms to ensure that your job is made easier not harder through integration problems.
If you would like to use Word in your classroom without spending days teaching the boring basics, then you’ll find this book a great resource. As each student words their way through a project, they learn skills as they go, not as separate skill lessons. Then you can, if you want to, adjust the lesson plan slightly to suit a whole range of classroom applications.
For example, the Tickets project could be adjusted so that students could make tickets for school functions and raffles.
Whether you are teaching 10 year olds or 50 year olds , these projects are perfect for your class. Each lesson is designed to take in the real world applications of Word .
Let’s face it… why teach a skill or application which isn’t going to help your students in their daily use of computers. You will find the instructions are laid out in clear, precise steps that take the user from starting Word, through to the end of the project and printing out the final result.
Some project titles:
- Resume Cover Letter
- Business Cards
- Personal Letter Name
- Card Brochure
- Advertising Flyer
- Company Introduction Letter
- Advertisement
- Laser Labels
- With Compliments Slip.
- Web Site Review
- Evaluating a Web Page
Throughout the book, we have incorporated many different skills and command s found in Word. Some of these include, envelopes & labels, headers, alignment, justification, editing, graphics, masking and tables.
All you need to do is photocopy the instructions and hand them out! Everything else is contained within Word itself…
- Great to give to substitute teachers
- Fantastic time fillers for finished students
- Get unlimited print rights for your school or classroom
Within a month of release, this book was one of the most talked about educational books available on the Internet. Rather than simply reading about it, why don’t you grab a copy?
Even better still, you get quick access to your purchase. No more waiting for the postman, you just download your book to your computer and open it with the Free Adobe Acrobat Reader.
You can’t lose with our 100%, Ironclad, Moneyback Guarantee
By the way, this bonus is yours to keep even in the unlikely event you decide to take advantage of our ironclad moneyback guarantee: Your satisfaction is assured through our no risk, you-can’t-lose, 6 month, 100%, no-questions-asked, iron-clad moneyback guarantee. If for any reason, you aren’t thrilled and satisfied with our product, just contact us and we’ll refund 100% of your purchase price. No hard feelings.
What I’m saying is, don’t decide now if this product is for you. Just get it and try it out. If it doesn’t do everything I say and more, if you don’t save money, time and frustration, if it isn’t life-changing, if it doesn’t work for you, you have nothing to worry about because you can get every dime of your money back under our no-loopholes guarantee. So you have nothing to lose and everything to gain. Order your copy of 25 Successful Projects for Word for $27.00 $17 today!
Have a great day teaching,
Brad Hauck Author / Teacher
Order your copy today. Click the button below now!
- Health Science
- Business Education
- Computer Applications
- Career Readiness
- Teaching Strategies
« View All Posts
Computer Applications | Microsoft Office | Microsoft Office Specialist (MOS)
Microsoft Office Lesson Plans Your Students Will Love
- Share This Article
May 18th, 2022 | 9 min. read

Print/Save as PDF
Do you teach middle or high school computer applications classes? If so, it's likely that your standards include requirements on teaching Microsoft Office.
As a computer applications curriculum developer, teachers often ask how we help teach Microsoft Office and prepare students for MOS certification.
While we provide a Microsoft Office curriculum system, our solution may not be the best fit for everyone.
Some teachers are only looking for supplemental resources or tips on improving their existing lessons.
If that's the type of information you're looking for, you're in the right place!
In this article, you'll discover Microsoft Office lesson plans and teaching tips for:
- Microsoft Word
- Microsoft Excel
- Microsoft PowerPoint
- Microsoft Access
- Microsoft Publisher
- Microsoft Office Specialist Certification
For each of these topics, you'll find a list of recommended resources to help you teach the best Microsoft Office lessons possible.
1. Microsoft Word Lessons & Activities

Microsoft Word is often the first jumping off point for many computer applications classes. Rather than spend hours creating your own Microsoft Word lesson plans and activities, wouldn't you like some that you can just integrate into your existing curriculum?
That's where this post can help: Microsoft Word Lesson Plans to Wow Your Students
It contains a number of resources that you can use to teach your middle or high school students to use Microsoft Word.
Want more than just Microsoft Word lesson plans to supplement your existing curriculum?
Business&ITCenter21 has lessons, quizzes, and projects to teach your students all about Microsoft Word.
The curriculum begins with Microsoft Word Essentials, which introduces your students to the basics of the application.
Next, you can use the Microsoft Word Fundamentals lessons to give students a more in depth look at formatting content within a Word document.
Once they have mastered the basics, your students can move on to the Microsoft Word Skills Project to put their skills to the test. The project requires learners to start from scratch and fully create a document.
If you want to take it one step further, you can assign the Microsoft Word Business Project, which requires students to create a job description booklet using more advanced skills.
Looking for additional tips? Read this article: How to Teach Microsoft Word in Middle School
2. Microsoft Excel Lesson Plans
Let's face it--Excel isn't the most exciting Microsoft application out there. So what can you do to spice up your Microsoft Excel lesson plans? Make them relevant to your students!
So where can you find engaging, relevant Microsoft Excel lesson ideas?
Start by reviewing these popular Microsoft Excel lesson plan resources:
- Excel Tutorials from GCFLearnFree.org
- Microsoft Excel Spreadsheets Lesson Plan Bundle from Computer Creations
- Lessons & Activities Bundle for Microsoft Excel from TechCheck Lessons
Each of these resources can help supplement any teacher's lessons on Microsoft Excel.
But what if you need more than a few extra spreadsheet activities?
Our computer applications curriculum has you covered with Excel, too!
The first module in the sequence is the Microsoft Excel Essentials, which provides an overview of working with spreadsheets, cells, rows, and columns. Students also learn about using basic functions and formulas.
Next, students can work through Microsoft Excel Fundamentals. This module provides an overview of the fundamentals of Microsoft Excel, including relative and absolute cell references, common functions, and formatting.
If you need to cover more advanced skills and features within Excel, you can assign the Microsoft Excel Skills Project or Microsoft Excel Business Project.
3. Microsoft PowerPoint Lesson Plans

PowerPoint is sometimes considered to be overused in schools, both by instructors and students. Because of this, it’s important that your Microsoft PowerPoint lesson plans are right on par (or above and beyond!)
Your PowerPoint lessons should be more than just a How-To. You must make sure that your students understand how a presentation can effectively (and ineffectively) be used.
So how can you teach your students to effectively use Microsoft PowerPoint?
We recommend you start with four topics on Microsoft PowerPoint:
- An Introduction to Microsoft PowerPoint
- The Basics of Building a PowerPoint Presentation
- More Features in PowerPoint
- Do’s & Don’ts of Effective Presentations
To find teaching tips and activity outlines, read these articles:
- Best PowerPoint Lessons for Middle School
- 4 Best PowerPoint Lesson Plans for High School
Need more structure and resources to teach Microsoft PowerPoint?
In Business&ITCenter21, the Microsoft PowerPoint Essentials module provides an overview of Microsoft PowerPoint essentials, themes, templates, and adding and inserting a variety of items into a presentation.
Then, in the Microsoft PowerPoint Fundamentals module, students learn about creating effective presentations that are interesting, engaging, and functional.
Once your students have the basics down, you can move on to more advanced concepts and features with the Microsoft PowerPoint Skills Project and Microsoft PowerPoint Business Project .
4. Microsoft Access Lesson Plans

Microsoft Access can be a challenging subject for middle school and high school students. So it’s no surprise that Microsoft Access lesson plans are a challenge for computer applications teachers.
To help you save time, we put together a list of popular Microsoft Access teaching resources :
- GCF Learn Free
- Tonya Skinner's Website
- Teachers Pay Teachers
Each of these websites has a variety of materials to help you teach Microsoft Access skills.
In addition, check out the Microsoft Access Fundamentals module within Business&ITCenter21.
This module provides an overview of database theory as students gain practical experience with Microsoft Access.
5. Microsoft Publisher Lesson Plans
Do you give Microsoft Publisher its fair share of attention? Many computer applications educators avid including Microsoft Publisher lesson plans in their curriculum.
We've found that's often because they don’t know where to find good Microsoft Publisher lessons!

To help you get started, we put together a list of popular Microsoft Publisher lessons and activities:
- Tangipahoa Parish School System
- Cape May County Technical School District
- Council Rock High School South
- Rochester Hills Public Library
- Instructables
- Shawano School District
- Microsoft Office Support
- Business&ITCenter21
Each of these resources can help you introduce Microsoft Publisher to your students when added to your existing Microsoft Office lesson plans.
But are you looking for a more structured resource on Publisher? If so, check out the Microsoft Publisher Fundamentals module within Business&ITCenter21.
This module provides an overview of the fundamentals of Microsoft Publisher through the creation of a number of desktop publishing documents.
6. Microsoft Office Certification Prep
In our experience, we've found that teachers searching for Microsoft Office lesson plans are often also interested in preparing their students for the Microsoft Office Specialist certification exams.
To help your students prepare for certification, you most likely need more than just a lesson or two. It might be beneficial to also include test prep material to help your students prepare.
For tips on how to best prepare your students for MOS certification, read these articles:
- How to Prepare Students for the MOS Word Exam
- Steps for Successful Microsoft Excel Test Prep
Start Teaching Microsoft Office Skills Today!
All of the resources and ideas listed on this page can help you put together a great Microsoft Office curriculum.
However, if you're like most computer applications teachers you don't have much time to spare for piecing together a hodgepodge of lessons and activities.
If you need a more robust Microsoft Office solution that helps you teach all of the Microsoft Office applications, consider looking into a full curriculum.
There are many Microsoft Office curriculum options available so it can feel overwhelming to decide which one is right for you.

404 Not found
9 Microsoft Word Tips to Edit Your College Assignment Faster
Struggling to edit your college assignments efficiently? Here are some useful Microsoft Word tips to accelerate your editing process and save time.
Assignments at the college and university levels are research-heavy, and you’re often expected to produce write-ups with a significant number of pages. Just when you think you’re done with producing the required word count, the next step is equally challenging and time-consuming: editing.
From keyboard shortcuts to simple, built-in features such as Find and Replace and the automatic table of contents, here are several tips you can use to edit and format your college assignment more efficiently in Microsoft Word.
1. Leave Paragraph Spacing as Your Last Step
Let’s first start on the right track. When you have a 3,000-word essay or report ahead, it’s tempting to set double-spacing when you only write a few sentences or a paragraph at most. It gives the comforting illusion that you have done more work than you actually have.
But to be more efficient at the final editing stage, it’s best to leave paragraph spacing as your last step. This way, you save time because you don’t have to scroll up and down much more than you need to while navigating through different sections and pages of your text.
2. Learn to Utilize Keyboard Shortcut Keys
Keyboard shortcuts make editing and formatting much faster compared to using a mouse. For example, when you use your mouse to select some words, you’ll probably miss a letter or two and have to re-highlight, or overshoot and include a period when you don’t need to.
In this case, you can select text accurately by using Ctrl + Shift , and the left and right arrow keys in Windows. There are many more Microsoft Word keyboard shortcuts that will enable you to get most editing done on the keyboard, without having to switch to your mouse or trackpad. Don’t underestimate the amount of time you save with this method!
3. Hide the Headers and Footers
When you’re reading through a continuous body of text, the blank headers and footers may feel disruptive. To have a smoother reading and editing experience, hide the headers and footers to join all the pages together.
Hover your cursor over the gray space between your current page and the next, then double-click. When you need to use the headers and footers in Microsoft Word again, unhide them by hovering your cursor over the page separator line and double-click.
4. Collapse the Headings and Subheadings
For long report-style assignments, you’ll likely split your content into headings and subheadings. As you move from one section to the next, or jump between sections to rewrite and edit, make it easier to scroll through your text by collapsing the headings.
Hover over the heading title, then click the triangle icon that appears next to it to hide the content. If you want to hide all headings at once, right-click on any heading, and select Expand/Collapse > Collapse All Headings .
5. Automatically Sort References by Alphabetical Order
The works cited list is an essential section in any higher education assignment and is usually sorted by alphabetical order. You’ve likely added references to the list as you cite them in your essay, but when it comes to sorting at the end, it’s unfeasible and time-consuming to sort them manually. You can simply sort them automatically in Microsoft Word.
Select all your references and go to the Home tab. Under the Paragraph section, click the Sort icon (A and Z, with a downward arrow). In the Sort by field, choose Paragraphs . In the Type field, select Text . Then, select Ascending and click OK . The list will now be sorted by alphabetical order.
However, you might notice a couple of outliers. For example, when some references start with symbols instead of a letter, they will all likely be pushed to the very top. These are the few ones you’ll then need to manually reinsert into your list correctly.
6. Use Find and Replace to Avoid Spelling Mistakes
Whether they’re textbooks or journal articles, every student has probably encountered authors with surnames that are a little tricky to spell. Typing the name over and over for each in-text citation is prone to human error. To avoid misspellings, you can use Find and Replace.
First, use a unique abbreviation as a placeholder when you write your assignment. I recommend including a number in this abbreviation. This is because if your abbreviation only consists of letters, there’s a chance that this short combination of letters may have appeared elsewhere, as a part of a word, in your essay.
Once you’re done with the body content, it’s time to replace the abbreviation with the actual surname. In the Home tab, click Replace in the Editing tab. In the Find what field, type your abbreviation. In the Replace with field, type the actual author's name. Then, click Replace All . All your abbreviations will now be replaced with the correct author surname.
7. Insert Your Picture Into an Invisible Table
If you haven’t quite got the hang of formatting pictures in Microsoft Word, here’s a simple alternative that helps guarantee your image won’t cause your text to break up at weird places: insert your picture into an invisible table.
Go to the part of the text where you want your picture to appear. Press Enter to go to a new paragraph. Head to the Insert tab, click Table , and select one box to create a 1x1 table. With the cursor inside your table, click Pictures > Insert Picture > This Device to upload your picture into the document.
You can resize your picture within the table. Once you’re satisfied, highlight the table, go to the Table Design tab, click Borders > No Border . The black table border will then disappear. Your picture now appears to be perfectly fitted between two paragraphs of text.
8. Have an Overview of Multiple Page at Once
When you’re almost done editing, it’s best to scroll through all the pages to make sure there are no odd blank pages, separate sections, or incorrect image displays. But if you have more than 20 pages worth of content, scrolling through that much content quickly is just dizzying.
Instead, go to the View tab. In the Zoom section, click Multiple Pages . This zooms out your Microsoft Word document , so you can view two or three pages at once. You can also click the Zoom slider at the bottom right to zoom out even more and view more pages at once.
9. Automatically Create a Table of Contents
One of the final assignment components is the table of contents. If you’ve been manually keying in each heading, typing a line of periods that end with the heading’s corresponding page number, and double-checking the said page number yourself, it’s time to let Microsoft Word handle the task.
First, make sure you have applied the correct style to your headings. You can check this by clicking on each heading and see which style is selected in the Home tab. Then, number the pages of your Microsoft Word document .
Finally, go to the blank page where you want to insert your Table of Contents. Head to the References tab, click on Table of Contents , and select one of the Automatic Tables . Microsoft Word instantly generates a table of contents for you.
Improve Your Editing Process in Microsoft Word
By applying the above tips, you can revise your assignment more quickly and effectively without burdening yourself with eye fatigue. Cut down on the excessive scrolling and other manual tasks that can be done automatically by Microsoft Word.
Plus, saving time on editing means you have even more time to proofread and review your essays thoroughly, enabling you to produce higher-quality essays and reports.
Quick links
- Make a Gift
- Directories
Teaching with Microsoft Word
Word provides a writing instructor with a wide range of ways to integrate word processing into the classroom. We have included a list of some of the most popular options here, but this list is certainly not exhaustive.
Option 1: Developing Close Reading Skills
Students can work individually or in groups, responding to guided questions about readings, or they can use the formatting and highlighting features of Word to visually ‘mark-up’ a passage. By taking a passage out of context, students can be forced to look much closer at the rhetorical “clues” provided in the text.
Sample Exercise: Close-Reading Textual Fragments
(Cindy Landwehr)
- Read the fragment of the story I’ve given you at least three times and very carefully. Don’t worry that it seems “out of context”—it is, and this may help you notice details that you wouldn’t notice if you were just reading for plot.
- Identify all the details or collections details that seem significant, troubling, important, or intriguing to you. These could be images, objects, specific words or phrases, ideas, relations. Mark on the paper as much as you want to—go ahead and underline words and make notes in the margins.
- Now, type out a list of the actual phrases or sentences that you have identified, and one by one reflect on what interests you about the details you have chosen. What is enlightening or puzzling or interesting about them? What do they reveal about the character(s) involved—judging from the passage that you are interpreting, how would you describe each character’s state of mind, personality, characteristics, and relationship with the other character(s)? What seems to be happening—plot-wise—in the story at this point?
- You will have the rest of the class period to compose your response. When you are finished, make sure to read over for things you may want to change or make clearer or add to, and of course proofread for typos and mechanical errors. You will be printing this out at the end.
INTEGRATED OPTION: Including the passage in the file would allow students to mark up the passage on-line, eliminating the need for retyping phrases.
Option 2: Using Microsoft’s “Insert Picture” Feature to Stimulate Discussion and Teach Verbal/Visual Literacy
Using Word’s “Insert Picture” function is an excellent means to encourage close reading as well as to distinguish variations in student initial responses to literary texts is the interpretive pairing of graphic with verbal imagery.
SAMPLE EXERCISE: JUDGING BOOKS BY THEIR COVERS?
(Laurie George)
In the following example, a simple Google “Image” search for photographs used by Jon Krakauer in his book Into the Wild produced the following self-portrait of the book’s protagonist, Christopher McCandless, a photograph that Krakauer reprinted as the first image (notably graphic, not verbal) inside the book’s cover.

One of his last acts was to take a picture of himself, standing near a bus under the high Alaska sky, one hand holding his final note toward the camera lens, the other raised in a brave, beatific farewell. His face is horribly emaciated, almost skeletal. But if he pitied himself in those first difficult hours—because he was so young, because he was alone, because his body had betrayed him and his will had let him down--it’s not apparent from the photograph. He is smiling in the picture, and there is no mistaking the look in his eyes. Chris McCandless was at peace, serene as a monk gone to God.
(Krakauer, Into the Wild, 1996)
Downloading the image into a Word file and then pairing it with some of Krakauer’s verbal descriptions of the starving McCandless provide excellent pedagogical means of teaching assorted critical approaches to literature—that is, an instructor can pose questions to students that reveal biographical, cultural, and/or formalist reader predispositions toward the interpretation of literature, questions such as these:
Why did Krakauer decide to include this picture (rather than the one of McCandless waving at the camera) and how does it complement/contrast with the verbal description he fashions when characterizing McCandless in the final stages of the young man’s life, starving to death in the wilderness that he had so idealized?
Does the photographic self-depiction of McCandless mesh with Krakauer’s imagined verbal depiction of the young man’s final days, thoughts, and emotions? What matters about any variance in the two depictions—is one less “true” than the other? What does any difference reveal about Krakauer’s so-called journalistic objectivity?
Such questions provide an excellent means to start a discussion of any text, as students can be asked to “read” the photo in relation to any number of philosophical/theoretical approaches (Naturalism, Realism, or Romanticism, for examples) and contrast these ideals with the verbal textual representations before writing about them.
Undertaking these interpretive exercises in class, students are introduced to core concepts of visual literacy and reader-response theory and must address core questions:
Do these graphic depictions enrich readers’ (difficult) pleasure by accompanying verbal text, or simply entertain and reproduce cultural stereotypes?
Do graphic additions rob readers’ imaginations, which might otherwise conjure revelatory images of an altogether different kind?
Option 3: Using Microsoft's Comment Tool to Annotate Texts
As much literature can be found online (Amazon.com publishes lengthy excerpts of even the most recent novels in online advertisements), an excellent means of teaching students to read closely and annotate thoughtfully (not just circle and underline) is to copy and paste a portion of any text (poetry, prose, whatever) into a Microsoft Word read-only document, have students make personal copies of the document in class, annotate the excerpt, and then project students’ annotated texts for discussions of the text, either in the computer classroom or in the seminar room via the laptop.
Sample Exercise: Annotating Text with Microsoft Word
Note: The collaborative nature and in-class locale of this exercise is important, as students can easily and readily access databases from the English Library Web page ( http://www.lib.washington.edu /subject/English/) to provide biographical, etymological, and socio-historical glosses to a variety of terms and allusions in the text. All enrich class discussion and broaden students’ horizons about critical approaches to literary interpretation.
On Thursday we’ll be spending the first half hour of class annotating an excerpt of “The Lottery,” using various databases available to us via the UW Library—specifically, Literature Resource Center (to find biographical information about Jackson), Oxford Reference Online, and English Language Dictionaries.
The goal is not to find critical articles that provide a story interpretation for you, but for you yourself to build an interpretation of Jackson’s story by stopping at any word, phrase, or allusion that she chooses to include. Do this remembering that Jackson started with a blank page and was fastidious about the words she used to craft characterizations, setting, mood, conflict, etc.—always remember that she had choices, that she had designs on you as a reader to think and feel a certain way about the cast of characters and how things play out during the course of the plot. Words are her essential means of gaining your attention, especially through language connotations, denotations, and allusions.
When you find a word, also use the thesaurus feature in Word (in the Tool bar above, select Tools > Language > Thesaurus) to consider how Jackson might have chosen other words that would have attracted/distracted your attention to different character attributes and themes.
So in the first half hour tomorrow, I will have you comb the first part of this text, its exposition, highlighting words and phrases in which to insert your annotations, your commentary.
So in the first half hour tomorrow, I will have you comb the first part of this text, its exposition, highlighting words and phrases in which to insert your annotations, your commentary. To do this:
Highlight the word or phrase in Jackson’s story that you are researching
Find the Tool Bar at the top of the page and left click on Insert
Drop the cursor down to Comment, selecting it
Keyboard your comment into the pop-up box that appears, briefly noting the information you researched and why you find it useful

Option 4: Using Audio to Facilitate Textual Annotation
(Definition and sample assignment, Laurie George)
Human speech is like a cracked kettle on which we tap crude rhythms for bears to dance to, while we long to make music that will melt the stars.
Gustave Flaubert
Although instructors think most readily of using DVD clips in classrooms, not as frequently do we consider audio without the visual—any number of sites online feature audio clips of poetry, short stories, speeches, and novels read by the authors:
In the following exercise, students are asked in the computer classroom to listen to a writer’s oral rendition of their text as the students read the written rendition onscreen, and then respond in writing to their audiovisual reading of authorial voice.
Some background: because it is important in audio sessions to have students focused on listening rather than distracted by other considerations, students arrive at the listening session (such as the one described below) well versed in the differences between indirect and direct modes of literary address, as well as generic differences between memoirs and fiction.
Students are also well aware of the basic plot line of the selected text featured: in the case below, a 41-year-old man describes his class meetings of Alliance Francaise in Paris, a class he enrolled in willingly to learn French despite his fears that the pedagogical model would be less than collaboratively constructive. His fears are realized; his instructor proves to be extraordinarily abusive towards all the students in the class, whatever their race, gender, or ethnicity: discipline and punish is one way of encapsulating the thematic core of this David Sedaris essay.
Plot in mind, students are asked to listen to the text in the computer lab as they read the print text from the screens in front of them, and to insert comments (from the Insert column of the shortcut bar on Microsoft Word) as they read and listen. The exercise works best if the clip is replayed at least once, and better twice.

Option 5: Using Word's Readability Tool to Evaluate Texts
Microsoft Word also includes a tool for checking a text’s readability, whether that “readability” concerns a student essay, a critical essay, a wall graffiti note, a blog entry, a presidential address, a short story, a novel, etc.
This tool is therefore enormously useful for checking the stylistic profile of any professional- or lay-authored text, including the fictional styles of characters and personae penned from whatever actual or virtual source.
Sample Exercise: Examining Texts with Word's Readability Tool
Any document saved into Microsoft Word can be scanned for certain “readability statistics” by configuring Word in the following ways:
Only after a text goes through the keyed-in process of running Spell Check does this program display information about the readability of the document—but it does, finally, and this is what it displays:

The most useful features of the tool relate to a student’s editing concerns for their own writing or a student’s need to analyze the stylistic features of a professional writer. Both goals apply to the three headings of “Counts,” “Averages,” and “Readability” in the following ways:
- In a student draft, does the text include enough words—or too many—slightly fitted or stuffed into paragraphs that match the writer’s rhetorical goals for a given reading audience?
- In the professional text, does the variance of word averages indicate a kind of authorial style—for example, the minimalism of a Raymond Carver story? Alternatively, does a high count of words in a page of dialogue reveal verbosity in a certain set of characterizations? How many paragraphs are included in this passage—if there were more or fewer, would the emotional and logical effect on the viewer be different? Would the difference add to credibility in whatever fashion?
- If a character in a fictional work is speaking a piece labeled “readable” in this manner, how reliably literate is this character?
- If the character or the author writes in extremely brief or extensively long sentences, what does the simplicity or complexity of the style reveal about the character, or the author’s style or the author’s values?
- What about the character’s or author’s passivity or activity in sentence construction? What does this stylistic attribute reveal about the character or author—is the writer hiding culpability behind passive voice? Is the author implying thematically that a character is unwilling to take agency, the passive voice indicative of that resistance?
- If conventional criteria measure this writing excerpt as “low” in the conventional reading level of “Flesch-Kinkaid” grade levels, then what does this gradation imply about the readers’ values or the evaluators’ values concerning literacy?
Option 6: Brainstorming and Freewriting
Brainstorming and freewriting often work best when they are made a regular part of the class routine. Word makes it easy to do this. Some instructors start off every day in the computer classroom with a ten-to-fifteen minute freewrite or with an electronic journal response. Alternatively, students could be given time in class to brainstorm before a paper is due. Unlike a handwritten freewrite, both the student and the instructor can share the end product. Students can print out a copy or save a copy to disk, and instructors can review the class responses from their offices.
Sample Exercise: Working Toward an Interpretative Thesis
During this class period, you will be working toward a strong, interpretive thesis based on the evidence and ideas you’ve already collected about your topic. The following steps are designed to help you get started in the thesis process; feel free to skip or alter them—whatever will help you most. Have the people near you read what you have written and advise you on it; ask questions, and offer suggestions. There’s no need to be silent. Hold the mouse over highlighted text to see instructions on how to do various tasks. Remember to SAVE OFTEN.
Review your journal entry from last night and, in the space below, type in your “proto-thesis,” or a summary of what you think you want to write about. If you need a few sentences, that’s okay; this statement is just a place to get you started.
II. Argument Brainstorm
As we’ve discussed in class, every argument breaks down into a number of sub-arguments—a series of subordinate ideas that are the building blocks of the larger argument. In the space below, begin to think about how your topic could be broken down. Start by looking at your topic statement above and listing off all the ideas that seem related to it. Or, if that doesn’t work, try listing a series of questions that you think you would need to answer in a paper about that topic. List these ideas, sub-topics, and questions in the left-hand column of the chart. In the column to the right, list two or three pieces of evidence that might be useful in developing a paragraph about each sub-topic. Try, whenever possible, to be very specific about your evidence. Don’t worry about whether or not you will use each one of these—at this point you are just generating ideas. If you run out of space, insert more rows in the table.
III. Speculations
Now, think carefully about the lists above. Generate a series of claims related to your topic that could serve as subtopics to organize and to develop your argument. Your goal here is to construct claims; write out complete sentences, as if these were going to be the topic sentences of your paragraphs. Use the top box to brainstorm freely, and come up with as many ideas as possible. Once you generate your list, cut and paste different claims into the bottom boxes, and experiment with organizing your ideas in different ways.
IV. Thesis Statements
Now that you have worked though your ideas and listed out both your evidence and possible organizational strategies, try to come up with two or three possible thesis statements. Look carefully at the lists you have made; you may have several more thesis options that you originally thought.
V. Peer Commentary
Review the worksheet, especially sections III and IV, and then comment on the thesis statements above. Consider whether or not the thesis seems broader than the ideas expressed in the brainstorming section. Does it seem arguable? How clear is it? Does it oversimplify? Is it too complex? Be sure to write your name in the gray box above your comments.
If you want to work with these reviews at home, be sure to print a copy of this file or save a copy to disk.
Integrated Option:
Additional instructions for how to add more rows to tables, print and save can be added using the comment function. When students move the mouse to the highlighted text, these instructions appear in a comment window.
Option 7: Peer Reviews and Self Assessments
Word gives you a number of options for peer-reviews and for student self-assessment. Students can read ‘hard-copies’ of each other’s papers, then write a peer review, assessing the strengths and weakness of the argument. Or they can comment on the paper electronically, making a copy of their partner’s file and inserting comments into the document itself. Word provides a number of features to help make their inserted comments stand out. Students can use the Comment feature or the Highlight feature, described below, or simply place all their comments in bold or in capital letters.
Sample Exercise: On-Screen Peer Editing
(Laura Kuske) Today you are going to workshop your peer’s paper and provide advice on how he or she could strengthen the argument. This time, your review will focus especially on organization, evidence, and paragraph structure. You will be working in pairs and using the prompts below to guide your responses to your partner’s paper. Before you begin, you will need to follow these initial instructions.
Getting Started
Step 1: Exchange file names with your partner, and open his or her document. Double-click on the “Word” icon to open Microsoft Word. Select Open from the File menu, and choose your partner’s file from the directory list.
Step 2: Make a personal copy of your partner’s file. Since you will be making changes to the file, you want to make sure you are working from a COPY, not the original. To do this, Select Save As from the File menu, and rename the file as directed by your instructor.
Step 3: Tell the computer who you are. The person you are reviewing will want to know who said what; you need to tell the computer who you are so it can attribute your comments to you. To do this, select Options from the Tool menu. From the window that pops up, select User Information. Type in your name and initials at the prompt.
Step 4: Begin your review. To insert comments, highlight the text you are commenting on and select Comments from the Insert menu. Type in your suggestions in the window that appears at the bottom of the screen. To add end comments, simply scroll to the end of the document, click the mouse at the bottom of the text, and begin typing. Use the following questions as your guide, and be sure to save your work periodically.
The Peer Review
1. Read the paper over once, fairly quickly. Do not make any comments. You are merely trying to formulate a general impression of the argument as a whole. At the end of the paper, describe your initial response to the argument. Without referring back to the essay, see if you can summarize the main points. What does the paper seem to argue? How persuasive did you find the argument? Thinking back, can you remember the logic of the argument, or is it all a blur? Was there anything about the paper that grabbed your attention? Were there claims that you strongly disagreed with or found insufficiently supported?
2. Reread the paper slowly and carefully, and comment on the introductory paragraph. First, find the thesis, and underline it. Next, insert a comment evaluating its effectiveness; consider both the myths and purposes of a thesis that we discussed in class last week.
3. Next, take a closer look at each body paragraph, and identify two that you feel might benefit from further revision. Considering all the structural issues we discussed today, think carefully about how the paragraph is put together:
Is there a topic sentence near the beginning of the paragraph? If so, highlight it, and comment on how well it fulfils its role. Does it present a concept or a detail from the story? Does it connect to the thesis?
Does it have a clear relationship to the ideas developed in the preceding paragraph? How well does it capture the main idea of the paragraph? If there is no clear topic sentence, comment on what you think the topic of the paragraph might be.
Look at the body of the paragraph. Insert your comment(s). Consider what type and how much evidence is used; is there enough? Is there too much evidence? Are claims being developed over the course of the paragraph? Does the writer do more than merely summarize from the story? Does he or she present you with specific details from the text? Does the writer explain what the evidence proves and WHY?
4. Insert a comment at the end of the paragraph considering the paragraph’s conclusion. Does the paragraph offer one? Does its conclusion offer any new perspective on the evidence and on how it relates to or develops the ideas expressed in both the topic sentence and in the thesis? Does the conclusion seem forced or obvious? Does it seem unrelated to the evidence offered? Do you see how the conclusion can be derived from the evidence offered?
Printing Your Comments
When you and your partner have finished commenting, you can print out a copy of the paper with all the comments. From the File menu, select Print. To select this option, you must use the menu; do not use the print icon. In the window that pops up, click on Options. Make sure that there is a check-mark next to Comments in the list that appears. If the check is not there, simply click the mouse in the box to insert the check-mark. Now, click OK to return to the print menu. Click OK again to send your file to the printer.
Sample Exercise: Self-Assessment of Organization in Film Analysis
(E.L. George)
In this revision of your essay, I'd like you to assess your own draft (before a classmate moves to your workstation to respond):
1. Make a copy of your essay and name it movie#OR
2. In the copy, above the title, use 14 pt. bold faced font to state your thesis (even if it appears again in the introductory paragraph). Then number the paragraphs in boldface in the space following each paragraph (create space as you need to).
3. Reread each paragraph, and in the space you've created, type out the main claim of the paragraph (if you use topic sentences in your paragraph, you would rewrite the topic sentence).
Examine the list, and ask yourself the series of questions noted in The St. Martin's Handbook.
What organizations strategies are used? spatial? chronological? logical? [compare & contrast?]
Are they used effectively and consistently?
Do the main points clearly relate to the thesis and to one another? Are any of them irrelevant [disunifying the essay]?
Can you identify any confusing leaps from point to point?
Do you need to provide additional or stronger transitions?
Can you identify clear links [either through a logical shift of ideas or obvious transitions or repeated words ] between paragraphs and ideas? Do any others need to be added?
Have any important points [about the likenesses and differences of movie x on corporate life vs. movie y] been left out? (63)
Sample Exercise: Self-Assessments Using Auto-Summary
(Laura Kuske)
Paper Title:
Today, instead of reviewing a partner's paper, you are going to do an extended assessment of your own writing… with a little help from Microsoft Word. Part of the point of today's exercise is to expand our discussion of paragraph structure and argumentative logic to include transitions -- which means that we are going to begin focusing on how to clearly express the connections BETWEEN ideas and between paragraphs. In order to begin to see why transitions are important, we are going to spend the first part of class today working on creating an abstract of our arguments. Ideally, an abstract can be formed by collecting the main ideas of an argument into a single paragraph. But for an abstract to MAKE SENSE, these ideas have to be expressed in ways that make the relationships between ideas clear, while still accurately reflecting the specific content of the paragraphs. That can be quite a challenge, and the attempt can often reveal quite a bit about the places where the connections are not yet clear enough in the larger argument.
What we do today may seem a little confusing at first, because you are going to move back and forth between two Word files -- this worksheet and your own paper-- and we are going to try out a few 'advanced' Word commands. If you have problems or get lost along the way, just raise your hand and I'll help get you back on track.
1. Begin by opening the file containing your draft. Do not close this worksheet before opening your paper. You will need to have BOTH files open to do this exercise. To move between the two files, click on the Windows menu and select to file you want to look at.
2. Once your paper file is open, select AutoSummarize from the Tools menu. AutoSummary will review your paper, collect what it takes to be your main ideas, and write an abstract of your paper. From the window that appears, select the option to hide everything but the summary, and set the percentage at 10%. Click OK. Word will create an abstract of your paper. Although the rest of your paper will disappear, it is still there. You may need to delete a few extra paragraph returns to format the summary. It should appear as a single paragraph. Creating/Critiquing/Revising your Computer Generated Abstract
1. Read carefully through the summary Word created. Does it seem accurate? Does the abstract read smoothly or is it choppy, abrupt or confusing? Pretend, for a moment, that this was not computer generated, but something written by you to be submitted (for instance) on the class Web page. Critique the abstract in the space below. Would you submit this abstract as representative of your paper and your writing? Why or why not? How would you revise it? Comments:
2. Now, return to your paper, and increase the percentage of the text Word uses to create the AutoSummary to 15%. Reread the summary. Keep playing with the percentage until you have what you consider to be the best 'raw material' for an abstract of your paper. You will be editing and revising this, don't worry if you have to include extra material to get in all the ideas you want to include. Cut and paste the text from your abstract here. Percentage: Abstract:
3. You are going to revise this material in a moment, but first, take a look at exactly what parts of your paper the computer selected to create your abstract. To do this, return to your paper file and click OK to clear away the summary and return to the argument itself. Select AutoSummarize again, but this time, select the option to hightlight key points and click OK. Set the percentage control window to the same percentage you used to create your abstract. Scroll through your paper and observe what parts of your paragraphs--and how much of the paragraphs-- the computer is using. Do the computer's selections reflect the topic sentence/conclusion pattern you might expect? How much 'other' material did you have to include to get a complete outline of your argument? Did the computer skip over some of your topic sentences and conclusions? Why? Comment on the patterns you notice and reflect on what they might suggest. Comments/Observations:
Now cut and paste the raw material above into the box below and revise it into a concise and accurate abstract for your paper. Your abstract should be no more than 12-15 sentences (approximately 1 to 2 sentences per paragraph). It should provide a reader with a quick summary of all your main points, and the ideas should 'flow' together smoothly. It should not read like a list. It should read like an overview of an argument. Revised Abstract:
When you are done, print out a copy of this page (only this page.), and a copy of your paper. You will be giving a copy of your paper and your abstract to a peer partner to review.
Option 8: Writing Workshops
Word offers a range of powerful tools to help workshop writing, especially when used in conjunction with the overhead projector. Word allows you to highlight text in different colors, track editorial changes made to a document, or move text around in order to try out a variety of organizational or stylistic strategies.
Sample Exercise: Group Highlighting
(Kimberlee Gillis-Bridges)
Students participated in the following writing workshop during the class preceding the final draft due date. The essay assignment asked students to analyze a single scene from one of three early horror films, focusing on the narrative and cinematic elements at play in the scene. Before the workshop, I created a document featuring excerpts from students’ papers as well as links to digitized video clips of the scenes. The excerpts represented the three main problems students had with their drafts: their paragraphs tended to be diffuse discussing several technical elements that served different functions; paragraphs often had little discernible connection to the thesis; and formal film terminology was absent or misused.
As they viewed the projected essay excerpts, the class analyzed weaknesses and developed strategies for revision. During the workshop, students asked to view the linked clips to confirm details or to point out cinematic elements the writer had missed. I served as recorder, using Word’s highlighting function to mark passages as directed by the students. Writers whose paragraphs we analyzed could copy their marked passages and paste them into another document; a number of writers did so during the workshop, taking notes on their peers’ comments, then saving the marked passage once the class had completed the review.
The following example demonstrates how students marked the excerpts:
Scene: Dracula; scene in which Dracula and Van Helsing Meet
Writer’s Thesis: The scene separates Dracula and Van Helsing from the other characters as it pits the two against one another in a struggle between evil and good.
Explanation of Highlighting: The yellow highlighting marks a passage connected with the first part of the thesis--that technical elements of the scene separate Dracula and Van Helsing from the other characters. Although the passage suggests that a pattern of alternating close-ups distinguishes these two characters from other characters in the scene, the class thought that the idea needed further explication, perhaps in another paragraph. The green highlighting indicates an idea that the class thought detracted from the analysis in the rest of the paragraph. The blue highlighting marks a passage the class viewed as connected to the thesis. Students suggested that the writer make this passage the focus of the paragraph. They also suggested that the writer connect the editing of the close-ups and the issue of knowledge. Van Helsing's growing knowledge is conveyed through editing, and it is this knowledge that pits him against Dracula.
Sample 2: Style Imposters
(Karen Kupka)
Read through the following passages carefully, using Word’s highlighter to note the distinctive features of the writer’s style. After you think you’ve grasped the stylistic differences between the two passages, try impersonating both authors. Pretend that you are Hemingway, and rewrite the excerpt from Carter’s The Bloody Chamber in your own inimitable style. When you’re done with that, transform yourself into Carter and elaborate on A Moveable Feast .
Option 9: Reverse Outlines
Word also provides a range of outlining features that allow students to take a paper and convert it into an outline. An outline can help students to see the organizational structure of their papers in a “bare bones” format. Word also allows you to easily break down a student’s paper paragraph by paragraph and create a reverse outline exercise. This type of reverse outline allows students to visualize their paper’s organization as it is—and as they want it to be.
Sample Exercise: Reverse Outline
Step 1: Read the following paper. As you finish each paragraph, type out what you think the most important idea (in other words, the thesis) of the paragraph is. What is the general claim of the paragraph? Be sure to write out the thesis in a single, grammatically correct sentence.
Despite appearances, I believe that Imogene & Marya's friendship is not the most important thing in Joyce Carol Oates's story, "Theft." No character in the story has as important a role as Marya, but her friendship with Imogene does not play the most important role in Marya's life. Therefore that friendship cannot occupy the most important part of the story. While this friendship concerned Marya a lot, she eventually discovered that other things--her work and especially her writing--played a much more important role in her life. Marya gave up her friendship with Imogene because it took up too much time, time in which she could do more important things like writing. Marya saw writing as the most important thing in her life because writing overcame the destructive effects of time, while friendship just passed the time.
THESIS OF 1st PARAGRAPH:
It's hard to say exactly why Marya wanted to be Imogene's friends, but whatever the reason was, it wasn't the most important thing in Marya's life. Marya of course didn't initiate the friendship. Imogene pursued her. Marya never planned to be Imogene's friend; it happened to her like an accident. But Marya had some curiosity towards Imogene. Before Imogene ever approached her, Marya found herself staring "at the blonde girl in her political science class" who wore "a handsome camel's hair coat" and "an engagement ring with a large square-cut diamond" (476). This attraction, however, didn't seem to have any reason, or at least any particular importance. Marya throughout the story stared at a lot of people, but doesn't end up friends with any of them, except Imogene. Again I would say the friendship depended more on Imogene than Marya.
THESIS OF 2nd PARAGRAPH:
Though her relation with Imogene confused her for a while, Marya came to realize that work held more importance for her. "It occurred to her with a chilling certitude that every moment not consciously devoted to her work was an error, a blunder" (487). Marya worried constantly whether she did enough work. This didn't mean her work at the library. If anything, she regretted the time her job took from her. What worried her was schoolwork. She wanted to work hard at it. She even enjoyed it. But fear motivated her as well. She thought nothing mattered as much as success, even her own health. She felt that only "one's personal accomplishment" (493) mattered in life. In the story two kinds of accomplishment mean the most to Marya: school and writing. As I will explain later, because of the problem time created in her life, writing proves more important than anything else.
THESIS OF 3rd PARAGRAPH:
What created this preference from writing over schoolwork was her attitude toward time. The idea of time kind of scared her. In fact, Marya got quite hung up on the idea of time. "Time is the element in which we exist...We are either borne along by it, or drowned in it" (487). Here Marya reveals her fear that time would destroy her. But she thought that time could help her as well, if she did things right & worked hard. She asked herself, "Wasn't time the precious element that would carry her along to her salvation" (481)? Marya obsessed over the destructive effects of time. Her thoughts about the photographs of the old athletes express her feelings:
Another rowing team. Hopeful young men, standing so straight and tall; their costumes slightly comical; their haircuts bizarre. An air of team spirit, hearty optimism, doom (481).
Marya thinks of doom when she sees this picture because the picture reminds her that those men eventually died. I think Marya expresses this sense of doom in other places in the story as well, like when Phyllis's mother and sister came to clean out Phyllis's room: "And then the waters close over your head.--This phrase ran through Marya's head repeatedly" (491). Marya is thinking her about the doom that overcame Phyllis: doom comes like a flood, then washes you away into oblivion. Marya's obsession over this phrase is a sign that she considered this more than just Phyllis's problem. It was a personal problem for Marya too, because the source of the problem was time itself, something Marya couldn't escape. I believe Marya believes that "doom" was another word for "time."
THESIS OF 4th PARAGRAPH:
The first problem Marya experiences with the problem of time comes from not having enough of it, so she gets rid of Imogene in order to have more time for work. I think the writing was on the wall from the very beginning of their relationship. In the coffee house with Imogene's friends, when Marya thought she "should have been elsewhere" (481), that other place was back at her room or in the library working. She always felt that "she hadn't...time for 'wasting' on people" (478). In her journal she writes the following words on the subject of friendship: "She hadn't time...she hadn't energy for something so...ephemeral" (483). This last quote points out what really bothered Marya about friendship, that it isn't permanent. Eventually she thought conversations with anyone, whether Imogene or not, wasted her time.
THESIS OF 5th PARAGRAPH:
This sense of impending doom scares Marya, but she has a game plan. Just after she thinks the thoughts about the rowing team, she decides "she really should leave...she shouldn't be here" (481), because she feels this same doom closing in on her, and feels that only through work can she escape it. And the work that could save her is writing. Without writing, she's doomed to destruction like the rowers. But if she could become a writer, she'd have an indestructible existence. We know she believes this when she says "a writer's authentic self...lay in his writing and not his life; it was the landscape of the imagination that endured, that was really real" (474). By becoming a writer she too could have an "authentic self" that "endured." People would read her books long after she'd gone. People would know her "authentic self" long after the end of her "life." So what work she puts into writing is work toward eternity, while what work she puts into friendship is, as she says of sex, "as good a way as any of passing the time" (499). But Marya doesn't want to just pass the time. Marya's quotation of Thoreau expressed her need to avoid such frivolity: "How can anyone kill time without injuring Eternity?" (487)
Step 2: Retype each thesis statement below: 1) 2) 3) 4) 5) What you have here is a reverse outline of the paper. It is called "reverse" because the outline was written after the paper was written. Based on this reverse outline, evaluate the argument of the paper by answering the following questions:
Was there a clear claim for the whole paper stated in the first paragraph?
How did the subsequent subordinate claims support the main claim? In other words, based on your reverse outline, describe how the supporting points that each paragraph brought out supported the main claim for the paper?
Do you get a sense of the progression in the subordinate claims? In other words, can you see how the supporting points follow one from the other?
Step 3: Pick out one paragraph from the paper to examine in further detail.
How has the writer signaled the transition from the previous paragraph to this one?
Evaluate the development & support of the paragraph. How did the details presented support the general claim of this paragraph?
How are the ideas within the paragraph related to each other? In other words, how has the writer tried to make the paragraph cohere, to make it flow together?
Has the writer considered possible objections to the general claim of the paragraph? How?
Option 10: Editing
Although the program has limitations, Word’s grammar and spell-check tools can assist students with the editing process. Moreover, because students can easily change their prose in Word, you can create exercises that allow them to explore a variety of options for word choice, syntax, and source integration.
Sample Exercise: Using Quotations
(Alison Tracy)
Make yourself a copy of this file called “quotex.doc” and be sure you are working in your own file. Go ahead and type your answers right into the prompts below.
The following exercise will give you some further practice in using quotations smoothly, effectively, and correctly in your own writing. Select a quote from the following passage to complete each sentence. First, read through the examples carefully.
I am not merely asserting that “We are not all alike.” Those who aren’t aware of that would not likely read this essay or anything like it. What I am saying is that generalizations from within are every bit as fragmenting as scrutiny from without. From my boyhood I have read and heard all manner of statistical facts and figures about black people. Really, they’ve told me very little about who I am, let alone who we are. We’re too big for that, and as individuals too complex. I’m not so sure we should ever find ourselves in the position of saying this general thing or that general thing about black people, expecting our words to discover the essence of our “true self-consciousness,” for when we do, we will be doing no more than talking about black people, talking around them, never quite getting it right, never pinning us down, never quite turning sound into substance, and never—much like the way sharks course around caged divers—ever able to sink our teeth into flesh. Reginald McKnight, p. 180
Try to use the quotes in several different ways throughout the exercise:
a) Use a signal phrase followed by a comma:
McKnight says,
McKnight claims,
b) Use your own complete sentence, then a colon, followed by the quotation (which must also be a complete sentence.) Notice that I’ve also left out a brief phrase by inserting the ellipses.
McKnight thinks that negative messages from his own black community are as bad as racist attitudes among other races: “generalizations from within are . . . as fragmenting as scrutiny from without” (180).
Work the quotation right into your own sentence (and here I’ve used brackets to indicate a slight change in wording in his sentence):
He thinks that people who want to pin down “black people” as one thing or the other are like “sharks cours[ing] around caged divers” (180).
You need to be sure you are using the correct methods to add the quote to your sentence. Each sentence can be complete several ways; be sure that whatever way you choose, you use the correct signals and punctuation. You may add words or alter the prompt slightly.
1. McKnight doesn’t want us to think that he is just restating a cliché; he claims,
2. McKnight wants to show that statements made by other black people can be just as harmful as those made by white people:
3. He claims that all of the “facts and figures” he has heard don’t do much to explain his culture to him
4. McKnight wants us to see “black people” not just as a group, but
5. Trying to pin down “blackness” to a certain set of qualities doesn’t do justice to the complicated natures of black individuals
6. McKnight uses the image of sharks biting to explain how vicious people can be about each other
7. He doesn’t think words can ever explain our true selves
8. He doesn’t want us to continue the mistakes of the past
Option 11: Grading
Students can use Word to develop and modify evaluation rubrics. Creating such rubrics allows students to consider their audience’s expectations, and it gives them an active role in the grading process.
Sample Exercise: Grading Rubric
(Alison Mandaville)
Rationale: In this exercise students use the Insert Table feature of Word to develop a grading rubric for essays which they will then apply to peer essays and, finally, to their own writing. Students work in groups at the computers to develop the rubric and then can either work in groups or alone to use the rubric to grade each other’s work. The nice thing about doing this on the computer is that students can then print out a copy which looks official and which all group members can read. In addition, the rubrics can be used later to project on the overhead for whole class discussion/modification. My students’ rubrics are fairly general, but you may also have students make rubrics that are very specific to a particular assignment/topic.
Spending the time making their own chart, agreeing on definitions and criteria for each score and then applying this rubric to their own work is a great way to both examine closely the elements of a good essay and begin to be able to systematically evaluate their own writing. For 104-5 students in particular, I think this exercise is useful in helpful empower students to evaluate their own work and begin to establish some control over their ability to understand and improve their grades. The group aspect reinforces all those good group skills and makes what could be a fairly dry exercise much more fun. There can be some tension around grading each other, so I retain final authority in assigning grades, but find that their grading gets more and more effective the more they do it until sometimes I have few changes to make.
The Exercise: The easiest way to create a table in Word is to use the “Insert Table” icon on the pictorial toolbar. First place you cursor in your document where you want the table to be. Then Left click on the icon that looks like a mini-table with a blue band at the top--the one without an Excel symbol on it. Hold down the mouse as you draw the size of your chart. When your chart is the size you want, release the mouse button, and the chart will drop in where your cursor was.
Students work together (one student creates the table and types in information OR everyone makes their own after agreeing on criteria) to label the chart (terms to define on one axis and scores on the other) and define the criteria for scoring an essay. The terms you ask them to define will depend on what you’ve been working on—you may ask them only to do one or two to start, adding another criteria with each assignment.
Students work to evaluate a draft of each other’s essays based on their own rubrics.
Large group discussion following the group exercise can help fill out individual groups’ charts and pinpoint areas of fuzziness re: writing criteria.
NOTE: Resist the impulse to create the chart for the students because first, it’s good to know how to make a chart, and second, the terms you ask them to define, and the scale you ask them to use will become much more firmly entrenched if you have them set it all up.
Option 12: Reflection
At the end of an assignment sequence, you can ask create a short reflection exercise that allows students to reflect upon both their essay and the usefulness of activities in the sequence. Students can type their responses into the document and save the file to an evaluation folder.
Sample Exercise: Reflecting on the Writing Process
1. How did the process of writing this essay help you to develop as a cinema studies thinker and writer? Did comparing and contrasting two films give you any insight into patterns and shifts in the horror genre?
2. Which elements of your first draft (thesis paragraph, use of evidence, organization, etc.) did you revise most extensively? How have those revisions made the essay stronger?
3. If you could still revise your essay, what would you revise? Why?
4. Which aspects of the writing process for this essay did you find easy? Which did you find difficult? Why?
5. Please offer a grade for each of your peer reviewers, using the following scale and explaining to what extent each reviewer's comments helped you to revise.
Plus: An extremely useful evaluation Check: A mostly useful evaluation Minus: Not very useful overall (perhaps not complete)
6. How did the process of reviewing other writers' work influence your revision process?
7. Was the flexibility of the peer critiquing method (paper, Word) useful? Do you have any suggestions for organizing the peer critique process for Essay #3?
8. Did issues discussed in the conference and my comments on your paper or Web site help you to revise your work? Why or why not?
9. Which activities and homework (responses, brainstorming sheet, discussion of lecture arguments and responses, in-class clip analyses and comparison presentation, essay workshop) did you find most and least helpful in writing your first draft? Why?
10. What types of activities and homework would you like to do in preparation for our next paper, an analytical essay that incorporates research?
Useful Advanced Features
Word is a powerful program with more features than it is possible to cover in a manual of this scope. However, the following table highlights some of the features available through Word 2007that are most useful to a writing classroom. More extensive information on how to use these features can be found in the on-line Word Help menu and in the sample exercises in this manual that make use of these features.
- Newsletter
Subject Explorer
School Subjects
Math & Science
Business & Technology
Electives & Health
Board & Administration
Teaching & Learning
Audio/Video Lectures
Books & Documents
Classifieds
Jobs & Resources
Discussions
Language & Literature
Word 19 Advanced Table
In this practice project for Word, students create a document with a table showing a school schedule. The blocks in the table are different sizes and will take individual work within the blocks to create the correct layout. The document includes a title and has the date in the top right corner.
Sign in to rate this resource.
Categories:
Resource Type:
Pass it on:
Related Items
More from this series: practice projects for microsoft word.

Word 22 Preset Headings
In this practice project for Word, students create a document using the preset headings to create a title bar. The document has different alignment and font, blanks, and a short outline. …

Word 21 Formatting Options
In this practice project for Word, students create a document that shows some different effects that can be used with the same font. …

Word 20 Numbered List
In this practice project for Word, students create a document that includes a centered title followed by a numbered list. …

Word 17 Columns
In this practice project for Word, students create a document with two identical columns in landscape orientation. Included in each are indented lines and different alignment and font. …

In this practice project for Word, students create a document with a table showing a school schedule. The blocks in the table are different sizes and will take individual work within the blocks to …

Word 16 Lesson Notes Handout
In this practice project for Word, students create a document like a student handout. This includes an outline with several levels, blanks for students to write on, and different font. …

Word 15 Lesson Notes
In this practice project for Word, students create a document with a header and two outlines. Students are asked to use the automatic numbering and outlining features in Word. They must use different …

Word 18 Columns
In this practice project for Word, students create a document with a header and two colomns. The columns include boldfaced and italic font and different alignment. …

Word 11 Formatting
In this practice project for Word, students create a document similar to a test or quiz. They must include points and subpoints, blanks, boldfaced text, tabs, and spacing. …

Word 10 Table
In this practice project for Word, students create a document with a title and two identical tables. These tables have a larger column on the left with student names. The remaining cells are …
Leave a Reply
Templates for college and university assignments
Include customizable templates in your college toolbox. stay focused on your studies and leave the assignment structuring to tried and true layout templates for all kinds of papers, reports, and more..

Keep your college toolbox stocked with easy-to-use templates
Work smarter with higher-ed helpers from our college tools collection. Presentations are on point from start to finish when you start your project using a designer-created template; you'll be sure to catch and keep your professor's attention. Staying on track semester after semester takes work, but that work gets a little easier when you take control of your scheduling, list making, and planning by using trackers and planners that bring you joy. Learning good habits in college will serve you well into your professional life after graduation, so don't reinvent the wheel—use what is known to work!
Microsoft 365 Word Lesson & Activities

- Microsoft OneDrive
What educators are saying
Description.
• Microsoft Word in Office 365 is a software application that allows the user to perform word processing and create beautiful and engaging documents.
• This lesson includes instructions along with screenshots and text bubbles to demonstrate how easy it is to create high-quality documents using Microsoft Word.
• It reveals and explains the main features located under the menu bar.
• Activities, student exemplars and marking schemes are included
1. Font (Style, Size, Color)
2. Bulleted and Numbered Lists
3. Bold, italics, Underline
4. Align and Center Text
5. Inserting (Tables, Pictures, Shapes, SmartArt, Charts, Header, Page Numbers, WordArt, Textboxes, Video)
6. Page Layout (Page Size, Margins, Orientation, Page Color)
7. References (Table of Contents, Bibliography, Endnotes and Footnotes, Citation)
8. Mailings (Labels)
9. Review (Spelling and Grammar, Thesaurus)
10. View (Zoom, Print and Web Layout)
11. Microsoft Word Activities (Instructions, Marking Scheme, Student Exemplars)
ACTIVITIES:
1. Creating pictures using shapes in Word
2. Using Picture Tools to add and move images
3. Creating a Resume
4. Using WordArt
5. Creating and Formatting a Table
6. Setting Up a Page
The “Setting Up a Page” activity that involves using margins, line spacing, page numbers, header/footer, page color and watermarks.
Lesson Plans have been added to this resource (PDF and editable PowerPoint copies)
Note : TeachwithTech products are regularly updated with new lessons, activities, layouts, screenshots and video/article links. You will always be able to download the updated version of this resource for free under your “my purchases” tab.
I have been teaching Computers since 2005!
This resource is also sold as part of a larger bundle. Click on the link below to view this bundle…
OFFICE 365 LESSONS & ACTIVITIES BUNDLE
*************************************************************************
Cover image purchased from depositphotos.com
Terms of Use:
Purchase of this product is for single classroom use by the purchaser only. It is a violation for individuals, schools, and districts to redistribute, edit, sell, or post this item on the internet or to other individuals.
Created by Gavin Middleton © TEACH WITH TECH ™ INC.
TeachwithTech is not affiliated with Microsoft
Thanks for visiting my store! If you decide to make a purchase, please do not forget to leave feedback. I am very interested to read your thoughts about my products!
Also, don't forget to "FOLLOW" me for exciting new product announcements, sales, promotions and updates!
Gavin Middleton
TEACH WITH TECH ™ INC.
Questions & Answers
- We're hiring
- Help & FAQ
- Privacy policy
- Student privacy
- Terms of service
- Tell us what you think
Free Front Page Design
Free Front Page Designs For Assignments And Projects [Download MS Word Templates]
A good front page design is important in a project because it makes a strong first impression. A well-designed cover page or front page can create a positive initial impression on the reader and set the tone for the rest of the project. It Conveys professionalism. A professional looking cover page demonstrates to the reader that the project has been completed with care and attention to detail.
The cover page should clearly communicate the title, author(s), and date of the project, as well as any other important information that the reader needs to know.
A well-designed cover page should reflect the content and tone of the project, helping to build a connection between the reader and the project’s contents.
In short, the cover page is a crucial component of a project and can have a significant impact on how the project is perceived and received by the reader.
Front Page Design Template Samples
Benefits of using a good front page design on your project
- Establish a visual identity: A consistent and recognizable design on the cover page can help to establish a visual identity for the project and make it easier for the reader to identify it in the future.
- Differentiate the project: A unique and eye-catching cover page design can help to distinguish the project from others and make it stand out.
- Create a sense of unity: A well-designed cover page can provide a sense of unity to the entire project and reinforce the idea that all of the elements of the project are part of a cohesive whole.
- Provide context: The cover page design can provide context and information about the purpose, audience, and goals of the project, helping the reader to better understand and engage with the content.
- Improving organization: A well-designed cover page can help to organize the contents of the project and make it easier for the reader to navigate.
- Facilitating access: A clear and well-designed cover page can make it easier for the reader to access the contents of the project, and quickly find the information they are looking for.
- Enhancing accessibility: For projects that are shared electronically, a well-designed cover page can enhance accessibility for users with disabilities, such as those using screen readers.
Overall, a good cover page design is not just a cosmetic detail, but an important aspect of the project that can influence the reader’s perception and understanding of the content.
A well-designed front page can set the tone for the entire project and make it stand out from the rest. In this blog, we’ll take a look at some sample front page designs, best practices and tips to help you create a stunning front page design for your next project.
Front Page Designs Of Assignment
Front page designs for assignments [free ms word template download].

Creative Front Page Design For Assignment [Free MS Word Template Download]

MORE ASSIGNMENT TEMPLATES
Tips for Stunning Front Page Design Of Assignment
While it’s important to keep the front page design simple, that doesn’t mean it can’t be creative. You can still add a touch of personality to your design while making sure it’s organized and professional.
Here are a few ideas to get you started:
- Use a unique font or color scheme
- Incorporate illustrations or graphics related to your project topic
- Experiment with different layout options
Science Project Front Page Design [Free MS Word Template Download]
When it comes to designing the front page for a science project, the design should reflect the topic and make the project stand out. You can include images or graphics related to the topic, and use a font that is easy to read.
Front Page Design For Physics Project

Front Page Design For Chemistry Project

Front Page Design Tips For Chemistry Project
To design a cover page for a Chemistry project, you could try the following design concept:
- Use a light blue or green gradient to represent the chemical elements in a test tube.
- Use a bold sans-serif font, such as Arial or Verdana, to write the title of the project in white or yellow. Make the title the focal point of the page.
- Use a smaller sans-serif font, also in white or yellow, to write a brief description of the project, such as “An investigation into the properties of chemical reactions.”
- Use a smaller sans-serif font in black to write your name, class, and date of submission, positioned in the bottom right or left corner of the page.
- Add the logo of your school or university in the top right or left corner of the page.
- Include a relevant image or illustration of a chemical reaction, periodic table, or other scientific concept to reinforce the subject of Chemistry.
- Consider adding a simple white border around the entire page to give it structure and definition.
- This design concept incorporates elements of the subject of Chemistry, while also keeping it simple, clean, and professional.
Front Page Design For Biology Project

Front Page Design Tips For Biology Project
For a biology project cover page, you can consider incorporating the following elements:
- Title: A descriptive and concise title that accurately reflects the content of the project.
- Author(s): The name(s) of the person(s) who completed the project, usually in a prominent position on the page.
- Date: The date the project was completed, which is typically included in the header or footer of the page.
- School or organization: The name of the school, institution, or organization that the project was completed for, if applicable.
- Relevant images or graphics: Images or graphics related to the biology topic being studied, such as diagrams, charts, or photos of specimens.
- Project description: A brief summary or description of the project, including the purpose, methodology, and key findings.
- Aesthetics: A clean and professional design with a color palette that reflects the biology topic being studied. For example, green and blue might be appropriate for an aquatic biology project, while warm oranges and yellows might be appropriate for a botany project.
It’s important to note that the specific requirements for a biology project cover page can vary based on the guidelines provided by the teacher or institution. However, these elements can serve as a starting point for creating a visually appealing and effective design for a biology project cover page.
Border Front Page Design For Project [Free MS Word Template Download]
Adding a border to your front page design can help make it look more polished and professional. You can choose a border that reflects the topic of your project, or use a simple border in a neutral color.

Front Page Design For English Project [Free MS Word Template Download]

Front Page Design Tips For English Project
To design a cover page for an English project, you can consider the following steps:
- Choose a theme that aligns with the project topic and make it visually appealing.
- Add a title that clearly represents the project, it should be big and legible.
- Add your name, class, and date in a clear and concise manner.
- If required, include the name of your instructor and school/university.
- Add any relevant graphics, images, or logos that reinforce the theme of your project.
- Make sure to use a font that is easy to read and aesthetically pleasing.
- Consider adding a border or design element that ties everything together.
Note: The design should be professional and align with any guidelines provided by the instructor.
School Project Front Page Design

Floral Front Page Design For School Project

Whether or not it’s a good idea to use a floral front page design for a school project depends on the context of the project and the guidelines provided by the teacher or instructor. If the project is related to a subject such as art, design, or gardening, then a floral design may be appropriate. However, if the project is focused on a more technical or scientific subject, a more straightforward design may be more suitable. It’s important to consider the purpose and audience of the project and to ensure that the design effectively communicates the information you want to convey.
Cute Front Page Design For Project

Simple Front Page Designs For Project

Front Page Designs For Math Project

Front Page Designs For Music Project

Handmade Front Page Design For Project
Tips to make your handmade front page designs more appealing .
A handmade cover page design can add a personal touch to your assignment and make it stand out. Here are some elements you could consider incorporating into your design:
- Hand-drawn illustrations or graphics: Use hand-drawn illustrations or graphics that are relevant to the subject matter of the assignment.
- Handwritten typography: Incorporate hand-written typography into your design to add a personal touch. Consider using a calligraphy pen or brush to create unique, hand-lettered text.
- Collage: Create a collage using different materials, such as paper, fabric, or photographs, to create a unique and visually interesting cover page design.
- Watercolor: Use watercolor to create a painted cover page design. Consider using colors that are consistent with the subject matter of the assignment.
By incorporating these elements, you can create a handmade cover page design that is both personal and professional. Keep in mind that a handmade design may take longer to create than a digital design, so be sure to allow enough time to complete it.
What are the best tools to create a beautiful Front Page Design for a project ?
There are many tools you can use to create a beautiful front page design for a project, including:
Here’s How You Can Create a Beautiful Front Page Design in MS Word:
- Choose a page size and orientation that suits your design. Go to Page Layout > Page Setup.
- Select a theme or color scheme. Go to Design > Colors.
- Add a header or footer for branding. Go to Insert > Header & Footer.
- Insert a title text box and customize its font, size, and color. Go to Insert > Text Box.
- Add an image to the background. Go to Insert > Picture.
- Add other design elements such as shapes, lines, or text boxes to create visual interest. Go to Insert > Shapes.
- Align and arrange elements as desired. Go to Home > Align.
- Apply styles to text, such as bold or italic, to make the page look more polished. Go to Home > Styles.
- Preview the page to check its appearance. Go to View > Print Layout.
- Save the document as a template to use as a starting point for future projects. Go to File > Save As > Word Template.
A good looking front page design for a school or assignment project or a science project is important because it reflects the attention and effort put into the project, and can impact the grade or evaluation received. A well-designed front page can also effectively convey the topic and purpose of the project, making it easier for the teacher or evaluator to understand and appreciate the content. A visually appealing and organized design can also make the project stand out, showing initiative and creativity, and can help the student effectively communicate their ideas and findings. In science projects, a clear and effective front page design can also help emphasize the significance and potential impact of the research. Ultimately, a good looking front page design can enhance the overall presentation and impact of the project.
What is the downloaded file format?
.doc (MS Word file extension)
How to edit the downloaded template?
Open it in MS Word and make changes according to your need.
What is the size of the template?
It is A4 size template.
Leave a Comment Cancel reply
Save my name, email, and website in this browser for the next time I comment.
14 Best Steps on How to Make an Assignment on MS Word

Nowadays, it is very common for students to complete their assignments using Microsoft Word. Thus, they look up how to make an assignment on MS Word. Because of the numerous options provided by MS Word, it might be difficult for a beginner to handle. All you have to do is become familiar with MS Word’s options before moving on to the assignment.
Here in this blog, we will explain 14 best steps you need to follow in order to know how to make an assignment on MS word.
How to make an assignment on MS word
Table of Contents
Yes, we understand that completing an assignment is challenging for most students. Because some of them are worried about completing the task like write my paper , and even if they aren’t worried, they don’t know how to use Microsoft Word effectively, which can be disastrous for many. Similarly, we are publishing this blog to teach you how to make an assignment in Microsoft Word.
Yes, we understand that completing an assignment is challenging for most students. Because some of them are worried about completing the task, and even if they aren’t worried, they don’t know how to use Microsoft Word effectively, which can be disastrous for many. This blog is being published to teach you how to make an assignment in Microsoft Word.
1. Setting the layout of the page for your assignment
On the Toolbar, select the Page Layout tab. Likewise, Page Setup options will appear.
2. Set Margins
Set the margins as follows (Standard measure for the margin):
- Bottom: 2.5cm
- Left: 2.5cm (or 3.2cm)
- Right: 2.5cm (or 3.2cm)
3. Setting Orientation of the page
- Orientation: Portrait
4. Setting Size
- Set to A4 unless otherwise specified.
5. Setting styles
Go Back to the Home tab, You will find the Styles options in the right of the toolbar you will need to use these steps to set the headings and paragraph text for your work.
6. For Headings
Always use the first three headings (Heading 1,2 and 3)
- H1: Arial 14 pt bold
- H2: Arial 12 pt bold, italics
- H3: Arial 10.5-11 pt bold
And the text type should be Normal text
- Times New Roman 12 pt (or equivalent)
7. To set the headings styles for your work, you will have to
- Click the small Styles icon/button.
- Select/highlight the style to modify (e.g. ‘H1’), and then right-click >Modify. Likewise, the Modify Style dialog box will appear.
- Under Formatting, You can change the font style and size as per your need.
- Click OK.
8. Setting up your assignment as the one document
Also, your Work, including the title page and references ( not the Assignment Attachment form*), must be aggregated as a single word (.docx) report.
Therefore, it is simpler to make one record, embed your significant headings, and enter the content from that point. But, if you decide to make separate documents while setting up your task (for example, a different record for references), you will need to copy and paste the final contents into the one-word document and finalize the formatting there.
*The assignment attachment structure is either submitted electronically as a different document or attached to a submitted printed copy.
If you face any issues related to PowerPoint or find it difficult to complete your PowerPoint homework, use our PowerPoint PPT Homework Help by Experts .
9. Inserting section breaks, page breaks, and page numbers
The document has two sections
Section 1 Contains
- The title page
- Table of contents
Section 2 Contains
- The remainder of the assignment.
There are then page breaks within each section i.e
(e.g. between ‘Abstract’ and ‘Table of contents’; ‘Conclusion’ and ‘References’).
To insert the Section break (i.e. make two sections)
- Position your cursor at the end of the Table of contents. (Just have this as a heading; the actual table will be added at the end.)
- From the toolbar at the top of your document, open the Page Layout tab and select Breaks>Section Breaks>Next Page. Under Section break types, select ‘Next page’. This has now divided the assignment into two sections.
Now to insert the page breaks
- Place your cursor at the foot of the title (cover) page.
- Select the Page Layout tab>Breaks>Page Breaks>Page. This has now created a page break between the title page and Abstract.
- Place the cursor at the foot of the Abstract page and repeat to make the break between the Abstract and Table of contents.
- Place a page break between the Conclusion in the next section.
10. Now to add the page numbers
For section 1:.
- Place your cursor within the title page. Click on the Insert tab and then select Page Number in the Header & Footer set of options.
- Select Top of Page>Plain Number 3 (‘right’ alignment). Do not close the Header and Footer just yet.
- Check the box for Different First Page. (This will remove the page number from the title page.)
- In the Header & Footer group of options to the left of the toolbar, select Page Number>Format Page Numbers. Select i, ii, iii .. from the Number format
- Drop-down list. Under Page numbering, click the Start at the radio button (if not already activated) and select i. Click OK.
- Close the Header and Footer. [This will paginate slightly differently from the example, with Abstract on page ii. ]
For section 2:
- Go to the start of section 2 (i.e. beginning at the ‘Introduction’) and double click on the existing page number. This will open the Header settings options.
- In the Header & Footer options section on the toolbar, select Page Number>Format Page Numbers.
- Make sure the ‘Show number on the first page is selected (i.e. the box is ticked).
- Select 1, 2, 3 from the Number format drop-down list. Under Page numbering, Click on the Start at the radio button and set the start on page 1.
11. Inserting the Table of contents
- Move the cursor under the ‘Table of contents’ heading.
- Check the checkboxes for ‘Show page numbers’ and ‘Right align page numbers’.In the (last) Show levels box, set it to either just ‘1’ (i.e. list only the heading 1 level headings) or ‘2’ (to show both H1, and H2 headings).
- To update the table anytime, right-click on the table and it’s almost done.
12. The title page
Follow these steps as the model for your work:
- Assignment title: Arial 28 pt, italics, centered
- (Assignment number): Arial 18 pt, italics, centered
- Other details: Times New Roman 14 pt, left-justified; single tab spacing for items on the one line.
13. Word count
Show the word count properly for the body of your assignment, because it’s’ important.
- Place your cursor on the Introduction title, hold the Shift key down, and got to the end of the Conclusion.
- And then Tools>Word Count and record the number of words.
14. Spelling and Grammar Check
Always keep an eye on spelling and sentence structure and Before you get a printed copy of your task,
What you have to do is
- Run the word spell and sentence structure, and carefully look at your Work. (Tools>Spelling and Grammar.)
- Ensure the Dictionary Language is set to English (Australia, UK, Canada).
Get the Best Excel Assignment Help Now
6 Tips On How To Make an Assignment First Page Best
8 Best Steps On How to Write An Assignment Report
4 Tips on How to Write an Assignment Introduction
6 Tips on How to Make An Assignment For High School
To this end, now you know the 14 best steps on how to make an assignment on MS Word in detail. Many times students are worried about their assignments but we are here to assist you with all your problems. You can contact our experts anytime if you have an issue with MS Office assignment help.
As a result, Our computer science assignment help experts are available for you to provide help 24/7.
Related Posts

How to Hire someone to do my Statistics Homework for Me?
Students ask to do my statistics homework for me. Although there are many online tutors or statistics homework service providing websites available to help you…

How to Get Good Grades in Exams Tips by Experts
Here in this blog, Codeavail professional experts will help you to understand how to get good grades in Exams. Notice that not all the material…
28+ Best Free Assignment Cover Page Formats for MS Word
What is an assignment cover page, key elements for a comprehensive front page.
- Institution Details: Begin by prominently featuring the name of your school, college, or institute. This establishes credibility and provides context for your assignment.
- Personal Information: Include your own name to indicate authorship and ownership of the assignment. This adds a personal touch and facilitates easy identification.
- Assignment Title: Clearly state the title of your assignment, conveying its purpose and focus. A concise and informative title sets the tone for your work.
- Course Information: Specify the relevant course title or code to indicate the academic context in which your assignment was completed. This assists in proper categorization and organization.
- Instructor’s Name: Acknowledge the teacher or professor who will be evaluating your assignment by including their name. This demonstrates respect and professionalism.
- Due Date: Clearly indicate the deadline or due date for the assignment submission. This ensures timely assessment and helps you stay organized.
What are the basic tips?
- Font style : It is always in the best interest to use bold, simple, and clear text instead of using fancy text fonts and styles. This helps the reader understand things in a better way. Moreover, the usage of pictures behind texts must be avoided as it creates poor visibility for the reader when reading the text printed on it.
- Presentation: Presentation plays an important role in expressing what you need to convey to someone and how you need to communicate it. Presenting the title page in the most effective manner is essential as this leaves an impression on the teacher reading the assignment. It also acts as a decisive tool for the teacher whether or not he/ she interestingly goes through the whole document.
- Spell Check: Before handing over the assignment, one should take a brief review of all the spelling and also look for any grammatical errors.
- Avoid plagiarism: A student must always be honest in what he writes. He should avoid copying material or texts from anywhere.
- Personal detail: One should never forget to mention his/her name. The font size used for writing the name must be bigger so that it makes the name visible to the teacher.
Advantages of an Impressive Assignment Cover Page
- Showcasing Professionalism: By meticulously designing your cover page, you demonstrate a strong commitment to professionalism. This attention to detail reflects positively on your work ethic and sets you apart as a dedicated student.
- Creating a Positive Impression: A well-crafted front page sets the tone for your assignment, capturing the attention of your teacher or professor. It establishes a positive first impression, arousing their interest and encouraging them to delve further into your work.
- Enhancing Visual Appeal: A visually appealing cover page enhances the overall presentation of your assignment. With carefully chosen fonts, colors, and layouts, you create an engaging and aesthetically pleasing introduction that captivates the reader’s attention.
- Communicating Pertinent Information: It provides a concise summary of essential details, such as the assignment title, your name, and the due date. This ensures clarity and facilitates seamless identification and organization of your work.
- Reflecting a Professional Attitude: By dedicating time and effort to creating an impressive cover page, you exemplify a professional attitude towards your academic pursuits. This level of dedication and care leaves a lasting impression on your teacher or professor.
Download Free Cover Page Templates
#1 – best format.

#2 – Assignment Cover Page for Case Study

#3 – Best Design for Critical Review

#4 – For Any Kind of Educational Assignment

Video Tutorial
#5 – essay assignment.

#6 – Syllabus Assignment

#7 – Cover Page For University Assignments

#14 – Cover Page for Business Assignment

#16 – Academic

#17 – Generic Cover Page for any Assignment

#18 – Biology Assignment

#19 – For Chemistry Projects

#20 – Cover Page for Computer Projects

#21 – For Engineering-Related Assignments

#22 – For English Assignment

#23 – For Geography Projects

#24 – Mathematics

#25 – Physics

#26 – Cover Page for School Assignments

#27 – Best for Science Projects

#28 – For Social Study Assignment

Versatile Designs and Layouts for Every Purpose
- Assignment Types: Our templates are designed specifically for different types of assignments, such as case studies, critical reviews, essays, syllabi, and business projects. Each template is tailored to suit the requirements and objectives of its respective assignment type.
- Academic Disciplines: Our collection includes templates suitable for various academic disciplines like biology, chemistry, computer science, engineering, English, geography, mathematics, physics, and social studies. Each template aligns with the themes and aesthetics of its corresponding discipline.
- Purposes: Whether you are a student, educator, or professional, our templates serve multiple purposes. They can be used for university assignments, school projects, research papers, or any academic or professional endeavor that requires a polished cover page.
- Designs, Layouts, and Styles: Our templates offer a diverse range of designs, from minimalistic and clean to visually captivating and sophisticated. You can choose from different layouts that creatively arrange text, images, and graphics. Our templates cater to a variety of styles, ensuring there is something for everyone’s preferences.
User-Friendly Customization: Make It Your Own
- Easy Modifications: We believe in keeping things simple. With just a few clicks, you can effortlessly modify our templates to suit your specific requirements. Change colors, fonts, and layouts with ease, and watch your cover page transform before your eyes.
- Colors and Themes: Infuse it with the perfect color scheme and themes that truly represent your assignment. Our templates offer a wide range of options, so you can find the ideal palette and theme that resonate with your content.
- Font Selection: The right font can make all the difference. Choose from our diverse selection of fonts to enhance the visual appeal and readability. From elegant and professional to modern and bold, we have fonts to suit every style.
- Layout Flexibility: It should reflect your unique presentation style. With our templates, you have the freedom to experiment with different layouts, arranging titles, subtitles, images, and text blocks in a way that best suits your assignment.
Benefits of Using Professionally Designed Templates: Make an Impact with Ease
- Time and Effort Saving: Our professionally designed templates eliminate the need to start from scratch. With pre-designed layouts, styles, and graphics, you can save valuable time and effort in creating visually appealing front pages. Simply customize the template to suit your assignment’s requirements, and you’re ready to impress.
- Consistency and Professionalism: Using our templates ensures consistency in your assignment submissions. The standardized design elements and formatting guidelines help maintain a professional appearance throughout your work. Presenting your assignments with a polished title page enhances the overall quality and credibility of your content.
- Visual Appeal: A visually appealing title page grabs attention and sets the tone for your assignment. Our templates are thoughtfully crafted by design professionals, incorporating aesthetically pleasing elements, color schemes, and typography. By leveraging these designs, you can effortlessly create eye-catching cover pages that captivate your professors or readers.
- Positive Impression: First impressions matter, and a well-designed cover page leaves a positive impact on professors and readers alike. Showcasing your assignment in a professional and visually appealing manner demonstrates your dedication and attention to detail. It sets the stage for an engaging reading experience, encouraging your audience to delve deeper into your work.
- User-Friendly Customization: Our templates are designed to be easily customizable, allowing you to add your personal touch without technical expertise. You can modify text, colors, images, and other elements to align with your assignment’s theme and requirements. This flexibility ensures that your cover page reflects your unique style while maintaining a professional look.
Tips for Maximizing the Impact: Make Your Cover Page Stand Out
- Choose Colors Wisely: Select colors that complement your assignment’s theme and evoke the desired emotions. Vibrant colors can grab attention, while muted tones create a sense of elegance. Maintain consistency with your assignment’s overall design and avoid using too many colors that may distract from the main message.
- Opt for Legible Fonts: Use clear and readable fonts to enhance the accessibility and professionalism of your cover page. Avoid overly decorative or complex fonts that may hinder readability. Opt for fonts that align with your assignment’s tone and maintain consistency throughout the document.
- Incorporate Relevant Graphics: Graphics can enhance the visual appeal of your cover page and reinforce the assignment’s subject matter. Choose images or icons that are directly related to the topic or convey the assignment’s main concept. Ensure that the graphics are high-quality and appropriately sized to maintain clarity.
- Organize Information Effectively: Arrange the information in a logical and visually appealing manner. Use headings, subheadings, and bullet points to break down content and make it easier to read. Highlight key details such as the assignment title, your name, course information, and submission date.
- Maintain Simplicity: While it’s important to make it visually appealing, avoid cluttering it with excessive elements. Keep the design clean and uncluttered, allowing the key information to stand out. Remember, simplicity often has a greater impact than complexity.
- Preview and Proofread: Before finalizing, preview it to ensure that all elements are properly aligned and visually balanced. Proofread the content to eliminate any spelling or grammatical errors. A polished and error-free cover demonstrates your attention to detail and professionalism.
← Previous Article
Next Article →
You may also like

- Doctor Prescription Pad Formats
- Printable ID Cards
- Creative Resume Formats for Freshers
- Modern Resume Templates
- Best Cover Page Formats
- Printable Report Cards
- Business Proposal Templates
- 22 Raffle Ticket Templates
- Free Certificate Templates
Search the database of 10,000+ templates, designs & formats for Microsoft Office.
- Share Your Appreciation: Free Memorial Day Card Templates
- Crafted with Love: Free Mother’s Day Cards to Warm Mom’s Heart
- Stand Out from the Crowd: 6+ Free Fact Sheet Templates
- Make Your Mark: Free Printable Dog Name Tags for Every Tail-Wagger!
- 7+ Free Stunning Easter Templates for Joyful Celebrations
- 9+ Free Admit-One Ticket Templates: Flexible and Easy to Edit
- Get Cooking with Style: 8+ Free Customizable Recipe Card Templates
- 11+ Free Mortgage Flyer Templates to Elevate Your Marketing
- Enhance Your Events with 20+ Unique and Free Ticket Voucher Templates
- Relaxation Redefined: Explore Free 8+ Spa Voucher Templates
- 24+ Free Employment Verification Letter Templates
- Free 5+ Best Christmas Wishlist Templates for Joyful Giving
- Certificates
- Cover Pages
- Educational
- Event Templates
- Invoices & Receipts
- Letterheads
- Office Related
- Personal Use
- 137+ Professional Reports – MS Word & Excel
- 70+ Printable & Editable ID Card Designs
- 59+ Proposal Formats
- 31+ Best Flyer Designs & Formats
- 100+ Cover Page Templates
- 22+ Free Letterhead Designs and Formats
- 24+ Free Resume Designs & for Freshers and Professionals
- 136+ Printable Certificate Templates
- 55+ Quotations & Invoices
- Create FREE PDF Calendar Online
55+ Best Microsoft Word Templates (Modern, Downloadable Word Documents)
Microsoft Word is a multipurpose tool you can use to create not just letters and documents but also resumes, brochures, flyers, and everything in between. This collection of Word templates will show you how versatile this software can be.
Whether you’re working on an important report for a client or making a simple flyer for an event, you can save a great amount of time by using a Word template. Templates come with pre-made designs so all you have to do is edit them to copy-paste your own content.
In this post, we share with you all kinds of Word templates you can use to quickly design professional documents without expert design experience.
6,000+ Word Templates & More With Unlimited Downloads
Discover thousands of Microsoft Word templates for your next project with an Envato Elements membership. It starts at $16 per month, and gives you unlimited access to a growing library of over 2,000,000 graphic templates, design assets, themes, photos, and more.

Resume & CVs
Unique & pro.

Magazine Templates
For word & indesign.

eBook Templates
Readable layouts.

Bill in Style

Letterheads
Simple & professional.

Certificates
Traditional & modern.
Explore Word Templates
Be sure to keep these Word templates saved on your computer so you can impress your team and clients with amazing document designs.
Brand Guidelines Word Business Template

This brochure template has one of the best designs for making brand guidelines documents. It has pages with clean layouts and beautifully organized structures for content. There are 20 pages in this template and it comes in Word and InDesign formats.
Annual Report Word Document Template

If you’re working on an annual report document with all the highlights of your company’s year, use this template to give your document a professional look. It has 20 unique page layouts with easily editable designs. It’s available in A4 size.
Project Proposal Document Word Template

With this Word template, you can design an attractive project proposal document that wins over your clients. You can easily edit this template using MS Word or InDesign to change the colors, fonts, and images. There are 16 pages in this template.
Professional Brochure Word Template

This is a multipurpose Word brochure template that can be used to create many different types of documents. It has a flexible layout with customizable colors and fonts. The template features 16 pages and comes in A4 and US Letter sizes.
Free Event Planner Word Brochure Template

A free Word brochure template for making a simple event planner. This template includes 6 page layouts, including pages for budget planning, expenses, guest lists, and many others. It’s perfect for creating a planner for a small event.
Company Annual Report Word Template

Design a professional-looking annual report for your company using this Word template. It has 40 different page layouts to choose from with lots of options for customizing the colors and fonts to your preference.
Company Profile Word & InDesign Template

This document template comes in both MS Word and Adobe InDesign formats. You can use whichever software you like to edit the design. The template includes 20 page layouts for making company profile brochures for various types of businesses.
Business Portfolio MS Word Template

Showcase your business portfolio in a professional way using this Word document template. It comes with 20 unique page layouts featuring auto page numbering, paragraph styles, and editable colors.
Brand & Business Profile Word Template

This is a high-quality Word template made for brands and businesses for creating company profiles. There are 20 pages in this template in A4 size. The template is also available in Adobe Illustrator format.
Free Simple Sales Planner Word Template

You can download and use this Word template for free to create a simple sales planner document. The template includes 4 page layouts with printable designs. It’s available in Google Docs and Apple Pages formats too.
Word Resume Template for Developers

This is an easy-to-edit Word resume template ideal for developers and designers looking to make a positive impression. With 100% editable elements, you can personalize colors and text to your liking. The downloadable file includes a resume and cover letter templates in MS Word, AI, and EPS formats.
Word Resume Template for Marketers

A fully customizable, professionally designed Word resume template ideal for freelancers and marketers. With clearly labeled layers and customizable text and colors, the template ensures ease of use. It also supports various file formats including MS Word and Illustrator.
Business Plan Brochure Word Template

A comprehensive Word brochure template for creating professional business plan documents. It’s customizable in both Microsoft Word and Adobe Indesign, with full editing capabilities for text, color, and objects. This A4 size, 36-page doc can be printed or turned into a digital document as well.
Creative Invoice Template for Word

A sleek and modern Word template for creating invoices. This A4 size template is fully customizable and print-ready, designed with well-organized layers and optimal 300 DPI, CMYK. The template is available in PSD and AI file formats as well.
Chic Invoice Template for Word

This Word invoice template features a unique blend of sleek design and functionality. Tailored to exude a chic, feminine aesthetic, this template ensures your invoices reflect your style. It’s set to A4 size, with neatly organized layers and a print-ready resolution of 300 DPI in CMYK.
Conference Agenda Word Template

This is a versatile Word template for constructing professional conference agenda documents. It’s compatible with Microsoft Word and Adobe InDesign and can be printed or converted to PDF. The 16-page, editable A4-sized document allows customization of text, color, and objects. It includes automated page numbers and paragraph and character styles.
Corporate Brochure Word Template

This Word brochure template is ideal for creating professional corporate documents. Supporting A4 size with a bleed area of 0.25 inches, this template offers 24 customizable pages, easy color, text, and image changes as well as page order adjustments. It’s compatible with InDesign, Photoshop, and MS Word.
Company Brochure Word Template

Another stylish Word brochure template for modern firms and companies for creating captivating documents. With it, you can tailor A4-sized, 16-page brochures in Indesign, Photoshop, or MS Word. You can also adjust colors, text, images, and page layout conveniently.
Product Catalog Template for Word

This is an editable brochure template suitable for print or digital use. It’s perfect for creating minimalist product catalogs for modern furniture brands. The template is compatible with Microsoft Word and Adobe InDesign, and also features A4 size, a 6-page document setup, and editable text, color, and objects.
Nonprofit Fundraising Flyer Word Template

This is a fully editable brochure template for Word, perfect for creating flyers for nonprofit fundraising events. It’s a two-page document that can be used for both print and digital flyers. The template offers the flexibility for customizing text, colors, and objects, utilizing paragraph and character styles, and comes with a detailed file guide for easy editing.
Professional CV & Resume Word Template

Designing a resume is not just about creating a document of information, it also needs to be attractive enough to grab the attention of the employer. With a beautiful template like this, you’ll have a higher chance of making a CV that lands you an interview. It comes in multiple file formats and includes a cover letter design as well.
Creative Word Resume Template

If you’re a creative professional applying for a job, this Word template will help you design a stylish CV that makes your application stand out from the rest. It comes in Word, Photoshop, and Illustrator file formats. And has a fully customizable design and layouts.
Kopec – Word Magazine Template

This Word document template is perfect for designing a modern magazine for a brand or business. It comes with minimal and stylish page layouts with a multipurpose design. The template is also available in Word, InDesign, and Illustrator file formats.
Skrup – Modern Magazine Word Template

Another magazine template for making documents and brochures for showcasing your business. This template comes in A4 size with modern page layouts that you can easily customize to your preference. It’s also available in multiple file formats.
Free Elegant Word Invoice Template

This is a simple free Word template you can use to create invoices. It has a clean and minimal design that’s ideal for creative professionals and freelancers. The template is free to download and use.
Event & Conference Flyer Word Template

If you’re working on promoting an event or conference, this Word template will help you craft a modern and attractive flyer to promote the event. It includes two versions of flyers with different colors. And it comes in Word, Photoshop, and InDesign file formats as well.
Company Brochure Word Document Template

With 32 different page layouts to choose from, this Word document template will allow you to design professional brochures for various types of companies. It has modern and visual page designs with editable paragraph styles. The template is also available in InDesign format.
Company Profile Word DOCX Template

This Word template is designed for making professional brochures for showcasing a company profile. It comes with 20 different page layouts with editable colors, shapes, paragraph styles, and much more.
Resume & Cover Letter Word Templates

A different style of a resume template that features a creative design. This resume lets you showcase your skills and experience in a visual way. It comes with a cover letter template as well. You can edit it using Word, InDesign, or Photoshop.
Free Word Resume CV Template for Freelancers

This is a basic resume template designed with freelancers in mind. It’s ideal for putting together a simple CV when applying for remote jobs. The template features free Google Fonts and a fully editable layout.
Modern Word Resume Template

This is one of the best Word resume templates we’ve ever seen. It features a truly one-of-a-kind design with many shapes and creative elements. If you want to create a resume that makes you stand out, this is the template for you. The template comes complete with a resume design, cover letter design, and portfolio template.
Classic MS Word CV Resume Template

Even though this resume template has a modern look, it also features lots of classic vintage design elements as well. This makes it ideal for creating a resume for a creative professional. In addition to the Word templates, it’s available in several other formats including Photoshop, Illustrator, and EPS. So you can edit it using any software you like.
Word Resume & Cover Letter Template Kit

Another modern and creative Word resume template kit that includes a CV template, cover letter template, and portfolio template. It has everything you need to create a unique resume that will highlight your application among hundreds of others. The template is fully customizable and comes in multiple formats.
Project Proposal Word Document Template

Many agencies and businesses still use the same old designs for creating documents. With this modern Word document template, you’ll be able to create brochures unlike anything your clients have seen before. It’s most suitable for creating project proposals but you can customize it to create other types of documents as well.
Business Plan MS Word Document Template

Looking for a Word document template to design a business brochure? Then this template will come in handy. It comes with 20 pages with multipurpose designs you can use to create business plan brochures, project proposals, company profiles, and much more. The template is available in both Word and InDesign formats.
Free Event Brochure Template for Word

You can use this Word template to create a tri-fold brochure to promote an event or a conference. The template is free to download and use. It also comes in multiple formats including Word, Apple Pages, and InDesign.
Free Tri-Fold Word Brochure Template

This free Word template is perfect for creating brochures for corporate agencies and businesses. It features a dark and modern design that attracts attention. The template is available in Word, Google Docs, Apple Pages, and Photoshop formats.
Creative Word Letterhead Template

Tired of using the same boring letterhead designs? Then this Word template will help you create a unique letterhead design for your brand. It features a very modern and creative design that will fit in perfectly for freelancers and agencies. You can easily edit the template to change colors and illustrations as well.
Word Letterhead & Envelope Template Kit

This is a complete stationery kit for Microsoft Word. It includes multiple letterheads and envelops templates in Word, Photoshop, and Illustrator file formats. The colorful and modern design of these templates makes them most suitable for creative agencies and brands.
Professional Newsletter Template for MS Word

This is a newsletter template that you can customize with Microsoft Word, InDesign, or Apple Pages. It comes with 16 page layouts with professional designs. You can customize each page to your preference to create an attractive newsletter for your brand or agency.
Minimal Word Newsletter Template

If you prefer to create a newsletter with rather a minimalist design, this template is made just for you. It features 4 different page layouts with editable layouts that are available in A4 and US Letter sizes. You can also edit the templates using both MS Word and Adobe InDesign.
Word Brochure Template for Agencies

A modern Word brochure template for making various documents for agencies. This template is perfect for crafting company profiles and agency portfolios. It includes 14 unique page layouts in A4 and US Letter sizes. The template is also available in Word and InDesign file formats.
Free Business Brochure Word Document Template

This is a free Word document template you can use to create a basic brochure for a business. It includes beautiful page layouts that you can customize to your preference. The template also comes in A4 and US Letter sizes.
Free Bi-Fold Word Brochure Template

You can use this Word template to create an elegant bi-fold brochure to promote a creative business. It’s most suitable for designers and photographers. The template can be customized with Word, Google Docs, Apple Pages, and InDesign.
Corporate Business Flyer Word Template

Did you know that you can design posters and flyers using Microsoft Word? Here’s proof. This template allows you easily make a flyer in Word. It features a professional design that’s ideal for printing flyers for a small business or agency. The template also comes in Photoshop and Illustrator formats.
Meetup Event Flyer Word Template

You can use this Word template to create a flyer for a meetup event. The bright colorful design will definitely help attract the attention of your audience more easily. The template is available in A4 and US letter sizes. You can customize it using InDesign, Photoshop, or Illustrator as well.
Trendy Word Letterhead Template

This Word template is perfect for creating unique letterheads for creative brands, agencies, and freelancers. It has a colorful design that will instantly grab the attention of your clients. The template is easily customizable and you can change its colors however you like.
Proposal Brochure Template for Word

Agencies and freelancers have to create project proposals all the time. Keep this Word template saved on your computer to easily make modern proposal brochures without effort. The template includes 26 unique page layouts in Word and InDesign file formats.
Modern Word Invoice Template

A good-looking invoice is a must for every creative business. This template will allow you to craft an attractive invoice design for your business. You can easily edit the template to change colors using Word, Illustrator, or Photoshop.
Clean & Minimal Word Invoice Template

Another beautiful invoice template with a minimal design. This Word template is perfect for making sophisticated invoices for freelancers and creative agencies. The template can be customized with InDesign or MS Word.
Free Word Resume Template

Looking for a resume template with a simple design? Then this Word template is perfect for you. It features a modern and creative resume design that you can customize using Word, Adobe XD, Sketch, or Photoshop.
Free Creative Resume Template for MS Word

Another creative resume template for crafting CV resumes for designers and freelancers. This template features seven sections for showcasing your details, skills, and experience. It’s also available in multiple file formats.
Modern Company Profile Word Document Template

If you want to create a brochure to showcase your company in an attractive way, this Word template will help. It includes 16 unique page layouts you can use to design different kinds of company profile brochures.
Elegant Word Letterhead Template

This letterhead template has a very elegant and classy design. It’s most suitable for high-end businesses and luxury brands. The template comes in light and dark color themes as well.
MS Word CV Resume Template

A creative and colorful resume template that’s ideal for freelancers. This template comes with a CV template, cover letter template, and portfolio template for creating a complete resume to showcase your skills.
Business Invoice Template for Word

You can use this Word template to design invoices for agencies, freelancers, or even corporate businesses. It’s easily editable and comes in Word, InDesign, Photoshop, and Illustrator file formats.
MS Word Stationery Templates Kit

This is a complete kit of Word templates you can use to design a branded set of stationery for your business. It includes templates for letters, contracts, business cards, project proposals, and everything in between.
If you’re looking for more templates, check out our best Word brochure templates collection.
16 Ideas for Student Projects Using Google Docs, Slides, and Forms
July 31, 2016

Can't find what you are looking for? Contact Us

As you probably know, Google Drive is far more than a place to store files online. It also includes a suite of versatile creation tools, many of which perform the same functions as the ones we use in other spaces. These include Google Docs, a word processing program that behaves similarly to Microsoft Word, Google Slides, a presentation program similar to PowerPoint, and Google Forms, a survey-creation tool similar to Survey Monkey. Although Drive also includes other tools, these three are particularly useful for creating rigorous, academically robust projects. If your school uses Google Classroom or at least gives students access to Google Drive, your students are probably already using these tools to write papers or create slideshow presentations, but there are other projects they could be doing that you may not have thought of.
Below I have listed 16 great ideas for projects using Google Docs, Slides, and Forms.
Annotated Bibliography By the time a student reaches the later years of high school, and certainly by the time she’s gotten to college, it’s likely that she’ll be required to write an annotated bibliography, a list of resources that not only includes the bibliographical information of each source, but also a short paragraph summarizing the resource and reflecting on its usefulness for a given project. Usually an annotated bibliography is required as a part of a larger research paper, but it could stand alone as an assignment that tasks students with seeking out and evaluating sources just for the practice of doing so. And the research tools in Google Docs allow students to locate, read, and cite their sources all in one place. To learn more, see this guide from Cornell University Library on How to Prepare an Annotated Bibliography .
Book Review Instead of a book report, have students write a book review instead. This is certainly not a new idea, but publishing the work electronically allows students to enhance the final product with the book’s cover image, a link to the book’s page on Amazon, and even links to other titles the author has written or articles on related topics. For models and inspiration, elementary and middle school students can read student-written reviews on sites like Spaghetti Book Club . Older or advanced students might work toward more sophisticated, nuanced review styles like book reviews written on Oprah.com .
Collaborative Story Because Google Docs is cloud-based, multiple people can work on a Doc at the same time. So students can work together on a story, a script for a play, or any other kind of group writing project. They can use the comments feature to give each other feedback and make decisions together. And because students can work from any location with an Internet connection, collaboration isn’t restricted to school hours; each group member can work on the project from any location whenever they have time.
Media-Rich Research Paper Any kind of research paper can be given a big boost when done in a Google Doc, because students can insert images, drawings, and links to other relevant resources, like articles and videos. Using the research tools built into Docs, students can research their topics and include in-text citations with footnotes.
Super Simple Blog If you don’t want to mess with actual blogging platforms, but want students to be able to experience writing blog posts that contain images and hyperlinks to other websites, this could be accomplished easily in a single running Google Doc.
Table Being able to organize information visually is an important skill, and students who understand how to build a table in Google Docs will have a skill for presenting all kinds of information in the future. They can be used as a compare and contrast exercise, to display data from an experiment, or even put together a schedule. Yes, you could do these things yourself, print them, and have students fill them out, but why not have students practice creating the tables themselves?
Choose-Your-Own-Adventure Story Because slides can contain hyperlinks to other slides, students could build a whole story where the reader chooses different options at key points in the story, leading them down completely different paths. The reader would consume the content as a slideshow, clicking on the links themselves as they go through. This could be a pretty massive undertaking, but we all know students who would be totally up for the challenge.
E-book These could take a variety of forms: mini-textbooks, children’s books, cookbooks or how-to manuals, personal art or writing portfolios, even yearbook-style memory books. To learn more about the possibilities, see my post from earlier this year on Student E-Books .
Magazine Along the same lines as an e-book, students could use a similar template to create a PDF magazine or newsletter that is shared online on a regular schedule. The possibilities here are endless, useful for student clubs or sports teams, classroom or grade-level newsletters, or magazines put out by groups of students who share a common interest, like gaming systems, soccer, or books.
Museum Kiosk Imagine if we could enhance science fair projects with a looping video display that provides the audience with vivid visuals and text about our topic. Or imagine an art show, where a self-running informational slideshow could be placed beside an art display to share the story behind the piece and photos of the work in progress? This is possible and EASY in Google Slides: Simply create a slideshow, then use the “Publish to the Web” feature to create a slideshow that auto-advances and has no need for a presenter. Pop that up on an iPad or laptop and you’re all set. This mock-up of a slideshow on Coral Reefs shows you what it could look like (click the image to open in a new window).
Short Film Students can upload their own images and add text boxes to a slideshow to create an animated story, then record the slideshow with a Google extension called Screencastify . They can either record their own voice as narration, add background music, or both. There are so many different kinds of films students could produce: illustrated stories or poems, final reflections for a 20 Time or Genius Hour project, video textbooks on content-related topics, or news-like feature stories of school or community events. In this quick sample, I added music from YouTube’s library of royalty-free music that anyone can use to enhance their recordings:
Video Tutorial Using the same screencasting software mentioned above, students could also create their own video tutorials by creating a Slides presentation on their topic (such as “How to Open a Combination Lock”), then recording the slideshow with narration. This would make a nice final product for a unit on informational writing or a way for students to demonstrate their learning at the end of a unit in science (“How to Take Care of Lab Equipment”), social studies (“How to Measure Distance on a Map”), or math (“How to Multiply Fractions”). Student-made tutorials could even be created to teach classroom procedures. And any tutorials students make could be stored for later, so other students can also benefit from them. Learn more about how Screencastify works right inside Chrome .
Peer Survey Whenever students need to gather data to support an argumentative essay or speech, let them gather data quickly and easily by creating a survey with Google Forms. Links to the survey can be sent out via email, QR codes , or through a post in a learning management system like Edmodo or Google Classroom. When results come in, students can use them to support whatever claim they are trying to make in their argument, or make adjustments based on what they discover in their research.
Feedback Form Have students provide feedback to each other’s presentations, speeches, even videos using Google Forms. Here’s how it would work: Each student creates her own form, asking for the kind of feedback she wants on the project. As other students view or the project, they can be sent to a form to offer praise or constructive criticism, which the creator would then be able to view privately and use to improve the project. Students could even use their feedback to write a reflection on their process after the project is done.
Quiz One great way to learn material is to create a test or quiz over the content. Have students use Google Forms to create their own multiple-choice, True/False, fill-in-the-blank, or open-ended quizzes on the content they are learning.
Visual Representation of Data Sets Whenever people enter responses to a Form, Google allows the form creator to view responses in charts and graphs. Have students gain a better understanding of how data can be represented visually by accepting responses (or entering their own fake ones) into a Form, then looking at how the numbers are represented in graphs. This could work well as a series of math lessons.
Way Beyond Worksheets
Just this morning on Twitter, someone posted a comment along these lines: “A worksheet on a Google Doc is STILL a worksheet. Students should be using tech to create!” I’ve heard this sentiment over and over, and it’s exactly why I’ve put this list together. Google offers some incredibly powerful tools if we know how to use them. I hope this list has given you a few new ideas to put into your students’ hands. ♦
What to Read Next
Categories: Instruction , Technology
Tags: assessment , content area literacy , English language arts , Grades 3-5 , Grades 6-8 , Grades 9-12 , project-based learning , teaching with tech , tech tools
51 Comments

This is wonderful.

This is my first year teaching in an alternative high school. All students have IEP’s as well as social and emotional disabilities. I really want to focus on literacy as many are well below grade-level, ability wise. Writing of course is a big part of literacy. I’m looking for ideas that they can collaborate on, via Google Docs, Slides, etc. Any thoughts would be appreciated.

Check out Boomwriter: A Fun Twist on Collaborative Writing . Lots of good resources there that you might like. Also take a look at Student-Made E-Books: A Beautiful Way to Demonstrate Learning .

I am an RSP teacher in Anaheim. For summer school I am going to have them build a “Bucket List” in Google slides.

Thanks for compiling these resources. I use many already but haven’t tried Screencastify yet. My district uses Google Classroom, but the forms app is blocked on student accounts- I think because it’s a perfect medium for under-the-radar cyberbullying (“How much do you hate Linda?…A little, a lot, a ton…”). Before teachers plan a lesson using forms, they should make sure the feature is enabled for students in their district. In my district, students can access forms and create them but they cannot send them to other students.

Thanks, Robyn. Good to know!

I love these ideas! You are so creative and now I have GREAT ideas for my SS project! Thanks! XD

this is all true

Our district is allowing extra credit this year and I have always been totally opposed to offering extra credit. These ideas are worth extra credit, and my focus this year is on what the students can teach me and the rest of their peers.

This gave me some good ideas for culminating activities. Thanks!

Thank you so much for sharing these ideas about creating projects by using the Google Drive! The middle school I teach at implemented a 1:1 program last year with Chromebooks, so the students have easy access to all of the Google apps. I had always grown up using Word docs and I was a little hesitant to start using Google docs at first. After just a few weeks, I absolutely fell in love with it! It is amazing how you can access all of your docs, forms, slides that you create from any device you’re using and the fact that everything automatically saves is just the cherry on top. I am grateful for this feature, especially working in a middle school where it is easy for students to forget to save something before exiting out. Although I teach Math, I found a lot of your project ideas to be utilized cross-curriculum and I truly appreciate it. I got my feet wet last year and had my students create google slides presentations in groups. At the beginning of this year, I started with a google form I created where students answered review questions from 6th grade Math. I love that when you get the results from all of the forms, you can easily see which areas students are struggling in and which areas they are proficient in because it is presented the results in graphs and charts. I just learned recently that you can create quizzes now, which is awesome because all of the testing in my district is done on the computers, so this will help prepare my students. I want to borrow your idea of having students create peer surveys that they can post on Google classroom in order to gather information and analyze results. This is a great skill for students to have. Thanks again, I truly enjoy reading your blogs!

Be positive at all time

Great collection of resources! Easy to read and very helpful for teachers who often do not get the tutorials they need to instruct with GAFE. I particular like the Museum Kiosk idea. It will work great will my history classes.
– Kevin

Hi everyone! I also would like to suggest my own (free) templates site. Im designing these presentations using “free” resources from other sites such as FreePik, FlatIcon,… and I think the result is pretty good. I invite you to have a look. The site is https://slidesppt.com

In the section of student blog posts, can you clarify how all the students in one class could be writing and posting a running blog which everyone in the class can read and respond to ?

This is Holly Burcham, a Customer Experience Manager. The idea Jenn laid out here is to simply create a shared Google Doc where each student would basically be responsible for his/her own page (literally page 1, page 2, etc.). Within a shared Doc, everyone with permission can be in and typing at the same time. Once “posts” are written, students can go in and add comments to others’ work. The comments would show up in the margins and would be arranged by corresponding content, not time like a typical blog post.
But, as you can imagine, this could quickly become very convoluted and a bit messy. The thought behind using Docs as a student blog is more for writing practice, getting the feel for writing a blog post without doing the real thing…
So, if you’re interested in your students truly creating a blog, we highly recommend checking out Edublogs and Kidblog . Hope this helps!

How are these good for projects? you said that these are for kid presentations, all I see are essay templates and idea’s for teachers to map out their classroom jobs(other then the coral)
Hi, Isaac! I’m not sure what could be used to map out classroom jobs specifically from this post, and I think the ideas here go way beyond essay outlines–please get back to me to clarify exactly what you’re referring to, because we believe all the ideas here are good for student use. Thanks!

You might update this post. Google Forms now supports branching which would be much easier to create a “choose your own” adventure type experience.
Thanks for the suggestion. I can picture how that would work, yes, but I guess the aesthetic experience might be lacking in a Google Form. With Slides you have complete creative freedom to design the slides like a real book. I guess it would be a matter of personal preference?

Where do I go to find accessibility features of Google docs, slides, and forms? I am a teacher of the blind and visually impaired. This technology is wonderful but without the ability to navigate the site independently, my students are at a lost. Can you direct me?
Hi! A couple of things that may be of help: Go to “Tools” in the menu bar and select Voice Typing (use Google Chrome). You can also click on Add-Ons in the menu bar and add the Speech Recognition Soundwriter extension for free. Here’s a link to find more Google Accessibility features — you just have to spend a bit of time looking through the list to see what may be relevant to your needs. I hope this helps!

You can also combine Google forms and docs to simplify book reports for elementary students: https://electriceducator.blogspot.com/2016/03/elementary-book-report-machine.html?m=1

Is there an available rubric or assessment piece for the museum kiosk activity?
Hi Colleen! No, sorry, I don’t have anything on that!

Hi I am a teacher at a elementary school and I was wondering if you had any ideas for what I could do for an autobiography book report.
Hi Madison,
There really are so many things you can have the kids do — I would first think about what you’re expecting the kids to be able to do in the end. What will actually be assessed and what will they be accountable for? (I suggest checking out Understanding Backward Design if you haven’t already.) From there, they can choose how to present what they learned, meeting the assessment criteria. I think using some of the ideas in the Slides section of the post could work really well, especially Student Made E-Books , or making a short film.

Madison, I love the idea of using Google Slides for autobiography book report. I’m thinking about Jennifer’s Slides suggestions and just tailoring it to your book report criteria/rubric. Thoughts?

thank you very much!!

Thank you! I can’t wait to explore some of these options more. This list is very much appreciated! 🙂

I really appreciate your kindness and your efforts and I’m going to try everything you have mentioned in this wonderful article

Thanks. Higher Ed ESOL Prof -no lesson prep for me… but I DO have my reading list for the next several (10-12) hours! All suggestions added to the original post are appreciated.

I am a huge fan of Google resources, but you have showed me some new ways I can use these. Thank you for sharing!

Thanks for some great ideas! I have another suggestion that I have used before- my students really liked it- a collaborative Google Slides presentation. I did this for types of organic molecules as an intro to organic chemistry. Each pair of students in the class was assigned a specific molecule to research. They had to create 1 slide with some specific information and add to a collaborative google slides presentation that I shared on Google Classroom. When the slideshow was complete, they could all access it, and they used it to take notes.

Great suggestion Susan! Thanks so much for sharing this idea.

I am wondering if I can find similar google instructions to send to my students now that we are teaching remotely and 90% of them probably don’t know how to use Google. This would be a fantastic use of their time. Thank you
Take a look at Jenn’s Google Drive Basics video course ! I think it’s got what you’re looking for – it’s for teachers and students!

I am thinking about doing a Rap Challenge in which they (as teams based on which class period they are in) create lyrics using WWII vocabulary we have used.
I create raps for my students and my though was that I would take parts of ALL of their submissions and create a WWII rap to add to the collection they have heard already.
Which of the Google Drive features would be my best bet for collaboration like that while the students are all working from home?
Hi Jim! I think this could be done in Google Docs pretty easily, as they are just writing a script, correct? If you want to share video or audio, you can just put these files into a shared folder in Drive and give all students access to those files. I hope this helps!

Amazing ideas

An innovative way to eliminate paper.

Hi! I love this site. I am beginning to use technology in my higehr education classroom. Could you help me to suggest some kind of game to use in Communication Skilss? Thanks a lot
Hi! Check out our Gamification Pinterest board and see what might be relevant. Hope this helps!

I’m a college student (who is now a nanny which brought me to this page) and for the screen recording, I highly reccomend Loom over Screencastify. In my experience using both during the remote learning period, the video quality is much higher on Loom, the user interface is easier, and you can’t edit Screencastify videos in an external editor like iMovie. (I had to do a group presentation and since partner lived in Kuwait we used this vs Zoom, etc. to record the presentation since we weren’t recording at the same time. It was very difficult to figure out how to merge our parts of the presentation into a single file.)
Also with screencastify the time limit per video on the free version (5 min I think) was frustrating as my work was longer. May not be a problem for students but for educators using the tool who don’t have the premium, this could be highly inconvenient. With Loom there isn’t a time limit.

What an adventure for me, who’s relatively new to this google drive thing. Mind blowing resources. It’s amazing. I’m excited as to what I can do with and in google drive. I’m definitely taking it one day at a time, will surely enjoy this ‘CRUISE’. Thank you Jennifer.

What does it mean to type I am from Germany?
Hi Flannery! It can mean a few different things depending on the context–either typing on a keyboard or the “kind” of something (“What type of ice cream do you like?”). We’d love to give a specific answer, so please let us know which part of the post or which comment you saw that you’d like more clarification on. Thanks!

Thanks for sharing these ideas. July 2021

I love all the awesome ways to incorporate technology in the classroom. This post had so many options to choose from and some that I personally loved when I was in school. There are so many different ways to make learning fun with technology!

So glad you enjoyed the post!
Leave a Reply
Your email address will not be published.
Free Microsoft Word Brainstorming Templates
By Becky Simon | May 30, 2024
- Share on Facebook
- Share on LinkedIn
Link copied
We’ve compiled the most useful free brainstorming templates to improve the creativity, productivity, and efficiency of your team’s brainstorming sessions. You can also learn how to create a brainstorming template in Microsoft Word , and find additional related brainstorming templates . Included in this article, you’ll find the following:
Column and row brainstorming template
Mind map brainstorming template
Compare and contrast brainstorming diagram template
Microsoft Word Basic Brainstorming Template

Download the Basic Brainstorming Template for Microsoft Word
When to Use This Template: This template is ideal for business, project management, healthcare, and human resources professionals to brainstorm ideas for planning, problem solving, and more. Share this template with your team to help generate and organize ideas.
Notable Template Features: This printer-friendly format provides plenty of fields and space for handwritten brainstorming, with rows for each new idea. The template is arranged with five different spokes for different categories or themes, which you can fill in for your team.
Learn more about brainstorming solutions for your organization and best practices with our guide to discovering the best brainstorming approaches and techniques .
Microsoft Word Column and Row Brainstorming Template

Download the Column and Row Brainstorming Template for Microsoft Word
When to Use This Template: Project management, marketing, business strategy, and data analysis professionals can use this template to organize ideas in a structured matrix.
Notable Template Features: This template comes pre-built with subcategories, so you can structure your brainstorm thematically. Use this template matrix to generate ideas by answering relevant questions for each subcategory. This format makes it easier to see patterns and interactions when brainstorming ideas.
Check out this collection of free Google Docs brainstorming templates to help your organization generate ideas and promote collaboration.
Microsoft Word Mind Map Brainstorming Template

Download the Mind Map Brainstorming Template for Microsoft Word
When to Use This Template: This template is ideal for brainstorming and visualizing ideas for marketing, project management, and business strategy professionals.
Notable Template Features: This template is structured as a mind map : a diagram where you can list ideas related to a central concept, and link related ideas with lines. The mind map structure makes it easy to visualize information and ideas nonlinearly.
Check out this collection of free SWOT analysis templates for Microsoft Word to help your team identify favorable internal and external factors to achieve its objectives.
Microsoft Word Compare and Contrast Brainstorming Diagram Template

Compare and Contrast Brainstorming Diagram Template for Microsoft Word
When to Use This Template: Business analysis, marketing, and project management professionals can use this template to analyze the similarities and differences between two items or scenarios.
Notable Template Features: This template features a comparison chart, or Venn diagram, that you can use to visualize and simplify complex relationships among ideas. This alternative approach to brainstorming and presenting ideas allows you to compare options, so you can see the pros and cons, as well as overlapping consequences of each.
Check out this free fishbone diagram template to determine the root causes and show their relationships for a specific problem or effect.
Microsoft Word Word Association Brainstorming Template

Download the Word Association Brainstorming Template for Microsoft Word
When to Use This Template: This template is ideal for marketing, brand strategy and design, product development, and UX/UI design professionals to generate new, creative ideas by encouraging free association. Encourage team members to add ideas by free associating related words or concepts based around a single central idea. This approach jump-starts creativity without logical constraints that can sometimes limit the brainstorming process.
Notable Template Features: Use random words from one side of the template to brainstorm new ideas and perspectives that relate to the central topic on the other side. The template center is large enough to accommodate a large, in-depth main topic with several associations.
How to Create a Brainstorming Template in Microsoft Word
You can create a brainstorming template in Microsoft Word to structure your brainstorming session and generate ideas. Start by identifying the core problem or topic in the center of the template center, and add ideas to the text boxes that surround the main topic. Download a basic brainstorming template to guide your brainstorming process. Follow these steps to have a successful session:
Define and Enter the Main Brainstorming Topic Define the problem or topic and enter it into the center box with the star.

List New and Related Ideas in the Text Boxes Enter additional ideas from the brainstorm in the text boxes connected to the central problem or topic.

Brainstorming Related Templates
Check out this list of problem-solving and strategic planning templates. Like brainstorming templates, these tools are designed to inform and improve decision-making processes.
Free Fishbone Diagram Templates

A fishbone diagram is a problem-solving tool that you can use to identify potential causes of a specific issue. Use this fishbone diagram template for Microsoft Excel to help your team identify and organize causes for an event.
Free SWOT Analysis Templates for Microsoft Word

Use one of these SWOT templates for Microsoft Word to evaluate how strengths, weaknesses, opportunities, and threats can impact your organization.
Streamline the Brainstorming Process with Real-Time Work Management in Smartsheet
Empower your people to go above and beyond with a flexible platform designed to match the needs of your team — and adapt as those needs change.
The Smartsheet platform makes it easy to plan, capture, manage, and report on work from anywhere, helping your team be more effective and get more done. Report on key metrics and get real-time visibility into work as it happens with roll-up reports, dashboards, and automated workflows built to keep your team connected and informed.
When teams have clarity into the work getting done, there’s no telling how much more they can accomplish in the same amount of time. Try Smartsheet for free, today.
Discover why over 90% of Fortune 100 companies trust Smartsheet to get work done.
MS Word Cover Page Templates
Download, personalize & print, cover page collection.
COMMENTS
Word 11 Formatting. ★★★★★. Kendall Myers November 15, 2017. In this practice project for Word, students create a document similar to a test or quiz. They must include points and subpoints, blanks, boldfaced text, tabs, and spacing. …. 1 2.
Microsoft Word is an effective tool in the classroom. The platform can assist in student learning, organizing, and the development of 21st-century skills. These skills develop critical thinking, collaboration, communication, and creativity. Microsoft Word helps develop and cultivate these skills in a variety of ways. Students can use Microsoft Word to explore new content or …
Materials Needed: Microsoft Office Word Software Handout 1 (table example) Grading Rubric Printer . Things to Remember: This project can be used in any class; the students will create a table, use the number feature, change style, font, etc. while answering questions about themselves. Procedures: 1.
5. Creating Tables: Teach students to create tables in Word for organizing data or creating simple charts. 6. Collaborative Storytelling: Assign groups of students to create a shared story using Word's collaboration feature, adding a sentence or paragraph one at a time. 7.
Microsoft Word practice exercises for beginners: 1. Create and Design Admission/Enquiry Forms etc. To create this kind of form, you need to use shapes, text boxes, colors, formatting options, tables, and horizontal lines in MS Word.
Order your copy of 25 Successful Projects for Word for $27.00 $17 today! Have a great day teaching, Brad Hauck. Author / Teacher. Order your copy today. Click the button below now! NOTE: This is a digital product that means that after ordering, you will be sent an email explaining how to login and download your book.
Their Microsoft Office curriculum includes Word, Excel, PowerPoint, and Access lessons for Office 2016, 2019, and 365 editions. Specifically for Word, you'll find 35 lessons that range from the basics of opening a document to advanced features like mail merge. These lessons include video walkthroughs and accompanying text for different aspects ...
In this article, you'll discover Microsoft Office lesson plans and teaching tips for: Microsoft Word. Microsoft Excel. Microsoft PowerPoint. Microsoft Access. Microsoft Publisher. Microsoft Office Specialist Certification. For each of these topics, you'll find a list of recommended resources to help you teach the best Microsoft Office lessons ...
Microsoft News lives an effective tool int the classroom. The platform can supporting in student scholarship, organizing, and the advanced of 21st-century skills. These skills develop critical thinking, concert, communication, and creativity. Microsoft Word helps develop and manage these skills in a variety of paths. Students can use Microsoft Word to explore new content or …
From keyboard shortcuts to simple, built-in features such as Find and Replace and the automatic table of contents, here are several tips you can use to edit and format your college assignment more efficiently in Microsoft Word. 1. Leave Paragraph Spacing as Your Last Step. Let's first start on the right track.
Getting Started. Step 1: Exchange file names with your partner, and open his or her document. Double-click on the "Word" icon to open Microsoft Word. Select Open from the File menu, and choose your partner's file from the directory list. Step 2: Make a personal copy of your partner's file.
Book Projects are a fun alternative to book reports! Included in this free download is a Book Project Ideas Booklet, a Student Prep Sheet, and a Teacher's Rubric. You can adjust all the files as you please because they come in Microsoft Word 2016 format.The booklet has 19 ideas and a brief description of each idea. The Prep Sheet lays out the expectations and guidelines for an excellent ...
Word 19 Advanced Table. ★★★★☆. Kendall Myers November 15, 2017. In this practice project for Word, students create a document with a table showing a school schedule. The blocks in the table are different sizes and will take individual work within the blocks to create the correct layout. The document includes a title and has the date ...
For Teachers K. Students practice saying their numbers and identifying the words. They use whole numbers and decimals to practice grouping numbers into different categories. They write the word of the number they are shown. Find microsoft word projects lesson plans and teaching resources. Quickly find that inspire student learning.
Explore a collection of creative MS Word assignment ideas that will engage and inspire students. Enhance their skills with these unique and interactive projects for a hands-on learning experience.
Work smarter with higher-ed helpers from our college tools collection. Presentations are on point from start to finish when you start your project using a designer-created template; you'll be sure to catch and keep your professor's attention. Staying on track semester after semester takes work, but that work gets a little easier when you take control of your scheduling, list making, and ...
Description. • Microsoft Word in Office 365 is a software application that allows the user to perform word processing and create beautiful and engaging documents. • This lesson includes instructions along with screenshots and text bubbles to demonstrate how easy it is to create high-quality documents using Microsoft Word.
Front Page Designs For Assignments [Free MS Word Template Download] Download. 946 KB. Download. 243 KB. Download. 3 MB. Download. 292 KB. Download. 618 KB. Download. 14 KB. Download. 924 KB. Download. 2 MB. Download. 242 KB. Download. ... Here are a few ideas to get you started: Use a unique font or color scheme;
13. Word count. Show the word count properly for the body of your assignment, because it's' important. Place your cursor on the Introduction title, hold the Shift key down, and got to the end of the Conclusion. And then Tools>Word Count and record the number of words. 14. Spelling and Grammar Check.
Download Free Cover Page Templates. Explore our collection of 23 beautifully designed cover page templates in Microsoft Word format. These templates feature captivating colors and layouts that are sure to make a lasting impression. Simply click on the preview image of each template and download it for free.
6,000+ Word Templates & More With Unlimited Downloads. Discover thousands of Microsoft Word templates for your next project with an Envato Elements membership. It starts at $16 per month, and gives you unlimited access to a growing library of over 2,000,000 graphic templates, design assets, themes, photos, and more.
Have students use Google Forms to create their own multiple-choice, True/False, fill-in-the-blank, or open-ended quizzes on the content they are learning. Visual Representation of Data Sets. Whenever people enter responses to a Form, Google allows the form creator to view responses in charts and graphs.
Download the Mind Map Brainstorming Template for Microsoft Word. When to Use This Template: This template is ideal for brainstorming and visualizing ideas for marketing, project management, and business strategy professionals. Notable Template Features: This template is structured as a mind map: a diagram where you can list ideas related to a central concept, and link related ideas with lines.
Work Completion Report Cover Pages. Biology Project Front Page Designs. Children's Book Cover Designs. Academic Calendar Cover Pages. Football Magazine Cover Pages. Collection of MS Word cover page templates for thousands of categories including business reports, assignment covers, title pages, report first pages, proposal pages...