

How To Add Sites to Internet Explorer Restricted Zone

In this post we will see the steps on how to add sites to Internet Explorer restricted zone.
To configure Internet Explorer security zones there are multiple ways to do it, in this post we will configure a group policy for the users and use Site to Zone assignment list policy setting to add the websites or URL to the restricted site zone.
This policy setting allows you to manage a list of sites that you want to associate with a particular security zone. Internet Explorer has 4 security zones, numbered 1-4, and these are used by this policy setting to associate sites to zones.
- Intranet zone
- Trusted Sites zone
- Internet zone
- Restricted Sites zone
The zone numbers have associated security settings that apply to all of the sites in the zone. Using the Site to Zone assignment list policy setting we will see how to add sites to the Internet Explorer restricted zone.
Please note that Site to Zone Assignment List policy setting is available for both Computer Configuration and User Configuration.
Launch the Group Policy Management Tool, right click on the domain and create a new group policy. Right the policy and click Edit .

In the Group Policy Management Editor navigate to User Configuration > Administrative Templates > Windows Components > Internet Explorer > Internet Control Panel > Security Page.
If you want to apply the group policy for the computers then navigate to – Computer Configuration > Administrative Templates > Windows Components > Internet Explore r > Internet Control Panel > Security Page.
On the right hand side, right click the policy setting Site to Zone Assignment List and click Edit .

Click Enabled first and then under the Options click Show . You need to enter the zone assignments. As stated earlier in this post Internet Explorer has 4 security zones and the zone numbers have associated security settings that apply to all of the sites in the zone.
We will be adding a URL to the Restricted Sites Zone . So enter the value name as the site URL that to Restricted Sites zone and enter the value as 4 . Click OK and close the Group Policy Management Editor.

We will be applying the group policy to a group that consists of users. In the Security Filtering section, click Add and select the group .

Login to the client computer and launch the Internet Explorer . Click on Tools > Internet Options > Security Tab > Restricted Sites > Click Sites .
Notice that the URL is added to the Restricted Sites zone and user cannot remove it from the list.

Sign Up For Newsletter
Join our newsletter to stay updated and receive all the top articles published on the site get the latest articles delivered straight to your inbox..
Good article Prajwal .Detailed Explanation on how to add sites to internet explorer restricted zone .Keep it up .I seen your videos also in YouTube its really great.Thanks for sharing this info.
Hi Prajwal, Thank you for your article. Is there any way to block sites in all browsers.
Block all sites ?. Why would you do that ?.
I think you misunderstood the user’s question. The user was asking if there was a way to block any particular website in ALL browsers. Not just Internet Explorer.
Leave a Reply Cancel reply
Your email address will not be published. Required fields are marked *
Save my name, email, and website in this browser for the next time I comment.
PatchMyPC Sponsored AD

Recast Sponsored AD

Popular Articles

SCCM 2012 R2 Step by Step Guide

How To Deploy Software Updates Using SCCM ConfigMgr

How to Install WSUS for SCCM | SUP Role | ConfigMgr

Fix Skype for Business Recording Shows Pending Status
Recent articles.

How to Remove a device from your Microsoft account

Fix: A Requested Power Operation is Already in Progress

Manage Diagnostics Collection for Autopilot failure in Intune

8 Ways to Fix Windows 11 Upgrade Error 0x800F0830-0x20003

Subscribe Newsletter
Subscribe to our newsletter to get our newest articles instantly!
techlauve.com – a knowledge base for IT professionals.
Inhale problems, exhale solutions..
- Nick’s Blog
- Active Directory
- Privacy Policy
« Outlook: “Sending and Receiving reported error (OX80040600)”
Terminal Server Does Not Accept Enough Client Connections »
Adding Sites to Internet Security Zones Using Group Policy
Sometimes it is useful to leverage the power of Group Policy in Active Directory to add sites to certain security zones in Internet Explorer. This can save the network admin the trouble of managing the security zone lists for each computer (or user) separately. In the following example, each user on the network needs to have a specific site added to the Trusted Sites list.
This tutorial assumes that group policy is in good working order on the domain and that all client users and computers can access the directory.
- Open the Group Policy Management MMC console.
- Right-click the organization unit (OU) that the policy should apply to, taking special care to consider whether the policy should apply to computers or users on this particular network.
- Select “Create and Link a GPO Here…” to create a new group policy object.
- In the “New GPO” window, enter a good, descriptive name for this new policy and click “OK”. (ex. “Trusted Sites Zone – Users” or something even more descriptive)
- Locate the newly created GPO in the left-side navigation pane, right-click it and select “Edit…”
- Expand “Administrative Templates” under either “Computer Configuration” or “User Configuration” depending on which type of OU the new policy was linked to in step 2.
- The path to the settings that this example will be using is: Administrative Templates -- Windows Components -- Internet Explorer -- Internet Control Panel -- Security Page
- In the right-hand pane, double-click “Site to Zone Assignment List”.
- Enable the policy and click the “Show…” button next to “Enter the zone assignments here.” This will pop up the “Show Contents” window.
- Click the “Add…” button. This will pop up the “Add Item” window.
- In the first box, labeled “Enter the name of the item to be added:”, enter the URL to the site. (ex. https://secure.ourimportantwebapp.com) . Keep in mind that wildcards can be used. (ex. https://*.ourimportantdomain.com) . Leave off any trailing slashes or sub-folders unless that type of specific control is called for.
- 1 – Intranet Zone
- 2 – Trusted Sites Zone
- 3 – Internet Zone
- 4 – Restricted Sites Zone
- Once the zone assignment has been entered, click “OK”. This will once again show the “Show Contents” window and the new entry should be present.
- Click “OK” and “OK” again to get back to the Group Policy Management Console.
The new policy will take effect at the next group policy refresh interval, which is usually 15 minutes. To test immediately, run a gpupdate /force on a user/computer that falls into the scope of the new policy and go to “Tools -> Internet Options -> Security -> Trusted Sites -> Sites”. The site(s) added should be in the list. If the sites do not show up, check the event logs for any group policy processing errors.
Related content:
- How To: Time Sync Across Windows Network
- Group Policy Not Applied To Remote VPN Users
- QuickBooks Payroll Opens/Saves the Wrong W2 Form
- Microsoft Virtual Server Web Console Constantly Asks For Password
- Group Policy: Applying Different User Policies to the Same User for Workstations and Terminal Server
No comment yet
Juicer breville says:.
November 26, 2012 at 12:11 am (UTC -5)
Hurrah, that’s what I was looking for, what a information! existing here at this web site, thanks admin of this web page.
Leave a Reply Cancel reply
Your email address will not be published.
You may use these HTML tags and attributes: <a href="" title=""> <abbr title=""> <acronym title=""> <b> <blockquote cite=""> <cite> <code> <del datetime=""> <em> <i> <q cite=""> <s> <strike> <strong>
Submit Comment
This site uses Akismet to reduce spam. Learn how your comment data is processed .
Remember Me
Connect With Us
Connect with us.
Social Connect by NewsPress
Not finding the answer that you're looking for? Need more help with a problem that is addressed in one of our articles?
techlauve.com is affiliated with Rent-A-Nerd, Inc. in New Orleans, LA.
- DFS Replication (1)
- Group Policy (1)
- Microsoft Exhange (3)
- Microsoft Outlook (11)
- Copiers (1)
- Multi Function Devices (1)
- Printers (2)
- Scanners (1)
- Blackberry (1)
- Firewalls (2)
- Wireless (2)
- Hard Drives (1)
- SAN Systems (1)
- Hyper-V (3)
- Virtual Server (1)
- WordPress (1)
- Security (7)
- QuickBooks (2)
- Quicken (1)
- Antivirus/Antimalware (4)
- Backup Exec (2)
- Internet Explorer (5)
- Microsoft SQL (1)
- Licensing (2)
- Steinberg Nuendo (1)
- Mac OS X (1)
- Server 2003 (12)
- Server 2008 (14)
- Small Business Server 2003 (7)
- Terminal Server (6)
- Updates (2)
- Windows 7 (9)
- Windows XP (11)
- Reviews (1)
- Rent-A-Nerd, Inc.
Except where otherwise noted, content on this site is licensed under a Creative Commons Licence .
Valid XHTML 1.0 Strict Valid CSS Level 2.1
techlauve.com - a knowledge base for IT professionals. uses Graphene theme by Syahir Hakim.

Windows security encyclopedia
#microsoft #windows #security
Search form
Site to zone assignment list.
This policy setting allows you to manage a list of sites that you want to associate with a particular security zone. These zone numbers have associated security settings that apply to all of the sites in the zone.Internet Explorer has 4 security zones numbered 1-4 and these are used by this policy setting to associate sites to zones. They are: (1) Intranet zone (2) Trusted Sites zone (3) Internet zone and (4) Restricted Sites zone. Security settings can be set for each of these zones through other policy settings and their default settings are: Trusted Sites zone (Low template) Intranet zone (Medium-Low template) Internet zone (Medium template) and Restricted Sites zone (High template). (The Local Machine zone and its locked down equivalent have special security settings that protect your local computer.)If you enable this policy setting you can enter a list of sites and their related zone numbers. The association of a site with a zone will ensure that the security settings for the specified zone are applied to the site. For each entry that you add to the list enter the following information:Valuename – A host for an intranet site or a fully qualified domain name for other sites. The valuename may also include a specific protocol. For example if you enter http://www.contoso.com as the valuename other protocols are not affected. If you enter just www.contoso.com then all protocols are affected for that site including http https ftp and so on. The site may also be expressed as an IP address (e.g. 127.0.0.1) or range (e.g. 127.0.0.1-10). To avoid creating conflicting policies do not include additional characters after the domain such as trailing slashes or URL path. For example policy settings for www.contoso.com and www.contoso.com/mail would be treated as the same policy setting by Internet Explorer and would therefore be in conflict.Value - A number indicating the zone with which this site should be associated for security settings. The Internet Explorer zones described above are 1-4.If you disable or do not configure this policy users may choose their own site-to-zone assignments.
Policy path:
Scope: , supported on: , registry settings: , filename: , related content.
- ManageEngine Products
Securing zone levels in Internet Explorer
Managing and configuring Internet Explorer can be complicated. This is especially true when users meddle with the numerous settings it houses. Users may even unknowingly enable the execution of malicious codes. This highlights the importance of securing Internet Explorer.
In this blog, we’ll talk about restricting users from changing security settings, setting trusted sites, preventing them from changing security zone policies, adding or deleting sites from security zones, and removing the Security tab altogether to ensure that users have a secure environment when using their browser.
Restricting users from changing security settings
A security zone is a list of websites at the same security level. These zones can be thought of as invisible boundaries that prevent certain web-based applications from performing unauthorized actions. These zones easily provide the appropriate level of security for the various types of web content that users are likely to encounter. Usually, sites are added or removed from a zone depending on the functionality available to users on that particular site.
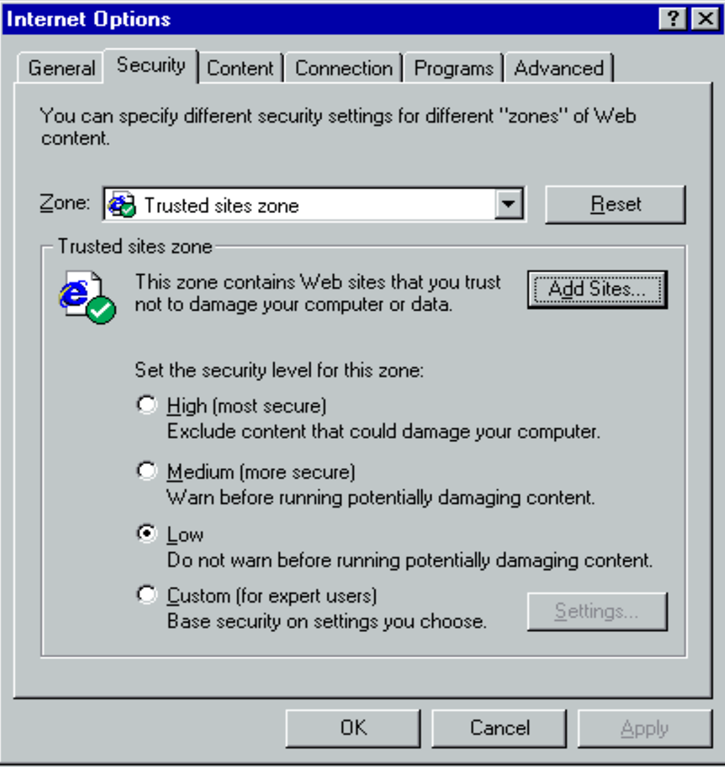
To set trusted sites via GPO
- Open the Group Policy Management Editor .
- Go to User Configuration > Policies > Administrative Templates > Windows Components > Internet Explorer > Internet Control Panel > Security Page .
- Select the Site to Zone Assignment List .
- Select Enabled and click Show to edit the list. Refer to Figure 1 below. The zone values are as follows: 1 — intranet, 2 — trusted sites, 3 — internet zone, 4 — restricted sites.
- Click Apply and OK .
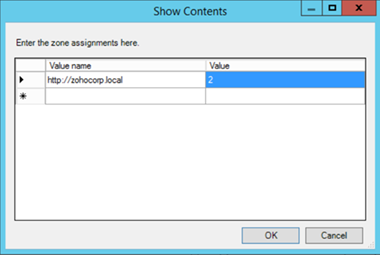
Figure 1. Assigning sites to the Trusted Sites zone.
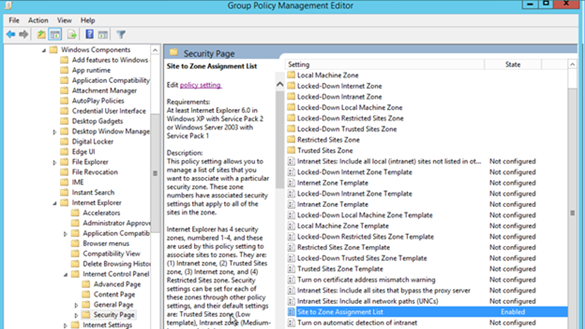
Figure 2. Enabling the Site to Zone Assignment List policy.
By enabling this policy setting, you can manage a list of sites that you want to associate with a particular security zone. See Figure 2.
Restricting users from changing security zone policies
- Go to Computer Configuration > Administrative Templates > Windows Components > Internet Explorer .
- Double-click Security Zones: Do not allow users to change policies .
- Select Enabled .
This prevents users from changing the security zone settings set by the administrator. Once enabled, this policy disables the Custom Level button and the security-level slider on the Security tab in the Internet Options dialog box. See Figure 3.
Restricting users from adding/deleting sites from security zones
- Double-click Security Zones: Do not allow users to add/delete sites .
This disables the site management settings for security zones, and prevents users from changing site management settings for security zones established by the administrator. Users won’t be able to add or remove websites from the Trusted Sites and Restricted Sites zones or alter settings for the Local Intranet zone. See Figure 3.
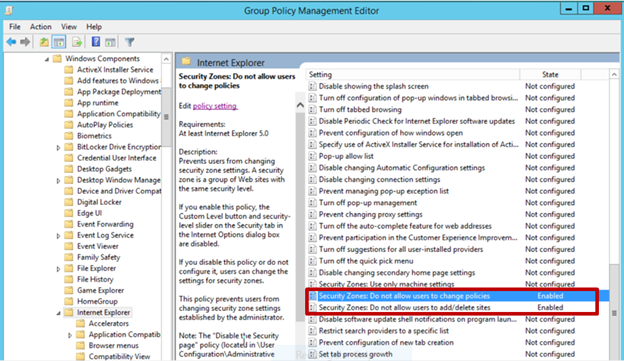
Figure 3. Enabling Security Zones: Do not allow users to change policies and Security Zones: Do not allow users to add/delete sites .
Removing the Security tab
The Security tab in Internet Explorer’s options controls access to websites by applying security settings to various download and browsing options, including defining security levels for respective security zones. By removing this tab, users will no longer be able to see or change the settings established by the administrator.
- Go to User Configuration > Policies > Administrative Templates > Windows Components > Internet Explorer > Internet Control Panel .
- Double-click Disable the Security page .
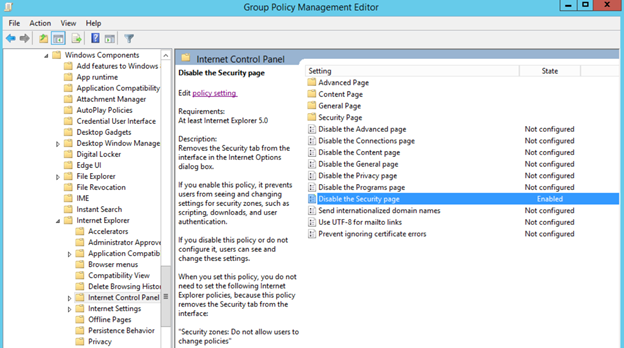
Figure 4. Enabling the Disable the Security page policy. Enabling this policy prevents users from seeing and changing settings for security zones such as scripting, downloads, and user authentication. See Figure 4.
There’s no denying the importance of securing Internet Explorer for any enterprise. By setting security levels, restricting users from changing security zone policies, preventing them from adding or deleting sites from security zones, and removing the Security tab, users will not be able to change any security settings in Microsoft Internet Explorer that have been established by the administrator. This helps you gain more control over Internet Explorer’s settings in your environment.
Derek Melber
Cancel reply.

Is there a way to enable Site to Zone assignment list and still let the user enter their own sites to the trusted list?
Hi Joe. You need to disable the below setting to achieve the requirement.

Note: Even if the policy is not configured, users can add their own sites. Only when the policy is enabled, users can’t add their own sites to trusted sites.

Thanks a lot.
Related Posts

El error de Microsoft que ha puesto en juego la seguridad del estado
Español 2 min read Read
Group Policy Central
News, Tips and Tutorials for all your Group Policy needss
How to configuring IE Site Zone mapping using group policy without locking out the user

Put simply we are going to setup the IE Zone registry keys manually using Group Policy Preferences…
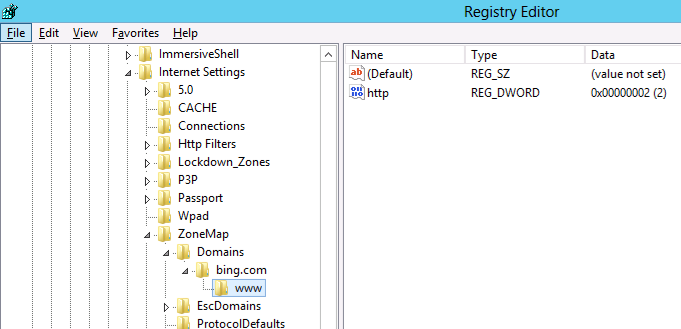
However it’s a little complicated as the URL that is in the Site to Zone mapping is actually stored as the name of the key. Finally the protocol is the registry value with a number that assigns it to the corresponding zone. In the example we use we will first look at the currently site that the users has setup in the trusted site list ( www.bing.com ). As you can see below the zone is store at HKCU\Software\Microsoft\Windows\CurrentVersion\Internet Settings\ZoneMap\Domains then the domain is stored as a key “Bing.com” then “www”. Within the “www” key the protocol (http and/or https) is the value name with the value representing what zone it should be a member.
Note: We are just using bing.com as an example as you would never add at search engine as a trusted site.
Now we will add the additional site www.google.com.au also to the trusted sites list using group policy.
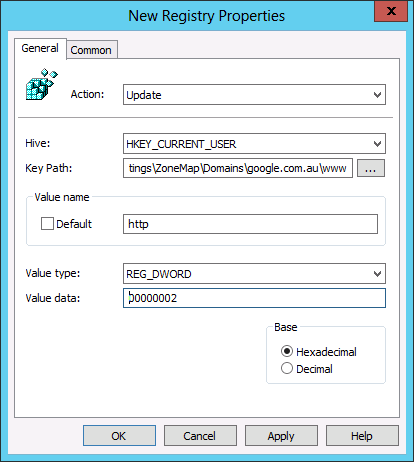
Step 1 . Edit a Group Policy that is targeted to the users that you want the IE Zones applied.
Step 2. Create a new Group Policy Preferences Registry Extension then select the “HKEY_CURRENT_USERS” Hive and then type “Software\Microsoft\Windows\CurrentVersion\Internet Settings\ZoneMap\Domains\google.com.au\www” in the Key path. Then enter the Value name of “HTTP” and selected the Value Type as “REG_DWORD” and set the value data as “00000002”.
And you’re Done…
TIP: For your reference the values and their corresponding Zones are listed below in the table.
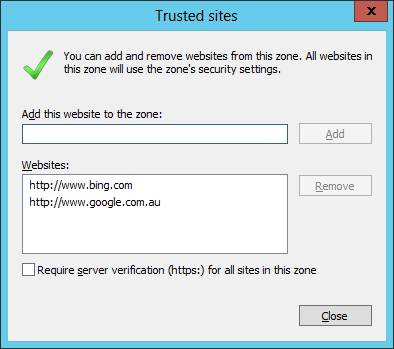
As you can see below the IE zone will push out to your users and it will be added to the trusted zone list, while still allowing them to add and remove other zones from the list.
TIP: As always the native group policy settings will take precedence over Group Policy Preferences therefore if you have the “Site to Zone Assignment List” setting configured as well this will override (not merge) the above settings (See image below).
Author: Alan Burchill
Related articles.

47 thoughts on “ How to configuring IE Site Zone mapping using group policy without locking out the user ”
Group Policy Central http://t.co/Y2cVZ0TP
Where on earth did you find this little gem?
I worked this one out on my own a few years back, Should have written a blog / guide back then! I’d be a millionnaire!!
But still – this is a great way to allow the users to add their own trusts, of on site to fix a broken site without returning to GPO Editor just for a single user!
- Pingback: Security Tip: Block Internet Explorer invocation of Java with Group Policy
I wasn’t able to get this to work. I tried it on both User and Computer settings. There was no sub folder under ‘hotmail.com’. The domain I’m trying to remove.
I’m unable to get this to work. Even the group policy results test shows it is successful, but it never shows up in the IE Internet settings. I’ve added a REG entry to also “uncheck” the require https: and that doesn’t show up either. I’ve test on both WinXP with IE8 and Win7 with IE9. Same results. I’ve looked at the registry and see nothing added. Plus, there are no errors in the event log.
Strange behavior.
I just troubleshooted with the same problem that it was not working with no error message to troubleshoot anywhere.
SOLUTION: I fired up regedit and navigated to “HKEY_CURRENT_USER\Software\Microsoft\Windows\CurrentVersion\Internet Settings\ZoneMap\” There I saw the site I wanted to add as a sub-key to “ZoneMap” and not as a subkey to “Domains” as it is supposed to be. The “Domains” subkey was empty. I deleted the site from “ZoneMap” and then did a gpupdate. When I then refreshed regedit the site was created no the correct location and everything was working. 🙂
Thanks for the info, but this isn’t my experience at all.
I’ve checked the registry for this same error and see nothing. I’ve even searched the entire registry for the domain name, and it finds nothing…
I’ve got a computer policy that is applied to the OU where the computer lives. All items in the policy are updating successfully, except for the registry entries. I’ve run the group policy results and see no errors. I’ve even created the policy by using the registry wizard and importing the items from my local registry. When I check the local registry on my test machines, I see nothing change. If I add the entries via IE, then they show up in the correct places. I’m stumped why this isn’t working…
Tough one. I often had typos in the GP preferences mess things up for me in the past, also the correct amount of \ signs in the key path is important. Personally I have never used it in computer policy, but I’ve always used user policy, perhaps that is worth a try? Also I always use “Replace” and not “update” in the GP Preference.
What do you mean by, “the correct amount of signs in the key path”? What is a sign?
I had the same thought about user policy yesterday and tried that as well. No luck. I haven’t tried the “Replace” option. I’ll test that next.
A bit clumsy explained, sorry about that. But I meant where you put the (slash) \ in the path. “Software\Microsoft\Windows\CurrentVersion\Internet Settings\ZoneMap\Domains\*.contoso.com” is the correct path, but if you write “\Software\Microsoft\Windows\CurrentVersion\Internet Settings\ZoneMap\Domains\*.contoso.com” or “Software\Microsoft\Windows\CurrentVersion\Internet Settings\ZoneMap\Domains\*.contoso.com\” then it will fail.
Not sure why but I can’t make this work at all. The GPP does not write the reg entries at all. I tried changing the action to create and also update, but no difference. Any suggestions?
well John, you don’t really tell me much of your setup so there is not much for me to go on here. But in general my checklist would be something like this:
1. It’s a GPP setting under the user (not computer) and it writes to the HKCU hive? 2. Use “replace” 3. Trippe-check that the path is written correctly. For example: “Software\Microsoft\Windows\CurrentVersion\Internet Settings\ZoneMap\Domains\*.contoso.com” 4. Use “gpresult -r” on the client computer to check that the user gets the GPP 5. If the user gets the GPP, check the application log on the computer. If a GPP fails you will see it in the application log at the time the user logs in and it usually tells you why.
That’s my suggestions at the moment.
You nailed the problem – I was using a computer policy, not a user policy. As soon as a rebuilt it as a user policy, everything fell into place perfectly. Thanks for posting this, it was a huge timesaver!
You’re welcome, I’m glad I could help. 🙂
Excellent post. I was just trying to figure out the exact registry keys to modify when I found this page. Nice work !
For the same case.. My user wants to add site to their trusted site list.. Please help…
Mahfuj: I’m not sure what you mean. If you use GPP to configure the IE zones then the users are allowed to add sites to them. Do you want ot prevernt them from adding sites to the trusted site list? Or do you want to allow them to add sites to the trusted site list?
Yes.. I want my user will add sites to trusted site list….. But “Add this website to the zone” field and “Add” button is gray out.. for all users.
Yes.. I want to allow my users to add sites to trusted site list….. But “Add this website to the zone†field and “Add†button is gray out.. for all users.
This means you have the administrative template still configured for the user so it will prevent them from editing their zone list. You have to be sure that you ONLY configure IE site zones via Group Policy Preferences…
I agree with Alan, it is most likely another GPO that contains settings for the IE zones, either in computer or user settings.
Thanks… I’ve figureout the issue.. Site to zone assignments list should be Not Configured for both Computer and user configuration settings….
You have a typo in the third paragraph that starts with “Hoever it’s a little complicted. Typo: “As you can see below the zone is store at HKCU\Software\Microsoft\CurrentVersion\Internet Settings\ZoneMap\Domains…” should be “As you can see below the zone is store at HKCU\Software\Microsoft\Windows\CurrentVersion\Internet Settings\ZoneMap\Domains…” The “Windows” part of the path is missing 😉
@KJS thanks.. I have corrected…
What versions of IE does this method support?
I have not tested it… but I think will work with all versions.
I am really loathing the decision by MS to go down the GPP route without replacing existing functionality with something equally simple. With this Zone mapping and the amount of work with getting favourites working it is a nightmare trying to replace existing simple easily updated GPOs with GPPs, I am not looking forward to doing it for Office.
Helpful. Thanks
Worked perfectly; delivering the following record helped the annoying windows security prompts for executing VBS/HTA files off network shares: file://privateDomainName.FQDN 1 file://privateDomainName 1
Many thanks,
My spouse and I absolutely love your blog and find a lot of your post’s to be exactly what I’m looking for. Would you offer guest writers to write content for you personally? I wouldn’t mind producing a post or elaborating on some of the subjects you write concerning here. Again, awesome weblog!
That brings us to quite possibly the most intriguing match-up to that point of the season when Oregon comes to Rice-Eccles. Alabama will try to rebound from their loss to the Sooners and rank fourth in the Sporting News college football preseason rankings. Ole Miss and Mississippi State moving the Egg Bowl away from Jackson, Miss.
What’s up, always i used to check web site posts here in the early hours in the morning, because i like to find out more and more.
Alan, great post. I’m having this issue my question is would this solution work for widows 7?
Yes it will
Very helpful posting, many thanks.
Has anyone had trouble getting this to work with Windows XP? It works well with all my Win& PC’s but is hit and miss on the XP.
Had a similar Issue, however a little different. This article may help you… http://www.grishbi.com/2015/03/unable-to-change-ie-zone-security-settings/
Excellent work Alan.
I know it is mentioned, but I would re-emphasize http or https as required.
As Per-Torben Sørensen suggested, use Replace. I’ve had issues with update instead of replace so I always use replace. It seems update doesn’t add something if it is missing, but replace does.
Remember rsop.msc is your friend. It doesn’t show the registry changes, but does show if an additional policy is applied that overrides the registry settings. With these specific settings, you can do a C:\>gpupdate /force, close and re-open the browser or re-run rsop.msc to see if the changes took place. All without logging out and back in, or rebooting.
Best, David
Much appreciated. Need to retain as much of the admin aspects for people doing programming while still giving them the tools needed for internal sites.
I am able to get the GP to work fine, however the site I am adding still doesn’t come up under the Intranet Zone as I have set. I am trying to add the internal IP of the site – 192.0.0.25. When I add this manually in IE, it works fine. When done through GP, it shows in IE under the Intranet zone, but doesn’t get treated like an intranet zone (File > properties, shows it as Internet). Is there a way to use the IP address instead of the domain name?
We needed to add a list of no less than 10 sites to the trusted list. Rather than doing it individually as you have shown, I exported the “Domains” key to a shared drive and then created a logon script that copies it to the local machine and then imports it to the registry. Now, whenever we need to add more trusted sites, I can just update the reg key in the shared location.
Question on using Wild Cards in the URL. I just found your post yesterday and am very excited about testing out using preferences in place of policies for our list of trusted sites.
I have several URLs that I am using wildcards in. If I enter the wildcard in the key path (Software\Microsoft\Windows\CurrentVersion\Internet Settings\ZoneMap\Domains\*.contoso.com) I end up with this listed in trusted sites in IE: http://*.contoso.com .
Will this function properly for all domains that add a prefix to .contoso.com? Also, is there anyway to use a wildcard to it would work with either http or https sites? We have several of those.
Excellent article…..working for me. One thing I want to mention that If you want to add just e.g., http://google.com it is working fine. but if you want to add http://google.com/xyz then you should add google.com/xyz after \Domains\ e.g. Software\Microsoft\Windows\CurrentVersion\Internet Settings\ZoneMap\Domains\google.com/xyz
Thanks for posting.
Is this applicable for HKLM registry location via GPP?
Since we need to implement for machine level.
Brilliant, thanks for this blog, works like a treat. thanks for your effort putting this up 5 years later and people are still coming across these things 🙂
Leave a Reply Cancel reply
Site sponsor, featured post.

Popular Posts

- Best Practice (40)
- Group Policy FAQ (3)
- KB Focus (5)
- Other Site Links (15)
- Podcast (2)
- ScreenCast (4)
- Security (33)
- Setting of the Week (41)
- Site News (19)
- TechEd (35)
- Tutorials (117)
- Uncategorized (6)
- RSS - Posts
- RSS - Comments
ericlaw talks about security, the web, and software in general
Security Zones in Edge
Last updated: 4 January 2024
Browsers As Decision Makers
As a part of every page load, browsers have to make dozens, hundreds, or even thousands of decisions — should a particular API be available? Should a resource load be permitted? Should script be allowed to run? Should video be allowed to start playing automatically? Should cookies or credentials be sent on network requests? The list is long.
In many cases, decisions are governed by two inputs: a user setting, and the URL of the page for which the decision is being made.
In the old Internet Explorer web platform, each of these decisions was called an URLAction , and the ProcessUrlAction(url, action,…) API allowed the browser or another web client to query its security manager for guidance on how to behave.

To simplify the configuration for the user or their administrator, the legacy platform classified sites into five 1 different Security Zones:
- Local Machine
- Local Intranet
Users could use the Internet Control Panel to assign specific sites to Zones and to configure the permission results for each zone. When making a decision, the browser would first map the execution context (site) to a Zone, then consult the setting for that URLAction for that Zone to decide what to do.
Reasonable defaults like “ Automatically satisfy authentication challenges from my Intranet ” meant that most users never needed to change any settings away from their defaults.

In corporate or other managed environments, administrators can use Group Policy to assign specific sites to Zones (via “Site to Zone Assignment List” policy) and specify the settings for URLActions on a per-zone basis. This allowed Microsoft IT, for instance, to configure the browser with rules like “ Treat https://mail.microsoft.com as a part of my Intranet and allow popups and file downloads without warning messages. “
Beyond manual administrative or user assignment of sites to Zones, the platform used additional heuristics that could assign sites to the Local Intranet Zone . In particular, the browser would assign dotless hostnames (e.g. https://payroll ) to the Intranet Zone, and if a Proxy Configuration script was used, any sites configured to bypass the proxy would be mapped to the Intranet Zone.
Applications hosting Web Browser Controls, by default, inherit the Windows Zone configuration settings, meaning that changes made for Internet Explorer are inherited by other applications. In relatively rare cases, the host application might supply its own Security Manager and override URL Policy decisions for embedded Web Browser Control instances.
The Trouble with Zones
While powerful and convenient, Zones are simultaneously problematic bug farms :
- Users might find that their mission critical corporate sites stopped working if their computer’s Group Policy configuration was outdated.
- Users might manually set configuration options to unsafe values without realizing it.
- Attempts to automatically provide isolation of cookies and other data by Zone led to unexpected behavior , especially for federated authentication scenarios .
Zone-mapping heuristics are extra problematic
- A Web Developer working on a site locally might find that it worked fine (Intranet Zone), but failed spectacularly for their users when deployed to production (Internet Zone).
- Users were often completely flummoxed to find that the same page on a single server behaved very differently depending on how they referred to it — e.g. http://localhost/ (Intranet Zone) vs. http://127.0.0.1/ (Internet Zone).
The fact that proxy configuration scripts can push sites into the Intranet zone proves especially challenging, because:
- A synchronous API call might need to know what Zone a caller is in, but determining that could, in the worst case, take tens of seconds — the time needed to discover the location of the proxy configuration script, download it, and run the FindProxyForUrl() function within it. This could lead to a hang and unresponsive UI.
- A site’s Zone can change at runtime without restarting the browser (say, when moving a laptop between home and work networks, or when connecting or disconnecting from a VPN).
- An IT Department might not realize the implications of returning DIRECT from a proxy configuration script and accidentally map the entire untrusted web into the highly-privileged Intranet Zone. (Microsoft IT accidentally did this circa 2011, and Google IT accidentally did it circa 2016).
- Some features like AppContainer Network Isolation are based on firewall configuration and have no inherent relationship to the browser’s Zone settings.
Legacy Edge
The legacy Edge browser (aka Spartan, Edge 18 and below) inherited the Zone architecture from its Internet Explorer predecessor with a few simplifying changes:
- Windows’ five built-in Zones were collapsed to three: Internet (Internet), the Trusted Zone (Intranet+Trusted), and the Local Computer Zone. The Restricted Zone was removed.
- Zone to URLAction mappings were hardcoded into the browser, ignoring group policies and settings in the Internet Control Panel.
Use of Zones in Chromium
Chromium goes further and favors making decisions based on explicitly-configured site lists and/or command-line arguments.
Nevertheless, in the interest of expediency, Chromium today uses Windows’ Security Zones by default in two places:
- When deciding how to handle File Downloads, and
- When deciding whether or not to release Windows Integrated Authentication (Kerberos/NTLM) credentials automatically.
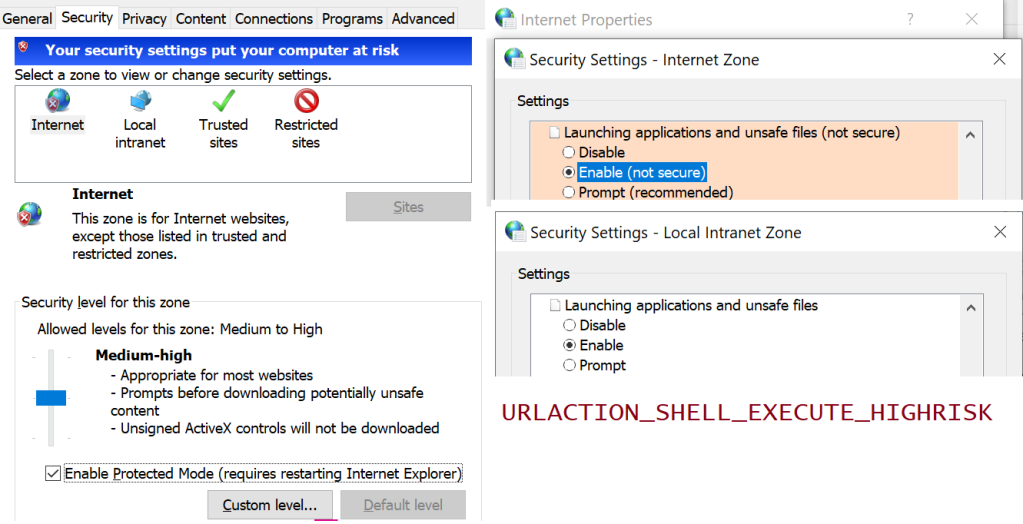
For the first one, if you’ve configured the setting Launching applications and unsafe files to Disable in your Internet Control Panel’s Security tab, Chromium will block file downloads with a note: Couldn't download - Blocked .
Similarly, because Chrome uses the Windows Attachment Execute Services API to write a Mark-of-the-Web on downloaded files , the Launching applications and unsafe files setting (aka URLACTION_SHELL_EXECUTE_HIGHRISK ) for the download’s originating Zone controls whether the MoTW is written. If this setting is set to Enable (as it is for LMZ and Intranet), no MoTW is written to the file’s Zone.Identifier alternate data stream. If the Zone’s URLAction value is set to Prompt (as it is for Trusted Sites and Internet zones), the Security Zone identifier is written to the ZoneId property in the Zone.Identifier file.
By setting a policy, Administrators can optionally configure Edge or configure Chrome to skip SmartScreen/SafeBrowsing reputation checks for File Downloads that original from the Intranet/Trusted Zone.
For the second use of Zones, Chromium will process URLACTION_CREDENTIALS_USE to decide whether Windows Integrated Authentication is used automatically, or the user should instead see a manual authentication prompt. Aside: the manual authentication prompt is really a bit of a mistake– the browser should instead just show a prompt: “Would you like to [Send Credentials] or [Stay Anonymous]” dialog box, rather than forcing the user to retype credentials that Windows already has.
Even Limited Use is Controversial
Any respect for Zones (or network addresses 2 ) in Chromium remains controversial— the Chrome team has launched and abandoned plans to remove all support a few times, but ultimately given up under the weight of enterprise compat concerns. The arguments for complete removal include:
- Zones are poorly documented, and Windows Zone behavior is poorly understood.
- The performance/deadlock risks mentioned earlier ( Intranet Zone mappings can come from a WPAD-discovered proxy script).
- Zones are Windows-only (meaning they prevent drop-in replacement of Windows by ChromeOS).
A sort of compromise was reached: By configuring an explicit site list policy for Windows Authentication, an administrator disables the browser’s URLACTION_CREDENTIALS_USE check, so Zones Policy is not consulted. A similar option is not presently available for Downloads.
Zones in the New Edge
Beyond the two usages of Zones inherited from upstream (Downloads and Auth), the new Chromium-based Edge browser adds three more:
- Administrators can configure Internet Explorer Mode to open all Intranet sites in IEMode . Those IEMode tabs are really running Internet Explorer, and they use Zones for everything that IE did.
- Administrators can configure Intranet Zone sites to navigate to file:// URIs which is otherwise forbidden .
- Administrators can configure Intranet Zone sites to not be put into Enhanced Security Mode .
Update: This is very much a corner case, but I’ll mention it anyway. On downlevel operating systems (Windows 7/8/8.1), logging into the browser for sync makes use of a Windows dialog box that contains a Web Browser Control (based on MSHTML) that loads the login page. If you adjust your Windows Security Zones settings to block JavaScript from running in the Internet Zone, you will find that you’re unable to log into the new browser .
Downsides/Limitations
While it’s somewhat liberating that we’ve moved away from the bug farm of Security Zones, it also gives us one less tool to make things convenient or compatible for our users and IT admins.
We’ve already heard from some customers that they’d like to have a different security and privacy posture for sites on their “Intranet”, with behaviors like:
- Disable the Tracking Prevention , “Block 3rd party cookie”, and other privacy-related controls for the Intranet (like IE/Edge did).
- Allow navigation to file:// URIs from the Intranet like IE/Edge did (policy was added to Edge 95).
- Disable “ HTTP and mixed content are unsafe ” and “ TLS/1.0 and TLS/1.1 are deprecated ” nags. ( Update: Now pretty obsolete as these no longer exist )
- Skip SmartScreen website checks for the Trusted/Intranet zones ( available for Download checks only).
- Allow ClickOnce/DirectInvoke / Auto-opening Downloads from the Intranet without a prompt. Previously, Edge (Spartan)/IE respected the FTA_OpenIsSafe bit in the EditFlags for the application.manifest progid if-and-only-if the download source was in the Intranet/Trusted Sites Zone. As of Edge 94, other policies can be used.
- Allow launching application protocols from the Intranet without a prompt .
- Drop all Referrers when navigating from the Intranet to the Internet; leave Referrers alone when browsing the Intranet. (Update: less relevant now ).
- Internet Explorer and legacy Edge automatically send your client certificate to Intranet sites that ask for it. The AutoSelectCertificateForUrls policy permits Edge to send a client certificate to specified sites without a prompt, but this policy requires the administrator to manually specify the site list.
- Block all (or most) extensions from touching Intranet pages to reduce the threat of data leaks ( runtime_blocked_hosts policy).
- Guide all Intranet navigations into an appropriate profile or container (a la Detangle ).
- Upstream , there’s a longstanding desire to help protect intranets/local machine from cross-site-request-forgery attacks; blocking loads and navigations of private resources from the Internet Zone is somewhat simpler than blocking them from Intranet Sites. The current plan is to protect RFC1918-reserved address space .
At present, only AutoSelectCertificateForUrls , AutoOpenFileTypes, AutoLaunchProtocolsFromOrigins . manual cookie controls, and mixed content nags support policy-pushed site lists, but their list syntax doesn’t have any concept of “the entire Intranet” (all dotless hosts, hosts that bypass proxy).
You’ll notice that each of these has potential security impact (e.g. an XSS on a privileged “Intranet” page becomes more dangerous; unqualified hostnames can result in name collisions ), but having the ability to scope some powerful features to only “Intranet” sites might also improve security by reducing attack surface.
As browser designers, we must weigh the enterprise impact of every change we make, and being able to say “ This won’t apply to your intranet if you don’t want it to ” would be very liberating. Unfortunately, building such an escape hatch is also the recipe for accumulating technical debt and permitting the corporate intranets to “rust” to the point that they barely resemble the modern public web.
Best Practices
Throughout Chromium, many features are designed respect an individual policy-pushed list of sites to control their behavior. If you were forward-thinking enough to structure your intranet such that your hostnames are of the form:
- https://payroll. contoso-intranet.com
- https://timecard. contoso-intranet.com
- https://sharepoint. contoso-intranet.com
…Congratulations, you’ve lucked into a best practice. You can configure each desired policy with a *.contoso-intranet.com entry and your entire Intranet will be opted in.
Unfortunately, while wildcards are supported, there’s presently no way to express the concept of “any dotless hostname.”
Why is that unfortunate? For over twenty years, Internet Explorer and legacy Edge mapped domain names like https://payroll , https://timecard , and https://sharepoint/ to the Intranet Zone by default. As a result, many smaller companies have benefitted from this simple heuristic that requires no configuration changes by the user or the IT department.
Opportunity: Maybe such a DOTLESS_HOSTS token should exist in the Chromium policy syntax. This seems unlikely to happen. Edge has been on Chromium for over two years now, and there’s no active plan to introduce such a feature.
- Internet Explorer and Legacy Edge use a system of five Zones and 88+ URLActions to make security decisions for web content, based on the host of a target site.
- Chromium (New Edge, Chrome) uses a system of Site Lists and permission checks to make security decisions for web content, based on the hostname of a target site.
There does not exist an exact mapping between these two systems, which exist for similar reasons but implemented using very different mechanisms.
In general, users should expect to be able to use the new Edge without configuring anything; many of the URLActions that were exposed by IE/Spartan have no logical equivalent in modern browsers.
If the new Edge browser does not behave in the desired way for some customer scenario, then we must examine the details of what isn’t working as desired to determine whether there exists a setting (e.g. a Group Policy-pushed SiteList) that provides the desired experience.
1 Technically, it was possible for an administrator to create “Custom Security Zones” (with increasing ZoneIds starting at #5), but such a configuration has not been officially supported for at least fifteen years, and it’s been a periodic source of never-will-be-fixed bugs.
2 Beyond those explicit uses of Windows’ Zone Manager, various components in Chromium have special handling for localhost/loopback addresses, and some have special recognition of RFC1918 private IP Address ranges, e.g. SafeBrowsing handling, navigation restrictions, and Network Quality Estimation. As of 2022, Chrome did a big refactor to allow determination of whether or not the target site’s IP address is in the public IP Address space or the private IP address space (e.g. inherently Intranet) as a part of the Private Network Access spec . This check should now be basically free (it’s getting used on every resource load) and it may make sense to start using it in a lot of places to approximate the “ This target is not on the public Internet ” check. Within Edge, the EMIE List is another mechanism by which sites’ hostnames may result in different handling.
Ancient History
Security Zones were introduced with Internet Explorer 4, released back in 1997:
The UI has only changed a little bit since that time, with most of the changes happening in IE5. There were only tiny tweaks in IE6, 7, and 8.
Share this:
Published by ericlaw.
Impatient optimist. Dad. Author/speaker. Created Fiddler & SlickRun. PM @ Microsoft 2001-2012, and 2018-, working on Office, IE, and Edge. Now a GPM for Microsoft Defender. My words are my own, I do not speak for any other entity. View more posts
2 thoughts on “ Security Zones in Edge ”
In IE it is possible to see which zone is active on a page you’re currently viewing (alt to show menu bar, -> file -> properties).
Is it possible to see this in the new Edge?
No, although as noted, the Zone isn’t used for very much. To see the Zone, you’d have to reload the same page in IE (or use a command line utility or similar).
Leave a comment Cancel reply

- Already have a WordPress.com account? Log in now.
- Subscribe Subscribed
- Copy shortlink
- Report this content
- View post in Reader
- Manage subscriptions
- Collapse this bar

an endpoint admin's journal
- Recent Posts
- Popular Posts
- Recent Comments

Deploy Trusted sites zone assignment using Intune
November 6, 2023

Zoom Desktop Client – Download older build versions from Zoom
October 31, 2023

Uninstall Teams chat app using remediation script and a configuration profile in Intune
October 30, 2023

Intune Last Check-in date not updating for Windows device
October 25, 2023

How to use Event Viewer to check cause of Blue screen of Death (BSOD)
October 23, 2023

5 Quick Mac OS Terminal commands to make a Mac user life easier

Powershell : Find disabled users and computers in AD

- Active Directory (1)
- Windows (7)
- November 2023
- October 2023
Deploy a set of trusted sites overriding users’ ability to add trusted sites themselves. To acheive this, an Intune configuration profile Trusted site zone assignment can be deployed to devices/users group as required.
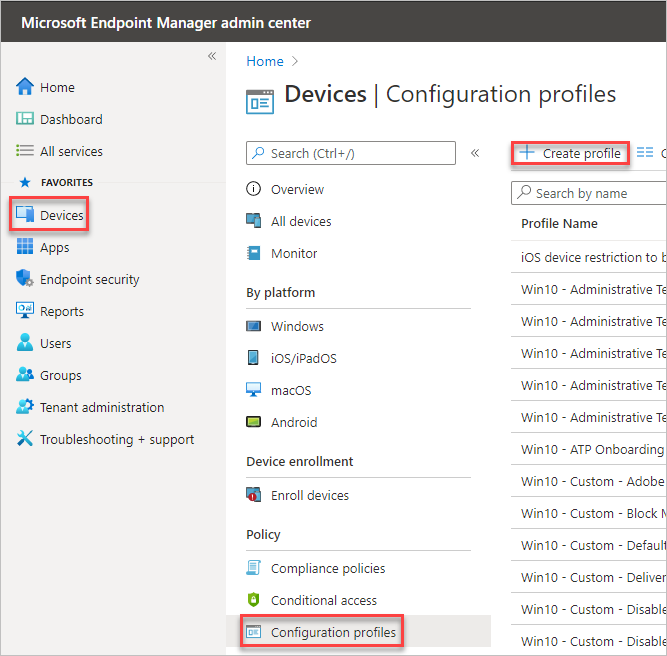
Login to Intune Portal and navigate to: Devices > Windows > Configuration Profiles .
Hit the Create button and Select New policy

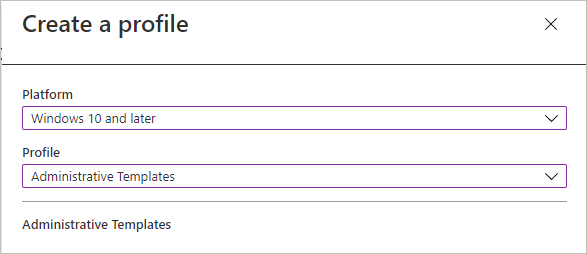
From the Create a profile menu, select Windows 10 and later for Platform , Templates for Profile type. Select Administrative templates and click Create .

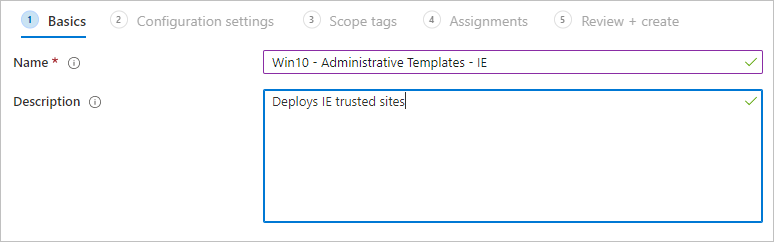
Give the profile desired name and click Next .

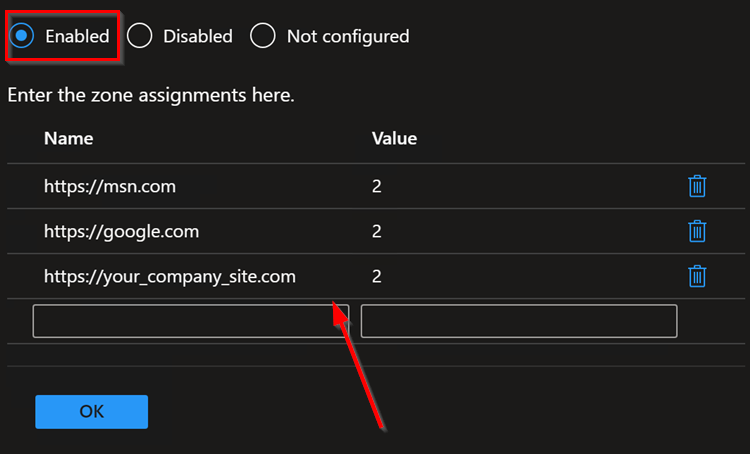
In Configurations settings, select Computer Configuration and search for keyword “ Site to Zone “, Site to Zone Assignment List setting will be listed under search results. Go ahead click on it to Select it.

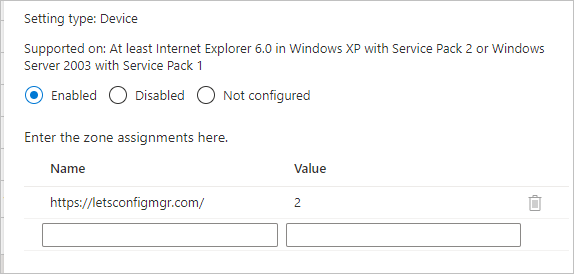
Once selected, a Site to Zone Assignment List page will appear on right side explaining different zones and values required for these zone for setup. Since this profile is being used for trusted sites, we will use the Value “2” . Go ahead and select Enabled button and start entering the trusted sites as required. please ensure to set each value to “2” . See example below:
Once done adding the list of sites, click OK to close it and Hit Next on Configuration settings page.
Add Scope tags if needed.
Under Assignments , Click Add groups to target the policy deployment to specific group of devices/users. You can also select Add all users / All all devices .
Hit Next . Then Hit Review + Save button to save.
Tags: Intune Windows
You may also like...

[Windows 10] How to completely uninstall Flash player

- Previous Zoom Desktop Client – Download older build versions from Zoom

thanks! I was just looking for this exact solution!

MEM – Deploying Trusted Sites
In this post, we will demonstrate how to deploy IE trusted sites via Microsoft Endpoint Manager (aka Intune), we will demonstrate two methods, one for complete control which will lock down the trusted sites location within Internet Settings and the other to maintain user choice, by simply adding an additional trusted sites to end users existing configuration.
- Force standard list of trusted sites and prevent end users from editing (Full Control)
- Add additional trusted sites to existing setup and allow end users to edit (One-time entry)
Full Control Method
As mentioned above, this the full control method is so administrators can control which sites are to be added to the trusted sites list, end users will not be able to add, edit or delete the entries, to get started, log into the MEM portal with your administrative account and browse to Devices , then Configuration Profiles and select Create Profile :
Select the platform to Windows 10 and later and profile to Administrative Templates :
Name and create the profile description :
In the next section, decide if this is going to be a Computer or User settings, in my case, I’m going to chose computer, browse to Computer Configuration, then Windows Components , Internet Explorer , Internet Control Panel and finally Security Page . From here select the Site to Zone Assignment List setting:
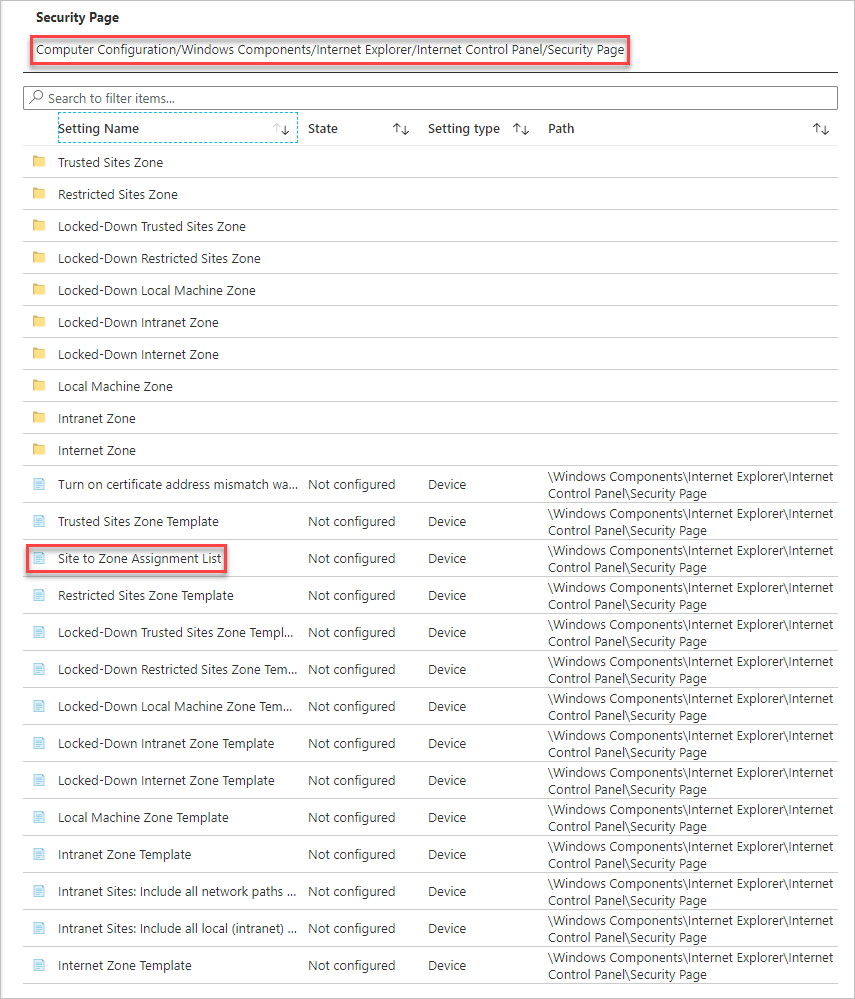
Within the setting, select Enabled and enter in the domains that you wish to add to the zone, in my case, I am going to add in https://letsconfigmgr.com/ and select a value of 2 :
The available values are as follows:
- 1 = Intranet
- 2 = Trusted Sites
- 3 = Internet Zone
- 4 = Restricted Sites
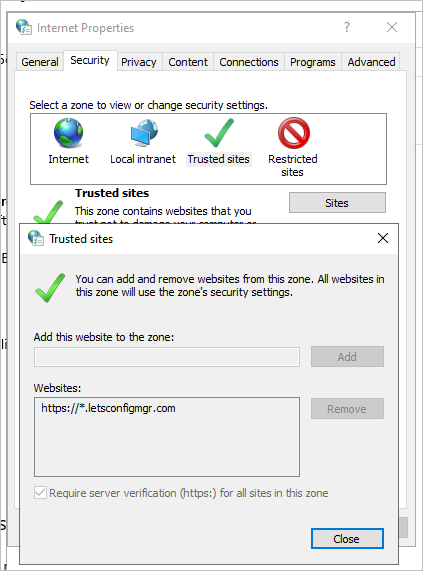
Deploy the configuration profile to a test computer group and verify the results on the device, by going to Control Panel, Internet Settings , Security , Trusted Sites and confirm that the desired sites are listed, note that you cannot add \ edit \ remove configurations:
One-Time Entry Method
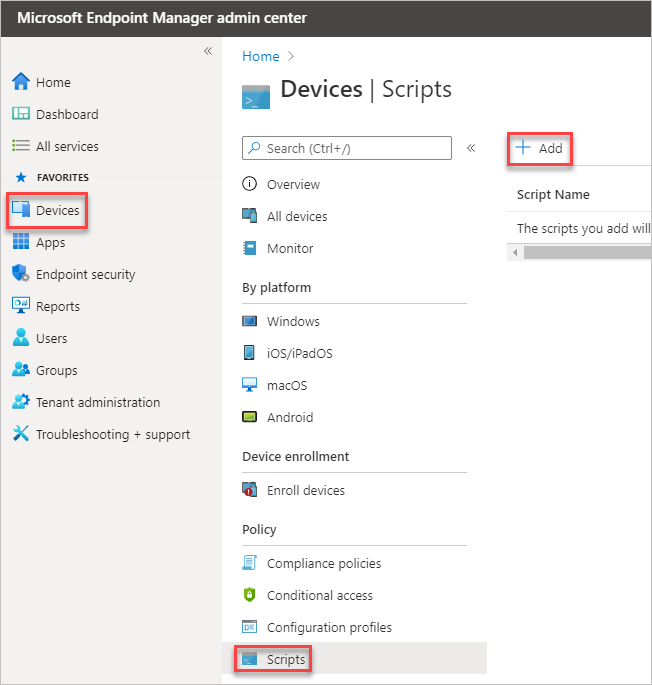
Some administrators may want to allow end users to control the trusted sites list, a great way to allow this via MEM and still add entries is to deploy a PowerShell script, to do this within the MEM portal , go to Devices, Scripts and select Add :
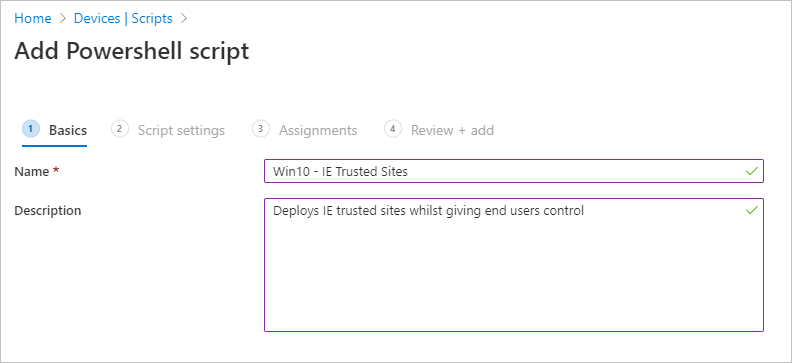
Select Windows 10 , name and set a description:
Copy the below code and save as a .ps1 file, edit lines 1, 5 and 7 to the domain that you wish to add to zones, for an example, I have added letsconfigmgr.com, note the value of 2 on the 7th line, which reflects adding the site to the trusted sites zone, the options are:
Within script settings, upload your script and select Run this script using the logged on credentials :
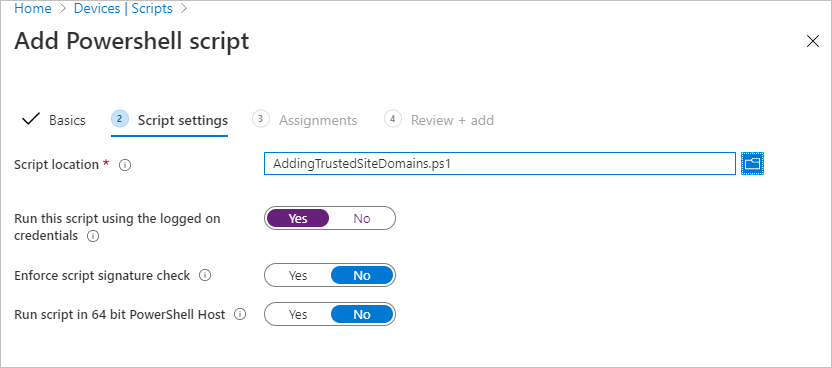
Once completed, assign the script to your test device and verify the results, by going to Control Panel, Internet Settings , Security , Trusted Sites and confirm that the desired sites are listed, note that you can add \ edit \ remove configurations:

A quick note on PowerShell scripts, once the scripts have run successfully, they won’t execute again, so be aware of this if an end-user removes an entry, the only way to execute the script again, if successful previously, is to edit the existing script and re-upload or create a new script with the same contents and redeploy.
Additionally, if you’re also using security baselines within MEM, I have discovered that the Windows 10 MDM baseline for May 2019 will block the ability for end-users to add \ edit \ remove \ view trusted sites with the default settings applied, if you wish for this ability then the following settings need to be edited within the baseline to allow this:
- Internet Explorer security zones use only machine settings = Disabled
- Internet Explorer users adding sites = Enabled
- Internet Explorer users changing policies = Enabled
Be sure to check the above settings with your security team to ensure that there are no security concerns before making changes to the security baselines and ensure that all settings have been tested fully prior to rolling out to production clients.
- Deploying Adobe Reader DC via ConfigMgr and Intune.
- MEM – Removing MS Teams Desktop Shortcuts
You May Also Like

Block USB Drives within Microsoft Intune

MEM – Configure OneDrive KFM via Intune
Manage Google Chrome Policies via Intune

Quick Assist – UAC Black Screen resolution via Intune

Configure Storage Sense using Setting Catalog via MSIntune
Stack Exchange Network
Stack Exchange network consists of 183 Q&A communities including Stack Overflow , the largest, most trusted online community for developers to learn, share their knowledge, and build their careers.
Q&A for work
Connect and share knowledge within a single location that is structured and easy to search.
IE11: How to check into which zone a URL falls?
I have applied several internet explorer settings via group policy. Especially a long list of URLs in the "site to zone assignment" setting. However it seems that one URL still falls into the "internet zone" even when assigned to the "trusted zone".
In earlier versions of internet explorer one could easily determine from the status bar into which zone an URL falls. How can this be done via IE11? Am I overlooking something obvious?
- group-policy
- internet-explorer
- I also agree with Matze. Even though, Microsoft provide the information in File-Properties. but it not easy to debug. If possible I would like to ask Microsoft return this feature back or give some option to selectable. – user255256 Nov 22, 2014 at 11:13
3 Answers 3
In the menu bar, if you go to File->Properties. The properties dialog shows the zone for that page.
- Just found it out by myself. Thanks for replying. support.microsoft.com/kb/2689449 – Matthias Güntert Jul 16, 2014 at 9:13
- 3 Press Alt + F + R key – Ivan Chau Jan 16, 2017 at 1:48
- 2 You can also right-click and go to properties. – davidtbernal Jul 12, 2018 at 21:32
This Microsoft created software will allow you to enter a URL and display not only the zone that falls into (including the local computer zone - there are actually four IE zones) but it will show the specific IE settings that would be applied. It's a great tool for diagnosing policy issues:
https://blogs.technet.microsoft.com/fdcc/2011/09/22/iezoneanalyzer-v3-5-with-zone-map-viewer/
You can check the zone via powershell:
Documentation for System.Security.Policy.Zone.CreateFromUrl: https://docs.microsoft.com/en-us/dotnet/api/system.security.policy.zone.createfromurl
You must log in to answer this question.
Not the answer you're looking for browse other questions tagged group-policy internet-explorer ..
- The Overflow Blog
- OverflowAI and the holy grail of search
- The Good, the Bad, and the Disruptive: Let us know where you stand in the...
- Featured on Meta
- Our Partnership with OpenAI
- What deliverables would you like to see out of a working group?
Hot Network Questions
- Unable to change file ownership through find-exec
- How to build apartment floors/ceilings to not transfer sound?
- Why did the Amiga 2000 only produce grayscale on its composite output?
- Why does Windows command prompt command chaining not short circuit when a batch file returns non-zero?
- Common Mode Rejection tests
- Reinstalling iOS on a phone and it is asking for a password but what password?
- Why do cryogenic fuels want an extra pressure tank?
- Anxious about possibly hitting bugs i can't solve and having to cancel my games
- How to become a witch: Fiction Novel - Girl finds a how-to book about witches at the library
- Do particle & anti-particle pairs belong to the same field?
- Retrosynthesis of 4-ethyl-2,2,5,5-tetramethyl-1,3-dioxane
- If we consider the spacetime of the universe to be four-dimensional, does the Big Bang lie in its center?
- Is a 0.5-1 cm buckle/bend in a rim repairable?
- Can White still castle?
- In what situation would universal full-body protective clothing be preferable to living in sealed habitats?
- Can I say "Rolex watches are astronomical", "astronomical" in the sense of "expensive"?
- Piano Sheet Music: Two Voices - Same Note
- Are circles required on the edge of the grid?
- My other Mac mini's clipboard history has my laptop's clipboard history and it's freaking me out
- Can this 1930s box support a ceiling fan?
- Reasons for implementing op-amps which are not unity-gain stable
- Can there be a multiplicative linear operator for real square matrices?
- Are one in four victims of intimate partner homicides in Australia male?
- What causes signal distortion in the BJT circuit I designed?
This browser is no longer supported.
Upgrade to Microsoft Edge to take advantage of the latest features, security updates, and technical support.
Quickstart: Microsoft Entra seamless single sign-on
- 5 contributors
Microsoft Entra seamless single sign-on (Seamless SSO) automatically signs in users when they're using their corporate desktops that are connected to your corporate network. Seamless SSO provides your users with easy access to your cloud-based applications without using any other on-premises components.
To deploy Seamless SSO for Microsoft Entra ID by using Microsoft Entra Connect, complete the steps that are described in the following sections.
Check the prerequisites
Ensure that the following prerequisites are in place:
Set up your Microsoft Entra Connect server : If you use pass-through authentication as your sign-in method, no other prerequisite check is required. If you use password hash synchronization as your sign-in method and there's a firewall between Microsoft Entra Connect and Microsoft Entra ID, ensure that:
You use Microsoft Entra Connect version 1.1.644.0 or later.
If your firewall or proxy allows, add the connections to your allowlist for *.msappproxy.net URLs over port 443. If you require a specific URL instead of a wildcard for proxy configuration, you can configure tenantid.registration.msappproxy.net , where tenantid is the GUID of the tenant for which you're configuring the feature. If URL-based proxy exceptions aren't possible in your organization, you can instead allow access to the Azure datacenter IP ranges , which are updated weekly. This prerequisite is applicable only when you enable the Seamless SSO feature. It isn't required for direct user sign-ins.
- Microsoft Entra Connect versions 1.1.557.0, 1.1.558.0, 1.1.561.0, and 1.1.614.0 have a problem related to password hash sync. If you don't intend to use password hash sync in conjunction with pass-through authentication, review the Microsoft Entra Connect release notes to learn more.
Use a supported Microsoft Entra Connect topology : Ensure that you're using one of the Microsoft Entra Connect supported topologies .
Seamless SSO supports multiple on-premises Windows Server Active Directory (Windows Server AD) forests, whether or not there are Windows Server AD trusts between them.
Set up domain administrator credentials : You must have domain administrator credentials for each Windows Server AD forest that:
- You sync to Microsoft Entra ID through Microsoft Entra Connect.
- Contains users you want to enable Seamless SSO for.
Enable modern authentication : To use this feature, you must enable modern authentication on your tenant.
Use the latest versions of Microsoft 365 clients : To get a silent sign-on experience with Microsoft 365 clients (for example, with Outlook, Word, or Excel), your users must use versions 16.0.8730.xxxx or later.
If you have an outgoing HTTP proxy, make sure that the URL autologon.microsoftazuread-sso.com is on your allowlist. You should specify this URL explicitly because the wildcard might not be accepted.
Enable the feature
Steps in this article might vary slightly based on the portal you start from.
Enable Seamless SSO through Microsoft Entra Connect .
If Microsoft Entra Connect doesn't meet your requirements, you can enable Seamless SSO by using PowerShell . Use this option if you have more than one domain per Windows Server AD forest, and you want to target the domain to enable Seamless SSO for.
If you're doing a fresh installation of Microsoft Entra Connect , choose the custom installation path . On the User sign-in page, select the Enable single sign on option.

The option is available to select only if the sign-on method that's selected is Password Hash Synchronization or Pass-through Authentication .
If you already have an installation of Microsoft Entra Connect , in Additional tasks , select Change user sign-in , and then select Next . If you're using Microsoft Entra Connect versions 1.1.880.0 or later, the Enable single sign on option is selected by default. If you're using an earlier version of Microsoft Entra Connect, select the Enable single sign on option.

Continue through the wizard to the Enable single sign on page. Provide Domain Administrator credentials for each Windows Server AD forest that:
When you complete the wizard, Seamless SSO is enabled on your tenant.
The Domain Administrator credentials are not stored in Microsoft Entra Connect or in Microsoft Entra ID. They're used only to enable the feature.
To verify that you have enabled Seamless SSO correctly:
- Sign in to the Microsoft Entra admin center as at least a Hybrid Identity Administrator .
- Browse to Identity > Hybrid management > Microsoft Entra Connect > Connect sync .
- Verify that Seamless single sign-on is set to Enabled .

Seamless SSO creates a computer account named AZUREADSSOACC in each Windows Server AD forest in your on-premises Windows Server AD directory. The AZUREADSSOACC computer account must be strongly protected for security reasons. Only Domain Administrator accounts should be allowed to manage the computer account. Ensure that Kerberos delegation on the computer account is disabled, and that no other account in Windows Server AD has delegation permissions on the AZUREADSSOACC computer account. Store the computer accounts in an organization unit so that they're safe from accidental deletions and only Domain Administrators can access them.
If you're using Pass-the-Hash and Credential Theft Mitigation architectures in your on-premises environment, make appropriate changes to ensure that the AZUREADSSOACC computer account doesn't end up in the Quarantine container.
Roll out the feature
You can gradually roll out Seamless SSO to your users by using the instructions provided in the next sections. You start by adding the following Microsoft Entra URL to all or selected user intranet zone settings through Group Policy in Windows Server AD:
https://autologon.microsoftazuread-sso.com
You also must enable an intranet zone policy setting called Allow updates to status bar via script through Group Policy.
The following instructions work only for Internet Explorer, Microsoft Edge, and Google Chrome on Windows (if Google Chrome shares a set of trusted site URLs with Internet Explorer). Learn how to set up Mozilla Firefox and Google Chrome on macOS .
Why you need to modify user intranet zone settings
By default, a browser automatically calculates the correct zone, either internet or intranet, from a specific URL. For example, http://contoso/ maps to the intranet zone, and http://intranet.contoso.com/ maps to the internet zone (because the URL contains a period). Browsers don't send Kerberos tickets to a cloud endpoint, like to the Microsoft Entra URL, unless you explicitly add the URL to the browser's intranet zone.
There are two ways you can modify user intranet zone settings:
Group policy detailed steps
Open the Group Policy Management Editor tool.
Edit the group policy that's applied to some or all your users. This example uses Default Domain Policy .
Go to User Configuration > Policies > Administrative Templates > Windows Components > Internet Explorer > Internet Control Panel > Security Page . Select Site to Zone Assignment List .

Enable the policy, and then enter the following values in the dialog:
Value name : The Microsoft Entra URL where the Kerberos tickets are forwarded.
Value (Data): 1 indicates the intranet zone.
The result looks like this example:
Value name: https://autologon.microsoftazuread-sso.com
Value (Data): 1
If you want to prevent some users from using Seamless SSO (for instance, if these users sign in on shared kiosks), set the preceding values to 4 . This action adds the Microsoft Entra URL to the restricted zone and Seamless SSO fails for the users all the time.
Select OK , and then select OK again.

Go to User Configuration > Policies > Administrative Templates > Windows Components > Internet Explorer > Internet Control Panel > Security Page > Intranet Zone . Select Allow updates to status bar via script .

Enable the policy setting, and then select OK .

Group policy preference detailed steps
Go to User Configuration > Preferences > Windows Settings > Registry > New > Registry item .

Enter or select the following values as demonstrated, and then select OK .
Key Path : Software\Microsoft\Windows\CurrentVersion\Internet Settings\ZoneMap\Domains\microsoftazuread-sso.com\autologon
Value name : https
Value type : REG_DWORD
Value data : 00000001

Browser considerations
The next sections have information about Seamless SSO that's specific to different types of browsers.
Mozilla Firefox (all platforms)
If you're using the Authentication policy settings in your environment, ensure that you add the Microsoft Entra URL ( https://autologon.microsoftazuread-sso.com ) to the SPNEGO section. You can also set the PrivateBrowsing option to true to allow Seamless SSO in private browsing mode.
Safari (macOS)
Ensure that the machine running the macOS is joined to Windows Server AD.
Instructions for joining your macOS device to Windows Server AD are outside the scope of this article.
Microsoft Edge based on Chromium (all platforms)
If you've overridden the AuthNegotiateDelegateAllowlist or AuthServerAllowlist policy settings in your environment, ensure that you also add the Microsoft Entra URL ( https://autologon.microsoftazuread-sso.com ) to these policy settings.
Microsoft Edge based on Chromium (macOS and other non-Windows platforms)
For Microsoft Edge based on Chromium on macOS and other non-Windows platforms, see the Microsoft Edge based on Chromium Policy List for information on how to add the Microsoft Entra URL for integrated authentication to your allowlist.
Google Chrome (all platforms)
The use of third-party Active Directory Group Policy extensions to roll out the Microsoft Entra URL to Firefox and Google Chrome for macOS users is outside the scope of this article.
Known browser limitations
Seamless SSO doesn't work on Internet Explorer if the browser is running in Enhanced Protected mode. Seamless SSO supports the next version of Microsoft Edge based on Chromium, and it works in InPrivate and Guest mode by design. Microsoft Edge (legacy) is no longer supported.
You might need to configure AmbientAuthenticationInPrivateModesEnabled for InPrivate or guest users based on the corresponding documentation:
- Microsoft Edge Chromium
- Google Chrome
Test Seamless SSO
To test the feature for a specific user, ensure that all the following conditions are in place:
- The user signs in on a corporate device.
- The device is joined to your Windows Server AD domain. The device doesn't need to be Microsoft Entra joined .
- The device has a direct connection to your domain controller, either on the corporate wired or wireless network or via a remote access connection, such as a VPN connection.
- You've rolled out the feature to this user through Group Policy.
To test a scenario in which the user enters a username, but not a password:
- Sign in to https://myapps.microsoft.com . Be sure to either clear the browser cache or use a new private browser session with any of the supported browsers in private mode.
To test a scenario in which the user doesn't have to enter a username or password, use one of these steps:
- Sign in to https://myapps.microsoft.com/contoso.onmicrosoft.com . Be sure to either clear the browser cache or use a new private browser session with any of the supported browsers in private mode. Replace contoso with your tenant name.
- Sign in to https://myapps.microsoft.com/contoso.com in a new private browser session. Replace contoso.com with a verified domain (not a federated domain) on your tenant.
Roll over keys
In Enable the feature , Microsoft Entra Connect creates computer accounts (representing Microsoft Entra ID) in all the Windows Server AD forests on which you enabled Seamless SSO. To learn more, see Microsoft Entra seamless single sign-on: Technical deep dive .
The Kerberos decryption key on a computer account, if leaked, can be used to generate Kerberos tickets for any user in its Windows Server AD forest. Malicious actors can then impersonate Microsoft Entra sign-ins for compromised users. We highly recommend that you periodically roll over these Kerberos decryption keys, or at least once every 30 days.
For instructions on how to roll over keys, see Microsoft Entra seamless single sign-on: Frequently asked questions .
You don't need to do this step immediately after you have enabled the feature. Roll over the Kerberos decryption keys at least once every 30 days.
- Technical deep dive : Understand how the Seamless single sign-on feature works.
- Frequently asked questions : Get answers to frequently asked questions about Seamless single sign-on.
- Troubleshoot : Learn how to resolve common problems with the Seamless single sign-on feature.
- UserVoice : Use the Microsoft Entra Forum to file new feature requests.
Coming soon: Throughout 2024 we will be phasing out GitHub Issues as the feedback mechanism for content and replacing it with a new feedback system. For more information see: https://aka.ms/ContentUserFeedback .
Submit and view feedback for
Additional resources
IMAGES
VIDEO
COMMENTS
Learn how to configure Internet Explorer and Edge to trust the required URLs for Hybrid Identity implementations that use Azure AD, Web Application Proxy and Office 365 services. Follow the steps to use Group Policy to add the URLs to the Trusted Sites zone and avoid browser prompts or hick-ups.
On the right hand side, right click the policy setting Site to Zone Assignment List and click Edit. Click Enabled first and then under the Options click Show. You need to enter the zone assignments. As stated earlier in this post Internet Explorer has 4 security zones and the zone numbers have associated security settings that apply to all of ...
Learn how to configure Internet Explorer's Local Intranet zone to enable Windows Integrated Authentication for Hybrid Identity implementations using AD FS, Web Application Proxies and Azure AD Connect. See the required URLs and the steps to use Group Policy to add them.
The zone assignments are as follows: 1 - Intranet Zone; 2 - Trusted Sites Zone; 3 - Internet Zone; 4 - Restricted Sites Zone; Once the zone assignment has been entered, click "OK". This will once again show the "Show Contents" window and the new entry should be present.
The "Site To Zone Assignment List" policy. The format of the Site To Zone Assignment List policy is described within the policy. This policy setting allows you to manage a list of sites that you want to associate with a particular security zone. These zone numbers have associated security settings that apply to all sites in the zone.
Learn how to use Group Policy to assign URLs to different security zones in Internet Explorer, such as Intranet, Trusted Sites, Internet and Restricted Sites. Follow the step-by-step tutorial with screenshots and zone number mapping table.
Learn how to use policies and settings to control browser behavior for different sites in Microsoft Edge. Windows Security Zones are still used for some decisions, such as credential release, file downloads, and IE mode.
Learn how to manage a list of sites and their associated security zones in Internet Explorer using group policy. See the policy path, scope, registry settings and zone templates for this policy.
Learn how to manage and configure security zones in Internet Explorer using Group Policy. This blog explains how to restrict users from changing security settings, adding or deleting sites, and accessing the Security tab.
Put simply we are going to setup the IE Zone registry keys manually using Group Policy Preferences… However it's a little complicated as the URL that is in the Site to Zone mapping is actually stored as the name of the key. Finally the protocol is the registry value with a number that assigns it to the corresponding zone.
Learn how browsers use Security Zones to make decisions about URL actions, file downloads, and credentials. See the pros and cons of Zones, and how they differ across browsers and platforms.
Learn how to use Intune configuration profiles to deploy a set of trusted sites overriding users' ability to add trusted sites themselves. Follow the steps to create a policy, select the Site to Zone Assignment List setting, and add the trusted sites list.
1. Find the setting. Use Group Policy Management console to locate one of these settings below: User Configuration > Preferences > Windows Settings > Registry = With this way, the site zone mapping will follow the user on any computer it is logged in to. Computer Configuration > Preferences > Windows Settings > Registry = With this way, the ...
Copy the below code and save as a .ps1 file, edit lines 1, 5 and 7 to the domain that you wish to add to zones, for an example, I have added letsconfigmgr.com, note the value of 2 on the 7th line, which reflects adding the site to the trusted sites zone, the options are: 1 = Intranet; 2 = Trusted Sites; 3 = Internet Zone; 4 = Restricted Sites
Especially a long list of URLs in the "site to zone assignment" setting. However it seems that one URL still falls into the "internet zone" even when assigned to the "trusted zone". In earlier versions of internet explorer one could easily determine from the status bar into which zone an URL falls. How can this be done via IE11?
Any zone that has Protected Mode enabled will use Enhanced Protected Mode. Users won't be able to disable Enhanced Protected Mode. If you disable this policy setting, Enhanced Protected Mode will be turned off. Any zone that has Protected Mode enabled will use the version of Protected Mode introduced in Internet Explorer 7 for Windows Vista.
Re: Site to Zone Assignment List - Powershell. # Step 2: Navigate to the Site to Zone Assignment List # This step is manual and requires navigating through the Group Policy Management Editor interface. # Step 3: Enable the Policy and Specify Zone Assignments # Define the list of URLs and their corresponding zone assignments.
3.Clearing ZoneMap Entries: Instead of relying solely on modifying the "site to zone assignment list" template, you can consider using a startup script in a GPO to delete the unwanted entries from the ZoneMap registry key. This script can run with elevated privileges and remove the obsolete entries. You can use PowerShell or batch scripting to ...
These registry entries are located in the following registry subkey: HKEY_LOCAL_MACHINE\SOFTWARE\Microsoft\Windows\CurrentVersion\Internet Settings\Zones\<ZoneNumber>. In this registry subkey, <ZoneNumber> is a zone such as 0 (zero). The 1200 registry entry and the 2000 registry entry each contain a setting that is named Administrator approved.
Steps performed: 1- Configuration Profiles --> Site to Zone Assignment List completed (\Windows Components\Internet Explorer\Internet Control Panel\Security Page) --> no changes in sites under Internet options-> Trusted sites, still shows the old ones. 2- Security Baseline, IE (users adding sites / changing policies set to "NOT Configured" ).
Select Site to Zone Assignment List. Enable the policy, and then enter the following values in the dialog: Value name: The Microsoft Entra URL where the Kerberos tickets are forwarded. Value (Data): 1 indicates the intranet zone. The result looks like this example: Value name: https://autologon.microsoftazuread-sso.com. Value (Data): 1