How to insert a word document into PowerPoint: Step-by-Step Guide
Inserting a Word document into PowerPoint can be a game-changer when you’re trying to create a dynamic presentation. With just a few clicks, you can integrate all the information from a Word doc into your slides, making it easier for your audience to follow along. So, let’s dive in and learn how to do it!

Step by Step Tutorial on How to Insert a Word Document into PowerPoint
Before we jump into the steps, know that inserting a Word document will save you loads of time copying and pasting text. You can insert the whole document, or just parts of it, into your presentation.
Step 1: Open your PowerPoint presentation
To start, open the PowerPoint presentation where you want to insert the Word document.
Opening PowerPoint is as simple as clicking on the icon on your desktop or searching for it in your computer’s search bar. Once the program is open, you can either create a new presentation or open an existing one where you want to insert the document.
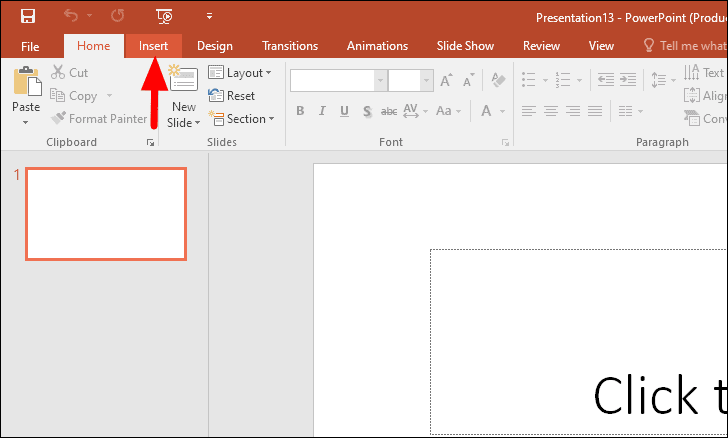
Step 2: Click on the "Insert" tab
Look for the "Insert" tab at the top of the PowerPoint window and click on it.
The "Insert" tab is where all the magic happens. It’s where you can add all sorts of things to your slides, like pictures, charts, and yes, documents!
Step 3: Select "Object" in the "Text" group
Within the "Insert" tab, you’ll find a group labeled "Text." Click on "Object" located in this group.
When you click on "Object," a dialog box will pop up that offers you several options for what kind of object you want to insert. This is where you’ll be able to insert your Word document.
Step 4: Choose "Create from file" and browse for your Word document
In the dialog box, select "Create from file," then click "Browse" to find and select your Word document.
Choosing "Create from file" allows you to insert the document as is, without any need to modify it first. Once you’ve found the file, select it and click "OK."
Step 5: Decide whether to link to the Word document
You have the option to link to the Word document. If you choose this, any changes made to the Word file will update in PowerPoint.
Linking to the Word document can be handy if you’re working on a document that’s frequently updated. However, if the file is final, you might not want to link it.
Step 6: Click "OK" to insert the Word document into your slide
After making your choice about linking, click "OK," and your Word document will be inserted into your PowerPoint slide.
And just like that, your document is now a part of your PowerPoint presentation! You can resize and move the object around on your slide to fit your layout.
After completing these steps, your Word document will be successfully inserted into your PowerPoint presentation. You can now manipulate the document within your slide, zoom in on specific sections, or scroll through the pages.
Tips for Inserting a Word Document into PowerPoint
- Make sure your Word document is finalized before inserting it to avoid unnecessary edits in PowerPoint.
- If you link the Word document, remember that any changes made to the original file will reflect in the presentation.
- Keep your Word document short and concise; lengthy documents can be overwhelming in a presentation.
- Consider breaking up the document into sections and inserting them on different slides for clarity.
- Use the "Format Object" options in PowerPoint to enhance the inserted document’s appearance with borders or effects.
Frequently Asked Questions
Can i edit the word document once it’s inserted into powerpoint.
No, you can’t directly edit the Word document in PowerPoint. You’ll need to edit the original Word file and then re-insert or update the link in PowerPoint.
Will the formatting from the Word document transfer over to PowerPoint?
Yes, most formatting will transfer over, but some complex elements may not appear exactly as they do in Word.
What if I only want to insert part of the Word document?
You can either edit the Word document before inserting it or take a screenshot of the part you want and insert it as an image.
Can I insert a Word document into PowerPoint on a Mac?
Yes, the process is similar on a Mac. You’ll use the "Insert" tab and the "Object" option to insert the Word document.
Is it possible to insert a Word document into an existing text box in PowerPoint?
No, you cannot insert a Word document into an existing text box. The document is inserted as an object that can be resized and moved, but not within a text box.
- Open your PowerPoint presentation
- Click on the "Insert" tab
- Select "Object" in the "Text" group
- Choose "Create from file" and browse for your Word document
- Decide whether to link to the Word document
- Click "OK" to insert the Word document into your slide
Inserting a Word document into PowerPoint is a seamless way to enhance your presentation without the hassle of manually copying text. It’s a straightforward process that can save you time and keep your slides looking professional and uniform. Whether you’re presenting in a classroom, a boardroom, or at a conference, the ability to incorporate a Word document directly into your PowerPoint slides is an invaluable skill.
Remember, once inserted, treat the document as you would any other element in PowerPoint. Resize it, position it, and make sure it complements your presentation’s overall flow. And don’t forget, if you link the document, any updates you make in Word will automatically reflect in PowerPoint, keeping your content fresh and up-to-date.
Now that you know how to insert a word document into PowerPoint, start integrating your reports, essays, and other documents into your presentations to create a more dynamic and informative experience for your audience. Happy presenting!

Matt Jacobs has been working as an IT consultant for small businesses since receiving his Master’s degree in 2003. While he still does some consulting work, his primary focus now is on creating technology support content for SupportYourTech.com.
His work can be found on many websites and focuses on topics such as Microsoft Office, Apple devices, Android devices, Photoshop, and more.
Share this:
- Click to share on Twitter (Opens in new window)
- Click to share on Facebook (Opens in new window)
Related Posts
- How to Rotate a Powerpoint Slide Presentation
- How to Insert Word Doc into PowerPoint: A Step-by-Step Guide
- How to Download a Google Slides Presentation as a Powerpoint File
- How to Insert an Excel Spreadsheet Into Powerpoint: A Step-by-Step Guide
- How to Do a Powerpoint Google Slides Presentation Conversion
- How to Make Google Slides Vertical (5 Quick Steps)
- How to Insert Slides from Another Presentation: Powerpoint 2024 Guide
- How to Add a Hyperlink on Google Slides
- How to Add a New Slide in Google Slides: A Step-by-Step Guide
- How to Delete a Slide in Powerpoint 2010: Step-by-Step Guide
- How to Merge Files in Powerpoint: A Step-by-Step Guide
- How to Delete Multiple Slides in Google Slides: A Step-by-Step Guide
- How to Hide a Slide in Powerpoint 2010: A Step-by-Step Guide
- How to Make a Powerpoint Slide Vertical in Powerpoint 2013: A Step-by-Step Guide
- How to Convert Powerpoint to Google Slides: A Tech Solution
- How to Remove Slide Numbers in Powerpoint 2019: Easy Steps
- How to Insert a File Into a Word 2013 Document: A Step-by-Step Guide
- How to Duplicate a Slide in Powerpoint: A Step-by-Step Guide
- How to End Powerpoint on Last Slide in Powerpoint 2010: A Step-by-Step Guide
- How to Insert a Google Slides Page Number: Step-by-Step Guide
Get Our Free Newsletter
How-to guides and tech deals
You may opt out at any time. Read our Privacy Policy
- Accessories
- Entertainment
- PCs & Components
- Wi-Fi & Networks
- Newsletters
- Digital Magazine – Subscribe
- Digital Magazine – Info
- Smart Answers
- Best laptops
- Best antivirus
- Best monitors
- Laptop deals
- Desktop PC deals
When you purchase through links in our articles, we may earn a small commission. This doesn't affect our editorial independence .
How to convert a Word document to a PowerPoint presentation

Whether you’re more comfortable working in PowerPoint or you’d like to present the content of your Word document in a different way, we’ve got you covered, There are a few different ways to convert a Word document to a PowerPoint presentation. If you have a Microsoft 365 account, you can use Word for the Web to make the conversion or you can do it directly with PowerPoint. There’s another option, too. Don’t want to convert your document to a presentation, but still need to use it as a reference? You can insert it as an object directly in a slide. If this all sounds super complicated, don’t worry. We’ll guide you each step of the way.
Convert a Word Document to a PowerPoint Presentation Using Word for the Web
First, open your web browser and log in to Office. Once logged in, open the document you want to convert in Word for the Web, and click the “File” tab in the top-left corner of the window.

IDG / Marshall Gunnell
Click “Export” in the left-hand pane and select “Export to PowerPoint Presentation (Preview).”

The Export to Presentation window will appear. Here, select the design theme you’d like to use and click “Export.”

Word for the Web will then begin preparing your new presentation. Once ready, click “Open Presentation.”

Your presentation will open in PowerPoint for the Web. If you need a local copy, you can always download it by going to File > Save as > Download a Copy.
Convert a Word Document to a PowerPoint Presentation Using PowerPoint
You can convert your Word document to a PowerPoint presentation using PowerPoint itself, but you’ll need to make sure your Word document is properly formatted for the conversion first. For content that you want to use as a slide title, make sure you give it the Heading 1 style. For content you want to use as text in the slide, give it the Heading 2 style.
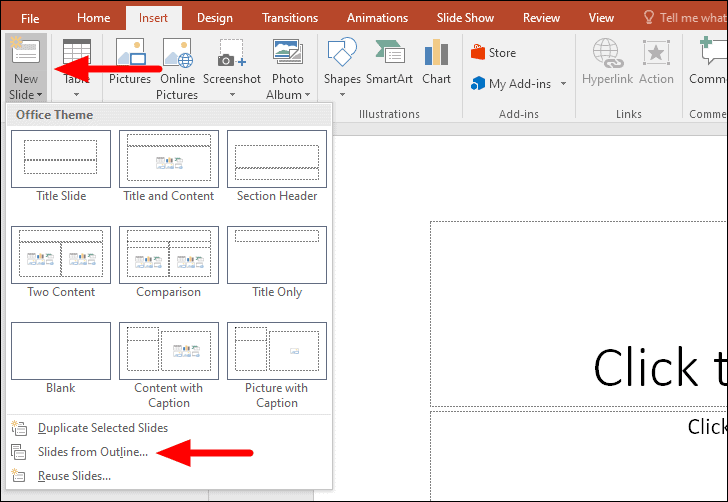
Once you’re ready, open PowerPoint and make sure you’re in the “Home” tab. Next, select “New Slide” in the ribbon and then “Slides from Outline” from the bottom of the menu that appears.

From here, locate the Word document you want to use, select it, and click “Insert.”

PowerPoint will then do its thing. While this way isn’t as good as using Word for the Web, it’ll still get the job done.
Insert Your Word Document as an Object in Your Presentation
If you’re not interested in converting your Word document to a PowerPoint presentation, you can insert it as an object for quick access.
Before we proceed, it’s important you understand the difference between the two types of objects you can insert your document as: Linked or Embedded.
The main difference between the two is where the data is stored. If you embed the object in your presentation, the data from that object is stored in the presentation. This is good if you’re worried about the location of the word document changing (which can break a linked object), but it will increase your file size. A linked object only inserts a link to the source file. In other words, the data from the object isn’t stored in the presentation—it simply links to it. This will keep your file size down, but that link may break if the source file is moved to a different location.
To insert your Word document as an object in your presentation, open your presentation and navigate to the slide you would like to add the object to. From there, click the “Insert” tab and select “Object.”

The Insert Object window will appear. Select “Create from File and click “Browse.”

Locate and select the document you would like to insert. Once inserted, you have two choices. You can either display the entire Word document in the PowerPoint slide or simply display the document icon. If you choose the latter, the document will open in Word when selected.

Click “OK” to insert the object. That’s all there is to it!
Author: Marshall Gunnell
Recent stories by marshall gunnell:.
- How to add the Developer tab to the Microsoft Office Ribbon
- How to block (and unblock) someone in Gmail
- How to enable dark mode in Microsoft Office
Home Blog PowerPoint Tutorials How to Insert a Word Document into PowerPoint
How to Insert a Word Document into PowerPoint

Many people require making presentations to summarize lengthy documents. In such a case, copying text to create slides can be quite laborious. To save time, one can insert a Word document into PowerPoint to make generating new presentations easier or share a file within a presentation deck with a user.
There are three different ways by which you can insert a Word doc in PowerPoint. It can be exported as a presentation, the outline for the file can be imported to build upon the basic structure of the document, or the entire document can be inserted as an object.
Export Word to PowerPoint
To export a Microsoft Word document as a presentation deck, you will require opening it in Word for the web, a.k.a. Word Online. To export a document, open it in Word for the web, and go to File > Export > Export to PowerPoint Presentation .

In the next step, select a theme for the exported document, or you can open it as a blank presentation.

The file’s content will be summarized in the form of PowerPoint slides and exported to the selected theme.

Once the document is ready, click Open Presentation to launch your Word document as a PowerPoint slide deck.

To further design your slides, you can use PowerPoint Designer for suggestions, including themes and images that might suit your presentation.

Below is an example of a Word document exported to PowerPoint as a presentation deck.

Import Outline from a Word Document
Sometimes, it’s not the several pages of text but the outline needed to start creating a presentation . To import the outline from a Word file, you will require the headings to be present hierarchically (e.g., H1, H2, and H3).
To import the outline, go to the Home tab and select New Slide > Slides from Outline .

Select the document you wish to use for importing the outline and click Insert .

This will import the document headings as an outline in PowerPoint.

Insert Word Document as an Object
When sharing a presentation via email, inserting documents as objects can enable the end user to open them instantly. To do this, go to Insert > Object .

In the dialog box that opens up, go to Create from File , browse and select your document. You can either insert the document as a link or as an icon in the presentation slide.

Word File as a link in PowerPoint
The below image shows a Word document inserted in PowerPoint as a link. In this case, a thumbnail image is automatically generated.

Word File as an Icon in PowerPoint
The below image shows a Word document inserted in PowerPoint as an icon.
Regardless of whether you insert a Word document as a link or icon, once the link or Word icon is clicked, the document will open up.
Third-Party Conversion Tools
Word to powerpoint converters.
You can use online converters that can directly convert Word to PPT, such as Convertio, Online2PDF, Online-Convert, etc.

Using Adobe Acrobat to Convert Word to PPT
You can also use third-party conversion tools to convert Word documents to PowerPoint. Many tools, such as Adobe Acrobat or Wondershare PDFelement, require converting the document to PDF from Word before converting it to PowerPoint.

Inserting a Word document into PowerPoint can save time when creating presentations, especially for summarizing lengthy documents. It lets you easily share detailed information within a presentation deck and maintain the document’s structure and content.
Yes, you must use Word Online (Word for the web) to export a document directly to PowerPoint.
Inserting a Word document as a link or an icon allows users to quickly access the full document by clicking on the link or icon. This method is useful for sharing detailed documents within a presentation without cluttering the slides.
Yes, if you insert the Word document as an object, you can double-click the link or icon to open and edit the document. Changes made will be reflected when the document is reopened from PowerPoint.
When inserting a Word document into PowerPoint, consider the format and structure of the document. Ensure that headings and sections are clearly defined to smooth the import process. Additionally, be mindful of the file size and content layout to maintain readability and performance.
To ensure formatting is preserved: – Use consistent styles and headings in your Word document. – Choose appropriate export or conversion options that retain the document’s structure. – Review and adjust the PowerPoint slides after importing to ensure the layout meets your needs.
Yes, after importing a Word document into PowerPoint, you can customize its appearance using PowerPoint’s design tools. You can apply themes, adjust layouts, and use PowerPoint Designer for additional design suggestions.
Word documents often contain information that is required to create presentations. Whether you wish to create a version of the document as a PowerPoint presentation, generate an outline from it, or simply insert it in a slide, the steps mentioned above can help you insert Word into PowerPoint to match your needs. If you don’t have Word installed on your computer or a Microsoft account to use the online version of Word, you can use third-party conversion tools to convert Word to PowerPoint.

Like this article? Please share
Presentation Tips, Presentations Filed under PowerPoint Tutorials
Related Articles

Filed under Google Slides Tutorials • May 22nd, 2024
How to Add Audio to Google Slides
Making your presentations accessible shouldn’t be a hard to accomplish task. Learn how to add audios to Google Slides and improve the quality and accessibility of your presentations.

How to Translate Google Slides
Whereas Google Slides doesn’t allow to natively translate slides, such process is possible thanks to third-party add-ons. Learn how to translate Google Slides with this guide!

How to Add Bullet Points in Google Slides
Discover how to add bullet points in Google Slides with this easy-to-follow tutorial. Find out how to customize bullet style, color and more here.
Leave a Reply

Feb 23, 2021
Export Word documents into PowerPoint presentations
Mohit Anand
- Add our blog to your RSS feed reader" href="/rss/blog.xml" data-bi-name="RSS Subscription" data-bi-id="rss_feed" data-bi-bhvr="120" data-bi-socchn="RSSSubscription" title="Microsoft 365 Insider Blog RSS" target="blank" class="d-inline-block">
Hi, Office Insiders, my name is Mohit Anand, and I’m a Program Manager on the PowerPoint team. I’m glad to share that a new scenario is now available in Word for the web . You can now export Word document s in to PowerPoint presentation s .
Word document s to PowerPoint presentation s
Have you ever wished you could easily export an existing Word document into a great PowerPoint presentation? If so, the wait is over!
When you use the Export command, it creates a presentation based on all the summarized sections of the document. It also adds imagery, icons, videos, themes, and fonts using AI.
How it works
To turn your Word document into a PowerPoint presentation:
- Open any document you want to convert into a presentation in Word for the web.
- Click File > Export > Export to PowerPoint presentation .
- When prompted , choose a design theme for your presentation.
- Click Open presentation to re view the results in PowerPoint for the w eb.
- The presentation w ill be created in the OneDrive root folder of the user who used this option.

Scenarios to try
- Open a Word document and explore the available PowerPoint themes.
- Open a Word document that is mostly text and see which AI-backed assets are added by clicking on Export .
Known Issues
- This feature is currently only available in English.
- It is not available in the Internet Explorer and Safari browser.
- We only support text content for the transformation to presentation, other media content support is not currently available. You can add your own media to the presentation after you have exported your Word document.
Availability
Export your document to PowerPoint presentation is rolling out to all Word for the web users shortly .
Features are released over some time to ensure that things are working smoothly. Therefore, we highlight features that you may not have because they’re slowly releasing to larger numbers of Insiders. Additionally, sometimes we remove elements to further improve them based on your feedback. Though this is rare, we also reserve the option to pull a feature entirely out of the product, even if you, as Insiders, have had the opportunity to try them.
Feedback
If you have any feedback or suggestions, you can submit them by clicking Help > Feedback.
Learn more about what other information you should include in your feedback to ensure it’s actionable and reaches the right people.
We’re excited to hear from you! Sign up for the Office Insider newsletter , and you’ll get the latest information about Insider features in your inbox once a month.
Sorry, JavaScript must be enabled to use this app.
How to Convert a Word Document into a PowerPoint Presentation
Easily convert a Word document into a PowerPoint presentation by formatting the document with proper Headings to automatically create separate slides in the presentation.

If you are heavily invested in Microsoft Office and use it for both personal and professional purposes, chances are you might need to convert your document from one format to another. One of the most common conversions users generally go with is Word document to PowerPoint presentation.
Copy/pasting the content of a document in a presentation is not feasible if the document is lengthy. Also, with the conversion feature embedded right into Microsoft Word, the need to use such outdated concepts negates. The feature to convert uses Artificial Intelligence for the job and is highly effective.
Preparing the Document for Converting into a Presentation
It is fairly easy to convert, given, you are aware of the basic formatting. All you have to do is format the text using the various heading options available in Microsoft Word.
The conversion process will use the Headings in your Word document and create separate slides based on the same into a PowerPoint presentation.
Since we are discussing the basics of the subject, we will only be using ‘Heading 1’ for slide’s Title in the converted presentation and ‘Heading 2’ as the slide content. You can similarly use the other available options in the ‘Style’ section of Word to enhance the clarity and quality of the presentation.
To format the titles, highlight them and then select ‘Heading 1’ from the ‘Styles’ section at the top. Remember, this will be used as the slide title in the PowerPoint presentation after being converted.
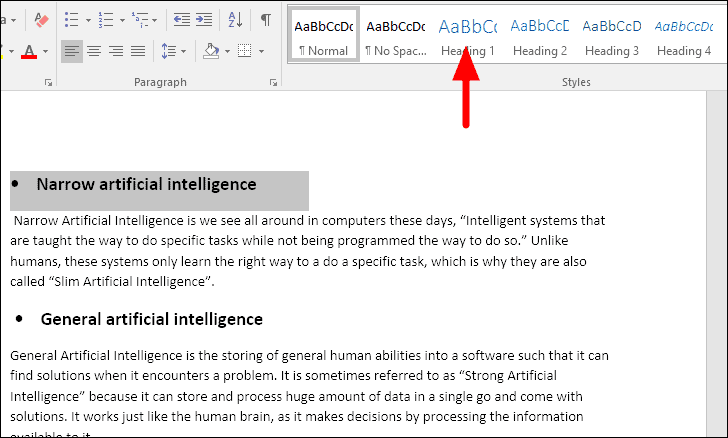
For the text under the heading, you can use other heading options. Again, highlight the content under the topic and select ‘Heading 2’. Since this will be nested under the Heading 1 that we previously used, the conversion process will put it as the slide content for the heading.
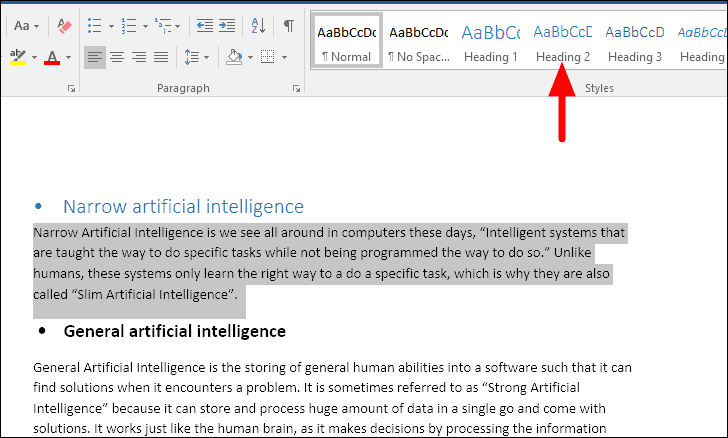
You can similarly format the rest of the document and make it readable and ready for conversion.
After you format the text, the text color will change to blue, which can be changed later on, using the themes options in Word.
To change the theme, go to the ‘Design’ tab at the top and then select the suitable document formatting from the listed options.

In this case, we have used ‘Basic (Stylish)’ and the text now looks green which is catchy and enhances the visual appeal of a presentation.

Converting Word Document to Presentation
There are two ways you can convert your document to a presentation, either through Microsoft Word or through Microsoft PowerPoint. However, for both methods, you will have to format the text in headings (for slide titles) and sub-headings (for slide content) structure in the document so that it can be converted.
Converting with Microsoft Word
After you have formatted the document, you will need to add the option to convert a document to presentation in the app’s toolbar, if not enabled currently, which will then be added to the top of Microsoft Word.
Click on the ‘File’ menu at the top-left corner to view the various options.
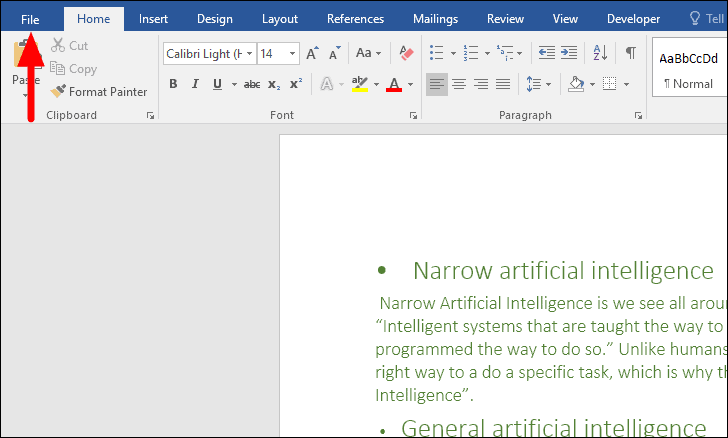
You can now view the information of the current document along with a bunch of features on the left. To enable the conversion icon, select ‘Options’ from the list on the left.
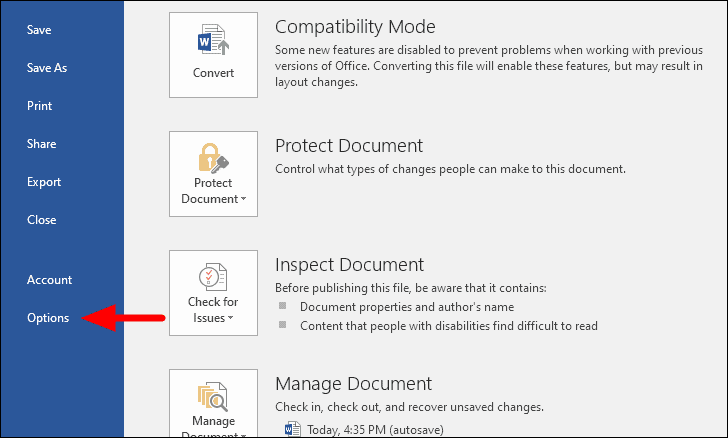
The ‘Word Options’ window will open, select the ‘Quick-Access Toolbar’ tab on the left.
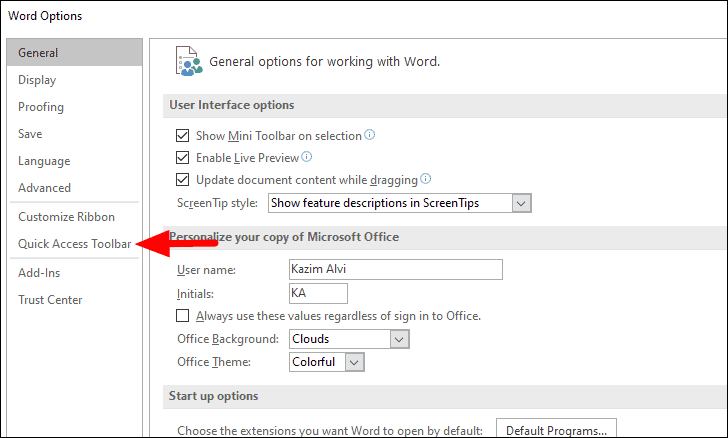
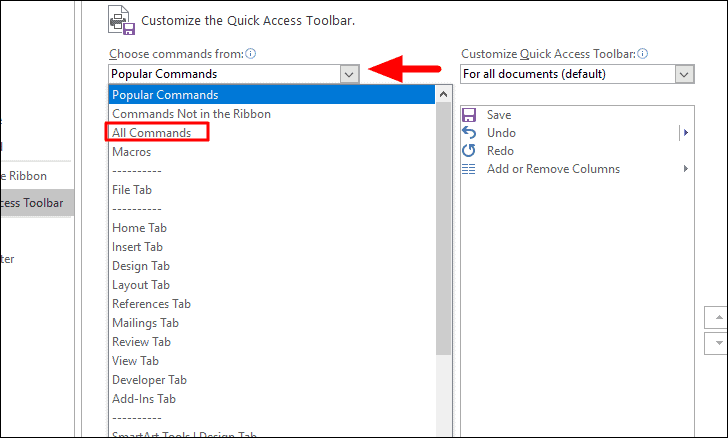
You can now customize the quick access toolbar from this section. Click on the box under ‘Choose commands from’ and select ‘All Commands’ from the drop-down menu.
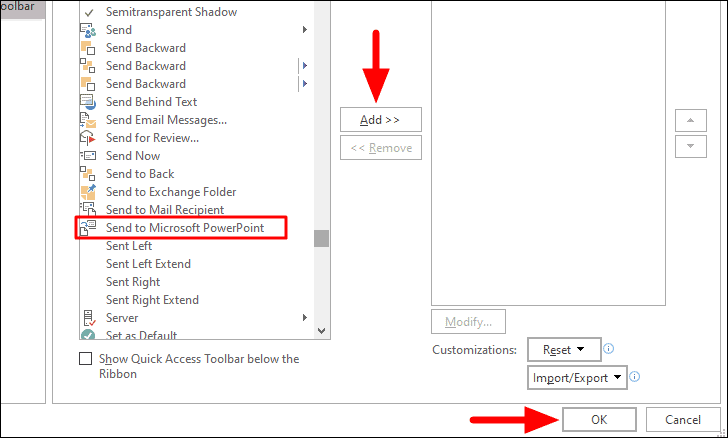
Next, scroll down and look for ‘Send to Microsoft PowerPoint’ from the list and click on ‘Add’ to enable it. The options are listed in alphabetical order; therefore, it wouldn’t be difficult to locate it. After you have added the feature to Microsoft Word, click on ‘OK’ at the bottom to save the changes and close the window.
Now, to convert the document into a PowerPoint presentation, click on ‘Send to Microsoft PowerPoint’ icon that we just added in the instructions above. You can find it above the ribbon bar in Word.
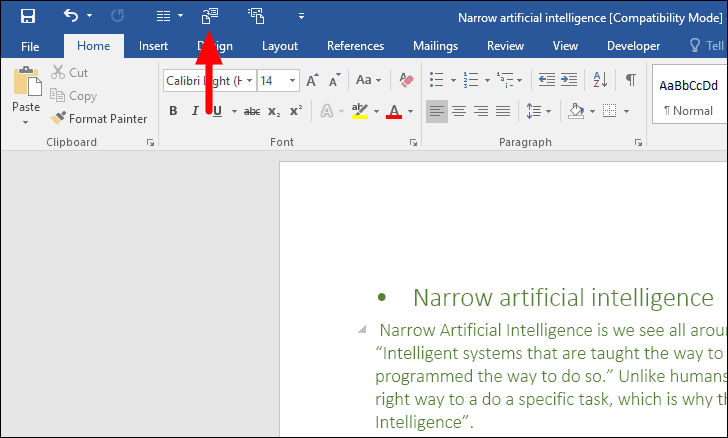
After you click on ‘Send to Microsoft PowerPoint’ icon, the conversion process will begin. It may take some time depending on the document type and length to convert it. Once the conversion is done, the document will now be in form of a presentation, differentiated by the headings we used earlier.
Converting with Microsoft PowerPoint
The process to convert a Word document to a PowerPoint Presentation is intricate in Microsoft Word, however, it is pretty straightforward and simple in Microsoft PowerPoint.
Open a new presentation on Microsoft PowerPoint and then select the ‘Insert’ tab at the top.
In the ‘Insert’ tab, you will see the option to add various items to the presentation. Since we are here to add a document, click on the ‘New Slide’ icon, the first option from the left. Next, select ‘Slides from Outline’ from the drop-down menu.
The ‘Insert Outline’ window will open where you can locate and select the document which you want to convert. After you have selected the document, click on ‘Insert’ at the bottom to convert and add to Microsoft PowerPoint.
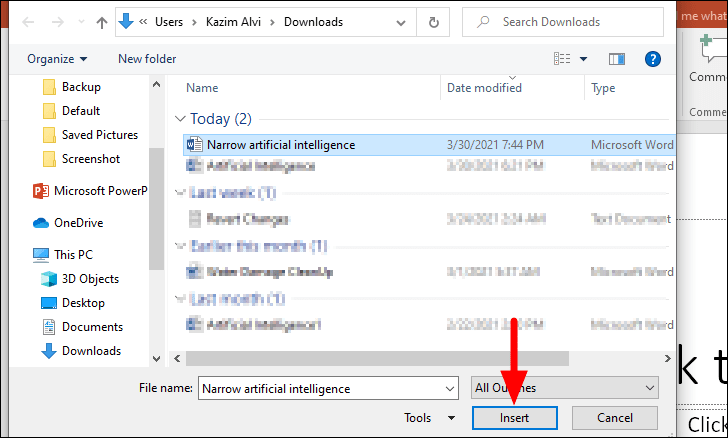
The Word document is now converted to a PowerPoint presentation and the content is distributed between slides by the heading levels that we earlier formatted.
Converting a document to a presentation might have seemed like a herculean task earlier, but it won’t be the case from now on. You can use either of the two methods discussed above for the conversion and save yourself from the hassle of copy/paste. Also, do remember to format the text accurately to attain effective results.

11 Ways GPT-4o is a Game Changer

How to Use Gemini Code Assist in VS Code

How to Code Using AI
Get all the latest posts delivered straight to your inbox., member discussion.

How to setup and use Microsoft Edge Workspaces

How to customize Spotify with Spicetify

You can now find songs stuck in your head in YouTube Music by humming

Want to translate YouTube videos in real-time? Edge will soon do it for you

How to Cancel Snapchat Plus Subscription
- Add an image
- Draft and add content
- Rewrite text
- Chat with Copilot
- Create a summary
- Copilot in Word on mobile devices
- Create a new presentation
- Add a slide or image
- Summarize your presentation
- Organize your presentation
- Use your organization's branding
- Copilot in PowerPoint for mobile devices
- Draft an Outlook email message
- Summarize an email thread
- Suggested drafts in Outlook
- Email coaching
- Get started with Copilot in Excel
- Identify insights
- Highlight, sort, and filter your data
- Generate formula columns
- Summarize your OneNote notes
- Create a to-do list and tasks
- Create project plans in OneNote

Create a new presentation with Copilot in PowerPoint
Note: This feature is available to customers with a Copilot for Microsoft 365 license or Copilot Pro license.
Create a new presentation in PowerPoint.

Select Send . Copilot will draft a presentation for you!
Edit the presentation to suit your needs, ask Copilot to add a slide , or start over with a new presentation and refine your prompt to include more specifics. For example, "Create a presentation about hybrid meeting best practices that includes examples for team building.”
Create a presentation with a template
Note: This feature is only available to customers with a Copilot for Microsoft 365 (work) license. It is not currently available to customers with a Copilot Pro (home) license.
Copilot can use your existing themes and templates to create a presentation. Learn more about making your presentations look great with Copilot in PowerPoint .

Enter your prompt or select Create presentation from file to create a first draft of your presentation using your theme or template.

Edit the presentation to suit your needs, ask Copilot to add a slide , organize your presentation, or add images.
Create a presentation from a file with Copilot
Note: This feature is only available to customers with a Copilot for Microsoft 365 (work) license. It is not currently available to customers with a Copilot Pro (home) license.

With Copilot in PowerPoint, you can create a presentation from an existing Word document. Point Copilot in PowerPoint to your Word document, and it will generate slides, apply layouts, create speaker notes, and choose a theme for you.

Select the Word document you want from the picker that appears. If you don't see the document you want, start typing any part of the filename to search for it.
Note: If the file picker doesn't appear type a front slash (/) to cause it to pop up.
Best practices when creating a presentation from a Word document
Leverage word styles to help copilot understand the structure of your document.
By using Styles in Word to organize your document, Copilot will better understand your document structure and how to break it up into slides of a presentation. Structure your content under Titles and Headers when appropriate and Copilot will do its best to generate a presentation for you.
Include images that are relevant to your presentation
When creating a presentation, Copilot will try to incorporate the images in your Word document. If you have images that you would like to be brought over to your presentation, be sure to include them in your Word document.
Start with your organization’s template
If your organization uses a standard template, start with this file before creating a presentation with Copilot. Starting with a template will let Copilot know that you would like to retain the presentation’s theme and design. Copilot will use existing layouts to build a presentation for you. Learn more about Making your presentations look great with Copilot in PowerPoint .
Tip: Copilot works best with Word documents that are less than 24 MB.
Welcome to Copilot in PowerPoint
Frequently Asked Questions about Copilot in PowerPoint
Where can I get Microsoft Copilot?
Copilot Lab - Start your Copilot journey

Need more help?
Want more options.
Explore subscription benefits, browse training courses, learn how to secure your device, and more.

Microsoft 365 subscription benefits

Microsoft 365 training

Microsoft security

Accessibility center
Communities help you ask and answer questions, give feedback, and hear from experts with rich knowledge.

Ask the Microsoft Community

Microsoft Tech Community

Windows Insiders
Microsoft 365 Insiders
Find solutions to common problems or get help from a support agent.

Online support
Was this information helpful?
Thank you for your feedback.
Enter your email address below and we'll send you password reset instructions.
- Audio Converter
- Video Converter
- Image Converter
- Document Converter
- Archive Converter
- Presentation Converter
- Font Converter
- Ebook Converter
DOC (WORD) to PPT Converter
Convert your doc files to ppt online & free.
- Presentation
Microsoft Word Document
Microsoft powerpoint 97/2000/xp, how to convert doc to ppt, upload doc-file(s).
Select files from Computer, Google Drive, Dropbox, URL or by dragging it on the page.
Choose "to ppt"
Choose ppt or any other format you need as a result (more than 200 formats supported)
Download your ppt
Let the file convert and you can download your ppt file right afterwards
DOC to PPT Quality Rating
Contribute to the Microsoft 365 and Office forum! Click here to learn more 💡
April 9, 2024
Contribute to the Microsoft 365 and Office forum!
Click here to learn more 💡
Word Forum Top Contributors: Stefan Blom - Charles Kenyon - Doug Robbins - MVP Office Apps & Services (Word) - Suzanne S. Barnhill - Bob Jones AKA: CyberTaz ✅
May 10, 2024
Word Forum Top Contributors:
Stefan Blom - Charles Kenyon - Doug Robbins - MVP Office Apps & Services (Word) - Suzanne S. Barnhill - Bob Jones AKA: CyberTaz ✅
- Search the community and support articles
- Microsoft 365 and Office
- Search Community member
Ask a new question
the web version of microsoft word isnt converting word to presentation
from past one month i have been trying to convert various word files to ppt but none of them work.i have even tried with various device and it still doesnt work.it says "we're having difficulty creating your presentation right now.please try again later" i need help with this to resolve this issue

- Subscribe to RSS feed
Report abuse
Reported content has been submitted
Replies (6)
- Microsoft Agent |
Dear Vishal R1,
Thanks for visiting Microsoft Community.
I understand that you can't convert Word files to PowerPoint in the web version of Word, right? It may be because the memory of the image you uploaded is too large for me to see your screenshot.
Is your account a personal or business account? Can you share the screenshot of your error message with me? Does this happen to you in other network environments? Have you tried converting Word to PowerPoint using another browser?
Did you follow the steps below to convert?

This feature is not available in the Internet Explorer or Safari browsers.
We only support text content for the transformation to presentation, other media content support is not currently available. You can add your own media to the presentation after you have transformed your Word document.
Requirements
1.A stable internet connection
2.Word for the web
3.A text-only Word for the web document
Please feel free to contact me if you need further assistance.
Best regards
Miyeon - MSFT |Microsoft Community Support Specialist
Was this reply helpful? Yes No
Sorry this didn't help.
Great! Thanks for your feedback.
How satisfied are you with this reply?
Thanks for your feedback, it helps us improve the site.
Thanks for your feedback.

After our test, we can convert the web version of Word to PowerPoint, you try a few more times to see if it can be converted, you try, is your account a personal account or a work account? Try to convert it in the privacy mode of your browser, try to delete the cache of your browser to see if it can solve the problem.
My account is a personal account and yeah i have even tried converting in the privacy mode of browser but that doesnt help too
Have you cleared your browser's cache, you can refer to this link for the steps to clear your browser's cache. View and delete browser history in Microsoft Edge - Microsoft Support
I tried it even this too doesnt work.pls suggest me some useful solution.i need this option it isnt working from so long
Question Info
- Norsk Bokmål
- Ελληνικά
- Русский
- עברית
- العربية
- ไทย
- 한국어
- 中文(简体)
- 中文(繁體)
- 日本語
Microsoft 365 Basic now includes ransomware protection for your files and photos at no extra cost.

Use Word, Excel, PowerPoint and more for free on the web
Office is now Microsoft 365
Get the free Microsoft 365 mobile app*
Start using Microsoft 365 today

Anywhere access
Whether you’re at work or on the go, create your best work on your favorite browser.
Familiar experience
The familiar Microsoft 365 experience you know and trust, so there’s nothing new to learn.
Work with anyone
Share your documents with anyone and work together in real-time.

Word for the web
Craft great-looking resumes, newsletters, and documents while inviting others to review and coauthor in real time. Plus, access free Word templates, formatting tools for APA, MLA, and Chicago style, and add functionality with free add-ins.
Excel for the web
Organize your data in familiar spreadsheets and workbooks, with all changes saved automatically. Create modern visuals that turn numbers into valuable insights. Work together in real time knowing that everyone is on the same page.

PowerPoint for the web
Turn your ideas into compelling presentations using professional-looking templates. Use animations, transitions, photos, and videos to tell one-of-a-kind stories. Co-author team presentations at the same time, from anywhere.
Start now at Microsoft365.com
No installation required. It's free.
* Availability of mobile apps varies by country/region.
Follow Microsoft 365
- Chat with sales
- Contact sales
Available M-F 9 AM to 6 PM.

6 Things You Probably Didn't Realize Microsoft Word Can Do
M icrosoft Word has been gracing our computer screens for four decades now, and it's rare to meet someone who hasn't used, or at the very least heard of it. After all, Word has become an integral part of everyone's life as it caters to a broad spectrum of needs, be it making professional reports or creating eBooks .
If you are a Word user, it's safe to say you're already well-acquainted with its core capabilities. You know that you can use the app to convert your document to a PDF, format your pages just the way you like it, and insert equations and images for better context. However, with the app constantly evolving and new features getting integrated regularly, some of these functionalities might have slipped under the radar of even the most seasoned users. Let's delve into six of the things you probably don't know Word can do.
Read more: Major PC Monitor Brands Ranked Worst To Best
Reuse The Same Phrases And Sentences
Working with countless documents means you'll be encountering similar pages and paragraphs here and there. Maybe your company uses a standard front page for every report or your math professor insists that you add the same score sheet to all your homework. Retyping such content every time you need it can be pretty time-consuming. This is where Quick Parts come into the picture. Quick Parts is essentially a collection of reusable text — be it words, phrases, or sentences. By saving these snippets, you can paste them into your document without much of a hassle.
- Fire up Word on your desktop.
- Type and highlight the content you want to add to your Quick Part gallery.
- Navigate to the Insert tab.
- In the Text group, press on the Quick Parts option.
- Click on Save Selection to Quick Part Gallery.
- Assign a name for your content.
- Hit OK to save it.
- Open your document in Word.
- Select Insert.
- Expand Quick Parts.
- Pick your content from the saved content.
- To insert the chosen snippet right where your cursor is, simply click on it.
- To insert the snippet in a different location, right-click on the content and select where you want to paste it (e.g., at the end of the document, at the page footer, at the beginning of a section).
Hide Certain Texts
Have you ever needed to make two versions of the same document because some parts of it aren't meant to be read by everyone? Say, for instance, a quiz where the answers shouldn't be visible, or a contract with sections irrelevant to certain hires. This method might work for others, but it's generally confusing having to manage two almost identical documents. Instead of doing so, there's a neat trick in Word you can use: hide texts. It's the perfect solution for those moments when you need to keep certain information out of the printed version but don't want to clutter your space with similar documents.
Here's a quick guide on how to do it:
- Open your Word document.
- Highlight the snippet you wish to hide.
- Press the Word keyboard shortcut Ctrl + D or go to the Font group under the Home tab and click the small arrow in the corner.
- In the Font dialog box, turn on the Hidden box under Effects.
Your selected text will now disappear from the document, both in the normal reading mode and in the printed version. Should you need to see this text again in the document, just click the Show/Hide button (looks like a backward P) in the Paragraph section of the Home tab. If you decide to include this hidden text in your printout, navigate to File > Options, select the Display tab in the dialog box, and tick Print hidden text.
Generate Placeholder Texts
Sometimes, when you're writing a document, you might not have all the data or content yet. However, because you need to finalize the formatting of your document, you'll resort to scouring the internet for random text or hopping on an online Lorem Ipsum generator to create one for you. However, you actually don't need to do those extra steps as Word comes with a built-in feature that generates placeholder text without much fuss.
In your Word document, simply type =rand() to insert a sample text in English or =lorem() to insert a Lorem Ipsum text. Then, press the Enter key. By default, the sample text will consist of three paragraphs. If you're looking for something longer than three paragraphs, you won't have to retype the keyword over and over again. Just modify the command slightly. Use =rand(x,y) or =lorem(x,y) instead. X represents the number of paragraphs you want and Y represents the number of lines per paragraph. So for instance, typing =rand(5,3) will give you five paragraphs, each with three lines.
Shrink Multiple Pages
Reading long documents on a screen can cause eye strain, so some people prefer having a physical copy instead. If you're the type to do so, then chances are you're all too familiar with the challenge of trying to squeeze your multi-page document into as few pages as possible to save on paper. The problem, however, is that you'd need to spend time experimenting with what font size and spacing to set your text to.
Luckily, Word can automate this process for you with just one click of the Shrink One Page button. This handy tool condenses your document by one page, so your two-page file becomes one page, your three-page document becomes two pages, and so on. It's indeed a time-saver, but it's not enabled by default on the app. Here's how to turn it on:
- Launch Word on your desktop.
- Navigate to the File tab.
- Select Options at the bottom of the page.
- In the Word Options dialog box, go to the Quick Access Toolbar.
- Under Choose commands from, select All Commands.
- Scroll down to Shrink One Page and click on it.
- Select the Add button.
- Press OK to exit the dialog box.
Now, you can conveniently access the Shrink One Page button from your toolbar (the group at the very top of the page with the save button). Just click on it to reduce your document size page by page until you have your ideal number of pages where the text is still readable enough.
Read Documents Better With Immersive Reader
While reading documents on your computer isn't the most fun thing to do, Word makes the experience a little more bearable with Immersive Reader. This feature changes the way your document looks for reading purposes without modifying the actual formatting of the document. It comes with several tools to help you read and focus better:
- Column Width: Adjusts the width of the text columns. Options include Very Narrow, Narrow, Moderate, and Wide. You can choose from Very Narrow, Narrow, Moderate, and Wide. If your document has only one column, selecting Wide stretches the text across the entire screen.
- Page Color: Changes the background color of the page to suit your preference. If you find a white background too harsh on your eyes, you can pick from other options, including sepia, gray, or more eye-popping colors like green and pink.
- Line Focus: Darkens all but a few lines of text to help you concentrate on specific parts of the document. You can choose to focus on one, three, or five lines at a time.
- Text Spacing: Changes the spacing between lines to improve readability.
- Syllables: Breaks all the words into syllables, making it easier to read and pronounce words correctly.
- Read Aloud: A robotic voice will read the text for you. This can be handy if you're unsure how to pronounce certain words or just prefer listening over reading.
To enable Immersive Reader on your desktop app, go to View, and in the Immersive group, click on Immersive Reader.
Turn Your Document Into A PowerPoint Presentation
If you frequently convert your Word documents into PowerPoint presentations, then you know how tedious and time-consuming it is. However, there's a game-changing trick you can use to speed up the process: just export the document as a PowerPoint presentation. This works exclusively for the web version of Word and for documents with headings and primarily text. The document's headings will be used as the titles of the PowerPoint slides, and the body will form the content of the slides. Here's how to use this trick:
- Save your document in OneDrive. In the Word desktop app, press Ctrl + S and choose OneDrive as the location.
- Open your browser.
- Go to office.com and sign in if you haven't already.
- Click on Word from the left panel.
- Select your document from the list to open it in the web app.
- Navigate to File > Export.
- Click on Export to PowerPoint presentation (preview).
- Pick your theme from the displayed options or hit See more themes for more choices.
- Press the Export button.
- Wait for the process to complete and click on Open Presentation.
You can now browse the presentation, polish the slides, and insert text boxes and images if needed. Do note that if your content is long, PowerPoint will summarize it and pick only certain parts to include in the slides. Be sure to go through each slide to everything you need to include is there.
Read the original article on SlashGear .

How-To Geek
6 features i'd love to see in microsoft word.
A few small additions would make a huge difference.
Quick Links
- An Automatic Quick Access Toolbar
- Removing (and Adding) Blank Pages
- Instant Saving
- More Excel-Type Function User-Friendliness in Tables
- Add Attachments to Mail Merge
- Better Image Integration
With its many features to support you when creating and editing documents, Microsoft Word is a powerful word processor. However, as a daily user of the desktop version of the software, there are some features that I've hoped would be added for many years—but my wishes are yet to be granted.
1. An Automatic Quick Access Toolbar
Microsoft's Quick Access Toolbar (QAT) is a great way of adding those features and functions that you use frequently to your toolbar at the top of your Microsoft Word window. For example, to speed up my work as a proofreader, I created macros and added these two buttons to my QAT to automatically make certain formatting changes every time I open up a Word document created by somebody else.
You can also quickly access most of Word's functions through the search box at the top of the window.
While these are both certainly useful ways to make things happen without having to trawl through Word's many menus, they both come with their problems.
Using the QAT is great if, like me, you only have a couple of icons to choose from, but if there are lots of things you do on a regular basis on Microsoft Word, your QAT can quickly become congested and confusing. That ultimately slowing you down as you try to remember which icon is the one you need to click. Equally frustratingly, the QAT isn't available on Microsoft Word for the web.
The search bar is only useful if you know the best keywords to type to find the feature you're looking for, and the Recently Used Actions and Suggested Actions that pop up when you click the search bar don't seem to represent reality.
To rectify this issue and speed up your work, Microsoft Word should have an extra tab on the ribbon, called Frequently Used Actions, that syncs between both the paid desktop app and its web-based counterpart. This alternative to the QAT would automatically log the tools you use more often in Microsoft Word, and make them available automatically without you having to manually add them to a toolbar, search for the function, or learn the keyboard shortcut.
2. Removing (and Adding) Blank Pages
There are various reasons for there being a blank page in a Word document, ranging from empty paragraph markers to hidden page or section breaks. You can use the Show/Hide icon (¶) to see if there are empty paragraph markers, and this will certainly go some way to helping you identify the source of the blank page.
The most problematic cause of a blank page for me, however, has been Microsoft Word insisting on there being a paragraph marker after a table.
As you can see in the screenshot above, after creating my table, clicking ¶ reveals that a new page has been created, even though this is the end of my document and I don't want a new page. As a result, to remove the extra page, I would have to change my font or line and paragraph spacing options, or adjust the page borders. And you can tell your printer not to print page 2 of your document, but it shouldn't be necessary to have to remember to do this.
The ideal solution to this issue would be for Microsoft to insert a Remove Blank Page option in the Layout tab on the ribbon.
You might also find situations where it would be useful to add a blank page to your document. While you can do this by adding a page break, because they're invisible unless you click "¶", sometimes it's easy to forget that they're there. So, as well as adding the option to remove the blank page, Microsoft should also consider having an Add Blank Page icon, too.
3. Instant Saving
Microsoft's AutoSave is a really handy safety net, as it automatically saves your work to your OneDrive . This means that you don't have to press Ctrl+S before closing your Word document, and if your computer suddenly shows you the blue screen of death , you can be confident that your work is sitting in the cloud, ready for you to continue once your PC has recovered.
But there's a catch. If you haven't initially saved your document, it won't be uploaded to your OneDrive, as Word will regard your document as a draft until you give it a name and save it to a folder.
As you can see in this example, I haven't given the document a name, so AutoSave is turned off, even though I have started to add text. If my computer were to require a spontaneous update, I'd lose this work.
As a workaround to this issue, it would be really handy if new Word documents were to save automatically as soon as they're created, even if named according to the first three or four words you type onto the page. What's more, with today's AI age, it would be even more useful if Word could scan your document, give it an appropriate name, and save it to a folder in your OneDrive where other similar documents have already been uploaded. But maybe that's pie-in-the-sky territory.
4. More Excel-Type Function User-Friendliness in Tables
You can use around 20 basic calculation formulas in tables on Microsoft Word , including =SUM, =AVERAGE, =COUNT, and =ROUND. But there's still a long way for Microsoft to go in this area.
First off, when you launch the Formula window after creating your table, there's no way for you to know which functions you can and cannot use. Unlike in Microsoft Excel, which offers formula suggestions when you start to type them into a cell, a very basic dialog box appears on Word, ultimately limiting what is actually a potentially really useful feature.
What's more, because there are no cell references on Word's tables, you have to type ABOVE , BELOW , LEFT , and RIGHT , which just seems cumbersome and less reliable.
And there's another issue (and it's a big one). If you change any of the values in the table, the calculations won't update automatically. Instead, you have to press Ctrl+A (to select all the functions) and F9, and it's very easy to forget to do this.
I'd really like to see Microsoft bring Word and Excel closer in this regard. When you create a table, the cells should be headed with column letters and row numbers, you should be given more of a clue which formulas you can use (and you should be able to use more), the formula syntax should be identical to what you'd type in Excel, and the formulas should update automatically if the data they rely on changes.
5. Add Attachments to Mail Merge
Word's Mail Merge tool is great for distributing the same copy of a document or email to many people but with certain elements personalized for each recipient, such as their name at the top. Let's say you want to send a personalized wedding invitation email to 100 friends and family, and you want to attach the itinerary to your email. While you can, indeed, send that personalized invitation through Word's Mail Merge, there are no easy ways to attach your itinerary. Instead, you'd have to install an add-in—which can work intermittently or pose a security risk—or create a complex macro—which takes a great deal of time to learn how to do.
I guess a lot of people would benefit greatly from the simple addition of an Add Attachment button to the Mail Merge dialog box in Microsoft Word—I know it'd make me very happy!
6. Better Image Integration
When you add images to a Word document , they can be frustrating to position and control, and often lead to layout changes in your work. Sometimes, it's difficult to know which option to choose when you right-click the image and select "Wrap Text," and selecting the wrong one can lead to the text behaving erratically around the image.
Also, if you add a large image to your document, this can significantly slow down its processing speed.
As an experienced Word user, I can adjust the settings and, ultimately, find ways to have the image behave how I want it to, but it shouldn't be that difficult. Things would be so much easier if, when you insert an image, a dialog box appeared before you see the image appear in your document, giving you options such as where and how you want the image to be placed among your words.
Ultimately, I'm a big fan of Microsoft Word and use it daily without any issues. But having these few extra features added would make my life a lot easier.
Present a document online using the Office Presentation Service
You can deliver a document from Word using the Office Presentation Service, a free, public service that allows others to follow along in their web browser. No setup is required. Use your free Microsoft account to get started.
In Word, open the document you want to share.
Click File > Share > Present Online .

If you want attendees to be able to download a copy of the document, click the box next to Enable remote viewers to download the document .
Click the Present Online button.
To send your meeting invitation to attendees, choose one of the following:
Copy Link – and paste it somewhere others can access it
Send in Email
Send in IM – available if you have an IM application installed
When you’re ready to present your document, click Start Presentation .
To end your online presentation, click the Present Online tab, and choose End Online Presentation .
To confirm that you want to end the presentation, click End Online Presentation .
More information about starting or joining an online meeting:
Present a Word document online using Lync
Join an online meeting with Lync

Need more help?
Want more options.
Explore subscription benefits, browse training courses, learn how to secure your device, and more.
Microsoft 365 subscription benefits
Microsoft 365 training
Microsoft security
Accessibility center
Communities help you ask and answer questions, give feedback, and hear from experts with rich knowledge.
Ask the Microsoft Community
Microsoft Tech Community
Windows Insiders
Microsoft 365 Insiders
Was this information helpful?
Thank you for your feedback.
👀 Turn any prompt into captivating visuals in seconds with our AI-powered design generator ✨ Try Piktochart AI!
- Piktochart Visual
- Video Editor
- AI Design Generator
- Infographic Maker
- Banner Maker
- Brochure Maker
- Diagram Maker
- Flowchart Maker
- Flyer Maker
- Graph Maker
- Invitation Maker
- Pitch Deck Creator
- Poster Maker
- Presentation Maker
- Report Maker
- Resume Maker
- Social Media Graphic Maker
- Timeline Maker
- Venn Diagram Maker
- Screen Recorder
- Social Media Video Maker
- Video Cropper
- Video to Text Converter
- Video Views Calculator
- AI Brochure Maker
- AI Document Generator
- AI Flyer Generator
- AI Image Generator
- AI Infographic
- AI Instagram Post Generator
- AI Newsletter Generator
- AI Report Generator
- AI Timeline Generator
- For Communications
- For Education
- For eLearning
- For Financial Services
- For Healthcare
- For Human Resources
- For Marketing
- For Nonprofits
- Brochure Templates
- Flyer Templates
- Infographic Templates
- Newsletter Templates
- Presentation Templates
- Resume Templates
- Business Infographics
- Business Proposals
- Education Templates
- Health Posters
- HR Templates
- Sales Presentations
- Community Template
- Explore all free templates on Piktochart
- Course: What is Visual Storytelling?
- The Business Storyteller Podcast
- User Stories
- Video Tutorials
- Need help? Check out our Help Center
- Earn money as a Piktochart Affiliate Partner
- Compare prices and features across Free, Pro, and Enterprise plans.
- For professionals and small teams looking for better brand management.
- For organizations seeking enterprise-grade onboarding, support, and SSO.
- Discounted plan for students, teachers, and education staff.
- Great causes deserve great pricing. Registered nonprofits pay less.
AI-Powered Poster Generator
With the Piktochart AI poster generator, you can turn any prompt into a gorgeous poster in seconds. No design skills? No problem. Just tweak it as you wish, then share your poster.
The new way of creating posters
Create in a Flash
Prompt to poster in 10 seconds
Say goodbye to complicated design steps. Simply type in your theme and watch as our AI poster maker transforms it into reality.
AI Image Generation
Bring your vision to life
Go stock photos and generate images that are contextualized to your needs with our advanced AI image generator. Put your creativity to the test and generate highly realistic images that make you stand out.

Create Without Limits
Where every idea finds its canvas
For events, marketing, learning, or personal creations, Piktochart AI delivers captivating poster designs for every need. Dive into a universe of impressive imagery tailored to suit any subject.

Create Your Vision
Piktochart starts, you put the finishing touches
Our AI sets the stage with a professionally crafted poster, then passes control to you, allowing you to modify and refine each detail to amplify your visual impact while keeping true to your brand.
Posters created using Piktochart’s AI-powered poster maker

Professionals like you use Piktochart’s free online poster maker to:

- Create eye-catching promotional materials that align with brand identity, ideal for advertising campaigns, product launches, and trade shows.
- Design captivating posters for corporate events, webinars, and conferences.
- Communicate new offers, services, or store openings.

HR & Internal Comms
- Internal announcements, motivational quotes, or event notifications.
- Job advertisements and onboarding materials to attract and welcome new employees.
- Convey important company policies and reminders through clear, engaging posters, ensuring better compliance and awareness.

NGOs and Government Organizations
- Develop impactful posters for awareness drives, fundraising events, and community outreach programs.
- Attract volunteers, highlighting the roles, benefits, and the difference they can make.
- Announce charity events, workshops, and seminars.

- Create informative posters on health topics, wellness tips, and medical advisories.
- Showcase healthcare services, specialist departments, and new medical technologies available at healthcare facilities.
- Display important health and safety protocols within healthcare settings.
How to Make a Digital Poster
1. Define Your Story
Briefly describe (within 120 characters) the purpose behind your poster. Whether it’s for promotion, making an announcement, driving awareness, or sharing health information.
2. Select from Our Varied Poster Designs
Jumpstart your project with our array of ready-to-use poster templates, perfect for shining a spotlight on any subject. After picking your preferred design, you’ll find yourself in our editing suite.
3. Tweak the Design with Piktochart Editor
With your template chosen, hitting the “Edit” button grants you entry into the Piktochart editor. This is your playground to adjust, alter, and align the design to reflect your personal touch and message.
4. Enhance with Visual Elements
Piktochart’s user-friendly drag-and-drop editor makes personalization a breeze. Tap into our rich collection of complimentary photos, icons, illustrations, and text options to craft a poster that stands out. Enhancing and tailoring colors is just a click away with our versatile design tool.
5. Publish and Promote
Once your poster is exactly as you envisioned, it’s time to save and share your work. Export in various formats like JPG, PNG, or PDF, catering to both digital platforms and print materials.
AI-Powered Visualization for Any Topic
What kinds of posters can be generated using this AI tool?
Navigating design elements and finding the right visual style can be daunting. With Piktochart AI, it’s easy to transform data into high-quality posters . Excellence made simple, just for you.
Event posters
Drum up buzz and awareness for an upcoming event. Piktochart AI transform dense data and information into engaging invitational posters for your events.
Advertising posters
Spark emotions that incite action – whether it is to make a purchase, improve brand opinion, donate to a cause, or make a lifestyle change. With Piktochart AI, it’s achievable at the click of a button.
Conference posters
Inform your audience with a glance about an upcoming conference. Whether it’s for a medical conference, marketing conference, or any conferences, Piktochart AI’s user-friendly poster maker helps you catch the attention of your audience effortlessly.
Ready to use AI to design posters like a pro?
Join more than 11 million people who already use Piktochart to create stunning posters.
Is it possible to personalize my poster with my own photos and diagrams?
What’s the limit on poster creation, how do i enhance the quality of my posters, is signing up mandatory to use piktochart, poster resources.

How to Make a Poster in 6 Easy Steps [2023 Guide With Templates]

25 Poster Ideas, Templates, and Tips for Creative Inspiration

Communications
7 Types of Posters and What Makes Them Stand Out
What else can you create with piktochart ai.
Free All-in-One Office Suite with PDF Editor
Edit Word, Excel, and PPT for FREE.
Read, edit, and convert PDFs with the powerful PDF toolkit.
Microsoft-like interface, easy to use.
Windows • MacOS • Linux • iOS • Android

Select areas that need to improve
- Didn't match my interface
- Too technical or incomprehensible
- Incorrect operation instructions
- Incomplete instructions on this function
Fields marked * are required please
Please leave your suggestions below
- Quick Tutorials
- Practical Skills
How to Remove Section Breaks in Word? [For Students]
As a student navigating the intricacies of academic formatting, I understand the frustration of encountering stubborn section breaks that disrupt the flow of your document. In this guide, I share my insights and experiences to help you tackle this common issue effectively. Let's dive in and unravel the mystery of removing section breaks in Word!
Part 1: Why Can’t I Remove Section Breaks in Word?
Have you ever struggled to remove a section break in your Word document? You're not alone. Section breaks, while useful for formatting, can sometimes be a bit tricky to delete. This part will explore two common scenarios where removing section breaks might cause frustration:
1. Failing to Remove Section Breaks in Word on Mac
Unlike Windows, deleting section breaks on Mac using Backspace or Delete might not work as intended. Here's why:
Hidden Section Break: Section breaks are hidden by default in Word. To see them, you need to enable the "Show/Hide" formatting marks.
Unselectable Break: Even with formatting marks displayed, the section break might still appear unselectable. This can happen if it's followed by a page break or other formatting element.
2. Failing to Remove the Last Section Break Without Losing Formatting in Your Essay
Especially for essays, the last section break might be causing an unwanted page break. However, deleting it can remove your formatting throughout the document. Here's why this occurs:
Linked Sections: Sections in your document can inherit formatting from the previous section. Deleting the last section break can merge its formatting with the preceding section, potentially causing inconsistencies.
Scenario: Imagine your essay has two sections. The first section has single line spacing, while the second (shorter) section has double line spacing for the references. Deleting the last section break might apply the double spacing to the entire essay.
Solution to these problems will be covered in Part 2!
Part 2: Easy Steps to Remove Section Breaks in Word for Your Essay
In Part 2 of this guide, I'll walk you through the simple steps to remove section breaks in Word for your essays. Whether you're using WPS Office or Microsoft Word, these easy-to-follow instructions will help you maintain smooth formatting in your documents. Say goodbye to pesky section breaks and hello to seamless editing with these straightforward techniques.
Remove a section break in Word
There are two main ways to remove section breaks in Word:
Using the Show/Hide button:
Step 1: Click the Show/Hide button in the Paragraph group on the Home tab. This will reveal all formatting marks in your document, including section breaks.
Step 2: Place your cursor at the beginning of the line after the section break you want to remove.
Step 3: Press the Backspace key.
Using the Navigation Pane :
Step 1: Open your Word document: Launch WPS Office and open the document where you want to remove the section break.
Step 2: Access the "View" tab: Look for the toolbar at the top of the Word window. Click on the "View" tab located in the menu options.
Step 3: Enable the Navigation Pane: Within the "View" tab, locate the "Show" section. Make sure that the "Navigation Pane" option is checked or enabled.
Step 4: Navigate to the "Section" tab: Once the Navigation Pane is activated, you'll see it appear on the left side of your document. Click on the " Section" tab within the Navigation Pane.
Step 5: Identify the section break: In the Navigation Pane, you'll now see a list of headings or sections in your document. Scroll through this list to find the section break you want to remove.
Step 6: Select the section break: Click on the section break you wish to delete. It will be highlighted in the Navigation Pane.
Step 7: Remove the section break: Once the section break is selected, simply press the "Delete" key on your keyboard. The section break will be deleted from your document.
Use Word, Excel, and PPT for FREE, No Ads.
Edit PDF files with the powerful PDF toolkit.
Microsoft-like interface. Easy to learn. 100% Compatibility.
Boost your productivity with WPS's abundant free Word, Excel, PPT, and CV templates.
Removing Multiple or All Section Breaks
There is no built-in way to remove all section breaks at once in Word. However, you can use the Find and Replace feature to find all section breaks and replace them with paragraph marks.
Here's how to do it:
Step 1: Press Ctrl+H to open the Find and Replace dialog box.
Step 2: In the Find what field, type ^b. This is the code for a section break in Word .
Step 3: Leave the Replace with field empty.
Step 4: Click Replace All.
WPS AI: Your Best Assistant with Essay Paper Work
Feeling overwhelmed by the blank page when starting your essay? Don't worry, WPS AI is here to be your secret weapon!
WPS AI is a powerful built-in feature within WPS Office that utilizes artificial intelligence to assist you in various writing tasks. One of its valuable tools is the ability to generate outlines and brainstorm ideas, giving your essay a strong foundation.
Here's how to leverage WPS AI to create an outline for your essay:
Step 1: Access WPS AI
Open your WPS Writer document and locate the AI Assistant icon on the top right corner. It might be labelled as "AI Writer" depending on your version. Click on the icon to activate the AI features.
Step 2: Describe Your Essay Topic
In the AI Assistant panel, you'll see a text box prompting you to "Enter instructions or questions." Here, clearly state your essay topic. For example, if your essay is about the environmental impact of fast fashion, you could type: "Outline for essay: Environmental impact of fast fashion"
Step 3: Generate the Outline
Once you've described your topic, click the "Generate" button. WPS AI will analyze your input and utilize its knowledge base to create a draft outline for your essay.
Step 4: Review and Refine
WPS AI will present a structured outline for your essay, including main points, sub-points, and even potential supporting arguments. Review the outline carefully and make any necessary adjustments to suit your specific essay needs. You can add, remove, or rearrange sections to ensure the outline accurately reflects your approach.
WPS AI: Streamlining Your Essay Writing Process
By using WPS AI to generate outlines, you can save valuable time and overcome writer's block. This AI assistant provides a solid framework to structure your essay, allowing you to focus on developing strong arguments and crafting compelling content.
Remember, WPS AI is a tool to empower you, not replace your own critical thinking. Use the generated outline as a starting point and personalize it to create a unique and well-structured essay.
How can I insert a section break in Word?
To insert a section break in Word, follow these steps:
Step 1. Place your cursor where you want to insert the section break.
Step 2. Go to the "Layout" or "Page Layout" tab in the toolbar.
Step 3. Click on the "Breaks" option.
Step 4. Select "Next Page" under the "Section Breaks" section.
How can I insert a page break in Word?
To insert a page break in Word , follow these steps:
Step 1. Place your cursor where you want to insert the page break.
Step 2. Go to the "Insert" tab in the toolbar.
Step 3. Click on the "Page Break" option.
What is the difference between page break and section break?
The key difference between a page break and a section break in Word lies in their impact on your document's layout and formatting. Here's a breakdown:
In this guide, I've shown you how to easily remove section breaks in Word. I've explained common problems and provided simple steps to solve them. Throughout, I've emphasized the convenience of using WPS Office , which makes editing documents a breeze. With clear instructions and practical tips, you can now handle section breaks with confidence and efficiency using WPS Office.
- 1. Inserting section break in Word document (Mac and PC)
- 2. How to Remove Page Breaks in Word[2024]
- 3. How to insert a section break in word
- 4. How to insert a section break in Word
- 5. How can we insert next page section break in WPS Writer
- 6. How to remove all page breaks from word document
15 years of office industry experience, tech lover and copywriter. Follow me for product reviews, comparisons, and recommendations for new apps and software.
IMAGES
VIDEO
COMMENTS
Make sure that it contains only text. The headings in the document will become the slide headings in the presentation. Go to File > Export > Export to PowerPoint presentation . In the Export to presentation window, choose a design theme for your presentation, and then select Export . Word exports and transforms the document, applying the design ...
If you leave the box unchecked, the content of the Word document will appear directly on the slide. Step 7: Click 'OK' to Insert. Once you've made your selection, click "OK." Your Word document will now be inserted into the selected slide. And just like that, you're done! Your Word document is now part of your PowerPoint presentation.
Step 4: Choose "Create from file" and browse for your Word document. In the dialog box, select "Create from file," then click "Browse" to find and select your Word document. Choosing "Create from file" allows you to insert the document as is, without any need to modify it first. Once you've found the file, select it and click "OK."
Find it, then choose Object . 2. Insert Word Document Into PowerPoint. When you click the Object button, you'll see the menu that lets you insert file into PPT. It's the Insert Object menu, and with it you can see how to insert a file into PPT. On the left, locate the Create from file bubble. Click it.
The easiest way to insert a Word document is to first create your document in Word, then add it to your presentation. Select the slide in which you want to place the Word document. Click Insert > Object. If the Word document already exists, in the Insert Object dialog box, select Create from file. Click Browse to locate the Word document you ...
To insert a Word document as an object within a PowerPoint, follow these steps: Select the slide on which you'd like to insert the document. Click "Insert" and then click "Object." If you've already created and named the document, select "Create from file" from within the "Insert object" dialog box. Then, click "Browse" and locate the document ...
First, open your web browser and log in to Office. Once logged in, open the document you want to convert in Word for the Web, and click the "File" tab in the top-left corner of the window. IDG ...
Insert Word Document as an Object. When sharing a presentation via email, inserting documents as objects can enable the end user to open them instantly. To do this, go to Insert > Object. In the dialog box that opens up, go to Create from File, browse and select your document. You can either insert the document as a link or as an icon in the ...
To turn your Word document into a PowerPoint presentation: Open any document you want to convert into a presentation in Word for the web. Click File > Export > Export to PowerPoint presentation. When prompted, choose a design theme for your presentation. Click Open presentation to re view the results in PowerPoint for the w eb.
The easiest way to insert a Word document is to first create your document in Word, then add it to your presentation. Select the slide in which you want to place the Word document. Click Insert > Object. If the Word document already exists, in the Insert Object dialog box, select Create from file. Click Browse to locate the Word document you ...
Next, select 'Slides from Outline' from the drop-down menu. The 'Insert Outline' window will open where you can locate and select the document which you want to convert. After you have selected the document, click on 'Insert' at the bottom to convert and add to Microsoft PowerPoint.
Head to the Microsoft Office online website, sign in to your account, and open your document in Word. You do not have to open PowerPoint in another tab or window. Click File > Export and choose the "Export to PowerPoint Presentation" option. You'll see a pop-up window with a collection of themes. Select the theme that you want to use and click ...
Click File > Export > Export to PowerPoint Presentation (preview), and the presentation window will display a few different design themes. Choose the theme most appropriate to the content. If you ...
Close the document in Word. Next, Import the Word Document into PowerPoint Your Word document is now ready to be imported into PowerPoint and converted into a presentation. Start the import process by opening PowerPoint on your computer. On the first screen in PowerPoint, click "Blank Presentation" to make a new presentation.
In this tutorial, we will learn the technique of Creating a PowerPoint Presentation from a Word Document in just a couple of clicks. You will learn how to ex...
Best practices when creating a presentation from a Word document Leverage Word Styles to help Copilot understand the structure of your document. By using Styles in Word to organize your document, Copilot will better understand your document structure and how to break it up into slides of a presentation. Structure your content under Titles and ...
Turn a spark of inspiration into personalized presentations with Copilot in PowerPoint. Copilot will turn existing Word documents into presentations, create new presentations from simple prompts or outlines, or find the best places for impactful imagery—and will help you leave audiences dazzled with skillful storytelling.
Best way to convert your DOC to PPT file in seconds. 100% free, secure and easy to use! Convertio — advanced online tool that solving any problems with any files. ... DOC is a file extension for word processing documents. It is associated mainly with Microsoft Word application. DOC files can also contain charts and tables, videos, images ...
Present a document online using the Office Presentation Service. Learn about 3 Word presentation features that let you independently read through the document. Skip to primary navigation
We only support text content for the transformation to presentation, other media content support is not currently available. You can add your own media to the presentation after you have transformed your Word document. Requirements. 1.A stable internet connection. 2.Word for the web. 3.A text-only Word for the web document.
PowerPoint for the web. Turn your ideas into compelling presentations using professional-looking templates. Use animations, transitions, photos, and videos to tell one-of-a-kind stories. Co-author team presentations at the same time, from anywhere. Start using PowerPoint for free Learn more about PowerPoint.
Change linked or embedded objects. Right-click the linked object, and then click Linked Slide Object or Linked Presentation Object. Click Open or Open Link, depending on whether the object is embedded or linked, and then make the changes that you want. If the object is embedded, the changes are only in the copy that is in the document.
Craft great-looking resumes, newsletters, and documents while inviting others to review and coauthor in real time. Plus, access free Word templates, formatting tools for APA, MLA, and Chicago style, and add functionality with free add-ins.
1 Make a provocative statement. "I want to discuss with you this afternoonwhy you're going to fail to have a great career." One surefire way to get your audience's attention is to make a provocative statement that creates interest and a keen desire to know more about what you have to say. The presentation above, for example, does just that by ...
Open your Word document. Highlight the snippet you wish to hide. Press the Word keyboard shortcut Ctrl + D or go to the Font group under the Home tab and click the small arrow in the corner. In ...
Removing (and Adding) Blank Pages. Instant Saving. More Excel-Type Function User-Friendliness in Tables. Add Attachments to Mail Merge. Better Image Integration. With its many features to support you when creating and editing documents, Microsoft Word is a powerful word processor. However, as a daily user of the desktop version of the software ...
In Word, open the document you want to share. Click File > Share > Present Online. Under Present Online, choose Office Presentation Service. If you want attendees to be able to download a copy of the document, click the box next to Enable remote viewers to download the document. Click the Present Online button. When you're ready to present ...
4. Enhance with Visual Elements. Piktochart's user-friendly drag-and-drop editor makes personalization a breeze. Tap into our rich collection of complimentary photos, icons, illustrations, and text options to craft a poster that stands out. Enhancing and tailoring colors is just a click away with our versatile design tool. 5.
Using the Navigation Pane: Step 1: Open your Word document: Launch WPS Office and open the document where you want to remove the section break. Launch WPS Office. Step 2: Access the "View" tab: Look for the toolbar at the top of the Word window. Click on the "View" tab located in the menu options. Access the.
Custom copilot is pre-populated with information from the file/folder selection. The copilot has a default folder name, branding, description, sources you've selected, and other fields already. You can keep these fields and parameters as-is, or easily update them. Customize the identity with a name change. Customize the grounding knowledge.