We use essential cookies to make Venngage work. By clicking “Accept All Cookies”, you agree to the storing of cookies on your device to enhance site navigation, analyze site usage, and assist in our marketing efforts.
Manage Cookies
Cookies and similar technologies collect certain information about how you’re using our website. Some of them are essential, and without them you wouldn’t be able to use Venngage. But others are optional, and you get to choose whether we use them or not.
Strictly Necessary Cookies
These cookies are always on, as they’re essential for making Venngage work, and making it safe. Without these cookies, services you’ve asked for can’t be provided.
Show cookie providers
- Google Login
Functionality Cookies
These cookies help us provide enhanced functionality and personalisation, and remember your settings. They may be set by us or by third party providers.
Performance Cookies
These cookies help us analyze how many people are using Venngage, where they come from and how they're using it. If you opt out of these cookies, we can’t get feedback to make Venngage better for you and all our users.
- Google Analytics
Targeting Cookies
These cookies are set by our advertising partners to track your activity and show you relevant Venngage ads on other sites as you browse the internet.
- Google Tag Manager
- Infographics
- Daily Infographics
- Template Lists
- Graphic Design
- Graphs and Charts
- Data Visualization
- Human Resources
- Beginner Guides
Blog Beginner Guides

How To Make a Good Presentation [A Complete Guide]
By Krystle Wong , Jul 20, 2023

A top-notch presentation possesses the power to drive action. From winning stakeholders over and conveying a powerful message to securing funding — your secret weapon lies within the realm of creating an effective presentation .
Being an excellent presenter isn’t confined to the boardroom. Whether you’re delivering a presentation at work, pursuing an academic career, involved in a non-profit organization or even a student, nailing the presentation game is a game-changer.
In this article, I’ll cover the top qualities of compelling presentations and walk you through a step-by-step guide on how to give a good presentation. Here’s a little tip to kick things off: for a headstart, check out Venngage’s collection of free presentation templates . They are fully customizable, and the best part is you don’t need professional design skills to make them shine!
These valuable presentation tips cater to individuals from diverse professional backgrounds, encompassing business professionals, sales and marketing teams, educators, trainers, students, researchers, non-profit organizations, public speakers and presenters.
No matter your field or role, these tips for presenting will equip you with the skills to deliver effective presentations that leave a lasting impression on any audience.
Click to jump ahead:
What are the 10 qualities of a good presentation?
Step-by-step guide on how to prepare an effective presentation, 9 effective techniques to deliver a memorable presentation, faqs on making a good presentation, how to create a presentation with venngage in 5 steps.
When it comes to giving an engaging presentation that leaves a lasting impression, it’s not just about the content — it’s also about how you deliver it. Wondering what makes a good presentation? Well, the best presentations I’ve seen consistently exhibit these 10 qualities:
1. Clear structure
No one likes to get lost in a maze of information. Organize your thoughts into a logical flow, complete with an introduction, main points and a solid conclusion. A structured presentation helps your audience follow along effortlessly, leaving them with a sense of satisfaction at the end.
Regardless of your presentation style , a quality presentation starts with a clear roadmap. Browse through Venngage’s template library and select a presentation template that aligns with your content and presentation goals. Here’s a good presentation example template with a logical layout that includes sections for the introduction, main points, supporting information and a conclusion:

2. Engaging opening
Hook your audience right from the start with an attention-grabbing statement, a fascinating question or maybe even a captivating anecdote. Set the stage for a killer presentation!
The opening moments of your presentation hold immense power – check out these 15 ways to start a presentation to set the stage and captivate your audience.
3. Relevant content
Make sure your content aligns with their interests and needs. Your audience is there for a reason, and that’s to get valuable insights. Avoid fluff and get straight to the point, your audience will be genuinely excited.
4. Effective visual aids
Picture this: a slide with walls of text and tiny charts, yawn! Visual aids should be just that—aiding your presentation. Opt for clear and visually appealing slides, engaging images and informative charts that add value and help reinforce your message.
With Venngage, visualizing data takes no effort at all. You can import data from CSV or Google Sheets seamlessly and create stunning charts, graphs and icon stories effortlessly to showcase your data in a captivating and impactful way.

5. Clear and concise communication
Keep your language simple, and avoid jargon or complicated terms. Communicate your ideas clearly, so your audience can easily grasp and retain the information being conveyed. This can prevent confusion and enhance the overall effectiveness of the message.
6. Engaging delivery
Spice up your presentation with a sprinkle of enthusiasm! Maintain eye contact, use expressive gestures and vary your tone of voice to keep your audience glued to the edge of their seats. A touch of charisma goes a long way!
7. Interaction and audience engagement
Turn your presentation into an interactive experience — encourage questions, foster discussions and maybe even throw in a fun activity. Engaged audiences are more likely to remember and embrace your message.
Transform your slides into an interactive presentation with Venngage’s dynamic features like pop-ups, clickable icons and animated elements. Engage your audience with interactive content that lets them explore and interact with your presentation for a truly immersive experience.

8. Effective storytelling
Who doesn’t love a good story? Weaving relevant anecdotes, case studies or even a personal story into your presentation can captivate your audience and create a lasting impact. Stories build connections and make your message memorable.
A great presentation background is also essential as it sets the tone, creates visual interest and reinforces your message. Enhance the overall aesthetics of your presentation with these 15 presentation background examples and captivate your audience’s attention.
9. Well-timed pacing
Pace your presentation thoughtfully with well-designed presentation slides, neither rushing through nor dragging it out. Respect your audience’s time and ensure you cover all the essential points without losing their interest.
10. Strong conclusion
Last impressions linger! Summarize your main points and leave your audience with a clear takeaway. End your presentation with a bang , a call to action or an inspiring thought that resonates long after the conclusion.
In-person presentations aside, acing a virtual presentation is of paramount importance in today’s digital world. Check out this guide to learn how you can adapt your in-person presentations into virtual presentations .

Preparing an effective presentation starts with laying a strong foundation that goes beyond just creating slides and notes. One of the quickest and best ways to make a presentation would be with the help of a good presentation software .
Otherwise, let me walk you to how to prepare for a presentation step by step and unlock the secrets of crafting a professional presentation that sets you apart.
1. Understand the audience and their needs
Before you dive into preparing your masterpiece, take a moment to get to know your target audience. Tailor your presentation to meet their needs and expectations , and you’ll have them hooked from the start!
2. Conduct thorough research on the topic
Time to hit the books (or the internet)! Don’t skimp on the research with your presentation materials — dive deep into the subject matter and gather valuable insights . The more you know, the more confident you’ll feel in delivering your presentation.
3. Organize the content with a clear structure
No one wants to stumble through a chaotic mess of information. Outline your presentation with a clear and logical flow. Start with a captivating introduction, follow up with main points that build on each other and wrap it up with a powerful conclusion that leaves a lasting impression.
Delivering an effective business presentation hinges on captivating your audience, and Venngage’s professionally designed business presentation templates are tailor-made for this purpose. With thoughtfully structured layouts, these templates enhance your message’s clarity and coherence, ensuring a memorable and engaging experience for your audience members.
Don’t want to build your presentation layout from scratch? pick from these 5 foolproof presentation layout ideas that won’t go wrong.

4. Develop visually appealing and supportive visual aids
Spice up your presentation with eye-catching visuals! Create slides that complement your message, not overshadow it. Remember, a picture is worth a thousand words, but that doesn’t mean you need to overload your slides with text.
Well-chosen designs create a cohesive and professional look, capturing your audience’s attention and enhancing the overall effectiveness of your message. Here’s a list of carefully curated PowerPoint presentation templates and great background graphics that will significantly influence the visual appeal and engagement of your presentation.
5. Practice, practice and practice
Practice makes perfect — rehearse your presentation and arrive early to your presentation to help overcome stage fright. Familiarity with your material will boost your presentation skills and help you handle curveballs with ease.
6. Seek feedback and make necessary adjustments
Don’t be afraid to ask for help and seek feedback from friends and colleagues. Constructive criticism can help you identify blind spots and fine-tune your presentation to perfection.
With Venngage’s real-time collaboration feature , receiving feedback and editing your presentation is a seamless process. Group members can access and work on the presentation simultaneously and edit content side by side in real-time. Changes will be reflected immediately to the entire team, promoting seamless teamwork.

7. Prepare for potential technical or logistical issues
Prepare for the unexpected by checking your equipment, internet connection and any other potential hiccups. If you’re worried that you’ll miss out on any important points, you could always have note cards prepared. Remember to remain focused and rehearse potential answers to anticipated questions.
8. Fine-tune and polish your presentation
As the big day approaches, give your presentation one last shine. Review your talking points, practice how to present a presentation and make any final tweaks. Deep breaths — you’re on the brink of delivering a successful presentation!
In competitive environments, persuasive presentations set individuals and organizations apart. To brush up on your presentation skills, read these guides on how to make a persuasive presentation and tips to presenting effectively .

Whether you’re an experienced presenter or a novice, the right techniques will let your presentation skills soar to new heights!
From public speaking hacks to interactive elements and storytelling prowess, these 9 effective presentation techniques will empower you to leave a lasting impression on your audience and make your presentations unforgettable.
1. Confidence and positive body language
Positive body language instantly captivates your audience, making them believe in your message as much as you do. Strengthen your stage presence and own that stage like it’s your second home! Stand tall, shoulders back and exude confidence.
2. Eye contact with the audience
Break down that invisible barrier and connect with your audience through their eyes. Maintaining eye contact when giving a presentation builds trust and shows that you’re present and engaged with them.
3. Effective use of hand gestures and movement
A little movement goes a long way! Emphasize key points with purposeful gestures and don’t be afraid to walk around the stage. Your energy will be contagious!
4. Utilize storytelling techniques
Weave the magic of storytelling into your presentation. Share relatable anecdotes, inspiring success stories or even personal experiences that tug at the heartstrings of your audience. Adjust your pitch, pace and volume to match the emotions and intensity of the story. Varying your speaking voice adds depth and enhances your stage presence.

5. Incorporate multimedia elements
Spice up your presentation with a dash of visual pizzazz! Use slides, images and video clips to add depth and clarity to your message. Just remember, less is more—don’t overwhelm them with information overload.
Turn your presentations into an interactive party! Involve your audience with questions, polls or group activities. When they actively participate, they become invested in your presentation’s success. Bring your design to life with animated elements. Venngage allows you to apply animations to icons, images and text to create dynamic and engaging visual content.
6. Utilize humor strategically
Laughter is the best medicine—and a fantastic presentation enhancer! A well-placed joke or lighthearted moment can break the ice and create a warm atmosphere , making your audience more receptive to your message.
7. Practice active listening and respond to feedback
Be attentive to your audience’s reactions and feedback. If they have questions or concerns, address them with genuine interest and respect. Your responsiveness builds rapport and shows that you genuinely care about their experience.

8. Apply the 10-20-30 rule
Apply the 10-20-30 presentation rule and keep it short, sweet and impactful! Stick to ten slides, deliver your presentation within 20 minutes and use a 30-point font to ensure clarity and focus. Less is more, and your audience will thank you for it!
9. Implement the 5-5-5 rule
Simplicity is key. Limit each slide to five bullet points, with only five words per bullet point and allow each slide to remain visible for about five seconds. This rule keeps your presentation concise and prevents information overload.
Simple presentations are more engaging because they are easier to follow. Summarize your presentations and keep them simple with Venngage’s gallery of simple presentation templates and ensure that your message is delivered effectively across your audience.

1. How to start a presentation?
To kick off your presentation effectively, begin with an attention-grabbing statement or a powerful quote. Introduce yourself, establish credibility and clearly state the purpose and relevance of your presentation.
2. How to end a presentation?
For a strong conclusion, summarize your talking points and key takeaways. End with a compelling call to action or a thought-provoking question and remember to thank your audience and invite any final questions or interactions.
3. How to make a presentation interactive?
To make your presentation interactive, encourage questions and discussion throughout your talk. Utilize multimedia elements like videos or images and consider including polls, quizzes or group activities to actively involve your audience.
In need of inspiration for your next presentation? I’ve got your back! Pick from these 120+ presentation ideas, topics and examples to get started.
Creating a stunning presentation with Venngage is a breeze with our user-friendly drag-and-drop editor and professionally designed templates for all your communication needs.
Here’s how to make a presentation in just 5 simple steps with the help of Venngage:
Step 1: Sign up for Venngage for free using your email, Gmail or Facebook account or simply log in to access your account.
Step 2: Pick a design from our selection of free presentation templates (they’re all created by our expert in-house designers).
Step 3: Make the template your own by customizing it to fit your content and branding. With Venngage’s intuitive drag-and-drop editor, you can easily modify text, change colors and adjust the layout to create a unique and eye-catching design.
Step 4: Elevate your presentation by incorporating captivating visuals. You can upload your images or choose from Venngage’s vast library of high-quality photos, icons and illustrations.
Step 5: Upgrade to a premium or business account to export your presentation in PDF and print it for in-person presentations or share it digitally for free!
By following these five simple steps, you’ll have a professionally designed and visually engaging presentation ready in no time. With Venngage’s user-friendly platform, your presentation is sure to make a lasting impression. So, let your creativity flow and get ready to shine in your next presentation!
Want to create or adapt books like this? Learn more about how Pressbooks supports open publishing practices.
14.1 Organizing a Visual Presentation
Learning objectives.
- Identify key ideas and details to create a concise, engaging presentation.
- Identify the steps involved in planning a comprehensive presentation.
Until now, you have interacted with your audience of readers indirectly, on the page. You have tried to anticipate their reactions and questions as all good writers do. Anticipating the audience’s needs can be tough, especially when you are sitting alone in front of your computer.
When you give a presentation, you connect directly with your audience. For most people, making a presentation is both exciting and stressful. The excitement comes from engaging in a two-way interaction about your ideas. The stress comes from the pressure of presenting your ideas without having a delete button to undo mistakes. Outside the classroom, you may be asked to give a presentation, often at the last minute, and the show must go on. Presentations can be stressful, but planning and preparation, when the time and opportunity are available, can make all the difference.
This chapter covers how to plan and deliver an effective, engaging presentation. By planning carefully, applying some time-honored presentation strategies, and practicing, you can make sure that your presentation comes across as confident, knowledgeable, and interesting—and that your audience actually learns from it. The specific tasks involved in creating a presentation may vary slightly depending on your purpose and your assignment. However, these are the general steps.
Follow these steps to create a presentation based on your ideas:
- Determine your purpose and identify the key ideas to present.
- Organize your ideas in an outline.
- Identify opportunities to incorporate visual or audio media, and create or locate these media aids.
- Rehearse your presentation in advance.
- Deliver your presentation to your audience.
Getting Started: Identifying and Organizing Key Ideas
To deliver a successful presentation, you need to develop content suitable for an effective presentation. Your ideas make up your presentation, but to deliver them effectively, you will need to identify key ideas and organize them carefully. Read the following considerations, which will help you first identify and then organize key ideas:
- Be concise. You will include the most important ideas and leave out others. Some concepts may need to be simplified.
- Employ more than one medium of expression. You should incorporate other media, such as charts, graphs, photographs, video or audio recordings, or websites.
- Prepare for a face-to-face presentation. If you must deliver a face-to-face presentation, it is important to project yourself as a serious and well-informed speaker. You will often speak extemporaneously, or in a rehearsed but not memorized manner, which allows for flexibility given the context or audience. You will need to know your points and keep your audience engaged.
Determine Your Purpose
As with a writing assignment, determining the purpose of your presentation early on is crucial. You want to inform your readers about the topic, but think about what else you hope to achieve.
Are you presenting information intended to move your audience to adopt certain beliefs or take action on a particular issue? If so, you are speaking not only to inform but also to persuade your listeners. Do you want your audience to come away from your presentation knowing how to do something they that they did not know before? In that case, you are not only informing them but also explaining or teaching a process.
Writing at Work
Schoolteachers are trained to structure lessons around one or more lesson objectives. Usually the objective, the mission or purpose, states what students should know or be able to do after they complete the lesson. For example, an objective might state, “Students will understand the specific freedoms guaranteed by the First Amendment” or “Students will be able to add two three-digit numbers correctly.”
As a manager, mentor, or supervisor, you may sometimes be required to teach or train other employees as part of your job. Determining the desired outcome of a training session will help you plan effectively. Identify your teaching objectives. What, specifically, do you want your audience to know (for instance, details of a new workplace policy) or be able to do (for instance, use a new software program)? Plan your teaching or training session to meet your objectives.
Identify Key Ideas
To plan your presentation, think in terms of three or four key points you want to get across. In a paper, you have the space to develop ideas at length and delve into complex details. In a presentation, however, you must convey your ideas more concisely.
One strategy you might try is to create an outline. What is your main idea? Would your main idea work well as key points for a brief presentation? How would you condense topics that might be too lengthy, or should you eliminate topics that may be too complicated to address in your presentation?
1. Revisit your presentation assignment, or think of a topic for your presentation. On your own sheet of notebook paper, write a list of at least three to five key ideas. Keep the following questions in mind when listing your key ideas:
- What is your purpose?
- Who is your audience?
- How will you engage your audience?
2. On the same paper, identify the steps you must complete before you begin creating your presentation.
Use an Outline to Organize Ideas
After you determine which ideas are most appropriate for your presentation, you will create an outline of those ideas. Your presentation, like a written assignment, should include an introduction, body, and conclusion. These components serve much the same purpose as they do in a written assignment.
- The introduction engages the audience’s attention, introduces the topic, and sets the tone for what is to come.
- The body develops your point of view with supporting ideas, details, and examples presented in a logical order.
- The conclusion restates your point of view, sums up your main points, and leaves your audience with something to think about.
Jorge, who wrote the research paper featured in Chapter 11 “Writing from Research: What Will I Learn?” , developed the following outline. Jorge relied heavily on this outline to plan his presentation, but he adjusted it to suit the new format.

Planning Your Introduction
In Chapter 12 “Writing a Research Paper” , you learned techniques for writing an interesting introduction, such as beginning with a surprising fact or statistic, a thought-provoking question or quotation, a brief anecdote that illustrates a larger concept or connects your topic to your audience’s experiences. You can use these techniques effectively in presentations as well. You might also consider actively engaging your audience by having members respond to questions or complete a brief activity related to your topic. For example, you may have your audience respond to a survey or tell about an experience related to your topic.
Incorporating media can also be an effective way to get your audience’s attention. Visual images such as a photograph or a cartoon can invoke an immediate emotional response. A graph or chart can highlight startling findings in research data or statistical information. Brief video or audio clips that clearly reinforce your message and do not distract or overwhelm your audience can provide a sense of immediacy when you plan to discuss an event or a current issue. A PowerPoint presentation allows you to integrate many of these different media sources into one presentation.
With the accessibility provided by the Internet, you can find interesting and appropriate audio and video with little difficulty. However, the clip alone will not sustain the presentation. To keep the audience interested and engaged, you must frame the beginning and end of the clip with your own words.
Jorge completed the introduction part of his outline by listing the key points he would use to open his presentation. He also planned to show various web links early on to illustrate the popularity of the low-carbohydrate diet trend.

Planning the Body of Your Presentation
The next step is to work with the key ideas you identified earlier. Determine the order in which you want to present these ideas, and flesh them out with important details. Chapter 10 “Rhetorical Modes” discusses several organizational structures you might work with, such as chronological order, comparison-and-contrast structure, or cause-and-effect structure.
How much detail you include will depend on the time allotted for your presentation. Your instructor will most likely give you a specific time limit or a specific slide limit, such as eight to ten slides. If the time limit is very brief (two to three minutes, for instance), you will need to focus on communicating your point of view, main supporting points, and only the most relevant details. Three minutes can feel like an eternity if you are speaking before a group, but the time will pass very quickly. It is important to use it well.
If you have more time to work with—ten minutes or half an hour—you will be able to discuss your topic in greater detail. More time also means you must devote more thought into how you will hold your audience’s interest. If your presentation is longer than five minutes, introduce some variety so the audience is not bored. Incorporate multimedia, invite the audience to complete an activity, or set aside time for a question-and-answer session.
Jorge was required to limit his presentation to five to seven minutes. In his outline, he made a note about where he would need to condense some complicated material to stay within his time limit. He also decided to focus only on cholesterol and heart disease in his discussion of long-term health outcomes. The research on other issues was inconclusive, so Jorge decided to omit this material. Jorge’s notes on his outline show the revisions he has made to his presentation.

You are responsible for using your presentation time effectively to inform your audience. You show respect for your audience by following the expected time limit. However, that does not mean you must fill all of that time with talk if you are giving a face-to-face presentation. Involving your audience can take some of the pressure off you while also keeping them engaged. Have them respond to a few brief questions to get them thinking. Display a relevant photograph, document, or object and ask your classmates to comment. In some presentations, if time allows, you may choose to have your classmates complete an individual or group activity.
Planning Your Conclusion
The conclusion should briefly sum up your main idea and leave your audience with something to think about. As in a written paper, you are essentially revisiting your thesis. Depending on your topic, you may also ask the audience to reconsider their thinking about an issue, to take action, or to think about a related issue. If you presented an attention-getting fact or anecdote in your introduction, consider revisiting it in your conclusion. Just as you have learned about an essay’s conclusion, do not add new content to the presentation’s conclusion.
No matter how you choose to structure your conclusion, make sure it is well planned so that you are not tempted to wrap up your presentation too quickly. Inexperienced speakers, in a face-to-face presentation, sometimes rush through the end of a presentation to avoid exceeding the allotted time or to end the stressful experience of presenting in public. Unfortunately, a hurried conclusion makes the presentation as a whole less memorable.
Time management is the key to delivering an effective presentation whether it is face-to-face or in PowerPoint. As you develop your outline, think about the amount of time you will devote to each section. For instance, in a five-minute face-to-face presentation, you might plan to spend one minute on the introduction, three minutes on the body, and one minute on the conclusion. Later, when you rehearse, you can time yourself to determine whether you need to adjust your content or delivery.
In a PowerPoint presentation, it is important that your presentation is visually stimulating, avoids information overload by limiting the text per slide, uses speaker notes effectively, and uses a font that is visible on the background (e.g., avoid white letters on a light background or black letters on a dark background).
Work with the list you created in Note 14.4 “Exercise 1” to develop a more complete outline for your presentation. Make sure your outline includes the following:
- An introduction that uses strategies to capture your audience’s attention
- A body section that summarizes your main points and supporting details
- A conclusion that will help you end on a memorable note
- Brief notes about how much time you plan to spend on each part of the presentation (you may adjust the timing later as needed)
Identifying Opportunities to Incorporate Visual and Audio Media
You may already have some ideas for how to incorporate visual and audio media in your presentation. If not, review your outline and begin thinking about where to include media. Presenting information in a variety of formats will help you keep your audience’s interest.
Use Presentation Software
Delivering your presentation as a slideshow is one way to use media to your advantage. As you speak, you use a computer and an attached projector to display a slideshow of text and graphics that complement the speech. Your audience will follow your ideas more easily, because you are communicating with them through more than one sense. The audience hears your words and also sees the corresponding visuals. A listener who momentarily loses track of what you are saying can rely on the slide to cue his or her memory.
To set up your presentation, you will need to work with the content of your outline to develop individual slides. Each slide should focus on just a few bullet points (or a similar amount of content presented in a graphic). Remember that your audience must be able to read the slides easily, whether the members sit in the front or the back of the room. Avoid overcrowding the slides with too much text.
Using presentation software, such as PowerPoint, allows you to incorporate graphics, sounds, and even web links directly into your slides. You can also work with available styles, color schemes, and fonts to give your presentation a polished, consistent appearance. Different slide templates make it easy to organize information to suit your purpose. Be sure your font is visible to you audience. Avoid using small font or colored font that is not visible against your background.
Use PowerPoint as a Visual Aid
PowerPoint and similar visual representation programs can be effective tools to help audiences remember your message, but they can also be an annoying distraction to your speech. How you prepare your slides and use the tool will determine your effectiveness.
PowerPoint is a slideware program that you have no doubt seen used in class, seen in a presentation at work, or perhaps used yourself to support a presentation. PowerPoint and similar slideware programs provide templates for creating electronic slides to present visual information to the audience, reinforcing the verbal message. You will be able to import or cut and paste words from text files, images, or video clips to create slides to represent your ideas. You can even incorporate web links. When using any software program, it is always a good idea to experiment with it long before you intend to use it; explore its many options and functions, and see how it can be an effective tool for you.
At first, you might be overwhelmed by the possibilities, and you might be tempted to use all the bells, whistles, and sound effects, not to mention the tumbling, flying, and animated graphics. If used wisely, a dissolve or key transition can be like a well-executed scene from a major motion picture and lead your audience to the next point. But if used indiscriminately, it can annoy the audience to the point where they cringe in anticipation of the sound effect at the start of each slide. This danger is inherent in the tool, but you are in charge of it and can make wise choices that enhance the understanding and retention of your information.
The first point to consider is which visual aid is the most important. The answer is you, the speaker. You will facilitate the discussion, give life to the information, and help the audience correlate the content to your goal or purpose. You do not want to be in a position where the PowerPoint presentation is the focus and you are on the side of the stage simply helping the audience follow along. Slides should support you in your presentation, rather than the other way around. Just as there is a number one rule for handouts (do not pass them out at the start of your presentation), there is also one for PowerPoint presentations: do not use PowerPoint slides as a read-aloud script for your speech. The PowerPoint slides should amplify and illustrate your main points, not reproduce everything you are going to say.
Your pictures are the second area of emphasis you will want to consider. The tool will allow you to show graphs, charts and illustrate relationships that words may only approach in terms of communication, but your verbal support of the visual images will make all the difference. Dense pictures or complicated graphics will confuse more than they clarify. Choose clear images that have an immediate connection to both your content and the audience, tailored to their specific needs. After the images, consider using only key words that can be easily read to accompany your pictures. The fewer words the better. Try to keep each slide to a total word count of less than ten words. Do not use full sentences. Using key words provides support for your verbal discussion, guiding you as well as your audience. The key words can serve as signposts or signal words related to key ideas.
A natural question at this point is, How do I communicate complex information simply? The answer comes with several options. The visual representation on the screen is for support and illustration. Should you need to communicate more technical, complex, or in-depth information in a visual way, consider preparing a handout to distribute at the conclusion of your speech. You may also consider using a printout of your slide show with a section for taking notes, but if you distribute it at the beginning of your speech, you run the risk of turning your presentation into a guided reading exercise and possibly distracting or losing members of the audience. Everyone reads at a different pace and takes notes in their own way. You do not want to be in the position of going back and forth between slides to help people follow along.
Another point to consider is how you want to use the tool to support your speech and how your audience will interpret its presentation. Most audiences wouldn’t want to read a page of text—as you might see in this book—on the big screen. They will be far more likely to glance at the screen and assess the information you present in relation to your discussion. Therefore, it is key to consider one main idea, relationship, or point per slide. The use of the tool should be guided with the idea that its presentation is for the audience’s benefit, not yours. People often understand pictures and images more quickly and easily than text, and you can use this to your advantage, using the knowledge that a picture is worth a thousand words.
Incorporate Visual Media
Even if you do not use a slideshow to complement your presentation, you can include visual media to support and enhance your content. Visual media are divided into two major categories: images and informational graphics.
Image-based media, such as photographs or videos, often have little or no accompanying text. Often these media are more powerful than words in getting a message across. Within the past decade, the images associated with major news stories, such as the Indian Ocean tsunami of 2004, the Abu Ghraib prison abuses from 2004 to 2006, and the 2010 earthquake in Haiti, have powerfully affected viewers’ emotions and drawn their attention to these news stories.
Figure 14.1

Even if your presentation addresses a less dramatic subject, you can still use images to draw in your audience. Consider how photographs, an illustration, or a video might help your audience connect with a particular person or place or bring a historical event to life. Use visual images to support descriptions of natural or man-made phenomena. What ideas lend themselves to being explained primarily through images?
In addition, consider how you might incorporate informational graphics in your presentation. Informational graphics include diagrams, tables, pie charts, bar and line graphs, and flow charts. Informational graphics usually include some text and often work well to present numerical information. Consider using them if you are presenting statistics, comparing facts or data about several different groups, describing changes over time, or presenting a process.
Incorporate Audio Media
Although audio media are not as versatile as visual media, you may wish to use them if they work well with your particular topic. If your presentation discusses trends in pop music or analyzes political speeches, playing an audio clip is an obvious and effective choice. Clips from historical speeches, radio talk shows, and interviews can also be used, but extended clips may be ineffective with modern audiences. Always assess your audience’s demographics and expectations before selecting and including audio media.
Review the outline you created in Note 14.11 “Exercise 2” . Complete the following steps:
- Identify at least two to three places in your presentation where you might incorporate visual or audio media. Brainstorm ideas for what media would be effective, and create a list of ideas. (In Chapter 14 “Creating Presentations: Sharing Your Ideas” , Section 14.2 “Incorporating Effective Visuals into a Presentation” , you will explore different media options in greater depth. For now, focus on coming up with a few general ideas.)
- Determine whether you will use presentation software to deliver your presentation as a slideshow. If you plan to do so, begin using your outline to draft your slides.
Figure 14.2

Source: http://www.agenciabrasil.gov.br/media/imagens/2010/01/14/14.01.10RP5978.jpg/view
Planning Ahead: Annotating Your Presentation
When you make a presentation, you are giving a performance of sorts. It may not be as dramatic as a play or a movie, but it requires smooth coordination of several elements—your words, your gestures, and any media you include. One way to ensure that the performance goes smoothly is to annotate your presentation ahead of time.
To annotate means to add comments or notes to a document. You can use this technique to plan how the different parts of your presentation will flow together. For instance, if you are working with slides, add notes to your outline indicating when you will show each slide. If you have other visual or audio media to include, make a note of that, too. Be as detailed as necessary. Jotting “Start video at 3:14” can spare you the awkwardness of searching for the right clip during your presentation.
In the workplace, employees are often asked to deliver presentations or conduct a meeting using standard office presentation software. If you are using presentation software, you can annotate your presentation easily as you create your slides. Use the notes feature at the bottom of the page to add notes for each slide. As you deliver your presentation, your notes will be visible to you on the computer screen but not to your audience on the projector screen.
In a face-to-face presentation, make sure your final annotated outline is easy to read. It will serve to cue you during your presentation, so it does not need to look polished, as long as it is clear to you. Double space the text. Use a larger-than-normal font size (14 or 16 points) if that will make it easier for you to read. Boldface or italics will set off text that should be emphasized or delivered with greater emotion. Write out main points, as well as your opening and closing remarks, in complete sentences, along with any material you want to quote verbatim. Use shorter phrases for supporting details. Using your speaker notes effectively will help you deliver an effective presentation. Highlighting, all capital letters, or different-colored font will help you easily distinguish notes from the text of your speech. Read Jorge’s annotated outline.

Some students prefer to write out the full text of their face-to-face presentation. This can be a useful strategy when you are practicing your delivery. However, keep in mind that reading your text aloud, word for word, will not help you capture and hold your audience’s attention. Write out and read your speech if that helps you rehearse. After a few practice sessions, when you are more comfortable with your material, switch to working from an outline. That will help you sound more natural when you speak to an audience.
In a PowerPoint presentation, remember to have your slides in logical sequential order. Annotating your presentation before submitting it to your audience or your instructor will help you check for order and logical transitions. Too much text or data may confuse your audience; strive for clarity and avoid unnecessary details. Let the pictures or graphics tell the story but do not overload your slideshow with visuals. Be sure your font is visible. Look for consistency in the time limit of your presentation to gauge your level of preparedness.
Begin to annotate your outline. (You will probably add more notes as you proceed, but including some annotations now will help you begin pulling your ideas together.) Mark your outline with the following information:
- Write notes in brackets to any sections where you definitely plan to incorporate visual or audio media.
- If you are presenting a slideshow, add notes in brackets indicating which slides go with each section of your outline.
- Identify and set off any text that should be emphasized.

Key Takeaways
- An effective presentation presents ideas more concisely than a written document and uses media to explain ideas and hold the audience’s interest.
- Like an essay, a presentation should have a clear beginning, middle, and end.
- Good writers structure their presentations on the thesis, or point of view; main ideas; and key supporting details and create a presentation outline to organize their ideas.
- Annotating a presentation outline is a useful way to coordinate different parts of the presentation and manage time effectively.
Writing for Success Copyright © 2015 by University of Minnesota is licensed under a Creative Commons Attribution-NonCommercial-ShareAlike 4.0 International License , except where otherwise noted.

- PRESENTATION SKILLS
What is a Presentation?
Search SkillsYouNeed:
Presentation Skills:
- A - Z List of Presentation Skills
- Top Tips for Effective Presentations
- General Presentation Skills
- Preparing for a Presentation
- Organising the Material
- Writing Your Presentation
- Deciding the Presentation Method
- Managing your Presentation Notes
- Working with Visual Aids
- Presenting Data
- Managing the Event
- Coping with Presentation Nerves
- Dealing with Questions
- How to Build Presentations Like a Consultant
- 7 Qualities of Good Speakers That Can Help You Be More Successful
- Self-Presentation in Presentations
- Specific Presentation Events
- Remote Meetings and Presentations
- Giving a Speech
- Presentations in Interviews
- Presenting to Large Groups and Conferences
- Giving Lectures and Seminars
- Managing a Press Conference
- Attending Public Consultation Meetings
- Managing a Public Consultation Meeting
- Crisis Communications
- Elsewhere on Skills You Need:
- Communication Skills
- Facilitation Skills
- Teams, Groups and Meetings
- Effective Speaking
- Question Types
Subscribe to our FREE newsletter and start improving your life in just 5 minutes a day.
You'll get our 5 free 'One Minute Life Skills' and our weekly newsletter.
We'll never share your email address and you can unsubscribe at any time.
The formal presentation of information is divided into two broad categories: Presentation Skills and Personal Presentation .
These two aspects are interwoven and can be described as the preparation, presentation and practice of verbal and non-verbal communication.
This article describes what a presentation is and defines some of the key terms associated with presentation skills.
Many people feel terrified when asked to make their first public talk. Some of these initial fears can be reduced by good preparation that also lays the groundwork for making an effective presentation.
A Presentation Is...
A presentation is a means of communication that can be adapted to various speaking situations, such as talking to a group, addressing a meeting or briefing a team.
A presentation can also be used as a broad term that encompasses other ‘speaking engagements’ such as making a speech at a wedding, or getting a point across in a video conference.
To be effective, step-by-step preparation and the method and means of presenting the information should be carefully considered.
A presentation requires you to get a message across to the listeners and will often contain a ' persuasive ' element. It may, for example, be a talk about the positive work of your organisation, what you could offer an employer, or why you should receive additional funding for a project.
The Key Elements of a Presentation
Making a presentation is a way of communicating your thoughts and ideas to an audience and many of our articles on communication are also relevant here, see: What is Communication? for more.
Consider the following key components of a presentation:
Ask yourself the following questions to develop a full understanding of the context of the presentation.
When and where will you deliver your presentation?
There is a world of difference between a small room with natural light and an informal setting, and a huge lecture room, lit with stage lights. The two require quite different presentations, and different techniques.
Will it be in a setting you are familiar with, or somewhere new?
If somewhere new, it would be worth trying to visit it in advance, or at least arriving early, to familiarise yourself with the room.
Will the presentation be within a formal or less formal setting?
A work setting will, more or less by definition, be more formal, but there are also various degrees of formality within that.
Will the presentation be to a small group or a large crowd?
Are you already familiar with the audience?
With a new audience, you will have to build rapport quickly and effectively, to get them on your side.
What equipment and technology will be available to you, and what will you be expected to use?
In particular, you will need to ask about microphones and whether you will be expected to stand in one place, or move around.
What is the audience expecting to learn from you and your presentation?
Check how you will be ‘billed’ to give you clues as to what information needs to be included in your presentation.
All these aspects will change the presentation. For more on this, see our page on Deciding the Presentation Method .
The role of the presenter is to communicate with the audience and control the presentation.
Remember, though, that this may also include handing over the control to your audience, especially if you want some kind of interaction.
You may wish to have a look at our page on Facilitation Skills for more.
The audience receives the presenter’s message(s).
However, this reception will be filtered through and affected by such things as the listener’s own experience, knowledge and personal sense of values.
See our page: Barriers to Effective Communication to learn why communication can fail.
The message or messages are delivered by the presenter to the audience.
The message is delivered not just by the spoken word ( verbal communication ) but can be augmented by techniques such as voice projection, body language, gestures, eye contact ( non-verbal communication ), and visual aids.
The message will also be affected by the audience’s expectations. For example, if you have been billed as speaking on one particular topic, and you choose to speak on another, the audience is unlikely to take your message on board even if you present very well . They will judge your presentation a failure, because you have not met their expectations.
The audience’s reaction and therefore the success of the presentation will largely depend upon whether you, as presenter, effectively communicated your message, and whether it met their expectations.
As a presenter, you don’t control the audience’s expectations. What you can do is find out what they have been told about you by the conference organisers, and what they are expecting to hear. Only if you know that can you be confident of delivering something that will meet expectations.
See our page: Effective Speaking for more information.
How will the presentation be delivered?
Presentations are usually delivered direct to an audience. However, there may be occasions where they are delivered from a distance over the Internet using video conferencing systems, such as Skype.
It is also important to remember that if your talk is recorded and posted on the internet, then people may be able to access it for several years. This will mean that your contemporaneous references should be kept to a minimum.
Impediments
Many factors can influence the effectiveness of how your message is communicated to the audience.
For example background noise or other distractions, an overly warm or cool room, or the time of day and state of audience alertness can all influence your audience’s level of concentration.
As presenter, you have to be prepared to cope with any such problems and try to keep your audience focussed on your message.
Our page: Barriers to Communication explains these factors in more depth.
Continue to read through our Presentation Skills articles for an overview of how to prepare and structure a presentation, and how to manage notes and/or illustrations at any speaking event.
Continue to: Preparing for a Presentation Deciding the Presentation Method
See also: Writing Your Presentation | Working with Visual Aids Coping with Presentation Nerves | Dealing with Questions Learn Better Presentation Skills with TED Talks
BibGuru Blog
Be more productive in school
- Citation Styles
How to do a class presentation (11 steps)

The best class presentations combine strong content and visuals with an engaging presentation style. This post offers 11 steps for creating memorable and high-performing class presentations.
1. Review assignment guidelines
Before you can strategize about how to start a class presentation, you need to be certain that you understand the assignment details. Consult materials that your instructor provided, like rubrics, to determine what your presentation needs to cover and what form it should take.
For instance, are you presenting individually or as part of a group? How long should the presentation be? Are you required to have visuals? Knowing these details will help you to plan a successful class presentation.
2. Make a presentation plan
Once you've reviewed the specific assignment details, it's time to make a presentation plan. You can start by making an outline of your talking points. Outlines for class presentations will look similar to those for papers, with sections and subsections that work through your main ideas. You'll want to be precise about what points are essential to communicate to your audience. Also, take some time to decide on a completion timeline to ensure that you're ready on presentation day. Remember to build in time for practice!
3. Choose your visuals
At this point, you'll also want to determine what kind of visual aid(s) you want to use: a handout or a digital presentation, or both? Keep in mind the assignment requirements, but also the audience and the presentation format. For example, are you presenting to a large audience? If so, a handout might not be efficient. Are you presenting in-person or online? If you're preparing an online presentation, a PowerPoint or Google slides presentation will help your audience follow along.
4. Fill out your outline and keep it simple
Now that you've developed a plan for completing your class presentation, you can begin to build out the actual content. If you've created a basic outline, fill it in with some substance. Remember to keep it simple. At around 10-15 minutes, the average in-class presentation can only effectively communicate around three main points. Avoid long quotes or monologues. Your audience may find it difficult to follow longer textual components.
5. Design your visuals with minimal text
Along similar lines, don't simply plop your outline or textual notes into your visuals. Visual aids should be just that: aids that allow your audience to better visualize the main points of your presentation. Large blocks of text on a PowerPoint can be hard to see, so work on creating a digital aid that is mostly comprised on images. When text is appropriate, use bullet points and active words that your audience can remember.
6. Allow time for revisions
Once you've compiled your notes and created your visuals, take some time away from the project. You'll return to your work with fresh eyes. Then, allow time for revision: be sure to proofread your notes, slides, and/or handouts and make sure your visuals are clear. Check to see if any images that you're using appear pixelated on a larger screen and make sure your text is readable from a distance.
7. Check your citations
Many in class presentations will require citations, especially if they are accompanying a paper or another class research project. You can use BibGuru's citation generator to create your citations and copy them to your slides or handout. Consult your assignment guidelines, or ask your instructor, to find out what citation style is required.
8. Practice...and practice again
Give yourself time to practice your presentation in front of an audience before the big day. Familiarize them with the assignment guidelines, as needed, and ask them to time you. You'll need to know if your presentation meets the time requirements. After the first run though, consider these questions:
- Is your presentation too long or too short?
- Are you hitting the main points in a logical sequence that your audience can follow?
- Are your visuals clear?
- Is your delivery fluid or are you pausing too often to look at your notes?
- Are you making eye contact with your audience?
Use your answers to these questions to determine what, if at all, you need to change and then schedule another practice. You should practice your presentation as many times as you need to in order to achieve a fluid delivery.
9. Prepare for technical difficulties
Since most class presentations will include a digital element, be prepared to troubleshoot if there are technical difficulties on presentation day. Always have a back-up plan and be sure to save your visuals in multiple places. Keep a copy of your notes and slides in your email, on a thumb drive, and/or on the cloud. Practice enough so that, in the event that you can't get your visual aid to work, you can still deliver your presentation.
10. Take the stage with confidence
If you've followed your plan, practiced thoroughly, and prepared for possible technical difficulties, you should be ready to take the stage with confidence. Nervousness is absolutely natural, but try your best to relax and breathe. A few shoulder rolls and deep breaths right before the presentation can go a long way to making you feel more focused and centered.
11. Connect with your audience
From the first moment of your presentation, you'll want to establish a strong connection with your audience. Smile, make eye contact, and modulate your voice appropriately. Remember, people exhibit all kinds of facial expressions when they are listening or concentrating, so try not to pay too much attention to individual faces.
Also, although your instructor will be the one grading you, don't simply present to them. Include the entire class in your gaze. Finally, be careful about pace. If you have a tendency to speed up your speech when you're nervous, make a conscious effort to slow down.
The bottom line
Following the tips above will enable you to confidently deliver a class presentation to your instructor and classmates, or to any audience. With solid preparation and ample practice, your next class presentation will be a memorable success.
Frequently Asked Questions about class presentations
The most successful presentations begin with a hook. This could be a short, yet compelling story, an eye-catching visual with brief analysis, or an inspiring quote or statistic. No matter how you begin, ensure that you can fluidly transition to the main substance of your presentation in a way that your audience can easily follow.
Regardless of the subject of your presentation, you can make it interesting for your audience by engaging them through consistent eye contact, a relaxed and confident delivery style, and interactivity. For instance, to keep your audience engaged, you might try including questions or brief activities in your presentation.
Wrap up your presentation by summarizing your key points. You can also end with a provocative question or thought. You should also thank your audience for listening.
Good presentations are well-organized, time-sensitive, clear, and delivered with confidence.
The most common presentation mistakes include: not engaging your audience, using visuals that are overloaded with text, and not practicing enough.

Make your life easier with our productivity and writing resources.
For students and teachers.

- SUGGESTED TOPICS
- The Magazine
- Newsletters
- Managing Yourself
- Managing Teams
- Work-life Balance
- The Big Idea
- Data & Visuals
- Reading Lists
- Case Selections
- HBR Learning
- Topic Feeds
- Account Settings
- Email Preferences
How to Make a “Good” Presentation “Great”
- Guy Kawasaki

Remember: Less is more.
A strong presentation is so much more than information pasted onto a series of slides with fancy backgrounds. Whether you’re pitching an idea, reporting market research, or sharing something else, a great presentation can give you a competitive advantage, and be a powerful tool when aiming to persuade, educate, or inspire others. Here are some unique elements that make a presentation stand out.
- Fonts: Sans Serif fonts such as Helvetica or Arial are preferred for their clean lines, which make them easy to digest at various sizes and distances. Limit the number of font styles to two: one for headings and another for body text, to avoid visual confusion or distractions.
- Colors: Colors can evoke emotions and highlight critical points, but their overuse can lead to a cluttered and confusing presentation. A limited palette of two to three main colors, complemented by a simple background, can help you draw attention to key elements without overwhelming the audience.
- Pictures: Pictures can communicate complex ideas quickly and memorably but choosing the right images is key. Images or pictures should be big (perhaps 20-25% of the page), bold, and have a clear purpose that complements the slide’s text.
- Layout: Don’t overcrowd your slides with too much information. When in doubt, adhere to the principle of simplicity, and aim for a clean and uncluttered layout with plenty of white space around text and images. Think phrases and bullets, not sentences.
As an intern or early career professional, chances are that you’ll be tasked with making or giving a presentation in the near future. Whether you’re pitching an idea, reporting market research, or sharing something else, a great presentation can give you a competitive advantage, and be a powerful tool when aiming to persuade, educate, or inspire others.
- Guy Kawasaki is the chief evangelist at Canva and was the former chief evangelist at Apple. Guy is the author of 16 books including Think Remarkable : 9 Paths to Transform Your Life and Make a Difference.
Partner Center

Giving Presentations
Understanding your assignment, planning your presentation, organizing your presentation, signal words and transition phrases.
- Group Presentations
- Using Presentation Software
- Engaging your Audience
- Finding and Using Images
- Citing Sources
- Overcoming Anxiety
Suggested Books

Learn how to deal with nerves, prepare concise and effective notes, anticipate questions or problems and keep your audience interested.

A Student's Guide to Presentations
Provides tips on presenting individually, in groups, and for job interviews.

Develop Your Presentation Skills
Improve your confidence and nail your presentations with this pocket guide to preparing and delivering them well.
As with any assignment, it's important to first check the assignment requirements before you start planning your presentation. Read over the assignment requirements and make sure you understand the following:
- Is it a group or individual presentation?
- Is there a time limit or requirement?
- Are you allowed to use videos? If so, how long can videos be? Instructors generally do not want videos to take up a big portion of your presentation, but short videos can help to illustrate a point
- What's the topic you will be presenting on? Do you get to choose?
- Are you required to prepare a visual component such as a PowerPoint or a poster?
- What is the purpose of the presentation? Are you summarizing an issue to inform your classmates? Are you presenting a paper you wrote? Are you trying to convince them of a particular argument related to an issue? Are you leading discussion on a reading?
A good presentation requires careful planning. In general, you will need to follow these steps to plan a successful presentation:
- Brainstorm and outline: What's your topic? What do you know about the topic? What do you want your audience to know?
- Research: Use research to support your argument, find examples and statistics, or to learn more about your topic.
- Write an outline .
- Write a draft.
- Plan any visual aids such as PowerPoint or any activities you want your audience to participate in
- Practice, practice, practice! Make sure your presentation is not too long, and edit it down as needed.
A good presentation should be well organized, with a beginning, middle and end.
Beginning :
The beginning of a presentation is very important! This is when you have an opportunity to grab the audience's attention, and set the tone for your presentation.
- Use an attention grabber. Some attention grabbing techniques include: asking a thought-provoking question, showing the audience am intriguing picture, telling a story or use a real life example related to your topic, sharing a shocking statistic related to your topic, sharing a powerful quote, playing a short video
- Introduce yourself and the topic you will be discussing
- Outline what you will be talking about.
- Discuss your main points in a logical order
- It should be clear to your audience when you are moving from one point to another
- Use examples to support your points
Conclusion:
- Summarize the main points
- Avoid providing new information at this point, but you can state any additional questions that you think your research has led you too
- Use language that lets your audience know that your presentation is coming to an end
- Avoid ending with "that's it!" or apologizing for your presentation
- Thank the audience for listening and invite questions
Using transition and signal phrases throughout your presentation will help keep it organized and ensure your thoughts are communicated clearly. Try using some of the phrases below to introduce ideas and structure your presentation.
Introducing your presentation:
- The topic/question I will be discussing today is...
- This presentation will investigate/examine...
Providing an outline:
- I want to start by..., then I will...
- This presentation is divided into [x number] of parts. First I will... then I will..., finally I will conclude by...
- There are [x number] of points I will discuss: A, B, C and D
- Let's begin by looking at... before examining...
Introducing your main point:
- A significant issue is...
- A major concern is...
- The central problem is...
Rephrasing your main point:
- In other words...
- Another way to think about the problem is...
Moving to another point:
- Now let's consider...
- I'd like to move on to examine...
- Now, turning to the issue of...
Introducing an example:
- A case in point is...
- Take the case of...
- This is illustrated/demonstrated by...
- An example of this is...
Introducing images or explaining visuals:
- This image/diagram illustrates...
- As you can see here...
Introducing and integrating videos:
- We will now watch a short video that illustrates...
- In the video we've just watched, it is important to note that...
- As the video demonstrates...
Conclusions:
- To sum up...
- In conclusion...
- In summary...
- To summarize...
- To conclude...
- Therefore...
Inviting and Answering Questions:
- I am happy to take questions now.
- That's a very interesting question. In my opinion,...
- Thanks for your question. What my research shows is that...
- That's a relevant question, but it is out of the scope of my research.
- I'm afraid I cannot answer that question, but that's an interesting topic.
The above tips have been adapted from RMIT University Study and Learning Centre's " Oral Presentations: Signalling and Transition Phrases."
- << Previous: Home
- Next: Group Presentations >>
- Last Updated: Aug 25, 2023 11:04 AM
- URL: https://columbiacollege-ca.libguides.com/presentations
- Online Degree Explore Bachelor’s & Master’s degrees
- MasterTrack™ Earn credit towards a Master’s degree
- University Certificates Advance your career with graduate-level learning
- Top Courses
- Join for Free
What Are Effective Presentation Skills (and How to Improve Them)
Presentation skills are essential for your personal and professional life. Learn about effective presentations and how to boost your presenting techniques.
![[Featured Image]: The marketing manager, wearing a yellow top, is making a PowerPoint presentation.](https://d3njjcbhbojbot.cloudfront.net/api/utilities/v1/imageproxy/https://images.ctfassets.net/wp1lcwdav1p1/1JnKR1F6C7RrqtObyeUr79/acdb15f7a7e894a375012e8d158ada4f/GettyImages-1358219358.jpg?w=1500&h=680&q=60&fit=fill&f=faces&fm=jpg&fl=progressive&auto=format%2Ccompress&dpr=1&w=1000 "what is presentation assignment")
At least seven out of 10 Americans agree that presentation skills are essential for a successful career [ 1 ]. Although it might be tempting to think that these are skills reserved for people interested in public speaking roles, they're critical in a diverse range of jobs. For example, you might need to brief your supervisor on research results.
Presentation skills are also essential in other scenarios, including working with a team and explaining your thought process, walking clients through project ideas and timelines, and highlighting your strengths and achievements to your manager during performance reviews.
Whatever the scenario, you have very little time to capture your audience’s attention and get your point across when presenting information—about three seconds, according to research [ 2 ]. Effective presentation skills help you get your point across and connect with the people you’re communicating with, which is why nearly every employer requires them.
Understanding what presentation skills are is only half the battle. Honing your presenting techniques is essential for mastering presentations of all kinds and in all settings.
What are presentation skills?
Presentation skills are the abilities and qualities necessary for creating and delivering a compelling presentation that effectively communicates information and ideas. They encompass what you say, how you structure it, and the materials you include to support what you say, such as slides, videos, or images.
You'll make presentations at various times in your life. Examples include:
Making speeches at a wedding, conference, or another event
Making a toast at a dinner or event
Explaining projects to a team
Delivering results and findings to management teams
Teaching people specific methods or information
Proposing a vote at community group meetings
Pitching a new idea or business to potential partners or investors
Why are presentation skills important?
Delivering effective presentations is critical in your professional and personal life. You’ll need to hone your presentation skills in various areas, such as when giving a speech, convincing your partner to make a substantial purchase, and talking to friends and family about an important situation.
No matter if you’re using them in a personal or professional setting, these are the skills that make it easier and more effective to convey your ideas, convince or persuade others, and experience success. A few of the benefits that often accompany improving your presentation skills include:
Enriched written and verbal communication skills
Enhanced confidence and self-image
Boosted critical thinking and problem-solving capabilities
Better motivational techniques
Increased leadership skills
Expanded time management, negotiation, and creativity
The better your presenting techniques, the more engaging your presentations will be. You could also have greater opportunities to make positive impacts in business and other areas of your life.
Effective presentation skills
Imagine yourself in the audience at a TED Talk or sitting with your coworkers at a big meeting held by your employer. What would you be looking for in how they deliver their message? What would make you feel engaged?
These are a few questions to ask yourself as you review this list of some of the most effective presentation skills.
Verbal communication
How you use language and deliver messages play essential roles in how your audience will receive your presentation. Speak clearly and confidently, projecting your voice enough to ensure everyone can hear. Think before you speak, pausing when necessary and tailoring the way you talk to resonate with your particular audience.
Body language
Body language combines various critical elements, including posture, gestures, eye contact, expressions, and position in front of the audience. Body language is one of the elements that can instantly transform a presentation that would otherwise be dull into one that's dynamic and interesting.
Voice projection
The ability to project your voice improves your presentation by allowing your audience to hear what you're saying. It also increases your confidence to help settle any lingering nerves while also making your message more engaging. To project your voice, stand comfortably with your shoulders back. Take deep breaths to power your speaking voice and ensure you enunciate every syllable you speak.
How you present yourself plays a role in your body language and ability to project your voice. It also sets the tone for the presentation. Avoid slouching or looking overly tense. Instead, remain open, upright, and adaptable while taking the formality of the occasion into account.
Storytelling
Incorporating storytelling into a presentation is an effective strategy used by many powerful public speakers. It has the power to bring your subject to life and pique the audience’s curiosity. Don’t be afraid to tell a personal story, slowly building up suspense or adding a dramatic moment. And, of course, be sure to end with a positive takeaway to drive your point home.
Active listening
Active listening is a valuable skill all on its own. When you understand and thoughtfully respond to what you hear—whether it's in a conversation or during a presentation—you’ll likely deepen your personal relationships and actively engage audiences during a presentation. As part of your presentation skill set, it helps catch and maintain the audience’s attention, helping them remain focused while minimizing passive response, ensuring the message is delivered correctly, and encouraging a call to action.
Stage presence
During a presentation, projecting confidence can help keep your audience engaged. Stage presence can help you connect with your audience and encourage them to want to watch you. To improve your presence, try amping up your normal demeanor by infusing it with a bit of enthusiasm. Project confidence and keep your information interesting.
Watch your audience as you’re presenting. If you’re holding their attention, it likely means you’re connecting well with them.
Self-awareness
Monitoring your own emotions and reactions will allow you to react well in various situations. It helps you remain personable throughout your presentation and handle feedback well. Self-awareness can help soothe nervousness during presentations, allowing you to perform more effectively.
Writing skills
Writing is a form of presentation. Sharp writing skills can help you master your presentation’s outline to ensure you stay on message and remain clear about your objectives from the beginning until the end. It’s also helpful to have strong writing abilities for creating compelling slides and other visual aids.
Understanding an audience
When you understand your audience's needs and interests, you can design your presentation around them. In turn, you'll deliver maximum value to them and enhance your ability to make your message easy to understand.
Learn more about presentation skills from industry experts at SAP:
How to improve presentation skills
There’s an art to public speaking. Just like any other type of art, this is one that requires practice. Improving your presentation skills will help reduce miscommunications, enhance your time management capabilities, and boost your leadership skills. Here are some ways you can improve these skills:
Work on self-confidence.
When you’re confident, you naturally speak more clearly and with more authority. Taking the time to prepare your presentation with a strong opening and compelling visual aids can help you feel more confident. Other ways to improve your self-confidence include practicing positive self-talk, surrounding yourself with positive people, and avoiding comparing yourself (or your presentation) to others.
Develop strategies for overcoming fear.
Many people are nervous or fearful before giving a presentation. A bad memory of a past performance or insufficient self-confidence can contribute to fear and anxiety. Having a few go-to strategies like deep breathing, practicing your presentation, and grounding can help you transform that fear into extra energy to put into your stage presence.
Learn grounding techniques.
Grounding is any type of technique that helps you steer your focus away from distressing thoughts and keeps you connected with your present self. To ground yourself, stand with your feet shoulder-width apart and imagine you’re a large, mature tree with roots extending deep into the earth—like the tree, you can become unshakable.
Learn how to use presentation tools.
Visual aids and other technical support can transform an otherwise good presentation into a wow-worthy one. A few popular presentation tools include:
Canva: Provides easy-to-design templates you can customize
Powtoon: Animation software that makes video creation fast and easy
PowerPoint: Microsoft's iconic program popular for dynamic marketing and sales presentations
Practice breathing techniques.
Breathing techniques can help quell anxiety, making it easier to shake off pre-presentation jitters and nerves. It also helps relax your muscles and get more oxygen to your brain. For some pre-presentation calmness, you can take deep breaths, slowly inhaling through your nose and exhaling through your mouth.
While presenting, breathe in through your mouth with the back of your tongue relaxed so your audience doesn't hear a gasping sound. Speak on your exhalation, maintaining a smooth voice.
Gain experience.
The more you practice, the better you’ll become. The more you doanything, the more comfortable you’ll feel engaging in that activity. Presentations are no different. Repeatedly practicing your own presentation also offers the opportunity to get feedback from other people and tweak your style and content as needed.
Tips to help you ace your presentation
Your presentation isn’t about you; it’s about the material you’re presenting. Sometimes, reminding yourself of this ahead of taking center stage can help take you out of your head, allowing you to connect effectively with your audience. The following are some of the many actions you can take on the day of your presentation.
Arrive early.
Since you may have a bit of presentation-related anxiety, it’s important to avoid adding travel stress. Give yourself an abundance of time to arrive at your destination, and take into account heavy traffic and other unforeseen events. By arriving early, you also give yourself time to meet with any on-site technicians, test your equipment, and connect with people ahead of the presentation.
Become familiar with the layout of the room.
Arriving early also gives you time to assess the room and figure out where you want to stand. Experiment with the acoustics to determine how loudly you need to project your voice, and test your equipment to make sure everything connects and appears properly with the available setup. This is an excellent opportunity to work out any last-minute concerns and move around to familiarize yourself with the setting for improved stage presence.
Listen to presenters ahead of you.
When you watch others present, you'll get a feel for the room's acoustics and lighting. You can also listen for any data that’s relevant to your presentation and revisit it during your presentation—this can make the presentation more interactive and engaging.
Use note cards.
Writing yourself a script could provide you with more comfort. To prevent sounding too robotic or disengaged, only include talking points in your note cards in case you get off track. Using note cards can help keep your presentation organized while sounding more authentic to your audience.
Learn to deliver clear and confident presentations with Dynamic Public Speaking from the University of Washington. Build confidence, develop new delivery techniques, and practice strategies for crafting compelling presentations for different purposes, occasions, and audiences.
Article sources
Forbes. “ New Survey: 70% Say Presentation Skills are Critical for Career Success , https://www.forbes.com/sites/carminegallo/2014/09/25/new-survey-70-percent-say-presentation-skills-critical-for-career-success/?sh=619f3ff78890.” Accessed December 7, 2022.
Beautiful.ai. “ 15 Presentation and Public Speaking Stats You Need to Know , https://www.beautiful.ai/blog/15-presentation-and-public-speaking-stats-you-need-to-know. Accessed December 7, 2022.
Keep reading
Coursera staff.
Editorial Team
Coursera’s editorial team is comprised of highly experienced professional editors, writers, and fact...
This content has been made available for informational purposes only. Learners are advised to conduct additional research to ensure that courses and other credentials pursued meet their personal, professional, and financial goals.

Introduction
CDHE Nomination
AUCC Requirements
Course Description
Sample Policy Statements
Syllabus Sequencing Strategies
Sample Daily Syllabi
Lesson Plans
Reading Selection Recommendations
Assignments
Response Papers and Discussion Forums
Presentations
Discusssion, Group, WTL Questions
Variations, Misc.
Curbing Plagiarism
Additional Teaching & Course Design Resources
Guide Contributors
Presentation Assignment Example
The following is an example of an individual presentation assignment and a group presentation. The individual presentation assignment explains that students will give two presentations over the semester on a topic of the student's choice. The student should submit a 1 to page paper explaining the presentation also. The group presentation provides four areas of focus: interpretive approach, important issues raised by the text, a comparison to another work, and using a scholarly source to further understand the work. A handout follows the assignment that clearly explains the criteria.
- You will each be responsible for giving two presentations this semester. The presentations should be between five and ten minutes long, and the topics will be of your own choosing. Along with each presentation, please submit a 1-2 page paper that summarizes your topic. I will return these to you with comments and a grade for your efforts. Please take these presentations seriously as we will often use them as starting point for our class discussions.
- The collaborative group presentation will require you to: 1) share your interpretive approach; i.e., explain how you accessed the text to make it “mean.” For example, was your interpretation influenced by one of the formal features of the novel (plot, point of view, etc.), by the presence of certain ideas or beliefs you related to, or a critical approach that helped you dis-entangle the complexities of the narrative? 2) identify, for discussion, the important issues and questions raised by the text; 3) contextualize the reading by relating it to another work by the same author, another contemporary text that invites comparison in terms of shared ideas, themes and "horizons" that respond in some way to the major concerns of the core text, or by locating it in some literary or paraliterary movement; 4) summarize a scholarly response to the work and try to identify the author’s critical approach.
Guidelines for Presentations
Equal Participation Each team member should contribute equally. Teams will compile a list of major topics to be covered in their presentation, and assign one to each member to research and present. Each member should speak for approximately three to five minutes. The presentation can reflect the diversity of viewpoints of the presenters. Designate one team member as the team leader. This person will be responsible for introducing the presentation as a whole, and each presenter. The team leader will also summarize the presentation at its conclusion, and lead a class discussion.
Grading Since grading is based on the presentation as a whole, team members should notify the professor before the date of the presentation if any member does not do their share. Shyness or stumbling do not negatively affect the grade.
Prepare Handouts Team members may decide among themselves how to distribute the work of preparing the following information sheets.
- Things to Know -- One to two sheets listing major facts relevant to your topic, significant concepts, key points, terminology with definitions, and other interesting points of information_
- Quotes -- One sheet containing salient quotes from your readings, with explanations of their significance.
- References -- A compilation of references used for the presentations, including two or more for each presenter, written in MLA style, with one sentence summarizing the content of the text.
Format Many students elect to use PowerPoint. This is not absolutely required, but provision of some visual aids is helpful.
Class Presentation Talk to us, don't read. You may use notes when you make your presentation, but you may not read from a fully written out text. Here is one way to make a successful presentation:
- Do plenty of reading and research. Explore the topic as fully as possible. Make notes.
- Read over your notes, and think over the results of your reading.
- Discuss your results with your team members. Tentatively plan the presentation in its general outlines.
- On your own again, and setting notes aside, brainstorm and write down all the interesting ideas that you have come up with.
- Organize these ideas into a coherent sequence. Return to your notes and add any information relevant to your major ideas which will illustrate or explain them..
- Add an introduction, which tells what you will talk about, and a conclusion which sums up what you have discussed and learned. Cut out any irrelevant or uninteresting material.
- Meet with your team members to organize and streamline the presentation.
- Visualize yourself giving a talk to the class, going through all these ideas, in a comfortable and relaxed fashion. If you wish, practice talking about your subject to a mirror.
- Using only brief notes, give your presentation to the class and have fun!
- The team leader will also prepare a short general introduction to the presentation, lead-ins for each individual presenter, and a very brief possible conclusion, which may change according to how the presentations unfold.
Discussion Topic Prepare three possible questions with which to lead a class discussion_ Designate one team member as the discussion leader. Other team members may contribute to the discussion, but the discussion leader will be responsible for organizing and controlling the discussion. Lead a discussion utilizing your prepared questions, along with any others which have occurred to you during the presentation. Conclude your presentation by opening the floor for questions and comments from the class audience.
Improve your practice.
Enhance your soft skills with a range of award-winning courses.
How to Structure your Presentation, with Examples
August 3, 2018 - Dom Barnard
For many people the thought of delivering a presentation is a daunting task and brings about a great deal of nerves . However, if you take some time to understand how effective presentations are structured and then apply this structure to your own presentation, you’ll appear much more confident and relaxed.
Here is our complete guide for structuring your presentation, with examples at the end of the article to demonstrate these points.
Why is structuring a presentation so important?
If you’ve ever sat through a great presentation, you’ll have left feeling either inspired or informed on a given topic. This isn’t because the speaker was the most knowledgeable or motivating person in the world. Instead, it’s because they know how to structure presentations – they have crafted their message in a logical and simple way that has allowed the audience can keep up with them and take away key messages.
Research has supported this, with studies showing that audiences retain structured information 40% more accurately than unstructured information.
In fact, not only is structuring a presentation important for the benefit of the audience’s understanding, it’s also important for you as the speaker. A good structure helps you remain calm, stay on topic, and avoid any awkward silences.
What will affect your presentation structure?
Generally speaking, there is a natural flow that any decent presentation will follow which we will go into shortly. However, you should be aware that all presentation structures will be different in their own unique way and this will be due to a number of factors, including:
- Whether you need to deliver any demonstrations
- How knowledgeable the audience already is on the given subject
- How much interaction you want from the audience
- Any time constraints there are for your talk
- What setting you are in
- Your ability to use any kinds of visual assistance
Before choosing the presentation’s structure answer these questions first:
- What is your presentation’s aim?
- Who are the audience?
- What are the main points your audience should remember afterwards?
When reading the points below, think critically about what things may cause your presentation structure to be slightly different. You can add in certain elements and add more focus to certain moments if that works better for your speech.

What is the typical presentation structure?
This is the usual flow of a presentation, which covers all the vital sections and is a good starting point for yours. It allows your audience to easily follow along and sets out a solid structure you can add your content to.
1. Greet the audience and introduce yourself
Before you start delivering your talk, introduce yourself to the audience and clarify who you are and your relevant expertise. This does not need to be long or incredibly detailed, but will help build an immediate relationship between you and the audience. It gives you the chance to briefly clarify your expertise and why you are worth listening to. This will help establish your ethos so the audience will trust you more and think you’re credible.
Read our tips on How to Start a Presentation Effectively
2. Introduction
In the introduction you need to explain the subject and purpose of your presentation whilst gaining the audience’s interest and confidence. It’s sometimes helpful to think of your introduction as funnel-shaped to help filter down your topic:
- Introduce your general topic
- Explain your topic area
- State the issues/challenges in this area you will be exploring
- State your presentation’s purpose – this is the basis of your presentation so ensure that you provide a statement explaining how the topic will be treated, for example, “I will argue that…” or maybe you will “compare”, “analyse”, “evaluate”, “describe” etc.
- Provide a statement of what you’re hoping the outcome of the presentation will be, for example, “I’m hoping this will be provide you with…”
- Show a preview of the organisation of your presentation
In this section also explain:
- The length of the talk.
- Signal whether you want audience interaction – some presenters prefer the audience to ask questions throughout whereas others allocate a specific section for this.
- If it applies, inform the audience whether to take notes or whether you will be providing handouts.
The way you structure your introduction can depend on the amount of time you have been given to present: a sales pitch may consist of a quick presentation so you may begin with your conclusion and then provide the evidence. Conversely, a speaker presenting their idea for change in the world would be better suited to start with the evidence and then conclude what this means for the audience.
Keep in mind that the main aim of the introduction is to grab the audience’s attention and connect with them.
3. The main body of your talk
The main body of your talk needs to meet the promises you made in the introduction. Depending on the nature of your presentation, clearly segment the different topics you will be discussing, and then work your way through them one at a time – it’s important for everything to be organised logically for the audience to fully understand. There are many different ways to organise your main points, such as, by priority, theme, chronologically etc.
- Main points should be addressed one by one with supporting evidence and examples.
- Before moving on to the next point you should provide a mini-summary.
- Links should be clearly stated between ideas and you must make it clear when you’re moving onto the next point.
- Allow time for people to take relevant notes and stick to the topics you have prepared beforehand rather than straying too far off topic.
When planning your presentation write a list of main points you want to make and ask yourself “What I am telling the audience? What should they understand from this?” refining your answers this way will help you produce clear messages.
4. Conclusion
In presentations the conclusion is frequently underdeveloped and lacks purpose which is a shame as it’s the best place to reinforce your messages. Typically, your presentation has a specific goal – that could be to convert a number of the audience members into customers, lead to a certain number of enquiries to make people knowledgeable on specific key points, or to motivate them towards a shared goal.
Regardless of what that goal is, be sure to summarise your main points and their implications. This clarifies the overall purpose of your talk and reinforces your reason for being there.
Follow these steps:
- Signal that it’s nearly the end of your presentation, for example, “As we wrap up/as we wind down the talk…”
- Restate the topic and purpose of your presentation – “In this speech I wanted to compare…”
- Summarise the main points, including their implications and conclusions
- Indicate what is next/a call to action/a thought-provoking takeaway
- Move on to the last section
5. Thank the audience and invite questions
Conclude your talk by thanking the audience for their time and invite them to ask any questions they may have. As mentioned earlier, personal circumstances will affect the structure of your presentation.
Many presenters prefer to make the Q&A session the key part of their talk and try to speed through the main body of the presentation. This is totally fine, but it is still best to focus on delivering some sort of initial presentation to set the tone and topics for discussion in the Q&A.

Other common presentation structures
The above was a description of a basic presentation, here are some more specific presentation layouts:
Demonstration
Use the demonstration structure when you have something useful to show. This is usually used when you want to show how a product works. Steve Jobs frequently used this technique in his presentations.
- Explain why the product is valuable.
- Describe why the product is necessary.
- Explain what problems it can solve for the audience.
- Demonstrate the product to support what you’ve been saying.
- Make suggestions of other things it can do to make the audience curious.
Problem-solution
This structure is particularly useful in persuading the audience.
- Briefly frame the issue.
- Go into the issue in detail showing why it ‘s such a problem. Use logos and pathos for this – the logical and emotional appeals.
- Provide the solution and explain why this would also help the audience.
- Call to action – something you want the audience to do which is straightforward and pertinent to the solution.
Storytelling
As well as incorporating stories in your presentation , you can organise your whole presentation as a story. There are lots of different type of story structures you can use – a popular choice is the monomyth – the hero’s journey. In a monomyth, a hero goes on a difficult journey or takes on a challenge – they move from the familiar into the unknown. After facing obstacles and ultimately succeeding the hero returns home, transformed and with newfound wisdom.
Storytelling for Business Success webinar , where well-know storyteller Javier Bernad shares strategies for crafting compelling narratives.
Another popular choice for using a story to structure your presentation is in media ras (in the middle of thing). In this type of story you launch right into the action by providing a snippet/teaser of what’s happening and then you start explaining the events that led to that event. This is engaging because you’re starting your story at the most exciting part which will make the audience curious – they’ll want to know how you got there.
- Great storytelling: Examples from Alibaba Founder, Jack Ma
Remaining method
The remaining method structure is good for situations where you’re presenting your perspective on a controversial topic which has split people’s opinions.
- Go into the issue in detail showing why it’s such a problem – use logos and pathos.
- Rebut your opponents’ solutions – explain why their solutions could be useful because the audience will see this as fair and will therefore think you’re trustworthy, and then explain why you think these solutions are not valid.
- After you’ve presented all the alternatives provide your solution, the remaining solution. This is very persuasive because it looks like the winning idea, especially with the audience believing that you’re fair and trustworthy.
Transitions
When delivering presentations it’s important for your words and ideas to flow so your audience can understand how everything links together and why it’s all relevant. This can be done using speech transitions which are words and phrases that allow you to smoothly move from one point to another so that your speech flows and your presentation is unified.
Transitions can be one word, a phrase or a full sentence – there are many different forms, here are some examples:
Moving from the introduction to the first point
Signify to the audience that you will now begin discussing the first main point:
- Now that you’re aware of the overview, let’s begin with…
- First, let’s begin with…
- I will first cover…
- My first point covers…
- To get started, let’s look at…
Shifting between similar points
Move from one point to a similar one:
- In the same way…
- Likewise…
- Equally…
- This is similar to…
- Similarly…
Internal summaries
Internal summarising consists of summarising before moving on to the next point. You must inform the audience:
- What part of the presentation you covered – “In the first part of this speech we’ve covered…”
- What the key points were – “Precisely how…”
- How this links in with the overall presentation – “So that’s the context…”
- What you’re moving on to – “Now I’d like to move on to the second part of presentation which looks at…”
Physical movement
You can move your body and your standing location when you transition to another point. The audience find it easier to follow your presentation and movement will increase their interest.
A common technique for incorporating movement into your presentation is to:
- Start your introduction by standing in the centre of the stage.
- For your first point you stand on the left side of the stage.
- You discuss your second point from the centre again.
- You stand on the right side of the stage for your third point.
- The conclusion occurs in the centre.
Key slides for your presentation
Slides are a useful tool for most presentations: they can greatly assist in the delivery of your message and help the audience follow along with what you are saying. Key slides include:
- An intro slide outlining your ideas
- A summary slide with core points to remember
- High quality image slides to supplement what you are saying
There are some presenters who choose not to use slides at all, though this is more of a rarity. Slides can be a powerful tool if used properly, but the problem is that many fail to do just that. Here are some golden rules to follow when using slides in a presentation:
- Don’t over fill them – your slides are there to assist your speech, rather than be the focal point. They should have as little information as possible, to avoid distracting people from your talk.
- A picture says a thousand words – instead of filling a slide with text, instead, focus on one or two images or diagrams to help support and explain the point you are discussing at that time.
- Make them readable – depending on the size of your audience, some may not be able to see small text or images, so make everything large enough to fill the space.
- Don’t rush through slides – give the audience enough time to digest each slide.
Guy Kawasaki, an entrepreneur and author, suggests that slideshows should follow a 10-20-30 rule :
- There should be a maximum of 10 slides – people rarely remember more than one concept afterwards so there’s no point overwhelming them with unnecessary information.
- The presentation should last no longer than 20 minutes as this will leave time for questions and discussion.
- The font size should be a minimum of 30pt because the audience reads faster than you talk so less information on the slides means that there is less chance of the audience being distracted.
Here are some additional resources for slide design:
- 7 design tips for effective, beautiful PowerPoint presentations
- 11 design tips for beautiful presentations
- 10 tips on how to make slides that communicate your idea
Group Presentations
Group presentations are structured in the same way as presentations with one speaker but usually require more rehearsal and practices. Clean transitioning between speakers is very important in producing a presentation that flows well. One way of doing this consists of:
- Briefly recap on what you covered in your section: “So that was a brief introduction on what health anxiety is and how it can affect somebody”
- Introduce the next speaker in the team and explain what they will discuss: “Now Elnaz will talk about the prevalence of health anxiety.”
- Then end by looking at the next speaker, gesturing towards them and saying their name: “Elnaz”.
- The next speaker should acknowledge this with a quick: “Thank you Joe.”
From this example you can see how the different sections of the presentations link which makes it easier for the audience to follow and remain engaged.
Example of great presentation structure and delivery
Having examples of great presentations will help inspire your own structures, here are a few such examples, each unique and inspiring in their own way.
How Google Works – by Eric Schmidt
This presentation by ex-Google CEO Eric Schmidt demonstrates some of the most important lessons he and his team have learnt with regards to working with some of the most talented individuals they hired. The simplistic yet cohesive style of all of the slides is something to be appreciated. They are relatively straightforward, yet add power and clarity to the narrative of the presentation.
Start with why – by Simon Sinek
Since being released in 2009, this presentation has been viewed almost four million times all around the world. The message itself is very powerful, however, it’s not an idea that hasn’t been heard before. What makes this presentation so powerful is the simple message he is getting across, and the straightforward and understandable manner in which he delivers it. Also note that he doesn’t use any slides, just a whiteboard where he creates a simple diagram of his opinion.
The Wisdom of a Third Grade Dropout – by Rick Rigsby
Here’s an example of a presentation given by a relatively unknown individual looking to inspire the next generation of graduates. Rick’s presentation is unique in many ways compared to the two above. Notably, he uses no visual prompts and includes a great deal of humour.
However, what is similar is the structure he uses. He first introduces his message that the wisest man he knew was a third-grade dropout. He then proceeds to deliver his main body of argument, and in the end, concludes with his message. This powerful speech keeps the viewer engaged throughout, through a mixture of heart-warming sentiment, powerful life advice and engaging humour.
As you can see from the examples above, and as it has been expressed throughout, a great presentation structure means analysing the core message of your presentation. Decide on a key message you want to impart the audience with, and then craft an engaging way of delivering it.
By preparing a solid structure, and practising your talk beforehand, you can walk into the presentation with confidence and deliver a meaningful message to an interested audience.
It’s important for a presentation to be well-structured so it can have the most impact on your audience. An unstructured presentation can be difficult to follow and even frustrating to listen to. The heart of your speech are your main points supported by evidence and your transitions should assist the movement between points and clarify how everything is linked.
Research suggests that the audience remember the first and last things you say so your introduction and conclusion are vital for reinforcing your points. Essentially, ensure you spend the time structuring your presentation and addressing all of the sections.
Organizing Your Social Sciences Research Assignments
- Annotated Bibliography
- Analyzing a Scholarly Journal Article
- Group Presentations
- Dealing with Nervousness
- Using Visual Aids
- Grading Someone Else's Paper
- Types of Structured Group Activities
- Group Project Survival Skills
- Leading a Class Discussion
- Multiple Book Review Essay
- Reviewing Collected Works
- Writing a Case Analysis Paper
- Writing a Case Study
- About Informed Consent
- Writing Field Notes
- Writing a Policy Memo
- Writing a Reflective Paper
- Writing a Research Proposal
- Generative AI and Writing
- Acknowledgments
In the social and behavioral sciences, an oral presentation assignment involves an individual student or group of students verbally addressing an audience on a specific research-based topic, often utilizing slides to help audience members understand and retain what they both see and hear. The purpose is to inform, report, and explain the significance of research findings, and your critical analysis of those findings, within a specific period of time, often in the form of a reasoned and persuasive argument. Oral presentations are assigned to assess a student’s ability to organize and communicate relevant information effectively to a particular audience. Giving an oral presentation is considered an important learning skill because the ability to speak persuasively in front of an audience is transferable to most professional workplace settings.
Oral Presentations. Learning Co-Op. University of Wollongong, Australia; Oral Presentations. Undergraduate Research Office, Michigan State University; Oral Presentations. Presentations Research Guide, East Carolina University Libraries; Tsang, Art. “Enhancing Learners’ Awareness of Oral Presentation (Delivery) Skills in the Context of Self-regulated Learning.” Active Learning in Higher Education 21 (2020): 39-50.
Preparing for Your Oral Presentation
In some classes, writing the research paper is only part of what is required in reporting the results your work. Your professor may also require you to give an oral presentation about your study. Here are some things to think about before you are scheduled to give a presentation.
1. What should I say?
If your professor hasn't explicitly stated what the content of your presentation should focus on, think about what you want to achieve and what you consider to be the most important things that members of the audience should know about your research. Think about the following: Do I want to inform my audience, inspire them to think about my research, or convince them of a particular point of view? These questions will help frame how to approach your presentation topic.
2. Oral communication is different from written communication
Your audience has just one chance to hear your talk; they can't "re-read" your words if they get confused. Focus on being clear, particularly if the audience can't ask questions during the talk. There are two well-known ways to communicate your points effectively, often applied in combination. The first is the K.I.S.S. method [Keep It Simple Stupid]. Focus your presentation on getting two to three key points across. The second approach is to repeat key insights: tell them what you're going to tell them [forecast], tell them [explain], and then tell them what you just told them [summarize].
3. Think about your audience
Yes, you want to demonstrate to your professor that you have conducted a good study. But professors often ask students to give an oral presentation to practice the art of communicating and to learn to speak clearly and audibly about yourself and your research. Questions to think about include: What background knowledge do they have about my topic? Does the audience have any particular interests? How am I going to involve them in my presentation?
4. Create effective notes
If you don't have notes to refer to as you speak, you run the risk of forgetting something important. Also, having no notes increases the chance you'll lose your train of thought and begin relying on reading from the presentation slides. Think about the best ways to create notes that can be easily referred to as you speak. This is important! Nothing is more distracting to an audience than the speaker fumbling around with notes as they try to speak. It gives the impression of being disorganized and unprepared.
NOTE: A good strategy is to have a page of notes for each slide so that the act of referring to a new page helps remind you to move to the next slide. This also creates a natural pause that allows your audience to contemplate what you just presented.
Strategies for creating effective notes for yourself include the following:
- Choose a large, readable font [at least 18 point in Ariel ]; avoid using fancy text fonts or cursive text.
- Use bold text, underlining, or different-colored text to highlight elements of your speech that you want to emphasize. Don't over do it, though. Only highlight the most important elements of your presentation.
- Leave adequate space on your notes to jot down additional thoughts or observations before and during your presentation. This is also helpful when writing down your thoughts in response to a question or to remember a multi-part question [remember to have a pen with you when you give your presentation].
- Place a cue in the text of your notes to indicate when to move to the next slide, to click on a link, or to take some other action, such as, linking to a video. If appropriate, include a cue in your notes if there is a point during your presentation when you want the audience to refer to a handout.
- Spell out challenging words phonetically and practice saying them ahead of time. This is particularly important for accurately pronouncing people’s names, technical or scientific terminology, words in a foreign language, or any unfamiliar words.
Creating and Using Overheads. Writing@CSU. Colorado State University; Kelly, Christine. Mastering the Art of Presenting. Inside Higher Education Career Advice; Giving an Oral Presentation. Academic Skills Centre. University of Canberra; Lucas, Stephen. The Art of Public Speaking . 12th edition. Boston, MA: McGraw-Hill Higher Education, 2015; Peery, Angela B. Creating Effective Presentations: Staff Development with Impact . Lanham, MD: Rowman and Littlefield Education, 2011; Peoples, Deborah Carter. Guidelines for Oral Presentations. Ohio Wesleyan University Libraries; Perret, Nellie. Oral Presentations. The Lab Report. University College Writing Centre. University of Toronto; Speeches. The Writing Center. University of North Carolina; Storz, Carl et al. Oral Presentation Skills. Institut national de télécommunications, EVRY FRANCE.
Organizing the Content
In the process of organizing the content of your presentation, begin by thinking about what you want to achieve and how are you going to involve your audience in the presentation.
- Brainstorm your topic and write a rough outline. Don’t get carried away—remember you have a limited amount of time for your presentation.
- Organize your material and draft what you want to say [see below].
- Summarize your draft into key points to write on your presentation slides and/or note cards and/or handout.
- Prepare your visual aids.
- Rehearse your presentation and practice getting the presentation completed within the time limit given by your professor. Ask a friend to listen and time you.
GENERAL OUTLINE
I. Introduction [may be written last]
- Capture your listeners’ attention . Begin with a question, an amusing story, a provocative statement, a personal story, or anything that will engage your audience and make them think. For example, "As a first-gen student, my hardest adjustment to college was the amount of papers I had to write...."
- State your purpose . For example, "I’m going to talk about..."; "This morning I want to explain…."
- Present an outline of your talk . For example, “I will concentrate on the following points: First of all…Then…This will lead to…And finally…"
II. The Body
- Present your main points one by one in a logical order .
- Pause at the end of each point . Give people time to take notes, or time to think about what you are saying.
- Make it clear when you move to another point . For example, “The next point is that...”; “Of course, we must not forget that...”; “However, it's important to realize that....”
- Use clear examples to illustrate your points and/or key findings .
- If appropriate, consider using visual aids to make your presentation more interesting [e.g., a map, chart, picture, link to a video, etc.].
III. The Conclusion
- Leave your audience with a clear summary of everything that you have covered.
- Summarize the main points again . For example, use phrases like: "So, in conclusion..."; "To recap the main issues...," "In summary, it is important to realize...."
- Restate the purpose of your talk, and say that you have achieved your aim : "My intention was ..., and it should now be clear that...."
- Don't let the talk just fizzle out . Make it obvious that you have reached the end of the presentation.
- Thank the audience, and invite questions : "Thank you. Are there any questions?"
NOTE: When asking your audience if anyone has any questions, give people time to contemplate what you have said and to formulate a question. It may seem like an awkward pause to wait ten seconds or so for someone to raise their hand, but it's frustrating to have a question come to mind but be cutoff because the presenter rushed to end the talk.
ANOTHER NOTE: If your last slide includes any contact information or other important information, leave it up long enough to ensure audience members have time to write the information down. Nothing is more frustrating to an audience member than wanting to jot something down, but the presenter closes the slides immediately after finishing.
Creating and Using Overheads. Writing@CSU. Colorado State University; Giving an Oral Presentation. Academic Skills Centre. University of Canberra; Lucas, Stephen. The Art of Public Speaking . 12th ed. Boston, MA: McGraw-Hill Higher Education, 2015; Peery, Angela B. Creating Effective Presentations: Staff Development with Impact . Lanham, MD: Rowman and Littlefield Education, 2011; Peoples, Deborah Carter. Guidelines for Oral Presentations. Ohio Wesleyan University Libraries; Perret, Nellie. Oral Presentations. The Lab Report. University College Writing Centre. University of Toronto; Speeches. The Writing Center. University of North Carolina; Storz, Carl et al. Oral Presentation Skills. Institut national de télécommunications, EVRY FRANCE.
Delivering Your Presentation
When delivering your presentation, keep in mind the following points to help you remain focused and ensure that everything goes as planned.
Pay Attention to Language!
- Keep it simple . The aim is to communicate, not to show off your vocabulary. Using complex words or phrases increases the chance of stumbling over a word and losing your train of thought.
- Emphasize the key points . Make sure people realize which are the key points of your study. Repeat them using different phrasing to help the audience remember them.
- Check the pronunciation of difficult, unusual, or foreign words beforehand . Keep it simple, but if you have to use unfamiliar words, write them out phonetically in your notes and practice saying them. This is particularly important when pronouncing proper names. Give the definition of words that are unusual or are being used in a particular context [e.g., "By using the term affective response, I am referring to..."].
Use Your Voice to Communicate Clearly
- Speak loud enough for everyone in the room to hear you . Projecting your voice may feel uncomfortably loud at first, but if people can't hear you, they won't try to listen. However, moderate your voice if you are talking in front of a microphone.
- Speak slowly and clearly . Don’t rush! Speaking fast makes it harder for people to understand you and signals being nervous.
- Avoid the use of "fillers." Linguists refer to utterances such as um, ah, you know, and like as fillers. They occur most often during transitions from one idea to another and, if expressed too much, are distracting to an audience. The better you know your presentation, the better you can control these verbal tics.
- Vary your voice quality . If you always use the same volume and pitch [for example, all loud, or all soft, or in a monotone] during your presentation, your audience will stop listening. Use a higher pitch and volume in your voice when you begin a new point or when emphasizing the transition to a new point.
- Speakers with accents need to slow down [so do most others]. Non-native speakers often speak English faster than we slow-mouthed native speakers, usually because most non-English languages flow more quickly than English. Slowing down helps the audience to comprehend what you are saying.
- Slow down for key points . These are also moments in your presentation to consider using body language, such as hand gestures or leaving the podium to point to a slide, to help emphasize key points.
- Use pauses . Don't be afraid of short periods of silence. They give you a chance to gather your thoughts, and your audience an opportunity to think about what you've just said.
Also Use Your Body Language to Communicate!
- Stand straight and comfortably . Do not slouch or shuffle about. If you appear bored or uninterested in what your talking about, the audience will emulate this as well. Wear something comfortable. This is not the time to wear an itchy wool sweater or new high heel shoes for the first time.
- Hold your head up . Look around and make eye contact with people in the audience [or at least pretend to]. Do not just look at your professor or your notes the whole time! Looking up at your your audience brings them into the conversation. If you don't include the audience, they won't listen to you.
- When you are talking to your friends, you naturally use your hands, your facial expression, and your body to add to your communication . Do it in your presentation as well. It will make things far more interesting for the audience.
- Don't turn your back on the audience and don't fidget! Neither moving around nor standing still is wrong. Practice either to make yourself comfortable. Even when pointing to a slide, don't turn your back; stand at the side and turn your head towards the audience as you speak.
- Keep your hands out of your pocket . This is a natural habit when speaking. One hand in your pocket gives the impression of being relaxed, but both hands in pockets looks too casual and should be avoided.
Interact with the Audience
- Be aware of how your audience is reacting to your presentation . Are they interested or bored? If they look confused, stop and ask them [e.g., "Is anything I've covered so far unclear?"]. Stop and explain a point again if needed.
- Check after highlighting key points to ask if the audience is still with you . "Does that make sense?"; "Is that clear?" Don't do this often during the presentation but, if the audience looks disengaged, interrupting your talk to ask a quick question can re-focus their attention even if no one answers.
- Do not apologize for anything . If you believe something will be hard to read or understand, don't use it. If you apologize for feeling awkward and nervous, you'll only succeed in drawing attention to the fact you are feeling awkward and nervous and your audience will begin looking for this, rather than focusing on what you are saying.
- Be open to questions . If someone asks a question in the middle of your talk, answer it. If it disrupts your train of thought momentarily, that's ok because your audience will understand. Questions show that the audience is listening with interest and, therefore, should not be regarded as an attack on you, but as a collaborative search for deeper understanding. However, don't engage in an extended conversation with an audience member or the rest of the audience will begin to feel left out. If an audience member persists, kindly tell them that the issue can be addressed after you've completed the rest of your presentation and note to them that their issue may be addressed later in your presentation [it may not be, but at least saying so allows you to move on].
- Be ready to get the discussion going after your presentation . Professors often want a brief discussion to take place after a presentation. Just in case nobody has anything to say or no one asks any questions, be prepared to ask your audience some provocative questions or bring up key issues for discussion.
Amirian, Seyed Mohammad Reza and Elaheh Tavakoli. “Academic Oral Presentation Self-Efficacy: A Cross-Sectional Interdisciplinary Comparative Study.” Higher Education Research and Development 35 (December 2016): 1095-1110; Balistreri, William F. “Giving an Effective Presentation.” Journal of Pediatric Gastroenterology and Nutrition 35 (July 2002): 1-4; Creating and Using Overheads. Writing@CSU. Colorado State University; Enfield, N. J. How We Talk: The Inner Workings of Conversation . New York: Basic Books, 2017; Giving an Oral Presentation. Academic Skills Centre. University of Canberra; Lucas, Stephen. The Art of Public Speaking . 12th ed. Boston, MA: McGraw-Hill Higher Education, 2015; Peery, Angela B. Creating Effective Presentations: Staff Development with Impact . Lanham, MD: Rowman and Littlefield Education, 2011; Peoples, Deborah Carter. Guidelines for Oral Presentations. Ohio Wesleyan University Libraries; Perret, Nellie. Oral Presentations. The Lab Report. University College Writing Centre. University of Toronto; Speeches. The Writing Center. University of North Carolina; Storz, Carl et al. Oral Presentation Skills. Institut national de télécommunications, EVRY FRANCE.
Speaking Tip
Your First Words are Your Most Important Words!
Your introduction should begin with something that grabs the attention of your audience, such as, an interesting statistic, a brief narrative or story, or a bold assertion, and then clearly tell the audience in a well-crafted sentence what you plan to accomplish in your presentation. Your introductory statement should be constructed so as to invite the audience to pay close attention to your message and to give the audience a clear sense of the direction in which you are about to take them.
Lucas, Stephen. The Art of Public Speaking . 12th edition. Boston, MA: McGraw-Hill Higher Education, 2015.
Another Speaking Tip
Talk to Your Audience, Don't Read to Them!
A presentation is not the same as reading a prepared speech or essay. If you read your presentation as if it were an essay, your audience will probably understand very little about what you say and will lose their concentration quickly. Use notes, cue cards, or presentation slides as prompts that highlight key points, and speak to your audience . Include everyone by looking at them and maintaining regular eye-contact [but don't stare or glare at people]. Limit reading text to quotes or to specific points you want to emphasize.
- << Previous: Analyzing a Scholarly Journal Article
- Next: Group Presentations >>
- Last Updated: Mar 6, 2024 1:00 PM
- URL: https://libguides.usc.edu/writingguide/assignments
Princeton Correspondents on Undergraduate Research
How to Make a Successful Research Presentation
Turning a research paper into a visual presentation is difficult; there are pitfalls, and navigating the path to a brief, informative presentation takes time and practice. As a TA for GEO/WRI 201: Methods in Data Analysis & Scientific Writing this past fall, I saw how this process works from an instructor’s standpoint. I’ve presented my own research before, but helping others present theirs taught me a bit more about the process. Here are some tips I learned that may help you with your next research presentation:
More is more
In general, your presentation will always benefit from more practice, more feedback, and more revision. By practicing in front of friends, you can get comfortable with presenting your work while receiving feedback. It is hard to know how to revise your presentation if you never practice. If you are presenting to a general audience, getting feedback from someone outside of your discipline is crucial. Terms and ideas that seem intuitive to you may be completely foreign to someone else, and your well-crafted presentation could fall flat.
Less is more
Limit the scope of your presentation, the number of slides, and the text on each slide. In my experience, text works well for organizing slides, orienting the audience to key terms, and annotating important figures–not for explaining complex ideas. Having fewer slides is usually better as well. In general, about one slide per minute of presentation is an appropriate budget. Too many slides is usually a sign that your topic is too broad.

Limit the scope of your presentation
Don’t present your paper. Presentations are usually around 10 min long. You will not have time to explain all of the research you did in a semester (or a year!) in such a short span of time. Instead, focus on the highlight(s). Identify a single compelling research question which your work addressed, and craft a succinct but complete narrative around it.
You will not have time to explain all of the research you did. Instead, focus on the highlights. Identify a single compelling research question which your work addressed, and craft a succinct but complete narrative around it.
Craft a compelling research narrative
After identifying the focused research question, walk your audience through your research as if it were a story. Presentations with strong narrative arcs are clear, captivating, and compelling.
- Introduction (exposition — rising action)
Orient the audience and draw them in by demonstrating the relevance and importance of your research story with strong global motive. Provide them with the necessary vocabulary and background knowledge to understand the plot of your story. Introduce the key studies (characters) relevant in your story and build tension and conflict with scholarly and data motive. By the end of your introduction, your audience should clearly understand your research question and be dying to know how you resolve the tension built through motive.
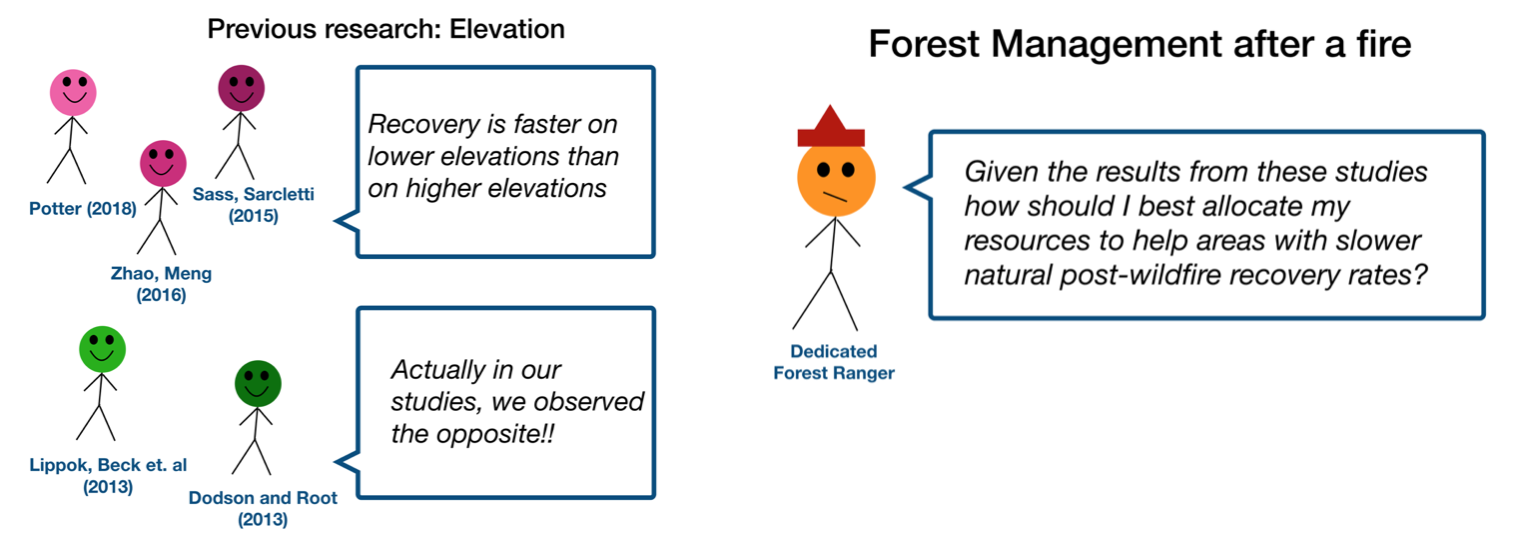
- Methods (rising action)
The methods section should transition smoothly and logically from the introduction. Beware of presenting your methods in a boring, arc-killing, ‘this is what I did.’ Focus on the details that set your story apart from the stories other people have already told. Keep the audience interested by clearly motivating your decisions based on your original research question or the tension built in your introduction.
- Results (climax)
Less is usually more here. Only present results which are clearly related to the focused research question you are presenting. Make sure you explain the results clearly so that your audience understands what your research found. This is the peak of tension in your narrative arc, so don’t undercut it by quickly clicking through to your discussion.
- Discussion (falling action)
By now your audience should be dying for a satisfying resolution. Here is where you contextualize your results and begin resolving the tension between past research. Be thorough. If you have too many conflicts left unresolved, or you don’t have enough time to present all of the resolutions, you probably need to further narrow the scope of your presentation.
- Conclusion (denouement)
Return back to your initial research question and motive, resolving any final conflicts and tying up loose ends. Leave the audience with a clear resolution of your focus research question, and use unresolved tension to set up potential sequels (i.e. further research).
Use your medium to enhance the narrative
Visual presentations should be dominated by clear, intentional graphics. Subtle animation in key moments (usually during the results or discussion) can add drama to the narrative arc and make conflict resolutions more satisfying. You are narrating a story written in images, videos, cartoons, and graphs. While your paper is mostly text, with graphics to highlight crucial points, your slides should be the opposite. Adapting to the new medium may require you to create or acquire far more graphics than you included in your paper, but it is necessary to create an engaging presentation.
The most important thing you can do for your presentation is to practice and revise. Bother your friends, your roommates, TAs–anybody who will sit down and listen to your work. Beyond that, think about presentations you have found compelling and try to incorporate some of those elements into your own. Remember you want your work to be comprehensible; you aren’t creating experts in 10 minutes. Above all, try to stay passionate about what you did and why. You put the time in, so show your audience that it’s worth it.
For more insight into research presentations, check out these past PCUR posts written by Emma and Ellie .
— Alec Getraer, Natural Sciences Correspondent
Share this:
- Share on Tumblr


- school Campus Bookshelves
- menu_book Bookshelves
- perm_media Learning Objects
- login Login
- how_to_reg Request Instructor Account
- hub Instructor Commons
- Download Page (PDF)
- Download Full Book (PDF)
- Periodic Table
- Physics Constants
- Scientific Calculator
- Reference & Cite
- Tools expand_more
- Readability
selected template will load here
This action is not available.
14.1: Organizing a Visual Presentation
- Last updated
- Save as PDF
- Page ID 4324
Learning Objectives
- Identify key ideas and details to create a concise, engaging presentation.
- Identify the steps involved in planning a comprehensive presentation.
Until now, you have interacted with your audience of readers indirectly, on the page. You have tried to anticipate their reactions and questions as all good writers do. Anticipating the audience’s needs can be tough, especially when you are sitting alone in front of your computer.
When you give a presentation, you connect directly with your audience. For most people, making a presentation is both exciting and stressful. The excitement comes from engaging in a two-way interaction about your ideas. The stress comes from the pressure of presenting your ideas without having a delete button to undo mistakes. Outside the classroom, you may be asked to give a presentation, often at the last minute, and the show must go on. Presentations can be stressful, but planning and preparation, when the time and opportunity are available, can make all the difference.
This chapter covers how to plan and deliver an effective, engaging presentation. By planning carefully, applying some time-honored presentation strategies, and practicing, you can make sure that your presentation comes across as confident, knowledgeable, and interesting—and that your audience actually learns from it. The specific tasks involved in creating a presentation may vary slightly depending on your purpose and your assignment. However, these are the general steps.
Follow these steps to create a presentation based on your ideas:
- Determine your purpose and identify the key ideas to present.
- Organize your ideas in an outline.
- Identify opportunities to incorporate visual or audio media, and create or locate these media aids.
- Rehearse your presentation in advance.
- Deliver your presentation to your audience.
Getting Started: Identifying and Organizing Key Ideas
To deliver a successful presentation, you need to develop content suitable for an effective presentation. Your ideas make up your presentation, but to deliver them effectively, you will need to identify key ideas and organize them carefully. Read the following considerations, which will help you first identify and then organize key ideas:
- Be concise. You will include the most important ideas and leave out others. Some concepts may need to be simplified.
- Employ more than one medium of expression. You should incorporate other media, such as charts, graphs, photographs, video or audio recordings, or websites.
- Prepare for a face-to-face presentation. If you must deliver a face-to-face presentation, it is important to project yourself as a serious and well-informed speaker. You will often speak extemporaneously, or in a rehearsed but not memorized manner, which allows for flexibility given the context or audience. You will need to know your points and keep your audience engaged.
Determine Your Purpose
As with a writing assignment, determining the purpose of your presentation early on is crucial. You want to inform your readers about the topic, but think about what else you hope to achieve.
Are you presenting information intended to move your audience to adopt certain beliefs or take action on a particular issue? If so, you are speaking not only to inform but also to persuade your listeners. Do you want your audience to come away from your presentation knowing how to do something they that they did not know before? In that case, you are not only informing them but also explaining or teaching a process.
writing at work
Schoolteachers are trained to structure lessons around one or more lesson objectives. Usually the objective, the mission or purpose, states what students should know or be able to do after they complete the lesson. For example, an objective might state, “Students will understand the specific freedoms guaranteed by the First Amendment” or “Students will be able to add two three-digit numbers correctly.”
As a manager, mentor, or supervisor, you may sometimes be required to teach or train other employees as part of your job. Determining the desired outcome of a training session will help you plan effectively. Identify your teaching objectives. What, specifically, do you want your audience to know (for instance, details of a new workplace policy) or be able to do (for instance, use a new software program)? Plan your teaching or training session to meet your objectives.
Identify Key Ideas
To plan your presentation, think in terms of three or four key points you want to get across. In a paper, you have the space to develop ideas at length and delve into complex details. In a presentation, however, you must convey your ideas more concisely.
One strategy you might try is to create an outline. What is your main idea? Would your main idea work well as key points for a brief presentation? How would you condense topics that might be too lengthy, or should you eliminate topics that may be too complicated to address in your presentation?
Exercise \(\PageIndex{1}\)
Revisit your presentation assignment, or think of a topic for your presentation. On your own sheet of notebook paper, write a list of at least three to five key ideas. Keep the following questions in mind when listing your key ideas:
- What is your purpose?
- Who is your audience?
- How will you engage your audience?
2. On the same paper, identify the steps you must complete before you begin creating your presentation.
Use an Outline to Organize Ideas
After you determine which ideas are most appropriate for your presentation, you will create an outline of those ideas. Your presentation, like a written assignment, should include an introduction, body, and conclusion. These components serve much the same purpose as they do in a written assignment.
- The introduction engages the audience’s attention, introduces the topic, and sets the tone for what is to come.
- The body develops your point of view with supporting ideas, details, and examples presented in a logical order.
- The conclusion restates your point of view, sums up your main points, and leaves your audience with something to think about.
Jorge, who wrote the research paper featured in Chapter 11 , developed the following outline. Jorge relied heavily on this outline to plan his presentation, but he adjusted it to suit the new format.

Planning Your Introduction
In Chapter 12 , you learned techniques for writing an interesting introduction, such as beginning with a surprising fact or statistic, a thought-provoking question or quotation, a brief anecdote that illustrates a larger concept or connects your topic to your audience’s experiences. You can use these techniques effectively in presentations as well. You might also consider actively engaging your audience by having members respond to questions or complete a brief activity related to your topic. For example, you may have your audience respond to a survey or tell about an experience related to your topic.
Incorporating media can also be an effective way to get your audience’s attention. Visual images such as a photograph or a cartoon can invoke an immediate emotional response. A graph or chart can highlight startling findings in research data or statistical information. Brief video or audio clips that clearly reinforce your message and do not distract or overwhelm your audience can provide a sense of immediacy when you plan to discuss an event or a current issue. A PowerPoint presentation allows you to integrate many of these different media sources into one presentation.
With the accessibility provided by the Internet, you can find interesting and appropriate audio and video with little difficulty. However, the clip alone will not sustain the presentation. To keep the audience interested and engaged, you must frame the beginning and end of the clip with your own words.
Jorge completed the introduction part of his outline by listing the key points he would use to open his presentation. He also planned to show various web links early on to illustrate the popularity of the low-carbohydrate diet trend.

Planning the Body of Your Presentation
The next step is to work with the key ideas you identified earlier. Determine the order in which you want to present these ideas, and flesh them out with important details. Chapter 10 discusses several organizational structures you might work with, such as chronological order, comparison-and-contrast structure, or cause-and-effect structure.
How much detail you include will depend on the time allotted for your presentation. Your instructor will most likely give you a specific time limit or a specific slide limit, such as eight to ten slides. If the time limit is very brief (two to three minutes, for instance), you will need to focus on communicating your point of view, main supporting points, and only the most relevant details. Three minutes can feel like an eternity if you are speaking before a group, but the time will pass very quickly. It is important to use it well.
If you have more time to work with—ten minutes or half an hour—you will be able to discuss your topic in greater detail. More time also means you must devote more thought into how you will hold your audience’s interest. If your presentation is longer than five minutes, introduce some variety so the audience is not bored. Incorporate multimedia, invite the audience to complete an activity, or set aside time for a question-and-answer session.
Jorge was required to limit his presentation to five to seven minutes. In his outline, he made a note about where he would need to condense some complicated material to stay within his time limit. He also decided to focus only on cholesterol and heart disease in his discussion of long-term health outcomes. The research on other issues was inconclusive, so Jorge decided to omit this material. Jorge’s notes on his outline show the revisions he has made to his presentation.

You are responsible for using your presentation time effectively to inform your audience. You show respect for your audience by following the expected time limit. However, that does not mean you must fill all of that time with talk if you are giving a face-to-face presentation. Involving your audience can take some of the pressure off you while also keeping them engaged. Have them respond to a few brief questions to get them thinking. Display a relevant photograph, document, or object and ask your classmates to comment. In some presentations, if time allows, you may choose to have your classmates complete an individual or group activity.
Planning Your Conclusion
The conclusion should briefly sum up your main idea and leave your audience with something to think about. As in a written paper, you are essentially revisiting your thesis. Depending on your topic, you may also ask the audience to reconsider their thinking about an issue, to take action, or to think about a related issue. If you presented an attention-getting fact or anecdote in your introduction, consider revisiting it in your conclusion. Just as you have learned about an essay’s conclusion, do not add new content to the presentation’s conclusion.
No matter how you choose to structure your conclusion, make sure it is well planned so that you are not tempted to wrap up your presentation too quickly. Inexperienced speakers, in a face-to-face presentation, sometimes rush through the end of a presentation to avoid exceeding the allotted time or to end the stressful experience of presenting in public. Unfortunately, a hurried conclusion makes the presentation as a whole less memorable.
Time management is the key to delivering an effective presentation whether it is face-to-face or in PowerPoint. As you develop your outline, think about the amount of time you will devote to each section. For instance, in a five-minute face-to-face presentation, you might plan to spend one minute on the introduction, three minutes on the body, and one minute on the conclusion. Later, when you rehearse, you can time yourself to determine whether you need to adjust your content or delivery.
In a PowerPoint presentation, it is important that your presentation is visually stimulating, avoids information overload by limiting the text per slide, uses speaker notes effectively, and uses a font that is visible on the background (e.g., avoid white letters on a light background or black letters on a dark background).
Exercise \(\PageIndex{2}\)
Work with the list you created in Exercise 1 to develop a more complete outline for your presentation. Make sure your outline includes the following:
- An introduction that uses strategies to capture your audience’s attention
- A body section that summarizes your main points and supporting details
- A conclusion that will help you end on a memorable note
- Brief notes about how much time you plan to spend on each part of the presentation (you may adjust the timing later as needed)
Identifying Opportunities to Incorporate Visual and Audio Media
You may already have some ideas for how to incorporate visual and audio media in your presentation. If not, review your outline and begin thinking about where to include media. Presenting information in a variety of formats will help you keep your audience’s interest.
Use Presentation Software
Delivering your presentation as a slideshow is one way to use media to your advantage. As you speak, you use a computer and an attached projector to display a slideshow of text and graphics that complement the speech. Your audience will follow your ideas more easily, because you are communicating with them through more than one sense. The audience hears your words and also sees the corresponding visuals. A listener who momentarily loses track of what you are saying can rely on the slide to cue his or her memory.
To set up your presentation, you will need to work with the content of your outline to develop individual slides. Each slide should focus on just a few bullet points (or a similar amount of content presented in a graphic). Remember that your audience must be able to read the slides easily, whether the members sit in the front or the back of the room. Avoid overcrowding the slides with too much text.
Using presentation software, such as PowerPoint, allows you to incorporate graphics, sounds, and even web links directly into your slides. You can also work with available styles, color schemes, and fonts to give your presentation a polished, consistent appearance. Different slide templates make it easy to organize information to suit your purpose. Be sure your font is visible to you audience. Avoid using small font or colored font that is not visible against your background.
Use PowerPoint as a Visual Aid
PowerPoint and similar visual representation programs can be effective tools to help audiences remember your message, but they can also be an annoying distraction to your speech. How you prepare your slides and use the tool will determine your effectiveness.
PowerPoint is a slideware program that you have no doubt seen used in class, seen in a presentation at work, or perhaps used yourself to support a presentation. PowerPoint and similar slideware programs provide templates for creating electronic slides to present visual information to the audience, reinforcing the verbal message. You will be able to import or cut and paste words from text files, images, or video clips to create slides to represent your ideas. You can even incorporate web links. When using any software program, it is always a good idea to experiment with it long before you intend to use it; explore its many options and functions, and see how it can be an effective tool for you.
At first, you might be overwhelmed by the possibilities, and you might be tempted to use all the bells, whistles, and sound effects, not to mention the tumbling, flying, and animated graphics. If used wisely, a dissolve or key transition can be like a well-executed scene from a major motion picture and lead your audience to the next point. But if used indiscriminately, it can annoy the audience to the point where they cringe in anticipation of the sound effect at the start of each slide. This danger is inherent in the tool, but you are in charge of it and can make wise choices that enhance the understanding and retention of your information.
The first point to consider is which visual aid is the most important. The answer is you, the speaker. You will facilitate the discussion, give life to the information, and help the audience correlate the content to your goal or purpose. You do not want to be in a position where the PowerPoint presentation is the focus and you are on the side of the stage simply helping the audience follow along. Slides should support you in your presentation, rather than the other way around. Just as there is a number one rule for handouts (do not pass them out at the start of your presentation), there is also one for PowerPoint presentations: do not use PowerPoint slides as a read-aloud script for your speech. The PowerPoint slides should amplify and illustrate your main points, not reproduce everything you are going to say.
Your pictures are the second area of emphasis you will want to consider. The tool will allow you to show graphs, charts and illustrate relationships that words may only approach in terms of communication, but your verbal support of the visual images will make all the difference. Dense pictures or complicated graphics will confuse more than they clarify. Choose clear images that have an immediate connection to both your content and the audience, tailored to their specific needs. After the images, consider using only key words that can be easily read to accompany your pictures. The fewer words the better. Try to keep each slide to a total word count of less than ten words. Do not use full sentences. Using key words provides support for your verbal discussion, guiding you as well as your audience. The key words can serve as signposts or signal words related to key ideas.
A natural question at this point is, How do I communicate complex information simply? The answer comes with several options. The visual representation on the screen is for support and illustration. Should you need to communicate more technical, complex, or in-depth information in a visual way, consider preparing a handout to distribute at the conclusion of your speech. You may also consider using a printout of your slide show with a section for taking notes, but if you distribute it at the beginning of your speech, you run the risk of turning your presentation into a guided reading exercise and possibly distracting or losing members of the audience. Everyone reads at a different pace and takes notes in their own way. You do not want to be in the position of going back and forth between slides to help people follow along.
Another point to consider is how you want to use the tool to support your speech and how your audience will interpret its presentation. Most audiences wouldn’t want to read a page of text—as you might see in this book—on the big screen. They will be far more likely to glance at the screen and assess the information you present in relation to your discussion. Therefore, it is key to consider one main idea, relationship, or point per slide. The use of the tool should be guided with the idea that its presentation is for the audience’s benefit, not yours. People often understand pictures and images more quickly and easily than text, and you can use this to your advantage, using the knowledge that a picture is worth a thousand words.
Incorporate Visual Media
Even if you do not use a slideshow to complement your presentation, you can include visual media to support and enhance your content. Visual media are divided into two major categories: images and informational graphics.
Image-based media, such as photographs or videos, often have little or no accompanying text. Often these media are more powerful than words in getting a message across. Within the past decade, the images associated with major news stories, such as the Indian Ocean tsunami of 2004, the Abu Ghraib prison abuses from 2004 to 2006, and the 2010 earthquake in Haiti, have powerfully affected viewers’ emotions and drawn their attention to these news stories.

Even if your presentation addresses a less dramatic subject, you can still use images to draw in your audience. Consider how photographs, an illustration, or a video might help your audience connect with a particular person or place or bring a historical event to life. Use visual images to support descriptions of natural or man-made phenomena. What ideas lend themselves to being explained primarily through images?
In addition, consider how you might incorporate informational graphics in your presentation. Informational graphics include diagrams, tables, pie charts, bar and line graphs, and flow charts. Informational graphics usually include some text and often work well to present numerical information. Consider using them if you are presenting statistics, comparing facts or data about several different groups, describing changes over time, or presenting a process.
Incorporate Audio Media
Although audio media are not as versatile as visual media, you may wish to use them if they work well with your particular topic. If your presentation discusses trends in pop music or analyzes political speeches, playing an audio clip is an obvious and effective choice. Clips from historical speeches, radio talk shows, and interviews can also be used, but extended clips may be ineffective with modern audiences. Always assess your audience’s demographics and expectations before selecting and including audio media.
Exercise \(\PageIndex{3}\)
Review the outline you created in Exercise 2. Complete the following steps:
- Identify at least two to three places in your presentation where you might incorporate visual or audio media. Brainstorm ideas for what media would be effective, and create a list of ideas. (In Section 14.2 , you will explore different media options in greater depth. For now, focus on coming up with a few general ideas.)
- Determine whether you will use presentation software to deliver your presentation as a slideshow. If you plan to do so, begin using your outline to draft your slides.

Planning Ahead: Annotating Your Presentation
When you make a presentation, you are giving a performance of sorts. It may not be as dramatic as a play or a movie, but it requires smooth coordination of several elements—your words, your gestures, and any media you include. One way to ensure that the performance goes smoothly is to annotate your presentation ahead of time.
To annotate means to add comments or notes to a document. You can use this technique to plan how the different parts of your presentation will flow together. For instance, if you are working with slides, add notes to your outline indicating when you will show each slide. If you have other visual or audio media to include, make a note of that, too. Be as detailed as necessary. Jotting “Start video at 3:14” can spare you the awkwardness of searching for the right clip during your presentation.
In the workplace, employees are often asked to deliver presentations or conduct a meeting using standard office presentation software. If you are using presentation software, you can annotate your presentation easily as you create your slides. Use the notes feature at the bottom of the page to add notes for each slide. As you deliver your presentation, your notes will be visible to you on the computer screen but not to your audience on the projector screen.
In a face-to-face presentation, make sure your final annotated outline is easy to read. It will serve to cue you during your presentation, so it does not need to look polished, as long as it is clear to you. Double space the text. Use a larger-than-normal font size (14 or 16 points) if that will make it easier for you to read. Boldface or italics will set off text that should be emphasized or delivered with greater emotion. Write out main points, as well as your opening and closing remarks, in complete sentences, along with any material you want to quote verbatim. Use shorter phrases for supporting details. Using your speaker notes effectively will help you deliver an effective presentation. Highlighting, all capital letters, or different-colored font will help you easily distinguish notes from the text of your speech. Read Jorge’s annotated outline.

Some students prefer to write out the full text of their face-to-face presentation. This can be a useful strategy when you are practicing your delivery. However, keep in mind that reading your text aloud, word for word, will not help you capture and hold your audience’s attention. Write out and read your speech if that helps you rehearse. After a few practice sessions, when you are more comfortable with your material, switch to working from an outline. That will help you sound more natural when you speak to an audience.
In a PowerPoint presentation, remember to have your slides in logical sequential order. Annotating your presentation before submitting it to your audience or your instructor will help you check for order and logical transitions. Too much text or data may confuse your audience; strive for clarity and avoid unnecessary details. Let the pictures or graphics tell the story but do not overload your slideshow with visuals. Be sure your font is visible. Look for consistency in the time limit of your presentation to gauge your level of preparedness.
Exercise \(\PageIndex{4}\)
Begin to annotate your outline. (You will probably add more notes as you proceed, but including some annotations now will help you begin pulling your ideas together.) Mark your outline with the following information:
- Write notes in brackets to any sections where you definitely plan to incorporate visual or audio media.
- If you are presenting a slideshow, add notes in brackets indicating which slides go with each section of your outline.
- Identify and set off any text that should be emphasized.

Key Takeaways
- An effective presentation presents ideas more concisely than a written document and uses media to explain ideas and hold the audience’s interest.
- Like an essay, a presentation should have a clear beginning, middle, and end.
- Good writers structure their presentations on the thesis, or point of view; main ideas; and key supporting details and create a presentation outline to organize their ideas.
- Annotating a presentation outline is a useful way to coordinate different parts of the presentation and manage time effectively.

6 Tools to Create Flawless Presentations and Assignments
No matter how you look at it, presentations are vital to students’ success. It is a great way to showcase your talents, demonstrate understanding of the subject, put a positive light on the assignment, and so on.
However, with limited time and resources, it can be tough for students to prepare impactful assignments and presentations.. Here, we will share with you seven best tools you can use when creating presentations and assignments.
Table of Contents
Tools for Presentation
1. venngage.
Students are often intimidated by the thought of creating attractive and informative presentations. Venngage is a highly effective presentation tool that helps students create impressive infographics. Users can add text, images, videos, slides, and other essential elements to enhance your presentations. Additionally, users can also edit the content in the presentation at any time and preview it before sharing it.
It’s a user-friendly tool to quickly create quick academic presentations. The drag-and-drop feature to add images from your computer or any other source makes it easier to add illustrations to presentations. Furthermore, the feature of adding text or import documents from Google Drive or Dropbox is an advantage with Venngage.
Keynote is another tool for creating presentations. It’s another easy-to-use tool for students to create presentations without getting into the technical details of designing slides and images.
Here are some noteworthy features of Keynote:
A Wide Range of Templates
You can use professionally designed default templates or create your slides with ease. This saves your precious time in making the right template. Get your hands on the available templates to serve your presentation purposes.
Easy-to-Use Interface
The interface of Keynote is extremely simple, which makes it easy for beginners to use it effortlessly. Even the most novice users can create professional-looking presentations within minutes using this tool without looking around for assistance.
Different Types of Transitions
You can add transitions between slides and animations to your presentations. This helps in keeping things interesting and engaging for your audience. You will also be able to choose different types of transitions, such as cross-dissolve, wipe transitions, and many more.
Free to Use
It’s free to download and use on all platforms, including Windows, macOS, iOS, and Android. It is also accessible with macOS version 10.10 and higher, so you don’t have to install anything else to use it.
Wide Range of Theme Collection
It has a wide range of themes to choose from. It allows theme customization with =with pictures and colors to create unique layouts and designs.
Canva is a free online tool that can be used to create posters, presentations, and other visual content.
If you want a way to create fascinating presentations, Canva is the perfect place to start with. It’s free, easy to use, and has many features to help you create better presentations.
Here are some of the great features available in Canva:
- Layouts are easy on the eyes and make it easier to read the text.
- Multiple pictures can be added on each slide with different sizes, shapes, and colors.
- Different text effects like drop shadows, outlines, and more.
- Stickers that you can use to personalize each slide.
- You can use a fully customizable background to add flair to your slides. Add text boxes, shapes, lines, and arrows by dragging and dropping from the toolbox or clicking the + button in the toolbar.
- Add custom design elements using Canva’s unique blend of fonts and graphics to create eye-catching designs that will get you noticed.
Tools for Assignments
4. enago plagiarism checker.
Enago plagiarism checker is a free online tool that helps students check their assignments and research papers for plagiarism. The tool is compatible with all device types and can be used to check any kind of text, including articles, essays, and even research papers. It also has an option to compare the original source with the copy presented in the assignment.
How does the Enago plagiarism checker work?
Enago works by scanning through the text of your assignment and finding any instances where it looks like someone else’s work has been copied into yours without attribution. The tool is easy to use and requires no technical skills.
The tool compares provided text against over 91 billion current and archived web pages. Furthermore, the advanced scholarly article check compares your text against over 135 million pay walled and open access write-ups. It’s detailed and accurate plagiarism report helps in making your assignment plagiarism-free.
5. Merge PDF
One of the most common problems students face is combining assignments from different sources.
Students may have to combine several assignments or projects they may have created on different platforms. An online PDF merger tool can help them combine your assignments into one document for easy submission.
This tool can help you merge PDF documents within seconds and make your assignments submission-ready in no time. The best thing about this tool is that it does not require any special skills or technical knowledge, which means anyone can use it without facing any issues.
How Does it Work?
You don’t have to follow a difficult process to combine PDF documents using an online PDF merger tool. Simply follow simple steps to get your job done.
- Upload the PDF documents that you want to combine. You can either upload from your device’s internal storage or cloud storage services such as Google Drive and Dropbox.
- Once uploaded, correct the order of the files by dragging and dropping documents in the required sequence.
- Now, you can click the ‘Merge Files’ button to combine files. You can download the consolidated document once it’s ready in a few seconds.
That’s how easily you can merge as many PDFs as you want into a single document. This tool is free to use and does not require registration or sign-up.
6. Trinka AI
Trinka AI is a digital assistant that corrects your grammar and spelling mistakes in real-time. It is the world’s first AI-powered grammar checker with a built-in platform for creating custom checks.
Trinka is exclusively made for academic and technical writing. It corrects over 3000 complex grammar errors to ensure delivering of error-free file. Furthermore, it checks tone, structure, word choice, writing style guides, and more. It goes beyond grammar checks and also flags sentences with informal language.
It helps polish your content with various advanced tools, including grammar checks, word suggestions, and conciseness. to
These features make Trinka AI an excellent resource for those who want to improve their grammar skills and those who want to learn new ones.
Students have a lot of things to think about while creating presentations or assignments. It’s easy to get overwhelmed by all the tasks you have due soon. One way to cope with your workload is using the right tools. The above six tools can help you understand how to present your work the best way and how to organize and manage your assignments as they move towards the submission process.
Rate this article Cancel Reply
Your email address will not be published.

Enago Academy's Most Popular Articles

- Language & Grammar
- Reporting Research
Best Plagiarism Checker Tool for Researchers — Top 4 to choose from!
While common writing issues like language enhancement, punctuation errors, grammatical errors, etc. can be dealt…

- Industry News
- Publishing News
2022 in a Nutshell — Reminiscing the year when opportunities were seized and feats were achieved!
It’s beginning to look a lot like success! Some of the greatest opportunities to research…

- Reference Management
Are Reference Managers Enough to Organize and Curate Different Scholarly Knowledge Resources?
I pulled my collar up, my hat down, and secured my glasses when I realized…

- AI in Academia
- Manuscripts & Grants
How to Scan Through Millions of Articles and Still Cut Down on Your Reading Time — Why not do it with an AI-based article summarizer?
Researcher 1: “It’s flooding articles every time I switch on my laptop!” Researcher 2: “Why…

Finding Relevant Scholarly Research for Literature Review: How can we be systematic?
On an average, it takes 15 clicks for a researcher to find an article (which…
2022 in a Nutshell — Reminiscing the year when opportunities were seized and feats…
Are Reference Managers Enough to Organize and Curate Different Scholarly Knowledge…
How to Scan Through Millions of Articles and Still Cut Down on Your Reading Time —…

Sign-up to read more
Subscribe for free to get unrestricted access to all our resources on research writing and academic publishing including:
- 2000+ blog articles
- 50+ Webinars
- 10+ Expert podcasts
- 50+ Infographics
- 10+ Checklists
- Research Guides
We hate spam too. We promise to protect your privacy and never spam you.
I am looking for Editing/ Proofreading services for my manuscript Tentative date of next journal submission:

What should universities' stance be on AI tools in research and academic writing?
- Privacy Policy
Buy Me a Coffee
Home » Assignment – Types, Examples and Writing Guide
Assignment – Types, Examples and Writing Guide
Table of Contents

Definition:
Assignment is a task given to students by a teacher or professor, usually as a means of assessing their understanding and application of course material. Assignments can take various forms, including essays, research papers, presentations, problem sets, lab reports, and more.
Assignments are typically designed to be completed outside of class time and may require independent research, critical thinking, and analysis. They are often graded and used as a significant component of a student’s overall course grade. The instructions for an assignment usually specify the goals, requirements, and deadlines for completion, and students are expected to meet these criteria to earn a good grade.
History of Assignment
The use of assignments as a tool for teaching and learning has been a part of education for centuries. Following is a brief history of the Assignment.
- Ancient Times: Assignments such as writing exercises, recitations, and memorization tasks were used to reinforce learning.
- Medieval Period : Universities began to develop the concept of the assignment, with students completing essays, commentaries, and translations to demonstrate their knowledge and understanding of the subject matter.
- 19th Century : With the growth of schools and universities, assignments became more widespread and were used to assess student progress and achievement.
- 20th Century: The rise of distance education and online learning led to the further development of assignments as an integral part of the educational process.
- Present Day: Assignments continue to be used in a variety of educational settings and are seen as an effective way to promote student learning and assess student achievement. The nature and format of assignments continue to evolve in response to changing educational needs and technological innovations.
Types of Assignment
Here are some of the most common types of assignments:
An essay is a piece of writing that presents an argument, analysis, or interpretation of a topic or question. It usually consists of an introduction, body paragraphs, and a conclusion.
Essay structure:
- Introduction : introduces the topic and thesis statement
- Body paragraphs : each paragraph presents a different argument or idea, with evidence and analysis to support it
- Conclusion : summarizes the key points and reiterates the thesis statement
Research paper
A research paper involves gathering and analyzing information on a particular topic, and presenting the findings in a well-structured, documented paper. It usually involves conducting original research, collecting data, and presenting it in a clear, organized manner.
Research paper structure:
- Title page : includes the title of the paper, author’s name, date, and institution
- Abstract : summarizes the paper’s main points and conclusions
- Introduction : provides background information on the topic and research question
- Literature review: summarizes previous research on the topic
- Methodology : explains how the research was conducted
- Results : presents the findings of the research
- Discussion : interprets the results and draws conclusions
- Conclusion : summarizes the key findings and implications
A case study involves analyzing a real-life situation, problem or issue, and presenting a solution or recommendations based on the analysis. It often involves extensive research, data analysis, and critical thinking.
Case study structure:
- Introduction : introduces the case study and its purpose
- Background : provides context and background information on the case
- Analysis : examines the key issues and problems in the case
- Solution/recommendations: proposes solutions or recommendations based on the analysis
- Conclusion: Summarize the key points and implications
A lab report is a scientific document that summarizes the results of a laboratory experiment or research project. It typically includes an introduction, methodology, results, discussion, and conclusion.
Lab report structure:
- Title page : includes the title of the experiment, author’s name, date, and institution
- Abstract : summarizes the purpose, methodology, and results of the experiment
- Methods : explains how the experiment was conducted
- Results : presents the findings of the experiment
Presentation
A presentation involves delivering information, data or findings to an audience, often with the use of visual aids such as slides, charts, or diagrams. It requires clear communication skills, good organization, and effective use of technology.
Presentation structure:
- Introduction : introduces the topic and purpose of the presentation
- Body : presents the main points, findings, or data, with the help of visual aids
- Conclusion : summarizes the key points and provides a closing statement
Creative Project
A creative project is an assignment that requires students to produce something original, such as a painting, sculpture, video, or creative writing piece. It allows students to demonstrate their creativity and artistic skills.
Creative project structure:
- Introduction : introduces the project and its purpose
- Body : presents the creative work, with explanations or descriptions as needed
- Conclusion : summarizes the key elements and reflects on the creative process.
Examples of Assignments
Following are Examples of Assignment templates samples:
Essay template:
I. Introduction
- Hook: Grab the reader’s attention with a catchy opening sentence.
- Background: Provide some context or background information on the topic.
- Thesis statement: State the main argument or point of your essay.
II. Body paragraphs
- Topic sentence: Introduce the main idea or argument of the paragraph.
- Evidence: Provide evidence or examples to support your point.
- Analysis: Explain how the evidence supports your argument.
- Transition: Use a transition sentence to lead into the next paragraph.
III. Conclusion
- Restate thesis: Summarize your main argument or point.
- Review key points: Summarize the main points you made in your essay.
- Concluding thoughts: End with a final thought or call to action.
Research paper template:
I. Title page
- Title: Give your paper a descriptive title.
- Author: Include your name and institutional affiliation.
- Date: Provide the date the paper was submitted.
II. Abstract
- Background: Summarize the background and purpose of your research.
- Methodology: Describe the methods you used to conduct your research.
- Results: Summarize the main findings of your research.
- Conclusion: Provide a brief summary of the implications and conclusions of your research.
III. Introduction
- Background: Provide some background information on the topic.
- Research question: State your research question or hypothesis.
- Purpose: Explain the purpose of your research.
IV. Literature review
- Background: Summarize previous research on the topic.
- Gaps in research: Identify gaps or areas that need further research.
V. Methodology
- Participants: Describe the participants in your study.
- Procedure: Explain the procedure you used to conduct your research.
- Measures: Describe the measures you used to collect data.
VI. Results
- Quantitative results: Summarize the quantitative data you collected.
- Qualitative results: Summarize the qualitative data you collected.
VII. Discussion
- Interpretation: Interpret the results and explain what they mean.
- Implications: Discuss the implications of your research.
- Limitations: Identify any limitations or weaknesses of your research.
VIII. Conclusion
- Review key points: Summarize the main points you made in your paper.
Case study template:
- Background: Provide background information on the case.
- Research question: State the research question or problem you are examining.
- Purpose: Explain the purpose of the case study.
II. Analysis
- Problem: Identify the main problem or issue in the case.
- Factors: Describe the factors that contributed to the problem.
- Alternative solutions: Describe potential solutions to the problem.
III. Solution/recommendations
- Proposed solution: Describe the solution you are proposing.
- Rationale: Explain why this solution is the best one.
- Implementation: Describe how the solution can be implemented.
IV. Conclusion
- Summary: Summarize the main points of your case study.
Lab report template:
- Title: Give your report a descriptive title.
- Date: Provide the date the report was submitted.
- Background: Summarize the background and purpose of the experiment.
- Methodology: Describe the methods you used to conduct the experiment.
- Results: Summarize the main findings of the experiment.
- Conclusion: Provide a brief summary of the implications and conclusions
- Background: Provide some background information on the experiment.
- Hypothesis: State your hypothesis or research question.
- Purpose: Explain the purpose of the experiment.
IV. Materials and methods
- Materials: List the materials and equipment used in the experiment.
- Procedure: Describe the procedure you followed to conduct the experiment.
- Data: Present the data you collected in tables or graphs.
- Analysis: Analyze the data and describe the patterns or trends you observed.
VI. Discussion
- Implications: Discuss the implications of your findings.
- Limitations: Identify any limitations or weaknesses of the experiment.
VII. Conclusion
- Restate hypothesis: Summarize your hypothesis or research question.
- Review key points: Summarize the main points you made in your report.
Presentation template:
- Attention grabber: Grab the audience’s attention with a catchy opening.
- Purpose: Explain the purpose of your presentation.
- Overview: Provide an overview of what you will cover in your presentation.
II. Main points
- Main point 1: Present the first main point of your presentation.
- Supporting details: Provide supporting details or evidence to support your point.
- Main point 2: Present the second main point of your presentation.
- Main point 3: Present the third main point of your presentation.
- Summary: Summarize the main points of your presentation.
- Call to action: End with a final thought or call to action.
Creative writing template:
- Setting: Describe the setting of your story.
- Characters: Introduce the main characters of your story.
- Rising action: Introduce the conflict or problem in your story.
- Climax: Present the most intense moment of the story.
- Falling action: Resolve the conflict or problem in your story.
- Resolution: Describe how the conflict or problem was resolved.
- Final thoughts: End with a final thought or reflection on the story.
How to Write Assignment
Here is a general guide on how to write an assignment:
- Understand the assignment prompt: Before you begin writing, make sure you understand what the assignment requires. Read the prompt carefully and make note of any specific requirements or guidelines.
- Research and gather information: Depending on the type of assignment, you may need to do research to gather information to support your argument or points. Use credible sources such as academic journals, books, and reputable websites.
- Organize your ideas : Once you have gathered all the necessary information, organize your ideas into a clear and logical structure. Consider creating an outline or diagram to help you visualize your ideas.
- Write a draft: Begin writing your assignment using your organized ideas and research. Don’t worry too much about grammar or sentence structure at this point; the goal is to get your thoughts down on paper.
- Revise and edit: After you have written a draft, revise and edit your work. Make sure your ideas are presented in a clear and concise manner, and that your sentences and paragraphs flow smoothly.
- Proofread: Finally, proofread your work for spelling, grammar, and punctuation errors. It’s a good idea to have someone else read over your assignment as well to catch any mistakes you may have missed.
- Submit your assignment : Once you are satisfied with your work, submit your assignment according to the instructions provided by your instructor or professor.
Applications of Assignment
Assignments have many applications across different fields and industries. Here are a few examples:
- Education : Assignments are a common tool used in education to help students learn and demonstrate their knowledge. They can be used to assess a student’s understanding of a particular topic, to develop critical thinking skills, and to improve writing and research abilities.
- Business : Assignments can be used in the business world to assess employee skills, to evaluate job performance, and to provide training opportunities. They can also be used to develop business plans, marketing strategies, and financial projections.
- Journalism : Assignments are often used in journalism to produce news articles, features, and investigative reports. Journalists may be assigned to cover a particular event or topic, or to research and write a story on a specific subject.
- Research : Assignments can be used in research to collect and analyze data, to conduct experiments, and to present findings in written or oral form. Researchers may be assigned to conduct research on a specific topic, to write a research paper, or to present their findings at a conference or seminar.
- Government : Assignments can be used in government to develop policy proposals, to conduct research, and to analyze data. Government officials may be assigned to work on a specific project or to conduct research on a particular topic.
- Non-profit organizations: Assignments can be used in non-profit organizations to develop fundraising strategies, to plan events, and to conduct research. Volunteers may be assigned to work on a specific project or to help with a particular task.
Purpose of Assignment
The purpose of an assignment varies depending on the context in which it is given. However, some common purposes of assignments include:
- Assessing learning: Assignments are often used to assess a student’s understanding of a particular topic or concept. This allows educators to determine if a student has mastered the material or if they need additional support.
- Developing skills: Assignments can be used to develop a wide range of skills, such as critical thinking, problem-solving, research, and communication. Assignments that require students to analyze and synthesize information can help to build these skills.
- Encouraging creativity: Assignments can be designed to encourage students to be creative and think outside the box. This can help to foster innovation and original thinking.
- Providing feedback : Assignments provide an opportunity for teachers to provide feedback to students on their progress and performance. Feedback can help students to understand where they need to improve and to develop a growth mindset.
- Meeting learning objectives : Assignments can be designed to help students meet specific learning objectives or outcomes. For example, a writing assignment may be designed to help students improve their writing skills, while a research assignment may be designed to help students develop their research skills.
When to write Assignment
Assignments are typically given by instructors or professors as part of a course or academic program. The timing of when to write an assignment will depend on the specific requirements of the course or program, but in general, assignments should be completed within the timeframe specified by the instructor or program guidelines.
It is important to begin working on assignments as soon as possible to ensure enough time for research, writing, and revisions. Waiting until the last minute can result in rushed work and lower quality output.
It is also important to prioritize assignments based on their due dates and the amount of work required. This will help to manage time effectively and ensure that all assignments are completed on time.
In addition to assignments given by instructors or professors, there may be other situations where writing an assignment is necessary. For example, in the workplace, assignments may be given to complete a specific project or task. In these situations, it is important to establish clear deadlines and expectations to ensure that the assignment is completed on time and to a high standard.
Characteristics of Assignment
Here are some common characteristics of assignments:
- Purpose : Assignments have a specific purpose, such as assessing knowledge or developing skills. They are designed to help students learn and achieve specific learning objectives.
- Requirements: Assignments have specific requirements that must be met, such as a word count, format, or specific content. These requirements are usually provided by the instructor or professor.
- Deadline: Assignments have a specific deadline for completion, which is usually set by the instructor or professor. It is important to meet the deadline to avoid penalties or lower grades.
- Individual or group work: Assignments can be completed individually or as part of a group. Group assignments may require collaboration and communication with other group members.
- Feedback : Assignments provide an opportunity for feedback from the instructor or professor. This feedback can help students to identify areas of improvement and to develop their skills.
- Academic integrity: Assignments require academic integrity, which means that students must submit original work and avoid plagiarism. This includes citing sources properly and following ethical guidelines.
- Learning outcomes : Assignments are designed to help students achieve specific learning outcomes. These outcomes are usually related to the course objectives and may include developing critical thinking skills, writing abilities, or subject-specific knowledge.
Advantages of Assignment
There are several advantages of assignment, including:
- Helps in learning: Assignments help students to reinforce their learning and understanding of a particular topic. By completing assignments, students get to apply the concepts learned in class, which helps them to better understand and retain the information.
- Develops critical thinking skills: Assignments often require students to think critically and analyze information in order to come up with a solution or answer. This helps to develop their critical thinking skills, which are important for success in many areas of life.
- Encourages creativity: Assignments that require students to create something, such as a piece of writing or a project, can encourage creativity and innovation. This can help students to develop new ideas and perspectives, which can be beneficial in many areas of life.
- Builds time-management skills: Assignments often come with deadlines, which can help students to develop time-management skills. Learning how to manage time effectively is an important skill that can help students to succeed in many areas of life.
- Provides feedback: Assignments provide an opportunity for students to receive feedback on their work. This feedback can help students to identify areas where they need to improve and can help them to grow and develop.
Limitations of Assignment
There are also some limitations of assignments that should be considered, including:
- Limited scope: Assignments are often limited in scope, and may not provide a comprehensive understanding of a particular topic. They may only cover a specific aspect of a topic, and may not provide a full picture of the subject matter.
- Lack of engagement: Some assignments may not engage students in the learning process, particularly if they are repetitive or not challenging enough. This can lead to a lack of motivation and interest in the subject matter.
- Time-consuming: Assignments can be time-consuming, particularly if they require a lot of research or writing. This can be a disadvantage for students who have other commitments, such as work or extracurricular activities.
- Unreliable assessment: The assessment of assignments can be subjective and may not always accurately reflect a student’s understanding or abilities. The grading may be influenced by factors such as the instructor’s personal biases or the student’s writing style.
- Lack of feedback : Although assignments can provide feedback, this feedback may not always be detailed or useful. Instructors may not have the time or resources to provide detailed feedback on every assignment, which can limit the value of the feedback that students receive.
About the author

Muhammad Hassan
Researcher, Academic Writer, Web developer
You may also like

Data Collection – Methods Types and Examples

Delimitations in Research – Types, Examples and...

Research Process – Steps, Examples and Tips

Research Design – Types, Methods and Examples

Institutional Review Board – Application Sample...

Evaluating Research – Process, Examples and...

Understanding Assignments
What this handout is about.
The first step in any successful college writing venture is reading the assignment. While this sounds like a simple task, it can be a tough one. This handout will help you unravel your assignment and begin to craft an effective response. Much of the following advice will involve translating typical assignment terms and practices into meaningful clues to the type of writing your instructor expects. See our short video for more tips.
Basic beginnings
Regardless of the assignment, department, or instructor, adopting these two habits will serve you well :
- Read the assignment carefully as soon as you receive it. Do not put this task off—reading the assignment at the beginning will save you time, stress, and problems later. An assignment can look pretty straightforward at first, particularly if the instructor has provided lots of information. That does not mean it will not take time and effort to complete; you may even have to learn a new skill to complete the assignment.
- Ask the instructor about anything you do not understand. Do not hesitate to approach your instructor. Instructors would prefer to set you straight before you hand the paper in. That’s also when you will find their feedback most useful.
Assignment formats
Many assignments follow a basic format. Assignments often begin with an overview of the topic, include a central verb or verbs that describe the task, and offer some additional suggestions, questions, or prompts to get you started.
An Overview of Some Kind
The instructor might set the stage with some general discussion of the subject of the assignment, introduce the topic, or remind you of something pertinent that you have discussed in class. For example:
“Throughout history, gerbils have played a key role in politics,” or “In the last few weeks of class, we have focused on the evening wear of the housefly …”
The Task of the Assignment
Pay attention; this part tells you what to do when you write the paper. Look for the key verb or verbs in the sentence. Words like analyze, summarize, or compare direct you to think about your topic in a certain way. Also pay attention to words such as how, what, when, where, and why; these words guide your attention toward specific information. (See the section in this handout titled “Key Terms” for more information.)
“Analyze the effect that gerbils had on the Russian Revolution”, or “Suggest an interpretation of housefly undergarments that differs from Darwin’s.”
Additional Material to Think about
Here you will find some questions to use as springboards as you begin to think about the topic. Instructors usually include these questions as suggestions rather than requirements. Do not feel compelled to answer every question unless the instructor asks you to do so. Pay attention to the order of the questions. Sometimes they suggest the thinking process your instructor imagines you will need to follow to begin thinking about the topic.
“You may wish to consider the differing views held by Communist gerbils vs. Monarchist gerbils, or Can there be such a thing as ‘the housefly garment industry’ or is it just a home-based craft?”
These are the instructor’s comments about writing expectations:
“Be concise”, “Write effectively”, or “Argue furiously.”
Technical Details
These instructions usually indicate format rules or guidelines.
“Your paper must be typed in Palatino font on gray paper and must not exceed 600 pages. It is due on the anniversary of Mao Tse-tung’s death.”
The assignment’s parts may not appear in exactly this order, and each part may be very long or really short. Nonetheless, being aware of this standard pattern can help you understand what your instructor wants you to do.
Interpreting the assignment
Ask yourself a few basic questions as you read and jot down the answers on the assignment sheet:
Why did your instructor ask you to do this particular task?
Who is your audience.
- What kind of evidence do you need to support your ideas?
What kind of writing style is acceptable?
- What are the absolute rules of the paper?
Try to look at the question from the point of view of the instructor. Recognize that your instructor has a reason for giving you this assignment and for giving it to you at a particular point in the semester. In every assignment, the instructor has a challenge for you. This challenge could be anything from demonstrating an ability to think clearly to demonstrating an ability to use the library. See the assignment not as a vague suggestion of what to do but as an opportunity to show that you can handle the course material as directed. Paper assignments give you more than a topic to discuss—they ask you to do something with the topic. Keep reminding yourself of that. Be careful to avoid the other extreme as well: do not read more into the assignment than what is there.
Of course, your instructor has given you an assignment so that he or she will be able to assess your understanding of the course material and give you an appropriate grade. But there is more to it than that. Your instructor has tried to design a learning experience of some kind. Your instructor wants you to think about something in a particular way for a particular reason. If you read the course description at the beginning of your syllabus, review the assigned readings, and consider the assignment itself, you may begin to see the plan, purpose, or approach to the subject matter that your instructor has created for you. If you still aren’t sure of the assignment’s goals, try asking the instructor. For help with this, see our handout on getting feedback .
Given your instructor’s efforts, it helps to answer the question: What is my purpose in completing this assignment? Is it to gather research from a variety of outside sources and present a coherent picture? Is it to take material I have been learning in class and apply it to a new situation? Is it to prove a point one way or another? Key words from the assignment can help you figure this out. Look for key terms in the form of active verbs that tell you what to do.
Key Terms: Finding Those Active Verbs
Here are some common key words and definitions to help you think about assignment terms:
Information words Ask you to demonstrate what you know about the subject, such as who, what, when, where, how, and why.
- define —give the subject’s meaning (according to someone or something). Sometimes you have to give more than one view on the subject’s meaning
- describe —provide details about the subject by answering question words (such as who, what, when, where, how, and why); you might also give details related to the five senses (what you see, hear, feel, taste, and smell)
- explain —give reasons why or examples of how something happened
- illustrate —give descriptive examples of the subject and show how each is connected with the subject
- summarize —briefly list the important ideas you learned about the subject
- trace —outline how something has changed or developed from an earlier time to its current form
- research —gather material from outside sources about the subject, often with the implication or requirement that you will analyze what you have found
Relation words Ask you to demonstrate how things are connected.
- compare —show how two or more things are similar (and, sometimes, different)
- contrast —show how two or more things are dissimilar
- apply—use details that you’ve been given to demonstrate how an idea, theory, or concept works in a particular situation
- cause —show how one event or series of events made something else happen
- relate —show or describe the connections between things
Interpretation words Ask you to defend ideas of your own about the subject. Do not see these words as requesting opinion alone (unless the assignment specifically says so), but as requiring opinion that is supported by concrete evidence. Remember examples, principles, definitions, or concepts from class or research and use them in your interpretation.
- assess —summarize your opinion of the subject and measure it against something
- prove, justify —give reasons or examples to demonstrate how or why something is the truth
- evaluate, respond —state your opinion of the subject as good, bad, or some combination of the two, with examples and reasons
- support —give reasons or evidence for something you believe (be sure to state clearly what it is that you believe)
- synthesize —put two or more things together that have not been put together in class or in your readings before; do not just summarize one and then the other and say that they are similar or different—you must provide a reason for putting them together that runs all the way through the paper
- analyze —determine how individual parts create or relate to the whole, figure out how something works, what it might mean, or why it is important
- argue —take a side and defend it with evidence against the other side
More Clues to Your Purpose As you read the assignment, think about what the teacher does in class:
- What kinds of textbooks or coursepack did your instructor choose for the course—ones that provide background information, explain theories or perspectives, or argue a point of view?
- In lecture, does your instructor ask your opinion, try to prove her point of view, or use keywords that show up again in the assignment?
- What kinds of assignments are typical in this discipline? Social science classes often expect more research. Humanities classes thrive on interpretation and analysis.
- How do the assignments, readings, and lectures work together in the course? Instructors spend time designing courses, sometimes even arguing with their peers about the most effective course materials. Figuring out the overall design to the course will help you understand what each assignment is meant to achieve.
Now, what about your reader? Most undergraduates think of their audience as the instructor. True, your instructor is a good person to keep in mind as you write. But for the purposes of a good paper, think of your audience as someone like your roommate: smart enough to understand a clear, logical argument, but not someone who already knows exactly what is going on in your particular paper. Remember, even if the instructor knows everything there is to know about your paper topic, he or she still has to read your paper and assess your understanding. In other words, teach the material to your reader.
Aiming a paper at your audience happens in two ways: you make decisions about the tone and the level of information you want to convey.
- Tone means the “voice” of your paper. Should you be chatty, formal, or objective? Usually you will find some happy medium—you do not want to alienate your reader by sounding condescending or superior, but you do not want to, um, like, totally wig on the man, you know? Eschew ostentatious erudition: some students think the way to sound academic is to use big words. Be careful—you can sound ridiculous, especially if you use the wrong big words.
- The level of information you use depends on who you think your audience is. If you imagine your audience as your instructor and she already knows everything you have to say, you may find yourself leaving out key information that can cause your argument to be unconvincing and illogical. But you do not have to explain every single word or issue. If you are telling your roommate what happened on your favorite science fiction TV show last night, you do not say, “First a dark-haired white man of average height, wearing a suit and carrying a flashlight, walked into the room. Then a purple alien with fifteen arms and at least three eyes turned around. Then the man smiled slightly. In the background, you could hear a clock ticking. The room was fairly dark and had at least two windows that I saw.” You also do not say, “This guy found some aliens. The end.” Find some balance of useful details that support your main point.
You’ll find a much more detailed discussion of these concepts in our handout on audience .
The Grim Truth
With a few exceptions (including some lab and ethnography reports), you are probably being asked to make an argument. You must convince your audience. It is easy to forget this aim when you are researching and writing; as you become involved in your subject matter, you may become enmeshed in the details and focus on learning or simply telling the information you have found. You need to do more than just repeat what you have read. Your writing should have a point, and you should be able to say it in a sentence. Sometimes instructors call this sentence a “thesis” or a “claim.”
So, if your instructor tells you to write about some aspect of oral hygiene, you do not want to just list: “First, you brush your teeth with a soft brush and some peanut butter. Then, you floss with unwaxed, bologna-flavored string. Finally, gargle with bourbon.” Instead, you could say, “Of all the oral cleaning methods, sandblasting removes the most plaque. Therefore it should be recommended by the American Dental Association.” Or, “From an aesthetic perspective, moldy teeth can be quite charming. However, their joys are short-lived.”
Convincing the reader of your argument is the goal of academic writing. It doesn’t have to say “argument” anywhere in the assignment for you to need one. Look at the assignment and think about what kind of argument you could make about it instead of just seeing it as a checklist of information you have to present. For help with understanding the role of argument in academic writing, see our handout on argument .
What kind of evidence do you need?
There are many kinds of evidence, and what type of evidence will work for your assignment can depend on several factors–the discipline, the parameters of the assignment, and your instructor’s preference. Should you use statistics? Historical examples? Do you need to conduct your own experiment? Can you rely on personal experience? See our handout on evidence for suggestions on how to use evidence appropriately.
Make sure you are clear about this part of the assignment, because your use of evidence will be crucial in writing a successful paper. You are not just learning how to argue; you are learning how to argue with specific types of materials and ideas. Ask your instructor what counts as acceptable evidence. You can also ask a librarian for help. No matter what kind of evidence you use, be sure to cite it correctly—see the UNC Libraries citation tutorial .
You cannot always tell from the assignment just what sort of writing style your instructor expects. The instructor may be really laid back in class but still expect you to sound formal in writing. Or the instructor may be fairly formal in class and ask you to write a reflection paper where you need to use “I” and speak from your own experience.
Try to avoid false associations of a particular field with a style (“art historians like wacky creativity,” or “political scientists are boring and just give facts”) and look instead to the types of readings you have been given in class. No one expects you to write like Plato—just use the readings as a guide for what is standard or preferable to your instructor. When in doubt, ask your instructor about the level of formality she or he expects.
No matter what field you are writing for or what facts you are including, if you do not write so that your reader can understand your main idea, you have wasted your time. So make clarity your main goal. For specific help with style, see our handout on style .
Technical details about the assignment
The technical information you are given in an assignment always seems like the easy part. This section can actually give you lots of little hints about approaching the task. Find out if elements such as page length and citation format (see the UNC Libraries citation tutorial ) are negotiable. Some professors do not have strong preferences as long as you are consistent and fully answer the assignment. Some professors are very specific and will deduct big points for deviations.
Usually, the page length tells you something important: The instructor thinks the size of the paper is appropriate to the assignment’s parameters. In plain English, your instructor is telling you how many pages it should take for you to answer the question as fully as you are expected to. So if an assignment is two pages long, you cannot pad your paper with examples or reword your main idea several times. Hit your one point early, defend it with the clearest example, and finish quickly. If an assignment is ten pages long, you can be more complex in your main points and examples—and if you can only produce five pages for that assignment, you need to see someone for help—as soon as possible.
Tricks that don’t work
Your instructors are not fooled when you:
- spend more time on the cover page than the essay —graphics, cool binders, and cute titles are no replacement for a well-written paper.
- use huge fonts, wide margins, or extra spacing to pad the page length —these tricks are immediately obvious to the eye. Most instructors use the same word processor you do. They know what’s possible. Such tactics are especially damning when the instructor has a stack of 60 papers to grade and yours is the only one that low-flying airplane pilots could read.
- use a paper from another class that covered “sort of similar” material . Again, the instructor has a particular task for you to fulfill in the assignment that usually relates to course material and lectures. Your other paper may not cover this material, and turning in the same paper for more than one course may constitute an Honor Code violation . Ask the instructor—it can’t hurt.
- get all wacky and “creative” before you answer the question . Showing that you are able to think beyond the boundaries of a simple assignment can be good, but you must do what the assignment calls for first. Again, check with your instructor. A humorous tone can be refreshing for someone grading a stack of papers, but it will not get you a good grade if you have not fulfilled the task.
Critical reading of assignments leads to skills in other types of reading and writing. If you get good at figuring out what the real goals of assignments are, you are going to be better at understanding the goals of all of your classes and fields of study.
You may reproduce it for non-commercial use if you use the entire handout and attribute the source: The Writing Center, University of North Carolina at Chapel Hill
Make a Gift
Chapter 14 Creating Presentations: Sharing Your Ideas
14.1 organizing a visual presentation, learning objectives.
- Identify key ideas and details to create a concise, engaging presentation.
- Identify the steps involved in planning a comprehensive presentation.
Until now, you have interacted with your audience of readers indirectly, on the page. You have tried to anticipate their reactions and questions as all good writers do. Anticipating the audience’s needs can be tough, especially when you are sitting alone in front of your computer.
When you give a presentation, you connect directly with your audience. For most people, making a presentation is both exciting and stressful. The excitement comes from engaging in a two-way interaction about your ideas. The stress comes from the pressure of presenting your ideas without having a delete button to undo mistakes. Outside the classroom, you may be asked to give a presentation, often at the last minute, and the show must go on. Presentations can be stressful, but planning and preparation, when the time and opportunity are available, can make all the difference.
This chapter covers how to plan and deliver an effective, engaging presentation. By planning carefully, applying some time-honored presentation strategies, and practicing, you can make sure that your presentation comes across as confident, knowledgeable, and interesting—and that your audience actually learns from it. The specific tasks involved in creating a presentation may vary slightly depending on your purpose and your assignment. However, these are the general steps.
Follow these steps to create a presentation based on your ideas:
- Determine your purpose and identify the key ideas to present.
- Organize your ideas in an outline.
- Identify opportunities to incorporate visual or audio media, and create or locate these media aids.
- Rehearse your presentation in advance.
- Deliver your presentation to your audience.
Getting Started: Identifying and Organizing Key Ideas
To deliver a successful presentation, you need to develop content suitable for an effective presentation. Your ideas make up your presentation, but to deliver them effectively, you will need to identify key ideas and organize them carefully. Read the following considerations, which will help you first identify and then organize key ideas:
- Be concise. You will include the most important ideas and leave out others. Some concepts may need to be simplified.
- Employ more than one medium of expression. You should incorporate other media, such as charts, graphs, photographs, video or audio recordings, or websites.
- Prepare for a face-to-face presentation. If you must deliver a face-to-face presentation, it is important to project yourself as a serious and well-informed speaker. You will often speak extemporaneously, or in a rehearsed but not memorized manner, which allows for flexibility given the context or audience. You will need to know your points and keep your audience engaged.
Determine Your Purpose
As with a writing assignment, determining the purpose of your presentation early on is crucial. You want to inform your readers about the topic, but think about what else you hope to achieve.
Are you presenting information intended to move your audience to adopt certain beliefs or take action on a particular issue? If so, you are speaking not only to inform but also to persuade your listeners. Do you want your audience to come away from your presentation knowing how to do something they that they did not know before? In that case, you are not only informing them but also explaining or teaching a process.
Writing at Work
Schoolteachers are trained to structure lessons around one or more lesson objectives. Usually the objective, the mission or purpose, states what students should know or be able to do after they complete the lesson. For example, an objective might state, “Students will understand the specific freedoms guaranteed by the First Amendment” or “Students will be able to add two three-digit numbers correctly.”
As a manager, mentor, or supervisor, you may sometimes be required to teach or train other employees as part of your job. Determining the desired outcome of a training session will help you plan effectively. Identify your teaching objectives. What, specifically, do you want your audience to know (for instance, details of a new workplace policy) or be able to do (for instance, use a new software program)? Plan your teaching or training session to meet your objectives.
Identify Key Ideas
To plan your presentation, think in terms of three or four key points you want to get across. In a paper, you have the space to develop ideas at length and delve into complex details. In a presentation, however, you must convey your ideas more concisely.
One strategy you might try is to create an outline. What is your main idea? Would your main idea work well as key points for a brief presentation? How would you condense topics that might be too lengthy, or should you eliminate topics that may be too complicated to address in your presentation?
- What is your purpose?
- Who is your audience?
- How will you engage your audience?
- On the same paper, identify the steps you must complete before you begin creating your presentation.
Use an Outline to Organize Ideas
After you determine which ideas are most appropriate for your presentation, you will create an outline of those ideas. Your presentation, like a written assignment, should include an introduction, body, and conclusion. These components serve much the same purpose as they do in a written assignment.
- The introduction engages the audience’s attention, introduces the topic, and sets the tone for what is to come.
- The body develops your point of view with supporting ideas, details, and examples presented in a logical order.
- The conclusion restates your point of view, sums up your main points, and leaves your audience with something to think about.
Jorge, who wrote the research paper featured in Chapter 11 “Writing from Research: What Will I Learn?”, developed the following outline. Jorge relied heavily on this outline to plan his presentation, but he adjusted it to suit the new format.
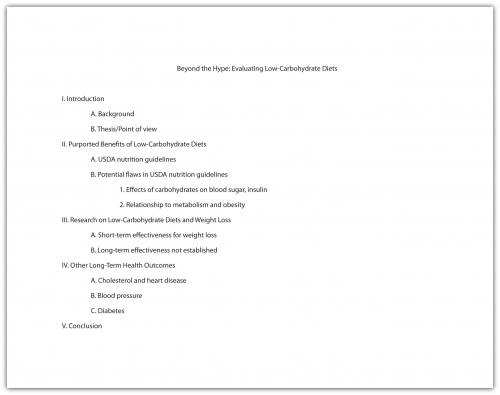
Planning Your Introduction
In Chapter 12 “Writing a Research Paper”, you learned techniques for writing an interesting introduction, such as beginning with a surprising fact or statistic, a thought-provoking question or quotation, a brief anecdote that illustrates a larger concept or connects your topic to your audience’s experiences. You can use these techniques effectively in presentations as well. You might also consider actively engaging your audience by having members respond to questions or complete a brief activity related to your topic. For example, you may have your audience respond to a survey or tell about an experience related to your topic.
Incorporating media can also be an effective way to get your audience’s attention. Visual images such as a photograph or a cartoon can invoke an immediate emotional response. A graph or chart can highlight startling findings in research data or statistical information. Brief video or audio clips that clearly reinforce your message and do not distract or overwhelm your audience can provide a sense of immediacy when you plan to discuss an event or a current issue. A PowerPoint presentation allows you to integrate many of these different media sources into one presentation.
With the accessibility provided by the Internet, you can find interesting and appropriate audio and video with little difficulty. However, the clip alone will not sustain the presentation. To keep the audience interested and engaged, you must frame the beginning and end of the clip with your own words.
Jorge completed the introduction part of his outline by listing the key points he would use to open his presentation. He also planned to show various web links early on to illustrate the popularity of the low-carbohydrate diet trend.

Planning the Body of Your Presentation
The next step is to work with the key ideas you identified earlier. Determine the order in which you want to present these ideas, and flesh them out with important details. Chapter 10 “Rhetorical Modes” discusses several organizational structures you might work with, such as chronological order, comparison-and-contrast structure, or cause-and-effect structure.
How much detail you include will depend on the time allotted for your presentation. Your instructor will most likely give you a specific time limit or a specific slide limit, such as eight to ten slides. If the time limit is very brief (two to three minutes, for instance), you will need to focus on communicating your point of view, main supporting points, and only the most relevant details. Three minutes can feel like an eternity if you are speaking before a group, but the time will pass very quickly. It is important to use it well.
If you have more time to work with—ten minutes or half an hour—you will be able to discuss your topic in greater detail. More time also means you must devote more thought into how you will hold your audience’s interest. If your presentation is longer than five minutes, introduce some variety so the audience is not bored. Incorporate multimedia, invite the audience to complete an activity, or set aside time for a question-and-answer session.
Jorge was required to limit his presentation to five to seven minutes. In his outline, he made a note about where he would need to condense some complicated material to stay within his time limit. He also decided to focus only on cholesterol and heart disease in his discussion of long-term health outcomes. The research on other issues was inconclusive, so Jorge decided to omit this material. Jorge’s notes on his outline show the revisions he has made to his presentation.
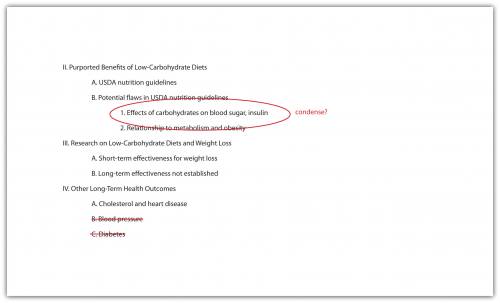
You are responsible for using your presentation time effectively to inform your audience. You show respect for your audience by following the expected time limit. However, that does not mean you must fill all of that time with talk if you are giving a face-to-face presentation. Involving your audience can take some of the pressure off you while also keeping them engaged. Have them respond to a few brief questions to get them thinking. Display a relevant photograph, document, or object and ask your classmates to comment. In some presentations, if time allows, you may choose to have your classmates complete an individual or group activity.
Planning Your Conclusion
The conclusion should briefly sum up your main idea and leave your audience with something to think about. As in a written paper, you are essentially revisiting your thesis. Depending on your topic, you may also ask the audience to reconsider their thinking about an issue, to take action, or to think about a related issue. If you presented an attention-getting fact or anecdote in your introduction, consider revisiting it in your conclusion. Just as you have learned about an essay’s conclusion, do not add new content to the presentation’s conclusion.
No matter how you choose to structure your conclusion, make sure it is well planned so that you are not tempted to wrap up your presentation too quickly. Inexperienced speakers, in a face-to-face presentation, sometimes rush through the end of a presentation to avoid exceeding the allotted time or to end the stressful experience of presenting in public. Unfortunately, a hurried conclusion makes the presentation as a whole less memorable.
Time management is the key to delivering an effective presentation whether it is face-to-face or in PowerPoint. As you develop your outline, think about the amount of time you will devote to each section. For instance, in a five-minute face-to-face presentation, you might plan to spend one minute on the introduction, three minutes on the body, and one minute on the conclusion. Later, when you rehearse, you can time yourself to determine whether you need to adjust your content or delivery.
In a PowerPoint presentation, it is important that your presentation is visually stimulating, avoids information overload by limiting the text per slide, uses speaker notes effectively, and uses a font that is visible on the background (e.g., avoid white letters on a light background or black letters on a dark background).
Work with the list you created in Note 14.4 “Exercise 1” to develop a more complete outline for your presentation. Make sure your outline includes the following:
- An introduction that uses strategies to capture your audience’s attention
- A body section that summarizes your main points and supporting details
- A conclusion that will help you end on a memorable note
- Brief notes about how much time you plan to spend on each part of the presentation (you may adjust the timing later as needed)
Identifying Opportunities to Incorporate Visual and Audio Media
You may already have some ideas for how to incorporate visual and audio media in your presentation. If not, review your outline and begin thinking about where to include media. Presenting information in a variety of formats will help you keep your audience’s interest.
Use Presentation Software
Delivering your presentation as a slideshow is one way to use media to your advantage. As you speak, you use a computer and an attached projector to display a slideshow of text and graphics that complement the speech. Your audience will follow your ideas more easily, because you are communicating with them through more than one sense. The audience hears your words and also sees the corresponding visuals. A listener who momentarily loses track of what you are saying can rely on the slide to cue his or her memory.
To set up your presentation, you will need to work with the content of your outline to develop individual slides. Each slide should focus on just a few bullet points (or a similar amount of content presented in a graphic). Remember that your audience must be able to read the slides easily, whether the members sit in the front or the back of the room. Avoid overcrowding the slides with too much text.
Using presentation software, such as PowerPoint, allows you to incorporate graphics, sounds, and even web links directly into your slides. You can also work with available styles, color schemes, and fonts to give your presentation a polished, consistent appearance. Different slide templates make it easy to organize information to suit your purpose. Be sure your font is visible to you audience. Avoid using small font or colored font that is not visible against your background.
Use PowerPoint as a Visual Aid
PowerPoint and similar visual representation programs can be effective tools to help audiences remember your message, but they can also be an annoying distraction to your speech. How you prepare your slides and use the tool will determine your effectiveness.
PowerPoint is a slideware program that you have no doubt seen used in class, seen in a presentation at work, or perhaps used yourself to support a presentation. PowerPoint and similar slideware programs provide templates for creating electronic slides to present visual information to the audience, reinforcing the verbal message. You will be able to import or cut and paste words from text files, images, or video clips to create slides to represent your ideas. You can even incorporate web links. When using any software program, it is always a good idea to experiment with it long before you intend to use it; explore its many options and functions, and see how it can be an effective tool for you.
At first, you might be overwhelmed by the possibilities, and you might be tempted to use all the bells, whistles, and sound effects, not to mention the tumbling, flying, and animated graphics. If used wisely, a dissolve or key transition can be like a well-executed scene from a major motion picture and lead your audience to the next point. But if used indiscriminately, it can annoy the audience to the point where they cringe in anticipation of the sound effect at the start of each slide. This danger is inherent in the tool, but you are in charge of it and can make wise choices that enhance the understanding and retention of your information.
The first point to consider is which visual aid is the most important. The answer is you, the speaker. You will facilitate the discussion, give life to the information, and help the audience correlate the content to your goal or purpose. You do not want to be in a position where the PowerPoint presentation is the focus and you are on the side of the stage simply helping the audience follow along. Slides should support you in your presentation, rather than the other way around. Just as there is a number one rule for handouts (do not pass them out at the start of your presentation), there is also one for PowerPoint presentations: do not use PowerPoint slides as a read-aloud script for your speech. The PowerPoint slides should amplify and illustrate your main points, not reproduce everything you are going to say.
Your pictures are the second area of emphasis you will want to consider. The tool will allow you to show graphs, charts and illustrate relationships that words may only approach in terms of communication, but your verbal support of the visual images will make all the difference. Dense pictures or complicated graphics will confuse more than they clarify. Choose clear images that have an immediate connection to both your content and the audience, tailored to their specific needs. After the images, consider using only key words that can be easily read to accompany your pictures. The fewer words the better. Try to keep each slide to a total word count of less than ten words. Do not use full sentences. Using key words provides support for your verbal discussion, guiding you as well as your audience. The key words can serve as signposts or signal words related to key ideas.
A natural question at this point is, How do I communicate complex information simply? The answer comes with several options. The visual representation on the screen is for support and illustration. Should you need to communicate more technical, complex, or in-depth information in a visual way, consider preparing a handout to distribute at the conclusion of your speech. You may also consider using a printout of your slide show with a section for taking notes, but if you distribute it at the beginning of your speech, you run the risk of turning your presentation into a guided reading exercise and possibly distracting or losing members of the audience. Everyone reads at a different pace and takes notes in their own way. You do not want to be in the position of going back and forth between slides to help people follow along.
Another point to consider is how you want to use the tool to support your speech and how your audience will interpret its presentation. Most audiences wouldn’t want to read a page of text—as you might see in this book—on the big screen. They will be far more likely to glance at the screen and assess the information you present in relation to your discussion. Therefore, it is key to consider one main idea, relationship, or point per slide. The use of the tool should be guided with the idea that its presentation is for the audience’s benefit, not yours. People often understand pictures and images more quickly and easily than text, and you can use this to your advantage, using the knowledge that a picture is worth a thousand words.
Incorporate Visual Media
Even if you do not use a slideshow to complement your presentation, you can include visual media to support and enhance your content. Visual media are divided into two major categories: images and informational graphics.
Image-based media, such as photographs or videos, often have little or no accompanying text. Often these media are more powerful than words in getting a message across. Within the past decade, the images associated with major news stories, such as the Indian Ocean tsunami of 2004, the Abu Ghraib prison abuses from 2004 to 2006, and the 2010 earthquake in Haiti, have powerfully affected viewers’ emotions and drawn their attention to these news stories.
Figure 14.1

Even if your presentation addresses a less dramatic subject, you can still use images to draw in your audience. Consider how photographs, an illustration, or a video might help your audience connect with a particular person or place or bring a historical event to life. Use visual images to support descriptions of natural or man-made phenomena. What ideas lend themselves to being explained primarily through images?
In addition, consider how you might incorporate informational graphics in your presentation. Informational graphics include diagrams, tables, pie charts, bar and line graphs, and flow charts. Informational graphics usually include some text and often work well to present numerical information. Consider using them if you are presenting statistics, comparing facts or data about several different groups, describing changes over time, or presenting a process.
Incorporate Audio Media
Although audio media are not as versatile as visual media, you may wish to use them if they work well with your particular topic. If your presentation discusses trends in pop music or analyzes political speeches, playing an audio clip is an obvious and effective choice. Clips from historical speeches, radio talk shows, and interviews can also be used, but extended clips may be ineffective with modern audiences. Always assess your audience’s demographics and expectations before selecting and including audio media.
Review the outline you created in Note 14.11 “Exercise 2”. Complete the following steps:
- Identify at least two to three places in your presentation where you might incorporate visual or audio media. Brainstorm ideas for what media would be effective, and create a list of ideas. (In Chapter 14 “Creating Presentations: Sharing Your Ideas”, Section 14.2 “Incorporating Effective Visuals into a Presentation”, you will explore different media options in greater depth. For now, focus on coming up with a few general ideas.)
- Determine whether you will use presentation software to deliver your presentation as a slideshow. If you plan to do so, begin using your outline to draft your slides.
Figure 14.2

Source: http://www.agenciabrasil.gov.br/media/imagens/2010/01/14/14.01.10RP5978.jpg/view
Planning Ahead: Annotating Your Presentation
When you make a presentation, you are giving a performance of sorts. It may not be as dramatic as a play or a movie, but it requires smooth coordination of several elements—your words, your gestures, and any media you include. One way to ensure that the performance goes smoothly is to annotate your presentation ahead of time.
To annotate means to add comments or notes to a document. You can use this technique to plan how the different parts of your presentation will flow together. For instance, if you are working with slides, add notes to your outline indicating when you will show each slide. If you have other visual or audio media to include, make a note of that, too. Be as detailed as necessary. Jotting “Start video at 3:14” can spare you the awkwardness of searching for the right clip during your presentation.
In the workplace, employees are often asked to deliver presentations or conduct a meeting using standard office presentation software. If you are using presentation software, you can annotate your presentation easily as you create your slides. Use the notes feature at the bottom of the page to add notes for each slide. As you deliver your presentation, your notes will be visible to you on the computer screen but not to your audience on the projector screen.
In a face-to-face presentation, make sure your final annotated outline is easy to read. It will serve to cue you during your presentation, so it does not need to look polished, as long as it is clear to you. Double space the text. Use a larger-than-normal font size (14 or 16 points) if that will make it easier for you to read. Boldface or italics will set off text that should be emphasized or delivered with greater emotion. Write out main points, as well as your opening and closing remarks, in complete sentences, along with any material you want to quote verbatim. Use shorter phrases for supporting details. Using your speaker notes effectively will help you deliver an effective presentation. Highlighting, all capital letters, or different-colored font will help you easily distinguish notes from the text of your speech. Read Jorge’s annotated outline.
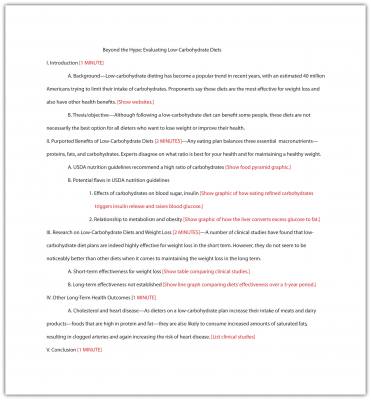
Some students prefer to write out the full text of their face-to-face presentation. This can be a useful strategy when you are practicing your delivery. However, keep in mind that reading your text aloud, word for word, will not help you capture and hold your audience’s attention. Write out and read your speech if that helps you rehearse. After a few practice sessions, when you are more comfortable with your material, switch to working from an outline. That will help you sound more natural when you speak to an audience.
In a PowerPoint presentation, remember to have your slides in logical sequential order. Annotating your presentation before submitting it to your audience or your instructor will help you check for order and logical transitions. Too much text or data may confuse your audience; strive for clarity and avoid unnecessary details. Let the pictures or graphics tell the story but do not overload your slideshow with visuals. Be sure your font is visible. Look for consistency in the time limit of your presentation to gauge your level of preparedness.
Begin to annotate your outline. (You will probably add more notes as you proceed, but including some annotations now will help you begin pulling your ideas together.) Mark your outline with the following information:
- Write notes in brackets to any sections where you definitely plan to incorporate visual or audio media.
- If you are presenting a slideshow, add notes in brackets indicating which slides go with each section of your outline.
- Identify and set off any text that should be emphasized.

Key Takeaways
- An effective presentation presents ideas more concisely than a written document and uses media to explain ideas and hold the audience’s interest.
- Like an essay, a presentation should have a clear beginning, middle, and end.
- Good writers structure their presentations on the thesis, or point of view; main ideas; and key supporting details and create a presentation outline to organize their ideas.
- Annotating a presentation outline is a useful way to coordinate different parts of the presentation and manage time effectively.
- Successful Writing. Authored by : Anonymous. Provided by : Anonymous. Located at : http://2012books.lardbucket.org/books/successful-writing/ . License : CC BY-NC-SA: Attribution-NonCommercial-ShareAlike
IMAGES
VIDEO
COMMENTS
Apply the 10-20-30 rule. Apply the 10-20-30 presentation rule and keep it short, sweet and impactful! Stick to ten slides, deliver your presentation within 20 minutes and use a 30-point font to ensure clarity and focus. Less is more, and your audience will thank you for it! 9. Implement the 5-5-5 rule. Simplicity is key.
Your presentation, like a written assignment, should include an introduction, body, and conclusion. These components serve much the same purpose as they do in a written assignment. The introduction engages the audience's attention, introduces the topic, and sets the tone for what is to come.
A Presentation Is... A presentation is a means of communication that can be adapted to various speaking situations, such as talking to a group, addressing a meeting or briefing a team. A presentation can also be used as a broad term that encompasses other 'speaking engagements' such as making a speech at a wedding, or getting a point across ...
The best class presentations combine strong content and visuals with an engaging presentation style. This post offers 11 steps for creating memorable and high-performing class presentations. 1. Review assignment guidelines. Before you can strategize about how to start a class presentation, you need to be certain that you understand the ...
A strong presentation is so much more than information pasted onto a series of slides with fancy backgrounds. Whether you're pitching an idea, reporting market research, or sharing something ...
Presentation Assignment Examples. Presentations enable students to practice their verbal communication skills. Students 'become the professional' by sharing a project, lesson plan, interpretation, etc. with the class. Some instructors schedule presentations the last few weeks of the semester. Others spread them throughout the semester. Many ...
A good presentation should be well organized, with a beginning, middle and end. Beginning: The beginning of a presentation is very important! This is when you have an opportunity to grab the audience's attention, and set the tone for your presentation. Use an attention grabber.
Presentation skills are the abilities and qualities necessary for creating and delivering a compelling presentation that effectively communicates information and ideas. They encompass what you say, how you structure it, and the materials you include to support what you say, such as slides, videos, or images. You'll make presentations at various ...
Presentation assignments. In-class presentation assignments give students valuable opportunities to consolidate learning and research into coherent explanations or arguments. Presentation tools such as Powerpoint, Keynote, and Google Slides are easy to use and for the most part, already very familiar to students.
Presentation assignments are often open to creative interpretation, which gives you a lot of room to explore new techniques and add a personal touch to the task. Think About Audience. Now that you've learned a bit about the various types of presentations, it's helpful to turn to another important part of presenting: the audience. ...
Outline your presentation before you get started (just like you would do for a paper). Use visuals to enhance what you are saying. Avoid text-heavy slides. Slides should be limited to 5-7 items, including images. Slides should not include full paragraphs--use the Notes area to draft full speaking notes or full paragraphs for an assignment.
Presentation Assignment Example. The following is an example of an individual presentation assignment and a group presentation. The individual presentation assignment explains that students will give two presentations over the semester on a topic of the student's choice. The student should submit a 1 to page paper explaining the presentation ...
This clarifies the overall purpose of your talk and reinforces your reason for being there. Follow these steps: Signal that it's nearly the end of your presentation, for example, "As we wrap up/as we wind down the talk…". Restate the topic and purpose of your presentation - "In this speech I wanted to compare…". 5.
In the social and behavioral sciences, an oral presentation assignment involves an individual student or group of students verbally addressing an audience on a specific research-based topic, often utilizing slides to help audience members understand and retain what they both see and hear. The purpose is to inform, report, and explain the significance of research findings, and your critical ...
Presentations with strong narrative arcs are clear, captivating, and compelling. Orient the audience and draw them in by demonstrating the relevance and importance of your research story with strong global motive. Provide them with the necessary vocabulary and background knowledge to understand the plot of your story.
Your presentation, like a written assignment, should include an introduction, body, and conclusion. These components serve much the same purpose as they do in a written assignment. The introduction engages the audience's attention, introduces the topic, and sets the tone for what is to come.
Assignment: Create a New Presentation. For this assignment, you will create a short PowerPoint presentation that includes several objects as well as slide transitions. In this assignment, imagine you have been asked to present at the next staff meeting. You know you will have lots of data tables and sales figures to discuss, but you also want ...
Tools for Presentation 1. Venngage. Students are often intimidated by the thought of creating attractive and informative presentations. Venngage is a highly effective presentation tool that helps students create impressive infographics. Users can add text, images, videos, slides, and other essential elements to enhance your presentations.
A PowerPoint presentation is a demanding assignment and would be relevant to many courses. As in other writing assignments, students must research, evaluate material, and present it in a concise, readable way. A PowerPoint presentation is an assignment that mirrors "real word" applications outside the classroom.
Tips For Designing a Digital Assignment. Establish and clarify your teaching and learning goals for the project and use those to formulate a grading rubric. Include objective, gradable moments in the process of planning and producing the project. Even if students are all using the same tools, the finished products may be different enough that ...
Proper formatting enhances the readability and professionalism of your assignment. Here are essential formatting guidelines to follow: a. Font and Size. Use a standard, easily readable font (e.g ...
Assignment is a task given to students by a teacher or professor, usually as a means of assessing their understanding and application of course material. Assignments can take various forms, including essays, research papers, presentations, problem sets, lab reports, and more. Assignments are typically designed to be completed outside of class ...
What this handout is about. The first step in any successful college writing venture is reading the assignment. While this sounds like a simple task, it can be a tough one. This handout will help you unravel your assignment and begin to craft an effective response. Much of the following advice will involve translating typical assignment terms ...
Your presentation, like a written assignment, should include an introduction, body, and conclusion. These components serve much the same purpose as they do in a written assignment. The introduction engages the audience's attention, introduces the topic, and sets the tone for what is to come.