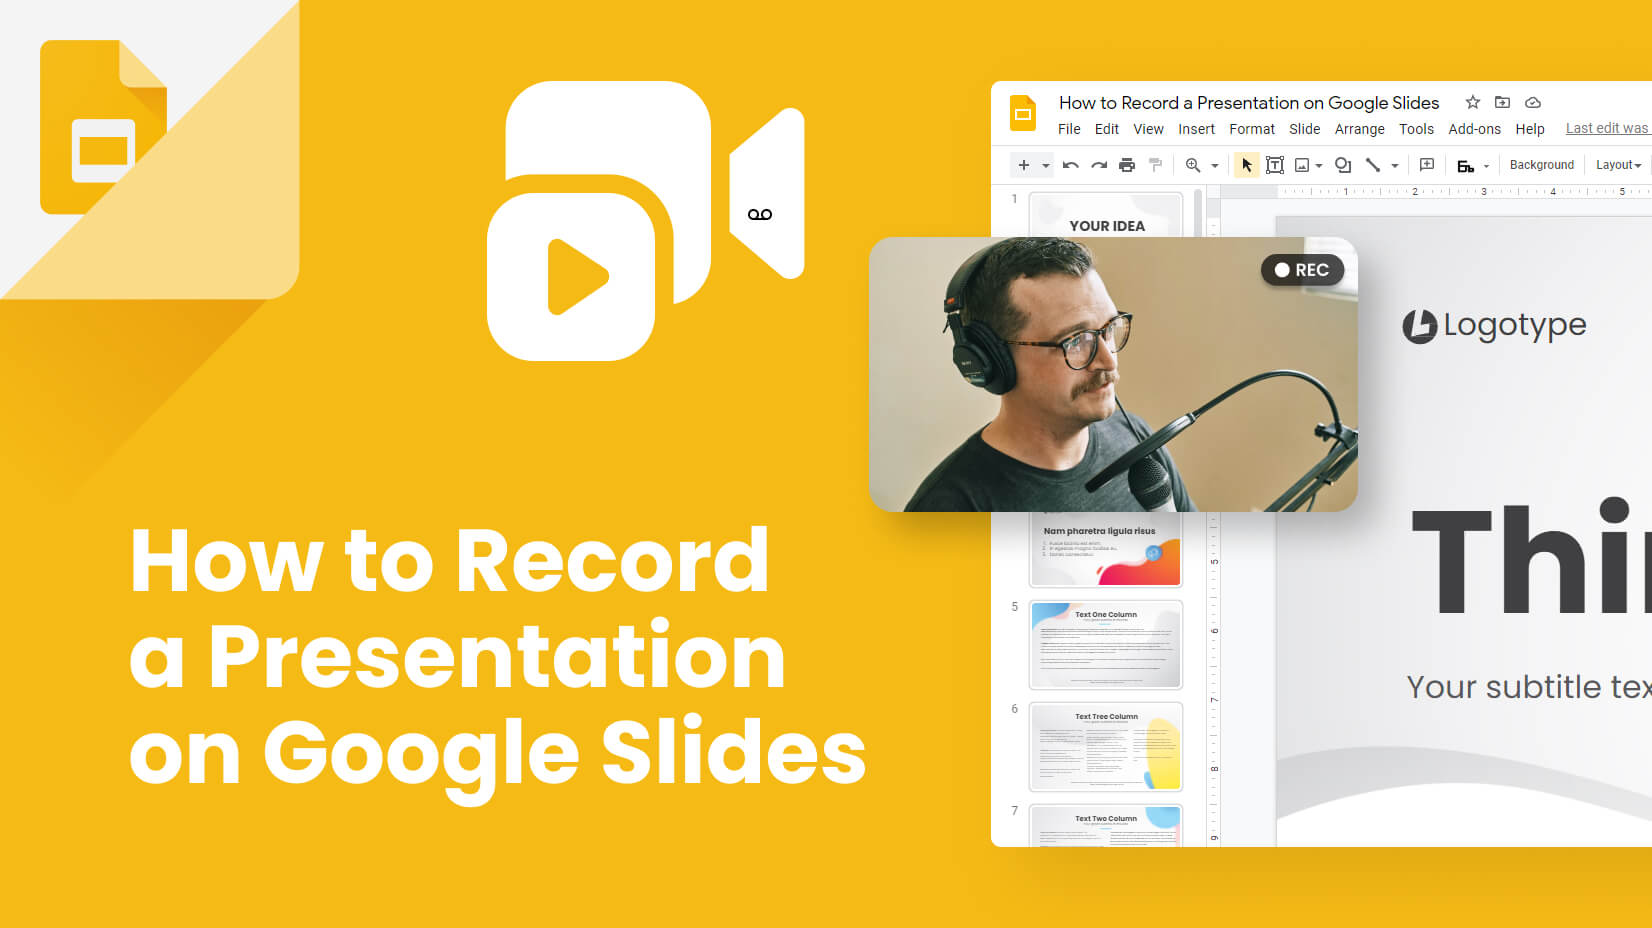
How to Record a Presentation with Webcam, Narration, and More

Everyone has, at some point, put a load of time and effort into creating the perfect PowerPoint presentation, only to use it once or twice. But isn’t it a shame for all that hard work to be discarded so quickly? Is every slide deck destined for deletion after just a couple of uses?
Isn’t there a better way to make the most out of your presentations? Well, yes. Yes, there is.
Rather than simply creating and presenting your work once or twice, recording your presentations can give them a new lease of life. Whether it’s a data report or a self-recorded PowerPoint, you can record a presentation in real-time, or in advance to make it available on-demand.
In this guide, we’ll explore two distinct ways of recording your presentation. First, we’ll discuss how to record a presentation from PowerPoint with audio and webcam, and then we’ll look at how to turn your .ppt slides into a video.

Benefits of Recording a Presentation
As well as there being many different ways to record a presentation, there are also many benefits of recording them. So, before we show you the ‘how,’ let’s talk about the ‘why.’
- Encouraging asynchronous communication : One key benefit is fostering asynchronous communication . By recording presentations, you’re letting your audience engage with the content in their own time, breaking the constraints of time zones and scheduling conflicts. This also ensures your viewers can absorb information at their own pace, and revisit it as needed.
- Boosting SEO : You can use your presentation to create a YouTube video and share it on your website to increase your online visibility and attract prospective customers. This can be a great way to expand your audience, increase web traffic, and establish yourself as an expert in your field.
- Perfecting your presentation : Whether it’s in-person or over Zoom, you don’t get second chances with live presentations. However, a pre-recorded keynote lets you perfect the content and the narration before anyone sees it. This is a great way to combat stage fright while honing your presentation skills and building confidence.
With this in mind, turning your slides into a video is a no-brainer. It’s an easy way to grow your audience and make the information you’re sharing more accessible and easier to digest.
Record your presentation today!
Download a free trial of Snagit to quickly and easily record your presentation.
How to record your presentation (with Snagit)
Depending on your audience and the type of presentation you need to deliver, TechSmith’s Snagit could just be the perfect tool for recording your PowerPoint. With its user-friendly interface and advanced features, Snagit is ideal for capturing top-notch presentation videos, in just a few clicks.
Now, there’s no denying that presentations are better when you can see the presenter… Fortunately, Snagit lets you capture your screen and webcam at the same time to create a Picture-in-Picture video.
In this section, we’ll guide you through the steps to record your presentation and webcam with Snagit.
Step 1: Open video capture
First, open Snagit and navigate to the Capture window. Select the Video tab, and start by clicking the big red Capture button.
Step 2: Select a recording area
Next, you’ll be prompted to choose which parts of your screen you want to record. Use Snagit’s orange crosshairs to select a specific region, window, or your entire screen.
Step 3: Configure recording settings
With the Video Recording toolbar, you can set options like Cursor Capture and Effects, System Audio, and Webcam.
If your webcam isn’t showing, click on the webcam icon. If you have an external webcam, select the one you want to use by clicking the dropdown arrow next to the webcam icon.
Step 4: Adjust your webcam
Next, adjust your webcam options to ensure your Picture-in-Picture recording looks how you want it. Here you can change the Picture-in-Picture placement as well as the shape and size of your webcam recording. You can even toggle between Picture-in-Picture and fullscreen webcam modes as you like.
The best part? You can make these adjustments even while recording.
Step 5: Manage recording
When you’re ready to roll, hit the Record button and click the Stop button when you’re finished. It’s that simple!
And remember, if there’s an interruption (like an unexpected visit from the mailman), just hit Pause. It’s okay to take a break — your video won’t be ruined by a little interruption.
Step 6: Edit your video
Once you’ve finished recording, Snagit will automatically open your video in the Snagit Editor, which is super easy to use. From here, you can make light edits to the footage as needed.
For example, if you need to cut or trim your footage , you can! Here’s how:
- Set Start Point : Drag the Start handle (green) on the timeline to your desired starting point.
- Set End Point : Similarly, drag the End handle (red) to where you want to end the cut.
- Review the Segment : Before making any cuts, you can review the segment by dragging the Playhead (white) left and right across the timeline. This ensures you’re only cutting the footage you intend to.
- Make the Cut : Once you’re satisfied with the selection, click the Cut button, which will pop up once you’ve made a selection.
And that’s all there is to it! If you want to go the extra mile, you can also use Snagit to save individual frames of your video as images , which can be used to create a thumbnail for your video .
How to record a presentation from PowerPoint with audio and webcam
Now, Snagit is great for recording less formal videos in a flash, but if your presentation is intended for a particularly large or important audience, you might be looking to create something more polished. This is where TechSmith’s Camtasia comes in.
Camtasia is one of the smartest and most intuitive pieces of editing software out there, but it also makes for a pretty nifty screen recorder too. Camtasia is great for recording presentations when you need more control and editing powers over the final product.
But best of all, Camtasia streamlines the process by letting you record your presentation and voice over directly within PowerPoint.
Step 1: Set up your presentation video recording
If you’re a Windows user, you’ll have the option to include a PowerPoint Add-in Toolbar when you install Camtasia. While this feature isn’t currently available on MacOS, the Camtasia Add-in Toolbar allows you to start, stop, and control your recordings from within PowerPoint — so you don’t need to switch between applications.

Just open the presentation you want to record and locate the Add-in toolbar under the Add-ins tab.
Don’t see the add-in toolbar? Go to File > Options > Add-ins, to enable it. Click on the Manage drop-down, select Disabled Items, then click Go. If the Camtasia Add-in is listed, select it, and click Enable.
If you’re an Apple user, don’t panic! You can still record your screen (with audio) on a Mac using Camtasia, and it’s just as easy. Alternatively, you can skip ahead to the next section and import your slides directly into Camtasia.
Step 2: Customize your recording options
Now let’s walk through each of the options on the toolbar before we begin recording.

Record audio
The microphone button controls whether or not audio is recorded as part of your presentation. When you enable it, you’ll be able to record your narration using a microphone.
If you are planning to record audio, this is where you’ll select your microphone. If you want to record great audio , we suggest using an external microphone, rather than the one that’s built into your laptop.
Some of the best microphones for recording video are likely to be less expensive than you think. But, if you’re on a shoestring budget, even the mic that’s built into your headphones could produce better audio than your laptop.
Once you’re set up, be sure to test the mic and adjust the volume slider as needed. You’ll also need to decide whether or not to record your system audio, which is any sound that comes out of your speakers, such as email notifications.
Record webcam
If you have a webcam, you can also record your camera during the presentation to create a Picture-in-Picture clip — just as you can with Snagit!

To customize even more of the recording settings, click the Recording Options button. Here you’ll find settings that let you record with a watermark and adjust your video frame rate . There are a few more options too, but the default settings should work just fine.
When you’re ready, click OK to close this window and save any changes made.
Step 3: Record your presentation
The final step is as simple as clicking the Record button in the toolbar. This will launch your slides into the Presentation Mode and start recording.
When you exit Presentation Mode or reach the end of your slideshow, you can either continue recording your screen, or stop recording and save your file. Pretty easy right?
Before you get started, let us show you another way to turn your presentation into a video, without recording your desktop .
How to turn your PowerPoint presentation slides into a video
Another way to create a video from your presentation is to import your PowerPoint slides into Camtasia. This way you can adjust how long each slide appears on screen, as well as add Behaviors and Annotations to personalize your presentation and highlight important information.
By importing your slides into Camtasia, and recording your voice over separately, you get a lot more flexibility with the editing process, which means you have more control over the finished article.
If you do decide to record your audio separately, you might want to take a look at TechSmith’s Audiate . This advanced audio recorder will transcribe your voice over in real-time and let you edit the audio file as if it were a text-based document. We don’t want to brag, but it’s probably the best way to add a voice over to a PowerPoint .
Regardless of how you decide to narrate your PowerPoint, here’s how to turn your presentation into a video:
1. Import your PowerPoint slides
First, start by importing your PowerPoint slides directly into Camtasia. Once your media is imported, you can edit it by dragging your slides into the Editing Toolbar.

You can now add the images to the Timeline, and edit them like any other media in a Project.

If you drag your slides to the Timeline, the slides will be placed in the order of the presentation, each with a default 5-second duration.

With your presentation on the timeline, use Ripple Move to create space in between slides to adjust the timing of each one. To do this, hold shift, then click and drag.

Once you’ve imported your slides and adjusted the duration of each one to correlate with your voice over, it’s time to start editing.
How to edit a presentation video (in Camtasia)
Add behaviors.
Firstly, add some visual interest with Camtasia Behaviors . A Behavior is an animation that brings movement to your slides, making them stand out on screen. This is a great way to bring parts of your presentation to life and take it from ordinary to extraordinary — because nobody likes a boring presentation .
To add a Behavior, click and drag the Behavior you wish to use onto the slide you want to animate. Once added, you can adjust the Behavior using the Properties tab.
Add annotations
Another good way to grab and direct your audience’s attention is to add some Annotations, which are great for highlighting important information.
To insert an Annotation, click the Annotation tab on the left side of the screen and drag it into the designated slide. You can then re-position and edit the Annotation in the Properties tab as needed.
Recording a PowerPoint Presentation, the FAQs
Absolutely! Both Snagit and Camtasia are excellent choices for recording a professional and polished presentation. Snagit is perfect for no-fuss recording and editing. If you require more sophisticated editing capabilities, Camtasia is the ideal choice, offering the added convenience of recording your slideshow and voice over directly within PowerPoint.
Click the Record button in the toolbar to launch your slides into the Presentation Mode and start recording. When you exit Presentation Mode or reach the end of your slideshow, you can either continue recording your screen or stop and save your file.
If you’re planning to record audio, select your microphone in the recording options. The microphone button controls whether or not audio is recorded as part of your presentation. If you have a webcam attached to your computer, you can also record your camera to create a Picture-in-Picture clip, perfect for showing the presenter during the presentation.
With Snagit, you can conveniently record your voice over as you go through your presentation, capturing both the audio and visuals in one go. If you’re looking for more advanced recording and editing options, you might also consider using Camtasia, which allows you to record your voice over while presenting. For even more control, use Audiate to record your audio separately and then import it into Camtasia for fine-tuning.

Justin Simon
Global Content Strategy Manager at TechSmith. I play a lot of golf and watch a lot of football.
- How To Rotate a Video
- How to Write A Shot List That Will Transform Your Video
- YouTube vs. Vimeo: What’s the Difference?
Subscribe to TechSmith’s Newsletter
Join over 200,000 people who get actionable tips and expert advice every month in the TechSmith Newsletter.
- Help Center
- Google Docs Editors
- Privacy Policy
- Terms of Service
- Submit feedback
- Google Slides
Use slides recording in Google Slides
You can only record your presentations in Google Chrome Browsers. However, you can view, share, and delete recordings from any browser.
Record a slideshow
- There's a 30-minute limit to every recording.
- Information about Slides recordings isn't available in Revision History.
- If you exceed your Drive Storage quota, you can’t create more recordings.
- You must have edit access to the slides in order to create a new recording.
- To open your presentation, go to Google Slides .
- To start over, pause and click Re-record .
- To save your recording, pause and click Save to Drive .
Find your recording
- On your computer, go to Google Slides .
- Open the presentation where you created the recording.
- Select your recording from the list that appears.
Tip: Recordings are saved into a My Drive folder called Slides recordings.
Share your recording
Recordings can be shared to collaborators on the document immediately after creation.
- To share your recording, click the title of the recording from the list.
- The video in the full-screen player layout appears.
- Select the user, audience, or URL visibility rules.
Tip : Alternatively, you can share a recording like you would share any file in Drive. Learn how to share files from Google Drive .
Remove a recording
- If you created the recording, you also have the option to move the recording file in Drive to Trash. If the recording in Drive isn't moved to Trash, the recording stays visible in Drive to anyone with access.
- If you didn't create the recording, it's still visible in the creator's Drive and anyone to with access.
Use external device
You can use a microphone or camera that isn't built into your computer, such as a USB-based external camera or wireless earbuds.
To get started, set up your camera or microphone device like you would normally use it with your computer.
- Open your presentation.
- When the recording studio opens, at the bottom toolbar, click Settings .
- If your external microphone or camera is available, it's listed in the dropdown of devices available to use while recording.
Troubleshoot camera & microphone
When you create a Slides recording for the first time, it asks for a series of permissions to use the camera and microphone of your computer.
Tip: Camera and microphone access isn't required to start recording.
If you decide not to grant access to your camera or microphone, you can change it later.
- On your computer, open Chrome.
- chrome://settings/content/microphone
- chrome://settings/content/camera
- Adjust the settings to grant access.
Need more help?
Try these next steps:.
Using Google products, like Google Docs, at work or school? Try powerful tips, tutorials, and templates. Learn to work on Office files without installing Office, create dynamic project plans and team calendars, auto-organize your inbox, and more.
Home Blog PowerPoint Tutorials How to Record a Presentation in PowerPoint
How to Record a Presentation in PowerPoint

Recording PowerPoint presentations can have several benefits. They can serve as recordings of a session that can be uploaded online, shared with participants who might not be able to attend a presentation session, or used as tutorials for passing on instructions.
How to Record a PowerPoint Presentation
PowerPoint provides multiple options for initiating recording for a presentation. You can also choose to record audio and yourself presenting the slides using your camera. When recording your presentations, you can choose PowerPoint templates or something minimalist made by you to record the session. Just be mindful of the graphics to ensure the video does not appear overpowering to the viewer.
How do I Record a PowerPoint Presentation as a Video?
You can start recording your presentation using the following method.
- Record Tab: To record a PowerPoint presentation, go to the Record tab and select whether you wish to record from the beginning, from the current slide, a specific area on the screen, or record audio.
- Slide Show Tab: you can also initiate recording a PPT via Slide Show -> Record to initiate recording from the current slide or the beginning of your presentation.
Record Button: If you’re using the latest version of PowerPoint, you can start Recording your presentation from the current slide via the Record button in the top right corner.

Record from the Current Slide or Beginning of the Presentation
Starting your recording from the beginning of the current slide will open your presentation in recording mode. Hit Record to start the recording.

Screen Recording in PowerPoint
If you initiate screen recording in PowerPoint, you can start recording a screencast by selecting the area you wish to record. This is similar to recording a PowerPoint presentation as a video, with the added advantage of recording other parts of your desktop. This method can also be used for recording a screencast, even if you’re not using a PowerPoint presentation in your video recording.
To start the recording, click Record or use the Windows+SHIFT+R hotkey. To stop the screen recording, click Pause to temporarily halt the recording to resume later or Stop or the Windows+SHIFT+Q hotkey to end the recording session.

The recorded video will be instantly added to your slide once you click Stop .

Record Audio
Another option in the Record tab in PowerPoint is to record audio narrations for your PowerPoint presentation. Simply click Record to start, Pause to temporarily halt, and Stop to stop the recording process.

Once the recording stops, the audio will be added to your PowerPoint presentation.

How can I Annotate Slides in PowerPoint During a Recording?
Once you enter recording mode, you can start annotating your slides using the Pen or Highlighter tool. Other tools in the menu include a Laser pointer and Eraser.

How can I Record a PowerPoint Presentation with Audio?
To enable audio for your Powerpoint recording, unmute the mic from the audio icon on top, CTRL+M hotkey, or click the three dots ( More options for recording menu), followed by the Microphone to select the audio device for recording. You can only record audio if an audio device is connected to your computer. This is a fairly simple process, unlike other presentation platforms. For example, in an earlier article, we showed you how to do a voiceover on Google Slides , which entails a slightly more elaborate process.

How to Record Yourself Presenting a PowerPoint?
Enable the camera during a recording session.
Like turning on audio, you can toggle the camera on or off using the icon on top. The camera input device can also be selected via the Camera option or CTRL+K hotkey, which can be revealed via the three dots from the top menu.

Insert Video Recording in a Slide using Cameo
PowerPoint’s Cameo feature enables recording a video to insert in a slide. You can use the feature to quickly insert a video message in your slides that can be played during a presentation session. This option might also be relevant if you intend to convert PowerPoint to video . If you are looking how to video record yourself presenting a PowerPoint, then follow the steps below.

Once Cameo is turned on, you can also choose to stylize the camera shape, style, border, and add effects. Cameo is quite a unique feature in PowerPoint that currently does not have alternatives in rival presentation apps. For example, you cannot use a similar feature if you wish to convert Google Slides to video .

How to Save Recording for a PowerPoint Presentation?
After you have completed your recording, click Export to save the presentation recording.

You can customize your recording settings via Customize Export or continue the process via Export Video .

Using the Customize Export option, you can choose between a desired output quality for your video, including Ultra HD (4K), Full HD (1080p), HD (720p), and Standard (480p).

Other options in the menu include the ability to choose and preview timings and narrations.

After you are satisfied with your recording settings, you can export your presentation to video.

The video recording of your PowerPoint presentation can be played using any standard video player. The video can also be embedded in PowerPoint slides, uploaded online, such as to a YouTube channel, or shared via cloud storage apps like Dropbox, Box, OneDrive, etc.

Final Words
Recording a PowerPoint presentation can provide a record of a session that might be required for further sharing. The best way to record a presentation is to ensure that your slides aren’t visually overpowering, your audio is clear and audible, and if using a camera, the cam input isn’t hazy, grainy, or too dark.
Once you are familiar with how to record a presentation on PowerPoint, it might take a bit of practice to make your video recording look professional and crisp. It’s best to practice your sessions before recording them until you can seamlessly record presentation decks.

Like this article? Please share
PowerPoint Addins, PowerPoint Tips, Presentation Tips, Presentations, Screencasts Filed under PowerPoint Tutorials
Related Articles

Filed under Design • April 23rd, 2024
How to Create the Perfect Handouts for a Presentation
Learn how to create effective handouts for presentations and the recommended structure for handouts with this guide.

Filed under Google Slides Tutorials • April 19th, 2024
How to Find Trash on Google Slides
Don’t worry if you accidently delete a presentation file. Learn how to find trash on Google Slides with this guide.

Filed under Business • April 10th, 2024
Discovering Coaching Presentation Tools
Discover the best PPT templates to use as coaching presentation tools with this article. Tools explained + examples.
One Response to “How to Record a Presentation in PowerPoint”
How do I generate webcam option in PowerPoint 2016 ?
Leave a Reply
How to Record a PowerPoint Presentation with Narration
Can be helpful in creating a dramatic narrative
Microsoft PowerPoint has a built-in recording tool that allows you to narrate your presentations using recorded audio. You can export and share recorded presentations as video files.
This tutorial covers everything about recording PowerPoint presentations on Windows and Mac computers.

Record PowerPoint Presentation with Narration
Open the PowerPoint file/presentation you want to record and follow the steps below.
Record PowerPoint Presentation on Windows
- Select the slide you want to start recording from on the slide thumbnail pane.

- Head to the Record tab on the ribbon and select the Record button to start recording from the current/selected slide.

To record from the first slide, select the down-facing arrow icon below the Record button and select From Beginning .

You can also record a presentation from the Slide Show tab. Select Slide Show on the ribbon and select Record , From Current Slide , or From Beginning .

That’ll open PowerPoint’s presentation recorder in a fullscreen window.
- Select the Record icon and start speaking after the three seconds countdown.

PowerPoint records the presentation window and captures your voice and webcam feed as you navigate the slides. Select the left-facing and right-facing arrows to move to the previous and next slides in the presentation.
Record PowerPoint Presentation in macOS
- Open the Slide Show tab and select Record Slide Show .

- Select the Record button on the toolbar to start recording your narration.

Use your keyboard arrow keys to move back and forth between slides. Press N or Space Bar to move to the next slide or animation in the presentation. Press P or Backspace to return to the previous slide or animation.
Select Tips in the top-left corner for more keyboard shortcuts and other presentation tips.

Note: The narration tool doesn’t record slide transitions. When moving between slides, wait for the destination slide to appear on the screen before speaking.
PowerPoint Recorder Control/Settings
You’ll find a handful of controls and options on the recording tool. We’ll show you how to use these controls to include voiceovers or audio recordings in your presentation.

Using Presentation Pointer Tools
PowerPoint provides several tools to mark up your slides when narrating your presentation. There’s a pen tool, eraser, laser pointer, and highlighter.
With the Pen tool, you can draw on slides during narration/recording. Press Ctrl + P (Windows) or Command + P (Mac) to use the pen tool. You can also select the Pen icon to convert the pointer to a pen.

The Laser pointer tool converts your cursor to an onscreen laser. Use the laser pointer to draw attention to something on a slide/presentation.
Press Ctrl + L (Windows) or Command + L (Mac) to use the laser pointer. There’s also a Laser pointer icon on the toolbar.

Pressing Ctrl + I (or selecting the Highlighter tool ) converts your cursor to a highlighter.

Use the Eraser tool to remove inks and highlight from slides. Select the Eraser icon or press Ctrl + E and select the ink to erase.

On macOS, select the Erase Pen icon (or press E ) to erase all drawings and highlights on the slide.

You can change the pointer tools ink from the color selection boxes. However, one major limitation is that you can’t change the size of these pointer tools.
Pause and Resume Your Recording
In Windows, press I on your keyboard or select the Pause button in the top-left corner to pause your recording.

Press I again or select the Record icon to resume the recording.

If you use a Mac, select the Pause icon in the top toolbar to pause the recording.

Unmute or Mute Microphone
Check that your microphone is unmuted before recording. Select the microphone icon in the bottom-right corner to mute or unmute your mic.

PowerPoint for Windows allows you to mute and unmute your microphone in real time while recording video/audio narrations. The macOS version of PowerPoint only lets you configure your camera and microphone settings before recording.
Switch Microphone or Camera
Want to record your presentation with an external microphone or camera? Press Ctrl + M or select the audio/camera settings icon in the top-right corner and choose your preferred microphone/camera.

In macOS, select the microphone icon to mute or unmute your microphone. Select the arrow-down icon next to the microphone or camcorder icons to switch input devices.

Enable and Disable Camera
The recorder displays your camera or webcam feed in the bottom-right corner of the presentation slides.
Select the camcorder icon to remove your webcam feed from the recording. Select the icon again to display your webcam feed in the presentation.

You can also use the Ctrl + K keyboard shortcut on Windows computers to enable or disable your camera.
On Mac computers, you’ll find the video control icon on the top toolbar.

Note: The recording tool greys out the camcorder icon if your microphone is turned off.
Enable or Disable Camera Preview
PowerPoint allows you to disable the camera preview without turning off your camera or webcam.
Press Ctrl + J (Windows) or select the Camera Preview icon in the bottom-right corner to disable or enable the camera preview.

End a Recording
Press S on your Windows keyboard or select the Stop icon to end the recording.

Replay or Preview Your Recording
When you end a narration, press V on your keyboard or select Replay to preview or watch the recording.

The recorded narration will include all pen inks, highlights, and laser pointer gestures made during the presentation.
You can also preview/replay the narration outside the recording tool. Open the Slide Show tab and choose to watch the playback From Beginning or From Current Slide .

PowerPoint allows you to preview the playback on individual slides. A speaker/audio icon appears in the bottom-right of PowerPoint slides with narrations.
Choose the slide you want to preview, hover your cursor on the speaker icon in the bottom-right corner, and select Play .

Delete Current Narration/Recording
Did you spot an error when previewing your presentation? Want to delete the current narration and start from scratch?
Select the Clear existing recordings icon and choose whether to Clear Recordings on Current Slide or Clear Recordings on All Slides .

On Mac, select the Bin icon to delete the entire narration/recording.

Close the Narration Tool
Select the X icon on the title bar to close the presentation narration tool and return to Powerpoint.

Select End Show in the top-left corner to close the recording tool on a Mac computer.

Delete Narrations from Slides
Want to delete the narration or timing on an individual slide or the entire presentation? Select the slide with the narration you want to delete and follow the steps below.
- Open the Record tab and select the down-facing arrow below the Record icon.
- Select Clear and choose to clear timing or narration on current or all slides.

Export Recorded or Narrated Presentation
You can export a narrated PowerPoint presentation as a video file. The video output includes ink strokes, recorded audio/video, laser pointer gestures, and webcam/camera recording.
- Open the Record tab and select Export to Video .

Alternatively, open the File menu, select Export on the sidebar, and select Create a Video .

- Choose the quality of the video export in the first drop-down box—Ultra HD (4K), Full HD (1080p), HD (720p), Standard (480p).

- Choose Use Recorded Timings and Narrations in the next drop-down box and select Create Video .

- Give the recorded presentation a file name and select Save .

Narrate Your PowerPoint Presentations
The Microsoft PowerPoint web app doesn’t have a recording tool. As a result, you can only record presentations with narrations using PowerPoint for Windows or Mac.
You might meet issues recording a slide show if you use an outdated version of PowerPoint. Also, the recording tool on older versions of PowerPoint has a different interface and lacks some controls. Update PowerPoint and restart your computer if you cannot record a slide show.

Sodiq has written thousands of tutorials, guides, and explainers over the past 4 years to help people solve problems with Android, iOS, Mac, and Windows devices. He also enjoys reviewing consumer tech products (smartphones, smart home devices, accessories, etc.) and binge-watching comedy series in his spare time. Read Sodiq's Full Bio
Read More Posts:
Leave a Reply
Your email address will not be published. Required fields are marked *
- Affiliate Disclaimer
- Privacy Policy
- Terms & Conditions
eLearning Desk
Your Online Learning Guide
How to Record a Google Slides Presentation (with Audio & Video)

Whether you’re teaching an online class or having an important meeting, recording your Google Slides presentation can come in handy later for your or your students’ reference.
Stay with us as we break down how to record a Google Slides presentation with audio and video using free software.
- 1.1 Step #1: Ensure You Have the Required Resources
- 1.2 Step #2: Install Required Software
- 1.3 Step #3: Run the Tool
- 1.4 Step #4: Set Up Your Presentation
- 1.5 Step #5: Prepare to Record
- 1.6 Step #6: Start Recording
- 2.1 Related posts:
How to Record a Google Slides Presentation (with Audio & Video)
Before you can begin recording your Google Slides presentation, you will need a few things:
Step #1: Ensure You Have the Required Resources
- A microphone (you can use your laptop’s mic or wear a headset)
- Recording software (we touch on this in the coming section)
- A Google account
Step #2: Install Required Software
There are several software tools available online for free that you can use to record a Google Slides presentation. For the sake of ease and clarity, we use Apowersoft, a free tool that you can download from CNET .
After downloading the executable, double click on it to run it and complete the wizard to install.

We recommend using this tool because it is 100% free to use and does not limit how much of your presentation you can record.
While an earlier version of the tool did not add a watermark to recorded videos, in the new version, you will have to sign up with Apowersoft to record videos without a watermark.
It’s important to remember that the basic tool does not offer any editing features. In other words, you will need to record your presentation in one take or use another editing program to piece together the clips of your presentation.
If you’re a teacher, we recommend recording short videos since they’re convenient to make and also easier for students to watch.
Step #3: Run the Tool
When you launch Apowersoft Free Screen Recorder, it will show you the region you can record with the tool right away.

You can change the region the tool will record by moving the recording area around by clicking and dragging the button in the middle. You can alter the bounds of the recording area by simply dragging the bounds as you please.
Alternatively, you can click on the “Full Screen” icon on the panel on the bottom. Since you need to record a Google Slides presentation, this is the button you want to click.
It’s also important to set up the tool correctly before proceeding to the next steps. If you look at the Apowersoft recorder’s panel, you will find video and audio options next to the record button on the left.

Ensure that the tool is set to record your screen and not your webcam and that the tool is recording audio from the correct microphone.
Note that if there is a video in your slideshow, you will need to record the sound from your computer.
Remember that choosing to record the system’s sounds also means that your computer’s error sounds (“bing”) and all other system sounds may also be recorded.
Step #4: Set Up Your Presentation
Before you can start recording, navigate to slides.google.com and find your presentation. Next, click on the “Slideshow” button in the top right corner. This will display the presentation in full-screen mode.

It’s important to ensure that your slides on Google slides load completely before you start recording. If all the slides aren’t fully loaded, the transitions from slide to slide may look choppy in your recording.
Step #5: Prepare to Record
When both the recording tool and your presentation are ready, you can hit the record button on the panel. Clicking the button will make a popup appear. If you have logged into your Apowersoft account, it will record without a watermark.
You will also see the hotkeys you can use to control the recording in the popup.

If you hit the “OK” button, a 3-second countdown timer will appear before the tool starts recording. If you don’t want the Apowersoft recorder’s panel to appear in your recording, like in the following image:

You will need to navigate to the options menu by clicking on the three dots button on the right side of the panel.
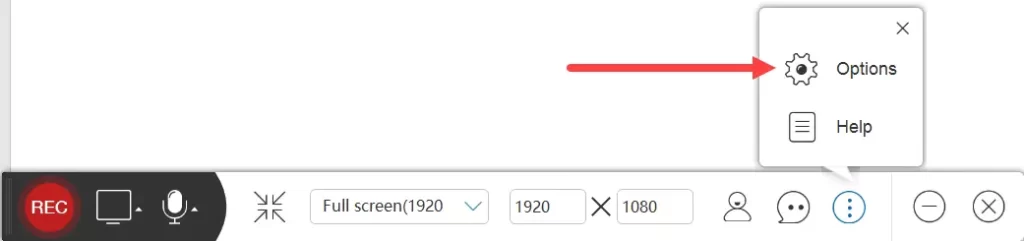
You can then toggle the “Show recording toolbar” option off from the options menu.

You can also change several other settings from this menu, including the recording format and the “Record” and “Stop Recording” keyboard shortcuts.
Step #6: Start Recording
Navigate to your slideshow window and click the “Rec” button. The tool will start recording after the countdown. You can go through the slides by pressing the right and left buttons.
One of the most useful features of this tool is that it allows you to pause recording at certain points if you need a moment to proceed to your next talking point.
If you’ve left the recording panel enabled, you can use it to pause the recording whenever you want.
Alternatively, you can press Ctrl-Alt-F3 to pause the recording. After you’ve caught up with the talking points or taken a moment to focus, you can press Ctrl-Alt-F1 to start the recording again.
After you finish recording the slideshow, press Ctrl-Alt-F2 to stop recording. The tool will then automatically start playing the video you recorded, and you can go through it.
You can use the handles on the extreme left and right of the player to trim the beginning and end of the video.
However, we suggest that you do not do any trimming with this software since it sometimes ruins the recording by not trimming at the correct point.
If you’re satisfied with the recording, click on the “Save” button on the bottom right to save the video.
A menu with a default name for the recording and the folder where it’ll be saved will open up.
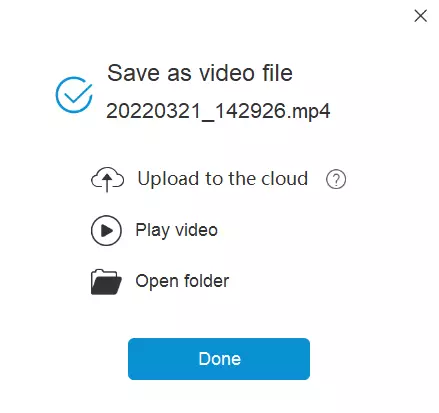
You can rename the file from this menu without any hassle. You can also select where you want to save the video from the “Open Folder” button.
If you’ve signed up with Apowersoft, they will offer you free cloud storage to save your videos. You can upload the video directly to the cloud storage by clicking on the “Upload to the cloud” button in the Save menu.
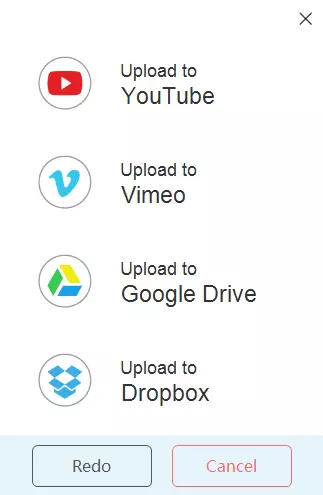
Alternatively, you can upload the video you recorded straight to YouTube, Vimeo, Google Drive, or Dropbox by clicking the “Cloud” button instead of the “Save” button.
If you are a teacher, saving the video to Google Drive may be the right way to go. You can easily share the video with your students by making the video sharable and sending them the link to the file.
How to Convert Google Slides to PowerPoint in Simple Steps
While there are many ways to record a Google Slides presentation, using the Apowersoft free video recorder is one of the easiest ways to go about it.
The software is quite intuitive, and you should be able to figure out what buttons perform which function without expressly reading through this guide.
That being said, learning all the functions before you begin using the tool is an excellent way to ensure you get the most out of the tool and make a solid recording for your future reference or for your students.
Related posts:
- 10 Top Disadvantages of Online Classes
- 15 Huge Benefits of Online Classes
- The Role of Operating Systems
By Maverick
This is Maverick. During Covid-19 Pandemic, A School Teacher turned into an online Instructor. Here I Share How you can build your own Online School and offers eLearning to your Students. I'm trying to make the eLearning Desk a resource for Students as well as for Teachers.
Related Post
10 ways to use a document camera for online learning, 10 best free drawing apps for students and digital artists 2024, 10 best wireless microphone for teachers in 2024.
How to Record a Presentation on Google Slides?
- Share on Facebook
- Share on Twitter
By Nikolay Kaloyanov
in How-To Tutorials
2 years ago
Viewed 3,461 times
Spread the word about this article:
Recording your presentation can be a very powerful move, as you don’t want to embarrass yourself in front of your audience. Instead of relying on your “inner feelings”, you can check how you sound, how you look, what gestures you make, and how well you play with words and details.
For this guide, we will use some of the most popular online tools on the market (Panopto and Loom) and some totally free options for Windows and Mac computers.
Article overview: 1. Why do people record their presentations? 2. How to record a presentation on Google Slides using Panopto? 3. How to record a presentation on Google Slides using Loom? 4. How to record a presentation on Google Slides using Microsoft Windows? 5. How to record a presentation on Google Slides on a Mac? 6. Other tools you can try
1. Why do people record their presentations?
There is a reason why people record their presentations. Unfortunately, you don’t know how your voice will sound or articulate when you are presenting. In such situations, it will be best to record your presentation to see if there is something you need to change before doing it live. Also, recording your presentations is a very good way to remember what you are about to say. But let’s see the main use cases when recording your Google Slides presentation will make great sense:
- Practice your presentation skills – you can’t hear yourself while talking. That is why recording your voice might be a good indicator of how you present. Is your tone of voice smooth? Do you need to raise it? Are you mumbling or “like”-ing? Recordings can help you identify problems in advance.
- Save valuable time – instead of recording each lecture, you can save your efforts once, and later sent them.
- When you have stage fright – not everyone has the natural confidence of Elon Musk. If you are a shy person who gets terrified when speaking in front of huge audiences, recording your presentation is a great move.
- Avoid distractions – during live presentations, interruptions are more common which can affect your flow. A recording of your presentation at home can later be sent as a follow-up.
2. How to record a presentation on Google Slides using Panopto?
There are plenty of tools that could be utilized, so feel free to use anything which you might find suitable. Panopto is a good option since it doesn’t require us to download a software extension, and it has a free plan which is more than enough for starters. Your videos are also stored on Panopto’s drive, so you will avoid issues with cluttering your computer or mobile device.
✔️ Panopto is very easy to use.
✔️ The software is cloud-hosted.
✔️ Speech and OCR (optical character recognition).
❌ Pricing model is scaling.
❌ Slow rendering process.
❌ Issues with captions.
Step 1. Open Panopto.com
When you open the website, you will see there are plenty of options out there.
Step 2. Click on “Record”
Once you’ve opened the website, click on the big red button “Record” (next to Company and before Get Started ).

Step 3. Select your Audio, Video, and Screen Options
The browser will ask for permission, so make sure you grant Panopto access to your webcam(s) and audio source(s). Usually, if you don’t have more than one source, they will be launched by default.

Step 4. Choose what to share
Now, you have to click on Screens and Apps , and select your preferred option.
Entire screen (if you have 2 or more, you can either select one of the screens or all of them), a Window , or a Chrome Tab .

Step 5. Fix the settings
When you click on the “Settings” button (in the bottom right corner), there will be a menu that you can access.

Step 6. Start recording
Click on the big circle in the center to start recording.

Step 7. Save your recording
Once you end your recording, you can send it to Panopto , YouTube , Classroom , or download it on your computer.

3. How to record a presentation using Loom?
Loom is among the most used recording pieces of software globally. It is great for teamwork and has a lot of collaboration tools. Let’s see where it shines.
✔️ It is very easy to use.
✔️ You can share the videos with a single click.
✔️ Developers are constantly updating the app.
❌ The 5-minute free plan is not enough for long projects.
❌ It renders the videos slowly.
❌Lack of options to insert tags and notes in a video.
Step 1. Open Loom.com
The first step is to launch Loom. Just like Panopto, it’s an online-based service, so you don’t have to download or install anything.
Step 2. Sign up
Now, you have to open an account. The good news is you can use your Google Account to log in.
Step 3. Enter the recording settings
In order to start recording, click on New Video , and then from the dropdown menu select Record a video .

Step 4. Start the recording
Once you have selected whether or not you will use your Screen, Camera (or both), you can add some specific options and start recording. You’re limited to five minutes on the free plan, so don’t waste much time.

Step 5. Pause/Finish the recording
On the bottom left corner, you will have the option to pause or finish (the red square button) the recording. Before saving, you will have the options to Trim the Video, change the title (Loom | Free Screen & Video Recording Software – Day/Month/Year is by default), and make some Video Preferences.
Step 6. Share the video

Video Tutorial
4. How to record a presentation using Microsoft Windows?
There is also a free way to record presentations on your Windows computer. If you use Windows 10 or 11, this might be a good option.
✔️ You don’t have a record limit (as long as you have memory).
✔️ It is totally free forever.
❌ It is a very basic recording option.
Step 1. Open Game Bar
Many of you may seem surprised, but Windows has a built-in recording tool. It’s called Game Bar. To access it, you need to press the WIN + G . Of course, make sure it is enabled first.
Step 2. Click on “Capture”
The Capture button is next to the sound button. It will unlock you with the option to record.

Step 3. Click on “Record”
Click on the Record button which is the third from left to right. You can also start recording with Win + Alt + R .

Step 4. Record your clip
Now, you can freely record your clip.
Step 5. Delete or save the clip
Once you have filmed your presentation, you can either go to the folder where your file is stored, or delete it.
5. How to record a video on a Mac?
Last but not least, we have another free option for Apple users.
✔️ QuickTime is free forever.
✔️ There are plenty of recording options.
✔️ You can record an unlimited time.
❌ You are storing the files on your Mac.
❌ Not available on desktop PCs for free.
Step 1. Open QuickTime
The first thing you need to do is open your QuickTime.
Step 2. Click on File -> New Screen Recording
Once you’ve opened QuickTime, you have to select File -> New Screen Recording .
Step 3. Select what portion you would like to be recorded
There are several options that you can choose from.

Step 4. Start recording
After you have selected what portion of your screen you will record, you are free to start recording your screen. You have plenty of options for convenience, such as a timer, built-in microphone, where to save the recording, etc.
Video tutorial
6. Other recording tools
Of course, these 4 are just the tip of the iceberg. There are many more apps that also deserve attention but couldn’t rank higher on our list. Let’s see which they are:
- Zoom – Zoom is one of the most popular presentation software on the market, and the only reason it doesn’t appear here is because of its significance. We have prepared a separate tutorial on how to record a presentation in Zoom .
- AnyMeeting – it’s a very powerful presentation recording software. However, over the past few years, it lost some of its sheer power and it got passed by different platforms that offer much more versatility at more affordable prices.
- Camtasia – what we love about Camtasia is that you can create a next-level video experience. The cross-platform functionality is a great addition. However, it seems too hard for small tasks and the $300 purchase is not the value we are looking for here.
- OBS Studio – it’s a top solution for cross-platform live streaming. It has high-end functionalities and it is open-source. That’s great but there’s a catch – it’s too complicated for the average user.
- Debut – Debut is a great free tool that allows webcam recording and presentation recordings, too. However, it’s not compatible with any other OS than Windows, and the user interface looks dull.
- Screencast-O-Matic – it’s a very simple and effective tool but you need to pay a decent amount of money to get value out of the app. The free version doesn’t support HD recordings which limits its capabilities a lot.
Many people wonder how to record a presentation on Google Slides. Fortunately, there are many programs, and you can easily switch to anything you want. We have found that QuickTime and the Game Bar are amazing options for unlimited recording which also comes for free. However, if you’d like to upload your content online with a click of a button, you might fight Panopto and Loom better.
If you liked our presentation about screen recording, you can find these tutorials helpful, too:
- How to Write Scannable Content? Step-by-Step Guide
- How to Convert Your PowerPoint Presentation into Google Slides
- How to Start and End a Presentation: 10 Practical Tips to Grab Attention and Make an Impact

Add some character to your visuals
Cartoon Characters, Design Bundles, Illustrations, Backgrounds and more...
Like us on Facebook
Subscribe to our newsletter
Be the first to know what’s new in the world of graphic design and illustrations.
- [email protected]
Browse High Quality Vector Graphics
E.g.: businessman, lion, girl…
Related Articles
Creating adobe character animator puppet from static character: the basics, 25 affinity designer tutorials to step up your game in 2022, character animator tutorials part 1: introduction, how to create a simple vector monster in adobe illustrator, what is google slides and how to get started, 500+ free and paid infographic templates compatible with google slides:, enjoyed this article.
Don’t forget to share!
- Comments (0)
Nikolay Kaloyanov
Nikolay is a copywriter with vast experience in Technology, Marketing, and Design. When he isn't playing with words and crafting texts, he watches sports and asks questions. He is a funny person...until you put him on a diet.

Thousands of vector graphics for your projects.
Hey! You made it all the way to the bottom!
Here are some other articles we think you may like:

How-To Tutorials
11 seo and keyword tips for your best google ranking.
by Bilyana Nikolaeva
How to do a Hanging Indent in Google Slides in a Few Steps?
by Nikolay Kaloyanov

How to Create a Cartoon Flyer Template For Your Business
by Momchil Karamitev
Looking for Design Bundles or Cartoon Characters?
A source of high-quality vector graphics offering a huge variety of premade character designs, graphic design bundles, Adobe Character Animator puppets, and more.
TechRepublic
Account information.

Share with Your Friends
How to Record a Video Presentation With Google Slides
Your email has been sent

Google Slides now lets you record a presentation with inset video from your webcam. Each recording may be a maximum of 30 minutes long. No longer do you need to turn to a third-party tool or web meeting app, such as Google Meet , to record a presentation. Instead, you can start and finish the task with nothing more than Google Slides on a laptop.
As of March 2024, slide recordings may be made by customers who use Google Workspace Business Standard or Plus; Enterprise Starter, Essentials, Essentials Plus, Standard or Plus; and Education Plus editions.
How to make a basic slide recording in Google Slides
To create a slide recording, you’ll need to use Google Chrome on a computer that has a camera and microphone.
- Go to Google Slides and open your presentation.
- Select the Rec button in the upper right area, then select the Record new video button ( Figure A ).
The system will switch to the screen recording interface, with recording controls displayed below your slides. By default, the system will display your inset (picture-in-picture) video in medium size in the lower right corner of a slide, since this portion of a slide is often empty.

- Optionally, before you start recording, you might adjust three settings:

- Modify the size of the inset video frame. Select the size icon, found to the right of the video inset location icon, then choose either a small, medium or large video frame size.
- Open speaker notes with the button found to the immediate left of the back slide (<) icon. This will display speaker notes for your reference while recording. (Ideally, you would not need to refer to speaker notes, so that you could instead look directly at the camera as you record.)
- When you are ready to record, select the large red button at the bottom of the screen.
- If prompted, you may need to allow access ( Figure C ) to the tab, along with the camera and microphone. For example, when recording on a Chromebook, you may be prompted to “Allow docs.google.com to see this tab?” and “Also allow tab audio.” Select Allow, if prompted.

In a few cases, you may need to visit the following links in Chrome to adjust permissions for:
- Camera: chrome://settings/content/camera.
- Microphone: chrome://settings/content/microphone.
- A brief countdown should display (i.e., 3, 2, 1), then your recording will begin. Record your video, advancing your slides as desired.
- To pause recording, press the large red button at the bottom of the screen.
- Once paused, you may select from two options ( Figure D ):

After you select Save to Drive, wait a bit until the system indicates the file has been saved. If you leave or close the tab too soon, you may lose your recording.
How to select inset video shapes and sizes
On any slide, you may use the Insert | Speaker spotlight option ( Figure E ), then select a shaped video frame. This inserts a frame where the speaker video will display on that slide. You may reposition or resize the frame: Select the shape, and then drag-and-drop it to move it to a different place on your slide, or select a corner and drag it to resize it.

When you insert a speaker spotlight shape, that supplants the position and size you might have selected on a basic recording. In other words, the speaker’s video will display in one of the corners or the center, and in the small, medium or large shape chosen with the settings — unless you’ve inserted a speaker spotlight shape on a page ( Figure F ). Use the speaker spotlight option to convey the most polished professional effect, since it allows precise control over the shape, size and location of a video frame.

How to play, share and manage slide recordings
You may access slide recordings within Google Slides on a computer. However, unlike recording, which requires you to use Google Chrome, you may access and play existing recordings within Google Slides on a variety of modern browsers. For example, the following steps all work when you use Google Slides within either Google Chrome or Apple’s Safari browser.
To access recordings associated with a Google Slides presentation, follow these steps.
- Select the Rec button in the upper right area. The recordings you’ve made of the presentations will display. Importantly, the system shows both the date and duration of each recording.
- To view, share or download a recording, click anywhere on the playback icon or title of the recording ( Figure G ). It should open in a new tab. Within this tab, you might:
- Select the Play icon in the center of the video image to play the recording.
- Select the Share button in the upper right corner of the screen to modify access settings and give other people access to the file.
- Select the Download icon in the down arrow above a tray icon in the upper right area of the screen to download the file.

- Select the three dot menu to the right of a listed recording to:
- Rename a file something other than the default recording title.
- Remove a previously made recording you no longer need.
- Copy link and obtain the Google Drive URL for the recorded file.
All Google Slides recordings are stored in a Slides recordings folder on Google Drive. The recordings are saved as .webm files, which is a widely supported web video format. You may easily open and play .webm files on both Apple and Android mobile phones. Any recordings you make using Google Slides should be easy to view on almost any device.
Does the ability to record a presentation within Google Slides streamline your workflow? What sorts of video presentations will you create with this new capability? Mention or message me on X ( @awolber ) to let me know how you use screen recording within Google Slides.
Subscribe to the Google Weekly Newsletter
Learn how to get the most out of Google Docs, Google Cloud Platform, Google Apps, Chrome OS, and all the other Google products used in business environments. Delivered Fridays
- How to share video with Google Sites
- How to present Google Slides in Google Meet
- Prezi announces Google Slides integration
- Google Meet: A cheat sheet to the app and platform features
- Google Meet: 3 presenter controls for smoother presentations
- Best software for businesses and end users

Create a TechRepublic Account
Get the web's best business technology news, tutorials, reviews, trends, and analysis—in your inbox. Let's start with the basics.
* - indicates required fields
Sign in to TechRepublic
Lost your password? Request a new password
Reset Password
Please enter your email adress. You will receive an email message with instructions on how to reset your password.
Check your email for a password reset link. If you didn't receive an email don't forgot to check your spam folder, otherwise contact support .
Welcome. Tell us a little bit about you.
This will help us provide you with customized content.
Want to receive more TechRepublic news?
You're all set.
Thanks for signing up! Keep an eye out for a confirmation email from our team. To ensure any newsletters you subscribed to hit your inbox, make sure to add [email protected] to your contacts list.
How to Record a Presentation on Google Slides
Do you want an easy way to record a Google Slides Presentation as a video to share later with your teammates? Once you have the Zight screen recorder, the process is easy and fast.
Article Last Updated: April 23, 2024

What Is a Google Slides Presentation?
What do you need to record google slides presentations, how to record a presentation on google slides with zight: step-by-step guide, faqs on how to record a presentation on google slides.
Here’s an interesting statistic: 91% of people believe a well-designed slide deck can increase your confidence as a presenter. The first step to creating a good presentation is to choose the best software, and then record the presentation in HD.
Tell you what? You can create slides with Google Slides, then use the Zight screen recording software to present and narrate your slides to your audience. This has many benefits, including saving your presentation for future collaboration or asynchronous communication , which, in many ways, has more benefits than synchronous communication in a digital and remote workspace.
Read on as we tell you how to create this presentation from scratch, in just a few steps!
Google Slides is a free web-based presentation software provided by Google as part of the Google Drive suite. You can use it on any device with an internet connection, offering various features like an easy-to-use presenter view, speaker notes, live captions, and the ability to present to Google Meet video calls. Plus, your slides can contain text, images, videos, animations, and more to create dynamic content.
While you can present live in a meeting, today’s work landscape teams need to improve communication and productivity with asynchronous video communication . So, when you can’t gather everyone in a Google meeting, you need a way to create and share a presentation with your teams. Your options include recording a Google Slides presentation with narration, just like you create a PowerPoint presentation with Zight .
Here’s what you need:
To record a presentation on Google Slides, you will need a few things:
- A device with an internet connection: It’s best to have a computer to make it easy to create and present Google Slides
- A screen recording software like Zight: While Google Slides allows you to present live in a meeting, it won’t record audio or video files to send later. That’s where Zight comes in, allowing you to record and narrate your slides as you present so you can share with attendees at a later time
- An external microphone (optional) to record audio for your presentation. However, you can still use your native microphone on your computer
- A webcam (optional): If you want to show yourself presenting alongside the slides, a webcam will be necessary for recording. To make things easy, you can just use the Zight webcam recorder which will use your native webcam app
- A Google account: You can only access Google Slides with a Google account, so make sure to sign in to be able to create slides
- Google Slides: Before using the screen recording tool , you want to create and add content to the Google slides you will be narrating. More on this below!
Before you start recording, search for Google Slides on your browser, log in to your account and open an untitled presentation.
Alternatively, click File on a current Google Slides presentation page, then New, and Presentation (or from the template gallery to pick a presentation template).
Add content to your slides, using the (+) sign on the upper left-hand side of your Google Slides presentation page (or Ctrl+M) to add new slides. You can also click the dropdown menu next to the (+) sign and choose slides with your ideal layout. Add content to the slides by typing in text, inserting images, videos, shapes, or charts, and customize them with a unique theme and background color.
Once your Google slides are ready, here’s how to start recording:
1. Download Zight
If you don’t have Zight, click the red button below to download.
- Record your screen with audio and webcam
- Annotate with arrows, lines, and blur
- Instantly share with a link or upload to YouTube or Vimeo
Alternatively, search for “Zight” on your web browser and create an account. Then, download the app that’s compatible with your computer. Zight is available for Mac , Windows , and even as a Google Chrome extension .
2. Choose your Screen Recording Preferences
Open your presentation on Google Slides and ensure you can easily navigate to the slides once you’re ready to record.
On the Zight App
Launch the Zight app and click Record.
You’ll find recording options like Full Screen and Select Region, plus the Screen Only or Screen & Cam options. Screen Only is good when you don’t want to use your webcam, while the latter allows you to incorporate your webcam for a personal touch.
Then, select your audio/mic and webcam options, move your webcam overlay to a good space on your screen, and click Start Recording. Wait for the 3-second timer to count down before you go to the Google Slides presentation.
On the Google Chrome Extension
Click on the Zight icon on the upper left of your Google Chrome browser, click Record, and select either Screen Only or Screen & Cam. Then, turn on your microphone and webcam camera.
Next, click Start Recording and choose Entire Screen. After that, select the screen you want to record, and click Share. Click your mouse on any part of the screen to start recording and wait out the 3-second countdown.
The Zight screen recorder software will now be recording your entire screen.
3. Start Narrating Your Google Slides Presentation
On the Google Slides presentation page, click on the dropdown menu next to Slideshow.
Click Presenter View if you are viewing the first Google slide. Alternatively, click Start from the beginning if you are not on the first slide. This will turn your presentation into a full-screen view and you will see that Zight is sharing your screen.
Then, start narrating your Google slides in high video and audio quality.
You can pause and resume your screen recording and restart it to capture moments you may have missed in the beginning. You can also cancel the recording and delete the file to avoid uploading it to the cloud.
4. Annotate Your Presentation
One of the best things about presenting your Google Slides with Zight is that you can annotate the video just as easily as you narrate it.
If you are recording from the Zight app, you can pause the recording and then click the annotations button on the recording menu (the icon looks like a pen).
Once you do, you will see the different annotations you can add to the slides, including a pen, highlighter, arrow, line, ellipse, and rectangle. You can choose a different color for your annotations, even how long the annotation lasts on the final recorded video.
After annotating, resume the recording, rinse and repeat!
5. Finish Recording and Edit Your Video
Once you narrate all your Google slides, click the Finish recording button and wait for the file to upload to the cloud. Zight will also open the file on your default browser where you can edit the video file further.
When the video link opens, click the Edit button, and continue to split and merge sections, trim, crop, filter, and finetune different sections until the presentation is faultless. Click Done to save those settings.
On top of the recording, annotating, and editing of your Google Slides presentation, Zight will also transcribe your video and send the text to your email so you can go through the notes in case you missed something.
You can also add custom branding, and use AI features to generate a video summary and video titles. If you want to share the presentation with global teams, you will also love that you can translate the video file into 50 different languages for seamless communication.
6. Share the Presentation for Asynchronous Communication
To share the presentation, you can send the shareable link to your teams via Slack , Asana , Trello , and other chat boards and productivity software you use at work.
Alternatively, you can embed the video file in an email, or even download it on your computer then upload it on a platform like YouTube to reach a global audience.
7. Collaborate and Track Analytics
The best part about recording your presentation in superior video footage with Zight is how you can save it for collaboration later.
Firstly, you can save the video to a Collection on your Zight dashboard or add it to a Favorites list. This way, the video will be readily available and you can track how many people interact with it, either through comments or reactions to finetune your collaboration and communication strategy.
In addition, this video presentation will always be available on your Zight cloud account, and, as long as you keep it, even your colleagues or recipients can always retrieve it for future reference.
There you have it, an easy way to record your Google Slides presentation using Zight! With this method, you can easily create and share professional-looking recordings of your presentations to a global audience.
If you want to feel more confident before your audience with a well-designed and narrated deck, ensure you have a reliable internet connection before starting the recording. In addition, close any unnecessary tabs or programs on your computer to avoid interruptions. Finally, while Zight may use the native mic on your computer, you can prefer to use a high-quality microphone for better audio clarity.
Most importantly, don’t forget to rehearse and practice your presentation beforehand to ensure a smooth delivery and minimize any mistakes during the recording. With these tips in mind, you can confidently create engaging presentations that will impress your audience.
So why wait? Get Zight today and take your presentations to the next level!
I) Can I Record My Screen in Google Slides?
No. Google Slides does not have a built-in screen recording feature. However, you can use third-party apps like Zight to record your presentation.
II) How do you turn a Google slide into a video?
Since Google Slides does not record the screen and audio (apart from when you’re presenting in a Google meeting), you will need a third-party app to record your screen and turn your slides into a video. Follow the steps mentioned above to record and then export your presentation as a video.
When you record your Google Slides presentation with Zight, you’ll also be able to explain the contents of your slides in high-quality audio for an even better personal touch to what would be a boring presentation without narration.
III) How Do You Create a Presentation on Google Slides?
To create Google slides, follow these steps:
- Go to Google Drive and sign in.
- Click on the “New” button, then select “Google Slides.”
- Choose a template or start with a blank slide.
- Add your content by typing in text, and inserting images, videos, shapes, or charts.
- Customize your slides by changing the theme, background-color
Create & share screenshots, screen recordings, and GIFs with Zight
Get Zight for iOS.
- Add, change, or remove transitions between slides Article
- Animate text or objects Article
- Use the Morph transition in PowerPoint Article
- Insert a video from YouTube or another site Article
- Add or delete audio in your PowerPoint presentation Article
- Record your screen in PowerPoint Article

Record your screen in PowerPoint
You can record your computer screen and related audio, and then embed it in your PowerPoint slide—or you can save it as a separate file.

Open the slide that you want to put the screen recording on.
On the Insert tab of the ribbon, select Screen Recording .

Tip: PowerPoint automatically records the audio and the mouse pointer, so by default those options are selected on the control dock. To turn them off, deselect Audio and Record Pointer.
Select Record . Use Pause as needed and Stop when you're done.
Note: Unless you pin the Control Dock to the screen, it will slide up into the margin while you record. To make the unpinned Control Dock reappear, point the mouse cursor at the top of the screen.
Your video is added to the slide. Right-click the video frame, select the Start icon and pick how you want your video to start: In Click Sequence , Automatically , or When Clicked On .
You can change the look of the video by right-clicking the video frame, select the Style icon, and pick another shape.
Save your screen recording as a separate file
Right-click the video frame and select Save Media as .
In the Save Media as box, choose a folder, and in the File name box, type a name.
Select Save.
Trim your video
Right-click the video frame and select Trim .
To determine where you want to trim your video footage, in the Trim Video box, select Play .
When you reach the point where you want to make the cut, select Pause . Use the Next Frame and Previous Frame buttons to specify precise timing.
Do one or more of the following:
To trim the beginning of the clip, select the start point (shown in the image below as a green marker). When you see the two-headed arrow, drag the arrow to the desired starting position for the video.

To trim the end of the clip, click the end point (shown in the image above as a red marker). When you see the two-headed arrow, drag the arrow to the desired ending position for the video.
Select OK .

Need more help?
Want more options.
Explore subscription benefits, browse training courses, learn how to secure your device, and more.

Microsoft 365 subscription benefits

Microsoft 365 training

Microsoft security

Accessibility center
Communities help you ask and answer questions, give feedback, and hear from experts with rich knowledge.

Ask the Microsoft Community

Microsoft Tech Community

Windows Insiders
Microsoft 365 Insiders
Was this information helpful?
Thank you for your feedback.
PowerPoint Recorder
Record your PowerPoint presentations online
Powerful Online PowerPoint Recorder
Make your presentations look professional using VEED’s online PowerPoint recorder. It’s fast, easy to use, and gives you access to video editing tools to make your presentation stand out. You can upload your slides or record your screen while you are presenting. Add yourself to the scene by recording your webcam and audio as well.
No need to install software. Open your browser and start recording! Choose from different layouts and customize your video after you record. You can also edit your recording using our professional video editor.
How to Record Your PowerPoint Presentation:
1 upload slides and select a layout.
Select from our list of layouts (you may need to click to ‘Allow’ permission to access your screen, camera, or microphone). You can record just your screen, your webcam, or both at the same time! You can either upload your slides or record while you’re presenting.
2 Start recording
Click the red button to start recording! You'll see a countdown before the recording starts. Don't worry if you mess up. You have unlimited time and unlimited retakes. You can navigate to other pages, and don't worry, you are still recording.
3 Review, edit, and export
You can playback your recording to review it, click ‘Share’ to share with friends and colleagues, or ‘Edit’ to edit your video (perfect for adding text, subtitles, and professional touches to your screen recording)

‘PowerPoint Recorder’ Tutorial

Highly customizable PPT recording software
VEED lets you easily customize your Microsoft PowerPoint presentation recordings. Select from different layouts and backgrounds. You can record your screen, webcam, audio, and upload your PowerPoint slides to present while recording. If you choose to record your entire desktop, you can easily switch the view between your presentation slides and other windows. When you’re finished, edit your video using our free video editor, where you can also add royalty-free music from our Stock Library.
All the things you need in a screen recorder
Our video capture software is packed with features that will help you create professional-looking recordings. When you press record, the countdown timer will appear to prompt you when your recording starts. To make sure that your audio is being picked up, check the little microphone icon on the bottom of your screen. It should be animated to indicate that your audio is being recorded. It only takes a few clicks. It’s the best app to record your Microsoft PowerPoint presentations.
Fast, free, and easy-to-use screen recorder software
Our screen recorder and video editor are free to use and beginner-friendly. However, if you need to record longer videos, you may need to subscribe to our premium plans. Check out our Pricing Page to see which plan suits your needs. It is super easy to use. It only takes a few clicks!
Frequently Asked Questions
Microsoft does allow you to record your presentation as well as your voice or audio. But you might be limited because you can’t switch screens. Use VEED to record your entire desktop and switch between windows.
With VEED, you can record your audio, webcam, screen, and presentation slides all at the same time!
To add yourself or your camera to the recording, select the layout that includes “webcam.” Choose the size and positioning of your camera feed and start recording!
Although there are many screen recorders out there, VEED is your best choice when it comes to recording your PC screen! It’s free and online. No need to install software. Plus you can use our free video editor to enhance your recording even more.
What they say about VEED
Veed is a great piece of browser software with the best team I've ever seen. Veed allows for subtitling, editing, effect/text encoding, and many more advanced features that other editors just can't compete with. The free version is wonderful, but the Pro version is beyond perfect. Keep in mind that this a browser editor we're talking about and the level of quality that Veed allows is stunning and a complete game changer at worst.
I love using VEED as the speech to subtitles transcription is the most accurate I've seen on the market. It has enabled me to edit my videos in just a few minutes and bring my video content to the next level
Laura Haleydt - Brand Marketing Manager, Carlsberg Importers
The Best & Most Easy to Use Simple Video Editing Software! I had tried tons of other online editors on the market and been disappointed. With VEED I haven't experienced any issues with the videos I create on there. It has everything I need in one place such as the progress bar for my 1-minute clips, auto transcriptions for all my video content, and custom fonts for consistency in my visual branding.
Diana B - Social Media Strategist, Self Employed
More than a PowerPoint recorder
VEED is a complete browser-based tool that lets you do so much more than just record and share your Microsoft PowerPoint presentations. You can annotate your videos to make your presentation more informative. Edit your recording to add images, subtitles, and more. It is a professional all-in-one video-creation and editing software that’s great for beginners and pros alike. Create professional-looking videos in just a few clicks. You don’t need any video editing experience. Create stunning videos that you can share on social media in just minutes. Try VEED to create professional PowerPoint recordings today!


- SUGGESTED TOPICS
- The Magazine
- Newsletters
- Managing Yourself
- Managing Teams
- Work-life Balance
- The Big Idea
- Data & Visuals
- Reading Lists
- Case Selections
- HBR Learning
- Topic Feeds
- Account Settings
- Email Preferences
How to Make a “Good” Presentation “Great”
- Guy Kawasaki

Remember: Less is more.
A strong presentation is so much more than information pasted onto a series of slides with fancy backgrounds. Whether you’re pitching an idea, reporting market research, or sharing something else, a great presentation can give you a competitive advantage, and be a powerful tool when aiming to persuade, educate, or inspire others. Here are some unique elements that make a presentation stand out.
- Fonts: Sans Serif fonts such as Helvetica or Arial are preferred for their clean lines, which make them easy to digest at various sizes and distances. Limit the number of font styles to two: one for headings and another for body text, to avoid visual confusion or distractions.
- Colors: Colors can evoke emotions and highlight critical points, but their overuse can lead to a cluttered and confusing presentation. A limited palette of two to three main colors, complemented by a simple background, can help you draw attention to key elements without overwhelming the audience.
- Pictures: Pictures can communicate complex ideas quickly and memorably but choosing the right images is key. Images or pictures should be big (perhaps 20-25% of the page), bold, and have a clear purpose that complements the slide’s text.
- Layout: Don’t overcrowd your slides with too much information. When in doubt, adhere to the principle of simplicity, and aim for a clean and uncluttered layout with plenty of white space around text and images. Think phrases and bullets, not sentences.
As an intern or early career professional, chances are that you’ll be tasked with making or giving a presentation in the near future. Whether you’re pitching an idea, reporting market research, or sharing something else, a great presentation can give you a competitive advantage, and be a powerful tool when aiming to persuade, educate, or inspire others.
- Guy Kawasaki is the chief evangelist at Canva and was the former chief evangelist at Apple. Guy is the author of 16 books including Think Remarkable : 9 Paths to Transform Your Life and Make a Difference.
Partner Center

How to Record Customized Camera Feeds With Cameo in PowerPoint
T he widespread adoption of remote work and virtual meetings has led many people and organizations to realize they don't have to be physically present in the same conference room to make presentations. In fact, you don't even need to conduct them live.
However, recording your PowerPoint slides with your face on them requires technical know-how and third-party apps like OBS. This makes recording presentations a bit difficult and discourages people from doing it.
Thankfully, Microsoft has addressed this issue in PowerPoint 365 with the Cameo feature. Here's what it is and how to use it.
What Is Cameo in PowerPoint?
Cameo is a PowerPoint feature that lets you add your webcam or any other camera feed into your presentation. This makes it easier to present virtually, as your audience can see you from within your slides.
Previously, you needed a third-party app like OBS to overlay yourself on your presentation. You can also use a green screen overlay in Capcut or other similar apps to achieve the same effect. However, this takes a lot of effort and know-how.
But with this feature, you can do it from inside PowerPoint with just a few clicks. Here's how to insert a cameo into your slides.
- Go to Insert > Cameo .
- After clicking on Cameo, PowerPoint will insert a placeholder object on your current slide and open the Camera Format tab.
- You can edit the object as you wish, much like any other shape on PowerPoint. You can also click on the options in the Designer pane on the right side of the screen to help you work faster.
- Once you're happy with its placement on your slide, click on the Preview button to see your live video.
With that, you can start presenting your PowerPoint slides via screen sharing while still keeping yourself on the screen.
How to Record Your PowerPoint Presentation With Cameo
You can also insert a cameo from Record > Cameo . Clicking on this will bring you to the same menu tab and insert a placeholder object for your video. However, even if you didn't set up Cameo beforehand, you can insert it directly while recording your presentation. Here's how:
- Go to Record > From Beginning or Record > From Current Slide .
- In the recording screen, click on the Camera icon at the top. This will insert a round object containing your video in your slides' lower-right-hand section.
- Click on the Red icon to start recording your presentation.
- Go through your presentation as usual. For more information, check out our guide on turning your presentations into videos .
- Once you've finished, click the Red icon again to stop recording.
- Click Export to go to the Export to video screen .
- Change the File Name as needed, then click Browse to select the location where you will save your recorded video.
- Once done, click Export Video .
With that, you don't have to spend much effort to add your video feed to your PowerPoint presentation recording. However, the app only places your video at one location across every slide; it might cover some of your content. That's why it's better to use the Cameo feature when you're building or editing your PowerPoint presentation.
If you're unhappy with your recording, press the Retake Video on the left of the record icon. You can pick between On Current Slide or On All Slides .
What You Need to Record Customized Camera Feeds
You need a webcam and a Microsoft 365 account to record your customized camera feed. Furthermore, you cannot use Cameo or record presentations in the PowerPoint web app. You need to download and install it on your computer to use these features.
The Cameo feature is already available on Microsoft PowerPoint 365 in Windows and Mac. However, recording your presentation with Cameo is only available on Windows. As of the time of writing, this feature isn't available for the main PowerPoint 365 for Mac version.
If you're running macOS, you must be a Microsoft 365 Insider to get this feature. However, since the Cameo recording feature is already announced in the Microsoft 365 Insider blog , we hope it will be available in the mainstream PowerPoint for Mac version in a few months.
Recording Your Presentations Is Now Much Easier
The Cameo feature has made presenting PowerPoint slides in video calls easier. And with the recording function, you no longer need a third-party app to put your video over your presentation.
You can integrate it into each slide, allowing you to control where you are on your screen. And you also save a lot of time and effort, as you can record and save your presentation as a video from within Microsoft PowerPoint.

Leaked presentation reveals Microsoft's astounding plan to ramp up data-center capacity for the AI boom
- Microsoft's data-center capacity jumped in recent quarters, a leaked internal presentation shows.
- The company is planning even faster data-center growth in the coming quarters.
- Microsoft delivered "record-level GPU capacity," according to the presentation.
Microsoft significantly expanded its data-center capacity recently and plans to ramp up growth to astounding levels going forward, according to an internal document obtained by Business Insider.
Since July 2023, the start of Microsoft's latest fiscal year, the company delivered more than 500 megawatts of new data-center capacity , the document disclosed.
This document was part of a confidential slide deck from the company's Cloud Operations and Innovation team that was presented earlier this year.
Under the heading "Commercial Cloud and AI Demands: Fueling our Expansion," the document said Microsoft surpassed 5 gigawatts of total data-center installed capacity in the first half of its latest fiscal year.
The rise of generative artificial intelligence and huge foundation models is fueling a new data-center boom . Microsoft is leading the way through its partnership with OpenAI , the startup behind ChatGPT and GPT-4 .
These AI models need to be trained on mountains of data and then fine-tuned intensely. That takes thousands of GPUs and a pile of other related gear that's housed in huge data centers. These facilities use so much power that their capacity is measured in megawatts and gigawatts of electricity.
Shaolei Ren , an electrical and computer engineering professor at the University of California, Riverside, said Microsoft's 5 gigawatts of installed data-center capacity, if fully used, would be equivalent to Hong Kong or Portugal's annual electricity consumption.
"Astonishing speed"
It doesn't stop there. The software giant laid out even more radical growth plans for its data-center empire in the document obtained by BI.
Related stories
"With a strong Commercial Cloud business, our goal is clear," Microsoft said in this part of the slide presentation.
Microsoft wants to double new data-center capacity in the second half of its fiscal year. This runs from early 2024 to the middle of this year.
In the first half of Microsoft's 2025 fiscal year, which runs from early July through the end of 2024, the company aims to "achieve 3x growth" in new data-center capacity.
This requires Microsoft to deliver more than 200 megawatts in data-center capacity every month.
"This is an astonishing speed," Ren told BI. "This is a very large data-center capacity."
Ren said Microsoft's capacity plans suggested the company was either seeing huge demand or simply wanting to stay competitive by securing future power capacity that otherwise might be taken by competitors.
He added that this also raised questions about the environmental consequences of adding such a large data-center footprint, given the carbon emissions and water consumption of the facilities.
A Microsoft spokesperson declined to comment.
'Record-level GPU capacity'
The company is also securing a record number of GPUs to handle new AI workloads in data centers.
In the second half of last year, Microsoft delivered "record-level GPU capacity," more than doubling its total installed GPU base, the document said, without mentioning actual numbers.
Microsoft's GPU footprint expanded into 39 additional data centers in this period, and the company now has "AI clusters" live in 98 locations globally.
Contact the reporter, Eugene Kim, via the encrypted-messaging apps Signal or Telegram ( +1-650-942-3061 ) or email ( [email protected] ). Reach out using a nonwork device. Check out Business Insider's source guide for other tips on sharing information securely.
Axel Springer, Business Insider's parent company, has a global deal to allow OpenAI to train its models on its media brands' reporting.
Watch: How tech layoffs could affect the economy
- Main content
July 2024 Market Price Change Filing Webinar Recording and Presentation Slides
Click here for the recording of the webinar:
Passcode: hs34eT*7
Yorktowne Hotel’s resilience leads to longevity as it nears century mark
When Harrisburg businessman E.Z. Wallower lifted his glass to toast the opening of the Penn-Harris Hotel in 1918, the response from the 500 assembled could be heard 25 miles south in York.
“This handsome hotel,” Wallower said about the downtown Harrisburg landmark, “will be a key to open the doors to the future hospitality and prosperity of Harrisburg.”
What brought cheers in Harrisburg would prompt a collective groan in York. The city hosted at least six hotels: the Colonial Hotel on York’s square, the Hotel Penn on North George and City Hotel on West Market Street, among others. But none rivaled the Penn-Harris and its 400 rooms.
So York community leaders got to work, and in 1924, set up a campaign to raise funds from community shareholders for a first-class hotel, built the following year, that would entice travelers to pass through Harrisburg to stay in York. Or travelers from the South would spend overnight in York without giving the Penn-Harris another thought.
As it turns out, the Penn-Harris, with its early start, stood only 55 years. The Yorktowne Hotel, Tapestry Collection by Hilton checks in guests today, 99 years later, a testament of resilience endured by its operators and community.
A madeover Yorktowne not only towers above York — with its 11 stories and 70-foot flagpole — but has again become a destination. The Friends of the York County History Center’s “If the Walls Could Talk” fundraising luncheon earlier this month, for example, packed its restored ballroom.
As I was preparing to present to this history-minded audience, some thoughts about that resilience emerged. So more than a year after the Yorktowne reopened after about a seven-year restoration process and less than a year before its 100th anniversary, I offer some thoughts about this tall landmark whose story, difficult and triumphant, reflects its community and shows how adaptation led to its longevity.
A leading indicator
The Yorktowne has long served as a transportation and community bellwether, an indicator of how York city and county are faring.
It was built handy to Continental Square where the east/west Lincoln Highway intersected with the north/south Susquehanna Trail. The square was a bustling place, where rail, trolley and auto passengers intertwined. The rail and trolley traffic would decline within two decades and automotive traffic would shape the square, the Yorktowne and the county thereafter.
Completion of Interstate 83 in 1959 and the Route 30 bypass in 1972 meant motorists could easily bypass York. You could say their crossing in Manchester Township about 2 miles away replaced York’s square as the transportation heart of York County. That was an unproductive swap, an austere suburban cloverleaf of asphalt versus the city’s pedestrian-friendly crossroads dating to, really, when Native Americans waded across the Codorus Creek.
In a three-year period after 1969, the Yorktowne weathered more issues than this loss of traffic, any of which would have scuttled a lesser landmark. The York race riots caused an acceleration of suburbanization that had begun in earnest in the 1960s. The turbulent 60s caused retailers — The Bon-Ton, Gregory’s and Wiest’s — to open suburban locations and eventually close their downtown stores. Then came the damaging floodwaters of Tropical Storm Agnes in 1972, contributing to a city population loss of 17% in the 1960s and 1970s.
In this era, the Yorktowne’s operators tried many things to combat the challenges of a deteriorating downtown. It explored — but didn’t act on — a plan to establish a motel site in suburbia. The Penn-Harris did that with the West Shore hotel that bears its name today.
It took on the name Yorktowne Motor Inn, but that name better fit a suburban motel and caused confusion with guests. And in an act that showed its level of desperation, the Yorktowne opened a first-floor club called the Boom Boom Room, with dancers in Playboy-style attire to attract a younger audience. That ended shortly after it began.
The city, meanwhile, was flailing in its own way. It was knocking down landmark buildings — City Market, Children’s Home, Hannah Penn Junior High — for parking or to serve motorists. It considered demolishing the Yorktowne’s longtime neighbor, the domed York County Courthouse, but fortunately expanded it instead.
The city flirted with an outdoor Market Street Mall, sans traffic, in the 1950s and 1970s, but better judgment led to the semi-mall with its wide sidewalks today and Cherry Lane Park. Later, in the early 2000s, the city briefly hosted a thankfully short-lived West Market Street nightclub scene that reflected, in part, the Boom Boom Room Hail Mary thinking.
And yet the Yorktowne survived all of these challenges.
Going against the grain
This study about how the Yorktowne persisted against immense challenges must include how it grew to embrace and welcome people of color.
In its construction plans, the Yorktowne went against the grain compared to other York businesses in employing Black people. But the hotel did this by following the flight path of Jim Crow: separate employee restrooms, for example. The hotel initially would not accept Black guests, even prominent entertainers. They would stay in homes in the Black community.
But by 1957, Jim Crow was unnested, and the Yorktowne was listed in the Green Book, an American guide of safe places for Black motorists to stay and eat. Thirty years later, redemption of those early sins continued when the Yorktowne refused a request from the Ku Klux Klan to hold a state meeting there, a decision that the Klan charged was discriminatory and then unsuccessfully sought legal remedy.
Those are some of the challenges and responses from the Yorktowne in its first near century. As it approaches its century mark, the landmark, with a complete makeover and Hilton in its name, shows promise perhaps higher than at any time since its beginning.
And the things it brings come at the right time for a rebuilding city.
Combining two movements
York County’s 250th anniversary in 1999 brought together two paths that lead to its future. One was a literal path, the York County Heritage Rail Trail, that connected York with its southern terminus at the Mason-Dixon Line.
That long ribbon, now reaching to Rudy Park in Manchester Township, sparked a strategy in York County that would build a new economy for the county and downtown York — a movement built around the outdoors. That newly opened rail trail ran near two cultural events linked to the anniversary: the Riverwalk Arts Festival and the Yorkfest music festival. The creative community has been a visible and growing part of the city and county ever since, as evidenced by street sculptures, outdoor murals and indoor galleries.
The restored Yorktowne stands today at the confluence of those two movements — recreationists and creatives — that have fostered an outdoors economy of green space and building preservation that is straining to replace a long-held preference for development. The hotel restorers assembled artists from the community to create pieces that appear from ground level to its rooftop lounge. It refurbished the iconic painting of George Washington in its ballroom and uncovered a long-hidden mural at its reception desk, both by noted American artist Cornelius Hicks.
The engaging Yorktowne stands as a brightly lit and colorful connector between two major cultural districts: the arts neighborhood surrounding Central Market and Royal Square near King and Queen streets. Further, the city will soon host a new museum and a cultural center: the York County History Center’s museum at the old West Philadelphia Street steam plant and Crispus Attucks History and Culture Center.
The Yorktowne provides an overnight option for trail users, a number that will increase when the Hanover Trolley Trail connects Hanover and York. There’s a place for those coming to town to run in the various 5K races. And there are downtown rooms ready for users enjoying the restored Codorus Creek as the Codorus Greenway project unfolds.
Putting it another way, one would be pressed to find promise in the new creative/recreationist economy in the city without a downtown hotel of the Yorktowne’s scope and quality.
Community at Yorktowne’s center
The same community that came together to build the Yorktowne in 1925 kept it going in its lean years. Philanthropic York County families supported it from about the mid-1970s through its 2016 closing. Community foundations and members continued to believe in it during the recent long makeover process that cost north of $50 million.
It’s instructive to loop back to the Penn-Harris, which faced many of the same challenges as York city and the Yorktowne in the 1960s: population loss to the suburbs, race riots and Agnes.
The downtown Penn-Harris closed in 1972, and it was demolished the next year. Harristown, a development corporation, formed in 1974 — 50 years ago — and a familiar landmark grew in its place: Strawberry Square. A connected Hilton would go up in 1990.
The Yorktowne, with its own Hilton label, has outlived the Penn-Harris. The York landmark started as a community enterprise and stands today on the eve of its 100th birthday because of the York County community’s support.
Sources: “Overnight Success: The Yorktowne Hotel at 70”; YDR files; Joe McClure, PennLive.com, “Harrisburg’s Penn-Harris Hotel, a downtown landmark, was demolished 50 years ago.”
Upcoming presentations
Jim McClure will present about "1960s in York County: How This Tumultuous Decade Shaped Our Communities Today" at May 13, OLLI at Penn State York, and on “Fascinating Things about York Haven” at 11 a.m. May 18, NeyChip History Center, 5 N Front St., York Haven.
Jim McClure is a retired editor of the York Daily Record and has authored or co-authored nine books on York County history. Reach him at [email protected] .
IMAGES
VIDEO
COMMENTS
You can record your PowerPoint presentation—or just a single slide—and capture voice, ink gestures, and your video presence. The completed recording is like any other presentation. You can play it for your audience in Slide Show or you can export it as a video file. So instead of just handing the deck to someone, people can see your ...
Learn how to record narration and timings for your PowerPoint slideshows with this step-by-step guide. Find out how to manage, pause, replay, remove, and save your recordings, and explore more options with PowerPoint training and community resources.
Learn how to record a presentation from PowerPoint with audio and webcam, or from a PowerPoint file, using Snagit or Camtasia. Find out the benefits of recording your presentations and how to edit them with Snagit or Camtasia.
Learn how to record a PowerPoint Presentation with audio and video simply by using the build-in PowerPoint functionalities and tools. You will learn how to...
In the Options dialog box, click the Customize Ribbon tab on the left. Then, in the right-hand box that lists the available ribbon tabs, select the Recording check box. Click OK. To get ready to record, select Record on either the Recording tab or the Slide Show tab of the ribbon.
You must have edit access to the slides in order to create a new recording. To open your presentation, go to Google Slides. To record your slideshow, in the top right, click Rec Record new video. To start recording, in the middle, click the red record button. To start over, pause and click Re-record. To save your recording, pause and click Save ...
In this video tutorial from Microsoft, you will learn how to record your PowerPoint presentation.You can record your PowerPoint presentation—or a single slid...
Let's see how to record a PowerPoint presentation in front of live audiences. Step 1 - save your PowerPoint presentation in OneDrive. Step 2 - open your PowerPoint slides from PowerPoint online. Step 3 - go to Present Live from the Slideshow Ribbon tab. Step 4 - share a live link with your audience.
Step 2 - Start Recording. Next, grant Vimeo Record permission to access your microphone and camera. Ensure that you are on the screen with your Google Slides presentation. Vimeo Record automatically syncs with your audio and video sources. Click on the Record button.
You can start recording your presentation using the following method. Record Tab: To record a PowerPoint presentation, go to the Record tab and select whether you wish to record from the beginning, from the current slide, a specific area on the screen, or record audio. Slide Show Tab: you can also initiate recording a PPT via Slide Show ...
Select the Record button on the toolbar to start recording your narration. Use your keyboard arrow keys to move back and forth between slides. Press N or Space Bar to move to the next slide or animation in the presentation. Press P or Backspace to return to the previous slide or animation.
To begin a recording of a PowerPoint presentation, move your cursor over the menu bar in Zoom. It's the series of options and buttons at the bottom of the app's screen. First, make sure that your microphone isn't muted. This setting is controlled by the Mute button, found on the left side of the menu bar.
Open your PowerPoint presentation and put it in "Slide Show" mode. With Panopto Express, you'll have two options for recording your slides: You can either record your slides by recording your screen or by recording the slides within the PowerPoint application. Click the screen capture icon and make your selection from the dialog window ...
How to Record a Google Slides Presentation (with Audio & Video) Before you can begin recording your Google Slides presentation, you will need a few things: Step #1: Ensure You Have the Required Resources. A microphone (you can use your laptop's mic or wear a headset) Recording software (we touch on this in the coming section) A Google account
A window appears onscreen counting down five seconds until the recording starts. In Google Slides, go to View > Slideshow on the menu bar. This displays your slides in full screen mode so that you can present. Go to View > Slideshow to play your Google Slides presentation deck in full screen.
Head on to the recording studio. Access the "Present and record" option on the editor's top-right side or click on the three-dot menu to select it among recommended actions. Select "Go to recording studio" and set up your camera and microphone. Start recording with your notes in Presenter's View and have the options to pause and ...
Record narration and timings for your presentation in Microsoft PowerPoint to give it a professional and polished feel. Record narration and timings:1. Selec...
Step 3. Enter the recording settings. In order to start recording, click on New Video, and then from the dropdown menu select Record a video. Step 4. Start the recording. Once you have selected whether or not you will use your Screen, Camera (or both), you can add some specific options and start recording.
Go to Google Slides and open your presentation. Select the Rec button in the upper right area, then select the Record new video button ( Figure A ). The system will switch to the screen recording ...
Free online presentation recorder. A powerful online screen, webcam, and audio recorder for creating professional video presentations. It's an incredibly better tool than Google Slides! VEED lets you easily capture your screen. Customize your layout, background, and camera feed in a few clicks. Our free presentation recorder works on Windows ...
To record a presentation on Google Slides, you will need a few things: A device with an internet connection: It's best to have a computer to make it easy to create and present Google Slides; A screen recording software like Zight: While Google Slides allows you to present live in a meeting, it won't record audio or video files to send later ...
Learn how to record your computer screen and related audio, and embed it in your PowerPoint slide or save it as a separate file. Follow the steps to select the area, start, stop, and trim your video, and choose the style and color of the video.
VEED is a complete browser-based tool that lets you do so much more than just record and share your Microsoft PowerPoint presentations. You can annotate your videos to make your presentation more informative. Edit your recording to add images, subtitles, and more. It is a professional all-in-one video-creation and editing software that's ...
A strong presentation is so much more than information pasted onto a series of slides with fancy backgrounds. Whether you're pitching an idea, reporting market research, or sharing something ...
Here's how: Go to Record > From Beginning or Record > From Current Slide. In the recording screen, click on the Camera icon at the top. This will insert a round object containing your video in ...
Record narration and timings for your presentation to give it a professional and polished feel.Record narration and timings:1. Select Slide Show -- Record Sl...
In the first half of Microsoft's 2025 fiscal year, which runs from early July through the end of 2024, the company aims to "achieve 3x growth" in new data-center capacity. This requires Microsoft ...
MTAC Meeting Agendas, Presentations and Webinars. Focus Group Presentations and Notes; MTAC Agendas; MTAC Meeting Presentations; Pre MTAC Webinars; MTAC Meeting Dates. Meeting Dates; Hotel Accommodations; MTAC Quarterly Session Registration; User Group, Work Group, and Task Team Information; National Postal Forum (NPF) Registration; Postal ...
As Prepared for Delivery on April 18, 2024. Thank you, Kelly and Matt, for your presentation and all the staff's work on this ANPR. Sound record retention practices, although not a topic often discussed, are critical to ensuring the continuity and longevity of credit unions and the credit union system.
Yorktowne Hotel's resilience leads to longevity as it nears century mark. Jim McClure. York Daily Record. 0:00. 1:14. When Harrisburg businessman E.Z. Wallower lifted his glass to toast the ...