MacBook tips: How to use speech-to-text to dictate in macOS
Take notes without a keyboard using this handy feature

Speech-to-text is a handy tool for dictation available in macOS. Once you set it up, you can scribble words to a page using this tool anywhere you would otherwise type with a keyboard. In addition to typing text, you can also enter punctuation marks and formatting such as line breaks and special symbols by speaking the commands.
While this feature was full of glitches and actually made typing more laborious in years past, Apple really has ironed out most of the wrinkles and made it fairly useful. If you find yourself needing a break from the keyboard, it’s definitely worth trying.
It is a handy tool when you need to work hands-free, or jot down a quick note before its lost forever. That said, it’s still not perfect, and I find that it works best when you speak slowly and accentuate bigger words.

1) Click the Apple icon in the upper left corner.
2) In the menu that opens, select System Preferences .

3) In System Preferences, select Keyboard .

4) In the Keyboard window, go to the Dictation tab .

Stay in the know with Laptop Mag
Get our in-depth reviews, helpful tips, great deals, and the biggest news stories delivered to your inbox.

5) There, switch on the dictation option .

6) Click Enable Dictation to allow Apple to use the recording.

7) In any document processor, click the Dictate icon and start speaking.

8) To change the default language, click the down arrow to open the language drop-down menu .

9) Select a language you would like to convert from speech to text.

M4 MacBooks: A timeline of when to expect Apple's next-gen laptops
Apple’s M4 chip reportedly ‘nearing production’ — and it could cause major headaches for Qualcomm and Intel
MacBook Pro M4 — everything we know so far
Most Popular
- 2 Endgame Gear OP1 8k gaming mouse review: This weightless mouse is too good to pass up
- 3 A murky monopoly: Apple vs. the Department of Justice
- 4 How to block built-in ads on Windows 10: No, I don't want to upgrade to Windows 11 or make a Microsoft Account
- 5 Second monitor not detected: How to fix this irritating Windows 10 problem
How to transcribe audio to text using Dictation on a Mac
You can use the Dictation feature built into your Mac to transcribe audio files, and in my experience, it's been about 98-99% accurate, so it saves a lot of time if you want to index your audio files, or you need a transcript for some other purpose.
These instructions were last updated for macOS Monterey 12.4.
First, open up System Preferences, go to Keyboard, then the 'Dictation' tab:

Turn on Dictation, and when prompted, accept the terms for Apple's Dictation service. Also take note of the 'Shortcut' (e.g. 'press dictation key' or 'press control twice'. You'll use that to activate dictation later.
Make sure you have your Mac's microphone selected, then open up TextEdit and create a new document:

Activate the dictation shortcut (e.g. press the dictation key), then start playing back your audio file through your Mac's speakers. The mic should pick up the audio and start transcribing live into the open document.
Bonus: Routing audio internally on the Mac with Loopback
If you have Rogue Amoeba's Loopback , you can also use it to route the audio signal internally , so you don't have to have audio playing out through the speakers.
After you have Loopback installed and running, create a new device called 'Transcription Device'. Delete the default Pass-thru source, and add in Quicktime Player as a new source:

Quit Loopback (the device will still be present on the system after quitting), then go back to the Dictation settings in System Preferences. In there, choose the new 'Transcription Device' sound input:

Then go back to TextEdit, and in a new document, activate Dictation using your configured shortcut (e.g. the dictation key). Pop over to QuickTime Player, and play your audio or video file, and watch as the words are transcribed as if by magic!

Alternative: Welder (or other online services)
As an alternative, you could use an online upload-to-transcribe service like Welder . I tested the same files on Welder that I used with Dictation, and Welder was better about adding punctuation and separating multi-person interviews.
Their transcription feature can be used for free; upload a video or audio file, and within a few minutes, you can read or download the transcribed text.
Further reading
- Transcribing recorded audio and video to text using Whisper AI on a Mac
- Recording multiple camera angles, full-size, simultaneously, on a Mac
- Playing sounds with Python on a Raspberry Pi
- Add new comment
This felt a little bit inefficient to me, so I did some digging and found that someone's made a command line tool for Apple's speech recognition API: https://github.com/sveinbjornt/hear
The real kicker here is that you can transcribe audio files, meaning that you don't have to wait for a video to play to get a transcript: hear -i /path/to/someone_speaking.mp3 > transcribed_text.txt
Oh nice, even better! I'll have to give it a try.
Thank you! :) Came here for this info.
Thanks for the link! I also found -d flag useful, forcing it to process video on a device. Otherwise, I got transcriptions only for the first minute of my mp3 file.
Yo when I try to follow your instructions without loopback, seems simple enough.. when i press play and go into TextEdit and begin dictation, macOS silences the audio output and this doesn’t work running macos 12.5.1 September 18 2022
When using Rogue Amoeba's loopback, you need to add a 'monitor device'. I just added the built-in speakers but you could use another audio device.
I have the same problem. How did you fix it?
This is now even easier with Whisper: https://github.com/openai/whisper
Thanks to this comment, I test drove Whisper yesterday, and wrote up this new blog post today: Transcribing recorded audio and video to text using Whisper AI on a Mac .
Thank you for the tutorial. I am trying to transcribe audio that is about a hour long. Once I start the transcribing process, the microphone stops working every 2-3 minutes. Is there a way I can make the microphone continue recording for longer periods of time? Thanks!
I would use the github suggestions, but am not familiar with using the files and have very little experience with Terminal. If anyone can direct me to some tutorials, I would appreciate that also.
When we try to do this, as soon as we start playing the audio file dictation turns off. Little microphone disappears and nothing is transcribed. There are two of us, both on Macs running Monterey. Mine's an M1 iMac, hers is a Mac Book Pro. Any ideas? She has Blackhole installed and I have SWB audio capture - will that mess it up?
I have the same issue of the audio silencing when I open the dictation on textedit. Any remedies to this without having to download another software?
same here. I'm on Monterey. As soon as I start playback, the dictation stops.
Ditto. Has anyone figured out how to keep the dictation microphone operational so that it transcribes audio files?
Is there a way to directly input a file from a digital voice recorder and have it transcribed? Or, do I have to save it as an audio file and follow one of the methods in this article? Thanks!
Can a previously recorded speech sound file be used for dictation? That is sound from a source other than a microphone. If so how is this done?
I could not install Loopback as it cannot add system items on my machine. Blackhole works as well.
I am on Sonoma. May I ask how you configured Blackhole? Based on your and another commentor I installed Blackhole, set up a multi-output profile, one of which is a Blackhole 2 channel device, then configured the system dictation source to the Blackhole device. When I activate dictation it stops the audio output and nothing happens. Thanks for any help you can offer.
Although the first solution would be great, I'm unfortunately now the 7th commenter reporting this problem:
-> "Start dictation" within TextEdit (..and Pages.app) seems to deactivate audio output from VoiceMemos. <-
Jeff Geerling or anyone else - Can you help us to somehow successfully use the 1st solution? Thank you!
How to dictate on a Mac computer, using the voice-to-text dictation feature that can type out your speech
- You can dictate on a Mac computer so that your computer types out your speech.
- But before you can start using dictation, you'll have to enable it via your Mac's System Preferences, and decide the shortcut you'll use to turn it on, as well as the language it will dictate in.
- Here's how to set up and use the dictation feature on a Mac computer.
- Visit Business Insider's homepage for more stories .
Voice-to-text is a helpful feature for those who are often out and about.
And for those who have a Mac computer, you can take that feature and use it in your everyday workflow. The key is a built-in feature known as dictation.
But before you can take advantage of dictation, you'll have to enable it. After that, it works similarly as any voice-to-text feature, any you may be able to access more in-depth voice commands to format your document.
Here's how to set it up and start using it.
Check out the products mentioned in this article:
Macbook pro (from $1,299.99 at best buy), how to set up dictation on a mac.
1. Click the Apple logo in the top-left toolbar, then choose "System Preferences."
2. Select "Keyboard."
3. Toggle over to "Dictation" in the menu at the top of the window.
4. Next to "Dictation" select "On" and if desired, turn on enhanced dictation by ticking the corresponding box — this allows you to use additional commands, like bold, italics, underline, copy, delete, and undo — and dictate without an internet connection (enhanced dictation is only available for those with OS X Mavericks v10.9 or later ).
5. Set the language and create the desired shortcut.
How to dictate on a Mac
Once you've enabled the dictation feature, here's how to use it:
1. Open a document.
2. Place your cursor to the desired location for your dictation.
3. Use the shortcut you established when setting up dictation; alternatively, you can also select "Edit" and then "Start Dictation."
4. Start talking.
You should see a microphone icon appear on the screen after you start the feature.
As you speak, it's important to remember to say your desired punctuation out loud, otherwise you'll end up with a long, run-on sentence. To stop dictation, click "Done" below the microphone icon.
Related coverage from How To Do Everything: Tech :
How to easily record audio on your mac using either of its 2 simple recording apps, how to uninstall apps on a mac computer in three different ways, how to create folders on a mac computer and organize your files, how to set an alarm or event reminder on a mac using the calendar app.
Insider Inc. receives a commission when you buy through our links.
Watch: A diehard Mac user switches to PC
- Main content
How to Use Dictation on a Mac for Voice-to-Text Typing
Here's how to use the dictation feature on your Mac to type without using a keyboard.
Typing isn't for everyone. If you have clumsy fingers or difficulty spelling, typing might be your least favorite part of using a computer. Fortunately, you can use the built-in dictation software on your Mac to speak what you want to type instead.
Unlike Voice Control---which is Apple's fully-featured accessibility tool---dictation is easy to use. It's also so accurate at translating your voice that some of the best dictation software developers, like Dragon Dictate, stopped making their own dictation apps for Mac to compete with it.
How to Use Dictation on a Mac
Double-press the Fn button to start dictating on your Mac. You should see a microphone icon appear or hear a macOS confirmation tone. If this is your first time using Dictation, click OK in the popup window to confirm you want to use it.
After activating Dictation, start saying what you want to type to see it appear on screen. Dictation ignores pauses in your speech, allowing you to take a moment to compose your thoughts. However, this does mean you need to dictate your own punctuation, which we explain below.
Apple suggests you dictate in short bursts of 40 seconds or less. This keeps your Mac from falling behind, since you can speak much faster than it can process what you say.
You can dictate text anywhere you'd usually type on your Mac. That includes writing documents, using Spotlight or search bars, entering web addresses, and composing emails. If that sounds useful, you might want to take a look at these dictation apps for your Android phone as well.
Use any of the following methods to stop dictating:
- Press Fn again
- Click Done beneath the microphone
Your dictated words appear underlined while your Mac is processing them. After you stop dictating, they'll reformat themselves, and any words your Mac was unsure of appear underlined in blue. Click these words to pick an alternative option or type it out manually if it was wrong.
The more you use Dictation, the better your Mac gets at understanding your voice. This means you'll see fewer mistakes and words underlined in blue less often.
How to Add Punctuation and Format Your Dictation
Chances are that you need to add punctuation to your dictation to make sure it's formatted correctly. This is easy to do while dictating your text by saying the particular punctuation marks you want to add.
For example, to dictate the following text:
Hello, my name is Dan. How are you?
You need to say:
Hello comma my name is Dan period how are you question mark
Apple includes a long list of over 50 punctuation marks, typography symbols, currency signs, mathematical signs, and voice commands you can use with Dictation in the macOS user guide. Visit Apple's voice dictation commands page to take a look at the list yourself.
Along with adding punctuation, you can also use a small set of voice commands to change the formatting of dictated text on your Mac. These commands include capitalization, line breaks, and even typing without spaces.
Say the following voice commands to format text with Dictation:
- New Line: Equivalent to pressing the Return key once
- New Paragraph: Equivalent to pressing the Return key twice
- Caps On/Off: Types the following words in "Title Case"
- All Caps On/Off: Types the following words in "ALL CAPS"
- No Space On/Off: Types the following words "withoutspaces" (useful for website URLs)
Troubleshoot Dictation Problems on Your Mac
Dictation is a fairly simple tool, but it doesn't work all the time. There are a few different problems that might stop you from being able to use Dictation on your Mac. Here's what they are and how to fix them.
Change the Dictation Shortcut
If nothing happens when you double-press the Fn button, you might have changed the Dictation shortcut on your Mac. You can change this shortcut to whatever you like, or check what the new shortcut is and use that instead.
To do so, open System Preferences and go to Keyboard > Dictation . Open the Shortcut dropdown menu and choose the dictation shortcut you want to use. To create your own, click Customize , then press the keyboard shortcut you'd like.
Test Your Internet Connection
Your Mac requires an active internet connection to use Dictation. This is because Apple processes your voice on its servers---using the latest language data---rather than locally on your Mac.
Without an internet connection, the microphone icon appears with three dots in it, but vanishes before you can start dictating.
To make sure your internet connection is working, try streaming a video on YouTube. To fix problems with your connection, restart your Wi-Fi router and follow our steps to get your Mac connected to Wi-Fi again . Contact your internet service provider for more help.
Choose a Different Microphone to Use
As you dictate, you should see a white bar in the microphone icon that fluctuates with the loudness of your voice. This shows the microphone input on your Mac. If nothing appears in the microphone, your Mac can't hear you. You need to use a different microphone to fix it.
Go to System Preferences > Keyboard > Dictation . Open the dropdown menu beneath the microphone at the left of the window to choose a different microphone. If you can't see your microphone, make sure it's connected with the latest drivers installed.
Change the Dictation Language
To dictate in a different language, you need to add that language in System Preferences and select it from the Dictation icon. Using the wrong language results in a lot of mistakes, as Dictation will use regional spellings or replace what you said with similar-sounding words from another language.
In System Preferences , go to Keyboard > Dictation and open the Language dropdown menu. Click Add Language and check the box next to whichever languages you want to use. Make sure you choose the appropriate region if your language is used in multiple countries.
The next time you activate Dictation, you should see the current language displayed beneath the microphone icon. Click it to change to another dictation language instead.
How to Make Dictation as Private as Possible
Dictation communicates with Apple's servers to convert your speech to text. This means it's never completely private, as explained by the popup message that appears when you enable Dictation for the first time. That said, there are still steps you can take to reclaim as much Dictation privacy as possible.
To change the data Dictation uses, open System Preferences and click on Security & Privacy . Go to the Privacy tab and scroll down to select Analytics & Improvements in the sidebar. Disable the option to Improve Siri & Dictation to stop Apple from storing or reviewing your future Dictation recordings.
Apple usually does this to help improve Dictation. Even with this option disabled, you still need to delete existing recordings from Apple's servers. Go to System Preferences > Siri and click Delete Siri & Dictation History to do so.
Do More With Your Voice Using Voice Control
Although many people confuse the two, Dictation and Voice Control are two separate features on your Mac. As we've explained, Dictation allows you to convert your speech to text, adding punctuation and line breaks where necessary. But Voice Control unlocks an entire world of voice commands that control your Mac.
If you want to save documents, switch applications, open menus, and do much more with your voice, you need to use Voice Control. This is primarily an accessibility tool; it lets anyone control a Mac using nothing but their voice. Take a look at our Mac Voice Control guide to learn how it works.
How to Use Speech to Text On Mac?

Finding ways to streamline our daily tasks has become significant in recent times. Imagine if you could effortlessly transform your thoughts into words without the constraints of manual typing. Say hello to MacBook’s speech to text functionality , which enables you to effortlessly convert spoken words into written text!
Speech recognition on your MacBook opens up a new dimension of efficiency and convenience. From drafting emails to crafting elaborate documents, the power of your voice becomes the catalyst for productivity, saving your valuable time and sparing your fingertips from the monotony of keystrokes.

Table of Contents
Boosted productivity, accessibility, multitasking , enable voice dictation, how to dictate text, customize and manage, using voice command to perform different actions, disabling mac dictation software, benefits of mac speech to text.

As time is a precious commodity and accessibility is a cornerstone of technology, the ability to convert spoken words into text on your MacBook is more than just a feature it’s a game-changer. Here are the key benefits of speech to text on Mac:
Whether you are composing emails, drafting reports, or brainstorming ideas, the accelerated pace at which MacBook seamlessly transcribes your thoughts into text on the screen empowers you to conquer tasks with unparalleled speed.
For those who may face challenges in typing, this feature becomes an invaluable lifeline, offering a means to communicate and interact with their Apple devices effortlessly. By bridging the accessibility gap, Apple’s commitment to inclusivity shines through, making the MacBook a device that caters to diverse user needs.
The hands-free nature of this feature allows you to articulate your thoughts into text while concurrently tackling other responsibilities. Whether you are engaged in a video conference, researching online, or managing multiple applications, the ability to seamlessly integrate speech into your workflow ensures that no moment goes underutilized. MacBook’s speech to text is a dynamic facilitator of efficiency in the complex dance of multitasking.
Steps to Enable Voice Dictation on a MacBook
MacBook’s Voice Dictation, also known as speech to text, is a powerful tool that promises to redefine your interaction with your MacBook. Here are the steps to enable voice dictation on a MacBook and how to use it:
Step 1: Access System Settings
Click on the Apple menu in the top-left corner of your screen and select “System Settings.” Then, navigate to “Keyboard” in the sidebar.
Step 2: Enable Dictation: Within the Keyboard settings, find and click on “Dictation” on the right. Turn it on, and if prompted, click “Enable.”
Step 3: Configure Siri and Dictation Settings
When asked if you want to improve Siri and Dictation, choose whether to share audio recordings with Apple by clicking “Share Audio Recordings” or “Not Now.”
Step 4: Language Settings
To dictate using a specific language, click the “Edit” button next to Languages, then select your desired language and dialect.
Step 5: Privacy Settings
To manage privacy settings related to Siri and Dictation, go to “Privacy & Security” in System Settings and adjust the “Improve Siri & Dictation” option under Analytics & Improvements.
Position Cursor: Place the insertion point in the application where you want to dictate text.
Initiate Dictation: Press the Microphone key (if available), use the keyboard dictation shortcut, or choose “Edit > Start Dictation.”
Start Dictating: When the microphone icon appears, start speaking. On Apple silicon Macs, you can even type while dictating.
Perform Commands: To insert emojis, punctuation, or perform simple formatting tasks, use voice commands like “heart emoji,” “exclamation mark,” or “new paragraph.”
Language Switching: If using multiple languages, click the language next to the microphone or the Globe key to switch languages.
End Dictation: Press the Dictation keyboard shortcut or the Escape key when finished. Dictation stops automatically after 30 seconds of no speech.
There are various customization options in a Mac to help you get the most out of the dictation function. Here are some of the key customization functions you can use to manage it better:
1. Set Keyboard Shortcut: Choose a specific Dictation keyboard shortcut or create a custom one in Keyboard settings.
2. Change Microphone Source: In Keyboard settings, adjust the microphone source for dictation based on your preference.
3. Turn Off Dictation: To disable dictation, go to System Settings, click “Keyboard,” find “Dictation,” and turn it off.
Embracing the power of voice commands on your MacBook elevates the user experience by enabling seamless interaction with your device. Here are various actions you can effortlessly perform using voice commands:
Opening Applications: Instantly open your preferred applications with a simple voice command, eliminating the need for manual navigation.
Creating and Editing Documents: Initiate the creation of new documents with voice commands, streamlining your workflow without touching the keyboard with Apple dictation. Edit text and make revisions hands-free, making the document editing process more dynamic and efficient.
Searching the Web: Conduct web searches effortlessly by vocalizing your queries and letting your MacBook fetch the necessary information without typing under Apple’s dictation.
Sending Messages: Dictate and send messages easily, making communication a breeze while multitasking on your MacBook.
While the dictation functionality on your Mac computer proves to be a valuable asset in boosting productivity, there may be instances where you prefer to turn it off. Whether for privacy concerns or personal preferences, turning off speech to text is straightforward. Follow these steps in system preferences under the Apple menu bar to disable dictation on your Mac:
Click on the Apple menu in the top-left corner of your screen and select “System Settings” to set the system preferences for the voice to text feature.
Step 2: Navigate to Keyboard Settings
Within System preferences, click on “Keyboard” in the sidebar.
Step 3: Turn Off Dictation
Locate the “Dictation” tab on the right-hand side of the Keyboard settings. Toggle the switch to turn dictation off.
The Last Word
With the seamless integration and diverse applications of speech to text, the benefits of free dictation software extend beyond mere convenience. Experiment with different dictation tool and settings, tailoring them to your unique needs and preferences. The ability to enable dictation, create documents, and perform various tasks with the dictation feature empowers you to navigate the digital ecosystem with unprecedented ease. Embrace the liberating potential of speech to text on your MacBook. Break free from the confines of traditional typing and let your words flow effortlessly.

Is speech to text available in all MacBook models?
Yes, the dictation feature is available on most recent MacBook models. However, it may also vary depending on the macOS version and the specific MacBook model.
Can I use voice commands to control other aspects of my MacBook?
Yes, you can use the Voice Control feature on your MacBook to control different aspects. For instance, users can say commands like “Open Mail” to open an email on their phone, or “Scroll down” to navigate the display screen, and so on.
Are there any voice typing apps for Mac that offer additional features?
While macOS includes a free dictation feature, third-party apps like Dragon Professional Individual for Mac offer advanced features like voice commands, transcription, and customization.
Is my voice data secure when using speech to text technology on my MacBook?
Apple prioritizes user privacy in the dictation software. When using Mac speech to text, your voice data is anonymized, associated with a random identifier, and subject to Apple’s stringent privacy policies.
How can I improve the accuracy of speech to text on my MacBook?
To enhance accuracy in the dictation software, speak clearly after tapping the microphone icon, use a quality microphone, and ensure a quiet environment. Additionally, regularly update your macOS to access improvements in speech recognition technology.
You should also read:

How Speech Recognition is Changing Language Learning

Future of AI in Speech Recognition

From Talk to Tech: Exploring the World of Speech Recognition
- Privacy Policy
- Advertising Disclosure

Best Dictation Software For Mac of 2024 (Free & Paid)
Why spend hours typing when you can dictate text in less than half the time? Speech recognition technology can save you time, money and stress so we tested and reviewed the most accurate dictation apps for Mac of 2024.
Whether you’re a business report writer, lawyer, secretary, author, journalist, technical writer or medical professional you’ll find Mac compatible speech-to-text software here that saves you valuable time and fits your budget.
In our research and testing, we found that the best dictation software on a Mac is Otter (Free) which offers incredible levels of accuracy and speed especially for transcribing conversations or meetings.
Quick Navigation
1. Otter (Free)
2. dragon dictate (best for accuracy), 3. macos dictation (best apple app), 4. macwhisper (best for writers), 5. google voice typing (best google app), 6. microsoft word (best for microsoft office), 7. dictation.io (best free web app), 8. onenote for mac (best for note taking), 9. speechnotes (best for chrome), 10. deepscribe (best for medical dictation), what is dictation software, why use dictation software, do macs have a dictation tool, dictation microphones to enhance recognition, useful dictation tips.

In our tests, we found Otter was the best dictation app for Macs overal l thanks to its impressive accuracy, ease of use on a Mac and generous free forever plan too .
Otter can be used for any kind of dictation although it has positioned itself more recently as an “AI meeting assistant” for transcribing meetings and sales meetings with tight integration with Zoom, Google Meet and Microsoft Teams.
Most importantly though, it was the only dictation tool that came close to the industry standard tool Dragon Dictate (see review below) in terms of accuracy and speech-to-text recognition.
It also works in any browser on a Mac whereas Dragon Dictate will only work on a Mac in a virtual machine running Windows since Nuance has discontinued the Mac desktop version.
Otter has many useful touches for meetings such as Speaker Identification which is ideal for transcribing Zoom meetings as it automatically detects different voices and transcribes them separately.
Otter also allows you to import audio and video files which it will then transcribe automatically.
It also includes a feature called “Otter AI chat” which allows you to chat within the app to other Otter meeting members and teammates to get instant answers to meeting questions.
Although there’s no desktop app, there is a Chrome extension for Otter which automatically detects if you’re about to enter a Zoom Meeting, Google Meet or Google Calendar appointment.
The Otter app also offers one of the best free plans with 300 minutes of dictation per month although there’s a limit of 30 minutes per session.
However, you’ll need to subscribe to Otter Pro starting at $10 per month for up to 1,200 minutes for transcription per month with a limit of 90 minutes per transcription.
The Otter Business Plan allows you to use Otter in multiple meetings at the same time for up to 6,000 minutes with a limit of 4 hours per conversation or meeting.
If you pay annually, the pricing plans are 40% cheaper so it’s well worth doing as you’re almost getting it for half price over paying monthly.
Enterprise plans are available on request for company wide deployments.
Our advice is to try the free version of Otter to see just how well it transcribes, meetings and just about anything you throw at it on your Mac.
Pricing: Free for 300 minutes/Plans starting from $10/month
Although Dragon Dictate is the industry standard when it comes to dictation, the reason it only comes second on our list is that Nuance discontinued the Mac version back in 2018.
However, you can still use the Windows version of Dragon Dictate on a Mac by running Windows on your Mac using a virtual machine.
Even though this adds an extra layer of software, we still think its worth doing because of the amazing accuracy and sophistication Dragon Dictate offers compared to any other dictation tool.
Dragon products use unique Deep Learning technology that actually learn your accent and speaking style to deliver accuracy rates of up to 99%.
In fact Microsoft was so impressed by Nuance’s range of products including Dragon Dictate that it bought Nuance for $16 billion in 2021.
The big downside for Mac users is that to use it, you need to run Windows on your Mac.
By far the easiest and best way to run Dragon Dictate on a Mac is by using Parallels which makes it simple to install Windows on a Mac.
In fact, one of the World’s leading Dragon Dictate teachers Scott Baker recommends using the Windows version of Dragon on a Mac because the Windows version of Dragon has more features anyway.
In particular, the Windows version gives you more control when tweaking and refining texts compared to on macOS.
Dragon Professional is ideal for office environments as it’s optimized for reducing background noise such as in cubicles. It also has Smart Format Rules which understand how you want phone numbers, dates, abbreviations and other data to appear.

Another nice touch is that you can import audio clips from a device such as your iPhone and Dragon Professional will transcribe it into text.
The accuracy isn’t quite as good as live dictation but it’s a lot faster than typing it out. This is especially useful for journalists who have to record and transcribe long interviews.
With Dragon Professional, there is also an option to listen to audio playback of your own dictation with the associated text highlighted on the screen making it easier than ever to proofread while supporting multi-tasking.
Dragon Dictate Professional also integrates with many word processing software on Mac too including Microsoft Word, Apple Pages, Scrivener and more.
Note that Nuance has discontinued the Home Edition of Dragon Dictate and you can now only get Dragon Professional Individual and Dragon Legal.
Unless you’re in the legal profession, we strongly recommend going with Dragon Professional Edition not least because it allows you to dictate directly in Microsoft Office and other apps.
There’s also Dragon Anywhere which is the mobile version of Dragon Dictate.
Pricing: $699
Dictation is Apple’s own free dictation app (and the equivalent of WSR – Windows Speech Recognition) that has been a feature since macOS Sierra.
Up until macOS Mojave, Dictation used it’s own voice recognition system but from macOS Catalina onwards, it now relies on Siri.
The good news for those concerned about privacy is that on Apple Silicon Macs with the M1, M2 and M3 chips, you can transcribe offline as long as your language is supported by Apple for offline dictation.
However, on older Intel Macs, anything you dictate in Apple Dictation is sent back to Apple’s servers so it may not be suitable if you want to dictate personal or confidential information.
Apple’s Dictation tool in macOS has improved significantly over the years and although it can’t compare to professional dictation apps, it’s free and works on your Mac desktop.
Dictation also works in many word processors on a Mac , messenger apps and just about any app that allows you to type.
By default it’s only suitable for dictations of 30 seconds or less but you can turn-on Enhanced Dictation for unlimited transcriptions.
To enable Apple Dictation in macOS Ventura and Sonoma:
- Go to the Apple () logo in the top left of your screen and select > System Preferences > Keyboard
- Click on the Dictation Tab
- Switch Dictation “On”

In macOS Catalina, Big Sur and Monterey Enhanced Dictation has been removed by default because anything you dictate is now translated by Siri.
Siri is far more accurate than the old Enhanced Dictation engine in macOS and even allows you to dictate offline on a Mac for supported offline languages.
If you want to delete your dictation history in Siri at any time:
- Go to the Apple Menu > System Preferences > Siri
- Click Delete Siri and Dictation History
If you’re still using High Sierra or Mojave, you can also dictate offline without being connected to the internet by activating “Enhanced Dictation” in the Dictation tab.
Be aware though that this requires 422MB of disk space to download some additional tools before it can work on your Mac.
You then simply configure a language and hotkey to start dictation or you can even activate it with a keyword. You can use this to start dictation in any application.

Dictation works with any app including Office applications (although not Google Docs which has its own voice recognition feature – see below).
What we also like in Apple Dictation is that the voice controlled formatting commands are quite extensive and you can even create your own customized commands.

Dictation also supports over 60 languages including English, Arabic, Chinese and Spanish.
If you’re looking for a free desktop dictation tool on your Mac that works offline for major languages, macOS Dictate is definitely worth trying.
Pricing: Free

MacWhisper is a free tool that uses the incredible power of OpenAI to quickly and accurately transcribe interviews, conversations, meetings and lectures on your Mac.
MacWhisper has a Mac desktop app and apart from the free version, is also available as a one off purchase for €29 for batch transcriptions and many other added features.
MacWhisper is very basic but supports dragging and dropping audio files for transcribing and can even export transcripts for subtitles in .srt and .vrt format.
The app also allows you to dictate offline – all transcription is done on your device using a local OpenAI model and nothing is sent to servers to protect your privacy.
MacWhisper supports over 100 languages and works on both Intel and Apple Silicon Macs. However, because the processing power required to transcribe is quite high, we recommend an Apple Silicon Mac with an M1, M2 or M3 chip.
If you want a free, offline app for basic dictation then MacWhisper is one of the best free dictation apps we’ve tried on a Mac.
You can buy MacWhisper direct from the developer Jordi Bruin or from the Mac App Store .
Pricing: Free/€29 one off purchase for Pro version
Not many people are aware that Google Docs has a surprisingly powerful free voice recognition engine which not only transcribes speech to text but also allows you to change the formatting of documents with voice commands.
Google Docs Voice typing is arguably even more accurate than Apple Dictation and it has now been updated to work with most browsers, such as the latest versions of Firefox, Edge and Safari.
To activate Google Docs Voice Typing, open any Google Doc and go to Tools > Voice typing… and click on the microphone that appears to start transcribing.

Google Docs Voice Typing is pretty accurate for a free online text-to-speech tool.
Probably the most impressive thing though is the an extensive list of commands for formatting text.
You can simply say things like “go to end of paragraph” or “create bulleted list” to perform formatting actions. Note that formatting commands are only available in English but the voice engine recognizes over 50 languages.

If you’re a Microsoft 365 subscriber then did you know you can use the speech to text function in Microsoft Word for Mac?
Microsoft Word is surprisingly good at recognizing speech and transcribing text as it is continuously being improved by being trained with Microsoft’s huge user base and artificial neural networks.
MS Word’s in-built dictation tools are easy to use:
- Go to Home > Dictate in Microsoft Word for Mac
- Click on the Dictate button and wait for the red button to appear
- Start talking and Word will transcribe your speech in real time
You can also use voice commands for punctuation and formatting.
Currently it only supports a few languages although Microsoft are adding to this all the time.
If you’re unsure about getting a Microsoft 365 subscription, check out our look at Microsoft 365 vs Office for Mac .
Pricing : Requires Microsoft 365 subscription

Dictation.io is a web based dictation platform that works on any browser on a Mac and supports over 100 languages.
The service is based on Google Speech Recognition so the accuracy is very good and its very quick at transcribing text.
Because of this though, Dictation.io only works in Google Chrome – it’s not compatible with Safari or Firefox and it also does not work on mobile devices.
Dictation.io saves all of your transcriptions in the browser so nothing is saved online unless you click “Publish” in which case, your transcriptions will be available publicly.
Other options include the ability to save transcriptions in a text file, tweet them, play the audio of it, email it and print it.
You have to grant Dictation.io permission to use your Mac’s internal microphone in Chrome too although this is only activated when you’re using Dictation.io.
You can’t dictate offline with Dictation.io either so you need to be online all the time.
OneNote For Mac is Microsoft’s note taking software for Mac and Windows and the Mac version now supports dictation.
If you’ve already got Microsoft Office For Mac or Microsoft 365 account then you’ll already have OneNote on your Mac.
Of course, OneNote isn’t really suitable for dictating letters and essays but it’s ideal for jotting down notes, memos and conducting research for later.

The dictate feature in OneNote for Mac allows you to format and organize text from speech and uses artifical intelligence (AI) to transcribe speech to text.
OneNote For Mac dictation also supports auto-punctuation although you can disable this.
OneNote for Mac dictation supports 50 languages and you can also filter out swear words or profanity.
To use dictation in OneNote for Mac follow these instructions:
- Go to Home > Dictate while signed into Microsoft 365 on any Mac with a Microphone which includes MacBooks.
- Wait for the Dictate button to activate.
- Start speaking and you will see text appear in OneNote.
You can find more information on how to dictate in OneNote for Mac here .
You can also read about some excellent alternatives to OneNote for Mac here .
Speechnotes is a cheap and cheerful online speech-to-text service which works in Google Chrome and on Android devices.
Speechnotes actually uses Google’s own voice recognition engine so it’s basically just an enhanced version of Google Docs Voice Typing tool.

There’s also a Speechnotes Chrome extension which allows you to voice type directly into any website including Gmail, WordPress and most other text fields.
Speechnotes claims to be a free alternative to Dragon Naturally Speaking and although the accuracy can’t really compare with Dragons products, it’s pretty good. Unlike Dragon Dictate, Speechnotes also can’t be used to voice control your Mac either.
Speechless gives you the advantages of Google’s voice recognition engine but with the added advantage of things like an Android app although there’s no iPhone app.
Pricing: Free / Plans starting from $1.9/month

Medical professionals need specialist dictation tools and privacy protections and DeepScribe is the best medical dictation software for Mac users.
DeepScribe works via iOS apps for iPhone and iPad but anything that is recorded and transcribed on it is then available on your Mac.
DeepScribe uses AI to filter out small talk and irrelevant parts of conversations with patients, doctors, nurses and doesn’t require prompting when you want it to record.
The AI used by DeepScribe has been trained on more than 2 million patients as it has the biggest database of medical conversations in the world.
The aim of DeepScribe is to remove the administrative burden from Clinicians so that they can spend more time with patients and giving care.
DeepScribe also integrates with EHR solutions including AdvancedMD, AthenaHealth, ClaimPower and many others. The AI technology in DeepScribe is also HIPAA compliant and protected by multi factor authentication and user access restrictions.
Pricing: On Request
Dictation tools enable your Mac to translate spoken words into written text which enables you to write much more than typing alone.
The average person can only type anything up to 1,000 words in half an hour.
However, most people can speak up to 4,000 words in the same time period – that equals a massive potential increase in your productivity especially if you’re having to do tediously jobs like transcribing meetings or business conversations.
Text to speech is already in everything from Siri to Google Docs although professional dictation apps offer much greater accuracy as they actually learn how you talk.
There are many reasons to use dictation software on your Mac but some of the most important ones are:
- It increases productivity as you can talk much faster than you can type.
- It saves valuable time transcribing meetings and other tedious tasks.
- Dictation is safer for you. Excessive typing is one of the most common reasons for repetitive strain injury on hands and the more people type on both keyboards and mobile phones, the bigger the problem is getting. Other keyboard related injuries on the rise include Tendonitis, Carpal Tunnel Syndrome and Quadriplegia.
- You can note down things hands free (for example when cooking, eating, doing the laundry etc).
- It prevents you forgetting ideas that you meant to type out later. It’s an especially good way for creative writers to get all their ideas down on paper without editing along the way.
- It’s more confidential than dictating notes to a secretary or colleague.
- Dictating cuts down on scribbled notes on pieces of paper if you want to go paperless .
Since macOS Catalina including Big Sur, Monterey, Ventura and Sonoma you can dictate on a Mac using macOS Dictation.
Dictation is based on the Siri personal assistant tool and although it doesn’t do a bad job of transcribing text, using macOS Dictation to dictate on a Mac is not as accurate as professional dictation software.
Because its based on Siri which is still mainly designed as a personal assistant to launch apps, answer questions and generally speed-up your workflow, Apple is slowly moving Siri closer towards being a more viable dictation option for Mac users.
macOS Dictation is now available in 64 languages although only major languages such as English, Spanish and Chinese work offline.
Note also that only Apple Silicon Macs can process data in macOS Dictation offline. Anything you dictate in macOS Dictation on Intel Macs is sent via Apple’s servers.
For more on this, check out our guide on how to dictate offline on a Mac .
In these reviews, we tested a combination of offline and online dictation programs that can be used on a Mac.
Note that web-based voice recognition and voice-to-text recognition apps all require a permanent internet connection in order to work and no not work for offline dictation
The in-built microphone on Macs is good but you’ll definitely get better results by using an external microphone or dictation headset.
External mics and headsets not only pick up your voice better because the microphone is closer to your mouth, but they’re better at reducing background noise.
You’ve got three different options when it comes to dictation devices: Wired Headsets , Wireless Headsets and Desktop Microphones .
The best option for you obviously depends on whether you want to wear something on your head, walk around, or just speak into a mic next to your Mac.
A good Wired Headset for dictation is the AAAPrice noise cancelling USB headset which is optimized for Dragon Dictate although works with any dictation program.
If you like to walk around, buy a Wireless Headset but just be careful with the range as it can vary wildly depending on the model. One of the best we’ve seen is the Logitech Wireless Headset which has an impressive Bluetooth range of up to 300 feet.
If you prefer not to wear something, Microphones deliver just as good results although you may find yourself craning over the desktop ones more than sitting up straight like you can with a headset.
Dictation microphones vary in price with basic ones like the FIFINE USB microphone going for around $20 ranging up to the professional handheld Nuance PowerMic microphone costing over $200.
Dictation in itself can be a strange experience if you’ve never done it before. It can feel strange at first talking to a computer and hearing the sound of your own voice constantly.
There’s a few other things to be aware of specifically related to the way dictation apps work too.
- The most important thing in any dictation app is how accurate it is at recognizing your voice. You will inevitably have a certain amount of correction to do whichever app you choose but the more accurate it is, the less errors you’ll have to correct. Most apps require you to do a certain amount of speaking first before using it so it can familiarize itself with your voice and accent.
- All dictation apps have their own commands and way of working. Some definitely feel easier to use than others and once you get used to the way one works, it’s a pain to switch software at a later date.
- Dictation obviously limits when and where you can work. If you’re in a public space such as on a train or even in an open plan office, it’s less private to dictate not to mention more complicated due to background noise.
- You’ll make more mistakes constructing sentences dictating rather than typing. On a keyboard, you have more time to think, go back and revise, delete etc. It’s harder to formulate sentences perfectly thinking off the top of your head but the advantage is your output is more “uncensored”.
- Try to avoid filler words like “erm”, “so..” and “OK” because editing these out later is a real pain. It’s actually much harder than you think to avoid filler words as it’s such a natural part of most people’s speech. Try to just take a pause or be silent instead while you think what you’re going to say next. To help avoid filler words, before you start dictating, have a rough plan of what you’re going to say.
If you want to keep Dragon working, don’t upgrade to Sonoma.
I had kept Dragon 6 working natively on my sequence of Macbooks Pros and MacOS versions until updated to Sonoma recently. Now Dragon flags errors when it opens. I’ve been very lucky keeping it working this long. I now have to decide whether to buy a Windows Version of Dragon and to install it on a Parallels VM.
Thanks for sharing your experience. Did you have a Time Machine backup of your previous version of macOS? If so you can roll back to it easily. If not, you can also use Recovery mode on your Intel Mac to roll back to Ventura or use a bootable installer of Ventura.
I’m looking to buy a new MacBook next month and would really like to be able to use Dragon Professional 16 on it, having had no luck with other dictation software so far. I have some questions I hope you can help with: Is running it on Windows 11 via Parallels the best option to do this? What Macbook specs would you recommend for this set up? I’d prefer to spend extra and get one will run it all easily and last me a good while than skimp on price/specs and end up needing to upgrade again
Yes, that would be your best option. Presuming you’re buying a new Apple Silicon MacBook Pro with M1, M2 or M3 chip you would only be able to run Windows ARM on it . Although Dragon Dictate doesn’t work natively in Windows ARM, Windows ARM can translate Intel only apps like Dragon Dictate to work on a Mac. In terms of Specs, any new MacBook Pro will more than be enough for running Windows Dragon Dictate although we’d probably avoid the latest 14 inch M3 model as it may be a little bit lightweight for running Parallels .
Otter’s free plan now only allows 300 mins free.
Thanks for the update.
I’m looking for some dictation software, but when I attempted to use Siri I encountered the problem mentioned above, that it cuts out every few seconds. My main concern though is that it states in the T&Cs that everything you write in it is sent to Apple, ostensibly to improve the product. This makes it of no use where other people’s confidentiality and privacy is concerned. The purpose I want dictation software for is very much to do with confidentiality obligations. I don’t think the article above mentions that as an issue at all. I imagine there will be other providers of dictation software who have the same policy as Apple/Siri, but this issue doesn’t feature in your reviews. Any guidance would be welcome.
It used to be possible to dictate offline on a Mac with the “Enhanced Dictation” feature but it was removed from macOS Catalina onwards. With products such as Dragon Dictate however, once they are installed and activated you don’t need to be online to dictate as all the language packs and speech recognition tools are downloaded on your desktop.
Re 10.15 Catalina at least: Apple Dictation under Siri is a huge step backwards: it is not usable: It times out regardless of your speaking (and of the above steps, ie turning it on in Preferences.) AND now, ANY TIME YOU TOUCH THE KEYBOARD it turns off. Previously you could use the keyboard AND Dictation. Now it is “beep beep” while you’re trying to think and compose. Unusable in my opinion. Since these were clearly conscious choices, and since usability is a company strength, my cynical side suspects they must have opted to aggressively cut open server threads for the sake of ??? increasing their profits. Sorry but I really liked what was there.
Why do you say that the best dictation software for Mac is Dragon, when Dragon is NOT available for mac?
Because you can use it on a Mac by using Parallels which allows you to run Windows on your Mac. This is made pretty clear in the article. Even if there’s no native Mac version, Dragon is sill the best dictation software in terms of accuracy and voice recognition.
That’s fair. What isn’t exactly clear, at least to me, is whether you can actually use the Parallels/Windows Dragon directly in Mac apps? Your post mentions something about Desktop Publishing software which seems to imply that, but it isn’t clear how it really works, or if it does with ease. Otherwise, one would have to get Mac versions of all apps and install them inside the Parallels Windows instance, which isn’t really the same thing as having Dragon usable on Mac. If I’m going that route, I might as well go ahead and switch to a native Windows device because I’ll be using Windows as the primary OS.
Yes only Windows applications in Parallels will work with Dragon. Depending on the license you have though, some software and apps such as Microsoft Office allow you to install more than one installation within Windows and macOS on the same license. But in some cases, you may have to purchase the Windows version of the app too in order to use it with Dragon.
Dragon Dictate Professional 15 will not run in Parallels and MacOS if you are running an Apple CPU such as the M1 or M2 chip. Dragon Dictate will not run on the Windows ARM version.
Dragon Naturally Speaking does run in Parallels running Windows ARM as long as you’re using Parallels 18.0.1 or later. Windows ARM can “translate” Intel only software to work in Windows ARM including Dragon. There was an issue with Dragon not working in Parallels 18 running Windows ARM initially but an update to Parallels fixed it.
Having bought Dragon 6.0.8 for Mac years ago, I still have it running very well natively on my MacBook Pro with OS 13.1. I’ve successfully migrated it several times with both hardware and software updates.
Not much help to others, I know.
I agree with Andy – excellent dictation on Mac. Sadly I had to stop using it because my older Mac OS version was 32 bits vs. the news ones 64 bits. (And the 6.0 version is probably no longer available. The big picture is: Microsoft has bought Dragon from what I hear – and then ‘killed’ the MacOS version… Is this fair competition?
It can be a little buggy but I am still able to use Dragon Dictate 4.04 on my MacBook Air running Monterey 12.2.1. With each Mac OS update I worry that it will fail to work but it’s still going strong, for which I am thankful.
Your Instruction for Mac For High Sierra IS WRONG! In systems Preferences, there is NO “Dictation and Speech”!!! There is Only ‘SirI’!
If you go to the Apple () logo in the top left of your screen and select > System Preferences > Keyboard you will see the Dictation Tab where you can Switch Dictation to “On”.
They are greedy and determined to make us give them all our data. They took off the ability to easily dictate off line in the last two upgrades/. Just greedy. and I do not like them acc essing everything. It is just so wrong.
I agree, but Tim Cook doesn’t see the advantage in this? But, then, Apple is trying to be a force unto itself and to hell with everyone else. Mistake.
It is really frustrating that Apple and Dragon can’t work together to provide dictation for the Mac equal to that available for Windows. Apple should accept that developing their own software to match Dragon is not cost effective and the best way for them would be to partner with Dragon. Apple are just that bit too proud, I suppose.
I have a new Air M1 and an older Mac laptop w Dragon on it. Parallels on the Air was a nightmare, so I dictate w Dragon on the older Mac and transfer it over to my new Air. Can’t be bothered with all the special software I had to download and install bc I have an M1. Why hasn’t Mac come up with a Dragon version of their own? Are they still in the “I’m typing all of this” dark ages?
Mac Version 4 is ancient… I used to have Mac Version 5 way back in 2015. His boastful post is nearly useless for this decade and what’s currently available.
Unfortunately, Mac’s dictation feature is extremely buggy to the point of being unusable. At first it only worked in just a few apps for me, then, without me changing anything, it quit working altogether. Voice commands like “paste that” still work everywhere but actual dictation of text is completely non-functional. It’s hard to believe that it’s 2021 and a leader like Apple fails so badly at accessibilty.
I should have said “Unless you use Parallels”, of course. I am a Parallels user, but for me Dragon works fine natively
I’m using Dragon 6.0.8 (14812) on Mac OS 11.4 and it works fine. Fortunately, Dragon has been preserved through each Mac Book Pro replacement. It has survived through transfers of accounts and apps using Migration Assistant. I very much doubt if there is a now way of installing Dragon on any Big Sur Mac.
It’s Mac Version 4.0.4 (13062).
Surprise. Dragon Dictate is working seamlessly on my Mac with Big Sur. It had been balky with Catalina but Big Sur somehow brought it back to life. No need for Parallels at this juncture.
Can you confirm which version of Dragon Dictate you’re using as the latest version 15 is Windows only?
So, in reality, there is no way to really just point a cursor in a document or mail and just start voice-typing on a Mac? I have Dragon, but it seems not to work in Catalina. Version 5.5 I have Parallels but don’t have a PC version of Dragon… for $200+ dollars. Seems Mac is behind on this important ability.
Very interesting article.
I have PARALLELS and know the DRAGON software well. My hesitation: many anecdotal reports were that it was hard to dictate from DRAGON on Windows to Mac applications
If this hurdle could be overcome, I would buy & install DRAGON WINDOWS in a heartbeat.
All the best,
Hello Andy, Thanks for your helpful comments. I am using the latest version of Parallels. I was trying to use the on-line install when I ran into difficulties. Since then Nuance have provided me with a temporary direct download ling for the complete .exe file and I am glad to say the installation has worked and I now have Dragon 15.61 running in my VM environment. My next challenge is now to make the necessary changes so I can dictate in English and in German. Cheers Hans
I am fortunate that I have Dragon running on Big Sur without recourse to Parallels, but I do use Parallels a lot for other things. It is no surprise that Nuance don’t support Dragon on Parallels. However, most Windows apps are oblivious to being run on Parallels. Dragon might differ because of the complexity of audio being routed through the Mac to the Windows virtual machine or the download process is sensitive to being run on a VM. The latter seems to be your current problem. Is the download just a download of an install package or an online install process, I wonder. If the former, you might try the download on a ‘pure’ Windows PC and copy the install package over. Are you using Parallels 16.1.2 the latest? Good luck!
Thank you for the clear article. I have followed your advice but have found that the Parallels/Windows 10 based approach is quite difficult to install. I have been trying for several days to download the Dragon Pro exe file and have not succeeded. I have tried three different browsers, have disabled the Windows Firewall but it simply does not work for me. The Nuance Download manager displays the message ‘creating download’ and gets stuck there without any progress. Nuance support are trying to help but make it quite clear that the Dragon on Windows on Parallels is not a supported environment. I would be grateful for any suggestions how to resolve this.
I am using MacOS 14.02. Do you know if Dragon Dictate professional works on this version?
As stated in the article, the Mac version has been discontinued. You need to run Windows on your Mac in order to install it but yet, it will work running Windows in macOS 14.02
I would be interested if the author of this nice article actually has used Dragon Professional for Windows on a Mac using Parallels? It sounds so nice. However, I bought Parallels and Dragon Professional…the Parallels was fine (although the fan ran constantly) but the Dragon on it never worked well and transferring to WOrd on Mac side was so clunky. I gave up trying (I have a day job!!). I am back using Dragon for Mac on Mojave with my wonderful library of words that I have trained over 10 years. It works fine. I am afraid to upgrade though and am looking for anyone who has tried it on M1 chip Macs.
Worth observing that some have had trouble installing Dragon 6.0.x on Catalina or even earlier MAC OS versions.
I originally installed an earlier version of Dragon, perhaps as much as 10 years ago. Since then I have taken every Dragon upgrade and every MAC OS upgrade including the Big Sur Public Beta and used Migration Assistant when I bought each new Mac. I’ve been lucky, perhaps.
It’s likely anyone wishing to do a clean install of Dragon on Catalina will fail.
Anyone who has Dragon 6.0.8 running on Mojave is likely to be able to get it working on Catalina or Big Sur by adopting my approach. Do NOT try going direct from Mojave to Big Sur.
Like some others, I have found that Dragon 6.0.8 works satisfactorily with Mac OS Catalina, despite support having been withdrawn by Nuance. Dragon remains my dictation tool of choice on the Mac.
In the last month, I have installed the Mac OS 11 ‘Big Sur’ public beta and I find Dragon still works.
There were a few problems selecting the microphone to dictate with, but that is just a change to Big Sur’s bluetooth selection.
I am dictating using my AirPods rather than a headset. I am usually in a quiet environment.
Thanks for sharing your experiences with it. Interesting that you’ve managed to get it to work with macOS Big Sur already.
Let’s face it: we Mac/IOS users continue to be at a disadvantage when it comes to dictation software. Ever since Nuance discontinued Dragon Dictate in 2018 we’ve had little to turn to. Apple’s current built-in dictation software (Catalina) is about where Dragon Dictate was around 2012 – it doesn’t “learn” or improve with us very well and you can’t even easily copy or download the commands for it found in Preferences.
We can hope for improvement with upcoming Big Sur and IOS 14, but chances are Apple will continue its traditional emphasis on gaming, glitz, and the creative arts other than serious writing. For serious long form writing beyond the memo we’re stuck with using the ancient Dragon Dictate 6, patching something else together, or paying a couple hundred dollars to install Parallels and Windows and buying the latest version of Dragon Naturally Speaking 16 for PC. Why bother using a Mac for dictation with all this going against us?
My setup: MacBook pro dec 2016; Catalina; MS Word 2019 standalone version (not 365); LG 5K display w/mic and camera; iPhone
OK, so this is how I do it: 1. record memo on iPhone Voice Memos 2. use airdrop to move memo to MacBook 4. Open Word 5. ->Edit -> Start Word Dictation 6. open and play the memo 7. watch Word listen to it and type it into the document
Pretty cool.
Obviously, I can just dictate straight into Word, but this is how I can input a memo made on my phone. I also played the memo on the iPhone in front of the microphone, and that worked too.
Interesting solution. It’s a bit long winded for most users but if you find the accuracy is good, then it’s a clever workaround.
My Mac version of Dragon crashed after many years of use. So installed Parallels and Windows 10. I installed Dragon Professional on this. I crashed after a day or two; when I called for support, Dragon said they did not support Dragon on Parallels. They offered to return my payment, which I accepted. Does anyone know if Dragon will run successfully under Bootcamp. Maybe I could try again with Dragon Professional, it worked well until it totally crashed and would not load.
After reading this article, I installed Parallels, Windows, and Dragon onto my Mac. I had used Dragon back in 2014, and am in need of dictation software again. The problem is that I’ve only been able to figure out how to dictate into a dictation box in the Windows window. I can get it to transcribe into any of my Apple apps. Is this a real limitation? Or is there some way to dictate into the programs I want to use, such as Scrivener?
Unfortunately you won’t be able to dictate into programs on macOS using Dragon Dictate installed in Windows under Parallels. It will only only work with Windows programs so you could use the Windows version of Scrivener instead.
Thank you for your prompt response. So, do you think it’s worthwhile to spend the time and effort to correct it is always mistakes by hand or his mistakes by hand? I mean, all his mistakes.
It’s worthwhile if you’re going to rely it for dictation but you may find you spend more time correcting than dictating in the long run. Dictation will probably improve in future versions of macOS though.
Thank you for your very helpful article. I am the published author of several books. During the recent pandemic, I have been Writing more than usual and my fingers started to hurt. In Seoul and so I’ve been using the Apple dictation the built in Apple dictation feature on my MacBook Air, my iPhone, and my iPad in various applications. My big question this question is does this thing learn? And if so, how do I make it learn my fission Lee learn more efficiently and faster? I have the Viking pression vegan impression vague impression that it works better on my cell phone damn on MacBook. Sb is this because the microphone is better? Any advice you are others may have for me would be much appreciate it. I’m also dismayed to read in your article that dragon the dragon has discontinue serving the Mac. I wrote this using dictation with a minimum amount of editing. Thank you very much!
macOS dictation doesn’t “learn” to recognize your voice in the way Dragon Dictate does. However, as you correct it manually, it will learn how to recognize those particular words better in future.
If we had a government that actually cared about regular citizens this wouldn’t be a problem as Nuance’s patents would be lifted by Congress because (1) they have a monopoly on the software; and (2) they refuse to share a significant minority of users in the Apple and Linux, etc. communities. This isn’t rocket science. Nuance should be either compelled to serve Mac OS users or lose the protections given to them by the US Government. This situation is analogous to a Pharma company patenting a vaccine for Covid-19 but refusing to market it.
Hope this helps at least a few people. I use Dragon Dictate 6.0.8, the last version available before Nuance pulled the plug on us. I installed it on this Mac (late 20`9 with Catalina) from a Time Machine backup of my older Mac. Dragon works just fine here, better accuracy than Apple Dictation and Voice Control. I dictate a lot of long book notes into Word and Scrivener with no problem. I don’t use it to control the computer or transcribe text from another source.
I just purchased a 2020 MacBook Pro, OS Catalina and am trying to figure out how to access the built-in speech recognition system when I’m offline. In comparison to my old (now defunct circa 2010) MacBook Pro, it doesn’t appear that I have the offline option as detailed above. When I click the “on” button for dictation, I get a msg. stating what I dictate will be transmitted to Apple to be converted into text, as well as other info such as names of my contacts. I want the option of dictating when off-line and am also leery of sending Apple my names of my contacts. Any ideas? Also, is Dragon Professional compatible with Mac OS Catalina?
It is possible to dictate offline in macOS Catalina but Apple has changed the way you activate it. It’s also not great if you need it for non US English languages.
As stated in the article, Dragon Professional has been discontinued on Mac but you can still run it on macOS Catalina by installing Windows on your Mac .
How do you judge TEMI or dictate2us v/s REV?
Aaaaand for the rest of us who’s Apple dictation simply does not work – the frustration is without bounds. I have tried EVERY possible site and absolutely no results. I have been using the build in Mac dictation for quite some time and I am happy with it – although I sometimes need to make a correction it is better than having to type up every single word. I am working on a publication with a deadline. Needless to say I am so unhappy about not getting dictation to work. I am currently searching for software to buy as I simply cannot continue like this. Very disappointed in Apple.
Yes John I agree with you about Apple. When apple started it was for artists, creators, and it offered a more secure, closed system free from all the tech problems that plagued windows. I was one of those artists that they counted on while they built their market share. I bought the 17 in laptop because I needed the real estate for my photoshop work. I am no longer their target market. They now cater to the masses so the 17 in can’t be special ordered or bought in any way. So, we see how apple treats those that supported them in the beginning as they built their name and market share. We aren’t their masses anymore. We are the artists and creators – still only the 5%, but probably the top 5%.
I would really love to move to a better dictation system than my built-in Mac version and I hate the thought of installing Windows on my Mac just to get Dragon.
So, tell me more about your experience running Dragon on Mojave; are you still happy with it? And, is it still possible to purchase the Dragon for Mac somewhere?
A few days ago I decided to give up on High Sierra and Dragon for Mac because it was a pain to use. So I decided to upgrade to Mojave and rely on Macintosh dictation. Just for fun, I tried out Dragon and found that works much better on Mojave than it does on High Sierra.
So far, I haven’t detected any major problem.
That’s interesting because according to Dragon, it still doesn’t support Mojave.
Anne-Louise, you’ve made a profound contribution to this discussion. I suffer from rheumatoid arthritis, and it’s devastated my ability to write. I’ve been described by others as a truly exceptional writer, and one editor/publisher told me “Don’t let life get in the way!” (of my book writing).
Life got in the way.
RA makes every single keystroke painful.
While RA might not be seen in the disability community as a truly disabling condition, I’ve discovered that it truly shuts down anything involved in my personal writing process.
So: All I can really contribute is a “me too” reply, but I hope that software developers, MacHow and similar blogs and sites, will take notice and advocate for better dictation options for Mac users who can’t type.
I have Parallels, and installed Dragon on it, but cannot get it to recognize the microphone plugged into the Mac. I spoke with Parallels support, and they were unable/unwilling to help. They said it was a Dragon problem.
Is there some video or web page that will guide me on how to get Dragon to work with Parallels? I am running Windows 10.
Does the error generate a technical report in Parallels? If so you can send the details to Parallels via Parallels Help Menu and they will try and diagnose the problem.
So how well does running Dragon Naturally Speaking for Windows on Parallels work? I have a Macbook Air 2014 w/ 8 GB Ram, and SSD drive. Has anyone tried this?
Yesterday, I used my computer (iMac) for the first time to dictate some material. The results were better than I had expected but not really completely satisfactory, so the thought of buying the Dragon version occurred to me. I had read about Dragon many years ago, so I presumed, perhaps unreasonably, that it would still be the best dictation software for my iMac. I had my finger on the Amazon purchase trigger, but then I decided t read the reviews. They were terrible. Not one of the Dragon models received even mediocre reviews. Now, I have my reservations about Amazon reviews, but I can’t disregard them, either. I was stuck. Buying a Dragon package seemed like a gamble with the odds against me, and I hadn’t decided what to do until I read your comments. I’ll certainly have to consider them. Installing a Windows’ product on my iMac instead of using a product designed for the Mac seemed ridiculous, but you’re the expert, and I’m not. I’m going to see what others have to say on the subject. That may seem overly cautious, but I am not a computer expert, so it is very possible that I might end-up blaming myself for problems caused by the software. Well, one thing is certain, I won’t be buying anything tonight.Thanks for improving my chances of success.
I will no doubt catch a lot of heat for this…but I believe that Apple has abandoned the idyllic original idea of the Mac being the computer created for “the rest of us” to give regular, every day, non-techie people, a computer that was friendly, simple to use… non-elitist. Apple should stop depending on companies like Nuance and Microsoft and a host of others who have interest in Mac users only so long as they are compliant with their wishes with no respect for us as significant users. Over the years, my first Mac was the Plus when it came off the line, I have seen Apple slowly drift away from its original tenets. Apple could easily develop great Dictation Software to help not just the ordinary at home user but also the handicapped and the professional. Maybe the focus should be diverted from continuing to build exotic new operating systems and to start agin to build user helpful and friendly computers and software for the “rest of us” who do not want to bow down to the world of Windows and its cohorts. God knows we spend enough on our Macs to get this done for us.
Nuance just discontinued the only available comprehensive voice dictation software for Mac, leaving disabled Mac users in the lurch.
For over a decade, disabled computer users have relied the only 2 comprehensive voice dictation software programs available-: Dragon NaturallySpeaking for Windows, and Dragon professional for Mac.
Nuance abruptly terminated and ended support for Dragon professional for Mac on October 18, 2018, leaving disabled Mac users in the lurch.
Mac users who upgrade their operating systems risk losing being able to continue to use their voice dictation software, due to software incompatibilities.
(Nuance warned Dragon for Mac users not to upgrade to more operating systems to Mojave, saying that it was not tested or supported.)
Only 3 limited and unsatisfactory options at present:
1) Not upgrading their Mac operating systems, in order to continue using Dragon for Mac. (However, this will not be an option when buying a new Mac, as it will not give the option of an older operating system).
2) Buy loads of expensive new Windows software to run voice dictation on Mac ( approximately $570).
3) Mac users abandoning Macs and switching over to Windows across the board.
For those who do not rely on voice dictation due to a disability, be assured that the voice dictation capabilities that exist on a Mac computer at present are not remotely as comprehensive as a full-fledged voice dictation program. It’s analogous to rollerskating across the United States versus driving in a car.
It seems important to get visibility about the issue before the public, Apple, potential software developers, and the disability community, in the hope of encouraging addressing the future void for disabled Mac users being able to continue using their Macs.
It is sobering to realize that a commercial third-party software monopoly has the potential to completely turn a disabled person’s tech world upside down by discontinuing its product.
Thanks for your thoughtful comment and you make a very good point about disabled users being left in the lurch by Dragon’s decision. Unfortunately, even if you install Windows on your Mac and then install Dragon Dictate, you still can’t control your Mac with it via voice. Dragon Dictate for Mac was by far the best tool for voice control and it’s a big loss for the disabled community that relied on it. In future versions of macOS, it would be nice to see Apple add more comprehensive voice controls so that you don’t have to resort to third party software in the first place.
I advise staying away from Dragon Dictate in any form. True, it works well but this is NOT a Mac oriented company. Support when I used the app was terrible, frequently rude and combative. Apple’s Dictation is very similar to Dragon, and I found it to be a viable asset for my Mac as it is 100% Mac supported!
I think Dragon simply didn’t think it was worth putting resources into supporting the Mac version, hence the poor customer support you experienced and the eventual decision to drop it. The problem is that it’s still the best dictation software on the market, particularly for professionals in the medical, legal and other fields. As mentioned in the article, even professional writer and Dragon Dictate expert Scott Baker uses a Mac but actually recommends installing Windows on your Mac and using the Windows version because it’s that good. As you say though, for general needs, macOS Dictate is a very good alternative nowadays.
Leave a Reply Cancel reply
This site uses Akismet to reduce spam. Learn how your comment data is processed .
Subscribe To MacHow2
Enter your email address to get notifications of new articles by MacHow2. No spam!
Email Address

How to Do Text to Speech on Mac
Learn how to set up and customize your Mac's text-to-speech feature.
Text-to speech technology is transforming how we communicate and consume content—but did you know that your Mac has in-built text-to-speech capabilities?
Imagine your computer reading out documents, emails, or even your favorite web articles with just a simple command. This is the power of text-to-speech on macOS.
Let’s delve into what text-to-speech is and how to use it on your Mac. Whether you're a professional seeking efficiency, a student aiming for a better learning experience, or someone exploring accessibility options, this guide’s for you.

Setting Up Text to Speech on Your Mac
Enabling text-to-speech on your Macbook or Apple desktop is a straightforward process. Here's how you can set it up and customize it to fit your needs:
Enabling Speak Selection
- First, access your Mac's System Settings and click on 'Accessibility' in the sidebar.
- Within the Accessibility settings, select 'Spoken Content'.
- Turn on the 'Speak selection' option. This feature allows your Mac to read out selected text or, in its absence, any text items in the current window, such as an email in Mail.
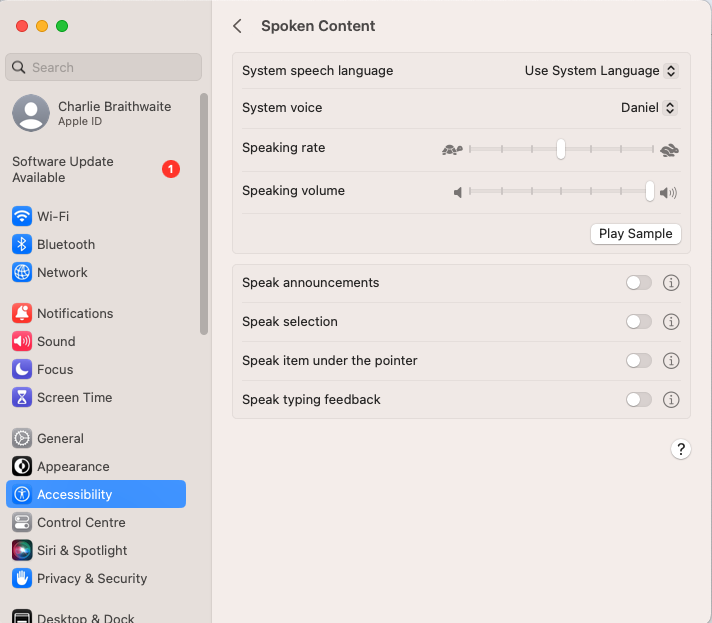
Customizing Keyboard Shortcuts
- To personalize your experience, you can set a custom keyboard shortcut for Speak selection.
- Go to System Settings, then click 'Keyboard' in the sidebar.
- Under Keyboard Shortcuts, choose 'Accessibility' to modify the shortcut for Speak selection. The default combination is Option-Esc, but you can change it to something that suits your workflow better.
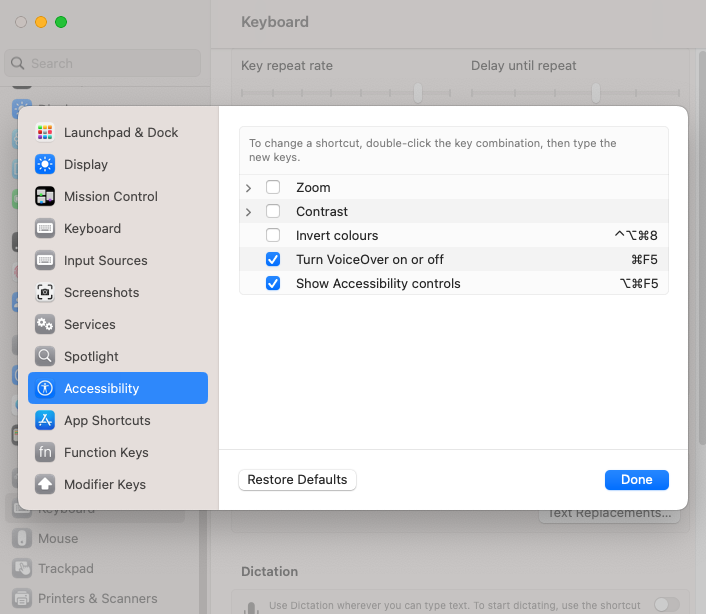
Using the Onscreen Controller
- When Speak selection is active, you have the option to display an onscreen controller.
- This controller includes buttons for adjusting the speaking rate, skipping sentences, playing/pausing, and stopping the speech.
- The controller is particularly handy for managing the speech in longer texts, allowing you to easily navigate and control the playback.

Highlighting Spoken Content
- For visual tracking, you can set your Mac to highlight words or sentences as they are spoken.
- In the Spoken Content settings, choose your preferred highlighting style and colors for both words and sentences.
- This feature enhances comprehension and is useful for following along with the spoken text.
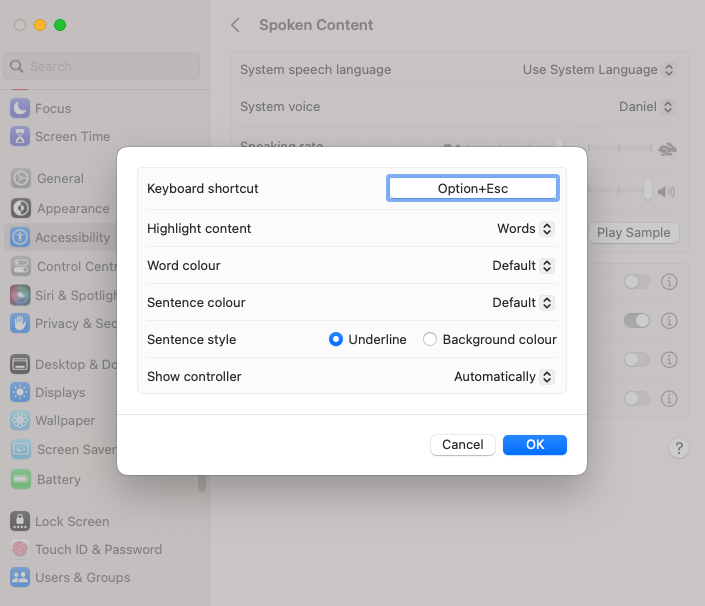
Customizing Sentence Style
- You can also customize how spoken sentences are indicated, either by underlining or background color, enhancing the readability and understanding of the text.
Controller Visibility Options
- Decide when the controller appears: automatically with the shortcut, always, or never. This customization ensures the controller is available according to your preference and usage patterns.
Advanced Features and Customization
Now you’ve enabled text-to-speech on your Mac, here’s how you can customize it according to your unique preferences.
Accessing Customization Options
To begin customizing text-to-speech on your Mac, open 'System Preferences' from the Apple menu and navigate to 'Accessibility.' From there, select 'Spoken Content' in the sidebar. This section houses a variety of settings that allow you to tailor the text-to-speech functionality to your specific needs.
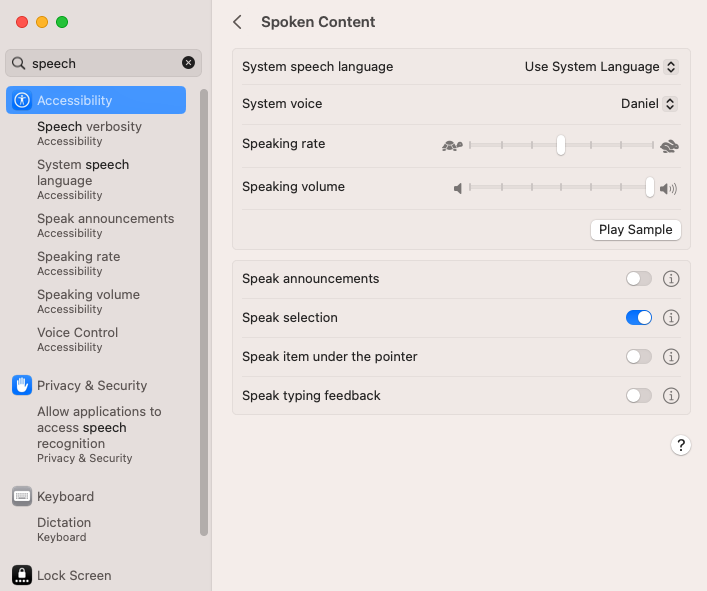
Choosing the Right Voice
MacOS offers an extensive selection of voices, varying in gender, accents, and languages—meaning you don’t just have to settle for the default voice. Some of these voices are even available for additional download from the App Store. Use the play button to preview different voices and select the one that resonates best with you.
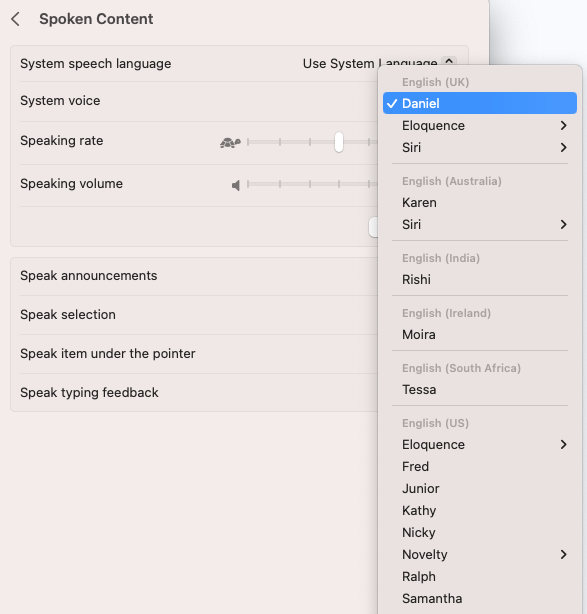
Adjusting Speaking Rate
The speaking rate of the text-to-speech feature is fully adjustable. You have the option to slow down the speech for clearer comprehension or speed it up to quickly absorb information. This level of control ensures the spoken content is delivered at a pace that suits your listening preferences.
Enjoying the Benefits
Customizing text-to-speech on your Mac enhances the overall user experience, whether for educational, professional, or leisure activities. By experimenting with the various settings available, you can discover the full potential of text-to-speech, making information more accessible and enjoyable for your specific needs and lifestyle.
With these customization features, your Mac becomes a more powerful and accommodating tool, bringing written content to life in a way that best suits your individual preferences and requirements.
Reasons to Choose Dedicated Text-to-Speech Software Over Mac's Built-In Functionality
While Macs have in-built text-to-speech capabilities, that doesn’t mean they’re best suited for all needs. If you’re a serious content creator looking for natural-sounding voices (e.g. if you create podcasts or Youtube videos), then you should use dedicated text-to-speech software like ElevenLabs.
Here’s why.
Advanced Voice Quality and Naturalness
Dedicated text-to-speech software, such as ElevenLabs , offers voices that are remarkably natural and human-like. This advanced voice quality and speech options significantly surpasses the often mechanical-sounding tones of Mac's built-in system voices. Users experience a more engaging and pleasant listening experience, making the software ideal for a wide range of applications.
Greater Customization and Control
Specialized text-to-speech programs provide extensive customization options. Users can choose from a diverse array of voice types and have greater control over speech modulation and patterns. This level of customization, which is not available in Mac’s in-built functionality, allows for a tailored auditory experience to suit specific preferences and needs.
Enhanced Language and Accent Options
Unlike the limited language and accent options in Mac's system, dedicated text-to-speech software offers a broad selection. This variety caters to a global audience, making it an invaluable tool for users who require content in multiple languages and dialects. Whether you’re looking for English, Spanish, or Arabic text-to-speech options, ElevenLabs has you covered.
Superior Contextual Understanding
The advanced algorithms in specialized text-to-speech software result in a superior understanding of context and nuances in text. This leads to more accurate and contextually appropriate speech output, ensuring that the synthesized voice conveys the intended message effectively and accurately.
Reliability and Support
Dedicated text-to-speech software providers typically offer reliable performance and robust customer support—a key combination. This level of service ensures users have assistance readily available, a benefit not always matched by built-in operating system features. Some providers even have dedicated how-to tutorials. The reliability and support offered make these programs a dependable choice for professional voiceovers and personal use.
Ongoing Development and Innovation
Specialized text-to-speech (TTS) software is often at the cutting edge of technology, with ongoing development and innovation. These continuous improvements ensure users have access to the latest advancements in speech synthesis, a level of innovation that built-in systems like Mac’s may not regularly receive.
In conclusion, dedicated text-to-speech software offers numerous advantages over Mac's built-in functionality, including superior voice quality, extensive customization, diverse language options, constantly updated new voices, enhanced contextual understanding, reliable performance, and continuous innovation. These benefits make it an ideal choice for users seeking an advanced, adaptable, and high-quality text-to-speech experience.
Final Thoughts
Choosing ElevenLabs' dedicated text-to-speech software over Mac's built-in functionality offers a vastly superior experience.
ElevenLabs provides exceptionally natural and engaging voices, extensive customization options, and a broad range of languages and accents. Its advanced algorithms ensure accurate contextual understanding and pronunciation, enhancing the effectiveness of the spoken word.
Coupled with reliable performance, continuous innovation, and strong customer support, ElevenLabs represents a significant upgrade in quality and versatility. It’s the ideal choice for those seeking a more immersive, personalized, and sophisticated text-to-speech experience.
Try ElevenLabs today
You are using an outdated browser. Please upgrade your browser to improve your experience.
How to get your Mac to read text out loud to you

While monitors are the primary way for people to get information from their Mac, not everyone has that luxury. For those who are visually impaired, they cannot rely on what is shown on the screen as a source of information, and so require alternative methods.
Apple has a solution to this, buried in its Accessibility settings, titled Spoken Content. The feature effectively allows you to set macOS to use Siri to read out text that appears onscreen.
While intended as an accessibility feature, it can also be useful for those with complete sight, as a way to enhance their computing experience.
For example, Siri could read text aloud while looking away from the screen, or to check a typed-out speech sounds fine when actually read aloud. You can also set Siri up to speak announcements.
Getting started with Spoken Content
The majority of Spoken Content's controls reside within the Accessibility menu.
How to enable Spoken Content in macOS
- Click the Apple icon in the menu.
- Click System Preferences .
- Click Accessibility .
- In the left-hand panel, select Spoken Content .
- Click the tickboxes next to the options you want enabled.
Spoken Content is divided into four general sections, with each having its own personalization options. They cover spoken announcements, selected text, items being pointed at with the mouse, and for typing feedback.
Depending on what you need enabled, simply click the option next to the specific feature.

At the top of the screen are the main voice settings, where you can select the voice Siri will use, test out the voice, and affect the rate of speech. In the System Voice dropdown, you can also select to Customize the voice, allowing you to select and download new voices, including those for other languages.
Next to the System Voice dropdown, the Play button can be used to hear a sample of the speech that will be used, allowing you to change the voice or the speaking rate before you leave the menu.
Speak announcements
If you select to enable Speak announcements, macOS will read out any notifications or alerts that pop up.
The Options button for the feature allows you to set a specific voice to be used for announcements, as well as to set a delay for when the announcement will be said after it appears on screen.

You can even set the phrase that can be said before the announcement itself. You can set it to be the application name, or an interruption from an editable phrase list, such as "Excuse me" and "Alert!"
Again, you are offered a play button to test out your settings.
Speak selection
Probably the most useful option on the list, Speak selection will read aloud any text that has been selected, after pressing a keyboard shortcut.
The Options button starts off by allowing you to set a specific keyboard shortcut for the feature. By default, it's Option and Escape pressed together, which works quite well.

Highlight content refers to macOS highlighting the part of a selected stretch of text being read at that moment. This can be set to words, sentences, words and sentences, or off.
Word color relates to the Highlight content feature, to determine what color the currently-said word will be highlighted by. Sentence color is the same thing, but for the current sentence, and can be set to a different color than the word version.

Sentence style lets you choose between the highlighting consisting of an underline or a change in background color.
Show Controller will determine whether the user will be able to see an extra controller window when text is being read aloud. The controller can be used to stop, play, and pause speech, skip forward and back in the text, and to speed up or slow down the speaking rate using the turtle and rabbit icons.

Speak items under the pointer
As the name suggests, it's a feature that will say what is currently under the pointer within macOS. This is intended to help visually impaired users identify what they are pointed at when using the mouse.
The feature can be set to run at all times, or when the macOS Zoom accessibility function is engaged, so that it isn't always active.

You can set the Speech verbosity to low, medium, or high, and for there to be a short or long delay before macOS says what is under the cursor.
Speech typing feedback
Ideally for those who need to be able to know what they are typing Speech typing feedback will tell users what they are typing. This can be set to run in a couple of ways.
Under Options, Echo characters will say each character on the keyboard the user has typed, including punctuation. Echo words does the same, but after the user has completed a word.

Echo selection changes will make macOS speak each time you select something on screen. This can include the contents of a webpage you've just clicked on, or text in a document.
The Echo selection changes also reads out highlighted text, in case you don't want to hear an entire page.
Echo modifier keys will speak out the name of each modifier key, which can help both people who cannot see the keyboard fully, and those who are not quite familiar with the keyboard's layout. When selected, it will say "Shift," "Control," "Command," and "Option" whenever they are pressed.
Sponsored Content

Buckle and Band offers a new take on designer Apple Watch bands for sophisticated owners
Top stories.

The history and triumph of Apple Silicon

iPhone 16 capacitive button rumor resurrected by supply chain report

If you're expecting a Mac mini at WWDC, you're probably going to be disappointed

Apple's macOS 15 to get rare cognitive boost via Project GreyParrot

When to expect every Mac to get the AI-based M4 processor
Featured deals.

Best Buy kicks off new M3 MacBook Air sale, blowout M2 deals up to $400 off still available
Latest comparisons.

M3 15-inch MacBook Air vs M3 14-inch MacBook Pro — Ultimate buyer's guide

M3 MacBook Air vs M1 MacBook Air — Compared

M3 MacBook Air vs M2 MacBook Air — Compared
Latest news.

Meta needs other companies & developers to challenge Apple Vision Pro
Apple's Vision Pro headset is gaining traction, so Meta has opened up its VR operating system to other manufacturers to maintain its lead in a market it previously dominated.

Europe's main financial entity believes Apple's proposed iPhone NFC changes aren't enough
The European Central Bank is opposed to Apple's proposed changes to the iPhone's near-field communication at the core of Apple Pay, and has complained about it to the European Commission.

Apple close to securing $1B TV rights to new FIFA soccer tournament
Apple's next addition to its sports coverage could involve more soccer, with Apple said to be close to signing a billion-dollar deal for a new tournament.
After a weekend round of closeout MacBook Air price cuts, Best Buy is starting the week with fresh discounts on the latest M3 models.

Morgan Stanley weirdly bullish on iPhone as it trims Apple stock price target
Investment bank Morgan Stanley says there are signs of increased iPhone, Mac, and Services revenue for Apple, but it has cut its target price by $10.

Nanoleaf string lights, new air purifiers, Qi2 chargers, & Govee floor lamps on HomeKit Insider
On this episode of the HomeKit Insider Podcast, we check out a pair of new purifiers, go hands on with the Mophie Qi2 dock, and break down more new product launches.

Apple has bought a French firm to help get AI processing on the iPhone
Apple has quietly acquired another AI firm involved in reducing the size of Large Language Modules for the iPhone, this time Paris-based Datakaleb.

Silicone straps, plastic leather, and Apple's introduction of FineWoven accessories aimed at reducing its carbon footprint have left those looking for a solid luxury Apple Watch band without many options — until now.

How to shoot 3D video for Apple Vision Pro on iPhone 15 Pro
Apple added the ability to record Spatial Video to the iPhone 15 Pro and iPhone 15 Pro Max as part of iOS 17.2. Here's how to record video to be viewed on the Apple Vision Pro.

How to make Apple Music more private by turning off 'Discoverable by Nearby Contacts'
Apple Music has a setting that automatically opts users into sharing your musical tastes with contacts by default. Here's what the problem is, and how to keep what you listen to a bit more private.

How to organize Safari tabs using tab groups in iPadOS 17
Safari tab groups have been in iPadOS for several years, and can really help you organize pages you've browsed. Here's how to use them in iPadOS 17.
Latest Videos

All of the specs of the iPhone SE 4 may have just been leaked

The best game controllers for iPhone, iPad, Mac, and Apple TV
Latest reviews.

Ugreen DXP8800 Plus network attached storage review: Good hardware, beta software

Espresso 17 Pro review: Magnetic & modular portable Mac monitor

Journey Loc8 MagSafe Finder Wallet review: an all-in-one Find My wallet

{{ title }}
{{ summary }}
- PRO Courses Guides New Tech Help Pro Expert Videos About wikiHow Pro Upgrade Sign In
- EXPLORE Tech Help Pro About Us Random Article Quizzes Request a New Article Community Dashboard This Or That Game Popular Categories Arts and Entertainment Artwork Books Movies Computers and Electronics Computers Phone Skills Technology Hacks Health Men's Health Mental Health Women's Health Relationships Dating Love Relationship Issues Hobbies and Crafts Crafts Drawing Games Education & Communication Communication Skills Personal Development Studying Personal Care and Style Fashion Hair Care Personal Hygiene Youth Personal Care School Stuff Dating All Categories Arts and Entertainment Finance and Business Home and Garden Relationship Quizzes Cars & Other Vehicles Food and Entertaining Personal Care and Style Sports and Fitness Computers and Electronics Health Pets and Animals Travel Education & Communication Hobbies and Crafts Philosophy and Religion Work World Family Life Holidays and Traditions Relationships Youth
- Browse Articles
- Learn Something New
- Quizzes Hot
- This Or That Game New
- Train Your Brain
- Explore More
- Support wikiHow
- About wikiHow
- Log in / Sign up
- Computers and Electronics
- Operating Systems
How to Activate Text to Speech in Mac OS X
Last Updated: July 6, 2021
wikiHow is a “wiki,” similar to Wikipedia, which means that many of our articles are co-written by multiple authors. To create this article, 11 people, some anonymous, worked to edit and improve it over time. This article has been viewed 251,332 times. Learn more...
So you want your Mac to read something to you? Read more to find out how.
Setting The Voice

The Shortcut Way

- A box will appear.

The Right-Click Way

Community Q&A
- You can right click on the text and click Stop Speaking. Thanks Helpful 0 Not Helpful 0
- You can press the key combination again to stop speaking. Thanks Helpful 0 Not Helpful 0
- In the System Preferences window where you set the Voice and Key Combination you can also make the computer announce the time and warn you when a pop-up window appears. Thanks Helpful 0 Not Helpful 0

- Some people absolutely hate it when the Computer announces the time. Thanks Helpful 0 Not Helpful 0
- Don't do this to someone else's computer, as it can be annoying. Thanks Helpful 0 Not Helpful 0
- Do not set the key combination to anything that you already use, because it will be over written. Thanks Helpful 0 Not Helpful 0
You Might Also Like

About This Article
- Send fan mail to authors
Is this article up to date?

Featured Articles

Trending Articles

Watch Articles

- Terms of Use
- Privacy Policy
- Do Not Sell or Share My Info
- Not Selling Info
wikiHow Tech Help:
Tech troubles got you down? We've got the tips you need
AI Speech to Text: Revolutionizing Transcription
Table of contents.
In the ever-evolving landscape of technology, AI Speech to Text technology stands out as a beacon of innovation, especially in how we handle and process language. This technology, which encompasses everything from automatic speech recognition (ASR) to audio transcription , is reshaping industries, enhancing accessibility, and streamlining workflows.
What is Speech to Text?
Speech to Text, often abbreviated as speech-to-text , refers to the technology used to transcribe spoken language into written text. This can be applied to various audio sources, such as video files , podcasts , and even real-time conversations. Thanks to advancements in machine learning and natural language processing , today’s speech recognition systems are more accurate and faster than ever.
Core Technologies and Terminology
- ASR (Automatic Speech Recognition) : This is the engine that drives transcription services, converting speech into a string of text.
- Speech Models : These are trained on extensive datasets containing thousands of hours of audio files in multiple languages, such as English, Spanish, French, and German, to ensure accurate transcription .
- Speaker Diarization : This feature identifies different speakers in an audio, making it ideal for video transcription and audio files from meetings or interviews.
- Natural Language Processing (NLP) : Used to enhance the context understanding and summarization of the transcribed text.
Applications and Use Cases
Speech-to-text technology is highly versatile, supporting a range of applications:
- Video Content : From generating subtitles to creating searchable text databases.
- Podcasts : Enhancing accessibility with transcripts that include timestamps , making specific content easy to find.
- Real-time Applications : Like live event captioning and customer support, where latency and transcription accuracy are critical.
Building Your Own Speech to Text System
For those interested in building their own system, numerous resources are available:
- Open Source Tools : Software like Whisper and frameworks that allow customization and integration into existing workflows.
- APIs and SDKs : Platforms like Google Cloud offer robust APIs that facilitate the integration of speech-to-text capabilities into apps and services, complete with detailed tutorials .
- On-Premises Solutions : For businesses needing to keep data in-house for security reasons, on-premises setups are also viable.
- AI tools : AI speech to text or AI transcription tools like Speechify work right in your browser.
Challenges and Considerations
While the technology is impressive, it’s not without its challenges. Word error rate (WER) remains a significant metric for assessing the quality of transcription services. Additionally, the ability to accurately capture specific words or phrases and sentiment analysis can vary depending on the speech models used and the complexity of the audio.
Pricing and Accessibility
The cost of using speech-to-text services can vary. Many providers offer a tiered pricing model based on usage, with some offering free tiers for startups or small-scale applications. Accessibility is also a key focus, with efforts to support multiple languages and dialects expanding rapidly.
The Future of Speech to Text
Looking ahead, the integration of speech-to-text technology in daily life and business processes is only going to deepen. With continuous improvements in speech models , low-latency applications, and the embrace of multi-language support , the potential to bridge communication gaps and enhance data accessibility is immense. As artificial intelligence and machine learning evolve, so too will the capabilities of speech-to-text technologies, making every interaction more engaging and informed.
Whether you are a pro looking to integrate advanced speech-to-text APIs into a complex system, or a newcomer eager to experiment with open-source software , the world of AI speech to text offers endless possibilities. Dive into this technology to unlock new levels of efficiency and innovation in your projects and products.
Try Speechify AI Transcription
Pricing : Free to try
Effortlessly transcribe any video in a snap. Just upload your audio or video and hit “Transcribe” for the most precise transcription.
Boasting support for over 20 languages, Speechify Video Transcription stands out as the premier AI transcription service.
Speechify AI Transcription Features
- Easy to use UI
- Multilingual transcription
- Transcribe directly from YouTube or upload a video
- Transcribe your video in minutes
- Great for individuals to large teams
Speechify is the best option for AI transcription. Move seamlessly between the suite of products in Speechify Studio or use just AI transcription. Try it for yourself, for free !
Frequently Asked Questions
<strong>is there an ai for speech to text</strong>.
Yes, AI technologies that perform speech to text, like automatic speech recognition (ASR) systems, utilize advanced machine learning models and natural language processing to transcribe audio files and real-time speech accurately.
<strong>Which AI converts audio to text?</strong>
AI models such as Google Cloud’s Speech-to-Text and OpenAI’s Whisper are popular choices that convert audio to text. They offer features like speaker diarization, support for multiple languages, and high transcription accuracy.
<strong>How do I convert AI voice to text?</strong>
To convert AI voice to text, you can use speech-to-text APIs provided by platforms like Google Cloud, which allow integration into existing applications to transcribe audio files, including podcasts and video content, in real-time.
<strong>What is the AI that converts voice to text?</strong>
AI that converts voice to text involves automatic speech recognition technologies, like those offered by Google Cloud and OpenAI Whisper. These AIs are designed to provide accurate transcription of natural language from audio and video files.
- Previous Real-Time AI Dubbing with Voice Preservation
- Next AI Speech Recognition: Everything You Should Know

Cliff Weitzman
Cliff Weitzman is a dyslexia advocate and the CEO and founder of Speechify, the #1 text-to-speech app in the world, totaling over 100,000 5-star reviews and ranking first place in the App Store for the News & Magazines category. In 2017, Weitzman was named to the Forbes 30 under 30 list for his work making the internet more accessible to people with learning disabilities. Cliff Weitzman has been featured in EdSurge, Inc., PC Mag, Entrepreneur, Mashable, among other leading outlets.
Recent Blogs

AI Speech Recognition: Everything You Should Know

Real-Time AI Dubbing with Voice Preservation

How to Add Voice Over to Video: A Step-by-Step Guide
Voice Simulator & Content Creation with AI-Generated Voices

Convert Audio and Video to Text: Transcription Has Never Been Easier.

How to Record Voice Overs Properly Over Gameplay: Everything You Need to Know
Voicemail Greeting Generator: The New Way to Engage Callers
How to Avoid AI Voice Scams
Character AI Voices: Revolutionizing Audio Content with Advanced Technology

Best AI Voices for Video Games
How to Monetize YouTube Channels with AI Voices

Multilingual Voice API: Bridging Communication Gaps in a Diverse World

Resemble.AI vs ElevenLabs: A Comprehensive Comparison
Apps to Read PDFs on Mobile and Desktop
How to Convert a PDF to an Audiobook: A Step-by-Step Guide

AI for Translation: Bridging Language Barriers
IVR Conversion Tool: A Comprehensive Guide for Healthcare Providers

Best AI Speech to Speech Tools
AI Voice Recorder: Everything You Need to Know
The Best Multilingual AI Speech Models
Program that will Read PDF Aloud: Yes it Exists
How to Convert Your Emails to an Audiobook: A Step-by-Step Tutorial
How to Convert iOS Files to an Audiobook
How to Convert Google Docs to an Audiobook
How to Convert Word Docs to an Audiobook
Alternatives to Deepgram Text to Speech API
Is Text to Speech HSA Eligible?
Can You Use an HSA for Speech Therapy?
Surprising HSA-Eligible Items
Ultimate guide to ElevenLabs

Speechify text to speech helps you save time
Popular blogs.
The Best Celebrity Voice Generators in 2024
YouTube Text to Speech: Elevating Your Video Content with Speechify
The 7 best alternatives to Synthesia.io
Everything you need to know about text to speech on TikTok
The 10 best text-to-speech apps for android, how to convert a pdf to speech, the top girl voice changers.
How to use Siri text to speech
Obama text to speech, robot voice generators: the futuristic frontier of audio creation.
PDF Read Aloud: Free & Paid Options
Alternatives to FakeYou text to speech
All about deepfake voices.
Only available on iPhone and iPad
To access our catalog of 100,000+ audiobooks, you need to use an iOS device.
Coming to Android soon...
Join the waitlist
Enter your email and we will notify you as soon as Speechify Audiobooks is available for you.
You’ve been added to the waitlist. We will notify you as soon as Speechify Audiobooks is available for you.
Navalny's death leaves despair and apathy in Moscow
- Medium Text
DEATH IN PRISON

WEST 'NOT OUR FRIEND'
Coming soon: Get the latest news and expert analysis about the state of the global economy with Reuters Econ World. Sign up here.
Reporting by Guy Faulconbridge Editing by Frances Kerry and Jan Harvey
Our Standards: The Thomson Reuters Trust Principles. New Tab , opens new tab

Thomson Reuters
As Moscow bureau chief, Guy runs coverage of Russia and the Commonwealth of Independent States. Before Moscow, Guy ran Brexit coverage as London bureau chief (2012-2022). On the night of Brexit, his team delivered one of Reuters historic wins - reporting news of Brexit first to the world and the financial markets. Guy graduated from the London School of Economics and started his career as an intern at Bloomberg. He has spent over 14 years covering the former Soviet Union. He speaks fluent Russian.

World Chevron

US rights report on India cites abuses in Manipur, harassment of media and minorities
The U.S. State Department's annual human rights assessment found "significant" abuses in India's northeastern Manipur state last year and attacks on minorities, journalists and dissenting voices in the rest of the country.

macOS User Guide
- What’s in the menu bar?
- Work on the desktop
- Search with Spotlight
- Quickly change settings
- Get notifications
- Open apps from the Dock
- Organize your files in the Finder
- Connect to the internet
- Browse the web
- Preview a file
- Take a screenshot
- Change your display’s brightness
- Adjust the volume
- Use trackpad and mouse gestures
- Use Touch ID
- Print documents
- Keyboard shortcuts
- Apps on your Mac
- Work with app windows
- Use apps in full screen
- Use apps in Split View
- Use Stage Manager
- Get apps from the App Store
- Install and reinstall apps from the App Store
- Install and uninstall other apps
- Create and work with documents
- Open documents
- Mark up files
- Combine files into a PDF
- Organize files on your desktop
- Organize files with folders
- Tag files and folders
- Back up files
- Restore files
- Change System Settings
- Choose your desktop wallpaper
- Add and customize widgets
- Use a screen saver
- Add a user or group
- Add your email and other accounts
- Automate tasks with Shortcuts
- Create Memoji
- Change your login picture
- Change the system language
- Make text and other items on the screen bigger
- Set up a Focus to stay on task
- Set up Screen Time for yourself
- Use Dictation
- Send emails
- Send text messages
- Make a FaceTime video call
- Edit photos and videos
- Use Live Text to interact with text in a photo
- Start a Quick Note
- Get directions
- Work across devices using Continuity
- Use iPhone as a webcam
- Use iPhone with Desk View
- Stream audio and video with AirPlay
- Use one keyboard and mouse to control Mac and iPad
- Hand off between devices
- Unlock your Mac with Apple Watch
- Make and receive phone calls on your Mac
- Sync music, books, and more between devices
- Manage Apple ID settings
- Set your Apple ID picture
- What is iCloud?
- What is iCloud+?
- Store files in iCloud Drive
- Share and collaborate on files and folders
- Manage iCloud storage
- Use iCloud Photos
- What is Family Sharing?
- Set up Family Sharing
- Set up Screen Time for a child
- Share purchases with your family
- Watch and listen together with SharePlay
- Share a Photo Library
- Collaborate on projects
- Find content shared with you
- Find your family and friends
- Play games with your friends
- Listen to podcasts
- Watch TV shows and movies
- Read and listen to books
- Read the news
- Track stocks and the market
- Apple Music
- Apple Arcade
- Apple News+
- Podcast shows and channels
- Manage subscriptions in the App Store
- View Apple family subscriptions
- Guard your privacy
- Use Mail Privacy Protection
- Control access to your camera
- Use Sign in with Apple for apps and websites
- Set up your Mac to be secure
- Keep your data safe
- Create a passkey
- Understand passwords
- Keep your Apple ID secure
- Find a missing device
- Get started with accessibility features
- Connect an external display
- Use the built-in camera
- Connect a Bluetooth device
- Use AirPods with your Mac
- Optimize your Mac battery life
- Optimize storage space
- Burn CDs and DVDs
- Control accessories in your home
- Use Windows on your Mac
- Resources for your Mac
- Resources for your Apple devices
Hear your Mac read documents
In many apps, your Mac can read aloud documents, webpages, messages, and more.
In an app on your Mac, do any of the following:
Hear an entire document: Choose Edit > Speech > Start Speaking.
Hear part of a document: In a document, select the text you want to hear, then choose Edit > Speech > Start Speaking.
Stop the speaking: Choose Edit > Speech > Stop Speaking.
IMAGES
VIDEO
COMMENTS
In an app on your Mac, place the insertion point where you want the dictated text to appear. Press if available in the row of function keys, use the Dictation keyboard shortcut, or choose Edit > Start Dictation. Note: Press and release to start Dictation; press and hold to activate Siri (Siri must be enabled).
6) Click Enable Dictation to allow Apple to use the recording. 7) In any document processor, click the Dictate icon and start speaking. 8) To change the default language, click the down arrow to ...
Here's how -. 1. Head over to the System Preferences, and select Keyboard. 2. In the Keyboard settings tab, tap on Dictation and select the On radio button next to Dictation. Once enabled, you ...
You'll use that to activate dictation later. Make sure you have your Mac's microphone selected, then open up TextEdit and create a new document: Activate the dictation shortcut (e.g. press the dictation key), then start playing back your audio file through your Mac's speakers. The mic should pick up the audio and start transcribing live into ...
How to set up dictation on a Mac. 1. Click the Apple logo in the top-left toolbar, then choose "System Preferences." 2. Select "Keyboard." Click on Keyboard in System Preferences. Devon Delfino ...
Use dictation to enter text in Pages on Mac. Place the insertion point where you want to begin dictating, or select the text you want to replace (to select placeholder text, click it). Choose Edit > Start Dictation (from the Edit menu at the top of your screen). If you haven't used dictation before, follow the guided setup instructions that ...
For supported languages, Dictation also adds certain punctuation automatically as you dictate text. If you need additional commands to edit and format text and to control your Mac, use Voice Control. For example, you can speak commands to select or delete text, capitalize or italicize words, or press the Return key. See Use Voice Control commands.
Double-press the Fn button to start dictating on your Mac. You should see a microphone icon appear or hear a macOS confirmation tone. If this is your first time using Dictation, click OK in the popup window to confirm you want to use it. After activating Dictation, start saying what you want to type to see it appear on screen.
Step 1: Access System Settings. Click on the Apple menu in the top-left corner of your screen and select "System Settings" to set the system preferences for the voice to text feature. Step 2: Navigate to Keyboard Settings. Within System preferences, click on "Keyboard" in the sidebar. Step 3: Turn Off Dictation.
(Lucas's MacLifeHacks #31)Want to write a world-changing blog post while your hands are full of lattes or hungry babies? Learn the basics and some pro tips f...
In our research and testing, we found that the best dictation software on a Mac is Otter (Free) which offers incredible levels of accuracy and speed especially for transcribing conversations or meetings. Quick Navigation [ hide] 1. Otter (Free) 2. Dragon Dictate (Best For Accuracy) 3. macOS Dictation (Best Apple App) 4.
Check out this video for how you can enable dictation to use Voice to text on M1 Mac. We will also show you how you can fix Voice to text feature not working...
Enabling Speak Selection. First, access your Mac's System Settings and click on 'Accessibility' in the sidebar. Within the Accessibility settings, select 'Spoken Content'. Turn on the 'Speak selection' option. This feature allows your Mac to read out selected text or, in its absence, any text items in the current window, such as an email in Mail.
Listen to spoken text. On your Mac, choose Apple menu > System Settings, then click Accessibility in the sidebar. (You may need to scroll down.) Click Spoken Content on the right. Open Spoken Content settings for me. Turn on "Speak selection.". On your Mac, press the specified keyboard shortcut (the default key combination is Option-Esc).
Click the Apple icon in the menu. Click System Preferences. Click Accessibility. In the left-hand panel, select Spoken Content. Click the tickboxes next to the options you want enabled. Spoken ...
Click the Accessibility section in the new window. On the left side of the panel, locate the Speech section. See the checkbox "Speak selected text when the key is pressed.". The default key is Option+Esc, but you can add any key you want. Once you do this, using the text to speech feature is as simple as it can be.
How to pause text to speech on Mac? Mastermind91. Community Answer. Navigate to the text you wish to read, and VoiceOver will start to read it. Press Ctrl and the reading will pause. ... 12 Ways to Spot Real vs. Fake Nike Air Jordan 4 Shoes. How to Clean & Care for Enameled Cast Iron Cookware. Categories; Computers and Electronics; Operating ...
Speech to Text, often abbreviated as speech-to-text, refers to the technology used to transcribe spoken language into written text. This can be applied to various audio sources, such as video files, podcasts, and even real-time conversations. Thanks to advancements in machine learning and natural language processing, today's speech ...
The death of Alexei Navalny robs the disparate opposition of its most charismatic and courageous leader as Vladimir Putin prepares for an election that will keep him in power until at least 2030.
President Vladimir V. Putin vowed to punish those responsible for the assault, one of the deadliest in Russia in decades. U.S. officials have attributed the attack to ISIS-K, a branch of the ...
On your Mac, choose Apple menu > System Settings, then click Accessibility in the sidebar. (You may need to scroll down.) Click Spoken Content on the right. Click the "System voice" pop-up menu, then choose a voice. To adjust how fast the voice speaks, drag the "Speaking rate" slider. Click Play Sample to test the voice and speaking rate.
CNN —. Russia has been left reeling in the wake of the nation's worst terrorist attack in decades. ISIS has claimed responsibility for the massacre, which saw armed assailants storm a popular ...
Moscow, Moscow, throw your glasses at the wall. And good fortune to us all. Ho ho ho ho ho - hey! Moscow, Moscow, join us for a kazadchok. We'll go dancing round the clock. Ha ha ha ha ha - hey ...
In many apps, your Mac can read aloud documents, webpages, messages, and more. Hear an entire document: Choose Edit > Speech > Start Speaking. Hear part of a document: In a document, select the text you want to hear, then choose Edit > Speech > Start Speaking. Stop the speaking: Choose Edit > Speech > Stop Speaking. Your Mac can read aloud ...