Logo top

How to Add Presenter Notes in Keynote on Mac, iPhone, and iPad

keynote presentation mode with notes

In this article, I will explain how you can add presenter notes to your slides in Keynote on your Mac, iPad, or iPhone.

When you are creating a presentation, for every slide, you can add presenter notes (also called speaker notes) to provide reference material for you, as the speaker or presenter, when you are presenting a slideshow in front of an audience. For example, these notes may help you recall important points during your presentation. These notes will only show up on your screen. They aren’t visible to the audience. You can also print these notes.

  • Open, Edit & Create a Keynote File (.Key) in PowerPoint on Windows PC
  • Easiest Way To Open / Edit a .Pages File On a Windows PC

Add presenter notes in Keynote on Mac

Follow the steps below:

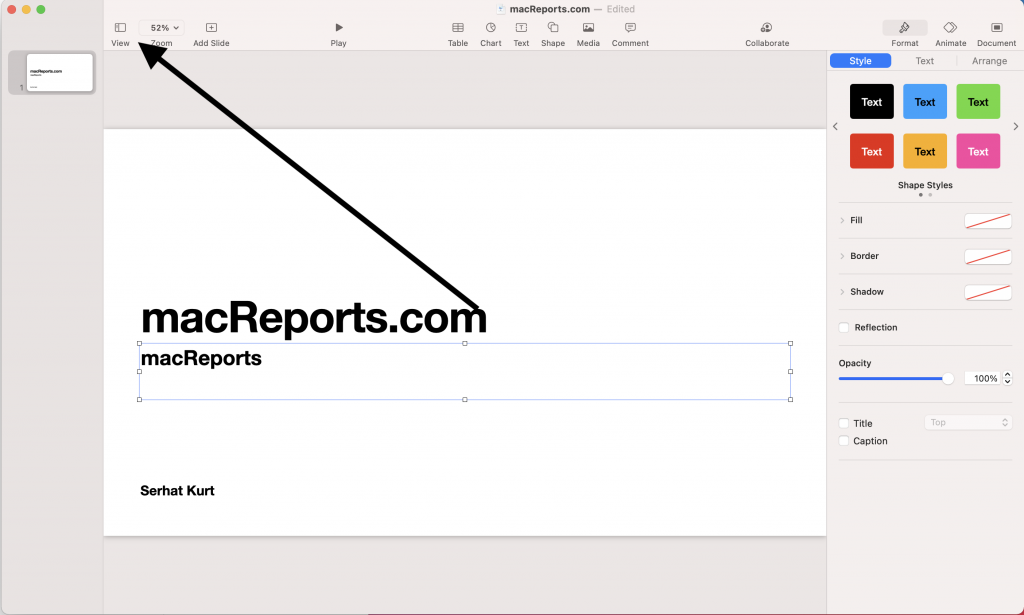
1 . Open Keynote and create your presentation. Select the slide you want to add notes to. When you are ready to add a note to a slide, click the View button in the toolbar.

keynote presentation mode with notes

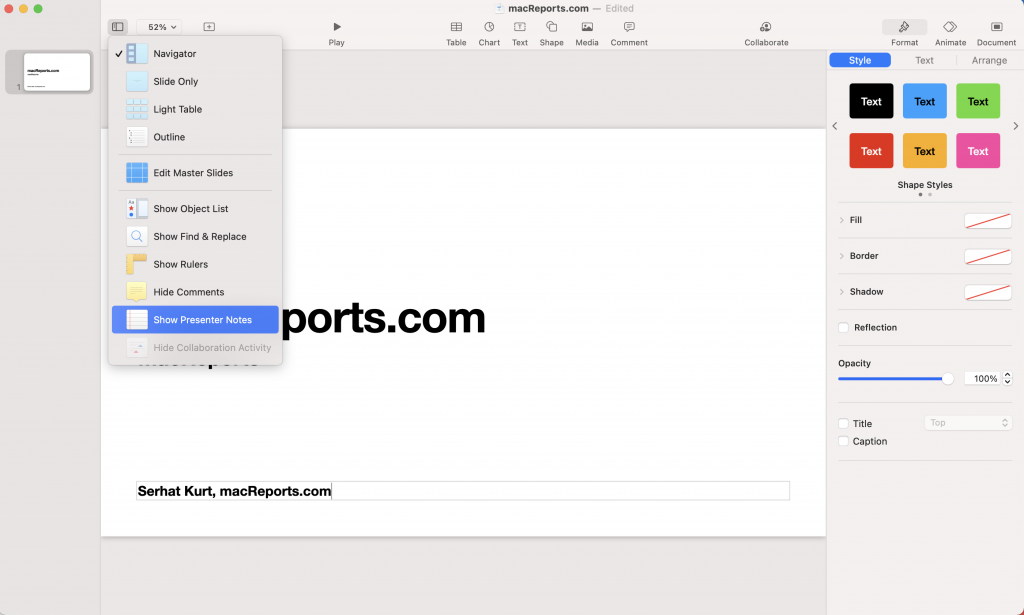
2 . This will open a menu, from the menu items, click Show Presenter Notes.

keynote presentation mode with notes

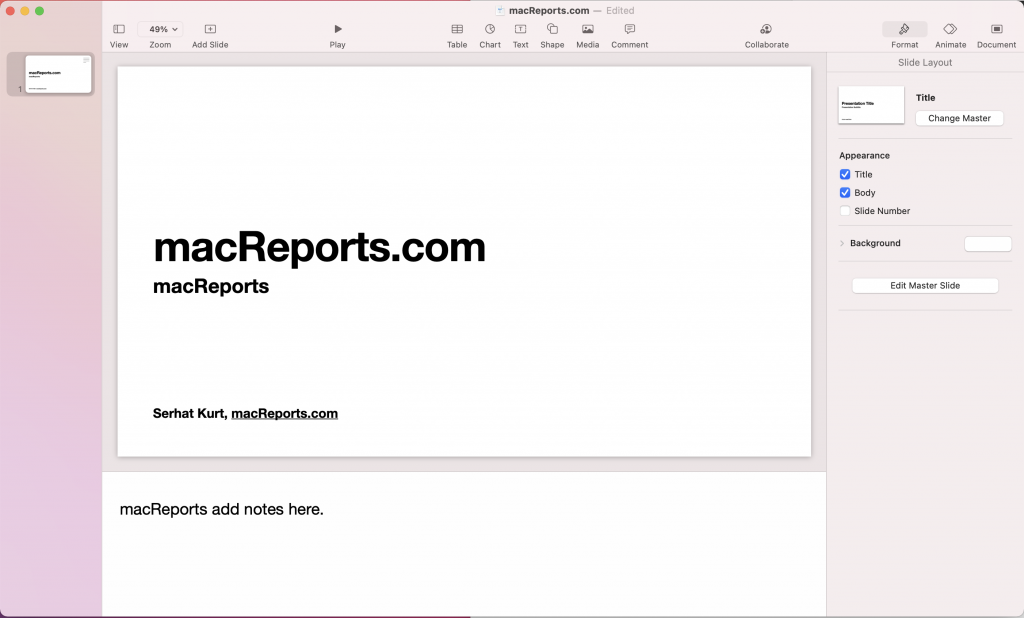
3 . The notes pane (a white area) will appear under your slide. Click the white area to add notes and type whatever you want.

keynote presentation mode with notes

And you are done. To hide the notes area, again click the View button and click Hide Presenter Notes.

See also: Apple .Pages File Extension – Everything You Need To Know

Add presenter notes in Keynote on iPhone

If you are creating your presentation on an iPhone, here is how you can add notes.

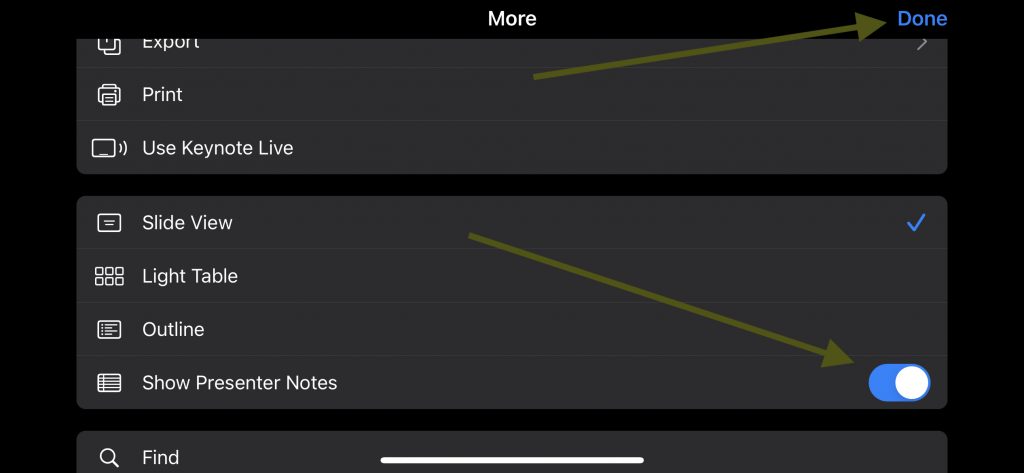
1 . In Keynote on your iPhone, select the slide and then tap the three-dot (…) more icon.

iPhone Keynote

2 . This will open a new menu. Find the “Show Presenter Notes” option and turn this on and then tap Done.

keynote presentation mode with notes

3 . This will open the notes area at the bottom of your screen. Tap the field to add notes. You can swipe up or down the field.

iPhone Presenter Notes

4 . You can hide this field after you have done adding your notes. Again tap the More icon and turn off the Show Presenter Notes option.

Add presenter notes in Keynote on iPad

If you are using your iPad to create a Keynote presentation, here is how you can add presenter notes.

1 . Open your presentation on your iPad and tap the slide you want to add notes to. And tap the Presenter tools icon on the top left.

iPad Keynote Notes

2 . This will reveal a menu. And turn on Show Presenter Notes.

Show Presenter Notes on iPad

3 . This will open the notes field. Tap the text field to add notes. To hide the text field, turn off the Show Presenter Notes option.

iPad add notes

So, you may wonder now how you can view your notes while you are delivering the slideshow. You can view your notes when you are showing your presentation on a connected display. If you have one screen, the notes you add will not be visible in Play mode, unless you are using the rehearsal mode by tuning on “Rehearse Slideshow”.

See also: Pages: Can’t Open Document, Fix

keynote presentation mode with notes

Dr. Serhat Kurt worked as a Senior Technology Director specializing in Apple solutions for small and medium-sized educational institutions. He holds a doctoral degree (or doctorate) from the University of Illinois at Urbana / Champaign and a master’s degree from Purdue University. He is a former faculty member. Here is his LinkedIn profile and Google Scholar profile . Email Serhat Kurt .

Similar Posts

How to boot in single-user mode or verbose mode in macos.

There are different special start-up modes that your Mac can be powered into. These modes can be used to troubleshoot various Mac problems. Advanced users may use these modes. Single user mode enables…

How to Set Up and Use the Journal App on iPhone

How to Set Up and Use the Journal App on iPhone

A lot of users keep a journal, either a digital or paper version, as a way to organize thoughts, improve creativity or minimize stress. A lot of people do this because it helps…

How to Share Files and Folders in iCloud Drive

With iCloud File Sharing, you can share folders and documents from your Mac, iPhone or iPad with other iCloud users. You may be familiar with this from using other cloud services like Dropbox….

How to Use Apple Cash with Apple Pay

iPhone users may wonder if they can “charge” their Apple Cash to pay for things with Apple Pay. Further, they may wonder how to set up their Apple Pay to use their Apple…

How To Manage Web Site Usernames & Passwords In Safari (iOS and macOS)

This article explains how you can view, add, and edit your web site usernames and passwords in iOS and macOS Safari. Safari has a built-in password manager. Safari will remember website and app passwords…

Photo Memories on iPhone: How to Pause, View, Zoom or Share

Photo Memories on iPhone: How to Pause, View, Zoom or Share

This is one I had been wondering about for awhile but just recently got around to figuring out. On my iPhone, I use a Photos widget. The photos change occasionally, and it’s a…

My keynotes presenter page shows various lengths of page. Some can be scrolled down others I have to shorten the notes or show two identical slides with half the notes for one and the other half on another slide.

Is there a way of making all the pages longer. I can make them wider and as long as my screen is high, but the text just fills up the page when I do that.

Can you use a smaller font in order to fit more notes?

Leave a Reply Cancel reply

Your email address will not be published. Required fields are marked *

Categories:

Looks like no one’s replied in a while. To start the conversation again, simply ask a new question.

christopherfromacton

See presenters notes during keynote live presentation?

Any quick help appreciated. I need to give a presentation in two days.

Posted on Apr 28, 2018 9:14 AM

Joseph_S.

Posted on May 22, 2018 10:56 AM

To view your presenter notes during a presentation, you must be showing your presentation on a connected display. The notes appear only on your screen, so only you can see them. Click in the toolbar on your Mac, then click . If you don’t see , move the pointer anywhere on the presenter display to make it appear. Select the Presenter Notes checkbox then click outside the dialog to close it. Do any of the following to change how the presenter notes appear: Change the size of the font: Move the pointer over the Presenter Notes window, then click one of the font buttons to make the font smaller or bigger. Invert the text and background colors: Move the pointer over the Presenter Notes window, then click the Invert Colors button to change the Presenter Notes window to white text on a black background or vice versa (other text colors aren’t affected).

Similar questions

  • Keynote Presentation So, Is their a way that I can Have my Presenter notes visible just for me , Not my Audience ? 253 1
  • Keynote over a Zoom meeting Is it possible to see my presenter notes when Keynote is in play mode? I am presenting over Zoom to a large audience and I just have my laptop. 2168 6
  • how to show presenter notes during presentation I've added Presenters Notes in my presentation, but can't seem to get them to appear when I'm doing the presentation. I've clicked on the customize Presenter display and have all the boxes checked. Any help? 341 1

Loading page content

Page content loaded

May 22, 2018 10:56 AM in response to christopherfromacton

earthtoandy

May 22, 2018 10:59 AM in response to christopherfromacton

I was having this issue too, and all of the suggestions, such as the one here, do not work as once you have started the live presentation there seems to be no way to change the view. All you have to do is hit 'X' on your keyboard, and that will switch it to presenter view.

How to customize the presenter display in Keynote

In this tutorial, we will help you customize the presenter display feature in the Keynote app on your Mac, iPad, and iPhone so you’re ready for your next presentation.

Customizing Presenter display in Keynote on iPhone

Do you present a lot of slideshows using Keynote or at least enough that you’d like to make things a bit easier? One way to do this is by taking advantage of the presenter notes feature, but another is customizing the presenter display.

When you show a presentation in Keynote, you can configure the screen you see as the presenter. Whether for comfort or easy access to items, setting up that view for what works best for you can lead to a successful presentation.

Related: How to work with Keynote Presenter Notes on Mac and iOS

Customize the Keynote presenter display on Mac

Open your slideshow in Keynote. You can either play your presentation, use the Rehearse Slideshow mode, or jump right into customizing the display.

  • #1 Click the Play button in the toolbar.
  • #2 Click Play in the menu bar and select Play Slideshow or Rehearse Slideshow .
  • #3 Click Play in the menu bar and select Customize Presenter Display .

If you choose #3, you’ll go directly to the customization options and skip the first group of settings you can adjust. For this tutorial, we’ll customize the display using #1 or #2 above so that you can see the first group of settings.

1) On the presenter screen (Play > Rehearse Slideshow), click the Layout Options button at the top. This is the square icon to the right of the Help button (question mark).

2) Here, you can check or uncheck the items available. This includes the current slide, next slide, presenter notes, ready indicator, clock, and timer.

If you check the Timer setting, you can then pick from displaying elapsed or remaining time. This is a terrific way to stay on track with longer presentations.

Customize Presenter Display Layout Options Keynote Mac

3) To change the layout of the display, click Customize Presenter Display in that small window.

4) You’ll then see those same checkboxes, and you can adjust them here if you like.

In addition, you can move, resize, and position items, as well as change the appearance of your presenter notes.

Customize Presenter Display Keynote Mac

Move items : Click and drag elements to different locations on the screen. By default, slide labels move with the slides, but you can drag a label separately if you like. To move multiple items at once, hold the Command key and click each one. You can then move the selected group.

Resize items : Drag a corner or edge of an element to resize it. To retain an item’s proportions when you resize it, hold the Shift key as you drag. To proportionally resize from the center of an item, hold the Shift and Option keys as you drag.

Automatically position items : Click the Use Auto Layout button.

5) When you finish customizing your display, click OK .

Customize the Keynote presenter display on iPhone and iPad

While it’s easier to present a Keynote slideshow on Mac, in my opinion, that might not be an option for you. So here are the steps to access the customization settings for your presenter display on iPhone and iPad.

1) If your external display is connected, tap Play . If not, select tap the More button (three dots) on the top right and select Rehearse Slideshow .

2) On the top right, tap the rectangle that displays your Layout Options. This is to the left of the X to stop the slideshow.

Tap the layout view you want to use from options like current or next slide, slides with notes, or notes only.

Customize Presenter Display Layout Options Keynote iPad

3) Below Presenter Notes , you can increase or decrease the font size of your notes or invert those colors.

By default, the clock displays at the top. If you tap it, it will switch to the timer with elapsed time.

Customize Presenter Display Timer Keynote iPad

You don’t have as many customization options for the presenter display on iPhone and iPad as you do on Mac. But those you do have should help to get your display in a way that works for you.

With some small adjustments, you can create the perfect presenter display to move through your Keynote slideshow. Are you going to keep these options in mind for your next presentation?

For more, check out:

  • How to add backgrounds and borders to Keynote slides
  • How to gain more workspace around your slides

Change Language

Use presenter notes, add presenter notes to your slides, add and edit notes for a slide, view presenter notes while playing your presentation.

You are using an outdated browser. Please upgrade your browser to improve your experience.

How to use Keynote's hidden presentation features to hold your audience's attention

William Gallagher's Avatar

Apple's Keynote application isn't only for creating slideshow presentations, it's for showing them too. That's quite unusual for software: nobody writes a book in Word and then holds their iPad up for people to read from. Yet the two sides of Keynote are complementary and what you set up while you were creating your presentation will help you now with showing it.

Keynote has a lot more to offer when you're getting ready to put this show on the road. There are tools to make your presentation work the way you expect — and there are tips to help ensure it does.

You've made that non-linear presentation using Master Slides, Outline View and Light Table . You've also included video even though we warned you about that.

keynote presentation mode with notes

The warning about video isn't only because you're relying on your venue to have loudspeakers. It's also because video files are big, and it makes your presentation file that much larger, and that much more difficult to transport.

Don't include any more video that you absolutely must. We mean that literally. If you have to have a 35-second clip, make it 35 seconds and not 36.

You can drag in a three-hour movie and then trim it down to 35 seconds in Keynote but you're not actually cutting the size of the video file. You're just determining how much of the whole file your audience will see. Keynote keeps the entire clip in your presentation so that you can later change your mind and adjust the clip you want.

For that reason, do your basic trimming in QuickTime Player on your Mac or use something like Final Cut Pro X to do more elaborate work. Only drag in the finished segment you need. Otherwise, your presentation could be so bloated that it takes longer to sync over iCloud from your Mac to your iPad.

It could also be so weighed down with the video file size that the presentation will run slower, too.

Watch your size

If your Mac's storage is not yet using APFS, the Apple File System, then after your presentation goes over about 500MB on your Mac, Keynote will step in. When you go to save it, you'll be prompted to choose between saving as a Single File or as a Package.

keynote presentation mode with notes

You get the choice but you only get it once: whatever you pick now is set for the life of this presentation. This is a problem that goes away when you're using APFS so over time it will be seen less and less. For now, though, your best bet is to choose Single File — so long as your presentation isn't already creakingly slow when you're editing it.

The reason is that a package lets Keynote split your presentation data out into separate files and folders so that it can then choose what to load and when. Rather than your video sitting there throughout 200 slides, it can be loaded when you reach the one slide it's on.

Plus a package with lots of little files suits the way that iCloud syncs data. So if you're the only person who's going to use this presentation and that's how you want to sync, choosing package could help you.

However, if you need to share it over Dropbox or really any other cloud service then packages aren't as robust as a single file is.

Even if you don't need to share the presentation with anybody else, though, save copies on different cloud services — and in different formats.

Belt and braces

Save your shiny new Keynote presentation to the Mac and/or iPad you're going to be presenting it from. Preferably save in iCloud Drive where all your devices can get it. Then save it to Dropbox too. Email yourself a copy. Pop one onto a USB stick.

And when you've done all that, do it all again but with the presentation saved in the old Keynote '09 format.

And then when you've done even that, do it all again but saving the presentation as a Microsoft PowerPoint file .

Sometimes your venue will have a Mac in place and it's better to use their equipment instead of yours because it's already tried and tested. Only, the Mac is using the older Keynote format.

keynote presentation mode with notes

Or perhaps the venue neglected to tell you that every speaker has to hand over their entire presentation at the start of the conference. There are companies that will insist on joining every speaker's presentation together so that a single file runs for the entire day. When that happens, you can bet it'll be a PowerPoint file.

Better you give them a PowerPoint file that Keynote has created than to trust that their PowerPoint will open Keynote okay.

Then there are the acts of God that will leave you without any copy of the presentation at all. Dropbox or iCloud should get it back but there is one further option.

Go to iCloud.com and sign in with your Apple ID. There's a fully-functioning copy of Keynote on that site and we've used it for three-day-long residential workshops when necessary.

Remember your place

All of this so far has been about the visual side of presentations, of about making sure your audience has something to look at. They also need to hear you, though, and Keynote has tools to help you make sure you stay on track.

keynote presentation mode with notes

Every time you create a slide, you can write your own notes at the bottom. These Presenter Notes won't be seen by your audience, they will only show on your Mac or iPad screen in front of you.

That's even when you're presenting from that screen: Keynote is excellent at by default routing only the slides to an external screen.

On the Mac, choose the View menu and then Show Presenter Notes . You get a small text box at the foot of the screen and it's tied to each individual slide. Write something in it, then move to the next slide and write in that one's empty text box.

When you duplicate slides, by the way, you also duplicate the notes. So if you've done a slide you really like and want to base the next few on it, select-and-cut the note before you duplicate the slide. Otherwise you'll have the same note in every one.

That's an issue if you've gone back to the View menu and chosen the Hide Presenter Notes option for any reason. When you later come to present and switch on the notes, you'll lose track of what you meant to write where.

On the iPad, tap on the three-dot ellipses icon at top right and then toggle on Show Presenter Notes .

What you see

It's years since we presented from our Macs because the iPad version of Keynote is so very good, especially when used with an Apple TV . Except for one thing.

On the Mac, you can have your screen be showing you all sorts of things that the audience isn't supposed to see. You can have your presenter notes, for instance, but also both the current and the next slides showing.

keynote presentation mode with notes

Then you can choose to have a clock showing you the current time or a countdown of how long you've been speaking — or both.

On the iPad, you're more limited. You can have the clock or the timer and many presenters don't even know you've got that option. By default Keynote shows you the clock but you can tap on it to swap to the timer.

Then you can have presenter notes and the current slide. You can have presenter notes and the next slide. You can have the current and next slides on your screen.

Only, you can't have current and next slides plus presenter notes and that's the one we want the most.

However, there is a way around it. Previously we recommended planning your Keynote presentation in another app such as OmniOutliner. If you've done that, and not strayed too far from the original plan, then you can re-use that outline now.

Open your Keynote presentation on the iPad, press Play to start the slideshow. Then swipe up from the bottom of the screen to show the dock and then choose OmniOutliner from there. Drag it up and to one side of the presentation.

keynote presentation mode with notes

So long as Keynote is playing the slideshow, your audience will see the current slide. And you'll see current and next plus an entirely separate outline.

What the audience gets

The audience or the venue will always ask you for a copy of your slides. You can tell them as often as you like that the slides make little sense without you standing there talking in front of them, but it doesn't matter.

Don't bother arguing and also don't bother doing any fiddling with the slides. Just choose File , Print and then in that print dialog click on Show Details .

There are options in these details to determine whether your printed version includes the presenter notes and slide numbers, whether it includes any skipped slides. Make sure those are all turned off and then click on the PDF button and choose Save as PDF .

Keep up with AppleInsider by downloading the AppleInsider app for iOS, and follow us on YouTube , Twitter @appleinsider and Facebook for live, late-breaking coverage. You can also check out our official Instagram account for exclusive photos.

Having done a number of travelling, online presentations -- the first back in 1986 before there were projectors and (real) laptops -- these are good tips. I have seen so many go out there there assuming that "you just turn it on a go" find out differently. But, they forgot the most important part:   donuts.   If all else fails, keep 'em happy with donuts.

Is there a way to print just the presenter notes?

Top Stories

article thumbnail

Save up to $130 on Apple's new iPad Air & M4 iPad Pro with AppleCare

article thumbnail

Flagship iPad head-to-head — M4 iPad Pro vs M2 iPad Pro compared

article thumbnail

Alleged M4 benchmarks verify Apple's iPad Pro performance claims

article thumbnail

Apple's 'Crush' iPad Pro ad sparks intense backlash from creatives

article thumbnail

Ultra Retina XDR OLED screens in iPad Pro are just the latest evolution of Apple's flagship display tech

article thumbnail

iPad Air shootout — 2024 M2 iPad Air vs M1 iPad Air compared

Featured deals.

article thumbnail

Save up to $350 on every M3 MacBook Pro, plus get up to $80 off AppleCare

Latest exclusives.

article thumbnail

Apple's new Photos app will utilize generative AI for image editing

article thumbnail

Siri for iOS 18 to gain massive AI upgrade via Apple's Ajax LLM

article thumbnail

Apple's iOS 18 to streamline task management with unified events and reminders

Latest comparisons.

article thumbnail

Apple headphone shootout: Beats Solo 4 vs AirPods Max

Latest news.

article thumbnail

Apple's new iPad Air and iPad Pro are already on sale, with every 2024 11-inch and 13-inch model eligible for an exclusive discount on the device and optional AppleCare.

author image

Judge questions Apple's commitment to App Store payment alternatives

A federal judge has raised concerns about whether Apple has overly complex barriers that could deter the usage of alternative payment methods in iPhone apps.

author image

The new iPad Pros skipped straight to M4, and initial benchmarks show the potential performance improvements match Apple's claims.

author image

The next Apple CEO: Who could succeed Tim Cook?

Apple CEO Tim Cook is planning to exit Apple within the next ten years. Here are the strongest contenders to be his replacement as chief executive.

author image

Maryland Apple Store employees to vote on strike, citing unmet demands

Workers at the first unionized Apple retail store in the US are preparing for a strike sanction vote to address unresolved issues with management.

article thumbnail

Apple loses another designer who worked in Jony Ive's core team

Duncan Kerr, a designer who has been a part of Apple's journey since the late 1990s is now departing, marking another loss for the design team in a relatively short span of time.

author image

iPad gives nonspeaking woman a voice to advocate for Americans with disabilities

A woman with nonspeaking autism got an iPad when she was 18, and through an app on it, is now speaking in schools — and working for the government.

author image

Alternate Avengers assemble on Apple Vision Pro in 'What If...? — An Immersive Story'

Disney is bringing even more immersive content to the Apple Vision Pro. This time it's the turn of Marvel's "What If...?" franchise.

article thumbnail

Apple has a new Swift tutorials webpage for budding developers

Apple has launched a new tutorial webpage featuring beginner resources for programming using Swift, Swift UI, and Xcode.

article thumbnail

macOS Sonoma update fixes USB hubs, Java crashes, and more

Following iOS and iPadOS updates late last week, Apple has released a complementary update to macOS Sonoma with security updates and some big bug fixes.

article thumbnail

How to use Apple's Time Capsule for backups on a modern wireless network

Time Capsule was Apple's discontinued line of network backup products. This is how you could use one on a modern network.

Latest Videos

article thumbnail

New iPad Air & iPad Pro models are coming soon - what to expect

article thumbnail

Beats Solo 4 headphones review: Great audio quality and features

article thumbnail

iPhone 16 Pro: what to expect from Apple's fall 2024 flagship phone

Latest reviews.

article thumbnail

Atoto S8 Pro Wireless CarPlay receiver review: great, but fragile aftermarket solution

article thumbnail

Unistellar Odyssey Pro review: Unlock pro-level astronomy with your iPhone from your backyard

article thumbnail

Ugreen DXP8800 Plus network attached storage review: Good hardware, beta software

article thumbnail

{{ title }}

{{ summary }}

author image

Keynote - Customizing the Presenter Display

Keynote > customizing the presenter display.

Presentations that stand out. Beautifully.

With its powerful tools and dazzling effects, Keynote makes it easy to create stunning and memorable presentations, and comes included with most Apple devices. Use Apple Pencil on your iPad to create diagrams or illustrations that bring your slides to life. And with real‑time collaboration, your team can work together, whether they’re on Mac, iPad, iPhone, or a PC.

See what’s new in Keynote

Present your story. Your way.

Keynote sets the stage for an impressive presentation. A simple, intuitive interface puts important tools front and center, so everyone on your team can easily add beautiful charts, edit photos, and incorporate cinematic effects. And Rehearse Mode lets you practice on the go, with the current or next slide, notes, and clock — all in one view.

Start with a gorgeous layout.

Choose from over 40 eye‑catching themes that instantly give your presentation a professional look. Or create your own slide designs, background images, and page‑by‑page customization.

Create next-level animations.

Add drama to your presentation with more than 100 cinematic transitions and effects. Make your words pop by adding textures, color gradients, and even photos — with just a tap. And animate objects along a path using Apple Pencil or your finger on your iPhone or iPad.

Make every slide spectacular.

Add subtle movement to your slides with dynamic backgrounds. Illustrate your point with over 700 Apple-designed shapes, or add photos, videos, music, image galleries, and charts. Easily remove backgrounds from supported images and live videos or manually refine adjustments as needed. You can even use your iPhone to take a photo or scan a document, and Continuity Camera can send it straight to Keynote on your Mac.

What’s new in Keynote.

Learn about everything you can do in Keynote

Get the updates. Then get in touch.

Stay up to date when people join, edit, or comment in collaborative presentations and easily get in touch with your team using Messages and FaceTime.

Get more done on iPad.

Quickly insert objects, find settings, and get to your favorite tools with the customizable toolbar. And Stage Manager makes it easy to multitask across multiple presentations and apps at the same time. 1

Make backgrounds disappear.

Now you can more easily remove backgrounds from supported images — and even live videos — or adjust them to your liking.

Add live video feeds to any slide.

Appear in a window, right on your slides, with a picture-in-picture display during remote presentations. Or include a live feed of your iPhone or iPad screen to show off apps.

Get started with dynamic themes.

Start with one of three beautiful new animated themes, then customize it to set the tone for each slide with 18 adjustable background presets — from understated to highly visual, monochrome to colorful, calm to energetic.

Captivate your audience with dynamic backgrounds.

Make your presentation stand out by adding stunning color and visual interest to your slides. Create motion on a title or closing slide for a bold statement, and keep viewers engaged with subtle movement throughout the presentation.

Present with your team. Seamlessly.

For slideshows with multiple presenters, you can take turns controlling a single deck — from anywhere — on Mac, iPad, and iPhone.

Play YouTube and Vimeo videos right in Keynote.

Embed a video from YouTube or Vimeo, then play it right in your presentations, without the need to download or open the video in a media player. 2

Present over video conference. Like a pro.

Play a slideshow in its own window so you can access other apps while you present. You can view your presenter notes, upcoming slides, and navigation in a separate window as well.

Outline your presentation. Easier.

With outline view for iPhone and iPad, quickly jot down your thoughts, restructure ideas, and move concepts from slide to slide. Then switch to slide view and start designing.

Present like never before. From anywhere.

With Keynote, presenting remotely can be just as seamless as presenting in person. Say goodbye to saying “Next slide, please” — now multiple people can present together, even remotely, with each person taking control of their section of the deck. Add a live video feed of yourself to any slide for a picture-in-picture experience. Or when presenting on your Mac, include a live feed of your iPhone or iPad screen to walk through your apps. You can even play a slideshow in its own window, so you can simultaneously access your notes and other apps.

Any presentation. Any device. Anytime.

You don’t work in one place on just one device. The same goes for Keynote. Work seamlessly across all your Apple devices. The slides you create using a Mac or iPad will look the same on an iPhone or web browser — and vice versa.

You can also work on presentations stored on iCloud or Box using a PC.

Start using Keynote at iCloud.com

Create and present together. Even when apart.

Work together in the same presentation, from across town or across the world. You can see your team’s edits as they make them — and they can watch as you make yours, too. You can even get notifications when people join, edit, or comment. When presenting as a team, you can also take turns controlling a single deck from anywhere.

Use Apple Pencil when inspiration strikes.

Add color, illustrations, and handwritten comments for more beautiful presentations with Apple Pencil on your iPad.

Plays well with Office.

Teaming up with someone who uses Microsoft PowerPoint? Keynote makes it a great working relationship. You can save Keynote presentations as PowerPoint files. Or import and edit PowerPoint presentations right in Keynote.

Learn more about Microsoft PowerPoint compatibility

See everything that’s new in Keynote

  • What’s new in Keynote for iPhone and iPad
  • What’s new in Keynote for Mac
  • Keynote for iCloud release notes

Additional Resources

  • Get Keynote support
  • Learn about Microsoft Office compatibility
  • Learn about collaboration for Pages, Numbers, and Keynote
  • Use Keynote in a video conference app

Keynote User Guides

  • Keynote User Guide for Mac
  • Keynote User Guide for iPad
  • Keynote User Guide for iPhone
  • Keynote User Guide for Web

Build spreadsheets that are bottom-line brilliant.

Create documents that are, in a word, beautiful.

  • Apple Watch
  • Accessories
  • Digital Magazine – Subscribe
  • Digital Magazine – Info
  • Smart Answers
  • Let Loose iPad event
  • New iPad Air
  • iPad mini 7
  • Best Mac antivirus
  • Best Mac VPN

When you purchase through links in our articles, we may earn a small commission. This doesn't affect our editorial independence .

How to use Keynote’s new Play Slideshow in Window feature with videoconferencing services

keynote mac icon 2020

Keynote is designed best for presenters to work across two screens. One is typically a projector or large monitor; the other, a laptop screen or computer screen in front of the presenter. Keynote fills that second screen with a variety of presenter’s tools, like notes, thumbnails of the previous and next slides, and a time-elapsed clock.

mac911 keynote presenter screen

In a normal two-screen Keynote presentation, slides occupy one screen (as at top), while presenter’s tools, including notes, fit on another screen.

In the new world of always-online meetings, whether professional or social club, you might have frequently been frustrated, even if you have two monitors at home. Full-screen app mode in macOS in general doesn’t interact well with Google Meet, Microsoft Teams, Zoom, and other videoconferencing tools, because you typically must stay in the app that’s gone full screen to keep it working in that fashion.

In particular, Keynote is tricky. In Zoom, for instance, you have to open the Keynote slide deck and not enter slideshow mode ( Play > Play Slideshow ). Instead, you switch back to Zoom, use its screen-sharing option to select the Keynote slide window, then return to Keynote and start the presentation.

However, even with all that monkeying about, you must remain in Keynote to present. Some conferencing tools (including Zoom), let you have access through floating overlays to certain features. Zoom can show a resizable strip of the participants watching the session, for instance. (Keynote does offer the option to press H—not Command-H, but simply H—to hide Keynote in presentation mode and return to the previous app without breaking out of full-screen mode.)

With a new option introduced in July by Apple to Keynote, however, you can have more control and flexibility, particularly if you want to switch among other apps or remain largely in the videoconferencing app while presenting. My trick combines that new presentation option with the Keynote for iOS/iPadOS app.

Apple added Play > Play Slideshow in Window to Keynote, which presents slides with full interactivity in a regular window instead of the previously required single- or dual-monitor full-screen mode. The presentation window can be resized and moved around. You can start the slideshow and then share its window in a videoconferencing app, so you don’t have to show the raw Keynote interface at all before you start the presentation, as you do with a full-screen slideshow.

mac911 presenter screen

A slide presentation in Zoom using Play Slideshow in Window looks just as good as when using Keynote’s full-screen mode.

Because the Slideshow in Window option is a regular window, you can switch among apps without causing problems with Keynote. But two problems remain: First, you have to return to the window to advance slides (or go backwards). Second, none of the presenter’s tools are available.

That’s where the mobile app comes in. With Keynote on your iPhone or iPad, you can use the Keynote Remote feature to link the app to your Mac. (See Apple’s step-by-step instructions here on pairing your devices via the Keynote apps.)

Once paired, you can use this sequence to share a Keynote screen. The example that follows is for Zoom, but it works with any tool that allows screen-sharing of a window or portion of a window:

Open your slide deck in Keynote for macOS.

Choose Play > Play Slideshow in Window .

In an active Zoom meeting on your Mac, click the Share Screen button and select the Keynote window from the Basic tab. Click Share .

On your iPhone or iPad, use Keynote Remote to select your Mac and tap Play (even though the presentation is already playing—this tap asserts control by the Keynote mobile app).

Tap the side-by-side screen icon and select a mode that shows you notes and slides as you like. You can pick among Current and Notes, Next and Notes, and Notes Only to see your notes.

mac911 keynote ios app control

The mobile Keynote app lets you remotely control a presentation in macOS.

You can now get the best of all worlds. Advance or pick slides from the mobile app; read your notes as needed on the mobile app; have full access to macOS without worrying about disturbing the Keynote presentation.

Ask Mac 911

We’ve compiled a list of the questions we get asked most frequently along with answers and links to columns: read our super FAQ to see if your question is covered. If not, we’re always looking for new problems to solve! Email yours to [email protected] including screen captures as appropriate, and whether you want your full name used. Not every question will be answered, we don’t reply to email, and we cannot provide direct troubleshooting advice.

Author: Glenn Fleishman , Senior Contributor

keynote presentation mode with notes

Glenn Fleishman ’s most recent books include Take Control of iOS and iPadOS Privacy and Security , Take Control of Calendar and Reminders , and Take Control of Securing Your Mac . In his spare time, he writes about printing and type history . He’s a senior contributor to Macworld , where he writes Mac 911.

Recent stories by Glenn Fleishman:

  • How to make noncontiguous selections in Pages, Numbers, and Keynote
  • How to show fonts in Pages for macOS that don’t appear in the menu
  • How to remove a Google Maps subscription
  • Start the presentation and see your notes in Presenter view Article
  • Add speaker notes to your slides Article
  • Rehearse and time the delivery of a presentation Article
  • Record a slide show with narration and slide timings Article
  • Print your PowerPoint slides, handouts, or notes Article
  • Create a self-running presentation Article

keynote presentation mode with notes

Start the presentation and see your notes in Presenter view

Using Presenter view is a great way to view your presentation with speaker notes on one computer (your laptop, for example), while only the slides themselves appear on the screen that your audience sees (like a larger screen you're projecting to).

If you're using a newer version of PowerPoint, just connect the monitors and PowerPoint automatically sets up Presenter View for you.

If Presenter view appears on the wrong screen, you can swap the display quickly .

Turn off Presenter view if you prefer not to use it.

Your browser does not support video. Install Microsoft Silverlight, Adobe Flash Player, or Internet Explorer 9.

Start presenting

On the Slide Show tab, in the Start Slide Show group, select From Beginning .

Start a slide show from the beginning.

Use the controls in Presenter view

To move to the previous or next slide, select Previous or Next .

Presenter View - Back and Next buttons

To view all the slides in your presentation, select See all slides .

Click Slide Navigator to view all slides

Tip:  You’ll see thumbnails of all the slides in your presentation (as shown below), making it easy to jump to a specific slide in the show.

A grid with thumbnail images of all slides in the presentation.

To view a detail in your slide up close, select Zoom into slide , and then point to the part you want to see.

Zoom into the slide

For more details on zooming in, see Zoom in to part of a slide .

To point to or write on your slides as you present, select Pen and laser pointer tools .

Use the pen or laser tool to point to or write on slides

Press the Esc key when you want to turn off the pen, laser pointer, or highlighter.

To hide or unhide the current slide in your presentation, select Black or unblack slide show .

Black or unblack a slide

You can use PowerPoint on your smartphone as a remote control to run your presentation and view your speaker notes. See Using a laser pointer on your smartphone when presenting in PowerPoint for more information, including a brief video.

Swap the Presenter view and Slide view monitors

To manually determine which screen shows your notes in Presenter view and which shows only the slides themselves, on the task bar at the top of Presenter view, select Display Settings , and then select Swap Presenter View and Slide Show .

Display Settings in Presenter View

What the notes look like in Presenter view

Tip:  You can add notes either while you’re presenting, directly from Presenter view, or as you’re editing your presentation. For information on how to add speaker notes to your presentation see  Add speaker notes to your slides.

keynote presentation mode with notes

The notes appear in a pane on the right. If you need to add or delete something, simply click in the text box to edit it. The text wraps automatically, and a vertical scroll bar appears if necessary. You can change the size of the text in the Notes pane by using the two buttons at the lower left corner of the Notes pane:

Change the size of the text in the Notes pane in Presenter view

To change the size of the panes in Presenter View, point your mouse at the vertical line that separates them, then click and drag.

Tip:  If you don't need to see the current slide in Presenter View at all, and would like your notes to be larger, drag that vertical separator line all the way to the left.

Turn off Presenter view

If you want Presenter view turned off while you are showing your presentation to others:

On the Slide Show tab of the ribbon, clear the check box named Use Presenter View .

The Slide Show tab in PowerPoint has a check box to control whether Presenter View is used when you show a presentation to others.

Keep your slides updated

If you're working with a team of people to create your slide deck it may be that changes are being made to the slides right up to the last minute. Traditionally once you've started your presentation your slides wouldn't update. If you're using PowerPoint for Microsoft 365 you have the option to let your slides be updated by your team even as you're presenting so that you always have the up-to-the-minute changes.

You can turn this on by going to the Slide Show tab of the ribbon, selecting Set Up Slide Show , and checking the box for Keep slides updated .  

The Show options group of Set Up Slide Show with Keep slides updated enabled.

If you've already started your presentation and you want to make sure that setting is on, you can do that from Presenter view. Select the More slide show options button (which looks like three dots) and on the menu make sure Keep Slides Updated is checked.

The More slide show options menu in Presenter view.

Using a laser pointer on your smartphone when presenting in PowerPoint

To start using Presenter view, select Slide Show > Presenter View .

Presenter View on the Slide Show tab

To move to the previous or next slide, select the Previous or Next arrow.

Navigation buttons in Presenter view.

To turn off the pen, laser pointer, or highlighter, press the Esc key.

To make the screen black or to un-black the screen, Press b on the keyboard.

Toggle subtitles on or off in Presenter view.

Extend your Mac desktop to the second monitor

On the Apple menu, select System Preferences .

Open the Displays app.

Click the Arrangement tab in the dialog box.

Clear the Mirror Displays check box.

By doing this process, you now have a two-monitor setup. You can present a PowerPoint slide show on one screen while having other applications open on the other screen, keeeping those other apps private to yourself.

To manually determine which screen shows your notes in Presenter view and which shows only the slides themselves, on the task bar at the top left of Presenter view, select Swap Displays .

When your computer is connected to a projector and you start Presenter View, it appears on your computer's screen, while only the slides appear on the projector screen.

Presenter view includes a pane for speaker notes on the right and a navigation pane at the bottom.

The notes appear in a pane on the right:

The text wraps automatically, and a vertical scroll bar appears if necessary.

You can edit the text in the Notes pane.

You can change the size of the text in the Notes pane by using the two buttons at the lower left corner of the Notes pane:

Font-size controls for the Notes in Presenter view.

You can adjust the size of the current slide, and notes and next slide panels, by using your mouse to grab and drag the vertical line that separates the two panels.

Turn off Presenter view before a presentation begins

On the PowerPoint menu, select Preferences .

In the PowerPoint Preferences dialog box, under Output and Sharing , click Slide Show .

In the PowerPoint Preferences dialog box, under Output and Sharing, click Slide Show.

In the Slide Show dialog box, clear the Always start Presenter View with 2 displays check box.

In the Slide Show dialog box, clear the Always start Presenter View with 2 displays check box.

Close the dialog box.

Turn off Presenter view during a presentation

At the top of the Presentation view window, click Use Slide Show .

Turn off Presenter view during a presentation by selecting "Use Slide Show" at the top of the Presenter view window.

This button closes Presenter view. As a result, both your personal computer screen and the projector screen show the slide show.

If you're working with a team of people to create your slide deck it may be that changes are being made to the slides right up to the last minute. Traditionally once you've started your presentation your slides wouldn't update. If you're using PowerPoint for Microsoft 365 for Mac you have the option to let your slides be updated by your team even as you're presenting so that you always have the up-to-the-minute changes.

You can turn this on by going to the Slide Show tab of the ribbon, and checking the box for Keep Slides Updated .  

The slide show tab of the ribbon showing "Keep Slides Updated" selected.

Create a self-running presentation

Record your slide show

Keep slides updated

Facebook

Need more help?

Want more options.

Explore subscription benefits, browse training courses, learn how to secure your device, and more.

keynote presentation mode with notes

Microsoft 365 subscription benefits

keynote presentation mode with notes

Microsoft 365 training

keynote presentation mode with notes

Microsoft security

keynote presentation mode with notes

Accessibility center

Communities help you ask and answer questions, give feedback, and hear from experts with rich knowledge.

keynote presentation mode with notes

Ask the Microsoft Community

keynote presentation mode with notes

Microsoft Tech Community

keynote presentation mode with notes

Windows Insiders

Microsoft 365 Insiders

Was this information helpful?

Thank you for your feedback.

Screen sharing a Keynote presentation

You can share a Keynote presentation to participants with Zoom. You would share a Keynote presentation like any other screen share , but this article covers a few tips for optimizing your experience when sharing with Keynote.

If you have other participants presenting portions of the Keynote, you can give them slide control in Zoom, so that they can control the slideshow on their end, without needing to ask you to move the slides forward.

Tips for sharing a Keynote presentation

keynote presentation mode with notes

  • Select the Slideshow tab 
  • Check the Allow Mission Control, Dashboard and others to use the screen option to allow Zoom full access to the Keynote slides as they advance.
  • If you want to show your mouse at all times, choose Show pointer when using the mouse or trackpad.
  • If you maximize Keynote, the Zoom meeting controls will disappear. Use Keynote in windowed mode to see the controls.
  • If you have dual screen, you can use the X key shortcut when in Presentation mode to swap the display.
  • If you go into full screen mode in macOS, screen share your Desktop, instead of the individual application.

Keynote User Guide for Mac

  • What’s new in Keynote 14.0
  • Intro to Keynote
  • Intro to images, charts and other objects
  • Create a presentation
  • Choose how to navigate your presentation
  • Open or close a presentation
  • Save and name a presentation
  • Find a presentation
  • Print a presentation
  • Undo or redo changes
  • Show or hide sidebars
  • Quick navigation
  • Change the working view
  • Expand and zoom your workspace
  • Customise the Keynote toolbar
  • Change Keynote settings on Mac
  • Touch Bar for Keynote
  • Create a presentation using VoiceOver
  • Add or delete slides
  • Reorder slides
  • Group or ungroup slides
  • Skip or unskip a slide
  • Change the slide size
  • Change a slide background
  • Add a border around a slide
  • Show or hide text placeholders
  • Show or hide slide numbers
  • Apply a slide layout
  • Add and edit slide layouts
  • Change a theme
  • Add an image
  • Add an image gallery
  • Edit an image
  • Add and edit a shape
  • Combine or break apart shapes
  • Draw a shape
  • Save a shape to the shapes library
  • Add and align text inside a shape
  • Add 3D objects
  • Add lines and arrows
  • Animate, share or save drawings
  • Add video and audio
  • Record audio
  • Edit video and audio
  • Add live video
  • Set movie and image formats
  • Position and align objects
  • Use alignment guides
  • Place objects inside a text box or shape
  • Layer, group and lock objects
  • Change object transparency
  • Fill shapes and text boxes with colour or an image
  • Add a border to an object
  • Add a caption or title
  • Add a reflection or shadow
  • Use object styles
  • Resize, rotate and flip objects
  • Move and edit objects using the object list
  • Add linked objects to make your presentation interactive
  • Select text
  • Copy and paste text
  • Use dictation to enter text
  • Use accents and special characters
  • Format a presentation for another language
  • Use phonetic guides
  • Use bidirectional text
  • Use vertical text
  • Change the font or font size
  • Add bold, italic, underline or strikethrough to text
  • Change the colour of text
  • Change text capitalisation
  • Add a shadow or outline to text
  • Intro to paragraph styles
  • Apply a paragraph style
  • Create, rename or delete paragraph styles
  • Update or revert a paragraph style
  • Use a keyboard shortcut to apply a style
  • Adjust character spacing
  • Add drop caps
  • Raise and lower characters and text
  • Format fractions automatically
  • Create and use character styles
  • Format dashes and quotation marks
  • Format Chinese, Japanese or Korean text
  • Set tab stops
  • Format text into columns
  • Adjust line spacing
  • Format lists
  • Add a highlight effect to text
  • Add mathematical equations
  • Add borders and rules (lines) to separate text
  • Add or delete a table
  • Select tables, cells, rows and columns
  • Add or remove rows and columns
  • Move rows and columns
  • Resize rows and columns
  • Merge or unmerge cells
  • Change the look of table text
  • Show, hide or edit a table title
  • Change table gridlines and colours
  • Use table styles
  • Resize, move or lock a table
  • Add and edit cell content
  • Format dates, currency and more
  • Create a custom cell format
  • Highlight cells conditionally
  • Format tables for bidirectional text
  • Alphabetise or sort table data
  • Calculate values using data in table cells
  • Use the Formulas and Functions Help
  • Add or delete a chart
  • Change a chart from one type to another
  • Modify chart data
  • Move, resize and rotate a chart
  • Change the look of data series
  • Add a legend, gridlines and other markings
  • Change the look of chart text and labels
  • Add a chart border and background
  • Use chart styles
  • Animate objects onto and off a slide
  • Animate objects on a slide
  • Change build order and timing
  • Add transitions
  • Present on your Mac
  • Present on a separate display
  • Present on a Mac over the internet
  • Use a remote
  • Make a presentation advance automatically
  • Play a slideshow with multiple presenters
  • Add and view presenter notes
  • Rehearse on your Mac
  • Record presentations
  • Check spelling
  • Look up words
  • Find and replace text
  • Replace text automatically
  • Set author name and comment colour
  • Highlight text
  • Add and print comments
  • Send a presentation
  • Intro to collaboration
  • Invite others to collaborate
  • Collaborate on a shared presentation
  • See the latest activity in a shared presentation
  • Change a shared presentation’s settings
  • Stop sharing a presentation
  • Shared folders and collaboration
  • Use Box to collaborate
  • Create an animated GIF
  • Post your presentation in a blog
  • Use iCloud Drive with Keynote
  • Export to PowerPoint or another file format
  • Reduce the presentation file size
  • Save a large presentation as a package file
  • Restore an earlier version of a presentation
  • Move a presentation
  • Delete a presentation
  • Password-protect a presentation
  • Lock a presentation
  • Create and manage custom themes
  • Transfer files with AirDrop
  • Transfer presentations with Handoff
  • Transfer presentations with the Finder
  • Keyboard shortcuts
  • Keyboard shortcut symbols

keynote presentation mode with notes

Add and view presenter notes in Keynote on Mac

You can add notes to any slide to help you present. If you’re presenting on an external display, you can refer to your presenter notes during your presentation when you set up the presenter display to show presenter notes.

Add and edit notes for a slide

the View menu button

Type notes in the white area below the slide.

the Format radio button

Thumbnails for slides with presenter notes have a small lined square in the top- or bottom-right corner.

View presenter notes while playing your presentation in full-screen mode

To view your presenter notes during your presentation, play your slideshow in full-screen mode on a connected display. Your notes appear only on your screen, so your audience can’t see them. You can also view presenter notes when you rehearse your presentation .

the Display Configuration button

Select the Presenter Notes tickbox then click outside the dialogue to close it.

Do any of the following to change how the presenter notes look:

Change the size of the font: Move the pointer over the Presenter Notes window, then click one of the font buttons to make the font smaller or larger.

Invert the text and background colours: Move the pointer over the Presenter Notes window, then click the Invert Colours button to show white text on a black background or vice versa (other text colours aren’t affected).

To add or edit presenter notes while you play your presentation, move the pointer over the Presenter Notes window, then click Edit.

View presenter notes while playing your presentation in a window

the Presenter Display button

Do any of the following:

Change the size of the text in the presenter notes: Move the pointer over the Notes window, then click a font button in the top-left corner.

Edit the notes: Double-click the notes window, or move the pointer over the Notes window, then click the Edit button.

To close the presenter display and notes, click the red close button in the top-left corner of the Presenter Display, or choose Play > Hide Presenter Display in Window.

To learn more about how to play a presentation in a window, see Present in a window .

You can also print your slides along with your presenter notes.

IMAGES

  1. Keynote 4 for iOS review

    keynote presentation mode with notes

  2. How to customize the presenter display in Keynote

    keynote presentation mode with notes

  3. Keynote

    keynote presentation mode with notes

  4. 35 Best Keynote Presentation Templates (For Mac Users 2021)

    keynote presentation mode with notes

  5. Sample Keynote Presentation

    keynote presentation mode with notes

  6. How to effectively set up your Keynote presentation

    keynote presentation mode with notes

VIDEO

  1. Keynotes: Overview and Keynote Types

  2. Keynote tips: Creating a drag and drop page in Keynote (iPad tutorial 2020)

  3. iPad Note-taking

  4. How to Add Notes in PowerPoint for Mac

  5. The Keynote of the Great Divine Director

  6. How to change your Keynote presentation type to "Links Only"

COMMENTS

  1. Add and view presenter notes in Keynote on Mac

    With the presentation playing in a window, move the pointer to the top part of the slideshow window then click , or choose Play > Show Presenter Display in Window.. Do any of the following: Change the size of the text in the presenter notes: Move the pointer over the Notes window, then click a font button in the top-left corner. Edit the notes: Double-click the notes window, or move the ...

  2. Play a presentation on a separate display in Keynote on Mac

    Keynote positions the items to make optimal use of the presenter display. Change the appearance of presenter notes: With presenter notes showing, move the pointer over the Presenter Notes window, then click a font button in the top-left corner of the window to make the font smaller or larger. Click the Invert Colors button to show white text on ...

  3. Share slides and see notes in Keynote Presenter View/Display with one

    Use your arrow keys or presentation remote to deliver the Keynote presentation. You can see your notes and other information while the attendees only see the slides. When you are done, stop sharing the window. If you end playing the presentation in Keynote before you stop sharing the slide window, it will automatically stop sharing the slides ...

  4. Play a Keynote presentation on Mac

    To advance through the presentation, do any of the following: Go to the next slide or build: Press the Right Arrow key. Go back a slide or reset the builds on the slide: Press the Left Arrow key. Jump to a different slide: Click , then click the slide's thumbnail in the slide navigator. You can also press any number key to make the slide navigator appear, enter the slide number in the text ...

  5. How to Add Presenter Notes in Keynote in 60 Seconds

    Add a presenter by selecting View > Show Presenter Notes. This opens up the Presenter Notes panel as shown below. Type your note into the Presenter Notes panel at the bottom of the slide. Then just type out the note that you want to add to this slide. You can add notes on a slide by slide basis.

  6. How to Add Presenter Notes in Keynote on Mac, iPhone, and iPad

    Follow the steps below: 1. Open Keynote and create your presentation. Select the slide you want to add notes to. When you are ready to add a note to a slide, click the View button in the toolbar. 2. This will open a menu, from the menu items, click Show Presenter Notes. 3.

  7. Keynote

    Outline your presentation. Easier. With outline mode for iPhone and iPad, you can look at your presentation in a whole new way. ... You can view your presenter notes, current and upcoming slides, and slide navigation in a separate window as well. ... Add a Keynote presentation to a shared iCloud Drive folder, and automatically start ...

  8. See presenters notes during keynote live …

    To view your presenter notes during a presentation, you must be showing your presentation on a connected display. The notes appear only on your screen, so only you can see them. Click in the toolbar on your Mac, then click . If you don't see , move the pointer anywhere on the presenter display to make it appear.

  9. How to customize the presenter display in Keynote

    Open your slideshow in Keynote. You can either play your presentation, use the Rehearse Slideshow mode, or jump right into customizing the display. #1 Click the Play button in the toolbar. #2 Click Play in the menu bar and select Play Slideshow or Rehearse Slideshow. #3 Click Play in the menu bar and select Customize Presenter Display.

  10. Use presenter notes, Keynote Help

    Click in the toolbar on your Mac, then click . Select Presenter Notes. Press the Right Arrow key or Space bar to advance through your presentation. See also. Present on a separate display. Rehearse your presentation. Use Keynote Remote. Add presenter notes to your slides You can add notes to any slide to help you present.

  11. Add and view presenter notes in Keynote on Mac

    With the presentation playing in a window, move the pointer to the top part of the slideshow window then click , or choose Play > Show Presenter Display in Window.. Do any of the following: Change the size of the text in the presenter notes: Move the pointer over the Notes window, then click a font button in the top-left corner. Edit the notes: Double-click the notes window or move the pointer ...

  12. How to use Keynote's hidden presentation features to ...

    Open your Keynote presentation on the iPad, press Play to start the slideshow. Then swipe up from the bottom of the screen to show the dock and then choose OmniOutliner from there. Drag it up and ...

  13. How to Use Keynote Presenter Display View in 60 Seconds

    Start by selecting the Play button. Now on my screen right now, you can see the regular presentation. But we actually want to swap this. On my other screen, I'll click the Swap button and now you can see Presenter View. Use the Swap button to see Keynote Presenter View. 2. Open the Presenter View Settings.

  14. Customizing the Presenter Display

    Access the presenter display preview by doing any of the following: Click the Customize Presenter Display button at the bottom of Presenter. Â. Display preferences. Choose Play > Customize Presenter Display. Â. 2. In the Customize Presenter Display window, select the options you want to see in the. presenter display.

  15. Keynote

    Keynote sets the stage for an impressive presentation. A simple, intuitive interface puts important tools front and center, so everyone on your team can easily add beautiful charts, edit photos, and incorporate cinematic effects. And Rehearse Mode lets you practice on the go, with the current or next slide, notes, and clock — all in one view.

  16. How to use Keynote's new Play Slideshow in Window feature with

    In particular, Keynote is tricky. In Zoom, for instance, you have to open the Keynote slide deck and not enter slideshow mode (Play > Play Slideshow).Instead, you switch back to Zoom, use its ...

  17. Hand-writing annotations on Keynote or PDF slides

    1. As an alternative, if you have an iOS device, it can be used as a remote to highlight and mark up slides during presentation. From the Apple Docs: If you're using Keynote Remote to control a presentation from iPhone or iPad, you can draw on your device and have your drawing appear on the device that's playing your presentation.

  18. Start the presentation and see your notes in Presenter view

    Start presenting. On the Slide Show tab, in the Start Slide Show group, select From Beginning. Now, if you are working with PowerPoint on a single monitor and you want to display Presenter view, in Slide Show view, on the control bar at the bottom left, select , and then Show Presenter View.

  19. beamer

    I really like the way Keynote and MS Office (and also OpenOffice & similar) support a presentation mode that displays the current slide, the next (and maybe previous) slide, the elapsed and current time, and also any notes attached to the slides on one screen and the presentation itself on the beamer/second screen.. It enables me to give good, professional presentations without having to know ...

  20. Screen sharing a Keynote presentation

    Notes: If you maximize Keynote, the Zoom meeting controls will disappear. Use Keynote in windowed mode to see the controls. If you have dual screen, you can use the X key shortcut when in Presentation mode to swap the display. If you go into full screen mode in macOS, screen share your Desktop, instead of the individual application.

  21. Play a presentation on a separate display in Keynote on iPad

    To show your presentation on a separate screen, connect your device to an external display, a projector, or Apple TV with AirPlay. The presentation plays on the connected screen, and the presenter display shows on your device. You can set the presenter display to show presenter notes, a timer, or a preview of the next slide.

  22. Add and view presenter notes in Keynote on iPad

    The notes appear only on your device, so only you can see them. You can also view presenter notes when you rehearse your presentation. Tap , then tap . Tap "Current and Notes" or "Next and Notes". Do any of the following to change how the presenter notes look: Change the size of the font: Tap to make the font larger, or to make it smaller.

  23. Add and view presenter notes in Keynote on Mac

    With the presentation playing in a window, move the pointer to the top part of the slideshow window, then click , or choose Play > Show Presenter Display in Window.. Do any of the following: Change the size of the text in the presenter notes: Move the pointer over the Notes window, then click a font button in the top-left corner. Edit the notes: Double-click the notes window, or move the ...