How to screen record on a Mac

It's easy to record your screen activity on Mac

How to screen record on a Mac

  • Quick steps
  • Detailed steps

Final thoughts

● System: macOS Mojave or newer ● Tools: a MacBook or an iMac ● Skill Level: Novice

Knowing how to screen record on a Mac is a skill that will come in handy. That's especially if you use your MacBook or iMac for work presentations or content creation - although its uses extend far beyond work stuff.

Screen recording allows you to capture screen activity for later use, whether it's to save YouTube fitness videos you'd like to watch daily for your workouts, record an epic game session to show off to your friends, or retain a workshop or tutorial for those who couldn't attend. You can even use it to record an issue on your laptop for technical support to pinpoint the problem. 

Despite having a lot of uses, it's surprisingly easy to do, too. In fact, it's so easy even a Mac newbie can do it, and we're here to show you how. You've spent a lot of money on the best MacBook or Mac on the market; learning this trick is one of the many ways you can maximize it.

Quick steps for screen recording on a Mac

  • Press Shift-Command-5
  • Tap either Record Entire Screen or Record Selected Portion
  • If selecting Record Selected Portion , make necessary frame adjustments
  • Press Stop when done recording

Step by step guide for screen recording on a Mac

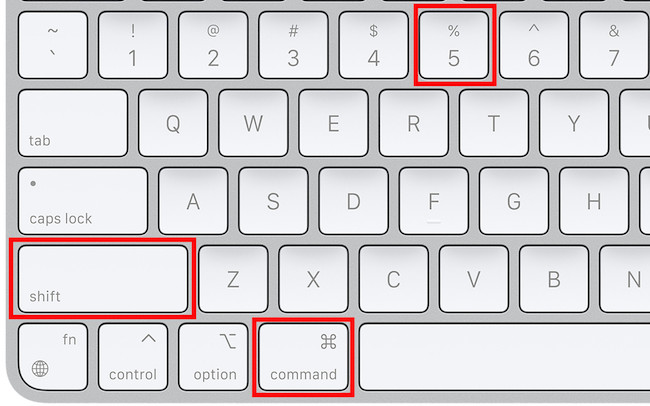
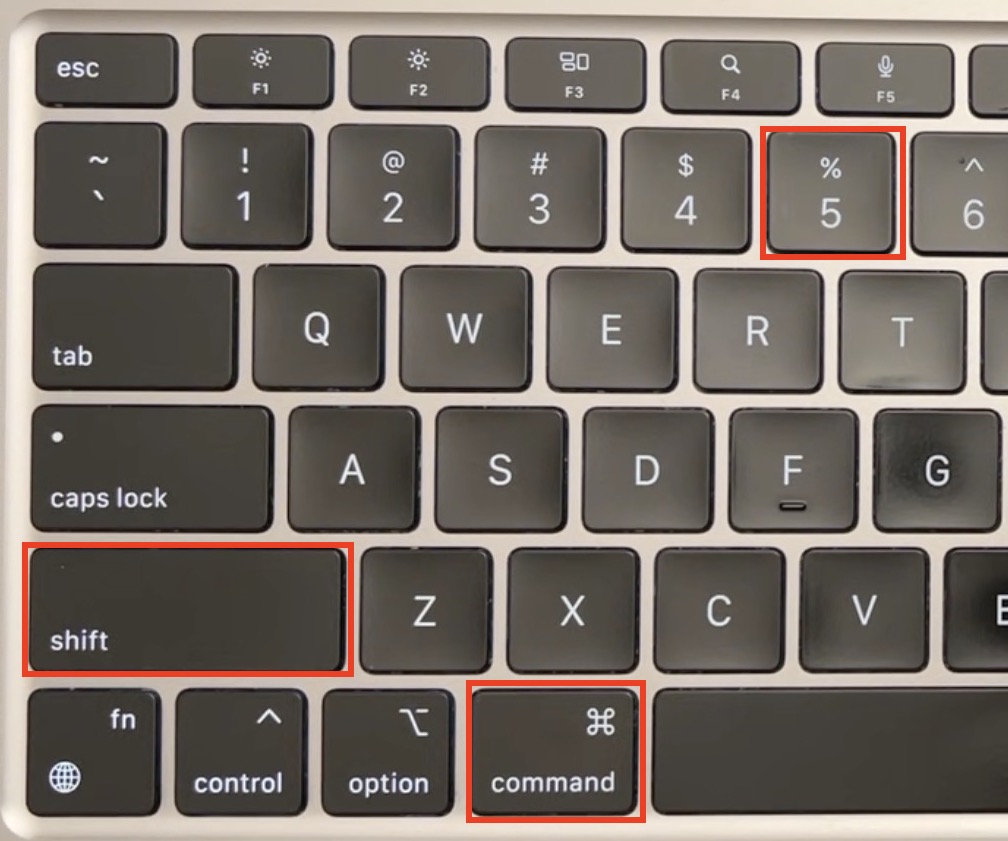
1. press shift-command-5.

How to screen record on a Mac

To get started you need to access the Screenshot toolbar, which not only lets you record your screen activity but also take screenshots. Be sure to prep everything you need for your video beforehand, just to make your video a little cleaner and easier to follow.

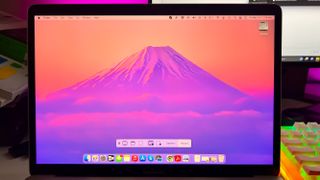
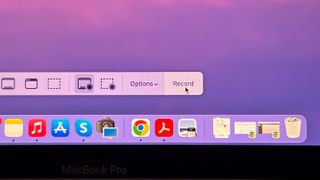
Accessing it is easy. Simply press and hold Shift-Command-5 , and the toolbar should appear near the bottom of your screen just above the Dock. This toolbar is separated into four sections, the first one housing the screenshots buttons and the second containing the screen record buttons.

2. Tap either Record Entire Screen or Record Selected Portion

How to screen record on a Mac

The second section of the Screenshot tool bar will contain two buttons, the Record Entire Screen and the Record Selected Portion options . 

Before you start recording, you should decide whether you want to record your whole screen or just a portion of it, the latter being the wise choice if you don't want the rest of your desktop in full display or if it contains sensitive information you don't want seen in the video.

When you've decided, tap on your choice .

3. Make necessary frame adjustments

How to screen record on a Mac

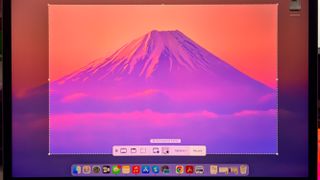
If you've chosen the Record Selected Portion button, an adjustable frame will appear on your screen. This frame will determine the area of the screen that will be captured on video. 

Make necessary frame adjustments by clicking and dragging the edges or corners. 

Note that you're skipping this step if you select the Record Entire Screen option.

4. Hit Record

How to screen record on a Mac

Once you've made the necessary frame adjustment (again, only if you've selected Record Selected Portion ), it's time to record. To do so, simply hit Record on the rightmost side of the Screenshot toolbar.

5. Press Stop when done

When you're done recording, simply hit Stop , which you'll find on the menu bar at the top of the screen. Your recording will automatically be saved as a .mov file on your desktop, but you will be given the chance to preview it and make edits as well.

The built-in Screenshot toolbar on macOS is not only readily available to all Mac users, whether you have a MacBook or an iMac AIO, but it's also incredibly user-friendly and streamlined, which is always the case with Apple proprietary apps. So much so you don't even need to have any prior experience in screen recording or making videos to successfully use it on your first attempt.

Bear in mind that you can also use the QuickTime Player to record your screen on a Mac instead; this is really your only option if you're using a version of macOS that's older than macOS Mojave. However, what you're using is truly out of date at this point, considering that support for Mojave ended in late 2021.

We highly recommend upgrading your macOS to the latest version that's compatible with your Mac model, though if you can't, Apple has a quick tutorial on how to screen record using QuickTime Player as well.

Get daily insight, inspiration and deals in your inbox

Get the hottest deals available in your inbox plus news, reviews, opinion, analysis and more from the TechRadar team.

Michelle Rae Uy

Michelle Rae Uy is the former Computing Reviews and Buying Guides Editor at TechRadar. She's a Los Angeles-based tech, travel and lifestyle writer covering a wide range of topics, from computing to the latest in green commutes to the best hiking trails. She's an ambivert who enjoys communing with nature and traveling for months at a time just as much as watching movies and playing sim games at home. That also means that she has a lot more avenues to explore in terms of understanding how tech can improve the different aspects of our lives. 

Apple could be playing it smart by waiting for its M4 chips before releasing a new Mac mini

Apple's M4 plans could make the latest MacBooks outdated already

This Game Boy-styled MagSafe stand just tickled my retro-gaming synapse – now all I need is a matching controller for Nintendo emulators

Most Popular

  • 2 New Deadpool and Wolverine trailer is packed with Marvel Easter eggs – here are 6 of the best
  • 3 Sony’s wearable air conditioner is the first step towards a real Dune stillsuit
  • 4 Samsung's S90C OLED is our best-rated TV, and it just crashed to a new record-low price
  • 5 This Android phone for audiophiles offers a hi-res DAC, balanced output and 3.5mm jack – plus a cool cyberpunk look that puts Google and OnePlus to shame
  • 2 Sony dropped OLED for its flagship 2024 TV – here's why
  • 3 Today's Wordle answer is the hardest this year, with an average score of 5.4, and 'Wordle 1037 X' is trending on Twitter – here's why it's so tough and what to do in future
  • 4 Missed out on the Fujifilm X100VI? New leak suggests the next best thing could land soon
  • 5 New Deadpool and Wolverine trailer is packed with Marvel Easter eggs – here are 6 of the best

how to screen record presentation on mac

3 ways to record your screen on a Mac computer

  • To screen record on Mac, use the Screenshot Toolbar or QuickTime Player.
  • Both built-in apps allow you to turn on your Mac's internal microphone to add narration.
  • You can also third-party screen recording apps like Apowersoft Screen Recorder, Snagit, and Loom.

Say you want to capture something on your Mac screen — but a screenshot just won't do it.

That's when screen recordings come in handy. You can record a video of your Mac's screen using either the Screenshot Toolbar tool, or the QuickTime Player app, both of which come pre-installed on your Mac.

How to screen record on a Mac using the Screenshot Toolbar

Again, remember that this method is only available if you're running macOS Mojave or newer. If you're not sure what version of macOS you have, read our article on how to check your macOS version and install any needed updates .

Once you're ready to record:

1. Press Command + Shift + 5 on your keyboard to open the Screenshot Toolbar.

A toolbar with a number of icons and options will appear at the bottom of the screen. You're looking for the icons that have the record symbol (a solid circle) over them. One will record a video of your entire screen, and the other will let you select a specific section of the screen to record.

2. Pick which recording type you want — and if you picked Record Selected Portion , highlight the part of your screen that you want to film — and then click Record . If you want to cancel a screen recording before it begins, press the Esc key.

3. Your screen recording will start immediately, and capture everything on your screen (or in the selected section) and any audio playing. When you're done, click the stop button in the menu bar on the top of the screen.

By default, your screen recordings will be saved to the desktop as .mov files. You can change this by opening the Screenshot Toolbar and clicking Options — see below for more details.

How to screen record on a Mac using QuickTime Player

This is the method you'll want to use if you're running an older version of macOS. If you go through these steps while running macOS Mojave or newer, it'll just lead you back to the Screenshot Toolbar.

1. Open the QuickTime Player app on your Mac. You can find it in your Applications folder, or by searching for it.

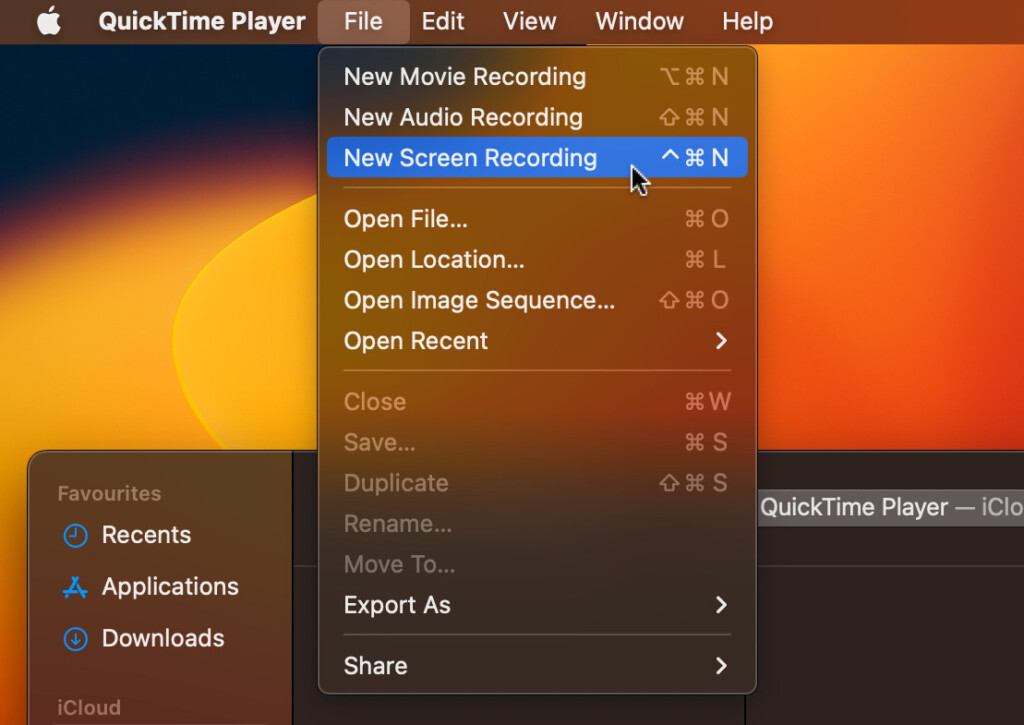
2. Click File in the menu bar at the top of your screen.

3. Click New Screen Recording and wait for a dark gray recording window to appear.

Select the "New Screen Recording" option. Devon Delfino/Insider

4. Click the red record button, then click anywhere on the screen to start a fullscreen recording, or drag your mouse to record only a specific section.

How to record audio in screen recordings

When you're recording your screen using QuickTime, you can also choose to record sounds, such as your own voice for narration. 

1. Open the QuickTime Player app on your Mac.

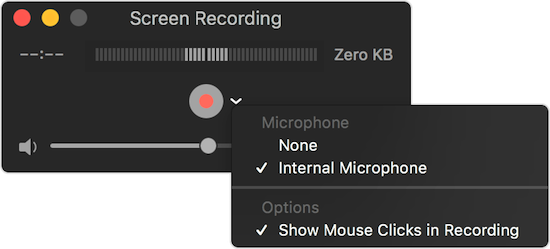
4. Click the down arrow next to the red record button to expand the dropdown. Then, click on Internal Microphone under "Microphone."

QuickTime will give you less options, but still lets you narrate the recording. Apple

Once you stop recording, your new video will open in QuickTime automatically. From here, you can watch, edit, and share it.

How to screen record with third-party apps

The beauty of recording your screen on a Mac is that you're not stuck with the built-in tools. There are plenty of third-party options you can use to capture your screen and even add narration.

Apowersoft Screen Recorder

Apowersoft Screen Recorder is free and easy to use. It's a browser-based app, meaning you have access to unlimited screen recording without having to download anything. 

Apowersoft Screen Recorder has flexible controls, allowing you to pause and resume recording easily, schedule your screen recordings, and select specific portions of your screen that you wish to capture.

If you're going to make an instructional video, then Snagit is the best choice. On top of allowing you to capture everything to your screen, it allows you to add visuals during editing to make your videos more interesting. 

It also has templates that help simplify the video creation process, allowing you to record tutorials, presentations, seminars, and other types of helpful videos in minutes.

Furthermore, Snagit allows you to instantly share your video to several platforms, such as Google Drive, Dropbox, Slack, and email, for easier feedback and collaboration. It's not free though, and you'll have to pay $62.99 to start (a free trial is available).

Loom allows you to capture both video and audio using its desktop app or Chrome extension. 

Once you capture the video, you can store it in Loom's native cloud storage so it doesn't take up space on your Mac , create a link, and share it with others right from your dashboard. And you can trim away any unnecessary segments to make the video focused, concise, and professional.

You can use Loom for free, but you'll be limited to recording five-minute videos. You can record for an unlimited amount of time starting from $8.00 per month with the Business plan.

how to screen record presentation on mac

  • Main content

How to Screen Record on Mac: A Step-by-Step Guide

Screen recording on a Mac is super easy, and you don’t need any fancy software to do it. The Mac’s built-in tool, QuickTime Player, lets you capture everything on your screen with just a few clicks. Whether you’re making a tutorial, recording a video call, or capturing gameplay, QuickTime Player has got you covered.

Step by Step Tutorial: How to Screen Record on Mac

Before we dive into the steps, it’s important to know that screen recording on Mac can help you create video tutorials, presentations, or even record a problem to get tech support. Let’s get started!

Step 1: Open QuickTime Player

Launch QuickTime Player from your Applications folder or use Spotlight search to find it.

QuickTime Player is the default media player on Mac, but it also has some hidden features like screen recording. Once you open the application, you’ll be ready to start the recording process.

Step 2: Select ‘New Screen Recording’

From the QuickTime Player menu bar, choose ‘File’ and then select ‘New Screen Recording’.

When you click on ‘New Screen Recording’, a recording control panel will appear on your screen. This panel allows you to choose whether to record the entire screen or just a portion of it.

Step 3: Choose Recording Options

Before starting the recording, click the arrow next to the record button to choose your microphone and other recording options.

In the recording options, you can decide whether or not to record audio with your screen recording. You can also choose to show mouse clicks in the recording to make it easier to follow along.

Step 4: Start Recording

Click the record button to start capturing your screen. You can click anywhere to record the whole screen or drag to select a specific area.

Once you’ve started recording, a stop button will appear in the menu bar at the top of your screen. You can use this to end the recording when you’re done.

Step 5: Stop and Save the Recording

Click the stop button in the menu bar or press Command-Control-Esc (Escape) to end the recording. Then, save the file to your desired location.

After stopping the recording, QuickTime Player automatically opens the recorded video. You can then playback to review your recording, edit it, or share it with others.

After you’ve completed these steps, you’ll have a screen recording of whatever was displayed on your Mac. You can use this file to showcase a process, create a tutorial, or save a memorable moment.

Tips for Screen Recording on Mac

  • Tip 1: Use a good quality microphone if you’re recording audio to ensure clear sound.
  • Tip 2: Close any unnecessary applications to avoid notifications popping up during the recording.
  • Tip 3: Use the editing tools in QuickTime Player to trim the start or end of your recording.
  • Tip 4: If you’re recording a how-to video, practice the steps beforehand to make the recording smooth.
  • Tip 5: Remember to get permission if you’re recording a conversation or video call with others.

Frequently Asked Questions

Can i record audio from my computer during a screen recording.

Yes, you can record audio from your computer by selecting the appropriate option in the recording control panel before you start recording.

How can I record the screen on my Mac with sound?

To record the screen with sound, choose the microphone option in the recording control panel, and make sure your computer’s volume is turned up.

Is it possible to record a specific section of my screen?

Absolutely! Just click and drag over the area you want to record after clicking the record button.

Can I pause a screen recording?

Currently, Mac does not offer a pause feature during screen recording. You need to stop and then start a new recording.

Will the screen recording capture my mouse clicks?

Yes, if you choose the option to show mouse clicks in the recording options, your clicks will be highlighted in the recording.

  • Open QuickTime Player
  • Select ‘New Screen Recording’
  • Choose Recording Options
  • Start Recording
  • Stop and Save the Recording

Screen recording on Mac is a breeze once you know the steps. It’s an incredibly useful feature whether you’re a professional creating tutorials or a student wanting to record a lecture. The simplicity of the built-in QuickTime Player means you don’t need to download additional software, and the range of options allows for versatility in your recordings. Always remember to respect privacy and copyright laws when recording content that isn’t yours. Happy recording, and don’t hesitate to explore the other creative possibilities your Mac offers!

Matthew Burleigh Solve Your Tech

Matthew Burleigh has been writing tech tutorials since 2008. His writing has appeared on dozens of different websites and been read over 50 million times.

After receiving his Bachelor’s and Master’s degrees in Computer Science he spent several years working in IT management for small businesses. However, he now works full time writing content online and creating websites.

His main writing topics include iPhones, Microsoft Office, Google Apps, Android, and Photoshop, but he has also written about many other tech topics as well.

Read his full bio here.

Share this:

Join our free newsletter.

Featured guides and deals

You may opt out at any time. Read our Privacy Policy

Related posts:

  • How to Screen Record on iPhone in 2023 – A Comprehensive Guide
  • How to Get Sound on iPhone Screen Recordings (2023 Guide)
  • How to Record Your Screen on iPhone 15
  • How to Screen Record on iPhone 11: A Step-by-Step Guide
  • How to Screen Record on iPhone 13
  • iOS 17 – How Do I Get the Screen Recording Button on My iPhone?
  • How to Record a Video Of Your iPhone 14 Screen
  • Where is Screen Record on iPhone 15? A Step-by-Step Guide
  • iPhone 15 – How to Capture a Video Of Your Screen
  • How to Turn On Screen Recording on iPhone 13: A Step-by-Step Guide
  • How to Share a Screen Recording on iPhone 13: A Step-by-Step Guide
  • How to Do a Screen Recording on iPhone 14: A Step-by-Step Guide
  • iOS 17: How to Screen Record on iPhone – A Step-by-Step Guide
  • How to Take a Video of Your Screen on iPhone 12: Step-by-Step Guide
  • What Does Screen Recording Mean on iPhone 15? A Complete Guide
  • How Big Are Screen Recordings on the iPhone?: A Comprehensive Guide
  • How to Record a Video on the iPad 2
  • How to Screen Record on iPad 6th Gen (An Easy 4 Step Guide)
  • How to Screen Record on iPhone 14: A Step-by-Step Guide
  • How to Make All Columns the Same Width in Excel 2013

How-To Geek

How to screen record on your mac.

Recording your screen on Mac is easier than ever.

Quick Links

Open the screenshot utility on mac, set your screen recording options, record your screen.

Screen recording on Mac was vastly improved with macOS Mojave (first introduced in 2018). With nothing but a built-in application, you can capture sound, mouse clicks, portions of your screen, and more. Here's how to screen record on your Mac.

You can use the same tool to screen record that you do to take screenshots . Open up the Screenshot app using one of these methods:

  • Press Command+Shift+5.
  • Use Spotlight (Command+Space), search for "Screenshot," and choose the app from the results.
  • Open the Applications folder using Finder and then click Go > Utilities from the menu bar at the top of your screen and select "Screenshot."

When you open Screenshot, you'll see a toolbar at the bottom of your screen. The three options on the left of the toolbar are for screenshots, so you'll start with the middle two for recordings.

One option is for recording your whole screen. Click "Record Entire Screen" to do this.

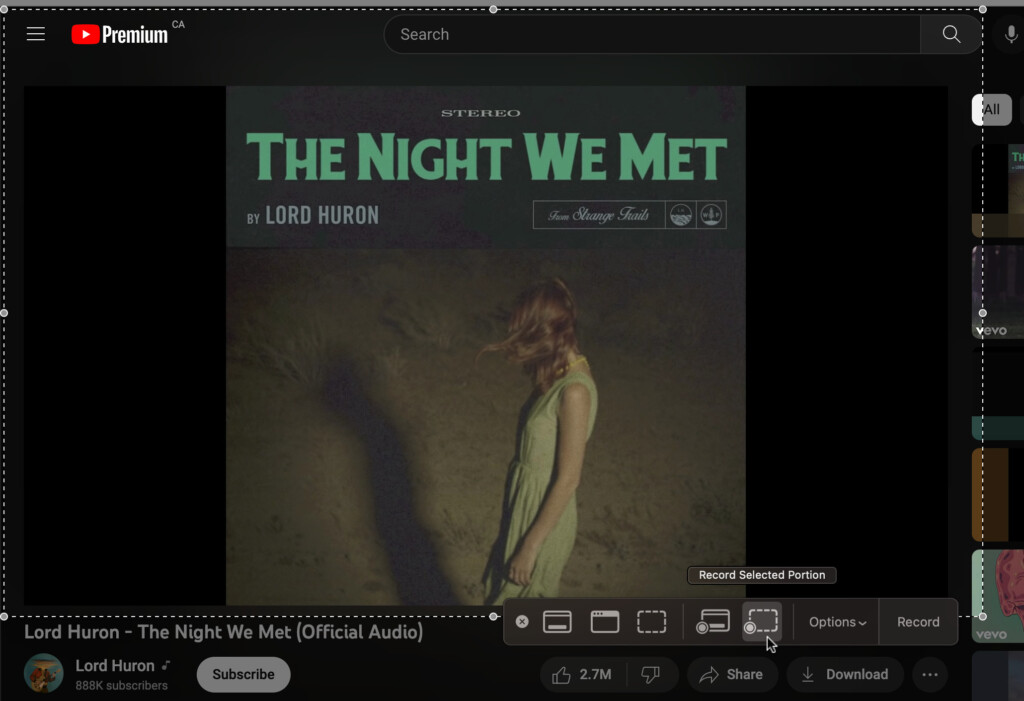
The other option is for selecting just a portion of it. If you only want to capture part of your screen, click "Record Selected Portion." Then, drag the dotted shape where you want it to go and resize it by dragging an edge or a corner.

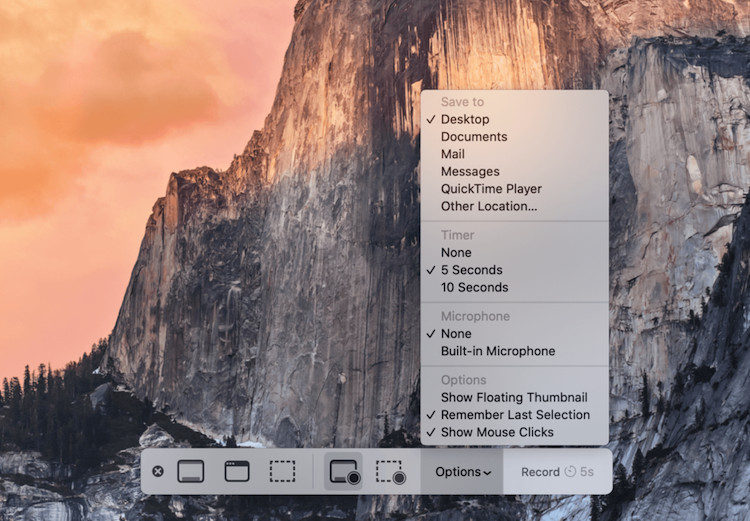
Before you start recording, click "Options." At the top of the list, you can pick a spot to save your recording. Then, you can get into some handy recording features.

When you need a few moments to prepare what's on your screen for the recording, use the Timer. You can pick 5 or 10 seconds from the time you hit Record until the recording begins.

If you want to include audio with your recording, select "Built-in Microphone." This is ideal for explaining what you're recording.

The "Show Floating Thumbnail" option is useful if you'll be demonstrating how to take a screenshot. As you know, a thumbnail appears in the corner of your screen by default.

Need to show the steps that you're taking on the screen? Use the "Show Mouse Clicks" option. When you enable this, each click of your mouse displays as a circle. That way, your audience can see the steps in a sequence, or even in a single, helpful click.

If you change your mind about recording your screen, you can simply close the Screenshot app. Either click the "X" on the left of the toolbar or press your Escape key.

Once you have your options set, it's time to record. Hit the "Record" button in the Screenshot toolbar. If you turned on the timer, you'll see how much time you have left to get ready on the Record button.

A small Stop button will appear in your menu bar as you capture your screen. Click that button to stop recording.

Then head to the location that you chose to save the recording in to view the video. You can then open the recording using the built-in Preview program your favorite video editing application.

If you've got an iPhone, it's a cinch to record your iPhone screen too.

Related: How to Open Finder with a Keyboard Shortcut on Mac

How to Screen Record on a Mac

You don't even need third-party screen recording tools unless you want more options.

Quick Links

How to screen record on a mac using the screenshot utility, how to screen record on a mac using quicktime player, how to screen record on a mac with obs, key takeaways.

  • The built-in Screenshot utility makes it easy to start or stop a screen recording on your Mac with keyboard shortcuts.
  • QuickTime Player is a great alternative if your Mac is running macOS High Sierra or older.
  • A third-party app like OBS Studio can offer more control and customization options for recording your Mac's screen.

You may want to record your Mac's screen to make a screencast tutorial, capture gameplay footage or video calls, create a business presentation, and more. Whatever your reason, we'll teach you how to screen record on a Mac.

You may be tempted to install third-party screen recorders on your Mac, but the easiest way to record your Mac's screen is by using the built-in Screenshot utility. This tool lets you capture screen recordings and screenshots with simple keyboard shortcuts.

Press Command + Shift + 5 on your keyboard to open the Screenshot utility. At the bottom of the window that appears, you'll see two options for screen recording: Record Entire Screen and Record Selected Portion .

If you choose Record Entire Screen , a camera icon will appear as your mouse cursor. This is handy if you use more than one monitor. Just move the camera to the screen you want to record and click for the recording to begin.

If you choose Record Selected Portion , drag the corners of the box you see to adjust the frame size. You can also move the box to a different area on your screen.

Clicking Options allows you to select various options for your Mac screen recording. This includes choosing your desired microphone, the location to save your recording, and whether you want to record mouse clicks. Once you're ready, hit the Record button to start the recording.

Once you're done recording your Mac's screen, you may be unsure how to stop it, as the Screenshot utility window won't be visible anymore. Instead, you'll see a small Stop icon in the macOS menu bar. Click on it to stop the screen recording on your Mac.

You can also hit Command + Control + Esc to stop recording your Mac's screen quickly. Alternatively, you can press Command + Shift + 5 to bring up the Screenshot utility window again, where you'll find the option to stop recording.

Can You Screen Record a FaceTime Call on Your Mac?

You may be wondering if you can screen record a FaceTime call. While Apple doesn't offer a native option in the FaceTime app itself, you can use the Screenshot utility to record video calls too.

It's important to note that the other person (or participants) on FaceTime won't be notified that you're recording the video call, so be sure to let them know.

An alternative method to record your Mac's screen is to use QuickTime Player. QuickTime Player uses the same Screenshot utility we described above, but the difference is that you control everything directly from the QuickTime Player app instead. This may be useful for old Macs running macOS High Sierra or earlier versions.

To record using the QuickTime Player, open the app, then select File > New Screen Recording from the menu bar.

This launches an overlay, allowing you to select various options to record your screen. You can choose to either Record Entire Screen or Record Selected Portion , similar to the Screenshot utility.

Once everything's set up, start recording by clicking the Record button. And when you're done, click the Stop icon in the macOS menu bar to end the screen recording session.

The recorded video will open immediately. You can choose to edit it as required (using Trim or Rotate tools). Once you're done, simply click File > Save from the menu bar or hit Command + S on your keyboard to save the video to your desired location.

While both methods let you record audio from your Mac's microphone, you can't record the system audio. A workaround is to install a free audio driver on your Mac to record system audio during screen recordings . However, if your screen recordings still don't have any audio, check out our troubleshooting guide to fix audio issues with your Mac screen recordings .

With the above two options, there's little reason to seek a third-party app for recording your Mac's screen unless you want more features. If you're unsatisfied with the built-in options, though, OBS Studio is our favorite third-party freeware to record your Mac's screen and audio easily.

The consensus among both casual and hardcore users is that there's no free screen recording utility as good as OBS Studio. The app offers features that allow you to customize every aspect of your screen recording. You can also use OBS Studio to stream directly to multiple platforms, including YouTube, Facebook, Twitch, and more.

Download: OBS Studio (Free)

As you can see, starting or stopping a screen recording on your Mac is pretty easy, especially if you're familiar with the useful macOS keyboard shortcuts . You have multiple built-in tools to record your screen on a Mac easily, but if you want advanced options, an open-source program like OBS can do the job. Hopefully, one of these methods is exactly what you need to record your Mac's screen.

Geek Dashboard Home

How to Record a Screen on Mac: The Ultimate Guide

Are you looking to create a tutorial, record a presentation, or capture a gaming session on your Mac computer? If so, this thorough guide will instruct you on how to screen record on a Mac . Whether you have a MacBook or an iMac, this guide has you covered.

In this Page

Update Your Software

Check your audio settings, free up disk space, 1. screenshot toolbar, 2. quicktime player, 1. movavi screen recorder, 2. obs studio, 3. screenflick, 4. cleanshot x, 1. screenapp.io, 2. screencapture.com, 3. screencastify, basic requirements for screen record on mac with audio.

Before you start the screen recording process, it’s crucial to ensure that your device meets some basic requirements. This will provide the best quality recording and ensure the process runs smoothly.

Make sure that your Mac’s operating system is up-to-date. Apple frequently releases software updates that can enhance the performance and functionality of your device, including its screen recording capabilities. To update your software, navigate to the Apple menu, select ‘ System Settings… ‘, and then click on ‘ General ‘ and go to ‘ Software Update ‘.

Since you’re going to record the screen with sound, it’s important to check your audio settings. Go to ‘ System Settings… ‘, then ‘ Sound ‘, and ensure that your input and output settings are properly configured. If you’re recording your own voice, test your microphone to make sure it’s working properly.

Screen recordings can take up a considerable amount of disk space on your Mac, especially if they’re long or high-quality. Therefore, before you start recording, make sure that you have enough free disk space . To check your available disk space, click the Apple menu, select ‘ System Settings… ‘, and then click on ‘ General ‘ and go to ‘ Storage ‘.

Using Built-In Screen Recording Tools on MacBook and iMac

Your MacBook or iMac comes with built-in tools that allow you to screen record with audio. These tools are simple to use and don’t require any additional software downloads.

The Screenshot Toolbar is a nifty tool built into macOS Mojave and later versions. It allows you to capture screenshots and screen recordings effortlessly. To access it, press Command + Shift + 5 on your keyboard. A toolbar will appear at the bottom of your screen with various options for screen capture.

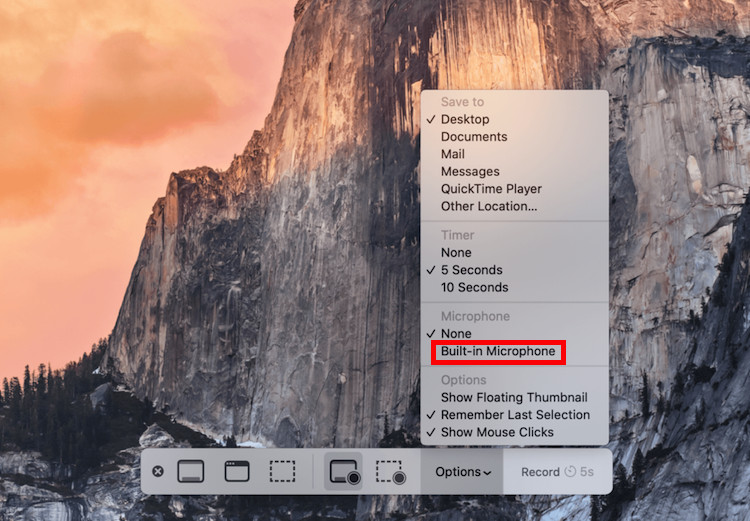
You can choose to record the entire screen, a selected window, or a specific portion of the screen. To record with audio, click ‘ Options ‘ and select ‘ Built-in Microphone ‘.

Screenshot Toolbar

When you’re done, click the ‘ Stop ‘ button in the menu bar to end the recording. Your screen recording will be saved automatically to the location specified in the Screenshot Toolbar options.

If your Mac runs on an OS version older than Mojave, you can use QuickTime Player for screen recording. Open QuickTime Player from your Applications folder and select ‘ File ‘ > ‘ New Screen Recording ‘ from the menu bar.

QuickTime Player - New Screen Recording

You’ll see a Screen Recording window. Click the drop-down arrow next to the record button to select your microphone for audio recording. Click ‘ Record ‘ to start and ‘ Stop ‘ when you’re done. QuickTime Player will automatically save your recording.

Using Third-Party Desktop Screen Recorders for Mac

While the built-in tools on your Mac are sufficient for basic screen recording, you might need more advanced features for professional or complex recordings. In this case, consider using a third-party Mac screen recorder.

Movavi Screen Recorder is straightforward to use, making it an excellent option for beginners that need to create explainer videos, capture webinars, video calls, and more. You can take screenshots, record different dimensions, add shapes, draw on the screen, and trim finished recordings. Additionally, the software allows you to schedule recording sessions in advance and supports direct export to YouTube and other platforms.

Movavi Screen Recorder

OBS Studio is a popular, free, and open-source screen recording software that offers a lot of flexibility and customization options. With OBS Studio, you can record your entire screen, a selected window, or a specific area of your screen. You can also add multiple audio inputs, making it a great option for recording a conversation or interview. It also supports a streaming module, so you can record and share the screen at the same time.

OBS Studio

ScreenFlick is a powerful screen recording software for Mac. It offers a wide range of features, including high-quality screen recording, audio capture, and a built-in movie editor. ScreenFlick can record your entire screen or a specific area, and it allows you to choose the frame rate of your recording. You can also draw on your screen while recording and choose video quality up to 60fps.

ScreenFlick

CleanShot X is another powerful screen recording software that’s designed specifically for Mac. Although it’s paid software, it offers a wide range of features that justify its price. With CleanShot X, you can record your screen with audio, edit your recordings, add annotations and effects, and even record from your iOS device. This tool supports Cloud storage , so you can keep all of your recordings in one place.

CleanShot X

Using Online Screen Recording Apps

If you’d prefer not to download any software to your Mac, you can use online screen recording tools. These web-based apps allow you to record your screen directly from your web browser.

Screenapp.io is a simple, user-friendly online tool for screen recording. It doesn’t require any downloads or installations – all you need is a web browser. Screenapp.io allows you to choose between recording your entire screen, a specific application window, or a browser tab. It also has a GPT plugin installed, which allows you to make notes and summaries automatically.

Screenapp.io

Screen Capture is an online screen recording tool that offers a range of features. It allows you to record your entire screen or a specific area, and it also offers webcam recording. Moreover, Screen Capture provides a Chrome extension, giving you access to screen recording within one click.

ScreenCapture.com

Screencastify is a screen recording extension for Google Chrome. It’s a versatile tool that can record your entire screen, a single tab, or a webcam. Additionally, Screencastify offers editing tools, that allow you to trim, crop, and annotate your screen recordings. Plus, it lets you share videos on any channel and keep track of viewing activity and comments.

Screencastify

Learning how to screen record on Mac with audio can significantly enhance your presentations, tutorials, or gaming sessions. Whether you choose to use the built-in tools on your MacBook or iMac or opt for a third-party app, this guide has provided you with the necessary steps to successfully record your screen with audio.

Remember to prepare your Mac properly before recording and pick the tool that best fits your needs. Happy recording!

Be the Change!

Spread the word and help us create better tech content

Avatar for Amar Ilindra

Amar Ilindra

Amar Ilindra is a tech-savvy individual who is passionate about gadgets and new technology. He is a full-stack developer who enjoys experimenting with technology and sharing his experiences through blogging. When he's not writing, he devotes his time to creating practical web and mobile applications for both Android and iOS platforms.

Leave a Reply Cancel reply

The comments section is to assist our readers with any inquiries. Each comment undergoes rigorous moderation before it can be approved for publication. Your name and comment will be publicly visible. Your email address will not be published. Required fields are marked *

Save my details (Name, Email, and Website) in browser and automatically add them when I visit next time.

By commenting on ths website, you agree to our Privacy Policy and Terms and Conditions *

  • Editorial Process
  • Why Trust Us?
  • Affiliate Linking Policy
  • Privacy Policy
  • Terms of Service

Weekly Must-Reads View All

7 things to do if you spilled water on your macbook.

Quick steps to save your MacBook from water damage

How to Boot Your Mac Into Verbose Mode: 4 Best Ways

Boot your Mac into Verbose Mode with this step-by-step guide

How to Fix Your Mac Shutting Down Randomly: 16 Fixes to Try

Troubleshoot random shutdowns on Mac with effective solutions

How Much Space Does macOS Take On Your Mac?

Understand macOS size and analyze your Mac's storage usage

Popular Topics

  • What to Do With Your Old MacBook? 13 Useful Ways to Reuse an Old Mac
  • What Is the MacBook Flexgate Issue and How to Fix It
  • What Is the MacBook Flexgate Issue
  • Uninstall Java
  • Safely Transfer Files from Mac to Mac
  • Safari Bookmarks Disappeared on Mac: 10 Best Ways to Restore Them
  • Repairing disk permissions
  • Old MacBook

Trending Now View All

7 Things to Do If You Spilled Water on Your MacBook Featured Image

  • Mac Tips and Tricks

How to Record a Video on Your Mac: 5 Best Ways

' src=

Hashir Ibrahim

' src=

Reviewed by

Last updated: January 31, 2024

Expert verified

To record a video on your Mac, you can use simple hotkeys and built-in apps like QuickTime Player, Photo Booth, and iMovie. You can also use third-party apps, like OBS Studio, Camtasia, and ScreenFlow if you want advanced recording features.

  • Press Command ⌘ + Shift ⇧ + 5 to access the screenshot toolbar to record the entire screen or a selected portion.
  • Popular conferencing apps like Zoom, Skype, and Microsoft Teams have built-in recording features.
  • After recording on a Mac, use the built-in editor to trim videos. Press Command ⌘ + Shift ⇧ + 5 for settings like location, timer, and audio.

Ever thought about capturing your Mac screen like a pro? Whether you’re crafting a tutorial, seizing a fleeting moment, or showcasing your latest project, your Mac can help you capture it.

Discover the top methods to record a video on your Mac, each tailored to ensure crisp, high-quality results. No more sifting through endless apps or grappling with settings. Ready to elevate your recording game? Let’s roll!

How to Record a Video on Your Mac

Now that you know the “why” of recording videos on a Mac, it’s time to explore the “how.” Whether you’re seeking built-in solutions or third-party applications, the following section will guide you through the most efficient and user-friendly methods to record a video on your Mac. Let’s dive in.

1. With Hotkeys

One of the simplest and most direct methods to record a video on your Mac is by using hotkeys. These Mac keyboard shortcuts are not only quick but also eliminate the need for any external software.

Here’s how you can use hotkeys for video recording on Mac:

This method works on macOS Mojave or later.

  • Press Command ⌘ + Shift ⇧ + 5 to bring up the screenshot toolbar.

macbook pro command shift 5

  • This toolbar offers options for recording the entire screen or a selected portion.
  • Click Record Entire Screen or Record Selected Portion and select the portion of the screen you’d like to record.

click record entire screen or record selected portion

  • After making your choice, click the Record button to start.

click the record button on the screenshot toolbar

  • Click the Stop button in the menu bar when you want to stop recording.

click the stop button in the menu bar

  • To save the recording, right-click the recorded file in the bottom right corner of your screen and select Save to Desktop or Save to Documents .

right click the recorded video icon and choose a relevant action from the context menu

Using hotkeys is all about muscle memory. The more you use them, the more intuitive and efficient your recording process will become!

2. Using Photo Booth

Photo Booth is a pre-installed app on Mac that’s primarily known for taking selfies and applying fun effects. However, it’s also a handy tool for recording videos. While it might not offer the advanced features of dedicated screen recording software, it’s perfect for quick video captures using your Mac’s built-in camera.

Here’s how to use Photo Booth to record a video on your Mac:

  • Navigate to your Applications folder and open Photo Booth .

double click the photo booth app to launch it

  • Once inside, you’ll notice three icons next to the red capture button. Click the video mode icon to switch from photo to video.

click the video icon in photo booth

  • With video mode activated, press the red button to start recording.

click the record button in photo booth

  • Your Mac’s camera will capture everything in its view.
  • To end the recording, click the red button again.

click the stop button to stop recording the video

  • Your video will automatically be saved to the Photo Booth library, and you can also export it to your desired location.

3. Via QuickTime Player

QuickTime Player, Apple’s default multimedia player, is more than just a tool for watching videos. It comes with a straightforward and efficient screen recording feature, making it a go-to for many Mac users.

Here’s how to use QuickTime Player to record a video on your Mac:

  • Launch QuickTime Player via the Launchpad.

open quicktime on your mac

  • In the menu bar, click File and select New Screen Recording .

click file and select new screen recording

  • The screenshot toolbar will appear at the bottom of your screen.
  • Before you start recording, you can opt to record the entire screen or drag to select a specific area.
  • If you wish to include audio, click the arrow next to the Options button and choose the appropriate microphone source.

click options and choose correct microphone source

  • Once you’ve made your selections, click the Record button.
  • To stop the recording, click the Stop icon in the menu bar.
  • After recording, QuickTime will automatically open the video. You can save, edit, or share it as needed.

4. Using iMovie

iMovie, Apple’s free video editing software, is renowned for its user-friendly interface and powerful editing tools. While primarily designed for video editing, it also allows you to record videos directly using the built-in camera.

Here’s how to use iMovie to record a video on your Mac:

  • Open iMovie from the Launchpad.

open imovie on your mac

  • Click Create New .

click create new in imovie

  • Select Movie from the dropdown.

click create new and select movie

  • In the workspace, click Import Media .

click import media in imovie

  • Select FaceTime HD Camera in the left sidebar and click the red record button.

select facetime hd camera in the left sidebar and click the red record button

  • iMovie will capture video using your Mac’s built-in camera.
  • Click the record button again to stop. The recorded clip will appear in the media library, and you can drag it to the timeline for editing or exporting.

5. Via Third-Party Apps

While Mac’s built-in tools are efficient, sometimes you might need advanced features or a different user experience. This is where third-party apps come into play. These applications often offer enhanced functionalities like annotations, webcam overlay, and more.

Here are some of my top picks for video recording apps on Mac:

  • OBS Studio : A free and open-source software, OBS Studio is perfect for screen recording and live streaming. With its customizable scenes and sources, you can capture multiple windows, add overlays, and even integrate with streaming platforms.
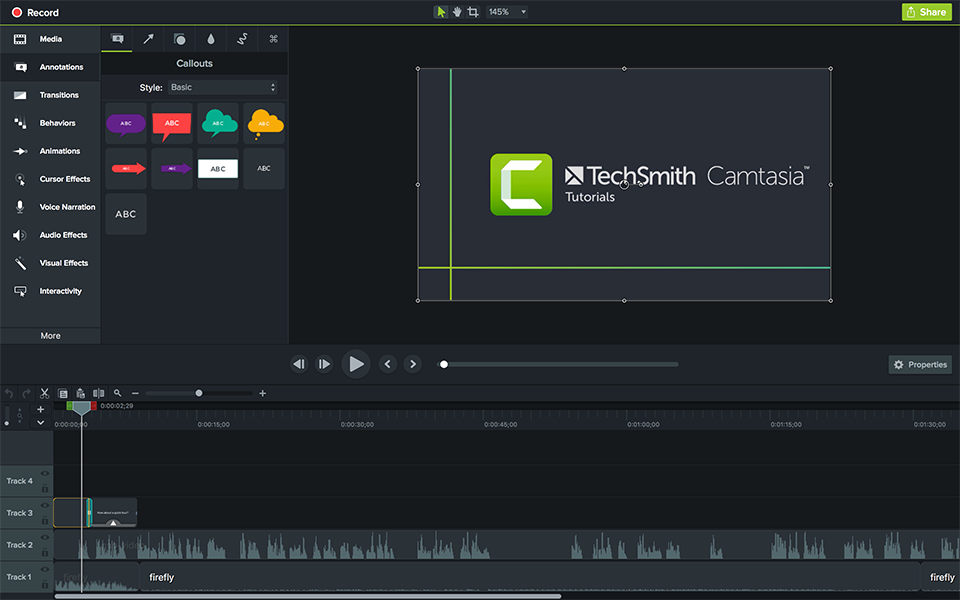
  • Camtasia : A professional-grade software, Camtasia offers a comprehensive suite of tools for screen recording and video editing. Its drag-and-drop editor, annotations, and effects make it a favorite for many.
  • ScreenFlow : Tailored for Mac users, ScreenFlow boasts a sleek interface and powerful features. It’s especially known for its high-quality recordings and intuitive editing tools.
  • Snagit : Beyond just screen recording, Snagit offers tools for capturing screenshots, creating GIFs, and annotating recordings, making it versatile for various tasks.
  • CleanShot X : CleanShot X is a modern screen-capturing tool for Mac that offers a clutter-free recording experience. With features like scrolling capture, annotation tools, and cloud storage integration, it’s a powerful yet streamlined choice for those who value efficiency and aesthetics.

To use any third-party app, you’ll need to download and install it from the respective website or the Mac App Store.

Once installed, each app will have its unique set of instructions for recording, but most follow a similar pattern of selecting the recording area, choosing audio sources, and starting/stopping the recording.

How to Record a Video Call on Mac

Recording a video call on a Mac can be crucial for various reasons, such as keeping records of meetings, revisiting important discussions, or creating content.

Most popular video conferencing apps have built-in recording features:

  • Zoom : During a meeting, click the Record button at the bottom. Once the meeting ends, Zoom will convert the recording and save it to a specified folder.
  • Skype : Click More options (three dots) during a call and select Start Recording . Skype will save the recording in the chat for 30 days, and you can download it within that period.
  • Microsoft Teams : Click More actions (three dots) during a meeting and select Start recording . The recording will be saved in Microsoft Stream.

Besides the built-in options, you can use QuickTime Player and third-party apps to record video calls on your Mac.

Always inform all participants before recording a video call. In many regions, it’s illegal to record someone without their knowledge or consent.

How to Edit and Change the Settings of the Recorded Video on Mac

Once you’ve completed a screen recording on your Mac, a thumbnail preview will momentarily pop up at the screen’s bottom right. If you don’t want to edit, you can dismiss this thumbnail by swiping it to the right or let it be and your recording will be saved on your Mac by default.

video preview thumbnail

However, if you want to modify the video, clicking this thumbnail before it disappears will launch Apple’s built-in editor for screen recordings.

apple built in editor for screen recordings

This editor lets you trim and adjust your video.

drag the trimming bar to trim the video

If you want to reposition the video on your Mac, drag the thumbnail to any folder on your desktop or in the Finder. You can also move this thumbnail to the Bin or attach it directly to an email via the Mail app.

For more options, right-click the thumbnail. This lets you select a different save location, delete the video, or open it with a preferred application.

By pressing Shift ⇧ + Command ⌘ + 5 , you can access the settings menu for screen recording. Here’s a breakdown of the available options:

  • Location : Under Save to , decide where your recordings will be saved by default. You even have the option to save directly to the clipboard, making it easy to paste into messages or documents later.
  • Timer : Set a delay of 5 or 10 seconds before the recording starts after hitting the Record button.
  • Audio : Record external audio using your Mac’s built-in microphone. If you have an external device, adjust the default settings by navigating to System Settings > Sound > Input .
  • Thumbnail Preview : Decide if you want a floating thumbnail to appear post-recording.
  • Selection Settings : If you want to retain your current settings for subsequent recordings, select Remember Last Selection .
  • Mouse Visibility : To highlight mouse clicks in your recording, toggle on Show Mouse Pointer .

By familiarizing yourself with these settings and features, you can optimize your screen recording experience on a Mac.

Why Record a Video on Your Mac?

Recording a video on a Mac offers several advantages and serves various purposes. Some common reasons for recording videos on Mac are as follows:

  • 🎓 Tutorials and Demonstrations : Mac’s crisp display and robust software ecosystem make it ideal for creating educational content. Whether you’re teaching software usage or giving a presentation, recording it allows for easy sharing and replay.
  • 📸 Digital Memories : Capture personal moments or events, turning them into digital memories that can be revisited anytime.
  • 🎥 Content Creation : For vloggers, animators, and digital creators, Mac provides powerful tools for video recording, ensuring high-quality content for platforms like YouTube, Vimeo, and more.
  • 💼 Professional Communication : Record meetings, webinars, or interviews, ensuring that no detail is missed and content can be reviewed later.
  • 💻 Software Development and Testing : Developers can record app functionalities or software demonstrations for testing, feedback, or promotional purposes.
  • 🎮 Gaming : With the rise of gaming on Mac, recording gameplay sessions for reviews, strategies, or sharing on platforms like Twitch becomes essential.
  • 📚 Educational Purposes : Teachers and students can record lectures or lessons, facilitating asynchronous learning and revision.
  • 🔧 Troubleshooting : If you’re facing an issue with software or an application, recording the problem can help technicians or support teams understand and resolve it faster.

Record Videos on Your Mac in No Time

Recording videos on your Mac has never been more accessible, thanks to a range of built-in tools and third-party apps. From quick hotkey commands to sophisticated software, there’s a method to suit every user.

Here are some more tips to enhance your video recording experience on Mac:

  • If your Mac camera is not working , you won’t be able to record videos. So, troubleshoot the camera before recording videos on your Mac.
  • You can record audio on your Mac to add it as a voice-over to your videos.
  • If you want to upload your videos to social media, you can compress a video on Mac to make it easy to upload.
  • Learn how to screen record on a MacBook in 5 easy ways.

Frequently Asked Questions

Do macs allow screen recording.

Yes, Macs allow screen recording with built-in tools like QuickTime Player. Additionally, macOS provides a screenshot toolbar ( Shift ⇧ + Command ⌘ + 5 ) for easy screen captures and recordings. You can also explore third-party apps for more advanced recording features.

Can I screen record on a Mac with sound?

Yes, you can screen record on a Mac with sound. Using QuickTime Player or macOS’s built-in screen recording feature, you can capture internal and external audio. Ensure your audio settings are correctly configured before recording to capture the desired sound seamlessly.

How do I record my Mac screen with a keyboard?

To record your Mac screen with a keyboard, press Shift ⇧ + Command ⌘ + 5 . This shortcut opens the screen recording tool, allowing you to select an area and start recording. Once done, click the stop icon in the menu bar to save the recording.

How do I record on a Mac without an app?

To record on a Mac without an app, use the built-in QuickTime Player. Go to File > New Screen Recording , then click the Record button. This method uses macOS’s native capabilities, eliminating the need for third-party applications.

Why is there no sound when I screen record on a Mac?

If there is no sound when you screen record on a Mac, it may be because the internal audio capture option isn’t selected. Ensure you’ve chosen the correct audio source in your recording settings, and check your Mac’s sound settings to confirm the correct output and volume levels.

' src=

I'm Hashir, a tech journalist with a decade of experience. My work has been featured in some of the top tech publications like MakeUseOf and MakeTechEasier. I have a bachelor's degree in IT, a master's in cybersecurity, and extensive knowledge of Apple hardware, specifically MacBooks. As the senior writer at MacBook Journal, I write in depth guides that help you solve any issues you have with your mac and unbiased reviews that help you make the right buying decisions.

' src=

Hi there! I'm Ojash, a tech journalist with over a decade of experience in the industry. I've had the privilege of contributing to some of the world's largest tech publications, making my mark as a respected Mac expert. My passion lies in exploring, using, and writing about MacBooks, and I enjoy sharing my expertise to help others make informed decisions and get the most out of their MacBook experience. Join me as we delve into the fascinating world of MacBooks together!

You May Also Like

How to Split Screen on a Mac Featured Image

How to Split Screen on a Mac: 3 Quick Ways

Written by Hashir Ibrahim Reviewed by Ojash Last updated: October 21, 2023

How to Boot Your Mac Into Verbose Mode Featured Image

How to Change Startup Programs on Your Mac: 4 Best Ways

Written by Hashir Ibrahim Reviewed by Ojash Last updated: October 10, 2023

How to AirPlay From a Mac to TV Featured Image

How to AirPlay From a Mac to TV: 3 Quick and Easy Methods

AirPlay from Mac to TV and stream content seamlessly

TheSweetBits Logo

How to Record Screen on Mac (macOS Sonoma Included)

Tips • Updated on Dec.18, 2023

screen record

T he screen recording feature has gone used to be a specialist feature that only a certain demographic required to craft marketing videos, tutorials, and college assignments. However, the ability to take still captures of what’s on the screen, or even record audio and video has become so essential, that even mobile operating systems natively offer it.

When Apple revealed the screen recorder tool with iOS 11, it became clear that screen recording is a necessity, and not just a novelty feature. So, it makes total sense that macOS would receive a more versatile and power-packed screen recorder too.

And, after the COVID-19 pandemic hit, schools, universities, and even entire workspaces have shifted to the virtual meeting rooms. Figuring out how to record screen on Mac can help you keep a record of interactions during Zoom meetings, and saving online lectures for study and research later on.

Fortunately, there is more than just a single way to create screen recordings on your MacBook or iMac, and here’s how you do it on macOS Ventura and all of the older versions too.

RELATED: Best Screenshot Apps for Mac (Free and Paid)

Using the Screenshot Toolbar

Considering how basic the ability to take screenshots has been on computers, it would be ludicrous to think that Apple hasn’t baked in a quick screen recorder tool into macOS. Known as the Screenshot Toolbar, this quick and easy screen recorder hovers over the desktop screen with the combination of a few keys.

Similar to the way Print Screen command works on Windows OS, what makes Screenshot Toolbar better is the fact that you have more control over what you capture on the screen. The built-in tool allows you to capture a selected window  or even the entire screen , as well as record a motion video  on the entire screen, or just a select portion.

  • Press the Command + Shift key on your keyboard and hit 5  on the numpad to bring up the Screenshot Toolbar.
  • To record the entire screen , press the center icon , or to record a specific portion of the screen , press the button right of the center
  • When trying to record a portion of the screen, you will be given a cut-out window to select the area on the screen.
  • Press the Record button to begin, and once you’re done recording the screen, press the square recording icon on the Menu Bar or Command + Control + Esc to stop the recording.

audio

Bonus: record screen with audio

  • Launch the Screenshot Toolbar by pressing the combination of Command + Shift + 5 on the keyboard.
  • Click on the Options tab and select the audio receiver device as Built-in Microphone  or any external microphone (if you have connected any).
  • From the same window, you can also set a Timer to begin the recording, and even change the default Save to  location of the recording.

Note:  The Screenshot Toolbar is only supported for macOS version Mojave and later. To record screen on older Mac computers, you will need to either use QuickTime, or a third-party screen recorder to get the job done.

  • Efficiently access features with a keyboard shortcut, no need for extra programs.
  • Pre-installed on Mac, eliminating the need for additional downloads.
  • Customizes frame size, audio inputs, and mouse click settings, saving preferences.
  • Lacks advanced editing, audio/visual effects, and annotations.
  • Exports only as .mov files; conversion required for other formats.
  • No scheduling; start and stop recordings manually.

Using QuickTime Player

A hidden gem among the features that Apple does not actively advertise, the native media player of macOS has a neat trick of screen recording up its sleeve. If you can’t use the Screenshot Toolbar due to an older operating system version, here’s how QuickTime Player doubles up as an excellent screen recorder.

quicktime

  • Launch the QuickTime Player on your Mac. In case you don’t have it installed by default, download it here .
  • Click on File and select New Screen Recording  from the drop-down menu.
  • Press the Record button and record the entire screen by clicking anywhere on the desktop.
  • If you want to record a specific portion of the screen, you can drag and select  the area.
  • To record audio along with the screen, press the drop-down button on the recorder toolbar and select the Microphone  you wish to use for the audio recording.
  • Once you’re done recording, press the square recording icon on the Menu Bar, or Command + Control + Esc to stop.

The saved screen recording will be opened automatically, at which point you can click File – Save  or Command + S  to choose the save location.

  • Like the Screenshot toolbar, QuickTime is also used for screen recording.
  • has a set of fundamental features for screen recording.
  • works seamlessly with older versions of macOS.
  • Being an older tool, QuickTime lacks certain features present in the Screenshot toolbar.
  • does not offer a timer option for delayed recordings.
  • Unlike the Screenshot toolbar, QuickTime does not remember user preferences.

Related: Top 7 Free Mac Screen Recording Alternatives To QuickTime

Using Third-Party Screen Recorders

Mainstream users should be able to get their screen recording needs fulfilled with Mac’s Screenshot Toolbar and QuickTime Player. However, if you need something more powerful and feature-rich, there is a slew of third-party screen recorders for Mac we’ve covered quite a few recently that you can try out.

How to record a screen with OBS Studio

For a free screen recording option on your Mac, OBS Studio is an open-source app widely used by YouTubers and content creators. It’s easy to use, offering features for both basic and advanced users, allowing you to capture your screen and record sound, including system sounds and microphone audio.

obs mac

  • Download the application from the official OBS site to your computer.
  • Install and open the application following the provided instructions.
  • Click the + icon in the Sources box, select Display Capture, and choose your main display; customize further by adding webcam or audio sources.
  • Use the Settings menu to adjust recording preferences and select the storage location for your recordings.
  • Initiate the recording process by pressing the Start Recording button in the bottom right.
  • Pause the recording at any point using the Pause button in the bottom left and press Stop Recording when finished; your recording will be automatically saved to your system.
  • Available for free and is an open-source tool.
  • Offers advanced video and audio recording capabilities.
  • Allows recording from multiple audio and video inputs.
  • Supports various platforms with multiple output options.
  • Might be a bit tricky to use for some users.
  • Lacks features for editing videos within the application.
  • Requires substantial system specifications.

How to record a screen with Snagit

When searching through the web for the best premium option, we came across Snagit , especially the updated 2024 version. The app is easy to use, with different screen recording options, built-in video editing tools, OCR (optical image recognition), and a seamless cloud connection, all allowing you to pick up text right from the recording on macOS Sonoma and older.

snagit

  • Launch the Snagit app on your Mac.
  • Open the Snagit app and clock on Video from the Capture window.
  • From the Selection option choose a specific Region  or the FullScreen  to begin.
  • Press Capture or Control + Shift + C  on the keyboard to begin the screen recording.
  • Using the crosshairs, adjust the portion that you want to screen record.
  • The Video Recording Toolbar will help you manage the recording window size, select the audio input, turn on or off the webcam mid-recording, capture screenshots, and more.
  • Once you stop the screen recording, the video clip will launch in the Snagit Editor , where you can make additional edits.
  • A straightforward and easy-to-use interface.
  • Provides templates for simplifying the recording process.
  • Allows overlaying visuals on recordings for enhanced presentation.
  • Compatible across multiple platforms for versatile use.
  • Does not support live streaming functionality.
  • The trial version comes with certain limitations.

Screen recording prep hacks for Mac videos

Remember, thorough preparation sets the stage for a successful screen recording. These tips will help you create clear, engaging, and professional-looking videos on your Mac!

  • Define your video’s purpose:  Know your message (instructional, entertaining, promotional?) to guide content and style.
  • Outline a simple script:  Key points and transitions keep you focused and avoid rambling.
  • Optimize your Mac:  Close unnecessary programs and processes for smooth recording.
  • Declutter your screen:  Minimize windows,  organize files , and silence notifications.
  • Choose a quiet & well-lit space:  Ensure minimal background noise and adjust webcam lighting.
  • Prepare visuals:  Gather screenshots, animations, or other media for engagement.
  • Practice & test:  Run through your script to improve delivery and ensure software setup works.

Final words

As powerful as the third-party screen recorder apps for Mac may be, it is hard to steal the thunder from the Screenshot Toolbar and QuickTime Player. When comparing to the basic, and fairly outdated PrintScreen screenshot option on Windows, it is a surprise Microsoft is yet to come up with a native screen recorder tool.

Not all of you will need the heavy-hitting screen recording features that Snagit or the other third-party apps offer. However, it is better to have it and not need it, than need it and not have it.

  • How to Take a Screenshot on Mac (incl. M1 M2)
  • A Content Creator’s Perspective – Mac Screenshot with CleanShot X
  • Top Free Screen Recorder Alternatives to Quicktime
  • How to Take a Screenshot on Windows 11/10

* Readers like you help support TheSweetBits. When you buy something through the links in this article, we may get a small commission at no extra charge to you.

Share this article, about the author: thesweetbits team.

' src=

Related Posts

Elephas AI: Unleash Seamless AI Writing Across Your Mac

Elephas AI: Unleash Seamless AI Writing Across Your Mac

From Blank Slide to Stunning Presentation: A Review of Slides AI

From Blank Slide to Stunning Presentation: A Review of Slides AI

Reclaim Your Time: A Review of Reclaim AI

Reclaim Your Time: A Review of Reclaim AI

ClickUp AI Review: Supercharge Your ClickUp Workflow

ClickUp AI Review: Supercharge Your ClickUp Workflow

  • Apple Watch
  • Accessories
  • Digital Magazine – Subscribe
  • Digital Magazine – Log In
  • Smart Answers
  • New iPad Air
  • iPad mini 7
  • Next Mac Pro
  • Best Mac antivirus
  • Best Mac VPN

When you purchase through links in our articles, we may earn a small commission. This doesn't affect our editorial independence .

How to record yourself on a Mac with or without a webcam

how to record yourself on a mac main

Key Takeaways

  • Mac offers built-in video recording tools to help users record themselves as a video from the webcam. QuickTime, iMovie, and Photo Booth are often used to record Mac screens with system audio and webcam without downloading anything.
  • A quiet, stable, and bright environment is important for recording a high-quality video on your Mac. Therefore, you’d better take recordings in your home and use a high-quality microphone to start.
  • To enjoy advanced recording features like noise reduction and automatic recording, a watermark-free third-party screen recorder like EaseUS RecExperts is a necessity.

People want to record their figures in the webcam on a Mac for various reasons. No matter if it’s making an online lesson for offline watching, taking down your communication with others, or recording a video message to friends, you will need to record a video of yourself on Mac. But how can you record yourself on a Mac successfully? Read the whole article and try the methods.

Method 1. Record a Video of Yourself with Audio using third-party software

One solution to record on a MacBook is to use EaseUS RecExperts. This screen recorder is capable of recording the webcam and audio on a Mac with simple clicks. Mac users can record themselves, the screen, audio, and even the live stream simultaneously.

Moreover, the EaseUS screen recorder is also capable of saving the video in 4K and even 8K resolution. It also allows users to save the video in various formats. MOV, MP4, FLV, MKV, and AVI formats are all supported.

The best thing about this easy-to-use program is that it offers an automatic recording feature, so you don’t need to start and finish the recording process manually. This is especially good when you can’t spare time to operate the software.

Follow the steps below to Record with EaseUS RecExperts:

Step 1. Launch EaseUS RecExperts on your Mac and select the “Webcam” button on the main interface.

Step 2. Then, the inbuilt camera will open automatically. You can also select another webcam from the drop-down arrow. You can also select the “System sound” or the “Microphone” to record them.

Step 3. When all is done, click on the red “REC” button to start recording on Mac. Click on the “Stop” button to finish recording. You will be led to the recording list automatically.

how to record yourself on a mac EaseUS Recexperts

Method 2. Record Your Own Video with Built-in QuickTime Player

QuickTime Player is mainly used as a video player on Mac. But it can also serve as a screen recorder for Mac. If you want a tool to screen record on a Mac computer, this is a good choice.

Video recordings by QuickTime Player are saved as MOV files by default. You can view it after recording directly on the Mac. One thing to note is that if you want to record the internal audio at the same time, you need to install Soundflower first.

The steps below show you how to record yourself with QuickTime:

Step 1. Run QuickTime Player on your Mac and choose “File” > “New Movie Recording”. The recording controls will appear, and you’ll see a green light next to the built-in camera on your Mac.

Step 2. Click “Options” and choose the Camera, Microphone, and Quality you like. The built-in camera on Mac now supports 1080P resolution, which should be enough for your recording.

Step 3. When all is done, click the “Record” button to start recording. Then, click the “Stop” button to finish.

Step 4. Then, you need to choose “File” > “Save” to name and save the recording.

how to record yourself on a mac Quicktime

Note: You need to choose the video quality carefully, as different qualities take up different amounts of space. For instance, Maximum-quality recordings produce uncompressed files, which can take up large amounts of storage space. Below are the descriptions of different quality settings.

Method 3. Record You and Screen in Photo Booth for Further Editing

How to record yourself on a MacBook Air? There is a built-in app called Photo Booth that can do it. Although it is usually used to take screenshots on your Mac with special effects, more and more people are using it to record videos recently.

It can record the webcam and the screen at the same time. So, you can use it to record you playing a game, teach a lesson, or even record your reaction when watching a live stream.

Check how to record a video on Mac with it below:

Step 1. Open Photo Booth on your Mac, and you will see a preview of your figure on the screen. It will be in the Camera mode by default.

Step 2. Click the “Record” button on the lower left corner to switch it to the recording mode.

Step 3. Then, click on the red “Camera” button to start recording. You can also add effects or filters to the recording if you like.

Step 4. Lastly, click the red square button to stop the recording. You can click “File” > “Save” to keep the recording on your Mac.

how to record yourself on a mac Photo Booth

Method 4. Record Yourself Speaking on a Mac with iMovie

If you don’t want to use the methods above, you can record video directly into iMovie using the built-in FaceTime HD camera. Moreover, it can record the camera and microphone simultaneously. You just need to select to record a voiceover in iMovie along with the webcam.

The best thing about this method is that it not only records a video but also edits the recording afterward to make it look like a well-made movie. If you want to make a high-quality video, you should try it.

Let’s see how to record with iMovie:

Step 1. Launch the iMovie app and click the “Import” button to open the “Import” window. If you don’t see the “Import” button, click “Media” first.

Note: If Image Capture, Photos, or another photo app opens, close the window.

Step 2. Select the built-in camera in the “Cameras” section of the sidebar, and a live video image from the camera will appear.

Step 3. You may also select to record the microphone by clicking the “Record Voiceover” button below the viewer.

Step 4. Then, specify the event you want to record by choosing from an existing event, create a new event, or choose the open project.

Step 5. Click the “Record” button below the live video image to start recording. To stop recording, click the “Record” button again.

how to record yourself on a mac iMovie

Method 5. Record Yourself Presenting a PowerPoint Using Slideshow on Mac

Many people use PowerPoint on their Mac computers. You may also use it to make a presentation before. But can I record myself on a Mac in a slideshow? In fact, it can do more than that.

In a PowerPoint slideshow, you can record the screen, webcam, and also the microphone in the meantime. After recording, you can save the video as an MP4 or a WMV file with high-quality. You may also edit the recording by using some basic functions like trimming.

Below are the steps to record your figure in the webcam via a slideshow:

Step 1. Open a file in PowerPoint, click “File” > “Save As…” > “File Format” > “PowerPoint Presentation (.pptx)”. This will change the PPT file format into PPTX format to make sure the recording won’t miss.

Step 2. Open a PowerPoint slideshow and click on “Record Slide Show”.

Step 3. Go to “Settings” and select the webcam and microphone you want to record from. Then, click on “Record”.

Step 4. Click on the “Stop” button to stop the recording. Then, you can save the recording by clicking on “File” > “Export” > “Create A Video”.

how to record yourself on a mac Slideshow

How to Improve the Recording Quality of Your Video and Voice

You may want to record a video on your Mac while singing Karaoke, streaming on the internet, teaching a lesson for offline viewing, or attending a meeting when you are outside the room. What can you do to ensure a high recording quality?

Choose a Screen Recorder with Advanced Recording Functions

If the recording environment is not ideal, you will need advanced screen recording software with noise-cancellation and automatic recording functions. In this case, EaseUS RecExperts is exactly what you are searching for.

Choose a High-Quality Camera/External Webcam

Nowadays, with the introduction of the 24-inch iMac, M1 MacBook Pros, and M2 MacBook Air, Full HD 1080p built-in cameras have become a reality. However, if you want a camera with advanced functions like automatic light filling, try a third-party one.

  • XPCAM webcam: this is a web camera with a full HD glass lens that delivers razor-sharp video. With automatic light correction and HDR technology, the computer camera auto-adjusts color and brightness for natural lighting. 1080P, 720P, 480P supported.
  • Logitech Brio: this is a camera that can be used in the office, at home, or somewhere else. It is four times the resolution of a typical HD webcam and can adjust the light automatically.
  • NexiGo N930E: this camera has a built-in light ring that offers lighting compensation at three different levels with touch control. Offering a 1080P quality, it is perfect for recording Zoom meetings on Mac .

Try to Make Sure the Environment is Quiet and Bright

Try to make sure your face is lit as evenly as possible. To do this, you may bounce a lamp light off a wall directly in front of you and adjust window blinds.

Also, you may get a good external microphone that can cancel noise during recording. Or, try to get something soft and cushiony behind the microphone to absorb noises.

Final Words

This article offers five feasible methods to record yourself on a Mac. If you don’t know which method to choose, check the table below.

We hope you get the information you want after reading it. Our advice for you is to use a high-quality webcam, choose the most suitable environment, and select an easy-to-use webcam recorder, like EaseUS RecExperts, to record on Mac computers.

Logo top

How To Record Your Face and Screen On Your Mac

how to screen record presentation on mac

In this article, I explain how you can record your face and screen at the same time so that you can create engaging and fun videos. Note that there are several apps that can do this. This tutorial shows you can create a screencast using the built-in Mac apps and hardware. So that you will not need to use any other third-party apps.  We will use QuickTime Player.

If you want to audio-only recording, see this article .

There are many advantages to creating screen videos. For instance, nowadays, teachers are recording your lessons so that their students can watch them anytime.

These types of videos will create recordings of the actions on your computer screen with accompanying audio and your face. This will let you provide quick video explanations or tutorials. For example, you can create Youtube tutorials using the method described in this article.

How to Screencast (Mac)

1-Launch QuickTime player. It can be found in the applications folder.

2-Select File > New Movie Recording.

Quicktime new movie create

3 -Select View > Float on top so that your camera window will be on top of any other application anywhere on your screen. If you do not select this, your video may not record you.

quicktime float on top of screen

4 -Now you can resize the camera window. You can move this camera view anywhere you want (left, right, top, bottom, etc).

quicktime camera

5 -Now  again, in QuickTime Player, select File > New Screen Recording

screen recording

You will see this:

quicktime screen

You can change some settings by clicking the arrow next to the Record button. You can record your full screen or part of your Mac screen. You may want to arrange your screen (where will your camera be etc?) before you start your recording.

6 -When you are ready to start recording, click the red record button. You have two options: (a) if you want to record your entire screen, click anywhere on your screen to start the actual recording (b) or you may drag to select an area.

record entire or part of your screen

7 -Now you are recording your screen and your camera view (e.g. your face). When you are done recording you may press the Command-Control-Esc keys. After you done, you may also edit your video using Quicktime. For instance, you may go to QuickTime > Edit  > Trim to remove the unwanted parts of your video.

Other notes:

  • You can also press Shift-Command (⌘)-5  to create video and capture still images of your screen .
  • Please note that if your Mac does not have a built-in camera, you can use an external camera.
  • You can use an iOS device connected to your Mac to record a video on your device.
  • How To Recover Unsaved Word Docs – OS X
  • Easiest Way To Open / Edit a .Pages File On a Windows PC
  • Critical Security Warning! Your Mac is Infected…Fix

how to screen record presentation on mac

Dr. Serhat Kurt worked as a Senior Technology Director specializing in Apple solutions for small and medium-sized educational institutions. He holds a doctoral degree (or doctorate) from the University of Illinois at Urbana / Champaign and a master’s degree from Purdue University. He is a former faculty member. Here is his LinkedIn profile and Google Scholar profile . Email Serhat Kurt .

Similar Posts

Screen recording failed to save error fix.

Are you unable to save screen recordings on your iPhone or iPad? Several iOS users have reported that they get the following error messages when they attempt to create a screen recording on…

How to Stop Text Messages and iMessages from Going to iPad from iPhone

This article explains how you can stop your iPhone text messages and iMessages from going to your iPad, so when you get a message, it won’t appear on your iPad. If you are…

How to Turn Off iPad Left Behind Notification

You may be getting left behind notifications for one or more of your devices. For many people, they receive this notification for an iPad. After all, most people keep their iPhones with them;…

How To Cancel Your Apple Credit Card

This article explains how you can properly cancel your Apple credit card. Closing your account is very easy but it requires you to follow specific steps. It is important that you cancel your account…

Face ID Unable To Set Up, Biometric Authentication Error, Fix

Several users have reported Face ID problems. More specifically, this problem occurs when users attempt to turn iTunes & App Store in Settings > Face ID & Passcode. Thus, some users are unable to…

How To Reset Your Macbook To Factory Settings

This article explains how to factory reset your Macbook Pro or Macbook Air computer to its original state, the day it was shipped from the factory. This step by step guide will teach…

29 Comments

Thank you! This worked well for creating sign language videos while capturing powerpoint presentation slides.

Nice, this is exactly what i needed to record my youtube videos

Hi. Thanks for this. It has worked but there is a delay in the recording with my voice being quicker than the actual movie of me talking making it look very badly dubbed. Is there a way around this?

Hi, Is there a recommended way to add a background image before I record so that I don’t show my office background but maybe a solid colour or landscape or city backdrop? How can I do this before I press record. Ie: Like adding in a virtual background in Zoom before you join in on a call. Many thanks. Appreciated. Dennis

Why there is no voice ?

You have to click on options and then select for microphone Macbook microphone

I tried to use this to record myself talking over a powerpoint presentation, but as soon as I put the powerpoint into slideshow mode the Quicktime controls disappeared. Is it possible to do this?

this was weird. It didn’t work for me. ;(

I am able to record the screen and myself as a preasenter. However I cannot see the presenter window on the screen recording

Hello, unfortunately I see the video controls on camera preview. Any way of turning this off?

I had this problem, but I was able to resolve by sliding the mouse pointer out of the camera preview window to the left/right/bottom (instead of top). Once you slide off your mouse in these directions, the controls disappeared.

Thank you! This helped!!!

Didn’t realise Quicktime could do this!!! Really really handy little tip, thank you 🙂

Nah I can not change taps it wont any one see my face so i can not slid (the for finger slide on mac)with it letting me record

Thank you. Great Work, is there a way to remove the background of the self video?

Thank you. I like the simplicity and clarity of your instructions.

However…one hour later and I was still trying to figure out how to get the screen recording the video of myself PLUS audio! Turns out that’s separate. Who knew? Anyway, I’m giving up for today because I still don’t know how to playback the screen recording with the audio and I’m exhausted.

When you select to screen record, next to the record button is a little down pointing arrow, click it and it will show you your microphone options. Select internal microphone and you should be good to go.

THANK YOU, Serhat. This is EXACTLY what I was looking for. And to think the solution was so simple. Great job. I can’t believe it’s so hard to find the solution on Google. I’m glad I kept looking, Thanks!!

I am doing all of the steps you mentioned, yet, when I finish recording and watch the video, I can’t hear myself talking. Is there a way to fix this?

click the arrow by the red button and then click internal mic

Hi- Great explanation of the process. I tried it and it worked well except for the audio of my voice is off from the PIP video window I put at the bottom of my screen. Any ideas how to fix that?

I had the same issue which I resolved by selecting “Internal Microphone” from the options hidden in the drop-down menu (click the little arrow beside the Record button.

You are AWESOME!!! I just spend a few days trying to find a suitable program to do this and didn’t even think of trying what you suggested here—but it works perfectly!! I LOVE using quicktime so this is just perfect.

Thanks again!

Can you control the pixel width/height?

Great, thanks! I want to record my Keynote slide presentation and also have my face on screen. Is there a way to do that? When I rehearse or record the slideshow, it automatically goes full screen and takes over even when my quicktime window is supposed to be floating on top.

I’m doing the same… The only solution I could come up with was to export my keynote as a PDF, then open it in Preview. You have to view the PDF in window mode, if you go fullscreen you get the same problem as in Keynote. When I did the screen recording I dragged a box so it only shows the PDF pages, not the rest of my screen, or the preview tools etc. Then I could keep my video floating on top, it’s a pity you can’t make the video smaller though, I think the smallest size is still too big and it gets in the way.

Okay I know how to do that now but how do you record yourself and an iPhone screen with the audio and everything perfectly. I want to record myself and a gameplay

Thank you so much! It helped me doing my school project!!

This is perfect for what I was looking for. I’d also recommend Acethinker Free Screen Recorder which I have used for many years. It supports recording system and microphone or both. I always take it to record videos and upload to YouTube so that I can share with friends. It works so well that I haven’t found some defects.

Leave a Reply Cancel reply

Your email address will not be published. Required fields are marked *

Categories:

Free All-in-One Office Suite with PDF Editor

Edit Word, Excel, and PPT for FREE.

Read, edit, and convert PDFs with the powerful PDF toolkit.

Microsoft-like interface, easy to use.

Windows • MacOS • Linux • iOS • Android

banner

  • Articles of PPT

How to Record a Presentation on Mac (Step-by-Step)

Many Mac users face the question of how to record a presentation on Mac for their office, content creation, and online earning. However, not everyone is familiar with the process as there are several options and apps that aren’t only convenient to use and free.

In this article, we will address the question of how to record a presentation on Mac and which software to use for the presentation recording process.

How to Record a Presentation in Keynote on Mac

When it comes to how to record a presentation on Mac, you will want to follow the below-given steps to record a presentation in keynote on Mac:

Step 1: Open the presentation in the keynote on Mac.

Step 2: Go to the slide navigator and select the first slide.

Step 3: Go to the “Play” menu at the top of the screen. From there, you will want to select “Play > Record Slideshow.”

Step 4: It will take you to the presenter display, which will display the recording controls at the bottom of your screen.

Step 5: You can customize the presenter display before you hit the recording button.

Step 6: Click the “Record” button to start recording a presentation on Mac.

Step 7: Click the “Stop” button to stop recording the presentation on Mac.

Step 8: You can also preview the recording to determine whether it is according to your needs.

Step 9: Press the “Esc” button to exit the presenter display.

Step 10: To export a recorded presentation in Mac in the form of another file format, you can choose the option of “Export.”

Pros of Recording a Presentation in Keynote on Mac:

High-quality output

Seamless integration

It offers various export formats

Cons of Recording a Presentation in Keynote on Mac:

Editing constraints

Resource intensive

How to Use the Default Screen Recorder in Microsoft PowerPoint

When it comes to how to record a presentation on Mac, you will want to follow the below-given steps to use the default screen recorder in Microsoft PowerPoint:

Step 1: Open the slides in Microsoft PowerPoint.

Step 2: Insert the “screen recording” option.

Step 3: On the far right-hand side of all “Insert” options, you will want to click on the option called “screen recording.”

Step 4: You will want to choose from the dialog with different options. Proceed to click on “Record.”

Step 5: You will get a countdown, and then it will tell you to press the “Win + Shift + Q” key to stop recording the presentation.

Step 6: You have several options for saving the presentation, such as in the form of a PowerPoint presentation.

Step 7: You can also expert the video file in the form of an mp4 video.

Pros of Using the Default Screen Recorder in Microsoft PowerPoint

The built-in functionality, no additional installations required.

Seamless integration with PowerPoint.

User-friendly interface.

Cons of Using the Default Screen Recorder in Microsoft PowerPoint

Limited features compared to dedicated software.

Potential performance impact on older machines.

No independent recording functionality.

How to Use Free Online Presentation Recorder by VEED Tools

When it comes to how to record a presentation on Mac, you will want to follow the below-given steps to use the free online presentation recorder by VEED Tools:

Step 1: To record a presentation on Mac, you will want to type VEED on Google and click on the first link.

Step 2: Before you start the recording process, you will want to select a suitable layout.

Step 3: As an example, choose the “Split screen 2” on VEED. After selecting the screen-recording layout, you will want to select the option of “Share my screen.”

Step 4: Click on the “Record” button. A countdown of three will start before you can proceed to record a presentation on Mac.

Step 5: After completing the recording, you can click on “Stop,” which will take you to the three options of “Edit,” “Download” and “Record.”

Step 6: You might want to click on the “Edit” option to edit the presentation on Mac right away.

Step 7: Explore the editor panel of VEED, as you can find various options to edit your presentation.

Step 8: After you have successfully recorded a presentation on Mac, you will want to click on the “Download” button that you can find in the top-right part of the screen.

Pros of Using the Online Presentation Recorder by VEED Tools

Quick sharing online

Cloud storage

Cons of Using the Online Presentation Recorder by VEED Tools

Limited features for unsubscribed users 

Privacy and security concerns

Use Word, Excel, and PPT for FREE, No Ads.

Boost your professional productivity by 10x with WPS's abundant free PPT templates.

Microsoft-like interface. Easy to learn. 100% Compatibility.

Using the Screen Recorder in WPS Office

If you are wondering how to record a presentation on Mac, you will want to opt for free software that is easy to use and comprises great free features, such as the WPS screen recorder.

It doesn’t matter whether you are using slides on PC or Mac; WPS is compatible with both as it is an “all-in-one” workspace that enables its users to flawlessly create and edit documents, including Presentations.

If you are looking for how to record a presentation on Mac, you will want to follow the below-given steps to use the screen recorder in WPS Office:

Step 1: Start with opening the slides with WPS.

Step 2: Proceed to click on the “tool” tab that you will find on the upper right corner of the page.

Step 3: Proceed to choose the option of “Screen Recorder.”

Step 4: A pop-up menu will appear on the screen that will take you to the following three options:

Step 5: Choose the option of “Record Screen”, and this is how to record a presentation on Mac.

Benefits of Using WPS to Record a Presentation on Mac

When it comes to how to record a presentation on Mac, you will want to opt for WPS – a free Office Suite for PDFs, Docs, Sheets, and Slides. The best part about using WPS Office for Max is that it is compatible with all PowerPoint, Word, and Excel formats.

WPS Office is an “all-in-one” workspace that is available for macOS v11/ 12/ 13 and the former versions. Here are some pros of using WPS Office on Mac:

A Great Alternative to Apple’s Pages

WPS Office offers a free alternative to Apple’s Pages, with a user-friendly interface that closely resembles the user interface of Microsoft Office. The user interface of WPS Office allows you to keep things neat and organized while providing you with a seamlessly familiar experience of Microsoft Office on Mac.

When it comes to how to record a presentation on Mac, you can also benefit from its split screen view that enables you to quickly manage your specific work areas on Mac without having to move or adjust the windows manually.

Free Office Suite for Mac

With other Office Suits, there might be some delimitations; however, you won’t have to face any such issues with the WPS Office Suite. You can use this Office Suite to edit and create PowerPoint, PDFs, Word, and Excel files easily.

WPS Office for Mac is a great alternative to Microsoft Office, and it can definitely enhance your productivity in all Mac versions, including v13, v12, and v11.

Smooth Compatibility with All MS Office File Formats

Due to its high compatibility with all MS Office file formats, including .pptm, .docx, .dotm, .pptx, and .csv, WPS Office ensures a smooth Office experience with Mac, which helps you boost productivity and the overall workflow.

1. How to add speaker notes to your presentation slides?

Go to the “View” menu and select “Normal.” Go to the respective thumbnail of the presentation slide if you will want to add speaker notes. A notes pane will pop up underneath the slide, where you will find the option of “Click to add notes.” Choose the option and type your speaker notes.

2. How to turn your presentation into a video in Microsoft PowerPoint?

After creating a presentation, you can save it in a video format with the below-given steps:

Step 1 : Select the “File” and then select “Export > Create a video.”

Step 2: Select the desired quality of the video.

Step 3: If you want to use recorded timings and narrations, you will want to choose the respective option.

Step 4: Choose the “time/ seconds” for each presentation slide.

Step 5: Click on the option of “Create Video.”

Step 6: Choose a name for the video file and save the video in a location.

WPS Office Suite – An All-in-One Workspace for Mac

As a Mac user, you might be searching for how to record a presentation on Mac, and if you want to keep things effortless, you will want to switch to the free all-in-one WPS Office suite that is compatible with Mac and comprises a screen-recording feature.

WPS Office comprises more than 100,000 templates for PPT, Excel, Word, and PDFs that help users streamline their workflow and save time. WPS Office performs well with all macOS systems, including v13, v12, and v11, which means that no matter what Mac system version you are using, you can easily work, edit, study, and create with WPS Office on your Mac.

  • 1. How to Record PowerPoint Presentation with Audio & Video on Mac
  • 2. How to Video Record Yourself Presenting a PowerPoint (Step-by-Step)
  • 3. How to Record Voice on PowerPoint on Mac (A Comprehensive Guide)
  • 4. How to Record a Macro in Excel A Step-by-Step Guide
  • 5. How to Record Audio on PowerPoint in WPS Office [Step-by-Step]
  • 6. How to Record a PowerPoint Presentation (Step-by-Step)

how to screen record presentation on mac

15 years of office industry experience, tech lover and copywriter. Follow me for product reviews, comparisons, and recommendations for new apps and software.

  • English   Español Deutsch Português Italiano Français 日本語 한국어 繁體中文 Türkçe Dutch Polish Thai Indonesian Malay
  •  Free Download    For Windows  For macOS
  • Screen Recording     RecExperts For Windows Screen recorder for PC   RecExperts For Mac Screen recorder for macOS   Online Screen Recorder Record screen online free   ScreenShot Take Screenshot on PC
  • Buy Now Buy Now
  • Student Discount
  • Resources   Screen Recorder Windows 10 Record Zoom Meeting Record Internal Audio Mac Record Gameplay on PC Video Recording Software
  • Support     Support Center Guides, License, Contact   Chat Support Chat with a Technician   Pre-Sales Inquiry Chat with a Sales Rep

How to Screen Record on Mac PowerPoint in 2024🔥

If you are a student, entrepreneur, educationist, or employee, you must have given many PowerPoint presentations on Mac to make your points. It is better to screen record and share your presentations in video format for better reach. This article shows you how to screen record on Mac PowerPoint in 2023.

 Trustpilot Rating 4.7

Don’t forget to share this post!

Page Table of Contents

how to screen record presentation on mac

Updated on Apr 19, 2024

The screen recording of a PPT presentation offers many advantages. It converts a lifeless, tedious work into an eye-catching video. You can add narrations to emphasize important points. The video format is easy to share and invariably gets more views. Plus, a recorded presentation is visible to people who don't have PowerPoint on their smartphones.

If you are a Mac user, this article will teach you about methods to record your PowerPoint presentations. Check the comparison chart of them before diving into the details.

From the table, we can see that EaseUS RecExperts is the most effective and easy-to-use tool to record PowerPoint on Mac. What are you waiting for? Download it right now!

Screen Record on Mac in PowerPoint

Many Mac users don't realize that Microsoft PowerPoint has a built-in video recorder. It can capture and save your presentation without any delay. You don't have to install any 3rd party app. Plus, this recording feature is free for all licensed PowerPoint users.

Follow these steps to screen-record your presentation with the PowerPoint video recorder.

Step 1. Open the   slide you want to record. Then, go to  Insert Tab  and choose the  Screen Recording  option.

Choose Screen Recording

Step 2. Select the recording area. The screen will show a cursor. Drag it to the desired area. For the entire screen, press  Windows + shift + F . After this, choose  Record  to start screen recording.

Click Record to Start

Step 3.  The video is added to the slide. Right-click on the   video frame and choose how the video will start. You may choose from  In Click Sequence , Automatically , or When Clicked On . When finished, save the recording.

Choose How the Video Starts

Find this post useful? Share it with others.

Other Ways to Screen Record PowerPoint on Mac

If you require high video quality and editing, there are other ways to record your screen on Mac.

1️⃣Screen Record on Mac with EaseUS RecExperts

Many people complain about the PowerPoint screen recording function not working issue. This may be due to various reasons. If you can't make it right, the best solution is to find an alternative to record PowerPoint on your Mac. And  EaseUS RecExperts  is among the best ones.

It can easily capture the screen, system audio, microphone sound, and even the webcam at the same time, which can help you in making an instructional video with screen recording, creating a video presentation, or whatever you want. You may also choose to record one of the elements.

After recording, you can save the video in 4K/8K quality. It also possesses a built-in Noise Remover to remove any unnecessary sounds. The output sound is clear with no distortions. A  schedule recording function is also supported to record the video automatically.

Download it now and follow the steps below to start recording a PowerPoint on Mac.

Step 1. Firstly, launch EaseUS RecExperts on your Mac. There are two options, "Full Screen" and "Region," for you to select the recording area.
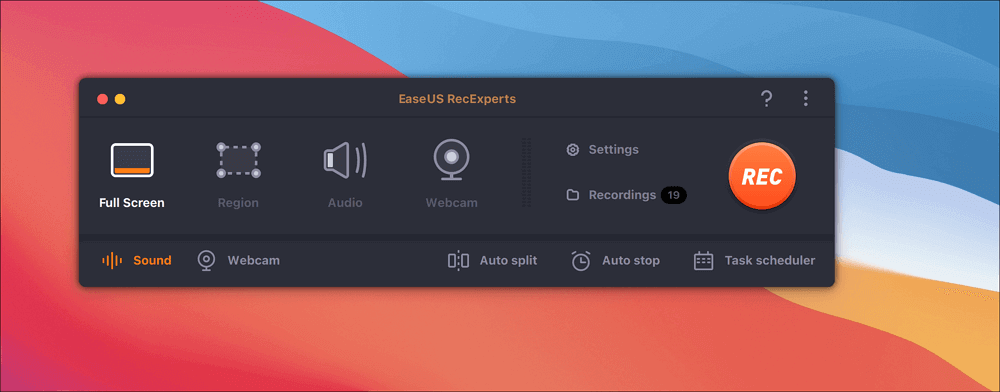
main interface

Step 2. Then, click on the "Webcam" button at the bottom. When a "Record webcam" window pops up, click the button to activate the webcam, and you can select the device you want to use from the dropdown menu.
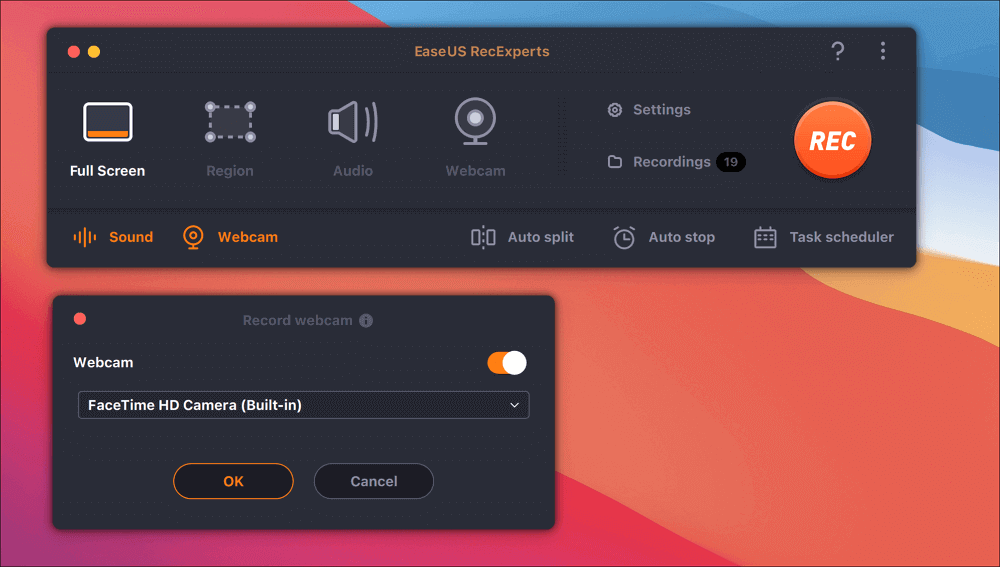
select webcam on mac

Step 3. If you want to capture the screen with audio, the "Sound" button beside "Webcam" can help. You can click on the two buttons on the "Select recording sound" window to choose the audio source, such as the system sound, the microphone audio, or two of them.
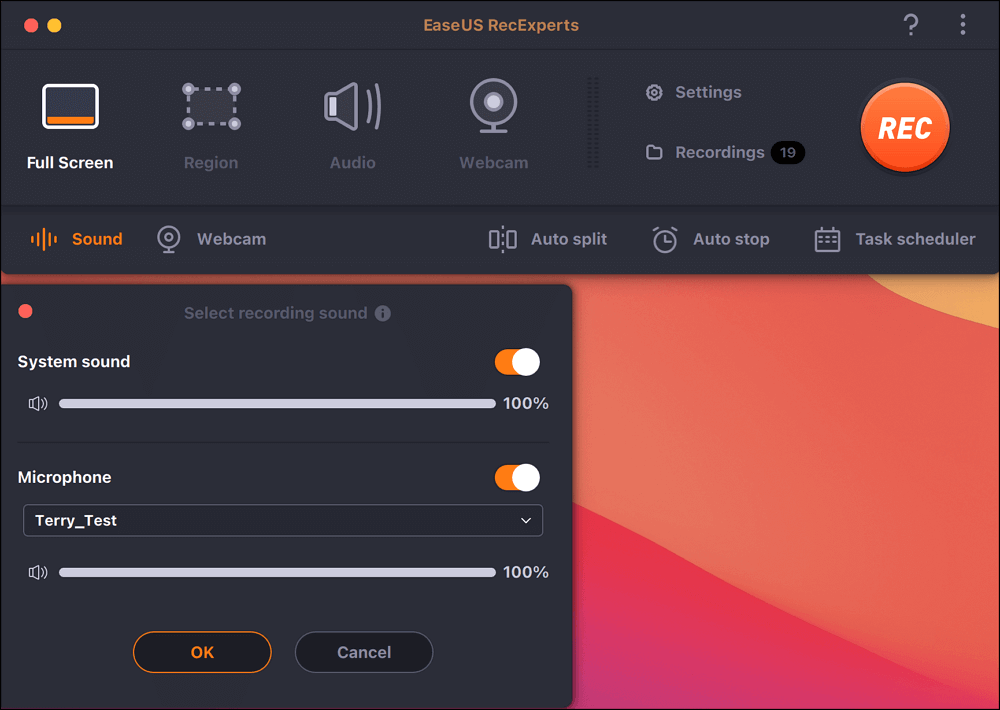
select audio source

After adjusting the settings appropriately, click on the "REC" button to start recording.

Step 4. Now, you can record the Mac screen and your webcam at the same time. After capturing all the content you need, hit the "Stop" button to end it, and this software will offer you a built-in video player to view the video you captured.

record screen and webcam at same time

2️⃣Screen Record on Mac with Recording Shortcut

Mac also has a built-in recorder. So you can  screen record on Mac with the shortcut . You can use it to record your PowerPoint presentations without any 3rd party app. The video quality is superb. However, it doesn't allow any video editing or customization.

This is how the Mac screen recorder works.

Step 1. Open the desired  PowerPoint slide . Press  Command + Shift+ 5  simultaneously to open the toolbar.

Step 2. Select  Record Entire Screen  or  Record Selected Portion  options as per requirement.
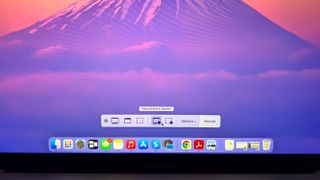
Step 3. After this, Press the  Record  button to start recording.  Stop  it when you're done. Then click File to  save  it in any folder you want.

Mac Screen Recording Shortcut

3️⃣Screen Record on Mac with QuickTime

Quick Time is an Apple Media player whose primary job is playing high-quality video clips. However, this feature can also be used to screen-record PowerPoint presentations. Like its predecessor, it doesn't offer supreme control over video editing.

QuickTime is present on all Apple products without any premium cost. You can screen record with audio via QuickTime  by:

Step 1. Open  QuickTime  on your Apple device. Then from its main interface, go to the  File menu  and choose file  New Screen Recording.

Step 2. Click the  down arrow  adjacent to the Record icon. Select the  microphone or audio input  and then adjust the volume of the  sound recorder.

Step 3. Select  Start  and choose the PowerPoint area you want to cover. The recording will start. Once done, click  Stop.  The recording will end. Save it in your preferred location.

QuickTime New Screen Recording

How to Screen Record on Mac PowerPoint FAQs

These are the most asked questions about how to record screen on Mac PowerPoint

1. Does Mac PowerPoint have Screen Recording?

Yes, Mac PowerPoint has a video recorder. It can capture the full or selected PowerPoint region with ease.

2. How do you record a video on PowerPoint on a Mac?

You can use a PowerPoint video recorder, Mac Recorder, Quick Time, and EaseUS RecExperts to record videos of  PowerPoint on Mac . The choice of method depends upon your requirements.

3. How can I screen record a PowerPoint?

You can screen record a PowerPoint slide with built-in video recorders or 3rd party screen recording apps. The in-house doesn't put a burden on RAM, While the 3rd apps provide high audio and video quality.

PowerPoint screen recording converts dull presentations into watchable videos. These videos are easy to understand and share. This article presents 4 methods to screen record PowerPoint presentations for Mac users.

You can screen record PowerPoint with PowerPoint Recorder, EaseUS RecExperts, Mac Recorder, and Quick Time. The details of all methods have been shared. We recommend downloading EaseUS RecExperts for the highest quality.

If you like this article, please share it with your family, friends, and circle of influence.

EaseUS RecExperts

how to screen record presentation on mac

One-click to capture anything on screen!

No Time Limit, No watermark

how to screen record presentation on mac

 

how to screen record presentation on mac

Melissa Lee

how to screen record presentation on mac

  

how to screen record presentation on mac

 

how to screen record presentation on mac

Related Posts

how to screen record presentation on mac

How to Record Private Video on Telegram [Solved]

how to screen record presentation on mac

How to Record BBC iPlayer with 3 Simple Steps [4K UHD]

how to screen record presentation on mac

How to Screen Record on Microsoft Surface Pro

how to screen record presentation on mac

Top 6 Overwolf Clipping Software Recommended in 2024

Success, thanks for submitting!

how to screen record presentation on mac

  • Refund Policy
  • Terms & Conditions
  • Do Not Sell

DMCA.com Protection Status

Copyright © 2004 - 2023 EaseUS. ALL RIGHTS RESERVED.

  • GTA 5 Cheats
  • What is Discord?
  • Find a Lost Phone
  • Upcoming Movies
  • Nintendo Switch 2
  • Best YouTube TV Alternatives
  • How to Recall an Email in Outlook

How to record your screen on Mac, Windows, and Chromebook

Anita George

Recording your screen on your Mac, Windows PC, or Chromebook is a great way to show friends your cool gaming tricks, make tutorial videos for software you use, and show off your techniques in digital art. Unfortunately, screen recording isn't quite as easy as taking a screenshot . There are however, a ton of ways to accomplish this task and you should be able to record your screen on Windows or any other device in just a few minutes after picking one.

How to screen record on Windows using Xbox Game Bar

How to screen record on windows using powerpoint, how to screen record on a mac using the screenshot tool, how to screen record on a mac using quicktime player, how to record your screen on a chromebook, multiplatform (chrome extension), alternative offline apps for professional work, obs studio (free), snagit ($63+), what you need.

Device with Windows 10 (Computer, Xbox), Mac, or Chromebook

PowerPoint (optional)

QuickTime Player (optional)

Screencastify (optional)

The task is easier than you might think, as Windows 10/11, MacOS, and even Chrome OS have built-in tools that can get the job done. In this guide, we’ll show you how by using native, open-source, and paid third-party tools.

Windows 10 includes a native video capture tool, but it’s primarily designed for gamers. However, it can be used for any open application, offering a convenient way to record the screen and even add audio if needed.

Note: All steps for Windows devices will also all work on Windows 11, including options to use PowerPoint explained below. However, Windows 11 will look a little different from the images we are using. If you prefer step-by-step instructions for Windows 11, be sure to check out our Windows 11-specific screen recording how-to guide .

To use the Xbox Game Bar feature, your PC needs to support one of the following encoders . Most modern graphics cards or processors support them.

  • Intel Quick Sync H.264 (Intel second-generation CPU or newer)
  • Nvidia NVENC (most Nvidia GeForce 600 or newer; most Quadro K series or newer)

Step 1: Select the Start button, followed by the Gear icon located in the Start Menu.

Step 2: Select Gaming in the Settings app.

  • The most common Microsoft Teams problems and how to fix them
  • How to keep your laptop battery healthy and extend its life
  • The most common Zoom problems and how to fix them

Step 3: The Xbox Game Bar section should load by default. As shown below, there’s a toggle under the second paragraph that should be set to On . If it reads Off , then select the toggle.

Step 4: Select Captures listed on the left to view and adjust further customization options if needed.

Under Captures , you can change your save location for your recordings and screenshots , enable background recording, and enable recordings even when your laptop isn’t plugged in. There are also options to enable recording while projecting your screen, set a maximum recording length, and adjust your audio settings and video quality settings.

Step 5: When you’re done adjusting your settings, type the default keyboard shortcut to open the Xbox Game Bar: Win + G .

You may or may not see a prompt asking if the highlighted application on your screen is a game. If you do, just select Yes . Sure, it’s a lie, as Xbox Game Bar is meant for capturing gameplay, but this little fib extends this feature out to other applications. However, Xbox Game Bar does not record the desktop or File Explorer, it only opens with applications.

Step 6: The Xbox Game Bar appears near your screen’s top-center edge. It provides buttons to access these overlays and settings:

  • Widget Menu
  • Performance
  • Xbox Social
  • Looking for Group

The Game Bar’s Capture overlay should appear by default. If not, select the Webcam icon on the Xbox Game Bar, as shown below.

Note : If your PC has more than one connected display, like a three-monitor setup, the Xbox Game Bar interface will appear on the screen where you last clicked.

Step 7: To begin, select the round Start Recording button on the Capture overlay. To stop the recording, select the Stop recording button, which looks like a square within a circle.

Alternatively, you can type the Win + Alt + R key combination to start and stop recording with Xbox Game Bar enabled.

All captured videos are saved as MP4 files in the Videos > Captures folder under This PC in File Explorer.

Recording your screen with PowerPoint is relatively easy. The drawback is that you need Microsoft’s desktop software for this to work — and a Microsoft 365 subscription . This does not work with the online-only version.

Step 1: With a PowerPoint file already open, select Insert on the menu bar followed by the Media icon on the far right side.

From the drop-down menu that appears, choose the Screen recording option.

Step 2: The screen dims white and renders a toolbar along your screen’s top-center edge, as shown below. Select the Select area button and use your mouse to draw a box around the area you want to record. The target area is then outlined with a red dashed line and devoid of the white transparency.

Alternatively, press the Windows + Shift + R keys simultaneously to record the entire screen.

Step 3: Select the Record button or press the Windows + Shift + R keys simultaneously.

Step 4: You can choose the Pause button — it replaces the Record button — to halt the recording as needed. Select the square Stop button to end the capture.

Step 5: To save the recording, right-click on the video displayed within PowerPoint and select the Save media as option on the pop-up menu. Follow the on-screen prompts to save your recording.

When you’re done, you can save the video as a separate file to access or embed as you see fit. Editing and control options are very limited after that, but PowerPoint is a great option for quick-and-dirty recording — especially if you’re doing it for a looming presentation.

Included with macOS Ventura is a native feature that allows you to record the screen and take screenshots . Here’s how:

Step 1: Press Shift + Command + 5 to bring up the screenshot toolbar.

Step 2: The toolbar appears on the screen with two sets of buttons: Three on the left to capture a screenshot and two in the middle for recording the screen. It also provides Options and Capture (or Record ) buttons.

Step 3: Select the Record entire screen button (left) or the Record selected portion button (right) followed by the Record button — it replaces Capture if the tool was originally in screenshot mode — located on the right.

Step 4: When done, select the little Record button located on the menu bar at the top of the display, as shown below. Alternatively, press Command + Control + Esc . The video saves to the desktop by default.

If you’re running a version of MacOS older than Mojave, you can always use QuickTime Player for basic screen recording, as well as audio recording. QuickTime recordings aren’t easy to edit, but if you want a fast and easy recording method, it’s one of the simplest.

Note : QuickTime Player is also available on Catalina and Big Sur.

Step 1: Open QuickTime Player from the Launchpad. If you don’t see it, check the Launchpad’s Other folder.

Step 2: With the app open, select File , located on the Menu Bar .

Step 3: Choose the New screen recording option listed on the drop-down menu.

Step 4: You may see a prompt asking permission to record the computer’s screen. Select the Open System Preferences button and add a tick to the checkbox next to QuickTime Player . You may need to restart QuickTime Player. If not, skip to Step 6.

Step 5: When QuickTime restarts, select File , followed by New screen recording .

Step 6: The Screenshot tool toolbar appears on the screen with two sets of buttons: Three on the left to capture a screenshot and two in the middle for recording the screen. Choose Options to add or remove mouse clicks, use the built-in microphone, and designate the video’s destination.

Step 7: Select the Record entire screen or Record selected portion button, followed by the Record button located on the right.

Step 8: When finished, navigate to the menu bar and select the Stop recording button, as shown below. Alternatively, select the appropriate symbol if your Mac has a Touch Bar.

Step 9: To save your recording, select File on the menu bar, followed by Save in the drop-down menu. Choose an appropriate save location (if you haven’t already) and name for the recording, then select Save to confirm.

If you have one of the best Chromebooks , Google offers a native screen recording tool for Chrome OS.

Step 1: Log in to Chrome OS. Simultaneously press Shift + Ctrl + the Show windows button (which looks like a box with lines beside it).

Step 2: Click the Screen capture button on the pop-up menu.

Step 3: The screen dims, and a toolbar appears along the bottom. In this example, the screen capture tool is set to Record partial screen , as shown above. Press and hold the mouse button or touchpad to draw a box around the area on the screen you want to capture. The toolbar also provides options for Record full screen and Record window .

Step 4: By default, the screen capture tool is set to Screenshot . Select the Screen record button on the toolbar — it resembles a movie camera pointing to the right — to capture video.

Step 5: Select the Record button centered within the selected area.

Step 6: To finish, choose the Stop screen recording button displayed on the Shelf next to the system clock.

By default, the captured video saves to the Downloads folder as Screen recording [date][time] in the WebM file format.

If you’re not keen on the native solutions listed above, you can install a Chrome extension called Screencastify that does a good job. Here’s how to install and use it:

Step 1: Open the Screencastify listing in the Chrome Web Store and select the Add to Chrome button, followed by Add extension in a pop-up window.

Step 2: Select the Screencastify icon located next to the address bar. If the icon doesn’t automatically appear there, you will need to select the Extensions icon (looks like a puzzle piece) and then select the pin icon next to Screencastify so you can pin the extension’s icon next to your address bar.

Step 3: Sign in with your Google account and follow the prompts to create a Screencastify account.

Step 4: Select the Screencastify icon in the top-right corner again. A drop-down menu will appear.

Step 5: Select a source: Browser tab , Desktop , or Webcam only .

Step 6: Enable the microphone and/or webcam if needed.

Step 7: Select Show more options for additional settings, like a countdown timer.

Step 8: Select the blue Record button. You can only record for 30 minutes using the free account.

Note : If you choose Desktop , the following screen prompts you to select your Entire Screen or application Window . After that, choose Share .

Step 9: When you’re done recording, select the pink and white End recording button in the bottom left corner of your screen.

Another tab will open with your recorded video ready to playback for you.

Step 10: You can now edit the video, share a copy, download it, and more. To edit the name, select the text field to the left of the Open in editor button.

The video saves to your Google Drive by default.

If you want an enhanced recording experience from an app specifically designed for more professional — and gaming-oriented — clips, then your best bet is to download one of the apps below.

As one of the more advanced and freely available screen-recording apps, OBS Studio is open-source and has built-in streaming functions for those who want a live audience while recording. OBS Studio is more fully-featured than some freemium apps, but setting up your personal preferences can take a little longer. However, it’s still the best of the free screen-recording apps currently available. It’s available for Windows, macOS, and Linux.

Snagit targets startups more than gamers. It packs a ton of recording features primarily for use in a workplace setting. You can use Snagit to help you put together your next training presentation or illustrate an idea or new workflow. These features include a screen recorder, annotations for screenshots, templates, and the ability to create video from a series of screenshots. It does cost $63 (and possibly more after the first year with a yearly Maintenance subscription), but if you don’t mind paying for the privilege, the added features are worth it. Snagit also offers a 15-day free trial.

Editors' Recommendations

  • How to convert FLAC to MP3 on Mac, Windows, and web
  • The most common GoTo Meeting problems and how to solve them
  • How to share your Outlook calendar
  • How to schedule an email in Outlook for Mac, Windows, and web
  • How to mass-delete all your emails on Gmail at once
  • How-To Guides
  • Microsoft Windows
  • Windows Guides

Anita George

Similar to zip files, a RAR (Roshal Archive) file is a way to compress multiple files down into a single, high-quality container. Once you’ve downloaded or received RAR content, the only thing you have to do is extract it to gain access to the media and docs within. Unlike zip files though, unpacking a .rar file isn’t as simple as selecting “unzip.”

Your MacBook is your go-to powerhouse for all things computing. Web browsing, graphic design, video editing, music production, you name it, the MacBook can do it. But like any good laptop, your MacBook has a number of battery-saving features built in and enabled by default. One of these functions is the computer’s sleep mode, which optimizes battery life by decreasing power usage.

Microsoft Teams is a terrific platform for workplace collaboration, but there may come a time when you need to leave a particular team. Whether it’s because a project has been completed, or specific employees are switching roles, or simply joining another team or project, removing yourself from an existing Teams collaboration couldn’t be easier. Plus, we’ve put together this step-by-step explainer for carrying out this task, which covers both desktop and mobile versions of Microsoft Teams.

how to screen record presentation on mac

Contribute to the Microsoft 365 and Office forum! Click  here  to learn more  💡

April 9, 2024

Contribute to the Microsoft 365 and Office forum!

Click  here  to learn more  💡

PowerPoint Top Forum Contributors: Steve Rindsberg  -  John Korchok   👍✅

April 17, 2024

PowerPoint Top Forum Contributors:

Steve Rindsberg  -  John Korchok   👍✅

  • Search the community and support articles
  • Microsoft 365 and Office
  • Search Community member

Ask a new question

Recording in PowerPoint on Mac

I have seen several videos and tutorials about using PowerPoint for recording videos.  It records the slideshow, your audio, and allows you to write or draw on the screen.  I cannot figure out how to get it to work on my Mac.  I am using the desktop version for Mac.  I have a teacher O365 account.

Note: I know about Zoom, Screencastify, Screencastomatic, Teams Meeting, and all the others.  I would like help specifically with recording in PowerPoint.

Report abuse

Jazlyn Xu MSFT

  • Microsoft Agent |

Was this reply helpful? Yes No

Sorry this didn't help.

Great! Thanks for your feedback.

How satisfied are you with this reply?

Thanks for your feedback, it helps us improve the site.

Thanks for your feedback.

Replies (5) 

Question info.

  • Norsk Bokmål
  • Ελληνικά
  • Русский
  • עברית
  • العربية
  • ไทย
  • 한국어
  • 中文(简体)
  • 中文(繁體)
  • 日本語
  • DemoCreator  > Easy video recorder and editor for PC & Mac
  • DemoAir  > Online screen recording tool for everyone
  • Effects Store  > NEW Creative video effects for DemoCreator
  • Virbo  > Easily convert text into spokesperson videos
  • Screen Recorder  >
  • Webcam Recorder  >
  • Voice Recorder  >
  • Game Recorder  > HOT
  • Video Presentation  >
  • Screen Drawing  >
  • Schedule Recorder  >
  • Video with Virtual Camera  >
  • Video Editor  >
  • Cut/Merge Video  >
  • Resize Video  >
  • Change Video Speed
  • Batch Processing  >
  • Video Overlay  >
  • Audio Editing
  • Online Screen Recorder  >
  • Online Voice Recorder  >
  • Online Webpage Screenshot  >
  • Screen Recorder for Chrome  >
  • Online Video Presentation Maker  >
  • HOT Video Editor  > Take your videos to the next level
  • NEW DemoCreator  > Easily make a visual video presentation
  • AI Avatar Video Generator  > HOT
  • AI Denoise  >
  • AI Voice Changer  >
  • AI Teleprompter  > HOT
  • AI Subtitle Generator  >
  • AI Speech Enhancer  >
  • AI Background Remover  >
  • AI Text to Speech  > HOT
  • AI Video  >
  • AI Voice  >
  • AI News  >
  • Hot Spot  >
  • Best AI Avatar Generators  >
  • AI Audio to Video  >
  • AI Virtual Friends Apps  >
  • Best AI Face Generators  >
  • Online Course >
  • PPT Recording >
  • Demo Video >
  • Game Recording >
  • Record on Windows  >
  • Record on Mac  >
  • Record on Mobile  >
  • Game Recording  >
  • YouTube Videos  >
  • Creative Effects  >
  • Audio Editing  >
  • Video Conference  >
  • Zoom Recording  >
  • Remote Work  >
  • Demo Video Tips  >
  • Online Class  > NEW
  • Teacher Skills  >
  • Elearning Tips  >
  • Lectures Recording  >
  • HOT DemoCreator Camp Take your videos to the next level

recom-item-pic

  • User Guide  >
  • Video Tutorial  >
  • Tech Specs  >
  • What's New  >
  • Download Buy Now Download Buy Now

The Ultimate Guide: 5 Ways To Take a Screenshot on Mac

Alma Elliott

  • How to Record Webcam on Windows and Mac
  • 6 Best Ways to Take a Scrolling Screenshot in Windows 11 or 10
  • Top Tips on How to Record Video on Windows 11
  • How to Use a Screen Video Recorder in Windows 7
  • Steps on How to Record Videos on Windows 8
  • 7 Most Efficient Screen Video Recorders for Windows 10
  • 10 Best Free Screen Recorders for PC To Capture Every Moment
  • 10 Best Voice Recorder Apps for PC To Enhance Your Recording
  • Top Offline Screen Recorder for Mac OS (Free & Paid)
  • 10 Best GIF Recorders for Mac
  • 10 Best Screen Recorders for Mac [2024]
  • How To Record a YouTube Video on a Mac – All Methods
  • The Ultimate Race: Top 10 Skype Call Recorders for Mac
  • How To Record the Screen With Audio on macOS
  • How To Screen Record on Mac – 3 Best Methods
  • Screen Recorder App for PC, Android, iPhone, and Chrome
  • Top 9 Best Android Apps for Screen Recording
  • 6 Best Free Webcam Recorders
  • Top 8 Secret Screen Recorder Apps in 2023
  • How To Record Console Gameplay
  • How to Take screenshots in Windows 11
  • How to Record YouTube Videos on Your PC [Only 5 Steps]
  • How to Record a Zoom Meeting
  • Record Facecam on Windows 11 – Top 8 Tools to Try on Windows 11
  • Best Webcam Recorder with Facial Beauty Function
  • Top 10 Audio Recording Software for Mac
  • Top Online Sound Recorders
  • Audio Extractor: 8 Best Software to Extract Audio from Video
  • 6 Best Ways to Record YouTube Audio [Easy]
  • 2 Best Ways to Record Audio in Windows 11
  • Top 2 Methods for Screen Recording With Audio on Windows 10
  • Windows 11 Screen Recorder
  • Best OBS Settings for Low-End PC
  • Best Windows Game Capture Programs
  • 12 Best Android Screen Recorders with Internal Audio
  • 10 Best 60 FPS Screen Recorders for Windows/Mac
  • Top14 HD 1080P Screen Recorders for PC
  • Best Facial Recognition Software
  • How To Record Audio in PowerPoint on Mac - Full Guide
  • How To Record a Powerpoint Presentation With Audio and Video on Mac

For those who use Apple devices, understanding how to screenshot on Mac is essential for seamless communication, documentation, and collaboration. This comprehensive guide will provide you with all the necessary tips and tricks for capturing the perfect screenshot on your Mac, whether you're using a MacBook Pro, Air, iMac, or any other model.

In this article

  • How To Customize the Screenshot Shortcuts on a Mac

Limitations of Screen Capturing on Mac Using Shortcut

  • Take Screenshots on Mac Using the Touch Bar

Limitations of Taking a Screenshot on Mac Using the Preview App

Limitations of the screenshot menu.

  • How To Screenshot a Full Webpage on Mac
  • Take a Screen Record on Mac Using DemoCreator

Way 1: Take a Screenshot on Mac With Keyboard Shortcuts

If you question yourself "how do I do a screen capture on a Mac", do not hesitate to use some keyboard shortcuts which are the simplest ways to take screenshots on your Mac. As it were, all you have to do is click this magic button and get your entire desktop saved, or just press these keys and have the activity on only that window recorded for future reference.

The following are some of the shortcuts of taking screenshot on Mac using keyboard:

As an example, let's take a look at how you can capture the whole Mac screen using the keyboard shortcut:

  • Press and hold the " Command ", " Shift " and " 3 " keys simultaneously. This will take a screenshot of your entire screen.

keyboard shortcut for screenshot mac

How To Customize the Screenshot Shortcuts on a Mac?

Occasionally, it might be that the default keyboard shortcuts for screenshots on Macs may either come into conflict with some other shortcuts for apps or you may simply not fancy them. This customization can help with making the process of taking screenshots much easier and quicker. Here's how to change screenshot keys combinations in Mac:

system preferences

  • You'll see a list of different screenshot actions and their corresponding keyboard shortcuts. Double-click on any shortcut combination you want to change.
  • Once you've entered your desired shortcut, click on the red Close button in the top-left corner to save your changes and exit the System Preferences window.
  • Limited editing options, no annotation or cropping tools
  • Inflexible capture options (full screen, selected area, window only)
  • No built-in sharing or cloud storage integration
  • Limited customization beyond remapping keyboard shortcuts

Way 2: Take Screenshots on Mac Using the Touch Bar

For users with 2016 and newer MacBook Pro models featuring the innovative Touch Bar, taking screenshots is as simple as a tap. This handy Mac snipping tool allows you to add a dedicated screenshot button right to your Touch Bar, providing quick access to capture anything on your screen.

Here is how to screenshot at a MacBook using the Touch Bar:

add screenshot to touch bar

  • Select whether you want to capture the entire screen, a window, or a specific area. Your screenshot will be saved to your desktop automatically.

Way 3: Take a Screenshot on Mac With the Preview App

macOS comes packed with a powerful built-in tool called Preview that allows you to view and edit various file types, including images and PDFs.

However, did you know that Preview can also be used to print a screenshot on Mac ? This versatile app offers a convenient way to take screenshots and even provides basic editing capabilities, making it a great all-in-one solution.

Here is how to snapshot screen on Mac using Preview:

  • Open the window or screen you want to capture. Launch the Preview app from the Applications folder or using Spotlight search .

screenshot on mac using preview

  • Once captured, the screenshot will open in Preview , where you can make edits if needed.
  • Editing options are basic (cropping, annotating, adjusting colors)
  • No advanced screenshot tools like scrolling capture or timed capture

Way 4: Take a Screenshot on Mac With the Screenshot Menu

macOS Mojave and later versions come equipped with a handy built-in Screenshot Menu , providing a centralized hub for all your screenshot needs.

This menu offers a variety of options for capturing your screen, making it a versatile tool for both basic and advanced users.

Here is how to take a screen grab on a Mac using Screenshot Menu:

  • Press Command + Shift + 5 on your keyboard to open the Screenshot Menu .

screenshot on mac using screenshot menu

  • Choose your desired capture mode: Entire Screen, Window, or Selection.
  • A thumbnail preview of your screenshot will appear in the corner of your screen. You can annotate, share, or save the screenshot from this preview.
  • No advanced features like scrolling window capture or timed screenshots
  • No built-in integration with cloud storage services
  • Limited customization options for capture settings

Way 5: How To Screenshot a Full Webpage on Mac

While the built-in screenshot tools on a Mac are great for capturing what's visible on your screen, they fall short when it comes to capturing an entire webpage. This is where online tools like DemoAir - Screenshot come in handy.

This web-based tool allows you to capture full-length screenshots of any webpage, regardless of its size or length, making it a valuable resource for web designers, developers, and anyone who needs to document or share entire web pages. You can enjoy the following features of DemoAir:

  • Capture full webpages, including content that extends beyond the visible screen
  • Choose between capturing the entire page or a specific section
  • Crop, resize, or blur the captured image before saving
  • Save screenshots directly to your computer or cloud storage services like Google Drive and Wondershare Drive

Here is how to take a screenshot on Mac of webpage using DemoAir:

  • Visit the DemoAir - Screenshot website. Enter the URL of the webpage you want to capture in the provided field.

demoair full webpage screenshot on mac

Way 6: Take a Screen Record on Mac Using DemoCreator

If you need to capture more than just static screenshots, DemoCreator is a powerful tool that allows you to record your Mac's screen, camera, and audio simultaneously. Whether you're creating tutorials, recording gameplay, or capturing video presentations, DemoCreator offers a comprehensive solution with its advanced recording modes and built-in editing capabilities.

Here are some of its best features:

  • Screen Recorder, Screen & Camera, Camera Recorder, Game Recorder, Avatar Recorder, and Video Presentation.
  • Record up to 4K/8K resolution at up to 120 fps, ensuring crystal-clear visuals.
  • Record screen, camera, and audio tracks independently for easier editing.
  • Trim, cut, and merge clips, add annotations, and apply various effects using the integrated editor.
  • Schedule recordings, customize capture settings, and utilize screen drawing tools.

Here is how to screen capture in Macbook using DemoCreator:

democreator screen recorder for mac

Taking screenshots and screen recordings on a Mac is no big deal because options for built-in or third-party software are available. While user-friendly approaches like shortcuts on keyboard, touch bar, preview and screenshot menu are useful in taking your desktop's picture with ease, they may not have advanced settings for editing purposes.

For those who want better comprehensiveness, tools like DemoAir - Screenshot and DemoCreator should be considered as the best alternatives. With this tool DemoAir, you can easily capture full webpage while DemoCreator has a couple of recording modes to choose from including excellent output quality and b editing features which will enable create highly professional videos on your Mac.

You May Also Like

democreator 7.0

how to screen record presentation on mac

How to Record Customized Camera Feeds With Cameo in PowerPoint

T he widespread adoption of remote work and virtual meetings has led many people and organizations to realize they don't have to be physically present in the same conference room to make presentations. In fact, you don't even need to conduct them live.

However, recording your PowerPoint slides with your face on them requires technical know-how and third-party apps like OBS. This makes recording presentations a bit difficult and discourages people from doing it.

Thankfully, Microsoft has addressed this issue in PowerPoint 365 with the Cameo feature. Here's what it is and how to use it.

What Is Cameo in PowerPoint?

Cameo is a PowerPoint feature that lets you add your webcam or any other camera feed into your presentation. This makes it easier to present virtually, as your audience can see you from within your slides.

Previously, you needed a third-party app like OBS to overlay yourself on your presentation. You can also use a green screen overlay in Capcut or other similar apps to achieve the same effect. However, this takes a lot of effort and know-how.

But with this feature, you can do it from inside PowerPoint with just a few clicks. Here's how to insert a cameo into your slides.

  • Go to Insert > Cameo .
  • After clicking on Cameo, PowerPoint will insert a placeholder object on your current slide and open the Camera Format tab.
  • You can edit the object as you wish, much like any other shape on PowerPoint. You can also click on the options in the Designer pane on the right side of the screen to help you work faster.
  • Once you're happy with its placement on your slide, click on the Preview button to see your live video.

With that, you can start presenting your PowerPoint slides via screen sharing while still keeping yourself on the screen.

How to Record Your PowerPoint Presentation With Cameo

You can also insert a cameo from Record > Cameo . Clicking on this will bring you to the same menu tab and insert a placeholder object for your video. However, even if you didn't set up Cameo beforehand, you can insert it directly while recording your presentation. Here's how:

  • Go to Record > From Beginning or Record > From Current Slide .
  • In the recording screen, click on the Camera icon at the top. This will insert a round object containing your video in your slides' lower-right-hand section.
  • Click on the Red icon to start recording your presentation.
  • Go through your presentation as usual. For more information, check out our guide on turning your presentations into videos .
  • Once you've finished, click the Red icon again to stop recording.
  • Click Export to go to the Export to video screen .
  • Change the File Name as needed, then click Browse to select the location where you will save your recorded video.
  • Once done, click Export Video .

With that, you don't have to spend much effort to add your video feed to your PowerPoint presentation recording. However, the app only places your video at one location across every slide; it might cover some of your content. That's why it's better to use the Cameo feature when you're building or editing your PowerPoint presentation.

If you're unhappy with your recording, press the Retake Video on the left of the record icon. You can pick between On Current Slide or On All Slides .

What You Need to Record Customized Camera Feeds

You need a webcam and a Microsoft 365 account to record your customized camera feed. Furthermore, you cannot use Cameo or record presentations in the PowerPoint web app. You need to download and install it on your computer to use these features.

The Cameo feature is already available on Microsoft PowerPoint 365 in Windows and Mac. However, recording your presentation with Cameo is only available on Windows. As of the time of writing, this feature isn't available for the main PowerPoint 365 for Mac version.

If you're running macOS, you must be a Microsoft 365 Insider to get this feature. However, since the Cameo recording feature is already announced in the Microsoft 365 Insider blog , we hope it will be available in the mainstream PowerPoint for Mac version in a few months.

Recording Your Presentations Is Now Much Easier

The Cameo feature has made presenting PowerPoint slides in video calls easier. And with the recording function, you no longer need a third-party app to put your video over your presentation.

You can integrate it into each slide, allowing you to control where you are on your screen. And you also save a lot of time and effort, as you can record and save your presentation as a video from within Microsoft PowerPoint.

How to Record Customized Camera Feeds With Cameo in PowerPoint

  • Accessories
  • Entertainment
  • PCs & Components
  • Wi-Fi & Networks
  • Newsletters
  • Digital Magazine – Subscribe
  • Digital Magazine – Log in
  • Smart Answers
  • Best laptops
  • Best antivirus
  • Best monitors
  • Laptop deals
  • Desktop PC deals

When you purchase through links in our articles, we may earn a small commission. This doesn't affect our editorial independence .

4 free ways to screen record Windows 11 [2024 guide]

A PC screen showing a recording

Knowing how to screen record Windows 11 is necessary, especially when you want to perform a software task, clip gameplay highlights, capture online classes, etc. Luckily, many screen recorder programs are available for Windows 11 PCs and laptops, including inbuilt tools (Game Bar, Snipping Tool) and professional third-party software (EaseUS RecExperts, OBS). Here, we will explore these screen capture software to optimize Windows 11 screen recording, empowering you to produce high-quality recordings for any purpose easily.

For your convenience:

  • If you want to find professional video recording software to perform Windows 11 screen recording, tools like EaseUS RecExperts and OBS are good options. They can easily handle various recording tasks, but OBS is more suitable for professionals.
  • For those who simply want to record screens in Windows 11 without any software, built-in programs (Xbox Game Bar and Snipping Tool) can meet your needs.

Record Windows 11 screen and sound in high quality

  • Difficulty: Super easy – With the on-screen instructions and simple UI, this tool is easy to operate without any tech knowledge.
  • Effectiveness: High – It offers many advanced recording tools for various recording tasks, and exports high-quality recorded files. Plus, it provides free and pro versions for different users.
  • Limitations: Like most third-party applications, its free version only lets you save 1 minute of your recording. If you are a light user, that’s enough.

EaseUS RecExperts is an ideal Windows 11 screen recorder with audio for those who want to create high-quality video clips easily and quickly. This professional Windows capture software offers various recording modes to meet almost all users’ needs, including game recording, protected video recording, screen and sound recording, flexible screen recording, and more. You can also use it to screen record Windows 10 with audio if needed.

While recording, you are able to use the real-time annotation tools to add text or draw something on your screen. Plus, it can record up to 4K video resolution on your desktop screen and export it in various formats. Last but not least, it will leave no watermark on any of your recordings!

Step 1. Download and launch it on your desktop, and you will see a simple interface. To make a screen recording, choose the Record screen icon on the left panel to continue.

EaseUS screen recording software

Step 2. Now, you can select your recording area. If you want to record the entire screen, click Full Screen . If you prefer to customize the recording range, select the Region option.

If you have a webcam, system sound, or microphone recording need, you can turn on the corresponding options respectively.

Step 3. To get high-quality recorded video clips, you can also click the gear icon to adjust recording parameters, like file path, video quality, shortcut keys, and so on. Once everything is ready, click REC to start recording.

Step 4. Finally, when your screen activity is over, click the stop button. You can preview your recorded videos by clicking Recordings . You can also edit your video clips here by trimming, adding opening credit, etc.

Record customized Windows 11 screen exclusively with the Snipping Tool

  • Difficulty: Easy – It has a neat interface and a single recording function.
  • Effectiveness: Medium – It lets you record any region on your screen and export recordings in a common format (MP4) for sharing.
  • Limitations: You cannot adjust recording parameters like format, resolution, etc. And the recording shortcuts are not available.

For Windows 11 users, the Snipping Tool is not only a tool for taking and editing screenshots but also a free Windows 11 screen recorder. This freeware offers a recording feature that lets you capture any region on your desktop by drawing a box. That means you can use it to record full or partial screen flexibly. If needed, you can even capture both audio (microphone or system sound) and screen simultaneously on your Windows 11 desktop.

However, to record the Windows screen with the Snipping Tool, your Windows operating system should be 22621.1344 or higher. You can click Settings > System > About to check the details.

Step 1. Enter Snipping Tool in the search bar and click on the result to bring up this free Windows 11 screen recorder.

Step 2. On the toolbar, choose the Record option (which looks like a camera). Next, click New to select the area you want to record.

Using the snipping tool

Step 3. Once the recording region is selected, you can flexibly choose to capture the Windows 11 screen with your system sound or microphone audio simultaneously.

Step 4. When you are ready, click Start to perform the screen recording activity. Once you stop the recording, the recorded video file will start playing automatically in a Snipping Tool preview window.

Capture Windows 11 desktop directly via Game Bar

  • Difficulty: Easy – You can open and use this tool with a few shortcuts.
  • Effectiveness: Medium – It supports recording a single Window and audio on your Windows 11 desktop and exporting files in HD quality.
  • Limitations: You can only record screens for up to 4 hours. And it cannot record File Explorer and Windows desktop.

Another free Windows 11 screen recorder is the Xbox Game Bar. Like the Snipping Tool, it is also pre-installed on your operating system. With its aid, you can capture Windows 11 screens on a PC or laptop for up to 4 hours with just a few shortcuts and then export them in HD quality. Better than the Snipping Tool, Game Bar allows you to adjust the quality, frame rate, and hotkeys for your recording. However, you cannot customize your recording region.

Step 1. Press the Windows icon + G keyboard shortcut to open the Xbox Game Bar on your Windows 11 PC or laptop. Or you can enter the Xbox Game Bar in the search bar and select it in the menu.

Note: If the Game Bar is not showing up, go to Settings > Gaming > Xbox Game Bar and enable the feature.

Step 2. Next, you will see a floating toolbar with various icons. Click Settings to adjust your recording parameters, such as choosing the sound source and customizing shortcut keys.

Step 3. Return to the floating toolbar and select the Capture option. Then, click on the Start recording button or press the Windows + Alt + R hotkeys to begin your Windows 11 screen recording directly.

Using the Game Bar

Step 4. During your recording, you can enable or disable your microphone at any moment. Once done, hit the same shortcut key, Windows + Alt + R, to end and view your video recordings by clicking Show all captures .

Advanced tips for recording Windows 11 desktop screen with Game Bar:

Click Settings > Gaming > Captures to adjust advanced recording settings, including:

  • Aaving path
  • Max recording length
  • Record desktop screen with microphone, system sound, or both
  • Video frame rate and video quality

Screen record Windows 11 for free with OBS

  • Difficulty: Hard – It’s difficult for novices to operate because of the complicated UI.
  • Effectiveness: High – It provides numerous recording and streaming tools and allows you to customize your personal recording settings.
  • Limitations: Like many open-source software, it lacks regular updating and technical support. You nearly cannot get help if something is wrong with your recordings.

OBS Studio is a free, open-source Windows 11 PC screen recorder that allows you to create high-quality recordings and save them in MP4 format on your laptop.

This screen capture software lets you record any area on your desktop. It offers many advanced features to improve your recording experience, including capturing desktops with audio or webcam, capturing dual monitors, and more. With its help, you are able to complete almost any recording task.

However, OBS is difficult to use because of its complicated UI. So, it is more suitable for professionals than novices.

Step 1. Download OBS Studio from its official website and install it on your Windows 11 PC by following the on-screen instructions.

Step 2. On the main interface, click the + button under the Source tab and find the Display capture button. Then, you will be led to your screen as the display capture.

OBS Studio screen recording software

Step 3. To record a Windows 11 screen with audio, you can click the + icon under the Source tab. Then, add your Audio Input Capture .

Step 4. (Optional) Click Settings to adjust the recording parameters based on your needs.

Step 5. If everything is correct, hit the Start Recording button at the lower right corner to begin recording.

Tips for selecting the right method of recording Windows 11 screen

Well! As you can see, there are numerous screen recorders that can help you capture screen activities on Windows 11 PCs or laptops. However, which one is best for you? Here, we will discuss it in detail.

First of all, you need to understand your requirements . If you are a general user who simply wants to share on-screen activities, you probably care nothing about the recording quality or something else. Then, some built-in free tools might help you. But, if you are a heavy user, like a content creator, you might place more weight on recording quality, tools, and many advanced features.

After knowing your own requirements best, you can start choosing a Windows 11 screen recorder by checking the items below:

1. Easy to use

An easy-to-use app will always improve your efficiency. So, you first need to check if the tool is friendly. Otherwise, you will waste a lot of time learning how to use it.

2. Recording features/quality

You might need to perform different recording tasks during work and life, so the screen recorder should be multifunctional. You need to make sure that whether its recording features and quality can meet your needs or not. Generally, a versatile screen recorder with high performance is more popular.

3. Price/trial

There is a wide range of pricing options for Windows 11 screen recording solutions, and you can obtain freeware or commercial applications. In most cases, a paid/freemium solution will offer more functionality and ease of use than free alternatives. You should prioritize solutions that offer the best value for money.

Record screen in Windows 11 FAQs

1. does windows 11 have a screen recorder.

Sure! Windows 11 operating system comes with some built-in recording tools, like Xbox Game Bar and Snipping Tool. Both tools can help users capture Windows 11 PC or laptop screens with sound in HD quality. However, each inbuilt Windows 11 screen recorder has its own limitations:

  • Game Bar: It doesn’t support capturing Windows desktop or File Explore. The max recording time is 4 hours.
  • Snipping Tool: There is no keyboard shortcut to jump directly into Recording like there is for Snipping (CTRL+Shift+S).

2. How do I record my screen on Windows 11 without any software?

To record screens on Windows 11 without any software, you can try online screen recording tools. These online services require no downloading or installation, and you can begin your Windows 11 screen capture activity as soon as you open its website. Here are some famous ones you can have a try:

  • EaseUS Online Screen Recorder

3. What is the shortcut key to screen record on Windows 11?

You can use the shortcut keys to perform Windows 11 screen recording activities quickly. Below are some common hotkey combinations for recording:

  • Windows + G: Open the built-in screen recorder – Xbox Game Bar
  • Windows + Alt + G: Start recording the last 30 seconds
  • Windows + Alt + R: Begin or end the screen recording
  • Windows + Alt + M: Enable or disable the microphone while recording
  • Windows + Alt + B: Turn HDR on or off

Use Notes on your iPhone, iPad, and iPod touch

With Notes, you can capture a quick thought, create checklists, sketch ideas, and more. And with iCloud, you can keep your notes updated across all your devices.

Notes icon

Get started

Make sure that your iPhone, iPad, or iPod touch has the latest version of iOS or iPadOS .

To use the latest features of Notes, make sure that you set up Notes with iCloud or have notes saved on your device. Many Notes features won't work with other email providers.

Create a new note

Open Notes.

Compose button

The first line of the note becomes its title. To change the formatting style of the first line, go to Settings > Notes > New Notes Start With, then select an option.

You can also quickly access Notes from Control Center. Go to Settings > Control Center, and add Notes. Then open Control Center and tap Notes to create a note. Or, just ask Siri to "Start a new note."

Do more with Notes

With Notes, you can pin your top notes, draw, create checklists, scan and sign documents, and add attachments — like photos, videos, or web links.

iPhone showing how to pin a note in the Notes app.

Format a note

The format options in Notes on iPhone

Undo changes to a note

No alt supplied for Image

Add an attachment

iPhone showing how to add an attachment in the Notes app.

Add a photo or video

iPhone showing how to add a photo or video to a note in the Notes app.

Link to a note

In iOS 17 and later, you can link to other notes within a note:

In a note, touch and hold blank space. Let go to bring up the options menu.

No alt supplied for Image

Enter the title of the note that you want to link to and select it from the list.

The options for adding a link in Notes on your iPhone with iOS 17 or later.

Turn Use Note Title as Name on or off. Enter different link text if needed.

You can also type ">>" in the body of your note, enter the title of the note that you want to link to, and select it from the list.

Create folders

Yellow arrow to go back to previous screen.

Choose where to add the folder. To create a subfolder, drag the folder that you want to be a subfolder to the main folder. It will move below the main folder and be indented.

Name your folder, then tap Save.

Move a note to a different folder

Tap the notes that you want to move.

iPhone showing how to move a note to a different folder in the Notes app.

Tap Move, then select the folder you want to move them to.

See your notes in Gallery view

iPhone showing what notes look like in the Gallery view.

To sort your notes inside of folders:

Go to the folder that you want to sort.

Choose how you want to sort your notes.

To sort all of your notes automatically, go to Settings > Notes, and tap Sort Notes By. Then choose how you want to sort your notes.

Search for a note or attachment

To search for a specific note, just tap the Search field, then enter what you’re looking for. You can search for typed and handwritten notes. Search can recognize what's in the images inside of your notes. For example, if you search for "bike," search will show you all images that you have with a bike. Search can also find specific text inside scanned documents or images, like receipts or bills.

Create an instant note from the Lock Screen

You can use an Apple Pencil with a compatible iPad to create an instant note from the Lock Screen or pick up where you left off on your last note. To change these settings, go to Settings > Notes, tap Access Notes from the Lock Screen, and choose an option.

Tap the Lock Screen with your Apple Pencil and create your note. Whatever you create is automatically saved in Notes.

Keep your notes secure

The Notes app lets you lock any note that you want to keep private from anyone else that might use your device. Depending on your device, you can use your device's passcode or your Mac login password, along with Face ID or Touch ID, to lock and unlock your notes.

Use password protection with your notes

Delete a note

Swipe left over the note in the Notes list.

Trash button

Learn what to do if you're missing notes

Recover a deleted note

In the Notes app, go to the Folders list.

Tap Recently Deleted.

Tap the note that you want to keep.

Tap anywhere in the note, then tap Recover.

Set up Notes with iCloud

You can use iCloud to update your notes across all of your devices. To set up Notes with iCloud, go to Settings > [your name] > iCloud, then turn on Notes. You’ll see your notes on all of your Apple devices that you’re signed in to with the same Apple ID.

Learn more about Notes

Learn how to draw with Notes on your iPhone, iPad, or iPod touch.

Share your notes with friends and family , and invite others to collaborate on select notes.

Use Tags and Smart Folders to organize your notes and easily filter your tagged notes across your folders.

Use iCloud Notes from a web browser

To use Notes on iCloud.com, go to icloud.com and sign in using your Apple ID (the one you use with iCloud). Click on the Notes app.

If you’re using another iCloud app, you can switch to Notes by clicking the app’s name at the top of the icloud.com window.

When working with Notes on iCloud.com, make sure that you use a browser recommended in System requirements for iCloud .

If you only see Pages, Numbers, Keynote, and Settings on iCloud.com, you don’t have an iCloud Notes account set up. To save your notes to iCloud, which lets you sync notes between your different devices and lets you access your notes on the Web, go to the iCloud Settings > Accounts on your device and turn Notes syncing on.

If you try to use Notes on iCloud.com, but get a message that says an iCloud email address is needed, your iCloud isn’t set up with a free @icloud.com email account. iCloud uses this email account to store notes for the original Notes app on iCloud.com and your devices. If you don’t have an @icloud.com email address, you can create one by turning on Notes in iCloud preferences on your Mac or in Settings on your iOS device.

how to screen record presentation on mac

Explore Apple Support Community

Find what’s been asked and answered by Apple customers.

how to screen record presentation on mac

Contact Apple Support

Need more help? Save time by starting your support request online and we'll connect you to an expert.

IMAGES

  1. How to screen record on your Mac (Easy ways explained)

    how to screen record presentation on mac

  2. 9 Best Ways to Record Screen on Mac (with Quick Guides)

    how to screen record presentation on mac

  3. How to Screen Record on Mac !

    how to screen record presentation on mac

  4. HOW TO SCREEN RECORD ON A MAC

    how to screen record presentation on mac

  5. How to record the screen on your Mac

    how to screen record presentation on mac

  6. How to Screen Record on Mac (Easy Step By Step Guide)

    how to screen record presentation on mac

VIDEO

  1. How to Record Your Screen on PC and Mac for Free (Advanced Screen Recorder Included)

  2. How to Screen Record on Mac NO DOWNLOAD

  3. How to record screen on Mac (Apple)

  4. How to record screen in macbook [easy]

  5. How to Screen Record on Windows and Mac with Filmora 13 #filmora #wondersharefilmora

  6. Screen Record Mac

COMMENTS

  1. Record Keynote presentations on Mac

    Open the presentation, then click to select the first slide in the slide navigator. Choose Play > Record Slideshow (from the Play menu at the top of your screen). The presenter display appears with recording controls visible at the bottom of your screen. To customize the presenter display before you start recording, move the pointer, then click .

  2. How to record the screen

    To start recording, click the Record button and then take one of these actions: Click anywhere on the screen to begin recording the entire screen. Or drag to select an area to record, then click Start Recording within that area. To stop recording, click the Stop button in the menu bar, or press Command-Control-Esc (Escape).

  3. How to screen record on a Mac

    1. Press Shift-Command-5. To get started you need to access the Screenshot toolbar, which not only lets you record your screen activity but also take screenshots. Be sure to prep everything you ...

  4. How to Record Your Screen on Mac

    1. Press Command + Shift + 5 on your keyboard to open the Screenshot Toolbar. A toolbar with a number of icons and options will appear at the bottom of the screen. You're looking for the icons ...

  5. Record your Mac screen the easy way. Here's how to do it

    When you're ready to record, click the Record button. A small stop sign-like icon will show up in your menu bar on the top-right side of your display. Click on that when you're done recording. A ...

  6. How to record the screen on your Mac

    To start recording, click the Record button and then take one of these actions: Click anywhere on the screen to start recording the entire screen. Or drag to select an area to record, then click Start Recording within that area. To stop recording, click the Stop button in the menu bar, or press Command-Control-Esc (Escape).

  7. How to Screen Record on Mac: A Step-by-Step Guide

    Tips for Screen Recording on Mac. Tip 1: Use a good quality microphone if you're recording audio to ensure clear sound. Tip 2: Close any unnecessary applications to avoid notifications popping up during the recording. Tip 3: Use the editing tools in QuickTime Player to trim the start or end of your recording. Tip 4: If you're recording a ...

  8. How to Screen Record on Your Mac

    Open the Screenshot Utility on Mac. You can use the same tool to screen record that you do to take screenshots. Open up the Screenshot app using one of these methods: Press Command+Shift+5. Use Spotlight (Command+Space), search for "Screenshot," and choose the app from the results. Open the Applications folder using Finder and then click Go ...

  9. How to Screen Record on a Mac

    Press Command + Shift + 5 on your keyboard to open the Screenshot utility. At the bottom of the window that appears, you'll see two options for screen recording: Record Entire Screen and Record Selected Portion . If you choose Record Entire Screen, a camera icon will appear as your mouse cursor.

  10. How to Record a Screen on Mac: The Ultimate Guide

    Open QuickTime Player from your Applications folder and select ' File ' > ' New Screen Recording ' from the menu bar. You'll see a Screen Recording window. Click the drop-down arrow next to the record button to select your microphone for audio recording. Click ' Record ' to start and ' Stop ' when you're done.

  11. How to Record a Video on Your Mac: 5 Best Ways

    Here's how to use iMovie to record a video on your Mac: Open iMovie from the Launchpad. Click Create New. Select Movie from the dropdown. In the workspace, click Import Media. Select FaceTime HD Camera in the left sidebar and click the red record button. iMovie will capture video using your Mac's built-in camera.

  12. How to Record Screen on Mac (macOS Sonoma Included)

    Press the Command + Shift key on your keyboard and hit 5 on the numpad to bring up the Screenshot Toolbar. To record the entire screen, press the center icon, or to record a specific portion of the screen, press the button right of the center. When trying to record a portion of the screen, you will be given a cut-out window to select the area ...

  13. How to Record Your Screen on a Mac : HelloTech How

    To record your screen on a Mac, open the QuickTime app and click File in the menu bar at the top of your screen. Then select New Screen Recording and click the red button in the pop-up window. To record audio, click. Open the QuickTime Player app. This is an app that comes pre-installed on Mac computers.

  14. How to record yourself on a Mac with or without a webcam

    Below are the steps to record your figure in the webcam via a slideshow: Step 1. Open a file in PowerPoint, click "File" > "Save As…" > "File Format" > "PowerPoint Presentation ...

  15. How To Record Your Face and Screen On Your Mac • macReports

    6-When you are ready to start recording, click the red record button. You have two options: (a) if you want to record your entire screen, click anywhere on your screen to start the actual recording (b) or you may drag to select an area. 7-Now you are recording your screen and your camera view (e.g. your face). When you are done recording you ...

  16. How to record yourself presenting a PowerPoint on Mac

    In the 'Slideshow Tab,' select 'Record Slideshow.'. To record your screen, go to the 'Insert' tab and select 'Screen Recording.'. Suppose you want to include audio in your presentation, select microphone from the recording menu. As needed, move the volume slider. You can also record camera video using your webcam.

  17. How to Record a Presentation on Mac (Step-by-Step)

    Cons of Recording a Presentation in Keynote on Mac: Editing constraints. Resource intensive. How to Use the Default Screen Recorder in Microsoft PowerPoint. When it comes to how to record a presentation on Mac, you will want to follow the below-given steps to use the default screen recorder in Microsoft PowerPoint:

  18. How to Screen Record on Mac PowerPoint [Updated ]

    Step 2. Then, click on the "Webcam" button at the bottom. When a "Record webcam" window pops up, click the button to activate the webcam, and you can select the device you want to use from the dropdown menu. Step 3. If you want to capture the screen with audio, the "Sound" button beside "Webcam" can help.

  19. How to Record PowerPoint Presentation with Audio and Video on Mac?

    1. Open the PowerPoint slides that you want to record and select the "Record Slide Show" option under the "Slide Show" tab. 2. Set the desired video and audio options in options dropdown in the recording toolbar. Here you can select the input settings and devices for video and audio. 3.

  20. Record PowerPoint Presentations with Audio and Video on Mac

    Open your PowerPoint presentation and the app and click on the All-in-One Recorder option. Next, customize your recording preferences in the next window, as presented in the image below. Set the capture area and decide whether you want to record system audio, microphone, or webcam simultaneously. After completing the customizations, click the ...

  21. How to record your screen on Mac, Windows, and Chromebook

    Step 1: Press Shift + Command + 5 to bring up the screenshot toolbar. Step 2: The toolbar appears on the screen with two sets of buttons: Three on the left to capture a screenshot and two in the ...

  22. Powerpoint for Mac

    Hi. I think the reason you don't find the option to insert a screen recording is because PowerPoint doesn't make screen recordings of other application windows. You can use QuickTime, which is built-into your Mac for this purpose, then insert the resulting video file. If you are seeking programs with advanced screen recording capabilities, they ...

  23. Recording in PowerPoint on Mac

    I have seen several videos and tutorials about using PowerPoint for recording videos. It records the slideshow, your audio, and allows you to write or draw on the screen. I cannot figure out how to get it to work on my Mac. I am using the desktop version for Mac. I have a teacher O365 account. Note: I know about Zoom, Screencastify ...

  24. How To Screenshot on a Mac Computer [5 Easy Ways]

    Here is how to screen capture in Macbook using DemoCreator: Download and install DemoCreator on your Mac. Launch the application and select the desired recording mode (e.g., Screen Recorder, Screen & Camera). Customize settings such as resolution, frame rate, and audio sources. Start recording by clicking the REC button. Capture your screen ...

  25. How to Record Customized Camera Feeds With Cameo in PowerPoint

    Go to Record > From Beginning or Record > From Current Slide.; In the recording screen, click on the Camera icon at the top. This will insert a round object containing your video in your slides ...

  26. 4 free ways to screen record Windows 11 [2024 guide]

    Step 2. Now, you can select your recording area. If you want to record the entire screen, click Full Screen.If you prefer to customize the recording range, select the Region option.. If you have a ...

  27. Record the screen on your iPhone, iPad, or iPod touch

    Go to Settings > Control Center, then tap the Add button next to Screen Recording. Open Control Center on your iPhone, or on your iPad. Tap the gray Record button, then wait for the three-second countdown. Exit Control Center to record your screen. To stop recording, tap the Screen Recording button at the top of your screen, then tap the Stop ...

  28. Remote control a Mac

    Screen Recording. Allows the remote user to view the macOS device in remote control sessions and meetings. 📌Note: Screen Recording permission is not needed on macOS 10.14 Mojave. Accessibility. Allows remote user access to the mouse and keyboard of the macOS device to allow control remotely. Full Disk Access

  29. Use Notes on your iPhone, iPad, and iPod touch

    Create an instant note from the Lock Screen . You can use an Apple Pencil with a compatible iPad to create an instant note from the Lock Screen or pick up where you left off on your last note. To change these settings, go to Settings > Notes, tap Access Notes from the Lock Screen, and choose an option.