- Online Text to STL
- 3D Printed Soldering Helper
- 3D Printed Coin Vault
- 3D Printed FLARE GUN (PROP/REPLICA) MULTI PART
- 3D Printed Mini Container with PET Bottle Cap Size

TEST 3D PRINTS
Easy & Fun Things to 3D Print

How To Make DIY Pen Plotter / Homework Writing Machine at Home
This Drawing Robot/Pen Plotter/Drawing Machine is similar to the commercially available AxiDraw. It is powered by an Arduino Uno controller, uses a CNC Shield, and GRBL firmware.
The cost to build the Drawing Robot is between $75 and $100 depending on where you buy your parts and whether you already own some of the parts such as the Arduino.
Parts and Materials Required
- 2 x Nema 17 Stepper Motors
- 2 x Linear Rod M8 x 450mm for X Axis
- 2 x Linear Rod M8 x 350mm for Y Axis
- 2 x Linear Rod 3mm for Z Axis (you can get it from old CDROM)
- 1 x Threaded Rod M8 x 480mm
- 8 x LM8UU Bearings
- 1 x Servo Sg90
- 1 x Spring 5m (from ball point pen)
- 2 x GT2 Pulley, 16 teeth
- 5 x Bearing 624zz
- 1 x 2000mm GT2 belt
- 1 x Arduino Uno
- 1 x CNC Shield
- 2 x A4988 Stepper driver with heatsink
- 6 x Jumpers
- 1 x 12V 2A Power Supply
- 4 x 5/16in-18
- 13 x Phillips M3-0.5 x 16mm
- 4 x Phillips M3-0.5 x 6mm
- 5 x Phillips M4-0.7x 35mm
- 1 x Hex M3-0.5 x 20mm
- 4 x 5/16in washer
- 4 x M3 washers
3D Printing
- Download the files from Thingiverse
- Open the 3D models in Cura or any other slicer(Sli3er, Simplify 3D, etc.)
- Use 75% infill on all the parts (An infill of 70 – 100% will work as well)
- Printed all the parts with 0.10 – 0.20 mm layer height
- Printed with Hatchbox Red PLA
- Use supports on the Penholder, Slider, X_Support_L and the X_Support_R
Note: The longest part took around 9hrs and the shortest took 30 minutes to print
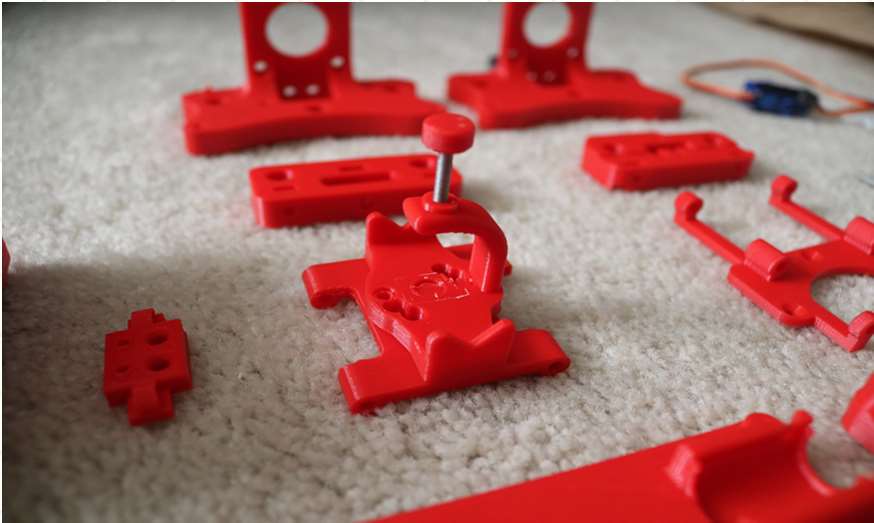
3D Printed Parts
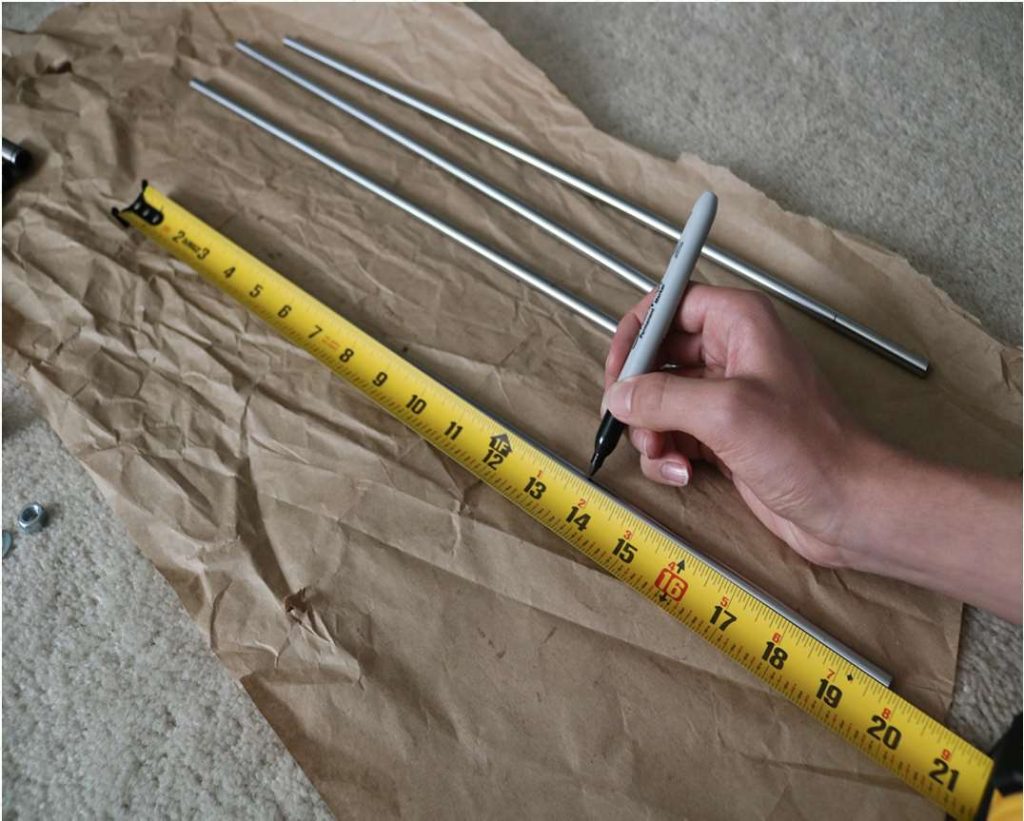
Cut your Linear Rods
Use a measuring tape and sharpie to mark the spots where the rods need to be cut
- Use a vise to hold the rods in place when you cut them
- Remember that you need (2) 350mm and (2) 450mm long linear rods
- On the threaded rod, mark your cutting point at 470mm
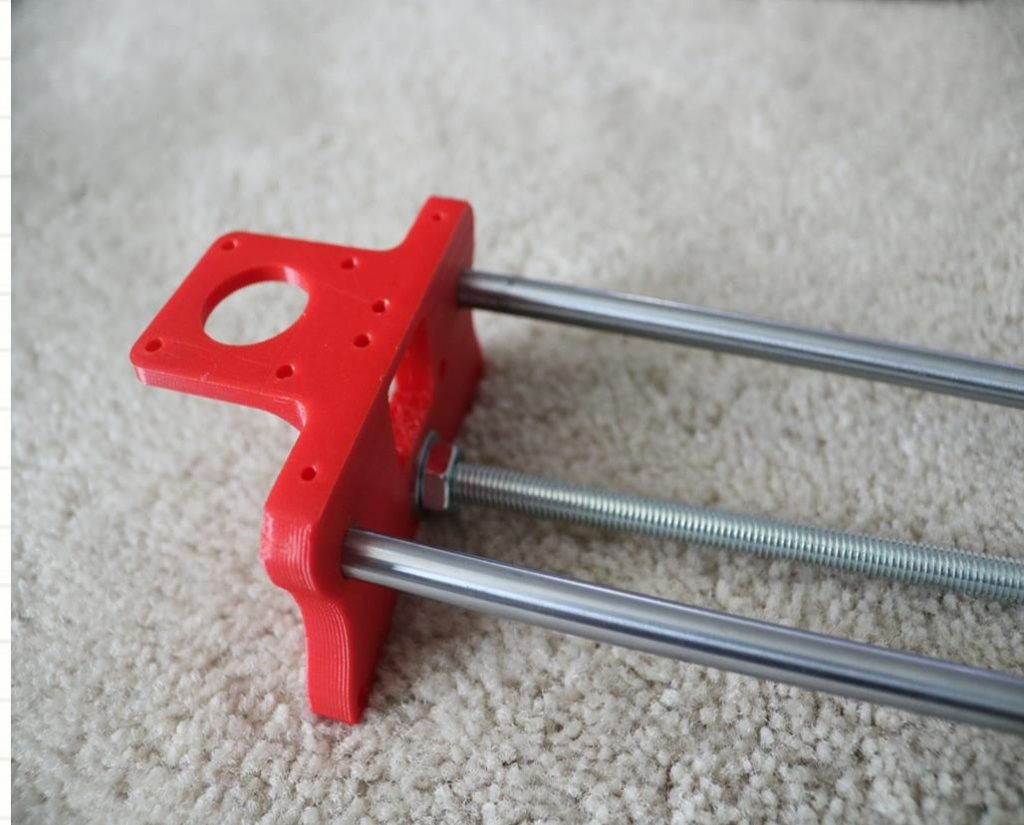
Assemble the X-Axis (Linear/Threaded Rods)
Take the (2) 450mm linear rods and insert them into either x-support part
- Use may need to use a round file to smooth out the holes that you insert them in
- Also, you can use a rubber mallet to help insert the rods
Now take the threaded rod and insert it in the hole below. Feed a 5/16in washer and 5/16in nut on both sides of the x-support part
Assemble the X-Axis (Bearings)
Now you want to push the LM8UU bearings into their place on the top and bottom clamshell (The top and bottom clamshell take (4) bearings each)
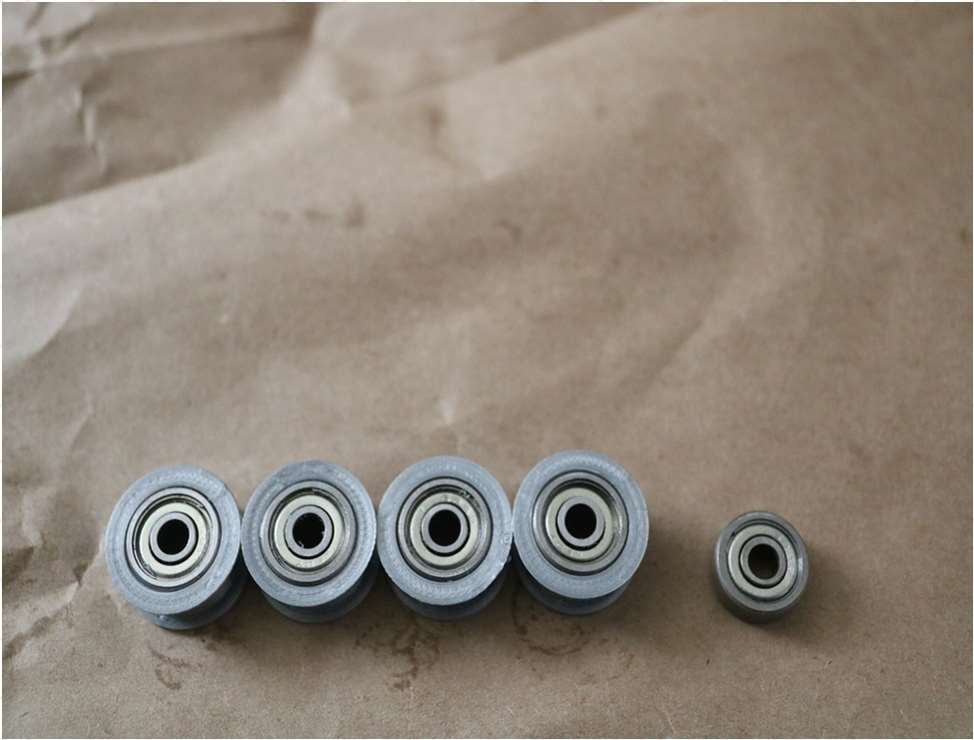
Take (4) 624zz bearings and push them through the 3D-printed idler pulleys. Leave the 5th bearing for later when you assemble the Y-axis
Assemble the X-Axis (Carriage)
- Get (4) M3-0.5 x 20mm screws, (4) M3 nuts, (4) M3 washers and (4) 624zz bearings with the idler pulleys installed
- Take one screw and feed a washer through it, the washer will rest on the bearing. The nut will be at the bottom of the carriage, which will secure the bearing in place

Assemble the X-Axis (X-Support)
- Slide the clamshell through the 450mm (X-axis) linear rods
- Use a rubber mallet again to attach the last X-support on the linear rods
- Make sure that the rods stick out equally on both sides
- Slide the other end of the threaded rod through the hole on the X-support
- Put on the last set of nuts and washers to hold the X-support in place
- Now that the X-axis is complete, you can use (2) Phillips M3-0.5 x 16mm screws per X-support to help keep the linear rods from sliding
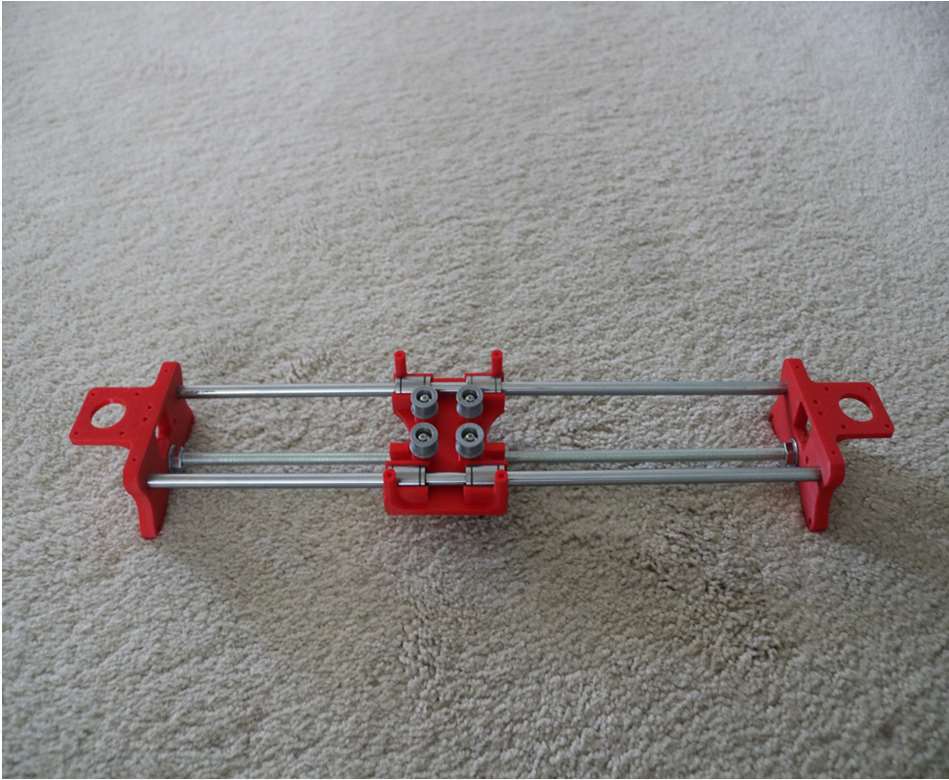
Assemble the X-Axis (Stepper Motors)
- Use an appropriate sized allen wrench to attach the 16 teeth pulleys on the stepper motor shafts
- Flipping the entire chassis around will make it easier to attach the stepper motors
- Use (8) M3-0.5 x 6mm screws and a Phillips screwdriver to attach the (2) stepper motors
Assemble the Y-Axis (Clamshell)
(Optional if you have problems keeping belt on bearings)
- Grab (4) M4-0.5 x 35mm screws and (4) M4 nuts
- Make sure that you have the (4) idler pulleys ( Download from Thingiversa ) and the (4) washers printed
- Insert the washers in between the two clamshells, with a screw in between
- Screw the top and bottom clamshells together

Assemble the Y-Axis (Y- Back/Front)
- Take the (2) 350mm linear rods and insert them the Y-back piece by using a rubber mallet
- Get (1) M4-0.5 x 35 screw, (1) M4 nut and the 5th 624zz bearing
- Get (2) M3-0.5 x 16 screws to secure the linear rods
- Slide in the bearing when inserting the screw through the Y-back piece
- Slide the the linear rods/Y-back piece through the LM8UU bearings and attach the Y-front piece using a rubber mallet
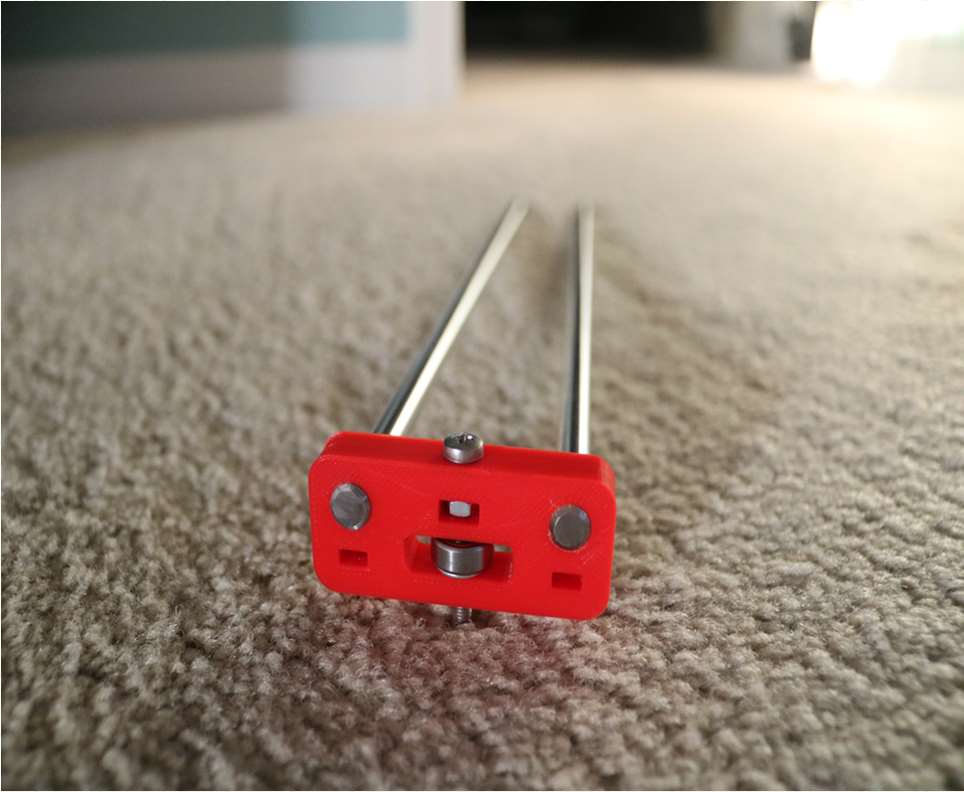
Assemble the X-Y Axis (Belt)
- Use a pair of needle nose pliers to help guide the GT2 belt more easily through the clamshell
- Take the two ends of the belt and slide them through the “teeth” on the Base Slider
- The belt should be tight and not loose
- Note that once the GT2 belt is on, it is normal for the clamshell not to move easily
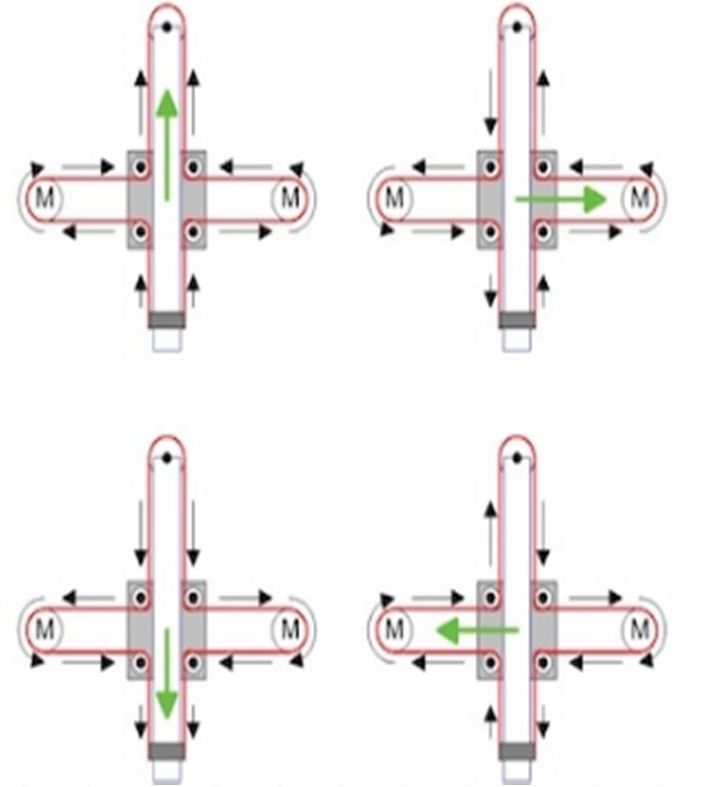
Belt Diagram
Assemble the Z-Axis
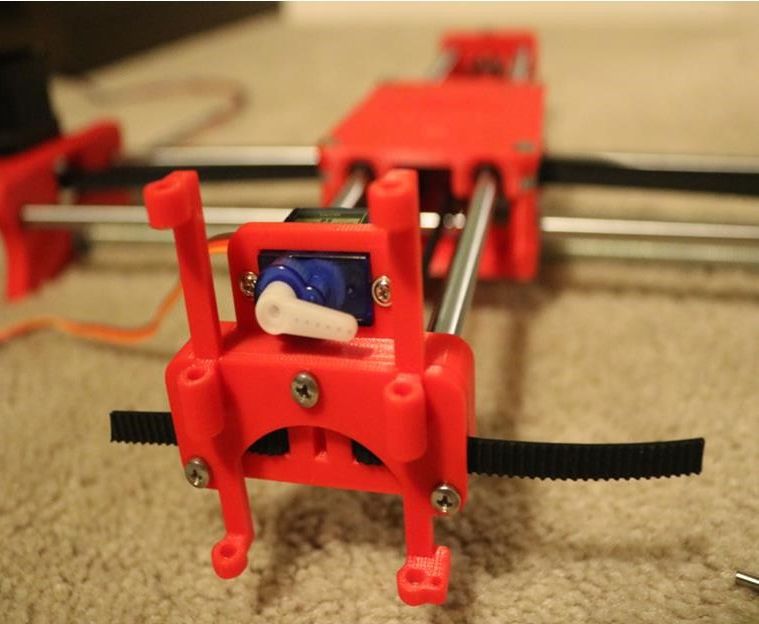
- Get (2) 3mm linear rods and the following 3D printed parts (Slider, Pen Holder, Base Slide, 3MM Metric Thumb Screw)
- Get (1) Hex M3-0.5 x 20mm screw and the Metric Thumb Screw and push them together. Use superglue to keep it together.
- Get (3) M3-0.5 x 16mm screws which you will use the secure the Base Slide to the Y-Front part. You may need to use (3) M3-0.5 nuts in order to hold it in place
- Push the Slider and Pen Holder together to make one piece
- Now take that new part and the (2) 3mm linear rods and slide the rods through the holes. Place a small spring in between the two parts so there is a little bit of pressure to lift the Slider. You may need to cut the spring a bit until there is an adequate amount of pressure on the slider.
Step By Step Video
The Original Instructions by Henry Arnold Jonathan K
- 3D Printed Hairy Lion →
12 thoughts on “ How To Make DIY Pen Plotter / Homework Writing Machine at Home ”
i constructed all the machine but when i press X+ the both X and Y axis are moving what is the problem
double check the steppers wiring
Have you solved it? I have the same problem with my machine, when I press X+, it’s necessary both motors move at same time, but, only one of them move…
Did you solve this problem?
Same problem how to solve ,?
Is it true that you didn’t use the microswitches in the final design?
Hello how to co figurę this machine to RUN on GRBL. What I mean is that GRBL interprets commands for x axis and y axis independently and if I look on your belt diagram it looks like both Motors have to run at the same time in order to move the carriage along y axis… How did you do that?
Have you solved it?
Thank you, thank you. It’s a very good built.
Is it possible to modify it to draw using brush ang oil based paint ?
Could you please tell what software/plug in and which version do you use to generate g-code for this machine?
Hello, what is the width of your belt? 6mm or 10mm? Thanks!
Leave a Reply Cancel reply
Your email address will not be published. Required fields are marked *
Save my name, email, and website in this browser for the next time I comment.
THE GINGER HOME
The ginger home.
I'm Amanda and I’m passionate about creating a well loved and well lived in home for my family and I I'd love to help you do the same!
learn more...

style
Spring .

let's connect
Get on the list.

never miss out. get exclusive tips, news & free resources!
Enroll now, free resource library, interior design style quiz, entertaining & holidays, all lifestyle, everyday living, renovation & design, seasonal décor, essential oils, all wellness, homesteading, style, photography, decluttering, favourites .
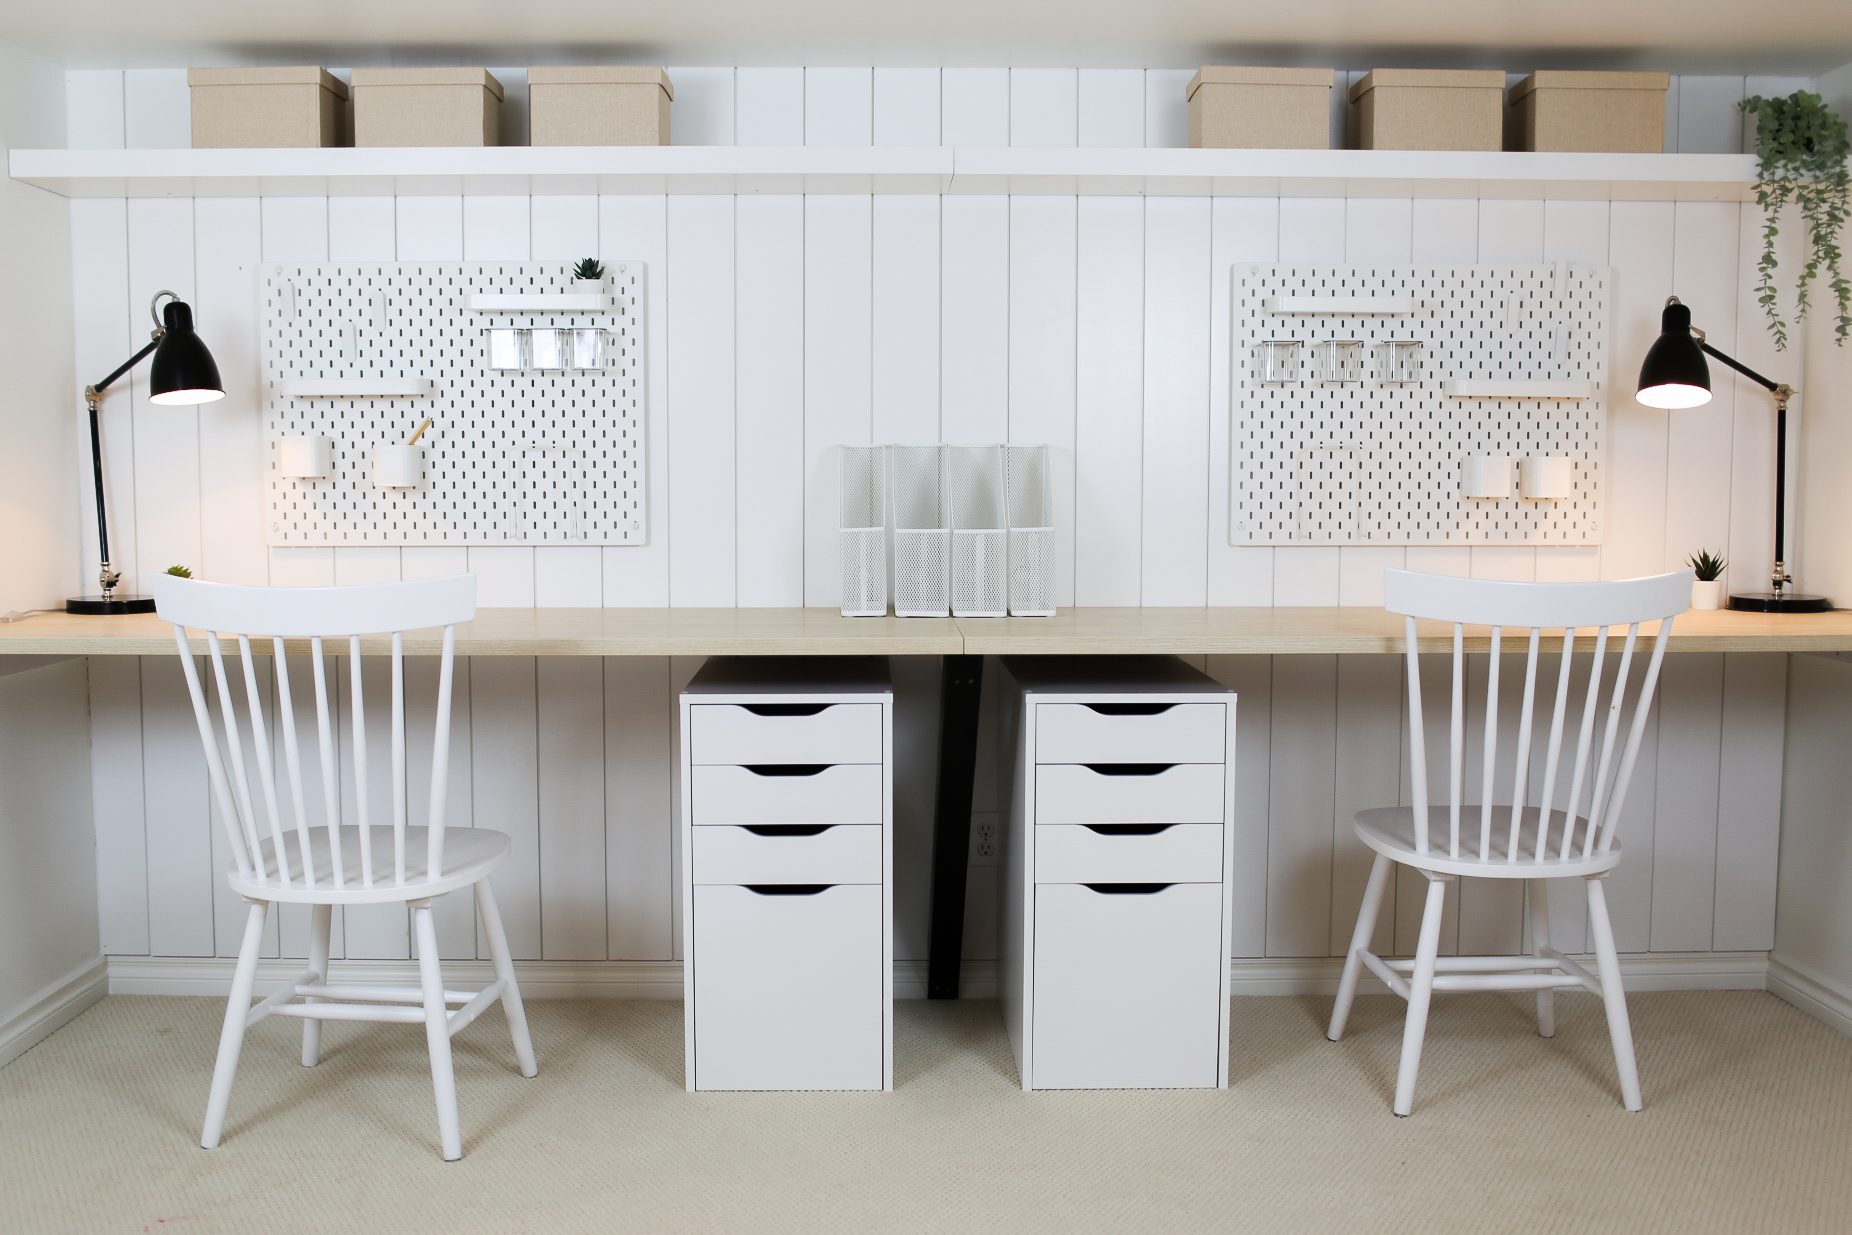
How to Build a DIY Homework Station
November 16, 2020.
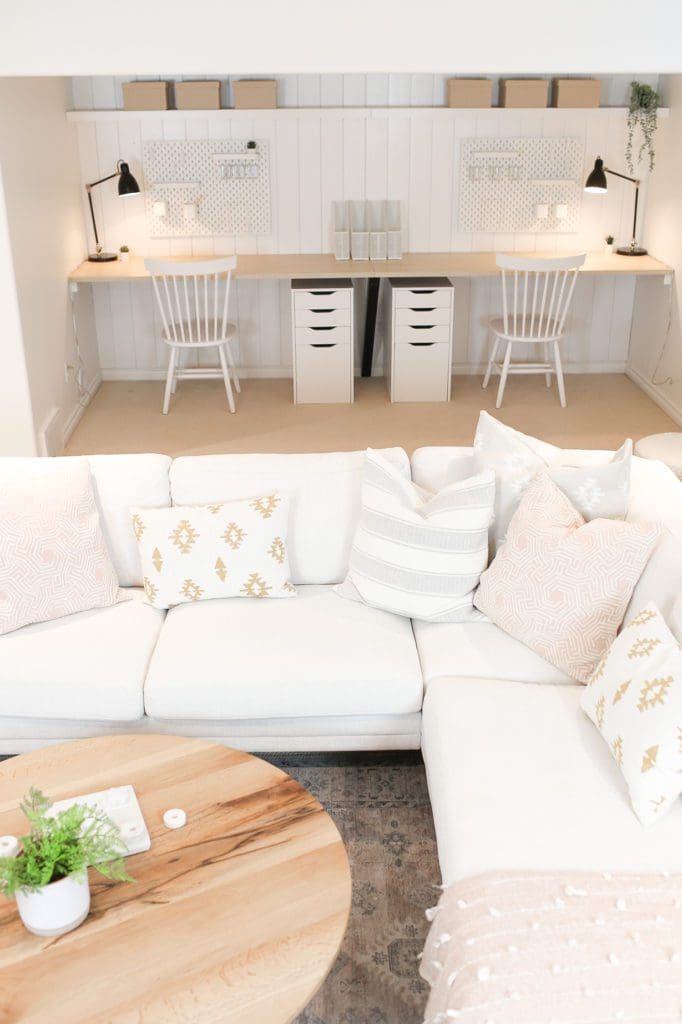
It’s been a weird year. In March 2020, everything shut down. We transitioned to “online learning” and spent A LOT of time at home. We realized that with two grade-schoolers at home, we needed a dedicated homework space. Our two girls and both have small rooms (in our small house), so fitting a desk in their bedrooms wasn’t ideal. We decided to renovate our family room space in the basement and add a DIY homework station into an unused nook in the back of the room!
Estimated reading time: 6 minutes
Note: This post may contain affiliate links that won’t change your price but may share some commission .
Table of Contents
A Built-In Homework Nook
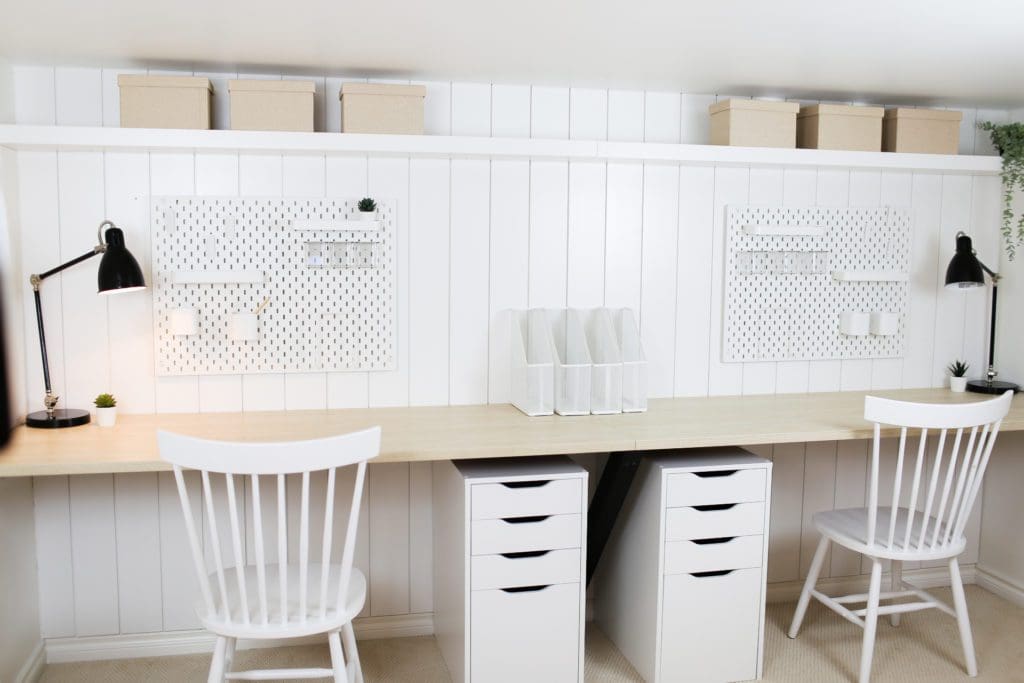
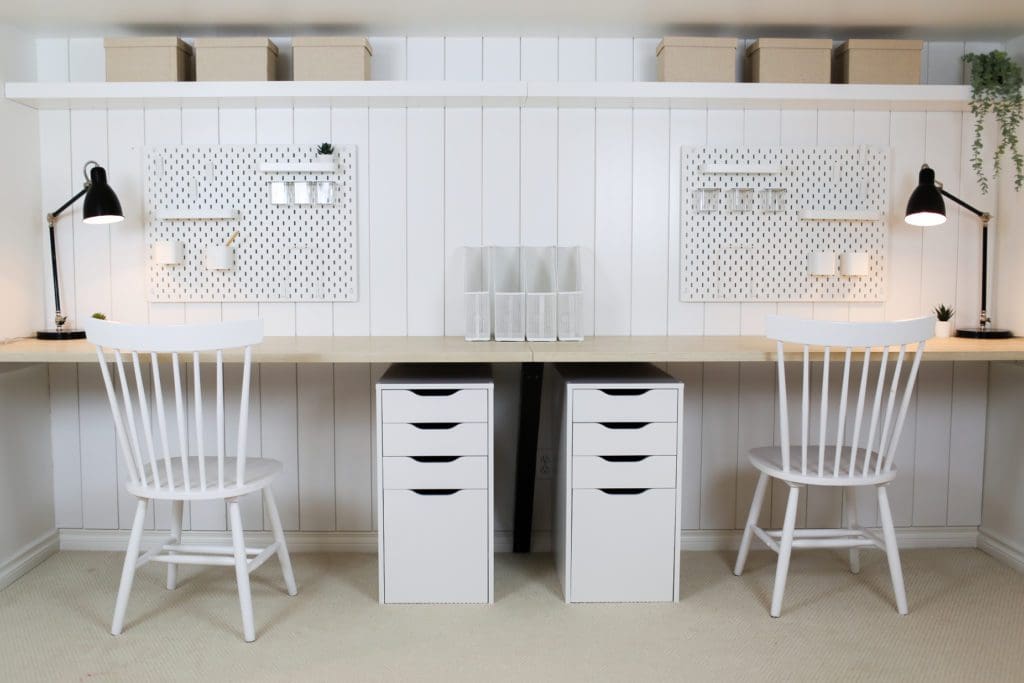
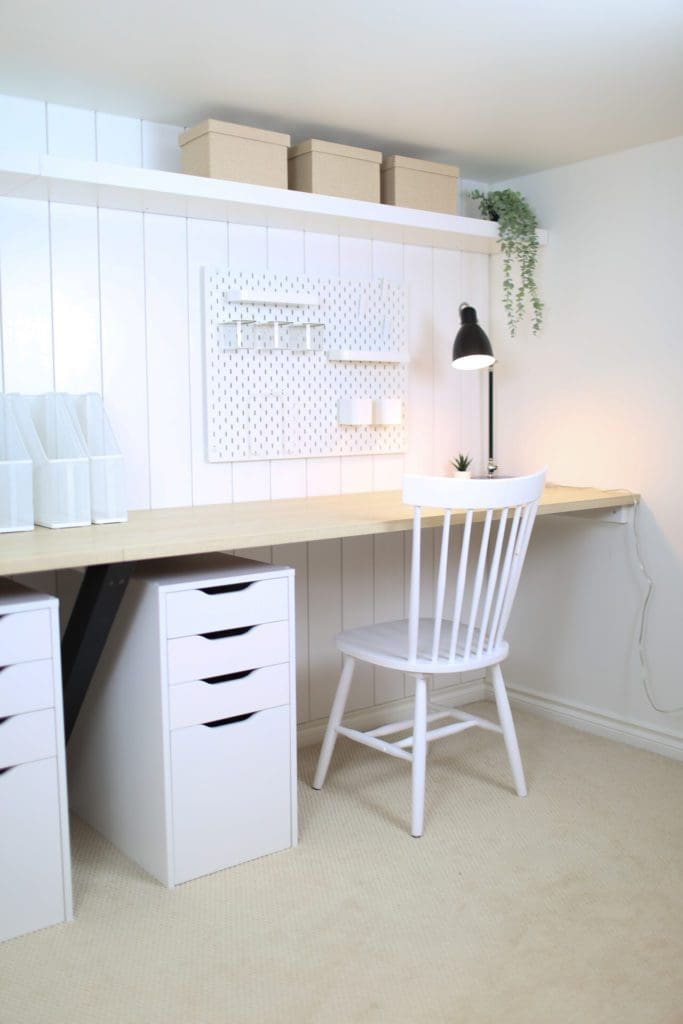
We didn’t want to spend a fortune, so we hacked some Ikea pieces to make a built-in homework station with plenty of space for both kids. They adore having their own workstations complete with file folder systems, drawers and pegboards! It made me so happy to see them just a little more excited about staying home.
The layout of our basement space was actually quite awkward (you can see the full renovation and details HERE ). We put the homework station in a weird little nook at the back of the room. The space has a low ceiling (ductwork runs above it) and no lighting, so we didn’t really use it at all before! It was just wasted space.
I love how finished it makes the room feel now and how much function it adds! The girls can come down here and do their homework and then lounge and relax when they are finished.

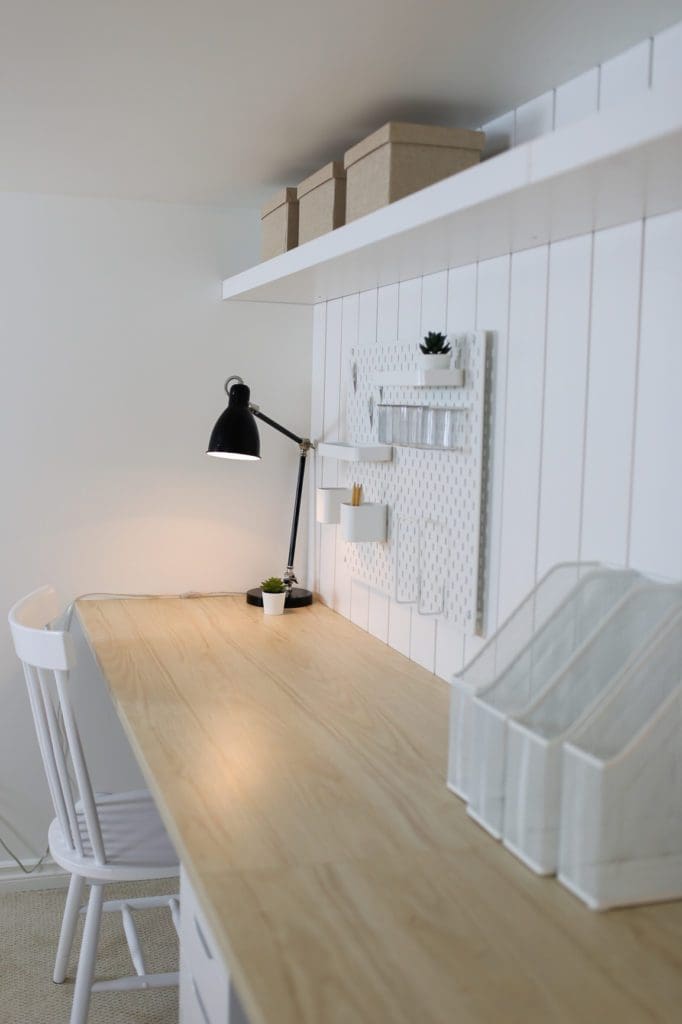
We used EKBACKEN Ash effect laminate counters from Ikea as desktops. They are inexpensive but surprisingly heavy and nicely made.
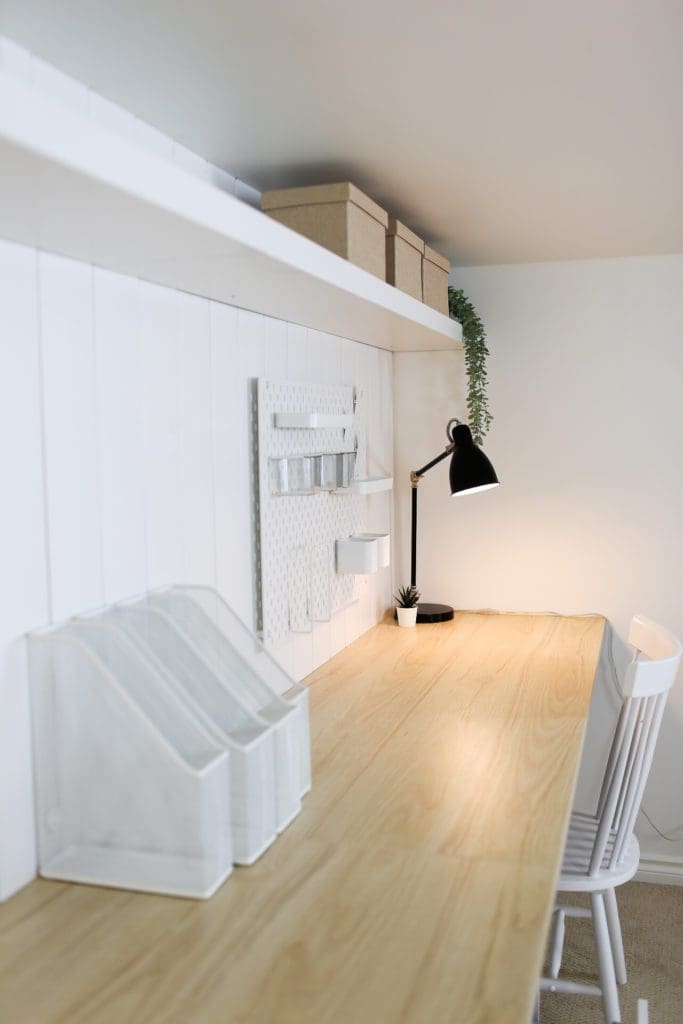
TIP: I’ve seen quite a few DIY homework spaces that use shelves as desktops. I personally don’t find this ergonomic. The space is too narrow to work comfortably. The 24″ deep countertop gives enough space to really spread out and work without feeling cramped.
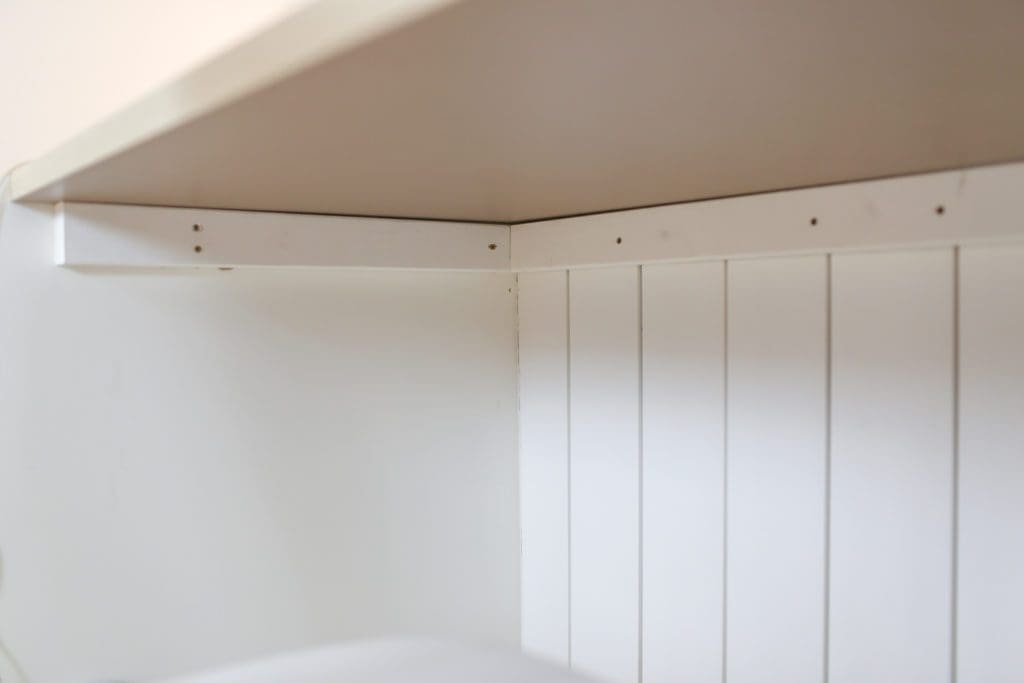
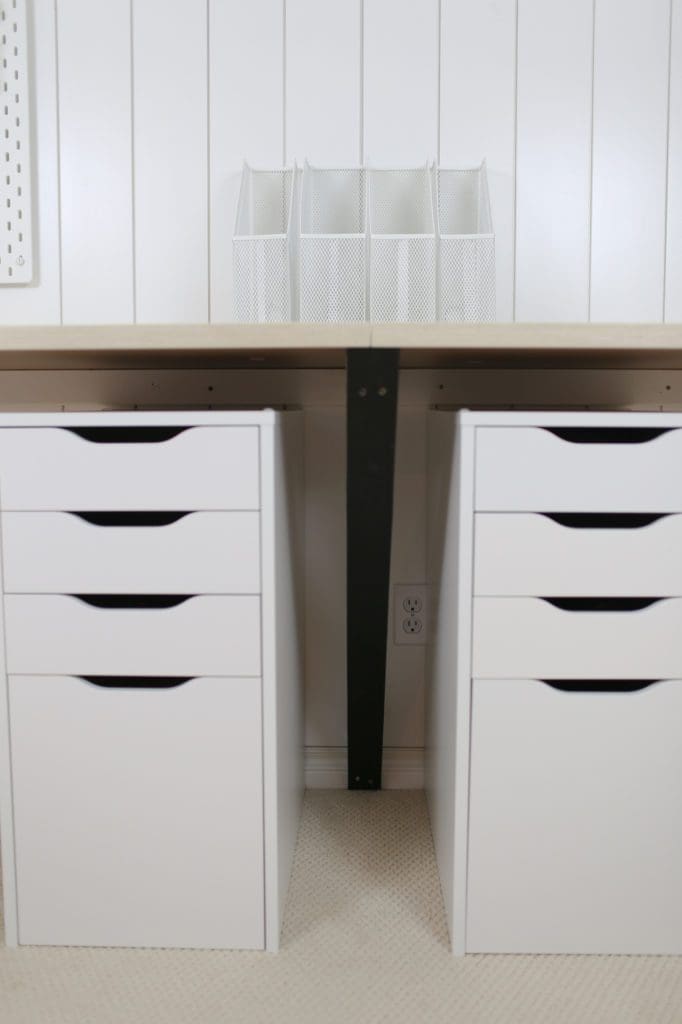
The space is about 11 ft wide so we had to use two countertop pieces and cut them down to size. We put the cut ends against the wall so that the finished, uncut edges would make a clean line/join in the centre. We added a support bracket in the middle to help hold the weight, and rested the pieces on 1 x 2 supports fastened to the walls underneath.
Each station is exactly the same (because… siblings) with a SKADIS peg board . I love the SKADIS system . It has so many fun options to add to the pegboards to store pens, papers etc…You can move the accessories easily as well, which is nice since my girls love to organize things! There are even little clips to hang their artwork or current math or spelling words.
Office Drawer Units/ Filing Cabinets
The ALEX drawer units have their own built in filing drawer, which is perfect for storing art projects, report cards or anything else we want to save over the school year.
Floating Shelves
We added some white LACK floating shelves from Ikea for extra storage above each desk. We did the same thing that we did with the counter and used 2 shelves cut down to fit the length. They come with hardware that attaches to the wall to mount them without brackets.
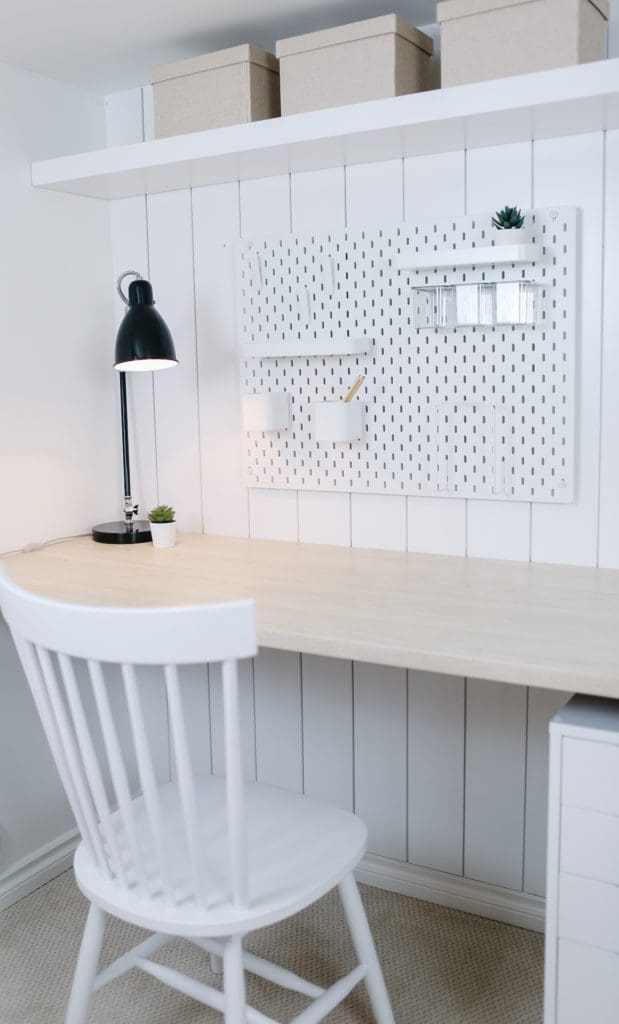
We were going to add built-in wall sconces and decided that we would just keep it simple and use traditional desk lamps! These were actually in our bedroom before, but they work much better in this space! I love when you can shop your home and save money!!
This DIY homework station was quick, easy and didn’t break the bank. But it’s made a huge difference in how we use this space…aka we actually use it now!!
I hope this DIY homework station gives you some inspiration for using an overlooked space in your own home! You can add function to pretty much every inch of space, no matter how awkward with a little creative thinking!
MORE GOOD READS:
- DIY Custom Closet on a Budget
- How to Style a Bookcase in 3 Easy Steps
- Should You Choose Marble Countertops?
- 10 Ways to Design a Custom Kitchen on a Budget
- Entryway Makeover in a Builder Grade Home
Hey there! Love this — we’re doing something similar in our basement thanks to your inspiration! Just wondering, what type of bracket did you use for the middle? We only have a wall on one side so we’ll need a bracket for the middle and one for the other end too. Love the triangle look of yours cuz it seems sturdy and adds to the style.
Leave a Reply Cancel reply
Your email address will not be published. Required fields are marked *
This site uses Akismet to reduce spam. Learn how your comment data is processed .
shop favourites
Home interior, home exterior, amanda's style.
I'm Amanda and I’m passionate about creating a well loved and well lived in home for my family and I'd love to help you do the same!
find me elsewhere
See you on social @thegingerhome, copyright 2023 © the ginger home | privacy policy | terms & conditions | cookies policy | design , copyright 2022 © the ginger home privacy policy | terms & conditions cookies po licy | desig n, quick links.

On The Go Homework Kit
While we try to not have too many activities with the wee ones, their inevitable aging means two things: they have more homework every night and every activity has become more intense. And of course they don’t happen at the same time. While Mister Man is at Little Miss’s gymnastics, he has homework to do. When Little Miss is at Mister Man’s tae kwon do, she has homework to do. And oddly, they never seem to have everything they need to get it done. So I solved that problem.
No more excuses.
I made an on the go homework kit that now lives in the back of my car and could easily fit in the trunk of your car, as well. We have everything the wee ones could possibly need (except, granted, a computer or printer) to get homework done, and it’s making our lives a whole lot easier. We no longer have to beg or borrow the forgotten materials. They are able to do the homework much neater than they were previously thanks to the clipboard I bought and the notebook paper I now stock – no more writing on the side of a chair with a piece of borrowed yellow paper from a small legal pad.

What you put into your kit definitely depends on your child and on the homework that he regularly has, but you can figure it out. I had the vast majority of the materials I needed already at home. The only things I actually bought? The clipboard for $1.44. Another ruler for $1.27. And that was it. Everything else we have from previous school years’ supplies that came home or just sitting around.
To start, you need a container. I am currently using a 16 quart clear container, but a smaller size would work just as well. I happened to have this empty one at home, and I know that I have the room in my car for this size container.

Inside, you’ll want your basic school supplies – the pens or pencils your child needs to write, the crayons or markers or colored pencils needed for “special” projects, a glue stick, a ruler, and a notebook with lined paper. Depending on your child, you may also need a protractor (we do), a calculator (kids are expected to do mental math in our school so it isn’t in ours), a thesaurus or dictionary or atlas (yep again), and scissors (who knows – we have enough, so I tossed a pair in).

I also got smart. My children’s biggest “issue” when doing homework outside our house is that their pencils break. I’m not sure how this happens because I know how often they sharpen their pencils since we have an electronic sharpener, but this appears to only be an issue when we aren’t home. They can’t use that excuse anymore. Not only do I have extra pencils packed – including some that aren’t yet sharpened – but I put in a mechanical pencil for Little Miss who likes them. I also included two manual sharpeners, so that there is always a way to get a good tip on your pencil. And of course my children tend to need more erasers than what lasts at the top of their pencils, so in went two full size erasers, too.
We also love to use whiteboards to help explain some of the concepts that are confusing to the wee ones or practice things like spelling words or math problems and the like. I have a bunch of little whiteboards in our house along with thin dry erase markers, so I popped that in, too. I’m also a cheapskate when it comes to erasers for our whiteboards. I refuse to buy one when an old sock does just as well. Shockingly, we have a huge assortment of socks with no matches and/or holes sitting in our laundry room. Easy peasy.

Lastly, I included a game that they like to play. It’s a math facts practice game that does addition and subtraction or multiplication and division at various difficulty levels. It’s a great way to keep them occupied and entertained if they finish homework early. Of course, the wee ones also tend to travel everywhere with books, so they are welcome to grab a book from the car or their backpacks to read instead.

For less than $3, I put together a homework kit that ensures we have everything we need in one place. When I pulled it out for Mister Man yesterday at gymnastics, he gave me a weird look asking what it was. Once we started working with it, however, he was pleased as punch that we were able to work on his homework with fewer distractions. He was calmer and more focused, which made all our lives easier. And my sanity? It’s definitely worth more than $3. How about yours?
Enjoy this article? Please share it and save it for later!
Leave a comment Cancel reply
Your email address will not be published. Required fields are marked *
Save my name, email, and website in this browser for the next time I comment.
This site uses Akismet to reduce spam. Learn how your comment data is processed .
[…] On The Go Homework Kit By Honest and Truly […]
[…] up and hunt, disrupting the focus on homework. If you’re doing homework at the kitchen table, create a homework bin like the one I have for my car that you can pull out whenever your child sits down to […]
Love this idea! It helps having the tools, the whiteboard for working, and the game as an incentive. Awesome concept!
Just brilliant! No excuses and homework gets done. 🙂
You are using an outdated browser. Please upgrade your browser to improve your experience.
Difficulty • • • •
Cost $ $ $ $
Estimated Time 2 Hours
DIY Homework Station
September 08, 2015 by Kirsten Dunn

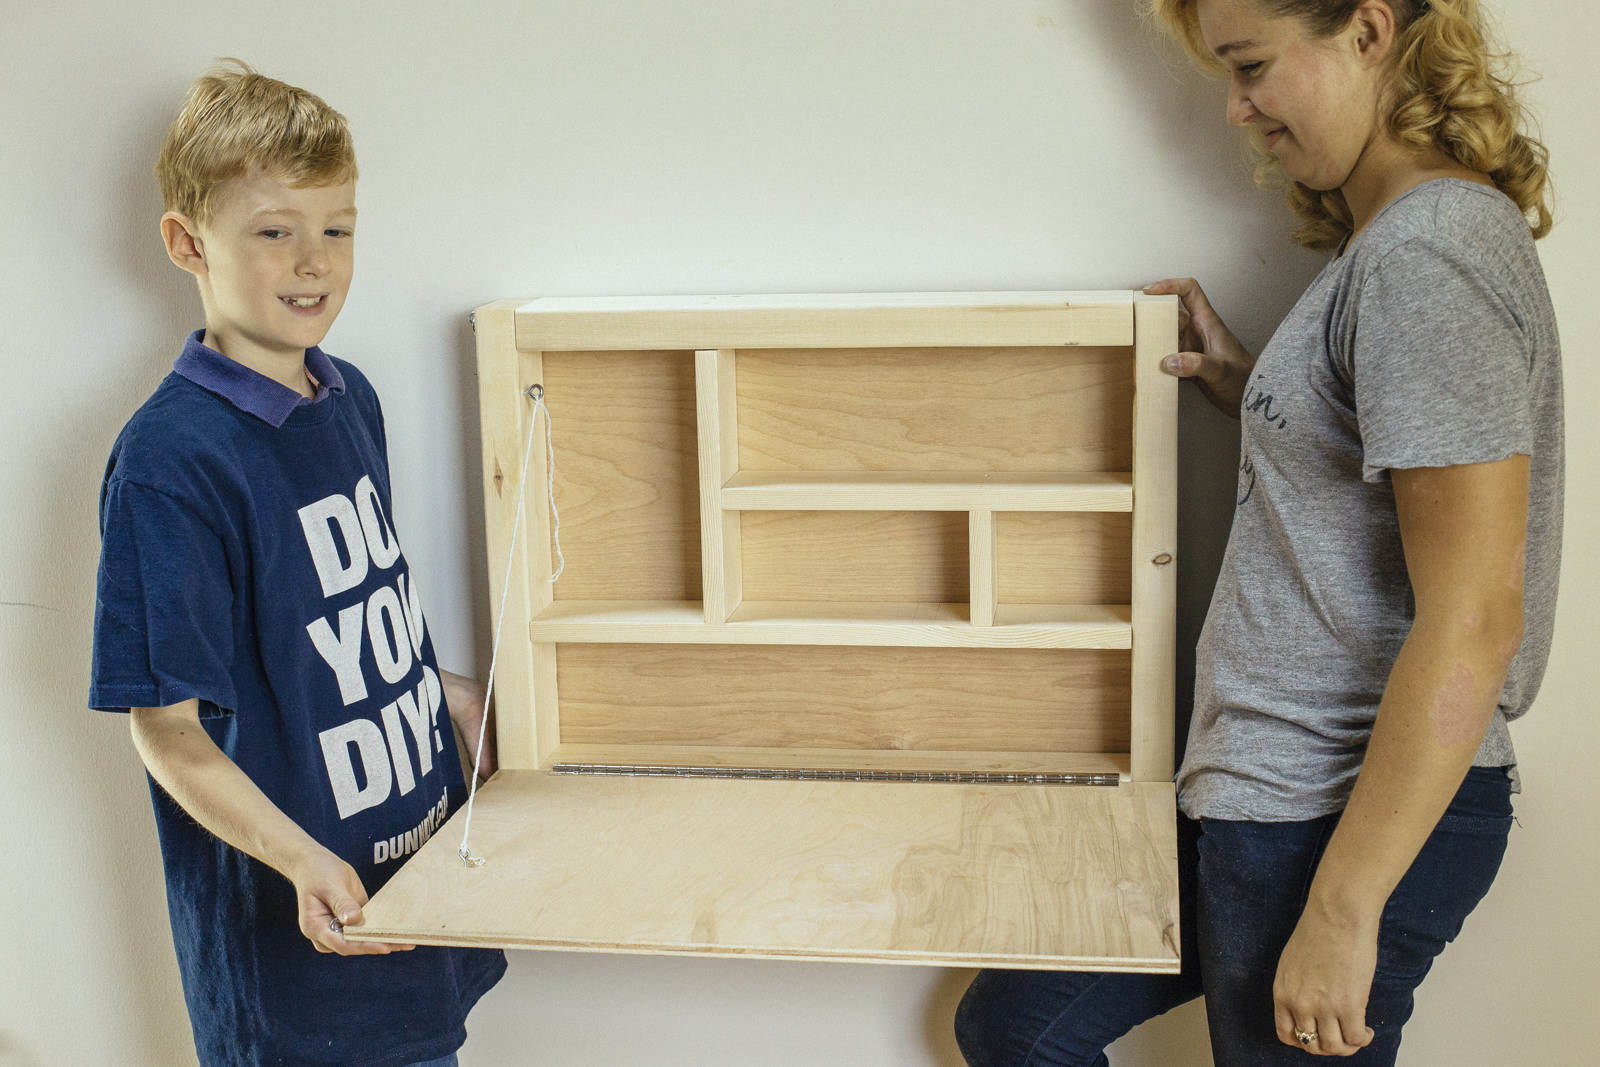
It's that time of year again. Book reports, long division, and art projects. We've created a fun diy homework station that's a perfect fall weekend project. This desk is easy to make, takes up minimal space, and provides a personal little nook for your student to do homework.
You may remember Logan from last year's Dunn DIY Flower Box post. He's quite a carpenter and we loved getting to work with him to build this handy dandy homework station.
Step 1: Cut lumber
Begin by cutting the lumber. Here are the cuts you will need to make:
- Cut 2x4 into two 21” pieces and two 18” pieces.
- Cut 1x4 into one 21” piece, one 14” piece, one 4” piece, and one 9 ½” piece.
- Cut plywood, or have Dunn cut it for you. Cut 1/8” ply to 24x18” and cut ½” ply to 24x16 ¼”.
Step 2: Sand pieces
Now it's time to sand the cut edges and any rough surfaces.

Step 3: Prepare hinge
We-screwed-up-so-you-don’t-have-to Cheat*
Sometimes it’s hard to foresee problems until you’re in the middle of them. But that means we get to give you advice from our experience. When we got to the step of putting on the hinges we found it was very difficult to get a good angle because the shelves were in the way. So we’re going to help you out and have you start with the hinges (which, as I mentioned, we didn't do):
Measure the hinge and mark at approximately 20”. Fold the hinge in half and cut through it with a hacksaw. This step requires either man power or patience. Again, this is a step for the adult!

Step 4: Attach hinge
Position on bottom piece of 2x4 (one of the 21” pieces). Mark holes. Tape off the 1/16” drill bit to avoid drilling too deep. Predrill and then screw down hinge. Again, we did this in the wrong order, so the pictures don't match. But the good news is you won't have to go through the headache of bending your wrist backwards to get the desk secured.

Step 5: Build frame
Put together the 2x4 frame. Pre- drill with a 3/32” bit through the longer top piece into the end of the side piece and secure with two 3” screws. Repeat on opposite side. Pre drill through bottom pieces into both ends and secure with screws.
When the 2x4 frame is screwed together, fit 1x4 shelves inside. Measure and make sure everything fits when square. Make any necessary adjustments.
Begin with the 21” piece and 9 ½” piece. With a pencil mark where the end of the shorter board meets the longer board. Remove from frame and line up along the pencil lines; predrill (3/32”) and fasten with two 1 5/8” screws. Fit these shelves back into the frame to double check they fit. It’s funny, but they always fit different after they’re screwed together.
Place the other two pieces and mark where the 14” piece meets the 9 ½” piece. Remove from the frame, predrill, and secure with screws. Place back in the frame, fit in the 4” piece and mark for that. Predrill and screw in the last piece from both top and bottom.
Fit all the shelves back into the 2x4 frame and mark where the ends of the shelves meet the frame. Make sure that all the shelves are level; this may require some wrestling. Predrill through the frame and secure with two 3” screws into the end of each board.

Step 6: Attach frame to back
Next attach the back. You can do this with nails or screws, but we recommend not using trim head screws because the plywood is so thin and they have a tendency to slip through. Make sure to predrill before screwing or nailing in order to prevent splitting the plywood.

Step 7: Attach desktop to hinge
Back to the hinges. Position the plywood desktop underneath the hinges. You can use a scrap piece of 2x4 to hold the plywood at the right height. Mark holes. Tape off the 1/16” drill bit to avoid drilling through the plywood. Predrill and then screw down hinge.

Step 8: Attach cord
Drill holes with the 3/32” bit predrill near the top on the inside of the frame and on the desktop surface for the eye lag screws. Depending on whether your child is right or left handed you’ll want to do this on the opposite side so it doesn’t get in their way.
Screw in the eyes by hand or with a pair of pliers. Tie a piece of cord in between the eyes to hold the desktop parallel to the floor.
Predrill on the outside of the frame and the side of the desk top for the gate hook. Screw in by hand or with a pair of pliers.

Step 9: Mount desk
Your desk is completed! There are a number of ways to mount your desk, and if you have any questions for what will work best for you, you can always ask for help at Dunn. Here’s one simple solution secure the desk to your wall through the studs:
First take a stud finder and locate the position of the studs in your wall. They should be about 16” apart, so you’ll be able to attach the desk to two separate studs. Position the desk on the wall and make two marks where the studs line up on the bottom and top of the frame.
Predrill four holes through the desk with a ¼” drill bit and countersink with a ½” bit. Make sure the desk is horizontal with a level . Using a 5/16” Nut Driver screw in four 5/16” x 5” Ledger Board Fastener through the desk frame and into the studs in the wall. For aesthetics you can put a ½” wood plug in the hole to hide the bolts.

Now that you have a dedicated homework area, how about building some more storage options for all those school (and just-for-fun) books? Whether you only have a little bit of space available on a wall or want to add a multipurpose bookcase, these DIY wooden bookshelves will come in handy!
- How To Build a Crown Moulding Bookshelf
- DIY Tabletop Bookshelf
- DIY Rotating Bookshelf
- DIY Wall-Mounted Bookshelf
How To Re-Cover an Office Chair
Difficulty • • ••
Reupholstering this office chair was a great way to bring new life to this old chair.
How To Make a Cucumber Martini
Difficulty • •••
We're showing you how to create a unique and refreshing cocktail with only three ingredients. Cheers!
How To Build a DIY Patio Cover
Extend the open-air gathering season as long as possible with this DIY temporary outdoor covering. It's simple to construct, but will keep you dry from that Pacific Northwest drizzle in the rainy months to come.
NORMANDY PARK

- PRO Courses Guides New Tech Help Pro Expert Videos About wikiHow Pro Upgrade Sign In
- EDIT Edit this Article
- EXPLORE Tech Help Pro About Us Random Article Quizzes Request a New Article Community Dashboard This Or That Game Popular Categories Arts and Entertainment Artwork Books Movies Computers and Electronics Computers Phone Skills Technology Hacks Health Men's Health Mental Health Women's Health Relationships Dating Love Relationship Issues Hobbies and Crafts Crafts Drawing Games Education & Communication Communication Skills Personal Development Studying Personal Care and Style Fashion Hair Care Personal Hygiene Youth Personal Care School Stuff Dating All Categories Arts and Entertainment Finance and Business Home and Garden Relationship Quizzes Cars & Other Vehicles Food and Entertaining Personal Care and Style Sports and Fitness Computers and Electronics Health Pets and Animals Travel Education & Communication Hobbies and Crafts Philosophy and Religion Work World Family Life Holidays and Traditions Relationships Youth
- Browse Articles
- Learn Something New
- Quizzes Hot
- This Or That Game New
- Train Your Brain
- Explore More
- Support wikiHow
- About wikiHow
- Log in / Sign up
- Personal Care and Style
- Personal Organization
How to Make a Homework Planner
Last Updated: January 6, 2024
This article was co-authored by Jake Adams and by wikiHow staff writer, Danielle Blinka, MA, MPA . Jake Adams is an academic tutor and the owner of Simplifi EDU, a Santa Monica, California based online tutoring business offering learning resources and online tutors for academic subjects K-College, SAT & ACT prep, and college admissions applications. With over 14 years of professional tutoring experience, Jake is dedicated to providing his clients the very best online tutoring experience and access to a network of excellent undergraduate and graduate-level tutors from top colleges all over the nation. Jake holds a BS in International Business and Marketing from Pepperdine University. This article has been viewed 44,758 times.
Keeping track of homework and assignment due dates can be tricky without an organizational strategy. With several classes worth of work to remember, relying on your memory can be a challenge. Put your mind at ease by making a homework planner, and soon you will have all of your assignments at your fingertips.
Crafting Your Own Planner

- You could also use just a calendar with extended areas for writing notes and planning. Also, you can use post-it or sticky notes to add extra notes to your planner.
- Notebook paper offers a quick solution because you probably already have some in your backpack.
- Blank computer paper allows you an unstructured space to plan, which may work really well for people who are creative.
- Using templates makes it easier to get started and stay organized. Since you’ll be printing your own templates, you can choose what best suits your needs. Templates may take more work than notebook paper, but they will make it easier to get started with your planning since the calendar and planning spaces are already created for you.
- Try printed papers for a fun approach to creating your planner. Visit your local craft store for tons of design options. If you use printed paper, keep in mind how you will be using the planner when you pick your designs. For example, don’t choose all dark colors if you want to write directly onto the paper because you won’t be able to see what you wrote.

- Organizing into monthly, weekly, and daily sections will allow you to keep similar planning sheets together. This is a standard format for many planners and will allow you to keep weeks together when the month changes midweek. It also allows you to be flexible with how you use your to-do list sheets.
- If you want to organize by month, take one monthly calendar and pair it with five weekly planning sheets and enough to-do list sheets to accommodate your planning needs.

- You can mark your sections by placing a sheet of colored paper between them.
- You could also use dividers or stick-on divider tabs.
- Another option is to mark the sections with tape. Take a strip of tape and fold it over on itself so that just the edges of the tape touch the paper between two sections, leaving the fold of the tape sticking out of the stack.
- If you have post-it notes, you can use them as section dividers or to highlight important sections.

- If you like to work on the computer, design your cover using your favorite app and then print it out.
- If you want to skip decorating your cover or want something that looks store-bought, use a piece of scrapbook paper from the craft store as your cover. For example, you could buy a piece of zebra print paper and print your planner title on the front.
- If you’re an artist, draw or paint your cover.
- If you don’t like to draw or craft, you could try decorating your planner with stickers that represent something you love, such as your hobby or favorite bands.

- You can also decide if this planner will be for all of your classes or just one of them. This could affect how many sections you decide to make.

- For a cleaner look, cut a two-inch-wide slip of paper and fold it so that it will fit over your staples. Glue the paper in place to make your homemade planner look like a composition book.
- You can also make a notebook using a hole punch and ribbon.

- Use the different colored inks for each class for the best results. [2] X Trustworthy Source Understood Nonprofit organization dedicated to resources and support to people with thinking differences, such as ADHD or dyslexia Go to source If you're using your planner for just one class, you could use different colored inks for different types of assignments. For example, you could use blue for essays, orange for worksheets, red for tests, etc.
- Enter assignments for the whole grading period at once, which will prevent you from overlooking due dates.
- Divide your larger assignments over several days so that you have time to complete the assignment. For example, if you have a science project due at the end of the month, you need to start working on it in advance. Write your project workdays onto your calendar as well.
Using a Standard Notebook

- If you’re artistic, take this as an opportunity to express your talent by sketching or painting your planner cover. Another option is to create a collage using clippings of photos, words, and phrases from a magazine. Simply glue the clippings to the cover of your notebook in your desired arrangement. To protect your work, self-laminate it with clear packing tape.
- If you enjoy crafting, you could glue fabric, paper, or magazine photos to your notebook.
- If you don’t like to draw or craft, you could try decorating your planner with stickers or photos. For example, you could cover your notebook with stickers representing your favorite bands, or you could print out your favorite photos of your friends to glue on the cover.

- Count out the number of sheets for each section. Because it’s your planner, how many sheets of paper you will need per section will depend on you. However, for a standard year-long planner, you would need at least 14 sheets of paper for monthly planning and 54 sheets of paper for weekly planning. Including extra sheets in each section will allow for section labels, do-overs, and section buffers.
- Create your section dividers by either using tape or cutting the edges of the paper. To make your dividers using tape, fold a piece of tape over on itself so that just the ends touch the paper. Leave a flap of tape sticking out from the paper so that you can easily see the divide between sections. You can also divide your planner by cutting the corners of two of your sections. For example, you could cut the top outer corner of the monthly calendars and cut the bottom outer corner of the weekly planning sheets, leaving your third section un-cut. This would allow you to easily find each of those three sections.

- To draw your calendar, you will need a ruler or a straight surface to trace. Using your ruler, draw a large box.
- Lengthwise, trace six evenly-spaced lines to create seven columns for the seven days of the week.
- Then draw four evenly-spaced lines down the width of the box to create the rows of weeks. When you are finished, you will have 35 boxes.
- Write the days of the week above each column.
- Write the name of the month and the correct dates for the first month of your homework planner.

- Draw a line down the center of your paper and then draw three evenly-spaced lines across your paper to create eight boxes.
- Label seven of the boxes with the days of the week, and label the eighth box “Notes.”

Using a Binder

- To avoid adding bulk to your backpack, print out calendars and weekly planning templates and put them in your regular binder. That way you can easily track your assignments without worrying about juggling an extra notebook.

- Open the rings on your binder and first insert your to-do list paper. Place an index divider on top of the stack.
- Add your monthly planning sheets, followed by the index divider for that section.
- Finally, add your calendars, and, if you like, an index divider for that section.
- You may want to also add a special index page or key that explains your organizational strategy.

Homework Planner Template


Expert Q&A

Using a Digital Planner
- If you already have an iPad or similar tablet device, there are a number of notetaking and calendar apps available that make digital planning an easy way to stay organized.
- You can take your notes or design your own custom planner directly through the apps, utilizing the numerous writing tools within them. However, you can also purchase planner templates from the internet to use as a base for your planner.
- New Semester, New Year, New Season. The first phase of maintaining a planner is to enter all known and repeating dates, these are usually established at the beginning of each new school year, semester, or season. The earlier you put these events in your planner, the better. It may take time to set this up, but the benefits are worth it! You’ll always know what’s going on rather than feeling in the dark.
- Sundays. The next anchor point is at the beginning of the week. First, take a look at your week ahead. Do you have any tests coming up? Special events? Appointments? Get familiar with your week at the front end to prevent surprises. Then, coordinate with your family during a Sunday Meeting.
- In Class. As soon as you receive a calendar or syllabus, enter: key dates, large assignments, projects, tests, and final exams in your planner. In class, assignments should be entered in a digital (or paper) planner as soon as they are assigned. Just be careful to not get distracted by other apps and messages.
- Take the time to personalize your homework planner so that you have an incentive to use it. Thanks Helpful 0 Not Helpful 0
- You can customize the sections however you like, so don’t feel like you have to use the suggested sections. Thanks Helpful 0 Not Helpful 0
- Cutting out paper and gluing it into your planner is a great solution for people who hate drawing. Thanks Helpful 1 Not Helpful 0

- Don’t spend more time working on your planner than you do on your homework. Thanks Helpful 33 Not Helpful 3
You Might Also Like

- ↑ Jake Adams. Academic Tutor & Test Prep Specialist. Expert Interview. 24 July 2020.
- ↑ https://www.understood.org/en/school-learning/learning-at-home/homework-study-skills/how-to-help-your-teen-develop-good-study-habits
About This Article

- Send fan mail to authors
Reader Success Stories
Nov 29, 2021
Did this article help you?
Apr 20, 2020
Jun 19, 2018
Pary Cacemy
Aug 24, 2022

Featured Articles

Trending Articles

Watch Articles

- Terms of Use
- Privacy Policy
- Do Not Sell or Share My Info
- Not Selling Info
Get all the best how-tos!
Sign up for wikiHow's weekly email newsletter
- Project Plans
Homework Kit
- Difficulty Medium
- SM20-03 Saw Max™ Tool Kit
- SM500 Wood & Plastic Carbide Wheel
- Dremel 150 1/8" Drill Bit
- 8D Finishing Nails
- Drill Driver and Wood Screws
- Paint and Paint Brush
- Sheet of 24" x 48" - 3/4" Thick Sanded Plywood
- 12" of 3/4" Wooden Dowel
Begin by cutting out the bottom and sizes of the kit. You can complete all cuts using the Dremel Saw-Max and the SM500 Wood & Plastic Wheel. Measure, mark and cut the following 5 pieces: • Bottom: 12" by 4" • 2 Long Sides: 10 1/2" by 4 1/2" • 2 Short Sides: 8" by 6" Tip: In the interest of safety and accuracy, be sure to clamp your material.
Next, cut the top corners of your two short side pieces at an angle. To draw the lines of your angle: Make a small mark an inch and 1/4 in from either side on the top Make a small mark 4 1/2" from the bottom. Then, connect each of the top marks to the bottom mark. You can make these angle cuts with the same SM500 Wood & Plastic Wheel. With your material clamped, simply follow your marked lines of cut through the notch at the front of your Saw-Max tool.
Secure all pieces by nailing the sides together with finishing nails. For extra support, add wood glue along the seams of all sides before sinking nails in completely to the adjoining sides.
Next, cut your dowel handle to size at 12" long. Measure and mark your cut & with your dowel secure, make one quick cut across your marked line using your Dremel Saw-Max and SM500 wheel.
To attach your dowel rod, pre-drill the top to short sides of your homework kit. This process is easy with the Dremel 4200 and 150 Drill bit. Simply pull back the levers of the 4200, insert the bit, set your tool to high speed and sink the bit into the top of each short side of the kit. Hold the dowel securely between the two pilot holes and sink in a small wood screw through each pilot hole.
Finally, paint and personalize as desired!
To reduce the risk of injury user must read instruction manuals for all tools used in this project. Wear eye and respiratory protection. Use clamps to support work piece whenever practical.

Create an assignment

For assignments using classes

Updated on: 17/11/2022
Was this article helpful?
Share your feedback

- Articles / Homework
Smart Homework: 13 Ways to Make It Meaningful
by MiddleWeb · Published 08/04/2014 · Updated 11/17/2019
In the first installment of Rick Wormeli’s homework advice, he made the case for take-home assignments that matter for learning and engage student interest . In Part 2, Rick offers some guiding principles that can help teachers create homework challenges that motivate kids and spark deeper learning in and out of school.
These articles are adapted and updated from Rick’s seminal book about teaching in the middle grades, Day One & Beyond: Practical Matters for New Middle Level Teachers . Rick continues to offer great advice about homework, differentiation, assessment and many other topics in workshops and presentations across North America. Check back in Part 1 for some additional homework resources.

I’ve been accumulating guiding principles for creating highly motivating homework assignments for many years — from my own teaching and from the distilled wisdom of others. Here are a baker’s dozen. Choose the ones most appropriate for students’ learning goals and your curriculum.
1. Give students a clear picture of the final product. This doesn’t mean everything is structured for them, or that there aren’t multiple pathways to the same high quality result. There’s room for student personalities to be expressed. Students clearly know what is expected, however. A clear picture sets purpose for doing the assignment. Priming the brain to focus on particular aspects of the learning experience helps the brain process the information for long-term retention. Setting purpose for homework assignments has an impact on learning and the assignment’s completion rate, as research by Marzano and others confirms.
2. Incorporate a cause into the assignment. Middle level students are motivated when they feel they are righting a wrong. They are very sensitive to justice and injustice. As a group, they are also very nurturing of those less fortunate than them. Find a community or personal cause for which students can fight fairly and incorporate your content and skills in that good fight— students will be all over the assignment.

4. Incorporate people whom students admire in their assignments. Students are motivated when asked to share what they know and feel about these folks. We are a society of heroes, and young adolescents are interested in talking about and becoming heroic figures.
5. Allow choices, as appropriate. Allow students to do the even-numbered or odd-numbered problems, or allow them to choose from three prompts, not just one. Let them choose the word that best describes the political or scientific process. Let them identify their own diet and its effects on young adolescent bodies. Let them choose to work with partners or individually. How about allowing them to choose from several multiple-intelligence based tasks? If they are working in ways that are comfortable, they are more likely to do the work. By making the choice, they have upped their ownership of the task.
6. Incorporate cultural products into the assignment. If students have to use magazines, television shows, foods, sports equipment, and other products they already use, they are likely to do the work. The brain loves to do tasks in contexts with which it is familiar.
7. Allow students to collaborate in determining how homework will be assessed. If they help design the criteria for success, such as when they create the rubric for an assignment, they “own” the assignment. It comes off as something done by them, not to them. They also internalize the expectations—another way for them to have clear targets.
With some assignments we can post well-done versions from previous years (or ones we’ve created for this purpose) and ask students to analyze the essential characteristics that make these assignments exemplary. Students who analyze such assignments will compare those works with their own and internalize the criteria for success, referencing the criteria while doing the assignment, not just when it’s finished.

9. Spruce up your prompts. Don’t ask students to repeatedly answer questions or summarize. Try some of these openers instead: Decide between, argue against, Why did ______ argue for, compare, contrast, plan, classify, retell ______ from the point of view of ______, Organize, build, interview, predict, categorize, simplify, deduce, formulate, blend, suppose, invent, imagine, devise, compose, combine, rank, recommend, defend, choose.
10. Have everyone turn in a paper. In her classic, Homework: A New Direction (1992), Neila Connors reminded teachers to have all students turn in a paper, regardless of whether they did the assignment. If a student doesn’t have his homework, he writes on the paper the name of the assignment and why he didn’t do it.

11. Do not give homework passes. I used to do this; then I realized how much it minimized the importance of homework. It’s like saying, “Oh, well, the homework really wasn’t that important to your learning. You’ll learn just as well without it.” Homework should be so productive for students that missing it is like missing the lesson itself.
12. Integrate homework with other subjects. One assignment can count in two classes. Such assignments are usually complex enough to warrant the dual grade and it’s a way to work smarter, not harder, for both students and teachers. Teachers can split the pile of papers to grade, then share the grades with each other, and students don’t have homework piling up in multiple classes.
There are times when every teacher on the team assigns a half-hour assignment, and so do the elective or encore class teachers. This could mean three to four hours of homework for the student, which is inappropriate for young adolescents.
13. Occasionally, let students identify what homework would be most effective. Sometimes the really creative assignments are the ones that students design themselves. After teaching a lesson, ask your students what it would take to practice the material so well it became clearly understood. Many of the choices will be rigorous and very appropriate.

This is one reason I always recommend that, as a basic premise, we avoid Monday morning quizzes and weekend or holiday homework assignments. Sure, there will be exceptions when long-term projects come due. But if we are really about teaching so that students learn and not about appearing rigorous and assigning tasks to show that we have taught, then we’ll carefully consider all the effects of our homework expectations. Our students will be more productive at school for having healthier lives at home.
▶ More resources from Rick Wormeli:
Although Rick never mentions the word homework in this article about helping adolescent students improve their “executive function,” you will immediately see the connections! At the AMLE website .
NEXT: In our final excerpt from Day One & Beyond, Rick Wormeli shares his approach to homework assessment – with an clear emphasis on maintaining teacher sanity.

His books include Meet Me in the Middle ; Day One and Beyond ; Fair Isn’t Always Equal: Assessment and Grading in the Differentiated Classroom ; Differentiation: From Planning to Practice; Metaphors & Analogies: Power Tools for Teaching Any Subject, and Summarization in Any Subject , plus The Collected Writings (So Far) of Rick Wormeli: Crazy Good Stuff I Learned about Teaching Along the Way .
He is currently working on his first young adult fiction novel and a new book on homework practices in the 21 st century.
Share this:
Tags: Day One & Beyond grading homework homework homework guidelines homework policies Rick Wormeli why homework
MiddleWeb is all about the middle grades, with great 4-8 resources, book reviews, and guest posts by educators who support the success of young adolescents. And be sure to subscribe to MiddleWeb SmartBrief for the latest middle grades news & commentary from around the USA.
4 Responses
- Pingbacks 0
This is a really great article. It has helped me tremendously in making new and better decisions about homework.
Fabulous sage advice! Although I love every single suggestion you’ve included, I am particularly fond of the elimination of the “homework pass”. As a former middle-level teacher and administrator, I too found the homework pass diminished the importance of follow-up work – a necessary component in determining the level of student understanding.
I do give 2 passes, but they just extend due date by a day. And if not used, they may be returned at the end of the 9 weeks for extra credit.
Rick Wormeli’s ideas and tips in this article continue to be stimulating and useful. That said, it’s been more than a decade since the first edition of his book on grading, homework and assessment, Fair Isn’t Always Equal appeared.
In the intervening years, Rick’s thinking about homework has benefited from his work with teachers and in schools and plenty of debate. In April 2018, he published a new 2nd edition of Fair Isn’t Always Equal that includes an even deeper discussion of homework and its relationship to best practice, differentiation, and the moral obligation of educators to insist on effective homework policies.
Visitors to the Stenhouse page for the new book can preview the *entire* text for free, so be sure to check that out.
Here’s a brief excerpt from the new book:
Tenet: Homework should enable students to practice what they have already learned in class and should not present new content for the first time. Principled Responses:
• I will not assign homework to students who do not understand the content. • I will give homework to some students and no homework or different assignments to others, depending on their proficiency. • I will use exit slips and formative assessment during class so I can determine proper after-school practice for each student. • I will not give homework because parents and administrators expect me to do so, or assign homework because it’s a particular day of the week. • I will assign homework only if it furthers students’ proficiency in the field we’re studying.
Thanks to Rick for giving us permission to share this!
Leave a Reply Cancel reply
Your email address will not be published. Required fields are marked *
Notify me of follow-up comments by email.
Notify me of new posts by email.
This site uses Akismet to reduce spam. Learn how your comment data is processed .
- Popular Posts
- Recent Posts
- Recent Comments

Collaboration / Making Questions Count
Nurturing Students As Collaborative Contributors

Equity / The Unstoppable ML Teacher
Equity for MLs Begins with Equitable Schedules

Articles / Reading
Relating Classic Texts to Students’ Lives Today

Book Reviews / Gifted Education
Mapping Out Diverse Gifted Programs

Articles / Digital Resources
New Teachers: Lean on Those Digital Resources

Articles / Technology
As Jamboard Sunsets, What Is on the Horizon?

New Teacher Tips / Your First Teaching Job
Tactics for Landing Your First Teaching Job

Book Reviews / Writing
Using 100-Word Stories for Expansive Writing

Articles / Resilience
Build a Classroom That’s Resilience-Friendly

Articles / Literacy
Teach Students to Read (and Write with) Video
- Judith Wilson says: Write On! I've always believed in the power of watching, analyzing,...
- Susan Cappellini says: Great ideas for incorporating comprehension for all students into the CBMs.
- MiddleWeb says: Yvonna - We've written to you about this. So glad you...
- Yvonna Graham says: This is a wonderful blog article! I would like to quote...
- Dr. Karin Hess says: Thank you, Judith, for your insightful comments. I totally agree with...
Sign Up & Receive the Latest News about Our Content…
Email address:
First Name:
Read our Privacy Policy
BOOK REVIEWS

What to Expect from AI in Class and Beyond

Strategies for Teaching Against Disinformation

The Democratic Roots Essential to Literacy

How to Reclaim Your Energy, Passion, & Time

A Leadership Blueprint for Growth and Success
A How-to Guide to Better Engage Your Students

10 Tools to Help Kids Develop Their Talents

The Reading Strategies Book Gets an Update

Opportunities for Swift Achievement Gains

Teaching for Retention, Application and Transfer

Strategies to Adjust ‘Up’ What Students Know

Assuring Just, Inclusive Learning for Newcomers

Building Bridges That Cultivate Teacher Growth

SEL, Civic Engagement, & a Healthy Democracy

An Enhanced Edition of ‘When Kids Can’t Read’

Shifting to Asset-Based Literacy Assessments

Bringing the Science of Reading into Grades 3-5

Class Libraries to Inspire and Challenge Readers
Homework Writing Machine

Introduction: Homework Writing Machine
DOWNLOAD OUR NEW APPLICATION TO GET ALL SCIENCE DIY PROJECTS AT ONE PLACE.TO DOWNLOAD CLICK BELOW.
CLICK HERE >>>>>> DIY PROJECTS
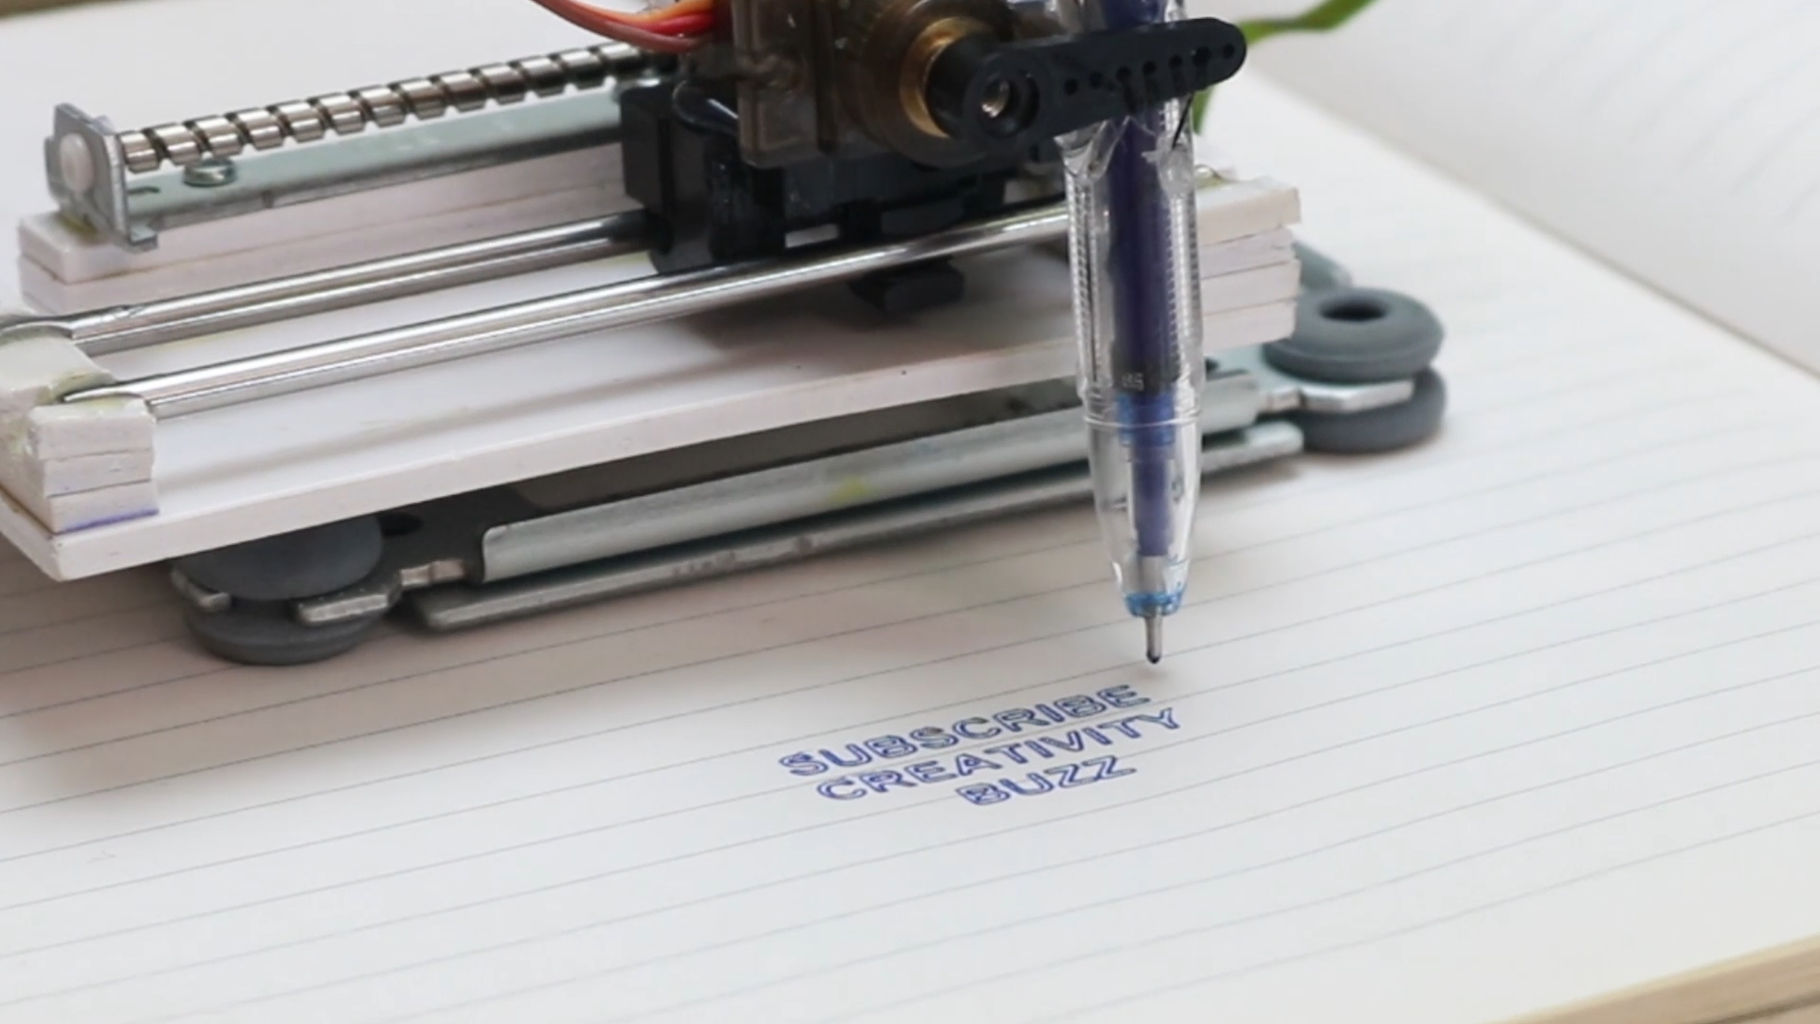
Hi guys , As per the title this is a simple project using Arduino to make Homework writing machine at your home.This machine can draw any design and write any type of fonts.You can see sharpness and perfection of writing in photos.
If you are looking for more Arduino Projects ideas than writing machine is the best projects for Arduino projects.
Step 1: Watch Youtube Video of Making Writing Machine
Here is full video of how writing machine is work on surface.If You Like This Project Please Press The Like Button.
Step 2: Disassemble DVD Writers.

First of all you need 2 DVD writers of your CPU.You can use non workable DVD writer for this project.
Take 2 DVD writers and open 5 screw on bottom of this DVD writer. Then open bottom case of DVD writer and disconnect all circuit.
Then open Top case of DVD writer.
Step 3: Disassemble All Parts.
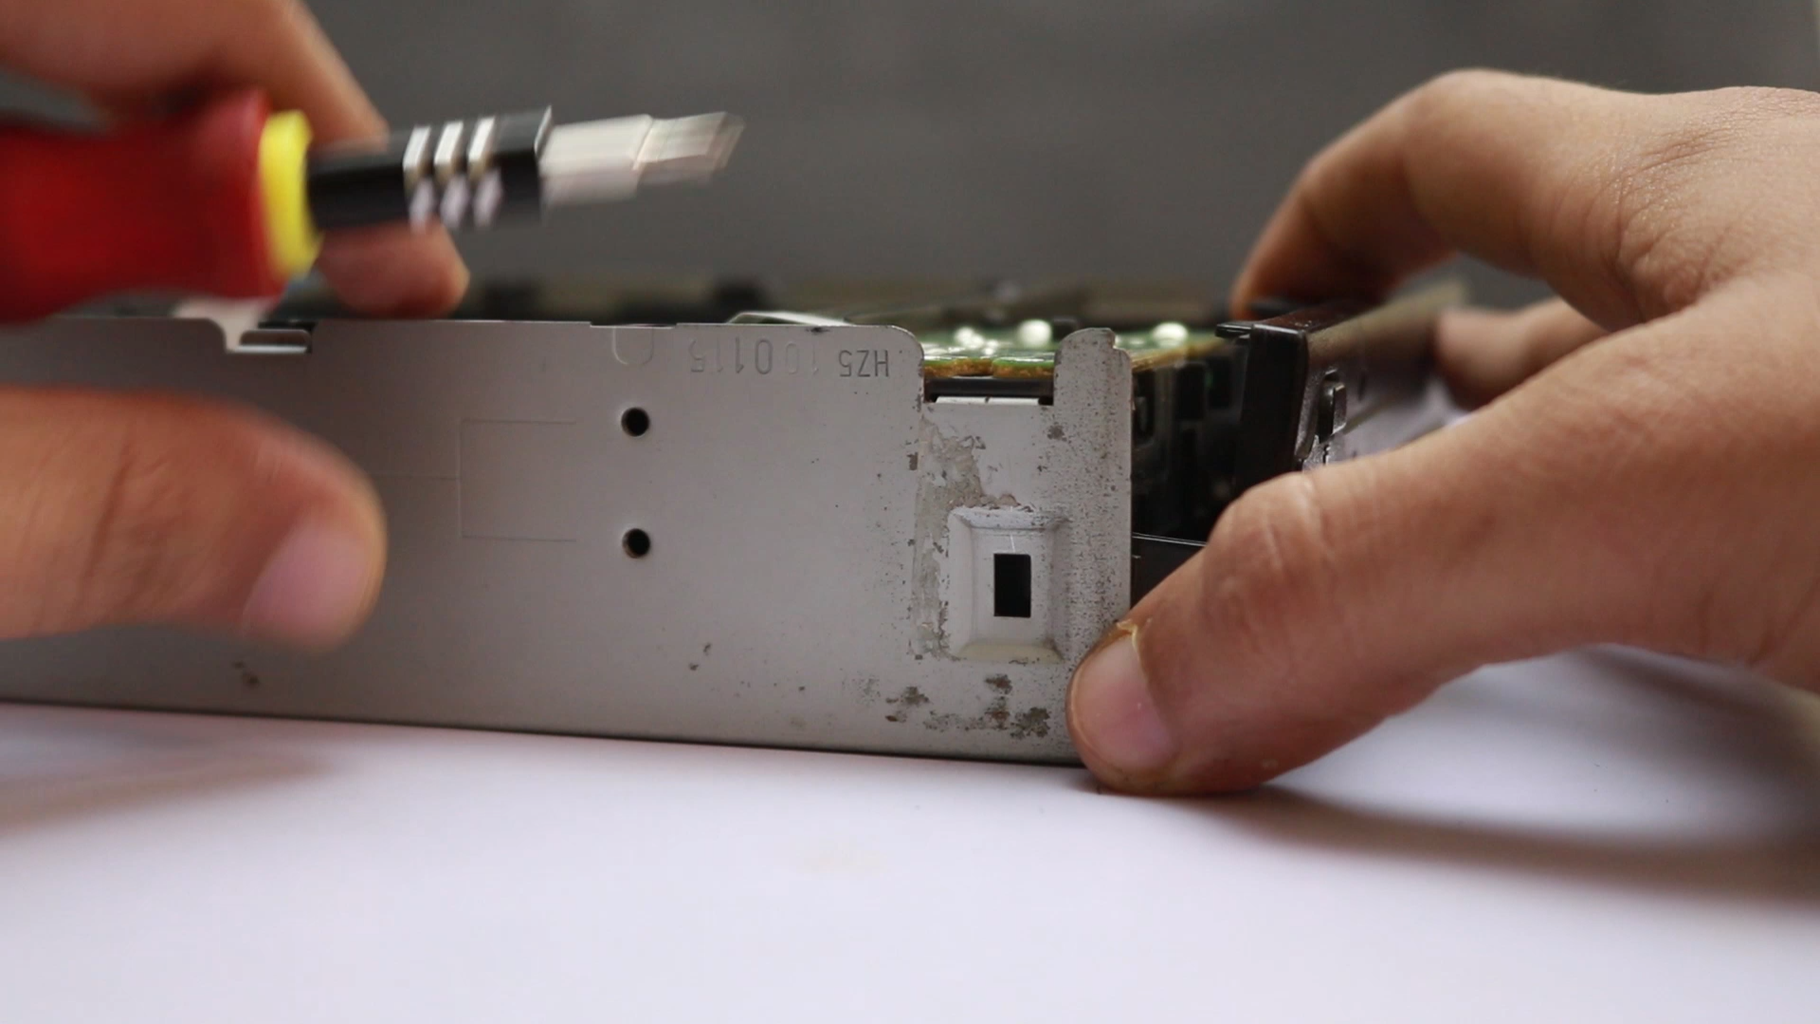
After this you see rectangle part of DVD writer with stepper motor on back side. Open 2 screw on this Rectangle and remove this rectangle outside.
Repeat this process for 2nd DVD writer.
After this you have two PCs of Rectangle Part (AS per 2nd Pic.)
Step 4: Unscrew Stepper Motor
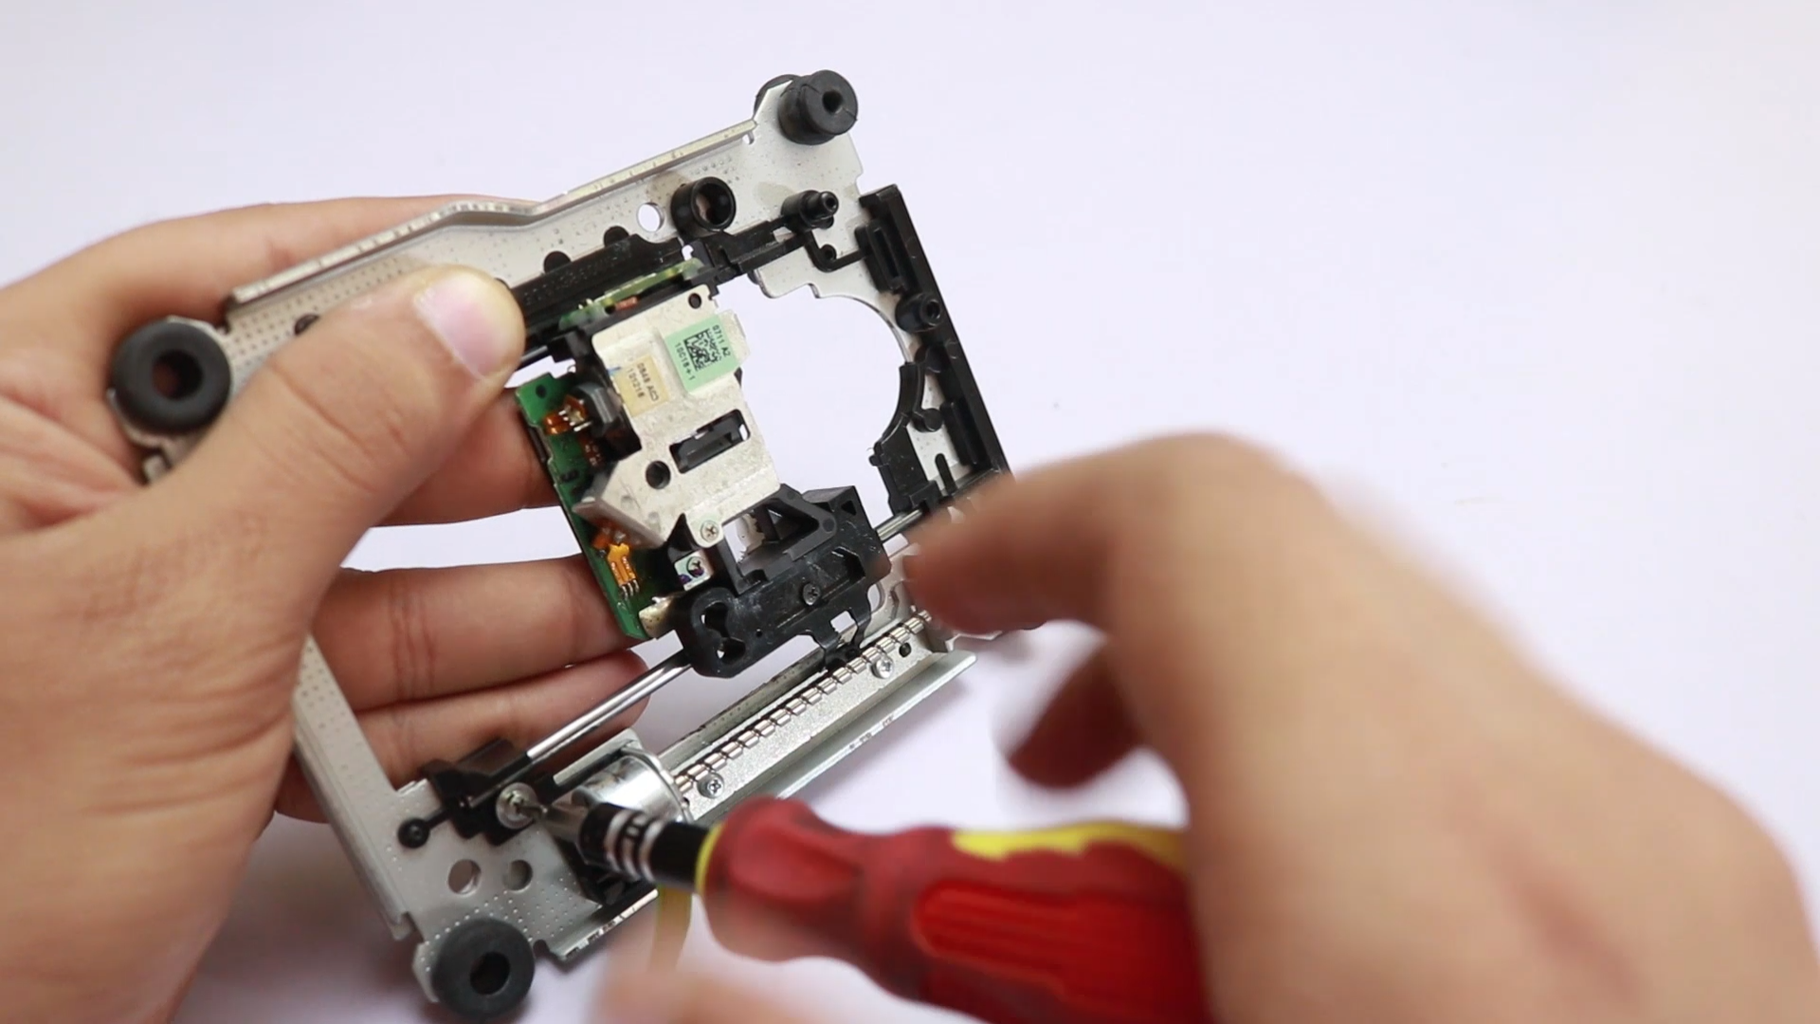
Open one screw on sliding shaft and 2 screw on stepper motor.
Disassemble stepper motor and sliding parts from one rectangle.
Remove all circuit of sliding part and cut middle part of this sliding part.
Now you have 2 PCs of plastic part.Combine both plastic object and stick with FeviQuik.
Step 5: Connection of Stepper Motor
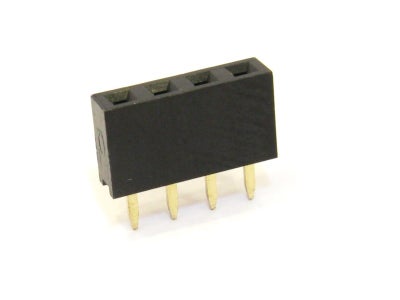
Take female header pin (4 pin) as a picture.
Connect two stepper motor with this 4 pin female header as show in picture(In the same line).
Step 6: Make X - Axes Gantry.

Take Sunboard sheet of 10 cm length and 9 cm width.
Take other sunboard sheet and cut this type of object.
1) 3 x ( 1cm x 10cm) combine with glue.
2) 3 x ( 1cm x 10cm) combine with glue.
3) 3 x ( 1cm x 5 cm ) combine with glue.
Stick 1st part on left side of 9x10cm sunboard sheet and 2nd part on right side of 9x10cm sunboard sheet.
Place shifting part on this sunboard sheet along X axes.
And your X axes Gantry is ready.
Sick 3rd part Parallel to shifting shaft and Stick Stepper motor with X axes Gantry.
Step 7: Connect With Y - Axes Gantry.
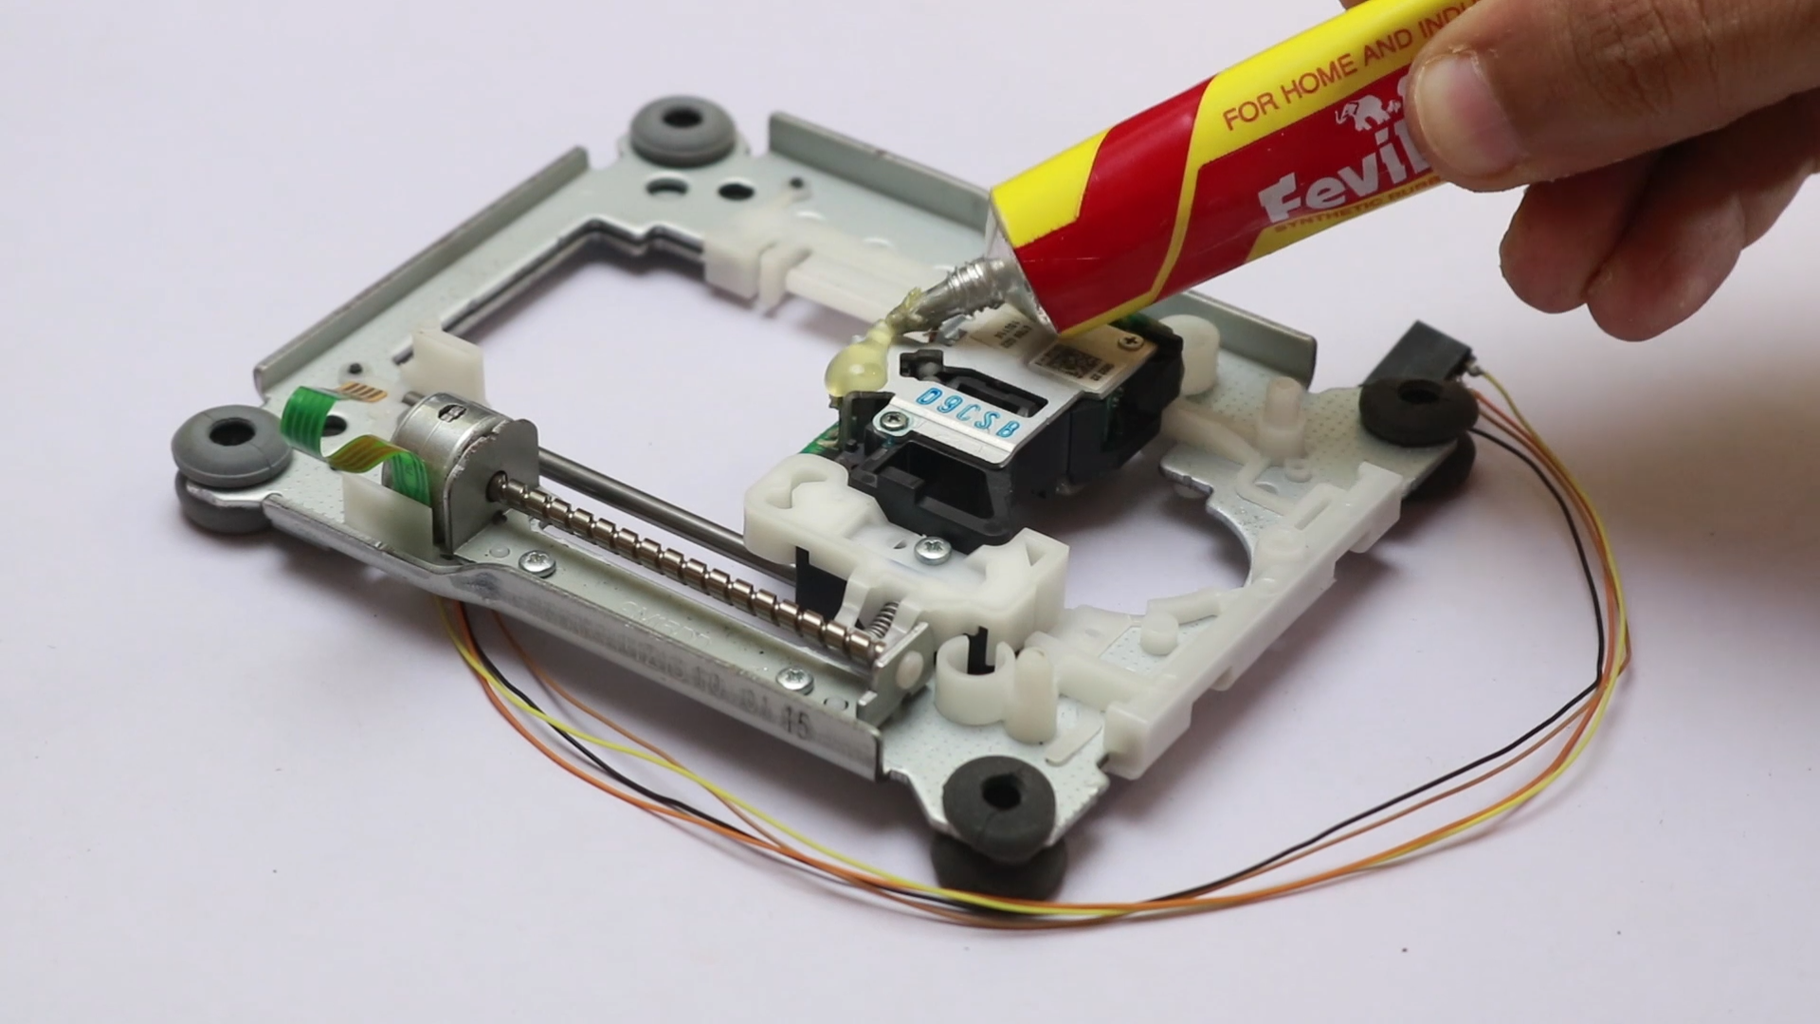
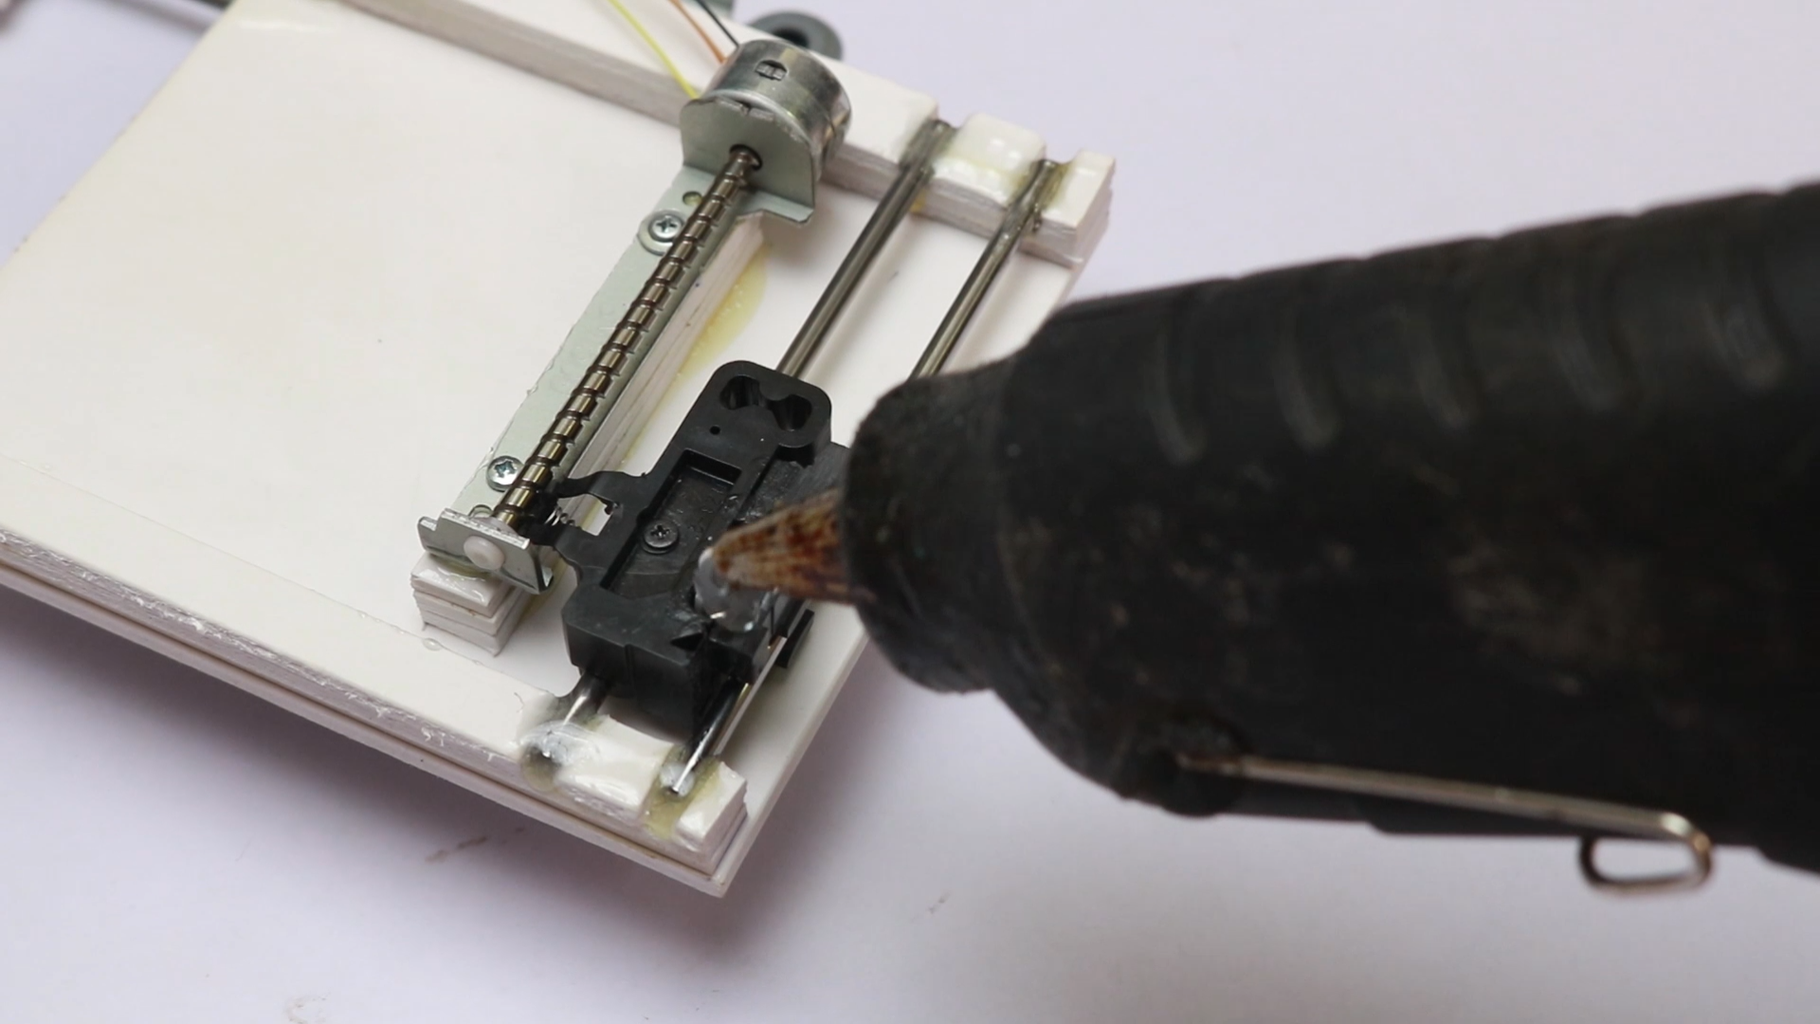
Step 8: Connect Servo Motor.
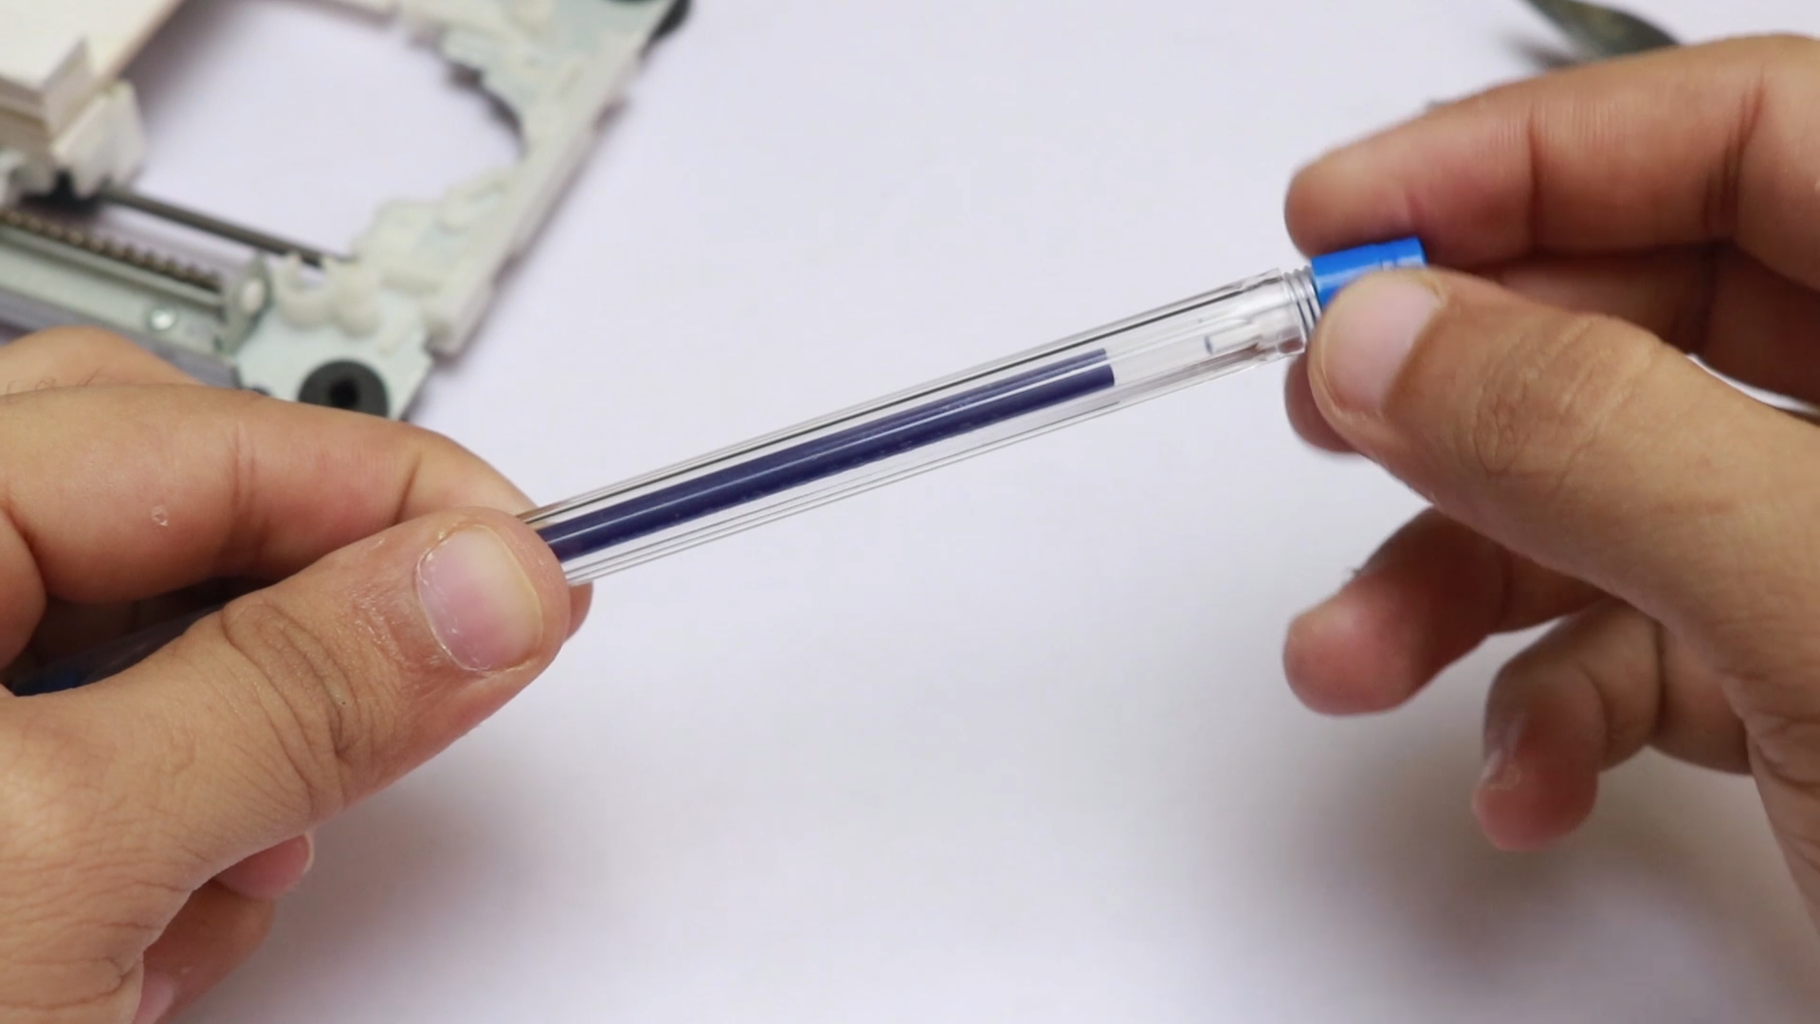
Step 9: Flexible-nib Pen Making
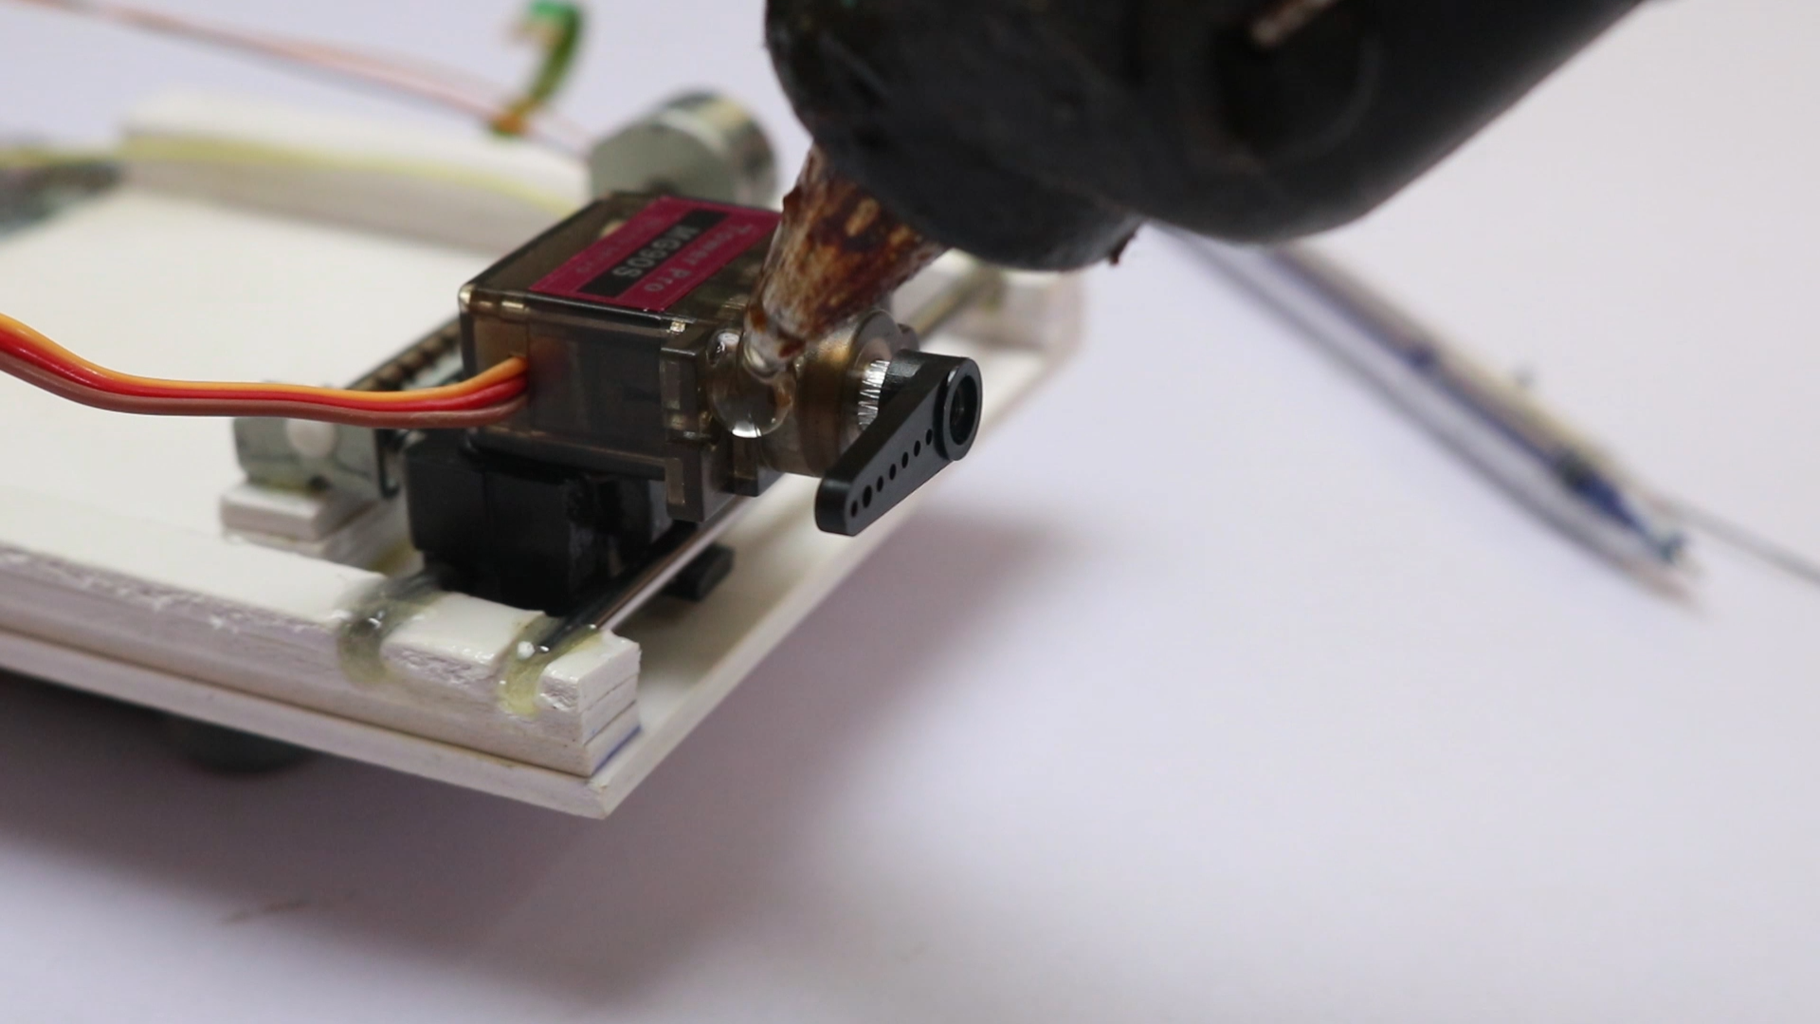
Step 10: Connect Pen
Step 11: Take All Circuit
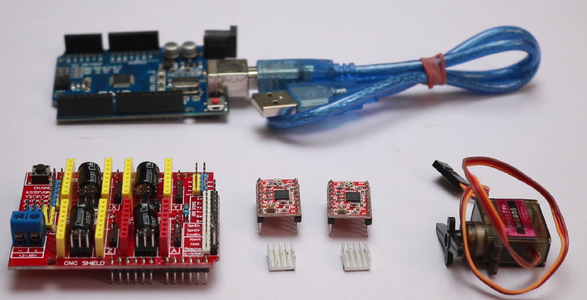
Ready your all circuit. 1) 2 PCs A4988 Stepper Motor Driver with heat sink
2)Expansion Board A4988 Driver
3)Arduino Uno R3
First of all take hit sink and stick on A4988 stepper motor Driver.
2 PCs A4988 Stepper Motor Driver connect on Expansion Board A4988 Driver module. Then this combination connect on Arduino Uno R3 (As per circuit Diagram).
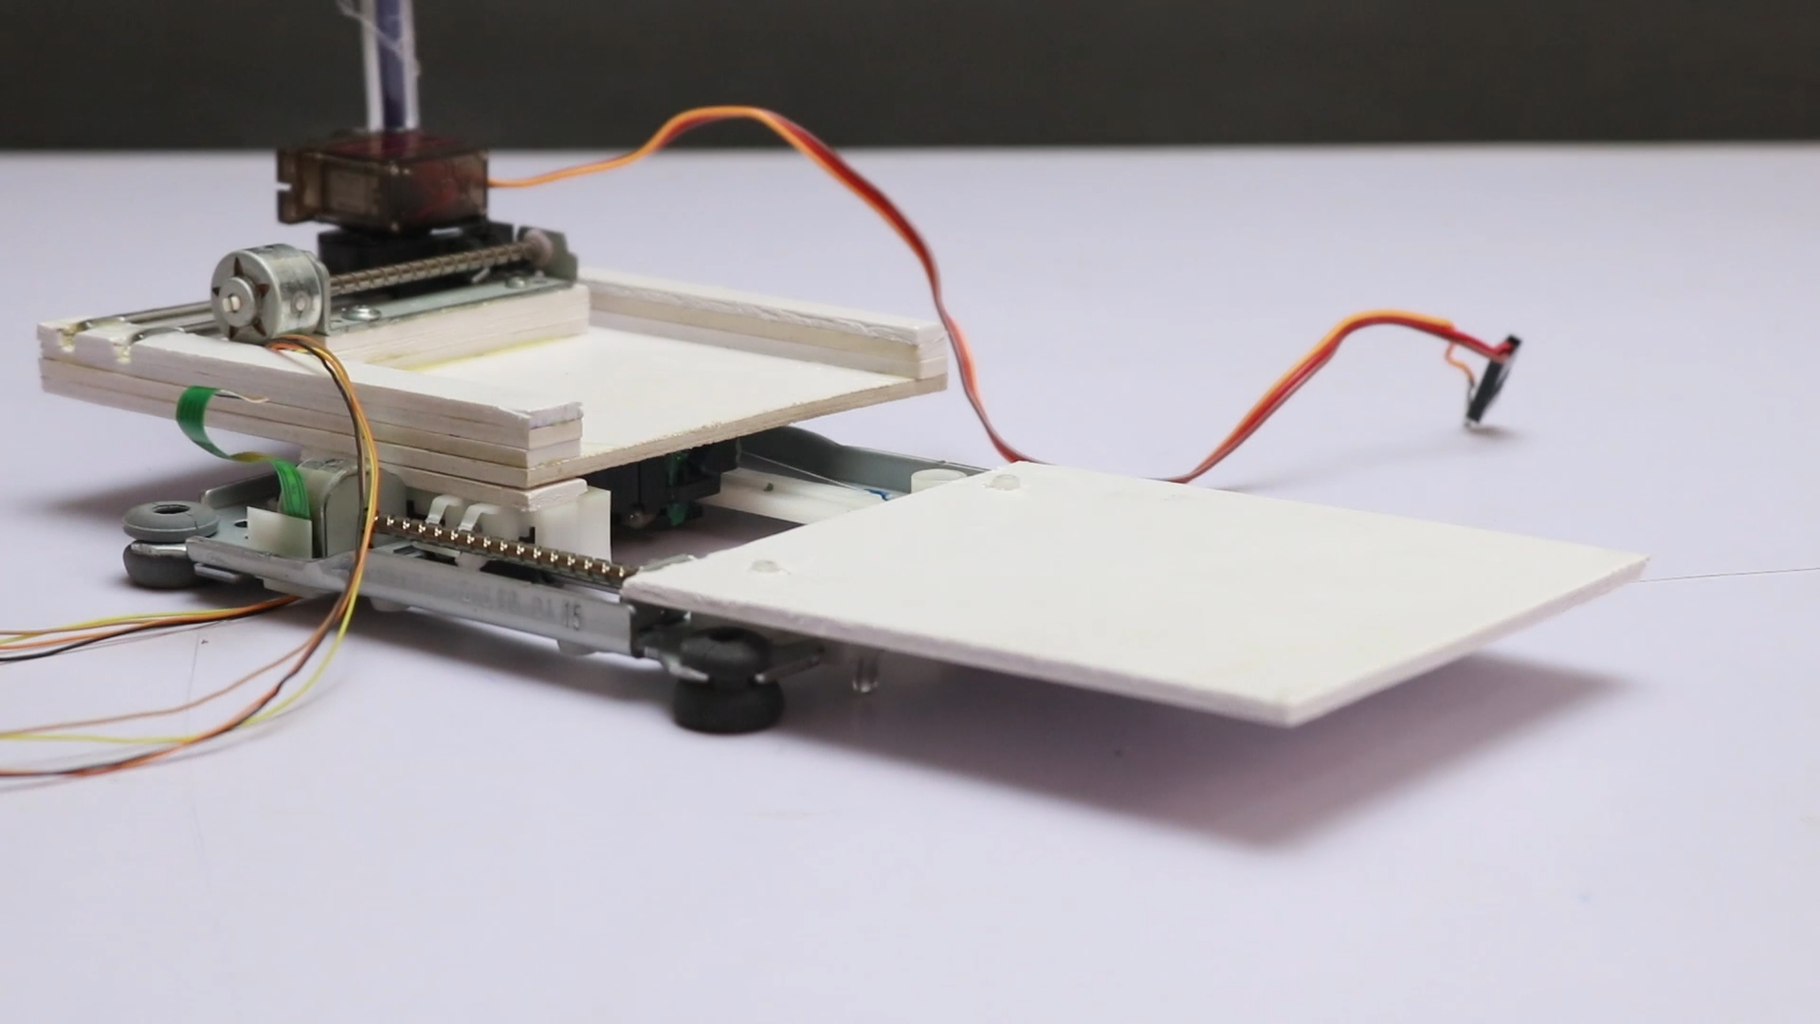
Step 12: Wiring
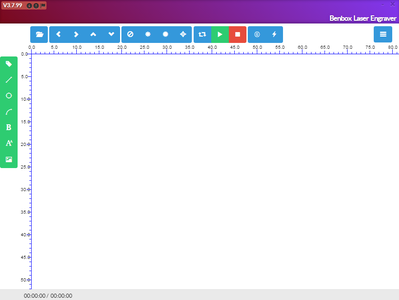
Step 13: Benbox Softwer Configuration.
Step 14: Watch This on Youtube.
IF YOU LIKE THIS PROJECT PLEASE VOTE ! VOTE ! VOTE ! IN CONTEST.
Step 15: Any Error !
If you have any questions about this project please comment in comment section.If you made this writing machine and any error during writing please attach your writing machine pictures.I will reply very soon.

Second Prize in the Arduino Contest 2017

Participated in the Design For Kids Challenge
Recommendations

Build-A-Tool Contest

Pets and Animals Contest

Big and Small Contest

- Skip to main content
- Keyboard shortcuts for audio player
- Dear Life Kit
- Life Skills
How much should I spend on a wedding present? Life Kit's tips of the month

The great thing about working on Life Kit is that the editors and producers get to pick up all sorts of nifty life hacks that save money, enhance our relationships and make our everyday lives more joyful.
Here are nine expert tips from our April episodes we were most excited to share — and put into practice in our own daily lives.
1. Planning a big trip? Consider traveling during "shoulder season," the period of time between a city's peak season and offseason. It's often less expensive and it can help your "destination deal with over-tourism and overcrowding," says Lale Arikoglu, articles director at Condé Nast Traveler magazine.

From food to finance, 9 life hacks from Life Kit experts
2. The rule that your wedding gift should cost as much as your plate is outdated, says etiquette coach Myka Meier. "That is kind of an old wives' tale that you have to spend what the couple spent on you, because that's often not possible for many people. At the end of the day, you need to stay within your budget."
3. To prevent digital eye strain, follow the 20-20-20 rule . For every 20 minutes of computer work, take a 20-second break and look 20 feet away, say eye experts .
4. To truly connect with a poem, don't worry about figuring out what the poet is trying to say . Instead, says poet Harryette Mullen, focus on how you feel . What impression do you get? What ideas float around in your mind as you read it?

24 nifty tips to make 2024 even brighter
5. Don't depend on an anti-choking device if your baby is choking, say pediatricians . The evidence-backed and proven method is to do back blows followed by chest blows on your child — and then, if they're unresponsive, proceed to call 911 and do CPR .
6. Start talking to your kids about vaping when they're in elementary school , says Dr. Deepa Camenga, a pediatrician and addiction medicine specialist with the Yale School of Medicine. You want to be the first person to have that conversation with them so they know what your expectations are.
7. Think of your birthday as your own personal holiday. A lot of people dislike their birthday — they don't like the attention or they've been disappointed by previous birthdays. Make your day special again by doing what you want to do, whether it's throwing yourself a giant bash or treating yourself to a spa day.
8. In negotiation, avoid simple yes or no answers by trying a tactic called "a menu of options," says career coach Joan Moon. For example: instead of asking for more flexibility at a new job and getting a flat-out no, you might propose a couple of options: working three days remote or a four-day workweek. It can help expand the possibility of a favorable outcome .

Having a roommate can be great, but it takes some work to make it work
9. Tired of having roommates? Consider "communal living." Communal living takes many forms, whether that's sharing a home with like-minded people or raising your kids on the same street as your friends. And it goes by many names: intentional communities, co-housing, co-ops or communes. But they all have one thing in common: people who co-live don't just simply live together as roommates . They make the long-term commitment to intertwine their lives with one another, says Gillian Morris, who co-runs a blog on communal living.
The digital story was written by Malaka Gharib and edited by Meghan Keane. The visual editor is Beck Harlan. We'd love to hear from you. Leave us a voicemail at 202-216-9823, or email us at [email protected].
Listen to Life Kit on Apple Podcasts and Spotify , and sign up for our newsletter .
- Life Kit: Life Skills
Homework Ban
- X (formerly Twitter)
NAT: Hey, Nat here, let's see what's making news. Poland has just banned homework. Yes, that's right no homework ever. For lower primary students anyway. Here's Wren.
DAKOTA: Are you thinking what I'm thinking?
JACK: Yeah. Let's move to Poland.
DAKOTA: No, let's make a mind control device so we can make the Prime Minister ban homework in Australia.
JACK: Okay.
Yep, over here in Poland, kids are here living the dream. Homework is now banned for students in years 1 to 3 and for students in years 4 to 8, it's optional and won't count towards grades.
OLA: I am happy because this homework, I did not like it too much and it didn't really make much sense because most people in my class, in the morning would copy it from someone who has done the homework.
JUILAN: It's a little bit uncool that there is no more homework. But when there is no homework, that's also rather cool.
The Polish government decided to make the big move. After a moment that went viral at a campaign rally in the lead up to the parliamentary elections were a 14-year-old decided to make a stand for all Polish kids.
MACIEK, PRIMARY SCHOOL STUDENT: This is a general problem of Polish schools that children's rights are being violated. For example, the right to take some rest. There is homework to be done during weekends, tests on Mondays, and so much homework is given us that we find no time for rest.
A lot of people agreed with Maciek. Before the ban, Polish kids spent around 1.7 hours per day on homework, which is more than a lot of other countries, and some experts questioned whether or not it was doing any good.
BARBARA NOWACKA, POLISH EDUCATION MINISTER: When I read research regarding the mental health of children, their overload with learning, the reasons of depression, of tensions, stress, or loss of interest in learning, one of the factors, the one that could be removed fastest, was the burden of homework.
Some studies have shown that while homework can be handy for high school students in primary school it doesn't necessarily help you learn and it takes up time that could be better spent doing things like hanging out with friends, playing sport, or doing other creative stuff.
STUDENT: I don't mind it but I still feel like it's a waste of time.
STUDENT: Because you could do everything else? Like you could do exercise? You could, like, play games.
On the flipside, fans of homework say, it can be a good way of making sure all the stuff you've learnt at school sticks in your head, and getting your parents involved in your learning. It can also teach you how to work independently, and to help you get ready for high school and university.
STUDENT: You can research more, and you have more time to catch up.
STUDENT: My grades have gone up a lot because of doing homework.
Some parents and teachers in Poland aren't on board with the ban, which they say happened too quickly and without enough consultation. So, could something like this happen here? Well, right now it's not on the cards and it's up to schools to decide their own homework policies. Unless of course…
DAKOTA: Three, two, one. JACK: Did it work? DAKOTA: Probably not.
Recently the Polish government decided to ban homework in lower primary and make it optional in upper primary. It’s a move that’s been welcomed by many kids although not all adults think it’s a good idea. We find out more about the debate over homework and whether or not it helps kids to learn.
- Justina Ward, Reporter
BTN Classroom Episode 10, 2024
In this episode
Kokoda Track
China Athlete Doping Claims
Should Homework Be Banned?
Homework Debate
Should Homework be banned? Newsround
- Latest News
- Indigenous affairs
- Political commentary
- The Growth Agenda
- Legal Affairs
- Margin Call
- Feeding the chooks
- Combat Sport
- Horse Racing
- Rugby Union
- The List 100 Arts & Culture
- Visual Arts
- The Wall Street Journal
- Luxury & Lifestyle
- Food & Drink
- The List: VL50
- Halliday’s Top 100 wines
- Top 20 beers
- Top 15 spirits
- Flight Reviews
- Higher Education
- Today’s Paper
- Our journalists
- The Australian Wine
- Subscription Help
Hi there , welcome to your account and your subscriber benefits
- The Australian Plus benefits
- The Australian app
- Newsletters
- My comments
- Saved stories
Share this article
Aussie olympic sailors to make waves with groundbreaking kit from sydney innovator zhik.

- 2:42PM May 1, 2024
Sponsored content
When Australia’s Olympic sailors take to the water in Marseilles, they’ll be armed with an industry first - a revolutionary high-performance neoprene-free wetsuit created by Sydney sailing apparel company Zhik.
Made from sustainable, plant-based Yulex rubber, the range sets a new standard for elite eco-friendly water sports apparel with superior thermal insulation, comfort and durability, all while generating 80 per cent fewer CO2 emissions than conventional neoprene wetsuits.
The fabric is infused with graphene, an advanced nanoscale 2D material that can return up to 20 per cent more body heat, keeping bodies warmer for longer, regulating temperatures during low-intensity activities and aiding the drying process.
Zhik is one of just three official suppliers to the Australian Olympic Team, with other two being global behemoths Speedo and ASICS.
Zhik CEO, sailing champion and multiple Olympic gold medallist, Mat Belcher OAM , said the company was thrilled to be named an official supplier for the Australian Olympic team for the second Games in a row.
“Zhik was first named an Olympic supplier for the Australian sailing team for the Tokyo Games in 2020. That year, Will Ryan and I won gold wearing Zhik gear,” he said.
“Since then, it’s evolved even more, and the current range sets a new standard for elite eco-conscious water sports attire.”
Along with the high-performance wetsuits, Zhik will supply all technical on-water kit needed to succeed across eight sailing disciplines contested by Australians.
This year’s Australian Olympic Sailing Team includes defending Olympic gold medallist Matt Wearn in the men’s single-handed class, 2012 Olympic women’s match racing silver medallist Olivia Price and Evie Haseldine in the women’s skiff.
Grae Morris, in the new discipline of wind foiling, has taken the world stage by storm, finishing second last week at the final major iQFoil event before the Marseilles Games.
France will be the first Olympics that will include iQFoil and kiteboarding.
Australian Olympic Committee CEO Matt Carroll said both disciplines required equipment with peak durability.
“Olympians are competing at the highest level and cannot compromise on performance but the AOC is also deeply committed to partnering with suppliers that care about environmental impact,” he said.
“Our challenge was to find a kit that ticked both boxes, and we’ve been able to do that with Zhik. It’s a bonus that this innovative gear is cutting-edge Australian technology too.”
Zhik was created in the Sydney garage of Brian Connolly, the founder of Lake Technology, which became Dolby Australia.
Connolly, a sailing enthusiast, saw an opportunity to revolutionise the industry’s gear and began creating clothing and equipment.
He designed solutions for uncomfortable harnesses by adding velcro entry systems and developing a breathable fabric four times more waterproof than the market-leading alternatives.
The company now supplies the most successful sailing teams in the world, including six of the ten Sail GP teams, winners of the Volvo Ocean and Sydney to Hobart races, and the Olympic sailing teams of Australia, New Zealand, Singapore and Denmark.
The prestigious SailGP circuit, featuring the best sailors on the planet, is renowned for pushing the boundaries of performance and technology.
As the demand for sustainable, high-performance gear intensifies, Belcher said Zhik was rising to the challenge of meeting elite athletes’ demands without compromising environmental responsibility.
“Our customers expect us to drive sustainability in our industry,” he said.
“They demand peak performance without forsaking environmental responsibility. Crafting kit that fulfils both criteria has been our mission, and we’re succeeding.”
This article was developed in collaboration with Zhik, a Stockhead advertiser at the time of publishing. This article does not constitute financial product advice. You should consider obtaining independent advice before making any financial decisions.
The Australian doesn't play nicely with your current browser.
Please take a moment to upgrade to the latest version.
Internet Explorer
v11 or later
Upgrade now

IMAGES
VIDEO
COMMENTS
Step 3: Added Stepper Motors. Next, take two stepper motors and insert them into the stepper motor holders' casing. Then tighten every screw on the holder joint and stepper motor. Take two 8 mm plain steel rods that are 35 cm long and pass them through the stepper motor holder's top holes.
Hello Friends, in this video i will show you DIY EleksDraw XY Plotter Pen Drawing Writing Robot Drawing Machine.It is an extremely versatile machine, designe...
Step 1: Assembly - Y Axis. Take the 2040mm profile and attach the base plates to both the ends. Use the sliding nuts and m4 bolts to attach the base plates to the profiles. Now turn the profile and attach rubber feet to the bottom slots of the base plates. These rubber feet will hold the machine in place on smooth surfaces.
Step 3: Assemble the X-Axis. Now take the threaded rod and insert it in the hole below. Feed a 5/16in washer and 5/16in nut on both sides of the x-support part. Remember that you need (2) 350mm and (2) 450mm long linear rods. Take the (2) 450mm linear rods and insert them into either x-support part.
This is the Version 2.0 of the Arduino Homework Writing Machine - 2D CNC Plotter. this version comes with a lot of upgrades from the previous one, which incl...
Take the (2) 350mm linear rods and insert them the Y-back piece by using a rubber mallet. Get (1) M4-0.5 x 35 screw, (1) M4 nut and the 5th 624zz bearing. Get (2) M3-0.5 x 16 screws to secure the linear rods. Slide in the bearing when inserting the screw through the Y-back piece.
How to Make Homework Machine at homeLearn How to make homework writing and drawing machine at home using Stepper motor.You can make this type of automatic wr...
Get (1) Hex M3-0.5 x 20mm screw and the Metric Thumb Screw and push them together. Use superglue to keep it together. Get (3) M3-0.5 x 16mm screws which you will use the secure the Base Slide to the Y-Front part. You may need to use (3) M3-0.5 nuts in order to hold it in place.
The space is too narrow to work comfortably. The 24″ deep countertop gives enough space to really spread out and work without feeling cramped. The space is about 11 ft wide so we had to use two countertop pieces and cut them down to size. We put the cut ends against the wall so that the finished, uncut edges would make a clean line/join in ...
The clipboard for $1.44. Another ruler for $1.27. And that was it. Everything else we have from previous school years' supplies that came home or just sitting around. To start, you need a container. I am currently using a 16 quart clear container, but a smaller size would work just as well.
6 Steps To Create Your Own Homework Station: Work out where you want to keep it. Decide what you want to use for the station itself. Decide what needs to go into it and buy your supplies. Store everything (get storage if necessary) Label containers so it's easy to put things back AND find things. Use and enjoy! P.S.
Make sure the desk is horizontal with a level. Using a 5/16" Nut Driver screw in four 5/16" x 5" Ledger Board Fastener through the desk frame and into the studs in the wall. For aesthetics you can put a ½" wood plug in the hole to hide the bolts.
For a cleaner look, cut a two-inch-wide slip of paper and fold it so that it will fit over your staples. Glue the paper in place to make your homemade planner look like a composition book. You can also make a notebook using a hole punch and ribbon. 8. Write your assignments into your planner.
Step 5. You need: To attach your dowel rod, pre-drill the top to short sides of your homework kit. This process is easy with the Dremel 4200 and 150 Drill bit. Simply pull back the levers of the 4200, insert the bit, set your tool to high speed and sink the bit into the top of each short side of the kit. Hold the dowel securely between the two ...
In this video we make homework writing machine using Arduino uno and stepper motors.This writing machine can be used for writing and drawing in science proje...
Step 2: Building X and Y Axis Carriages. Take out the stepper Motor from dvd writer as in the picture. You need to open 2 dvd writers carefully without damaging anything inside it. Screw one carriage which contained the stepper motor to the 1ft.x1ft. board, this is the X-axis motor carriage. Keep some gap for Y axis motor carriage to be placed .
Here's how to create an assignment: From your Dashboard, click the "Assign HW" button next to any Kit. You can also create an assignment from your Assignments section. If you create a new assignment in this way, you'll need to select a kit before continuing. Select the mode you'd like to use with your assignment from the mode picker and click ...
Throughout a Kit, each student will get exposure to the questions multiple times to ensure mastery. Earn. Students earn in-game cash by answering questions correctly. ... You can also assign it as homework. Students love it and assignments are graded for you automatically. KitCollab. With KitCollab, students create questions for the game!
The brain loves to do tasks in contexts with which it is familiar. 7. Allow students to collaborate in determining how homework will be assessed. If they help design the criteria for success, such as when they create the rubric for an assignment, they "own" the assignment.
Here's how to conquer the homework of adulthood so you can get back to living your life. 1. Make it visible. Recognize that these tasks are important and deserve your attention. "The first part is ...
NPR's Life Kit talks with experts about ways to overcome some of that stress by making friends in a new place. Life Kit 5 easy tips for making friends as an adult
Step 6: Make X - Axes Gantry. Take Sunboard sheet of 10 cm length and 9 cm width. Take other sunboard sheet and cut this type of object. 1) 3 x ( 1cm x 10cm) combine with glue. 2) 3 x ( 1cm x 10cm) combine with glue. 3) 3 x ( 1cm x 5 cm ) combine with glue. Stick 1st part on left side of 9x10cm sunboard sheet and 2nd part on right side of ...
7. Think of your birthday as your own personal holiday. A lot of people dislike their birthday — they don't like the attention or they've been disappointed by previous birthdays.
Homework is now banned for students in years 1 to 3 and for students in years 4 to 8, it's optional and won't count towards grades. OLA: I am happy because this homework, I did not like it too ...
This video will show you how to assign a kit as a homework assignment for students to complete asynchronously.
Crafting kit that fulfils both criteria has been our mission, and we're succeeding." This article was developed in collaboration with Zhik, a Stockhead advertiser at the time of publishing.