Join Meeting Test
Test your internet connection by joining a test meeting..
If you are unable to join the meeting, visit Zoom Support Center for useful information.
- Integrations
- Sustainability & ESG
- How to Videos
- Developer Platform
- Zoom Ventures
- Zoom Merchandise Store
- Zoom Rooms Client
- Browser Extension
- Outlook Plug-in
- Lync Plug-in
- Android App
- Zoom Virtual Backgrounds
- 1.888.799.9666
- Contact Sales
- Plans & Pricing
- Request a Demo
- Webinars and Events
- Support Center
- Learning Center
- Zoom Community
- Accessibility
- Developer support
- Privacy, Security, Legal Policies, and Modern Slavery Act Transparency Statement
- Bahasa Indonesia
- US Dollars $

Upcoming Meetings
8 tips on how to present over Zoom like a pro

Today, Zoom is a central part of the remote workplace. It and other video conference platforms are widely used for meetings, job interviews, webinars, and presentations.
In-person presentations can be stressful enough, and having to conduct them virtually can seem even more daunting.
But it doesn't have to be that way. Our eight pro tips for presenting over Zoom may help you feel more prepared, comfortable, and confident. Read on to find out more.
1. Plan out your Zoom background/location ahead of time.
You can use a location in your home or a virtual Zoom background. If you select a place in your house, make sure it is uncluttered and clean. A plain wall or shelves with neatly arranged books provide a professional setting.
Consider lighting. Soft lighting placed in front of you illuminates you evenly; sitting in front of a window can cause glare and shadows.
Make sure your background doesn't distract from you and your presentation. You don't want your audience focusing on a family photo or the dishes in the sink.
2. Test your equipment before your presentation.
Your equipment can make or break your Zoom presentation.
To avoid surprises, check your internet connection, plug in your laptop, and ensure that your camera angle is correct and that the microphone works.
You can confirm your internet connection, audio, and visual with a Zoom test meeting . Using a hard-wired connection rather than wifi is the safer option. And closing any applications you won't need during the presentation can conserve bandwidth.
Taking precautions can avoid or minimize frozen screens, views of the top of your head, dead batteries, and sound problems.
3. Put notes in the right place on your screen(s).
Zdnet recommends, the best webcams for remote-working video calls.
The pandemic lockdown will leave a legacy of increased remote working, so it's a good time to upgrade your webcam. Here are ten leading contenders.
You need your notes where you can see them, but you don't want to keep looking down or off to the side during your presentation.
To combat this, you can use dual monitors . Position your presentation on one of them, visible to all, and your presenter's notes — plus the webcam you're using — on the other, visible only to you.
Or you can present your slide show in a window and put a private view of your notes in another window on the same screen. Zoom provides step-by-step instructions for single and dual screens.
4. Practice Zoom presenting as if it were the real thing.
Zoom allows you to practice in the precise environment where you will be presenting. Set up your background, lighting, and screens as you will on presentation day. You can schedule a webinar practice session on Zoom and run through your presentation exactly as you will on the day. You can invite a friend to join you and offer feedback.
Practicing can make the difference between a smooth presentation or an awkward one. Rehearse as often as you can, and visit our page of public speaking tips .
SEE: What tech jobs don't require public speaking?
5. Minimize clutter on your slides.
Slides are a key part of a virtual presentation and can help you and the audience stay on track.
Slides should be easy to read and navigate. Avoid brightly colored backgrounds, complicated fonts, and too many graphics.
Each slide should communicate one concept or idea. Avoid a long list of bullet points on a single slide.
While a slide with few words in readable, bolded font works fine, visuals like charts, maps, and illustrations or photos can be more effective and keep your audience engaged.
6. Use easy-to-understand visuals.
Visuals liven up your Zoom presentation in ways words don't. Instead of a long list of numbers explaining company statistics, try a graph or pie chart. Visuals aid understanding and keep your audience interested.
Explaining technical procedures with videos or illustrations rather than wordy descriptions alone enables you to show and tell. They also accommodate different learning styles within your audience.
Microsoft posts tutorials for incorporating visual elements into PowerPoint slides and inserting videos from the web or your computer .
7. Explain your agenda before you begin presenting.
Most people like to know what to expect when logging onto a meeting. Opening your presentation with a slide outlining your agenda sets the timeline for your meeting and reassures your audience. If you plan to allow audience interaction, make sure to highlight when and how in your agenda.
You can list the points you're going to cover in your presentation on your slide(s) and/or use graphics. You can pose a question on a slide, then show how you plan to answer it. Starting off with a funny (but work-appropriate) photograph or illustration can put you and your audience at ease.
8. If appropriate, encourage your audience to interact.
Unless you have a good reason not to, encourage your audience to interact during or after your presentation.
Some presenters ask participants to use Zoom's chat function for questions and pause the presentation periodically to answer them or wait until the end. Presenters can mute and unmute the audience and allow time for comments and questions that way. Zoom also allows for engagement through participant polls during the presentation
The size of your audience may dictate how you want to handle audience interaction.
Not allowing participant interaction risks losing your audience to their phones and other distractions.
In conclusion
The hardest part of presenting on Zoom may be the technology for some and the public speaking for others. We hope our tips help.
Online public speaking courses can help with anxiety and discomfort. Developing emotional intelligence skills can also benefit your Zoom presentations.
👀 Turn any prompt into captivating visuals in seconds with our AI-powered visual tool ✨ Try Piktochart AI!
- Piktochart Visual
- Video Editor
- AI Design Tools
- Infographic Maker
- Banner Maker
- Brochure Maker
- Diagram Maker
- Flowchart Maker
- Flyer Maker
- Graph Maker
- Invitation Maker
- Pitch Deck Creator
- Poster Maker
- Presentation Maker
- Report Maker
- Resume Maker
- Social Media Graphic Maker
- Timeline Maker
- Venn Diagram Maker
- Screen Recorder
- Social Media Video Maker
- Video Cropper
- Video to Text Converter
- Video Views Calculator
- AI Brochure Maker
- AI Document Generator
- AI Flyer Generator
- AI Infographic
- AI Instagram Post Generator
- AI Newsletter Generator
- AI Report Generator
- AI Timeline Generator
- For Communications
- For Education
- For eLearning
- For Financial Services
- For Healthcare
- For Human Resources
- For Marketing
- For Nonprofits
- Brochure Templates
- Flyer Templates
- Infographic Templates
- Newsletter Templates
- Presentation Templates
- Resume Templates
- Business Infographics
- Business Proposals
- Education Templates
- Health Posters
- HR Templates
- Sales Presentations
- Community Template
- Explore all free templates on Piktochart
- The Business Storyteller Podcast
- User Stories
- Video Tutorials
- Visual Academy
- Need help? Check out our Help Center
- Earn money as a Piktochart Affiliate Partner
- Compare prices and features across Free, Pro, and Enterprise plans.
- For professionals and small teams looking for better brand management.
- For organizations seeking enterprise-grade onboarding, support, and SSO.
- Discounted plan for students, teachers, and education staff.
- Great causes deserve great pricing. Registered nonprofits pay less.
15 Tips for Engaging Zoom Presentations + Examples

Your next Zoom presentation is a week away. And your mind is racing.
What presentation software should you use?
What if the other attendees can hear your neighbor’s loud music?
Will they find your presentation boring?
Relax and take a deep breath.
You don’t have to figure out the answers to these questions by yourself. This guide will cover everything you need to know about planning and delivering engaging Zoom presentations without stress and anxiety!
After reading this article, you’ll be brimming with confidence and competence on your next Zoom presentation.
Table of contents :
The science behind your Zoom presentation anxiety
- Downloadable Zoom presentation checklist
Part 1: Tips on how to plan and prepare for your Zoom presentation
Part 2: tips during your zoom presentation.
- How to share your Piktochart slide deck on Zoom
- Present with ease on Zoom using Piktochart presentations

Before we get into all the other Zoom presentation tips, perhaps the most important is to deal with your Zoom presentation anxiety. And you’re not alone – anxiety over Zoom presentations is more common than you think .
A 2021 paper on why students have difficulties learning during synchronous presentations over Zoom found that 80 percent of the students polled experienced anxiety and trouble focusing during their virtual classes. But what causes this worry? In a peer-reviewed article, Professor Jeremy Bailenson, founding director of the Stanford Virtual Human Interaction Lab , highlighted the results of their research and cited four primary reasons behind Zoom fatigue, stress, and anxiety:
- Your brain interprets excessive amounts of close-up eye contact during video chats as an “intense situation.”
- Like looking at the mirror, you become more critical of yourself as you see yourself on camera.
- Limited movements while you’re chained in your chair and table.
- Video chats require a higher cognitive load than face-to-face presentations.
“You’ve got to make sure that your head is framed within the center of the video. If you want to show someone that you agree with them, you have to do an exaggerated nod or put your thumbs up. That adds cognitive load as you’re using mental calories in order to communicate,” shares Bailenson.
Finally, you have to consider tech troubles and presentation software fiascos, as well as dealing with the pressure of public speaking.
15 Zoom presentation tips and tricks to help you own the room like a pro
Now that you understand why Zoom presentations give you sweaty palms, let’s go through 15 actionable steps to prepare for the slides.
We created a checklist of the Zoom presentation tips so you can cross off each task.

Prefer video learning instead? Watch the video below.
The success of your Zoom presentation is the result of thoughtful planning and preparation.
Get ready for your online class, product webinar, or job interview on Zoom with the following pre-presentation tips:
1. Decide on the scope of your Zoom presentation
Before presenting on Zoom, ask yourself — what one particular idea or insight would you want your audience to learn from you?
“Defining the scope is the most critical step. What are the boundaries, what are the deliverables, what is the topic that you are covering?”, recommends Linda Parry Murphy , CEO of Product Launchers, Inc.
Trying to cover every subject will only make you more nervous.
Remember the Stanford study earlier about too much cognitive load as one of the reasons behind Zoom presentation anxiety?
Limiting the scope of your presentation can significantly reduce your cognitive load while keeping your audience focused on the key points.
2. Plan for the structure of your online presentation
It’s important to master the sequence and structure of your presentation as part of your preparation. Creating a framework guides the meeting participants so they understand what the data means, why it’s important, and what the implications are in this situation.
A solid structure in place also makes it easier to go back to what you’re saying. As a result, you will feel more confident because you can keep track of your talking points with a quick glance at your outline if you lose your train of thought.
Matt Abrahams, a lecturer in Organizational Behavior and author of Speaking Up Without Freaking Out , recommends the following examples of presentation structures that you can use:
- Past-Present-Future – review a process or share a timeline
- Comparison-Contrast – show the benefits of a certain idea, insight, product, or service
- Cause-Effect – explain the rationale behind a decision
- Problem-Solution-Benefit – motivate or convince your audience
- What?-So What?-Now What? – convince people to do a specific action after your presentation
Another simple presentation structure you can work on is to start with an introduction, the meat of your presentation where you can highlight 3 points, and wrap up with the summary and call-to-action.
3. Prepare your presentation visuals
Plenty of research and evidence shows that including images is more effective in getting your message across than written text or oral communications alone.
For instance, a captivating visual is four times more effective in conveying information than words alone. People remember 80 percent of what they see and do, compared to 20 percent through reading and 10 percent through hearing, respectively.
If your goal is to convince your audience during your Zoom presentation, you’ll also be delighted to know that using visuals can help you become more persuasive.
A Wharton School of Business research found that around a third of the audiences they polled felt that presenters who used visuals were more persuasive.
So remember that well-chosen images, even stock photos, can do wonders to augment your slides.
When making visuals for your presentation, use these questions as your guide:
- Is there an icon, illustration, or image that could represent your point in a more meaningful way?
- What types of diagrams , such as a timeline, flowchart, pie chart, arrows, or graphs, will help get your point across to your audience?
- Who are my target audiences? When choosing visuals for my presentation, are there certain cultural taboos or inappropriate humor that I should be aware of?
One more thing – consider using bullet points if you find slides with walls of text. They’ll be easier to digest without taking the focus away from you.
4. Eliminate clutter in your surroundings

Staying in one place with no room to maneuver probably doesn’t spark joy for anyone. KonMari your environment by eliminating clutter on your desk and in the space around you. This means extra keyboards, unused notebooks, pens, food boxes, and books can go.
Eliminating clutter gives your brain the impression that there’s more room for you to move around during your Zoom event.
If the space you’re presenting in makes it difficult to clear off clutter, you could find a plain wall to present against. And if that’s not an option, you can use a clean virtual Zoom background . Keeping your surroundings out of sight means it’s out of mind for you and your audience; one less thing to worry about while presenting.
5. Do a tech prep
Presenting in Zoom while you’re at home or traveling is a technological wonder in itself. But technology can be frustrating at times too.
Spending some time optimizing your Zoom settings by clicking in the toolbar while you’re in a Zoom meeting. Under video settings, you’ll find a few options that can help with the visuals, such as focus assist.
Before your presentation, double-check the following:
- Make sure that your laptop, computer, lighting, headset, webcam, microphone, and internet connection are working. Have backup equipment if possible.
- Familiarize yourself with the Zoom app and other relevant software you’re going to use during the presentation.
- Close unnecessary browsers, applications, or software before the presentation. Turn off your laptop or desktop notifications. The goal is to optimize and speed up the device to have a smooth presentation.
- Prepare a PDF version of your presentation slides and have an extra copy of your presenter notes in case of technical mishaps with your slides. It also makes sense to have a short link to your presentation that you can share with the audience.
- Position your notes in the right spot so you know where to find them while presenting.
- Check Zoom settings and do a quick audio and video check.
6. Rehearse your presentation
After taking care of your surroundings and equipment, the next step is to prepare yourself.
Practicing your Zoom presentation in advance can help boost your confidence. Here are some tips to help you rehearse well for your presentation:
- Screen record yourself. Afterward, check your recorded video for technical issues, your body language, and whether or not your voice is audible or not.
- Practice with a family member or friend who can give feedback on any distracting nonverbal communication habits like too many hand gestures.
- Rehearse in the same room where you’ll be presenting. Use the same lighting, computer setup, and everything.
- Practice speaking to the camera, not your computer screen.
If you’re not used to face-to-face presentations, you could record your presentation and watch it back. I know, I know – it can feel so uncomfortable watching yourself. But a quick analysis will reveal if you use too many hand gestures, that can be distracting, and also if you need to reposition your camera so it shows your upper body while presenting.
The time has come for presentation day! You already know the ins and outs of your presentation, and you’ve practiced your Zoom presentation skills to a T. A couple of checks you can do before you start are:
- Make sure you’re in a quiet area to minimize any potential interruptions.
- Do a test call with a friend to check the internet connection and if you’ll stay connected.
Take note of the following tips and hacks to make your Zoom presentation engaging and anxiety-free during your webinar or talk:
7. Dress the part
Wear clothes that are appropriate for your presentation and audience. It also helps to be more mindful of your accessories and hairstyle. The outfits and accessories you wear during your Zoom meeting will speak volumes about you as a person.
For example, if you’re presenting to your coworkers, wear work clothes. If you’re pitching to a group of angel investors, wearing a tie can help convey that you’re serious and trustworthy. However, this may not be a good idea if you’re presenting to a group that is more open to change and tends to be more relaxed when it comes to conventional standards.
Another benefit of dressing the part is what you wear actually impacts how you think. Wearing formal clothes can improve abstract thinking and give you a broader sense of perspective, which is influential in helping you make better decisions.
8. Ditch the chair
Standing up when presenting in Zoom rather than sitting down helps you become more confident because you’re not hunched down on your chair.
Standing straight with your shoulders back also enables you to breathe easily, making your voice sound more powerful and confident. Finally, it allows you to move more and make explanatory gestures which is a charisma boost.
The more confident you appear in your presentation, the more confident you’re likely to feel.
“When your mind starts to feel more confident and powerful — it starts to see those challenging situations not as threats but as opportunities,” shares Harvard psychologist professor Amy Cuddy.
If you can’t stand up during your presentation, try to sit straight in your chair and back up your camera a little to show your upper body and not just your face.
9. Have a memorable introduction

National best-selling author and founder at Science of People Vanessa Van Edwards specifically recommends opening your presentation with IISSAAQQ to make it more memorable. IISSAAQQ stands for:
- I cebreaker
- I llustration
- S hort story
- S tatistic or surprising fact
- A nalogy or metaphor
Bonus points if you can weave in humor with some background information with a relevant fact. Research found that more popular talks used humor 12.92 times, whereas less popular talks used humor only 3.92 times on average.
You don’t have to force a joke – humor could just be a play on words or surprising the audience with a funny image or meme that contrasts with a statement. Nothing breaks the ice better than laughter.
10. Look your audience in the eye (or rather your webcam)
Looking your audience in the eye is easier during face-to presentations than Zoom presentations. It can be a little tricky during online meetings because we tend to look at people’s faces on the computer screen. Maintain eye contact by looking into your webcam.
“A good idea is to lower the monitor camera a little so that you don’t have to tilt your head back to gaze up at it. If you can’t help looking at someone’s face on the screen instead of their camera, it helps to move the Zoom window to the part of the screen nearest to the camera so at least you’re looking at approximately the right place when you’re looking at their face,” shares Carol Kinsey Goman , Ph.D., executive coach and international keynote speaker.
You could treat the camera as if you were doing a face-to-face presentation. This way, it’ll be a bit simpler to hold eye contact with your audience when you’re not looking at your notes.
11. Think happy thoughts
Find ways to boost your mood before your presentation. Aside from helping you feel good (which in turn can boost your confidence), you’re also likely to smile often with happy thoughts.
When you smile at your audience, they will also likely “mirror” your action and think happy thoughts.
“Mirroring is relevant to our tendency to be empathetic. When I see you smiling, my mirror neurons for smiling fire up, and I get your state of mind right away. I feel it as you feel it. We need that mirroring in order to create a full empathic response to other people,” describes Marco Iacoboni , author of Mirroring People and UCLA professor.
When you’re having a good time and sharing enthusiasm with your audience, they’ll reciprocate through their nonverbal communication. This means fewer folded arms and blank stares and more nodding along and smiles.
12. Delegate the chatbox
Have someone else take care of Zoom chat or manage the waiting room to keep you from being distracted. This person could be the meeting host, a colleague, or someone you trust who has your back during your presentation.
13. Engage your audience
A boring presentation is when there’s no interaction, and you’re being spoken at (hello, university lectures). You’ll be able to tell from everyone’s body language in the meeting room.
Make your presentation a two-way street. Here are some ways to encourage interaction and participation amongst your audience during your Zoom meetings:
- Ask questions. For example, if you’re presenting a team productivity software in Zoom, ask your audience about their top productivity problems at work. You can also use this time as an opportunity to transition to your next presentation slide.
- If you have a small audience, remember each person’s name and address them using their first names.
- Use visuals like illustrations, infographics, or a short video clip in your slide show. Tool recommendation : Use Piktochart Video to transform a long video into short clips.
- Use interactive quizzes while presenting online to change the pace and keep your audience engaged.
14. Talk like a human and avoid too much jargon
Alright, what does talking like a human mean in Zoom presentations?
For a start, avoid talking too much jargon and corporate speak. It makes you more relatable, keep your audience’s attention longer because your points will be easier to understand, and also helps you stand out from other presenters.
Just because you’re presenting in virtual meetings doesn’t mean you’re not talking to people. The only difference is you’re sharing your presentation in front of your camera instead of in front of the lecture room.
Next, improve your visual storytelling skills . Your presentation will be more memorable if you briefly share a story and pair it with visuals. Sign up for our free visual storytelling course . Check out the teaser video below.
15. Slow down
When you’re anxious and not too confident about your Zoom presentation, you’ll tend to speak fast, which in turn will make you more nervous. It’s a vicious cycle.
When presenting in Zoom, be mindful of your pace. Slowing down will not only take the edge off your nerves but also make you appear more confident.
Don’t be scared of pauses or gaps between your statements. Sometimes, you might need a sip of water to hydrate your throat. Other times, you could use the pauses as extra emphasis to drive key points.
Slowing down and changing up your talking pace will help you deliver an impactful presentation because you’ll have more control and be better able to drive the point home.
5 presentation examples and templates
To make presenting your Zoom presentation easy, here are some presentation templates and examples for inspiration.
Quarterly finance update
Have a big meeting coming up where you need to share sales performance and revenue figures? We’ve got you covered with this template.
It’s equipped with graphs where you can easily drop your revenue figures in and share performance with customizable graphs. There are also template slides for customer feedback and if your team is planning to introduce new processes.

Marketing strategy plan template
This marketing strategy slide deck is perfect if you’re onboarding a new client and want to walk them through your research, analysis, and proposed actions.

Group project
Presenting your collaborative project in a Zoom meeting to your classmates? Take the worry off so you can focus on sharing the results by using this science group project template .
Despite the name, you can use it for any kind of school or university project because the structure works for any type of research presentation. The template has slides for:
- Group introduction
- Your hypothesis/basis for the project
- Your theory
- How you tested the theory
- Key takeaways

Buyer persona template
The customer buying journey is always evolving, and you might need to present a case study to leadership or your team on recent findings. Our template makes it simple to share your customer’s story, as the template has slides for:
- The customer profile
- Motivations/goals
- Personal insights
- Responsibilities

Team update in the all-hands meeting
It’s common for managers, or project leads to update the company with their results in company meetings. In these cases, you might just need a single slide to share your progress.
This work breakdown structure template does the job, giving you space to share what your team’s objectives were, what the key results were, who was involved, and what the shipping date was for these goals.

How to share your Piktochart slide deck on Zoom
Step 1 : On the Piktochart editor, click Share to get the link to your presentation.
By default, your presentation is not publicly visible.
Step 2 : Copy and paste the link into your browser bar. Then, click the Show Presentation button. This will launch in fullscreen presentation mode, and now you’re ready to shine.
Step 3: Click Share Screen on your Zoom account and choose the browser with the Piktochart link.
For a visual demonstration, watch the short tutorial below with detailed instructions.
Ready to deliver your presentation?
That’s it for our Zoom presentation tips; now over to you.
You have a brilliant idea or insight to present, and you need to share them with your audience in your next Zoom presentation. It’s high time you nail it with the virtual presentation tips we outlined in this guide.
Take Piktochart for a test drive today and create your next presentation slide minus the stress using our free presentation maker .

Other Posts

75 Best Work Anniversary Wishes for Coworkers and Colleagues

9 Strategies for Effectively Communicating Change to Employees (With Examples)

What is Internal Communications?
The Ultimate Guide to Giving Virtual Presentations on Zoom
Part 1: an introduction to giving virtual presentations on zoom.
PART I Introduction 1 – Cool Zoom Features 2 – Virtual Presentation Do’s 3 – Virtual Presentation Don’ts PART II 4 – Presentation Purpose 5 – Structure & Flow 6 – Slide Design PART III 7 – Connect with the audience 8 – Audience Participation 9 – Sharing Content PART IV 10 – Video & Audio Recordings 11 – Post-production 12 – Your Phone as a Webcam PART V 13 – When Things Go Wrong 14 – How to Ground Yourself PART VI 15 – Advanced Techniques 16 – Zoom Webinars vs Meetings 17 – 23 Essential Settings
There are three things I hate about Zoom…
#1 the super awkward must-click-two-buttons-to-leave-the-meeting debacle.
You say goodbye, search the bottom-right corner of the screen for the red button, click the red button, continue to stare awkwardly at the corner of the screen because the call is still open and you need to click a second red button.

Never fear, this can be turned off. In General Preferences simply uncheck the “Ask me to confirm when I leave a meeting” setting and poof! One-click exits. You’re welcome.

#2 Inviting someone and never knowing what the difference is between these two options: “Copy invite link” and “Copy invitation”.
I can sense you nodding along with me.

Just remember that it’s “invite link” you want 99% of the time vs “invitation”, and you can set an option that copies the link to your clipboard as soon as you start a meeting.
#3 The dropdown to change video settings is part of the “Stop Video” button. What the actual?!
Are you trying to make me screw up my presentation?

I also love Zoom.
Why? Because it works.
A year into our forced isolation, Zoom fatigue has set in. We’re avoiding calls and talking about concepts like Zoom holidays, just to get a break.
But the answer isn’t fewer Zoom calls, it’s better Zoom calls. Almost every Zoom presentation is boring, ugly, terribly structured, poorly executed, and designed to make you fall asleep.
In this guide I’ll show you
- How to create beautiful slides that communicate with clarity and class
- Unknown and awesome features of Zoom that you can use to your advantage
- How to overcome your nerves and survive technical problems
- And how to look like a total pro every time you give a presentation—or run a meeting—on the platform we all love to hate.
Note: for the sake of brevity, unless I’m talking about Zoom-specific functionality, these tips are applicable to any platform that offers meeting and presentation software such as GotoMeeting, Google Meet, Webinar Jam etc.
There are instructional videos throughout the guide to demonstrate the best parts in more depth. You can binge watch the videos on the “Presenting on Zoom” video channel here , or read on for the word and pictures.
If you want to stand out from your peers it’s good to understand the full power of the platform and know the features most people don’t know about.
#1 Set up your own configurable ‘personal meeting room’
It can be really distracting to hear a bunch of people talking over one another when you kick off a meeting. A good solution is to use what’s called a Personal Meeting ID (PID) which gives you control of the Zoom environment right from the start.

Features of your PID include:
- Using the same invite ID and URL whenever you start a meeting, bypassing the need to repeatedly check the settings. Note: because it’s a permanent URL,you should uncheck the “Allow participants to join anytime” setting to prevent randoms dropping in unannounced.
- Placing participants into a “waiting room” which lets them in when you are ready to begin– either individually or all at once.
- Automatically recording your meetings on your computer. Having a video of your presentation is always a good idea so you can re-use your content.
#2 Press the ‘spacebar to temporarily un-mute yourself’
You can help to ensure a quality audio recording by placing everyone on mute by default. And while this feature is more appropriate for meetings vs. presentations, it’s a great thing to know about – and to tell your audience about. It’s easy to use, hold down the spacebar to un-mute yourself and let it go to turn your audio off again. It prevents people from forgetting to re-mute when they walk off to do something else forcing you to listen to their snoring dog or screaming baby.

Even if it doesn’t get used during your presentation (unless it’s a workshop you won’t want people to randomly chime in), many of your audience will thank you for learning this tip.
Note: You may need to enable it in your Zoom Preferences.
#3 Record ‘separate audio files’ for each speaker, host, or panelist in the presentation
If you have a host or a co-presenter there will be content in the session that’s not yours. Having separate audio recordings lets you use only the audio that was from your part of the presentation.
You can enable this in Preferences > Recording.

#4 Enable the ‘non-verbal feedback’ feature to allow audience interactions
Cool zoom feature #4 – enable non-verbal feedback.
To make your presentations interactive you can enable the non-verbal feedback feature. This allows participants to express reactions to your presentation.
This is not to be confused with ‘meeting reaction emojis’ which are temporary reactions that disappear after 5 seconds. To be honest, it’s hard not to be confused when there are two sets of interactions with different names.
Non-verbal feedback is for direct feedback to the speaker or host that others can agree with by clicking the same icon. The result is that the speaker can see how many people are expressing the feedback.
The options for non-verbal feedback are shown in the image below:

An example of how this would be used in a presentation is to ask the speaker to speed up or slow down. This might seem like a weird thing to be told during your talk, and if it’s just one person asking you’d most likely ignore it. But if 50 people are saying to slow down, that’s a pretty good indication that your current presentation style isn’t working for them.
It provides a pretty amazing insight – something I wish I’d had that feedback during an on-stage talk.
You can also use it to ask binary questions to the audience that they can respond yes or no to – a great way to segment the audience so you can tailor your content based on their responses.
Combine this feature with a QTINTA audience participation question for a really engaging experience. You’ll have to watch the video to know what QTINTA means.
#5 Use the Zoom ‘beauty mode’ to soften your appearance
Zoom includes a “Touch up my appearance” filter in the “Preferences > Video” settings, which gives your skin a softer appearance. There’s a slider that lets you control how much it applies the effect. It can look weird if you crank it too much, but having just a little can really help – especially if you’re looking a big bedraggled.
Settings are maintained when you quit so you can expect to look the same way every time.
#6 Use Zoom ‘video filters’ to add a cinematic high-contrast appearance
We’re all familiar with Zoom backgrounds, but a more impressive feature in my mind are the video filters. You can access them via the “Stop Video” dropdown arrow. Yes, there are some silly ones which can be funny when in a meeting, but for presenting stick to the non-silly ones. They can help improve the quality of your on-camera look. I particularly like the first option “Boost” which kicks your contrast up a notch removing any bland washed out lighting, it also removed some warmer tones which I like as it reduces the redness I often have in my skin.

You can see that it increases the contrast but also cuts down on the redness in my face.
Unlike the “Touch up my appearance” feature, your video filter settings are not maintained between sessions, which is a frustrating extra step each time if you found a setting you like.
#7 Encourage attendees to use ‘side-by-side mode’ to view you and your slides
This can be a good setting if you want to make your talk feel more personal. It shows your camera video beside your slides, and viewers can resize the videos as they see fit.

It can be a good idea to point this out as not everyone will know.
E.g. “You should be viewing this presentation in side by side mode so you see me and the slides. If you want to make the slides bigger (or smaller) you can resize them by dragging the slider between my video and the slides.”
#8 Use Zoom ‘annotations’ to mark up your slides live, or a ‘whiteboard’ for a blank canvas
A really cool feature of Zoom is Annotations. This lets you write or draw on top of the screen you are sharing. Once the feature is activated , you can access it from the menu at the top when you are sharing your screen.

This is really helpful when you have a complex slide and you want to focus people’s attention on different areas of the screen as you talk. When presenting live on a stage you can gesture towards a particular area, but it’s not as easy in a virtual presentation which is why it’s handy.
There is also a Whiteboard feature that gives you, well, a whiteboard. This could be useful if you find that you need to dig into a point you’re making in a more detailed way or discover during your talk that you need a different way to explain it.
You might want to take a quick screenshot when you’re done if you happened to get some interesting ideas marked up.

Rock open a whiteboard and sketch a diagram. Having a tablet and pen would be very helpful for this, versus trying to draw with a mouse. It might be wise to use the non-verbal feedback feature to get folks to say “Yes” to a “Let me know if you’re ready to move on” question.
Note, this is a screen sharing feature, so in order to get to the whiteboard, you need to stop sharing your screen, then share once more but choose Whiteboard as the option. Then you’ll have to stop sharing and share your slides again. Make sure you’ve practiced this if you think you’ll be using it.
#9 Use ‘closed captions’ to increase the accessibility of your virtual presentation and video recording
Zoom has transcription features that let you add closed captions to your session. You can do it manually for free, but that means someone will have to type them live, which is a pretty specific skill to have, and requires someone to do it for you.
If you have a paid Zoom account (roughly $20/month) live transcriptions are included. An alternative is to integrate with a platform like Otter.ai, to add closed captions in real time. You can also use Otter for transcribing any other audio or video files you have which makes it a much better value.
There are several reasons why closed captions are a good thing to do.
- No headphones: if an attendee doesn’t have or forgot their headphones and they’re in an environment where they can’t have the volume on, closed captions are a life saver that could be the difference between them staying or leaving.
- Accessibility: Captions allow meetings to be accessible to all. For the deaf, hard of hearing, or non-native speakers, they are an absolute necessity to understand what’s going on.
- Attention and recall: closed captioning can increase the amount of your content that an attendee comprehends and remembers. This is because they are getting it using two senses, and you have to focus more intently when you are reading.
You can check out Otter here to set up live captions.
#10 Use Zoom ‘breakout rooms’ to split workshop participants into groups
Without question, one of the most popular Zoom features is Breakout Rooms. They are exactly as they sound, allowing you to break out attendees into separate rooms. This could be for hosting a multi-track event where there is a speaker in each breakout room, or more commonly it is to allow groups to work together away from the “Main Room” and then come back in to rejoin you as the speaker.
This is a wonderful feature if you are running workshops that require groups to work through some of your worksheets or tasks for example.
There’s a good demo of how to use Zoom breakout rooms here.
#11 Use a Zoom ‘waiting room’ to hold attendees before you let them in at the same time
Nobody shows up at the same time to a presentation, and you don’t always want to start until an acceptable threshold of attendees have arrived. Particularly if the beginning of your talk is fundamental to your big idea.
The waiting room is basically a holding area where attendees are listed as they show up. They get to see a simple welcome screen (annoyingly simple really – I’d much prefer to have the options to have a fully custom slide in there), and you can admit them one by one, or all at once, when you are ready to begin.
It also allows you to block people from entering, although for the most part there’s not much reason to do this when you are presenting to a large audience. Useful if someone becomes disruptive for any reason.
Caution: it’s very easy to forget about the waiting room and have people sitting around unable to get in after you’ve started. I recommend assigning this task to your co-host.
Cool Zoom Feature to Avoid – ‘Present with your PowerPoint or Keynote slides as a virtual background’.
This is an interesting feature that’s worth discussing both for why it’s cool and why it’s uncool.
What it does
Instead of a regular screen share, it takes your slide deck and sets it as the background much like any other Zoom background. As such it places a ‘mini you’ floating on top of the slides in cutout mode which is kinda fun. Kinda.
To access the feature (beta at time of writing) click the “Advanced” tab in the “Share Screen” popup, and select “Slides as Virtual Background”.
This is what it looks like from the attendee’s perspective. And yes, you appear twice on the screen. Once on top of your slides, and again beside them. Silly.

Note: you must download a local copy of your slide deck to your computer as it doesn’t connect to cloud-based slides.
If you have audio and video in your slides, checking the “Share Sound” option at the bottom-left of the share popup should make that transmit to the audience. However, it doesn’t. In fact I couldn’t get any video or audio to play at all.
There’s also a second “Split Video from Slides” option which kinda defeats the purpose. As you can see below, you are back with your regular background in a separate window, and you are only on the screen once.
With the split setting in place, it would be a fair to wonder why you’d use this feature as it looks just the same as the regular view.
There are however, a few key differences.
The major difference is that you don’t need to have your slides in fullscreen mode on your computer. In the screenshot below you’ll see that I’m looking at a Zoom window with my slides inside it. I can now move through my slides while having other windows open such as the chat and participant windows. This is actually pretty great as the audience doesn’t see your layout, they see what they would normally see.
A nice side effect of this setting is the audience won’t see the awkward moment at the start of your talk where your whole screen is visible until you start the slides.

Looking at the main window, you can clean up the view a bit by having attendee video off by un-checking “More > Allow Participants to Start Video” in the Participants panel, and then selecting “Hide non-video participants” from the “…” menu on one of the participant video boxes.
You can take it a step further if you select “Hide self view” from the … on your video thumbnail. This will give you a view of just your slides. As much as the layout annoys me (I’d rather pop the self view out to the side with the chat), it can be important to see yourself to make sure you’re not moving out of frame – particularly if you are speaking standing up.
However, at this point in the beta it’s just not usable enough to be a serious and professional solution because of a few technical failings:
- It’s buggy like most beta features are
- It doesn’t show any animations or slide transitions
- If you are recording the screen, the merge view while fun, is a little unprofessional looking
- Audio and video didn’t work at all for me, despite there being a setting to allow slide audio to work. I think this might be because the videos didn’t play.
- When you start the share it has to process the slides before it starts which causes a delay if you aren’t expecting it.
Overall, it’s a feature with some exciting elements, although to be perfectly honest, the good aspects are nothing to do with the feature itself, but are side effects. I’d prefer to see a new feature that allows you to avoid presenting in fullscreen to allow a much greater degree of presenter screen setup.
The chapter title says it all. Do these things and your virtual presentations will be better. If you don’t, your presentation won’t be better than the last one you did, missing an important opportunity grow your skills as a virtual presenter.
Seriously. Do these things.
#1 Test your slides from the ‘attendee perspective’ using another laptop or tablet
Your slides might look amazing on your retina laptop or 5K monitor, but not all screens are alike, and your super-detailed tiny-text “revolutionary new marketing method” process diagram might look more like a dot-matrix printout to someone with a lesser screen.
Viewing your slides on a smaller or alternative screen isn’t enough. You also need to view them on Zoom on that screen, because virtual presentation software tends to change things you wouldn’t expect.
The golden rule of presentation QA is to run through every slide on the platform you’re going to be delivering on (Zoom, GotoWebinar, etc.) watching out for the things below:
- Any virtual presentation platform will add small visual artifacts to the video stream—they’re imperfect degenerative medium where some quality will be lost in transmission. As a result, your slides will never be quite as sharp as directly viewing your slides.
- If you have audio in your slides, check that the audio levels are balanced and not too loud or quiet. Remember to also test it with headphones on as that’s a common listening scenario for your audience.
- If you have video in your slides it may not come across well when presenting virtually. There’s usually some lag or choppiness that makes it skip frames. This can make the audio look out of sync.
- If you have multiple slides with audio, set them at the exact same level so people don’t get deafened. A common problem in that scenario is that the attendees will turn down their audio if you blast them, and then the next time you have audio it’s too quiet to hear properly. Your presentation software will have a setting for the audio or video volume. The best way to make sure they are the same is to move your slides to be one after the other (you can reorder them afterwards), then step through them to gauge the balance.
- If you have complex animations or transitions, they may render more slowly or less smoothly when piped through Zoom and a wifi connection. If they don’t work the way you want them to, consider simplifying them (fewer animations) or removing them altogether – replacing them with static slides. You can still use a technique like the Progressive Reveal to create a pseudo animation effect.
To prevent an audio feedback loop when testing your audio and video slides, have your partner/friend/colleague be on the viewer/attendee side in another room.
Whatever your specific case is, there’s a good chance that on the viewer’s side it’s not as perfect. So double, triple, and quadruple check.
I guess you should also single check. Why does nobody say that?
“You should single check your work to make sure it’s awesome.”
The best way to QA is to record some video of it from the viewer’s perspective. Have your QA buddy record their screen (with audio). If you don’t have anyone to help you, just set up your extra laptop (hopefully you have one somewhere) in another room and record the screen from there. If you’re using a Mac, Quicktime is an easy way to get a recording. On a PC, you can use PowerPoint to do a screen recording (more on that later), or find some free screen recording software for a test.
If you do have a helper, you can also reverse roles where they present and you observe on their machine. This will give you the truest sense of what might need to be fixed. It’ll no doubt be quite hilarious to watch, unless they turn out to be better at it than you.
#2 Remove all hashtags from your slides
My typical advice regarding hashtags is to make sure you update them to use the current event’s hashtag if you’ve used this slide deck before. If you don’t it looks awful to the audience and makes them feel like you didn’t put in the effort to make a presentation just for them.
However, the main goal of this entire guide —primarily covered in chapters 10 and 11— is to ensure you create a professional-grade recording of your virtual presentation that you can repurpose over and over for multiple virtual events.
If you leave event hashtags in your slides they will be forever embedded in your recording, rendering it useless for re-use. And trust me, once you’ve created a high-resolution awesomely edited recording of your talk, you will feel amazing about it.
It may feel counterintuitive, but you should delete all the hashtags from your slides.
If the event mentions it and asks you why or asks you to include them, just politely let them know your rationale. I’ve found that many virtual events have interactive chat in the interface they use which tends to dilute the number of people hanging out on a Twitter hashtag anyway.
#3 Have a wired Internet connection
If attendees have a poor connection they can always leave and download the video and slides later on.
But the presenter is the one person who absolutely must have a great Internet connection, and the best way to do that is to have directly wired Ethernet.
A side benefit of this is that it will help you end the endless debate over who’s connection is causing the problem. I’m sure you’ve been in a meeting where someone suggests your Internet is slow, and you say yours is fine, and they say that theirs has been working brilliantly all week.
Just say “Yeah, but I have a hardwired Ethernet connection.” End of conversation.
If you don’t have a wired connection, work on getting one set up, and in the meantime tell your eager tech wannabe roommates NOT to reset the ******* wifi while you’re presenting.
#4 Have a backup audio input device
“Is this mic on? Can you hear me at the back?”
Sometimes your mic will stop working, and it’s one of the most uncomfortable panic-ridden things that can happen to a speaker (see When Things Go Wrong ). It could be a dead battery issue, or your headphone cable could be old and the internal wiring failed.

Whatever the cause, you need to have a way to deal with the problem.
If you are using a posh external mic that stops working, ditching it for the internal microphone of your laptop will likely degrade the audio quality significantly, but it’s better than nothing.
In a later chapter I do a deep dive comparison video about microphone options for virtual presenting .
Probably the simplest backup is another set of headphones. The classic Apple headphones are only $25 now. Make sure you get the ones with the 3.5mm jack, and not the lightning cable, (especially if you’re not an Apple person) as that’s only useful for your iPhone. And if you aren’t an Apple person, there are a million other options on Amazon.
However, be warned that these headphones are rife with audio problems such as noisy cables (you’ll need to sit still which sucks), and they should only be used on Zoom. When using them with any other audio recording software they have a horrific background hiss that destroys your audio, but Zoom’s noise removal feature (on by default) actually does a fantastic job of removing it, making them a viable last minute solution. Hopefully, you’ll never need to use them.
#5 Have a slide dedicated to encouraging non-verbal feedback
The non-verbal feedback feature of Zoom is a great way to make your talk more dynamic. But you don’t want to try and explain it in the middle of your talk as it’ll break the flow and screw up the fluidity of your recording.
Instead, consider which aspects of the feature you want to use, and have a slide at the start of your presentation (slide 2 for example) that focuses on this. You can quickly walk people through how it works, and tell them how you’ll be using it throughout.
#6 Have everyone muted by default
It goes without saying, but I’ll say it anyway. You don’t want attendees, whether it’s 5 or 500, to be chatting before or during your presentation. So this one is simple. Make sure you mute everyone. If you’re using your Personal Meeting ID you might have this already set up.
You can mute everyone in the Participants sidebar, or as a global default setting in the web portal administration settings “Settings > Schedule Meeting > Mute all participants when they join a meeting”.

#7 Wear confidence clothes
Just because you can present in your PJs it doesn’t mean you should present in your PJs. Treat it like an on-stage talk and get ready in your mojo outfit. You’ll gain confidence and look more professional.
Something I like to do when I’m on the road presenting, is lay out my clothes the night before. It helps me get in the right mindset and also saves time the next day when you might be stressing out.
#8 Close all of your other software to prevent your machine slowing down
Take a look at your computer right now and count A) how many different apps are running, and B) how many tabs you have open in your browser.
Here’s a screenshot of mine, for reference.

Tabs open in Chrome? 39. Apps open? 20
You need to be concerned about two things, the amount of memory and processing power being hogged by all the apps you have open, and the number of ways you might receive a notification during your talk.
For PCs running Windows 10, there’s a built-in function to silence notifications when presenting . But if you’re a Mac user the settings for this are horrendous (slightly better in Big Sur). Fortunately there’s a free app called Muzzle that silences all of your notifications as soon as you share your screen.

#9 Have two pre-made slides ready for Q&A at the end of your virtual presentation
It’s common for your host to ask questions that the audience has submitted in the chat window (or the Q&A window for Zoom Webinars) at the end of your session. The best way to utilize this opportunity—if you’re still in control of the screen—is to have two slides prepared.
The first slide should simply have Q&A written on it, really big.
The second slide should be a promo slide with a special offer you have.
I like to leave up the Q&A slide until the questions start, then flip it to the promo slide so it can sit there for the next 5-10 minutes. It’s a great way to have it visible for a long period of time without actually having to be salesy in your presentation.
It’s fairly common that an event organizer will ask you if you have something to promote, but if they don’t, ask them if it’s okay that you use a slide at the end like this.
#10 Build a background set to make your virtual presentations look professional
If you spend a lot of time on Zoom, instead of using a Zoom background, start thinking about how you can built a bit of a set where you do your presentations. Not only will it look more professional, but it will fill you with confidence and make you feel like you’re in presentation mode when you’re there.
I’m fortunate to have a space for my office/studio, and I’ve seen and felt the difference a well-designed environment makes when I show up to work. It took me months to get it right, so don’t think you have to suddenly have something perfect. Just chip away at it over time, turning on your webcam every day and giving a little thought as to how you can make the space more special. Small shelves with plants or books can work great, and Pinterest is definitely your friend for this type of thing.
Many folks won’t have a dedicated workspace to claim as your “stage”, but I’m pretty sure your significant other won’t complain if you make your home that little bit nicer.
Speaking of “stages”, I actually built a stage in my studio—almost burning down the house in the process —but that’s a story for another time. Like I said, it took months to get to this stage. I keep saying stage.

#11 Reboot your computer the night before your virtual presentation
Restarting your computer can help speed it up a bit, especially if you haven’t done it in ages. Any little performance advantage you can get is valuable for a live presentation. It will help clear out any processes that are stuck or hogging the CPU.
However, it’s best not to do this right before your talk, as you risk it doing some weird software updates that take hours to complete.
#12 Do a test Zoom meeting to check your camera angles and lighting
As Springsteen said in Dancing in the Dark—”I check my look in the mirror, I wanna change my clothes, my hair, my face.”—you should always check how you look on camera before the presentation starts. Adjust the angle of the camera for your most flattering look and the best view of your background, which of course is a well-decorated wall, and not a zoom background of a beach or mountaintop.
Make sure to turn on the lights you’ll be using to light your lovely face, wick away any sweat using blotting wipes, and apply some simple makeup to remove shiny reflections from your head. More details on those techniques in the lighting section .
Here’s the smart part, record your test meeting and play it back to make sure there are no weird things in the background, it’s often easier to analyze a recording as opposed to your webcam view.
#13 Double-check your audio for background noise
At the same time as your camera check, watch your test recording and listen very carefully for any noise in the background. You’ll be surprised at how oblivious you can be to background noise when you’re busy and/or nervous.
Sounds to watch out for:
- Laundry sounds: Depending on where your washer/dryer are it may not be an issue, but the low hum can travel far. Start a Zoom recording, making sure to use which ever audio (mic) input you plan on using, go turn on your washer or dryer or dishwasher, then come back and replay the recording to see if it’s discernible. Crank the volume to make sure. There is NOTHING worse than doing a badass presentation then finding out the recording is ruined by a persistent hum in the background, or the sound of someone’s hoody zip clattering round and round in the dryer.
- Tube lights: If you have any tube lights where you are recording, or even in a nearby room, turn them off. They can be soooo noisy. Then put in the effort to replace them with silent LED tube bulbs when you have time. It does require some rewiring, but it’s not that hard—I did it recently and I made sure to choose bulbs with the same colour temperature as the lights I’ll be using to light me up in the video–more on that in the A/V chapter .
- Ceiling fans: Another subtle and repetitive sound. Turn ’em off unless the resulting heat will make you sweat to the point of scaring the audience.
- Heating: Not all heating is noisy, but many houses in North America use what’s called forced air. It’s noisy. A low hum, yes, but it’s an audio killer.
- Noisy clothes: Your clothes can cause bad scratching sounds—even if you use a shotgun microphone that’s not attached to your clothes—which is an audio killer. What happens is that any loose clothing rubs against you when you gesticulate with your arms. Tighter clothes like a t-shirt are the solution to this. I go into more depth including a comparison video in What to do When Noisy Clothes Ruin Your Audio .
- Noisy shoes: if you’re wearing any kind of heels, they will cause irritating sounds if you shuffle your feet (while presenting standing up, which you should do). The simplest solution is to take them off and present in your socks (or bare feet).
- Analog watches: I’m kidding.
And make sure everyone in the house knows not to bother you while you’re presenting. If you are in a room with a door, hang a sign on it with the time of your event, and say not to disturb you until you take the sign off the door.
Guess what? Not every thing you can do as a virtual presenter is something you should be doing—I’m talking about you, speaker who likes to take a bathroom break while mic’d up, two minutes before the session starts.
Similarly, not every feature of Zoom has a positive impact on the audience or speaker experience. In this short and not-so-sweet chapter I’ll give you some tips about things to avoid so your talks go more smoothly.
#1 Don’t use a free Zoom account for your presentation
If you’re running the show yourself this is an important one. The free Zoom plan allows up to 100 attendees which is great, and more than enough for a small event, however there is also a 40-minute time limit, which would be very embarrassing if you didn’t know that and all of a sudden everyone gets kicked out of your virtual event.
#2 Try to avoid saying “Can you hear me?”
This is a classic intro statement that nervous presenters ask, but it makes you sound unprofessional. Instead, make a subtle change to how you position it, like this:
“Thanks {host name}, let’s get started, and let us know in the chat window if you have any issues hearing my audio.”
#3 Don’t use your laptop’s microphone if your webcam is sitting on an external monitor
When you do this, the laptop will be off to one side and your audio will be really quiet and sound like you’re in a different room.
#4 Don’t use stock photos in your slides
Just as you shouldn’t use a stock photo as the header background on your website, you shouldn’t use them in your presentations. To illustrate my point, it’s way too common for software companies to think it’s cool to use an overhead shot of a laptop and a coffee cup. It’s actually hilarious how prevalent it is. I recommend entering the URL of any image you’re considering using into tineye.com which will tell you how many times it’s been used.

If you absolutely have to use one, try hard to find one that’s not so widely used. Unsplash.com is a good resource for free photography that’s typically got less of a stock feel to it.
But all in all, the best way to avoid using stock photos is to develop an original content mindset (in chapter 6) .
#5 Don’t use a Zoom background. You heard me.
Zoom backgrounds can be fun in meetings, but when you’re presenting it can look unprofessional and can be really distracting. It can also make some of your head/hair disappear and speaking for myself, I need all the hair I can get.
#6 Don’t record the call without permission
This is a big no-no on certain types of call. For a presentation you can make a statement that it’s being recorded, as this is always helpful information for attendees to know (no permission needed) but if it’s a meeting with a client, customer, or coworker, you should be explicit that you are recording and why: “If it’s okay with you I’d like to record the call so I don’t miss any of the details.” This is important when you are a guest in an interview too. Asking for permission will add a level of trust and respect in the eyes of who you are asking – and in the very rare occasion that they say no, be graceful and say okay no worries. Then follow up with,”I may be taking notes throughout so bare with me if I’m scribbling”.
Also be aware, that if you are recording the session, everyone on the other side will see a blinking “recording” signal in the top-left corner, so there’s no creeping allowed.
To recap, remember these rules when it comes to recordings:
- Meetings: Ask for permission, and don’t record if your guest is uncomfortable with it.
- Presentations: Let people know that it’s being recorded and that you will be making it available after. Ideally after some post-production enhancements in chapter 11.
#7 Don’t be the host if you might leave early
This is a nightmare as the other participants are suddenly without a meeting and they might not know why. Then they have to re-coordinate to set up a new meeting, which is always a chore and often involves Slack or text messages or even worse, emails.
Intro Introduction to Virtual Presentations on Zoom
Chapter 1 18 Cool Zoom Features You Should Know About
Chapter 2 12 Things You Should Do in Your Zoom Presentation
Chapter 3 8 Things You Shouldn’t Do in Your Zoom Presentation
Chapter 4 Defining Your Presentation’s Purpose
Chapter 5 How to Define Your Talk’s Structure, Story, & Flow
Chapter 6 41 Slide Design Tips for Virtual Presentations
Chapter 7 6 Ways to Make Eye Contact With an Invisible Audience
Chapter 8 How to do Audience Participation in a Virtual Presentation
Chapter 9 How to Share Content during a Zoom Presentation
Chapter 10 How to Create a Stunning Video and Audio Recording
Chapter 11 Using Post-Production to Add Value to Your Zoom Recording
Chapter 12 How to Use Your Phone as a Beautiful Webcam
Chapter 13 What to Do When Things go Wrong in Your Presentation
Chapter 14 How to Ground Yourself and Get Ready to Present
Chapter 15 Advanced & Creative Zoom Presentation Techniques
Chapter 16 The Difference Between Zoom Meetings and Zoom Webinars
Chapter 17 23 Zoom Settings to Enable or Disable for a Smooth Presentation
Plan Smarter, Grow Faster:
25% Off Annual Plans! Save Now

0 results have been found for “”
Return to blog home
How to Be Effective and Keep Participants Engaged When Presenting Remotely
Posted august 23, 2021 by eleanor hecks.

Whether you’re doing a more traditional presentation via Zoom , giving a live interview, or conducting a webinar, the experience is very different from doing so in person. There won’t be a physical audience in front of you, and sometimes timing is extremely challenging to sync up — people often try to talk over others during conference calls. What’s more, it can be just as difficult to convey the appropriate emotions and body language, especially when just the top half of you — or sometimes even just your head — is visible.
It makes one wonder: What are some things you can do to prepare for the presentation or conference? Are there any tips you should keep in mind during the live event? What else should you know?
How to prepare your Zoom presentation
The planning phase is one of the most critical, as it’s where you’ll decide your topics, your major discussion beats, and where you’ll elaborate. You may not be using a teleprompter, but you will be creating a loose script. In addition, you’ll need to create the media that will go along with your presentation, which should be error-free, captivating, and on point.
Here are some tips to improve planning and design:
1. Design for everyone
While creating your media — the slides — understand that you are creating for a wide audience who will likely be tuning in from multiple devices and platforms. The media is going to look very different on a large, HD-ready computer monitor than it will on a smartphone or tablet. Design the content, images, and layouts so that they are compatible and friendly for all. Someone browsing on their phone should be able to see precisely the same information as someone on a laptop or computer.
Be sure to test out your presentation on different devices and resolutions. Also, try to remember that too much screen time can cause focus and stimulation problems in both children and adults. Try to limit the total presentation time, so that it’s accommodating for everyone.
2. Tone down the visuals
Yes, every presentation needs captivating visual content to go along with the text and audio. But you don’t want it to take away from the meat of the experience. It’s okay to use maps, charts, graphs, videos, photos, including stock images, GIFs, memes, and more.
Just don’t overdo it on a single slide. Try to keep it relatively confined so your audience doesn’t go into a stimulation overload. If they’re trying to read a ton of text, listen to you speak, and process several images — especially animated ones — things can get really hectic.
3. Get your area ready
On a live stream, everything around you is as much the star of the show as you. Figurines, pictures on the wall, and even clutter will all feature prominently unless you alter the background — which Zoom allows you to do. Be sure to tidy up your space before the event and remove anything from the frame that you don’t want your audience to see.
4. Brighten up the room
Webcams, even UHD cams, tend to work much better in bright conditions. If you haven’t already, open your blinds to let in some natural light. Test out the camera conditions beforehand to see whether it’s too bright, or not enough. If you’re using a laptop, you can move around your home to find the best spot.
Audiences should have a clear view of your face. Most importantly, they should be able to see when you’re speaking and what gestures you’re making.
5. Test your equipment
You can make a test call to a friend or family member, or just test out the equipment locally, but make sure everything is working. Check your audio and your microphone, be sure the video is clear and bright, check your internet signal and speeds, and ensure all equipment is plugged in and not running on battery power. You should be doing this as close to the conference or event as possible. It doesn’t help if you check out your equipment days in advance and then run into issues the day of.
People do not like to encounter technical errors. For instance, when a page’s load speed increases by just 1-3 seconds, the bounce rate also increases by 32% . A 5-second increase boosts that bounce rate to 90%. So, the longer it takes to set up your presentation and get things moving, the more likely it is that people will tune you out or leave altogether.
6. Rehearse
Practice in front of a mirror, or hop on a call with friends and family and allow them to provide feedback. Never go into a presentation unprepared, especially if you’ve never given one before via Zoom or anywhere.
7. Create a checklist
A checklist is always a good way to review what you need to get done before an event or activity. Professionals use them to avoid costly mistakes , and you should be taking inspiration from that.
Try to remember every small detail or requirement that you need to complete before the presentation. You can even create a multi-tier checklist that deals with before, during, and after the big event.
Hosting the Zoom presentation
So, you’re all ready for the big event? Now, it’s time to make sure everything goes smoothly during your presentation. Here are some helpful tips.
1. Speak plainly
It helps if you write the script or guidelines similar to how you will be presenting, however, you should speak plainly and enunciate as much as possible. Unless the subject matter explicitly calls for it, try to avoid industry or specialized jargon. That will also mitigate how much you need to explain or move off-topic. Furthermore, it ensures your entire audience can follow along, regardless of skill level or expertise.
2. Minimize potential interruptions
You can’t control what happens on the other end of that presentation, but you can certainly control things on your side. Try to mitigate potential distractions as much as possible. Put your phone on silent. Wear headphones so there’s no audio echo or distortion. Close your door or isolate yourself so no one comes in to interrupt. You might also consider turning on Do Not Disturb mode on your computer to pause notifications during the meeting.
3. Keep your materials handy
Two points. First, you want to keep your notes or script handy so that if you get stuck you can continue with little to no pause. Second, those materials should be in a place that has you facing the camera. If you have a document up on a monitor, for example, you don’t want to be glancing sideways all the time to read what’s next.
Situate the screen and camera so they’re at the same angle, so you’re constantly looking at the camera while you read. It’s a lot easier to do with a laptop because the camera is usually in the top bezel. With a desktop, you might have to move your display(s) around, or reposition your webcam. If you’re using a phone or tablet, you should have those propped up on a stand or tripod to keep them stable.
4. Dress to impress
Dress just as you would if you were paying a visit to the office or making a presentation in public. Put on the whole outfit too, and not just the shirt, because you never know what’s going to happen. If the camera falls, you don’t want it to expose that you’re just wearing underpants along with that collared shirt.
5. Have your media ready
It’s a simple tip, but a crucial one. Have your slides and other media ready to go and queued up for sharing. Don’t wait until the presentation to get things in order. You should be able to swap to the necessary screen, share the content, and go. Have all hyperlinks, videos, and interactive elements prepared beforehand, as well.
6. Pause for effect and questions
After each major beat, pause for a moment to allow your audience to ask questions, raise concerns, or ask for you to reiterate the message. This is much more difficult when you’re dealing with a large audience, but most Zoom meetings are relatively intimate with a local group.
7. Pay attention to chat
Alongside every Zoom event or meeting, there is a live chat window that can sometimes be forgotten if you’re busy focusing on your presentation. Don’t neglect it. Your audience may be asking more questions, providing valuable feedback, or even pointing out something wrong — like your mic cutting out.
8. Record your presentation
Make sure you’re recording the presentation to reference later, not just for everyone else but for yourself too. It allows you to rewatch the feed to review questions and commentary, and also to perceive your mannerisms and dynamic content. You can use that information to build a better presentation later.
9. Leverage the Zoom tools
There’s a host of tools you can use with Zoom , including screen sharing, annotations, live polling, and much more. Incorporate them into your presentation whenever possible, and don’t forget they exist! They can help make the experience more fun, engaging, and memorable.
10. Keep it interesting
It’s easy when you’re talking, especially about dull subjects, to lose your audience. One way to keep them invested and interested is to add the occasional “boom” moment. It’s an impactful instant, like a shocking statistic, joke, or alarming point, that ties together everything you’ve been talking about up until that moment.
The follow-up
After the presentation is completed, don’t make the mistake of thinking your work is all done. The first thing to do is make the media and the recording of the presentation available so that anyone who wants to can go back and review the experience.
Next, you need channels in place to collect feedback. People will have follow-up questions and concerns, and they may want you to clarify certain points. Also, you’ll want people to share their experiences. What did they enjoy? What did they dislike? How could you have improved as a presenter? Don’t be too scared to ask these questions, as they’ll help improve your Zoom presentation skills.
Finally, consider wrapping it all up with a nice bow by giving away free content or materials to those who attended the event, like a free e-book written by you or your colleagues, or a promo code to your storefront.
With these ideas in mind, you’ll be ready to knock your next Zoom presentation or remote meeting out of the park!
Like this post? Share with a friend!

Eleanor Hecks
Posted in management, join over 1 million entrepreneurs who found success with liveplan, like this content sign up to receive more.
Subscribe for tips and guidance to help you grow a better, smarter business.
You're all set!
Exciting business insights and growth strategies will be coming your way each month.
We care about your privacy. See our privacy policy .
Home Blog Business How to Ace Your Zoom Presentation: Tips for Successful Virtual Presenting
How to Ace Your Zoom Presentation: Tips for Successful Virtual Presenting
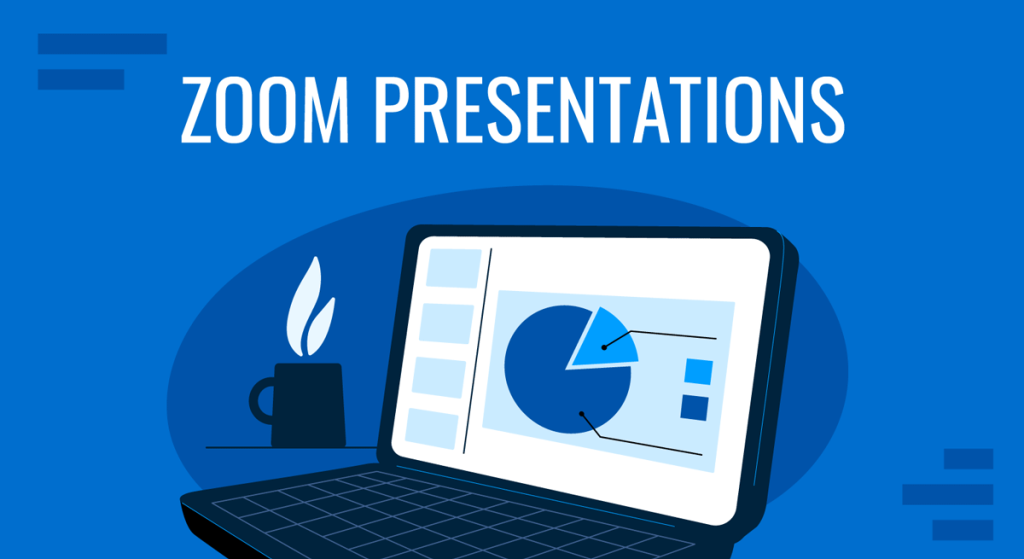
It’s your turn to speak during a Zoom social event in your company when your cat decides to make an impromptu appearance, climbing onto your keyboard and causing a flurry of emojis to flood the screen. Thankfully, everyone loved your feline co-worker and joked about the hilarious scene.
But what if it happens in a more meaningful setting, like a virtual sales pitch you’ve been looking forward to for weeks? You wouldn’t want to risk losing a client – and your job – just because a pet rains on your parade.
In this article, we will provide you with essential tips and tricks on how to ace your Zoom presentation like a pro. From preparing your visual aids and keeping your audience engaged to handling technical glitches with finesse, we’ve got you covered.
Table of Contents
Preparing Your Zoom Presentation
Tips for delivering a successful zoom presentation.
- How to Share PowerPoint on Zoom
Handling Technical Issues During a Zoom Presentation
Follow up after a zoom presentation.
Like in-person presentations, a successful Zoom presentation requires careful preparation to ensure you can send your audience the right message. Here are some tips to help you prepare presentations for Zoom.

Use Relevant Visuals
There are many ways you can present information besides plain boring texts. Sixty-five percent of humans are visual learners , so your audience might retain the information you share better if you present them in charts, graphs, images, or other visualizations.
You may use several types of visuals throughout your Zoom presentation, but make sure they are easy to understand in a virtual setting and are relevant to your subject.
For instance, if you present a new product, you may record a video demonstration highlighting its features. Using Zoom’s built-in video player, you can then embed the video into PowerPoint or play it during your presentation.
Use a Simple Presentation Template
A simple presentation template can help you create a cohesive and professional-looking presentation on Zoom. Choose a template that complements your content and aligns with your branding, but avoid overly complex designs that may distract your audience.
You may use a roadmap PowerPoint template or include an agenda slide to set the timeline of your presentation and provide an overview of the topics you will cover. Aside from it keeps the presentation flowing smoothly, it helps your audience orient their thoughts on what will happen in the meeting.
Make It Interactive
Just because you are the presenter doesn’t mean you have to do all the talking – you can let your audience speak too! One of the key aspects of delivering a successful Zoom presentation is to make it interactive and engage your audience.
Think of some icebreakers that will keep your audience involved. It can be a simple open-ended question or a poll to stimulate discussion. You can also use breakout rooms to facilitate small group interactions or collaborative activities.
Interactive presentations help to break the monotony of one-way communication and make your Zoom presentation more dynamic and engaging. Having no activities encouraging interaction makes losing your audience’s interest during virtual meetings easier.
Practice the Presentation and Timing
Aside from the content of your presentation, you also have to worry about the technicalities of presenting on Zoom, so having a dry run before the real thing is important to ensure a smooth delivery.
Practice your presentation multiple times before the event to ensure you are comfortable with the content, pacing, and timing. This will familiarize you with the Zoom platform and its features, such as screen sharing, chat, and breakout rooms.

You have a killer Zoom PowerPoint. Now it’s time to focus on delivering it effectively. Here are some Zoom presentation tips:
Use a Neutral Background
Your background in a Zoom presentation can impact how your audience perceives your professionalism and credibility. Choose a neutral background that is free from distractions and clutter.
If you have an office space at home, that will work even better. Pick from Zoom’s virtual backgrounds, preferably plain and clean. Make your background boring so your audience’s attention is drawn to you. Stay away from bed!
Dress Appropriately
Even though you may be presenting from the comfort of your home, it’s important to dress professionally for your Zoom presentation. It’s not bad to wear your usual duds when attending a casual game night with your team. But if it’s a formal setup, like a business proposal, you must suit up to invite success.
Dressing up smartly may improve your mood and confidence. In a 2014 study , two groups of male subjects were asked to put on business suits and sweatpants before engaging in a negotiation task. Those who dressed up obtained more profitable negotiations than the other group.
As a rule of thumb, avoid wearing loud colors or busy patterns that may distract your audience.
Keep an Eye Contact
Maintaining eye contact is essential in any presentation, whether in person or on Zoom. Making eye contact helps you connect with your audience and convey your message more effectively.
The common advice you’ll get to achieve this on Zoom is to look directly into the camera to create the impression of eye contact with your audience. We agree with these, but as the speaker, you also have to read the facial expressions of your audience and see how they react to what you are saying.
If you are using a desktop or laptop, the simplest solution to achieving these two is to reduce Zoom to a smaller window and place it directly below your webcam. This way, you can glance at their faces occasionally while keeping the illusion of eye contact.
Keep Your Notes Minimal
If you are an expert in the topic you are presenting, it would be best to ditch your notes during Zoom events. Constantly looking down at your notes can be distracting for your audience.
But if the need calls for it, make sure to keep your notes minimal and stick them in the right place. You can use a second screen or a tablet, or position your notes close to the camera to refer to them without breaking eye contact. This way, you can stay focused on engaging with your audience and delivering your presentation smoothly.
How to Share PowerPoint on Zoom (Step by Step)
How to present on Zoom? Once you understand what Zoom presentations are and the tips for Zoom presentations, it is time to give the presentation using Zoom. Let’s see this step by step:
Step 1. Open the PowerPoint file you want to present.
Step 2. Join the Zoom meeting and click on the Share Screen icon in the meeting control panel at the bottom of your screen.

[Optional] You can customize who can share their screen in the Zoom meeting. Click on the small arrow in the corner of the Share Screen icon and select Advanced Sharing Options.

Select Hosts Only or All Participants.

Step 3. Select the window you want to share – in this case, the one that contains the PowerPoint slide – and click on Share.
If you are playing audio or video within your presentation, make sure to tick Share sound and Optimize for video clip.

Step 4. Click on the Slide Show tab in the PowerPoint window and begin the presentation by selecting Play from Start or Play from Current Slide.

Step 5. To stop screen sharing of PowerPoint, hover over the meeting controls at the top of your screen and select Stop Share.

It’s not uncommon for technicalities to derail a live Zoom presentation – video, Wi-Fi, or audio may fail. But there are things you can do to prevent them, or at least minimize their impact on your presentation when they happen.
First, test your equipment before your presentation and make sure everything is in place. You can join a meeting test on Zoom to check your internet connection, camera, audio, and microphone.
You may also send a PDF copy of your presentation to the attendees before the meeting if sharing your screen won’t work. This will allow you to carry on as you or your technical team figures out the problem.
If the technical issues persist, you should have a good Plan B and be prepared to continue on a different platform like Google Meet. Send the alternative link with the meeting invitation and give clear action steps when technical difficulties happen.
Following up after a Zoom presentation is a crucial step in maintaining momentum and maximizing the impact of your presentation. For example, if you are selling a product, you can use a follow-up email to make the final push of your sales pitch.
Start your email by expressing appreciation for their participation and summarizing the key points of your presentation. Include any additional resources, such as presentation slides or a video presentation recording, to reinforce your message. Offer yourself as a resource for further questions or discussions, and encourage feedback or comments from your audience.
Here’s an example of a well-executed follow-up email for a Zoom workshop event:

Conducting a virtual presentation sounds overwhelming as you must consider technical aspects in addition to delivering your message and keeping it engaging.
Remember, there’s no such thing as overpreparing when you have bosses or potential clients to impress. Follow the tips in this article to nail your next Zoom presentation!

Like this article? Please share
Business Presentations, Video Filed under Business
Related Articles

Filed under Business • April 22nd, 2024
Setting SMART Goals – A Complete Guide (with Examples + Free Templates)
This guide on SMART goals introduces the concept, explains the definition and its meaning, along the main benefits of using the criteria for a business.

Filed under Business • February 7th, 2024
How to Create & Present a Competitive Landscape Slide for Your Pitch Deck
Get to know how to properly create a winning competitive landscape slide for your pitch deck. Boost your pitch performance now.

Filed under Business • February 2nd, 2024
Business Plan Presentations: A Guide
Learn all that’s required to produce a high-quality business plan presentation in this guide. Suggested templates and examples are included.
Leave a Reply
Improve your practice.
Enhance your soft skills with a range of award-winning courses.
11 Essential Tips for Presenting on Zoom
January 24, 2022 - Dom Barnard
A boss unwittingly disguised as a potato during Zoom meetings, cries of “you’re on mute!” and guest appearances by kids and pets, are among the hilarious anecdotes attached to this hugely popular app.
However, it becomes serious when you need to make a good impression in a virtual meeting, job interview or presentation.
Zoom became a massively popular communications tool for business, education and social meetings during the Pandemic. In 2020, there were 485 million Zoom downloads , which is 30 times more than the year before!
Of course, some of the top Zoom presentations tips apply equally well to in-person or online delivery. Such as establishing your end goals, preparing a flowing framework and strong content, then practising your speech more than once. However, there are particular advantages and disadvantages to Zoom, to get the right results for presenting online.
These Zoom presentation tips will help grow your competence, confidence and success.
1. Put some trousers on!
One of the great things about Zoom presentations is there is a degree of informality and comfort.
You can dress just your top half smartly, have a hot beverage just off-screen, and do your best public speaking in familiar surroundings.
One of the worst things about Zoom presentations is …there is a degree of informality and comfort!
You can find yourself easily distracted, lacking in focus and slower in your responses.
The best way to present well on Zoom – when the stakes are high – is to create a wholly business-like environment and attitude. Use a space in your home or field location that’s as bland and clinical as possible, with no potential noise disturbance. Dress smartly from head to toe to create the best mindset.
Site your technology in front of you and imagine it’s a lectern and a set of multi-media tools in a meeting room or lecture theatre.
2. Use the superpower of data
While you’re using technology to communicate or collaborate, it’s common sense to optimise ways to enhance your presentations.
As part of your extensive preparation for important Zoom meetings, consider what documents, images and graphics to share, to add credibility and professionalism to your pitch. Or, simply to hold the attention of a Zoom audience from start to finish.
Familiarise yourself with the Share Screen option on Zoom, and the best ways of displaying videos during a Zoom call, including advanced share methods for online presentations.
There are good Zoom share screen tips here, including how to add a video to presentations on Zoom.
Zoom presentations with visual content are 43% more persuasive . Also, 90% of the information we process comes from visual input. So your Zoom presentation materials could be what gets you that job, funding or agreement.
3. Non-verbal communications tips for Zoom
Don’t assume that online presentations release you from many of the body language pitfalls and best practices. The opposite is true, as you need to focus on non-verbal cues even more.
If you deliver your Zoom presentation in a rigid, static and clinical way, you are missing out on some of the best ways to be successful in communications.
People respond to people. Effective communication requires warmth, authenticity and establishing a strong personal connection with your audience. Being robotic when presenting online won’t help you to succeed.
If this is an intense online meeting, then showing empathy can also increase the engagement and openness you achieve.
How do you communicate non-verbally on Zoom?
Without going over the top, be purposeful and slightly exaggerated in your body language. Sit straight and lean subtly towards the screen. Never away from it and certainly no slumping, crossed arms or chin/elbow leaning!
Smile, nod and keep strong eye contact, including showing your attention passing from person to person across a split-screen. Use hand gestures and show subtle movement in your upper body to add emphasis to key points.
4. Verbal communications skills
Zoom presentations also make it too easy to slip into a monotone voice or race through a presentation. You may even find the process of talking to technology – not live people – causes you to ramble, or get lost in your ad-libs or Q&A responses.
Make sure you articulate clearly, add emphasis when needed, and generally modify your tone regularly but logically.
Don’t be afraid to leave small pauses to drive a point home, or to take a deep breath while you construct your next point. If you look directly at the screen and hold eye contact, this ‘white space’ is perfectly acceptable.
5. Is everyone listening?
One of the most important presentation skills, in general, is reading the room. Is your potential boss or buyer looking bored? Are the panel of decision-makers getting confused? In contentious presentations, being able to spot your biggest dissenter from their non-verbal communication can help you shift your focus to winning them over.
It’s challenging to gain that sort of body language intel from online meetings. So, the best Zoom presentations compensate for that.
It can be as simple as adding more direct questions to your content and literally pausing regularly to ask your audience about queries or concerns. Make your questions open-ended, not a yes or no response.
“Let’s take a minute. What else do you need to know about that part of my presentation?”
Also, keep Zoom presentations succinct, flowing and animated. Your audience will drift away subconsciously if your delivery is pedestrian or you talk for too long without involving them.
Remember, attention spans are even shorter on technology!
Practice your video presentation and get feedback on your performance with VirtualSpeech .
6. Opening Zoom presentations with pizazz
No, this doesn’t refer to grabbing your audience’s attention with a juggling trick or wearing your most colourful or glamourous finery.
How you start a Zoom presentation sets the tone. If you instantly engage their interest with a compelling opening, the attention and engagement last.
This should primarily be 100% clarity on the purpose of your presentation and the desired outcome. As well as establishing your credibility and methods to achieve the end goal.
Vague introductions and slowly revealing your key points drains your time and your audience’s attention.
What makes a good opening for Zoom presentations?
7. Icebreakers
You can’t shake their hand, but you can issue a quick, warm greeting and a short, relevant fact about yourself that helps them to warm to you.
8. Storytelling techniques
These work for a myriad of business communication tasks. Give a short (that word again) anecdote or illustration, to give context to your Zoom presentation. That could be about you, your product or the outcome you are requesting, for example.
9. Meaningful quotes in presentations
“The single biggest problem in communication is the illusion that it has taken place.” – George Bernard Shaw.
Good quotes can work!
10. High impact fact
Another great opening for Zoom presentations is a little known fact or ‘behind the scenes’ secret that grabs attention. Did you know, one-third of adults still sleep with a ‘comforter’ like a soft toy or blanket? (Not relevant to many presentations but it’s a memorable statistic that caught OUR attention.)
Wake your audience up with something they want to remember – and share with others – and they will be alert and ready to listen.
11. End Zoom presentations correctly
One last piece of advice on Zoom presentations. Don’t get so relieved when you get to the end, that you forget your call to action.
All communication should include an invitation of some kind, in clear language. What would you like your audience to do, now your Zoom time is over? Tell them that and thank them for your attention, with one last warm smile.
How to Give a Presentation on Zoom? [A Step-by-Step Guide!]
By: Author Shrot Katewa
![How to Give a Presentation on Zoom? [A Step-by-Step Guide!]](https://artofpresentations.com/wp-content/uploads/2021/03/Featured-Image-How-to-Give-a-Presentation-on-Zoom.jpg "practice zoom presentation")
If you’ve never used Zoom, giving a presentation on it might seem a bit challenging. But, that’s a challenge we will have to learn to overcome as the world moves digital more and more day by day. The key question really is how to give a presentation on Zoom!
To give a presentation on Zoom, first, start by joining a meeting. Now open the presentation file on your computer and share the slides on Zoom using its “Share Screen” feature. You should test your camera, mic, speaker, and internet connection before you start with your presentation.
As easy as it may seem, some of you may need further detailed instructions. So, in this article, I will provide a step-by-step guide on things that you need to do in order to deliver a presentation on Zoom successfully! Plus, I will also share some tips that can help you ace your presentation on Zoom!
So, without any further delay, let’s get started!
Understanding the Zoom Application Interface
Before we understand the steps to give a presentation using Zoom, it is perhaps a good idea to acquaint yourself with the Zoom user interface first. If you are well-versed with it, then perhaps you may want to skip this section and click here instead.
Logging into Zoom
Although you can login to your account using zoom website too, but it is best to download and use the zoom app .
Once you have download the app, you will be prompted to login to your account. If you don’t have an existing account, you can either sign up or even login using your social account such as Google or Facebook. It’s actually quite simple.
If you feel that you don’t want to sign up or even use the social accounts for your meeting, you can choose to use “Sign In with SSO” option. SSO stands for single sign on and this allows you to sign in even when you don’t have an account with Zoom just once.
Zoom Home Screen
Once you’ve logged in, you will be taken to the home screen on Zoom.
There are a bunch of different things that you ca do with the home screen on Zoom. If you have been invited for a meeting, you will need to click on “ Join “. However, you will also need the meeting ID and the password for the meeting. If you don’t have the details, you will perhaps need to contact the person hosting the meeting.
You can also host the meeting yourself by using the “ New Meeting ” button. You can set a new meeting and invite others to join using this option.
Likewise, you can also schedule a meeting in the future using the “ Schedule ” option.
Furthermore, for changing the account related information, just click on your profile picture in the top-right corner of your window.
Lastly, there are several other detailed settings that you can tweak for your Zoom application. Almost all the other settings can be found in the “ Settings ” section by clicking on the “ Gear Icon “.
Zoom Virtual Meeting Window Interface
Once you are a participant in a virtual meeting, either by joining an existing meeting or by starting a new meeting, you will be greeted with an image similar to the one mentioned above.
On this screen, you will be presented with several different options. Some of the key functions that you will need to be aware of are as follows –
- Mute – Turning on the Mute or Unmute
- Video – Toggling between your Video
- Participants – Checking the names of the Participants
- Share Screen – to deliver a presentation (more on this later)
- Record – To record a meeting session
- End – Knowing how to end a meeting and exiting a call.
All the above functions will be visible on a small bar at the bottom of the window. If you are not able to see this option bar at the bottom, just hover over at the bottom part of your screen and all the options will appear .
Although there are other features that are also available for a zoom user or a participant, however, the aforementioned features should be good enough to deliver a presentation. These 6 features are at the very least something that you should be aware of.
How to Give a Presentation on Zoom (Step-by-Step)
Zoom has become a common tool for giving virtual presentations today. It is a widely used tool at conferences, meetings, and other events! If you are giving a presentation on Zoom for the first time, then perhaps you should be aware of a few things –
Here is a quick step-by-step guide on how you can give a presentation on Zoom:
Step 1: Install Zoom
Download and install the Zoom application to your desktop. To download the application, visit https://zoom.us/download and download the Zoom Client to your computer.
Step 2: Login to your Zoom Account
After installing the application, open it and log into your Zoom account. If you don’t have one, you can sign up for free using your email account.
Zoom also has options to sign in using SSO (Single Sign-On) or with your Facebook or Google account.
Step 3: Test Audio and Video Settings
Before you start or join a meeting, you will need to configure and test your audio and video settings.
To do that click on the gear icon on the Zoom application’s home screen. This will open the settings menu.
Now click on the “Audio” tab and select the microphone you are going to use. Try our different audio settings. After the microphone, select the speaker for audio output. If you can’t hear anything, try out another speaker source.
After configuring audio, click on the “Video” tab. From there, select the camera that is connected to your desktop. Tweak different video settings and find out what works best for you.
Step 4: Join or Schedule a Meeting
Now start a meeting by clicking on “New meeting”. You can also schedule a meeting on Zoom. To do that, click on “Schedule” and set up when you want to start the meeting. After completing the set-up, Zoom will give you a URL. Share it with the team members to join the meeting.
Or you can join a meeting by clicking “Join” on the Zoom client’s home screen. You can use a meeting ID or URL to join a meeting in Zoom.
Step 5: Open the Presentation
Once you have everything setup, you then need to prepare to show your presentation with your audience. To do that, open the presentation slides on your computer.
Step 6: Share Your Presentation
The last step in giving your presentation is to make sure that you share your presentation with your audience. To do that, click on “Share Screen” from the Zoom clients meeting window , select the screen where your presentation slides are open, and click “Share”. Now start presenting your slides to the audience.
Step 7: Stop Sharing to end the Presentation
One thing to know is how to end the presentation. To stop screen sharing, simply click on “Stop Share” located at the top of the screen . This option will only appear when you start sharing your screen.
How to Share a PowerPoint with Presenter View on Zoom?
To share your PowerPoint presentation slides with presenter view on Zoom, follow the steps given below:
Step 1: Open the Zoom App and Login
The first step really is to open the zoom app and login to your account.
Step 2: Join or Setup a Virtual Meeting on Zoom
Next, join the meeting. Remember, you need the meeting ID and password to join a meeting. Make sure you have requested for the details beforehand.
Step 3: Open Your PowerPoint Presentation
First step is really to open your presentation file that you want to present on the PowerPoint application.
Step 4: Put the Presentation in Presenter View
Now select the “Slide Show” tab from the top of the screen and click on either “From Beginning” or “From Current Slide” depending on your preference. This will open the slides in the “Presenter” view.
Step 5: Switch to the Zoom Application
Now, go to the Zoom application, start or join a meeting. While you are in the “Presenter” view on PowerPoint, press “ Alt+Tab ” to switch between applications in Microsoft Windows-powered computers. For iMac, use “Command+Tab” to move through open apps.
Step 6: Share Screen on Zoom’s Meeting Window
Once you are in Zoom’s meeting window, click on “Share Screen”, select the window where your PowerPoint slides are open in the presenter’s view, and click “Share”.
And that’s all you have to do in order to share PowerPoint with the presenter’s view in your Zoom meetings.
How to Share PowerPoint on Zoom Without Showing Notes?
There are two methods that you can use to share PowerPoint slides on Zoom without sharing your presenter notes. For the first method, you will need to have two monitors connected to your computer.
As for the second one, you can still share your PowerPoint slides on Zoom without sharing your notes (and you won’t need two monitors either). I’ve briefly explained both methods below.
Method 1 – Dual Monitor Method
In this method, you will be presenting your PowerPoint file on one monitor while looking at your presenter’s notes on the other one. Here’s how you can do that:
Step 1: First of all, open your slides on PowerPoint.
Step 2: Now join or start a Zoom meeting.
Step 3: Now click on “Share Screen” and select “Screen 1”. Then click “Share”. Here, “Screen 1” is your primary monitor.
Note: If you are not sure which one is your primary monitor, select where the PowerPoint file opened in.
Step 4: Now go to the PowerPoint application, click on the “Slide Show” tab, and from there click on “Monitor” and select “Primary Monitor”.
Step 5: Open the presentation file in the presenter’s view by clicking on the “Slide Show” tab and selecting “From Beginning” or “From Current Slide”.
If you have done everything correctly, participants will only be able to see the presentation slides while you have your presenter’s notes open on the second monitor.
In case you shared the wrong monitor on Zoom, click on “Screen Share” on Zoom’s meeting window, select “Screen 2” and click on share. This should fix your problem.
When you are sharing a screen on Zoom, you will notice a green border around that screen. This indicates which monitor you are currently sharing.
Method 2 – Sharing Portion of Your Screen
Follow the steps below if you have only a single monitor connected to your computer.
Step 1: Join or start a meeting on Zoom.
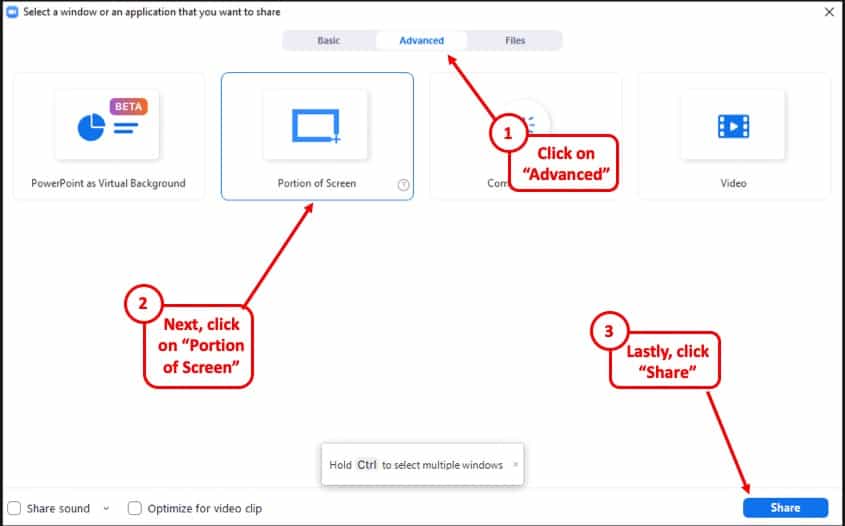
Step 2: Click on “Share Screen” and from the pop-up window select “Advanced”. From there select “Portion of Screen” and click on “Share”. This will give you a green border on your screen that you can adjust. Only the things that are inside this border will be shared on Zoom.
Step 3: Now open the presentation file in PowerPoint, and go to the presenter’s view by selecting “Slide Show> From Current Slide or From Beginning”.
Step 4: Adjust the size of the green border so that it only shows the presentation slides in the presenter’s view.
And that’s all you have to do. By doing so, your audience will only see the slides that you are presenting, but not your notes.
How to Show Yourself During a Zoom Presentation?
Ensuring that you are visible from time to time during a presentation can make it slightly more engaging and much more interactive. Here is how you can do that-
Step 1: First, start or join a Zoom meeting.
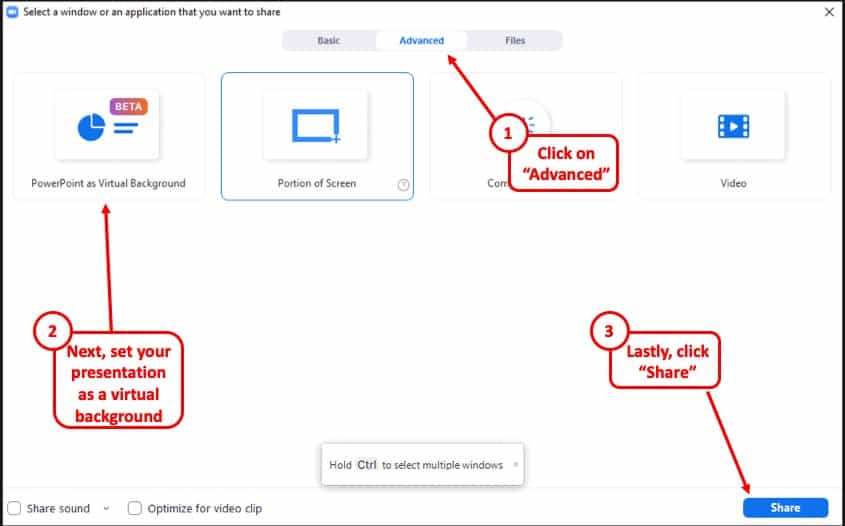
Step 2: Click on “ Share Screen ” and select the “ Advanced ” option. From there, select “ PowerPoint as Virtual Background ” and select the file you want for your presentation. Then click on “ Share ”.
Step 3: Make sure your video is switched on so that you are also visible to your audience. You can do that by clicking on “ Start Video ” on the Zoom Virtual Meeting Interface.
It will take some time for your slides to appear on the Zoom client. When it is done, participants will be able to see your face in front of the slides in Zoom. Make sure that your camera is connected to your computer and configured correctly.
This feature works best if you have a green screen behind you . If you have one, go to Zoom’s settings menu, select the “Background and Filter” tab and check “I have a green screen”. If you want to stop showing yourself during a zoom presentation, click on “Stop Video” on the meeting window and that will do the job.
Furthermore, you may sometimes want to show just yourself to the audience and not show the presentation at all. For that, all you need to do is simply click on “Start Video” in the Zoom Virtual Meeting Interface.
How to Record a Presentation on Zoom?
If you want to record your presentation on Zoom, you can do it easily. After joining or starting a meeting on Zoom, click on the “Record” icon located at the bottom of the meeting window. Once the recording starts, you can pause the recording or stop it whenever you like.
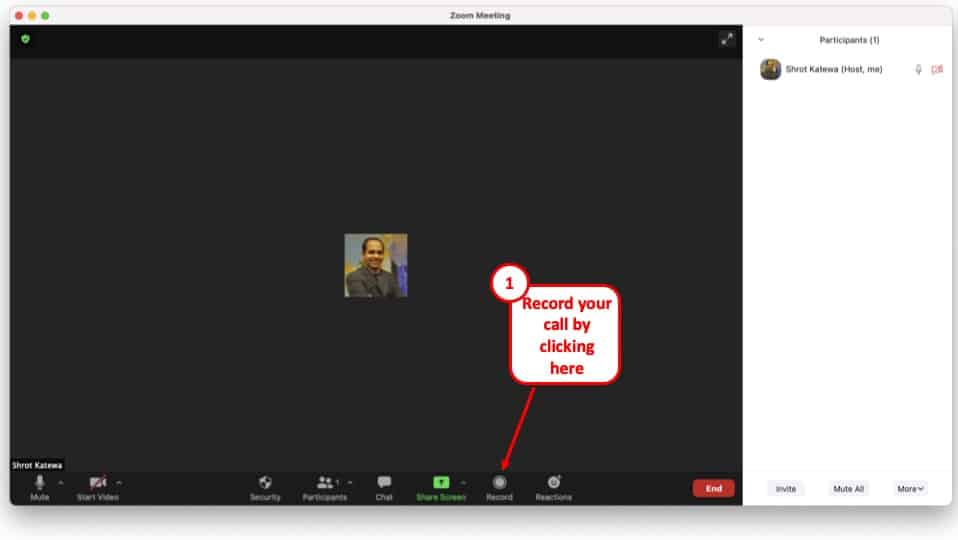
After the end of the meeting, the recorded video will be automatically converted into “.mp4” format and stored on your computer.
Tips for Giving an Awesome Presentation on Zoom
Giving a presentation in front of an audience is always a challenging task. Especially if it is online, many things can go wrong during your presentation. This is why I’m sharing some tips that can help you deliver an awesome presentation on Zoom. These are as follows –
1. Make a Professional Looking Presentation
There are several ways to make your presentation look really professional and high quality. One obvious method is to outsource your presentation to a specialised design agency! But, that can become really expensive depending on your budget.
Another (non-obvious) option is to use a PowerPoint Presentation Template! There are several high-quality and professional templates that you can get quite easily! In fact, using these Presentation Designs is quite inexpensive! You can download as many presentation templates as you want for as little as $16.5/month!
My favorite one is Agio PowerPoint Presentation template. It is perfectly suited to give a professional look to your presentation and yet it is quite quick and easy to use. Check out some of the images below –
Agio PowerPoint Presentation Template
Furthermore, make the presentation as simple and straightforward as possible. Do not confuse your audience with a network of colorful texts, graphs, or other contents.
Only use data and graphs that are relevant to your presentation. Also, the clever use of transition animations can make the slide appear much more engaging.
2. Check Your Equipment Beforehand
Whenever you are giving your presentation online, many things can go wrong. For example, your camera or mic may not function properly. Such interruptions will only make you a laughing stock in front of the participants.
Check your mic, camera, and speakers to find out whether they are working properly or not. Also, check your internet connection and your laptop’s battery level. If everything is ok, then you are good to go on with your presentation.
More Related Topics
- Change the Style of Your Bullet Points and Stand-out from the Crowd!
- 7 EASY Tips to Always Make your Presentations Attractive! (Even if You are a Beginner)
- How to Reduce the Size of Your PowerPoint File? The Perfect Method!
- Auto Create Your PowerPoint Slides using Design Ideas Feature!
- Main Features of PowerPoint! [I bet You DIDN’T Know These]
Credit to Cookie_Studio for the featured image of this article
Like what you're reading?
Zoom presentation tips to bring human connection into virtual meetings
Get your team on prezi – watch this on demand video.

Līva Luriņa November 01, 2021
Gartner has acknowledged Zoom as a leader in meeting solutions for the sixth year in a row. That’s well deserved, as it’s pretty challenging to find a person in the digital world who’s never joined a Zoom meeting.
In a sea of countless Zoom presentations , it’s crucial to stand out in order to succeed. But what’s the best way to tell your story, engage your audience, and avoid virtual meeting fatigue ? Through personal connection.
Read on to learn the nine best Zoom presentation tips to help you build a human connection in the era of virtual meetings and discover 11 handy Zoom hacks to advance your Zoom presentation skills.

1. Do your homework
The most important Zoom presentation tip is to think about your audience before thinking about the slides. You need to understand their expectations to bring value and build a real connection.
Consider things about your audience such as:
- What do they need or want from your Zoom presentation?
- Challenges or fears they face
- Tone of voice or vocabulary that is the most appropriate to use
- Examples or stories can they relate to
Once you’ve answered these questions, you can design your presentation accordingly. It’s a good idea to modify your presentation each time you face a new group of people.
2. Tell a story
There’s no better way to create an emotional connection with the audience than telling a story. Including storytelling in presentations will also help them better understand and remember information that’s important both in business and education.
But how do you actually include a story in your presentation? To really unlock all the potential, the storyline has to be connected to your main goal and, following the best Zoom presentation tips, carried throughout the whole presentation.
First, clarify what emotion you want to evoke, whether it’s surprise, joy, desire, anger, or anything else. Think of relatable examples, statistics, jokes, or experiences that will resonate with your audience. When you see people nodding their heads, that’s usually a sign that you’re nailing the presentation, and you’ve made an emotional connection with your audience (or they’re practicing active listening skills :)).
Elena Valentine, CEO of Skillscout, uses Prezi Video to show the importance of storytelling in presentation and shares some tips to help you hone in on using story as the ultimate attention grabber. Learn all about it in here video.
3. Visual vs. textual information
Zoom presentations with visual aids are 43% more persuasive than those without. The human brain loves visuals – they make it easier to quickly process the message compared to slides with text. Also, ideas presented graphically are easier to comprehend and remember than those presented through text alone.

To bring the human connection to your Zoom presentation, you need all eyes on you. If your audience is focused on reading lines or bulleted lists on the screen, they are more likely not paying attention to what you’re saying.
That’s why it’s important to include visual information in your slides. Here are some Zoom presentation tips about types of visuals for your slides:
- Data visualizations. Charts and graphs are your best friends if you want to communicate data and numbers. Prezi’s data visualization tools can help you with that – easily create designs to support your story and make your presentation more delicious.

- Maps . Turn geographical data and insights into interactive maps for cities, regions, or even whole continents – our brains love the data associated with reality.
- Images and videos. These visual assets are a must-have in presentations to explain how things work, emphasize the idea, or draw attention to your message. Your choice of images will impact the emotional connection with the audience, so choose them wisely.
- Graphic elements. Flowcharts, diagrams, icon blocks, notes, and other features are excellent ways to communicate processes, plans, or ongoing situations. Combine your story with these elements, and you can be sure your message will be apparent to everyone.
- GIFs and stickers. Sometimes one GIF can express more than words could say. They are super helpful if you want to create an exact image in the audience’s head. For example, imagine a presentation about monthly sales performance and this GIF on the first slide:
This celebratory GIF is a great way to kick things off and get your team excited to hear the rest of your presentation.
4. Let your audience hear and see you
Another Zoom presentation tip regards what your audience can see and hear. It’s best to come off as professional as possible.
Good lighting conditions don’t mean spotlights all around you. Natural light is the best tool to look good in a virtual presentation . Make sure you sit near the window but avoid having it behind your back as it will create a shadow. If the natural lighting isn’t an option, play around with your lamps – even a cheap ring light can make a huge difference. Watch this video to learn how to create the best video lighting and more.
Now, when your audience can see you, make sure they can hear you as well. There’s nothing worse than watching a Zoom presentation when the speaker has disruptive noise in the background or a squeaky mic.
In the video below, we explain the best ways to make a crisp and clear sound when you’re presenting. Even more, Zoom has several ways you can improve your audio – look for more Zoom presentation tips and hacks at the end of this article.
5. Make sure your Zoom presentation flows
This Zoom presentation tip works well with storytelling. Everything you say and show should have a good segue – both your story and your presentation slides.
Rather than transitioning through slides linearly, use Prezi’s presentation templates to have a more conversational presentation. You can create various flows and zoom in on a topic to go deeper. Or, let the conversation guide you and jump straight into the most relevant topics that your audience is interested in.
In his video, Brian Fanzo, Digital Futurist and keynote speaker, covers how to avoid coming off as scripted in an online presentation. Watch his video here for more:
6. Body language is worth a thousand words
Body language has an enormous impact on how your audience perceives your Zoom presentation. Jessica Chen, Founder and CEO of Soulcast Media in her Prezi video explains that body language determines up to 60% of how we receive the information presented, whereas the choice of words makes only 7% and tone of voice only 33%.
There are many ways you can mindfully use your body language during presentations. One of the top Zoom presentation tips is to stick something eye-catching next to your laptop camera so you can hold eye contact with the audience. To look confident and persuasive, move slowly, fluidly, create space between your shoulders and ears, and keep your head straight. And most importantly – use your hands, especially at the start of your video call. It will create a warm and safe place both for you and your audience.
7. Don’t hide behind the slides
It’s hard to make your presentation personal if you’re just a small rectangle in the corner of the Zoom window. All your audience can see on their screen is a giant slide with information and data.
Using your body language is a key Zoom presentation tip, that’s why you should forget about sharing your screen and display your content right next to you. This makes a more memorable experience and impactful presentation. Prezi Video is the right tool for that – easily drag and drop the content you’d like to show or use our templates to build presentations that will amaze your audience.
8. Activate your audience
Another great Zoom presentation tip to keep your audience engaged is through conversational presenting with interactions. Once in a while, stop presenting to talk with your audience and allow them to ask questions or clarify something. Encourage them to use the Zoom chat or respond to a poll .
Zoom breakout rooms are an excellent choice for online workshops or training sessions. Participants can discuss the topics from your presentation in greater detail and express their ideas, enabling collaborative learning and knowledge sharing.
However, not everyone feels comfortable speaking up. Using Prezi Video during online meetings allows your audience to share instant reactions – images, GIFs , text, or stickers. By organizing that kind of interactivity in your Zoom meeting, everyone can participate and raise the level of energy in the meeting.
For more tips on activating your audience on Zoom, watch this Prezi video by Rich Mulholland, founder of the presentation company Missing Link:
9. Create, rehearse, present
You can agree on or not with Malcolm’s Gladwell “ 10,000-hour rule “, but one thing is clear – the more you present, the better you become at it.
Once you’ve created your presentation content, rehearse it. You can use Prezi Video to record yourself before going live to Zoom so that you can see yourself in action. Practice where you’ll add pauses, ask the audience a question, or make a joke. Think about what tone of voice you should use to keep the audience focused and what your body language is saying.
You can even record your presentation and review it later to gauge how you can improve it. Practice makes perfect.
Selling on video expert, Julie Hansen, shares Zoom presentation tips for more effective sales meetings in her video here:
11 Zoom presentation hacks for even better meetings
Add prezi virtual camera.
Download Prezi Video desktop app and connect Prezi Virtual Camera with your Zoom . After that, you can instantly share your content and ideas with you on screen, making everything from internal updates, trainings, and sales pitches more interesting.
Change your Zoom virtual background
To jazz up your Zoom presentation, you can create and upload your own virtual background image . Surprise coworkers with your office’s picture in the background, join a meeting from a sunny beach in Spain, or create a professional-looking background as your business card. Use one of our virtual background templates to get started.
Test the sound
It’s always a good idea to test your mic before joining a Zoom meeting. Go Zoom Settings > Audio and test both your microphone and speakers. This way, you can avoid that awkward “Can you hear me?” moment at the start of your meeting.
Spacebar to mute/unmute
Forget about those awkward moments when you’re trying to find the mic to unmute yourself and say something quickly. One nifty Zoom presentation tip: hit the spacebar and hold it to unmute yourself as you speak.
Turn off video and audio by default
Avoid that “first look tension” when joining a Zoom meeting. Go to Settings > Audio and mute your mic when joining a meeting to control the first sound. Under the Settings > Video settings, check the “ Stop my video when joining the meeting ” so that you can always greet your team with a smile and a wave.
Hide non-video participants
During large team meetings or all-hands, it’s nice to see other coworkers in your Zoom window. To avoid a cluttered screen with static images and videos, you can hide meeting participants without video from the gallery view. Go to Settings > Video and click Hide non-video participants . Now you can enjoy live reactions and people around you all meeting long.
Hide your self-view during Zoom presentations
In Zoom meetings, we tend to pay too much attention to how we look. It can be a real distraction and steal the focus of the presenter. To avoid that, press the three dots button on your video and choose Hide Self View . This will create a more natural feeling, as you most likely wouldn’t look in the mirror during a face-to-face meeting.
Share your screen with confidence
Eliminate notifications like messages or ads popping out when you’re sharing your screen. If you’re using a Mac, we recommend turning on Do Not Disturb mode , and for Windows users, use Focus Assist to avoid unnecessary pop-ups.
Mute all participants
It’s common for someone to have their mic on by accident, which can cause unwelcome distractions like background conversations, traffic sounds, or a barking dog. Skip these moments and mute everyone: hit Command+Control+M on Mac or Alt+M on PC.
Ensure the best visual quality
To ensure the best presentation quality, always go on Fullscreen mode . It’s especially important when presenting data during a meeting or explaining complicated graphs with small text.
Use reactions to interact
Small things matter, especially when you want your virtual presentation to have more human connection. Though Zoom allows you to use reactions like applause, love, thumbs up, and others, you can unlock even more interactivity with Prezi Video. Encourage your audience to share comments, GIFs, or any image during your presentation, allowing them to react and give feedback without unmuting or affecting meeting time.
Put these Zoom presentation tips into action
With more presentations happening online than ever before, it’s important to understand the basics of Zoom and how it affects your presentations. Learn more Zoom presentation tips when you visit the Prezi Video Gallery or get started by creating your first Zoom presentation today.

Give your team the tools they need to engage
Like what you’re reading join the mailing list..
- Prezi for Teams
- Top Presentations

Zoom Presentation Tips to Make Your Audience Go ‘WOW’
- November 15, 2022

Whether you’re an experienced specialist with pre-presentation jitters, or a student with a head full of anxiety – or anyone else in between, let me start by telling you: you got this . There ain’t nothing that a well-crafted list of Zoom presentation tips can’t solve!
It’s possible you’ve already scrolled through some tips for presenting on Zoom and still have that fidgety feeling of anxiety. So let’s get the first one out in the open straight away. Nerves are normal – but not neccessary. In fact, that’s maybe the most important thing to remember – so let’s make that our first tip.
1. Embrace the Fear
A lot of people seem to think that nerves are a sign of weakness: “ if I’m nervous before presenting, maybe I don’t know the subject well enough.”
Everybody gets nervous, especially when they have to navigate the technical factors of presenting on Zoom, or lack public speaking experience. Throw in someone asking ‘ can we record this presentation? ‘ and you’re surely bound to get nervous.
Even those with tons of experience feel a little tense every now and then. Maybe the audience is larger than normal, the topic more complex, or the people listening need to make some critical decision based on your presentation.
Feeling fear is normal. Feeling anxious is normal. Feeling tense is normal. These emotions are your body’s way of telling you that you are in a new situation that it doesn’t quite know how to deal with, so it places you on red alert. You become more aware. The tension you feel in your muscles is your body’s primitive instinct kicking in and preparing you for action.
Your body reacts the same way with excitement. In fact, there is very little difference between excitement and fear – which means you can choose to turn fear into excitement. The only difference between the two emotions is what you choose to associate them with. If it’s something you’re scared to do, it becomes a negative feeling. If it’s something you’re delighted to do, it becomes a positive feeling.
By recognizing your instincts, you are able to overcome them. Embrace the fear.
Not only that – but who is your audience to judge you? We’re all human. Taking a few deep breaths is scientifically proven to help calm nerves . Speak slowly – don’t try to rush through. If you make a small blunder, don’t sweat it. Don’t take yourself too seriously. Chances are, when the meeting starts, your audience is wondering what to have for dinner tonight, not analyzing your every move. Which is why it’s important to grab their attention early …
2. Grab Your Audience’s Attention and Don’t Let Go
Want to know how to do a presentation on Zoom that your audience will remember? Get their attention early and don’t let go until it’s time to end the call.
Most people who have to attend a presentation are probably bored before it’s even begun. This is why you need to set your tone from the very beginning, and maintain it throughout. If you take too long to get started, or waste time fumbling with your presentation mode settings, your audience will lose interest. Fast. As you’re not going to let that happen, you need to start as you mean to go on. First impressions are important – and preperation is key.
Enter with 100% clarity on your presentation’s purpose. What’s the goal? What do you want the audience to do with the information you’re about to give them? How will you convey the key information? When will your audience get to ask questions?
Establish your credibility early. Why are you the right person to be speaking about this topic? There may be gaps in your knowldge with regards to certain aeras – and that’s OK too. Acknoweldge what you don’t know.
Consider starting with an icebreaker. I’d recommend avoiding dad jokes (unless your audience is full of Dads, of course). A good idea is to start with a warm welcome and a relevant fact about yourself that helps make a connection with the audience.
3. Configure Your Zoom Settings in Advance
Another thing for making your presentation start on the right foot: make sure you’ve got everything configured in advance. This includes:
- Backgrounds
- Screenshare settings
- Recording permissions
If you want to add some professionalism to your presentation, you can blur your background on Zoom and thereby declutter your camera view. On the other hand, if you’d like to get some laughs out of your audience, you could choose a funny Zoom background that’s relevant to the topics of the presentation. Either way, get your background sorted before you begin.
Same goes for your camera and mic. Since you’ll probably be sharing your screen, make sure you have closed all non-relevant tabs, have all the presentation material to hand – and your speaker notes readily available.
Get ready before the meeting begins by running a test or two before you join. It’ll make you more confident straight off the bat when you know that you won’t need to fiddle with your settings under pressure.
Tip for Recording Presentations on Zoom
Typically, an important Zoom presentation will be recorded. If that is the case, you’ll want to ensure beforehand that you have the neccessary Admin permission. If you want to record the Zoom meeting without host permission , you can do so easily with a free meeting recorder like tl;dv .
The benefit of tl;dv is that you’ll also be able to edit the Zoom presentation afterwards (cutting out any small talk, or technical blips) and lift take-aways directly from the free transcript . You can also add timestamps to your recorded presentation before you share it with anyone – so viewers can jump directly to the moment in the presentation where you tackle different agenda items.
4. Use Good Visuals
A critical aspect of most presentations is the visual side of them. Will it just be you talking, or will you have a slideshow to share? If so, follow the point above and make sure you know how to present a ppt on Zoom via the Screen Share option before you start presenting.
It’s also a good idea to include relevant:
- Data and Statistics
- Images and Videos
- GIFs and Stickers
- Quizzes and Questionnaires Accessed via QR Codes
Presentation templates can be a game-changer here, streamlining the process and helping you create impactful presentations effortlessly, ensuring your audience stays engaged.
Don’t hide behind the slides though. The last thing people want to see is a non-stop slideshow with your face in a tiny box in the corner. Be sure to only show what’s necessary, and cover the rest yourself.
5. Put Your Notes in the Right Place
If you’re wondering how to present on Zoom without showing notes, you have a few options. One way to make sure you keep eye contact with your audience – or your camera – without forgetting your notes, is to have them on sticky notes stuck to your screen. Even better if you have a dual screen set up, you can have notes on your other monitor and not have to look down every ten seconds.
There are also apps you can get for notes that you can leave open over the top of your Zoom presentation. It’s more engaging and professional when you at least appear to know what you’re talking about without having to look down to read what you wrote.
Legend has it that every time you look down at your notes, the mind of at least one audience member wanders away, never to return…
6. Dress to Impress
We know it can be tempting to go with the good old fashioned shirt and underwear combo, but if you’re presenting, it helps to get in the zone and dress for the occasion. If you’re feeling smart, chances are you’ll be more engaging and more powerful in your speech.
Having said that, if you’re still feeling nervous, you can also just imagine that everyone in your audience is naked – half of them probably are from the waist down anyway. 🤷

7. Practice, Practice, Practice
Everyone’s heard the saying, practice makes perfect, but 21% of people don’t practice their presentations at all . On the other hand, the same survey showed that 22% of the ones that did practice spent more than 5 hours rehearsing! We believe there is probably a healthy midground.
With tl;dv, your practice time just became a whole lot more productive. You can record unlimited Zoom calls , so you can literally do your presentation to yourself and then rewatch it to see how it went.
Looking down at your notes too much? Stick them somewhere you can see. Lighting not as good as you’d hoped? Switch it up. Gone are the days where practicing meant just repeating the presentation to yourself and arbitrarily judging whether it was good or not. Now you have the proof.
The Zoom extension is free to download and you can learn a lot from revisiting your presentations to identify strengths and areas for improvement. You can also timestamp certain areas that you’d like feedback on, so your colleagues can jump straight to the relevant part. Know your introduction is spot on but need to add a little more oomph to end CTA? Just timestamp it, and get someone else’s eyes on it! It’s a great way to collect input and feedback.
8. Non-verbal Communication
Just because you’re presenting online doesn’t mean you can skimp on the body language. One of the little-utilized Zoom presentation tips is to make use of non-verbal communication.
We don’t want to advocate for you to start throwing your arms all over the place in a frenzied rush, but one of the ways to engage your audience and express empathy from behind a screen is by slightly exaggerating your body language . As this is an online presentation, you need to emphasize each movement just a little more so that it can be felt the same way it would in a face-to-face presentation.
It’s also important to be purposeful with your actions. Sit up straight to display confidence. Use hand gestures for emphasis. Avoid slumping, slouching or leaning as these subtle actions tend to disengage the audience.
It sounds obvious, but smiling, nodding and other forms of positive feedback are great ways to warm an audience. It makes them feel welcome and ready to interact.
9. Verbal Communication
Talking to a screen can often be more intimidating than talking to actual people. With less feedback from your audience, you can often go off on tangents and ramble a little more than necessary.
Remember not to talk too fast. Articulate yourself clearly and speak with purpose, emphasizing tone and pitch where necessary. Use well-placed notes to stay on topic.
Silence can be your best friend . If you want to make a hard-hitting statistic really hit home, deliver it and let it sit for a beat. A pause in the right place can do way more than words.
Remember to hold eye contact while you’re speaking too, and complement your voice with some non-verbal gestures outlined above. Filler-words like ‘uhm’ can distract from your message and make you sound less confident. Though totally normal in everyday speech, you can make a presentation even more amazing by avoiding some of the classic ‘uuuhs’ and ‘like’. When you’re tempted to use a filler word, practise being silent instead. As mentioned, a simple pause can be a lot more effective than rambling the entire time!
10. Give a Call to Action
Even if you give the most mind-blowing presentation known to man, it can still fall flat if there is no call to action (CTA). This is one of the most important, yet often overlooked, Zoom presentation tips.
What do you want your audience to do after your presentation? What’s their next move? What was the crucial core of your talk and how does it influence them to act? Always give a clear call to action to your audience so that they know what to do with the new information you’ve presented to them.
Let’s say you’re giving a presentation on why tl;dv is the best online meeting software . End the presentation by telling your audience to install the tool for free , accompanying this CTA with a clear, concise message about why it’s beneficial to do so: it’s a free extension that lets you catch up on meetings in minutes.
11. Master the Agenda
By showing your audience a clear and agenda at the beginning of the presentation, you’ll help them feel prepared. An agenda shows the progression of the presentation, so your audience knows when to expect specific aspects to be covered, and roughly how much time will be spent touching upon each agenda item.
If you have guest speakers, an agenda will let them mentally prepare for the moment it will be their turn to contribute. For longer presentations, you’ll want to factor in a ‘short break’ into the agenda, so everyone knows when they can expect that much-needed toilet break.
12. End With Impact
Just like with storytelling, you want to hook your audience from the start, keep them thoroughly engaged throughout, then end with a BANG! There are many ways you can do this, but one that we love is with a quote.
Choose a quote relevant to your Zoom presentation topic, preferably something that will make your audience stop and think. A good quote can still be ringing in their ears days later.
If you can’t think of a quote from the top of your head, Google is your best friend. Just type in your purpose or topic followed by the word “quotes” and you’ll get hundreds to choose from. Obviously, you might have to sift through some crap before you get to the goodies, but it’ll be worth it.
But what if you can’t summarize your topic focus with a succint quote? Albert Einstein has some words of wisdom for you:
“If you can’t explain it simply, you don’t understand it well enough." Albert Einsten
tl;dr: How to ace your Zoom presentation
- Prepare well in advance
- Serve up an amazing agenda
- Learn from recordings of past presentations
- Turn your fear into excitement
- Use the power of a simple ‘pause’
- Make your slides engaging with visuals
- Don’t panic!
You got this. Now go WOW your audience.

Subscribe and stay up to date with the latest tips and news on Meetings, Sales, Customer Success, Productivity, and Work Culture.
Get started with tl;dv today

Google Meet
Microsoft Teams
Meeting Assistants
Subscribe to our Blogs
How To Present Powerpoint On Zoom

- How-To Guides
- Software Tutorials

Choosing the Right Presentation Format
When it comes to presenting your PowerPoint on Zoom, choosing the right format is crucial to ensure that your audience can view and interact with your slides effectively. Whether you’re conducting a business meeting, delivering a training session, or giving a presentation, consider the following factors when deciding on the best format for your presentation:
- Full Screen: This format allows you to occupy the entire Zoom window with your slides. It’s ideal for presentations that heavily rely on visuals or require your audience to focus solely on the content.
- Presenter View: If you need to access your notes, manage your slides, or view upcoming slides while presenting, the Presenter View format is your best bet. It gives you a separate window with additional tools and features.
- Side-by-Side: This format enables you to display your PowerPoint slides alongside other applications or materials, such as a video conferencing window or a shared document. It’s useful if you need to refer to external resources during your presentation.
- Custom Layout: Zoom allows you to customize the layout of your presentation, allowing you to combine multiple formats or adjust the size and position of your slides and other elements on the screen.
Consider the nature of your presentation, your objectives, and the visual elements you plan to incorporate when selecting the presentation format. Additionally, take into account the size of your audience, the devices they’ll be using, and the level of interactivity you wish to achieve.
Remember, a well-chosen presentation format can enhance your delivery and engage your audience more effectively. Spend some time experimenting with different formats in Zoom’s settings before your presentation to determine the layout that works best for your needs.
Preparing Your PowerPoint Slides
Before presenting your PowerPoint on Zoom, it’s important to ensure that your slides are well-prepared and optimized for the virtual environment. Here are some essential tips to consider:
- Simplify Your Content: Keep your slides concise and focused. Use bullet points, short sentences, and key phrases to convey your message effectively. Avoid overcrowding slides with excessive text or complex images.
- Use High-Quality Visuals: Choose high-resolution images and graphics that align with your topic and enhance understanding. Avoid pixelated or distorted visuals that may hinder audience comprehension.
- Consider Font Size and Typeface: Use a clear and legible font size, typically around 24-32 points, to ensure readability on different screen sizes. Stick to standard fonts like Arial or Calibri to avoid technical issues.
- Contrast Colors: Opt for high contrast between the background and text colors to ensure visibility. Dark text on a light background or vice versa works best. Avoid using color combinations that strain the eyes or make text illegible.
- Include Engaging Multimedia: Incorporate videos, animations, or interactive elements to enhance audience engagement. However, ensure that the multimedia elements are relevant, purposeful, and do not distract from your main points.
- Consistent Design: Maintain a consistent design across your slides for a professional and cohesive look. Use the same font styles, colors, and layout throughout your presentation to create a visually appealing and easily navigable experience for your audience.
- Proofread and Edit: Check for spelling, grammar, and content errors in your slides. Ensure that all text is grammatically correct and appropriate for your target audience. Consider seeking feedback from colleagues or friends to validate the clarity and effectiveness of your slides.
By following these tips, you can create visually appealing and well-structured PowerPoint slides for your Zoom presentations. Investing time and effort in the preparation phase will translate into a more engaging and impactful virtual presentation experience.
Optimizing Your Zoom Settings
Before you start presenting your PowerPoint on Zoom, it’s essential to optimize your Zoom settings to ensure a smooth and hassle-free experience for both you and your audience. Consider the following settings to enhance the quality and functionality of your presentation:
- Audio Settings: Test your microphone and speakers to ensure clear audio. Adjust the microphone sensitivity and speaker volume as needed. Consider using an external microphone for better sound quality.
- Video Settings: Check your camera settings and ensure that you’re well-lit and in focus. Adjust the video resolution based on your internet connection to maintain a stable presentation stream.
- Screen Sharing: Familiarize yourself with the screen sharing options in Zoom. Choose the appropriate settings to optimize the display of your PowerPoint slides. Select the “Optimize for full screen video” option for a smoother playback experience.
- Virtual Background: If desired, experiment with Zoom’s virtual background feature to create a professional and distraction-free backdrop. Choose a background image that aligns with your presentation topic and enhances your visual presence.
- Chat and Q&A: Decide whether you want to enable the chat or Q&A feature during your presentation. This allows your audience to ask questions or provide feedback. Determine how you want to manage and address these interactions during your presentation.
- Recording: If you plan to record your presentation, ensure that you have sufficient storage space and that you’ve enabled the recording function in Zoom. Inform your audience in advance if you intend to record the session.
- Mute and Unmute: Familiarize yourself with the mute and unmute controls in Zoom. During your presentation, be mindful of muting yourself when not speaking to minimize background noise and distractions.
- Practice and Test: Before your actual presentation, conduct a practice session to test your Zoom settings. Ensure that everything is working as expected, including audio, video, screen sharing, and any interactive features you plan to use.
By optimizing your Zoom settings in advance, you can ensure a seamless and professional presentation experience. Paying attention to audio, video, screen sharing, and other essential settings will help you deliver a high-quality presentation that engages your audience effectively.
Sharing Your Screen on Zoom
One of the key features of Zoom is the ability to share your screen, allowing you to display your PowerPoint slides to your audience. Follow these steps to successfully share your screen during a Zoom presentation:
- Start a Zoom Meeting: Open Zoom and start a meeting. You can choose to start a new meeting or join an existing one.
- Open Your PowerPoint Presentation: Open the PowerPoint file that contains your presentation. Make sure it’s ready to be displayed.
- Click the “Share Screen” Button: In the Zoom meeting window, locate the green “Share Screen” button at the bottom of the screen and click on it.
- Select Your PowerPoint Window: A dialog box will appear with a list of available screens and windows to share. Choose the window that has your PowerPoint presentation open.
- Ensure “Share Computer Sound” is Checked: If your PowerPoint presentation includes audio or video, make sure to check the “Share computer sound” checkbox in the dialog box. This will transmit the audio along with your slides.
- Click “Share”: Once you have selected the appropriate window, click on the “Share” button in the bottom right corner of the dialog box.
- Start Presenting: Your PowerPoint presentation will now be visible to your audience in the Zoom meeting. Begin presenting your slides as you normally would.
- Stop Sharing: To stop sharing your screen, locate the “Stop Share” button at the top of your screen or in the Zoom meeting controls and click on it.
Remember to ensure that your PowerPoint slides are visible and legible to your audience. Check the Zoom meeting preview window to verify the quality of your shared screen. Adjust the size and position of your slides if necessary to optimize visibility.
Sharing your screen on Zoom allows your audience to view your PowerPoint presentation in real-time, enhancing their engagement and understanding of your content. Practice this process before your actual presentation to become familiar with the steps and ensure a smooth screen sharing experience.
Using Presenter View
Presenter View is a powerful feature in PowerPoint that allows you to view your speaker notes, manage your slides, and have better control over your presentation while presenting on Zoom. Follow these steps to use Presenter View effectively:
- Enable Presenter View: Before you start your presentation, click on the “Slide Show” tab in PowerPoint and check the “Use Presenter View” box. This will activate Presenter View on your screen.
- Start the Slide Show: Begin your presentation by selecting the “From Beginning” or “From Current Slide” option under the “Slide Show” tab, depending on where you want to start.
- Access Presenter View: Once your presentation starts, you’ll see two different windows. The main window displays the current slide that your audience sees, while the Presenter View window contains your speaker notes, thumbnails of upcoming slides, and slide navigation controls.
- View Speaker Notes: In the Presenter View window, you can see your speaker notes for each slide, allowing you to stay on track with your talking points and key information.
- Preview Upcoming Slides: Take advantage of the thumbnail view in Presenter View to preview the next few slides. This helps you anticipate and smoothly transition to the next topic without losing your flow.
- Annotate Slides: Use the annotation tools available in Presenter View to highlight important points or draw attention to specific areas of your slides. This can enhance your audience’s understanding and engagement during your presentation.
- Manage Slides: In Presenter View, you can easily navigate between slides using the arrow keys or the slide navigation controls. This allows you to jump back and forth between slides or quickly go to a specific slide as needed.
- End the Presentation: Once you’ve completed your presentation, press the Esc key or click on the “End Slide Show” button in the Presenter View window to exit the presentation mode.
Presenter View in PowerPoint and Zoom provides you with the tools and flexibility to deliver a seamless and professional presentation. Take advantage of its features to stay organized, deliver your content effectively, and engage your audience during your Zoom presentation.
Navigating Slide Show Controls
When presenting your PowerPoint on Zoom, it’s important to familiarize yourself with the slide show controls to navigate through your slides smoothly and deliver an engaging presentation. Here are the key controls you can use while in slide show mode:
- Advance to Next Slide: To proceed to the next slide, simply press the right arrow key on your keyboard, click the mouse, or use a presenter remote if available. This allows you to progress through your presentation at your desired pace.
- Go Back to Previous Slide: If you need to revisit a previous slide, press the left arrow key on your keyboard or click the mouse’s left button. This enables you to go back and address questions or clarify information for your audience.
- Jump to a Specific Slide: If you want to navigate to a specific slide in your presentation, press the slide number on your keyboard followed by the Enter key. Alternatively, you can right-click on the slide and choose the desired slide from the context menu.
- Access Slide Thumbnails: In PowerPoint’s slide show mode, you can access a thumbnail view of your slides by pressing the Ctrl key and clicking on any slide. This enables you to quickly navigate to a specific slide without disrupting the flow of your presentation.
- Zoom In and Out: If you need to highlight specific details or make text more readable to your audience, use the Ctrl key and the plus (+) or minus (-) keys to zoom in and out, respectively. This feature is especially useful when showing complex diagrams or small texts.
- End the Slide Show: To exit the slide show mode, press the Esc key on your keyboard or right-click anywhere on the screen and select “End Show” from the context menu. This will bring you back to the normal editing view in PowerPoint.
- Use Presenter View: If you have enabled Presenter View, you can access additional controls and features to manage your presentation more effectively. Refer to the “Using Presenter View” section for more details on how to utilize this feature.
By familiarizing yourself with these slide show controls, you can navigate through your PowerPoint presentation confidently and deliver a more dynamic and interactive experience for your audience on Zoom.
Engaging Your Audience in a Zoom Presentation
Engaging your audience is crucial when presenting on Zoom to maintain their attention and ensure the effectiveness of your message. Here are some strategies to actively involve your audience and make your Zoom presentation interactive:
- Ask Questions: Pose questions to your audience throughout your presentation to encourage participation. You can use the chat feature in Zoom or ask attendees to unmute themselves and speak up.
- Use Polls: Take advantage of Zoom’s polling feature to gather instant feedback or opinions from your audience. Create engaging poll questions related to your presentation topic to encourage active participation.
- Encourage Chat Participation: Remind your audience to use the chat feature to ask questions, share insights, or provide feedback. Monitor the chat regularly and respond to messages to make attendees feel heard and valued.
- Incorporate Interactive Activities: Break up your presentation with interactive activities to keep your audience engaged. This could include case studies, brainstorming sessions, group discussions, or virtual simulations.
- Share Relevant Resources: Provide links to additional resources related to your topic in the chat or through screen sharing. This encourages further exploration and engagement even after the presentation ends.
- Use Visual Aid: Utilize visual aids such as charts, graphs, and images to enhance understanding and engagement. Visuals can help convey complex information in a more digestible and memorable way.
- Tell Stories: Incorporate relevant stories or anecdotes to make your content more relatable and captivating. Personal experiences are powerful tools for capturing your audience’s attention and keeping them engaged.
- Interact with Body Language: Use appropriate facial expressions, gestures, and body language to convey enthusiasm and connect with your audience. Non-verbal cues can enhance engagement and create a more memorable experience.
- Pause for Questions: Give your audience regular opportunities to ask questions or seek clarification. Pause after key points or at designated breaks to allow for interaction and address any queries.
- Display Empathy: Be attentive and empathetic towards your audience’s needs and emotions. Show genuine interest in their thoughts and perspectives, and create a safe and inclusive environment for discussion and interaction.
By incorporating these strategies, you can create a more interactive and engaging Zoom presentation that captivates your audience’s attention and encourages their active participation throughout the session.
Troubleshooting Audio and Video Issues
Technical difficulties with audio and video can disrupt the flow of your Zoom presentation. To ensure a smooth experience, it’s important to be familiar with troubleshooting common issues that may arise. Here are some troubleshooting tips for audio and video problems during your Zoom presentation:
- Check Your Internet Connection: A stable and reliable internet connection is crucial for smooth audio and video. Ensure that you have a strong connection and consider connecting via an Ethernet cable for a more stable connection.
- Test Your Audio and Video Devices: Before your presentation, test your microphone and camera to ensure they are functioning properly. Use the Zoom audio and video settings to select the correct devices and adjust their settings if needed.
- Adjust Your Audio Settings: If your audio is distorted, low, or inconsistent, check the audio settings in Zoom. Increase the volume, adjust the microphone sensitivity, and ensure that the correct audio device is selected.
- Restart Your Devices: If you experience audio or video issues during your presentation, try restarting your computer and reopening the Zoom application. This can resolve any temporary glitches that may be affecting your devices.
- Close Unnecessary Applications: Close any unnecessary applications or software running in the background during your presentation. This can free up system resources and prevent audio or video lag or interference.
- Use Headphones or External Microphones: If you are experiencing audio issues, consider using headphones or an external microphone. This can help eliminate background noise, improve audio quality, and minimize the chance of audio feedback.
- Optimize Camera Placement: Ensure that your camera is positioned correctly and at eye level. Avoid backlighting or excessive lighting that may affect the quality of your video. Adjust the camera angle and lighting as needed for the best visual appearance.
- Update Your Software: Keep your Zoom application and other relevant software up to date. Updates often include bug fixes and performance enhancements that can solve audio and video issues.
- Seek Technical Support: If you encounter persistent audio or video issues that you cannot resolve, consider contacting Zoom technical support or consulting with a technical expert for assistance.
By following these troubleshooting tips, you can minimize audio and video issues during your Zoom presentation and deliver a seamless and professional experience for your audience.
Tips for a Successful PowerPoint Presentation on Zoom
When delivering a PowerPoint presentation on Zoom, it’s essential to adapt your approach to the virtual environment. Here are some valuable tips to help you create a successful and impactful presentation:
- Practice and Rehearse: Familiarize yourself with your presentation and practice it multiple times before your actual Zoom presentation. This will boost your confidence, help you refine your delivery, and ensure a smoother flow.
- Create a Engaging Opening: Capture your audience’s attention with a strong opening that introduces the topic and highlights its relevance. Use a compelling anecdote, surprising statistic, or thought-provoking question to hook your audience from the start.
- Use Visuals Wisely: Leverage the power of visuals to support your message. Incorporate impactful images, charts, and graphs that enhance understanding and engagement. Avoid overwhelming your slides with excessive text or cluttered visuals.
- Speak Clearly and Slowly: Pay attention to your diction and pace of speech. Enunciate your words clearly and speak slowly and deliberately to ensure that every participant can follow along easily.
- Engage with Eye Contact: Look directly into the camera to establish eye contact with your virtual audience. This creates a stronger connection and helps maintain engagement throughout your presentation.
- Use Gestures and Body Language: Incorporate appropriate gestures and body language to enhance your presentation. It adds dynamism and visual interest, making your delivery more engaging and authentic.
- Encourage Interaction: Foster audience engagement by inviting questions, encouraging comments, or conducting interactive activities. This promotes a two-way communication and keeps participants actively involved.
- Time Management: Keep track of time and pace yourself accordingly. Avoid rushing through slides or going over time. Practice beforehand to ensure your presentation fits within the allocated timeframe.
- Use Breaks Strategically: Incorporate short breaks throughout your presentation to give your audience a chance to process information, ask questions, or engage in discussions. This helps maintain energy and prevents Zoom fatigue.
- Be Mindful of Your Background: Choose a clean and uncluttered background for your video. Consider using a virtual background or a well-organized physical setting that is visually appealing and free from distractions.
- Technical Backup: Have a backup plan in case of technical issues. Keep a secondary device ready, ensure you have a stable internet connection, and have a contact person to help troubleshoot any unforeseen problems.
By implementing these tips, you can maximize the impact of your PowerPoint presentation on Zoom. Remember to adapt to the virtual medium while maintaining your confidence, engaging your audience, and delivering a compelling presentation.
Leave a Reply Cancel reply
Your email address will not be published. Required fields are marked *
Save my name, email, and website in this browser for the next time I comment.
- Crowdfunding
- Cryptocurrency
- Digital Banking
- Digital Payments
- Investments
- Console Gaming
- Mobile Gaming
- VR/AR Gaming
- Gadget Usage
- Gaming Tips
- Online Safety
- Tech Setup & Troubleshooting
- Buyer’s Guides
- Comparative Analysis
- Gadget Reviews
- Service Reviews
- Software Reviews
- Mobile Devices
- PCs & Laptops
- Smart Home Gadgets
- Content Creation Tools
- Digital Photography
- Video & Music Streaming
- Online Security
- Online Services
- Web Hosting
- WiFi & Ethernet
- Browsers & Extensions
- Communication Platforms
- Operating Systems
- Productivity Tools
- AI & Machine Learning
- Cybersecurity
- Emerging Tech
- IoT & Smart Devices
- Virtual & Augmented Reality
- Latest News
- AI Developments
- Fintech Updates
- Gaming News
- New Product Launches
Learn To Convert Scanned Documents Into Editable Text With OCR
Top mini split air conditioner for summer, related post, comfortable and luxurious family life | zero gravity massage chair, when are the halo awards 2024, what is the best halo hair extension, 5 best elegoo mars 3d printer for 2024, 11 amazing flashforge 3d printer creator pro for 2024, 5 amazing formlabs form 2 3d printer for 2024, related posts.

How To Make A Zoom Background

How To Make A Powerpoint On A Tablet

How To Share A Document On Zoom

How To Download Images From Powerpoint

How To Connect Powerpoint To Projector

How To Zoom Out On A PC

How To Zoom In With Keyboard

How To Zoom Out On Dell Laptop
Recent stories.

Fintechs and Traditional Banks: Navigating the Future of Financial Services

AI Writing: How It’s Changing the Way We Create Content

How to Find the Best Midjourney Alternative in 2024: A Guide to AI Anime Generators

How to Know When it’s the Right Time to Buy Bitcoin

Unleashing Young Geniuses: How Lingokids Makes Learning a Blast!
- Privacy Overview
- Strictly Necessary Cookies
This website uses cookies so that we can provide you with the best user experience possible. Cookie information is stored in your browser and performs functions such as recognising you when you return to our website and helping our team to understand which sections of the website you find most interesting and useful.
Strictly Necessary Cookie should be enabled at all times so that we can save your preferences for cookie settings.
If you disable this cookie, we will not be able to save your preferences. This means that every time you visit this website you will need to enable or disable cookies again.
Using Webinar practice session
A webinar practice session allows you to set up and get acquainted with webinar controls before starting your webinar. The practice session is accessible by the host, alternative host, and any panelist .
To enter the practice session, the host, alternative host, and panelist need to simply join the webinar before the host begins broadcasting the webinar live to attendees, as the webinar will begin in the practice session when started. The host or co-host can start broadcasting when everyone is ready.
- You can use the practice session days before the actual webinar. You can start the practice session, broadcast, and end the event hours or days ahead of the scheduled date, without impacting your ability to start the webinar at the actual start date/time.
- Panelists joining the webinar practice session must use the unique panelists join link sent to them by the host, or be signed-in to their Zoom account on the desktop or mobile app with the email matching the panelist assignment. If not signed-in or signed-in with a different Zoom account, they will be directed to join as an attendee and will not be able to join the practice session.
- Even if you have automatic recording enabled, it will not start for a webinar practice session.
This article covers:
How to enable a webinar practice session
How to start a webinar practice session, how to start a webinar from within a practice session, prerequisites for webinar practice session.
- Pro, Business, Education, or Enterprise account with Zoom Webinars add-on
- Windows: version 5.8.6 or higher
- macOS: version 5.8.6 or higher
- Linux: version 5.8.6 or higher
- Android: version 5.8.6 or higher
- iOS: version 5.8.6 or higher
- Sign in to the Zoom web portal.
- In the navigation menu, click Webinars .
- Schedule a webinar , or click the title of a webinar that's already scheduled.
- Click Edit this Webinar.
- In the Webinar Options section, click the Enable Practice Session check box.
Attendees will not be able to join the practice session, only the host, alternative host, or panelists. There can only be one active practice session for each webinar. For example, if the host starts a practice session and then an alternative host starts one, they will be in the same practice session.
Desktop client
- Sign in to the Zoom desktop client.
- In the Home or Meetings tab, start the webinar. The host, alternative host, and panelists will see a banner at the top of Zoom window that lets them know they are in practice mode.
- Click a webinar with a practice session.
- Click Start Practice Session .
- Start a webinar practice session.
- In the top banner, click Start Webinar .
- Click Start to begin the webinar and allow attendees to join the webinar. The host and other panelists will see a banner at the top of the Zoom window that lets them know the webinar is now live.
Note : This will not change the original start time that you set when scheduling the webinar. We recommend coordinating with panelists when you wish to join the practice session ahead of the scheduled start time so that the practice session does not go into the scheduled start time.
COMMENTS
Join Meeting Test. Test your internet connection by joining a test meeting. If you are unable to join the meeting, visit Zoom Support Center for useful information. Preview your next Zoom Meeting using out test meeting tool to check your settings and display.
Step 1: Publish your presentation. When you're finished designing your presentation in Visme, navigate over to the top right corner of your screen, and click on "Share". Next, click on "Publish for Web" on your left, type in a title and description for your presentation, and click on "Publish and get my link".
Our eight pro tips for presenting over Zoom may help you feel more prepared, comfortable, and confident. Read on to find out more. 1. Plan out your Zoom background/location ahead of time. You can ...
Step 2: Copy and paste the link into your browser bar. Then, click the Show Presentation button. This will launch in fullscreen presentation mode, and now you're ready to shine. Step 3: Click Share Screen on your Zoom account and choose the browser with the Piktochart link.
Prepare for upcoming Zoom meetings by setting up a Zoom test call. Within your test meeting, you have the ability to check your internet connection, familiarize yourself with Zoom's video conferencing features, and adjust your audio and video before joining the meeting.
Roughly speaking—and by that I mean super specific—the Ultimate Guide to Giving Virtual Presentations on Zoom contains six thematic parts, seventeen chapters, 29,584 words, eighty four precision-crafted interface screenshots to show you how to do cool things, high-production instructional videos full of fun, insights, marvellous techniques to marvel at, and did I mention that it's twenty ...
Kinda. To access the feature (beta at time of writing) click the "Advanced" tab in the "Share Screen" popup, and select "Slides as Virtual Background". This is what it looks like from the attendee's perspective. And yes, you appear twice on the screen. Once on top of your slides, and again beside them.
6. Pause for effect and questions. After each major beat, pause for a moment to allow your audience to ask questions, raise concerns, or ask for you to reiterate the message. This is much more difficult when you're dealing with a large audience, but most Zoom meetings are relatively intimate with a local group. 7.
This online exercise allows you to practice your presentation skills over web-conferencing tools such as Zoom, Webex, and Microsoft Teams, by recreating the look and feel of them with a virtual audience. After each practice session, you'll receive feedback on your performance, including on your pace, filler words, pitch, listenability, and more ...
Practice your presentation multiple times before the event to ensure you are comfortable with the content, pacing, and timing. This will familiarize you with the Zoom platform and its features, such as screen sharing, chat, and breakout rooms. ... Following up after a Zoom presentation is a crucial step in maintaining momentum and maximizing ...
2. Use Zoom to present. Now that the windows have been separated, you can easily use Zoom to present the slideshow window. While in a meeting, click on the 'Share Screen' button and select the browser window with Google Slides on top. Finally, hit 'Share' to start the screen-sharing session.
Because Zoom runs on multiple devices—including mobile phones and tablets—one great way to practice is to launch a Zoom meeting on your computer and then sign into that meeting on your iPhone, iPad, or Android Device. (But turn the audio off on your mobile device in order to avoid audio echo or feedback). Zoom's Host and Co-Host Controls ...
Practice your video presentation and get feedback on your performance with VirtualSpeech. 6. Opening Zoom presentations with pizazz. No, this doesn't refer to grabbing your audience's attention with a juggling trick or wearing your most colourful or glamourous finery. How you start a Zoom presentation sets the tone.
5 TIPS FOR DELIVERING GREAT ZOOM PRESENTATION / If you follow these 5 tips, you will ace your online presentation- and it'll be memorable too! Sometimes (lik...
Here is how you can do that-. Step 1: First, start or join a Zoom meeting. Step 2: Click on " Share Screen " and select the " Advanced " option. From there, select " PowerPoint as Virtual Background " and select the file you want for your presentation. Then click on " Share ".
Zoom presentations with visual aids are 43% more persuasive than those without. The human brain loves visuals - they make it easier to quickly process the message compared to slides with text. ... Practice makes perfect. Selling on video expert, Julie Hansen, shares Zoom presentation tips for more effective sales meetings in her video here: ...
Finally an environment for you to practice your Zoom presentation. Play this video in full screen to practice you next upcoming presentation over video chat.
Practice, Practice, Practice. Everyone's heard the saying, practice makes perfect, but 21% of people don't practice their presentations at all. ... Choose a quote relevant to your Zoom presentation topic, preferably something that will make your audience stop and think. A good quote can still be ringing in their ears days later.
Click the "Share Screen" Button: In the Zoom meeting window, locate the green "Share Screen" button at the bottom of the screen and click on it. Select Your PowerPoint Window: A dialog box will appear with a list of available screens and windows to share. Choose the window that has your PowerPoint presentation open.
How can you get familiar with using Zoom to prepare for an online meeting without the help of anyone else? Check out this video to learn how to practice a sp...
Switch back to Powerpoint and click the Slide Show tab. Begin the presentation by selecting the Play from Start or Play from Current Slide options. PowerPoint will display the slide show in a window. In Zoom, start or join a meeting. Click Share Screen in the meeting controls. Select the PowerPoint window and then click Share.
Start a webinar practice session. In the top banner, click Start Webinar. Click Start to begin the webinar and allow attendees to join the webinar. The host and other panelists will see a banner at the top of the Zoom window that lets them know the webinar is now live. Note: This will not change the original start time that you set when ...
SEVEN: Create video variet y. Next time you watch a TV ad (if you really do watch them) pay attention to the rapid scene changes. You will want to do that with Zoom. For example, if you start off with Speaker View showing you as the only one on the screen, alternate between that setting and Gallery View. One of Zoom's features most presenters ...