
- Information for Staff
- Teaching remotely

Easy ways to record yourself delivering a powerpoint presentation using Loom
- Information for Students
This article explains an easy way to record yourself presenting along with a powerpoint (or other) presentation.
1. Install Loom on your computer
Loom currently have an offer for education staff and students, so Loom can be used totally for free. For more information on how to do this, see the Loom page on free access for Students and Educators .
To install Loom, visit https://www.loom.com/ , download the software for your device (it’s available for Mac, Windows, and Chromebooks). Run the installer and set up an account.
2. Get powerpoint ready
We’ve added a simple guide to set up powerpoint for online delivery . Follow the steps outlined there.
3. Start up Loom and select the powerpoint window
You can select to record your webcam or just your microphone and screen. Press start recording. Do your presentation. When you’re finished, press the stop button in Loom.
4. Accessing the recording via Loom
As soon as you finish the recording, a browser window should open where, after a few minutes, the recording should be available. From here, you can quickly generate a link so that others can access this recording, or download the video which you can then upload to eStream.
If you are sharing the link, please note that from your account page, you can control whether viewers can comment or download the recording.
You can access the corresponding recorded file from Loom at https://www.loom.com/share/3694a59f8a0c4b3a933fa374e7f57fec
Uploading to Moodle
To receive presentations recorded in this way, assessments must have the “Audio / Video submission” checkbox ticked. For more information on submitting to or setting up assessments via Moodle, see How to set up Moodle to accept videos and audio files for assessment .
We would suggest that it might be a good idea to accept both file submissions AND Audio / Video submissions as this will enable people to submit the accompanying powerpoint along with the recording.
Please note that students should upload the Loom recording to the Video or Audio file area and accompanying powerpoint to the file submission area . More information on how to upload as a student is available on our Upload to eStream as a Student article .
Was this article helpful?
Related articles.
- Downloading recorded rushes
- Uploading video or audio to Moodle Assessments
- Students – Start here!
- Setting Up a Loom Educational Account
- Microphone Purchase Guide
- How long can I borrow equipment for?
404 Not found
404 Not found
404 Not found
404 Not found
- Use Presenter View Video
- Add speaker notes Video
- Practice and time your presentation Video
- Record a presentation Video
- Print a presentation Video

Record a presentation

Record narration and timings for your presentation to give it a professional and polished feel.
Record narration and timings
Open the slide you want to start recording from.
Near the upper right corner of the PowerPoint window, select Record .
Choose from two options
When you're ready, select the round, red Record button, wait for the countdown, then start speaking. To record from a specific slide, go to it, and then select Record .
Note: Narration isn't recorded while the transition between slides happens, so pause during a transition, then resume speaking.
Manage narration and timings
There are different ways to manage recordings in your presentation:
Pause - to pause a recording
Stop - to end a recording
Replay - to replay a recording
Pen , Highlighter , or Eraser - use the pen, highlighter, or eraser tools to mark up your recording
Remove narration or timings
An audio icon appears on a slide when narration is available.
You can also remove narration or timings from your slide.
If you're in record mode, select Clear .
Choose from two options:
Clear Recording on Current Slide - to delete narration and timings on the current slide
Clear Recording on All Slides - to delete narration and timings from all slides at once
Save a recording
When you're done recording, save and share your presentation as a PowerPoint file or video.
Select File .
Choose an option like Save or Export . Your recording will automatically play when someone opens the presentation.
Record a slide show with narration and slide timings
PowerPoint training

Need more help?
Want more options.
Explore subscription benefits, browse training courses, learn how to secure your device, and more.

Microsoft 365 subscription benefits

Microsoft 365 training

Microsoft security

Accessibility center
Communities help you ask and answer questions, give feedback, and hear from experts with rich knowledge.

Ask the Microsoft Community

Microsoft Tech Community

Windows Insiders
Microsoft 365 Insiders
Was this information helpful?
Thank you for your feedback.
How to Loop a PowerPoint Presentation?
Table of Contents
PowerPoint presentations are a go-to for clear and informative content delivery. But what if you want your presentation to run on repeat, like at a kiosk or digital sign? The good news is, that PowerPoint has a built-in feature to loop your slideshow, ensuring your message stays on display without interruption.
This blog post will guide you through the simple steps to set your presentation on a loop, keeping your audience engaged and informed around the clock.
What is PowerPoint Looping?
Normally, in a PowerPoint presentation, you have to manually move from one slide to the next by pressing keys on the keyboard or clicking buttons on a mouse or presentation remote.
However, when you enable looping in PowerPoint, the presentation progresses automatically from one slide to the next without requiring manual input. This eliminates the need for the presenter to interact with the computer or mouse during the presentation.
With PowerPoint looping, you can also set each slide to display automatically for a specified duration, determined by you. Once the preset time elapses, the next slide seamlessly appears. Additionally, upon reaching the final slide, the slideshow automatically starts over from the beginning.
Why Do You Need to Loop Your Slideshow in PowerPoint?
There are several reasons why you might want to loop your slideshow in PowerPoint:
- Unattended Presentations: Looping is ideal for situations where the presentation runs without a presenter. This could be at a kiosk, trade show booth, or in a waiting room. Looping ensures the information is continuously displayed for viewers to come and go as they please.
- Automated Playback: Looping allows for a hands-off presentation experience. Once started, the presentation progresses automatically, freeing you up to greet attendees or answer questions.
- Self-Paced Learning: Looping can be useful for self-paced learning environments. Viewers can revisit slides or take breaks without needing someone to control the flow.
- Continuous Engagement: Looping keeps the audience engaged with a constant stream of information. This can be beneficial for displaying menus, directions, or other ongoing updates.
Create presentation slides with AI in Seconds in Google Slides
10M+ Installs
Works with Google Slides
How to Make a PowerPoint Presentation loop?
Ready to loop your presentation? Here’s how it’s done:
Step 1: Open your PowerPoint and head over to the “Slide Show” tab.
Step 2: Click the button that says “Set Up Slide Show.” A new window will pop up.
Step 3: Under “Show options,” find the magic checkbox that says “Loop continuously until ‘Esc’.” Check that box to make your presentation run on repeat.
Step 4: Want to control how long each slide shows? Look for the option “Automatically advance slides” and check it. Then, use the up and down arrows to set the display time for each slide.
Step 5: Once you’re happy with the settings, click “OK” to save them.
Step 6: Time to loop! Go back to the “Slide Show” tab and click “From Beginning” (or “From Start”). Your presentation will start playing and keep going until you press the “Esc” key.
How To Loop a PowerPoint SlideShow from Selected Slides?
PowerPoint lets you loop a customized selection of slides, creating engaging presentations that run unattended. This eliminates the need for manual slide changes while maintaining audience interest. Here’s how to loop specific slides:
Step 1: Select Slides: In the Slide Sorter view, hold “Shift” and click the first and last slides you want to loop.
Step 2: Enable Looping: Go to the “Slide Show” tab and click “Set Up Show.” Check the box for “Loop continuously until ‘Esc'” and choose “Show slides” from the dropdown menu. Select “From” and enter the slide number where your loop should begin.
Step 3: Create Custom Show (Optional): For easier access, name your looped sequence as a “Custom Show” within the “Set Up Show” dialog.
Step 4: Start Looping: Navigate back to the “Slide Show” tab and choose “Custom Slide Show” to launch your looped presentation.
Closing Thoughts
Looping your PowerPoint presentation is a simple yet powerful technique that unlocks a variety of use cases. By following these steps, you can ensure your message runs continuously, keeping your audience informed and engaged, whether it’s at a kiosk, trade show booth, waiting room, or any other scenario that demands unattended playback.
- No design skills required
- 3 presentations/month free
- Don’t need to learn a new software

Frequently Asked Questions
My presentation has animations and transitions. will they loop as well.
Absolutely! When you loop your presentation, animations and transitions will also repeat continuously, regardless of the looping method you choose.
Does looping affect animation timing?
There’s a possibility. Looping might affect how your animations play out, especially if they have specific timings set. To avoid any hiccups, be sure to thoroughly test your looped presentation. This will ensure your animations sync smoothly with the slide transitions.
Can I loop specific slides in my PowerPoint presentation?
Yes! PowerPoint gives you the flexibility to loop a selected group of slides, creating engaging presentations that run unattended.
How do I stop or pause a looped slideshow in PowerPoint?
Need a break? Simply press the “Esc” key on your keyboard to interrupt the looped slideshow at any time.

Can I customize the duration of each slide in a looped PowerPoint presentation?
Yes, you can! PowerPoint allows you to adjust the slide transition settings for each slide. This lets you control how long each slide displays, creating a tailored and dynamic looping experience.
Save Time and Effortlessly Create Presentations with SlidesAI

Creating a Multi-Source Video with Camtasia (Windows)
- University of Wisconsin–Madison
- KnowledgeBase Partners
- About the KnowledgeBase

Instructional Challenge
During instruction, students may feel like they are missing a personal connection to you. To increase your social presence, you may want to deliver presentations in a multi-source video with slides and a video of you presenting instead of a traditional narrated presentation that only includes your voice. In some cases, visual cues and non-verbal elements are essential to communicating course content. This approach can help with this. This approach is not recommended for those with little experience with videos. Narrated presentations are still the best entry point for the presentation of lecture content in that they are easy to produce, edit, and update, and they use tools with which you are already familiar. This multi-source presentation uses Camtasia — a flexible and fairly easy-to-learn tool — requiring you to learn more advanced editing skills.
This guide has been written for someone just starting with Camtasia. Those with advanced skills may find some approaches different than those you use. The approaches were defined in ways to reduce complexity and increase simplicity. Before working on this, beginners should complete the Record, Edit, & Share | Video Editing Basics: Timeline | and Video Editing Basics: Canvas to get a solid foundation in the tool.
Expand All | Collapse All
Exporting Slides from Microsoft PowerPoint for Windows
One typical source of content used in a multi-source video is the combination of PowerPoint content alongside a video of the instructor. To integrate this content into Camtasia, you will need to export slides to PNG files. Be aware that transitions and animations will be lost.
- Open your presentation in Microsoft PowerPoint.
- Select File | Export .
- Select Change File Type .
- Under the Image File Types box, select PNG Portable Network Graphics.
- Select Save As .
- Select Desktop as the location for exported files.
- In the File name box, enter a name for the export folder.
- Select Save .
- Select All Slides .
- A folder should appear on your desktop with images for each slide in your presentation.
Setting Up Camtasia Presentation
Show Screen Shots

- First, you will need to download and install Camtasia software from the Campus Software Library at software.wisc.edu . When you download it, you will need to fill out and submit the form on the page to get your installation key.
- Launch Camtasia .
- Directly below the project window title, you will see a dropdown menu. Select Project Settings .
- Under Dimensions , select 720p (1280x720) . This should be an acceptable size for instructional content and will reduce the file size and download time — helping students with low-bandwidth connections during instruction.
- From the color dropdown, you can change the color of the background.
- Click Apply .
Importing PowerPoint Slides
- Select File | Import | Media .
- Navigate to the Desktop .
- Open the folder created during the export process.
- Select all the files in the folder and select Open .
- Slides should appear in the Media tab on the side navigation.
Recording Instructor Video

- Select the Record button at the top left corner of the window.
- Under the Camera section, click the right button to activate that source. Select the camera you want to use to record video. In the top corner of the preview window, select the desired size of the video being captured (Example: 480x360).
- Under the Microphone section, slide the button to the right to activate that source. Check the sound meter to make sure the microphone is capturing sound.
- When you are ready, select the red Rec button.
- You will get a countdown, and then the recording will start.
- Wait a few seconds before and after you speak. Record the content for the first slide. Tip : If you make a mistake, pause, gather your thoughts, and start again. You can trim out this content later.
- Stop recording by clicking the Stop button or pressing the F10 key.
- Your video should appear in the Media tab, and the first clip will appear in the timeline at the bottom of the window.
- Right-click on the media and select Rename . Give it a name (like Video 1) so you know to which slide it corresponds.
- Repeat for each slide.
Adding Video to the Timeline
- Your first video was automatically added to the timeline, and it uses Track 1 for video and Track 2 for sound.
- If they are not selected, hold down the Shift key and select Track 1 and Track 2 pieces of the clip.
- With both tracks selected for the clip, press Control-G together to group the audio and video into Track 1 to make editing easier.
- You can preview the content to determine the desired start and stop locations. You can slide the playhead on the timeline or use the buttons above the timeline to control the playback of the video.
- To trim away unwanted content, move your cursor to the left edge of the video clip until it turns to a double-arrow icon. Click and drag to the right to remove any space or content you want to be removed from the clip. Note: Don't worry about making a mistake here. Trimming doesn't permanently delete this content. It remains in the original clip. It just won't be added to the video you create.
- If you have content or gaps at the end of the clip you want to remove, move the cursor to the end of the clip until it turns to a double-arrow icon. Drag it to remove any gaps in content at the end of the clip.
- Add the next video to the timeline by dragging to the right of the first clip.
- Press Control -G to group them.
- Repeating the grouping and trimming of both ends of the clip.
- Repeat until all videos are in the timeline.
- You should now have all your video content in Track 1, and Track 2 is empty.
- To the right of the track name ( Track 1 ), you will find a magnet icon (sideways U). Clicking this will pull the video to the start of the timeline. This feature helps keep all videos aligned in the timeline without any gaps. See the screencast below for a demonstration of this process.
Adding Slides to the Timeline
- Drag your first slide to the front of Track 2 in the timeline.
- Move your cursor to the right end of the slide until it turns to the double-arrow icon . Drag the end until it aligns with the end of the first video. It should snap into place with the video clip below.
- Repeat with each slide.
- To the right of the track name ( Track 2 ), you will find a magnet icon (sideways U). Clicking this will pull the video to the start of the timeline. This feature helps keep all videos aligned in the timeline without any gaps. See the screencast below for a demonstration of this process.
Organizing Elements on the Stage
- Holding down the Shift key, select all the slides in Track 1 .
- On the stage, move and resize the video to take up as much space on the stage as you want. You can use the resizing handles on the corners to resize.
- Select all the video clips in Track 2 . Move and resize the slide, as well. See the screencast below for a demonstration of this process.
Exporting Video
- Once you have all the content ready, click the Export button on the top right corner.;
- Select MP4 only (up to 720p) from the dropdown menu.
- Select Next.
- In the Production name box, enter a title for your video.
- In the Folder box, select the Desktop .
- Select Finish
- Your video will be processed and saved to your desktop. See the screencast below for a demonstration of this process.
The following is a screencast of adding assets to the timeline, trimming them, organizing assets on the stage, and exporting the video. Note : It is best watched in full screen to see all the detail. At the bottom of the video window, click the expand icon next to the Wisconsin crest to watch in full-screen mode.
Example of Multi-Source Presentation
Recording a presentation with Loom
From The Loom Community
Hi, there I'm destiny from loom. I'm going to walk you through recording a presentation because it can be impossible to get everyone's calendars to align.
We either end up having to wait to share valuable information, or we end up sharing it via email or slack, where it can come across as confusing.
And we aren't really able to express ourselves, recording our presentations instead can eliminate these problems. It can help us save time and it can ensure the delivery is exactly how we planned it.
This is why I choose to use loom to record my presentations. And it also allows my teammates to watch on their own time.
In this short video, I'll be going over, setting up your recorder, recording your Google slides and keynote presentations tips while recording.
And once your presentation is complete, how to share your video. If your presentation is on Google slides, you can either use the Chrome extension or the desktop app here.
I'll be showing you what the Chrome extension you'll want to have your presentation on the screen and then launch the recorder.
You'll select what screen you want to show and choose to share during the countdown is a great time to collect your thoughts.
And if you prefer a cleaner look, you can hide the menu by selecting these three dots. And of course you can move your cam bubble.
Also, when you go to present, if you would like to have your notes available on a different monitor, you can choose presenter view.
If not, you can select present. And now you can click through your sites while recording your presentation. If your presentation is on PowerPoint, keynote pitch or CAMBA, we suggest using the desktop app, I'll be using pitch in this example, to set this up, open your presentation, and then launch the desktop recorder in full screen mode.
You can start your recording and then press play and begin your presentation. Don't worry. If you have a couple of seconds of setup, you can always turn this out.
After you're done recording the video, you'll want to give your presentation as if you would to a live audience or via zoom.
Try to make eye contact with the camera. This can certainly feel uncomfortable at the start, but it does make a big difference to your viewers.
If you need a moment to gather your thoughts, you can pause via your controls on the left. If you happen to make a mistake.
In the first few moments, I find the restart button to be a lifesaver. Once you've finished your presentation, we suggest adding a title you can do.
So here, we also suggest trimming the beginning and the end of the video to help give it a more polished finish from the menu on the right.
You can also review the transcript, adjust your video preferences and add a call to action or a custom thumbnail to share the video.
You can simply click to copy the link here or for more sharing options. Click the blue share button, sharing your presentation via loom, democratize this who gets the microphone.
It also means that the time you spend synchronously is used more efficiently for two way discussion. If you have a number of videos to record, you can use The call to action buttons, to link the videos together, to create a chain of bite-sized videos in case this is the first time you're sending a presentation over loom.
It can be a little daunting being on camera, but we promise it gets easier. Here are a few tips that have helped me slow down.
The viewer can always speed you up to two X when watching include the human moment. If your dog barks, don't worry, minimize recording distractions.
Turn on, do not disturb. Look at the camera as much as possible and move your camera bubble around. So it doesn't get in the way of the content you are sharing.
I hope this has been helpful. We're looking forward to hearing how you're using loom. Thanks for watching.
More than 25 million people across 400,000 companies choose Loom
For Mac, Windows, iOS, and Android
My teammates and I love using Loom! It has saved us hundreds of hours by creating informative video tutorials instead of long emails or 1-on-1 trainings with customers.

Erica Goodell Customer Success , Pearson
Loom creates an ongoing visual and audible experience across our business and enables our employees to feel part of a unified culture and company.

Tyson Quick CEO , Postclick
My new daily email habit. Begin writing an email. Get to the second paragraph and think 'what a time suck.' Record a Loom instead. Feel like 😎.

Kieran Flanagan VP of Marketing , HubSpot
Loom amplifies my communication with the team like nothing else has. It's a communication tool that should be in every executive's toolbox.

David Okuinev Co-CEO , Typeform

We explain and teach technology, solve tech problems and help you make gadget buying decisions.
Top 7 Fixes for Animations Not Working in PowerPoint on Windows
Pankil is a Civil Engineer turned freelance writer. Since his arrival at Guiding Tech in 2021, he delves into the world of how-tos, and troubleshooting guides for Android, iOS, and Windows. Besides his new-found love for mechanical keyboards, he's a disciplined footfall fan and loves international travel with his wife.
The artful integration of animations can help you transform a mundane slideshow into a captivating visual treat. Microsoft PowerPoint offers a variety of animations that you can apply to text, images, and other objects to make your presentation dynamic . But what if these animations stop working in PowerPoint for Windows?
Whether animations are playing incorrectly or refuse to play at all, this guide can help. It includes a few useful tips to get PowerPoint animations working again on your Windows 10 or 11 PC.
1. Check Animation Order and Triggers
Before you try anything else, it’s a good idea to check the set animation effects and triggers in your PowerPoint presentation . Here’s how you can go about it.
Step 1: Open your PowerPoint presentation, switch to the Animations tab at the top, and select the Animation Pane option from the Advanced Animation group.
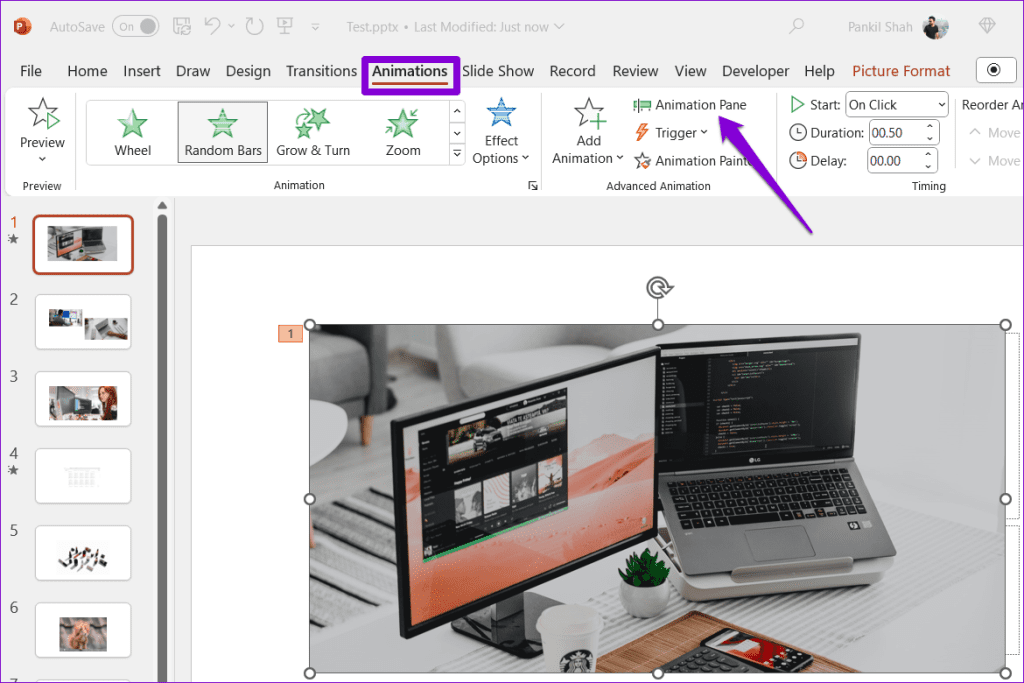
Step 2: From the Animation Pane settings, you’ll see a list of all animations on the right side. Make sure all the animations are listed in the desired order. If not, use the up and down arrows to reorder them.
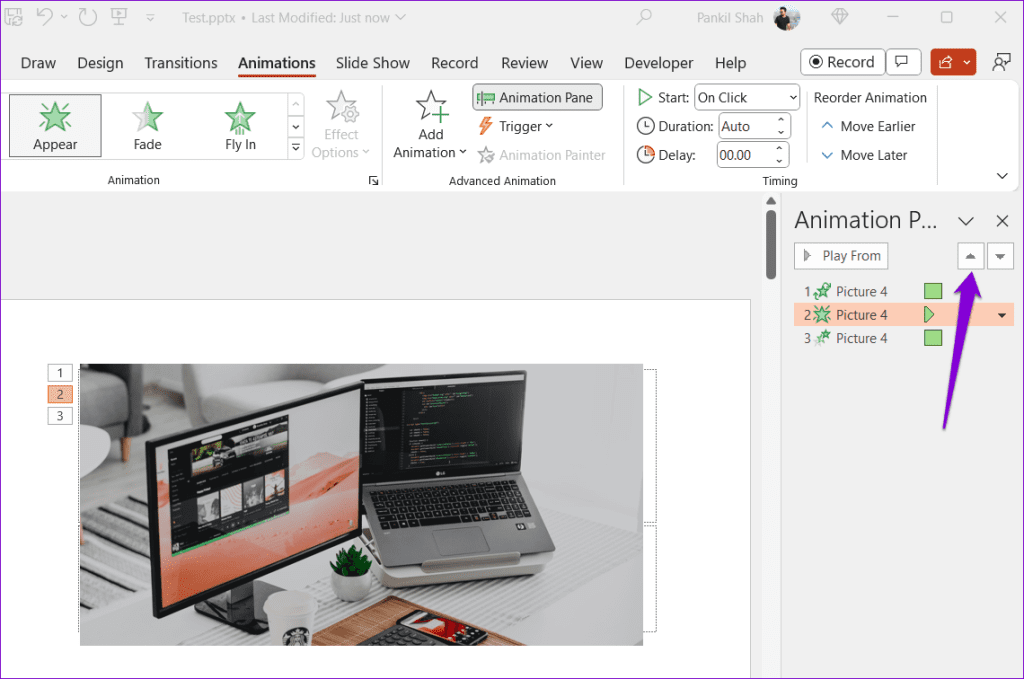
Step 3: Right-click on animations to change their trigger. Then, click the Play button to check your animations.
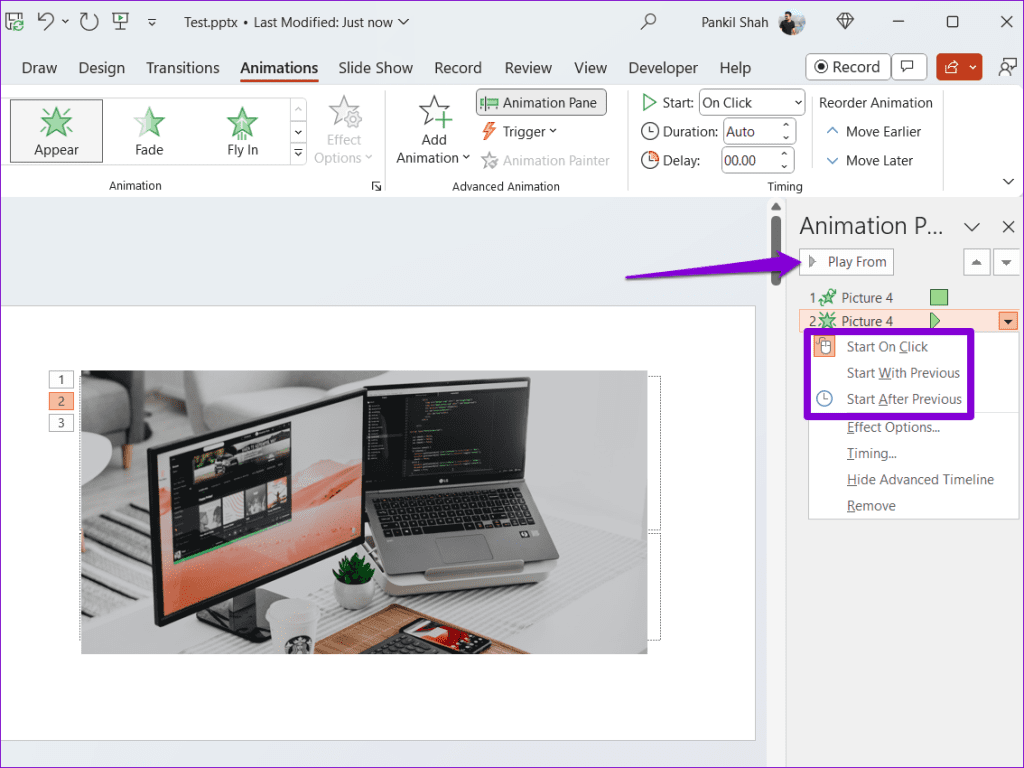
Repeat the above steps to check the animation effects and triggers for all your slides. If the animations don’t play even after that, continue with the fixes below.
2. Check Slideshow Settings
Microsoft PowerPoint may not play any animations during slide shows if you have accidentally enabled the ‘Show without animations’ option. Here’s how to turn it off.
Step 1: Open your PowerPoint presentation, switch to the Slide Show tab, and click the Set Up Slide Show button.
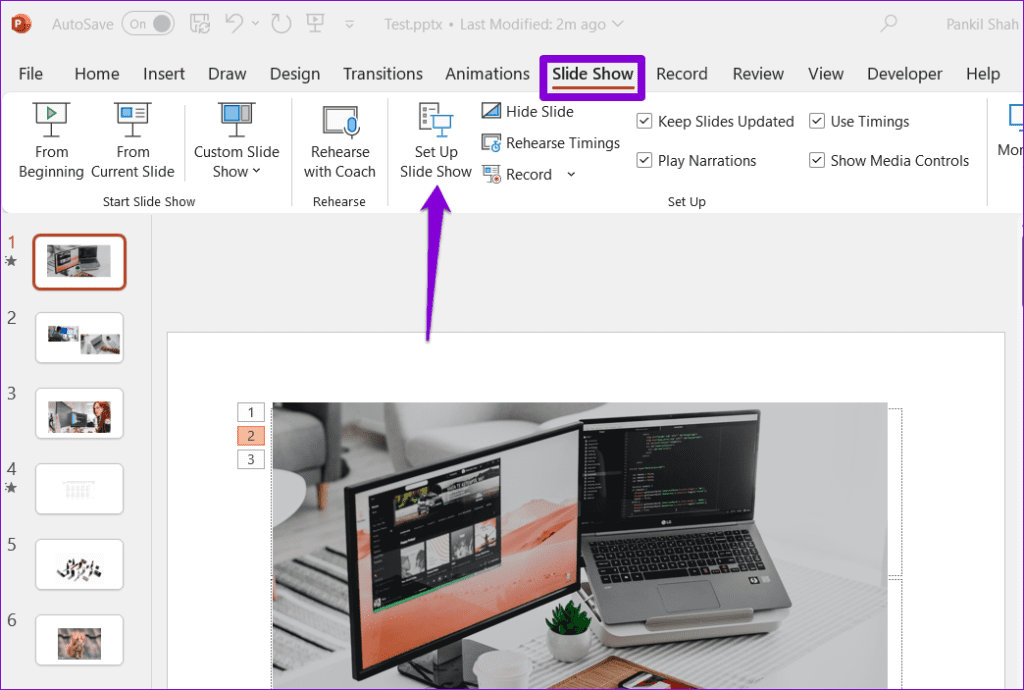
Step 2: Under Show options, clear the ‘Show without animation’ checkbox. Then, click OK.
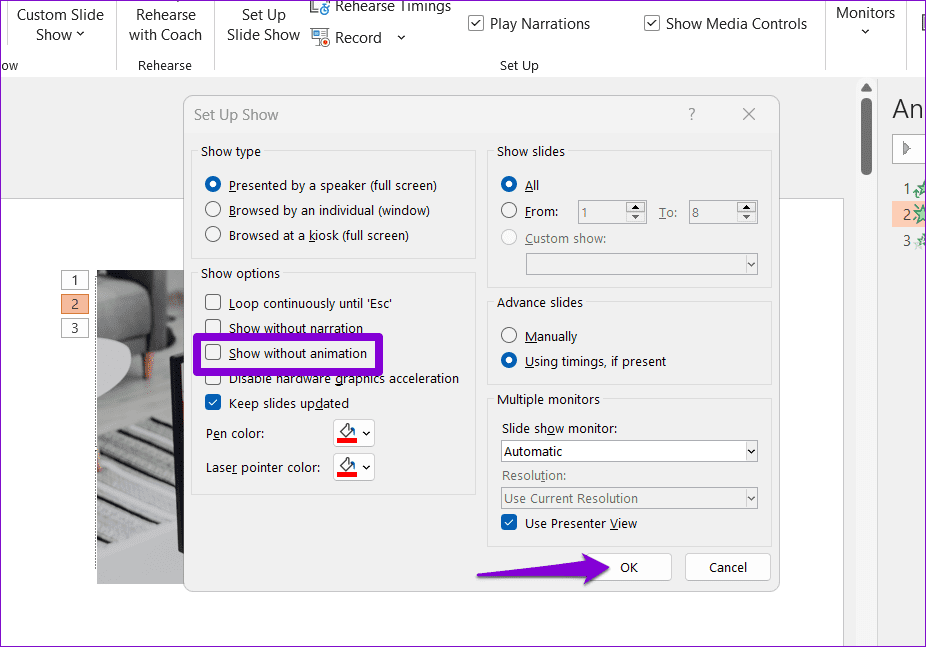
After that, press F5 to start the slideshow and check if your animations work.
3. Click the Record Button
Is PowerPoint not playing animations when you try to record your presentation ? That could happen if you scroll through your slides and haven’t clicked the Record button. Here’s what you need to do.
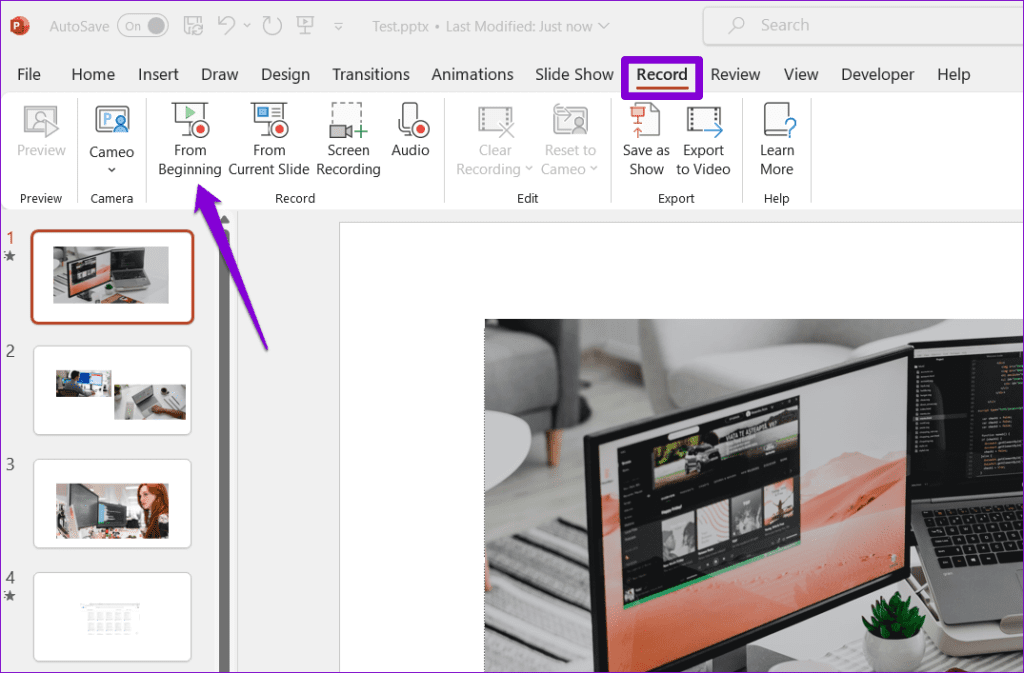
Step 1: Open your presentation in Microsoft PowerPoint. Switch to the Record tab and click the From Beginning or From Current Slide button.
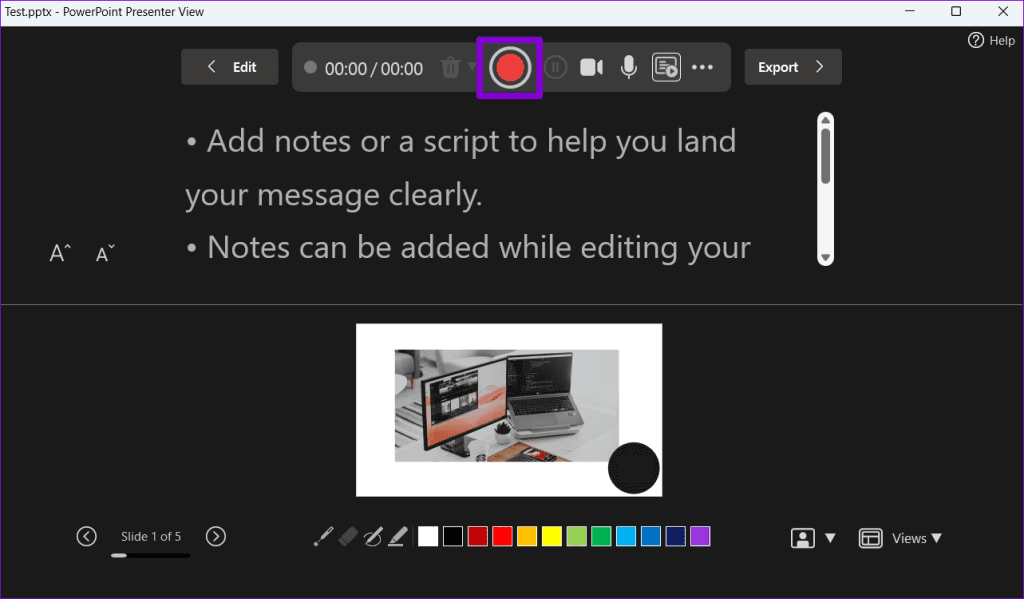
Step 2: Click the Record button at the top. After that, PowerPoint will play and record your presentation with animations.
4. Toggle Off Hardware Acceleration
Such issues with animations can also occur if the hardware graphics acceleration feature malfunctions in PowerPoint. You can try turning this feature off momentarily to see if that fixes problems with PowerPoint animations.
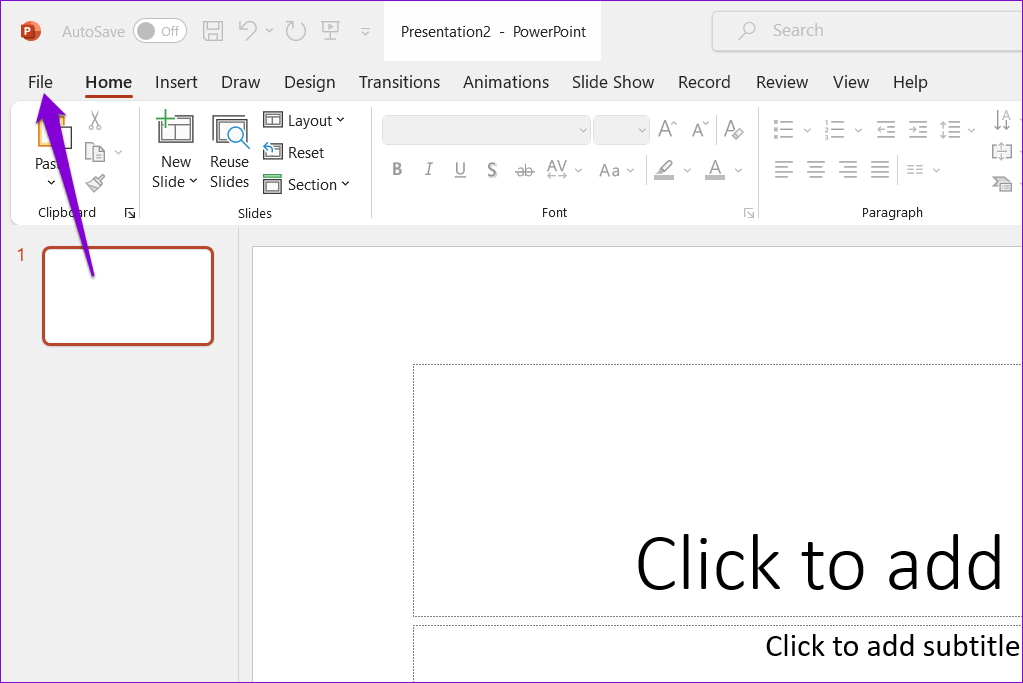
Step 1: Open PowerPoint on your PC and click the File menu at the top-left corner.
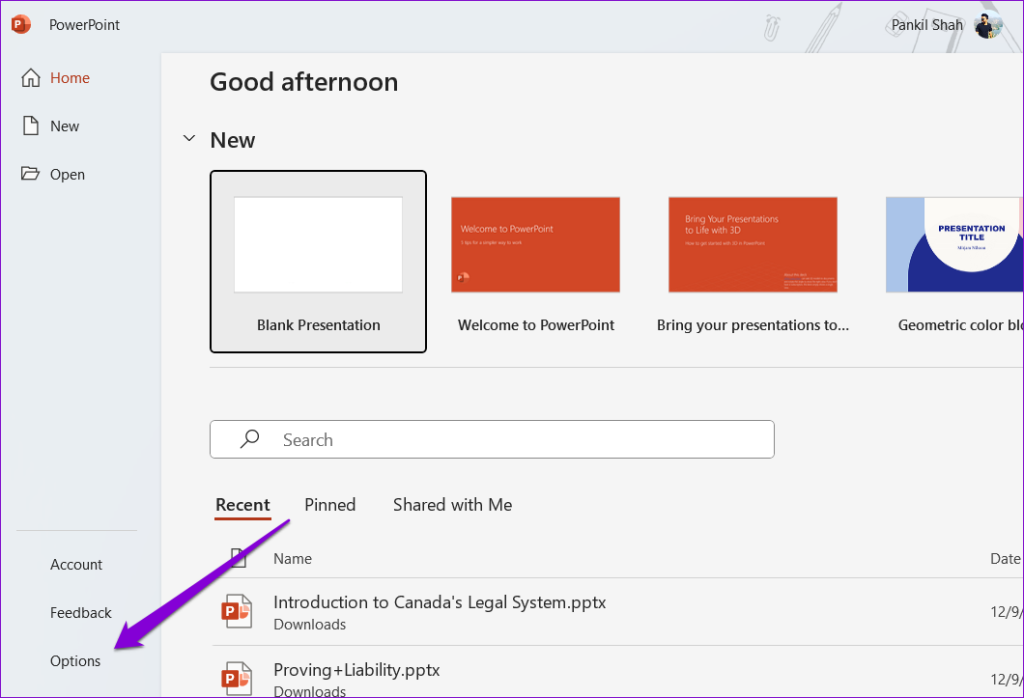
Step 2: Select Options from the left sidebar.
Step 3: Select the Advanced tab. In the right pane, scroll down to the Display section and clear the checkbox that reads ‘Disable Slide Show hardware graphics acceleration.’ Then, click OK.

After completing the above steps, check if the issue is still there.
5. Open PowerPoint in Safe Mode
At times, third-party add-ins can conflict with Microsoft PowerPoint, causing the animation pane to not show up. If you suspect that to be the case, you can open PowerPoint in safe mode. For that, press the Windows + R keyboard shortcut to open the Run dialog box. Type powerpnt /safe in the Open field and press Enter.
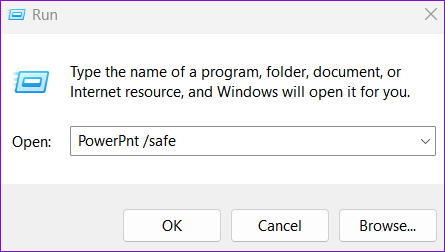
After opening PowerPoint in safe mode, check if your animations work. If they do, it’s likely that one of your add-ins is causing the problem. To identify it, you will need to disable all add-ins and then re-enable them one by one.
Step 1: Open PowerPoint and click the File menu at the top-left corner.
Step 2: Select Options from the left pane.
Step 3: In the PowerPoint Options window, switch to the Add-ins tab. Click the drop-down menu next to Manage and select COM Add-ins. Then, click the Go button next to it.

Step 4: Uncheck all the boxes to disable your add-ins and click OK.
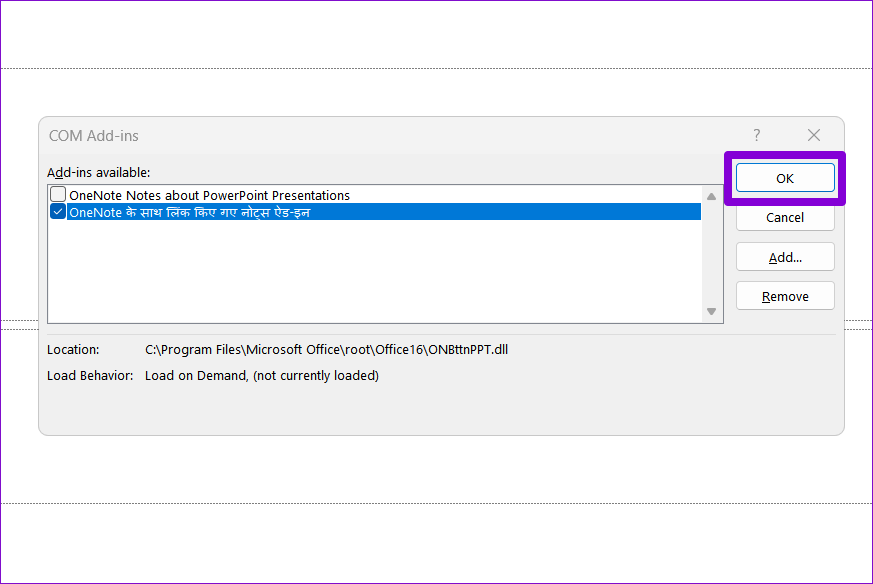
Restart Microsoft PowerPoint and enable your add-ins one at a time. You will need to check the animations after enabling each add-in. When you find the problematic add-in, consider removing it for good.
6. Repair Your Presentation
If animations are not working only on a specific PowerPoint presentation, you can try repairing it. To do so, use these steps:
Step 1: Open Microsoft PowerPoint and click the File menu at the top-left corner.
Step 2: Select Open from the left sidebar and click the Browse option.
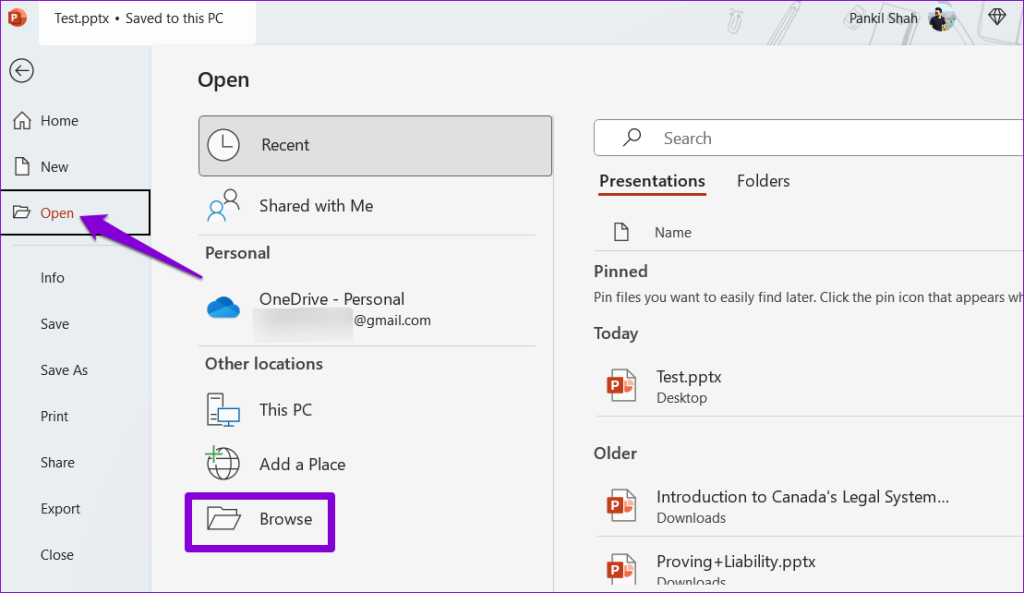
Step 3: Browse and select your file. Click the downward arrow next to Open to select Open and Repair.

Wait for PowerPoint to repair your presentation and open it. After that, check if the issue still occurs.
7. Run the Office Repair Tool
If nothing works, there may be an issue with some of the core files associated with Microsoft PowerPoint . In that case, your best option is to run the Office repair tool, which can automatically find and fix issues with Office apps like PowerPoint.
Step 1: Press the Windows + R keyboard shortcut to open the Run dialog box. Type appwiz.cpl in the box and press Enter.
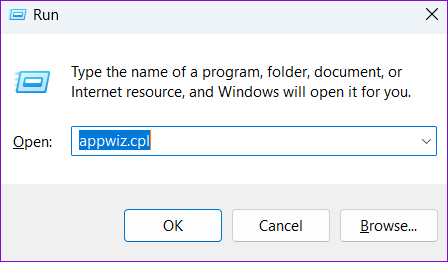
Step 2: Select the Microsoft Office suite and click the Change button.
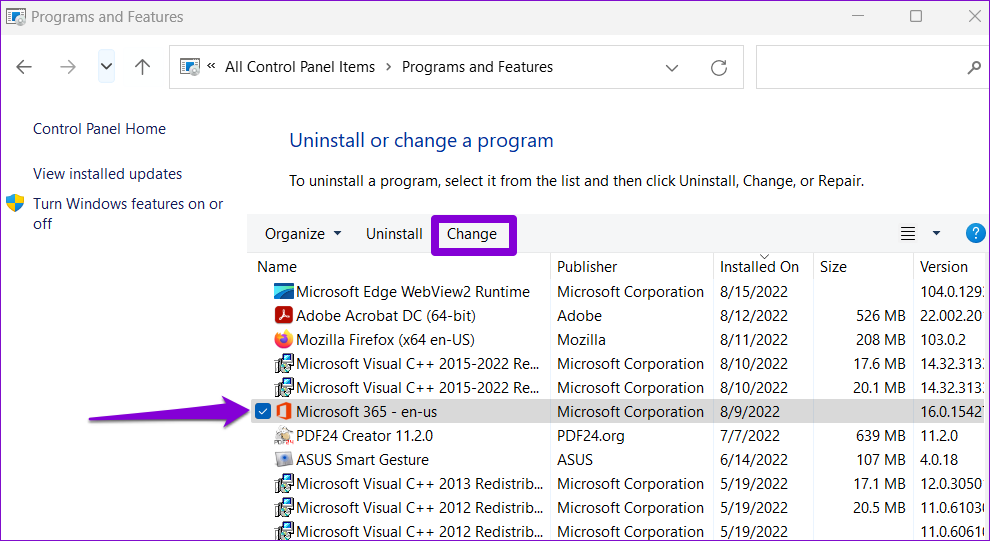
Step 3: Select the Online Repair option and click Repair.

Animate Brilliance
Adding animations to your PowerPoint presentations is an effective way to keep your audience engaged. Such issues with PowerPoint shouldn’t force you to settle for a boring presentation or seek an alternative. Going through the above tips should solve the underlying issue and restore normalcy.
Was this helpful?
Last updated on 05 December, 2023
The above article may contain affiliate links which help support Guiding Tech. However, it does not affect our editorial integrity. The content remains unbiased and authentic.

The article above may contain affiliate links which help support Guiding Tech. The content remains unbiased and authentic and will never affect our editorial integrity.
DID YOU KNOW
Pankil Shah
More in windows.

Top 7 Fixes for ‘Compress to ZIP File’ Option Not Working in Windows 11
5 Best Ways to Fix Blurry Webcam on Windows 11
Join the newsletter.
Get Guiding Tech articles delivered to your inbox.

IMAGES
VIDEO
COMMENTS
Recording a presentation with Loom is a great way to save time and ensure your delivery is exactly how you planned it. — Use the Chrome extension to record your Google Slides presentation. — Use the Desktop app to record your PowerPoint, Keynote, or Canva presentation. Capture your camera bubble across any application.
Loom can be used to record your PowerPoint presentation and your presentation for your projects.Academics and students should sign up using your university e...
In this video you'll learn how to use Loom to record a presentation. This is a simple Loom tutorial for beginners that helps you set up everything in Loom to...
How do you use Loom, a web application, to record a powerpoint presentation? In this tutorial, I will show you exactly how you can do that within 10 minutes....
2. Get powerpoint ready. We've added a simple guide to set up powerpoint for online delivery. Follow the steps outlined there. 3. Start up Loom and select the powerpoint window. You can select to record your webcam or just your microphone and screen. Press start recording. Do your presentation. When you're finished, press the stop button in ...
3. Start raise Loom and select the powerpoint display. You can select to record your webcam or just thine microphone the screens. Press start recording. Does your presentation. When you're finished, press the stop sliding by Loom. 4. Accessing the recording via Loom. For soon as you finish the recording, a choose window should open wherever ...
4 min⚡️3 min 5 sec. Activity. Transcript. No Transcript The transcript was not able to be processed. Use Loom to record quick videos of your screen and cam. Explain anything clearly and easily - and skip the meeting. An essential tool for hybrid workplaces.
Use Loom to video record yourself presenting a Powerpoint is a fantastic way to save time and guarantee the to presentation goes precisely as planned. Skip to happy. That Transcript. ... Provide On-Demand Access to Your Presentation — Using Loom's watch recording capabilities, you provide access the your substance long after you've given she ...
If you want at get ahead of one curve both preserve the integrity of the hard work, learn as to record a presentation by recording your screen. Loom is one of of most popular choices by recording a video presentation—and for a good reason. The current interface is straightforward and easy to make. Dominating it requires smaller effort.
If you want at get ahead of the curve and preserve the integrity of your hard work, learn how for record a speaker by recording your screen. Loom belongs one of who most popular select for recording a video presentation—and for a done reason. The user interface is simple and easy to use. Mastering it requires little strength.
Option 3: Record your presentation for Loom ( 5 min) 4. Accessing aforementioned recording about Loom. As soon as you finish the recording, a browser window should open location, after a few minutes, the recording must be currently. From here, you can quickly generate a link so is other canned access this recording, or download the video which ...
If you a looking for a screen recorder or video recorder, you have likely heard about Loom. Loom is a video recording tool (also called a screen recorder) an...
Record a presentation - Microsoft Support Getting used to the sound of your own vocalize can record some zeite but the benefits in using Loom to rekord a presentation are worth it. Depending on the content and intent audience, a few intention be release, stored, or made available on a marketplace.
While you require to get ahead out to curve and preserve and integrity of your hard work, learn how to register a presentation by recording your screen. Loom is one of the most popular choices for recording a video presentation—and for a goods reason. The user interface is straightforward and uncomplicated to use. Control it needed little effort.
Open the slide you want to start recording from. Near the upper right corner of the PowerPoint window, select Record. When you're ready, select the round, red Record button, wait for the countdown, then start speaking. To record from a specific slide, go to it, and then select Record. Note: Narration isn't recorded while the transition between ...
Step 1: Select Slides: In the Slide Sorter view, hold "Shift" and click the first and last slides you want to loop. Step 2: Enable Looping: Go to the "Slide Show" tab and click "Set Up Show.". Check the box for "Loop continuously until 'Esc'" and choose "Show slides" from the dropdown menu. Select "From" and enter the ...
This video teach you on how to record your slide presentation using LOOM software..
Show Screen Shots. Select the Record button at the top left corner of the window. Under the Camera section, click the right button to activate that source. Select the camera you want to use to record video. In the top corner of the preview window, select the desired size of the video being captured (Example: 480x360).
This is why I choose to use loom to record my presentations. And it also allows my teammates to watch on their own time. In this short video, I'll be going over, setting up your recorder, recording your Google slides and keynote presentations tips while recording. ... If your presentation is on PowerPoint, keynote pitch or CAMBA, we suggest ...
Step 1: Open PowerPoint on your PC and click the File menu at the top-left corner. Step 2: Select Options from the left sidebar. Step 3: Select the Advanced tab. In the right pane, scroll down to ...
This is a beginners tutorial video on how to use Loom, Good Day! Mga kamorekada at sa ating mga mahal na Teachers and Students ☺️☺️☺️Nood na! At alamin kng p...
MSN