
How to Use Presentation Mode in Microsoft Word

Microsoft Word’s presentation mode is an excellent feature for collaborating on documents in real-time. This mode allows presenters to walk meeting attendees through a Word document, enabling remote collaboration.
In this comprehensive guide, we’ll cover everything you need to know to use presentation mode effectively, including:
Enabling Presentation Mode
The first step is enabling presentation mode within Word:
- Open the Word document you wish to present. Ensure all attendees have access to this file.
- Navigate to the Share tab on the ribbon.
- Click Present Online .
- Select Office Presentation Service from the dropdown menu.
- Check the box to Enable remote viewers to download the document if desired. This allows attendees to save a copy of the document locally if needed.
- Click Present Online to begin the presentation.
Once enabled, Microsoft Word will provide a meeting link that presenters can send to attendees. When attendees access this link, they’ll be able to follow along in real-time as the presenter navigates through the document.
Enabling presentation mode in Word
Presenting with Word’s Collaboration Tools
With presentation mode enabled, Microsoft Word unlocks powerful real-time collaboration tools:
Communicating with Attendees
The presenter can communicate with attendees using the built-in Send In Email and Send In IM options. This opens up communication channels, allowing the presenter to field questions and feedback during the presentation.
Presenters should monitor these communication channels closely during the presentation to identify and respond to attendee questions promptly.
Viewing Attendee Status
Microsoft Word provides attendee status updates in real-time so presenters can track whether attendees are actively following the presentation. If an attendee loses their place in the document, status indicators will show:
- Following Presenter – The attendee is viewing the same content as the presenter currently.
- Viewing Slide X – The attendee has navigated away from the content the presenter is actively viewing.
If the status shows attendees are not following along, presenters can pause and allow attendees to catch up before continuing.
Controlling Attendee Views
Beyond monitoring status, Microsoft Word also allows presenters to control attendee views to ensure everyone is seeing the same content during the presentation.
Presenters can enable Follow Presenter through the collaboration toolbar. This automatically syncs an attendee’s view to match the presenter’s location within the document.
With Follow Presenter enabled, attendees cannot scroll away or lose their place. Their view is controlled completely by the presenter.
Annotating Content During Presentations
Presenters can also annotate document content in real-time during the presentation, highlighting or calling out important information for attendees:
- Draw tab – Enables pen and highlighter markup options
- Type tab – Adds text boxes for callouts/annotations
Annotations appear for all attendees, allowing the presenter to guide the audience’s attention effectively.
Wrapping Up the Presentation
Once a presentation is complete, presenters should conclude the session:
- Navigate to the Present Online tab
- Click End Online Presentation
Ending the session closes collaboration channels and attendee access to the document.
Following this simple process allows presenters to enable and leverage Microsoft Word’s excellent built-in presentation mode during meetings and remote collaboration sessions. The powerful tools help presenters guide and collaborate with audiences in real-time.
Key Takeaways:
- Access presentation mode under the Share tab
- Communicate with attendees via email/IM
- Track attendee status
- Control attendee views
- Annotate content during the presentation
- Conclude the session when finished
With these steps, anyone can master Microsoft Word’s robust presentation capabilities for impactful remote collaboration.
About The Author
Vegadocs Staff
Related posts.

How to Open PDFs in Microsoft Word
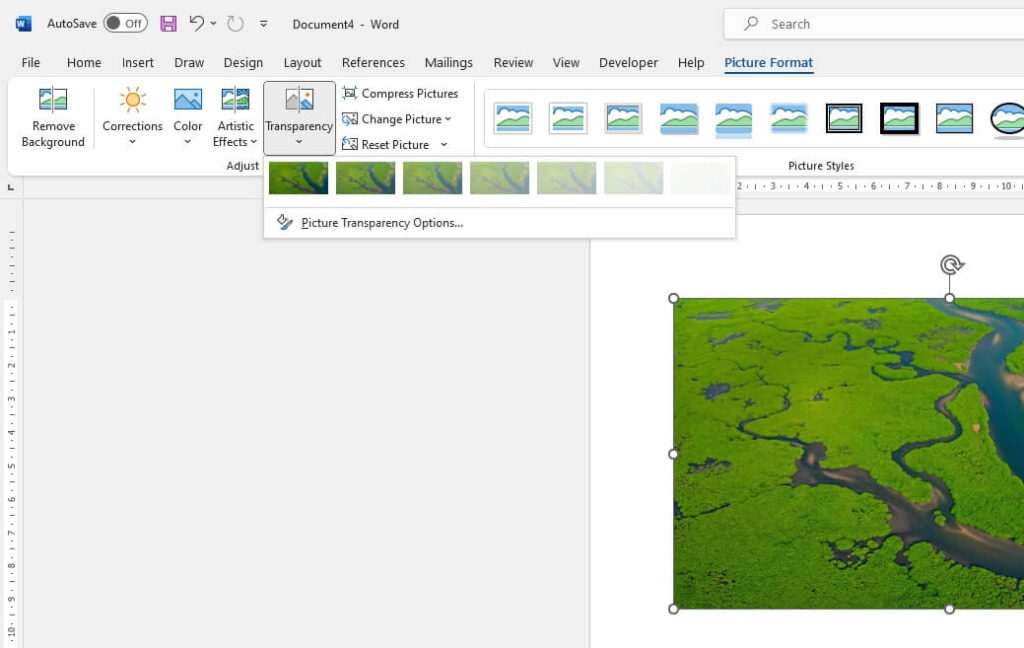
How to Fade Pictures in Microsoft Word

How to Change a Page to Landscape Mode in Microsoft Word

How to Put Borders Around Images in Microsoft Word

View Word Documents in Full-Screen Mode
We'll show you the quickest ways to access it
Full screen mode used to exist in the really old versions of Microsoft Word. It allowed you to use up the entire screen of your computer to view your documents. However, in the newer versions of Word, the feature is missing and you won’t find the option to make Word full screen.
The question is, has the option really been removed and is there really no way to make Word go full screen on your computer?

Luckily, there’s still a way. Even though the option has been removed from the Word interface, the feature somehow still seems to exist and lets you use the old full-screen layout of Word. Since it’s hidden from the main options, you’re going to have to find a way to enable it and add it to a menu from where you can easily access it.
There are actually multiple ways to activate full-screen mode in newer versions of Microsoft Word.
Use a Keyboard Shortcut To View Word Full Screen
One of the quickest and easiest ways to make your latest version of Word go full screen is to use a keyboard shortcut. Although the option has been removed from the interface, the keyboard shortcut for it continues to work and does the exact task it’s supposed to do.

While you’re viewing a document in the normal mode and you want to make it full-screen, simply press the Alt + V keys at the same time on your keyboard. Then immediately press the U button on your keyboard and your document takes up your entire screen.
When you want to return to the normal mode, press the Esc key and you’ll be back to where you were.
Enable Word Full Screen From The Quick Access Toolbar
You may have noticed that there’s a small toolbar at the very top of your Word screen. It’s called the Quick Access toolbar, and as the name suggests, it lets you quickly access some of Word’s features on your machine.
You can actually use the toolbar to make Word full screen. There’s a command that you can add to the toolbar which then when clicked, opens your document in full-screen mode.
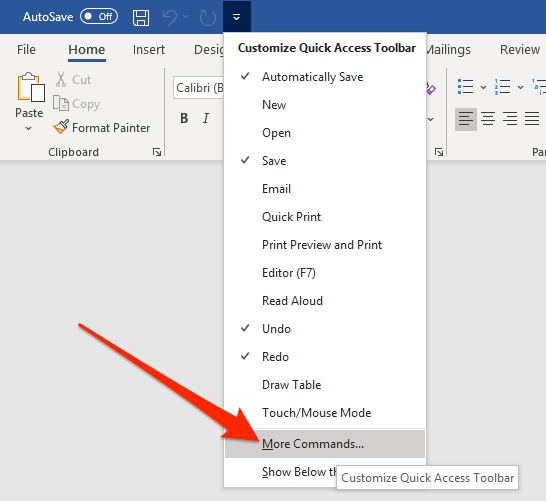
- Click on the small down-arrow icon in the Quick Access toolbar and a menu will open on your screen. Select the option that says More Commands from this newly opened menu.
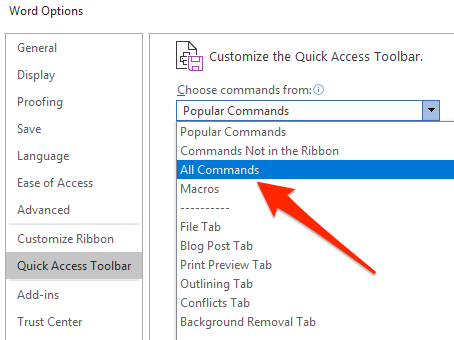
- The following screen lists the commands you can add to the toolbar but it doesn’t show all the commands by default. To make it show all available commands, select All Commands from the Choose commands from the dropdown menu.
- When all the commands are shown on your screen, look for the command that says Toggle Full Screen View . Click on it to select it and then click on the Add button to add the command to your toolbar.
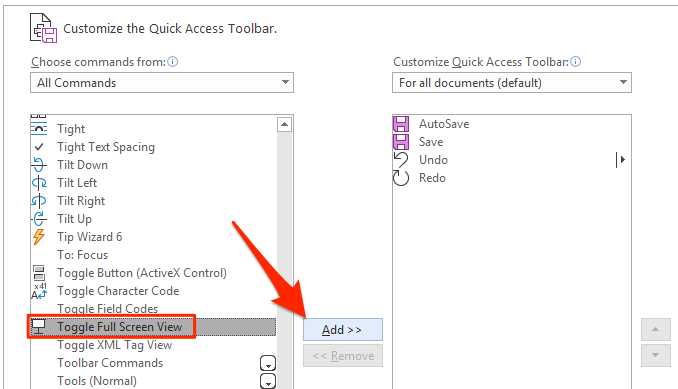
- When it’s added to your toolbar, you’ll see it in the right-hand side commands list. Click on the OK button at the bottom to save your changes.
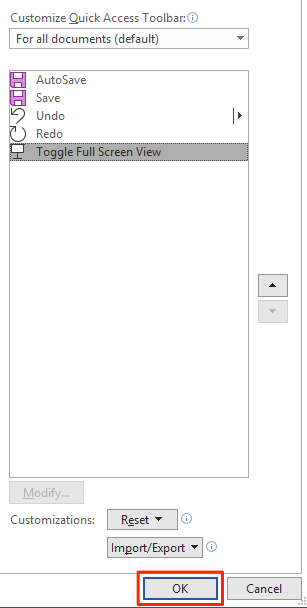
- You’ll now find a new icon appearing in your Quick Access toolbar. Click on the icon and it’ll open your current document in full-screen mode.
- When you want to exit full-screen, just press Esc on your keyboard.
The icon for full-screen mode will continue to be there in your toolbar for all of your documents. If you ever want to remove it, you can do so by opening the pane you used to add the command, selecting the command in the right-hand side pane, and clicking Remove .
Make Word Full Screen Using The Read Mode
The Word full screen reading view may not be exactly a full-screen solution for your documents but it does the job to some extent. It hides many of your formatting toolbars and other items from your screen letting you focus on the document on your screen.
You are going to see some of the options at the top, though, which can’t be removed in this mode.
To access the read mode in MS Word, click on the View menu while your document is open and select the Read Mode option.
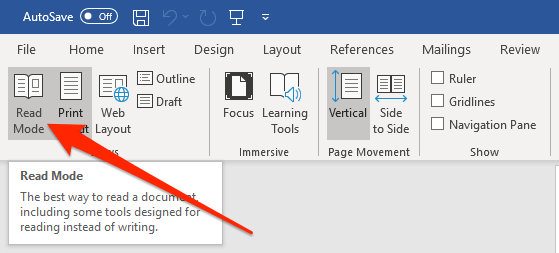
To switch back to the normal mode, press the Esc key on your keyboard. You’ll be back to the normal editing screen with all the toolbars on it.
Create a Customizable Keyboard Shortcut For Word Full Screen Mode
If you don’t want to use the default keyboard shortcut for Word full screen mode and you’d rather create your own, you can do so by using Macro in Word.
A Macro is a set of actions that are performed when you trigger the macro. You don’t really need to know much about it to be able to create a full-screen shortcut for Word, though.
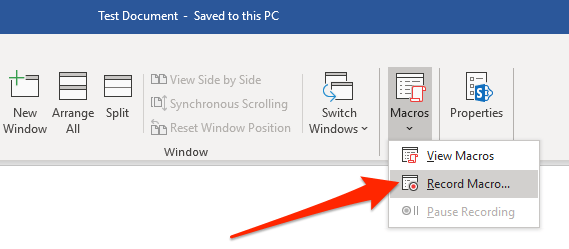
- Open your document in MS Word, click on the View tab at the top, click on the down-arrow icon under Macros , and select Record Macro .
- Enter any value in the Macro name field. Then click on Keyboard in the Assign macro to section so you can assign a keyboard shortcut to your macro.
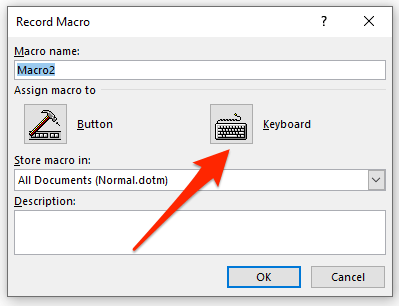
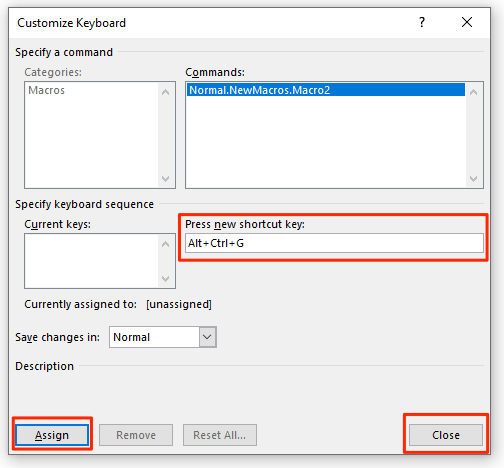
- Once you click on Keyboard, you’ll see a new dialog box on your screen. Put your cursor in the Press new shortcut key field and press the keyboard shortcut that you want to assign to the full-screen mode. Click on Assign followed by Close to save your changes.
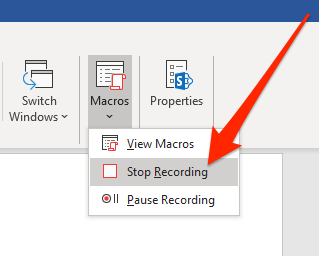
- Press Alt + V on your keyboard. Then click on the down-arrow icon in the Macros option in your toolbar and select Stop Recording .
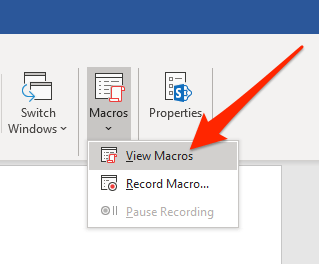
- Click on the Macros down-arrow again and select View Macros .
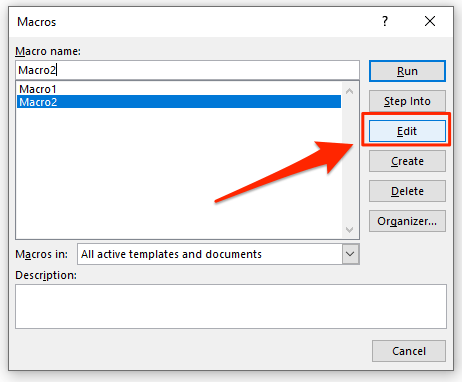
- Choose your macro in the list and click the Edit button.
- Make sure your macro only contains the following code. You can copy and paste the following code in your macro if you want. Hit Ctrl + S to save changes.
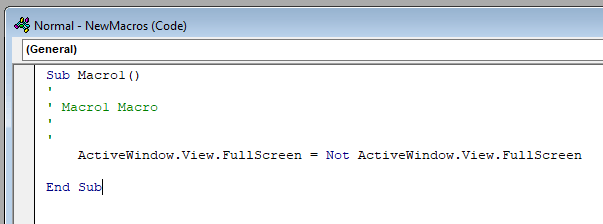
From now on, whenever you press your custom keyboard shortcut in Word, it’ll launch your document in full-screen mode.
Mahesh has been obsessed with technology since he got his first gadget a decade or so ago. Over the last few years, he's written a number of tech articles on various online publications including but not limited to MakeTechEasier and Android AppStorm. Read Mahesh's Full Bio
Read More Posts:

How To Use Presentation Mode In Microsoft Word
How to use presentation mode in microsoft word #.
Let’s take a look at three of the Word presentation features.
1] Attendee Independent Navigation: #
Sometimes, it so happens the person who is presenting the content moves on before the person whom he is sharing the content with has finished reading. This interrupts the reader and prevents him from reading any further. As a solution to this problem, Word has included a temporary alert feature that alerts a reader/attendees they are no longer following the presenter. A status bar at the bottom of the Word file informs attendees they are no longer following the presenter and that they are independently reading through the document using their mouse, keyboard, or touch input. The mode, however, can be reversed at any given time and a reader can invariably switch back to Follow Presentation mode, whenever required. All he needs to do is click the Follow Presenter button located in the top toolbar. Once enabled, it allows attendees to easily go back to the same place the presenter is presenting. Read: How to view Notes in PowerPoint with Presenter view
2] Presenter Edits: #
No one is perfect! So, while reading a document together, you might come across certain typos or minor edits, such as correcting the spelling of someone’s name, etc. To beat this problem, an editing feature that allows presenters to quickly make changes and update the document for attendees has been provided. See the screen-shot.
3] Download and Distribute: #
Word makes the process of distributing a document with the attendees extremely smooth. How? It will support a ‘Enable remote viewers’ option to help readers/attendees download the document when starting the presentation. Hope this helps. Now read: Wrong Email alias showing in Outlook.
How-To Geek
How to enable dark mode in microsoft office.
A colorful Microsoft Office? I must have it painted black.
Quick Links
How to enable microsoft office's dark mode on windows, how to enable microsoft office's dark mode on mac, key takeaways.
To enable dark mode in Microsoft Office for Windows, navigate to File > Account, then set the Office Theme to "Black." You can also change Windows 10 or Windows 11 to dark mode and use the default "Use system setting" setting. On a Mac, you must change your system theme to dark mode.
Microsoft Office includes black and dark gray themes. The system-wide dark mode on Windows 10 , Windows 11, and Mac will now affect Office apps, but you can also separately choose a dark theme for Office apps like Microsoft Word, Excel, Outlook, and PowerPoint on Windows.
According to Microsoft , Office's dark mode is only available if you have a Microsoft 365 (previously known as Office 365) subscription on Windows 10 and Windows 11 PCs. (However, you can change your theme to "dark gray" on Office 2016 and Office 2013. This even works on Windows 7.)
To change your theme on Windows, click the "File" menu at the top left corner of an Office application like Word, Excel, Outlook, or PowerPoint.
Click the "Account" option in the sidebar. On the right, open the "Office Theme" dropdown menu, and then select your desired theme.
The default theme in Microsoft Office is now "Use system setting." This means Office will only use a dark theme if you have your Windows 10 or Windows 11 PC set to use a dark theme.
You may still have your Office installation set to use another option, like "Colorful," which was previously the default setting.
To enable dark mode, select "Black" for the darkest possible Office style.
(If you prefer sticking with the "Use system setting" option, you can choose a dark Windows system theme from Settings > Personalization > Colors on Windows 10 or Windows 11. Select "Dark" under "Choose your color" on Windows 10 or under "Choose your mode" on Windows 11 .)
You can also select "Dark Gray." This theme uses lighter dark grays, which you might prefer if you find the Black theme too dark.
You can select a different "Office Background" from here, too. For example, if you'd rather not see a design behind Office's ribbon bar, click the "Office Background" box and select "No Background."
These theme and background settings affect all Microsoft Office applications on your system. They even affect Office applications on other Windows PCs, assuming you sign into them with the same Microsoft account.
There's a second place where you can choose your theme, too. To find it, click File > Options. Ensure the "General" category is selected and look for the "Personalize your copy of Microsoft Office" section. Click the "Office Theme" box and choose your desired theme. Click "OK" to save your changes.
Documents you create will have a background matching your theme by default. For example, with the dark theme, Office will show white text on a dark background. To stop this from happening, check "Never change the document page color" in the Word Options window.
This setting is just visual. If you send a Word document created in dark mode to someone else, they'd only see a black background with white text if they open it in dark mode. It won't require a large amount of ink or toner if someone prints such a document; it will print as normal.
Related: How to Enable Dark Mode in Windows 10
Office's dark mode is available in both Microsoft 365 or Office 2019 for Mac, but you must activate it by enabling your system-wide dark mode. You can't enable dark mode separately for only Office apps while using your Mac in light mode.
To activate your Mac's system-wide dark mode , use the toggle in your Mac's Control Center or head to System Preferences > General and choose the "Dark" appearance. Office apps like Word, Excel, and PowerPoint for Mac will immediately enter dark mode.
You can choose not to use Dark Mode for individual Office apps if it's enabled system-wide. For example, to disable Dark Mode for Word, head to Word > Preferences and select "Turn Off Dark Mode" under Personalize. You'll have to repeat this step for each app separately. For example, to change this for Excel, head to Excel > Preferences.
In Microsoft Word's preferences, you can also choose whether your Word documents will have a visually dark background color while you're working on them. Choose from either "Dark Mode has a dark page color" or "Dark Mode has white page color" under Personalize.
Related: How to Turn on Dark Mode on Mac
- Slidesgo School
- PowerPoint Tutorials
How to Use the Presentation Modes and the Screen Recording Features in PowerPoint

After designing all the slides for your presentation, the next and last step is presenting in front of your audience. In this new Slidesgo School tutorial, you’ll see how the presenter view works and how you can record your presentation .
Presentation Modes
Presentation modes — set up slide show, presentation modes — record slide show.
- There are different presentation modes in PowerPoint, besides the one you can find at the bottom of the screen.
- To access the presentation modes, go to the Slide Show tab.
- The first two options allow you to start the presentation from the beginning or from the currently selected slide.

- If you choose Present Online, an URL will be generated, which you can then share with your potential online viewers. After clicking this button, a new window will open, displaying info about the Microsoft Office online presentation service and a checkbox to enable remote download for your online audience. To enjoy this service, you need an Office 365 account. When you’re ready, click Connect to generate the URL.
- If you choose Custom Slide Show, you can select which slides to display in your presentation. First, create a new custom slide show and select the slides that you want to display. Then, click Add, enter the name of the presentation and click OK. This new custom presentation will appear on the list. Select it and click Show to begin the presentation.
- In the Set Up group you’ll find options to set up the presentation, hide slides, rehearse your presentation and even record it.
- Click Set Up Slide Show to adjust several settings regarding your presentation. You’ll find more information in the next section of this tutorial .
- If you click Hide Slide, the selected slide won’t show up during your presentation. Hidden slides will appear faded out on the list and their numbers will be crossed out.
- If you click Record Slide Show, you’ll be able to record your presentation from the beginning or from the current slide. We’ll go into detail in the last section of this tutorial.
- There are several checkboxes regarding whether to play narrations, use timings and show media controls.

- In the Monitors group you can choose which screen to display your presentation.
- The last group, Captions & Subtitles, is only available in Office 365. You’ll find options to enable subtitles, which will be generated out of your speech (so you’ll need to have a mic). There are settings to change the language and the position of the subtitles.
- Open your presentation in PowerPoint.
- Go to the Slide Show tab.
- In the Set Up group, click Set Up Slide Show. A new window will open, where you’ll find several options.
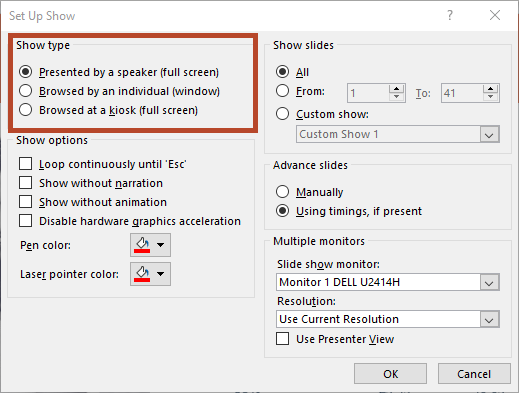
- In the top-left corner, under “Show type”, you can choose whether the presentation will be in fullscreen with speaker notes, windowed, or in fullscreen without speaker notes or the menu bar.
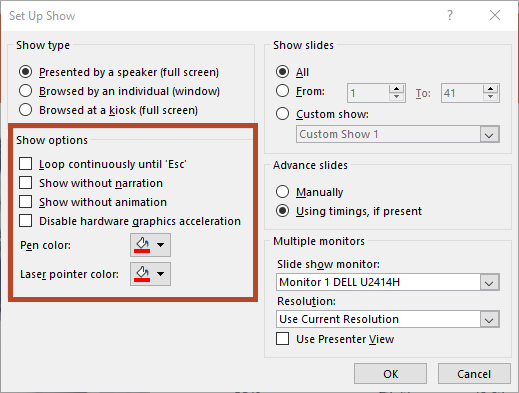
- Under “Show options” you can choose whether to show the presentation without narration or animations, or disable the hardware graphics acceleration (for better performance). You can also set the pen and laser pointer color.
- Under “Show slides”, you can choose which slides to show in your presentation. You can select all of them, a specific range or a custom slideshow.
- There are other settings to determine how to advance slides (manually or using timings), what the resolution will be and whether to use the presenter view.
- Click Record Slide Show. From the drop-down menu, select From the Current Slide or From the Beginning.
- A new window will open, along with the presentation in fullscreen mode. At the top-left you’ll find a button to start recording.
Do you find this article useful?
Related tutorials.

How to Use the Presenter View in Google Slides
Google Slides, like PowerPoint, has different presentation modes that can come in handy when you’re presenting and you want your slideshow to look smooth. Whether you’re looking for slides only, speaker notes or the Q&A feature, in this new Google Slides tutorial, you’ll learn about these and their respective settings. Ready? Then let’s explore the presenter view!

How to Download Google Slides Templates
When preparing a presentation, many people start panicking because they realize how much time it will take to edit each and every slide. Creating them from scratch, filling them in, looking for pictures, moving the elements...How stressful! But there is a solution that saves you a lot of time. We're sure that you've browsed the internet for templates, or basically, pre-established designs and elements, that can be downloaded for free and can be edited to your liking. Are we right? Then, we have some good news for you!


Discover our collection of printable templates
With the advance of technology, printing has become something that is no longer a necessity. Smartphones have made the paper format less and less frequent, but there are still certain cases in which having physical resources is much more convenient. Whether it's for taking notes, handing out assignments, making worksheets or handing out business cards or invitations, it's necessary to print your customized designs.From now on, in every Slidesgo printable presentation that you download, you will find the instructions for printing on the third slide. Depending on the style, colors or format of each presentation, we will tell you if you can...

How to Add Superscript and Subscript in Google Slides
Let’s take the most famous formula: E=mc^2, Einstein’s relativity equation. It wouldn’t be the same if it was E=mc2, right? Okay, yes, some people write it like that because it’s very famous and it won’t be misunderstood. But technically… It can! This is where the sophistication of superscript or subscript enters the room! Do you know how to write them in equations, copyright brands or even footnotes in your presentations? Let’s figure out how.
- Tech Gift Ideas for Mom
- Hot Tech Deals at Target Right Now
How to Add PowerPoint Slides Into a Word Document
Insert PowerPoint slides as individual images
- Brock University
What to Know
- In Word, go to Insert > Add from Files and select the PowerPoint file. Choose Insert Slide for each slide you want to add.
Use the Picture Format menu to adjust each inserted slide.
When you want to use PowerPoint slides in a Microsoft Word document, use the Add from Files tool to import one or more slides from a PowerPoint presentation as images to the Word file. We show you how to do it using Microsoft Word for Microsoft 365, Word 2019, Word 2016, and Word for Mac.
How to Insert PowerPoint Slides Into a Word Document
Slides from an existing PowerPoint presentation can be inserted as an image into a blank document or an existing document.
Open an existing or blank Word document, then position the cursor where you want to insert the PowerPoint slide.
Go to the Insert tab and select Add from Files .
Select the PowerPoint file that contains the slides you want to add to the Word document.
If the file isn't listed, select Show More Files to browse the filesystem and choose a file.
In the Insert From File panel, find the slide you want to insert as an image and select Insert Slide to insert it into the document.
The slide appears as an image. It can only be edited with photo tools.
Considerations
In old versions of Microsoft Office , it sometimes made sense to export PowerPoint content into Word to mark it up with the speaker's notes and other information. However, PowerPoint has advanced such that these workarounds no longer prove as helpful.
PowerPoint presentations can be exported in different formats including PDF, several image formats, several movie formats, and a rich-text outliner format. Use these export formats as an alternative to a multi-step Word process.
Get the Latest Tech News Delivered Every Day
- Converting PowerPoint Presentations to Word Documents
- How to Merge PowerPoints
- Converting PowerPoint Slides to Word Documents
- How to Link or Insert Excel Files to Word Documents
- Create Pictures From PowerPoint Slides
- How to Add a Background Picture to PowerPoint Slides
- How to Add Page Numbers in PowerPoint
- How to Print PowerPoint Slides With Notes
- A Beginner's Guide to Text Wrap in PowerPoint
- How to Insert PDF Files Into PowerPoint Presentations
- How to Make a PowerPoint Presentation
- 3 Ways to Delete a Blank Page in Word
- Copy Slides to Another PowerPoint Presentation
- How to Add Pages to a PDF
- Use PowerPoint Slide Finder
- Insert a Picture Inside Text on a PowerPoint Slide

Contribute to the Microsoft 365 and Office forum! Click here to learn more 💡
April 9, 2024
Contribute to the Microsoft 365 and Office forum!
Click here to learn more 💡
- Search the community and support articles
- Microsoft 365 and Office
- Search Community member
Ask a new question
how to add speak to presentation mode in PowerPoint
Can someone please assist me with adding speak to presentation mode of Power Point. I can get it to work in design mode but when I switch to presentation mode it will not do the speaking of the notes for the slide. Please help.
Report abuse
Replies (1) .
- Microsoft Agent |
Dear meadoman2000,
Greetings! Thank you for posting in Microsoft forum.
May I know if you are referring to Text-to-speech (TTS) feature in PowerPoint? Speak is a built-in feature of Word, Outlook, PowerPoint, and OneNote. You can use Speak to have text read aloud in the language of your version of Office. For reference ,see Use the Speak text-to-speech feature to read text aloud - Microsoft Support
I tested and checked, the Speak function does not work directly in slide show mode. When you are in editing mode, select the portion of the text that you want to be read out loud. This will activate the Speak button in the Quick Access Toolbar, while it is reading, you can switch to Presentation mode. To use Speak function, you need to select text or block text to activate it in editing mode. It won’t continue reading the text in slide show mode.
I understand your requirement and I agree it would be a great improvement to PowerPoint if Speak (or any alternate method) can be implemented in slide show mode. In this regard, I will request you please consider sending your feedback to PowerPoint feedback portal and let the Product group know about your requirement. The Feedback portal is the best way to give feedback to Product Group as it’s actively monitored by them.
Thank you for your understanding and co-operation. Stay safe and stay healthy.
With sincerest regards,
Neha Singh | Microsoft Community Moderator
1 person found this reply helpful
Was this reply helpful? Yes No
Sorry this didn't help.
Great! Thanks for your feedback.
How satisfied are you with this reply?
Thanks for your feedback, it helps us improve the site.
Thanks for your feedback.
Question Info
- For business
- Norsk Bokmål
- Ελληνικά
- Русский
- עברית
- العربية
- ไทย
- 한국어
- 中文(简体)
- 中文(繁體)
- 日本語
- Use Presenter View Video
- Add speaker notes Video
- Practice and time your presentation Video
- Record a presentation Video
- Print a presentation Video

Use Presenter View

PowerPoint Presenter View shows you the current slide, the next slide, and your speaker notes, to help you focus while presenting and connect with your audience.
Select the Slide Show tab.
Select the Use Presenter View checkbox.

Select which monitor to display Presenter View on.

In Presenter View , you can:
See your current slide, next slide, and speaker notes.
Select the arrows next to the slide number to go between slides.
Select the pause button or reset button to pause or reset the slide timer in the upper left.
See the current time to help you pace your presentation.
Select the font icons to make the speaker notes larger or smaller.
Select the annotations pen icon to draw on the screen in real time, or select a laser pointer.
Select the thumbnail icon to see all the slides in your presentation and quickly jump to another slide.
Select the magnifying glass icon to zoom in on a particular part of a slide.
The screen icon let's you make the screen temporarily black to focus the attention on you.
Select END SLIDESHOW when you're done presenting.
Start the presentation and see your notes in Presenter view

Need more help?
Want more options.
Explore subscription benefits, browse training courses, learn how to secure your device, and more.

Microsoft 365 subscription benefits

Microsoft 365 training

Microsoft security

Accessibility center
Communities help you ask and answer questions, give feedback, and hear from experts with rich knowledge.

Ask the Microsoft Community

Microsoft Tech Community

Windows Insiders
Microsoft 365 Insiders
Was this information helpful?
Thank you for your feedback.
- Website Examples
- Website Builder Comparisons
- WooCommerce
- HTTP Errors
- WordPress Errors
How to Put WordPress in Maintenance Mode: Quick Setup Guide

Purpose of maintenance mode
Impact on visitors , search engine considerations, assessing the scope of changes, communication strategies, scheduling downtime, using a maintenance mode plugin, manual activation via code, how to put your site in maintenance mode using hpanel dashboard, design and layout, adding custom messages and contact information, adding subscription options, countdown timer and progress bar, social media integration, setting up user roles and access, excluding urls from maintenance, testing updates and functionality, smooth transition back online, handling plugin conflicts, resolving access problems.
Putting your site in maintenance mode is an essential part of managing your WordPress website. When conducting updates , making changes, or fixing issues on your site, it’s important to ensure that your visitors have a smooth experience even when your site is temporarily unavailable. By activating maintenance mode, you create a courteous barrier between your work in progress and your audience. This mode informs visitors that your site is undergoing maintenance, while also preventing them from encountering broken pages or error messages.
To get started with putting your WordPress site in maintenance mode, you can utilize various methods. One of the most straightforward ways is through the use of plugins specifically designed for this purpose.
For those who prefer a more manual approach or wish to implement maintenance mode without the use of additional plugins, you can put your WordPress site in maintenance mode by adding code snippets to the functions.php file of your theme. It’s crucial, however, to ensure that you back up your website before making any direct changes.
What steps are involved in activating maintenance mode on WordPress?
How can I create a custom maintenance page in WordPress?
Creating a custom maintenance page can be done by using a maintenance mode plugin that allows you to design and publish a maintenance page. SeedProd is one such plugin offering templates and a drag-and-drop builder to customize your maintenance page from your WordPress dashboard.
Can I put my site in maintenance mode in WordPress using Elementor?
Yes, if you’re using Elementor, there’s a built-in maintenance mode feature. You can design your maintenance page with the Elementor page builder, then choose to put WordPress in maintenance mode by going to the Elementor settings and configuring your preferences under the ‘Maintenance Mode’ tab.
How can maintenance mode be turned on without a plugin in WordPress?
To put your website in maintenance mode without using a plugin, you can add code to your theme’s functions.php file or create a .maintenance file. Both methods require you to manually insert specific code that triggers maintenance mode when visitors access your site.
What are the ways to resolve WordPress being stuck in maintenance mode?
If WordPress is stuck in maintenance mode , you can typically fix it by deleting the .maintenance file from your website’s root directory. This file is automatically generated by WordPress during updates and sometimes doesn’t get deleted after the process is complete.
Understanding maintenance mode
When you put your WordPress site in maintenance mode , it serves as a notification that your website is temporarily down for updates or changes. This feature is crucial for preserving your site’s reputation and search engine ranking while making necessary modifications.
Maintenance mode is used to signal that your website is undergoing temporary changes or updates. It provides you with the peace of mind to perform updates, implement new features, or resolve issues without negatively affecting your site’s user experience. By communicating this status to your visitors, you maintain transparency and preempt confusion or frustration.
When maintenance mode is active, visitors are typically greeted with a notification screen that informs them of the ongoing maintenance. This screen can provide useful information, such as the reason for downtime and an estimated time when your site will be back online. It’s essential to craft this message thoughtfully to ensure visitors understand the situation and are encouraged to return.
For search engines , maintenance mode can be handled carefully to avoid any negative impact on SEO and your site’s search engine ranking . It’s important to return the correct HTTP status code to ensure that search engines understand that the downtime is temporary. Using the 503 status code tells search engines to check back later without demoting your site for being inaccessible. This strategy helps maintain your reputation in search engine results during the maintenance period.
Preparing for maintenance
Before entering maintenance mode for your WordPress site, it’s crucial to have a clear plan in place. The way you prepare can significantly impact the duration and success of the updates or changes you are implementing.
Determine whether you’re updating themes, plugins, or core files. This will affect the complexity and duration of the maintenance.
- Updates : List out each update with its expected impact.
- Fixes : Note any specific bugs you plan to address.
- Changes : Clearly define any content or design changes to be made.
By understanding the extent of the work needed, you can estimate the downtime required and prepare accordingly.
Communicate upcoming maintenance effectively to minimize inconvenience to your site visitors.
- Coming soon page : Implement a ‘Coming Soon’ or ‘Under Maintenance’ page with details about the maintenance.
- Social media : Utilize social media platforms to inform your audience beforehand.
- Contact details : Keep your contact details visible for users to reach out if needed.
Be transparent about the nature of the updates and offer reassurance that the site will be back with improvements.
Choose a time for maintenance when website traffic is typically low to lessen the impact on visitors.
- Low-traffic window : Identify your site’s off-peak hours through analytics data.
- Time estimate : Communicate how long the site will be under maintenance.
- Monitoring : Be prepared to monitor the site’s return to functionality to address any immediate issues.
Organizing the maintenance for a specific window can help streamline the process and set clear expectations for your users.
How to put your site in maintenance mode
When you’re updating your WordPress site, enabling maintenance mode is essential to prevent visitors from encountering errors or a broken site. It’s a straightforward process that can be accomplished either by using a plugin or by manually editing code. Choose the method that best suits your comfort level with WordPress.
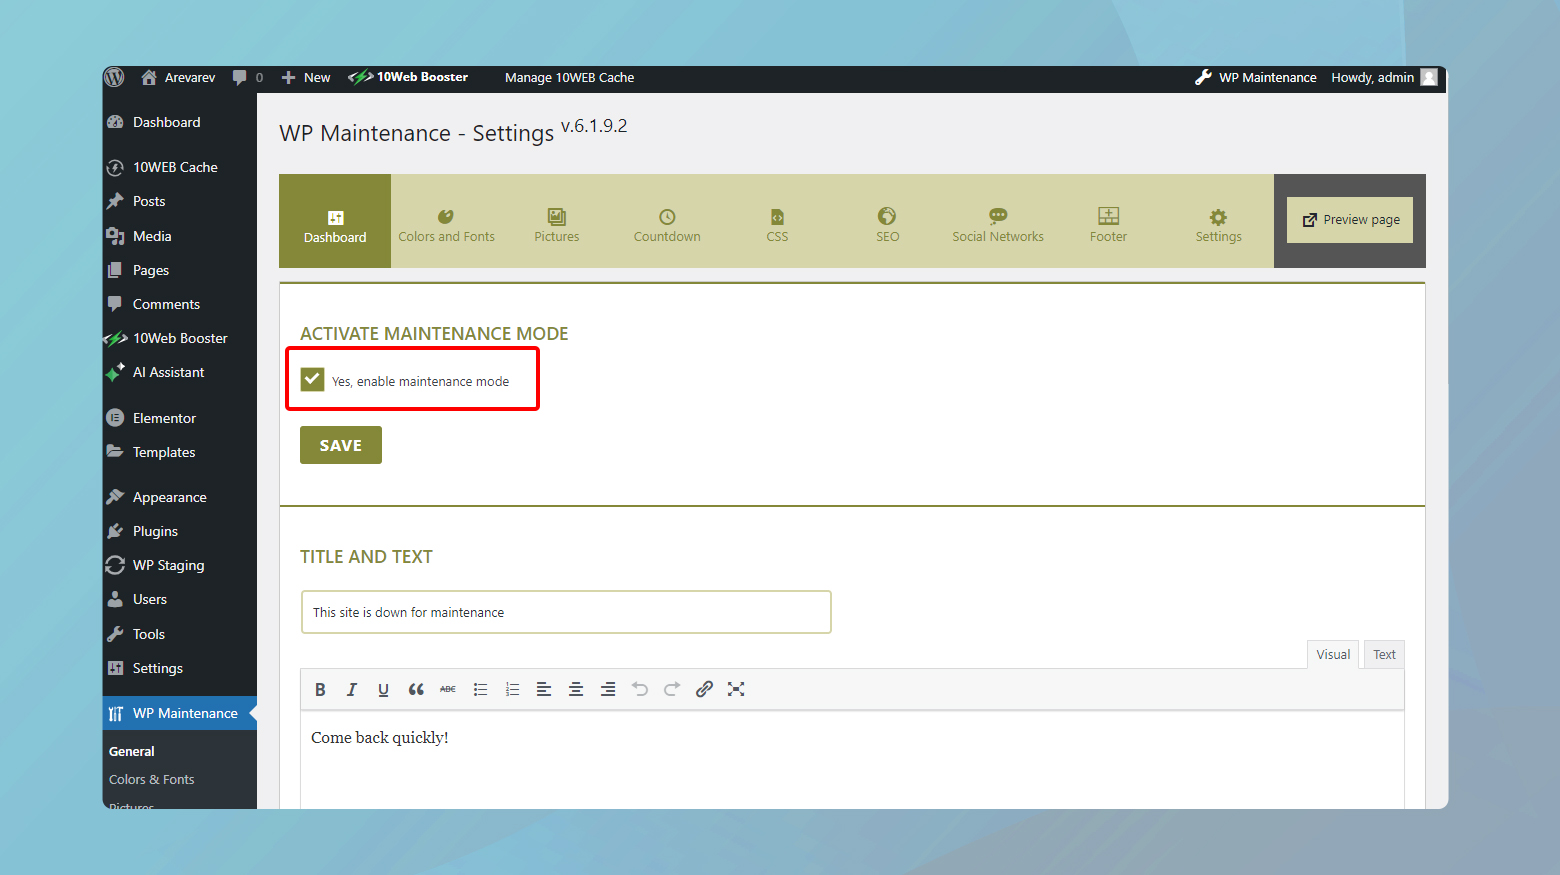
Using a plugin is the most user-friendly way to activate maintenance mode. One popular choice is the WP Maintenance Mode plugin . Here are the steps:
- Install the WP Maintenance Mode plugin from the WordPress plugin repository.
- Activate the plugin through your WordPress dashboard.
- Navigate to Settings > WP Maintenance Mode .
- Set the mode to Activated to put your site in maintenance mode.
If you are more technically inclined, you can manually put your WordPress website in maintenance mode by editing your site’s functions.php file . Below is how:
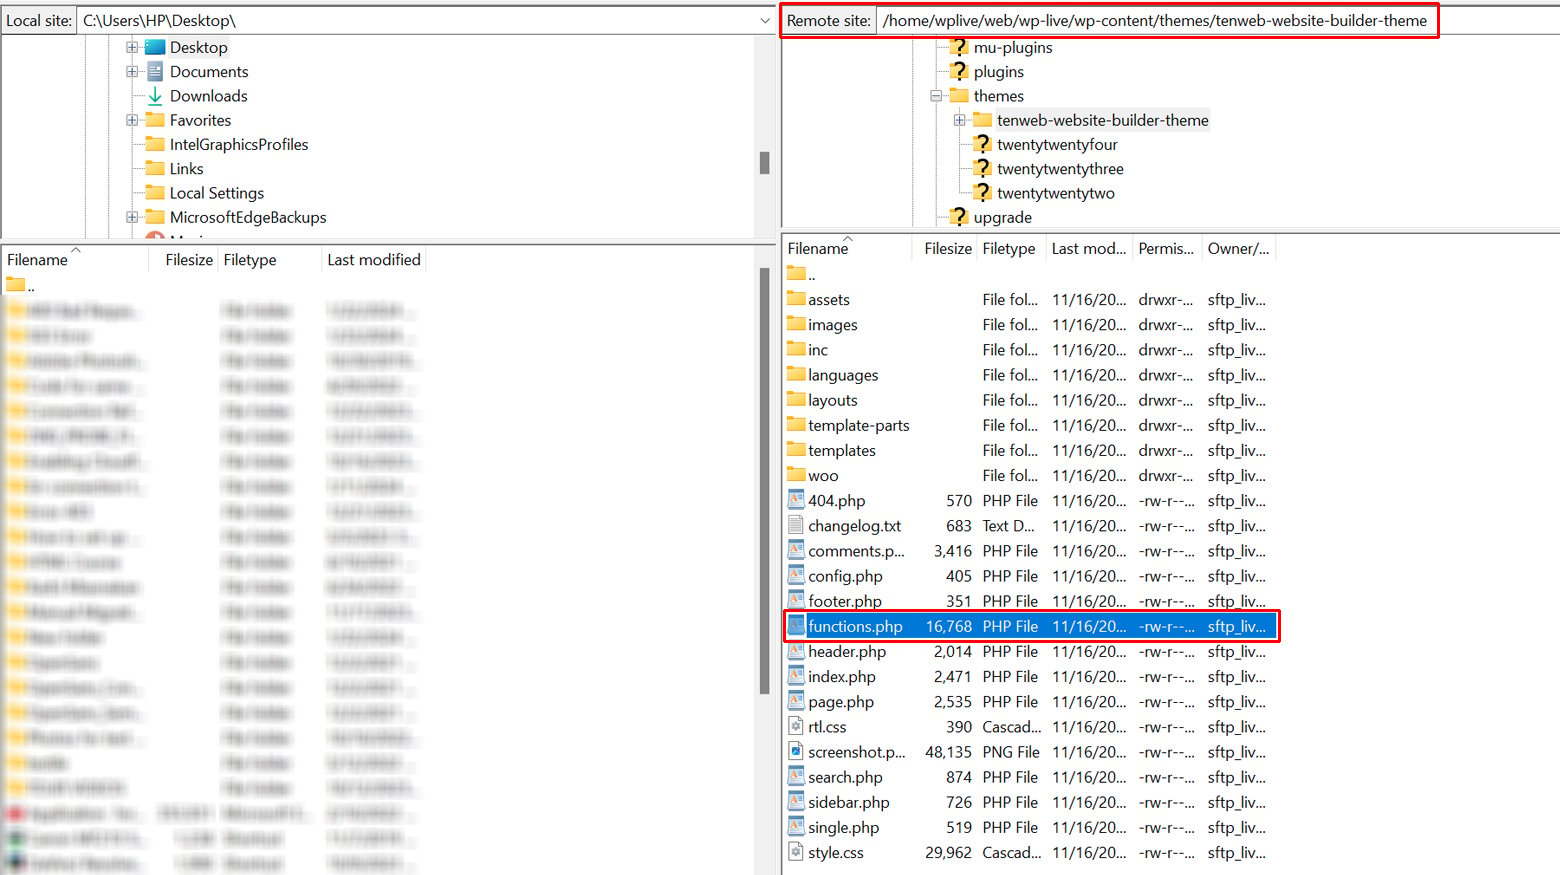
- Access your WordPress theme’s functions.php file .
- At the end of the file, insert a snippet of code that triggers maintenance mode.
- Save your changes to activate.
If your hosting provider offers an hPanel dashboard, you can typically enable maintenance mode through it:
- Locate File Manager within your hPanel dashboard.
- Edit the .htaccess file within your site’s root folder or create a .maintenance file to activate maintenance mode.
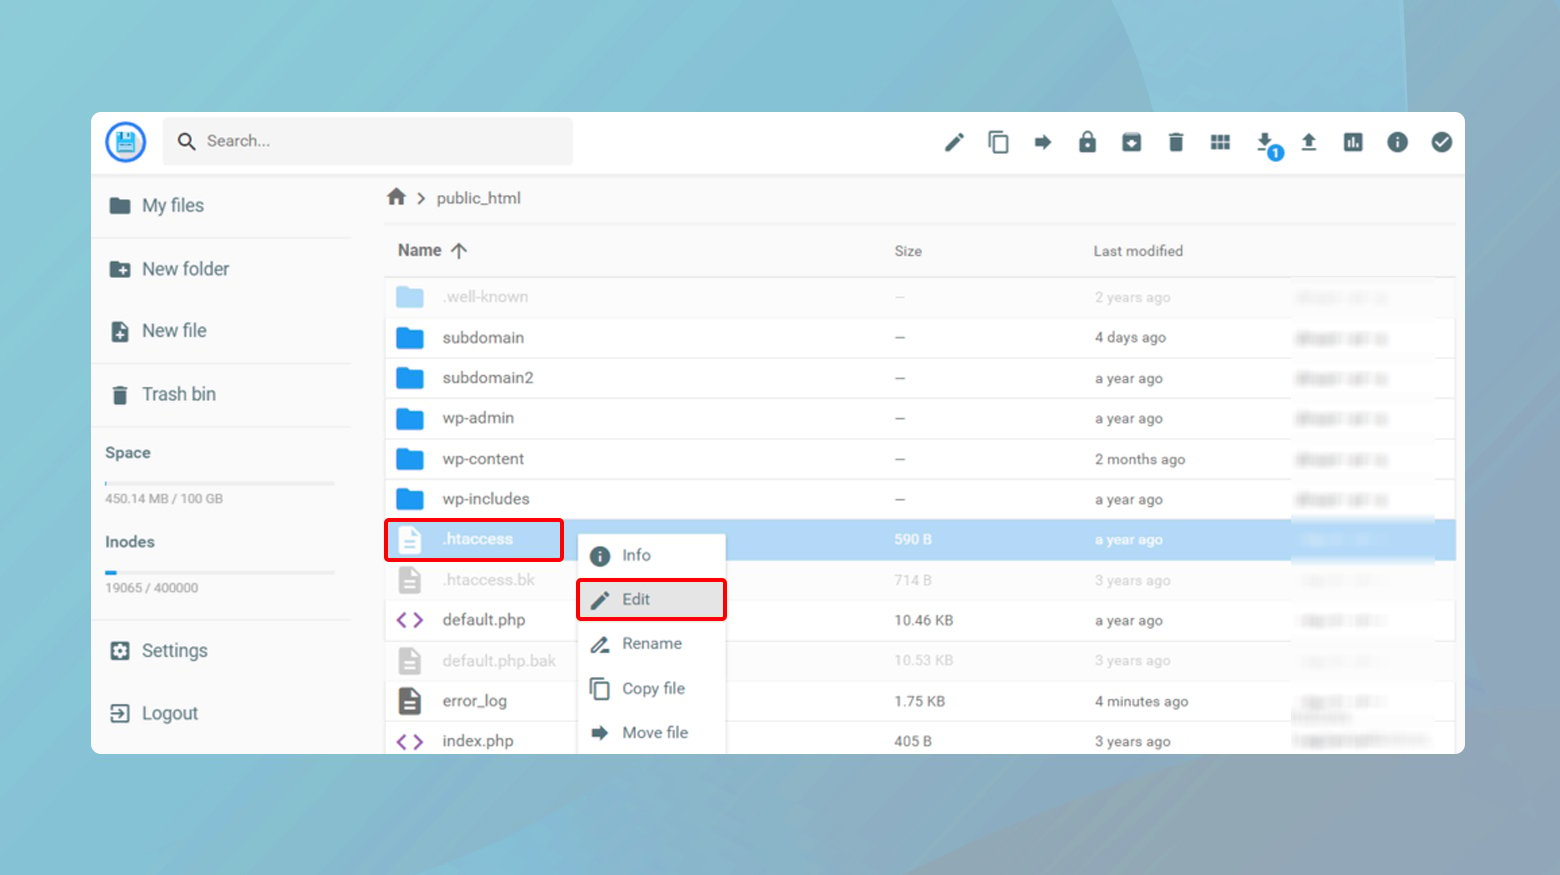
Remember, whichever method you choose, always verify that maintenance mode is activated by visiting your site’s front end.
Customizing the maintenance page
When your WordPress site is under maintenance, it’s crucial to present visitors with a clear and aesthetically pleasing maintenance page. Customization allows you to maintain your brand’s look and feel even when updating your site.
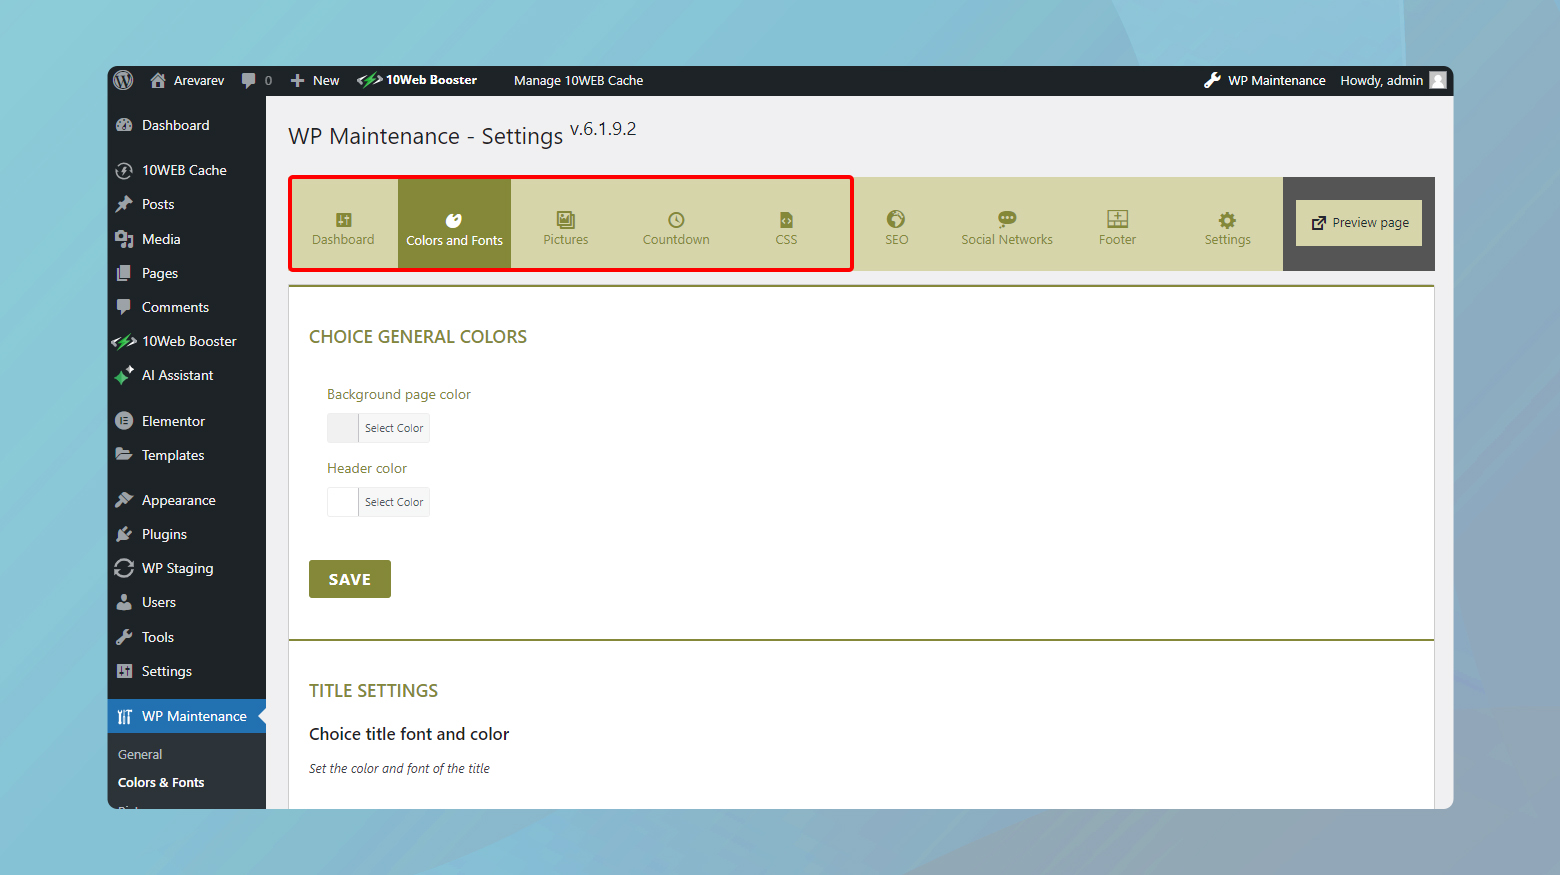
Your maintenance mode page should align with your site’s overall design to ensure brand consistency. Themes and templates serve as the foundation for your maintenance page’s appearance. You can select from a variety of pre-designed templates or create a custom design to match your brand. Consider the following elements for customization:
- Background : Choose a color or image that complements your brand.
- Layout : Position elements like text and buttons in a user-friendly manner.
- Colors and fonts : Ensure your text is readable and the color scheme matches your website.
Remember, your maintenance page is an extension of your website and should reflect the same level of professionalism and style.
A custom message provides clarity to your visitors about why they can’t access your site. Keep your message concise and informative. Here’s how you can add valuable content to your maintenance page:
- Custom message : Explain the maintenance activity in a brief text. Use a friendly tone to reassure your visitors.
- Contact information : Offer a way to reach out. Include an email address or a contact form link.
- Maintenance duration : Give an estimated timeframe for when the site will return online.
- Updates : Optionally, add a sign-up button for updates to keep your visitors informed.
By providing essential information and maintaining open channels for communication, you ensure a positive experience even during downtime.
Advanced features and functionalities
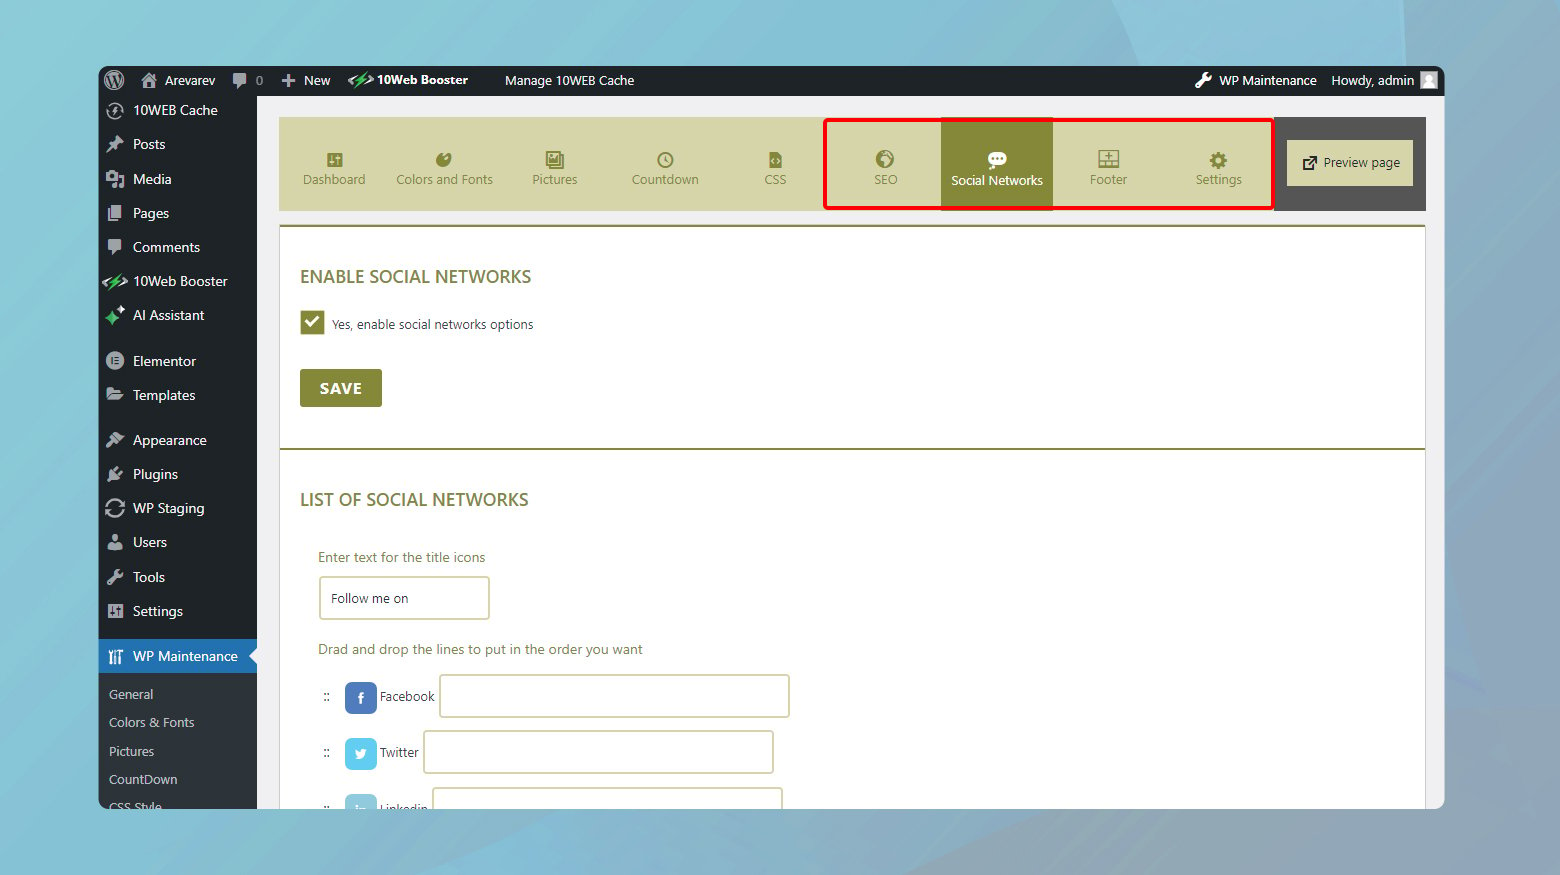
When you put your WordPress site in maintenance mode, you have the opportunity to not only notify visitors of ongoing updates but also to keep them engaged. Advanced features such as subscription options, timers, and social media links can enhance the user experience even when your site is temporarily offline.
You can incorporate a subscription form module directly on your maintenance mode landing page . This enables visitors to subscribe to updates and get notified when your website goes live again. Make sure you include a clear contact form with fields for users to enter their email addresses.
How to add a subscription form
- Install a maintenance plugin that supports subscription modules.
- Configure the plugin’s settings to display a subscription form.
- Collect email addresses in a database or integrate with an email service provider.
Adding a countdown timer creates anticipation for your website’s return. A progress bar can be useful for showing the current status of the updates. These features communicate transparency and can reduce visitor frustration.
Steps to include timers and progress bars:
- Select a plugin with timer and progress bar functionalities.
- Customize the design to match your site’s branding.
- Set the timer to count down to the estimated live time.
Social media integration allows you to connect with your audience on different platforms while your site is under maintenance. Directing them to your social media accounts keeps the lines of communication open.
How to add social media links:
- Choose a plugin with social media module options.
- Add your social media profile URLs to the appropriate fields.
- Design the icons to align with the overall look of your maintenance page.
Managing site accessibility during maintenance
During website maintenance , it’s crucial to manage who can view your site and what remains accessible. WordPress allows for precise control over these aspects, ensuring that necessary users can still perform their duties while visitors see a maintenance mode page.
In your WordPress dashboard, under the Settings menu, you have the option to define which user roles can have access to the site during maintenance mode. Typically, you’d want to allow Administrators to have full access. To do so:
- Navigate to the maintenance mode plugin settings.
- Look for the section labeled Access or Permissions .
- Check the roles that should have access, such as Administrator .
- Save your changes.
Remember, users with the selected roles will need to login to see the site.
Sometimes you may need certain parts of your website to remain accessible to all visitors, like a contact page or a privacy policy. To exclude specific URLs from maintenance mode:
- Look for a setting within your plugin labeled Exclusions or Exclude URLs .
- Enter the URLs you want to exclude from maintenance.
- Use relative paths (e.g., /contact instead of https://yoursite.com/contact ).
By carefully managing accessibility and exclusions, you can maintain a functional user experience even while performing site maintenance.
Finalizing and disabling maintenance mode
Before you deactivate maintenance mode, ensuring that your updates function correctly and preparing for a seamless transition back to live status are critical steps.
After implementing updates, rigorously test your website’s functionality. This includes checking all pages, links, forms, and any other interactive elements to confirm they work as expected. Specifically, you should:
- Verify plugin and theme updates by navigating through your site as both an admin and a user.
- Perform a responsiveness test to ensure your site displays correctly on various devices and browsers.
- Check for 404 errors and resolve any broken links that could impact user experience and search engine rankings.
When you’re confident that your site is ready, moving back online should be swift and trouble-free. Follow these quick steps:
- If you’ve used a plugin to initiate maintenance mode, navigate to the settings of the plugin and click the button to deactivate .
- Should you have manually set maintenance mode by editing the functions.php file, remove or comment out the code snippet you added to disable it.
- After deactivation, clear any caching mechanisms on your site to ensure that users will see the updates immediately.
- Announce the completion of maintenance on your social media or through an email newsletter to inform users that your site is back online.
Remember to test your site’s visibility on search engines post-maintenance to ensure your presence remains uninterrupted.
Troubleshooting common issues
When enabling Maintenance Mode in WordPress, it’s essential to smoothly navigate through occasional stumbling blocks. Confident and clear guidance is here to help you troubleshoot the two most common issues: plugin conflicts and access problems.
If you’re encountering errors after activating Maintenance Mode, plugins may conflict with each other. To diagnose and resolve this issue:
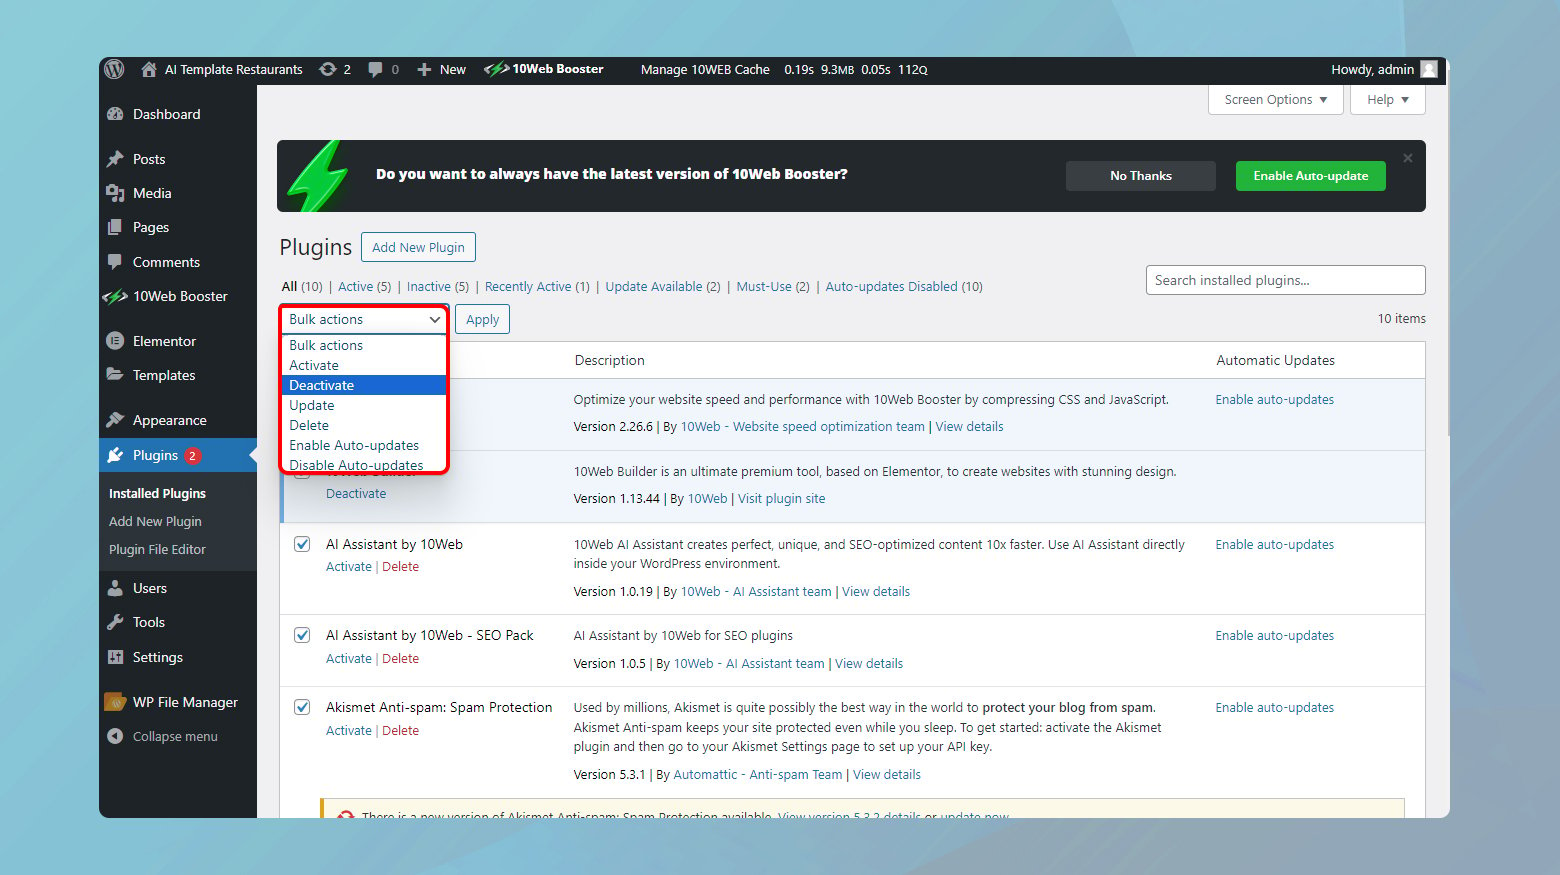
- Deactivate all your plugins from the WordPress dashboard. You do this by navigating to the “Plugins” section and selecting “Deactivate” from the bulk actions menu.
- Reactivate them one by one, each time checking to see if the site returns to maintenance mode properly.
- If you discover a conflict, reaching out to the plugin’s developer or checking the plugin’s support forums may offer a solution. Alternatively, you may choose to replace the troublesome plugin with an alternative.
Remember that it’s crucial to backup your site before making any changes, in case you need to revert to a previous state.
Sometimes, after placing WordPress in Maintenance Mode, you might find yourself unable to access your dashboard. In such cases:
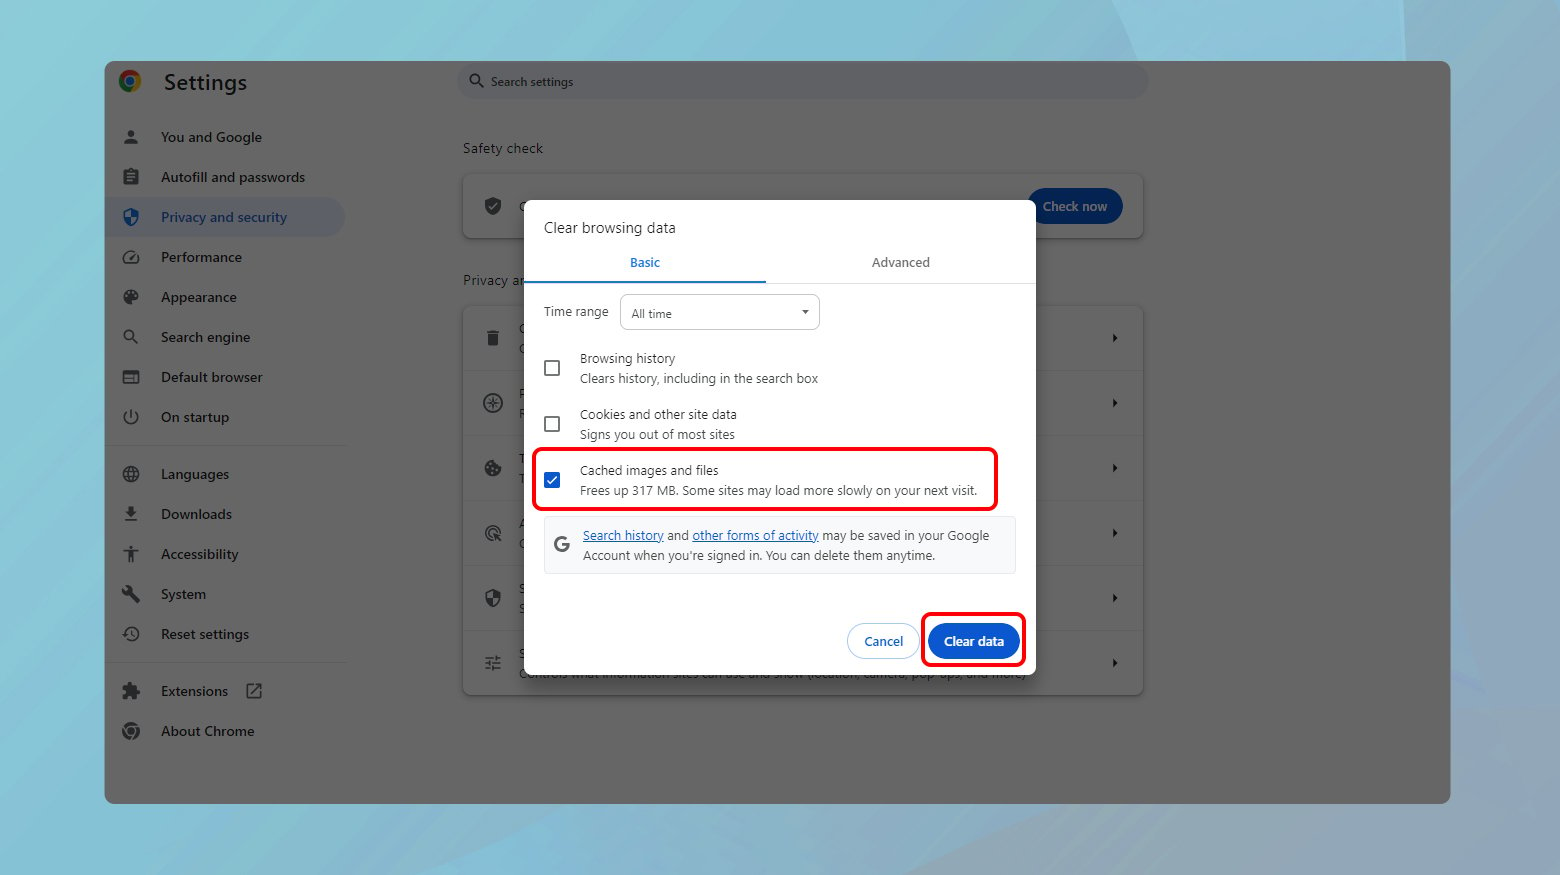
- Clear your browser cache and attempt to log in again; cached versions of your site could be interfering with the login process.
- If the problem persists, access your site using a FTP client or your hosting provider’s File Manager . Navigate to the root directory and delete the .maintenance file.
- Alternatively, if you have access to your hosting account, some providers offer the option to disable maintenance mode directly from their dashboard.
By methodically working through these steps, you can effectively troubleshoot and resolve the common issues experienced with WordPress Maintenance Mode. Always ensure you have a direct line of communication with your hosting provider for additional support when needed.
Implementing maintenance mode on your WordPress website is a crucial step for maintaining a positive user experience during updates, changes, or troubleshooting. Whether you opt for plugin-based solutions for their ease of use and functionality or prefer manual coding methods for a more customized approach, the end goal remains the same: to provide a seamless transition for your visitors. Maintenance mode not only safeguards your site’s reputation and search engine ranking but also offers a platform to communicate directly with your audience, minimizing potential frustrations.
Accelerate your WordPress website creation with AI
Create a custom WordPress website tailored to your business needs 10X faster with 10Web AI Website Builder.

How to Create a Custom WordPress Theme Without a Line of Code
There is definitely no shortage of WordPress themes. Both free and paid themes are available, whether you go looking in the official depository or turn to third-party marketplaces and independent theme developers. These WordPress themes make creating a website for your clients relatively easy. However, there are times when you need a more custom design. In such situations, the obvious…

A Simple Guide on How to Create WordPress Custom User Roles and Capabilities
Creating WordPress custom user roles and capabilities you’re bound to experience the agony of choice. Your head will be spinning from endless opportunities. Basically, you may have no clue which roles and capabilities you should create and how to best combine them. That’s why we’re here to tell you why you need custom user roles and capabilities to begin with,…

What’s New in PHP 7.4 (Features, Deprecations, Updates)
About the PHP 7.4 release PHP 7.4 was released on November 28, 2019 for General Availability. With this PHP release you can expect a noticeable performance increase. However, although PHP 7.4 improves performance and code readability, you can expect a true boost from PHP 8, as a JIT inclusion has already been approved for that version.By the way if you…
How to Build a User Registration Form on WordPress
You’re probably a member of many different websites. Remember when you registered on that website to be able to download an ebook? What about your account on your favorite local soap shop’s ecommerce site? So, it’s only natural that on your website as well the need to build a WordPress registration form will arise. Luckily, the question “How to create…

How to Prepare Your Images for SEO
Wondering how to effectively optimize website images for SEO? Explore this article and find out how to prepare images for your website’s SEO in detail.

How to Restart PHP and Change PHP Version on Your WordPress Website
Looking for information on changing the PHP version of your WordPress website. Here’s is a brief guide 📗 on changing the PHP version in 10Web Dashboard
Rank Math vs All in One SEO: The WordPress SEO Plugin Battle
Yoast premium vs free: is yoast premium worth it, all in one seo vs yoast: the wordpress seo plugin battle, rank math vs yoast: the wordpress seo plugin battle, wordpress default theme: what it is and how to change it, leave a comment cancel reply.
Your email address will not be published. Required fields are marked *
Your email address will never be published or shared. Required fields are marked *
Email address *
Save my name, email, and website in this browser for the next time I comment.
Get a head start on website creation with AI
Create a custom website tailored to your business needs 10X faster with 10Web AI Website Builder!

IMAGES
VIDEO
COMMENTS
How to use Presentation Mode in Microsoft Word. Download Windows Speedup Tool to fix errors and make PC run faster. Microsoft Word has been specifically built keeping in mind users' needs. As a ...
Enabling Presentation Mode. The first step is enabling presentation mode within Word: Open the Word document you wish to present. Ensure all attendees have access to this file. Navigate to the Share tab on the ribbon. Click Present Online. Select Office Presentation Service from the dropdown menu.
Put your cursor in the Press new shortcut key field and press the keyboard shortcut that you want to assign to the full-screen mode. Click on Assign followed by Close to save your changes. Press Alt + V on your keyboard. Then click on the down-arrow icon in the Macros option in your toolbar and select Stop Recording.
Select a mode as follows: In the opened Word document, find the mode-selection button in the ribbon, located top-right, by the Share button. The mode-selection button name will reflect the current mode (including any mode change you might subsequently make). Note the available modes. If you have edit permissions for this document, all modes ...
To access the full-screen mode on a Windows computer, first, you need to enable this option. Click on the downwards pointing arrow in the Quick Access toolbar and choose More Commands. Next, select All Commands from the drop-down menu under Customize the Quick Access Toolbar. Then, highlight Toggle Full Screen View and click on Add.
Start presenting. On the Slide Show tab, in the Start Slide Show group, select From Beginning. Now, if you are working with PowerPoint on a single monitor and you want to display Presenter view, in Slide Show view, on the control bar at the bottom left, select , and then Show Presenter View.
View your speaker notes as you deliver your slide show. Draw on or highlight slides during a presentation. Turn your mouse into a laser pointer. Add speaker notes to each slide in a presentation. Training: Presenter view is like a dashboard that contains in one window everything you need to run your slide show. You control the show on a ...
This tutorial shows you how to present a Word 2016 Document to somebody who doesn't have Office 365. The presentation software inside Word allows you to shar...
A status bar at the bottom of the Word file informs attendees they are no longer following the presenter and that they are independently reading through the document using their mouse, keyboard, or touch input. The mode, however, can be reversed at any given time and a reader can invariably switch back to Follow Presentation mode, whenever ...
But you will be able to access the Windows Mobility Center options on Windows 10. 1. Click on Search bar. 2. Type " Windows Mobility Center " without the quotes in search bar and click on it. Let us know if you need any further assistance on Windows related issues and we will be glad to help.
Head to the Microsoft Office online website, sign in to your account, and open your document in Word. You do not have to open PowerPoint in another tab or window. Click File > Export and choose the "Export to PowerPoint Presentation" option. You'll see a pop-up window with a collection of themes. Select the theme that you want to use and click ...
Key Takeaways. To enable dark mode in Microsoft Office for Windows, navigate to File > Account, then set the Office Theme to "Black." You can also change Windows 10 or Windows 11 to dark mode and use the default "Use system setting" setting. On a Mac, you must change your system theme to dark mode. Microsoft Office includes black and dark gray ...
1. Open the Windows Mobility Center (mblctr.exe). 2. Click/tap on the available Turn on or Turn off button for Presentation Settings. (see screenshots below) 3. When finished, you can close the Windows Mobility Center if you like. OPTION TWO.
Simply double-click on the section to expand the selection. Step 4: On the right-hand side, double-click Turn off Windows presentation settings. Step 5: To disable this setting, tick on the Disabled option. Step 6: To Enable, click on the Enabled option. Step 7: Finally click on the Apply button, followed by OK.
Choose the theme most appropriate to the content. If you don't like any of the suggested themes, choose the plain one at the bottom right. When done, click the Export button. Your document is ...
In Word, open the document you want to share. Click File > Share > Present Online. Under Present Online, choose Office Presentation Service. If you want attendees to be able to download a copy of the document, click the box next to Enable remote viewers to download the document. Click the Present Online button. When you're ready to present ...
Find it, then choose Object . 2. Insert Word Document Into PowerPoint. When you click the Object button, you'll see the menu that lets you insert file into PPT. It's the Insert Object menu, and with it you can see how to insert a file into PPT. On the left, locate the Create from file bubble. Click it.
Presenter View is not available in that version. Instead, start PowerPoint for Windows installed on your computer, then choose the Slide Show tab. Author of "OOXML Hacking - Unlocking Microsoft Office's Secrets", ebook now out. John Korchok, Production Manager. [email protected].
QUICK LINKS: 00:51 — Converting a Word document for teleprompter use. 03:00 — Positioning the prompter screen for eye contact to the camera. 03:54 — Using a Microsoft Teams meeting on a phone to send the prompter screen. 04:52 — Using the Microsoft Teams web app to join a second meeting to view the prompter for in-person or remote co-presenters. 05:41 — Closing remarks
First, create a new custom slide show and select the slides that you want to display. Then, click Add, enter the name of the presentation and click OK. This new custom presentation will appear on the list. Select it and click Show to begin the presentation. Defining a custom slide show.
Go to the Insert tab and select Add from Files . Select the PowerPoint file that contains the slides you want to add to the Word document. If the file isn't listed, select Show More Files to browse the filesystem and choose a file. In the Insert From File panel, find the slide you want to insert as an image and select Insert Slide to insert it ...
When you are in editing mode, select the portion of the text that you want to be read out loud. This will activate the Speak button in the Quick Access Toolbar, while it is reading, you can switch to Presentation mode. To use Speak function, you need to select text or block text to activate it in editing mode. It won't continue reading the ...
Select the Slide Show tab. Select the Use Presenter View checkbox. Select which monitor to display Presenter View on. Select From Beginning or press F5. In Presenter View, you can: See your current slide, next slide, and speaker notes. Select the arrows next to the slide number to go between slides. Select the pause button or reset button to ...
Navigate to Settings > WP Maintenance Mode. Set the mode to Activated to put your site in maintenance mode. Manual activation via code. If you are more technically inclined, you can manually put your WordPress website in maintenance mode by editing your site's functions.php file. Below is how: Access your WordPress theme's functions.php file.