We explain and teach technology, solve tech problems and help you make gadget buying decisions.


How To Remove Someone From a Slack Channel
A Slack Channel creates organized communication among your teammates. But when required, here’s how to remove someone from a Slack Channel.

How to Check Processor on Your Android Phone (Including Samsung)
Unsure what processor your device currently has? Here are 4 ways you can use to check the processor on your Android phone.

How to Put Different Headers and Footers on Different Pages in Word
Easily customize your document layout by learning how to put different headers and footers on different pages in Word.
Recommended

HP Omen Transcend 14 Review: Almost Perfect!
Looking for a new portable gaming laptop? Check out our review of the HP Omen Transcend 14, powered by the latest Intel Core Ultra processors.

6 Best Budget Gaming Monitors Under $100
Shopping on a tight budget for monitors? Check out the best budget gaming monitors that can be yours for under $100 right now.

5 Best Laptop Sleeves for Apple MacBook Air M3
If you want to invest in the safety of your new purchase, here are the best laptop sleeves for Apple MacBook Air M3 you should buy now.
Follow Guiding Tech
Join the newsletter.
Get Guiding Tech articles delivered to your inbox.
3 Ways to Compare Columns in Excel for Matches
5 ways to stop microsoft gameinput service from crashing your windows pc, 6 ways to fix recycle bin corrupted error on windows 11.
More →
How to Find IMEI Number on Android (With/Without Phone)
Top 7 fixes for black screen of death on samsung galaxy phone, how to check if your samsung phone is original or fake, 3 ways to play local mp3 files on iphone, 5 easiest ways to transfer files from iphone to mac, top 7 ways to fix ipad could not be restored error 4013, how to use glanceable directions on google maps.

How to Play Music on Twitch Without Infringing Copyright
Want to improve your Twitch stream? Learn how to play music on Twitch without any copyright hurdles and improve your stream.

How to Use Voice Typing on Google Docs on Mobile and Desktop
Here’s how you can enable and use Voice Typing in Google Docs on your mobile and desktop to jot down your ideas quicker.

More Latest Articles

3 Best Ways to Extract a URL From Hyperlinks in Microsoft Excel
Need to extract the hyperlink URLs within your Microsoft Excel spreadsheet? Here are the best timesaving ways to do so.
6 Best Ways to Fix Apple TV Stuck on Apple Logo
Apple TV getting stuck at the Apple logo can spoil your ideal streaming setup. Check the top ways to troubleshoot the problem.

Top 7 Fixes for Grammarly Not Working in Google Docs
If Grammarly is not showing writing suggestions in Google Docs, here are some tips to get it working again in Chrome, Edge, Firefox, or Safari.

3 Best Ways to Record Audio on Mac
Here’s how you can record audio on your Mac using built-in tools. We will also share the steps to record your Mac screen with audio.

How to Add Friends on Steam Without Paying
Tired of playing alone on Steam? Learn how to add your friends on Steam, share your stats, and compete with them.

Need to transfer files, photos, or videos from your iPhone? Explore these five easiest ways to transfer files from your iPhone to a Mac.
Internet and Social
How to go frame by frame on youtube on desktop and mobile, what does battery service recommended mean on mac, 4 best fixes for launchpad icon missing from dock on mac, 8 best utility apps for mac to speed up your workflow, bluetti ac240 power station: top 7 features of this new portable powerhouse, top 6 fixes for ps5 not recognizing external hard drive.
Guiding Tech YouTube Channel →
- PC & Mobile
- Google Meet
How to Present a PowerPoint in Google Meet
Lee Stanton Lee Stanton is a versatile writer with a concentration on the software landscape, covering both mobile and desktop applications as well as online technologies. Read more February 14, 2022
Device Links
- Device Missing?
Google Meet is an ideal platform for sharing presentations virtually. During your video call, there will be many things to consider. You can decide to share your whole screen or just one window. Another way to go may be to disable your video feature so that participants only see your slides.

This guide is here to help you navigate your way through setting up a PowerPoint presentation on Google Meet.
Check out how to professionally give a virtual talk on Google Meet. Whether using a desktop PC or a mobile device, this tutorial will show you the ins and outs of a Google Meet PowerPoint presentation.
How to Present a PowerPoint on Google Meet on a PC
Sharing a PowerPoint presentation on Google Meet from your computer can be accomplished in a few steps. Whether you are using Windows or accessing the platform through your Mac browser, this is what you need to do.

- Your presentation will now show up in whatever format chosen in Step 4.

You are now presenting on Google Meet from your PC. Clicking on the camera icon in Google Meet will either hide you from being seen by the audience or make you visible to them. A line through the icon means that the meeting participants will not see you, only your slides.
If you click on “Entire Screen” in Step 4, the other users will see everything on your screen, including your talking points.
Additionally, reducing the size of your PowerPoint window on your screen will enable you to see the other participants in the meeting.
Once you are ready to end your presentation, tap “Stop Presenting.” The button is located in the top right corner of the PowerPoint window. You will no longer be sharing your screen with the audience, but you will still be in the meeting. To exit Google Meet, press the “Leave Call” button at the bottom of your screen.
How to Present a PowerPoint in Google Meet on an Android
To hold a PowerPoint presentation on your Android device, you will first have to install the app . This is how to use Google Meet for a PowerPoint talk on Android.

- In the top right corner of the Meet screen, tap the three-dot menu.

- To exit full-screen mode, tap on the top right corner of the screen.

How to Present a PowerPoint in Google Meet on an iPhone
With your Microsoft PowerPoint app installed on your iPhone, you can hold presentations from your device. The steps below will walk you through how to do that.

- Navigate to the three-dot menu in the top right corner.

- Everything on your screen will now be visible to the participants.

How to Present a PowerPoint on Google Meet on an iPad
Giving presentations on your iPad can be done using the PowerPoint app . Once it’s installed on your iPad, you can use the guideline below to run your talk on Google Meet.

- In the top right corner, select the three-dot menu.

- Participants will now be able to view your entire screen.

Additional FAQs
While presenting, can others see you.
You have the option to make yourself visible to the audience when presenting. If your camera is switched on, both your video and presentation will be seen. Turning off your camera will show only your presentation and hide you on Google Meet. When the camera icon at the bottom of your screen is red, it means that your camera is off.
Can you speak during your PowerPoint presentation?
Google Meet gives you the option to speak and explain your slides during a presentation. All you have to do is unmute your microphone. To do this, tap the microphone icon at the bottom of your Google Meet screen.
Will ending the presentation end the meeting?
No, once you stop the presentation, the video call will still be active. You would have to exit the Meet to disconnect from the call. However, if you end the call, your presentation will also come to a halt.
Get Cracking on Google Meet
Learning how to use Google Meet for presentations can be very useful. You can do this while making yourself visible to the audience, or you can hide your video if that would make more sense. You even have the option to explain your slides as you show them to the participants on the call. Different devices will have varying methods of presenting slideshows. This tutorial gives you a feel of navigating Google Meet PowerPoint presentations from whichever device you are using.
Do you often use Google Meet to hold virtual presentations? What device do you use? Let us know in the comments below.
Related Posts

Disclaimer: Some pages on this site may include an affiliate link. This does not effect our editorial in any way.

Lee Stanton May 31, 2023

Lee Stanton March 21, 2023

Lee Stanton March 7, 2023
Send To Someone
Missing device.
Please enable JavaScript to submit this form.
Present Google Slides directly in Google Meet
This announcement was made at Google Cloud Next ‘22 . Visit the Cloud Blog to learn more about the latest Google Workspace innovations for the ever-changing world of work.
What’s changing
Who’s impacted , why you’d use it , getting started .
- Admins: There is no admin control for this feature.
- End users:
- Select ‘Present a Tab’ in Meet > choose a Google Slide presentation > manage your presentation with controls in the bottom corner of the presentation.
- Visit the Help Center to learn more about controlling Slides presentations in Google Meet .
Rollout pace
- Rapid Release and Scheduled Release domains : Extended rollout (potentially longer than 15 days for feature visibility) starting on October 20, 2022
Availability
- Available to Google Workspace Business Standard, Business Plus, Enterprise Essentials, Enterprise Standard, Education Standard, Enterprise Plus, Education Plus, the Teaching and Learning Upgrade, and Nonprofits customers
- Not available to Google Workspace Essentials, Business Starter, Education Fundamentals, Frontline, as well as legacy G Suite Basic and Business customers
- Not available to users with personal Google Accounts
- Google Help: Control Slides presentations in Google Meet
- Cloud Blog: Introducing innovations in Google Workspace to help your organization thrive in hybrid work
Roadmap
- This feature was listed as an upcoming release .
Filter by product
- Accessibility
- Admin console
- Cloud Search
- Directory Sync
- Drive for desktop
- Education Edition
- G Suite for Education
- G Suite for Government
- Google Apps Script
- Google Calendar
- Google Chat
- Google Classroom
- Google Cloud Directory Sync
- Google Docs
- Google Drawings
- Google Drive
- Google Forms
- Google Hangouts
- Google Keep
- Google Maps
- Google Meet
- Google Meet Hard
- Google Meet Hardware
- Google Photos
- Google Sheets
- Google Sites
- Google Slides
- Google Tasks
- Google Vault
- Google Voice
- Google Workspace
- Google Workspace Add-ons
- Google Workspace for Education
- Google Workspace Marketplace
- Google Workspace Migrate
- Marketplace
- Microsoft Exchange
- Microsoft Outlook
- Premier Edition
- Rapid Release
- Rapid Releases
- Scheduled Release
- Security and Compliance
- Weekly Recap
- What's New
Filter by date
Subscribe by feed, subscribe by email, localized google workspace updates, useful links, join the official community for google workspace administrators.
In the Google Cloud Community, connect with Googlers and other Google Workspace admins like yourself. Participate in product discussions, check out the Community Articles, and learn tips and tricks that will make your work and life easier. Be the first to know what's happening with Google Workspace.
______________
Learn about more Google Workspace launches
On the “What’s new in Google Workspace?” Help Center page, learn about new products and features launching in Google Workspace, including smaller changes that haven’t been announced on the Google Workspace Updates blog.
How-To Geek
How to present google docs, sheets, and slides in google meet.
Present your document, spreadsheet, or slideshow in Google Meet with a click.
Quick Links
Table of contents.
Presenting a document in Google Meet has never been easier. You'll notice a handy button at the top of your Google Docs, Sheets, or Slides menu that lets you present your document directly to your meeting participants in Google Meet.
You have three convenient ways to present the document. You can open the document in a new tab for an active meeting, click a scheduled Google Calendar event, or enter a meeting code or link.
At the time of writing in July 2021, the feature is only available when using Google Chrome.
Present to Google Meet in Another Tab
- Present with a Scheduled Google Calendar Event
- Present with a Google Meet Code or Link
- How to Stop Presenting Your Document
If you've already joined your Google Meet meeting, presenting your Google Docs, Sheets, or Slides document is simple.
Open Docs, Sheets, or Slides in a new Google Chrome tab and navigate to the document you want to present.
On the top right of the screen, next to the Share button, click the icon for "Present to a Meeting" (a box around an up arrow). You should see your current active meeting appear in the drop-down box. Click "Present Tab to Meeting."
In the subsequent pop-up window, make sure "This Tab" is selected and displays your document. Select the tab content to highlight it and click "Share."
Pop over to your Google Meet tab and you should then see the document you're presenting simultaneously with your meeting participants .
Present With a Scheduled Google Calendar Event
If the meeting organizer scheduled the Google Meet in Google Calendar, you can present your document directly to the event.
Open the document and click the "Present to a Meeting" icon (a box around an up arrow). If the meeting hasn't started yet, you'll see the name and time. If it has started, you'll see the name and Now. Click the event.
In the subsequent screen, click "Present Tab to Meeting" and follow the same process as above to select the tab content and hit "Share."
While this option does have you presenting your document, it will not join you to the meeting automatically. You'll need to join your meeting like any other Google Meet and will see your document presented once you do.
Present With a Google Meet Code or Link
If you don't have the Google Meet meeting open and active and also don't have a Google Calendar event for it, you can use the meeting code or link to present your document. This assumes that you've obtained the Google Meet code or meeting link from the organizer.
Open your document, click "Present to a Meeting"(a box around an up arrow), and choose "Present Using a Meeting Code."
Enter the meeting code or link and click "Continue."
Click "Present Tab to Meeting" and follow the same process to select the tab content and click "Share."
Like with the Google Calendar event option above, you'll still need to join the meeting in Google Meet . And again, when you do, you'll see your document being presented.
Stop Presenting Your Document
When you join a Google Meet and present your document, you'll see a note of this at the top of the meeting screen. So, when you're done presenting the document, click "Stop" in that message.
Alternatively, you can go to your document tab in Chrome, click the "Present to a Meeting" icon again, and then click "Stop Presenting Tab."
There are times when sharing your screen in Google Meet is appropriate. But for those other times when you simply want to show a document, remember this handy trick.
4 Ways to See Your Google Meet Audience While Presenting
Want to see your audience on Google Meet when presenting from Google Slides or PowerPoint? Here's how to do it.
You’ll no longer see your audience when presenting your Google Slides or Microsoft PowerPoint presentation via Google Meet. That’s because your presentation will take up your monitor’s space.
While slideshows are great at sharing knowledge visually, it’s still crucial to see your audience and how they see you to present effectively. So, here are three ways you can present a slideshow without losing view of your Google Meet room.
1. Open Your Google Slides Presentation in Presenter View
If you’re presenting using Google Slides, you can use Presenter View to launch a separate presenter window . You can then dock this view to the left or right side of your screen and switch to your Google Meet tab. Here’s how you can do so:
- Choose Presenter view .
- Once you click on Presenter view, your Google Slides presentation will begin in the Google Slides tab. A presenter window will appear, showing the preview of your slides, among other information.
- Dock the presenter window to your screen’s left or right side for a more organized view.
- Once you’re ready to present, click on the Present now button at the bottom of the Google Meet window, then choose the A tab .
- Once you’re done presenting, click on the You are presenting button at the bottom of the Google Meet window and click Stop presenting.
2. Set Up Your PowerPoint Slide Show to Window View
While Google Slides is a popular choice for creating presentations, another ubiquitous slide show app is PowerPoint. If you used this to create your presentation, you don’t need to open it on Google Slides. Instead, you can just set it to window view when presenting.
- When you open your PowerPoint file, click on the Slide Show ribbon.
- Once you’re back in the main PowerPoint window, click on From Beginning to start your slide show.
- Your slide show will then appear in a PowerPoint Slide Show window. Dock this window to the left or right side of your monitor.
- Open and log in to your Google Meet meeting if you haven’t done so yet. You can dock the window for Google Meet on the opposite side of your presenter window for better organization.
3. Use a Second Device to See Your Audience
If you prefer seeing your presentation on your entire screen and only want to view your audience on a secondary screen, you can use another device like a tablet or your smartphone. Here’s how to set it up:
- Open and join your Google Meet meeting.
- Launch your Google Slides or Microsoft PowerPoint presentation.
- Once your presentation is open, start the slide show. This will cover your entire screen.
- Pull out your secondary device—this can be a smartphone, a tablet, or any other device where you can download and install the Google Meet app—and open Google Meet.
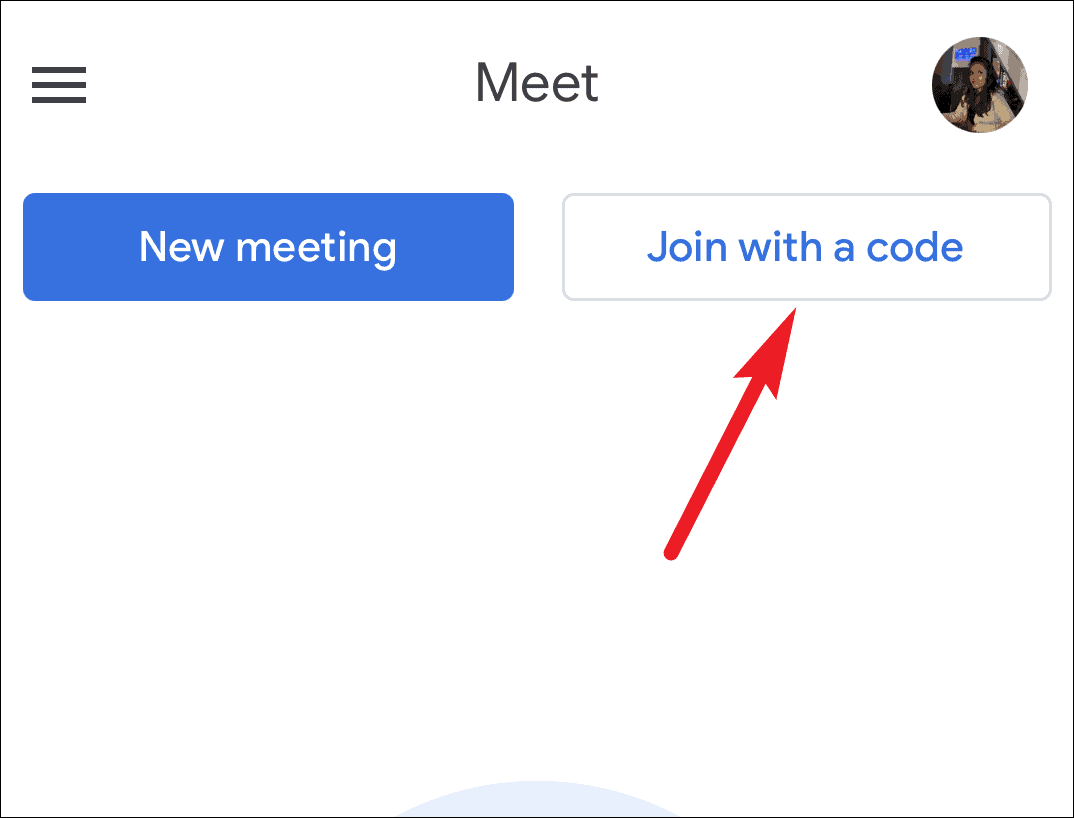
- In the main Google Meet window, tap on Join with a code , and paste the link you copied from your computer. Once done, tap on Join in the upper-right corner of the screen.
- Once you’re in the meeting room lobby, you can turn off your secondary device’s camera and microphone to avoid echoes and multiple camera views.
- If you’re the meeting organizer, tap on Join beside the microphone mute button. But if you’re joining as a guest, you should ask the host to approve your secondary device. Once you’re in the meeting, you’ll see your secondary device appear in Google Meet on your computer.
- When you’re ready to present, go to your computer where your presentation is, click on the Present now button at the bottom of the Google Meet window, and choose A window .
- You can then control your presentation on your computer while looking at your audience on your secondary device. Once you’re done presenting, simply end the presentation and open the Google Meet window on your computer.
4. Add Another Monitor
Consider getting a secondary monitor if you’re a heavy multitasker, frequently present to multiple people, or both. This setup allows you to work with multiple full-screen windows simultaneously, including Google Meet and your presentation.
If you already have a secondary monitor, these are the steps you need to take to present on Google Meet:
- Launch your presentation on your secondary monitor.
- Open and connect to your Google Meet meeting on your primary monitor.
- Click on the Present now button at the bottom of the Google Meet window, then choose your entire screen .
- In the Share your entire screen window, choose the screen where your presentation is showing, and press Share .
- Once you’re done presenting, click on the You are presenting button at the bottom of the Google Meet window and click Stop presenting .
See Your Audience and Your Presentation Simultaneously
One of the key ways you can be an effective presenter is to gauge your audience’s reaction and adjust your presentation accordingly. With these techniques, you can keep track of your audience even if they’re miles away from you.
If you think a secondary monitor is an effective tool for presenting online and increasing your productivity, here’s how you can set one up for yourself.
How to Present in Google Meet and Still See Participants

Google Meet is one of the forerunners in the video conferencing ecosystem, as one would expect it to be. And quite right too, products from such big companies often spark such expectations. And yet, even though Google Meet is steadily ahead in the race, it’s not winning.
It has been consistently behind its competitors in bringing the features that users most covet. Even an offhanded comparison with it’s biggest competitors, Zoom and Microsoft Teams, would show that it’s been the last to bring features such as virtual backgrounds and tiled view in meetings. These features have persistently been fan favorites, the ones users haven’t been shy in voicing their love for.
Google Meet has now caught up considerably, but it seems like there’s still a long way to go. Even though you can share your screen in meetings that make it possible to deliver presentations or just share content, something essential is sorely missing on Google Meet. And you guessed it right! It’s almost unbelievable that Google Meet doesn’t have the mechanics to also view the meeting participants’ videos while you’re presenting.
Not being able to see other participants’ videos while you’re sharing your screen makes it incredibly difficult, almost impossible even, to connect with students, colleagues, or even friends trying to watch a movie together. Fortunately, the lack of a feature hasn’t stopped anyone before. There are a few ways you can see the participants’ videos while sharing your screen. They might not be as ideal as a built-in functionality, but it’s at least something.
Attach a Second Monitor to your Computer
This has to be the solution that most users find the most convenient in every sense. It’s easy to pull off, and you get to view the presentation as well as the video feeds on full screens. The only requirements are a spare monitor, a cable for the required ports, and the desk space. Many people will find it at home, whether it’s a screen from an old computer or a spare TV screen.
Whether you’re using a laptop or a desktop computer, you can attach a second monitor to it. Most systems have multiple VGA or DVI ports. The easiest perhaps might be using the HDMI port, though. It’s also a better solution. And there’s a good chance your laptop will have it. If not, you could use a USB to HDMI adapter.
Once you connect the second monitor to your system, you want to ensure that the screen is extending, not duplicating. On Windows 10, right-click on the desktop and select ‘Display settings’ from the menu.

The display settings window will open. Scroll down until you find the option for ‘Multiple Displays’.
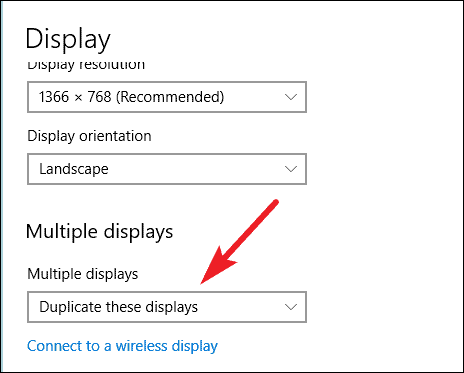
‘Duplicate these displays’ will be selected by default. Click on it to expand the drop-down menu and select ‘Extend these displays’ from the options.
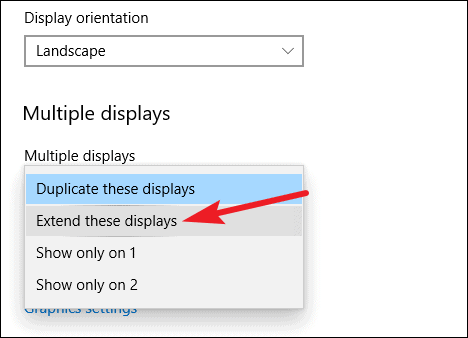
A confirmation message might appear on your screen asking whether you want to keep these changes, or else the changes will revert back in a few seconds. Click the ‘Keep changes’ button.

Now, when you need to share your screen in Google Meet, remember to do this. If the content you want to share is a Chrome tab, pop it out as a separate window. If it’s already a window, well, you need to perform one less step. Now, drag that window onto the extended monitor. Then, share it from Google Meet.
Now, one of your monitors will have the content you’re sharing, and on the other, you can see the video feeds of other participants.
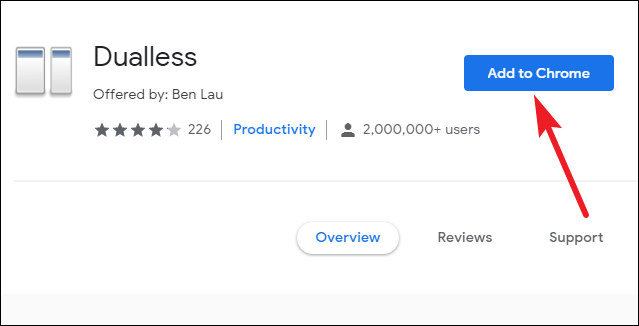
Use the Dualless Chrome Extension
Now, for people who don’t have a second monitor or consider it too much of a hassle setting it up, you can use the Chrome extension ‘Dualless’ that produces a similar effect. But the only problem is that this is only useful when the content you’re presenting is in a browser window.
The Dualless extension splits your browser window into 2 screens of varying ratios. You can have one portion of the screen for your presentation content and the other for the Google Meet window to view the video feeds of other participants.
Go to the Chrome web store on Google Chrome or other browsers like Microsoft Edge that support it and search for ‘Dualless’. You could also click the button below to hop there in a jiffy.
Click the ‘Add to Chrome’ button to install the extension on your browser.
A confirmation dialog box will appear. Click the ‘Add extension’ button to confirm.
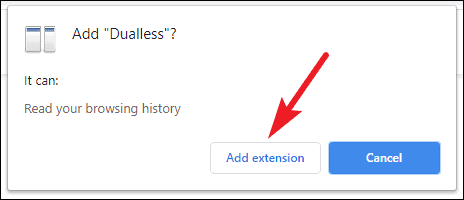
The extension will install, and the icon for the extension should appear on the right of your address bar. If it doesn’t, click the ‘Extensions’ button (the jigsaw-puzzle icon).
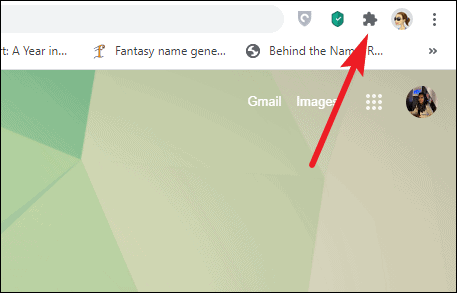
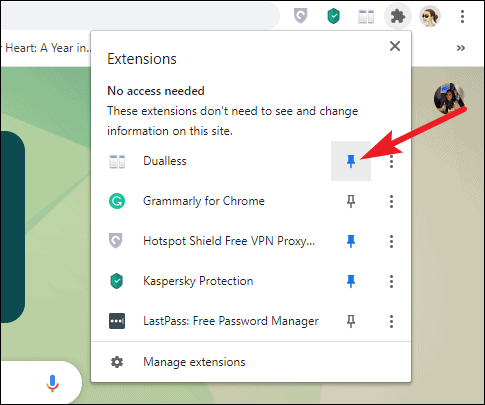
Then, click the ‘Pin’ icon next to the Dualless extension to pin the extension to your address bar. You could also use the extension from the Extensions menu every time without the need to pin it. Pinning it just makes it easily and quickly accessible.
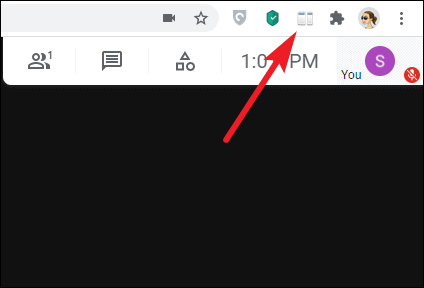
Now, use the extension in the meeting when you want to present your screen. Click the extension icon from either tab – Google Meet window or the tab you want to share.
Then, select the ratio of how you’d like to split your screen and click on it. Available ratios include 3:7, 4:6, 5:5, 6:4, and 7:3. You can change this ratio at any time later if you want to.

The tab from where you just clicked the extension icon will split in one part of the screen, left or right, depending on which side you clicked from Dualless’s menu. The rest of the tabs will split in the remaining part of the screen. It means that if you clicked the extension icon from the Google Meet tab and then clicked the left side tile, then Google Meet will appear on the left side and all remaining tabs on the right.
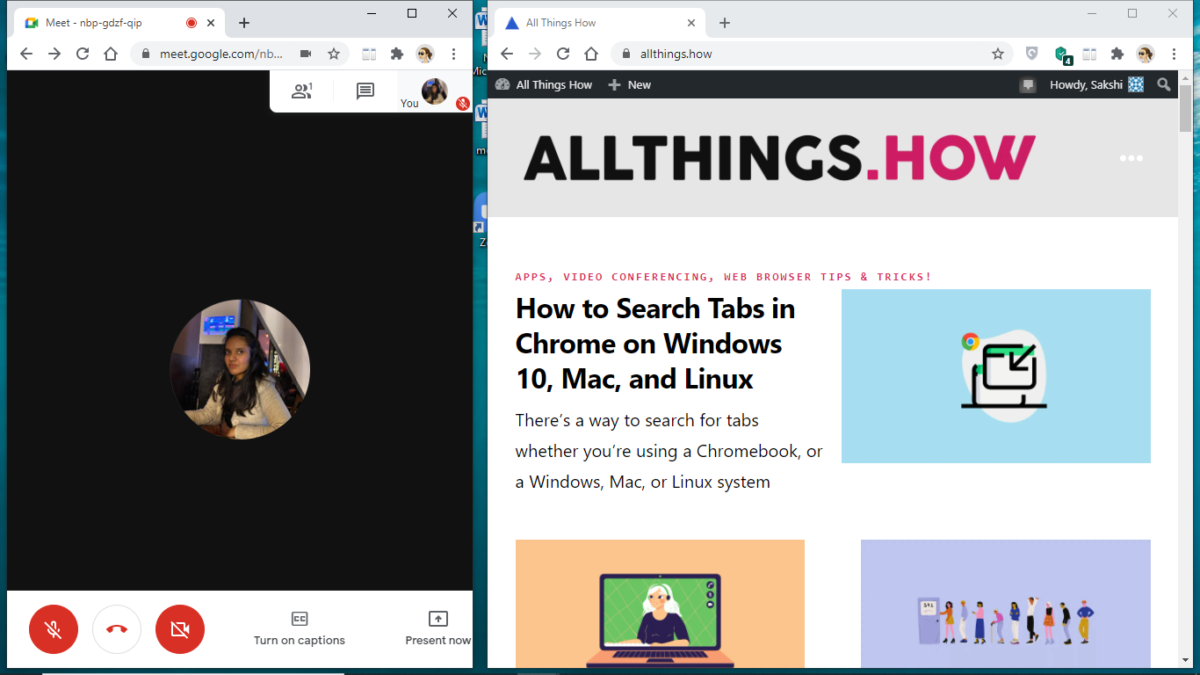
Now, share the screen from Google Meet, and you’ll be able to see the content you’re sharing on one side of the screen and participants’ videos on the other.
Use a Second Device to login to Meet a 2nd Time
So, you don’t have a second monitor, and the Dualless extension won’t help either as the content you want to share is not present in the browser tab. What else can you do? There’s still a couple of options.
If you’re attending the meeting from your computer and have another device, perhaps a smartphone or a tablet, you can log into your own meeting a 2nd time from that device. Google Meet lets you log in to a meeting more than one time from a single account. This allows you to view the participants’ videos on that device while presenting the content from the first device.
Open Google Meet on the 2nd device, and log in with your account. Now, click the ‘Join with a code’ button and enter the meeting code from the previous device. Remember to join the existing meeting and not start a new meeting.
The meeting will now have two instances of your account.
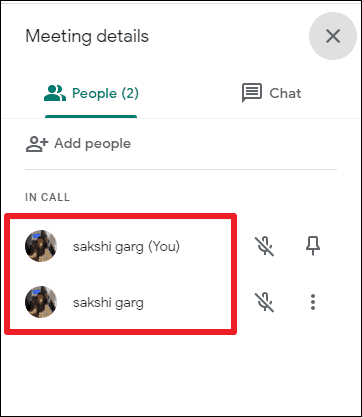
If you do choose to log in to a second device, remember to mute the microphone, as well as the speaker sound, on that device to avoid noise echo. Keep the 2nd device only to view the video feeds of other participants. Then, when the presentation is over, end the meeting on the 2nd device to return to the normal meeting experience.
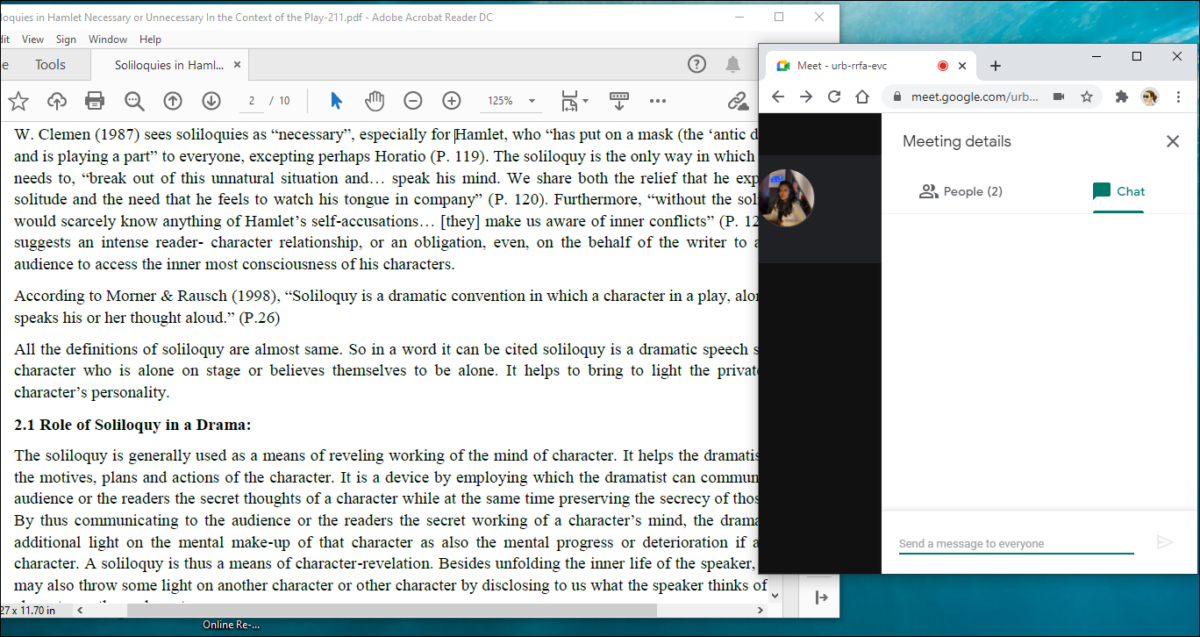
Adjust Your Presentation and Meet Windows Manually
When you can’t use any of the above solutions, there’s the good old-fashioned manual adjusting of the windows. Restore down both your Google Meet and the presentation content window. Then, reduce their sizes and overlay them in a position that lets you see the presentation content on one side and Google Meet window on the other.
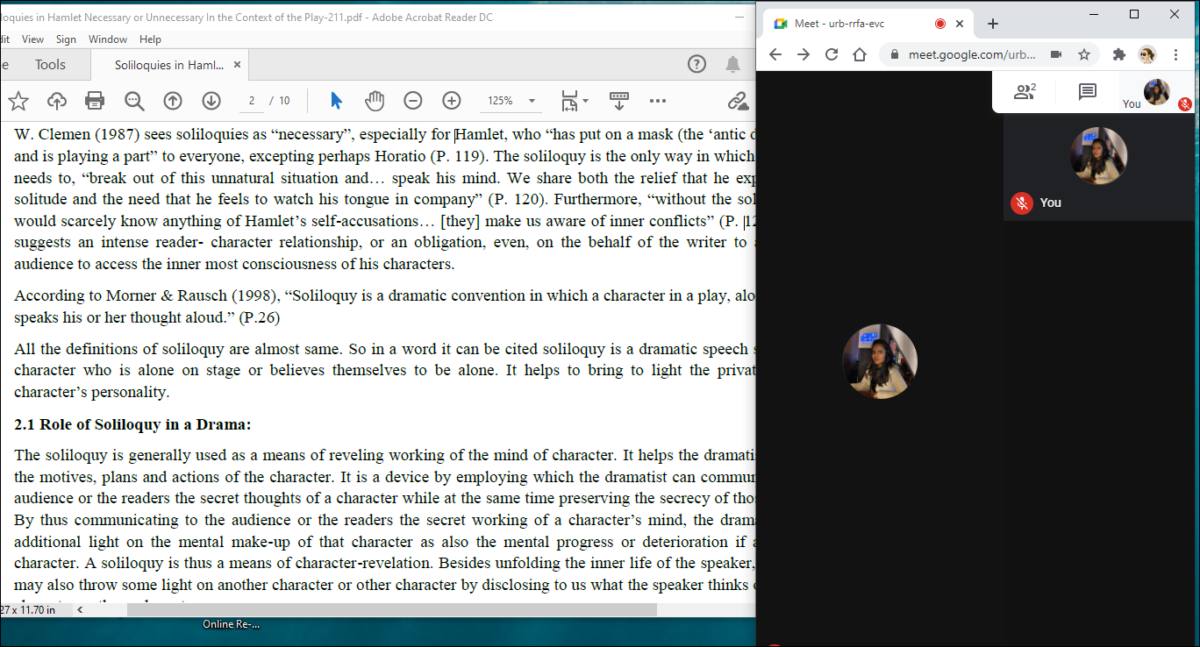
This might not be the most ideal solution, but for meetings with few participants at least, it’d work smoothly. If there are a lot of students in the meeting, you can direct the students to ask any questions in the chat. And you can keep an eye on the chat panel from the repositioned Google Meet window and open it while sharing your screen easily.
Imagine not being able to see other participants when you’re presenting in a real-world scenario. It would suck, just like it does in virtual meetings. Fortunately, these few tips might help you get ahead of the situation.

How to Code Using AI

Microsoft Copilot Pro Review: There is a lot of Unrealized Potential

How to Create a Custom Copilot GPT
Get all the latest posts delivered straight to your inbox., member discussion.

What is Companion Mode in Google Meet and How to Use It

How to Use Google Meet on Laptop or Desktop

How to Join Google Meet by Phone

How to Get Notifications from Chat in Google Meet and Save Chat Logs from the Meeting

How to Set a Video Background in Google Meet on iPhone
- Generative AI
- Office Suites
- Collaboration Software
- Productivity Software
- Augmented Reality
- Emerging Technology
- Remote Work
- Artificial Intelligence
- Operating Systems
- IT Leadership
- IT Management
- IT Operations
- Cloud Computing
- Computers and Peripherals
- Data Center
- Enterprise Applications
- Vendors and Providers
- United States
- Netherlands
- United Kingdom
- New Zealand
- Newsletters
- Foundry Careers
- Terms of Service
- Privacy Policy
- Cookie Policy
- Copyright Notice
- Member Preferences
- About AdChoices
- E-commerce Affiliate Relationships
- Your California Privacy Rights
Our Network
- Network World
Google Slides cheat sheet: How to get started
How to use Google Slides to create, collaborate on, and lead business presentations.

Need to build a slide presentation for a meeting, training, or other event? Google Slides is an easy-to-use web app that comes with the essential tools and more. It stores your presentations in the cloud with Google Drive. Anyone with a Google account can use Slides and Drive for free, and they’re also included with a Google Workspace (formerly G Suite) subscription for business and enterprise customers. There are Google Sheets mobile apps for Android and iOS, too.
This guide will help you become familiar with the Google Slides web interface and show you how to start a new presentation, upload a Microsoft PowerPoint file to edit in Google Slides, collaborate with others on your presentation, and finally, present it to others.
Create or open a presentation
Log in to your Google or Workspace account. Then:
From Google Slides : At the top of the home page, you’ll see a “Start a new presentation” header, with a row of thumbnails underneath. To start a new, blank presentation, click the Blank thumbnail. To start a new presentation in a template, select one of the thumbnails to the right or click Template gallery toward the upper-right corner, then click any thumbnail on the page that appears.

The Google Slides home page. (Click image to enlarge it.)
Below the “Start a new presentation” area you’ll see a list of presentations that are stored in your Google Drive or shared with you. To open a presentation, click it in this list.
The list of your presentations appears in reverse chronological order starting with the presentation you most recently opened. Clicking the “AZ” icon at the upper right of this list changes the sort order to Last modified by me , Last modified , or in alphabetical order by presentation title. You can also browse to a specific folder by clicking the folder icon next to the “AZ” icon.
From Google Drive : Presentations stored in your Google Drive are listed in the main window of the Drive home page. To see a listing of presentations that others are sharing with you, click Shared with me in the left column. From either list, double-click a presentation to open it in Google Slides.
To start a new, blank presentation, click the New button at the upper-left of the screen and then click Google Slides .
If you want to use a template to start a new presentation, click the New button, then move the cursor over the right arrow next to Google Slides and select From a template . The template gallery for Google Slides will open; click a thumbnail to start a new presentation in that template.

Creating a new presentation from Google Drive.
From Google Slides or Drive: You also can use the search box at the top to find presentations in your Google Drive or shared with you. Enter words or numbers that may be in the presentation you’re looking for.
Upload a PowerPoint presentation to Slides
You can edit a Microsoft PowerPoint presentation in Google Slides, but first you must upload it to Google Drive.
From Google Slides: Click the folder icon ( Open file picker ) that’s above and toward the right corner of your presentations list. On the panel that opens, click the Upload tab. Drag-and-drop your PowerPoint file (.ppt or .pptx) onto this panel, or browse your PC’s drive to select it.
From Google Drive: Click the New button, then File upload , and select the PowerPoint file from your PC’s drive and click Open .
Traditionally, when you uploaded PowerPoint files to Google Drive, they were automatically converted to Slides format. That’s still the case when you upload PowerPoint files via the Google Slides home page .
However, Google now supports the ability to edit Microsoft Office files in their native format. By default, any .pptx files that you upload via Google Drive will remain formatted as PowerPoint documents. You can edit and collaborate on a PowerPoint file right in Slides, with all changes made by you or your collaborators saved directly to the PowerPoint file.
On the Google Slides and Drive home pages, native PowerPoint files will be denoted with an orange “P” icon, and when you open a native PowerPoint file in Sheets, you’ll see a “.PPTX” flag to the right of the document title.

Native PowerPoint files show the PowerPoint icon (top) instead of the Google Slides icon (bottom).
If you’d rather have Google convert PowerPoint files to Slides format automatically when you upload them via Google Drive, click the gear icon in the upper-right corner of the Drive home screen and select Settings from the drop-down menu. In the Settings box next to “Convert uploads,” check the checkbox marked Convert uploaded files to Google Docs editor format .
Work in a presentation
When you open a new or existing presentation, its first slide appears in the main window of Google Slides. Here’s a breakdown of the toolbars, menus, panes, and sidebars that appear around your presentation.
The left pane shows thumbnails of all the slides in your presentation. Click a thumbnail, and the slide it represents will appear in the main window, where you can edit it.

The Google Slides editing interface. (Click image to enlarge it.)
Your presentation’s title appears along the top of the screen. To change it, click anywhere inside the title and start typing.
The menu bar below your presentation’s title has a complete set of tools for working with presentations. These are the main submenus to know:
- File has commands for taking action on the whole presentation, including Print, Rename, and Share.
- Edit lists the standard editing commands such as copy, cut, paste, delete, duplicate, and find and replace.
- View lists several ways that you can view your slides as you design and edit them. This includes arranging them into a grid, previewing them as a slideshow, or zooming in on them. You can also watch the transition effect that takes place between slides when they’re played in a slideshow.
- Insert lets you add several objects to your slides, including charts, diagrams, pictures, tables, and text. You can also add links to YouTube videos or sound or video files that are stored in your Google Drive.
- Format lets you change the look of your slides. Certain functions on this submenu become clickable depending on whether you’ve selected an image or text on a slide, or selected the slide itself.
- Slide is where you can add, delete, or duplicate a slide that you’ve selected. You can also add a preset layout to a slide, change its background or theme color, or add and edit a transition effect that takes place between slides when your presentation is played as a slideshow.
- Arrange lists tools that let you group or reorder objects on a slide in relation to another. For example, you can place an image behind another image or group an image and a block of text together to make them easier to move at once.
- Tools leads to several miscellaneous functions. These include letting you record a voice clip to go with a slide, running a spell checker, and showing you a list of objects in your presentation that are linked to other files.
The toolbar directly above your presentation puts commonly used commands in easy reach. From this toolbar, you can click buttons to add to a slide or change its background, comments, layout, objects (images, lines, shapes, text), text style, theme colors for the whole presentation, transition effects during a slideshow, and more. The buttons on the toolbar change depending on whether you’ve selected image or text on a slide or the slide itself.
Notice that there’s no Save button in the toolbar — or anywhere in Google Slides. That’s because Slides automatically saves any changes you make to your presentation.
Speaker notes: Along the bottom of each slide you’ll see an area marked Click to add speaker notes . Here you can type in brief notes to remind yourself what to do or say when the slide is being shown. Only you will see these notes when you show your presentation to an audience.
Themes sidebar: When you start a new blank presentation, the Themes sidebar opens on the right side of the screen. (You can also open this sidebar at any time by clicking Theme on the toolbar above your presentation.) Themes apply the same fonts, colors, and other design elements to all the slides in a presentation, giving it a consistent look and feel. Click a thumbnail in this sidebar to change your presentation to that theme.
Create and manage slides
Here are the basic things to know about working with slides in a presentation.
Add a new, blank slide to your presentation: Click the + button at the left end of the toolbar above your presentation. Alternatively, if you click the down arrow next to the +, you can choose a layout to use as the basis for a new slide.

Click the down arrow next to the + button in the toolbar to choose a layout for a new slide.
Apply or change a slide’s background: Select the slide’s thumbnail in the left sidebar and click Background on the toolbar above your presentation. On the panel that opens, you can change the slide’s background color or use an image file from your Google Drive, Google Photos account, or PC as the background.
Apply or change a slide’s layout: Select the slide’s thumbnail in the left pane, then click Layout on the toolbar above your presentation. On the panel that opens, select the layout you want to apply to this slide.
Apply or change a slide’s transition: Select the slide’s thumbnail in the left sidebar and click Transition on the toolbar above your presentation. In the Motion sidebar that opens along the right side of the screen, you can apply or change the animated transition effect that is played before this slide.

Choosing a transition style in the Motion pane.
Move a slide to a different spot in the slideshow sequence: Click and hold its thumbnail in the left sidebar, drag it up or down to another place in the sequence, and release it.
Delete a slide: Right-click its thumbnail in the left sidebar and select Delete from the pop-up menu. Alternatively, select its thumbnail and select Edit > Delete from the menu bar or just press the Delete key.
Share and collaborate on a presentation
Presentations are often a group effort, with several team members contributing to and polishing a presentation. In Slides, it’s easy for multiple collaborators to work on a presentation together.
First, you need to share the presentation. When you’re viewing your presentation in Google Slides, click the Share button at the upper-right. Or, from your Google Drive homepage, click to highlight the presentation that you want to share. Then, in the toolbar toward the upper right, click the Share icon (a head-and-shoulders silhouette with a +).
Either way, the “Share” panel will open.

Setting permissions for a file being shared privately.
Share a presentation privately
In the entry box, enter the email addresses (or names of your Google Contacts) of the people with whom you want to share. By default, the people you invite to your presentation can edit it and reshare it with others.
To change access permissions for invitees: Click Editor to the right of the entry box and choose another option from the drop-down menu. Commenter means they can view your spreadsheet and add comments but can’t change it. Viewer means they can view your presentation but can’t edit it or add comments.
To prevent your presentation from being reshared, downloaded, or printed: Click the gear icon at the upper-right of this panel. On the smaller panel that opens, uncheck the boxes by Editors can change permissions and share and Viewers and commenters can see the option to download, print, and copy .
When you’re done setting permissions (and, optionally, typing in a message to your invitees), click Send , and everyone you’ve added will receive an email with a link they can click to access the document.
The shared presentation icon.
A presentation you’ve shared (or that others have shared with you) will have an icon of two silhouetted heads next to it in the presentations list on your Google Sheets and Google Drive home pages.
To limit or change a person’s access to your presentation: With the presentation open in Google Slides, click the Share button at the upper-right. Or, from Google Drive, highlight the presentation and click the Share icon.
The Share panel reopens showing a list of all the people you’ve invited, along with their permission status. Click the down arrow to the right of a person’s name, change their permission level or remove their access entirely, and click Save .

You can change permissions for people you’ve shared a presentation with on an individual basis.
If you have a Google Workspace subscription, another option is to select Give temporary access and, next to Access expires , select a date within one year of the current date. If you set an expiration date for a person that you’ve assigned as Editor, their access will be downgraded to Commenter on the expiration date.
Share a presentation publicly
Most business users will want to share presentations privately with select colleagues or clients, but you do have the option to share a presentation publicly. At the bottom of the Share panel is a “General access” area where you can copy a link to the document. By default, this link is restricted to those you invite to the document. To change it to a public link, click Restricted and select Anyone with the link from the menu that appears.
Click Copy link and the link to your presentation will be copied to your PC’s clipboard. You can share this link by pasting it into a chat message, document, email, forum post, or most other means of online written communication. Anyone who clicks this link will be able to view your presentation online. (Be aware that anyone can copy and reshare this link.)
To allow anyone in the public to comment on or edit your presentation: At the bottom right of the Share panel, click Viewer and select Commenter or Editor from the drop-down menu. Then click the Done button. Now the web link to your presentation will let anyone who clicks it add a comment or edit it.

Sharing a spreadsheet publicly.
To turn off public sharing for your presentation: Bring up the Share panel again. Near the bottom, click Anyone with the link and select Restricted from the menu, then click the Done button.
Note: You can apply both public and private sharing methods to your presentation. For example, you could allow the public to only view your presentation, but allow specific people that you’ve invited to comment on or edit it.
Collaborate on a presentation
The people you’ve shared a spreadsheet with can view or work on it at the same time as you or at other times. Remember that people who have Editor privileges to your presentation can change all aspects of it. Having multiple people making changes to a presentation can get confusing. In most cases, setting everyone to Commenter is the best way to collaborate in Slides: People can attach comments to a slide or to objects in a slide, but their comments won’t alter your presentation’s information or design.
To add a comment to a slide: Right-click its thumbnail in the left sidebar and select Comment from the menu that opens. Alternatively, you can select its thumbnail and select Insert > Comment from the menu bar or click the Add comment button (a speech balloon with a + sign).
A blank comment card with your name on it opens to the right of the slide in the main window. On this card’s entry line, type a brief comment, and when you’re finished, click the Comment button.

Typing in a new comment.
To add a comment to an object on a slide: Right-click the object (a block of text, chart, image, picture, etc.) and select Comment from the menu that opens. Alternatively, you can select the object and select Insert > Comment from the menu bar.
To draw someone’s attention to a comment: As you’re composing the comment, type the @ symbol and begin typing their name, then select the person from the list of suggested Google contacts that appears. They’ll receive an email notifying them of the comment and linking to it.
To read, reply to, or remove a comment: A slide that contains a comment is denoted in the left sidebar with a speech balloon by its thumbnail. Click the slide’s thumbnail to make the slide appear in the main window, and you’ll see all its comment cards on the right.
To reply to a comment, click its card. The card will expand to reveal an entry line where you can add a comment in response.

Replying to a comment.
Clicking the checkmark at the upper right marks the comment card as “resolved” and removes the card from the presentation. Clicking the card’s three-dot icon opens a menu that lets you edit or delete your comment.
To see a list of all comments: Click the Open comment history icon (the speech balloon) to the left of the Slideshow button. A sidebar will open along the right side of the screen; it lists all the comment cards in your presentation. When you click a comment on this list, the view of your presentation in the main window will jump to the cell where the comment is located and open its comment card.

The Comments pane lets you quickly review all comments and jump to specific ones.
For more details about collaborating on your presentation, including what it’s like to collaborate in real time, see “ How to collaborate on a document ” in our Google Drive guide. You can also collaborate on a presentation in Google Chat; that’s covered later in this story.
Recover older versions of a presentation
It’s easy to go too far when making tweaks to a presentation. Fortunately, it’s also easy to roll back to an earlier version of the presentation. Click File > Version history > See version history . This opens a panel on the right that shows a list of older versions of your presentation.

Using Version history to view an earlier version of a presentation. (Click image to enlarge it.)
To view an earlier version of your presentation: Click the date for it in the list. That version of the presentation will then appear in the main window.
To restore an earlier version so it replaces your current presentation: With the version you want to restore showing in the main window, click the yellow Restore this version button at the top of the screen. The restored version will then appear at the top of the version history list.
To give an older version a unique name: Click on its date. You’ll be prompted to type in words to replace the date. (The date and time will then appear in smaller size underneath the new name.)
Give a presentation
When it’s time to play your presentation to an audience, Google Slides has two modes: Slideshow and Presenter view. Slideshow mode essentially shows what your audience will see. Presenter view mode provides additional tools for your eyes only that run alongside Slideshow mode.
Slideshow mode: Click the Slideshow button at the upper-right corner of the screen. Google Slides will expand to full-screen view and show the slide that’s currently in the main window. (If you want to start the slideshow from the first slide in your presentation, click the down arrow to the right of the Slideshow button and select Start from beginning .)

The control bar in Slideshow mode lets you click through the slides, turn on auto-play, use a laser pointer effect, and more. (Click image to enlarge it.)
When you move the on-screen pointer to the lower-left corner of your presentation, a control bar appears. You use this to click forward and back through the slides. Clicking the three-dot icon on the control bar opens a menu with other controls, such as starting auto-play and adjusting how quickly it moves from slide to slide.
On this menu, Turn on the laser pointer turns the mouse pointer into a simulated red laser dot. Captions preferences — available only if you’re using a Chrome browser or Chromebook — lets you turn on real-time, automatic transcribing of your words as you say them (English only) and shows them to your audience as on-screen captions. Open speaker notes takes your presentation out of full screen and opens a separate “Presenter view” window, as described below.
Presenter view mode: Click the down arrow to the right of the Slideshow button and select Presenter view . This shows the presentation in your browser window and launches a separate window that assists you while you’re giving your presentation.

Presenter view lets you (but not your audience) see your speaker notes while presenting. (Click image to enlarge it.)
From the Presenter view window, you can jump to any slide in your presentation, read the speaker notes you wrote for a slide, and control the Q&A feature. There’s also a timer that you can set to remind yourself how much time you’re spending showing a slide — or the entire presentation — to your audience.
Click the AUDIENCE TOOLS tab to use the Q&A feature, which lets you take questions from your audience. To open questions for a slideshow, click the Start new button. A web link appears at the top of your presentation. An audience member watching your presentation on their computer, phone, or tablet can click/tap that link, which will take them to a page where they can type a question for you. You’ll see the question in your Presenter view window, and you can choose whether to show their question to the rest of your audience during the presentation. To close questions for a presentation, turn the switch from ON to OFF .

Audience members can submit questions from their devices, and the presenter can decide whether to display them as part of the slideshow. (Click image to enlarge it.)
Present in Google Meet
Need to give a presentation during a Google Meet video meeting? As long as you’re using a Chromium-based browser (Chrome, Microsoft Edge, Opera, etc.), it’s easy: Toward the upper right of the Google Slides page, click the Google Meet icon. From the panel that opens, select a meeting that’s scheduled on your Google calendar today, start a new meeting, or type/paste in the web link or code that you have for another meeting.

Click the Meet icon to get started presenting to a video meeting.
If you start a new meeting, a sidebar for the meeting will open on the right. At the bottom of the sidebar, click the Present now icon (a box with an up arrow). On the panel that appears, select your presentation and click the Share button, and you’ll be presenting to the meeting.

Choose which tab or window you want to share and click the Share button. (Click image to enlarge it.)
If you join a scheduled meeting, you have two choices: “Join the call” and “Just present this tab.” If you click Join the call , a sidebar for the meeting will open on the right. Follow the same steps as above to present to the meeting. If you click Just present this tab , you’ll go directly to the panel where you select your presentation and click Share , but you won’t have a sidebar where you can follow the main meeting.
To stop sharing your presentation to the meeting, click the Stop sharing button at the top left of your browser window.
For more details about using Google Meet, see our Google Meet cheat sheet .
Download and export a presentation
Google Slides lets you download presentations for use offline. On the top menu, select File > Download and choose a file format. You can save your presentation to your PC as a PowerPoint (.pptx) file or in other formats such as PDF, or as JPG or PNG for an individual slide.
5 tips for working with Google Slides
Now that you’re comfortable working in Google Slides, try these intermediate tips.
Use the Google Slides mobile app
With the exception of the “Version history” tool, the Google Slides app for Android , iPhone , and iPad has many of the same features described in this guide.
When you have a slideshow open, the toolbar at the top of the screen lets you take a variety of actions:
- To present your slides on your phone or tablet, on a Chromecast device, or in a Google Meet meeting, tap the triangle icon.
- To share your presentation with other people, the headshot silhouette. (See “How to share from the Google Drive, Docs, Sheets, and Slides mobile apps” in our Google Drive cheat sheet .)
- To view all the comments in the presentation, tap the Comments icon (a chat balloon) if you see it in the toolbar, or tap the three-dot icon and select View comments from the menu that appears.
- The three-dot menu also lets you see the presentation’s Q&A history, export it, make it available offline, and more.

The Google Slides Android app.
To edit or comment on a slide: Tap the slide, and a menu will appear that lets you add or view comments for that slide or edit it. Tap an element on a slide, such as text or an image, and tools to edit that element will appear.
Any changes you make to your presentation in the mobile app are automatically saved and will appear the next time you open it in the Google Slides web app.
Get suggested slide layouts and content
Click the Explore icon at the lower-right corner of the screen. The Explore sidebar will open along the right side. In most cases, you’ll be presented with thumbnails of suggested layouts that Google Slides has automatically customized for the slide that’s open in the main window. Click the one you want, and it will be applied to the slide.

Use the Explore tool to get suggested layouts (left) and search for images (right).
At the top of the Explore sidebar is a search box. You can type in a word or phrase to find related content on the web or in your Google Drive. Search results appear on separate Web, Images, and Drive tabs in the sidebar. Click a web or Drive result to open it in a new browser tab. On the Images tab, click the + icon on the upper-right corner of an image to insert it onto your slide.
Create custom slide layouts to use as templates
You can design your own slide layouts to use as templates in any future presentation. First, open a new, blank presentation as described above. Then:
- On the menu bar over the blank presentation, select View > Theme builder .
- The main window switches to a layout editor. Toward the left you’ll see a column with the heading THEME on top and LAYOUTS just below that. Click the thumbnail of any layout in the LAYOUTS list. It will appear in the main window.
- You can remove objects that are already in any layout. For example, click on a block of text. A frame appears around the text. Without selecting the text itself, move the pointer to ward an edge of the frame, right-click, and select Delete from the menu that opens.

Creating a custom slide layout. (Click image to enlarge it.)
- Using the formatting toolbar above the slide, you can add new objects to the slide, including images, image placeholders, shapes, lines, and blocks for text. (Tip: enter placeholder words inside the text blocks.) When you click on any object, a frame appears around it. Drag and drop the frame to relocate it on the slide, or drag its edges to change its shape or size. You can also add or change the border and background colors for any object on the slide and/or change the background color for the whole slide.
- When you’re finished designing your layout, click the Rename button above the slide and give the layout a unique name.
- If you want to create another custom layout, click on the thumbnail of another layout under the column LAYOUTS and repeat the above steps starting from #3.
- When you are finished custom-designing all your layouts, click the X toward the upper-right of the slide layout in the main window.
- Along the top of the screen, click anywhere inside Untitled presentation and start typing. Tip: Use a name that indicates this is a template (e.g., “Annual Budget Presentation – Template”).
In the future, you can make new presentations starting from this template, and your custom slide layouts will be available.
- Open the template presentation you created in the steps above. On the menu bar, click File > Make a copy > Entire presentation . On the panel that opens, type in a name for the new presentation you want to create and click the Make a copy button. Google Slides will open this new presentation in a new browser tab.
- On the toolbar above the first slide of your new presentation, click Layout . From the panel of thumbnails that opens, select one of the layouts that you created. It will then be applied to the slide in the main window.
Collaborate on a presentation in Google Chat
An alternative way to collaborate on a presentation is to share it in Google Chat. Other people in your chat can add comments and help make changes to your presentation.
Start in Google Chat . To the left of the box where you type in your chat messages, click the + icon and select Drive file from the menu that opens. A panel will open over the screen listing the files in your Google Drive. Find and click your presentation to highlight it, then click INSERT on the lower-right corner.
You’ll be taken back to the chat message box. Click the blue right-pointing arrow to the right of the box, and a panel will open over the screen designating permissions for the shared presentation. By default, permissions are set to Comment. To change this, click Comment and select View or Edit . You can also allow the people in the chat to share a web link to your presentation with others outside of the chat by selecting Turn link sharing on .

You can share a presentation to individual or group chats in Google Chats. (Click image to enlarge it.)
After you’ve set the permissions, click SEND , and your message will appear in the chat stream with a large thumbnail of your presentation. To open a presentation in the chat, click the thumbnail. The presentation will open inside a large window that’s laid out alongside the right of the chat stream.
This is actually Google Slides running inside the chat window with your presentation loaded in it. Thus, most of the Slides commenting and editing tools are available for you and others in the chat to use on your presentation (if you granted them permission to comment or edit). The user interface is the same, except there’s no menu bar.

Collaborating on a presentation from within a Google Chat. (Click image to enlarge it.)
Use keyboard shortcuts
Save time in Slides by using keyboard shortcuts for common tasks. Below are some of the most useful to know. For more, select Help > Keyboard shortcuts from the top menu when you have a spreadsheet open or press Ctrl + / (Windows, Chrome OS) or ⌘ + / (macOS).
Handy Google Slides keyboard shortcuts
This story was originally published in September 2019 and updated in August 2022.
Related content
How many jobs are available in technology in the us, apple's find my system is coming to android, how to use a smartphone as a mobile hotspot, android 14 upgrade report card: predictable unpredictability, from our editors straight to your inbox.
Howard Wen ( www.howardwen.com ) is a longtime contributor to Computerworld . He specializes in explainer guides, how-tos, and reviews of office applications and productivity tools.
More from this author
Google docs cheat sheet: how to get started, 8 highly useful slack bots for teams, microsoft onedrive cheat sheet, 9 chrome extensions that supercharge google drive, most popular authors.

- Howard Wen Contributing Writer
Show me more
A phish by any other name should still not be clicked.

India is about to become Apple's third-biggest market
Windows 11 Insider Previews: What’s in the latest build?
The link between smartphones and social media addiction

Sam Bankman-Fried gets 25 years in prison

How to combat social media addiction

Android Police
How to add video embeds to google slides.
A video is certainly worth more than a thousand words
Google Slides allows you to add videos to your presentation. However, you can't upload videos from your PC or the best budget Chromebook to your Google Slides presentation. Instead, you'll upload a video to Google Drive and embed it into your presentation. This extra step keeps your presentation's size small, making it easy to share. You can also embed videos from YouTube. This guide walks you through the steps to add video embeds to Google Slides.
How to add video embeds to Google Slides using Google Drive
You can easily add video embeds to Google Slides if the video is uploaded or backed up on Google Drive. Follow these steps to learn how.
- Open your Google Slides presentation .
- Find a slide where you want to embed a video.
- Click the Google Drive tab.
- Select the video you want to add from your Google Drive.
How to change the size of your Google Slides
How to embed local videos into google slides.
To add a local video to your Google Slides presentation, start by uploading it to your Google Drive.
- Open Google Drive on the web.
- Click the New button in the upper-left corner of the screen.
- Navigate to the folder where your video is located and select it to upload.
- After your video is uploaded to Google Drive, open your Google Slides presentation.
- Find a slide where you want to add a video.
- Go to the Google Drive tab and select the video you just uploaded.
How to add YouTube video embeds to Google Slides
YouTube has a vast library of videos, and you can embed one into your Google Slides presentation. You can add YouTube videos by pasting the URL or manually searching for the video within Slides.
- Go to the slide where you want to add the YouTube video.
- Select the YouTube tab. If you have the URL of the video you want to add, paste it into the search bar at the top. If not, search for keywords related to the video you want to add.
How to fix YouTube embeds in Google Slides (AKA Error 150)
Use video formatting options in google slides.
After you insert a video into your Google Slides presentation, click the thumbnail to explore various formatting options.
- Video Playback : Select whether you want the video to play automatically upon entering the slide or when clicking the Play button. Click Start at and End at to adjust the times for when you want the video to begin and end. Tick the Mute Audio box to mute the added YouTube video.
- Size & Rotation : Use this option to change the height and width of the video or to lock the aspect ratio.
- Postion : Adjust the position of the video on the slide using this menu.
- Alt text : Describe your video in a few sentences for people who may have trouble seeing your content.
Presentations don't have to be boring
Embedding a video, whether educational or fun animation, can make your presentation more interesting. You can also add an audio clip and use one of the best Google Slides templates to spice up your presentation.

Google Slides: How to add GIFs and stickers to your presentation
G oogle Slides helps you make impressive presentations with its diverse template library, collaboration options, and seamless integration with Google apps. You can use it on your Android phone, iPhone, desktop PC, laptop, or affordable Chromebook . Your audience might lose interest if your slides appear uninspired. Break the monotony by including an occasional GIF or sticker. This tutorial shows you how to add GIFs and stickers to Google Slides.
When to add GIFs and stickers to Google Slides
A GIF (Graphics Interchange Format) is an image file that uses a series of pictures to create an animated sequence. It's like a video without sound and is typically used to express reactions or make memes.
If you think your presentation might cause audience members to nod off to sleep, add a GIF or two to your Google Slides. There's a time and place for humor, so use it sparingly. For instance, a funny Star Wars GIF or sticker will attract your classmates' attention. But it might not fly during a board meeting presentation.
How to autoplay your Google Slides presentation
How to get gifs and stickers for your presentation.
If you can't find a particular GIF or sticker online, go to Giphy or Tenor.com and enter your search term. You can also explore the trending section to find popular GIFs. If you're using a phone, download the Giphy app from the Google Play Store or Apple App Store. You'll also find other third-party apps for Android and iOS.
How to add GIFs and stickers on desktop
We walk you through three ways of adding GIFs and stickers to Google Slides. The first method adds them from the web, the second accesses GIFs downloaded to your desktop PC, and the third uses a web link.
How to add GIFs and stickers from the web
- Open Google Slides .
- Click Insert from the toolbar.
- Select Image .
- Choose GIFs and stickers .
- Enter your search term.
- Select the GIF or sticker you want to add.
- Click Insert .
- To resize the image, click and drag any corner.
How to add GIFs and stickers saved on your computer
Adding GIFs and stickers from your computer is the easiest way to include them in your slideshow. You must download them to your PC before following these steps.
- Click Upload from computer .
How to add GIFs and stickers via URLs
First, keep your GIF or sticker's URL handy.
- Choose By URL .
- Paste the link.
- Click Insert image .
How to add GIFs and stickers on mobile
The Google Slides mobile app isn't as feature-rich as the desktop version. However, it will do in a pinch. First, download the GIFs or stickers you want on your phone. You can't add them to your presentation via URL.
The following steps work on Android and iOS. We use an Android smartphone in this tutorial, but iPhone users can follow along.
- Open the Google Slides app.
- Tap the plus icon in the upper-right corner.
- Select Image . Close
- Tap From photos .
- Choose a GIF or sticker from your gallery. Close
Why can't I add a GIF or sticker to Google Slides?
There are many reasons why your GIF or sticker might not load correctly despite following the steps listed above.
- Older versions of Google Slides might have issues with GIF playback, so get the latest update.
- GIFs and stickers may not appear as intended if you have poor internet connectivity. To avoid issues, download and add them to your slides instead of using URLs.
- Large GIF files may not work well with Slides. Compress the images or replace them with smaller files.
The best Google Slides templates for work, school, and home
How to edit gifs and stickers in google slides.
You can customize GIFs to match the theme of your presentation. You can add a border, crop, resize, and recolor images.
How to crop an image
- Double-click the GIF or sticker.
- Drag the black tabs until the image gets cropped to your preference.
- When you're happy with the final image, press Enter . If you aren't, type Ctrl + Z to undo the changes.
How to use formatting options
Use Google Slides' formatting options to change your GIF or sticker's orientation, size, color, opacity, and brightness.
- Select your GIF or sticker by clicking it.
- Select Format from the toolbar.
- Click Format options .
- Adjust the orientation or size from the Size and Rotation section.
- Change the tone of the image from the Recolor section.
- Customize your image's opacity, brightness, or contrast from the Adjustments section.
How to add a border
- Click the GIF or sticker.
- Select the pencil icon from the menu bar.
- Choose a border color.
- Click the border weight icon to adjust the thickness.
Get your point across with GIFs and stickers
If a picture is worth a thousand words, animated GIFS are worth even more. Pique your audience's interest by adding GIFs and stickers in Google Slides. If you want to make custom GIFs on Android, we have a guide for creating GIFs from stop-motion photos .

- Help Center
- Get started with Google Meet
- Start or join a video meeting
- Gemini in Meet
- During the meeting
- After the meeting
- Feature availability
- Settings in Google Meet
- Calling in Google Meet (formerly Duo)
- Troubleshooting
- Google Meet
- Privacy Policy
- Terms of Service
- Submit feedback
- Learn about the new Meet app
- Get started with Google Meet What's new in Google Meet Set up Google Meet Learn how to use Google Meet Meet tutorials Use Meet on third party products and devices Use Meet on other Google products and devices
- Start or join a video meeting Create a video meeting Join a video meeting Livestream a meeting
- During the meeting Activities in Google Meet Change how you view yourself and others Present in a meeting Background and reactions Host controls Accessibility
- Feature availability Basic features in Google Meet Premium features in Google Meet
- Settings in Google Meet Audio and video settings Notification settings
- Calling in Google Meet (formerly Duo) Get Started with calling in Google Meet Calling features Troubleshoot calling Set up calling on your TV
- Present in a meeting
Co-present Slides in Google Meet
Calling is available in the new Meet app. Get started with calling in Google Meet to stay connected with friends and family .
Want advanced Google Workspace features for your business?
Try Google Workspace today!
- Workspace Individual
- Business Standard
- Business Plus
- Enterprise Essentials
- Enterprise Starter
- Enterprise Standard
- Enterprise Plus
- Education Plus
- Teaching & Learning Upgrade
When you use Google Meet on an eligible work or school account, you can control Google Slides presentations from within a video meeting. You can also make other people in the video meeting co-presenters.
Important: To control a Google Slides presentation from a Google Meet video meeting, you must use a computer with a Chrome or Edge browser.
Become a main presenter
A main presenter is someone who starts presenting their Google Slides presentation from inside a Meeting.
- On your computer, open a Chrome or Edge browser.
- In the browser, open the file you want to present in Slides .
- In a different tab, join a video meeting on Google Meet .
- Tip: For co-presenting to work, your presentation has to be shared as a tab. If you share a window or your entire screen, co-presenting won't work.
- In Google Meet, hover over the presented tile.
- You can only control a presentation and co-presenters in Google Meet when you're in slideshow mode.
- If another presenter starts presenting a new presentation, then they become the main presenter and all current co-presenters are cleared.
You can control the presentation with the control panel at the bottom of the presentation tile and designate co-presenters.
- To jump to a specific slide, click the slide number then choose from the list of slides.
- Hover over the presented tile.
- Anyone joining from a mobile device, meeting room or an invited user who hasn't joined the meeting as yet can't be made a co-presenter.
- If a co-presenter leaves the meeting and re-joins, they have to be made a presenter again.
- Whenever the meeting's main presentation changes, all co-presenters will be demoted
- If the main presenter switches to presenting a different Slides presentation, all co-presenters will be demoted.
- Keep in mind that a co-presenter will need edit access to the Google Slides file to see speaker notes while presenting.
- Tip: Co-presenters only can control the presentation while in slideshow mode.
Important: When someone is promoted to a co-presenter, they get access to the presentation file's link as well. If the co-presenter isn't meant to get access to the presentation file, make sure to switch off link sharing before promoting someone to be a co-presenter. Keep in mind that a co-presenter will need edit access to a file to see speaker notes while presenting.
Become a co-presenter
Who is a co-presenter.
Anyone who’s appointed by the main presenter becomes a co-presenter. The co-presenter must be inside the meeting to be designated.
You can control the presentation with the control panel at the bottom right of the presented tile.
Co-presenters can't exit or enter slideshow mode.
Once you’re made a co-presenter, you get a visual notification inside Meet that you’re made a co-presenter.
Related resources
- Use Google Meet with Google Docs, Sheets, Slides, & Jamboard
- Present during a video meeting
Need more help?
Try these next steps:.

Google Meet is your one app for video calling and meetings across all devices. Use video calling features like fun filters and effects or schedule time to connect when everyone can join.
IMAGES
VIDEO
COMMENTS
Once you've customized your template, here's how to present a PowerPoint on Google Meet: 1. Open the PPT file. To begin, locate the PowerPoint file on your PC that you want to share on Google Meet and open it. You'll need to have your PowerPoint presentation completely done and ready to present before continuing. 2.
In a different Chrome window, open Google Meet and join a video meeting. At the bottom of the meeting screen, click Present now A Tab . You can either present from the Google Meet tab, or present directly from the Slides tab. Select the tab with the Slides presentation, then click Share. In Google Meet, at the bottom right of the screen, click ...
Presenting over Google Meet is a little bit different than presenting in-person. You'll need to know how to use the video app's interface so you can lead the...
In this video you will learn how to present a PowerPoint presentation in Google Meet either in editing mode or in full screen mode. This PowerPoint tutoria...
Open your PowerPoint presentation. Join a Google Meet meeting. If you're the host, you have to first create a Google Meet . Click the Present now icon when it's your turn to present. Navigate to the Window tab, select the PowerPoint window, and click Share . If your PowerPoint window is minimized, it won't appear under the Window tab.
In a different Chrome window, open Google Meet and join a video meeting. At the bottom of the meeting screen, click Present now A tab . You can either present from the Google Meet tab, or present directly from the Slides tab. Select the tab with the Slides presentation, then click Share. In Google Meet, in the bottom right of the screen, click ...
To join the meeting only to present, go to meet.google.com and enter the meeting code to join the meeting. After reaching the 'Meeting ready' page, click on 'Present' button instead of 'Join now'. After you've entered the meeting, a pop-up box will appear where you can choose what you want to share. Choose either a Chrome tab, or ...
Step 2: Close all apps other than PowerPoint. Open the Google Meet app on your iPhone and iPad and join a meeting. You can disable your camera before joining a meeting. Step 3: Tap on the three ...
In a different Chrome window, open Google Meet and join a video meeting. At the bottom of the meeting screen, click Present now A Tab . Select the tab with the Slides presentation, then click Share. In Google Meet, at the bottom right of the screen, click Start slideshow . Important: You can only control a presentation in Google Meet when you ...
In this #GoogleMeet tutorial, I show you how to #Share a #Presentation and at the same time engage with your audience. Chapters: 0:00 Intro0:25 Step 1 Start ...
Open the presentation on your phone. Launch Google Meet and start or join a meeting. In the top right corner of the Meet screen, tap the three-dot menu. Select "Present screen.". A message ...
Select 'Present a Tab' in Meet > choose a Google Slide presentation > manage your presentation with controls in the bottom corner of the presentation. Visit the Help Center to learn more about controlling Slides presentations in Google Meet.
If you want to share your entire screen, click "Your Entire Screen." In the next popup, select the screen you want to share. If you're using multiple monitors, you'll see all of them here. Click "Share." Google Meet will start sharing your entire screen. You'll also see it in the chat window.
Open your document, click "Present to a Meeting" (a box around an up arrow), and choose "Present Using a Meeting Code." Enter the meeting code or link and click "Continue." Click "Present Tab to Meeting" and follow the same process to select the tab content and click "Share." Like with the Google Calendar event option above, you'll still need ...
This video shows how to share Powerpoint slides in Google Meet, which is useful for giving a presentation in an online meeting or class. More Google Meet tut...
You simply need to click on the Previous and Next slide icons in the Presenter view to control your presentation. Once you're done presenting, click on the You are presenting button at the bottom of the Google Meet window and click Stop presenting. 2. Set Up Your PowerPoint Slide Show to Window View.
Now, use the extension in the meeting when you want to present your screen. Click the extension icon from either tab - Google Meet window or the tab you want to share. Then, select the ratio of how you'd like to split your screen and click on it. Available ratios include 3:7, 4:6, 5:5, 6:4, and 7:3. You can change this ratio at any time ...
Important: To control a Google Slides presentation from a Google Meet video meeting, you must use a computer with a Chrome or Edge browser. Become a main presenter. A main presenter is someone who starts presenting their Google Slides presentation from inside a meeting. On your computer, open a Chrome or Edge browser.
Open the template presentation you created in the steps above. On the menu bar, click File > Make a copy > Entire presentation. On the panel that opens, type in a name for the new presentation you ...
Google Meet - Online Video Calls, Meetings and Conferencing. Real-time meetings by Google. Using your browser, share your video, desktop, and presentations with teammates and customers.
This video tutorial will show how to use the presenter view in Google meet. You can see your participants and your notes (this can't be seen by your viewers/...
Open your Google Slides presentation . Find a slide where you want to embed a video. Select Insert at the top and click Video . Click the Google Drive tab. Select the video you want to add from ...
In this episode of Google Workspace Productivity Tips, we show you how to see meeting participant's faces, who has raised their hands and more all while pres...
G oogle Slides helps you make impressive presentations with its diverse template library, collaboration options, and seamless integration with Google apps. You can use it on your Android phone ...
On your computer, open a file in Google Docs, Sheets, Slides, or Jamboard. At the top right, click Meet . To start a new meeting, click Start a new meeting. On the right, a side panel shows your meeting. To invite people to your meeting and: Add other people in the call: Beside "This video call only," click Copy .
Important: To control a Google Slides presentation from a Google Meet video meeting, you must use a computer with a Chrome or Edge browser. Become a main presenter. A main presenter is someone who starts presenting their Google Slides presentation from inside a Meeting. On your computer, open a Chrome or Edge browser.