How-To Geek
How to add music to your powerpoint presentation.
There are many ways to improve your PowerPoint presentation---adding animations to objects, customizing slide transition styles, and using interesting themes to name a few.

Quick Links
Adding music to your presentation.
There are many ways to improve your PowerPoint presentation---adding animations to objects, customizing slide transition styles, and using interesting themes to name a few. In addition to all that, you can also add music to your presentation.
PowerPoint makes it very simple to add music to your presentation. Adding music to your presentation may be a great idea, but there are also cases where it may be considered unprofessional. We’re not here to tell you when to do it, just how to do it, but make sure it’s appropriate for the situation.
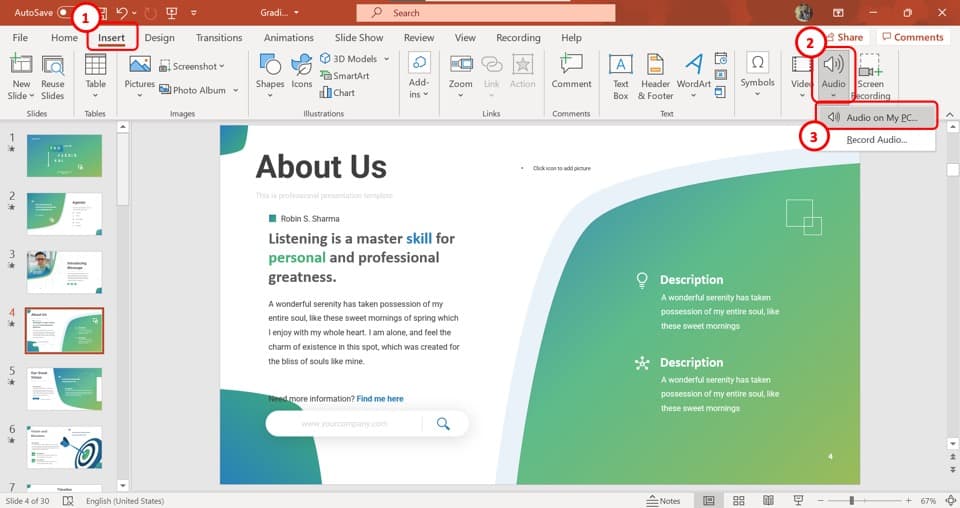
Switch to the "Insert" tab and then click the “Audio” button.
A menu will appear, giving you the option to either upload music from your PC or record your own audio track.
If you’d like to record your own audio, select “Record Audio,” and the “Record Sound” window will appear. Go ahead and give your audio a name, then click the “Record” icon when you’re ready to start.
After the “Record” icon is selected, a timer will start which gives you the total length of the sound being recorded. Once you’re ready to stop recording, press the “Stop” icon. To listen to your recording, you can press the “Play” icon. If you’re happy with what you're recording, select “OK” to insert it into your presentation.
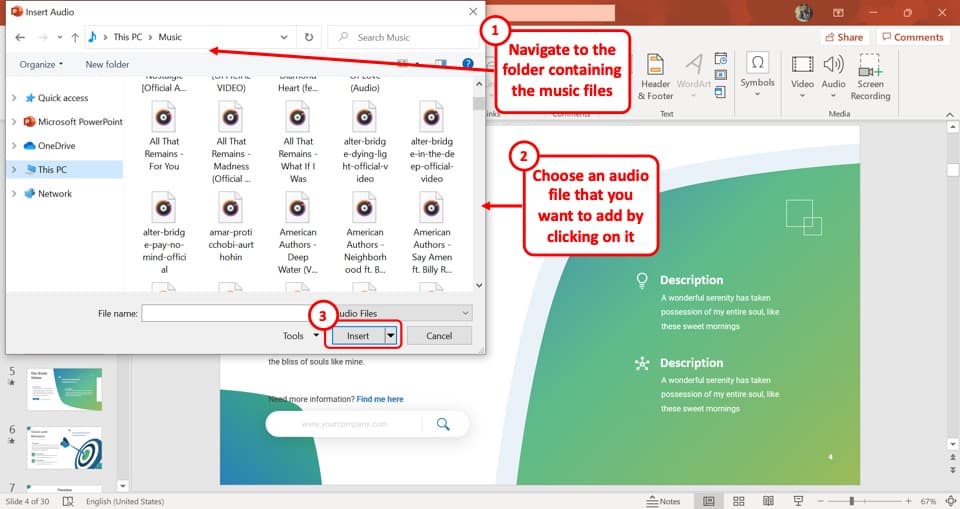
If you prefer to upload music from your PC instead, go back to the audio options menu and select “Audio on My PC.” This will open your PC’s directory. Locate the audio file you’d like to use, then select “Insert” at the bottom-right of the window. PowerPoint supports several popular formats, like MP3, MP4, WAV, and AAC.
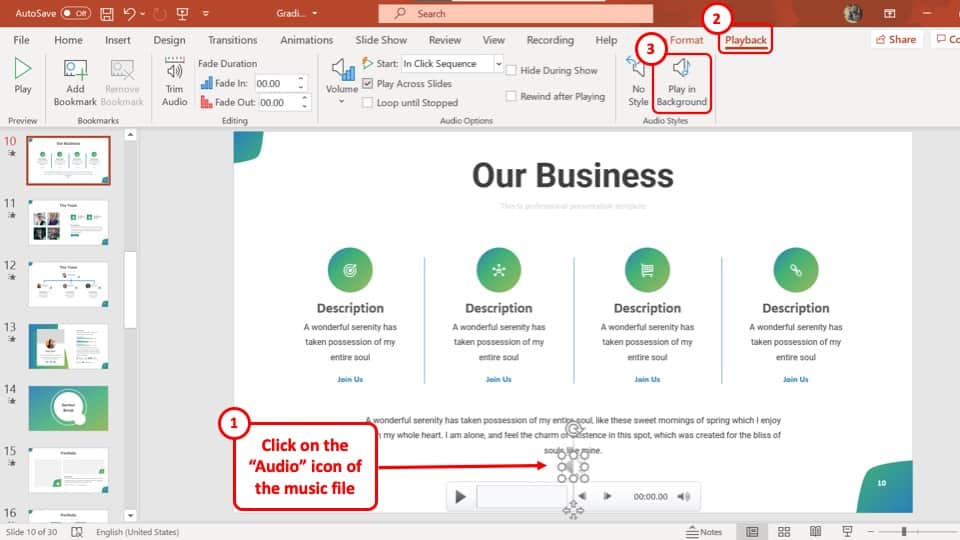
Now you’ll see a speaker icon appear in your presentation. Here, you can play the audio, control the volume, and move the audio back or forward 0.25 seconds.
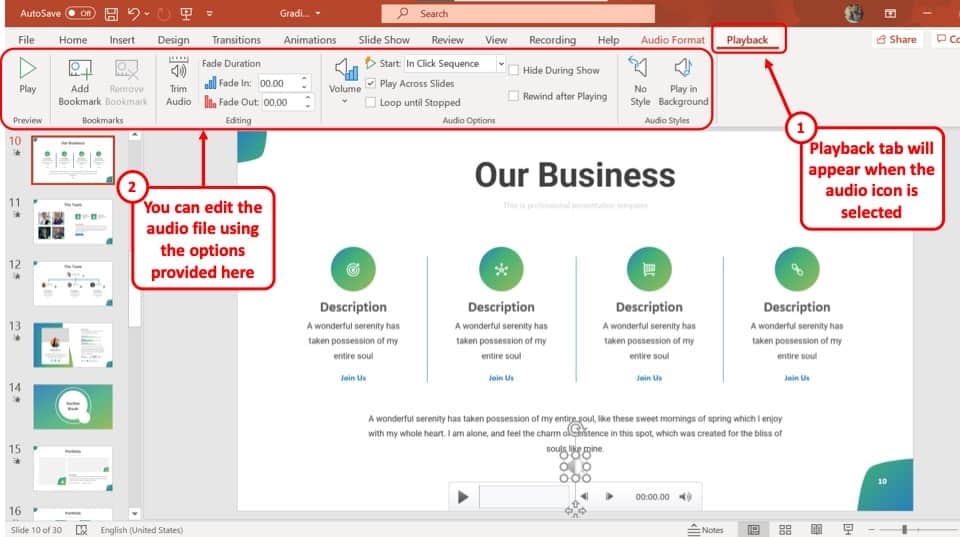
Additionally, the “Playback” tab appears in the ribbon. By default, the “Audio Style” is automatically set to “No Style.” This means that the audio will only play on the slide where you insert it, the icon will appear in the presentation, and the audio will only begin once you click that icon.
But you can change all that. You can use the options here to adjust the default playback volume, choose whether the music starts automatically or on a click, whether it plays across other slides, whether it loops until you stop it, and so on.
We’re going to change this by selecting “Play in Background” in the “Audio Styles” section.
There are a few other options available to you, as well. You can add (or remove) bookmarks for specific times in your audio clip, trim parts of the audio, and give your audio a fade in/out effect.
Use these tools to customize the perfect audio for your presentation.
Home Blog PowerPoint Tutorials How to Add Music to PowerPoint
How to Add Music to PowerPoint

When editing PowerPoint templates or creating new presentations from scratch, you might want to insert a narration or add music to PowerPoint. There are two methods by which you can insert music into your PowerPoint slides and control how it is played.
Adding Music to PowerPoint using an Audio File
You can add music to PowerPoint by using an existing audio file via Insert > Audio > Audio on my PC .

Select the music file from your device to insert it into your PowerPoint presentation.

Once the audio file is added, you can drag and drop the audio icon to place it in your slide or keep it hidden via the Playback tab by checking the Hide During Show option. The Playback tab also lets you control whether to start the music by clicking or automatically.

You can also play the music in a loop and across all slides instead of just one. Other options allow you to preview audio, trim the music file, add a fade duration at the beginning and/or end of the audio track, and adjust the volume.

Adding Music to PowerPoint by Recording Audio
You can also record audio to insert a song or music into PowerPoint. You can use this feature if you intend to add a background score by recording it using a mic. Such as recording Live playback music. To start recording your mic and computer audio, go to Insert > Media > Audio > Record Audio .

Click the Start button to begin recording music from your connected mic.

Once the recording is complete, click Stop to insert the audio into your PowerPoint presentation. Once the audio file is added, you can manage playback settings via the Playback tab to play the video across or a single slide, trim audio, add fade effect, play in a loop, hide in the slideshow, and adjust other options according to need.

While many PowerPoint users might ask the question as to how to add music to a PowerPoint presentation, the process is the same as adding or recording audio in general. The same process can also be used to add narration, be it from an existing file or by recording it.

Like this article? Please share
PowerPoint Tools, Presentation Ideas Filed under PowerPoint Tutorials
Related Articles

Filed under Design • April 23rd, 2024
How to Create the Perfect Handouts for a Presentation
Learn how to create effective handouts for presentations and the recommended structure for handouts with this guide.

Filed under PowerPoint Tutorials • April 16th, 2024
How to Insert an Equation in PowerPoint
Learn how to create easy-to-understand science slides by mastering how to insert an equation in PowerPoint. Step-by-step guide.

Filed under PowerPoint Tutorials • April 9th, 2024
How to Remove Notes from PowerPoint
Make alternative versions of your presentation files by learning how to remove notes from PowerPoint. Step-by-step guide with screeshots.
Leave a Reply
- GTA 5 Cheats
- Print on a Chromebook
- Nothing Phone 2 Review
- Best YouTube TV Alternatives
- Asus ROG Ally vs. Steam Deck
- Gameshare on Nintendo Switch
5 ways to add music to PowerPoint

Depending on the type of slideshow you’re creating in Microsoft PowerPoint , music might be the perfect addition to the show. You may want a fun upbeat song on a slide or a soft subtle melody throughout the presentation.
Upload a song from your computer
Download free music, record music while creating the slideshow, add an offscreen video, play the song or use as background music.
We’ll show you how to add music to PowerPoint a few different ways and then use a single song on a slide or play background music from start to finish.
What You Need
Microsoft PowerPoint
Probably the easiest way to add music to your slideshow is to upload a song from your computer. This can be a tune you’ve saved and listen to often or one from a playlist.
Step 1: Open your PowerPoint presentation and select a slide to add the music.
Step 2: Go to the Insert tab and choose the drop-down arrow for Audio on the right side of the ribbon.
- How to embed a YouTube video in PowerPoint
- How to print a PowerPoint presentation with notes
- This PowerPoint ploy could help hackers empty your bank account
Step 3: Pick Audio on my PC , browse for the music file, and select Insert .
Step 4: You’ll then see an audio icon on your slide for the song.
Step 5: Use the Play button to listen and the Playback tab to adjust the playback options.
Maybe you have the type of song in mind you want, but don’t have a copy saved to your computer. There are a few online resources for obtaining royalty-free songs for presentations at no cost.
Fesliyan Studios Inc. : Choose a genre at the top such as commercial, happy, sad, or relaxing. Press the Play button to listen, then check out alternate versions where available. Choose Download to get the song.
Chosic : You’ll see a slew of songs for presentations from upbeat to soft. When you hear the song you want, select Download > Free Download .
SoundCloud : If you’re already a SoundCloud listener, this is a good option for presentation music. Type “free downloads” or similar into the search box and review the results. When you find the song you want, select More or the three dots to download the tune.
If you can find royalty-free music on YouTube as well, there are a number of ways to download MP3s from YouTube .
Once you download one of these songs, save it to your device and simply upload it to the slideshow as described above.
If you’re lucky enough to be gifted with musical talent, you can use your skills to record a song directly in PowerPoint. Warm up your vocal cords or grab your guitar and make your own presentation music.
Step 1: Open your PowerPoint presentation and select a slide to record the music.
Step 3: Pick Record audio . Note: You must have either a built-in or external microphone for your computer.
Step 4: When the Record Sound box appears, select the red, round Record button to start recording.
Step 5: Press the square Stop button when you finish. To listen to the recording, press the green Play button.
Step 6: When you finish, select OK to insert it onto the slide.
Step 7: You’ll then see the audio icon just like with an inserted audio file. Press the Play button to hear the recording.
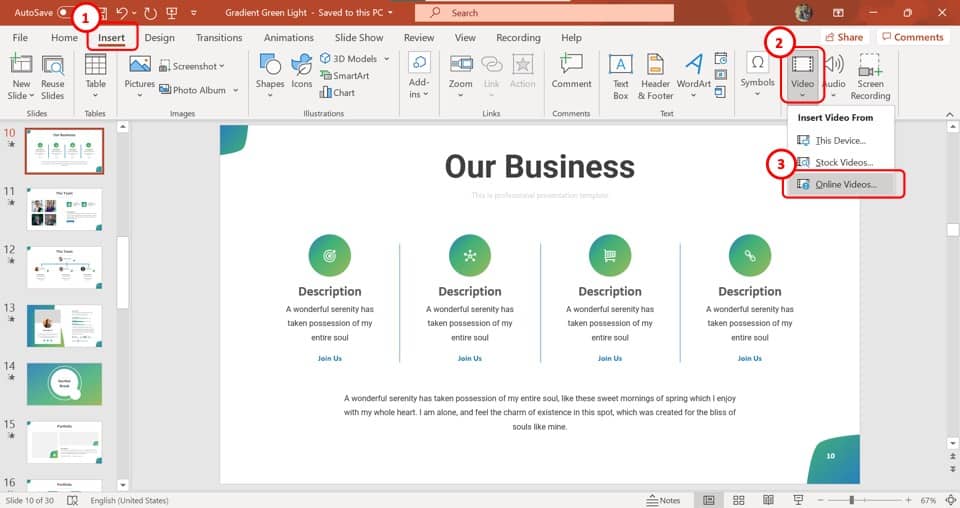
Sometimes the ideal song for a situation is attached to a video. While you can’t currently just play the audio and you probably don’t want the video as part of your presentation, there’s a workaround to get that tune in your show.
Step 1: Open your PowerPoint presentation and select a slide to add the video.
Step 2: Go to the Insert tab and choose the drop-down arrow for Video on the right side of the ribbon.
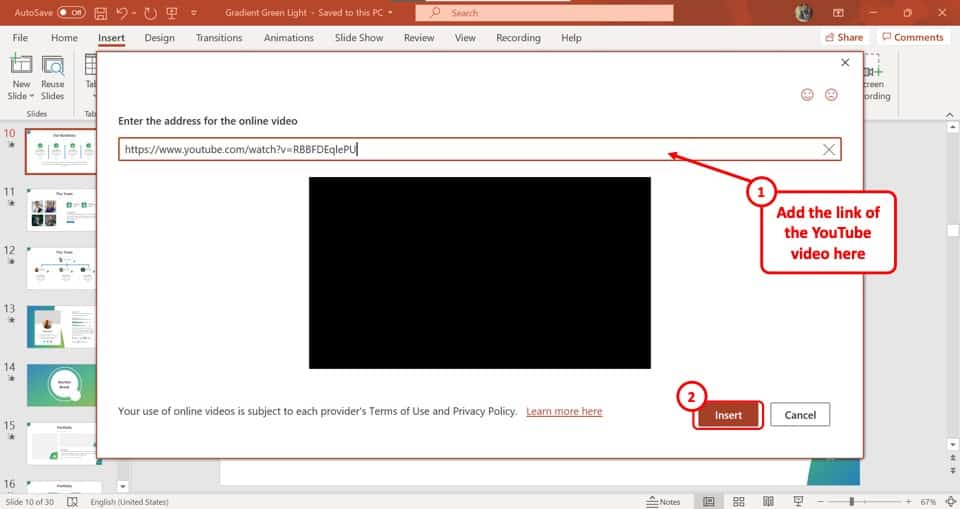
Step 3: Pick This Device , Stock Videos , or Online Videos and follow the prompts to insert the video.
Step 4: When the video appears on the slide, drag a corner or edge to make it smaller and then drag it off of the slide to one of the sides.
This allows you to play the video to hear the audio but not see the video in your slideshow.
Step 5: Select the video and use the Playback tab to adjust the options for playing it when clicking the slide or automatically.
Once you add the music to PowerPoint, you can set it to play on a single slide or last the duration of the presentation.
Step 1: Go to the slide containing the music and select it.
Note: If you want the music to play in the background throughout the slideshow, you’ll likely want the file on the first or second slide per your preference.
Step 2: Head to the Playback tab and choose to play the song with the slide or as background music.
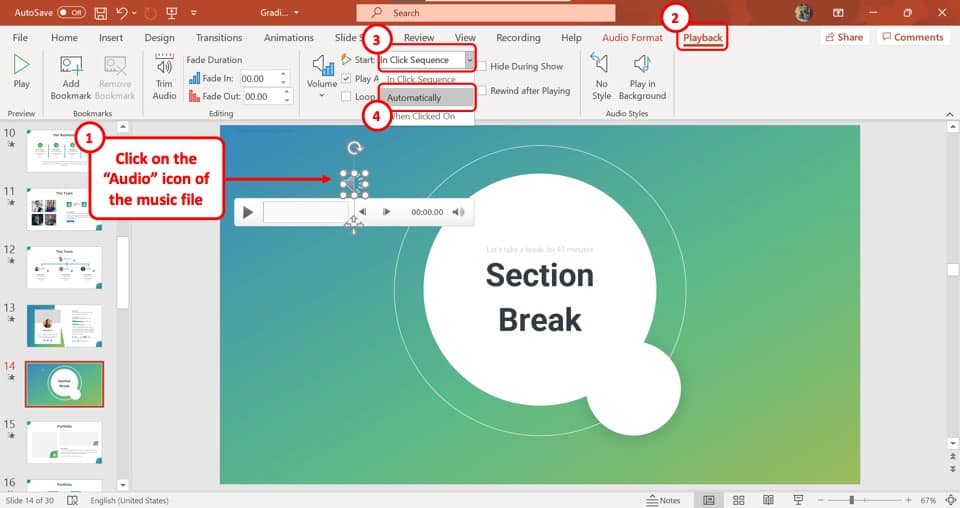
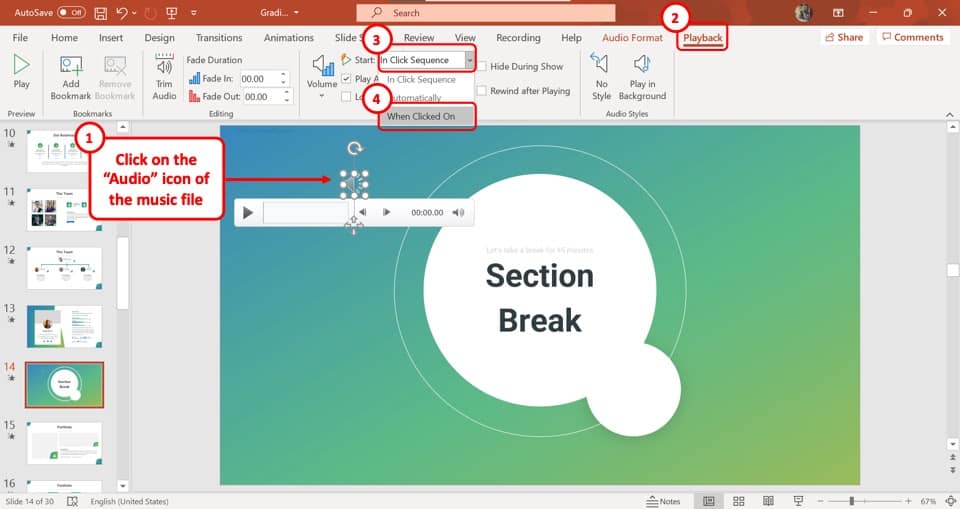
Step 3: To play the song only on that slide, choose the Start drop-down box in the Audio options section of the ribbon and pick how you want the music to begin. You can select In click sequence , Automatically , or When clicked on . When you advance to the next slide, the song stops playing.
Step 4: To play the song throughout the presentation, select Play in background in the Audio styles section. This automatically checks the boxes for Play across slides and Loop until stopped . You can also choose an option in the Start drop-down box for how to begin playing the song.
Keep in mind this only works with audio files, not the video file method described above.
Step 5: Adjust any other options on the Playback tab per your preference. You can increase or decrease the volume, rewind the song after it plays, or add a fade in or out effect.
Remember to practice your presentation after you add the music to make sure it sounds the way you want. You might also consider adding closed captioning for the hearing impaired.
Editors' Recommendations
- Best Microsoft Office deals: Get Word, PowerPoint, and Excel for free
- How to convert a PowerPoint to Google Slides
- Apple’s Vision Pro to get bespoke Microsoft 365 apps at launch
- PowerPoint will use ChatGPT to create entire slideshows for you
- Microsoft might put ChatGPT into Outlook, Word, and PowerPoint
- How-To Guides

If you're using Microsoft Office on your Windows PC, then you might want to keep your eye out for potential new security issues.
Microsoft has just backtracked on a decision it made earlier in 2022, and will no longer be blocking Visual Basic for Applications (VBA) macros in Office files by default across Word, PowerPoint, Excel, Access, and Visio.
Whether you’re presenting a slideshow to your executives, clients, or peers, you want to convey your message clearly and successfully. Unfortunately, many mistakes can be made when creating PowerPoint presentations.
From hard-to-read fonts to colors that hurt the eyes of your audience, here are some best practices to keep in mind for your next PowerPoint slideshow. Choose the fonts wisely Using a fancy, dramatic, or even whimsical font can be tempting. But you must consider the readability of the font. You want your audience to easily see your headings and bullet points. Consider the two basic font styles: serif and sans serif.
Microsoft PowerPoint offers many features for creating slideshows. Some of those features go a bit unnoticed but can be useful when building your presentation.
Before you create your next PowerPoint, take a look at these tricks. They can save you time, let you customize the show, and stay organized from start to finish. Save time by reusing slides You may not realize it, but you can reuse slides from other presentations to save time. You might reuse a slide with your company mission, contact information, or details of all your locations.
Critical PowerPoint Shortcuts – Claim Your FREE Training Module and Get Your Time Back!
How to Add Music to PowerPoint (Step-by-Step)
- PowerPoint Tutorials
- Shortcuts & Hacks
- October 18, 2019
In this article you’ll learn how to add music to PowerPoint, and the different playback and looping options that are available to you.

There are two main things to note about adding music (or other audio files) to PowerPoint:
1. Adding music to your presentation is slightly different than adding narration directly from within PowerPoint.
If you are trying to add pre-recorded narration files to your presentation, I recommend instead using the Record Audio or Record Slideshow features to narrate a PowerPoint.
That’s because the built-in narration tools make lining up your voice narration with your slides a lot easier. To learn all about how to narrate a PowerPoint using these tools, read our guide here .
2. Adding music to PowerPoint will increase the size of your PowerPoint presentation, as you can see in the picture below.

Because the MP3 music files are embedded directly into your PowerPoint presentation, the size of your presentation will increase by the size of the MP3 music file you add.
For example, if you add a 17MB song to your presentation, the size of your presentation will increase by 17MB. If you add two music files to your slides, it will increase even further.
Embedding lots of audio files can make sharing your presentation difficult. To learn different ways you can compress PowerPoint to reduce your file size, read our guide here.
How to add music to PowerPoint (MP3 or other)

To add music to a PowerPoint presentation, simply:
- Navigate to your Title slide (or wherever you want your music to start)
- Click the Insert tab
- Open the Audio drop down (in the Media group)
- Select Audio on My PC…
- Navigate to the folder on your computer
- Select the Audio file
- Click Insert
As a result, the audio file is embedded in your presentation as an object on your slide, and two new Ribbon tabs become available as you can see in the picture below.

Because the audio file is embedded in your presentation, anyone who now opens the presentation can access and play the music inside PowerPoint.
By default, your song will play within the Click Sequence of your presentation (see details below).
After inserting music to your presentation, you can then convert your entire presentation into a video and share it with your colleagues. To learn how to save your presentation as a video, read our guide here .
How to hide an audio file in PowerPoint

If you don’t want your audio file to be visible on screen during your presentation, you can either click and drag it off your slide space, or simply:
- Select the Audio File
- Open the Playback Options tab
- Select Hide During Presentation
Selecting Hide During Presentation hides the audio file object on the slide when running your Slideshow, so that it doesn’t display.
If you do this, make sure you are using either the In Click Sequence or Automatically play options for your audio file, otherwise your music will never play, as discussed below.
Note: Make sure you add your audio and music files to the exact slides on which you want them to play, because they can only be played once you reach the slide where they have been placed.
Adjusting when your music plays in PowerPoint
By default, your music files will play as part of the click sequence of your presentation which you can see and set within the Animations Pane (see In Click Sequence below).
However, like for most things in PowerPoint, you can change what triggers your music to play.

To change when your music file starts playing in PowerPoint, simply:
- Select the Music file on a slide
- Open the Playback Options tab
- Open the Start drop down
- Choose In Click Sequence , Automatically or When Clicked
Below is an explanation of what each of these different playback options means.
1. In Click Sequence
In Click Sequence means that your song will play based on it’s click sequence in your Animations Pane. If you have no animations or triggers set up on your slide, your song will play right before you advance to the next slide.

To change the order of your Click Sequence with other animations, simply.
- Open the Animations tab
- Click the Animation Pane
- Reorder your music file with your other animations
2. Automatically

Automatically means that your music plays as soon as you advance to that slide, and continues playing until either the song ends, or you advance to the next slide.
If you think you might be on this slide awhile and want the song to continue playing, simply select Loop Until Stopped .
3. When Clicked On
When Clicked On means that the music file will only play if someone physically clicks on the music file during your presentation.
This can be useful when you only want to play a song under certain circumstances, or when you want to control when the music starts or stops using your mouse.

Just make sure that if you select When Click On that you don’t also select Hide During Show . That’s because Hide During Show hides the audio file when you are giving your presentation, which means that you cannot click on it to start your song.
How to loop music across your entire presentation

If you are turning your PowerPoint presentation into a video, or want your music to play across all your slides as you present them, follow these steps:
- Insert and select your music file on your first slide
- Open the Playback tab
- Check Loop Until Stopped
- Check Play Across Slides
- Set the Start to play Automatically
Doing so, your music will play as soon as you start your presentation ( F5 on your keyboard) and will continue to loop and play throughout your presentation.

Your music will now only stop when you either exit slideshow mode (hitting Esc on your keyboard) or get to the end of your presentation.
To learn the different keyboard shortcuts for starting and stopping a PowerPoint slideshow, read our guide here .
How to trim music in an PowerPoint presentation
If you only want a section of your audio file to play, you can use the audio trimmer tool in PowerPoint.

To trim an audio file in PowerPoint after you’ve inserted it, simply:
- Select your Audio file
- Select the Trim Audio command
- Adjust the Start time
- Adjust the End Time
As a result, your audio file will be trimmed to the new start and end times you set.
Note: If you later compress the media in your presentation, the parts of the audio file you trimmed away will be permanently removed.
This will decrease the size of the audio in your PowerPoint presentation, but it will also permanently alter your music file.
To learn a variety of different ways you can reduce your PowerPoint file size by compressing things in PowerPoint, read our guide here .
How to remove all music files from your presentation
Audio and media files can easily be removed from your presentation by simply selecting them and hitting Delete.
However, if you have a lot of audio, video or music files spread out throughout your presentation, you can remove them all at the same time by following these simple steps.
1. Find your presentation in File Explorer

Save and close your PowerPoint presentation, and then open the file folder where your presentation sits.
If your presentation is on the Desktop, simply click and drag it into a folder so you can see it in File Explorer as pictured above.
2. Turn on File name extensions

To turn on the file name extensions in File Explorer , simply:
- Click on the View tab
- Select File name extension s
This enables you to see (and edit) the file name extensions of your files. For example:

3. Turn your PowerPoint into a ZIP file

To turn your PowerPoint presentation into a ZIP file, simply:
- Right-click your file
- Select Rename
- Replace the ‘ .pptx ‘ part with ‘ .zip ‘ and hit Enter
- Select Yes
This converts your PowerPoint presentation into a ZIP file with all your PowerPoint objects in it. As a result, you’ll be able to open the folder and edit its contents.

4. Delete any MP3 or MP4 files from your media folder

For example, if you want to delete the media files (MP3 and MP4) out of your presentation, simply:
- Open the ZIP folder
- Double-click PowerPoint
- Double-click Media
- Select the MP3 and MP4 files you want to delete and hit Delete
This deletes all the selected files from your presentation, regardless of where they exist within your presentation.
Note: The media folder also includes any audio or video narrations you have added to your presentation, so if you delete all those file types, you’ll remove the narration as well.
Therefore, if you are not sure which MP3 or MP4 files you want to delete from the folder, double-click them inside the ZIP folder to preview them before you delete them.
5. Turn your ZIP folder back into a PowerPoint presentation

Once you’ve deleted your media files, turn your ZIP file folder back into your PowerPoint presentation, simply:
- Right-click your ZIP folder
- Change the ‘ .zip ‘ to ‘ .pptx ‘
As a result, you can now open your PowerPoint presentation without all the media files you deleted.

Note: If you don’t like seeing the File extension names in your file folders, you can simply turn them off in File Explorer, like this:
- Navigate to the View tab
- Uncheck File name extensions

In conclusion, there is a lot you can do with audio when you add music to your presentation.
If you followed the instructions in this article, you now know exactly how to add music to PowerPoint, and the different playback and looping options available to you.
Just remember to pay attention to how and when you trigger your music to play in PowerPoint… especially if you choose to hide your audio file in Slideshow mode, as otherwise it might not play.
If you enjoyed this article, you can learn more about how to improve your PowerPoint skills by visiting us here .
What’s Next?
Related articles, about the author.

Popular Tutorials
- How to Strikethrough Text (l̶i̶k̶e̶ ̶t̶h̶i̶s̶) in Word, Excel & PowerPoint
- How to Make Animated Fireworks in PowerPoint (Step-by-Step)
- Strikethrough Shortcut (l̶i̶k̶e̶ ̶t̶h̶i̶s̶) for Word, Excel & PowerPoint
- How to Create a Flash Card Memory Game in PowerPoint (Like Jeopardy)
- Keyboard Shortcuts Not Working: Solved
PowerPoint Tutorial Categories
- Strategies & Opinions
- Presentation Design
- Pictures, Icons, Videos, Etc.
- New Features
- Miscellaneous
- Charts & Data Viz
We help busy professionals save hours and gain peace of mind, with corporate workshops, self-paced courses and tutorials for PowerPoint and Word.
Work With Us
- Corporate Training
- Presentation & Template Design
- Courses & Downloads
- PowerPoint Articles
- Word Articles
- Productivity Resources
Find a Tutorial
- Free Training
- For Businesses
We help busy office workers save hours and gain peace of mind, with tips, training and tutorials for Microsoft PowerPoint and Word.
Master Critical PowerPoint Shortcuts – Secure Your FREE Training Module and Save Valuable Time!
⌛ Master time-saving expert techniques.
🔥 Create powerful presentations.
🚀 Propel your career to new heights.
We value your privacy – we keep your info safe.
Discover PowerPoint Hacks Loved by Industry Giants - KKR, AmEx, HSBC!
Over 114,880 professionals in finance, marketing and sales have revolutionized their PPT skills with our proven methods.
Gain FREE access to a full module of our premium PowerPoint training program – Get started today!
We hate spam too and promise to keep your information safe.
You are currently viewing a placeholder content from Facebook . To access the actual content, click the button below. Please note that doing so will share data with third-party providers.
- Slidesgo School
- PowerPoint Tutorials
How to Add, Record or Edit Audio or Music in PowerPoint

Do you want to set the right mood and keep your audience engaged and entertained during your next presentation? In this new Slidesgo School tutorial, you’ll learn how to add audio or music to your presentations . You’ll also find out how to edit them to your liking .
Adding Audio from your Computer
Recording audio from powerpoint, editing audio, adding online audio, adding music from youtube, playing several clips in succession during your presentation.
- Before we begin, please note the following: in PowerPoint 2010 or older, you should use .wav or .wma files in Windows, and .wav files in Mac. If you’re using a newer version, we recommend that you work with AAC .m4a files.
- Open your PowerPoint presentation and select the slide where you want to add audio.
- On the Insert tab, in the Media group, click the Audio drop-down arrow. You’ll see two options: the first one allows you to add audio from your PC, whereas the second one allows you to record audio (you’ll need to have a microphone set up in your computer).
- Select Audio from My PC. A new window will open, where you have to locate the audio file you want to add to your presentation.
- Once located, click the drop-down arrow next to Insert. You’ll see two options:
- If you choose Insert , the audio will be directly inserted into your presentation, increasing the size of the document.
- If you choose Link to File , a link to the file will be created, reducing the size of the document. However, there could be issues if you use the presentation in a different computer, forcing you to link the audio file to the presentation again.
- Select the option that best suits your needs.
- If you want to export any audio included in your PowerPoint presentation, right-click its icon → Save Media As (you can only do this with audio inserted from your PC).
- Please note that if you want to play a different audio in each slide, you’ll need to add the audio files one by one. You’ll also need to uncheck “Play Across Slides”. You can refer to the “ Editing Audio ” section in this tutorial if you want more information.
- On the Insert tab, in the Media group, click the Audio drop-down arrow. Select Record Audio. A new window will open.
- Enter the name of the audio file you’re about to record.
- Press Record to start recording. To stop, press the Stop button. To play what you’ve recorded, press Play.
- If you’re happy with what you’ve recorded, click OK. If that’s not the case, click Cancel.
- Select the audio whose format you want to adjust. A new set of tabs, called Audio Tools, will appear on the toolbar.
- In the Bookmarks group, you’ll find an option to add bookmarks, which will be visible in the timeline. These can be helpful if you want to quickly find the main points in your audio during the presentation.
- In the Editing group, there are options to add a fade in and a fade out. You’ll also find the Trim Audio option. If you click it, a new window will open, where you can set the start point and the end point of the audio clip.
- In the Audio Options group, you’ll find the following options to adjust the behavior of the audio clip:
- Volume: It allows you to set the volume of the clip.
- Start: Click the drop-down arrow to choose how you want the audio to start. If you’re using Office 2010, you’ll also find an option here to play the audio clip during the entire presentation.
- Loop until Stopped: Once the audio clip finishes, it starts again indefinitely until you stop it.
- Play Across Slides: If you enable this, the audio clip will be played during the entire presentation. If “Loop until Stopped” is enabled too, it won’t stop playing until you reach the end of the presentation.
- Hide During Show: Check this option if you want to hide the icon.
- Rewind after Playing: Check this option if you want the timer of the audio clip to go back to the beginning when it reaches the end.
- If you’re using newer versions of PowerPoint, you’ll find a group called Audio Styles. Choose “No Style” if you don’t want additional effects. Choose “Play in Background” if you want the audio clip to be played in the background during your presentation.
- You can change the icon of the audio clip. To do so, on the Format tab, in the Adjust group, click Change Picture.
- Insert an icon or a picture. We’ll use it to link the online audio. Please refer to the How to Add and Modify Icons tutorial to learn how to insert icons.
- Add the link to the online audio resource. If you don’t know how to do it, please refer to the How to Insert a Hyperlink in PowerPoint tutorial.
- Once added, click the icon of this audio. A new window will open, where you must click the Play button. Some audio platforms, such as Soundcloud, allow you to generate an autoplay sharing link. With that, you just need to click the icon to play the audio automatically.
- If you want to pause the playback, you’ll need to exit the presentation mode and do it manually.
- Insert the video containing the audio or music you want. If you don’t know how, please refer to the How to Add a Video in PowerPoint tutorial.
- Decrease the size of the video and place it outside the visible part of the slide.
- We need to set it to automatically play in presentation mode. To do this, on the Playback tab, in the Video Options group, click the Start drop-down arrow and select “Automatically”. If you need more information, please refer to the How to Add a Video in PowerPoint tutorial.
- Please note that the audio will stop when changing slides.
To create a playlist that plays across all slides during your presentation, you need to use an audio editing software, such as Audacity or Adobe Audition, and edit the clips so that they come one after another. When you’re done, export it as a single audio file, which you can now use in your presentation.
Do you find this article useful?
Related tutorials.

How to print PowerPoint notes
Crafting an impactful PowerPoint slideshow and delivering a captivating presentation are distinct skills. The first focuses on designing appealing visuals to convey a clear message, while the second involves employing effective presentation techniques to ensure the audience grasps the idea. The content of this article will help you with the latter part of this process, guiding future presenters on how to print PowerPoint with speaker notes to enhance your presentations success and effectiveness.

Discover Our Online Presentation Software for Free
We have great news for you today! If you’ve been a Slidesgo fan for years (or months, or weeks, or days, or mere hours, we welcome everyone!), you’ll probably know for now that our templates are available mostly in two formats: for use in Google Slides and PowerPoint.Google Slides is a free tool, since you only need a Google account in order to use it. PowerPoint, on the other hand, is part of the Microsoft Office suite, so it’s not a free program, but that didn’t stop it from being one of the most popular options in the world!What if we...

Webinar: Presentation Audit
With more than 15,000 templates released on Slidesgo and a user base composed of millions of people, we estimate that the total number of presentations created adds up to… um, a lot! Our team of professional designers work very hard to provide you with editable slides so that the only thing you need to do is, well, customize the elements to your liking. Starting from any given template, the results may vary a lot depending on the person who edited the contents.Have you ever wondered “Is my presentation good enough?” and wished that an expert on presentations looked at your template...

How to Change Slides Orientation in Google Slides
A change of perspective is always good! Do you want your public to look at your slides in a new way? Changing slides orientation will do the work. In this tutorial you’re going to learn how to go from horizontal slides, to vertical ones (and vice versa!).
How to add music to a PowerPoint slideshow to make your presentation more engaging
- You can easily add music to a PowerPoint slideshow if you want to make your next presentation more engaging.
- You can add any MP3, MP4, WAV, or AAC file on your computer to your PowerPoint presentation, and adjust the settings so that it plays across slides if you want to.
- Visit Business Insider's Tech Reference library for more stories .
It's true that Microsoft PowerPoint is a business program made for creating official-looking presentations for school or office settings — but that doesn't mean you can't use it to make your presentations fun, too.
One way to spice up a presentation is to add music — in a business setting, it'll be unexpected, and the fun surprise may just make your colleagues sit up straighter, pay attention, and maybe even enjoy the meeting.
This feature can also give a little extra umph to a school presentation — for example, a presentation on America in the '60s could be enhanced by the addition of some Motown music in the background.
Check out the products mentioned in this article:
Microsoft office (from $149.99 at best buy), apple macbook pro (from $1,299.00 at apple), acer chromebook 15 (from $179.99 at walmart), how to add music to a powerpoint presentation.
1. At the top of the PowerPoint screen, on the toolbar, click the "Insert" tab.
2. Under "Insert, on the right side of the screen, click "Audio."
3. If you're using a PC, click the option for "Audio on My PC." If you're using a Mac, click the option for "Audio from File" or "Audio Browser."
Note: You can also record your own sound if you select "Record Audio."
4. Locate the file you'd like to use, then click "Insert" in the dialog box. You can use MP3, MP4, WAV, or AAC files.
5. The file will appear on your PowerPoint as a little playback bar. You can use this to control the song. Move it to a part of your slide where it won't be in the way.
6. If you want the sound to play throughout the presentation, rather than just on the slide that the audio file is located on, click on the file to bring up the "Playback" tab on the toolbar at the top of your screen, and click on it.
7. Directly underneath the "Playback" tab, click the option for "Play in Background" to play the sound throughout.
Adjust any other options you want in this tab, like volume, fade in and out, and looping. When you're finished, return to the home tab to continue working on your presentation, or click save to finish.
Related coverage from Tech Reference :
How to change and format the background of your powerpoint slides to custom designs, how to add a border to slides in powerpoint, and give your slideshow a sleek design, how to change your language settings in microsoft powerpoint in 3 different ways, how to copy or duplicate a powerpoint slide and put it anywhere in your slideshow, how to download and access microsoft powerpoint on your mac computer.
Insider Inc. receives a commission when you buy through our links.
Watch: How Apple’s keynote formula keeps audiences engaged
- Main content
- Get One: Tornado Alert Apps
- The Best Tech Gifts Under $100
How to Add Music to PowerPoint
Music sets the mood for your presentation
:max_bytes(150000):strip_icc():format(webp)/TriciaGoss-c6bcd4d050f744c2b13efbf760819c9d.jpg "powerpoint presentation how to add music")
- Pima College
What to Know
- Go to a slide and select Insert > Audio > Audio on My PC .
- Start music automatically under Audio Tools Playback .
- Play a song across all slides by inserting the audio file on the first slide, then Playback > Play in Background > Loop Until Stopped .
This article explains how to play music automatically at a certain point in the slideshow, play after a delay, or play the music throughout multiple slides on both Windows and Mac. Instructions in this article apply to PowerPoint for Microsoft 365, PowerPoint 2019, 2016, 2013, and 2010; and PowerPoint for Mac.
How to Insert a Music File on A Slide
It's easy to insert a music file on a slide. Go to a slide and select Insert > Audio > Audio on My PC . In the dialog box, choose the file and select Insert . An icon for the music file appears in the center of the slide.
How to Play Music When a Slide Appears
You can start music automatically when a specific slide appears or after a delay.
To start playing music automatically:
Insert the music file on the PowerPoint slide where you want the music to play.
Select the music icon on the PowerPoint slide.
Go to Audio Tools Playback .
Select the Start down arrow and choose either In Click Sequence or Automatically .
In PowerPoint 2010, PowerPoint 2013, and PowerPoint for Mac 2011, In Click Sequence is not available.
Go to Slideshow and select From Beginning to test the music.
How to Play Music After a Delay
Set music to play after the amount of time you choose.
Go to View and select Normal view.
Select the audio icon on the slide.
Go to Animations , select Add Animation , and choose Play .
Select Animation Pane and make sure the audio clip is the first item listed. If you have no other animations in place, it will be the only item.
Select the arrow next to the sound clip and select Effect Options .
Go to the Effect tab.
Select From Beginning under Start Playing .
Select After Current Slide under Stop Playing .
Go to the Timing tab.
Select the Start down arrow and choose With Previous .
Press the Up Arrow in the Delay box to choose how many seconds you want to wait before the music begins.
Select OK when you're finished.
How to Play a Song Across All Slides
You can play a single song or a collection of music throughout an entire presentation, as well.
To play music during the entire presentation in PowerPoint 2019, PowerPoint 2016, PowerPoint 2013, and PowerPoint 2010:
Insert the music file on the first slide of your PowerPoint presentation.
Select the audio icon on the slide, go to Playback , and select Play in Background . In PowerPoint 2010, choose Play Across Slides .
Place a check next to Loop Until Stopped .
Play Music in PowerPoint for Mac
Play music during an entire presentation in PowerPoint for Mac.
Open the PowerPoint presentation in which you want to play music throughout the slideshow and display the first slide.
Go to Home , select Media, and choose Audio Browser .
Locate the audio file you wish to add to the PowerPoint presentation and drag it to the slide.
Go to Format Audio .
Select the arrow next to Start in the Audio Options group and choose Play Across Slides .
Go to Playback Options and select Loop Until Stopped .
Hide the Audio Icon
You may not want the audio icon to be visible on the slide where you inserted music. Fortunately, hiding it is a simple task.
Select the audio clip icon.
Go to Playback and select the Hide During Show checkbox.
In PowerPoint for Mac, select the Playback Options down arrow and choose Hide Icon During Show .
Audio File Formats Supported by PowerPoint
Before you add music to your PowerPoint presentations, understand which audio file formats are supported. If it's not listed below, you can't use it.
- AIFF Audio file (.aiff)
- AU Audio file (.au)
- MIDI file (.mid or .midi)
- MP3 Audio file (.mp3)
- Advanced Audio Coding - MPEG-4 Audio file (.m4a, .mp4)
- Windows Audio file (.wav)
- Windows Media Audio file (.wma)
- AIFF Audio file (.aiff or .aif)
- AU Audio file (.au or .snd)
- MP3 Audio file (.mp3 or .mpga)
- MP2 audio (.mp2)
- MPEG-4 Audio file (mp4 or .mpg4)
- Waveform Audio file (.wav, .wave, .bwf)
- Audible.com audio (.aa or .aax)
- Apple MPEG-4 audio (.m4a)
- Advanced Audio Coding - MPEG-2 Audio file (.aac or .adts)
- Apple CoreAudio format (.caf)
- Adaptive Multi-rate Audio (.amr)
- Ringtone (.m4r)
- AC-3 audio (.ac3)
- Enhanced AC-3 audio (.eac3, .ec3)
Get the Latest Tech News Delivered Every Day
- Adding Sounds, Music or Narration to PowerPoint Slide Shows
- Why Doesn't the Music or Sound Play in My PowerPoint Presentation?
- Edit Music, Sound, or Other Audio Settings in PowerPoint
- How to Do a Voiceover on PowerPoint
- How to Fix Audio Playback Issues in PowerPoint Presentations
- How to Make a Slideshow on PowerPoint
- How to Add Audio to PowerPoint
- What Is Microsoft PowerPoint?
- Play Sound and PowerPoint Animation at the Same Time
- How to Place a Picture Inside a PowerPoint Shape
- How to Insert PDF Files Into PowerPoint Presentations
- Use This PowerPoint Template for a Multiple Choice Quiz
- How to Add Music to Google Slides
- How to Add Audio to Google Slides
- How to Put a GIF in PowerPoint
- Loop a PowerPoint Slide Show
2 Ways to Add Any Music to PowerPoint in 2021
PowerPoint presentations are far more engaging with music added. I'll go over 2 different ways to add any track you want to your presentations in 2021.

An appropriate song can be effective in setting the tone of the presentation, retaining your audience's attention , and making your project more memorable .
Even better – a musical track playing along with your presentation can help you refine your timing when you prepare, so you're on pace when you present. It's easy to add any music you have saved to your device, or even a track you found online, to your PowerPoint presentation. Here's what you'll need to know:
Adding a track from your computer
Adding a track from youtube or soundcloud, editing the audio timing in powerpoint.
Open your presentation and select the slide where you'd like the track to begin playing. Select the " Insert " tab in the top toolbar and choose " Audio ," then " Audio from file ." When you've selected the file you want to use from your file browser, PowerPoint will add a small audio layer that looks like a speaker icon.

Even easier, you can simply find the right audio file in your file browser, then drag & drop it onto the correct PowerPoint slide. Once you've added it to your presentation, you'll need to customize its timing and trigger so it works the way you want.
You can add any music you want to your presentation, even if you don't have them saved already. I recommend finding music on YouTube or SoundCloud : YouTube contains nearly every song you know, and SoundCloud is perfect for discovering new music in pre-curated playlists, and both are completely free & accessible. Once you've found the track you want to use, right-click on the URL bar and copy the song's link.

Next, head over to Kapwing.com, and paste the link you copied into the white box. Wait a few seconds while Kapwing uploads the file.

Then, click the green "Export Video" button in the top right corner and selection "MP3" from the dropdown. If you want to use just a specific part of the track, you can also trim the file while you're in the Studio.

Once your music is finished processing, click "Download" to save it to your computer. Now, open your presentation and select the slide where you'd like the track to begin playing.
Select the " Insert " tab in the top toolbar and choose " Audio ," then " Audio from file ." Alternatively, you can find the recently downloaded file in your file browser and drag & drop it directly into your PowerPoint window. Now you're ready to customize your presentation's timing!
Just adding music to your PowerPoint presentation isn't enough – you'll need to make sure it starts playing when you want it to, with the right triggers, and for the correct duration. Start by selecting the audio layer – it looks like a white speaker icon. With the track selected, choose " Animations " from the top toolbar.

Click the "Play" icon in the top toolbar to open the animations sidebar. Using the options in the sidebar, you can set the beginning of your audio track, the end trigger, the duration, and the media options.
I recommend using the " After Previous " option for the beginning trigger, and setting the media duration using slide numbers – if you want the music to play automatically until the end, just set the duration to the remaining number of slides under the " Media Options " section.
For more content on audio, video, and presentation editing, check out our YouTube channel Kapwing App . And for for information on audio editing and high-level presentation creation, read through some related articles on audio editing with Kapwing:
• How to Add Music to an Instagram Story • How to Add Any Music to TikTok • How to Add Music to Snapchat • Add Music to Photos Using Kapwing

How to Make the "My Elf Challenge" Meme That's Trending on Instagram

How to Make Your Own Logo Online

How to Make Clip Compilation Videos Like Friday Beers
How to Add Music to PowerPoint? [A Complete Guide!]
By: Author Shrot Katewa
![How to Add Music to PowerPoint? [A Complete Guide!]](https://artofpresentations.com/wp-content/uploads/2021/09/Featured-Image-How-to-Add-Music-in-PowerPoint.jpg "powerpoint presentation how to add music")
Whether you want to play some pleasing melody while playing your presentation at an event or whether you want to play some soothing music when giving a presentation to a class, the first step is to know how to add music in PowerPoint!
To add music to PowerPoint, first, click on the “Insert” tab. Then, click on the “Audio” option from the ribbon, and then choose “Audio from my PC” from the dropdown. A file explorer window will open up. Navigate to the folder containing the music file, select the file, and click on “Insert”.
But, just knowing how to add a music file is not enough. There are quite a few things that you can do with music in PowerPoint!
In this article, we’ll do a deep-dive on adding music to PowerPoint. We shall also take a look at how you can play the music across slides. Plus, we shall also learn how to adjust a few settings so we can play the music with a click! That, and much more!
So, let’s get started!
1. How to Add Music to PowerPoint?
Microsoft PowerPoint has an “Audio” feature that allows you to add a recorded presentation speech or music to a slide. Although you can choose to add some music to your presentation, with this feature you can also add narration to your slides in PowerPoint!
Here’s a detailed step-by-step process that you need to follow to add music to your PowerPoint presentation –
Step-1: Click on the “Insert” tab
Select the slide to which you want to add the music to from the slide thumbnail pane and then click on the “Insert” option from the menu bar located at the top of your screen.
Step-2: Click on the “Audio” button
In the “Insert” menu, click on the “Audio” button which is the speakerphone icon. In the dropdown menu, select the “Audio on My PC” option (as shown in the image in step 1).
This will open a “File Explorer” popup window.
Step-3: Select the preferred audio from “File Explorer”
In the “File Explorer” window, select the music file that you want to add to the PowerPoint slide. Then click on the “Insert” button at the bottom of the window.
1a. Add Music to PowerPoint 2007
All older versions of Microsoft PowerPoint, including PowerPoint 2007 allow you to add music to a slide. All you have to do is follow the 4 simple steps mentioned below –
The first step is to click on the slide where you want to add music. Then click on the “Insert” tab from the menu bar located at the top of your screen.
Step-2: Click on the “Sound” option
Under the “Insert” tab, click on the “Sound” option with a downward-facing arrow. Be sure not to click on the speakerphone icon right over the “Sound” option. This will open a dropdown menu.
Step-3: Click on “Sound from File”
In the dropdown menu, click on the “Sound from File” option to open a “File Explorer” window. Now all you have to do is select your preferred music file and click on the “OK” button.
Step-4: Select preferred way to play the music
Now you will see a dialogue box in the middle of the screen. Click on the “Automatically” option if you want to play the music as soon as the slide is opened. Click on the “When Clicked” option if you want to play the music manually during the presentation.
1b. Add Music to PowerPoint 2016
The process of adding music in PowerPoint 2016 is similar to that of PowerPoint 2020.
To add music, all you have to do is click on the “Audio” button in the “Insert” menu and select the “Audio on My PC” option. Then select the preferred music from the “File Explorer” window.
1c. Add Music to PowerPoint on Mac
In a Mac device, you can easily add music to a Microsoft PowerPoint slide. Follow the 3 quick steps.
In the menu bar located at the top of the screen, click on the “Insert” tab to open the “Insert” menu.
Step-2: Select the “Audio Browser” option
In the “Insert” menu, click on the “Audio” button which is the musical note icon. Now click on the “Audio Browser” option from the dropdown menu. This will open a dialogue box.
Step-3: “Drag and Drop” the music file
Scroll through the “Audio Browser” dialogue box to find your preferred music file. Now all you have to do is “Drag and Drop” the music file from the dialogue box to the selected slide.
If you are using Office 365 on Mac, the process is the same as the one described for Windows.
2. Choosing Music for your Presentation
Now that you know how to add music to your presentation, you will most definitely need to know where to get the music files from!
There are a couple of things that you can do apart from adding music that you may already own on your computer.
The first thing that you can do is use music videos from YouTube!
2a. How to Add Music to PowerPoint from YouTube?
Microsoft PowerPoint allows you to add media files including music files from external sources as well. You can add media files from online sources like Youtube, Vimeo, Stream, etc.
In Microsoft PowerPoint, you can directly add music from YouTube. In this method, I’m going to show you how to add a video from YouTube in PowerPoint.
All you have to do is follow the easy steps mentioned below –
Step-1: Click on the “Insert” menu
In the slide thumbnail pane, click on the slide where you want to add the music. Then click on the “Insert” tab from the menu bar at the top of the screen.
Step-2: Click on the “Online Videos” option
In the “Insert” menu, click on the “Video” button to open a dropdown menu. Select the “Online Videos” option from the dropdown menu (as shown in the image in step 1).
This will open a dialogue box.
Step-3: Paste the link to the Youtube video
Click on the box under the “Enter the address for the online video” option. Now all you have to do is paste the link of the Youtube music video which you want to add to the slide.
Then click on the “Insert” button at the bottom of the dialogue box.
Step-4: Move the Video Outside the Slide Canvas
If you don’t want the video to show, you can simply drag the video outside the slide canvas and it won’t appear during the slideshow. However, it will still play if you have set it to play on a click! (which we shall talk about later in the article)
2b. Can You Add Music to PowerPoint from Spotify?
Microsoft PowerPoint does not support the “Ogg Vorbis” file format which the Spotify application uses. So you cannot directly add music from Spotify to PowerPoint.
Furthermore, the music files in Spotify are encrypted, so it is not legal to add a music file to PowerPoint from Spotify. However, you can add the music from YouTube or from iTunes in a PowerPoint on Mac.
I’d highly recommend getting a music file from one of the other sources that I’ve shared in this article rather than getting it through illegal means from Spotify!
3. How to Get FREE Music for PowerPoint?
So, if Spotify doesn’t work, you may be wondering how to get free music for your PowerPoint presentations!
Well, there are actually quite a few websites on the internet that will provide you with some music options. But, you really need to be careful with the licenses and legalities involved.
I’ve had the most success with the following three options!
1. YouTube Audio Library
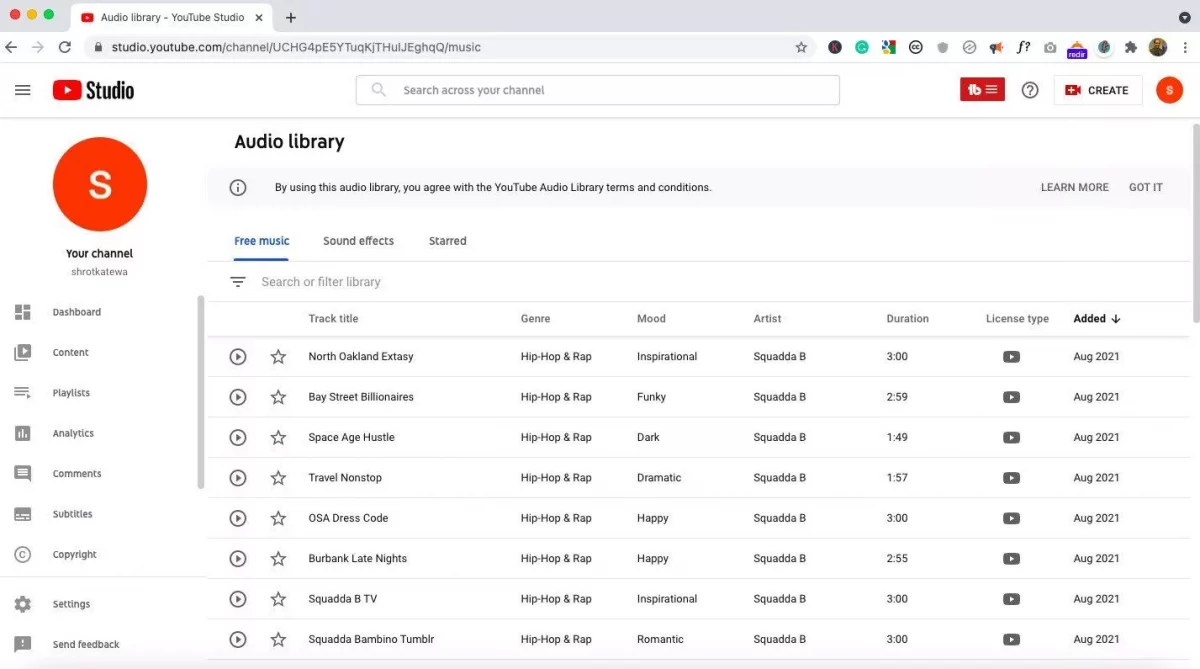
YouTube Audio Library is a great free resource to get some good music.
You can easily search for a particular type of music. You can also search by a specific genre or even the artist.
Then, click on the file to play it and see if you like it. Once you’ve decided on the file that you like, you can simply download the file on your computer.
One drawback with YouTube Audio Library is that you need to have a YouTube channel to access it. However, creating a channel is free and it only takes a minute. You don’t have to run the channel, just create it and use the audio library for the music.
Do make sure that you check out the license terms and conditions of use of the music provided by YouTube.

Another great resource for some decent music is Pixabay .
The music available on Pixabay is completely free to download and use even for commercial projects. You can easily search through a variety of different moods and genres of music through the panel on the left.
You can also use the search bar to quickly look for a good music option.
In my experience, although Pixabay is free, it takes a lot of time to find a really good music file that you can actually use in your presentation!
3. Envato Elements
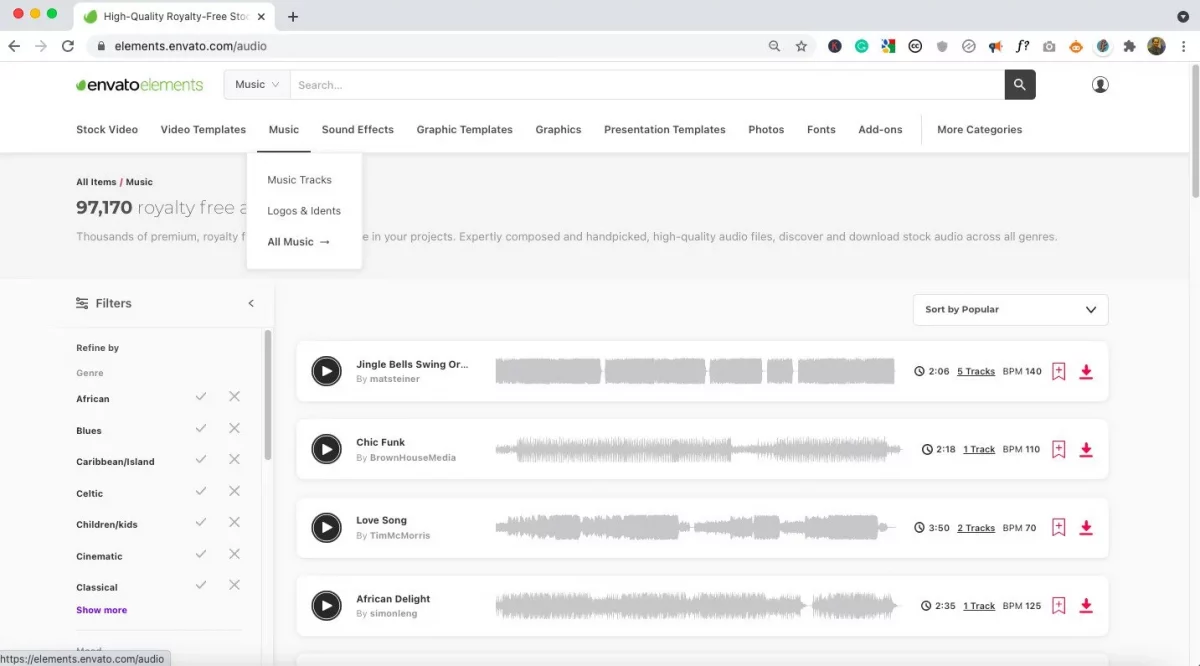
The best option on this list is Envato Elements .
With Envato Elements , you get a ton of options and the quality of the music provided is surprisingly really high! So, it really doesn’t take too long to find a good music option that you can actually use in your presentation!
You can easily search for the type of music file that you are looking for.
Although Envato Elements requires you to pay a monthly subscription fee. But the reason I consider this a FREE resource is that you get to download unlimited files! You heard that right, you get UNLIMITED downloads with no restrictions!
And, while you are at it, you can also download an unlimited number of presentation templates for your future needs as well!
You can sign up once and cancel the subscription immediately. So, you end up paying for just 1 month. And, when you cancel your subscription, your account still remains active for the end of the cycle.
For that one month, go crazy downloading all the files that you need! [You can thank me later! :-)]
4. How to Play Music Across Multiple Slides in PowerPoint?
In Microsoft PowerPoint, you can easily play the music inserted in one slide across all slides of the particular presentation.
To play music across slides, first, select the audio file. Then, click on the “Playback” tab. From the ribbon, click on the “Play in Background” option.
Once that’s done, the music will play in the background across all the slides in PowerPoint when in presentation mode.
5. How to Edit Music or Audio Files in PowerPoint?
PowerPoint allows you to carry out some of the basic editing functions to the music file.
After inserting music or an audio file in Microsoft PowerPoint, you can easily edit the music. Here’s what you need to do –
Step-1: Click on the speakerphone icon

In the slide with the music added, click on the speakerphone or “Audio” icon.
Step-2: Click on the “Playback” tab
Now all you have to do is click on the “Playback” tab from the menu bar located at the top of the screen. In the “Playback” menu, you will find various options to edit the music or audio file.
Here, you can trim the music file, apply fade-in or fade-out effect, play it across slides, loop until you want to stop it, and much more!
6. How to Get Music to Play Automatically in PowerPoint?
It is very easy to get the music to play automatically in PowerPoint. All you have to do is click on the “Playback” menu.
Now click on the “Start” button and select the “Automatically” option from the dropdown menu.
7. How to Set Music to Play on a Click in PowerPoint?
Microsoft PowerPoint allows you to choose how to play the music added to a slide.
To set the music to play on a click, open the “Playback” menu from the menu bar located at the top of the screen. Now all you have to do is click on the “Start” box and select the “When Clicked On” option from the dropdown menu.
8. How to Delete the Music File in PowerPoint?
If you receive a PowerPoint presentation that has a music file that you want to get rid of or if you want to insert a different music file in your presentation, you can easily delete the audio file in PowerPoint!
To delete the music file in PowerPoint, first, select the music file by clicking on the “Speaker” icon of the audio file on the slide. Then, simply press the “Delete” key on your keyboard to remove the music file from your presentation.
Once the file has been deleted, you can choose to insert a different music file by following the process described in the article to add an audio file!
Credit to drobotdean (on Freepik) for the featured image of this article (further edited).
- PRO Courses Guides New Tech Help Pro Expert Videos About wikiHow Pro Upgrade Sign In
- EDIT Edit this Article
- EXPLORE Tech Help Pro About Us Random Article Quizzes Request a New Article Community Dashboard This Or That Game Popular Categories Arts and Entertainment Artwork Books Movies Computers and Electronics Computers Phone Skills Technology Hacks Health Men's Health Mental Health Women's Health Relationships Dating Love Relationship Issues Hobbies and Crafts Crafts Drawing Games Education & Communication Communication Skills Personal Development Studying Personal Care and Style Fashion Hair Care Personal Hygiene Youth Personal Care School Stuff Dating All Categories Arts and Entertainment Finance and Business Home and Garden Relationship Quizzes Cars & Other Vehicles Food and Entertaining Personal Care and Style Sports and Fitness Computers and Electronics Health Pets and Animals Travel Education & Communication Hobbies and Crafts Philosophy and Religion Work World Family Life Holidays and Traditions Relationships Youth
- Browse Articles
- Learn Something New
- Quizzes Hot
- This Or That Game New
- Train Your Brain
- Explore More
- Support wikiHow
- About wikiHow
- Log in / Sign up
- Computers and Electronics
- Presentation Software
- PowerPoint Insertions
How to Insert Multiple Music to Powerpoint
Last Updated: January 11, 2019
wikiHow is a “wiki,” similar to Wikipedia, which means that many of our articles are co-written by multiple authors. To create this article, 11 people, some anonymous, worked to edit and improve it over time. This article has been viewed 179,666 times. Learn more...
Show you how to insert multiple music to PowerPoint presentation with step-by-step illustrations.

Community Q&A
You Might Also Like

About This Article
- Send fan mail to authors
Is this article up to date?

Featured Articles

Trending Articles

Watch Articles

- Terms of Use
- Privacy Policy
- Do Not Sell or Share My Info
- Not Selling Info
Keep up with the latest tech with wikiHow's free Tech Help Newsletter
- Insert music and time it Video
- Trim a music clip Video
- Play music for a set duration Video

Insert music and time it

Play audio, such as music or a song automatically when a slide appears, while you are presenting, and time the slides to fit the music.
I want to play music in the background of this slide show and time the slides to fit the music.
Let's do that.
First, I'll insert the music file.
With the first slide displayed, I'll click INSERT , Audio , and Audio on My PC .
I'll select the music file, and click Insert .
The file is placed in the middle of the slide.
It is selected, and the AUDIO TOOLS tabs are available.
To set the music, so it plays in the background, on the PLAYBACK tab, I'll click Play in Background .
Note that this applies the following settings: the Start setting switches from On Click to Automatically .
And these three options are now checked: Play Across Slides , Loop until Stopped , and Hide During Show .
I don't need the music to repeat, so I'll uncheck Loop until Stopped .
While that turns off Play in Background , all the settings that I want are still in place.
Let's click Slide Show to see how this plays.
The music starts automatically and plays continuously, as I click, in the background of my slides.
Now, I want the slides to advance automatically, timed to match the length of the music.
So next, I'll add slide timings.
First, let's see how long the music clip is.
On Slide 1, I'll point to the audio icon to see the playbar. When I point to the end of the playbar, a pop-up shows the clip's total time, 14.89, which is about 15 seconds.
I'll set the slide timings with this in mind.
To set timings, click the TRANSITIONS tab, and under Advance Slide , check the After box. Then, specify a time. I'll click the up arrow to set the slide timing to 1.00 second.
Then, I'll click Apply To All . So, each slide will play for 1 second and then advance.
Now, 1 second per slide may seem too short, but note that the slides have a Fade transition applied too, and the transitions add to the total playing time.
For the last slide, I am going to increase the timing, though. I'll click the up arrow to 4 seconds, because the picture has a Fade animation.
I'll click the ANIMATIONS tab , Preview , so we can see it.
I need to allow time for that fade out.
The playing time for the slides should now be close to the 15 seconds for the music.
For good measure, let's click the SLIDE SHOW tab and make sure Use Timings is checked.
We are ready to see the show.
I'll press F5 to play it from the top.
The slides advance on their own, according to the timings, and the overall time fits with the music.
Finally, here is a file-management tip.
When we clicked Insert to insert the audio file, the file was embedded in the presentation, and that creates a large file size overall.
To reduce file size in a presentation with embedded audio, save the presentation, and click the FILE tab.
On the Info tab, under Properties , you'll see the file's size.
This presentation file is over 8 megabytes.
To make the presentation file smaller and more manageable for sharing, click Compress Media , and choose a type of compression, in terms of quality.
Let's try Internet Quality . The file gets compressed, and the Compress Media window shows the amount of space saved.
We'll close this window. When I save the file, and click FILE again, I see that the file size is reduced almost by half.
If I don't like the result of the compression, I can click Compress Media , Undo .
If you want to avoid the issue of a large file size, another option is to link to the audio file.
To do that, when you first insert the file, click the arrow next to Insert , and click Link to File .
When you present, you need to have access to the linked audio file from the presenting computer.
For more information about this, see the course summary at the end of this course.
Up next: Trim a music clip and fade it out .

Need more help?
Want more options.
Explore subscription benefits, browse training courses, learn how to secure your device, and more.

Microsoft 365 subscription benefits

Microsoft 365 training

Microsoft security

Accessibility center
Communities help you ask and answer questions, give feedback, and hear from experts with rich knowledge.

Ask the Microsoft Community

Microsoft Tech Community

Windows Insiders
Microsoft 365 Insiders
Was this information helpful?
Thank you for your feedback.
IMAGES
VIDEO
COMMENTS
Switch to the "Insert" tab and then click the "Audio" button. A menu will appear, giving you the option to either upload music from your PC or record your own audio track. If you'd like to record your own audio, select "Record Audio," and the "Record Sound" window will appear. Go ahead and give your audio a name, then click the ...
Play a song across slides. On the Insert tab, select Audio, and then Audio on My PC. In the file explorer, browse to the music file you want to use, and then select Insert. With the audio icon selected on the slide, on the Playback tab, select Play in Background. Play in Background makes the audio file start automatically during a slide show ...
If you want music to play in the background throughout your presentation, insert an audio file. Click "Insert" → "Audio" → "Audio on My PC/Audio from File". Select a file and click "Insert". To embed a music video, click "Insert" → "Video" → "Online Videos/Online Movie". Paste the video URL and click "Insert".
You can add audio to a single slide, play audio automatically when a slide appears, or add a song that plays as background music during your entire presentation. You can add your own narration or commentary to an entire presentation by recording it on the Slide Show tab. See Record your slide show for more information. Add audio to a single slide
The music starts automatically and plays continuously, as I click, in the background of my slides. Now, I want the slides to advance automatically, timed to match the length of the music. So next, I'll add slide timings. First, let's see how long the music clip is. On Slide 1, I'll point to the audio icon to see the playbar.
In this step-by-step tutorial video, learn how to add music in your Microsoft PowerPoint presentation that plays automatically across all slides and loops un...
To start recording your mic and computer audio, go to Insert > Media > Audio > Record Audio. Click the Start button to begin recording music from your connected mic. Once the recording is complete, click Stop to insert the audio into your PowerPoint presentation. Once the audio file is added, you can manage playback settings via the Playback ...
Here's how you get started: Go to Insert > Audio > Audio On My PC. How to add music to PowerPoint. The Insert Audio dialog box will then pop-up. Select the audio file you want to use in your presentation. For this example, I selected the music track, mp3. Hit Insert.
Learn how to add music to your PowerPoint presentations. With just a few steps you can add background music to enhance your message or focus audience attent...
Step 1: Open your PowerPoint presentation and select a slide to record the music. Step 2: Go to the Insert tab and choose the drop-down arrow for Audio on the right side of the ribbon. Step 3 ...
To add music to a PowerPoint presentation, simply: Navigate to your Title slide (or wherever you want your music to start) Click the Insert tab. Open the Audio drop down (in the Media group) Select Audio on My PC…. Navigate to the folder on your computer. Select the Audio file.
Open your PowerPoint presentation and select the slide where you want to add audio. Insert the video containing the audio or music you want. If you don't know how, please refer to the How to Add a Video in PowerPoint tutorial. Inserting a video. Decrease the size of the video and place it outside the visible part of the slide. Scaling the video
Training: Add and record audio, such as music, narration, or sound bites, to your PowerPoint presentation and select the playback options. Watch this video to learn how.
1. At the top of the PowerPoint screen, on the toolbar, click the "Insert" tab. 2. Under "Insert, on the right side of the screen, click "Audio." At the top of the screen, click Insert > Audio ...
Go to Home, select Media, and choose Audio Browser . Locate the audio file you wish to add to the PowerPoint presentation and drag it to the slide. Go to Format Audio . Select the arrow next to Start in the Audio Options group and choose Play Across Slides . Go to Playback Options and select Loop Until Stopped .
In this video, learn how to add music in your Microsoft PowerPoint presentation that plays automatically across all slides and loops until the presentation i...
Open your presentation and select the slide where you'd like the track to begin playing. Select the " Insert " tab in the top toolbar and choose " Audio ," then " Audio from file ." When you've selected the file you want to use from your file browser, PowerPoint will add a small audio layer that looks like a speaker icon. Even easier, you can ...
Step-1: Click on the "Insert" menu. In the slide thumbnail pane, click on the slide where you want to add the music. Then click on the "Insert" tab from the menu bar at the top of the screen. Step-2: Click on the "Online Videos" option. In the "Insert" menu, click on the "Video" button to open a dropdown menu.
1. Take PowerPoint 2007 for example. PowerPoint 2003 is similar with it. 2. Insert a Sound File ( let the sound play through slide 5 to slide 8, assume that the presentation has 20 slides .) 3. At slide 5, click insert -> sound -> sound from file. Select the music you want to insert; 4.
In this tutorial, you'll learn how to add background music to your PowerPoint presentation. Adding background music to your PowerPoint presentation can enhan...
The music starts automatically and plays continuously, as I click, in the background of my slides. Now, I want the slides to advance automatically, timed to match the length of the music. So next, I'll add slide timings. First, let's see how long the music clip is. On Slide 1, I'll point to the audio icon to see the playbar.
This video shows you how to add music to a PowerPoint presentation.See more videos by Max here: https://www.youtube.com/c/MaxDaltonVideo Transcript:Microsoft...