How to Use Assignments in Microsoft Teams: Quick 12-Minute Tutorial for Teachers

Sara Wanasek

Using Microsoft Teams in the classroom gained popularity during the pandemic. However, it can, and is, being used in both online and physical classrooms today. As a learning management tool, Teams works seamlessly with other Microsoft products like Word, Excel, and PowerPoint which are classic favorites for students and teachers alike.
This multi-functional tool allows you to stay in touch with your students not only through video calls, but with chats, files, and assignments in Microsoft Teams. Teams can seem daunting when you first begin to use it, but it really is quite simple and easy to use. To make it seem less intimidating, we have broken down and explained some main features of Teams separately. Here are links to our other guides on features of Microsoft Teams:
- Microsoft Teams for Online Teaching – A Guide for Teachers
- Using Breakout Rooms in Microsoft Teams
- Assignments in Teams
- Class Notebook in Microsoft Teams
- 15 of the Best Teams Tips and Tricks .
Below is a quick, everything-you-need-to-know guide on assignments in Microsoft Teams. Let’s get started!

Create an Assignment in Microsoft Teams
To begin creating assignments in Microsoft Teams, you first need to be sure of two things:
- You are logged in with a Microsoft EDU account
- The Team you have created is a Class Team type
If both of those things are complete you will be able to see the Assignments tab on the side ribbon and on the top ribbon in the General channel. If you need help getting to know the interface and basics of Teams, check out our Teams Guide for Teachers.

Start a New Assignment
Now, to create your assignment, click on the Assignments tab from the top ribbon under your General Channel. Click Create , and then Assignment , to begin your first assignment. You can explore creating a quiz with the help of Microsoft Forms and creating an assignment based on a pre-existing assignment another time.

Add Assignment Details
In your new assignment, add a title and a description to let your students know what to do to complete the assignment.
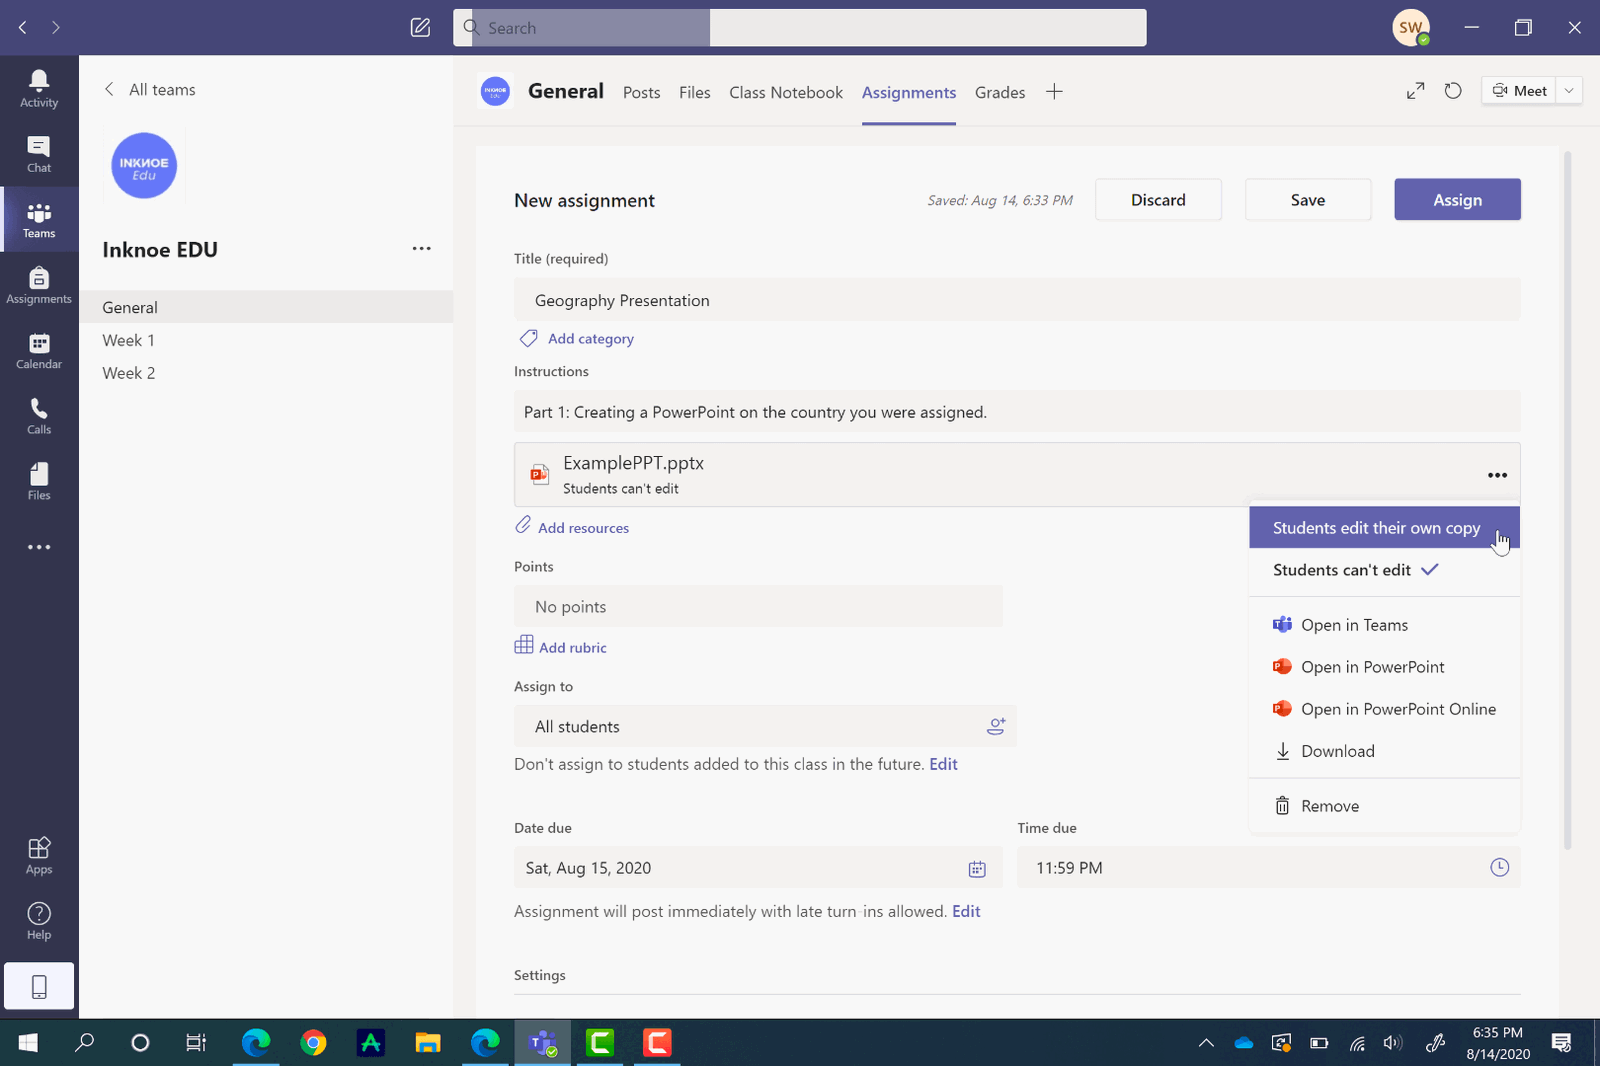
If you prefer to attach the instructions as a document, or have supporting materials to the assignment, you can attach them under the Add Resources link. Teams allows you to attach files in many different ways: through your OneDrive, ClassNoteBook, from a link, by creating a new file, or from uploading a document from your computer.
When you attach a resource, you have the option to allow students to edit it or not. By default, they cannot edit; however, if you prefer to change this, just click on the three dots at the end of the resource and click, Students edit their own copy. Now, when students edit this file, a new copy will be made for them, and it is automatically attached to this assignment for an easy turn-in.
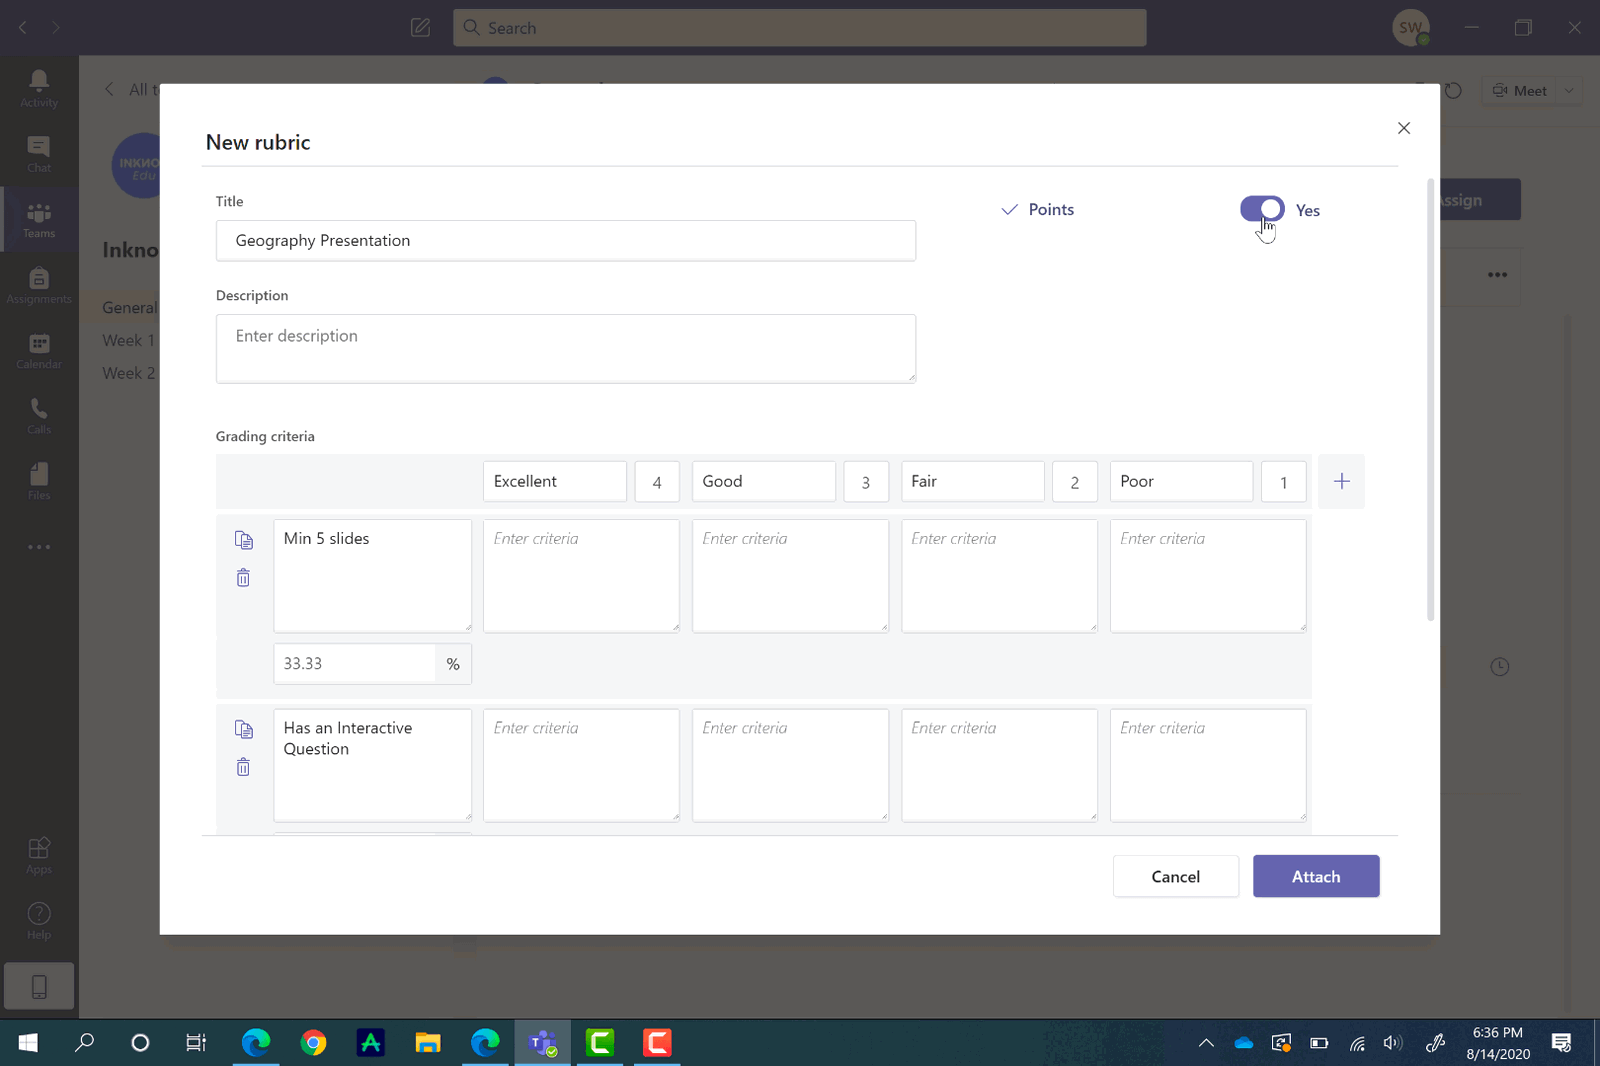
Set Points and a Rubric
To easily grade this assignment in Teams, assign the number of points it is worth, or add a rubric . Similar to creating assignments, you can use a pre-existing rubric, upload one, or create a new one.
Creating a new rubric is very customizable so you are able to add all the information your students need to complete the assignment. Just add a title , and a description , then fill in the rest of the rubric. If you need more categories , just click the plus button at the end of the columns, or after the bottom row. In addition, you can assign points to each category of the rubric.
Choose Students to Assign the Work to
The next step in creating an assignment is to assign it to your students. You can assign it to all of them, or a certain student(s) for more individualized work. Just click Assign to All, or go through the list and click the students you would like to assign this to.

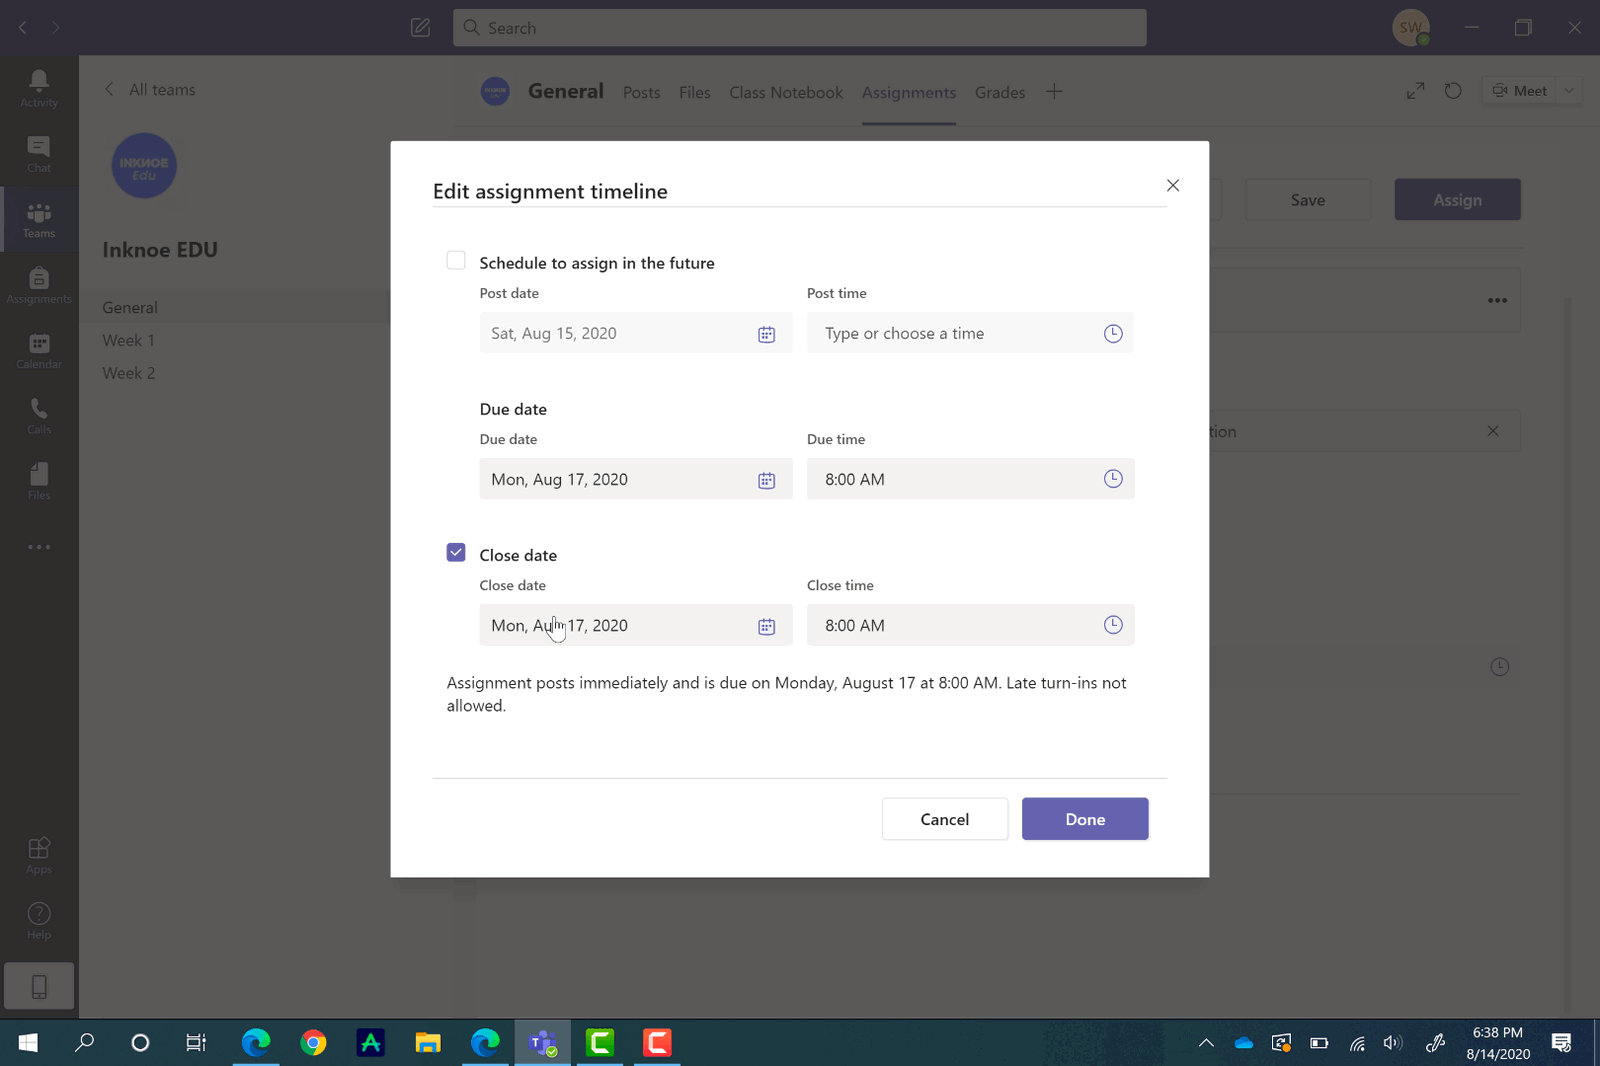
Give a Due Date & Close Date
In Teams, there are two different categories of dates for when the assignment is due.
Due Date: This is when the assignment is due, however, students are still able to turn in the assignment late, after the due date has passed.
Close Date: This is when the assignment closes and no more submissions are allowed.
To set both of these, and schedule this assignment for the future, click Edit under the Due Date section. To set a Close Date , click the checkbox on the side and set the date.
When all of your setups are complete, back at the top of the page, click assign, or save for later if it still needs a bit more work.
How Students Can Turn in Assignments
After you assign an assignment, students will receive a notification. They are able to view the assignment in the General Channel or on the Assignment tabs.
The student’s view of the assignment is very similar to the teacher’s view. They will see the Due Date and Close Date, the instructions, any files you have attached, and a rubric if there is one.
Students can begin their assignments right away in Teams if you have attached a document for them to work on. In the example below, students would be using PowerPoint on their desktops simultaneously with ClassPoint to make their presentations more interactive. As they work, their changes will be saved automatically. If you don’t have a document attached, students can upload and attach their work instead.
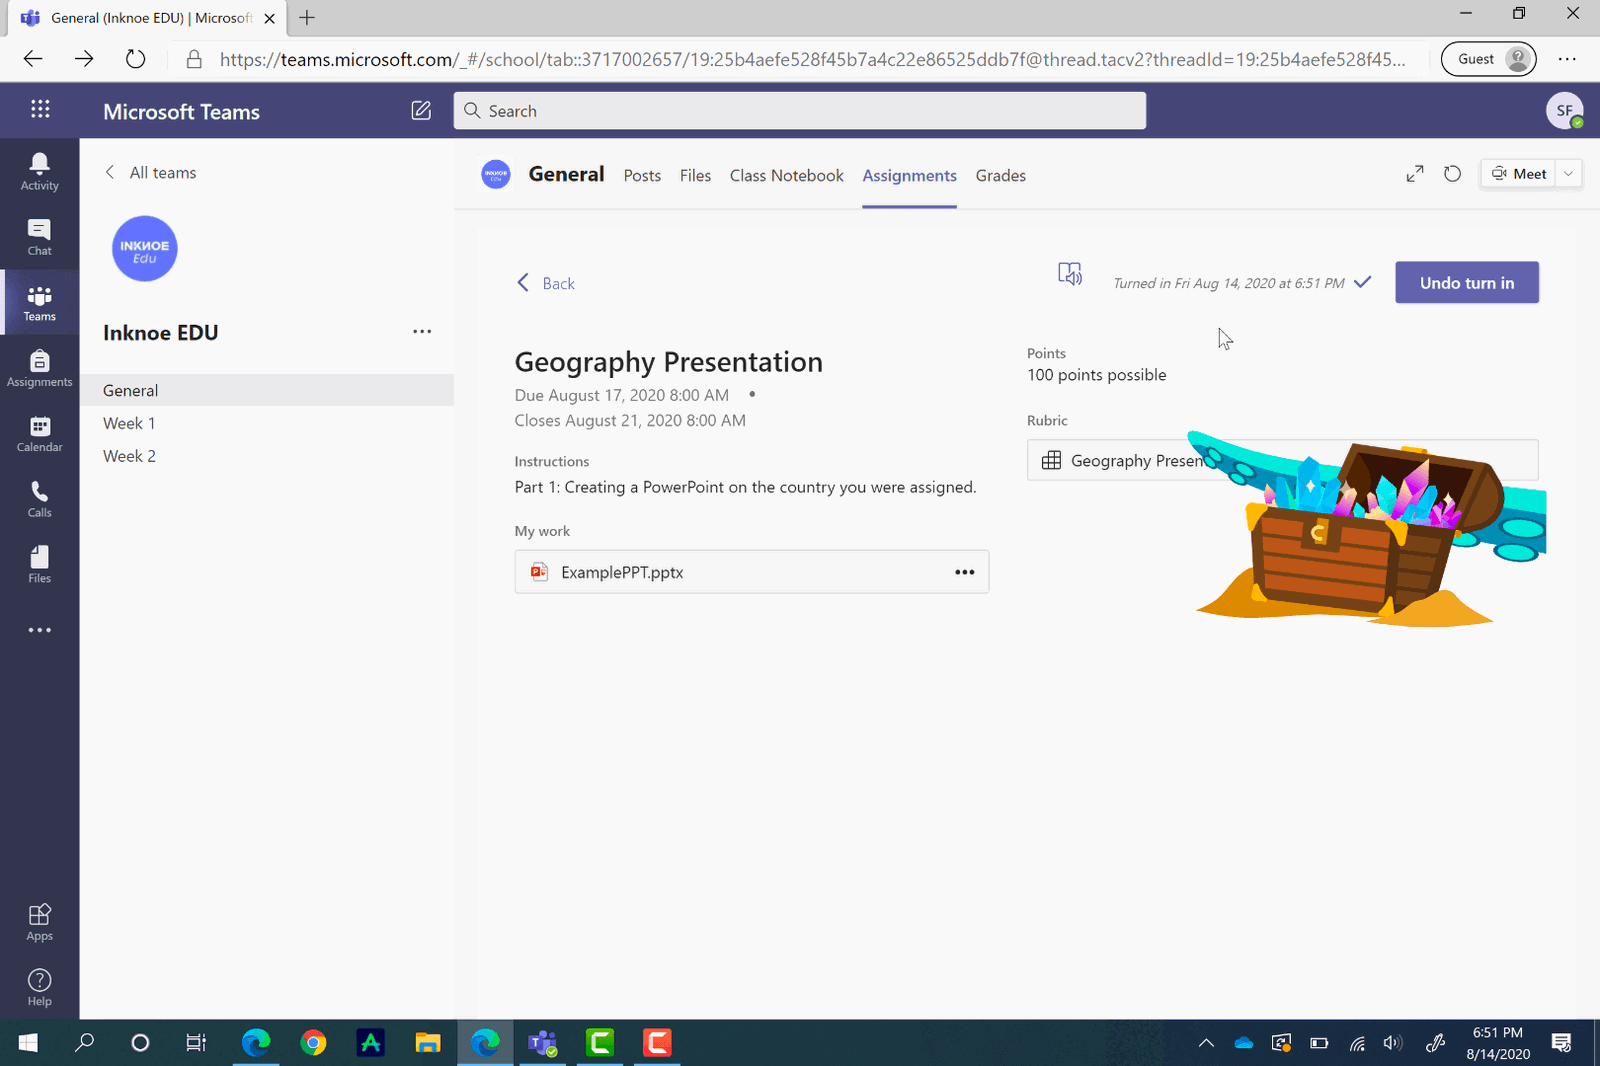
When they have completed their work, they just need to click Turn In. They will see a fun animation appear indicating the turn-in is successful.
How to Grade Assignments
Once students have turned in their work, you will receive a notification. Now, you can easily look over and grade their work. Click into an assignment to view how many students have turned in their work, how many need grading, and how many you have already graded.
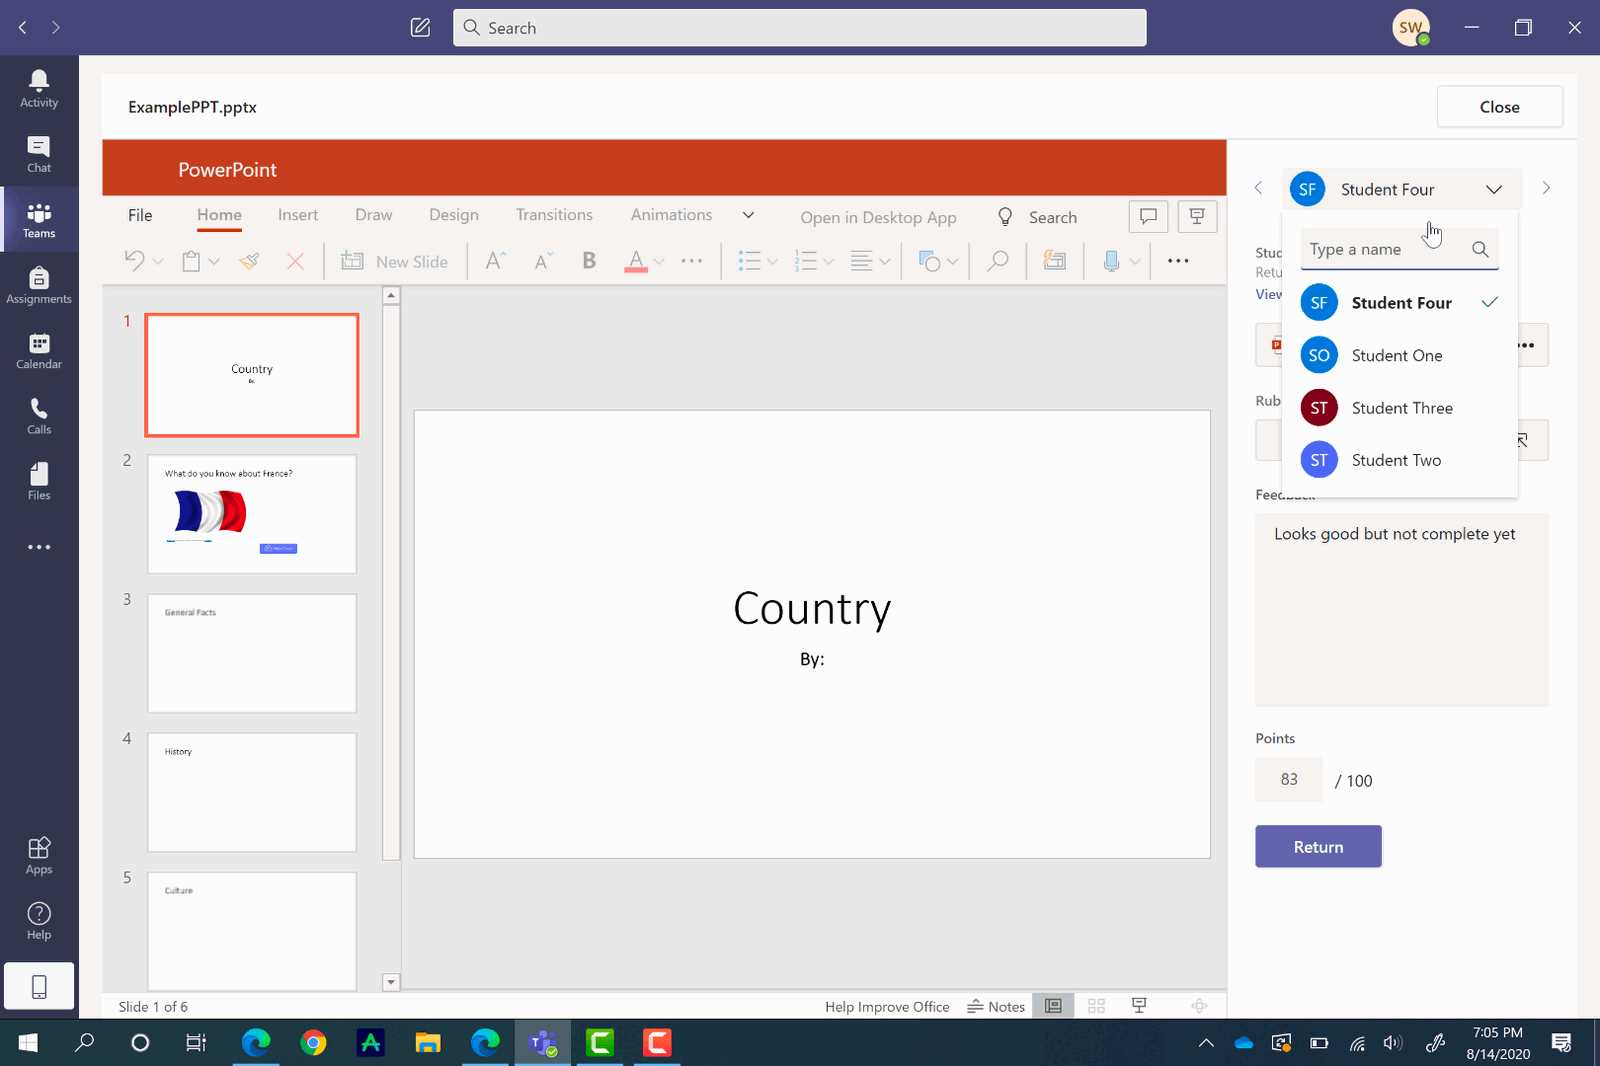
To grade an assignment, click on the Turned in status. Here, you are able to view their work alongside a tab for you to give them feedback. If you have a rubric , it will open for you to assign the points for each category. Scrolling down, you can leave feedback to let them know what they excelled at and what needs more work.

When the grading is completed, you can return it to the student. They can view your feedback, make changes, and turn it in again if necessary.
To easily jump between students for a continuous grading experience, click the arrows on the side of the student’s name, or click on the student’s name for a drop-down menu of your other students.
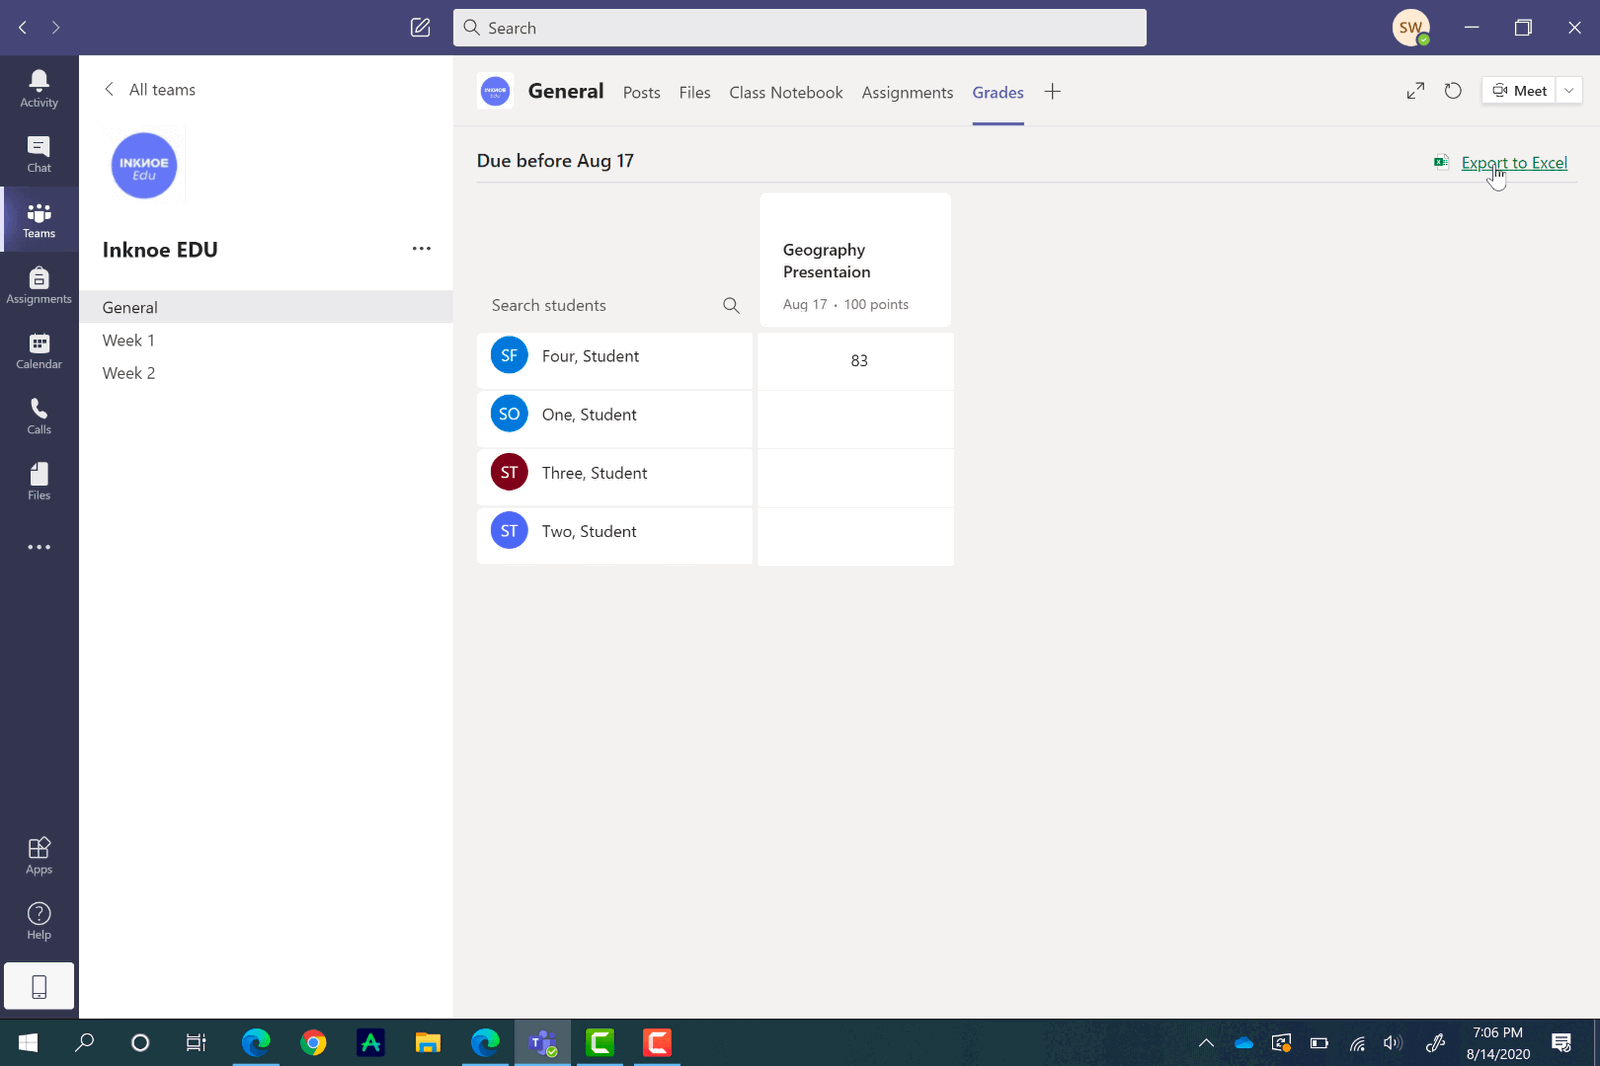
Export Grade Data
In Teams, it is really easy to export data, especially for assignments. You can export data for certain assignments, in addition to exporting all assignments and student grade data. This can be done from the Grades pivot on the top toolbar. You will see a complete list of your students, and of each assignment on this tab that you have assigned throughout the year.
Frequently Asked Questions
And that completes this tutorial on Assignments in Microsoft Teams! There is plenty you can do with this feature on Teams to make it suitable for your students and classroom. Enjoy using it to its fullest potential.
We have put together some frequently asked questions in case you still have some lingering questions before you get started!
What if I don’t see the Assignments tab?
If you don’t see the Assignment tab on the top ribbon in your General channel, or on the side ribbon, you are not logged in with a Microsoft EDU account. Create your own, or get in touch with your IT department for your login.
What is the difference between the Due Date and the Close Date?
Students can still turn in Assignments after the Due Date has passed, but once the Close Date has passed, no more submissions are allowed.
If I return the assignment to my student does that mean I want them to redo it?
Not necessarily. You can return all assignments to the students so that they can see your feedback. If you want a student to redo the assignment, you should let them know in your feedback.
Can I attach a PDF for my students to edit to the assignment?
You can do this through your Class Notebook! Insert the PDF to a Class Notebook page and set it as the background. Then, you can assign this page to your students.
Watch this for a visual guide on how to insert a PDF to a Class Notebook page.
Can I assign an assignment to a certain channel?
Unfortunately, no. You can only assign to the General Channel, which is all your students, or assign to individual students when setting up the assignment.
About Sara Wanasek
Try classpoint for free.
All-in-one teaching and student engagement in PowerPoint.
Supercharge your PowerPoint. Start today.
500,000+ people like you use ClassPoint to boost student engagement in PowerPoint presentations.

Create an assignment in Microsoft Teams
Create assignments for your students in Microsoft Teams for Education . Manage assignment timelines, add instructions, create resources to turn in, and more.
Note: Assignments is only available in class teams . You can assign assignments to classes of up to 1000 students. Classes larger than 300 can't use a Class Notebook or Makecode.
In this article
Create a new assignment, title and category, instructions and attachments.
Points, rubrics, and grading
Assigning to students or groups
Due dates and scheduling, assign, save, or discard, classwork modules.
Navigating the Grades tab
Navigate to the desired class team, then select Assignments .
Select Create > New Assignment .

At a minimum, you must give the assignment a title. This is required. You can optionally add a tag, which will make this assignment easier to search for in the future.

Assignments only supports the following image file types: .png, .jpeg, and .gif.
On mobile, Images will resize to the screen.
On desktop, you can use sizing handles on images to resize them.
You can also attach existing files, links, or assignment integrations and create and name a new file right from here for students to turn in.
Note: You can add up to five files for students to edit. The total number of resources you can add to an assignment is 10, whether editable or non-editable. Read-only reference files can be up to 500 MB in size. Files for students to edit can be up to 50 MB in size.
Select Attach to attach resources to the assignment. Choose a file from your OneDrive, upload a file from your device, or choose one of the other options set by your admin, such as MakeCode.
Note: If you're assigning a Class Notebook page, check what version of OneNote your students are using to ensure that their assignment pages will lock after the assignment due date passes.
Select +New to create a blank Word (.docx), Excel (.xlsx), PowerPoint (.pptx), or Whiteboard document, or a new video recording to hand out to your students.
Select Apps to attach content from an app to the assignment. Admins can manage Teams apps in the Microsoft Teams admin center .
Select Learning Accelerators to add Reading Progress , Search Progress and other Learning Accelerators to the Assignment.
By default, Students can't edit attached documents, meaning the document is read-only. This is a great option for reference materials.

Note: If you have older documents with the file extension .doc, .xls, or .ppt, students won't be able to edit them. You can either attach them as read-only reference material or create a new file in Teams, copy in the old content, and save it. All new files you create in Teams or other Microsoft 365 apps will have the correct extension.

The Assign to field is where you choose the class for this assignment. By default, the class team you are in will be selected.

Multiclass Publish
Multiclass publish allows educators to create an assignment for multiple classes with the same due date.
Do this by navigating to the Assign to field and check the boxes for classes the assignment will be published to.

Points and rubrics
You can select which grading scheme, grading categories , and points the assignment is worth.
If you have configured the class to use Grading Categories, you need to select a Grading Category for assignment with points.
Select the amount of points this assignment is worth, if any. You can use points on any number-based scale including whole numbers of 100 and set your own denominator. Examples: 88/100 or decimals 3.7/4.0.
Select Add rubric to create a rubric .
Select Manage grading categories to create or edit the grading categories for the class.
Setting up Grading Schemes
Letter grading and grading categories must be set as a Grading Scheme in the Grade settings section to display these options.

2. Navigate down to Grade settings .
3. Choose Add Schemes or Manage schemes .
Note: If no other grading schemes other than "Points" have been set, this link will read Add Schemes . Once you have gone through the steps to add a new scheme, the link will change to Manage schemes.

5. Set the grading levels. Letter grades will be the normal A, B, C, D, F, scheme. Ensure that there are enough levels to cover the entire 0-100 percent range.
6. Select the Save button when complete.
Finish by choosing the Done button.

Choose multiple classes, individual students, or groups of students in one class to assign to.
By default, only students who are in your class now will receive this assignment. Change this by selecting an option from the dropdown menu.
Note: If you choose a close date, any student who joins will receive this assignment until the close date.

Select a time and date for the assignment to be due. To schedule an assignment, next to Assignment will post immediately with late turn-ins allowed select Edit assignment timeline . Here, you can customize when your assignment will be posted to students and when it will close for turn-ins. By default, no close date will be selected, which allows students to turn in assignments late.
Note: If you choose multiple classes to publish the assignment to, you can select Set due date per class to set individual schedule , due and close date for each class

You can choose whether to add this assignment to your calendar on Outlook, students' calendars, and other educators or staff in your class team. Set this preference for all assignments in Assignments Settings .
Next to Add assignment to calendars , select the dropdown and pick one of the following options:
Students only adds the assignment to just student calendars.
Students and me adds the assignment to both student calendars and your calendar.
Students and team owners to adds the assignment to both student and other educators or staff in the class team calendars.

Choose the channel where you'd like notifications for this assignment to post. This allows you to keep student work and discussion organized by unit, topic, or subject. By default, assignments will be posted in the General channel or your selection in Assignments Settings.
To choose a channel to post in, next to Post assignment notifications to: select the down arrow for a list of available channels.
Pick the channel you’d like this assignment notification to post in, your selection will be applied immediately.
To post assignment notifications to a channel, make sure bot posting is enabled. You can check that here or ask your IT Admin for help.
Assignments will post to channels that are visible to all students. Private channels will not appear during this step.
If you have selected multiple classes, select Set per Class to set which channel to use or just use the General channel. Assignments to individual students do not post to channels.
When you're ready, you can finish the process of creating your new assignment by assigning it to students.
Note: If your school uses Turnitin, you can sync assignment turn-ins to Turnitin .
Assign will immediately publish the assignment and your students will be notified of the new assignment on the day you specified and the notification linking to this assignment will post in the channel you selected. They'll also have an entry on their Teams and Outlooks calendars if you've selected that option.
Save will save a draft of the assignment. Students will not receive any notification, and nothing will be added to any calendar.
Discard will delete the draft of the assignment. Students will not receive any notification, and nothing will be added to any calendar.

Create a New Module
1. Navigate to the desired Class Team, then select Classwork.
2. Select Add module.

3. Enter a title for the new module.
4. Optionally, enter a description.
5. Select Save to save the module as a draft.

Note: Draft modules are only visible to Team owners (teachers) until published. All new modules are created in draft states.
Learn more about managing classwork modules in Microsoft Teams.
Navigate the Grades tab
To open the Grades tab, navigate to your desired class team and select Grades .

You'll see that students appear in a column, with their assignments in a row next to their name. Assignments are listed in order by due date with the nearest date at the beginning.
Learn more about the Grades tab.
Create a group assignment
Edit an assignment
Save an assignment as a draft
Grade, return, and reassign assignments
Additional resources for educators
Ask the community

Need more help?
Want more options.
Explore subscription benefits, browse training courses, learn how to secure your device, and more.

Microsoft 365 subscription benefits

Microsoft 365 training

Microsoft security

Accessibility center
Communities help you ask and answer questions, give feedback, and hear from experts with rich knowledge.

Ask the Microsoft Community

Microsoft Tech Community

Windows Insiders
Microsoft 365 Insiders
Was this information helpful?
Thank you for your feedback.
Simplify your class workflow with new Assignments features from Teams
September 20, 2023.
By Microsoft Education Team

Share this article
Whether it’s the beginning of a new school year or mid-winter semester, we know it’s important for you to have the right tools to help prepare, teach, and assess your students more efficiently. With customizable features and options, Microsoft Teams for Education helps you simplify your class workflow and create a quality learning environment for students as well as educators.
Explore four new Assignments features in Microsoft Teams for Education designed to help you make the most of your valuable instruction and assessment time.
1. Duplicate or share assignments in a snap with new quick actions
With the latest updates to quick actions in the Assignment list, you can click on an assignment and choose from these options: Edit, Copy Link, Duplicate, Mark as Inactive, or Delete. With Duplicate, you can copy the assignment to another class. With Copy Link, you can get a direct link to the assignment and share it over chat, email, or any other platform you use to communicate with your students.
With quick actions in the Assignment list in Teams, you can choose these options for assignments: Edit, Copy Link, Duplicate, Mark as Inactive, or Delete.
2. Set individual assignment due dates for multiple classes
If you have multiple classes to publish an assignment to, you can now set individual schedule, due, and close dates for each class with new multi-publish support. With new multi-class assignment options, you can quickly make one or more changes and publish to all your classes in one action, saving you time and streamlining the management of your assignment timelines.
3. Configure quiz time limits directly in Assignments
Timed Quiz is a popular feature in Microsoft Forms, enabling you to set the amount of time students have for a quiz. Now, you can configure and change the time for each quiz directly inside of Assignments settings in Teams. This new capability allows you to make any quiz a Timed Quiz without having to go into Forms to change the settings.
Configure and change the time for each quiz directly inside of Assignments settings in Teams.
4. Customize your grading with new Grade settings
In Assignments and Grades, the Grade settings now support multiple grading schemes. Use this feature to map to your grading schemes for grading inside Teams . Once configured, you can either use points or a new scheme of your choice in your grading and reporting. The system is flexible to support a variety of needs—you can even use emojis for your grading!
In Assignments and Grades, use the Grade settings to customize your grading schemes for grading inside Teams.
With the latest updates from Microsoft Teams for Education , you’ll find simplified ways to help streamline, manage, and customize your class workflow. Discover all the newest updates to Microsoft Teams in What’s New in Teams for Education | August 2023 .
Ready to go deeper? Take the free, online training Master Microsoft Teams for any learning environment from Microsoft Learn.
Related stories

8 transformative tools to elevate project-based learning
Navigating the complexities of project-based learning (PBL) can be overwhelming, but you’re not alone. Many educators find balancing the hands-on approach of PBL with structured planning and managing groups challenging. Fear not—we can help!

4 new Teams updates to enhance classroom engagement
Students are engaged by dynamic learning environments—the type of environments that offer experiences and tools that help students relate to content, understand why their learning matters, and show their thinking in various ways. Dynamic learning environments also help educators to swiftly and effectively evaluate and adjust learning experiences to suit students’ specific needs.

Eight how-to guides for educators: Quickly get started with Microsoft Education classroom technology solutions
Each school year may bring new adventures and challenges but learning how to use new technology in your classroom shouldn’t be one of them. Since we know you’re busy, we’ve put together a list of eight free how-to guides to help you quickly get started with Microsoft Education solutions in your classroom.
- SCHOOL STORIES
- MICROSOFT EDUCATOR CENTER
- CONTACT SALES
This browser is no longer supported.
Upgrade to Microsoft Edge to take advantage of the latest features, security updates, and technical support.
Configure assignments for Teams
- 5 contributors
The content stored in SharePoint includes metadata and details about Assignments and Submissions that's stored for Assignments. The export user data is supported for both Student and Teacher users. However, delete data is only supported for Students due to co-mingling and data retention compliance. Teachers can delete their data in app by deleting assignments or classes. For more information, review the Assignments Admin documentation .
There are three scripts to use depending upon the scenario:
Shared common step for Export and Delete user data scenario:
Use the Get-UserClasses.ps1 script to create a list of classes that user is part of. If the user has left the class, then a text file containing those class Ids can be provided to include data from those classes. Otherwise data won't be exported or deleted from those classes. Running this script creates a csv file that contains a list of classes, the role of the user in class, and whether or not export or delete for the user was processed (which is set to false by default).
Exporting User data:
Use the Export-EDUAssignments.ps1 script to export data for the user. The csv file generated in the above step is input to this script. Running this script will get assignments and submissions of each assignment and generates two files. The assignment file (assignment.json) contains assignments and submissions and report file(GetAssignmentsReport.csv) - status of running the script. After running the script, it updates the GetSubmissionsProcessed column in the csv input file to true for that specific class so that if there's a failure the script can be rerun.
Deleting User data:
Use the Delete-EDUAssignments.ps1 script to delete data for the user. The script reads the class details of user from input csv file generated in the previous shared step. It then deletes the submissions, and generates a report file(DeleteAssignmentsReport.csv) for status of running the script. When the deletion of submission is done it updates the DeleteSubmissionsProcessed column to true for that specific class, so that if there's a failure the script can be rerun. The script also removes students from the class unless optionally specified to not do so by the Tenant Admin, failing that the student will get all the assignments applicable to them be redistributed to them.
Additional resources
- Start a chat with others
- Send and read
- Send a file, picture, or link
- Send a loop component
- Send an emoji, GIF, or sticker
- Send Praise to people
- Read receipts
- Use suggested replies
- Like or react to messages
- Chat in a Teams meeting
- Share your screen in a chat
- Reply to a specific message
- Share a link to a specific message
- Forward a message
- Use file suggestions
- Record a video clip
- Use editor text predictions
- Send Viva Topics
- Schedule chat messages
- Format a message
- Edit or delete a message
- Delete a chat thread
- Copy and paste
- Mark a message as saved
- Mark as important or urgent
- Pin a chat message
- Hide, unhide, mute, pin, or mark a chat as unread
- Open a chat in a new window
- Resume an old conversation
- Add or invite people outside your org to a chat
- Search for messages
- Translate a message
- Change the spacing
- Leave or remove someone from a group chat
- Personalize your group chat avatar
- Chat with someone on Teams for personal use
- Chat with members from distribution list or M365 group
- Manage chats with the Teams mobile app
- Send code snippets in a message
- Use Markdown formatting
- Use Immersive Reader
- Share to Outlook from Teams
- Send messages to skype for Business users
- Create, edit, or delete a contact group
- Do your one-on-ones with Teams chat
- Use Teams with skype
- Accept people outside your org
- Block or unblock people outside your org
Chat with others in Microsoft Teams
Note: Some features detailed below are available as part of the public preview program and might undergo further changes before being released publicly. To get access to this and other upcoming features, switch to Teams public preview .

Start a chat with another person

You can also start a one-on-one chat from someone's profile card. Open it by choosing their picture in a channel or finding their name using the Search box .
Start a chat with yourself
When you first use Teams, you'll see your name pinned to the top of your chat list. Use this space for drafts, to send messages and files to yourself, or to get to know chat features a little better.

Start and name a group chat
A group chat includes multiple people in a conversation. Create a group chat the same way you start a one-on-one chat.

Select the down arrow to the far right of the To field and then type a name for the chat in the Group name field.
Type in the names of the people you’d like to add in the To field.

This starts a new conversation. Everyone who has access to the group chat can send messages .
You can include up to 250 people in a group chat.
Add people to the conversation

Type the names of the people you'd like to chat with. If it is already a group chat, you can also choose how much of the chat history to include.

Select Add to add them to the conversation.
Note: You can only include chat history when adding someone to an existing group chat, not a one-on-one.
Teams saves the entire chat history, all the way back to the first message. If someone leaves the group, their chat responses will remain in your chat history.
See who's in a group chat

Chat with Microsoft support
Contact - Microsoft Support
Want to learn more? See First things to know about chats and First things to know about group chats .

Start a chat with another person

You’ll see your name pinned to the top of your chat list by default.

Start and name a group chat
Create a group chat the same way you start a one-on-one chat.
Compose and send your message.
Tap the names of the participants at the top of your screen.

Tap Group chat name .

Type a group name and then tap Save .

Everyone who has access to the group chat can send messages.
Add people to the conversation
To loop more people into the conversation:

Type the names of the people you'd like to chat with, choose how much of the chat history to include, then tap Done .

Note: You can only include chat history when adding someone to a group chat (not a one-on-one).
Teams saves the entire chat history, all the way back to the first message. If someone leaves the group their chat responses remain in your chat history.
See who's in a group chat
To see who’s in a group chat, tap the names of the participants at the top of your screen for a list of everyone’s names.

Need more help?
Want more options.
Explore subscription benefits, browse training courses, learn how to secure your device, and more.
Microsoft 365 subscription benefits
Microsoft 365 training
Microsoft security
Accessibility center
Communities help you ask and answer questions, give feedback, and hear from experts with rich knowledge.
Ask the Microsoft Community
Microsoft Tech Community
Windows Insiders
Microsoft 365 Insiders
Find solutions to common problems or get help from a support agent.

Online support
Was this information helpful?
Thank you for your feedback.
Teams Top Forum Contributors: EmilyS_726 👍✅
April 17, 2024
Teams Top Forum Contributors:
EmilyS_726 👍✅
Contribute to the Teams forum! Click here to learn more 💡
April 9, 2024
Contribute to the Teams forum!
Click here to learn more 💡
- Search the community and support articles
- Microsoft Teams
- Teams for education
- Search Community member
Ask a new question
Reading Progress Missing in Teams Assigment
I follow the step to setup the Reading Progress under Assignments > Create > Attached. In the list ' Reading Progress ' is missing. Where do I go to turn it on or add it back, please. It is the same for app and web Teams

- Subscribe to RSS feed
Report abuse
Reported content has been submitted
Replies (5)
- Independent Advisor
Hi Kenneth, My name is Umar and I'd be happy to help you out with your question. Please note: This is a user-to-user community forum. We are users just like you who help others. We are not employees of Microsoft. The "Reading Progress" feature in Microsoft Teams is a built-in tool designed to support and track reading fluency in classes. If you are unable to find it under "Assignments > Create > Attach," it is likely that it is not enabled or configured correctly. Here are some steps to help you troubleshoot and potentially resolve the issue: Check if the "Reading Progress" feature is enabled for your organization or school. If it's not, you might need to contact your IT administrator or the person responsible for managing Microsoft Teams settings in your organization. Also, Ensure that your Microsoft Teams app is updated to the latest version. Sometimes, updates can resolve issues like this. For more information: https://support.microsoft.com/en-au/topic/getting-started-with-reading-progress-in-teams-7617c11c-d685-4cb7-8b75-3917b297c407 I hope this information is helpful. Please let me know if you have any other questions. Help the next person who has this issue by indicating if this reply solved your problem. Click Yes or No below. Best Regards, Umar Majeed
Was this reply helpful? Yes No
Sorry this didn't help.
Great! Thanks for your feedback.
How satisfied are you with this reply?
Thanks for your feedback, it helps us improve the site.
Thanks for your feedback.
Thanks Umar - much appreciated.
We are running if not the latest, just one version behind teams. As an admin, I've checked the Teams Admin Center and Manage apps. I could not find Reading Progress. Do it mean it is not available to us. We are on A3 license and an educational institution.
Where else I should check and look for enabling the Reading Progress
Thanks for the update! You are welcome. If you are running a version of Microsoft Teams that is not the latest, and you are unable to find the "Reading Progress" feature in the Teams Admin Center or Manage apps, it is likely that the feature is not available to you. However, as an educational institution with an A3 license, you should be able to access the feature. Here are some additional steps you can take to troubleshoot and potentially enable the feature. Double-check that you have correctly followed the steps to set up "Reading Progress" under "Assignments > Create > Attach." Ensure that you have selected the correct option from the dropdown menu. https://support.microsoft.com/en-au/topic/reading-progress-data-in-education-insights-premium-a5ecdf73-8e88-4ed2-8a82-cc4be29fed5d If you are using the web version of Teams, try clearing your browser cache and cookies. If you are using the app, try reinstalling it or checking for any updates. Regards Umar Majeed
I have ensured that I am on the latest version of Teams. Reading Progress still not appear. I think I will have to enable it from Teams Admin > Education > Assignments settings, but unfortunately, I don't see 'Reading Progress" is available there.
Any suggestions are much appreciated.
If you have ensured that you are on the latest version of Teams and still cannot find the 'Reading Progress' option, it is likely that the feature is not available in your setup or supported in your current version. Additionally, the 'Reading Progress' feature might not be included in your A3 license or might be restricted in your educational institution's setup. Regards Umar
Question Info
- Assignments
- Norsk Bokmål
- Ελληνικά
- Русский
- עברית
- العربية
- ไทย
- 한국어
- 中文(简体)
- 中文(繁體)
- 日本語
IMAGES
VIDEO
COMMENTS
Create assignments for your students in Microsoft Teams for Education. Manage assignment timelines, add instructions, create resources to turn in, and more. Note: Assignments is only available in class teams. You can assign assignments to classes of up to 1000 students. Classes larger than 300 can't use a Class Notebook or Makecode.
See how assignments in Microsoft Teams brings creating, reviewing, grading and analyzing assignments together all in one place - without a single piece of pa...
Find out how to create an Assignment in Microsoft Teams by watching this video. This video on how to set up an assignment in Microsoft Teams will give a step...
Here are some of the latest and greatest features Assignments has to offer: 1. Filter assignments by class. Sometimes keeping track of assignments can almost feel like a greater task than reviewing them. Educators can now rest easy and stay organized by filtering student assignments by the classes they teach for a convenient and visual list view.
1. Navigate to a class team and select Assignments. You can also use your search bar to search for an assignment by keyword. 2. Select the assignment you'd like to edit. 3. Select More options > Edit assignment. 4. Make the changes you need. 5. Select Update to save your changes. Learn more. Create an assignment. Save an assignment as a draft
00:00 Introduction00:16 Assignments homepage 01:43 Create06:11 Rubrics00:07:13 Tagging07:51 Notifications08:56 Assigning assignments09:44 Editing assignments...
In this step-by-step tutorial video, learn how to create assignments and then grade those assignments in Microsoft Teams.Watch all of my videos on Microsoft ...
A quick step by step tutorial on how to create Assignments in Microsoft Teams for Education. This cover the basics on Microsoft Teams Assignments, but also ...
Create an Assignment in Microsoft Teams. To begin creating assignments in Microsoft Teams, you first need to be sure of two things: You are logged in with a Microsoft EDU account; The Team you have created is a Class Team type; If both of those things are complete you will be able to see the Assignments tab on the side ribbon and on the top ribbon in the General channel.
An easy-to-follow step-by-step guide on how to create and grade assignments in Microsoft Teams during your online teaching.🔔 Subscribe to stay updated: ht...
Create assignments for your students in Microsoft Teams. Manage assignment timelines, add instructions, create resources to turn in, and more. Note: Assignments is only available in class teams .
Course Organize content, create assignments, and assess learners' understanding in Teams. Learn how to use Classwork to organize content, Grades to streamline assignments, Microsoft Forms to simplify assessments, and Insights to track academic and SEL trends.
From the beginning, you asked us for a way to preview how assignments appear to your students. Now, just click the new Student view option and you're there. Add Close dates to your assignments. Edit all the dates that matter to your assignment with new, more fine-tuned controls. Schedule to assign in the future, add a due date, and now ...
Explore four new Assignments features in Microsoft Teams for Education designed to help you make the most of your valuable instruction and assessment time. 1. Duplicate or share assignments in a snap with new quick actions. With the latest updates to quick actions in the Assignment list, you can click on an assignment and choose from these ...
Use the Export-EDUAssignments.ps1 script to export data for the user. The csv file generated in the above step is input to this script. Running this script will get assignments and submissions of each assignment and generates two files. The assignment file (assignment.json) contains assignments and submissions and report file ...
Create an assignment in Microsoft Teams. How to set up New education policy to have the option to create assignments with Teams. Thank you for participating in the Microsoft Community, I am Skypper G. I am an independent advisor, let me help you with this. Assignments in Teams is only available for Office 365 Tenant Education.
Generally, there are only two possible ways for students to have permission to access to others: 1. The student is set as a teacher in the class team by mistake, however, in your case, since you can assign a task to him, so he should indeed be a student role. 2. The student is assigned with a "faculty" license, users who have this license ...
Assign training and policy tasks to frontline employees (task list for each team member) 2. Automatically send repeat tasks to frontline locations (task list recurrence) ... As with any form you create via Microsoft Forms, you have a range of options on the types of questions you can include. You can ask for a text response or ask respondents ...
In Teams, tap Calendar at the bottom of the screen. Then tap Expand meetings menu > Schedule event . Give your meeting a name in the Event name field. You can Add participants to your meeting by entering their name or email. You can also find participants by phone number if they are Teams users. You can set the meeting for All day, or you can ...
Create a group chat the same way you start a one-on-one chat. Select New chat at the top of your chat list. Select the down arrow to the far right of the To field and then type a name for the chat in the Group name field. Type in the names of the people you'd like to add in the To field. Type a name for the group chat and add people.
Reading Progress Missing in Teams Assigment. Hi, I follow the step to setup the Reading Progress under Assignments > Create > Attached. In the list ' Reading Progress ' is missing. Where do I go to turn it on or add it back, please. It is the same for app and web Teams.
You can create different types of fields like date fields, multi-choice fields, text fields and more.- Tasks conversations* - Using a premium plan that's added as a tab in a Teams channel, your team can start Teams chats in the context of tasks in the plan. Easily @ mention other team members, use emojis, gifs and all the other Teams chat ...
Now let's take a look at this month's updates: Expanded capabilities. Copilot with Graph-grounded chat now available in Outlook. Use local files to ground Copilot prompts. Create and consume Word documents more efficiently with Copilot. Generate multiple formula columns with Copilot in Excel.