
Assignment fields
The following are the assignment fields in Microsoft Office Project. For more information, click a field name.
Actual Cost fields
Actual Finish fields
Actual Overtime Cost fields
Actual Overtime Work fields
Actual Start fields
Actual Work fields
ACWP fields
Assignment Delay fields
Assignment Units fields
Baseline Cost fields
Baseline Finish fields
Baseline Start fields
Baseline Work fields
Baseline1-10 Cost fields
Baseline1-10 Finish fields
Baseline1-10 Start fields
Baseline1-10 Work fields
BCWP fields
BCWS fields
Confirmed fields
Cost fields
Cost Rate Table fields
Cost Variance fields
Cost1-10 fields
Critical fields
Date1-10 fields
Duration1-10 fields
Enterprise Cost1-10 fields
Enterprise Date1-30 fields
Enterprise Duration1-10 fields
Enterprise Flag1-20 fields
Enterprise Number1-40 fields
Enterprise Resource Outline Code1-29 fields
Enterprise Text1-40 fields
Finish (assignment field)
Finish Variance fields
Finish1-10 fields
Flag1-20 fields
Hyperlink fields
Hyperlink Address fields
Hyperlink Href fields
Hyperlink SubAddress fields
Indicators fields
Leveling Delay fields
Linked Fields fields
Notes fields
Number1-20 fields
Outline Level fields
Overallocated fields
Overtime Cost fields
Overtime Work fields
Peak fields
Percent (%) Work Complete fields
Priority fields
Project fields
Regular Work fields
Remaining Cost fields
Remaining Overtime Cost fields
Remaining Overtime Work fields
Remaining Work fields
Request/Demand (assignment field)
Resource Group fields
Resource ID (assignment field)
Resource Initials fields
Resource Name (assignment field)
Resource Type (assignment field)
Response Pending fields
Start fields
Start Variance fields
Start1-10 fields
Task ID (assignment field)
Task Name (assignment field)
Task Outline Number (assignment field)
Task Summary Name fields
TeamStatus Pending fields
Text1-30 fields
Unique ID fields
Update Needed fields
Work fields
Work Contour fields
Work Variance fields


Need more help?
Want more options.
Explore subscription benefits, browse training courses, learn how to secure your device, and more.

Microsoft 365 subscription benefits

Microsoft 365 training

Microsoft security

Accessibility center
Communities help you ask and answer questions, give feedback, and hear from experts with rich knowledge.

Ask the Microsoft Community

Microsoft Tech Community

Windows Insiders
Microsoft 365 Insiders
Was this information helpful?
Thank you for your feedback.
Microsoft Project Example – Let’s create your first real project in a just few steps
- by Adrian Neumeyer
Creating a project plan in Microsoft Project isn’t difficult at all.
This article will teach you how to create a simple project plan using a real project example.
Some basic configuration before you start
Before you create a schedule, you need to make two important changes in your settings:
Setting change 1: Make Auto Scheduling the default
o to File –> Options

Make sure to set Auto Schedule for new tasks:

What does Auto Scheduled mean?
It means that new tasks will be scheduled automatically based on your project start date (or end date). More specifically, Project will determine the optimal start and end date for each task automatically, which is what we want (why would we use a computer-based scheduling tool if we would not want to automate the scheduling? Read more about manual vs. automatic scheduling in Project .)
Close the window. At the bottom left corner of the screen it should look like this:

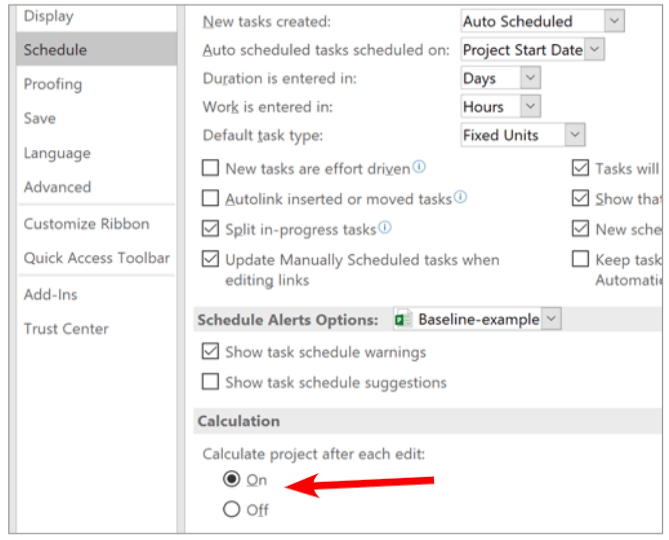
Setting change 2: Enable immediate calculation
We want Microsoft Project to re-calculate the project schedule immediately after we make a change. This ensures the data you see is always up to date. Unless you run a mega-project, leave the setting enabled.
Now, let’s schedule a simple project!
Our sample project: We are setting up our own business. We have picked a business idea and now we need to go from writing a business plan to a fully established business. For these steps, we are going to create a project plan.
Step 1: Create a new project

Choose Blank Project.
You will see a blank window.
First, let’s create a Project Summary Task . This is like an overall “wrapper” task that contains our entire project.

Here’s what you should see:

Give your project a suitable name:

Don’t worry about the duration and the dates – we’ll take care of this later.
Step 2: Enter a project start date
You need to tell Project the date at which the project officially starts.
To set the project start date, open the Project tab and click Project Information :

Enter the project start date (in our example: 14th September 2020):

Note: You can decide whether you want Microsoft Project to schedule your project forward from a specific start date or backward from a desired end date. If you already have committed to a golive date and want to know by when you need to begin work, then chose Schedule from Project End Date to trigger the backward planning. For this example, we want to base our schedule on a start date of 14th September 2020.
Press OK after you’ve entered the project start date. You can see now the start date for our tasks is 14th September 2020.
Step 3: Enter the list of tasks
In this project, we need to accomplish the following tasks:
- Create business plan
- Get business license
- Set up bank account
- Get funding
- Pick a business location
- Set up office equipment and furniture
- Run promotion
If you look at the list, you notice that the tasks must be performed in a specific order. There are also some dependencies between the tasks.
For example, we can’t get a bank account without having a business license. We also can’t get funding (i.e. a bank loan) without having a business license. And of course we need the money to hire people for our store. So, everything is connected with each other.
Now let’s enter those tasks into Microsoft Project.
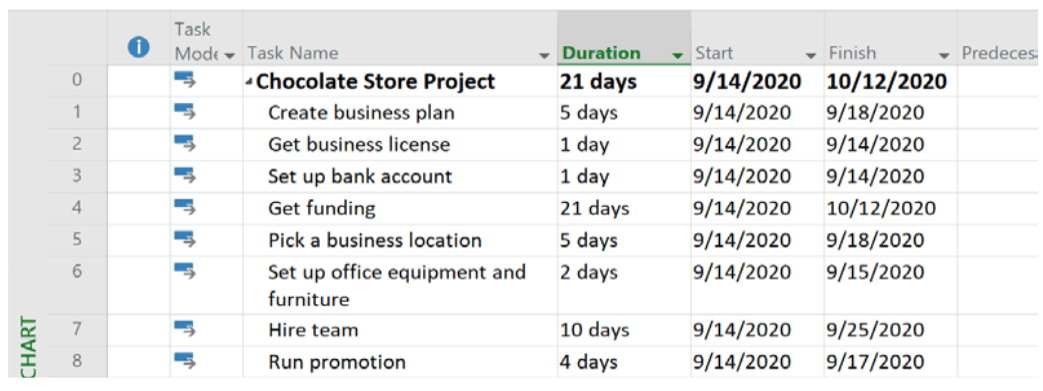
Enter the tasks into the table next to the Gantt view :

At this stage, Project doesn’t have all the information it needs to create a schedule. It doesn’t know how long each task is going to take. Therefore the Duration column has a question mark and the start and finish dates aren’t correct yet.
Let’s continue. You now need to “link” all tasks in the right order and enter the estimated durations .
Step 4: Enter task durations
Now, tell Project how long each task is going to take. What you enter here is the duration of the task, which is not the same as the effort. Duration is the total timespan until a task is finished. Effort (in Project, effort is called Work ) is the amount of actual working time.
Enter the estimated duration in the duration column. Tip: you can either use the up/down ar- rows to change the values or enter for example “3d” to specify 3 days or “2w for 2 weeks of duration.
Step 5: Link tasks in the right sequence
As I mentioned before, tasks should be performed in a specific order. And we want to show this order in Project. Let’s link the tasks one after each other.
There are two ways how you can link tasks:
- The first method is to enter for each task which other task should come before it. That is, by defining a “predecessor”.
- The second method is by using the “link” button from the menu
I’ll show you both methods now.
Let’s look at the first two tasks: Create business plan and Get business license. We could do both at the same time, since we don’t necessarily have to have a business plan to apply for a license. But we want to focus on our business plan, get it done, and then work on the next task. So getting a business license should follow after creating business plan .
To tell Project that getting business license comes after create business plan , you can simply enter create business plan as a predecessor for task Get business license (in the Predecessors column).
The tasks are organized in a way similar to Excel using row numbers. These row numbers are used to identify tasks .
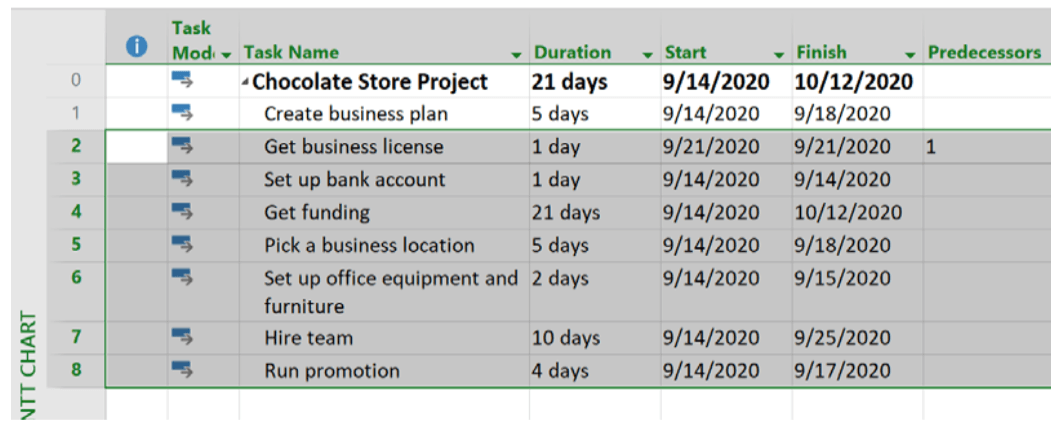
Do the following: In the predecessor column, enter “1” for task #2 (Get business license):

Watch the result: Task “Get business license” is now scheduled right after task “Create busi- ness plan” (look at the blue task bars).
Did you notice that your change immediately changed the Gantt chart on the right side? Also note that Project skipped the weekend because our calendar settings defined that there should be no work on weekends.
Next, we still have to arrange the other tasks in the right order. To do so, I now show you the other way of linking dependent tasks. There is a shortcut in the menu. Select the remaining tasks in rows 2-8 , as I have done below:
From the Task tab press the link button (watch what happens to the Gantt view!).

Our tasks are now arranged in the right order, and the Gantt chart is updated :

Pro tip: If you have a lot of tasks and you schedule is very wide and want to jump to the respec- tive task in the Gantt view, just right-click on the task and choose Scroll to Task. This will pull up the corresponding task bar.

Step 6: Add a milestone to your schedule
In every project you have certain milestones you are working towards. Milestones are certain points in time where some goal must be achieved. For example, a document must be prepared or a component must be finished. We haven’t included any milestone yet, so let’s do that now.
To mark the point where we’ve fully set up our business, create a new milestone named ‘ Business fully set up ’. How?
You create a milestone by changing a task’s duration to zero (zero days) .
Milestones are shown as a grey diamonds:

I didn’t mention this before, but of course you need to schedule the “milestone task” right after the last regular task (Run promotion). For this, you need to enter a predecessor for the milestone task.
The milestone we entered also marks the estimated finish date of the project.
Excellent job! You have now created your first schedule in Project.
If you want to dive deeper into Project, take a look at my e-Book:

Hi! I'm Adrian, former Senior IT Project Manager and founder of Tactical Project Manager. I created the site to help you become an excellent project leader and manage intense projects with success!
View all posts
Recommended articles

How to Hire Your First Project Manager
You have witnessed the growth of your company from its beginnings to a thriving business. And, what’s great: you are...

Essential Project Documentation: A Guide by an Experienced Project Manager
“I was handed this project. I’m unsure which documents are needed. Should I create a: RAID WBS Issue Log Project...
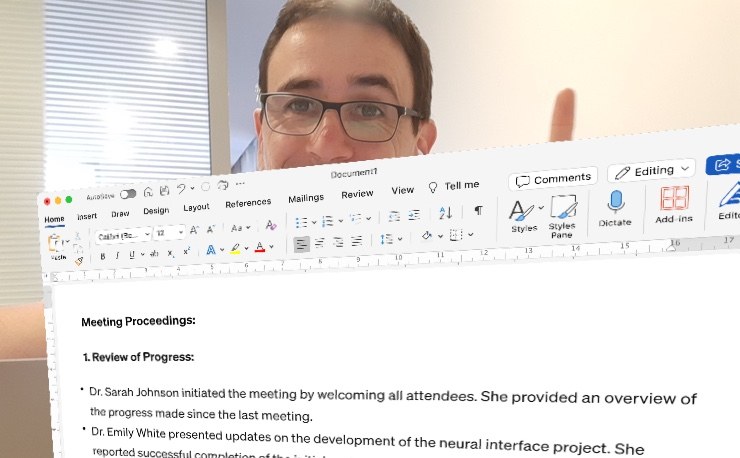
Running a Meeting and Taking Notes: How I Manage Both As A Busy Project Manager
Do you often find yourself in a situation where you hosted a meeting and took notes, but as you prepare...
Assignments in Microsoft Project

Assignments in Microsoft Project. Most people use Microsoft Project to see tasks in a ‘Gantt Chart’. Assigning resources to these tasks via the ‘Resource Sheet’ is usually their next step.
Assignment views are required when you want to look at how a particular resource works on a particular task. This is important if the assignment has a different pay rate for the task, or if the work is unequally spread through the duration.
Here is a short video clip on adding resources to tasks and editing assignments and cost table rates.
Adding Tasks and Resources to Microsoft Project
Most people are aware of the following MS Project actions.
Adding tasks to the ‘Gantt Chart’ view, and adding resources into the ‘Resource Sheet’ view. More information can then be obtained by double clicking the task or the resource:
- Double click a task: Task Information – everything about the task
- Double click a resource: Resource Information – everything about the resource
However, it is often necessary to look at how a resource works on just one particular task – this is an assignment. For instance how Sam works on Task B, but not how she works on Task A.
Finding the Assignments in Microsoft Project
To see the assignments, you will need to change to one of the ‘Usage’ views – I recommend the ‘Resource Usage’ view.

Resource Usage View
Now, double-click on an assignment to see ‘Assignment Information’.

Assignment Information
In this dialog box you can change the work profile or contour, and change the cost rate tables.
A good use for this would be if the resource gets paid extra for working off-site, or on certain tasks.
I have a separate blog and video which examines the application of work contours to assignments .
Assignments are about how a resource works on a particular task – not about everything the resource does.
AbleSim Project Management Simulations YouTube Channel
AbleSim have a YouTube channel dedicated to work with Project Management Simulations, Masters Dissertation Support and MS Project.
Subscribe to this channel here!
Project Management Training YouTube Channel
Andrew Bell has a YouTube channel dedicated to Project Management Training with over 10 hours of video arranged by 97 videos in 20 playlists.
Follow 🔔 AbleSim 🔔 on twitter @AbleSim
Join the conversation #pmsim
- Tweets could not be loaded at this time.
Like us on Facebook
- Privacy Overview
- Strictly Necessary Cookies
- 3rd Party Cookies
This website uses cookies so that we can provide you with the best user experience possible.
Cookie information is stored in your browser and performs functions such as recognising you when you return to our website and helping our team to understand which sections of the website you find most interesting and useful.
Strictly necessary cookies should be enabled at all times so that we can save your preferences for cookie settings.
If you disable this cookie, we will not be able to save your preferences. This means that every time you visit this website you will need to enable or disable cookies again.
This website uses Google Analytics to collect anonymous information such as the number of visitors to the site, and the most popular pages.
Keeping this cookie enabled helps us to improve our website.
Please enable Strictly Necessary Cookies first so that we can save your preferences!
Exploring Resource Management and Task Assignment in Microsoft Project
In a recent webinar , we delved into the various aspects of resource management and task assignment in Microsoft Project . This article aims to provide a concise summary of the key points discussed during the session. We will explore how to effectively use different views, such as the Gantt chart, and leverage the resource tab to quickly manage, assign, and replace resources. Let’s dive into the details.
Using Views and the Ribbon:
Microsoft Project offers different views tailored to specific functions, such as tasks and resources. When working with tasks, the task ribbon provides a range of helpful tools, while the resource tab becomes essential when dealing with resource-related activities. The ribbon was organized based on functional areas to enhance usability, streamlining access to relevant features. Previously absent in Microsoft Project, the ribbon was added later, providing users with easier navigation and improved functionality.
Within the resource tab, the resource assignment dialog box is a powerful tool for managing and assigning resources. By selecting one or more tasks, users can quickly assign resources or replace them. To aid decision-making, tooltips provide information about resource availability, such as whether they are currently working, or their status in an enterprise environment or Active Directory.
Replacing Resources and Handling Actuals:
When replacing a resource, Microsoft Project ensures that actual work remains unaffected. Instead, it focuses on finding remaining work associated with the tasks and swapping out the resources accordingly. This feature is particularly useful for efficiently managing resources in complex projects.
An initial approach to assigning resources might involve a global find or simply using the resource column. Clicking the drop-down arrow gives you a selection of resources to assign. However, this method assigns the resources wholesale, which might not always be ideal. For example, when assigning a resource to a 40-hour or 40-day task where you’re only anticipating 10 hours of work, checking off resources from a list won’t suffice.
In these situations, it’s advisable to use Microsoft Project’s advanced features and views to delve deeper into resource assignment. The ‘Ribbon’ and ‘ Timeline View ‘ are particularly useful in this context. By collapsing the timeline view, you reveal the task entry form. This is one of the software’s most potent views, aptly termed ‘Task Entry View’.
In the Microsoft Project interface, the ‘Task Entry View’ is located within the ‘View’ tab on the ‘Ribbon’.

- Click on the ‘View’ tab in the ‘Ribbon’, which is the strip of tools located at the top of your Microsoft Project workspace.
- Under the ‘Split View’ group on the ‘View’ tab, check the ‘Details’ checkbox. This will split your screen, showing the Gantt chart on the top and another view at the bottom.
- If ‘Task Entry’ isn’t the default view that shows up at the bottom, you can choose it by clicking on the ‘Details’ dropdown list in the ‘Split View’ group and selecting ‘Task Form’. Note that ‘Task Entry’ and ‘Task Form’ are used interchangeably in different versions of Microsoft Project.
This dual-pane view lets you modify resource assignments with granular control.

For example, if you assigned a resource, Andre, to work 40 hours, but later realized you only need him for 16 hours, you can simply adjust this in the task entry view. Clicking ‘OK’ here triggers an automatic adjustment in your schedule, guided by your pre-set parameters – be they fixed work, fixed units, or fixed durations.
Setting tasks as’ fixed duration’ is advantageous if you want to avoid your Gantt chart or schedule constantly shifting. This keeps the start and finish days immovably locked, even if work hours need adjusting. Understanding how the scheduling engine works allows you to effectively manage resources and assignments.
The initial goal is to get individuals assigned to tasks. This might involve an iterative process of identifying who will do the work, meeting with them to determine effort levels, and comprehending the difference between elapsed duration and the number of work hours. Microsoft Project’s multiple views help in tailoring these assignments.
One can even adjust the level of assignment percentage. When diving into the work management or schedule itself, users might be inputting actual, remaining, or overtime work hours. Remember, overtime doesn’t trigger overallocation and might carry different associated costs. It provides the flexibility to allocate hours beyond the standard work day or week without triggering overallocation.
Microsoft Project’s views facilitate the management of these task details, offering a comprehensive platform to access, modify, and update project information effectively. It’s an invaluable tool for fine-tuning your project’s assignments and schedules.
Managing Your Resources in the Cloud
The location and method of managing your resources can greatly impact the efficiency of your project. You have a few options depending on the scale of your project and the software environment you’re working in, whether it’s a standalone desktop version or an enterprise online environment.
For those using the standalone desktop version or handling multiple projects concurrently, the necessity of an overview of work across various project schedules into one resource assignment becomes apparent. This is where you start contemplating resource management on a broader scope.
Before the advent of an enterprise environment or a global resource pool , all this was handled in the desktop version. So, let’s consider where and how to source your resources in this context.
Microsoft Project Online offers a solution. Included with your license, it allows you to input or create your resource information directly within the online platform. You can access this via the ‘Resource’ tab on the ‘Ribbon’. From there, you can draw resources from an enterprise environment.
This enterprise environment is enabled by your Office 365 administrator via Microsoft Project Online. While the primary intention of this environment is to save and publish your schedules, it also provides a place to add all your resources. You can fill out their information just as you would in a resource sheet. Now, when your projects require resources, they can pull them directly from this online repository.

This feature provides flexibility in resource storage, allowing you to choose between cloud storage or local storage. Therefore, you have the options to suit the specific needs of your project or organizational structure.
Managing Resources Locally
The option of storing resources directly in the project file is another method of resource management. It has certain benefits such as allowing every team member to have their unique resources, which they can adjust and modify as needed, thereby customizing them according to the project’s needs. However, it is crucial to remember that resources stored this way are confined to that specific file.
To illustrate this process, consider a project schedule titled “needing resources”. This schedule is a copy of another file you’ve previously worked on and presently, it doesn’t have any resources assigned. The resource sheet view would, therefore, display no resources.
For cases where you need to add resources without interacting with an enterprise environment, creating a local file proves handy . This file can be stored on a shared folder or OneDrive, or any other location that can be easily accessed. The technique has been frequently used, sometimes with a local file share, and other times, by creating what we call a local resource pool. To do this :
- Access the Resource Sheet: Navigate to the “View” tab on the ribbon, and select “Resource Sheet”. This displays the resource management view.
- Enable Local Resource Pool: In the resource management view, find the “Resource Pool” button in the “Resources” group on the “Resource” tab. Click on the arrow next to the button to open a dropdown menu.
- Share Resources: In the dropdown menu, select “Share Resources”, and then choose “Share Resources…” from the submenu. This action prompts the “Share Resources” dialog box to appear.
- Select Resource Pool Option: In the “Share Resources” dialog box, select the option “Use resources”, then choose the file which will serve as your resource pool, and click “OK”. Microsoft Project will then start using the chosen file as a resource pool where you can manage your resource information.
- Specify Local Resource Pool Location: A dialog box will appear, prompting you to choose a location to save your resource pool file. A shared folder or a location on your local computer are good options, but saving the file on cloud storage services like OneDrive can make it easily accessible to the team. Specify your preferred location and give your resource pool file a name, then click “Save.”
- Add Resources to the Local Resource Pool: Once the local resource pool is set up, you can start adding resources. Go back to the resource management view, click on the cell below the last existing resource, and enter the resource names and other relevant information.
- Assign Local Resources to Tasks: After adding resources to the local resource pool, they can be assigned to tasks in your project file. Go to the task view, select the task to which you want to assign a resource, and in the “Resource Names” column, click on the cell to start typing the name of the resource from your local resource pool. As you type, Microsoft Project will suggest matching resources, allowing you to select the appropriate one.
In conclusion, effective resource management and task assignment are key to the successful execution of any project, and Microsoft Project provides robust and comprehensive tools to achieve this. The variety of views and features offered by the software allows for an efficient and fine-tuned approach to project management, accommodating both local and cloud-based resource storage and allocation.
Managing Teams

Leave a Reply Cancel Reply
You must be logged in to post a comment.
Remember Me
Lost Password
Please enter your username or email address. You will receive a link to create a new password via email.

Get Your Team on Task With Microsoft's Project Management Software, Under $20
A I is great at many things, but nothing beats the creativity of a team working toward a common goal — at least if you can get them all in sync. That's where Microsoft Project Professional 2021 comes in, offering streamlined project task management, automatic tools, and more.
Through April 22, project managers can get Microsoft's essential project management tool for only $19.97 (reg. $249) — the lowest price online.
With Microsoft Project Professional, the entire team has a hub where they can gather to see updates on a dynamic timeline and plan their next steps. It also has customizable pre-made templates for a range of projects, allowing teams to begin projects properly.
This project management software is compatible with MS Office and Office LTSC and can be synced with Project Online and Project Server. Users can additionally submit timesheets that reflect project and non-project work quickly. Managers can even run projections to predict the outcome of a certain course of action and auto-populate project start and dates.
Maximize your and your team's project efficiency with lifetime access to Microsoft Project Pro 2021 for just $19.97 , the best price online. This offer ends April 22 at 11:59 PM Pacific.
Prices subject to change. PCMag editors select and review products independently. If you buy through StackSocial affiliate links, we may earn commissions, which help support our testing.
This article may contain affiliate links that Microsoft and/or the publisher may receive a commission from if you buy a product or service through those links.

IMAGES
VIDEO
COMMENTS
The Assignment fields indicate whether the row is an assignment row, rather than a task or resource row. There are several categories of Assignment fields. Data Type Yes/No. Assignment (task field) Entry Type Calculated. How Calculated If the row is an assignment row, the Assignment field contains Yes. If not, the Assignment field contains No.
The following are the assignment fields in Microsoft Office Project. For more information, click a field name. Actual Cost fields. Actual Finish fields. Actual Overtime Cost fields. Actual Overtime Work fields. Actual Start fields. Actual Work fields. ACWP fields.
Solution. The solution to this problem is for the project manager to use the Assignment Owner field in the Microsoft Project schedule. However, before the project manager can use this field, he/she must complete a couple of preliminary steps. The first step is to build the project team and to include the supervisor as a part of the team.
In this Microsoft Project 2021 training course for beginners, learn how to assign resources to a task that are available to you in MS Project.🌍 Get unlimite...
Creating a project plan in Microsoft Project isn't difficult at all. This article will teach you how to create a simple project plan using a real project example. Some basic configuration before you start. Before you create a schedule, you need to make two important changes in your settings: Setting change 1: Make Auto Scheduling the default
In this video, i will show you how to assign resources in 3 different ways. You will learn efficient ways to assign resources, ways that allow you to get gr...
Finding the Assignments in Microsoft Project. To see the assignments, you will need to change to one of the 'Usage' views - I recommend the 'Resource Usage' view. Now, double-click on an assignment to see 'Assignment Information'. In this dialog box you can change the work profile or contour, and change the cost rate tables.
In a recent webinar, we delved into the various aspects of resource management and task assignment in Microsoft Project.This article aims to provide a concise summary of the key points discussed during the session. We will explore how to effectively use different views, such as the Gantt chart, and leverage the resource tab to quickly manage, assign, and replace resources.
Option 1: Use the Task Information Window. To manage resource assignments for a specific task, double-click anywhere on that task. Here, we are double-clicking on the Resource Names cell, but any cell in that row will do: When the Microsoft Project Task Information window appears, click on the Resources tab:
We want to define material resources for this project so we select the resource tab, view ribbon group, and resource sheet, Figure 2. Figure 2. In Figure 3 we define a pipe resource and assign it the type material. Figure 3. Microsoft project provides initials, which we may change.
This video explains how to apply an assignment delay in Microsoft Project. Assignment Delay. The tutor demonstrates how to resolve resource over allocation, ...
Step 2: Open the Resource sheet. To add resources in Microsoft Project, open your project file. Head to the "View" tab on the Ribbon and select "Resource Sheet" from the "Resource Views ...
An assignment delay in Microsoft Project is the amount of time a resource is to wait before starting work on an assignment. It is calculated as the differenc...
MS Project Assignment 1 - Getting Started. Complete the Microsoft Project exercise below before February 11. We will use the output of this exercise for Assignment 2 which will become available to you on February 11. After completing the assignment submit the following two items on Blackboard
Created by Mandy Valentin, Certified SM & PO. Published 4/2024. English. Complete 2024 Microsoft Project Class - Project Management. 0.0 (0 ratings) 1 student. $19.99.
Can't access your account? Terms of use Privacy & cookies... Privacy & cookies...
With Microsoft Project Professional, the entire team has a hub where they can gather to see updates on a dynamic timeline and plan their next steps. It also has customizable pre-made templates for ...
Currently an using Monday.com for tasks and project lists. This includes notes and files. Its not perfect but wors pretty well. ... Find out more about the Microsoft MVP Award Program. Video Hub. Azure. Exchange. Microsoft 365. Microsoft 365 Business. Microsoft 365 Enterprise. Microsoft Edge. Microsoft Outlook. Microsoft Teams.