How To Create a Link to a Specific Slide in Google Slides
Lee Stanton Lee Stanton is a versatile writer with a concentration on the software landscape, covering both mobile and desktop applications as well as online technologies. Read more April 12, 2022
If you have ever made a PowerPoint presentation, you already know that you can add a hyperlink to your slides. Google Slides takes linking to a whole new level, allowing you to add links to specific slides in your presentation. With this handy feature, you’ll be able to jump from one slide to another without the hassle of pausing your slideshow just to find something.

Continue reading to find out how to add a link to a specific slide in Google Slides. This guide will also explain how to add a link to a different presentation in Google Slides.

How to Add a Link to a Specific Slide in Google Slides
Knowing how to add a link to a specific slide in Google Slides can be quite handy. For example, with this feature, you can create a link at the end of the presentation that says “Return to the first slide” or something along those lines. If you’re making a huge presentation with over 50 slides, having links that take you back and forth to specific points in the presentation will save you a lot of time. While the author of the presentation can use this linking tool in many ways, it’s also useful for the audience, as it will help them get around the presentation with less effort.
Not only can you add a link to a specific slide in Google Slides, but you can also insert a link that will take you to another Google Slides presentation. There’s no limit to how many links you can add, and you can even edit them.
This feature allows you to create a connection between different slides within the same Google Slides presentation. Here’s what you need to do to add a link to a specific slide in Google Slides:
- Open Google Slides in your preferred browser.

- Click on the “Apply” button.
The linked word or text will immediately turn blue. You can click on it right away to make sure you added the link successfully. When you click on the link, you’ll see a box with a preview of where the link will take you. Simply select the link in the box, and you will be taken to the slide you chose.
Since this online presentation platform is a part of the Google Docs Editors suite, you won’t be required to save the presentation. Any type of changes made on Google Slides will be automatically saved.
A much faster way to add a link to a specific slide is to highlight the text and right-click on it. You will see the “Link” option somewhere on the drop-down menu. Follow the same steps from the instructions above to complete the linking process. An even faster way to insert a link is to use the shortcut “Ctrl + K.”
Depending on the slide you’re on at the moment, Google Slides will give you a few suggestions. For example, if you’re on the first slide, you will have the option to add a link for the second slide. Similarly, if you want to add a link to the third or fourth slide, you will also have a few recommendations. If you can’t find the slide you want to add the link for, go directly to “Slides in this presentation” under the options.
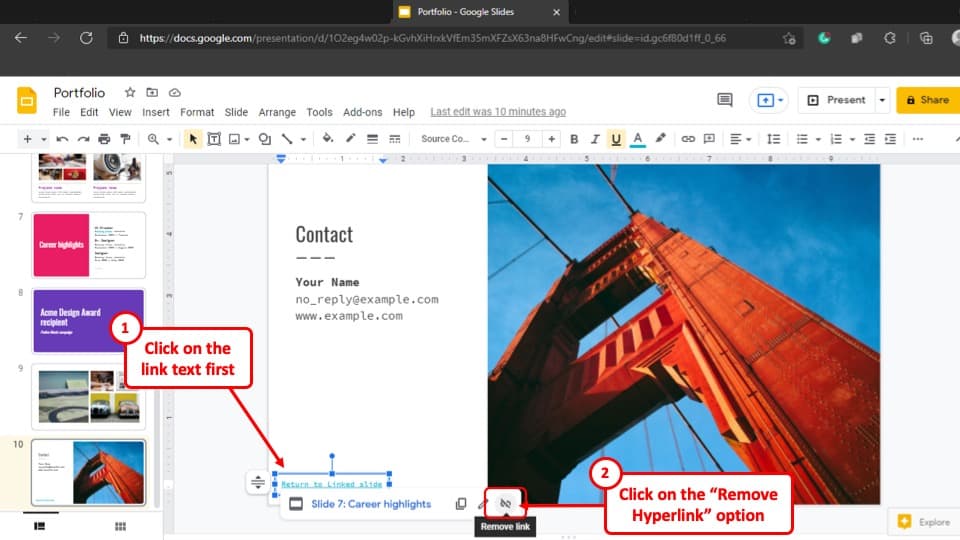
Once the link is added, it’s relatively easy to customize it. Let’s say you linked the wrong slide, and you want to remove the link altogether. Simply click on the link you’ve just made and select the “Remove link” icon on the pop-up menu. Another option you have is to copy a link without having to use the standard “Ctrl + C” and “Ctrl + V” key combination. Instead, just click on the link and select the “Copy link” icon. These shortcuts save you a lot of time, allowing you to focus on your presentation.
If you have made a mistake, or if you want to change which slide the link will take you to, you can edit it in no time. This is done by selecting the pen icon on the pop-up menu. From this point, you can edit the text the link is attached to and which slide it’s linked to. If you want to insert a new link, don’t forget to click on the “Apply” button.
Google Slides allows you to be creative with your links. For example, you can also attach a link to pictures, diagrams, shapes, or stickers in your presentation, which can be extremely useful for educational presentations made for young learners.
How to Add a Link to a Different Presentation in Google Slides
As mentioned before, you also have the option to insert a link to a totally different presentation on Google Slides. This is a great tool for two presentations that cover similar topics or that are connected in some other way. This is how you can add a link to a different presentation in Google Slides:

If you have viewed or edited the other presentation, it should appear in the “suggestions” menu. If it isn’t there, you will have to add the link to that presentation manually. If you’re interested in how you can do this, go through these instructions:

That’s all there is to it. This method takes a bit longer, but if you view or edit the presentation where the link should go, it will appear in the “suggestions” menu. You can do this with all your presentations on Google Slides, even those shared with you by other Google users.
Improve Your Google Slide Presentations with the Link Tool
The ability to add a link that will take you to a specific slide in Google Slides is very useful, and it saves you a lot of time when you’re presenting it. With this tool, you can add a link to a word or text and even use it for pictures, diagrams, animations, and various other visual content. You can be as creative and practical as you like with your Google Slide presentations.
Did you try to add a link for a specific slide in Google Slides? How did you manage to do it? Tell us about your experience with Google Slides in the comments.
Related Posts
Disclaimer: Some pages on this site may include an affiliate link. This does not effect our editorial in any way.

Lee Stanton April 24, 2024

Lee Stanton March 18, 2024

Lee Stanton March 16, 2024
Send To Someone
Missing device.
Please enable JavaScript to submit this form.

Cloud Storage

Custom Business Email

Video and voice conferencing

Shared Calendars

Word Processing

Spreadsheets
Presentation Builder

Survey builder

Google Workspace
An integrated suit of secure, cloud-native collaboration and productivity apps powered by Google AI.
Tell impactful stories, with Google Slides
Create, present, and collaborate on online presentations in real-time and from any device.
- For my personal use
- For work or my business

Jeffery Clark
T h i s c h a r t h e l p s b r i d g i n g t h e s t o r y !

E s t i m a t e d b u d g e t

Make beautiful presentations, together
Stay in sync in your slides, with easy sharing and real-time editing. Use comments and assign action items to build your ideas together.

Present slideshows with confidence
With easy-to-use presenter view, speaker notes, and live captions, Slides makes presenting your ideas a breeze. You can even present to Google Meet video calls directly from Slides.

Seamlessly connect to your other Google apps
Slides is thoughtfully connected to other Google apps you love, saving you time. Embed charts from Google Sheets or reply to comments directly from Gmail. You can even search the web and Google Drive for relevant content and images directly from Slides.

Extend collaboration and intelligence to PowerPoint files
Easily edit Microsoft PowerPoint presentations online without converting them, and layer on Slides’ enhanced collaborative and assistive features like comments, action items, and Smart Compose.

Work on fresh content
With Slides, everyone’s working on the latest version of a presentation. And with edits automatically saved in version history, it’s easy to track or undo changes.

Make slides faster, with built-in intelligence
Assistive features like Smart Compose and autocorrect help you build slides faster with fewer errors.

Stay productive, even offline
You can access, create, and edit Slides even without an internet connection, helping you stay productive from anywhere.
Security, compliance, and privacy

Secure by default
We use industry-leading security measures to keep your data safe, including advanced malware protections. Slides is also cloud-native, eliminating the need for local files and minimizing risk to your devices.
Encryption in transit and at rest
All files uploaded to Google Drive or created in Slides are encrypted in transit and at rest.
Compliance to support regulatory requirements
Our products, including Slides, regularly undergo independent verification of their security, privacy, and compliance controls .
Private by design
Slides adheres to the same robust privacy commitments and data protections as the rest of Google Cloud’s enterprise services .

You control your data.
We never use your slides content for ad purposes., we never sell your personal information to third parties., find the plan that’s right for you, google slides is a part of google workspace.
Every plan includes

Collaborate from anywhere, on any device
Access, create, and edit your presentations wherever you are — from any mobile device, tablet, or computer — even when offline.

Get a head start with templates
Choose from a variety of presentations, reports, and other professionally-designed templates to kick things off quickly..

Photo Album

Book Report

Visit the Slides Template Gallery for more.
Ready to get started?

- Get started with computers
- Learn Microsoft Office
- Apply for a job
- Improve my work skills
- Design nice-looking docs
- Getting Started
- Smartphones & Tablets
- Typing Tutorial
- Online Learning
- Basic Internet Skills
- Online Safety
- Social Media
- Zoom Basics
- Google Docs
- Google Sheets
- Career Planning
- Resume Writing
- Cover Letters
- Job Search and Networking
- Business Communication
- Entrepreneurship 101
- Careers without College
- Job Hunt for Today
- 3D Printing
- Freelancing 101
- Personal Finance
- Sharing Economy
- Decision-Making
- Graphic Design
- Photography
- Image Editing
- Learning WordPress
- Language Learning
- Critical Thinking
- For Educators
- Translations
- Staff Picks
- English expand_more expand_less
Google Slides - Linking Between Slides
Google slides -, linking between slides, google slides linking between slides.

Google Slides: Linking Between Slides
Lesson 17: linking between slides.
/en/googleslides/audience-qa/content/
Linking between slides
In Google Slides , you can easily turn any text or object into a link, and linking between slides is a powerful feature with lots of possibilities.
Watch the video below to learn how to use this feature to create an interactive presentation.
Creating an interactive presentation
In this lesson, you are going to learn how to create an interactive presentation about the solar system. Along the way, you will learn how to turn text into links , how to turn part of your slide into a link , how to edit links , and more.
Open our example file if you'd like to work along with the lesson. Make sure you're signed in to Google, then click File > Make a copy .
You can view the finished product to see what the presentation will look like when we're done.
Turning text into a link to another slide
To build our interactive presentation, we will begin by creating a link from the Jupiter slide back to the home slide.

Selecting a linked object
Whenever you select an object that has a link, a dialog box will appear. From this dialog, you can click the remove link icon , click the pencil icon to edit the link, click the copy icon , or click the name to go to the link.

Turning part of your slide into a link
Now, we are going to turn Jupiter into a link that takes users to the Jupiter slide. This is going to be a little tricky because this entire slide is a single image, which means that you can't actually select the planet.
Fortunately, there is a workaround. We are going to create a transparent shape and place it over Jupiter. Then, we will add a link to that shape. This technique allows you to turn any part of your slide into a link.

Copying, pasting, and editing links
Creating a new transparent shape for every planet would take a long time. It's much quicker to copy and paste your existing shapes.

Testing your links
It's important to test your links before sharing your presentation. Click Present to start the presentation.

The cursor changes when you hover over part of the slide that has a link.

Click a link to go to a slide.

It's a good idea to test every link in your Google Slides presentation to make sure that it leads to the correct slide.

Once you learn how to link between slides, there are nearly endless possibilities.
/en/googleslides/inserting-and-editing-videos/content/
- I Tried Both: Apple Watch 9 vs Fitbit Charge 6
- Best Places to Print Photos Online
How to Link Slides in Google Slides
CTRL+K (Command+K for Macs) is the shortcut, but the INSERT menu works, too
:max_bytes(150000):strip_icc():format(webp)/tim-fisher-5820c8345f9b581c0b5a63cf.jpg "presentation link for google slides")
- Emporia State University
:max_bytes(150000):strip_icc():format(webp)/ryanperiansquare-de5f69cde760457facb17deac949263e-180a645bf10845498a859fbbcda36d46.jpg "presentation link for google slides")
- Western Governors University
In This Article
Jump to a Section
- Linking to a Slide
- Editing the Hyperlinks
- Use the Hyperlink During a Presentation
Why Internal Hyperlinks Are Useful
- Frequently Asked Questions
What to Know
- On the website, go to Insert > Link to choose a destination slide.
- In the app, tap Insert link to pick where the link should go.
This article explains how to link to another slide from within a Google Slides presentation. Instructions for both the desktop website and the mobile app are included.
How to Link to a Slide in Google Slides
It's as easy as choosing the source object and the destination slide, but the directions are a little different between the website and app.
Link Slides From the Website
Use the Insert menu to find the hyperlink option.
Highlight the text or select the object/image for which you want to create a hyperlink.
Be careful what you're choosing here. If you have text on top of a large object, you might accidentally choose the object when you really want to add a link to the text.
Go to Insert > Link , or press Ctrl+K (Windows) or Command+K (Mac).
Select the slide you want to link to. If you have trouble finding it, choose Slides in this presentation to view only those slides.
Link Slides From the App
Tap-and-hold the item to see the hyperlink option.
Select the object or press-and-hold the text to highlight it (double-tap the text to enter edit mode).
Tap Insert link . If you don't see this option, you either can't add a hyperlink to that specific object, or it's in the overflow menu (the three dots).
Search for and then select the slide you want to link to. All the slides in your presentation are listed in the Slides menu.
Tap the checkmark at the top right to save the link, and then be sure to also select the checkmark at the top left of the next screen to save the changes you made to the slide.
Editing Hyperlinks in Google Slides
At any time, you can change or remove the hyperlinks you've made.
Select the hyperlink once for a small menu to pop up. Use the second link (called Edit link in the app) to change which slide should appear when it's clicked, or use the third link ( Remove link in the app) to completely delete that hyperlink.
You can also change the formatting of the link to adjust the color or remove the hyperlink's underline. You might do this to make the text flow better with the slide's overall theme, so it blends in and looks like other items in the slideshow, instead of an obvious link.
To do that, highlight the text, and then use the formatting menu to make any changes you want. In the example below with the letter C , we've removed the underline and restored the black text color so it looks more like the text from the other slides. The link still works despite the formatting changes.
How to Use the Hyperlink During a Presentation
When you want to proceed to the next slide in a presentation, it's typical to click somewhere on the slide. However, if you have a specific slide you want to advance to—one you've already made a hyperlink for—you have to make sure to select that link when it comes time to access the slide you want to present.
A presentation naturally flows from the first slide to the second one, and then the third, and so on. If there are things you want to address earlier than they'd be presented during the natural flow of the slideshow, you can jump to them ahead of time through hyperlinks. It's essentially a shortcut to wherever you want to go next.
For example, maybe you have a citations slide at the very end of the presentation that provides sources for the data you're discussing. Creating a hyperlink provides an easy way to link to that slide from all your slides so you don't have to click through potentially dozens of slides just to reach the one you want to present right now, nor do you need to squeeze all the citations in each slide that needs them. If you care to show those sources during the presentation, they're now just a click away.
Another handy use for a hyperlink is to link back to the first slide from every other slide, maybe because you're using a table of contents to outline the slideshow. Linked slides are also convenient if you're building a walkthrough, such as a software tutorial, because specific objects you've hyperlinked can then go directly to whatever slide provides details about that item.
You must select an object before you can insert a link. Make sure there's a blue box around the object you want to link.
To embed a video in Google Slides , go to Insert > Video and select Google Drive, by URL, or use the YouTube search bar. Choose a video and click Select to insert it.
You can convert the PDF to an image and insert it that way. Alternatively, upload the PDF to your Google Drive, right-click the file, and select Get link . Then, insert the link in Google Slides.
Get the Latest Tech News Delivered Every Day
- The 8 Best Google Drive Add-ons for 2024
- How to Add Audio to Google Slides
- How to Add a Hyperlink in a Google Doc
- How to Insert PDF Files Into PowerPoint Presentations
- How to Use Google Duet in Slides
- How to Group Objects in Google Slides
- The 13 Best Free PDF Editors (May 2024)
- How to Put a Spreadsheet in Google Slides
- How to Use Portrait and Landscape Slides in the Same Presentation
- How to Embed Video in Google Slides
- How to Link to Other Slides or Websites in PowerPoint
- Use This PowerPoint Template for a Multiple Choice Quiz
- How to Do a Hanging Indent in Google Slides
- How to Make Google Slides Portrait
- Add Hyperlinks to PowerPoint Presentations
- How to Add Music to Google Slides
How to share your Google Slides presentation
- Written by: Emma Trantham
- Categories: Google Slides
- Comments: 4

Wondering how to share a Google Slides presentation? Good news! It’s a pretty simple process. There are multiple ways of sharing a Google Slides deck. The right method for you will depend on how you’re going to deliver the slides, the required file type, and your audience. Do you want to share so that a colleague can proof-read and edit, or so that an online audience has the virtual equivalent of a handout?
As Google Slides exists completely online, sharing your presentation with others isn’t limited to an email attachment. This post will show you how to share Google Slides presentations in five ways, there’s definitely something here to meet your needs!
Share with people and groups
Publish to the web
Download as different file type
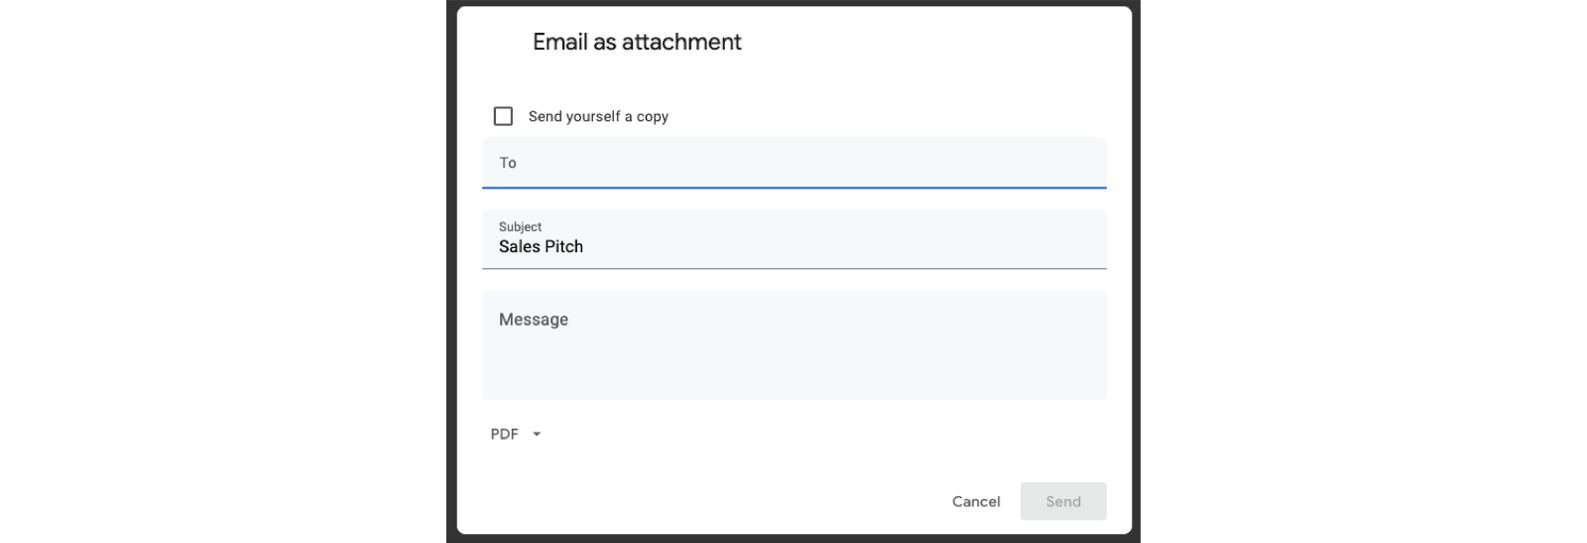
Email as attachment
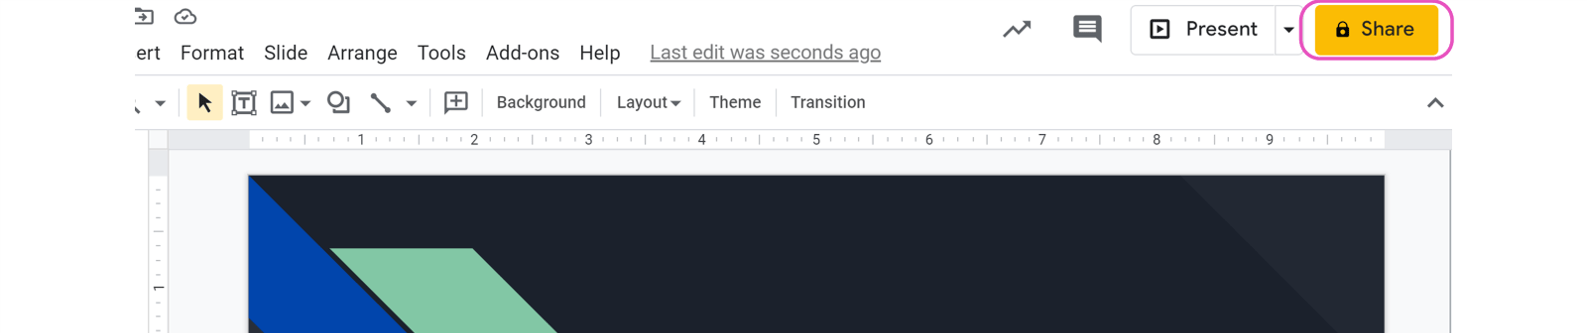
Before we get to that, you need to know where to find the Share function in Google Slides.
- Open Google Slides and click File , in the top bar
- Click Share at the top of the drop-down menu
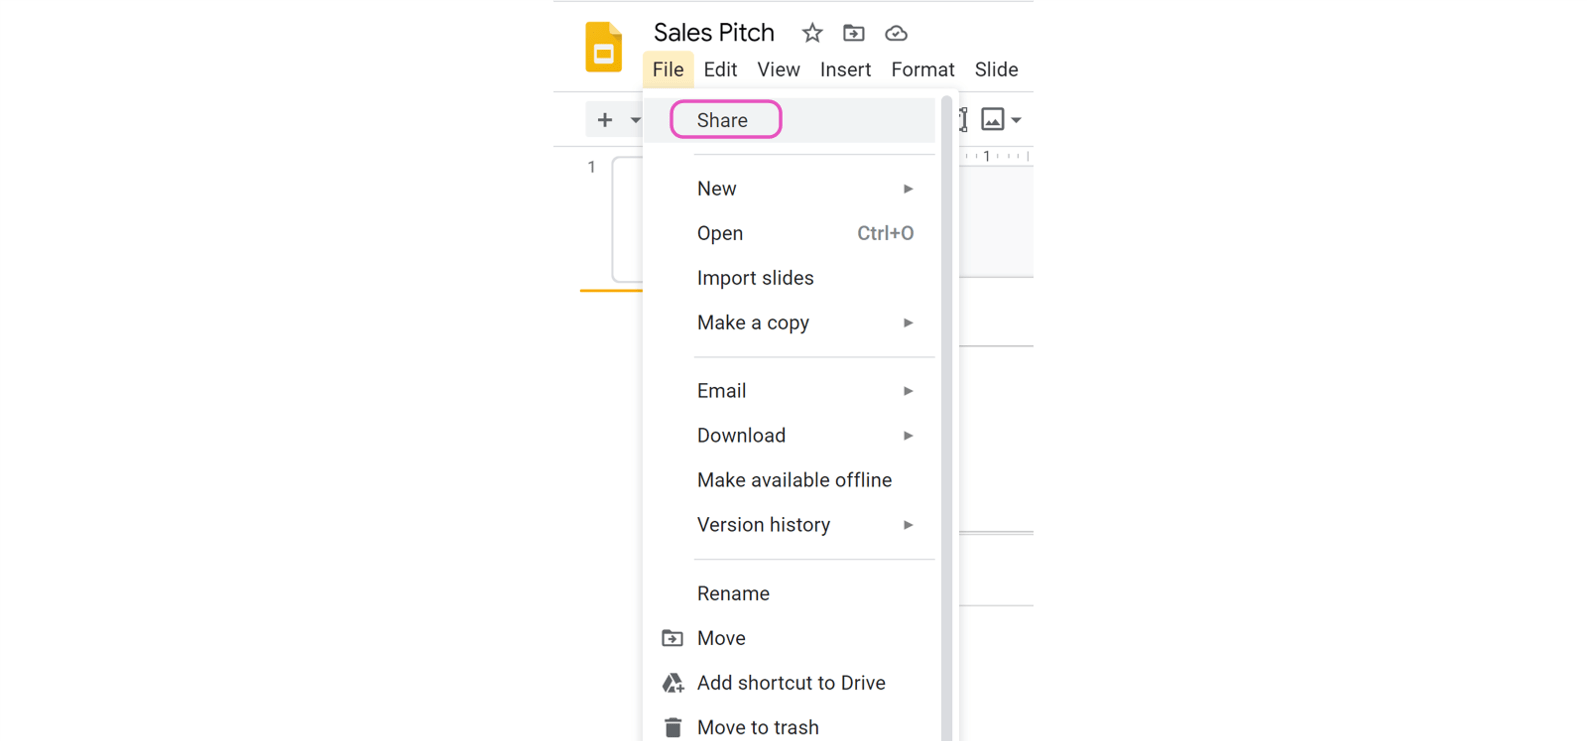
- Or, click Share at the top right-hand side of your window.
1. How to share Google Slides presentations with people and groups
Using Share with people and groups , you can share your Google Slides presentation with multiple people at once. This is helpful if your teammates need to collaborate in the same deck or if you require feedback from a colleague or client. Share with people and groups allows you to change the editing permissions per contact. You can allow each contact to simply view the document, or add comments, or edit it themselves. The level of permission you choose can be different for each contact you share with, giving you a lot of flexibility.
- Click Share to bring up the Share with people and groups pane.
- Next to Add people and groups , start typing the name or email address of the contact you want to share the deck with. A list of recommendations will appear as you type. Once you’ve selected the right contact, their name will appear at the top of the pane. If the person you want to share with is not already in your contact list, you need to type in their full email address.
- Click the small cross next to a contact name to deselect the contact.
When you share using Share with people and groups , Google will ask the user to log in to their Google account to access your shared file. If the user does not have a Google account, they will be unable to access your deck. Just head to the next section to find out how to grant access to non-Google users.
Now you’ve chosen your contact, you can alter their permissions to change how they are able to interact with the deck. There are three options – Viewer , Commenter , and Editor . Simply click on the option currently visible and a drop-down menu will appear allowing you to choose whether your contact can… well… view, comment on or edit the deck. Pretty self-explanatory, right?
But which permission should you give to who and when?
- Viewer: This will prevent contacts from editing slides. If your deck is completely finished and approved, set the permissions to Viewer to stop contacts accidentally editing – or even deleting – slides from your finished presentation!
- Commenter: The best option for gathering feedback. If your contact has limited knowledge of Google Slides, direct them towards our handy Ultimate Guide to Google Slides post so that they can brush up! In the meantime, share your deck using the Commenter function. This way, contacts can comment without being able to rearrange slides, or change text or animations.
- Editor: Perfect for collaborative projects. Editor allows you to share an editable version of your deck. Everyone with this permission can work on the same slides at the same time. This means you don’t end up with multiple versions of the same deck.
For more tips on how to improve collaboration in Google Slides, check out these 6 ways to get the most out of online collaboration with Google Slides .
Once you’ve selected one of these permission options, you’re free to hit Send . If you tick Notify people , your contact will receive an email letting them know that they have permission to access or interact with your deck.

In the Share with people and groups pane, the owner of the Google Slides presentation appears at the top. Beneath that, you can see who has access to the deck and the status of their permissions. If you want to change someone’s permissions, press the yellow Share button at any time and edit permissions using the same drop-down menu.
To stop sharing with a specific person:
- Click Share and scroll to the contact you want to remove
- Click the drop-down arrow next to their name
- Select Remove
- Click Save .
Notice the Give temporary access and Make owner options. If you choose to Give temporary access , you can edit the number of days that your contact has access to your deck. All you have to do is click the number of days next to Access expires to change the expiration date. This can be a great option if you’re working with people outside of your organization, such as clients or agencies. For example, you can schedule the expiration date for the end of a project, once the feedback has been received and the work completed.
Make owner allows you to pass ownership of the deck to another user. After you’ve created a presentation you might need to hand it over, to the presenter for example. You can use this option to give someone else complete control. Use it with caution, however. Once you’ve handed over ownership, you cannot retrieve it – unless the new owner hands it back or chooses to grant you access permissions.
Top tip: If you’re the owner of the deck (if you have created it yourself or have been given ownership by the original creator), there are further sharing options. When you click Share , you’ll notice a cog appears in the top right-hand corner pop up. This allows you to choose whether your Editors can change permissions and share or if Viewers and commenters can see the option to download, print, and copy. All you have to do is tick or untick the box. Easy!
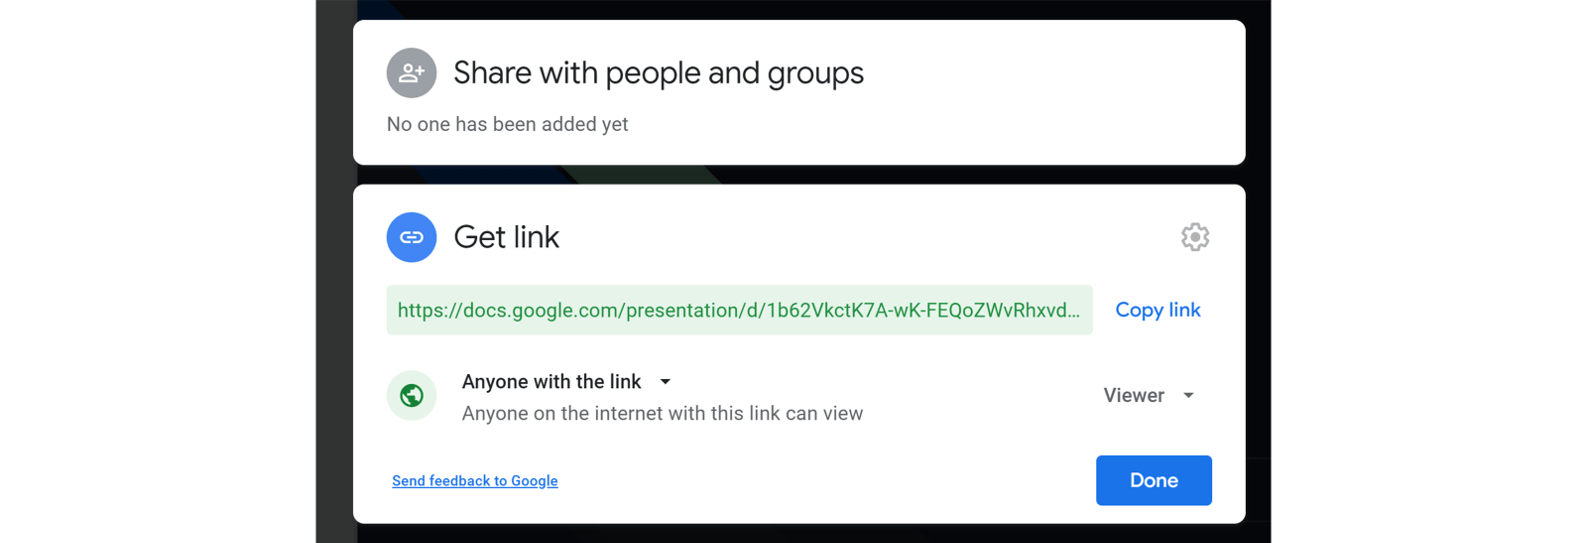
2. How to share a Google Slides presentation via a link
In this window you can also get a link.
- Click the blue Copy link button.
- Paste the link anywhere, from an email draft to a Microsoft Teams chat
This link will only work for people who have been given permission to view, edit or comment on the deck. To change this:
- Click Share
- In the Get link section, press Change .
- Choose whether your deck is Restricted or if Anyone with the link can view. Note: when you change a link’s setting to Restricted , the only people who can still see the deck are those you have directly shared with in the Share with people and groups section.
Though the Anyone with link function can be useful, it’s not the most secure option. Remember: the users that you originally shared the link with can continue to share the link with their friends, colleagues, and contacts too, meaning your presentation can be shared endlessly and with anyone! If your deck contains confidential content, you should not use this method.
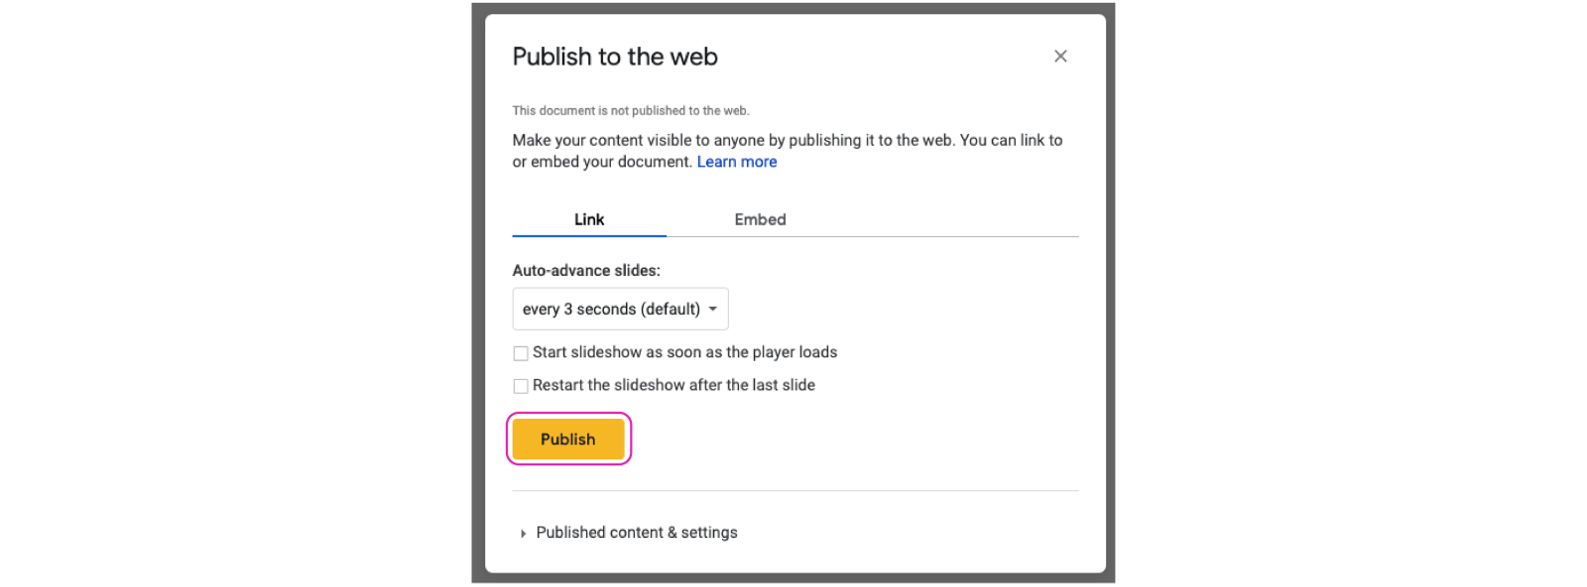
3. How to publish a Google Slides presentation to the web
If you don’t want your viewers to edit your deck, then Share with groups and people may not be the option for you. Instead, choose to Publish to the web . With this option, your deck becomes non-editable, it will simply play as if your deck was a video; auto-advancing through the slides. This means that the viewer won’t have control over which slides they view or the order they view them in. The content of your slides will be visible to anyone and everyone when publishing to the web, so be careful about choosing this option if your slides contain confidential information.
- Click File
- Select Publish to the web
- Choose Link or Embed. You can share the URL with your contacts, or you can embed the link on a website or blog
- Choose how your slides playback using the drop-down menu beneath Auto-advance slides
- Click Publish
- Copy the URL or HTML and share your deck
4. How to download a Google Slides deck as different file type
Another method of sharing (or saving) your slides involves downloading the deck as a different type of file.
- Under File select Download .
- Select the format you need (Microsoft PowerPoint (.pptx), PDF Document (.pdf), or JPEG Image (.jpeg)), and the download will begin.
- Open your file
While there are many formats available, we don’t recommend all of them. For example, when downloading as an Image, whether PNG or JPEG, the quality of your slides can be lost, the presentation will be static, and you can only download one slide at a time. If you’re printing or emailing your deck, downloading as a PDF is the best option to get a static version of your slides.
Since PowerPoint is the closest option to Slides, this format retains the presentability of the deck. However, there’s a chance that your content will corrupt or break as not all features are transferable between file formats. Check for any changes and make tweaks – like removing animations – before sending your presentation to your contacts. To find out more about the differences between PowerPoint and Slides, check out 9 Google Slides features we wish PowerPoint had or if you want to try different platforms to PowerPoint, we recommend The ULTIMATE Guide to PowerPoint Alternatives .
5. How to email your Google Slides presentations as an attachment
If all these sharing options still aren’t quite cutting it, there’s one more! To share your slides via email:
- Select Email as attachment
- Type the name or email address of your contact
- Pick the file type your deck
- Add a message, then hit Send
That’s the last of our five tips on how to share a Google Slides presentation. Now you know pretty much everything there is to know about sharing your slides and, if you want to make those slides even more awesome and effective, you have got to check out these 5 Google Slides video tutorials to level up your skills .

Emma Trantham
Principal consultant, related articles, how to present in google slides with present mode toolbar.
- Google Slides / Presentation skills
It takes time to create engaging, visual slides, so why undermine all your effort at the crunch point? Delivering a presentation properly really isn’t that tricky! With Google Slides’ Present mode toolbar, it’s super easy to present in Google Slides navigating your presentation effortlessly.

How to use Presenter view in Google Slides
- Comments: 5
For seasoned presenters and newbies alike, the move to online presenting comes with the joint complications of an online audience and unfamiliar tech. Talk about spinning plates! This blog post covers how to use Presenter view in Google Slides, so that you can be more professional and feel more confident.
The best free Google Slides templates
- Google Slides
- Comments: 1
Google Slides templates are a great starting point to improve the look and feel of your presentation. They’re fab as they’re accessible and low cost, but it’s important to remember that even well-designed presentations can be ineffective if the content is text heavy.

What is the name of piece that I attach to my chromebook that allows me to present Google slides
Hi Milton. I’m not sure what you mean – could you please clarify?
Hello, My PowerPoint contains an audio file. I uploaded it to Google Sites (new) and there’s no audio. So I uploaded my PowerPoint to Google Slides and inserted that into my Google portfolio Site hoping that would fix the problem. It didn’t. Can you tell me how to get the audio file to upload to my portfolio site, along with my slides? Thank you! Pam
Hi, I am looking for a way to have Google slides running on a laptop or tablet and instead of the presentation going to a screen, to go live i.e. as it would on a projecter in a URL that I can tell people about, so they can use it with their mobile phones, tablets etc. The sort of application would be for Carol singing, each slide would have no more than two lines to allow for large type and as it goes through the verses it shows on singers devices, one slide at a time. This of course would be outside, i.e. people would at best use mobile data, or if it would work for a larger number by wifi tethering (wifi provided by 1phone/tablet. Thank you, Sam
Join the BrightCarbon mailing list for monthly invites and resources
I am always astonished at how quickly BrightCarbon consultants pick up the key messages in very complex healthcare services. Sarah Appleton Brown Practice Plus Group

How to Embed a Link in Google Slides (Quick Guide)

Google Slides is a great way to create and share presentations online. But did you know that you can also embed links in your slides? This can be a great way to add extra content or reference materials to your presentation.
This tutorial will show you how to embed links in Google Slides. Let’s get started!
Steps to Embed a Link in Google Slides
But what if you want to add a link to an image, how to embed a video in the google slides.
When it comes to presentation, you will want your slides to be visually appealing, informative, and easy to navigate. In some cases, you might require adding a link to your slides.
However, adding a URL as text on your slide will not be nice. Instead, you can use the hyperlink feature to add a link that your audience can click on.
Here are the steps that you need to follow to embed a link in Google Slides:
1. Start by opening your presentation in Google Slides.

2. Select the text or object to which you want to add a link. In my case, you want to link to the text “information” so I have selected it.

3. In the top menu, click on Insert > Link.

4. Paste the URL of the link you want to add and then press Apply.

That’s it; you are done. Your link will be live now.

You will be glad to know that there are other ways to add links to your slides as well. For example, you can select the text or object you want to link to and then press the insert icon to add the link. There is even a keyboard shortcut to do this; you can just press CTRL+K on your keyboard.
You can do this by first selecting the image and then clicking on the link icon in the top menu. You can also use the CTRL+K keyboard shortcut in this case as well.
Once you have added the link, you might want to test it out to ensure that it is working. To do this, just click on the text or object you have just linked. A popup window will show the thumbnail of the link. Pressing on the thumbnail should open your browser and take you to the linked page.
That’s all there is to it! As you can see, it is pretty easy to add links to your Google Slides presentation. Just remember to test the link before sharing your presentation with others to make sure it’s alright.
Do you know you can also embed a video in your Google Slides? This can be really helpful if you want to add a video clip or tutorial to your presentation. Here’s how you can do it:
1. Start by finding the video you want to add to your presentation.
2. Once you have found the video, copy its URL from the address bar of your web browser.
3. Next, open your presentation in Google Slides and go to the slide where you want to add the video.
4. In the top menu, click on Insert > Video.

5. Choose the By URL option and Paste the video URL in the box that appears and then press Select.

The video will be added to your slide and you can resize and reposition it to suit the other objects and text of the presentation. You can also edit the video playback options by left-clicking on the Video and then selecting the Format Options.
Adding links to your Google Slides presentation can be a great way to add extra content or reference materials. It is also an easy way to add videos to your presentation. Just remember to test the links before you share your presentation with others to make sure they are working as they should.
Thanks for reading!
Related Posts:
")
How to Hyperlink in Google Slides? [The Complete Tutorial!]
By: Author Shrot Katewa
![How to Hyperlink in Google Slides? [The Complete Tutorial!]](https://artofpresentations.com/wp-content/uploads/2021/08/Featured-Image-How-to-Add-Hyperlink-in-Google-Slides-Optimized.jpg "presentation link for google slides")
Addling links in your Google Slides presentation can not only help you showcase your citations and sources, but it can also be highly useful when you want to quickly jump over to a video, or even to another slide within your presentation! But, how do you add a hyperlink in Google Slides?
To add a hyperlink in Google Slides, first, select the text or the object. Then, click on the “Insert” tab. Next, click on the “Link” option. Paste the URL in the pop-up, and click on “Apply”. You can also use the keyboard shortcut “Ctrl+K”. Then, paste the URL and click on “Apply”.
Adding hyperlinks can be quite useful. So, in this article, we shall learn everything about hyperlinks in Google Slides. I’ll talk about how to add hyperlinks not just to text, but also to images, shapes, and objects. We’ll also learn how to make changes to the hyperlink and even remove it when needed!
So, without any further delay, let’s get started!
1. How to Add Hyperlink in Google Slides?
Let’s first learn to add the hyperlinks in Google Slides before we understand the other aspects.
To add hyperlinks in Google Slides, you have to insert a link into a text or a picture using the “ Insert ” tab.
Although I’ve talked about the process above, I’ve described the steps involved with pictures below –
Step-1: Click on the “Insert” tab
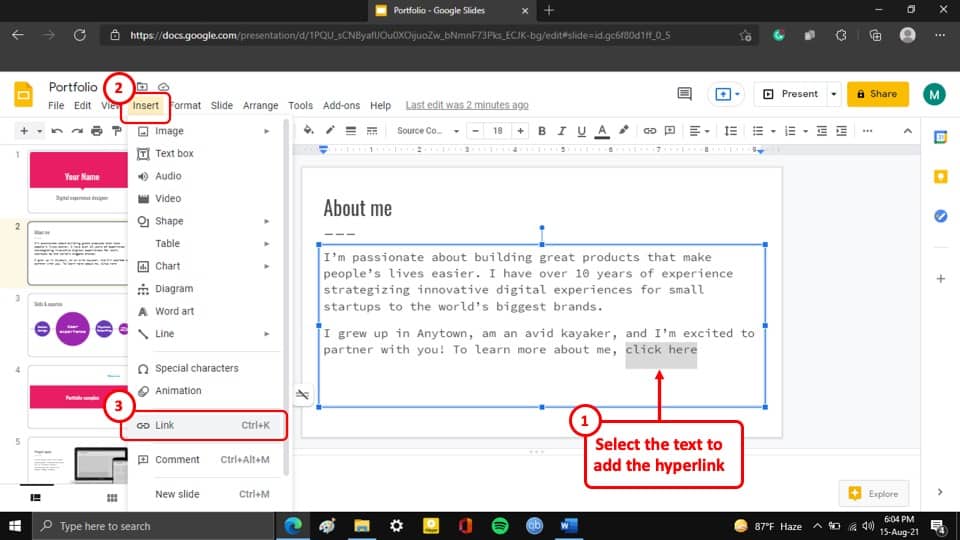
The first step to hyperlink in Google Slides is to select the text or the image where you want to add a link and to click on the “ Insert ” tab. It is the 4 th tab in the ribbon.
Step-2: Select the “Link” option
Clicking on the “ Insert ” tab will open a drop-down menu. Click on the “ Link ” option from the drop-down menu. This will open a box under the selected text or image, where you can add the hyperlink.
Step-3: Insert the link in the box
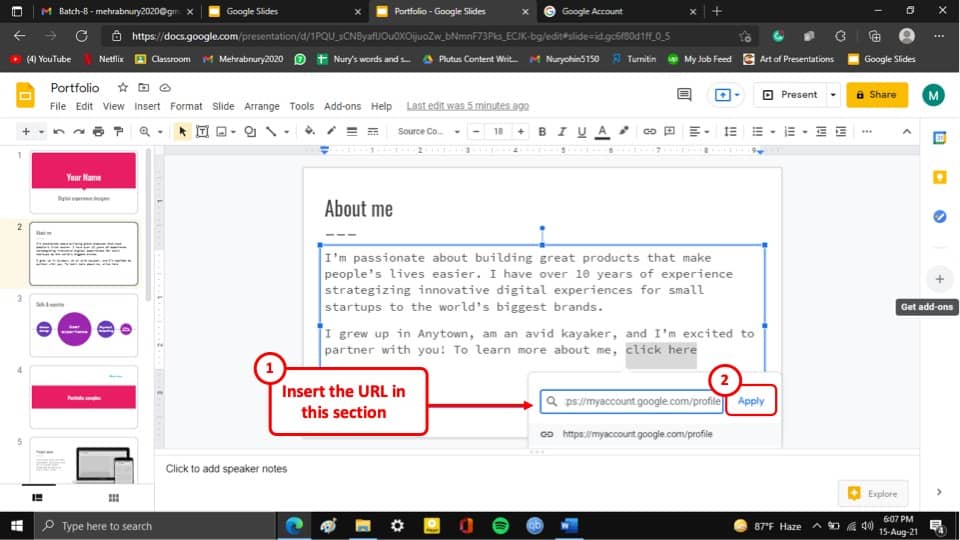
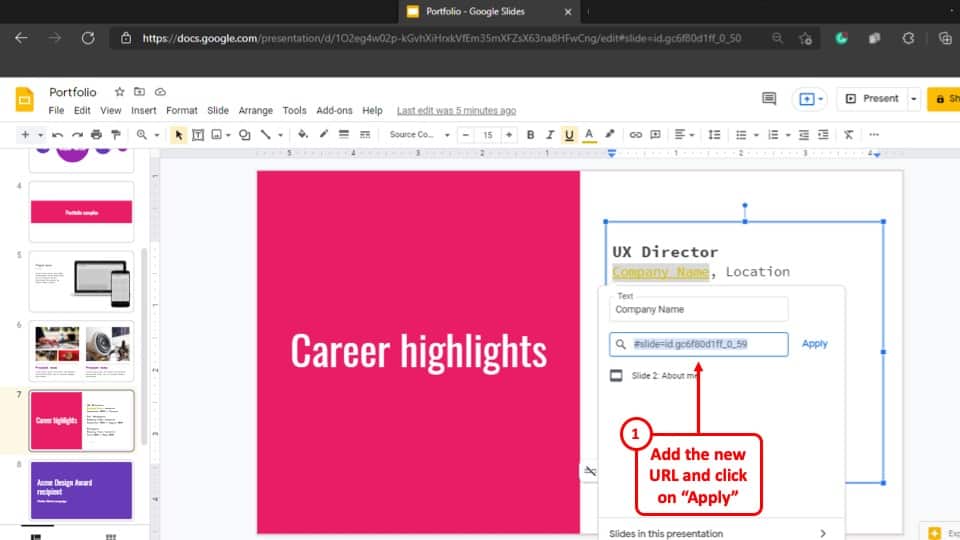
Insert the link that you want to hyperlink to the slide in the empty box and hit the blue “ Apply ” button. This will insert the hyperlink to the slide of your Google Slides presentation.
1a. Shortcut to Add Hyperlink
There are 3 shortcuts to add a hyperlink in your Google Slides presentation. All of the methods are described below.
Method 1: Using the “Right-Click” option
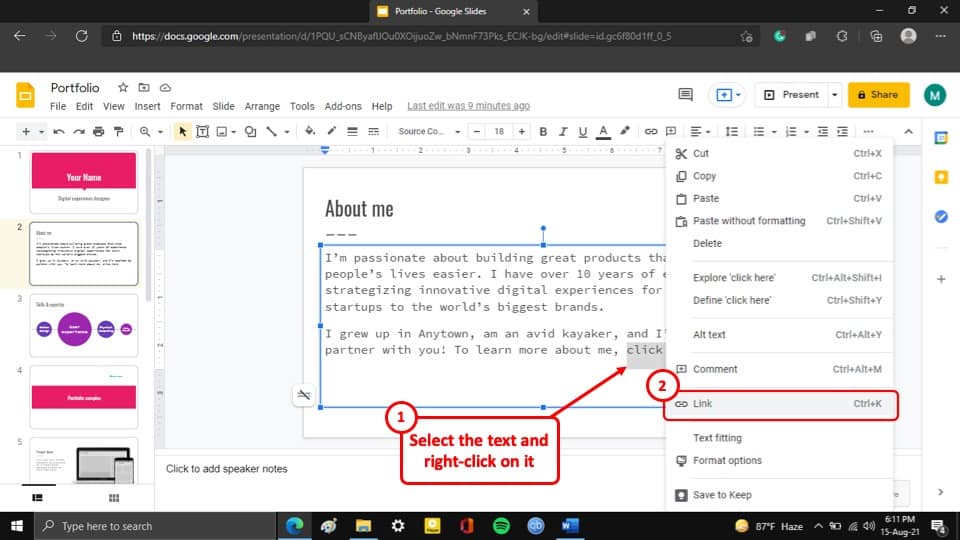
One shortcut is to “ Right-click ” on the text or image that you want to add a link to and then select the “ Link ” option from the drop-down menu.
Method 2: Using the keyboard
You can also use the keyboard shortcut to add hyperlinks in Google Slides. All you have to do is select the text or the image by clicking on them and then press the “Ctrl + K” keys simultaneously using the keyboard of your computer.
After you press the two keys at the same time, add your link to the box which will appear under the selected text or image.
Method 3: Using the Editing Tool Bar

In this method, all you have to do is select the text or image that you want to add a hyperlink to and then click on the “ Insert link ” button which is located on the editing toolbar right under the ribbon of your Google Slides presentation.
2. How to Add a Link to Another Slide in Google Slides?
To add a link to another slide in your Google Slides presentation, select the text or the image and click on the “ Link ” option and follow the simple steps described below.
Step-1: Select the “Slides in this presentation” option
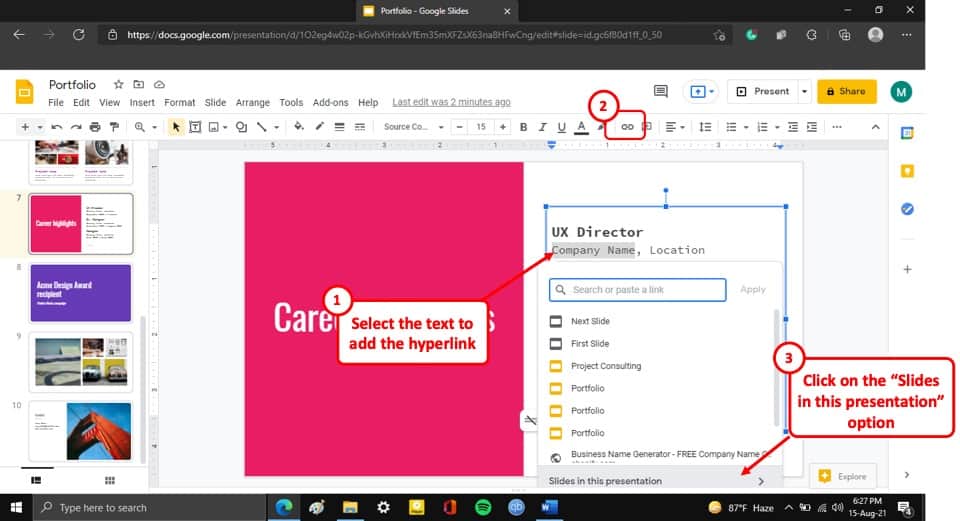
After you open the “ Link ” option, click on the “ Slides in this presentation ” option from the box that appears under the selected text or image. This option is located at the very bottom of the menu.
Step-2: Select the slide that you want to link
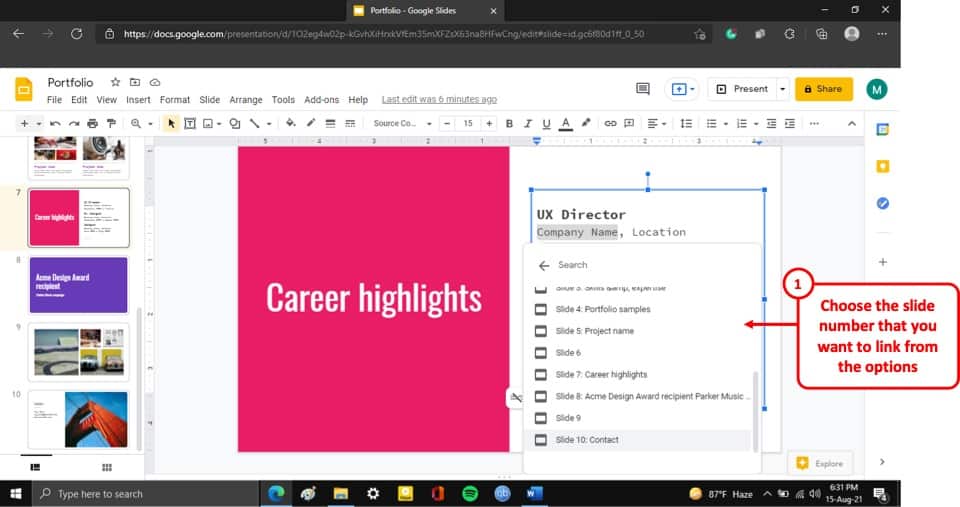
After you select the “ Slides in this presentation ” option, you will be taken to a new page in the window, where you will see a list of all the slides in the Google Slides presentation. Simply select the slide that you want to link this slide to, and the link will be added to the text or image immediately.
3. How to Go Back to a Slide after Hyperlink?
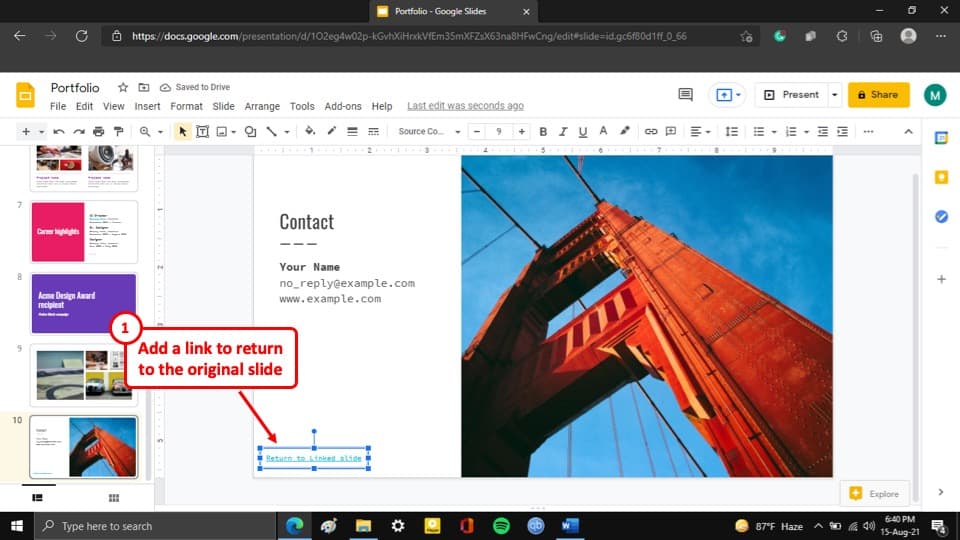
It is a bit of a hassle to navigate and go back to the original slide from the slide in the hyperlink since there is no direct way of going back to the original slide.
To get around this problem, you have to insert a return link to the slide that will take you back to the original slide. Simply follow the steps described in the previous section and add a link to the original slide.
4. How to Hyperlink Image in Google Slides?
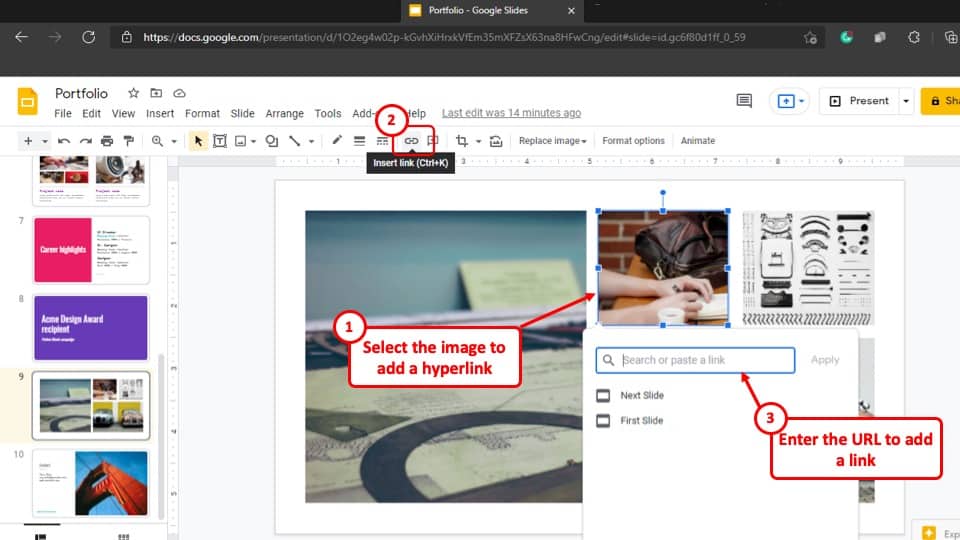
Adding hyperlinks to images is identical to linking a text in your Google Slides presentation. All you have to do is select the image, click on the “ Insert link ” button and then insert the link in the “ Search or paste a link ” box and the hyperlink will be added to the image.
5. How to Remove Hyperlink in Google Slides?
It is very easy to remove a hyperlink from texts or images in Google Slides. Simply click on the link and a dialogue box will appear under the hyperlinked text.
Click on the “ Remove link ” button, which has an icon of a link with a line over it. It is the last button in the dialogue box. After you click on the “ Remove link ” button, the link will be removed immediately.
6. How to Change Color of Hyperlink in Google Slides?
To change the Colour of the hyperlink in Google Slides, you have to go to the “ Slide Master ” view. The whole process is described step-by-step below.
Step-1: Select the “Theme Builder” option
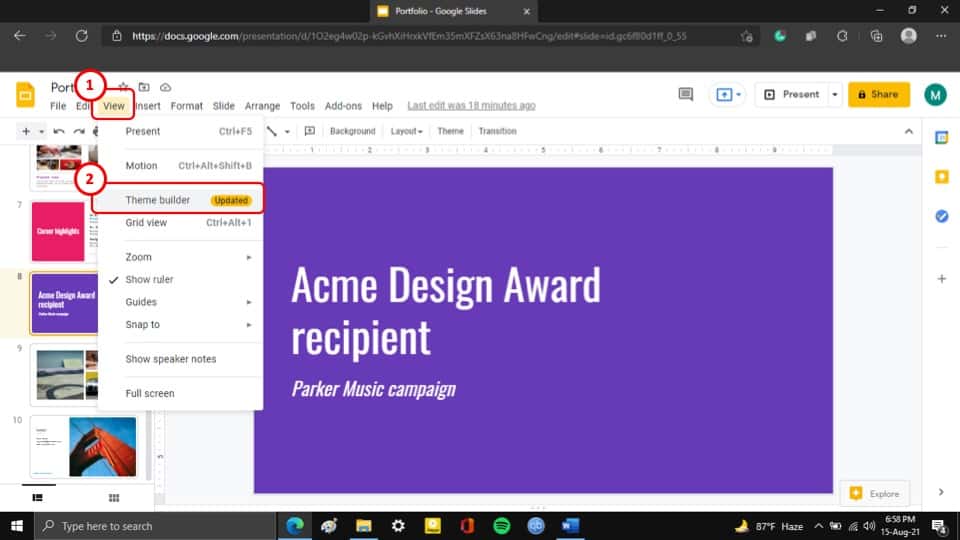
To access the “ Slide Master ” view, select the “ Theme Builder ” option which is located in the “ View ” tab of your Google Slides presentation. It is the third option in the “ View ” tab.
Step-2: Select the “Colors” tool

By selecting the “ Theme Builder ” option, you will be taken to the “ Slide Master ” view. While in the “ Slide Master ”, click on the “ Colors ” tool in the editing toolbar below the ribbon.
Step-3: Expand the “Choose a theme color” box
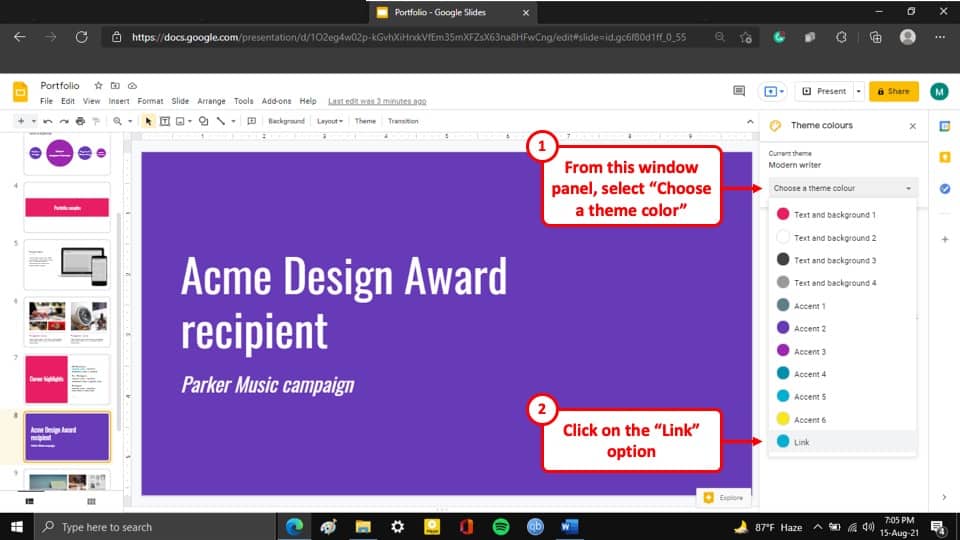
After you have clicked on the “ Colours ” option, the “ Theme Colours ” sidebar will appear on the right side of your screen. Select the “ Choose a color ” option to open its drop-down menu.
Step-4: Select the “Link” option
From the drop-down menu, click on the “ Link ” option. It is the last option in the drop-down menu.
Step-5: Select your preferred color
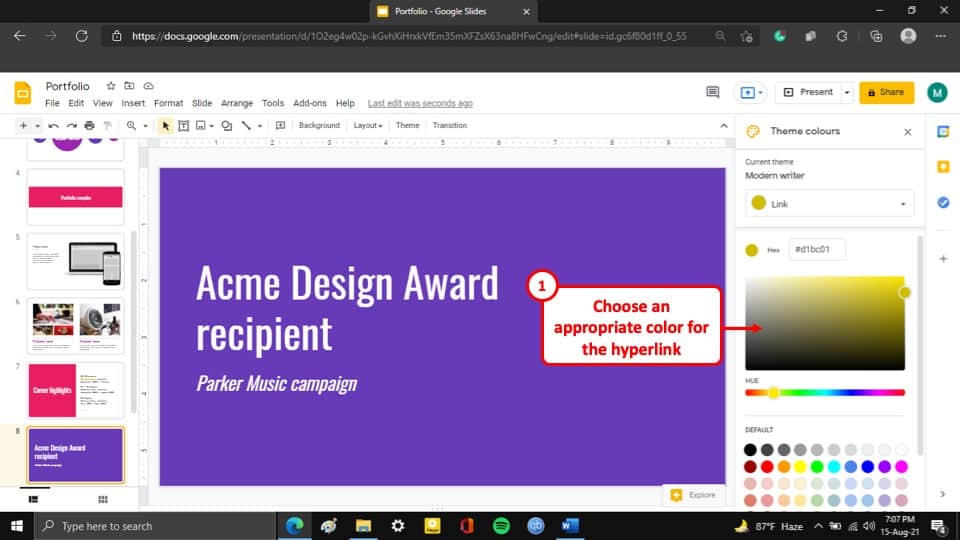
All you have to do now is select your preferred color for hyperlinks and close the “Theme Colours” sidebar and the links in your Google Slides presentation will change colors accordingly.
7. How to Edit a Hyperlink in Google Slides?
Follow the two simple steps described below to learn how to edit a hyperlink in Google Slides.
Step-1: Select the “Edit link” button
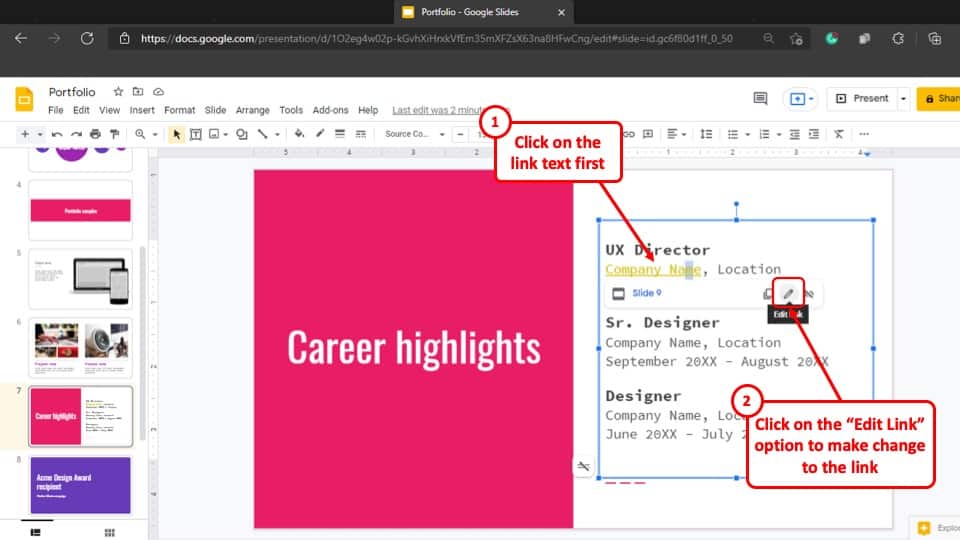
The first step is to select the link to open its dialogue box. After that, click on the “ Edit link ” button which has an icon of a reclined pen and is the middle button of the 3 buttons on the right side of the dialogue box.
Step-2: Edit the link
After you select the “ Edit link ” button, the pop-up box containing the link will appear under the linked text. Now simply make your preferred edits and the link will be changed accordingly
8. How to Hyperlink a Video in Google Slides?
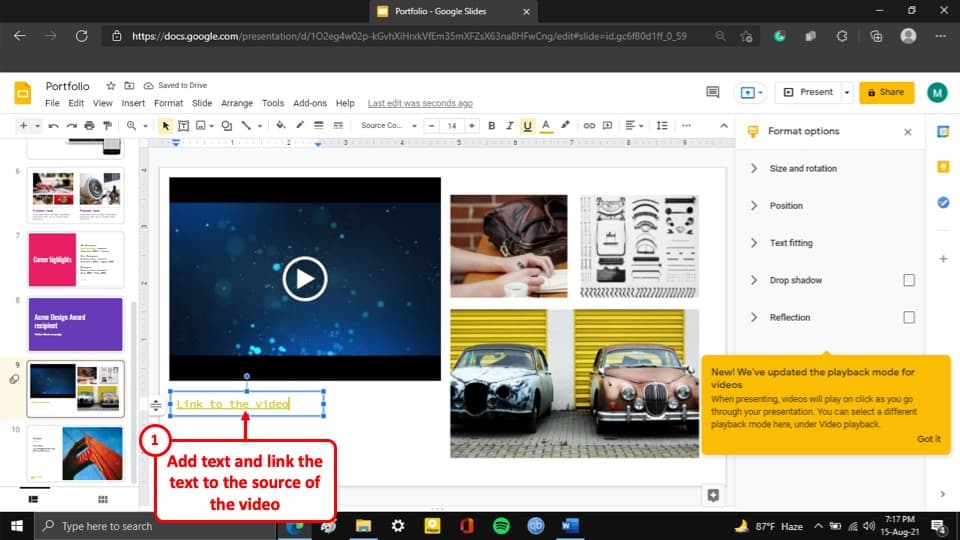
Unfortunately, you can’t add a hyperlink to a video in your Google Slides presentation. When you select the video, all the options to add a hyperlink are greyed out and can’t be used.
What you can do is add a text under the video and add your desired hyperlink to the text, following the steps shown above.
9. How to Hyperlink a PDF in Google Slides?
In order to hyperlink a PDF file in Google Slides, you first need to upload the PDF file to Google Slides.
Unfortunately, currently there is no direct method to convert or upload your PDF to Google Slides. Fortunately, there are a few ways you can mitigate this issue.
I have written a detailed article on how to add a PDF to Google Slides . Make sure you check out that article and add a thumbnail for that PDF file.
Once you’ve added an image thumbnail, upload the PDF document to your Google Drive and add a hyperlink to the PDF image thumbnail for the destination of your PDF file on your Google Drive!
More Articles Related to Google Slides
![How to Group & Ungroup Objects in Google Slides? [Step-by-Step]](https://artofpresentations.com/wp-content/uploads/2023/02/Featured-Image-1-2.jpg "presentation link for google slides")
How to Group & Ungroup Objects in Google Slides? [Step-by-Step]

How to Move Image to the Back (or Front) in Google Slides?
![How to Add a Border in Google Slides? [Complete Guide!]](https://artofpresentations.com/wp-content/uploads/2023/02/Featured-Image-1-4.jpg "presentation link for google slides")
How to Add a Border in Google Slides? [Complete Guide!]
![Insert Check Box in Google Slides [Everything to Know!]](https://artofpresentations.com/wp-content/uploads/2023/01/ezgif.com-gif-maker-2.webp "presentation link for google slides")
Insert Check Box in Google Slides [Everything to Know!]
Credit to Nakaridore (on Freepik) for the featured image of this article (further edited)
Google Slides
How to Hyperlink in Google Slides?

Table of Contents
A hyperlink is like a clickable link that takes you to another document, webpage, or even a specific part of a presentation. Adding hyperlinks to your Google Slides presentation can provide your audience with additional information on the topic.
Many presentation designers like using hyperlinks because it keeps the presentation clean and organized, without showing long URLs that might distract from the content. In this guide, you’ll learn how to easily insert hyperlinks into your Google Slides presentations. Without waiting further, let’s get started.
Types of Hyperlinks in Google Slides
Here are the different types of Hyperlinks users can create in Google Slides:
- External Websites: The most common type, you can link text, images, or shapes to any relevant web page, allowing viewers to explore more information online.
- Internal Navigation: Link to another slide within your presentation, either by number or by selecting the slide itself. This helps guide viewers to specific sections or create a non-linear flow.
- Google Drive Documents: Link directly to a relevant document stored in your Drive, giving viewers easy access to additional details or reference materials without leaving the presentation.
Create Hyperlinks in Google Slides: Different Methods
There are four different methods to add hyperlinks in your Google Slides presentation:
- From the Menu: This method involves using the “Insert” menu option.
- Right-Click Menu: You can also add hyperlinks by right-clicking on the element and selecting “Link”.
- Keyboard Shortcut: For a quicker approach, use the keyboard shortcut “Ctrl + K” (Windows) or “Cmd + K” (Mac).
- Toolbar Button: Look for the “Insert Link” button on the toolbar for another way to add hyperlinks.
Let’s take a closer look at how these methods function below.
Method 1: Add Hyperlinks in Google Slides Menu
Step 1: Select your slide and content : Open the Google Slides presentation and navigate to the slide where you want to add the hyperlink. Choose the text or object you want viewers to click on.
Step 2: Insert the hyperlin k: Go to the top menu bar and click “Insert,” then select “Link.” A dialog box will appear.
Step 3: Paste the link and apply : Paste the web address (URL) you want to link to in the provided field. Once done, click “Apply” to finalize the hyperlink.
Method 2: Add Hyperlinks with a Right-Click in Google Slides
Step 1: Select the Text: Start by highlighting the text you want to turn into a link.
Step 2: Right-Click and Link Up: Next, right-click on the selected text and choose “Link” from the menu.
Step 3: Paste and Apply: A dialog box will appear. Paste the web address (URL) you want to link to in the provided field, and then click “Apply” to create the hyperlink.
Method 3: Use Shortcut Keys for Hyperlinking in Google Slides
Step 1: Select Your Target: Begin by highlighting the text or object you want to turn into a link.
Step 2: Using the Keyboard Shortcut: Press “Ctrl+K” on Windows or “Cmd+K” on Mac to bring up the hyperlink dialog box.
Step 3: Paste and Apply: Paste the web address (URL) you want to link to in the designated field, and then click “Apply” to create the hyperlink.
Method 4: Add Hyperlinks by Using a Toolba r
Step 1: Choose Your Target: Begin by selecting the element (text, image, shape) you want to turn into a hyperlink.
Step 2: Click the Link Icon: Go to the toolbar and find the “Insert Link” icon (it might look like a chain). Click on it.
Step 3: Enter Your URL: A dialog box will appear with a blank field. Paste the web address (URL) you want to link to in this field.
Step 4: Apply the Link: Click the “Apply” button to create the hyperlink.
Create presentation slides with AI in Seconds in Google Slides
10M+ Installs
Works with Google Slides

How to Link a Specific Slide using Hyperlink?
Step 1: Choose Your Target: Select the object or text on the slide that you want to act as the hyperlink.
Step 2: Insert the Link: Click “Insert” in the toolbar and choose “Link.”
Step 3: Navigate to Your Slide: In the link menu, select “Slides in this presentation” and then choose the slide you want to link to.
Step 4: Apply the Hyperlink: Click “Apply” to finalize the hyperlink. Now, clicking the object or text will jump to the chosen slide during your presentation.
How to Edit a Hyperlink In Google Slides?
Step 1: Right-click on the hyperlink you want to change.
Step 2: Choose the option you want: “Edit Link” to modify the destination, or “Remove Link” to break the connection.
Closing Thoughts
Adding hyperlinks to your Google Slides presentations can significantly enhance the audience’s experience. By incorporating hyperlinks, you can provide viewers with additional resources, improve navigation within your presentation, and keep your slides clean and organized.
- No design skills required
- 3 presentations/month free
- Don’t need to learn a new software

Frequently Asked Questions
Why should i use hyperlinks in my google slides presentation.
Hyperlinks can significantly enhance your Google Slides presentation. They enable interactivity, making your presentation engaging and informative. You can use them to navigate lengthy presentations, cite sources, facilitate collaboration, and add visual appeal. In essence, hyperlinks make your presentation more interactive and dynamic, catering to various learning preferences.
How do I remove a hyperlink in Google Slides?
To remove a hyperlink, simply select the linked text or object, right-click, and choose “Remove link” from the context menu.
Are there any limitations to the types of URLs I can hyperlink in Google Slides?
Google Slides supports hyperlinks to various types of URLs, including webpages, Google Drive files, and email addresses.
How can I test if my hyperlinks are working correctly before a presentation?
You can test your hyperlinks by entering presentation mode and clicking on each hyperlink to verify that it directs you to the intended destination.
Can I use hyperlinks in Google Slides when presenting offline?
Hyperlinks in Google Slides require an internet connection to function properly. However, you can download your presentation for offline use, but the hyperlinks may not work until you reconnect to the internet.
Can I hyperlink images in Google Slides?
Absolutely! You can follow the same steps mentioned above to hyperlink images in your presentation.
Save Time and Effortlessly Create Presentations with SlidesAI

Got any suggestions?
We want to hear from you! Send us a message and help improve Slidesgo
Top searches
Trending searches

holy spirit
35 templates

11 templates

business pitch
598 templates

ai technology
169 templates

21 templates

environmental science
36 templates
The best Google Slides and Powerpoint presentation templates
Here's a selection of the best free & premium google slides themes and powerpoint presentation templates from the previous month. these designs were the most popular among our users, so download them now, the best presentations from may.

It seems that you like this template!
Premium template.
Unlock this template and gain unlimited access
AI Tech Agency
It’s amazing how robots and computers are able to perform tasks that we thought only humans could do. If your agency is specialized in artificial intelligence, this free marketing presentation template can help you get your points across easily!

Minimalist Business Slides
Minimalism is an art style that frees the canvas and that lets the content stand out for itself. It’s a way of conveying modernism, simplicity and elegance and can be your best ally in your next presentation. With this new design from Slidesgo, your business presentations will be as professional...

Minimal Charm
Are you looking for a monochromatic theme that is interesting at the same time? How about using a simple and clean theme, along with black-and-white pictures, to convey business or corporate content in a professional way?
Elegant Workplan
Developing a successful business plan can be challenging, but with the right tools at your disposal, it becomes much simpler. This template is a comprehensive document that allows you to outline your business goals, strategies, and financial projections in a professional and aesthetically pleasing way. The full suite of resources...

Notebook Lesson
These are the last days before the Summer break! We know that there are some pending lessons that you need to prepare for your students. As they may be thinking about their friends and their holidays, catch their attention with this cool template!

Fantasy Cloud Sky Theme
You're not dreaming. Well, maybe you are. But we're glad that Slidesgo exists in your dreams too. Whether it's real life or your dream world, please check out this new template. It's a wonderful collection of slides with sparkles and all the colors of the rainbow. Pure magic, pure fantasy!...

Integers: Positive or Negative?
Download the "Integers: Positive or Negative?" presentation for PowerPoint or Google Slides and teach with confidence. Sometimes, teachers need a little bit of help, and there's nothing wrong with that. We're glad to lend you a hand! Since Slidesgo is committed to making education better for everyone, we've joined hands...

Time Boxing Step by Step
Download the "Time Boxing Step by Step" presentation for PowerPoint or Google Slides and teach with confidence. Sometimes, teachers need a little bit of help, and there's nothing wrong with that. We're glad to lend you a hand! Since Slidesgo is committed to making education better for everyone, we've joined...

Chalkboard Background
There’s an object that comes to mind when you think of a classroom. What’s in there, other than the students, the teacher and the desks? A chalkboard! The design of our new template focuses on this! Since today is Teachers’ Day in Spain, we’re sure you’re going to love it!

Futuristic Background
When you need to impress everybody and stay relevant, you must look ahead and aim to be the first. Take a peek into the future with this new template Slidesgo has just designed. It’s free and perfect for techie topics or just for giving your presentation a futuristic vibe!

Social Skills Subject for Middle School - 6th Grade: How to Treat Your Teachers
You must treat your teachers with respect, as they are the ones who are in charge of your learning (besides your parents). Besides, as you learn to do that, you'll also learn how to address your superiors. Since we want education to be fun too, here's a template that will...

Elegant Black & White Thesis Defense
Present your research findings with grace and assertiveness through this template. Available for Google Slides and PowerPoint, this design set offers minimalistic charm with its simple, gray scale elegance. The template not only provides a polished platform to showcase your thesis but also ensures seamless and efficient delivery of your...

School Assignments
Design some school assignments for your students so they can learn while they are having fun. Download this cool template now and make use of its resources. It looks like a sheet of a notebook and we have added drawings of stationery. Get your pencil!

Computer Engineering Technology
We dream of things, and then computer engineers come and make them into reality! Phones were just a dream a few decades ago, and now everyone has one on their pocket. What will engineering come up with next? Be a part of the change the world is waiting to see...

Minimalist Korean Aesthetic Pitch Deck
Templates based on a minimalist style are usually very useful in business presentations, as they make the audience focus on the content and not on the ornaments of the design. This minimalist style template that we propose here is perfect for a pitch deck to present your product or your...

Elegant Bachelor Thesis
Present your Bachelor Thesis in style with this elegant presentation template. It's simple, minimalist design makes it perfect for any kind of academic presentation. With an array of features such as section dividers, images, infographics and more, you can easily create a professional and creative presentation that stands out from...

Cream & Pastel Palette Healthcare Center Characters
Let us introduce you to a new way of presenting healthcare centers. Did you think that we were going to use blue? Tut-tut! This time, the palette revolves around cream (the color of the backgrounds) and other pastel tones. As you explain in detail (or in brief) your healthcare services,...

Welcome to Middle School Class
Welcome, everyone! This is our middle school class, take a look! Our students, our teachers, our subjects, our schedules… We have written everything about it in this presentation! The cool waves of color flow amazingly with this design. Everything is super creative and colorful! Prepare for the back to school...
- Page 1 of 1342
Great presentations, faster
Slidesgo for Google Slides :
The easy way to wow

Register for free and start editing online
- Help Center
- Google Docs Editors
- Privacy Policy
- Terms of Service
- Submit feedback
- Present or print slides
Present slides
Want advanced Google Workspace features for your business?
Try Google Workspace today!
You can present Google Slides so they show on a full screen.
View a presentation
To present a full-screen presentation in Google Slides:
- Open a presentation in Google Slides .
- From the current slide, the presentation will become full screen. To change slides, use the arrow keys on your keyboard or click the arrows at the bottom of the presentation.
- To exit full-screen, press the Esc key.
Present with notes, auto-advance slides & more
View a presentation with speaker notes.
- Click Presenter view .
- Click Speaker notes .
Advance slides automatically
- You present your presentation.
- Someone clicks on a link to your published presentation.
- Someone views your published presentation that's embedded in a website.
Advance slides automatically while you present
- Open a presentation in Google Slides.
- Choose how quickly to advance your slides.
Advance slides automatically for a published presentation
- If you use Google Slides through work or school, you can only share the link with people within your organization.
- After you publish your presentation, anyone with the link will be able to see your presentation.
- Choose Link or Embed .
- Under "Auto-advance slides," choose how much time you want to add between slides.
Stop publishing
Highlight & annotate as you present.
When you present, you can use a pen tool to draw or make annotations. Annotations stay during your presentation, but disappear after you end your slideshow.
Use the pen tool during a slideshow
- On your browser, open a presentation in Google Slides .
- To draw or annotate, click and drag on your slide.
Other actions while presenting
When you present, you can choose more options from the toolbar at the bottom of the presentation window:
- Select slides to present from a list
- Open "Presenter" view
- Turn on laser pointer
- Print the presentation
- Download the presentation in PDF or PPTX format
PC keyboard shortcuts
Mac keyboard shortcuts, chrome keyboard shortcuts, need more help, try these next steps:.
Using Google products, like Google Docs, at work or school? Try powerful tips, tutorials, and templates. Learn to work on Office files without installing Office, create dynamic project plans and team calendars, auto-organize your inbox, and more.
Slideegg Blog
- PPT Design Service
- Free Slides
- Architecture
- More No content found
How to Insert and Edit Icons in Google Slides
Home / Google Slides Tutorials / How to Insert and Edit Icons in Google Slides

Icons are tiny visual powerhouses that can add clarity, personality, and professionalism to your Google Slides presentations. But how do you get them in there and make them look just right? Fear not, fellow presenter! This guide will walk you through the simple process of adding and editing icons in Google Slides.
Step 1: Open Google Slides and access the presentation where you want to add or edit icons.
Step 2: Click on the Insert menu at the top of the screen. From the dropdown menu, select Icon. This will open a treasure trove of icons just waiting to be used!
Step 3: You can either use the search bar to find specific icons with keywords (think “growth chart” or “light bulb”) or browse through the various categories to discover hidden gems.
Welcome to Icons Presentation Template ! Once you’ve found the perfect icon, click on it to select it. Then, click the Insert button. Your chosen icon will appear on your slide. After that, you can customize the icon to match your presentation’s look and feel using Google Slides’ customization options.
Customize Your Icon
Now that your icon is on the slide, let’s make it shine! To edit the icon, simply click on it. You’ll see small blue handles appear around it, letting you know it’s ready for your customization touch.
Resize: Want to make your icon bigger or smaller? Click and drag any of the blue handles to resize it to your liking.
Feeling playful? Click and drag the green rotation handle at the top to rotate your icon and add a touch of dynamism. Align the icon perfectly for your specific needs.
Enhance Your Icon: Don’t like the default color? No problem! Click on the Fill color icon (it looks like a paint bucket) in the toolbar at the top. Choose a new color from the palette or enter a specific color code for ultimate personalization.
Format Frenzy (Optional): Feeling fancy? The Format options panel appears on the right side of the screen when your icon is selected. Here you can add effects, borders, and more to make your icon truly stand out.
Icon Replacement (Optional): Change your mind about the icon. No worries! Select the existing icon and press the “Delete” key on your keyboard. Then, follow steps 2-4 to insert a new icon of your choice.
Slide Harmony Move your icon around the slide by clicking and dragging it to the desired position. Use the alignment tools in the toolbar at the top to make your icon perfectly aligned with other elements on the slide.
Save Your Work Once you’re happy with your icons and their placement, don’t forget to save your presentation. Click on the File menu and select Save or Save as.
With these easy steps, you’re now a Google Slides icon pro! No more boring presentations filled with walls of text. Lend your slides some personality and watch your audience perk up and take notice. Who knows, you might even get some compliments on your newfound design skills.

Ramachandiran
Related blogs.

How-To Geek
How to autoplay and loop a google slides presentation.
Play your presentation without touching a thing.
Quick Links
Set up autoplay and loop when presenting, set up autoplay and loop when publishing to the web.
If you don't want to worry about clicking through your slideshow, you can set up Google Slides to play your presentation automatically. Plus, you can have the slideshow loop, so it starts over at the beginning when it ends.
You might be playing your slideshow at a kiosk, during a conference, or publishing it to the web. These are the ideal times to use AutoPlay and Loop in Google Slides . You can automatically present the show and choose the timing between slides. Then, restart the presentation at the beginning each time it ends.
If you plan to start the slideshow and then let it play, you can set up AutoPlay and Loop , or simply one or the other.
Related: How to Loop a PowerPoint Presentation
Start the presentation by clicking "Slideshow" at the top of Google Slides. You can also use the arrow to pick either "Presenter View" or "Start From Beginning" per your preference.
When the slideshow opens, display the Presenter Toolbar by hovering your cursor over the bottom left corner of the presentation.
Click the three dots on the right of the Presenter Toolbar, then move to AutoPlay. You'll see a pop-out menu that lets you select the advance timing for the slides. You can pick from every second up to every minute.
If you also want to loop the slideshow, select "Loop" at the bottom of the pop-out menu.
When you finish, click "Play" to automatically play your presentation.
To stop the slideshow, simply click on a slide. You can then resume AutoPlay from the Presenter Toolbar by selecting "Play" again.
Maybe you plan to publish your slideshow to the web or embed it on a website rather than play it locally. You can set up AutoPlay and Loop as part of the publish settings.
Related: How to Share a Google Docs, Sheets, or Slides File as a Web Page
Go to File > Publish to the Web in the menu.
Choose either "Link" or "Embed" per your intent. Then use the Auto-Advance Slides drop-down box to choose the timing for the slides. Here again, you can pick from every second up to every minute.
To loop the slideshow, check the box for Restart the Slideshow After the Last Slide.
You can then mark the checkbox for Start Slideshow as Soon as the Player loads if you like, so that the viewer doesn't have to take any action to begin the presentation.
When you finish, click "Publish" and confirm to obtain the link or embed code for the slideshow.
To share a Google Slides presentation that doesn't require you to walk viewers through it, remember these steps to automatically play and loop the slideshow.
IMAGES
VIDEO
COMMENTS
Click Insert > Link from the menu. Use the Insert Link button in the toolbar. Right-click the item and choose "Link" (this may not be available for images). When the add link box displays below the item, you can select one of the suggested slides in your slideshow. If you don't see the one you want, click "Slides in This Presentation" at the ...
Go to "Insert.". Choose "Link" from the list of options. Select which slide the link will take you to. If you don't see the slide number, select "Slides in this presentation ...
Use Google Slides to create online slideshows. Make beautiful presentations together with secure sharing in real-time and from any device.
Step 2. Access the Link Option. After you've opened your presentation, selecting File > Publish to the web menu option: Select the Publish to the web menu option in Google Slides. The Publish to the web dialog box appears. The Link tab opens by default: Use the Link tab to publish your presentation online.
Select the object you want to add the hyperlink to and go to "Insert" in the main menu. 2.-. Click on "Link ," and a blank bar will open next to the object selected. 3.-. Enter the URL of the website or document you want to link to. 4.-. Click on " Apply ". Your hyperlink will now appear on the slide.
Select the transparent shape. Right-click and choose copy. Right-click again and choose paste. To edit the link, click the pencil icon. Alternatively, you can right-click and choose link just like we did before. Click the Slides in this presentation drop-down menu and choose the correct slide. Click Apply.
Select the resource. Click Insert → Link or press Ctrl + K (Cmd + K in Mac). You can also click the Insert link button on the toolbar. Adding links in Google Slides. Click the Slides in this presentation drop-down arrow and select the slide you want to link to. You also have options to go to the next, previous, first and last slide too.
Link Slides From the App. Tap-and-hold the item to see the hyperlink option. Select the object or press-and-hold the text to highlight it (double-tap the text to enter edit mode). Tap Insert link. If you don't see this option, you either can't add a hyperlink to that specific object, or it's in the overflow menu (the three dots).
Present like a pro, directly from Google Meet. Access all of your Slides and Meet controls in one place, and enjoy smoother high resolution presentations. Premium feature. This feature is available on some Google Workspace and Google Workspace plans.
By adding links, you can jump to any slide during your presentation. You can use links to create a table of contents, navigation buttons, or other kinds of i...
How to share a Google Slides presentation via a link. In this window you can also get a link. Click the blue Copy link button. Paste the link anywhere, from an email draft to a Microsoft Teams chat; This link will only work for people who have been given permission to view, edit or comment on the deck. To change this:
Here are the steps that you need to follow to embed a link in Google Slides: 1. Start by opening your presentation in Google Slides. 2. Select the text or object to which you want to add a link. In my case, you want to link to the text "information" so I have selected it. 3. In the top menu, click on Insert > Link. 4.
How to Create a Blank Presentation. Now that you have a Google account, it's time to create your first presentation. Head over to Google Slides and place the cursor on the multicolored "+" icon in the bottom-right corner. The + turns into a black pencil icon; click it. Pro Tip: Type.
Remove a link to a presentation you own. Find the file or folder in Google Drive, Google Docs, Google Sheets, or Google Slides. Open or select the file or folder. Click Share or Share Copy link . Under "General access", click the Down arrow . Select Restricted.
Step-1: Click on the "Insert" tab. The first step to hyperlink in Google Slides is to select the text or the image where you want to add a link and to click on the " Insert " tab. It is the 4 th tab in the ribbon. Step-2: Select the "Link" option. Clicking on the " Insert " tab will open a drop-down menu. Click on the " Link ...
On your computer, open a document or presentation in Google Docs or Google Slides. Click Insert Chart From Sheets. Click the spreadsheet with the chart you want to add, then click Select. Click the chart you want to add. If you don't want the chart linked to the spreadsheet, uncheck "Link to spreadsheet." Click Import.
Rename your presentation—Click Untitled presentation and enter a new name.. Add images—Click Insert Image to add images from your computer, the web, Google Drive, and more. You can also move, delete, or resize images. Add text—Click Insert Text box to add new text boxes. Then, click a text box to enter text. You can move, delete, or re-size text boxes.
Download the Ecological Packaging Agency presentation for PowerPoint or Google Slides. Your agency is set to reach new heights and milestones. Allow us to accompany you on the journey to success with this all-rounded template. No need for typical sales fluff, this template speaks its cutting-edge design loudly.
How to Link a Specific Slide using Hyperlink? Step 1: Choose Your Target: Select the object or text on the slide that you want to act as the hyperlink. Step 2: Insert the Link: Click "Insert" in the toolbar and choose "Link." Step 3: Navigate to Your Slide: In the link menu, select "Slides in this presentation" and then choose the slide you want to link to.
Navigate to your file (s) and then click "Open.". Alternatively, you can drag and drop a file from your computer directly into the web browser for an easy upload. Once your file uploads, right-click it, point to "Open With" on the context menu, and then select "Google Slides.". Google then converts your presentation into a Google ...
Access Google Slides with a personal Google account or Google Workspace account (for business use).
The best Google Slides and Powerpoint presentation templates Here's a selection of the best free & premium Google Slides themes and PowerPoint presentation templates from the previous month. These designs were the most popular among our users, so download them now! ...
Create, edit and collaborate on presentations from your Android phone or tablet with the Google Slides app. With Slides, you can: - Create new presentations or edit existing ones - Share presentations and collaborate in the same presentation at the same time - Work anywhere, anytime - even offline - Add and respond to comments
3 Google Slides. Last updated on May 18, 2023. Google Slides is the presentation software available via your Google account. Just like you can create documents and spreadsheets with Google Docs and Sheets, you can create presentations with Google Slides. The setup is very similar to PowerPoint and is free to use for anyone with a google account.
Don't just read off of your slides—you'll bore your audience. Practice and rehearse your presentation or create index cards with speaking notes to make your presentation more engaging. Don't use a new design, transition, animation, etc., on each slide—you'll clutter up your design. Choose one single design, color scheme, font ...
Use the pen tool during a slideshow. On your browser, open a presentation in Google Slides. At the top right corner, click Slideshow . At the bottom left, click Options Enable pen tool. To draw or annotate, click and drag on your slide. Optional: To change the pen color, at the bottom, click Pen tool Select a color.
2. Google Slides. Everyone has heard of Google, right? So it's no surprise that Google Slides is one of the more popular presentation apps and PowerPoint alternatives available. But popular does not always mean best. While the service is free to any Google account holder, its slide layouts are basic at best and its design capabilities are ...
Step 1: Open Google Slides and access the presentation where you want to add or edit icons. Step 2: Click on the Insert menu at the top of the screen. From the dropdown menu, select Icon.
Go to File > Publish to the Web in the menu. Choose either "Link" or "Embed" per your intent. Then use the Auto-Advance Slides drop-down box to choose the timing for the slides. Here again, you can pick from every second up to every minute. To loop the slideshow, check the box for Restart the Slideshow After the Last Slide.
This easy-to-use template, available for both PowerPoint and Google Slides, features a soothing gray palette and delicate floral designs, setting the right tone for your remembrance. Ideal for anyone looking to create a moving and dignified presentation, it helps you share cherished memories and celebrate a life well-lived.