Set and Check User Rights Assignment via Powershell
You can add, remove, and check user rights assignment (remotely / locally) with the following powershell scripts..
Posted by : blakedrumm on Jan 5, 2022


Local Computer
Remote computer, output types.
This post was last updated on August 29th, 2022
I stumbled across this gem ( weloytty/Grant-LogonAsService.ps1 ) that allows you to grant Logon as a Service Right for a User. I modified the script you can now run the Powershell script against multiple machines, users, and user rights.
Set User Rights
How to get it.
All of the User Rights that can be set:
Note You may edit line 437 in the script to change what happens when the script is run without any arguments or parameters, this also allows you to change what happens when the script is run from the Powershell ISE.
Here are a few examples:
Add Users Single Users Example 1 Add User Right “Allow log on locally” for current user: . \Set-UserRights.ps1 -AddRight -UserRight SeInteractiveLogonRight Example 2 Add User Right “Log on as a service” for CONTOSO\User: . \Set-UserRights.ps1 -AddRight -Username CONTOSO\User -UserRight SeServiceLogonRight Example 3 Add User Right “Log on as a batch job” for CONTOSO\User: . \Set-UserRights.ps1 -AddRight -Username CONTOSO\User -UserRight SeBatchLogonRight Example 4 Add User Right “Log on as a batch job” for user SID S-1-5-11: . \Set-UserRights.ps1 -AddRight -Username S-1-5-11 -UserRight SeBatchLogonRight Add Multiple Users / Rights / Computers Example 5 Add User Right “Log on as a service” and “Log on as a batch job” for CONTOSO\User1 and CONTOSO\User2 and run on, local machine and SQL.contoso.com: . \Set-UserRights.ps1 -AddRight -UserRight SeServiceLogonRight , SeBatchLogonRight -ComputerName $ env : COMPUTERNAME , SQL.contoso.com -UserName CONTOSO\User1 , CONTOSO\User2
Remove Users Single Users Example 1 Remove User Right “Allow log on locally” for current user: . \Set-UserRights.ps1 -RemoveRight -UserRight SeInteractiveLogonRight Example 2 Remove User Right “Log on as a service” for CONTOSO\User: . \Set-UserRights.ps1 -RemoveRight -Username CONTOSO\User -UserRight SeServiceLogonRight Example 3 Remove User Right “Log on as a batch job” for CONTOSO\User: . \Set-UserRights.ps1 -RemoveRight -Username CONTOSO\User -UserRight SeBatchLogonRight Example 4 Remove User Right “Log on as a batch job” for user SID S-1-5-11: . \Set-UserRights.ps1 -RemoveRight -Username S-1-5-11 -UserRight SeBatchLogonRight Remove Multiple Users / Rights / Computers Example 5 Remove User Right “Log on as a service” and “Log on as a batch job” for CONTOSO\User1 and CONTOSO\User2 and run on, local machine and SQL.contoso.com: . \Set-UserRights.ps1 -RemoveRight -UserRight SeServiceLogonRight , SeBatchLogonRight -ComputerName $ env : COMPUTERNAME , SQL.contoso.com -UserName CONTOSO\User1 , CONTOSO\User2
Check User Rights
In order to check the Local User Rights, you will need to run the above (Get-UserRights), you may copy and paste the above script in your Powershell ISE and press play.

Note You may edit line 467 in the script to change what happens when the script is run without any arguments or parameters, this also allows you to change what happens when the script is run from the Powershell ISE.
Get Local User Account Rights and output to text in console:
Get Remote SQL Server User Account Rights:
Get Local Machine and SQL Server User Account Rights:
Output Local User Rights on Local Machine as CSV in ‘C:\Temp’:
Output to Text in ‘C:\Temp’:
PassThru object to allow manipulation / filtering:
I like to collaborate and work on projects. My skills with Powershell allow me to quickly develop automated solutions to suit my customers, and my own needs.
Email : [email protected]
Website : https://blakedrumm.com
My name is Blake Drumm, I am working on the Azure Monitoring Enterprise Team with Microsoft. Currently working to update public documentation for System Center products and write troubleshooting guides to assist with fixing issues that may arise while using the products. I like to blog on Operations Manager and Azure Automation products, keep checking back for new posts. My goal is to post atleast once a month if possible.
- operationsManager
- troubleshooting
- certificates
- CommandPrompt

How to Export Local Policy Settings Using PowerShell

Local policies are important settings that define the security and behavior of Windows. System administrators often back up these settings or share them between different machines. By learning how to export local policy settings using PowerShell, you can streamline these tasks and make it easier to maintain system integrity. This article will detail the steps to do so.
Checking the Necessary Tools and Prerequisites

Before exporting local policies, let’s check some prerequisites and the necessary tools.
Prerequisites
- The target computer must be running Windows OS.
- Access with administrative privileges is possible.
Necessary Tools
- PowerShell: A command-line tool that comes standard with Windows. It is recommended to use the latest version.
- LocalGPO Tool: This tool is part of Microsoft’s Security Compliance Toolkit and is used for exporting local policies. It can be downloaded from Microsoft’s official website.
Preparing the Environment
- Ensure that PowerShell is up to date. You can open PowerShell and execute the following command to check your version information.
- If the LocalGPO tool is not installed, download it from Microsoft’s official site and follow the instructions to install it.
Once these prerequisites and tools are in place, you can move on to the task of exporting local policies. The next section will explain the specific export procedures.
Steps to Export Local Policies Using PowerShell Commands
To export local policies, you will use PowerShell in combination with the LocalGPO tool. The following steps will guide you through effectively exporting local policy settings.
Preparing for Export
First, run PowerShell as an administrator. This can be done by searching for “PowerShell” in the start menu and selecting “Run as administrator” from the right-click menu.
Exporting with the LocalGPO Tool
Use the LocalGPO tool to export local group policy settings. In the Command Prompt or PowerShell window, execute the following command. Here, you will need to specify the directory where you want to save the exported policy settings.
Here, [destination path] specifies the full path to the directory where you want to save the exported policy files, and "Policy Backup Name" is the name you give to the exported policy file. For example, if you want to export to the C:\PolicyBackups directory with the name MyPolicyBackup , the command would be as follows.
Confirming Successful Export
After executing the above command, check that the policy file has been saved in the specified directory. If successful, a folder named MyPolicyBackup will be created in the C:\PolicyBackups directory, containing the exported policy settings.
Points to Note
- When using the LocalGPO tool, ensure that the Command Prompt or PowerShell is run with administrator privileges.
- The exported policy settings can be imported into other Windows systems, but it is important to check compatibility between different versions of Windows.
In this section, we introduced the basic steps for exporting local policy settings using PowerShell and the LocalGPO tool. Through this process, you can effectively manage the security settings of your system and maintain consistency across different environments.
How to Check the Exported Policy Settings
After exporting local policy settings, it’s important to verify that they were exported correctly. This section explains how to check the exported policy settings.
Components of the Export File
The exported policy settings are usually saved in multiple files and folders. This includes the actual policy files that define the policy settings, as well as settings for applications and security options. Open the exported directory and ensure it contains elements like the following.
- GptTmpl.inf : A file containing security settings.
- Registry.pol : A file containing registry-based policy settings.
- Other files and folders : Additional files related to specific policy settings, such as system audit policies and user rights assignments.
Verifying the Exported Settings
To verify the exported settings, open specific files in a text editor to view their contents. For example, opening the GptTmpl.inf file allows you to check security options and user rights settings. This file includes settings for password policies, account lockout policies, etc.
The Registry.pol file contains policy settings applied through the registry. While it is not recommended to edit this file directly, viewing its contents can be useful for verifying the exported settings.
Detailed Analysis of Settings
If a detailed analysis of the exported policy settings is necessary, specialized tools can be used. For example, tools like Microsoft’s Policy Analyzer can be used to analyze the exported policy settings files, assessing the completeness of settings and identifying security issues.
Verifying the exported policy settings is an essential step in maintaining system security and integrity. Through this process, you can ensure that the exported settings are accurate and applicable as intended.
How to Utilize Exported Policy Settings

Exported local policy settings are useful in many scenarios. This section explains how to utilize the exported policy settings files.
Applying Policy Settings to Different Computers
The exported policy settings can be easily applied to other computers within the same organization or to new systems. This allows for the maintenance of consistent security policies and system settings. To apply, copy the exported policy files to the target computer and import them using the LocalGPO tool or PowerShell scripts.
Use as a Backup
When rebuilding or upgrading systems, it’s important to retain existing policy settings. By keeping the exported policy settings files as a backup, they can be quickly restored when needed. This allows for rapid recovery of security policies while minimizing system downtime.
Security Audits and Compliance Checks
The exported policy settings can also be useful during security audits or compliance checks. Analyzing the exported files can verify whether an organization’s security policies conform to industry best practices and regulatory requirements. Additionally, tracking changes in policy settings can help detect unauthorized changes or signs of security breaches.
Education and Training
The exported policy settings can also be used as training materials for IT staff and security personnel. Real policy settings can be used to teach security policy settings, system administration best practices, and troubleshooting techniques. This can help to improve security awareness and expand skill sets within the organization.
Utilizing exported local policy settings is very effective in enhancing the operation and security management of an organization’s IT infrastructure. By properly managing and utilizing these settings in various scenarios, system integrity can be maintained and security risks minimized.
Common Troubleshooting and Solutions

This section explains potential troubles that may occur while exporting local policy settings and their solutions.
Export Does Not Complete
There may be instances where the export process stops or does not complete. This is often due to running processes or a lack of resources.
- Solution : Before rerunning the command, check if any heavy processes are running. Also, ensure there is enough disk space and confirm that the command is being executed with administrative privileges.
Compatibility Issues When Importing Exported Policies
When attempting to import policies between different versions of Windows, compatibility issues may arise.
- Solution : Verify the Windows versions of the export source and import target, and if possible, perform operations between the same versions. If compatibility issues are suspected, refer to Microsoft’s official documentation to check for policy setting differences between versions.
Export Failure Due to Insufficient Permissions
Attempting to export without administrative privileges may result in export failure due to insufficient permissions.
- Solution : Ensure that PowerShell or the Command Prompt is run as an administrator. This can be done by right-clicking in the start menu and selecting “Run as administrator” or by adjusting user account permissions in the control panel.
We introduced how to export local policy settings using PowerShell. This process is very useful for backing up system security settings or maintaining consistent settings across different systems. We also discussed how to utilize the exported policy settings and troubleshoot potential issues. By following the proper preparations and procedures, you can smoothly execute the export process and enhance the integrity and security of the organization’s IT infrastructure.
Managing User Rights in Powershell

Managing User Rights Assignments in Powershell
Windows User Rights, also known as Windows Privileges, are traditionally managed via GPO or in the simplest of cases via the server’s Local Security Policy. These assignments control special permissions that are often needed by IIS applications or other application hosting on Windows Servers.
So how can we manage these assignments in Powershell? There’s no obvious solution provided in Powershell, but there are several options are available. None of which are a pure Powershell solution, but some are close.
- Wrap the ntrights.exe process in Powershell. This is relatively simple, but the downside is having an external dependency on the ntrights.exe file.
- Embed a wrapper class to the LSA API in your script. This is a pretty good solution but certainly bloats your script.
- Load and Reference the Carbon DLL (If you haven’t already checked out this Powershell library, you should it is very powerful and regularly updated. I choose this approach because it keeps the script clean and compact, it returns an array of strings for easy interrogation. It does require a dependency on carbon.dll, but this library provides a ton of functionality beyond just this.
I like the 3rd option, its very clean, and I like working with the Carbon library.
Now lets take this script to the next level and wrap it into a DSC Script implementation. We can use this same logic in a DSC configuration to make sure our desired User Rights Assignments are kept in place.
What else can we do? We could also create a Custom DSC Resource to have a cleaner DSC Configuration.
Related Posts

Local Administrator Audit Script

Powershell Log Archival Script
My new stories.

Stack Exchange Network
Stack Exchange network consists of 183 Q&A communities including Stack Overflow , the largest, most trusted online community for developers to learn, share their knowledge, and build their careers.
Q&A for work
Connect and share knowledge within a single location that is structured and easy to search.
How to export User Rights Assignments and import them on another machine
How would one export all of the user rights assignments from one Windows Server 2008 box and import them on another. Neither would be on a domain so this would just be local security policy.
- windows-server-2008
- command-line-interface
- user-permissions
Just had to right click on enough stuff :-)
You can export by right-clicking on Security Settings in secpol.msc and selecting export. This creates an INF of the User Rights Assignments which can be imported using the same method on another computer only selecting Import instead.
- @Tom It won't let before two days ;-). – Andy Arismendi Jan 24, 2012 at 14:32
- @AndyArismendi Thanks, it helped me. However, is there any way to do it in CMD? (or should we remove command-line tag from question?) – Jet Jul 23, 2014 at 17:16
You must log in to answer this question.
Not the answer you're looking for browse other questions tagged windows-server-2008 command-line-interface scripting security user-permissions ..
- The Overflow Blog
- Why do only a small percentage of GenAI projects actually make it into...
- Spreading the gospel of Python
- Featured on Meta
- Our Partnership with OpenAI
- Imgur image URL migration: Coming soon to a Stack Exchange site near you!
Hot Network Questions
- The rationale for when significance or null hypothesis testing is needed
- How to write this melody with repeat signs?
- Why is Afghanistan experiencing extreme deflation?
- Evolution of black holes. Could they lose mass faster than the Hawking radiation?
- Can I use a hose clamp to ground a wire to EMT?
- Bubbly foamed cone with insect inside
- Hash as filename to protect data
- Universal Graphical Representation of a specific moment in time
- Huffy Sea Pines from the late 70's.The hub will slip
- Changing output impedance of a logic gate to 50 ohm
- Proverb for someone who mistakenly assumes he has found the right answer and is unwilling to accept his error?
- Must a domain of discourse always be specified in universally quantified statements?
- How to track PBKDF2 progress?
- How’s the interest adjusted for additional Principal payment?
- Where did Jesus perform the “Feeding of the 4,000"?
- How does flying a steeper entry trajectory make the exclusion zone smaller?
- Why my super-capacitor self-discharge so fast?
- Can a piece of duct tape bring down a plane today (Flight 603, Perú)?
- Program: human-like species, they are terrified of some sort of monster, that is themselves in next stage of their lifecycle
- Information can't take an s
- Refused entry stamp (c) in Paris. Will it create problems?
- Create an address self-complete bar
- Does target of Geas know the penalty for disobeying?
- What happens to a trial if the presiding judge is unable to finish the trial?
- Outlook – General Tab
- Outlook – Phone Tab
- ADUC – General Tab
- ADUC – Address Tab
- ADUC – Account Tab
- ISA/TMG Scripts
- Active Directory on Fixed Ports
- RPC Internet Ports in Windows 2008
- DNS High Memory Utilization Issue
- WP – Cookies for Comments
- PHPBB HTTP 403 Forbidden Issue
- Shift Key and RDP Woes
- Domain Controller crash – memory leaking process
- Associate MP3 files to MPG123.EXE with parameters
- Privacy Policy

- Active Directory
Powershell GPO Deep Dive – Part 1

Creating a GPO in order to set User Rights Assignment completely in PowerShell: Can it be done?
This series of posts aims to share some interesting things learned about how GPOs are structured and things discovered about what backup-gpo and import-gpo routines are doing within the Powershell GPO module . The research was limited to User Rights Assignments and scripting up such a GPO – with absolutely no warranties what so ever!
Remember that changing security settings and user rights assignments can cause issues.
It turnns out that there is another way that this can be done by creating a blank GPO and creating the relevant files directly in SYSVOL in around 10 lines of code but this does feel even more dangerous / hacky to me.
Create a GPO for User Rights Assignment in Powershell
One of my colleagues asked me if we could script up an end-to-end GPO that would add in some Deny elements within the User Rights Assignments section. I immediately replied with “yeah sure, no worries” with a vague recollection that there was now a bunch of GPO commands like New-GPO that could create a GPO and command-lets that let you set registry values ( Set-GPRegistryValue ).
Some time later I discovered that actually…. NO.. No it is not possible to script up a full GPO to do what we wanted. It is possible to make a new empty GPO, Link it, add registry settings but if there is a need to add Deny Logon type elements to the Security node under User Rights Assignment, this is not currently possible.
This discovery disappointed me to say the least. What other options are available? Before moving any further let’s talk about what our given scenario was:
We would like to script up a GPO that will allow us to dynamically inject the usernames and groups that we want to be denied access to various User Rights Assignment elements in a GPO.

Of course, you could make a GPO through the GUI and then export it as a Backup using the Backup-GPO command and then save that somewhere and you could just import that GPO using Import-GPO . In our scenario, this just won’t cut it. We need to be able to inject our own account and group names – If we just blindly import, we’ll just get a bunch of stuff that may or may not be valid based on some statically exported values.
This got me thinking: what if we could Back up a GPO, get the resultant files prepared in such a way that we can replace the relevant values in the files that it creates with the user and group names of the things we want inside the GPO, and THEN run the Import-GPO command?
Before we jump down that rabbit hole, let us consider what gets created by the backup-gpo command-let in the specific scenario we are looking at.
What’s in an Empty GPO?
In order to back up a GPO, we first need a GPO to back up. In our example, we will create a GPO called “NewGPO”

Looking at this GPO, we can see that it is empty. The only thing of note for us is the Unique ID (GUID) of {28AA0345-4804-4CE9-A41D-F7C89D5D5BD3}

We will find this policy “{28AA0345-4804-4CE9-A41D-F7C89D5D5BD3}” under sysvol. In the filesystem, it looks like this:

The first folder “Machine” is the structure for Computer related elements. The second folder “User” is for User related Policy Elements.
Since our GPO is empty, both folders will also be empty. However there is a file called “GPT.INI” in the root of this folder (note that the filename is in capital letters – strangely, capitals only when created not restored). At this point the GPT.INI contains the GPO Version (how many times the policy has been modified and saved) and displayName of the policy as shown in the console. The encoding for this file is “UTF-8” (see screenshot below as an example):

A GPO with one User Rights Assignment value set
Lets go back into our GPO and create a single element for Deny Access to this computer from the network and set it for Administrators as pictured below:

If we walk the filesystem under SYSVOL as we did earlier, we will find that everything is the same, except that the “Machine” folder tree now has a subfolder \Machine\Microsoft\Windows NT\SecEdit containing a single file called GptTmpl.inf
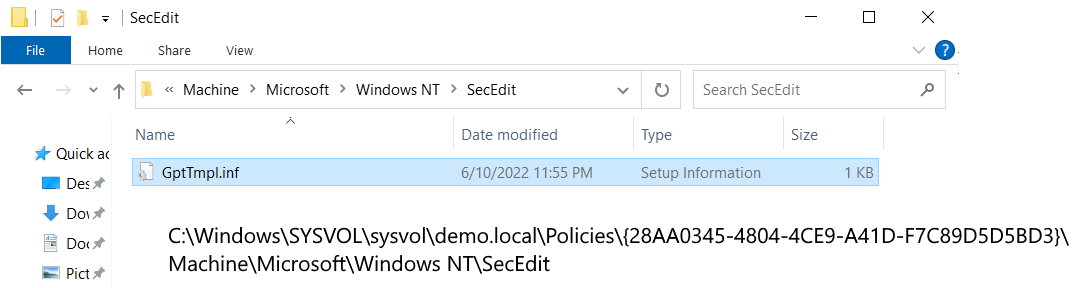
Looking at the file, we can see it is like any old school .inf file with sections in square brackets. The last section is where the actual Logon Rights are stored. In this case; we asked for Deny Access to this computer from the network to be set for administrators. The system translated that to DenyNetworkLogonRight = *S-1-5-32-544.
The system has converted our plain text request into this instruction. The SID shown here is simply a translation from the list of well known SIDs for Administrator.
What’s inside a Backup-GPO?
Let’s back up our example GPO using the Backup-GPO command in powershell:
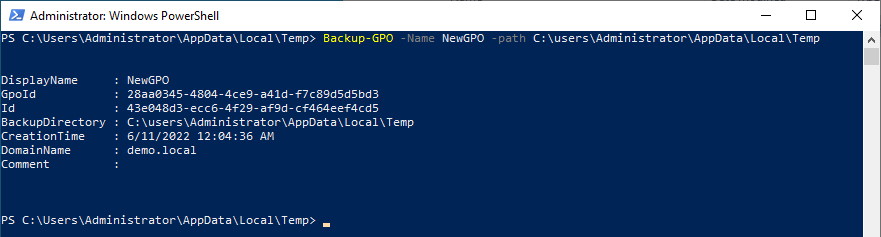
This creates a file structure within the Administrator’s temp folder. It creates a folder with a newly created random guid (referred to as the Backup ID). The original GPO’s GUID {28AA0345-4804-4CE9-A41D-F7C89D5D5BD3} is stored in the backup as “GpoID” and can be seen in the results of the command above (and in some of the GPO’s backed up files – more on that in a moment).
The backed up GPO has been saved under the new ID Folder name of {43E048D3-ECC6-4F29-AF9D-CF464EEF4CD5}.
Be aware that there are two extra hidden XML files that get created after running a Backup-GPO command. The first file is outside the GUID folder at the folder where the command ran, The file is called Manifest.xml and is very important if you wish to import the GPO somewhere else.

The manifest.xml file is quite ugly. It is in XML, but it will probably show as one big long line of unbroken text. Here’s a version of our manifest.xml (encoding is UTF-8) with wordwrap turned on in Notepad:
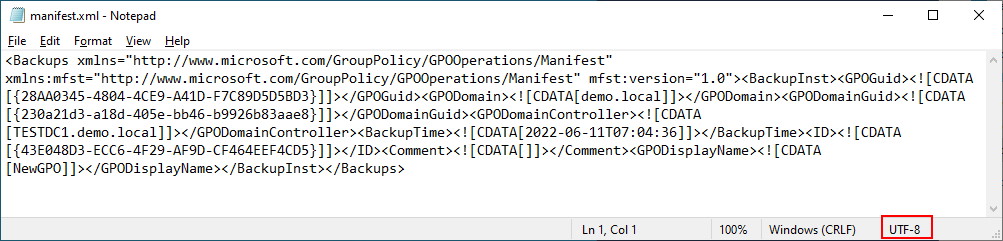
In short, the Manifest.xml file is used by the import-gpo routine to provide instructions on where GPOs that have been backed up can be found. It also contains information on the domain and domain controller it was backed up from. You will also find the time and the display name of the original GPO. Each GPO backed up will be found inside a <BackupInst> tag set.
As mentioned earlier, there is another hidden file. This file is in the GUID folder and called bkupinfo.xml. It looks remarkably similar to the Manifest file with one less tag. The first tag <backups> is not present – The Backups tag is only found in the manifest file and is used to encapsulate each GPO that can be found at the backed up folder location along with its associated GUID/ID pair. In our case, we only have one GPO, so the file looks almost identical (without the <Backups> tag).
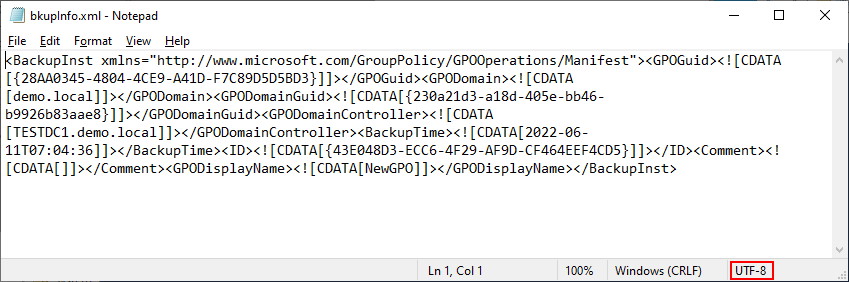
NOTE: For this file to be able to be imported, you must not break some tags over new lines or the import command will completely crash the powershell session; eg; The file formatted as below would cause the client to crash. You can remove the empty lines without a problem.
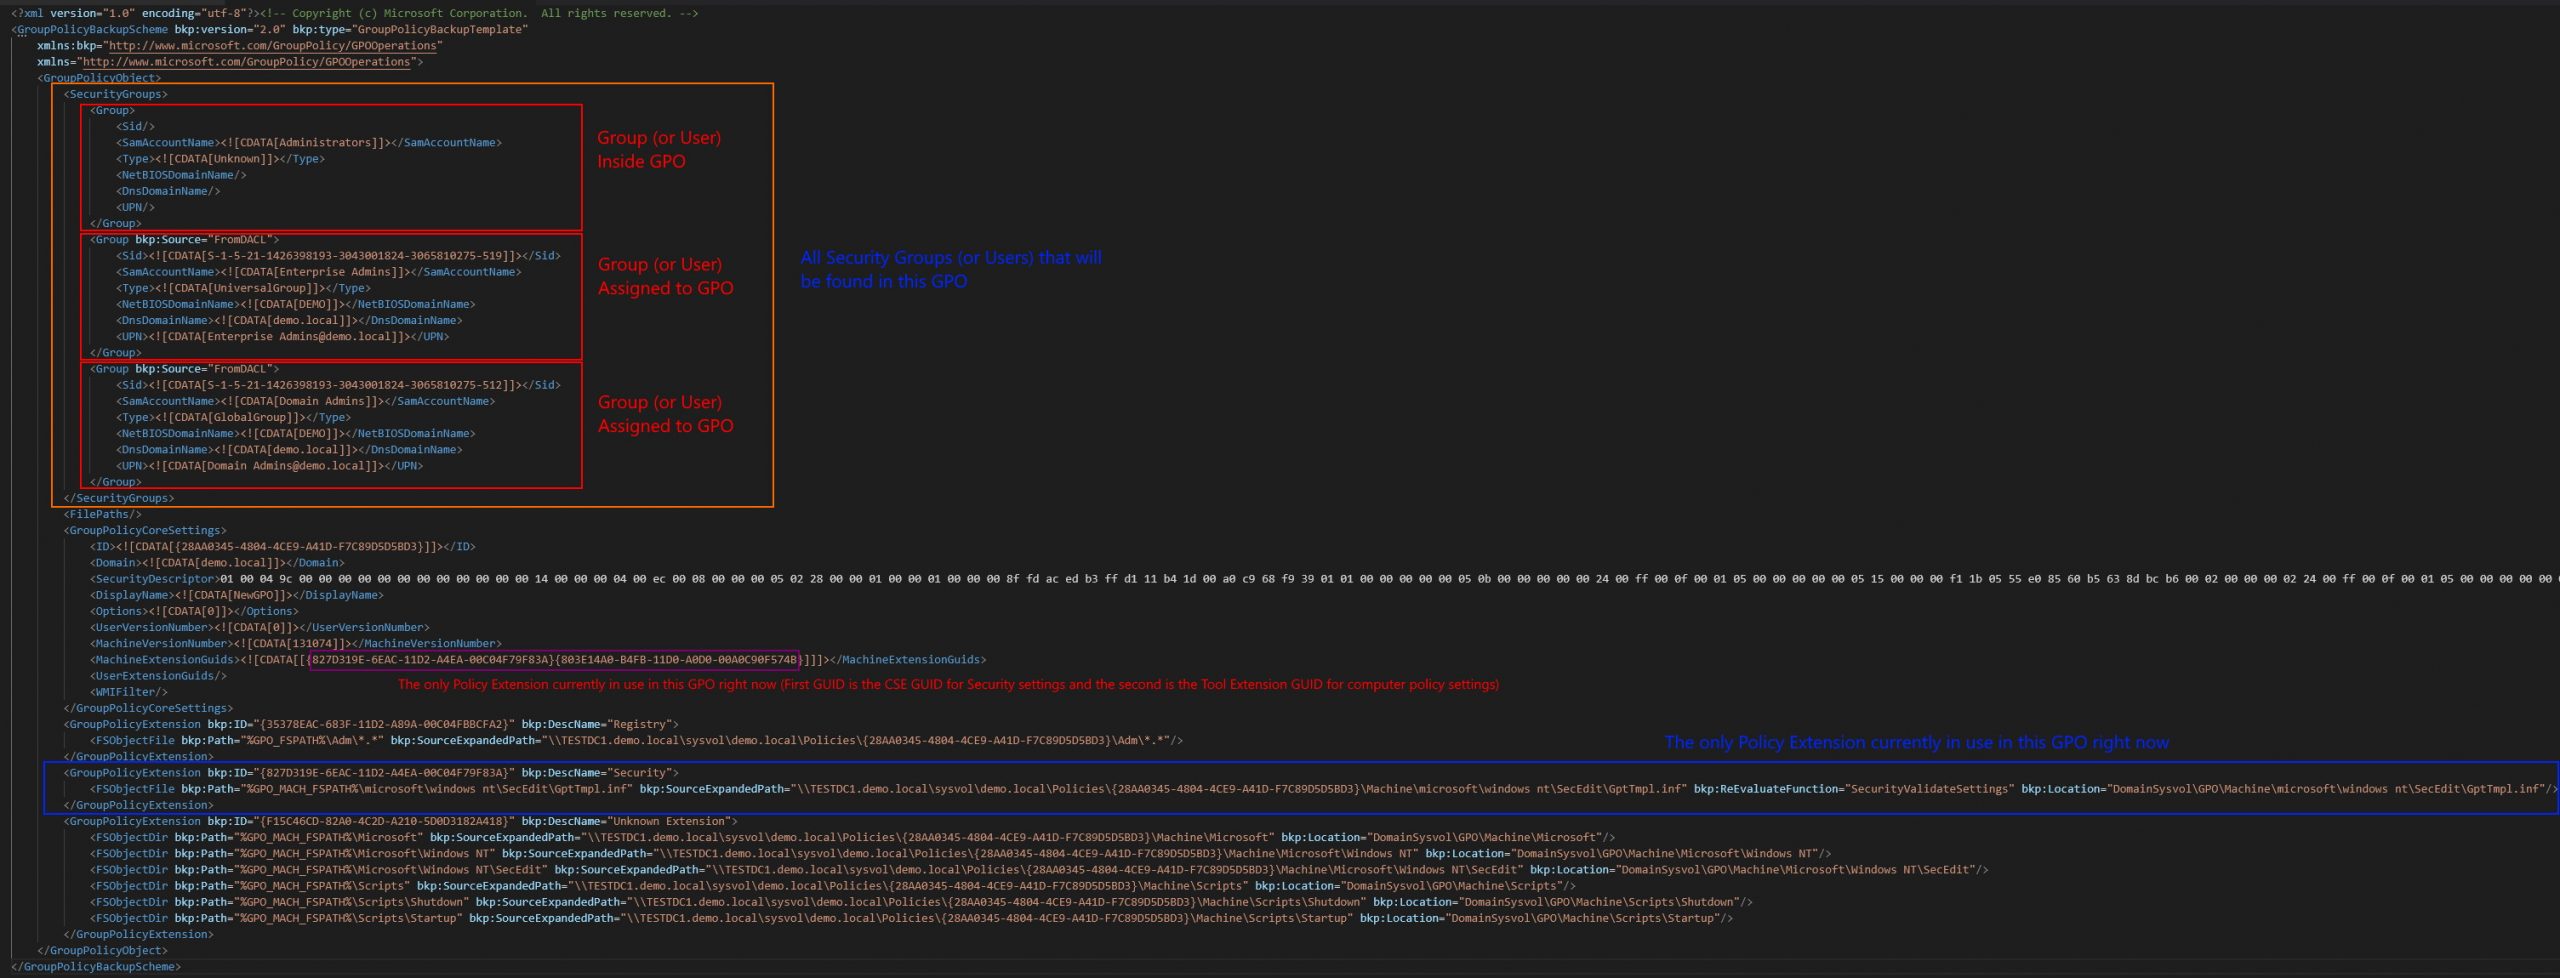
The purpose of the SecuritGroups section is so that if you have custom user/group names inside your policy, they can be transformed if imported into a new domain. Be aware that the entire SecurityGroups section MUST be on a single unbroken line otherwise Import-GPO will crash and terminate the current powershell session.
The purpose of the GroupPolicyCoreSettings is to capture some of the basic GPO settings, Domain, original GPO GUID (stored as ID) and any machine policies that are in use. In our example, we are only using the one policy for the Security section of our GPO – {827D319E-6EAC-11D2-A4EA-00C04F79F83A}{803E14A0-B4FB-11D0-A0D0-00A0C90F574B}. This section MUST all be on a single unbroken line otherwise Import-GPO will crash and terminate the current powershell session.
In our example, we are actually only using the Extension highlighted in blue, so we really don’t need the other extensions for import-gpo to work. In our scenario, we could safely remove the other extensions below the extension highlighted in blue. Be aware that the entire GPO Extension lines MUST be in a continuous unbroken line otherwise Import-GPO will crash and terminate the current powershell session.
Finally, we have the gpttmpl.inf file that is stored in the same subfolder location as the live GPO. The file also is identical to what was present in SYSVOL. Be aware that this file MUST be encoded as UTF-16LE (Unicode).
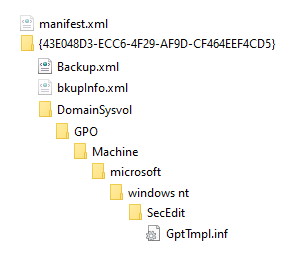
To build our GPO to set just our User Rights assignment, the minimum number of files is 4 (2 hidden):
Manifest.xml in the root of the folder where the backup was created (outside the GUID folder) – hidden. backup.xml inside the root of the GUID folder bkupinfo.xml inside the root of the GUID folder – hidden. GptTmpl.inf in the same subfolder structure as the oriignal real live GPO (<Guid>\DomainSysvol\GPO\Machine\microsoft\windows nt\SecEdit)
The structure looks like this:
The Backup.inf file
What if I told you… we could build this all out and remove most of the values present in the backup.inf and still import fine with import-gpo ? Tune in next week for the next part in this series to learn more. I’ll put together some example template files.
In the mean time, here’s a sneak peak at the script that will be discussed: https://github.com/Jigsolving/powershell/blob/main/User%20Rights%20Assignment%20GPO/create-customURAGPO.ps1
Happy GPOing.
A full list of User Rights Assignment
The table below lists all the User Rights Assignments and their translated constant values. Each Policy setting is linked to a page over at Microsoft (***except one – there seems to be an error over there).
Notes: *You MUST specify at least Administrator for this right ** Administrators and SERVICE MUST be granted this right *** The associated description for this right is missing over at Microsoft at time of writing.
The featured photo in this post: Part of a photo by Francisco Jesús Navarro Hernández on Unsplash
RELATED ARTICLES MORE FROM AUTHOR
Install rsat tools via powershell, scheduled tasks: on event triggers with variables, protecting rpc, dhcp client stuck with 5 minute lease time, adcs web enrollment page takes a long time to load, leave a reply cancel reply.
Save my name, email, and website in this browser for the next time I comment.
Stack Exchange Network
Stack Exchange network consists of 183 Q&A communities including Stack Overflow , the largest, most trusted online community for developers to learn, share their knowledge, and build their careers.
Q&A for work
Connect and share knowledge within a single location that is structured and easy to search.
How to add a user group in the "Shut down the system" group policy in Windows Server by CMD or PowerShell
I've read some documentation on Microsoft and other sites. Some of them suggest GPRegistryValue for registry-based policies and other recommended third-party software.
The full path of the key is: "Computer Configuration\Windows Settings\Security Settings\Local Policies\User Rights Assignment"
But in my case I cannot use other packages except CMD or PowerShell (UI not available).
- group-policy
- windows-server
- superuser.com/questions/1254253/… and blakedrumm.com/blog/set-and-check-user-rights-assignment might help you for a starting point to play with. – Vomit IT - Chunky Mess Style Nov 25, 2022 at 21:25
- This is just local security policy settings. What did you search for as this is a common task? powershell 'Local User Rights Management' – postanote Nov 25, 2022 at 21:37
Windows provides the secedit.exe tool for this and or custom code, as per the link provided in my comment to you.
Also, did you check the mspowershellgallery.com site for modules that assist with local user security policy?
Update as per '@Vomit IT - Chunky Mess Style', suggestion.
The more succinct/elegant option.
FYI --- Update for '@Vomit IT - Chunky Mess Style'. Using the PS_LSA.Wrapper
- 1 @VomitIT-ChunkyMessStyle... update provided. – postanote Nov 25, 2022 at 21:43
- Oh yeah, now you're talking!!! I saw github examples of that Indented.SecurityPolicy you suggested listed there. I like it! – Vomit IT - Chunky Mess Style Nov 25, 2022 at 21:55
- 1 Yeppers, I've got a bunch of these I've collected, refactored, and written over the years in different engagements. Even one using the underlying OS PS_LSA Windows library. – postanote Nov 25, 2022 at 22:06
- Thanks for helping me.The module of 'SecurityPolicy' is available, but when I try to find its modules "Get-Command -Module 'SecurityPolicy'" nothing is listed. Thus, I can't execute 'Add-UserRightsAssignment'. – Daniel Teodoro Nov 29, 2022 at 13:38
- If you did this Get-Command -Module 'SecurityPolicy' , and you see nothing? If so, that means it's not installed/in your PSModulePath. Did you install the module as I show in my suggested answer? If not, then you need to. Then you use Get-Module -ListAvailable to validate it's on your system. – postanote Nov 30, 2022 at 6:37
You must log in to answer this question.
Not the answer you're looking for browse other questions tagged powershell group-policy windows-server ..
- The Overflow Blog
- Why do only a small percentage of GenAI projects actually make it into...
- Spreading the gospel of Python
- Featured on Meta
- Our Partnership with OpenAI
- Imgur image URL migration: Coming soon to a Stack Exchange site near you!
Hot Network Questions
- Emulation and BIOS Initialization for an IBM PS/2 Model 30
- Is this "Survivalist Fighter" archetype balanced?
- In what kinds of situations do you use "holder" and "owner"?
- Not displaying bold chinese character in Times New Roman font
- Is a four-armed humanoid body-plan as realistic as a centaur-like body-plan?
- Universal Graphical Representation of a specific moment in time
- What's the minimum survivable mid-air collision altitude in a glider?
- “Out of the mouths of babes”: Is this idiom strictly used to refer to children?
- Estne in lingua Latina verbum pro die ante heri?
- Next door neighbor's smoke alarm keeps chirping every 30 seconds
- Brocard's Conjecture Candidate Finder
- Water in attic AC air handler pan
- Closed form for sum of series with exponents in a geometric progression
- Can you draw these figures?
- How to anchor between "X.north" and "X.north west"?
- What chord symbol would you use to describe this voicing?
- For what kind of distributions, the joint distribution could be determined uniquely by marginal distribution and correlation?
- How can I separate curve from profile using Geometry Nodes?
- Changing output impedance of a logic gate to 50 ohm
- How’s the interest adjusted for additional Principal payment?
- Is it common to win a war with a strictly defensive posture?
- What would one use a theory of quantum gravity for?
- Program: human-like species, they are terrified of some sort of monster, that is themselves in next stage of their lifecycle
- What happens to a trial if the presiding judge is unable to finish the trial?

Export Microsoft 365 Users and their Licenses to CSV with PowerShell
Microsoft 365 admin center supports the Active Users report which lists the active Office 365 users and the assigned licenses. In this post, we will explore how to export Azure AD users and assigned licenses using PowerShell script.
- Export All Microsoft 365 Users and their License details
Export Licensed Microsoft 365 Users
List unlicensed microsoft 365 users.
- Find Microsoft 365 Users with a specific license
Find users with a specific service plan license
We can use the Get-AzureADUser cmdlet to retrieve the Azure AD user details. Before you start, install the latest Azure AD PowerShell module, and run the following command to connect the module.
Run the following command to view the licensed users in your organization. Lists the user accounts that have been assigned to any of your license plans.
The following command returns all the unlicensed users in your Azure AD tenant.
Export All Microsoft 365 Users and their License details to CSV
The Get-AzureADUser cmdlet supports the property AssignedLicenses . This property returns the SkuId (GUID value) of the assigned licenses. We can use the Get-AzureADSubscribedSku cmdlet to fetch all the available license data for the tenant and resolve the SkuName of the assigned licenses.
The following commands retrieve the Azure AD users with required properties (You can add more properties if needed) and resolve the applied license details for all users. Finally, export the report to a CSV file.
The above commands store the user details in the array object $Result . We can generate more reports by applying a filter in the $Result array using the available fields.
The following command exports only the licensed users.
Use the below command to list the unlicensed users.
Find Microsoft 365 Users with a specific license type
To filter users with the applied license, we should know the SkuPartNumber of the license. Microsoft listed the Product names (License friendly name) and SkuPartNumber in this post: Product names and service plan identifiers for licensing . You can refer to the post and get your String ID (SkuPartNumber) and use it in the below command to find users with a specific license type.
The below command lists the users with the Office 365 E5 license.
We can also filter the users with their applied service plans (licensed apps). You can refer to this post to view the available service plans and their friendly names. The below command lists the users with the Microsoft Stream license.
Share this:
Related posts.
- Export Office 365 Users to CSV using PowerShell
- Export Enabled and Disabled Office 365 Users to CSV using PowerShell
- Export UPN and Email Addresses of Microsoft 365 Users using PowerShell
- Export Office 365 Email Addresses to CSV using Powershell
- Find and Export Disabled Office 365 Users using Powershell
This browser is no longer supported.
Upgrade to Microsoft Edge to take advantage of the latest features, security updates, and technical support.
PowerShell script for a list of users and their assignment path depending on licens.
I'm looking for a PowerShell script where I can pick a license type, i.e. E1 or EMS, and get a CSV output with the Username of all users who have that license and the assignment path for that user.
From searching for an answer I can't find anything that does this, it's either look what licens a user have or what users have a specific assignment path, but that's not what I need. I need to be able to pick a license and go from there.
I found an old script that used MSOL PowerShell but that script doesn't seem to work anymore. Bellow is the script, and it works so far that I get the list, if the licens is direct or inherited but it doesn't show the group, something isn't working anymore.
Microsoft Entra ID A Microsoft Entra identity service that provides identity management and access control capabilities. Replaces Azure Active Directory. 19,701 questions Sign in to follow
@Erik Brandt I just wanted to check in and see if you were able to resolve this issue?
If you're still having issues:
- Can you share where you found this script?
- From your post, it sounds like everything is working as expected, except the script isn't returning the group? Can you share a screenshot of the output you're getting?
Any additional information or screenshots would be greatly appreciated.
If you have any other questions, please let me know. Thank you for your time and patience throughout this issue.
I don't see any logic in the above script to actually set the group name, it's in fact always going to be an empty string. Try adding this to line 26:
Thanks for the response.
Something strange happened when I edited my post, I've added the correct script now, the previous one was missing a few lines.
IMAGES
VIDEO
COMMENTS
2. I'm new to PowerShell (PS). Currently I'm using windows server 2012 and I'm interested to know whether there is any way to export User Rights Assignment into a txt file. I tried. secedit /export /areas USER_RIGHTS /cfg d:\policies.txt. The above should should export it. So, I get this: Current Output.
Personal File Server - Get-UserRights.ps1 Alternative Download Link. or. Personal File Server - Get-UserRights.txt Text Format Alternative Download Link. In order to check the Local User Rights, you will need to run the above (Get-UserRights), you may copy and paste the above script in your Powershell ISE and press play.
9. You can use AccessChk in accomplish this task. Accesschk "domain\user" -a * will list all the permissions of a given domain user. You can call this program within a PowerShell script, concatenate the results into a text file, then filter out just the permissions you want to know about. Share.
To find the permissions required to run any cmdlet or parameter in your organization, see Find the permissions required to run any Exchange cmdlet. ... The RoleAssignee parameter specifies the role group, assignment policy, user, or universal security group (USG) for which you want to view role assignments. If the RoleAssignee parameter is used ...
Use the LocalGPO tool to export local group policy settings. In the Command Prompt or PowerShell window, execute the following command. Here, you will need to specify the directory where you want to save the exported policy settings. LGPO.exe /b [destination path] /n "Policy Backup Name".
1. 0. Managing User Rights Assignments in Powershell. Windows User Rights, also known as Windows Privileges, are traditionally managed via GPO or in the simplest of cases via the server's Local Security Policy. These assignments control special permissions that are often needed by IIS applications or other application hosting on Windows Servers.
user_rights: User logon rights and granting of privileges. regkeys: Security on local registry keys. filestore: Security on local file storage. services: Security for all defined services. /log: ... To export the security database and the domain security policies to an inf file, and then import that file to a different database in order to ...
Manual steps: Open Group Policy Management. Navigate to the following path in the Group Policy Object. Select Policy. Right click & Edit: Computer Configuration\Windows Settings\Security Settings\Local Policies\User Rights Assignment. Add/remove the necessary users. Windows. A family of Microsoft operating systems that run across personal ...
How to Set Logon User Rights with the Ntrights.exe in windows 10(64 bit) [duplicate] Ask Question Asked 7 years, 9 months ago. Modified 8 months ago. ... Set and Check User Rights Assignment via Powershell You can add, remove, and check User Rights Assignment (remotely / locally) with the following Powershell scripts. ...
They include account policies, local policies, user rights assignment, the Windows firewall, software restrictions, and so on. There are several ways to configure security policy settings. The most common are: Group policy objects (GPO) - Used in Active Directory domains to configure and regularly reapply security settings to multiple computers.
I want to modify the user rights associated with a local user account.I want to add groups and users to a particular User Rights. This is done by opening the group policy and opening the following folder in the console tree: Computer Configuration\Windows Settings\Security Settings\Local Policies\User Rights Assignment.
Just had to right click on enough stuff :-) You can export by right-clicking on Security Settings in secpol.msc and selecting export. This creates an INF of the User Rights Assignments which can be imported using the same method on another computer only selecting Import instead.
Creating a GPO in order to set User Rights Assignment completely in PowerShell: Can it be done? This series of posts aims to share some interesting things learned about how GPOs are structured and things discovered about what backup-gpo and import-gpo routines are doing within the Powershell GPO module.The research was limited to User Rights Assignments and scripting up such a GPO - with ...
This cmdlets returns the effective policies for a user, based on either direct policy assignment or inheritance from a group policy assignment. For a given policy type, if an effective policy is not returned, this indicates that the effective policy for the user is either the tenant global default policy (if set) or the system global default policy. This cmdlet does not currently support ...
I want to Export folder Permissions for a subset of folders. Each Folder in Department has two child's, Public and Internal. For example, I want the permissions of the folder D:\Data\Department\Science\Public or D:\Data\Department\Sales\Public. Error: Get-Acl : Cannot validate argument on parameter 'Path'. The argument is null or empty.
Find-Module -Name '*sec*pol*' # Results <# Version Name Repository Description ----- ---- ----- ----- 2.10.0.0 SecurityPolicyDsc PSGallery This module is a wrapper around secedit.exe which provides the ability to configure user rights assignments 1.3.2 Indented.SecurityPolicy PSGallery Security management functions and resources 0.0.12 ...
Export All Microsoft 365 Users and their License details to CSV. The Get-AzureADUser cmdlet supports the property AssignedLicenses. This property returns the SkuId (GUID value) of the assigned licenses. We can use the Get-AzureADSubscribedSku cmdlet to fetch all the available license data for the tenant and resolve the SkuName of the assigned ...
To list role assignments for a specific resource, use Get-AzRoleAssignment and the -Scope parameter. The scope will be different depending on the resource. To get the scope, you can run Get-AzRoleAssignment without any parameters to list all of the role assignments and then find the scope you want to list.
I'm looking for a PowerShell script where I can pick a license type, i.e. E1 or EMS, and get a CSV output with the Username of all users who have that license and the assignment path for that user. From searching for an answer I can't find anything that does this, it's either look what licens a user have or what users have a specific assignment ...
Powershell: Export User Rights Assignment. 0. Powershell doesnt recognize script. 8. Exporting System.Object[] to string in PowerShell. 3. Powershell Array to export-csv shows System.Object[] 0. Powershell script permission. 2. PowerShell: Admin Rights - What is wrong? 2.
Thank @jdweng for your help. I have managed to resolve the issue myself - turns out Export-csv simply does what I need (I forgot to underline that I would export the data eventually, my bad here).