The best presentation software in 2024
These powerpoint alternatives go beyond the basics..

The latest presentation apps have made it easier than ever to format slides and create professional-looking slideshows without giving off a "this is a template" vibe. Even standard PowerPoint alternatives have updated key features to make it easier than ever to collaborate and create presentations quickly, so you can spend more time prepping for your actual presentation.
If, like me, you've used Google Slides unquestioningly for years, it's a whole new world out there. The newest crop of online presentation tools go way beyond the classic slideshow experience, with new features to keep your audience's attention, streamline the creation process with AI, and turn slide decks into videos and interactive conversations.
I've been testing these apps for the past few years, and this time, I spent several days tinkering with 25 of the top presentation software solutions out there to bring you the best of the best.

The best presentation software
Beautiful.ai for AI-powered design
Prezi for non-linear, conversational presentations
Powtoon for video presentations
Pitch for collaborating with your team on presentations
Gamma for conversational AI features
Mentimeter for audience engagement
Tome for generative AI features
What makes the best presentation app?
How we evaluate and test apps.
Our best apps roundups are written by humans who've spent much of their careers using, testing, and writing about software. Unless explicitly stated, we spend dozens of hours researching and testing apps, using each app as it's intended to be used and evaluating it against the criteria we set for the category. We're never paid for placement in our articles from any app or for links to any site—we value the trust readers put in us to offer authentic evaluations of the categories and apps we review. For more details on our process, read the full rundown of how we select apps to feature on the Zapier blog .
When looking for the best presentation apps, I wanted utility players. After all, slideshows are used for just about everything, from pitch decks and product launches to class lectures and church sermons. With that in mind, here's what I was looking for:
Pre-built templates. The best presentation tools should have attractive, professional-looking templates to build presentations in a hurry.
Sharing and collaboration options. Whether you plan to share your webinar slides later, or you just want to collaborate with a coworker on a presentation, it should be easy to share files and collaborate in real-time.
Flexibility and customization options. Templates are great, but top presentation apps should enable you to customize just about everything—giving you the flexibility to build exactly what you need.
Affordability. Creating compelling presentations is important, but you shouldn't have to bust your budget to make it happen. With capable free tools on the market, affordability is a top consideration.
Standalone functionality. There's no reason to use multiple tools when one can do it all, so I didn't test any apps that require and work on top of another presentation app like PowerPoint or Google Slides.
Familiar, deck-based interface. For our purposes here, I only tested software that uses slides, with the familiar deck-based editor you expect from a "presentation" tool (versus, for example, a video creation app).
While most apps now offer AI features in one way or another, it isn't a universal feature yet—and some apps' AI features leave a lot to be desired. For that reason, I opted not to make AI features a strict must-have for this year (though it probably will be a requirement next time I update the article). That means I've still included some apps that don't offer AI—if you opt for one of those, you can still easily get AI-generated images and text from a separate tool and copy them into your presentation app of choice.
Beyond that, I also looked for presentation apps that brought something unique to the table—features above and beyond what you can get for free from a legacy solution like PowerPoint or Google Slides.
Here's what my testing workflow looked like:
I went through any onboarding or guided tutorials.
I created a new deck, scanning through all available templates, noting how well-designed they were (and which were free versus paid).
I added new slides, deleted slides, edited text and images, and played around with other content types.
I changed presentation design settings, like color schemes and background images.
I reviewed and tested the sharing and collaboration options.
I tested out presenter view (when available).
After my first round of testing, I went back into the top performers to test any unique or niche features, like AI, brand settings, and interactive content. With that, these are the best presentation apps I found—each one really brings something different or radically easy to the table.
The best presentation software at a glance
The best free presentation software, canva (web, windows, mac, android, ios).

Canva pros:
Excellent free plan
Tons of amazing templates for all use cases
Feature-rich
Canva cons:
The AI tools aren't groundbreakingly useful
Canva offers one of the most robust free plans of all the presentation apps I tested. The app delays account creation until after you've created your first design, so you can get started building your presentation in seconds. Choose from an almost overwhelming number of beautiful templates (nearly all available for free), including those designed specifically for education or business use cases.
Anyone who's accidentally scrolled too far and been bumped to the next slide will appreciate Canva's editor interface, which eliminates that problem altogether with a smooth scroll that doesn't jump around. Choose from a handful of preset animations to add life to your presentations, or browse the library of audio and video files available to add. And Canva also has a number of options for sharing your presentation, including adding collaborators to your team, sharing directly to social media, and even via QR code.
Present directly from Canva, and let audience members submit their questions via Canva Live. Once you share a link to invite audience members to your presentation, they can send questions for you to answer. As the presenter, you'll see them pop up in your presenter view window, so you can keep the audience engaged and your presentation clear. Alternatively, record a presentation with a talking head bubble—you can even use an AI presenter here—to share remotely.
Canva has added a number of AI-powered tools , but I wasn't super impressed by them yet. The Magic Design tool, for example, isn't much more useful than the many pre-designed templates already available, while Magic Write is basically just white-labeled ChatGPT. These features will likely improve in time, but for now, you're better off starting from one of Canva's many great templates.
Canva pricing: Free plan available; paid plans start at $120/year for 1 user and include additional features like Brand Kit, premium templates and stock assets, and additional AI-powered design tools.
If you're looking for a capable free presentation tool with a more affordable upgrade, Zoho Show is worth a look. It's completely free for most features, offers a clean, intuitive editor, and includes a number of great templates. Plus, you can automate Zoho Show by connecting it with Zapier .
The best presentation app for AI-powered design
Beautiful.ai (web, mac, windows).
Beautiful.ai pros:
True AI design
No fussing around with alignment
Still allows for customization
Beautiful.ai cons:
No free plan
If you're like me, editing granular spacing issues is the absolute worst part of building a presentation. Beautiful.ai uses artificial intelligence to take a lot of the hassle and granular design requirements out of the presentation process, so you can focus on the content of a presentation without sacrificing professional design. If I needed to make presentations on a regular basis, this is the app I'd use.
Many apps have recently added AI design features, but Beautiful.ai has been doing it for years—and they've perfected the experience of AI design, ensuring the tool's reign as the most streamlined and user-friendly option for AI design.
The editor is a little different from most presentation apps, but it's still intuitive—and you'll start off with a quick two-minute tutorial. When creating a new slide, scroll through "inspiration slides" to find a layout you like; once you choose, the app will pull the layout and automatically adapt it to match the design of the rest of your presentation.
With 10 themes, several templated slides, over 40 fully-designed templates, and more than 20 different color palettes to choose from, Beautiful.ai strikes a perfect balance between automation and customization.
While Beautiful.ai doesn't offer a free plan, paid plans are reasonably priced and offer sharing and collaboration options that rival collab-focused apps like Google Slides. And speaking of Google, you can connect Beautiful.ai with Google Drive to save all your presentations there.
Note: I re-tested the generative AI feature (called DesignerBot) this year. It's great for adding individual slides to an existing presentation—automatically choosing the best layout and matching the design to the rest of the deck—but as with most other apps, it struggled to pull in relevant images.
Beautiful.ai pricing: Plans start at $12/month for unlimited slides, AI content generation, viewer analytics, and more. Upgrade to a Team plan for $40/user/month to get extra collaboration and workspace features and custom brand controls.
If you're a founder looking for an AI presentation tool for your pitch deck, Slidebean is a great Beautiful.ai alternative for startups. The app offers a number of templates; a unique, content-first outline editor; and a generative AI tool that builds a whole pitch deck based on your website. I didn't include it on the list mainly because of the price: the free plan is quite limited, and the paid all-access plan can only be billed annually.
The best presentation app for conversational presentations
Prezi (web, mac, windows, ios, android).
Prezi pros:
Doesn't restrict you to standard presentation structure
Lots of customization options
Prezi Video lets you display a presentation right over your webcam video
Prezi cons:
Steep learning curve
Struggling to squeeze information into a basic, linear presentation? Give Prezi a try. Unlike nearly all other presentation apps on the market, Prezi Present doesn't restrict the structure of your presentation to a straight line. The editor focuses on topics and subtopics and allows you to arrange them any way you want, so you can create a more conversational flow of information.
With the structural flexibility, you still get all the same customization features you expect from top presentation software, including fully-editable templates. There's a learning curve if you're unfamiliar with non-linear presentations, but templates offer a great jumping-off point, and Prezi's editor does a good job of making the process more approachable.
Plus, Prezi comes with two other apps: Prezi Design and Prezi Video. Prezi Video helps you take remote presentations to a new level. You can record a video where the presentation elements are displayed right over your webcam feed. Record and save the video to share later, or connect with your video conferencing tool of choice (including Zoom, Microsoft Teams, and Google Meet) to present live.
Prezi's generative AI feature works ok, but it's more useful as a wireframe. When I asked it to create a presentation about the Stanley Cup Playoffs, for example, the resulting content read a lot like a student writing a term paper in the broadest strokes possible to avoid doing any actual research.
Prezi pricing: Free 14-day trial and a free plan that includes up to 5 visual projects; paid plans start at $7/month and include additional features like private presentations and Prezi Present.
The best presentation app for video presentations
Powtoon (web, ios, android).
Powtoon pros:
Timing automatically changes based on the content on the slide
Can toggle between slideshow and video
Can orient presentation as horizontal, vertical, or square
Powtoon cons:
Limited free plan
Powtoon makes it easy to create engaging videos by orienting the editor around a slide deck. Editing a Powtoon feels just like editing a presentation, but by the time you finish, you have a professional video.
You can edit your slides at any time, and when you hit play, a video plays through your deck—the feel is almost like an animated explainer video. Each slide includes the animations you choose and takes up as much time as is needed based on the content on the slide. Powtoon figures the timing automatically, and you can see in the bottom-right of the editor how much time is used on your current slide versus the total presentation. If you ever want to present as a slide deck, just toggle between Slideshow and Movie.
You'll likely need to subscribe to a paid plan to get the most out of Powtoon—like creating videos longer than three minutes, downloading them as MP4 files, and white-labeling your presentations—but doing so won't break the bank. Plus, you'll unlock tons of templates complete with animations and soundtracks.
One of my favorite Powtoon features is the ability to orient your video: you can choose horizontal orientation (like a normal presentation) or opt for vertical (for mobile) or square (for social media). When your presentation is ready, you can publish straight to YouTube, Wistia, Facebook Ads, and any number of other locations.
Powtoon pricing: Limited free plan available; paid plans start at $15/month and include white-labeling, priority support, additional storage, and more.
The best presentation app for collaborating with your team
Pitch (web, mac, windows, ios, android).

Pitch pros:
Google levels of collaboration
Assign slides to specific team members
Excellent generative AI feature
Pitch cons:
User interface is a little different than you're used to
Need to collaborate on presentations with your team? Pitch is a Google Slides alternative that gets the job done. As far as decks go, Pitch includes all the beautifully-designed templates, customizability, and ease of use you expect from a top-notch presentation tool. But the app really shines when you add your team.
The right-hand sidebar is all about project management and collaboration: you can set and update the status of your deck, assign entire presentations or individual slides to team members, plus comment or add notes. Save custom templates to make future presentations even easier and faster.
You can also invite collaborators from outside your company to work with you on individual decks. And if you opt for a paid plan, Pitch introduces workspace roles, shared private folders, and version history.
Pitch also offers one of the most impressive generative AI features on this list. It still struggles to pull in relevant images, but I found the AI-generated written content and design to be top-notch.
Pitch pricing: Free plan offers unlimited presentations, custom templates, and live video collaboration; paid plans start at $22/month for 2 users with additional workspace features, presentation analytics, and more.
The best presentation app for conversational AI
Gamma (web).
Gamma pros:
Creates fully fleshed-out presentations from a prompt
Conversational chatbot-like experience
Can still manually edit the presentation
Gamma cons:
Not as much granular customization
I tested a lot of apps claiming to use AI to up your presentation game, and Gamma's conversational AI features were head and shoulders above the crowd.
Simply give the app a topic—or upload an outline, notes, or any other document or article—approve the outline, and pick a theme. The app will take it from there and create a fully fleshed-out presentation. It's far from perfect, but Gamma produces a very useful jumping-off point. (Last year, it was by far the best, but this year, other apps are catching up.)
Here's the key: Gamma is much more geared toward the iterative, chatbot experience familiar to ChatGPT users. Click on the Edit with AI button at the top of the right-hand menu to open the chat, and you'll see suggested prompts—or you can type in your own requests for how Gamma should alter the presentation.
Once you've done all you can with prompts, simply close the chat box to manually add the finishing touches. While you do sacrifice some granular customizability in exchange for the AI features, you can still choose your visual theme, change slide layouts, format text, and add any images, videos, or even app and web content.
Gamma pricing: Free plan includes unlimited users, 400 AI deck credits, and basic view analytics; upgrade to the Plus plan for $8/user/month to get unlimited AI credits, remove Gamma branding, and more.
The best presentation app for audience engagement
Mentimeter (web).

Mentimeter pros:
Tons of audience engagement features
Simple for participants to interact
Mentimeter cons:
Less granular customizability
Bit of a learning curve
If you need to engage with an audience during your presentation, Mentimeter makes that easy. The app is designed around interactive elements like quizzes, surveys, Q&As, sliders, and more (even a Miro whiteboard!).
Each of these is included in a number of different, professional-looking templates, so you can build a fully interactive presentation super quickly.
When it's time to present, your audience members can scan the QR code with their phone cameras or type in the URL and access code to participate. There's one code per presentation (so they won't have to do this on every slide), which gives access to each slide as you move through the presentation.
There are two main drawbacks to this one, though. First, there's a bit of a learning curve and less familiar editing interface (but I found it pretty easy to learn with some practice). The other drawback is that you can't get as granular with the visual customization as you can with many other presentation tools.
Mentimeter pricing: Free plan includes 50 participants per month and 34 different slide types; upgrade to the Basic plan for $11.99/presenter/month to get unlimited participants and slide types, private presentations, and more.
The best presentation app for generative AI

Top-tier generative AI features
Simple, customizable templates
Intuitive doc-style editor
There's definitely a learning curve
Tome is one of the new additions to this list that I'm most excited about. If you're looking for generative AI that just genuinely works , it's definitely worth a look. The editor is a bit more stripped down than most presentation apps but intuitive nonetheless—it's almost a cross between your standard deck editor and a Notion-style doc.
To generate an AI deck, click Generate with AI in the top right, and either write your own prompt or choose from the example prompts that cover a handful of common use cases, like sales enablement and company pitches. Edit or approve the suggested outline, then generate the full presentation.
From there, you can edit each slide as a doc via the right-hand menu—without limits on how much information you can include. During the presentation, you simply size down any slides that take up more than the standard amount of space. It's super simple but somehow feels revolutionary in a presentation app.
Tome pricing: Free plan available for manual editing without AI; upgrade to the Professional plan for $16/user/month to use the generative AI and design tools, plus engagement analytics, branding tools, and more.
What about the old standbys?
You might notice a few major presentation players aren't on this list, including OGs Microsoft PowerPoint, Apple Keynote, and Google Slides. These apps are perfectly adequate for creating basic presentations, and they're free if you have a Windows or Mac device or a Google account.
I didn't include them on the list because the presentation space has really developed in the last several years, and after testing them out, I found these behemoths haven't kept pace. If they weren't made by Microsoft/Apple/Google, I might not even be mentioning them. They're pretty basic tools, they're behind the curve when it comes to templates (both quantity and design), and they don't offer any uniquely valuable features like robust team collaboration, branding controls, video, and so on.
Some of these companies (think: Microsoft and Google) are openly working on some pretty impressive-sounding AI features, but they haven't really been focused on their respective presentation solutions just yet. Rest assured, I'm watching this space, and the next time we update this article, I'll re-test tools like Copilot for PowerPoint and Gemini for Google Slides to see what new features may be available.
In any case, if you're reading this, you're probably looking for an alternative that allows you to move away from one of the big 3, and as the presentation platforms featured above show, there's a ton to gain—in terms of features, usability, and more—when you do.
What about PowerPoint and Google Slides add-ons?
While I focused my testing on tools with full feature-sets—those that can serve as your sole presentation tool—there are a ton of add-on tools you can use atop big name tools like PowerPoint and Google Slides.
If you're looking to expand what you can do with PowerPoint or Google Slides, apps like Marq (formerly Lucidpress), Plus AI , Slidesgo , and Simplified can help you do things like access additional templates, save branded assets, and generate AI presentations from the app you're already using.
Related reading:
Canva AI tools to improve your design workflow
The best online whiteboards for collaboration
How to share a presentation on Zoom without sharing your browser tabs and address bar
This post was originally published in October 2014 and has since been updated with contributions from Danny Schreiber, Matthew Guay, Andrew Kunesh, and Krystina Martinez. The most recent update was in April 2024.
Get productivity tips delivered straight to your inbox
We’ll email you 1-3 times per week—and never share your information.

Kiera Abbamonte
Kiera’s a content writer who helps SaaS and eCommerce companies connect with customers and reach new audiences. Located in Boston, MA, she loves cinnamon coffee and a good baseball game. Catch up with her on Twitter @Kieraabbamonte.
- Presentations
Related articles

The 5 best team chat apps for business in 2024
The 5 best team chat apps for business in...

The best Asana alternatives in 2024

The best help desk software and customer support apps in 2024
The best help desk software and customer...

The top AI text generators in 2024
Improve your productivity automatically. Use Zapier to get your apps working together.

👀 Turn any prompt into captivating visuals in seconds with our AI-powered design generator ✨ Try Piktochart AI!
- Piktochart Visual
- Video Editor
- AI Design Generator
- Infographic Maker
- Banner Maker
- Brochure Maker
- Diagram Maker
- Flowchart Maker
- Flyer Maker
- Graph Maker
- Invitation Maker
- Pitch Deck Creator
- Poster Maker
- Presentation Maker
- Report Maker
- Resume Maker
- Social Media Graphic Maker
- Timeline Maker
- Venn Diagram Maker
- Screen Recorder
- Social Media Video Maker
- Video Cropper
- Video to Text Converter
- Video Views Calculator
- AI Brochure Maker
- AI Document Generator
- AI Flyer Generator
- AI Infographic
- AI Instagram Post Generator
- AI Newsletter Generator
- AI Report Generator
- AI Timeline Generator
- For Communications
- For Education
- For eLearning
- For Financial Services
- For Healthcare
- For Human Resources
- For Marketing
- For Nonprofits
- Brochure Templates
- Flyer Templates
- Infographic Templates
- Newsletter Templates
- Presentation Templates
- Resume Templates
- Business Infographics
- Business Proposals
- Education Templates
- Health Posters
- HR Templates
- Sales Presentations
- Community Template
- Explore all free templates on Piktochart
- Course: What is Visual Storytelling?
- The Business Storyteller Podcast
- User Stories
- Video Tutorials
- Need help? Check out our Help Center
- Earn money as a Piktochart Affiliate Partner
- Compare prices and features across Free, Pro, and Enterprise plans.
- For professionals and small teams looking for better brand management.
- For organizations seeking enterprise-grade onboarding, support, and SSO.
- Discounted plan for students, teachers, and education staff.
- Great causes deserve great pricing. Registered nonprofits pay less.
15 Tips for Engaging Zoom Presentations + Examples

Your next Zoom presentation is a week away. And your mind is racing.
What presentation software should you use?
What if the other attendees can hear your neighbor’s loud music?
Will they find your presentation boring?
Relax and take a deep breath.
You don’t have to figure out the answers to these questions by yourself. This guide will cover everything you need to know about planning and delivering engaging Zoom presentations without stress and anxiety!
After reading this article, you’ll be brimming with confidence and competence on your next Zoom presentation.
Table of contents :
The science behind your Zoom presentation anxiety
- Downloadable Zoom presentation checklist
Part 1: Tips on how to plan and prepare for your Zoom presentation
Part 2: tips during your zoom presentation.
- How to share your Piktochart slide deck on Zoom
- Present with ease on Zoom using Piktochart presentations

Before we get into all the other Zoom presentation tips, perhaps the most important is to deal with your Zoom presentation anxiety. And you’re not alone – anxiety over Zoom presentations is more common than you think .
A 2021 paper on why students have difficulties learning during synchronous presentations over Zoom found that 80 percent of the students polled experienced anxiety and trouble focusing during their virtual classes. But what causes this worry? In a peer-reviewed article, Professor Jeremy Bailenson, founding director of the Stanford Virtual Human Interaction Lab , highlighted the results of their research and cited four primary reasons behind Zoom fatigue, stress, and anxiety:
- Your brain interprets excessive amounts of close-up eye contact during video chats as an “intense situation.”
- Like looking at the mirror, you become more critical of yourself as you see yourself on camera.
- Limited movements while you’re chained in your chair and table.
- Video chats require a higher cognitive load than face-to-face presentations.
“You’ve got to make sure that your head is framed within the center of the video. If you want to show someone that you agree with them, you have to do an exaggerated nod or put your thumbs up. That adds cognitive load as you’re using mental calories in order to communicate,” shares Bailenson.
Finally, you have to consider tech troubles and presentation software fiascos, as well as dealing with the pressure of public speaking.
15 Zoom presentation tips and tricks to help you own the room like a pro
Now that you understand why Zoom presentations give you sweaty palms, let’s go through 15 actionable steps to prepare for the slides.
We created a checklist of the Zoom presentation tips so you can cross off each task.

Prefer video learning instead? Watch the video below.
The success of your Zoom presentation is the result of thoughtful planning and preparation.
Get ready for your online class, product webinar, or job interview on Zoom with the following pre-presentation tips:
1. Decide on the scope of your Zoom presentation
Before presenting on Zoom, ask yourself — what one particular idea or insight would you want your audience to learn from you?
“Defining the scope is the most critical step. What are the boundaries, what are the deliverables, what is the topic that you are covering?”, recommends Linda Parry Murphy , CEO of Product Launchers, Inc.
Trying to cover every subject will only make you more nervous.
Remember the Stanford study earlier about too much cognitive load as one of the reasons behind Zoom presentation anxiety?
Limiting the scope of your presentation can significantly reduce your cognitive load while keeping your audience focused on the key points.
2. Plan for the structure of your online presentation
It’s important to master the sequence and structure of your presentation as part of your preparation. Creating a framework guides the meeting participants so they understand what the data means, why it’s important, and what the implications are in this situation.
A solid structure in place also makes it easier to go back to what you’re saying. As a result, you will feel more confident because you can keep track of your talking points with a quick glance at your outline if you lose your train of thought.
Matt Abrahams, a lecturer in Organizational Behavior and author of Speaking Up Without Freaking Out , recommends the following examples of presentation structures that you can use:
- Past-Present-Future – review a process or share a timeline
- Comparison-Contrast – show the benefits of a certain idea, insight, product, or service
- Cause-Effect – explain the rationale behind a decision
- Problem-Solution-Benefit – motivate or convince your audience
- What?-So What?-Now What? – convince people to do a specific action after your presentation
Another simple presentation structure you can work on is to start with an introduction, the meat of your presentation where you can highlight 3 points, and wrap up with the summary and call-to-action.
3. Prepare your presentation visuals
Plenty of research and evidence shows that including images is more effective in getting your message across than written text or oral communications alone.
For instance, a captivating visual is four times more effective in conveying information than words alone. People remember 80 percent of what they see and do, compared to 20 percent through reading and 10 percent through hearing, respectively.
If your goal is to convince your audience during your Zoom presentation, you’ll also be delighted to know that using visuals can help you become more persuasive.
A Wharton School of Business research found that around a third of the audiences they polled felt that presenters who used visuals were more persuasive.
So remember that well-chosen images, even stock photos, can do wonders to augment your slides.
When making visuals for your presentation, use these questions as your guide:
- Is there an icon, illustration, or image that could represent your point in a more meaningful way?
- What types of diagrams , such as a timeline, flowchart, pie chart, arrows, or graphs, will help get your point across to your audience?
- Who are my target audiences? When choosing visuals for my presentation, are there certain cultural taboos or inappropriate humor that I should be aware of?
One more thing – consider using bullet points if you find slides with walls of text. They’ll be easier to digest without taking the focus away from you.
4. Eliminate clutter in your surroundings

Staying in one place with no room to maneuver probably doesn’t spark joy for anyone. KonMari your environment by eliminating clutter on your desk and in the space around you. This means extra keyboards, unused notebooks, pens, food boxes, and books can go.
Eliminating clutter gives your brain the impression that there’s more room for you to move around during your Zoom event.
If the space you’re presenting in makes it difficult to clear off clutter, you could find a plain wall to present against. And if that’s not an option, you can use a clean virtual Zoom background . Keeping your surroundings out of sight means it’s out of mind for you and your audience; one less thing to worry about while presenting.
5. Do a tech prep
Presenting in Zoom while you’re at home or traveling is a technological wonder in itself. But technology can be frustrating at times too.
Spending some time optimizing your Zoom settings by clicking in the toolbar while you’re in a Zoom meeting. Under video settings, you’ll find a few options that can help with the visuals, such as focus assist.
Before your presentation, double-check the following:
- Make sure that your laptop, computer, lighting, headset, webcam, microphone, and internet connection are working. Have backup equipment if possible.
- Familiarize yourself with the Zoom app and other relevant software you’re going to use during the presentation.
- Close unnecessary browsers, applications, or software before the presentation. Turn off your laptop or desktop notifications. The goal is to optimize and speed up the device to have a smooth presentation.
- Prepare a PDF version of your presentation slides and have an extra copy of your presenter notes in case of technical mishaps with your slides. It also makes sense to have a short link to your presentation that you can share with the audience.
- Position your notes in the right spot so you know where to find them while presenting.
- Check Zoom settings and do a quick audio and video check.
6. Rehearse your presentation
After taking care of your surroundings and equipment, the next step is to prepare yourself.
Practicing your Zoom presentation in advance can help boost your confidence. Here are some tips to help you rehearse well for your presentation:
- Screen record yourself. Afterward, check your recorded video for technical issues, your body language, and whether or not your voice is audible or not.
- Practice with a family member or friend who can give feedback on any distracting nonverbal communication habits like too many hand gestures.
- Rehearse in the same room where you’ll be presenting. Use the same lighting, computer setup, and everything.
- Practice speaking to the camera, not your computer screen.
If you’re not used to face-to-face presentations, you could record your presentation and watch it back. I know, I know – it can feel so uncomfortable watching yourself. But a quick analysis will reveal if you use too many hand gestures, that can be distracting, and also if you need to reposition your camera so it shows your upper body while presenting.
The time has come for presentation day! You already know the ins and outs of your presentation, and you’ve practiced your Zoom presentation skills to a T. A couple of checks you can do before you start are:
- Make sure you’re in a quiet area to minimize any potential interruptions.
- Do a test call with a friend to check the internet connection and if you’ll stay connected.
Take note of the following tips and hacks to make your Zoom presentation engaging and anxiety-free during your webinar or talk:
7. Dress the part
Wear clothes that are appropriate for your presentation and audience. It also helps to be more mindful of your accessories and hairstyle. The outfits and accessories you wear during your Zoom meeting will speak volumes about you as a person.
For example, if you’re presenting to your coworkers, wear work clothes. If you’re pitching to a group of angel investors, wearing a tie can help convey that you’re serious and trustworthy. However, this may not be a good idea if you’re presenting to a group that is more open to change and tends to be more relaxed when it comes to conventional standards.
Another benefit of dressing the part is what you wear actually impacts how you think. Wearing formal clothes can improve abstract thinking and give you a broader sense of perspective, which is influential in helping you make better decisions.
8. Ditch the chair
Standing up when presenting in Zoom rather than sitting down helps you become more confident because you’re not hunched down on your chair.
Standing straight with your shoulders back also enables you to breathe easily, making your voice sound more powerful and confident. Finally, it allows you to move more and make explanatory gestures which is a charisma boost.
The more confident you appear in your presentation, the more confident you’re likely to feel.
“When your mind starts to feel more confident and powerful — it starts to see those challenging situations not as threats but as opportunities,” shares Harvard psychologist professor Amy Cuddy.
If you can’t stand up during your presentation, try to sit straight in your chair and back up your camera a little to show your upper body and not just your face.
9. Have a memorable introduction

National best-selling author and founder at Science of People Vanessa Van Edwards specifically recommends opening your presentation with IISSAAQQ to make it more memorable. IISSAAQQ stands for:
- I cebreaker
- I llustration
- S hort story
- S tatistic or surprising fact
- A nalogy or metaphor
Bonus points if you can weave in humor with some background information with a relevant fact. Research found that more popular talks used humor 12.92 times, whereas less popular talks used humor only 3.92 times on average.
You don’t have to force a joke – humor could just be a play on words or surprising the audience with a funny image or meme that contrasts with a statement. Nothing breaks the ice better than laughter.
10. Look your audience in the eye (or rather your webcam)
Looking your audience in the eye is easier during face-to presentations than Zoom presentations. It can be a little tricky during online meetings because we tend to look at people’s faces on the computer screen. Maintain eye contact by looking into your webcam.
“A good idea is to lower the monitor camera a little so that you don’t have to tilt your head back to gaze up at it. If you can’t help looking at someone’s face on the screen instead of their camera, it helps to move the Zoom window to the part of the screen nearest to the camera so at least you’re looking at approximately the right place when you’re looking at their face,” shares Carol Kinsey Goman , Ph.D., executive coach and international keynote speaker.
You could treat the camera as if you were doing a face-to-face presentation. This way, it’ll be a bit simpler to hold eye contact with your audience when you’re not looking at your notes.
11. Think happy thoughts
Find ways to boost your mood before your presentation. Aside from helping you feel good (which in turn can boost your confidence), you’re also likely to smile often with happy thoughts.
When you smile at your audience, they will also likely “mirror” your action and think happy thoughts.
“Mirroring is relevant to our tendency to be empathetic. When I see you smiling, my mirror neurons for smiling fire up, and I get your state of mind right away. I feel it as you feel it. We need that mirroring in order to create a full empathic response to other people,” describes Marco Iacoboni , author of Mirroring People and UCLA professor.
When you’re having a good time and sharing enthusiasm with your audience, they’ll reciprocate through their nonverbal communication. This means fewer folded arms and blank stares and more nodding along and smiles.
12. Delegate the chatbox
Have someone else take care of Zoom chat or manage the waiting room to keep you from being distracted. This person could be the meeting host, a colleague, or someone you trust who has your back during your presentation.
13. Engage your audience
A boring presentation is when there’s no interaction, and you’re being spoken at (hello, university lectures). You’ll be able to tell from everyone’s body language in the meeting room.
Make your presentation a two-way street. Here are some ways to encourage interaction and participation amongst your audience during your Zoom meetings:
- Ask questions. For example, if you’re presenting a team productivity software in Zoom, ask your audience about their top productivity problems at work. You can also use this time as an opportunity to transition to your next presentation slide.
- If you have a small audience, remember each person’s name and address them using their first names.
- Use visuals like illustrations, infographics, or a short video clip in your slide show. Tool recommendation : Use Piktochart Video to transform a long video into short clips.
- Use interactive quizzes while presenting online to change the pace and keep your audience engaged.
14. Talk like a human and avoid too much jargon
Alright, what does talking like a human mean in Zoom presentations?
For a start, avoid talking too much jargon and corporate speak. It makes you more relatable, keep your audience’s attention longer because your points will be easier to understand, and also helps you stand out from other presenters.
Just because you’re presenting in virtual meetings doesn’t mean you’re not talking to people. The only difference is you’re sharing your presentation in front of your camera instead of in front of the lecture room.
Next, improve your visual storytelling skills . Your presentation will be more memorable if you briefly share a story and pair it with visuals. Sign up for our free visual storytelling course . Check out the teaser video below.
15. Slow down
When you’re anxious and not too confident about your Zoom presentation, you’ll tend to speak fast, which in turn will make you more nervous. It’s a vicious cycle.
When presenting in Zoom, be mindful of your pace. Slowing down will not only take the edge off your nerves but also make you appear more confident.
Don’t be scared of pauses or gaps between your statements. Sometimes, you might need a sip of water to hydrate your throat. Other times, you could use the pauses as extra emphasis to drive key points.
Slowing down and changing up your talking pace will help you deliver an impactful presentation because you’ll have more control and be better able to drive the point home.
5 presentation examples and templates
To make presenting your Zoom presentation easy, here are some presentation templates and examples for inspiration.
Quarterly finance update
Have a big meeting coming up where you need to share sales performance and revenue figures? We’ve got you covered with this template.
It’s equipped with graphs where you can easily drop your revenue figures in and share performance with customizable graphs. There are also template slides for customer feedback and if your team is planning to introduce new processes.

Marketing strategy plan template
This marketing strategy slide deck is perfect if you’re onboarding a new client and want to walk them through your research, analysis, and proposed actions.

Group project
Presenting your collaborative project in a Zoom meeting to your classmates? Take the worry off so you can focus on sharing the results by using this science group project template .
Despite the name, you can use it for any kind of school or university project because the structure works for any type of research presentation. The template has slides for:
- Group introduction
- Your hypothesis/basis for the project
- Your theory
- How you tested the theory
- Key takeaways

Buyer persona template
The customer buying journey is always evolving, and you might need to present a case study to leadership or your team on recent findings. Our template makes it simple to share your customer’s story, as the template has slides for:
- The customer profile
- Motivations/goals
- Personal insights
- Responsibilities

Team update in the all-hands meeting
It’s common for managers, or project leads to update the company with their results in company meetings. In these cases, you might just need a single slide to share your progress.
This work breakdown structure template does the job, giving you space to share what your team’s objectives were, what the key results were, who was involved, and what the shipping date was for these goals.

How to share your Piktochart slide deck on Zoom
Step 1 : On the Piktochart editor, click Share to get the link to your presentation.
By default, your presentation is not publicly visible.
Step 2 : Copy and paste the link into your browser bar. Then, click the Show Presentation button. This will launch in fullscreen presentation mode, and now you’re ready to shine.
Step 3: Click Share Screen on your Zoom account and choose the browser with the Piktochart link.
For a visual demonstration, watch the short tutorial below with detailed instructions.
Ready to deliver your presentation?
That’s it for our Zoom presentation tips; now over to you.
You have a brilliant idea or insight to present, and you need to share them with your audience in your next Zoom presentation. It’s high time you nail it with the virtual presentation tips we outlined in this guide.
Take Piktochart for a test drive today and create your next presentation slide minus the stress using our free presentation maker .

Other Posts

75 Best Work Anniversary Wishes for Coworkers and Colleagues

9 Strategies for Effectively Communicating Change to Employees (With Examples)

What is Internal Communications?
Prezi, The Zooming Presentation Editor
Prezi: The Zooming Presentation Editor An Assessment of the Online Presentation Tool Jack Bishop, Ph.D. Instructional Technologist UCLA Office of Instructional Development
Whether using presentation software or online tools, the basic concept of a presentation is to share pertinent and useful information, usually in one direction – from the presenter to the audience. Although PowerPoint has become the standard presentation software in use at universities, there are many others to choose from including a few online tools. One such tool I would like to examine is Prezi – The Zooming Presentation Editor. Right away the title of the website gave me apprehension. Zooming? I couldn’t wait to dig in. The web site continued with grandiose claims like: “Create Amazing Presentations Live and on the Web,” and “create stunning presentations with Prezi.” When you click on the introductory video on the home page we are told that presentations are used to share ideas, introduce work, or as a tool of persuasion. The video then continues, “But, what used to be a great opportunity has turned into a dreadful experience for you and your audience. The reason? Boring presentations. That’s where Prezi comes in.” Hmm. According to information display guru Edward Tufte, “If your presentations are boring, it’s your content, so get new content” (Tufte 2008). However, the trend has been to not get better content, but to add more of the bells and whistles that come with PowerPoint in an attempt to make boring content more “amazing” and “stunning.” This is a fatal error. Flying text, zooming words, spinning images and sound effects all add distractions to the information being conveyed by the presentation. Proven best practices dictate that motion on the slides in a presentation should be reserved for demonstrating a specific movement pertinent to the lesson at hand. It is a waste of everyone’s time to sit through a presentation laden with animated text that is bouncing, spinning or zooming. Waiting for the animation to settle so everyone can read it can be a great time waster. If you have three animations on each slide and each animation takes 1 second that’s 3 seconds of wasted time per slide. If the presentation is 20 slides long, you have wasted 60 seconds (or a minute) on unnecessary “phluff.” This does not take into account the amount of distraction and anxiety such animation can cause in your audience.
What is Prezi? Prezi is a web-based presentation tool (in the Flash format) that uses a single “canvas” as opposed to a presentation composed of separate slides. You insert the text, images, videos or any other objects onto a single “infinite” canvas then they can be grouped together into “frames.” The canvas becomes a sort of map of ideas on which presenters zoom in and out. The presenter can then define the pathway through the map – zooming on objects, text and media in any order they wish. In this sense Prezi describes itself as being “non-linear.” As Prezi moves between ideas, it automatically zooms out, spins the canvas, then zooms back into the next idea. If you are using the free version “freemium” you build the presentation in the web browser and then you must save it on the Prezi web site. To use it in the classroom, you must log in to the Prezi site and use it from there. If you purchase the Prezi Pro license you are able to create the presentation in the browser window, then download it for use without an Internet connection.
The Prezi workspace, as mentioned, is an “infinite” single canvas rather than a series of individual slides. When you add an idea it is essentially the same as creating your first slide. As you add ideas (slides) you create a path that navigates between them by zooming out of the first idea, spinning the canvas and then zooming back in on the second idea.
There are two main tools used for creating Prezis: the Bubble menu, and the Zebra. According to the Prezi website there are only six steps to take, and “in just a few minutes, you’ll be set to create a stunning presentation!” Let us look at those steps.
1. Double-click anywhere to write – By double-clicking the canvas a text box appears into which you can enter your text 2. Zoom in to develop your ideas – “Once you have added your ideas to the canvas as text, you can zoom in to these ideas to develop them and add more text.” 3. Use the Zebra for structure and size – When you click on a text box you see what Prezi calls the Zebra Transformation Tool. Clicking on the center of the Zebra allows you to move it around the canvas. You can size and scale the text by clicking on the inner rings, and by clicking on the outer ring you can rotate the text. 4. Add images from Insert on the Bubble menu – Click the insert bubble and choose from files, youtube and three shape tools: arrow, thin line, thick line 5. Create your storyline – the storyline is created by using the sequence tool (highlighted in yellow in the image below) to move between ideas. 6. Click “Show” on the Bubble menu to present
To see a Prezi in action, please go to: http://prezi.com/explore/ . What you will see is everything a good presentation is not. There will be incessant zooming in on ideas, re-zooming to smaller text, spinning to the next idea then zooming in on it, more spinning, zooming, etc., etc. The result has a disorienting effect on many viewers who find the zooming and spinning to be unnecessary and redundant. In the end all Prezi does is zoom in on, and spin between, ideas. Slideshows created by Powerpoint, Keynote or other slideware are far more elegant, and versatile, and If you want to zoom you can, it is not mandatory.
Prezi is also prone to several issues that make it even less desirable as a main presentation ware. Prezi is prone to “clogging” a condition by which Prezi loses your information and does not zoom smoothly. This problem is so common that it bears the name “Prezi Zoomed Away.” Prezi is a zoomable space, where every text, image and object has a size besides a horizontal and vertical position on the canvas. When you enlarge, scale down or move an object these coordinates are recalculated. Unfortunately, there are technical limitations on how many digits these calculated numbers can have.
When a prezi reaches these technical limitations, it starts to behave erratically. This happens when the horizontal or vertical distance between two objects, or the size difference between the smallest and the largest object is too big. Since it is relatively easy to zoom deep into a prezi and place an object there, usually it is the size difference (and not the horizontal or vertical position) which is causing the problem. There are no such limits or restrictions with slideware, and you will never have your materials disappear and you will not have to go through 7 steps to retrieve it. There are several other troublesome issues with Prezi. Here is a short list of those issues:
1. Cutting and pasting text in Prezi does not work with keyboard shortcuts in MAC OSX when using Chrome or Opera 2. Accented characters do not work in Google Chrome 3. It is not possible to edit right to left scripts 4. When uploading images the JPG must be configured a certain way or there will be problems because Prezi cannot accept progressive JPGs 5. If you click on “Send to back” or “Bring forward” multiple times in a quick sequence, the object moved may fade away completely. Reloading your prezi solves this 6. URLs (links in the presentation) other than those beginning with http will not get converted to live links 7. For links to become live, you “sometimes” have to save and refresh the presentation 8. If your content is too small you may experience a jerky movement to the presentation. To fix this you must go back and resize everything on the canvas. 9. It is currently not possible to load a PDF in Prezi Desktop, the offline editor 10. Creating a prezi in the Prezi Desktop Editor with images that are not supported in the online editor may be possible. If you upload such a prezi from Prezi Desktop, these images will not be visible online (a download bubble may show up instead)
You will experience none of these problems when using slideware. I find it incredible how far people will go out of their way to avoid learning to use PowerPoint correctly and effectively. Slideware, when done properly, is far more effective and memorable as a teaching aid than swirling canvases and zooming text.
In conclusion, Prezi does little to create “stunning” presentations. (Perhaps dizzying is a more accurate term). Prezi offers nothing to help you with the content of your presentation and only provides a mechanism to zoom in and away from individual ideas. In other words, Prezi adds a lot of “PowerPoint Phluff” (Tufte 2008) to hide the fact that the material and the presenter are boring. Although Prezi is being mentioned more and more on campus these days, my advice is to steer clear of any program that claims to make your presentations amazing and stunning without addressing the most important feature of the presentation – the content.
For anyone wishing to learn to use PowerPoint properly as an effective teaching aid, please contact me at: [email protected] or call 310-794-9726.
Tufte, Edward. 2008. “Presenting Data and Information: A One-Day Course Taught by Edward Tufte,” at the Sheraton Hotel Universal City, Los Angeles CA. Aug.12.
Critical PowerPoint Shortcuts – Claim Your FREE Training Module and Get Your Time Back!
How to zoom in on PowerPoint slides (3 different techniques)
- PowerPoint Tutorials
- Shortcuts & Hacks
- December 27, 2017
How do you zoom in on something in PowerPoint without PowerPoint first centering in on your slide?
This was a great question we got from subscriber Derek (thanks Derek!).
And it’s not so intuitive…
For example, let’s say you want to zoom in on a specific icon or two to edit them, like in the picture below. How do you do it without scrolling around, driving yourself crazy?

In this tutorial, you’ll learn 3 different ways to zoom in PowerPoint, plus a few sneaky places you might never have thought of zooming in PowerPoint before.
Looking for the NEW Zoom Transition?
If you want to learn all about the brand new Zoom Transition in PowerPoint that was added in 2016, see our other guide here .
The problem with the standard PowerPoint zoom
The problem with the standard PowerPoint zoom, is that PowerPoint automatically goes to the center of your slide as you zoom in.
The center zoom is great if the object that you want to edit is in the center of your slide, but if it’s not, that means you have to use the scroll bars to find what you are looking for.
The problem with the scroll bars is that they are hard to control, often jumping you over to the next slide as you try to find the object that you want to edit.
So instead of making your life easier (which is what they were designed to do), they make it harder.
3 Ways to Zoom in on an Object
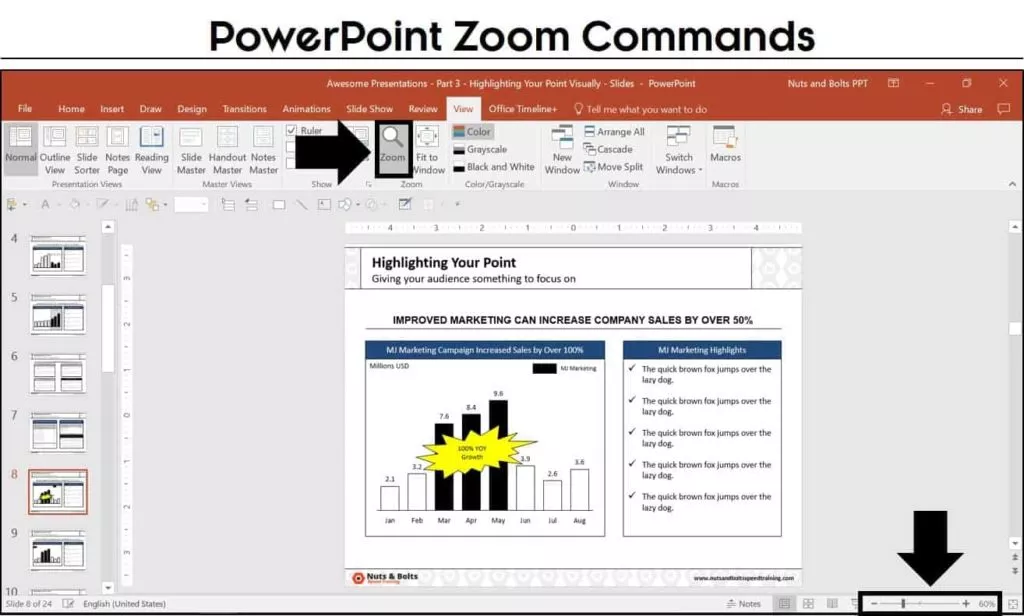
There are three different ways you can zoom in on a PowerPoint slide:
- The View tab Zoom command (zoom dialog box)
- The Zoom slider at the bottom of the screen
- The CTRL + mouse spin wheel shortcut (my personal favorite because it’s universal, as you’ll see in a second)
If you are looking for the new zoom transition, you can learn more about what that is on the Microsoft blog here .
Pro Tip: Use the ‘Fit to Window’ tools
After zooming in on something in PowerPoint, you can quickly refit your PowerPoint window in one of two ways:
- ‘Fit slide to current window’ in the lower right-hand corner your screen
- ‘Fit to Window’ in the View tab

Zoom in on a Picture in PowerPoint
To zoom in a on a specific picture (or object) in PowerPoint, all you need to do is first select the object before you zoom. Once you select an object, any of the 3 zoom methods described above will zoom you specifically in on the object:
- The zoom dialog box
- The zoom slider
- Using CTRL plus your mouse spin wheel
This zoom trick works on anything that you can select in PowerPoint, including zooming in on a table, zooming in on a chart, zooming in on a text box, etc.
Note: If you are trying to zoom in on a picture to show a specific part of it, you can also just crop your picture down to the desired piece.
To learn all about how to crop pictures in PowerPoint, read our step-by-step guide here .
If you have multiple objects that you want to zoom into and edit in PowerPoint, the fastest way to do that is to:
- Select and zoom in on your first object
- Edit or format your first object
- Hit Fit Slide to Current Window
- Select and zoom in on your second object
- Edit or format your second object
If you have more than two objects, you can continue zooming in and out of your slide in this way to make all of your adjustments.
PowerPoint Thumbnail Zoom
Besides zooming in on a slide while editing it, you can also use the CTRL + mouse spin wheel shortcut to zoom in on the thumbnail images of your PowerPoint slides on the left.

Zooming in on the thumbnail images allows you to control how much of your presentation you see, and how much slide editing space you give yourself on the right.
Zooming in allows you to get a big thumbnail image of each of the preceding and following slides, while zooming out gives you an idea of how many slides are in your presentation.
Slide Sorter View Zoom
Another place you can zoom in PowerPoint to see the overall flow of your presentation, is Slide Sorter View. To open the Slide Sorter View, simply click the slide Sorter command at the bottom of your screen.

All three zoom methods work in the Slide Sorter View:
Zooming in and out of the Slide Sorter View is useful when you want to see the overall flow of your slides within your presentation at varying levels of detail.
Slide Show View zoom
Two other places you can zoom in PowerPoint are the Slide Show Mode (F5) and Presenter View (SHIFT + F5) of your presentation. To see these PowerPoint shortcuts in action, check out the video below.
Start Slide Show PowerPoint Shortcuts
There are four keyboard shortcuts for starting slide show in PowerPoint:
Once you are in one of the presentation views of your slides, you can zoom in or zoom out by either using the CTRL + mouse spin wheel shortcut (if you have a mouse), or you can use the keyboard shortcuts listed below.
- Zooming in allows you to focus on a specific section of your slide (focusing your audience’s attention on that section).
- Zooming out allows you to see all the slides in your presentation as thumbnails.

This is often an easier way to navigate the slides in your presentation if someone wants to go back and see something, rather than trying to remember where it was in your presentation.
Knowing how to properly zoom in and out of the objects you want to edit in PowerPoint will save you a ton of time.
The key to remember is that PowerPoint will use the object you have selected as the focal point of your zoom.
If you enjoyed this tutorial and want to learn more about our other PowerPoint tutorials and free resources, visit us here .
What’s next?
Related articles, about the author.

Popular Tutorials
- How to Strikethrough Text (l̶i̶k̶e̶ ̶t̶h̶i̶s̶) in Word, Excel & PowerPoint
- How to Make Animated Fireworks in PowerPoint (Step-by-Step)
- Strikethrough Shortcut (l̶i̶k̶e̶ ̶t̶h̶i̶s̶) for Word, Excel & PowerPoint
- How to Create a Flash Card Memory Game in PowerPoint (Like Jeopardy)
- Keyboard Shortcuts Not Working: Solved
PowerPoint Tutorial Categories
- Strategies & Opinions
- Presentation Design
- Pictures, Icons, Videos, Etc.
- New Features
- Miscellaneous
- Charts & Data Viz
We help busy professionals save hours and gain peace of mind, with corporate workshops, self-paced courses and tutorials for PowerPoint and Word.
Work With Us
- Corporate Training
- Presentation & Template Design
- Courses & Downloads
- PowerPoint Articles
- Word Articles
- Productivity Resources
Find a Tutorial
- Free Training
- For Businesses
We help busy office workers save hours and gain peace of mind, with tips, training and tutorials for Microsoft PowerPoint and Word.
Master Critical PowerPoint Shortcuts – Secure Your FREE Training Module and Save Valuable Time!
⌛ Master time-saving expert techniques.
🔥 Create powerful presentations.
🚀 Propel your career to new heights.
We value your privacy – we keep your info safe.
Discover PowerPoint Hacks Loved by Industry Giants - KKR, AmEx, HSBC!
Over 114,880 professionals in finance, marketing and sales have revolutionized their PPT skills with our proven methods.
Gain FREE access to a full module of our premium PowerPoint training program – Get started today!
We hate spam too and promise to keep your information safe.
You are currently viewing a placeholder content from Facebook . To access the actual content, click the button below. Please note that doing so will share data with third-party providers.

- Best practices
- Network design
- Strategy reviews
- User awareness training
- Vendor procurement
- Business moves
- Network assessments
- Project planning
- Anti-virus / Anti-spam
- Configurations
- Disaster recovery
- IT staff augmentation
- Key date management
- Management reporting
- Network maintenance
- Network security
- Proactive monitoring
- Systems administration
- Desktop support
- Emergency IT support
- On-site services
- Remote services
- Server support
- Cloud services
- Hosted Exchange
- Managed backup
- Pre-scheduled on-sites
- Server hosting
- Cybersecurity Resources
- Get support
- Quick Tips video tutorials
- Request information
- Security Office Hours
- User Awareness Training
- User guides
- Core values
- Client testimonials
- Customer reviews
- Endsight team
- The Endsight way
- Vendor partners
- Why choose Endsight
Zoom In On Screen and Annotate with This Free Presentation Software
/shatton.jpg "zooming presentation editor")
Subscribe to get updates!
Table of contents.
Cybersecurity Fundamentals Training
Endsight provides a complimentary cybersecurity training. Our goal is to bring awareness of the latest trends and best practices to help reduce cyber risk for our customers, our business community, and their families.
Register Now
Share to love!
In technical presentations, you often need to highlight to the audience something on a computer screen. Sometimes you may want to zoom in on screen other times you may want to annotate. Without tools like this, it can be difficult for them to see what you're pointing out and doing with your mouse cursor. A computer developer named Mark Russinovich created a free solution and has made it available for all of us!
Let's take a look at a tool I recently discovered that can help you have better presentations and a more efficient team while on virtual team meetings.
With ZoomIt, you can zoom in on specific parts of the screen and annotate them so that others watching via screen share can see what you're doing. And it's lightweight, free, and you can download it directly from the Microsoft website.
Here are the main features of ZoomIt
- Zoom in on specific parts of the screen
- Screen annotation with text, draw square, circle, line, or free draw on screen
- Full screen countdown timer
- Keyboard shortcuts make it using it look professional
- This is free software, available directly from Microsoft's website.
- It is lightweight and requires no installation
How to Zoom In on Screen
Because ZoomIt is mostly run by keyboard commands, I find it to be much better than Windows built-in zoom feature "Magnify". All you need to do is click the system tray icon and select Zoom OR use keyboard shortcut CTRL+1 to toggle zoom. You can also set your own keyboard shortcut for toggle. The escape key will exit as well.
You can also Specify the initial level of magnification when zooming in on screen.

They also have a zoom feature called LiveZoom, which lets you annotate too, but I find it to be a bit clunky and sometimes the cursor will disappear, so I just keep it off.
How to use the screen annotation tool works
Similar to the Zoom feature, you can toggle the "Draw" annotation feature to free draw (default) or create lines, arrows, squares/rectangles, circles/ellipses, or text. You simply click on the annotation tool or hit the hotkey CTRL+2 and then draw it onto your screen.
Keyboard shortcuts when the Draw annotation tool is toggled:
- Straight Line - Shift key
- Rectangle - Control key
- Ellipse - Tab key
- Arrow - Shift+Control key combo
- Text - "T" key
Change color of text
You can also change the color by pressing "g" for green or "r" for red or "b" for blue, etc.
Set defaults for text

Here is a GIF I created that shows these at work. Mind you, these can all be done in real-time while in a live video screen share for a demo, webinar, or recording your screen.
Use the full screen countdown timer feature for breaks
The Break feature is especially useful for technical demos because you can toggle it on when taking a quick break. It's a pretty handy feature for breaks or activities. You can also set the background image for it when you display it. It's a toggle too. Simply press the hotkey CTRL+3 to start and ESC to exit. You could also keep it running and click the system tray to bring it back.

If you want to try ZoomIt yourself find it here:
Visit the Windows website here for ZoomIt .
In conclusion - ZoomIt is a free software that helps make technical presentations easier to understand by providing annotation and zooming in on the screen. In conjunction with other presentation software, it can be used to make your presentations (live video broadcasts, tech demos, or webinars) better. Shout out to Josh Vorves at LearnIt for teaching us about this tool during a Microsoft Office productivity training. Thank you!
If you use Microsoft Office 365 and want to stay sharp, you can check out the replay for the training where we first saw this feature or you can sign up for our 365 Tip of the Week Newsletter .

When I Partner with Endsight, What Am I Paying For?
Partner with the IT professionals who are invested in your success. Key takeaways: We know the true meaning of customer..
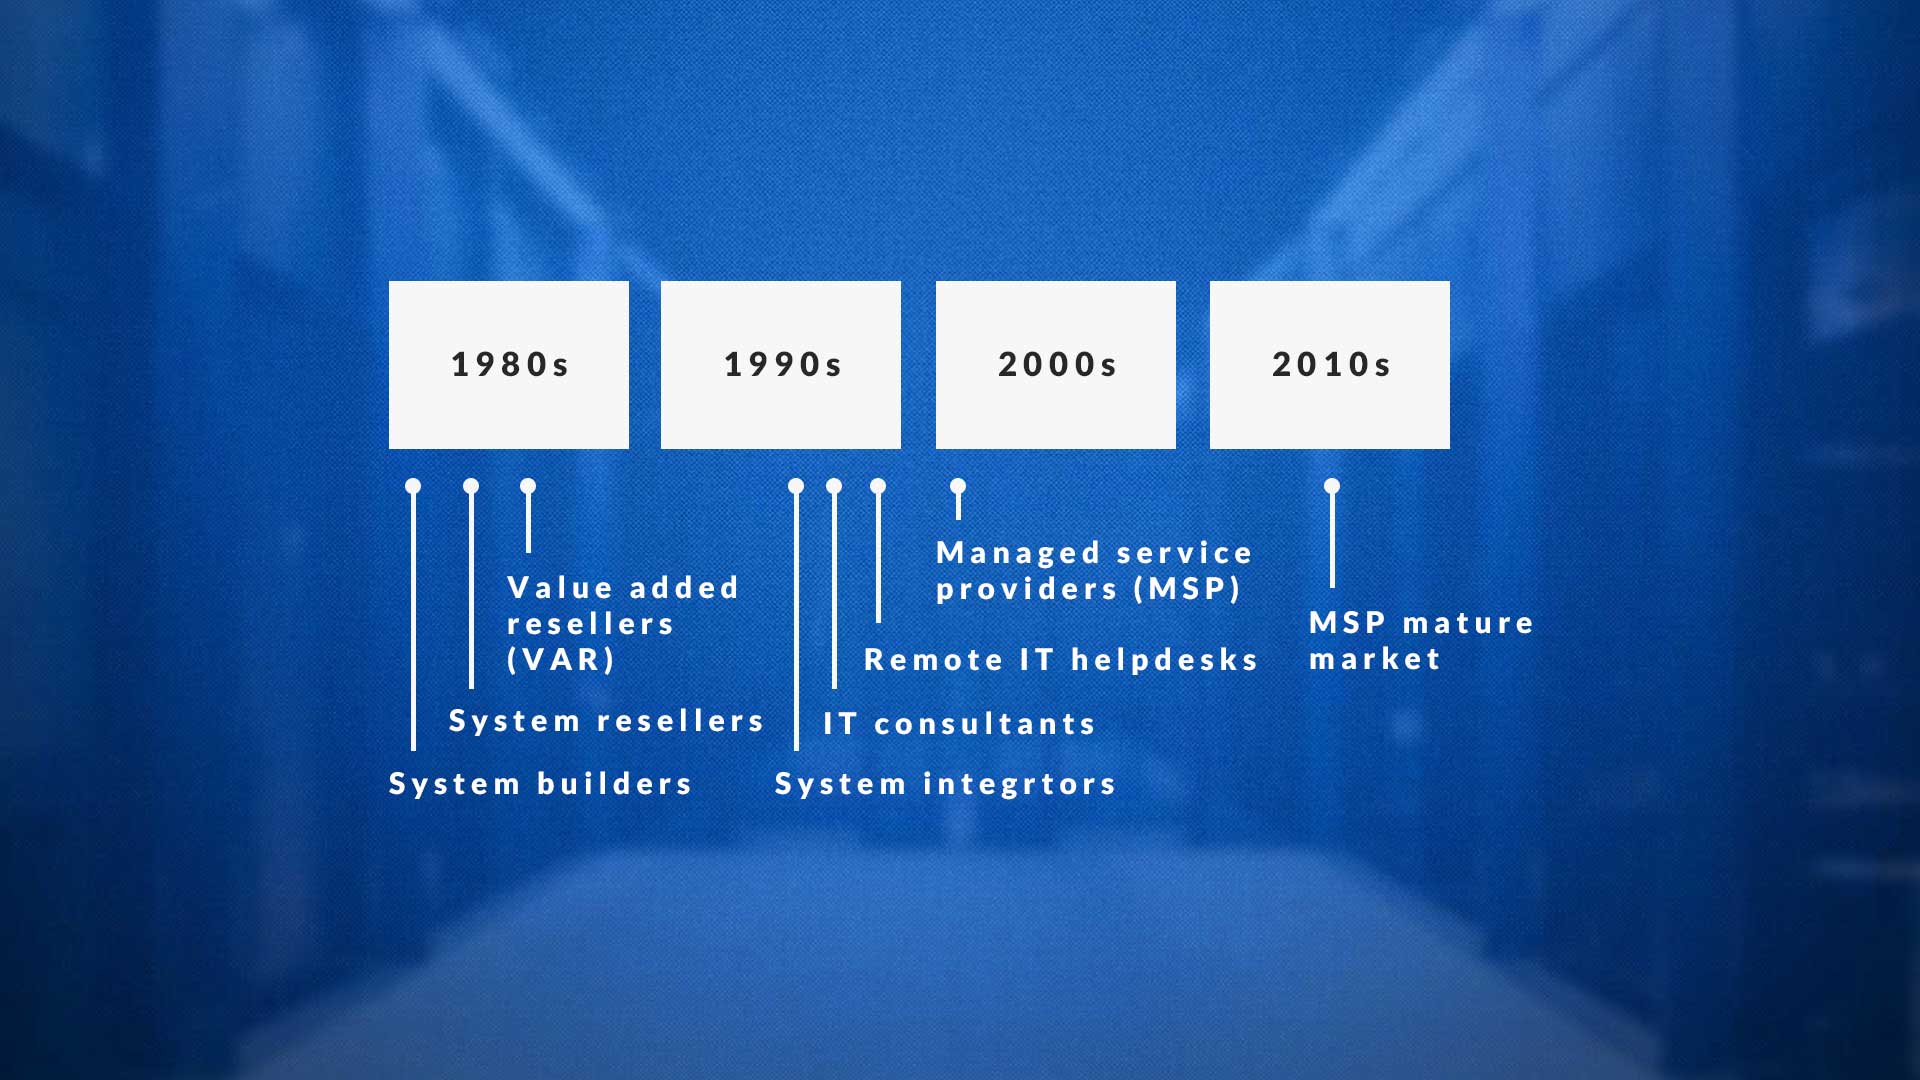
A Short History of the MSP and How to Choose the Right One for the Future.
MSP is an acronym for Managed Services Provider. But what does that mean in the world of IT? An MSP relieves businesses..

11 Urgent Signs It’s Time to Change Your IT Support
Good vendor relationships can go bad. Here’s how to know it’s time to make a change for the better. Key Takeaways:..
Navigation Menu
Search code, repositories, users, issues, pull requests..., provide feedback.
We read every piece of feedback, and take your input very seriously.
Saved searches
Use saved searches to filter your results more quickly.
To see all available qualifiers, see our documentation .
- Notifications
A "zooming" presentation editor
sozi-projects/Sozi
Folders and files, repository files navigation.
Sozi is a presentation tool for SVG documents.
It is free software distributed under the terms of the Mozilla Public License 2.0 .
More details can be found on the official web site: http://sozi.baierouge.fr
Building and installing Sozi from sources
Get the source files.
Clone the repository:
Install the build tools and dependencies
The following instructions work successfully in Ubuntu 22.04.
Install Node.js and Gulp. The build script for Sozi is known to work with Node.js 14 from Nodesource .
From the root of the source tree, run:
If you plan to build a Windows executable, also install wine . In Debian/Ubuntu and their derivatives, you can type the following commands.
If you plan to build Debian packages, install the following additional packages:
If you plan to build Redhat packages, install the following additional packages:
If you plan to build Archlinux packages, install the following additional packages:
The zip compression tool must also be installed:
Get the binaries for ffmpeg (optional, but video export will not work without them). Download and unzip the FFMPEG executables to the following folders:
- Linux 32-bit: resources/ffmpeg/linux-ia32
- Linux 64-bit: resources/ffmpeg/linux-x64
- Windows 32-bit: resources/ffmpeg/win32-ia32
- Windows 64-bit: resources/ffmpeg/win32-x64
- MacOS X 64-bit: resources/ffmpeg/darwin-x64
To build and run the desktop application without packaging it, run the following commands from the root of the source tree. At startup, Sozi will show an error notification that can be ignored.
To build and package the desktop application for all platforms, do:
After a successful build, you will get a build/dist folder that contains the generated application archives for each platform.
Helping debug Sozi
While Sozi is running, press F12 to open the developer tools. Check the Console tab for error messages.
Some environment variables will enable debugging features in Sozi. When running Sozi from the command line, you can add one or more variable assignments like this:
Where SOME_VAR and SOME_OTHER_VAR are variable names from the first column of this table:
Releases 22
Contributors 65.
- JavaScript 93.0%
- Python 2.1%
Think Outside The Slide
4 Options for How to Present a PowerPoint Slide Show in a Zoom meeting
If you are using Zoom to meet with others who are working remotely, you may not realize that you have six choices when it comes to how you will present your PowerPoint slides to the group (I added two options I discovered after the article was first published). In this article I will share more details on these six options and you will get a link to that option in my video that shows you what your audience will see. In this article I am using the Zoom app in Windows 10. The six options are:
- Share your entire screen/desktop
- Share the Slide Show window
- Share the editing window with a clean look
- Run the Slide Show in a window and share that window
- Use Presenter View to show the audience your slides while you see Presenter View
- Present with your video beside your PowerPoint slides
Did you find this article using a Google search? Get more answers to your virtual presentation questions here and get updates of new articles and videos here .
Option 1: Share your entire screen/desktop
This is the default method that most people choose because it is the closest to what we would do if we were in a meeting room with the participants sitting around the table. In Zoom, you choose the sharing option called Screen. The audience sees everything that is on your screen, so if PowerPoint is not full screen, they will see any wallpaper you have and any other open applications with potentially confidential information displayed. They will not see the Teams controls at the top of the screen as those are always hidden from the audience when sharing your screen or a window.
You start your slide show in PowerPoint and all features will work, including animations and transitions. You can use a presentation remote to advance through your slides or use the arrow keys. Even though the slides take up the whole screen, you can still access the Zoom controls by moving your mouse to the top of the screen and selecting the controls you want. If you are concerned that you may miss any chat or questions from the audience, click on the Chat option in the Zoom controls and the chat window will be shown on top of your slides without the audience seeing it. Be careful as seeing comments in the chat window may distract you from your presentation.
Here is the section of my video that shows Option 1: Share your entire screen/desktop
Option 2: Share the Slide Show window
Because Zoom allows you to share any window that is open on your computer, another option you have is to share the window that has the Slide Show in it. Before you start sharing in Zoom, start the Slide Show in PowerPoint. This will display the slides on the entire screen. Use Alt+Tab to go back to the Zoom window. In the Zoom sharing options, choose the window that is displaying the slide show (make sure you select the slide show window, not the PowerPoint regular window).
Again, since you are using full PowerPoint, all features work and this is similar to presenting before an audience in a meeting room. Because you are only sharing a window, the audience won’t see anything else on your screen. Even though the slides take up the whole screen, you can still access the Zoom controls by moving your mouse to the top of the screen and selecting the controls you want.
Here is the section of my video that shows Option 2: Share the Slide Show window
Option 3: Share the editing window with a clean look
The first two options don’t allow you to see any other documents or notes that you may have on your screen because the slides cover the entire screen. If you don’t need any animation or transition features and are comfortable with the audience seeing the edit view of PowerPoint, you can choose to use a view that minimizes the PowerPoint interface so the slide is the focus.
In the normal editing view, minimize the slide thumbnails by dragging the vertical divider all the way to the left until it just shows the text indicating that thumbnails are available. Drag the horizontal divider at the bottom of the slide down to hide any notes that are below the slides. Third, collapse the ribbon by clicking on the collapse indicator (an upward arrow head) in the lower right corner of any ribbon. Finally, maximize the size of the slide in the editing window if it did not automatically resize itself. Now your slide is large in the editing window and PowerPoint has a cleaner look than the normal editing view.
In the Zoom sharing options, choose the window for this PowerPoint presentation. When you move through the slides, you are not using Slide Show mode so there are none of the animation or transition features available. Any embedded media will not run automatically and must be manually played. You can move through the slides using the down and up arrow keys or the PageDown and PageUp keys.
This is not as clean as Slide Show mode, but it allows you to see other open documents on your screen without the audience seeing them. You can still see and access the Zoom controls by moving your mouse to the top of the screen.
Here is the section of my video that shows Option 3: Share the editing window with a clean look
Option 4: Run the Slide Show in a window and share that window
Many presenters are not aware that PowerPoint has the option to run a slide show within the window it is in without taking up the entire screen. PowerPoint refers to this as the “Browsed by an individual” mode or Reading View. To use this mode, on the Slide Show ribbon, click on the Set Up Slide Show button. In the dialog box, in the Show type section in the to left corner, change the option by clicking on the radio button for “Browsed by an individual”. Click the OK button to save the change and exit the dialog box. Now whenever you enter Slide Show mode, the slides are run just in this PowerPoint window, not the full screen. You can change this back to the default of “Presented by a speaker” after the meeting is done.
Update Aug 11 2020: A recent Zoom update seems to have changed the order you need to do the steps. First start the Slide Show mode in PowerPoint. You will see the slide show with some additional controls at the top and bottom of the window and possibly black bars on the top/bottom or left/right depending on the size of the window relative to the size of the slides. This is a slightly different look for the audience if they are used to the full screen version of Slide Show mode. Then, in the Zoom sharing options, choose the window for this PowerPoint presentation. If you share the PowerPoint window first before entering Slide Show mode it confuses Zoom and it will stop sharing the window.
Because this is Slide Show mode, all animations and transitions work as expected. What is different than the full screen Slide Show mode is that the laser pointer, inking, and some other features are not available. Since you are only sharing this window, the audience does not see any other documents you may have open on the screen. You can still see and access the Zoom controls by moving your mouse to the top of the screen. This allows you to keep up with any chat discussion while presenting.
Since this option is only sharing one window, it uses less bandwidth than sharing a full screen which may help users on lower speed connections have a better experience with less lags or distortion. This option may give you the best combination of PowerPoint features and presenter controls and options.
Here is the section of my video that shows Option 4: Run the Slide Show in a window and share that window
Option 5: Use Presenter View to show the audience your slides while you see Presenter View
If you prefer to use Presenter View to see your speaking notes while the audience only sees your slides, I have instructions for using Presenter View in Zoom with 1 or 2 screens and in Windows or on a Mac in my Complete Guide to using PowerPoint Presenter View in Zoom .
Option 6: Present with your video beside your PowerPoint slides
You can present in a Microsoft Teams or Zoom meeting with your video beside your PowerPoint slides so your facial expressions can be easily seen along with the slides. The idea is to arrange our video and slides on our desktop and share the entire screen, so we control the size of both the video and the slides. This does not require you to install any software and uses the built-in features of the operating system and PowerPoint. For Windows 10 I explain the detailed steps in this article and show you how this is done in this video . For a Mac I explain the detailed steps in this article .
In my opinion, Option 5, using Presenter View, is the best option for most presenters because it allows you to see your notes and access all the expert features of Presenter View while the attendees see your full slides. It is what I use when I deliver my customized training courses .
( Get more articles on using Zoom effectively here )
Full video with all four options
Dave Paradi has over twenty-two years of experience delivering customized training workshops to help business professionals improve their presentations. He has written ten books and over 600 articles on the topic of effective presentations and his ideas have appeared in publications around the world . His focus is on helping corporate professionals visually communicate the messages in their data so they don’t overwhelm and confuse executives. Dave is one of fewer than ten people in North America recognized by Microsoft with the Most Valuable Professional Award for his contributions to the Excel, PowerPoint, and Teams communities. His articles and videos on virtual presenting have been viewed over 4.8 million times and liked over 17,000 times on YouTube.
Online PowerPoint Editor
Edit powerpoint presentation. edit pptx, ppt, or odp., powered by aspose.com and aspose.cloud ., * by uploading your files or using our service you agree with our terms of service and privacy policy ..
Send the download link to
Press Ctrl + D to save this page as a bookmark.
We've already processed ??? files with a total size of ??? Mbytes.

How to edit presentation online
- Click Drop or upload your file .
- Select the PowerPoint file you want to open and edit on your computer. Your PowerPoint will be uploaded and then presented in an online Editor menu.
- Edit your PowerPoint: Edit text; Change the size of fonts; Use formatting options; Move shapes and objects; And perform other tasks.
- Once you finish editing your presentation, click the Download icon.
Aspose.Slides Editor App is used to create and edit PowerPoint presentations (PPT or PPTX), templates and layouts. Load your presentation and observe the slides. Choose the element on a slide and modify its properties, color, size, layout, etc. Move, resize and delete elements. Zoom the slides, change z-order, etc. Download the resulting presentation in different formats as PDF, TIFF, etc. Other Aspose Apps you may want to try: Merger web app for merging presentations; Watermark web app for adding watermarks to presentations. Read an article on creating invitations in PowerPoint: 3 Easy Steps for Creating Invitations in PowerPoint

Aspose.Slides Editor
- Online PPTX or PPT Editor.
- Open PPTX or PPT online.
- Edit PowerPoint online. Save edited presentation.
- Edit or create PowerPoint presentation online.
- Edit any PowerPoint file: PPT , PPTX or ODP.
- Edit presentation slideshow: PPS , PPSX .
- How do I edit a PowerPoint presentation online? To edit your PowerPoint online, upload the PowerPoint file. Then you get to access editing options.
- Can I edit PowerPoint without Office? Yes. You do not have to install Office or Microsoft PowerPoint. To use Aspose Editor, all you have to do is upload your file. No payment, software installation, or plugin is required.
- How do I edit a text box in PowerPoint? Upload your PowerPoint file. Click the text box. You can now edit or make changes to the text.
- How do I edit PowerPoint on my mobile phone? Aspose PowerPoint Editor works everywhere: mobile phones (iPhones and Android devices) or computers (Windows, macOS). Use it.
- Can I format a text in PowerPoint online? Yes, you can format a text. Click the text and then apply your preferred formatting options to it.
- Are there limits on uploaded files? For a single presentation, the maximum file size is 35 MB and the maximum number of slides is 50. If you must edit a presentation that exceeds 35 MB or contains more than 50 slides, we recommend you use Aspose PowerPoint Splitter to divide the slides into multiple presentations. You can then modify the presentations you obtained individually.
Simple Editing
Edit from Anywhere
Trusted operations
Other supported editors.
We provide editors used to work with other PowerPoint documents. Please, see the list below.
- Edit PDF (Edit PDF document)
- Edit PDF text (Edit text in PDF)
- Change PowerPoint Background (PowerPoint Presentation)
- Create Presentation (PowerPoint Presentation)
- Create Slides (PowerPoint Presentation)
- Edit PowerPoint Template (PowerPoint Presentation)
- Edit PPS (PowerPoint Presentation)
- Edit Slideshow (PowerPoint Presentation)
- PowerPoint Creator (PowerPoint Presentation)
- Web PowerPoint (PowerPoint Presentation)
Oops! An error has occurred.
Error has been reported successfully..
You have successfully reported the error, You will get the notification email when error is fixed. Click this link to visit the forums.
� Aspose Pty Ltd 2001-2022. All Rights Reserved.
How to Give a Presentation on Zoom? [A Step-by-Step Guide!]
By: Author Shrot Katewa
![How to Give a Presentation on Zoom? [A Step-by-Step Guide!]](https://artofpresentations.com/wp-content/uploads/2021/03/Featured-Image-How-to-Give-a-Presentation-on-Zoom.jpg "zooming presentation editor")
If you’ve never used Zoom, giving a presentation on it might seem a bit challenging. But, that’s a challenge we will have to learn to overcome as the world moves digital more and more day by day. The key question really is how to give a presentation on Zoom!
To give a presentation on Zoom, first, start by joining a meeting. Now open the presentation file on your computer and share the slides on Zoom using its “Share Screen” feature. You should test your camera, mic, speaker, and internet connection before you start with your presentation.
As easy as it may seem, some of you may need further detailed instructions. So, in this article, I will provide a step-by-step guide on things that you need to do in order to deliver a presentation on Zoom successfully! Plus, I will also share some tips that can help you ace your presentation on Zoom!
So, without any further delay, let’s get started!
Understanding the Zoom Application Interface
Before we understand the steps to give a presentation using Zoom, it is perhaps a good idea to acquaint yourself with the Zoom user interface first. If you are well-versed with it, then perhaps you may want to skip this section and click here instead.
Logging into Zoom
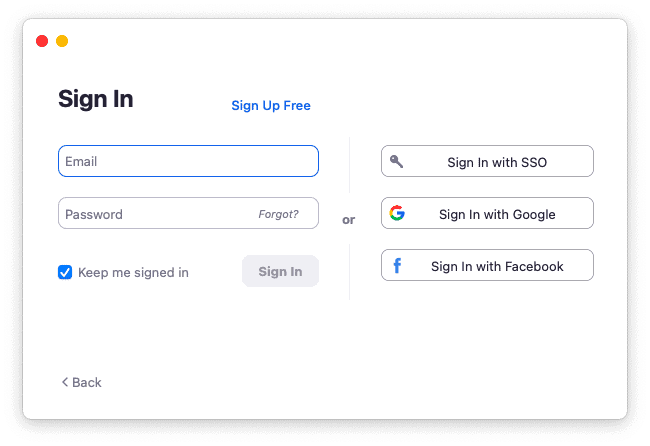
Although you can login to your account using zoom website too, but it is best to download and use the zoom app .
Once you have download the app, you will be prompted to login to your account. If you don’t have an existing account, you can either sign up or even login using your social account such as Google or Facebook. It’s actually quite simple.
If you feel that you don’t want to sign up or even use the social accounts for your meeting, you can choose to use “Sign In with SSO” option. SSO stands for single sign on and this allows you to sign in even when you don’t have an account with Zoom just once.
Zoom Home Screen
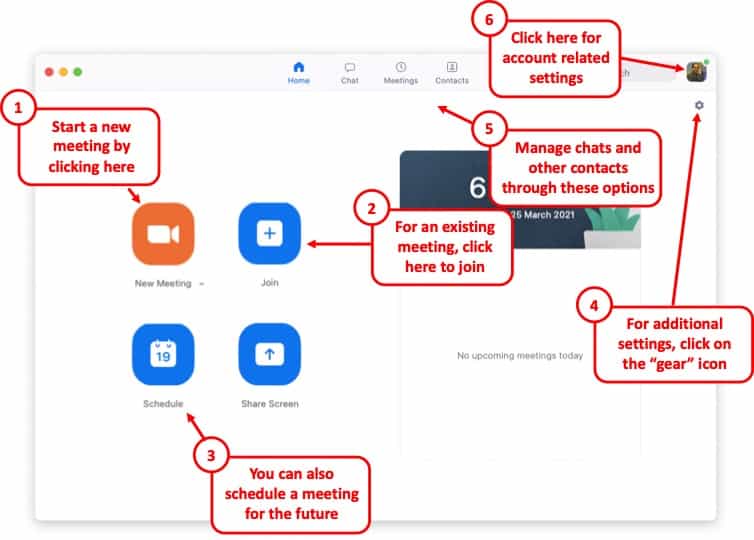
Once you’ve logged in, you will be taken to the home screen on Zoom.
There are a bunch of different things that you ca do with the home screen on Zoom. If you have been invited for a meeting, you will need to click on “ Join “. However, you will also need the meeting ID and the password for the meeting. If you don’t have the details, you will perhaps need to contact the person hosting the meeting.
You can also host the meeting yourself by using the “ New Meeting ” button. You can set a new meeting and invite others to join using this option.
Likewise, you can also schedule a meeting in the future using the “ Schedule ” option.
Furthermore, for changing the account related information, just click on your profile picture in the top-right corner of your window.
Lastly, there are several other detailed settings that you can tweak for your Zoom application. Almost all the other settings can be found in the “ Settings ” section by clicking on the “ Gear Icon “.
Zoom Virtual Meeting Window Interface
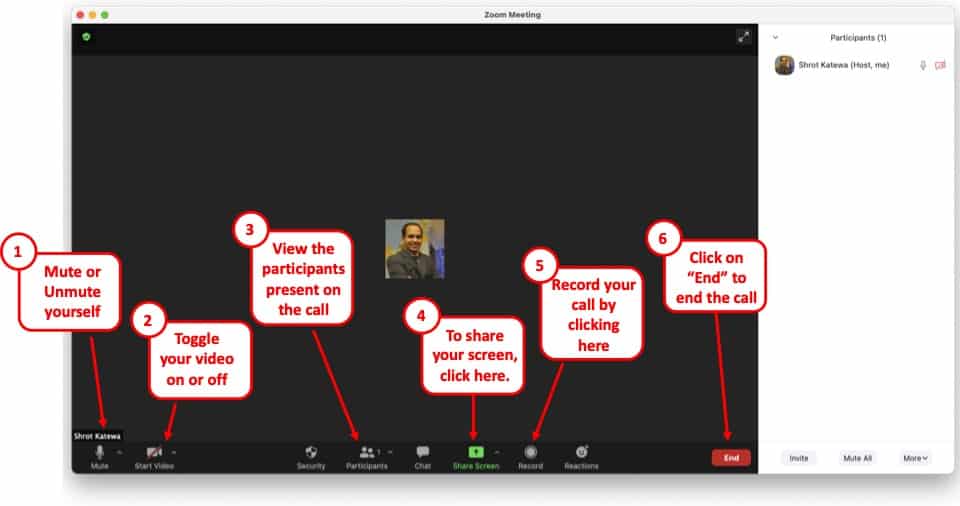
Once you are a participant in a virtual meeting, either by joining an existing meeting or by starting a new meeting, you will be greeted with an image similar to the one mentioned above.
On this screen, you will be presented with several different options. Some of the key functions that you will need to be aware of are as follows –
- Mute – Turning on the Mute or Unmute
- Video – Toggling between your Video
- Participants – Checking the names of the Participants
- Share Screen – to deliver a presentation (more on this later)
- Record – To record a meeting session
- End – Knowing how to end a meeting and exiting a call.
All the above functions will be visible on a small bar at the bottom of the window. If you are not able to see this option bar at the bottom, just hover over at the bottom part of your screen and all the options will appear .
Although there are other features that are also available for a zoom user or a participant, however, the aforementioned features should be good enough to deliver a presentation. These 6 features are at the very least something that you should be aware of.
How to Give a Presentation on Zoom (Step-by-Step)
Zoom has become a common tool for giving virtual presentations today. It is a widely used tool at conferences, meetings, and other events! If you are giving a presentation on Zoom for the first time, then perhaps you should be aware of a few things –
Here is a quick step-by-step guide on how you can give a presentation on Zoom:
Step 1: Install Zoom
Download and install the Zoom application to your desktop. To download the application, visit https://zoom.us/download and download the Zoom Client to your computer.
Step 2: Login to your Zoom Account
After installing the application, open it and log into your Zoom account. If you don’t have one, you can sign up for free using your email account.
Zoom also has options to sign in using SSO (Single Sign-On) or with your Facebook or Google account.
Step 3: Test Audio and Video Settings
Before you start or join a meeting, you will need to configure and test your audio and video settings.
To do that click on the gear icon on the Zoom application’s home screen. This will open the settings menu.
Now click on the “Audio” tab and select the microphone you are going to use. Try our different audio settings. After the microphone, select the speaker for audio output. If you can’t hear anything, try out another speaker source.
After configuring audio, click on the “Video” tab. From there, select the camera that is connected to your desktop. Tweak different video settings and find out what works best for you.
Step 4: Join or Schedule a Meeting
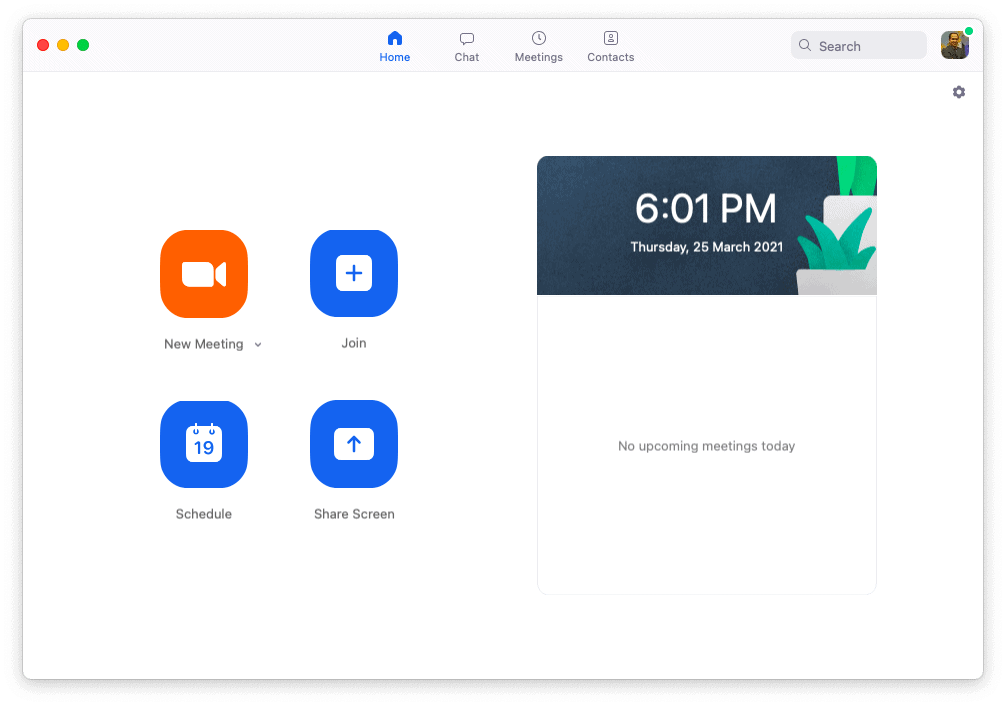
Now start a meeting by clicking on “New meeting”. You can also schedule a meeting on Zoom. To do that, click on “Schedule” and set up when you want to start the meeting. After completing the set-up, Zoom will give you a URL. Share it with the team members to join the meeting.
Or you can join a meeting by clicking “Join” on the Zoom client’s home screen. You can use a meeting ID or URL to join a meeting in Zoom.
Step 5: Open the Presentation
Once you have everything setup, you then need to prepare to show your presentation with your audience. To do that, open the presentation slides on your computer.
Step 6: Share Your Presentation
The last step in giving your presentation is to make sure that you share your presentation with your audience. To do that, click on “Share Screen” from the Zoom clients meeting window , select the screen where your presentation slides are open, and click “Share”. Now start presenting your slides to the audience.
Step 7: Stop Sharing to end the Presentation
One thing to know is how to end the presentation. To stop screen sharing, simply click on “Stop Share” located at the top of the screen . This option will only appear when you start sharing your screen.
How to Share a PowerPoint with Presenter View on Zoom?
To share your PowerPoint presentation slides with presenter view on Zoom, follow the steps given below:
Step 1: Open the Zoom App and Login
The first step really is to open the zoom app and login to your account.
Step 2: Join or Setup a Virtual Meeting on Zoom
Next, join the meeting. Remember, you need the meeting ID and password to join a meeting. Make sure you have requested for the details beforehand.
Step 3: Open Your PowerPoint Presentation
First step is really to open your presentation file that you want to present on the PowerPoint application.
Step 4: Put the Presentation in Presenter View
Now select the “Slide Show” tab from the top of the screen and click on either “From Beginning” or “From Current Slide” depending on your preference. This will open the slides in the “Presenter” view.
Step 5: Switch to the Zoom Application
Now, go to the Zoom application, start or join a meeting. While you are in the “Presenter” view on PowerPoint, press “ Alt+Tab ” to switch between applications in Microsoft Windows-powered computers. For iMac, use “Command+Tab” to move through open apps.
Step 6: Share Screen on Zoom’s Meeting Window
Once you are in Zoom’s meeting window, click on “Share Screen”, select the window where your PowerPoint slides are open in the presenter’s view, and click “Share”.
And that’s all you have to do in order to share PowerPoint with the presenter’s view in your Zoom meetings.
How to Share PowerPoint on Zoom Without Showing Notes?
There are two methods that you can use to share PowerPoint slides on Zoom without sharing your presenter notes. For the first method, you will need to have two monitors connected to your computer.
As for the second one, you can still share your PowerPoint slides on Zoom without sharing your notes (and you won’t need two monitors either). I’ve briefly explained both methods below.
Method 1 – Dual Monitor Method
In this method, you will be presenting your PowerPoint file on one monitor while looking at your presenter’s notes on the other one. Here’s how you can do that:
Step 1: First of all, open your slides on PowerPoint.
Step 2: Now join or start a Zoom meeting.
Step 3: Now click on “Share Screen” and select “Screen 1”. Then click “Share”. Here, “Screen 1” is your primary monitor.
Note: If you are not sure which one is your primary monitor, select where the PowerPoint file opened in.
Step 4: Now go to the PowerPoint application, click on the “Slide Show” tab, and from there click on “Monitor” and select “Primary Monitor”.
Step 5: Open the presentation file in the presenter’s view by clicking on the “Slide Show” tab and selecting “From Beginning” or “From Current Slide”.
If you have done everything correctly, participants will only be able to see the presentation slides while you have your presenter’s notes open on the second monitor.
In case you shared the wrong monitor on Zoom, click on “Screen Share” on Zoom’s meeting window, select “Screen 2” and click on share. This should fix your problem.
When you are sharing a screen on Zoom, you will notice a green border around that screen. This indicates which monitor you are currently sharing.
Method 2 – Sharing Portion of Your Screen
Follow the steps below if you have only a single monitor connected to your computer.
Step 1: Join or start a meeting on Zoom.
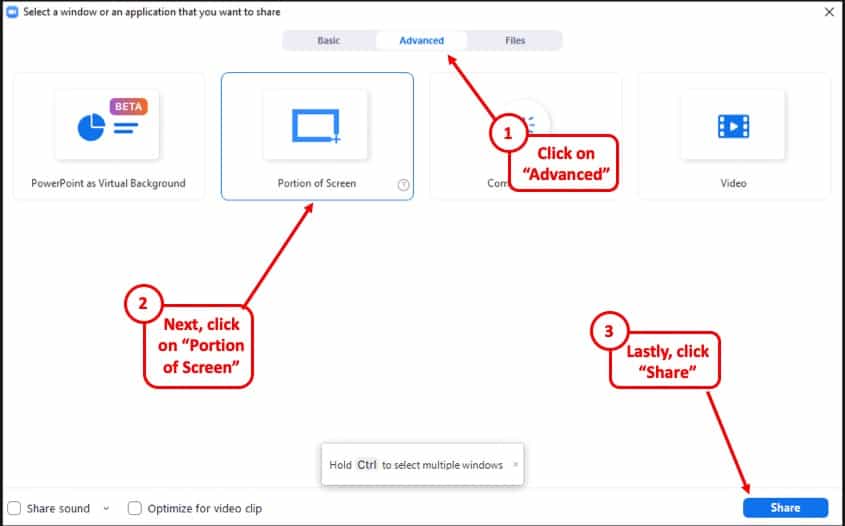
Step 2: Click on “Share Screen” and from the pop-up window select “Advanced”. From there select “Portion of Screen” and click on “Share”. This will give you a green border on your screen that you can adjust. Only the things that are inside this border will be shared on Zoom.
Step 3: Now open the presentation file in PowerPoint, and go to the presenter’s view by selecting “Slide Show> From Current Slide or From Beginning”.
Step 4: Adjust the size of the green border so that it only shows the presentation slides in the presenter’s view.
And that’s all you have to do. By doing so, your audience will only see the slides that you are presenting, but not your notes.
How to Show Yourself During a Zoom Presentation?
Ensuring that you are visible from time to time during a presentation can make it slightly more engaging and much more interactive. Here is how you can do that-
Step 1: First, start or join a Zoom meeting.
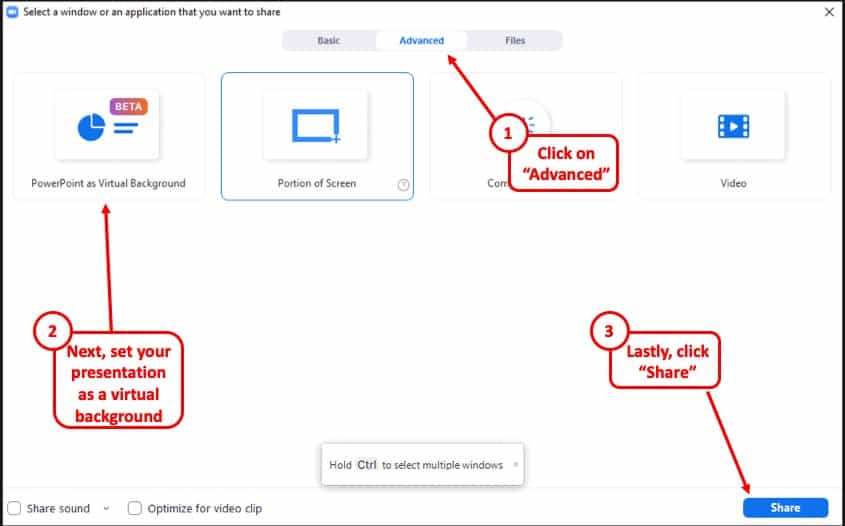
Step 2: Click on “ Share Screen ” and select the “ Advanced ” option. From there, select “ PowerPoint as Virtual Background ” and select the file you want for your presentation. Then click on “ Share ”.
Step 3: Make sure your video is switched on so that you are also visible to your audience. You can do that by clicking on “ Start Video ” on the Zoom Virtual Meeting Interface.
It will take some time for your slides to appear on the Zoom client. When it is done, participants will be able to see your face in front of the slides in Zoom. Make sure that your camera is connected to your computer and configured correctly.
This feature works best if you have a green screen behind you . If you have one, go to Zoom’s settings menu, select the “Background and Filter” tab and check “I have a green screen”. If you want to stop showing yourself during a zoom presentation, click on “Stop Video” on the meeting window and that will do the job.
Furthermore, you may sometimes want to show just yourself to the audience and not show the presentation at all. For that, all you need to do is simply click on “Start Video” in the Zoom Virtual Meeting Interface.
How to Record a Presentation on Zoom?
If you want to record your presentation on Zoom, you can do it easily. After joining or starting a meeting on Zoom, click on the “Record” icon located at the bottom of the meeting window. Once the recording starts, you can pause the recording or stop it whenever you like.
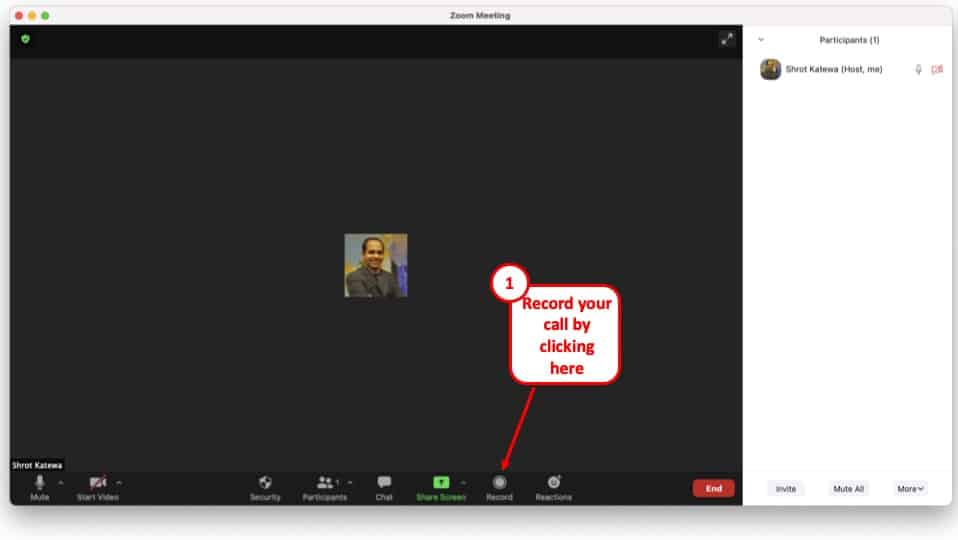
After the end of the meeting, the recorded video will be automatically converted into “.mp4” format and stored on your computer.
Tips for Giving an Awesome Presentation on Zoom
Giving a presentation in front of an audience is always a challenging task. Especially if it is online, many things can go wrong during your presentation. This is why I’m sharing some tips that can help you deliver an awesome presentation on Zoom. These are as follows –
1. Make a Professional Looking Presentation
There are several ways to make your presentation look really professional and high quality. One obvious method is to outsource your presentation to a specialised design agency! But, that can become really expensive depending on your budget.
Another (non-obvious) option is to use a PowerPoint Presentation Template! There are several high-quality and professional templates that you can get quite easily! In fact, using these Presentation Designs is quite inexpensive! You can download as many presentation templates as you want for as little as $16.5/month!
My favorite one is Agio PowerPoint Presentation template. It is perfectly suited to give a professional look to your presentation and yet it is quite quick and easy to use. Check out some of the images below –
Agio PowerPoint Presentation Template
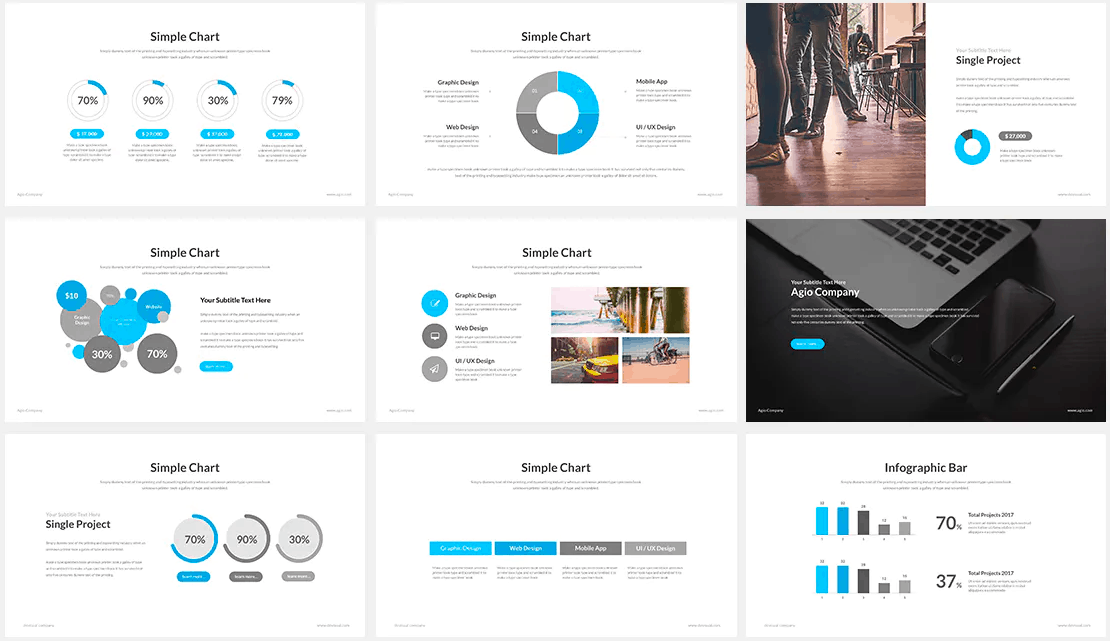
Furthermore, make the presentation as simple and straightforward as possible. Do not confuse your audience with a network of colorful texts, graphs, or other contents.
Only use data and graphs that are relevant to your presentation. Also, the clever use of transition animations can make the slide appear much more engaging.
2. Check Your Equipment Beforehand
Whenever you are giving your presentation online, many things can go wrong. For example, your camera or mic may not function properly. Such interruptions will only make you a laughing stock in front of the participants.
Check your mic, camera, and speakers to find out whether they are working properly or not. Also, check your internet connection and your laptop’s battery level. If everything is ok, then you are good to go on with your presentation.
More Related Topics
- Change the Style of Your Bullet Points and Stand-out from the Crowd!
- 7 EASY Tips to Always Make your Presentations Attractive! (Even if You are a Beginner)
- How to Reduce the Size of Your PowerPoint File? The Perfect Method!
- Auto Create Your PowerPoint Slides using Design Ideas Feature!
- Main Features of PowerPoint! [I bet You DIDN’T Know These]
Credit to Cookie_Studio for the featured image of this article
Free Online Presentation Software
Free zooming presentation maker - focus on your great idea, example more examples.
It is the novel and interesting way to realize your great idea in presentation. Differently from PowerPoint, it is endowed with the power to zoom to bring attention to choose items and the power to arrange the organization organically. So the presentation can be on show in your casual order. It is better to convey your great idea.
Video Tutorials Knowledge Base
Create your own template
It is said that an outline of our points in PowerPoint makes no effect for understanding. However, Focusky free zooming presentation maker enables you to create your unique templates to explore the relationship between ideas. Like a painter, you can design the development to select your favorite shapes and images to form your style.
Zoom to attract attention
When you want to stress your key point, you can use the zooming effect to appeal the audience. The power of Focusky lies in the flexible turning page and zooming effect. Your great idea will be blended in the whole process. For example, if you want to explain the relationships between seven continents, you can first group up the seven continents. As you want to know more details, you can zoom in the continents one by one. With the zooming effect, the process seems to be on an adventure in exploring the continent.
Preview before publish
When everything is done, it is sure that you can have a preview of your great idea. At the same time, you can make sure whether the presentation reaches your goal. If not, you can edit right now. It is possible for you to change an image or insert a link. Just remember, the process is visual and you can edit before publish.
Zooming and Panning Transition
Show all slide on free-scaling canvas and go through the path with zooming and panning transition effect.
Various Templates and Themes
A lot of well-designed templates and themes availible, which make the work of building presetation easy.
Multi-language Supported
The Focusky supports multiple languages input, such as English, Chinese, French, German, Arabic, Korean, etc.
Publish Online
Easily export HTML type of presentation and publish it online to spread your idea everywhere.
Rich Media supported
Enrich your presentation with images, Flash, local video, audio, YouTube video, Vimeo video and smart art.
Social Share
Reach your audience on Facebook, Twitter and other social networks.

A simple guide to slideshows
Learn what slideshows are, how they’re used, common features, and how to choose a slideshow maker. Get started creating your own slideshows today with Microsoft PowerPoint.
What is a slideshow?
What are slideshows used for.

Meetings and presentations
Slideshows are most frequently used to create professional presentations for business meetings, conferences, and educational purposes. A slideshow program allows people to organize content, include visuals, and enhance the overall impact of their message.

Visual storytelling
Because slideshows sequentially display engaging visuals, text, and other multimedia, they’re a strong way to tell a cohesive and compelling narrative from start to finish.

Content creation
Slideshows give content creators a versatile and efficient way to organize information, increase visual appeal, and communicate effectively across different contexts.

Photo and video sharing
Slideshow makers are popular for creating photo and video presentations, especially for events like weddings, birthdays, and vacations. People can add transitions, music, and captions to fully bring the photo-sharing experience to life.

Training and tutorials
Slideshows help break down complex information into digestible chunks with the support of visuals and text, making them ideal for instructional materials, tutorials, and training modules.

Collaborative projects
In collaborative settings, teams use slideshow makers to create joint presentations or reports. The best slideshow makers enable multiple contributors to add their content simultaneously, which helps ensure a cohesive and unified presentation.
What are the features of a slideshow creator?
Slideshow creators vary in what they offer but ideally include:
A library of templates, themes, and images.
If you’re not a designer, this feature is huge. Simply browse the options available in your slideshow maker library to create a polished, professionally designed presentation in a flash. Be sure to confirm that access to the library is free and the images are approved for unrestricted usage.
Audio and video compatibility.
Keeping your audience engaged is key to any successful slideshow presentation. To mix things up, being able to add a multimedia element—like a song or a video clip—will help people stay focused and interested.
Presentation tools.
Handy presenter tools go a long way toward making your slideshow experience seamless. For example, straightforward slide navigation, slideshow keyboard shortcuts, pen and highlighter markup, and adjustable resolution settings.
AI assistance.
With AI revolutionizing content creation, using a slideshow maker that has AI capabilities will enhance efficiency and innovation. Depending on the slideshow app you have, creating an entire slideshow could be as easy as a quick prompt, like “Make a presentation about the benefits of sustainable fashion that has 15 slides.”
Animations.
Like audio and video, animations give your audience a bit of sensory surprise that can capture their attention.
Slide transitions.
Add some pizzazz to how you change slides with visual effects like fading, wiping, and zooming.
Screen recording.
Being able to record your screen in a slideshow maker is helpful when giving an instructional talk, software demonstration, and other types of presentations that require visual aids.
A place to put speaker notes.
Having somewhere to jot a few notes down will help remind you of everything you want to cover as you present.
Different viewing options.
Looking at different views—for example, a presenter view, an audience view, and a high-level view of slide order—is useful when organizing your slideshow’s structure and understanding and preparing for what you’ll see versus what your audience will see.
How do I choose the right slideshow maker?
When choosing a slideshow maker, keep the following questions in mind to make sure you get the most for your money:
Is it scalable with your business?
As your organization grows and changes, it’s important to have flexible technology that adapts to new needs. Having certain features—such as cloud-based collaboration, compatibility with other work apps, and a mobile app—will help ensure that no matter how your business changes, the slideshow maker is up to the task. This also applies to pricing plans. Consider choosing a slideshow app that has a subscription plan (so the software is always up to date), volume-based pricing, or enterprise-level pricing.
Does it have a variety of visual elements?
It’s pretty much a given that a slideshow maker will allow you to add images, but think outside the JPEG box—what other visual elements are available to you? Features like preset themes, free templates, SmartArt, a built-in clip art library, shape tools, background styles, 3D models, and charts and graphs provide diverse ways to switch up how a slideshow looks without relying solely on adding your own images.
Is it easy to use?
You could have the most feature-rich slideshow maker on the market, but if it isn’t easy to use, you probably won’t use it. Or you will, but you’ll be frustrated, waste valuable time, and have difficulty convincing people you work with to use it. As you research slideshow makers, look for videos that show the apps’ interfaces in action to help you decide if they’re intuitive and will have a shorter learning curve.
Does it have collaboration and sharing options?
Because making a slideshow is often a collaborative effort, it’s worthwhile to find a slideshow creator that was designed with this in mind. Pick one that offers editing controls and commenting, as well as the ability to work on a slideshow at the same time as someone else. Having a cloud-based slideshow maker will be key here. You’ll not only save yourself time but also keep things simple by not having multiple versions of the same slideshow.
Explore more about slideshows and slideshow makers
Copilot in powerpoint.
Transform how you make slideshows with the versatile AI in Copilot for PowerPoint.
Improve your presenting skills
Practice presenting with an AI speaker coach to get feedback on body language, repetition, and pronunciation.
Six slideshow tips and tricks
Read up on tips about how to finesse your slideshows to give your most confident presentations.
Get free PowerPoint templates
Show your style with PowerPoint templates in more than 40 categories.
How to make a branded slideshow
Create a cohesive visual identity for your brand that goes beyond adding a logo to every slide.
Try a photo album template
Relive your favorite memories with photo album templates designed for all your unforgettable moments.
The benefits of visual aids in slideshows
Discover why using visual aids helps communicate ideas and messaging more effectively.
Slideshows that reach all learners
Explore the different ways that people learn and how to include all learning styles in your presentations.
Frequently asked questions
How do i make a good slideshow.
Making a good slideshow in PowerPoint is easy:
Plan what you’d like to include in your slideshow.
Launch your slideshow creator.
Choose the theme you’d like.
Import media.
Add text, music, and transitions.
Record, save, and share your slideshow.
Learn more about how to make a slideshow .
How do I add music to a slideshow?
To add music to a slideshow, first make sure that you’re using a slideshow maker with music compatibility. In PowerPoint, follow these steps:
Open your PowerPoint presentation and select the slide where you want to add music.
Click on the Insert tab in the ribbon menu.
Click on the Audio button and select Audio on My PC.
Browse to the folder on your computer where the audio file is located and select it.
Click on the Insert button.
How do I record a slideshow?
The steps for recording a slideshow in PowerPoint will vary depending on the version that you own. Get help with slideshow recording based on your version.
What types of files can I add to a slideshow?
File compatibility in PowerPoint includes the use of JPEGs, PNGs, TIFFs, GIFs, PDFs, MP3s, WAVs, MIDIs, MPEG-4 Videos, and Windows Media Videos.
How do I share my slideshow?
To share your PowerPoint slideshow, follow these steps:
Open your presentation and click Share at the top right of your screen.
If your presentation isn't already stored on OneDrive, select where to save your presentation to the cloud.
Choose a permission level, like Anyone with a link , or maybe just people in your company. You can also control if people can edit or just view the doc.
Select Apply.
Enter names and a message.
Select Send.
Follow Microsoft
IMAGES
VIDEO
COMMENTS
Give more engaging, meaningful, virtual presentations in Zoom. Prezi Video for Microsoft Teams. Make your Microsoft Teams meetings more visual and engaging. ... Prezi has been a trusted presentation partner for over 15 years. 180+ countries. 140,000,000+ 140M+ people who ️ Prezi. 25%. more effective than slides* 40%. more memorable*
Head on to the recording studio. Access the "Present and record" option on the editor's top-right side or click on the three-dot menu to select it among recommended actions. Select "Go to recording studio" and set up your camera and microphone. Start recording with your notes in Presenter's View and have the options to pause and ...
3. From here you can add zoom area or zoom out to overview, topic, or subtopic/page. If you select an object on the canvas, you can also add a zoom to animation to it. 4. The animations you add will be added to the presentation path in the left sidebar where you can move, edit or delete them. Add zoom area. Click Add zoom area and a rectangle ...
Presenting on Zoom doesn't have to mean sharing your screen. With Prezi, you can now keep the face-to-face connection with your audiences for more engaging Zoom presentations. Try for FREE. Let's talk! 1-844-773-9449. 8:30 am-5 pm PST.
You need high-quality business presentation software to take your slides to the next level. Some of the best presentation software include Visme, Haiku Deck, Prezi, Microsoft Powerpoint, Canva and Google Slides. In this comparison guide, we'll analyze each of these tools and many more to understand what the difference is between them so you ...
Prezi's online presentation tools help you connect with your audience and create conversational presentations that come with you on-screen to any video call. With professionally-designed templates, branding solutions, immersive views, and more, it's never been easier to create and present online. Try for FREE. Let's talk!
The editor is a bit more stripped down than most presentation apps but intuitive nonetheless—it's almost a cross between your standard deck editor and a Notion-style doc. To generate an AI deck, click Generate with AI in the top right, and either write your own prompt or choose from the example prompts that cover a handful of common use cases ...
Prezi: The Zooming Presentation Editor An Assessment of the Online Presentation Tool Jack Bishop, Ph.D. Instructional Technologist UCLA Office of Instructional Development. Whether using presentation software or online tools, the basic concept of a presentation is to share pertinent and useful information, usually in one direction - from the presenter to the audience.
How to share your Piktochart slide deck on Zoom. Step 1: On the Piktochart editor, click Share to get the link to your presentation. By default, your presentation is not publicly visible. Step 2: Copy and paste the link into your browser bar.
Prezi: The Zooming Presentation Editor An Assessment of the Online Presentation Tool Jack Bishop, Ph.D. Instructional Technologist UCLA Office of Instructional Development. Whether using presentation software or online tools, the basic concept of a presentation is to share pertinent and useful information, usually in one direction - from the presenter to the audience.
ALT + SHIFT + F5. Once you are in one of the presentation views of your slides, you can zoom in or zoom out by either using the CTRL + mouse spin wheel shortcut (if you have a mouse), or you can use the keyboard shortcuts listed below. Zoom in (Slide Show Mode) CTRL + =. Zoom out (Slide Show Mode) CTRL + -.
Step 1: Publish your presentation. When you're finished designing your presentation in Visme, navigate over to the top right corner of your screen, and click on "Share". Next, click on "Publish for Web" on your left, type in a title and description for your presentation, and click on "Publish and get my link".
All you need to do is click the system tray icon and select Zoom OR use keyboard shortcut CTRL+1 to toggle zoom. You can also set your own keyboard shortcut for toggle. The escape key will exit as well. You can also Specify the initial level of magnification when zooming in on screen. They also have a zoom feature called LiveZoom, which lets ...
A "zooming" presentation editor sozi.baierouge.fr. Topics. svg presentation sozi Resources. Readme License. MPL-2.0 license Activity. Custom properties. Stars. 1.5k stars Watchers. 72 watching Forks. 171 forks Report repository Releases 22. Sozi release 23.07 Latest Jul 25, 2023 + 21 releases Contributors 65
7. Embed entertaining video content. Video can make your Zoom presentation go from boring to fun. It's a key attention-grabbing element that can help keep your audience engaged and attentive throughout the meeting. Your attendees may even generate their own personal discussion after watching the clip.
In this article I am using the Zoom app in Windows 10. The six options are: Share your entire screen/desktop. Share the Slide Show window. Share the editing window with a clean look. Run the Slide Show in a window and share that window. Use Presenter View to show the audience your slides while you see Presenter View.
In fact, change the content format every two to four minutes to keep things dynamic and magnetic. 4. Heighten the humanity. If you're delivering a presentation from a stage, it's automatically ...
The best free html5 presentation maker that allows you to create awesome business presentation & animated video explainers.. ... Take good use of transition effect to present the video presentation smoothly. Slide, rotate, zoom and pan effects make the business presentation present like an animated movie. ... Animation Editor. Adding animation ...
Prezi: The Zooming Presentation Software by Drew Banks on Prezi. Blog. April 18, 2024. Use Prezi Video for Zoom for more engaging meetings. April 16, 2024. Understanding 30-60-90 sales plans and incorporating them into a presentation. April 13, 2024.
How to edit presentation online. Click Drop or upload your file. ... Zoom the slides, change z-order, etc. Download the resulting presentation in different formats as PDF, TIFF, etc. Other Aspose Apps you may want to try: Merger web app for merging presentations; Watermark web app for adding watermarks to presentations.
Here is how you can do that-. Step 1: First, start or join a Zoom meeting. Step 2: Click on " Share Screen " and select the " Advanced " option. From there, select " PowerPoint as Virtual Background " and select the file you want for your presentation. Then click on " Share ".
However, Focusky free zooming presentation maker enables you to create your unique templates to explore the relationship between ideas. Like a painter, you can design the development to select your favorite shapes and images to form your style. ... Just remember, the process is visual and you can edit before publish. Zooming and Panning ...
A video presentation is a presentation that can be shared and viewed as a video. Technically, for a presentation to be a video presentation, it must be an MP4 or MOV file type. A video presentation can be shared online on YouTube, Vimeo and other social media platforms. The best part of a video presentation with audio is that you can share it ...
Add some pizzazz to how you change slides with visual effects like fading, wiping, and zooming. Screen recording. Being able to record your screen in a slideshow maker is helpful when giving an instructional talk, software demonstration, and other types of presentations that require visual aids. A place to put speaker notes.
Prezi - The Zooming Presentation Editor. 90 7. Learn about Prezi. Download PDF. JA.