Critical PowerPoint Shortcuts – Claim Your FREE Training Module and Get Your Time Back!

How to make a Watermark in PowerPoint (Draft or Confidential)
- PowerPoint Tutorials
- Presentation Design
- January 22, 2024
In this post you’ll how to make a watermark in PowerPoint for all your slides as a PowerPoint background.
This is commonly used in PowerPoint to add a draft or confidential stamp to all your slides so that someone doesn’t accidentally send them along as final before they are ready.
What is a watermark in PowerPoint?
A watermark is often grey text (as you can see DRAFT in the picture below), or a washed-out image that appears on all your slides behind your content.
This allows you to mark all your slides at once for a variety of purposes, like adding DRAFT or CONFIDENTIAL to your presentation.

The trick to properly making a watermark like this is knowing where to add it in PowerPoint so that it automatically appears on all your slides at once.
The last thing you want to do is make the mistake of trying to manually add (or update) your watermark individually on all your slides, one at a time.
Table of Contents
[watch] how to create a watermark in powerpoint.
You are currently viewing a placeholder content from Youtube . To access the actual content, click the button below. Please note that doing so will share data with third-party providers.
To get access to all our best PowerPoint speed training courses and resources for one affordable monthly price, check out our PowerPoint Pro Membership here .
Two important questions about your watermark in PowerPoint
Before you make your first watermark in PowerPoint using any of the below techniques, you’ll first want to answer the following two questions.
The reason these questions are important is that they dictate where you add watermark, and what method you use to create it in PowerPoint. There are always a variety of different ways to accomplish the same thing in PowerPoint, so it’s best to know WHAT you want to create before you spend any time creating it.
1. Where do you want your watermark?
That is, do you want your watermark to appear on all the slides within your presentation, or just a few individual slides?
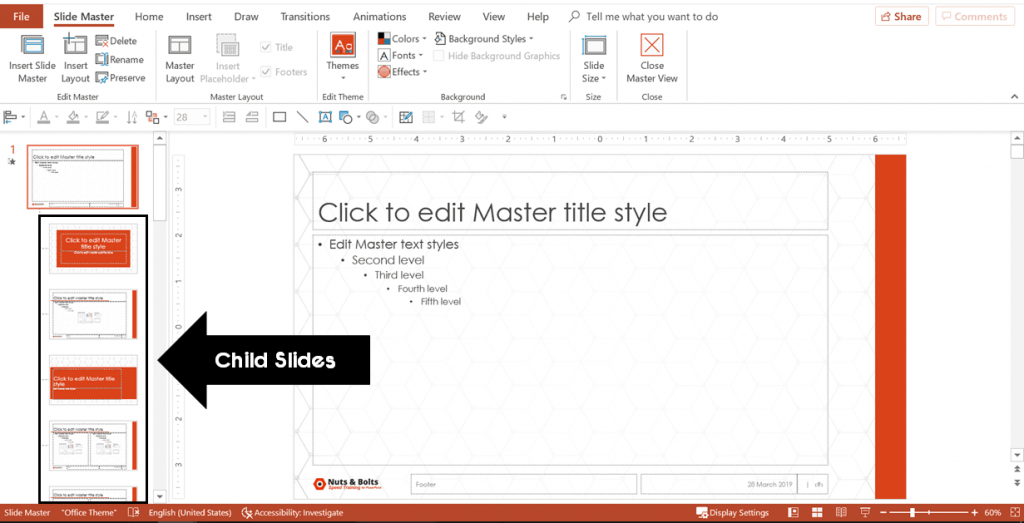
If you want your watermark to appear on all of your slides, then you will want to add it on the Parent slide as pictured below.

If instead you only want your watermark on a few individual slides, you’ll want to add it to just the child slide layouts in question where you want it to appear in your presentation.
2. Do you want an editable watermark?
That is, do you want to be able to edit the watermark in the future?
The answer to this question determines whether you add it to your slide, or whether you add it as a slide background as an image (explained below).
Where to place your watermark?
Regardless of what kind of watermark you want to create for your slides, you want to do this on your Slide Master.
That’s because when you properly add it to your slide master, it will then show up on ALL the slides within your presentation (with a few exceptions discussed below).
That not only means that you can add it once, and have it show up everywhere within your presentation, it also means that if you later want to change or edit your watermark, you can edit it in one place, and have those edits reflected throughout your entire presentation.

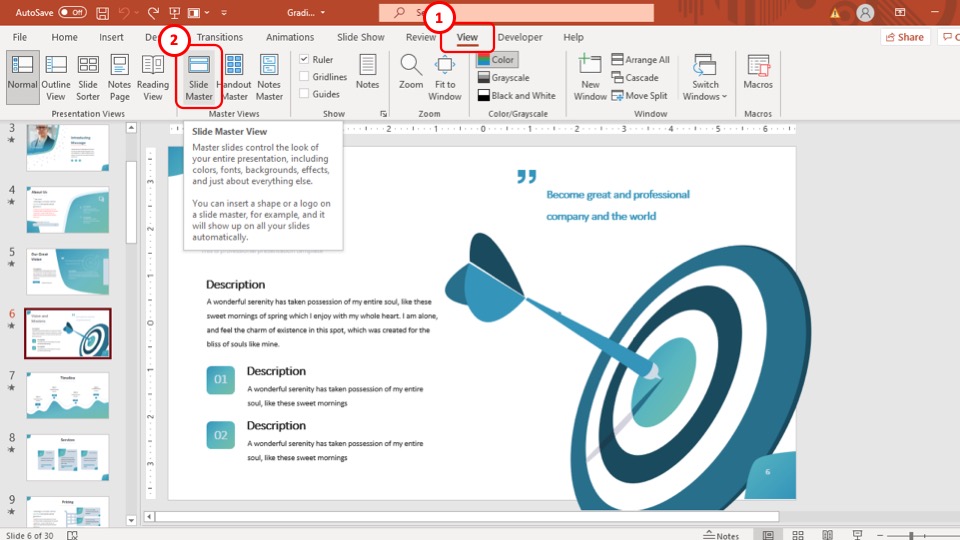
To open your slide master in PowerPoint, simply:
- Navigate to the View Tab
- Select Slide Master
You can also jump to your slide master by holding the Shift key and clicking the Normal Icon at the bottom of your PowerPoint workspace (a hidden PowerPoint shortcut).
How to create a text watermark

To create a text watermark on your Parent slide, follow these steps.
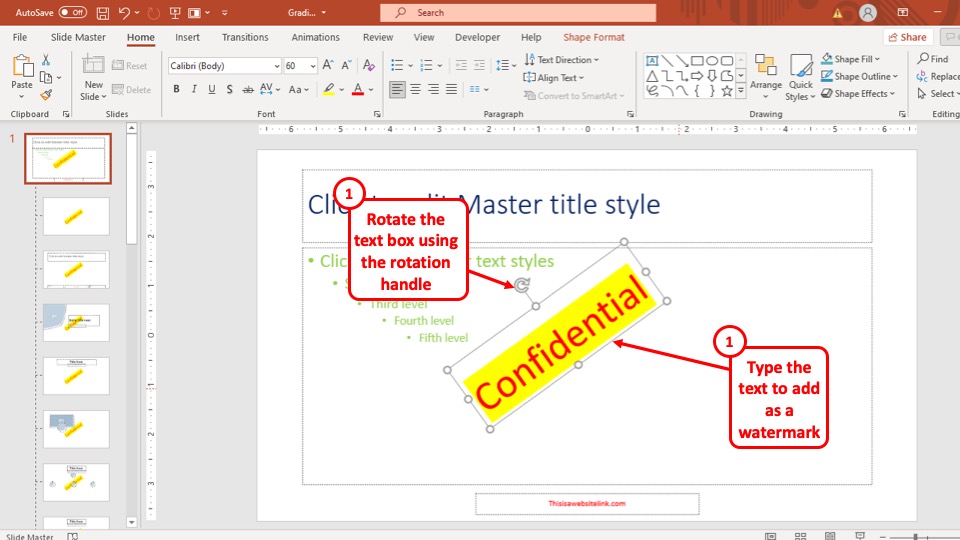
- Insert a Text Box (from the insert tab)
- Type the word DRAFT
- Change the font (size, style, color) as per your choice
- Drag your text to where you want it to be on your slide
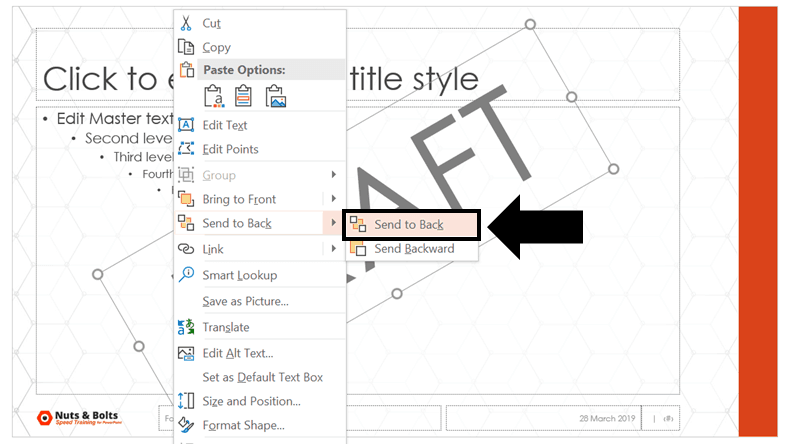
- Send the image to back (so it’s behind your content)
To send to back, simply right-click the text watermark you created and select Send to Back .
How to create a picture watermark

To add a picture watermark to your Parent slide (so it’s not editable).
- Insert an image or photo (like your company logo).
- Resize and orient your picture where you want it to be.
- Send it to the back (so that it shows up behind your content).
On top of that, you can also choose to washout or recolor your logo if you want.

To washout or recolor your photo, simply:
- Select your photo
- Navigate to the Drawing Tools Format tab
- Select the Color drop down
- Select Washout (or a grey color)
You can see the difference between the original and the washed out logo below.

There are a variety of other picture formatting options you can choose, but I think the washout effect works best for marking your slides like this.
How to make an uneditable watermark

If you don’t want someone to be able to edit your watermark, you’ll want to add it as a slide background image to your slide. To do that, simply:
- Ctrl+C to Copy the elements you want to add as the watermark to your slide background.
- Right-click off the edge of your slide and select F ormat Background
- Select Picture or texture fill
- Choose Clipboard
After you’ve added it as your slide background image, you can select and delete the original graphic you used (text or picture).
If you like, you can even duplicate lots of little draft watermarks and add them all to your slide as pictured below. Read our insider guides to learn more about the Copy shortcut and the Paste shortcut .

For help creating this kind of effect (plus some other pointers), see the video at the top of this page to see the step-by-step instructions and pointers.
Troubleshooting your watermarks

If you properly add your watermark but still find that it’s not showing up on all your slides, the likely issue is that some of your child slide layouts have the Hide Background graphics option checked.
To fix this, navigate to your PowerPoint Slide Master and for the layouts where it is not showing up, make sure you uncheck Hide Background Graphics .
NOTE: The Hide Background Graphics option will only show up for your Child Slide layouts, it will be greyed out on your Parent slide.
How to watermark photos

To watermark a photo in PowerPoint, follow these steps.
- Insert your the image or text that you want to use as a watermark on your photo.
- Select your image and holding Shift select your text or image (so they are both selected)
- Hit Ctrl + C to copy both images
- Hit Alt + Shift + V for Paste Special
- Select either the PNG or JPEG file format

Clicking okay, PowerPoint creates a single image out of your original photo and your watermark text or image, thereby watermarking your image.
To expand your knowledge and learn how to compress your images if they are too large, read our guide here .
So that’s how to make a watermark in PowerPoint, and the different things you need to take into consideration.
Regardless of what type of watermark you create, the key is to build it out on your slide master. That way you can update all of the slides within your presentation at once.
If you enjoyed this tutorial, you’ll also love our other PowerPoint training courses and videos that you can learn more about here .
🔒 Unlock the PowerPoint Shortcuts Trusted by Industry Leaders KKR, American Express, HSBC, and More!
Join over 114,880 professionals from diverse fields including consulting, investment banking, advertising, marketing, sales, and business development who have supercharged their PowerPoint game with our proven methods.
✅ Customize compelling presentations effortlessly.
✅ Master time-saving techniques for faster deck creation.
✅ Boost your career prospects with top-notch PowerPoint skills.
Get FREE access to the Critical PowerPoint Shortcuts module of our premium training course by entering your name and email below.
DISCLAIMER: PC Users Only!
We respect your privacy and will keep your info safe and confidential.
Related Articles
About the author.

Popular Tutorials
- How to Strikethrough Text (l̶i̶k̶e̶ ̶t̶h̶i̶s̶) in Word, Excel & PowerPoint
- How to Make Animated Fireworks in PowerPoint (Step-by-Step)
- Strikethrough Shortcut (l̶i̶k̶e̶ ̶t̶h̶i̶s̶) for Word, Excel & PowerPoint
- How to Create a Flash Card Memory Game in PowerPoint (Like Jeopardy)
- Keyboard Shortcuts Not Working: Solved
PowerPoint Tutorial Categories
- Strategies & Opinions
- Shortcuts & Hacks
- Pictures, Icons, Videos, Etc.
- New Features
- Miscellaneous
- Charts & Data Viz
We help busy professionals save hours and gain peace of mind, with corporate workshops, self-paced courses and tutorials for PowerPoint and Word.
Work With Us
- Corporate Training
- Presentation & Template Design
- Courses & Downloads
- PowerPoint Articles
- Word Articles
- Productivity Resources
Find a Tutorial
- Free Training
- For Businesses
We help busy office workers save hours and gain peace of mind, with tips, training and tutorials for Microsoft PowerPoint and Word.
Master Critical PowerPoint Shortcuts – Secure Your FREE Training Module and Save Valuable Time!
⌛ Master time-saving expert techniques.
🔥 Create powerful presentations.
🚀 Propel your career to new heights.
We value your privacy – we keep your info safe.
Discover PowerPoint Hacks Loved by Industry Giants - KKR, AmEx, HSBC!
Over 114,880 professionals in finance, marketing and sales have revolutionized their PPT skills with our proven methods.
Gain FREE access to a full module of our premium PowerPoint training program – Get started today!
We hate spam too and promise to keep your information safe.
You are currently viewing a placeholder content from Facebook . To access the actual content, click the button below. Please note that doing so will share data with third-party providers.
How to Add or Remove Watermark in PowerPoint? [EASY Guide!]
By: Author Shrot Katewa
![How to Add or Remove Watermark in PowerPoint? [EASY Guide!]](https://artofpresentations.com/wp-content/uploads/2021/10/Featured-Image-How-to-Add-or-Remove-Watermark-in-PowerPoint.webp "how to watermark powerpoint presentation")
There are times when you want your PowerPoint presentation to show terms like “Confidential” or “Draft” on top of the slides. This can easily be achieved by adding a watermark in PowerPoint! Although PowerPoint doesn’t provide a watermark feature by default, there is a way to work around this problem.
To add a watermark in PowerPoint, click on “View”. Then, click on “Slide Master”. Select the “Master Slide”, and insert a text box using the “Insert” tab. Add the watermark text in the text box, and click on “Close Master View” to exit the master.
In this article, I will explain the process of adding a watermark in PowerPoint in a step-by-step manner with the help of visual references so you can easily follow along even as a beginner!
Plus, we shall also understand how you can remove a watermark from a PowerPoint file that you have received. That, and much more!
So, let’s get started!
A Quick Note Before We Begin – if you want to make jaw-dropping presentations, I would recommend using one of these Presentation Designs . The best part is – it is only $16.5 a month, but you get to download and use as many presentation designs as you like! I personally use it from time-to-time, and it makes my task of making beautiful presentations really quick and easy!
1. What is a Watermark in PowerPoint and Why Do You Need It?
A watermark in PowerPoint is a semi-transparent text visible on the slides. A watermark is used to indicate that a slide is still a draft, contains confidential information, or simply indicate that it should not be used beyond the intended purpose.
The watermarks can be an image or a text. The most common use for watermarks is to include a message on the background of slides to emphasize it.
You can use a watermark to state its current position, for example, you can add a watermark that says “Confidential” to every slide to emphasize the sensitivity of the message, or you can put a watermark that says “Draft” to indicate that the current status of the presentation is still in development.
You can also add a subtle company logo on each slide to indicate that the presentation was made specifically by the company or for the company.
2. How to Add a Watermark in PowerPoint?
As mentioned previously, there is no direct button that allows you to add a watermark in PowerPoint.
However, you can add a text or an image in the Master Slide of your PowerPoint presentation, and it will be added to all the slides in your presentation as a watermark.
Follow the simple steps given below, to add a watermark in the slides of your PowerPoint presentation.
Step-1: Go to “Slide Master”
The first step is to click on the “ View ” tab which is located in the ribbon of your PowerPoint presentation.
After you have accessed the “ View ” tab, click on the “ Slide Master ” option which is located in the “ Master Views ” section of the “ View ” tab.
Step-2: Click on “Insert”

Once you’ve clicked on the “ Slide Master ” viewing option, your PowerPoint view will change and you will now be able to edit the “ Master Slide ”.
Now, click on the “ Insert ” tab which is located in the ribbon of your PowerPoint presentation.
Step-3: Insert a “Text Box”
Once you’re in the “ Insert ” tab, select the first slide in the “ Slide Master ” view, which is the “ Master Slide ” of your PowerPoint presentation.
After that, click on the “ Text Box ” button located in the “ Text ” section of the “ Insert ” tab and add a text box in the “ Master Slide ”
Step-4: Add the text to create a watermark
In this step, all you have to do is to type the text in the text box that you want to keep on the background of your presentation as a watermark and format it to fit your preference.
After that simply close the “ Slide Master ” view and the watermark will be added to all the slides in your PowerPoint presentation.
3. How to Add a Watermark to a Single Slide in PowerPoint?
The process mentioned above will add a watermark to every slide in PowerPoint in one go. However, there are times when you want to add a watermark to just one slide in PowerPoint. Here’s how to do that –
To add a watermark to a single slide in PowerPoint, first, select the slide. Then, click on the “View” tab and open the “Slide Master”. Click on the individual slide layout of the selected slide, and add the watermark specifically to the slide. Click on “Close Master” to exit the Slide Master.
Here’s the process explained in a step-by-step manner with pictures for better understanding –
Step-1: Select the Slide and open the Slide Master

The first step is to select the specific slide on which you would like to add the watermark text.
Then, click on the “ View ” tab. From the ribbon, click on the “ Slide Master ” option. This will open the slide master view in PowerPoint.
Step-2: Add a Text Box
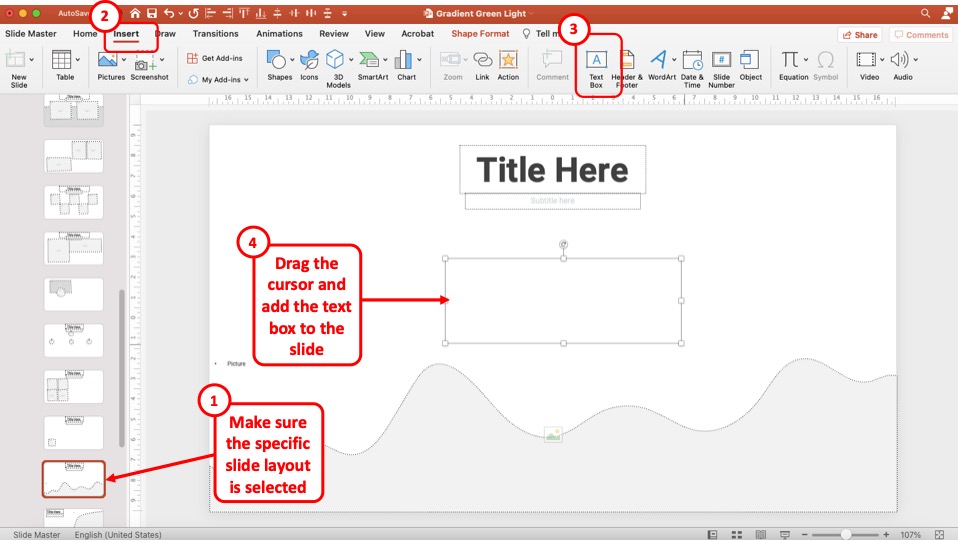
The slide master should open on the specific slide used for the slide that was selected in the normal view in step 1 above. Make sure that the specific slide layout is selected on the left part of the screen first (as shown in the image above).
Then, click on the “ Insert ” tab. Next, click on the “ Text Box ” option to add a text box to the slide. Finally, drag the cursor on the slide to add the text box.
Step-3: Add the Watermark Text
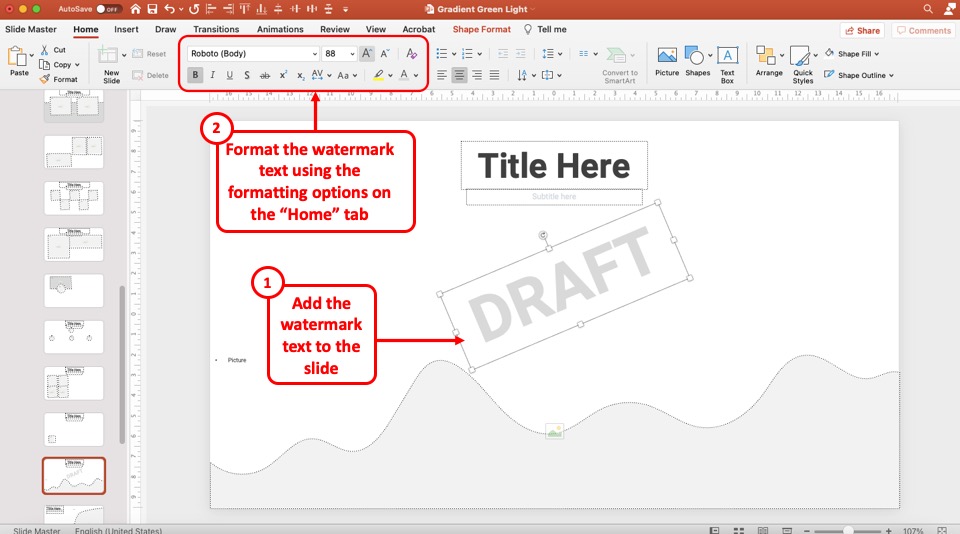
Once you’ve added the text box, simply add the watermark text that you would like to display.
Once you’ve added the text, feel free to format the text by clicking on the “Home” tab and using the text formatting options present on the ribbon.
If you are unsure how to do this, check out my other article on how to format text in PowerPoint that shows everything in a detailed manner.
Alternatively, you can also match the font type, font styles, font size and the font color to the one that I’ve used by checking the values in the image above!
Step-4: Exit the Slide Master View
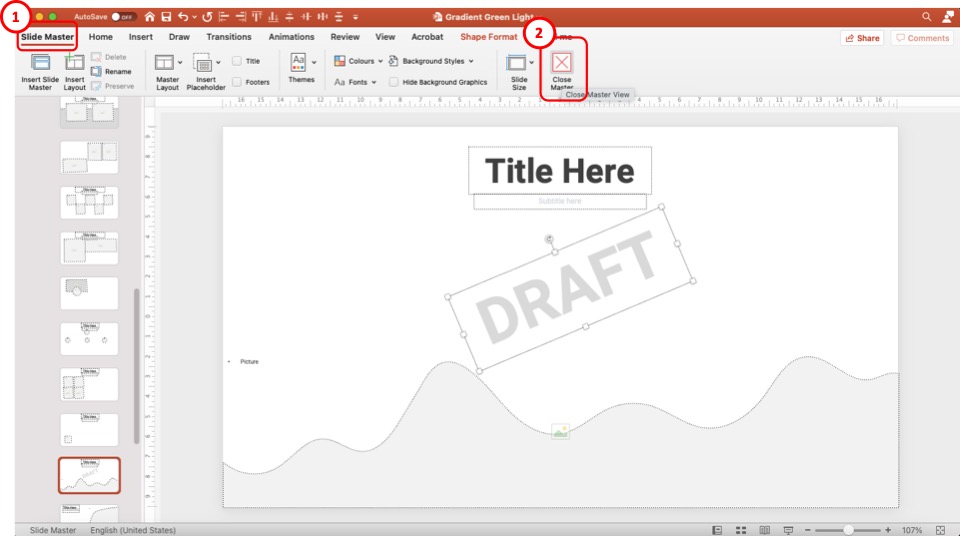
Once you’ve made the changes to the watermark text, it is time to go back to the normal view and exit the slide master.
To do that, first, you will have to click on the “ Slide Master ” tab (as shown in the image above). Then, from the ribbon, click on the “ Close Master ” option.

You should now return back to the normal view. You will also notice that the watermark has been added to the slide (as shown in the image above).
Furthermore, you will also see that the watermark is present only on this slide.
Caveat to this method
There is only one small caveat to this method. Since you have added the watermark to a specific slide layout, the watermark will be visible everytime you use that slide layout.
This means, if you create a new slide but use the same layout, the watermark will now be visible on that slide as well!
The only way to solve this problem is to go back to the slide master view, and create a copy of the said slide layout in use. From the copy of the slide layout, delete the watermark and rename the slide layout.
If you are unsure of how to do this, check out my other article on Slide Layouts in PowerPoint which will help you understand these nuances in further detail.
4. How to Use Picture as a Watermark in PowerPoint?
The process of adding a picture as a watermark in your PowerPoint presentation is very similar to adding text as a watermark.
Follow the simple steps described below –
Step-1: Open the Slide Master View in PowerPoint
As before, the first step is to open the slide master view in PowerPoint.
To do that, click on the “ View ” tab, and click on the “ Slide Master ” option from the ribbon.
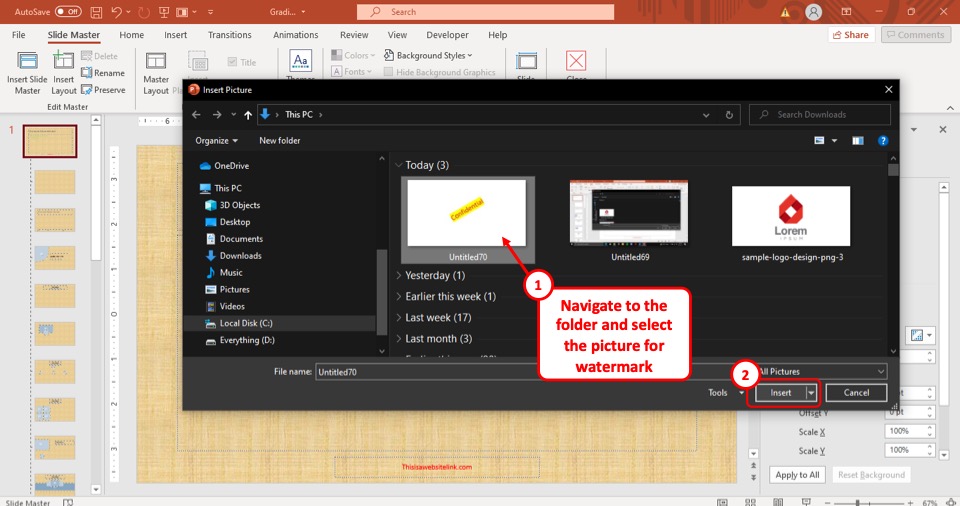
Step-2: Insert an Image by Clicking on the “Pictures” button
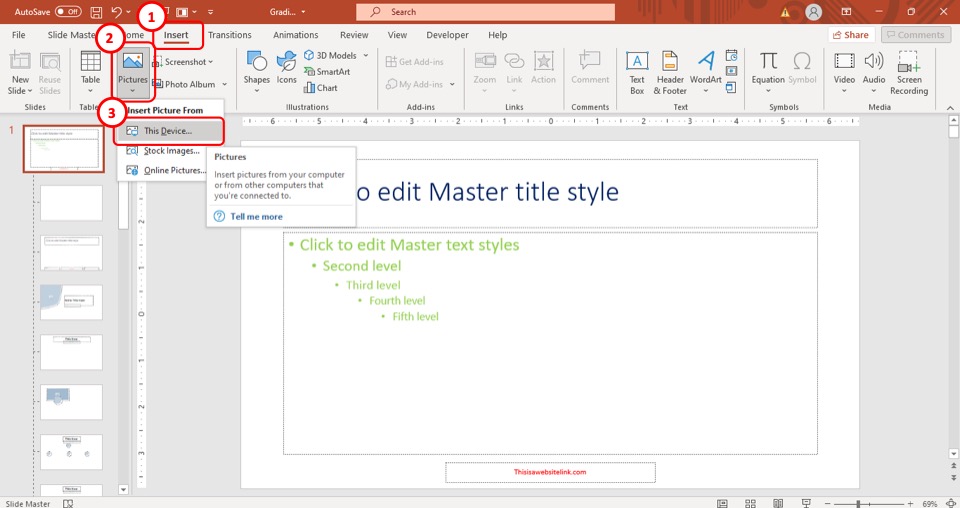
The next step to inserting a picture as a watermark is to select the “ Pictures ” button in the “ Insert ” tab. This will open a drop-down menu.
Step-3: Click on “This Device”
After you have opened the drop-down menu, simply click on the “ This Device ” option, which is the first option in the menu (as shown in the image in step 2).
This will open a pop-up window on your screen.
Step-4: Select your preferred image
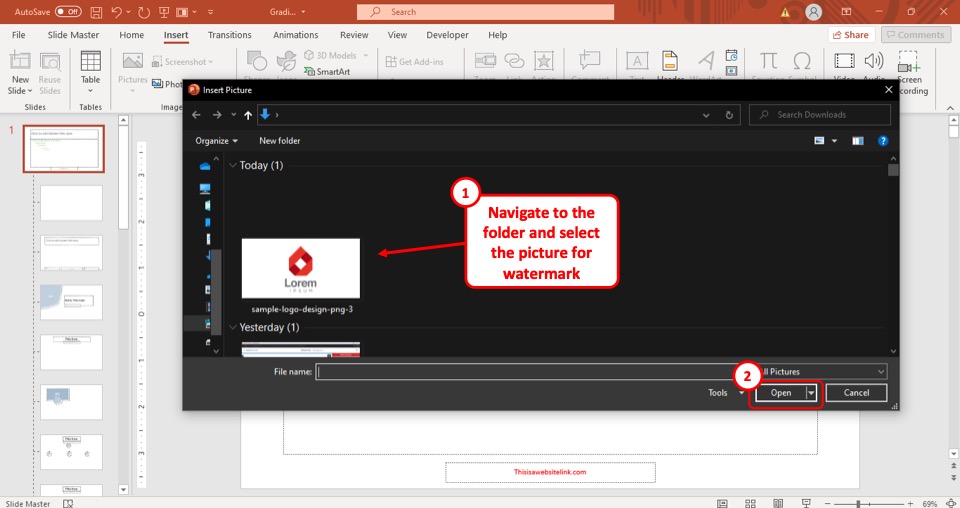
From the pop-up window, click on the image that you want to insert as a watermark and then click on the “ Open ” button.
This will immediately insert the image in your “ Master Slide ”
Step-5: Resize and position the image
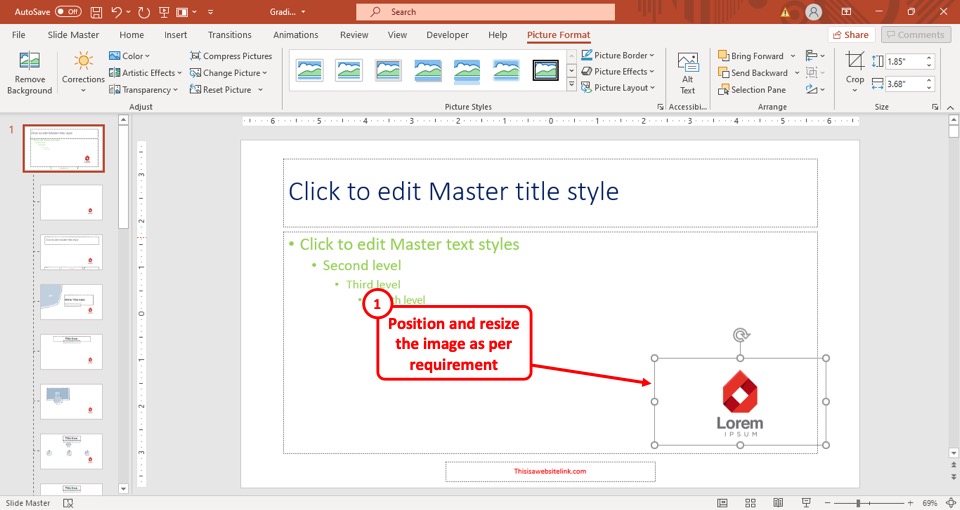
In the last step, all you have to do is to format the image and position it to your preference. After that, the image will be added to all the slides in your PowerPoint presentation as a watermark.
5. How to Edit a Watermark in PowerPoint?
To edit a watermark in your PowerPoint presentation, all you have to do is to go to the “ Master Slide ” by following the steps described earlier in this article.
Then, locate the slide layout in which the watermark is present. Once you’ve identified the watermark, make the desired changes in the text box containing the watermark.
Once you are done, the watermark on all the slides will change accordingly.
6. How to Remove a Watermark in PowerPoint?
Again, to remove a watermark from your PowerPoint presentation, all you have to do is to go to the “ Master Slide ” of your presentation as described earlier in this article.
Then, select the text box of the watermark, and click on the “ Delete ” key on your keyboard.
This will remove the watermark from your “ Master Slide ” and also all the other slides in your PowerPoint presentation.
If, however, the watermark is present only on a single slide then you will have to locate the slide layout containing the watermark and delete the watermark by clicking on it and pressing the “delete” button on the keyboard.
7. How to Add a Watermark That Can’t be Removed
Any watermark can be removed from PowerPoint unless you have implemented one of 7 ways to protect your presentation that I decribed in one of my earlier articles.
But, adding a watermark as a background image to the slide can make it really difficult for someone to remove it!
To add a watermark in your PowerPoint presentation that can’t be removed, you have to insert the watermark as an image in the background of your “ Master Slide ”.
Go to the “ Master Slide ” following the instructions described earlier in this article and follow the steps given below.
Step-1: Click on “Format Background”
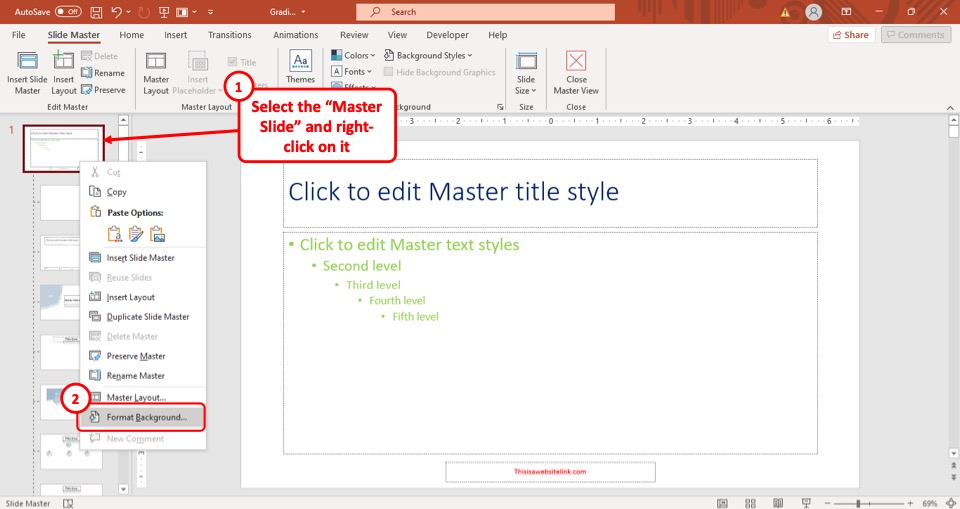
The first step of the process is to “ Right-click ” on the thumbnail of the “ Master Slide ” from the slide navigation pane of the “ Slide Master ” view.
This will open a drop-down menu. From the drop-down menu, click on the “ Format Background ” option. This will open the “ Format Background ” sidebar to the right of your screen.
Step-2: Click on “Picture or Texture Fill”
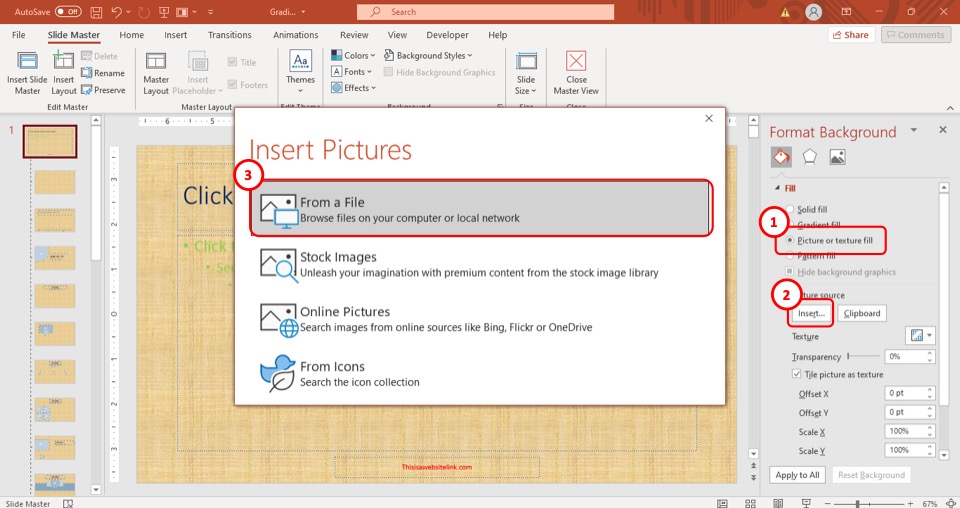
From the “ Format Background ” sidebar, click on the “ Picture or Texture Fill ” option which is the 3 rd option in the sidebar.
Step-3: Click on the “From a File” button
In the “ Picture or Texture Fill ” option, click on the “ Insert ” button. This will open a pop-up window on your screen. From the pop-up window, click on the “ From a file ” button (as shown in the image in step 2).
This will open yet another pop-up window.
Step-4: Insert the Background image
After you open the pop-up window by clicking on the “ From a file ” option, simply select the image that you want to add as a permanent watermark and then hit the “ Insert ” button located at the bottom right corner of the pop-up window.
After that, the image will be added to the background of your “ Master Slide ” and the watermark can not be edited.
8. How to Add a Logo to PowerPoint Footer?
You can also use the logo as an image to add to all your slides in PowerPoint. Sometimes, this can also act as an indication that the specific presentation is for a particular organization.
To add a logo in the footer of your PowerPoint presentation, you have to use the “ Header and Footer ” option which is located in the “ Text ” section of the “ Insert ” tab in your PowerPoint presentation.
I’ve covered this topic in great detail in another article. Make sure you check out how to edit footer in PowerPoint . In the said article, I’ve provided detailed steps on how to add a logo to the footer of a PowerPoint presentation. So, make sure you check it out!
9. How to Add Background Graphics in PowerPoint?
In PowerPoint, you can add pictures, textures, and more from the “ Format Background ” option.
To learn more about how to add background graphics in your PowerPoint presentation and the different ways you can use it to spice up your presentation, check out my dedicated article on how to format background graphics in PowerPoint !
Credit to drobotdean (on Freepik) for the featured image of this article (further edited).
How to Create and Add Watermark in PowerPoint Slides

A C.A. by profession and a tech enthusiast by passion, Gaurav loves tinkering with new tech and gadgets. He used to build WordPress websites but gave it all up to develop little iOS games instead. Finally, he dropped out of CA to pursue his love for tech. He has over 5 years of experience as a writer covering Android, iOS, and Windows platforms and writes how-to guides, comparisons, listicles, and explainers for B2B and B2C apps and services. He currently divides his time between Guiding Tech (writer) and Tech Wiser (editor).
Microsoft PowerPoint is widely used to present slides or give presentations . The nature of the slides could be confidential, personal, or the content could be in draft mode. Either way, a watermark can help drive home the message in a subtle way. PowerPoint allows users to create and add a watermark to both slides and images.

A watermark is an image placed in the background and is slightly faded to not interfere with the text and other elements in the slide. You can place a company logo to deter unauthorized sharing. Either way, there is a way to add a watermark in PowerPoint slides.
Let’s begin.
Create and Add Watermark to Slides
You can add a watermark to individual slides or all slides in PowerPoint at once. If you want to add it to all the slides in one go, use the Master Slide feature (begin from Step 1 below). We will be using the Slide Master function to add a watermark to all slides but if you want to add to only one slide, skip the first two steps below (begin from Step 3).
Note that the first slide in the presentation is usually the master slide, and any design changes that you make in this slide, like fonts or background, will be reflected in all slides.
We will be using PowerPoint 365 version, but the steps will remain, more or less, the same for other versions too.
Step 1: Click on the View tab from the menu bar and select Slide Master.

Step 2: Select the first slide, which is the master slide, from the left sidebar. You will notice that all other slides are nested below it.

Step 3: Now under the Insert tab, click on the Text Box button and select ‘Draw Horizontal Text Box’ option.

Step 4: A text box will materialize in the middle of the chosen slide. In our case, it is the master slide. You can drag the corners to adjust the size now or later.

Step 5: Once you are happy with the size of the text box, click anywhere inside the box and begin typing. Click on the Home tab to customize the font type, size, color, and other details of the watermark. On some versions of PowerPoint, you may find these options under the Format tab instead.

Step 6: You can now turn the watermark using the circular grab handle at the top.

Step 7: Select Send to Back option under the Arrange menu to keep the watermark in the background so that the text and other elements on the slides are visible to viewers clearly.

Step 8: Right-click on the master slide and select Format Background.

Step 9: A sidebar will appear from the right. Under the Text tab, increase the transparency to 80% or some other value to make the watermark fade in the background making other elements and text more visible.

Step 10: Once you are happy with the watermark, click on Normal under the View tab.

Your watermark is ready and should be visible on all existing and future slides created and added to the PowerPoint presentation. It is a good idea to choose a light color so that text and other elements are easily visible to the naked eyes.
Create and Add Watermark to Images in PowerPoint
Are you planning to add some original screenshots or images to the PowerPoint slides? The method mentioned above will only add a watermark to the slides but not images. But there is a way to add a watermark to images directly inside PowerPoint too.
Step 1: Simply drag and drop the image you want to add to the slide. Alternatively, you may also use the Pictures option under the Insert tab if the image is stored in the cloud, or you want to search for a stock image.

Step 2: Under the Insert tab, click on WordArt and choose a watermark text style that suits your needs.

Step 3: A box will appear where you can type the watermark’s text.

Step 4: Just like in the previous point, you can change the position of the watermark, font type, size, and color, and move around the watermark wherever you want.

Step 5: Under the Design tab, click on Format Background.

Step 6: Now select the watermark text, click on the Text Options and scroll a little to find Transparency slider. Move the slider to add a transparent effect to the watermark text so it looks translucent and doesn’t ruin the image elements.

You may change how the watermark looks and feels later.
Add Watermarks Easily
PowerPoint used to be the default choice for making presentations back in the day, but now things have changed. There are plenty of other apps that you can use to create beautiful presentations quickly. However, PowerPoint still offers many useful features and ease of use and is tightly integrated with the rest of the Office suite of apps with its perk.
We hope your query was resolved. If you have any further doubts, do let us know in the comments section below.
Next up: Become the guru of PowerPoint slideshow with these simple tips and tricks for animations. Learn how to add animations into your PowerPoint presentations.
Was this helpful?
Last updated on 07 February, 2022
The above article may contain affiliate links which help support Guiding Tech. However, it does not affect our editorial integrity. The content remains unbiased and authentic.
Leave a Reply Cancel reply
Your email address will not be published. Required fields are marked *

The article above may contain affiliate links which help support Guiding Tech. The content remains unbiased and authentic and will never affect our editorial integrity.
DID YOU KNOW

Gaurav Bidasaria
More in internet and social.

How to Restart Discord on Mobile and Desktop

What Is Allow Chrome Sign-In and Should You Disable It?
Join the newsletter.
Get Guiding Tech articles delivered to your inbox.
- Slidesgo School
- PowerPoint Tutorials
How to Create a Watermark in PowerPoint

Watermarks are small elements or images that are inserted into digital creations to help identify who’s the author, preventing plagiarism. If you want to learn how to insert a watermark into your PowerPoint presentation , this tutorial will teach you in no time!
Adding a Watermark to a Slide
Adding a watermark to all the slides.
- Open your PowerPoint presentation.
- On the Insert tab, click Pictures. A new window will open, where you must locate the image that you want to insert from your computer.

- After inserting the image, modify it to your liking. We recommend lowering its size and placing it somewhere far from the main elements so it doesn’t draw too much attention.

- Watermarks often have some transparency so that they’re even less distracting. To do so, select the image, go the Picture Format tab, click Transparency and choose an option from the list.

- On the View tab, click Slide Master.

- From the list of slides to the left, scroll up and select the first slide (the one on the top). This is the slide master and acts as parent slide, which means if you insert the image into this slide, it will appear in all the slides.

- Once you’ve selected the slide master, on the Insert tab, click Pictures.

- Modify the image so that it looks like a watermark. You should lower its size and place it close to the edges of the slide.

- Watermarks tend to have some transparency so they’re not too distracting. To modify the transparency of the image, select it, go to the Picture Format tab, click Transparency and choose an option from the list.

- Once done, close the master view by clicking Close Master View, located on the Slide Master tab.

- Check your slides and make sure the watermark appears in all of them.

Do you find this article useful?
Related tutorials.

How to Make a Banner in PowerPoint
The uses that a banner has are almost endless: from ads to sections for websites, or even signatures for certain types of emails. The purpose is up to you, but the thing is: how to design one? If you think that you need expensive software to make banners, think again. Here at Slidesgo, we know a lot about presentations and, thus, about programs such as PowerPoint. The truth is that PowerPoint is all you need to create your own design! Keep reading to learn how!

How to Create a Banner in Google Slides
Banners have been around us (at least, when it comes to browsing the net or participating in forums, among other things) for a long time. Creating one is by no means a difficult task, and you can do it with free software such as Google Slides. The steps that you’ll need to follow are very simple, so we’re sure you’ll start creating banners one after another in a few minutes. Let’s see how to proceed!

Storyset by Freepik: Awesome illustrations for creative presentations
With inspiration and the adequate resources, a PowerPoint or Google Slides presentation can be the most creative slide deck your audience has ever been, regardless of topic. In this Slidesgo School article, we’re going to introduce Storyset, a new Freepik project where you’ll find illustrated concepts to visually reinforce the message you want to convey, turning your work into a memorable experience.

How to Add a Watermark in Google Slides
A watermark is a little identifying image used as a fixed element in digital creations such as photos, documents, videos or, in this case, presentations. It helps protect that creation and prevents plagiarism or uses without attribution. In this Slidesgo School tutorial, you’ll learn, step by step, how to insert a watermark into your presentation.
How to Add a Watermark to One Slide in PowerPoint: A Step-by-Step Guide
Adding a watermark to one slide in PowerPoint is a practical way to brand your presentation or protect your content. To do this, simply go to the “Design” tab, select “Watermark,” choose or upload the image you want to use, and then adjust its size and transparency as needed. Apply the watermark to the selected slide, and voila, you’ve got yourself a customized slide that stands out.
After you complete this action, your selected slide will have a semi-transparent image or text overlay, which serves as your watermark. This won’t interfere with the content of the slide and will be visible in the background. It’s a subtle yet effective way to mark your work.
Introduction
When it comes to creating a presentation, making it unique and safeguarding your work is crucial. That’s where watermarks come in handy. But what exactly is a watermark? Think of it as a stamp of ownership or a signature—it’s a semi-transparent logo, text, or image that’s overlaid onto a slide. It’s a way to brand your presentations, show their authenticity, or prevent others from using your slides without permission.
Now, you might be wondering, why would you need to add a watermark to just one slide? Well, perhaps that one slide contains sensitive information, or maybe it’s the title slide that you want to distinguish from the rest. Regardless, knowing how to add a watermark to a single slide in PowerPoint can be incredibly beneficial, especially in professional settings. This skill is relevant to business professionals, educators, students, or anyone who uses PowerPoint for presentations. So, let’s dive in and learn how to make your slides not only informative but also uniquely yours.
How to Add a Watermark to One Slide in PowerPoint
Before we dive into the step-by-step guide, let me give you a quick overview of what we’re about to do. We’re going to select a slide, add a watermark to it without affecting the other slides, and ensure it’s positioned and formatted the way you want it. Ready? Let’s get started.
Step 1: Open PowerPoint and select the slide
Open your PowerPoint presentation and click on the slide where you want to add the watermark.
This is the first and most straightforward step. Just navigate to the slide you wish to watermark.
Step 2: Go to the “Design” tab and select “Watermark”
In the PowerPoint ribbon, locate the “Design” tab and click on the “Watermark” option.
You’ll find this in the toolbar at the top of your PowerPoint window. The “Watermark” option is usually located in the “Background” group.
Step 3: Choose or upload your watermark image
From the “Insert Watermark” dialog, you can choose a pre-existing image or text, or upload your own custom watermark.
If you’re adding a logo or a specific design, make sure you have the image saved on your computer. If you’re using text, you can type it directly into the dialog box.
Step 4: Adjust the size and transparency of your watermark
After inserting, adjust the watermark’s size to your liking and modify the transparency to ensure it doesn’t overshadow your slide’s content.
Remember, a watermark should be subtle. Adjust the transparency slider until the watermark is visible enough without being distracting.
Step 5: Apply the watermark to the selected slide
Once the watermark is customized to your preference, click “Apply” to add it to your selected slide.
Make sure not to click “Apply to All” unless you want the watermark to appear on every slide in the presentation.
Additional Information
Now that we’ve tackled the basics of adding a watermark to a single slide in PowerPoint, let’s chat about some additional nuances. First off, remember that consistency is key. If you choose to watermark other slides, make sure they match in terms of design and transparency. You want your presentation to look cohesive, right?
Secondly, consider the placement of your watermark. You don’t want it to interfere with crucial content, so think about putting it in a corner or an area with less important information. Also, did you know that you can even animate your watermark? Yep, just like any other object in PowerPoint, you can make that subtle stamp of ownership fade in, zoom, or perform other animations, adding a professional touch to your slide.
Lastly, let’s talk about the prompt keyword – watermark. This is a feature that many aren’t aware of, but once you know how to use it, it elevates your PowerPoint game significantly. So, get creative, protect your work, and brand your presentations like a pro.
- Open PowerPoint and select the slide.
- Go to the “Design” tab and click “Watermark.”
- Choose or upload your watermark image.
- Adjust the size and transparency.
- Apply the watermark to the selected slide.
Frequently Asked Questions
Can i add a different watermark to each slide.
Yes, you can customize each slide with a different watermark by repeating the process for each slide individually.
Will the watermark appear when I print the slides?
Typically, yes. However, depending on your print settings, there may be options to exclude the watermark.
Can I remove a watermark?
Absolutely. Simply select the watermark, and press delete, or go to the “Watermark” option and select “Remove Watermark.”
Can I use any image as a watermark?
Yes, but make sure you have the rights to use the image, and it’s high enough quality to not appear pixelated.
Is it possible to add a watermark to a presentation in Google Slides or Keynote?
While the process might differ slightly, both Google Slides and Keynote have options to add watermarks to slides.
There you have it, a step-by-step guide on how to add a watermark to one slide in PowerPoint. Whether it’s for branding purposes, to protect your content, or to authenticate the presentation, adding a watermark is a simple yet effective way to make your slides stand out.
Remember to keep it subtle, be mindful of its placement, and ensure it aligns with your overall presentation design. With this newfound knowledge, go forth and watermark your slides like the presentation wizard you are!

Matthew Burleigh has been writing tech tutorials since 2008. His writing has appeared on dozens of different websites and been read over 50 million times.
After receiving his Bachelor’s and Master’s degrees in Computer Science he spent several years working in IT management for small businesses. However, he now works full time writing content online and creating websites.
His main writing topics include iPhones, Microsoft Office, Google Apps, Android, and Photoshop, but he has also written about many other tech topics as well.
Read his full bio here.
Share this:
Join our free newsletter.
Featured guides and deals
You may opt out at any time. Read our Privacy Policy
Related posts:
- How to Set Time for Slides in Powerpoint
- How to Save Powerpoint as PDF with Notes
- Can I Convert My Powerpoint to Google Slides?
- How to Add Page Numbers in Powerpoint 2010
- How to Unhide a Slide in Powerpoint 2013
- How to Make a Powerpoint Slide Vertical in Powerpoint 2013
- How to Delete a Slide in Powerpoint 2010
- How to Loop a Slideshow on Powerpoint 2013
- How to Rotate a Slide in PowerPoint: A Step-by-Step Guide
- How to Insert Draft Watermark in Word 2013
- How to Change the Font on All Slides in Google Slides
- How to Hide a Slide in Powerpoint 2010
- How to Change Hyperlink Color in Powerpoint 2010 (An Easy 5 Step Guide)
- How to Delete Multiple Slides in Google Slides
- How to Insert Slides from Another Presentation in Powerpoint 2010
- How to End Powerpoint on Last Slide in Powerpoint 2010
- How to Change Line Spacing in Powerpoint for Every Slide at Once
- How to Duplicate a Slide in Powerpoint 2010
- How to Insert Check Mark in Powerpoint for Office 365
- Add a Watermark to the HP Color Laserjet CP1215
How to Add a Watermark in PowerPoint
Want to show your ownership in a presentation? Here's how to add a watermark in PowerPoint in a few steps.
Adding a watermark to your PowerPoint presentation is an easy way to make it look more professional. Also, it helps you protect your information in case someone wants to steal it and use it for their interest. And it only takes a few minutes.
Let’s walk through the process of adding the watermark, so you will be ready to impress your clients or coworkers.
How to Add Text as a Watermark
Follow these steps to add text as watermark to your presentation:
- Open the View tab and select Slide Master .
- Select the Insert tab from the menu bar, so you can start creating the watermark.
- Click the Text Box icon and choose Draw Horizontal Text Box . PowerPoint will create a text box and place it in the middle of the slide. You can move, rotate, or resize it at any time during this process.
- Select the Home tab or double-click the text to choose the size, font type, color, or other customization details. When selecting the text color, it’s better to choose a light color, so it doesn’t make parts of your text hard to read.
- Right-click the master slide and select Format Background . Then, click the watermark.
- In the Format Shape menu, select Text Options .
- Once you are done editing your watermark, click the View tab and select Normal .
Note: On some PowerPoint versions, you will find the text editing options in the Format tab.
Related: Turn a Microsoft Word Document Into a PowerPoint Presentation
How to Add an Image as a Watermark
If you want to add your business logo as a watermark, you can easily do it by going through the following steps.
- Open the View tab and select Slide Master to apply the logo to every slide in the presentation.
- Select the Insert tab and click Shapes .
- Right-click the shape you just added and select Format Shape . This will bring up the Format Picture window.
- In the Format shape window, scroll down to Line and check the No line option. This will remove the shape line and improve your presentation design.
Related: How to Crop an Image to a Perfect Circle in PowerPoint
How to Add Watermark to an Image
You can add information such as author, date, location, or company name to pictures in your presentation, without decreasing the image’s size by adding a watermark. And we will show you how to do it.
- Add the picture by simply dragging it over the slide or by opening the Insert tab and clicking Pictures .
- Select the Design tab and click Format Background to adjust the watermark’s level of transparency, so it doesn’t cover your image details
Make Your Presentation Unique
Adding a watermark to your PowerPoint presentation is a great way to make it stand out. You can use our guide and add text or pictures as a watermark or add info to your pictures without having to resize them.
- Working with watermarks Video
- Add a picture watermark Video
- Remove a watermark Video

Add a picture watermark

See how to add a picture watermark behind text. But this time, instead of putting it on the slide master, we'll add it to the slide itself, and then, copy it to another slide.
Click VIEW > Slide Master .
In Slide Master view, in the thumbnail pane on the left, click the slide layout(s) where you want to add a picture watermark.
Right-click the slide and click Format Background .
In the Format Background pane on the right, click Picture or Texture Fill , and under Insert picture from , click an option.
In the Format Background pane, slide the Transparency bar to the right to set the transparency percentage.
To apply the watermark to all the slides in the presentation, in the Format Background pane, click Apply to all .
On the SLIDE MASTER tab, click Close Master View .
Add a background picture (or watermark) to slides
Add a DRAFT watermark to the background of slides
Remove a watermark from the background of your slides
Let's add a picture watermark behind this text.
But this time instead of putting it on the slide master, we'll add it to the slide itself, and then, copy it to another slide.
Keep in mind that if you want the watermark on more than just a few slides, it makes more sense to use the Slide Master , because it saves you from manually copying the watermark.
Go to the INSERT tab, click Shapes , and select a rectangle. Then, draw it on the slide.
On the DRAWING TOOLS FORMAT tab, click Shape Outline and click No Outline .
Then, click Shape Fill and Picture . Browse for the picture you want and click Insert .
We are adding the picture to the fill property of the shape, instead of directly to the slide. This way, we have more options to work with, including Transparency .
By default, the picture stretches to fill the shape.
To get the right aspect ratio, go to the PICTURE TOOLS FORMAT tab, click Crop , and then, click Fit .
Drag the crop handles to crop out the empty space around the picture. Click Crop again to turn it off.
Now, we can press Shift and drag the corner handles to resize the picture without changing the aspect ratio.
And then, move the picture into place.
Next, we need to tweak the formatting to make the picture work as a watermark.
First, click Send Backward and Send to Back .
Then, click the Format Shape dialog box launcher, and the Fill & Line tab.
Add Transparency until the foreground elements are clearly visible. But, make sure it is not so transparent that the viewer won't know what the picture is.
Watermark pictures are tricky because you have to find an image that is easily recognizable, but doesn’t fight for dominance with the foreground elements.
You'll want to avoid images with lots of fine detail, and images like this, which will take too much effort for the viewer to figure out.
This picture of kids works because the viewer will know immediately what it is, and how it relates, but it contains a lot of detail.
So, we can use these options to reduce some details, so the image will blend in better with the background.
On the Picture tab, you can try Brightness and Contrast , and Color options, like Saturation and Recolor .
Also, try using Sharpness to remove detail.
The Effects tab has ARTISTIC EFFECTS . For this picture, let's add the Line Drawing effect and increase the Pencil Size .
Click away from the picture to get a better idea of how everything looks without the selection border.
If you find you can't select the picture again because it is behind other objects, go to the HOME tab, click Select and open the Selection Pane .
Now, you can select the picture by clicking it in the list.
So once you are happy with the watermark, you can Save as picture and insert in other slides, or you can simply Copy it to the Clipboard, move to another slide, and then, Paste it. Right-click the picture and Send to Back layer.
Now, let's say, we decide to change the look of our presentation by going to the DESIGN tab and applying a theme like Ion , for example.
As you can see, your choice of watermark picture depends greatly on the design you choose for your slides.
In this case, all we need to do is adjust the picture settings to help it blend in with the design.
But you may need to find a new picture.
Also, since we didn’t use the slide master, we'll need to copy the finished picture to the other slides manually.
So now, you know how to add text or picture watermarks.
Up next, we'll use what we learned to remove a watermark.

Need more help?
Want more options.
Explore subscription benefits, browse training courses, learn how to secure your device, and more.

Microsoft 365 subscription benefits

Microsoft 365 training

Microsoft security

Accessibility center
Communities help you ask and answer questions, give feedback, and hear from experts with rich knowledge.

Ask the Microsoft Community

Microsoft Tech Community

Windows Insiders
Microsoft 365 Insiders
Was this information helpful?
Thank you for your feedback.
- Slide Library
- Slide Library for PowerPoint
- Downloadable slides and shapes
- Slide Library search
- Search Library via shortcut keys
- Slide Library update alerts
- Rename or delete objects
- Share Slide Library
- Save slides or shapes to Slide Library
- Save presentation to Slide Library
- Manage Templates
- View all templates and set default
- Agenda Wizard
- Create Agenda Slides
- Update Agenda Slides
- Agenda Slide Numbering
- Navigate via Agenda
- Table of Contents
- Import Agenda Items
- Save Agenda Format
- Manage Colors
- Color Palette Toolbar
- Customize Color Toolbar
- Apply fill with outline color
- Recolor Charts
- View RGB color values & names
- Theme Color Tints and Shades
- Share Color Palette with team
- Insert Shapes
- Standard PowerPoint shapes
- Callouts / Speech Bubbles
- Hand Drawn Circles
- Harvey Balls
- Create Mini Slides
- Move to Multiple Slides
- Right Facing Centered Triangle
- Status Indicators
- Arrange and Align Shapes
- Select same color or size
- Select shapes by attribute
- Align shapes
- Align to first selected shape
- Choose Align anchor point
- Align using shortcut keys
- Copy paste position multiple shapes
- Straighten Lines
- Swap positions
- Distribute evenly
- Set Horizontal Gaps
- Set Vertical Gaps
- Squeeze or expand gaps
- Remove gaps
- Group Objects by Row
- Group Objects by Column
- Send to back, bring to front
- Send backward, bring forward
- Flip or rotate
- Group, ungroup and regroup
- Edit Shapes
- Same height, same width
- Copy paste position, size
- Resize shapes
- Slice shapes
- Multiply shapes
- Stretch shapes and fill gaps
- Toggle line weight and style
- Change margins toggle
- Chevrons same angle
- Paragraph Styles
- Save Paragraph Styles
- Apply Paragraph Styles
- Use PowerPoint Indent Increase/ Decrease to apply bullet styles
- Reset Paragraph Styles
- Ticks and Crosses bullets
- Paint Formatting
- Advanced Format Painter
- Position & Size Painter
- Table Format Painter
- Style Painter
- Text Format Painter
- Change Shape Painter
- Chart Format Painter
- Angles & Curves Painter
- Animation Painter
- Cycle Accent Colors
- Format Text
- Fit text to textboxes
- Wrap Text Toggle
- Merge Textboxes
- Split Textboxes
- Increase/ Decrease Font size
- Change Text Case
- Color Bold Text
- Delete Text or Replace
- Insert Superscript text
- Format Tables
- Create table from text boxes
- Convert table to text boxes
- Convert text to table
- Insert columns and rows
- Paste Excel data without source formatting
- Paste Excel data into text box tables
- Export Table or Box Table Data to Excel
- Set cell margins
- Express Table layout
- Table stripes
- Autofit columns
- Evenly space columns
- Align shapes over tables
- Harvey Balls for Tables
- Status Indicators for Tables
- Customizable PowerPoint Shortcuts
- Extra PowerPoint shortcuts
- Add PowerPoint shortcuts
- Search shortcut keys
- Reassign PowerPoint shortcuts
- Reset PowerPoint shortcuts
- McKinsey PowerPoint shortcuts
- F4 or Ctrl+Y redo or repeat
- Printable PowerPoint Shortcuts PDF
- How to Print a Custom Shortcuts list
- Search Shortcut Keys
- Searchable PowerPoint Shortcuts list
- Format Toolbar Overview
- Format Toolbar Layout Options
- Lock or Unlock Objects
- Lock objects
- Lock objects to the Slide Master
- Unlock objects
- Proofing Tools
- Check Formatting
- Check Fonts
- Check Template
- Check Slide Layout
- Check Content
- Check Punctuation & Spacing
- Reduce File Size
- Set Proofing Language
- Change set language for PowerPoint presentations
- Flip PowerPoint Slides
- Flip Slides for Translation
- Slide Numbering
- Manage Slide Numbering
- Slide Numbers with totals
- Add words to Slide Numbers
- Change Starting Slide Number
- Skip Slide Numbers on Hidden Slides
- Slide Navigator
- Footers & Footnotes
- Filename Footer
- Enlarge Footnotes
- Refine Slides
- Add summary slide
- Format slide title
- Display No Fly Zone
- Send slide to appendix
- Camouflage mode
- Format Painter
- Set Grayscale
- Format Images
- Compress file size
- Format Charts
- Charts Toolbar
- Config Options
- Customize Settings
- Dark Mode Display
- Review Slides
- Customizable Status Stamps
- Sticky Notes
- Tag slides with filename and page number
- Share Slides
- Email selected slides in PPT or PDF format
- Print selected slides
- Save selected slides
- Slide Library for Teams
- Team Slide Library
- Create multiple Team Slide Libraries
- Synchronize Team Slide Libraries
- Synchronize Team Slide Library to your company Dropbox/ Box/ OneDrive folder
- Updating your Team Slide Library
- Import entire presentation to the Slide Library
- Share Slide Library with a colleague
- Share Custom Settings
- Share Custom Settings with Team
- Getting Started
- Getting started with PPT Productivity add-in for PowerPoint
- Downloadable PowerPoint Elements for Slide Library
- Tutorial - How to Create Custom Paragraph Styles for PowerPoint
- Can I use PPT Productivity on a Mac?
- PPT Productivity Basic Tools Tutorial
- PPT Productivity Plus Tools Tutorial
- New Features
- August 2023 update: Color Toolbar enhancement, new icons and more
- February 2023 update: New Slide Libraries available to download!
- January 2023 Update: Agenda Wizard, Format Painters + More
- How to copy and paste formatting in PowerPoint
- PowerPoint How To
- What are the most popular PowerPoint shortcuts?
- Where are PPT templates stored? Finding templates in PowerPoint
- Pasting data into a PowerPoint table without source formatting?
- Consulting Toolkit
- How to create effective consulting slides using Minto Principles
- Missing the McKinsey PowerPoint Shortcuts?
- Missing the Accenture QPT for PowerPoint?
- Missing the BCG PowerPoint Tools?
- Missing the Bain Toolbox for PowerPoint?
How to add Stamps or Stickers to PowerPoint slides?
- Looking for a Consulting PowerPoint Toolbar?
- Top 10 PowerPoint Hacks / Shortcuts used by strategy consultants
- PowerPoint Tips
How to add a PowerPoint Watermark and Lock it in place
- March 15, 2022
This hints and tips post explains what a PowerPoint watermark is, a step by step guide for adding a Watermark in PowerPoint as well as how to lock a watermark to PowerPoint slides.
Why add Watermarks to PowerPoint?
There are a several reasons for adding a Watermark in PowerPoint :
- PowerPoint Draft Watermark: Add watermark to the background of PowerPoint slides to indicate they are still in Draft. Useful for example if your presentation contains sensitive material or data that you do not want relied on.
- PowerPoint Confidential Watermark: Add a Confidential watermark to slides to ensure they are not accidently forwarded when they shouldn't be. The Confidential watermark also appears when the slides are printed, reminding those with copies of the presentation regarding the need to take care regarding who can view the document.
- PowerPoint Author Watermark: Add a watermark to PowerPoint presentations to ensure the author of the document gets the accreditation due. Whatever the reason, you want to make sure they are added correctly.
- PowerPoint Watermark Image: Similar to the Author Watermark, you may want to add add an image watermark to PowerPoint to reflect ownership or licensing of an image such as a photograph.
In this article we provide a step by step guide for how to add a watermark to all PowerPoint slides, or a subset of slides. Also how to lock a PowerPoint watermark to a slide so is it cannot be removed.
How to Add a Watermark to All PowerPoint Slides?
You can insert a PowerPoint watermark to all your slides, or to selected individual slides.
To insert a watermark to all PowerPoint slides in your presentation, it's best to add the watermark to the documents Parent Slide. The Parent slide is the thumbnail at the top of the Master Thumbnail view. (Learn more about Parent slides ).
To add a watermark for PowerPoint to the Parent Slide in the document, you need to open the Slide Master view. To Open the Slide Master view, Navigate to the View tab on the top Ribbon then select Slide Master.
When you have the PowerPoint Slide Master view open, select the Parent Slide - the first/ top slide.
To add a text watermark to PowerPoint slides so they appear on all slides in the presentation;
- Insert a Text Box - You can insert a Text Box from the PPT Productivity Format Toolbar (if you're a PPT Productivity user), or via the PowerPoint Ribbon > Insert tab. Alternatively you can also use keyboard shortcut Alt+shift+X (or Alt+Q if you are a McKinsey alum using the PPT Productivity pre-assigned McKinsey Keyboard shortcuts ).
- Type the text you would like to use at the watermark . For example, Confidential, Draft or perhaps your initials or company name.
- Format the text box according to your font, color and size preferences.
- Set the position of your text on the slide
- Now send the text box to back, so it’s behind your slide content. To send the text box to back, use the Send to Back function on the Format Toolbar, keyboard shortcut Ctrl+Shift+] or right mouse click and select Send to back

If you want to add an image as a PowerPoint watermark rather than a text box, follow the steps above, but insert the image rather than a text box. You can also add image effects such as color, artistic effects or, as in the example below, transparency.
To add image effects to a PowerPoint image watermark, select the image and choose the desired effect from the selections in the Picture Format menu on the top ribbon.
How to Lock a PowerPoint Watermark to Slides
To prevent users from editing or removing a watermark in PowerPoint you can use the PPT Productivity shape locking feature. PPT Productivity is a timesaving add-in for PowerPoint, with features to boost your productivity.
To lock a watermark to PowerPoint presentations,
- Save the file then select the image watermark on the slide . If the watermark is a text box, first convert the text box to a table cell or to an image before locking.
- Navigate to Slide Master Tab - if you are not already in Slide Master view, navigate to the Slide Master tab on the top ribbon
- Select 'Lock Shapes' from the top ribbon . The file will close briefly then re-open. Once re-opened the PowerPoint watermark will be locked to the Master Slides to prevent editing or removal.
If your PowerPoint Watermark is a text box, before locking the shape you need to add it to the slide as a background image or a table cell.
To convert your textbox to an image,
- Select the text box, then use Ctrl + C to Copy the text you want to add as the watermark to your slide background.
- Right-click on the slide, and select from the Paste options, paste as a picture
- The copied textbox will now be pasted onto your slide as an image.
- Send the image to the back (Ctrl+Shirt+]) then delete the original text box from the slide
How Can I Add PowerPoint Watermark to Selected Slides?
To add a watermark to PowerPoint slides so they appear on only selected slides in your presentation;
- Open the Slide Master from the View tab
- Select the specific Child Slide Masters that require the watermark
- Insert a Text Box or the image for the watermark
- If you are using a text box, type the text you would like to use at the watermark. For example, Confidential, Draft or perhaps your initials or company name.
- Format the text box or image according to your font, color and size preferences.
- Set the position of your text box or image on the slide
- To add to more than one Child Slide Master, copy the text box or image and then paste to selected Child Slide Masters
- This has added your Watermark to the foreground. To send the PowerPoint watermark to background (so it’s behind your slide content), use the Send to Back function on the Format Toolbar, keyboard shortcut Ctrl+Shift+] or right mouse click and select Send to back.
Alternatively, you can also use PPT Productivity's status stamps to denote status on selected slides. The status stamps appear like a stamp or sticker on the slide (e.g. top right, or top left). The status stamps are great for indicating that selected slides are still in draft for example. Read more about status stamps for PowerPoint .

Want to see our tools in action?
Book a personalized demo with our PowerPoint professionals

Download 30 Day Free Trial
Download your 30 day free trial - Microsoft Office for Windows
Related productivity tips

Looking for PowerPoint stamps and stickers? Perhaps you’ve come out of one of the top tier ...

Difference between PowerPoint Templates, Themes, and Layouts?
Wondering what is the difference between a PowerPoint theme and a PowerPoint template? Or what is ...

Can I lock a shape, image or object in PowerPoint? Yes!
With PPT Productivity add-in for PowerPoint you can now lock shapes, images or other objects in ...
How to Add a Watermark to PowerPoint
A watermark in PowerPoint is a semi-transparent image or text displayed in the background of slides, often used for branding, security, or stylistic purposes. It helps establish brand identity by incorporating logos or slogans, creating a consistent and professional appearance.
Watermarks also protect intellectual property by discouraging unauthorized use or distribution with copyright symbols or identifying information.They can convey confidentiality, labeling slides as “confidential” or “internal use only” when dealing with sensitive information.
In this article, we will discuss how to add a watermark to your PowerPoint slides using different methods.
How Does Unlimited PowerPoint Templates Sound?
Download thousands of PowerPoint templates, and many other design elements, with a monthly Envato Elements membership. It starts at $16 per month, and gives you unlimited access to a growing library of over 2,000,000 presentation templates, fonts, photos, graphics, and more.

Ciri Template

Modern PPT Templates
New & innovative.

Explore PowerPoint Templates
Method 1: Adding a Watermark to the Slide Master
The easiest way to add a watermark to all slides in your presentation is by using the Slide Master feature. This method ensures that the watermark appears consistently throughout your presentation.
- Open your PowerPoint presentation and click on the “View” tab in the toolbar.
- Select the “Slide Master” option to access the Slide Master view.
- In the Slide Master view, select the top-most slide in the left-hand pane (the Slide Master).
- Click on the “Insert” tab in the toolbar, and choose either “Text Box” or “Picture,” depending on whether you want a text or image watermark.
- For a text watermark, draw a text box on the slide and type your watermark text. For an image watermark, locate and insert the image you want to use.
- Adjust the size, position, and transparency of the watermark as needed.
- Click on “Close Master View” to return to the normal view of your presentation. The watermark will now appear on all slides.

Method 2: Adding a Watermark to an Individual Slide
If you want to add a watermark to only one or a few specific slides, follow these steps:
- Select the slide where you want to add the watermark.
- Right-click on the watermark, select “Send to Back,” and then choose “Send Backward” to move the watermark behind the slide content.
Adjusting Watermark Transparency
To ensure your watermark doesn’t distract from the slide content, you may need to adjust its transparency. Here’s how:
- Text Watermark: Select the text box, click on the “Home” tab, and then click on the arrow next to the font color icon. Choose “More Colors” and use the transparency slider to adjust the text opacity.
- Image Watermark: Right-click on the image, choose “Format Picture,” and then select the “Picture Transparency” slider in the “Format Picture” pane to adjust the image opacity.

Tips for Creating Effective Watermarks
When adding watermarks to your PowerPoint slides, keep these tips in mind to ensure your presentation remains visually appealing and professional:
- Keep it subtle: Use a light color and adjust the transparency so that the watermark doesn’t compete with the slide content.
- Choose a suitable location: Place your watermark in a location where it won’t interfere with the readability of your slide content.
- Be consistent: Use the same watermark design, color, and position across all slides for a cohesive and professional appearance.
- Consider your audience: Ensure your watermark adds value to your presentation and is relevant to your audience. Avoid using distracting or unrelated images or text.
- Keep it simple: A watermark should be a simple and unobtrusive element of your slides. Avoid using complex designs or large images that may draw attention away from the main content.
Removing a Watermark
If you need to remove a watermark from your PowerPoint slides, follow these steps:
- From the Slide Master: To remove a watermark added through the Slide Master, return to the Slide Master view (View > Slide Master), select the watermark, and press the “Delete” key on your keyboard. Close the Slide Master view to see the changes on your slides.
- From an Individual Slide: To remove a watermark added to an individual slide, simply select the watermark on the slide and press the “Delete” key on your keyboard.
Adding a watermark to your PowerPoint presentation can enhance its appearance and provide valuable branding or copyright information. By using the Slide Master feature or adding watermarks to individual slides, you can easily incorporate watermarks into your presentation. Keep in mind the tips provided for creating effective watermarks and adjust the transparency as needed to maintain a professional and visually appealing design.
Unlimited Access to PowerPoint Templates & more! Starting at only $49 Unlock Full Access

Making a Watermark in PowerPoint (Draft or Confidential)
In this post you’ll how to make a watermark in PowerPoint for all your slides as a PowerPoint background.
This is commonly used in PowerPoint to add a draft or confidential stamp to all of your slides so that someone doesn’t accidentally send them along as final before they are ready.
What is a watermark?
In PowerPoint, a watermark is often grey text (as you can see DRAFT in the picture below), or a washed out image that appears on all of your slides behind your content.
This allows you to mark all of your slides at once for a variety of purposes.

The trick to properly making a watermark like this is knowing where to add it in PowerPoint so that it automatically appears on all of your slides at once.
The last thing you want to do is make the mistake of trying to manually add (or update) your watermark individually on all of your slides, one at a time.
Before you make your first watermark in PowerPoint you’ll first want to answer these questions.
Question #1: Where do you want your Watermark?
That is, do you want your watermark to appear on all the slides within your presentation, or just a few individual slides?
If you want your watermark to appear on all of your slides, then you will want to add it on the Parent slide as pictured below.

If instead you only want your watermark on a few individual slides, you’ll want to add it to just the child slide layouts in question where you want it to appear in your presentation.

Question #2: Do you want an editable Watermark?
That is, do you want to be able to edit the watermark in the future?
This will determine whether you directly add it to your slide or whether you add it as a slide background as an image (explained below).
[Watch] PowerPoint Watermark Tutorial
For additional help understanding your slide master in PowerPoint, see our guide on creating PowerPoint templates here .
Navigate to your Slide Master
Regardless of what kind of watermark you want to create for your slides, you want to do this on your Slide Master.
That’s because when you properly add it your slide master, it will then show up on ALL of the slides within your presentation (with a few exceptions discussed below).
That not only means that you can add it once, and have it show up everywhere within your presentation, it also means that if you later want to change or edit your watermark, you can edit it in one place, and have those edits reflected throughout your entire presentation.

To open up your slide master in PowerPoint, simply:
- Navigate to the View Tab
- Select Slide Master
You can also jump to your slide master by holding the Shift key and clicking the Normal Icon at the bottom of your PowerPoint work space (a hidden PowerPoint shortcut).
To see this hidden Slide Master jump shortcut in action, click here .
How To Watermark With Text

To create a text watermark on your Parent slide, follow these steps.
- Insert a Text Box (from the insert tab)
- Type the word DRAFT
- Change the font (size, style, color) as per your choice
- Drag your text to where you want it to be on your slide
- Send the image to back (so it’s behind your content)
To send to back, simply right-click the text watermark you created and select Send to Back .

In the picture above, I’ve made the following formatting adjustments:
- Font color grey
- Font size 166
- Rotated 45 degrees
- Center and middle aligned on the slide
How To Watermark With Pictures

To add a picture watermark to your Parent slide (so it’s not editable).
- Insert an image or photo (like your company logo).
- Resize and orient your picture where you want it to be.
- Send it to the back (so that it shows up behind your content).
On top of that, you can also choose to washout or recolor your logo if you want.

To washout or recolor your photo, simply:
- Select your photo
- Navigate to the Drawing Tools Format tab
- Select the Color drop down
- Select Washout (or a grey color)
You can see the difference between the original and the washed out logo below.

There are a variety of other picture formatting options you can choose, but I think the washout effect works best for marking your slides like this.
How To Make An Uneditable Watermark

If you don’t want someone to be able to edit your watermark, you’ll want to add it as a slide background image to your slide. To do that, simply:
- Ctrl + C to Copy the elements you want to add as the watermark to your slide background.
- Right-click off the edge of your slide and select F ormat Background
- Select Picture or texture fill
- Choose Clipboard
After you’ve added it as your slide background image, you can select and delete the orginal graphic you used (text or picture).
If you like, you can even duplicate lots of little draft watermarks and add them all to your slide as pictured below.
For help creating this kind of effect (plus some other pointers), see the video at the top of this page to see the step-by-step instructions and pointers.
Troubleshooting Your Watermark

If you properly add your watermark but still find that it’s not showing up on all of your slides, the likely issue is that some of your child slide layouts have the Hide Background graphics option checked.
To fix this, navigate to your PowerPoint Slide Master and for the layouts where it is not showing up, make sure you uncheck Hide Background Graphics .
Note: the Hide Background Graphics option will only show up for your Child Slide layouts, it will be greyed out on your Parent slide.
How To Watermark A Photo

To watermark a photo in PowerPoint, follow these steps.
- Insert your the image or text that you want to use as a watermark on your photo.
- Select your image and holding Shift select your text or image (so they are both selected)
- Hit Ctrl + C to copy both images
- Hit Alt + Shift + V for Paste Special
- Select either the PNG or JPEG file format
- Click OK

Clicking okay, PowerPoint creates a single image out of your original photo and your watermark text or image, thereby watermarking your image.
If your resulting image is too large, you can learn how to compress images in PowerPoint here .
So that’s how to make a watermark in PowerPoint, and the different things you need to take into consideration.
Regardless of what type of watermark you create, the key is to build it out on your slide master. That way you can update all of the slides within your presentation at once.
If you enjoyed this tutorial, you’ll also love our other PowerPoint training courses and videos that you can learn more about here .
Home » Microsoft Powerpoint » How to Add Watermark to PowerPoint Presentation
How to Add Watermark to PowerPoint Presentation
You may be presenting some confidential information in your PowerPoint slides. You may want to alert the audience that the information is only for internal use. The audience must know that the information is not for general distribution.
Likewise, some information you are sharing may be in draft form. You may want to inform your audience that you have not yet finalized the details. In such a case inserting a draft Watermark will be useful.
In such cases as above, the solution is to add a watermark to your slides. It helps to inform your audience that they must be careful with the data. A watermark is a text or picture embedded in the background of the slide and delivers the warning. You can make the watermark partly transparent. That way, it does not interfere with the content of the slide. Note that watermarks work best in slides containing mostly textual matter.
2 ways to add Watermark to Powerpoint Presentation
- Add Watermark only on one slide containing text
- Add Watermark to All slides containing text
If the sensitive information is present in only one slide, you may want to add the watermark there. But it is also possible to add watermarks in all slides with text.
Here, we show you simple steps on how to add a watermark to your slide or slides.
Let us begin.
Method #1: Adding a watermark to a slide.
Step #1: open the powerpoint presentation.
Open your presentation.
Navigate to the slide where you want to add the watermark. It must contain mostly text.

Step #2: Add a Text Box
On the top menu bar, click on the Insert tab to change the ribbon.

In the section Text, click on Text Box.

The shape of the cursor will change.
Use the mouse to draw a text box near the middle of the slide.

Step #3: Format the watermark
Write your warning inside the text box.
Select the text and change the font and its size as you want.

Use the handle on the text box to rotate the watermark.

Step #4: Change the watermark color and make it transparent
Select the watermark and right-click on it.
In the menu that opens, click on Format Text Effects.

A Format Shape interactive menu opens on the right side.

The menu offers three controls:
- Text Fill & Outline — Choice between hollow text or filled, color, and transparency.
- Text Effects — Add shadow, reflection, glow, and 3D effects
- Textbox — Adjust the position of text within the box, add margins etc.
Make your choice and click anywhere outside the slide to see the effects.
Once the results are satisfactory, close the interactive menu. Click on the X in its top right-hand corner.
PowerPoint will apply your choices.

Method #2: Add watermark to all slides
Step #2: open the slide master.
In the top menu bar, click on the View tab to change the ribbon.

In the section Master View, click on the Slide Master icon.

Navigate to the topmost slide.
Step #3: Add watermark
Follow all steps in Method #1 starting from Step #2.
Step #4: Close Slide Master
In the section Close, click on the Close Master View button to exit the Slide Master.

The watermark will now appear in all slides with text.
Use our stepwise instructions to easily add a watermark to your slides.
Leave a Comment Cancel reply
Save my name, email, and website in this browser for the next time I comment.
How to Add a Watermark to One Slide in PowerPoint
- Small Business
- Setting Up a New Business
- Open My Own Business
- ')" data-event="social share" data-info="Pinterest" aria-label="Share on Pinterest">
- ')" data-event="social share" data-info="Reddit" aria-label="Share on Reddit">
- ')" data-event="social share" data-info="Flipboard" aria-label="Share on Flipboard">
The Best Way to Save a Word Document Into a PowerPoint Document
How to open a wi file, how to make a 3d cylinder in powerpoint.
- How to Create and Apply a Watermark to PDF Documents
- How to Watermark a Photo in iPhoto
Digital watermarks are used much like paper watermarks, often identifying the content’s creator, origin or owner. Microsoft’s presentation platform, PowerPoint, is commonly used in business applications as a graphical aid in combination with a speaker. When the PowerPoint presentation is posted online, a watermark acts as a deterrent against theft and inhibits others from copying the slide or slides. You can add a watermark to all the slides in a PowerPoint presentation if desired. Adding a watermark to all slides at once often alters the slide content, but adding it one slide at a time preserves slide content.
Open the PowerPoint file containing the slide to which you want to add the watermark. Choose the slide that will get the watermark by clicking on its image in the PowerPoint user interface.
Click the “Insert” tab and hover the cursor over “Picture” on the drop-down menu. Click the source of the watermark – “Clip Art…” or “From File…” – from the sidebar menu.
Select the clip art or browse your files for the image you will use as your watermark. If using your own image, open the file containing it.
Right-click the image on the slide. Click “Format Picture.” To change the size of the watermark, click the “Size” tab. Adjust the values in the “Height” and “Width” fields to resize the watermark.
Click “Draw” to center your watermark. Click “Align and Distribute” next, followed by “Relative to Slide.” Click “Draw” a second time followed by “Align and Distribute.” Click “Align Middle” followed by “Align Center.”
Click the “Picture” tab and open the drop-down menu in the “Color:” field. Select “Washout” if using PowerPoint 2003 and later. Select “Watermark” if using a prior version.
Right-click the watermark on the slide. Hover the cursor over “Order” and select “Send to Back.”
- Microsoft: Insert a Transparent Background or Watermark to Your Slides
A.J. Andrews' work has appeared in Food and Wine, Fricote and "BBC Good Food." He lives in Europe where he bakes with wild yeast, milks goats for cheese and prepares for the Court of Master Sommeliers level II exam. Andrews received formal training at Le Cordon Bleu.
Related Articles
How to insert a watermark onto slides, how to make powerpoint pictures transparent, how to unlink a powerpoint, how to put a watermark on photos in faststone, how to make a slide show in pdf format, transferring illustrator to word, how to take an image from my computer & transfer it to a word document, how to make a monogram in powerpoint, how to change powerpoint odp to work on microsoft word, most popular.
- 1 How to Insert a Watermark Onto Slides
- 2 How to Make Powerpoint Pictures Transparent
- 3 How to Unlink a PowerPoint
- 4 How to Put a Watermark on Photos in FastStone
You’re using an older browser version. Update to the latest version of Google Chrome , Safari , Mozilla Firefox , or Microsoft Edge for the best site experience.
- Corporate Training
- Course Selling
- Academic Learning
- Learning Basics
- Instructional Design
- Online Training Tools
- Manufacturing
- Products iSpring Suite iSpring Learn
- Use Cases Onboarding Compliance Training Induction Training Product Training Channel Partner Training Sales Training Microlearning Mobile Learning
- Company About Us Case Studies Customers Partnership Course Development Contact Us
- Knowledge Hub Knowledge Hub Academy Webinars Articles Guides Experts on iSpring
- Language EN English Français Deutsch Español Italiano Nederlands Português Polski 中文 日本語 العربية Indonesia
- Shopping Cart
Watermark in PowerPoint: Protect Your Slides from Unauthorized Use

content creator
Helen Colman See full bio →

A PowerPoint watermark is a semi-transparent image or text that appears behind the content of a PowerPoint slide. It is often used to add a logo to a presentation or to show that the presentation is a draft or is confidential.
Watermarks are important for several reasons. First, they can add a professional touch to your presentation by incorporating your brand logo or design. This can help establish a consistent visual identity across all the slides and all of your presentations.
Second, they can be used to indicate the status of a presentation clearly, such as whether it is a draft version or a final version, or whether it is confidential and should not be shared outside the company.
To add a watermark to your PowerPoint presentation, you can:
- Create a text box with your desired text and format the transparency level to create a text watermark.
- Insert an image or logo, adjust the transparency level, and position it behind the content to create an image watermark.
Copy and paste the watermark onto all slides where you want it to appear or follow one of the guides below to add the watermark to all or selected slides automatically.
- Creating a Text Watermark
- Creating an Image Watermark
- Adding a Watermark in PowerPoint 365, 2019, 2016, 2013, 2010, and 2007
How to Add a PowerPoint Watermark to Selected Slides
How to add a watermark to a powerpoint presentation in powerpoint 365, 2019, 2016, 2013, 2010, and 2007.
Below, you’ll find a general step-by-step guide to adding watermarks to all the slides in various versions of PowerPoint.

Please note: While the general process of adding a watermark is similar across different versions of PowerPoint, some specific steps or options may differ. For example, the location of the Slide Master view, ribbon menu options, or use of placeholder text may vary between versions.
So, here are the general steps to add a watermark to a PPT presentation in the most popular versions of PowerPoint:
- Open the PowerPoint presentation that you want to add a watermark to.
- Go to the “View” tab in the ribbon menu.
- Click on Slide Master .
- In the “Slide Master” view, go to the first slide in the thumbnail pane, then select the Insert tab in the ribbon menu.
- Click on Text Box (for text watermarks) and Shape (for image watermarks), depending on the type of watermark you want to add.
- Insert the text or image for the watermark. If you want to use an image from your computer as a watermark, select Pictures , then find the image and click Insert .
- Adjust the position and size of the watermark to your preference in the Format tab.
- Go back to the Normal view to see the watermark applied to all your slides.
That’s it! You have successfully added a watermark to all PowerPoint slides except the title slide.
If you don’t need a watermark on all the slides, you can add them only to some of them. This is what it looks like:

Here are the general step-by-step instructions on how to add a watermark (both text and image) to selected slides in the most popular versions of PowerPoint:
- Open the presentation that you want to add the watermark to.
- Go to the View tab and select Slide Master.
- Select the slide layout that you want to add the watermark to from the left-hand pane.
- Click on Text Box (to add text for text watermarks) and Picture or Shape (for image watermarks), depending on the type of watermark you want to add.
- Click and drag the text box or an image to the desired location on the slide.
- Type in the watermark text. It can be a company name, phrases like “Company Confidential,” “Draft copy,” “Sample,” or something else.
- Adjust the font size, color, texture fill, and opacity of the text, or adjust the image as desired. If you need to adjust a shape, simply right-click on the image and select Format shape .
- Once you’ve finished preparing your watermark, click the Close Master View button in the Close group under the Slide Master tab.
- The watermark will now appear on all slides that use the slide layout that you edited in the Slide Master.
That’s it! You have successfully added a watermark to individual slides.
Below you’ll find answers to the most frequently asked questions related to watermarks.
How to create an uneditable watermark in PowerPoint

It’s not possible to create an uneditable watermark in PowerPoint without converting the presentation to PDF. While you can create a watermark in PowerPoint, it’s possible for someone to remove or edit the watermark by simply selecting it and hitting the delete key or modifying it in some way.
When you convert your PowerPoint presentation to PDF, it creates a static image of the slides, which makes it difficult for someone to edit or remove the watermark without specialized tools .
So, to ensure that your watermark is uneditable, it’s recommended that you convert the presentation to PDF after adding the watermark.
To create a watermark in PowerPoint that a viewer will not be able to edit, follow these steps:
- Open PowerPoint and go to the slide where you want to add the watermark.
- Go to the Insert tab and select Header & Footer .
- In the Header and Footer dialog box, click on the Slide tab.
- Check the Footer box and enter the text for your watermark, such as “Confidential” or “Draft”.
- Click on the Apply button and then click on the Close button.
- Your watermark will now appear at the bottom of the slide.
- To make the watermark uneditable, go to the File tab and select Save As .
- In the Save As dialog box, select PDF from the Save as type dropdown menu.
- Click on the Options button and make sure that the Document properties checkbox is unchecked.
- Click on the OK button and then click on the Save button.
Your PowerPoint file will now be saved as a PDF file with an uneditable watermark.
Note: Keep in mind that this method will only work if the viewer is using a PDF viewer that does not have the ability to edit the PDF file. If the viewer has a PDF editor, they may still be able to remove or modify the watermark.
How can I insert a watermark into a PDF document?
There are various ways to insert a watermark in a PDF document, depending on the software you are using. Here are some methods using popular PDF editors:
Using Adobe Acrobat Pro DC:
- Open the PDF document in Adobe Acrobat Pro DC.
- Click on Edit PDF in the right-hand pane.
- Click on Watermark in the toolbar at the top.
- Select Add Watermark and choose either Text or Image .
- Customize the watermark’s appearance and placement.
- Click OK to save your watermark.
Using Microsoft Word:
- Open Microsoft Word and create a new document.
- Insert the image or text that you want to use as a watermark.
- Click on File and then Save As .
- Choose PDF as the file type and save your document.
- Open the PDF document and your watermark should be visible.
Using online tools:
- There are various online tools available that allow you to add watermarks to PDF documents, such as Smallpdf, Sejda, and PDF Candy.
- Upload your PDF document to the tool’s website.
- Download the watermarked PDF document.
It’s important to note that adding a watermark to a PDF document may not prevent someone from copying or sharing the document. Watermarks are typically used to indicate ownership or to make it clear that a document is confidential.
In conclusion, adding a watermark to your presentation can enhance its visual appeal and provide important information about the status or confidentiality of the content. By following the simple steps outlined in this article, you can easily create a text or image watermark and adjust its transparency and position to suit your needs. Whether you are using PowerPoint 365, 2019, 2016, 2013, 2010, or 2007, using a watermark is a straightforward process that can help protect your presentations and establish a consistent visual identity across your work.
If you’re looking for an even more powerful tool to create engaging and interactive presentations, you may wish to consider iSpring Suite . This is an advanced, yet easy-to-use PowerPoint add-in that empowers you to create interactive presentations, quizzes, and eLearning courses easily with customizable slide templates, backgrounds, characters, and other ready-made assets.

It includes a variety of features such as narration , screen recording, and interactions that can help you to create engaging and immersive learning experiences. Download a free 14-day iSpring Suite trial and start creating impactful learning quickly and easily.
Overall, whether you’re using PowerPoint alone or taking advantage of additional tools like iSpring Suite, a watermark is a simple way to add a professional touch and communicate important information to your audience.
Table of Contents
iSpring Suite
Create online courses and assessments in record time.

Content creator
Helen Colman
She enjoys combining in-depth research with expert knowledge of the industry. If you have eLearning insights that you’d like to share, please get in touch .
Subscribe to our blog
Stay tuned to get our latest eLearning tips and tricks!
By clicking “Subscribe”, you agree to our Privacy Policy . All emails include an unsubscribe link, so that you can opt-out at any time.
We use cookies to give you the best possible experience on our website and also for analytics and marketing purposes. You can enable or disable optional cookies as desired. See our Cookie Policy for more details.
Manage your cookies
Essential cookies are always on. You can turn off other cookies if you wish.
Essential cookies
Analytics cookies
Social media cookies
How to Add a Watermark in PowerPoint
If you are wondering whether you should add a watermark to a PowerPoint presentation, the answer is yes. Naturally, the main purpose of a watermark is to protect your digital property and prevent unauthorized use. Afterall, it is possible for someone to steal your presentation – the presentation you’ve been working so hard on! – and pass it as their own. If you don’t want this to happen, you should watermark your PowerPoint presentation. It’s a great and effective way to safeguard your digital property.
A brand logo in the background of your slides can add a touch of professionalism to your presentation and make it look neat. In addition to this, if you are a freelancer or an owner of a small brand and you need to pitch something to a bigger company, by adding a watermark to your presentation, you will make people at this company remember your brand better. After all, if you want to make your brand name and logo stick in people’s minds, show it to them repeatedly and as often as you can.
With the help of a watermark you can inform people that your presentation is merely a draft or a final version. A textual watermark that says “Confidential” is usually used to show that a presentation contains sensitive information that shouldn’t be shared with anyone else.
What’s great about watermarks is that adding a watermark to a PowerPoint presentation is a simple task that isn’t laborious or time-consuming. You’ll be able to do this even if you’re a complete beginner when it comes to watermarking your content. Yet, a watermark on a PowerPoint presentation will bring you a lot of benefits.
What is a Watermark in PowerPoint?
A watermark is some text or an image that is shown on the slides of your presentation. Commonly, a watermark is placed somewhere in the background, behind the content of your slide. It can appear on every slide of your PowerPoint presentation or just on selected ones. It also tends to be quite transparent because your watermark should be visible, yet it shouldn’t distract or interfere in any way with the content of your presentation. Only then it will be able to do its main job.
Generally, there are two types of watermarks: a textual watermark and a logo watermark . The latter is pretty self-explanatory – you use your brand logo as a watermark. Naturally, for this, you actually need to have a brand logo. You need to either create it yourself or hire a designer who can create it for you. In other words, there’s some preparation involved before you get to watermarking.
A textual watermark is basically some text. Sometimes, textual watermarks are paired with icons. But in the majority of cases, people just tend to use their brand name as a watermark. This is an easy and quick way to protect your content because you won’t have to do anything prior to watermarking. Plus, it’s possible to use any text you want. You can write “Confidential” or “Draft”, etc. In a way, with a textual watermark, you will have a bit more freedom.
Of course, you can mix and match your watermarks in PowerPoint. You can watermark one presentation with your logo, then the other one with your brand name. It’s even possible to watermark some slides with a logo and other slides with a textual watermark. It all depends on your needs and preferences.
Without further ado, let’s see how you can insert watermarks in a PowerPoint presentation.
Let’s start with adding a textual watermark in PowerPoint. Here are the simple steps that you need to follow:
This wasn’t very complicated, was it?
How to Add a Logo Watermark in PowerPoint
What if you have a brand logo and you want it to be in the background of your presentation? It’s not that complicated to do this, either. In fact, if you follow these steps, you’ll be able to insert any picture as a watermark in a PowerPoint presentation.
- Once you’re done with editing your logo, go to Slide Master > Close Master View. Now, every slide has your logo in the background!
Here’s a tip!
It’s possible to add a watermark only to certain types of slides. In other words, you can watermark only selected slides in PowerPoint. You can do this in the Slide Master, as well. Here’s how you can watermark selected slides in PowerPoint:
Watermark Photos in PowerPoint
So far we’ve talked about watermarking the slides themselves. But what if there are images in your presentation and you want to protect them with a watermark, too? Let’s see how you can do this:
- Export your watermarked photo to your device. Voila, now you know how to watermark a photo in PowerPoint.
If you realized that you want to make adjustments to your watermark in PowerPoint or if there’s another image that you want to watermark, here’s what you need to do:
- Once you are done, press CTRL + A to select both items. Go to Shape Format > Group > Group. Now you watermarked another image! If necessary, save it to your device in the same way as you saved the first watermarked image.
How to Improve the Protection of your PowerPoint Presentation
As you can see, adding a watermark to a PowerPoint presentation isn’t extremely difficult or complicated. You can add some text or a logo to every slide within a couple of minutes. On top of this, PowerPoint isn’t an advanced software. It’s quite easy to master. If all you require is to insert watermarks in PowerPoint presentations, it’s easy to do this in the program itself; there’s no need to look for any third-party apps.
There’s a downside, though.
Even though the main purpose of a watermark is to protect your content and prevent unauthorized use, PowerPoint watermarks don’t provide as much protection as you might want.
Surely, it’s possible to restrict editing in PowerPoint. There’s a read-only mode, for instance. However, this mode doesn’t offer any encryption and as a result, it won’t take long to disable it. And, obviously, once this mode is disabled, anyone will be able to edit your PowerPoint file. It means that they can easily go to the Slide Master and remove all of your watermarks.
If you want to avoid this, you can save your PPT presentation as a PDF file.
As you may know, contents of a PDF file tend to be challenging to edit, including watermarks . Naturally, it’s impossible to show a PDF file as a presentation. But if you need to share the actual file that contains your presentation with others, it might be a good idea to save a copy of your PowerPoint presentation as a PDF file and share this very file with others, while keeping the editable PPT file only to yourself. This way, no one will be able to remove your watermark.
What’s more, Watermarkly has two browser-based apps for watermarking – one for watermarking photos and the other one for watermarking PDFs . Thus, you won’t have to deal with watermarking your PPT presentation. You can simply convert your presentation to a PDF file, then upload your PDF into our watermarking app and watermark it there. Watermarkly allows you to add both some text and a logo. You’ll be able to upload your own logo file or pick an icon from the Logo Gallery. However, please note that Watermarkly doesn’t support any of the PowerPoint formats. So, you can only watermark your PPT presentation if you save it as a PDF file.
PowerPoint gives you some basic tools for designing a watermark. However, you will have much more room for experimentation with Watermarkly. You will have access to a broader toolkit for editing your watermarks. There’s a tile option that allows you to fill your image or PDF pages with repeated watermarks. This will provide you with maximum protection. Not to mention that it can be quite tedious to create repeated watermarks in PowerPoint because you will need to do it manually. You can also add one of several effects to your watermark. For instance, it can look like a 3D watermark. This cannot be done in PowerPoint.
As another layer of protection, you can actually add a watermark not only to your slides, but to images in your presentation, as well. Removing watermarks from photos is extremely challenging; especially if you follow some tips that will help you improve your watermark protection . If you poured a lot of work into your presentation and want to protect it as much as possible, you should watermark photos before inserting them into your presentation.
Watermarkly’s main advantage is that it has batch-processing. Surely, in PowerPoint, you can add a watermark to every single slide in a matter of a few clicks. But you can watermark only one image at a time. Not to mention that you’ll have to create a separate blank slide for this. If you have a lot of images in your PowerPoint presentation and want to watermark all of them, this will be incredibly time-consuming. On the other hand, in Watermarkly, watermarking a batch of images requires neither much time nor effort.
How to add a Draft watermark to your PowerPoint slide?
This is much easier than it seems. First, you need to open your presentation or create a new one, then open the Slide Master by going to View > Slide Master. Make sure that you are on the very first slide at the top. Next, go to “Insert” and pick the “Word Art”, then select the font style. A text box will now appear on your slide. Type in the word “DRAFT” into the text box. Edit your text – make it bigger or smaller, adjust its angle, reposition it. You can make your text semi-transparent in the Text Options in the Format Shape section. Plus, you can right-click on the text and there will be some editing options in the menu. Finally, exit the Slide Master.
How to create a transparent watermark in PowerPoint?
If you want to make a semi-transparent or almost completely transparent watermark, here’s how you can do it:
- Go to View > Slide Master, then pick the first slide in the thumbnail pane on the left.
- Go to the Insert section and pick the “Word Art”, then choose the font style that you like.
- Enter your text and edit it, if necessary.
- Right-click on the text and select Format Shape.
- In the “Format Shape” section pick the “Text Options” tab, then set the transparency to 80-90% in the “Text Fill”. It’s also a good idea to experiment with the level of transparency here.
- When your watermark looks the way you want it to, close the Format Shape section and exit the Slide master by going to Slide Master > Close Master View.
Now you have a transparent textual watermark in PowerPoint!
How do I insert a logo in a PowerPoint without the background?
It’s perfectly possible to remove the background from your logo in PowerPoint. It can be a white background or a background of any other solid color. Follow these steps:
- Once your logo is imported, click on it to select it.
- Open the Picture Format section in the ribbon.
- Then go to the Color and select the Set Transparent Color in the drop-down menu. This will turn your cursor into an eyedropper.
- Using the eye-dropper, click on the white background that you want to remove. Now, the white color will be set as transparent. And just like that your white background is removed!
However, the downside of this is that all the white areas in your image will become transparent. So, it won’t work if there’s quite a lot of white in your logo, too.
How do I add a background image to a PPT slide?
You’ll be surprised how easy it is. Let’s see how this can be done:
- First, open your presentation or create a new one.
- At the top, select View > Slide Master.
- Select the very first slide in the pane on the left, if you need an image to be on every slide.
- In the ribbon, select the Insert section and click on the “Pictures”. You can import your image from your device as well as use Stock or Online images.
- Import your image, then resize and reposition it. Make any other necessary adjustments to the image.
- Go to Picture Format > Transparency and choose the necessary level of transparency.
- Right-click on the image and pick the “Send to Back” option in the menu.
- Finally, close the Slide Master.
All done! Now, there’s a background image on your PPT slide.
Watermarking your PowerPoint presentation might seem like a complicated and intimidating task. But it’s really not. In fact, it’s not laborious, tedious or time-consuming. It can take you just a couple of minutes to add a watermark to every slide in your PowerPoint presentation. Moreover, if you add a new slide, your watermark will appear on it automatically. You can write any text in your watermark. You can watermark your presentation with a logo, which will make you look like a true professional. It’s a great idea to watermark photos in your PowerPoint presentation, too. This way, you won’t have to worry about anyone stealing your presentation or the visual content in it. Watermarking is an important skill to master as it will benefit you and your work greatly.
How to Add a Watermark to PowerPoint Slides – A Detailed Guide
Table of contents.
Have you ever poured your heart and soul into crafting a presentation, only to worry about how your content might be used elsewhere? Fear not! Adding a watermark to your PowerPoint slides provides a simple yet powerful solution. A watermark not only safeguards your work but also helps you to strengthen your brand identity or flag the document as confidential.
Regardless of your experience level, mastering this technique can significantly enhance the professionalism of your presentations and provide peace of mind. Join us as we explore the art of adding watermarks to your slides and discover how this simple addition can make a world of difference in your presentations.
Inserting Watermarks in PowerPoint : Two Effective Methods Explained
Method 1: using the header & footer feature.
- Go to the Insert tab.
- Click on Header & Footer .
- In the Header or Footer section (depending on your preference), type the desired text as your watermark.
- Adjust formatting options like font size, color, and transparency using the available controls.
- Click Apply to add the watermark to all slides or Apply to All to incorporate it throughout the presentation.
Method 2: Using the Background Image Feature
Step 1 : Navigate to the “View” tab and select “Slide Master“
Step 2 : On the slide master thumbnail at the top, click to access its editing options.
Step 3 : Go to the “Insert” tab and choose “Text Box“ or “Pictures”
Step 4 : Click and drag to create a text box or add an image on the slide master.
Step 5 : Type your desired watermark text (e.g., “Draft,” “Confidential”).
Step 6 : Customize the text formatting (font, size, color) or image and adjust its position using the rotation handle.
Step 7 : Ensure the text color opacity or image transparency is low for a subtle watermark effect.
Step 8 : Exit “Slide Master” to see your watermark applied to all slides (except title slides).
Create presentation slides with AI in Seconds in Google Slides
10M+ Installs
Works with Google Slides

How to Remove Watermark from PowerPoint Slide?
Removing a watermark in PowerPoint involves checking different locations depending on how it was inserted. Here’s a breakdown:
Removing Watermark Inserted with Slide Master Feature:
Step 1 : Go to the View > Slide Master.
Step 2 : Click on the top slide, and select the image or text watermark you want to remove.
Step 3 : Press Delete and close the Slide Master.
Removing Watermark Inserted with Header & Footer Feature:
- Clear the content from the Header and Footer sections.
- Click Apply to remove the watermark from the current slide or Apply to All to remove it from all slides.
How to Create an Uneditable Watermark in PowerPoint
Unfortunately, while you can add watermarks to PowerPoint presentations, making them completely uneditable within the software itself is not currently possible. If someone has access to the presentation file, they might be able to remove or modify the watermark using different methods.
However, here are some alternative approaches to consider if you need a higher level of protection:
1. Convert to PDF: Save your presentation as a PDF document. This usually makes it more difficult to edit the content, including the watermark.
2. Use third-party add-ins: Explore third-party add-ins for PowerPoint designed to create uneditable watermarks. These add-ins may use different methods, like embedding watermarks within the presentation data or converting the presentation to a secure format.
3. Implement password protection : Apply password protection to your PowerPoint file. While this doesn’t directly protect the watermark, it restricts unauthorized access to the entire presentation, making it more challenging to modify the content, including the watermark.
Optimizing Your Watermark for Visual Appeal
1. Text Color Selection
Opt for a light and transparent text color to prevent content obstruction and maintain readability.
2. Font Choice
Pick a font that goes well with your presentation’s style.
3. Watermark Placement
Strategically position the watermark to ensure its visibility without causing distraction from the main content.
- No design skills required
- 3 presentations/month free
- Don’t need to learn a new software

Frequently Asked Questions:
1. can i add an image as a watermark in my presentation.
While PowerPoint doesn’t directly support image watermarks, you can achieve this by inserting an image and formatting it similarly to a text watermark.
2. How do I add a “Confidential” watermark to my slides?
- Go to “View” > “Slide Master”.
- Insert a text box and type “Confidential” (or your message).
- Use a light color and adjust the text box position using the “Format” tab.
- Close “Slide Master” to apply the watermark to all slides.
3. How can I convert a picture into a watermark?
- Go to the “Insert” tab, click “Picture,” and choose your image.
- Right-click the image and select “Format Picture.”
- Adjust the picture transparency using the “Transparency” slider to make it subtle.
- Position the image and send it backward using the “Arrange” menu to place it behind the content.
4. Can I adjust the transparency of the watermark text?
Absolutely! Select the text box and go to the “Format” tab. Under “Text Box Fill,” use the “Transparency” slider to control the level of transparency.
5. Is it possible to center the watermark on the slide?
Yes. On the “Format” tab, use the “Align Text” options. Choose “Center” for both horizontal and vertical alignment.
6. My watermark text appears blurry. How can I fix it?
Ensure the text opacity is very low, as high opacity can cause blur. Choose a clear, readable font to avoid distortion.
7. Can I include a date or timestamp in my watermark?
While PowerPoint doesn’t directly insert dynamic text like dates, you can manually update the watermark text whenever needed. Consider third-party add-ins for dynamic watermarks.
8. How can I add a watermark to all slides at once?
Use the “Slide Master view” function. This allows you to modify the default slide template, applying the watermark to all slides.
9. Is it possible to watermark only specific slides?
Yes. Follow the standard watermarking process but outside the “Slide Master view” to target individual slides.
Save Time and Effortlessly Create Presentations with SlidesAI

This website uses cookies. Learn more
How to Add a Watermark to PowerPoint Presentation
· Create Courses

Why do you need to add a watermark to a PowerPoint Presentation?
Safeguard your work, present your work professionally , reduces distraction for viewers, does powerpoint have a watermark feature, things to keep in mind before you add a watermark to a powerpoint presentation, how to add a watermark in powerpoint to all slides , how to add an image as a watermark, graphy, the online course creation, and selling platform.
In this blog, we will discuss the steps to add a watermark to a PowerPoint presentation.
It’s a good idea to add a watermark to your presentation. A watermark helps if you are creating a PowerPoint presentation with sensitive information or need to ensure the integrity of your slides.
I want to teach online GOT YOUR CONTENT READY? GRAPHY IS ALL YOU NEED TO GET STARTED!
A watermark is an image or text that appears across all slides in the background. It makes your presentation appear more professional and secure.
In this article, we will show you how to add a watermark to your PowerPoint presentation .
Also read: What are video watermarks? Why add watermarks to your content?
Table of Contents
Adding a watermark to your presentation is a great way to protect your work. You have put in the time and effort to create something. Thus, it’s only natural that you want to ensure that it isn’t stolen or copied without proper credit given to the original author.
For example, you can use your watermark if you are creating an online course. You might need to give students access to your material in exchange for payment or registration beforehand. This way they know who created the material, who owns it, and what they have access to before they actually pay for anything.
Also read: How to create a video presentation in PowerPoint?
A watermark also gives an added professional touch, which can help set your work apart from others.
You can add a watermark to a PowerPoint presentation to make it stand out from other people’s presentations. It helps reinforce that someone having expertise in their field created the presentation.
Also read: How to add a hyperlink to a PowerPoint presentation
Distracting backgrounds or other elements can ruin a good PowerPoint design. They can take attention away from the main points in a presentation. A simple watermark will keep these distractions out of view while protecting against unauthorized use, which is important.
PowerPoint doesn’t have ready-made watermarks like MS Word or a feature specifically used to add watermarks. If you want to add a watermark to a PowerPoint presentation , you’ll have to follow certain steps and do it manually. You can create your watermark in the PowerPoint or upload a watermark from your device.
Before you add a watermark to a PowerPoint presentation , there are a few things to keep in mind:
Make sure the watermark is legible
You don’t want anyone trying to read your PowerPoint presentation on a screen smaller than 20 inches. They’ll have trouble identifying what the watermark is about. Your best bet is to have a large enough font size (14 points or larger), so everyone can easily see the watermark from any distance or angle.
Make sure the watermark is in the right place
This sounds like common sense. But, putting your watermark where someone’s face should be and vice versa can throw off their whole presentation experience. It makes the presentation look bad and can prove off-putting.
If possible, try putting important information on either side of each slide instead of covering up faces completely. This way, viewers will still see the watermark, and it won’t hinder their experience while going through the presentation.
Placement and positioning
Make sure it fits into the layout scheme chosen for each slide. If possible, choose one color scheme across all slides rather than different ones depending upon the theme. You can opt for a lighter color if you don’t want the watermark to come into the limelight. Otherwise, you can choose a brighter color to make the watermark more prominent.
You can add a watermark to a PowerPoint presentation without adding it to every slide manually. You can place them on just one master slide. Then, PowerPoint will automatically apply it for you to all of the slides in the presentation. Here’s how you can do it.
Step 1 : Open the PowerPoint presentation and click on “View” to open the window.

Step 2 : Select the “Slide Master” option. It enables you to access the “Slide master” window. You’ll use the options to add a watermark to a PowerPoint presentation .

Step 3 : Scroll through the slides pane and select the first item/slide. Selecting the first slide is important because it acts as the master slide. Adding a watermark to this slide helps you automatically apply it to the rest of the slides.

Step 4 : Click on “Insert” and select “Text box.” This option can add a text watermark to your PowerPoint presentation.

Step 5 : Type in the text you want to use as a watermark. Click and hold the rotation handle at the top of the text box to rotate your watermark text.

Step 6 : Select the text in the text box, and then make changes to the font style, color, or size. People usually prefer light colors in the watermark. (If you don’t see the format tab, it might be because you’ve not selected the text)

Step 7 : Click “Close Master View” in the Slide master window.

This is how you add a watermark to a Powerpoint presentation . You’ll see the watermark appear on all the slides except the title slide window. Nobody can edit, click or change the watermark safeguarding your work.

Follow the same three steps mentioned above if you want to add an image as a watermark to the presentation.
Then, you have to follow the steps given below:
Step 4 : Click on “Insert” and then select “Pictures.”

Step 5 : From the drop-down box, click on “this device” to upload your logo as a watermark in a PowerPoint presentation. You have to option to upload a stock image or search online to upload a watermark. However, it’s not a preferred option.

Step 6 : Select the photo you want to upload as a watermark from the device window. Then, click on “Insert.”

Step 7 : Place the watermark in an appropriate position. Then, click “Close Master View” in the Slide Master window.

That’s it when it comes to how you can add a watermark to a PowerPoint presentation . You have both text and image options to upload your watermark. Use them to dent your originality on your original and unique piece of work.
Also read: Graphy: The best Thinkific alternative in 2022
If you are looking to create your online course and sell it with minimum effort and easy-to-use features, then Graphy is the best place for you. Graphy has thousands of active content creators who have created their own online courses and monetized their skills. You can also do the same, and the best thing is that you can start for free.

Graphy offers a load of features that will definitely add stars to your success, features like:
- Branded website and mobile app
- Advanced-level marketing and sales tools and features
- Multi-layer content security
- Rich multimedia
- 24*7 customer support
- Customizable landing/sales pages
- Personalized course completion certificates for your learners
- Integrated payment gateways and country-specific pricing
Isn’t it amazing?
So join Graphy, just like 40,000+ creators. GOT YOUR CONTENT READY? GRAPHY IS ALL YOU NEED TO GET STARTED!
Online course platform
create your online course
sell online course
PowerPoint presentation
Add a watermark to a PowerPoint presentation
Top creators use Graphy to sell courses and memberships
Join 100K+ creators who have launched their online knowledge business using Graphy
You may also want to read

Top 7 Christmas Marketing Strategies to Boost Sales

9 Telegram Bots Every Telegram Channel Owner Must Have (2024 Updated)

How To Create a Paid Telegram Channel In 2024 (Updated)?
How-To Geek
How to remove a background or watermark in powerpoint.
You aren’t stuck with the background your presentation came with!
Quick Links
Remove a background using the design tab, remove a background by changing the master.
An attractive image or company watermark can make a nice background for your presentation. But if you want to remove that background and use your own or none at all, you have two ways to do it in Microsoft PowerPoint.
The right background is an important element of your slideshow. You want something that enhances your presentation without distracting from the content. Unfortunately, you may have obtained a template created by someone else that includes a background you don't want such as an image or watermark. Here's how to remove it.
One way to remove the background from your PowerPoint presentation is using the Design tab. You can use this option for changing individual slides or all of them.
Related: How to Remove Watermarks From PDFs
Open your presentation and select the slide you want to change. If you plan to change them all, you can select any slide.
Go to the Design tab and click "Format Background" in the Customize section of the ribbon.
When the Format Background sidebar opens, select the Fill tab.
Expand the Fill section and mark the Solid Fill option. You can also pick a different option if you want to use a Gradient or Pattern Fill.
Choose the color for the background using the drop-down box to the right of Color. Optionally, you can adjust the Transparency slider.
If you want to change all slides to the new background, click "Apply to All" at the bottom of the sidebar.
Another way to remove the image background is by changing the Master slide. This replaces the background for all slides in the presentation in one fell swoop.
Related: How to Use an Image as the Background in PowerPoint
Open your presentation and go to the View tab. Click "Slide Master" in the Master Views section of the ribbon.
You'll then be on the Slide Master tab automatically. Select the Master slide on the left side which is numbered 1.
Click the Background Styles drop-down arrow in the Background section of the ribbon. Pick one of the styles to replace the image or watermark background. You can hover your cursor over each option to see a preview on your slide. Click the one you want.
You can also select "Format Background" in the list to open the sidebar and choose the style of background or a different color from there.
You'll see all slides along the left below the Master slide update to the new background.
If you have more than one Master in your presentation containing the background image, you can do the same for the additional Master slide(s). Click "Close Master View" when you finish.
A pleasing background can certainly enhance a presentation. But if you end up with an image or watermark that you don't want , you can change it easily.
For more, take a look at how to create a custom template in PowerPoint .
Byte Bite Bit
How to Edit Background Graphics in PowerPoint: Step-by-Step Guide for Effective Presentations
Editing background graphics in PowerPoint can transform a mundane presentation into something that captivates and engages your audience. We all know that a well-designed slide can significantly impact how our message is received. By using the Slide Master view, we can easily add, edit, or remove background graphics for all or specific slides, ensuring our presentation aligns with our branding and enhances visual appeal.

Perhaps you’re working on a project that requires a unique look and feel. Switching up background visuals not only boosts the slide’s attractiveness but also reinforces your brand’s identity. There are various methods to do this, such as using the Designer option, Slide Master feature, or selecting patterns and colors that reflect your brand’s theme.
Imagine presenting to an audience with slides that are not just informative but also visually compelling. The ability to customize slide backgrounds effortlessly elevates the overall quality of our presentations. Let’s dive into how we can make our slides stand out by exploring different tools and options available in PowerPoint.
- 1.1 Accessing Slide Master View
- 1.2 Customizing Slide Layouts
- 1.3 Applying a Theme or Template
- 2.1 Formatting the Slide Background
- 2.2 Working with Colors and Gradients
- 2.3 Applying Professional Background Styles
- 3.1 Inserting and Editing Images
- 3.2 Utilizing Watermarks and Logos
- 3.3 Adjusting Image Transparency and Effects
- 4.1 Maximizing the Impact of Text and Fonts
- 4.2 Designing for Readability and Accessibility
- 4.3 Fine-tuning with Advanced Slide Features
Setting Up Your Slide Master for Consistency
Creating a consistent look throughout your PowerPoint presentation involves using Slide Master. This feature allows us to standardize the appearance of all our slides, including colors, fonts, and layout.
Accessing Slide Master View
First, open your PowerPoint presentation. Navigate to the View tab on the ribbon.
Click on Slide Master . This opens the master view where we can control the slide layout and other design elements.
In this view, you’ll see thumbnails of each slide layout. By editing these, we ensure that any changes apply throughout the presentation.
Customizing Slide Layouts
Each slide layout caters to different types of content. We can adjust these layouts to fit our specific needs.
In the master view, select a layout thumbnail. We might want to add title placeholders or modify existing text boxes.
Remember, changes here affect every slide that uses this layout. Let’s add our logo to the corner, ensuring consistency on all slides.
Applying a Theme or Template
Go to the Design tab to pick a theme. Themes can drastically change the look of your presentation with one click.
We can also apply templates that offer pre-designed layouts, saving us time. Choose a theme or template relevant to our presentation’s purpose.
To apply changes across all slides, select “Apply to All.” This makes sure every part of our deck maintains the same style.
Using Slide Master helps us create polished, professional presentations easily.
Enhancing Slides with Background and Color
Enhancing slides with background graphics and colors can make a presentation visually appealing and engaging. High-quality images, color gradients, and cohesive background styles can significantly improve the overall design.
Formatting the Slide Background
Formatting the slide background is fundamental. We start by selecting the “Design” tab, then click “Format Background.” Here, we choose between a solid color , gradient fill , or inserting a picture.
Solid Color: Offers a consistent look. Use the color palette to match your presentation’s theme.
Gradient Fill: Use preset gradients or create a custom gradient by adjusting colors, direction, and angle.
Additionally, we can set the transparency and brightness levels to make text and graphics more readable.
Working with Colors and Gradients
Colors and gradients can provide depth and clarity to slides. First, choose a primary color that aligns with our theme. Use this for titles and major elements to maintain consistency.
Gradients can be adjusted using opacity settings and preset options to fine-tune the background. Custom gradients allow us to select specific colors and angles, creating a more dynamic slide.
Applying Professional Background Styles
Professional background styles elevate our presentation. We can add high-quality images as backgrounds, ensuring they don’t overwhelm the content.
To upload images, go to the “Insert” tab, select “Pictures,” and browse for our file. Setting transparency for images can help text remain readable. Watermarks are another professional element, typically with low opacity to serve as subtle background graphics.
Additionally, PowerPoint offers preset background styles under “Design.” These include combinations of patterns, textures, and color fills designed to look aesthetically pleasing and cohesive.
By effectively using background graphics, colors, and professional styles, we enhance the visual experience of our slides.
Incorporating Images and Graphics with Clarity
When working in PowerPoint, incorporating images and graphics enhances the visuals and reinforces the message. Let’s break down how to insert , edit , and apply effects to images and graphics to make your slides clear and impactful.
Inserting and Editing Images
To add a picture, go to the Insert tab , select Pictures , then choose from This Device , Stock Images , or Online Pictures . If needed, use icons or 3D models for additional visual interest.
Once an image is inserted, resize it by clicking and dragging the corners. To maintain the aspect ratio, hold the Shift key . For more precision, use the Format tab where you can crop, adjust brightness, or add artistic effects.
For example, selecting Picture Format > Crop lets you trim the image. Use Artistic Effects to create unique visuals like Color Pencil or Blur , adding a professional touch.
Utilizing Watermarks and Logos
Watermarks and logos can establish brand identity and consistency. To add a watermark , go to the View tab and select Slide Master . Insert a picture or shape, position it, and adjust its transparency from the Picture Format tab .
For logos, use Insert > Pictures . Ensure the logo is consistent in size and placed in the same position on every slide for coherence. Set the transparency if the logo is overpowering the content.
Repeat the steps on each Slide Layout to apply the logo or watermark across all slides. This step avoids the need to manually add graphics to each slide and maintains uniformity.
Adjusting Image Transparency and Effects
Adjusting transparency can create a subtle background without overshadowing main content. Select your image and go to Picture Format > Transparency to set the desired level.
Using Picture or Texture Fill found in Format Background within the Design tab offers further options. It allows tiling a small image as a pattern or using a texture for stylish backdrops.
Additionally, explore Picture Effects like Shadow, Reflection, Glow, Soft Edges, Bevel , and 3-D Rotation to add depth and dimension. Be mindful of using effects sparingly to keep the overall look clean and professional.
Expert Tips for Content and Layout Optimization
Effective content and layout optimization can transform your PowerPoint presentations, making them more engaging and easier to understand. From choosing the right fonts to leveraging advanced slide features, our tips will guide you in creating impactful slides.
Maximizing the Impact of Text and Fonts
Choosing the right font can significantly enhance your presentation. We recommend using sans-serif fonts like Arial or Calibri for readability. Avoid overly decorative fonts as they can be distracting.
Text size matters. For titles, a size of 30 points or more works best, while body text should be no smaller than 18 points .
Using bold and italic text strategically highlights important points. Remember, less is more—keep text brief to allow your audience to focus on the key message.
Alignment is key as well. Left-aligned text is generally easier to read than centered or right-aligned text.
Designing for Readability and Accessibility
Creating readable and accessible slides ensures everyone in your audience can engage with your content. Start by selecting high-contrast color schemes— dark text on a light background or light text on a dark background .
Use bullet points or numbered lists instead of long paragraphs to make information digestible.
For accessibility, ensure your slide titles are descriptive and clear. This helps screen readers interpret the content accurately. Additionally, avoid using complex or fancy word art that might not be readable by all.
We should also consider alternative text for all images and graphics, enabling screen readers to describe the visuals.
Fine-tuning with Advanced Slide Features
Microsoft PowerPoint offers advanced features that can take your slides to the next level. For example, using the “Design Ideas” tool can provide creative layout suggestions.
Leverage the Slide Master to maintain consistency across your presentation. This tool allows you to edit background graphics, fonts, and other design elements globally.
Transitions and animations can add flair when used sparingly. Opt for subtle transitions such as “Fade” or “Appear” to keep the focus on your content.
Don’t forget to use SmartArt graphics for creating diagrams and flowcharts. They provide a professional look while simplifying the presentation of complex information.
Pro Tip: Regularly preview your slides in Slide Show mode to ensure they look as expected on the big screen.
Related posts:
- How to Embed a YouTube Video in PowerPoint: Step-by-Step Guide
- How to Add a Video to PowerPoint: Step-by-Step Tutorial
- How to Add Speaker Notes in PowerPoint for Effective Presentations
- How to Add Narration to PowerPoint: Step-by-Step Guide for Effective Presentations
- How to Add Slide Numbers in PowerPoint: A Step-by-Step Guide
- How to Insert GIF into PowerPoint: A Step-by-Step Guide
- How to Do a Voice Over on PowerPoint: Easy Steps for Professionals
- How to Add Notes to PowerPoint: Enhance Your Presentations with Ease
- How to Add Music to PowerPoint: Step-by-Step Guide for Seamless Presentations
- How to Make an Org Chart in PowerPoint: A Step-by-Step Guide
- How to Make a PowerPoint Presentation: Step-by-Step Guide for Beginners
- Why Is My PowerPoint File So Large? Key Causes and Solutions
Leave a Comment Cancel reply
Save my name, email, and website in this browser for the next time I comment.
IMAGES
VIDEO
COMMENTS
To add a watermark to all the slides, Select View > Slide Master. Scroll to the top of the thumbnail pane on the left, and select the first item, the slide master. Select Insert > Text Box, and then click and drag to draw the text box on the slide master. Type the watermark text (such as "DRAFT") in the text box.
To watermark a photo in PowerPoint, follow these steps. Insert your the image or text that you want to use as a watermark on your photo. Select your image and holding Shift select your text or image (so they are both selected) Hit Ctrl + C to copy both images. Hit Alt + Shift + V for Paste Special.
To insert the text or image you want to use as your watermark, click the "Insert" tab. Click the "Text Box" button. A text box will appear on your slide. Type whatever you would like in that text box. After you have typed what you want to, you can mess with the formatting of the text box. You might want to drag the curved arrow to rotate the ...
Step-1: Select the Slide and open the Slide Master. The first step is to select the specific slide on which you would like to add the watermark text. Then, click on the " View " tab. From the ribbon, click on the " Slide Master " option. This will open the slide master view in PowerPoint. Step-2: Add a Text Box.
Learn how to insert a photo, picture or other image as a watermark in PowerPoint in this video from Microsoft. PowerPoint doesn't have a gallery of ready-mad...
Step 1: Simply drag and drop the image you want to add to the slide. Alternatively, you may also use the Pictures option under the Insert tab if the image is stored in the cloud, or you want to ...
Adding a Watermark to all the Slides. Open your PowerPoint presentation. On the View tab, click Slide Master. Accessing the master slides. From the list of slides to the left, scroll up and select the first slide (the one on the top). This is the slide master and acts as parent slide, which means if you insert the image into this slide, it will ...
Add a watermark. Select View > Slide Master. Scroll to the top of the thumbnail pane and select the Slide Master at the top. Select Insert > Text Box, then drag to draw a text box on the slide. Type the text you want in the text box. Choose a light font fill color and make any other changes to the font and style.
Step 2: Go to the "Design" tab and select "Watermark". In the PowerPoint ribbon, locate the "Design" tab and click on the "Watermark" option. You'll find this in the toolbar at the top of your PowerPoint window. The "Watermark" option is usually located in the "Background" group.
Save the file in Photoshop as a transparent PNG. 2. Open the PowerPoint Slide Master. Open PowerPoint to a presentation that you want to watermark. Go to the View tab and switch to the Slide Master . Putting the watermark on the Slide Master means it appears on every slide in the presentation.
From the left sidebar, click on the first slide. This way, you will insert the watermark to all slides. Select the Insert tab from the menu bar, so you can start creating the watermark. Click the Text Box icon and choose Draw Horizontal Text Box. PowerPoint will create a text box and place it in the middle of the slide.
Add a picture watermark. Click VIEW > Slide Master. In Slide Master view, in the thumbnail pane on the left, click the slide layout (s) where you want to add a picture watermark. Right-click the slide and click Format Background. In the Format Background pane on the right, click Picture or Texture Fill, and under Insert picture from, click an ...
Select the text box, then use Ctrl + C to Copy the text you want to add as the watermark to your slide background. Right-click on the slide, and select from the Paste options, paste as a picture. The copied textbox will now be pasted onto your slide as an image.
Method 2: Adding a Watermark to an Individual Slide. If you want to add a watermark to only one or a few specific slides, follow these steps: Select the slide where you want to add the watermark. Click on the "Insert" tab in the toolbar, and choose either "Text Box" or "Picture," depending on whether you want a text or image watermark.
To watermark a photo in PowerPoint, follow these steps. Insert your the image or text that you want to use as a watermark on your photo. Select your image and holding Shift select your text or image (so they are both selected) Hit Ctrl + C to copy both images. Hit Alt + Shift + V for Paste Special.
Select the watermark and right-click on it. In the menu that opens, click on Format Text Effects. A Format Shape interactive menu opens on the right side. The menu offers three controls: Text Fill & Outline — Choice between hollow text or filled, color, and transparency. Text Effects — Add shadow, reflection, glow, and 3D effects.
Find beautiful and engaging PowerPoint templates with Envato Elements: https://elements.envato.com/presentation-templates/compatible-with-powerpoint?utm_ca...
Learn how to add a logo watermark to all slides in PowerPoint effortlessly! In this tutorial, we'll guide you through the simple steps to insert a picture wa...
Click "Draw" to center your watermark. Click "Align and Distribute" next, followed by "Relative to Slide.". Click "Draw" a second time followed by "Align and Distribute ...
Open the PowerPoint presentation that you want to add a watermark to. Go to the "View" tab in the ribbon menu. Click on Slide Master. In the "Slide Master" view, go to the first slide in the thumbnail pane, then select the Insert tab in the ribbon menu. Click on Text Box (for text watermarks) and Shape (for image watermarks), depending ...
This is crucial if you want your watermark to appear on every slide of your PowerPoint presentation including any new slides that you create. Next, go to Insert > Text Box. Once the Text Box is selected, use your cursor to draw a new text box on your slide. Type in any text you want.
Click Apply to add the watermark to all slides or Apply to All to incorporate it throughout the presentation. Method 2: Using the Background Image Feature. Step 1: Navigate to the "View" tab and select "Slide Master". Step 2: On the slide master thumbnail at the top, click to access its editing options. Step 3: Go to the "Insert ...
Step 4: Click on "Insert" and select "Text box.". This option can add a text watermark to your PowerPoint presentation. Step 5: Type in the text you want to use as a watermark. Click and hold the rotation handle at the top of the text box to rotate your watermark text. Step 6: Select the text in the text box, and then make changes to ...
Select the Master slide on the left side which is numbered 1. Click the Background Styles drop-down arrow in the Background section of the ribbon. Pick one of the styles to replace the image or watermark background. You can hover your cursor over each option to see a preview on your slide. Click the one you want.
First, open your PowerPoint presentation. Navigate to the View tab on the ribbon. Click on Slide Master. This opens the master view where we can control the slide layout and other design elements. ... To add a watermark, go to the View tab and select Slide Master. Insert a picture or shape, position it, and adjust its transparency from the ...