How To Create Your Own Website For A School Project - The Website Architect
- Website Design
- How To Create Your Own Website For A School Project

Websites are a great way to go above and beyond for a school project. If you make a website, you take your assignment to a level, not like any other student. Thankfully for you, websites can be quite cheap and easy to set up if you’re willing to learn and put the time into it. Let’s discuss different kinds of websites you can make, and different ways you can go about making one.

What kind of school project website should you make?
If your school project is open-ended it can be difficult to figure out what kind of website to make. Heres a list of 5 ideas to get you started:
- Create an online portfolio to display your student work. This is a great way to build upon and share existing art or science projects.
- Have a website that walks through the steps of a science experiment that they conducted in class, or share the story behind the experiment.
- Start a school newspaper or literary magazine with student contributors (you’ll want to use WordPress if you’re doing this one).
- A website about a field trip that your class took.
- A website promoting an upcoming event at your school.
For a more comprehensive list see the full list of school website project ideas .
How can I create a simple school project website?
There are plenty of ways you can go about making a website now-a-days, you can use a website builder, code it yourself, or even use a mix of both coding and visual page building. What one you decide to go with can help you choose what platform you want to use to make your website.
Hand-coding your website is a great way to learn a lot and show your dedication to a school project.
Using something like Squarespace is a great way of coming up with something simple to wow your school teacher without having to look at code.
Using something like WordPress can be a great mix between them both code and visual building.
Here’s what it would look like to go about making your website for a school project using those 3 different methods.
Using HTML and CSS to hand-code your website
- This method will take 4-12 days to learn the basics of HTML and CSS and setup your website
- It will take some technical skills to learn the 2 programming languages
- Will result in a website that might not look that professional, but will demonstrate your skills and dedication. If you want your HTML website online with a live URL, you have to buy a domain and hosting. I recommend using BlueHost for hosting as its the cheapest and the most beginner-friendly platform. Otherwise, your website will work locally off of a USB or file folder. if opened through a web browser.
HTML and CSS are the basic programming languages of any website. When I first learned HTML and CSS, it was a very fun rewarding experience. In fact, I had learned it to make a website about the Peregrine Falcon for a school project myself.
To get started with learning HTML and CSS to build your first website, you first have to get a text editor. Notepad++ is probably the most popular to use when coding websites, but Sublime Text 3 is my personal favourite because of how nice it looks.
After getting an editor, let’s set up the website files.
- Make a folder on your desktop and call it whatever you want.
- Inside the folder, right-click and then click New > Rich Text Document (that’s on windows mac might be slightly different).
- Then rename the file to index.html , it might have a popup asking are you sure about something and just click yes to confirm the name change.
- Lastly, open that new HTML file in your new text editor so you can get started coding.
Next, you’ll want to start with a video. Videos are great for visual learners and following alongside when coding. Attentively, you can read through W3 Schools tutorial page by page, clicking the “next” button at the bottom to learn about HTML and CSS at your own pace.
Here’s a great video to get you started. If you want to search for something different you can just search for “html css tutorial” in YouTube.
After learning the basics and trying out some HTML code on your own, you should begin to plan out and wireframe your website . This is a mistake I always made when I first started, programming before a plan. If you do this your website will turn out ugly and nonsensical – your choice!
After a solid plan and wireframe begin making your website. This will take a lot of time and practice so be patient.
Here’s what my first website looked like when I was first learning:

Using SquareSpace to make your website
- This method will take 2-4 days to learn Squarespace and set up the website
- Squarespace doesn’t require any technical skills to make a website, but if you want the final website to be accessible by a live URL you’ll have to pay monthly (starting at $12 a month). Otherwise, you can use the 15-day free trial and sign into your website to show it off privately.
- Will result in a professional and clean looking website
If you’re looking to set up a basic website as quickly as possible for a few bucks, Squarespace should be your #1.
To get started with SquareSpace make an account and then select the template/theme you want to start with.

Getting good with Squarespace is really about just using it for a couple of hours to get used to where everything is and how it works.
If you do choose to go with Squarespace, keep in mind its limited in the different kind of functionality your website can have. For example, do you want popups? Too bad! Want a slider? Not happening.
Do remember that Squarespace is only as good as text, images and some basic e-commerce features if needed, so keep that in mind when thinking about going with Squarespace.
Using WordPress to make your website
- This method will take 4-8 days to learn and set up the website
- WordPress itself is free but it will require you to pay for a domain and hosting. I recommend using BlueHost for hosting as its the cheapest and the most beginner-friendly platform. Or you can run it locally with XAMPP .
- Will result in a professional-looking blog (or nice content-focused website if you put time into it). A great platform for blogging, having authors with articles
WordPress is the industry standard for making websites. This website (The Website Architect) is built using WordPress. With WordPress, you can make almost any website you can imagine without knowing any programming knowledge. With programming knowledge, you can take your WordPress website that much further.
There are 2 types of WordPress, wordpress.org , and wordpress.com . WordPress.com is kind of like Squarespace, with limited functionality, and pricing plans. WordPress.org is a free framework you can download (for free) to build your own super custom and limitless website .
You can use wordpress.com as an alternative to Squarespace for making a simple website, but if you use wordpress.org’s framework you website can be without limitations.
To start with wordpress.org you’ll need to buy a website domain and hosting to get your website online. It’s usually around $15 a year for a domain, and $3-$20 a month for hosting.
Once you get your hosting, you can install the WordPress framework with a click of a button in the hosting tools.

After WordPress is installed go to Appearance > Themes and pick from one of the free theme templates. From there, it’s a matter of creating pages and posts to make the website you want. You can even install plugins which are little widgets or mini-programs that make your website have even more functionality and use.
If you don’t want to build and code your own WordPress them you can use a professionally built theme or browse around for some at Envato Market’s ThemeForest is the single best place to find the best WordPress themes .
WordPress is quite big so it will take time to learn and fully explore. WordPress being so popular, 9 times out of 10 if you google how to do something specific in WordPress there will be plenty of resources to help you out.
If you want to learn web design, WordPress, and how to be an effective web developer, check out my YouTube channel to make superb websites.
- Is it difficult to create your own website?
- How To Check If A Website Is SEO Friendly

The Website Achitect
I'm The Website Architect - NOT Just another web developer from Toronto, Canada. I'm passionate about web design, WordPress, and anything UX related. My goal is to make the Internet a more beautiful and usable place, one design decision and website at a time.
Recent Posts
- 8 Hand-Picked WordPress Themes for Long-Form Writing
- How To Remove Unused Icons For Font Awesome
- How to Practice Your Web Design Skills
- Does SEO Require Coding?
- Why is the Layout of a Website Important?
- How do you draw a website wireframe?
- How do you Find out What’s Slowing Down Your Website?
- Website builder
- Domain Name
- Online Store
- Custom Website
- WebSelf Simple
- en En Fr Es
Create a website for my school project
It is already challenging to make your school project, so why should you complicate your life when creating your website after choosing your research topic and starting to write your project, why not use a website to disseminate it, how to create a website for my school project.
After you sign up, three steps must be followed to create your website.
Choose one of our 200 designs
Customize the website with your images and texts, publish it it's that simple, using webself to create a school project website gives you a lot of advantages....
It's simple to use! You will then have more time to work on your project.
Lots of design choices. We certainly have one that will meet your needs, no matter your chosen topic!
It's free! You can make a 5 pages website completely free with WebSelf.
Our experience: WebSelf has been helping people create their websites for over 10 years.
Pourquoi devriez-vous avoir un site pour présenter votre TPE?
It's easy to put different elements on a website to support your words. For example, you can put videos, images, graphs, and statistics! Your presentation will be all the more appreciated. Stand out from other teams by opting for a professional and harmonious design!
School projects websites created with WebSelf examples

What is the future of space propulsion?
This team decided to make a comparison between liquid-fueled rocket motors, which are very efficient but have complex and expensive technology and cannot be used for the higher thrusts needed for liftoff; and the less efficient solid-fuel rocket motors, relatively crude but capable of providing very significant thrust; and how these two types of fuel are used symmetrically in recent rockets, in the form of powers associated with the 1st stage.

Organic farming
This team decided to deepen their knowledge of organic farming through various research and experiments. First, the introduction highlights the following: how to produce vegetables sustainably? Then, after explaining the supply of plants, the fight against weeds, and how to preserve production, this team concludes the third part that there is still work to be done for the use of organic farming despite the interest of fellow citizens.

Fine perfumery
These three students of the Lycée Français International de Porto Marius Latour have decided to mix the notions of chemistry, history, and geography to concoct a school project on fine perfumery. Indeed, after making the history of perfume through the ages and explaining the olfactory pyramid, these students tried to create perfume using the different processes studied (via hydrodistillation, decantation, fractional distillation, and chromatography). Perfume is undoubtedly not something simple!

Gender inequalities at work in France
Three students decided to focus on a topical topic, gender inequalities at work in France. They decided to make a website to support their project to present the many photos and graphics supporting their remarks. There are many statistics and quotes on the first page, in addition to having opted for a sober, simple, and professional design. This team raises the shortcomings present at home and at work, in addition to suggesting possible solutions to improve the situation experienced by women.
Signing up takes only seconds
Build my website...for free, your idea deserves a great site.
- About WebSelf
- Social Implication
- Terms of Use
- Privacy Policy
Partnership
- Our Partners
- White Label
- Domain name
- Help Center
- Examples from our clients
WebSelf is an online editor that allows you to easily build a website . No programming skills are required.
Discover How to create a website in 3 easy steps. Register for free, Choose a design among the themes offered and create your content.
Everyone can easily create a free website with WebSelf.net.
WebSelfTM is a registered trademark, specialized in creating websites for professionals and small businesses.
© All rights reserved, 2007- 2023
- Inspiration
- Website Builders
In This Article
Why create your own website project as a student, some ideas to make a website as a final project, final thoughts, related articles, 7 website project ideas [for students].
Follow on Twitter
Updated on: February 14, 2024
The web development space has so many segments to it. The jobs that entail within this sector are abundant and there is a lot of emerging technology throughout the web industry.
Web development is a great place to start, there are loads of resources to get started, loads of courses online to learn new skills, something which you can also learn about with required web developer skills that I wrote about.
g One of the best ways to improve your web developer skills is to get started on a project, something that you can actually start to build and face real-world issues during development. You can join all the courses or read all the books but you won’t learn real skills until you develop something from scratch yourself.
It may feel like you are throwing yourself in the deep end but you’ll be much more competent afterward.

You may be looking to improve your web developer skills or you may have been given a college assignment to complete a website project yourself . Either way, it will be a great journey to complete a project yourself. That’s why we have pre-selected a list of website project ideas ideal for your final project as a student.
Here are some great website project ideas for students:
- Single Page Portfolio Website
- News Website With Slider
- To-do List App
- Code-snippet storage
- JavaScript Drawing Canvas
- CSS Grid Layout
- Calendar App
Each student website project idea will be easy enough to complete as a beginner but hard enough to challenge you, a good balance between being practical and something you can be proud of.
And remember, you may be reinventing the wheel but it doesn’t matter, these website project ideas are for students, for you to learn and understand what goes on in the real world.
Let’s start!
1. Single-Page Portfolio Website
Your browser does not support the video tag.
This student website project idea can be more interesting than it seems. It holds so much value to it. Even though we will give just a general idea, you can spin this one into your own. Pick a design for a single-page website : a photography portfolio, a web developer portfolio or even a video portfolio – The choice is pretty much endless.
I’ve written about photography websites before and different website layouts . With this idea, you can really show off your skills and piece together graphic design, CSS animations and web developing skills in general.
You can add as many things as you consider to make it more complex. Comment system connected with a database, newsletter subscriptions, work on performance, play with SEO, etc.
You can even use some made-up components that might help with your portfolio design such as fullPage.js – A JavaScript library that allows you to create beautiful full-screen websites that will include all the features to show off your work: easy navigation, large media elements, responsiveness, etc. Check it out!
2. News Website With Slider

If you are looking to build something that has more requirements for both front and backend, this one’s for you. This website project idea for students is based around a news website where articles can be posted, maybe even supporting multiple authors and profiles between them.
The website can be used to display a range of different articles on a topic of your choosing. There could be a website homepage that shows off the currently available articles – You could even get fancy with this and rotate articles based on date or view count, etc.
If you are looking to challenge yourself more, once the frontend is done you could program a backend that allows you to post an article and save it to a database. Or maybe even add a comment system… The feature list is endless! For the frontend as well, it would be amazing to create a news website slider to showcase popular articles on the site.
3. To-do List App

Everyone has heard of a to-do list website in some form or another. This can easily be built and is a great way to learn a wide range of skills. Both front and backend skills.
Expect to use HTML, CSS, and JavaScript to create the frontend. You can easily set up routine tasks, reminders, and task groups. For the backend, a simple Node.js application or something built with PHP and linked up with MySQL would work fine.
There are many features to a to-do list so you can pick ones which you are interested in. Could be a file upload, group labels, kanban boards, etc.
To push this website project idea for students even further, you could implement a login/register system, there are many frameworks that help you with this.
4. Code Snippet Storage

As a programmer, you will have come across lots of different ways of doing things and maybe you wanted to save snippets of code to help you remember things?
That is where a code snippet manager will come in handy, some will even have an HTML & CSS sandbox to test code in as well. However, it’s great to keep useful bits of code organized and saved somewhere safe.
A code snippet website app will allow you to make a frontend and backend. You will need somewhere to save these code snippets, a database like MySQL would work nicely. Other features like sharing, snippet groups, and a notes section might be a good idea to push this project idea for students further.
We are sure your programming teachers will love this website idea for students and maybe they will start using it for their job!
If you want some recommendations for a database management tool, check out our review on TablePlus , available for Mac, Windows, Linux, and iOS.
5. JavaScript Drawing Canvas

Ever wanted to make your own art studio online? Have you been inspired to make something like the Windows Paint program? You could make your own online website for drawing and art creation.
By using HTML5 you can use a canvas with the addition of CSS and JavaScript to create your own paint tool. Add buttons for different pens, colors, and shapes.
Then you could even add a backend for people to log in and save their work or share it with others via a generated URL, you don’t have to go that far but the possibilities are endless. Perfect for a student website project.
6. CSS Grid Layout
If you are looking to test your frontend design skills, CSS grid layouts are a fantastic way to build a complex design that is both responsive and great for displaying lots of content. This website project idea for students will take advantage of CSS Grid or CSS Flexbox properties.
CSS grid offers a layout system that works best for a page with busy content, take this example from the Imgur.com website and their grid system:

This is a classic example of why a CSS grid system works so well for busy sites. You could make an app or design to do with images, news articles, or build something to display videos. Either way, a CSS grid system is a great way to show off your CSS skills and build a layout that is responsive and flexible.
7. Calendar App

This website project idea for students could be done by building a nice frontend website that displays a calendar. We see the use of calendars in email services like Gmail and Outlook. They are good ones to get inspiration from.
You could adapt this student website project idea to add different features like events, link up with work tasks, schedules, and meetings, etc. Maybe you can mix this website project idea with the to-do list project mentioned before.
With this website project, you would need to build both the frontend and backend so that a user could save their calendar items for later. It would be a good idea to add a cache system so items are not downloaded from the server all the time.
I truly believe that starting your own project is such a great way to learn new skills and get stuck in with your interests. Web development has many segments and starting a project can help you find what you enjoy.
With all these website project ideas for students , hopefully, you have found some inspiration. Don’t worry about feeling overwhelmed either, at first it might feel like you are in the deep end but you would be surprised how quickly you can learn something, especially in the world of web development, there are so many resources out there.
More articles which you may find interesting:
- Great Website Ideas
- Best Candle Website Ideas
Luke Embrey
Luke Embrey is a full-stack developer, BSc in Computer Science and based in the UK. Working with languages like HTML, CSS, JavaScript, PHP, C++, Bash. You can find out more about him at https://lukeembrey.com/
Don’t Miss…

- Legal Notice
- Terms & Conditions
- Privacy Policy
A project by Alvaro Trigo

You're signed out
Sign in to ask questions, follow content, and engage with the Community
- Canvas Student
- Student Guide
How do I enter a URL as an assignment submission?
- Subscribe to RSS Feed
- Printer Friendly Page
- Report Inappropriate Content
in Student Guide
Note: You can only embed guides in Canvas courses. Embedding on other sites is not supported.
Free website builder for students
The easiest free website builder you have ever seen! Create your own student website right now :)
You will get a free trial of premium for 14 days
Free website builder opportunities for students
One platform for all needs.
Weblium's young team remembers their student years very well. That's why we perfectly know all your pains and are ready to offer you the working solution a — free website maker for students so that you can easily create: ● a CV website to start your career; ● personal or portfolio website to showcase your works; ● exhibition site to make money on your hobby; ● landing page for your project or startup (why not?); ● and many other site types you may need!
Total customization
Weblium website builder for students allows using the best web development practices without having any technical skills yourself. Just choose one of the already existing and successfully functioning templates, and customize it according to your needs. All you need is to fill the template with your unique content.
All-in-one approach to website building
Using the Weblium website builder for students is highly beneficial: ● Firstly, you spend little time and effort. ● Secondly, it's cost-efficient. ● Thirdly, you use real prototype examples. ● Finally, you can always rely on the professional team not only during all development stages but also after the launch.
Free website templates for students
Education Consultancy
Frontend Courses
Oratory School
Now, you are just one step away from turning a website builder for students into a real website.
Ready-made integrations.
Weblium allows adding additional plugins to your website to expand its functionality
Weblium customers’ feedback
Find out why over 130,000 website creators have opted for Weblium
Marketing Specialist
Amazing platform, super easy to use and fabulous support team who never give up on you until they find a solution for you, even if you are being a tad thick! It’s a relatively new platform but has surprisingly few problems, and those that come up are solved quickly and efficiently and since I am one to really push the boundaries, if anyone was going to find the glitches it would be me! Well done Team Weblium!
Jacquey Dougherty
President at Dougherty Financial Consultants, Inc.
Weblium created a very professional website for my Insurance Agency/Accounting Firm business. When I indicated that I wanted to be able to add news items/blogs on a regular basis, they were extremely patient with me in training me how to do it. They took the time to send me videos that were extremely user-friendly and easy to follow. When I have a question, I email it and a consistent member of the staff gets back to me literally right away. I highly recommend Weblium!
Hillary Moon
Hillary Moon Performance Art
I had a Facebook page but wanted to share my work with more potential clients. When I found Weblium's offer, it seemed too good to be true at first. But Weblium did a great job! They built the website I needed and helped me learn how to manage it. 10/10.
Kate Goncharova
Mimodels Management
We decided to create a website since it’s the best way to showcase your talents in modeling business. Weblium created a site that both meets our expectations perfectly and is pretty simple to manage on your own. I can vouch for the quality of this service
How to create a professional website: step-by-step guide
- Cecilia Lazzaro Blasbalg
- 10 min read
Get started by: Creating a website → | Getting a domain →

A professional website can simultaneously operate as a marketing tool, a store platform, a display of talent, a communication channel, and an engine for branding. Essentially, it opens up the entire world to you and your business, giving you a unique platform to accomplish nearly anything.
In this post, we will provide a step-by-step guide explaining how to make a website and walk you through the technicalities and details of building your own professional site, which may differ from building a personal site. We will also focus on branding and marketing essentials to guarantee your site is as effective as it is beautiful.
Or get started by understanding more about creating a website with AI from these best AI website builders .
How to create a professional website
Strategize your brand
Master the web design
Prioritize website usability
Optimize for search engines
Professionalize your site
Optimize for mobile
Launch a content marketing plan
Maintain your professional website
01. Strategize your brand
Start with outlining a clear and consistent brand strategy that will impact each touchstone of your site, from the overall website purpose , to the guiding visual philosophy and tone of voice. All of these should become clear as you pursue the following:
Identify your target market : Who are they? Which demographic groups do they belong to? What do they like to do? How do your target audience see themselves? How will your business or website influence their lives?
Research your competitors : Do some market research to get a feel on what the competition is doing, what their strengths and weaknesses are, and how you can carve a niche for yourself in the field.
Define your brand identity : If you had to describe your brand in three words, what would they be? What is the vision that motivates your brand? Think of your brand’s personality and extract from it tangible traits like brand colors, vocabulary and style.
Prepare consistent branding material : Now it’s time to get practical and prepare the materials that will soon be featured on your site and across your other branding assets. Make sure to create your own logo , as well as images, slogans, videos, textual content and more. These elements should all correspond to your brand identity and serve your branding strategy.
Learn more: Website name ideas

02. Master the web design
From choosing the right website color scheme, to crafting the right layout for your site, you have to take into account many aspects of professional website design . If you already know how to build a website from scratc h and have some previous experience, you can build your site starting from a blank website template , deciding whether you want to create a static website or a dynamic one. If you're worried about how long it takes to build a website , and want save some time, you can also create a professional website with Wix's HTML website creator in the following three steps:
Choose a template or start with AI : Using a website builder with What You See is What You Get (WYSIWYG) software, like Wix, you don't need any code to create your site—it's already built into the interface. The platform provides customers with customizable website templates as a solid foundation for designing their sites from scratch. There is a vast selection of professional website templates for a range of themes, styles and purposes. Whether you’re creating a personal website , using an online store builder or any other type of site, find the template that best suits your vision. Ideally, the one you pick will already be structured according to your needs and in line with your business goals (Learn more about starting a business ). Alternatively, you can let Wix's AI website maker design your site for you, and then customize it later on. This means you don't need to be well-versed in HTML , CSS or other web development lingo. Simply chat with AI and let Wix's artificial design intelligence work its magic. Learn more about how to create a website with AI . If you are an expert, check out Wix Studio for features such as responsive AI and a web creation platform built for agencies.
Customize your template : It’s time to turn it into your very own site by customizing and editing. Add in all your content, including text, videos, links and images. Wix recommends using JPEG, PNG and GIF files for images to ensure they appear their best on your site. Next, refine the design using the editor's site and theme design to easily align your site design with your brand. Customization can be as basic or as elaborate as you want it to be. For inspiration, take a look at this selection of striking Wix websites , created from three different templates. Notice how the original simple website templates have been adapted to result in unique, individually-designed sites.

Tweak the look : There is much more to creating a website than just choosing the best fonts, colors and images. You can incorporate a variety of media features to enhance your overall aesthetic. Try adding background videos or animation to your website design for added movement, or parallax scrolling to craft a sense of depth.
Waste no time and create your site from start to finish with Wix's website builder .
03. Prioritize website usability
Your website needs to catch the eye of any potential customer, but to ensure that visitors will keep browsing, you must also provide a positive user experience. A beautiful website that does not function properly will not get you far. As you create a professional website, pay attention to these important points:
Navigation flow : For optimal website navigation, make sure the site structure is clear and intuitive. Visitors should be able to easily navigate between pages and subpages using the main menu or internal links.
Content hierarchy : Hierarchy is one of the seven principles of design, which is why you should pay extra attention to it. Your aim is to guide visitors through your site in the order that best suits your interest. When thinking through how to plan a website , make sure that the most crucial layout elements are the most prominent. Reflect this hierarchy in your design, emphasizing the most important elements through size, color and placement on the page. For example, if you want people to subscribe to your service, make sure your ‘Subscribe’ button stands out on the page. This landing page explaining how to create a blog with a blog creator, clearly demonstrates content hierarchy done right, with large headers and eye-catching buttons.
Calls-to-action : CTAs are the short messages that invite site visitors to take direct action. They can encourage visitors to “Register Free,” “Get Yours Today” or “Subscribe.” In short, they tell the visitors explicitly what you want them to do and make it easy for them to trust what will happen after clicking a button.
Readability : Readability is a basic principle in typography. Make sure to use clear fonts and comfortable font sizes, that your text colors contrast well with the background colors, and that you have enough empty space (whitespace) around your written content. Check out our guide for more details on how to make website accessible .
Footer : The bottom part of your site is known as the website footer (the top is the header). Footers are not immediately visible to site visitors, but they can be used in a number of ways to enhance usability. Consider adding your contact information to the footer, including buttons linking to social media channels and your privacy policy . You could also display a simplified site map that links to all your pages, as well as a brief explanation of who you are, or a site disclaimer text.
04. Optimize for search engines
Getting your site to rank prominently on search results is one of the most valuable ways to increase your traffic. This is why it’s so important to prioritize search engine optimization ( SEO ) in the early stages of creating your professional website. A key part of online marketing, SEO is a science in its own right. Its key elements are:
Keyword research : Put yourself in the shoes of your potential site visitor or client. Which questions or phrases might they search for on Google that could lead them to your website? The keywords within their search queries will guide your SEO strategy. Using keyword research tools, you’ll be able to make an informed decision on which keywords you should be targeting. This can also be helpful for choosing a domain name that's relevant and searchable.
Text : Every piece of text on your website, from your menu to your FAQ page, blog, footer or bio section, should be written with SEO in mind. While there are many SEO tips to boost your website, the general idea is to find subtle and elegant ways to integrate your keywords into your site’s textual content without compromising on quality. Search engine crawlers are smart, and they could down-rank you if they think you sound too much like an ad.
Meta tags : Search engines like Google read your metadata. It’s up to you to control what it is that they see and how they present your site in search results. It is well worth it to take the time to add custom meta tags to your site with the goal of optimizing your content and helping search engines understand what your pages contain.

Alt text : Images also play a prominent role in your SEO efforts. Every image that you upload to your website should have alt text (short for alternative text) added to it. Alt text is a very short line that explains to search engines what the image depicts. In turn, this allows your images to be ‘found’ in search results, which is why it’s important to write SEO friendly alt text for all your images.
Link building : Broadly put, your ranking on search engine results is likely to improve if you have other websites linking to your site. You can start by submitting your professional website to directories, making sure that all your social media profiles link to your site, and encouraging site visitors to share your content as well.
Keep in mind that SEO is a long-term process that does not end once your website launches. You will need to continue to refine it as you go along in order to achieve sustainable results.
05. Professionalize your website
In addition to acting as the online face of your business or service, you should ask yourself how your website can further enhance your professional success. Depending on your industry or field, your site could be offering a number of features that will make it more appealing to your target market:
Scheduling software : Is an ideal solution for managing appointments online and helps you take bookings and get payments more efficiently, as well as showcase your services in their best light.
Online store : It’s never been easier to create and manage an eCommerce website, which includes professional features such as advanced marketing tools, secure online payments and multiple sales channels. You can start building your website from scratch or pick one of these online store templates .
Fitness website : As you build a fitness business, you need an all-in-one solution with gym management software, online booking and payments, and convenient staff and scheduling options.
Music website : Sell your music directly on your website with Wix, and keep 100% of the profits. You will also be able to expand your audience while maintaining total creative freedom.
Essential apps : The Wix App Market holds a large selection of apps that will help you fulfill your website’s potential to the max. Consider, for instance, a tool to track your visitor analytics , a countdown timer to help increase your sales, and sophisticated text animation to impress your visitors.
06. Optimize for mobile
Making sure your website functions just as well on mobile as it does on desktop is crucial in this day and age. In fact, mobile usage stats indicate that mobile devices account for over 50% of web page views worldwide . Not only that, but since Google implemented mobile-first indexing, websites are ranked on search results predominantly by their mobile versions. Clearly, it’s worth investing your time in optimizing your mobile website .
When you create a professional website with Wix, the mobile editor automatically converts your desktop design into a mobile-friendly site. You can then adjust the layout and design to suit mobile devices, paying particular attention to readability, text sizing and navigation. You can even make your website an app for users to download to their smartphones.
For users who are looking for full control over breakpoints, Wix Studio is an advanced creation platform built exclusively for designers and agencies. It combines cutting-edge, responsive design with intuitive drag-and-drop on a flexible new canvas. This gives you absolute design control, so you can design your site at any viewport size.
07. Launch a content marketing plan
Once your professional website goes live, you will see that the main challenge shifts to attracting and maintaining visitors. You can prepare for this task by developing a content marketing strategy, or the nuts and bolts of creating, publishing and promoting content that builds brand loyalty and trust. Here are two ways to launch a content marketing plan:
Make newsletters : Marketing emails, like a newsletter, can generate traffic using relevant and enticing content that makes a reader want to click. You can make your own successful email marketing campaign with Wix using fully customizable layouts, marketing automation tools, easy-to-read stats tracking, and more.
Start a blog : There are many reasons why blogging is well worth your time and effort. Besides the fact that you can use it to monetize a website , having a blog can positively impact your site’s traffic. By covering a wide array of topics, you can draw in more readers and in turn more users to your product or service. Blog articles can also be repurposed and shared on social media.
Content-wise, having your own blog will let you communicate your message and ideas in a more personal tone, as well as demonstrating your level of professionalism in your field.
Social media is another great way to reach a wider audience. When you update your website, you can share the news on your social media channels. However, don't just promote your website. Engage with your audience in a genuine way, too.
08. Maintain your professional website
As your professional website grows traffic and attracts more site visitors, you’ll need it running like a well-oiled machine. While website maintenance can feel like a big chore, it doesn’t have to be overwhelming. There are some easy steps you can take to stay on top of your site with little investment. These include updating your content, like on your contact form, responding to customer reviews, checking online inventory and removing broken links or updating your privacy policy . Maintaining helps keep your audience engaged and your site looking professional.
It's also important to check your software and add-ons for updates at least monthly. Outdated software can be a security risk, even if you have strong website security measures in place.
Tip: Need a catchy title for your website's domain or subdomain ? Use a website name generator for inspiration and ideas.
When it comes to creating a professional website you'll want to make sure you use a website builder, whether do it yourself or headless, that comes with advanced website infrastructure. This means with web hosting provided automatically, the chance to choose and connect a domain name and security that delivers 24/7 monitoring.
How to create a professional website FAQ
Can i build my own professional website.
Yes. All you need to do is choose a website builder, like Wix, find the right professional website templates and get creating. With Wix, your web hosting and web security are taken care of, so you can focus on the design and content of your site. Learn more about the advantages of Wix in this comparison guide: Wix vs Squarespace .
Can I create a professional website for free?
How much does it cost to build a professional website, how can i create a professional website as a beginner, what is a personal professional website, how to spot a professional website, why should i create a professional website, related posts.
What is a virtual assistant website, why you need one and how to make
How to create a sports team website and build a following
How to create a medical website in 10 steps
Was this article helpful?
HTML beginner's tutorial: Build a webpage from scratch with HTML
Become a Software Engineer in Months, Not Years
From your first line of code, to your first day on the job — Educative has you covered. Join 2M+ developers learning in-demand programming skills.
If you are a web dev novice and want to get started with the exciting world of web design, you’ve probably heard of HTML , which is the foundation of every web page online. Any successful web developer or designer must have a strong understanding of HTML.
Today, we will go through a beginner’s tutorial on HTML and build a web page step-by-step. Most web development tutorials talk about CSS and JavaScript right away, but we want to make sure you have a solid understanding of HTML before moving onto the next steps.
We will discuss the basics of HTML that you’ll use throughout your web dev career. No prerequisite knowledge of programming is required, but to be most successful with this article, a basic understanding of programming is helpful. For a quick introduction or refresher, check out The Absolute Beginner’s Guide to Programming.
Today we will cover:
- What is HTML?
Key HTML terms and formatting
- How to build your own web page with HTML
What to learn next
Hyper Text Markup Language (HTML) is the markup language we use to make webpages. It is the basis of every website that you encounter on the internet. Think of HTML as the bricks that you need to build anything for the web. Once we write our HTML code, we can add other languages to the page, such as CSS and JavaScript, to add interactivity, style, and more.

Imagine a document that you would create in a word processor. That document will usually use different font sizes to indicate sections of the text, such as headers, main content, footers, table of contents, etc. HTML is the process of building that document and setting the sizes of our text.
HTML provides a website’s structure and layout. We define that structure using various elements. But in order for a browser to appear how we want it, it must be explicitly told what each piece of content is. HTML is how we communicate and tell a computer how to render. The computer can interpret our HTML elements and translate them onto the screen.
Explore HTML on your own. You can view the HTML source code of any website by right clicking on a rendered page and selecting “View Source”. This will open a page that details the HTML foundations of that site. Try it out with this article!
Now that we know what HTML is, let’s briefly introduce a few key terms before moving onto a step-by-step guide. You will use these basics throughout your entire web dev career!
Tags and elements
An element is an individual component of an HTML document that represents the semantics of that page. For example, the title element translates to the title of a page.
Semantics refers to the meaning of a particular element. Syntax refers to the structure of a programming language.
To create an element, we use tags . Think of these as descriptors for each piece of content you want on your page. Most tags are quite self-explanatory.
- <p> : used to describe a paragraph
- <img> : add an image
- <h1> : set the text to the largest size heading
- <a> : an anchor will create a hyperlink to other HTML files
To use tags, we wrap the content between an opening and closing tag. The closing tag uses the forward slash / , while the opening tag does not. HTML tags are case not sensitive so <P> is the same as <p> .
You can nest HTML elements when you want to apply multiple tags. Say you wanted to make a paragraph that is also bold. You could write the following HTML code:
Attributes and hyperlinks
HTML attributes provide additional information about our elements. Think of these like properties of an element. Attributes are placed in the opening tag, use the = sign, and wrap the attribute value in quotation marks " " .
Attributes can do all sorts of things to our elements such as embed images, add color, declare the language of a page, or add a title. For example, we can add color to our text using the following format.
Note: You can add color using Hex color codes (for specific colors) or one of the 140 text color names built-into HTML.
One of the most common uses of attribute is hyperlinking . We can connect any HTML page to another HTML page using an anchor tag. The href attribute will create a connection between the two sites.
Headings and lists
Headings are how we specify the difference between the main header and sub-headers. The HTML standard has six text heading elements, appropriately named h1 (the largest) through h6 (the smallest).
Note: Headers are used to represent text semantically. This is different than specifying font size. We use CSS to change font size.
If we want to list items, either as a bulleted of numbered list, we use the <li> tag. We can either create an unordered list (bulleted) or an ordered list (numbered).
- Unordered lists begins with the <ul> tag and the nested <li> tags for teach item.
- Ordered lists begins with the <ol> tag and the nested <li> tags for teach item.
Add images: <img> tag
We can add images to our webpage using the <img> tag. We need to add a src attribute that contains a file path to that image. You will also include an alt attribute, which provides an alternative text description in case the image does not load.
In the example below, we also defined two class attributes. The class attribute is used to identify specific elements with an identifier. This makes it possible to use an elements in a later part of our code. An element can have multiple class values, such as a title and a caption, as we use below.
Note: The image tag does not use a closing tag.
HTML tables
We can add tables to a webpage by translating a table’s data into row and columns. Each row/column pair will have a piece of data associated with it called a table cell . So, how do we build a table in HTML?
First, we declare an HTML table using the <table> tag. Then, we add rows to our table with the <tr> tag. From there, we specify the cells with the <td> tag.
Take a look at this example below, but note that the table is not stylized at all. It will only list the data as it is provided. If we want to add style to the table (background color, padding, borders, etc.), we must use the language CSS.
Formatting an HTML document
Now that we know the terms of HTML, let’s discuss the basics of formatting. We will look at a basic HTML file before discussing each part below.
The first line, <DOCTYPE! html> , is called the doctype declaration. This indicates to browser what HTML version the file is written in. This file indicates that it is written in HTML5.
On the second line, we write the opening <html> tag to indicate the root element. From there, we branch off into other elements in a tree-like structure. To properly define an HTML file, we must place <head> and <body> elements within that root.
- The <head> element contains supporting information about the file. We call this metadata. There must be a <title> to providing a title to the page directly underneath the <head> element.
- The <body> element contains the main content of our file that will be rendered by a browser. There can be only one <body> element. Most of the HTML code you write will exist here.
- Within the body element, we then branch off to our highest-level heading <h1> and a paragraph <p> .
As you can see from this example, some elements are inline while others are block-level . Block-level HTML elements take the full width of a webpage and start on a new line. Some of these elements include headings, lists, and paragraphs. Inline elements do not take the full width and are in-line with text content. Some examples include anchors, images, and bolded text.
Become a frontend developer for free.
This is the ideal place to start your journey as a front-end developer with 6 curated modules. With no prior knowledge needed, you will gain a mastery of HTML, CSS, and JavaScript, allowing you to put together beautiful, functional websites and web apps yourself.
Become a Front End Developer
How to build your own webpage with HTML
Alright, now we know the basic terms of HTML and how to format an HTML file properly. But how do you actually make a webpage? Let’s go through a step-by-step guide to learn how it’s done. We will be making a simple “About Me” webpage that includes the following:
- Title with your name
- Description of yourself in a paragraph
- List of your skills
- Hyperlink to a website you like (or a personal website)
- Table of your work experience
1. Download and open an HTML editor
Webpages are created using HTML editors. Think of this like a word processor but specifically for creating HTML files. There are many options for text editors that vary in complexity and robustness. If you’re just getting started, I recommend using simple text editor like TextEdit (Mac), Notepad (PC), or Atom. Most text editors are free to download.
Here, we will use Educative’s build-in text editor widget where you can explore HTML without downloading anything. You can also follow along with your own editor of choice.
2. Write a basic HTML file
Once you open your editor, start a new file and write the basics structure of an HTML page. Try writing the basic structure yourself in the code widget below using what we learned above. The answer can be found below if you get stuck. You should include:
- Document type declaration
- A page title called “My HTML Webpage: (Your name)”
- A header ( h1 ) called “About Me: (Your name)”
- Paragraph with 1-2 sentences about you
- Proper closing tags
3. Hyperlink to a website you like (or personal website)
Now, let’s add a link to your personal website or a website of your choosing. Copy the code you wrote from above and continue adding to it below. Try it yourself before checking the solution. We will add this just below your personal description. It should include:
- The title of the page you are linking to
- The URL to link to that site
4. Add a list of your skills
Now, let’s add an unordered list of your skills. Copy what code you have from above and continue adding this next step of HTML code. Try writing the code yourself in the code widget below using what we learned above. The answer can be found below if you get stuck. You should include:
- A header ( h3 ) called “My Skills”
- A bulleted list of 5 skills
- Proper closing tags for the list
5. Add a table of your work experience
Now, let’s add a table of your work experience. Copy what code you have from above and continue adding this next step of HTML code. Try writing the code yourself in the code widget below using what we learned above. The answer can be found below if you get stuck. You should include:
- Column headers: Employer, Job Title, Years
- 3 former jobs with each of the above columns filled in
6. Finish and save your webpage
Once you complete all these steps, you’ll want to save the HTML file on your computer. Select File > Save as in the Notepad or other text editor menu. Name the file your_name.html and set the encoding to UTF-8 (preferred for HTML files).
Once you save the file you can open it in your browser by right clicking on the file, clicking Open with , and selecting your browser. You will see your basic HTML page!

Congrats! You’ve officially made a simply webpage on your own. You’re well on your way to becoming a frontend web developer. There’s still a ton to learn, but HTML is a really important stepping stone. The next steps in your web dev journey are:
- Advanced HTML
- CSS (for adding style)
- JavaScript (for interactivity)
- Libraries and frameworks (prewritten code)
- Advanced web dev concepts
To get you started with these concepts, Educative has created a learning path to walk you through all the skills necessary to become a professional web developer. Our Become a Front End Developer Learning Path offer 6 curated modules. You’ll learn how to add style to a webpage, the basics of JavaScript, and even how to deploy your own website!
Happy learning!
Continue reading about web development
- A Beginner’s Guide to Web Development
- JavaScript Snake Game Tutorial: build a simple, interactive game
- Animate CSS code: create a panda animation with HTML & CSS

Learn in-demand tech skills in half the time
Mock Interview
Skill Paths
Assessments
Learn to Code
Tech Interview Prep
Generative AI
Data Science
Machine Learning
GitHub Students Scholarship
Early Access Courses
For Individuals
Try for Free
Gift a Subscription
Become an Author
Become an Affiliate
Earn Referral Credits
Cheatsheets
Frequently Asked Questions
Privacy Policy
Cookie Policy
Terms of Service
Business Terms of Service
Data Processing Agreement
Copyright © 2024 Educative, Inc. All rights reserved.
- How to Make a Website
How to Code a Website
Learn to Build a Website Using HTML and CSS

Staff Writer
Want to learn how to create a website with HTML and CSS?
You’re in the right place. In this guide, we show you all the steps to get from a blank screen to a working website that’s optimized and quite good-looking at the same time.
But first, what is HTML and CSS?
Well, you could just look up both terms in Wikipedia, but those definitions aren’t very reader-friendly. Let’s simplify things a bit:
- HTML (Hypertext Markup Language) defines the structure and contents of a web page – where things go, how they are laid out, and what’s on the page
- CSS (Cascading Style Sheets) defines the styling/presentation of a web page and the elements on it
You can’t really have one without the other – the two work together to make up the final web page, its design, and the content that’s on it.
Note; when we say “a web page,” what we mean is a single HTML document – a single page that’s part of your website. Whereas, “a website” is the complete thing – your whole site with all its individual web pages.
Table of contents
- Learn the basics of HTML
- Understand HTML document structure
- Get to know CSS selectors
- Put a CSS stylesheet together
- Get Bootstrap
- Pick a design
- Customize your website with HTML and CSS
- Add content and images
- Fine-tune colors and fonts
- Create additional pages
If you think this is too complicated, we recommend either creating a website using WordPress or choosing one of the website builders.
Before You Start, Gather Your Resources:
So, the first thing you need even before creating a website with HTML and CSS is a web server (hosting). Don’t worry, though; you don’t have to buy your own machine. Many web hosting companies will sell you a simple hosting service on their machines. Just google for “web hosting” and pick something that isn’t too expensive or check our web hosting reviews .
With the server sorted, the next thing you need is a domain name. The domain name is what the website is identified on the web. For example, this site’s domain name is websitesetup.org .
When you have both a domain name and a server, you can connect the two together.
To have this sorted out with no pain on your end, we recommend signing up with a company like Bluehost.
They will handle all the setup for you. Meaning that they will: (a) set up a hosting account for you, (b) register a domain name on your behalf, (c) configure everything to work together, and (d) give you access to an easy-to-use dashboard.
Go ahead and sign up with any of the web hosting services , we’ll wait. When you’re back and have your web server configured and ready to go, scroll to the next step.
P.S. If you just want to experiment with an HTML website on your computer , and don’t intend to make it public, use a local web server software. The one we recommend and like to use is called XAMPP . It has versions for both Mac and PC, and it’s easy to use. Here’s a guide on how to install it on your computer.
1. Learn the Basics of HTML
The main element of an HTML structure is an HTML tag .
A tag, for example, looks like this:
Here, we’re dealing with a <b> tag. This one will bold a piece of text that’s between the opening tag ( <b> ) and the closing tag ( </b> ). In this case, that piece of text is SOMETHING .
But there are other tags, just to name a few:
- <i>...</i> will italicize the text between the opening and closing tags
- <u>...</u> will underline it
- <p>...</p> is a paragraph of text
- <h1>...</h1> is the main header on the page
Apart from those simple tags, there are also more complex tags. For example, if you want to build a list like the following:
Item 1 Item 2 Item 3
… you can do that with the following HTML code:
Or, if you want to add a link to another page, like this one:
This is a link to our homepage
… you can do that with this piece of code:
Read this to get the full list of HTML tags . It’ll become useful as you’re creating a website with HTML and CSS.
2. Understand HTML Document Structure
Think of your HTML page as if it was built of Legos. You put different bricks on top of one another to end up with a given bigger structure.
But instead of Lego bricks, you get HTML tags…
Here’s the simplest HTML document structure:
You can take the code above, copy and paste it to a new file, save the document as index.html , and it’s going to be a perfectly valid HTML page.
Let’s explain the individual parts of this code:
- <!doctype html> – the initial declaration of the document
- <html lang="en"> – another declaration; says that what’s to come next is an HTML document written in English
- <head> – marks the start of the head section; the head section is where all the basic parameters of the page go; most of those are not going to be shown on the screen; they just define what’s going on under the hood
- <meta charset="utf-8"> – defines what character set is used to write the document; no need to spend too much time on this; just use this declaration as is
- <title>Hello, world!</title> – the title of the page; this is what people will see in the title bar of their browsers, e.g.:

- <body> – marks the start of the body section; this is where all the content of the page goes; it’s the main part of an HTML document; let us emphasize this, this section is where you’re going to be including all the content that’s meant to appear on the page
- <h1>Hello, world!</h1> – the main header on the page
- <p>My first web page.</p> – a simple paragraph of text
- </html> – the closing tag of the whole HTML document
An important note here. Working on an HTML file in a basic text app or a complex text processor like MS Word is not a good experience. To make things easy on yourself, install a HTML editor called Sublime Text . It has versions for both Mac and PC, and it is free.
Why is it better? Among other things, it will colorize the syntax of an HTML file. Meaning, it’ll visually distinguish your HTML tags from text content, tag parameters, and other values. Basically, it’ll all become readable. Here’s what our simple HTML structure looks like in Sublime Text:

Okay, back on topic. You can take that new index.html file of yours, copy it to where the main directory of your web server is, and then see that page by navigating to it through a web browser. Don’t get too excited, though; this page will be rather ugly (see below).

Okay, so the page is ugly, how to make it not so?
3. Get to Know CSS Selectors
Just like HTML has its tags, CSS has selectors .
Selectors describe how a given element should behave appearance-wise. Here’s an example of a CSS selector:
This selector indicates that all HTML <p> tags within the document will have a font size of 18px.
However, a more practical way of using CSS selectors is not to restrict all tags of a given type to a certain styling, but rather create different “classes” and assign them to tags one by one.
For example, a class selector in CSS looks like this:
Notice the dot ( . ) before the name of the class ( normal-text ). With the “normal-text” class defined, we can now assign that class to those specific HTML tags that we want to make 18px in size.
For example:
Let’s take one more minute to explain all the elements of that piece of CSS code above:
- .normal-text – class definition; everything after the name of the class and between the opening and closing brackets {} defines what the elements assigned to this class will look like
- font-size – an example CSS property
- 18px – a value assigned to the property
There’s a ton of CSS properties apart from the above font-size . Here’s the complete list if you’re curious.
4. Put Together a CSS Stylesheet
An HTML document is very structural – every element has its place, and the order of elements is crucial for the final construction and appearance of the web page in question. A CSS document is a lot less so.
CSS documents are often referred to as stylesheets . Basically, a CSS stylesheet is a list of all the class definitions that are being used in the corresponding HTML document. The order of the class definitions is not that crucial most of the time (at least for simple designs).
The way you put a CSS stylesheet together is by defining each class one by one, and then testing if the outcome in your page design is what you wanted.
This sounds like tedious work, and it is.
But we’ll make things easier on you, and not force you to learn HTML and CSS design by hand. Instead of teaching you everything from scratch, we’ll take a living organism and dissect its elements.
This is where a thing called Bootstrap comes into play.
5. Download/Install Bootstrap
Bootstrap is an open-source toolkit for creating a website with HTML and CSS.
In plain English, Bootstrap takes care of the basic structure of an HTML document and CSS stylesheet for you. It delivers a framework that makes sure that the main scaffolding of your web page is ready and optimized for further development.
Basically, Bootstrap lets you not start from scratch, and instead go right into the fun part. With it, you don’t have to work on the often boring early stages of creating a website with HTML and CSS.
There are two paths you can take:
- Option (a) : learn Bootstrap – go to the Bootstrap homepage, download the main Bootstrap package and start building on top of it.
- Option (b) : take a shortcut – get a starter pack for Bootstrap with a good-looking design and a demo web page already built.
Option (a) might have some learning curve at the beginning, but it’s not in any way the worse way to approach creating a website with HTML and CSS. Once you master the core Bootstrap structure, it might be easier for you to build new pages and make them look exactly as you want them. The Bootstrap documentation is a great place to get started with this path.
We’re going to go with Option (b) for this guide. We’re doing this for a couple of reasons, chief of them:
Starting with a ready-made structure saves a lot of pain in trying to figure out the basic necessities of an HTML document. This lets you focus on the interesting stuff – like laying out content and making it look good.
In short, learning things this way will give you a better-looking result quicker, which we guess is what you want.
6. Pick a Design
When you’re creating a website with HTML and CSS, you are free to use any Bootstrap template you like. They should all work similarly enough.
However, for this guide, we’re going to use one of the templates by Start Bootstrap . They have a nice selection of free templates that are optimized, work trouble-free, and are also very well designed.
The theme we’re going to use is called Creative . The final effect we’re going for will look something like this:

To begin with, the Creative template, click on the Free Download button that’s on the right (on this page ) and save the zip package to your desktop.
Unzip the package and move its contents to the main directory of your local web server or your web hosting account.
Now open that location through your web browser. You’ll see the stock version of the template:

It’s already quite good-looking, but now it’s time to learn how to use HTML and CSS to make it into exactly what you want it to be.
7. Customize Your Website With HTML and CSS
Let’s work on the homepage of the design first. This is going to show us how to replace the graphics, texts, and tune everything up in general.
We’ve talked about the head section of an HTML document briefly above. Let’s have a more in-depth look into it here.
When you open the index.html file of your Bootstrap site in Sublime Text, you’ll see a head section like this (we removed all the non-crucial things from this code for clarity *):
* Apart from the above, there was also code to load Google Fonts, Font Awesome icons and a lightbox module for the images displayed on the page.
Most of the declarations here we already know, but there are a couple of new ones:
- First off, everything between the <!-- ... --> brackets is an HTML comment. It doesn’t show up on the final page.
- <meta name="viewport" content="width=device-width, initial-scale=1, shrink-to-fit=no"> – it’s one of Bootstrap’s own declaration tags. It defines the size of the website’s viewport.
- <link href="css/creative.min.css" rel="stylesheet"> – this line loads the CSS stylesheet of the Creative template and it also houses the default stylesheet of Bootstrap.
Let’s modify that last declaration – the line loading the CSS – to make it easier to work with later on.
Change that line to:
This is just a small difference – it’ll load the non-shortened version of the same CSS sheet. This version is just easier to modify.
Now scroll down to the very bottom of the index.html file. You’ll see the following lines right before the closing body tag:
They’re responsible for loading JavaScript files that handle some of the more visual interactions of the design. For instance, when you click on the About link in the top menu, you’ll be taken smoothly to the about block on the same page – this, among other things, is done via JavaScript. We don’t need to trouble ourselves understanding this code right now. Let’s leave this for another time.
Instead, let’s work on adding our own content to the page:
8. Add Content and Images
The first thing you’ll want to do is change the title of the page.
1. Change the Title
Find the title tag in the head section and replace the text between the tags to something of your own:
2. Customize the Hero Section
The hero section is what we call this block:

It would be cool to have our own content inside of it. To modify this block, go back to your index.html file and find this section:
This whole block of code controls what’s in the hero section.
There are some new tags here:
- <header> – this is a tag defining that this whole section is the header of the page; this tag has a couple of brothers and sisters in the form of the <section> tag and <footer> tag
- <div> – is a general CSS tag that indicates that what follows is a separate section (aka division ) in the HTML document; using it makes it easier to distinguish individual sections on the page visually
You’ll also notice that some of the other tags (which we already know) look to be a bit more complex, with multiple CSS classes assigned to them. For example:
The classes assigned to the <h1> tag here is text-uppercase text-white font-weight-bold .
These classes have been created by Bootstrap and by the Creative theme’s developer. The good news is that you too can use them freely when creating a website with HTML and CSS.
Quite frankly, you can customize any tag you add to your page’s structure by assigning any number of classes to it.
If you want to see the complete list of the classes available, you can open the main creative.css file that’s in the css subdirectory of the Creative theme.
Getting a grasp of all these classes can seem intimidating at first, but it’s actually way easier than it looks.
For example, one of the classes assigned to some of the paragraphs in our index.html file is font-weight-light . When you jump into the creative.css file and ctrl+f looking for that class name, you’ll see that it simply sets the font-weight parameter like so:
Modifying the default texts in the index.html file is very simple. Just find the tag that you want to edit and change what’s between the opening and closing tags.
For example, to change the main headline, just change this:
To something like the following:
You can do the same to all the paragraphs and other tags on the page.
What’s important is that you can also add new paragraphs freely. For example, we can take the paragraph that’s already on the page, make a copy of it and paste it right below the original paragraph; like so:
Now, with the texts taken care of, let’s replace the image that’s in the background.
This is a bit more complicated to do since it requires us to go into the CSS stylesheet file and do the modification there. As you can see in the HTML code of the Masthead section, no tag would indicate including an image to the page in any way. This is all done via CSS.
When you take another look at the whole block of code handling the Masthead section, you’ll see that it’s assigned to a class called masthead . This line of code handles the class assignment:
The masthead class is the one that puts an image in the background of the whole block.
Let’s open the creative.css file again and look for the “masthead” class:
This code does all kinds of fancy things to our image (like adding an overlay, shading, etc.), but the important part is this: url("../img/bg-masthead.jpg") . This is the line that indicates where to find the background image. It’s going to be in the img subdirectory.
To change this background image, take any image of your own, copy it to the img subdirectory and then copy and paste its name in place of the original bg-masthead.jpg file. In short, change this: url("../img/bg-masthead.jpg") to this: url("../img/YOURFILE.jpg") .
3. Customize the Other Blocks on the Page
As you go through the index.html file, you’ll notice that there’s a lot of different sections already on the page. We have a section for the navigation , and about a block, some services , a portfolio , a call to action , a contact block, and a footer .
While there’s different content in all these sections, the sections themselves are similar in structure. They all have roughly the same set of HTML tags – just different CSS classes assigned to them.
The best way to modify the page to fit your needs is to go through the blocks one by one and experiment by changing things around.
Apart from modifying the texts, you can also move whole sections around (the parts between the <section> tags). Granted, you do have to do that by hand (by cutting and then pasting elements into place), it still is straightforward to do.
With that being said, there are two quite basic modifications that we haven’t talked about yet. Let’s cover these next:
9. Fine-Tune Colors and Fonts
Changing colors or fonts is very easy to do in HTML and CSS. The simplest thing you can do is assign some in-line styling to an HTML tag. For example:
In HTML, colors are represented by their hex values; “#FF0000” is red. Here’s a table of all the other standard colors .
A better way to assign colors is to do it via the CSS stylesheet. For example, to get the same effect as the code above, we could put this in our CSS stylesheet:
And then use the following piece of HTML code in the main document:
That second method is basically how things are done in Bootstrap.
To change the color of any text on the page, first find the tag responsible for styling that text, and then go into the stylesheet and modify the corresponding class, or create a new class.
Here’s an example; say you want to change the color of the header saying “At Your Service.” Currently, it’s black, and this is the code handling it:
To change its color, the best way is to create a new class called, say, .text-orange and set the color value there, like so:
* The !important will make sure that this color setting will overwrite any other color setting that came before it.
Now, we can go back to our header, and change its code to:
With these changes, the header will now be orange:

To change the font and its size, you can do something very similar. But first, an example of what a font definition block looks like in CSS:
- load fonts Merriweather , Roboto , and a system-default sans-serif font (read this to learn about web-safe fonts )
- set the font size to 18px
This sort of definition can be placed into any CSS class, just like the color definition. Actually, font and color definitions are often found in the same class declarations.
Going back to our previous example, to change the font size for that header that says “At Your Service,” we could first create a class like this:
And then assign this class to the header:
When changing the colors or fonts in your Bootstrap-made template, first look through the CSS stylesheet for classes that might already provide you with alternative sizes or colors. Use those where available.
10. Create Additional Pages
Now that you have the homepage customized, it’s time to start working on some additional pages and then link them to the homepage.
When creating a website with HTML and CSS, you can build any number of sub-pages and then link them all together.
Here are some of the common pages that most websites need:
- products/services
- policies (privacy policy, terms, etc.)
1. Start With the Layout
When building a new web page, the first decision you have to make is what you want the layout to be.
When creating a website with HTML and CSS, nothing is stopping you from crafting whatever layout you want. The only difficulty is actually putting it together.
HTML and CSS can be tough to deal with when starting from a blank screen, so we’re going to use Bootstrap here as well. First, we’re going to show you some principles of crafting a layout and then demonstrate how to do it with Bootstrap.
The way you can think of your web page’s layout is to consider it a sequence of individual blocks – one on top of another. Something like this (notice the four distinct blocks):

The great thing about Bootstrap is that it handles the basic layout principles and appearance details for you so that you can just focus on putting those blocks in the right places.
In this section of the guide, we’re going to create a new “about” page.
To begin, we’ll create just a very basic project of the layout. Something like the one above.
- there’s a navigation menu at the top,
- a full-width headline block below the menu,
- the main content section in the middle, boxed in the center of the screen (not full-width),
- and a footer.
Now let’s build this layout in HTML.
2. Build a New Page
The easiest way to start working on a new page is to duplicate an existing page and use it as a template. That’s what we’re going to do.
Create a copy of the index.html file and rename it about.html .
Just to make the pages easier to distinguish at this early stage, edit the new about.html file and change what’s in the <title> tag. For example, <title>About Me</title> .
Now let’s go through the file line by line and decide what we’ll leave and what we’ll remove:
- The navigation menu (below <!-- Navigation --> ). You probably want to keep this section intact, just to make the navigation experience uniform on all pages.
- The main hero section (below <!-- Masthead --> ). This one we won’t need according to our layout project. You can go ahead and erase the whole section.
- The about section (below <!-- About Section --> ). We’re going to reuse this section as our main headline block.
- The services section, portfolio section, call to action section, and contact section (everything between <!-- Services Section --> and <!-- Footer --> ). We don’t need these sections at all. You can go ahead and erase them.
- The footer section and everything below it (below <!-- Footer --> ). This we’ll need to keep.
This makes our current code quite simple. It basically is just this:
The thing that we’re missing here is the main content section. To build it, we’re going to reuse the about section.
Go ahead and make a copy of the about section. This one:
Now change the first two lines to this:
Since we don’t need the <h2> header there and the <hr> element, let’s just remove them. The only thing left inside this whole block is going to be a paragraph of text. Like so:
When you save the file and navigate to it via your browser, you’ll see that you basically have two very similar blocks one below the other, with the same color background:

It’d be better to have a white background in the main content section. To change it, the only thing we need to do is remove the bg-primary class from the main <section> tag. In other words, make the tag into this:
That’s better:

Let’s add some dummy paragraphs to the page to populate it some more, plus maybe a sub-head:
Here’s what this looks like on the page:

If you don’t like the text to be centered then just remove the text-center class from one of the <div> tags.

If you want to put some more flair on these blocks of text, you can create new CSS classes (like before) and assign them to the paragraphs in the block. Or, you can have a peek into the current stylesheet and see what classes are already there for this purpose. Here are the ones we assigned to the <p> and <h3> tags:
And here’s the effect:

One more thing we’re going to do here is add an image somewhere on the page.
Here’s what an example image tag in HTML looks like:
Fairly simple, right? The only parameter there is the path to the image file. To keep things nicely organized, you can put your image in the img directory again (just like you did with that background a while ago). In such a case, the image tag will be:
That being said, the image tag in this particular configuration is fairly limited. To make it a bit more refined, let’s assign some Bootstrap classes to it. Particularly:
These two classes will give your image rounded corners and will also make sure that the size of the image doesn’t exceed the size of the block where it sits.
You can now add a tag like this somewhere in the main content section of your about page. For example, here:
And here’s the final effect on the page:

Here’s our about page in all its glory:

3. Link to the New Page
With the new page done, let’s now link it from the homepage (the index.html file). Naturally, the best place to add this link is in the navigation menu (below <!-- Navigation --> ).
In particular, look for this line:
We’re going to change it to this:
This is something we haven’t talked about yet, but the <a> tag is a link tag in HTML. Using it, you can link to any web page by providing the address of that page in the href parameter. The text of the link – the clickable part of the link – will be the text between the opening and closing <a></a> tags.
When you refresh the homepage now, you’ll see your new link pointing to the about page.
Further Reading
At this stage, you’ve basically built yourself a simple website consisting of two pages – a homepage and an about page.
What you should do now is rinse and repeat by creating new pages, tuning them up, adding content to them, and then linking everything from the navigation menu.
Other things worth doing as you’re going through these steps is further learning HTML and CSS principles, going through the checklist , and also learning Bootstrap and its structures and classes. Some resources for that:
- HTML5 cheat sheet
- CSS cheat sheet
- Javascript cheat sheet
- Bootstrap tutorial
- Bootstrap cheat sheet
Mastering Bootstrap, highly likely the best path currently available to building optimized and beautiful websites with HTML and CSS.
If you have any questions about creating a website with HTML and CSS, don’t hesitate to submit them in the comments.
- Help Center
- Privacy Policy
- Terms of Service
- Submit feedback
- Announcements
- Organize and communicate with your class
- Create assignments
Create an assignment
This article is for teachers.
When you create an assignment, you can post it immediately, save a draft, or schedule it to post at a later date. After students complete and turn in their work, you can grade and return it to the students.
Open all | Close all
Create & post assignments
When you create an assignment, you can:
- Select one or more classes
Select individual students
Add a grade category, add a grading period, change the point value, add a due date or time, add a topic, add attachments, add a rubric.
- Turn on originality reports
Go to classroom.google.com and click Sign In.
Sign in with your Google Account. For example, [email protected] or [email protected] . Learn more .
- Enter the title and any instructions.
You can continue to edit and customize your assignment. Otherwise, if you’re ready, see below to post, schedule, or save your assignment .
Select additional classes
Assignments to multiple classes go to all students in those classes.
- Create an assignment (details above).
Unless you’re selecting multiple classes, you can select individual students. You can’t select more than 100 students at a time.
- Click a student's name to select them.
Use grade categories to organize assignments. With grade categories, you and your students can see the category an assignment belongs to, such as Homework or Essays . Teachers also see the categories on the Grades page.
For more information on grade categories, go to Add a grade category to posts or Set up grading .
To organize assignments and grades into your school or district’s grading structure, create grading periods, such as quarters or semesters.
- From the menu, select a grading period.
Tip: Before adding a grading period to an assignment, create a grading period for the class first. Learn how to create or edit grading periods .
You can change the point value of an assignment or make the assignment ungraded. By default, assignments are set at 100 points.
- Under Points , click the value.
- Enter a new point value or select Ungraded .
By default, an assignment has no due date. To set a due date:
- Click a date on the calendar.
- To create a topic, click Create topic and enter a topic name.
- Click a topic in the list to select it.
Note : You can only add one topic to an assignment.
Learn more about how to add topics to the Classwork page .
- Create an assignment.
- Important: Google Drive files can be edited by co-teachers and are view-only to students. To change these share options, you can stop, limit, or change sharing .
- To add YouTube videos, an admin must turn on this option. Learn about access settings for your Google Workspace for Education account .
- You can add interactive questions to YouTube video attachments. Learn how to add interactive questions to YouTube video attachments .
- Tip: When you attach a practice set to an assignment, you can't edit it.
- If you see a message that you don’t have permission to attach a file, click Copy . Classroom makes a copy of the file to attach to the assignment and saves it to the class Drive folder.
- Students can view file —All students can read the file, but not edit it.
- Students can edit file —All students share the same file and can make changes to it.
Note : This option is only available before you post an assignment.
Use an add-on
For instructions, go to Use add-ons in Classroom
For instructions, go to Create or reuse a rubric for an assignment .
For instructions, go to Turn on originality reports .
You can post an assignment immediately, or schedule it to post later. If you don’t want to post it yet, you can save it as a draft. To see scheduled and drafted assignments, click Classwork .
Post an assignment
- Follow the steps above to create an assignment.
- Click Assign to immediately post the assignment.
Schedule the assignment to post later
Scheduled assignments might be delayed up to 5 minutes after the post time.
- To schedule the same assignment across multiple classes, make sure to select all classes you want to include.
- When you enter a time, Classroom defaults to PM unless you specify AM.
- (Optional) Select a due date and topic for each class.
- (Optional) To replicate your selected time and date for the first class into all subsequent classes, click Copy settings to all .
- Click Schedule . The assignment will automatically post at the scheduled date and time.
After scheduling multiple assignments at once, you can still edit assignments later by clicking into each class and changing them individually.
Save an assignment as a draft
- Follow the steps above to create an assignment
You can open and edit draft assignments on the Classwork page.
Manage assignments
Edits affect individual classes. For multi-class assignments, make edits in each class.
Note : If you change an assignment's name, the assignment's Drive folder name isn't updated. Go to Drive and rename the folder.
Edit a posted assignment
- Enter your changes and click Save .
Edit a scheduled assignment
- Enter your changes and click Schedule .
Edit a draft assignment
Changes are automatically saved.
- Assign it immediately (details above).
- Schedule it to post at a specific date and time (details above).
- Click a class.
You can only delete an assignment on the Classwork page.
If you delete an assignment, all grades and comments related to the assignment are deleted. However, any attachments or files created by you or the students are still available in Drive.
Related articles
- Create or reuse a rubric for an assignment
- Create a quiz assignment
- Create a question
- Use add-ons in Classroom
- Create, edit, delete, or share a practice set
- Learn about interactive questions for YouTube videos in Google Classroom
Was this helpful?
Need more help, try these next steps:.
How TO - Make a Website
Learn how to create a responsive website that will work on all devices, PC, laptop, tablet, and phone.
Create a Website from Scratch
A "layout draft".
It can be wise to draw a layout draft of the page design before creating a website:
Navigation bar
Side content.
Some text some text..
Main Content
First step - basic html page.
HTML is the standard markup language for creating websites and CSS is the language that describes the style of an HTML document. We will combine HTML and CSS to create a basic web page.
Note: If you don't know HTML and CSS, we suggest that you start by reading our HTML Tutorial .
Example Explained
- The <!DOCTYPE html> declaration defines this document to be HTML5
- The <html> element is the root element of an HTML page
- The <head> element contains meta information about the document
- The <title> element specifies a title for the document
- The <meta> element should define the character set to be UTF-8
- The <meta> element with name="viewport" makes the website look good on all devices and screen resolutions
- The <style> element contains the styles for the website (layout/design)
- The <body> element contains the visible page content
- The <h1> element defines a large heading
- The <p> element defines a paragraph
Creating Page Content
Inside the <body> element of our website, we will use our "Layout Draft" and create:
- A navigation bar
- Main content
- Side content
Semantic Elements
HTML5 introduced several new semantic elements. Semantic elements are important to use because they define the structure of web pages and helps screen readers and search engines to read the page correctly.
These are some of the most common semantic HTML elements:
In this tutorial we will use semantic elements.
However, it is up to you if you want to use <div> elements instead.
A header is usually located at the top of the website (or right below a top navigation menu). It often contains a logo or the website name:
Then we use CSS to style the header:
Try it Yourself »
Advertisement
Navigation Bar
A navigation bar contains a list of links to help visitors navigating through your website:
Use CSS to style the navigation bar:
Create a 2-column layout, divided into a "side content" and a "main content".
We use CSS Flexbox to handle the layout:
Then add media queries to make the layout responsive. This will make sure that your website looks good on all devices (desktops, laptops, tablets and phones). Resize the browser window to see the result.
Tip: To create a different kind of layout, just change the flex width (but make sure that it adds up to 100%).
Tip: Do you wonder how the @media rule works? Read more about it in our CSS Media Queries chapter .
Tip: To learn more about the Flexible Box Layout Module, read our CSS Flexbox chapter .
What is box-sizing?
You can easily create three floating boxes side by side. However, when you add something that enlarges the width of each box (e.g. padding or borders), the box will break. The box-sizing property allows us to include the padding and border in the box's total width (and height), making sure that the padding stays inside of the box and that it does not break.
You can read more about the box-sizing property in our CSS Box Sizing Tutorial .
At last, we will add a footer.
And style it:
Congratulations! You have built a responsive website from scratch.
W3Schools Spaces
If you want to create your own website and host your .html files, try our website builder , called W3schools Spaces :

COLOR PICKER

Contact Sales
If you want to use W3Schools services as an educational institution, team or enterprise, send us an e-mail: [email protected]
Report Error
If you want to report an error, or if you want to make a suggestion, send us an e-mail: [email protected]
Top Tutorials
Top references, top examples, get certified.
How to Build Your Own Developer Portfolio Website with HTML, CSS, and JavaScript

Everyone needs websites and web applications these days. So there are many opportunities for you if you work as a web developer.
But if you want to get a web developer job, you'll need a good portfolio website to showcase your skills and experience.
In this tutorial, I'll discuss some of the main reasons why you should make a portfolio website for yourself. Then, I'll walk you through how to build your own fully responsive portfolio website with HTML, CSS, and JavaScript.
Table of Content
What is a developer portfolio website, why you should have a portfolio website, portfolio project – how to build your own online developer portfolio, the project folder structure, the basic html boilerplate, the navbar section, how to style the navbar, how to build the hero section, how to style the hero section, how to build the more about me section, how to build the skills section, how to style the skills section, how to build the projects section, how to style the project section, how to build the contact section, how to style the contact section, how to style the social icons, how to add the scroll to top button, the html for the scroll to top button.
- H ow to Style the Scroll to Top Icon
How to Make Your Portfolio Website Responsive
How to create the media query for tablets and mobile phones (max-width 720px), how to build the hamburger menu, the javascript for the hamburger menu, how to make the hero section responsive, how to make the more about me section responsive, how to make the skills section responsive, how to make the projects section responsive, how to make the contact form responsive, how to make the website responsive on small phones.
A developer portfolio website provides relevant information to potential employers about your skills, experience, and projects you've worked on.
You can consider your portfolio website to be your online résumé.
1. A Portfolio Website Increases Your Online Presence
As a developer, you need an online presence. You can cultivate this online presence on social media platforms such as Twitter, Facebook, and Instagram. But those are not entirely your own, as the moderators of those platforms have almost full control over your account.
With your own portfolio website, it's live on your own domain online. And people can easily find you when they search for your name on a search engine like Google, provided you put the right things in place when it comes to SEO.
2. A portfolio website is your online résumé
Your portfolio website is like your online résumé. Potential clients and hiring managers can easily find you online and check out your previous projects and skills.
This also means that when anyone wants to give you an opportunity to work for them, and they ask for your previous projects, you just give them one link to your website (your portfolio). It not only has your projects but your skillset and information about your past experience as well.
3. A Portfolio Website Shows Evidence of Expertise in your Field
Having (let alone building you own) portfolio website as a developer sends out a clear message that you're putting your skills into practice and that you know what you are doing.
A portfolio can also help build trust with clients because they have direct evidence of the quality of your work.
You can make a cool portfolio website for yourself with HTML, CSS, and JavaScript. And that’s what we are going to do here.
I already did this some months ago and made it available to everyone as a free product on Gumroad, so I decided to create a tutorial on how I got it done.
This is the live demo of what we will be building.
To follow along with me, you can grab the starter files from Github .
To avoid confusion, I will be arranging the HTML, CSS, JavaScript, icons, and images of the project in their respective folders.
The HTML file goes in the root folder, and the image, icon, CSS, and JavaScript files will be in their separate subfolders in an asset folder. This is a common practice.

There is also a readme file containing all the tools I used in the project, with their respective links. It's available in the starter files.
Everyone has their preferences when coding out a whole project with HTML, CSS, and JavaScript. Some like to define the whole HTML boilerplate first and then the CSS later, but I like to do everything section by section.
So, I will be starting with the navbar section. But it’s good to show what the basic HTML boilerplate looks like first:
I have all the sections in the HTML commented out so you can follow along better. In the boilerplate there are also the CDNs for animate CSS (A CSS animation library), and Ionic icons, the icon library I chose for the project.
I have a favicon made through Favicon IO and linked it in the head section. Favicon is the little image that shows on a browser tab.
The Navbar section contains the simple logo of h1 text, and the nav menu:
If you are wondering what the button element represents, it’s the bars for toggling the nav menu on mobile (a hamburger menu). This will be hidden on desktop but shown on mobile.
I will also be linking the individual sections of the website to these nav items, so when the user clicks on any of the nav items, they are taken to the section that corresponds to the nav item they click.
That’s why I have the hyperlink reference ( href ) attributes set to #about , #skills , #projects , and #contacts , respectively. The individual section of the website will have these attributes as ids.

The navbar definitely needs some styling to make it look a bit nicer.
Before styling the navbar properly, I will be declaring some CSS variables to make things easier later. This is because, with CSS variables, it is easier to avoid redundancy and repetition in your CSS file.
The syntax for declaring CSS variables looks like this:
To use the variable, you do this:
I will also import the Roboto font from Google, and declare some CSS resets to remove some default features such as margin and padding for elements, text-decoration for anchor tags, and list-style-type for lists.
If you notice, I set a hover state for all links on the website from line 39 to 41. When the user hovers on any link, it changes to the secondary color I set in the CSS variables.
Here's a good rule of thumb for declaring CSS variables: if you find yourself using the same property and value often in the same CSS file, you should declare a variable for it to avoid repetition.
You should also make your variable names are as descriptive as possible, like I did, in order to help others who might work with your code.

To style the navbar and align the content in it, I will be using CSS Flexbox:
What's the CSS above doing?
I made the navbar sticky with the position property, so it remains at the top no matter what.
The z-index property with the value of 1 makes sure the navbar displays over any other element on the web page. That's how you make a sticky navbar.
In addition, I also applied a shadow to the bottom of the navbar with the box-shadow property.

But we're not finished yet. The nav menu items need to be side by side, not on top of each other. I will be doing that with Flexbox too.
I will also finish up the rest of the navbar styling by making the h1, nav items, and the hamburger menu button look nicer. I'll do this with some CSS variables initially declared.
The hamburger menu bar also needs to be hidden. It has a class of .burger-menu , so we can set a display of none with it and also make the button look better.

The next section we'll work on is the hero section. This won’t take quite as much work as the navbar.
The HTML boilerplate for the hero section is in the code snippet below:
The only thing that's a bit strange are the classes of animate__animated animate__shakeX attached to the div containing the About Me text. The class names are from animate CSS and they serve to animate the About Me text container.

Flexbox will come to the rescue once again! This section has two major sets of content – an image and text in a div. So we can use flexbox to display them side by side. You can see how it works in the CSS code snippet below:

Our Jane Doe image is too big, so we need to reduce its width and height. We also need to style the bio text (About Me text) for readability too. The CSS variables initially declared will be very instrumental here.

I included this section to include some more information about Jane Doe with some placeholder text.
You can take advantage of this to include information you were unable to put in the About Me section.
The HTML boilerplate for this section is quite short and simple:
The CSS is straightforward as well. All we'll do is set a background-color with the --bg-color CSS variable, make the section readable by setting the padding, margin, line-height, and aligning the h2 text to the center:

From the live demo, you'll see that the skills section contains relevant skills such as HTML, CSS, JavaScript, and so on. I was able to get the icons of those languages as SVGs from Icons8.
The HTML boilerplate for this section is in the code snippet below:
There are six icons in total. And instead of having to align them with Flexbox, I grouped them in two places (3 teach), with the classes of first-set and second-set, so they stay on top of each other. This means that the stylings we'll apply will be more readable. Easy!
Notice that I’ve been attaching the loading attribute to the individual icons and images and setting it to lazy. This will make sure that the images are loaded only when the user scrolls to the sections containing them. This will subsequently speed up load time, because only what is needed will be loaded.

We should style the section a little bit because it doesn’t look good enough yet:
In the CSS above, I defined a maximum width for the whole section to push things to the center for a better user experience.
Other stylings we applied relate to clarity and readability. For example, I increased the size of the icons to make them more visible with the width and height properties. I also applied a padding of 1rem (16 pixels) to all the icons to push them apart from each other a little bit.

Still, I think the section can be better, so I have decided to make some more tweaks with the box-shadow property.
Remember from the HTML that there is a class attribute called .icon-card attached to all the icons. I will be using the class name to put all the icons in a card:

One of the major purposes of a portfolio website is to show off your projects. So we'll need to build a section to showcase projects you've worked on in the past.
This section is probably the most tedious to style, but Flexbox won’t stop being our friend.
The HTML for this section is in the code snippet below:
Looking at the HTML, there are three projects in total, all in their individual divs with the class name of project-container and project-card. These class names will be instrumental in styling the projects consistently.
The containing section element itself has a class of projects, and an id attribute of projects as well. The class name is for styling, and the id is for linking it to the Projects link on the navbar.
The projects have their individual images with the class name of project-pic , their titles with a class of project-title , more details with the class name of project-details , and links with the class name of project-link .
The sole purpose of giving all of them unique class names is to style them.
These are a few of the projects I worked on myself when I was starting out as a developer.
The section doesn’t look good yet, though – there is even an annoying horizontal scrollbar caused by the images. So we have a lot to do with CSS.
First of all, I will give the whole section a background color by setting the greyish color (--bg-color) we declared in the CSS variables as the value.
I will also reduce the width and height of the project images by usung the project-pic class. Then I'll use Flexbox to put the projects side by side.

The images now look better, but the project title, project details, and project links need to be aligned nicely within their individual containers.
The whole project section also needs to be pushed to the center. You don’t need Flexbox to do this, though – it can be done by setting the text align property to the value of center:
Notice that I also set a width of 21.875rem (350 pixels) for the individual project containers. This will push them apart from the sides for a better user experience. In this case, the user would not need to look all the way across before they see everything.

We can still make this section better. The project titles, project details and project links look chunked together, so we should add some padding and margins.
The individual project containers also need to look more distinct. The box-shadow property will be instrumental here again, so I’m putting them in their individual cards.

If a potential employer or client finds your portfolio website attractive, they might want to contact you. So you'll want to have a contact form in this section, alongside links to your social media profiles.
The HTML for this section looks like this:
Here we've built a contact form with input fields for name and email, a textarea so people can enter the message to be sent, and a submit button for submitting the message so you can see it.
If you take a good look at the form element, you’ll see I have an action attribute set to a URL from Formspree. This is what I chose for the form submission. With Formspree, you can get the message directly in your email inbox without having to set up a server with complex PHP or JavaScript.
Note that you can't use my URL – it won't work for you. You can easily setup your own on the Formspree website for free. I also attached a resource on how to set up Formspree to the readme file of the project.
I have set some id and class attributes for the individual inputs to style them. There is also a name attribute for all the input fields. This is required by the Formspree form submission service.
To get a basic validation, I attached a required attribute, so the form refuses to submit if the user leaves any of the input fields unfilled.

All I will do in the CSS is align the whole content to the center and make the input fields look better.
With the text align and margin properties, you can align the h2 and the container for the contact form to the center.
I will also put the whole form in a card with the box-shadow property.

The input fields, textarea, labels and placeholders definitely need some styling as well to help with alignment and clarity:

But the placeholders are not consistent with the labels. So we need to give it a color and some padding. I will be giving it the primary color set in the CSS variable lists.
To select the placeholders for styling, you can use the placeholder pseudo-class:

In the contact form, the only thing left is to style the button. Buttons are quite easy to style:
In the CSS code snippet above, I made the button go all the way across in the form container by giving it a width of 100%. I also made it more visible with some padding, a margin, a border, and a bolder font weight.
The border-radius property with a value of 5px removes the sharp edges and the transition serves to slow things down a little when the button is in the hover state.
The hover state is defined in the CSS code snippet below:
Remember that having your social media links in your portfolio website is a plus for anyone who might want to contact you. That’s the next thing we are going to do, and we are going to do it in a unique way.
The HTML for the social buttons is in the code snippet below:
The social icons I chose are animated gif icons from icons8. I put all of them in a container with the class of socials , and gave them an individual class of socicon for styling.
With the CSS above, the social icons will be fixed to the right on the web page, so anyone who visits the website sees them no matter where they scroll.
Look at that!
The only thing left to do is the footer. There’s nothing complex in the footer HTML and CSS apart from the reserved character entity for copyright symbol and heart:
We need to make all the content of the individual sections display on section on top of the another (in a column layout). We can do this pretty easily with media queries and Flexbox.
Before adding the media queries for responsiveness, lets implement a scroll-to-top button with HTML, CSS, and JavaScript.
For the HTML, I got an animated icon from Icons8 and decided to put it in an i tag.
The i tag has a class of scroll-up for styling and an id of scroll-up for selecting it with JavaScript. This is because in my projects, I like to use classes for styling and ids for JavaScript functionalities.
How to Style the Scroll to Top Icon
I will make the scroll-to-top icon fixed just like the social icons. I'll also give it a cursor property of pointer, so the cursor changes when the user hovers on it.
With the class of up-arrow attached to the scroll-to-top icon, I will also increase the size of the icon for visibility:
But it doesn’t do anything yet. So we need to make it functional with a few lines of JavaScript:
What is the script above doing?
The first line selects the scroll-to-top button with the id attribute attached to it in the HTML. We used the querySelector() method here. You can also use the getElementById() method.
In the remaining lines, I used the click eventListener to get the user’s click action and exploit the scrollTo part of the windows object to make the button functional.
With this functionality, when the user clicks on the scroll-to-top button, the page scrolls to the top and left side of the website smoothly. I did this by setting top to 0 , left to 0 , and behavior to smooth .
You can learn more about the windows object by opening up your browser’s developer tools console. Type in window and hit enter, then you see everything available in the windows object, like I did below:
To make the website responsive, we will be using CSS media queries and Flexbox.
First, we'll need to make the images and text look smaller, and then we'll make the content of each section display in a vertical layout by setting the flex-direction to column.
In the media query, I will be using 2 breakpoints – 720px and 420px .
The 720px breakpoint is for tablets and mobile phones, and 420px is for small phones like an iPhone 6, and small Android phones.
Media query Breakpoints are the points at which you want the content of a website to respond according to the width of a device. So, any code put under the 720px breakpoint reflects on devices with a screen less than or more than 720px, depending on whether you specify max-width or min-width.
In the case of a max-width of 720px , the media query syntax looks like this:
We will start making the website responsive right from the navbar, because the navbar doesn’t look good on smaller devices.

First, I’m going to reduce the padding of the navbar so the h1 logo and nav menu items fit in nicely:

On small devices, the nav menu items need to be on top of one another, and they need to be hidden. So, its time to update the code so the hamburger menu is initially hidden.
To make the hamburger menu, we need to take the nav menu items out of the viewport. Then we need to set a class of show on the nav list items that will be toggled with few lines of JavaScript (remember the nav items are in an unordered list).
In the CSS code snippet above, I set a position of fixed on the unordered list ( ul ) to make it float on the screen. I also pushed it down 86px from the top with top: 86px , and 10% to the left.
I gave it a width of 80% of its parent (the nav element from the HTML), pushed it to the center with text-align: center , and finally hid it with the transform property set to translateX(120%) . This will push it to the right and force it out of the viewport.
And now, when the user clicks to show the nav items, they all slide in from the right. Awesome.
If you want the nav menu items to slide in from the left, change the transform property value to transform: translateX(-120%) (this is the direct opposite of transform: translateX(120%) ). It's as easy as that, depending on your preference.
I also assigned a margin of 8px to the nav items to give them more space.

The hamburger menu bar remains hidden. So we need to show it by giving it a display of block, setting a class of show to translate on the x-axis to 0 in order to show it, and then toggle it with JavaScript.

Our hamburger menu bars now gets shown, but the nav items remain hidden. To show it, we need to toggle the show class on and off with JavaScript.
To toggle the navbar nav menu items on and off with JavaScript, we first need to select all relevant items of the navbar and store them in some variables:
- The burger variable select the hamburger menu bars
- The ul variable selects the list items (the nav links altogether)
- The nav variable selects the container itself (the nav element)
What we need to do next is toggle the nav ul.show class when the user clicks the hamburger menu bar. We'll do this by adding a click eventListener to the hamburger menu bar, and then using the toggle method to remove and add the class of show .
Remember that we selected it and stored it in a variable called burger .
But there is a problem – the mobile nav is not hidden any time any of the nav item links are clicked. So we need to remove the class of nav ul.show when any of the nav item links are clicked.
We can do this with a few lines of JavaScript too:
Remember that the nav links have a class of nav-link from the HTML. So I selected all of them with that class and put them in a variable called navLink. We did this with the querySelectorAll( ) method.
I then looped through all the links with the forEach array method and listened for a click event on all of them. Then I used the remove() method provided by the DOM to remove the class of show any time any of the nav menu items are clicked. This will take all the list items out of the viewport.
That’s a lot of work. With what we just covered you can make a hamburger menu for any website.

All we need to do is give it a flex direction of column in the media query, reduce the width and height of Jane Doe's image, and make the About Me text (bio text) readable.

I have the following CSS to make it readable and more presentable:

All we need to do in the media query is reduce the sizes of the icons with the width and height properties:

In the projects section, we need to make the three projects stack on top of one another by setting the flex direction to column. I will also reduce the width of the individual containers a little bit.
The width of the contact form needs to be reduced to push it away from the sides and make sure that the fixed social media icons are not on top of it.
All we need to do is set a maximum width:

To fix these quirks, I will be adding some media queries at the 420px breakpoint:
I reduced the size of our Jane Doe image, and also reduced the width of the bio text (About Me text), the project container, and the contact form container as well.
That’s the end of it all. We have a fully responsive portfolio website.
You can download the finished version as a zip file from this GitHub repo .
You can also check out the live demo of the portfolio website as well. It has a readme that contains information about the tools I used, and how you can customize the website.
In this tutorial, you learned what a developer portfolio website is and why you should have one.
You also learned how to make a fully responsive portfolio website with HTML, CSS, and JavaScript.
The different parts of this tutorial are each small projects that, when combined, turn into a giant one-page website. For example, you can make card design, a responsive menu bar, a functional contact form, and a scroll-to-top button as the tutorial covers them all.
Feel free to customize the website to your taste.
If you find this tutorial useful, you can share it with your friends and family. I would really appreciate that.
Web developer and technical writer focusing on frontend technologies. I also dabble in a lot of other technologies.
If you read this far, thank the author to show them you care. Say Thanks
Learn to code for free. freeCodeCamp's open source curriculum has helped more than 40,000 people get jobs as developers. Get started
for Education
- Google Classroom
- Google Workspace Admin
- Google Cloud
Easily distribute, analyze, and grade student work with Assignments for your LMS
Assignments is an application for your learning management system (LMS). It helps educators save time grading and guides students to turn in their best work with originality reports — all through the collaborative power of Google Workspace for Education.
- Get started
- Explore originality reports

Bring your favorite tools together within your LMS
Make Google Docs and Google Drive compatible with your LMS
Simplify assignment management with user-friendly Google Workspace productivity tools
Built with the latest Learning Tools Interoperability (LTI) standards for robust security and easy installation in your LMS
Save time distributing and grading classwork
Distribute personalized copies of Google Drive templates and worksheets to students
Grade consistently and transparently with rubrics integrated into student work
Add rich feedback faster using the customizable comment bank
Examine student work to ensure authenticity
Compare student work against hundreds of billions of web pages and over 40 million books with originality reports
Make student-to-student comparisons on your domain-owned repository of past submissions when you sign up for the Teaching and Learning Upgrade or Google Workspace for Education Plus
Allow students to scan their own work for recommended citations up to three times
Trust in high security standards
Protect student privacy — data is owned and managed solely by you and your students
Provide an ad-free experience for all your users
Compatible with LTI version 1.1 or higher and meets rigorous compliance standards

Product demos
Experience google workspace for education in action. explore premium features in detail via step-by-step demos to get a feel for how they work in the classroom..
“Assignments enable faculty to save time on the mundane parts of grading and...spend more time on providing more personalized and relevant feedback to students.” Benjamin Hommerding , Technology Innovationist, St. Norbert College

Classroom users get the best of Assignments built-in
Find all of the same features of Assignments in your existing Classroom environment
- Learn more about Classroom
Explore resources to get up and running
Discover helpful resources to get up to speed on using Assignments and find answers to commonly asked questions.
- Visit Help Center

Get a quick overview of Assignments to help Educators learn how they can use it in their classrooms.
- Download overview

Get started guide
Start using Assignments in your courses with this step-by-step guide for instructors.
- Download guide

Teacher Center Assignments resources
Find educator tools and resources to get started with Assignments.
- Visit Teacher Center

How to use Assignments within your LMS
Watch this brief video on how Educators can use Assignments.
- Watch video
Turn on Assignments in your LMS
Contact your institution’s administrator to turn on Assignments within your LMS.
- Admin setup

Explore a suite of tools for your classroom with Google Workspace for Education
You're now viewing content for a different region..
For content more relevant to your region, we suggest:
Sign up here for updates, insights, resources, and more.
Teaching, Learning, & Professional Development Center
- Teaching Resources
- TLPDC Teaching Resources
How Do I Create Meaningful and Effective Assignments?
Prepared by allison boye, ph.d. teaching, learning, and professional development center.
Assessment is a necessary part of the teaching and learning process, helping us measure whether our students have really learned what we want them to learn. While exams and quizzes are certainly favorite and useful methods of assessment, out of class assignments (written or otherwise) can offer similar insights into our students' learning. And just as creating a reliable test takes thoughtfulness and skill, so does creating meaningful and effective assignments. Undoubtedly, many instructors have been on the receiving end of disappointing student work, left wondering what went wrong… and often, those problems can be remedied in the future by some simple fine-tuning of the original assignment. This paper will take a look at some important elements to consider when developing assignments, and offer some easy approaches to creating a valuable assessment experience for all involved.
First Things First…
Before assigning any major tasks to students, it is imperative that you first define a few things for yourself as the instructor:
- Your goals for the assignment . Why are you assigning this project, and what do you hope your students will gain from completing it? What knowledge, skills, and abilities do you aim to measure with this assignment? Creating assignments is a major part of overall course design, and every project you assign should clearly align with your goals for the course in general. For instance, if you want your students to demonstrate critical thinking, perhaps asking them to simply summarize an article is not the best match for that goal; a more appropriate option might be to ask for an analysis of a controversial issue in the discipline. Ultimately, the connection between the assignment and its purpose should be clear to both you and your students to ensure that it is fulfilling the desired goals and doesn't seem like “busy work.” For some ideas about what kinds of assignments match certain learning goals, take a look at this page from DePaul University's Teaching Commons.
- Have they experienced “socialization” in the culture of your discipline (Flaxman, 2005)? Are they familiar with any conventions you might want them to know? In other words, do they know the “language” of your discipline, generally accepted style guidelines, or research protocols?
- Do they know how to conduct research? Do they know the proper style format, documentation style, acceptable resources, etc.? Do they know how to use the library (Fitzpatrick, 1989) or evaluate resources?
- What kinds of writing or work have they previously engaged in? For instance, have they completed long, formal writing assignments or research projects before? Have they ever engaged in analysis, reflection, or argumentation? Have they completed group assignments before? Do they know how to write a literature review or scientific report?
In his book Engaging Ideas (1996), John Bean provides a great list of questions to help instructors focus on their main teaching goals when creating an assignment (p.78):
1. What are the main units/modules in my course?
2. What are my main learning objectives for each module and for the course?
3. What thinking skills am I trying to develop within each unit and throughout the course?
4. What are the most difficult aspects of my course for students?
5. If I could change my students' study habits, what would I most like to change?
6. What difference do I want my course to make in my students' lives?
What your students need to know
Once you have determined your own goals for the assignment and the levels of your students, you can begin creating your assignment. However, when introducing your assignment to your students, there are several things you will need to clearly outline for them in order to ensure the most successful assignments possible.
- First, you will need to articulate the purpose of the assignment . Even though you know why the assignment is important and what it is meant to accomplish, you cannot assume that your students will intuit that purpose. Your students will appreciate an understanding of how the assignment fits into the larger goals of the course and what they will learn from the process (Hass & Osborn, 2007). Being transparent with your students and explaining why you are asking them to complete a given assignment can ultimately help motivate them to complete the assignment more thoughtfully.
- If you are asking your students to complete a writing assignment, you should define for them the “rhetorical or cognitive mode/s” you want them to employ in their writing (Flaxman, 2005). In other words, use precise verbs that communicate whether you are asking them to analyze, argue, describe, inform, etc. (Verbs like “explore” or “comment on” can be too vague and cause confusion.) Provide them with a specific task to complete, such as a problem to solve, a question to answer, or an argument to support. For those who want assignments to lead to top-down, thesis-driven writing, John Bean (1996) suggests presenting a proposition that students must defend or refute, or a problem that demands a thesis answer.
- It is also a good idea to define the audience you want your students to address with their assignment, if possible – especially with writing assignments. Otherwise, students will address only the instructor, often assuming little requires explanation or development (Hedengren, 2004; MIT, 1999). Further, asking students to address the instructor, who typically knows more about the topic than the student, places the student in an unnatural rhetorical position. Instead, you might consider asking your students to prepare their assignments for alternative audiences such as other students who missed last week's classes, a group that opposes their position, or people reading a popular magazine or newspaper. In fact, a study by Bean (1996) indicated the students often appreciate and enjoy assignments that vary elements such as audience or rhetorical context, so don't be afraid to get creative!
- Obviously, you will also need to articulate clearly the logistics or “business aspects” of the assignment . In other words, be explicit with your students about required elements such as the format, length, documentation style, writing style (formal or informal?), and deadlines. One caveat, however: do not allow the logistics of the paper take precedence over the content in your assignment description; if you spend all of your time describing these things, students might suspect that is all you care about in their execution of the assignment.
- Finally, you should clarify your evaluation criteria for the assignment. What elements of content are most important? Will you grade holistically or weight features separately? How much weight will be given to individual elements, etc? Another precaution to take when defining requirements for your students is to take care that your instructions and rubric also do not overshadow the content; prescribing too rigidly each element of an assignment can limit students' freedom to explore and discover. According to Beth Finch Hedengren, “A good assignment provides the purpose and guidelines… without dictating exactly what to say” (2004, p. 27). If you decide to utilize a grading rubric, be sure to provide that to the students along with the assignment description, prior to their completion of the assignment.
A great way to get students engaged with an assignment and build buy-in is to encourage their collaboration on its design and/or on the grading criteria (Hudd, 2003). In his article “Conducting Writing Assignments,” Richard Leahy (2002) offers a few ideas for building in said collaboration:
• Ask the students to develop the grading scale themselves from scratch, starting with choosing the categories.
• Set the grading categories yourself, but ask the students to help write the descriptions.
• Draft the complete grading scale yourself, then give it to your students for review and suggestions.
A Few Do's and Don'ts…
Determining your goals for the assignment and its essential logistics is a good start to creating an effective assignment. However, there are a few more simple factors to consider in your final design. First, here are a few things you should do :
- Do provide detail in your assignment description . Research has shown that students frequently prefer some guiding constraints when completing assignments (Bean, 1996), and that more detail (within reason) can lead to more successful student responses. One idea is to provide students with physical assignment handouts , in addition to or instead of a simple description in a syllabus. This can meet the needs of concrete learners and give them something tangible to refer to. Likewise, it is often beneficial to make explicit for students the process or steps necessary to complete an assignment, given that students – especially younger ones – might need guidance in planning and time management (MIT, 1999).
- Do use open-ended questions. The most effective and challenging assignments focus on questions that lead students to thinking and explaining, rather than simple yes or no answers, whether explicitly part of the assignment description or in the brainstorming heuristics (Gardner, 2005).
- Do direct students to appropriate available resources . Giving students pointers about other venues for assistance can help them get started on the right track independently. These kinds of suggestions might include information about campus resources such as the University Writing Center or discipline-specific librarians, suggesting specific journals or books, or even sections of their textbook, or providing them with lists of research ideas or links to acceptable websites.
- Do consider providing models – both successful and unsuccessful models (Miller, 2007). These models could be provided by past students, or models you have created yourself. You could even ask students to evaluate the models themselves using the determined evaluation criteria, helping them to visualize the final product, think critically about how to complete the assignment, and ideally, recognize success in their own work.
- Do consider including a way for students to make the assignment their own. In their study, Hass and Osborn (2007) confirmed the importance of personal engagement for students when completing an assignment. Indeed, students will be more engaged in an assignment if it is personally meaningful, practical, or purposeful beyond the classroom. You might think of ways to encourage students to tap into their own experiences or curiosities, to solve or explore a real problem, or connect to the larger community. Offering variety in assignment selection can also help students feel more individualized, creative, and in control.
- If your assignment is substantial or long, do consider sequencing it. Far too often, assignments are given as one-shot final products that receive grades at the end of the semester, eternally abandoned by the student. By sequencing a large assignment, or essentially breaking it down into a systematic approach consisting of interconnected smaller elements (such as a project proposal, an annotated bibliography, or a rough draft, or a series of mini-assignments related to the longer assignment), you can encourage thoughtfulness, complexity, and thoroughness in your students, as well as emphasize process over final product.
Next are a few elements to avoid in your assignments:
- Do not ask too many questions in your assignment. In an effort to challenge students, instructors often err in the other direction, asking more questions than students can reasonably address in a single assignment without losing focus. Offering an overly specific “checklist” prompt often leads to externally organized papers, in which inexperienced students “slavishly follow the checklist instead of integrating their ideas into more organically-discovered structure” (Flaxman, 2005).
- Do not expect or suggest that there is an “ideal” response to the assignment. A common error for instructors is to dictate content of an assignment too rigidly, or to imply that there is a single correct response or a specific conclusion to reach, either explicitly or implicitly (Flaxman, 2005). Undoubtedly, students do not appreciate feeling as if they must read an instructor's mind to complete an assignment successfully, or that their own ideas have nowhere to go, and can lose motivation as a result. Similarly, avoid assignments that simply ask for regurgitation (Miller, 2007). Again, the best assignments invite students to engage in critical thinking, not just reproduce lectures or readings.
- Do not provide vague or confusing commands . Do students know what you mean when they are asked to “examine” or “discuss” a topic? Return to what you determined about your students' experiences and levels to help you decide what directions will make the most sense to them and what will require more explanation or guidance, and avoid verbiage that might confound them.
- Do not impose impossible time restraints or require the use of insufficient resources for completion of the assignment. For instance, if you are asking all of your students to use the same resource, ensure that there are enough copies available for all students to access – or at least put one copy on reserve in the library. Likewise, make sure that you are providing your students with ample time to locate resources and effectively complete the assignment (Fitzpatrick, 1989).
The assignments we give to students don't simply have to be research papers or reports. There are many options for effective yet creative ways to assess your students' learning! Here are just a few:
Journals, Posters, Portfolios, Letters, Brochures, Management plans, Editorials, Instruction Manuals, Imitations of a text, Case studies, Debates, News release, Dialogues, Videos, Collages, Plays, Power Point presentations
Ultimately, the success of student responses to an assignment often rests on the instructor's deliberate design of the assignment. By being purposeful and thoughtful from the beginning, you can ensure that your assignments will not only serve as effective assessment methods, but also engage and delight your students. If you would like further help in constructing or revising an assignment, the Teaching, Learning, and Professional Development Center is glad to offer individual consultations. In addition, look into some of the resources provided below.
Online Resources
“Creating Effective Assignments” http://www.unh.edu/teaching-excellence/resources/Assignments.htm This site, from the University of New Hampshire's Center for Excellence in Teaching and Learning, provides a brief overview of effective assignment design, with a focus on determining and communicating goals and expectations.
Gardner, T. (2005, June 12). Ten Tips for Designing Writing Assignments. Traci's Lists of Ten. http://www.tengrrl.com/tens/034.shtml This is a brief yet useful list of tips for assignment design, prepared by a writing teacher and curriculum developer for the National Council of Teachers of English . The website will also link you to several other lists of “ten tips” related to literacy pedagogy.
“How to Create Effective Assignments for College Students.” http:// tilt.colostate.edu/retreat/2011/zimmerman.pdf This PDF is a simplified bulleted list, prepared by Dr. Toni Zimmerman from Colorado State University, offering some helpful ideas for coming up with creative assignments.
“Learner-Centered Assessment” http://cte.uwaterloo.ca/teaching_resources/tips/learner_centered_assessment.html From the Centre for Teaching Excellence at the University of Waterloo, this is a short list of suggestions for the process of designing an assessment with your students' interests in mind. “Matching Learning Goals to Assignment Types.” http://teachingcommons.depaul.edu/How_to/design_assignments/assignments_learning_goals.html This is a great page from DePaul University's Teaching Commons, providing a chart that helps instructors match assignments with learning goals.
Additional References Bean, J.C. (1996). Engaging ideas: The professor's guide to integrating writing, critical thinking, and active learning in the classroom . San Francisco: Jossey-Bass.
Fitzpatrick, R. (1989). Research and writing assignments that reduce fear lead to better papers and more confident students. Writing Across the Curriculum , 3.2, pp. 15 – 24.
Flaxman, R. (2005). Creating meaningful writing assignments. The Teaching Exchange . Retrieved Jan. 9, 2008 from http://www.brown.edu/Administration/Sheridan_Center/pubs/teachingExchange/jan2005/01_flaxman.pdf
Hass, M. & Osborn, J. (2007, August 13). An emic view of student writing and the writing process. Across the Disciplines, 4.
Hedengren, B.F. (2004). A TA's guide to teaching writing in all disciplines . Boston: Bedford/St. Martin's.
Hudd, S. S. (2003, April). Syllabus under construction: Involving students in the creation of class assignments. Teaching Sociology , 31, pp. 195 – 202.
Leahy, R. (2002). Conducting writing assignments. College Teaching , 50.2, pp. 50 – 54.
Miller, H. (2007). Designing effective writing assignments. Teaching with writing . University of Minnesota Center for Writing. Retrieved Jan. 9, 2008, from http://writing.umn.edu/tww/assignments/designing.html
MIT Online Writing and Communication Center (1999). Creating Writing Assignments. Retrieved January 9, 2008 from http://web.mit.edu/writing/Faculty/createeffective.html .
Contact TTU
Save up to 25%

Requirements
Why choose directorist, step 1: install & activate directorist, step 2: install a free directory theme, step 3: create categories & tags for your website, step 4: how to add new locations, step 5: listing submission by users, extending functionalities of a wordpress directory website for courses, pro tips: monetize your course directory website with directorist, bonus tips: adding a free payment gateway, final thoughts, how to create a directory website for courses.

- Directory Niche Tutorials WordPress
- 6 mins read
As we step into the digital world, the demand for accessible and diverse educational resources is becoming higher and higher than ever. A directory website for courses serves as a centralized platform where students, educators, and course providers can connect, share, and access a wide array of educational opportunities. Such a website simplifies the search for the right course and enhances the overall learning experience by offering a structured, user-friendly interface.
But, how do you ensure that your course directory website stands out of the box? Well, if you want to host your site on WordPress, then this article is for you. Here we will walk you through the steps to build a lucrative directory website for courses.
So, without further ado, let’s dig deeper.
To build a course directory website with WordPress, you just need several things –
- WordPress latest version
- A niche-specific domain ( Namecheap , GoDaddy , etc.)
- A reliable hosting ( Bluehost , Hostinger , Cloudways , etc)
- A WordPress directory plugin, Directorist .

Directorist is a widely-used directory website builder plugin, boasting over 10,000 users globally and a stellar customer rating of 4.7 out of 5. It offers the following benefits:
Core (free) features include :
- includes a drag-&-drop based form builder with unlimited custom fields
- CSV Bulk Importer
- Powerful search filter
- Multi Directory facility
- WooCommerce multi-vendor plugin compatibility
- 17 Elementor widgets
- 16 Gutenberg blocks
- monetization with featured listing
- charge for every listing
- receive payments through offline bank transfer
- CSV export-import
- one-click demo import
- google maps integration
- OpenStreet maps integration
- free support via WordPress.org
- free directory themes like BestListing, Directoria, etc.
- 100% mobile responsive with an intuitive design
- RTL Support
- Loco translate support
- WPML integration
- and many more
Premium features include:
- Comes with a flutter-based native mobile app, compatible with both Android & iOS
- Integration with Oxygen Builder, MailChimp, Google reCaptcha, BuddyBoss, BuddyPress, etc.
- Integration with popular payment gateways such as Stripe, PayPal, Authorize.net
- Niche-based themes (dPlace, dRestaurant, dLawyers, OneListing Pro, dDoctors, dRealEstate, dCar, dList, dService, and dClassified, dHotels, dJobs, etc.)
- Monetization with regular subscription plans
- Monetization with WooCommerce Pricing Plans
- Monetization with Rank Featured Listing
- Advanced review system
- Coupon creation
- HelpGent integration
- Digital Marketplace
Explore all the premium features from this link .
If you’re looking for the best directory website builder, this one stands out. We believe this tool is the perfect deal to create a directory website for courses.
How to Build a Directory Website for Courses in a Flash
We assume that you have a WordPress website up and running. Now the only thing you have to do to create an online directory is to follow these steps:
Navigate to the WP Admin Dashboard > Plugins > Add New > Search for the keyword ‘Directorist’ > Hit the “Install Now” button.

Next, activate and configure the setup wizard for a fresh start. For optimal configuration, we recommend visiting our official documentation to tailor the settings to your needs.
Directorist is compatible with all WordPress themes, allowing you to select any theme you prefer. However, opting for a directory-specific theme can enhance the overall look and feel of your website.
To do this, you can install the niche-centric ‘ OneListing ‘ theme, which is available for free. If you want to enhance your directory website further, you have the option to upgrade to the premium version later.
Once you get the theme, navigate to the WP Admin Dashboard > Appearance > Themes > Add New .

Then click on Upload Theme > Choose File and select the ‘onelisting.zip’ > Install Now .

Now, activate the theme to take an effect:

Upon installing the theme, you will see some plugins and tools suggested to install. So, make sure you have installed all the suggested ones so that the theme works perfectly fine. For example, you must install & activate the Elementor, Contact Form 7, MailChimp, and a Theme ToolKit. So, we recommend you hit the “ Begin Installing Plugins ” option to install them all at once.

And that’s it!
A directory website must be user-friendly in a way that visitors can find their listing item in a flash of an eye. Upon creating relevant categories, Directorist can suggest related listings according to the visitors’ choice.
To this end, you need to create a set of relevant categories and tags. In the Directorist menu, you will find both of these items where (category) you can also add images, assign the category to a parent one, give a description, add icons & colors.
To do so, you just need to go to the Directory Listings > Categories > Fill out the fields > Hit the “Add New Category” button .

Similarly, you can add tags so that Directorist can show the relevant listing item to the visitors. You can do it from Directory Listings > Tags > Enter Credentials > Add New Tag .

Just like adding categories or tags adding locations helps the users find the desired course listing from course providers. To add locations, you have to go to the Directory Listing > Locations > Enter credentials (name, description, directory type, etc.) > Hit the Add New Location button.

To add listings to your course directory website, navigate to the WP Admin Dashboard > Directory Listings > Add New Listing .
However, the course owners will add or submit the majority of the listings. One thing you can do is to check whether the listings violate your community standard or not. And, you can charge money for every listing.
To add listings, course owners need to have a registration with your site. After the registration is done, course owners can freely add more listings from the “Add listings” option. You can check the progress whether the submission is okay or not.
Earlier, we finished building the basic directory website for courses. Now, if you want to extend the functionalities of your course directory website, then you can move easily with Directorist’s advanced features and extensions.
For example, you want to allow the listing owners to set different pricing plans for their listings so that their users can have different options to choose from. To set this feature, you can add this feature to your course directory website using the Pricing Plans extension.
Again, you can allow directory website users to compare listings just by adding an extension to your existing course directory website.
To add the extension, go to the WP-Admin Dashboard ➝ Plugins ➝ Add New ➝ Upload Plugin ➝ and upload the Extension ZIP file and Activate it.
Making money from a directory website should be one of the prime goals of a directory website owner. With Directorist, you can monetize your course directory website in a number of ways.
- Charge for listings (Free)
- Featured listings (Free)
- Allow businesses to claim listings (Premium)
- Charge for viewing private listings (Premium)
- Allow private/sponsored advertising (premium)
- Charge for membership (Premium)
- Sell business leads (Premium)
- Promote affiliate products (Premium)
- Allow sponsored articles/guest posting (Premium)
- Bookings & appointment (Premium)
- Paid ad placement (Premium)
Directorist free version supports only the offline bank transfer method to receive payments. To add your bank account details, navigate to the WP Admin Dashboard > Directory Listings > Settings > Monetization > Offline Gateways Settings > Insert your details > Save changes .
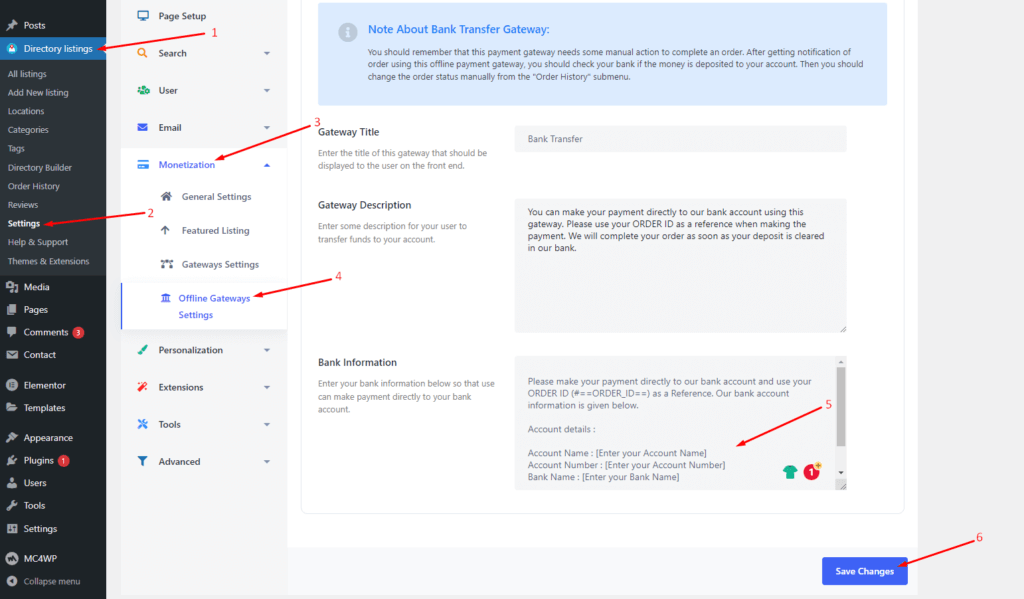
- You should remember that this payment gateway needs some manual action to complete an order. After getting a notification of an order using this offline payment gateway, you should check your bank if the money is deposited into your account. Then you should change the order status manually from the “Order History” submenu.
- Apart from the offline Bank transfer method, Directorist also supports online payment gateways like Stripe, PayPal, and Authorize.net . However, they are available in the premium version only.
We believe you have mastered the basics of creating a course directory website. To elevate the visual appeal and functionalities of your course directory website, consider upgrading to the pro version of Directorist. This version is meticulously crafted to help you build a top-notch directory website for lawyers.
If you liked our posts, don’t forget to subscribe to our blog so that we can notify you once any post is published. Directorist is now on Facebook , Twitter , and LinkedIn ! You can also join the Directorist Community for sharing your thoughts and experiences relating to the directory niche. Come and join us to see what we’re up to.
Md. Hamim Khan
Md Hamim Khan is a man of letters who puts up his hands for technical content writing at Directorist. He loves to keep himself engaged in playing cricket & chit-chatting with friends, family, and colleagues in the time when he leaves out of work.
Related Articles

How to Add Products to Google Shopping: A Step-by-Step Guide
- May 28, 2024

Top Free Wiki Submission Sites in 2024
- May 20, 2024
- Directory Niche
- 9 mins read
Leave a Reply Cancel reply
You must be logged in to post a comment.
I'm an entrepreneur with 6 tips for building a website for your small business without breaking the bank
Affiliate links for the products on this page are from partners that compensate us and terms apply to offers listed (see our advertiser disclosure with our list of partners for more details). However, our opinions are our own. See how we rate products and services to help you make smart decisions with your money.
- I built my first business website in 2000 — it was hard to get started, and even harder to make it look good.
- Now, there are low-cost options to make your small business website look professional.
- Many hosting plans give you a staging area where you can experiment with your site's design.
You can do many things to succeed as a small-business owner — steps like forming an LLC and getting a business credit card can help. One of the most important steps you can take is building a website for your business.
I got my first business website around 2000. In those days, you had to learn Dreamweaver or HTML to build your site from scratch, and it would still probably look terrible. I didn't know how to do it myself, so I hired a designer. I had to wait for her to be available for updates, which meant my site was often stale. I vowed never to have another business website I couldn't manage myself.
Now, many tools are available to help new business owners build and take control of their websites. I built my freelance writing website in WordPress, which is much fancier than I could have designed without those tools. I had help from a consultant to develop this version of my site, but you don't need that. Here's what you need to know.
1. Plan to spend some time on your website
When I was ready to build my first business website, a friend who had created a site for her business told me she could help me and we could do it in an evening. That was not overly optimistic. I spent about 10 hours getting my website up and another 15 hours updating it with a new theme a few years later.
2. Build it in WordPress
There's a reason WordPress is the most popular website-building platform. It is robust and full-featured, updates often, and is free. Because of its popularity, there are endless plugins, many free, that you can use to increase functionality. WordPress comes with a built-in page builder that's easy to use. Platforms like Wix or Weebly that promise simpler builds don't have the flexibility and, in my experience, aren't any easier to work with than WordPress.
One of the best things about WordPress is online help. I have never taken a class in WordPress; the online community is my help desk and instructor. I now help manage WordPress sites for my clients, not because I'm a techie but because it truly is easy.
3. Choose a low-cost hosting platform
WordPress is free, but you'll need to pay for hosting. I use Bluehost and pay about $400 annually, which gives me access to several security add-ons. Many services offer low-cost hosting for WordPress sites, and you can often manage your domain registration through the same company.
4. Use a page builder
WordPress's web builder keeps improving, but I recommend adding a drag-and-drop builder to give you more tools to add functionality and visual interest. There are many builders with free versions; two popular ones are Elementor and Beaver Builder. I use the Divi builder, which is not free, but I bought a lifetime license on sale for around $150.
5. Start with page templates
Templates are packs of pages with all the design elements in place. All you have to do is substitute your graphics and text. One way to choose a page builder is by looking at templates and using the builder for the template you like.
There are both free and paid templates. My builder subscription includes many free template packs; I chose one designed for freelancers. Using template pages gave my website a unified look, saving me a tremendous amount of time in design.
6. Do not fear failure
One of my favorite things about working on the web is that absolutely anything can be changed. I once accidentally changed the background color of my theme, which made all my pages look hideous, but I simply changed it back — no lasting harm done. Be experimental. Try new things.
One final pro tip: My hosting plan allows me to create a staging site where I can fiddle around to my heart's content while my current site remains live and unchanged. It is shockingly easy to set this up. When I first built my current website, I used a WordPress theme that wasn't very flexible. I created a staging site where I could take my time renovating the site with my new builder and templates. When I was ready, I switched to the updated pages with a click.
Watch: How two brothers are turning busted skateboards into bowls, furniture, and jewelry
- Main content
IMAGES
VIDEO
COMMENTS
Websites are a great way to go above and beyond for a school project. If you make a website, you take your assignment to a level, not like any other student. Thankfully for you, websites can be quite cheap and easy to set up if you're willing to learn and put the time into it. Let's discuss different kinds of websites you can make, and different ways you can go about making one.
It is already challenging to make your school project, so why should you complicate your life when creating your website? After choosing your research topic and starting to write your project, why not use a website to disseminate it?
Learn how to make a website from scratch in 11 steps. From choosing a domain to creating engaging content, this guide will help you launch your site with ease.
Need websites inspiration for your student projects? We have you covered! Check out these great 7 website project ideas for students!
In Canvas, you can enter a website URL as an assignment submission. When a URL is submitted as an assignment, Canvas takes a screenshot of the web page at the time it was submitted. Before submitting an assignment, you may want to review all assignment information, such as the assignment rubric, if ...
This guide walks you through how to design a website from start to finish. Design a website that impresses your visitors and brings more business.
Want to learn how to create a website? This beginner's guide will help you make your own website in an easy step-by-step format.
Learn how to make a class website with Google Sites. In this week's education technology tutorial, veteran educator Sam Kary shows you everything you need to know in order to create a dynamic ...
Create your own students website with the new free website maker for students! Create your own website for students without any coding skills — it's free and easy.
Use Assignments to create, collect, and give feedback on assignments in a learning management system (LMS).
A professional website is a necessity for almost all careers and business ventures. Here's a full guide on how to create a website.
In this project-centered course*, you'll design, build, and publish a basic website that incorporates text, sound, images, hyperlinks, plug-ins, and social media interactivity. We'll provide you with step-by-step instructions, exercises, tips, and tools that enable you to set up a domain name, create an attractive layout for your pages, organize your content properly, ensure that your site ...
HTML is the backbone of every webpage on the internet. Let's build a website step-by-step using only HTML. Perfect for absolute beginners!
Curious how to create a website with HTML and CSS? You're in the right place! This step-by-step tutorial teaches you to code your own website from scratch.
Follow the steps above to create an assignment and select classes. To schedule the same assignment across multiple classes, make sure to select all classes you want to include. Next to Assign, click the Down arrow Schedule. Next to the date, click the Down arrow and select a publish date and time for each class.
To help students get familiar with how to create and design a website of their own, assign them to come up with a business idea to build their website around. Then you can provide a series of assignments to help them learn the skills required to have a website that performs well.
Learn how to build a website from scratch with W3Schools How TO. Follow step-by-step instructions and examples to create your own web pages.
Learn how to make a website with HTML and CSS from scratch. W3Schools provides free tutorials, examples, and online editor for web development.
In this tutorial, I'll discuss some of the main reasons why you should make a portfolio website for yourself. Then, I'll walk you through how to build your own fully responsive portfolio website with HTML, CSS, and JavaScript.
Assignments is an app that helps educators manage, grade, and analyze student work using Google Workspace tools. Learn how to get started with Assignments for your LMS.
Make assignments professional-looking and aim for a great grade. Explore ways you can use design to create a professional-looking homework and ace it!
Watch: Introduction to Create a One-Page Website, a free video lesson from Applied Digital Skills designed to help learners with Google Sites.
In order to create assignments, you will first need to create a class. Jump to: Step 1: find and select the music. Step 2: customize assignment name, instructions and parameters. Step 3: set the grading rubric. Step 4: determine the assignment settings. Step 5: assign the newly created assignment template to your students.
Your goals for the assignment. Why are you assigning this project, and what do you hope your students will gain from completing it? What knowledge, skills, and abilities do you aim to measure with this assignment? Creating assignments is a major part of overall course design, and every project you assign should clearly align with your goals for the course in general. For instance, if you want ...
If you want to host your site on WordPress, this article is for you. Here we will walk you through the steps to build a lucrative directory website for courses.
I'm an entrepreneur with 6 tips for building a website for your small business without breaking the bank
The Coast Guard has adjusted the 2025 Assignment Year (AY25) timelines for enlisted members to give the workforce additional time to make decisions after this year's Servicewide Exams (SWEs) had to be rescheduled for Aug. 26 - Aug. 29, 2024.
At some point, your business will likely need an online presence. Learn how to create a website for your business with our guide.
OpenStax College Success is a comprehensive and contemporary resource that serves First Year Experience, Student Success, and College Transition courses.
Medicaid covers a broad range of physical and behavioral health services, including doctor visits when you're sick, preventive care like health screenings, vaccines, hospital stays, prescription medications, mental health and substance use disorder care, and more. Check coverage details for: