How-To Geek
How to change a drive letter on windows 10 or windows 11.
You can change your drive letters in Windows 10 and 11 using the Disk Management utility.

Quick Links
What changing a drive letter does, how to change a drive letter, how to fix programs broken by changing a drive letter.
Changing the letter of a drive is easy on Windows 10 and Windows 11, but you should do it as soon as you add the drive to prevent future hassles. Find out how to change a drive letter here.
Windows assigns drive letters alphabetically --- starting with C --- when they're initialized. If you want to change a drive letter, you should do it before you install anything on the drive. Changing a drive letter after programs are installed could break them since there will be references to an installation location that is no longer there.
Windows has gotten pretty smart about updating shortcuts so that programs work after changing a drive letter. Most of your applications' shortcuts will probably be automatically corrected. Unfortunately, Windows isn't as good about updating file associations. You'll have to manually set the default apps associated with files to fix file associations if they were broken by changing the drive letter.
It is possible to change the boot drive letter to something else, but we don't recommend it. Changing C:\ to another letter is likely to result in severe issues, like a PC that cannot boot into Windows at all. Even if it were able to boot, there would be a huge number of programs that would not be able to run.
Technically speaking, while they are commonly called drive letters, each letter actually refers to a partition on a disk. If you have multiple partitions on a single disk, you will need to assign a letter to each partition to make them all accessible. If a disk has just a single partition, it will just have a single letter pointing to that partition. (However, you do not have to assign a letter to each partition. Partitions without drive letters will not appear in File Explorer and elsewhere.)
Changing a drive letter is pretty simple. Click the Start button, type "Disk Management" in the search bar, and then hit Enter.
The program name displayed in the search will not be Disk Management. It will be "Create and format hard disk partitions."
You could also hit Windows+X or right-click the Start button, and then click "Disk Management."
Identify the drive you'd like to change in the Disk Management Window. In this example, we'll change the letter of the D:\ drive to J:\. You can right-click the drive on the text list, or on the menu below. Either works.
Select "Change Drive Letter and Paths" in the right-click menu that appears.
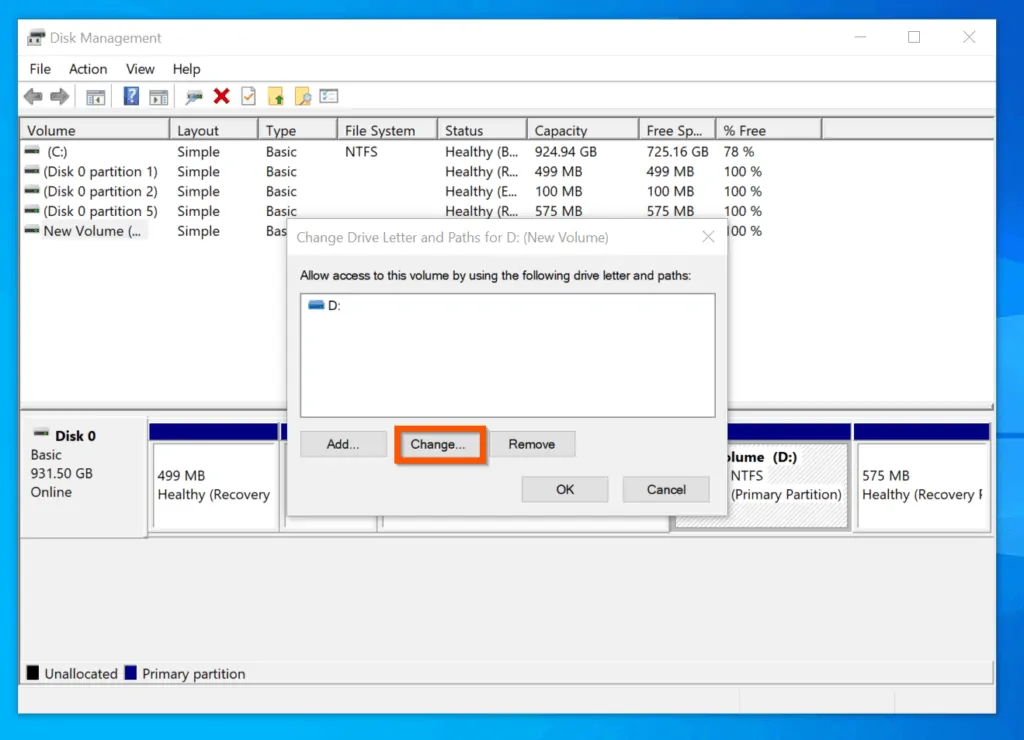
In the window that pops up, click "Change."
Select whatever letter you want from the drop-down menu. Then click "Ok."
Two popups will warn you about changing your drive letter. Click "Yes" on both of them, and then restart your computer.
Once Windows has restarted, the drive letter should be changed.
There are a few ways you can fix a program broken by changing the drive letter.
Fix The Shortcut
If you're lucky, the only thing that is broken is the shortcut. Fix a shortcut by right-clicking the shortcut on your desktop, and then click Properties.
You need to change the target of the shortcut to the new drive letter.
For example, if GIMP was previously installed at " D :\GIMP 2\bin\gimp-2.10.exe," and you changed the D drive to J, change the target of the shortcut to " J :\GIMP 2\bin\gimp-2.10.exe."
Finalize the change by clicking "Apply" and then "Ok."
Reinstall the Program
Reinstalling the program will generate new entries in the registry, so everything on the computer will know where to look for the program. Some installers won't like reinstalling directly over existing files, so you may need to rename or delete the old installation first.
Change the Drive Letter Back
If you changed the drive letter of a drive with a lot of programs installed, it might be easier to change the drive letter back. Changing the drive letter back should automatically fix any programs and file associations that were broken.
Edit the Registry
You can break programs, or even Windows itself, by editing the registry. Be careful, and learn about how to edit the registry before you try it. Make sure you backup the Windows registry first. You should not attempt this method unless you have no other options.
Windows, and a lot of programs, track where programs are installed via the Windows registry. It is possible to manually adjust the registry to fix broken programs. Keep in mind that there could be dozens of registry entries you need to edit. A program like GIMP can have registry entries for the context menu, for the "Open With" menu, for any file associations, and for the location of its executables. Other programs may only have a few entries related to where it is installed.
If you're not deterred, here's how you do it.
First, you need to know where the program was previously installed. In this case, the program was installed to the "D:\GIMP 2" folder, and the executables were found the "D:\GIMP 2\bin" sub-folder. It is now located at "J:\GIMP 2" instead.
We need to update the registry to reflect the change in location. Click the Start button, type "regedit" into the search bar, right-click Regedit, and click "Run as administrator."
In Regedit, hit Ctrl+F to bring up a search window. Type in the old location for the program you're trying to fix --- "D:\GIMP 2" for our example --- then click "Find Next."
Once Regedit has found something with "D:\GIMP 2" as part of a path, it'll show it to you. Here is an example from the GIMP search.
To actually change them, double click the name of the registry entry you want to modify. Then change the drive letter to J, or whatever you chose. If you didn't otherwise move the folder, leave the rest of the path alone. Then click "Ok."
You'll need to repeat this multiple times. To find the next result using your search term, you can hit the F3 key. There will be a popup once you've found all of the entries.
Changing drive letters can be a simple way to customize your PC. Do it before you install anything on the drive, however. You'll prevent any problems before they occur, and probably save yourself quite a bit of troubleshooting.
This browser is no longer supported.
Upgrade to Microsoft Edge to take advantage of the latest features, security updates, and technical support.
Change a drive letter
- 4 contributors
Applies To: Windows 11, Windows 10, Windows Server 2022, Windows Server 2019, and Windows Server 2016
If you want to change a drive letter assigned to a drive, or you have a drive that doesn't yet have a drive letter, use Disk Management to change it. You can also mount the drive in an empty folder so that it appears as a folder. For more information, see Mount a drive in a folder .
If you change the drive letter of a drive that already contains Windows or apps, apps might have trouble running or finding the drive. We suggest not changing the drive letter of a drive that already contains Windows or apps.
The following steps show how to change the drive letter.
Open Disk Management with administrator permissions.
In Disk Management, select and hold (or right-click) the volume on which you want to change or add a drive letter and select Change Drive Letter and Paths .

If you don't see the Change Drive Letter and Paths option or it's grayed out, the volume either isn't ready to receive a drive letter or it's unallocated and needs to be initialized . It might also be that the drive isn't accessible, which is the case with EFI system partitions and recovery partitions. If you've confirmed that your volume is formatted with a drive letter that you can access but you're still unable to change it, that's beyond the scope of this article. We suggest contacting Microsoft Support or the manufacturer of your PC for more help.
To change the drive letter, select Change . To add a drive letter if the drive doesn't already have one, select Add .

Select the new drive letter and choose OK . Then select Yes when prompted about how programs that rely on the drive letter might not run correctly.

Coming soon: Throughout 2024 we will be phasing out GitHub Issues as the feedback mechanism for content and replacing it with a new feedback system. For more information see: https://aka.ms/ContentUserFeedback .
Submit and view feedback for
Additional resources
How to assign permanent letters to drives on Windows 10
You can assign drive letters manually, and in this guide, we show you how on Windows 10.

On Windows 10, when connecting a removable storage device or an internal hard drive, the system detects and assigns a drive letter automatically to make it usable. However, when reconnecting an external drive (such as a USB flash drive or SD or microSD cards), the system can end up assigning a different letter, which can be annoying.
If you want to see the same drive letter on a particular device, you can manually assign a permanent letter to any drive connected to your computer, and on Windows 10 , you can do this in at least three different ways, using Disk Management, Command Prompt, or PowerShell.
Using this approach will prevent Windows 10 from assigning a new letter or trying to set a letter already in use, which can cause conflicts. Also, it helps to select a drive letter that makes more sense to you.
In this Windows 10 guide, we walk you through several methods to manually assign a permanent letter to a drive, as long as you're connecting the drive to the same device and the letter isn't already in use.
How to assign a drive letter using Disk Management
How to assign a drive letter using command prompt, how to assign a drive letter using powershell.
To manage drive letters with the Disk Management tool, use these steps:
- Open Start .
- Search for Create and format hard disk partitions and click the top result to open the Disk Management experience.
- Right-click the drive and select the Change Drive Letter and Paths option.

- Click the Change button.

- Select the Assign the following drive letter option.
- Use the drop-down menu to assign a new drive letter. Quick tip: To avoid the system trying to assign the same letter to another drive, it's a good idea to start adding letters in backward order. For instance, instead of using D, E or F, it better to start with Z, Y or X when assigning a new letter.

- Click the OK button.
- Click the OK button again.
Once you complete these steps, the drive will permanently retain the assigned letter, even after reconnecting it. However, if you connect the drive to another device, it may receive a different letter.
While the easiest way to assign a new drive letter is to use Disk Management, you can also use DiskPart in Command Prompt to perform the same task.
Get the Windows Central Newsletter
All the latest news, reviews, and guides for Windows and Xbox diehards.
To assign a drive letter using Command Prompt, use these steps:
- Search for Command Prompt , right-click the result, and then select the Run as administrator option.
- Type the following command to start DiskPart and press Enter : diskpart
- Type the following command to list all the available volumes and press Enter : list volume
- Type the following command to select the volume (drive) to assign a new letter and press Enter: select volume 3 In the command, make sure to change "3" to the number that represents the drive on your device.
- Type the following command to assign a new drive letter, and press Enter : assign letter=Z The command assigns the letter "Z" to the drive assuming it's available. However, you need to make sure to change the letter for the one that you want to use.

After completing these steps, similar to Disk Management, every time you reconnect the storage to the same device, Windows 10 should assign the same letter automatically.
Alternatively, you can also use PowerShell to change a drive letter on Windows 10 using these steps:
- Search for PowerShell , right-click the result, and then select the Run as administrator option.
- Type the following command to list the available drives and press Enter : Get-Disk
- Type the following command to assign a permanent letter to the drive and press Enter : Get-Partition -DiskNumber 1 | Set-Partition -NewDriveLetter Z In the command, make sure to change "1" to the number that represents the drive that you want to modify, and change "Z" for the new letter that you want to use.

Once you complete the steps, the drive will be accessible through File Explorer using the letter that you assigned, and Windows 10 won't try to change it.
Updated March 7, 2019: We revised this guide to make sure it's current with the latest version of Windows 10.
More Windows 10 resources
For more helpful articles, coverage, and answers to common questions about Windows 10, visit the following resources:
- Windows 10 on Windows Central – All you need to know
- Windows 10 help, tips, and tricks
- Windows 10 forums on Windows Central
Mauro Huculak is technical writer for WindowsCentral.com. His primary focus is to write comprehensive how-tos to help users get the most out of Windows 10 and its many related technologies. He has an IT background with professional certifications from Microsoft, Cisco, and CompTIA, and he's a recognized member of the Microsoft MVP community.
- 2 Warhammer 40,000: Rogue Trader's first DLC expansion is revealed
- 3 'Uh Oh', VK is pulling the plug on its nostalgic ICQ (I Seek You) instant messaging platform after nearly three decades of keeping people connected
- 4 Microsoft gives a subtle reminder about the upcoming death of Windows 10
- 5 The next DOOM is called 'DOOM: The Dark Ages,' with a medieval feel — and it's coming to Xbox, Windows, and PlayStation
- All about AI
- Google Gemini AI
- Inflection AI Pi Chatbot
- Anthropic Claude
- Multimodal AI
- Generative AI
- AI Image Generation
- AI VIdeo Generation
- AI Coding Assistants
- AI Regulation
- AI Research
- Large Language Models (LLM)
- Surface Pro
- Surface Laptop
- Surface Book
- Surface Duo
- Surface Neo
- Surface Studio
- Surface Hub
- Surface Pen
- Surface Headphones
- Surface Earbuds
- About WinBuzzer
- Follow Us: PUSH, Feeds, Social
- Join our Team
- Cookie Policy and Privacy Policy
- Terms of Service
How to Assign / Change Drive Letter in Windows 10
We show you how to change the drive letter in CMD, DIsk Management, PowerShell, and Registry editor in Windows 10.

Table of Contents:
Windows 10 helpfully assigns drive letters to disks as they're added, but they aren't always the most logical choices. While we all know that C: is the system drive, it doesn't make quite as much sense to have D: as your games drive or E: as your media drive. Luckily it's quite easy to change a drive letter in Windows 10, and we're going to walk you through the process today.
How does Windows 10 drive letter assignment work?
For the most part, Windows 10 automatically assigns letters to drives as they're connected, in alphabetical order. However, there are a few exceptions to this rule that may leave some users confused.
As mentioned earlier, C: is always reserved for the system drive, but A: and B: are reserved too, for rarely used floppy drives. Because of Windows automatic assignment, you may have also noticed that Windows changes the drive letter of your USB stick if you've connected another before it.
If you want letters that are easier to identify in bios or don't want your USB letters jumping around, it's quite easy to permanently change a drive letter in Windows 10 to something of your choosing. We're going to cover a few different ways today, including how to change the drive letter in CMD.
How to Change Drive Letter in Windows 10 via Disk Management
The most user-friendly way to assign drive letters in Windows is through the Disk Management interface, which is relatively easy to use.

How to Change Drive Letter in CMD using a DISKPART Disk Management Command
Though it's not quite as user-friendly, it can be much faster to change a drive letter with Command Prompt.

How to Change Drive Letter in Windows 10 with a PowerShell Disk Management Command
Those more familiar with PowerShell can use this method instead to achieve the same result.

How to Change / Assign a Drive Letter via the Registry Editor
Alternatively, if none of the above methods worked or you're just feeling brave, you can modify the drive letter via the registry. Just be sure to read our safe registry editing guide first.

If you enjoyed this guide, you may want to consider enabling or disabling disk caching or turning on BitLocker for your newly customized drives.
- Assign drive letter
- assign drive letter windows 10
- Change boot drive letter Windows 10
- Change drive letter windows 10
- change usb drive letter Windows 10
- DIsc Management
- Disk management command
- how to change drive letter Windows 10
- powershell change drive letter
- win 10 change drive letter
Recent News
UK Government Defends Faculty AI Safety Contracts

Digital Decay: 38% of Webpages from 2013 No Longer Exist
Subscribe to WinBuzzer on Google News

How to Change Drive Letter on Windows 10
By Victor Ashiedu
Published May 6, 2020
On this page...
This Itechguide teaches you how to change drive letter on Windows 10.
Option 1: Change Drive Letter with Disk Management
- Right-click Windows 10 Start menu and select Disk Management .

- Then, right-click the partition you want to change drive letter for and select Change Drive Letter and Paths…

- On the Change Drive Letter and Paths pop-up, click Change .
- Then, on the Change Drive Letter or Path pop-up, click the Assign the following drive letter drop-down and select a new drive letter.
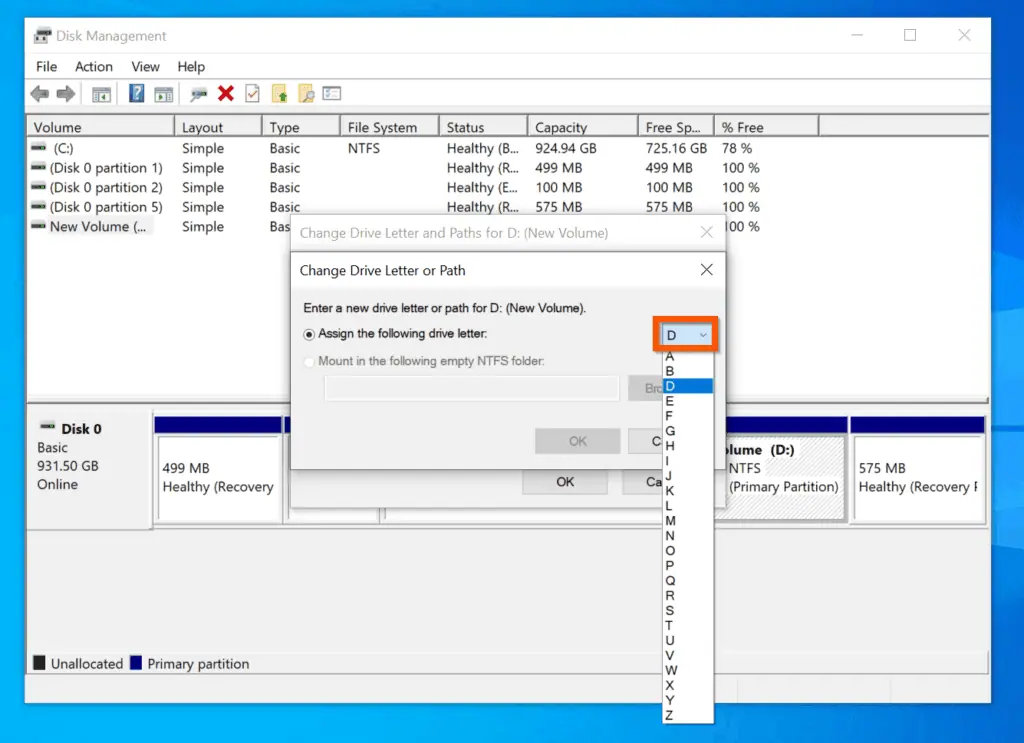
- Finally, to change drive letter on Windows 10 with Disk Management, after selecting a new drive letter, click OK.
- Then, on the confirmation pop-up, note the warning and if you want to proceed, click OK.

Option 2: Change Drive Letter with DISKPATH
- Type command prompt in the Windows 10 search box. Then, from the search results, right-click Command Prompt and select Run as Administrator .

- You will receive a User Access Control (UAC) confirmation, requesting you to allow the “app to make changes to your PC”. On the UAC prompt, click Yes .

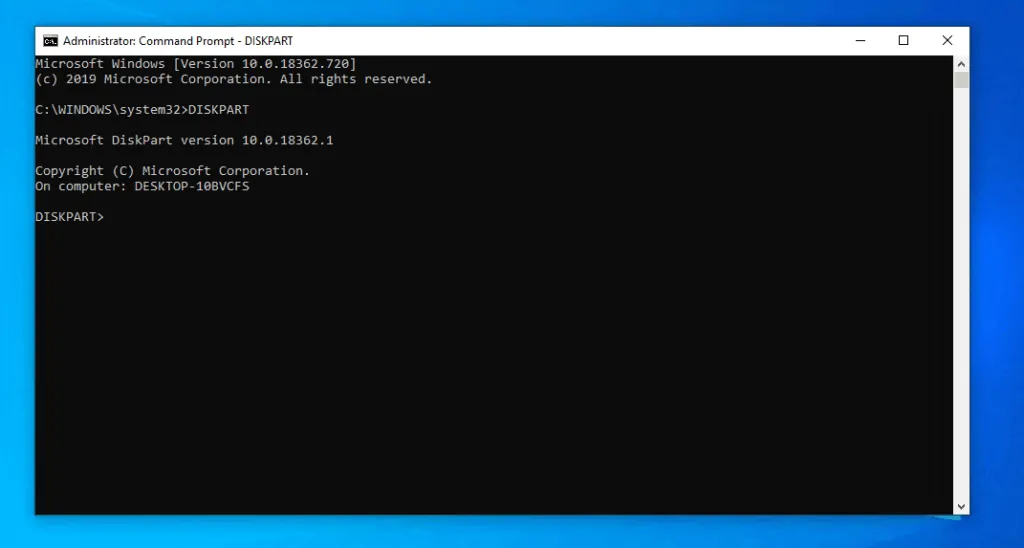
- On the command Prompt, to open the DISKPART, type the command below and press enter.
The DISKPART prompt will open.
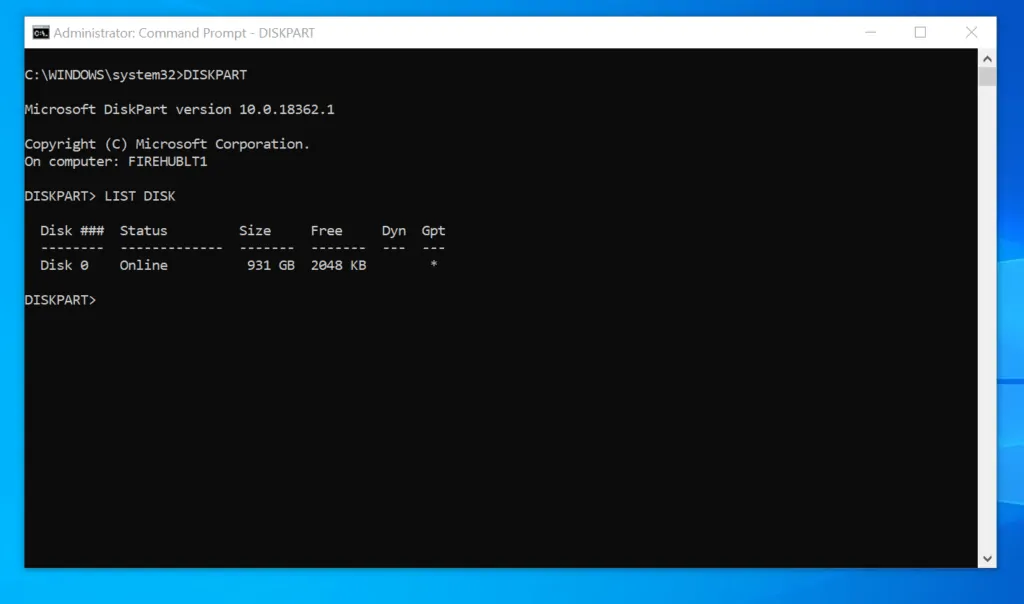
- On the DISKPART prompt, to list all available disks – type this command and press enter.
The command will list all disks on your computer. The next step is to select a disk.
- To select a disk, enter the command below and press enter.
The command will return “Disk # is now the selected disk.” The next step is to list all available partitions on the selected disk.

- To list all partitions on the selected disk, enter the LIST PARTITION command and press enter.
Before you proceed to the next step, note the partition # of the partition you want to change drive letter for.
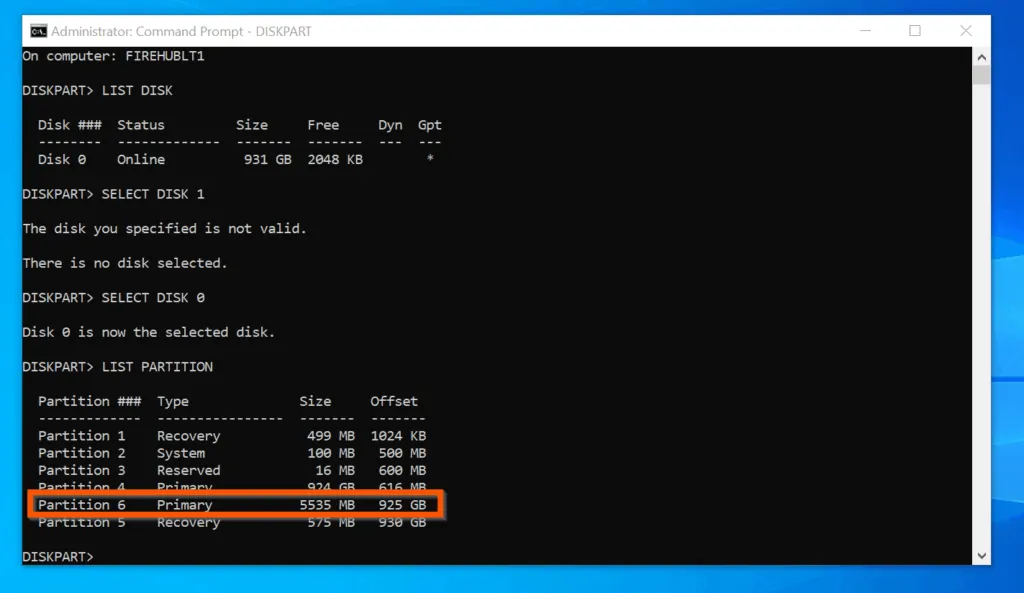
- Then, to select the partition, enter the SELECT PARTITION command followed by the partition # and press enter.
Change 6 to the partition number for the partition you want to change its drive letter.
- Finally, to change drive letter on Windows 10 with DISKPART, use the ASSIGN LETTER command. In this example, I want to assign driver letter D to the partition.
If the drive letter is available, DISKPPART will assign the drive letter and return a confirmation message.

However, if the drive letter is already assigned to another partition, DISKPPART will return an error message. If you receive an error message, try another drive letter.
Option 3: Change Drive Letter with PowerShell
- Type PowerShell in search bar. Then click Run as administrator .

- To identify the disk with the partition you want to assign drive letter, type the Get-Disk cmdlet and press enter.
The command will display information about all disks on the computer. Note the Disk number (first column) – from the screenshot below, mine is disk number 0. The next step is to get the partitions on the disk.

- To list all partitions on a disk, enter the Cmdlet below and press enter
All partitions on the disk will be displayed. Note the partition number of the partition you want to change its drive letter. From the screenshot below, mine is partition 6.
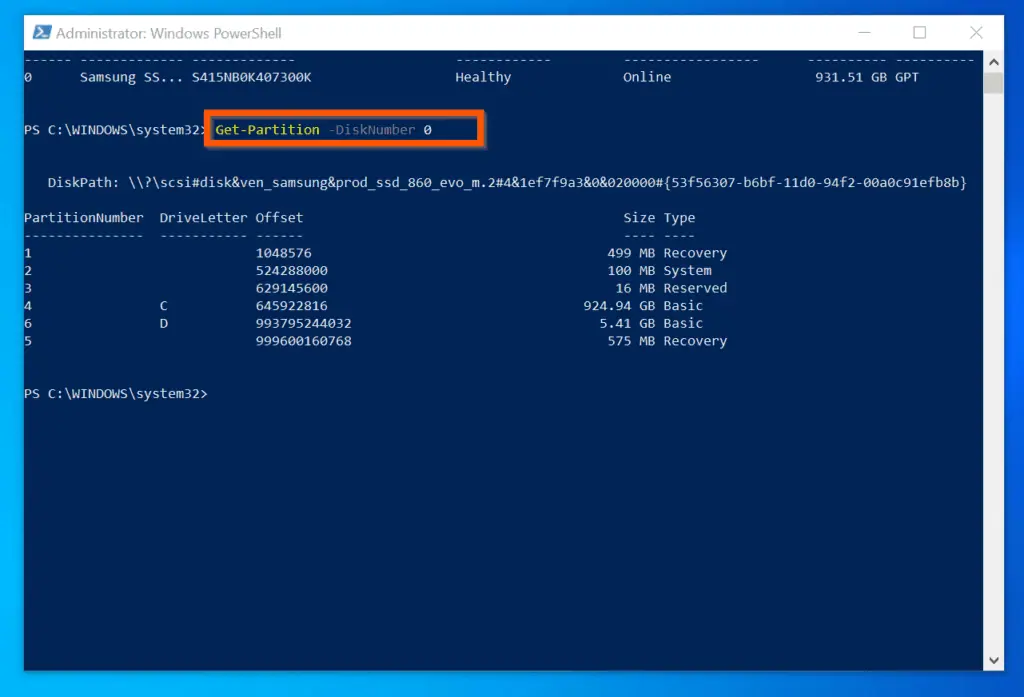
- Finally, to change drive letter on Windows 10 with PowerShell, enter the Cmdlet below and press enter.
Change 0 , 6 and E to your disk number, partition number and drive letters respectively.
You can use the methods covered in this Itechguide to change drive letter Windows 10!
I hope you found this Itechguide helpful. If you did, click on “Yes” beside the “Was this page helpful” question below.
You may also express your thoughts and opinions by using the “Leave a Comment” form at the bottom of this page.
Finally, for more Windows 10 Itechguides, visit our Windows 10 How – To page. You may also find our Work from Home page very helpful.
- Was this page helpful?
- Yes (0) No (0)
About the Author

Victor Ashiedu
Related Articles

How to Create, Rename, Delete Files or Folders in Windows

How to Set Paging File Size in Windows 11 or Windows 10

How to Download and Install Windows 10 22H2 Update Manually
Get in Touch
We're committed to writing accurate content that informs and educates. To learn more, read our Content Writing Policy , Content Review Policy , Anti-plagiarism Policy , and About Us .
However, if this content does not meet your expectations, kindly reach out to us through one of the following means:
- Respond to "Was this page helpful?" above
- Leave a comment with the "Leave a Comment" form below
- Email us at [email protected] or via the Contact Us page.
Leave a comment Cancel reply
Save my name, email, and website in this browser for the next time I comment.

What the UK Energy Price Cap Means and How it Works
TechRepublic
Account information.

Share with Your Friends
How to assign a drive letter in Windows 10
Your email has been sent

When you connect a new drive to your PC, Windows automatically assigns the next available letter after C, which is normally used for your system drive. So an external hard drive or USB thumb drive could end up as D, E, F, or whatever, depending on how many drive letters are already being used.
This is all well and good, but what if you want to assign the drive a letter? Maybe you want to use M for your music files or X for your top-secret X-Files. Here’s how in Windows 10.
- Ensure that the drive you’re relettering isn’t in use and that no files from that drive are open.
- Right-click on the Start button.
- Click Disk Management to open the Disk Management console.
- Right-click the volume that has the drive letter you want to change.
- Click Change Drive Letter And Paths.
- Click the Change button.
- Choose from a list of available drive letters. (Don’t use A or B, which have historically been reserved for floppy drives and can sometime confuse older software.)
- Click Yes if a popup windows appears asking if you really want to do this.
- Close the Disk Management console.
You may need to restart your machine for the change to take effect, but once you do the drive will use the new letter.
More Windows tips…
- How to turn on or off hibernate in Windows 10
- Regain hard disk space by using Windows Update Cleanup in Windows 7 and 8.x
- Restore a Windows XP backup in Windows 8
- How to replace SkyDrive with Libraries in Windows 8.1
- Pro tip: Use an optical Recovery Drive in Windows 8.1
Subscribe to the Developer Insider Newsletter
From the hottest programming languages to commentary on the Linux OS, get the developer and open source news and tips you need to know. Delivered Tuesdays and Thursdays
Create a TechRepublic Account
Get the web's best business technology news, tutorials, reviews, trends, and analysis—in your inbox. Let's start with the basics.
* - indicates required fields
Sign in to TechRepublic
Lost your password? Request a new password
Reset Password
Please enter your email adress. You will receive an email message with instructions on how to reset your password.
Check your email for a password reset link. If you didn't receive an email don't forgot to check your spam folder, otherwise contact support .
Welcome. Tell us a little bit about you.
This will help us provide you with customized content.
Want to receive more TechRepublic news?
You're all set.
Thanks for signing up! Keep an eye out for a confirmation email from our team. To ensure any newsletters you subscribed to hit your inbox, make sure to add [email protected] to your contacts list.
How to Change Drive Letter in Windows 10 & 11
Drive or partition letters are not fixed. You can change them. Here is how to change a drive letter in Windows 10 & 11 operating systems.
Windows automatically assigns a unique drive letter for all the drives, partitions, and plugged-in USB drives. Generally, the assigned letters are in incremental order starting with the letter C. For the most part, you don’t have to change the drive letter as it is pretty inconsequential in most cases. However, there might be times when you need to manually modify the drive letter of a drive, partition, or plugged-in USB drive to meet certain requirements.
For example, I want to use the drive letter X for one of my partitions because one of my older scripts requires it. The script won’t work as intended if it doesn’t have that specific drive letter. Since these are older files, and there are many of them, in typical Windows fashion, I tend to swap the drive letter rather than making the necessary changes to the script files.
Thankfully, Windows has several ways to change the drive letter . You can use the built-in partition manager or execute a few commands in the terminal. I will show both ways, follow the method you like.
Table of contents:
Change drive letter using partition manager
Commands to change drive letter.
Note: Close all active programs except your browser before proceeding with the below steps. It will reduce potential conflicts between programs and the drives.
Important: Do not change the drive letter of system volume or boot partition (C drive).
The steps below work the same in Windows 10 and 11.
Though most don’t know, Windows has a built-in partition manager called Disk Management. You can use it to quickly and easily change the drive letter. All you have to do is go to the drive options and choose the new drive letter.
Here is how to do it:
- Press “ Win + R ” to open Run .
- Type “ diskmgmt.msc ” and click “ Ok .”
- Find the drive you want to modify.
- Right-click on the drive.
- Choose the “ Change drive letter and paths ” option.
- Click the “ Change ” button.
- Select the “ Assign the following drive letter ” radio option.
- Choose a drive letter from the dropdown.
- Click “ Ok .”
- Click “ Yes ” in the warning window.
- Again, click “ Yes ” in the second warning window.
- Close the main disk management window.
- You have successfully changed the drive letter in Windows 10 and 11.
Steps with more details:
First, search and open “Create and format hard disk partitions” from the Start menu. You can also use the “diskmgmt.msc” Run (Win + R) command.
After opening the Disk Management tool, find the drive you want to change the drive letter, right-click on it, and choose the “Change drive letter and paths” option.

Now, click the “Change” button.

Select the “Assign the following drive letter” radio option, choose a drive letter from the dropdown menu, and press “Ok.”

You will see a couple of warning prompts. Press the “Yes” button in both prompts.

Finally, close the Disk Management tool, and you are done.
That is all. You’ve successfully changed the drive letter in Windows. To make the changes take full effect, reboot the system.

You can use the diskpart command to change the drive letter of any drive, partition, or USB drive in Windows. Here’s how to use the command to modify the drive letter.
Press the Windows Key to open the Start menu . Type “ Command Prompt ,” right-click on the result, and select the “ Run as administrator ” option. You can also right-click the Start menu, choose “Windows Terminal (Admin),” and open the Command Prompt tab in it.
After opening the cmd window, type “ diskpart ” and press Enter. This will launch the diskpart program in the cmd window.

Type “ list volume ” and press Enter.
The above command will list all partitions and their volume numbers. Take note of the volume number of the drive you want to modify.
Next, execute the “ select volume #number ” command. Don’t forget to replace the #number with the actual volume number.

After selecting the volume, execute the “ assign letter=NewDriveLetter ” command. Replace “ NewDriveLetter ” with the actual drive letter you want to assign.

Once assigned, close the cmd window.
That is all. Once the diskpart commands are executed successfully, the drive letter is changed instantly. To make the changes take full effect, reboot Windows.
I hope this simple and easy Windows how-to guide helped you.
If you are stuck or need some help, send an email, and I will try to help as much as possible.
Did you know you can change a drive icon to anything you want? Follow the linked article to understand how to do it.
About The Author

Leave a Comment Cancel Reply
Your email address will not be published. Required fields are marked *
Save my name, email, and website in this browser for the next time I comment.

- I Tried Both: Apple Watch 9 vs Fitbit Charge 6
- Best Places to Print Photos Online
How to Change a Drive Letter
Don't like the letters assigned to your drives in Windows? Change them!
:max_bytes(150000):strip_icc():format(webp)/tim-fisher-5820c8345f9b581c0b5a63cf.jpg "change drive letter assignment windows 10")
- Emporia State University
:max_bytes(150000):strip_icc():format(webp)/image-5e6611aebe974bb7886a24b5070c834f.jpg "change drive letter assignment windows 10")
- The Ultimate Laptop Buying Guide
What to Know
- Open Disk Management. Locate the drive you want to change. Right-click and choose Change Drive Letter and Paths > Change .
- Select the drive letter you want to assign from Assign the following drive letter . Then select OK and choose Yes .
The letters assigned to your hard drives, optical drives, and USB drives in Windows are not fixed. Use the Disk Management tool in Windows to change drive letters. These steps apply to Windows XP and newer versions of Windows .
How to Change Drive Letters in Windows
Follow these steps to change the driver letters in any version of Windows.
You can't change the drive letter of the partition that Windows is installed onto. On most computers, this is usually the C drive.
Open Disk Management , the tool in Windows that lets you manage drive letters, among [many] other things.
In Windows 11/10/8, Disk Management is also available from the Power User Menu ( WIN + X keyboard shortcut) and is probably the quickest way to open it. You can also start Disk Management from the Command Prompt in any version of Windows, but starting it via Computer Management is probably best for most of you.
Locate from the list at the top, or from the map at the bottom, the drive you want to change the drive letter of.
If you're not sure that the drive you're looking at is really the one you want to change the drive letter for, you can right-click or tap-and-hold the drive and then choose Explore . If you need to, look through the folders to see if that's the right drive.
Right-click or tap-and-hold the drive and choose Change Drive Letter and Paths .
Select Change .
If you've selected the primary drive by accident, some versions of Windows will display a message that reads Windows cannot modify the drive letter of your system volume or boot volume.
Choose the drive letter you want Windows to assign to this storage device by selecting it from the Assign the following drive letter drop-down box.
You don't need to worry if the drive letter is already being used by another drive because Windows hides any letters you can't use.
Select OK .
Choose Yes to the Some programs that rely on drive letters might not run correctly. Do you want to continue? question.
If you have software installed to this drive, it might stop working properly after changing the drive letter. See details on this in the section below.
Once the drive letter change is complete, which usually only takes a second or two, you're welcome to close any open Disk Management or other windows.
The drive letter is different from the volume label. You can change the volume label using similar steps .
If You Have Programs Not on the Main Drive
Changing drive letter assignments for drives that have software installed to them may cause the software to stop working. This isn't quite as common with newer programs and apps but if you have an old program, especially if you're still using Windows XP or Windows Vista, this is likely to be a problem.
Fortunately, most of us don't have software installed to drives other than the primary drive (typically the C drive), but if you do, consider this your warning that you might need to reinstall the software after changing the drive letter.
No Changes for the Operating System Drive
You cannot change the drive letter of the drive that the Windows operating system is installed on. If you'd like Windows to exist on a drive other than C , or whatever it happens to be now, you can make that happen but you'll have to complete a clean install of Windows to do it. Unless you have a pressing need to have Windows exist on a different drive letter, we don't recommend going through all that trouble.
Change, Don't Switch
There's no built-in way to switch drive letters between two drives in Windows. Instead, use a drive letter that you don't plan on using as a temporary "holding" letter during the drive letter change process.
For example, let's say you'd like to swap Drive A for Drive B . Start by changing Drive A's letter to one that you don't plan on using (like X ), then Drive B's letter to Drive A's original one, and finally Drive A's letter to Drive B's original one.
Using the Command Prompt
You can also change the drive letter from Command Prompt . It's not as easy as using Disk Management and you can't see right away which letters are available to choose, but it is completely doable with the diskpart command.
Get the Latest Tech News Delivered Every Day
- The 34 Best Free Data Destruction Tools of 2024
- 10 Best Free Disk Partition Software Tools
- How to Open Disk Management
- How to Format a Hard Drive in Windows
- What Is a Volume Label of a Drive?
- How to Back Up Your iPhone to an External Hard Drive
- How to Partition a Hard Drive (Windows 11, 10, 8, 7, +)
- How to Burn an ISO File to a USB Drive
- How to Properly Reboot (Restart) a Windows Computer
- How to Use the Format Command to Write Zeros to a Hard Drive
- AOMEI Partition Assistant Standard Edition v10.4.0 Review
- What Is the NTFS File System?
- How to Open Disk Management From Command Prompt
- Disk Management
- What Is a Partition?
- How to Find a Drive's Volume Label or Serial Number
Sign up for our daily newsletter
- Privacy Policy
- Advertise with Us
6 Ways to Change the Drive Letter in Windows

If your PC suddenly stops showing one of your internal drives in the file explorer or not list your external drive, it could be due to the OS getting confused with the drive letters. Simply changing your assigned drive letters can help you bypass this conflict. Here are six ways to change the drive letter.
1. Change the Drive Letter Using Settings
2. using command prompt, 3. disk management, 4. registry editor, 5. windows powershell, 6. drive letter changer software, frequently asked questions.
Also read: How to Clean Up and Make Space on Your Windows “C” Drive
Is It Safe to Change a Drive Letter in Windows?
Changing the drive letter is not entirely harmless and can cause significant problems based on the contents of your drive. If you have applications and software installed on your drive, those applications may cease to work.
For example, if you change the name of your D: drive to an F: drive, then the software installed in the D drive will still search for code in the D: file. While you can still access the data inside, there may be errors that will cause a nuisance in your day-to-day usage.
However, you may safely change the letter of some drives. If a partition simply includes data files that you rarely use, changing the drive letter may cause minor inconvenience, but nothing serious. The letters of external drives can almost always be changed without any problems.
- Press Win + I to open the Settings app, then select the “System” tab. Scroll down and click on “Storage.”

- Scroll down on the right side and click on “Advanced storage settings.”

- Under Advanced storage settings, click on “Disks & Volumes.”

- Select the drive whose letter you want to change, then click on the “Properties” button for that drive.

- In the Drive Properties, you will find the option to change the drive letter of the selected drive.

- Once you click on the option to change the drive letter, you will find a drop-down menu that will allow you to change the drive letter.

- Click on the letter you want to assign.

- Once you have selected your preferred letter, click on “OK” to confirm your choice.

Also read: How to Format a Drive in FAT32 in Windows
- Search for the command prompt on the start menu by typing cmd , right-click on it, and select “Run as administrator”.

- On the command prompt home screen, type:

- Press Enter , then type:

- Press Enter. You’ll see a list of your system’s drives. Make a note of the volume number of the drive. In the example pictured, it’s “Volume 3”.

- Type the following code:
- Type the following code to assign the new letter:
Instead of “new drive letter,” type the letter you want. For example: assign letter=S

The drive letter will be changed to your preferred letter.
Also read: 8 Ways to Customize Windows Terminal
- Right-click on the Windows button and open “Disk Management.”

- Under the “Volume” column, you will find the various partitions of your storage. You need to find the drive whose letter you’ll change and right-click on it.

- In the dialog box that appears, click on “Change.”

- Click the drop-down menu next to “Assign the following drive letter,” then select your letter and press “OK.”

- A warning message will pop up. Click “Yes” if you are sure about your decision to change the drive letter.

Also read: Which Allocation Unit Size Is Best for Your Drive?
- To change the drive letter through registry editor, first press Win + R to open the Run dialog and type regedit .

- Type in the following address at the top of the application:
and press Enter .

- Navigate to the list of binary keys. Select the key that corresponds to the drive letter that you want to change. For example, if we want to change the letter of the D: drive, we would look for “\DosDevices\D:”
- Right-click on the selected registry and rename the drive letter to what you want, just as you would rename any other file.You will have to restart your computer for the effects to take place.

Also read: 16 Useful Windows Registry Hacks to Optimize Your Experience
- Using the search button on the taskbar, search for “Powershell” and run it as administrator.

- Type the following command:

- A screen will show you your disk partitions. Make a note of what drive letter you want to change.

- To change the drive letter, type the following command:
Make sure to substitute “current drive letter’ and “new drive letter” with the actual drive letters, then press Enter .

Also read: How to Map a WebDAV Drive in Windows
If you are looking for a tool that can help you manage your partition and drives, these software will help you change your drive letter.
- MiniTool Partition Wizard
- AOMEI Partition Assistant
- EaseUS Partition Master
These tools are easy to use and have GUI interfaces that make them simple to use and also a one-stop destination for you to manage your storage devices. For the purposes of the demonstration, we are using MiniTool Partition Wizard to change the drive letter.
- Download MiniTool Partition Wizard. (It is a direct download link.)

- Run the installer and launch the app. You will get a listing of all your drive partitions mentioned below.

- Right-click on the target drive partition and select “Change Letter.”

- Open the drop-down list and select a new drive letter for your target drive.

- Click on “Apply” to save the changes.

- You will receive a warning pop-up asking you to close all background applications. Click “Yes.”

- You will now receive a confirmation message telling you that the new changes have been applied.Click “OK.”

Also read: How to Format Your USB Drives in Windows
1. How are drive letters assigned in Windows?
Drive letters are assigned to every new drive in alphabetical order. Traditionally, the A: and B: drives were used for floppy disks, and the system drive on which Windows is installed is named C: by default.
2. Can I change the drive letter for the System Drive?
No, changing the drive letter on the system drive is not possible, as Windows is installed on the system drive. If that was changed, the system drive would not be found and the computer would cease working.
3. Can I switch drive letters among two drives?
No, there is no functionality in Windows to switch drive letters directly between two drives. If you want to switch the drive letters between the D: drive and the E: drive, you will have first change the D: drive to another letter (so as to free up the D:), change the E: to D:, then change the first one to E:.
Image credit: Plastic magnetic letters by 123RF
Our latest tutorials delivered straight to your inbox

Ojash has been writing about tech back since Symbian-based Nokia was the closest thing to a smartphone. He spends most of his time writing, researching, or ranting about Bitcoin. Ojash also contributes to other popular sites like MakeUseOf, SlashGear, and MacBookJournal.

Home > Microsoft > Windows
Assign or Change Drive Letter in Windows 10 & 11 File Explorer
Drive letters are one of the two ways to identify a drive on your Windows computer. The other is the Drive name. Since Windows lets users easily rename drives, it isn’t the most reliable way to identify drives. Therefore, drive letters are important. You can still change the drive letter in the Windows 10 file explorer. Windows also lets you assign a new drive letter to a drive that doesn’t have one. Also, you can hide a drive on Windows 10 entirely from prying eyes.
Let’s imagine a scenario where the drive name was the only way to identify a drive. Now imagine you install a program in the programs folder in a drive named ProgramDrive. On Windows, you can right-click and select rename to change the name of a drive. This means many users might often do it or sometimes even accidentally. But when you change the name of the drive to NewProgramDrive, the programs installed in the programs folder may stop working. The default install path they’ve set up is now not there. You can follow another guide I wrote some time ago to install programs on external storage on Windows 10.
This is what makes drive letters so important on Windows. Instead of identifying a drive by its name, Windows does this via drive letters. The names are just for the convenience of the user. But the same logic also applies to drive letters. Windows does let you change the drive letter or assign a new one. However, if you change the drive letter for a drive where Windows or another program is installed, it may cause problems.
We recommend that you shouldn’t change the drive letter of such a drive.
Steps to Assign or Change Drive Letter in Windows 10 Explorer
This can be done from the Disk Management console. There are several ways to launch it. On Windows 10, the easiest way to do that is to right-click the Start menu and select Disk Management .

- You can see all your drives listed in the top half of the Disk Management window. It also shows the disks in a more graphical representation at the bottom half of the window.

- From the context menu, select the Change Drive Letter and Paths… option.
- If the Drive does not already have a letter assigned, click on the Add button.

- Click OK and then click Yes on the warning dialog that appears.
The drive letter will be changed once you do that. However, Windows will still keep using the previous drive letter to keep programs running. If you install new programs in that drive, they will also be installed using the old drive letter. This is fixed once you restart Windows. And yes, if your Windows PC takes a long time to boot up, you can follow these tips to make Windows 10 boot faster .
Read Next: How to Enable and Use Windows Sandbox
- File Explorer

Related Posts

How to Rename Single or Multiple Files with PowerShell

350+ Most Useful and Amazing Websites on the Internet (PDF)

Complete List of ADB Shell Commands (Cheat Sheet)

How to Hide a Drive in Windows 11, 10, 8 and 7

17 Windows 10 Registry Editor Tweaks & Mods

71 Best Google Search Tips, Tricks and Hacks in 2024

3 Ways to Change Drive Letter in Windows 10
3 Ways to Change Drive Letter in Windows 10: When you re-install Windows or have started your PC for the first time, you will notice that all your drives or volumes are by default assigned drive letter by Windows 10, well in future you might want to change these letter and in this post we will cover how to do that. Even when you connect an external drive such as hard disk, or a simple USB, you will notice that Windows 10 will automatically assign a drive letter to these connected drives.

The process of Windows is quite simple, it progresses through the alphabet from A to Z to assign the available drive letters to devices as connected. But there are some letters which are exceptions such as A & B are reserved for floppy drives, whereas the drive letter C can only be used for the drive which has Windows installed on it. Anyway, without wasting any time let’s see How to Change Drive Letter in Windows 10 with the help of the below-listed tutorial.
Table of Contents
Make sure to create a restore point just in case something goes wrong.
Method 1: How to Change Drive Letter in Windows 10 using Disk Management
1.Press Windows Key + R then type diskmgmt.msc and hit Enter to open Disk Management.

2.Now right-click on the drive for which you want to change the drive letter for and then select “ Change Drive letters and Paths ” from the context menu.

3.On the next screen, select the currently assigned drive letter then click on the “ Change ” button.

4.Make sure to select or check “ Assign the following drive letter ” then select any available drive letter you want to assign for your drive and click OK.

5.Click Yes to confirm your actions.
6.Once finished, you can close Disk Management.
Method 2: How to Change Drive Letter in Command Prompt
1.Press Windows Key + X then select Command Prompt (Admin).

2.Type the following command into cmd and hit Enter after each one:
diskpart list volume (Note down the number of the volume for which you want to change the drive letter for) select volume # (Replace the # with the number which you noted above)

assign letter=new_drive_letter (Replace new_Drive_letter with actual drive letter which you want to use for example assign letter=G)

Note: If you selected an already assigned drive letter or the drive letter is not available then you will receive the error message indicating the same, again use a different drive letter to successfully assign a new drive letter for your drive.
3.Once finished, you can close the command prompt.
Method 3: How to Change Drive Letter in Windows 10 using Registry Editor
1.Press Windows Key + R then type regedit and hit Enter to open Registry Editor.

2.Navigate to the following registry key:
HKEY_LOCAL_MACHINE\SYSTEM\MountedDevices

3.Make sure to select MountedDevices then in right window pane right-click on the binary (REG_BINARY) value (ex: “\DosDevices\F:”) for the drive letter (ex: “F”) of the drive you want to change the drive letter for and select Rename.
4.Now rename only the drive letter part of the above Binary value with an available drive letter for example. “ \DosDevices\G: ” and hit Enter.

5.Close Registry Editor and reboot your PC.
Recommended:
- How to Change Monitor Refresh Rate in Windows 10
- How to Fix Scaling for Blurry Apps in Windows 10
- Enable or Disable Domain Users Sign in to Windows 10 Using Biometrics
- How to Change Drive Icon in Windows 10
That’s it you have successfully learned How to Change Drive Letter in Windows 10 but if you still have any questions regarding this tutorial then feel free to ask them in the comment’s section.
About The Author

Aditya Farrad

How to Color Code Calendar on Notion
How to Change Duolingo App Icon on Android

How to Use Plinky to Organize Links

How to Reset Tinder Matches

How to Uninstall Valorant from Riot Client

How to Clear Delivery Optimization Cache in Windows
Leave a comment cancel reply.
Your email address will not be published. Required fields are marked *
At the edge of tweaking
Advertisement
Change the drive letter in the command prompt
- Open an elevated command prompt .
- Type diskpart .

You are done.
Change the drive letter in PowerShell
- Open an elevated PowerShell instance .

For example, the command can look as follows:

Winaero greatly relies on your support. You can help the site keep bringing you interesting and useful content and software by using these options:
If you like this article, please share it using the buttons below. It won't take a lot from you, but it will help us grow. Thanks for your support!
Author: Sergey Tkachenko
Sergey Tkachenko is a software developer who started Winaero back in 2011. On this blog, Sergey is writing about everything connected to Microsoft, Windows and popular software. Follow him on Telegram , Twitter , and YouTube . View all posts by Sergey Tkachenko
One thought on “How to Change Drive Letter in Windows 10”
Really thank you this steps very helpful
Leave a Reply Cancel reply
Your email address will not be published. Required fields are marked *

Privacy Overview
How to change drive letter using PowerShell on Windows 10
If the a new drive is missing on your device, it could be a letter assignment issue, and here's the fix on Windows 10.

- To change the drive letter on Windows 10, open PowerShell (admin) and run the “Get-Partition -DiskNumber DRIVE-NUMBER | Set-Partition -NewDriveLetter NEW-LETTER” command.
On Windows 10, when you connect an internal or external drive to your computer, the system assigns a drive letter automatically to identify the logical partition inside the hard drive.
A drive letter (or device letter) can be any letter from the English alphabet, excluding the letter “C,” as it’s reserved for the main drive that contains the operating system. Although the assignment process happens automatically, sometimes Windows might try to assign a letter already in use, preventing the new drive from appearing on File Explorer.
If you run into this problem or simply want to change the drive letter for any reason, Windows 10 offers multiple ways to complete this configuration, but using PowerShell is perhaps one of the most reliable ways to assign a new drive letter.
In this guide , I will explain the steps to change the drive letter using the PowerShell command-line console on Windows 10. (These steps should also work on Windows 11 and higher releases.)
Change drive letter using PowerShell on Windows 10
To change the drive letter through PowerShell commands, use these steps:
Open Start on Windows 10.
Search for PowerShell , right-click the result, and select the Run as administrator option.
Type the following command to identify the hard drive you want to change the letter and press Enter :
Type the following command to view the partitions and letters for a specific drive and press Enter :
In the command, update “1” to the disk number of the drive to change.
(Option 1) Type the following command to assign or change the drive letter if the hard drive has only one partition and press Enter :
In the above command, update “1” to the disk number of the drive to change and “G” to the letter you want to assign to the storage.

(Option 2) Type the following command to change the drive letter if the hard drive has multiple partitions and press Enter:
In the command, update “G” for the current letter and “H” for the new letter you want to appear on the drive.

(Option 3) Type the following command to assign a drive letter to a partition without any letter and press Enter:
In the command, update “1” for the drive number containing the partition, then change the other “1” for the partition number without a letter, and then “K” for the new drive letter.

Once you complete the steps, the drive will have a new letter assignment and appear in File Explorer.

Mauro Huculak is a Windows How-To Expert who started Pureinfotech in 2010 as an independent online publication. He has also been a Windows Central contributor for nearly a decade. Mauro has over 14 years of experience writing comprehensive guides and creating professional videos about Windows and software, including Android and Linux. Before becoming a technology writer, he was an IT administrator for seven years. In total, Mauro has over 20 years of combined experience in technology. Throughout his career, he achieved different professional certifications from Microsoft (MSCA), Cisco (CCNP), VMware (VCP), and CompTIA (A+ and Network+), and he has been recognized as a Microsoft MVP for many years. You can follow him on X (Twitter) , YouTube , LinkedIn and About.me . Email him at [email protected] .
- Microsoft account vs. local account, what’s the difference on Windows?
- How to set Google as your default search engine on Microsoft Edge
We hate spam as much as you! Unsubscribe any time Powered by follow.it ( Privacy ), our Privacy .
- PC & Mobile
How to Change a Drive Letter in Windows 10
Lee Stanton Lee Stanton is a versatile writer with a concentration on the software landscape, covering both mobile and desktop applications as well as online technologies. Read more November 19, 2022
Changing drive letters in Windows certainly has its benefits. You can hide a specific drive from all apps on your computer, thus preventing these apps from writing on a specific partition or edit the drive letter after adding a new HDD or SSD.

If you’re looking to change drive letters in Windows 10, you’ve come to the right place. In this article, we’ll provide you with detailed steps on how to change or remove various drive letters.
There are a couple of different ways to change a drive letter in Windows 10. Below, we’ll show you how to do so with Disk Management. This is the most straightforward way to apply changes to your drive letters in Windows 10.

You have now successfully changed a drive letter in Windows 10.
How to Change Drive Letter in Windows 10 Using Command Prompt
Another way to change drive letters in Windows 10 is using Command Prompt. This process is relatively simple:
- Make sure you’re running your PC in Admin mode.

You have now changed your drive letter in Windows 10.
How to Remove a Drive Letter in Windows 10
If you want to remove a drive letter in Windows 10, you can do so from Desk Management. Just follow these simple steps:

- Click OK to confirm the operation.
You have now successfully removed a drive letter in Windows 10. After removing a drive letter, you won’t be able to see it in your File Explorer any longer. Also, to remove a letter, you must sign in as the administrator.
How to Change a Network Drive Letter in Windows 10
Changing a network drive letter in Windows is a pretty straightforward process. Just follow these steps, and you’ll be good to go:

Additional Steps if You Receive an Error Message:

You’ll now see your network share in the This PC screen.
How to Change a USB Drive Letter in Windows 10
You might want to change a USB drive letter in Windows 10 if Window Explorer doesn’t recognize the external hard drive. For this or any other reason, just follow the simple steps shown above for an HDD/SSD to change your USB drive letter.
How to Change DVD Drive Letter in Windows 10
Changing a DVD drive letter in Windows 10 can be done easily through Disk Management. Just follow the steps shown above to also change the DVD drive letter.
You have now successfully changed your DVD drive letter in Windows 10.
How to Change Recovery Drive Letter in Windows 10
Changing your recovery drive will only take a few seconds. Just as before, follow the directions shown previously to quickly change your recovery drive letter.
How to Change Boot Drive Letter in Windows 10
Unfortunately, changing your boot drive letter in Windows is not possible through Desk Management.
We only recommend changing your boot drive in case of an emergency. Otherwise, you shouldn’t make any changes to your boot drive. If you make a wrong step, you might not be able to run your system properly. For that reason, please follow the steps we’ve provided carefully. You should also make a system backup before proceeding any further.
Below, we’ll explain how to swap drive C and D letters. To assign your C drive with another letter, you should rename the \DosDevice\letter: value to another letter that’s not already in use.
Also, before you mess with the Register, it’s a good idea to create a copy of the Register before it’s been edited.

- Close the Registry Editor, wait a few seconds, and then open it back up.

- Click Rename .
- Rename the file to a new drive letter \DosDevices\Z:. This will empty your C partition.
- Locate the drive you wish to change the letter of. Find \DosDevice\D:. Right-click on it and click Rename .
- Change the name to the new drive letter \DosDevice\C:.
- Choose the appropriate value for \DosDevices\Z: and click Rename .
- Change the name to \DosDevices\D:.
- Close Regedit and open it back up.
- Change the Admin permission settings to Read Only .
- Restart your PC.
You have now successfully changed your boot drive letter in Windows 10.
Additional FAQs
Is it safe to change drive letters.
Changing drive letters is not a problem in itself. But if your computer needs to run a file that’s written in that very drive, you might have an issue. It’s not just for any reason that Windows warns you before changing a drive letter.
Generally, it’s not recommended to change drive letters unless that would help solve a specific issue. For example, if your Windows Explorer doesn’t recognize an external device under a certain driver, it’s okay to change its name.
There are some drives you can change the letters of without consequences. For example, to a partition that has files you rarely use. Also, you can change an external drive’s letter without problems.
Changing Drive Letters in Windows 10
In this article, we’ve provided you with some useful tips on how to change drive letters in Windows 10. Remember, only do this if strictly necessary, as it might cause some apps on your computer to not run properly.
Have you ever had to change your drive letters for a specific reason? Did you run into any problems? Share your experiences in the comments section below.
Related Posts

Disclaimer: Some pages on this site may include an affiliate link. This does not effect our editorial in any way.

Lee Stanton March 14, 2024

Digvijay Kumar March 8, 2024

Aman Kumar March 7, 2024
Send To Someone
Missing device.
Please enable JavaScript to submit this form.

Microsoft Learn Q&A needs your feedback! Learn More
May 20, 2024
Microsoft Learn Q&A needs your feedback!
Want to earn $25 for telling us how you feel about the current Microsoft Learn Q&A thread experience? Help our research team understand how to make Q&A great for you.
Find out more!
Contribute to the Windows forum! Click here to learn more 💡
May 10, 2024
Contribute to the Windows forum!
Click here to learn more 💡
Windows 11 Forum Top Contributors: Ramesh Srinivasan - Kapil Arya MVP - neilpzz - RAJU.MSC.MATHEMATICS - _AW_ ✅
Windows 11 Forum Top Contributors:
Ramesh Srinivasan - Kapil Arya MVP - neilpzz - RAJU.MSC.MATHEMATICS - _AW_ ✅
- Search the community and support articles
- Search Community member
Ask a new question
- Article Author
Manually assigning a drive letter using CMD/Diskpart
[Localization from this article: Manuelles Zuweisen eines Laufwerksbuchstaben mit CMD bzw. Diskpart - Microsoft Community ]
Technical Difficulty: Expert
Applies to: Windows 10 & 11
In some cases, Windows will not assign a drive letter automatically to an inserted drive. For example, this can happen when using a Windows installation media.
In that case, you can use diskpart to manually assign a drive letter.
NOTE: If your drive doesn't get assigned a drive letter, even though you are in a normal Windows environment, this can indicate a problem with the drive. Please back up your files in that case.
Open up a command prompt (CMD/PowerShell).
Type "diskpart" to start up diskpart. You will see the prompt change to "DISKPART>".

Type "list vol" to list all available volumes. You can identify the drive by size and file system.
Additionally, the volume doesn't currently have a drive letter.

Select the volume using "sel vol <number>".

Assign the drive letter using "assign letter=<letter>".

You can now exit diskpart by typing "exit" and switch to the drive using "<letter>:".

It should also be available from Windows Explorer now.
59 people found this helpful
- Subscribe to RSS feed
Was this article helpful? Yes No
Sorry this didn't help.
Great! Thanks for your feedback.
How satisfied are you with this article?
Thanks for your feedback, it helps us improve the site.
Thanks for your feedback.
Comments (17)
* Please try a lower page number.
* Please enter only numbers.
Thanks for the tutorial, I don't think I need to use Google for it anymore!
Congrats on Article Author too! :)
Report abuse
Reported content has been submitted
6 people found this comment helpful
Was this comment helpful? Yes No
How satisfied are you with this comment?
Thanks for the tutorial, I don't think I need to use Google for it anymore! Congrats on Article Author too! :)
5 people found this comment helpful
Thanks! Happy I could help! :)
1 person found this comment helpful
Very helpful Thanks.
3 people found this comment helpful
Thank for this informative article.
I ran this in PowerShell PS C:\WINDOWS\system32> GWMI -namespace root\cimv2 -class win32_volume | FL -property DriveLetter, DeviceID
The results are below. I need to know more about the DriveLetter, that does not have a letter and I cannot give it a letter, as you can see in DiskPart.
I'm sure someone personally hacking my computer. I'm wondering if this them hiding on it, and that is why I someone is typing over me and has more control at times of my computer then I do. Maybe a hidden AD Hoc.
I have searched for this on Google I'm either getting blocked or there is no information out there on this.
PS C:\WINDOWS\system32> GWMI -namespace root\cimv2 -class win32_volume | FL -property DriveLetter, DeviceID
DriveLetter : B:
DeviceID : \\?\Volume{26xxxxxx--xxxx-xxxx-xxxxxxxxxxxxxx}\
DriveLetter : C:
DriveLetter :
DeviceID : \\?\Volume{d5xxxxxx--xxxx-xxxx-xxxxxxxxxxxxxx}\
DriveLetter : D:
PS C:\WINDOWS\system32> DiskPart
Microsoft DiskPart version 10.0.19041.1
Copyright (C) Microsoft Corporation.
On computer: My Computer
DISKPART> List Volume
Volume ### Ltr Label Fs Type Size Status Info
---------- --- --- -------- ----- ---------- ------- --------- --------
Volume 0 D RAW DVD-ROM 2048 B Healthy
Volume 1 B System Rese NTFS Partition 100 MB Healthy System
Volume 2 C NTFS Partition 698 GB Healthy Boot
2 people found this comment helpful
I followed the instructions to CHANGE the letters assigned for three external hard drives. (The computer had named them E, F, G but gave the names to the wrong external hard drive) I changed the letters to the correct names singly (I disconnected the two not being adjusted) Now, I have 2 E, 2 F, 2 G names in the list (when accessed through File Explorer. When I click on "This PC", it shows just the one of each. If I click on either, or both of the same letter name, the same exact files will open. This is annoying. Anyone have a clue what can be done? This is on a brand new computer running Windows 11.
Sorry about the late reply.
That sounds weird... Usually, windows doesn't allow you to assign a drive letter twice.
If you want to change the letters, you usually have to remove them first and then reassign them.
Can you send me a screenshot of disk management, and of the list of volumes?
the partition that is not shown in diskpart is most likely some sort of recovery or reserved partition.
This is not the typical way of hiding an infection with malware...
Also, do note that your ESP (Volume B) should not be mounted, since modifying it can corrupt your Bootloader.
As for the suspected hacking, what symptoms did you observe? Mouse moving on its own, high resource usage, unexpected firewall prompts? Other things?
If you have a compromised system, its almost impossible to clean it from infections without doing a clean install of windows. I would suggest you do that if you suspect an infection. It will take time though and will delete everything on your PC. (Including files, programs, settings.) Create a backup before you reinstall.
There are no viruses nor malware on this computer. I believe it is a reflection of the original name choice. The information contained on each external hard drive is identical, yet when I go into MY PC, it only shows one set of externals. I am afraid to delete one of the duplicates because it might be just mirrored and it will make everything go away. I have way too many things on these external hard drives to lose any of them.
Thanks for your input. Jan
Forum Article Info
- Devices and drivers
- Norsk Bokmål
- Ελληνικά
- Русский
- עברית
- العربية
- ไทย
- 한국어
- 中文(简体)
- 中文(繁體)
- 日本語
5 Ways To Change Drive Letter In Windows 11, 10

Windows is programmed to assign drive letters automatically when a new partition is created. If you do not like the drive letter assigned to a partition, or for any other reason, you can change it.
Windows assigns drive letters in alphabetical order, starting with “C.” “A” and “B” are reserved for floppy disk drives. Since the first partition to be created is the system drive, it is usually labeled “C” by default.
For a partition to show up in Windows Explorer , it must have a drive letter assigned to it. Otherwise, you cannot access the partition. This is also true in case you attach a USB flash drive to your computer.
Table of Contents
On This Page
Is it possible to change system drive letter.
Before we discuss how to change a drive letter, we must inform you that you cannot change the drive letter of the system drive, after the operating system has been installed on it. This is because many dependent applications and programs are installed which require the complete path to files to function properly.
If the drive letter in the path to a file is changed, the associated app may no longer function. For example, if the initial path “C:\Windows\System32” was changed to “J:\Windows\System32,” certain components of the app may no longer find the file required.
Similarly, if an app or program is installed on another partition other than the system partition, and it does not automatically pick up the changed path (which most modern apps usually do), you may have to make manual changes to the Windows Registries to provide the new path.
Let us now show you 5 ways to change drive letters in Windows.
How to Change Drive Letters in Windows
Change drive letter using disk management console.
The Disk Management Console provides several options to manage your storage partitions and volumes, such as formatting or creating new partitions, shrinking or expanding them, or assigning/changing drive letters.
Follow the steps given below to change the partition’s assigned drive letter:
Open the Disk Management Console by typing in “ diskmgmt.msc ” in the Run Command box .

Right-click on the partition you want to change the letter for, and then click “ Change Drive Letter and Paths ” from the context menu.
Note: If you see that the option is not available or has been greyed out, then the partition’s drive letter cannot be changed.

From the pop-up wizard, click Change .

Select an available drive letter from the drop-down menu in front of “ Assign the following drive letter: ” and then click Ok .

Click Yes on the confirmation dialog box .

[Conditional] You may then see another warning message. If you do, click Yes again, and then restart your computer for the changes to fully take effect.

You will now see that the drive letter has been successfully changed.
Change Drive Letter using Command Prompt
If you are a command-line guy, you can also change the drive letter of a partition using the Command Prompt. Here is how:
Open Command Prompt with administrative privileges .
Enter the disk partition mode by typing in the following, and then hitting Enter :

Run the following to obtain a list of current partitions and their details.

Now select the volume for which you wish to change the drive letter by running the following cmdlet.
Replace [Number] in the command below with the volume number you see in the table obtained in Step 3 above.

Now use the following command to assign a new, vacant drive letter to this volume.
Replace [Alphabet]] with the new drive letter that you want to assign.

The new drive letter will now be assigned. You may now close the Command Prompt since the partition will now automatically open in Windows Explorer.
Change Drive Letter using PowerShell
Changing the drive letter using Windows PowerShell allows you to do so using the Command Line Interface (CLI) in a few easy cmdlets, as opposed to the lengthy process of using the Command Prompt. Here is how:
Launch Windows PowerShell with administrative rights .
Run the following cmdlet to get the current partitions and their associated details:

Now use this information to change a partition’s drive letter.
Replace [OldLetter] with the current drive letter for volume, and [NewLetter] with the new drive letter which you want to assign to the volume.

The drive letter will now change, and the partition will now automatically open in Windows Explorer.
Change Drive Letter from Windows Registry
You can also change the drive letter directly from the Windows Registry. Here is how:
Note: Misconfiguration of critical values in the system’s registry could be fatal for your operating system. Therefore, we insist that you create a system restore point or a complete system image backup before proceeding forward with the process.
You can also use our top selection of disk imaging and backup software so you never lose your data or operating system again.
Open the Registry Editor by typing in “ regedit ” in the Run Command box.

Now paste the following into the navigation bar at the top of the Editor for quick navigation:

In the right-hand pane, look for the values whose name starts with “ \DosDevices .” This will display the current drive letters for the partitions on your computer.
Right-click on the drive letter you want to change, and then click Rename from the context menu.
For example, to change “J”, right-click “ \DosDevices\J: ” and then click Rename .

Now rename the value and replace the old drive letter with the new one, as we did in the image below.

Now restart your computer for the changes to take effect.
When the computer reboots, you will see the drive letter has been changed.
Use Drive Letter Changer
Drive Letter Changer is a third-party freeware that can be used to perform a number of different tasks, including changing a partition’s drive letter. Moreover, it is portable software, which means it does not need to be installed on your PC.
Perform the following steps to download and use Drive Letter Changer to change drive letters:
Download the Drive Letter Changer here .
Extract the contents of the compressed folder.
Run the application labeled “ dChanger .”
The application will now automatically detect existing partitions and drive letters.
Right-click on the drive letter you want to change, expand “ Change drive letter ,” and then select a vacant drive letter that you wish to assign.

The drive letter will now change in an instant.
How to Swap Drive Letters Between Volumes
Unfortunately, there is no direct way of swapping drive letters between 2 partitions; you can only assign a vacant drive letter or remove it.
Therefore, if you wish to swap drive letters between two partitions, you must first change the drive letter of the primary partition to something else, so its initial drive letter becomes vacant. Then, change the drive letter of the secondary partition and assign the drive letter recently vacated from the primary partition. Now you can assign the vacated drive letter from the secondary partition to the primary partition.
This can be a bit confusing, so we have drafted down the process in the methods below.
Swap Drive Letter from Disk Management Console
Open the Disk Management Console by typing in “ diskmgmt.msc ” in the Run Command box.
Right-click on the primary partition and click “ Change Drive Letter and paths “ from the context menu.

From the popup wizard, click Remove .

If prompted for a confirmation, click Yes .

You may then see another warning message. If you do, click Yes again.
Now right-click on the secondary partition and click “ Change Drive Letter and paths ” from the context menu.

Now assign the drive letter from the primary partition and click Ok .

In the confirmation box, click Yes .
Now right-click on the primary partition again, and click “ Change Drive Letter and Paths ” from the context menu.

From the pop-up wizard, click Add .

Now assign the drive letter initially assigned to the secondary partition, and click Ok .

(Optional, but recommended) Now restart your computer so the changes can be finalized.
You can apply the same logic to switch drive letters between 3 or more partitions as well.
Swap Drive Letter using Command Prompt
You can also switch the drive letters between 2 partitions (or more) using the same logic. Here is how:
Enter the disk partition mode by typing in the following, and then hitting Enter .
Now paste the following to obtain a list of current partitions and their details:

Now select the primary volume using the cmdlet below.
Replace [Number] in the command with the volume number you see in the table obtained in Step 3 above.

Now remove the assigned drive letter using the following cmdlet.
Replace [Alphabet] with the drive letter currently assigned to this volume.

Now select the secondary volume using the cmdlet below.

Now assign the recently-vacated drive letter from the primary partition to this volume using the given cmdlet.
Replace [Alphabet] with the drive letter initially assigned to the primary volume.

Now select the primary partition again.

Now assign the drive letter from the secondary partition to this volume.

The drive letters have been swapped successfully. You can now close the Command Prompt.
You can apply similar logic to other methods to swap drive letters between 2 or more drives. This can be done using Windows PowerShell, Windows Registry, and the Drive Letter Changer software.
How to Fix Affected Programs After Changing Drive Letter
As we already mentioned, changing a drive letter where an app or program may be installed might break it. If the problem is not fixed automatically after a reboot, you may have to fix it manually. Here are a few solutions that might work.
Change Path for Shortcut
If you are trying to run an app or program using its shortcut, then just fixing the path of the shortcut might fix the problem.
Right-click on the shortcut and click Properties .

Switch to the Shortcut tab, change the drive letters in the “ Target ” and “ Start in ” fields with the new drive letters, and then continue to click Apply and Ok .

Now try re-running the program using the shortcut.
Revert Drive Letter
If the issue occurs after changing the drive letter, then you can try changing it back to the old one using the given methods above.
This is not an ideal case, but it will probably solve the problem.
If you do not wish to revert to the drive letter, you can skip this method and try out the ones discussed below.
Change Drive Letter in Windows Registry
From the Registry Editor, click Edit and then click Find .

Type in the old location for the app you are trying to troubleshoot, and then click “ Find Next .”

When the search wizard finds a match, double-click on the Value in the right pane, and then change the old drive letter with the new one in the text field under “ Value Data .”

Now repeat steps 2 through 5 until all paths have been updated with the new drive letter.
Once done, close the Registry Editor and restart the computer for the changes to take effect.
After the computer reboots, check to see if the issue has been resolved.
Reinstall Program
If none of these methods have worked for you, you can try reinstalling the program. Simply delete the app, download the new setup from the vendor’s website, and perform a new install.
Closing Words
People often mistake the drive letter for the name of the volume. However, these 2 are totally different. A drive letter is an alphabet defining a volume/partition on the disk, whereas a name could be anything you want it to be.
By default, Windows names a new volume as “New Volume.” You can change the name of the system volume, but cannot change its drive letter.
That said, we would like to know what prompted you to change the drive letter(s) on your system.
- How To Change Screen Brightness Using Command Line In Windows 11, 10
- 2 Ways to Change Power Modes in Windows 11
- 2 Ways To Change Touchpad Sensitivity On Windows 11

(Cancel Reply)
Notify me of follow-up comments by email.
Notify me of new posts by email.
Get Updates in Your Inbox
Sign up for the regular updates and be the first to know about the latest tech information
Email Address
Stack Exchange Network
Stack Exchange network consists of 183 Q&A communities including Stack Overflow , the largest, most trusted online community for developers to learn, share their knowledge, and build their careers.
Q&A for work
Connect and share knowledge within a single location that is structured and easy to search.
How can I change Windows 10 drive letter assignments outside a full load of the OS?
I have the following disks:
I want to replace D: with a new SSD, but Windows loads various background services from that drive, so I want to avoid trying to 'hot-swap' the drive letter while the OS is up.
My plan was:
- Install the new SSD, let it auto-assign to J:
- Clone D: 's partition to J:
- Reboot into recovery mode
- Use diskpart to switch drive letters for J: and D:
- Boot back into Windows
However when I load diskpart in recovery mode, the drive letter assignment is different to when Windows is loaded - it's defaulting to auto-assigning by-device-then-partition, eg D: is assigned to disk 2, partition 1.
How can I edit the drive letter assignments that Windows uses once loaded, but without loading it?
2 Answers 2
I ended up using safe mode to do the drive letter swap; As far as I was able to tell by reading around, 3rd-party background services don't get loaded in safe mode, and that turned out to be the case for those running from the old partitions here.
It was useful to first enable F8 safe mode by, per this post , issuing the command:
(Otherwise the only way to enter safe mode without first loading normal mode is to kill the power during boot over and over again until Windows panics and tries to repair itself.)
I suspect that it might have been possible to edit the drive letter assignments by loading and editing the registry in recovery mode, but that was a rabbit-hole that I didn't want to explore unless absolutely necessary.
Whenever I've done a drive replacement, even for Windows, I've used Linux to clone the old drive to the new drive using dd (making sure to shrink/move any partitions first if the replacement is smaller, and expand to fill the drive space once cloned). I have Linux installed, but most live installers or miniature distros would include all you'd need for this. Using dd to clone a disk is a risky exercise as you can permanently lose all the data on your disk(s) if you don't get the input and output flags for dd correct - you need to make doubly and perhaps triply sure that you get the drives correct. It's definitely a "do this at your own risk" solution, I am not recommending that you do it and can offer no support if it goes wrong. If you already know how to to this, you are comfortable with accepting the risks, and you have good backups on another drive (preferably offline), there are instructions on how to clone a disk using dd here: https://medium.com/codex/the-art-of-cloning-disks-the-dd-command-primary-usage-patterns-ff377b7616c9 The same can probably be achieved by other disk cloning tools that are more user-friendly than dd , so those may be a better option for you if you're not familiar with Linux or want to keep the solution Windows-only. However, after doing that, you can remove the old drive, insert the new drive, and Windows will (or at least should) use the new drive as though nothing happened. Cloning the drive copies across the device/partition/volume identifiers, so you don't need to tell Windows to look somewhere else for the disk it's trying to find.
- Nice answer, but not for this question. 🙁 – MGM Oct 28, 2023 at 8:55
You must log in to answer this question.
Not the answer you're looking for browse other questions tagged windows windows-10 hard-drive ssd ..
- The Overflow Blog
- You should keep a developer’s journal
- Would you board a plane safety-tested by GenAI?
- Featured on Meta
- Testing a new version of Stack Overflow Jobs
- What deliverables would you like to see out of a working group?
Hot Network Questions
- Estimate Box-Cox Transformation Lambda Using Skewness and Kurtosis
- Can a crater form inside another crater
- How to make the separation between bibliography label and entry auto-adjust (BibLaTeX)
- Why can’t God just be replaced by a naturalistic alternative and end the god debate?
- Best Snippers For Exposed Nail Tips
- Which signals (wifi, mobile phone, gps) can reliably be blocked by aluminum foil
- Are transponders sometimes referred to as ‘parrots’?
- Rotating a Pot of Boiling Water on a Stove
- How to display `\hat` when using sans-serif?
- 4 Wire connections to fuse box
- 3-clue 5x5 Hidato
- Can a salary be reduced?
- Showing the language of all graphs that are both 4-colorable and not 3-colorable is coNP-hard
- designing an elven magic system that blends with a WW1-esque world
- 'to+verb' vs 'to+be+verb-ing'
- Can we save thermal noise?
- Algebraic structure on conjugacy classes
- Campagnolo Ekar thumb shifter hooks from half of the cassette
- Has Plummer's open problem on the cyclic connectivity of planar graphs been solved?
- Why is it written in an 'it is that' structure?
- How can I find the area situated under an airport traffic pattern?
- Java - Converting a skip list to the ASCII art
- How does a Clockwork Amulet interact with advantage / disadvantage?
- Jesus Withdraws to the Mountain...Again? - John 6:15 (Confusion/Clarification)

How to Recover Data from Lost Partitions in Windows?
C reating partitions in Windows devices offers several benefits, both for your organization and to manage your system more efficiently. However, sometimes you may encounter a situation when data stored in these partitions get deleted without any warning. Losing a partition can be a daunting experience, especially if it contains any important data.
Luckily, there are several partition recovery software as well as manual methods that you can try to recover data from lost partitions. In this guide, we will explore various methods to help you learn how to recover data from lost partitions in Windows devices. Just go through these recovery workarounds along with the mentioned preventive measures to avoid partition loss in the future.
Common Causes for Partition Loss on Windows
Before diving into recovery methods, it’s important to understand what partition loss is and why such instances occur. A partition is a distinct storage part on your hard drive that is separated from other sections. Instances like partition loss usually occur when your device OS no longer recognizes or accesses one of these sections.
There are many reasons why partition gets deleted on Windows devices, some of them are:
- Accidental Deletion: Partitions can be accidentally deleted while performing disk management operations or reinstallation of device OS.
- File System Corruption: Sometimes, the file system gets corrupted due to improper shutdowns, malware, or software errors which can corrupt your partition or make it inaccessible.
- Bad Sectors: Physical damage to the hard drive can cause bad sectors, causing partition loss on your device.
- Partition Table Errors: Problems in the partition table, which keeps track of all partitions on the drive, can lead to lost partitions.
- Software Bugs: Bugs in disk management software or operating system updates are also the main reason for partition loss on Windows devices.
How do I Recover Data from Lost/Deleted Partitions in Windows 10/11?
Irrespective of the causes for the deletion of data from your lost partition on Windows devices, there are several data recovery methods, including built-in Windows tools or third-party partition recovery software to help you out. Here are some commonly used methods to restore your lost partition:
Method 01: Use the Stellar Data Recovery Professional Tool
Whether you are a beginner or an expert, this is the easiest and quickest approach to recovering your data from a lost partition. Stellar Data Recovery Professional is an all-in-one professional data recovery software which supports the recovery of data lost due to several reasons, including partition loss, re-partitioning, accidental deletion of partitions, improper cloning, etc.
The Stellar Data Recovery Professional tool is known for several amazing features, such as:
- The software supports the recovery of a wide range of file types deleted from your lost partition, including photos, videos, documents, audio files, and many more.
- It supports the recovery of data from various storage mediums, such as SD cards, USB flash drives, external hard disks, etc.
- Recover lost partitions on internal or external hard drives.
- This partition recovery software is compatible with both Windows and Mac devices. 100% safe and secure to use.
Here’s how to recover data from lost partitions in Windows using the Stellar Data Recovery Professional tool:
Step 1: After downloading and installing the Stellar Data Recovery Professional software on your Windows device, launch it. From the homepage of the software, select the type of data you need to recover and click Next .
Step 2: Now, from the Recover From window, click the ‘Can’t Find Drive’ button and select the desired hard drive partition. Click the Scan button to begin the scanning process.
Step 3: After successful completion of the scanning, preview all the files from the left navigation pane and choose the files you want to recover. Click the Recover button to save selected files at the desired storage location.
Method 02: Recover Lost Partition in Windows Using CMD
If you don’t want to use any third-party partition recovery software, then you can try using Windows' in-built Command Prompt, i.e., CMD utility to restore data from lost partitions. This method is quite complicated, but you can easily restore lost data by executing a few steps. All you have to do is:
- Press the Windows + R keys on your device to launch the Run Prompt.
- Type diskmgmt.msc in the Run window and press OK to open Disk Management .
- Now, type CMD in the search box to launch Command Prompt, and select Run as administrator option to run it with administrative privileges.
- Next, type Diskpart in the open Window and one-by-one type the following commands and press the Enter key after each command to execute it:
- list disk (to display all the available disks on your screen)
- select disk # (replace # with a disk with lost partitions)
- list volume
- select volume # (replace # with the number of the lost partition)
- assign letter=# (# indicates with an available drive letter)
Method 03: Recover Deleted Partition by Assigning a Drive Letter
Sometimes, deleted partitions on Windows devices are not entirely lost but rather unallocated, meaning it doesn't have an assigned drive letter. You can assign a drive letter using the built-in Windows Disk Management tool to recover it. To recover deleted partition using this method, you need to:
- Press the Windows + X keys and select Disk Management from the menu that appears.
- From the Disk Management window which displays a list of all connected drives and partitions, locate the unallocated space, which could be your deleted partition.
- Right-click on that unallocated space and choose the " Change Drive Letter and Paths " option.
- Now, click the Add button and then assign a drive letter on the pop-up window that appears and click OK .
Once done with the above steps, check for the partition in the File Explorer with the newly assigned drive letter.
Conclusion
Recovering data from a lost partition in Windows is possible using the above-mentioned manual methods as well as third-party professional data recovery software . Whether you are using built-in tools or any software like Stellar Data Recovery Professional, the key is to act promptly. Moreover, it is also important to find the exact cause of partition loss to determine an effective recovery method. You can even consider preventive measures like maintaining regular backups, keeping your OS updated, using antivirus software, and running disk check utilities to avoid the risk of partition loss in the future.

- How to Change Drive Letter in Windows 11: A Step-by-Step Guide
Changing the drive letter in Windows 11 is a simple task that can be done in a few steps. This process is useful if you want to organize your drives or if you need to assign a specific letter to a drive for software compatibility. Follow these steps to easily change the drive letter in Windows 11.
How to Change Drive Letter in Windows 11
Changing the drive letter in Windows 11 involves accessing the Disk Management tool, selecting the specific drive, and assigning it a new letter. This task is straightforward and can be completed in just a few minutes.
Step 1: Open Disk Management
To open Disk Management, type "Disk Management" in the Windows search bar and select "Create and format hard disk partitions."
Disk Management is a built-in tool in Windows 11 that allows you to manage your disk drives and their partitions. It’s a safe and convenient way to change your drive letters.
Step 2: Locate the Drive
In the Disk Management window, find the drive for which you want to change the letter.
Each drive is listed with its current letter and other details. Make sure you choose the correct drive to avoid any issues.
Step 3: Right-click the Drive
Right-click on the drive you want to change the letter for and select "Change Drive Letter and Paths."
This option opens up a menu where you can add, change, or remove the drive letter assigned to the selected drive.
Step 4: Click "Change"
In the dialog box that appears, click on the "Change" button.
This step allows you to choose a new drive letter from a dropdown menu, giving you the flexibility to assign the letter you prefer.
Step 5: Assign a New Letter
Select the new drive letter from the dropdown menu and click "OK."
Choose a letter that is not currently in use by another drive to avoid conflicts. Windows 11 will automatically update the assigned letter.
Step 6: Confirm the Change
A warning might appear, informing you that some programs might not run correctly after the drive letter has been changed. Click "Yes" to confirm.
This step ensures that you are aware of potential issues, though they are rare and usually not problematic.
After completing these steps, the drive will be reassigned to the new letter, and you can continue using it as normal.
Tips for Changing Drive Letter in Windows 11
- Backup Important Data : Before making any changes, it’s always a good idea to back up any important data on the drive.
- Use Unique Letters : Ensure the new letter is unique and not already in use by another drive.
- Check Software Dependencies : Some software may rely on specific drive letters, so double-check before making changes.
- Avoid System Drives : Be cautious when changing letters for system drives (like C:), as it can cause system issues.
- Restart if Needed : If you experience any issues after changing the drive letter, try restarting your computer.
Frequently Asked Questions
What happens if i change the drive letter.
Changing the drive letter will update the path for accessing that drive. Some programs that rely on the old path might need to be reconfigured.
Can I change the letter of the C: drive?
It is not recommended to change the letter of the C: drive as it can cause your system to become unstable or unbootable.
Will changing the drive letter affect my files?
No, changing the drive letter will not affect the files on the drive. It only changes how the drive is accessed.
How do I fix issues after changing the drive letter?
If you encounter issues, you can change the drive letter back to its original letter or restart your computer to see if that resolves the problems.
Can I change the drive letter for an external drive?
Yes, you can change the drive letter for external drives using the same steps outlined above.
Summary of Steps
- Open Disk Management.
- Locate the drive.
- Right-click the drive.
- Click "Change".
- Assign a new letter.
- Confirm the change.
Changing the drive letter in Windows 11 is a useful skill that allows you to better manage your computer’s storage. Whether you’re organizing your drives or resolving software compatibility issues, the process is straightforward and can be completed in just a few steps. Always remember to back up important data and choose unique drive letters to avoid conflicts.
For further reading, you can explore other Disk Management features and learn how to create new partitions or format drives. If you found this guide helpful, share it with others who might benefit from managing their drive letters more effectively.

Kermit Matthews is a freelance writer based in Philadelphia, Pennsylvania with more than a decade of experience writing technology guides. He has a Bachelor’s and Master’s degree in Computer Science and has spent much of his professional career in IT management.
He specializes in writing content about iPhones, Android devices, Microsoft Office, and many other popular applications and devices.
Read his full bio here .
Share this:
- Click to share on Twitter (Opens in new window)
- Click to share on Facebook (Opens in new window)
- Click to email a link to a friend (Opens in new window)
- Click to share on LinkedIn (Opens in new window)
- Click to share on Reddit (Opens in new window)
- Click to share on Pinterest (Opens in new window)
- Click to share on Tumblr (Opens in new window)
Related posts:
- Changing Startup Disk on Mac: A Step-by-Step Guide
- How to Merge Two Drives in Windows 11: A Step-by-Step Guide
- How to Format M.2 SSD Windows 11: Step-by-Step Guide for Beginners
- How to make a cover letter on Google Docs: A Step-by-Step Guide
- How to Check Total Hard Disk Space in Windows 11: A Step-by-Step Guide
- How to Put an Accent Over a Letter in Google Docs: A Step-by-Step Guide
- How to Set Up New SSD Windows 11: A Step-by-Step Installation Guide
- Important Windows 7 Folder and File Options to Know
- How to Make All Columns Same Width – Google Sheets
- How to Use Letters Instead of Numbers for an iPhone Passcode
- How to Cascade Windows in Windows 11: A Step-by-Step Guide
- Setting Up SQL Server Management Studio on a Mac: A Step-by-Step Guide
- How to Add an Accent Mark in Google Docs (An Easy 3 Step Guide)
- How to Cascade Windows in Windows 11: A Simple Step-by-Step Guide
- How to Make All Letters Capital in Excel 2013
- How to Create a Virtual Machine in Windows 11: A Step-by-Step Guide
- How to Install Windows 10 from Windows 11: A Step-by-Step Guide
- Enter a Password to Unlock the Disk Macintosh HD: A Step-by-Step Guide
- How to Create Windows 11 Bootable USB: A Step-by-Step Guide
IMAGES
VIDEO
COMMENTS
Changing a drive letter is pretty simple. Click the Start button, type "Disk Management" in the search bar, and then hit Enter. The program name displayed in the search will not be Disk Management. It will be "Create and format hard disk partitions." You could also hit Windows+X or right-click the Start button, and then click "Disk Management."
1 Open an elevated command prompt. 2 Type diskpart into the elevated command prompt, and press Enter. (see screenshot below) 3 Type list volume into the elevated command prompt, and press Enter. 4 Make note of the volume number (ex: 5) for the drive letter (ex: "F") of the drive (volume) you want to change.
The following steps show how to change the drive letter. Open Disk Management with administrator permissions. In Disk Management, select and hold (or right-click) the volume on which you want to change or add a drive letter and select Change Drive Letter and Paths. Tip. If you don't see the Change Drive Letter and Paths option or it's grayed ...
Search for Create and format hard disk partitions and click the top result to open the Disk Management experience. Right-click the drive and select the Change Drive Letter and Paths option. Click ...
Open Settings on Windows 10. Click on System. Click on Storage. Under the "More storage settings" section, click the Manage Disks and Volumes option. Manage Disks and Volumes. Select the drive with the partition you want to change the letter. Quick note: You may need to click the arrow button in the top right corner of the drive to see all ...
Right-click the drive that you want to change or free the letter from and click "Change Drive Letter and Paths…". Click the "Change…" button. If you want to free up the letter you can ...
Right-click Windows 10 Start menu and select Disk Management. Then, right-click the partition you want to change drive letter for and select Change Drive Letter and Paths…. On the Change Drive Letter and Paths pop-up, click Change. Then, on the Change Drive Letter or Path pop-up, click the Assign the following drive letter drop-down and ...
Right-click on the Start button. Click Disk Management to open the Disk Management console. Right-click the volume that has the drive letter you want to change. Click Change Drive Letter And Paths ...
Press " Win + R " to open Run. Type " diskmgmt.msc " and click " Ok .". Find the drive you want to modify. Right-click on the drive. Choose the " Change drive letter and paths " option. Click the " Change " button. Select the " Assign the following drive letter " radio option. Choose a drive letter from the dropdown.
To set a new drive letter for it, click or tap the Change drive letter in the Volume data section. Windows 11 will then ask you to "Choose which drive letter to use for this volume.". Click or tap on the currently displayed letter. Select the new drive letter you want to use. The new drive letter is now selected.
In the Disks & volumes section, scroll down and click the drive you want to change. Next, click the Properties button. Under the Volume Data section, click the Change drive letter button. When the ...
Right-click and choose Change Drive Letter and Paths > Change. Select the drive letter you want to assign from Assign the following drive letter. Then select OK and choose Yes. The letters assigned to your hard drives, optical drives, and USB drives in Windows are not fixed. Use the Disk Management tool in Windows to change drive letters.
Press Win + I to open the Settings app, then select the "System" tab. Scroll down and click on "Storage.". Scroll down on the right side and click on "Advanced storage settings.". Under Advanced storage settings, click on "Disks & Volumes.". Select the drive whose letter you want to change, then click on the "Properties ...
Right-click on the drive that doesn't have a letter or the drive you want to change the drive letter for. From the context menu, select the Change Drive Letter and Paths… option. Click on the Change… button on the new pop-up window that appears. If the Drive does not already have a letter assigned, click on the Add button.
1.Press Windows Key + R then type diskmgmt.msc and hit Enter to open Disk Management. 2.Now right-click on the drive for which you want to change the drive letter for and then select " Change Drive letters and Paths " from the context menu. 3.On the next screen, select the currently assigned drive letter then click on the " Change " button.
Let's review them. To change the drive letter in Windows 10, do the following. Press the Win + X keys together. In the menu, select Disk Management. In Disk Management, right-click on the partition whose drive letter you would like to change. Select Change Drive Letter and Paths in the context menu.
To change the drive letter through PowerShell commands, use these steps: Open Start on Windows 10. Search for PowerShell, right-click the result, and select the Run as administrator option. In the command, update "1" to the disk number of the drive to change. In the above command, update "1" to the disk number of the drive to change and ...
Right-click on the drive you want to change a letter for and choose Change Drive Letter and Paths from the menu. Click Change. Windows will now ask you to assign a new name for your drive. You can ...
Procedure. Open up a command prompt (CMD/PowerShell). Type "diskpart" to start up diskpart. You will see the prompt change to "DISKPART>". Type "list vol" to list all available volumes. You can identify the drive by size and file system. Additionally, the volume doesn't currently have a drive letter. Select the volume using "sel vol <number>".
With that said, the settings method is extremely simple. Here are the necessary steps: Press Win + I and select System > Storage > Advanced storage settings > Disks & volumes. Select the drive whose letter you'd like to change and click on Properties. Click on Change drive letter, select an available drive letter, and press OK.
Right-click on the shortcut and click Properties. Open item properties. Switch to the Shortcut tab, change the drive letters in the " Target " and " Start in " fields with the new drive letters, and then continue to click Apply and Ok. Fix issues with apps affected by changing drive letters.
Reboot into recovery mode. Use diskpart to switch drive letters for J: and D: Boot back into Windows. However when I load diskpart in recovery mode, the drive letter assignment is different to when Windows is loaded - it's defaulting to auto-assigning by-device-then-partition, eg D: is assigned to disk 2, partition 1.
Right-click on that unallocated space and choose the "Change Drive Letter and Paths" option. Now, click the Add button and then assign a drive letter on the pop-up window that appears and click OK .
Download Disk Copy now and clone your hard drive with easy and simple steps. Here is how to use EaseUs disk clone software to clone a hard disk. Step 1. Download, install and run EaseUS Disk Copy on your PC. Click "Disk Mode" and select the hard drive that you want to copy or clone. Click "Next" to continue.
In the Disk Management window, find the drive for which you want to change the letter. Each drive is listed with its current letter and other details. Make sure you choose the correct drive to avoid any issues. Step 3: Right-click the Drive. Right-click on the drive you want to change the letter for and select "Change Drive Letter and Paths."