
How to Double Space in Microsoft Word
Certain academic and professional writing requires it
Crafting the ideal document is essential, whether you’re a student, professional, or simply someone looking to organize your thoughts. Microsoft Word offers numerous formatting options to ensure your content looks clean and polished. One such option is double-spacing, which can make your text easier to read.
Microsoft Word makes adjusting line spacing simple and provides several ways to get the job done. Even better, you can set double-spacing as the default format for all future documents.

Which Writing Styles Require Double-Spaced Text?
Double-spacing is often required in various academic and professional writing styles to enhance readability and facilitate editing or annotating. Here are some of the more prominent writing styles that typically require double spacing.
- American Psychological Association (APA) Style: Commonly used for writing research papers and essays in the social sciences, education, and psychology.
- Modern Language Association (MLA) Style : Widely used for writing papers and citing sources within the liberal arts and humanities.
- Chicago Manual of Style (CMS): Used in various disciplines, including history, literature, and the arts, and often used in book publishing and manuscript preparation.
Regardless, you still need to ask about the specific guidelines for the writing style you are using. Individual institutions, professors, or editors might have their own preferences or requirements regarding line spacing.
Double-Space the Entire Document
You can adjust a setting that double-spaces the entire document, including future edits. Here’s how.
- Open the Word document you want to set to double space, then click the Design tab.
- Click Paragraph Spacing .
- Select Double from the bottom of the drop-down menu.

The document is now set to double space.
Double Space Part of a Document
Sometimes you may only need to double-space part of a document. For example, CMS uses double-spacing for the main text, but footnotes and endnotes are generally single-spaced. In this case, you’ll only want to double-space the body of the document.
- Open the document and select the text you want to double-space by clicking and dragging your cursor over it.
- Click the Paragraph Settings icon in the Paragraph group of the Home tab. This is the icon in the bottom-right corner of the group.

- The Paragraph window will appear. Click the down arrow under the Line Spacing option in the Spacing group. Select Double from the drop-down menu, and then click OK .
The selected text is now set to double space.
Double Space All or Part of a Document With a Keyboard Shortcut
There’s also a keyboard shortcut that lets you set the spacing to double. First, select the text you want to double space. Then, you can select part of the document by clicking and dragging your mouse over the text, or you can select all the text in the document by pressing Ctrl + A .
Once the text is selected, all you have to do is press Ctrl + 2 . The text is now set to double space.
Set Double Space as the Default Line Spacing
If most of the documents you create in Word are going to be set to double space, then you can set double space as the default line spacing instead of setting it with each document individually.
- Open Word and click the Design tab.
- Select Paragraph Spacing > Custom Paragraph Spacing .

- The Manage Style window will appear. Choose Double under Line Spacing .
- Select the bubble next to New documents based on this template , and then select OK .

All future documents will be set to double space.

Marshall is a technical writer based in Tokyo, Japan. His bylines are found on VGKAMI, How-To Geek, PCWorld, Zapier, and many other online magazines. Read Marshall's Full Bio
Read More Posts:

- Link to facebook
- Link to linkedin
- Link to twitter
- Link to youtube
- Writing Tips
Microsoft Word Tips: Adjusting Paragraph Spacing
3-minute read
- 24th August 2018
The space between paragraphs is important for professional formatting . Some style guides will even specify the paragraph spacing to use in a document. But how does this work in Microsoft Word ?
Paragraph Spacing Basics
Paragraph spacing refers to the space between paragraphs in a document. And while you could add a manual blank line to divide paragraphs by hitting “Enter” on your keyboard, it is much easier and neater to let the formatting options in Microsoft Word do this for you!
The quickest way to do this is via the Paragraph section of the Home tab on the ribbon :
- Select the text you want to format

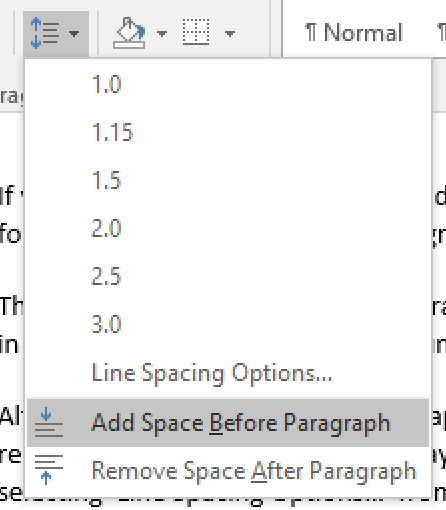
- Choose Add Space Before Paragraph or Add Space After Paragraph
This will add a default space in the place selected. If the text has already been formatted, you will instead have the option to Remove Space Before Paragraph or Remove Space After Paragraph .
Custom Paragraph Spacing
If you want more control over the spacing in your document, you have two main options. The first is to open the Paragraph menu. You can do this via the Paragraph section of the Home tab:
Find this useful?
Subscribe to our newsletter and get writing tips from our editors straight to your inbox.
- Open the Line and Paragraph Spacing dropdown menu
- Click Line Spacing Options…
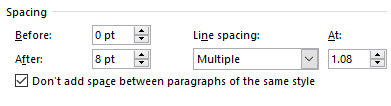
- In the window that opens, go to the Spacing section
- Adjust the values in the Before and After fields as required

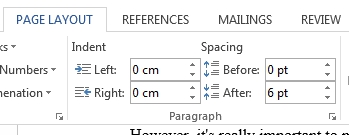
Your second option is to use the Layout tab on the main ribbon. To do this:
- Go to Layout and find the Paragraph section

Typically, for text with a font size of 10-12 pts, you will want a spacing value between 6-8 pts.
An Alternative Approach
Finally, there is another way to control spacing in Microsoft Word. This is accessed via the Design tab on the main ribbon. Here, in the Document Formatting section, you’ll find a Paragraph Spacing dropdown menu with pre-set options to adjust the spacing in your document.

However, this applies spacing throughout your entire document and also controls line spacing . It therefore offers much less customization than the methods described above.
Share this article:
Post A New Comment
Got content that needs a quick turnaround? Let us polish your work. Explore our editorial business services.
9-minute read
How to Use Infographics to Boost Your Presentation
Is your content getting noticed? Capturing and maintaining an audience’s attention is a challenge when...
8-minute read
Why Interactive PDFs Are Better for Engagement
Are you looking to enhance engagement and captivate your audience through your professional documents? Interactive...
7-minute read
Seven Key Strategies for Voice Search Optimization
Voice search optimization is rapidly shaping the digital landscape, requiring content professionals to adapt their...
4-minute read
Five Creative Ways to Showcase Your Digital Portfolio
Are you a creative freelancer looking to make a lasting impression on potential clients or...
How to Ace Slack Messaging for Contractors and Freelancers
Effective professional communication is an important skill for contractors and freelancers navigating remote work environments....
How to Insert a Text Box in a Google Doc
Google Docs is a powerful collaborative tool, and mastering its features can significantly enhance your...
Make sure your writing is the best it can be with our expert English proofreading and editing.
- Skip to main content
- Skip to secondary menu
- Skip to primary sidebar
- Skip to footer
Erin Wright Writing
Writing-Related Software Tutorials
How to Adjust the Space between Words in Microsoft Word
By Erin Wright
In my last Microsoft Word tutorial, we adjusted the space between letters . Today, we’re going to adjust the space between words in Microsoft Word without altering the letter spacing.
A Word of Caution: You may be tempted to increase the space between words by adding multiple spaces. I strongly advise against this practice because adding unnecessary spaces (rather than making individual spaces bigger, as shown in this tutorial) can disturb other formatting in your document.
This tutorial is available as a YouTube video showing all the steps in real time.
Watch more than 200 other writing-related software tutorials on my YouTube channel .
The images below are from Word for Microsoft 365. These steps will also work in Word 2021, Word 2019, Word 2016, and Word 2013.
How to Adjust the Space between Words
- Select the Home tab in the ribbon.

- (Optional) Select the Show/Hide button in the Paragraph group to reveal your document’s formatting.

- Select the part of the text you want to change. ( Pro Tip: Press Ctrl + A to select the entire document.)

- Take note of your current font size in the Font Size menu. The default space between words is based on your current font size.

- Select the Replace button in the Editing group to open the Find and Replace dialog box.

- Place your cursor in the Find what text box and then press your spacebar once to create one space.

- Place your cursor in the Replace with text box and then press your spacebar once to create one space.

- Select the More button to expand the dialog box. (Disregard this step if your dialog box is already expanded.)

- Select the Format button.

- Select Font in the Format menu.

- Select a larger or smaller font size in the Size menu in the Replace Font dialog box. Alternatively, you can type a specific size into the text box at the top of the menu.

- Select the OK button.

- Select the Replace All button.

- A dialog box will report the number of replacements.
- Select Yes if you want to expand the replacements to your whole document.
- Select No if you only want the replacements in the text you selected in step 3.

- Select the Close button.

The spacing between words should now be changed in your selected text.

- (Optional) Reselect the Show/Hide button to hide your formatting (see figure 2).
Related Resources
How to Adjust Line Spacing in Microsoft Word
How to Adjust Page Margins in Microsoft Word
Updated February 16, 2023
- Microsoft Word Tutorials
- Adobe Acrobat Tutorials
- PowerPoint Tutorials
- Writing Tips
- Editing Tips
- Writing-Related Resources
How to Do Double Spacing in Word: A Step-by-Step Guide
Double spacing in Word is a breeze once you know where to look. With just a few clicks, you can transform your document from a single-spaced wall of text to a more readable, double-spaced masterpiece. Whether you’re writing an essay, preparing a report, or drafting a letter, double spacing can give your document a polished, professional look. Ready to learn how? Let’s dive in!
Step by Step Tutorial: How to Do Double Spacing in Word
Before we get into the nitty-gritty, let’s understand what we’re aiming for. By following these steps, you’ll be able to double space your entire Word document or just selected portions, depending on your needs.
Step 1: Select the text you want to double space
If you want to double space your entire document, click anywhere on the text. If you only want to double space a specific section, highlight the text you want to format.
Remember, you can select the entire document by pressing "Ctrl+A" (or "Command+A" on a Mac). This step defines what part of your document will have the double spacing applied, so make sure you’ve got the right text selected!
Step 2: Click on the ‘Home’ tab
Look for the ‘Home’ tab at the top of your Word document. It’s the one with all the basic formatting options like font size, bold, italics, and so on.
The ‘Home’ tab is your gateway to all the fundamental formatting tools in Word. It’s also where you’ll find paragraph settings, which is where the magic happens for double spacing.
Step 3: Find the ‘Paragraph’ group
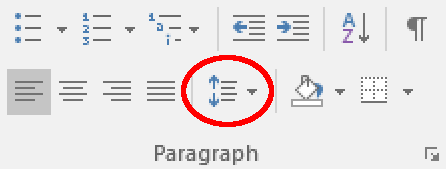
Within the ‘Home’ tab, there is a section called ‘Paragraph.’ In this group, you’ll see a bunch of buttons and drop-down menus for adjusting alignment, line spacing, and more.
The ‘Paragraph’ group is like the control center for how your text behaves and appears in terms of structure. It’s where you can tweak things like indents, spacing, and bullets.
Step 4: Click on the line spacing button
The line spacing button looks like a few lines with up and down arrows next to it. Clicking on it will reveal a drop-down menu with different spacing options.
This little button is the key to transforming your document’s feel. With a simple click, you can go from compact to spacious in your text layout.
Step 5: Choose ‘2.0’ from the menu
From the drop-down menu that appears, select ‘2.0’ to apply double spacing to your selected text.
Selecting ‘2.0’ tells Word to make the space between lines twice as much as the default setting. It’s a standard setting for many academic papers and formal documents, making your text easier to read and mark up.
After completing these steps, your selected text should now be double spaced. The changes will take effect immediately, and you’ll see more space between each line of text. This can make your document look cleaner and more organized, and it’s often a requirement for academic papers and professional reports.
Tips: Making the Most of Double Spacing in Word
- If you’re working with a document that has both double-spaced and single-spaced sections, you can apply double spacing to specific paragraphs by simply highlighting them and following the steps above.
- Use keyboard shortcuts to speed up the process. After selecting the text, press "Ctrl+2" (or "Command+2" on a Mac) to apply double spacing without going through the menus.
- If you want to adjust the spacing even further, choose "Line Spacing Options" from the line spacing drop-down menu to fine-tune the spacing.
- Keep in mind that double spacing may increase the page count of your document, so plan accordingly if you have page limits.
- Remember to adjust your spacing before adding footnotes or endnotes, as these may also be affected by changes in line spacing.
Frequently Asked Questions
How do i double space just one paragraph in word.
To double space a single paragraph, simply click within that paragraph (no need to select the text) and follow the same steps outlined above. This will apply double spacing to the current paragraph only.
Can I apply double spacing to a document I’ve already written?
Absolutely! You can apply double spacing to a document at any stage of the writing process. Just select the text you want to format and follow the steps.
Will double spacing affect my document’s formatting?
Double spacing will increase the space between lines, which may affect the overall look of your document. However, other formatting elements like font size, margins, and paragraph alignment will remain unchanged.
Can I use a shortcut to double space my text?
Yes, the keyboard shortcut "Ctrl+2" (or "Command+2" on a Mac) will apply double spacing to your selected text without going through the menus.
Is double spacing a standard requirement for documents?
In many academic and professional settings, double spacing is often a formatting requirement for easier reading and annotation. Always check the guidelines for your specific document.
- Select the text you want to double space.
- Click on the ‘Home’ tab.
- Find the ‘Paragraph’ group.
- Click on the line spacing button.
- Choose ‘2.0’ from the menu.
Double spacing in Word is a simple yet effective way to improve the readability of your documents. Whether you’re crafting an essay, drafting a business proposal, or preparing a report, understanding how to do double spacing is crucial. With the step-by-step tutorial and additional tips provided, you’re now equipped to tackle this task with ease. And if you ever find yourself stuck, the frequently asked questions section is there to guide you through any common hurdles.
But why stop at double spacing? Word offers a multitude of formatting options to enhance your documents further. Dive deeper into its features, experiment with different styles, and discover how you can make your documents stand out. Remember, the key to mastering Word is practice, so don’t hesitate to apply what you’ve learned today in your next writing project. Happy spacing!

Matt Jacobs has been working as an IT consultant for small businesses since receiving his Master’s degree in 2003. While he still does some consulting work, his primary focus now is on creating technology support content for SupportYourTech.com.
His work can be found on many websites and focuses on topics such as Microsoft Office, Apple devices, Android devices, Photoshop, and more.
Share this:
- Click to share on Twitter (Opens in new window)
- Click to share on Facebook (Opens in new window)
Related Posts
- How to Turn Off Double Spacing in Word 2013: A Step-by-Step Guide
- How to Single Space in Word for Office 365: A Step-by-Step Guide
- How to Fix Microsoft Word Line Spacing Too Big: A Step-by-Step Guide
- How to Double Space on Google Docs for iPad, iPhone & Windows
- How to Double Space in Word 2013: A Step-by-Step Guide
- How to Double Space in Word 2010: A Step-by-Step Guide
- How to Double Space in Google Docs
- How to double space in Word: A step-by-step guide
- Formatting Documents: A Guide to Single Spacing in Word
- How to Double Space in Word Office 365
- How to Reduce Gap Between Lines in Word: A Step-by-Step Guide
- How to Fix Weird Spacing Between Words in Word: A Step-by-Step Guide
- How to Make Text Vertical in Google Docs
- How to Expand Character Spacing in Word: A Step-by-Step Guide
- Google Docs Space After Paragraph: Tips to Add or Remove
- How to Make Columns in Word Office 365
- How to Put a Line Between Columns in Google Docs: A Step-by-Step Guide
- How Do You Remove Formatting in Word 2013: A Step-by-Step Guide
- How to Insert a Horizontal Line in Word: A Step-by-Step Guide
- How to Change Margins in Google Docs (A Quick 4 Step Guide)
Get Our Free Newsletter
How-to guides and tech deals
You may opt out at any time. Read our Privacy Policy
- PRO Courses Guides New Tech Help Pro Expert Videos About wikiHow Pro Upgrade Sign In
- EDIT Edit this Article
- EXPLORE Tech Help Pro About Us Random Article Quizzes Request a New Article Community Dashboard This Or That Game Popular Categories Arts and Entertainment Artwork Books Movies Computers and Electronics Computers Phone Skills Technology Hacks Health Men's Health Mental Health Women's Health Relationships Dating Love Relationship Issues Hobbies and Crafts Crafts Drawing Games Education & Communication Communication Skills Personal Development Studying Personal Care and Style Fashion Hair Care Personal Hygiene Youth Personal Care School Stuff Dating All Categories Arts and Entertainment Finance and Business Home and Garden Relationship Quizzes Cars & Other Vehicles Food and Entertaining Personal Care and Style Sports and Fitness Computers and Electronics Health Pets and Animals Travel Education & Communication Hobbies and Crafts Philosophy and Religion Work World Family Life Holidays and Traditions Relationships Youth
- Browse Articles
- Learn Something New
- Quizzes Hot
- This Or That Game
- Train Your Brain
- Explore More
- Support wikiHow
- About wikiHow
- Log in / Sign up
- Computers and Electronics
- Microsoft Office
- Microsoft Word
How to Double Space in Word
Last Updated: March 6, 2024
wikiHow is a “wiki,” similar to Wikipedia, which means that many of our articles are co-written by multiple authors. To create this article, 44 people, some anonymous, worked to edit and improve it over time. This article has been viewed 863,649 times. Learn more...
Changing the line spacing can make a Word document easier to read and make notes on when printed. Follow this guide to change the spacing in any version of Word, regardless of your operating system.
Adding Double Line Spacing to a Word Document
To double-space an entire Microsoft Word document, click Design at the top. Select Paragraph Spacing , and then select Double .
Word 2016/2013/Office 365

- To double-space a specific area of text, highlight the text, click the Line and Paragraph Spacing button on the Home tab (4 horizontal lines with two blue arrows), then select 2.0.
Word 2007/2010

- If you don’t see the line spacing button, it is most likely missing because the window isn’t large enough. You can access it by clicking the arrow button next to the word Paragraph. This will open the Paragraph menu.
- In the Paragraph menu, you can adjust the line spacing using the Line Spacing dropdown menu from the Spacing section.

- Before will add space before the paragraph begins.
- After will add spacing every time you press Enter to start a new paragraph.

- ”Exactly” will allow you to set an exact spacing between lines, measured in points. There are 72 points to an inch.
- ”Multiple” will allow you to set larger spacing, such as triple spacing.

- You can change the spacing of the entire document by selecting all of the text and then adjusting the spacing settings. To quickly select all of the text Press Ctrl + A (PC) or ⌘ Command + A (Mac). This will not affect headers, footers, or text boxes. You will need to select these sections individually to change the spacing in them.

- Select all the text you wish to change the spacing of.
- Press Ctrl + 2 (PC) or ⌘ Command + 2 (Mac). This will give you double spacing.
- Press Ctrl + 5 (PC) or ⌘ Command + 5 (Mac). This will give you 1.5-line spacing.
- Press Ctrl + 1 (PC) or ⌘ Command + 1 (Mac). This will give you single spacing.

Expert Q&A
You might also like.

- ↑ https://support.office.com/en-us/article/double-space-the-lines-in-a-document-9c026fce-5231-4508-b236-5cd3a4953469
About This Article
1. Click the Design tab. 2. Click Paragraph Spacing . 3. Click Double . Did this summary help you? Yes No
- Send fan mail to authors
Is this article up to date?

Featured Articles

Trending Articles

Watch Articles

- Terms of Use
- Privacy Policy
- Do Not Sell or Share My Info
- Not Selling Info
Keep up with tech in just 5 minutes a week!
- Delete a Page in Word
- Convert PDF to Word
- Page Numbers in Word
- Double Space in Word
- Table of Contents in Word
How to double space in Microsoft Word
Double-spacing is a great way to organize your word processing, and an excellent optimization that is built into most word processing tools. And whenever we hear “word processing,” one of the first programs that comes to mind is Microsoft Word . This handy software has been around for a minute, and we’re going to teach you how to implement double spaces throughout your next Word doc.
How to double space in Word for certain paragraphs
How to double space in word for the entire document, what’s the difference between line and paragraph spacing, is line and paragraph spacing the same as alignment, what you need.
Microsoft Word
It only takes several clicks to double space certain paragraphs in a Microsoft Word document . Here's how to do it:
Step 1: Open your Word document and select the paragraphs you want to double space.
Step 2: Select the Home tab from the Ribbon menu at the top of the screen.
- How to get the word count in Apple Pages
- How to factory reset Windows 10 or Windows 11
- How to keep your Microsoft Teams status active
Step 3: Within the Paragraph section of the Home tab, click on the Line and paragraph spacing icon. (This icon looks like a paragraph with two vertically-oriented arrows to the left of it. The arrows should be pointing in opposite directions.)
Step 4: From the drop-down menu that appears, click on 2.0 . Your selected paragraphs should now be double spaced.
Note: You can also use a variation of this method to double space an entire Word document that's already been written. To do so, use the following keyboard shortcut to select the entire text: Ctrl + A . Then complete steps 2 to 4 as usual.
If you haven't written your Word document yet, but you already know you want it to be double spaced, you can format your whole document ahead of time. This way, your document will automatically be double spaced as you type. Here's how to do that:
Step 1: Open a new Word document.
Step 2: Select the Home tab from the Ribbon menu.
Step 3: Click on the Line and paragraph spacing icon. (This icon is located within the Paragraph section of the Home tab.)
Step 4: From the drop-down menu that appears, select 2.0 . After that, you can begin typing your document, and your lines of text should automatically be double spaced.
Note: You can also use the Design tab to double space your document before writing it. Just open a new document, choose the Design tab, and click on Paragraph spacing . A drop-down menu will appear. From this menu, click on Double . You can then start typing your document and your lines should automatically be double spaced.
Line spacing refers to the vertical space available between the lines of text in your Word doc. If you have several sentences on the page already, you can think of line spacing as a measurement of height between a line in Row 1, and a second line in Row 2.
Paragraph spacing is a similar concept, but instead of the spacing between two lines of prose, paragraph spacing refers to the size of the indentation between two different paragraphs.
No they’re not. Line and paragraph spacing refers to just the vertical spacing between two or more sentences, or two or more paragraphs. Alignment refers to what part of the page a line or paragraph will be justified toward.
In Microsoft Word, there are four alignment options: Left, Center, Right, and Justified.
Editors' Recommendations
- How to draw in Microsoft Word
- How to find your Windows 11 product key
- Microsoft finally fixed copy and paste in Word
- Best Microsoft Office deals: Get Word, PowerPoint, and Excel for free
- How to create a bibliography in Word on Windows and Mac
- How-To Guides

You may find that Google Docs has a UI that is almost too clean. It can be difficult to find basic things you're used to, such as margin settings. Don't worry, though, you can change margins in Google Docs just like with any other word processor through a couple of different means.
Microsoft Word is a powerful word processing application that's capable of creating complex and compelling documents. It can also perform very simple but useful tasks, like alphabetizing a list.
Here's how to alphabetize lists in Microsoft Word.
Navigating through a Microsoft Word document can be a tedious task for some. Assignments and contracts can lead to many pages that can be hard to keep track of. One solution Microsoft offers for this is a table of contents. In addition to providing an outline and general overview of the content, the feature gives the document a more professional look.
Here’s a guide on how to create a table of contents in Microsoft Word.

How to double space or change line spacing in Microsoft Word

When typing in Microsoft Word , you might need to change the line spacing, depending on the document's style. The steps to enable double spacing differ slightly between versions. Consequently, you may need to use intuition to adapt them for older versions.
Use the keyboard shortcuts Ctrl + 1 to single space, Ctrl + 2 to double space, or Ctrl + 5 to set the spacing to 1.5 line spacing on any line, paragraph, or all highlighted text.
When pressing Enter , it starts a new paragraph with extra space between the two paragraphs. To go to the next line without starting a new paragraph, press Ctrl + Enter .
To increase or decrease line spacing or enable double spacing, select a link below and follow the steps.
- Enable double spacing for the whole document.
- Modify line spacing for all or part of an existing document.
- Related information.
Enable double spacing for the whole document
Microsoft word 2016 and later (office 365), and word online.
- Open Microsoft Word.
- Select the desired spacing option from the available list.
- For additional spacing options, select Line Spacing Options in the list.

Microsoft Word 2007, 2010, and 2013
- On the Home tab, in the Styles group, right-click Normal .
- Select Modify from the drop-down menu .
- Under Formatting , click the Double Space button (shown below).
- Click the Page Layout tab.
- Click the down arrow in the bottom right corner next to Paragraph to bring up the Paragraph window.

- In the Paragraph window, make sure you are on the Indents and Spacing tab.

- Click the down arrow next to the Line spacing box.
- Select Double and click the OK button.
Modify line spacing for all or part of an existing document
Microsoft word 2007 and later.
- Open Microsoft Word and the document you want to modify.
- Highlight the text where you want to change the line spacing or select all .
- Right-click the highlighted text, and select Format and then Paragraph , or only Paragraph or Paragraph Options , depending on your version of Word.
- Click the down arrow in the Line spacing drop-down box.
Related information
- See the double space definition for further information and related links.
- Microsoft Word help and support.
How to Double Space a Word Document
Double spacing your text can make it more legible. Let's look at the different ways to set double spacing in Word.
This article explains how to double space lines, paragraphs, and the entire document in Microsoft Word. There are four ways to double space lines in Microsoft Word. You can use any of these options to modify a few lines or the entire document in Word.
Double Space Lines From the Home Tab
This is the quickest way to double-space your document. You can use this when you want to add double spaces for only part of the document. Select the paragraphs you want to change and follow the steps below.
- Open Microsoft Word.
- Go to the Home > Paragraph group > Select the Line and Paragraph Spacing icon.
- To double space lines, choose 2.0 from the dropdown.
- For more spacing options, select Line Spacing Options in the list.
Double Space Between Paragraphs From the Design Tab
Modify the vertical space between paragraphs in your document by setting the spacing before or after each paragraph. Do note that this applies spacing throughout your entire document and also affects line spacing. It gives you less scope to control line spacing than the other methods here.
- Go to Design > Paragraph Spacing and choose Double .
Double Space Lines From the Page Layout Tab
Use this option to set up double spaced lines before you start adding content to your document. The settings here allow you to finetune your text with other options.
- Go to the Page Layout tab.
- Go to the Paragraph group. Click the tiny down arrow in the bottom right corner to bring up the Paragraph settings dialog.
- Stay on the Indents and Spacing tab.
- Click the down arrow next to the Line spacing box.
- Select Double and click the OK button to exit the dialog box.
Double Space Lines With Styles
Do you write double spaced essays? You can save this as a special style in Word for only essays or modify an existing style.
- Go to the Home > Styles group . Right-click Normal .
- Select Modify from the drop-down menu.
- Under Formatting , click the Double Space button.
What Does Double Spaced Lines Mean?
Line spacing is nothing but the height of the space between each row of text. A double space means sentences will have a blank line equal to the full height of two lines of text between each line. By default, most word processors have single spacing enabled (or slightly more than single spacing), which is space that’s just one line high. Word has a default line spacing of 1.08 .
Line spacing is an important style consideration and just one of the ways to format your text for better legibility.

Change spacing between paragraphs
Click Design , then Paragraph Spacing . Pick which spacing you want (the default is Open ), and notice your whole document will preview as you mouse over the different settings.

If you don’t like those options, click Custom Paragraph Spacing and change the numbers under Paragraph Spacing .

Don’t want to change the spacing in the whole document?
Click anywhere in the paragraph you want to change.
Go to Layout , and under Spacing , click the up or down arrows to adjust the distance before or after the paragraph. You can also type a number directly.

Need more help?
Want more options.
Explore subscription benefits, browse training courses, learn how to secure your device, and more.

Microsoft 365 subscription benefits

Microsoft 365 training

Microsoft security

Accessibility center
Communities help you ask and answer questions, give feedback, and hear from experts with rich knowledge.

Ask the Microsoft Community

Microsoft Tech Community

Windows Insiders
Microsoft 365 Insiders
Was this information helpful?
Thank you for your feedback.
Microsoft Word Double Space Option: A Step-by-Step Guide
Double spacing your document in Microsoft Word is a breeze! Simply select the text you want to double space, go to the ‘Home’ tab, click on ‘Line and Paragraph Spacing’, and choose ‘2.0’. Voilà! Your text is now double-spaced, which not only makes it easier to read but also gives you room for editing or making notes.
After double spacing your text, the lines of text will be further apart, creating a clearer and more visually appealing document. Whether you’re writing an essay, report, or letter, double spacing can improve readability and give your document a professional look.
Introduction
Double spacing in Microsoft Word is one of those simple yet powerful tools that can make a world of difference in your documents. But why is it so important, and who should care? Well, let’s start with students and educators. When you’re writing an essay or a research paper, double spacing is often a requirement. It makes it easier for teachers to read and grade your work and leaves room for comments and corrections.
But it’s not just for the academic world. Professionals, writers, and basically anyone creating a document can benefit from double spacing. It makes your work look cleaner and more organized, which is always a plus in any setting. Plus, it can be a lifesaver for those with visual impairments, as it improves readability significantly.
You might be thinking, “Isn’t this just for long texts?” Not at all! Even short documents can benefit from some breathing room between lines. It’s all about making your text inviting and easy to navigate for the reader. And let’s be real, in our fast-paced world, anything that makes reading easier is a win. So, whether you’re a student, a professional, or just someone who likes their documents looking sharp, mastering the art of double spacing in Microsoft Word is a skill worth having.
Related: How to Single Space in Word for Office 365
Step by Step Tutorial: How to Use the Microsoft Word Double Space Option
Before we dive into the steps, let’s clarify what we’re trying to achieve. Double spacing will increase the space between the lines of your text, making it clearer and more readable. Now, let’s get to it!
Step 1: Select the text you want to double space
Click and drag your cursor over the text that you want to double space.
Selecting the text is crucial because it tells Word exactly which part of your document you want to apply the double spacing to. If you want to double space the entire document, simply press Ctrl+A (Cmd+A on Mac) to select all the text.
Step 2: Go to the ‘Home’ tab
Click on the ‘Home’ tab located at the top of your Word document.
The ‘Home’ tab is where all the basic formatting options are located. It’s your go-to for making any text changes, including double spacing.
Step 3: Click on ‘Line and Paragraph Spacing’
Within the ‘Home’ tab, find and click on the ‘Line and Paragraph Spacing’ icon.
This icon might look different depending on your version of Word, but it’s generally represented by a few lines with arrows pointing up and down. It’s your gateway to adjusting the space between your lines of text.
Step 4: Choose ‘2.0’
From the dropdown menu that appears, select ‘2.0’ to apply double spacing to your selected text.
The number ‘2.0’ corresponds to double spacing because it doubles the space between lines compared to single spacing. And just like that, your text is more reader-friendly!
Additional Information
Double spacing in Microsoft Word is a feature that can really elevate the professionalism and readability of your document. But there are a few additional tips to keep in mind. For instance, don’t forget to double-space your headers, footers, and references if they’re a part of your document. Consistency is key!
What if you’re working with a document that has different spacing needs throughout? No worries! You can select specific sections and apply double spacing only where needed. And hey, if you decide double spacing isn’t for you, it’s just as easy to revert back to single spacing or choose another spacing option that suits your needs better.
Remember, the double space option in Microsoft Word isn’t just about following guidelines or making your text look pretty. It’s about creating a document that’s easy on the eyes and a pleasure to read. So next time you’re working on a document, give double spacing a try and see the difference it makes!
- Select the text you want to double space.
- Click on the ‘Home’ tab.
- Click on ‘Line and Paragraph Spacing’.
- Choose ‘2.0’.
Frequently Asked Questions
Does double spacing apply to the entire document or just selected text.
Double spacing can be applied to the entire document or just specific parts of it, depending on what you select before following the steps.
Can I use a keyboard shortcut to double space my text?
While there’s no direct keyboard shortcut for double spacing, you can use Ctrl+2 (Cmd+2 on Mac) after selecting your text and opening the ‘Line and Paragraph Spacing’ dropdown with your mouse.
How do I know if I’ve properly double-spaced my document?
After applying double spacing, you should see a noticeable increase in the space between lines. You can also use the ‘Show/Hide ¶’ button to see the spacing marks.
Can double spacing be used in combination with other formatting options?
Absolutely! Double spacing can be used along with other text formatting options like font size, style, and color.
Is double spacing a requirement for APA or MLA format?
Yes, double spacing is typically required for documents that follow APA or MLA format guidelines.
Double spacing in Microsoft Word is a skill that can make your documents stand out in the best way possible. It’s not just about meeting academic or professional standards; it’s about presenting your ideas in a clear and accessible format.
Whether you’re a student, an educator, or a professional, taking the time to master the double space option can significantly enhance the quality of your work. So next time you fire up Microsoft Word, remember the power of double spacing and use it to your advantage!

Matthew Burleigh has been writing tech tutorials since 2008. His writing has appeared on dozens of different websites and been read over 50 million times.
After receiving his Bachelor’s and Master’s degrees in Computer Science he spent several years working in IT management for small businesses. However, he now works full time writing content online and creating websites.
His main writing topics include iPhones, Microsoft Office, Google Apps, Android, and Photoshop, but he has also written about many other tech topics as well.
Read his full bio here.
Share this:
Join our free newsletter.
Featured guides and deals
You may opt out at any time. Read our Privacy Policy
Related posts:
- How to Double Space in Word Documents
- How to Double Space on Google Docs – iPad, iPhone, and Desktop
- How to Single Space in Word for Office 365
- Google Docs Space After Paragraph – How to Add or Remove
- How to Turn Off Double Spacing in Word 2013
- How to Change Line Spacing in Powerpoint for Every Slide at Once
- How to Change the Default Line Spacing in Word 2010 to Double Spacing
- How to Insert Text Box in Google Docs
- How to Remove Section Breaks in Word Documents
- How to Select All in Word for Office 365
- Microsoft Word Line Spacing Too Big?
- How to Change Line Spacing in Powerpoint 2010
- How to Add Two Spaces After Period in Word 2013
- How to Do a Hanging Indent on Google Docs
- How to Use Double Spacing in Microsoft Word 2010
- How to Return to Normal View in Word 2010
- How to Center Text in Word [2023 Guide]
- How to Get a Word Count in Microsoft Word for Office 365: A Step-by-Step Guide
- How to Make All Columns the Same Width in Excel 2013
- How to Count Characters in Microsoft Word 2013 (A Quick 3 Step Guide)
How to double space in Microsoft Word on different versions of the word processor
- You can double space in Word for an entire document or selected paragraphs and increase the amount of space between your lines of text.
- To double space in newer versions of Word, click on the Design tab and set your Paragraph Spacing to 2.0.
- In older versions of Word, including Word 2007-2010, you will need to go to the Styles section of the Home tab and in the Formatting menu click Double Space.
Whether you've been asked to double space a Word document or prefer to read double space documents, this formatting can be applied to an entire Word document or selected sections with just a few clicks.
Double spacing increases the amount of space between lines of text and can be helpful to a teacher or editor in marking the document or adding comments. Double spacing a Word document will differ depending on which version of Word you have.
Here are the steps for newer versions of Word and for Office 2007-2010.
- Main content
Popular Posts
- Contact Amy ==>
HOW TO – Format papers in standard academic format (using Microsoft Word)
This guide explains how to format your documents in Microsoft Word so that they follow the standard rules for formatting academic papers as described in most MLA and APA style books for undergraduate writing. These rules apply to most of the papers you will submit in your college classes, but in some cases your professors will want you to follow specific guidelines that may differ from those below. Always clarify with your professor which set of guidelines he or she wants you to follow before you submit a paper.
Using standard formatting for academic papers shows that you understand the customs of the university community and therefore helps to boost your own credibility. Using unusual or highly distinctive formatting, on the other hand, suggests that your previous schooling did not adequately prepare you for university work. Consider the impact of unusual formatting: not only does it call attention to your paper in a way that might not be positive, professors might also see it as a sign that you’re trying to artificially inflate page length.
Note: These instructions apply to all versions of Word for Mac and for the 2003 version of Word for Windows. I haven’t yet updated them to include instructions for the 2007 version of Word for Windows, but the tools should nevertheless be easy to find if you look around on the toolbar at the top.
- 2 DOCUMENT MARGINS
- 3 INDENTATION
- 5 ALIGNMENT
- 6.1 Heading
- 6.3 Sample First Page
- 7 PAGE NUMBERS
- 8.1 Document Spacing
- 8.2 Paragraph Spacing
- 9 CREATE NEW PAGE
- 10 BLOCKED QUOTATIONS
- 11 RESOURCES
DOCUMENT MARGINS
Rule : Papers submitted for review or grading should have 1” margins all around. This should be the default for Word, but if your default setting is to have left and right margins of 1.25”, change your default. Page length requirements are based on 1” margins.
Instructions : Go to the Format menu, drag down to Document, change the margins, and the click on the Default button and accept the change to the Normal template. Make sure you leave the gutter set to 0” or you’ll mess up your document formatting.
INDENTATION
Rule : The first line of each paragraph should be automatically indented.
Instructions : This should be the default for Word, but if not, you might want to change your Normal style, as described above. To change the indentation format for a document, choose Select All from the Edit menu. Then go to the Format menu, drag down to Paragraph, look under the “Special” drop-down menu in the Indentation section, and select “First Line.” This setting automatically indents the first line of a new paragraph so that you don’t have to do it manually.
Rule : College papers should be in a standard academic font: either Times New Roman or Cambria, in 12pt size. (If you submit a paper in another font, I will change it on the file I download.)
Instructions : Times New Roman or Cambria 12pt should be the default for Word, but if yours is different then change your default. Go to the Format menu, drag down to Style, make sure “Normal” is selected from the list of styles, and click “modify.” Choose the correct font and size from the Formatting menu. Click “OK” to make the change to your default settings.
Rule : The text of your paper should be left aligned, NOT justified, as justified text is hard to read if it hasn’t been professionally typeset. The default in Word is left alignment, so don’t change it.
FIRST PAGE FORMAT
Rule : In the upper left corner of the first page of your document, type your name, the date, the course number and section (or topic), and the version of the paper (such as Paper 1 Second Draft), each on a separate line. Be sure to change the date and paper version when you submit revisions and final versions. See the sample below.
DO NOT use the “headers” feature from the header/footer menu to create this full heading as that will make it appear on every page, which is not customary in academic writing. Also do NOT use a title page unless the assignment specifically asks for one.
Rule : Skip a line after the heading and center an original title that conveys the topic of your paper. Do not use underlining or italics in the heading (unless you’re referring to the title of a book or periodical). Do not use bold text or ALL CAPS.
Sample First Page
Page numbers.
Rule : All papers should have automatically inserted page numbers that show in the upper right corner on all pages except the first. Do not insert these page numbers by hand. Instead, use Word’s Header/Footer tool.
For documents following MLA format, put your last name and page number in the upper right corner. For documents following APA format, put a short version of your title (instead of your last name) and the page number in the upper right corner.
Instructions : Go to the View menu and choose “Header and Footer.” You’ll see a header box appear at the top and a footer box at the bottom. Click in the header box, type your last name (or title), make it align to the right, and then select Page Numbers from the Insert menu.
When you’re finished, click on the “Close” tab under the Header view. Each page of your document should now display a page number at the upper right that updates automatically when you make changes to the document. It will appear as grayed out text unless you active the Header and Footer tool to make changes.
To change the setting so that page numbers do not display on the first page, go to the Format men, drag down to Document, and click on the Layout button. Then check the box next to “Different First Page.” Click OK. If necessary, remove the header that appears on the first page and insert a header on the second page, which will automatically appear on all subsequent pages as well.
Document Spacing
Rule : The entire paper should be double-spaced, including the heading and bibliography.
Instructions : Choose “Select All” from the Edit menu, go to the Format menu and drag down to Paragraph, and choose “double” from the “line spacing” menu in the Spacing section. Or you can use these keyboard shortcuts. On a Mac, use Cmd-A to select all and Cmd-2 to double-space. On a PC, use Ctrl-A to select all and Ctrl-2 to double space.
Paragraph Spacing
Rule : Papers should have no extra spacing after paragraphs. This should be the default for Word, but if your default setting is to have 10pt spacing after paragraphs, change your default.
Instructions : Go to the Format menu, drag down to Style, make sure “Normal” is selected from the list of styles, and click “modify.” In the lower left corner, select the dropdown menu that starts with “Format” and drag down to Paragraph. In the paragraph settings menu that pops up, change the settings for Spacing After to 0pt.
CREATE NEW PAGE
Instead of using a lot of returns before starting your bibliography, create a new page for it following these instructions.
Go to the Insert menu, drag down to Break, and then drag over to Page Break.
BLOCKED QUOTATIONS
Rule : If a quotation will exceed four lines within a paragraph, you should separate it out by blocking and indenting it. As with any quotation, a blocked quotation should be clearly introduced by the sentence that leads up to it and it should also be properly cited, but the rules for blocked quotations are somewhat different. The blocking take the place of quotation marks, and unlike in a regular in-paragraph quotation, the parenthetical citation goes outside of the final period instead of inside of it (given that the blocked quote might contain several sentences.)
Instructions : Type the quotation in its own paragraph, without quotation marks, and remove the indent from the first line. Type the source in parentheses after the last period of the last sentence. With your cursor, select the quotation, from the first word to the end of the parenthetical citation, and click the Increase Indent button from the Paragraph Formatting menu.
- MLA Formatting Guidelines for College Papers
- APA Formatting Guidelines for College Papers
- Search for:
WHAT IS THIS SITE? See the About tab in the top menu.
UNDER PERPETUAL REVISION : All materials on this site are subject to ongoing revision and improvement!
© 2017 - Amy Goodloe - All Rights Reserved
HELP & HOW-TO
- HOW TO: Capture & Edit Video (18)
- HOW TO: Find & Edit Images (13)
- HOW TO: Make Screen Recordings (7)
- HOW TO: Record & Edit Audio (16)
- HOW TO: Use Google Drive (19)
- HOW TO: Use iMovie (13)
- HOW TO: Use Social Media Tools for Class (3)
- HOW TO: Use the Class Blog (Wordpress) (35)
- HOW TO: Use Your WordPress.com Blog (12)
- INSPIRATIONS & FYI'S (21)
- NIFTY APPS & TOOLS (7)
- PLANNING & DRAFTING New Media Projects (23)
- RESOURCES: About New Media Writing (7)
- RESOURCES: Animations & Comics (9)
- RESOURCES: Apps for Creating New Media Projects (22)
- RESOURCES: Digital Storytelling (17)
- RESOURCES: Presentations & Information Design (6)
- RESOURCES: Storytelling Prompts (14)
- RESOURCES: Writing for the Web (4)
- TECH TIPS (28)
STUDENT SAMPLES
- SAMPLES – Academic Analyses (9)
- SAMPLES – Audio Narratives & Essays (16)
- SAMPLES – CDS-Style Digital Storytelling (30)
- SAMPLES – Educational Presentations & Web Sites (9)
- SAMPLES – Educational Visuals (14)
- SAMPLES – Graphic Storytelling (16)
- SAMPLES – Mini-Documentary (15)
- SAMPLES – Multimedia Commentary (8)
- SAMPLES – Pop Culture Artifact Analyses (13)
- SAMPLES – Turning Points & Epiphanies (7)
- SAMPLES – WRTG 3020: Rhetoric of G&S (96)
- SAMPLES – WRTG 3090: New Media Storytelling (33)
- HOW TO – Format papers in standard academic format (using Microsoft Word) 118,204 views
- HOW TO – Put your file into a shared folder on Google Drive 85,097 views
- HOW TO – Make Preview the Default PDF Reader on a Mac 52,498 views
- HOW TO – Create a Hyperlink (Turn a Word into a Link) 42,916 views
- HOW TO – Export an mp3 out of GarageBand 29,446 views
- HOW TO – Add a shortcut to a shared folder to My Drive (for easy access) 22,365 views
- Creative non-fiction writing exercises 19,160 views
- TROUBLESHOOTING – Audio problems when recording with QuickTime X 12,247 views
- TIPS – Camera Angles and Shooting Tips for Digital Storytelling 9,993 views
- HOW TO – Save a Google Docs document 9,927 views
Tips for Formatting an Essay in Microsoft Word: Fonts and More
- Brian D. Taylor
- Categories : Help with writing assignments paragraphs, essays, outlines & more
- Tags : Homework help & study guides

Why is Formatting Important?
Formatting refers to the arrangement of text on a document. There are many ways to format different types of documents. The focus of this guide will be formatting for essays.
In general, you will want your documents to look neat and professional. Special attention to formatting will ensure that your essays make a great first impression. In fact, some teachers will mark your paper down if you do not format correctly, or follow specific guidelines the teacher has requested (such as double spacing.)
Typography is a term that was first used when referring to how letters were chosen and set for printing on a press. In today’s age of word processors, it now refers to font selection and formatting. Pay careful attention to how you use typography in your essay. Font selection is of key importance. When you are writing an essay for a school assignment, you should make sure your font looks neat and professional. Remember, your essay will have to be read at some point, so you should make sure it can be read easily.
Fonts to Choose
Serif fonts assist with readability. A serif font has little lines on the end of the character. The lines help the eye move from letter to letter more easily. Some examples of standard serif fonts in Microsoft Word are Times New Roman, Courier New, and Book Antiqua. You should use a serif font for the majority of your essay. Be careful, though. Some serif fonts, still would not be acceptable. For instance, serif font styles such as Goudy Stout or Engravers MT would not look professional as the text of your essay because they are big and bulky. Choose carefully.
Sans serif fonts do not have the little lines at the end of the letters. Some examples of sans serif fonts are Arial, Calibri, and Comic Sans. Usually, sans serif fonts work well in short sections of text such as headings or titles. It is best not to use a sans serif font as the bulk of your essay. Furthermore, while I suggested Comic Sans as an example for a sans serif font, its use is typically frowned upon as it does not present a professional quality.
Another aspect of typography is the size of your font. Fonts are measured in points. A one point font is 1/72 of an inch. A 72 point font would measure one inch. Normally, you should choose 10 to 12 point font for all parts of your essay. Font sizes smaller than ten points become difficult to see and read. Font sizes larger than twelve point are difficult to read as well, and they make your teacher think that you’re just trying to use more space.
Bolding & Italicizing
At times, you may need to use bold, italics, or underlining. Bold is best used only in the title of your essay, if at all. Italics and underlining are typically used when you need to emphasize text or if you are referring to a title of another work.
To format your fonts in Microsoft Word, first select the text you wish to format. From there, you have a few options. You can format directly with the formatting toolbar which, by default, appears at the top of the window. You can also use the Format Font Window, which will give you more options. To get there, right click with the mouse and choose “Font” from the menu that appears. The Format Font Window looks like the image to the left (click on the image for a larger view). The selected text will appear in the preview pane. As you format the text, you can see how your text will look in the preview pane. When you have completed formatting your text, click OK to return to your document.
Spacing refers to the amount of space between lines of text. Typically, teachers ask for double spaced text for most assignments. The extra space between each line gives them room for comments and corrections. The extra space also makes the text easier to read. Always double check your teacher’s spacing policy, though. Sometimes a teacher will require a certain page total for your writing, while expecting single spaced lines. Double spacing will cut the length of your essay in half which will cause you to lose points. Always be sure to double check what the teacher wants.
Typically, headings are single spaced. There’s not much reason to have extra space between lines of your heading, so do not use it unless you’ve been directed otherwise. If you are using a quote of four lines or larger, it requires special formatting. Typically, this should be single spaced, as well.
You can also space at the paragraph level. This type of spacing appears before or after a paragraph.

To control spacing in Microsoft Word, select the text, then right click. Choose “Paragraph.” This will open the Format Paragraph Window. It should look like the image to the left (click on the image for a larger view). In the Spacing section, you’ll see two fields: one for Before and one for After. These allow you to space paragraphs apart, either before the paragraph or after. The spacing is measured in points, similar to fonts.
To the right, you can space at the line level. To double space your essay, choose Double from the drop down menu. Similarly, choose Single to single space. There are some other choices for more precise line spacing, but typically double and single will do for most school essays.
Indentation
Indentation refers to spacing from the left or right of the page. For most of the paragraphs in your essay, you will need to indent the first line. A good standard is a .5" first line indent. The tab key is usually set to tab over .5", but it is good practice to use the Format Paragraph Window to ensure that your indentations are correct.

To set a .5" first line indent for all paragraphs, select your text, then right click. Choose “Paragraph.” This will bring up the Format Paragraph Window. In the Indentation section, choose First Line from the drop down menu labeled Special. This will activate a first line indent for your text. Now choose the measurement for the indent. Again, .5" is a good standard to follow.
There are other times when you may need to pay attention to indentation. Let’s say you have a research paper that requires a bibliography or works cited page. The hanging indent option can come in handy and many works cited entries require one. A hanging indent is like the opposite of a first line indent; it indents everything but the first line. You set up a hanging indent in the same way you do a first line indent, only choose Hanging from the drop down menu in the Format Paragraph Window.

Finally, if you are quoting material of four or more lines, you will need to separate the text from the rest of the paragraph and indent both sides. To do this, go to the Format Paragraph Window. Choose the text to be indented and choose the measurement of indent for both left and right sides. Usually, you will want 1" on each side of quoted material. A sample image is attached to show how this should appear on the page.
Working with Images
Sometimes, a teacher will allow the use of images in an essay. Be sure to check with the teacher before adding images as some teachers frown upon their use. Even if the images are allowed, be sure to use them wisely and sparingly. Typically, less is more when it comes to using pictures in essay writing. Teachers want you to create pictures with your words instead!

To insert an image you can copy and paste it into the document, or you can use the insert image function. Once the image is placed into the document, it can be formatted. Begin with the layout of the photo. Right click the image and choose Format Picture. Click on the Layout tab at the top of the window. Here you have several options. In line with Text will cause your image to act as text. This option may cause your text to behave in unexpected ways. This option will almost always create large gaps of space in your essay and is best avoided. The Square or Tight options will cause the text to wrap around your image, thus eliminating the problem of the gaps. One of these two options is best.
Next, you will need to choose the alignment of the image. This appears near the bottom of the Layout tab. Choose which side of the page you wish the image to appear and click OK to see your results. If you change your mind about the alignment of the image, you can now click and drag the image to where you would like it. Since you’ve chosen the Square or Tight text alignment option, the text will simply wrap around the image wherever you place it. Be sure that when placing the image, the text remains in a neat and professional arrangement.
Good luck on your essay! If you have any additional Microsoft Word tips to share post them in the comments.
Macdonald DeWitt Library at SUNY Ulster
Microsoft word: formatting your paper.
- Font & Font Size
- Header/Page Number
Remove Space After Paragraph
Double spacing.
- Works Cited/References/Bibliography
- Citation Tools in Word and Docs
- Video Tutorials
Citation Style Guides
- APA Style 7th Edition by Marla Gruner Last Updated Apr 4, 2024 947 views this year
- MLA Style 9th Edition by Marla Gruner Last Updated Feb 5, 2024 695 views this year
By default, Microsoft Word adds an extra space after every paragraph. You do not want this. Here's how to get rid of it:
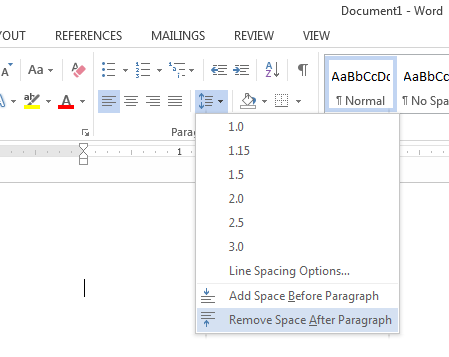
Select the paragaph icon on the Home tab then Remove Space After Paragraph.
All of your content should be double-spaced. See below:
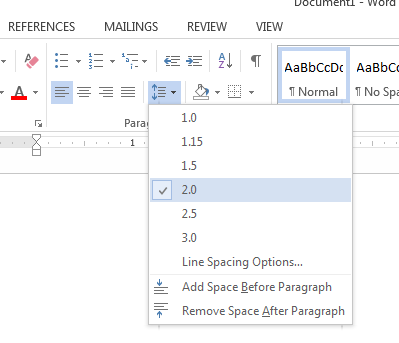
Select the paragraph icon on the Home tab, then 2.0 for double spacing.
- << Previous: Header/Page Number
- Next: Indents >>
- Last Updated: Feb 15, 2024 12:57 PM
- URL: https://libguides.sunyulster.edu/word
- All about AI
- Google Gemini AI
- Inflection AI Pi Chatbot
- Anthropic Claude
- Multimodal AI
- Generative AI
- AI Image Generation
- AI VIdeo Generation
- AI Coding Assistants
- AI Regulation
- AI Research
- Large Language Models (LLM)
- Surface Pro
- Surface Laptop
- Surface Book
- Surface Duo
- Surface Neo
- Surface Studio
- Surface Hub
- Surface Pen
- Surface Headphones
- Surface Earbuds
- About WinBuzzer
- Follow Us: PUSH, Feeds, Social
- Join our Team
- Cookie Policy and Privacy Policy
- Terms of Service
How to Double Space in Microsoft Word and Word Online
We show you how to do double spacing in Word, while explaining what double spaced means and why it's important.

Table of Contents:
Learning how to double space in Word is an essential skill for anyone involved in writing, whether it’s for academic purposes, professional editing, or publication submissions. Double spacing not only makes documents easier to read but also provides ample space for editors and reviewers to insert comments and suggestions. This tutorial will guide you through the process of applying double spacing in both Microsoft Word and Word Online, ensuring your documents meet the required standards for submissions and reviews.
What Does Double Spacing Mean?
Double spacing refers to the practice of inserting approximately twice the amount of vertical space between lines compared to standard single spacing. This creates a full blank line between each row of text, offering space for annotations. Originating from the era of typewriters, double spacing has been a long-standing requirement in various writing and publishing contexts. Despite the modern shift towards single spacing for economic reasons, double spacing remains crucial for academic papers, legal documents, and manuscripts intended for editing. Double spacing is particularly beneficial in scenarios where detailed feedback and editing are expected. It is a standard requirement for academic essays, manuscripts submitted to publishers, and legal documentation. Additionally, some writers find double spacing helpful for improving focus and readability during the drafting process. However, it’s important to maintain consistency in spacing throughout your document to avoid confusing your readers.
How to Double Space in Microsoft Word
Microsoft Word simplifies the process of applying double spacing, making it accessible even for those new to document formatting.

How to Double Space in Word Online
Double spacing in Word Online involves a slightly different process, accommodating the web-based nature of the application.

FAQ – Frequently Asked Questions About Double Spacing in Microsoft Word
What is the shortcut for double spacing in Microsoft Word?
In Microsoft Word, you can quickly apply double spacing by selecting the text you wish to format and pressing Ctrl + 2 . This keyboard shortcut instantly changes the line spacing of the selected text to double. If no specific text is selected, the entire document’s line spacing will be set to double, affecting both existing text and any new text added thereafter.
Can I apply double spacing to tables in Word?
Yes, double spacing can be applied within table cells. To do this, first select the cells you want to format. Then, right-click and choose “ Table Properties .” Go to the “ Row ” tab, and ensure the “ Specify height ” option is checked. Finally, set this value to at least twice the size of your font used in the table. Remember, this adjusts the minimum row height and not directly the line spacing, so manual line spacing adjustments might still be needed for the text within the cells.
Is double spacing the same as setting line spacing to 2.0?
Yes, in Microsoft Word, setting the line spacing to 2.0 effectively creates double spacing. This means that the vertical space between lines will be twice that of single spacing, offering a clear separation for enhanced readability and providing ample room for annotations when editing or reviewing documents.
What is the importance of double spacing in academic writing?
Double spacing is a critical element in academic writing for several reasons. It enhances readability, making long texts less daunting and easier to navigate. Furthermore, it provides adequate space for instructors and peer reviewers to insert comments, suggestions, and corrections directly into the text. Double spacing is often a requirement for academic submissions, reflecting a standard practice for essays, research papers, and thesis documents to facilitate detailed review and feedback processes.
Can I save a template with double spacing as default in Word?
Absolutely, after setting your document to double spacing, you can save it as a template for future use. Go to “ File ” > “ Save As ” and choose “ Word Template (*.dotx) ” in the “ Save as type ” dropdown menu. Give your template a name that indicates its double spacing feature for easy identification. Whenever you start a new document, you can select this template from the “ Personal ” templates section to begin with double spacing as the default format.
How to ensure double spacing is consistently applied throughout the entire document?
To guarantee uniform double spacing across your entire document, press Ctrl + A to select all text. Then, apply double spacing by using the appropriate method for your version of Word (e.g., through the “ Design ” or “ Layout ” tab or using the ribbon’s paragraph spacing options). Double-check headers, footers, footnotes, and endnotes, as these areas might require manual adjustment to match the document’s overall spacing.
Does double spacing apply to footnotes and endnotes in Word?
Applying double spacing to the main body of a document does not automatically adjust the spacing for footnotes or endnotes . To change these, you need to access the “ References ” tab, click on “ Footnote & Endnote Dialog Box Launcher ,” select the “ Footnotes ” or “ Endnotes ” tab, and then adjust the spacing options accordingly. This ensures that your comprehensive document maintains a consistent formatting style, enhancing its professional appearance.
How can double spacing impact the page count of a document?
Double spacing significantly increases a document’s page count, as it expands the vertical space between lines of text. For documents like academic essays, research papers, or manuscripts, this can be an important factor to consider, both for meeting submission guidelines which often stipulate maximum page counts, and for ensuring the document is accessible and easily navigable for reviewers and readers.
What are some alternate spacing options if double spacing is not required?
Microsoft Word provides several line spacing options tailored to different needs and preferences. Apart from the standard double spacing ( 2.0 ), options include single spacing ( 1.0 ), one-and-a-half spacing ( 1.5 ), and a custom setting that allows for precise control over the exact spacing desired. These variations cater to different document types and purposes, allowing users to balance readability with space efficiency according to their specific needs.
Can the spacing between paragraphs be adjusted similar to line spacing?
The spacing before and after paragraphs in Microsoft Word can be tailored independently from line spacing, offering further control over document layout. This adjustment is found under the “ Paragraph ” settings, where you can specify exact measurements for space before and after paragraphs. This is particularly useful for distinguishing between sections or improving the overall aesthetics and readability of your document.
How can I double space a specific part of the document only?
To double space a particular section of your document, highlight the text you want to format. Then, either right-click and select “ Paragraph ” to access spacing options or use the ribbon to directly apply double spacing to only the selected text. This method leaves the rest of the document unaffected, allowing for flexible application of double spacing where needed.
Does applying double spacing affect paragraph spacing as well?
When double spacing is applied, it specifically alters the line spacing within paragraphs. If you also wish to adjust the spacing before and after paragraphs—either to increase readability between sections or to meet specific formatting requirements—you can do so by accessing the “ Paragraph ” dialogue via the right-click menu or the ribbon, where separate controls allow you to set precise measurements for both.
How can double spacing benefit the editing process?
Double spacing is immensely beneficial during the editing and reviewing process. It provides clear and ample space for inserting corrections, comments, and suggestions directly between lines of text, facilitating an easier and more thorough analysis of the content. This is especially important in academic and professional settings where detailed feedback is crucial for the refinement and improvement of manuscripts, essays, and other documents.
Is it possible to automate double spacing for all future documents in Word?
While Microsoft Word doesn’t have a built-in feature to automatically set double spacing as the default for all new documents, creating and using a custom template with double spacing can serve as an effective workaround. Once created, you can start every new document with this template, ensuring that double spacing is applied by default, saving time and ensuring consistency across all your documents.
How do I revert a document to single spacing after applying double spacing?
If you need to revert your document to single spacing after applying double spacing, you can easily do so by selecting the text or entire document and then choosing single spacing from the paragraph formatting options. This process will adjust your document back to single-line spacing, reducing the vertical space between lines to the standard setting, thereby making your document more compact and reducing the overall page count.
Related: How to Remove or Clear Formatting in Microsoft Word
Related: How to Use Word Templates and Change the Template File “Normal.dotm”

Related: How to Enable Autosave in Word to Never Lose Your Edits

- double spaced essay
- Double spacing in Word
- how do you double space in word
- how to do double spacing in word
- how to double space in word
- Microsoft 365
- Microsoft Office
- Microsoft Word
- Word Online
- Word Processors

Recent News
Sam Altman is “Genuinely Embarrassed” About OpenAI’s Exit Agreement Clauses

Reddit’s Awards System Returns, Coins Replaced by Gold
Subscribe to WinBuzzer on Google News

- Link to facebook
- Link to linkedin
- Link to twitter
- Link to youtube
- Writing Tips
Microsoft Word Skills: Paragraph Spacing
3-minute read
- 17th October 2017
Many things go towards making a well-formatted document. Paragraph spacing, for instance, adds a gap between blocks of text in a document. This ensures that your written work is evenly spaced and neatly presented. And with Microsoft Word , it’s reassuringly simple to do.
How to Add and Remove Paragraph Spacing
Although you could just hit ‘Enter’ twice after each paragraph in a document, the paragraph spacing options in Microsoft Word offer an even easier way of adding a space between passages. They also make sure that your formatting is consistent throughout.
The most basic option in Word (on PC) adds or removes a space before or after paragraphs. Simply:
- Select the text you want to format
- Go to the ‘Paragraph’ section of the ‘Home’ tab in Microsoft Word
- Pick where you want to adjust the spacing from the bottom of the menu (the option will say ‘Add’ if there’s no spacing there yet, or ‘Remove’ if formatting has already been applied)
This will add a default space as selected. Generally, adding a space after paragraphs is more common. However, you may want to use spacing before some bits of text, such as headings , to clearly separate them from the passages before and after.
Custom Spacing
If you’re following a specific style guide, or if you just want more control over how your document is formatted, you can set custom paragraph spacing values. There are two main ways to do this.
The first involves going to the ‘Paragraph’ section of the ‘Layout’ tab. Here, you can adjust the values in the ‘Before’ and/or ‘After’ boxes under ‘Spacing’. This also works on Word for Mac.
Find this useful?
Subscribe to our newsletter and get writing tips from our editors straight to your inbox.
Alternatively, open the main ‘Paragraph’ menu by clicking the little arrow in the bottom right of the relevant section on the ‘Home’ or ‘Layout’ tabs (in Word for Mac, you can reach this menu by selecting ‘Line Spacing Options…’ from the dropdown menu on the ‘Home’ tab).
Once you have opened this menu, you need to:
- Go to the ‘Spacing’ section in the new window
- Set the values in the ‘Before’ and ‘After’ boxes as required
- Click ‘OK’ to set the spacing for your selected text
You can also adjust these settings when customising a ‘style’ in Microsoft Word. This will then apply the selected spacing to all passages formatted using the modified style.
Finally, you can adjust the spacing in a document by selecting one of the predefined settings from the ‘Paragraph Spacing’ menu under the ‘Design’ tab. However, these apply to the entire document and also adjust the line spacing, so it is usually better to use the options described above.
Share this article:
Post A New Comment
Get help from a language expert. Try our proofreading services for free.
9-minute read
How to Use Infographics to Boost Your Presentation
Is your content getting noticed? Capturing and maintaining an audience’s attention is a challenge when...
8-minute read
Why Interactive PDFs Are Better for Engagement
Are you looking to enhance engagement and captivate your audience through your professional documents? Interactive...
7-minute read
Seven Key Strategies for Voice Search Optimization
Voice search optimization is rapidly shaping the digital landscape, requiring content professionals to adapt their...
How to Ace Slack Messaging for Contractors and Freelancers
Effective professional communication is an important skill for contractors and freelancers navigating remote work environments....
How to Insert a Text Box in a Google Doc
Google Docs is a powerful collaborative tool, and mastering its features can significantly enhance your...
2-minute read
How to Cite the CDC in APA
If you’re writing about health issues, you might need to reference the Centers for Disease...
Make sure your writing is the best it can be with our expert English proofreading and editing.
How-To Geek
How to make only one page landscape in a word document.
Sometimes landscape is just the way to go.
Quick Links
Turn specific pages landscape by inserting a break, change specific pages to landscape with page setup.
By default, Microsoft Word orients its pages in portrait view. While this is fine in most situations, you may have page or group of pages that would look better in landscape view. Here are two ways to make this happen.
Regardless of which method you use, be aware that if the text runs over to an extra page as a result of the rotation, that new page will also adopt the landscape orientation.
You can make a page or group of pages landscape by using section breaks , but there are slight differences in how to do this depending on the position of those pages in your document.
Enable Show/Hide
Unless you change your settings, section breaks are invisible pagination controls and can cause confusion if you forget where you've added them. To make them visible, click the Show/Hide (¶) icon in the Paragraph group of the Home tab.
Re-orientate the First Page or Pages
Place your cursor at the end of the page or pages you want to change to landscape. In the Layout tab, click "Breaks," and choose "Next Page." This inserts a next page section break in your document.
With your cursor on the first page (before the section break you just added), in the Layout tab, click "Orientation," and pick "Landscape."
This changes the first page or group of pages (depending on where you added your section break) to landscape.
Re-orientate Pages in the Middle of Your Document
If you have three or more pages, and you need to change the middle page or pages to landscape, place your cursor at the start of the first page you want to change. Then, as before, in the Layout tab, click "Breaks" and "Next Page." This inserts a section break at the start of the pages you want to re-orientate.
Next, with your cursor at the beginning of the new section you have just created, head to the Layout tab, click "Orientation," and then click "Landscape." This changes the current and all subsequent pages to landscape view.
But, as you only want certain pages in the middle of your document to be landscape, you'll need to add a second page break at the end of your landscape section.
Then, click anywhere after this new section break, and use the Orientation option in the Layout tab to turn the remaining pages to portrait, leaving the pages in between your section breaks in landscape view.
Re-orientate the Last Page or Pages
To change the end of your document to landscape, simply place your cursor at the start of this final section, add a next page section break here, and change the orientation accordingly (using the same steps as outlined above).
To delete a section break, place your cursor before the paragraph marker (¶), and press Delete.
Another way to convert a page or a number of adjacent pages from portrait to landscape in Word is to select the content and turn only those pages manually. This method works with text, images , tables, and other items you have on the page.
Select all items on the page or pages you want to rotate 90 degrees. If you have text, drag your cursor through all of it. If you have an image, table, chart, or another type of object, simply select it.
In the Layout tab, click the arrow in the bottom-right corner of the Page Setup group.
In the Page Setup dialog box that opens, confirm that you're on the Margins tab . In the Orientation section, choose "Landscape." Then, at the bottom, change the "Apply To" drop-down choice to "Selected Text," and click "OK."
When the dialog box closes, you will see the pages you selected turn to landscape view.
While this method is the simplest, you may run into difficulties. For instance, if you have an image or table with text wrapped around it , changing the page's orientation may alter its layout. Also, you might run into difficulties if you want to add more landscape pages to your document. The most structurally secure way to change page orientation is through the first method described at the top of this article.
If you use Google Docs, you can change the page orientation in Google Docs just as easily.
- Microsoft 365
AI brings new life to flexible work with Microsoft Places
- Jared Spataro, Corporate Vice President, AI at Work
- Microsoft Copilot for Microsoft 365
- Microsoft Teams
- Hybrid Work
- Teams Premium
The moments that matter
People continue to want flexibility at work—our research shows that nearly half (48%) of global employees are likely to ask their direct manager for a more flexible work schedule or location in the next year. 1 But maintaining connection in flexible work takes work. Organizations that don’t actively bring people together for moments that matter put connection at risk: 43% of employees feel disconnected from their company. 1 The tension between flexibility and connection at work isn’t new and therefore requires an innovative solution. AI innovation is already improving how you work; improving where you work is the next opportunity. With Microsoft Places , an app that reimagines flexible work, AI can make coordinating in-office time and connecting with coworkers even easier.

Microsoft Places
Join the Public Preview program for the new connected workplace app that reimagines flexible work.
In addition to fostering improved coordination and connection, Places optimizes the effectiveness and engagement of the workplace. Importantly, Places features are accessible across surfaces you regularly use for coordination and collaboration, like Outlook and Microsoft Teams, so flexible work coordination and connection can happen within your normal flow of work.
Coordinate when and where you come into the office
Scheduling in-office time with coworkers and planning ahead to book rooms and a desk are regularly cited challenges for flexible teams. When employees get to the office, they don’t want to be greeted by a sea of empty desks—they want facetime with their manager and the coworkers they collaborate with most frequently. Nearly half (49%) of global knowledge workers have struggled with this situation over the past year. 1
With Places, you can more easily coordinate across coworkers and spaces in the office. Places location plan allows you to set and share your proposed location schedule with coworkers while also viewing their plans.

Updating or adjusting your location is always available within the Places app, but it’s also accessible within your regular flow of work in the Outlook Calendar. With a click, you can adjust your schedule and access the peek card —which shows your closest collaborators who plan to come in and allows quick access to space booking—for more information. There is also a link on the peek card that allows you to see all coworkers schedules in the Places app.

In addition to coordinating schedules with coworkers, you can easily see your manager’s schedule expectations too. With team guidance in Places, managers communicate which days their team should plan to be in the office and what the priorities are for each in-office day. Providing a purpose for team days in the office gives you another reason to come into the office.

The integration of Places data into Microsoft Copilot will make coordination even easier. Coming in the second half of 2024, you will be able to use Copilot to understand which days are best to come into the office. Copilot will even share reasons why certain days are best to come in, highlighting things like in-person meetings, your manager’s planned attendance, or if most of your coworkers are planning to be in the office. You will be able to ask Copilot to adjust your schedule based on this information—changing your work location to the office on recommended days and rescheduling in-person meetings.

After you’ve decided which days to come in, you’ll need to find the right spaces for your meetings and focused work. From software to hardware, Microsoft offers an end-to-end booking solution that provides an improved workplace experience. Starting with the Places finder , accessible in Outlook, you can now search for rooms and desks and receive additional information to guide your booking decision. Places finder shows images of the room or desk pool, includes a map of where the space is in the office, and offers details about available technology or other amenities. Places finder can be enhanced when combined with other workplace experiences from Microsoft and our device partners. With Teams, users can take advantage of bookable desk capabilities that allow users to walk up to a shared work desk, connect their laptop to the monitor, and reserve the spot automatically.

In your Calendar, Places also provides helpful reminders if no rooms or desks have been booked for an in-office day. You can click on the location pin in Calendar to bring up the peek card and browse suggestions for desks and rooms that best meet your needs for the day.

End-to-end booking will be further enhanced with Copilot in the second half of 2024. Building on booking suggestions Copilot managed booking will find and book the right space for the needs of your meeting for recurring meetings where one room might not be available week-to-week.

Enable more in-office connections
One of the perks of being in the office is an impromptu conversation with coworkers. With expanded presence , a new Places feature that appears across Microsoft 365 apps , you can see coworkers who are nearby. With awareness of who is around, quick chats can happen in-person or an overdue lunch can be scheduled. By adjusting presence to indicate when an employee is in the office or which building they’re in, coworkers easily see when they’re nearby.

In Teams group chats, coworkers can see participant locations or type @nearby to notify those around them about an activity or change in the meeting room.

It’s important to note that in making sure flexible work ‘works,’, all location data collection adheres to Microsoft stringent privacy standards. Opt-in and opt-out controls for expanded presence are available at both the tenant admin and user levels, are limited to signals about in-office locations, and will be aggregated and anonymized in reports about office occupation trends.
Confidently optimize the effectiveness of the workplace
IT Admins and Real Estate and Facilities (RE&F) professionals have encountered challenges in flexible work too. Static buildings haven’t kept pace with the evolving nature of how and where employees work. AI can play a role in improving the management of space by actively highlighting areas of opportunity for optimization.
Any decision about optimizing the workplace must start with an understanding of what spaces are available and how they are being used. Combining intent and actual occupancy patterns available in Places allows administrators to see a clearer picture of the space available and what’s actually needed.

Unlocking the power of collaboration
Utilization of spaces is another important input in managing the workplace. With more integrated check-in functionality for conference rooms and desk pools, administrators can adjust policies to automatically release unused rooms or desks that have been booked—creating clarity on actual utilization of bookable spaces. Microsoft delivers utilization insights and analytics across workplace products. In addition to device deployment and management capabilities, Microsoft Teams Rooms Pro Management provides valuable space and device utilization data for meeting and collaboration spaces and shared desks that can help validate intent data in Places.

Coming in the second half of 2024, the data from Places will enable Copilot to provide additional intelligence to guide IT admins and RE&F professionals on how to manage and adapt space, like suggestions about consolidating floors on days with low occupancy, adjusting food services to avoid waste, or adding more huddle rooms to support new ways of working. Administrators will be able to run additional analysis on the connected workplace data they’ve collected to make even more informed decisions or better understand patterns and trends that exist. Adjustments can have a material impact on an organization’s operating budget and sustainability goals.

Get started today
As we continue to build solutions across the connected workplace, we’re actively partnering with companies across this market. With Microsoft Places , we are starting with a subset of ecosystem of partners (listed below) who will build on top of the Places platform with new and existing solutions, leveraging and enhancing data related to people, location, and space. As Places capabilities grow and expand, so will the partner ecosystem.
Places will be licensed as part of Microsoft Teams Premium , contributing to the Teams vision to build a smart workplace. Get started today with Places coordination and connection features and sign up for access to additional features. Copilot integrations will be available in the second half of 2024—improving where you work.
For the latest research insights on the future of work and generative AI, visit WorkLab .
1 May 2024 Work Trend Index survey, Microsoft.
Related Posts

3 new ways the Microsoft Intune Suite offers security, simplification, and savings

Microsoft Teams Premium: The smart place to work is also a smart investment

Microsoft Mesh enters general availability in January, including a new Teams experience

Microsoft recognized as a Leader in 2023 Gartner® Magic Quadrant™ for Desktop as a Service
IMAGES
VIDEO
COMMENTS
First, highlight the text you want or use Ctrl+A to select all: Right-click your mouse to bring up a menu and select "Paragraph: ". In the "Paragraph" menu, select the drop-down menu located beneath "Line Spacing:" Select "Double" and click "OK :" Using these methods to quickly double space text in Microsoft Word will help you get past those ...
Method 1: Using the Ribbon. Open your Microsoft Word document. Highlight the text you want to double space or press Ctrl + A to select the entire document. Go to the Home tab on the Ribbon. In the Paragraph group, locate the Line Spacing option. It usually looks like three lines with an arrow next to it. Click on the arrow to open the Line ...
Open Word and click the Design tab. Select Paragraph Spacing > Custom Paragraph Spacing. The Manage Style window will appear. Choose Double under Line Spacing . Select the bubble next to New documents based on this template, and then select OK. All future documents will be set to double space.
Figure 4. Line and Paragraph Spacing button (Basic Method) Select Add Space Before Paragraph or Remove Space After Paragraph from the drop-down menu.Alternatively, you will have the option to select Remove Space Before Paragraph or Add Space After Paragraph if the paragraph spacing has already been adjusted.; Important Note: The size of the adjustment is based on the paragraph's current font ...
The quickest way to do this is via the Paragraph section of the Home tab on the ribbon: Select the text you want to format. Go to Home > Paragraph and click Line and Paragraph Spacing. The spacing menu. Choose Add Space Before Paragraph or Add Space After Paragraph. This will add a default space in the place selected.
How to Adjust the Space between Words. Select the Home tab in the ribbon. Figure 1. Home tab. (Optional) Select the Show/Hide button in the Paragraph group to reveal your document's formatting. Figure 2. Show/Hide button. Select the part of the text you want to change. ( Pro Tip: Press Ctrl + A to select the entire document.)
You can double-space all or part of a Word document. To double-space the whole document, go to Design > Paragraph Spacing, and choose Double. Tip: To double-space only part of the document, select the paragraphs you want to change, go to Home > Line and Paragraph Spacing, and choose 2.0.
Step 1: Select the text you want to double space. If you want to double space your entire document, click anywhere on the text. If you only want to double space a specific section, highlight the text you want to format. Remember, you can select the entire document by pressing "Ctrl+A" (or "Command+A" on a Mac).
Click Paragraph Spacing. A menu of spacing options will expand. 3. Click Double. The entire document is now double-spaced. To double-space a specific area of text, highlight the text, click the Line and Paragraph Spacing button on the Home tab (4 horizontal lines with two blue arrows), then select 2.0. Method 2.
Step 1: Open your Word document and select the paragraphs you want to double space. screenshot / Digital Trends. Step 2: Select the Home tab from the Ribbon menu at the top of the screen ...
Tip. Use the keyboard shortcuts Ctrl + 1 to single space, Ctrl + 2 to double space, or Ctrl + 5 to set the spacing to 1.5 line spacing on any line, paragraph, or all highlighted text. Note. When pressing Enter, it starts a new paragraph with extra space between the two paragraphs. To go to the next line without starting a new paragraph, press ...
Open Microsoft Word. Go to the Page Layout tab. Go to the Paragraph group. Click the tiny down arrow in the bottom right corner to bring up the Paragraph settings dialog. Stay on the Indents and Spacing tab. Click the down arrow next to the Line spacing box. Select Double and click the OK button to exit the dialog box.
Some word processing tools like Microsoft Word also offer larger line spacing options like 2.5 and 3.0. How to adjust your line spacing in Microsoft Word. If you want to change the line spacing of your Microsoft Word document: Highlight all of the text in your document. Navigate to the Home button. Select the Line and Paragraph Spacing icon.
Change spacing between paragraphs. Click Design, then Paragraph Spacing. Pick which spacing you want (the default is Open ), and notice your whole document will preview as you mouse over the different settings. If you don't like those options, click Custom Paragraph Spacing and change the numbers under Paragraph Spacing.
Step 3: Click on 'Line and Paragraph Spacing'. Within the 'Home' tab, find and click on the 'Line and Paragraph Spacing' icon. This icon might look different depending on your version of Word, but it's generally represented by a few lines with arrows pointing up and down. It's your gateway to adjusting the space between your ...
With your document open on the Home tab, highlight the paragraphs you want to double space. Click the arrow in the bottom right corner of the Paragraph box. Select the arrow in the bottom corner ...
Instructions: Go to the Format menu, drag down to Style, make sure "Normal" is selected from the list of styles, and click "modify.". In the lower left corner, select the dropdown menu that starts with "Format" and drag down to Paragraph. In the paragraph settings menu that pops up, change the settings for Spacing After to 0pt.
On the Home tab, click the "Line and Paragraph Spacing" button. This opens a dropdown menu with presets for line spacing (at the top) and paragraph spacing (at the bottom). The line spacing is shown in multiples. "2.0" is double spacing, "3.0" is triple spacing, and so on.
To control spacing in Microsoft Word, select the text, then right click. Choose "Paragraph.". This will open the Format Paragraph Window. It should look like the image to the left (click on the image for a larger view). In the Spacing section, you'll see two fields: one for Before and one for After.
By default, Microsoft Word adds an extra space after every paragraph. You do not want this. Here's how to get rid of it: Select the paragaph icon on the Home tab then Remove Space After Paragraph. Double Spacing. All of your content should be double-spaced. See below:
It is more space-efficient, however, to us a first-line indent (Use the TAB key and adjust the indent size in the Home ribbon). Word makes default indents too big; they only need to be 0.5 cm or so (around 5 - 6 spaces). Hanging indents are necessary for your reference list. Select the text and click on the Paragraph Dialogue Box button ...
Double spacing in Word Online involves a slightly different process, accommodating the web-based nature of the application. Open the "Layout" tab of the ribbon, click the three dots on the ...
The most basic option in Word (on PC) adds or removes a space before or after paragraphs. Simply: Select the text you want to format. Go to the 'Paragraph' section of the 'Home' tab in Microsoft Word. Select the 'Line and Paragraph Spacing' menu. The Line and Paragraph Spacing menu. Pick where you want to adjust the spacing from the ...
Place your cursor at the end of the page or pages you want to change to landscape. In the Layout tab, click "Breaks," and choose "Next Page." This inserts a next page section break in your document. With your cursor on the first page (before the section break you just added), in the Layout tab, click "Orientation," and pick "Landscape."
Enable more in-office connections. One of the perks of being in the office is an impromptu conversation with coworkers. With expanded presence, a new Places feature that appears across Microsoft 365 apps, you can see coworkers who are nearby. With awareness of who is around, quick chats can happen in-person or an overdue lunch can be scheduled.