

Use keyboard shortcuts to deliver PowerPoint presentations
Many users find that using an external keyboard with keyboard shortcuts for PowerPoint helps them work more efficiently. For users with mobility or vision disabilities, keyboard shortcuts can be easier than using the touchscreen and are an essential alternative to using a mouse.
For a separate list of shortcuts to use while creating your presentation, go to Use keyboard shortcuts to create PowerPoint presentations .
The shortcuts in this topic refer to the US keyboard layout. Keys for other layouts might not correspond exactly to the keys on a US keyboard.
A plus sign (+) in a shortcut means that you need to press multiple keys at the same time.
A comma sign (,) in a shortcut means that you need to press multiple keys in order.
This article describes the keyboard shortcuts and some other common shortcut keys that apply while you're delivering your presentation with PowerPoint for Windows.
To quickly find a shortcut in this article, you can use Search. Press Ctrl+F, and then type your search words.
If an action that you use often does not have a shortcut key, you can record a macro. For step-by-step instructions to record a macro, refer to the section “Record a macro” in Automate tasks with the Macro Recorder to create one.
During the presentation, to open a list of shortcuts, press F1. Use the arrow keys to move between the tabs in the Slide Show Help dialog box.
Get the PowerPoint 2016 keyboard shortcuts in a Word document at this link: PowerPoint 2016 for Windows keyboard shortcuts .
In this topic
Frequently used shortcuts, control the slide show, control media in the slide show, pointer and annotations in the slide show, rehearse the presentation, maneuver in presenter view.
This table lists the most frequently used shortcuts in PowerPoint for Windows.
Top of Page
You can use the following keyboard shortcuts while you’re delivering your presentation in Slide Show (full-screen) mode, with or without Presenter View .
Control media in the slide show
These keyboard shortcuts work with video files imported from your computer or other device. They don't work with online video files.
Use the following keyboard shortcuts to control the pointer and to use it to create annotations during your presentation.
You can use these keyboard shortcuts when you are rehearsing your presentation.
You can use the following keyboard shortcuts while you’re delivering your presentation using Presenter View in PowerPoint 2013 and newer. Presenter View lets you look at your presentation with your speaker notes on one screen (your laptop, for example), while the audience views the notes-free presentation on a different screen.
When you are connected to a second display, Presenter View is shown automatically when you start the slide show. To start a presentation in Presenter View even if you have only a single display, press Alt+F5.
Tip: If Presenter View does not start automatically with two displays, go the Slide Show tab, select the Use Presenter View checkbox, and select the preferred monitor.
PowerPoint help & learning
Screen reader support for PowerPoint
Use keyboard shortcuts to create PowerPoint presentations
Basic tasks to create a presentation in PowerPoint with a screen reader
Use a screen reader to explore and navigate PowerPoint
This article describes the keyboard shortcuts and some other common shortcut keys that apply while you're delivering your presentation with PowerPoint for macOS.
The settings in some versions of the Mac operating system (OS) and some utility applications might conflict with keyboard shortcuts in Microsoft 365 for Mac. For information about changing the key assignment for a keyboard shortcut, refer to Mac Help for your version of macOS or your utility application.
If you don't find a keyboard shortcut here that meets your needs, you can create a custom keyboard shortcut. For instructions, go to Create a custom keyboard shortcut for Office for Mac .
Many of the shortcuts that use the Ctrl key on a Windows keyboard also work with the Control key in PowerPoint for macOS. However, not all do.
To quickly find a shortcut in this article, you can use the Search. Press Command+F, and then type your search words.
During the presentation, to open a list of shortcuts, press forward slash (/).
Pointer and annotations in the slide show
Navigate the presenter view on macos 10.15 (catalina) and later.
This table lists the most frequently used shortcuts in PowerPoint for macOS.
You can use the following keyboard shortcuts while you’re delivering your presentation in Slide Show (full-screen) mode, with or without the Presenter View .
Use the following keyboard shortcuts to control media during a presentation.
You can use the following keyboard shortcuts while you’re delivering your presentation using the Presenter View on macOS 10.15 (Catalina) and later, and when the keyboard control navigation is turned on. For instructions, refer to Turn on the keyboard control navigation .
Use the shortcuts in the table below to move in the Presenter View in PowerPoint for macOS.
Skip ahead in your presentation
You can use your keyboard to skip ahead several slides without the audience seeing the slides as you transition to the new slide.
Press the Tab key until you reach the Slide Navigator control (filmstrip).
Press and hold down the Option key and press the Left or Right arrow key repeatedly until you find the slide you want to skip to.
Release the Option key to move to the slide you want to skip to.
Turn on the keyboard control navigation
To use your keyboard to move between and activate controls on your Mac, turn on the keyboard control navigation.
If you're not using VoiceOver, on your computer, select System Preferences > Keyboard > Shortcuts , and select the Use keyboard navigation to move focus between controls checkbox.
If you're using VoiceOver, the control navigation should be on by default. To check the setting, do the following:
On your computer, press Control+Option+M to access the Apple menu bar item. To open the Apple menu, press Control+Option+Spacebar.
Press Control+Option+Down arrow key until you hear "System preferences ellipses," and then press Control+Option+Spacebar.
The System Preferences window opens. The focus is in the Search text box.
Type Keyboard , and then press Return. The Keyboard dialog box opens.
Press Control+Option+Right arrow key until you hear "Shortcuts tab," and then press Control+Option+Spacebar.
Press Control+Option+Right arrow key until you hear: "Use keyboard navigation to move focus between controls." VoiceOver also announces if the option is selected or unselected. To toggle the option on or off, press Control+Option+Spacebar.
To close the Keyboard dialog box, press Command+W.
This article describes the keyboard shortcuts that apply while you're delivering your presentation with PowerPoint for the web.
If you use Narrator with the Windows 10 Fall Creators Update, you have to turn off scan mode in order to edit documents, spreadsheets, or presentations with Microsoft 365 for the web. For more information, refer to Turn off virtual or browse mode in screen readers in Windows 10 Fall Creators Update .
When you use PowerPoint for the web, we recommend that you use Microsoft Edge as your web browser. Because PowerPoint for the web runs in your web browser, the keyboard shortcuts are different from those in the desktop program. For example, you’ll use Ctrl+F6 instead of F6 for jumping in and out of the commands. Also, common shortcuts like F1 (Help) and Ctrl+O (Open) apply to the web browser – not PowerPoint for the web.
This table lists the keyboard shortcuts you can use to control the slide show.
Technical support for customers with disabilities
Microsoft wants to provide the best possible experience for all our customers. If you have a disability or questions related to accessibility, please contact the Microsoft Disability Answer Desk for technical assistance. The Disability Answer Desk support team is trained in using many popular assistive technologies and can offer assistance in English, Spanish, French, and American Sign Language. Please go to the Microsoft Disability Answer Desk site to find out the contact details for your region.
If you are a government, commercial, or enterprise user, please contact the enterprise Disability Answer Desk .

Need more help?
Want more options.
Explore subscription benefits, browse training courses, learn how to secure your device, and more.

Microsoft 365 subscription benefits

Microsoft 365 training

Microsoft security

Accessibility center
Communities help you ask and answer questions, give feedback, and hear from experts with rich knowledge.

Ask the Microsoft Community

Microsoft Tech Community

Windows Insiders
Microsoft 365 Insiders
Find solutions to common problems or get help from a support agent.

Online support
Was this information helpful?
Thank you for your feedback.

Powerpoint Assist
Tips for Powerpoint by Regina Griffin
How To Get Into Presentation Mode In PowerPoint
Are you looking to take your PowerPoint presentations to the next level?
Presentation Mode in PowerPoint is a powerful tool that can help you create engaging and professional presentations.
We will discuss why you should use Presentation Mode, how to enter it, its key features, and how to navigate through your slides.
Explore the ins and outs of Presentation Mode in PowerPoint, brought to you by teacher Regina Griffin from Oregon, US. Enhance your presentation skills!
Key Takeaways:
- Presentation mode in PowerPoint allows for a more engaging and organized presentation, resulting in a better experience for both the presenter and the audience.
- To enter presentation mode, simply click on the “Slide Show” tab and select “From Beginning” or “From Current Slide”.
- Presentation mode offers features such as a full-screen display, laser pointer/pen tool, and presenter view with notes and slide previews, making it easier to navigate through slides and deliver a professional presentation.
What Is Presentation Mode in PowerPoint?
Presentation Mode in PowerPoint refers to a feature that allows presenters to display their slides in a full-screen view, enhancing the visual impact of their presentation.
This mode is particularly useful during formal presentations, as it eliminates distractions and ensures that the audience’s focus remains on the content being discussed. In Presentation Mode , presenters can navigate through their slides smoothly, interact with their content, and make annotations in real time. One notable advantage of this mode is the Presenter view , where speakers can see upcoming slides, and speaker notes, and even manage time effectively without disrupting the flow of the presentation.
Why Use Presentation Mode in PowerPoint?
Using Presentation Mode in PowerPoint offers numerous advantages, such as creating a more engaging and professional presentation experience for both the presenter and the audience.
When in Presentation Mode, your PowerPoint transforms into a seamless slide show that eliminates distractions and focuses solely on your content. This feature optimizes the screen view for your audience, ensuring they stay engrossed in your message.
Presentation Mode allows the presenter to navigate slides effortlessly, maintaining a smooth flow of information that keeps the audience’s attention intact. The ability to preview slides on a separate monitor while presenting ensures that the speaker remains in control of the presentation pace and content delivery.
Allows for a more engaging and professional presentation
One of the key reasons to use Presentation Mode in PowerPoint is that it allows presenters to deliver a more engaging and professional presentation by providing advanced control over their slides, including features like a laser pointer .
With Presentation Mode, presenters can seamlessly navigate through their slides, controlling the flow of information and keeping the audience’s attention focused. The ability to access advanced controls such as animations, transitions, and speaker notes enhances the overall delivery quality.
The built-in laser pointer feature enables presenters to highlight specific points on the slides, emphasizing crucial information and guiding the audience’s focus. This interactive element adds a dynamic touch to the presentation, making it more engaging and memorable.
Helps the presenter stay on track and organized
Presentation Mode in PowerPoint aids presenters in maintaining focus, organization, and efficiency throughout their presentation by offering tools like Presenter View, where notes and slide previews can be accessed.
This feature is particularly useful as it allows presenters to keep an eye on upcoming slides while also referring to their speaking notes discreetly, enhancing the flow of the presentation. The ability to adjust display settings such as screen mirroring or extending desktops simplifies the setup process, ensuring that the presentation runs smoothly. The note-taking capabilities within Presentation Mode enable presenters to jot down important points or reminders directly within the application, eliminating the need for external notes and promoting a more organized approach to presenting.
Provides a better experience for the audience
Engaging Presentation Mode in PowerPoint not only benefits the presenter but also enhances the audience’s experience by ensuring a seamless and visually appealing display of the content.
When toggling to Presentation Mode, the display settings undergo a transformation that optimizes the presentation for viewer interaction. The ability to seamlessly swap displays allows the presenter to effortlessly navigate through slides, ensuring a smooth transition between different sections of the presentation. This elegant integration of features not only captivates the audience but also enables a more fluid and engaging delivery of the content. The visual appeal of the slides is enhanced, making it easier for viewers to follow along and grasp the key points being presented.
How to Enter Presentation Mode in PowerPoint?
To enter Presentation Mode in PowerPoint, follow these simple steps: open your presentation, click on the ‘Slide Show’ tab in the menu bar, and select ‘From Beginning’ or ‘From Current Slide’ to start your presentation.
If you want to ensure a seamless transition into Presentation Mode, it’s essential to set the right display options. First, check your display settings by going to the ‘Slide Show’ tab and clicking on ‘Set Up Slide Show.’ Here, you can choose whether to present your slides on the primary monitor, a secondary monitor, or in a window. Make sure to select the appropriate display mode based on your setup to guarantee a professional and effective presentation.
Step 1: Open your PowerPoint presentation
The first step to enter Presentation Mode in PowerPoint is to ensure that your presentation file is open and ready for display.
To do so, open PowerPoint and locate the file containing your presentation. Click on the file to open it. Review that the slides are arranged in the correct order and that any speaker notes or animations are set up as desired. Check the slide sorter view to confirm the flow of your presentation. Ensure that the current slide is the one you want to begin with when Presentation Mode is activated. This initial setup is crucial for a seamless transition into your presentation.
Step 2: Click on the ‘Slide Show’ tab in the top menu bar
Once your presentation is open, navigate to the ‘Slide Show’ tab located in the top menu bar of PowerPoint to access presentation controls and features like zooming into specific slides.
Once you’re on the ‘Slide Show’ tab, you’ll find a variety of essential controls that aid in delivering a seamless presentation experience. Here, you can click on ‘From Beginning’ to start the slide show from the very first slide. You can choose ‘From Current Slide’ to begin from the slide you’re currently on.
You’ll notice the ‘Slide Show’ tab offers options to toggle various functionalities like accessing presenter view or setting up custom slide shows. This tab is a hub of useful tools that elevate your presentation delivery.
Step 3: Select ‘From Beginning’ or ‘From Current Slide’ to start the presentation
After accessing the ‘Slide Show’ tab, choose between the ‘From Beginning’ or ‘From Current Slide’ options to initiate your presentation in Presentation Mode, ensuring the desired display settings and presenter view are selected.
When you opt for ‘From Beginning,’ your presentation will start from the very first slide, whereas selecting ‘From Current Slide’ allows you to start your presentation from the slide you are currently on. This choice depends on whether you want to begin at the start of the presentation or jump in at a specific point.
It is crucial to carefully review and adjust the display settings to ensure that your content appears as intended on the screen during the presentation. Make sure to enable the presenter view option for a more dynamic and organized delivery of your content, offering you control over what the audience sees and what you see on your screen.
What Are the Features of Presentation Mode in PowerPoint?
The features of Presentation Mode in PowerPoint are designed to enhance the presenter’s experience and engage the audience, offering functionalities such as Presenter view with notes, laser pointer integration, and slide previews.
Presenter view with notes allows speakers to refer to their talking points discreetly, ensuring a seamless delivery. The incorporated laser pointer feature permits highlighting key areas on slides, directing the audience’s focus effectively. Slide previews provide a comprehensive overview of the presentation flow, aiding in smoother transitions between topics. The option to hide or reveal slides as needed enhances the element of surprise and control during the presentation, captivating the audience’s attention. These combined features transform the presenter’s performance into a dynamic and engaging experience for all participants.
Full-screen display of slides
Presentation Mode in PowerPoint offers a full-screen display of slides, ensuring that the audience can focus solely on the content being presented.
This feature eliminates distractions and directs attention to the key points of the presentation. By seamlessly transitioning between slides, the flow of information is maintained, keeping the audience engaged throughout the talk. The full-screen view enhances the visibility of multimedia elements, such as images and videos, making them more impactful.
Ability to use a laser pointer or pen tool
Presentation Mode enables presenters to use a laser pointer or a pen tool to highlight key points on slides, enhancing the clarity and impact of their presentation.
The laser pointer, a staple in traditional presentations, offers a precise way to direct attention to specific details, aiding in engaging the audience. On the other hand, the pen tool, usually found in digital platforms like smartphone apps or presentation software, allows for more creativity and flexibility in drawing emphasis without the need for physical devices like remote controls. This versatility caters to different presenter preferences and presentation styles, ensuring a dynamic and interactive delivery of content.
Presenter view with notes and slide previews
Presenter view in PowerPoint provides presenters with a comprehensive overview of their slides, including notes and slide previews, facilitating better organization and seamless delivery.
When utilizing the Presenter view, presenters gain the advantage of accessing notes discretely without them being displayed to the audience, allowing for a more professional and polished delivery. In addition, having a live preview of the upcoming slides enables the presenter to seamlessly transition between points, enhancing the flow of the presentation. Through system preferences or the displays app, customization options such as adjusting the layout to suit individual preferences or toggling between speaker notes and slide previews can be easily configured, providing a tailored experience for each presenter.
Option to hide the presentation controls
One convenient feature of Presentation Mode is the ability to hide presentation controls , providing a cleaner and more immersive viewing experience for both the presenter and the audience.
By opting to hide presentation controls, presenters can focus on delivering their content without any distractions or overlays obstructing their view. This is especially beneficial when engaging in live demonstrations, showcasing visual content, or utilizing mirror displays for a seamless and professional presentation.
In scenarios where presenters are utilizing a two-monitor setup for advanced display configurations, such as showing notes on one screen while presenting on the other, hiding presentation controls on the main display ensures that only the essential content is visible to the audience, maintaining a neat and streamlined appearance.
How to Navigate Through Slides in Presentation Mode?
Navigating through slides in Presentation Mode can be done efficiently using keyboard shortcuts, mouse controls, or specific commands within PowerPoint.
One handy method to quickly move to the next slide during a presentation is by pressing the Spacebar or Enter key on your keyboard. Conversely, to go back to the previous slide, you can use the Backspace key. You can effortlessly jump to a specific slide by entering the slide number followed by pressing the Enter key. For a more visual approach, you can click on the slide thumbnails on the left sidebar or use the scroll wheel to navigate through the slides.
Use the arrow keys on your keyboard
Utilize the arrow keys on your keyboard to seamlessly advance through slides in Presentation Mode, ensuring a smooth and controlled flow of your presentation.
With the simple and intuitive collaboration of the arrow keys, you can effortlessly navigate through your slides, enabling precision in delivering your content. The arrow keys allow you to move forward or backward with ease, keeping the focus on your message during the presentation. This feature is especially useful in Presenter View, where you can see upcoming slides and speaker notes, maintaining a seamless delivery. When you record a slide show, the arrow keys help you pace your narration perfectly, ensuring synchronization between your speech and slide transitions.
Click on the arrows in the bottom left corner of the screen
For a more interactive navigation experience, users can click on the directional arrows located in the bottom left corner of the screen to progress through their presentation while having access to speaker notes and animations.
Users can enhance their presentation experience by utilizing the fullscreen mode . By entering fullscreen, viewers can keep the focus solely on the presentation content, removing any distractions from the surrounding interface elements. This feature is particularly useful when showcasing detailed slides or when presenting to a larger audience, allowing for a more immersive and engaging delivery.
Use the scroll wheel on your mouse
Another seamless way to navigate through slides in Presentation Mode is by utilizing the scroll wheel on your mouse, providing smooth and intuitive control over slide transitions and content progression.
The scroll wheel allows users to effortlessly advance slides without the need to click buttons or use keyboard shortcuts, enhancing the overall presentation experience.
With its responsive nature, the scroll wheel ensures quick and precise movements, enabling presenters to fluidly transition between slides with the utmost ease.
This feature is particularly handy when presenting slides with high resolution , allowing for a seamless display of detailed content in a visually appealing manner.
How to Exit Presentation Mode in PowerPoint?
Exiting Presentation Mode in PowerPoint is a simple process that involves pressing the ‘Esc’ key on your keyboard, clicking on the ‘End Show’ button, or selecting ‘End Show’ from the drop-down menu to return to the normal viewing mode.
To exit Fullscreen mode in PowerPoint, you can simply press the ‘Esc’ key, the keyboard shortcut that is universally used to escape full-screen views across various applications. This action will promptly take you out of the immersive mode and back to the regular interface.
Another convenient way to exit the Presentation Mode is by navigating to the bottom left corner of the screen and clicking on the ‘End Show’ button. This button serves as a quick exit route from the full-screen display, offering an immediate transition back to the standard PowerPoint screen.
Step 1: Press the Esc key on your keyboard
The first step to exit Presentation Mode is to press the ‘Esc’ key on your keyboard, which will promptly exit the full-screen display and return you to the standard PowerPoint interface.
Exiting Presentation Mode using the ‘Esc’ key is a simple maneuver that can swiftly transition you back to your familiar workspace. Once you press the ‘Esc’ key, the fullscreen effect will dissolve, and any Speaker Notes you might have been glancing over will no longer dominate your screen, ensuring a seamless flow as you exit the presentation. This action provides an effortless way to shift the focus back to the general view of your PowerPoint, facilitating a smooth continuation of your usual workflow.
Step 2: Click on the ‘End Show’ button on the top left corner of the screen
To exit Presentation Mode, users can also click on the ‘End Show’ button located in the top left corner of the screen, providing a direct and visible method to conclude the presentation.
Once you are ready to end your presentation and exit the immersive Presentation Mode, simply direct your attention to the top left corner of the screen where the ‘End Show’ button awaits your command. By clicking on this button, you seamlessly transition back to the regular view, enabling you to navigate your presentation’s content, check additional details, or record the slide show for future reference. This function provides an effortless way to not only conclude your speech but also to review or amend content from the current slide onward, ensuring a smooth transition and accessibility for your audience.
Step 3: Select ‘End Show’ from the drop-down menu
For a more detailed exit process, users can select ‘ End Show ‘ from the drop-down menu within PowerPoint, ensuring a controlled and comprehensive conclusion to their presentation.
Once ‘End Show’ is chosen, users can seamlessly transition back to PowerPoint’s standard interface, bidding farewell to the presenter view. Exiting this mode allows presenters to access additional options to end their presentation smoothly and efficiently.
Upon choosing ‘End Show’, users can review their content, make final adjustments, and conclude their presentation with confidence, maintaining professionalism throughout the process. This method ensures a polished and professional exit from Presentation Mode, leaving a lasting impression on the audience.
Frequently Asked Questions
How do i enter presentation mode in powerpoint.
To enter presentation mode in PowerPoint, click on the Slideshow tab in the top menu and then select “From Beginning” or “From Current Slide” depending on where you want to start your presentation.
Can I customize the way I enter presentation mode in PowerPoint?
Yes, you can customize the way you enter presentation mode by going to the Slideshow tab and selecting “Set Up Slide Show.” From there, you can choose options such as looping, presenter view, and more.
Is there a shortcut to enter presentation mode in PowerPoint?
Yes, you can press the F5 key on your keyboard to enter presentation mode in PowerPoint. You can also press Shift+F5 to start from the current slide.
Can I use a different display for presentation mode in PowerPoint?
Yes, you can use a different display for presentation mode by going to the Slideshow tab and selecting “Set Up Slide Show.” From there, you can choose to present on a secondary monitor or projector.
How do I exit presentation mode in PowerPoint?
To exit presentation mode in PowerPoint, press the Escape key on your keyboard or right-click and select “End Show.” You can also press the B key to go back to the previous slide.
Can I add speaker notes while in presentation mode in PowerPoint?
Yes, you can add speaker notes while in presentation mode by clicking on the Notes section at the bottom of the screen. This will allow you to add notes that only you can see while presenting.
Similar Posts
How to get morph transition in powerpoint.
Have you ever wondered how to create seamless and visually appealing transitions in your PowerPoint presentations? Look no further than the Morph Transition feature. In this article, we will explore what Morph Transition is, why it is beneficial to use in PowerPoint, and most importantly, how to use it effectively. Follow along as we guide…
How To Calculate In PowerPoint
Are you looking to enhance your PowerPoint skills by adding some basic functions, a calculator, a custom calculator, and formulas to your presentations? In this tutorial by Oregon-based teacher Regina Griffin, we will explore the various ways you can calculate in PowerPoint. From simple additions to formatting numbers, we will cover everything you need to…
How To Embed A YouTube Video In PowerPoint For Mac
In today’s digital age, presentations have become an essential part of communication. To make your PowerPoint presentations more engaging and dynamic, embedding YouTube video In PowerPoint For Mac can be a game-changer. Not only does it allow for easy access to videos during your presentation, but it also adds variety to your content. In this…
How To Play One Video After Another In PowerPoint
Looking to enhance your PowerPoint presentations with engaging videos? In this tutorial by Regina Griffin, a teacher from Oregon, US, we explore the benefits of incorporating videos into your slides. From keeping your audience engaged to providing visual aids, videos can take your presentations to the next level. Learn how to insert and play videos…
How To Group Slides In Powerpoint
Are you looking to take your PowerPoint presentations to the next level? Grouping slides can help you organize your content, make editing easier, and improve navigation for your audience. In this tutorial by Regina Griffin, a teacher from Oregon, US, you will learn why and how to group slides in PowerPoint. From selecting slides to…
How To Add Timer In PowerPoint
Looking to enhance your PowerPoint presentations and keep your audience engaged? Adding a timer can help you stay on track and ensure your presentation runs smoothly. In this tutorial by Regina Griffin, a teacher from Oregon, US, learn how to easily add a timer to your slides. From inserting a text box to setting the…
- Slidesgo School
- PowerPoint Tutorials
How to Use the Presentation Modes and the Screen Recording Features in PowerPoint

After designing all the slides for your presentation, the next and last step is presenting in front of your audience. In this new Slidesgo School tutorial, you’ll see how the presenter view works and how you can record your presentation .
Presentation Modes
Presentation modes — set up slide show, presentation modes — record slide show.
- There are different presentation modes in PowerPoint, besides the one you can find at the bottom of the screen.
- To access the presentation modes, go to the Slide Show tab.
- The first two options allow you to start the presentation from the beginning or from the currently selected slide.

- If you choose Present Online, an URL will be generated, which you can then share with your potential online viewers. After clicking this button, a new window will open, displaying info about the Microsoft Office online presentation service and a checkbox to enable remote download for your online audience. To enjoy this service, you need an Office 365 account. When you’re ready, click Connect to generate the URL.
- If you choose Custom Slide Show, you can select which slides to display in your presentation. First, create a new custom slide show and select the slides that you want to display. Then, click Add, enter the name of the presentation and click OK. This new custom presentation will appear on the list. Select it and click Show to begin the presentation.
- In the Set Up group you’ll find options to set up the presentation, hide slides, rehearse your presentation and even record it.
- Click Set Up Slide Show to adjust several settings regarding your presentation. You’ll find more information in the next section of this tutorial .
- If you click Hide Slide, the selected slide won’t show up during your presentation. Hidden slides will appear faded out on the list and their numbers will be crossed out.
- If you click Record Slide Show, you’ll be able to record your presentation from the beginning or from the current slide. We’ll go into detail in the last section of this tutorial.
- There are several checkboxes regarding whether to play narrations, use timings and show media controls.

- In the Monitors group you can choose which screen to display your presentation.
- The last group, Captions & Subtitles, is only available in Office 365. You’ll find options to enable subtitles, which will be generated out of your speech (so you’ll need to have a mic). There are settings to change the language and the position of the subtitles.
- Open your presentation in PowerPoint.
- Go to the Slide Show tab.
- In the Set Up group, click Set Up Slide Show. A new window will open, where you’ll find several options.
- In the top-left corner, under “Show type”, you can choose whether the presentation will be in fullscreen with speaker notes, windowed, or in fullscreen without speaker notes or the menu bar.

- Under “Show options” you can choose whether to show the presentation without narration or animations, or disable the hardware graphics acceleration (for better performance). You can also set the pen and laser pointer color.

- Under “Show slides”, you can choose which slides to show in your presentation. You can select all of them, a specific range or a custom slideshow.
- There are other settings to determine how to advance slides (manually or using timings), what the resolution will be and whether to use the presenter view.
- Click Record Slide Show. From the drop-down menu, select From the Current Slide or From the Beginning.
- A new window will open, along with the presentation in fullscreen mode. At the top-left you’ll find a button to start recording.
Do you find this article useful?
Related tutorials.

How to Use the Presenter View in Google Slides
Google Slides, like PowerPoint, has different presentation modes that can come in handy when you’re presenting and you want your slideshow to look smooth. Whether you’re looking for slides only, speaker notes or the Q&A feature, in this new Google Slides tutorial, you’ll learn about these and their respective settings. Ready? Then let’s explore the presenter view!

How to Download Google Slides Templates
When preparing a presentation, many people start panicking because they realize how much time it will take to edit each and every slide. Creating them from scratch, filling them in, looking for pictures, moving the elements...How stressful! But there is a solution that saves you a lot of time. We're sure that you've browsed the internet for templates, or basically, pre-established designs and elements, that can be downloaded for free and can be edited to your liking. Are we right? Then, we have some good news for you!

Discover our collection of printable templates
With the advance of technology, printing has become something that is no longer a necessity. Smartphones have made the paper format less and less frequent, but there are still certain cases in which having physical resources is much more convenient. Whether it's for taking notes, handing out assignments, making worksheets or handing out business cards or invitations, it's necessary to print your customized designs.From now on, in every Slidesgo printable presentation that you download, you will find the instructions for printing on the third slide. Depending on the style, colors or format of each presentation, we will tell you if you can...

How to Add Superscript and Subscript in Google Slides
Let’s take the most famous formula: E=mc^2, Einstein’s relativity equation. It wouldn’t be the same if it was E=mc2, right? Okay, yes, some people write it like that because it’s very famous and it won’t be misunderstood. But technically… It can! This is where the sophistication of superscript or subscript enters the room! Do you know how to write them in equations, copyright brands or even footnotes in your presentations? Let’s figure out how.
PowerPoint Keyboard Shortcuts for Slide Show Presentations
Whether you use a mouse or remote control to navigate through a PowerPoint slide show presentation, one of the best ways to more effectively deliver PowerPoint presentations with greater engagement is to take advantage of handy slide show shortcuts.
Try this selection of PowerPoint keyboard shortcuts for your next in-person or virtual PowerPoint slide show (or watch my video of presentation shortcuts):
- Run a slide show: [F5]
- Run a slide show from the current slide: [Shift] + [F5]
- Help during slide show (displays PowerPoint keyboard shortcuts): [F1]
- Advance to the next slide (any of these): [Right] , [Down] , N (for Next), [Spacebar] , [Page Down] (or click the left mouse)
- Return to the previous slide (any of these): [Left] , [Up] , P (for Previous), [Backspace] , [Page Up]
- Go to the first slide in a presentation: [Home]
- Go to the last slide in a presentation: [End]
- Go to a specific slide number during a slide show: type the slide number and press [Enter]. This is one of my favorite tips to quickly skip past slides or to return to a previous slide. To create a list of slide numbers, print out your presentation as a handout; I choose 9 slides per page. Current versions of PowerPoint display the slide numbers on handouts. If this isn’t available, simply manually add slide numbers to your printout or create a simple hand-written cheat sheet.
- What if you don’t know the slide number? Display the PowerPoint slide selector with [Ctrl] + S
- To show a visual display of slides: press G
- Display a black screen or go back to slide show: B or [Period]
- Display a white screen or go back to slide show: W or [Comma]. (Use carefully as the bright screen can be distracting to an audience).
- To draw on the screen (annotations), press [Ctrl] + P to enable the Pen mode. Use your mouse to draw directly on the slide. To change the pen color or to enable other tools (Laser Pointer, Highlighter) to emphasize your slide content, right-click on a slide and left-click on Pointer Options. From this menu, you can change the ink color.
- To annotate with the highlighter: [Ctrl] + I
- To clear annotations, press [Ctrl] + E to bring up the eraser to remove individual pen or highlighter annotations.
- Erase all annotations: press E to erase at any time. Or, right-click on a slide and left-click on Pointer Options , where you’ll see options for the Eraser or to Erase All Ink on Slide .
- To call attention to slide content with a laser: [Ctrl] + L
- To switch from the Pen (or highlighter or laser) mode back to the Arrow, press [Ctrl] + A or [Ctrl] + U . Or even better, press [Ctrl] + H to hide the pointer or pen to avoid displaying a distracting or moving mouse pointer.
- To turn live subtitles on or off: J . To change subtitles settings, either right-click on your slide show for Subtitles or find these options under the Slide Show Ribbon in PowerPoint.
- Zoom In on a slide: +
- Zoom Out on a slide: –
- End a slide show: [Esc]
More Tips: You can also right-click anywhere on the slide show screen for a shortcut menu with many of these same actions. Although your audience will also see this shortcut menu, this is a handy way to quickly choose presentation options.
Click here to download a handout of PowerPoint keyboard shortcuts and discover more PowerPoint tips and tricks .
© Dawn Bjork, MCT, MOSM, CSP®, The Software Pro® Microsoft Certified Trainer, Productivity Speaker, Certified Speaking Professional

Related Posts
3 Time-Saving PowerPoint Shortcuts with the SHIFT Key March 21, 2022
Microsoft PowerPoint: Easy Navigation with Hyperlinks 23 Mar at 9:22 pm
Top 6 Reasons Why You Need a Presentation Remote for PowerPoint April 20, 2022
Join Our Tips Newsletter
Receive 477+ shortcuts & more!
- Presentation Hacks
5 PowerPoint Shortcuts Every Presenter Should Know
- By: Camille Holden
We all know there’s no easy button for becoming a successful public speaker. It takes hard work, lots of practice, and a unique blend of science and artistry.
That’s why it’s all the more heartbreaking when you see a good presenter get derailed by their technology. There’s nothing more embarrassing than having to apologize for your missed cues and misfires.
But it doesn’t have to be that way.
Presentation technology can be a blessing, rather than a curse, as long as you know how to use it to your benefit. And while there is no easy button for that either, there are certain buttons that can make your presentations more seamless and make your delivery a lot smoother.
To make sure you’re not letting technology get in your way, here are the 5 PowerPoint shortcuts* every presenter needs to know.
*I’m omitting the truly basic ones that work across all of your applications, like copy/paste and save.
Key PowerPoint Shortcut #1 – Blacking / White-ing the Screen Sometimes you may need to pause the presentation for a lunch break or to answer a question unrelated to the presentation. In these situations, you can use shortcut keys to display a blank screen and keep your audience’s attention focused on you.
Here are the shortcuts you need to know: W or comma (while in Slide Show Mode) will turn the screen completely white. Hit either shortcut once more, and you will return to your slide.
B or period (while in Slide Show Mode) will turn the screen completely black. Hit either shortcut once more, and you will return to your slide.
Key PowerPoint Shortcut #2 – Activating the Laser Pointer When giving your talk, you may have specific elements on your slide that you want to point out to your audience. One great way to do that is to use a laser pointer – and PowerPoint provides one directly within the software.
While in Slide Show Mode, hold down the CTRL key on your keyboard and click and drag with your mouse. Doing so turns on the laser pointer, allowing you to point out things on your slide and focus your audience’s attention.
Here are the shortcuts you need to know: Hold the Ctrl key and click with your mouse (in Slide Show Mode).
Key PowerPoint Shortcut #3 – Inking Your Slides Some of the best tools native to PowerPoint when presenting in front of an audience – whether on a webinar or in a room – are the inking tools.
You can use these tools to highlight parts of the slide, add notes, diagram elements in, etc.
The inking tools include the pen and the highlighter.
Here are the shortcuts you need to know: Ctrl + P (while in Slide Show Mode) will activate the pen, allowing you to write / draw on your slides. Hitting CTRL + P a second time will turn the Pen off.
Ctrl + I (while in Slide Show Mode) will activate the highlighter, allowing you to highlight / draw on your slides.
Ctrl + M (while in Slide Show Mode) will hide all the ink on your slide. If you use the shortcut a second time, you will make the ink re-appear.
E (while in Slide Show Mode) will erase all the ink on your slide.
Pro Tip: Be careful when erasing the Ink on screen as there is no way to un-erase that ink. If you typically want to save the ink on yours, memorize the CTRL + M shortcut instead as it merely hides the ink.
Key PowerPoint Shortcut #4 – Launching Presenter View Presenter View is a great alternative to Slide Show Mode, allowing you to play your presentation for an audience.
I love using Presenter View, because it allows you to do several things: 1. See the slide that your audience is viewing so that you can address that slide, 2. See the notes you have for that slide, 3. Preview the next slide to prepare you for what’s to come, 4. View the time and duration of your presentation, and 5. Use the laser pointer and ink features to mark up your presentation.
Knowing how to jump straight to Presenter View from a shortcut allows you to launch it on the fly and be ready to start your talk at any point.
Here are the shortcuts you need to know: Alt + F5 to launch Presenter View from the first slide.
Additional Pro Tips: 1. This is a great view for reviewing your slides before a presentation to spot check them for errors. 2. Best practice is not to overly rely on this view, as you want to be looking at your audience – not looking at your screen, which is just as bad as reading your slides.
Key PowerPoint Shortcut #5 – Jumping to a Slide in Your Presentation When you give a presentation, your talk doesn’t always end up going according to plan. And you want to be prepared in case that happens.
There are some situations when you will need to jump around in your presentation. For instance, say you are on slide 50, and your audience puts a question that requires you to jump back to slide 20.
Pressing Page Up 30 times is time-consuming and looks unprofessional. That’s why PowerPoint has two handy methods for doing so efficiently.
The first method is to simply type the slide number in, and then hit Enter (Ex. “20 Enter”).
The second method is to use the All Slides dialog box. This feature allows you to visually see all the slides within your presentation so you can immediately jump to the correct one. This is handy when you want to move forward or backward quickly within your presentation and you don’t know what the slide number is.
Here are the shortcuts you need to know: Slide number + Enter (while in Slide Show Mode) will jump you to that slide.
Ctrl + S (while in Slide Show Mode) will launch the All Slide dialog box.
Why Shortcuts Matter Creating a PowerPoint presentation is no small task! It requires juggling all sorts of PowerPoint stuff like charts, tables, pictures, object formatting, text, and shapes, and then there is the delivery of the presentation itself. On top of that, you’re expected to have it all done yesterday!
It’s all about trying to get more done in less time. And that’s where PowerPoint keyboard shortcuts come in handy.
With a little bit of practice, PowerPoint shortcuts will seriously cut down your build time, make your slides look more polished and professional, and get you to Happy Hour faster.
For more of the top PowerPoint keyboard shortcuts, check out my in-depth Favorite 80 PowerPoint Shortcuts article.
About the Author: Camille Holden is the Co-Founder and CEO of Nuts & Bolts Speed Training , where she helps busy professionals save PowerPoint hours and gain peace of mind. As an expert trainer and coach, she is passionate about empowering people who are short on time but big on ideas with the tools to truly master PowerPoint and create presentations that work.

Camille Holden
Join our newsletter today.
© 2006-2024 Ethos3 – An Award Winning Presentation Design and Training Company ALL RIGHTS RESERVED
- Terms & Conditions
- Privacy Policy
- Diversity and Inclusion

5 PowerPoint Keyboard Shortcuts to Start a Slide Show

Try These Useful PowerPoint Shortcuts to Start a Slide Show
by Avantix Learning Team | October 16, 2021
Applies to: Microsoft ® PowerPoint ® 2013, 2016, 2019 and 365 (Windows)
You can start a slide show in PowerPoint using several keyboard shortcuts. In this article, we'll review shortcuts to start a show using function keys or by using key tips.
Recommended article: How to Strikethrough or Cross Out Text in PowerPoint (4 Ways with Shortcuts)
If the function key shortcuts don't work, you may need to press the Fn key on your keyboard at the same time.
Typically, you would start a slide show from Normal View or Slide Sorter View. To exit a slide show, press ESC.
If Presenter View is selected on the Slide Show tab in the Ribbon, the show will start in Presenter View. If you have two monitors and Automatic is selected as the Monitor setting on the Slide Show tab, the show will display as a standard slide show on the second monitor and will display Presenter View on the presenter's screen by default.
1. Start a presentation from the beginning using a function key
2. start a presentation from the current slide using a function key.
Press Shift+F5.
3. Start the presentation in Presenter View using a function key
Press Alt + F5.
4. Start a presentation from the beginning using key tips
Press Alt > S > B (press Alt, then S, then B).
5. Start a presentation from the current slide using key tips
Press Alt > S > C (Alt, then S, then C).
There are many shortcuts you can use during a PowerPoint slide show as well. Check out the article PowerPoint Slide Show Shortcuts (50+ Keyboard Shortcuts).
Subscribe to get more articles like this one
Did you find this article helpful? If you would like to receive new articles, JOIN our email list.
More resources
How to Insert Slide Numbers in PowerPoint
How to Crop a Picture in PowerPoint (4 Ways)
How to Change the Background of Your PowerPoint Slides
How to Remove the Background of a Picture in PowerPoint (2 Ways)
How to Add Animation in PowerPoint (Animate Images, Text or Other Objects)
Related courses
Microsoft PowerPoint: Intermediate / Advanced
Microsoft PowerPoint: Design for Non-Designers
Microsoft PowerPoint: Animations Bootcamp
Microsoft Excel: Intermediate / Advanced
VIEW MORE COURSES >
Our instructor-led courses are delivered in virtual classroom format or at our downtown Toronto location at 18 King Street East, Suite 1400, Toronto, Ontario, Canada (some in-person classroom courses may also be delivered at an alternate downtown Toronto location). Contact us at [email protected] if you'd like to arrange custom instructor-led virtual classroom or onsite training on a date that's convenient for you.
Copyright 2024 Avantix ® Learning
You may also like

How to Insert or Type E with an Accent Mark in PowerPoint (È, É, Ê, Ë, è, é, ê, or ë)
You can insert or type e with an accent mark in PowerPoint using built-in tools or keyboard shortcuts (including Alt code shortcuts). The letter e can be inserted with an accent in both upper or lower case in text boxes or placeholders on slides, the slide master or layouts. The following are common accents in upper or lower case – È, É, Ê, Ë, è, é, ê, or ë.

How to Fade a Picture or Part of a Picture in PowerPoint (Using a Gradient)
You can fade a picture in PowerPoint by drawing a rectangle shape on top of the picture and then filling the rectangle with a gradient from opaque to transparent. This technique is often used to fade an image into the background of a slide. Since the rectangle is placed on top of the image and then text may be placed on top of the rectangle, you may need to reorder the objects.

How to Lock an Image, Shape or Other Object in PowerPoint
You can now lock an image, shape or other object in PowerPoint. Objects can be locked in Normal View or Slide Master View. Only PowerPoint 365 users can lock objects to prevent moving and resizing. This is helpful if you want to select and move other objects on the slide or prevent others from moving or resizing an object. You can lock items using the context menu or the Selection Pane.
Microsoft, the Microsoft logo, Microsoft Office and related Microsoft applications and logos are registered trademarks of Microsoft Corporation in Canada, US and other countries. All other trademarks are the property of the registered owners.
Avantix Learning |18 King Street East, Suite 1400, Toronto, Ontario, Canada M5C 1C4 | Contact us at [email protected]

Our Courses
Avantix Learning courses are offered online in virtual classroom format or as in-person classroom training. Our hands-on, instructor-led courses are available both as public scheduled courses or on demand as a custom training solution.
All Avantix Learning courses include a comprehensive course manual including tips, tricks and shortcuts as well as sample and exercise files.
VIEW COURSES >
Contact us at [email protected] for more information about any of our courses or to arrange custom training.
Privacy Overview
Pin it on pinterest.
- Print Friendly
SlideDesigning
Free Download Presentation Templates
Microsoft Office PowerPoint Keyboard Shortcuts and Cheat Sheet
Save your time and Boost Your Productivity

Microsoft PowerPoint is one of the most popular tools for creating and delivering presentations, but a lot of people are still unaware of how to use it as quickly and efficiently as possible.
If you’re a frequent user of Microsoft Office PowerPoint, you know that there are a lot of different features and functions to master. One way to make your workflow more efficient is by using keyboard shortcuts.
Here are some of the most useful keyboard shortcuts for PowerPoint:
Ctrl + N: Create a new presentation.\ Ctrl + O: Open an existing presentation.\ Ctrl + S: Save your presentation.\ Ctrl + P: Print your presentation.\ Ctrl + Z: Undo your last action.\ Ctrl + Y: Redo your last action.\ Ctrl + C: Copy selected text or object.\ Ctrl + X: Cut selected text or object.\ Ctrl + V: Paste copied or cut text or object.\ Ctrl + A: Select all objects on a slide.\ Ctrl + F: Find and replace text.\ Ctrl + B: Apply or remove bold formatting.\ Ctrl + I: Apply or remove italic formatting.\ Ctrl + U: Apply or remove underline formatting.\ Ctrl + E: Center align text.\ Ctrl + L: Left align text.\ Ctrl + R: Right align text.\ Ctrl + M: Insert a new slide.\ Ctrl + D: Duplicate currently selected slide.\ Ctrl + H: Show or hide the Ribbon.
These shortcuts can save you a lot of time and effort, especially if you’re working on a large presentation. To view a full list of keyboard shortcuts for PowerPoint, you can access the “Keyboard shortcuts for PowerPoint” help article on the Microsoft website. In addition to keyboard shortcuts, you can also create your own custom shortcuts by assigning a keyboard shortcut to a specific command or function. To do this, select “Options” from the “File” tab, then select “Customize Ribbon” and “Keyboard Shortcuts.” From there, you can select the command you want to assign a shortcut to and create your custom shortcut.
By utilizing keyboard shortcuts and custom shortcuts, you can streamline your PowerPoint workflow and become a more efficient presenter.
Microsoft Office PowerPoint – Keyboard Shortcuts and Cheat Sheet
Shortcuts are a quick and easy way to elevate your design skills and improve your overall presentation. Take the time to memorize them I promise it’s worth it.

Published by SlideDesigning
Free download presentation templates
How-To Geek
All the best microsoft powerpoint keyboard shortcuts.
Even if you’re familiar with Microsoft PowerPoint, you might be surprised by the number and variety of keyboard shortcuts you can use to speed up your work and generally make things more convenient.
Quick Links
General program shortcuts, selecting and navigating text, objects, and slides, formatting and editing, helpful slideshow shortcuts.
Now, does anyone expect you to memorize all these keyboard combos? Of course not! Everyone’s needs are different, so some will be more useful to you than others. And even if you pick up a few new tricks, it’s worth it. We’ve also tried to keep the list clean and simple, so go ahead and print it that helps!
Also, even though our list of shortcuts here is pretty long, it’s by no means a complete list of every keyboard combo available in PowerPoint. We’ve tried to keep it to the more generally useful shortcuts. And, you’ll be happy to know that almost all of these shortcuts have been around for a long time, so they should be helpful no matter what version of PowerPoint you’re using.
Note: We present keyboard combos using the following convention. A plus means you should press those keys together. A comma means you should press keys in sequence. So, for example, "Ctrl+N" means to hold down the Ctrl key while pressing the N key and then release both keys. On the other hand, "Alt+N,P" means you should hold the Alt key down, press the N key, release the N key, press the P key, and then release all keys.
First, let's review some general keyboard shortcuts for opening, closing, and switching between presentations, as well as navigating the Ribbon.
- Ctrl+N: Create a new presentation
- Ctrl+O: Open an existing presentation
- Ctrl+S: Save a presentation
- F12 or Alt+F2: Open the Save As dialog box
- Ctrl+W or Ctrl+F4: Close a presentation
- Ctrl+Q: Save and close a presentation
- Ctrl+Z: Undo an action
- Ctrl+Y: Redo an action
- Ctrl+F2: Print Preview View
- F1: Open the Help pane
- Alt+Q: Go to the “Tell me what you want to do” box
- F7: Check spelling
- Alt or F10: Turn key tips on or off
- Ctrl+F1: Show or hide the ribbon
- Ctrl+F: Search in a presentation or use Find and Replace
- Alt+F: Open the File tab menu
- Alt+H: Go to the Home tab
- Alt+N: Open the Insert tab
- Alt+G: Open the Design tab
- Alt+K: Go to the Transitions tab
- Alt+A: Go to the Animations tab
- Alt+S: Go to the Slide Show tab
- Alt+R: Go to the Review tab
- Alt+W: Go to View tab
- Alt+X: Go to the Add-ins tab
- Alt+Y: Go to the Help tab
- Ctrl+Tab: Switch between open presentations
You can use keyboard shortcuts to navigate throughout your presentation easily. Try these shortcuts for quick and easy ways to select text within text boxes, objects on your slides, or slides in your presentation.
- Ctrl+A: Select all text in a text box, all objects on a slide, or all slides in a presentation (for the latter, click on a slide thumbnail first)
- Tab: Select or move to the next object on a slide
- Shift+Tab: Select or move to the previous object on a slide
- Home: Go to the first slide, or from within a text box, go to the beginning of the line
- End: Go to the last slide, or from within a text box, go to the end of the line
- PgDn: Go to the next slide
- PgUp: Go the previous slide
- Ctrl+Up/Down Arrow: Move a slide up or down in your presentation (click on a slide thumbnail first)
- Ctrl+Shift+Up/Down Arrow: Move a slide to the beginning or end of your presentation (click on a slide thumbnail first)
The following keyboard shortcuts will save you time so you can edit and format in a snap!
- Ctrl+X: Cut selected text, selected object(s), or selected slide(s)
- Ctrl+C or Ctrl+Insert: Copy selected text, selected object(s), or selected slide(s)
- Ctrl+V or Shift+Insert: Paste selected text, selected object(s), or selected slide(s)
- Ctrl+Alt+V: Open the Paste Special dialog box
- Delete: Remove selected text, selected object(s), or selected slide(s)
- Ctrl+B: Add or remove bold to selected text
- Ctrl+I: Add or remove italics to selected text
- Ctrl+U: Add or remove underline to selected text
- Ctrl+E: Center a paragraph
- Ctrl+J: Justify a paragraph
- Ctrl+L: Left align a paragraph
- Ctrl+R: Right align a paragraph
- Ctrl+T: Open the Font dialog box when text or object is selected
- Alt+W,Q: Open the Zoom dialog box to change the zoom for the slide
- Alt+N,P: Insert a picture
- Alt+H,S,H: Insert a shape
- Alt+H,L: Select a slide layout
- Ctrl+K: Insert a hyperlink
- Ctrl+M: Insert a new slide
- Ctrl+D: Duplicate the selected object or slide (for the latter, click on a slide thumbnail first)
When you're ready to start a presentation, the following keyboard combos should come in handy.
- F5: Start the presentation from the beginning
- Shift+F5: Start the presentation from the current slide (this one is great when you want to test out how the slide your currently working on will look in your presentation)
- Ctrl+P: Annotate with the Pen tool during a slideshow
- N or Page Down: Advance to the next slide during a slideshow
- P or Page Up: Return to the previous slide during a slide show
- B: Change the screen to black during a slideshow; press B again to return to the slideshow
- Esc: End the slideshow
The more you use keyboard shortcuts, the easier they are to remember. And no one expects you to memorize all of them. Hopefully, you've found a few new ones you can use to make your life in Excel a little better.
Need more help with keyboard shortcuts? You can access Help anytime by pressing F1. This opens a Help pane and allows you to search for help on any topic. Search for "keyboard shortcuts" to learn more.

PowerPoint Presentation Shortcut Keys
Do you have a list of the best Microsoft PowerPoint Shortcut keys? I didn’t think so, most people that use PowerPoint only use a few of it’s functions and many people don’t know about the fantastic time saving range of shortcut keys that are built into all Microsoft Office tools. These shortcuts are particularly useful with PowerPoint In this guide, I will list the best PowerPoint shortcut keys to help you work more efficiently, whether you’re a novice or an experienced user. There are literally 1’000s but these are my favorites and the ones I find the most useful.
PowerPoint Shortcut Keys for Creating Presentations
There are a range of general shortcuts that can be used across most Microsoft Office tools

- Ctrl + N: Create a new presentation.
- Ctrl + O: Open an existing presentation – this will open a screen with a list of all your recent presentations
- Ctrl + S: Save the current presentation.
- Ctrl + P: Print the current presentation.
- Ctrl + Z: Undo the last action – This is my favourite
- Ctrl + Y: Redo the last action.
- Ctrl + F: Find text within your presentation.
- Ctrl + H: Replace text in your presentation
Shortcut keys for editing text
- Ctrl + X: Cut selected text.
- Ctrl + C: Copy selected text.
- Ctrl + V: Paste copied/cut text.
- Ctrl + B: Bold text.
- Ctrl + I: Italicize text.
- Ctrl + U: Underline text.
- Ctrl + E: Center align text.
- Ctrl + L: Left align text.
- F7: Start spell check
- Ctrl + R: Right align text.
Shortcut keys for formatting text
- Ctrl + Shift + >: Increase font size.
- Ctrl + Shift + <: Decrease font size.
- Ctrl + ]: Increase font size by 1 point.
- Ctrl + [: Decrease font size by 1 point.
- Shift + F3: Toggle between Upper case, Lower case or Sentence case
- Ctrl + Shift + K: Insert a hyperlink.
- Ctrl + M: Insert a new slide.
- Alt + Shift + Arrow Up/Arrow Down: Move selected text or object up/down in the order.
Shortcut Keys For Working With Objects
Selecting objects on your slides
- Tab: Cycle through objects on a slide.
- Shift + Tab: Cycle backward through objects.
- Ctrl + A: Select all objects on a slide.

Working with Objects on your slides
- Ctrl + D: Duplicate selected object(s).
- Ctrl + T: Open the Format Text dialog box.
- Ctrl + G: Group selected objects.
- Ctrl + Shift + G: Ungroup selected objects.
- Ctrl + ]: Bring selected object forward.
- Ctrl + [: Send selected object backward.
Shortcut Keys for Slide Design
Formatting your Master slide
- Shift + Slide Sorter View button: Access Slide Master view.
- Ctrl + Shift + C: Copy formatting from one object to another.
- Ctrl + Shift + V: Paste formatting to another object.
Changing your design
- Alt + Shift + Left Arrow/Right Arrow: Navigate between design elements.
- Alt + A: Open the Animations tab
- Alt + G: Open the Design tab
- Alt + H: Open the Home tab
- Alt + K: Open the Transitions tab
- Alt + N: Open the Insert tab
- Alt + R: Open the Review tab
- Alt + S: Open the Slide Show tab
- Alt + W: Open the View tab
- Alt + Shift + T: Open the Header & Footer screen
Shortcut Keys for Presenting
These shortcuts are great for using when you are presenting
- F5: Start the slideshow from the beginning.
- Shift + F5: Start the slideshow from the current slide.
- Space bar or Enter: Advance to the next slide.
- Backspace or P: Go back to the previous slide.
- B: Turn the screen black (press any key to return to the slide).
- W: Turn the screen white (press any key to return to the slide).
- Ctrl + L: Turn your mouse into a laser pointer – only works in presentation mode. Pressing it again turns the laser pointer off
As mentioned there are 1’000s of different shortcuts and some of them only work on older or newer versions of PowerPoint so don’t get frustrated if one doesn’t work on your PC, you can even create your own shortcuts by using the Alt function and following the letters that appear. For example if you press “Alt” the letters will all appear over the functions, if you type the relevant number or letter it will open that function and will then display letters over each function there. you can keep doing this to select what you need simply using your keyboard. So pressing “Alt”, “H” & “U” would open the bullet point function. If at anytime you want to escape simply press “Alt” again

If you don’t create or use PowerPoint very often I find the biggest issue is remembering the shortcuts, I used to use a printed page that went everywhere with me in my laptop bag but then I discovered these fantastic desk mats that have loads of my favourite shortcuts for PowerPoint, Word, Excel and general Windows too. I find these are a great tool for referring to whenever I need to remember a shortcut.

Mastering these PowerPoint keyboard shortcuts will significantly enhance your productivity and efficiency when creating presentations. Whether you’re a student, business professional, educator or just creating a presentation at home these shortcuts will help you navigate PowerPoint with ease.They are not difficult and just require a little practice, the desk mats are a fantastic way to have them in front of you at all times and the ALT method is a really easy way to navigate quickly through almost any function. So, start practicing today, and take your PowerPoint skills to the next level.
I really enjoy learning new tips and tricks so if you have any you would like to share please let me know in the comments below what your favourite PowerPoint tips are
4 thoughts on “PowerPoint Presentation Shortcut Keys”
Currently, I am in college studying to be a paralegal. I always have to make a lot of PowerPoint Presentations. I was looking for ways to make this easier. Your blog post really helped with that! I am definitely going to use the PWP Shortcut Keys for creating presentations, I am so happy I can now save time while working on school projects!
Really glad that the post helped, I was always looking for PowerPoint shortcuts as I knew they existed but could never find them when I needed them.I initially just pulled them together for my own work but was convinced there must be other people in the same boat so just figured I should share it too. Thanks for the feedback and feel free to let me know if you find any that I haven’t included
Hi,that’s crazy there is 1000s of shortcut keys. I would have thought 20 or 30. Max 50.
it just shows how customizable these presentations can be.
but it makes sense because technology is getting so good so fast. Maybe when there is quantum computers there will be millions of shortcuts. Just imagine trying to memorize those for your upcoming speech.
But you did a great job of listing these so I can just bookmark this.
Thanks for your feedback, I put my list together initially as I could never find them when I needed them but I have to admit that I never thought to just bookmark it. That is why I ended up buying the desk mat with the shortcuts shown as I find it really useful. It is perfect for people like me with a bad memory 🙂
Thanks again Jake
Leave a Comment Cancel reply
Save my name, email, and website in this browser for the next time I comment.
Critical PowerPoint Shortcuts – Claim Your FREE Training Module and Get Your Time Back!
120 PowerPoint Shortcuts: Learn More, Be Faster, Save Time
- PowerPoint Tutorials
- Shortcuts & Hacks
- December 12, 2017

In this article you’re going to learn all of the Microsoft PowerPoint shortcuts that are available to you.
And this is important, because based on our experience, the PPT average only knows between 10 to 30 PowerPoint shortcuts.
This shortcut guide covers over 120 shortcuts in PowerPoint that will dramatically improve your productivity!
This guide is NOT designed to be consumed in one sitting…this is not a cram session for some pretend PowerPoint exam… and we are not handing out gold stars here.
Instead, pick a PowerPoint activity you frequently perform, learn its shortcuts and save time… And once you have one activity’s shortcuts down, come back and pick up another one.
Use this Microsoft PowerPoint shortcut guide, learn how to REALLY use it and shine!
See you at Happy Hour!
If you’re using PowerPoint for work, then learning shortcuts (including some hidden and bad ass ones), is a must!
Looking for a specific shortcut? Check out the complete shortcut index here.
To see a break out a shorter list of our 80 favorite PowerPoint shortcuts, see our guide here .
Duplicating slides and objects shortcuts
You are currently viewing a placeholder content from Youtube . To access the actual content, click the button below. Please note that doing so will share data with third-party providers.

Header, footer, and date & time shortcuts

Inserting a new slide shortcuts

New slide shortcuts – PowerPoint pro tips
Inserting and navigating hyperlink shortcuts.
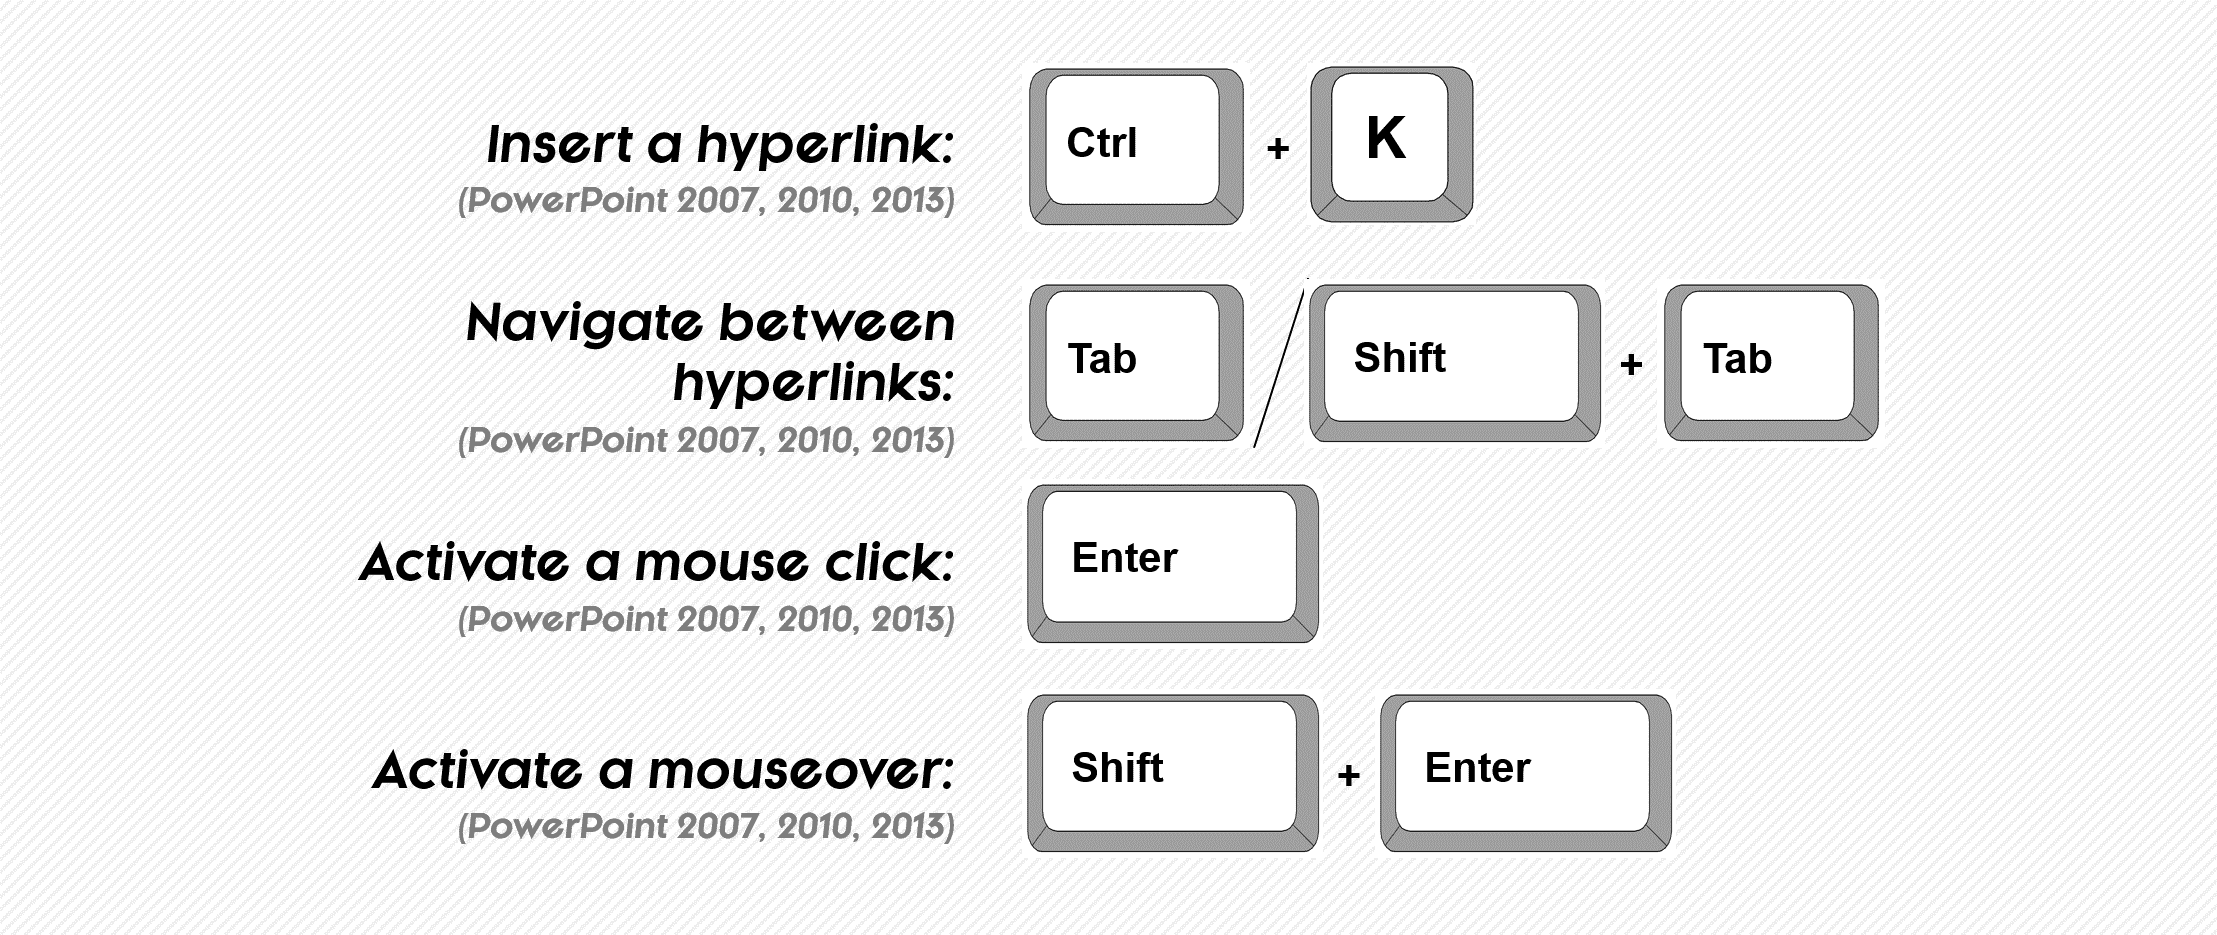
How to Create a Hyperlink in PowerPoint
Chart formatting and moving shortcuts, formatting a specific chart element, copying and pasting formatting and animations, copy paste formatting: a little-known but awesome shortcut.
An almost unknown set of PowerPoint shortcut keys, what I call the “Format Dipper”, allows you to pick up or copy (CTRL + SHIFT + C) an object’s formatting (font style, shape fill, outline, etc.) and quickly apply it to another shape (CTRL + SHIFT + V).
This hotkey has been around FOREVER….and sadly, almost no one is using it.
This is similar to copying (CTRL + C) and pasting objects (CTRL + V) in PowerPoint except it includes the SHIFT key.
Tweak this shortcut just slightly (so ALT + SHIFT + C) and you can copy a sequence of PowerPoint animations too! Hitting this shortcut activates the animation painter, which allows you to then apply your sequence of animations to other objects in PowerPoint.
This two shortcuts will save you HOURS of otherwise annoying and repetitive rework. These are critical for anyone who wants to save time in PowerPoint.
PowerPoint Pro Tip
When copying an object’s formatting (CTRL + SHIFT + C), the formatting stays with you, regardless of how many actions you perform, until you pick up or copy another object’s formatting.
As such, you can pick up your standard formatting for your entire presentation and carry it with you throughout your work session, applying it whenever needed with CTRL + SHIFT + V.
Cut, copy, clipboard, paste and paste special shortcuts
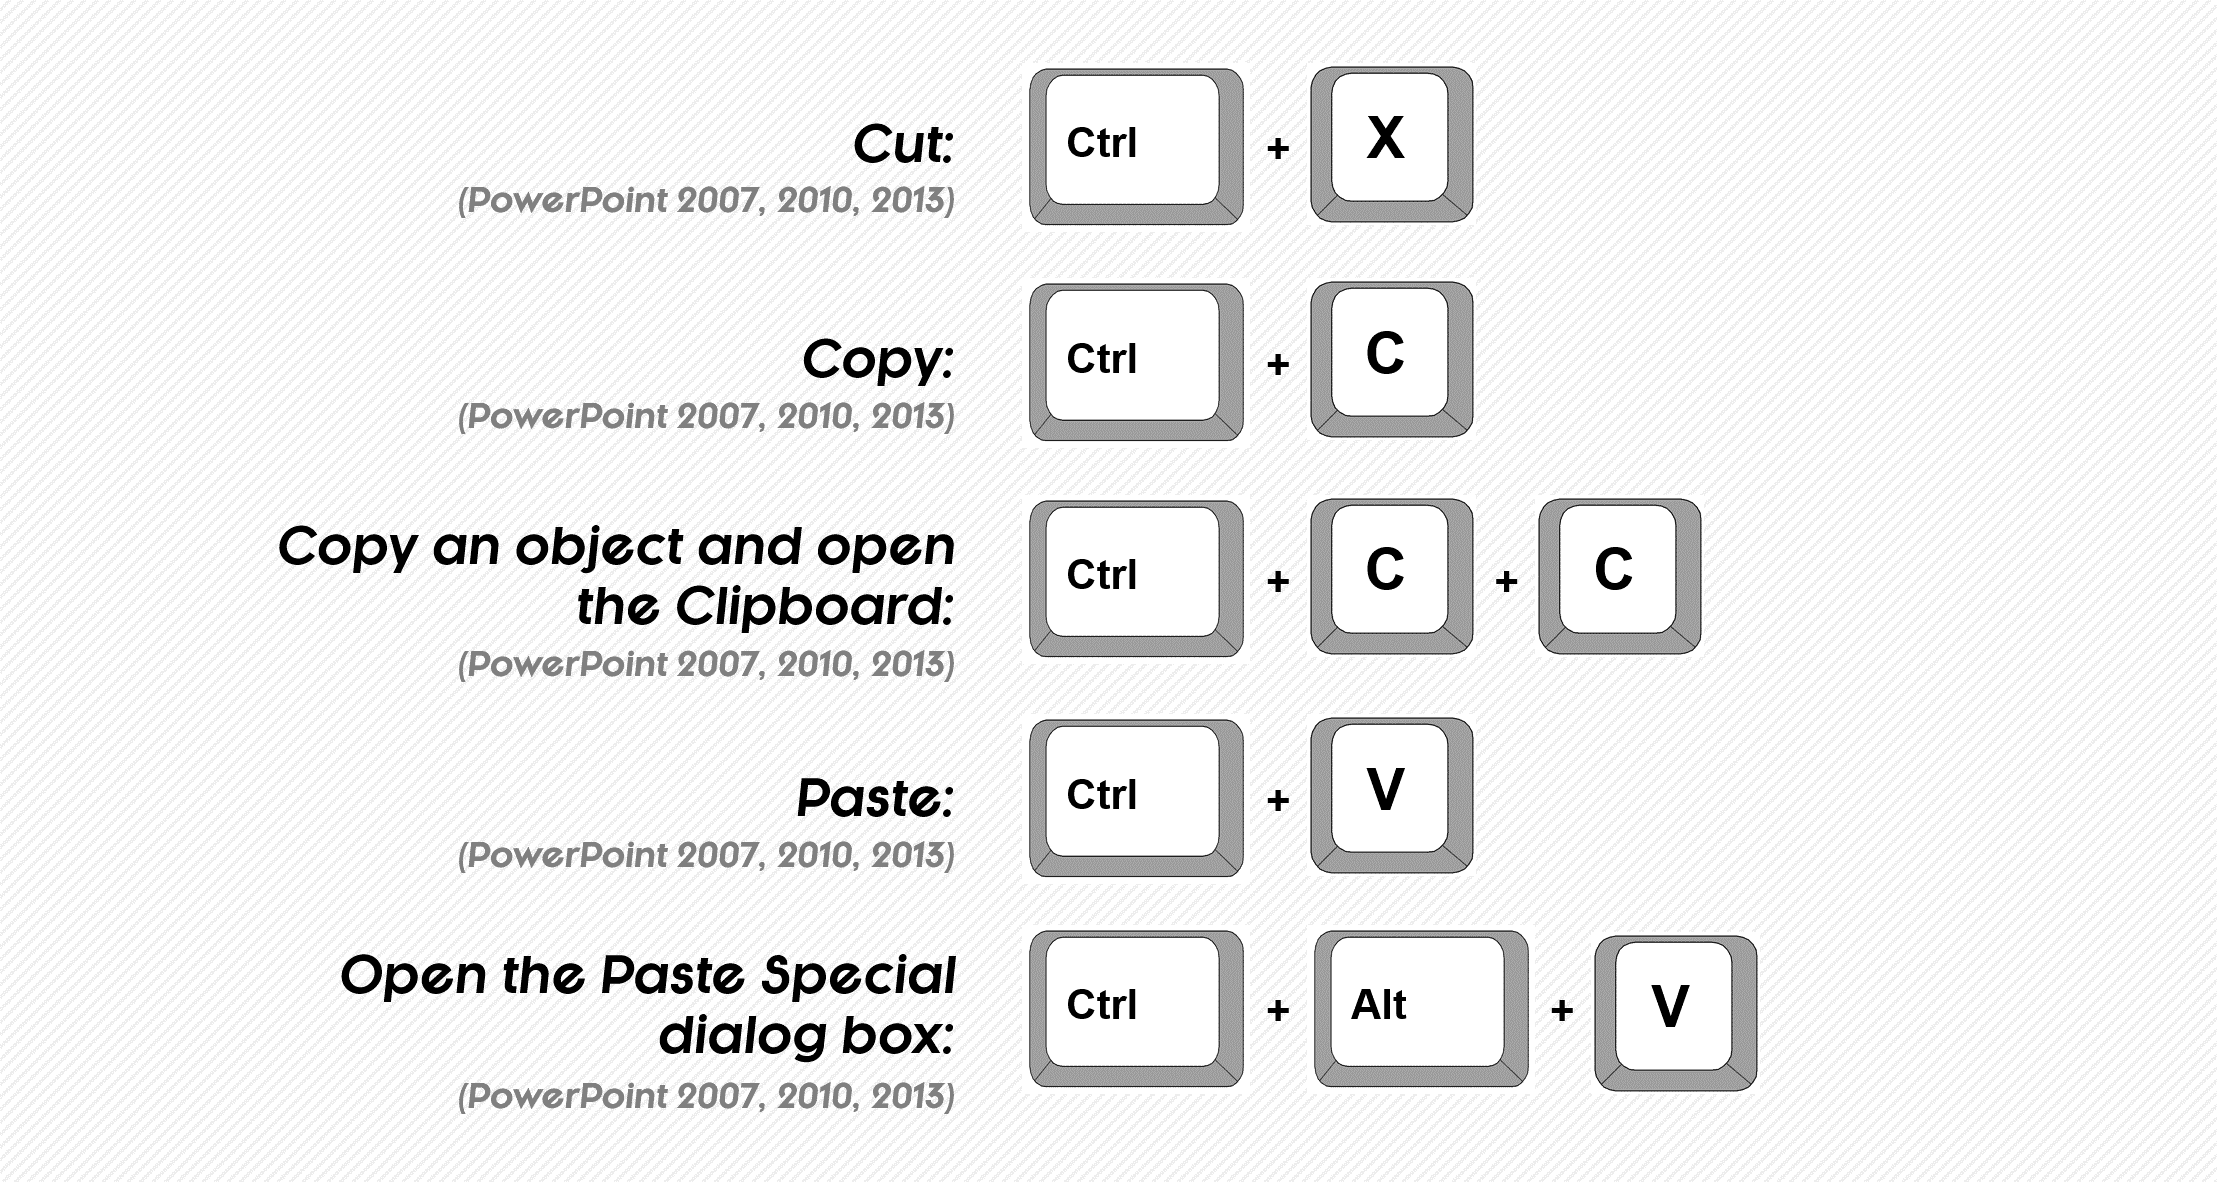
Clipboard Copy Shortcut
- From the Home tab, click the downward facing arrow in the Clipboard group, which opens up the clipboard.
- At the bottom of the clipboard, click on Options
- Make sure that the ‘Show Office Clipboard when Ctrl+C is pressed twice’ is selected.
Paste Special PowerPoint Shortcut
Grouping and ungrouping shortcuts.
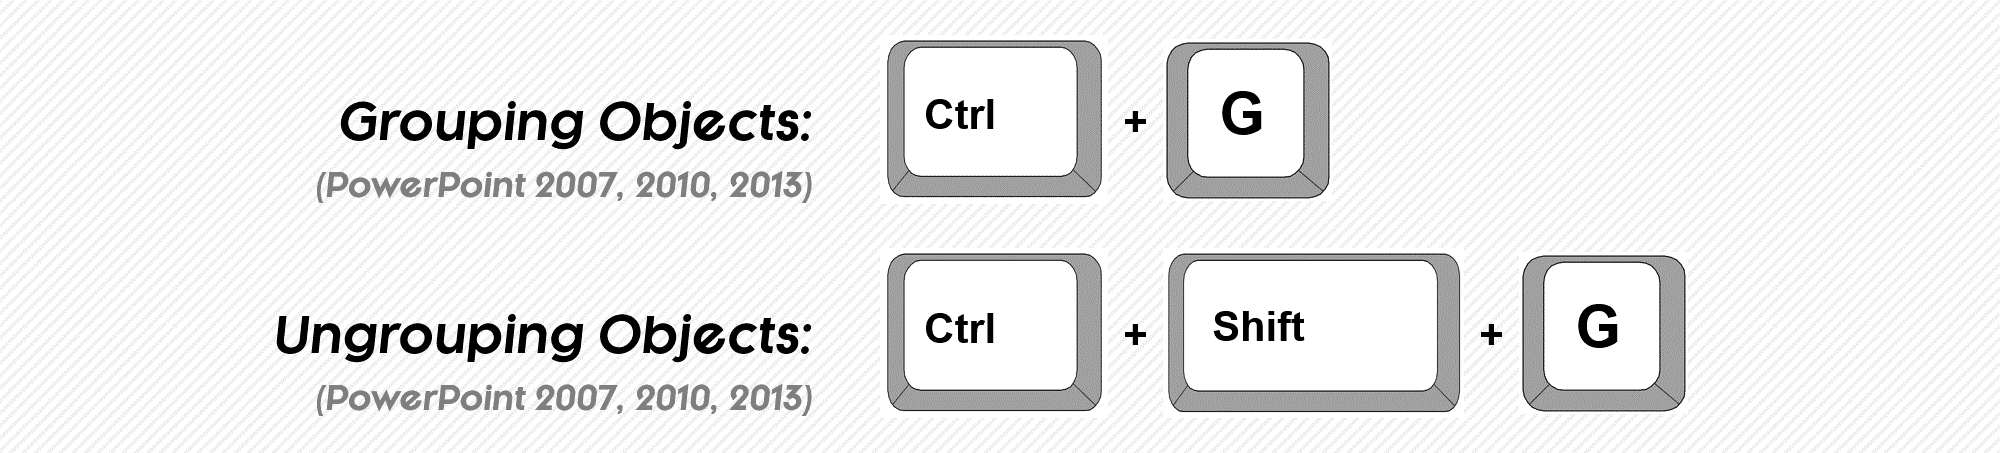
How to Group Things in PowerPoint
CTRL + G is the keyboard shortcut for how to group things in PowerPoint, and it works in all versions of PowerPoint. This is a CRITICAL shortcut to learn as it allows you to quickly move and/or resize multiple objects at the same time as a single group, instead of wasting time moving things around piece by piece.
Objects can also be part of more than one group. For example, you can first group two rectangles together (as a box layout) and then take that box layout and group it together with a chart.
To learn more about grouping in PowerPoint, see our guide here .
Not all PowerPoint objects can be part of a group
You can group most PowerPoint objects: charts, tables, pictures, shapes, lines text boxes, etc.
That said, a few PowerPoint objects that CANNOT grouped (or be part of a group) are: #1) tables, #2) any content containers set on your Slide Master (slide titles, page numbers, footers, etc.) and, #3) SmartArt graphics.
How Do You Ungroup in PowerPoint?
The inverse of grouping objects in PowerPoint is ungrouping them, which you can easily accomplish with the CTRL + SHIFT + G shortcut keys.
In addition to ungrouping already grouped objects, you can also:
- Ungroup SmartArt graphics, which breaks the graphic down into shapes, lines and text boxes.
- Ungroup vector graphics, which breaks them down into shapes
- Ungroup tables and charts if you first paste them as Metafiles
Manipulating shapes shortcuts
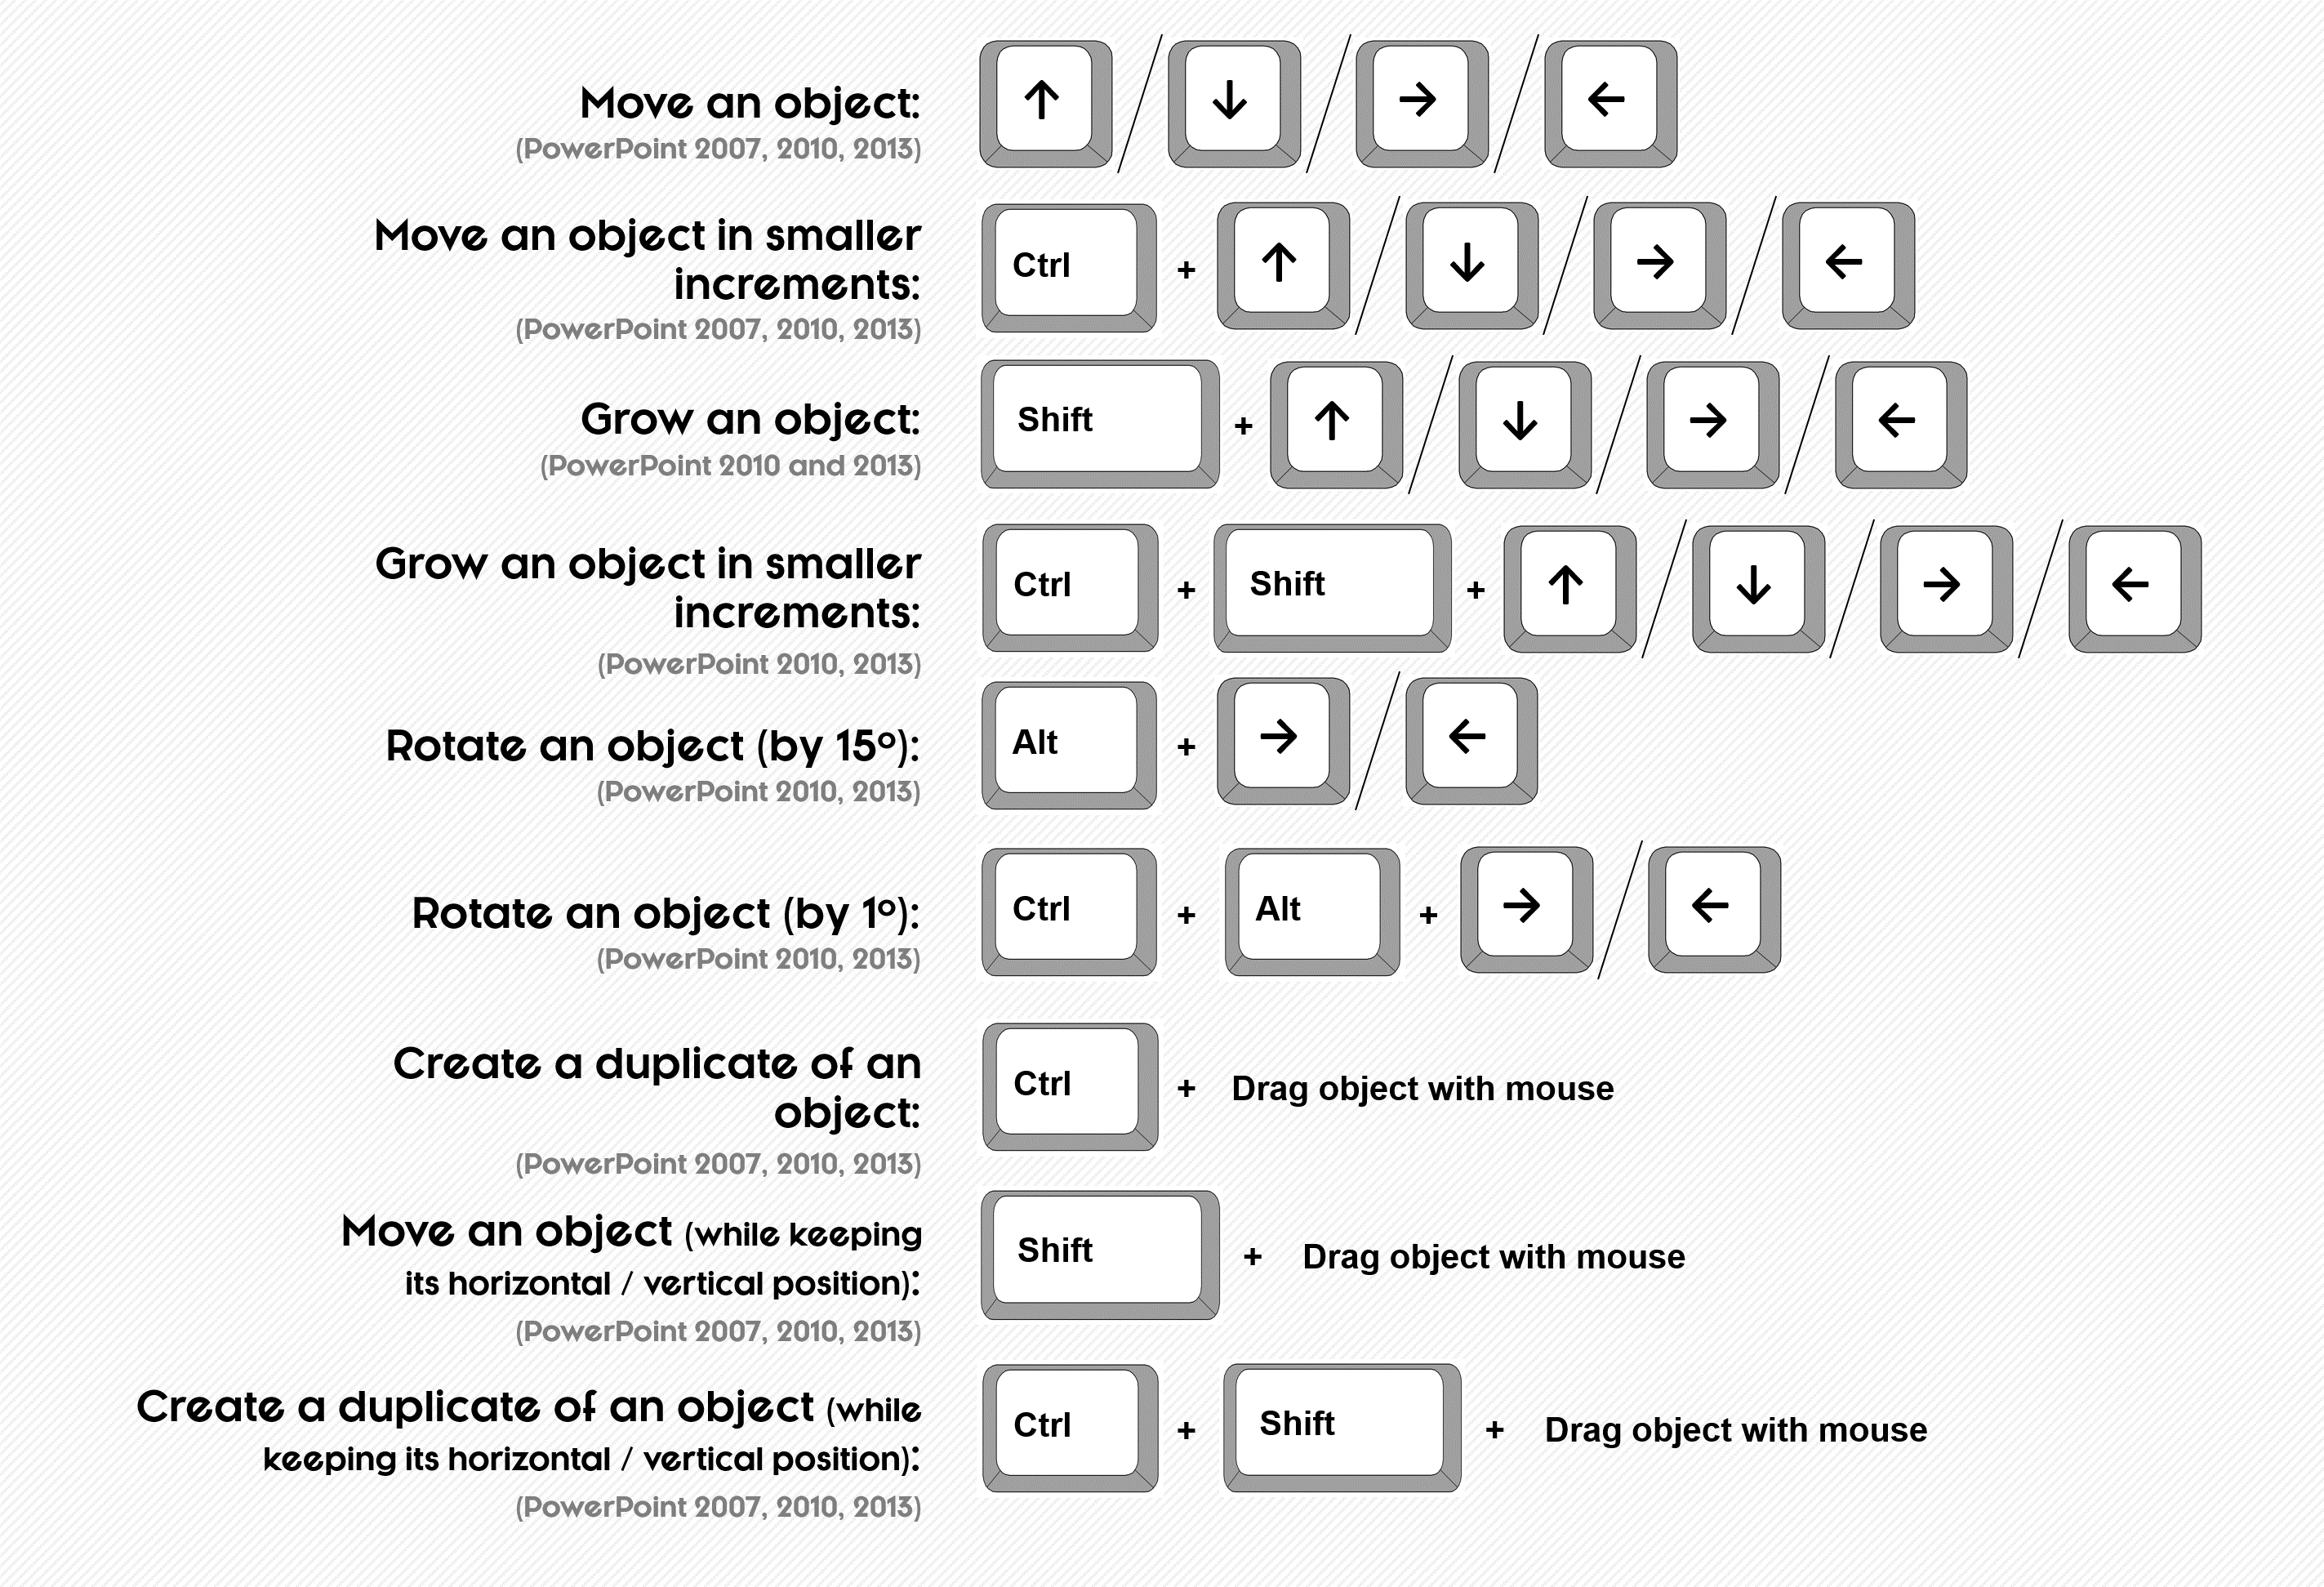
Moving, Growing, Rotating, and Duplicating Shapes in PowerPoint
These shortcuts are incredibly simple, and yet, so powerful. Once you learn them, you will never want to reach for your mouse to manipulate your shapes again!
Selection Pane shortcuts
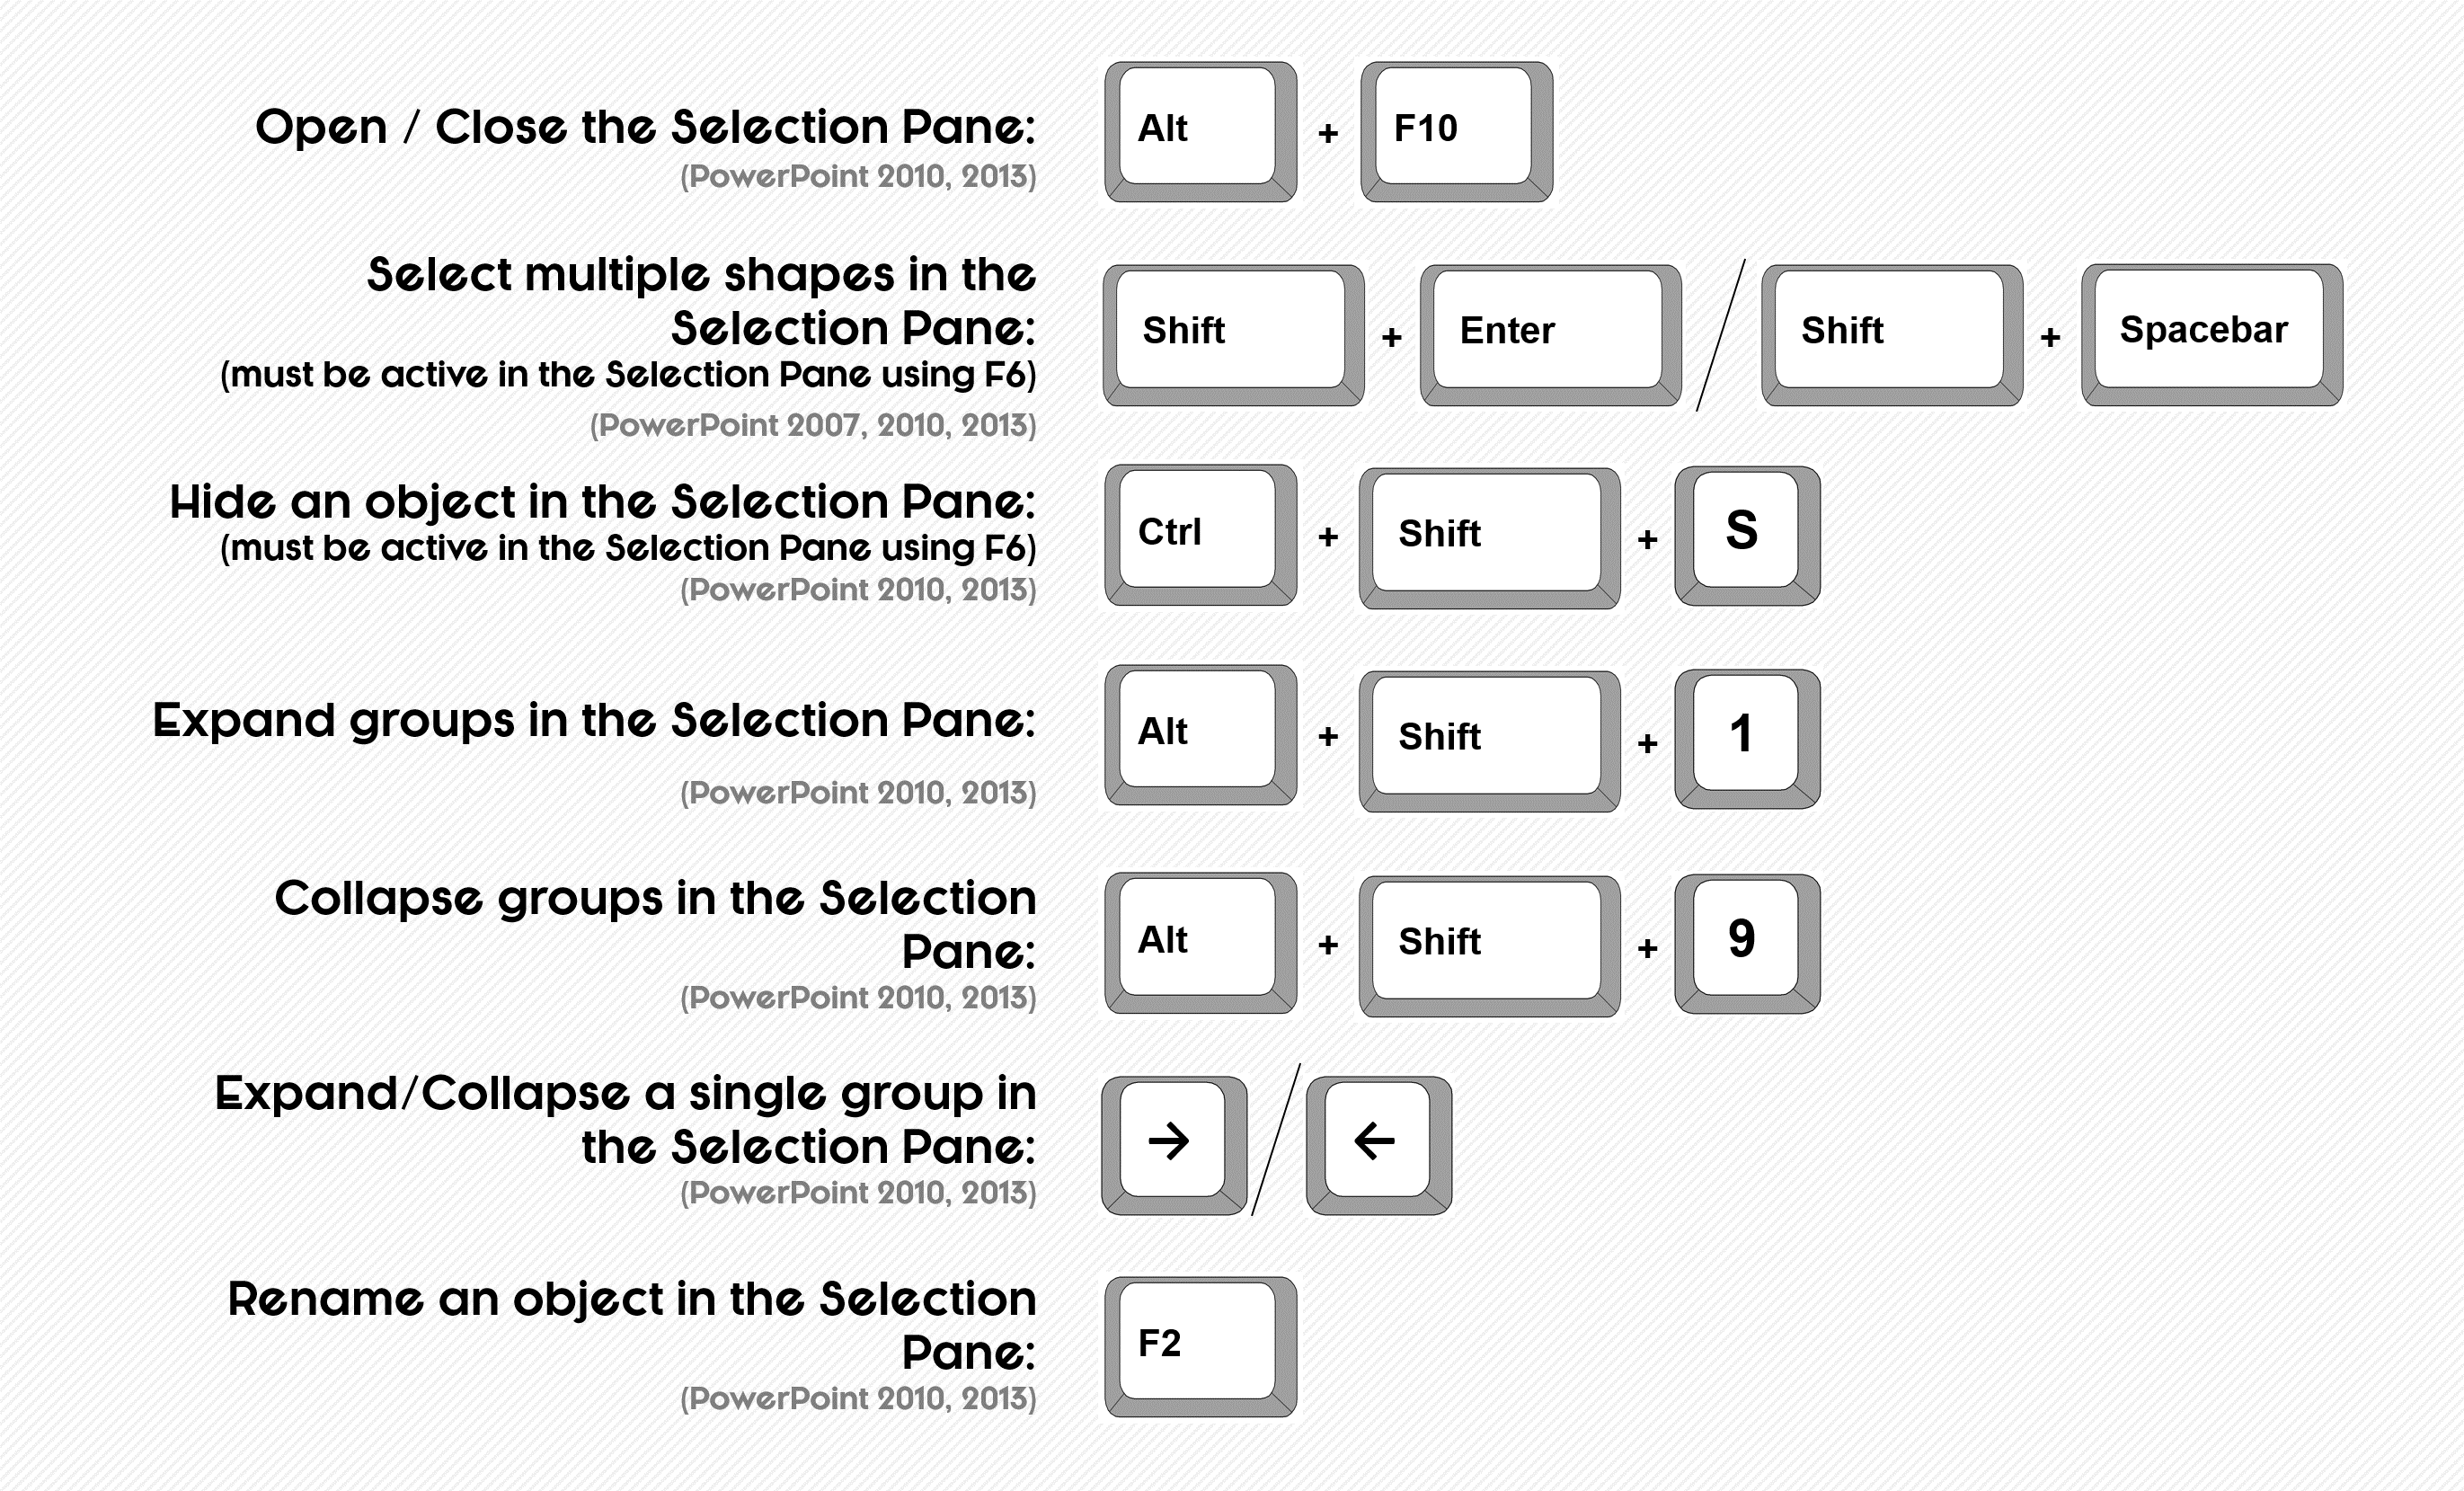
How to use the Selection Pane in PowerPoint
The most useful of the Selection Pane shortcuts in PowerPoint 2010 and 2013 is simply opening and closing it with the ALT + F10 keyboard shortcut. Once the pane is open, you can either navigate ti with your keyboard (for the more advanced keyboard users), or simply use your mouse (which is good enough for most things).
In PowerPoint 2007, the Selection Pane is known as the ‘Selection and Visibility’ pane and must be opened with your mouse (there is no keyboard shortcut for opening and closing it).
To open the pane in PPT 2007, from the Home tab, select the Arrange tool drop down and then select the Selection Pane at the bottom of the dropdown.
Selection Pane Pro Tip
To use ALL of the Selection Pane shortcuts (like collapsing and expanding groups) in PowerPoint 2010 and 2013, you need to get to the Selection Pane by rotating through active panes from your keyboard (using F6)… which is SUPER weird, but that’s how it is.
Let me quickly explain.
Normally, you can click something with your mouse to activate it in PowerPoint. Right? Well this doesn’t work with the a couple of shortcuts for the Selection Pane.
Instead you need to hit F6 on your keyboard to rotate to it… otherwise some of the keyboard shortcuts shown above won’t work.
Subscripts, superscripts, font dialog box, and text formatting shortcuts
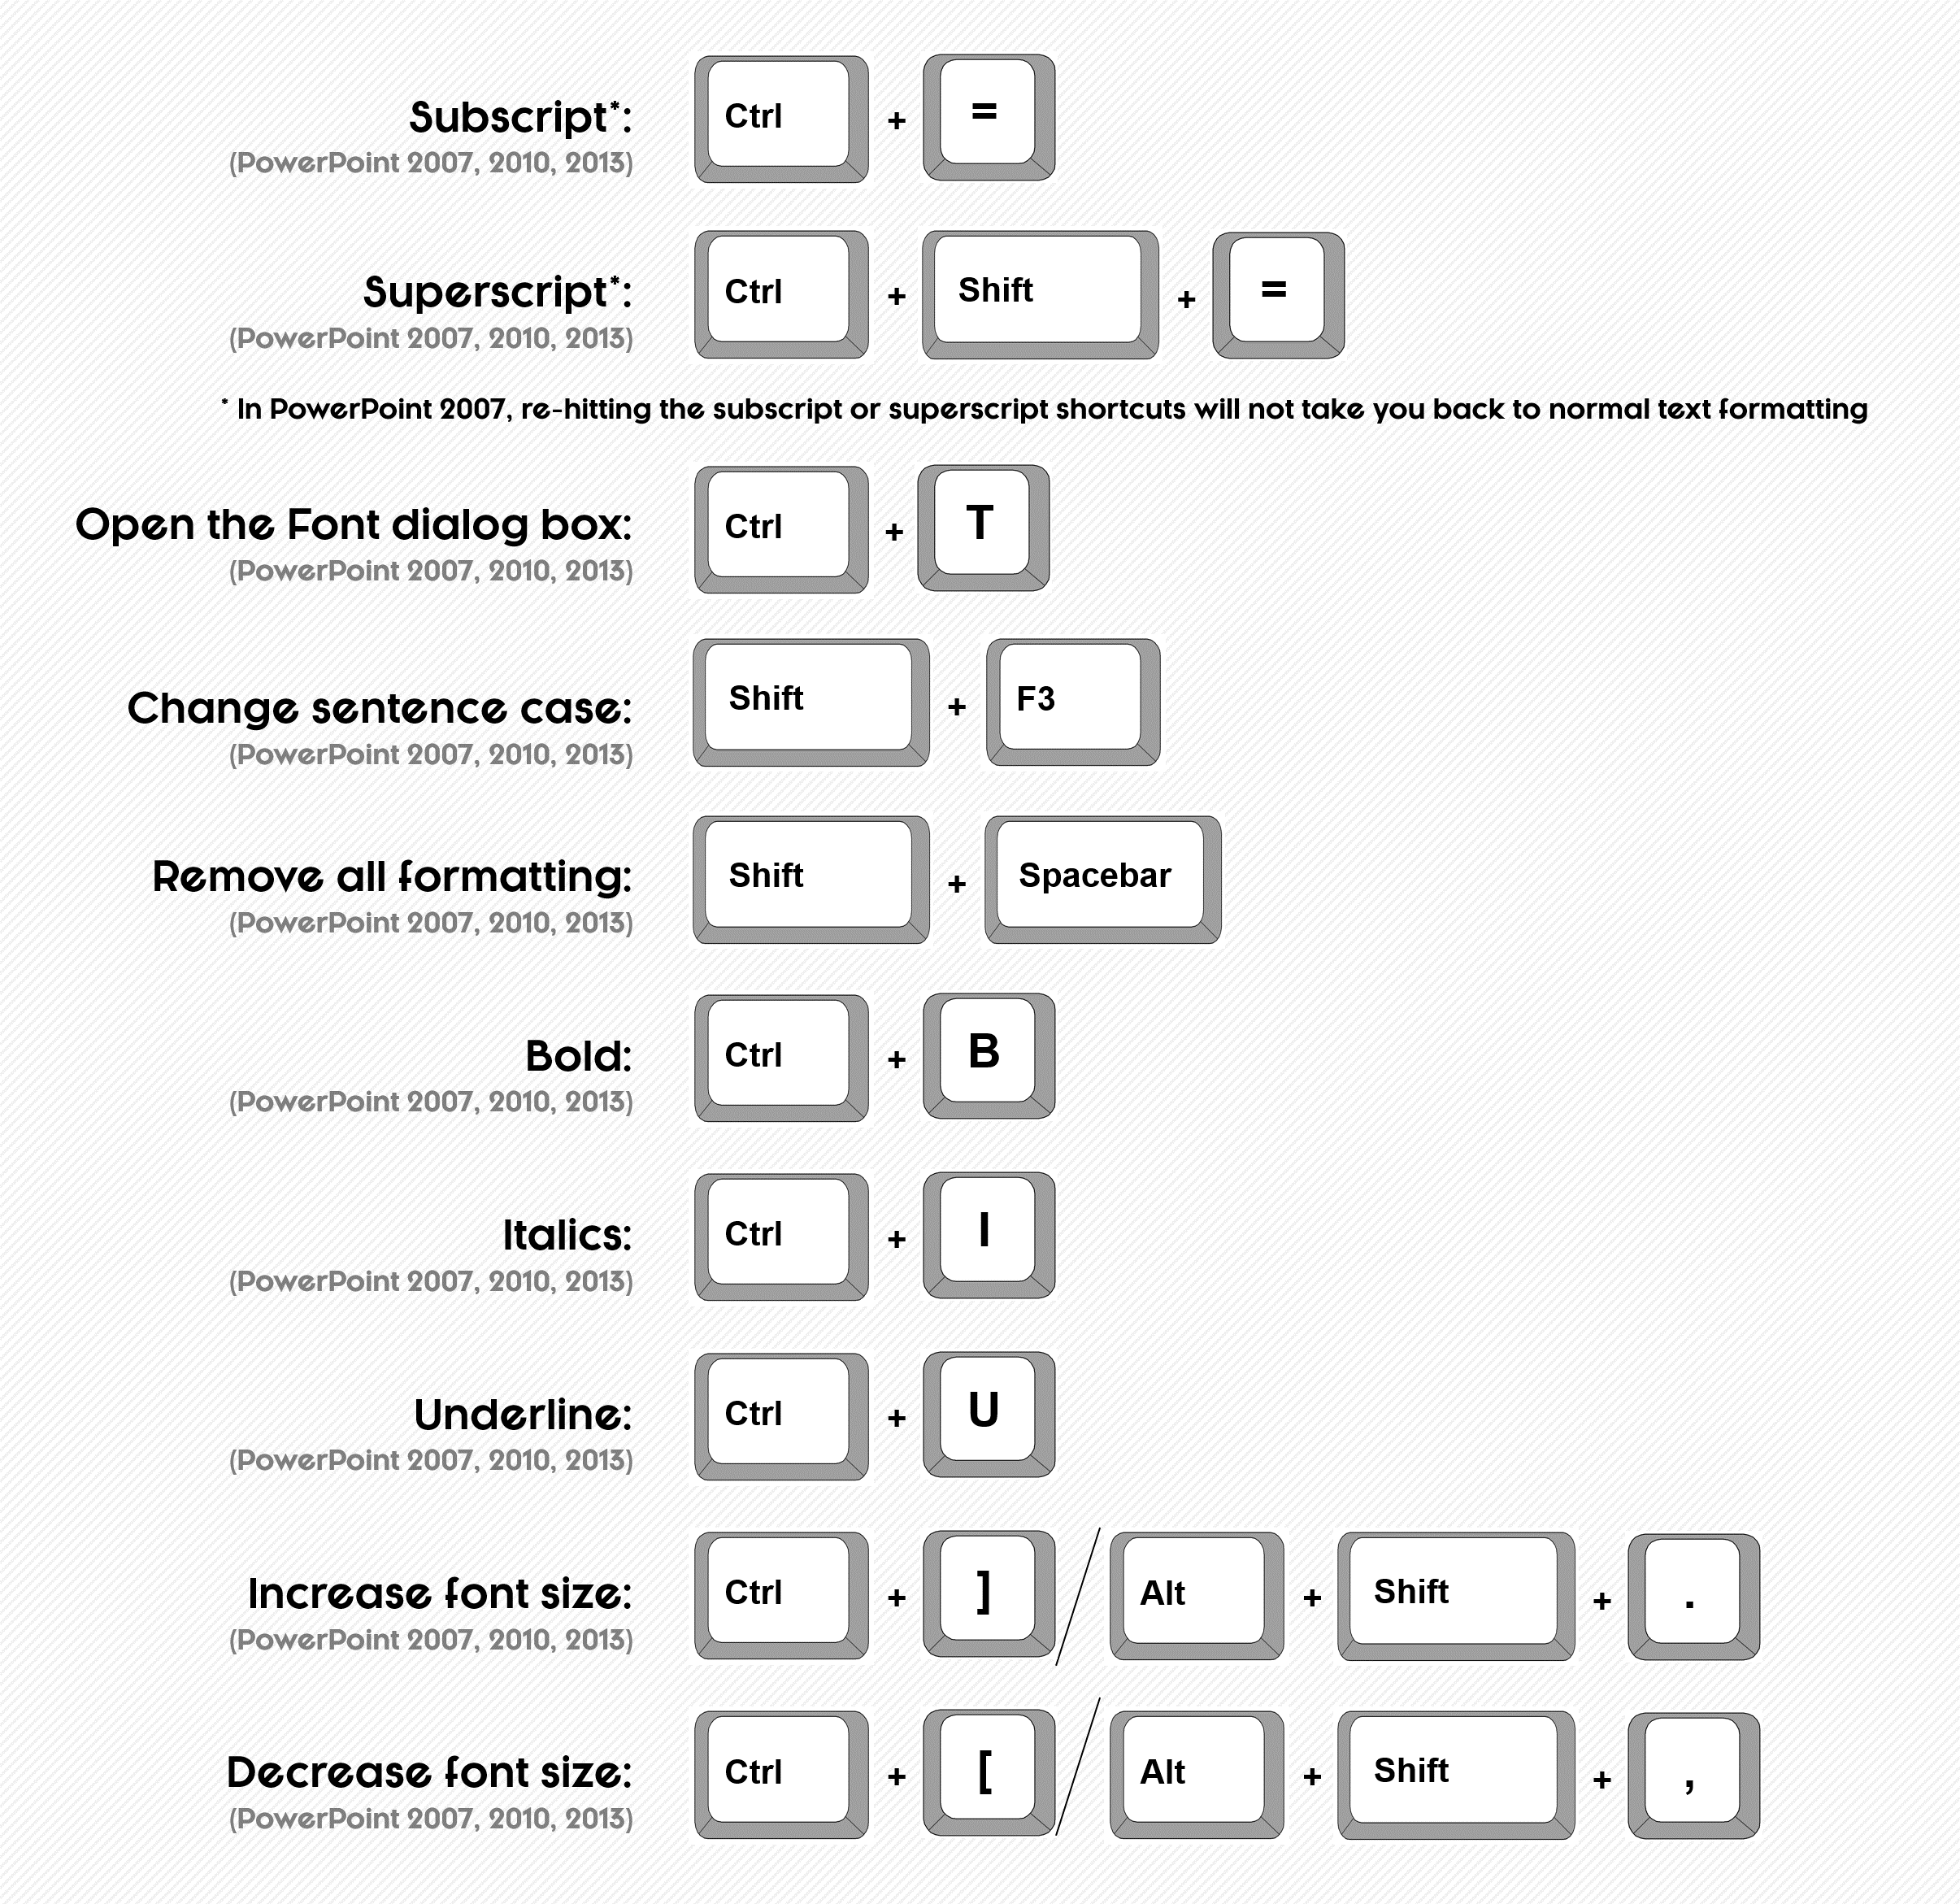
How to create subscripts and superscripts in PowerPoint
In PowerPoint 2010 and 2013, you can turn subscript writing on and off with the CTRL + ‘=’ keyboard shortcut, and superscripts on and off with the CTRL + SHIFT + ‘=’ keyboard shortcut.
These same shortcuts work in PowerPoint 2007 to make superscripts and subscripts, except to turn them back off you need to launch the font dialog box, CTRL + T on your keyboard.
Font dialog box pro tip: The Font dialog box is keyboard driven, so after opening it (CTRL + T) you can continue to navigate your options directly from your keyboard.
Look for the underlined letters in the words within the dialog box, which you can activate by holding the ALT key and hitting those letters on your keyboard.
For example, to select the “strikethrough” command within the dialog box, hit ALT + K.
To learn how to use the strikethrough shortcut click here
Text alignment shortcuts
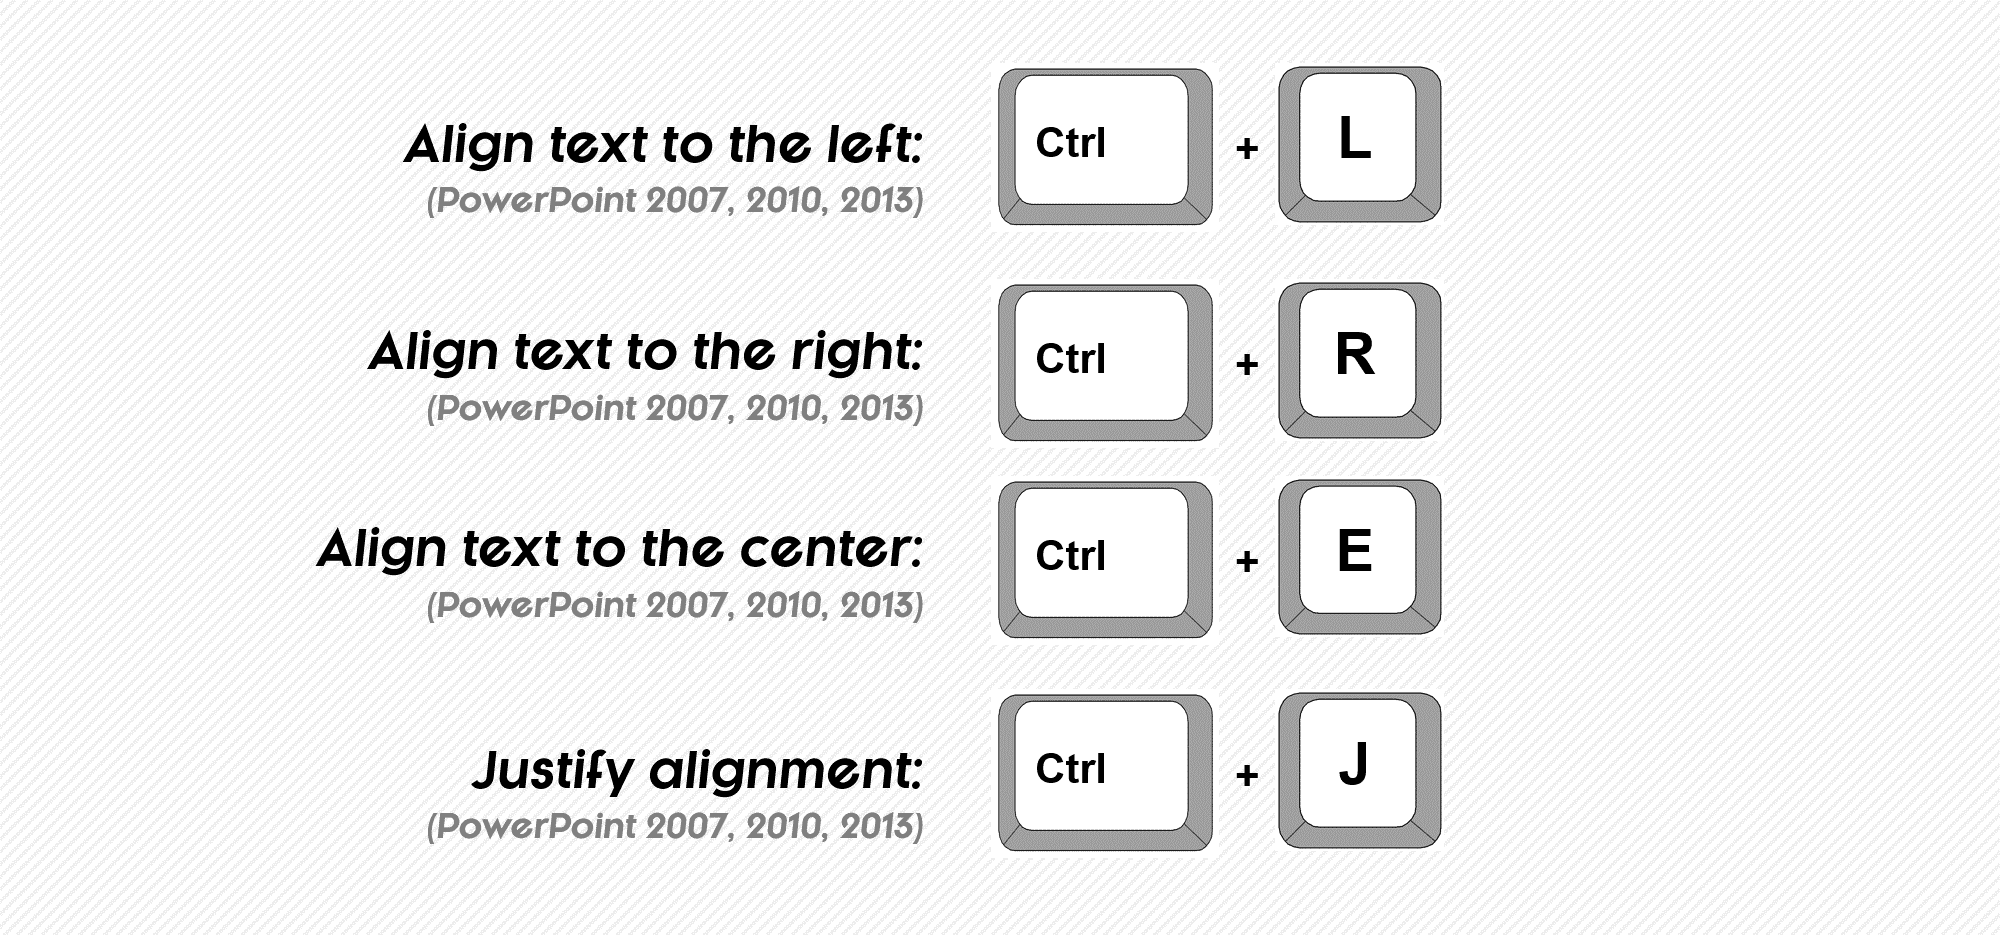
Aligning text in PowerPoint
There are four text alignment shortcuts that allow you to quickly change how you lay your text out within your slide’s text boxes or shapes:
Center Align Text (CTRL + E) is often used for titles, and will align your text in the center of its container.
Left Align Text (CTRL + L) is the most common text alignment option, starting your text alignment form the left.
Right Align Text (CTRL + R) aligns your text to the right, which is useful when building your own titles for bar charts, for example.
Justify Align Text (CTRL + J) spreads your text out between the margins you have set. It’s important to note that the last hanging lines in your paragraphs will not be justified, as that would create weird text spacing.
Working with blocks of text
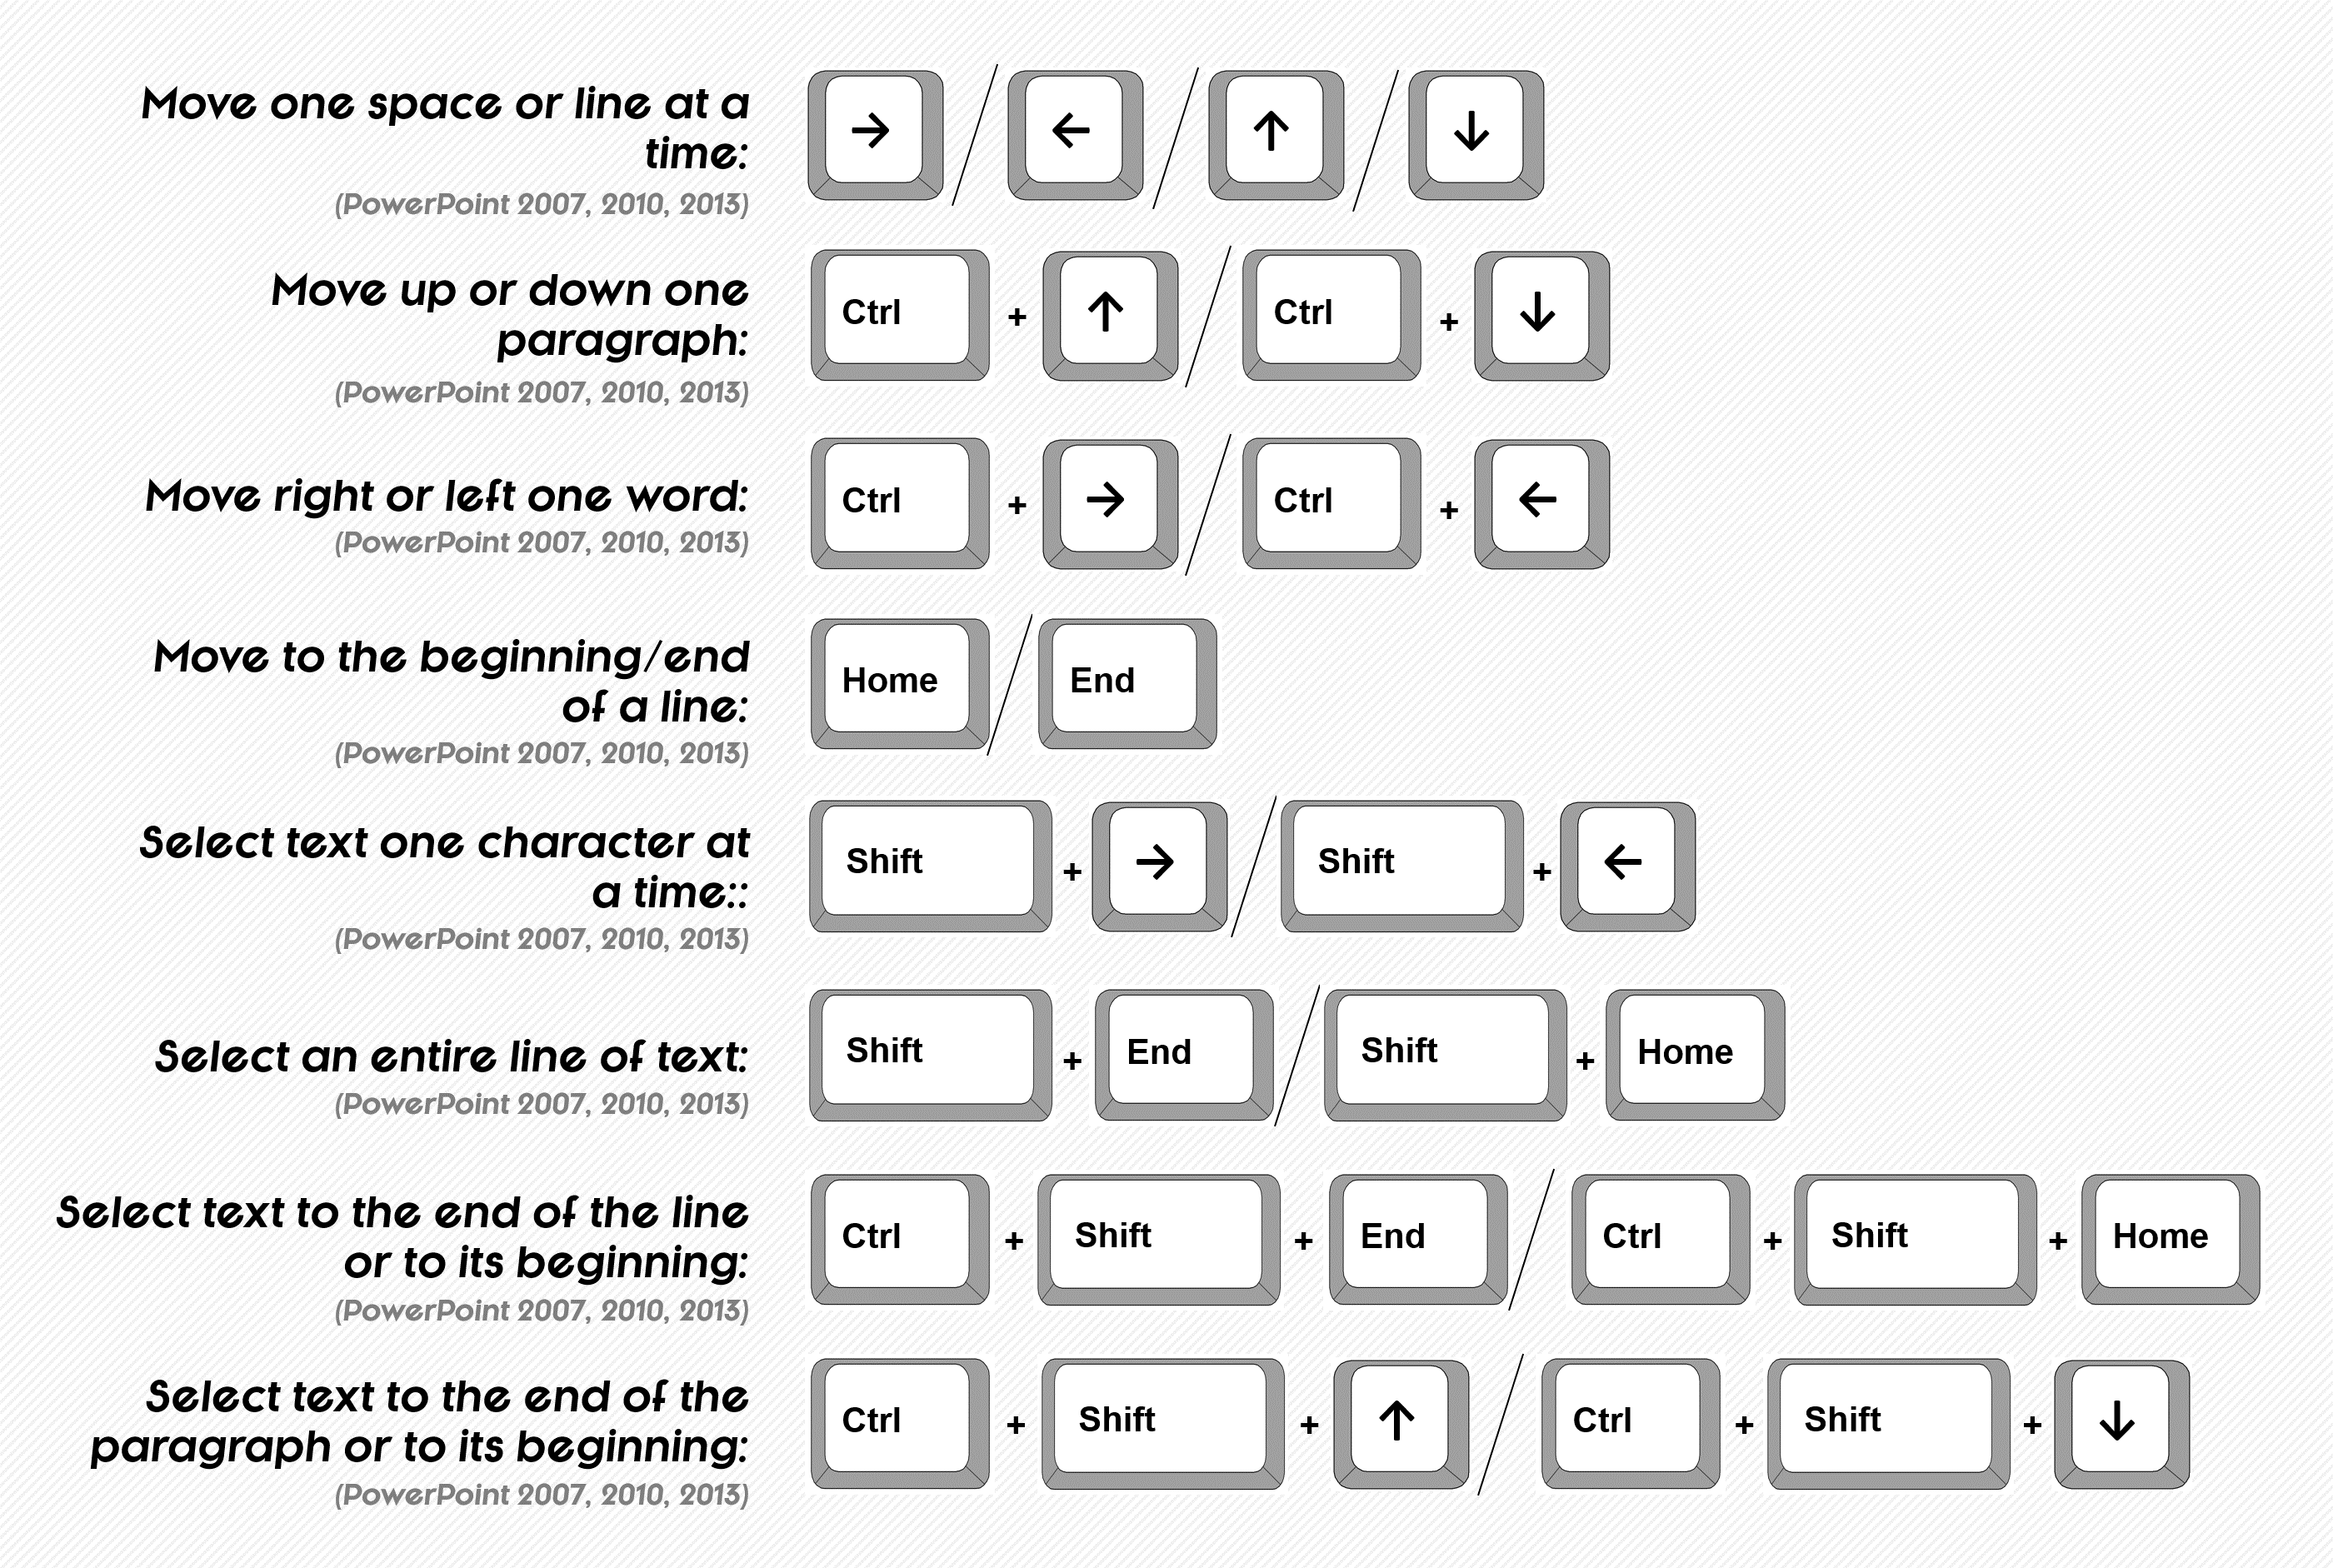
How to navigate and manipulate text from the keyboard
The above shortcuts are VITAL to your ability as an office worker to increase your word processing speed, whether you are typing in Microsoft PowerPoint or in Microsoft Word.
These shortcuts allow you to quickly navigate, select, edit and rearrange blocks of text… which is likely what you are dong ALL DAY long.
Learning the above shortcuts will DRAMATICALLY improve the speed at which you type and process text.
Arranging PowerPoint windows shortcuts
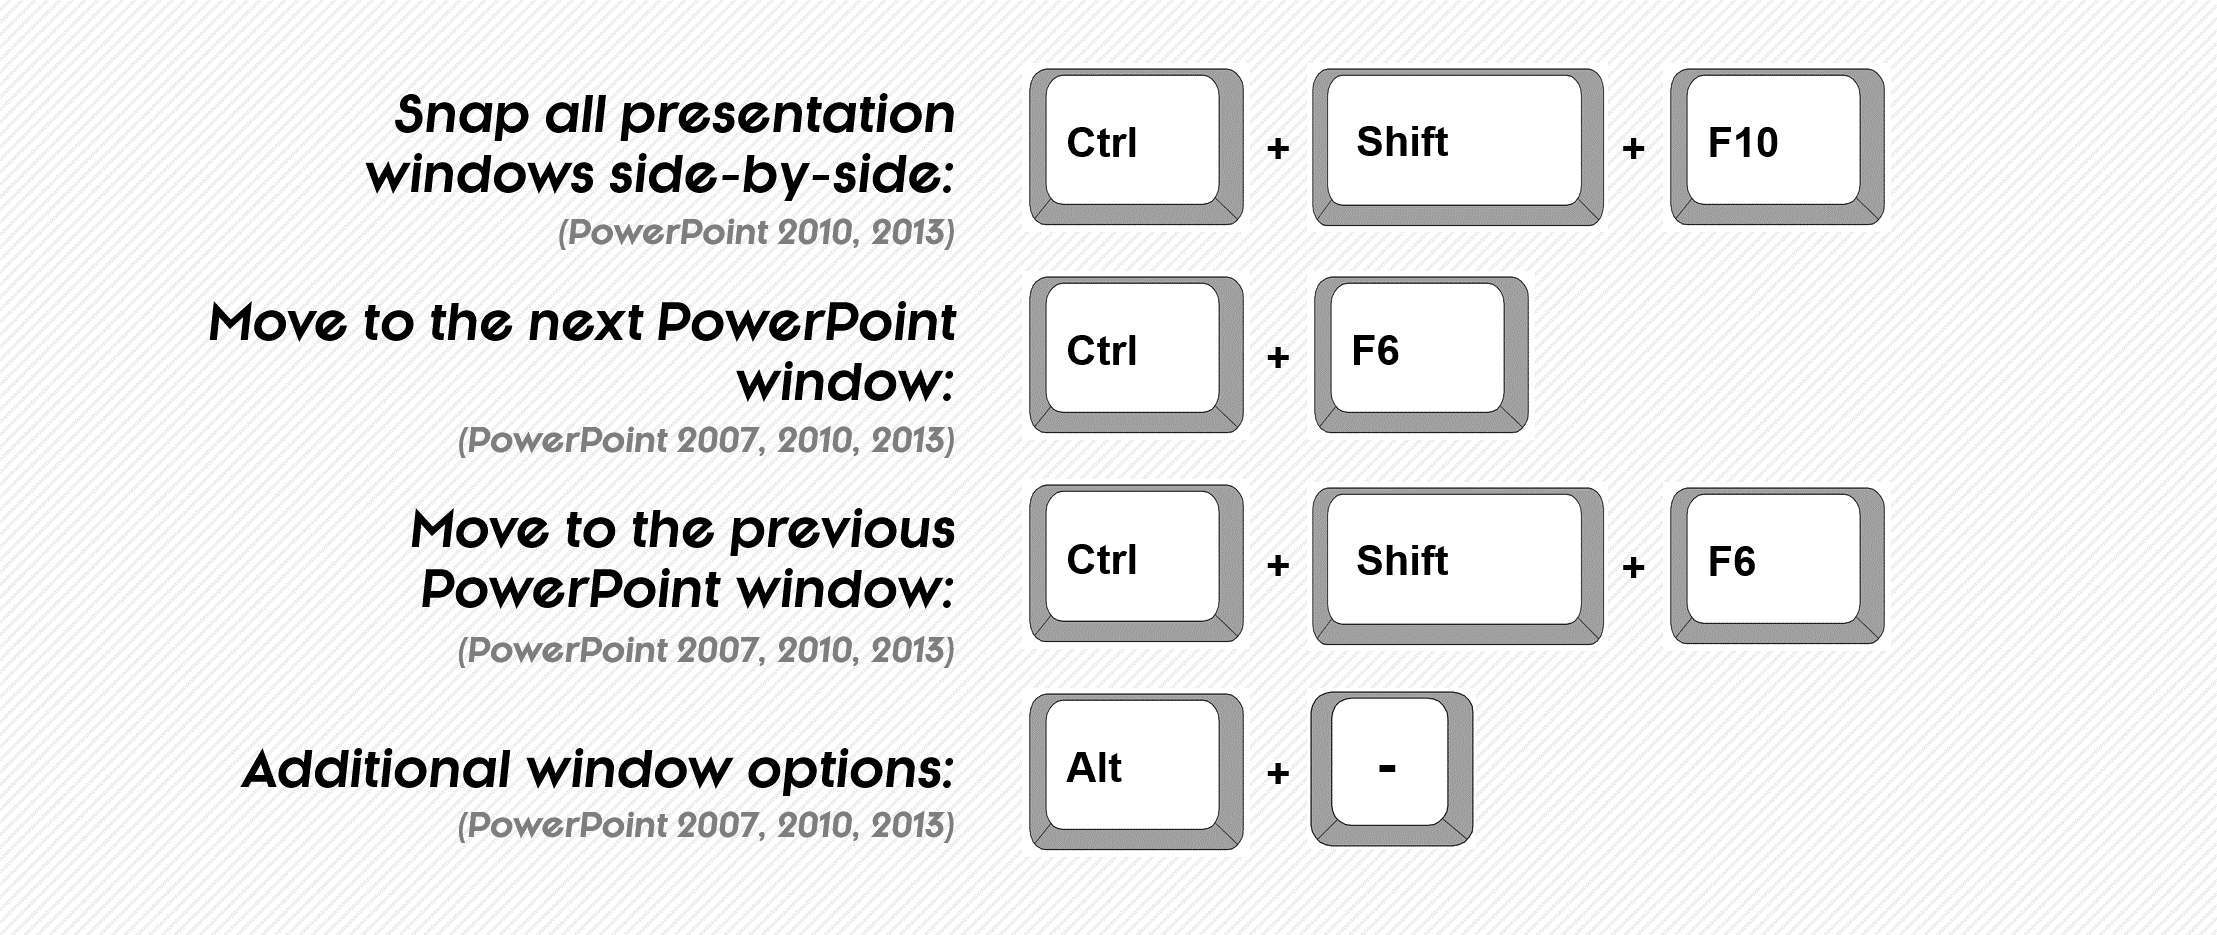
When working with multiple presentations open at the same time, knowing how to cycle forward through them (CTRL + F6) and quickly snap them all side-by-side (CTRL + SHIFT + F10 in PowerPoint 2010 and 2013) is a lifesaver.
Of all the places to lose time when working under a tight deadline, the last thing you want to stumble on is simply flipping through and arranging your presentations.
‘Distraction Free Mode’ and collapsing the Ribbon shortcuts

Clearing the clutter from your workspace
These two shortcuts are a great way to create some visual space on your screen so that you can more easily work on what Cal Newport calls ‘Deep Work’: Professional activities performed in a state of distraction free concentration that push your cognitive capabilities to their limit. These efforts create new value, improve your skill and are hard to replicate.
For more details about these two shortcuts (including the brand-new 2016 one), see our article here .
Gridlines, guides and rulers shortcuts
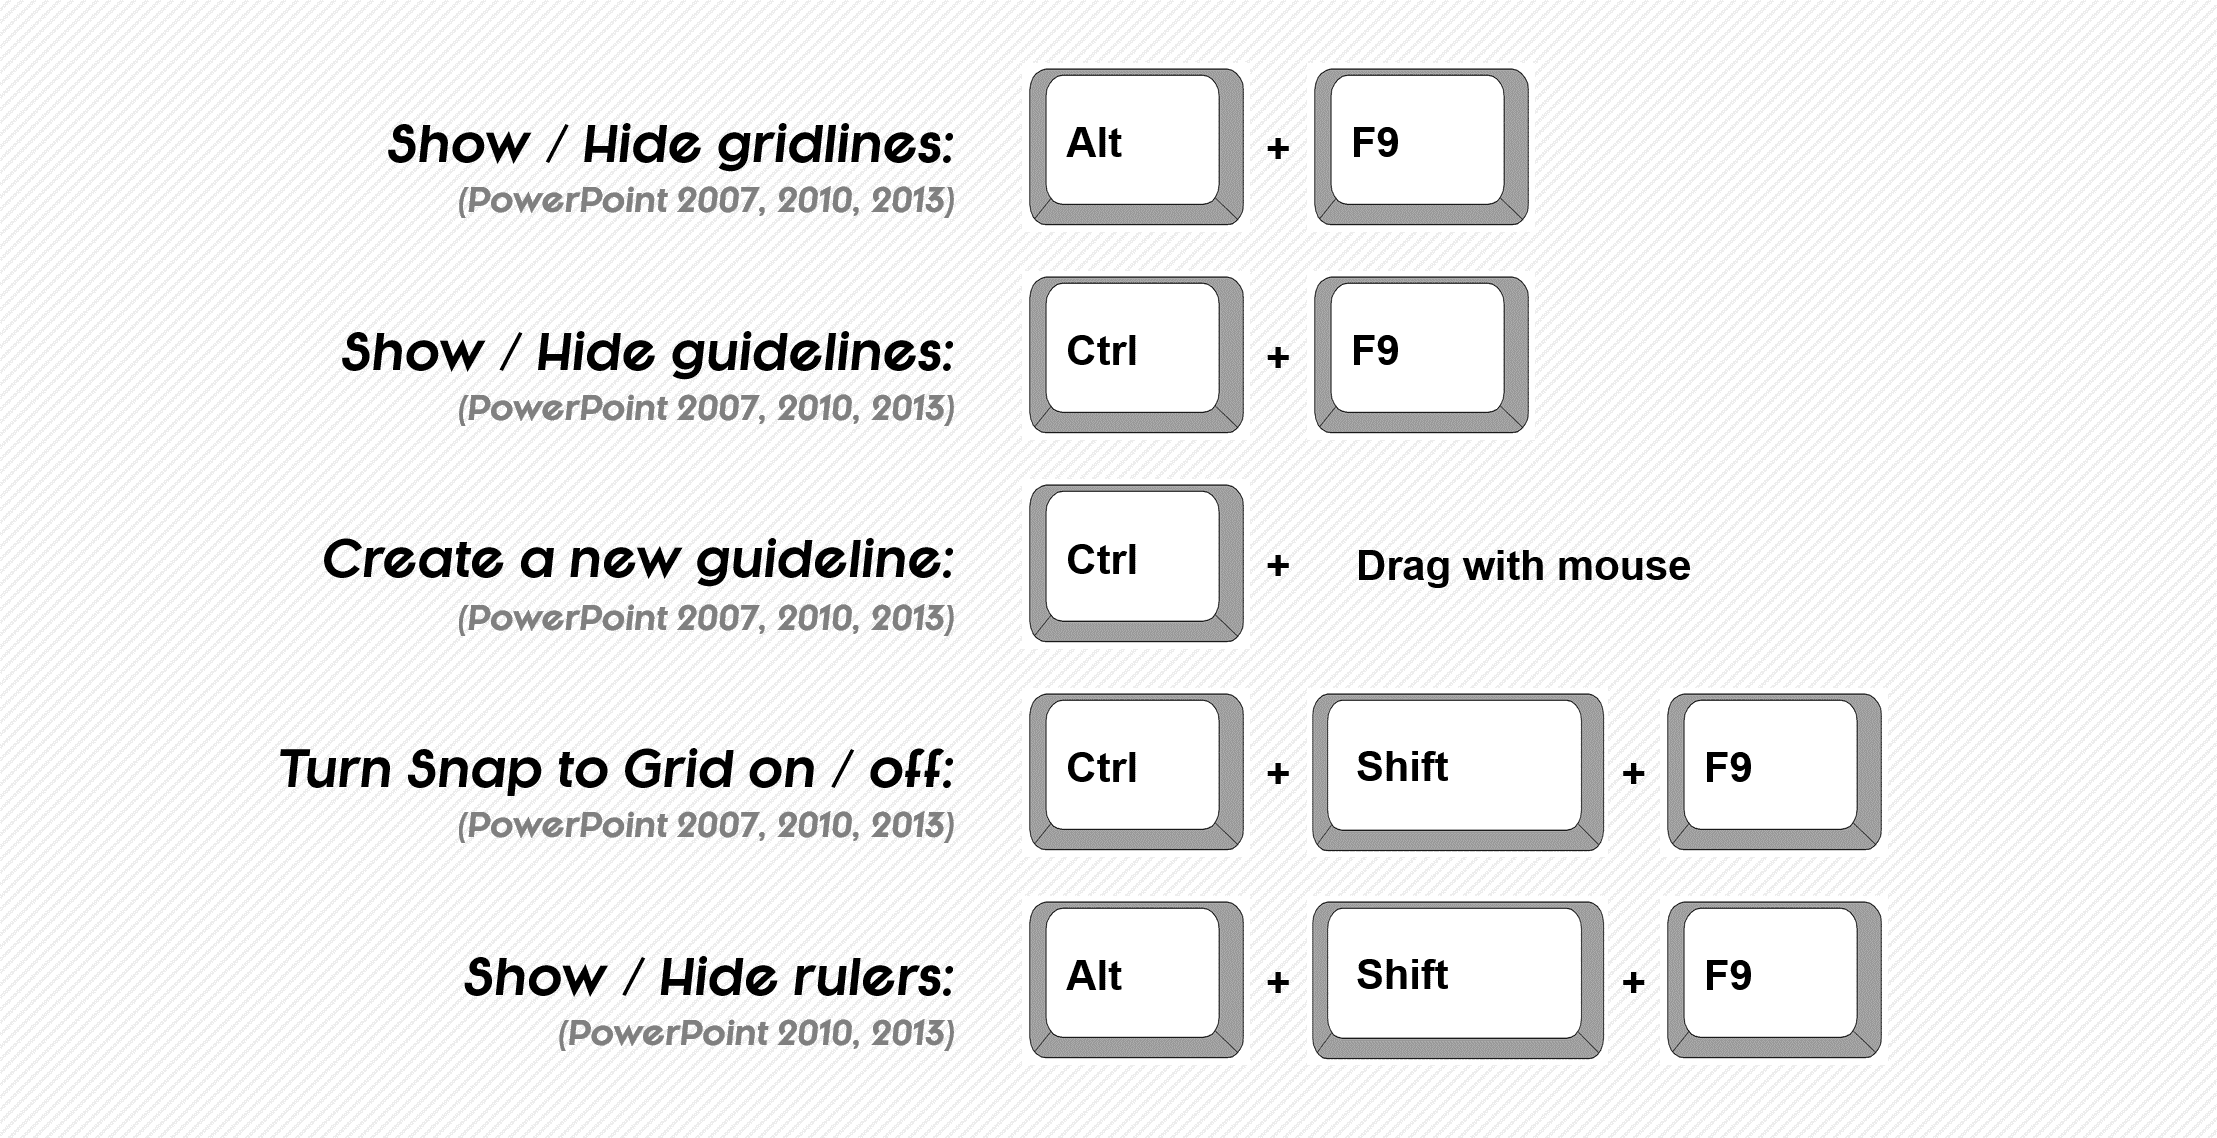
Better layout options for your presentations
The PowerPoint gridlines (SHIFT + F9), PowerPoint drawing guides (ALT + F9) and PowerPoint ruler (ALT + SHIFT + F9), are all features to help you better layout your content across your slides, improving the professionalism of your presentation.
I find the drawing guides (ALT + F9) much easier to use than the gridlines (SHIFT + F9), as you can manually adjust their position on your slide and quickly add new ones by holding the CTRL key and dragging with your mouse.
An example of using the drawing guides is setting the left side of your slide where you want all of your objects to start on each and every slide. Once the line is set, you can then see that line on all of your slides and layout your content accordingly.
Drawing guides PowerPoint 20013 – New features
PowerPoint 2013 introduced some new (handy) drawing guide features, including:
- Allowing you to change the color of the drawing guides by right-clicking them, making it easier to see what you have laid out on your slide.
- Allowing you to set them on your slide master, so that they cannot be nudged or moved in the normal view.
Turning your PowerPoint ruler on and off is also a convenient shortcut when you are working on a small screen (ALT + SHIFT + F9). Typically you only need the ruler for adjusting your bullet point spacing, so having a quick way to turn it on and off is handy.
Navigating active panes shortcuts
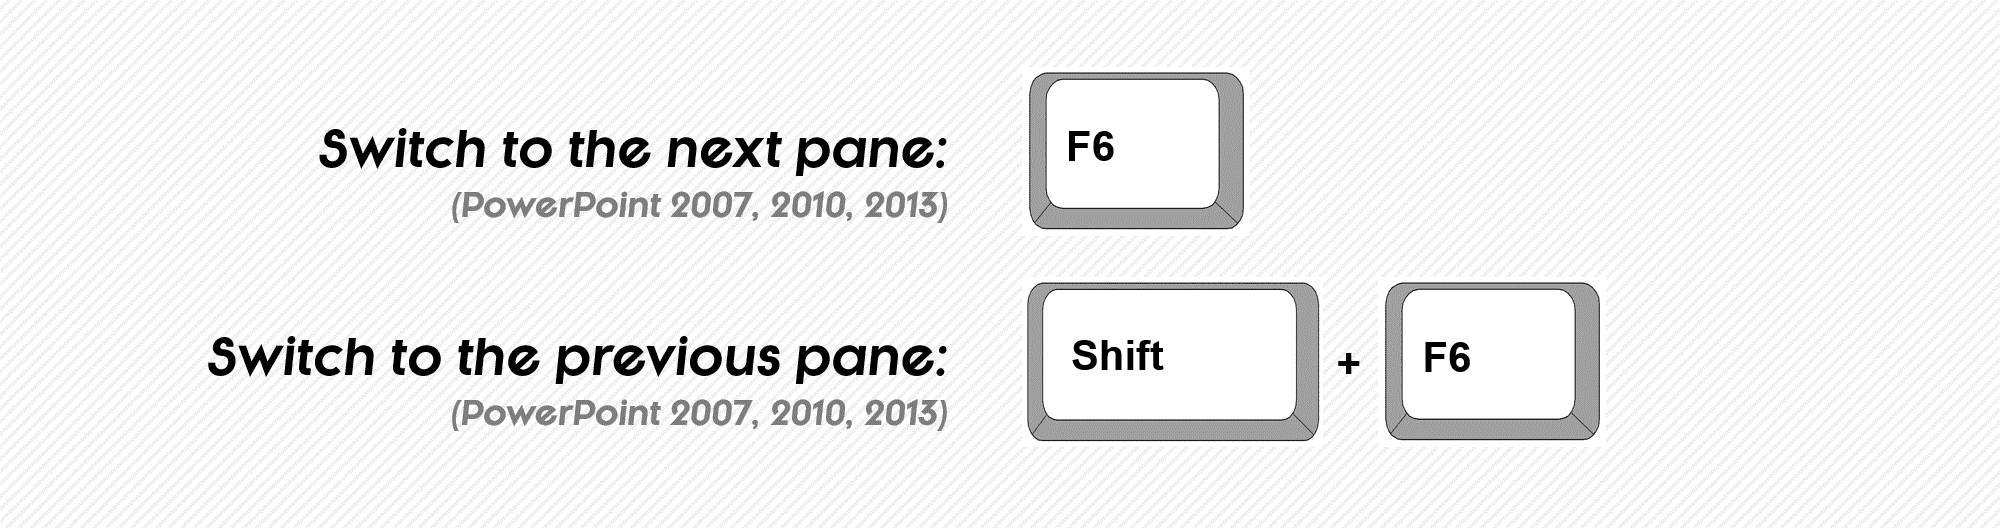
What these do is allow you to rotate between the open panes in the PowerPoint environment (of which there are five default ones) and any other panes or dialog boxes that you have open.
The default panes in order are:
- The Workspace
- The command bar (at the bottom of your workspace)
- The Notes pane
- The slide thumbnail view on the left side of your screen
You can cycle forward through these panes with the F6 key, or backwards through them with SHIFT + F6, allowing you to get at the various commands in these views directly from your keyboard… sorry mouse!
Rotating to the Outline View and the Selection Pane
I find these shortcuts are best used in combination with the Selection Pane (ALT + F10) and Outline View (CTRL + SHIFT + TAB) shortcuts, as these are the panes most of us need to frequently get to. Also, both of these panes have very useful keyboard shortcuts associated with them.
For example, to use some of the Selection Pane shortcuts, after opening the Selection Pane (ALT + F10), you need to make it the active pane before you can use the other shortcuts associated with it.
So after opening it, hit F6 on your keyboard and you will rotate to it, and use your other select pane shortcuts.
The same is true for the Outline View, except that instead of rotating forwards to it, you need to rotate backwards to it… Don’t ask me why. So after opening the Outline View (CTRL + SHIFT + TAB), you can activate it from you keyboard by hitting SHIFT + F6.
Outline View shortcuts
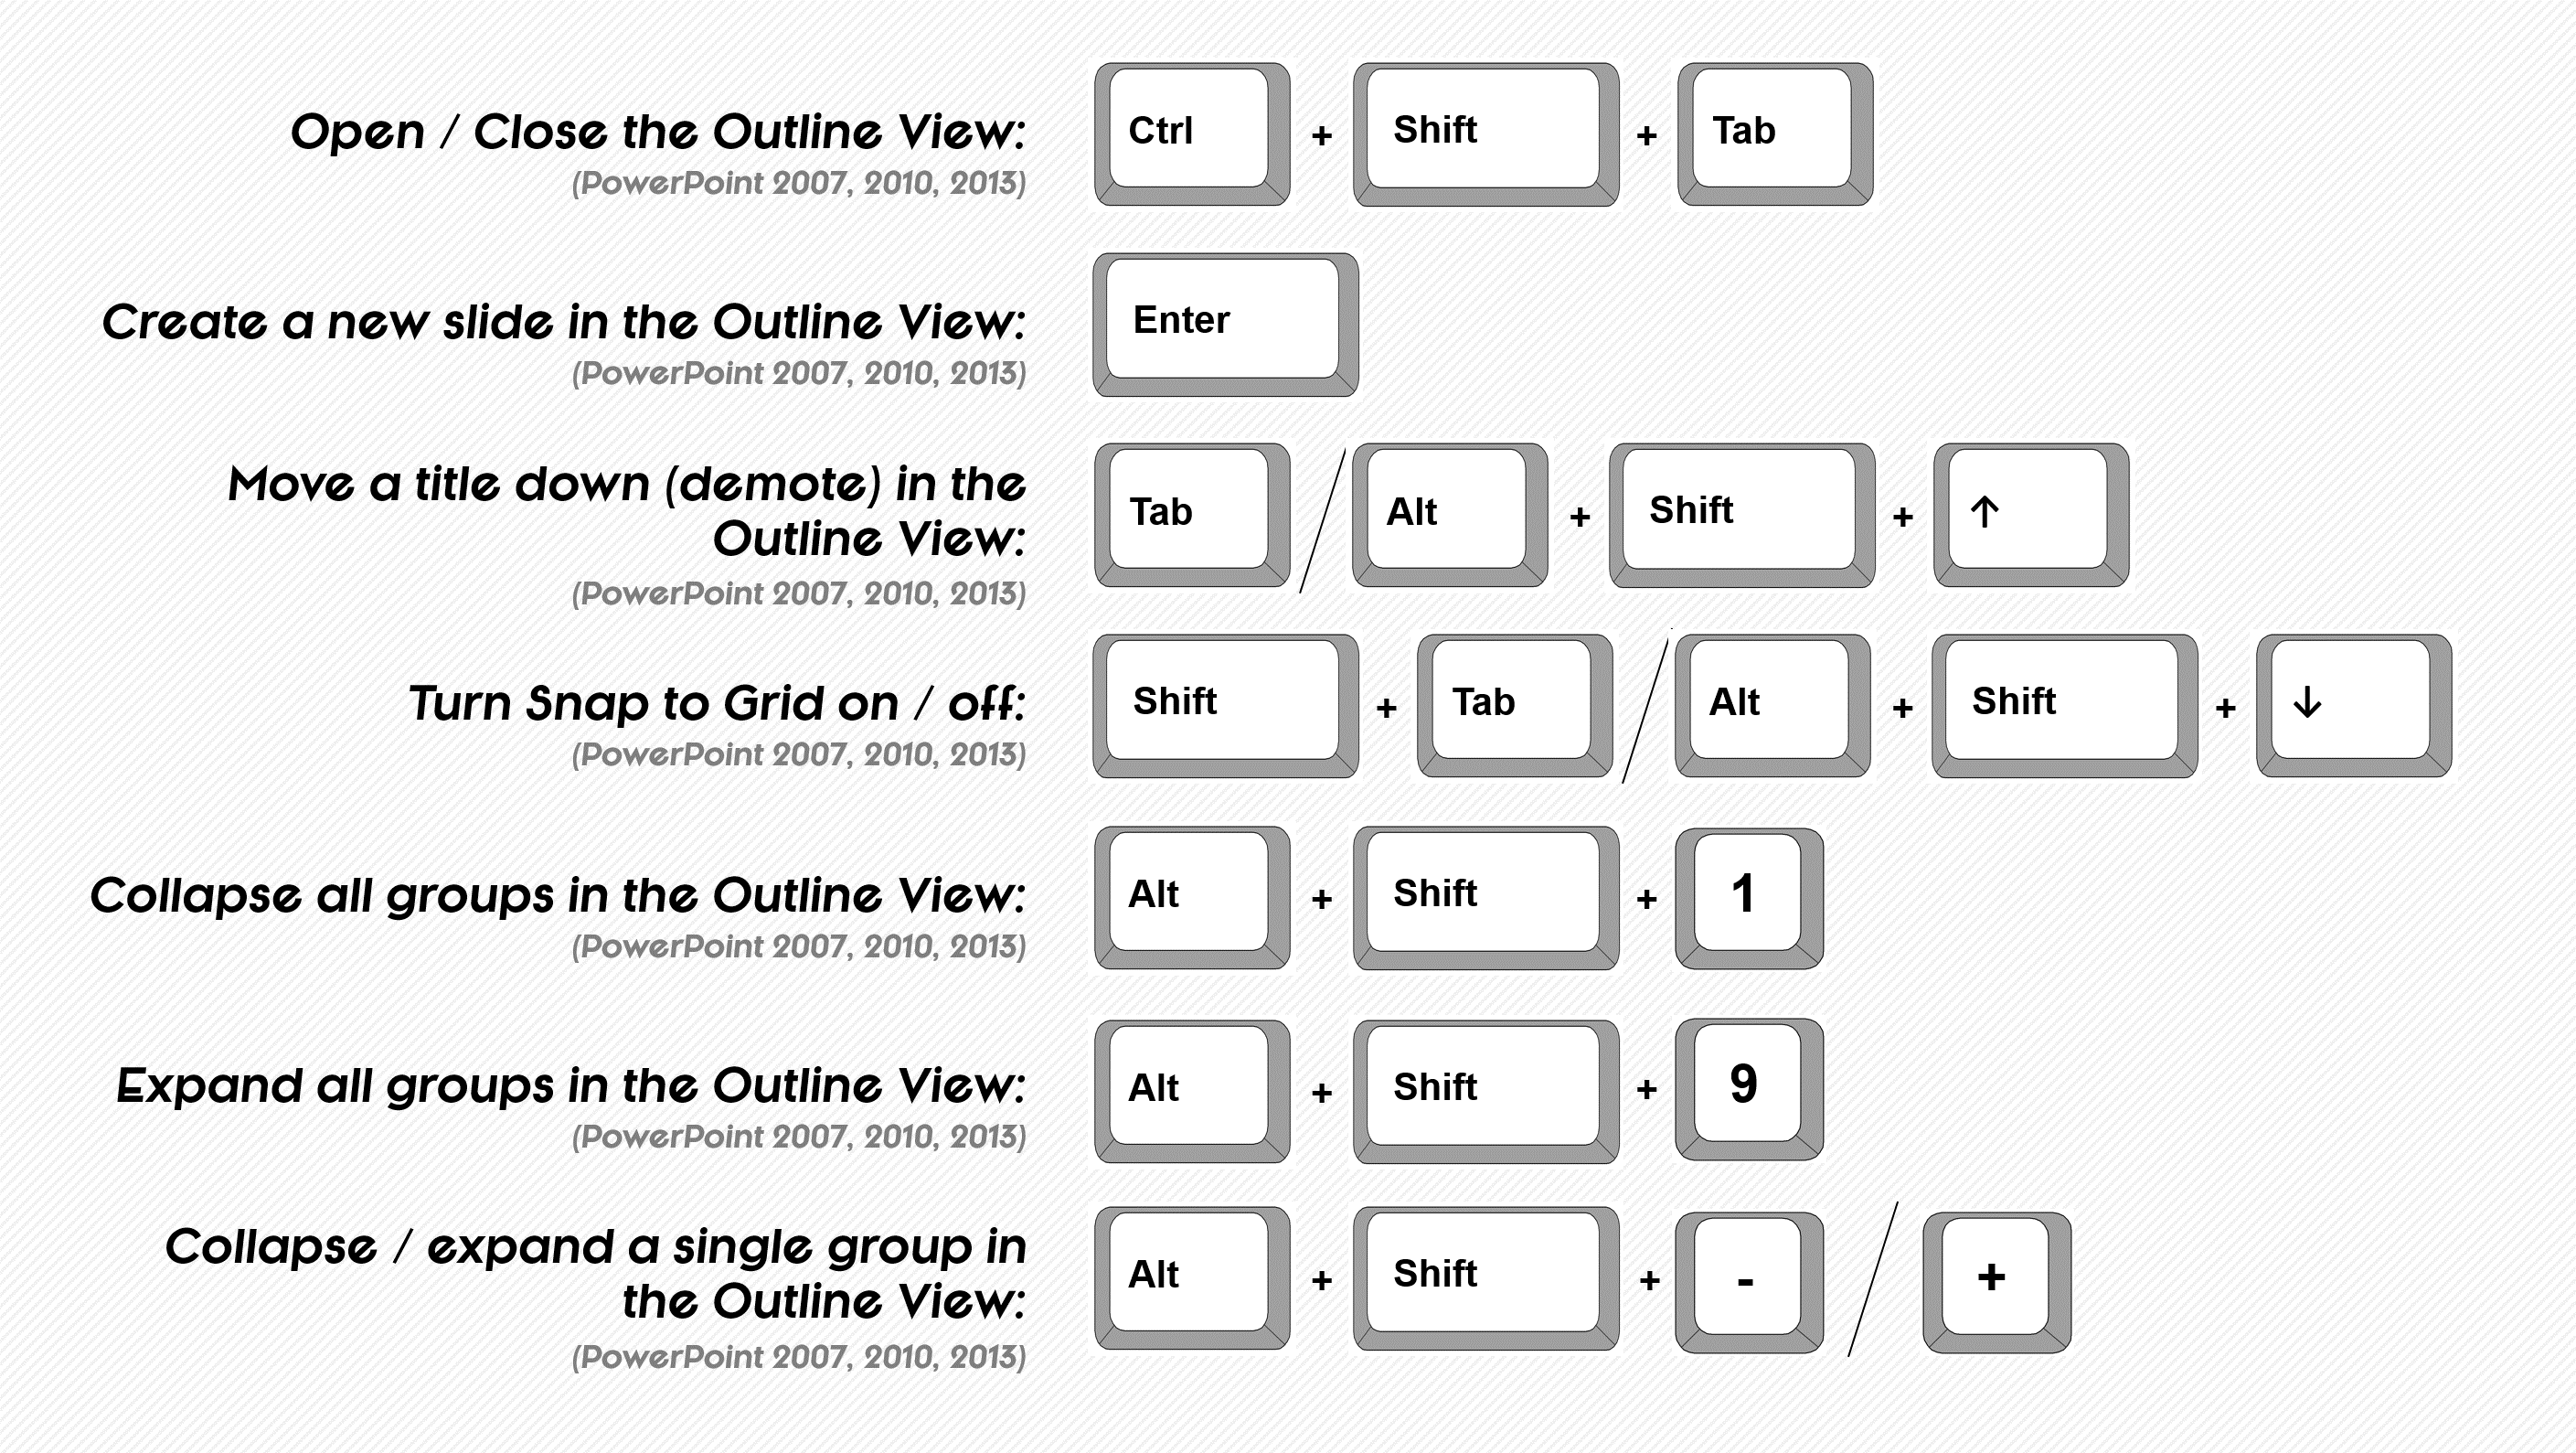
PowerPoint Outline View
The Outline View is great for managing large presentations, as it allows you to quickly cycle through, rearrange and evaluate your content at a 30,000 foot view.
It’s also a great way to insert and quickly update your content (titles, subtitles and content containers) as a bulleted list.
To quickly open or close the Outline View in any version of PowerPoint, simply use the CTRL + SHIFT + TAB keyboard shortcut.
Using ALL of the Outline View shortcuts
To use all of the Outline View shortcuts, you need to be active in the Outline View from your keyboard… you cannot just select it with your mouse.
After opening the Outline View (CTRL + SHIFT + TAB), you can rotate to it by hitting SHIFT+F6 on your keyboard.
See the Navigating Active Panes shortcuts for more.
To expand your knowledge and learn more about using Outline View in PowerPoint, read our guide here .
Shortcuts for closing and quitting PowerPoint
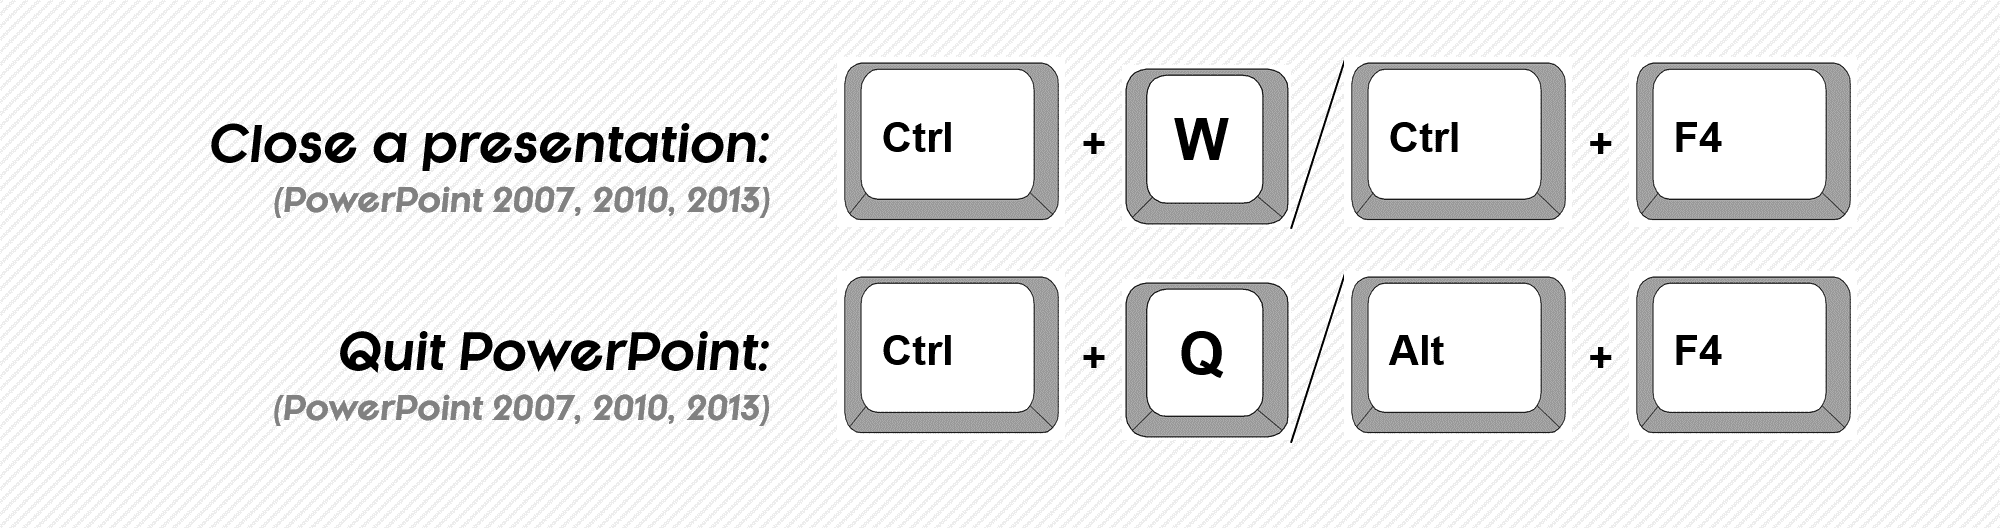
NOT unique to PowerPoint: these ‘close file’ and ‘close application’ shortcuts work for all Microsoft Office Programs (Word, Excel, Outline, etc.), and the ALT + F4 shortcut will work for any open window in Windows.Creating and opening presentations
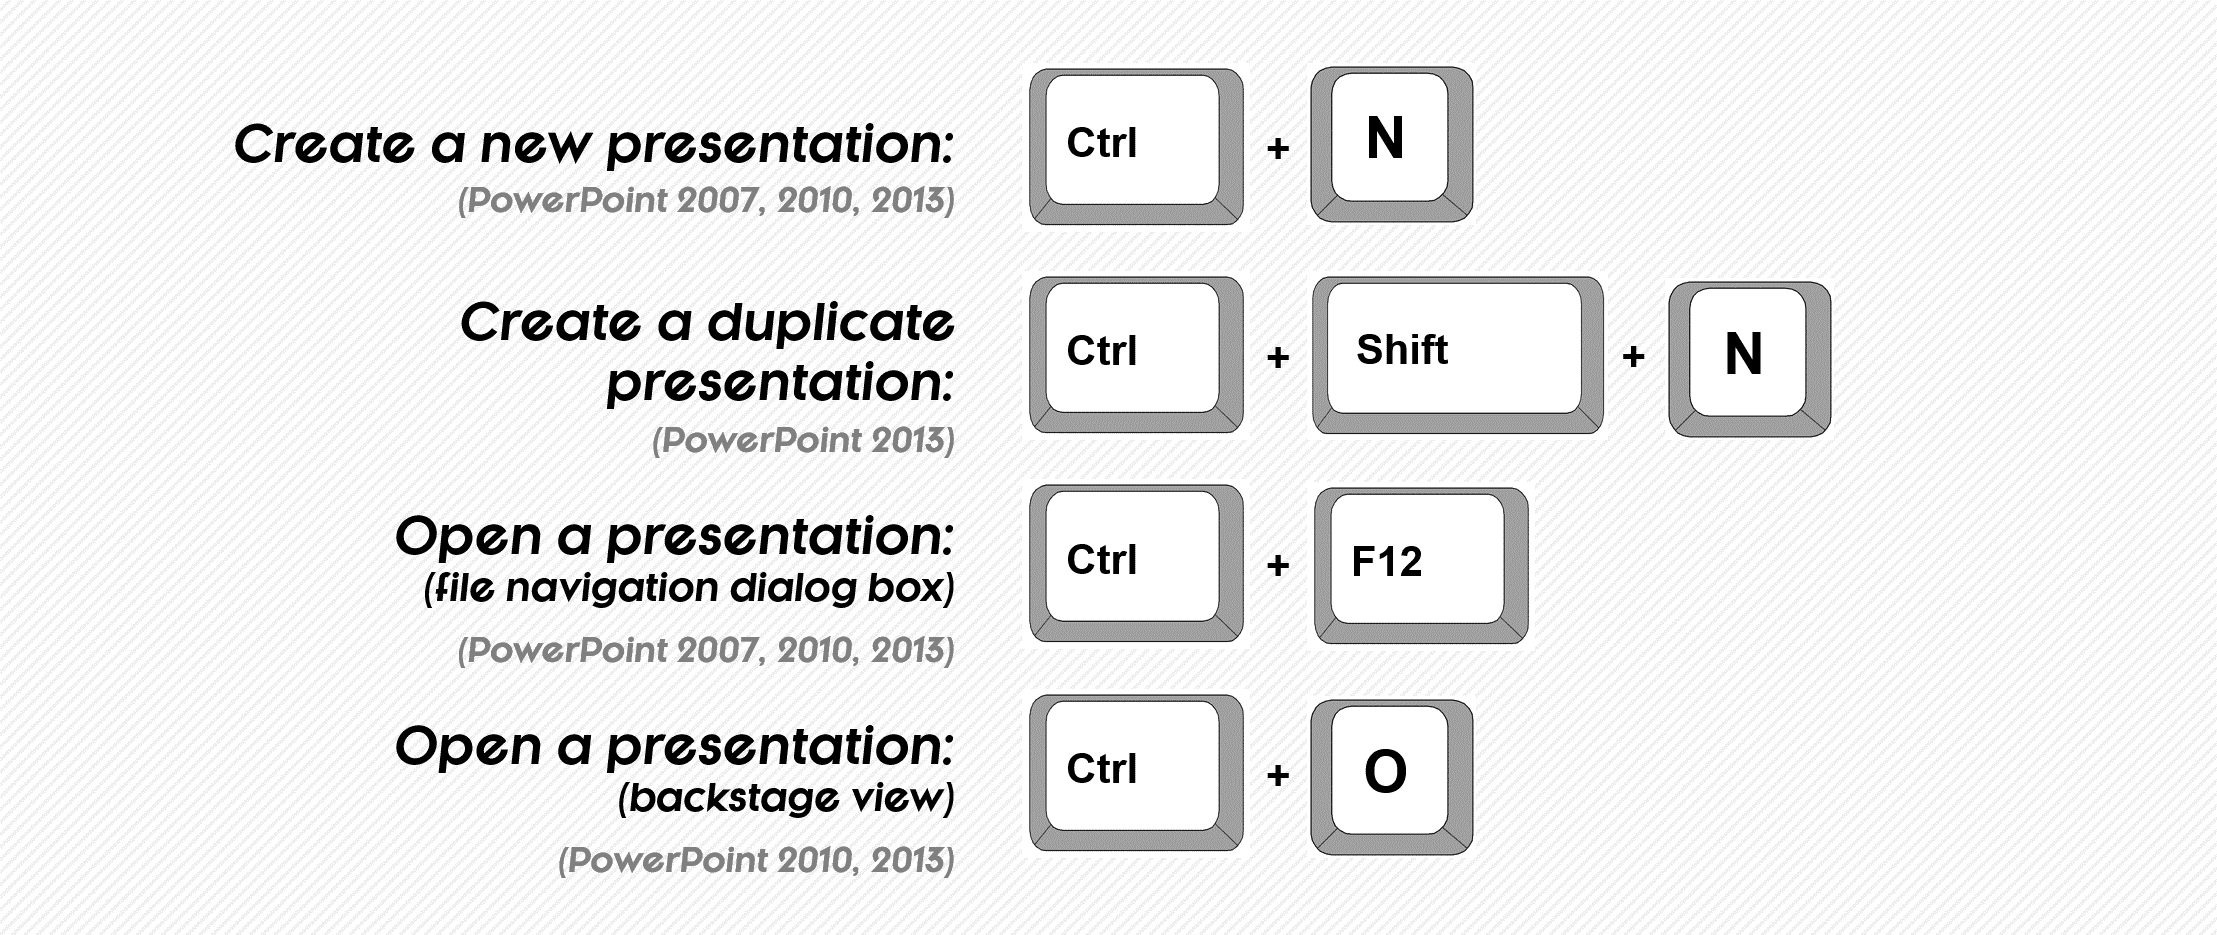
Two shortcuts for opening a presentation
>Here is another subtle difference for the hardcore shortcut user:
- CTRL + O will take you the backstage view in PowerPoint to open a presentation, which is ideal for opening a recent presentation.
- CTRL + F12 will take you directly to a file navigation dialog box to find a presentation on your computer.
It is a subtle difference, but if you are frequently opening and closing presentations, these shortcuts will help you jump start your search more effectively (depending on where you want to start).
Pro tip for remembering these shortcuts
The F12 key is directly above the ‘O’ key, so these are actually pretty easy to remember.
Saving and printing shortcuts
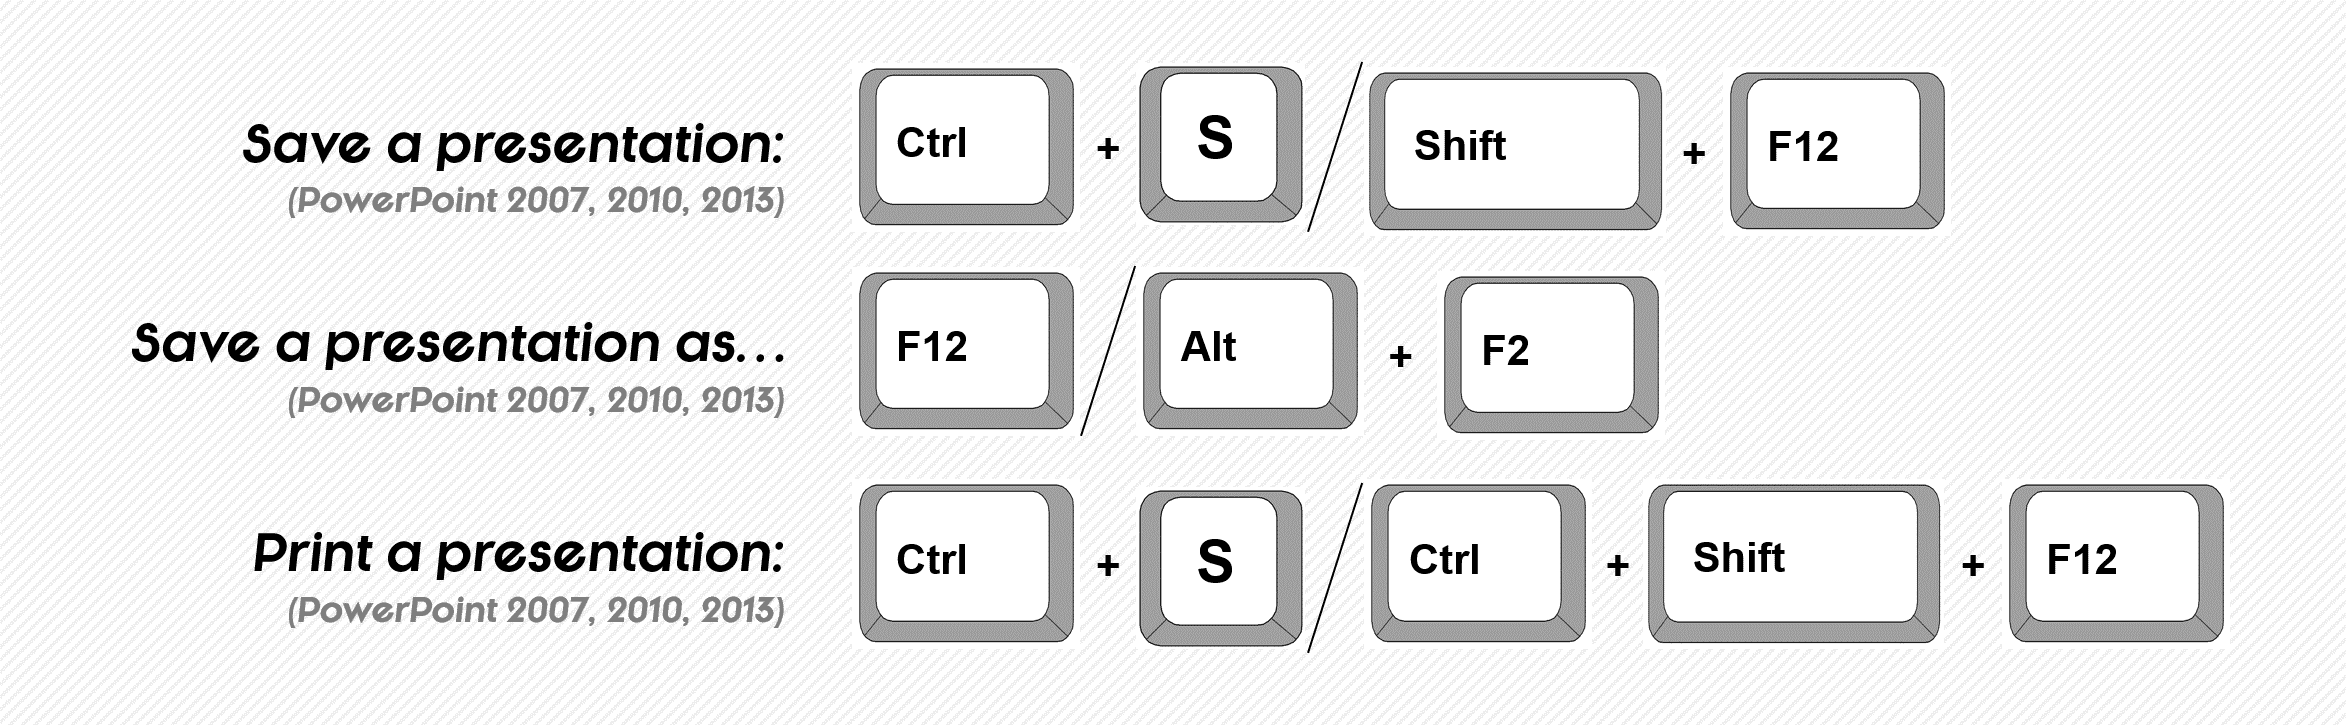
These three shortcuts work across the ENTIRE office suite and are MANDATORY shortcuts for any knowledge worker: Save (CTRL + S) is your best friend as there is little more aggravating than spending hours editing a document to later find that you lost all your work because you forgot to save it. CTRL + S as often as you can while working on a presentation
Save As (F12) is a slightly more advanced version of the Save shortcut, as it allows you to save your file with a new name, change its save location or change its file type. The most frequently used alternative file type is the PDF file format, which you can select in the drop down.
Print (CTRL + P) takes to you the backstage view where you can choose among various printing options. Two of the often overlooked printing options are the Notes pages and the Outline View.
To learn how to print multiple slides per page using the Print dialog box, read our guide here .
Protecting your presentation
You can use the Save As (F12) shortcut to protect your presentation by saving it as the Picture Slideshow file type. Doing so turns your presentation into pictures that someone can run natively in PowerPoint in Slideshow mode, but cannot edit. To learn more click here .
Shortcuts for inking and highlighting your presentation
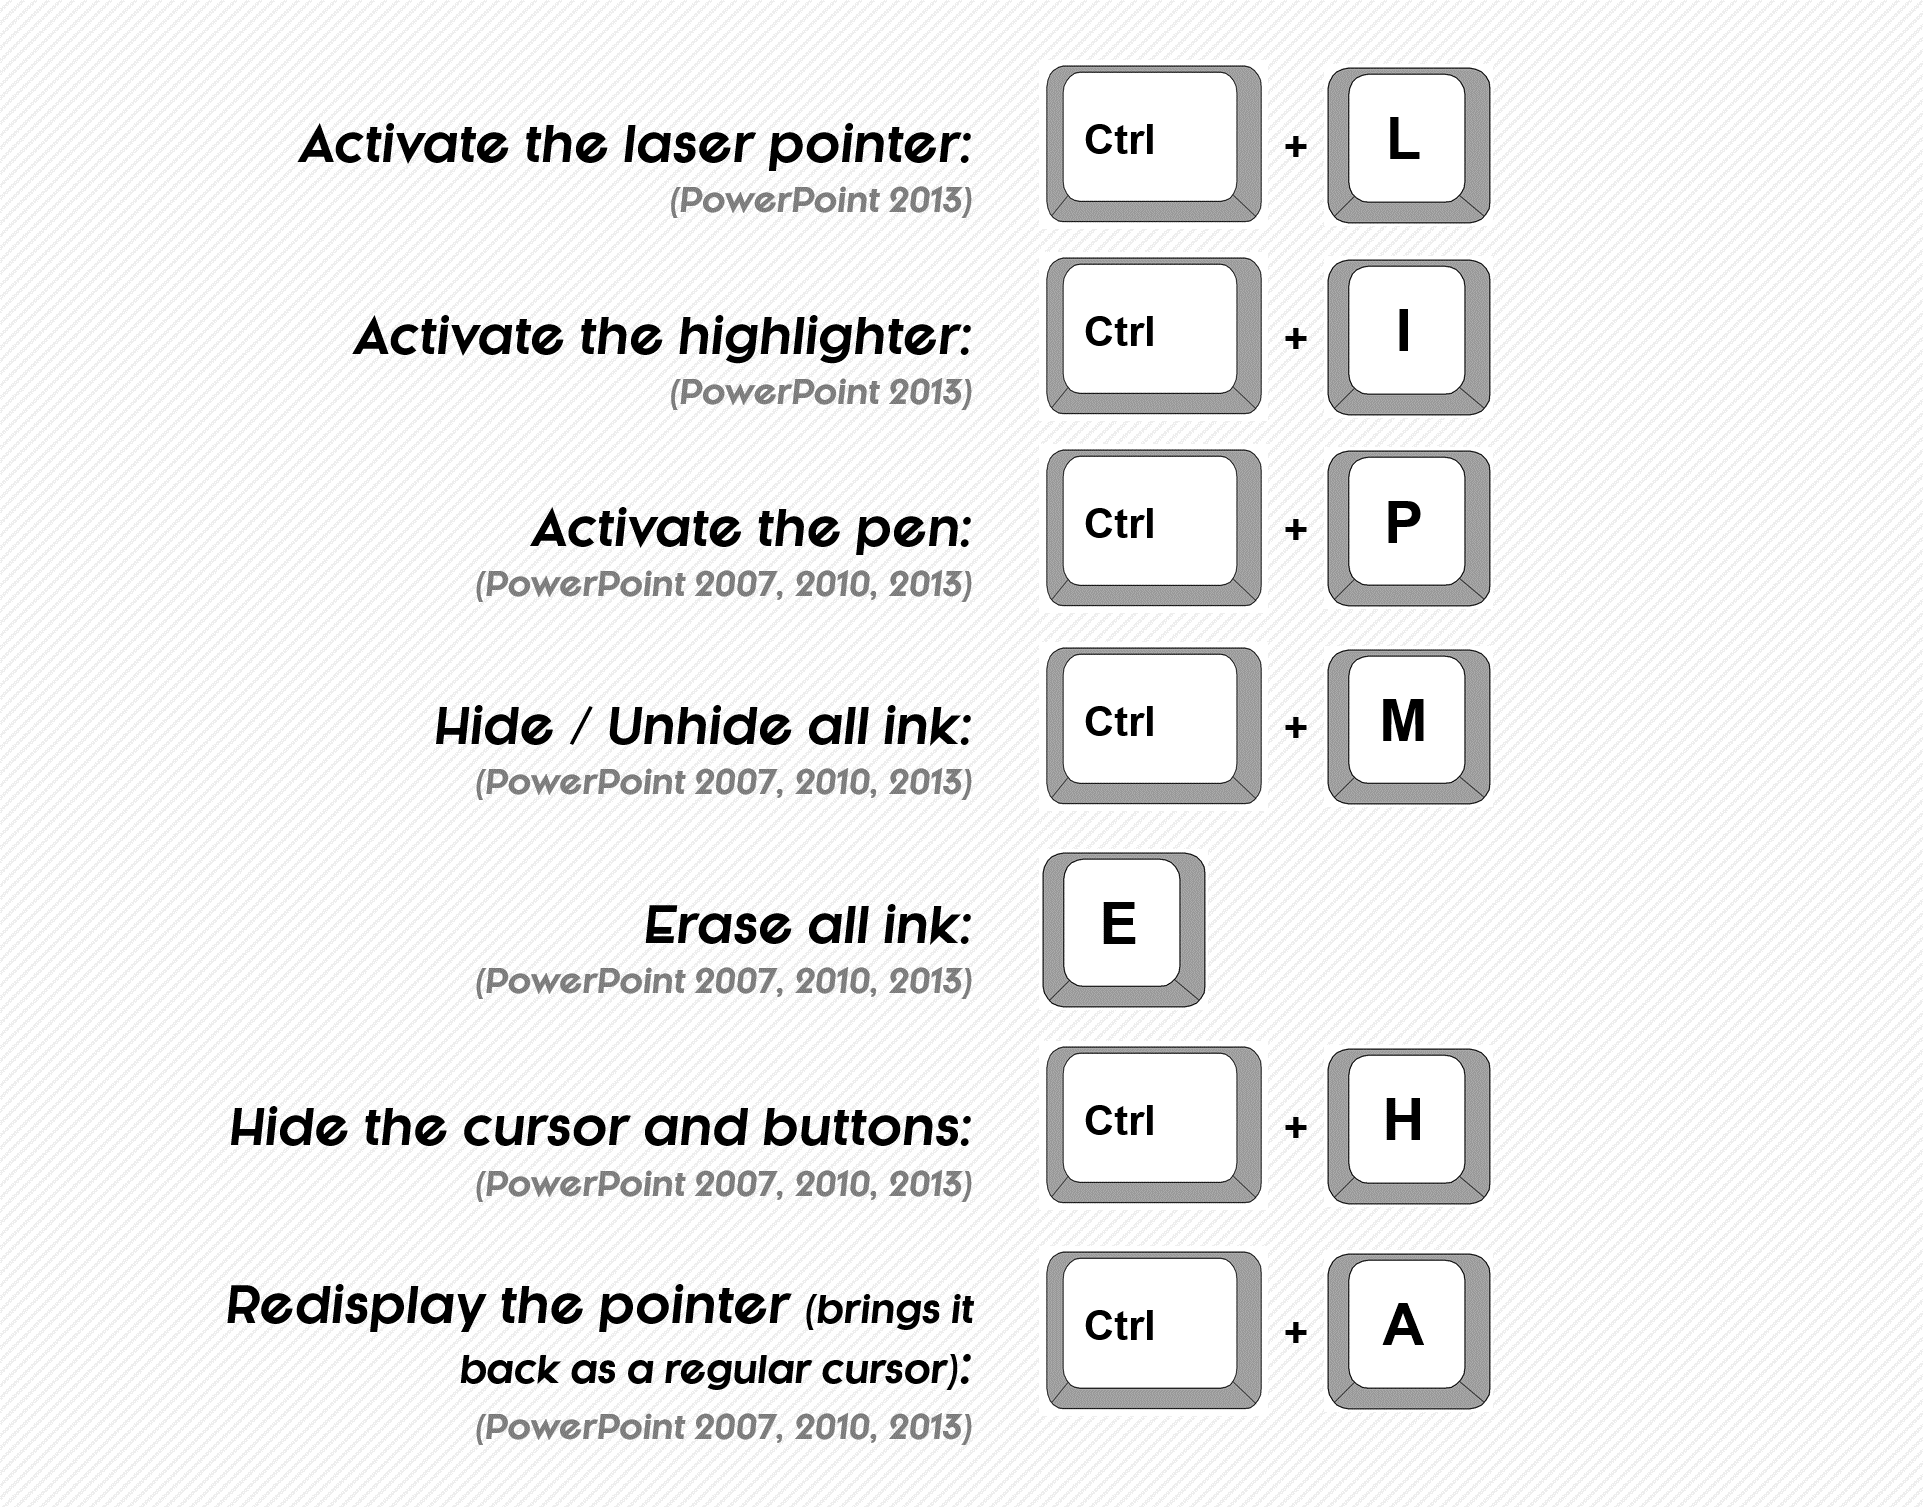
Inking your presentation
You have two inking options in PowerPoint (the pen and the highlighter) which allow you draw on your slides during your presentation to make your point visually.
Once the ink is on your slide, you can either:
- Save the ink in your presentation – Simply hit ESC to exit Slideshow Mode and select Save Ink. Saving the ink turns your annotations into object that you can then resize and position on your slides.
- Hide the ink on the screen – Hit CTRL + M to hide the onscreen ink. Hitting CTRL+M a second time will unhide the ink (i.e. make it reappear).
- Erase the ink on the screen – Hit E on your keyboard and any ink that you have added in Slideshow Mode will be erased. Be careful when using this shortcut though as you cannot undo the erase action.
Pre-inking your presentation… sneaky trick alert!
Besides adding ink to your slides in Slideshow Mode, you can also pre-ink your slides and still use your CTRL + M shortcut to hide and show your ink.
To pre-ink your slide, simply open the ink tools, which you can find on the Review tab. You can then draw on your slides (however you like) and make your notes.
After you have inked your presentation, in Slideshow Mode you can hide or display the ink by hitting CTRL + M on your keyboard… pretty sneaky, no?
Start slideshow shortcuts
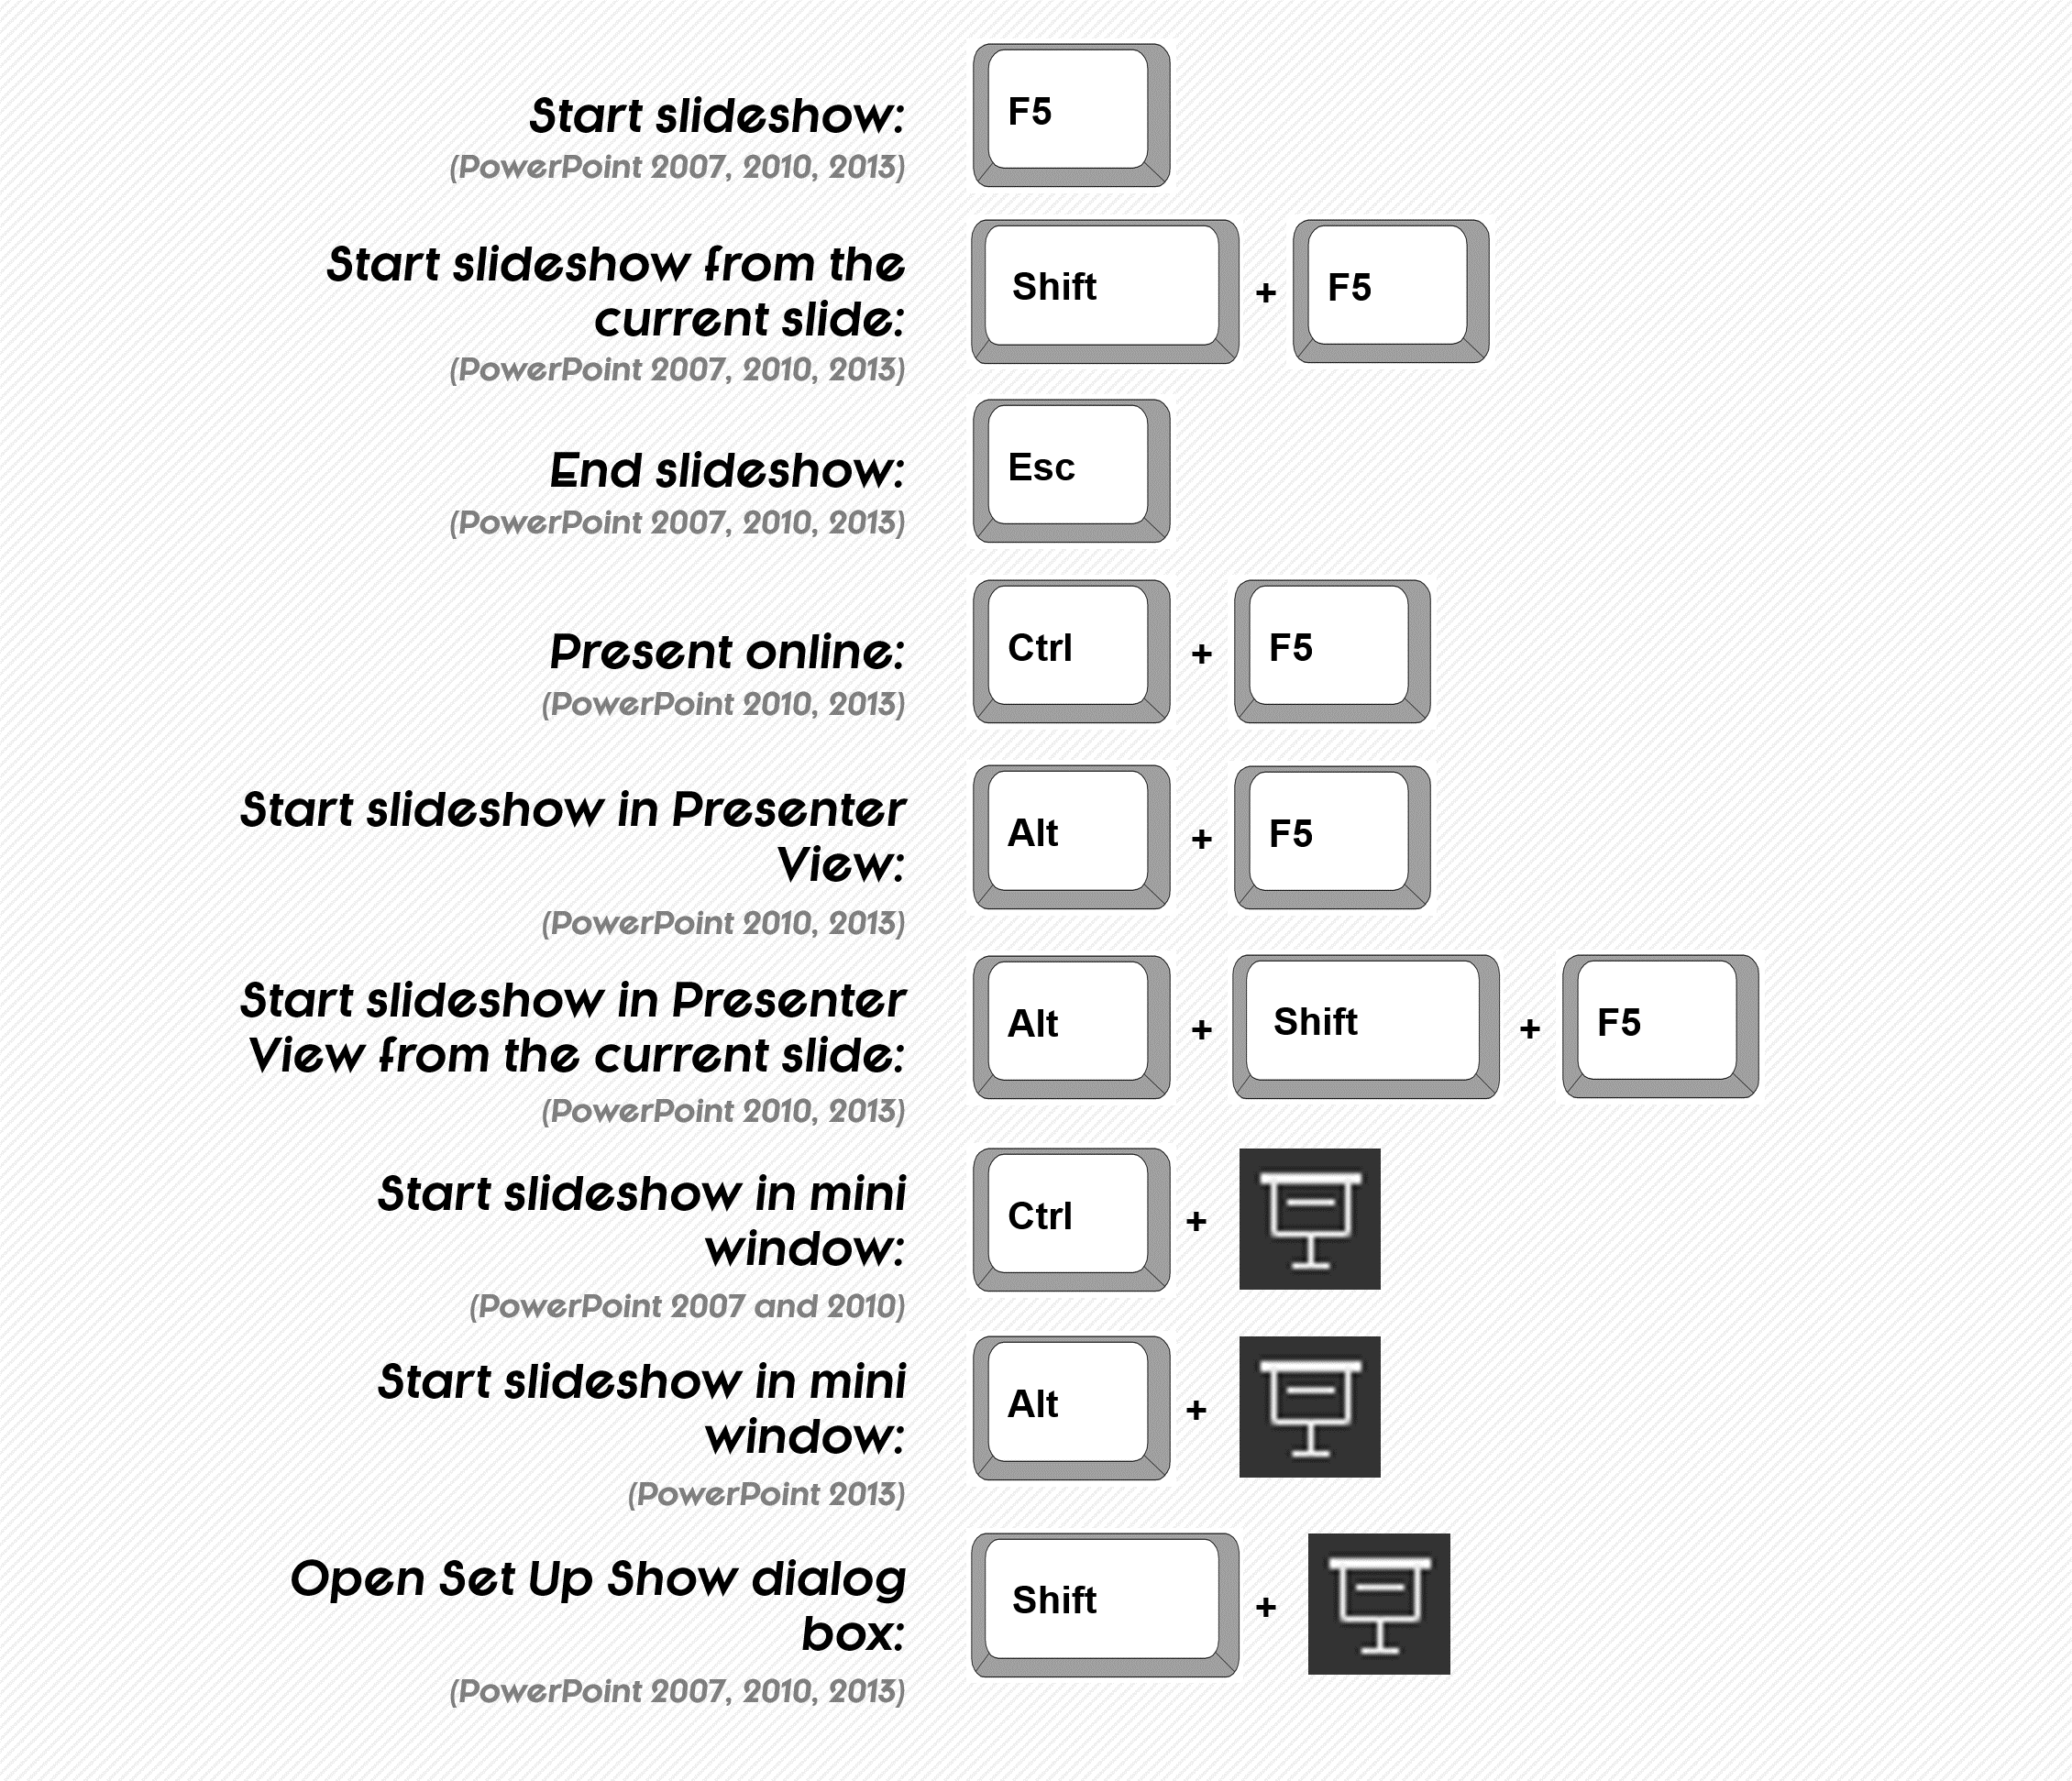
How to start a slideshow in PowerPoint
The different shortcuts for starting a slideshow give you flexibility in terms of where you are in your deck and in what View you’re in when you want to start your slideshow.
Start Slideshow from Beginning – Slideshow Shortcuts
- Presentation Mode – F5 will start your slideshow from the beginning of your presentation.
- Presenter View – ALT + F5 will start your slideshow from the current in the normal presentation mode.
Start Slideshow from Current Slide – Slideshow Shortcuts
- Presentation Mode – SHIFT + F5 will start your slideshow from the beginning of your presentation in the Presenter View. This view works in PowerPoint 2013 and in PowerPoint 2010 if you are hooked up to an external monitor.
- Presenter View – ALT + SHIFT + F5 will start your slideshow from the current slide in the new Presenter’s View. This works in PowerPoint 2010 if you are hooked up to an external monitor and in PowerPoint 2013.
I find the Start from Current Slide the most flexible for spot checking your content in fullscreen mode, and rehearsing individual slides in the new Presenter View.
Spot checking for errors
When spot checking your presentation for errors in Slideshow Mode, it’s a best practice to go through your deck multiple times, each time looking for a single type of error (unaligned titles, wrong formatting, etc.).
Although it might appear to take more time, it makes spotting embarrassing presentation errors significantly easier when you are simple-mindedly focused on a specific error.
Navigating slides in a slideshow shortcuts
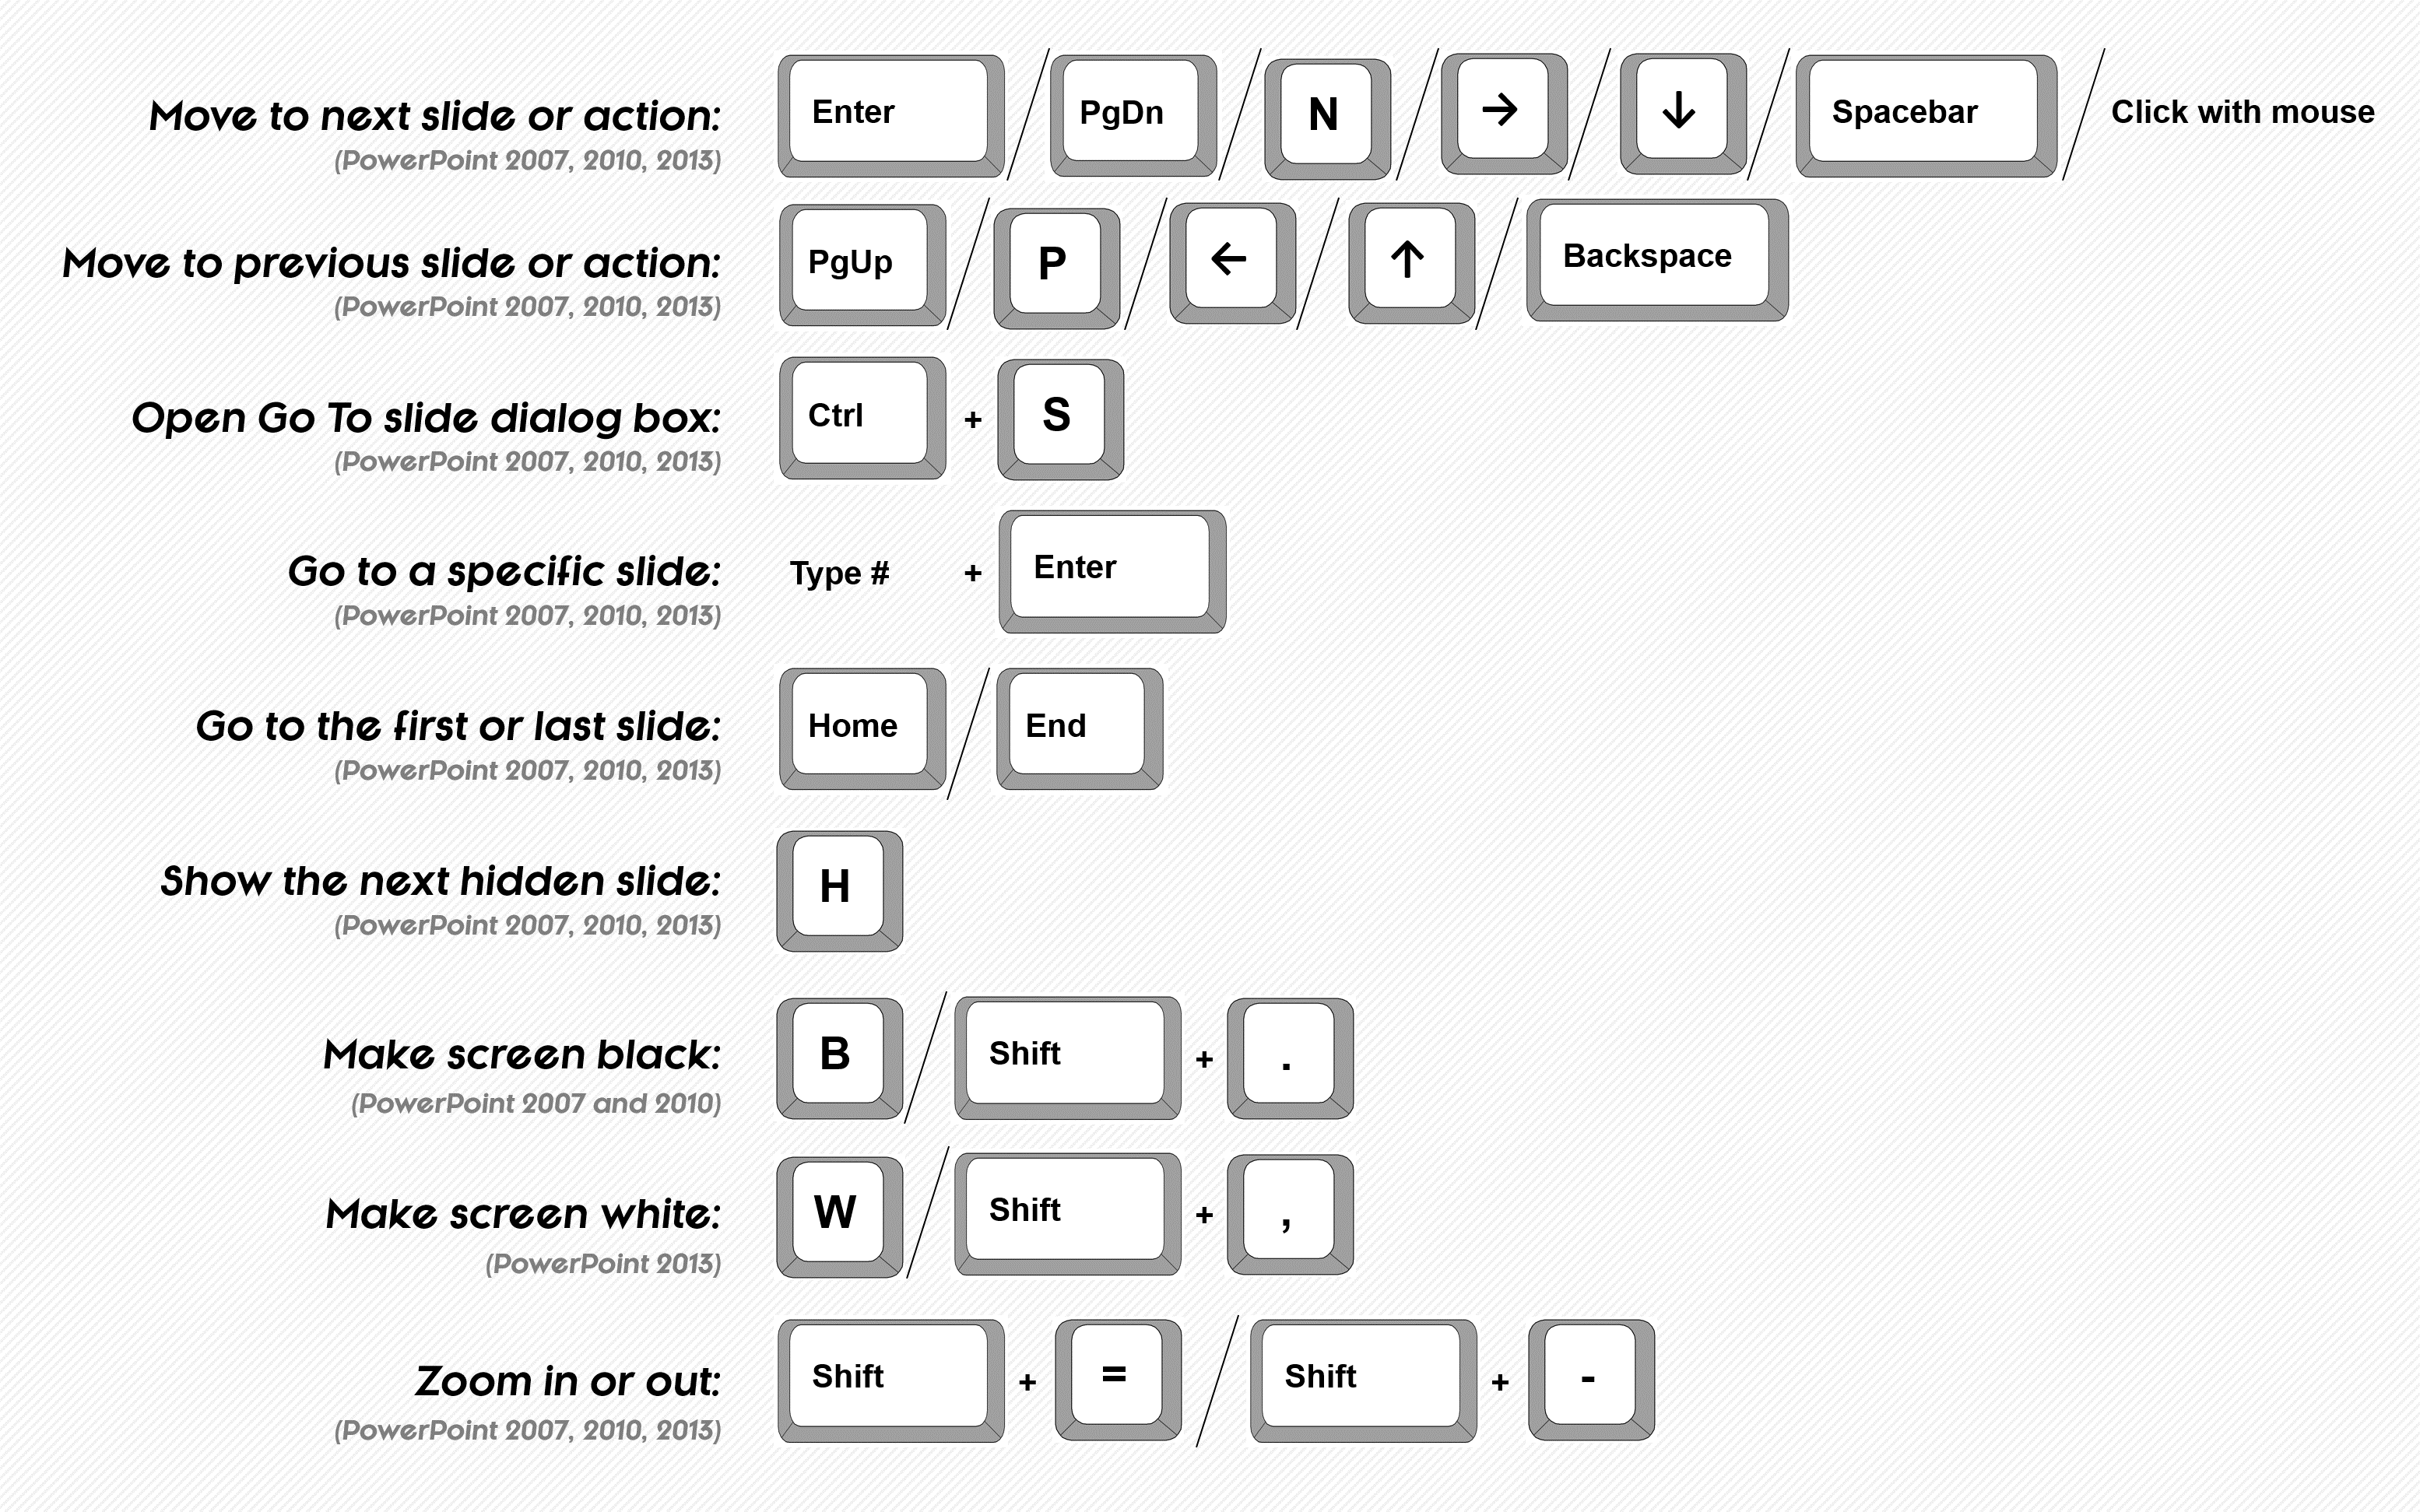
Navigating your slides in a slideshow
The two easiest ways to jump between the slides in your presentation in Slideshow Mode are:
Method #1: Assuming you know the slide’s number, hit the number on your keyboard and then hit ENTER. For example, if you want to jump to slide number 22, hit 2, then 2, and then ENTER and you will jump to slide #22.
Method #2: Assuming you don’t know your slide’s number, you can hit CTRL+S on your keyboard to see a list of all the different slides and use this dialog box to jump around within your presentation.
A third option is to use hyperlinks, which you can also navigate to from your keyboard in Slideshow mode. See our guide here for details
PowerPoint pro tip: Use the black and white screen shortcuts to save ink
Using the ‘B’ or ‘W’ keys to make your screen black or white during your presentation is much better than adding black or white slides to your presentation for two reasons:
- It gives you more flexibility as to when you blank out your screen to manage your audience.
- It cuts down the size of your deck and SAVES your printer’s toner cartridge, especially if you are using black slides to blank out your screen.
I’ve seen people print decks with many completely black slides (i.e. the points at which the presenter wanted to pause during the presentation) and completely killed the printer’s toner cartridge.
Video and audio playback shortcuts
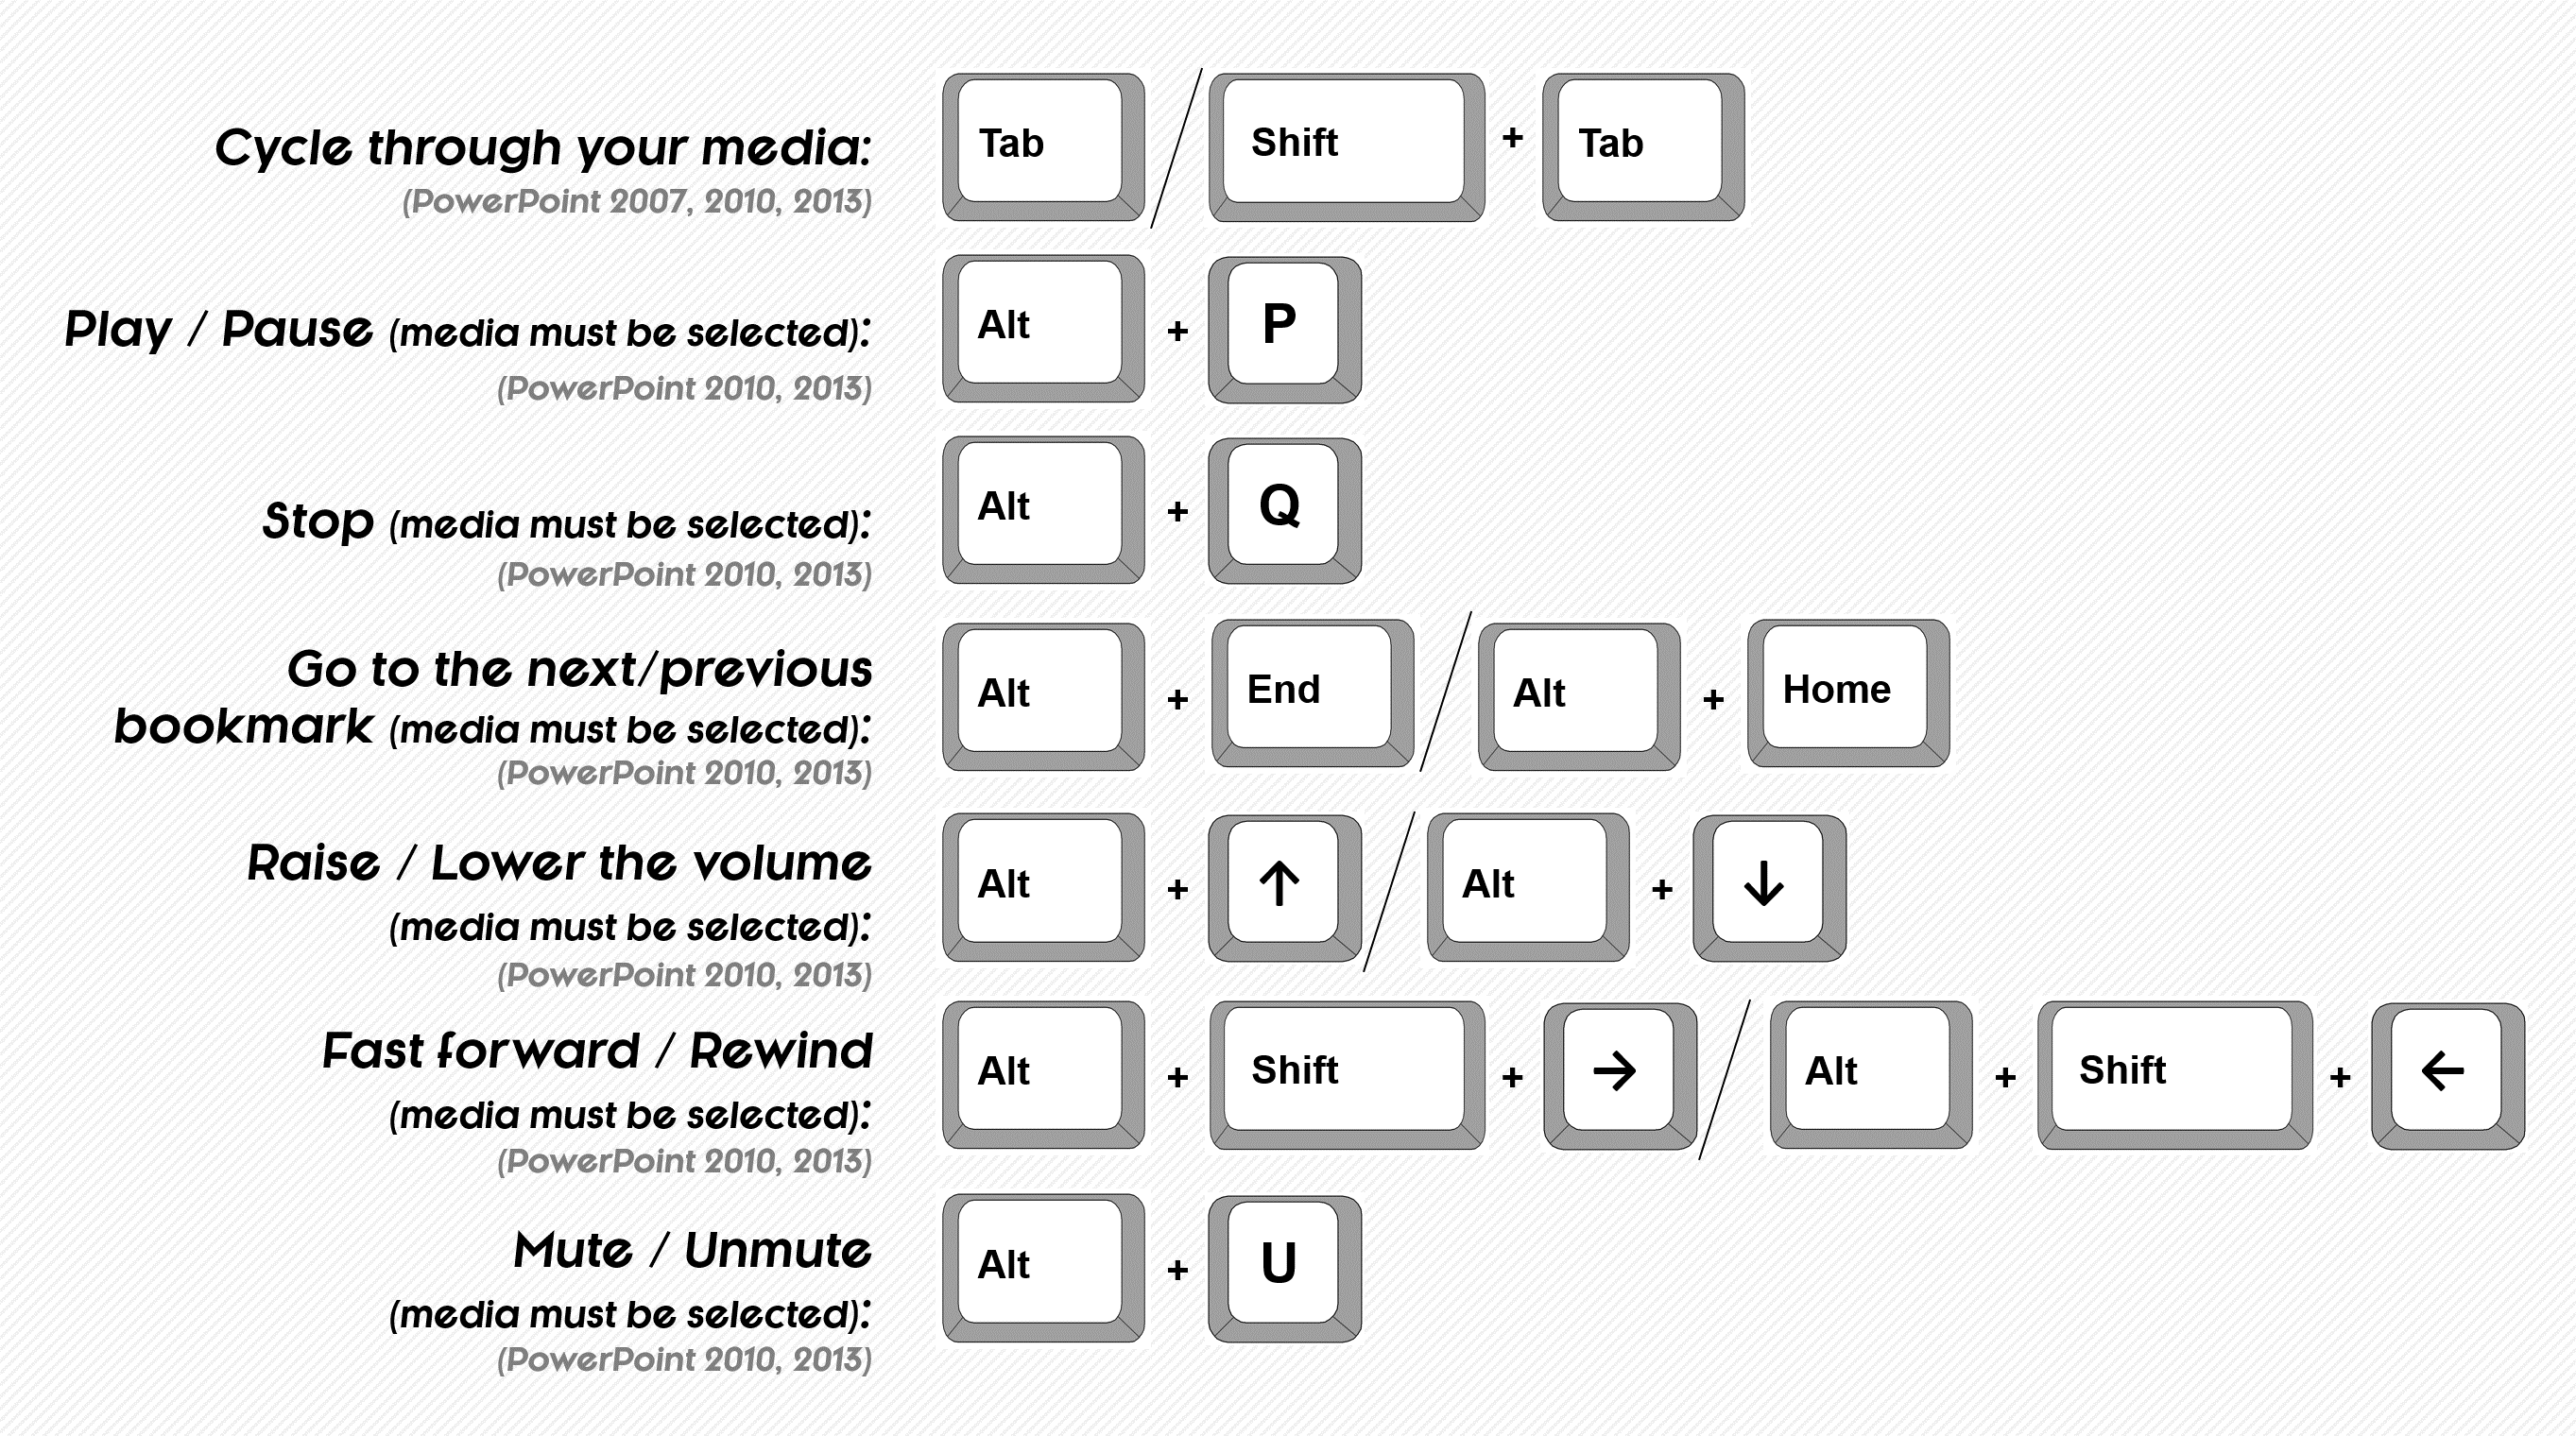
PowerPoint video and audio shortcuts
PowerPoint 2010 and 2013 now lets you control the multimedia in your presentation directly from your keyboard including pausing and playing your videos or audio (ALT + P), controlling the volume (ALT + ↑↓), and jumping between bookmarks in your videos (ALT + Home / END).
How to create a bookmark in your video
To add a bookmark to your video, select it in PowerPoint, and follow these steps:
- Place the play bar on the video’s timeline in the place where you want your bookmark to be
- Navigate to the Video Tools Playback Tab in the Ribbon
- Select ‘Add Bookmark’
Find and replace shortcuts
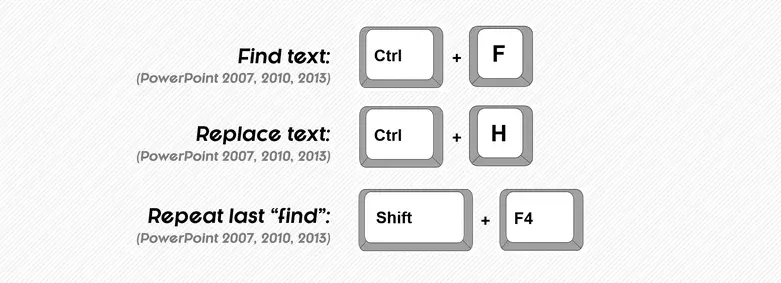
Using the find and replace keyboard shortcuts
Find (CTRL + F) is good for finding text strings within your presentation. For example, you could search for the name of your product to jump to its description.
Replace (CTRL + H) is good for finding AND replacing text strings within your presentation. For example, if you are scrubbing a deckto remove your client’s name, you could search for your client’s name and replace it with ‘The Company’.
Find Again (SHIFT + F4) will find the next instance of the text string that you previously searched for… without reopening the Find dialog box. It’s good for continuing to cycle through your presentation and make edits.
Pro PowerPoint tip: Word of caution with ‘Replace All’
When using the Replace dialog box (CTRL + H), you have a ‘Replace All’ option.
If you use this option, PowerPoint will sweep through your ENTIRE presentation, including your Slide Master, and replace every instance of the word you are searching for and replacing. This can be good if that’s what you are trying to do, but NIGHTMARE if you are not 100% sure. So just be careful.
If you accidentally do ‘Replace All’ you can thankfully CTRL + Z to undo all of the replacements.
Undo and Redo

Using the Undo and redo shortcuts
The Undo and Redo commands are Microsoft Office essentials! As you know, Undo is CTRL + Z.
As for Redo, or Repeat Last Action, there are two flavors of the shortcut that work across the entire Office suite (PowerPoint, Excel, Word, etc.). You have CTRL + Y and F4, both of which are best used in PowerPoint when working in a sweeping technique.
By a sweeping technique, I simply mean working through your slides accomplishing a single task at a time, like changing font or fill colors, outlines, text size, etc.
When sweeping through your deck, if you use one of the Repeat Last Action commands, you can simply repeat your last action over and over again, saving yourself a lot of clicking around and wasted time.
Setting the number of ‘undo’s’
As demonstrated in the video above, you can change the limit of how many Undo commands you can perform.
- Navigate to the File menu
- Select Options at the bottom of the menu
- Select Advanced on the left
- In the ‘Editing Options’ section, type in the number of Undo’s you’d like in the box next to ‘Maximum number of undos’
Complete indexed list of shortcuts (from A to Z)
Want a fast way to find a shortcut? Hit Ctrl + F on your keyboard to search the page.
What’s Next?
Related articles, about the author.

This Post Has 4 Comments

What could be a shortcut key for “save as picture” which is appeared using right click to any picture.

Hi Atif! There’s no direct shortcut for that, unfortunately. However, there is what we call a Hybrid Shortcut. If you right-click an image, you can then hit S on your keyboard, and it will launch the Save As dialog box. If you want to do that for a text box or shape, you’ll have to right-click, then hit S, and then hit Enter. Hope that helps!
Cool! Thanks
My pleasure, Atif!
Comments are closed.
Popular Tutorials
- How to Strikethrough Text (l̶i̶k̶e̶ ̶t̶h̶i̶s̶) in Word, Excel & PowerPoint
- How to Make Animated Fireworks in PowerPoint (Step-by-Step)
- Strikethrough Shortcut (l̶i̶k̶e̶ ̶t̶h̶i̶s̶) for Word, Excel & PowerPoint
- How to Create a Flash Card Memory Game in PowerPoint (Like Jeopardy)
- Keyboard Shortcuts Not Working: Solved
PowerPoint Tutorial Categories
- Strategies & Opinions
- Presentation Design
- Pictures, Icons, Videos, Etc.
- New Features
- Miscellaneous
- Charts & Data Viz
We help busy professionals save hours and gain peace of mind, with corporate workshops, self-paced courses and tutorials for PowerPoint and Word.
Work With Us
- Corporate Training
- Presentation & Template Design
- Courses & Downloads
- PowerPoint Articles
- Word Articles
- Productivity Resources
Find a Tutorial
- Free Training
- For Businesses
We help busy office workers save hours and gain peace of mind, with tips, training and tutorials for Microsoft PowerPoint and Word.
Master Critical PowerPoint Shortcuts – Secure Your FREE Training Module and Save Valuable Time!
⌛ Master time-saving expert techniques.
🔥 Create powerful presentations.
🚀 Propel your career to new heights.
We value your privacy – we keep your info safe.
Discover PowerPoint Hacks Loved by Industry Giants - KKR, AmEx, HSBC!
Over 114,880 professionals in finance, marketing and sales have revolutionized their PPT skills with our proven methods.
Gain FREE access to a full module of our premium PowerPoint training program – Get started today!
We hate spam too and promise to keep your information safe.
You are currently viewing a placeholder content from Facebook . To access the actual content, click the button below. Please note that doing so will share data with third-party providers.
Stack Exchange Network
Stack Exchange network consists of 183 Q&A communities including Stack Overflow , the largest, most trusted online community for developers to learn, share their knowledge, and build their careers.
Q&A for work
Connect and share knowledge within a single location that is structured and easy to search.
what is the shortcut key to Swap Presenter View and Slide show view while presenting in powerpoint 2016?

- microsoft-powerpoint
- microsoft-powerpoint-2016
You must log in to answer this question.
Not the answer you're looking for browse other questions tagged microsoft-powerpoint microsoft-powerpoint-2016 ..
- The Overflow Blog
- Why do only a small percentage of GenAI projects actually make it into...
- Spreading the gospel of Python
- Featured on Meta
- Our Partnership with OpenAI
- What deliverables would you like to see out of a working group?
Hot Network Questions
- Proverb for someone who mistakenly assumes he has found the right answer and is unwilling to accept his error?
- The words to describe a slave's mentality
- How to provide opportunities for role playing in a single player campaign focused on travelling and wilderness survival?
- Is nitroglycerin synthesis within human digestive system from eating soap possible?
- Are there any completely, or 'true', Mendelian traits that do not display any polygeny at all?
- Why isn't LD_PRELOAD disabled by default in Linux?
- Is this considered cheating?
- Timetable for Cercanias AM narrow gauge railway in Spain
- Waste Products from Hydrogen Fuel Cells
- An algebraic group has how many representations?
- Can I use a hose clamp to ground a wire to EMT?
- How to Fetch Only Template-defined Fields Using GraphQL
- Late 1990s to early 2000s movie that involved aliens and meat everywhere
- How do I find the whole number (n) that when multiplied by (m) will be closest to (x)?
- What would one use a theory of quantum gravity for?
- Information can't take an s
- can every program still be written without recursion or cyclic calls?
- Will the journal contact my supervisor without me knowing?
- What word would you use to describe this figure: "20 per 1000 people"? A proportion?
- Where to find chess videos where an expert explains their moves real-time
- Finding the price of the last item
- Is the conventionalism re: the terms "electron" and "positron" an article of evidence for the inversion account of negation?
- Can Nolzur's Marvelous Pigments be used with the Mage hand cantrip?
- If we can say "roomy jackets", can we say "a roomy shirt"?
- CPAs + Advisors
- Wealth Management

- Meet Our Team
- Newsletter Sign-up
- Client Onboarding
- Training Guides
- Polycom Video Guides
- Huntress Managed Security
- Cisco Umbrella DNS Filtering
- Security Awareness & Training
- Microsoft Cloud Security
- Backup & Disaster Recovery
- Web Development
10 Keyboard Shortcuts to Use When Presenting PowerPoint Slideshows

In business meetings, you can use Microsoft PowerPoint slideshows to highlight important information and capture audiences’ attention. During a slideshow , clicking through various options with the mouse can throw off your timing. Plus, the audience can see you perform these actions.
A better approach is to use keyboard shortcuts . Besides being faster, you will look like a more experienced presenter. Here are 10 keyboard shortcuts that you can use when presenting slideshows using PowerPoint 2016, 2013, 2010, or 2007. You can also Google some other keyboard shortcuts!
Keyboard Shortcuts For PowerPoint
Pressing the F5 key begins the slideshow from the first slide.
2. Shift+F5
To begin the slideshow from the current slide , press Shift+F5. In other words, press the Shift and F5 keys at the same time.
3. Spacebar, N, or Right Arrow
When you are ready to advance to the next slide or perform the next animation, you can press any of the following: the Spacebar , the N key, or the right arrow key.
4. Backspace, P, or Left Arrow
If you need to backtrack , press the Backspace, P, or left arrow key to go back to the previous slide or animation.
Pressing Ctrl+P changes the mouse pointer from an arrow to a pen. You can then use the pen to add a note to a slide or call attention to an item.
6. W or Comma
During a presentation , you might want to pause the slideshow so that you can discuss a certain point. Pressing the W or comma key pauses it and displays a white screen. Pressing the W or comma key again resumes the slideshow. When the slideshow is paused, you can use the pen to write on the white screen. If you do not already have the pen activated, though, you will need to do so with the mouse (Pressing Ctrl+P to activate the pen does not work – it simply prompts the slideshow to resume.) Anything you write on the white screen will not be saved when you resume the slideshow .
7. B or Period
Pressing the B key or period key pauses the slideshow and displays a black screen, which you can write on. Press the B or period key again to resume the slideshow.
8. Ctrl+E or E
If you need to erase a mark you made with a pen on a slide, you can change the pointer to an eraser by pressing Ctrl+E. You can erase all the marks you made to a slide at once by pressing the E key. (The pointer will not change in the latter case.) You cannot use Ctrl+E or E to erase marks on a white or black screen created when pausing a slideshow.
Pressing Ctrl+A changes the pointer to the default arrow.
Another way to change the pointer to the default arrow is pressing the Esc key. If the pointer is already an arrow, pressing Esc exits the slideshow.
Share this post
Related posts.

What are MailTips in Microsoft Outlook?
While composing a message in Microsoft Outlook, you may have... read more

Windows 11 In-place Upgrade or Clean Install?
Security updates and support for Windows 10 will end Oct.... read more

Planning Your Upgrade from Windows 10 to 11
Next year, Oct. 14, 2025, to be exact, Microsoft will... read more

Microsoft Unbundles Teams and Office: What You Need to Know
Earlier this month, Microsoft announced it will sell its messaging... read more

Why Does Windows 11 Need TPM 2.0?
If your organization is looking to make the jump to... read more

What Determines Whether an Email Goes to Junk Folder or Quarantine?
If your organization uses Microsoft Defender, you may have received... read more

Why We Recommend Microsoft 365 Business Premium to Our Clients
Microsoft 365 Business Premium is a subscription service that allows... read more

How to Modify Outlook Calendar Sharing Permissions
Microsoft Outlook allows people in your organization to view and... read more

What You Need to Know About the New Microsoft Teams
In October 2023, Microsoft announced the general availability of the... read more

How to Use Microsoft Loop to Create To-do Lists
Between email; instant messaging services like Webex, Microsoft Teams and... read more
Contribute to the Microsoft 365 and Office forum! Click here to learn more 💡
April 9, 2024
Contribute to the Microsoft 365 and Office forum!
Click here to learn more 💡
PowerPoint Forum Top Contributors: Steve Rindsberg - John Korchok - Bob Jones AKA: CyberTaz ✅
May 10, 2024
PowerPoint Forum Top Contributors:
Steve Rindsberg - John Korchok - Bob Jones AKA: CyberTaz ✅
- Search the community and support articles
- Microsoft 365 and Office
- Search Community member
Ask a new question
Best way to quickly switch between PowerPoint in Presenter View and demoing another program
Hi everyone
I love presenter view - it's amazing. It's so useful being able to view my notes as well as the slides on my laptop screen and having it so that delegates can only see the slides without notes on the main screen.
However...I'm a systems trainer. So I often have to switch out of PowerPoint to demo other programs - IE, Word, Excel etc. a fair bit and then quickly switch back to my slides to provide additional info etc.
I used to skip in and out of presentations easily on a regular basis by using the Alt+ Tab keys.
However, when I try Alt+Tab when using Presenter View, I can only switch to other programs on my laptop monitor. The display for delegates remains on the slides only.
What's the easiest and quickest way to switch out to another program on the delegate's screen (ideally mirrored with my laptop screen so I have a good view of the program too) while retaining your place in the slides in Presenter View in the PowerPoint window?
Report abuse
Reported content has been submitted
Replies (1)
See the steps here: https://answers.microsoft.com/en-us/msoffice/forum/msoffice_powerpoint-mso_other/how-do-i-toggle-between-my-powerpoint-presentation/13fc24a3-2e34-46d1-9e36-771ed606cc7c
There are two options there, for ALT+TAB and Windows Key+D..
7 people found this reply helpful
Was this reply helpful? Yes No
Sorry this didn't help.
Great! Thanks for your feedback.
How satisfied are you with this reply?
Thanks for your feedback, it helps us improve the site.
Thanks for your feedback.
Question Info
- Norsk Bokmål
- Ελληνικά
- Русский
- עברית
- العربية
- ไทย
- 한국어
- 中文(简体)
- 中文(繁體)
- 日本語
A simple guide to slideshows
Learn what slideshows are, how they’re used, common features, and how to choose a slideshow maker. Get started creating your own slideshows today with Microsoft PowerPoint.
What is a slideshow?
What are slideshows used for.

Meetings and presentations
Slideshows are most frequently used to create professional presentations for business meetings, conferences, and educational purposes. A slideshow program allows people to organize content, include visuals, and enhance the overall impact of their message.

Visual storytelling
Because slideshows sequentially display engaging visuals, text, and other multimedia, they’re a strong way to tell a cohesive and compelling narrative from start to finish.

Content creation
Slideshows give content creators a versatile and efficient way to organize information, increase visual appeal, and communicate effectively across different contexts.

Photo and video sharing
Slideshow makers are popular for creating photo and video presentations, especially for events like weddings, birthdays, and vacations. People can add transitions, music, and captions to fully bring the photo-sharing experience to life.

Training and tutorials
Slideshows help break down complex information into digestible chunks with the support of visuals and text, making them ideal for instructional materials, tutorials, and training modules.

Collaborative projects
In collaborative settings, teams use slideshow makers to create joint presentations or reports. The best slideshow makers enable multiple contributors to add their content simultaneously, which helps ensure a cohesive and unified presentation.
What are the features of a slideshow creator?
Slideshow creators vary in what they offer but ideally include:
A library of templates, themes, and images.
If you’re not a designer, this feature is huge. Simply browse the options available in your slideshow maker library to create a polished, professionally designed presentation in a flash. Be sure to confirm that access to the library is free and the images are approved for unrestricted usage.
Audio and video compatibility.
Keeping your audience engaged is key to any successful slideshow presentation. To mix things up, being able to add a multimedia element—like a song or a video clip—will help people stay focused and interested.
Presentation tools.
Handy presenter tools go a long way toward making your slideshow experience seamless. For example, straightforward slide navigation, slideshow keyboard shortcuts, pen and highlighter markup, and adjustable resolution settings.
AI assistance.
With AI revolutionizing content creation, using a slideshow maker that has AI capabilities will enhance efficiency and innovation. Depending on the slideshow app you have, creating an entire slideshow could be as easy as a quick prompt, like “Make a presentation about the benefits of sustainable fashion that has 15 slides.”
Animations.
Like audio and video, animations give your audience a bit of sensory surprise that can capture their attention.
Slide transitions.
Add some pizzazz to how you change slides with visual effects like fading, wiping, and zooming.
Screen recording.
Being able to record your screen in a slideshow maker is helpful when giving an instructional talk, software demonstration, and other types of presentations that require visual aids.
A place to put speaker notes.
Having somewhere to jot a few notes down will help remind you of everything you want to cover as you present.
Different viewing options.
Looking at different views—for example, a presenter view, an audience view, and a high-level view of slide order—is useful when organizing your slideshow’s structure and understanding and preparing for what you’ll see versus what your audience will see.
How do I choose the right slideshow maker?
When choosing a slideshow maker, keep the following questions in mind to make sure you get the most for your money:
Is it scalable with your business?
As your organization grows and changes, it’s important to have flexible technology that adapts to new needs. Having certain features—such as cloud-based collaboration, compatibility with other work apps, and a mobile app—will help ensure that no matter how your business changes, the slideshow maker is up to the task. This also applies to pricing plans. Consider choosing a slideshow app that has a subscription plan (so the software is always up to date), volume-based pricing, or enterprise-level pricing.
Does it have a variety of visual elements?
It’s pretty much a given that a slideshow maker will allow you to add images, but think outside the JPEG box—what other visual elements are available to you? Features like preset themes, free templates, SmartArt, a built-in clip art library, shape tools, background styles, 3D models, and charts and graphs provide diverse ways to switch up how a slideshow looks without relying solely on adding your own images.
Is it easy to use?
You could have the most feature-rich slideshow maker on the market, but if it isn’t easy to use, you probably won’t use it. Or you will, but you’ll be frustrated, waste valuable time, and have difficulty convincing people you work with to use it. As you research slideshow makers, look for videos that show the apps’ interfaces in action to help you decide if they’re intuitive and will have a shorter learning curve.
Does it have collaboration and sharing options?
Because making a slideshow is often a collaborative effort, it’s worthwhile to find a slideshow creator that was designed with this in mind. Pick one that offers editing controls and commenting, as well as the ability to work on a slideshow at the same time as someone else. Having a cloud-based slideshow maker will be key here. You’ll not only save yourself time but also keep things simple by not having multiple versions of the same slideshow.
Explore more about slideshows and slideshow makers
Copilot in powerpoint.
Transform how you make slideshows with the versatile AI in Copilot for PowerPoint.
Improve your presenting skills
Practice presenting with an AI speaker coach to get feedback on body language, repetition, and pronunciation.
Six slideshow tips and tricks
Read up on tips about how to finesse your slideshows to give your most confident presentations.
Get free PowerPoint templates
Show your style with PowerPoint templates in more than 40 categories.
How to make a branded slideshow
Create a cohesive visual identity for your brand that goes beyond adding a logo to every slide.
Try a photo album template
Relive your favorite memories with photo album templates designed for all your unforgettable moments.
The benefits of visual aids in slideshows
Discover why using visual aids helps communicate ideas and messaging more effectively.
Slideshows that reach all learners
Explore the different ways that people learn and how to include all learning styles in your presentations.
Frequently asked questions
How do i make a good slideshow.
Making a good slideshow in PowerPoint is easy:
Plan what you’d like to include in your slideshow.
Launch your slideshow creator.
Choose the theme you’d like.
Import media.
Add text, music, and transitions.
Record, save, and share your slideshow.
Learn more about how to make a slideshow .
How do I add music to a slideshow?
To add music to a slideshow, first make sure that you’re using a slideshow maker with music compatibility. In PowerPoint, follow these steps:
Open your PowerPoint presentation and select the slide where you want to add music.
Click on the Insert tab in the ribbon menu.
Click on the Audio button and select Audio on My PC.
Browse to the folder on your computer where the audio file is located and select it.
Click on the Insert button.
How do I record a slideshow?
The steps for recording a slideshow in PowerPoint will vary depending on the version that you own. Get help with slideshow recording based on your version.
What types of files can I add to a slideshow?
File compatibility in PowerPoint includes the use of JPEGs, PNGs, TIFFs, GIFs, PDFs, MP3s, WAVs, MIDIs, MPEG-4 Videos, and Windows Media Videos.
How do I share my slideshow?
To share your PowerPoint slideshow, follow these steps:
Open your presentation and click Share at the top right of your screen.
If your presentation isn't already stored on OneDrive, select where to save your presentation to the cloud.
Choose a permission level, like Anyone with a link , or maybe just people in your company. You can also control if people can edit or just view the doc.
Select Apply.
Enter names and a message.
Select Send.
Follow Microsoft
IMAGES
VIDEO
COMMENTS
To do this. Press. Start a presentation from the beginning. F5. Start a presentation from the current slide. Shift+F5. Start the presentation in Presenter View. Alt+F5. Perform the next animation or advance to the next slide.
Step 1: Open your PowerPoint presentation. The first step to enter Presentation Mode in PowerPoint is to ensure that your presentation file is open and ready for display. To do so, open PowerPoint and locate the file containing your presentation. Click on the file to open it. Review that the slides are arranged in the correct order and that any ...
First, create a new custom slide show and select the slides that you want to display. Then, click Add, enter the name of the presentation and click OK. This new custom presentation will appear on the list. Select it and click Show to begin the presentation. Defining a custom slide show.
If this happens to you often, these are the PowerPoint shortcuts you need for a quick text alignment before starting your slide show: Use "Ctrl + J" to justify your text. Press "Ctrl+E" to center the text. Use "Ctrl+L" for left alignment. Press "Ctrl+R" to right-align your text.
Click From Beginning. Holding down the Alt key and clicking From Beginning, the Presenter View will launch from the very first (non-hidden) slide in your presentation. You can also launch the presenter view from the beginning of your presentation at any time by clicking Alt + F5 on your keyboard.
PowerPoint Hacks: Presenter View & Keyboard Shortcuts. Powerpoint hacks, such as keyboard shortcuts, are essential when using PowerPoint, especially when presenting to a live audience via Presenter View. For your next presentation, review the tips and tricks below to keep from fumbling through your slides and floundering during your delivery. 1.
Turn On PowerPoint Presenter View. In PowerPoint for macOS, simply click on Presenter View on the Slide Show tab to kick off the presentation in Presenter view. Turn on Presenter View by clicking on Presenter View on the Slide Show tab. You'll see the Presenter View interface on one screen.
Creating a PowerPoint presentation is no small task! It requires juggling all sorts of PowerPoint stuff like charts, tables, pictures, object formatting, text and shapes just to create your slides in the first place. ... While in Slide show mode, to go to the first or next hyperlink on a slide hit the TAB key. While in Slide show mode, ...
Run a slide show: [F5] Run a slide show from the current slide: [Shift] + [F5] Help during slide show (displays PowerPoint keyboard shortcuts): [F1] Advance to the next slide (any of these): [Right], [Down], N (for Next), [Spacebar] , [Page Down] (or click the left mouse) Return to the previous slide (any of these): [Left], [Up], P (for ...
Key PowerPoint Shortcut #4 - Launching Presenter View Presenter View is a great alternative to Slide Show Mode, allowing you to play your presentation for an audience. I love using Presenter View, because it allows you to do several things: 1. See the slide that your audience is viewing so that you can address that slide, 2.
Start the presentation in Presenter View using a function key. Press Alt + F5. 4. Start a presentation from the beginning using key tips. Press Alt > S > B (press Alt, then S, then B). 5. Start a presentation from the current slide using key tips. Press Alt > S > C (Alt, then S, then C).
Here are some of the most useful keyboard shortcuts for PowerPoint: Ctrl + N: Create a new presentation.\ Ctrl + O: Open an existing presentation.\ Ctrl + S: Save your presentation.\ Ctrl + P: Print your presentation.\ Ctrl + Z: Undo your last action.\ Ctrl + Y: Redo your last action.\ Ctrl + C: Copy selected text or object.\
Ctrl+L: Left align a paragraph. Ctrl+R: Right align a paragraph. Ctrl+T: Open the Font dialog box when text or object is selected. Alt+W,Q: Open the Zoom dialog box to change the zoom for the slide. Alt+N,P: Insert a picture. Alt+H,S,H: Insert a shape. Alt+H,L: Select a slide layout. Ctrl+K: Insert a hyperlink.
Shortcut Keys For Working With Objects. Selecting objects on your slides. Tab: Cycle through objects on a slide. Shift + Tab: Cycle backward through objects. Ctrl + A: Select all objects on a slide. Working with Objects on your slides. Ctrl + D: Duplicate selected object (s). Ctrl + T: Open the Format Text dialog box. Ctrl + X: Cut selected text.
PowerPoint Duplicate Slideshow - New Feature A brand new keyboard shortcut in PowerPoint 2013 and PowerPoint 2016 is the CTRL + SHIFT + N shortcut, which creates a new duplicate slideshow, or presentation, of the one you are currently working in. So if you find a presentation that you want to quickly copy and tweak, in PowerPoint 2013 or 2016 (same thing as Office 365) just CTRL + SHIFT + N ...
There is no shortcut for this, but the easiest way would be to use Windows key+P and then extend your screen. When you start a presentation using F5 , PowerPoint should show the presenter view on the PC screen and the slide show on the secondary screen (projector) by default.
Shift+F5. To begin the slideshow from the current slide, press Shift+F5. In other words, press the Shift and F5 keys at the same time. 3. Spacebar, N, or Right Arrow. When you are ready to advance to the next slide or perform the next animation, you can press any of the following: the Spacebar, the N key, or the right arrow key. 4.
So I often have to switch out of PowerPoint to demo other programs - IE, Word, Excel etc. a fair bit and then quickly switch back to my slides to provide additional info etc. I used to skip in and out of presentations easily on a regular basis by using the Alt+ Tab keys. However, when I try Alt+Tab when using Presenter View, I can only switch ...
Run PowerPoint in safe mode. 1] Maximize PowerPoint from your taskbar The first thing you can do to fix the issue is to try maximizing the PowerPoint window from your taskbar.
To add music to a slideshow, first make sure that you're using a slideshow maker with music compatibility. In PowerPoint, follow these steps: Open your PowerPoint presentation and select the slide where you want to add music. Click on the Insert tab in the ribbon menu. Click on the Audio button and select Audio on My PC.