- PRO Courses Guides New Tech Help Pro Expert Videos About wikiHow Pro Upgrade Sign In
- EDIT Edit this Article
- EXPLORE Tech Help Pro About Us Random Article Quizzes Request a New Article Community Dashboard This Or That Game Popular Categories Arts and Entertainment Artwork Books Movies Computers and Electronics Computers Phone Skills Technology Hacks Health Men's Health Mental Health Women's Health Relationships Dating Love Relationship Issues Hobbies and Crafts Crafts Drawing Games Education & Communication Communication Skills Personal Development Studying Personal Care and Style Fashion Hair Care Personal Hygiene Youth Personal Care School Stuff Dating All Categories Arts and Entertainment Finance and Business Home and Garden Relationship Quizzes Cars & Other Vehicles Food and Entertaining Personal Care and Style Sports and Fitness Computers and Electronics Health Pets and Animals Travel Education & Communication Hobbies and Crafts Philosophy and Religion Work World Family Life Holidays and Traditions Relationships Youth
- Browse Articles
- Learn Something New
- Quizzes Hot
- This Or That Game
- Train Your Brain
- Explore More
- Support wikiHow
- About wikiHow
- Log in / Sign up
- Computers and Electronics
- Presentation Software
- PowerPoint Presentations

How to Open a PPT File on PC or Mac
Last Updated: September 1, 2022 Tested
Using PowerPoint
Using google slides, using powerpoint online.
This article was co-authored by wikiHow Staff . Our trained team of editors and researchers validate articles for accuracy and comprehensiveness. wikiHow's Content Management Team carefully monitors the work from our editorial staff to ensure that each article is backed by trusted research and meets our high quality standards. The wikiHow Tech Team also followed the article's instructions and verified that they work. This article has been viewed 85,982 times. Learn more...
This wikiHow teaches you how to open and view the contents of a PPT (PowerPoint presentation) file in Windows and macOS. PPT is the native presentation format in Microsoft PowerPoint's earlier versions and is supported by all versions of the software. If you don't have PowerPoint, you can open the file in Google Slides or PowerPoint Online (a free version of PowerPoint accessible on the web).

- If you don't have PowerPoint installed on your computer, make sure to check out this article for detailed instructions on how to download it.
- Alternatively, you can download and use Apache OpenOffice ( https://www.openoffice.org/download ), or Apple Numbers ( https://itunes.apple.com/tr/app/numbers/id409203825 ).
- To open the PPT with a different program, just select the program you want to use on the "Open with" menu.

- If you're prompted, sign in with your Google account.

- Alternatively, you can drag and drop your PPT file here.

- If you're prompted, sign in with your Microsoft account.

Expert Q&A
You might also like.

About This Article

1. Right-click the PPT file. 2. Hover over Open with . 3. Select Microsoft PowerPoint . Did this summary help you? Yes No
- Send fan mail to authors
Is this article up to date?

Featured Articles

Trending Articles

Watch Articles

- Terms of Use
- Privacy Policy
- Do Not Sell or Share My Info
- Not Selling Info
wikiHow Tech Help Pro:
Level up your tech skills and stay ahead of the curve
How to Use a Mac With PowerPoint: A Step-by-Step Guide
Using a Mac with PowerPoint is simple. First, make sure you have PowerPoint installed on your Mac. You can find it at the App Store or through a Microsoft 365 subscription. Open PowerPoint, and you’ll be greeted with a range of templates to start your presentation. From here, you can add text, images, and animations to create an engaging slideshow. Once done, you can present directly from your Mac or save your presentation to share with others.
After you’ve completed your PowerPoint presentation on your Mac, you’ll have a professional and compelling visual aid to support your speech or lecture. You can also share it with others or export it into different formats such as PDF, video, or even a web page.
Introduction
Are you ready to impress your audience with a stunning presentation? If you’re a Mac user, fear not – using PowerPoint on your macOS is as smooth as on any Windows PC. Let’s be honest, presentations are a part of life: whether you’re a student, a professional, or just someone with a story to tell, at some point, you’re going to need to put some slides together. PowerPoint for Mac has all the tools you need to create a presentation that’s both visually captivating and content-rich.
Why is this important? Well, PowerPoint presentations are a staple in the professional world. They’re used for everything from business pitches to academic lectures. Knowing how to create an effective PowerPoint presentation on your Mac could be the difference between persuading your audience or leaving them unimpressed. And who is this relevant to? Everyone! Whether you’re a newbie to presentations or a seasoned speaker looking to refine your skills, this guide will help you master PowerPoint on your Mac.
Step-by-Step Tutorial: Using PowerPoint on a Mac
Before jumping in, let’s clarify what you’ll achieve by following these steps. By the end, you’ll be able to create, edit, and present a PowerPoint slideshow on your Mac.
Step 1: Install PowerPoint
Install PowerPoint on your Mac from the App Store or through a Microsoft 365 subscription.
After installing PowerPoint, you’ll need to sign in with your Microsoft account to activate the software, then you’ll be ready to start creating your presentation.
Step 2: Open PowerPoint
Open PowerPoint and choose a template or open a blank presentation.
PowerPoint offers a variety of templates to suit different presentation styles. If you choose to start with a blank slate, you’ll have complete creative freedom.
Step 3: Add Content
Add slides and content such as text, images, and shapes to your presentation.
Remember to keep your slides simple and not clutter them with too much content. Visual aids should support your speech, not replace it.
Step 4: Customize Your Slides
Customize your slides’ design with themes, colors, and animations.
This step is where you can get creative with your presentation’s look and feel. Just be sure not to go overboard with animations – they should enhance your presentation, not distract from it.
Step 5: Present Your Slideshow
Present your slideshow directly from your Mac or save it to share with others.
You can start your presentation by clicking the ‘Slide Show’ tab and then ‘Play from Start’. Make sure you practice your presentation beforehand to ensure everything runs smoothly.
Additional Information
Now, let’s sprinkle in some extra tidbits that could elevate your PowerPoint game on a Mac. First off, did you know that PowerPoint for Mac supports real-time collaboration? Yup, you can work with your teammates on the same presentation at the same time, no matter where you are. And if you’re all about shortcuts, PowerPoint for Mac has plenty. For instance, pressing Command + Shift + N instantly creates a new slide.
Another neat feature is the Presenter View, which lets you see your notes, the upcoming slide, and a timer, all while the audience only sees the current slide. And for those who value accessibility, PowerPoint for Mac has tools to make presentations more accessible, including options for larger text and high contrast. Just remember, when using PowerPoint on a Mac, you have all the essentials at your fingertips to create presentations that are not just informational, but also memorable.
- Install PowerPoint on your Mac from the App Store or Microsoft 365.
- Open PowerPoint and select a template or start with a blank presentation.
- Add and customize your slides with text, images, and animations.
- Present directly from your Mac or save your presentation for later use.
Frequently Asked Questions
Can i use powerpoint on a mac.
Yes, PowerPoint is available for Mac users and can be downloaded from the App Store or included in a Microsoft 365 subscription.
Is PowerPoint for Mac different from Windows?
While there are some differences in design and available features, PowerPoint for Mac offers a comparable experience to the Windows version.
Can I collaborate with others using PowerPoint for Mac?
Absolutely! PowerPoint for Mac supports real-time collaboration, allowing multiple users to work on the same presentation simultaneously.
Can I open a PowerPoint presentation made on a Mac on a Windows PC?
Yes, presentations made in PowerPoint for Mac are compatible with PowerPoint for Windows, ensuring easy file sharing and collaboration.
Does PowerPoint for Mac support Presenter View?
Yes, Presenter View is available in PowerPoint for Mac, providing speakers with a private view of their notes and upcoming slides while presenting.
In conclusion, mastering the use of PowerPoint on a Mac can be a game-changer for anyone looking to create impactful and persuasive presentations. Whether you’re a student, educator, entrepreneur, or professional, the ability to present your ideas clearly and attractively is invaluable.
So, dive in, explore the features, and harness the power of PowerPoint on your Mac to captivate your audience. Remember, a well-crafted presentation can be the key to success. Happy presenting!

Matthew Burleigh has been writing tech tutorials since 2008. His writing has appeared on dozens of different websites and been read over 50 million times.
After receiving his Bachelor’s and Master’s degrees in Computer Science he spent several years working in IT management for small businesses. However, he now works full time writing content online and creating websites.
His main writing topics include iPhones, Microsoft Office, Google Apps, Android, and Photoshop, but he has also written about many other tech topics as well.
Read his full bio here.
Share this:
Join our free newsletter.
Featured guides and deals
You may opt out at any time. Read our Privacy Policy
Related posts:
- Can I Convert My Powerpoint to Google Slides?
- How to Save Powerpoint as PDF with Notes
- How to Drag Slides From One PowerPoint to Another: A Step-by-Step Guide
- How to Make a Powerpoint Slide Vertical in Powerpoint 2013
- How to Set Time for Slides in Powerpoint
- What Are Benefits of PowerPoint? A Comprehensive Guide
- How to Combine PowerPoint Presentations With Different Orientations
- How to Check Word Count on Powerpoint 2010
- How to Insert Slides from Another Presentation in Powerpoint 2010
- How to Change Hyperlink Color in Powerpoint 2010 (An Easy 5 Step Guide)
- How Is Microsoft PowerPoint Used in Business: A Comprehensive Guide
- How to Unhide a Slide in Powerpoint 2013
- How to Convert a PowerPoint to Word and Edit with Ease
- How to Loop a Slideshow on Powerpoint 2013
- How to: Effortlessly Create PowerPoint Looping Presentations
- How to Change the Font on All Slides in Google Slides
- How to Change Line Spacing in Powerpoint for Every Slide at Once
- How to Insert Check Mark in Powerpoint for Office 365
- How to Start PowerPoint: A Step-by-Step Guide for Beginners
- How to Email a PowerPoint Slideshow: A Step-by-Step Guide
- I Tried Both: Apple Watch 9 vs Fitbit Charge 6
- Best Places to Print Photos Online
How to Get PowerPoint on a Mac
Get the widely used presentation tool
:max_bytes(150000):strip_icc():format(webp)/SamCostello-d7fcf106ec2048ccb06d1e2190b3396d.jpg "how to open presentation on mac")
- Ithaca College
:max_bytes(150000):strip_icc():format(webp)/ryanperiansquare-de5f69cde760457facb17deac949263e-180a645bf10845498a859fbbcda36d46.jpg "how to open presentation on mac")
- Western Governors University
What to Know
- From the Mac App Store: Apple Menu > App Store > search for PowerPoint > Get > Install > enter Apple ID if prompted > Open .
- PowerPoint requires a subscription from Microsoft. You can sign up via In-App Purchase or at the Microsoft website.
- Keynote, Apple's alternative to PowerPoint, comes pre-installed on new Macs (and can be downloaded from the Mac App Store).
This article explains how to get PowerPoint on Mac, its requirements—including a subscription—and some free alternatives available on the Mac.
How Do I Get PowerPoint on Mac?
Getting PowerPoint on your Mac is very easy. Just a few clicks, and you'll be ready to start making slides and building presentations. Here's what to do:
Open the Mac App Store by going to the Apple menu > App Store or the Applications folder > App Store .
You can also download PowerPoint directly from Microsoft , but these instructions focus on the Mac App Store.
Search for PowerPoint .
On the search results screen, click Get .
Click Install .
Enter your Apple ID password when prompted.
When the download is finished, click Open to launch PowerPoint.
Once you've opened PowerPoint, you'll need to sign into your Microsoft account or use a free trial.
Is PowerPoint Free for the Mac?
PowerPoint is not free on the Mac (or on Windows, for that matter). Microsoft offers a free, 30-day trial after you download PowerPoint. Once the free trial expires, you need to pay to keep using the app. Options include a one-time purchase price or a monthly or annual subscription , which provides cloud storage features and ongoing technical support. You can subscribe through Microsoft's website or use in-app purchases via your Apple ID.
Do Macs Come With PowerPoint?
No. To get PowerPoint on your Mac, you need to download and install it using the steps from the first section of this article (or, as noted before, directly from Microsoft).
What Is the Mac Version of PowerPoint?
While PowerPoint may be the most well-known program for making slides and creating presentations, it's far from the only one. Your Mac probably came with one of the alternatives pre-installed.
Apple makes a program called Keynote which is a direct competitor to PowerPoint. It offers all of the core features of PowerPoint—creating slides and presentations, animations, templates, presenter mode, etc. It integrates tightly with Apple's other software and services like iCloud.
Keynote comes pre-installed for free on all modern Macs. It's likely in your Applications folder as you read this. If it's not, and if your Mac and version of the macOS are compatible with it, you can download it for free from the Mac App Store by searching for "Keynote."
Need to make slides and want to avoid both PowerPoint and Keynote? There are many other PowerPoint alternatives , but one place to start is Google Slides , which is free, web-based, and integrates with your Google account and other Google productivity tools.
To print PowerPoint slides with Notes on a Mac, open your presentation and select Print . In the Print dialog box, select Show Details . In the Layout box, select Notes . Configure the rest of your printing options and select Print .
The easiest way to record a voiceover in PowerPoint on a Mac is to record by slide. Select the slide where you want to add the narration, then select Insert from the menu bar and click Audio > Record Audio . Enter a name for the narration, select Record , read your script, and select Stop when you're finished recording.
To convert PowerPoint to video on a Mac, open the presentation you want to save and select File > Export . In the export window, next to File Format , select a file format option, such as MP4 or MOV . Choose your video quality, choose whether you want to include narrations, adjust timing, and select Export .
Get the Latest Tech News Delivered Every Day
- How to Use Copilot in Powerpoint
- How to Use Microsoft's Free PowerPoint Viewers
- The Best Free Productivity Apps for the iPad
- 4 Ways of Transferring Files From Android to Mac
- How to Install Mac OS on PC
- The 10 Best Word Processing Apps for iPad in 2024
- How to Use WhatsApp on a Mac
- What Is Microsoft PowerPoint and How Do I Use It?
- The 20 Best Mac Apps of 2024
- How to Fix 'Cannot Be Opened Because the Developer Cannot be Verified' Error on Mac
- How to Transfer Files Between an iPhone and a Mac
- How to Convert PowerPoint to Video
- How to Update PowerPoint on Windows and Mac
- What Is an Animation in Presentation Software?
- What Is Microsoft Word for Mac?
- How to Make a Poster in PowerPoint
How to Open a PowerPoint Presentation? [Complete Guide!]
By: Author Shrot Katewa
![How to Open a PowerPoint Presentation? [Complete Guide!]](https://artofpresentations.com/wp-content/uploads/2021/05/Featured-Image-how-to-Open-a-PowerPoint-Presentation-File.jpg "how to open presentation on mac")
Knowing how to master the PowerPoint application starts with the basics. If you are just starting out with Microsoft PowerPoint, the first thing you need to know is really how to open a PowerPoint presentation!
To open or view an existing PowerPoint file, double-click on the file from the folder. Alternatively, open the PowerPoint application. Then, click on “File>Open>Browse”, and locate the file on your computer to open it. To open a new presentation file, simply click on “File>New>Blank Presentation”.
The process of opening a PowerPoint presentation is actually quite simple and it only takes a few seconds. So, in this article, first we will take you through the process of opening a presentation step-by-step in a visual manner. Then, I will provide answers to all questions related to opening a PowerPoint presentation!
So, let’s get started!
[A Quick Note Before We Begin – for this article, I will be using one of the presentation templates from Envato Elements . With Envato Elements, you get access to thousands of presentation designs with unlimited downloads so you never run out of options again. Plus, you get free previews so you know exactly what you’re getting before buying! It is also very affordable. Check out their pricing here ]
1. How to Open a PowerPoint Presentation?
There are a couple of different methods in which you can open a PowerPoint file. Both the methods are actually quite easy.
The first method requires the least number of steps. To open or view a PowerPoint presentation simply locate the PowerPoint file on your computer, and double-click on it. You can also right-click on the file, and from the dropdown menu, click on “Open”.
The second method requires you to start the PowerPoint application first.
If you do not see the PowerPoint icon on your desktop or taskbar, just go to the search bar and type ‘PowerPoint’ using your keyboard to find it. After opening the PowerPoint application, all you have to do is select your presentation file to open it. Just follow the steps below:
1a. How to Open a New PowerPoint Presentation?
Follow the steps below to open/create a new PowerPoint Presentation:
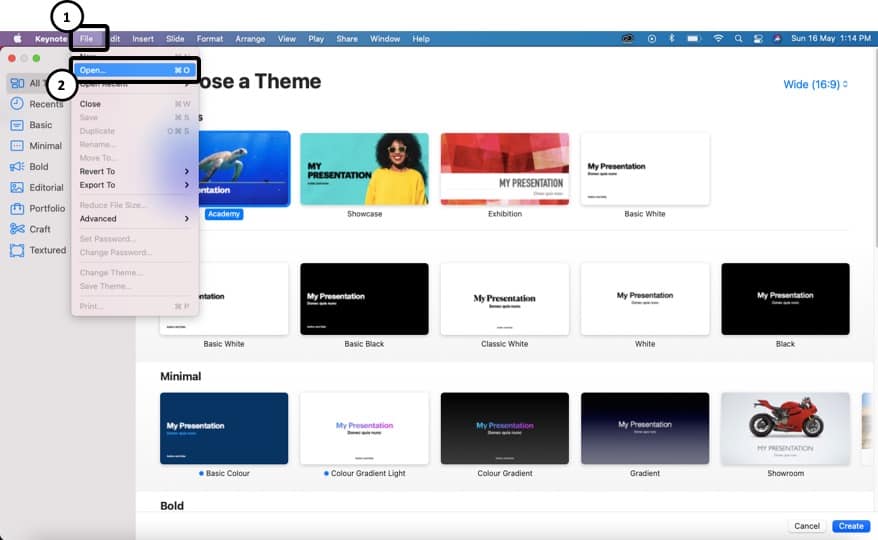
Step-1: Click on the “File” Menu button
At the top left side of your Microsoft PowerPoint application, you will find the ‘File’ menu option. The first step is to click on it.
Step-2: Click on “New”, and select the “Blank Presentation” button
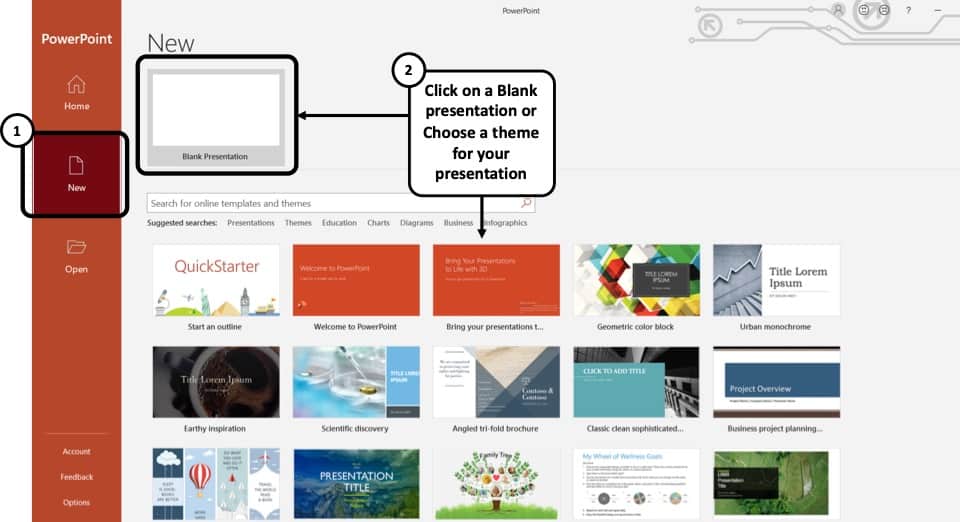
Then, from the PowerPoint Backend view, you need to click on “ New “.
Now on your screen, you will find an option that says ‘Blank Presentation’ for you to click on. A new PowerPoint presentation with a blank slide will be created once you click on it.
You can also choose to click on any of the templates below to go with a pre-made design theme.
1b. How to Open an Existing PowerPoint Presentation?
It is common to have PowerPoint presentation files saved in different folders of your computer. There are two very easy ways to open these existing PowerPoint presentation files.
You can either open an existing PowerPoint file by browsing to the folder it is stored in and double-clicking on the file. Or you can open it from the Microsoft PowerPoint application itself. I’ll discuss both of the ways below:
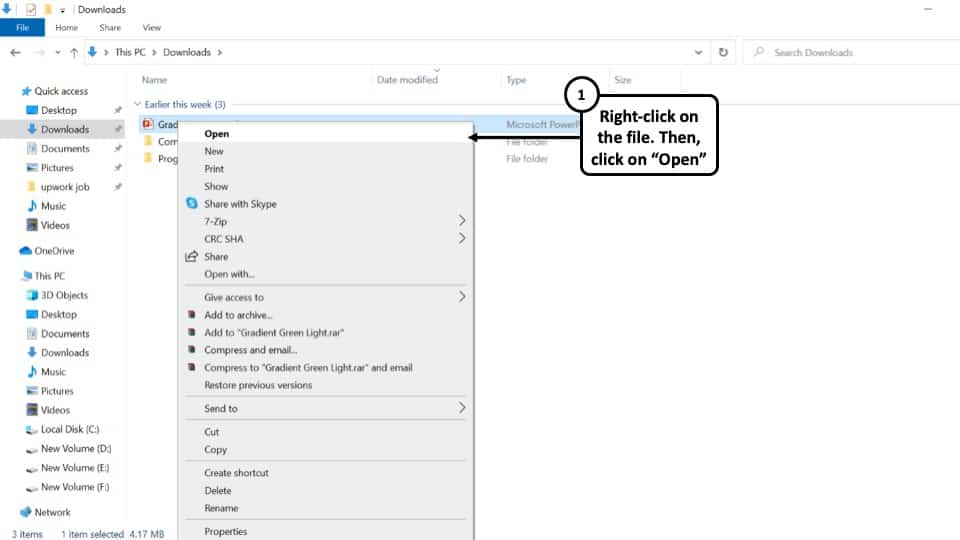
Opening an existing PowerPoint Presentation file from the file location
Step:-1: Go to the folder your PowerPoint Presentation file is stored in

Open the folder where you had saved your PowerPoint presentation file. It could be on any of your local drives, or if you have recently downloaded the file, it could be on the ‘Downloads’ folder.
Step-2: Double-click on the PowerPoint Presentation file.
‘ Left click’ on the file twice using your mouse to open it. You can also ‘Right click’ on the file once and from the dropdown menu click on the ‘Open’ option to open the file on your Microsoft PowerPoint application.
Opening an existing PowerPoint Presentation from the Microsoft PowerPoint Application
Step-1: Open the Microsoft PowerPoint application and go to the “File” menu
The first thing you have to do is open the Microsoft PowerPoint application and click on the “ File ” menu option on the top-left corner of the screen.
Step-2: Click on ‘Open’, and then ‘Browse’
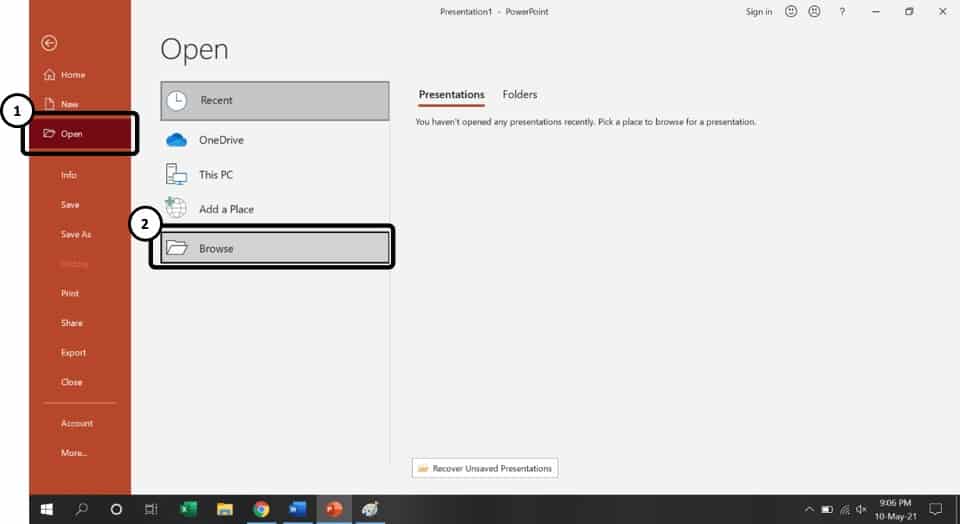
Clicking on the File option will open the background view of PowerPoint. Then, click on “ Open “
In the ‘Open’ tab, you will find all the Presentation files you have used/viewed recently under the ‘Recent’ section. If the file you want to open is not present here, simply click on ‘Browse.’
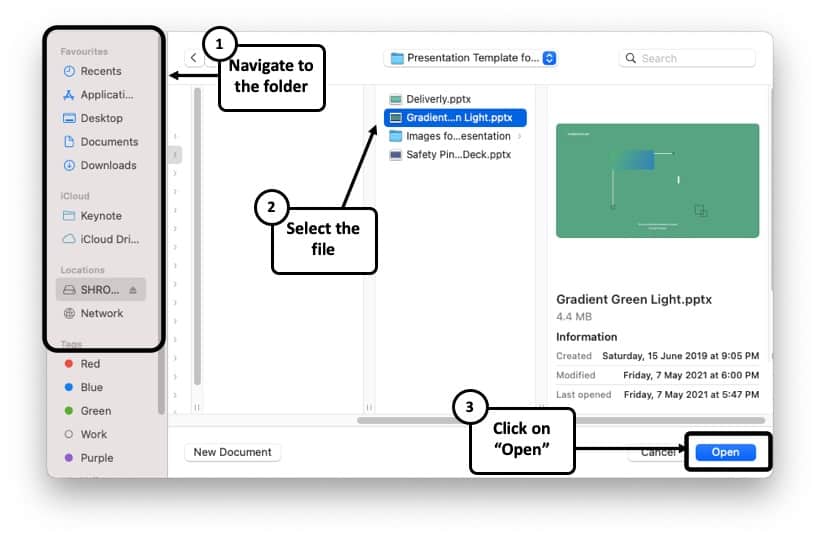
Step-3: Go to the file location click on it to select it.

After that, a window will pop up using which you can use to choose the file you want to open. Go to the folder containing the PowerPoint presentation file and select it by ‘Left-clicking’ on its name.
Step-4: Click on ‘Open.’
After selecting the file, click on ‘Open’ to get the job done. You can also edit the slides by clicking on ‘Enable Editing.’
You can follow any of the two methods mentioned above to open an existing PowerPoint Presentation file.
1c. Shortcut Key to Open a Presentation in PowerPoint
You can open both a new PowerPoint Presentation as well as an existing PowerPoint file using shortcut keys.
Here are the shortcut keys to open a PowerPoint presentation –
- To open a new PowerPoint presentation – Press “Ctrl+N” (Cmd+N on Mac)
- To open an existing PowerPoint presentation – Press “Ctrl+O” (Cmd+O on Mac)
Remember, in order to use the above shortcut keys, you need to open the PowerPoint application first on your computer.
2. How to Open a PowerPoint Online? (Using OneDrive)
Microsoft PowerPoint can also be saved online. Microsoft actually has integration with its own cloud service called OneDrive. In fact, if you are using Microsoft Office 365 , you also get free cloud storage of up to 1 TB with your account!
When you try to open an online version of a PowerPoint file, you will need to do so using OneDrive. In the following steps, I will show you how to open a PowerPoint Presentation file online using OneDrive:
Step-1: Click on the “File” menu
The first step, as usual, is to click on the “ File ” menu option. This will open the backend view of PowerPoint.
Step-2: Click on “Open” and choose “OneDrive”
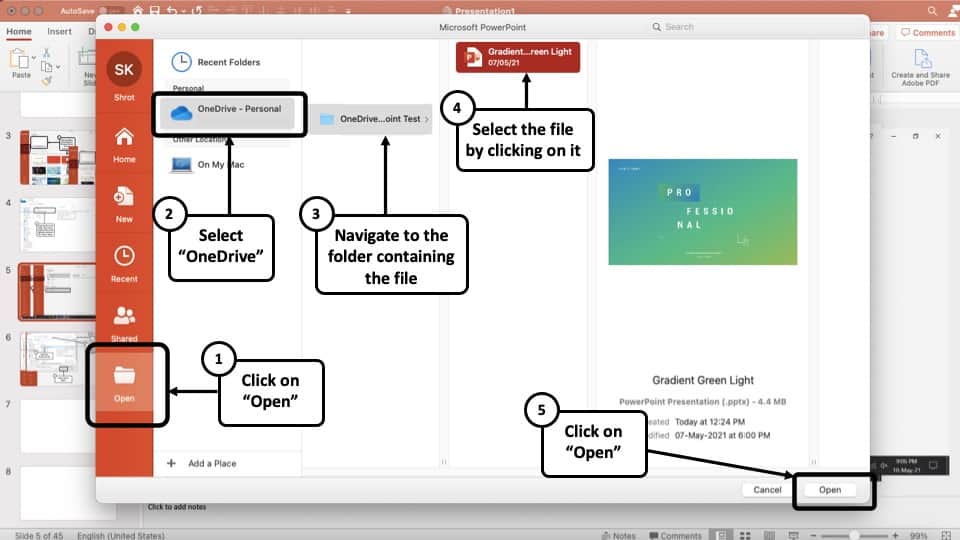
From the backend view, click on the “ Open ” option. Then, click on “ OneDrive “. You may need to login into your OneDrive account. Then, navigate to the respective folder containing the PowerPoint file.
Step-3: Select the File and Click “Open”
Navigate to the designated folder on OneDrive that contains the PowerPoint file. Select it and then click “Open”.
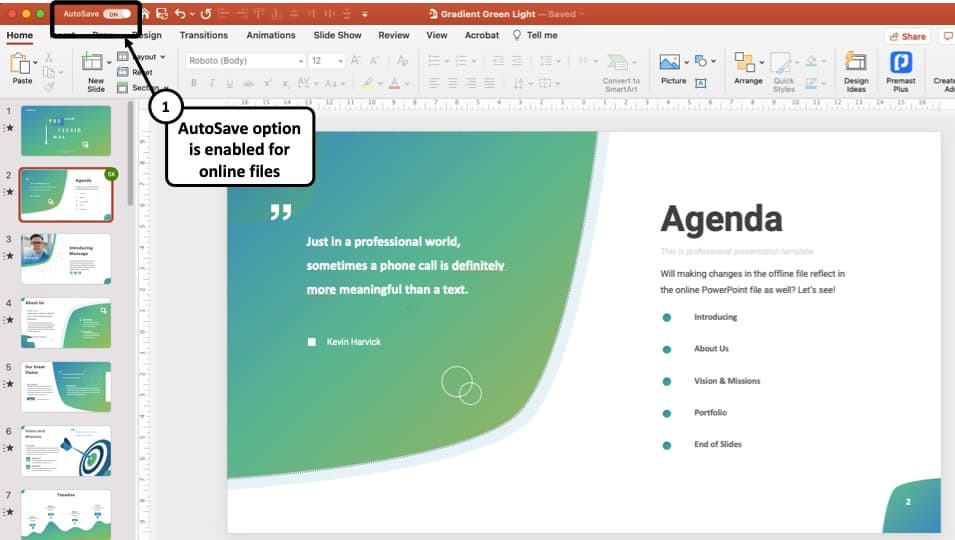
PowerPoint will then download the file for you. Once it opens the online file, you will notice that the “ Autosave ” feature in PowerPoint will be turned on.
This basically means, every time you make a change to the file, it will automatically reflect in the file saved online in OneDrive!
How to Open and View a PowerPoint file in OneDrive?
You can also view the same PowerPoint file using your internet browser. All you need to do open the OneDrive login page and log in to your OneDrive account using your email address and password.
Once you are logged in into your OneDrive account, follow the below mentioned steps –
Step-1: Locate your PowerPoint file and Click on it
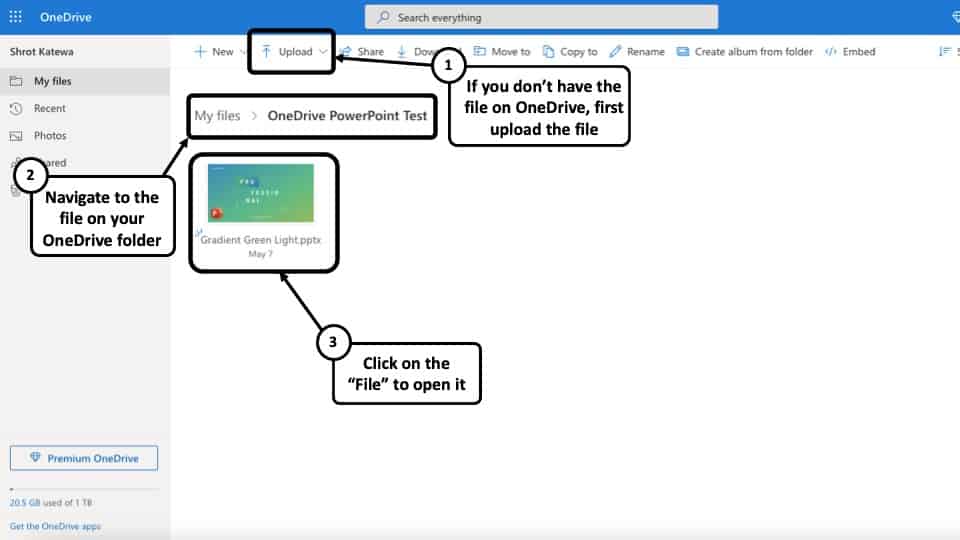
If you already have the file uploaded, then simply navigate to the respective folder, locate the file and click on it.
Step-2: Start Editing the File
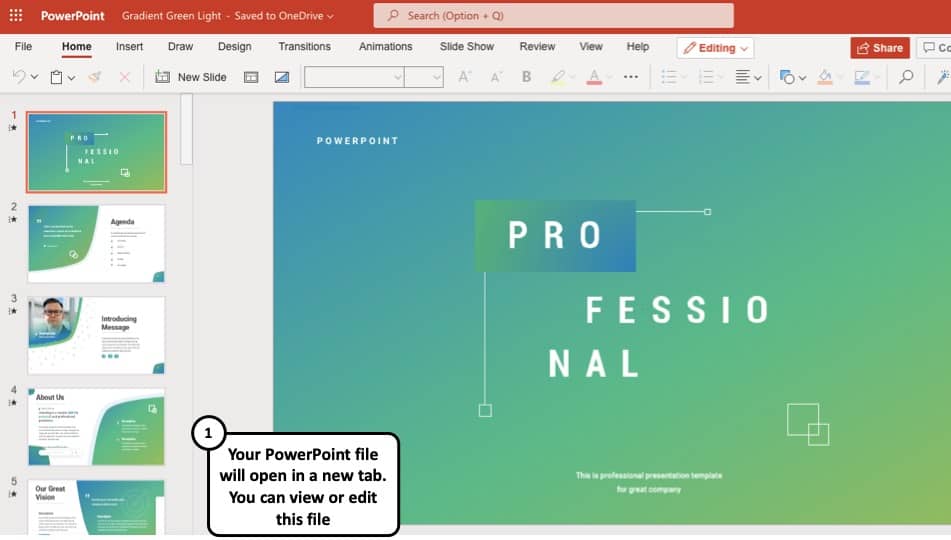
Your file will be opened in a new tab on your browser. You can directly start editing the PowerPoint file online!
The best part is, you don’t even need to have the PowerPoint application installed to edit, open or view a PowerPoint presentation online file!
3. How to Open a PowerPoint Presentation in Google Slides?
Google Slides in one of the most popular online tools out there for creating and opening presentations. You can also use Google Slides to open you PowerPoint Presentation file with just a few clicks. Follow the steps below:
Step-1: Go to Google Slides and click on ‘Open File Picker’ option
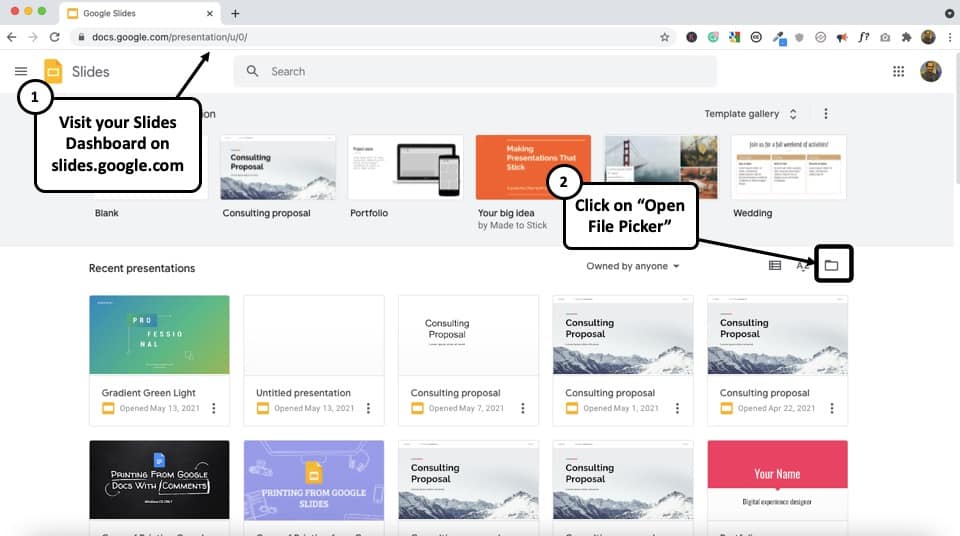
To open a PowerPoint Presentation in Google Slides, the first step is to log in to your Google account and go to Google Slides. Then, click on the “ Open File Picker ” option – the icon that looks like a file folder (see the image above).
Step-2: Go to the ‘upload’ section for uploading the presentation file
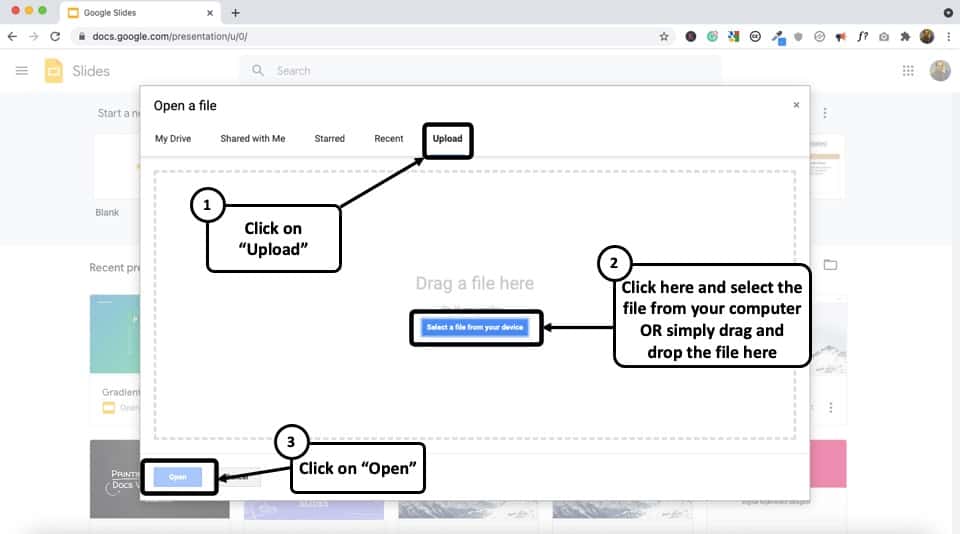
Since Google Slides is cloud-based, the next step is to upload the Presentation file. To do that, from the pop-up window, go to the ‘Upload’ section. Now click on ‘Select a file from your device.’
Step-3: Locate your PowerPoint Presentation file and click on ‘Open.’
From the pop-up window, go to the folder containing the Presentation file and select it. Then click on ‘Open’ to upload the file from your computer. It might take a few seconds to upload and load the Presentation file on Google Slides. That’s it!
4. How to Open a PowerPoint Presentation in Keynote on Mac?
To open a Microsoft PowerPoint Presentation on Apple’s Keynote application, just follow the steps below:
Step-1: Open ‘Keynote’ and locate your PowerPoint Presentation file
On your Mac Computer open the ‘Keynote’ application. From the window, navigate to the folder containing the PowerPoint Presentation file.
Step-2: Select your Presentation file and click on ‘Open.’
After locating your PowerPoint Presentation file on Keynote, simply click on it to select it. Then click on ‘Open’ to access it. A window might appear stating that some changes were made while importing the file, which is quite normal for highly customized PowerPoint files.
Step-3: View or Edit the PowerPoint file in Keynote

Once the file is opened in Keynote, you can now view or edit the file directly in Keynote just as you would on any other presentation design application!
5. How to Open a PowerPoint Presentation Without PowerPoint?
Incase you do not have PowerPoint installed on your computer or do not have access to PowerPoint, you can still open a PowerPoint presentation file through various means. I’ll be discussing some of the ways to open a PowerPoint Presentation without PowerPoint below:
Method 1 – Using Online Tools
If you don’t have PowerPoint installed on your computer, you can still view a PPT or PPTX file. One of the best ways to view it is using online tools.
Two of the most commonly used FREE online tools are ‘Google Slides’ and ‘One-Drive’ . Both these methods have been discussed previously in this article. Thus, I would recommend going through them once again if you need some help on that.
Method 2 – Using Aspose Slides Viewer
Another method is using the “Aspose Slides Viewer”. Using this online tool, you can open your Presentation files. It supports PPT, PPTX, PPS, and ODT files that are amongst the most common PowerPoint Presentation formats.
Here’s how to use Aspose Slides Viewer tool to open PowerPoint Presentations –
Step-1: Go to Aspose Slides Viewer using an Internet Browser
The first step is to open your Internet Brower and go to: https://products.aspose.app/slides/viewer
Step-2: Click on ‘Drop or upload your file’
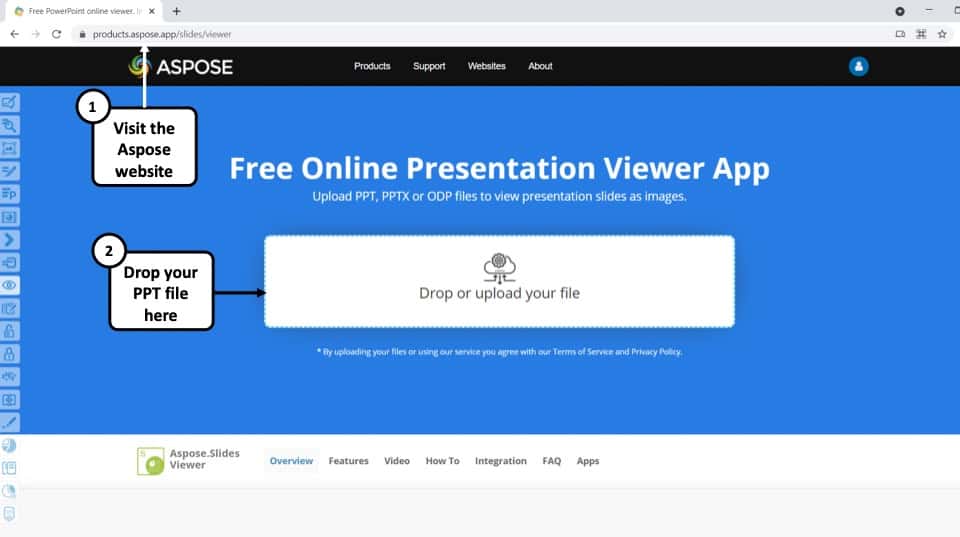
Once the webpage is done loading on your browser, click on ‘ Drop or upload your file.’
Step-3: Locate your file and click on ‘Open’
From the pop-up window, go to the folder containing the PowerPoint Presentation file and select it. Then click on ‘Open’ to upload the file from your computer to Aspose Slides Viewer. Once the upload is finished, you will be able to view the PowerPoint Presentation on your screen.
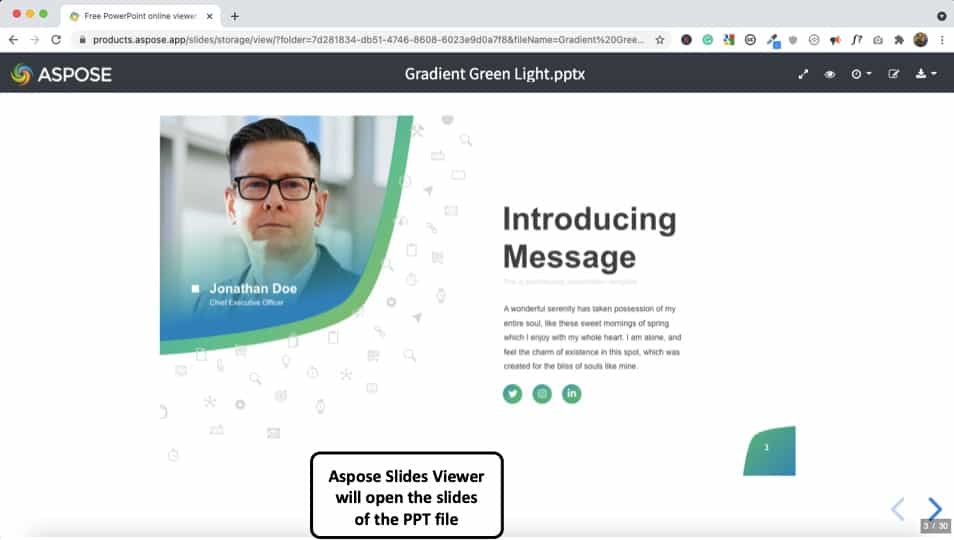
The good part about Aspose Slides Viewer is that it is completely FREE. When viewing the ppt file, it shows a surprisingly accurate representation of the presentation. You can also edit the PPT file. However, the options are quite limited. So, it can be used for basic text editing at the very best!
Method 3 – Using Third-Party Applications
There are a few Third-Party Applications out there, which you can use to Open PowerPoint Presentation files. Two of the most common among them are ‘LibreOffice Impress’ and ‘Kingsoft Presentation Professional.’
LibreOffice supports almost all types of PowerPoint files including PPT, PPTXS, PPTX, PPTS. It allows you to not only open PowerPoint presentations but also make necessary customizations. You can download it for free from here .
Kingsoft Presentation Professional is another standard presentation tool with lots of in-built features. It is quite similar to Microsoft PowerPoint and supports PPT and PPTX files. Download Kingsoft Presentation Professional from here .
6. How to Open PowerPoint in Presentation Mode?
You can directly open your PowerPoint Presentation file in Presentation Mode, instead of having to normally opening it first and then changing the view mode. This might be time saving for some, as you will be able to start your presentation with just a few clicks. Follow the step-by-step guide below to find out the process:
Step-1: Go to the folder which contains your PowerPoint Presentation file
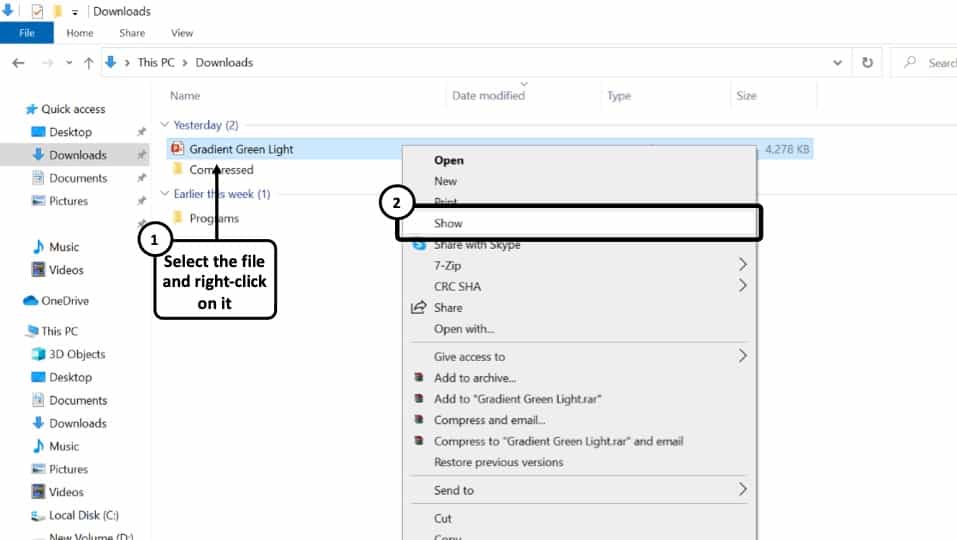
Go to the folder on your computer where you have saved your PowerPoint Presentation file. ‘Right Click’ on the file to open a dropdown menu.
Step-2: Click on ‘Show’
From the dropdown menu, click on the fourth option that says ‘Show.’ This will directly open the PowerPoint file in Presentation Mode.
If you have a “.pps” or “.ppsx” file, you don’t need to right-click on it. These files are designed to be directly open as slideshow!
7. How to Open PowerPoint in Safe Mode?
Opening Microsoft PowerPoint in Safe Mode means opening the application without any add-ons, extensions, or other forms of customizations you might’ve made.
AutoCorrect and a few other features will also not work while in Safe Mode. You can both open the Microsoft PowerPoint application in safe mode or a particular PowerPoint Presentation file.
I’ll be discussing both of them below:
Opening the Microsoft PowerPoint Application in Safe Mode
Step-1: Press ‘Ctrl’ while opening the Microsoft PowerPoint Application
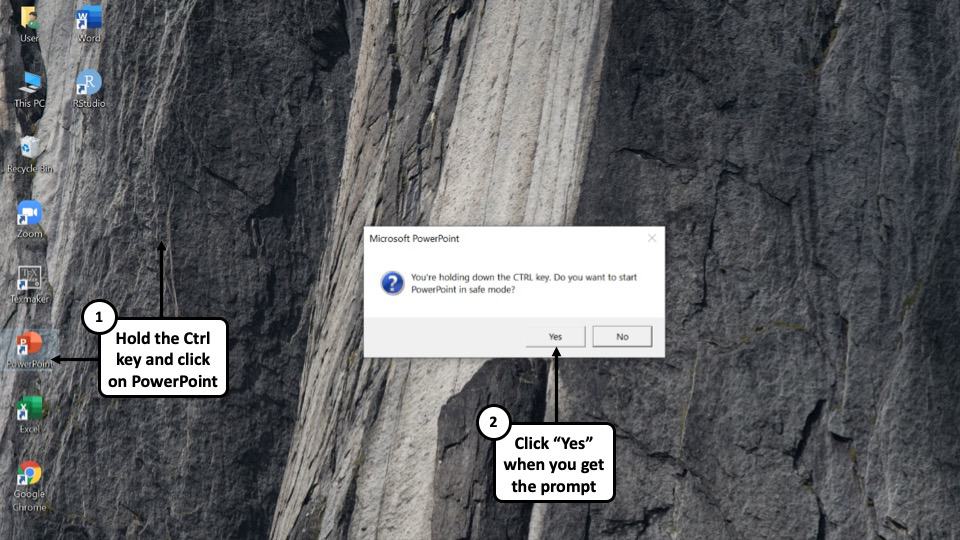
To open the Microsoft PowerPoint application in Safe Mode, hold the ‘Ctrl’ button of your keyboard and ‘Left Click’ on the Microsoft PowerPoint Icon on your taskbar, start-menu, or desktop.
Step-2: Click on ‘Yes’ to enable Safe Mode.
A dialogue box will appear where you will be asked if you want to start Microsoft PowerPoint in Safe Mode or not. Click on ‘Yes’ to open the PowerPoint in Safe Mode.
Opening a specific PowerPoint Presentation on Safe Mode:
To open a specific PowerPoint Presentation file on Safe Mode, follow the steps below:
Step-1: Hold the ‘Ctrl’ Key and click on the PowerPoint file
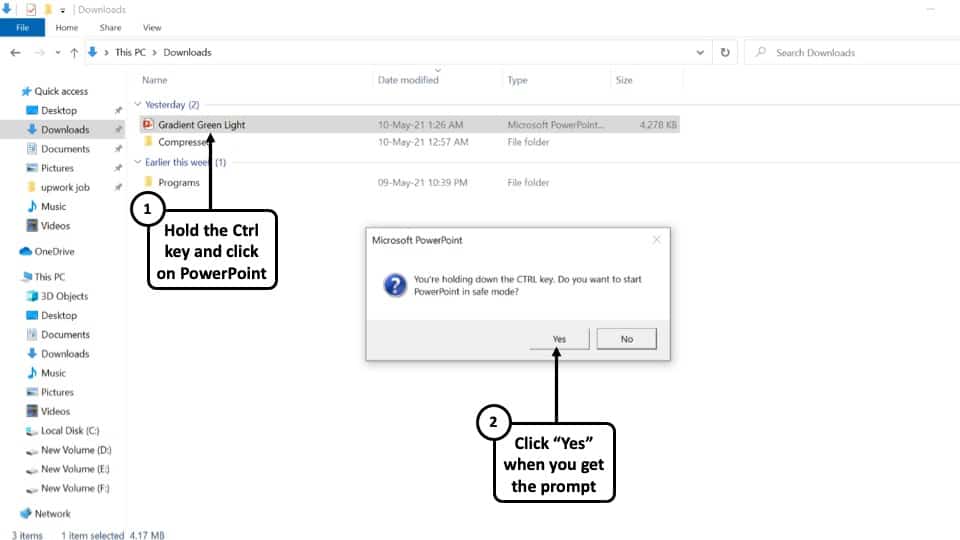
Browse to the folder on your computer where you have you have saved your presentation file. Now, while holding the ‘Ctrl’ button on your keyboard, ‘Left-click’ on the file to open it on Safe Mode. A dialogue box will appear on your screen.
Step-2: Click on ‘Yes’ in the Prompt that opens up
You will now be asked if you want to open this PowerPoint file in Safe Mode. Click on ‘Yes’ to get the job done!
8. How to Open a PowerPoint Presentation on Zoom?
Zoom meetings has now become an integral part of our lives, both in terms of work and education. The global pandemic has forcefully replaced on-stage presentations with virtual ones and Zoom is one of the most popular choices for it.
Related Article – How to Give a Presentation on Zoom? [A Complete Step-by-Step Guide!]
If you want to open a PowerPoint presentation on Zoom, follow the steps mentioned below –
Step-1: Open the PowerPoint presentation on your device
The first step is to open the PowerPoint Presentation file on your computer using Microsoft PowerPoint. You can do that by either ‘ Left-Clicking’ on the file from its location or going to the ‘Open’ tab on Microsoft PowerPoint and selecting the file from the ‘Browse’ option.
I have discussed this in detail on the points above.
Step-2: Open Zoom meeting and click on ‘Share Screen’.
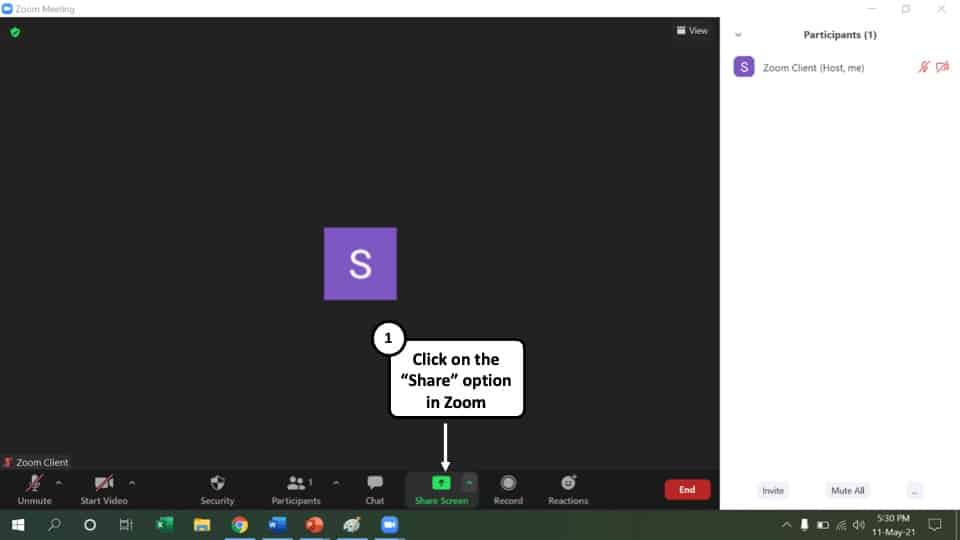
Join or launch a Zoom meeting where you will be sharing your PowerPoint presentation. Click on the option that says ‘Share Screen’ at the bottom.
Step-3: Click on ‘Share’ option
A new window will pop-up where you will find all the applications opened on your computer. Hover your cursor over the ‘ PowerPoint Slide Show’ window and click on it. Now click on the option that says ‘Share’ at the bottom right corner of your screen.
Step-4: Open the PowerPoint presentation in Zoom
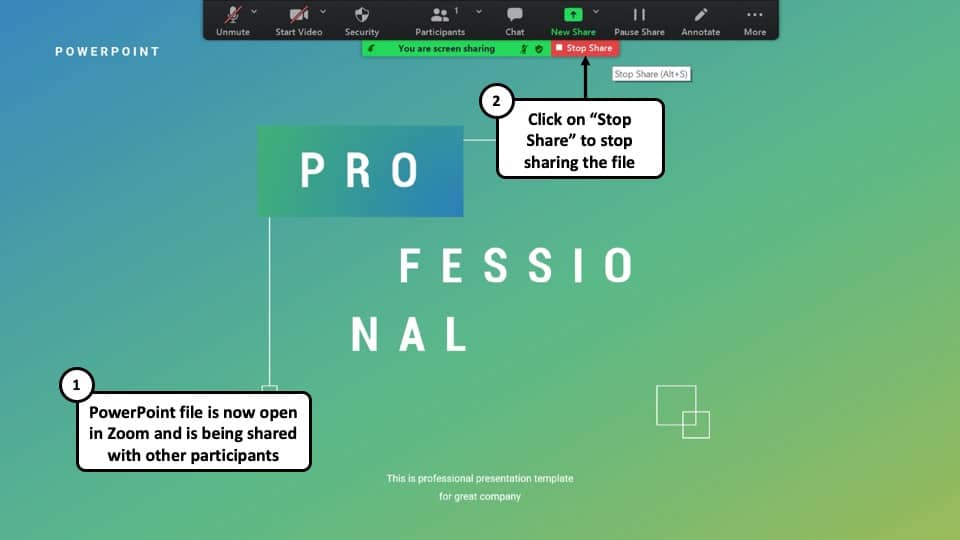
Once you click on ‘Share’ , the PowerPoint presentation file will be opened in Zoom and all the participants in the meeting will be able to view your screen. You can stop sharing your screen by clicking on the option that says ‘Stop Share.’
More PowerPoint Related Topics
- How to Crop a Picture in PowerPoint? [Complete Step-by-Step Tutorial!]
- What is a Presentation Clicker? [And How to Use it!]
- How to Convert a PowerPoint to PDF? [A Simple Guide!]
- PowerPoint vs Google Slides: Which is Better? [ULTIMATE Test!]
- How to Change Bullet Style in PowerPoint? A Complete Guide
Credit to drobotdean (via Freepik) for the featured image of this article
- Apple Watch
- Accessories
- Digital Magazine – Subscribe
- Digital Magazine – Info
- Smart Answers
- 11th-gen iPad
- New AirPods
- Best Mac antivirus
- Best Mac VPN
When you purchase through links in our articles, we may earn a small commission. This doesn't affect our editorial independence .
How to edit .pptx PowerPoint files on Mac, iPad or iPhone

Keynote is arguably the best way to create presentations on your Mac or iOS device, but it’s not necessarily the software most people have installed. If you work with Windows PCs then there’s a good chance that Microsoft Powerpoint will be the go-to package. The problem is that when it comes to sharing Powerpoint creations they arrive in the .pptx format – one not often seen on macOS or iOS. Read next: How to edit PDFs on Mac for free
Stay your angst though, as Apple won’t be overcome by the wrong letters at the end of a filename. So here are the easiest ways to edit a .pptx file on a Mac, iPad or iPhone.
For a more detailed look at how to work with Apple’s presentation software you could also take a look at our How to use Keynote guide.
What is a .pptx file?
As you’ve probably guessed, a .pptx file is the proprietary file format used by Microsoft for its PowerPoint software.
This file type actually replaced the .ppt version in 2007, with the x indicating Microsoft’s switch to an XML format which is far friendlier for other applications to open.
By contrast, .key is the standard file format for Keynote presentations.
How to edit a .pptx file on a Mac
Import .pptx files to keynote.
This one is pretty straightforward as every Mac since 2013 comes with Keynote preloaded. For those with older machines you’ll be pleased to know that Apple has now made the entire iWork suite (Keynote, Pages, and Numbers), along with GarageBand, and iMovie free to download from the App Store.
With Keynote installed you just locate the .pptx file in Finder. Right click on it, then move the cursor onto Open with… and select Keynote .

You may see some warnings of fonts not being available. These will be proprietary ones, but Keynote will substitute them with a suitable replacement which you can always change if you prefer a different style.
Now you can edit the file as normal.
Export .pptx files from Keynote
Once you’ve finished editing your presentation you can export it in a .pptx format that your colleagues can use on PowerPoint.
Open the file in Keynote then go to File > Export To and select PowerPoint .

You’ll see a box appear with Format: pptx . This is what you want so click Next , name the file then click Export .

This will create a file that you can now share without fear of getting a ‘how do I open this?’ email.
Use Microsoft Office
Of course the easiest way to interact with PowerPoint files on a Mac is to actually use PowerPoint itself. Microsoft offers the entire Office suite on macOS, and it’s very good.
The current trend is to pay a monthly or yearly fee, the cost of which is £5.99 p/m or £59.99 p/a for a single user licence. Other tiers are also available if you want access to the software on more than one machine.
How to edit a .pptx file on iPad or iPhone
Importing to keynote.
Much like on the Mac, Apple has now made Keynote, Number, Pages, iMovie and GarageBand free on iOS. So if you don’t already have Keynote installed, go to the App Store and download it.
To import your .pptx file you’ll first need to ensure that the file is stored in your iCloud Drive. Once this is done open Keynote, tap Locations in the upper left corner, then select iCloud Drive .

You’ll now be presented with the various folders on iCloud. Navigate to your file and tap it to import it to Keynote.

You might see a dialog box saying you need to change your iCloud settings to allow this. If this happens select Go to Settings and you’ll be taken to the iCloud section. Here you just need to turn the Use iCloud option on.
Once that’s done return to Keynote and repeat the above steps to open your presentation. Again you might see a warning saying that the presentation was created in an older version of the software and that some fonts will be different. Tap Open and you’ll finally see your PowerPoint presentation.
Now you can edit the file, add new slides, effects, and what have you, just like any other Keynote presentation.
Exporting from Keynote
Any presentation you work on in Keynote will automatically be saved as a .key file. When you want to share this with PowerPoint users you’ll first need to convert it to a .pptx file. This is achieved through the Send a Copy feature.
Tap the Presentations option in the top left corner to take you back to the main Keynote menu. Here you’ll see all your files. In the upper right corner is the Share button (a square with a arrow pointing out of the top), tap this.

You’ll be presented with three options – Collaborate with Others , Send a Copy , and Move to… – from which you should choose Send a Copy .
You’ll now be asked to select which file you want to send. Tap your presentation and you’ll see a pop-up box with the file types available. Tap PowerPoint and Keynote will convert your file.

Of course you’ll want to send it to someone, so Keynote will open the Share menu where you can pick which method of communication you wish to use: Mail, Message, WebDav, and a number of others.
Use Microsoft Office Apps
Yep, just like on the Mac you can also use Microsoft’s official PowerPoint app on iPhone and iPad. You can do basic editing on the free version and save to OneDrive, but for full features you’ll need a paid Office365 account.
So there you go, various ways to share and edit PowerPoint files on your Mac, iPhone or iPad. For similar tips be sure to check out our How to open .docx files on Mac, iPhone, and iPad .
Author: Martyn Casserly , Contributor

Martyn has been involved with tech ever since the arrival of his ZX Spectrum back in the early 80s. He covers iOS, Android, Windows and macOS, writing tutorials, buying guides and reviews for Macworld and its sister site Tech Advisor.
Recent stories by Martyn Casserly:
- Best iPad for seniors 2024
- iPad Air M2 vs iPad Pro M4: Power vs price
- How to find and delete duplicate files on Mac
Keynote User Guide for Mac
- What’s new in Keynote 14.0
- Intro to Keynote
- Intro to images, charts, and other objects
- Create a presentation
- Choose how to navigate your presentation
- Open or close a presentation
- Save and name a presentation
- Find a presentation
- Print a presentation
- Undo or redo changes
- Show or hide sidebars
- Quick navigation
- Change the working view
- Expand and zoom your workspace
- Customize the Keynote toolbar
- Change Keynote settings on Mac
- Touch Bar for Keynote
- Create a presentation using VoiceOver
- Add or delete slides
- Reorder slides
- Group or ungroup slides
- Skip or unskip a slide
- Change the slide size
- Change a slide background
- Add a border around a slide
- Show or hide text placeholders
- Show or hide slide numbers
- Apply a slide layout
- Add and edit slide layouts
- Change a theme
- Add an image
- Add an image gallery
- Edit an image
- Add and edit a shape
- Combine or break apart shapes
- Draw a shape
- Save a shape to the shapes library
- Add and align text inside a shape
- Add 3D objects
- Add lines and arrows
- Animate, share, or save drawings
- Add video and audio
- Record audio
- Edit video and audio
- Add live video
- Set movie and image formats
- Position and align objects
- Use alignment guides
- Place objects inside a text box or shape
- Layer, group, and lock objects
- Change object transparency
- Fill shapes and text boxes with color or an image
- Add a border to an object
- Add a caption or title
- Add a reflection or shadow
- Use object styles
- Resize, rotate, and flip objects
- Move and edit objects using the object list
- Add linked objects to make your presentation interactive
- Select text
- Copy and paste text
- Use dictation to enter text
- Use accents and special characters
- Format a presentation for another language
- Use phonetic guides
- Use bidirectional text
- Use vertical text
- Change the font or font size
- Add bold, italic, underline, or strikethrough to text
- Change the color of text
- Change text capitalization
- Add a shadow or outline to text
- Intro to paragraph styles
- Apply a paragraph style
- Create, rename, or delete paragraph styles
- Update or revert a paragraph style
- Use a keyboard shortcut to apply a style
- Adjust character spacing
- Add drop caps
- Raise and lower characters and text
- Format fractions automatically
- Create and use character styles
- Format dashes and quotation marks
- Format Chinese, Japanese, or Korean text
- Set tab stops
- Format text into columns
- Adjust line spacing
- Format lists
- Add a highlight effect to text
- Add mathematical equations
- Add borders and rules (lines) to separate text
- Add or delete a table
- Select tables, cells, rows, and columns
- Add or remove rows and columns
- Move rows and columns
- Resize rows and columns
- Merge or unmerge cells
- Change the look of table text
- Show, hide, or edit a table title
- Change table gridlines and colors
- Use table styles
- Resize, move, or lock a table
- Add and edit cell content
- Format dates, currency, and more
- Create a custom cell format
- Highlight cells conditionally
- Format tables for bidirectional text
- Alphabetize or sort table data
- Calculate values using data in table cells
- Use the Formulas and Functions Help
- Add or delete a chart
- Change a chart from one type to another
- Modify chart data
- Move, resize, and rotate a chart
- Change the look of data series
- Add a legend, gridlines, and other markings
- Change the look of chart text and labels
- Add a chart border and background
- Use chart styles
- Animate objects onto and off a slide
- Animate objects on a slide
- Change build order and timing
- Add transitions
- Present on your Mac
- Present on a separate display
- Present on a Mac over the internet
- Use a remote
- Make a presentation advance automatically
- Play a slideshow with multiple presenters
- Add and view presenter notes
- Rehearse on your Mac
- Record presentations
- Check spelling
- Look up words
- Find and replace text
- Replace text automatically
- Set author name and comment color
- Highlight text
- Add and print comments
- Send a presentation
- Intro to collaboration
- Invite others to collaborate
- Collaborate on a shared presentation
- See the latest activity in a shared presentation
- Change a shared presentation’s settings
- Stop sharing a presentation
- Shared folders and collaboration
- Use Box to collaborate
- Create an animated GIF
- Post your presentation in a blog
- Use iCloud Drive with Keynote
- Export to PowerPoint or another file format
- Reduce the presentation file size
- Save a large presentation as a package file
- Restore an earlier version of a presentation
- Move a presentation
- Delete a presentation
- Password-protect a presentation
- Lock a presentation
- Create and manage custom themes
- Transfer files with AirDrop
- Transfer presentations with Handoff
- Transfer presentations with the Finder
- Keyboard shortcuts
- Keyboard shortcut symbols
Play a Keynote presentation on Mac
There are two ways to play a Keynote presentation on your Mac:
Present in full screen: Shows the current slide on your primary display while the presenter display , with your notes and controls, is hidden. If you have a separate display connected to your Mac, the presenter display is shown on your Mac while the slideshow plays on the secondary display. This is useful when you’re presenting the slideshow in person and have a separate display or projector.
Present in a window: Shows the slideshow in one window and the presenter display in another. This is useful when you don’t have a secondary display or projector and need to access your presenter notes, desktop, or other apps without interrupting the presentation.
Present in full screen
Choose Play > In Fullscreen (from the Play menu at the top of your screen).
In the slide navigator , click to select the slide you want to begin with.
The presentation begins with the slide you selected displayed in full screen.
To advance through the presentation, do any of the following:
Go to the next slide or build: Press the Right Arrow key.
Go back a slide or reset the builds on the slide: Press the Left Arrow key.
Jump to a different slide: Press any number key to make the slide navigator appear, enter the slide number in the text field at the top, then press Return.
To show the slideshow controls with options to show the slide navigator, keyboard shortcuts, live video sources , or multipresenter slideshow controls, move the pointer over the bottom of your screen.
Note: To always hide the controls (for example, when you don’t want your audience to see the slideshow controls during a presentation), click Keynote > Settings, click Slideshow at the top of the window, then turn off “Show slideshow controls when pointer is at the bottom of the screen.”
To stop playing the presentation, press Esc.
Tip: To see all of the keyboard shortcuts you can use as you present, press the Question Mark (?) key on your keyboard. To close the overlay, press the Question Mark (?) key again.
By default, when you play a slideshow in full screen, the pointer is only visible on slides with a link , movie , or live video . To make the pointer visible anytime you move it, click Keynote > Settings, click Slideshow, then turn on “Show pointer when using the mouse or trackpad.”
Present in a window
When you play a presentation in a window, the slideshow and presenter display appear in two windows on your screen. If you’re presenting virtually with a videoconferencing app, you can share the slideshow window so the other meeting participants can see it. You can edit your notes and navigate the presentation in the presenter display window.

Choose Play > In Window (from the Play menu at the top of your screen).
While presenting, you can also do any of the following:
Change the size of the text in the presenter notes: Move the pointer over the Notes window, then click a font button in the top-left corner to make the font smaller or larger.
Close the presenter display: Click the red close button in the top-left corner, or choose Play > Hide Presenter Display in Window.
Reveal the toolbar in the current slide window: Move the pointer over top of the window, then click a button to show the slide navigator, keyboard shortcuts, live video sources , or multipresenter slideshow controls.
To take a screenshot of the presenter notes or to make them visible to your audience with a videoconferencing app, choose Keynote > Settings, click Slideshow at the top of the settings window, then select the checkbox next to “Show presenter display in other applications.” Play the presentation, then take a screenshot of the window or share it with your video conference app.
Use the Touch Bar when you present
If your Mac has a Touch Bar, thumbnails of your slides appear in the Touch Bar as you present, as well as buttons for quickly accessing other Keynote features. You can use the thumbnails and buttons to view and control your presentation.

Scroll through slides: Swipe the thumbnails. You can scroll through slides without changing what viewers see.
Advance to the next slide: Press an arrow key. If you scrolled ahead, the thumbnails scroll back to the slide you advanced to.
Switch between the clock and the timer: If you’re presenting on your Mac, tap the clock or timer.
See keyboard shortcuts you can use to present: Tap the Question Mark (?) button.
Require a password to exit a presentation
You can require a password to stop or exit a presentation. This password requirement is useful, for example, when the presentation is set to play automatically in a kiosk.
With the presentation open, choose Keynote > Settings (from the Keynote menu at the top of your screen).
Click Slideshow at the top of the settings window, then select the “Require password to exit slideshows” checkbox.
Type a password, then click Set Password.
To remove the password, choose Keynote > Settings, then deselect the “Require password to exit slideshows” checkbox.
This password applies only to slideshows played on the Mac where you set the password.
How to Make a PowerPoint on Mac? (A Step-by-Step Guide)
If you’ve ever wanted to create a professional-level PowerPoint on your Mac, you’re in luck! In this step-by-step guide, we’ll walk you through the entire process from start to finish.
You’ll learn what Keynote is and how to open it on your Mac, how to create a PowerPoint, customize the slides, add text, images, and media, utilize themes and animations, and finally, save and share your PowerPoint.
By the end of this guide, you’ll be a PowerPoint pro on your Mac!
Table of Contents
Short Answer
Making a PowerPoint on a Mac is easy.
First, open up the Pages application on your Mac.
Then, select the File menu and choose New from Template.
From there, you can select a PowerPoint template and customize it to fit your needs.
When you are finished, you can save your presentation and share it with others.
What is Keynote?
Keynote is a presentation software program developed by Apple Inc.
and is available on all Mac computers.
It is a powerful program that allows users to easily create engaging and professional presentations.
Keynote provides users with a wide range of tools and features, including customizable slides, themes, animations, and more.
With Keynote, users can create stunning presentations in minutes.
It is a great tool for creating presentations for business, education, and personal projects.
Keynote is easy to use and is a great choice for anyone who wants to make a professional-looking PowerPoint on a Mac computer.
How to Open Keynote on Mac
Opening the Keynote app on a Mac computer is quite simple.
To open the app, you can either use the “Finder” app in your Applications folder, or you can use the “Spotlight Search” tool to quickly find the Keynote app.
If you choose to use the Finder, simply open the Finder app and navigate to the Applications folder.
From there, you will find the Keynote app.
You can then double-click on the Keynote icon to open the app.
Alternatively, you can use the Spotlight Search tool to quickly locate the Keynote app.
To do this, click on the magnifying glass icon in the top-right corner of your screen.
You can then type in “Keynote” in the search bar and hit the “Enter” key.
The Keynote app should appear in the search results.
You can then click on the Keynote icon to open the app.
Once the Keynote app is open, you can begin creating your PowerPoint presentation.
You can customize your slides by adding text, images, and other media.
You can further customize your slides by using various themes and animations.
Once you have created your presentation, you can save it as a .pptx file and share it with others.
With the Keynote app, you can easily create a professional-looking PowerPoint on a Mac computer.
Creating a PowerPoint on a Mac
Creating a PowerPoint presentation on a Mac computer is a straightforward process, whether youre creating a presentation for work or school.
The first step is to open the Keynote app on the computer.
Keynote is the presentation software for Mac computers, and it makes creating a presentation simple and easy.
Once you have opened the Keynote app, you can begin customizing your presentation.
You can add text, images, and other media to your slides, as well as utilize various themes and animations to make your presentation look professional and eye-catching.
You can also customize the layout of your slides, allowing you to add different elements and adjust their placement.
When your presentation is complete, you can save it as a .pptx file and share it with your colleagues, classmates, or anyone else who needs to view it.
You can also export your presentation as a PDF, a movie file, an HTML file, or a JPG file, depending on your needs.
With the Keynote app, creating a professional-looking PowerPoint on a Mac computer is easy and stress-free.
All you need to do is open the app, customize your slides, and then save your presentation in the desired format.
Whether youre creating a presentation for work or school, the Keynote app will help you get the job done quickly and efficiently.
Customizing the Slides
Customizing the slides is an important part of creating a stunning PowerPoint presentation on a Mac.
The Keynote app provides a variety of tools and features to help you design your slides.
You can easily add text, images, and other media to customize your slides.
To add text to your slides, simply select the text box and type in your desired text.
To add images, you can either drag and drop them into the slide or use the Insert Image button.
You can also insert shapes, charts, and other media to customize your slides.
Additionally, Keynote offers a range of themes and animations to help you further customize your presentation.
Themes allow you to quickly change the overall look and feel of your slides.
Animations can be used to add a touch of flair to your slides, such as transitions between slides and animated text.
To access the themes and animations, simply click on the Themes or Animations tabs in the upper right-hand corner of the app.
By taking advantage of the Keynote apps customization features, you can easily create a professional-looking PowerPoint on a Mac computer.
With just a few clicks, you can customize your slides and make them look stunning.
So, if youre looking to create an impressive presentation, the Keynote app is the perfect tool for the job.
Adding Text, Images, and Media
When it comes to creating a professional-looking PowerPoint on a Mac computer, adding text, images, and other media is key.
With the Keynote app, you can easily customize your slides by adding text, images, and other media elements.
To add text, select the text box icon from the top menu, and then type in the text you want to include in the text box.
You can also adjust the font type, font size, font color, and other text properties.
Once you have finished editing the text, click the Done button to save your changes.
To add images, click the Add Image icon from the top menu, and then select an image from your computer, or add an image from the web.
You can also adjust the size, position, and transparency of the image to make it look more professional.
Finally, you can add other media elements such as audio and video to your slides.
To do this, click the Add Audio or Add Video icon from the top menu, and then select the audio or video file you want to include.
You can also adjust the size, position, and playback settings of the media element to make it look more professional.
By using these methods, you can easily add text, images, and other media elements to your PowerPoint slides on a Mac computer.
Once you have added all the elements, you can save your presentation as a .pptx file and share it with others.
Utilizing Themes and Animations
Creating a PowerPoint presentation on a Mac computer is made easier with the help of the Keynote app.
Not only can you easily create a professional-looking presentation, but you can also customize your slides with various themes and animations.
With the help of themes and animations, you can create a presentation that is visually appealing and engaging.
When creating a presentation, you can choose from a wide variety of themes and animations.
You can choose from a variety of colors, fonts, and designs to give your presentation a unique look.
You can also choose from several animation styles to give your presentation a more dynamic feel.
For example, you can choose to have your slides transition in with a fade or a slide, or you can animate specific objects within your slides.
Themes and animations can also help to emphasize certain points in your presentation.
For instance, you can use animations to draw attention to a particular slide or element in your presentation.
Additionally, you can use themes to create a professional and consistent look throughout your presentation.
Creating a presentation with themes and animations is easy.
In the Keynote app, simply select the themes tab to access the available themes and animations.
From there, you can customize your slides with the desired theme and animations.
You can also preview your slides and animations before you save them.
Creating a professional-looking and engaging presentation on a Mac computer is easy with the help of the Keynote app.
With the help of themes and animations, you can create a presentation that is visually appealing and will help to emphasize certain points you want to make.
With a few clicks, you can quickly create a presentation that will be sure to impress.
Saving and Sharing Your PowerPoint
Once you have finished creating your PowerPoint presentation, you can save it as a .pptx file and share it with others.
To save your PowerPoint, click the File menu at the top of the Keynote window and then click Save.
You will be given the option to save your file to your Macs hard drive or to the cloud.
If you wish to share your presentation with others, you can do so by exporting it as a PDF file or by sharing it directly with other users.
To export your presentation to a PDF file, click the File menu and then select Export.
You will be given the option to export your PowerPoint as a PDF file.
If you would like to share your presentation directly with other users, you can do so by clicking the Share menu at the top of the Keynote window and selecting Share with Others.
Here, you can enter the email addresses of the people you would like to share your presentation with.
You can also set a password for your shared presentation if you wish.
Once you have saved and/or shared your presentation, you can open it up again at any time by double-clicking on the .pptx file.
This will open up the presentation in the Keynote app and you can make any changes that you wish.
With the Keynote app, creating a professional-looking PowerPoint on a Mac computer is easy and convenient.
The steps outlined above will help you create a great presentation and save/share it with others in no time.
Final Thoughts
Creating a professional-looking PowerPoint on a Mac computer doesn’t have to be difficult.
With the help of the Keynote app, you can easily create slides with text, images, and other media, and customize your slides with themes and animations.
Now that you know how to make a PowerPoint on Mac, you’re ready to create your own presentations and share them with others.
So get to it and start making your own PowerPoint today!
James Wilson
James Wilson has extensive knowledge in the information technology industry.His second love, besides dealing with computers, is smart home technology. He is continually updating information to better comprehend this problem and has a deep understanding of the apartment’s support system.
Recent Posts
Is Airtable a Public Company? Unveiling the Truth
No, Airtable is not a public company. As of now, Airtable is a private company that has raised funds from various investors but has not gone through an initial public offering (IPO) to be listed on...
How to Make Money with Airtable: Top Strategies and Success Stories
To make money with Airtable, you can offer consulting services to businesses looking to optimize their workflows through the platform. You can also create and sell templates or automation scripts...
How to share your Microsoft PowerPoint presentation on a Mac, PC, or web browser
- It's easy to share a PowerPoint presentation on your Mac or PC app.
- You can also share a presentation if you use the online version of PowerPoint.
- Sharing a presentation can help you collaborate with friends or coworkers.
- Visit Business Insider's Tech Reference library for more stories .
When creating Microsoft PowerPoint presentations for work or school, it's often necessary to collaborate with others on your projects.
Thankfully, it's easy to share a PowerPoint presentation no matter what version you use. The process looks fairly similar on both Mac and PC programs, as well as on the online version that can be accessed from any web browser. The online option is helpful if you don't have the Microsoft Office program downloaded to your desktop.
For all of these options, you can add a collaborator (which operates similarly to sharing Google Slides ) or opt to send your file as a presentation or PDF via email. There are also alternative methods, such as sending via social media.
Here's how to share a presentation.
Check out the products mentioned in this article:
Apple macbook pro (from $1,299.00 at apple), acer chromebook 15 (from $179.99 at walmart), microsoft office (from $149.99 at best buy), samsung chromebook (from $269.00 at amazon), how to share a powerpoint presentation on a pc.
Sharing a presentation on the PC version of PowerPoint should look similar on most computer types. The following steps and accompanying photos detail the process on a Samsung Chromebook.
1. Open the PowerPoint presentation you wish to share on your PC.
2. Click the "Share" symbol in the upper right hand corner of the screen. This should give you the option to share either the full document or just the current slide.
- If you prefer to add a collaborator instead (similar to Google Slides functions), you will need to click the orange button to save a copy of the file to your OneDrive.
3. Choose how you'd like to share the document or slide as an attachment. You can choose to send an email via Outlook or as a message via Zoom, for example.
Additionally, when you first launch the program, you can also find a "Share" tab on the left hand side. This will provide you with the same options for sharing a file.
How to share a PowerPoint Presentation on a Mac
1. Open the PowerPoint presentation on your Mac desktop or laptop.
2. Click the "File" tab in the top left corner.
3. Select "Share" from the dropdown menu. This will grant you the option to either send or copy a link to share, send the file as a presentation or PDF, or manage access to a shared file. Select whichever option you'd like and follow the directions to add contact information.
- If you wish to manage access and add collaborators, you will have to make sure the file has been uploaded to your OneDrive before proceeding. (If it hasn't, PowerPoint should prompt you to do so at this time.)
4. Sending the file as an email is the most common choice. Selecting this option will automatically open a new draft with the file attached. (Be sure to select "Send PDF" if you'd prefer it to send as a PDF file instead of as a presentation.) Add an address, subject, and body text before sending.
You can also share a presentation by clicking the "Share" button in the upper right hand corner. (This is similar to how it appears on a PC.)
This option is extremely helpful as it provides all of your possible options in a single pop-up. Enter a name or email address (along with an optional message) to send the document.
You can change the permissions settings at the top before clicking "Send," "Copy Link," or "Mail" to share your work. Click "More Apps" to browse additional options, such as sending via social media or text message. Lastly, you can select "Send a Copy" to send as a traditional attachment.
How to share a PowerPoint presentation on a web browser
You can access PowerPoint online on either a Mac or PC, as long as you have your login information for Microsoft Office. Regardless of what browser you prefer to use, the steps to share a presentation are exactly the same.
1. Log in to your Microsoft Office account on your preferred web browser and open the presentation you wish to share.
2. Click the "Share" button in the upper right hand corner of the screen.
3. This will open a pop-up in the center of the page. Enter a name or email address (along with an optional message) to send the document. You can change the permissions settings at the top before sending the link by clicking the "Send" or "Copy Link" option. (Those who have followed these steps on a Mac will recognize that it looks similar.)
Additionally, when you open the main menu, you can click the "Share" tab on the left hand side. This will allow you to invite others to edit the presentation or embed the presentation for a blog or website.
If you are looking to embed online, this will open a different pop-up that will generate a code for you. Select the dimensions desired and then paste the text as needed. Click the "Close" or "X" buttons to minimize the window.
Related coverage from Tech Reference :
How to embed a youtube video into your microsoft powerpoint presentations using a mac or pc, how to convert a powerpoint to google slides in two different ways, how to convert google slides to a powerpoint presentation in 4 easy steps , how to copy or duplicate a powerpoint slide and put it anywhere in your slideshow, how to download and access microsoft powerpoint on your mac computer.
Insider Inc. receives a commission when you buy through our links.
Watch: A diehard Mac user switches to PC
- Main content
We explain and teach technology, solve tech problems and help you make gadget buying decisions.
7 Best Ways to Fix Microsoft PowerPoint Not Opening on Mac

Paurush dabbles around iOS and Mac while his close encounters are with Android and Windows. Before becoming a writer, he produced videos for brands like Mr. Phone and Digit. On weekends, he is a full-time cinephile trying to reduce his never-ending watchlist, often making it longer.
Microsoft PowerPoint is available as a separate app for making presentations on the Mac. That means you can choose to download and install it whenever the need arises. Also, you can convert your PowerPoint presentation to a video for easily showing it anywhere. Many users rely on PowerPoint on Mac as their go-to optin to create presentations and other materials.

However, if you can’t open the PowerPoint app on Mac, it becomes an obstacle in your workflow. This post will cover the best solutions to fix Microsoft PowerPoint not opening on Mac.
1. Force Quit and Relaunch PowerPoint
Whenever the PowerPoint app fails to open on your Mac, you may force quit it to shut it down completely. Next, you can try to relaunch the app to check if it opens properly. Follow these steps to force quit and relaunch PowerPoint.
Step 1: Click the Apple logo in the top-left corner.
Step 2: Select Force Quit from the drop-down menu.

Step 3: Select Microsoft PowerPoint from the list of applications. Click on Force Quit.

Step 4: Relaunch the PowerPoint app.
2. Update the PowerPoint App
If force quit and restart didn’t help, your second option is to check for an app update. This could be happening on your Mac because of a bug in the current version of the PowerPoint app. Follow these steps.
Step 1: Click on Launchpad. Alternatively, you can press Command+Space to launch Spotlight search bar, type in App Store , and press Return to launch the Mac App Store directly.

Step 2: Click on the App Store icon to open it.

Step 3: Select the Updates option from the left menu.

Step 4: Press Command + R to refresh the page.
Update the PowerPoint app if you see that one is available. Then relaunch the PowerPoint app.
3. Boot Your Mac in Safe Mode
If the first two solutions did not solve the problem, it is now time to dig a little deeper. You can boot your Mac in Safe Mode . This will close all third-party applications and will keep only the system apps alive while booting your Mac. Follow these steps.
For M1 Mac Users
Step 1: Click the Apple logo in the top-left and select Shut Down.

Step 2: After it shuts down, press and hold the Power Button till you see two options on the screen.
Step 3: Select Macintosh HD. Hold the Shift key and select Continue in Safe Mode.

Step 4: Once your Mac boots in Safe Mode, launch the Microsoft PowerPoint app to check if it works in the Safe Mode environment.
For Intel Mac users
Step 1: Click the Apple logo in the top-left and select Restart.

Step 2: As soon as your Mac restarts, press and hold the Shift key.
Step 3: Release the Shift key after you see the login window on your screen.
After your Intel Mac boots in Safe Mode, you’ll need to launch the PowerPoint app to inspect if it works fine. If it works fine, then the problem must lie in the regular mode on your Mac. Proceed to the next solution to fix that.
4. Remove Powerpoint Preference Files
A Preference File of Microsoft PowerPoint gets created that saves all your app preferences. You can relocate the preference file temporarily in order to fix this problem. Follow these steps.
Step 1: Launch the Finder app.

Step 2: Select the Go option from the top Menu bar.

Step 3: Click on ‘Go to Folder’ option.

Step 4: In the search box, type ~/ Library and press Return.

Step 5: Click the first result.

Step 6: Select the Containers folder from the list.

Step 7: Once you open the folder, type com.microsoft.PowerPoint.plist in the search box and press Return.

Step 8: Select the file and drag it towards the Recycle Bin.

Step 9: Relaunch the Microsoft PowerPoint app.
5. Run First Aid in Disk Utility
In case your Mac is facing any storage errors after you’ve removed a large number of apps, you can fix those errors using Disk Utility. These errors might be causing issues with the PowerPoint app. Plus the overall performance of your Mac gets affected as well. Follow these steps.
Step 1: Press Command + Spacebar to open Spotlight Search, type Disk Utility and press Return.

Step 2: Click on the First Aid option in the Disk Utility window.

Step 3: Click on Run to launch First Aid.

Step 4: Click on Continue to confirm your action.

After Disk Utility finishes running First Aid, relaunch the PowerPoint app.
6. Create and Switch to a New User Account
If none of the options work on your Mac so far, then you may create a new user account temporarily. Switching to a new user account is also a good option to try for fixing PowerPoint not opening on your Mac. Follow these steps.
Step 1: Click the Apple logo on the top-left and select System Preferences.

Step 2: Select Users & Groups.

Step 3: In the Users & Groups tab, click on the Lock icon at the bottom-left.

Step 4: Enter your Mac password and click Unlock.

Step 5: Click on the Plus sign to add a new user.

Step 6: Add all the info and click on Create User.

The newly created user profile will appear on the left menu.

Step 7: Select the new user profile and select ‘Allow user to administer this computer.’

Step 8: Close the tab and click the Apple logo again.
Step 9: Log out from the current user account and sign in with the newly created account.

Once you sign in, try relaunching the PowerPoint app.
7. Uninstall and Reinstall Microsoft Powerpoint
The last option for you is to try uninstalling and reinstalling the PowerPoint app. A fresh start might just be the one solution to fix this issue. Here’s how.
Step 1: Click on Launchpad.
Step 2: Look for the PowerPoint icon and long-press it till all apps start jiggling.

Step 3: Click the cross icon on the top of the PowerPoint app.

Step 4: Click on Delete to confirm your action.

Step 5: Once the app gets deleted, open the App Store and reinstall Microsoft PowerPoint.

Present Your Points With Power
These solutions will help you to get rid of situations when PowerPoint fails to open on your Mac. While the solutions mentioned above should help most of the times, it helps to keep the app updated to ensure a consistent experience.
Was this helpful?
Last updated on 11 May, 2022
The above article may contain affiliate links which help support Guiding Tech. However, it does not affect our editorial integrity. The content remains unbiased and authentic.
Leave a Reply Cancel reply
Your email address will not be published. Required fields are marked *

The article above may contain affiliate links which help support Guiding Tech. The content remains unbiased and authentic and will never affect our editorial integrity.
DID YOU KNOW

Paurush Chaudhary
More in mac.

How to Lock an Image in Microsoft Word

5 Best Fixes for Apple Books App Not Downloading Books
Join the newsletter.
Get Guiding Tech articles delivered to your inbox.
Free All-in-One Office Suite with PDF Editor
Edit Word, Excel, and PPT for FREE.
Read, edit, and convert PDFs with the powerful PDF toolkit.
Microsoft-like interface, easy to use.
Windows • MacOS • Linux • iOS • Android

- Articles of PPT
How to Use PowerPoint on Mac (Step-By-Step Guide)
PowerPoint is an indispensable tool for creating, editing, and formatting slides. It is widely used for work, study, and personal projects. However, not everyone knows how to download and use PowerPoint on Mac OS. This article will walk you through the steps of downloading and using PowerPoint on a Mac and two other free and built-in presentation editors: WPS Presentation and Keynote.
Why Do You Need PowerPoint on a Mac?
PowerPoint is a presentation software that allows you to create and deliver engaging presentations. It offers various features, including adding text, images, videos, charts, and graphs to your slides. You can also customize the look and feel of your presentations using themes, templates, and fonts.

What is PowerPoint used for?
PowerPoint is used for a variety of purposes, including:
Business presentations: PowerPoint is commonly used to deliver business presentations to clients, colleagues, and investors.
Educational presentations: PowerPoint is also used to create educational presentations for students of all ages.
Personal presentations: PowerPoint can also be used to create personal presentations, such as wedding slideshows and travel photo presentations.
Alternatives to Microsoft PowerPoint
While PowerPoint is the most popular presentation software, there are several other alternatives available, including:
WPS Presentation: WPS Presentation is a free and open-source presentation editor that is compatible with PowerPoint files.
Keynote: Keynote is a built-in presentation editor for Mac users. It offers a variety of features, including templates, themes, and transitions.
How to download WPS Presentation on Mac?
WPS Presentation is a free presentation app for Mac offered by WPS Office. With a streamlined interface and handy tools, it makes an excellent PowerPoint alternative.

Users often choose WPS Presentation to create simple slide decks quickly. The drag-and-drop flexibility when inserting charts or arranging objects helps speed up their workflow.
WPS Presentation stands out with these key features:
Intuitive editing tools similar to PowerPoint
Thousands of free templates
Ability to export PPT and PPTX files
PDF converter and editor
Cloud sync and multi-device support
To download the WPS Presentation on your Mac:
Step 1: Go to https://www.wps.com/download/
Step 2: Click on the Free Download button in WPS Office for Mac box

Step 3: Indicate the download location and click Save.

Step 4: Double-click the “.zip” installer file to extract WPS Office Installer once the download completes.

Step 5: Open WPS Office Installer, then click Open.

Step 6: Click Install Now, then follow the instructions on installing WPS Office and related apps like Presentation.

After installation, you can find WPS Presentation conveniently in your Applications folder or Launchpad. Its clean interface will be familiar to PowerPoint users, with menus for Home, Insert, Design, Transitions, and more.

How to download Microsoft PowerPoint on Mac?
Here is a step-by-step walkthrough with pictures on how to download PowerPoint for Mac using the App Store:
Step 1 : Open the App Store on your Mac.

Step 2: In the search bar at the top right, type in "PowerPoint" and press Return.

Step 3: The Microsoft PowerPoint app should appear as the first result. Click on the Get button and then Install.

Step 4: You'll see a progress bar as PowerPoint downloads. After it finishes, you'll find it in your Applications folder.

Step 5: Open PowerPoint and sign in with your Microsoft account or create a new free account to use it.

After opening PowerPoint, you can pick from a wide selection of templates to create your first presentation!
How to Use the Built-in Mac Keynote?
Mac users can also access the powerful Keynote app built into Apple's iWork suite. With its intuitive interface and gorgeous themes, Keynote makes creating beautiful slides on a Mac easy.

Image’s link: https://www.thegioididong.com/hoi-dap/keynote-la-gi-cach-su-dung-keynote-tren-iphone-macbook-chi-1359032
I like using Keynote when I want to assemble visually impressive presentations quickly. The animated builds and transitions between slides keep audiences engaged.
Standout features of Keynote:
Pre-built themes with elegant animations
Drag-and-drop image/chart insertion
Tools for flowcharts, diagrams, and shapes
Record presenter narration and timings
Easy sharing via iCloud or Apple TV
Steps to create and edit a new slide in Keynote:
Follow these steps to begin a new presentation in Keynote:
Step 1: Open Keynote from your Applications folder or Launchpad.

Step 2: Click New Document to access the Keynote homepage.

Step 3: Double-click the desired slide layout to insert a new one.

Step 4: Customize the slide by adding a title, text, images, and other media.

Step 5: To add more slides, click Add Slide.

Step 6: Click the Play button in the top toolbar to present the slides

With just a few clicks, you can create amazing-looking presentations through Keynote's simplicity and built-in Apple polish.
Practical Tips for Using Keynote on Mac
To add a slide transition effect, select the slide from the slide navigator on the left, then click on the Animate tab in the window's top-right corner. Choose the Action option and click on the Add an Effect button. You can select from over a dozen effects and customize their duration, direction, and start time.

To animate individual objects on the slides, select the objects and go to Animate > Build In > Add an Effect. You can preview the effect and change its order, timing, and delivery. You can also use the Build Out option to animate how objects disappear from the slides.
To use Magic Move, duplicate a slide and change the position of the objects on both slides. Then select the first slide and choose Magic Move from the Add an Effect menu. Keynote will automatically create a smooth animation between the two slides. You can adjust the duration and other options as well.

To edit your slide layouts, go to View > Edit Slide Layouts. You can add, delete, or modify any slide layout to suit your needs. You can also change your presentation's theme, background, and color scheme.

To customize your toolbar, go to View > Customize Toolbar. You can drag and drop any tool you want to add or remove from the toolbar. You can also choose between icon-only, text-only, or icon-and-text modes.

To use action buttons for shapes in Keynote, select a shape and go to Format > Add Link > Slide. You can choose which slide to link to or use the Next Slide or Previous Slide options. This way, you can create interactive presentations that let you jump around different slides with a click.

To access a variety of chart styles, simply click the Chart button on the toolbar or navigate to Insert > Chart in the menu bar. You'll find a wide range of styles, including 2D, 3D, and Interactive options.

What are the Differences between PowerPoint on Mac and PowerPoint on Windows?
While PowerPoint on Mac retains most core features from the Windows version, there are some critical differences in how specific tools work:
The user interface follows Mac design language instead of the Windows ribbon
Animations and transitions have fewer effects options on Mac
Saving as older PPT formats may cause formatting changes
Linked media like charts can break when moving files cross-platform
Mac menus lack certain administration tools for managing templates
Some other limitations include:
Occasional font compatibility issues
Differences in default autocorrect/styling behavior
Variation in how slide masters/layouts are handled
Mac PPT files render slightly differently in Windows
However, the web-based PowerPoint for Office 365 helps mitigate most cross-platform issues. But keeping the above differences in mind can help avoid headaches when collaborating between Mac and PC.
Practical Skills for Using PowerPoint on Mac
To start mastering PowerPoint on your Mac, try out these handy tips:
Use keyboard shortcuts like Command + M to quickly add slides from the master view
Right-click on objects like charts to open formatting options
Hide slides rather than deleting them in case you need them again later
Use section breaks in the slide sorter view to divide related slides into groups
Align or distribute objects under the Format menu to cleanly organize elements
Adjust video playback quality under Playback to optimize performance
Enable Auto Save and Auto Recover to prevent data loss from unexpected shutdowns
Use Notes Page view to add detailed presenter notes to each slide
Click the Record Slide Show button to record timings and narration for the presentation
To deliver a presentation in PowerPoint on Mac, you can also use the keyboard shortcut Command + Shift + F5 to start a slide show.
With PowerPoint's robust set of features tailored for Mac, you can create and deliver polished presentations efficiently.
Use Word, Excel, and PPT for FREE, No Ads.
Edit PDF files with the powerful PDF toolkit.
Microsoft-like interface. Easy to learn. 100% Compatibility.
Boost your productivity with WPS's abundant free Word, Excel, PPT, and CV templates.
Can I use PowerPoint on Mac for free?
Yes, you can access PowerPoint for free on a Mac through the online Office web apps or via a 30-day trial of Microsoft 365.
Does PowerPoint work the same on Windows and Mac?
PowerPoint on Mac generally provides the same core features as the Windows version. However, minor differences may exist in how specific tools, effects, fonts, and media function when moving files cross-platform. For example, the ability to create macros is unavailable in PowerPoint on Mac.
Is PowerPoint Mac compatible with PPT files from Windows?
You can usually open PPT and PPTX files created on Windows in PowerPoint on Mac without issues. But occasionally, some advanced formatting, animations, or linked media may break when transferring the file.
What are some excellent alternatives to PowerPoint on Mac?
Some good alternatives to PowerPoint on Mac include WPS Presentation and Keynote. WPS Presentation is a free and open-source presentation editor that is compatible with PowerPoint files. Keynote is a built-in presentation editor for Mac users.
PowerPoint remains the top choice for creating professional presentations on both Windows and Mac. While the Mac version has a few limitations, it provides the full PowerPoint toolset tailored for Apple devices.
Whether you choose Microsoft PowerPoint, WPS Presentation, or Keynote, you now have the tools and knowledge to create compelling presentations. Start crafting your next masterpiece and leave a lasting impression on your audience.
- 1. How to Use a Master Slide in PowerPoint (Step-By-Step Guide)
- 2. How to Use Zoom PowerPoint Presenter View: A Step-by-Step Guide
- 3. How To Narrate a PowerPoint on Mac – A Comprehensive Guide
- 4. How to Export PowerPoint Notes to Word Mac (Step-by-Step Guide)
- 5. How to Compress a Powerpoint on Mac A Comprehensive Guide
- 6. How to Export PowerPoint to Video on Mac (Step-by-Step)

15 years of office industry experience, tech lover and copywriter. Follow me for product reviews, comparisons, and recommendations for new apps and software.
- PDFelement for Windows
- PDFelement for Mac
- PDFelement on Mac App Store
- PDF Reader for Windows
- PDFelement for iPhone/iPad
- Get from App Store
- PDFelement for Android
- Get from App Google Play
- PDF Scanner for iPhone
Cloud & SDK
- Document Cloud
- PDFelement Pro DC
- PDFelement SDK
Online PDF Tools
- PDF to Word
- Compress PDF
- Word to PDF
Educational Users
- Annotate PDF
- Combine PDF
Personal Users
- Convert PDF
- Organize PDF
Professional Users
- eSign PDFs Legally
- Extract Data from PDF
- Password Protect PDF
PDF Solutions for
- Chat with PDF
- AI PDF Summarizer
- AI PDF Translator
- AI Content Detector
- AI Rewrite PDF
- Proofread PDF
- Add Bookmarks to PDF
- Explain PDF
- Mac Software
- OCR PDF Tips
- Online PDF Tips
- Edit PDF like Word
- PDF Converter Tips
- PDF Compressor Tips
Why PDFelement
- Customer Stories
- PDF Software Comparison
- Contact Support
- PDFelement for iOS
- InstaScan for iPhone
Explore More
- Reviews See what our users say.
- Free PDF Templates Edit, print, and customize free templates.
- PDF Knowledge PDF-related information you need.
- Download Center Download the most powerful and simple PDF tools.
- Download Download Pricing Pricing
How to Open PowerPoint on Mac without PowerPoint App

Elise Williams
2024-04-30 11:04:01 • Filed to: PowerPoint Tips • Proven solutions
PowerPoint is Window’s application for presentations. Apple has its version of PowerPoint named Keynote. But not all PC users have Mac. Some use Windows, others use Mac. And if you are a Mac user, you might need to open a PPT file on your Mac. But how to open PowerPoint on Mac ? Well, there are a couple of ways to open the PPTX file on Mac, and we will share them with you.
How to Open PowerPoint on Mac with PDFelement
One of the simplest ways to open a PowerPoint file on Mac is to convert it to a suitable file format, i.e. a PDF format. Moreover, it is necessary for you to employ a powerful PDF tool to help you achieve this process. So, Wondershare PDFelement - PDF Editor , as a one-stop PDF solution, is the best choice for you. Here is a guide on how to open PowerPoint on Macbook Pro using PDFelement.
- Step 1. Create a PDF file from the PowerPoint file. To do this, simply launch PDFelement, and go to the “Home” menu. Click on “Create” > "PDF from File". Then locate the PPT/PPTX file, and click it.
- Step 2. Once the file opens, it will automatically convert to PDF format. From there, you can edit the file using PDFelement.
- Step 3. If you need, you can further convert the file to another format. For example, you can convert it back to PPT, or other file formats, including HTML, and much more.

The process of converting files to and from PDF is quite simple with PDFelement. It features the familiar ribbon-style design of Microsoft Office. But what makes the software delight to use without sacrificing productivity is its features. PDFelement combines essential business features with a simple interface. And unlike Adobe Acrobat, it won’t empty your wallet. The price is reasonable and affordable. Here are some of the main features of the software:
- Quickly and easily edit PDF documents, including text and images.
- Add hyperlinks to PDF files if needed.
- Create a PDF document from scanned images or any other file format.
- Convert PDF files to a variety of formats, including RTF, HTML, Image formats, TXT, Microsoft Office formats, and more.
- Review and mark up files using a wide set of commenting tools.
- Extract data from PDF files.
- Automatically recognize, create, and fill fillable forms.
- Drag and drop to create web forms in a few of minutes.
- Control access to documents by applying password.
- Redact sensitive information from any file.
Other Methods to Open PowerPoint on Mac without PowerPoint App
In addition to using third-party PDF software for how to open PowerPoint on Mac, you can use some of the default Mac applications. The results, however, will not be the same. The two apps you can use are Keynote and Preview.
Method 1. Open PowerPoint on Mac Using Keynote
- Step 1. Launch and open Keynote.
- Step 2. The moment you launch the app, a window will automatically open. Locate the PowerPoint file you want to open. In most cases, the file is in the Documents folder. Click on it in the left sidebar. You can also locate the file by going “File” > “Open”, and then navigate to the desired file.
- Step 3. When you open the file, Keynote will inform you that there were changes made during the import process. Usually, these changes include formatting, fonts, and images. The more complicated the presentation is, the more changes there will be.
- Step 4. Once you locate all of the changes and you fix them, you can view the PPT file in Keynote. Sadly, in some cases, there are too many changes, and you might not even be able to use the presentation.
Method 2. Open PowerPoint on Mac Using Preview
- Step 1. Launch Preview application. Click “File” > “Open”, and locate the PowerPoint file. It will open as a PDF file
- Step 2. The problem with Preview is that you cannot make changes to the file. You can use it only as a quick option to see the slides or print them.
- Step 3. If you want to see the slides, simply scroll down.
As you can see, Apple’s default options for opening PPT on Mac are fairly limited. Therefore, we suggest using third-party software such as PDFelement. That way, you can further edit the file, and you can convert it without the loss of formatting.
Free Download or Buy PDFelement right now!
Buy PDFelement right now!
chief Editor
Speak Your Mind
Related articles.
- How to Add Video Background to PowerPoint
- How to Convert PowerPoint to MP4
- How to Convert Excel to PowerPoint
- Easily Edit Background Graphics in Microsoft PowerPoint
- Top Tips to Use PowerPoint Transitions

Using Templates in PowerPoint for Mac
Note: This article has done its job, and will be retiring soon. To prevent "Page not found" woes, we're removing links we know about. If you've created links to this page, please remove them, and together we'll keep the web connected.
PowerPoint templates can help you design interesting, compelling, and professional-looking presentations. They contain content and design elements that you can use as a starting point when creating a new presentation. All the formatting is complete; you just add the content.
Apply a template to a new presentation
Open PowerPoint, and you'll see a set of standard templates in the gallery. If you're already working in PowerPoint, click File > New from Template to see the templates.
(In version 2011, you then select All under the Templates category.)

You can choose one of the standard templates, or, if you want to find a more specific template, type a search phrase in the Search All Templates box, such as business plan, report, business proposal, training, or calendar. You'll find hundreds of options from templates.office.com that you can use as a starting point for your presentation.

When you find the template you want to use, double-click it, or select it and click Create .
The template is downloaded to PowerPoint, and you are ready to begin working on your presentation.
More information about PowerPoint templates:
To learn how to create your own templates, see Create and use your own template in Office for Mac
To learn the difference between a template and a theme, see Differences between templates, themes, and Word styles
Apply a template to an existing presentation

Need more help?
Want more options.
Explore subscription benefits, browse training courses, learn how to secure your device, and more.

Microsoft 365 subscription benefits

Microsoft 365 training

Microsoft security

Accessibility center
Communities help you ask and answer questions, give feedback, and hear from experts with rich knowledge.

Ask the Microsoft Community

Microsoft Tech Community

Windows Insiders
Microsoft 365 Insiders
Was this information helpful?
Thank you for your feedback.
Contribute to the Microsoft 365 and Office forum! Click here to learn more 💡
April 9, 2024
Contribute to the Microsoft 365 and Office forum!
Click here to learn more 💡
PowerPoint Forum Top Contributors: Steve Rindsberg - John Korchok - Bob Jones AKA: CyberTaz ✅
May 10, 2024
PowerPoint Forum Top Contributors:
Steve Rindsberg - John Korchok - Bob Jones AKA: CyberTaz ✅
- Search the community and support articles
- Microsoft 365 and Office
- Search Community member
Ask a new question
How do I get to file on a mac? There is no powerpoint on the menu bar
How do I get to file on a Mac? there is no powerpoint in the menu bar.
- Subscribe to RSS feed
Report abuse
Reported content has been submitted
Replies (4)
- Microsoft Agent |
Thanks for posting in the community. We are happy to help you.
Are you saying that you downloaded a PowerPoint file, such as *.pptx, but cannot open it?
If not, please provide more details about the situation on your end.
If so, have you ever installed a PowerPoint app on your Mac before? Do you mean the PowerPoint app disappeared or do you mean you don't have the PowerPoint desktop app to view the PowerPoint file?
If you have installed the PowerPoint application and it has disappeared, please point it out.
If you don't have the PowerPoint desktop app to view the PowerPoint file, I suggest you upload the file to OneDrive, and then use PowerPoint for Web to view it. Please go to www.office.com , sign into your account, and click the OneDrive icon in the left sidebar. In OneDrive for Web, click "Add new" and upload this file. After that, please refresh the page, click "My files" in the left sidebar, find and open the file in PowerPoint for Web.
We look forward to your response. Thanks for your cooperation.
George | Microsoft Community Moderator
Was this reply helpful? Yes No
Sorry this didn't help.
Great! Thanks for your feedback.
How satisfied are you with this reply?
Thanks for your feedback, it helps us improve the site.
Thanks for your feedback.
You can check to see if PowerPoint is installed by typing Comand>Space bar, then start typing "power...". The app will show up if it is installed.
If you want to navigate directly to the file instead, use the Finder (blue smiley face) to go to the file location (probably "Downloads" if you downloaded it).
- Volunteer Moderator
The menu is the horizontal bar that the top of your screen. PowerPoint commands only appear there once PowerPoint is running.
You might be referring to the Dock , which appears by default at the bottom of your screen, but can also be placed at either side. Office installation doesn't automatically add PowerPoint to the Dock. To add it. open your Applications folder, then drag Microsoft PowerPoint to the Dock.
You may be comparing PowerPoint for Mac to PowerPoint for Windows.
The Menu Bar is the bar at the very top of your screen. It starts with an Apple symbol. That's where you find the File menu. Here's a screen shot of the Menu Bar :

You are probably thinking of the Ribbon, which is a wider band beneath the title bar. In Windows PowerPoint there is File tab, but there is not a File tab on the Mac. On Mac, the first tab is Home , not File, as shown here:

The reason Windows PowerPoint has a File tab on the Ribbon is because on Windows there is no Menu Bar at all and they had to put the File menu someplace. They also moved some of the Preferences from Preferences to the File Tab in PowerPoint for Windows and they renamed Preferences as Options,, but these are still in their original locations on Mac.
Question Info
- Norsk Bokmål
- Ελληνικά
- Русский
- עברית
- العربية
- ไทย
- 한국어
- 中文(简体)
- 中文(繁體)
- 日本語
Assassin’s Creed Shadows 17+
Enter feudal japan.
- Expected Nov 2024
- This content may change without notice, and the final product may be different.
Screenshots
Description.
Experience an epic historical action-adventure story set in feudal Japan! Become a lethal shinobi Assassin and a powerful legendary samurai as you explore a beautiful open world in a time of chaos. Switch seamlessly between two unlikely allies as you discover their common destiny. Master complementary playstyles, create your shinobi league, customize your hideout, and usher in a new era for Japan. - Explore the captivating open world of feudal Japan, from spectacular castle towns and bustling ports to peaceful shrines and war-ravaged landscapes. Adventure through unpredictable weather, changing seasons, and reactive environments. - Become Naoe, a shinobi Assassin, and Yasuke, a legendary samurai, as you experience their riveting stories and master their complementary playstyles. As Naoe, use stealth to avoid detection and agility to confound your enemies. As Yasuke, strike your foes with lethal precision and power. Unlock new skills, gear, and progression independently for each character. - Make information your weapon as you explore the world, and build your own network of spies to be your eyes and ears across locations to hunt down your next target. Along the way, recruit new allies with unique abilities to help accomplish your missions. - Create a fully customizable hideout for your growing shinobi league as you train your crew, craft new gear, interact with key characters, and choose your base’s layout, decorations, and accessories.
App Privacy
The developer, Ubisoft , indicated that the app’s privacy practices may include handling of data as described below. For more information, see the developer’s privacy policy .
Data Not Collected
The developer does not collect any data from this app.
Privacy practices may vary, for example, based on the features you use or your age. Learn More
Information
- Developer Website
- App Support
- Privacy Policy

Family Sharing
Up to six family members can use this app with family sharing enabled., more by this developer.
Hungry Shark Evolution
Hungry Shark World
Just Dance Now
Just Dance Controller
Ubisoft Connect
ChatGPT arriving on the Mac in new desktop app from OpenAI ahead of WWDC
Today at OpenAI’s spring update keynote , the company announced that ChatGPT would soon become more easily accessible thanks to a brand new desktop app launching on the Mac.
New Mac app makes ChatGPT more accessible for users
Apple and OpenAI were recently rumored to be striking a partnership ahead of WWDC. This partnership would bring ChatGPT to iOS 18 as a built-in, system-integrated chatbot option.
Ahead of that partnership, OpenAI has announced its own first-party ChatGPT app coming to the Mac. The app is designed to make ChatGPT more easily accessible and perpetually available for users. A very brief preview of the app was shown during the presentation, but more details were shared in a press release .
For both free and paid users, we’re also launching a new ChatGPT desktop app for macOS that is designed to integrate seamlessly into anything you’re doing on your computer. With a simple keyboard shortcut (Option + Space), you can instantly ask ChatGPT a question. You can also take and discuss screenshots directly in the app. You can now have voice conversations with ChatGPT directly from your computer, starting with Voice Mode that has been available in ChatGPT at launch, with GPT-4o’s new audio and video capabilities coming in the future. Whether you want to brainstorm a new idea for your company, prepare for an interview or have a topic you’d like to discuss, tap the headphone icon in the bottom right corner of the desktop app to start a voice conversation.
ChatGPT for Mac is rolling out today to Plus users, and will come to all free GPT users in the weeks ahead. A Windows app is also planned for later this year.
9to5Mac’s Take
It’s always great to have a new first-party Mac app debut. I always prefer a native app experience over using a web app, and that will be no different with ChatGPT.
Previously, Mac users were limited to using ChatGPT via the web client or a third-party app. For almost a year OpenAI has offered an iPhone app for ChatGPT , but it was unknown whether the AI-powered service would ever receive a dedicated app for the Mac. It’s great to see that change today ahead of hopefully more OpenAI-related Apple news in the weeks ahead.
FTC: We use income earning auto affiliate links. More.
Check out 9to5Mac on YouTube for more Apple news:

Apple’s Mac lineup consists of MacBook, MacBoo…

Ryan got his start in journalism as an Editor at MacStories, where he worked for four years covering Apple news, writing app reviews, and more. For two years he co-hosted the Adapt podcast on Relay FM, which focused entirely on the iPad. As a result, it should come as no surprise that his favorite Apple device is the iPad Pro.

Manage push notifications

How to resize images: a guide to making images larger and smaller on Windows, Chrome, or Mac devices
W hether you're prepping images for a presentation, optimizing them for web use, or just trying to save some disk space, resizing images is a fundamental skill that comes in handy. This guide will walk you through the simplest ways to resize images on Windows, macOS, and ChromeOS.
If you're a Linux user and want to resize images in the terminal, you'll need to install a software suite like ImageMagick. If you're using a Linux distro, like Ubuntu, there is a pre-installed image viewer, but this won't allow you to resize images, so you may want to install a third-party application to do this.
How to resize images using the Photos app in Windows
This method uses the Photos app built into Windows for a quick and straightforward way to resize images without needing additional software.
The steps below are for Windows 11, but earlier versions of Windows will work in a similar way.
1. Open the application
Select the image that you want to resize in File Explorer. Right-click and select Open with... Then select Photos from the drop-down list.
Note: if you have Photos set as your default images application in Default apps in your settings, you won't need to do these steps. You'll be able to double-click the file in the folder and go straight to Photos.
2. Select the menu
From the Photos screen, select the three dots at the top.
3. Select Resize image
From the drop-down list, select Resize image .
You will now see the Resize window, which provides several options for resizing your image.
Choose Resize Method: You can resize your image by Pixels or by Percentage.
If you choose Pixels, you can enter the exact width and height in pixels.
If you choose Percentage, you can scale the size up or down based on the image's current dimensions. For instance, typing 50 in both Width and Height fields under Percentage will resize the image to half its original size.
Adjust Quality: There's a slider for Quality below the dimensions. Moving this slider left will decrease the image's quality and file size, while moving it right will increase the quality and file size. Adjust this according to your needs.
Choose File Type: You can select the desired file type for your resized image from the File type drop-down menu, such as JPG, PNG, etc.
Preview Size: As you make changes, the Current and New fields at the bottom of the Resize pane will update to show the original and new dimensions and file sizes, allowing you to preview the result before saving.
Save the Image: Once you're satisfied with the new size and quality, click the Save button to apply the changes. You may be prompted to choose a location to save the resized image.
How to resize images using Gallery in ChromeOS
If you're operating on a Chromebook or any ChromeOS device, you can use its built-in Gallery app to edit, crop, and resize your images.
1. Open in Gallery and select Rescale icon
Open your image so that it displays in Chrome's Gallery application. From the row of icons at the top, select the Rescale icon . This is a square with rows of dots in two of the corners.
2. Enter new width or height
Once you have selected Rescale, you will see the resizing options panel. This displays the width and height of your image in pixels. There is also a padlock icon, which is the aspect ratio lock.
To change the size of your image, adjust its height or width . If the aspect ratio lock is toggled on, it will adjust the other number automatically. To turn aspect ratio off, click the padlock icon . It will now display as an open padlock.
3. Save your resized image
To save your image, click the Save button at the top right of the window. You can overwrite your original image or save as a new file.
If you want to exit without saving, select Discard edits.
How to resize images using Preview on macOS
MacOS devices come with a handy tool called Preview that lets you view images and PDFs and perform basic editing tasks like resizing.
1. Open image in Preview
Find the image you want to resize, right-click on it, and choose Open With > Preview.
2. Select Tools > Adjust Size
In Preview, click on Tools in the menu bar and select Adjust Size.
3. Adjust Width or Height
You can now resize your image. Change the image dimensions using pixels, centimeters, millimeters, points, or inches. Ensure Scale proportionally is checked to keep your image from becoming distorted.
4. Save resized image
Save your image by selecting Save from the File menu. If you want to save it under a different format or name, then select Export.
Final thoughts
With built-in tools on Windows, macOS, and ChromeOS, you can easily resize images, whether you're looking to shrink photos to save space or enlarge them for a project.
If you want to do more advanced image editing, there are many third-party image editing applications available, including Pixlr X, Canva, Photoshop, and GIMP. Some are free or have free basic versions, and others you will need to pay for.
But for basic image changes, like making images larger or smaller, free pre-installed applications like Photos, Gallery, or Preview will handle the job just fine.
You might also like
- The best camera for beginners 2024
- How to resize images in Photoshop
- How to install macOS 14 Sonoma on your Mac or MacBook

IMAGES
VIDEO
COMMENTS
Open the folder that contains your presentation, and locate your PPT file. 2. Right-click on the PPT file. This will open your file options on a drop-down menu. 3. Hover over Open with on the menu. This will open a sub-menu with a list of programs you can open the PPT file with. 4.
Step 2: Open PowerPoint. Open PowerPoint and choose a template or open a blank presentation. PowerPoint offers a variety of templates to suit different presentation styles. If you choose to start with a blank slate, you'll have complete creative freedom.
Apply or change slide layouts. Customize a slide master. Change the page orientation of your PowerPoint presentation. Create and use your own presentation template. Create your own theme in PowerPoint. Learn about SmartArt graphics. Compress the picture size. Crop a picture. Add a transparent picture (watermark) to your slides.
Here's how. In Keynote, click on the File menu and move your cursor to "Export to". A pop-up menu will appear. Select PowerPoint. In the Export Your Presentation window that appears next ...
To convert PowerPoint to video on a Mac, open the presentation you want to save and select File > Export. In the export window, next to File Format, select a file format option, such as MP4 or MOV. Choose your video quality, choose whether you want to include narrations, adjust timing, and select Export.
Open a presentation you recently worked on: In Keynote, choose File > Open Recent (from the File menu at the top of your screen). Keynote shows up to the last ten presentations you opened. Open a presentation stored somewhere other than your Mac (such as iCloud Drive): In Keynote, choose File > Open (from the File menu at the top of your screen ...
Step-1: Click on the "File" Menu button. At the top left side of your Microsoft PowerPoint application, you will find the 'File' menu option. The first step is to click on it. Step-2: Click on "New", and select the "Blank Presentation" button. Then, from the PowerPoint Backend view, you need to click on " New ".
This is achieved through the Send a Copy feature. Tap the Presentations option in the top left corner to take you back to the main Keynote menu. Here you'll see all your files. In the upper ...
To set how to navigate your presentation, do the following: Open the presentation. In the Document sidebar, click the Document tab. Select one of the following options in the Presentation Type menu: Normal: The presentation changes slides or starts animations when the presenter or viewer presses the Right Arrow or Left Arrow key, or clicks a link.
How to Use Microsoft PowerPoint On a Mac - Tutorial 1 - Start a New Presentation - Basic Tutorial | New #office365 #computersciencevideos #MicrosoftPowerPoin...
To play the presentation, click in the toolbar, then press the arrow keys to advance through the slides. To end the presentation, press the Esc (Escape) key. For more ways to show a presentation, see Play a presentation on your Mac. To close the presentation, click the red close button in the top-left corner of the window.
To advance through the presentation, do any of the following: Go to the next slide or build: Press the Right Arrow key. Go back a slide or reset the builds on the slide: Press the Left Arrow key. Jump to a different slide: Click , then click the slide's thumbnail in the slide navigator. You can also press any number key to make the slide navigator appear, enter the slide number in the text ...
Step 2. Image Credit: Screenshot courtesy of Apple. Click the Format menu and select PPT if you want to save the file in PPT format for older computers. Otherwise, click Next to use the default PPTX format. Note that Keynote can password-protect the file if you click the Require Password to Open check box.
Create, edit, collaborate, and share presentations using PowerPoint for Mac. Now it's easier than ever to create, edit, and share presentations seamlessly across your devices and with others. Share your files and collaborate in real time within a document or edit Office docs attached to emails. Get smart assistance features as soon as they ...
To do this, click on the magnifying glass icon in the top-right corner of your screen. You can then type in "Keynote" in the search bar and hit the "Enter" key. The Keynote app should appear in the search results. You can then click on the Keynote icon to open the app. Once the Keynote app is open, you can begin creating your PowerPoint ...
-In today's lesson, we will teach you how to open a PowerPoint in Safari for macOS.Open Safari web browser and paste a link you can find in the description b...
Step 1: Open the Apple Store on your Mac to get started. Type "PowerPoint" into the search box. Step 2: Select "Get" from the first search result to begin the installation procedure. Step 3: Then click "Open" to start Microsoft PowerPoint on your Mac when the download is complete.
1. Open the PowerPoint presentation on your Mac desktop or laptop. 2. Click the "File" tab in the top left corner. 3. Select "Share" from the dropdown menu. This will grant you the option to ...
Use PowerPoint in a web browser. If you have a Microsoft account (hotmail.com, outlook.com, live.com, msn.com) or a Microsoft 365 work or school account, you can view and edit a presentation for free in a web browser. Save the file to OneDrive or Dropbox and use PowerPoint for the web to open it. If you don't already have a Microsoft account ...
Step 4: Once your Mac boots in Safe Mode, launch the Microsoft PowerPoint app to check if it works in the Safe Mode environment. For Intel Mac users. Step 1: Click the Apple logo in the top-left ...
Step 1: Open the App Store on your Mac. App Store Icon on Mac Launcher. Step 2: In the search bar at the top right, type in "PowerPoint" and press Return. App Store Search Bar. Step 3: The Microsoft PowerPoint app should appear as the first result. Click on the Get button and then Install.
Open PowerPoint on Mac Using Preview. Step 1. Launch Preview application. Click "File" > "Open", and locate the PowerPoint file. It will open as a PDF file. Step 2. The problem with Preview is that you cannot make changes to the file. You can use it only as a quick option to see the slides or print them.
Apply a template to a new presentation. Open PowerPoint, and you'll see a set of standard templates in the gallery. If you're already working in PowerPoint, click File > New from Template to see the templates. (In version 2011, you then select All under the Templates category.) You can choose one of the standard templates, or, if you want to ...
In OneDrive for Web, click "Add new" and upload this file. After that, please refresh the page, click "My files" in the left sidebar, find and open the file in PowerPoint for Web. We look forward to your response. Thanks for your cooperation. Sincerely, George | Microsoft Community Moderator
Claude 3 Haiku, Sonnet, and Opus are the next generation of Claude models. They are state-of-the-art text and vision models that can generate human-like text outputs based on both image and text inputs. With powerful vision capabilities, they open up exciting possibilities for computer vision and image understanding applications.
Become a lethal shinobi Assassin and a powerful legendary samurai as you explore a beautiful open world in a time of chaos. Switch seamlessly between two unlikely allies as you discover their common destiny. Master complementary playstyles, create your shinobi league, customize your hideout, and usher in a new era for Japan.
Guessing May 13th's announcement. GPT-4o ("o" for "omni") is a step towards much more natural human-computer interaction—it accepts as input any combination of text, audio, and image and generates any combination of text, audio, and image outputs. It can respond to audio inputs in as little as 232 milliseconds, with an average of ...
New Mac app makes ChatGPT more accessible for users. Apple and OpenAI were recently rumored to be striking a partnership ahead of WWDC. This partnership would bring ChatGPT to iOS 18 as a built-in ...
1. Visme. Let's start with the best app for presentations you can use to design your presentation. Visme is a cloud-based graphic design software that allows designers and non-designers alike to create beautiful and professional presentations, infographics, social media graphics and more.
Moving this slider left will decrease the image's quality and file size, while moving it right will increase the quality and file size. Adjust this according to your needs. Choose File Type: You ...