10+ Best Photography Presentation Templates
Showcase your photographic work beautifully with our photography presentation templates. These tools provide a range of visually engaging designs that can enhance the impact of your photography presentations.


Cygni Photography PowerPoint Template
Cygni is a modern photography presentation for PPT with a beautiful minimalist design. This photography PowerPoint template has over 34 distinctive sl...

Abram Presentation Template
Abram is another PowerPoint template for photography that we think is a perfect choice for both beginners, and professional photographers. It will ins...

Fashioned Photography PPT Template
Our next template is specially designed keeping in mind the needs of fashion photographers. This template PPT photography presentation comes with icon...

Creative Photography PowerPoint Template
This is a contemporary photography presentation template. It comes with 39 unique slides that are perfect for a presentation on photography. This phot...

Lembert Presentation Template
The modern Lembert photography presentation template is designed with your portfolio in mind. It comes with 23 unique slides and a dark mode color the...

Akhasia Photography PowerPoint Template
Akhasia is one of the PowerPoint templates for photography that delights with color. This photography PPT template comes with 50 unique slides and 100...

Haben Photography PowerPoint Template
This fully editable PowerPoint template for photography has 40 unique slides. Each one’s got a unique layout to showcase your photos. The photog...

Elegant Photography PowerPoint Template
This is a pared-back canvas for your photography PowerPoint presentation ideas. The white and gold color scheme is minimal and draws attention to your...

The Twitter Lookbook Photography PPT Template
Whether you’re looking to create a fashion lookbook, or photography portfolio to impress your clients in the upcoming presentation, this templat...

Potraits Photography PowerPoint Template
If you’re looking to get your hands on the best photography PowerPoint templates available on the market, Potraits is an excellent contender for...
FAQs About Photography Presentation Templates
What are photography presentation templates.
Photography Presentation Templates are pre-designed formats or layouts intended for presentations that revolve around photography. These templates can be used by photographers, photo studios, or anyone dealing with a presentation that includes photographic content. They are designed to showcase photographs in the best possible way, accentuating details and helping to convey apparent messages.
These templates come in various designs and formats and are typically editable, allowing users to customize them to suit their specific needs. As such, users can adjust the templates by incorporating their images, changing the color schemes, adjusting fonts, etc., to reach their desired aesthetic.
What Software is needed to use Photography Presentation Templates?
There are various software applications compatible with Photography Presentation Templates. Commonly used ones include Microsoft PowerPoint, Google Slides, Adobe InDesign, and many other presentation design applications available in the market. The software required for a specific template depends primarily on the template's format or file type.
It's essential to ensure the software installed aligns with your template for ease of use and full customization capabilities. Some software applications have more advanced customization options compared to others, depending on the sophistication of the presentation required.
How do Photography Presentation Templates enhance presentations?
Photography Presentation Templates are purposely designed to enhance the visual appeal of presentations. They organize and display photographs professionally, thereby enhancing the look and feel of the presentation. The best templates will balance text and graphics perfectly, maintaining audience engagement and attention.
Beyond aesthetics, templates streamline the process of creating presentations. They save time and effort that would otherwise be spent designing every slide from scratch. Moreover, they create a consistency that lets the presenter focus on the presentation content, rather than worrying about the layout or design.
Can Photography Presentation Templates be customized?
Yes, most photography presentation templates are customizable. They come with editable elements, allowing you to incorporate your creativity and preferences into the presentation. The degree of customization will depend on the specific template and the software used. For example, one can adjust elements like color, fonts, layouts, and inclusion of personal photos or logos.
However, it's good to note that while templates are customizable, the extent of the modifications that can be carried out could be constrained by the original design. Therefore, it’s advisable to select a template that closely aligns with your envisaged presentation style.
Where can I find Photography Presentation Templates?
The internet is a vast marketplace for presentation templates. Websites such as Envato Elements, Canva, GraphicRiver, SlideModel, etc., offer a plethora of photography presentation templates. In purchasing or using free templates, be sure to comply with copyright regulations stipulated by the website or the template designer.
Another method is through software applications like PowerPoint or Google Slides, which often have a selection of templates within the program, some of which are suitable for photography presentations. Be sure that the templates suit your presentation needs before choosing and customizing them.
404 Not found
The Essential Guide to Exhibiting Your Photography
A Post By: Leanne Cole

There is nothing like having your photos displayed on a wall for everyone to see, admire, and appreciate. Even better is seeing those little round red stickers underneath the prints to indicate that the work has been sold.
For most artists, exhibiting work is a driving force – and that’s especially true of photographers who make images intended for walls and gallery displays.
But putting together a photography exhibition can be harder than you think. You have to consider an array of questions, such as:
- Where should you exhibit your work?
- How do you submit photos?
- How do you price your work?
- Do you purchase insurance?
- How should you frame your photos (if at all)?
Exhibiting your work can also be very expensive, so it’s important to understand the basic costs before you take the leap.
In this article, I aim to answer all of these questions (and more!). That way, if you do decide to move forward with an exhibition, you know how to make it as successful as possible.
Why do a photography exhibit?

Artists have been exhibiting their work for centuries, and today is no different – though some of the reasons for displaying your photos have changed.
Before the internet, exhibitions were one of the best ways to showcase your work, and artists used them to make money. They would invite special clients or benefactors to the openings, hoping they would buy one or a few pieces.
Selling art is harder these days, so if your sole reason for exhibiting is to sell your photos, then you may be very disappointed. However, if your goal is to put your work up on a wall to show people what you are capable of as an artist, then an exhibition can be very rewarding. Take it from me: Having all your best work up for everyone to see can feel like quite an achievement.
Another reason many artists exhibit is to put the exhibitions down on their artist’s CV. The CV (or curriculum vitae) is a list of all your exhibitions, as well as your education and a few other things, similar to a résumé. It’s what galleries look at when considering whether they’ll show your work.

Costs and budgeting
Exhibitions are not cheap! Therefore, before you decide to go all-in on an exhibit, there are many factors you’ll need to consider, including:
- What sort of space will you exhibit in and how much will access cost?
- What other expenses will there be?
- How many images will you prepare for the exhibit, and what will the reproduction outlays cost?
- Should you have a solo exhibition or start with group shows?
These are all questions you need to think about, and that I address in greater detail below.
Group vs solo exhibits
Solo shows are fantastic, and they’re ultimately what every artist wants. (Imagine having an entire show dedicated to just your images!) But solo shows are also very expensive, especially because you won’t have anyone with whom you can share the expenses.
Therefore, instead of diving headfirst into solo exhibiting, most artists start with group shows. Then, if they have some success, they move up to solo shows.
Group shows are a good way to get your feet wet and start building your artist’s CV. There are a handful of different ways to get started with group shows, but I’d encourage you to find some friends who are also interested in exhibiting, then apply together to galleries to see if you can get an exhibition.
Many galleries also hold group shows of their own, and they’ll often advertise for artists to participate – so you can often look out for those and apply!

Where to exhibit your photos
Honestly, you could probably create an endless list of exhibition possibilities, but the most common places are galleries that specialize in the type of work you create.
However, there are other places, like cafes or restaurants, that like to have exhibitions featuring different artwork on their walls. There are benefits and disadvantages to each of these approaches:
Exhibiting at cafes, restaurants, and foyers
These places often allow you to exhibit for free, and they don’t always have schedules, so you can sometimes have your work up for longer than you could in a gallery.
Cafes and restaurants may not want a commission from the sale of work, but they may want you to handle all the sales, so you would need to leave contact information. And they usually won’t take any responsibility for your art pieces, so be aware of that (in other words, loss and damage won’t be covered).

When exhibiting at one of these places, you won’t have access to a mailing list, and you’ll have to do all the advertising yourself. People generally don’t just wander in to look at the work; sure, the customers will see your images, but they’re there for specific reasons (e.g., to eat lunch), and buying images isn’t one of them. While you can sell pieces from a cafe exhibit, your audience isn’t there to buy what you are selling, which makes this type of show a bit more passive.
Your work will most likely need to be framed for hanging, and you will probably have to install it yourself at the exhibit space.

Exhibiting at galleries
There are many different types of galleries, and it’s up to you to decide which type will work best for your photography. Here are the basic gallery categories to keep in mind:
Artist-run spaces
The cheapest spaces to use are generally artist-run. You pay less to show your work, but you are expected to “sit the exhibition.” That means you have to be there when the gallery is open to watch your work and manage any sales.
Attending the entire time the gallery is open can be time-consuming. Many artists will get together for a group show, split the costs of renting the space, and draw up a roster to sit the exhibition. For artists starting out, this can be a much better option. If you want to do a group show with a split schedule but don’t know anyone to exhibit with, try contacting the gallery; they may know some artists looking to share a show.
While artist-run spaces don’t come with hefty upfront fees, you’ll need to take on most of the remaining expenses. The cost of the opening is covered and organized by you. You must also pay for most of the advertising, though some galleries will have a mailing list for you to use.

Staffed galleries
Staffed galleries are the next level. They cost more, but you are relieved of the burden of having to sit the exhibition.
There are two types of staffed galleries – commercial and non-commercial – and they often work in different ways.
Non-commercial galleries
These are often smaller galleries that charge you for renting the space and to sit the photography exhibit for you. They are often the most expensive galleries to use for an exhibition. Non-commercial galleries will help advertise the opening, but they are generally not interested in promoting you and your work beyond the exhibition; in other words, the relationship is short-term.
Non-commercial galleries make their money from your rental fee. They also take a commission from any work you sell (usually around 30%). These galleries are a good way to start getting work on your CV. Some also do a lot of group shows, so I’d recommend seeing if you can get work into them.
Non-commercial galleries aren’t typically picky about what they exhibit, as long as the quality of work is good. They won’t mind if one exhibition is all abstract paintings and the next is all landscape photographs. It can be a lot easier to get a show at one of these galleries than at the commercial galleries.

Commercial galleries
Commercial galleries are a lot harder to get exhibitions with. They have many artists to choose from and usually have a particular type of artist in mind. They’re less interested in a short-term relationship, and are more interested in helping you establish yourself as one of their artists – in other words, they want to represent you.
Commercial galleries will keep some of your work in a stockroom and advertise what you do. They try to get collectors to view your work (so the collectors will begin collecting and supporting you, as well).
Commercial galleries usually represent a niche market. If you send your photos to a gallery that only deals with Indigenous art, they are not going to be interested. Therefore, when approaching these galleries, you need to do your research. Make sure your work fits in with the other artists they represent. At the same time, if they have another artist who does work that is almost the same as yours, then they’re not going to be interested, either. The trick is to find galleries where your photos fit but are also somewhat unique.
Commercial galleries often cost a lot less for an exhibition. However, they are harder to get shows in and will take a higher commission. (Here in Australia, that rate is usually around 40%, compared to the 30% taken by non-commercial galleries.)

Submitting your work to galleries
Most galleries advertise when it’s a good time to submit proposals. While you can send inquiries at other times, it is best to check their websites for submission dates (i.e., times when they are asking people to send in exhibition proposals).
Commissions and pricing your work
All galleries charge a commission, and some cafes do, too. When pricing your work, you need to consider this amount. Make sure you find out the commission percentage when first inquiring about exhibiting in the space.
Also, when it comes to pricing, you should be realistic. If you are new to the art world, charging thousands of dollars for your work isn’t feasible. Only established artists can command prices like that. To get an idea of what you can realistically charge, look at the space in which you’ll be exhibiting and see how much previous artists have charged for similar work. If you are happy with the prices, you could try charging the same.
As your reputation grows and more people start buying your work, then you can consider charging more.

Handling loss due to damage or theft
When you rent a space to show your work, you also take on the responsibilities of it as well. Even galleries are unlikely to cover any theft or damage to your artwork.
This is often in the contract or terms. Make sure you are aware, and if you’re worried, then insurance could be an option.
Insuring your work
As I said, most places will not cover your work if it’s damaged or stolen. Therefore, insurance is something you need to consider when displaying your art. Do you need to purchase insurance? In truth, most artists don’t worry about it, but that doesn’t mean you should do the same. I’d recommend doing some research; see how much it will cost and if it feels worth it.
Now, if the work has cost you a lot of money to produce, then insurance is more important. You can also talk to the gallery and see if they have had problems in the past, especially with theft.
Also, if the work is going into a high-traffic zone, like a walkway, where it can be damaged or someone could walk off with it, then it’s definitely worth considering.
At the end of the day, whether you get an insurance policy should depend on the work itself, but also on the exhibition space. If your work is displayed in a cafe, then the staff may not have the time to watch the work at all, especially during busy periods. A gallery is going to be in a better position to watch – but only if they have the staff. If you have to sit the space yourself, can you watch everything?
Should you frame your work?

Many places will answer the question of framing for you: They will either say the work has to be framed or that it can be pinned to the wall.
If the work has to be framed, then you must decide if that is something you can afford. Getting work custom-framed can be very expensive. For this reason, a lot of artists make all their work the same size (or use the same size frames and just alter the mat sizes according to the images). They then go to a place like Ikea and buy cheaper frames. If you do the framing yourself, then you can reuse the frames every time you want to do a show.
If you don’t have to frame your prints and can pin the images on the wall, that doesn’t mean you can’t get the work framed. Again, you’ll want to take your budget into account. However, if you choose to pin your images on the wall, you need to figure out the best way to do this. If the purpose of the show is to sell your work, then pinholes in your photos might not be desirable to potential buyers. Also, unframed prints don’t look as professional or finished (the buyer can’t just take home an unframed print and hang it on the wall).
How many images should you exhibit, and at what sizes?

Determining how much work to prepare and how big to print comes down to price and space. Your exhibition budget can only be determined by you – and how many pieces you can make, and the size at which you can get your work reproduced, is going to be determined by your budget.
It is also important to know how much space you have available for the exhibit. If the space has only 3 m (10 ft) of wall space, then putting up three images that are one meter (39 in) across will make it crowded and not allow enough space between each photo. However, if you have 10 m (33 ft) of space, and you put up four images that are only 50 cm (20 in) across, that will give you too much space between them.
Consider the space carefully. If you think your work looks great when enlarged, then perhaps having fewer, large pieces is better. But the larger they are, the more they will cost.
The same goes for the number of images. You don’t want to completely fill the space – giving each image room will allow them to be shown better. Just because you paid for the space doesn’t mean you have to fill it up. And if you choose to frame, consider the size of the frames, as well!
Editioning your photography

Editioning is also referred to as “limited editions” and is something to consider with photography. Printmakers have been doing this for centuries. It means that you’re promising your potential clients that only a certain number of those images (prints) will be available for sale.
Editions can be a good way to make your work more valuable. If you have an image and do an edition of 20, then you need to make sure that the buyer knows what number in the edition they are receiving (8/20, for example). You need to keep records of this so you know how many prints of the image you’ve sold. Once you’ve sold 20, you can’t sell anymore. You made a promise to those who bought the first 20 that you would only sell 20 of them. Think about how many prints of a photo you might sell from the start, and be realistic.
Another thing you need to be careful about with editioning is making sure the photos are all printed exactly the same. They all have to be consistent. If you put a piece in a show and sell it a few times, people won’t be happy if the image they receive is not the same as the one they saw in the exhibition. You don’t have to get them all printed at the same time, but make sure you use the same printer for all of them and that the printer knows how to replicate them identically.
Selecting a printing medium
The medium you choose for printing should be determined by your budget – but you should also consider how to make your work look its best. Do you want prints in frames? Or is canvas better for the type of image you’ll be printing? Getting work printed on metal is becoming popular now as well, though it is also very expensive and (arguably) only suits some styles of photography.
Whatever you choose, you need to be careful. You want to show off your work in the best way possible . Consider printing some of your images a few different ways, then deciding which you like the best.

Choosing which images to exhibit
Choosing the images to include in the exhibit is the hardest part for most people. How do you know what images will be the best to show? There is no real way to tell.
If you are working with a gallery that employs a curator, you can likely get a lot of help from them; they can use their experience with the gallery and what sells to give you advice. If a curator isn’t available, you might have to enlist the help of friends. Ask them to identify their favorite pieces. Perhaps your social media sites will also help you see the images that were most popular online.
When it comes to curating the show, there should be a cohesiveness to the work and to the final exhibition. Make sure all the work fits together and flows well. Be clear on your vision for the exhibition. The better your images look on the walls, the more you could sell.

Start planning your photography exhibition!
Hopefully, this article answered many of your questions about exhibiting photos, and explained some of the ways that galleries work.
There are a lot of decisions that need to be made, and before you start preparing, it is good to have a plan of what you want to do, why you want to do it, and how you will pay for it.
Have you done a photography exhibit before? Please share your experience or post your questions in the comments below!

Read more from our Tips & Tutorials category

graduated from the VCA with a Bachelor of Fine Arts in Melbourne, Australia. She has since been working as a practicing artist and teaching people how to be Fine Art Photographers. She also teaches long exposure photography and runs workshops around Melbourne. Click here to download her 10 tips for Long Exposure Photography in the City . You can find her on her website .
- Guaranteed for 2 full months
- Pay by PayPal or Credit Card
- Instant Digital Download

- All our best articles for the week
- Fun photographic challenges
- Special offers and discounts
Got any suggestions?
We want to hear from you! Send us a message and help improve Slidesgo
Top searches
Trending searches

8 templates

memorial day
12 templates

ocean theme
44 templates

environmental science
36 templates

art portfolio
82 templates

49 templates
Photography Presentation templates
Presenting your photography work is now easy with our free google slides and powerpoint templates. a successful presentation will make your audience get the picture for sure..

It seems that you like this template!
Photography project proposal.
If you are a photographer you need to take a look at this photography project proposal template. Its design is a mixture of simplicity and professionalism, which together with the black and white colors give it an extra touch of elegance. Use it to present your work to new galleries...

Premium template
Unlock this template and gain unlimited access
Portrait Photography Workshop
A portrait captures the essence of a person, the part of their self that is open to others. It would be nice to hold a workshop on portrait photography, right? Well, now's your chance to create a slideshow for it, so you can tell your students what they'll learn or...

Camera Types Thesis Infographics
Download the Camera Types Thesis Infographics template for PowerPoint or Google Slides and discover the power of infographics. An infographic resource gives you the ability to showcase your content in a more visual way, which will make it easier for your audience to understand your topic. Slidesgo infographics like this...

Photography and Videography School Center
You know what they say: a picture is worth a thousand words, and a video? Well, that's worth a million. That's the magic of photography and videography. And if you're looking to unleash your own creativity behind the camera, joining a photography and videography school might be what you’re looking...

Nature Aerial Scenes for IG Stories
Download the Nature Aerial Scenes for IG Stories presentation for PowerPoint or Google Slides. How do you use social media platforms to achieve your business goals? If you need a thorough and professional tool to plan and keep track of your social media strategy, this fully customizable template is your...

Adventure Photographer Portfolio
You've been to many awesome places, always carrying your camera and taking the best photos that the world has ever seen. Do you relate? Then download this template for portfolios and start creating your own in order to show everyone your work and your impressive pictures. The style of this...

Camera Types Thesis
The world of photography is truly fascinating. Those wonderful devices have helped us capture some of the most important moments of our lives and history. If you are interested in this world and you are preparing a thesis on the different types of cameras that exist, we recommend you take...

Camera Fanatic Sales MK Campaign
The memories we make throughout our life should be unforgettable... But how to ensure you'll remember them for life? With photos! If you are a fanatic of cameras, get this new template and detail your marketing campaign for those who are just like you! Do you want spots made with...

How Does a Camera Work Minitheme
Is photography your passion? Do you master how to control ISO, shutter speed, focus and aperture? Then share your knowledge with a workshop and make others love the world of cameras as much as you do! With this design you can explain details about how cameras work in a modern,...

Designer Portfolio
A good portfolio is the perfect instrument when it comes to getting a job, and with this new Slidesgo template you have a great tool to become the most creative person when presenting any project.

Photography Infographics
Download the Photography Infographics template for PowerPoint or Google Slides and discover the power of infographics. An infographic resource gives you the ability to showcase your content in a more visual way, which will make it easier for your audience to understand your topic. Slidesgo infographics like this set here...

Stock Photographer Portfolio
The latest Slidesgo template will catch the attention of all photographers! If you need a design to present your portfolio, that is, a document where you show all your training, experience, and examples of the type of photography you do, this is the perfect template. The backgrounds are completely black,...

Let's Celebrate World Photo Day!
Celebrate World Photo Day in style with our breathtaking Google Slides and PowerPoint template, adorned with charming camera illustrations that bring life to your presentation instantly! Whether you are a photography enthusiast or simply appreciate the art of capturing memories and moments, this template is sure to make your presentation...

Grain Photography Workshop
Photography workshops are in great demand, as its a very creative and artistic discipline. With this template, you can use its slides to give some lessons, for example, on how to treat grain in pictures. The composition of the slides is simple and professional at the same time. There are...

Nature Photography Day
June 15th is the perfect opportunity to enjoy going out and taking some pictures! With this template about the Nature Photography Day you can speak about photography tips, the best locations or moments to capture nature at its best, or share your favourite pictures in a beautiful presentation that will...

Papyrus Backgrounds Portfolio
Download the "Papyrus Backgrounds Portfolio" presentation for PowerPoint or Google Slides. When a potential client or employer flips through the pages of your portfolio, they're not just looking at your work; they're trying to get a sense of who you are as a person. That's why it's crucial to curate...

Videography Workshop
Get ready to roll! If you're looking for a creative and dynamic way to showcase your videography skills, put your focus on this design: our Google Slides and PPT template for videography workshops is here to capture your audience's attention. With a sleek and modern design, this template is optimized...

Street Photography Portfolio
Download the "Street Photography Portfolio" presentation for PowerPoint or Google Slides. When a potential client or employer flips through the pages of your portfolio, they're not just looking at your work; they're trying to get a sense of who you are as a person. That's why it's crucial to curate...
- Page 1 of 4
Great presentations, faster
Slidesgo for Google Slides :
The easy way to wow

Register for free and start editing online
- Presentation Hacks
Tips for Shooting Your Own Presentation Photography
- By: Gabrielle Reed
Finding photography to place within the slides of your presentations can oftentimes be a challenging task. Some companies, brands, and individuals prefer to use the free stock photography options out there like istock, Pixabay, Flickr, and Pexels. But others struggle to find the right photos for their presentations in the confines of those sites. If you want to put the fate of your presentation photography into your own hands, here are a few tips to keep in mind:
1. Employ the Rule of Thirds
Once you learn what the Rule of Thirds is, you’ll be able to spot it almost anywhere. To use the Rule of Thirds, you must envision two horizontal lines upon two vertical lines. When shooting a photo, make sure to place the dominant object or subject off center to the left or right of the frame. This photography technique allows the viewer to explore the image instead of merely glancing at it and moving on, visually.

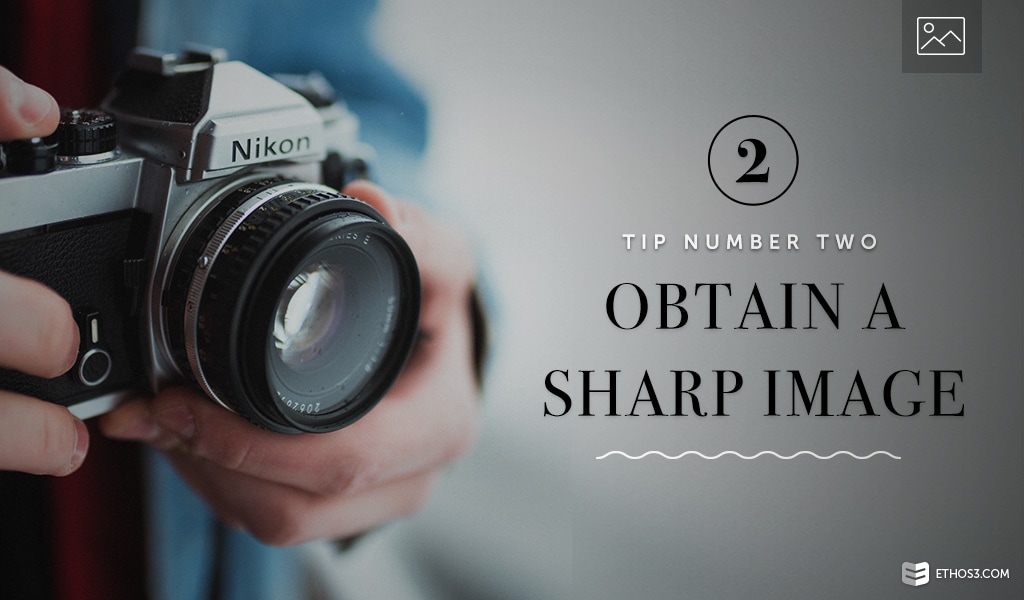
2. Obtain a sharp image
There are several ways you can go about achieving this one. Everything from sturdy camera positioning to accurate ISO speed will work together towards crafting a quality photo. Position your camera on a tripod or between both of your hands to avoid blurring or shaking. In addition, consider whether you want to take photos indoors or outdoors or a combination of the two. If you are indoors, use a higher shutter speed – 800 to 1600 – and a wider aperture. As a standard rule of thumb, the darker the setting of your photo, the higher you need to make your ISO. The lighter the setting, the lower the ISO speed.
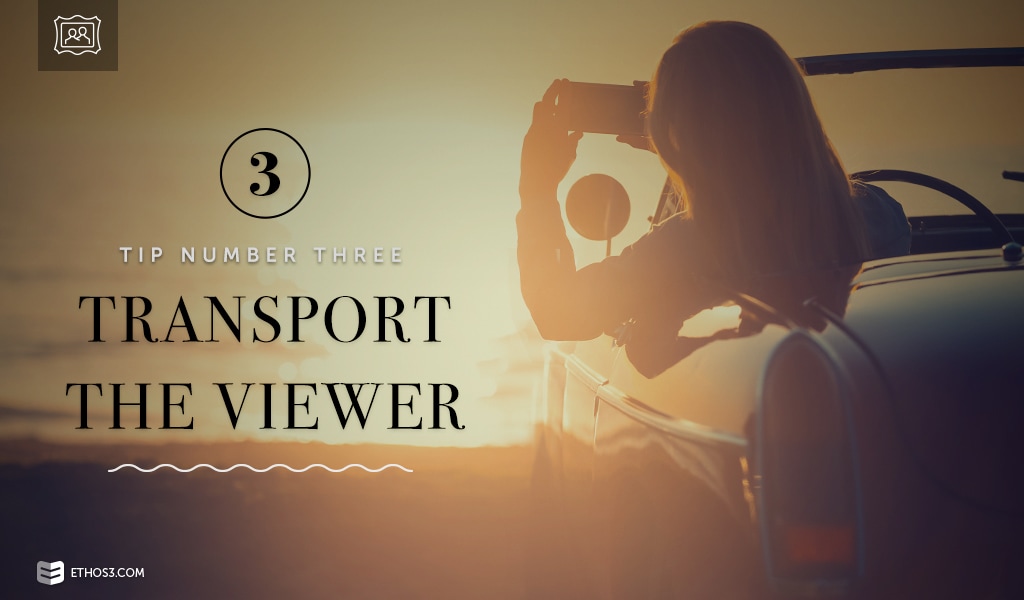
3. Transport the viewer
If you’ve ever watched Friday Night Lights, you understand the appeal of making the audience feel like they are in the scene you are capturing. The way Jason Katims filmed the series made viewers feel like they were actually living in Dillon, Texas for the duration of each episode. By adding an element of shakiness to the footage and including a variety of close-up shots on situations and characters, Katims transported the audience. You can do this in a photo by creating depth with a wide lens and f/16 aperture.
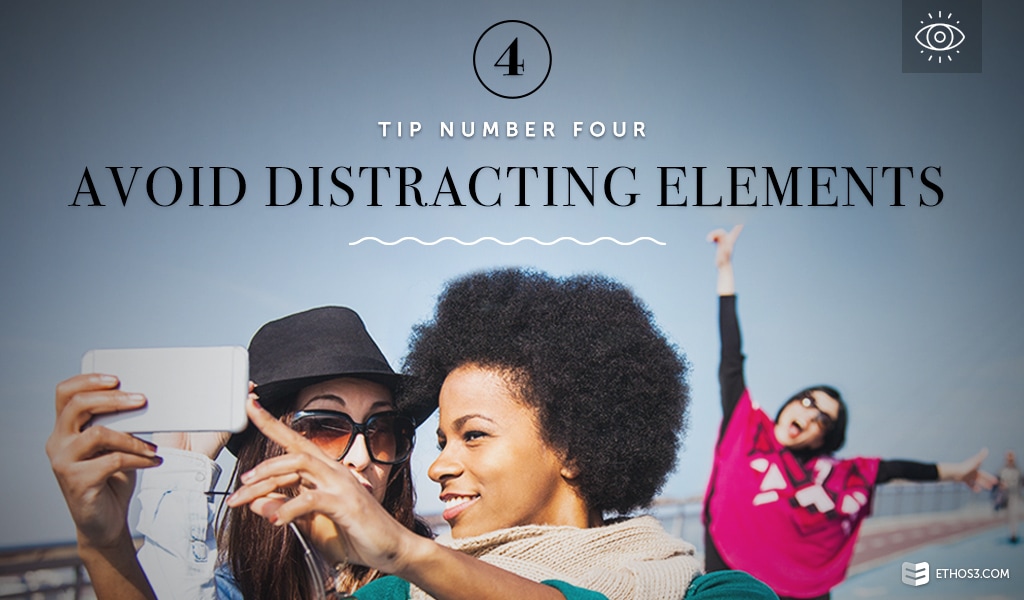
4. Avoid distracting elements
Rely on simple backgrounds to many of your presentation photos. Since you will likely be overlaying your imagery with copy and textual content, the less involved the background, the clearer your overall message. This tip is especially important for text-heavy slides.
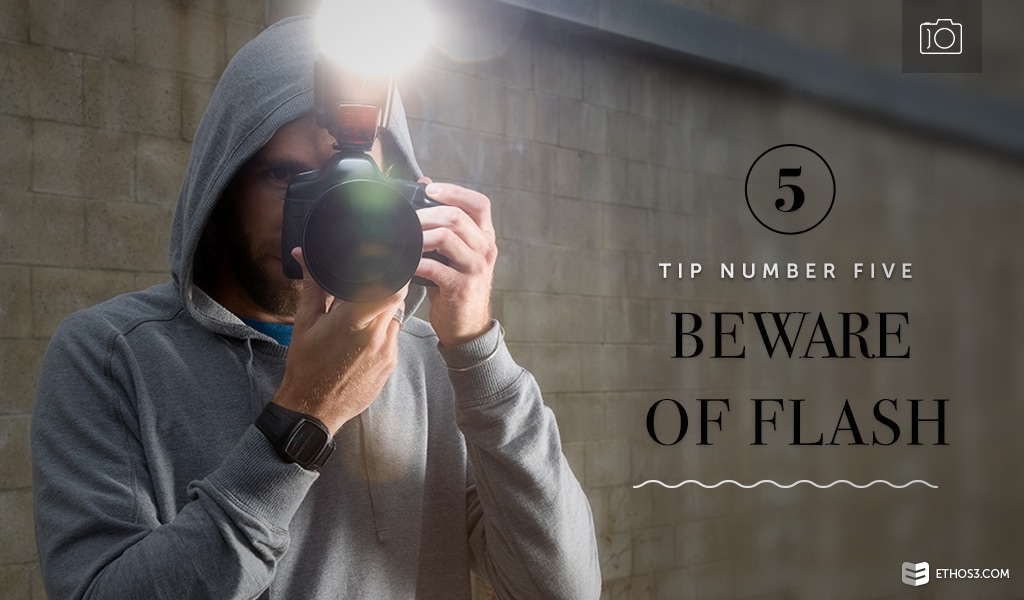
5. Beware of flash
For indoor photography, never use flash. Those stock photos you despise so much tend to look like they’ve been taken with flash. And we know you don’t want to mimic that approach. Instead, opt for natural lighting and really focus on the ISO and aperture you are using.
6. Implement the pan technique
Depending on various factors related to your presentation and corresponding narrative, you may want to include photography that demonstrates movement. If you want to employ this technique, it would be in your best interest to secure a tripod. From there, pan the camera in the direction of the object you are capturing in motion.

7. Consider the subject matter
Finally, always make photography decisions based on the subject matter. If you are presenting about the state of the restaurant industry, make sure that you are snapping photos in related settings and of relevant scenarios.

For more presentation design tips and ideas, review the resources below:
A Presentation Design Debate: Conceptual Versus Literal Images
The Beauty of Relinquishing Control of Your Presentation Content
Back to the Drawing Board: Rethink the Investor Presentation

Gabrielle Reed
Join our newsletter today.
© 2006-2024 Ethos3 – An Award Winning Presentation Design and Training Company ALL RIGHTS RESERVED
- Terms & Conditions
- Privacy Policy
- Diversity and Inclusion
- Photography Workshops
- Photography Presentations & Lessons
- Fine Art Prints
- Get In Touch
Camera Club, Arts Guilds, And Group Presentations
Informative and entertaining photography presentations, i’m happy to judge camera club competitions, juried shows and exhibitions..
Entertaining and informative photography presentations will instruct and show your group great places both local and distant. The instructional photography presentations provide insights on creativity and the practical techniques for making great photographs.
Presentation Topics – All presentations are updated every year with new information and photographs.
Finding Your Creative Voice: Learn how 1 simple word and 4 questions can change your photography VERY POPULAR
Every photographer needs to find their unique creative voice. It is the basic building block of creating a unique photographic style that allows a photographer to make photographs that do not look like everyone else. So how does someone develop a style? It was something I struggled with for years until I realized a simple solution… Ask questions. In this presentation I teach you 4 simple questions whose answers will lead you to define your style. I also teach one important key word that will drive everything you do with your photography, and possibly your life. This presentation is full of examples of how this questioning approach lead to creative solutions based on a unique creative voice.
Photographing the New Jersey Pinelands, Our Wilderness Next Door VERY POPULAR
I’ve been photographing this uniquely special wilderness for over 30 years. Learn the secrets of the Pinelands including finding locations, composing images in this unusual environment and what equipment to bring with you. Please inquire about adding an optional 1 day photography workshop as at discounted price in the Pinelands in addition to this presentation.
Attitude, Inspiration and Composition: A No BS Approach To Photography NEWLY UPDATED AND VERY POPULAR
This isn’t a lesson in basic composition, it is a serious, but entertaining look at the 3 fundamentals building blocks required to create great photography.
Photographing with Drones: Bring your photography to new heights! NEW
Drones can provide a photographer a whole new way to create. This presentation will cover how to use a drone to create awesome aerial abstracts, elevated landscapes, photographs with interesting and unusual camera angles, and more. Also covered are useful accessories and what you need to know to fly a drone legally.
Night Photography, NOT Night Sky Photography NEW
There are many great presenters who teach how to photograph the night sky, the Milky Way and star trails. That is astrophotography. This presentation looks beyond the Milky Way. Actually, this presentation explores how to photograph the things below the Milky Way. The world is very different at night. Familiar places like your own backyard become ominous and otherworldly. Your town or local park may not seem photogenic during the day, but at night the ordinary can become extraordinary.
This presentation is designed to inspire and instruct. Learn how to use your camera in the dark when most automatic camera settings do not work. Learn to find and work with the little bit of light that night affords like moonlight, twilight and the lights in towns and cities. These and other tips and tricks will help you get out of the dark about photographing in the dark.
What is Photography? You just may be surprised NEW
Since photography transitioned from film to digital, the door to continue the creative process after the shutter is clicked was opened. Post processing has caused more arguments, discussion and rules in photography since color film overtook black and white film. So what has changed since digital photography? Are photographs really different? You just might be surprised by the answer during this entertaining and informative discussion of exactly what is photography and what you need to know to create great photographs no matter what kind of camera you use.
What Judges look for in Competitions and Exhibitions
This is a fun, yet very frank look at the hardest job any photographer can do… Judging! We’ll examine both the objective and subjective things that make a photograph great and exhibition worthy. Plus, YOU GET TO BE THE JUDGE! This is a presentation with audience participation and you get to judge some of my work and the work of the photography masters. You’ll discover that no photograph is perfect.
Neighborhood Nukes, How To Do A Photography Project
Learn how weave photographic story that goes beyond the individual images you create. This presentation uses my work documenting abandoned Cold War Nike Missile bases as an example. Note: This presentation has also been adapted to be a more historical presentation for historical societies and military organizations.
Hidden Treasures, Photographing Abandoned Buildings
There is a certain allure of abandoned buildings that attracts photographers. This presentation will show my work with abandoned places, including cold war military bases, industrial sites, and neglected, but important historic sites. It also covers specific approaches to photographing the strange and surreal beauty of forgotten places safely and without getting arrested.
Presentations can be customized and adapted to any meeting format. I am also happy to judge photo competitions if you hold them. For more information, you can fill out the form below or email me at [email protected] .l
Testimonials
“i didn’t know what to expect last night of your pine barrens photography presentation but you blew me away. the artistic aspect of your photos were incredible.” -monmouth county camera club, “thanks for last night your judging was spot on. will you be available to judge next season” -ocean county camera club, “everyone thought you did an excellent job in judging the many images presented – it was a difficult assignment and you handled the task very well.” -cranbury digital camera club, “your presentation on finding your creative voice was outstanding. it really opened my eyes to the creative process. the photographs displayed were amazing too. we greatly appreciate you presenting to our club.” -lehigh valley photography club, camera club presentation request.
- Student Successes
- My Learning
Photography for Beginners (The Ultimate Guide for 2024)

You can also select your interests for free access to our premium training:
Cameras are complicated, but photography for beginners doesn’t have to be. When I started shooting, I was frustrated with my first DSLR camera. I couldn’t capture what I saw through my viewfinder.
It took a ton of trial and error to improve my photography. But when I managed to work it all out, I started taking some pretty spectacular images. So, this beginner guide will share everything I’ve learned from my mistakes.

- Learn to effortlessly set up your camera for any situation.
- Master the art of selecting the perfect exposure every time.
- Discover 10 composition rules that elevate your photos instantly.
If you buy a product through one of our referral links we will earn a commission (without costing you anything). Prices last updated on .
As an Amazon Associate, I earn from qualifying purchases. Product prices and availability are accurate as of the date/time indicated and are subject to change. Any price and availability information displayed on Amazon at the time of purchase will apply to the purchase of this product.
Photography for Beginners (5 Photography Basics)
We’ll go over some camera, lens, and composition basics. Plus, we’ll look at some photography terms and suggest some equipment to get you started.
- Learn How Cameras Work
- Find a Camera
- Understand Your Camera
- Understand Your Lens
- Learn Composition and How to Take Sharp Photos
How Do Cameras Work?
As beginner photographers, we tend to be visual learners. And it’s my job to make beginning photography as easy as possible for you.
So I thought, “What better way to help a beginner photographer learn how to use their cameras than by creating an infographic ?” And that’s exactly what I did.
I collaborated with an illustrator friend, and together we made these images. The following will make understanding exposure and how cameras work much easier!
Check out what we came up with below.

Understanding exposure is the key to capturing a great image.
Learning how exposure works will help you take control of your camera and take better photos . Shutter speed, aperture, and ISO are the three essential elements that combine to create an exposure. Photography is all about balancing these three components.
The exposure triangle is a great way to remember the three settings and how they relate to each other. Combined, they control the amount of light your camera captures.

This will help you understand that changing one setting will require changing the others. That is if you photograph the same scene with the same lighting conditions.
As you’ll soon learn, these elements affect more than exposure. They also cause alterations in depth of field , motion blur , and digital noise .
You can dive into manual settings once you understand how each one works. This is where you take control back from your camera. So, let’s explore exposure in the three settings we’ve mentioned
1. Aperture
The first element of the exposure triangle we’ll look at is aperture . This is the hole inside the lens that allows light to pass through to the camera’s sensor.
It’s similar to the pupil of your eye. The wider the aperture, the more light is allowed into the camera. If you make the aperture smaller, it lets less light in.
We measure the size of the aperture in a scale of f-stops and each f-stop denotes the size of the aperture. The confusing thing is that smaller apertures have larger f-stop numbers, and bigger apertures have smaller numbers.
For example, an f/22 aperture is very narrow and doesn’t let much light in. An f/1.8 aperture is wide and lets in a lot of light. That means you need high a high f-stop in bright light and a low f-stop in low light.
But aperture doesn’t only effect the amount of light that passes through. It also has a big effect on focus and depth of field.
Depth of field refers to how much of your scene is in focus. A shallow depth of field gives you a narrow focal plane, so only your subject is in focus. The foreground and background are out of focus.
A deep depth of field means the foreground, background and everything in between are in focus.
Using a narrow aperture with a high f-stop gives you a deep depth of field, which you need to landscape images. A wide aperture with a small f-stop gives you a shallow depth of field and blurred background, which is popular with portrait photographers.
Exposure will be much easier if you can memorize the f-stop scale. A standard scale is f/1.4, f/2, f/2.8, f/4, f/5.6, f/8, f/11, f/16, f/22. Some specialty lenses go above and below this scale.

2. Shutter Speed
The next exposure setting we need to look at is shutter speed .
Once the light has passed through the lens’s aperture, it reaches the shutter. The speed at which the shutter opens and closes determines how much light the camera lets through.
Ordinarily, you only want a very small fraction of a second (for example, 1/250 s) to prevent motion blur. But different shutter speeds complement different situations.
Shutter speed can be anything from really fast (1/4000 s) for sports photography to really slow (30 seconds) for night photography.
It all depends on what you’re shooting and how much light you have available. That’s why knowing how your shutter speed works is key to understanding photography basics.

Once the light has passed through the aperture and is filtered by the shutter speed, it reaches the camera sensor. This is where we decide how to set the ISO .
The ISO determines how sensitive the camera sensor is to light. The higher the ISO setting, the more sensitive it is.
Higher ISO settings allow you to work in lower light. However, as the ISO increases, picture quality decreases. The higher you go the more likely it is your images will start to show digital noise. This is a grainy quality that has a negative effect on image quality.
Low ISO settings give you better picture quality, but you need more light to capture a proper exposures. This means you have to strike a balance as to whether you prioritize low-light performance or image quality.
For example, I would reduce the image quality if it meant that I could prevent motion blur in my photo. There’s no possible way to fix that in post-production (yet, at least).

Exposure Summary
Once you have a basic grasp of aperture, shutter speed, and ISO, you need to learn how each element of exposure works together. Read about it in our article on the exposure triangle .
Exposure is the essence of photography, which is why it’s so important to learn the three basic principals. If you don’t have these down, composition and framing become a moot point in beginner photography.
So, learn the “stop-based” system for measuring exposure and master aperture, shutter speed, and ISO complete control of your camera.

Finding a Camera for Digital Photography
Now we’ll look at how to find a camera that suits you. We’ll look at camera types and the different features you should look for. Plus, we’ll take a look at the top camera brands.
Finding the Best Camera
There’s no such thing as “the best camera” because all photographers are different. We all want different things, and a camera that’s right for one photographer might not be right for another
Finding the best camera is about finding one that helps you achieve your photography goals. You might want to learn some camera basics and explore the art form.
Or you might be looking for a camera for a particular type of photography. Thankfully, there are plenty of cameras for everyone, from portrait photographers to vloggers.
If you’re new to photography, you can check out our list of the best cameras for beginners . We also review the best entry-level cameras for the top camera brands:
- Canon cameras for beginners
- Nikon cameras for beginners
- Sony cameras for beginners
If you’re further along, you can check out our camera recommendations for all the photography styles below.
- Best camera for portrait photography
- Best camera for landscape photography
- Best camera for street photography
- Best vlogging camera
- Best streaming camera
- Best camera for sports photography
- Best camera for wildlife photography

DSLR vs Mirrorless
There are two main types of cameras in photography. You have the more traditional DSLR models. And you have the newer mirrorless cameras.
You can look at the full comparison in our DSLR vs mirrorless article . Basically, DSLR cameras use the traditional shutter and mirror system carried over from analog cameras.
Mirrorless cameras no longer use this system, which is why they are called mirrorless. Yet, they are both interchangeable lens systems, meaning you can remove lenses and swap them for another.
DSLRs are popular with photography purists. And they are still used by everyone, from amateurs to professionals.
There’s no denying DSLRs are on the way out . But they are still beloved by many photographers. Plus, DSLRs are also a great option as an entry-level camera .
Without the shutter and mirror, mirrorless cameras have new strengths. They are smaller and more lightweight than DSLRs.
A mirrorless camera also has faster burst modes. They also have better video features, making them superior multimedia cameras. You can see our picks for the best DSLRs and the best mirrorless cameras .

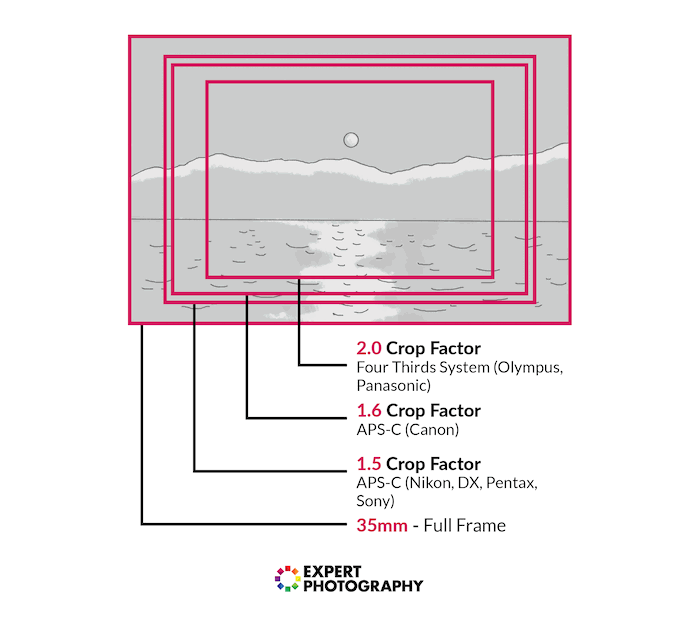
What Sensor Size Do You Need?
DSLRs and mirrorless cameras will have one of two sensor sizes, either APS-C (crop frame) or full frame.
APS-C sensors are smaller than full-frame sensors. This means the APS-C camera bodies are more compact and lightweight than their full-frame cousins.
Crop sensors don’t have the same RAW power in terms of resolution. And they are more associated with the entry-level end of the camera market.
Full-frame cameras are generally bigger, more powerful, and more expensive. The larger sensor size allows for a higher MP count, increasing resolution. The bigger sensor also gives you better dynamic range .
Full-frame cameras dominate the professional camera scene. Some of the specs are incredible, but the impressive tech comes with a heavy price tag.
It may be difficult to justify if you’re a beginner photographer. But for many professionals, it’s an investment with a high return. Read more about this in our APS-C vs full-frame article .

Other Types of Cameras
There are many other camera types if you don’t fancy a DSLR or mirrorless. There are compact cameras (or point-and-shoot cameras). There are even full-frame compacts . You also have action cameras like GoPros and similar alternatives .
As the names suggest, they are small and easy to use. You simply point the camera and click the trigger.
They have fixed lenses, sometimes with zoom capabilities. And these cameras are favorites of street photographers.
Compact cameras are also excellent for casual photography. They are great for holidays and family events. Read our recommendations for the best compact cameras .
You also need to know about Micro Four Thirds cameras. These are also interchangeable lens cameras. But they are smaller than APS-C and full-frame cameras.
They are also excellent hybrid cameras with fab features for photography and video. Check out our recommendations for the best Micro Four Thirds cameras .
Medium format cameras have an even bigger sensor than full frame cameras. They are specialist cameras with powerful image resolutions, but they also have specialist price tags.
Medium format camera are usually limited in terms of additional features like the ones found in modern mirrorless cameras. But you can’t beat them for image quality.
You can read our full article on medium-format vs full-frame cameras. And you can check out our list of the best medium-format cameras .

Crop Factor
You have to be aware of crop factor when deciding whether to choose an APS-C or full frame camera.
As we discussed, this means your sensor is much smaller than one on a professional camera . So, it is cropping your image. And the crop factor has a range of effects on your photographs.
It creates a narrower viewing angle. And this will affect the focal length of your lens, increasing the focal length and adding magnification. So, a beginner photographer should research cameras and lenses that will help their field of photography.
Which Is the Best Camera Brand?
Quite a few camera brands are making fantastic cameras. You have Canon, Nikon, Fujifilm, Sony, and others turning out new models yearly. That’s great for choice. But which camera brand is best?
The truth is, no one camera brand can be considered the best. It all comes down to what you want from your camera.
Some camera manufacturers specialize in certain areas. And knowing each brand’s strengths can help you find the perfect camera.
You can read our full article on all the best camera brands . But we’ll give you a head start here.
Nikon and Canon are two traditional heavy hitters. They produce a wide range of cameras, including DSLR and mirrorless models. They also have excellent compact cameras.
Sony is a mirrorless specialist. They have some of the best full-frame mirrorless cameras on the market. Each new model redefines the possibilities and expectations of mirrorless cameras.
Fujifilm is dedicated to APS-C mirrorless cameras. They don’t have a wide range of cameras like the others. But their retro looks, matched with state-of-the-art tech, create a loyal fan base.
Olympus produces Micro Four Thirds cameras. You don’t have the widest selection of Olympus cameras to choose from, but they are fantastic hybrid machines with a wide range of features.
If you want a multimedia camera, check out Panasonic Lumix . Whether you’re shooting photography or videography, their cameras have everything you need for top results.
You can also check out the best Leica cameras if you can afford one. They are one of the oldest camera brands and make luxury cameras photographers rave about. Just be careful, Leica cameras don’t come cheap.

Understanding Your Camera
Now, we’ll look at the cameras in more detail. This section breaks down some technical information. And it will help you understand some of the basic features found on digital cameras .
Why Are Megapixels Important?
A sensor’s sensitivity is measured in megapixels (MP). But what are megapixels? And why are they important in photography? Well, the amount of megapixels a camera has determines image resolution.
As a general rule, the higher the MP count, the better the photo quality. That’s because the megapixels react to light and absorb the information.
The camera’s processor then takes info from all the megapixels and turns it into an image. The more info it has to work with, the better the quality.
Other features also influence the image quality of a camera. But the MP should always be one of the first things you check in a camera. It gives you a good indication of what you can expect.
Read more about this in our article about resolution and megapixels .
Metering Modes
Digital photography for beginners can be confusing. Exposure isn’t as simple as learning about aperture, shutter speed, and ISO.
You also have to learn how your camera receives light. Metering modes tell your camera how you want it to look at a scene.
The picture below was taken in Spot Metering mode . If you were to take the same photo using the Evaluative mode, you would have a completely different exposure.
This is also covered in our Photography Unlocked eBook . We’ve also written an article about how and when to use digital metering modes (including Canon).
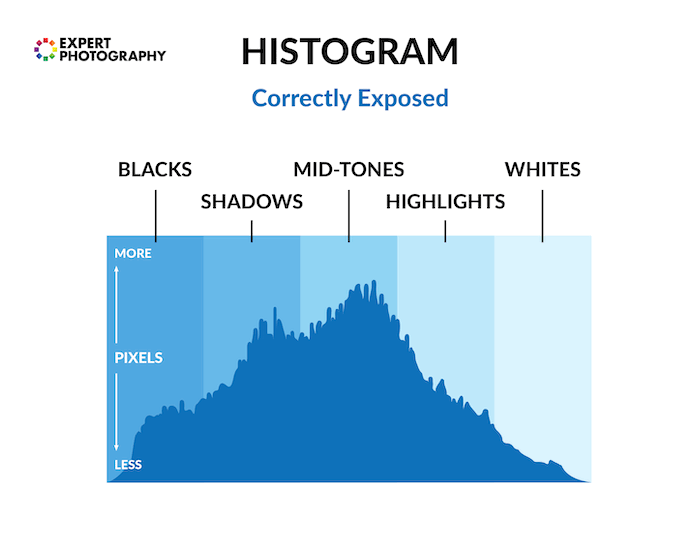
This basic camera feature is one of the keys to understanding why your photos come out underexposed or overexposed .

A histogram shows you a mathematical exposure overview after taking the photo. It tells you how evenly exposed a photo is.
A new photographer often finds it frightening to understand. But it is easy, and I show you this in our histogram article.
LCD screens aren’t very good at showing you this information through their image display. This is because they are affected by the ambient lighting conditions you’re in and the screen’s brightness.
That’s why the histogram is a powerful tool for beginning photography correctly.
Shooting Modes
Auto, Program , Aperture Priority , Shutter Speed Priority , or Manual mode . How do you work out which one you should be using?
There are also a lot of misconceptions about which mode to use under which conditions. Lean more by reading our full article on shooting modes .
When you understand what each mode does, the one that will suit your situation becomes much clearer. This is also covered in our Photography Unlocked eBook .

Depth of Field
The depth of field refers to how much of your scene is in focus. You control the depth of field by changing the camera’s aperture.
When shooting in low light, you must widen your aperture to allow enough light into the lens. But this has a major side effect—a shallow depth of field .
You can creatively use this. But it’s not the only possibility.
You’ll want to use a narrower aperture in many situations, like landscapes. You want to use a narrow aperture to keep the whole scene focused.
Our tutorial on depth of field walks you through everything you need to know. It’s about choosing the right aperture (and the depth of field) for the right situation.
When covering all the basics of photography, depth of field is very important.

White Balance
White balance is something I wish I’d learned more about much sooner than I did. I look back on some photos now and wonder what I was thinking.
The white balance changes the color cast of the entire photo. It’s responsible for overall warmth. It can determine whether your photo appears blue or orange, cold or warm.
Auto White Balance (AWB) doesn’t often do a good job, especially with tungsten light . The sooner you learn about this beginner’s photography principle, the more accurate your photos will look.
This is also covered in our Photography Unlocked eBook .

Understanding Your Lens
In many ways, your lens is just as important as your camera. Knowing how your lens works gives you more creative control.
And specific lenses are better for certain types of photography. Knowing this allows you to choose a lens that suits your style.
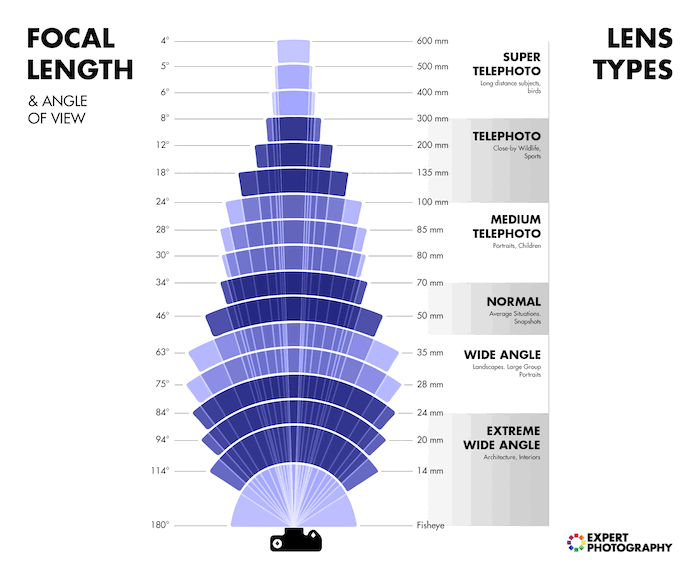
Focal Length
Have you ever wondered what the “mm” on your lens means ? Or do you wonder why people use longer focal lengths for portraits?
The focal length determines the magnification level of the lens. A 35mm focal length gives you a view similar to the one from a human eye.
A small focal length, like 16mm, gives you a wide viewing angle. And a focal length like 300mm gives you a high level of magnification.
If you want to know more, it’s all discussed in our post on focal length . It affects more than the “zoom.” It also influences the perspective and magnification.
We cover which focal length you want to use in different situations and their possible side effects. It’s a worthy read and one of my favorite tutorials.
Prime vs Zoom Lenses
Zoom and prime lenses are both popular with photographers. But both types of lenses have their strengths and weaknesses. Deciding between the two is about deciding what suits your photography.
A prime lens has a fixed focal length. The field of view can’t be changed, meaning you can’t zoom in or out. That’s the downside of a prime lens.
But the upsides are that they are lighter and more compact. And they often have better image quality, particularly around the edges.
Zoom lenses, with their variable focal lengths, are more versatile. You have more shot variety when shooting.
They let you get closer to your subject without moving from a spot. The downsides are their size, weight, and impaired image quality.
You can read our full article on prime vs zoom lenses .
The Nifty Fifty
What can I say about the nifty fifty ? What’s not to love?
If you are a beginner photographer, I’m referring to a 50mm f/1.8 (or faster) prime lens when I talk about the nifty fifty. This can be picked up very cheaply for most DSLRs.
It’s a great introduction to buying better-quality lenses. And it’s an excellent way of getting to grips with what aperture is.
The linked article is a review and guide. I wrote it because I recommend this lens as the first upgrade for every beginner photographer to make.
It’s easy to use. And, for the price, it will yield some excellent results!

What Lens Is Best for Beginners?
Finding the best lens can transform your photography. But, like cameras, choosing the best lens depends on the photography you want to shoot. Developing a basic understanding of lenses helps you find the one that suits your needs.
Certain lenses favor different types of photography. And picking one that suits you will help you succeed in that discipline.
Standard focal lengths, like 35 or 50mm, are great for street and travel photography . As mentioned, the field of view is similar to the human eye. So you can snap what you see in front of you.
Real estate and architecture photographers need wide-angle lenses. The broad field of view helps them capture expansive exteriors and tight interiors.
The same can be said for landscape photographers. They also like wide angles for capturing large open areas.
You can use 50mm lenses for portrait photography. But larger focal lengths give you tighter, more intimate compositions.
You can try anything from 70 to 120mm. These are also great lenses for product and food photography .
A fast maximum aperture is also beneficial in a portrait or product lens. It gives you excellent exposure control. And you can achieve a shallow depth of field and a smooth bokeh effect .
Sports and wildlife photographers use super-telephoto lenses . They give you excellent magnification. So, if you’re up in the stands or riding in a safari vehicle, you can get a close-up shot!
You can see the best lenses for each discipline below.
- Best lenses for street photography
- Best lenses for landscape photography
- Best lenses for real estate photography
- Best lenses for portrait photography
- Best lenses for product photography
- Best lenses for travel photography
- Best lenses for food photography
- Best lenses for sports photography
- Best lenses for wildlife photography

Lens Filters
Camera lens filters are a great tool for modifying or enhancing your photography work. They’re practical camera accessories that sit in front of your lens. And they can make a huge difference to the way you work.
There are two different types of glass filters. One screws onto the end of your lens and the other is mounted in front of the lens.
The filters you should consider buying straight away are lens-protective filters or UV filters . A UV filter doesn’t dramatically affect your image. And both these filters protect your lens’s glass.
Other filters block or change light as it passes through into the lens and camera. Different filters change the light in different ways. Read more about how each one can help you take better pictures or certain types of photography:
- Polarizing filters (polarizers or CPL filters)
- Neutral density filters or ND filters
- Graduated ND filters
- Variable ND filters
- Light pollution filters
- Infrared filters
- Astrophotography filters

Composition and Taking Sharp Photographs
It’s important to understand exposure. But you’ll struggle to take really good photos if you can’t understand basic composition .
I’m not saying that you have to follow every compositional rule. But it helps to learn these rules so they can help guide you in taking better photos.
We will also briefly touch on the importance of snapping sharp images . (Unless you want some cool motion blur in your photo.)
Rule of Thirds
The rule of thirds is often the first compositional rule that any beginner photographer comes across. And that’s for an excellent reason—it’s simple and works.
The basic premise is that you divide your camera’s frame into thirds. The image’s composition works better by planting key objects on these lines.
This is a tool that always works. But it is easy to overuse it. If you’ve not learned much about photography yet, it’s a great way of improving your photos. It will help to make them more exciting.

Visual Weight
Visual weight differs in size or weight as we know it. It’s all about what we’re drawn to when we look at a photo.
You’ll understand how people look at photos when you understand visual weight. You’ll learn to position certain elements in a frame to direct the viewer’s attention to where you want them to look.
It’s not so much a tool or a rule. It’s an understanding.

Shapes are essential in photography. Triangles are in almost everything we see in one way or another. It’s only a case of distinguishing and knowing what to do with them.
Triangles make great compositional tools. They’re easy to make and manipulate and are quite common. They are a great way to create the simplest and most basic photography compositions.
They are also perfect for combining different compositional photography techniques. These include lines and paths to create a more interesting part of a photo.
You can use them to make a photo look more stable or unstable.

If you take photos of people, you’re taking photos with eye lines . Understanding how eye lines affect how we view a photo is important.
Eye lines are the direction in which your subject’s eyes are pointed. The negative space in front of the subject’s face is called “ lead room .”
These can focus our attention on a particular part of the photo. They also produce tension and other photographic elements.
They’re not physical lines. But they can be used as such to draw attention to parts of a photo. Or they can even create a sense of mystery or curiosity about what is not in the frame.

Balance in a photo affects how we feel when we look at it. An unbalanced photo can make us feel uneasy. A balanced photo will make us feel more relaxed.
Whether you choose to make the photo balanced or unbalanced doesn’t matter. But it’s best to understand why you’ve chosen one or the other.
Both affect your photos in different ways. Again, it’s one of those situations where the more you know, the easier it will be to produce the desired effect.

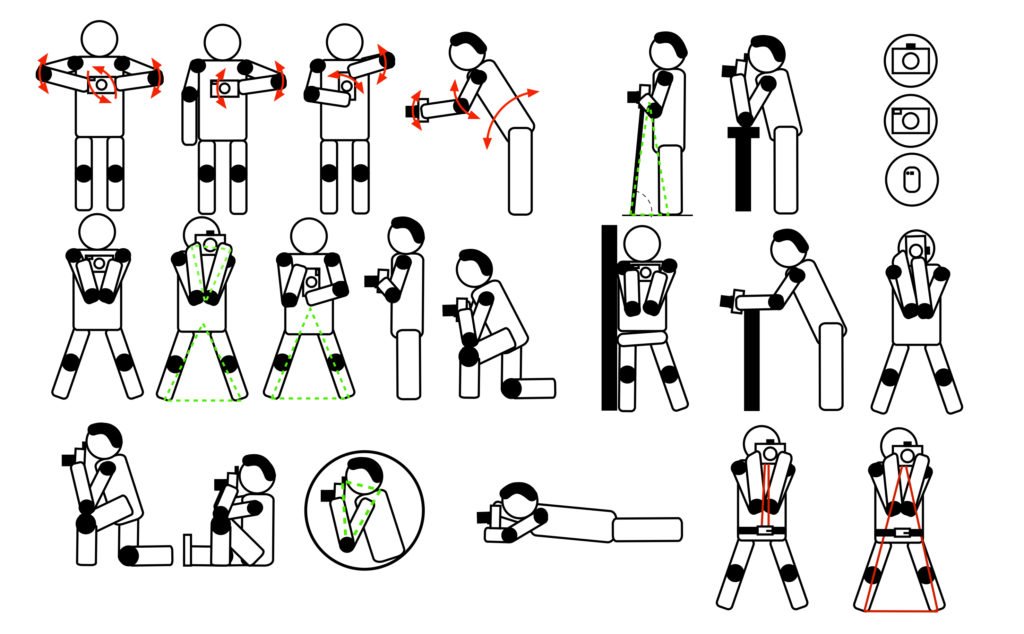
Take Sharp Images Like a Pro Photographer
In the article linked above, we walk you through the process of taking sharp photos like a professional. It covers everything from choosing the right shutter speed to using a tripod and shooting in RAW .
It’s pretty easy to make only a few small mistakes that result in blurry images. So, we cover the 13 most important photography tips.
Conclusion: Photography for Beginners
So, that’s a brief introduction to digital photography for beginners. But, of course, there are tons more you can learn about photography.
I encourage you to go and explore our tutorial archive . And you can check out our Photography Unlocked eBook for more camera basics. Or check out our Photography for Beginners course to master everything you need to know about taking photos!

Popular Content

Photography Basics – A Beginner’s Photography Guide
Home | Photography | Photography Guides | Photography Basics | Photography Basics – A Beginner’s Photography Guide
The photography basics are fundamental for anyone who is beginning to work in photography .
Regardless of your interests, gear, or goals, having a solid foundation of the main concepts of photography is key to capturing better images and improving your photography.
However, things are not easy when you start off; What are the photography basics? Which are the fundamental concepts of digital photography? What’s the best way to learn the basic elements?
I was in that position too, and I know that it’s hard. There are plenty of photography basics articles online , but the information is often incomplete or displayed in a non-logical order.
For that reason, I decided to create this beginner’s photography guide to learning the basics .
This photography basics guide is what I’d have loved to find when I first picked up my camera; all the important information you need to understand the main photography concepts displayed in a logical and digestible order. To help you in the process, I also included plenty of examples, infographics, and photography basics cheat sheets that will make everything easier.
Ready to learn the digital photography basics ?
Basic concepts of photography
We’ll dive into each photography concept below but, in a nutshell, these are the main photography basics :
- Shutter speed
- Exposure triangle
- Depth of field
- Focal length
- Sensor size
- Camera settings
- Camera modes
- Metering modes
- Focus modes & areas
- White balance
- Composition
- Photography gear
- Photography tips for beginners
Below you’ll find all these photography basics explained .
Apart from this information, the best way to learn the basics is to check the specific article that you’ll find at the end of each photography concept. You can also download this photography basics guide as a PDF if you’re interested.
I promise that if you follow this beginner’s photography guide , you’ll learn and master all the photography fundamentals in a flash !

GET OUR FREE EBOOK TO MASTER THE PHOTOGRAPHY BASICS
20 LESSONS AND 80+ PAGES WITH EXAMPLES, INFOGRAPHICS, TIPS, AND MORE!
1. Exposure – The main element of photography
Exposure is the most important photography basic and the first photography concept that you need to understand.
You’ve probably heard before the expression “photography is painting with light”, and it’s completely true! Photography is about capturing light, and exposure is so important because it’s the amount of light collected by your camera.
The photography exposure basics are composed of different elements that we’ll discuss below like the aperture , shutter speed , and ISO . The fundamental thing to understand is the effect of exposure, which is to capture the image with a determined brightness (this is also called “Exposure Value”).
Ideally, the image should be correctly exposed , that is, with the perfect amount of brightness where you can see all the detail in the highlights and the shadows. However, in photography exposure there’s no right or wrong, and the artistic choice of many photographers is to capture an underexposed or overexposed image. For now, we’ll focus on the elements to capture a correct exposure.
Exposure basics also has other effects on the final look of the image like the depth of field , the motion , and the digital noise . We’ll also get into this throughout this photography basics tutorial .
Below, you can see a photography basics infographic with the main effect of exposure on an image.

Not clear enough? Check out our guide to photography exposure !
2. Aperture – A fundamental concept in photography
Aperture is the first concept of the photography exposure basics .
In brief, the aperture works like our pupils; it’s the opening of the camera lens, which controls the amount of light that goes through the lens to the camera sensor.
This basic photography concept has a direct effect on the exposure; the wider the aperture the brighter the image will be, and the narrower the aperture the darker it will be. It also plays a significant role in the depth of field and sharpness of the image.
The max. and min. aperture of the lens is defined by a value known as “F-stop” . The larger the F-stop number is, the smaller/narrower the aperture and vice versa. This number follows a sequence like this:

The best aperture camera settings will depend on the light, the subject that you’re shooting, and the final look that you want in your image.
You can see all the main effects of this exposure setting in the below photography basics cheat sheet for aperture.

Interested in learning more about aperture with some real examples? Click below and check out our Guide to photography aperture !
3. Shutter Speed – A key element for beginner photography
The second photography fundamental related to exposure basics is the shutter speed .
In short, shutter speed is related to how long the camera shutter is open and capturing light.
This has a significant impact on the exposure ; a shorter shutter speed will translate into a darker image whereas a longer shutter speed will capture a brighter image.
Shutter speed is also a photography fundamental for capturing motion , something vital in some genres like long exposure photography . It also has an effect on the camera shakiness and the possibility of shooting handheld vs. the need for using a tripod.
The main way to measure shutter speed is using seconds and fractions of a second following a sequence like this:

The best shutter speed settings will depend on the available light and the motion that you want to capture in your subject.
You can see the main effects of this setting in the below photography basics chart related to shutter speed:

Want to find more information and examples? Check our complete guide to shutter speed !
4. ISO – A must in any beginner’s photography guide
The last of the exposure photography basics is the ISO .
In short, the ISO works by increasing the light information captured by the camera sensor.
This has a drastic effect on the exposure ; the higher the ISO , the brighter the image will be, and the lower the ISO , the darker the photograph will be.
Apart from exposure, ISO has a major side effect called “ digital noise ”. As you increase the ISO, your image will be brighter but will also have more digital noise, which is an important element related to the quality of the image.
The ISO number is usually measured using “ ISO levels ”, which follows this sequence:

The main ISO camera settings will depend on the available light. If you’re shooting in low-light or night environments, you’ll have to use a higher ISO if you want to capture the right exposure. The same applies if you want to use a narrow aperture or fast shutter speed and there’s not enough light. You’ll have to strike a balance with the other photography basics. This might seem complex but it’s rather easy as you’ll see in the next photography concept.
You can see all the ISO effects in the following photography basics cheat sheet .

Would you like to master ISO? Check out our Guide to ISO in digital photography !
5. Exposure triangle – the secret to understanding the photography basics
Once you understand the photography basics of aperture, shutter speed, and ISO , it’s time to put them all together!
The best way to see how these elements interact with each other is through the exposure triangle .
The exposure triangle is included in most beginning photography guides , and it’s simply an analogy to explain the effects and interaction of the main photography basics of exposure. According to this, all three elements must be in balance if you want to capture a correctly exposed image. So, when you adjust one side of the triangle, you’ll have to adjust one or the two other sides to strike a balance.
For instance, if you open your aperture, you’ll have to either reduce the shutter speed or decrease the ISO to achieve the same amount of brightness (exposure level).
Using the exposure triangle is one of the best basic photography tips for beginners , and once you understand it, it’s very easy to put it into practice.
To make things easier, below you can find a photography basics cheat sheet with the exposure triangle analogy.
")
You can find an in-depth guide full of examples in our exposure triangle guide !
6. Depth of field – A basic concept in photography
One of the fundamentals of digital photography is the depth of field .
In short, depth of field is simply the space in the image that is acceptably sharp and in focus.
In photography, we can say that there’s a shallow depth of field when just a narrow portion of the frame is acceptably sharp, whereas we speak about a large depth of field when a big portion of the frame is considered to be in focus.
Depth of field is affected by many different factors:
- Aperture : The wider the aperture, the shallower the depth of field
- Focal length : The longer the focal length, the shallower the depth of field
- Focusing distance : The closer the subject to the lens, the shallower the depth of field
- Sensor size : The smaller the camera sensor size, the shallower the depth of field (*using the same focal length).
A good way to calculate the depth of field is by using a depth of field app or calculator. It’ll tell you the portion of your frame that will be reasonably sharp according to your camera, lens, and aperture.

The best way to understand this photography concept is through real examples, which you can find in our depth of field photography guide .
7. Focal length – photography lens basics
Focal length is related to the photography lens basics .
It’s a vital photography concept to understand for creating your images and choosing the lenses that you’ll need in your gear.
The focal length works by describing each lens in terms of millimeters from the optical center of the lens to the sensor. Depending on how short or long the focal length is, this will have a direct impact on the field of view of your images and in other aspects like the depth of field .
For example, shorter focal lengths like wide-angle lenses will have a wide-angle of view , whereas longer focal lengths like telephotos will have a narrower angle of view . The focal length will also create different effects, like distortion in wide angles of view, and magnification in narrower angles of view.
All these elements are essential for anyone who is beginning in photography since it will affect the final look of your subject and image.
You’ll find this photography concept easily explained following the below basic infographic.

You can also find more info and examples of images taken with different focal lengths in our focal length guide !
8. Sensor size – A good photography fundamental to learn
Another photography fundamental for beginners that often goes overlooked is the camera sensor size .
The camera sensor size is truly important. There’s not an absolute best sensor size in photography, but rather different sensor sizes for different photographic needs.
The size used as a reference in digital photography is the classic 35 mm sensor size , also known as Full-Frame . If the sensor is smaller than this size, it’s said to be “ cropped ”, and if it’s bigger, it’s considered “ medium format. “ Knowing the different types of sensors, their qualities, and what they can achieve, is also crucial to taking the pictures that you want.
For example, a basic rule in night photography is to use a sensor with larger pixels , since these are better at capturing light and will allow you to take a better-quality image with less digital noise.
The focal length is also important since smaller sensors will offer more reach and greater magnification for shooting subjects far away like in wildlife or sports.
The depth of field is the last effect of the camera sensors. Using the same field of view, the depth of field will be narrower in cameras with larger sensors and larger in cameras with cropped sensors. An example is portrait photography, where photographers usually shoot with larger sensors to decrease the depth of field and bokeh effect .
As you can see, understanding the sensor size is one of those photography basics that you must pay attention to.
Below you can see a photography basic cheat sheet with the main types of sensors in the market.

If you want to learn more about this and see examples taken with different sensors, check our guide to camera sensor size !
9. Focus – An essential concept to master
Focusing is one of the most common struggles for anyone beginning in photography .
Briefly, focusing consists of adjusting the lens to find the maximum sharpness, contrast, and resolution for a chosen subject.
There are two ways to focus in digital photography :
- Manual focus : Using your hands to tweak the focus ring until you get to the best focus.
- Automatic focus : Using the camera’s and lenses’ internal motors to focus on a given subject.
Using manual focus or autofocus will depend on the type of photography that you do. For instance, in some genres like macro and night photography, it’s better to use manual focus. Yet, in other genres, like wildlife or sports, autofocus is faster and will make things easier.
In some genres like landscape photography, you can focus on a specific distance that will help you achieve the maximum depth of field (or reasonable sharpness). This is called the Hyperfocal distance and it’s one of the best photography basics to learn . There are also more advanced techniques to achieve maximum sharpness like focus stacking that you can apply if you already have some experience.

Talking about cameras , these are very different in terms of their focusing capabilities. Basic cameras usually have worse focusing capabilities like fewer focus points, and they are less reliable, while advanced cameras have a better focusing capacity even in low-light situations.
Most digital cameras include different focus modes and areas that we’ll cover in the photography basic settings below .
This photography basics infographic breaks down the main differences between Manual Focus vs. Autofocus.

You can learn how to focus and find 10 tips for focusing in our guide to focusing in photography .
10. Sharpness – The vital photography basic for better quality
Sharpness is a basic photography concept that can be more technical than others, but it’s rather easy to understand.
In a nutshell, sharpness is just how clearly detail is captured and processed in an image.
There are many factors affecting the sharpness of an image, like the sensor resolution , the lens , and even some photography basics that we already covered like the aperture, shutter speed, and ISO.
The editing basics and post-processing techniques are also important to achieve more sharpness. Images usually lack detail when they are taken straight out of camera (something called “softness” in photography), and you can correct this by using some sharpening software.
Lastly, the viewing distance is another important factor affecting sharpness. By definition, the perception of sharpness increases as the viewing distance of the image grows. That’s why billboards have a very small resolution when looked at closely.

“Soft” vs sharpened image
I highly encourage you to dive more into this photography concept by following our sharpening article and our guide with 30 tips to take sharper photos .
11. Camera Settings – Basic photography settings
Once you understand the basic photography concepts , it’s time to put them into practice using the main photography settings on camera!
In short, these are the best camera settings for anyone starting in photography :
- Aperture : f/1.8-f/5.6 in low light or for a narrower depth of field, and f/8-f/16 for a wider DoF
- Shutter Speed : From 30 seconds to 1/4000 th of a second depending on the scene
- ISO : 100-3200 in entry-level cameras, and 100-6400 in more advanced cameras
- Camera Mode : Manual camera mode or Aperture-priority mode
- Metering Mode : Matrix/Multi/Evaluative depending on your camera model
- Focus Mode : AF-S for stills and AF-C for moving subjects
- Focus Area : Single-point for stills and Dynamic/Zone for moving subjects
- White Balance : Automatic WB
- File Format : Raw File (or JPEG if you don’t want to edit your pictures)
- Drive Mode : Single shooting for stills and continuous for moving subjects
- Long exposure noise reduction : Off
- High ISO noise reduction : Off
- Color Space : sRGB
- Image stabilization : On when shooting handheld and Off when shooting from a tripod
- HDR/DRO : Off

We have a dedicated guide to basic camera settings for beginners where you can learn all the above buttons, dials, and functions on your camera.
12. Camera Modes – The basics to make the most of your camera
Understanding camera modes is one of the basics in photography to help you familiarize yourself with your camera and improve as a photographer.
To put it simply, camera modes are the camera controls that allow the photographer to choose the main exposure settings for aperture, shutter speed, and ISO.
They’re also called “ shooting modes, “ and these are the main modes available in most digital cameras:
- Program Camera mode (“P Mode”) : Using this mode, the camera automatically sets the shutter speed and aperture.
- Shutter Priority Mode (“Tv/S Mode” ): You set the shutter speed and the camera selects the aperture.
- Aperture Priority Mode (“Av/A Mode”) : You set the aperture and the camera sets the shutter speed.
- Manual Camera Mode (“M Mode”) : You set all the main settings on camera.
Using each mode will depend on your subject and your photographic skills, but generally, learning when to use the different camera modes is basic photography knowledge .

You can find more information and examples in our camera modes guide for beginners.
13. Metering Modes – The fundamental lighting concepts
Another photography fundamental for starters is the metering modes .
In short, metering modes are simply the way your camera calculates the available light of the scene. In photography, this can be done using the built-in exposure meter in camera or a handheld device .
Understanding how light works in photography is a basic concept that any photographer must know, and it’s the first step in learning the different ways your camera can calculate the light of the scene.
These are the basic metering modes to calculate the light in most digital cameras:
- Multi/Matrix metering : This mode evaluates the light of the entire scene by dividing the frame into different zones.
- Center-weighted metering : This mode uses the center of the frame to measure the light of the scene.
- Spot metering : Using this mode, the camera uses a single focus point to read the light.
By default, one of the basic photography techniques in any DSLR or mirrorless camera is to use Multi/Matrix metering , which will be accurate in most situations. However, in some particular scenarios, you might benefit from using either Center or Spot metering.
You can check out some examples in the below photography basics infographic related to the main camera metering modes.

If you want to dive into each specific mode and more examples, check out our dedicated guide to metering modes!
14. Focus Modes & Areas – Photography basics for any genre
You can’t learn the photography basics without understanding how the focus modes and areas work.
The focus modes help you decide whether you want the camera to lock the focus on a subject or to keep adjusting the focus as the subject moves across the frame.
The two main focus modes are:
- Single Autofocus Mode (AF-S/One-shot AF) : The camera locks the focus on a subject and, if the subject moves, you’ll have to press the focus button again and repeat the process.➜ Best for stills, landscape, macro, astro, etc.
- Continuous Autofocus Mode (AF-C/AI-Servo): After focusing, the camera will track the subject when it moves within the frame. ➜ Best for action, wildlife, sports, street, etc.

Moving into the focus areas , these will help you set where the camera seeks to focus within a scene.
To do this, your camera uses different focus points and AI technology. In some genres, using a specific focus area is fundamental. That’s why the focus areas are one of the wildlife photography basics and it’s also vital in other genres like sport or street photography.
In a nutshell, these are the main focus areas in photography :
- Single Point Area Mode : You can select a single focus point. ➜ Best for landscape, still portraits, macro, and architecture.
- Dynamic Area Mode : If your subject moves, your camera will use several focus points to track it. ➜ Best for wildlife, sports, and street.
- Auto Area Mode : The camera automatically decides the best focus points. ➜ Best for scenes where you need to focus on something easy and close to the camera.
This camera basics infographic will give you a better understanding of the different focus areas.

The best way to learn this photography basic is by seeing real examples. You can see plenty in our Focus Modes & Areas article!
15. White Balance – A must in any photography guide
White balance is one of those easy to understand photography basics .
Briefly, white balance is a photography concept aimed at capturing accurate colors in your image without being affected by the color of the light source. White Balance is related to color temperature , which is measured in “Kelvins” or “K” . The higher the K number, the cooler the color will be.
In your camera, you’ll have several white balance options :
- Automatic white balance (AWB) : The camera automatically adjusts the best WB camera setting.
- White balance Presets (Semi-Automatic White Balance) : The camera includes different preset modes related to different color temperatures.
- White balance manual camera setting (Custom white balance mode) : You can manually adjust the white balance by either creating a custom white balance or setting a specific Kelvin number.
One of the best photography basic tips is to set the white balance to automatic . Thankfully, the white balance is a setting that you can change in post-processing without affecting the quality of the image, as long as you shoot in Raw.
I hope this photography basics cheat sheet helps you learn when to use the different white balance adjustments.

You can find more info & examples in our basic guide to white balance!
16. Histogram – Understand the exposure basics
The histogram is a photography concept that most people beginning in photography find daunting. It looks like complex mathematics but, believe me, it’s very easy to understand and one of the most useful tools in your camera.
In a few words, the histogram is just a graphic representation of the exposure levels within an image. Using the histogram, you’ll be able to see a more accurate representation of the highlights and shadows of your image.
Reading the histogram is one of the basics in digital photography and will help you see if your image is correctly exposed or under/overexposed.
This photography basics infographic will help you understand how to read the histogram.

I also created a specific article where I talk about the best histogram and show real examples of histograms in photography. You can check it out below.
17. Composition – An indispensable photography basic
Beyond photography settings, gear, and other technical aspects, if you want your pictures to speak for themselves, one of the photography basics to master is the composition .
Composition is the language of photography, and using different compositional elements and rules, you’ll be able to capture and shape your visual message. When you compose your image, you have to arrange the elements of the scene to make them attractive to the viewer. This will also help you represent your visual message in the most harmonious and impactful way.
Composition can be broken down into different parts:
- Rules : Like the photography basic rule of thirds , the golden triangle, the rule of space, the golden spiral, the rule of odds, etc.
- Elements : Like leading lines, curves, geometric shapes, colors, etc.
- Techniques : Like symmetry, balance, repetition, patterns, scale, etc.
All these fundamentals are basic photography knowledge that you must learn if you want to capture the best possible images according to your vision.

The best way to learn composition is by studying basic photography books on composition and studying another good photographer’s or artist’s work.
You can start by checking our guide with the 25 photography composition basics .
18. Photography gear – Camera and lens basics
Just as a carpenter uses a hammer, the camera , lenses, and other gear are your main tools to create images.
Basic photography gear includes the following elements:
- Digital cameras : The basic is a digital camera, and preferably it’s a DSLR or mirrorless camera with interchangeable lenses. (You can see the different types in our DSLR vs. mirrorless guide ).
When you shoot in low-light, like when photographing the Milky Way , certain camera models will help you get better results. You can see different models in our guide to cameras for Milky way photography .
- Lenses : They are as equally important as cameras to shoot quality images.
The photography lens basics include a wide range from fish-eye lenses of 7-8 mm to super-telephoto lenses like 600-800 mm.
The type of lens and focal length will depend entirely on the type of photography that you’re doing. In most scenarios, your images will be in the range from 14-400 mm .
The brightness of the lens is also crucial. Lenses with a large aperture, like f/1.8 or f/2.8, are usually aimed at shooting portraits and low-light photography like astrophotography. These are called “fast lenses”. You can see some of these in our article on the best lenses for night photography .
- Tripods : A sturdy tripod is essential in some genres like long-exposure photography , Milky Way photography , Northern Lights photography , and other photographic situations.
- Lens filters : These types of filters will allow you to create long exposures and to achieve creative effects in your images. There are many different types and models that you can take a look at in our guide to camera lens filters .
- Others : There are many other pieces of gear like camera bags , SD cards , batteries , etc., and others that you might need depending on your shooting, like flashes and external lights , photography gloves , star trackers , etc.

This basic photography concept deserves its own article, which you can find below.
19. Editing – Photography editing basics
One of the last photography basics consists of the final editing and processing of our images.
The photography editing basics are about striking a balance in the exposure between the highlights and the shadows, sharpening the image, managing the color, and generally fine-tuning the final image.
Some photographers also use post-processing to create artistic effects that can represent their vision. This, of course, depends on your personal taste, but editing and processing are photography fundamentals that you need to know to have well-rounded images.
For anyone beginning in photography , I always recommend checking editing video tutorials online from photographers they like and admire. It’s one of the best ways to be engaged in learning the editing basics .

Editing and processing is a fundamental step to make the most of your image
20. Photography tips for beginners – The ultimate tips for beginning in photography
We couldn’t finish this photography concepts guide without a few photography basics tips and tricks for beginners .
- Understand how light in photography works
- Get started in photography by shooting in Raw
- Don’t be afraid of the camera’s manual mode
- Learn how to properly hold your camera
- Be aware of the importance of a tripod when you start in photography
- Take your time to zoom in on your images to find mistakes
- Study and look at as many photographs as possible
- Ask for feedback from other photographers
- Take your camera with you as much as you can
- Focus on the process, not the results

I explain these and 15 more photography basic tips in our article on the best 25 tips for beginners!
Learning the photography basics can look like an uphill task. There are too many photography concepts to understand , and so much information can be overwhelming at first.
However, I’m sure that using this beginner’s photography guide will make the process easier for you. My advice is to learn the main photography fundamentals one by one. Understand the theory, check the examples, and most importantly, try to put them into practice!
I hope that this photography basics tutorial along with all the infographics and specific articles will help you along the way. Remember that you can also download our photography basics PDF guide so you can check it out anywhere in the future 😉
My last tip for anyone beginning in photography is not to be shy, so if you have any questions, feel free to leave them in the comments!

20 replies on “ Photography Basics – A Beginner’s Photography Guide ”
A concise, useful and complete guide for beginners.
Thanks so much, Azad! Glad it helps 😉
You are really good on this tips
Many thanks, James! 🙂
Great article, very informative for beginners.
Very useful! Thank you!
Thank you,it was really helpful
Thank you so much, so glad it helps!
Thanks Dan, I love the article! I am sure this will help me getting the fundamentals down!
Glad it helped, Tamara!
This is great, Dan. It’s a really big help.
Thanks, Daisy! I Appreciate your nice words!
Tried to download your e-book, A Guide To Mastering The Basics. I answered the questions as requested but I never received a code needed to complete the process.
There might have been an issue with the server. I’ve already sent you a copy by email.
Great beginners guide, has been very helpful to me, a complete novice to photography.
Many thanks Dan.
Thank you, Eddie! ;=)
Thanks for this tips
Thanks, Laura!
Leave a Reply Cancel reply
Your email address will not be published. Required fields are marked *
This site is protected by reCAPTCHA and the Google Privacy Policy and Terms of Service apply.

get our free ebook to mastering the PHOTOGRAPHY basics
- 20 lessons and 80+ pages
- Photography examples
- Infographics
- Photography tips & tricks
- 30+ Photography resources
- PRO Courses Guides New Tech Help Pro Expert Videos About wikiHow Pro Upgrade Sign In
- EDIT Edit this Article
- EXPLORE Tech Help Pro About Us Random Article Quizzes Request a New Article Community Dashboard This Or That Game Popular Categories Arts and Entertainment Artwork Books Movies Computers and Electronics Computers Phone Skills Technology Hacks Health Men's Health Mental Health Women's Health Relationships Dating Love Relationship Issues Hobbies and Crafts Crafts Drawing Games Education & Communication Communication Skills Personal Development Studying Personal Care and Style Fashion Hair Care Personal Hygiene Youth Personal Care School Stuff Dating All Categories Arts and Entertainment Finance and Business Home and Garden Relationship Quizzes Cars & Other Vehicles Food and Entertaining Personal Care and Style Sports and Fitness Computers and Electronics Health Pets and Animals Travel Education & Communication Hobbies and Crafts Philosophy and Religion Work World Family Life Holidays and Traditions Relationships Youth
- Browse Articles
- Learn Something New
- Quizzes Hot
- This Or That Game
- Train Your Brain
- Explore More
- Support wikiHow
- About wikiHow
- Log in / Sign up
- Education and Communications
- Presentations
How to Create a Photo Slideshow with PowerPoint
Last Updated: February 6, 2023 Fact Checked
wikiHow is a “wiki,” similar to Wikipedia, which means that many of our articles are co-written by multiple authors. To create this article, 57 people, some anonymous, worked to edit and improve it over time. There are 12 references cited in this article, which can be found at the bottom of the page. This article has been fact-checked, ensuring the accuracy of any cited facts and confirming the authority of its sources. This article has been viewed 935,255 times. Learn more...
With so many fun and accessible ways to take photos, there is no wonder why everyone is so photo-happy these days. As easy as it may be to stock up on photos, it can be a challenge to keep them organized. One great way to keep your photos in a convenient place, that is easy to access when you want to reminisce on special memories, is by uploading them into PowerPoint. By doing this, you can create a slideshow that is a fun-filled way to back up the memories in your life.
Creating Photo Slideshows for PC Computers

- Remember to save your presentation after something that will help you to remember what pictures are in the file. This will help you to locate them later on.

- Select a layout that will accommodate your image, such as a slide with a title box and an image box, a slide with just an image box, or even a blank slide.

- Double-click inside the image box (or go to Insert > Picture > From File ), then browse to the desired image.
- Click "Okay" or "Insert" to add the image. If you don't like the way it looks, select the image and click on "Picture" to change it out for a different one. You can also select the image and hit "Delete" to remove the picture.

- Locate the "Slide Sorter" button near the bottom of the image pane. Then, click and drag the slides to the desired destinations.

- To add music, click on the movies and audio icon located under the "Insert" tab. First, go to "Audio from file", and then, click on "Music" to pull up your music. When you choose the song you want, click on the song, and press "Link to file" before pressing "Insert". [9] X Research source
- You can choose if the song plays for just one slide or the entire presentation by clicking on "Format Audio" next to the "Home" button, and then, clicking on "Play Across Slides" under "Audio Options". [10] X Research source

Creating Photo Slideshows for Mac Computers

- You can scroll through your photos and choose the ones you want to add to your slideshow by double-clicking on them.

- To add music, click on the movies and audio icon located at the top of the PowerPoint screen. Then, click on "Music" and all of your music should appear. When you choose the song you want, drag and drop the file onto one of your slides.
- You can choose if the song plays for just one slide or the entire presentation by clicking on "Format Audio" next to the "Home" button, and then, clicking on "Play Across Slides" under "Audio Options".

Sample Slideshow

Community Q&A
- Choose a theme for the photo slideshow. If the photos are from a summer vacation, choose a bright yellow background or upbeat music. Thanks Helpful 0 Not Helpful 0

You Might Also Like

- ↑ https://support.microsoft.com/en-us/office/create-a-presentation-in-powerpoint-422250f8-5721-4cea-92cc-202fa7b89617
- ↑ https://support.microsoft.com/en-us/office/save-your-presentation-file-34377c9c-a1e5-44e1-9c3f-e6e72ee6c541
- ↑ https://tsengcollege.csun.edu/sites/default/files/PDFs/forWindows/Slide_Titles_in_Microsoft_PowerPoint.pdf
- ↑ https://support.microsoft.com/en-us/office/add-rearrange-duplicate-and-delete-slides-in-powerpoint-e35a232d-3fd0-4ee1-abee-d7d4d6da92fc
- ↑ https://support.microsoft.com/en-us/office/insert-a-picture-in-powerpoint-5f7368d2-ee94-4b94-a6f2-a663646a07e1
- ↑ https://support.microsoft.com/en-us/office/add-transitions-between-slides-e89a076e-ed81-404e-9598-021a918fa1ba
- ↑ https://guides.lib.umich.edu/c.php?g=283149&p=1886370
- ↑ https://support.microsoft.com/en-us/office/play-music-across-multiple-slides-in-your-slide-show-b01ded6a-28c8-473a-971a-6dfa92cc9367
- ↑ http://answers.microsoft.com/en-us/office/forum/officeversion_other-powerpoint/powerpoint-how-to-add-music-throughout-the/10a366a4-9727-4f78-aa06-e9f76c8a5269
- ↑ https://support.microsoft.com/en-us/office/add-rearrange-duplicate-and-delete-slides-in-powerpoint-e35a232d-3fd0-4ee1-abee-d7d4d6da92fc#OfficeVersion=macOS
- ↑ https://support.microsoft.com/en-us/office/insert-a-picture-in-powerpoint-5f7368d2-ee94-4b94-a6f2-a663646a07e1#OfficeVersion=macOS
- ↑ https://support.microsoft.com/en-us/office/play-music-across-multiple-slides-in-your-slide-show-b01ded6a-28c8-473a-971a-6dfa92cc9367#OfficeVersion=macOS
About This Article
- Send fan mail to authors
Did this article help you?

Featured Articles

Trending Articles

Watch Articles

- Terms of Use
- Privacy Policy
- Do Not Sell or Share My Info
- Not Selling Info
wikiHow Tech Help Pro:
Develop the tech skills you need for work and life
Photos and Videos – How to Take the Best Presentation Shots
by AmondaRose Igoe | Sep 9, 2016 | Advanced Presentation Skills , Event Venues , Hosting Workshops , Keynote Presentations , Marketing , Money , Presentation Marketing , Public Speaking Tips , Room Set-up and Design , Social Media , speaker photos video , Video

Are you wondering how to shoot the best speaker photos and video footage, when presenting at events, conferences or groups? Do you want to maximize your next speaking opportunity with some high impact video segments and photos opportunities? If yes, this article is perfect for you.
I will be covering what makes a great shot angle, how to find someone to film, where to do the shots and what to do to get the best video footage.
#1 first, get all the right angles..
Whether you are shooting video or desire a powerful speaker image to use in your marketing, you want to get all the angles.

These ideal speaker photo and video angles include:
- Back of you – Yes, this provides a great shot of you presenting, but the focus is really on the audience perspective
- Side of you – Include both left and right side angles – one angle may provide the better shot because of lighting and things out of your control. And, you might prefer one side shot to the other but shoot both to be certain.
- Far away – In these shots include the conference logo and/or your information which highlights you, your brand and/or your experience.
- Distance shot – This is a great shot to create social proof by including you speaking and the back of audience’s heads. Try to make every image look full without empty seats.
- Straight on Action Shot or Video – These are full body images that showcase you as a speaker and your presentation style. These are the type of photos the media prefers to use so you want to have a few of these.

Secondly, decide on who is going to take the shots.
- With today’s technology you have so many great options for video and photos. If you are having a friend take video from a distance, make sure you are using a microphone so the audio quality is crisp and clear. Ask your friend to sit down on the floor in front of the stage or take a seat in the front row. As well as, asking them to take pictures from all stage angles.
- Do you need to hire a pro? Hiring a professional videographer or photographer can be rather pricey. If you can get really great video quality on your own, have the pro do the video editing only. The end result of hiring a pro is you will have an edited version that highlights you and your message rather than distracting from it.
- Ask the event coordinators to have the presentation recorded on video and/or take photos and share it with you. This can be a great promotional and marketing tool for them and for you too as long as you position it as a win-win.

Thirdly, find the right highlights to use in all your marketing.
- Get photos of you with other Speakers, VIPs and Audience Members to demonstrate social proof.
- Collect video testimonials from event coordinators and presentation attendees to highlight why others need to book you as a speaker.
- Additional video and photography highlights can include the registration table when guests are getting the program and their nametags. And consider taking pictures of the guests listening to your presentations, smiling and clapping which makes an ideal speaker presentation photo.
Need to mention:
- You need to ensure that the presentation guests signed a media release when they got their name tags or you get their permission in writing or on video film.
Now you know how to maximize your next video and photos at your first or next presentation. Go get those high impact photo angles and power video footage and use them in all your speaker and business marketing.
Get expert speaking help and apply now for a 30-minute complimentary 6-Figure Speaker Strategy Session.
7-Step Process on How to Get Speaking Engagements
An eye-opening step-by-step process for quickly finding and getting speaking engagements with ease.
Free Training >
Connect with AmondaRose:
Are you a coach, consultant or service based business owner who wants to avoid costly and common speaking mistakes, including….
- Unclear Messaging that Undermines Your Speaking Success
- Lacks Compelling Presentation Content that Leaves Your Audience Wanting MORE
- Lackluser Speaking Offers that Don’t Create a Rush of Clients Every Time You Speak
If you said “ YES! ” to one or more of these, you’re in the Right Place!
While these are all different experiences and desires, they all require expert guidance.
Get expert speaking help and schedule a complimentary Speaking Success Strategy Session.
Recent Posts

Speaker Training and Blog Categories
Pin it on pinterest.
- https://www.facebook.com/amondarose
- https://www.linkedin.com/in/amondarose/detail/recent-activity/posts/
- Skip to primary navigation
- Skip to main content
- Skip to footer
DIGITAL PHOTO MENTOR
Photography tips, tutorials and guides for Beginner and Intermediate Photographers.
Camera Club Presentations
Looking for speakers that can provide training for your camera club members? Want to host a class for your group? If you’re part of a camera club that’s looking for a guest speaker and an educational presentation for your group members, look no further.
Educational photography presentations & classes for your camera club
Available topics cover an entire range of disciplines including the following:
- Portrait photography
- Street photography
- Night photography
- Photo editing workflow
- Travel photography
- How to get sharper images
- 10 ways to improve your image quality
- Image critique (club member image review)
- How to critique images (group lesson and discussion)
- HDR photography
- Private club member photo editing demonstrations
Choose from our list of topics
You can get going fast by picking one of our existing presentation topics and then all we need to do is pick a date.
Customize a topic for your group
If you have something else in mind or your members want a custom topic, that can be done too with a bit more work and slightly higher cost.
Virtual meetings via Zoom
We handle all the technical aspects including scheduling the event and sending the link to your members.
Q&A session always included
A question and answer session is always included with every class. Darlene stays until every question has been answered!

10 Portrait Photography Mistakes to Avoid
In this class, you’ll get 10 valuable tips that you can apply immediately to take your people photography to the next level.

Learn Night Photography and Light Painting
From camera settings and gear needed, to how to find good subjects – all aspects of night photography are covered with special attention on how to do light painting.

How to Take Sharper Photos
Designed for beginners, this class will help you get sharper results through the proper camera settings, as well as things you can do to ensure sharp images. Some post-processing tips are included.

Learn How to Review or Critique Images
In this lively, interactive class members will learn 10 criteria to use to assess and critique images objectively. Then examples will be given and discussed in a debate-style format that is a lot of fun for everyone.

Street Photography Tips From a Pro
There are certain nuances and tricks to doing good street photography. Learn how you can master them, about the etiquette involved in photographing strangers, and how to be ready for anything.

Travel portrait photograhy tips
Prepare to be inspired and motivated after this 90-minute presentation on travel people photography. See some great examples, learn about lighting, planning, and other logistics of making great travel portraits.
Choose From Our List of Presentations Or Create a Custom One For Your Club
The selection of presentations above is only a small portion of our offerings. Once you touch base with me, I can provide the full list of presentations, topics or create a custom designed one specifically for your camera club.
Pre Determined Presentations
I have a selection of presentations or talks I’ve done before on multiple topics. A full list is provided once you reach out. Topics range from 60 minutes and up to 2 hours or longer.
Custom Presentations
Depending on the needs of your camera club, a custom presentation could be designed to address specific club member sticking points, or some other custom topic.
Live Editing Demonstration
A public or private live photo editing demonstration for club members showing editing techniques, how to approach the photo, first steps in editing, designing an editing workflow or more.
Feedback From Previous Camera Clubs
Some feedback about our workshops, presentations and camera club speaking events from members of other clubs from around the globe.
Darlene spent a whole session editing photos submitted by members of the Seaford Camera Club in South Australia as part of her free YouTube live sessions “Learn How to Edit Photos.” A number of our members hadn’t done much editing of photos in the past and they were stimulated to do more because they had their eyes opened as to what could be achieved. Even the more experienced in the group learnt some handy tips. Darlene has a gentle encouraging approach to teaching, even if there are problems with the photo.
Lynton Stacey
I would highly recommend Darlene as she is well versed and knowledgeable in all aspects of photography. It doesn’t seem to matter what the questions may be, she always answers in a respectfully manner. Darlene is a pleasant person to deal with.
Barry Ryziuk
Darlene Hildebrandt has been very generous with our club members, sharing her knowledge and skillsets by making presentations on a variety of topics, doing critiques of images submitted by our members to our competitions, and delivering various workshops. She is a high energy person with a very upbeat and positive attitude toward her craft, and appears to really enjoy teaching and watching her students grow in their skills. Everything she has done for our club has been extremely well received by our members.
Darlene’s Learn How to Edit Photos LIVE session for Charlotte Camera Club was great fun and helpful. Darlene took care of collecting the photos and making the choice of which ones to edit, so as organizer of the event for our club I had little to do other than to sit back and enjoy the show!.

Lorraine Shannon – Past President

Not Limited by Geography
With the current state of technology we are no longer limited by geographical locations. Camera club presentations can be done with clubs anywhere in the world through Zoom meetings.
Time zones are irrelevant. With a few weeks notice, a presentation for your club can be held at nearly any time. We’re eager to arrange to host a speaking event for your members.
Camera Club Resources
Below are some hand picked photography resources for your camera club. Feel free to link to any of these pages if you find they’re of value to your club.

Photography Terms
A great resource for camera clubs to link to from their websites. This comprehensive list of photography terms, definitions and jargon.

Using Back Button Focus
What is back button focus, how do you do it, and how using back button focus can help you get sharper images in really tricky shooting situations.

How to Use White Balance
Learn how to use camera white balance, color temperature and how to adjust your settings to your advantage, and get better photos.
Contact Darlene to discuss!
Darlene Hildebrandt has been a professional photographer for over 33 years. She’s photographed everything from weddings to food. While specializing in portrait and travel photography, Darlene’s skillset and presentation style lead to exceptional learning opportunities.
Please fill in the form below and she will be in touch.
Additional Info

Learn Photography Basics
Yes, you can learn to take better photos! It’s my passion to help you learn the photography basics and take better pictures. It’s also the same reason I teach workshops, do photo travel tours, and have online photography courses available.
Enroll in our free photography basics for beginners course, or 12-part portrait photography course , also free.
Recent Photography Articles
- Get Into Gear By Completing 10 Powerful Composition Challenges
- Lifestyle Photography Tips for Realistic Portrait Photos
- Step-by-Step Guide to Making Stunning Portraits With One Light
- How To Discover and Develop Your Unique Photography Style
- Luminar Neo GenExpand: Game-Changer or Just Hype?
Useful Links
- Beginner Photography
- Intermediate Photography
- Photography Challenges
- Photography Tips
- Photo Editing
- Recommended Amazon Products
- Course Login
- Write for Us
- SUGGESTED TOPICS
- The Magazine
- Newsletters
- Managing Yourself
- Managing Teams
- Work-life Balance
- The Big Idea
- Data & Visuals
- Reading Lists
- Case Selections
- HBR Learning
- Topic Feeds
- Account Settings
- Email Preferences
What It Takes to Give a Great Presentation
- Carmine Gallo

Five tips to set yourself apart.
Never underestimate the power of great communication. It can help you land the job of your dreams, attract investors to back your idea, or elevate your stature within your organization. But while there are plenty of good speakers in the world, you can set yourself apart out by being the person who can deliver something great over and over. Here are a few tips for business professionals who want to move from being good speakers to great ones: be concise (the fewer words, the better); never use bullet points (photos and images paired together are more memorable); don’t underestimate the power of your voice (raise and lower it for emphasis); give your audience something extra (unexpected moments will grab their attention); rehearse (the best speakers are the best because they practice — a lot).
I was sitting across the table from a Silicon Valley CEO who had pioneered a technology that touches many of our lives — the flash memory that stores data on smartphones, digital cameras, and computers. He was a frequent guest on CNBC and had been delivering business presentations for at least 20 years before we met. And yet, the CEO wanted to sharpen his public speaking skills.
- Carmine Gallo is a Harvard University instructor, keynote speaker, and author of 10 books translated into 40 languages. Gallo is the author of The Bezos Blueprint: Communication Secrets of the World’s Greatest Salesman (St. Martin’s Press).
Partner Center
How to video record yourself presenting a PowerPoint

What type of content do you primarily create?
Recording yourself presenting a PowerPoint can be challenging, especially getting the technical aspects right. You need to capture your screen, webcam, and audio seamlessly while delivering your content naturally and avoiding awkward transitions between slides.
Finding a tool that integrates all these components can seem daunting. However, recording yourself presenting a PowerPoint doesn't have to be reserved for the tech-savvy or professional speakers.
Whether you're a teacher creating online lessons, a marketer producing a product demo, or someone looking to improve their presentation skills, this guide will walk you through user-friendly tools and strategies that will teach you how to video record yourself presenting a PowerPoint.
- Recording yourself presenting a PowerPoint can be challenging, but it doesn't have to be reserved for experts.
- Video recording offers unlimited reach, repurposing opportunities, and a more engaging experience.
- Use PowerPoint's built-in recording feature or tools like Descript for a polished presentation.
- Other tools like Zoom, Loom, OBS Studio, Clipchamp, and Quick Time Player can also be used for recording.
- Tips include practicing your script, using slide notes, ensuring high-quality audio and lighting, and incorporating storytelling techniques.
Why video record yourself presenting a PowerPoint?
Video recording your PowerPoint presentations offers several advantages:
- Unlimited reach : Unlike in-person presentations confined to a specific time and location, recorded videos allow your message to reach audiences globally at their convenience.
- Repurposing opportunities: Recorded presentations can be repurposed as evergreen content across multiple platforms, such as social media, online courses, webinars, and internal training materials, maximizing their value.
- Personal and engaging : Recording yourself narrating a presentation adds a personal touch and dynamic element that static slides alone cannot replicate. Your viewers can see and hear you deliver the content, creating a more immersive and engaging experience.
How to record your presentation with the PowerPoint app
Built-in recording feature in powerpoint.
1. Open the PowerPoint slide you want to record.
2. Click on the Record tab of the top toolbar.
3. Click on the Record button and choose from any of the following options:
- From Current Slide
- From Beginning
4. You'll see the PowerPoint screen recording window.
5. Select the microphone and camera from the icon on the top-right.
6. Click the Stop and Replay buttons to end or replay your recording.
7. To export your presentation's recording, click Export to Video within the Recording tab.
Benefits : Easy to use, no external tools needed
Limitations : Limited editing capabilities.
How to make a more polished recording of your presentation with Descript
While PowerPoint's built-in recording features are helpful, they may not produce the refined result you want for your presentation. That's where Descript comes in handy.
It’s a whole production studio at your fingertips, with video recording, transcription, and editing capabilities, ready to transform dull PowerPoint slides into an engaging experience for your audience. Descript also has a built-in screen recorder.
You can use Descript on Windows, Mac, or even straight from your web browser.
Here's step-by-step guide to recording your PowerPoint presentation with Descript.
Set up your screen recording
1. Install and open Descript. At the top of the editor, click and open the Record panel.
2. Select Screen.
3. Set Recorder settings:
Adjust the default recording settings to your liking, including the transcription language, the maximum recording resolution, and more.
4. Set recording options. Choose which audio and video sources to record (e.g., microphone, computer audio, camera). Remember to turn the camera on to capture your talking head video alongside your PowerPoint presentation.
5. Click the Additional Settings icon for
- Studio Sound (Optional): Enhance audio quality with noise reduction and background removal
- Transcription (Optional): Enable automatic transcription for easier editing
- Recording separate audio tracks
6. Add (optional) Speaker labels for each audio track (e.g., "Narrator," "Expert") by typing them in the text box next to your audio inputs.
Capture your screen recording
1. Select the right recording option:
- Recording into script : Choose this if you haven’t recorded anything yet.
- Replace selection : Choose this if you already have a script and want to replace a specific section with a new recording.
- Record new layer : Pick this for recording your video as a new layer on top of an existing recording.
2. Click Record at the bottom of the Record panel.
3. Drag over the area of your screen you wish to record. Click Start Recording. Press Space to start recording the full screen.
4. Click Stop to finish recording
Bonus: Descript creates separate tracks for camera, microphone, and computer audio. You can edit each track individually for more precise control.
- Do a short test recording to ensure everything is set up correctly.
- Set your recording to transibe for easier editing.
Editing and polishing your PowerPoint recording in Descript
Descript's AI video editing tool makes it a breeze to trim, cut, and splice your video footage, ensuring a seamless flow from start to finish. You can add smooth transitions and other visual effects to make your presentation pop.
Here’s a glimpse of how to edit and polish your PowerPoint recording in Descript:
Edit your recording like a doc
Did you make a mistake during a slide transition? No problem. Just delete those sections in the text transcript (created automatically by Descript) and the video will adjust to match.
Remove filler words
Sound smoother and more confident by easily removing filler words like "um" and "uh" from the transcript.
Fix voiceover mistakes by typing
Didn't nail your delivery on a specific slide? No need to start from scratch! Descript's Overdub feature lets you simply type in the correct narration and replace the audio on that slide with AI voice cloning.
Boost video quality and engagement :
- Crisp up audio quality by reducing background noise and room reverb with the AI-powered Studio Sound feature.
- Replace your background completely with the Green Screen Video Editor —look like you're presenting in a sleek studio or broadcasting from a beach.
- Enable Eye Contact simulation with AI, so it appears you're making direct eye contact with viewers, even if you’re looking or reading something off-camera.
Other ways to video record yourself presenting a PowerPoint
Use Zoom’s meeting recording feature to record yourself giving a PowerPoint presentation. Start a Zoom meeting with yourself, share your PowerPoint window, and enable recording
Loom is a handy screen recording tool that also offers a webcam overlay. Launch the Loom app or Chrome extension and set it to record your screen and webcam. Expect high-quality recordings but no advanced editing features. The free plan offers only five minutes of recording at a stretch.
3. OBS Studio
OBS Studio is a free, open-source screen recorder/streaming software with a steeper learning curve. It’s popular among advanced or tech-savvy users who need granular customization and control.
To record your presentation, add a "Screen Capture" source to capture your PowerPoint window and a "Video Capture Device" source for your webcam.
4. Clipchamp: Recording natively in Windows
You can use Microsoft’s Clipchamp , the built-in screen recorder and video editor for Windows, to simultaneously capture your computer screen, webcam, and audio for recording your PowerPoint presentation. It’s also available as a browser-based app. You can record up to 30 minutes on screen and webcam recordings.
Users can also adjust the screen and webcam recordings in the editing timeline separately.
5. Quick Time Player Recording natively in Mac
Use Mac’s Quick Time Player to record your PowerPoint presentation. It’s not as straightforward as the other options on this list, so here’s a quick guide to help you out:
- Launch Quick Time Player.
- Select File and go to New Movie Recording.
- You'll be recording your entire screen in addition to recording your face, so adjust the size and location of the recording window so that it's in a nonintrusive corner of your PowerPoint.
- Go to View and select Float on Top .
- Next, go to File and select New Screen Recording.
- On the menu that appears, select Record Selected Portion and drag a border around your PowerPoint and the webcam recording window.
- Press Record and start presenting.
- You can adjust the video quality and the audio source in the webcam recording window.
How to turn your PowerPoint presentation slides into a video
Did you know PowerPoint lets you save your presentation as a video, too?
Here's a breakdown of the two ways you can do so—keeping all the presentation elements (narration, animation, pointer movements, timings, and so on) intact in the presentation itself.
Save your PowerPoint presentation as a video
This creates a separate video file (MP4 or WMV) that anyone can play, even without PowerPoint.
Follow these steps:
- Save your presentation
- Go to File > Export > Create a Video
- Ultra HD (4K): Best for large screens (if you have Windows 10+)
- Full HD (1080p): Great for computers and TVs
- HD (720p): Good for streaming online or on DVDs
- Standard (480p): Smallest size, good for phones
4. Decide on narration
- If you haven't recorded yourself talking, choose "Don't Use Recorded Timings and Narrations" from the dropdown menu
- If you have a recording, choose "Use Recorded Timings and Narrations." You can also set how long each slide shows for (default is 5 seconds)
5. Click Create Video
6. Name your video, pick a folder to save it in, and choose a file type (MPEG-4 or Windows Media Video)
Creating the video might take a while, especially for longer presentations. You can even leave it running overnight. Once done, find your video in the chosen folder and double-click to play it.
Save your PowerPoint presentation as a slideshow
This saves your presentation as a special file (PPSX) that starts playing automatically on full screen when opened. It only works with PowerPoint.
Here’s how it works:
- Make sure your presentation is saved (regular PowerPoint file)
- Go to File > Save As .
- Pick a folder to save the slideshow in.
- Under Save as type, choose PowerPoint Show (*.ppsx) .
- Click Save .
Now when someone opens the file, it will automatically play the slideshow.
Pro tips for making better video PowerPoint presentations
Practice your script.
Recording a flawless PowerPoint video rarely happens in one take. The key is practice.
Record practice run-throughs and watch them back. Make notes on areas that need improvement or parts lacking clarity. The more you drill your script, the more confident and natural you'll sound in the final recording.
Take advantage of PowerPoint's built-in Speaker Coach . The feature shows you whether your pace is too fast or slow, your use of filler words like "um," and suggestions to improve your voice modulation.
Use slide notes for coherent delivery
Wouldn’t a personal teleprompter make presentations so much easier? That’s what slide notes are for.
Having your thoughts and talking points organized within your PowerPoint file lets you have all crucial information and prompts readily available when recording.
Go ahead and add detailed notes or even a full script for each slide. This will help you stay on track and provide a handy transcript reference if you need to do any editing or voiceover work in post-production.
Use high-quality audio equipment or turn on Studio Sound
Poor audio recording quality is a surefire way to make even the most visually polished video feel amateurish. Do your presentation justice by investing in a decent external or Bluetooth microphone and audio interface to capture clear voiceover audio.
If you must use a built-in mic, record in a quiet environment to minimize background noise pickup. Or better yet, pair up with an AI-powered audio enhancement tool like Descript's Studio Sound , which reduces background noise , reverb, and other artifacts.
Ensure a clean background and even lighting
Ditch cluttered backgrounds. You want people to focus on the content of your PowerPoint and not be distracted by the funny shapes and colors in your video.
Your video lighting and framing matters, too. Position yourself facing a natural light source or bring supplemental video lighting to eliminate weird shadows and squinting-level glare.
Look directly into the camera or turn on Eye Contact
Looking directly into the camera is essential to create a sense of connection with the audience. Position your webcam or camera at eye level and imagine you're talking to a friend. If you're using Descript, enable the Eye Contact feature to auto-adjust your gaze towards the camera.
- Dress professionally and maintain a good posture to project confidence and authority.
- Use visuals, animations, and multimedia elements to enhance your presentation and keep your audience engaged.
- Consider adding closed captions or subtitles to your video for better accessibility and engagement, especially for those watching without sound.
- Speak clearly and at a moderate pace, using vocal variety to emphasize key points and maintain interest.
- Incorporate storytelling techniques, real-life examples, or personal anecdotes to make your video presentation more relatable and memorable .
Take your PowerPoint presentations from amateur to amazing
Recording yourself virtually presenting a PowerPoint allows you to distribute your message using the most engaging type of content: video. And there are many screen recording tools out there that can capture your screen and web camera footage with just a few clicks.
But how do you stand out?
By focusing on the presentation's depth, your delivery, and the video's quality. The first two are the bare minimum to communicate your message effectively.
But the right screen capture software and all-in-one video creation tool like Descript can help you with third. Use the tool to improve the quality of your recorded PPT presentations.
With Descript, it's easier than ever to record your screen, polish up the audio, and create stunning visuals all in one place. So why wait?
Sign up for Descript today and simplify your workflow while creating a PowerPoint presentation video that sticks with your audience in the long term.
How do you make a presentation video with your face?
To create a presentation video with your face, follow these steps:
- Open your presentation in PowerPoint.
- Go to the Slide Show tab.
- Click on Record and choose From Current Slide or From Beginning .
- Choose your microphone and camera by clicking on a sound icon on the top-right.
- Start recording by clicking on the record button.
- Speak into your microphone to narrate the presentation.
- Your webcam will capture your face during the recording.
- Click Stop when you finish recording.
- Export your recorded presentation by clicking on File> Export>Create a video.
How do you present yourself in PowerPoint?
To present yourself effectively in PowerPoint, follow these steps:
- Determine the key information to include in your presentation.
- Design and prepare your PowerPoint slides with a cohesive theme.
- Craft a compelling introduction to engage your audience.
- Tailor your presentation to different time constraints for flexibility.
- Capture the audience's attention before you begin speaking.
Related articles

Featured articles:
10 excellent Loom alternatives to record your screen
Looking for the best ways to record your screen without Loom? Find out 10 Loom alternatives, their features, and pricing.

How to record a YouTube video: A guide for all devices
If you want to record a YouTube video for personal use or fair-use repurposing, here are the steps to get started.

For Business
Social media video marketing: Everything you need to know
Learn how to win over potential customers (and the algorithms) with the right social media video marketing tools, strategy, and optimizations.

How to record a podcast on Zoom: A beginner’s guide
Follow this step-by-step guide on how to record a podcast on Zoom, then learn about why it may not be your best recording option.

How to record a Microsoft Teams meeting: 5 easy ways
Learn how to record a Microsoft Teams meeting on any device and get answers to common problems.

10 effective how-to videos to engage your audience
How-to videos are a great way to educate your audience. Whether you’re recording a software demo or training instructions, here’s how to create a how-to video.

Articles you might find interesting
Dynamic vs. condenser microphones: What’s the difference?
A dynamic microphone uses a magnetic field to generate an electrical signal. A condenser microphone is a type that creates audio signals using a capacitor.

Product Updates
Season 2 updates: New ways to make shareable video for promoting your work, blazing-fast publishing, and more
Today we’re releasing our quarterly product update, with new features for making shareable video for promoting your work on social media, blazing-fast publishing, and more.

How to stop saying “um”: 6 tips for removing filler words
Want to stop saying um, like, you know, and other filler words? Learn tips for flawless speech—and how to edit out filler words afterward with Descript.

Case study: 2 podcasters who use SquadCast and Descript to simplify their podcast production workflow
We love showing off the creative folks in the SquadCast and Descript communities that have the art of recording and editing figured out with our integrated platforms.

Podcast livestream: How to stream your podcast live & engage your audience
Curious about what it takes to livestream a podcast? Learn the different types of podcasts and platforms to broadcast from in this guide.

Join millions of creators who already have a head start.
Get free recording and editing tips, and resources delivered to your inbox.
Related articles:
Share this article
Apple unveils stunning new iPad Pro with the world’s most advanced display, M4 chip, and Apple Pencil Pro

Thinnest Apple Product Ever

World’s Most Advanced Display

Only Possible with M4

Outrageously Powerful Device for AI
Pro Cameras

Pro Connectivity
Apple Pencil Pro

All-New Magic Keyboard and Smart Folio
Powerful iPadOS Features

Logic Pro for iPad 2

Final Cut Pro for iPad 2

iPad Pro and the Environment
- Customers can order the new iPad Pro with M4 starting today, May 7, at apple.com/store , and in the Apple Store app in 29 countries and regions, including the U.S., with availability in stores beginning Wednesday, May 15.
- The new 11-inch and 13-inch iPad Pro will be available in silver and space black finishes in 256GB, 512GB, 1TB, and 2TB configurations.
- The 11-inch iPad Pro starts at $999 (U.S.) for the Wi-Fi model, and $1,199 (U.S.) for the Wi-Fi + Cellular model. The 13-inch iPad Pro starts at $1,299 (U.S.) for the Wi-Fi model, and $1,499 (U.S.) for the Wi-Fi + Cellular model. Additional technical specifications, including nano-texture glass options, are available at apple.com/store .
- For education, the new 11-inch iPad Pro is available for $899 (U.S.) and the 13-inch iPad Pro is $1,199 (U.S.). Education pricing is available to current and newly accepted college students and their parents, as well as faculty, staff, and home-school teachers of all grade levels. For more information, visit apple.com/us-hed/shop .
- The new Apple Pencil Pro is compatible with the new iPad Pro. It is available for $129 (U.S.). For education, Apple Pencil Pro is available for $119 (U.S.).
- Apple Pencil (USB-C) is compatible with the new iPad Pro. It is available for $79 (U.S.) and $69 (U.S.) for education.
- The new Magic Keyboard is compatible with the new iPad Pro. It is available in black and white finishes. The new 11-inch Magic Keyboard is available for $299 (U.S.) and the new 13-inch Magic Keyboard is available for $349 (U.S.), with layouts for over 30 languages. For education, the 11-inch Magic Keyboard is available for $279 (U.S.) and the 13-inch Magic Keyboard is available for $329 (U.S.).
- The new Smart Folio is available for $79 (U.S.) in black, white, and denim finishes for the new 11-inch iPad Pro and $99 (U.S.) for the new 13-inch iPad Pro.
- Logic Pro for iPad 2 is available on May 13 as a free update for existing users, and for new users, it is available on the App Store for $4.99 (U.S.) per month, or $49 (U.S.) per year, with a one-month free trial. Logic Pro for iPad 2 requires iPadOS 17.4 or later. For more information, visit apple.com/logic-pro-for-ipad .
- Final Cut Pro for iPad 2 will be available later this spring on the App Store for $4.99 (U.S.) per month, or $49 (U.S.) per year, with a one-month free trial.
- Apple offers great ways to save on the latest iPad. Customers can trade in their current iPad and get credit toward a new one by visiting the Apple Store online , the Apple Store app, or an Apple Store location. To see what their device is worth, and for terms and conditions, customers can visit apple.com/shop/trade-in .
- Customers in the U.S. who shop at Apple using Apple Card can pay monthly at 0 percent APR when they choose to check out with Apple Card Monthly Installments, and they’ll get 3 percent Daily Cash back — all upfront.
Text of this article
May 7, 2024
PRESS RELEASE
Featuring a new thin and light design, breakthrough Ultra Retina XDR display, and outrageously fast M4 performance with powerful AI capabilities, the new iPad Pro takes a huge leap forward
CUPERTINO, CALIFORNIA Apple today unveiled the groundbreaking new iPad Pro in a stunningly thin and light design, taking portability and performance to the next level. Available in silver and space black finishes, the new iPad Pro comes in two sizes: an expansive 13-inch model and a super-portable 11-inch model. Both sizes feature the world’s most advanced display — a new breakthrough Ultra Retina XDR display with state-of-the-art tandem OLED technology — providing a remarkable visual experience. The new iPad Pro is made possible with the new M4 chip, the next generation of Apple silicon, which delivers a huge leap in performance and capabilities. M4 features an entirely new display engine to enable the precision, color, and brightness of the Ultra Retina XDR display. With a new CPU, a next-generation GPU that builds upon the GPU architecture debuted on M3, and the most powerful Neural Engine yet, the new iPad Pro is an outrageously powerful device for artificial intelligence. The versatility and advanced capabilities of iPad Pro are also enhanced with all-new accessories. Apple Pencil Pro brings powerful new interactions that take the pencil experience even further, and a new thinner, lighter Magic Keyboard is packed with incredible features. The new iPad Pro, Apple Pencil Pro, and Magic Keyboard are available to order starting today, with availability in stores beginning Wednesday, May 15.
“iPad Pro empowers a broad set of pros and is perfect for anyone who wants the ultimate iPad experience — with its combination of the world’s best displays, extraordinary performance of our latest M-series chips, and advanced accessories — all in a portable design. Today, we’re taking it even further with the new, stunningly thin and light iPad Pro, our biggest update ever to iPad Pro,” said John Ternus, Apple’s senior vice president of Hardware Engineering. “With the breakthrough Ultra Retina XDR display, the next-level performance of M4, incredible AI capabilities, and support for the all-new Apple Pencil Pro and Magic Keyboard, there’s no device like the new iPad Pro.”
The new iPad Pro — the thinnest Apple product ever — features a stunningly thin and light design, taking portability to a whole new level. The 11-inch model is just 5.3 mm thin, and the 13-inch model is even thinner at a striking 5.1 mm, while both models are just as strong as the previous design. The 11-inch model weighs less than a pound, and the 13-inch model is nearly a quarter pound lighter than its predecessor — allowing pro users to extend their workflows in new ways and in more places. The new iPad Pro is available in two gorgeous finishes — silver and space black — both with 100 percent recycled aluminum enclosures.
The new iPad Pro debuts the Ultra Retina XDR, the world’s most advanced display, to provide an even more remarkable visual experience. The Ultra Retina XDR display features state-of-the-art tandem OLED technology that uses two OLED panels and combines the light from both to provide phenomenal full-screen brightness. The new iPad Pro supports an incredible 1000 nits of full-screen brightness for SDR and HDR content, and 1600 nits peak for HDR. No other device of its kind delivers this level of extreme dynamic range. Tandem OLED technology enables sub-millisecond control over the color and luminance of each pixel, taking XDR precision further than ever. Specular highlights in photos and video appear even brighter, and there’s more detail in shadows and low light than ever before on iPad — all while delivering even more responsiveness to content in motion. For pro users working in high-end, color-managed workflows or challenging lighting conditions, a new nano-texture glass option comes to iPad Pro for the first time. 1 Nano-texture glass is precisely etched at a nanometer scale, maintaining image quality and contrast while scattering ambient light for reduced glare. With its breakthrough tandem OLED technology, extreme brightness, incredibly precise contrast, brilliant colors, and nano-texture glass option, the new Ultra Retina XDR display is the world’s most advanced display, giving iPad Pro customers an unparalleled viewing experience.
The incredibly thin and light design and game-changing display of the new iPad Pro is only possible with M4, the next generation of Apple silicon that delivers a huge leap in performance. M4 is built on second-generation 3-nanometer technology that’s even more power efficient, which is perfect for the design of the new iPad Pro. With an entirely new display engine, M4 introduces pioneering technology for the stunning precision, color, and brightness of the Ultra Retina XDR display. The new CPU offers up to four performance cores and now six efficiency cores, 2 with next-generation machine learning (ML) accelerators, to deliver up to 1.5x faster CPU performance over M2 in the previous-generation iPad Pro. 3 M4 builds on the GPU architecture of M3 — the 10-core GPU includes powerful features like Dynamic Caching, and hardware-accelerated mesh shading and ray tracing, which come to iPad for the first time. Coupled with higher unified memory bandwidth, pro rendering apps like Octane will see up to 4x faster performance than M2. 3 M4 also delivers tremendous gains and industry-leading performance per watt. Compared to M2, M4 can deliver the same performance using just half the power, and compared to the latest PC chip in a thin and light laptop, M4 can deliver the same performance using just a quarter of the power. 4 A new advanced Media Engine includes support for AV1 decode, providing more power-efficient playback of high-resolution video experiences from streaming services.
The new iPad Pro with M4 features Apple’s most powerful Neural Engine ever, capable of 38 trillion operations per second, which is 60x faster than Apple’s first Neural Engine in the A11 Bionic chip. Combined with next-generation ML accelerators in the CPU, a high-performance GPU, more memory bandwidth, and intelligent features and powerful developer frameworks in iPadOS, the Neural Engine makes the new iPad Pro an outrageously powerful device for AI. With iPad Pro with M4, users can perform AI-enabled tasks even faster, like easily isolate a subject from its background in 4K video with just a tap with Scene Removal Mask in Final Cut Pro. With this advanced level of performance, the Neural Engine in M4 is more powerful than any neural processing unit in any AI PC today.
iPadOS also has advanced frameworks like Core ML that make it easy for developers to tap into the Neural Engine to deliver phenomenal AI features locally, including running powerful diffusion and generative AI models, with great performance on device. iPad Pro also supports cloud-based solutions, enabling users to run powerful productivity and creative apps that tap into the power of AI, such as Copilot for Microsoft 365 and Adobe Firefly.
The updated camera system on the new iPad Pro delivers even more versatility, and with its rich audio from four studio-quality mics, users can shoot, edit, and share all on one device. The 12MP back camera captures vibrant Smart HDR images and video with even better color, improved textures, and detail in low light. It also now features a new adaptive True Tone flash that makes document scanning on the new iPad Pro better than ever. Using AI, the new iPad Pro automatically identifies documents right in the Camera app, and if a shadow is in the way, it instantly takes multiple photos with the new adaptive flash, stitching the scan together for a dramatically better scan.
On the front, the TrueDepth camera system moves to the landscape location on the new iPad Pro. The Ultra Wide 12MP camera with Center Stage makes the experience of video conferencing in landscape orientation even better, especially when iPad is attached to a Magic Keyboard or Smart Folio.
iPad Pro includes a high-performance USB-C connector with support for Thunderbolt 3 and USB 4, delivering fast wired connectivity — up to 40Gb/s. Thunderbolt supports an extensive ecosystem of high-performance accessories, including external displays like the Pro Display XDR at its full 6K resolution, and external storage, all connected using high-performance cables and docks. iPad Pro supports Wi-Fi 6E for super-fast Wi-Fi connections for pro workflows on the go. Wi-Fi + Cellular models with 5G allow users to access their files, communicate with colleagues, and back up their data in a snap while on the go. Cellular models of the new iPad Pro are activated with eSIM, a more secure alternative to a physical SIM card, allowing users to quickly connect and transfer their existing plans digitally, and store multiple cellular plans on a single device. Customers can easily get connected to wireless data plans on the new iPad Pro in over 190 countries and regions around the world without needing to get a physical SIM card from a local carrier.
Apple Pencil Pro features even more magical capabilities and powerful new interactions that take the Apple Pencil experience even further. A new sensor in the barrel can sense a user’s squeeze, bringing up a tool palette to quickly switch tools, line weights, and colors, all without interrupting the creative process. A custom haptic engine delivers a light tap that provides confirmation when users squeeze, use double-tap, or snap to a Smart Shape for a remarkably intuitive experience. A gyroscope allows users to roll Apple Pencil Pro for precise control of the tool they’re using. Rotating the barrel changes the orientation of shaped pen and brush tools, just like pen and paper. And with Apple Pencil hover, users can visualize the exact orientation of a tool before making a mark.
With these advanced features, Apple Pencil Pro allows users to bring their ideas to life in entirely new ways, and developers can also create their own custom interactions. Apple Pencil Pro brings support for Find My for the first time to Apple Pencil, helping users locate Apple Pencil Pro if misplaced. It pairs, charges, and is stored on the side of iPad Pro through a new magnetic interface. iPad Pro also supports Apple Pencil (USB-C), ideal for note taking, sketching, annotating, journaling, and more, at an incredible value.
Designed for the new iPad Pro, an all-new thinner and lighter Magic Keyboard makes it more portable and versatile than ever. The new Magic Keyboard opens to the magical floating design that customers love, and now includes a function row for access to features like screen brightness and volume controls. It also has a gorgeous aluminum palm rest and larger trackpad that’s even more responsive with haptic feedback, so the entire experience feels just like using a MacBook. The new Magic Keyboard attaches magnetically, and the Smart Connector immediately connects power and data without the need for Bluetooth. The machined aluminum hinge also includes a USB-C connector for charging. The new Magic Keyboard comes in two colors that perfectly complement the new iPad Pro: black with a space black aluminum palm rest, and white with a silver aluminum palm rest.
The new Smart Folio for iPad Pro attaches magnetically and now supports multiple viewing angles for greater flexibility. Available in black, white, and denim, it complements the colors of the new iPad Pro.
iPadOS is packed with features that push the boundaries of what’s possible on iPad. With Reference Mode, iPadOS can precisely match color requirements of the Ultra Retina XDR display for tasks in which accurate colors and consistent image quality are critical — including review and approve, color grading, and compositing. Stage Manager enables users to work with multiple overlapping windows in a single view, resize windows, tap to switch between apps, and more. With full external display support of up to 6K, iPad Pro users can also extend their workflow, as well as use the built-in camera on an external display for enhanced video conferencing. Users can take advantage of the powerful AI capabilities in iPad Pro and intelligent features in iPadOS, including Visual Look Up, Subject Lift, Live Text, or Live Captions and Personal Voice for accessibility.
With iPadOS 17 , users can customize the Lock Screen to make it more personal — taking advantage of the larger display on iPad — and interactive widgets take glanceable information further with the ability to get tasks done right in the moment with just a tap. The Notes app gives users new ways to organize, read, annotate, and collaborate on PDFs, and working with PDFs is also easier with AutoFill, which intelligently identifies and fills fields in forms.
Logic Pro for iPad 2 , available starting Monday, May 13, introduces incredible studio assistant features that augment the music-making process and provide artists help right when they need it — all while ensuring they maintain full creative control. These features include Session Players, which expand on popular Drummer capabilities in Logic to include a new Bass Player and Keyboard Player; ChromaGlow, to instantly add warmth to tracks; and Stem Splitter, to extract and work with individual parts of a single audio recording.
Final Cut Pro for iPad 2 , available later this spring, introduces Live Multicam, a new feature that transforms iPad into a mobile production studio, allowing users to view and control up to four connected iPhone and iPad devices wirelessly. 5 To support Live Multicam, an all-new capture app also comes to iPad and iPhone, Final Cut Camera, 6 giving users control over options like white balance, ISO, and shutter speed, along with monitoring tools like overexposure indicators and focus peaking. Final Cut Camera works as a standalone capture app or with Live Multicam. Final Cut Pro for iPad 2 also allows users to create or open projects from external storage, giving editors even more flexibility, and offers new content options. 7
The new iPad Pro is designed with the environment in mind, including 100 percent recycled aluminum in the enclosure, 100 percent recycled rare earth elements in all magnets, and 100 percent recycled gold plating and tin soldering in multiple printed circuit boards. The new iPad Pro meets Apple’s high standards for energy efficiency, and is free of mercury, brominated flame retardants, and PVC. The packaging is 100 percent fiber-based, bringing Apple closer to its goal to remove plastic from all packaging by 2025.
Today, Apple is carbon neutral for global corporate operations, and by 2030, plans to be carbon neutral across the entire manufacturing supply chain and life cycle of every product.
Pricing and Availability
- Nano-texture glass is an option on the 1TB and 2TB configurations of the 11-inch and 13-inch iPad Pro models.
- iPad Pro models with 256GB or 512GB storage feature the Apple M4 chip with a 9‑core CPU. iPad Pro models with 1TB or 2TB storage feature the Apple M4 chip with a 10‑core CPU.
- Testing was conducted by Apple in March and April 2024. See apple.com/ipad-pro for more information.
- Testing was conducted by Apple in March and April 2024 using preproduction 13-inch iPad Pro (M4) units with a 10-core CPU and 16GB of RAM. Performance was measured using select industry‑standard benchmarks. PC laptop chip performance data is from testing ASUS Zenbook 14 OLED (UX3405MA) with Core Ultra 7 155H and 32GB of RAM. Performance tests are conducted using specific computer systems and reflect the approximate performance of iPad Pro.
- Final Cut Pro for iPad 2 is compatible with iPad models with the M1 chip or later, and Logic Pro for iPad 2 will be available on iPad models with the A12 Bionic chip or later.
- Final Cut Camera is compatible with iPhone X S and later with iOS 17.4 or later, and iPad models compatible with iPadOS 17.4 or later.
- External project support requires iPadOS 17.5 or later.
Press Contacts
Tara Courtney
Apple Media Helpline
Images in this article

iPhone Photography Basics: How to shoot a 365 project
W hat better way to learn the iPhone photography basics than by capturing an image every single day for a whole year? A 365 project might sound like a daunting task, but when you consider the thousands of photos that likely already exist on your iPhone or on iCloud , it’s an entirely doable challenge. In fact, there’s a good chance you use your iPhone camera almost every day anyway. The only difference here is that you’re going to be taking your photography that little bit more seriously so you can develop your skills as an iPhone photographer.
Embarking on a 365 project will immediately give you a goal to work towards, adding a sense of purpose to the photographs that you capture. And if you plan your days effectively, you’ll be able to throw in your fair share of challenges along the way. This is integral in allowing you to develop your photography skills, just make sure you don’t become too ambitious too quickly. Just like an endurance race, a 365 project is a marathon, not a sprint. Shoot three sunsets and four sunrises in the first week and there’s no way you can keep that level of commitment up.
So, if you’re thinking about starting a 365 project today, here are a few tips to help you avoid throwing the towel in so you can journey forth and become a better photographer…
Brainstorm photography ideas
There is quite simply no genre of photography that doesn’t benefit from planning. And a 365 project is no different. If you leave capturing your photo to the last minute every day, you risk running out of ideas and becoming frustrated. You certainly won’t be capturing your best work.
As soon as you commit to a 365 project, brainstorm your ideas. Your iPhone’s Notes app is a great way of doing this, so you have access to them at all times. Write down the various genres you’d like to try and then get more specific with particular mini projects you’d like to work on. You can then start to plan your time more effectively and shoot more ambitious images.
Avoid unrealistic expectations
Vowing to capture 365 images in a single year is a huge undertaking and it’s easy to become disillusioned, especially if you set unrealistic expectations. A 365 project is anything you want it to be: a visual diary of your life, an excuse to take photos or a practice regime that allows you to build your skillset. Just don’t expect to capture an award-winning iPhone image every single day. Even the world’s best photographers would struggle to shoot their best work on such a consistent basis.
Instead, allow yourself to find creative ways to come up with easy wins on days when you’re busy and save more ambitious projects for the days when you’ve got the time. If all you manage to capture is an artistic ray of window light, highlighting the cup on your desk one day, that’s not a problem. And while you should try your best not to miss a day, if you do, simply shoot two photos the next day and move on.
Keep a camera with you at all times
If you were shooting with a dedicated camera, this would be an extremely important step. But it highlights the real beauty of iPhone photography and why – even as a seasoned photographer – I take my iPhone Camera seriously . It’s the camera that’s always by your side, making it arguably the best camera you could use for a 365 project.
Whether you’re on your way back to the office with your lunch and you spot a fantastic piece of architecture, or you’re walking the dog in the evening and are met with beautiful golden light, or you’re off on a city break, your iPhone is the camera that’s always by your side.
Experiment with genres and iPhone tech
Experimentation is key if you want to use your 365 project to develop your skills, but it’s also a great way to get to know your iPhone camera inside out. I’m willing to bet that most iPhone photographers keep their camera on the main wide-angle lens and don’t deviate further. This is your chance to experiment with different lenses: try shooting a fun portrait with the ultra-wide-angle lens or if you’re lucky enough to have an iPhone 15 Pro Max , put that brand-new 5x telephoto lens through its paces. Explore functions like Pano, Portrait, and Night modes. Apply a filter and shoot in black and white or finally get round to learning how to edit iPhone photos the right way by delving into the Photos app’s editing functions.
Challenge yourself
Just as you don’t want to set yourself unrealistic expectations, you also don’t want to go too far the other way. If all you do is take a quick snap every day, with little thought regarding composition , the quality of light, or whether or not you’re using the right lens, you simply will not improve as a photographer. You need to push yourself out of your comfort zone at certain times throughout the year. This might be trying a different genre like street photography or portraiture, it might be learning more about your iPhone camera and using the various features to their fullest. Either way, you have to push yourself to get better.
Share and collate your images
There really is something special about seeing a body of work. In a world where digital photography means we can shoot and move on, and the time-sensitive nature of digital media means articles and images are soon lost to the annals of time, seeing a collection of your images in one place is a really satisfying way to chart progress. It’s one of the main reasons why Instagram became so popular, after all.
Creating an Instagram account for your 365 project is a fantastic way of collating your work and sharing it with others. It also gives your project an additional purpose and allows you to receive constructive criticism, garner inspiration from other accounts and receive positive comments to motivate you further. And if you don’t want to share your project online, you can create a folder in the Photos app, so you can still collate your work and browse through it in one place.
Find a photography partner
Persuading a friend, or even a group of friends, to partake in a 365 project is a great way to stay inspired and motivated, while also introducing a healthy dose of competition. This allows you to really immerse yourself within the project. Encouragement will spur you on and constructive criticism will help you develop. You may even find yourselves heading out together and becoming more ambitious with your efforts. But easily the most valuable by-product of teaming up, is an added sense of accountability. If you ever find yourself disillusioned or lacking the motivation to continue, your photography partner will be there to lift you up and encourage you to push on.
But I’m too busy to take a photo every day…
Photography should be about having fun. Force yourself to embark on a 365 project and it could have an adverse effect. If your life is simply too busy for a 365 project right now, you can still use almost all of the tips above, but apply them to more manageable, mini projects. This might be taking a photo every time you walk the dog, only capturing black and white photography for a month, or focusing on a street photography project during a city break. Multiple ‘mini projects’ throughout the year may prove just as valuable as a 365 project. You're on the right track as long as you’re motivated to capture photos regularly.

IMAGES
VIDEO
COMMENTS
25 Top Envato Elements Photography PowerPoint Templates for 2024. Envato Elements offers premium picture PowerPoint templates with everything you need to put together a great photography portfolio. Here's a list of some of the best picture PowerPoint templates on Envato Elements: 1. Focus - Photography PowerPoint Presentation Template.
Choose photography according to the context of the presentation. Pay attention to the quality of the images. Where to include the photos in the slides. Choose photography according to the context of the presentation. Photographs should add value to your presentation. Always keep in mind what the goal of the presentation is and what you want to ...
This fully editable PowerPoint template for photography has 40 unique slides. Each one's got a unique layout to showcase your photos. The photography PowerPoint template is easy to edit thanks to image placeholders. Just drag and drop to make a photography PPT. Use Ultra as a starting point for your design.
There are various software applications compatible with Photography Presentation Templates. Commonly used ones include Microsoft PowerPoint, Google Slides, Adobe InDesign, and many other presentation design applications available in the market. The software required for a specific template depends primarily on the template's format or file type.
Choose this slides you're going to use in your presentation over photography. Into do this, go to View > Slide Sorter or clear all the slides you don't want to keep by right-clicking the erase them. 2. Add Your Content. Here's where you can add your picture speaker ideas.
Perhaps your social media sites will also help you see the images that were most popular online. When it comes to curating the show, there should be a cohesiveness to the work and to the final exhibition. Make sure all the work fits together and flows well. Be clear on your vision for the exhibition.
Minimalist Beauty. Download the "Minimalist Beauty" presentation for PowerPoint or Google Slides and start impressing your audience with a creative and original design. Slidesgo templates like this one here offer the possibility to convey a concept, idea or topic in a clear, concise and visual way, by using different graphic resources.
502 templates. Create a blank Photography Presentation. Minimal Black and White Design Brand Portfolio Presentation. Presentation by Pixasquare. Colorful Minimalist Modern Creative Portfolio Presentation. Presentation by Luvisual. Modern and Minimal Photography Portfolio Presentation. Presentation by Amit Debnath.
Learn how to create a photo slideshow in Microsoft PowerPoint in this tutorial video. See step-by-step how to import photos, how to make quick edits to the p...
4. Avoid distracting elements. Rely on simple backgrounds to many of your presentation photos. Since you will likely be overlaying your imagery with copy and textual content, the less involved the background, the clearer your overall message. This tip is especially important for text-heavy slides. 5.
If you want to harness that power and learn how to take the best possible photos, welcome to "Photography Basics: The Beginner's Guide.". This comprehensive tutorial explains the fundamental concepts you should know about photography from start to finish. Nikon D7000 + Nikon 105mm f/2.8 @ 105mm, ISO 280, 1/400, f/4.0.
Presentation Topics - All presentations are updated every year with new information and photographs. Finding Your Creative Voice: Learn how 1 simple word and 4 questions can change your photography VERY POPULAR Every photographer needs to find their unique creative voice. It is the basic building block of creating a unique photographic style that allows a photographer to make photographs ...
So, let's explore exposure in the three settings we've mentioned. 1. Aperture. The first element of the exposure triangle we'll look at is aperture. This is the hole inside the lens that allows light to pass through to the camera's sensor. It's similar to the pupil of your eye.
If so, try to organise them in this manner so it's easier to consider images in sets. Have a target figure in mind, for example you could have 5 sets with 10 images in each, so 50 in total. If you start with 100 shots, whittle it down to the best 75, then the best 60 and finally the best 50.
4. ISO - A must in any beginner's photography guide. The last of the exposure photography basics is the ISO.. In short, the ISO works by increasing the light information captured by the camera sensor.. This has a drastic effect on the exposure; the higher the ISO, the brighter the image will be, and the lower the ISO, the darker the photograph will be. ...
Creating Photo Slideshows for PC Computers. Open PowerPoint and create a new presentation. To do this, click on the PowerPoint icon on your browser. When PowerPoint opens, click on "File" near the top, left-hand corner and then click on "New" listed under "File".
Step 1: Make a draft to structure your presentation. As we said before, writing a draft or script of your content will be vital to start on the right foot as a PowerPoint beginner. This advice is so important that we choose it as the first step to learning how to make a PowerPoint presentation.
Back of you - Yes, this provides a great shot of you presenting, but the focus is really on the audience perspective. Side of you - Include both left and right side angles - one angle may provide the better shot because of lighting and things out of your control. And, you might prefer one side shot to the other but shoot both to be certain.
ppt on photography. Art & Photos. Slideshow view. Download now. PHOTOGRAPHY PPT. PHOTOGRAPHY, CAMERA, LENSES AR-807 ELECTIVE-I SUBMITTED TO:- MR.VIJENDER SAGAR SUBMITTED. PHOTOGRAPHY • Photography is. PHOTOGRAPHY • Comes from. THE FIRST PHOTOGRAPH.
Educational photography presentations & classes for your camera club. Available topics cover an entire range of disciplines including the following: Portrait photography. Street photography. Night photography. Photo editing workflow. Travel photography. How to get sharper images. 10 ways to improve your image quality.
Presentation on Travel Photography at the Leica Store. The Leica Store in Bellevue, Washington recently invited me to talk about Travel Photography and I gladly accepted. The presentation was well attended and many stayed afterward to continue the discussion. Here is my presentation, slide by slide. Unfortunately, the audio isn't available ...
Here are a few tips for business professionals who want to move from being good speakers to great ones: be concise (the fewer words, the better); never use bullet points (photos and images paired ...
If you're learning photography, these should be especially helpful for you along the way. 1. Work with Your Composition. To take engaging photos, you need to be engaged with what you're doing. Don't just fly by on autopilot. Instead, put thought into your composition and try to make your photos as good as possible.
Record new layer: Pick this for recording your video as a new layer on top of an existing recording. 2. Click Record at the bottom of the Record panel. 3. Drag over the area of your screen you wish to record. Click Start Recording. Press Space to start recording the full screen. 4. Click Stop to finish recording.
The new iPad Pro — the thinnest Apple product ever — features a stunningly thin and light design, taking portability to a whole new level. The 11-inch model is just 5.3 mm thin, and the 13-inch model is even thinner at a striking 5.1 mm, while both models are just as strong as the previous design. The 11-inch model weighs less than a pound ...
Experimentation is key if you want to use your 365 project to develop your skills, but it's also a great way to get to know your iPhone camera inside out. I'm willing to bet that most iPhone ...