

How to Record Audio in PowerPoint for Narration or Voice-Over | Step-by-Step
I’ve scrolled through a lot of slideshows and, let’s face it, they’re not always the easiest to follow or understand what’s going on. I’m sure you have felt this too.
Have you ever thought, it would be great if the slides came with audio so that the presenter could explain and talk through each slide?
In this article, we’re going to show you how to record audio in PowerPoint as a narration or voice-over so your audience can feel as if you are presenting live and in person.
All you have to do is record yourself talking through each slide and PowerPoint will take care of the rest!
Related topic : If you are only looking to insert or add an audio that does not advance or move a slideshow in time and in synch your voice, this article: Adding Music to PowerPoint Slideshow explains how.
How to record audio as a voice-over or narration in PowerPoint – Quick Guide
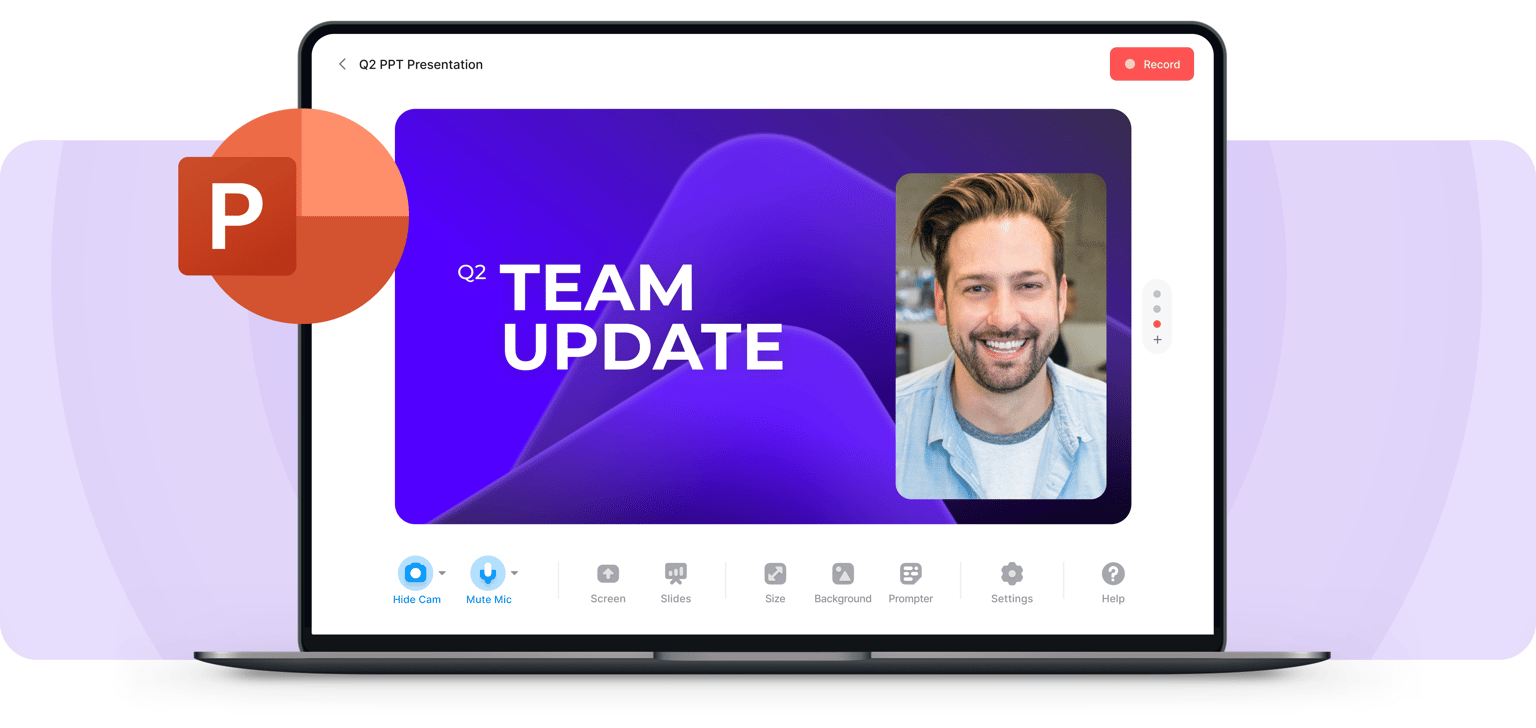
- In PowerPoint, choose a slide.
- From Slide Show menu > click lower part Record Slide Show button
- Select a slide to Record from Current Slide, or Record from Beginning from the sub-menu
- NOTE: PowerPoint versions 2013-2016 only: A “Slide Show Settings” dialog box will appear for animation timings etc. You can leave both checked.
- PowerPoint will then open into full-screen Recording Mode
- NOTE: Microsoft Office PowerPoint versions 2013-2016 and Microsoft for Mac 365 will start recording immediately.
- In Recording Mode > click the Record button in the top left to start recording countdown.
- You are now ready to talk through your presentation and record your voice.
- To Stop or Pause recording > click Pause button or Stop / End Show (x) button.
- Jump to the full step-by-step tutorial below
Why use narrations or voice-overs in PowerPoint Presentation?
Adding a narration or voice-over into a presentation will enable your slideshow to be played and move forward in time or sync with your voice.
Recording audio for your slideshow is a widely used feature and has many benefits. For example:
- It’s useful in situations when a speaker is not available and when people want to view presentations on their own and at their leisure.
- It is also an effective way for speakers to rehearse and time specific slides or the entire presentations before they happen.
- And you may have watched many instructional videos or online courses with a recorded voice over, just because it makes the content easier to understand, is more engaging and lively than just written words alone.
After you finish the audio recording you can share or export your presentation by converting or exporting your PowerPoint (.ppt) file into a video (.mp4 or .mov file) which will have both your audio and visuals contained in one file.
Before recording your narration or voice-over – tips.
Make sure your microphone works..
An important step to take before recording your audio is to ensure your microphone is set up correctly and your voice can be played back clearly. The video below runs through how to set up an external mic for your Windows or Mac .
First, plug in your headset or microphone to your computer if you are not using the inbuilt mic. Or if you are using a Bluetooth headset, make sure it’s paired/connected properly.
To make sure everything is working OK, access the audio device settings on your computer as shown in the video above. While you are in the device settings menu, select your microphone and set it as default.
You can test the playback quality by using the free software tools on your machine:
- Windows 10 – Use Voice Recorder (previously called Sound Recorder)
- Mac – Use Voice Memos
- Chromebook – New in 2021 from OS 88. Use Screen Capture to test your audio recording by pressing the Ctrl, Shift, and Overview keys to bring up the capture bar. ( You may need to enable by entering chrome://flags in the URL address bar and search for “capture” in the search bar or by entering chrome://flags/#screen-capture in the URL address bar.)
Note – In PowerPoint 2016, you cannot change which microphone device you want to record in screen recording mode (so do it first!), however in 2019/Office 365 it is possible to do so, by using the settings link in the full-screen recording mode.
How to Record Audio in PowerPoint Step-by-Step Instructions.
Versions Covered: PowerPoint 2013, 2016, 2019, 2020, Office 365, PowerPoint for PC / Windows, PowerPoint for macOS and Chromebook.
- Start by opening the PowerPoint presentation in which you want to record your audio.

- Stop Recording. To end the slideshow recording, click the Stop (square button) at the top left. Or keyboard shortcut – Press Alt+S. You’re done recording your captivating and engaging PowerPoint slideshow with a voice-over / narration!
- Exit full screen recording window. Click the (x) button int the corner. To save your slide timings, click “yes” if prompted. When you return to your slide view, a small icon of a microphone appears on the bottom right corner of each slide. Click this icon to hear your voice over for any particular slide.
Advanced PowerPoint Audio Recording Options.
Add annotations to your recorded powerpoint slide show..
Adding annotations to your PowerPoint presentation is an optional step and can help your presentation stand out. But, what are annotations, and how should you use them when recording your voice-over?
If you want to draw a user’s attention to a specific area or to add some interactivity; using annotations is the way to do it. It is basically a virtual marker you can use to highlight elements in your presentation slides e.g by circling a word or picture, underlining a phrase, writing additional notes on-screen, or pointing to specific items.
To use the Annotation Tool in PowerPoint: Scroll to the bottom of the full screen recording view (as shown in the image below). Then, select any of the tools available (the laser pointer, highlighter or pen) and annotate your slide, by drawing with them using any mouse or other pointing device.
Note, this will not make a permanent change to your slides, it’s only visible in the recorded playback!

Using the Timings Function to Adjust Recording Speed.
As you record your narration, you will be able to see a clock in the bottom left corner showing how much time you spend on each slide, against the total amount of time recorded so far.
While this is very helpful for rehearsing your presentation, it’s quite common to have issues with timings with your recorded slideshow. For example when you have switched to the next slide too quickly.
To Change the Timings of Your Recording: Navigate to the Slide Show tab in the top ribbon > (Next to the Record Slide Show icon, we used before) > click the Rehearse Timings icon. The presentation will now once again go to full-screen mode, and you can use your arrow keys to change the slides and set new timings.
Clearing or Deleting your narration and / or timings
If you are not happy with your voice-over on a slide or wish to start the recording from the beginning, PowerPoint gives you some easy options to do so.
To Delete a Narration or Timings: Navigate to the Slide Show tab in the top ribbon OR the Recording Tab. Select the down arrow on the “ Record Slide Show ” button > from the menu choose “ Clear ” > Select the appropriate timings and/or narration option.
Save and Distribute the Presentation with Audio as a Movie / Video file.
Now that you are finished recording your PowerPoint presentation, your voice audio will be attached to the same file and it’s time to distribute it by exporting your PowerPoint (PPT file) into a video (.mp4 or .wmv) .
To Export your Presentation as a video: In PowerPoint navigate to File Menu > Export > Select your preferred options. (E.g.) File Format: MP4 . Quality Width 1,920 Height 1,080
Recording Audio Tips and Tricks
Macos 2019 – powerpoint audio recording tip.
To give PowerPoint access to record your screen in macOS you need to set up the right security and privacy permissions:
- Open System Preferences
- Select Security & Privacy
- Select Privacy tab.
- In the left panel scroll to Screen Recording > click “ +” icon .
- In the “Applications” window select PowerPoint

Microsoft 365, 2016, 2019 for Windows PC – Recording tab in PowerPoint
Microsoft 365 subscribers with the Click-to-Run version of Microsoft 365 for Windows PC can use the Recording tab .
The Recording tab shows the recorded video , screenshots, and screen recording options in a single menu for easy access. To turn on the Recording tab of the ribbon in PowerPoint 365 Windows PC
- Select the File menu > click Options .
- In the PowerPoint Options dialog box > click Customize Ribbon
- In the right-panel > select the Recording check box.
- Click OK .

If you click the button on the bottom of the “Record Slide Show” button, you can start from the beginning of the slideshow or from where you are.

Knowing the basics of recording audio in PowerPoint is a powerful tool for anyone who wants to make a downloadable slideshow, create an internet streamed webinar, upload a video for YouTube, Vimeo, or any other digital platform such as your website or other digital platforms.
You may also like: How to Turn a PowerPoint Into a Video

Related Posts
How to add music to powerpoint slideshow and find free music, [solved] how to upload powerpoint to google drive, 10s method: how to add bullet points in powerpoint.
Blog > Record voice narration for PowerPoint
Record voice narration for PowerPoint
01.11.21 • #presentation #powerpoint #voiceover #narration.
In this blog post, you'll learn how you can add a narration for your PowerPoint presentation. Adding audio or video narration can be very helpful, especially in a time where many seminars and meetings have to be conducted online. If you would rather give your presentation using a live stream (which has many benefits), scroll down to the bottom and learn how you can do that!
Here's what you need for recording:
- a microphone (your computer's microphone should do)
- a finished set of PowerPoint slides
- a video camera (only if you want to record video as well)
- Open your PowerPoint presentation or create a new one.
- In the taskbar, select Slide Show . Then click Record Slide Show .
- Choose the option Record from Beginning .

- You'll now get to a different view, which we'll call "Recorder View". Here's an overview:

- In the bottom right corner, you'll see three icons. The one on the left is for switching the microphone on/off. Make sure this function is turned on. The icon in the middle is for turning on/off your camera. You can choose if you want to switch the video recording on or not. The last icon is only available if you've chosen the video recording function. If the function is enabled, you'll be able to see a video preview.
- In the top right corner under "Settings", you can choose what microphone (and camera) you'd like to use. This is only relevant if you have an external recording device that you would like to use. If you're recording with your computer, you don't have to set anything here.
- Now it's time to record. Click the big red Record button on the top left and start speaking.
- Tip: You can either record all the slides at once without pressing pause, or you record each slide individually, then click pause, then go on to the next slide and record again. However, it's important to note that PowerPoint creates an individual audio file for each slide, even if you record all at once.
- Important : PowerPoint does not record during transitions, so only speak when you're on a slide.

- You can also draw on your slides with the painting tools on the bottom. These drawings will be saved to your presentations.
- On the bottom left corner, you'll see what slide you're on. You can also see two time counts. The first one is for the recording on the current slide, the second one is for the recording of the presentation overall.
- If you want to delete the whole voiceover, click Clear and Clear Recordings on all Slides . If you only want to delete the recording on the specific slide you are on, click Clear Recording on current Slide.
- If you want to re-record the audio from one slide after deleting it, just go to that slide and click Record again. Record what you want to say, then click Stop when you're done.
- Once you're done, leave the Recorder View. Click the small x in the top right corner or hit Esc .
- You can now either save the presentation as a regular PowerPoint file (just click Save and you're done) or as a video. If you'd like a video, follow the instructions below:
Save Presentation as Video
- Go to File in the PowerPoint taskbar

- Choose Export on the left, then Create a Video .

- Select the quality you'd like. We recommend Full HD (1080p).
- In the following drop-down menu, make sure Use Recorded Timings and Narrations is selected.

- The setting Seconds spent on each slide is only for the slides where there is no recording (if you have recordings on all of your slides, you can just ignore this setting.)
- Click Create Video and choose where the video should be saved. The video creation might take a while, so don't close PowerPoint right away!

Live interaction with polls & quizzes
If you prefer to give a talk where you can also interact with your audience, then the free software SlideLizard is the ideal solution! Using live polls , Q&A and feedback , your presentations will become even more exciting and interactive. SlideLizard integrates directly with PowerPoint, making it a breeze to use.

Can I record a presentation in PowerPoint?
Yes, PowerPoint also allows you to record your presentation with voice and video narration. You can read about how this works in our blog .
How can I record a presentation in PowerPoint with audio and video?
At first create your presentation. For the recording you will need a microphone (the one on your computer should do), your finished presentation and a video camera (if you also want to record a video). We have created a tutorial on our blog where you can read the further steps.
Related articles
About the author.

Pia Lehner-Mittermaier
Pia works in Marketing as a graphic designer and writer at SlideLizard. She uses her vivid imagination and creativity to produce good content.

Get 1 Month for free!
Do you want to make your presentations more interactive.
With SlideLizard you can engage your audience with live polls, questions and feedback . Directly within your PowerPoint Presentation. Learn more
Top blog articles More posts

Create an animated timeline in PowerPoint + Free Template

How to use the morph transition in PowerPoint

Get started with Live Polls, Q&A and slides
for your PowerPoint Presentations
The big SlideLizard presentation glossary
Internal preview.
An Internal Preview is a statement, which is made in the body of the speech, so that the audience knows what the speaker is going to discuss next.
Leading Questions
Leading questions subconsciously make the respondent think in a certain direction.
.pptm file extension
A .pptm file is a macro-enabled presentation created by MS PowerPoint which contains slides with layout, images, texts and embedded macros.
Internal Communication
Internal communication is particularly important for corporate communication. It communicates important information from leadership to staff so that they can do their jobs in the best possible way and work processes run well.
Be the first to know!
The latest SlideLizard news, articles, and resources, sent straight to your inbox.
- or follow us on -
We use cookies to personalize content and analyze traffic to our website. You can choose to accept only cookies that are necessary for the website to function or to also allow tracking cookies. For more information, please see our privacy policy .
Cookie Settings
Necessary cookies are required for the proper functioning of the website. These cookies ensure basic functionalities and security features of the website.
Analytical cookies are used to understand how visitors interact with the website. These cookies help provide information about the number of visitors, etc.
3 Simple Ways to Record Audio on PowerPoint Presentations

Sara Wanasek

Enhance your PowerPoint presentations by incorporating music and adding your own narration or unique sound bites. This not only keeps your audience engaged but also complements your written content. Learning how to add and record audio in PowerPoint is a valuable skill, enabling you to create compelling presentations for professional, educational, and personal purposes.
Recording audio in PowerPoint offers significant advantages, especially when delivering remote or asynchronous presentations. You can:
- Record yourself giving the presentation and share the recording for viewers to access at their convenience, or
- Include audio clips to emphasize transitions, key points, or significant moments within your presentation.
Continue reading to discover how to record audio live in PowerPoint on Windows devices, add pre-recorded audio, and find useful tips for editing!
Step-by-step guide: How to Record Audio on PowerPoint
In PowerPoint, you have the capability to record two types of audio:
- Recording for exporting as a video: This method is ideal for narrating your presentation, making it perfect for sharing with others to watch at their own pace.
- Recording short audio clips: This method allows you to incorporate audio into your live presentation.
Let’s walk you through both methods of recording audio directly within PowerPoint:
Option 1: Record Narration for All Slides
Step 1: Open Your PowerPoint Presentation
Launch PowerPoint and open a new or existing PowerPoint file. If your are starting from scratch, make sure to complete the slides with design and interactive elements (make sure your presentation is engaging !) before adding your audio.
Step 2: Choose the Starting Position
- Go to the ‘SlideShow’ tab and click on the arrow next to ‘Record Slide Show.’
- Choose between ‘From Current Slide’ or ‘From Beginning’ based on your requirements.
- This will open the recorder window, where you can make necessary adjustments to the settings.

Step 3: Adjust Settings
You can select the microphone, view your notes, and toggle your camera on or off.

Step 4: Begin Recording
When you are ready, click the ‘Play’ button to begin recording. You will see a 3-second countdown, then the recording will start and you can begin speaking.

Use the side arrows for smooth navigation through your presentation while recording. Pause or stop the recording at any point. To review the recorded audio, click ‘ Replay .’ To delete any recordings, click the ‘x’ next to the speaker icon.
At the bottom left, you’ll find two timers: one for the entire presentation and one for the specific slide, helping you keep track of the recording length.

Step 5: Stop Recording
When done, click the ‘X’ in the top right-hand corner. Your audio recordings will be saved to each slide, indicated by the speaker icon at the bottom right corner of your slide.
Step 6: Share Recording
To share your recording, export the PowerPoint file as a video , selecting ‘Use Recorded Timings and Narrations.’ Then, easily share it via email or add it to a Learning Management System for convenient viewing.

Option 2: Record Audio for Specific Slides
Step 1: Navigate to the Desired Slide
Select the specific slide where you want to record audio. This could be for narration, background music, or sound effects, depending on your presentation’s needs.
Step 2: Insert Audio
To add audio, click the ‘Insert’ tab on your PowerPoint ribbon. Then in the Media section, select ‘Audio’ then ‘Record Audio’.

Step 3: Name Audio Sound
Name the sound uniquely for easy future retrieval.

- Click the red ‘Recording’ button to start.
- Use the green ‘Play’ button to review the audio.
- If it’s satisfactory, click ‘OK.’
- The speaker icon will be added to your slide, and you can reposition it as needed.
Step 5: Set Audio Playback Options
After adding audio to your slide, you can specify how and when you want it to play. Click on the Audio icon and select the ‘Playback’ tab in the PowerPoint ribbon.

In PowerPoint, utilize editing tools to refine your audio. Trim, adjust volume, and apply fade-in or fade-out effects for a professional touch. You can also set the start and stop points for the audio and save it for future use.
Step 6: Test Your Audio
Before your important presentation, test the audio to ensure it works smoothly. Play through your presentation to confirm that everything sounds and plays correctly.
Option 3: Adding Pre-Recorded Audio to PowerPoint
Already have the audio you want to use? No problem! Adding audio to your PowerPoint can be done in 4 simple steps:
Step 1: Navigate to the Slide
Select the slide where you want to addyour pre-recorded audio.
Click the ‘Insert’ tab and choose ‘Audio’ from the Media Section. Select ‘Audio on My PC’ and search for your pre-recorded audio to be uploaded.

Step 3: Configure Playback Options
Customize your playback settings to suit your needs, such as when the audio should start and how it should play.
Step 4: Test it out
Ensure that the audio plays well and syncs up with your slide transitions and animations for a seamless presentation.
Expert Tips for the Best Recording
Use these tips to get the best recording in PowerPoint:
- Choose the Right Microphone: Opt for a high-quality microphone for clear and professional audio. For frequent recordings, consider an external microphone.
- Minimize Ambient Noise: Record in a quiet space to reduce background noise. Close doors and windows, and use noise-canceling software if necessary.
- Prepare Your Narration: Outline your narration to ensure a structured delivery, preventing pauses or monotony. Avoid reading line by line.
- Practice Your Delivery: Practice your narration multiple times for improved flow and clarity. Utilize PowerPoint’s Speaker Coach for help with pace, tone, and filler words.
- Edit Minor Mistakes: Don’t worry about small errors during recording; you can edit them out later using PowerPoint’s editing tools.
- Enhance Accessibility: When recording the entire presentation, add closed captions or subtitles to make it accessible to a broader audience, including those with hearing impairments.
Bonus: Recording Interactive PowerPoint Presentations
Want to take your PowerPoint recordings to the next level? Include interactive elements in your PowerPoint recordings to engage your audience more effectively with ClassPoint.
ClassPoint is an interactive teaching tool that integrates directly into PowerPoint, Coffering live presentation engagement features such as interactive questions , gamification , and presentation tools !
When recording your presentation, use third-party recording software like Zoom, Teams, Loom, or Screencast-O-Matic, and incorporate ClassPoint features alongside your audio narration, like so:
1. Live Annotations
Use Pens , Highlighters , Shapes , and even Text Boxes to add notes and highlight the important information on your slides while recording.
2. Added Whiteboard Slides
Add variety to your presentation by annotating on a blank whiteboard slide of your choosing.
3. Laser Pen
ClassPoint’s laser can be used as a pen with disappearing ink and a spotlight when you press the ‘S’ key on your keyboard, allowing you to guide your audience’s attention more effectively.
4. Draggable Objects
Enhance audience understanding by moving objects on your slide as you explain , emphasize key concepts, and create visual associations.
5. Embedded Browser
If you need to search the web to emphasize a key point or show a video, simply open a browser within your presentation without interrupting your seamless presentation and recording.
6. Timer or Stopwatch
If you want your audience to reflect on a question or complete an activity independently, use the timer or stopwatch to create a brief pause before resuming your recording.
Final Thoughts
Whether you’re narrating a presentation for asynchronous viewing or incorporating audio into a live session, you’re now equipped with the knowledge of how to record audio on PowerPoint in the best way.
With added audio, you can engage your audience in a way that ensures your message resonates, no matter where or when they access your content.
Begin experimenting with these techniques, and see how recording audio on PowerPoint and leveraging ClassPoint can transform your PowerPoint presentations, both live and virtually.
Recommended Readings
3 Ways to Watch & Insert Videos in PowerPoint
How to Add Notes to PowerPoint Presentations: A Comprehensive Guide
About Sara Wanasek
Try classpoint for free.
All-in-one teaching and student engagement in PowerPoint.
Supercharge your PowerPoint. Start today.
500,000+ people like you use ClassPoint to boost student engagement in PowerPoint presentations.
How to Record a PowerPoint Presentation with Narration
Can be helpful in creating a dramatic narrative
Microsoft PowerPoint has a built-in recording tool that allows you to narrate your presentations using recorded audio. You can export and share recorded presentations as video files.
This tutorial covers everything about recording PowerPoint presentations on Windows and Mac computers.

Record PowerPoint Presentation with Narration
Open the PowerPoint file/presentation you want to record and follow the steps below.
Record PowerPoint Presentation on Windows
- Select the slide you want to start recording from on the slide thumbnail pane.

- Head to the Record tab on the ribbon and select the Record button to start recording from the current/selected slide.

To record from the first slide, select the down-facing arrow icon below the Record button and select From Beginning .

You can also record a presentation from the Slide Show tab. Select Slide Show on the ribbon and select Record , From Current Slide , or From Beginning .

That’ll open PowerPoint’s presentation recorder in a fullscreen window.
- Select the Record icon and start speaking after the three seconds countdown.

PowerPoint records the presentation window and captures your voice and webcam feed as you navigate the slides. Select the left-facing and right-facing arrows to move to the previous and next slides in the presentation.
Record PowerPoint Presentation in macOS
- Open the Slide Show tab and select Record Slide Show .

- Select the Record button on the toolbar to start recording your narration.

Use your keyboard arrow keys to move back and forth between slides. Press N or Space Bar to move to the next slide or animation in the presentation. Press P or Backspace to return to the previous slide or animation.
Select Tips in the top-left corner for more keyboard shortcuts and other presentation tips.

Note: The narration tool doesn’t record slide transitions. When moving between slides, wait for the destination slide to appear on the screen before speaking.
PowerPoint Recorder Control/Settings
You’ll find a handful of controls and options on the recording tool. We’ll show you how to use these controls to include voiceovers or audio recordings in your presentation.

Using Presentation Pointer Tools
PowerPoint provides several tools to mark up your slides when narrating your presentation. There’s a pen tool, eraser, laser pointer, and highlighter.
With the Pen tool, you can draw on slides during narration/recording. Press Ctrl + P (Windows) or Command + P (Mac) to use the pen tool. You can also select the Pen icon to convert the pointer to a pen.

The Laser pointer tool converts your cursor to an onscreen laser. Use the laser pointer to draw attention to something on a slide/presentation.
Press Ctrl + L (Windows) or Command + L (Mac) to use the laser pointer. There’s also a Laser pointer icon on the toolbar.

Pressing Ctrl + I (or selecting the Highlighter tool ) converts your cursor to a highlighter.

Use the Eraser tool to remove inks and highlight from slides. Select the Eraser icon or press Ctrl + E and select the ink to erase.

On macOS, select the Erase Pen icon (or press E ) to erase all drawings and highlights on the slide.

You can change the pointer tools ink from the color selection boxes. However, one major limitation is that you can’t change the size of these pointer tools.
Pause and Resume Your Recording
In Windows, press I on your keyboard or select the Pause button in the top-left corner to pause your recording.

Press I again or select the Record icon to resume the recording.

If you use a Mac, select the Pause icon in the top toolbar to pause the recording.

Unmute or Mute Microphone
Check that your microphone is unmuted before recording. Select the microphone icon in the bottom-right corner to mute or unmute your mic.

PowerPoint for Windows allows you to mute and unmute your microphone in real time while recording video/audio narrations. The macOS version of PowerPoint only lets you configure your camera and microphone settings before recording.
Switch Microphone or Camera
Want to record your presentation with an external microphone or camera? Press Ctrl + M or select the audio/camera settings icon in the top-right corner and choose your preferred microphone/camera.

In macOS, select the microphone icon to mute or unmute your microphone. Select the arrow-down icon next to the microphone or camcorder icons to switch input devices.

Enable and Disable Camera
The recorder displays your camera or webcam feed in the bottom-right corner of the presentation slides.
Select the camcorder icon to remove your webcam feed from the recording. Select the icon again to display your webcam feed in the presentation.

You can also use the Ctrl + K keyboard shortcut on Windows computers to enable or disable your camera.
On Mac computers, you’ll find the video control icon on the top toolbar.

Note: The recording tool greys out the camcorder icon if your microphone is turned off.
Enable or Disable Camera Preview
PowerPoint allows you to disable the camera preview without turning off your camera or webcam.
Press Ctrl + J (Windows) or select the Camera Preview icon in the bottom-right corner to disable or enable the camera preview.

End a Recording
Press S on your Windows keyboard or select the Stop icon to end the recording.

Replay or Preview Your Recording
When you end a narration, press V on your keyboard or select Replay to preview or watch the recording.

The recorded narration will include all pen inks, highlights, and laser pointer gestures made during the presentation.
You can also preview/replay the narration outside the recording tool. Open the Slide Show tab and choose to watch the playback From Beginning or From Current Slide .

PowerPoint allows you to preview the playback on individual slides. A speaker/audio icon appears in the bottom-right of PowerPoint slides with narrations.
Choose the slide you want to preview, hover your cursor on the speaker icon in the bottom-right corner, and select Play .

Delete Current Narration/Recording
Did you spot an error when previewing your presentation? Want to delete the current narration and start from scratch?
Select the Clear existing recordings icon and choose whether to Clear Recordings on Current Slide or Clear Recordings on All Slides .

On Mac, select the Bin icon to delete the entire narration/recording.

Close the Narration Tool
Select the X icon on the title bar to close the presentation narration tool and return to Powerpoint.

Select End Show in the top-left corner to close the recording tool on a Mac computer.

Delete Narrations from Slides
Want to delete the narration or timing on an individual slide or the entire presentation? Select the slide with the narration you want to delete and follow the steps below.
- Open the Record tab and select the down-facing arrow below the Record icon.
- Select Clear and choose to clear timing or narration on current or all slides.

Export Recorded or Narrated Presentation
You can export a narrated PowerPoint presentation as a video file. The video output includes ink strokes, recorded audio/video, laser pointer gestures, and webcam/camera recording.
- Open the Record tab and select Export to Video .

Alternatively, open the File menu, select Export on the sidebar, and select Create a Video .

- Choose the quality of the video export in the first drop-down box—Ultra HD (4K), Full HD (1080p), HD (720p), Standard (480p).

- Choose Use Recorded Timings and Narrations in the next drop-down box and select Create Video .

- Give the recorded presentation a file name and select Save .

Narrate Your PowerPoint Presentations
The Microsoft PowerPoint web app doesn’t have a recording tool. As a result, you can only record presentations with narrations using PowerPoint for Windows or Mac.
You might meet issues recording a slide show if you use an outdated version of PowerPoint. Also, the recording tool on older versions of PowerPoint has a different interface and lacks some controls. Update PowerPoint and restart your computer if you cannot record a slide show.

Sodiq has written thousands of tutorials, guides, and explainers over the past 4 years to help people solve problems with Android, iOS, Mac, and Windows devices. He also enjoys reviewing consumer tech products (smartphones, smart home devices, accessories, etc.) and binge-watching comedy series in his spare time. Read Sodiq's Full Bio
Read More Posts:

- Slidesgo School
- PowerPoint Tutorials
How to Add, Record or Edit Audio or Music in PowerPoint

Do you want to set the right mood and keep your audience engaged and entertained during your next presentation? In this new Slidesgo School tutorial, you’ll learn how to add audio or music to your presentations . You’ll also find out how to edit them to your liking .
Adding Audio from your Computer
Recording audio from powerpoint, editing audio, adding online audio, adding music from youtube, playing several clips in succession during your presentation.
- Before we begin, please note the following: in PowerPoint 2010 or older, you should use .wav or .wma files in Windows, and .wav files in Mac. If you’re using a newer version, we recommend that you work with AAC .m4a files.
- Open your PowerPoint presentation and select the slide where you want to add audio.
- On the Insert tab, in the Media group, click the Audio drop-down arrow. You’ll see two options: the first one allows you to add audio from your PC, whereas the second one allows you to record audio (you’ll need to have a microphone set up in your computer).
- Select Audio from My PC. A new window will open, where you have to locate the audio file you want to add to your presentation.
- Once located, click the drop-down arrow next to Insert. You’ll see two options:
- If you choose Insert , the audio will be directly inserted into your presentation, increasing the size of the document.
- If you choose Link to File , a link to the file will be created, reducing the size of the document. However, there could be issues if you use the presentation in a different computer, forcing you to link the audio file to the presentation again.
- Select the option that best suits your needs.
- If you want to export any audio included in your PowerPoint presentation, right-click its icon → Save Media As (you can only do this with audio inserted from your PC).
- Please note that if you want to play a different audio in each slide, you’ll need to add the audio files one by one. You’ll also need to uncheck “Play Across Slides”. You can refer to the “ Editing Audio ” section in this tutorial if you want more information.
- On the Insert tab, in the Media group, click the Audio drop-down arrow. Select Record Audio. A new window will open.
- Enter the name of the audio file you’re about to record.
- Press Record to start recording. To stop, press the Stop button. To play what you’ve recorded, press Play.
- If you’re happy with what you’ve recorded, click OK. If that’s not the case, click Cancel.
- Select the audio whose format you want to adjust. A new set of tabs, called Audio Tools, will appear on the toolbar.
- In the Bookmarks group, you’ll find an option to add bookmarks, which will be visible in the timeline. These can be helpful if you want to quickly find the main points in your audio during the presentation.
- In the Editing group, there are options to add a fade in and a fade out. You’ll also find the Trim Audio option. If you click it, a new window will open, where you can set the start point and the end point of the audio clip.
- In the Audio Options group, you’ll find the following options to adjust the behavior of the audio clip:
- Volume: It allows you to set the volume of the clip.
- Start: Click the drop-down arrow to choose how you want the audio to start. If you’re using Office 2010, you’ll also find an option here to play the audio clip during the entire presentation.
- Loop until Stopped: Once the audio clip finishes, it starts again indefinitely until you stop it.
- Play Across Slides: If you enable this, the audio clip will be played during the entire presentation. If “Loop until Stopped” is enabled too, it won’t stop playing until you reach the end of the presentation.
- Hide During Show: Check this option if you want to hide the icon.
- Rewind after Playing: Check this option if you want the timer of the audio clip to go back to the beginning when it reaches the end.
- If you’re using newer versions of PowerPoint, you’ll find a group called Audio Styles. Choose “No Style” if you don’t want additional effects. Choose “Play in Background” if you want the audio clip to be played in the background during your presentation.
- You can change the icon of the audio clip. To do so, on the Format tab, in the Adjust group, click Change Picture.
- Insert an icon or a picture. We’ll use it to link the online audio. Please refer to the How to Add and Modify Icons tutorial to learn how to insert icons.
- Add the link to the online audio resource. If you don’t know how to do it, please refer to the How to Insert a Hyperlink in PowerPoint tutorial.
- Once added, click the icon of this audio. A new window will open, where you must click the Play button. Some audio platforms, such as Soundcloud, allow you to generate an autoplay sharing link. With that, you just need to click the icon to play the audio automatically.
- If you want to pause the playback, you’ll need to exit the presentation mode and do it manually.
- Insert the video containing the audio or music you want. If you don’t know how, please refer to the How to Add a Video in PowerPoint tutorial.
- Decrease the size of the video and place it outside the visible part of the slide.
- We need to set it to automatically play in presentation mode. To do this, on the Playback tab, in the Video Options group, click the Start drop-down arrow and select “Automatically”. If you need more information, please refer to the How to Add a Video in PowerPoint tutorial.
- Please note that the audio will stop when changing slides.
To create a playlist that plays across all slides during your presentation, you need to use an audio editing software, such as Audacity or Adobe Audition, and edit the clips so that they come one after another. When you’re done, export it as a single audio file, which you can now use in your presentation.
Do you find this article useful?
Related tutorials.

New feature available: edit our templates with Canva
Whenever you need to create, Slidesgo is there. We’re continually enhancing your presentation design process with templates that are primed to impress for any occasion. And in order to let your ideas flow best, comfort is key. How could Slidesgo help you with this? By making you feel right at home with our resources, no matter your preferred platform.You spoke, and we listened. Now, your favorite slides can be accessed on a new platform: Canva! This new format adds to our existing options (PowerPoint and Google Slides), expanding your ways to utilize our first-rate presentation content. We’ve started with a selection of Canva-ready...

How to print PowerPoint notes
Crafting an impactful PowerPoint slideshow and delivering a captivating presentation are distinct skills. The first focuses on designing appealing visuals to convey a clear message, while the second involves employing effective presentation techniques to ensure the audience grasps the idea. The content of this article will help you with the latter part of this process, guiding future presenters on how to print PowerPoint with speaker notes to enhance your presentations success and effectiveness.

Discover Our Online Presentation Software for Free
We have great news for you today! If you’ve been a Slidesgo fan for years (or months, or weeks, or days, or mere hours, we welcome everyone!), you’ll probably know for now that our templates are available mostly in two formats: for use in Google Slides and PowerPoint.Google Slides is a free tool, since you only need a Google account in order to use it. PowerPoint, on the other hand, is part of the Microsoft Office suite, so it’s not a free program, but that didn’t stop it from being one of the most popular options in the world!What if we...

Webinar: Presentation Audit
With more than 15,000 templates released on Slidesgo and a user base composed of millions of people, we estimate that the total number of presentations created adds up to… um, a lot! Our team of professional designers work very hard to provide you with editable slides so that the only thing you need to do is, well, customize the elements to your liking. Starting from any given template, the results may vary a lot depending on the person who edited the contents.Have you ever wondered “Is my presentation good enough?” and wished that an expert on presentations looked at your template...
- I Tried Both: Apple Watch 9 vs Fitbit Charge 6
- Best Places to Print Photos Online
How to Do a Voiceover on PowerPoint
Narrate your presentations with ease
:max_bytes(150000):strip_icc():format(webp)/ColettaTeske-af57404a91b342578a97252b7dbd720f.jpg "record audio over powerpoint presentation")
- Central Washington University
What to Know
- Single slide: Select a slide. Go to Insert > Audio > Record Audio . Type a name, select Record , then read your script. Select Stop .
- Entire slideshow: Select View > Normal and choose the first slide. Select Slide Show > Record Slide Show > Record from Current Slide .
- To review the recording, click the sound indicator (it looks like a speaker) and then select Play to hear your recording.
This article explains how to record a voiceover on PowerPoint for a single slide or for the entire slideshow. The instructions apply to PowerPoint for Microsoft 365 , PowerPoint 2019, PowerPoint 2016, and PowerPoint 2013.
How to Record a Voiceover for a Single Slide
Before narrating your PowerPoint presentation, be prepared:
- You’ll need a microphone attached to, or built into, your computer. Test the microphone to make sure it is working. Set the sound level so your audio is easy to hear.
- Prepare yourself for the narration. Write a script you can follow while recording the voiceover. Practice the presentation a couple of times so your voiceover will sound smooth.
- Decide whether to record the voiceover one slide at a time or record a voiceover for the entire presentation in one go.
The simplest way to record audio for a voiceover is to record one slide at a time. To get started, select the slide where you want to add the narration, then go to Insert > Audio > Record Audio .
Here’s how to record a voiceover on the slide:
Type a Name for the voiceover narration.
Select Record (the button with a red dot).
Read your script or ad-lib the narration.
Select Stop when you’re finished recording.
The Record Sound dialog box disappears, and a speaker indicating sound appears in the center of the slide.
To review the recording, click that sound indicator and then select Play to hear your recording.
When you're finished, click anywhere outside the playback controls to accept the recording.
You’ll see an audio icon in the middle of the slide. Move this icon anywhere on the slide to get it out of the way of other elements on the slide.
How to Record a Voiceover for an Entire Presentation
The voiceover for the entire presentation can be recorded at one time. In addition to recording a voiceover, you can record a video of yourself giving your presentation.
To set up your presentation when you want to narrate an entire slideshow:
Select View > Normal
Select the first slide in the presentation where you want to record audio.
Select Slide Show > Record Slide Show > Record from Current Slide .
In PowerPoint 2019, the Recording window opens.
In PowerPoint 2016 and earlier versions, a Record Slide Show dialog box prompts you for further options. In the Record Slide Show box, select options to set up the slideshow:
- Slide and animation timings: When recording, PowerPoint automatically tracks the timing of slide changes and any animations that occur.
- Narrations, ink, and laser pointer: When recording, PowerPoint automatically tracks when narrations, any inking, or laser pointing occurs.
Leave both checked to make automating your slideshow easier.
Select Record .
In PowerPoint 2016, select Start Recording .
Select Pause to temporarily stop the recording if you need a break.
If you made a mistake and want to start over, select Clear > Clear Recordings.
In PowerPoint 2016 select Clear > Clear Recordings on Current Slide .
When you’ve finished recording a slide, select the Advance button to advance to the next slide or press the spacebar on your keyboard.
When you’re done recording your narration on the slide, select Stop and close the recording window to return to the presentation.
You may have noticed some controls at the bottom left side of the screen. These are a few controls to aid you in your presentation.
These handy handy tools include the Laser Pointer , Highlighter , and Eraser . As you advance through your presentation, mark or highlight parts of your slides as you narrate. PowerPoint records the timing of these marks (if you left the boxes checked) to go along with your narration. Likewise, using the laser pointer shows a simulated red laser dot so that you can point out different things on your slides as you narrate your presentation.
How to Listen to the Recorded Voiceover
Once you’ve recorded your narration, you can go back to the slides and listen to your voiceover.
Here’s how to play a narration:
Select the slide containing the voiceover you want to hear.
Look for the recording icon on the slide. It should appear as either a small video screenshot or a speaker icon on the slide.
Hover over select this icon and then click Play to preview the recording.
How to Turn a Voiceover Off
If you don’t want to hear your narrations when playing a slideshow, but want to keep the narrations with the slide, turn voiceover off.
To turn voiceover off, select Slide Show and click to deselect the Play Narrations checkbox.
How to Delete a Voiceover
There are a couple of ways to delete voiceover audio in your presentation. To delete the audio on a single slide, find and select the recording on that slide, then press the Delete key.
To delete the voiceover from all the slides in a presentation: Select Slide Show and then select the down arrow to open the Record Slide Show menu. Then, select Clear Narration on All Slides .
Embedding Versus Linking Audio Files in PowerPoint
When you use the PowerPoint tools to record a voiceover narration, the audio file is embedded in PowerPoint. This means the audio is part of the PowerPoint file and not stored in a separate file, making it easy to play your presentation on any device.
If you have audio you recorded using other software and it's stored on your computer, you can link to the audio file. Linked files keep your presentation size smaller, but links can be broken if the audio file isn't available to the PowerPoint presentation. To prevent broken links, store the presentation file and the audio files in the same folder on your computer.
Get the Latest Tech News Delivered Every Day
- How to Add Audio to PowerPoint
- Loop a PowerPoint Slide Show
- Adding Sounds, Music or Narration to PowerPoint Slide Shows
- How to Make a Slideshow on PowerPoint
- Edit Music, Sound, or Other Audio Settings in PowerPoint
- How to Get PowerPoint on a Mac
- How to Use Copilot in Powerpoint
- How to Make and Add Your Own Sound on TikTok
- How to Convert PowerPoint to Video
- Change Order of Animations for PowerPoint Slides
- How to Add Music to PowerPoint
- Using Design Themes in PowerPoint
- How to Use Speaker Notes in PowerPoint
- How to Change a Black-and-White Picture to Color in PowerPoint
- How to Add Page Numbers in PowerPoint
- How to Print PowerPoint Slides
PowerPoint Recorder
Record your PowerPoint presentations online
Powerful Online PowerPoint Recorder
Make your presentations look professional using VEED’s online PowerPoint recorder. It’s fast, easy to use, and gives you access to video editing tools to make your presentation stand out. You can upload your slides or record your screen while you are presenting. Add yourself to the scene by recording your webcam and audio as well.
No need to install software. Open your browser and start recording! Choose from different layouts and customize your video after you record. You can also edit your recording using our professional video editor.
How to Record Your PowerPoint Presentation:
1 upload slides and select a layout.
Select from our list of layouts (you may need to click to ‘Allow’ permission to access your screen, camera, or microphone). You can record just your screen, your webcam, or both at the same time! You can either upload your slides or record while you’re presenting.
2 Start recording
Click the red button to start recording! You'll see a countdown before the recording starts. Don't worry if you mess up. You have unlimited time and unlimited retakes. You can navigate to other pages, and don't worry, you are still recording.
3 Review, edit, and export
You can playback your recording to review it, click ‘Share’ to share with friends and colleagues, or ‘Edit’ to edit your video (perfect for adding text, subtitles, and professional touches to your screen recording)

‘PowerPoint Recorder’ Tutorial

Highly customizable PPT recording software
VEED lets you easily customize your Microsoft PowerPoint presentation recordings. Select from different layouts and backgrounds. You can record your screen, webcam, audio, and upload your PowerPoint slides to present while recording. If you choose to record your entire desktop, you can easily switch the view between your presentation slides and other windows. When you’re finished, edit your video using our free video editor, where you can also add royalty-free music from our Stock Library.
All the things you need in a screen recorder
Our video capture software is packed with features that will help you create professional-looking recordings. When you press record, the countdown timer will appear to prompt you when your recording starts. To make sure that your audio is being picked up, check the little microphone icon on the bottom of your screen. It should be animated to indicate that your audio is being recorded. It only takes a few clicks. It’s the best app to record your Microsoft PowerPoint presentations.
Fast, free, and easy-to-use screen recorder software
Our screen recorder and video editor are free to use and beginner-friendly. However, if you need to record longer videos, you may need to subscribe to our premium plans. Check out our Pricing Page to see which plan suits your needs. It is super easy to use. It only takes a few clicks!
Microsoft does allow you to record your presentation as well as your voice or audio. But you might be limited because you can’t switch screens. Use VEED to record your entire desktop and switch between windows.
With VEED, you can record your audio, webcam, screen, and presentation slides all at the same time!
To add yourself or your camera to the recording, select the layout that includes “webcam.” Choose the size and positioning of your camera feed and start recording!
Although there are many screen recorders out there, VEED is your best choice when it comes to recording your PC screen! It’s free and online. No need to install software. Plus you can use our free video editor to enhance your recording even more.
What they say about VEED
Veed is a great piece of browser software with the best team I've ever seen. Veed allows for subtitling, editing, effect/text encoding, and many more advanced features that other editors just can't compete with. The free version is wonderful, but the Pro version is beyond perfect. Keep in mind that this a browser editor we're talking about and the level of quality that Veed allows is stunning and a complete game changer at worst.
I love using VEED as the speech to subtitles transcription is the most accurate I've seen on the market. It has enabled me to edit my videos in just a few minutes and bring my video content to the next level
Laura Haleydt - Brand Marketing Manager, Carlsberg Importers
The Best & Most Easy to Use Simple Video Editing Software! I had tried tons of other online editors on the market and been disappointed. With VEED I haven't experienced any issues with the videos I create on there. It has everything I need in one place such as the progress bar for my 1-minute clips, auto transcriptions for all my video content, and custom fonts for consistency in my visual branding.
Diana B - Social Media Strategist, Self Employed
More than a PowerPoint recorder
VEED is a complete browser-based tool that lets you do so much more than just record and share your Microsoft PowerPoint presentations. You can annotate your videos to make your presentation more informative. Edit your recording to add images, subtitles, and more. It is a professional all-in-one video-creation and editing software that’s great for beginners and pros alike. Create professional-looking videos in just a few clicks. You don’t need any video editing experience. Create stunning videos that you can share on social media in just minutes. Try VEED to create professional PowerPoint recordings today!

How to video record yourself presenting a PowerPoint

What type of content do you primarily create?
Recording yourself presenting a PowerPoint can be challenging, especially getting the technical aspects right. You need to capture your screen, webcam, and audio seamlessly while delivering your content naturally and avoiding awkward transitions between slides.
Finding a tool that integrates all these components can seem daunting. However, recording yourself presenting a PowerPoint doesn't have to be reserved for the tech-savvy or professional speakers.
Whether you're a teacher creating online lessons, a marketer producing a product demo, or someone looking to improve their presentation skills, this guide will walk you through user-friendly tools and strategies that will teach you how to video record yourself presenting a PowerPoint.
- Recording yourself presenting a PowerPoint can be challenging, but it doesn't have to be reserved for experts.
- Video recording offers unlimited reach, repurposing opportunities, and a more engaging experience.
- Use PowerPoint's built-in recording feature or tools like Descript for a polished presentation.
- Other tools like Zoom, Loom, OBS Studio, Clipchamp, and Quick Time Player can also be used for recording.
- Tips include practicing your script, using slide notes, ensuring high-quality audio and lighting, and incorporating storytelling techniques.
Why video record yourself presenting a PowerPoint?
Video recording your PowerPoint presentations offers several advantages:
- Unlimited reach : Unlike in-person presentations confined to a specific time and location, recorded videos allow your message to reach audiences globally at their convenience.
- Repurposing opportunities: Recorded presentations can be repurposed as evergreen content across multiple platforms, such as social media, online courses, webinars, and internal training materials, maximizing their value.
- Personal and engaging : Recording yourself narrating a presentation adds a personal touch and dynamic element that static slides alone cannot replicate. Your viewers can see and hear you deliver the content, creating a more immersive and engaging experience.
How to record your presentation with the PowerPoint app
Built-in recording feature in powerpoint.
1. Open the PowerPoint slide you want to record.
2. Click on the Record tab of the top toolbar.
3. Click on the Record button and choose from any of the following options:
- From Current Slide
- From Beginning
4. You'll see the PowerPoint screen recording window.
5. Select the microphone and camera from the icon on the top-right.
6. Click the Stop and Replay buttons to end or replay your recording.
7. To export your presentation's recording, click Export to Video within the Recording tab.
Benefits : Easy to use, no external tools needed
Limitations : Limited editing capabilities.
How to make a more polished recording of your presentation with Descript
While PowerPoint's built-in recording features are helpful, they may not produce the refined result you want for your presentation. That's where Descript comes in handy.
It’s a whole production studio at your fingertips, with video recording, transcription, and editing capabilities, ready to transform dull PowerPoint slides into an engaging experience for your audience. Descript also has a built-in screen recorder.
You can use Descript on Windows, Mac, or even straight from your web browser.
Here's step-by-step guide to recording your PowerPoint presentation with Descript.
Set up your screen recording
1. Install and open Descript. At the top of the editor, click and open the Record panel.
2. Select Screen.
3. Set Recorder settings:
Adjust the default recording settings to your liking, including the transcription language, the maximum recording resolution, and more.
4. Set recording options. Choose which audio and video sources to record (e.g., microphone, computer audio, camera). Remember to turn the camera on to capture your talking head video alongside your PowerPoint presentation.
5. Click the Additional Settings icon for
- Studio Sound (Optional): Enhance audio quality with noise reduction and background removal
- Transcription (Optional): Enable automatic transcription for easier editing
- Recording separate audio tracks
6. Add (optional) Speaker labels for each audio track (e.g., "Narrator," "Expert") by typing them in the text box next to your audio inputs.
Capture your screen recording
1. Select the right recording option:
- Recording into script : Choose this if you haven’t recorded anything yet.
- Replace selection : Choose this if you already have a script and want to replace a specific section with a new recording.
- Record new layer : Pick this for recording your video as a new layer on top of an existing recording.
2. Click Record at the bottom of the Record panel.
3. Drag over the area of your screen you wish to record. Click Start Recording. Press Space to start recording the full screen.
4. Click Stop to finish recording
Bonus: Descript creates separate tracks for camera, microphone, and computer audio. You can edit each track individually for more precise control.
- Do a short test recording to ensure everything is set up correctly.
- Set your recording to transibe for easier editing.
Editing and polishing your PowerPoint recording in Descript
Descript's AI video editing tool makes it a breeze to trim, cut, and splice your video footage, ensuring a seamless flow from start to finish. You can add smooth transitions and other visual effects to make your presentation pop.
Here’s a glimpse of how to edit and polish your PowerPoint recording in Descript:
Edit your recording like a doc
Did you make a mistake during a slide transition? No problem. Just delete those sections in the text transcript (created automatically by Descript) and the video will adjust to match.
Remove filler words
Sound smoother and more confident by easily removing filler words like "um" and "uh" from the transcript.
Fix voiceover mistakes by typing
Didn't nail your delivery on a specific slide? No need to start from scratch! Descript's Overdub feature lets you simply type in the correct narration and replace the audio on that slide with AI voice cloning.
Boost video quality and engagement :
- Crisp up audio quality by reducing background noise and room reverb with the AI-powered Studio Sound feature.
- Replace your background completely with the Green Screen Video Editor —look like you're presenting in a sleek studio or broadcasting from a beach.
- Enable Eye Contact simulation with AI, so it appears you're making direct eye contact with viewers, even if you’re looking or reading something off-camera.
Other ways to video record yourself presenting a PowerPoint
Use Zoom’s meeting recording feature to record yourself giving a PowerPoint presentation. Start a Zoom meeting with yourself, share your PowerPoint window, and enable recording
Loom is a handy screen recording tool that also offers a webcam overlay. Launch the Loom app or Chrome extension and set it to record your screen and webcam. Expect high-quality recordings but no advanced editing features. The free plan offers only five minutes of recording at a stretch.
3. OBS Studio
OBS Studio is a free, open-source screen recorder/streaming software with a steeper learning curve. It’s popular among advanced or tech-savvy users who need granular customization and control.
To record your presentation, add a "Screen Capture" source to capture your PowerPoint window and a "Video Capture Device" source for your webcam.
4. Clipchamp: Recording natively in Windows
You can use Microsoft’s Clipchamp , the built-in screen recorder and video editor for Windows, to simultaneously capture your computer screen, webcam, and audio for recording your PowerPoint presentation. It’s also available as a browser-based app. You can record up to 30 minutes on screen and webcam recordings.
Users can also adjust the screen and webcam recordings in the editing timeline separately.
5. Quick Time Player Recording natively in Mac
Use Mac’s Quick Time Player to record your PowerPoint presentation. It’s not as straightforward as the other options on this list, so here’s a quick guide to help you out:
- Launch Quick Time Player.
- Select File and go to New Movie Recording.
- You'll be recording your entire screen in addition to recording your face, so adjust the size and location of the recording window so that it's in a nonintrusive corner of your PowerPoint.
- Go to View and select Float on Top .
- Next, go to File and select New Screen Recording.
- On the menu that appears, select Record Selected Portion and drag a border around your PowerPoint and the webcam recording window.
- Press Record and start presenting.
- You can adjust the video quality and the audio source in the webcam recording window.
How to turn your PowerPoint presentation slides into a video
Did you know PowerPoint lets you save your presentation as a video, too?
Here's a breakdown of the two ways you can do so—keeping all the presentation elements (narration, animation, pointer movements, timings, and so on) intact in the presentation itself.
Save your PowerPoint presentation as a video
This creates a separate video file (MP4 or WMV) that anyone can play, even without PowerPoint.
Follow these steps:
- Save your presentation
- Go to File > Export > Create a Video
- Ultra HD (4K): Best for large screens (if you have Windows 10+)
- Full HD (1080p): Great for computers and TVs
- HD (720p): Good for streaming online or on DVDs
- Standard (480p): Smallest size, good for phones
4. Decide on narration
- If you haven't recorded yourself talking, choose "Don't Use Recorded Timings and Narrations" from the dropdown menu
- If you have a recording, choose "Use Recorded Timings and Narrations." You can also set how long each slide shows for (default is 5 seconds)
5. Click Create Video
6. Name your video, pick a folder to save it in, and choose a file type (MPEG-4 or Windows Media Video)
Creating the video might take a while, especially for longer presentations. You can even leave it running overnight. Once done, find your video in the chosen folder and double-click to play it.
Save your PowerPoint presentation as a slideshow
This saves your presentation as a special file (PPSX) that starts playing automatically on full screen when opened. It only works with PowerPoint.
Here’s how it works:
- Make sure your presentation is saved (regular PowerPoint file)
- Go to File > Save As .
- Pick a folder to save the slideshow in.
- Under Save as type, choose PowerPoint Show (*.ppsx) .
- Click Save .
Now when someone opens the file, it will automatically play the slideshow.
Pro tips for making better video PowerPoint presentations
Practice your script.
Recording a flawless PowerPoint video rarely happens in one take. The key is practice.
Record practice run-throughs and watch them back. Make notes on areas that need improvement or parts lacking clarity. The more you drill your script, the more confident and natural you'll sound in the final recording.
Take advantage of PowerPoint's built-in Speaker Coach . The feature shows you whether your pace is too fast or slow, your use of filler words like "um," and suggestions to improve your voice modulation.
Use slide notes for coherent delivery
Wouldn’t a personal teleprompter make presentations so much easier? That’s what slide notes are for.
Having your thoughts and talking points organized within your PowerPoint file lets you have all crucial information and prompts readily available when recording.
Go ahead and add detailed notes or even a full script for each slide. This will help you stay on track and provide a handy transcript reference if you need to do any editing or voiceover work in post-production.
Use high-quality audio equipment or turn on Studio Sound
Poor audio recording quality is a surefire way to make even the most visually polished video feel amateurish. Do your presentation justice by investing in a decent external or Bluetooth microphone and audio interface to capture clear voiceover audio.
If you must use a built-in mic, record in a quiet environment to minimize background noise pickup. Or better yet, pair up with an AI-powered audio enhancement tool like Descript's Studio Sound , which reduces background noise , reverb, and other artifacts.
Ensure a clean background and even lighting
Ditch cluttered backgrounds. You want people to focus on the content of your PowerPoint and not be distracted by the funny shapes and colors in your video.
Your video lighting and framing matters, too. Position yourself facing a natural light source or bring supplemental video lighting to eliminate weird shadows and squinting-level glare.
Look directly into the camera or turn on Eye Contact
Looking directly into the camera is essential to create a sense of connection with the audience. Position your webcam or camera at eye level and imagine you're talking to a friend. If you're using Descript, enable the Eye Contact feature to auto-adjust your gaze towards the camera.
- Dress professionally and maintain a good posture to project confidence and authority.
- Use visuals, animations, and multimedia elements to enhance your presentation and keep your audience engaged.
- Consider adding closed captions or subtitles to your video for better accessibility and engagement, especially for those watching without sound.
- Speak clearly and at a moderate pace, using vocal variety to emphasize key points and maintain interest.
- Incorporate storytelling techniques, real-life examples, or personal anecdotes to make your video presentation more relatable and memorable .
Take your PowerPoint presentations from amateur to amazing
Recording yourself virtually presenting a PowerPoint allows you to distribute your message using the most engaging type of content: video. And there are many screen recording tools out there that can capture your screen and web camera footage with just a few clicks.
But how do you stand out?
By focusing on the presentation's depth, your delivery, and the video's quality. The first two are the bare minimum to communicate your message effectively.
But the right screen capture software and all-in-one video creation tool like Descript can help you with third. Use the tool to improve the quality of your recorded PPT presentations.
With Descript, it's easier than ever to record your screen, polish up the audio, and create stunning visuals all in one place. So why wait?
Sign up for Descript today and simplify your workflow while creating a PowerPoint presentation video that sticks with your audience in the long term.
How do you make a presentation video with your face?
To create a presentation video with your face, follow these steps:
- Open your presentation in PowerPoint.
- Go to the Slide Show tab.
- Click on Record and choose From Current Slide or From Beginning .
- Choose your microphone and camera by clicking on a sound icon on the top-right.
- Start recording by clicking on the record button.
- Speak into your microphone to narrate the presentation.
- Your webcam will capture your face during the recording.
- Click Stop when you finish recording.
- Export your recorded presentation by clicking on File> Export>Create a video.
How do you present yourself in PowerPoint?
To present yourself effectively in PowerPoint, follow these steps:
- Determine the key information to include in your presentation.
- Design and prepare your PowerPoint slides with a cohesive theme.
- Craft a compelling introduction to engage your audience.
- Tailor your presentation to different time constraints for flexibility.
- Capture the audience's attention before you begin speaking.
Related articles

Featured articles:
10 excellent Loom alternatives to record your screen
Looking for the best ways to record your screen without Loom? Find out 10 Loom alternatives, their features, and pricing.

How to record a YouTube video: A guide for all devices
If you want to record a YouTube video for personal use or fair-use repurposing, here are the steps to get started.

For Business
Social media video marketing: Everything you need to know
Learn how to win over potential customers (and the algorithms) with the right social media video marketing tools, strategy, and optimizations.

How to record a podcast on Zoom: A beginner’s guide
Follow this step-by-step guide on how to record a podcast on Zoom, then learn about why it may not be your best recording option.

How to record a Microsoft Teams meeting: 5 easy ways
Learn how to record a Microsoft Teams meeting on any device and get answers to common problems.

10 effective how-to videos to engage your audience
How-to videos are a great way to educate your audience. Whether you’re recording a software demo or training instructions, here’s how to create a how-to video.

Articles you might find interesting
How do teleprompters work, and do I need one?
A teleprompter might sound like a dream come true — why wouldn’t you want to read something while still making eye contact with your audience? But just like with anything, there are tradeoffs to using a teleprompter.

AI for Creators
100+ ChatGPT prompts for creators: Speed up your workflow with AI
There are many ways creators can use ChatGPT to remove guesswork, improve their workflows, and grow their audience. You just need the right prompts. Think Mad Libs, but for content production.

Automatic Apple Podcasts transcripts are coming. Here's how to make sure they're accurate.
Automatic Apple Podcasts transcripts are coming—and bringing better accessibility and SEO along. Make sure yours are accurate with this guide.

The best free video editing software with no watermark: Top 10 picks
Free video editing software usually leaves ugly watermarks on your project, but these 10 picks let you create the video you want with no watermark at no cost.

Point of view shot: Why a subjective shot is important in film
Here’s a deep dive on this essential shot, including how best to use it and some of the classic film scenes that made it famous.

How They Made It
My Perfect Console’s Simon Parkin on how to make your interview podcast stand out
Simon Parkin didn't set out to make an indie podcast, but that's what he did. He shares how a sharp format helps his interview show stand out and how to stay creative with a day job.
%20(1).JPG)
Join millions of creators who already have a head start.
Get free recording and editing tips, and resources delivered to your inbox.
Related articles:
Share this article

Microsoft Learn Q&A needs your feedback! Learn More
May 20, 2024
Microsoft Learn Q&A needs your feedback!
Want to earn $25 for telling us how you feel about the current Microsoft Learn Q&A thread experience? Help our research team understand how to make Q&A great for you.
Find out more!
Contribute to the Microsoft 365 and Office forum! Click here to learn more 💡
April 9, 2024
Contribute to the Microsoft 365 and Office forum!
Click here to learn more 💡
PowerPoint Forum Top Contributors: Steve Rindsberg - John Korchok - Bob Jones AKA: CyberTaz ✅
May 10, 2024
PowerPoint Forum Top Contributors:
Steve Rindsberg - John Korchok - Bob Jones AKA: CyberTaz ✅
- Search the community and support articles
- Microsoft 365 and Office
- Search Community member
Ask a new question
cant recrord sound to my powerpoint presesntation
My microphone works, but it does not allow me to record my voice. it records just without sound. This is for a PowerPoint presentation. I have tried switching microphones and cameras for a cameo. However, both say they do not connect properly even though they both (camera and mic) work in other apps or applications like Teams for a test or example. Am I missing something in the settings? Or an update on the PowerPoint I missed. please help
and it wont allow me to put a screen shot here:(

- Subscribe to RSS feed
Report abuse
Reported content has been submitted
Replies (1)
- Microsoft Agent |
Hello, Dennis Stelmack
Welcome to Microsoft Community.
It seems like you’ve already done some troubleshooting by testing your microphone and camera in other applications. Since they work elsewhere but not in PowerPoint, the issue might be with the settings. Here are some additional steps you can try:
Verify PowerPoint has access to your microphone and camera in Windows privacy & security settings.
See if the issue persists in a new file. Sometimes, the problem might be with the specific presentation file.
Temporarily turn off any VPN or antivirus programs (Remember to turn them on immediately to keep your device safe), and make sure no other apps are using the microphone or camera.
Open PowerPoint in Safe Mode to check for add-in issues: How to open Office apps in safe mode on a Windows PC - Microsoft Support
As a last resort, reinstall the Office suite.
Microsoft Community Technical Support
Was this reply helpful? Yes No
Sorry this didn't help.
Great! Thanks for your feedback.
How satisfied are you with this reply?
Thanks for your feedback, it helps us improve the site.
Thanks for your feedback.
Question Info
- Norsk Bokmål
- Ελληνικά
- Русский
- עברית
- العربية
- ไทย
- 한국어
- 中文(简体)
- 中文(繁體)
- 日本語
How-To Geek
6 ways to create more interactive powerpoint presentations.
Engage your audience with cool, actionable features.
Quick Links
- Add a QR code
- Embed Microsoft Forms (Education or Business Only)
- Embed a Live Web Page
- Add Links and Menus
- Add Clickable Images to Give More Info
- Add a Countdown Timer
We've all been to a presentation where the speaker bores you to death with a mundane PowerPoint presentation. Actually, the speaker could have kept you much more engaged by adding some interactive features to their slideshow. Let's look into some of these options.
1. Add a QR code
Adding a QR code can be particularly useful if you want to direct your audience to an online form, website, or video.
Some websites have in-built ways to create a QR code. For example, on Microsoft Forms , when you click "Collect Responses," you'll see the QR code option via the icon highlighted in the screenshot below. You can either right-click the QR code to copy and paste it into your presentation, or click "Download" to add it to your device gallery to insert the QR code as a picture.
In fact, you can easily add a QR code to take your viewer to any website. On Microsoft Edge, right-click anywhere on a web page where there isn't already a link, and left-click "Create QR Code For This Page."
You can also create QR codes in other browsers, such as Chrome.
You can then copy or download the QR code to use wherever you like in your presentation.
2. Embed Microsoft Forms (Education or Business Only)
If you plan to send your PPT presentation to others—for example, if you're a trainer sending step-by-step instruction presentation, a teacher sending an independent learning task to your students, or a campaigner for your local councilor sending a persuasive PPT to constituents—you might want to embed a quiz, questionnaire, pole, or feedback survey in your presentation.
In PowerPoint, open the "Insert" tab on the ribbon, and in the Forms group, click "Forms". If you cannot see this option, you can add new buttons to the ribbon .
As at April 2024, this feature is only available for those using their work or school account. We're using a Microsoft 365 Personal account in the screenshot below, which is why the Forms icon is grayed out.
Then, a sidebar will appear on the right-hand side of your screen, where you can either choose a form you have already created or opt to craft a new form.
Now, you can share your PPT presentation with others , who can click the fields and submit their responses when they view the presentation.
3. Embed a Live Web Page
You could always screenshot a web page and paste that into your PPT, but that's not a very interactive addition to your presentation. Instead, you can embed a live web page into your PPT so that people with access to your presentation can interact actively with its contents.
To do this, we will need to add an add-in to our PPT account .
Add-ins are not always reliable or secure. Before installing an add-in to your Microsoft account, check that the author is a reputable company, and type the add-in's name into a search engine to read reviews and other users' experiences.
To embed a web page, add the Web Viewer add-in ( this is an add-in created by Microsoft ).
Go to the relevant slide and open the Web Viewer add-in. Then, copy and paste the secure URL into the field box, and remove https:// from the start of the address. In our example, we will add a selector wheel to our slide. Click "Preview" to see a sample of the web page's appearance in your presentation.
This is how ours will look.
When you or someone with access to your presentation views the slideshow, this web page will be live and interactive.
4. Add Links and Menus
As well as moving from one slide to the next through a keyboard action or mouse click, you can create links within your presentation to direct the audience to specific locations.
To create a link, right-click the outline of the clickable object, and click "Link."
In the Insert Hyperlink dialog box, click "Place In This Document," choose the landing destination, and click "OK."
What's more, to make it clear that an object is clickable, you can use action buttons. Open the "Insert" tab on the ribbon, click "Shape," and then choose an appropriate action button. Usefully, PPT will automatically prompt you to add a link to these shapes.
You might also want a menu that displays on every slide. Once you have created the menu, add the links using the method outlined above. Then, select all the items, press Ctrl+C (copy), and then use Ctrl+V to paste them in your other slides.
5. Add Clickable Images to Give More Info
Through PowerPoint's animations, you can give your viewer the power to choose what they see and when they see it. This works nicely whether you're planning to send your presentation to others to run through independently or whether you're presenting in front of a group and want your audience to decide which action they want to take.
Start by creating the objects that will be clickable (trigger) and the items that will appear (pop-up).
Then, select all the pop-ups together. When you click "Animations" on the ribbon and choose an appropriate animation for the effect you want to achieve, this will be applied to all objects you have selected.
The next step is to rename the triggers in your presentation. To do this, open the "Home" tab, and in the Editing group, click "Select", and then "Selection Pane."
With the Selection Pane open, select each trigger on your slide individually, and rename them in the Selection Pane, so that they can be easily linked to in the next step.
Finally, go back to the first pop-up. Open the "Animations" tab, and in the Advanced Animation group, click the "Trigger" drop-down arrow. Then, you can set the item to appear when a trigger is clicked in your presentation.
If you want your item to disappear when the trigger is clicked again, select the pop-up, click "Add Animation" in the Advanced Animation group, choose an Exit animation, and follow the same step to link that animation to the trigger button.
6. Add a Countdown Timer
A great way to get your audience to engage with your PPT presentation is to keep them on edge by adding a countdown timer. Whether you're leading a presentation and want to let your audience stop to discuss a topic, or running an online quiz with time-limit questions, having a countdown timer means your audience will keep their eye on your slide throughout.
To do this, you need to animate text boxes or shapes containing your countdown numbers. Choose and format a shape and type the highest number that your countdown clock will need. In our case, we're creating a 10-second timer.
Now, with your shape selected, open the "Animations" tab on the ribbon and click the animation drop-down arrow. Then, in the Exit menu, click "Disappear."
Open the Animation Pane, and click the drop-down arrow next to the animation you've just added. From there, choose "Timing."
Make sure "On Click" is selected in the Start menu, and change the Delay option to "1 second," before clicking "OK."
Then, with this shape still selected, press Ctrl+C (copy), and then Ctrl+V (paste). In the second box, type 9 . With the Animation Pane still open and this second shape selected, click the drop-down arrow and choose "Timing" again. Change the Start option to "After Previous," and make sure the Delay option is 1 second. Then, click "OK."
We can now use this second shape as our template, as when we copy and paste it again, the animations will also duplicate. With this second shape selected, press Ctrl+C and Ctrl+V, type 8 into the box, and continue to do the same until you get to 0 .
Next, remove the animations from the "0" box, as you don't want this to disappear. To do this, click the shape, and in the Animation Pane drop-down, click "Remove."
You now need to layer them in order. Right-click the box containing number 1, and click "Bring To Front." You will now see that box on the top. Do the same with the other numbers in ascending order.
Finally, you need to align the objects together. Click anywhere on your slide and press Ctrl+A. Then, in the Home tab on the ribbon, click "Arrange." First click "Align Center," and then bring the menu up again, so that you can click "Align Middle."
Press Ctrl+A again to select your timer, and you can then move your timer or copy and paste it elsewhere.
Press F5 to see the presentation in action, and when you get to the slide containing the timer, click anywhere on the slide to see your countdown timer in action!
Now that your PPT presentation is more interactive, make sure you've avoided these eight common presentational mistakes before you present your slides.
Delete Recordings on PowerPoint: A Step-by-Step Guide
- Recent Posts
- Print an Outline in PowerPoint: A Step-by-Step Guide - May 24, 2024
- PowerPoint Presentation Images: Do You Need to Cite Stock Photos? - May 24, 2024
- Grouping Pictures in PowerPoint: A Step-by-Step Guide - May 24, 2024
Have you ever recorded audio for a PowerPoint presentation, only to realize later that you need to remove it? Don’t worry, deleting recording on PowerPoint is a simple process. As someone who has had to remove audio from a presentation before, I can attest to the ease of the process. In this article, I will share with you the steps to delete recording on PowerPoint.

To start, let’s clarify what we mean by “recording.” Recording refers to any audio or video that you have added to your presentation, either through the Record Audio or Record Video features in PowerPoint. This could include a voiceover, background music, or any other audio or video content that you have added to your presentation.
Deleting recording on PowerPoint can be done in a few simple steps. Whether you want to remove all audio from your presentation or just delete audio from a specific slide, PowerPoint makes it easy to do so. In the following sections, I will guide you through the steps to delete recording on PowerPoint and provide tips for making the process as smooth as possible.
JUMP TO TOPIC
Preparing Slides and Transitions
Configuring audio and video settings, using the record slide show feature, incorporating narration and timing, adding annotations and gestures, inserting interactive elements, reviewing and editing your recording, exporting and distributing online, setting up your presentation.

Before recording a presentation, it is essential to prepare the slides and transitions, configure audio and video settings, and ensure that everything runs smoothly. In this section, I will guide you through the necessary steps to set up your presentation for recording.
First, you need to create your presentation. To do this, open PowerPoint and create a new file or open an existing one. Once you have your presentation ready, you can start preparing your slides and transitions.
To add a new slide, click on the “New Slide” button on the ribbon. You can choose from a variety of slide layouts to suit your needs. You can also add animations and transitions to your slides to make them more engaging. To do this, go to the “Animations” tab and select the animation or transition you want to add.
Next, you need to configure your audio and video settings. To do this, go to the “Slide Show” tab and click on “Set Up Slide Show.” Under “Show Type,” select “Browsed by an individual (window),” and under “Show Options,” select “Show without narration.” This will ensure that your presentation plays without any narration.
If you want to record your narration, go to the “Record” tab and select “Record Slide Show.” You can choose to record the narration for the current slide or the entire presentation. To start recording, click on the “Record” button and speak into your microphone. You can use the arrow keys on your keyboard to move between slides and animations.
Finally, make sure that your audio and video settings are configured correctly. To do this, go to the “Transitions” tab and select the transition you want to use. You can also adjust the duration of the transition and add sound effects.
In conclusion, setting up your presentation for recording requires careful planning and attention to detail. By following these steps, you can ensure that your presentation is engaging and professional.
Recording Your Slide Show
As a presenter, you may want to record your presentation in PowerPoint for future reference or sharing with others. PowerPoint offers a built-in feature called “Record Slide Show” that allows you to record your presentation with or without narration and timings. In this section, I will guide you through the process of recording your slide show in PowerPoint.
To start recording your slide show, you need to have your presentation open in PowerPoint. Then, follow these steps:
- Click on the “Slide Show” tab in the ribbon at the top of the PowerPoint window.
- Click on the “Record Slide Show” button in the “Start Slide Show” group.
- In the “Record Slide Show” dialog box, choose whether you want to start recording from the beginning or from the current slide.
- Check the boxes next to “Narrations” and “Timings” if you want to include them in your recording.
- Click on “Start Recording” to begin.
Once you start recording, PowerPoint will automatically advance to the next slide after a set amount of time, depending on your timing settings. You can also manually advance to the next slide by clicking your mouse or pressing the arrow keys on your keyboard.
If you choose to include narration and timings in your recording, PowerPoint will record your voiceover and the time you spend on each slide. To record your narration, you will need a microphone connected to your computer. Here’s how to incorporate narration and timing into your recording:
- In the “Record Slide Show” dialog box, check the boxes next to “Narrations” and “Timings.”
- When you’re ready to start recording, click on the “Record” button in the recording toolbar.
- Speak into your microphone to record your narration.
- When you’re finished with the slide, advance to the next slide by clicking your mouse or pressing the arrow keys on your keyboard.
- Repeat steps 4-6 for each slide in your presentation.
PowerPoint will automatically save your recording as a separate file, which you can play back at any time. If you want to edit your recording, you can do so by clicking on the “Playback” tab in the ribbon and selecting “Edit Recording.”
In conclusion, recording your slide show in PowerPoint is a great way to create a reusable presentation that you can share with others. With the “Record Slide Show” feature, you can easily incorporate narration and timing into your recording to create a professional and polished presentation.
Enhancing Your Presentation
When it comes to presentations, the goal is to convey your message in a clear and engaging way. Adding annotations and gestures can help you emphasize important points and keep your audience engaged. Additionally, inserting interactive elements can make your presentation more memorable and impactful.
One way to enhance your presentation is by adding annotations and gestures. This can be done using tools such as the pen, ink, highlighter, eraser, and laser pointer. These tools can help you emphasize key points and draw attention to specific areas of your slide.
For example, you can use the pen or ink tool to draw attention to important text or images. The highlighter tool can be used to emphasize key phrases or concepts. The eraser tool can be used to remove annotations or mistakes. The laser pointer tool can be used to highlight specific areas of your slide during a presentation.
In addition to these tools, PowerPoint also allows you to use ink gestures. Ink gestures are predefined shapes that you can draw on your slide to perform specific actions. For example, you can draw a circle around an object to highlight it, or draw an arrow to point to a specific area of your slide.
Another way to enhance your presentation is by inserting interactive elements. This can include things like quizzes, polls, and interactive diagrams. These elements can help you engage your audience and make your presentation more memorable.
For example, you can use PowerPoint’s trigger feature to create interactive diagrams. Triggers allow you to link objects on your slide to specific actions, such as displaying additional information or playing a video. This can be a great way to create interactive diagrams that allow your audience to explore different concepts and ideas.
You can also use PowerPoint’s animation feature to animate text and other objects on your slide. Animating text can help you emphasize key points and keep your audience engaged. Additionally, you can use animations to reveal information gradually, which can help build suspense and keep your audience interested.
In conclusion, adding annotations, gestures, and interactive elements can help you enhance your PowerPoint presentation and make it more engaging and memorable. By using these tools effectively, you can create a presentation that effectively conveys your message and keeps your audience interested.
Finalizing and Sharing
Once you have recorded and edited your PowerPoint presentation, it’s time to finalize and share it. In this section, I’ll go over the steps you need to take to review and edit your recording, as well as how to export and distribute your presentation online.
Before you finalize your recording, it’s important to review it to ensure that everything is as you want it. To do this, you can preview your recording by playing it back within PowerPoint. You can also trim your recording to remove any unwanted sections or clear the narration altogether.
To preview your recording, simply click on the “Preview” button in the “Recording” tab. This will allow you to play the recording back from the beginning or from a specific slide. If you need to trim your recording, click on the “Trim Audio” button in the same tab. This will open up the “Audio Tools” tab, where you can select the section you want to remove and delete it.
If you want to clear the narration altogether, you can do this by going to the “Slide Show” tab and selecting “Set Up Slide Show.” Under the “Show Options” section, select “Show without narration” and click “OK.” This will remove the narration from your presentation.
Once you’re happy with your recording, it’s time to export and distribute it online. To do this, you can save your presentation as a video file or publish it to Microsoft Stream for live streaming.
To save your presentation as a video file, go to the “File” tab and select “Export.” Under the “Create a Video” section, choose the quality and size of the video you want to create, and click “Create Video.” This will save your presentation as a video file that you can upload to any video sharing platform.
If you want to publish your presentation to Microsoft Stream, you can do this by going to the “File” tab and selecting “Share.” Under the “Publish to Stream” section, select the channel you want to publish to and click “Publish.” This will make your presentation available for live streaming on Microsoft Stream.
Overall, finalizing and sharing your PowerPoint presentation is a straightforward process that can be done in just a few clicks. Whether you want to export your presentation as a video or live stream it on Microsoft Stream, these steps will help you get your presentation in front of your audience.
Leave a Comment Cancel reply
Save my name, email, and website in this browser for the next time I comment.
How to Record Audio on Google Slides [Step by Step]
- Updated May 20, 2024
- No Comments
Google Slides is ideal for quickly creating visually stunning presentations and sharing them online with your clients and coworkers. If you want to make your presentations a bit more interesting, you can jazz them up by recording audio and adding it to your slides.
Unfortunately, Google Slides doesn’t have a built-in recording option, so you can’t automatically select a particular slide and start recording. However, with the right tools, you can easily put together a clear and crisp audio and insert it into your presentation. Here’s how.
Preparing to Record Audio
Recording audio on Google Slides may seem like a very complex and confusing process. Luckily, by following the correct steps, it becomes something almost anyone can do. However, before you start recording, here are a few tips that can help you prepare for the presentation and elevate it to the next level:
Select the Right Equipment
One piece of equipment that can completely enhance your presentation is a good microphone. While most computers and cell phones have built-in microphones, they don’t offer the professional-grade audio quality you’re aiming for. For this reason, it’s advisable to invest in a high-quality microphone, like the LARK MAX , or even one that’s on the lower cost side of the spectrum.
Write a Script
It’s better to prepare a script for every slide you’ll add audio to. Since you’ll know what to say and when to say it, you’ll be able to record your audio more quickly and easily.
Keep in mind that a good script breaks down the entire presentation into a few important points. Make sure you also add an introduction to give listeners an overall idea of the topic you’ll be describing, and then explain each point, step, or sub-idea included in the presentation.
It’s also advisable to match the tone of your script to the environment. For instance, if you’re presenting to board members, use formal language, while a more casual speech will be suitable for a discussion between your friends. Lastly, try to be clear and concise, and avoid going off-topic in the script.
Choose the Right Recording Platform
There are several different recording software available today, so make sure you choose one that best suits your needs. Consider the factors that matter the most to you, such as ease of use, virtual guest capabilities, cost, or recording tools, before making a decision. Make sure you also choose software that’s compatible with your device and provides high-quality recordings, so you can enjoy the crispest and clearest audio.
Pick the Ideal Recording Environment
The right room for recording depends on a wide range of factors, such as the room’s size, acoustics, and shape. Rooms with minimal reverberation or echo, good sound insulation, and a moderate size, are more suitable for recording audio. Carpets, curtains, and soft furnishings can further help absorb unwanted sound and enhance your recording’s sound quality.
Clear your Throat
Most people underestimate the importance of a smooth, good-quality voice. There’s no need to hire a professional voice-over artist – simply have the right warm-up, and you’ll be able to deliver much better content.
Sound Confident
Your confidence won’t increase with teleprompters and high-quality microphones alone. Practice your script in front of a mirror to ensure you sound great.
Recording the Audio
While there’s a wide range of recording software available, it’s important to remember that a difference in quality also exists. To ensure you choose the right option, the following are two popular recording platforms and the steps to recording audio with them:
ChromeMP3 Recorder
A free recording application, ChromeMP3 is perfect for beginners who want to make an audio recording quickly and easily. The app allows you to start, stop, playback, and rewind a recording, and more. It saves your recording as a compact MP3 file, but you can also save your recording directly to Google Drive for easier uploads to Slides. However, keep in mind that it only works with ChromeOS.

Here are the steps you need to follow to record audio with ChromeMP3:
- Download and install ChromeMP3 Recorder, and then launch the app.
- Click on the button with the circle to start recording.
- End your recording by clicking on the button with the square. A window should appear on your screen for the location of the saved audio file.
- Navigate to the Google Drive tab, click on My Drive , and then name and save the recording.
Audacity
Audacity is a free, versatile audio recording tool that allows you to capture and edit your audio recordings. With effects like tempo and speed changes, you can also tweak your audio to fit the style of your presentation. The app supports popular audio files, like WAV and MP3, making it ideal for quick hands-on recording sessions.
Here’s how you can record audio for Google Slides with Audacity:
- Download and install Audacity, and then launch the app.
- Personalize features like audio drivers and sample rate (optional).
- Navigate to the toolbar header and use the drop-down menu to choose your microphone and speaker.
- Click on the red circle button to start your recording and click on the black square button next to it to stop the recording.
- If you want to edit the recording, use the app’s tools, such as the cut, copy, and paste tools.
- Click on File > Export , and then select a file type, like mp3, to export the audio.
- Give a name to your recording and save it.
Uploading Audio to Google Drive and Inserting Audio Into Google Slides
Once you’ve recorded your audio, you can upload it to Google Drive and then insert it into each slide. Here’s what you need to do:
- Log into your Google Drive, select New , and then click on File Upload .

- Locate your audio file on your computer and select it.
- Wait for Google to upload the files. It’s better to organize the audio files by naming them according to the slide you want to add them to.
- Open your presentation on Google Slides and navigate to the slide on which you want to add the audio. Click on Insert and choose Audio from the drop-down menu.

- The new window will display all the audio files you have in your Drive. Locate the audio you want to add, choose it, and click on Select .

- Your slide should now have a small icon that indicates the slide has an audio file. There should also be a new menu on your screen’s menu listing Audio Playback options.
- Replay the audio and explore the audio menu to ensure the sound is playing just like it should. You can have the audio play automatically or on click, and even adjust the volume level for when the recording plays. Google Slides also gives you the option to loop the audio and stop it from playing when you switch to the next slide.

- Once you’ve configured the settings, your slide should play the recording the way you want it to. Repeat this process for any other slides that you want to add audio to.
Can I record audio directly on Google Slides?
Unfortunately, Google Slides doesn’t allow you to record audio directly. However, you can record audio using a third-party app, upload it to your Google Drive, and then insert it into your slides.
What audio file formats are supported by Google Slides?
Google Slides supports WAV and MP3 file formats. It’s also important to note that it only supports files that are in your Google Drive, so make sure you upload them beforehand.
How can I ensure my audio plays automatically in a Google Slides presentation?
To ensure your audio plays automatically in your presentation, insert your audio, navigate to the Audio Playback options, and under the Start Playing header, click on Automatically .
Are there any limitations to the size of the audio file I can upload to Google Drive for use in Google Slides?
While Google Slides doesn’t have a strict limit on the file size, it’s advisable to optimize the audio file for faster loading times.
- Google Slides , Record Audio , step by step

I am John, a tech enthusiast with a knack for breaking down complex camera, audio, and video technology. My expertise extends to social media and electronic gadgets, and I thrive on making the latest tech trends understandable and exciting for everyone. Sharing my knowledge through engaging content, I aim to connect with fellow tech lovers and novices alike, bringing the fascinating world of technology to life.
Leave a Reply Cancel reply
Your email address will not be published. Required fields are marked *
Table of Contents

Related Posts
![How to Reinstall Audio Drivers? [Step by Step]](https://www.hollyland.com/wp-content/uploads/2024/05/how-to-reinstall-audio-drivers-step-by-step.jpg "record audio over powerpoint presentation")
How to Reinstall Audio Drivers? [Step by Step]
Are you experiencing sound issues on your computer? Whether it’s crackling audio, no sound at all, or distorted playback, faulty audio drivers could be the
![How to Cut Audio in Audacity? [Step by Step]](https://www.hollyland.com/wp-content/uploads/2024/05/how-to-cut-audio-in-audacity-step-by-step.jpg "record audio over powerpoint presentation")
How to Cut Audio in Audacity? [Step by Step]
The world of audio editing is undergoing a tremendous shift as technology advances and accessibility to powerful editing tools increases. With the rise of software
![How to Speed up Playback in Davinci Resolve [Step by Step]](https://www.hollyland.com/wp-content/uploads/2024/05/how-to-speed-up-playback-in-davinci-resolve-step-by-step.jpg "record audio over powerpoint presentation")
How to Speed up Playback in Davinci Resolve [Step by Step]
DaVinci Resolve is a powerful video editing software used by professionals and hobbyists alike. However, due to its extensive capabilities, achieving smooth playback can be
How to See Keyframes in Davinci Resolve [Step by Step]
DaVinci Resolve is a powerful video editing software used by professionals and amateurs alike. Keyframes are essential in animation and video editing as they allow

- Español
- Français
- 0 Items 0
Unfortunately, we had trouble loading your cart. If you get this message more than once, please contact us , and we’ll do our best to help you out.
- Free Download
- Maintenance

Video editing software trusted by more than 39 million creators
Make professional-quality videos quickly and easily with Camtasia. Record your screen or upload an existing video, then bring the “Wow!” with effects, music, and much more.
- Download Now

New in Camtasia 2023
Accelerate Video Creation with the New AI-Assisted Workflow in Camtasia
- See How it Works
Video editing software that works for you
Whether you make videos for marketing and sales, internal training, customer success, virtual or in-person learning, demonstrations, social media, or pretty much anything else, Camtasia helps make your vision a reality.

Camtasia for Educators

Camtasia for Instructional Designers

Camtasia for Tech Marketers
Inspire, educate, and excite your audience
We know that creating videos may seem like a daunting task, especially if you don’t have any experience. That’s why we created Camtasia – your all-in-one screen recorder and video editing software. In virtually no time, you can create awesome videos that truly connect with your audience.

Sharing your knowledge has never been easier! Start by uploading a presentation or existing footage, then capture your screen, camera, and microphone to craft a pro-quality video that makes complex ideas simple, demonstrates a new process, trains people on a new skill, and much more.

Ready to “WOW!” your audiences? Camtasia has everything you need to create and edit incredible videos in record time. Easily add pop and pizazz to your videos with effects, transitions, music, and more. Best of all, they’re incredibly easy to find, use, and customize, leaving you more time to create.

Keep your audience focused on the action with text, shapes, animations, and more. Zoom in to highlight details. Draw attention with a customized cursor. Add effects to transition ideas or just add some extra flair. The options are as limitless as your imagination!
Complete video projects up to 40% faster
A great video starts with great audio — and great audio starts with Audiate. Edit your voice over just like text and generate captions automatically. Plus, instantly remove hesitations and all those “ums” and “uhs.” You can even edit your video as you edit your audio.

- See Audiate
You can with Camtasia
Your video, your way. Camtasia’s intuitive interface and drag-and-drop features help anyone create professional-quality video.
Your all-in-one screen recorder and video editing software
Leave boring screen recordings behind. In addition to high-resolution screen capture, Camtasia records your microphone, system audio, camera, and cursor so you can edit them separately or all at once. Your video editing will be faster and easier and the results will be incredible.

Capture your camera as you record to add personality to your videos. Position your camera video anywhere on the canvas.
Great audio is an essential element to your video. Camtasia makes it easy to capture your microphone for crystal-clear voice over.
System Audio
Need to share the sounds generated by your software or computer? Now your viewers can hear what you hear.
Cursor Data
Your mouse cursor can help highlight important features or UX elements. Capture this data to make it easier to edit later.
Make your creative spark a wildfire
Video editing software doesn't have to be intimidating. Fortunately, Camtasia offers hundreds of templates, assets, and text effects to help kindle your creative spark. Making and editing professional looking videos has never been easier!

Go from zero to done more quickly with pre-made templates. Or, make your own and share them with your team.
Amazing video clips, music, images, and more at your fingertips — just drag and drop them to the timeline!
Did you know your text can dance? Camtasia’s Behaviors make it easy to animate text for that extra kick.
Put your cursor in the spotlight
Grab your audience’s attention and guide them to what’s really important. Camtasia’s cursor effects take your videos to whole new level and ensure your audience gets the point.

Cursor Replacement
Replace your cursor or increase its size to make it stand out!
Path Smoothing
Smooth your mouse movements or create a whole new path.
Trusted by millions

“Excellent professional-level editing made easy.”
Get camtasia today.

Camtasia Trial
Try Camtasia for free to see the value for yourself.
Content exported during trial is watermarked.
- Start Free Trial
Subscription and perpetual options for Camtasia.
100% risk free. 30-day money back guarantee.
- Buy Camtasia Now

Camtasia + Audiate
One-year subscription to Camtasia and one-year subscription to Audiate.
- Add to Cart
" role="button" data-toggle="collapse" data-parent="[data-id='56634'] .panel-group" data-target="#collapse-56634-1" aria-expanded="false" aria-controls="collapse-56634-1"> What is Camtasia?
Camtasia is a powerful, but incredibly easy-to-use video editing software and screen recorder trusted by more than 35 million video creators worldwide.
" role="button" data-toggle="collapse" data-parent="[data-id='56634'] .panel-group" data-target="#collapse-56634-2" aria-expanded="false" aria-controls="collapse-56634-2"> What are Camtasia's minimum system requirements?
Camtasia's minimum system requirements are:
- Microsoft Windows 10 (64-bit) 20H2 version or later (Recommended: Microsoft Windows 11 (64-bit) 22H2 version or later)
- Intel® 8th Gen or newer CPU – or AMD Ryzen™ 2000 Series or newer CPU (Recommended: Intel® 12th Gen or newer CPU – or AMD Ryzen™ 4000 Series or newer CPU)
- 8GB RAM minimum (Recommended: 16GB RAM or more) 2GB GPU memory (4GB or more recommended)
- 4GB of available disk space (Recommended: SSD with 4GB of available disk space)
- macOS 11.0 (Recommended: macOS 13.0 or later)
- Intel® Core™ i5 Processor with 4 CPU Cores; or gen 1 M1 SoC (Recommended: 2.4 Ghz Intel® Core™ i5 Processor with 4 CPU Cores or better; gen 1 M1 Pro / Pro Max SoC)
- 8GB of RAM (Recommended: 16GB of RAM or greater)
View the full Camtasia system requirements
" role="button" data-toggle="collapse" data-parent="[data-id='56634'] .panel-group" data-target="#collapse-56634-3" aria-expanded="false" aria-controls="collapse-56634-3"> Is Camtasia good for beginners?
We’ve created Camtasia to be easy enough for beginners but powerful enough to be your video solution for life. Most people are able to create their first video quickly, even if they’ve never made a video before. Additionally, we offer a huge library of Camtasia tutorials and frequent webinars to help you get the most out of Camtasia no matter your level of experience with video editing software..
" role="button" data-toggle="collapse" data-parent="[data-id='56634'] .panel-group" data-target="#collapse-56634-4" aria-expanded="false" aria-controls="collapse-56634-4"> Does Camtasia have captions?
Yes! Camtasia offers a easy-to-use interface that makes it easy to create closed captions for video accessibility. When paired with TechSmith Audiate , Camtasia’s captioning capabilities become even easier and more powerful.
" role="button" data-toggle="collapse" data-parent="[data-id='56634'] .panel-group" data-target="#collapse-56634-5" aria-expanded="false" aria-controls="collapse-56634-5"> Does Camtasia work on Mac?
Yes! Camtasia has versions for both Windows and Mac operating systems.
" role="button" data-toggle="collapse" data-parent="[data-id='56634'] .panel-group" data-target="#collapse-56634-6" aria-expanded="false" aria-controls="collapse-56634-6"> Can Camtasia edit 4K video?
Camtasia can capture and edit video up to 4K at 60 frames per second.
" role="button" data-toggle="collapse" data-parent="[data-id='56634'] .panel-group" data-target="#collapse-56634-7" aria-expanded="false" aria-controls="collapse-56634-7"> Is Camtasia free?
Camtasia offers a free trial that includes full use of the software. Any exported videos will have a watermark until the full version of Camtasia is unlocked with a perpetual or individual subscription license.
" role="button" data-toggle="collapse" data-parent="[data-id='56634'] .panel-group" data-target="#collapse-56634-8" aria-expanded="false" aria-controls="collapse-56634-8"> Can I install Camtasia on more than one computer at the same time?
You may install your license on up to two computers for a single user.
" role="button" data-toggle="collapse" data-parent="[data-id='56634'] .panel-group" data-target="#collapse-56634-9" aria-expanded="false" aria-controls="collapse-56634-9"> Do you offer volume discounts on Camtasia?
Volume discounts are available starting at five perpetual licenses or more. The more licenses you buy, the higher the discount. Volume discounts are not available for individual subscription licenses. Find out more about volume discounts .
" role="button" data-toggle="collapse" data-parent="[data-id='56634'] .panel-group" data-target="#collapse-56634-10" aria-expanded="false" aria-controls="collapse-56634-10"> What is the difference between the individial subscription license and perpetual license for Camtasia?
The individual subscription license is a non-transferable license for individual creators and it is billed annually. No software key is needed and users have access to the latest updates as they are released. The perpetual license for Camtasia is one-time paid, fully transferable license for individuals and businesses. It offers volume pricing and one year of Maintenance.
" role="button" data-toggle="collapse" data-parent="[data-id='56634'] .panel-group" data-target="#collapse-56634-11" aria-expanded="false" aria-controls="collapse-56634-11"> Where can I find Camtasia tech support?
Our tech support team is ready to help you. Get started with tech support here .
" role="button" data-toggle="collapse" data-parent="[data-id='56634'] .panel-group" data-target="#collapse-56634-12" aria-expanded="false" aria-controls="collapse-56634-12"> How can I learn to use Camtasia?
We offer a huge library of Camtasia tutorials and frequent webinars to help you get the most out of Camtasia.
" role="button" data-toggle="collapse" data-parent="[data-id='56634'] .panel-group" data-target="#collapse-56634-13" aria-expanded="false" aria-controls="collapse-56634-13"> How do I find my Camtasia software key?
Use our automatic key lookup tool . If you have an individual subscription license, there is no software key. Simply sign in to Camtasia with your TechSmith Account credentials.
" role="button" data-toggle="collapse" data-parent="[data-id='56634'] .panel-group" data-target="#collapse-56634-14" aria-expanded="false" aria-controls="collapse-56634-14"> How much is Camtasia?
The Camtasia individual subscription license is $179.88 billed annually. The Camtasia perpetual license is $299.99 billed once and includes one year of Maintenance. The Camtasia perpetual license is eligible for volume discounts starting at five licenses or more.
- Privacy Policy
- Supported File Formats
- License Agreement
- Windows Version History
- Mac Version History
- Find a Reseller Partner
- Add, change, or remove transitions between slides Article
- Animate text or objects Article
- Use the Morph transition in PowerPoint Article
- Insert a video from YouTube or another site Article
- Add or delete audio in your PowerPoint presentation Article
- Record your screen in PowerPoint Article
Record your screen in PowerPoint
You can record your computer screen and related audio, and then embed it in your PowerPoint slide—or you can save it as a separate file.

Open the slide that you want to put the screen recording on.
On the Insert tab of the ribbon, select Screen Recording .

Tip: PowerPoint automatically records the audio and the mouse pointer, so by default those options are selected on the control dock. To turn them off, deselect Audio and Record Pointer.
Select Record . Use Pause as needed and Stop when you're done.
Note: Unless you pin the Control Dock to the screen, it will slide up into the margin while you record. To make the unpinned Control Dock reappear, point the mouse cursor at the top of the screen.
Your video is added to the slide. Right-click the video frame, select the Start icon and pick how you want your video to start: In Click Sequence , Automatically , or When Clicked On .
You can change the look of the video by right-clicking the video frame, select the Style icon, and pick another shape.
Save your screen recording as a separate file
Right-click the video frame and select Save Media as .
In the Save Media as box, choose a folder, and in the File name box, type a name.
Select Save.
Trim your video
Right-click the video frame and select Trim .
To determine where you want to trim your video footage, in the Trim Video box, select Play .
When you reach the point where you want to make the cut, select Pause . Use the Next Frame and Previous Frame buttons to specify precise timing.
Do one or more of the following:
To trim the beginning of the clip, select the start point (shown in the image below as a green marker). When you see the two-headed arrow, drag the arrow to the desired starting position for the video.

To trim the end of the clip, click the end point (shown in the image above as a red marker). When you see the two-headed arrow, drag the arrow to the desired ending position for the video.
Select OK .

Need more help?
Want more options.
Explore subscription benefits, browse training courses, learn how to secure your device, and more.

Microsoft 365 subscription benefits

Microsoft 365 training

Microsoft security

Accessibility center
Communities help you ask and answer questions, give feedback, and hear from experts with rich knowledge.

Ask the Microsoft Community

Microsoft Tech Community

Windows Insiders
Microsoft 365 Insiders
Was this information helpful?
Thank you for your feedback.
IMAGES
VIDEO
COMMENTS
Training: Add and record audio, such as music, narration, or sound bites, to your PowerPoint presentation and select the playback options. Watch this video to learn how.
In the Options dialog box, click the Customize Ribbon tab on the left. Then, in the right-hand box that lists the available ribbon tabs, select the Recording check box. Click OK. To get ready to record, select Record on either the Recording tab or the Slide Show tab of the ribbon.
Open the PowerPoint presentation in which you would like to record a voiceover narration. Head over to the "Slide Show" tab and, in the "Set Up" group, select "Record Slide Show.". Once selected, a drop-down menu will appear. Here, you can choose to start the narration from the beginning or from the current slide.
Open the slide you want to start recording from. Near the upper right corner of the PowerPoint window, select Record. When you're ready, select the round, red Record button, wait for the countdown, then start speaking. To record from a specific slide, go to it, and then select Record. Note: Narration isn't recorded while the transition between ...
From Slide Show menu > click lower part Record Slide Show button. Select a slide to Record from Current Slide, or Record from Beginning from the sub-menu. NOTE: PowerPoint versions 2013-2016 only: A "Slide Show Settings" dialog box will appear for animation timings etc. You can leave both checked.
Learn how to record a PowerPoint Presentation with audio and video simply by using the build-in PowerPoint functionalities and tools. You will learn how to...
Tutorial. Open your PowerPoint presentation or create a new one. In the taskbar, select Slide Show. Then click Record Slide Show. Choose the option Record from Beginning. You'll now get to a different view, which we'll call "Recorder View". Here's an overview: In the bottom right corner, you'll see three icons.
Record narration and timings for your presentation in Microsoft PowerPoint to give it a professional and polished feel. Record narration and timings:1. Selec...
Learn how to add or record audio, such as music, narration, or sound bites, to your Microsoft PowerPoint presentation. Find out more at: https://msft.it/6008...
No problem! Adding audio to your PowerPoint can be done in 4 simple steps: Step 1: Navigate to the Slide. Select the slide where you want to addyour pre-recorded audio. Step 2: Insert Audio. Click the 'Insert' tab and choose 'Audio' from the Media Section.
Open the Slide Show tab and select Record Slide Show . Select the Record button on the toolbar to start recording your narration. Use your keyboard arrow keys to move back and forth between slides. Press N or Space Bar to move to the next slide or animation in the presentation.
Open your PowerPoint presentation and select the slide where you want to add audio. On the Insert tab, in the Media group, click the Audio drop-down arrow. Select Record Audio. A new window will open. Record Audio option. Enter the name of the audio file you're about to record. Entering the file name. Press Record to start recording.
Step 2. Press Record in PowerPoint. To record narrations in PowerPoint, start off by finding the Slide Show tab on PowerPoint's ribbon. Click on the Slide Show tab to change the available options.. On the Slide Show tab, click Record to start the recording process.. Make sure that you start on the first slide in PowerPoint to record audio and timings for the entire presentation.
Single slide: Select a slide. Go to Insert > Audio > Record Audio.Type a name, select Record, then read your script.Select Stop.; Entire slideshow: Select View > Normal and choose the first slide. Select Slide Show > Record Slide Show > Record from Current Slide.; To review the recording, click the sound indicator (it looks like a speaker) and then select Play to hear your recording.
You can record your PowerPoint presentation—or just a single slide—and capture voice, ink gestures, and your video presence. The completed recording is like any other presentation. You can play it for your audience in Slide Show or you can export it as a video file. So instead of just handing the deck to someone, people can see your ...
The toolbar is the menu that runs along the top of the screen. Select "Audio" within the "Insert" tab and choose the "Record Audio" option. In the dialog box, name the audio file before clicking "Record." Record the audio by speaking or playing the sound you wish the program to record. When finished, click "Stop."
To record and hear any audio, your computer must be equipped wi... You can add audio, such as music, narration, or sound bites, to your PowerPoint presentation.
More than a PowerPoint recorder. VEED is a complete browser-based tool that lets you do so much more than just record and share your Microsoft PowerPoint presentations. You can annotate your videos to make your presentation more informative. Edit your recording to add images, subtitles, and more. It is a professional all-in-one video-creation ...
Record new layer: Pick this for recording your video as a new layer on top of an existing recording. 2. Click Record at the bottom of the Record panel. 3. Drag over the area of your screen you wish to record. Click Start Recording. Press Space to start recording the full screen. 4. Click Stop to finish recording.
See if the issue persists in a new file. Sometimes, the problem might be with the specific presentation file. Temporarily turn off any VPN or antivirus programs (Remember to turn them on immediately to keep your device safe), and make sure no other apps are using the microphone or camera. Open PowerPoint in Safe Mode to check for add-in issues ...
Then, with this shape still selected, press Ctrl+C (copy), and then Ctrl+V (paste). In the second box, type 9. With the Animation Pane still open and this second shape selected, click the drop-down arrow and choose "Timing" again. Change the Start option to "After Previous," and make sure the Delay option is 1 second.
Step 1. Head to the Microsoft PowerPoint interface and create or add your presentation. On the software's top-most ribbon, locate the Insert tab. Now click the Audio option with the Insert tab under the Media section and select Record Audio from the drop-down menu. Step 2.
Select the audio icon and then select the Playback tab. Then select which options you'd like to use: To trim the audio, select Trim and then use the red and green sliders to trim the audio file accordingly. To fade in or fade out audio, change the number in the Fade Duration boxes. To adjust volume, select Volume and select the setting you ...
Recording refers to any audio or video that you have added to your presentation, either through the Record Audio or Record Video features in PowerPoint. This could include a voiceover, background music, or any other audio or video content that you have added to your presentation. Deleting recording on PowerPoint can be done in a few simple steps.
In this you will learn how to record a voice over a PowerPoint presentation, how to edit that audio snippet in PowerPoint and how to save the presentation ...
Open your presentation on Google Slides and navigate to the slide on which you want to add the audio. Click on Insert and choose Audio from the drop-down menu. The new window will display all the audio files you have in your Drive. Locate the audio you want to add, choose it, and click on Select.
Complete video projects up to 40% faster. A great video starts with great audio — and great audio starts with Audiate. Edit your voice over just like text and generate captions automatically. Plus, instantly remove hesitations and all those "ums" and "uhs.". You can even edit your video as you edit your audio. See Audiate.
The seventh edition of the Publication Manual has the most current guidelines for APA Style.. The Style and Grammar Guidelines page on the APA Style website has resources for learning the new seventh edition style.. We have archived the sixth edition frequently asked questions for authors, editors, and students working on papers in the previous style.
Today's video will show you how to add and record audio narration to your slides in Microsoft PowerPoint. You'll need to make sure you have a recording devic...
On the Control Dock, choose Select Area (or if you want to select the entire screen for recording, press Windows logo key+Shift+F). You'll see the cross-haired cursor . Select and drag to select the area of the screen you want to record. The minimum size area you can record is 64x64 pixels. Tip: PowerPoint automatically records the audio and ...