How to Record a Presentation with Webcam, Narration, and More

Everyone has, at some point, put a load of time and effort into creating the perfect PowerPoint presentation, only to use it once or twice. But isn’t it a shame for all that hard work to be discarded so quickly? Is every slide deck destined for deletion after just a couple of uses?
Isn’t there a better way to make the most out of your presentations? Well, yes. Yes, there is.
Rather than simply creating and presenting your work once or twice, recording your presentations can give them a new lease of life. Whether it’s a data report or a self-recorded PowerPoint, you can record a presentation in real-time, or in advance to make it available on-demand.
In this guide, we’ll explore two distinct ways of recording your presentation. First, we’ll discuss how to record a presentation from PowerPoint with audio and webcam, and then we’ll look at how to turn your .ppt slides into a video.

Benefits of Recording a Presentation
As well as there being many different ways to record a presentation, there are also many benefits of recording them. So, before we show you the ‘how,’ let’s talk about the ‘why.’
- Encouraging asynchronous communication : One key benefit is fostering asynchronous communication . By recording presentations, you’re letting your audience engage with the content in their own time, breaking the constraints of time zones and scheduling conflicts. This also ensures your viewers can absorb information at their own pace, and revisit it as needed.
- Boosting SEO : You can use your presentation to create a YouTube video and share it on your website to increase your online visibility and attract prospective customers. This can be a great way to expand your audience, increase web traffic, and establish yourself as an expert in your field.
- Perfecting your presentation : Whether it’s in-person or over Zoom, you don’t get second chances with live presentations. However, a pre-recorded keynote lets you perfect the content and the narration before anyone sees it. This is a great way to combat stage fright while honing your presentation skills and building confidence.
With this in mind, turning your slides into a video is a no-brainer. It’s an easy way to grow your audience and make the information you’re sharing more accessible and easier to digest.
Record your presentation today!
Download a free trial of Snagit to quickly and easily record your presentation.
How to record your presentation (with Snagit)
Depending on your audience and the type of presentation you need to deliver, TechSmith’s Snagit could just be the perfect tool for recording your PowerPoint. With its user-friendly interface and advanced features, Snagit is ideal for capturing top-notch presentation videos, in just a few clicks.
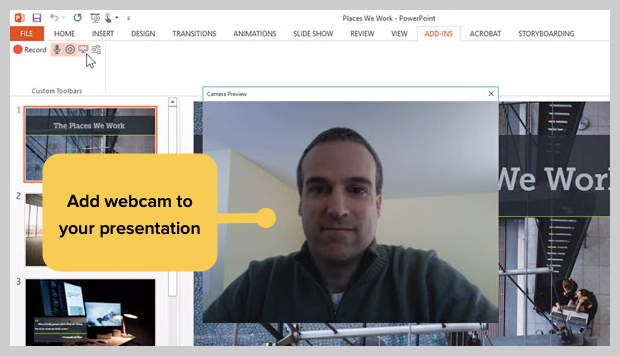
Now, there’s no denying that presentations are better when you can see the presenter… Fortunately, Snagit lets you capture your screen and webcam at the same time to create a Picture-in-Picture video.
In this section, we’ll guide you through the steps to record your presentation and webcam with Snagit.
Step 1: Open video capture
First, open Snagit and navigate to the Capture window. Select the Video tab, and start by clicking the big red Capture button.
Step 2: Select a recording area
Next, you’ll be prompted to choose which parts of your screen you want to record. Use Snagit’s orange crosshairs to select a specific region, window, or your entire screen.
Step 3: Configure recording settings
With the Video Recording toolbar, you can set options like Cursor Capture and Effects, System Audio, and Webcam.
If your webcam isn’t showing, click on the webcam icon. If you have an external webcam, select the one you want to use by clicking the dropdown arrow next to the webcam icon.
Step 4: Adjust your webcam
Next, adjust your webcam options to ensure your Picture-in-Picture recording looks how you want it. Here you can change the Picture-in-Picture placement as well as the shape and size of your webcam recording. You can even toggle between Picture-in-Picture and fullscreen webcam modes as you like.
The best part? You can make these adjustments even while recording.
Step 5: Manage recording
When you’re ready to roll, hit the Record button and click the Stop button when you’re finished. It’s that simple!
And remember, if there’s an interruption (like an unexpected visit from the mailman), just hit Pause. It’s okay to take a break — your video won’t be ruined by a little interruption.
Step 6: Edit your video
Once you’ve finished recording, Snagit will automatically open your video in the Snagit Editor, which is super easy to use. From here, you can make light edits to the footage as needed.
For example, if you need to cut or trim your footage , you can! Here’s how:
- Set Start Point : Drag the Start handle (green) on the timeline to your desired starting point.
- Set End Point : Similarly, drag the End handle (red) to where you want to end the cut.
- Review the Segment : Before making any cuts, you can review the segment by dragging the Playhead (white) left and right across the timeline. This ensures you’re only cutting the footage you intend to.
- Make the Cut : Once you’re satisfied with the selection, click the Cut button, which will pop up once you’ve made a selection.
And that’s all there is to it! If you want to go the extra mile, you can also use Snagit to save individual frames of your video as images , which can be used to create a thumbnail for your video .
How to record a presentation from PowerPoint with audio and webcam
Now, Snagit is great for recording less formal videos in a flash, but if your presentation is intended for a particularly large or important audience, you might be looking to create something more polished. This is where TechSmith’s Camtasia comes in.
Camtasia is one of the smartest and most intuitive pieces of editing software out there, but it also makes for a pretty nifty screen recorder too. Camtasia is great for recording presentations when you need more control and editing powers over the final product.
But best of all, Camtasia streamlines the process by letting you record your presentation and voice over directly within PowerPoint.
Step 1: Set up your presentation video recording
If you’re a Windows user, you’ll have the option to include a PowerPoint Add-in Toolbar when you install Camtasia. While this feature isn’t currently available on MacOS, the Camtasia Add-in Toolbar allows you to start, stop, and control your recordings from within PowerPoint — so you don’t need to switch between applications.
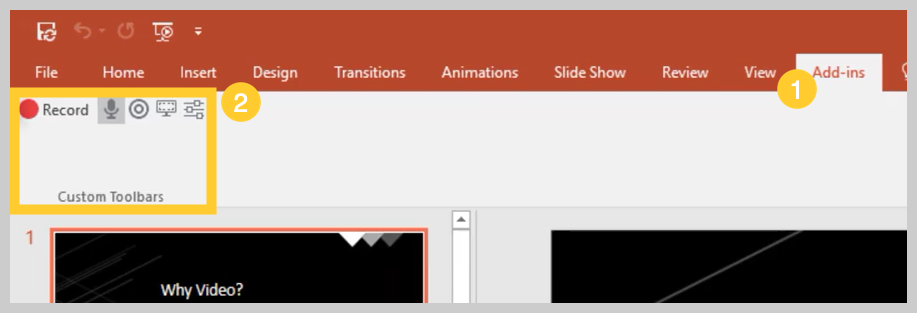
Just open the presentation you want to record and locate the Add-in toolbar under the Add-ins tab.
Don’t see the add-in toolbar? Go to File > Options > Add-ins, to enable it. Click on the Manage drop-down, select Disabled Items, then click Go. If the Camtasia Add-in is listed, select it, and click Enable.
If you’re an Apple user, don’t panic! You can still record your screen (with audio) on a Mac using Camtasia, and it’s just as easy. Alternatively, you can skip ahead to the next section and import your slides directly into Camtasia.
Step 2: Customize your recording options
Now let’s walk through each of the options on the toolbar before we begin recording.
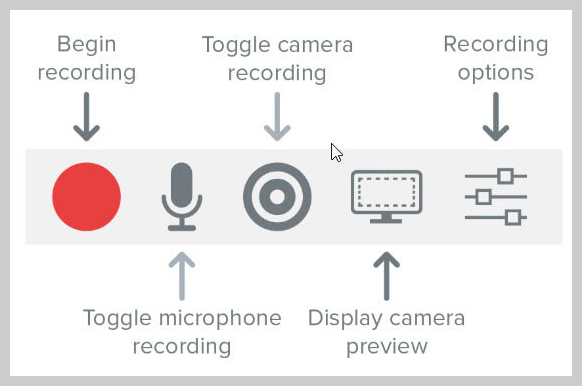
Record audio
The microphone button controls whether or not audio is recorded as part of your presentation. When you enable it, you’ll be able to record your narration using a microphone.
If you are planning to record audio, this is where you’ll select your microphone. If you want to record great audio , we suggest using an external microphone, rather than the one that’s built into your laptop.
Some of the best microphones for recording video are likely to be less expensive than you think. But, if you’re on a shoestring budget, even the mic that’s built into your headphones could produce better audio than your laptop.
Once you’re set up, be sure to test the mic and adjust the volume slider as needed. You’ll also need to decide whether or not to record your system audio, which is any sound that comes out of your speakers, such as email notifications.
Record webcam
If you have a webcam, you can also record your camera during the presentation to create a Picture-in-Picture clip — just as you can with Snagit!
To customize even more of the recording settings, click the Recording Options button. Here you’ll find settings that let you record with a watermark and adjust your video frame rate . There are a few more options too, but the default settings should work just fine.
When you’re ready, click OK to close this window and save any changes made.
Step 3: Record your presentation
The final step is as simple as clicking the Record button in the toolbar. This will launch your slides into the Presentation Mode and start recording.
When you exit Presentation Mode or reach the end of your slideshow, you can either continue recording your screen, or stop recording and save your file. Pretty easy right?
Before you get started, let us show you another way to turn your presentation into a video, without recording your desktop .
How to turn your PowerPoint presentation slides into a video
Another way to create a video from your presentation is to import your PowerPoint slides into Camtasia. This way you can adjust how long each slide appears on screen, as well as add Behaviors and Annotations to personalize your presentation and highlight important information.
By importing your slides into Camtasia, and recording your voice over separately, you get a lot more flexibility with the editing process, which means you have more control over the finished article.
If you do decide to record your audio separately, you might want to take a look at TechSmith’s Audiate . This advanced audio recorder will transcribe your voice over in real-time and let you edit the audio file as if it were a text-based document. We don’t want to brag, but it’s probably the best way to add a voice over to a PowerPoint .
Regardless of how you decide to narrate your PowerPoint, here’s how to turn your presentation into a video:
1. Import your PowerPoint slides
First, start by importing your PowerPoint slides directly into Camtasia. Once your media is imported, you can edit it by dragging your slides into the Editing Toolbar.
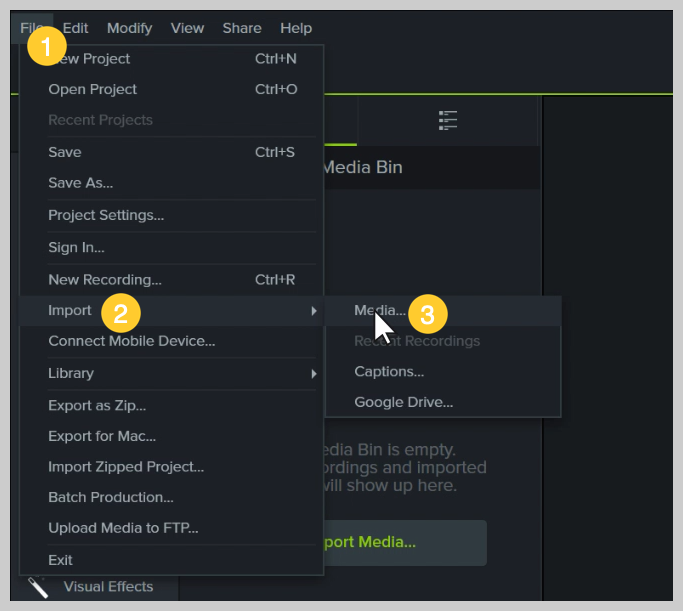
You can now add the images to the Timeline, and edit them like any other media in a Project.
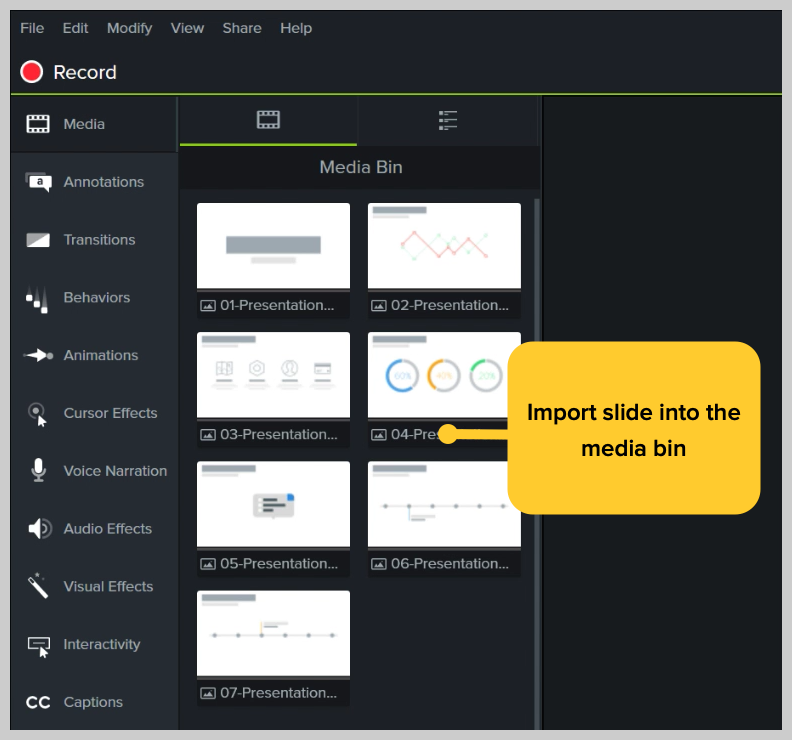
If you drag your slides to the Timeline, the slides will be placed in the order of the presentation, each with a default 5-second duration.
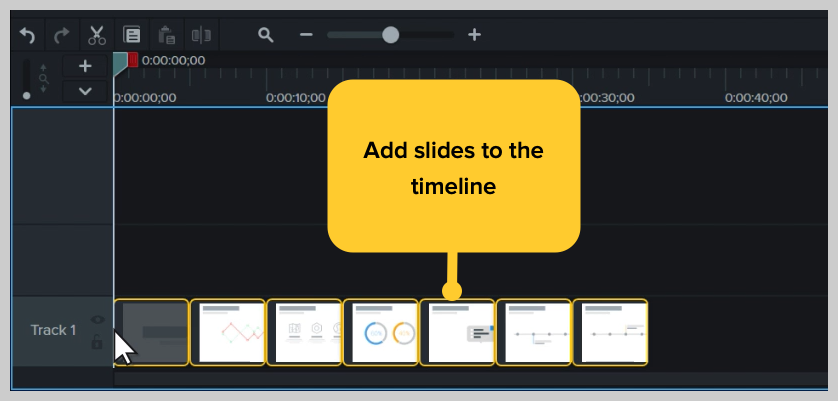
With your presentation on the timeline, use Ripple Move to create space in between slides to adjust the timing of each one. To do this, hold shift, then click and drag.
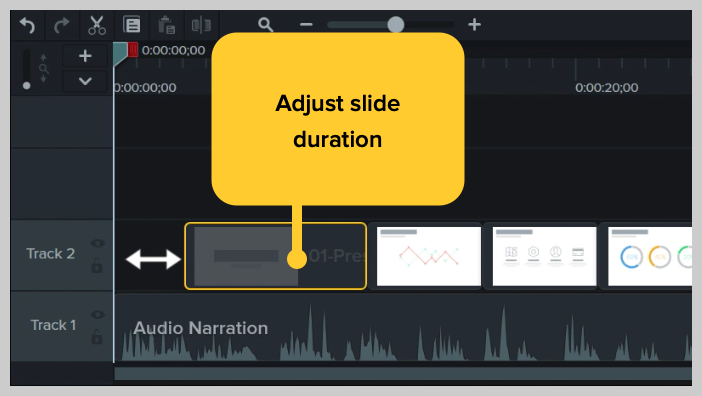
Once you’ve imported your slides and adjusted the duration of each one to correlate with your voice over, it’s time to start editing.
How to edit a presentation video (in Camtasia)
Add behaviors.
Firstly, add some visual interest with Camtasia Behaviors . A Behavior is an animation that brings movement to your slides, making them stand out on screen. This is a great way to bring parts of your presentation to life and take it from ordinary to extraordinary — because nobody likes a boring presentation .
To add a Behavior, click and drag the Behavior you wish to use onto the slide you want to animate. Once added, you can adjust the Behavior using the Properties tab.
Add annotations
Another good way to grab and direct your audience’s attention is to add some Annotations, which are great for highlighting important information.
To insert an Annotation, click the Annotation tab on the left side of the screen and drag it into the designated slide. You can then re-position and edit the Annotation in the Properties tab as needed.
Recording a PowerPoint Presentation, the FAQs
Absolutely! Both Snagit and Camtasia are excellent choices for recording a professional and polished presentation. Snagit is perfect for no-fuss recording and editing. If you require more sophisticated editing capabilities, Camtasia is the ideal choice, offering the added convenience of recording your slideshow and voice over directly within PowerPoint.
Click the Record button in the toolbar to launch your slides into the Presentation Mode and start recording. When you exit Presentation Mode or reach the end of your slideshow, you can either continue recording your screen or stop and save your file.
If you’re planning to record audio, select your microphone in the recording options. The microphone button controls whether or not audio is recorded as part of your presentation. If you have a webcam attached to your computer, you can also record your camera to create a Picture-in-Picture clip, perfect for showing the presenter during the presentation.
With Snagit, you can conveniently record your voice over as you go through your presentation, capturing both the audio and visuals in one go. If you’re looking for more advanced recording and editing options, you might also consider using Camtasia, which allows you to record your voice over while presenting. For even more control, use Audiate to record your audio separately and then import it into Camtasia for fine-tuning.
Justin Simon
Global Content Strategy Manager at TechSmith. I play a lot of golf and watch a lot of football.
- How To Rotate a Video
- How to Write A Shot List That Will Transform Your Video
- YouTube vs. Vimeo: What’s the Difference?
Subscribe to TechSmith’s Newsletter
Join over 200,000 people who get actionable tips and expert advice every month in the TechSmith Newsletter.
How to Record A PowerPoint Presentation [2022 User Guide]
- Share on Facebook
- Share on Twitter
By Nikolay Kaloyanov
in How-To Tutorials
2 years ago
Viewed 643 times
Spread the word about this article:
If knowing how to record a PowerPoint presentation wasn’t necessary a decade ago, this isn’t how things stand today. The pandemic taught us a valuable lesson – if we don’t catch up with technology, we will fall short.
Fortunately, Microsoft’s app is the global leader in presentation software and provides you with all the required tools to create an excellent presentation you can show in front of your audience. But how to record a presentation on PowerPoint, and is it easy to do so?
Article overview: 1. What are the benefits of recording PowerPoint presentations? 2. How to record a PowerPoint presentation? 3. How to live stream a PowerPoint presentation? 4. Frequently asked questions
1. What are the benefits of recording PowerPoint presentations?
I am are pretty sure that if recording presentations weren’t helpful, PowerPoint wouldn’t offer it to its users. Well, we all know that’s not the case. Recording your PowerPoint slides can bring a ton of benefits. Let’s see which they are:
- Save time – regardless if you’re a lecturer or present in front of colleagues, having a video of your recording will save you many hours. Imagine speaking in front of your marketing team, but 2 members are on summer holidays. It’s fine. They’ll catch up later when they watch your PowerPoint recording.
- Focus on the presentation – usually, if you’re presenting in front of an audience, it’s typical to get asked many questions that you need to answer promptly. But that is a good reason to get distracted from your core information. Thus, it makes sense to record your presentation beforehand.
- Practice before presenting – the best way to carry out a great presentation is to spend some time at home, focusing on key details. When you record your PowerPoint slides, you can find areas of improvement and work on them.
2. How to record a PowerPoint presentation?
There are many tools that you can use to record a PowerPoint presentation. From Loom and Panopto, and even Apple’s basic Quicktime and Windows’ own recording tool. But here we will discuss none of the other options. Why? The answer is simple: PowerPoint has its own in-built, robust recording tool.
Unlike other options, PowerPoint’s recording feature enables you to record slide by slide. This effectively means you can create as many recordings as you like, until you like the playback version, and move on to the next slide.
Pro tip : PowerPoint doesn’t record slide transitions. You need to start recording each slide when it is opened and finish the recording before you move on to the next one.
Let’s see how to record a PowerPoint presentation with video and audio in just a few steps.
Step #1: Open your PowerPoint presentation
The first step is to open the PowerPoint presentation you wish to record. Ensure you have all the necessary slides and information on them. While this seems logical, there aren’t one or two cases when presenters have recorded wrong or unfinished slides, which leads to a disappointing outcome.
Step #2: Prepare your video and audio devices
Before you start the recording, you should check your camera and microphone. Try to make a sound check and see if your camera works properly.
Step #3: Select the slides you wish to record
PowerPoint gives you the option to record a presentation right from the beginning, or from a specifically selected slide.
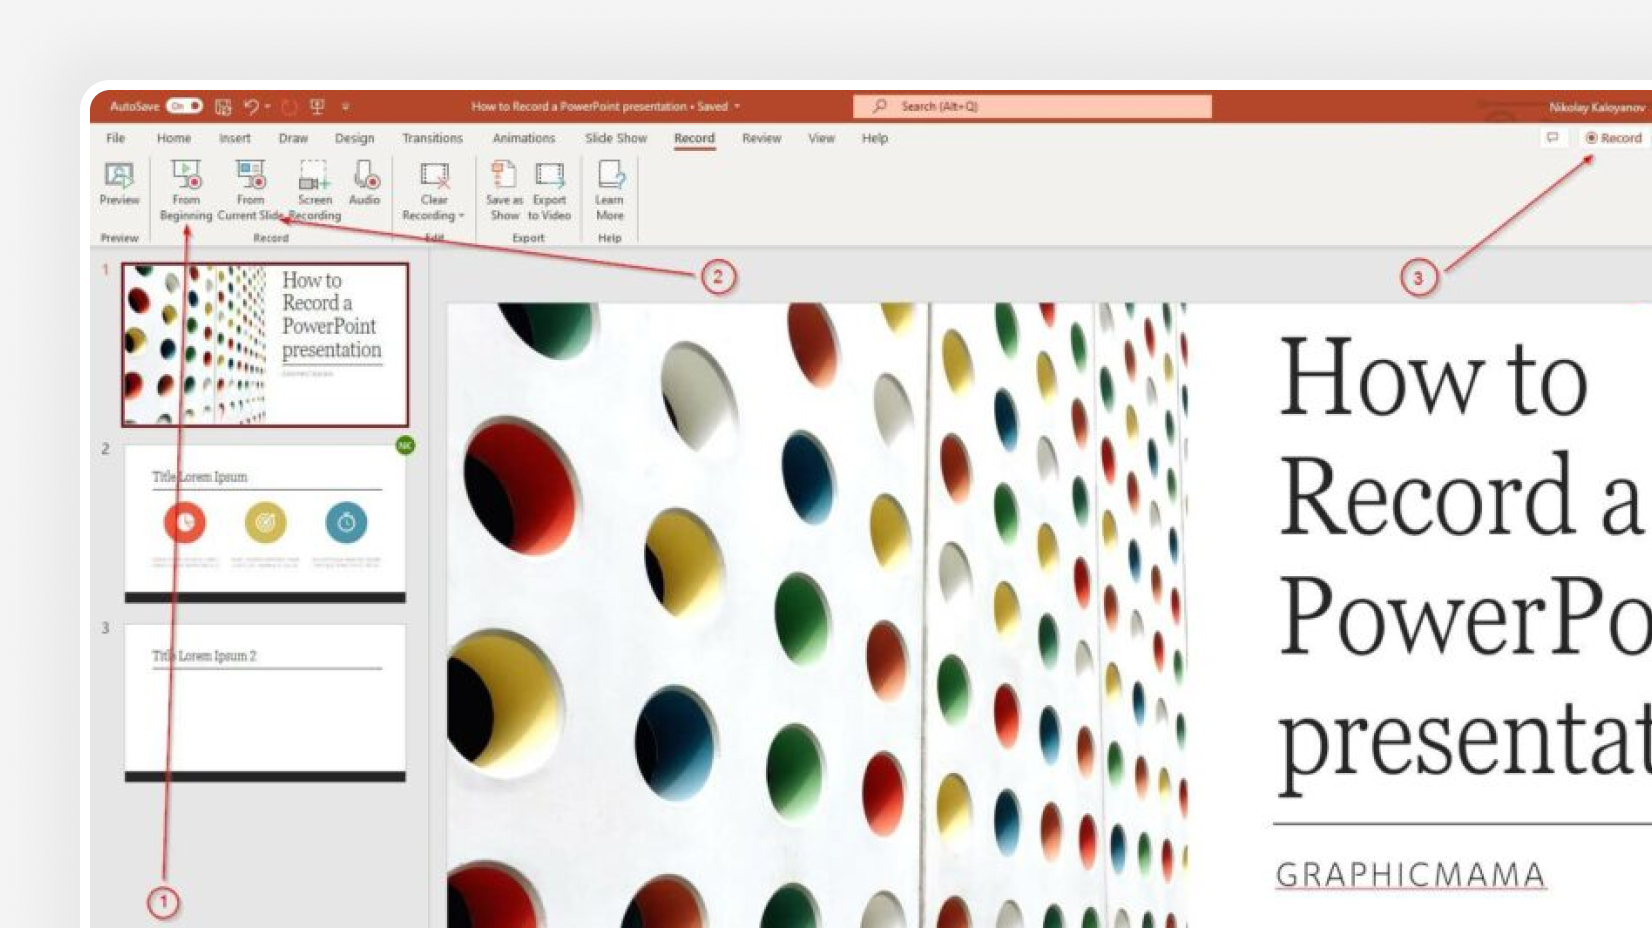
- Pick “ From Beginning ” (1) from the Record tab of the Ribbon if you wish to start from the first slide.
- Pick “ From Current Slide ” (2) from the same tab in case you would like to start from a selected slide (which isn’t the first one).
- Click the Record button (3) which is positioned in the top right corner, between the Comments and Share buttons. It starts the recording from the slide you have currently selected.
Step #4: Start the recording
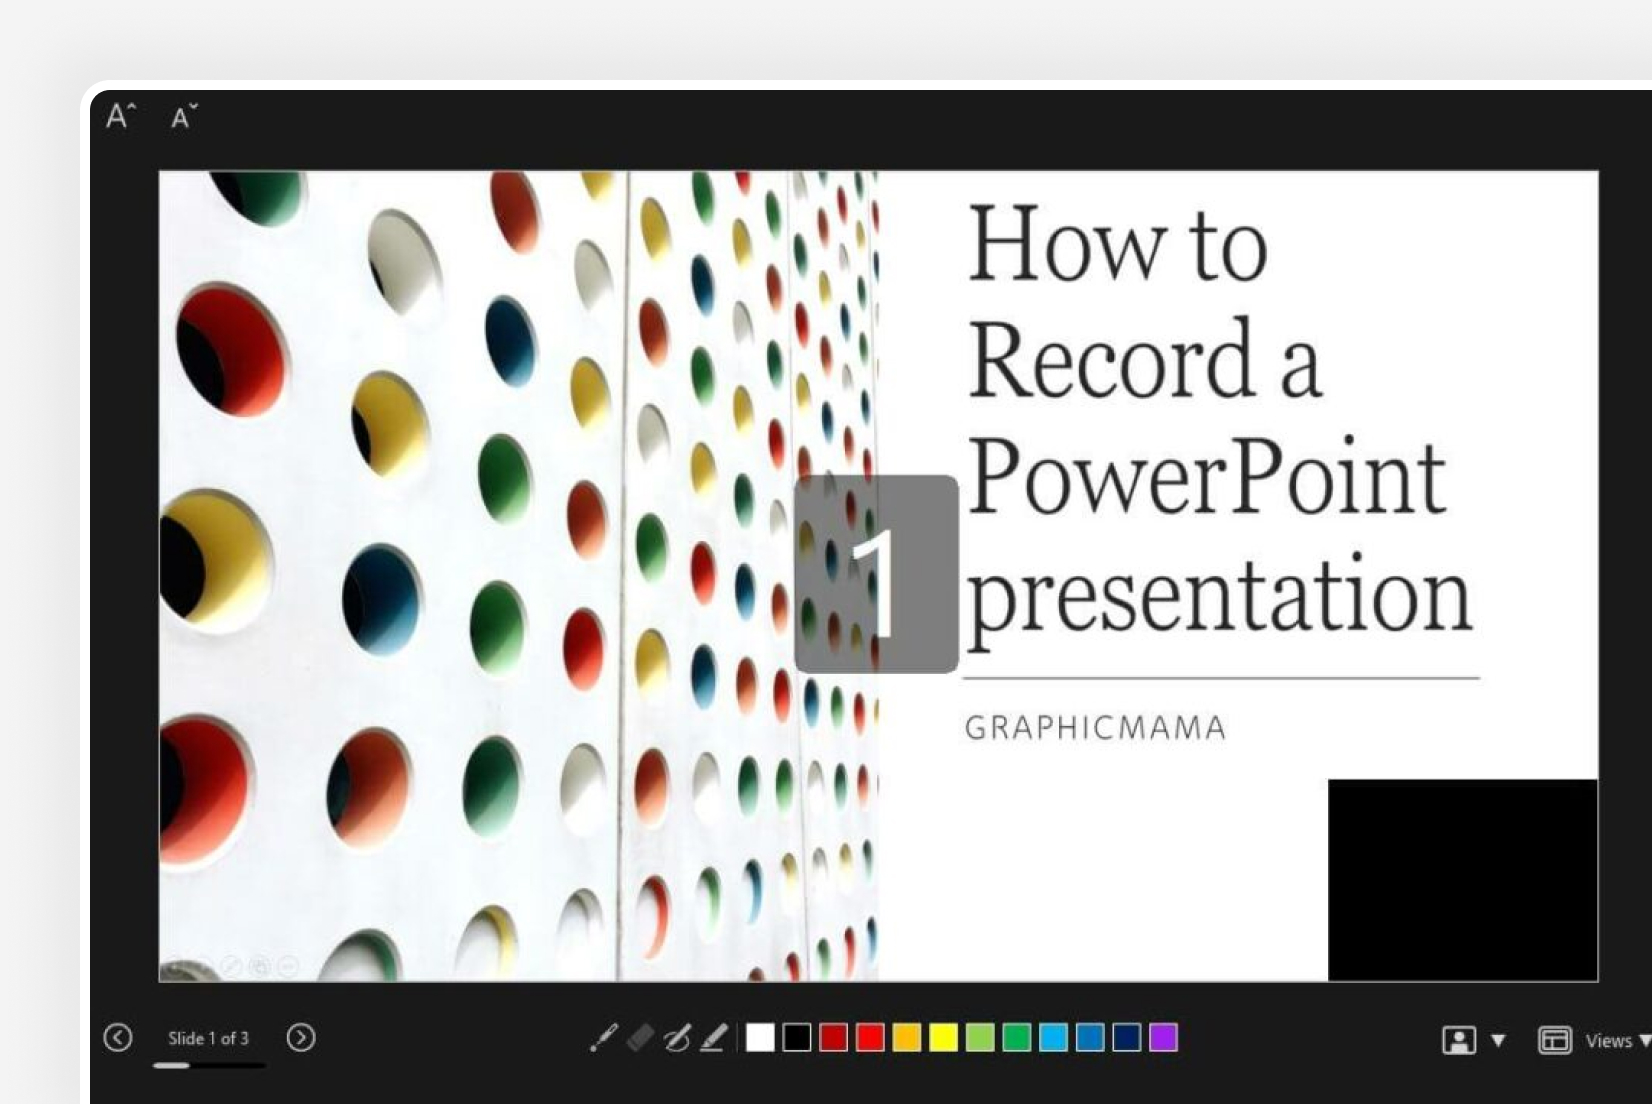
Once you click on one of the options, you are ready to start narrating your PowerPoint presentation. You will see a countdown timer, after which you can start narrating slides.
Step #5: Manage your PowerPoint recording
You have probably seen a couple of other options aside from the recording one. Let’s see which they are:
- Timer with a grey/red light – if you are recording your narration, you will see a timer and a small circle with a red light that indicates you are recording. If you pause, the small circle indicator will become grey again and the timer will stop counting.
- Refresh icon – right next to the timer there is a refresh-like icon but it serves a different purpose – to re-take the recording. You have the option to record again the current slide or all slides.
- Start/Stop button – the big red button serves as a start/stop button for your recordings. Only stop the recording when you want to move on to the next slide.
- Pause button – if you would like to stop the slide recording, in order to drink some water or read your speaker notes, you can use the Pause button, and then resume the recording. Bear in mind you cannot pause and move to the next slide. You have to stop the recording, to indicate you have finished with the current slide.
- Camera button – clicking the camera button will work as a toggle on/off.
- Microphone Button – clicking the microphone button will work as a toggle on/off.
- Ellipsis – this is the place where you can select camera and microphone settings, as well as erase recordings from the current slide or all slides.

Step #6: Export your PowerPoint video recording
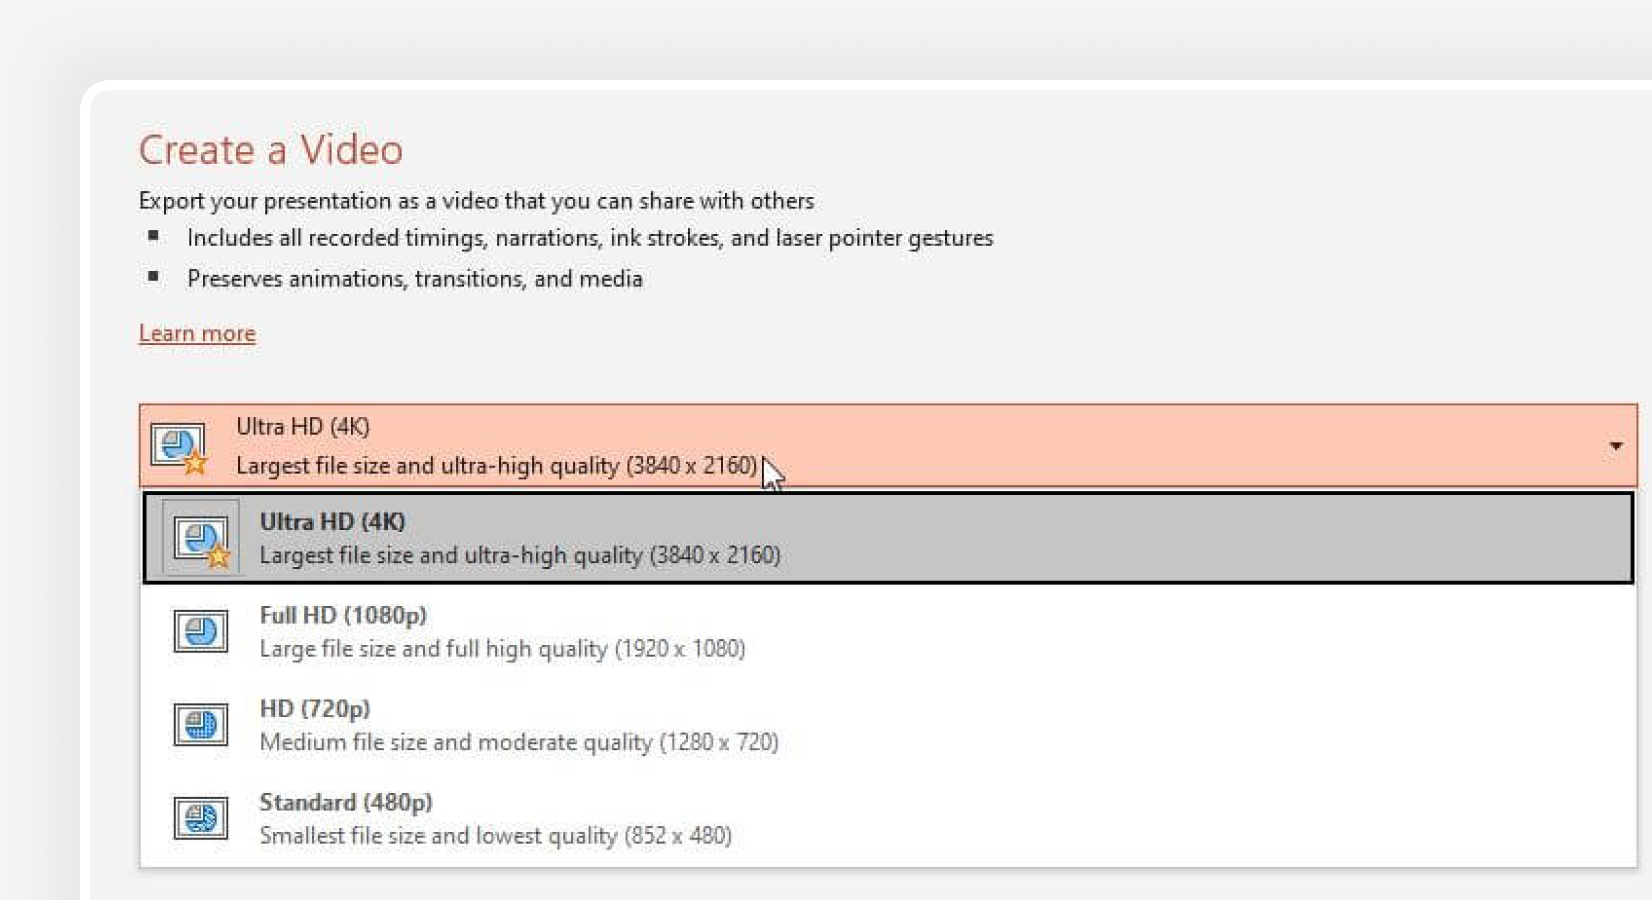
The last button from the menu is the Export setting. You can export your narration as an mp4 file in Full HD size by default. However, you can customize your export and get your narration in 4 sizes – 480p, 720p (HD), 1080p (Full HD – standard), and 4K. We don’t recommend Ultra HD exports.
Pro Tip : Exporting 4K PowerPoint presentation recordings doesn’t necessarily mean you will get better quality (unless you have 4K resources within your presentation) but it does guarantee a significantly larger file size – up to 4 times more than on standard Full HD recordings.
3. How to live stream a PowerPoint presentation?
If you have already honed your skills and would like to stream your PowerPoint slides directly to your audience, there are many ways to do so. We are going to cover two of them.
3.1. How to stream a PowerPoint presentation from OneDrive?
Microsoft has invested a lot of resources to make OneDrive a powerful cloud service, and so far they have been quite successful. Let’s see how to record a PowerPoint presentation in front of live audiences.
Step 1 – save your PowerPoint presentation in OneDrive.
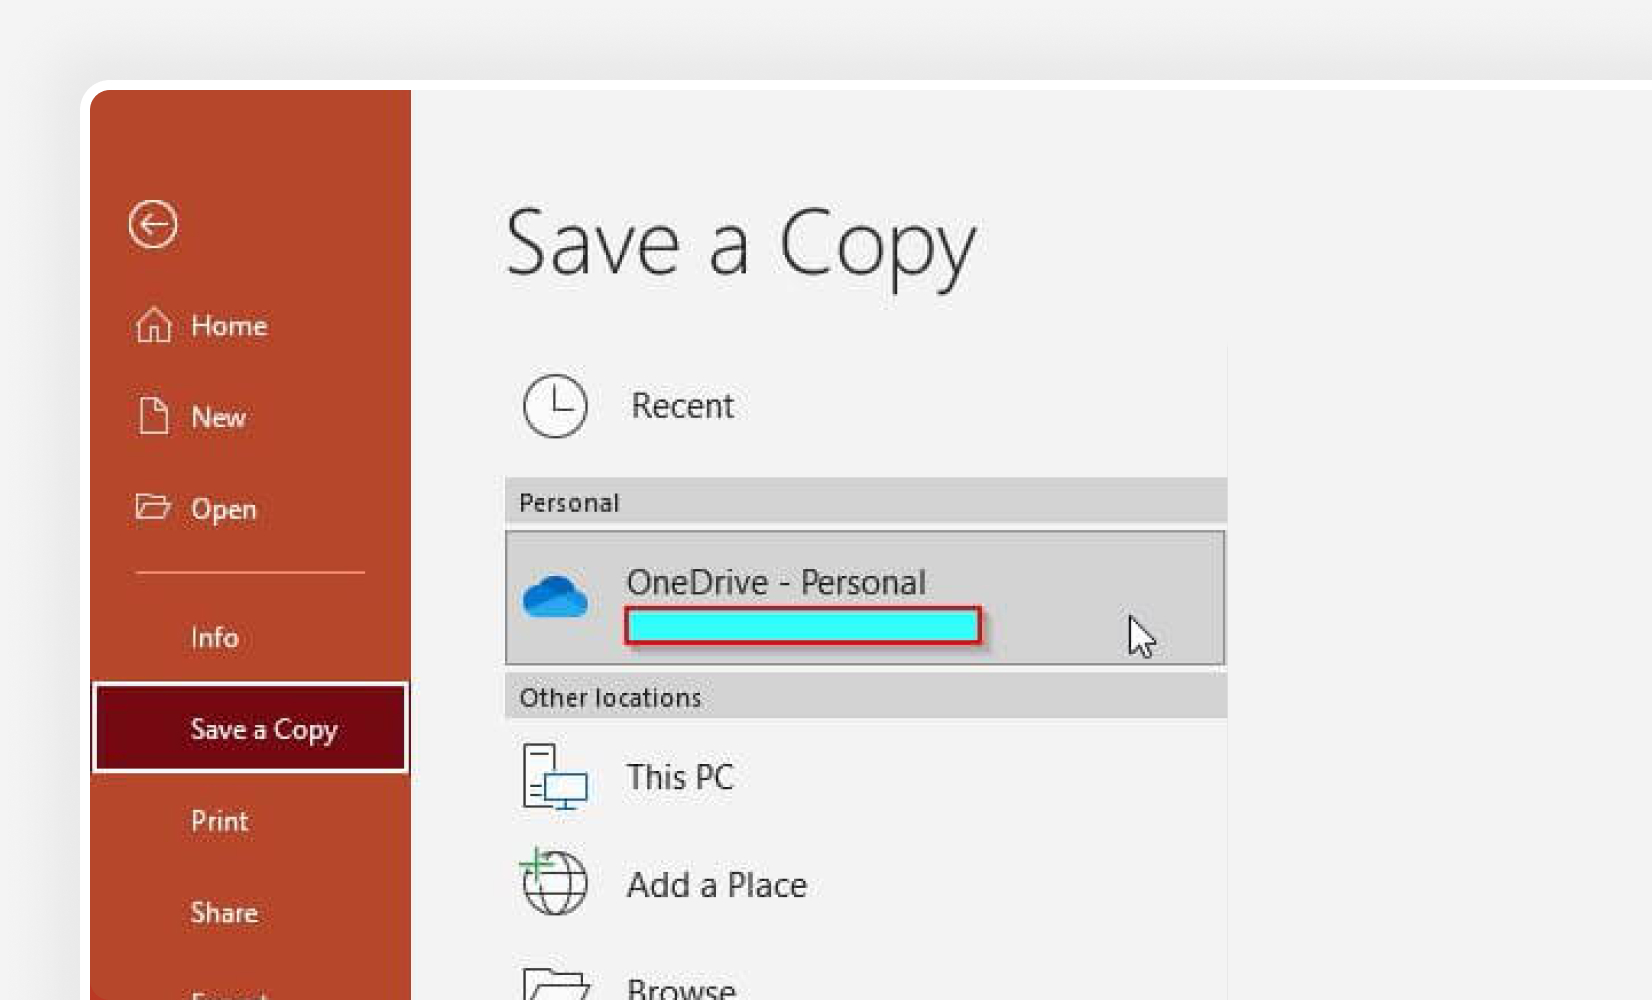
Step 2 – open your PowerPoint slides from PowerPoint online.
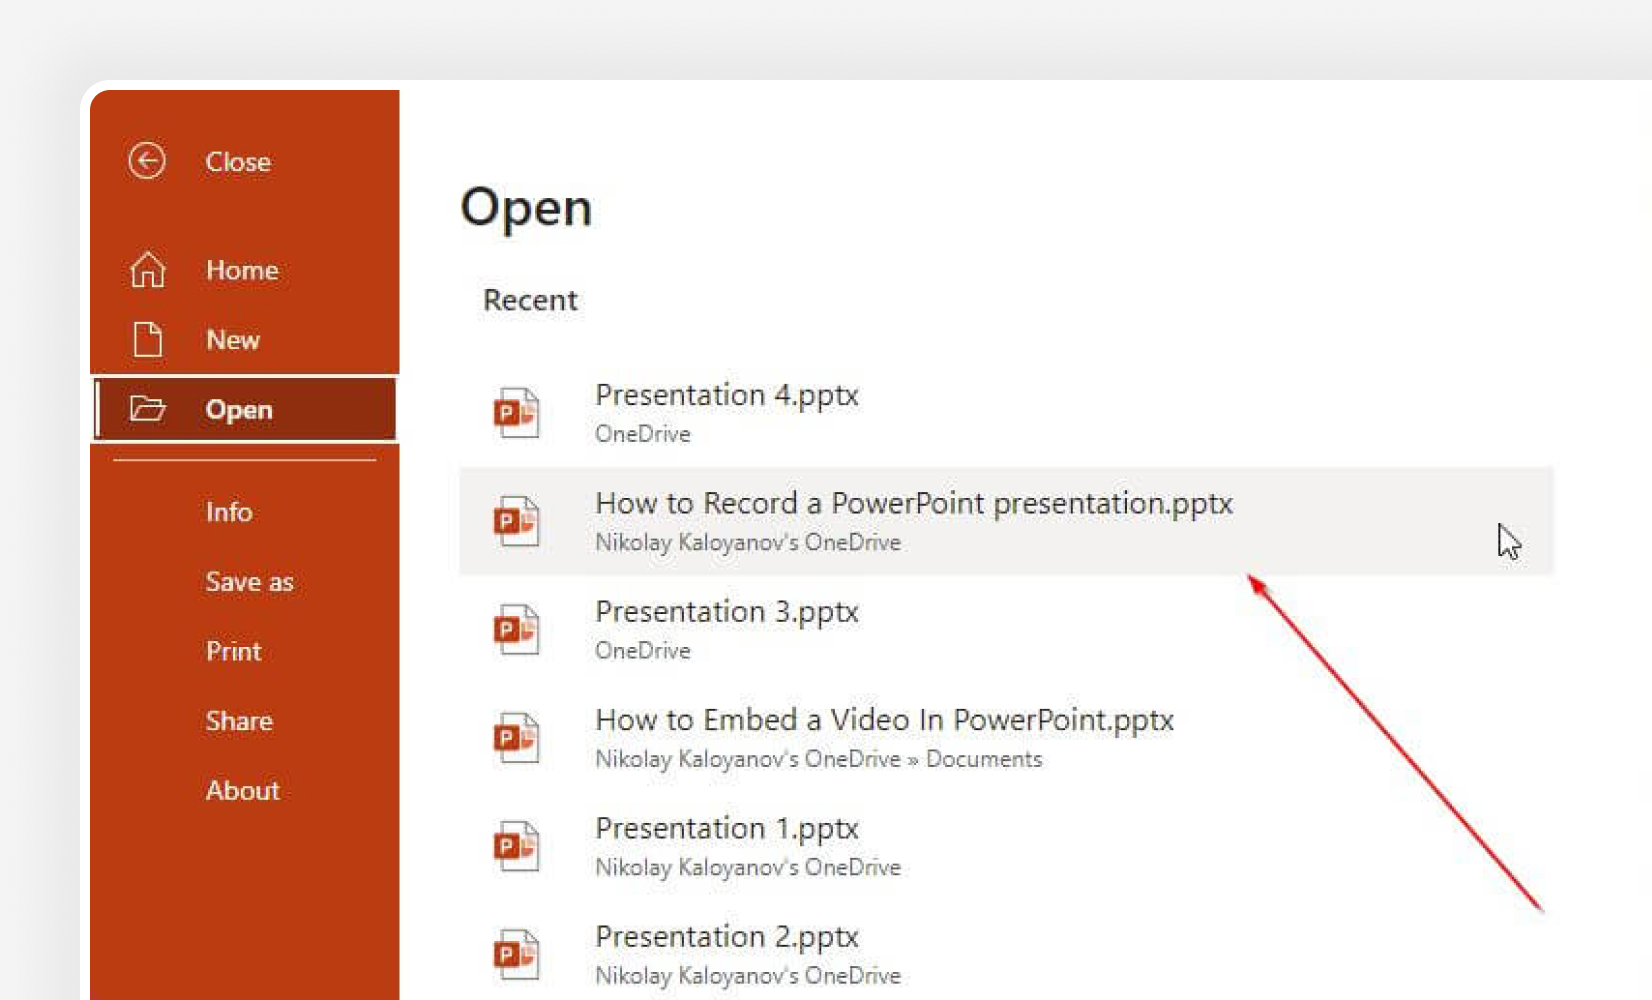
Step 3 – go to Present Live from the Slideshow Ribbon tab.

Step 4 – share a live link with your audience.
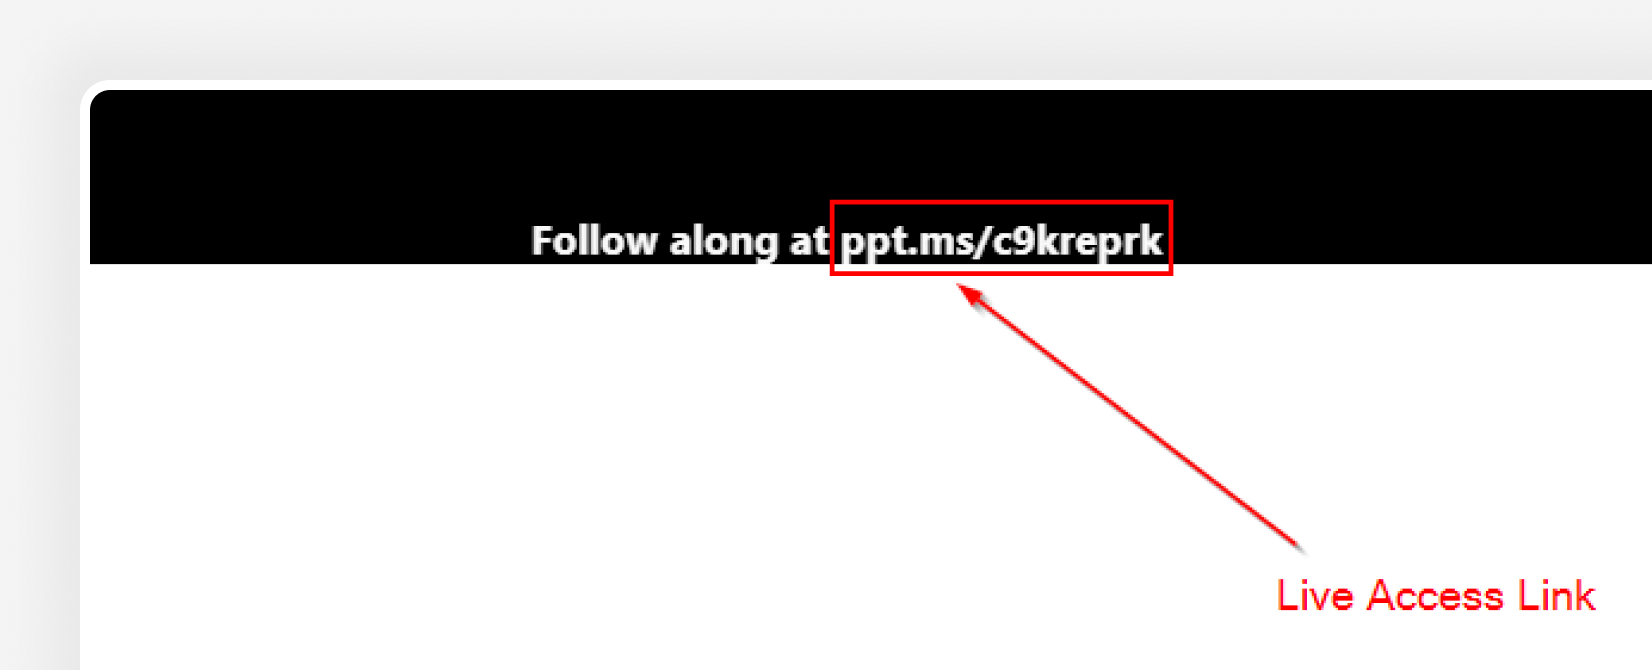
3.2. Stream your PowerPoint presentation in Zoom
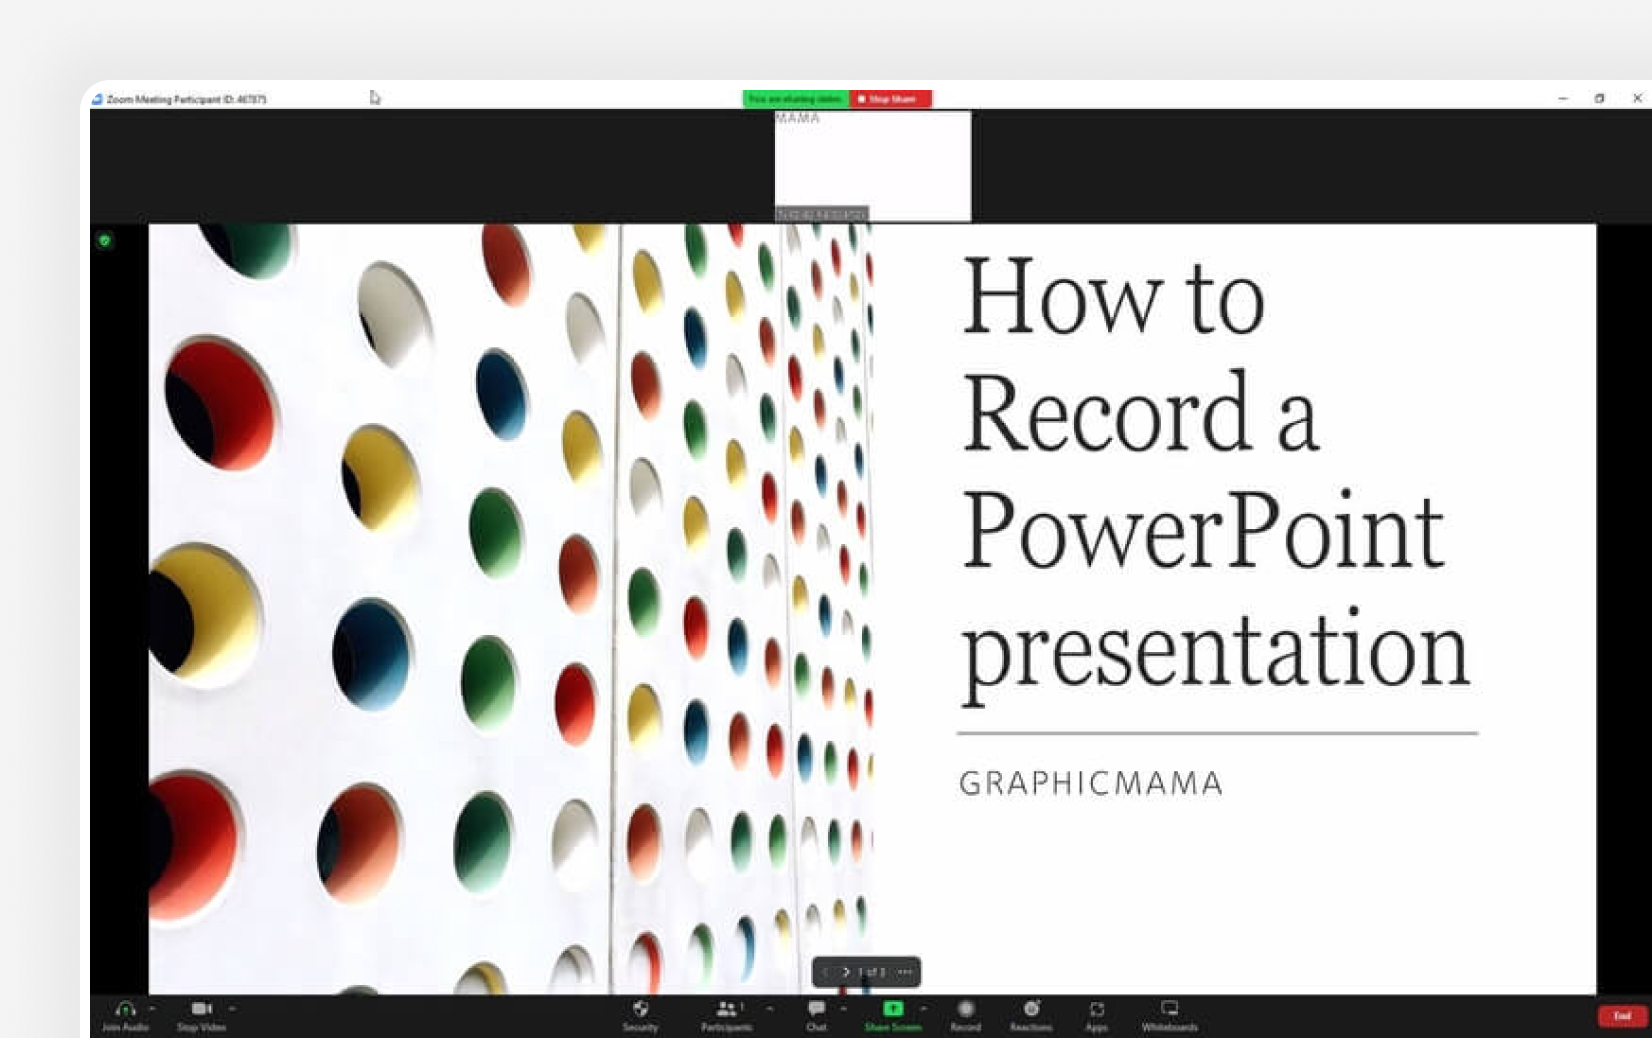
Zoom is one of the most popular conference call apps which has plenty of tools, including live streaming presentations. Since PowerPoint is the leading presentation program in the world, Zoom developers have created some amazing things, like PowerPoint presentation recording with a web camera on a transparent background. If you’re interested, you can check our guide on how to record a Zoom presentation .
Does PowerPoint have a screen recording?
PowerPoint has a screen recording window and you can select the area you would like to be recorded. Go to Record (from the Ribbon), then select Screen Recording , choose the area and start recording.
Can I view speaker notes while recording narration?
You are able to access your speaker notes if you have created them beforehand. To insert speaker notes, you have to go to View -> Notes Page and you will have a text box that you can utilize for speaker notes.
What format does PowerPoint use for video?
PowerPoint records videos in mp4 format. The default resolution is 1080p (Full HD).
Recording your PowerPoint presentations can make the difference between a successful and smooth speech and a bad narration. Being able to record each slide means you can get the best narration possible for your whole presentation.
And if you would like to stream your presentation live, there are more than enough options to do so – both via the online version of PowerPoint or via third-party apps like Zoom.
If you found this article helpful, you can also check some of our other PowerPoint tutorials:
- Add Audio to PowerPoint: The Quick Step-by-Step Guide
- Insert GIFs into PowerPoint – a 2022 Pocket Guide
- How to Convert Your PowerPoint Presentation into Google Slides ?

Add some character to your visuals
Cartoon Characters, Design Bundles, Illustrations, Backgrounds and more...
Like us on Facebook
Subscribe to our newsletter
Be the first to know what’s new in the world of graphic design and illustrations.
- [email protected]
Browse High Quality Vector Graphics
E.g.: businessman, lion, girl…
Related Articles
How to create an online course in 7 simple steps, what is google slides and how to get started, how to craft a cartoon facebook cover in photoshop, how to create a poster: the best beginner tutorials + useful tips, how to use google slides offline and work anywhere, enjoyed this article.
Don’t forget to share!
- Comments (0)
Nikolay Kaloyanov
Nikolay is a copywriter with vast experience in Technology, Marketing, and Design. When he isn't playing with words and crafting texts, he watches sports and asks questions. He is a funny person...until you put him on a diet.

Thousands of vector graphics for your projects.
Hey! You made it all the way to the bottom!
Here are some other articles we think you may like:
How-To Tutorials
Character animator tutorials part 2: basic puppet in illustrator.
by Slavena Simeonova

by Momchil Karamitev
20+ Secrets to Taking Amazing Photos For Blogs and Social Media
by Bilyana Nikolaeva
Looking for Design Bundles or Cartoon Characters?
A source of high-quality vector graphics offering a huge variety of premade character designs, graphic design bundles, Adobe Character Animator puppets, and more.

How to Record a PowerPoint Presentation with Narration
Can be helpful in creating a dramatic narrative
Microsoft PowerPoint has a built-in recording tool that allows you to narrate your presentations using recorded audio. You can export and share recorded presentations as video files.
This tutorial covers everything about recording PowerPoint presentations on Windows and Mac computers.
Record PowerPoint Presentation with Narration
Open the PowerPoint file/presentation you want to record and follow the steps below.
Record PowerPoint Presentation on Windows
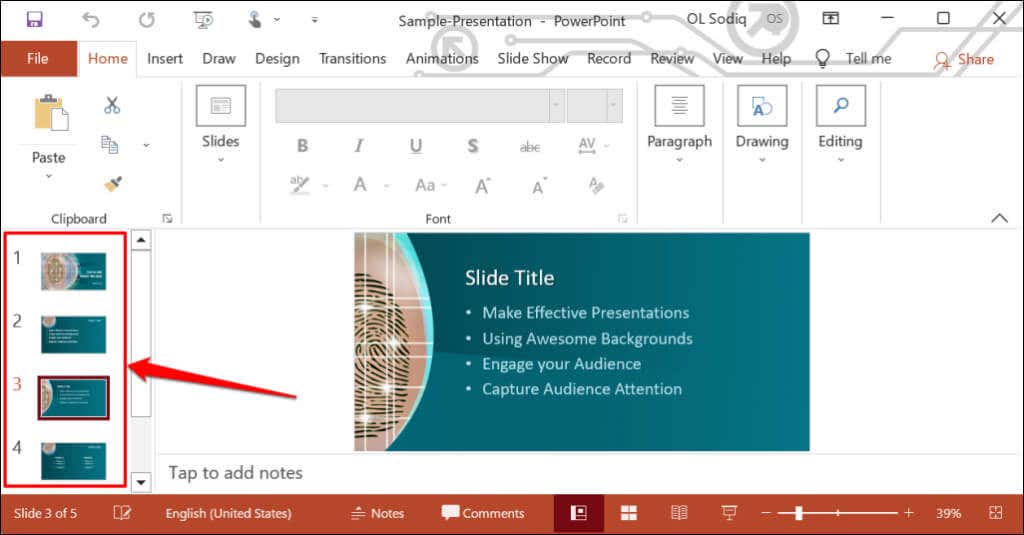
- Select the slide you want to start recording from on the slide thumbnail pane.
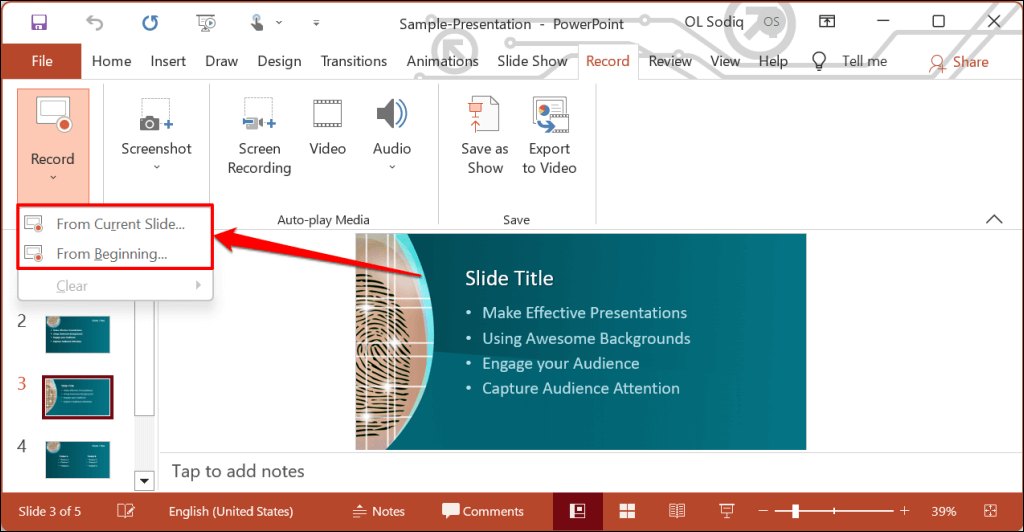
- Head to the Record tab on the ribbon and select the Record button to start recording from the current/selected slide.
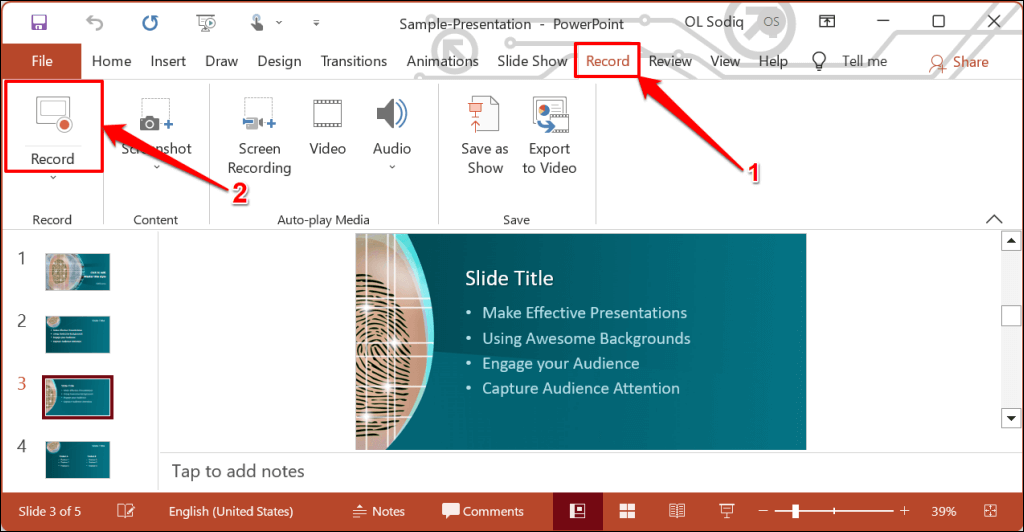
To record from the first slide, select the down-facing arrow icon below the Record button and select From Beginning .
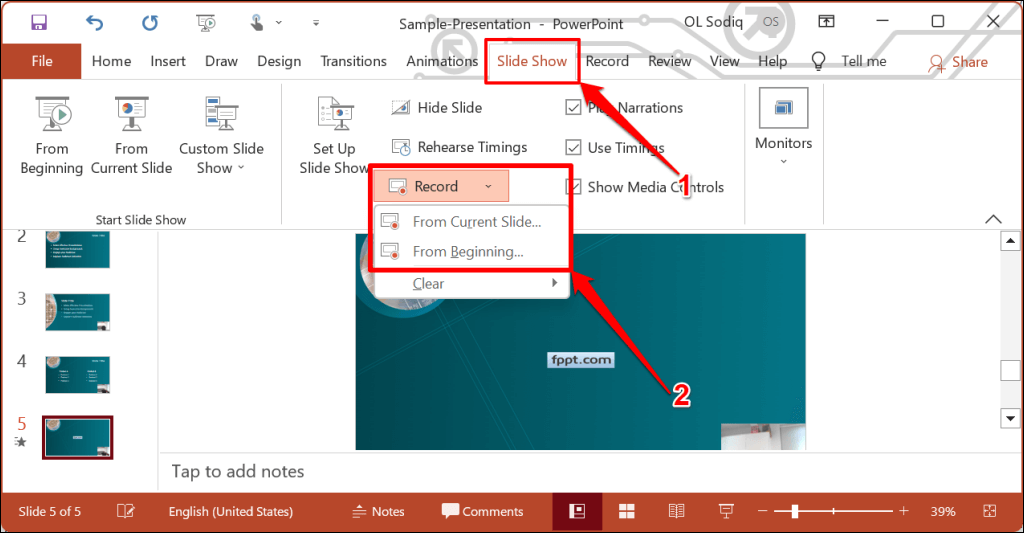
You can also record a presentation from the Slide Show tab. Select Slide Show on the ribbon and select Record , From Current Slide , or From Beginning .
That’ll open PowerPoint’s presentation recorder in a fullscreen window.
- Select the Record icon and start speaking after the three seconds countdown.
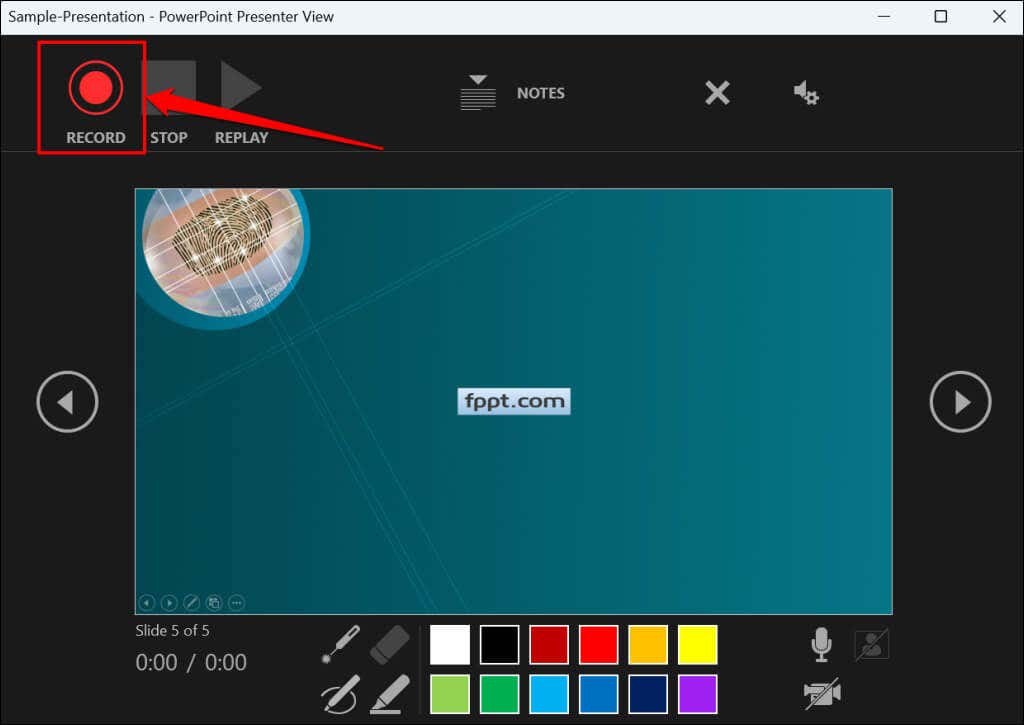
PowerPoint records the presentation window and captures your voice and webcam feed as you navigate the slides. Select the left-facing and right-facing arrows to move to the previous and next slides in the presentation.
Record PowerPoint Presentation in macOS
- Open the Slide Show tab and select Record Slide Show .
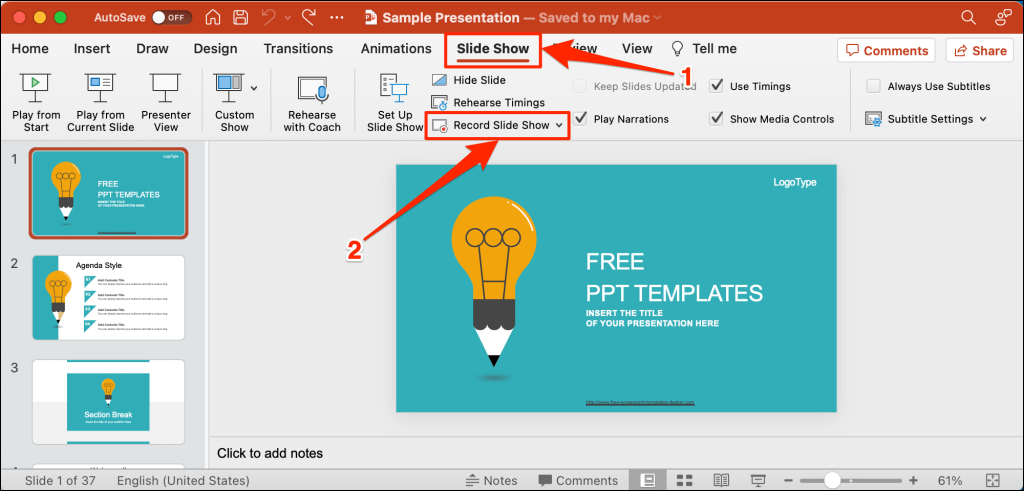
- Select the Record button on the toolbar to start recording your narration.
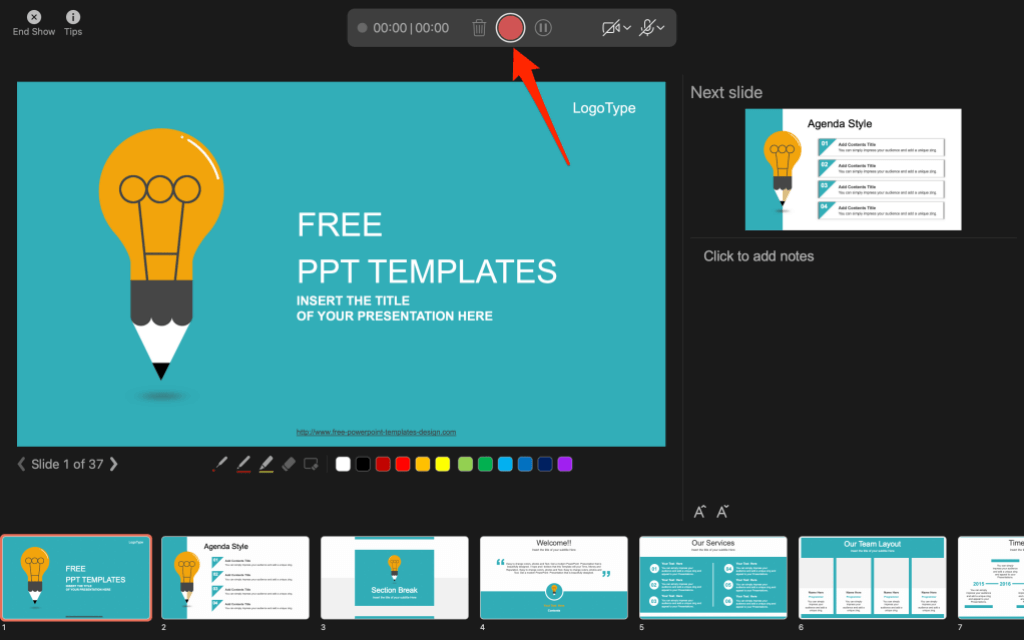
Use your keyboard arrow keys to move back and forth between slides. Press N or Space Bar to move to the next slide or animation in the presentation. Press P or Backspace to return to the previous slide or animation.
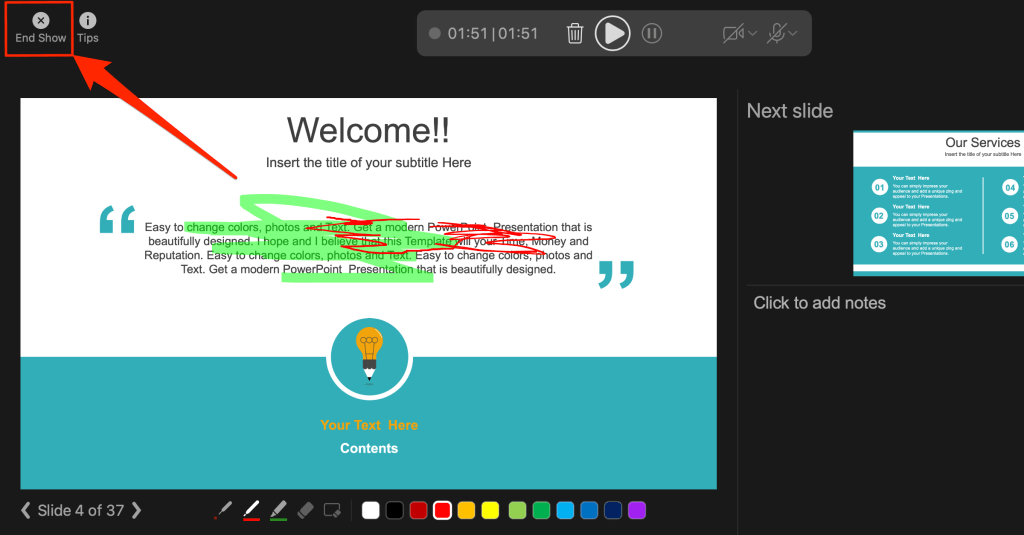
Select Tips in the top-left corner for more keyboard shortcuts and other presentation tips.
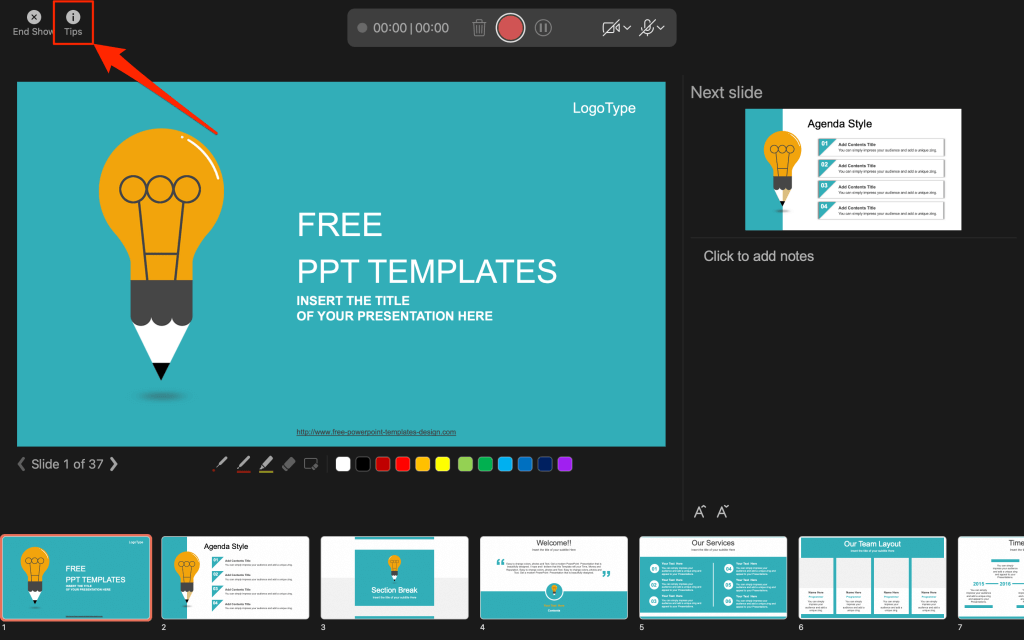
Note: The narration tool doesn’t record slide transitions. When moving between slides, wait for the destination slide to appear on the screen before speaking.
PowerPoint Recorder Control/Settings
You’ll find a handful of controls and options on the recording tool. We’ll show you how to use these controls to include voiceovers or audio recordings in your presentation.
Using Presentation Pointer Tools
PowerPoint provides several tools to mark up your slides when narrating your presentation. There’s a pen tool, eraser, laser pointer, and highlighter.
With the Pen tool, you can draw on slides during narration/recording. Press Ctrl + P (Windows) or Command + P (Mac) to use the pen tool. You can also select the Pen icon to convert the pointer to a pen.
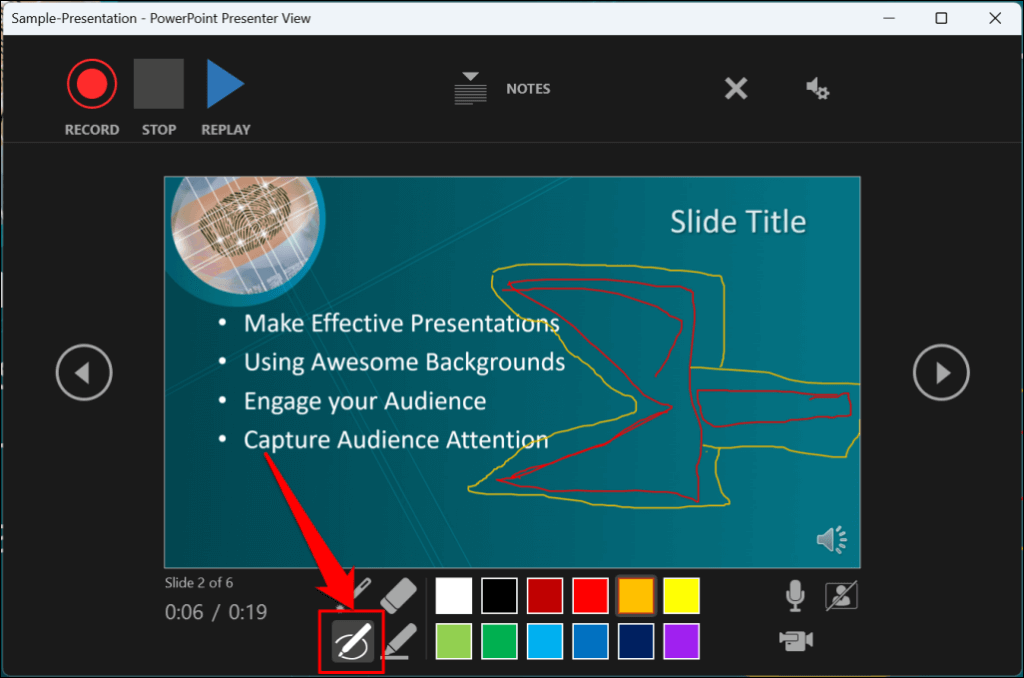
The Laser pointer tool converts your cursor to an onscreen laser. Use the laser pointer to draw attention to something on a slide/presentation.
Press Ctrl + L (Windows) or Command + L (Mac) to use the laser pointer. There’s also a Laser pointer icon on the toolbar.
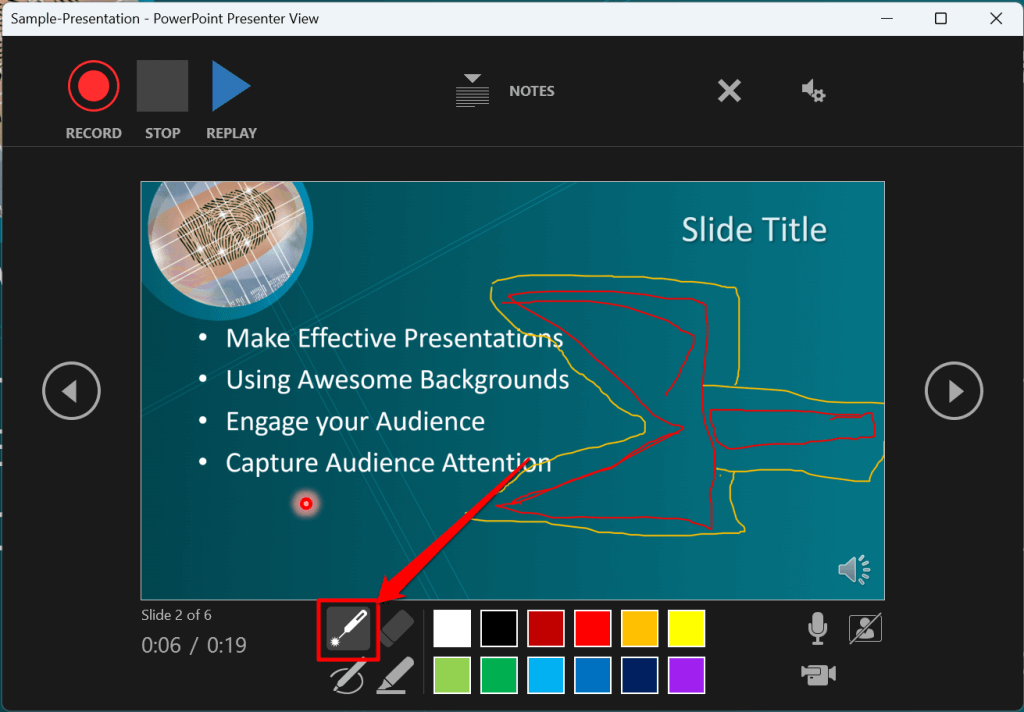
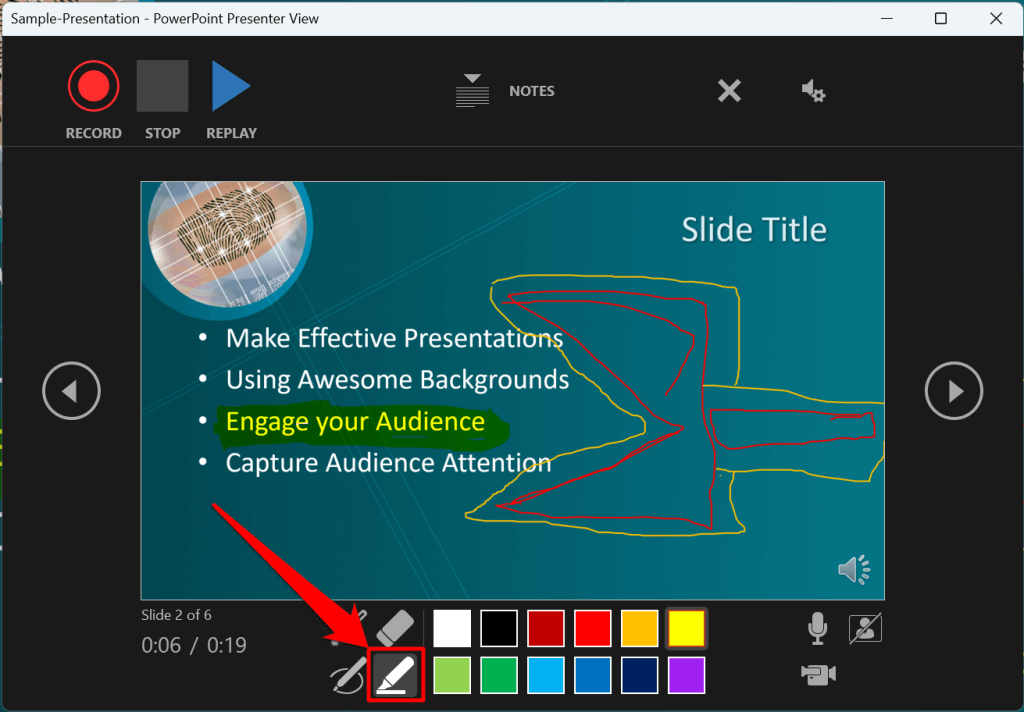
Pressing Ctrl + I (or selecting the Highlighter tool ) converts your cursor to a highlighter.
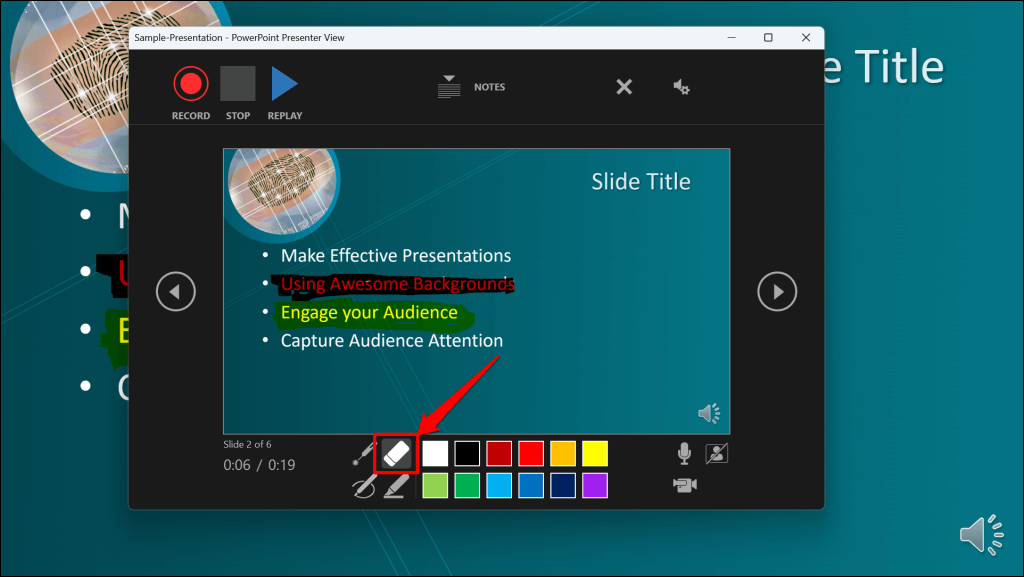
Use the Eraser tool to remove inks and highlight from slides. Select the Eraser icon or press Ctrl + E and select the ink to erase.
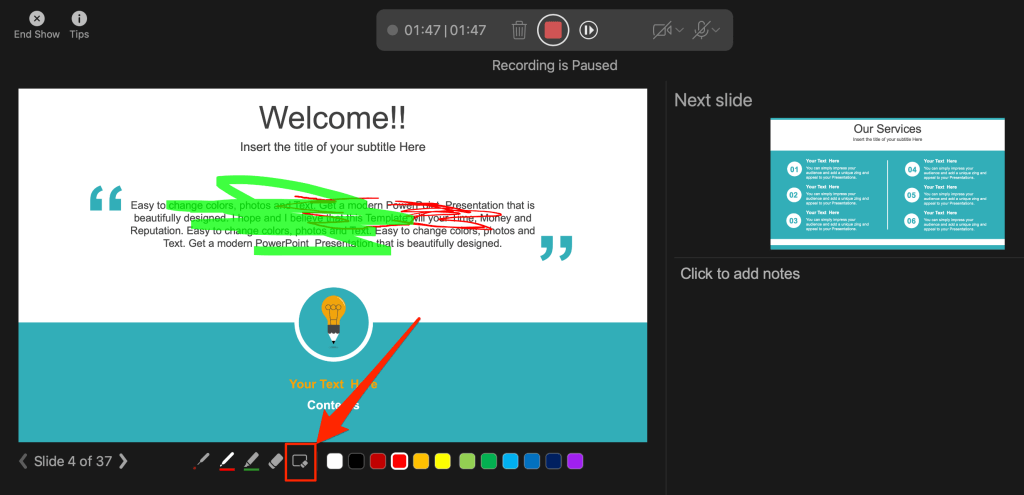
On macOS, select the Erase Pen icon (or press E ) to erase all drawings and highlights on the slide.
You can change the pointer tools ink from the color selection boxes. However, one major limitation is that you can’t change the size of these pointer tools.
Pause and Resume Your Recording
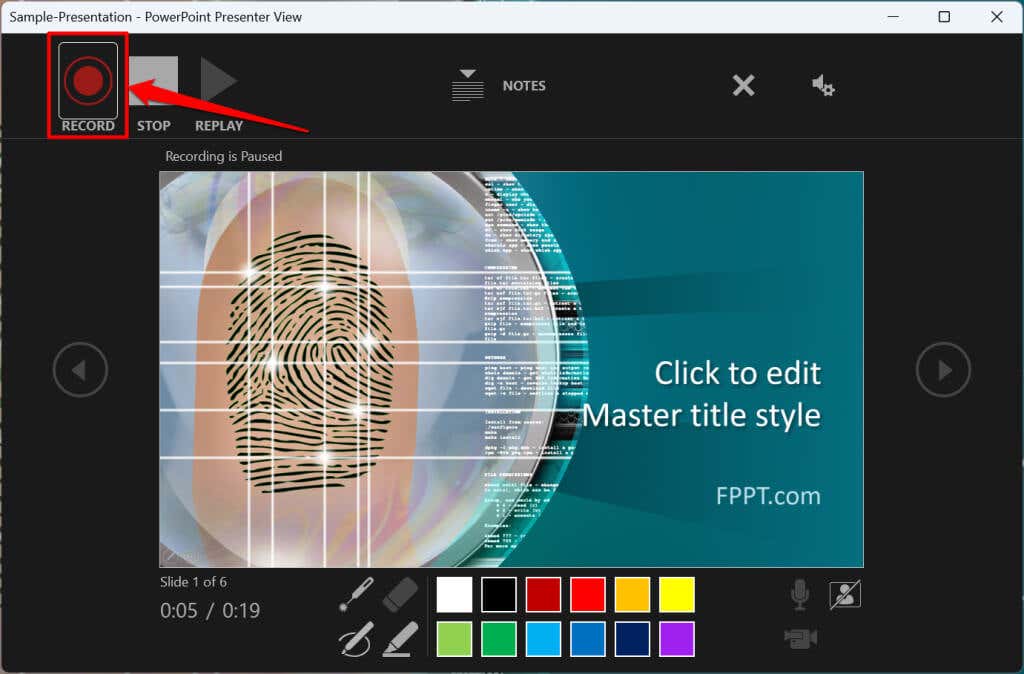
In Windows, press I on your keyboard or select the Pause button in the top-left corner to pause your recording.
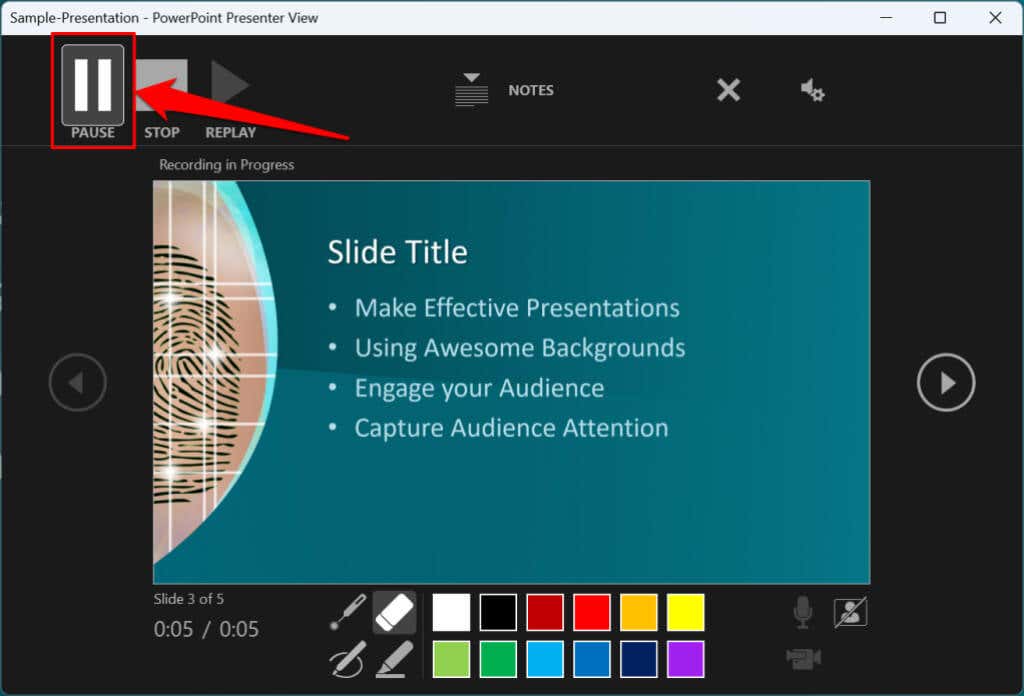
Press I again or select the Record icon to resume the recording.
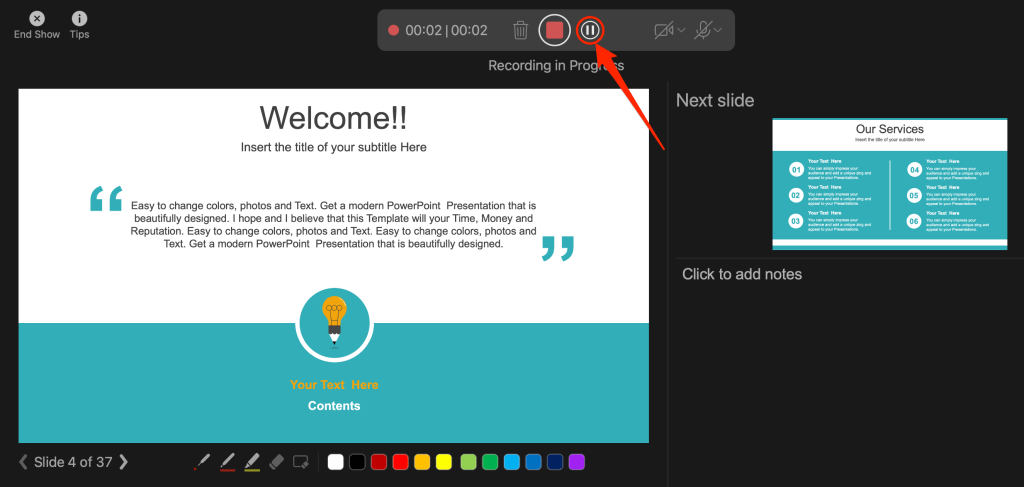
If you use a Mac, select the Pause icon in the top toolbar to pause the recording.
Unmute or Mute Microphone
Check that your microphone is unmuted before recording. Select the microphone icon in the bottom-right corner to mute or unmute your mic.
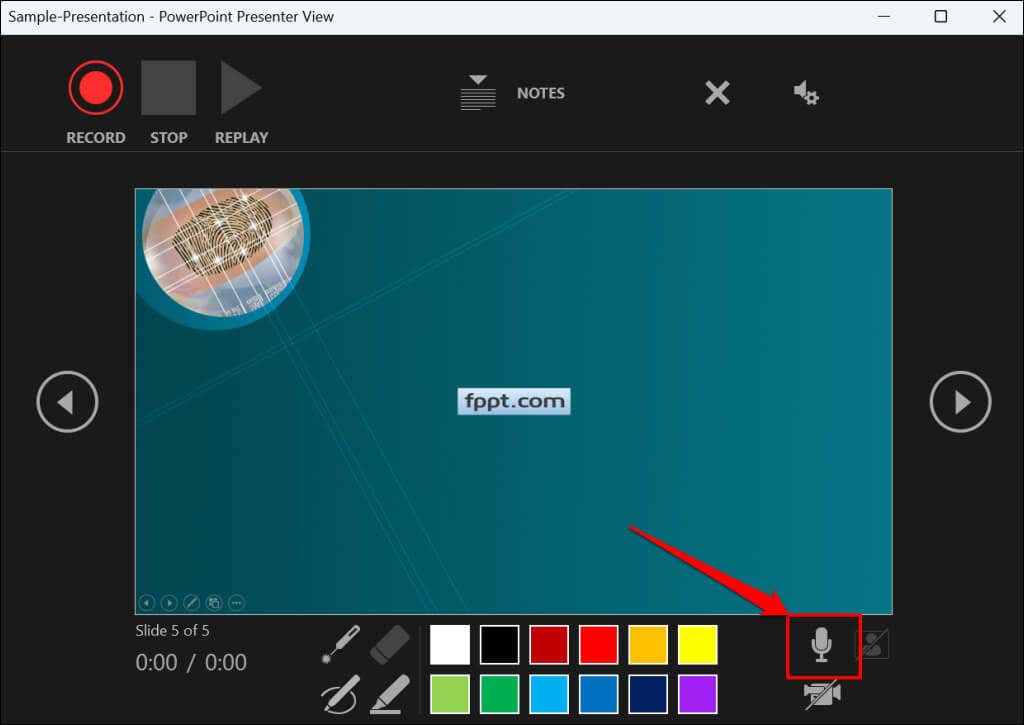
PowerPoint for Windows allows you to mute and unmute your microphone in real time while recording video/audio narrations. The macOS version of PowerPoint only lets you configure your camera and microphone settings before recording.
Switch Microphone or Camera
Want to record your presentation with an external microphone or camera? Press Ctrl + M or select the audio/camera settings icon in the top-right corner and choose your preferred microphone/camera.
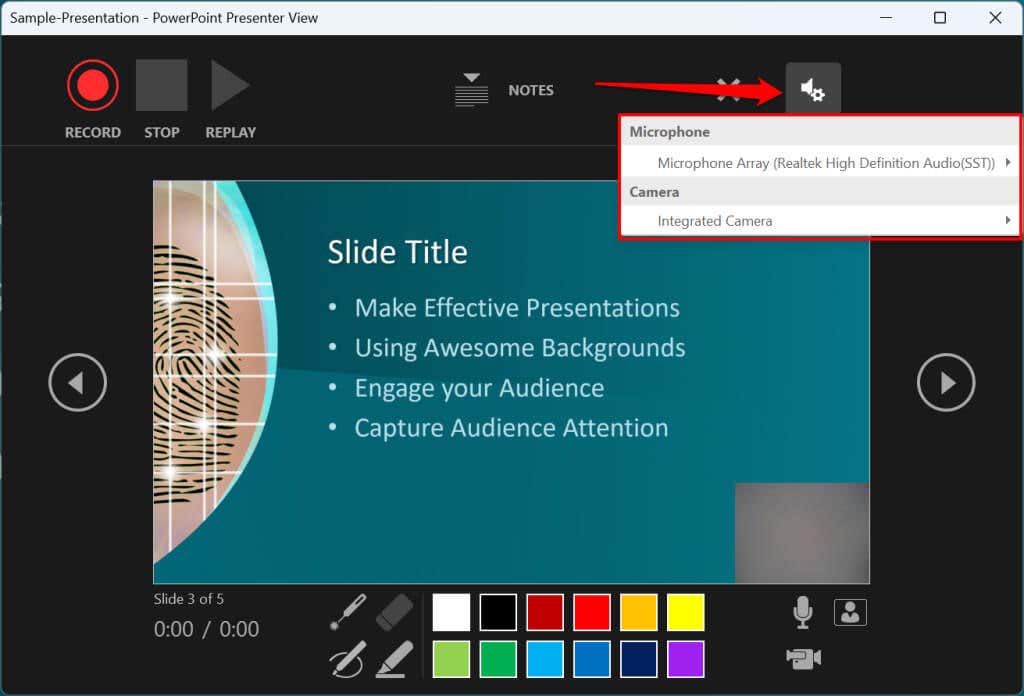
In macOS, select the microphone icon to mute or unmute your microphone. Select the arrow-down icon next to the microphone or camcorder icons to switch input devices.
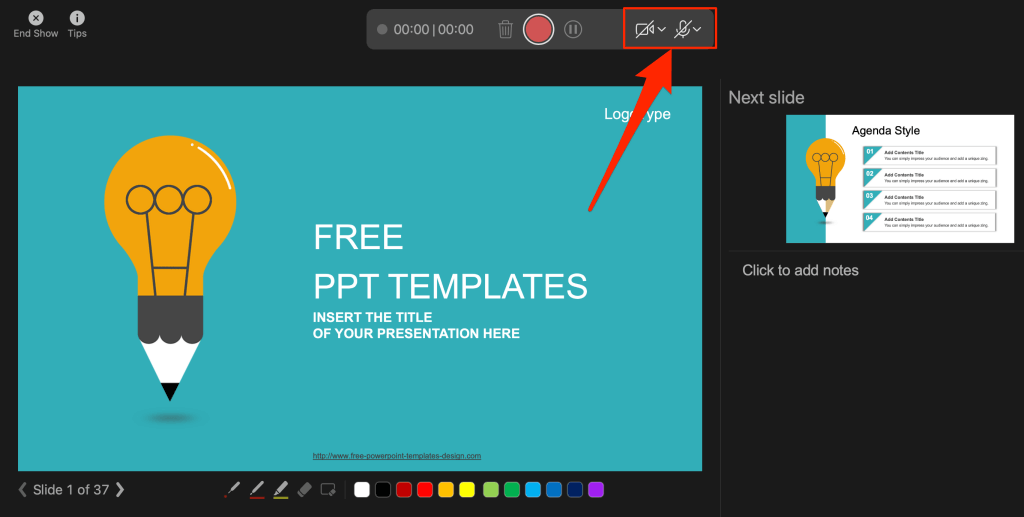
Enable and Disable Camera
The recorder displays your camera or webcam feed in the bottom-right corner of the presentation slides.
Select the camcorder icon to remove your webcam feed from the recording. Select the icon again to display your webcam feed in the presentation.
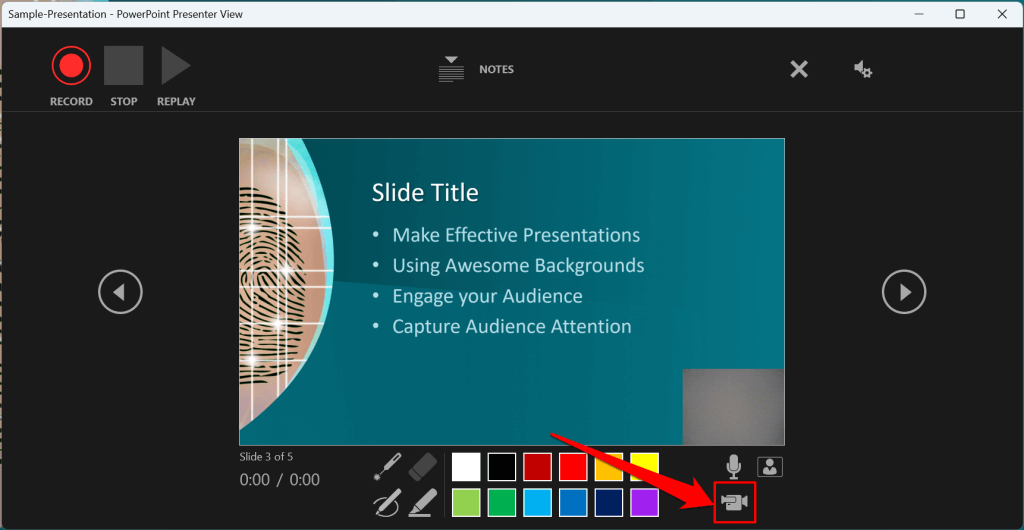
You can also use the Ctrl + K keyboard shortcut on Windows computers to enable or disable your camera.
On Mac computers, you’ll find the video control icon on the top toolbar.
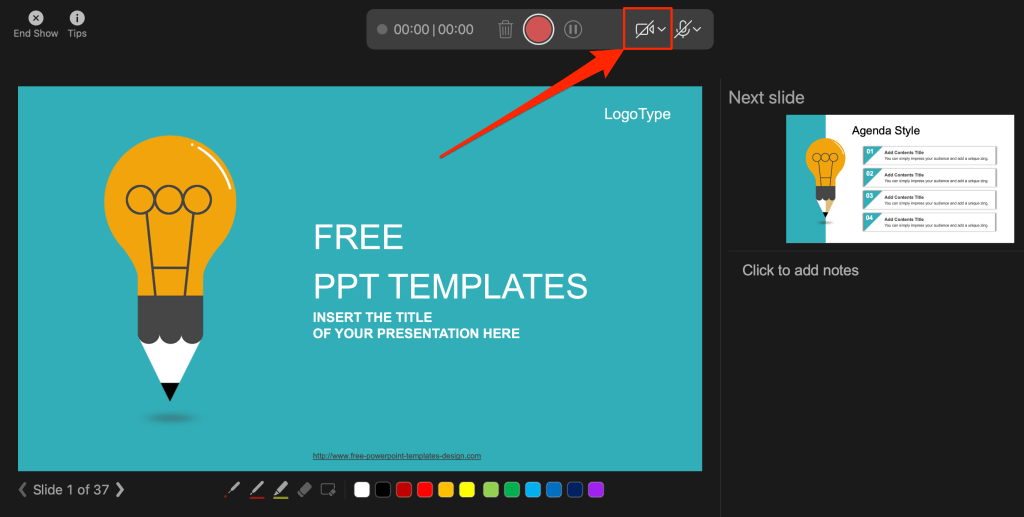
Note: The recording tool greys out the camcorder icon if your microphone is turned off.
Enable or Disable Camera Preview
PowerPoint allows you to disable the camera preview without turning off your camera or webcam.
Press Ctrl + J (Windows) or select the Camera Preview icon in the bottom-right corner to disable or enable the camera preview.
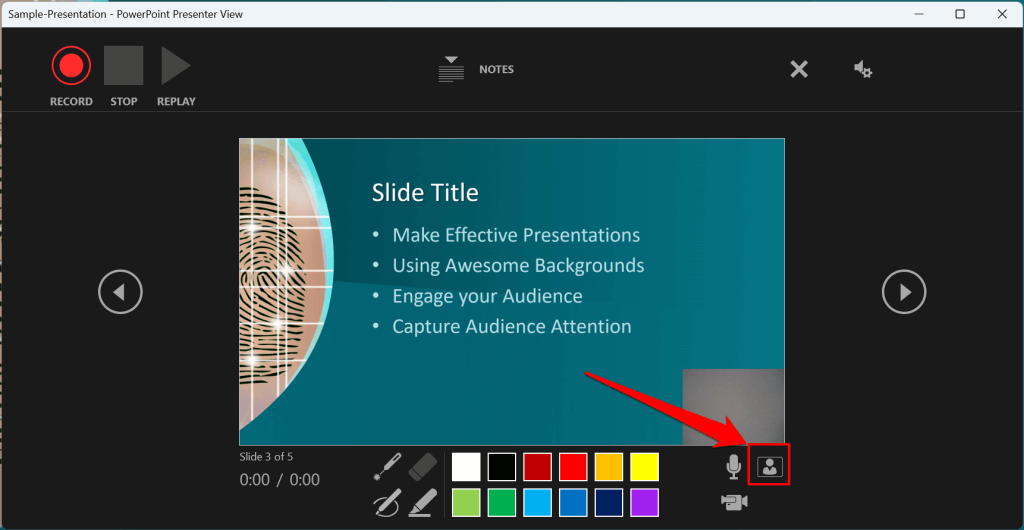
End a Recording
Press S on your Windows keyboard or select the Stop icon to end the recording.
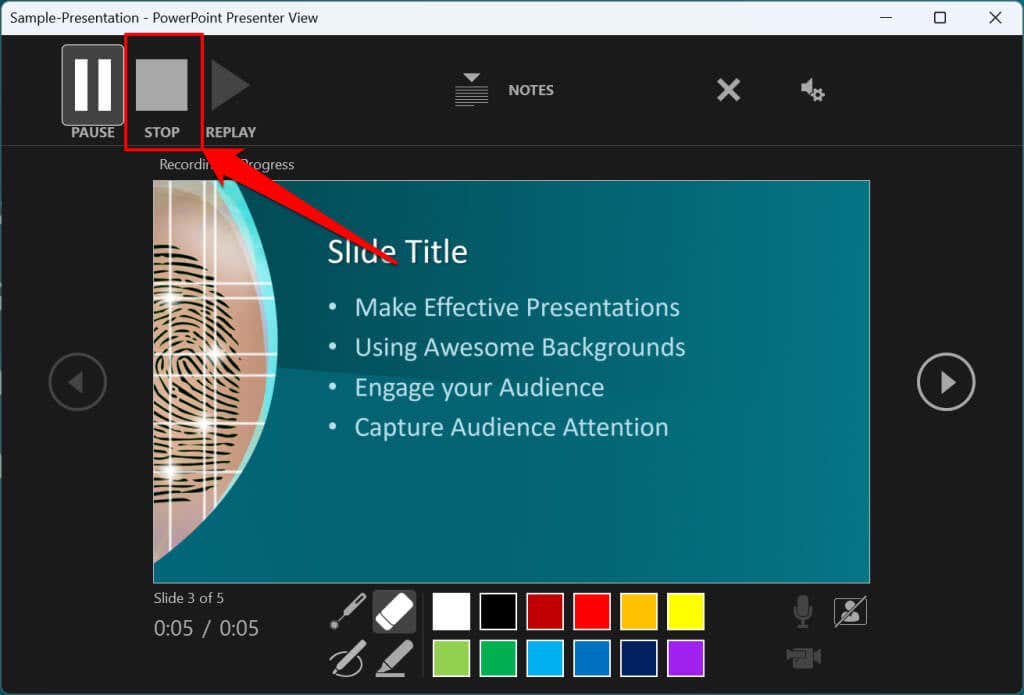
Replay or Preview Your Recording
When you end a narration, press V on your keyboard or select Replay to preview or watch the recording.
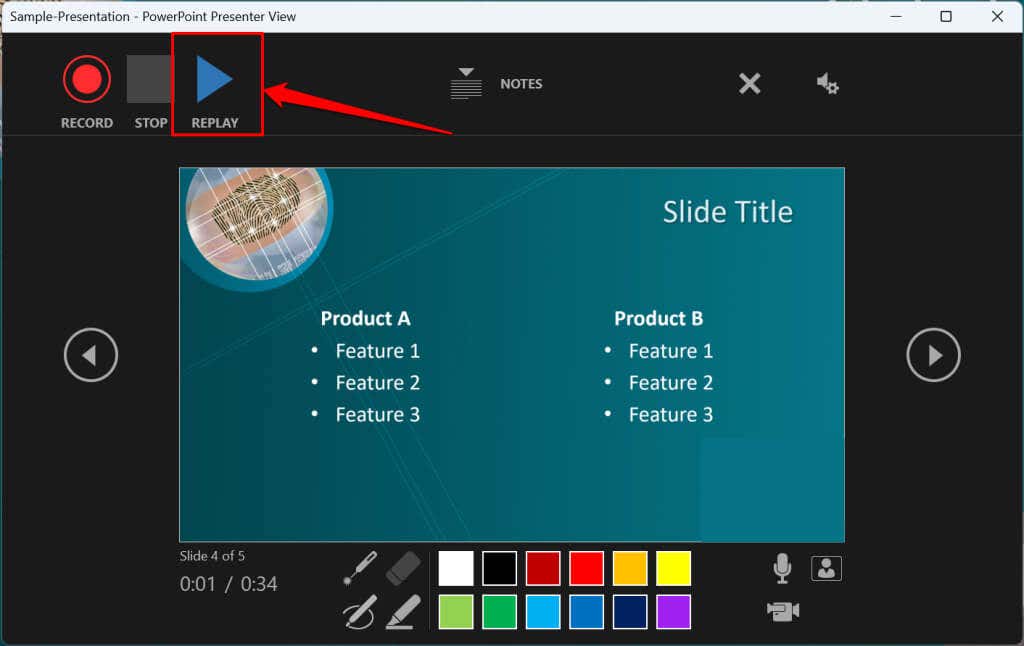
The recorded narration will include all pen inks, highlights, and laser pointer gestures made during the presentation.
You can also preview/replay the narration outside the recording tool. Open the Slide Show tab and choose to watch the playback From Beginning or From Current Slide .
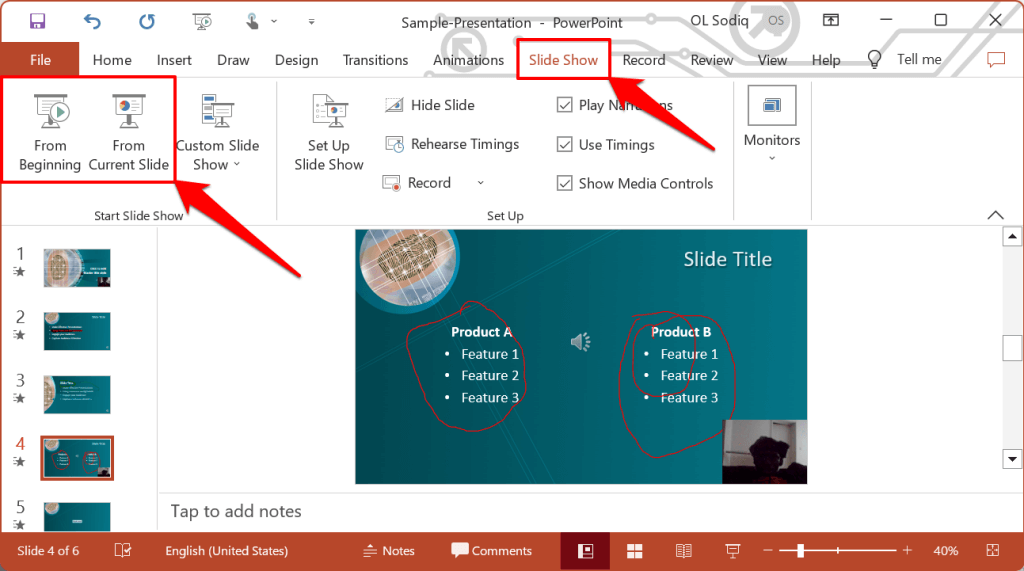
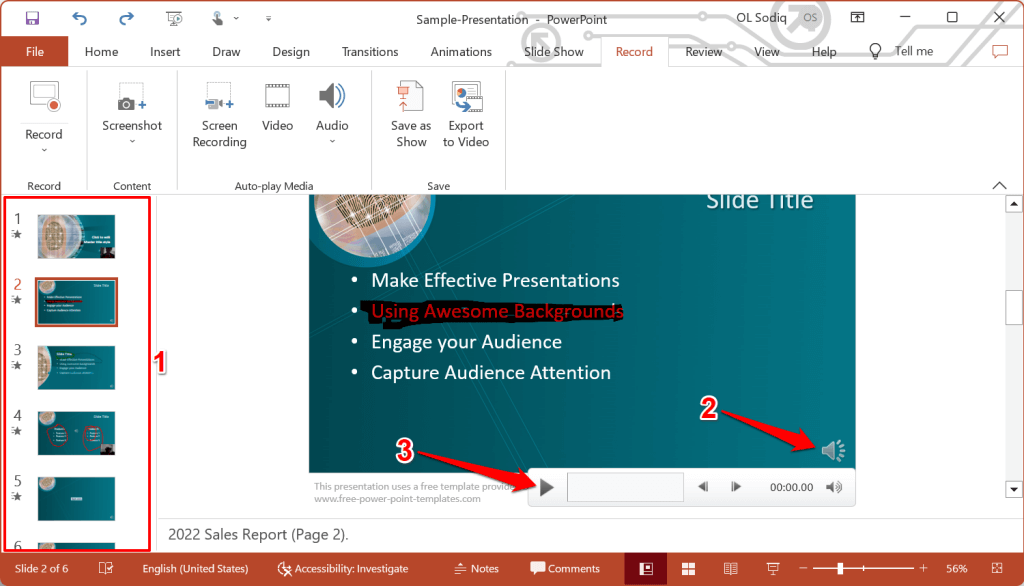
PowerPoint allows you to preview the playback on individual slides. A speaker/audio icon appears in the bottom-right of PowerPoint slides with narrations.
Choose the slide you want to preview, hover your cursor on the speaker icon in the bottom-right corner, and select Play .
Delete Current Narration/Recording
Did you spot an error when previewing your presentation? Want to delete the current narration and start from scratch?
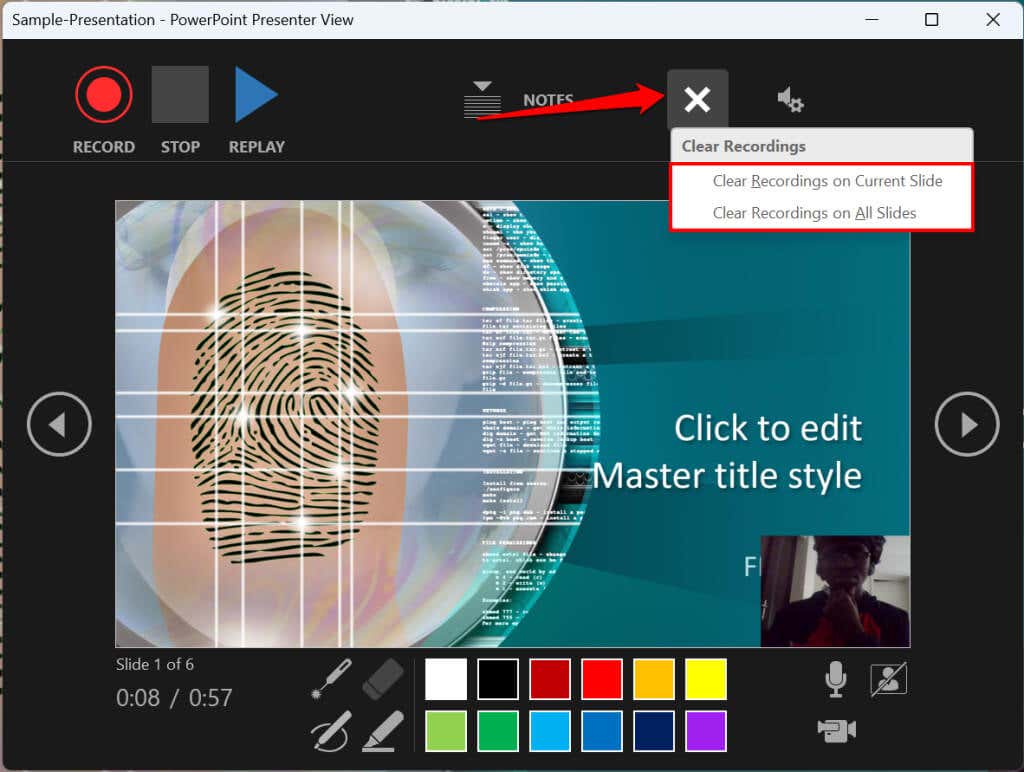
Select the Clear existing recordings icon and choose whether to Clear Recordings on Current Slide or Clear Recordings on All Slides .
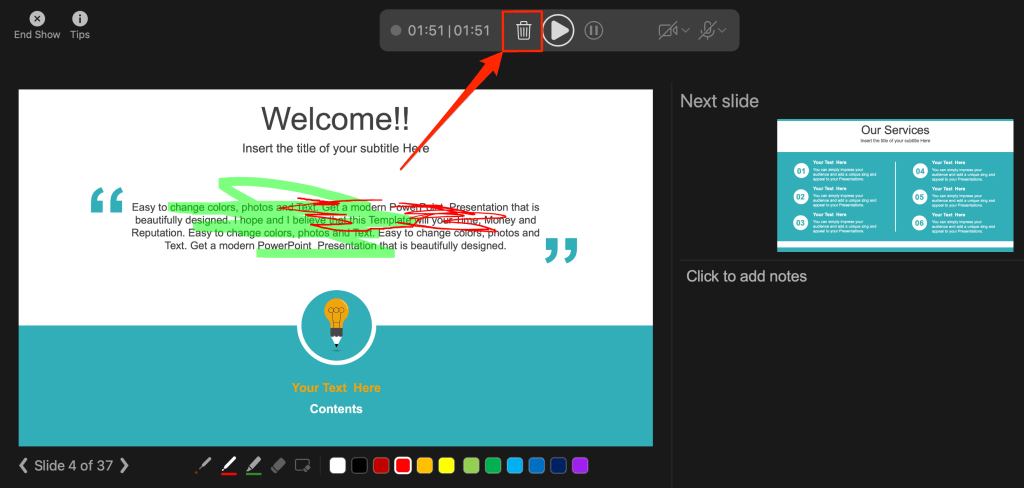
On Mac, select the Bin icon to delete the entire narration/recording.
Close the Narration Tool
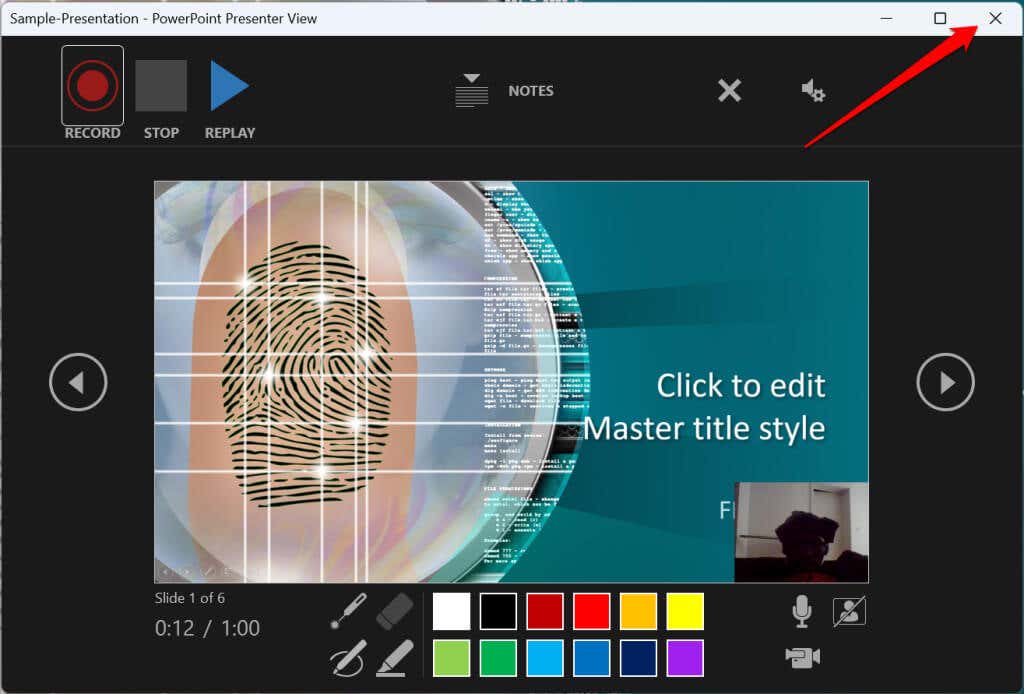
Select the X icon on the title bar to close the presentation narration tool and return to Powerpoint.
Select End Show in the top-left corner to close the recording tool on a Mac computer.
Delete Narrations from Slides
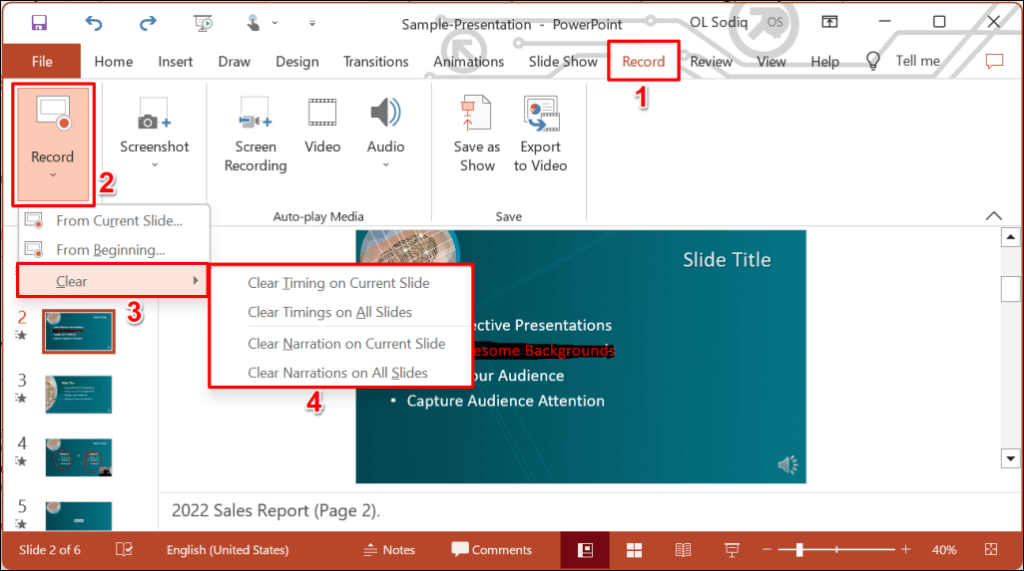
Want to delete the narration or timing on an individual slide or the entire presentation? Select the slide with the narration you want to delete and follow the steps below.
- Open the Record tab and select the down-facing arrow below the Record icon.
- Select Clear and choose to clear timing or narration on current or all slides.
Export Recorded or Narrated Presentation
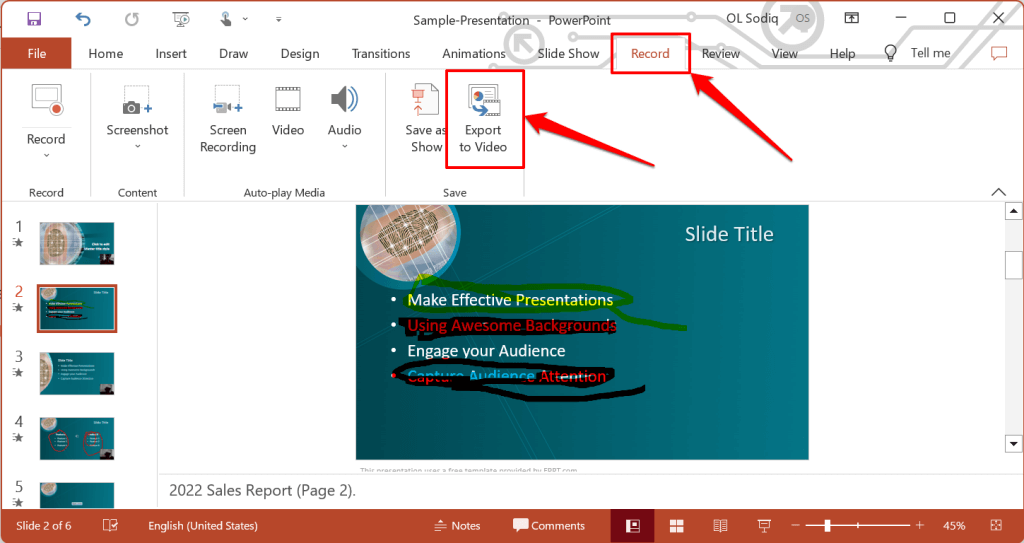
You can export a narrated PowerPoint presentation as a video file. The video output includes ink strokes, recorded audio/video, laser pointer gestures, and webcam/camera recording.
- Open the Record tab and select Export to Video .
Alternatively, open the File menu, select Export on the sidebar, and select Create a Video .
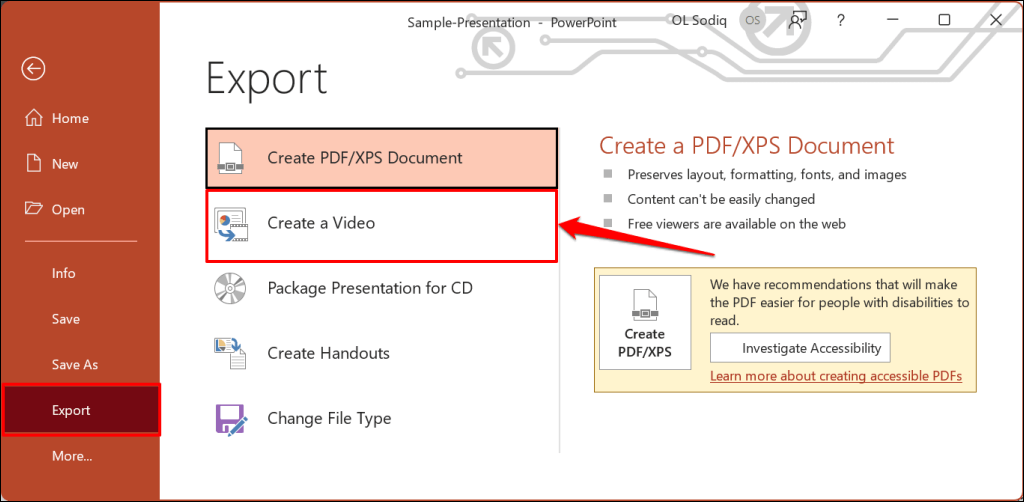
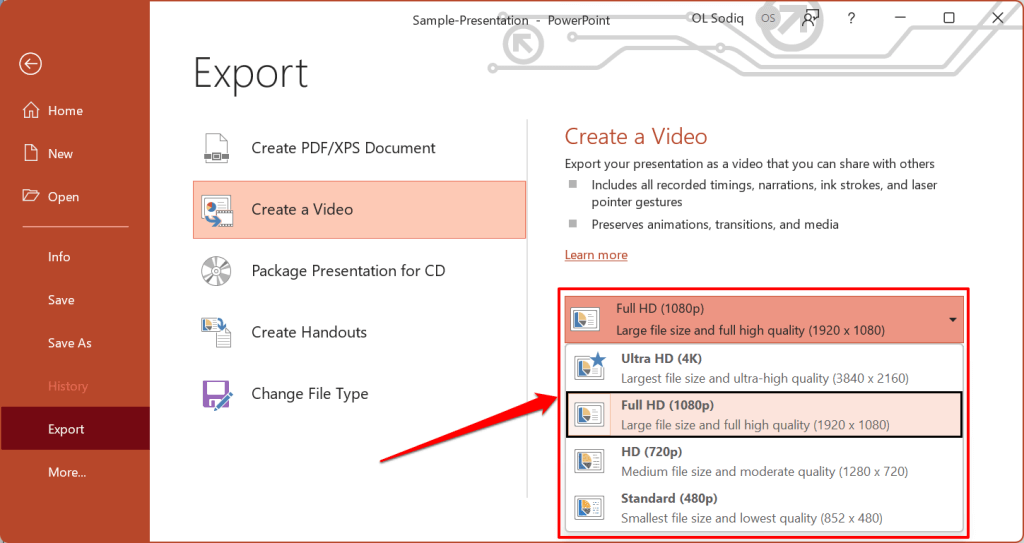
- Choose the quality of the video export in the first drop-down box—Ultra HD (4K), Full HD (1080p), HD (720p), Standard (480p).
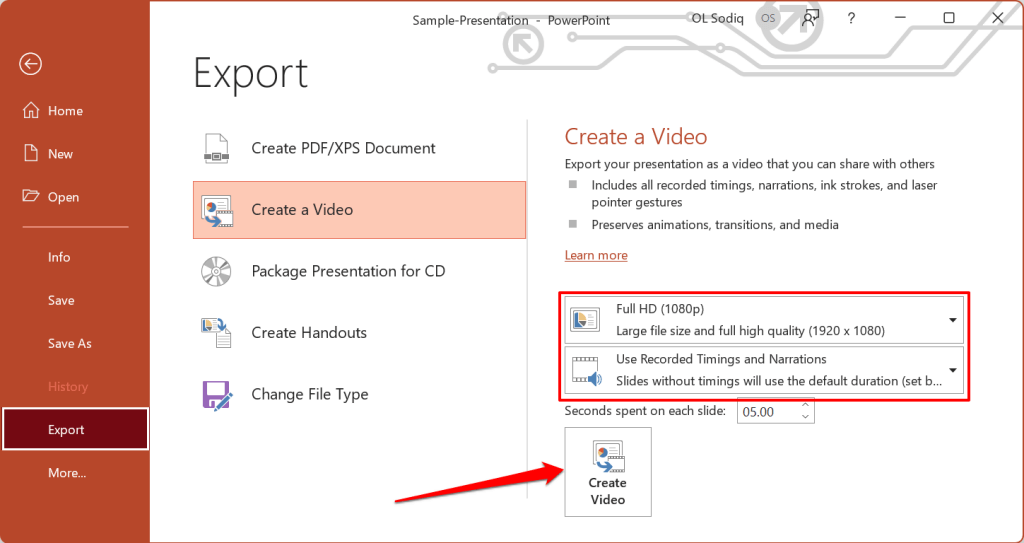
- Choose Use Recorded Timings and Narrations in the next drop-down box and select Create Video .
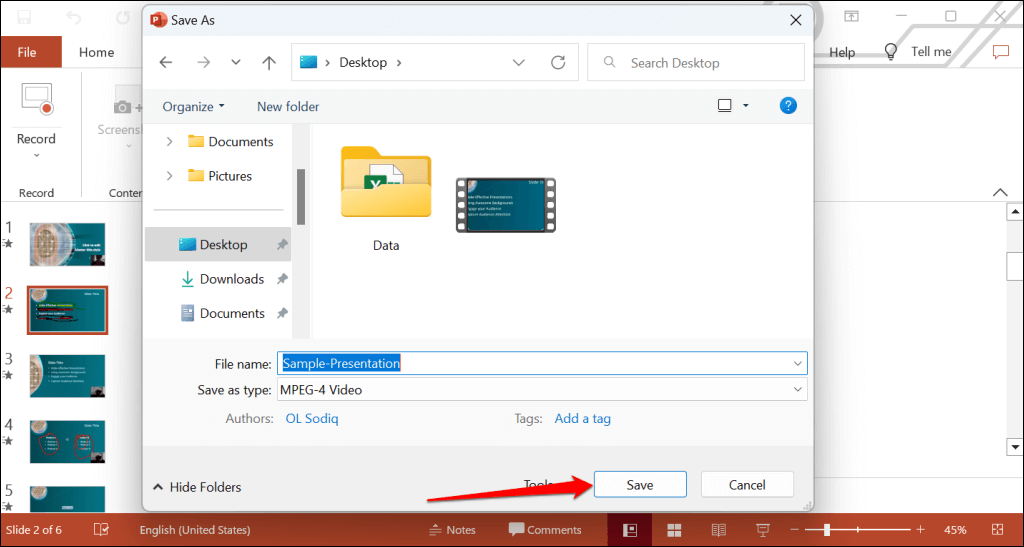
- Give the recorded presentation a file name and select Save .
Narrate Your PowerPoint Presentations
The Microsoft PowerPoint web app doesn’t have a recording tool. As a result, you can only record presentations with narrations using PowerPoint for Windows or Mac.
You might meet issues recording a slide show if you use an outdated version of PowerPoint. Also, the recording tool on older versions of PowerPoint has a different interface and lacks some controls. Update PowerPoint and restart your computer if you cannot record a slide show.
Sodiq has written thousands of tutorials, guides, and explainers over the past 4 years to help people solve problems with Android, iOS, Mac, and Windows devices. He also enjoys reviewing consumer tech products (smartphones, smart home devices, accessories, etc.) and binge-watching comedy series in his spare time. Read Sodiq's Full Bio
Read More Posts:

Leave a Reply
Your email address will not be published. Required fields are marked *
Home Blog PowerPoint Tutorials How to Record a Presentation in PowerPoint
How to Record a Presentation in PowerPoint
Recording PowerPoint presentations can have several benefits. They can serve as recordings of a session that can be uploaded online, shared with participants who might not be able to attend a presentation session, or used as tutorials for passing on instructions.
How to Record a PowerPoint Presentation
PowerPoint provides multiple options for initiating recording for a presentation. You can also choose to record audio and yourself presenting the slides using your camera. When recording your presentations, you can choose PowerPoint templates or something minimalist made by you to record the session. Just be mindful of the graphics to ensure the video does not appear overpowering to the viewer.
How do I Record a PowerPoint Presentation as a Video?
You can start recording your presentation using the following method.
- Record Tab: To record a PowerPoint presentation, go to the Record tab and select whether you wish to record from the beginning, from the current slide, a specific area on the screen, or record audio.
- Slide Show Tab: you can also initiate recording a PPT via Slide Show -> Record to initiate recording from the current slide or the beginning of your presentation.
Record Button: If you’re using the latest version of PowerPoint, you can start Recording your presentation from the current slide via the Record button in the top right corner.
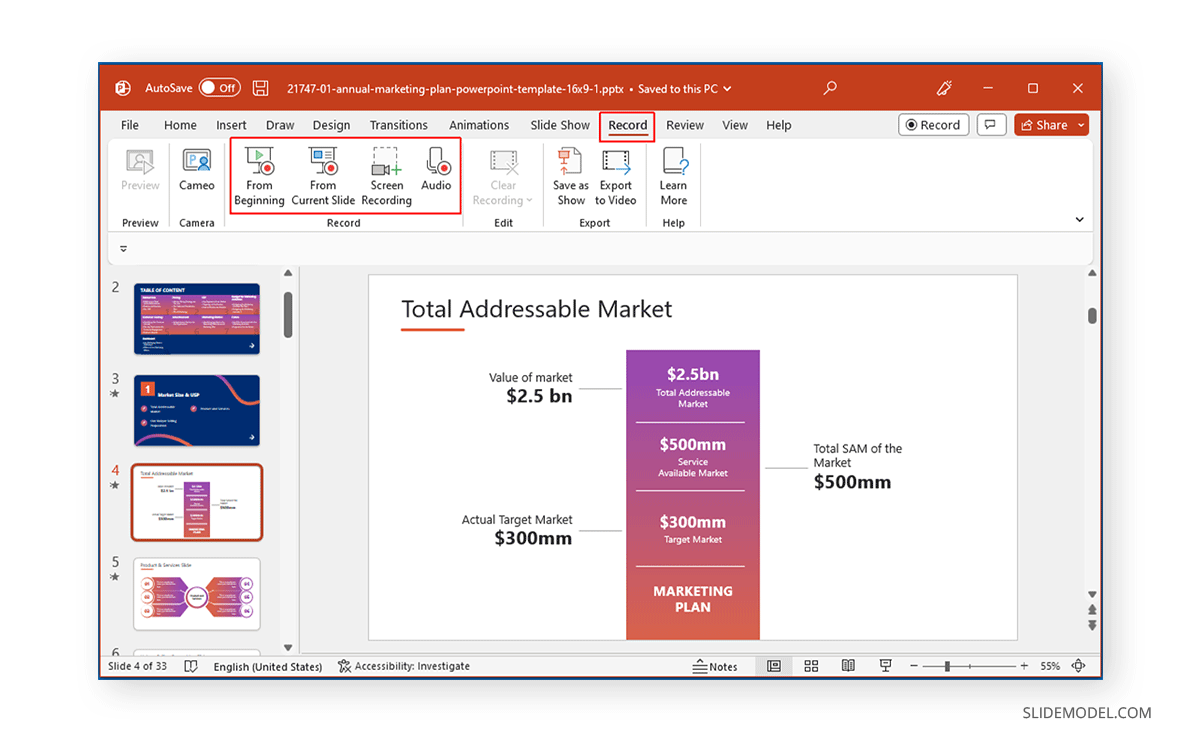
Record from the Current Slide or Beginning of the Presentation
Starting your recording from the beginning of the current slide will open your presentation in recording mode. Hit Record to start the recording.
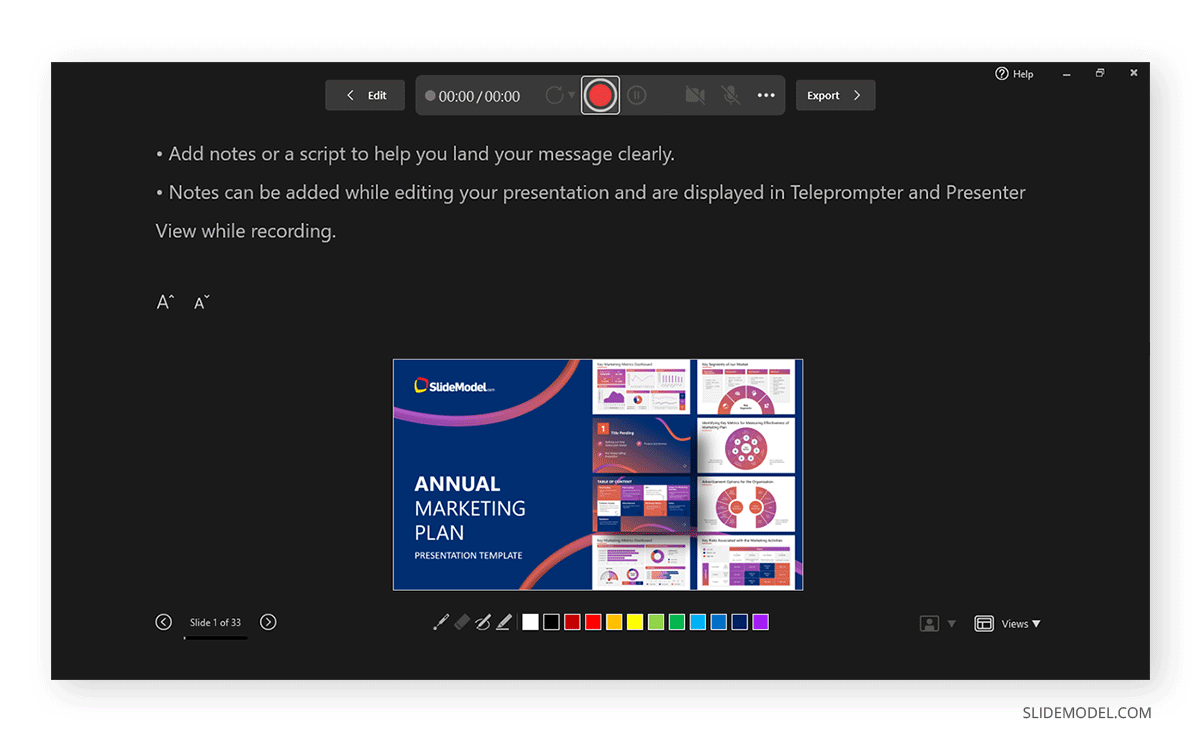
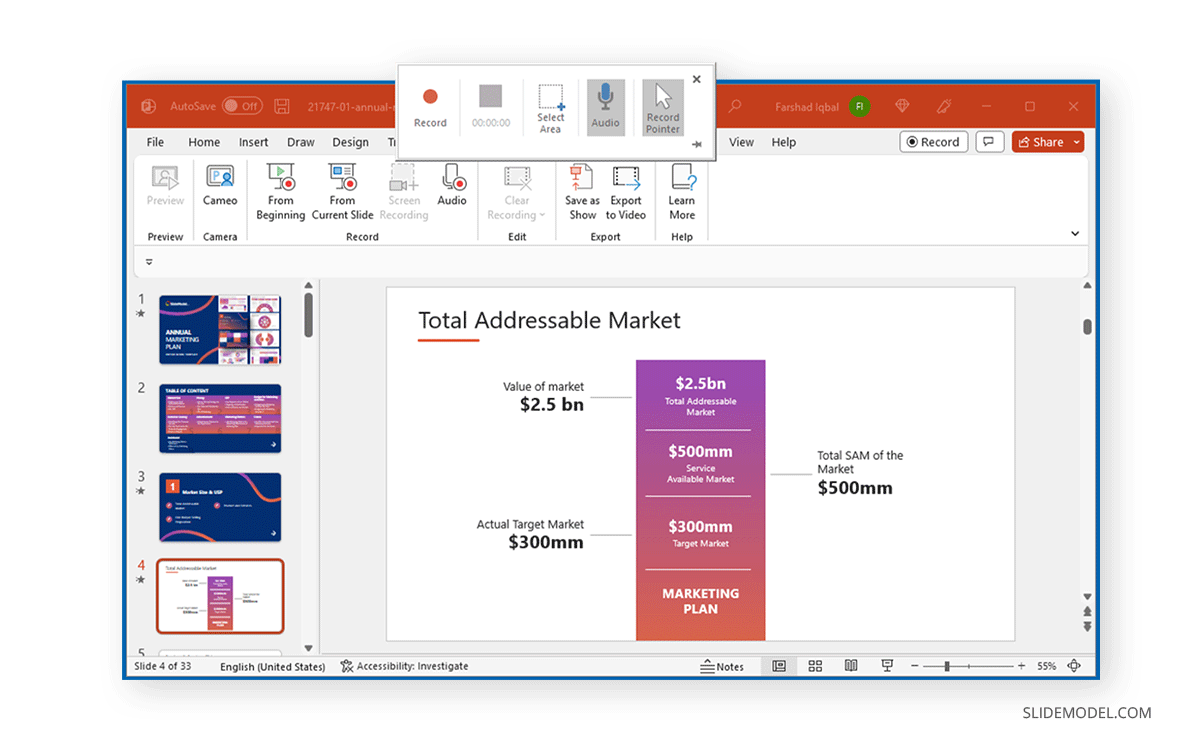
Screen Recording in PowerPoint
If you initiate screen recording in PowerPoint, you can start recording a screencast by selecting the area you wish to record. This is similar to recording a PowerPoint presentation as a video, with the added advantage of recording other parts of your desktop. This method can also be used for recording a screencast, even if you’re not using a PowerPoint presentation in your video recording.
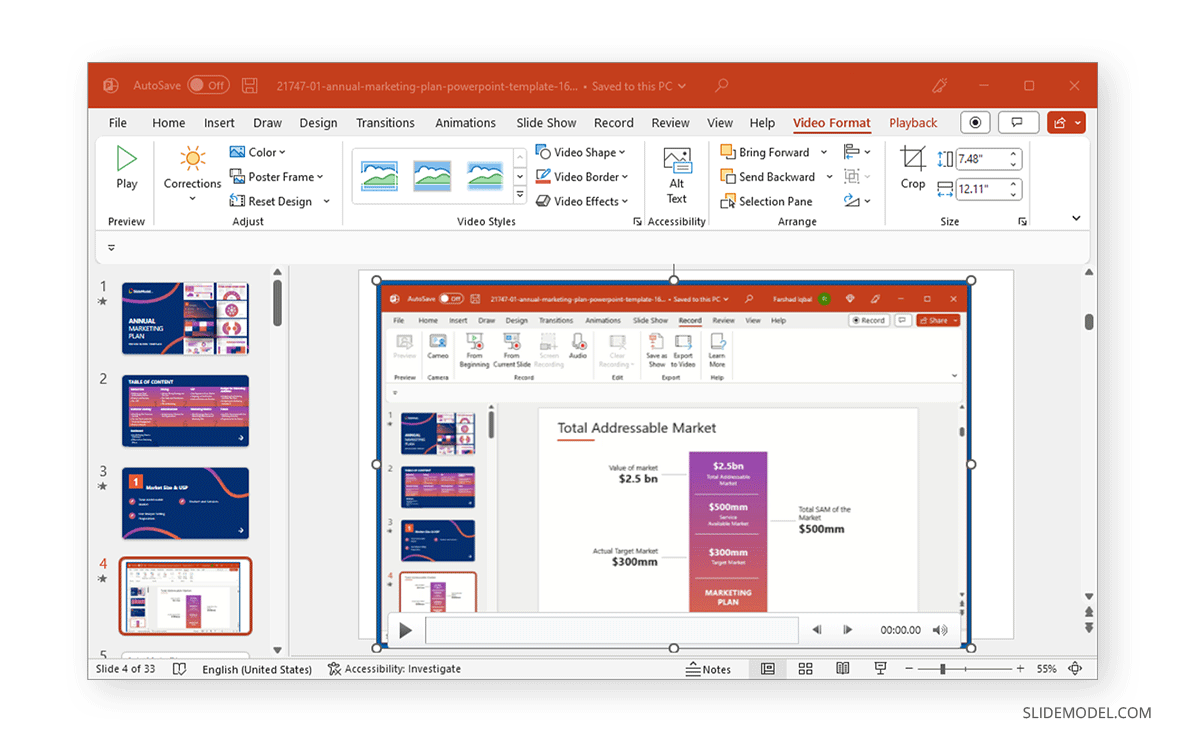
To start the recording, click Record or use the Windows+SHIFT+R hotkey. To stop the screen recording, click Pause to temporarily halt the recording to resume later or Stop or the Windows+SHIFT+Q hotkey to end the recording session.
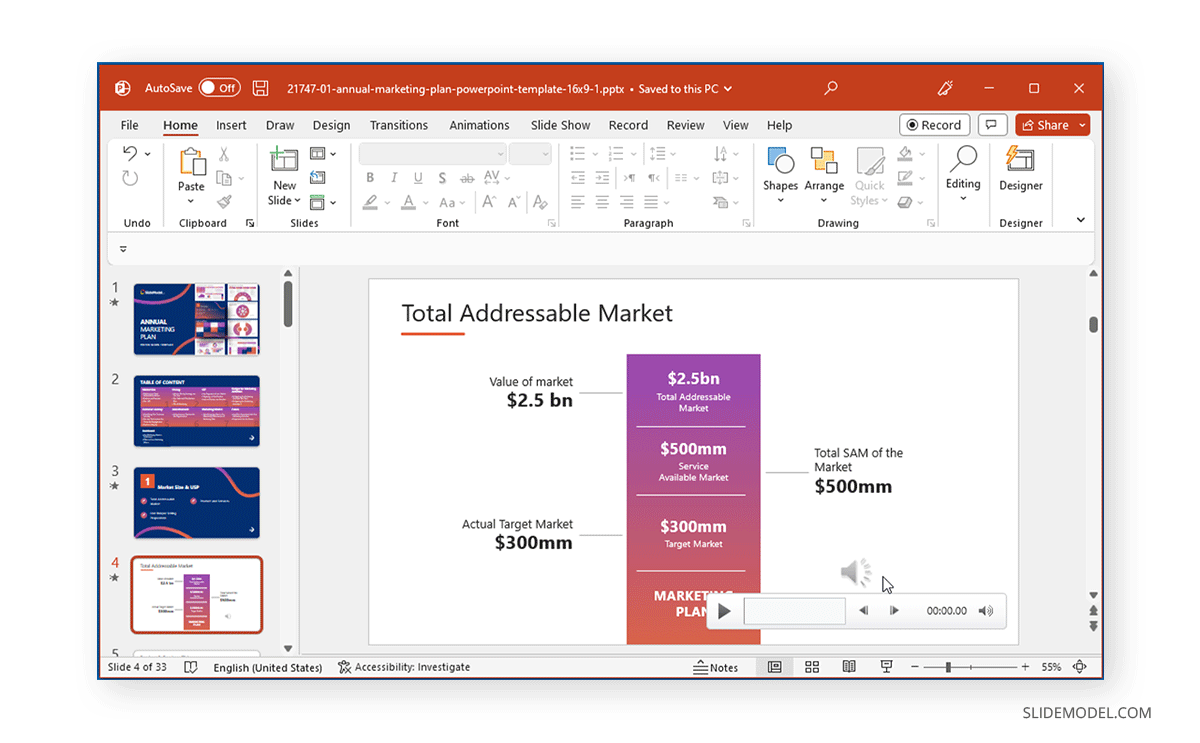
The recorded video will be instantly added to your slide once you click Stop .
Record Audio
Another option in the Record tab in PowerPoint is to record audio narrations for your PowerPoint presentation. Simply click Record to start, Pause to temporarily halt, and Stop to stop the recording process.
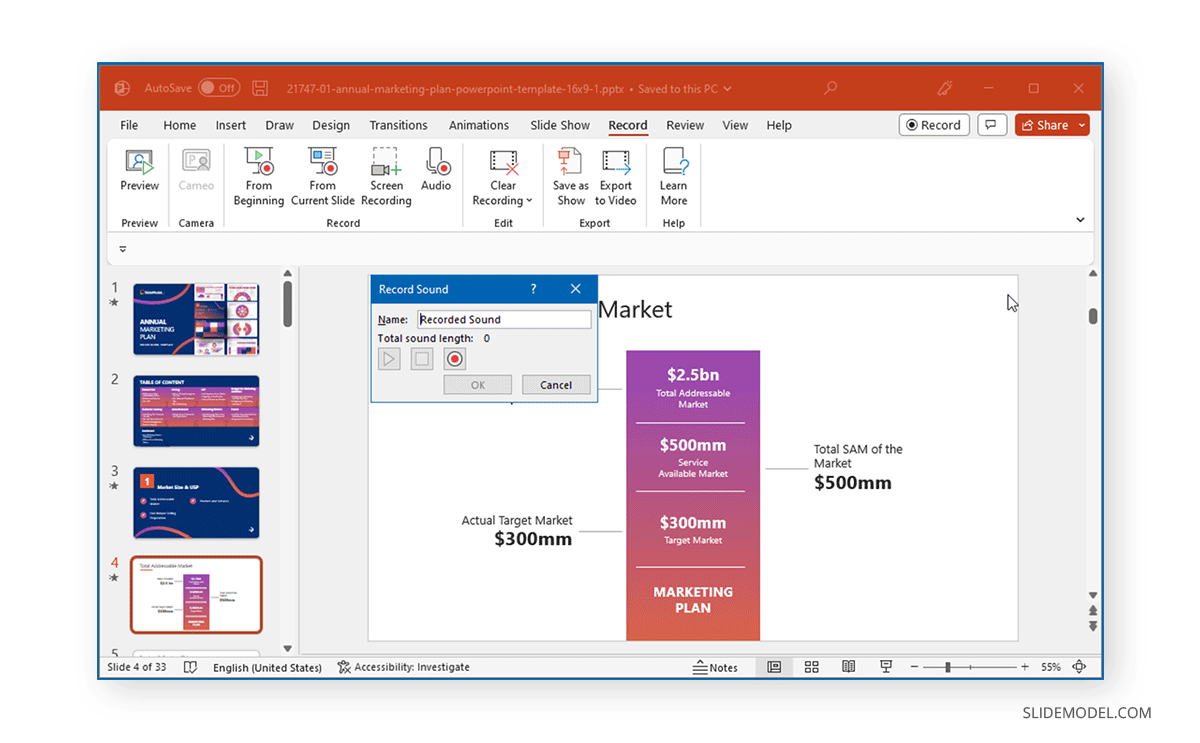
Once the recording stops, the audio will be added to your PowerPoint presentation.
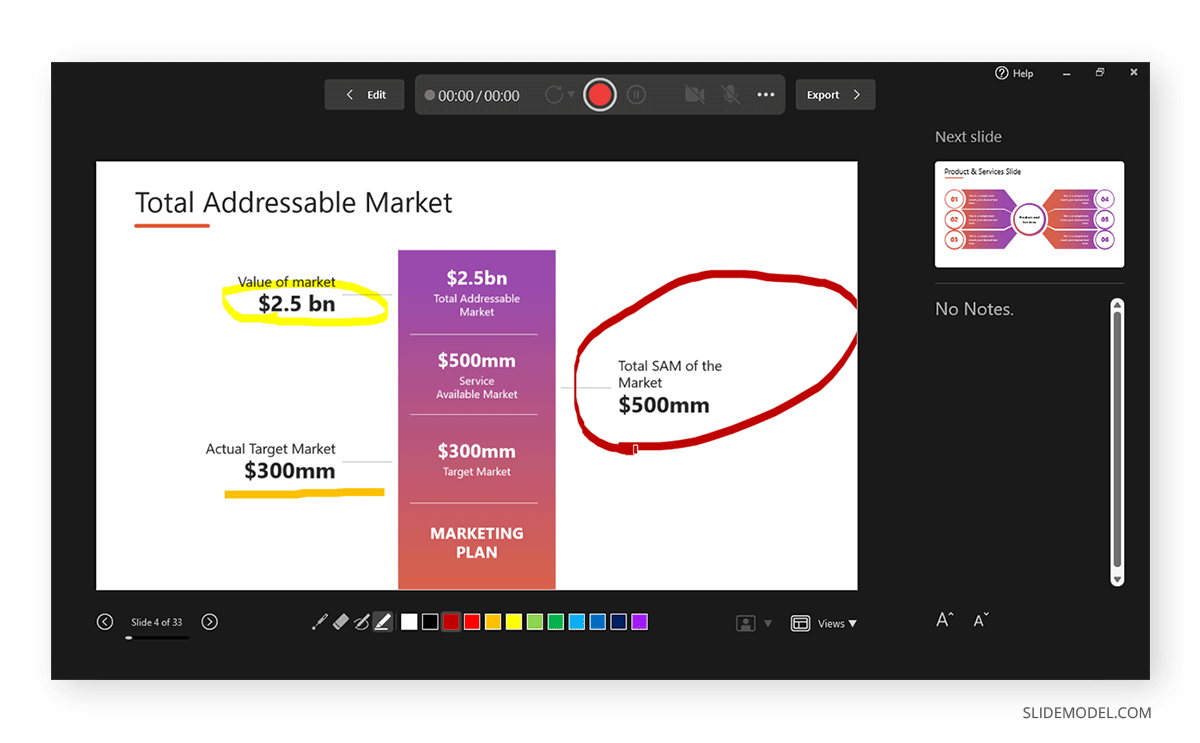
How can I Annotate Slides in PowerPoint During a Recording?
Once you enter recording mode, you can start annotating your slides using the Pen or Highlighter tool. Other tools in the menu include a Laser pointer and Eraser.
How can I Record a PowerPoint Presentation with Audio?
To enable audio for your Powerpoint recording, unmute the mic from the audio icon on top, CTRL+M hotkey, or click the three dots ( More options for recording menu), followed by the Microphone to select the audio device for recording. You can only record audio if an audio device is connected to your computer. This is a fairly simple process, unlike other presentation platforms. For example, in an earlier article, we showed you how to do a voiceover on Google Slides , which entails a slightly more elaborate process.
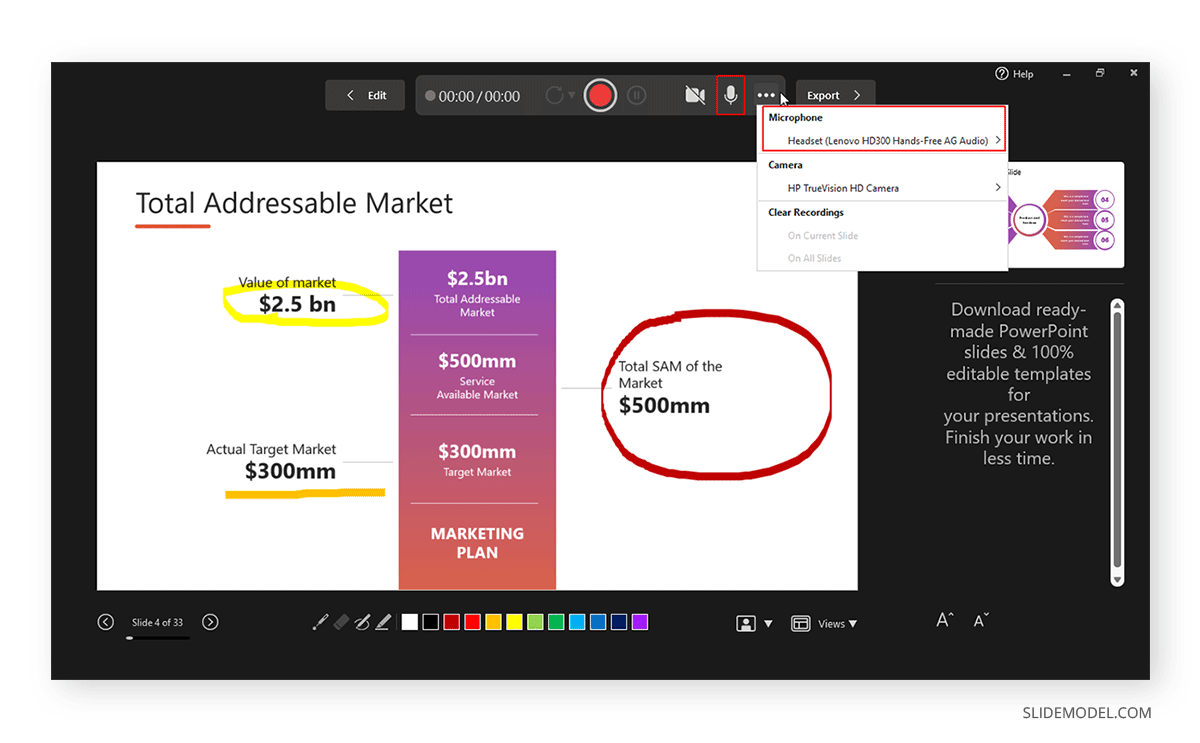
How to Record Yourself Presenting a PowerPoint?
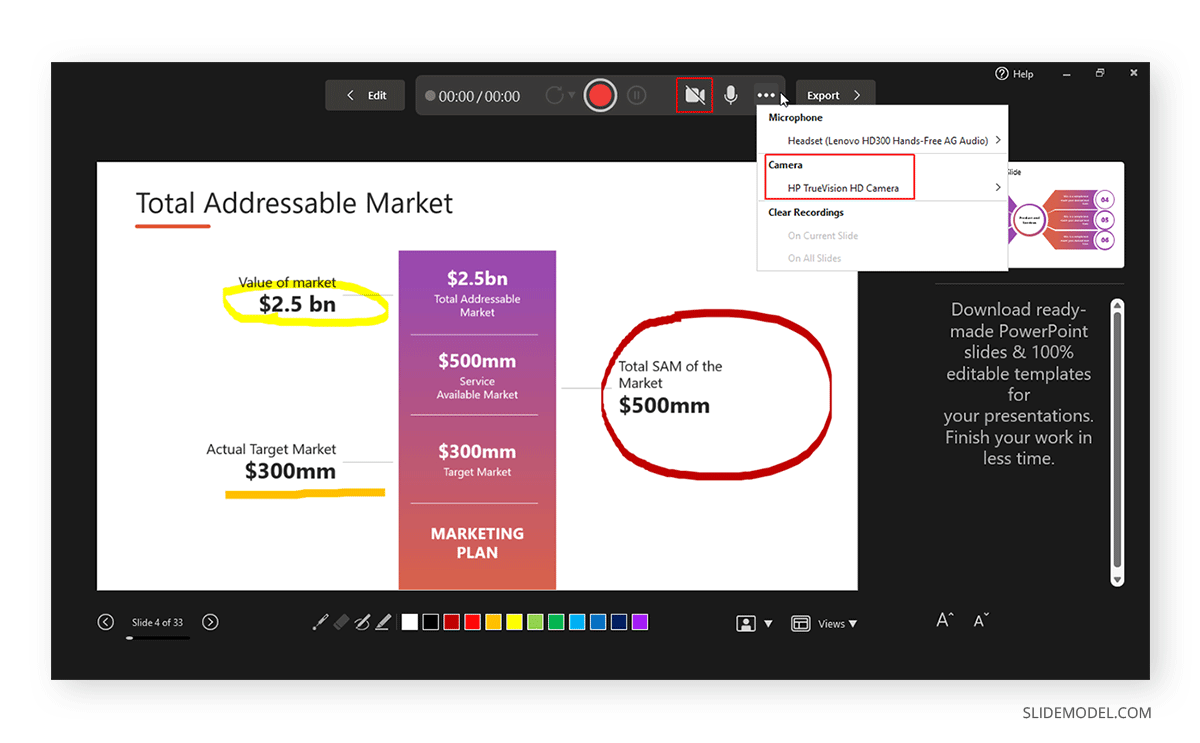
Enable the camera during a recording session.
Like turning on audio, you can toggle the camera on or off using the icon on top. The camera input device can also be selected via the Camera option or CTRL+K hotkey, which can be revealed via the three dots from the top menu.
Insert Video Recording in a Slide using Cameo
PowerPoint’s Cameo feature enables recording a video to insert in a slide. You can use the feature to quickly insert a video message in your slides that can be played during a presentation session. This option might also be relevant if you intend to convert PowerPoint to video . If you are looking how to video record yourself presenting a PowerPoint, then follow the steps below.
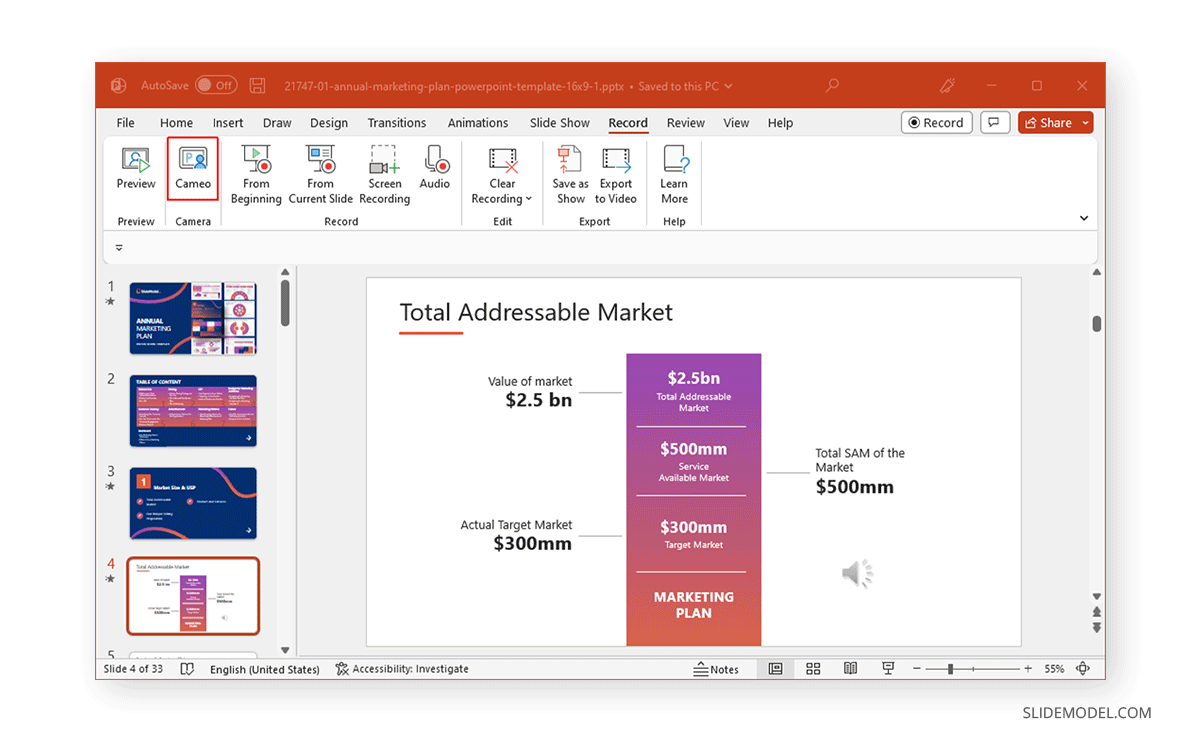
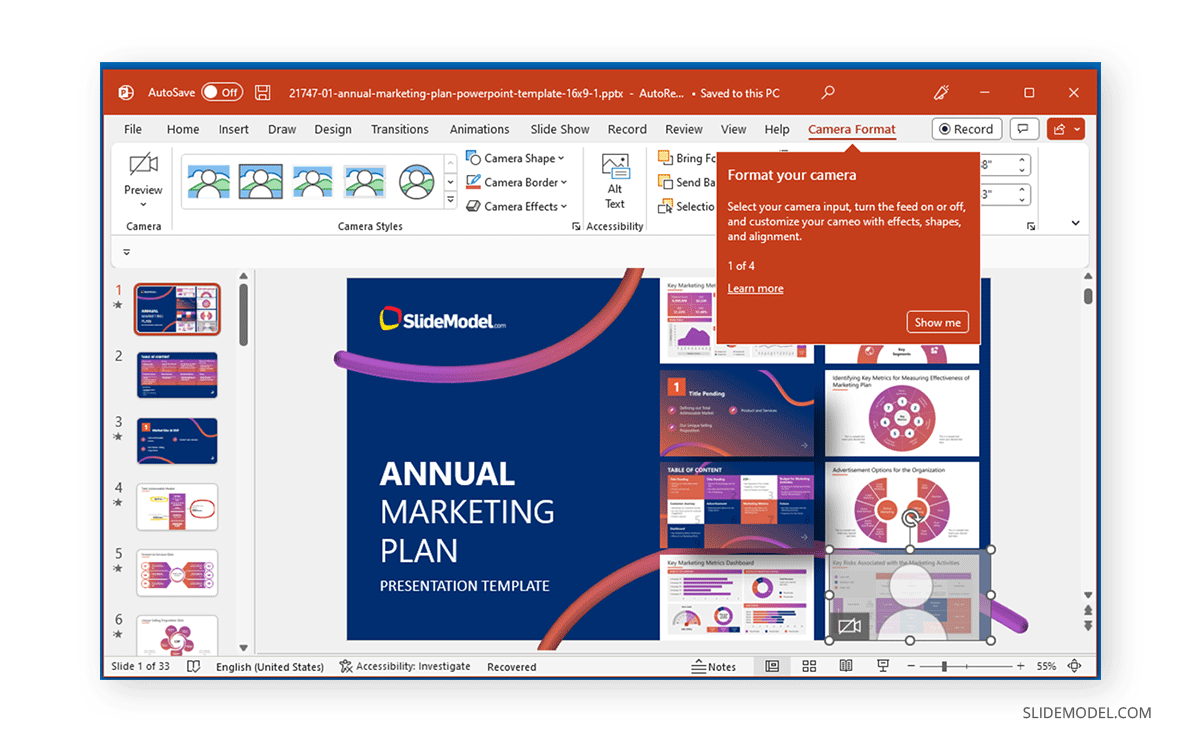
Once Cameo is turned on, you can also choose to stylize the camera shape, style, border, and add effects. Cameo is quite a unique feature in PowerPoint that currently does not have alternatives in rival presentation apps. For example, you cannot use a similar feature if you wish to convert Google Slides to video .
How to Save Recording for a PowerPoint Presentation?
After you have completed your recording, click Export to save the presentation recording.
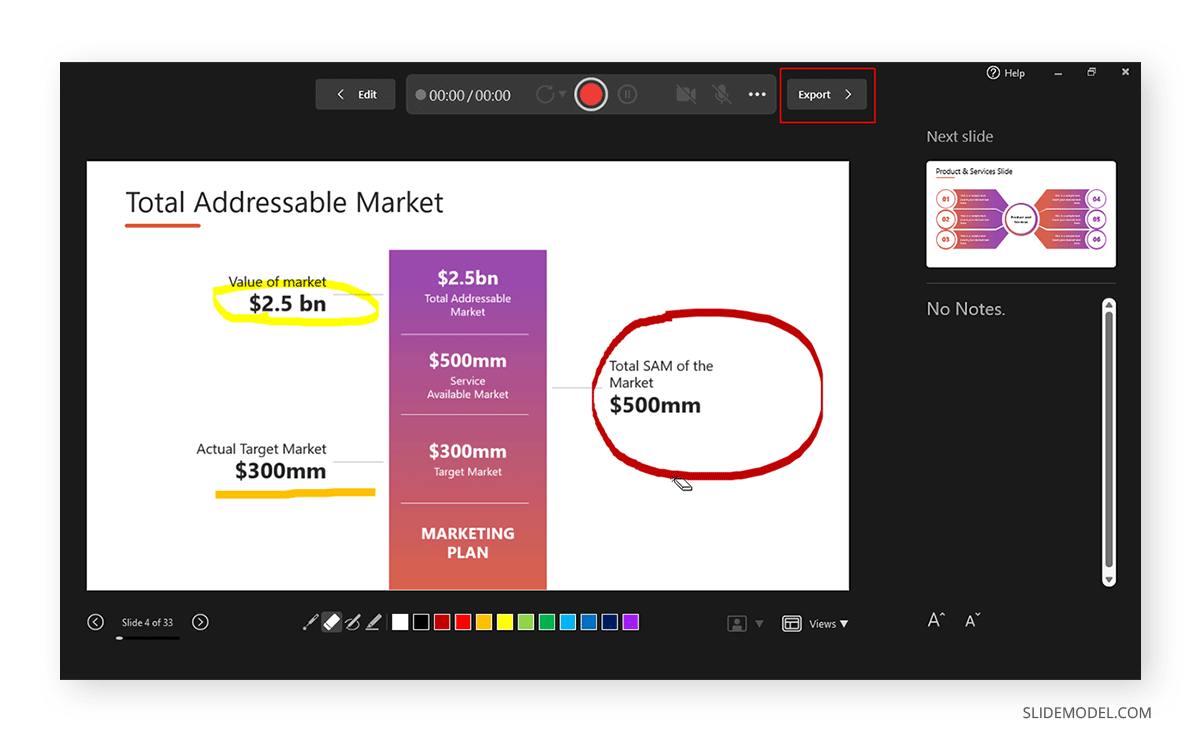
You can customize your recording settings via Customize Export or continue the process via Export Video .
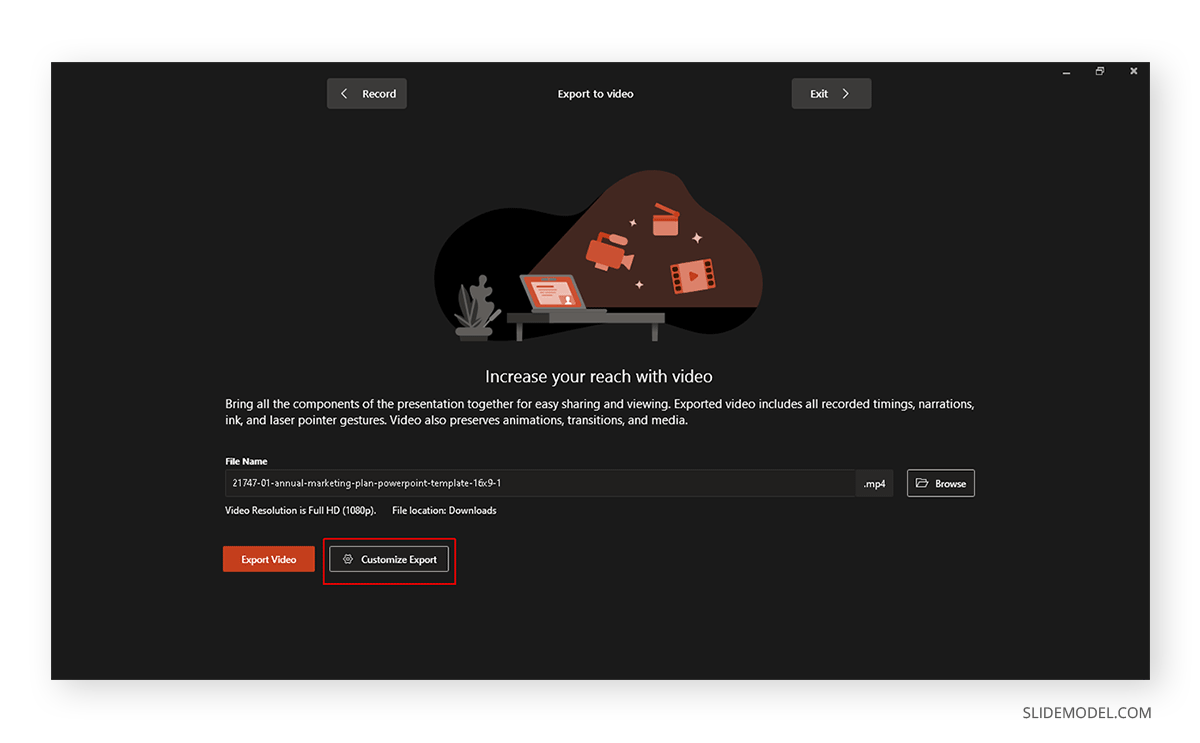
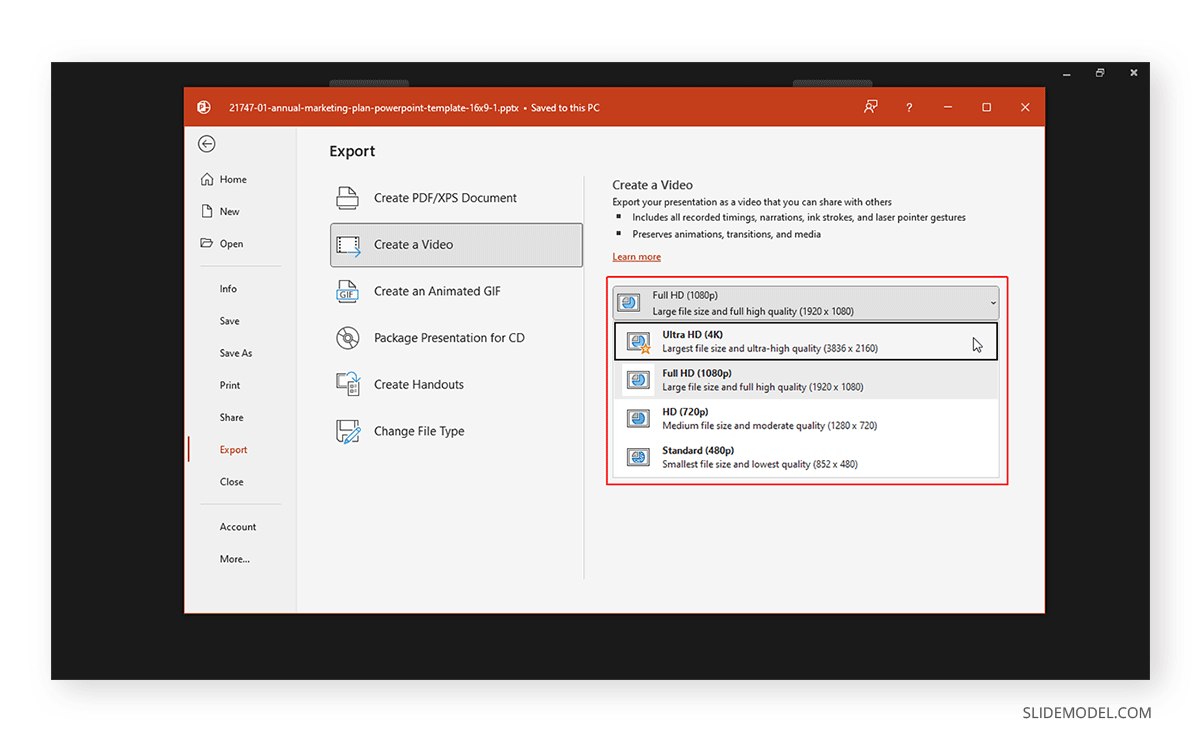
Using the Customize Export option, you can choose between a desired output quality for your video, including Ultra HD (4K), Full HD (1080p), HD (720p), and Standard (480p).
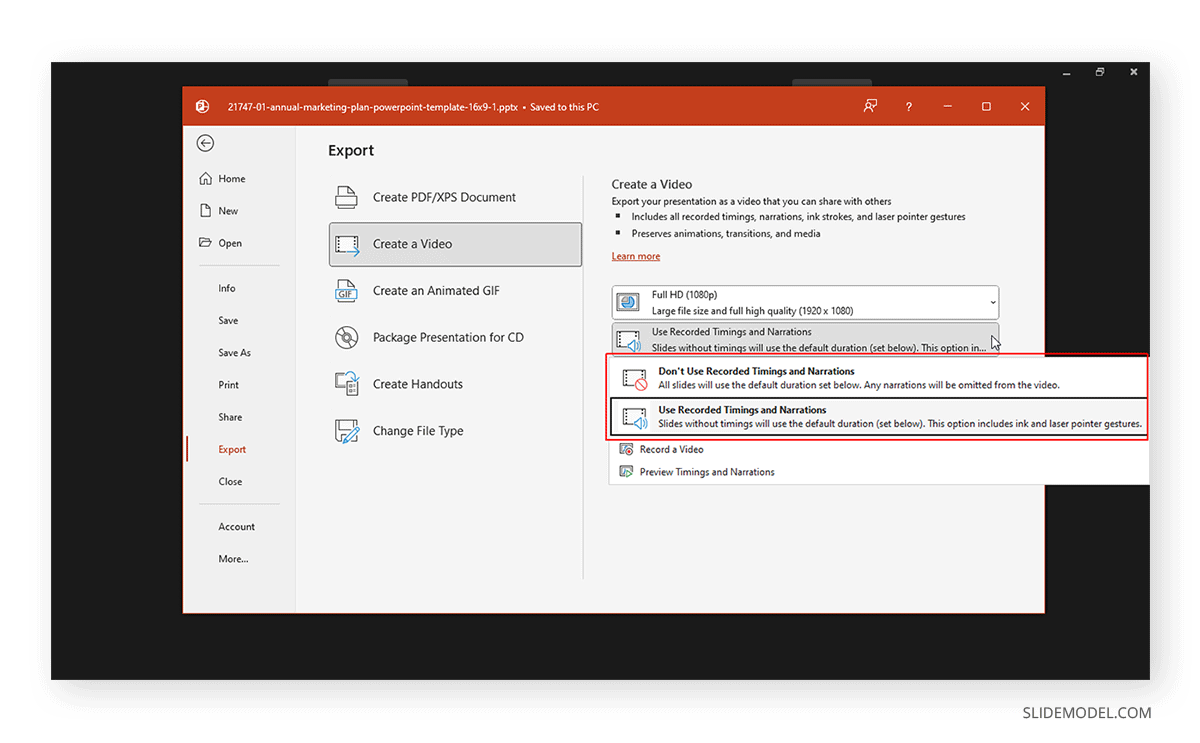
Other options in the menu include the ability to choose and preview timings and narrations.
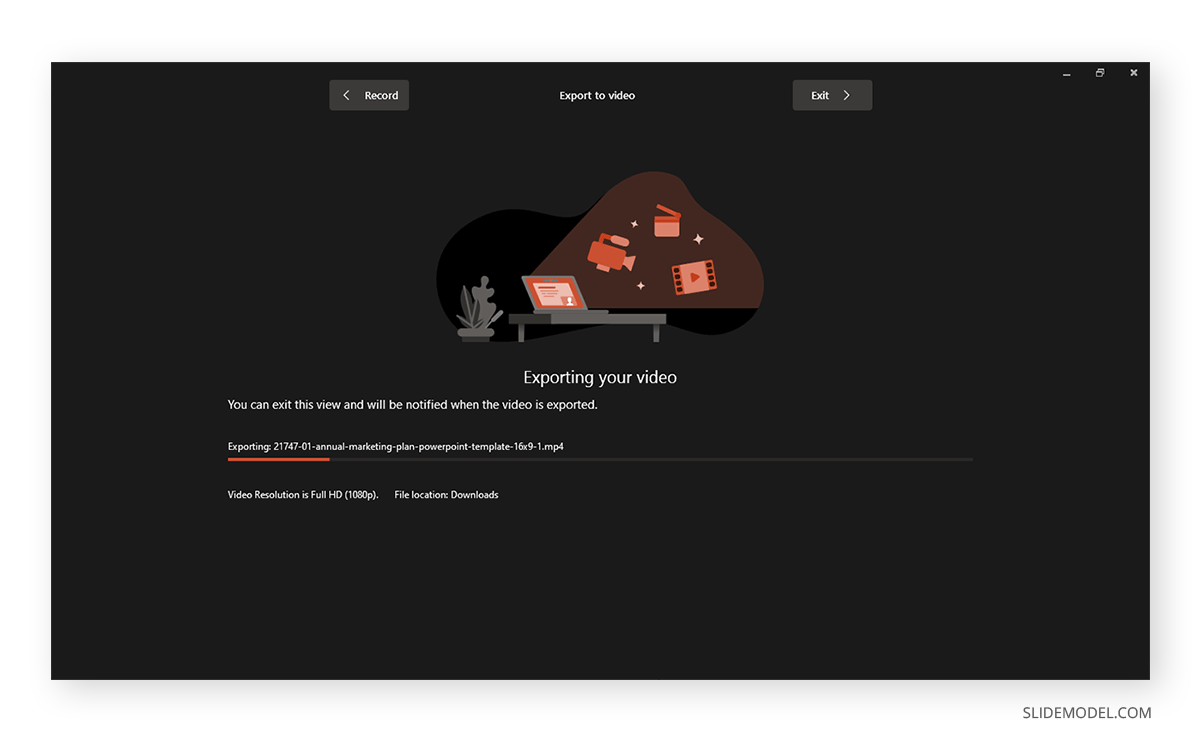
After you are satisfied with your recording settings, you can export your presentation to video.
The video recording of your PowerPoint presentation can be played using any standard video player. The video can also be embedded in PowerPoint slides, uploaded online, such as to a YouTube channel, or shared via cloud storage apps like Dropbox, Box, OneDrive, etc.
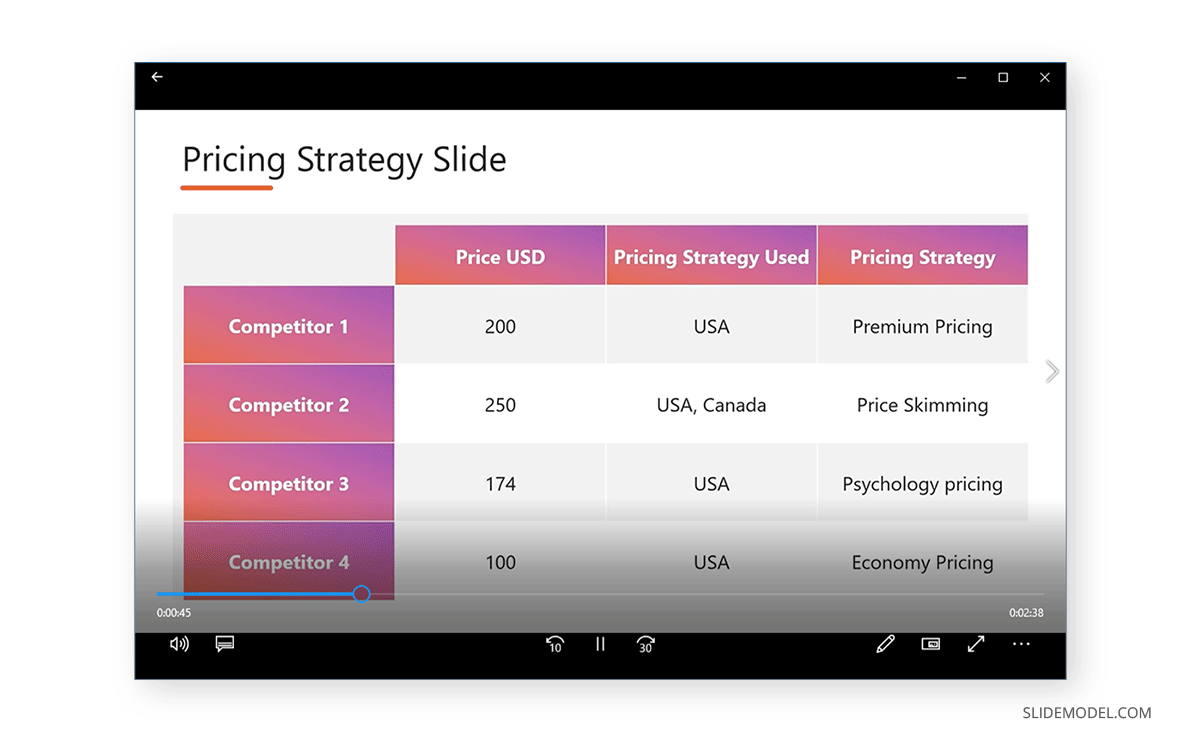
Final Words
Recording a PowerPoint presentation can provide a record of a session that might be required for further sharing. The best way to record a presentation is to ensure that your slides aren’t visually overpowering, your audio is clear and audible, and if using a camera, the cam input isn’t hazy, grainy, or too dark.
Once you are familiar with how to record a presentation on PowerPoint, it might take a bit of practice to make your video recording look professional and crisp. It’s best to practice your sessions before recording them until you can seamlessly record presentation decks.
Like this article? Please share
PowerPoint Addins, PowerPoint Tips, Presentation Tips, Presentations, Screencasts Filed under PowerPoint Tutorials
Related Articles
Filed under Google Slides Tutorials • May 3rd, 2024
How to Work with Google Slides Version History
Go back to previous changes or check who edited your presentation. Learn how to work with Google Slides Version History here.
Filed under Google Slides Tutorials • April 29th, 2024
Best Google Slides Add-Ons
Optimize your Google Slides experience by installing the best Google Slides add-ons available in the market. Full list with photos.
Filed under Design • April 23rd, 2024
How to Create the Perfect Handouts for a Presentation
Learn how to create effective handouts for presentations and the recommended structure for handouts with this guide.
One Response to “How to Record a Presentation in PowerPoint”
How do I generate webcam option in PowerPoint 2016 ?
Leave a Reply
- Start the presentation and see your notes in Presenter view Article
- Add speaker notes to your slides Article
- Rehearse and time the delivery of a presentation Article
- Record a slide show with narration and slide timings Article
- Print your PowerPoint slides, handouts, or notes Article
- Create a self-running presentation Article

Record a slide show with narration and slide timings
You can record your PowerPoint presentation—or a single slide—and capture voice, ink gestures, and your video presence. When completed, it’s like any other presentation. You can play it for your audience in a Slide Show or you can save the presentation as a video file. So, instead of just “handing the deck” to someone, people can see your presentation with the passion and personality intact.
A new feature for Microsoft 365 was rolled out in early 2022. Exactly when your business has this feature is also based on when your admin distributes new features in Microsoft 365.
This article contains procedures for both the new experience and the classic experience:
New experience
Classic experience

All recording tools are in the Record tab in the ribbon, but you can start by selecting the Record button.

You can also record by selecting one of the options in the Record section of the Record tab.

If you have notes in your presentation, they’re turned into text at the top of the screen so you can use them like a teleprompter as you record.
Tip: Use the auto-scroll feature in teleprompter and set it to scroll at your preferred speed.
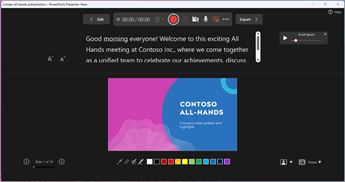
There are several options you can use when you record a presentation. You can turn your camera and microphone on or off by selecting the icons at the top. There are several options you can use when you record a presentation. You can turn your camera and microphone on or off by selecting the icons at the top. To change your camera or microphone, choose the Select more options <···> icon. You can even add a customizable camera that can be resized, repositioned, and formatted to go with your slide content. Select Edit , then select Cameo . Adjust the formatting for the camera, then select Record again to return to the recording environment.
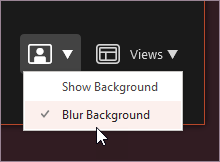
In the Select the camera mode menu, you can select Show Background or Blur Background .
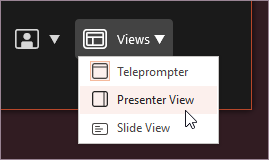
You can also change the layout in the Views menu to switch between Teleprompter , Presenter View , or Slide View .
When you’re ready, select Start recording and a countdown will begin.
Use the onscreen laser, colored pens, or highlighters in the tray below markup slides and it’ll record as well.
To record narration for a specific slide, use the previous or next arrows.
Note: Narration won’t record during slide transitions so let those play first before you start speaking.
Pause the recording as needed or select Stop if you’re done.
To review the video, select the Play button.
To quickly delete and re-record your video on current slide or on all slides, select Delete . While Clear will delete the recorded narration, Reset to Cameo additionally replaces the recorded narration with the camera feed for an easy retake.
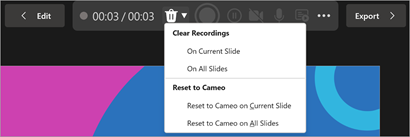
When you’re done, select Export > Export Video .
After you successfully export the video, you can view the video by selecting View and share video .

At any time, you can return to your document by selecting the Edit button.
Want more?
About Record in PowerPoint
Create a self-running presentation
Export or turn your presentation into a video
Classic experience
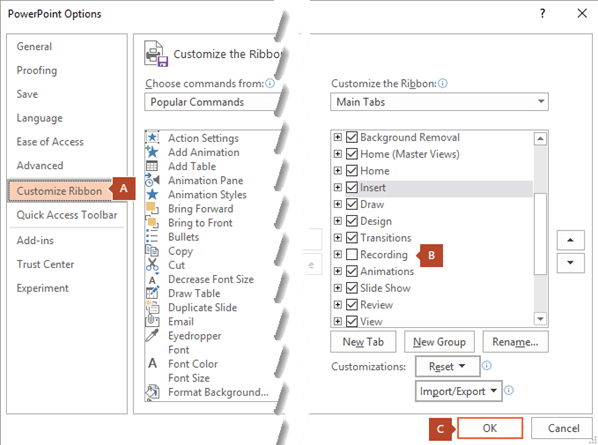
Turn on the Recording tab of the ribbon: On the File tab of the ribbon, click Options . In the Options dialog box, click the Customize Ribbon tab on the left. Then, in the right-hand box that lists the available ribbon tabs, select the Recording check box. Click OK .
To get ready to record, select Record on either the Recording tab or the Slide Show tab of the ribbon.
Clicking the upper half of the button starts you on the current slide.
Clicking the lower half of the button gives you the option to start from the beginning or from the current slide.
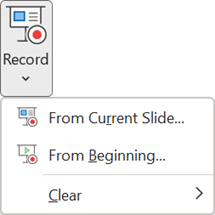
(The Clear command deletes narrations or timings, so be careful when you use it. Clear is grayed out unless you have previously recorded some slides.)
The slide show opens in the Recording window (which looks similar to Presenter view), with buttons at the top left for starting, pausing, and stopping the recording. Click the round, red button (or press R on your keyboard) when you are ready to start the recording. A three-second countdown ensues, then the recording begins.
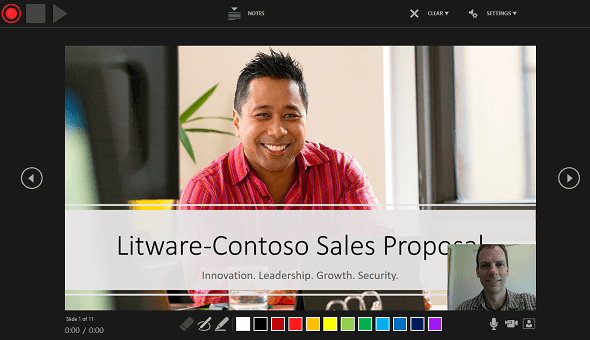
The current slide is shown in the main pane of the Recording window.
You can stop the recording any time by pressing Alt + S on your keyboard.
Navigation arrows on either side of the current slide allow you to move to the previous and next slides.
PowerPoint for Microsoft 365 automatically records the time you spend on each slide, including any Animate text or objects steps that occur, and the use of any triggers on each slide.
You can record audio or video narration as you run through your presentation. The buttons at the lower-right corner of the window allow you to toggle on or off the microphone, camera, and camera preview:

If you use the pen, highlighter, or eraser, PowerPoint records those actions for playback also.

If you re-record your narration (including audio and ink), PowerPoint erases your previously recorded narration (including audio and ink) before you start recording again on the same slide.
You can also re-record by going to Slide Show > Record .
You can pick a pointer tool (pen, eraser, or highlighter) from the array of tools just below the current slide. There are also color selection boxes for changing the color of the ink. ( Eraser is grayed out unless you have previously added ink to some slides.)
To end your recording, select the square Stop button (or press S on your keyboard).
When you finish recording your narration, a small picture appears in the lower-right corner of the recorded slides. The picture is an audio icon, or, if the web camera was on during the recording, a still image from the webcam.

The recorded slide show timing is automatically saved. (In Slide Sorter view, the timings are listed beneath each slide.)
In this process, what you record is embedded in each slide, and the recording can be played back in Slide Show. A video file is not created by this recording process. However, if you need one, you can save your presentation as a video with a few extra steps.
Preview the recorded slide show
On the Slide Show tab, click From Beginning or From Current Slide .
During playback, your animations, inking actions, audio and video will play in sync.

Preview the recorded sound
In the Recording window, the triangular Play button near the top left corner lets you preview the recording of the slide that currently has the focus in that window.

In Normal view, click the sound icon or picture in the lower-right corner of the slide, and then click Play . (When you preview individual audio in this way, you won't see recorded animation or inking.)
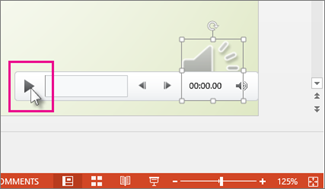
You can pause playback while previewing the audio.
Set the slide timings manually
PowerPoint for Microsoft 365 automatically records your slide timings when you add narrations, or you can manually set the slide timings to accompany your narrations.
In Normal view, click the slide that you want to set the timing for.
On the Transitions tab, in the Timing group, under Advance Slide , select the After check box, and then enter the number of seconds that you want the slide to appear on the screen. Repeat the process for each slide that you want to set the timing for.
If you want the next slide to appear either when you click the mouse or automatically after the number of seconds that you enter—whichever comes first—select both the On Mouse Click and the After check boxes.
You can use manual slide timings to the trim the end of a recorded slide segment. For example, if the end of a slide segment concludes with two seconds of unnecessary audio, simply set the timing for advancing to the next slide so that it happens before the unnecessary audio. That way you don't have to re-record the audio for that slide.
Delete timings or narration
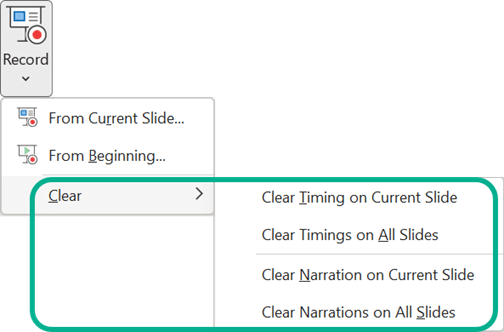
The Clear command is for deleting timings or narration from your recording that you don't want or that you want to replace.
In the Recording window, the Clear command in the top margin of the window allows you to:
Clear recordings on the current slide
Clear recordings on all slides
In Normal view, there are four different Clear commands that allow you to:
Delete the timings on the currently selected slide
Delete the timings on all slides at once
Delete the narration on the currently selected slide
Delete the narration on all slides at once
If you do not want to delete all the timings or narration in your presentation, open a specific slide that has a timing or narration that you do want to delete.
On the Recording tab of the PowerPoint for Microsoft 365 ribbon, on the Record Slide Show button, click the down arrow, point to Clear , and then choose the appropriate Clear command for your situation.
Turn off timings or turn off narrations, and ink
After you've recorded your PowerPoint for Microsoft 365 presentation, any timings, gestures, and audio you performed are saved on the individual slides. But you can turn them all off if you want to view the slide show without them:
To turn off recorded slide timings: On the Slide Show tab, clear the Use Timings box.
To turn off recorded narrations and ink: On the Slide Show tab, clear the Play Narrations box.
Publish the recording to share it with others
Once you've edited the recording to your satisfaction, you can make it available to others by publishing to Microsoft Stream.
With the presentation open, on the Recording tab, select Publish to Stream .
Type a title and a description for the video.
Set other options, including whether you want others in your organization to have permission to see the video.
Select the Publish button.
The upload process can take several minutes, depending on the length of the video. A status bar at the bottom of the PowerPoint window tracks the progress, and PowerPoint shows a message when the upload is finished:
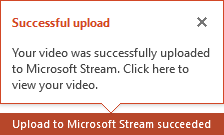
Click the message to go directly to the video playback page on Microsoft Stream.
Create closed captions
To make your video more accessible by including closed captions, choose from these options, which are described in separate Help articles:
Manually write a closed caption file yourself
Get a closed-caption file automatically generated by Microsoft Stream
Once you have a closed-caption file, you can add it to your video file by using PowerPoint .
Record a slide show
With your presentation open, on the Slide Show tab, click Record Slide Show .
(The Clear command deletes narrations or timings, so be careful when you use it. Clear is grayed out unless you have previously recorded some slides.)
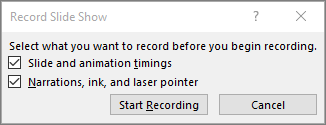
In the Record Slide Show box, check or clear the boxes for your recording, and click Start Recording .
More about these options:
Slide and animation timings : PowerPoint automatically records the time you spend on each slide, including any animation steps that occur, and the use of any triggers on each slide.
Narrations, ink, and laser pointer: Record your voice as you run through your presentation. If you use the pen, highlighter, eraser, or laser pointer, PowerPoint records those for playback as well.
Important: Pen, highlighter, and eraser recording are available only if you have the February 16, 2015 update for PowerPoint 2013 or a later version of PowerPoint installed. In earlier versions of PowerPoint, pen and highlighter strokes are saved as ink annotation shapes.
At the top left corner of the window is the Recording toolbar, which you can use to:

If you re-record your narration (including audio, ink, and laser pointer), PowerPoint erases your previously recorded narration (including audio, ink, and laser pointer) when you start recording again on the same slide.
You can also re-record by going to Slide Show > Record Slide Show .
To use ink, eraser, or the laser pointer in your recording, right-click the slide, click Pointer options , and pick your tool:
Laser Pointer
Highlighter
Eraser (This option is grayed out unless you have previously added ink to some slides.)
To change the color of the ink, click Ink Color .
To end your recording, right-click the final slide, and click End Show .
Tip: When you finish recording your narration, a sound icon appears in the lower-right corner of each slide that has narration.
The recorded slide show timings are automatically saved. Timings are shown in Slide Sorter view just beneath each slide.
In this process, what you record is embedded in each slide, and the recording can be played back in Slide Show. A video file is not created by this recording process. However, if you want a video file, you can save your presentation as a video with a few extra steps.
On the Slide Show tab, click From Beginning or From Current Slide.
During playback, your animations, inking actions, laser pointer, audio and video play in sync.
Preview the recorded audio
In Normal view, click the sound icon in the lower-right corner of the slide, and then click Play.
PowerPoint automatically records your slide timings when you add narrations, or you can manually set the slide timings to accompany your narrations.
On the Transitions tab, in the Timing group, under Advance Slide , select the After check box, and then enter the number of seconds indicating how long the slide should appear on the screen. Repeat the process for each slide that you want to set the timing for.
Tip: If you want the next slide to appear either when you click the mouse or automatically after the number of seconds that you enter—whichever comes first—select both the On Mouse Click and the After check boxes.
The Clear command is for deleting timings or narration from your recording that you don't want or that you want to replace. There are four different Clear commands that allow you to:
On the Slide Show tab of the PowerPoint ribbon, on the Record Slide Show button, click the down arrow, point to Clear, and then choose the appropriate Clear command for your situation.
Turn off timings or turn off narrations, ink, and laser pointer
After you've recorded your PowerPoint presentation, any timings, gestures, and audio you performed are saved on the individual slides. But you can turn them all off if you want to view the slide show without them:
To turn off recorded narrations, ink, and the laser pointer: On the Slide Show tab, clear the Play Narrations box.
Turn your mouse into a laser pointer
Animate text or objects
Turn your presentation into a video
Create a self-running presentation
Record your presentation

Toggle video and audio options in the options dropdowns in the recording toolbar.

Note: Your video will be re-recorded just as you had styled.
After you exit Recording Studio with the Esc key (or by clicking End show ) you will see narration (audio/video) applied to your slide along with the proper slide timings and ink animations.
Tip: Audio, video, and inking elements can all be resized and moved in edit view after recording.

Reset to Cameo
To delete your recording and retain your camera style, do the following:
On the Record tab, select Reset to Cameo .

Clear timings or narration
On the Record tab, select Clear Recording

Keyboard shortcuts during the recording process
Related information.
Present with Cameo
Save a presentation as a movie file or MP4
Record audio in PowerPoint for Mac
Add or delete audio in your presentation
Prepare to record
To begin, open the presentation you want and click the Slide Show tab.
Tip: If your presentation has a lot of slides, you might find it more convenient to work in Slide Sorter view. Click View > Slide Sorter to try it out.
Here are some things to check before you begin recording:
If you want to record only part of your slide deck, do one of the following before you begin:
Select the slides you don't want to include, and click Hide Slide .
Click Custom Show > Custom Slide Show > + (add).

Use the Rehearse button to change the timing between slides without affecting the narration or gestures you've already recorded.

Make sure your microphone is set up correctly. On the Mac, go to System Preferences > Sound .
Record your slide show
If you want to add narration or commentary to the slide show, make sure your microphone is set up and working.
To start recording:
Click the Slide Show tab, select the slide where you want the recording to begin, and then click Record Slide Show .

During recording, use Ctrl+click to access the recording commands that let you navigate through the slides, change cursors, or trigger screen blackouts or whiteouts.
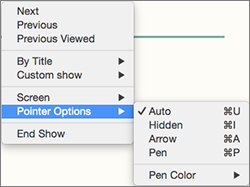
Click End Show to stop recording.
A Save dialog box appears. Click Yes to save your recording, or No if you want to record it again.
Saving overwrites anything you've previously recorded. If you want to record another slide show with the same set of slides, save your presentation file with a different name.
Click Play from Start to preview your recording.
You may want to print this list of keyboard shortcuts to refer to while you're recording:
Set playback options
When you've finished recording and are ready to distribute the presentation, click Set up Slide Show and choose the options that are right for your audience.
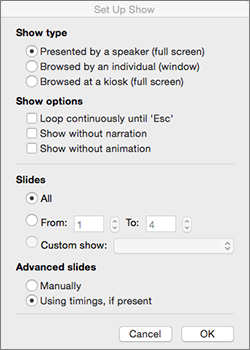
Show type Show full screen or windowed.
Show options Turn off narration or animations.
Slides Choose a subset of slides, or a Custom show if you've set one up.
Advance slides Set up this version of the slide show so someone can page through it manually.
Add, change, or remove transitions between slides
Start the presentation and see your notes in Presenter view
We're sorry. PowerPoint for the web doesn't support recording a slide show.

Need more help?
Want more options.
Explore subscription benefits, browse training courses, learn how to secure your device, and more.

Microsoft 365 subscription benefits

Microsoft 365 training

Microsoft security

Accessibility center
Communities help you ask and answer questions, give feedback, and hear from experts with rich knowledge.

Ask the Microsoft Community

Microsoft Tech Community

Windows Insiders
Microsoft 365 Insiders
Was this information helpful?
Thank you for your feedback.
How to Record a Presentation on Google Slides
Recording a presentation can be an excellent way to share information asynchronously, ensure consistent delivery, or prepare for a virtual audience.
While Google Slides is a widely used tool for creating presentations, it does not have a built-in feature to record presentations directly. However, there are effective ways to record your Google Slides presentation, including narration, using various tools and techniques.
This guide will walk you through the process and share some best practices to ensure a professional and engaging recording.
2 Million+ Google Slides Themes, Presentation Templates + More With Unlimited Downloads
Download thousands of Google Slides themes, and many other design elements, with a monthly Envato Elements membership. It starts at $16 per month, and gives you unlimited access to a growing library of over 2,000,000 presentation templates, fonts, photos, graphics, and more.
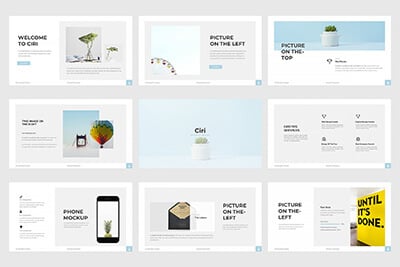
Ciri Slides Template
Clean & minimal.
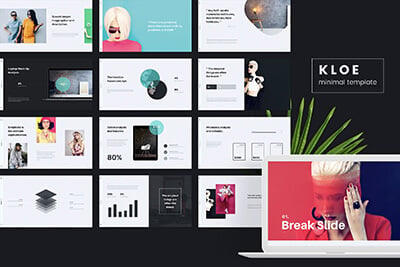
Kloe Minimal Template
Clean & simple design.
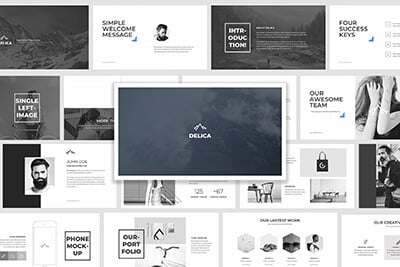
Delica Google Slides
133+ unique slides.

Alloyz Business Template
Google slides.
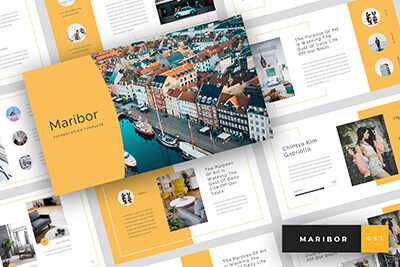
Creative Template
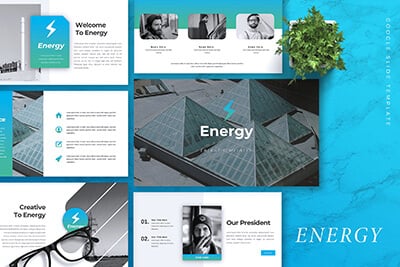
Company Profile Template
Explore Google Slides Themes
Step 1: Preparing Your Google Slides Presentation
Ensure that your presentation is complete with all the necessary content, animations, and transitions. It’s important to rehearse and familiarize yourself with the flow of the presentation.
If you plan to include narration, use the speaker notes section at the bottom of each slide to jot down key points or a script for your presentation.
Step 2: Choosing a Screen Recording Tool
Since Google Slides does not natively support recording, you will need to use a screen recording tool.
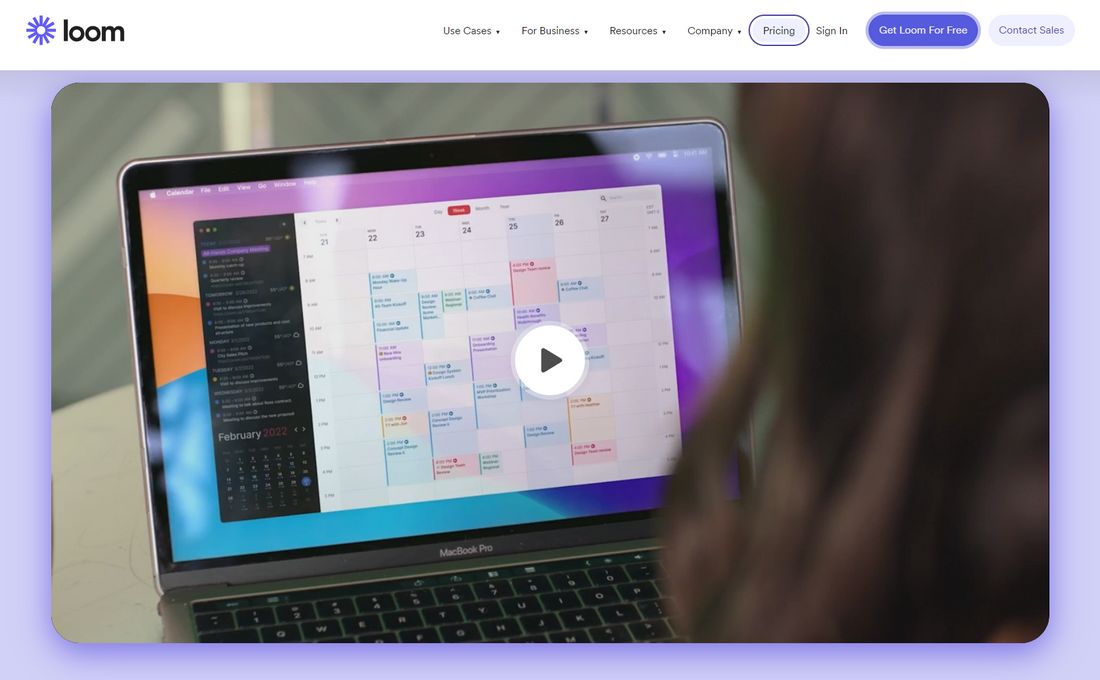
Choose a screen recording tool that suits your needs. Popular options include Loom , ScreenPal , and OBS Studio . Many of these tools offer free versions with basic features.
Before recording your presentation, spend some time getting to know the screen recording software. Learn how to start and stop recording, how to include your webcam (if desired), and how to capture audio.
Step 3: Setting Up for Recording
Proper setup is crucial for a high-quality recording.
Check Your Microphone and Webcam
If you are including narration or a video of yourself, ensure that your microphone and webcam are working properly. Do a test recording to check the audio and video quality.
Eliminate Distractions and Interruptions
Record in a quiet, well-lit room. Turn off notifications and other potential interruptions on your computer to ensure a smooth recording.
Step 4: Recording Your Presentation
Now you’re ready to record your presentation.
1. Open Your Presentation
Launch your Google Slides presentation and open the screen recording tool. You may have to sign-in to your account, depending on which screen recording tool you use.
2. Start Recording
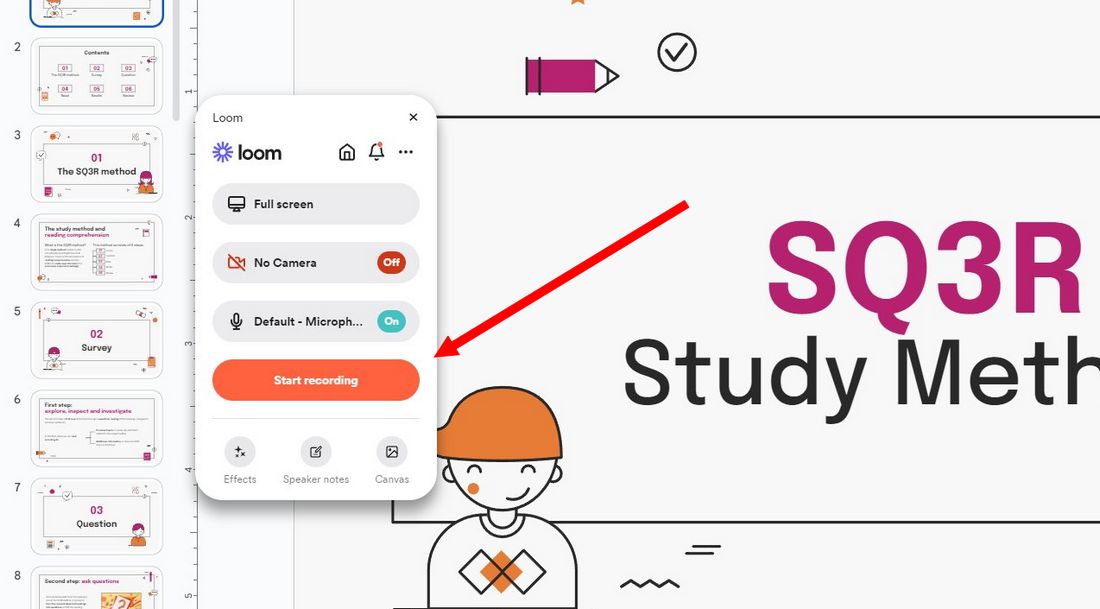
Begin the recording following the screen recorder’s instructions. For example, when you open Loom, it gives you an interface with several options for recording your presentation.
You can choose whether to record fullscreen or a specific window, include your webcam, and much more.
Once you hit the Start Recording button, it will even give you a countdown to begin the recording. But that feature is only available in Loom.
It’s usually a good practice to wait a few seconds before starting your presentation to ensure the recording captures everything.
3. Deliver Your Presentation
Go through your slides at a steady pace. Use your speaker notes as a guide, but try to sound natural and engaging.
4. End the Recording
Once you’ve reached the end of your presentation, pause for a few seconds and then stop the recording. Save the file in your preferred format and location.
Step 5: Editing and Sharing Your Recorded Presentation
After recording, you might want to edit your presentation for a polished look.
Edit the Recording
Use video editing software to trim the start and end of the recording, remove any mistakes, or add additional elements like music or text overlays.
Free video editing apps like Clipchamp and CapCut are perfect for these simple projects.
Share Your Presentation (Optional)
Upload your recorded presentation to a video-sharing platform like YouTube, Vimeo, or Google Drive, and share the link with your audience.
Some screen recording tools, like Loom, allow you to host your videos and share directly from the platform as well.
Tips for a Successful Google Slides Recording
1. practice makes perfect.
Before hitting the record button, practice your presentation several times. This will help you speak more fluently, maintain a good pace, and reduce the number of pauses or errors during the actual recording.
2. Control Your Speaking Volume and Speed
Speak clearly and at a moderate pace. Avoid speaking too quickly, as this can make it difficult for your audience to follow along. Also, modulate your voice to emphasize key points and keep the presentation dynamic.
3. Test Audio and Video Quality
Do a trial recording to check the audio and video quality. Make sure there’s no background noise, and the microphone is picking up your voice clearly. If using a webcam, check the lighting and camera angle.
4. Utilize Editing to Refine Your Presentation
Post-recording editing can significantly enhance the quality of your presentation. Use editing tools to trim unnecessary parts, correct errors, or add additional visual elements like captions or transition effects.
5. Be Conscious of File Size and Format
Larger video files can be difficult to share and may not be easily accessible to all audience members. Optimize your video for a smaller file size without significantly compromising quality. Also, choose a widely compatible video format like MP4.
6. Plan for Audience Questions
If your recorded presentation is part of a larger event, plan for a live Q&A session afterward or provide a way for viewers to submit questions, such as through a form or email.
In Conclusion
Recording a Google Slides presentation might seem daunting at first, but with the right tools and preparation, it can be a straightforward and rewarding process. By following these steps and best practices, you can create a professional and engaging presentation that resonates with your audience, regardless of where or when they view it.
7 Steps to Record a Successful Virtual Presentation
By Jeff Cobb . Last Updated on August 3, 2023
If you are someone who speaks or aspires to speak at professional and industry conferences or similar events, then it is almost certain you will need to record a virtual presentation at some point.
To do that you could, of course, just fire up Zoom and record yourself narrating a slide deck, possibly with your tiny self-visible in a video box off to the side.
You could. (Yawn.)
Or you could put in a little effort and create something event planners and attendees are much more likely to find engaging – and that will result in your attendees actually learning something. (What we’re all about here at Learning Revolution.)
In this post, I’ll go through the steps I follow. I can’t claim to have mastered them, but I do know they are rooted in learning science, and they result in presentations that are much more engaging and impactful than what you usually get at virtual conferences and other virtual events.
We’ll get to the details momentarily, but first let’s consider why it matters
Virtual Events Are Here to Stay
Given that it looks like everything may return to “normal” soon, you may be asking “Why should I care about how to record a virtual event presentation?”
Clearly, we saw a huge surge in traditional events moving online with the emergence of COVID-19 and it’s tempting to think that as the pandemic recedes, all those events will simply go back to their usual face-to-face settings. Some will, of course, but a lot won’t.
Why? Having been forced to go virtual, many organizations have now realized that it has a lot of benefits. For example, with a virtual event, the average organization:
- Saves a lot of money on event costs
- Takes on a lot less risk (e.g., no food and beverage or hotel block commitments)
- Has the potential to reach many more people than with its face-to-face events
While many – maybe most – organizations will return to face-to-face with their flagship events, the idea of making these “hybrid” – i.e., with people participating both in-person and online – is currently all the rage in the events industry. And, that trend aside, many organizations will make the switch to virtual permanent for their smaller or second tier events and will likely add new virtual event offerings to their portfolio.
As part of this shift, many organizations have realized that there are significant benefits to getting most of the presentations for a virtual (or hybrid) event recorded in advance. Getting not only slides but entire presentations in advance offers a lot of peace of mind to stressed out event planners. Presentations can then be replayed at a scheduled time, often in combination with live chat. For speakers, this offers the benefit of actually engaging with attendees in the chat – often very hard to do when delivering content in real time.
Overall, the greater ease, convenience, and cost savings represented by virtual events – along with the pandemic having pushed them into the mainstream – means we are likely to see as many or more of them in the post-COVID world. So, there is a ton of virtual opportunity for speakers.
But that brings us back to virtual presentations.
Expectations Are on the Rise
As organizations have gotten used to hosting virtual events and attendees have gotten used to participating online, expectations have gone up. A lot. The average talking-over-PowerPoint presentation that has been the mainstay of Webinars for years just doesn’t cut anymore in most cases.
It’s not that these types of presentations can’t be good and useful. It’s just that most of them aren’t, and never have been. And now that attendees are being subjected to an even higher volume of them than usual, patience for them is dropping fast.
In some cases, event planners and attendees are vocal in complaining about them. I see this a fair amount on association discussion boards that I frequent. More commonly, though, attendees simply tune out or (because their expectations have rarely been met in the past) simply don’t show up.
Now, if you are a speaker, regardless of whether you get paid for it, you probably have goals like building a brand for yourself and your business and actually having a positive impact on the lives of the people you address.
So, a presentation that sucks just isn’t good for anyone.
On to the “how-to.”
1. Plan It, Script It
When you present in a live face-to-face setting, you have a good bit of wiggle room. It’s pretty easy to speed up, slow down, or even drop entire sections of your content on the fly. With slides as a backdrop (or crutch) and a rough outline or notes, many speakers make it through these types of presentations with relatively little planning or practice.
This is a much harder approach to pull off with a recorded virtual presentation.
In the first place, there is almost always going to be some sort of time constraint for your talk. If the event planner tells you “25 minutes” for example, you may be able to come in a few minutes short or long, but any more than that and you may really screw up the timing for the event.
So, ideally, you need to have a solid idea of how long your content will run before you press record.
Second, because you will not be able to answer questions as you speak or adjust your content on the fly, it pays to really think through the most essential points you want to make and figure out how to make them in the most logical, concise, and compelling way. (Of course, good speakers should also do this with their live presentations, but let’s face, many don’t.)
Fortunately, there is a sure-fire way to address the issues I’ve just raised: write out your entire presentation .
I can feel groans rumbling through my keyboard even as I write this, but really, there is no better way to make sure you have you content structured effectively and that you can deliver it in the time allotted. We know very well, after all, the number of words that correspond to a minute of speech. Using an online calculator like this one , you can easily determine how many words you need to write.
Now, it’s possible that with a general idea of the number of words you are aiming for you can manage to work off of just an outline and notes. Good for you if you can, but I’ve never found that to work well. I strongly prefer to script the whole presentation and either memorize it or read it ( with the help of a simple teleprompter like this one ). Either way with enough practice runs so that I am able to do it naturally.
As I write, I have four key aims in mind, which leads to my next point …
2. Nail the Opening
First, I want to make sure the introduction pulls attendees in as much as possible. Again, this is a good practice for any presentation, but I think it is particularly important for recorded virtual presentations. Attendees can check out very quickly – whether figuratively or literally – if you aren’t able to engage them in a meaningful way right at the start.
So, “Hi, I’m Jeff. So nice to be here” isn’t a great start.
My stand-by for introductions is to share a story or anecdote with just me on screen – usually no slides, at least for the first minute or so. I think of this story as a sort of “landing page” or sales page for the entire presentation. Its purpose is to move attendees to “buy in” to watching and participating in the rest of the presentation. With that perspective in mind, it can be useful to borrow the classic AIDA approach used by marketers in deciding on and structuring your story:
A: Attention – Offer content at the very beginning that will grab attention. This may be a provocative statement, question, or quote; it may be an image; it may be the setting you choose to film yourself in or just something about how you present yourself on screen. Really, the possibilities are endless.
I: Interest – Grabbing attention purely for the sake of attention is pointless (and can be annoying). How can you build on the attention you receive to foster deeper interest? Usually, this will mean pivoting quickly to establish the relevance of your opening attention grabber to your audience. It means beginning to establish the “why” of your presentation for the audience you are addressing
D: Desire – Interest is a necessary step beyond attention, but for attendees to really engage with you and your material, they have to see the potential for value and applicability in their own lives. This is the classic “WIIFM,” or “What’s In It For Me” aspect of adult learning. While you don’t have to explicitly address the WIIFM aspect of your presentation in your opening, there should be a strong enough sense of it that attendees want to – better yet, feel compelled to – stick around to realize the value that your presentation promises.
A: Action – A good sales page includes a clear “call to action,” and so should the opening to your presentation. Each of the three steps above lead to the action you want from your attendees: a commitment to watch and participate in the remainder of your presentation . You may ask for this commitment more or less overtly, depending on the nature of your opening, but it should be clear as you transition to the next part of your content that you want and expect your attendees to come along for the ride. This may literally include asking them to acknowledge – to themselves or in the chat area, if there is one – that they are committed to participating.
While addressing each of the components of AIDA may seem challenging, there are few things that make a bigger difference in how a presentation is received than the opening. It sets the tone; it sets expectations; it establishes a sort of agreement with your attendees. A strong opening builds momentum that can carry attendees through even weaker parts (there are always some!) in the remainder of your presentation.
A story, of course, is just one approach. Another one might be to present some sort of challenge or problem that is relevant to the topic and the audience. Present it and then build in some time in which you are silent and allow attendees to work on the problem before you present a solution. Or, present a thought-provoking question, a quote from a well-known thinker or practitioner, or a compelling image. Any of these can be a door into gaining attention, exciting interest, developing desire, and asking for action.
One final point: While I’ve relied on a marketing inspired approach here, I’ll note that all of this jibes with what research in cognitive and behavioral science has taught us. Establishing and sustaining attention is critical to learning as is taking action. Helping these things happen is the essence of good teaching, and that’s exactly what a strong opening step you up for.
Again, all of this is even truer with presentations that are both virtual and recorded. So, it is well worth devoting a significant amount of your thinking, planning, and writing for any virtual event presentation to nailing the opening.
Here’s an example of an intro segment I did for a session on learner engagement for the California Society of Association Executives (CalSAE). I’ll leave it to you analyze how well I do – or don’t – practice what I preach in this one.
3. Cut and Chunk
As important as the beginning of your presentation is, the real substance of it is in the content that follows. That means you need to maintain attendees’ attention, focus it on your most important points, and do what you can to support longer-term retention and application of your material.
When you think about it, that’s a tall order. The 30 to 60 minutes an average presentation lasts isn’t much time for achieving any real impact, and yet, it is also a very long period of time to keep the average person’s attention – especially in a world of cell phones, social media, and other distractions.
So, how you put your content together is critical . Just riffing to your slides will rarely cut it these days – especially if you want your attendees to actually learn something and retain what they learn.

First, get crystal clear about your objectives
Your starting point for achieving that is to get ultra -clear in your own mind about the objectives of your presentation. The objectives represent the strategy for the course and should drive decisions about content—what stays, what goes; what approaches are most useful, etc. In short, your objectives determine what it is most important for your learner to pay attention to in the course.
To clarify your objectives, ask, “How should attendees behave (differently) as a result of participating in my presentation?” Even if you see your presentation as primarily informational, be clear about what the learner should be able to do with the information. How will she apply it in the real world?
Keep in mind that only so much information can be absorbed and only so much change can be prompted by a single presentation. Most presentations suffer from a lack of clarity about objectives, too many objectives, or both. Exactly what will amount to too many objectives will depend on a range of variables – from the complexity of the topic to the background of the learners – but as general rule, it’s best to aim for achieving no more than two, possibly three objectives in a one-hour session.
Then, on to cutting and chunking
Once you have your objectives clear, focused, and reduced to a realistic number, you can move on to cutting and chunking.
As a presenter, you no doubt hope that your attendees will remember everything you share with them, but you also no doubt recognize that human beings have limited capacity for memory. More technically, we can only hold so much information in our working memory, the type of memory involved with storing, focusing attention on, and manipulating information for a relatively short period of time, time measured in seconds. Learning is a process of bringing information into working memory and then moving it into long-term memory—which, as far as we know, does not have any limitations.
The amount of working memory resources used for a task or in a situation is referred to as cognitive load, and, as a presenter, you want to do what you can to keep cognitive load at as manageable a level as possible for your attendees. This effort often starts with resisting the temptation to share everything you know about a subject and being disciplined about cutting content that is not truly relevant or germane for achieving your targeted learning outcomes.
To cut, go back to objectives: What is it truly necessary for the learner to know to achieve the desired outcomes? What is extraneous or perhaps “nice to know”?
Literally, list these out. It can help to know that “nice to know” information doesn’t have to totally ignored. You can still make this available in a number of ways—through resource pages, downloadables, and other types of “bonus” content. But get it out of the main flow of the content that is truly targeted to achieving the objectives.
Next, chunking longer content into shorter segments and allowing for brief pauses before continuing on from one segment to the next will also help to keep cognitive load at manageable level. Shorter segments—typically meaning no more than 10 minutes—are more in line with what our limited working memory can process and pauses allow time for that processing to happen.
At the highest level, your chunks of content should serve to focus attention on related concepts and information. These would typically be the larger sections of your presentation. In the presentation on learner engagement, I referenced in the video clip earlier, for example,
I chunked the content down into the following top-level segments:
- Defining Learner Engagement
- Requirements for Engagement
- Signals and Support of Engagement
- Accountability for Engagement
Within those major segments, I further chunked the content down into topics that I felt were most essential to those larger concepts. For example, in “Signals and Support of Engagement,” I addressed:
- Promote and Convert
- Design, Develop, & Deliver
- Retain & Reactivate
Finally, I chunked the content down further to each individual slide or snippet of video, being careful to try focus on one essential point within each and to try to ensure that I stayed within the limits of working memory in each.
As you might guess, while there is science behind all that effort, there is also more than a bit of art and guesswork to it. I won’t claim to have gotten exactly right – in fact, in retrospect, I’m sure I didn’t. Few presenters do, but practice with chunking over time can dramatically improve your capabilities.
4. Mix media wisely
As you are cutting, chunking, and sequencing your content you, of course, have options regarding the types of media you can use—text, images, audio, and videos, just to name some of the most common examples. Varying the types of media, you use is almost always a good practice. It can help keep a presentation interesting, maintain attention, and ultimately, help your attendees learn and remember what you present.
But again, there are research-based rules that apply to doing it right. You need to be careful to use media in a way that does not increase—and ideally decreases—cognitive load.
In the context of a recorded virtual presentation, the three types of media you are most likely to use are text, audio, and images, so I’m just going to focus on those in providing some guidance. (I know – the whole presentation is a video, but that make video as ort of “meta” medium in this case, rather than something you use as an element of instruction.)
First, research indicates that including images to illustrate key points in your presentation can be an effective way to support learning. And sometimes, it’s the best way. If, for example, someone doesn’t know what a dragon fruit looks like and the goal is to for them to be able to buy one at the market, would it be more efficient to describe the fruit’s leathery slightly leafy pink exterior and its white flesh pitted with black seeds or show a picture?
The picture is more efficient in this case. And you should also consider when using an illustration, a photo, or a graph rather than a verbal description might reduce extraneous cognitive load when making a point.
But using multimedia effectively isn’t as simple as sprinkling a few photos or graphics throughout your slides – and you definitely don’t want to clutter up your presentation with too much media. There are research-based rules that should be followed. Based primarily on the work of Richard Mayer and Ruth Clark, here are four that are particularly important and useful for the average online presentation:
First, use only graphics images, text, and narration that clearly support learning goals. Images that are merely decorative or text that is tangential or supplemental, for example, will only increase cognitive load and make it harder for learners to absorb your key points.
Second, as you are narrating your presentation, avoid using both graphics and text at the same time. While there are exceptions, it generally increases the learner’s cognitive load to have to process both text and audio while also viewing a graphic.
Third, where appropriate, make use of arrows, highlighting, and other signals to draw attention to important information. This practice helps to focus the learner’s attention while also reducing the need for extraneous text.
Fourth, present in a conversational way. It can be easy, especially if you are presenting on a complex topic, to slip into jargon or academic, formal-sounding language. But research suggests that a more relaxed, informal approach can positively impact learning.
There are other rules – and many nuances – for using multimedia in the most effective to support learning. To the extent you want to go deeper into those, I’ve included a few supplemental resources at the end of this article. Just implementing the above suggestions, though, will go a long way toward ensuring you are making the most of the media you use in your presentations.
5. Space and repeat
If your goal is to help you attendees actually learn something – as opposed to purely entertaining or motivating them – then this point, in combination with the next one, is critical: you need to revisit key concepts and give attendees the chance to engage with them throughout your presentations .
You probably know from your own experience that being exposed to information only once rarely results in our remembering it. And a wealth of research supports the idea that repetition is essential for learning—but not just any repetition. The repetition must have two key qualities.
First, it needs to occur over time to be most effective. That is, there needs to be some space between the time when an attendee first engages with the material to be learned and each subsequent time. So, plan to revisit your most essential ideas and concepts at different points in time throughout your presentation. As I’ll discuss soon, it’s also a good idea to provide attendees with ways that they can revisit key ideas and concepts on their own at multiple times following your presentation.
Second, repetition needs to involve some effort if you really want the repeated material stick. The attendee needs to re-engage with material cognitively and—in cases where the learning involves a skill or other observable behavior—physically.
I’ll come back to the importance of effort momentarily, but, for now, it’s essential to understand that repetition is a way to re-focus attention to the most salient material, the material that most supports the objectives of your presentation. For that reason, it’s critical to plan out the repetition and review of key concepts in different ways throughout the presentation.
Along these lines, it’s worth noting that one of the desirable outcomes of the cutting process I covered earlier is to ensure you preserve sufficient time for revisiting material—rather than simply introducing more and more new material. Winding back even further, that same thinking applies to objectives: given the need to repeat key material throughout your virtual presentation, there are really only so many objectives you can address.
6. Provide for Participation
Now, let’s return to that idea of repetition needing to be combined with effort on the part of the attendee. Even in on-demand, recorded presentations, participation from attendees is possible and desirable—but clear opportunities have to be called out and supported.
So, first …
Prompt and pause
As obvious as it may seem, an often-overlooked aspect of participation is that you usually must ask for it and then – here’s the kicker – actually build in sufficient time for it. That means including silence during live presentations (including replays with chat) or – more common in completely on-demand presentations – having attendees hit the pause button to allow time for whatever it is you ask them to do.
Here’s a brief example of me allowing for some silence in a virtual presentation. Note, too, that I use a tactic for commenting on chat even though this is a recorded presentation, and I can’t actually know in advance what will be said in the live chat that occurs during the presentation replay.
Not rocket science, obviously – just one of those things you have to plan for and execute. (Which goes back to the points above about scripting, objectives, etc.)
Yes, doing something like this can feel a bit awkward, but it can really help tremendously with learning and memory. A fundamental problem with most presentations is that the learning evaporates once the learner exits the physical room or online session. To combat forgetting, we have to encourage and guide attendees to “practice” with the material and prompting and pausing creates the opportunity to do that.
I’ll note, too, that prompting and pausing are a way of focusing attention—signaling to attendees what is important and giving them an opportunity to engage and re-engage with that important material.
Of course, once you have focused or re-focused attention in this way, you have to provide the actual participation opportunity – which leads to my next point.
There are many ways to enable participation in a virtual participation – and most of them are not especially complicated. You don’t need fancy animations or elaborate games. Simple methods like reflection questions, contributions to chat, quizzes, challenge problems, or even assignments to be completed later can be quite effective.
Using a variety of methods throughout your presentation can help maintain learner interest. Just as importantly, if you give learners the opportunity to engage with the material in a variety of ways, you’ll be supporting different aspects of learning.
A simple “pop quiz” (i.e., pose a question and pause momentarily to let attendees think about the answer) might help to bolster memory for a key concept; a reflection question might provide a means of “elaboration”—challenging the attendee to think through how the concept applies to her own situation—to something she commonly does back at work, for example. A suggested assignment could then challenge her to apply one or more key concepts when she is actually back in her work context.
To go back to the earlier point about spacing and repeating, it’s highly effective to provide for repeated, but varied types of participation throughout your presentation. You might, for example, pose a problem or challenge as a way of introducing a key concept, and then return to the same concept later, offer a solution, and present a reflection question.
One key in mixing your methods in the most meaningful way is get your attendees to make an effort—to retrieve, to elaborate, to rehearse, to apply, to make their own connections between the material you share and their own contexts. A wealth of research suggests that this kind of effort is essential for making learning stick.
So, as you deliver the presentation, overtly tie your material back to the outcomes and positive change that attendees are seeking. But even more importantly, help attendees – through participation – make such connections for themselves. They’re better able than you are to make the “why” of any learning experience more meaningful and specific. You just need to encourage them and – through prompting and pausing – give them the cognitive space to do so.
7. Pave the Path Forward
I’ve now covered most of what happens during the time that attendees are actually present for your virtual presentation, but what about what comes after?
While rates of forgetting can vary widely from person to person, most of us will forget most of what we hear and see in a presentation within a matter of weeks, if not days or – sadly – hours. So, if you really want your attendees to retain and use what you present to them, your presentation is just one step in a longer journey to fully absorbing and mastering the material you cover.
To ensure that journey is ultimately successful, it’s important to help learners understand the need to revisit and continue to engage over time with the key concepts and ideas covered in your presentation. And it’s also important to provide them with or help them find opportunities for doing this.
So, to wrap up, let’s take a look at how you can help your attendees create a future in which the learning you’ve facilitated sticks and gets put into action.
Provide a map
First, taking the “journey” metaphor to heart, provide your learners with a map. Or, even better, co-create a map with them.
By “map,” I mean a concrete resource like a document or a web page where you suggest clear steps or actions learners may take over time, starting immediately, to ensure that they retain and apply what they have learned.
Depending on the nature of your virtual presentation, these could include anything from trying out a particular method or procedure in different situations. Or it might mean asking learners to make daily journal entries for a period of time to note down when they have applied one of your key concepts and the results they got.
That’s your part of the map.
But it’s also useful to ask attendees to add their own elements to the map – whether by creating their own supplemental resource or providing them with an editable version of whatever you provide. While you probably have a great deal of expertise or experience in whatever topic you are presenting, there’s no way you can know where each attendee is trying to go. The destination – the why, the goal – will vary some from attendee to attendee.
By asking learners to co-create the map – essentially, to identify what they will do differently in the future as a result of what was covered in your presentation – you offer them the ability to personalize the learning experience, to make it as relevant as possible in their specific contexts.
Provide resources
Along with the map, provide resources to support the learner along her journey, as she pursues the actions on the map. These might include things like reference and tip sheets, checklists, self-checks that learners should complete at established intervals, or links to additional materials – articles, books, videos – that help reinforce or expand upon the most essential elements of your virtual presentation.
Again, these can be put into a document or posted to web page.
Encourage accountability
Finally, for the map and resources to have an impact, they have to be used.
So, encourage learners to make clear, measurable commitments to themselves – for example, by setting dates by which they will accomplish items on the map – and to find accountability partners—in their workplace or within professional networks or communities they’re part of to help hold them to applying what they learn.
As part of supporting accountability, you may even want document concrete ways in which a colleague and/or manager can best support accountability—one of the resources you provide may help support this. You might even create a brief guide for accountability partners—i.e., what do you want them to do, when, why?
It’s a Process
One of my mantra’s is that learning is a process, not an event. Just like a single virtual presentation will have only so much impact on your attendees, reading this article will only have so much impact on your presenting. Everything discussed here takes a lot of practice over time to do really well.
But, of course, every journey begins with a single step.
Just becoming conscious and intentional (or, if this is familiar ground, more conscious and more intentional) about what goes into more effective, engaging virtual event presentations is an essential step. Beyond that, continuing to review, practice, and improve at everything covered here over time will ensure that your virtual presentations stand out and deliver real impact.
One last note: while I’ve focused on improving virtual event presentations here, everything I have covered applies to creating content for online courses and, indeed, for most methods of sharing your expertise and helping others learn.
So, I encourage you to bookmark this page, share it with friends and colleagues who might benefit from the information offered here, and return to it periodically to reinforce your own learning.
Additional Reading
Here are some additional resources you may find helpful. (I plan to add to these over time – just one more reason it is useful to bookmark and share this page as a reference).
12 Brain Rules
John Medina’s Brain Rules is one of the main sources for the rule of thumb for chunking content into segments of no more than 10 minutes, As Medina writes:
Audiences check out after 10 minutes, but you can keep grabbing them back by telling narratives or creating events rich in emotion.
You can download all 12 brain rules at the link above.
Chunking Informational for Instructional Design
eLearning Coach Connie Malamed provides some good, concise tips on how to chunk content to ensure you support learning.
How to use Mayer’s 12 Principles of Multimedia
To keep things simple and actionable, I touch on just a few key principles of multimedia above. If you want to go deeper, this article gives a good overview of twelve principles based on the research of educational psychologist Richard Mayer.
Spacing Learning Events Over Time: What the Research Says
This classic research round-up from Dr. Will Thalheimer makes clear how powerful “spacing” is.
- 7 Keys to Make Money from Webinars
- How to Deliver Great Webinars with Wayne Turmel
- How to Host a Virtual Conference – 10 Tips for Success
- Best Screen Recording Software
Jeff Cobb, Founder of Learning Revolution
Jeff Cobb is an expert in online education and the business of adult lifelong learning. Over the past 20+ years he has built a thriving career based on that expertise – as an entrepreneur, a consultant, an author, and a speaker. Learning Revolution is a place where Jeff curates tips, insights, and resources to help you build a thriving expertise-based business. Learn more about Jeff Cobb here.
Table of Contents
Related Posts
Leave a comment cancel reply.
Your email address will not be published. Required fields are marked *
This site uses Akismet to reduce spam. Learn how your comment data is processed .
How to Record A Presentation
Looking for our Text to Speech Reader ?
Featured In
Table of contents, looking to record a presentation 5 tools you'll need, step 1: picking a software, what to use to record audio, what to use to record video, how to record your screen, step 3: recording & tips for succeeding, tips to improve engagement, how do i record my screen and voice for a presentation, how do i record a powerpoint presentation as a video, what is the best way to record a presentation.
Presentations are a staple in the professional and academic world. They allow us to share our ideas, findings, and insights with others in a structured...
Presentations are a staple in the professional and academic world. They allow us to share our ideas, findings, and insights with others in a structured and engaging way. However, recording a presentation can be a daunting task, especially if you're new to it. This article will guide you through the process step-by-step, using tools like PowerPoint, Google Slides, and the best AI text-to-speech voice reader, Speechify.
Before you start recording, you'll need a few tools:
- Screen Recorder : This is software that captures what's happening on your screen. It's essential for recording your slide show and any live demonstrations during your presentation.
- Presentation Deck : This is the collection of slides that you'll be presenting. You can create this using software like PowerPoint or Google Slides.
- Speechify : This is an AI text-to-speech voice reader that can create high-quality voiceovers for your presentation.
- Webcam : If you want to record yourself presenting, you'll need a webcam. Most modern laptops come with one built-in.
- Microphone : To record audio, you'll need a microphone. Again, most modern laptops have one built-in, but you might want to consider a standalone microphone for better audio quality.
The first step in recording a presentation is choosing your software. The three most popular options are PowerPoint, Google Slides, and Zoom. Both are excellent choices, but they each have their pros and cons.
PowerPoint is a Microsoft product and is part of the Office suite. It's been around for a long time and is very feature-rich. No matter the version of Powerpoint, You can create complex PowerPoint Presentations presentations with a variety of transitions, animations, and multimedia elements. PowerPoint slides also have a built-in feature for recording presentations.
Google Slides , on the other hand, is a free, web-based tool. It's not as feature-rich as PowerPoint, but it's straightforward to use and great for collaboration. You can share your slide deck with others and work on it together in real-time.
Zoom is another excellent tool you can use to record a presentation. It's particularly useful if you're delivering a live presentation to an audience and want to record it for later use. Their screen capture and presentation recording features are easy to use and doesn't require any additional software. Plus, you can record both your presentation and yourself presenting, which can help to create a more engaging video.
Step 2: Recording Options
Once you've chosen your software and created your presentation, it's time to start thinking about how you're going to record it.
For recording audio, you have a couple of options. You can record narration live as you present, or you can create a voiceover using Speechify.
Use Speechify
Speechify is the leading AI text-to-speech app, with millions of downloads on Chrome, iOS, Android, and Mac. It can turn your text into a natural-sounding voice, making it perfect for creating voiceovers for your presentation. You can customize the speed, accent, and character of the voice to suit your needs. Here's how you can use Speechify to create voiceovers for your presentation:
- Input Your Script into Speechify : Once your script is ready, input it into Speechify. You can do this by copying and pasting your script into the Speechify app or by uploading a document with your script.
- Customize Your Voiceover : Speechify allows you to customize your voiceover to suit your needs. You can choose from a variety of voices, adjust the speed and pitch, and even add pauses for effect.
- Generate Your Voiceover : Once you're happy with your settings, click on the "Generate" button. Speechify will then turn your text into speech, creating a high-quality voiceover for your presentation.
- Add Your Voiceover to Your Presentation : The final step is to add your voiceover to your presentation. You can do this by importing the audio file into your presentation software and syncing it with your slides.
If you want to record yourself presenting, you'll need a webcam. Make sure your webcam is set up correctly and that you're in a well-lit area. You can record yourself in full screen or use a picture-in-picture format to keep the viewer’s attention on your slides.
To record your screen, you'll need a screen recorder. There are many free and paid screen recorders available for both Windows and Mac. These tools can capture your entire screen, a specific window, or a custom area. They can also record audio and webcam footage, making them perfect for recording presentations.
Now that you've got everything set up, it's time to start recording. Here are some tips to help you succeed:
- Practice : Before you hit the record button, practice your presentation a few times. This will help you feel more comfortable and ensure that your presentation flows smoothly.
- Clear Audio : Make sure your microphone is set up correctly and that there's no background noise. If you're using Speechify for voiceovers, ensure that the text is correctly inputted.
- Good Lighting : If you're recording yourself, make sure you're well-lit. This will make you more visible and create a more professional-looking video.
- Screen Settings : Check your screen settings before you start recording. Make sure you're recording the correct screen or window and that any notifications are turned off.
- Take Your Time : Don't rush through your presentation. Speak clearly and take your time with each slide. Remember, you can always edit the video later.
- Engage Your Audience : Use your voice and body language to engage your audience. Ask rhetorical questions, use gestures, and vary your tone and pace to keep your audience interested.
- Use Visuals : Visuals can help to illustrate your points and keep your audience engaged. Use images, graphs, and diagrams where appropriate.
- Keep It Simple : Don't overload your slides with information. Keep your slides simple and use them to support your speech, not replace it.
- Use Transitions : Transitions can help to guide your audience through your presentation. Use them to signal when you're moving on to a new point or topic.
- Interact with Your Slides : If you're recording your screen, you can use your mouse to highlight important points on your slides.
- Use Speechify : Speechify's high-quality AI voices can make your presentation more engaging and professional. You can even customize the voice to suit your presentation style.
Recording a presentation can seem like a daunting task, but with the right tools and a little practice, anyone can do it. Whether you're using PowerPoint or Google Slides, a screen recorder or a webcam, or creating voiceovers with Speechify, the key is to plan ahead, practice, and keep your audience in mind. With these tips, you'll be well on your way to creating engaging, high-quality presentations that you can share with the world.
Remember, the goal is not just to record a presentation but to create a video presentation that captures your audience's attention and communicates your message effectively. So, don't be afraid to experiment with different recording features, customization options, and presentation styles until you find what works best for you.
Whether you're recording a how-to video, a YouTube video, or a professional presentation, the most important thing is to be clear, engaging, and authentic. So, hit that record button and start sharing your ideas with the world!
You can use a screen recorder to capture your screen and a microphone to record your voice. Some screen recorders also have built-in webcam recording features, allowing you to record your screen, voice, and video all at once.
PowerPoint has a built-in feature that allows you to record your presentation as a video. Simply go to the "Slide Show" tab, click on "Record Slide Show", and then start recording. Once you're done, you can save your presentation as a video file.
The best way to record a presentation depends on your needs and resources. However, a combination of PowerPoint or Google Slides for creating your slide deck, a screen recorder for capturing your screen, and Speechify for creating high-quality voiceovers is a great place to start.
How to cancel Synthesia
Alternatives to Podcastle.ai for Podcast Creators

Cliff Weitzman
Cliff Weitzman is a dyslexia advocate and the CEO and founder of Speechify, the #1 text-to-speech app in the world, totaling over 100,000 5-star reviews and ranking first place in the App Store for the News & Magazines category. In 2017, Weitzman was named to the Forbes 30 under 30 list for his work making the internet more accessible to people with learning disabilities. Cliff Weitzman has been featured in EdSurge, Inc., PC Mag, Entrepreneur, Mashable, among other leading outlets.
- Audio/Video Creation
- Last Updated: August 21, 2022
How To Video Record Yourself Presenting A PowerPoint (with 4 Pro Tips)

Our content is reader supported, which means when you buy from links you click on, we may earn a commission.
An estimated 35 million PowerPoint presentations are given every single day . From corporate boardrooms to high school classrooms, a PowerPoint presentation is among the most popular mediums for sharing content that can engage your viewers and help them get a better understanding of various concepts.
Due to convenience, more and more people now prefer online courses over the traditional, offline mode of learning. Online course providers might need to stream or record their lectures into videos so that their students can watch them on their own time. In the absence of a blackboard, an online PowerPoint presentation is a much better alternative for creating online courses and lessons.
Why Should Course Creators Video Record Themselves When Presenting a Slide Show?
In many cases, a screen recording showing PowerPoint slides on their own just doesn’t do enough to convey the information well. Hence, many course creators have tried the following:
- Recorded narration over the PowerPoint slides.
- Used a screen recorder to capture slides and voice-over.
- Use an online chat tool to record the slides as they are being presented.
Although these methods are a step above the plain and regular PowerPoint presentation, they are not able to engage viewers as completely as a course creator presenting in front of them would. The most effective type of PowerPoint presentation is one where the learners are shown both the slide show as well as the presenter.
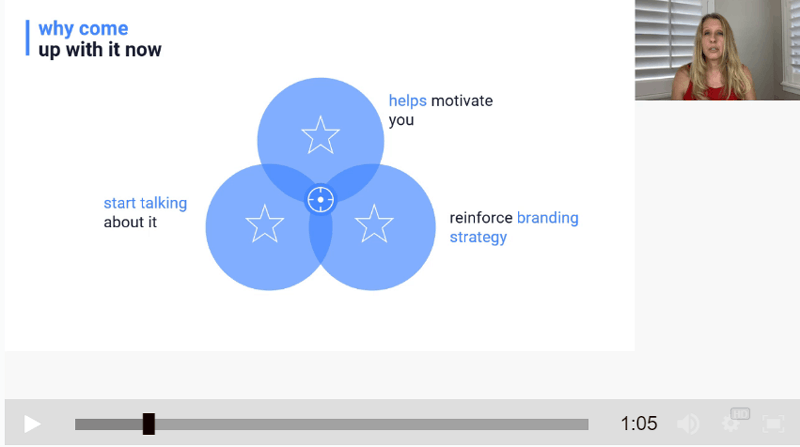
Because of the face-to-face contact and body language, learners feel more like they are in an actual classroom. This will help them remain focused on the topic, improve comprehension, and make them retain the subject matter for a longer period.
Hence, when it comes to class lectures, online skill-sharing, and organizational training, using PowerPoint presentations in conjunction with video is the best way to share information.
Here are some reasons course creators prefer a PowerPoint presentation where you record yourself presenting the slide show rather than lifeless slides:
Greater Power of Persuasions:
Video presentations have higher persuasion ability through video-audio communication and involve the sight, sounds, and emotions that trigger engagement.
Better Retention:
According to statistics, viewers retain approximately 95% of the message when watching a video recording as compared to just 10% when viewing only text.
Available at Your Fingertips:
About 75% of all audio and video are played on smartphones, tablets, and other mobile devices. This means accessing and viewing videos are now easier than ever. This provides course creators a big opportunity to ensure more and more people watch their content.
Time-Saving:
Video presentations allow course creators to break big blocks of information into bite-sized pieces. This makes it easier for the learners to process the information.
Overview: Steps to Create Video PowerPoint Presentations
Almost everyone who has ever used a computer has a basic idea of how a PowerPoint presentation works. Initially, the slide show was created for overhead projector transparencies, which was the most favored medium for many instructors before video projectors.
However, thanks to advancements in digital technology, creators can now enjoy various interactive elements like animated transitions in between slides and audio and video embeds in their presentation to make it more engrossing.
Creating PowerPoint Slides
Every PowerPoint presentation starts with the same basic template. Your slides can be fully customizable or you can choose from pre-made templates to expedite the design process of the slides.
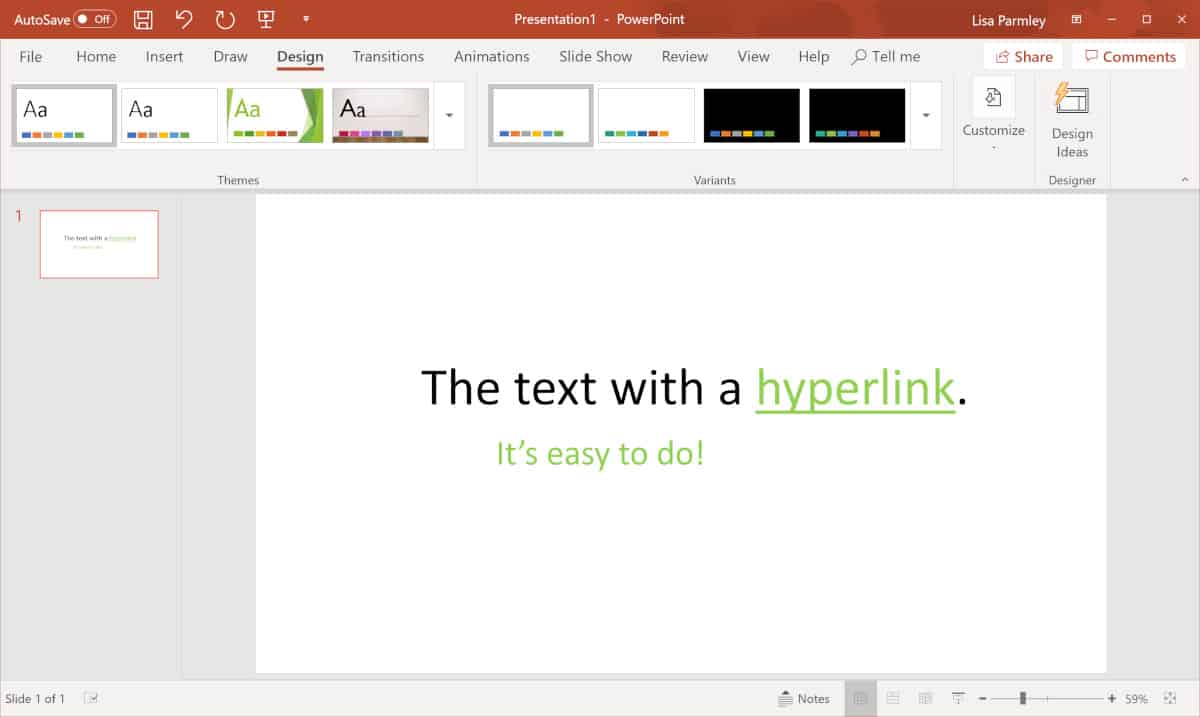
To make a simple PowerPoint presentation, you need to add text, bullet points, and images. You can use the standard layout or select the content themes from the top ribbon.
PowerPoint now also comes with a gallery of stock images. In addition, the application also recommends design ideas based on your layout so that your slide looks more professional. This is a useful feature if you do not have a lot of time customizing the slide design.
Once you are satisfied with the general look of your slides, you will need to add the audio and video content to the presentation. You can then export the entire presentation and share it with your learners.
Recording Audio on PowerPoint
Do you know that PowerPoint software itself allows you to record your audio onto the presentation? This summary you a quick run-down of how to use this feature.
Before you start the audio recording, it is a good idea to use the “Rehearse Timings” option to see how your script fits your slides. This will open up a test screen, which will show how long you played the slide show and how much time you took on a single slide.
You can use the “Pause” and “Reset” buttons to make changes and use the “Notes” section to document the changes you made to your script.
To add your voice recording, go to the “Slide Show” tab on the top ribbon. Go to the “Record Slide Show” option and start recording the audio. You can also use the audio on and off toggle video options at the top of the record screen to record only the audio.
Although you can record your audio through the built-in microphone on your laptop or phone, it is a good idea to invest in a good-quality mic for better quality audio.
PowerPoint allows you to record the full slide show in a single take. You can also click through the slides to trigger the added animations or to make progress through the presentation.
Once you are done, you should review the recording, which will be saved on a slide-by-slide basis, so you do not need to record the presentation again to fix any errors.
PowerPoint audio is not recorded during slide transition, so make sure you finish speaking before you skip to the next slide to avoid cutting off your conversation.
Creating a Video of Yourself
To add yourself to the PowerPoint presentation, switch on the video option located on the Record Slide Show screen. By default, PowerPoint will show the video picked by your camera at the bottom right of the presentation during the recording.
Once your video has been recorded, you should return to the editing screen. You will find your video recording shown at the bottom right of the slide.
Resizing and Repositioning the Clip:
You can drag your recording from the default place to anywhere on the slide. You can also blow it up to fit the slide frame or remove the recording by selecting it and pressing the delete option.
Making Video Presentations with a Screen Recorder
Although PowerPoint presentations allow you to make a perfectly good screen recording, you can also find a lot of powerful and robust third-party tools that can take your video presentation to the next level. Making your video presentation appear more professional and sleek will help you stand out from the crowd and will help you establish trust and authority with your learners.
Screen recorders or screencasting software offers a more comprehensive range of editing and post-production options, including closed captioning , professional transitions, and the ability to add interactive elements. They also come with an added bonus of directly sharing your online lesson to video-sharing sites like YouTube and Vimeo and allow you to save your presentation in alternative formats, including .mpeg2, .avi, and .mov.
Let’s take a look at how you can video record a PowerPoint presentation with Camtasia.
Using Camtasia to Record PowerPoint Presentations
Camtasia is an industry leader in video editing and screen recording. The software allows you to capture videos via your webcam, add sound effects from the royalty-free music library, record sections from your screen, capture content from iPhone, integrate animations, set up customized video themes, add device themes, and allow course creators to benefit from a whole lot of other features.
If you have Camtasia on your computer, you can import your PowerPoint slides into the software and edit them through Camtasia. Just click on the “Import Media” option and select your PowerPoint file. This will turn your slides into PNG format. PNG files are not editable so you will not be able to change the content in your slide, it will give you better control over the presentation design and style since you will be able to adjust your slides to fit in with your video and audio overlay easily.
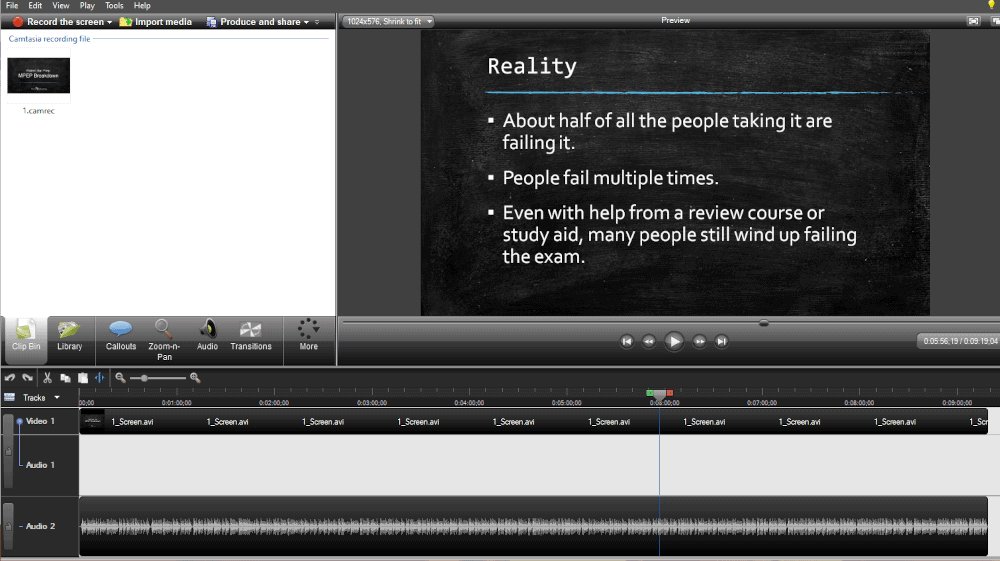
For online course creators, Camtasia offers real benefits since it allows you to export your finished file as a SCORM package. This means it can be downloaded to any SCORM-compliant LMS and will enable the LMS to track learning activities, like quiz performances and time spent on a course.
This is not possible if you are making your presentation using only PowerPoint software.
Recording the Screen
To start the screen recording, you need to click the “Record” button at the top of the toolbar. This will open up the Camtasia recorder which is default set to capture everything that is happening on your screen.
Customize Recording
You can either choose to record the full screen or click on the arrow to “select area to record.” You can also choose to record other elements on the screen, including the webcam, mic audio, and system audio. Click on the down arrow button or the double arrows next to the options to choose a specific webcam (if you have one) or mic. This way you can record yourself presenting a PowerPoint. Click on the “Start Recording” button to begin.
Record Yourself Presenting the PowerPoint Presentation
As mentioned, you can use the tools within Camtasia to record your screen which consists of your PowerPoint slides. Then you can use the recorder to choose a specific webcam. However, you can also use a different device to record yourself presenting a PowerPoint.
For instance, if you have a video camera or a Smartphone, you can set that up to record yourself as you go through the presentation. Then you can import that video file into Camtasia later on.
Finish Recording
Depending on whether you are using Windows or Mac computers, you will need to follow slightly different to finish recording on Camtasia. If you use Windows, click the Camtasia recorder icon located on the taskbar and press the “Stop” button. To re-record, delete the recording and then start over. Alternatively, you can also press “F9” to pause and resume the recording and “F10” to stop the recording.
If you use a Mac, click the Camtasia icon on the Apple menu bar and press the “Stop Recording” button. To re-record, click on the “Start Over” button. Alternatively, you can also press “CMD+SHIFT+2” to pause or resume a recording, and “CMD+OPTION+2” to stop a recording.
Import the Audio and Video into Your Camtasia Project
Camtasia works with projects. Once you’re done with your presentation recording and you end the recording, a new project should open. You’ll want to import any additional audio and video into that project.
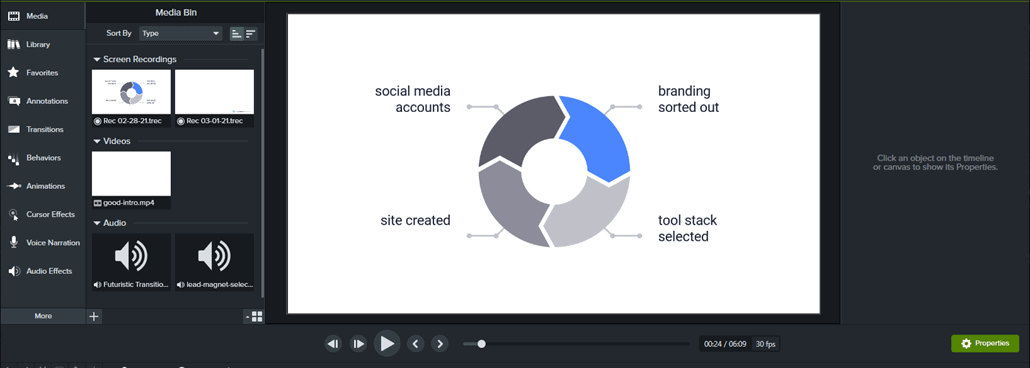
That means if you recorded yourself separately on your Smartphone, you’ll need to upload that to the project. Then you can organize both your Camtasia recording and the video of you presenting a PowerPoint on the timeline.
Trimming the Video
To remove the extra content that is often found at the start of a video, drag the end of the clip “in” on the timeline. If you remove too much material from the recording, drag it back out to restore the video. A great thing about this is that any edits you make on the timeline will not change the original recording saved in the media bin.
Cutting Out the Video
To cut out a certain section on the video, drag the red or green handle on the video playhead to select a specific area on the timeline. Then, click on the “Cut” button to remove that section. The program will add a stitched line on the timeline to show where the cut was made. In addition, if you want to bring the playhead together, double-click on the playhead.
Adding Titles and Annotations
Make your video more professional by adding titles, annotations, and effects to the content. You can easily add an annotation by clicking and dragging the relevant option from the tool panels to your video timeline or the canvas.
Double click the annotation to change the test. You can change the background color, font, and other elements in the properties panel. To change the position, rotation, and size of the annotation, click and drag the handles.
Adding Effects
Camtasia also offers you “Shapes” and “Blur” options as effects you can add to your Powerpoint presentation. You can add a shape by clicking and dragging one from the tool panel to the timeline or the canvas. If you want to hide sensitive or copyright information, use the “Blur” option. In addition, you can also adjust the size, position, and intensity of the blur in the properties panel.
Exporting the Video:
Click on the “Export” button to see all the export options that Camtasia provides. The first option downloads the video file on the computer. Other options allow you to upload your file to web services. This requires you to sign in to an account. You can then invite your learners to review the video presentation.
Using a Zipped Project
You should export your file in zip format. This way, all the original media used in the video presentation will be placed in one file. This allows you convenient access to all files in the project. To zip your files, go to “File” and select “Import Zipped Project.” This will import the zipped files into a new project.
Pro Tips for Making Better Video PowerPoint Presentations
To make your PowerPoint videos even better, you should consider the following tips:
1. Make it Short, Sweet, and Simple:
Your video clips should just be long enough to captivate your audience, not bore them to tears. Depending on what course you are offering, the length of your video will vary. However, make sure you do some research to find out how long is too long for your students.
2. Focus on the Point:
Before starting on the core subject, make sure you inform your learners about the goals and objectives of the course. Once you start the presentation, do not deviate from the core message. Your text, audio, and graphics should all be relevant to the subject matter. They should not detract your learners from your main lesson.
3. Know Your Audience:
The tone of your PowerPoint video presentation should match the content of your course. For example, if you are offering a makeup tutorial, your words should be simple. If, however, you are teaching an advanced course on physics or engineering, your language will be technical since your course covers a technical topic.
4. Adding Engagement:
You can turn up the engagement of your videos by adding more interesting elements to the content. For example, you can add YouTube videos, music, and interactive quizzes to ensure your course has the learner’s full attention.
A Meaningful Ending:
When ending your presentation, make sure you leave your learners with a resource that they can take away from the lesson. It could be a simple link to your website, a short ebook as a freebie, or just a few links. This provides a lot of value and creates a lasting impression on your customers.
Frequently Asked Questions on Recording Video
How can i record video online.
There are a few different ways to record videos online. One option is to use a screen-recording program like Camtasia or Snagit. These programs allow you to record your screen and create professional-looking videos.
Another option is to use a webcam to record yourself. This is a good option if you want to record a tutorial or how-to video.
Finally, you can use your smartphone. This is a good option if you’re recording something impromptu or if you want to record video in a format that’s easy to share online.
How can I record video for free?
One free option for recording video is to use a smartphone or tablet. Most devices come with a built-in camera, and there are also many apps available that can be used for recording video. If you already have a smartphone, then you may not need anything else to start recording for free.
How can I record audio and video online?
There are a few different ways you can record audio and video online. One option is to use a screen recording program like Screencast-O-Matic, Camtasia , or Snagit. These programs allow you to record your screen, along with any audio coming in through a microphone. You can then save the recording as a video file and share it online.
Another option is to use a webcam. Most computers come with a built-in webcam, or you can purchase an external webcam that plugs into your computer’s USB port.
Once you have a webcam set up, you can use it to record video by using a program like Skype or Zoom. You can set a webcam up to record audio through a microphone (if you want higher quality audio).
You can record audio separately (or with your video) by using a program like Audacity, Camtasia , or GarageBand. Once you’ve recorded your audio or video, you can save it as a .MPG file and share it online.
What is the best free online video recorder?
There are a number of free online video recorders available. These mostly cater to people using webcams and include Movavi’s Webcam Recorder , Webcamera.io , and Screen Capture .
While you’re looking for the best free online video recorder, consider the following factors:
- Ease of use: Look for a recorder with a user-friendly interface that won’t take hours to learn.
- Quality: The video recorder should produce high-quality recordings. Look for a recorder that offers various quality settings so you can adjust them according to your needs.
- File format: Look for a recorder that can export to different file formats so you can view your recordings on any device.
- Storage: Look for a recorder that offers cloud storage or that can save recordings directly to your hard drive.
How can I record my screen with audio online?
The first thing you’ll need to do is choose a screen recorder or screencast software. There are many options available, but some of the most popular include Screencast-O-Matic, Snagit, and Camtasia.
Nearly all screen recorders will connect up to an external microphone (if you have one) which will make the voice-over higher quality than using the built-in mic on your device.
Once you’ve selected a screen recorder, simply follow the instructions to record your screen. Often, it’s as simple as pressing a ‘record’ button!
Typically, you can record both your screen and your voice-over at the same time. When you’re finished, save your recording and share it online.
Final Words
PowerPoint presentations have come a long way from simple bullet points and stock images. Now, you can benefit from a plethora of impressive designing and editing options that allow you to create even more engaging and informative content for your online courses, tutorials, or webinars. In addition, there are plenty of tools available that allow you to record these presentations so that they are accessed and viewed anywhere, at any time.
Making excellent video PowerPoint presentations is now more important than ever. There is an increasing number of reasons to believe that more and more courses, classes, conferences, and events will be hosted through virtual content in the future.
As video presentations grow in popularity, learners will demand a higher quality of content. Hence, it is now more important than ever to produce sleek, professional quality, captivating PowerPoint presentations to establish yourself as an industry leader in the world of online courses.
Lisa Parmley
Lisa Parmley is the founder of coursemethod.com. After gaining a Master's degree, she worked in research for about seven years. She started a training company in 2001, offering a course helping people pass a professional exam. That course has earned multiple 7 figures. She created SEO and authority site building training around 2007 which went on to earn well into the 6-figure mark.
She has 22+ years of experience in the trenches creating and selling online courses. Get help starting and growing your online course business here .
Grow faster with free step-by-step training for online course founders.
Access Course Method Pro progress tracking and Strategic Planners + gain inspiration from successful course creators in weekly emails .
Unsubscribe at any time.
About Stanford GSB
- The Leadership
- Dean’s Updates
- School News & History
- Commencement
- Business, Government & Society
- Centers & Institutes
- Center for Entrepreneurial Studies
- Center for Social Innovation
- Stanford Seed
About the Experience
- Learning at Stanford GSB
- Experiential Learning
- Guest Speakers
- Entrepreneurship
- Social Innovation
- Communication
- Life at Stanford GSB
- Collaborative Environment
- Activities & Organizations
- Student Services
- Housing Options
- International Students
Full-Time Degree Programs
- Why Stanford MBA
- Academic Experience
- Financial Aid
- Why Stanford MSx
- Research Fellows Program
- See All Programs
Non-Degree & Certificate Programs
- Executive Education
- Stanford Executive Program
- Programs for Organizations
- The Difference
- Online Programs
- Stanford LEAD
- Seed Transformation Program
- Aspire Program
- Seed Spark Program
- Faculty Profiles
- Academic Areas
- Awards & Honors
- Conferences
Faculty Research
- Publications
- Working Papers
- Case Studies
Research Hub
- Research Labs & Initiatives
- Business Library
- Data, Analytics & Research Computing
- Behavioral Lab
Research Labs
- Cities, Housing & Society Lab
- Golub Capital Social Impact Lab
Research Initiatives
- Corporate Governance Research Initiative
- Corporations and Society Initiative
- Policy and Innovation Initiative
- Rapid Decarbonization Initiative
- Stanford Latino Entrepreneurship Initiative
- Value Chain Innovation Initiative
- Venture Capital Initiative
- Career & Success
- Climate & Sustainability
- Corporate Governance
- Culture & Society
- Finance & Investing
- Government & Politics
- Leadership & Management
- Markets & Trade
- Operations & Logistics
- Opportunity & Access
- Organizational Behavior
- Political Economy
- Social Impact
- Technology & AI
- Opinion & Analysis
- Email Newsletter
Welcome, Alumni
- Communities
- Digital Communities & Tools
- Regional Chapters
- Women’s Programs
- Identity Chapters
- Find Your Reunion
- Career Resources
- Job Search Resources
- Career & Life Transitions
- Programs & Services
- Career Video Library
- Alumni Education
- Research Resources
- Volunteering
- Alumni News
- Class Notes
- Alumni Voices
- Contact Alumni Relations
- Upcoming Events
Admission Events & Information Sessions
- MBA Program
- MSx Program
- PhD Program
- Alumni Events
- All Other Events
10 Tips For Giving Effective Virtual Presentations
What to know before you go live.
September 26, 2016

Presenting online? Try these suggestions to improve your results. | Illustration by Tricia Seibold
As audiences go global and you need to reach more people through technology (including webinars, conference calls and teleconference), you must consider the challenges to connecting with a virtual audience. Here I pinpoint 10 valuable best practices to ensure you communicate successfully.
1. Be Brief
Audiences begin to lose attention after roughly 10 minutes of hearing from the same presenter. If you have more than 10 minutes of content, use interactive activities to keep your audience engaged (for example, take a poll, give quizzes, or ask audience members for their opinions via chat).
2. Be Simple
Keep slides simple — avoid too many words, graphics and animation features. Less is definitely more!

Light yourself well | Illustration by Tricia Seibold
3. Be a TV Personality
Look straight into your camera, not the screen. Wear clothing that is neutral in color (no plaids or stripes). Light yourself well and from above. Be mindful of what appears behind you in the background. Invest in a good microphone.
4. Be Standing
Even though your audience cannot see you, stand when you present. This allows you to stay focused and use good presentation delivery skills such as belly breathing, vocal variety, and pausing.
5. Be Prepared
Practice delivering your presentation with your technology in advance of your talk. Make sure all of the features of the technology work. Record your practice using the recording feature of your tool. Watch and listen to learn what works and what you can improve.
6. Be Assisted
Have someone available to deal with technical issues and to field email/text questions. Also, if you have multiple remote audience members in one location, be sure to pick one of them to be your “eyes and ears.” Ask them to queue up questions and facilitate discussion on your behalf.
7. Be Specific
Ask pointed questions to avoid too many people answering at once. For example, rather than ask, “Are there any questions?” try “Who has a question about the solution I provided?” Set a ground rule that people state their names prior to speaking.

Imagine your audience | Illustration by Tricia Seibold
8. Be Synchronized
Transitions are critical. You must connect what you just said to what is coming next when you move from point to point. Transitions between topics and slides are good opportunities to get people reengaged to your talk.
9. Be Connected
Imagine your audience even though you can’t see them. You can place pictures of audience members behind your camera so you can look at people as you present.
10. Be Early
Encourage your audience to access your call or webinar in advance of the start time so you can iron out any technical issues in advance and get them familiar with the technology.
Matt Abrahams is a Stanford GSB organizational behavior lecturer, author, and communications coach.
For media inquiries, visit the Newsroom .
Explore More
Lose yourself: the secret to finding flow and being fully present, speak your truth: why authenticity leads to better communication, when words aren’t enough: how to excel at nonverbal communication, editor’s picks.

April 04, 2016 A Big Data Approach to Public Speaking Key takeaways from analyzing 100,000 presentations.
November 19, 2014 Matt Abrahams: The Power of the Paraphrase An expert on public speaking shows how paraphrasing can help you navigate tricky communication situations.
- Priorities for the GSB's Future
- See the Current DEI Report
- Supporting Data
- Research & Insights
- Share Your Thoughts
- Search Fund Primer
- Teaching & Curriculum
- Affiliated Faculty
- Faculty Advisors
- Louis W. Foster Resource Center
- Defining Social Innovation
- Impact Compass
- Global Health Innovation Insights
- Faculty Affiliates
- Student Awards & Certificates
- Changemakers
- Dean Jonathan Levin
- Dean Garth Saloner
- Dean Robert Joss
- Dean Michael Spence
- Dean Robert Jaedicke
- Dean Rene McPherson
- Dean Arjay Miller
- Dean Ernest Arbuckle
- Dean Jacob Hugh Jackson
- Dean Willard Hotchkiss
- Faculty in Memoriam
- Stanford GSB Firsts
- Certificate & Award Recipients
- Teaching Approach
- Analysis and Measurement of Impact
- The Corporate Entrepreneur: Startup in a Grown-Up Enterprise
- Data-Driven Impact
- Designing Experiments for Impact
- Digital Business Transformation
- The Founder’s Right Hand
- Marketing for Measurable Change
- Product Management
- Public Policy Lab: Financial Challenges Facing US Cities
- Public Policy Lab: Homelessness in California
- Lab Features
- Curricular Integration
- View From The Top
- Formation of New Ventures
- Managing Growing Enterprises
- Startup Garage
- Explore Beyond the Classroom
- Stanford Venture Studio
- Summer Program
- Workshops & Events
- The Five Lenses of Entrepreneurship
- Leadership Labs
- Executive Challenge
- Arbuckle Leadership Fellows Program
- Selection Process
- Training Schedule
- Time Commitment
- Learning Expectations
- Post-Training Opportunities
- Who Should Apply
- Introductory T-Groups
- Leadership for Society Program
- Certificate
- 2023 Awardees
- 2022 Awardees
- 2021 Awardees
- 2020 Awardees
- 2019 Awardees
- 2018 Awardees
- Social Management Immersion Fund
- Stanford Impact Founder Fellowships and Prizes
- Stanford Impact Leader Prizes
- Social Entrepreneurship
- Stanford GSB Impact Fund
- Economic Development
- Energy & Environment
- Stanford GSB Residences
- Environmental Leadership
- Stanford GSB Artwork
- A Closer Look
- California & the Bay Area
- Voices of Stanford GSB
- Business & Beneficial Technology
- Business & Sustainability
- Business & Free Markets
- Business, Government, and Society Forum
- Get Involved
- Second Year
- Global Experiences
- JD/MBA Joint Degree
- MA Education/MBA Joint Degree
- MD/MBA Dual Degree
- MPP/MBA Joint Degree
- MS Computer Science/MBA Joint Degree
- MS Electrical Engineering/MBA Joint Degree
- MS Environment and Resources (E-IPER)/MBA Joint Degree
- Academic Calendar
- Clubs & Activities
- LGBTQ+ Students
- Military Veterans
- Minorities & People of Color
- Partners & Families
- Students with Disabilities
- Student Support
- Residential Life
- Student Voices
- MBA Alumni Voices
- A Week in the Life
- Career Support
- Employment Outcomes
- Cost of Attendance
- Knight-Hennessy Scholars Program
- Yellow Ribbon Program
- BOLD Fellows Fund
- Application Process
- Loan Forgiveness
- Contact the Financial Aid Office
- Evaluation Criteria
- GMAT & GRE
- English Language Proficiency
- Personal Information, Activities & Awards
- Professional Experience
- Letters of Recommendation
- Optional Short Answer Questions
- Application Fee
- Reapplication
- Deferred Enrollment
- Joint & Dual Degrees
- Entering Class Profile
- Event Schedule
- Ambassadors
- New & Noteworthy
- Ask a Question
- See Why Stanford MSx
- Is MSx Right for You?
- MSx Stories
- Leadership Development
- Career Advancement
- Career Change
- How You Will Learn
- Admission Events
- Personal Information
- Information for Recommenders
- GMAT, GRE & EA
- English Proficiency Tests
- After You’re Admitted
- Daycare, Schools & Camps
- U.S. Citizens and Permanent Residents
- Requirements
- Requirements: Behavioral
- Requirements: Quantitative
- Requirements: Macro
- Requirements: Micro
- Annual Evaluations
- Field Examination
- Research Activities
- Research Papers
- Dissertation
- Oral Examination
- Current Students
- Education & CV
- International Applicants
- Statement of Purpose
- Reapplicants
- Application Fee Waiver
- Deadline & Decisions
- Job Market Candidates
- Academic Placements
- Stay in Touch
- Faculty Mentors
- Current Fellows
- Standard Track
- Fellowship & Benefits
- Group Enrollment
- Program Formats
- Developing a Program
- Diversity & Inclusion
- Strategic Transformation
- Program Experience
- Contact Client Services
- Campus Experience
- Live Online Experience
- Silicon Valley & Bay Area
- Digital Credentials
- Faculty Spotlights
- Participant Spotlights
- Eligibility
- International Participants
- Stanford Ignite
- Frequently Asked Questions
- Operations, Information & Technology
- Classical Liberalism
- The Eddie Lunch
- Accounting Summer Camp
- Videos, Code & Data
- California Econometrics Conference
- California Quantitative Marketing PhD Conference
- California School Conference
- China India Insights Conference
- Homo economicus, Evolving
- Political Economics (2023–24)
- Scaling Geologic Storage of CO2 (2023–24)
- A Resilient Pacific: Building Connections, Envisioning Solutions
- Adaptation and Innovation
- Changing Climate
- Civil Society
- Climate Impact Summit
- Climate Science
- Corporate Carbon Disclosures
- Earth’s Seafloor
- Environmental Justice
- Operations and Information Technology
- Organizations
- Sustainability Reporting and Control
- Taking the Pulse of the Planet
- Urban Infrastructure
- Watershed Restoration
- Junior Faculty Workshop on Financial Regulation and Banking
- Ken Singleton Celebration
- Marketing Camp
- Quantitative Marketing PhD Alumni Conference
- Presentations
- Theory and Inference in Accounting Research
- Stanford Closer Look Series
- Quick Guides
- Core Concepts
- Journal Articles
- Glossary of Terms
- Faculty & Staff
- Researchers & Students
- Research Approach
- Charitable Giving
- Financial Health
- Government Services
- Workers & Careers
- Short Course
- Adaptive & Iterative Experimentation
- Incentive Design
- Social Sciences & Behavioral Nudges
- Bandit Experiment Application
- Conferences & Events
- Reading Materials
- Energy Entrepreneurship
- Faculty & Affiliates
- SOLE Report
- Responsible Supply Chains
- Current Study Usage
- Pre-Registration Information
- Participate in a Study
- Founding Donors
- Location Information
- Participant Profile
- Network Membership
- Program Impact
- Collaborators
- Entrepreneur Profiles
- Company Spotlights
- Seed Transformation Network
- Responsibilities
- Current Coaches
- How to Apply
- Meet the Consultants
- Meet the Interns
- Intern Profiles
- Collaborate
- Research Library
- News & Insights
- Program Contacts
- Databases & Datasets
- Research Guides
- Consultations
- Research Workshops
- Career Research
- Research Data Services
- Course Reserves
- Course Research Guides
- Material Loan Periods
- Fines & Other Charges
- Document Delivery
- Interlibrary Loan
- Equipment Checkout
- Print & Scan
- MBA & MSx Students
- PhD Students
- Other Stanford Students
- Faculty Assistants
- Research Assistants
- Stanford GSB Alumni
- Telling Our Story
- Staff Directory
- Site Registration
- Alumni Directory
- Alumni Email
- Privacy Settings & My Profile
- Success Stories
- The Story of Circles
- Support Women’s Circles
- Stanford Women on Boards Initiative
- Alumnae Spotlights
- Insights & Research
- Industry & Professional
- Entrepreneurial Commitment Group
- Recent Alumni
- Half-Century Club
- Fall Reunions
- Spring Reunions
- MBA 25th Reunion
- Half-Century Club Reunion
- Faculty Lectures
- Ernest C. Arbuckle Award
- Alison Elliott Exceptional Achievement Award
- ENCORE Award
- Excellence in Leadership Award
- John W. Gardner Volunteer Leadership Award
- Robert K. Jaedicke Faculty Award
- Jack McDonald Military Service Appreciation Award
- Jerry I. Porras Latino Leadership Award
- Tapestry Award
- Student & Alumni Events
- Executive Recruiters
- Interviewing
- Land the Perfect Job with LinkedIn
- Negotiating
- Elevator Pitch
- Email Best Practices
- Resumes & Cover Letters
- Self-Assessment
- Whitney Birdwell Ball
- Margaret Brooks
- Bryn Panee Burkhart
- Margaret Chan
- Ricki Frankel
- Peter Gandolfo
- Cindy W. Greig
- Natalie Guillen
- Carly Janson
- Sloan Klein
- Sherri Appel Lassila
- Stuart Meyer
- Tanisha Parrish
- Virginia Roberson
- Philippe Taieb
- Michael Takagawa
- Terra Winston
- Johanna Wise
- Debbie Wolter
- Rebecca Zucker
- Complimentary Coaching
- Changing Careers
- Work-Life Integration
- Career Breaks
- Flexible Work
- Encore Careers
- Join a Board
- D&B Hoovers
- Data Axle (ReferenceUSA)
- EBSCO Business Source
- Global Newsstream
- Market Share Reporter
- ProQuest One Business
- Student Clubs
- Entrepreneurial Students
- Stanford GSB Trust
- Alumni Community
- How to Volunteer
- Springboard Sessions
- Consulting Projects
- 2020 – 2029
- 2010 – 2019
- 2000 – 2009
- 1990 – 1999
- 1980 – 1989
- 1970 – 1979
- 1960 – 1969
- 1950 – 1959
- 1940 – 1949
- Service Areas
- ACT History
- ACT Awards Celebration
- ACT Governance Structure
- Building Leadership for ACT
- Individual Leadership Positions
- Leadership Role Overview
- Purpose of the ACT Management Board
- Contact ACT
- Business & Nonprofit Communities
- Reunion Volunteers
- Ways to Give
- Fiscal Year Report
- Business School Fund Leadership Council
- Planned Giving Options
- Planned Giving Benefits
- Planned Gifts and Reunions
- Legacy Partners
- Giving News & Stories
- Giving Deadlines
- Development Staff
- Submit Class Notes
- Class Secretaries
- Board of Directors
- Health Care
- Sustainability
- Class Takeaways
- All Else Equal: Making Better Decisions
- If/Then: Business, Leadership, Society
- Grit & Growth
- Think Fast, Talk Smart
- Spring 2022
- Spring 2021
- Autumn 2020
- Summer 2020
- Winter 2020
- In the Media
- For Journalists
- DCI Fellows
- Other Auditors
- Academic Calendar & Deadlines
- Course Materials
- Entrepreneurial Resources
- Campus Drive Grove
- Campus Drive Lawn
- CEMEX Auditorium
- King Community Court
- Seawell Family Boardroom
- Stanford GSB Bowl
- Stanford Investors Common
- Town Square
- Vidalakis Courtyard
- Vidalakis Dining Hall
- Catering Services
- Policies & Guidelines
- Reservations
- Contact Faculty Recruiting
- Lecturer Positions
- Postdoctoral Positions
- Accommodations
- CMC-Managed Interviews
- Recruiter-Managed Interviews
- Virtual Interviews
- Campus & Virtual
- Search for Candidates
- Think Globally
- Recruiting Calendar
- Recruiting Policies
- Full-Time Employment
- Summer Employment
- Entrepreneurial Summer Program
- Global Management Immersion Experience
- Social-Purpose Summer Internships
- Process Overview
- Project Types
- Client Eligibility Criteria
- Client Screening
- ACT Leadership
- Social Innovation & Nonprofit Management Resources
- Develop Your Organization’s Talent
- Centers & Initiatives
- Student Fellowships
More From Forbes
Best practices for virtual presentations: 15 expert tips that work for everyone.
- Share to Facebook
- Share to Twitter
- Share to Linkedin
In today’s COVID-19 world, virtual meetings and presentations have become the norm. While many presentation skills and best practices apply to both in-person and virtual presentations, expert virtual presenters understand the importance of adjusting their approach to match the medium. With in-person presentations, you more or less have a captive audience — you still need be engaging, but your audience is kind of stuck with you for the duration. But with virtual presentations, your audience has a greater opportunity to stray. You now have to compete for their eyes, ears, hearts, and minds against diminished attention spans, increased home and work life distractions, and conflicting priorities.
Here are 15 expert tips to set you up for success in your next virtual presentation:
1. Get the Lighting Right: As a presenter, it is essential that people can see you well. Make sure you have good front light—meaning the light shines brightly on your face. If your back is to a window, close the shades. While natural light is often the best choice, if your home office doesn’t have natural light and you do a lot of virtual presentations, consider purchasing supplemental lighting to enhance your image.
2. Choose the Right Background: Try to use a background that enhances your professional image and is aligned with your message. Avoid a cluttered background or anything that can be distracting. Learn whether your presentation platform enables you to use virtual backgrounds (like Zoom) or whether you can blur your background (like Microsoft Teams). Your background can either add to your professional presence or detract from it.
3. Know the Technology: Nothing kills a presentation faster than a presenter who fumbles with the technology. This is a performance, so make sure you know how to make it work. A dry run is essential so that you’re comfortable with the platform features. It’s best to have a co-host (or producer or moderator) assist you with the technology so that you can focus on your presentation. Make sure you practice with the same technical set up (computer and internet connection) that you will use when you deliver the presentation.
4. Play to the Camera: When you are the one speaking, look directly into your computer’s camera , not on the screen or at the other participants. This takes some practice, but it makes the viewer feel as if you are looking right at them. Some presenters turn off their self-view so that they aren’t distracted by their own image. Put the camera at eye level . Try not to have your camera too far above or below you. If it’s too low, then you run the risk of creating a double chin. A camera too high makes it difficult to maintain eye contact, as you may find your gaze dropping as you speak. If you are part of a panel or a team of presenters, make sure you are aware of when your camera is on. If you are not speaking but your camera is on, make sure you look like you are paying attention! Powerful presenters understand the importance of making eye contact with their audience, so this means you have to simulate the same effect virtually.
Best Travel Insurance Companies
Best covid-19 travel insurance plans.
5. Get Close (But Not Too Close). You want the camera to frame your face, neck, and shoulders. People are drawn to faces, so you don’t want to lose that connection by being too far away, but you also don’t want your face to take over the whole screen like a dismembered head because, well, that looks weird. Practice your positioning and distance.
6. Stand Up: If possible, use a standing desk or position your laptop so you can stand at eye level with your computer. Standing up provides a higher energy level and forces us to put our body in a more presentation-like mode. If you have to sit, lean forward as you would if you were presenting at a real meeting or as if you were a TV news anchor. Avoid slouching away from the camera, as that sends a signal that you are disconnected from the audience.
7. Be Animated: Just like in a live presentation, you want to present with a little energy and animation. Too slow or too monotone in your voice makes it easy for folks to disengage and tune out. Keeping people engaged virtually requires you to actually be engaging.
8. Pace Yourself: Without real-time visual audience feedback cues, getting the pacing right can be difficult. Even though you want to infuse some animation and energy into your presentation don’t pump up the speed too much. If you tend to be a fast talker in real life, practice slowing down just a bit. If you’re a slow talker, you may want to speed up just a bit.
9. Do A Sound Check: If your sound is garbled, people will tune out. While people may forgive less than perfect video, if they can’t clearly hear you, they will leave. Practice with someone on the other end of the presentation platform. Make sure your sound emits clearly. Sometimes headphones or external microphones work better than the computer audio, sometimes not. Every platform is different, so make sure your sound quality is excellent every time. And again, you should practice with the same technical configurations and location that you will use for your presentation.
10. Plug into Your Modem: If possible, plug your computer directly into your modem using an Ethernet cable. This will give you the strongest signal and most stable internet connection. The last thing you want to happen during your presentation is to have a weak or unstable internet signal.
11. Incorporate Redundant Systems. If using slides, make sure someone else (another webinar co-host or producer) also has a copy of the slides just in case your internet goes wonky and you have to present by calling in. If you are using slides, make them visually appealing. Use high-quality graphics and limit the amount of text on each slide. It’s your job as presenter to deliver the content. The slides are meant to enhance your spoken words, not replace them.
12. Engage Your Participants. Just as if you were doing an in-person presentation, craft your presentation to engage the audience. Incorporate chats, polls, raised hand features, etc. Try not to speak for more than ten minutes without some sort of audience engagement. Use the participant list to interact with your participants by name. Have people chat or raise a hand if they want to speak. Keep track of the order of people and then call on them to invite them to turn on their mics or cameras.
13. Let Someone Else Check the Chats. Don’t get sidetracked by the chats during your presentation. You’ll be shocked at how distracting it is to your train of thought if you attempt to read the chats while speaking. Instead, have your co-host or producer monitor the chats. If you ask people to chat you answers or comments to a question you’ve posed, then pause your talking and engage directly with the chats by acknowledging them, reading them out loud, and commenting on them.
14. Evaluate and Enhance: If possible, record the session and take the time to play back and look for areas that worked well and areas that you might want to improve upon. Great presenters, whether virtual or in person, understand the value of continually honing their craft. Be sure to acknowledge your strengths as well as your areas of improvement.
15. Be Yourself and Have Fun: Again, just like in face-to-face presentations, audiences connect to authenticity, so be yourself! Let your personality show through. Have fun. If you look like you’re enjoying the presentation so will others. Research shows that happy people retain information better than bored or disinterested people, so model the energy that you want to create. The audience takes its cue from you.
Remember, whether you are presenting in-person or virtually, all presentations are performances. And all performances are in service to your audience. Their time is valuable, so honor that time by delivering the best presentation you can. No matter what kind of presentation you are giving, you must find ways to create authentic audience connection, engagement, and value.
- Editorial Standards
- Reprints & Permissions

14 Practical Tips to Improve Your Presentation Skills
- The Speaker Lab
- May 11, 2024
Table of Contents
Ever felt complete dread and fear at the thought of stepping up to deliver a presentation? If so, you’re not alone. The fear of public speaking is more common than you might think, but with the right presentation skills , it’s a hurdle that can be overcome.
In this article, we’ll help you master basic confidence-building techniques and conquer advanced communication strategies for engaging presentations. We’ll explore how body language and eye contact can make or break your connection with your audience; delve into preparation techniques like dealing with filler words and nervous habits; discuss tailoring content for different audiences; and much more.
Whether you’re prepping for job interviews or gearing up for big presentations, being prepared is key. With adequate practice and the proper attitude, you can crush your speech or presentation!
Mastering the Basics of Presentation Skills
Presentation skills are not just about speaking in front of a crowd. It’s also about effective communication, audience engagement, and clarity. Mastering these skills can be transformative for everyone, from students to corporate trainers.
Building Confidence in Presentations
Becoming confident when presenting is no small feat. But fear not. Even those who feel jittery at the mere thought of public speaking can become masters with practice and patience. Just remember: stage fright is common and overcoming it is part of the process towards becoming an effective presenter.
Taking deep breaths before you start helps calm nerves while visualizing success aids in building confidence. Also, know that nobody minds if you take a moment to gather your thoughts during your presentation—everybody minds more if they cannot understand what you’re saying because you’re rushing.
The Role of Practice in Enhancing Presentation Skills
In line with old wisdom, practice indeed makes perfect, especially when improving presentation skills. Consistent rehearsals allow us to fine-tune our delivery methods like maintaining eye contact or controlling body language effectively.
You’ll learn better control over filler words through repeated drills. Plus, the extra practice can help you troubleshoot any technical glitches beforehand, saving you the sudden panic during your actual presentations.
Remember that great presenters were once beginners too. Continuous effort will get you there sooner rather than later.
Find Out Exactly How Much You Could Make As a Paid Speaker
Use The Official Speaker Fee Calculator to tell you what you should charge for your first (or next) speaking gig — virtual or in-person!
Body Language and Eye Contact in Presentations
The effectiveness of your presentation can hinge on more than just the words you say. Just as important is your body language .
Impact of Posture on Presentations
Your posture speaks volumes before you utter a word. Standing tall exudes confidence while slouching could signal nervousness or lack of preparation.
If there’s one lesson to take away from our YouTube channel , it’s this: good presenters know their message but great ones feel it through every fiber (or muscle) of their being. The audience can sense that energy when they see open body language rather than crossed arms.
Maintaining Eye Contact During Your Presentation
Eyes are often called windows to the soul for a reason. They’re communication powerhouses. Making eye contact helps build trust with your audience members and keeps them engaged throughout your speech.
Avoid staring at note cards or visual aids too much as this might give an impression that you’re unprepared or uncertain about your chosen topic. Instead, aim to maintain eye contact between 50% of the time during presentations. This commonly accepted “50/70 rule” will help you exhibit adequate confidence to your audience.
If stage fright has gotten a hold on you, take deep breaths before you start speaking in order to stay calm. Make sure that fear doesn’t disrupt your ability to maintain eye-contact during presentations.
If body language and eye contact still feel like a lot to manage during your big presentation, remember our golden rule: nobody minds small mistakes. It’s how you handle questions or mishaps that truly makes a difference—so stay positive and enthusiastic.
Preparation Techniques for Successful Presentations
Presentation skills are like a craft that requires meticulous preparation and practice. Aspects like visual aids and time management contribute to the overall effectiveness of your delivery.
The first step towards delivering an impactful presentation is research and organization. The content should be well-researched, structured logically, and presented in simple language. This will make sure you deliver clear messages without any room for misinterpretation.
Dealing with Filler Words and Nervous Habits
Nervous habits such as excessive use of filler words can distract from your message. Luckily, there are plenty of strategies that can address these issues. For instance, try taking deep breaths before speaking or using note cards until fluency is achieved. In addition, practice regularly to work on eliminating these verbal stumbling blocks.
Avoiding Distractions During Presentations
In a digital age where distractions abound, maintaining focus during presentations has become an even more crucial part of the preparation process. This video by motivational speaker Brain Tracy provides insights on how one could achieve this level of focus required for effective presentations.
Maintaining Confidence Throughout Your Presentation
Confidence comes from thorough understanding of the chosen topic combined with regular practice sessions before the big day arrives. Make use of note cards or cue cards as needed but avoid reading from them verbatim.
Taking control over stage fright starts by arriving early at the venue so that you familiarize yourself with the surroundings, which generally calms nerves down considerably. So next time you feel nervous before a big presentation, remember—thorough preparation can make all the difference.
Engaging Your Audience During Presentations
Connecting with your audience during presentations is an art, and mastering it can take your presentation skills to the next level. Making the message conveyed reach an emotional level is essential, not just conveying facts.
Understanding Your Target Audience
The first step towards engaging your audience is understanding them. Tailor the content of your presentation to their needs and interests. Speak in their language—whether that be professional jargon or everyday slang—to establish rapport and ensure comprehension.
An effective presenter understands who they’re speaking to, what those individuals care about, and how best to communicate complex ideas understandably.
Making Complex Information Understandable
Dense data or complicated concepts can lose even the most interested listener if presented ineffectively. Breaking your key points down into manageable chunks helps maintain attention while promoting retention. Analogies are especially useful for this purpose as they make unfamiliar topics more relatable.
Audience Participation & Questions: A Two-Way Street
Incorporating opportunities for audience participation encourages engagement at another level. It allows listeners to become active participants rather than passive receivers of knowledge.
Consider techniques like live polls or interactive Q&A sessions where you invite questions from attendees mid-presentation instead of saving all queries until the end.
This gives you a chance not only engage but also address any misunderstandings right on spot.
- Treat each question asked as an opportunity—it’s evidence someone has been paying attention. Even challenging questions should be welcomed as they demonstrate an engaged, thoughtful audience.
- Encourage participation. It can be as simple as a show of hands or the use of interactive technologies for live polling during your presentation. This keeps your audience active and invested in the content.
Remember, your presentation isn’t just about putting on a show—it’s about meaningful interaction.
Free Download: 6 Proven Steps to Book More Paid Speaking Gigs in 2024
Download our 18-page guide and start booking more paid speaking gigs today!
Presentation Skills in Specific Contexts
Whether you’re nailing your next job interview, presenting an exciting marketing campaign, or delivering insightful educational content, the context matters. Let’s take a look.
The Art of Job Interviews
A successful job interview often hinges on effective communication and confidence. Here, the target audience is usually small but holds significant influence over your future prospects. Body language plays a crucial role; maintain eye contact to show sincerity and interest while open body language communicates approachability.
Bullet points summarizing key experiences are also helpful for quick recall under pressure. This allows you to present your chosen topic with clarity and positive enthusiasm without relying heavily on note or cue cards.
Pitching in Public Relations & Marketing
In public relations (PR) and marketing contexts, presentations need to capture attention quickly yet hold it long enough to deliver key messages effectively. Visual aids are valuable tools here—they help emphasize points while keeping the audience engaged.
Your aim should be highlighting presentation benefits that resonate with potential clients or partners, making them feel as though ignoring such opportunities would mean missing out big time.
Educational Presentations
An educational setting demands its own unique set of presentation skills where deep understanding trumps flashy visuals. You must make complex information understandable without oversimplifying essential details—the use of analogies can be beneficial here.
Keeping the audience’s attention is critical. Encourage questions and participation to foster a more interactive environment, enhancing learning outcomes for all audience members.
Tips for Becoming a Great Presenter
No single method is suitable for everyone when it comes to speaking in public. However, incorporating continuous improvement and practice into your routine can make you an exceptional presenter.
Tailor Your Presentation to Your Audience
Becoming an excellent speaker isn’t just about delivering information; it’s also about making a connection with the audience. So make sure that you’re taking setting, audience, and topic into consideration when crafting your presentation. What works for one audience may not work for another, so be sure to adapt your presentation styles according to the occasion in order to be truly effective.
The Power of Practice
The art of mastering public speaking skills requires practice —and lots of it . To become a great presenter, focus on improving communication skills through practice and feedback from peers or mentors. Try to seek feedback on every speech delivered and incorporate those pointers in your future presentations. Over time, this cycle of delivery-feedback-improvement significantly enhances your ability to connect with audiences and convey ideas effectively.
If you’re looking for examples of good speakers, our speech breakdowns on YouTube provide excellent examples of experienced presenters who masterfully utilize speaking techniques. Analyzing their strategies could give you great ideas for enhancing your own style.
Finding Your Style
A crucial part of captivating any audience lies in how you deliver the message rather than the message itself. Developing a unique presentation style lets you stand out as an engaging speaker who commands attention throughout their talk. Through — you guessed it — practice, you can develop a personal presentation style that resonates with listeners while showcasing your expertise on the chosen topic.
Your body language plays a pivotal role here: open gestures communicate confidence and enthusiasm towards your subject matter, two qualities essential for keeping audiences hooked. Similarly, using vocal variety adds dynamism to speeches by emphasizing points when needed or creating suspense during storytelling parts of your talk.
Cultivating Passion & Enthusiasm
Showcasing genuine passion for the subject helps keep listeners engaged throughout even lengthy presentations. Sharing stories related to the topic or expressing excitement about sharing knowledge tends to draw people in more than mere data recitation ever could.
Recognize that everybody is distinctive; don’t expect identical results from every speaker. The path to becoming a great presenter involves recognizing your strengths and working tirelessly on areas that need improvement.
FAQs on Presentation Skills
What are good presentation skills.
Good presentation skills include a clear message, confident delivery, engaging body language, audience understanding, and interaction. They also involve effective preparation and practice.
What are the 5 steps of presentation skills?
The five steps of presenting include: planning your content, preparing visual aids if needed, practicing the delivery aloud, performing it with confidence, and finally post-presentation reflection for improvements.
What are the 5 P’s of presentation skills?
The five P’s stand for Preparation (researching your topic), Practice (rehearsing your talk), Performance (delivering with confidence), Posture (standing tall), and Projection (using a strong voice).
What are your presentation skills?
Your personal set of abilities to deliver information effectively is what we call your presentation skill. It can encompass public speaking ability, clarity in speech or writing as well as visual communication talent.
Mastering presentation skills isn’t an overnight process, but practice and perseverance will put you well on your way to becoming an effective speaker.
You’ve learned that confidence plays a crucial role in effective presentations, so take deep breaths, make eye contact, and keep your body language open. As always, preparation is key. Tackle filler words head-on and get comfortable with visual aids for impactful storytelling.
Remember the importance of audience engagement — it’s all about understanding their needs and tailoring your content accordingly. This way, complex information turns into digestible insights.
Above all else: practice! After all, nothing beats experience when it comes to improving public speaking abilities.
- Last Updated: May 9, 2024

Explore Related Resources
Learn How You Could Get Your First (Or Next) Paid Speaking Gig In 90 Days or Less
We receive thousands of applications every day, but we only work with the top 5% of speakers .
Book a call with our team to get started — you’ll learn why the vast majority of our students get a paid speaking gig within 90 days of finishing our program .
If you’re ready to control your schedule, grow your income, and make an impact in the world – it’s time to take the first step. Book a FREE consulting call and let’s get you Booked and Paid to Speak ® .
About The Speaker Lab
We teach speakers how to consistently get booked and paid to speak. Since 2015, we’ve helped thousands of speakers find clarity, confidence, and a clear path to make an impact.
Get Started
Let's connect.
Copyright ©2023 The Speaker Lab. All rights reserved.

- Instructors
- Institutions
- Teaching Strategies
- Higher Ed Trends
- Academic Leadership
- Affordability
- Product Updates
How to Prepare Prerecorded Presentations That Work

Joseph Ferrantelli is a Professor of Education at Hunter College
If you’re teaching a college course online like so much of the country, it’s likely you’ve recorded or prerecorded presentations for your students. But chances are, if you do record presentations, you don’t think too deeply about the process, you just do it. In this article, I examine why we prepare prerecorded presentations in the first place, and outline my typical process for creating presentations that resonate with my students.
Planning Prerecorded Lessons
Prerecording your lessons is ideal when presenting asynchronously, as students can watch the recording at their leisure while recording a synchronous lecture is perfect for persons that can’t attend. Recorded lessons can also be uploaded to a learning management system (LMS) for all to watch after the fact.
Planning is essential in any online or in-person presentation. First, you must ask yourself, to whom am I presenting? What is my topic? Once these questions are clear, you should create an objective for the presentation that articulates what you want students to leave with that they did not know before attending.
A clearly defined presentation objective is the foremost step to a fantastic presentation that works. Once you have a clear objective, you can plan what content you will present. Be sure to script everything and have those notes available while recording your presentation.
Choosing Technology to Record Your Presentations
Next, you’ll want to think of the best way to record this content. There are a few free options available. You can get a free Zoom account, which allows you to record and save your presentation as an MP4 file. Since I teach Math, I like the Whiteboard feature on Zoom, as I can annotate next to each step of the solution. If you prefer not to use Zoom’s Whiteboard, Bitpaper is a dedicated whiteboard program that has a free version.
You can also use Screencast-O-Matic to record yourself, your PowerPoint presentation or both at the same time. A free account will allow you up to a 15-minute recording, which you can save to any drive.
A good rule of thumb is to keep your video presentation short. While it’s easy to watch a fantastic movie or an excellent motivational speaker for an hour, think of how much stamina one would need to view a lecture for that long. If you need an hour to present your content, make sure that you can hold students’ interest, captivate them and keep them engaged. If you don’t think this can be done, consider having some of your content uploaded as reading material to your LMS. Pro tip : You can record your screen using PowerPoint .
Another free option is to record yourself with your cell phone or video camera. With this option, you may need video editing software to fix any mistakes.

If you don’t mind spending money on video editing software, then you have a lot of options. I use Camtasia. In teaching my Math class, I’ve found Lightboards to be a great tool for engaging students. The picture to the left is a still of a lesson I recorded while using my lightboard.
If you use PowerPoint to present your content, remember that your slides are merely a guide. You are the expert; you need to talk the talk. Do not record yourself reading from your slides—individuals that view your recording can read them on their own.
According to an Inc. article by Molly St. Louis , approximately 65 percent of the population are visual learners, so try to use more visuals and fewer bullet points to trigger engagement. Including data in your PowerPoint slide is a plus, but make sure that your graphical representation allows the audience to focus on the data you are describing. Avoid presenting a huge colorful graph. Instead, piecemeal the data out to your audience as you speak to it. Focusing on one piece at a time helps viewers better understand your explanation.
If you have PowerPoint and a webcam, you can record your slides as a movie where you are embedded in the slide while presenting the content. To do this:
- Click on the File tab, then click on Options, then click on Customize Ribbon
- Under the Main Tabs, find the recording tab and check the box to the left
- Click “OK” and you’ll see the recording tab at the top of the screen
- Click on the recording tab, then click on the Record Slide Show button on the left top corner
PowerPoint also has a screen capture capability that you can learn more about here .
My last tip is practice, practice, practice . And when you are done practicing? Practice again . PowerPoint even has a built-in function that can help you practice—and perfect.
For additional strategies that can elevate your virtual instruction, download our ebook, Peer-proven Strategies for a Successful Online Course .
Related articles.


9 Effective Tips For Remote Presentations
In the landscape of remote work, where teams are geographically dispersed and face-to-face interactions are limited, effective presentations have taken on a new significance. They are now the cornerstone of communication in virtual settings, encouraging collaboration and the exchange of ideas across distributed teams.
Delivering compelling presentations remotely is now an indispensable ability. For many, such a skill does not come naturally — but it can be developed over time. In this article, we’ll share nine tips to help you build and deliver the kind of presentations that will capture the attention of any audience you end up addressing.
Tips For Effective Remote Presentations
1. know your audience.
Tailoring your presentation to your audience’s specific needs and interests is crucial for capturing their attention and keeping them engaged. Research their demographics, interests, and knowledge levels to customize your content accordingly and include relevant examples or anecdotes that resonate with their experiences and challenges.
For example, if your audience is a group of virtual students, you should focus more on fun, interactivity, and participation. But if you’re delivering to a corporate client team, you’ll want to remain composed and poised.
2. Use Compelling Visuals
Stunning visuals are paramount in remote presentations because they act as an anchor for audience attention. They also ensure accessibility and comprehension for all attendees, as well-designed slides with clear graphics can help bridge language barriers, accommodate different learning styles, and ensure that information is conveyed effectively, regardless of participants’ backgrounds or technical capabilities.
Creating slides from scratch may initially appear challenging, but pre-designed templates can simplify the task and elevate the quality of your presentation. Numerous online platforms offer free PowerPoint templates that can quickly streamline your process.
3. Engage With Your Audience
Remote presentations can feel impersonal, but incorporating interactive elements helps keep participants engaged. Polling options, chats, or breakout rooms can all inspire participation and discussion. You can also pose thought-provoking questions, share real-life examples, or conduct live demonstrations to make your presentation more interactive and dynamic.
For instance, if your topic is entrepreneurial success, ask the audience to list their favorite entrepreneurs or name startups that create an impact.
4. Master Body Language
Nonverbal cues play a major role in virtual communication. Pay attention to your body language during presentations to convey confidence and enthusiasm, as effective use of body language can help you establish rapport and create a connection with your audience despite the physical distance.
Maintain good posture and make gestures when emphasizing points. Smile, look into the camera to create the perception of eye contact, and vary your tone of voice to keep listeners engaged and attentive. You must also wear suitable attire and dress according to the formality (or informality) of the presentation.
5. Study The Audience’s Responses
When presenting remotely, pay attention to the audience’s response to gauge how they’re receiving your message. Watch their facial expressions and body language. Respond promptly to their questions or comments and adjust your presentation to clarify key points if you notice any confusion or concern.
6. Mind Your Environment
Your physical environment can impact how your audience perceives you and your message. Choose a quiet, well-lit space free from noise and distractions.
Make sure your background is uncluttered, as it reflects on your credibility as a presenter. Position yourself before a neutral wall or use virtual backgrounds to maintain a professional appearance.
7. Prepare And Rehearse
Imagine delivering your presentation to thousands of people from across the globe. Suddenly, the mic stops working. Your connection drops. What a nightmare! You want to avoid such situations — that’s why it’s vital to prepare properly.
Begin by familiarizing yourself with the platform you will be using. Test your audio, video, and screen-sharing capabilities to ensure everything works smoothly. Additionally, practice your presentation thoroughly to refine your delivery, timing, and transitions between slides or topics.
You can also do a dry run for your friends and family before the big day to ensure a good experience for the audience.
8. Practice Time Management
Plan your presentation carefully to allow sufficient time for each section or topic, allowing for transitions, interactive activities, and audience engagement. Practice delivering your slides within the allotted time frame to stay on track and avoid rushing through essential points. You may want to use visual cues such as timers or agenda slides to help participants track their progress and stay engaged.
9. Seek Feedback
After your presentation, solicit participant feedback to gain insights into their experience and identify areas where you can improve. Use their reviews to refine your content, delivery style, and technical setup for future presentations.
Consider conducting post-presentation surveys or scheduling follow-up meetings to gather input and engage with your audience further. Remember to embrace feedback as a chance for growth.
You might also draft a follow-up email summarizing the main points and inviting further discussion. Share relevant materials, links, or recordings of the presentation for participants to review or share with others. Demonstrating a commitment to ongoing engagement can help reinforce the impact of your presentation and maintain momentum beyond the initial session.
Even though remote presentations may seem daunting, delivering them is a skill you can perfect by practicing and implementing these tips. Remember to prepare diligently, engage your audience, and continuously seek opportunities for improvement. By trying and testing various approaches, you will find the ones that work best for you and ultimately become a master.
Similar Posts
Managing and improving code quality in a remote environment.
In the past few years, remote work has surged, due largely to evolving technologies and, more recently, necessitated by global events. Among the sectors most affected is web development, with many teams now fully remote. The shift to remote work brings a range of challenges in maintaining code quality. Below, we’ll explore strategies to manage and improve code quality in a remote web development environment….
10 Must-Have Perks For Remote Employees In 2024
Can perks help you attract and retain top talent? They sure can. We’ve compiled several suggestions to help you treat your remote workers right.
How To Start A Photography Business From Home
Thanks to numerous technological advancements, working from home is no longer viewed as something unusual. Launching a business from the comfort of home is attractive to entrepreneurs of all stripes, but particularly in creative areas like photography, which relies more on your product and service than a physical location. The remote career path provides photographers with creative flexibility and a comfortable working environment according to…
8 Mistakes Of Internal Communication In The Virtual Workplace
Internal communication challenges in the remote work environment can significantly impact productivity. When a company doesn’t focus on internal communication, remote employees may lose motivation and fall behind on assignments and tasks. On top of that, customers get poor service. More and more organizations are adopting remote work models. If such a model is well-managed, it helps reduce costs while maintaining high-quality work. Communication is…
Building An Effective & Productive Remote SEO Team
The concept of remote work is hardly new, though the pandemic had a large hand in bringing it to the mainstream. Businesses around the world now grapple with how to effectively build teams that may not be located in one place but are still expected to produce outstanding work. This is particularly evident in the field of search engine optimization, where teams have really benefited…
Consider A Gaming Laptop For Your Home Office
Is your home office all about meetings, Excel sheets, tiresome video editing, or any other 9-to-5 routine? Why not transform it into something that allows you to get the job done…while being an outstanding battle station for gaming? Gaming laptops are ideal for graphics and audio-intensive work such as video editing, 3D design, architecture, and music production. They bring numerous advantages to the home office,…
Leave a Reply Cancel reply
Your email address will not be published. Required fields are marked *
Save my name, email, and website in this browser for the next time I comment.
- SUGGESTED TOPICS
- The Magazine
- Newsletters
- Managing Yourself
- Managing Teams
- Work-life Balance
- The Big Idea
- Data & Visuals
- Reading Lists
- Case Selections
- HBR Learning
- Topic Feeds
- Account Settings
- Email Preferences
How to Present to an Audience That Knows More Than You
- Deborah Grayson Riegel

Lean into being a facilitator — not an expert.
What happens when you have to give a presentation to an audience that might have some professionals who have more expertise on the topic than you do? While it can be intimidating, it can also be an opportunity to leverage their deep and diverse expertise in service of the group’s learning. And it’s an opportunity to exercise some intellectual humility, which includes having respect for other viewpoints, not being intellectually overconfident, separating your ego from your intellect, and being willing to revise your own viewpoint — especially in the face of new information. This article offers several tips for how you might approach a roomful of experts, including how to invite them into the discussion without allowing them to completely take over, as well as how to pivot on the proposed topic when necessary.
I was five years into my executive coaching practice when I was invited to lead a workshop on “Coaching Skills for Human Resource Leaders” at a global conference. As the room filled up with participants, I identified a few colleagues who had already been coaching professionally for more than a decade. I felt self-doubt start to kick in: Why were they even here? What did they come to learn? Why do they want to hear from me?
- Deborah Grayson Riegel is a professional speaker and facilitator, as well as a communication and presentation skills coach. She teaches leadership communication at Duke University’s Fuqua School of Business and has taught for Wharton Business School, Columbia Business School’s Women in Leadership Program, and Peking University’s International MBA Program. She is the author of Overcoming Overthinking: 36 Ways to Tame Anxiety for Work, School, and Life and the best-selling Go To Help: 31 Strategies to Offer, Ask for, and Accept Help .
Partner Center

10 Tips for a Persuasive Presentation
Powerful presentation is persuasion. here's how to elevate your impact..
Posted May 11, 2024 | Reviewed by Ray Parker
- Presentations aim to effect change. It's essential to be clear about what change you want to see.
- Powerful presenters embrace and extend empathy to seek first to understand their audience.
- Substance and style both matter to create an audience-informed communication experience.
- Persuasive presentations are relevant, reasoned, real, and resonant.

How many of us realize that giving a presentation or making a speech is all about persuasion , influence, and emotional intelligence ? Impactful presenters understand the power of empathy to understand and engage their audience, the efficiency and kindness of having a clear objective and message, and the importance of substance and style—all as a way to connect in a way that engages and inspires.
Much has been written on the power and behavioral science of persuasion, not least by expert Robert Cialdini. His bestselling book Influence: The Psychology of Persuasion explains seven research-based universal principles of influence .
From my experience as a leadership coach working with thousands of people worldwide, I have compiled a list of ten essentials to elevate our presentation.
1. Maintain an "other" focus. What do you know about your audience and how can you find out more? Ask yourself what kind of a speaker will appeal to your audience, what arguments are likely to resonate with them, and what feelings you want to inspire so the audience will positively respond to your ask.
If your audience is predominantly data-driven, you may want to use more evidence-based arguments. If the audience is mixed, a combination of data, authority, and storytelling may be more appropriate. Extend Daniel Goleman’s three types of empathy to gather intelligence , understand your audience, and tailor your intervention to connect more profoundly.
2. Determine a specific objective. Presentations aim to effect change in some way. What change do you want to see in your audience?
For instance, gaining their approval for a certain investment, soliciting their buy-in for a change, or creating a sense of enthusiasm for an idea or initiative. The purpose of a presentation is to bring about change so make sure you are clear on what kind of change you want to bring about.
3. Design a grabber. Our attention spans have shrunk as we have more and more competing demands on our attention . If you want to get someone’s attention, you need to grab it at the outset and try and hold on.
You can do this in several different ways. Throw out a question that demands a response from the audience. Give a surprising fact or statistic, or quote from a well-known figure. Tell a story or an anecdote. A good grabber captures the attention of everyone there and makes them focus on what you have to say.
4. Crystalize your message and construct your arguments. Your message is the heart of your speech. Craft a brief phrase that clearly defines your proposal in 10-12 words—for example, “This post is about crafting presentations that inspire and engage others to elevate their presentations.”
Make it memorable by choosing inspiring words, symbols, catchy expressions, something that will remain in the audience's mind. As Brené Brown says: “Clear is kind,” and a clear message provides a path to develop your ideas.
When you have a clear and concise message, it helps you formulate your arguments. Think of developing your arguments using the rule of three —three compelling arguments to convince but not overwhelm your audience.
5. Prepare a call to action. Remember, we want to change our audience in some way, so we need to make our ask clearly and concretely. Consider your call to action in terms of what you want your audience to think/feel/do:
- Think: “I want you to think about how you can improve your presentations.”
- Feel: “I want you to feel enthusiastic and motivated so that you can elevate your power to persuade.”
- Do: “I want you to try out some of these tips and tools for yourself.”
6. Craft a memorable closing. Close the speech in an elegant and memorable way. We need people to remember what we've told them, so prepare it well.

This is not the time to improvise. Try to connect your closing to your opening grabber, which makes the presentation more memorable. Good preparation means preparing everything to the very end—finish well.
7. Plan your delivery. A dynamic speaker draws listeners in by using vocal variety (tone, intonation, speed, volume, pace, pauses, silence) and body language (posture, gestures, expression, and movement) to highlight important points and hold the audience’s attention. Be intentional: How will you use your voice and your body to emphasize a thought or idea? Think about it: If you increased the time you spent on style or delivery by 20 percent, what would it mean for the impact you make?
8. Think about how you will engage your audience. You want the audience to feel considered throughout. Include pauses so they can process what’s being said; connect with individuals throughout the room and make deliberate eye contact while speaking, especially when delivering key points. Read and respond to the audience by changing how you deliver as you go based on the audience’s nonverbal communication .
9. Rehearse and practice. Practice is one of the most crucial elements of presenting—and probably the most neglected one. If this is new to you, start by reading your presentation in front of a mirror to get comfortable speaking your presentation.
Next, video yourself and watch out for nervous or distracting habits to eliminate them and identify any areas where you can improve your delivery. If you are feeling brave, practice in front of an audience and ask for feedback.
10. Prepare your success rituals and mantra. Public speaking and/or stage fright can feel debilitating for some. Have your calm-down ritual prepared and ready to go before you start your presentation. This might be a certain gesture, a power pose, breathwork, or a mantra.
Try this tip: Identify three adjectives to describe how you would like to show up during this presentation. This sets an intention and helps focus our cognitive and emotional resources on success.
Powerful presenters embrace and extend empathy to seek first to understand their audience. They use this intelligence to carefully make choices about substance and style to create an audience-informed communication experience that feels relevant, reasoned, real, and resonant and creates a pathway for change.

Palena Neale, Ph.D. , is a women’s leadership coach, lecturer, and founder of unabridged, a boutique leadership development practice.
- Find a Therapist
- Find a Treatment Center
- Find a Psychiatrist
- Find a Support Group
- Find Online Therapy
- United States
- Brooklyn, NY
- Chicago, IL
- Houston, TX
- Los Angeles, CA
- New York, NY
- Portland, OR
- San Diego, CA
- San Francisco, CA
- Seattle, WA
- Washington, DC
- Asperger's
- Bipolar Disorder
- Chronic Pain
- Eating Disorders
- Passive Aggression
- Personality
- Goal Setting
- Positive Psychology
- Stopping Smoking
- Low Sexual Desire
- Relationships
- Child Development
- Therapy Center NEW
- Diagnosis Dictionary
- Types of Therapy
At any moment, someone’s aggravating behavior or our own bad luck can set us off on an emotional spiral that threatens to derail our entire day. Here’s how we can face our triggers with less reactivity so that we can get on with our lives.
- Emotional Intelligence
- Gaslighting
- Affective Forecasting
- Neuroscience
Jaguars stadium renovation deal will be announced Tuesday, City Council president says
The Jaguars and Mayor Donna Deegan have reached a deal for renovations of the stadium , City Council President Ron Salem announced Wednesday.
"The mayor reached out to me late yesterday afternoon to inform me that the executive branch and the Jaguars have reached an agreement on the stadium renovation," Salem said at the beginning of a joint meeting with the Duval County School Board Wednesday morning.
The mayor’s office and consultants have led the city’s negotiations since August and will present the proposed agreement to council at the next regular meeting on Tuesday.
“We have reached an agreement on the framework of a deal," Deegan said in a statement Wednesday. "The negotiating team is currently putting the final details on paper, and we will release that information as soon as it is available.”
Nate Monroe: Jaguars stadium deal will be a challenge for Mayor Deegan unlike any other
Gene Frenette: Jaguars, city appear on a good track to close out deal on renovated NFL stadium
Salem did not comment on what share the city could carry of the potential $1.4 billion renovation.
"I do not know the specifics of this particular deal but look forward to engaging the council during the month of June as we move forward to review it," Salem said.
City Council will have to approve the deal over the next few months. The Jaguars, according to previous Times-Union reporting , hope to have a deal finalized by early summer in order to take it to the NFL owners meeting in October.
The city will host a series of public meetings to discuss the deal, much like the Jaguars “huddles” last year.
Deals in other cities: Stadium deals in Buffalo and Nashville show how Jacksonville agreement could be shaped
The current lease for the Jaguars to use city-owned EverBank Stadium goes through the 2029 season. A major piece of the stadium renovation involves negotiations for a new 30-year lease.
The talks also have involved whether the Jaguars would play home games away from Jacksonville during the 2026 and 2027 seasons or just the 2027 season because of the extensive construction.
Deegan has said a key area for her is what the “community benefit” portion of the agreement would be for the Jaguars to support neighborhood improvement programs, such as in the Eastside neighborhood that is located near the sports complex.
Memorial Day: Best and worst times for San Diegans to travel and other tips

For Southern California travelers, San Diego will be the second most popular destination, just behind Las Vegas, so expect plenty of crowds over the holiday weekend
- Show more sharing options
- Copy Link URL Copied!
Southern Californians’ love of travel will be in full force over the Memorial Day holiday weekend, with forecasts predicting a record-setting number of people getting away by plane, car, train and cruise ships.
The Auto Club of Southern California’s forecast, released Monday, expects 3.5 million people to travel over the holiday period, which translates to a 4.7 percent increase over 2023 and 150,000 more travelers compared to 2019, a year before the pandemic. It marks the second year in a row that the record has been broken for Memorial Day travel.
Even as experts are predicting a coming slowdown in the pace of travel overall, the Auto Club says it’s pleased to see continued enthusiasm for domestic getaways for the holiday weekend.
“It’s remarkable,” said spokesperson Marie Montgomery. “It kind of shows how people are really prioritizing spending more time with family and friends and travel is a great way to do that. There certainly are some more economic concerns in the mix so time will tell if this pans out. But given what our partner, S&P Global Market Intelligence, is projecting, they believe it’s another positive year for travel. They’re taking into account leading economic indicators such as employment, household net worth, stock prices, and the housing market.”
More people traveling by car than ever

The majority of people traveling between Thursday, May 23, and Monday, May 27, will do so by automobile despite still high gasoline prices. The Auto Club of Southern California predicts 2.9 million people will be driving to their destinations, while 371,000 will be flying, and the remainder — 237,000 — will be taking the train, bus or boarding a ship for a cruise.
Similarly, 38.4 million of the 43.8 million expected to travel nationally will be doing so by car, according to AAA’s forecast. Both in Southern California and nationally, that’s a new record, and represents about a 4 percent increase over the same period a year earlier.
While gasoline prices have been dipping slightly in recent weeks, they still are topping out at more than $5 a gallon and are well ahead of last year’s price of $4.83 a gallon. As of Monday, a gallon of regular gasoline averaged $5.27, about five cents less than a week earlier, according to the Auto Club.
For those driving to their holiday destinations, the Auto Club recommends that motorists inspect their vehicle tires, battery, and fluid levels. Also, pack food, water, a first-aid kit, and mobile phone charger in case your car breaks down. Nationwide, AAA expects to rescue more than 378,000 stranded drivers at the roadside, including more than 95,000 in California.
Best and worst times to drive

INRIX, a provider of transportation data and insights, has taken the guesswork out of how to time your travel. It’s advising that if possible, you should try to avoid the afternoons and evenings of Thursday, May 23, and Friday, May 24, when freeways will be most congested.
In Southern California, the busiest stretch of freeway is expected to be Interstate 5 North from Los Angeles to Bakersfield on the afternoon and evening of May 23, when the normal travel time of 90 minutes will surge by 84 percent to nearly three hours.
More optimal times to hit the highways, INRIX says, are before 11 a.m. or after 8 p.m on Thursday and Friday; before 1 p.m. on Sunday; and after 7 p.m. on Monday.
Most popular getaway destinations

San Diego, as it often is, will be the second most popular destination for Southern Californians getting away for the holiday weekend.
Las Vegas retains its position as No. 1 but in a change from last year, when Santa Barbara, Grand Canyon and Palm Springs filled out the top three remaining spots, this year, Grand Canyon remains in the top five but Hawaii and Seattle/Alaska cruises are identified as the fourth and fifth most popular destinations.
“We had the downturn in Hawaii travel after the fires and all of Hawaii was affected by that,” Montgomery said. “Now there seems to be some pent up demand for Hawaii now that it is all reopened, so that’s a popular destination. And cruises are doing very well but the vast majority of people will be driving, and in Southern California we’re fortunate to have so many great locations 50 miles or less to choose from.”
Tips if you’re headed to the beach
A big help transportation-wise for those wanting to hang out in Pacific Beach is an on-demand shuttle called the Beach Bug . While it debuted last year, this will be the first Memorial Day that it will be available. For most riders, it costs $2.50, which covers all-day access.
Operating hours are 7 a.m. to 6 p.m. Mondays through Thursdays; 7 a.m. to 9 p.m. Fridays; 10 a.m. to 9 p.m. Saturdays; and 10 a.m. to 6 p.m. Sundays. Like the popular FRED shuttle that has long operated downtown, the Beach Bug responds to requests made on a smartphone app called Ride Circuit.
Also be wary of a new regulation enacted this year that prohibits private companies from staging picnics , corporate events, large parties, bonfires or similar organized activities on any city beach.
While the city had weighed a formal permitting process, it ultimately opted for an outright ban. However, there are specific locations in the city where luxury-style picnics will be permitted — Fanuel Park, Sunset Point, Ventura Cove, Playa I and Vacation Isle West on Mission Bay, the Arbor and Botanical Lawn East and West in Balboa Park, and shoreline parks Ellen Browning South, Saratoga, South Palisades and Sunset Cliff-South Cuvier.
Get U-T Business in your inbox on Mondays
Get ready for your week with the week’s top business stories from San Diego and California, in your inbox Monday mornings.
You may occasionally receive promotional content from the San Diego Union-Tribune.


IMAGES
VIDEO
COMMENTS
Recording tips. Recordings are added to the presentation on a per-slide basis. If you want to change a recording, you can re-record one or more slides. You can rearrange the order of slides in a recorded presentation without having to re-record anything. This also means it's easy to pause for a break while recording a presentation.
Step 3: Open Your PowerPoint Slides and Capture the Screen. Open your PowerPoint presentation and put it in "Slide Show" mode. With Panopto Express, you'll have two options for recording your slides: You can either record your slides by recording your screen or by recording the slides within the PowerPoint application.
Step 3: Configure recording settings. With the Video Recording toolbar, you can set options like Cursor Capture and Effects, System Audio, and Webcam. If your webcam isn't showing, click on the webcam icon. If you have an external webcam, select the one you want to use by clicking the dropdown arrow next to the webcam icon.
1. Start Recording. You can start recording your presentation in two ways: by clicking the "Record" button on the top ribbon or by going to the "Record" tab. 2. Choose your recording options. The recording tab allows you to choose whether to record from the beginning of your presentation or the current slide. 3.
Let's see how to record a PowerPoint presentation in front of live audiences. Step 1 - save your PowerPoint presentation in OneDrive. Step 2 - open your PowerPoint slides from PowerPoint online. Step 3 - go to Present Live from the Slideshow Ribbon tab. Step 4 - share a live link with your audience.
Select the Record button on the toolbar to start recording your narration. Use your keyboard arrow keys to move back and forth between slides. Press N or Space Bar to move to the next slide or animation in the presentation. Press P or Backspace to return to the previous slide or animation.
Check the volume and image quality on your content regularly. Watch your body language (sit up straight and look directly at the camera). Time each section of the presentation correctly. Spend enough time on each slide or piece of content. 4. Record your presentation. Now it's time to record your presentation.
You can start recording your presentation using the following method. Record Tab: To record a PowerPoint presentation, go to the Record tab and select whether you wish to record from the beginning, from the current slide, a specific area on the screen, or record audio. Slide Show Tab: you can also initiate recording a PPT via Slide Show ...
In the Options dialog box, click the Customize Ribbon tab on the left. Then, in the right-hand box that lists the available ribbon tabs, select the Recording check box. Click OK. To get ready to record, select Record on either the Recording tab or the Slide Show tab of the ribbon.
Share Your Presentation (Optional) Upload your recorded presentation to a video-sharing platform like YouTube, Vimeo, or Google Drive, and share the link with your audience. Some screen recording tools, like Loom, allow you to host your videos and share directly from the platform as well. Tips for a Successful Google Slides Recording 1.
Here are a few tips for business professionals who want to move from being good speakers to great ones: be concise (the fewer words, the better); never use bullet points (photos and images paired ...
Make it look professional. Cut out the beginning and the end. Rookie videographers keep in the parts where they are turning on the video, getting in place or turning off the video. No one wants to ...
This tutorial will demonstrate how to create better slide presentations using PowerPoint screen recording features. I will demonstrate how to record your sli...
4. Mix media wisely. As you are cutting, chunking, and sequencing your content you, of course, have options regarding the types of media you can use—text, images, audio, and videos, just to name some of the most common examples. Varying the types of media, you use is almost always a good practice.
They can also record audio and webcam footage, making them perfect for recording presentations. Step 3: Recording & Tips for Succeeding. Now that you've got everything set up, it's time to start recording. Here are some tips to help you succeed: Practice: Before you hit the record button, practice your presentation a few times. This will help ...
To re-record, delete the recording and then start over. Alternatively, you can also press "F9" to pause and resume the recording and "F10" to stop the recording. If you use a Mac, click the Camtasia icon on the Apple menu bar and press the "Stop Recording" button. To re-record, click on the "Start Over" button.
First, you can introduce a question in the beginning or middle of your presentation and answer it in a funny, surprising way at the end. Second, you can end a story you started but stopped in the beginning or middle of the presentation. Some really good people to draw inspiration from are stand-up comedians.
Use the tips below to give a great presentation. Create Visuals Many recorded presentations will also require visuals, such as a PowerPoint presentation. Be sure to avoid using text-heavy visuals and use a design that is visually appealing and easy to read. For additional tips on creating a PowerPoint presentation, use this How to Make a ...
4. Be Standing. Even though your audience cannot see you, stand when you present. This allows you to stay focused and use good presentation delivery skills such as belly breathing, vocal variety, and pausing. 5. Be Prepared. Practice delivering your presentation with your technology in advance of your talk.
Here are 15 expert tips to set you up for success in your next virtual presentation: 1. Get the Lighting Right: As a presenter, it is essential that people can see you well. Make sure you have ...
Instead, aim to maintain eye contact between 50% of the time during presentations. This commonly accepted "50/70 rule" will help you exhibit adequate confidence to your audience. If stage fright has gotten a hold on you, take deep breaths before you start speaking in order to stay calm.
To do this: Click on the File tab, then click on Options, then click on Customize Ribbon. Under the Main Tabs, find the recording tab and check the box to the left. Click "OK" and you'll see the recording tab at the top of the screen. Click on the recording tab, then click on the Record Slide Show button on the left top corner.
9 Tips For Effective Remote Presentations. 1. Know Your Audience. Tailoring your presentation to your audience's specific needs and interests is crucial for capturing their attention and keeping them engaged. Research their demographics, interests, and knowledge levels to customize your content accordingly and include relevant examples or ...
Stressing out about doing a presentation ONLINE this semester? The Speaking Studio team has you covered! Check out these tips for recorded individual present...
Summary. What happens when you have to give a presentation to an audience that might have some professionals who have more expertise on the topic than you do? While it can be intimidating, it can ...
Open your PowerPoint presentation. Go to the Insert tab on the PowerPoint ribbon. Click on Cameo. You have the option to add Cameo to a particular slide, or to your entire presentation: Choose what you want and a placeholder will appear on your slide that looks like this: Click on the camera button on the bottom left corner to switch on your ...
Tell a story or an anecdote. A good grabber captures the attention of everyone there, and makes them focus on what you have to say. 4. Crystalize your message and construct your arguments: Your ...
4:41. The Jaguars and Mayor Donna Deegan have reached a deal for renovations of the stadium, City Council President Ron Salem announced Wednesday. "The mayor reached out to me late yesterday ...
Southern Californians' love of travel will be in full force over the Memorial Day holiday weekend, with forecasts predicting a record-setting number of people getting away by plane, car, train ...