

You're signed out
Sign in to ask questions, follow content, and engage with the Community
- Canvas Question Forum
Printing an entire assignment
- Subscribe to RSS Feed
- Mark Topic as New
- Mark Topic as Read
- Float this Topic for Current User
- Printer Friendly Page

- Mark as New
- Report Inappropriate Content
Solved! Go to Solution.

View solution in original post
- All forum topics
- Previous Topic
Importing an older version of Examviewer
Missing grade schema -- please create grade schema..., image too small, peer review assignments, multiple rubrics, multipl..., grouping separate lines of text in an svg image, adding a section and speedgrader, health science prep., browser preference, community help, view our top guides and resources:.
To participate in the Instructurer Community, you need to sign up or log in:
Getting Started with Canvas Assignments
- Last modification date Updated On June 8, 2023
- Categories: Assignments , Canvas , Uncategorized
- Categories: assessment , Getting Started , Grading

Canvas Assignments are a way for instructors to provide students opportunities to practice using the knowledge and skills they have gained or to assess student performance related to such knowledge and skills. (Creating an Assignment is the only way to create a new column in the Gradebook.)
In Canvas there are four basic Submission Types for assignments. The submission types include:
- No Submission : For assignments for which you are not collecting any content from the students.
- Text Entry : For students to enter text directly into a text box on Canvas.
- Website URL : For students to enter a URL (usually to a blog, video, podcast, etc.).
- Media Recordings : For students to upload or record media for submission.
- File Uploads : For students to upload files for submission ( Restrict Upload File Types will allow you to limit which types of files may be submitted).
- On Paper : For assignments students will submit in person.
- External Tool : For assignments which students will submit through a third-party tool (such as Turnitin, Panopto Video Quiz, and PlayPosit).

Managing an Assignment
Managing assignment groups.
When getting started with Assignments, learn to
- Create an assignment shell with the Canvas guide How do I create an assignment?
If you select Peer Reviews Appear Anonymously , annotation tools in SpeedGrader will become unavailable.
If you change the Assign To area from Everyone to select students after submissions have already begun, and do not have a second set of Assign To dates, submissions from unassigned students will disappear.
- Published assignments are visible as existing outside of availability dates, but students cannot see the details.
- If looking to update the due and/or availability dates on multiple assignments, see How do I bulk update due dates and availability dates as an instructor?
- If choosing the option to make an assignment a Group Assignment : If only assigning to specific groups, make sure to click the X on the Everyone Else choice under Assign to .
Media Recording Assignments are not recommended due to technical reasons. Instead, have students submit media by embedding it in a Text Entry assignment through Panopto .
Clearly express expectations and criteria for grading by using a Rubric .
Be cautious limiting submission attempts, as students often make mistakes loading documents and need multiple attempts to ensure you have the correct submission.
- Delete an assignment with the Canvas guide How do I delete an assignment?
- This duplication process will not work for Quizzes.
- Attach a rubric to an assignment for grading or to communicate expectations to students with the Canvas guide How do I add a rubric to an assignment?
Accessibility Tips
- Use descriptive text for links, instead of long URLs or ‘click here’.
- Make instructions brief and to-the-point. Avoid long paragraphs and sentences.
- Consider allowing multiple submission types to accommodate technical limitations students may face.
Assignment Groups are a way to categorize different graded items in Canvas. For example, you may have journals, blogs, and essays which your students create in your course. Assignment Groups allow you to label and group different types of assignments separately in order to better organize and for ease when applying weighting (see How do I weight the final course grade based on assignment groups? ). When getting started with Assignment Groups, learn to
- Add and delete assignment groups with the Canvas guide How do I add an assignment group in a course?
- Move or reorder an assignment group with the Canvas guide How do I move or reorder an assignment group?
- Make rules governing grading expectations within assignment groups with the Canvas guide How do I create rules for an assignment group?
Additional Resources
- CTI Resource: What is the Assignments Index Page?
- How do I bulk update due dates and availability dates as an instructor?
- How do I weight the final course grade based on assignment groups?
- Canvas Student Guide

Subscribe By Email
Get a weekly email of all new posts.
Your Email Leave this field blank
This form is protected by reCAPTCHA and the Google Privacy Policy and Terms of Service apply.
About assignments in Canvas
Watch a video overview of Canvas assignments
Why do I have to re-create my assignments in Canvas?
If you already have assignments created in Word or Google docs, Catalyst tools, or posted online, you might wonder, “What’s the point is of recreating them in Canvas?” Not only does Canvas make it easy to create assignments with lots of options (selective release, group assignments, peer review, submission type) it also adds convenience for you and your students.
What are Assignment Groups?
Like Catalyst Gradebook, Canvas prefers for you to create assignment groups for organization. The groups you create control how the gradebook is structured and you can choose to weight final grades based on those groups. By default you begin with a group called Assignments. You can choose to keep all of your assignments in this one group, or create as many new ones as you like.
Where do I create assignments?
You can create assignments in the Assignments area of Canvas or in the Calendar. Your Assignments page will show the work you have assigned. In student view, the Assignments page will show all assigned work and the point value of each (if you set point values when setting up an assignment). Any graded activity (such as a discussion, quiz, essay or project) can be an assignment.
When you create an assignment in your Canvas course it is automatically added to the assignment list on the Syllabus page, the course calendar, and your gradebook. If you change the due date for an assignment, Canvas updates it course-wide. If you alter the assignment you can have Canvas notify your students.
What can I do with assignments?
Assignments can be used to:
- Set up online submissions that can be quickly graded in the SpeedGrader™
- Grade online submissions work submitted on paper
- Set up peer review
- Grade Discussions, either among the whole class or student groups
- Open Quizzes for a limited amount of time
- Create ungraded activities that align with course outcomes
Assignments and Grading
Having your assignments in Canvas and automatically linked to the gradebook means you can take advantage of SpeedGrader and rubrics to make the grading process faster and more efficient. Canvas communication tools allow you to provide your students with text or multimedia feedback on all assignments.
- Create account
- View source
Print from Canvas
In general, Canvas pages can be printed via any web browser. To print annotated student submissions requires Adobe Acrobat and a few more steps. Please see below for directions. If you need help printing from Canvas, please contact Academic Technologies for assistance.
To print a Canvas page via the web browser
- Navigate to the page you would like to print
- Use the print function to preview the page to double-check you're getting all pages
How to print student submissions to include annotations, annotated comments and feedback left in sidebar comments field:
Part 1: create a pdf of the student submission via canvas.
- Go to SpeedGrader
- Navigate to/open the student's submission in SpeedGrader
- Use the down-arrow button at upper left of the student submission to download the student submission as a PDF file to your computer
Part 2: Print via Adobe Acrobat to capture comments/feedback:
Open the PDF in Adobe Acrobat, go to File and select Print to preview the document
- In the print settings window that comes up, go to Comments & Forms at right
- this should open another (smaller) pop-up window asking,
- "Do you want to include the text of summarized comments in the document being printed?"
- Click on the Yes button
- Allow Adobe Acrobat a minute or so to process this request
- After the request has processed, you should see there are additional pages to print (the comments are printed on separate pages following the original submission)
- Click Print in the lower right of the print dialogue window
- This page was last modified on 5 December 2017, at 19:38.
- Content is available under CC-BY-SA unless otherwise noted.
The Evergreen State College
- Maps & Directions
- Search Evergreen
- Directories
- Privacy Policy
- Emergency Info
Simon Fraser University Engaging the World
Canvas support.
- A-Z directory
Downloading submitted assignments
You can download assignments from the assignments section:
1. Click Assignments in the course navigation sidebar on the left.

2. Find the assignment name of the assignment you want to download and click on the name.

3. Click Download Submissions in the Related Items sidebar on the right.

4. The assignments will be zipped and automatically downloaded. If the zip file doesn't automatically download when finished, click the Click here to download link.

5. Once you have finished marking, you can re-upload the marked or annotated files back into Canvas for students to view.
Zip all of the marked assignment files into a single zip file. Make sure the file names are the same as when they were unzipped.
In the same assignment, click Re-Upload Submissions in the Related Items sidebar on the right.

3. Select the zip file using Choose File [1] and upload it by clicking Upload Files [2].

4. A success screen will display the results of the upload.

Canvas Tutorials: Assignments, Discussions, and Rubrics
- Getting Started in Canvas
- Syllabus & Home Page
- Files & Pages
- Using Images in Canvas
- Assignments, Discussions, and Rubrics
- Gradebook, SpeedGrader, Attendance
- Announcements
- Google Assignments (LTI 1.3)
- Kaltura & Media
- VoiceThread
- Accessibility Tools
- Copying Courses
- Sakai (WISE) to Canvas
- Training Session Recordings
Assignments, Discussions, Rubrics
Assignments.
- Discussions
- Video Tutorials: Assignments, Discussions, Rubrics
Canvas Instructor Guide: Assignments • Assignments Video Tutorial
Canvas allows you to create many different types of assignments, so you can choose the best format for your courses. Broadly speaking, Canvas supports five assignment types : Quizzes, Discussions, and assignments that take online submissions (including entries into text boxes, uploaded files, and so on), external tools, and ungraded assignments. Assignments can be assigned to everyone in a course to to specific groups. When you create any type of assignment, it automatically shows up in the grade book and can be graded using the SpeedGrader tool. As an instructor, you can select an assignment type when creating an assignment shell. However, you can also create assignments within an assignment type by visiting each type's respective Index Page.
>> Be sure to set a due date when you create an assignment; when you do this, Canvas creates an entry in the To Do list on the student's Dashboard to help them track their assignments.
When creating an assignment in Canvas, instructors can specify the following information:
- Assignment name and description: This is where instructors can provide students with details about the assignment, such as its purpose, requirements, and due date.
- Submission type: Instructors can specify how students should submit the assignment, such as uploading a file or typing directly into a text box.
- Grading criteria: Instructors can specify how the assignment will be graded, including the grading scale, rubrics, or criteria for partial credit.
- Availability and due dates: Instructors can specify when the assignment is available to students and its due date.
- Assignment group: Instructors can group assignments by category, such as "quizzes," "papers," or "presentations."
Adding Documents to an Assignment:
You can attach documents to an assignment by clicking the Attach button and selecting the file you want to attach. You can choose from course files and/or your computer.
Editing Assignments
When editing assignments, make sure to click the notification box at the bottom of the page before saving so students receive a notification about any changes made, if necessary.

Peer Review
Canvas peer review is a feature that allows instructors to enable students to review and provide feedback on each other's work. Setting up Peer Review:
- Create an assignment: To enable peer review, you must first create an assignment in Canvas.
- Enable peer review: In the assignment details page, click on the "Peer Reviews" tab. From there, you can enable peer review and configure the settings for the review process. You can choose whether reviews are anonymous or not, how many reviews each student should complete, and the criteria for review.
- Assign reviewers: Once peer review has been enabled, you can assign reviewers to each submission. Canvas will automatically assign reviewers based on the settings you specified, but you can also manually assign reviewers if necessary.
- Review submissions: Once peer review has been completed, you can review the feedback provided by each reviewer. You can access the reviews by going to the "SpeedGrader" tab in the assignment details page. From there, you can view the original submission, the reviewer's comments, and the reviewer's score.
External Tools
Canvas features integrations for Perusall, Turnitin, and VoiceThread, which allow instructors to incorporate additional feedback and promote academic integrity.
Additionally, Canvas's analytics tools allow instructors to track student progress on assignments and identify areas where students may need additional support.
- View Course Analytics
- What are Assignments?
Allowing or Restricting Late Assignments
When you create or edit an assignment you can set limits on how many times a student can submit an assignment under the "Submission Attempts" section.
You set the assignment due date in the "Assign" section at the bottom of the page. In this section you also set when an assignment is available to students. Be sure to enter a date in the "Available from" box, or students will not be able to make a submission. If you do not want to allow late assignments, enter the submission cut off date in the "Until" box.

Ungraded and Graded Discussions
Discussions allow students and instructors to create posts in response to a prompt you create, or they can take the form of a group discussion. You can choose to make your Discussions ungraded or graded.
Canvas Instructor Guide: Discussions • Discussions Video Tutorial
Discussion Types
- Focused Discussion: Use a focused discussion for single posts and related comments. One discussion leader typically posts a message and multiple learners comment on it.
- Threaded Discussion: This type of discussion allows participants to respond to a post and create a thread of replies. Threaded discussions include infinite layers of response nesting, allowing commenters to continue responding on a single nested thread. Threaded discussions lend themselves to the refining of complex ideas.
- Student-Generated Discussions: Students are able to create their own discussions. If you would like to remove this option, open "Discussions" from the course navigation menu at left and click the settings gear (first image below), then unclick the "Create Discussion Topics" box under "Student Settings" in the pop-up modal that will appear on the screen (second image below).

Creating a Discussion
To begin, click on "Discussion" in the the course's left side bar. Then on the Discussion's page, click the red "+ Discussion" button in the top right corner.

On the new Discussion page, you can enter your prompt. If you look for the word "Options" near the bottom of the page, you'll see check boxes that allow you to allow students to respond to each other in threaded replies, you can require students to post before viewing other responses by checking the appropriate box, and you can check a box to set a Discussion as graded or ungraded.

Because I want this to be a graded discussion, I checked the "Graded" box in this options section, which brings up more fields like "Points Possible," a drop down menu for the groups you want to assign the discussion to, and information to fill out about when the Discussion assignment is due.

Be sure to save and publish your Discussion!
Canvas Instructor Guide: Rubrics • Canvas Rubrics Overview Video
Rubrics in Canvas are a feature that allows instructors to create a set of criteria for evaluating student work and assigning grades. Rubrics provide a clear and transparent framework for grading assignments, making it easier for instructors to provide feedback and for students to understand what is expected of them.
To create a rubric in Canvas, instructors can navigate to the Assignments tool and select the assignment they want to create a rubric for. They can then select the "View Rubric" option and create a new rubric, or edit an existing one.
Rubrics in Canvas can be based on a variety of criteria, such as content, organization, grammar, and citation. Instructors can also customize the criteria to align with specific learning objectives and course outcomes.
Once a rubric is created, instructors can use it to evaluate student work by selecting the appropriate rubric when grading an assignment. The rubric provides a clear set of expectations and criteria for each level of achievement, which allows instructors to assign grades more accurately and provide more effective feedback to students.
Rubrics can also be added to discussions and Quizzes .
Demonstration of Rubrics
Here is a sample rubric in editing mode.

To add a rubric to an assignment, open the assignment and click the "+ Rubric" button at the bottom of the assignment's page.

This will open a pop-up with any rubrics you have created. Select the rubric you want to apply to the assignment, then click the "Use This Rubric" button at the bottom of the pop-up.

Here is what a sample assignment with a rubric looks like.

Tech support: For technical assistance, start a ticket with WITS
Brainstorming: For ideas on how to use tools in your course, contact the DLS
- << Previous: Using Images in Canvas
- Next: Quizzes >>
- Last Updated: May 16, 2024 10:49 AM
- URL: https://libguides.willamette.edu/canvas-tutorials
Willamette University Libraries
The Overlake School Knowledge
For more results, please log in with your Owl ID
View and Print Feedback (as a student)

Written By Mollie Page ()
Updated at April 27th, 2020
How to View and Print Canvas Feedback
In Canvas, go to the Grades tab .
The image below explains the information available on the grades page.
Click on each icon to see the specific feedback for the assignment.

To see the comments written on your work, click on the Assignment Name .
A new window will open as shown below.
You can click on different areas to see the different types of feedback.
Click on View Feedback to see your paper with teacher comments

To print your feedback,
Open the downloaded file with Adobe Acrobat Reader DC
Click Print to open the print menu
Click Summarize Comments
Then click Yes when prompted
Print your file – the comment locations will be numbered and the actual comments will print in a numbered list on the last page.

Related Articles
Your browser does not support HTML5 video. How to copy the Overlake Online Studen...
See Canvas article on How to create Events...
Announcements are a useful way to communicate with students in your Canvas classe...
For Admins only If you are a Canvas Administrator, you can restore deleted assig...
You need to have JavaScript enabled in order to access this site.
Forgot Password?
Enter your Username (NOT your full email) and we'll send you a link to change your password.
Search Utah State University:
Using the image tool in designplus.
How to use the Image tool to insert and style images to your course. You will also learn how to use the alt text input field to update an image's alt text.
On This Page
Add an Image to Any Page
Add alt text to any image (using the image alt checker), add a caption to any image.
You can add an image or replace an existing image with the Image tool. The image tool also has many other options including adding style and alt text.
Navigate to Pages

Click + Page

Give the page a title

Launch DesignPLUS by clicking on the Rocket Ship icon in the top-right corner
Users should have updated the Legacy Design Tools sidebar to the new DesignPLUS sidebar .

Place your cursor in the editor where you want the image to go
Try to keep the larger text on a single line, but if you need to explain more, put it in the text below.

Click the Add New Elements tab if not already selected

Select Image from the Basic Content panel
This will insert an image placeholder at your cursor position. Note: You can also search for “image” or, if used recently, it may also appear in Recently Used Tools.

Select the image source where your image is located in the Edit Current Element tab
You may have to click the up arrow next to Change Image to expand the image options. You can choose from:
- User Images : Select the image to upload and embed the image in your Canvas page. If you are choosing an image file from a course other than the current course, you will be prompted to import the file into the current course. Select the destination and click "Copy to Course". This will import the file and update the image source path in the Rich Content Editor, so it is viewable by anyone in the course.
- Course Images : Use the search field or Folders/Filters dropdown to locate the file. Once you find your image from the course files, select it and the image placeholder will update with the image path to the original image.
- Primary images : Select "All Folders" to display course files and images.

Provide Alt Text or select image as Decorative
Alternative text provides information for an image if a user for some reason cannot view it (because of slow connection, an error in the src attribute, or if the user uses a screen reader).

(Optional) Click on Add Link to add a link to the image
Doing so will load the Link tool so that you can update the URL.

Use the Style panel to add borders, shadow, or round the edges
In the style panel you can adjust the dimensions of an image, float an image around text, and specify the maximum width settings.
- Image Alignment floats the image left or right, centers the image, or resets the image to the default alignment.
- Fill Container Width fills the entire width of the container with the image. Max Width Fill will display an image at a set width. The image will be responsive and will reduce in size as your students’ browser size decreases, but it will never expand beyond the size set. This is helpful for images that are not high resolution and may become pixelated as your students’ browser size increases.
- Border Options applies the selected border to the image.

Click Save to keep your changes

The DesignTools Sidebar also provides a panel where you can update alt text (alternative text) for all images embedded on a page. Alt text is an alternative (non-visual) way to describe the meaning of an image. Alt text should be specific and not overly descriptive. Good descriptions are concise, but describe what's in your images accurately enough to understand their context.
Select the page you want to review for Alt Text

Click Edit

Click on the Accessibility/Usability tab

Select Image Alt Checker from the Accessibility panel
The Image Alt Checker interface renders a list of all images found in the page contents. A red border is used to flag any image alt text that should be reviewed.

Scroll through your images to set alt text or mark as decorative
When image alt text is updated, the red borders and warnings will be removed.

Click Save to keep your changes

You can use the DesignTools Sidebar to add an image with captions. Captions allow to you add additional information to an image or better describe what is happening in the photo. An image caption is different from alt text in that it displays on the screen. Alt text is read aloud to someone using assistive technology but is hidden from a sighted user.
Click + Pages
Select Image & Caption from the Basic Content panel
This will insert a placeholder for an image and caption at your cursor position.

Select an image from the Edit Current Element tab

Enter your caption text from the Content Panel

(Optional) Adjust the caption appearance and settings in the Style panel
Once your image is added, you can use the Style panel to set your Caption Style and Border Options.

Web Request Blocked
Your request has been identified as a security risk and has been blocked by TeamDynamix. If you believe the request is valid, please report the blocked web request. You'll need to include the Blocked Request Url and Support ID in your report.
Learning Systems Announcements
Put some tech in your t&l, canvas feature updates – april 2024, mobile – mobile offline support.
Production Environment Availability: 4/20/2024
The Mobile offline mode feature option is available to admin allowing students to sync course content to view as read-only when offline. Note: As instructors develop course content, it is essential to carefully consider the origin of visual elements or links associated with the material. This feature provides users increased flexibility, productivity, and improved experiences in various scenarios where internet connectivity may be unreliable or unavailable.
For more information about the student mobile view, see the Canvas Student Release Notes (iOS 7.0) and the Canvas Student Release Notes (Android 7.0) .
New Quizzes – Item Analysis Report Additional Data
Production Environment Availability: 4/20/204
The following data is added to the Item Analysis report:
- Essay and File Upload- Score distribution chart, CSV support
- Numeric-Answer Frequency Summary, Aggregation and CSV support
This update provides additional information on specific question types for instructors to evaluate student responses and provide appropriate intervention.
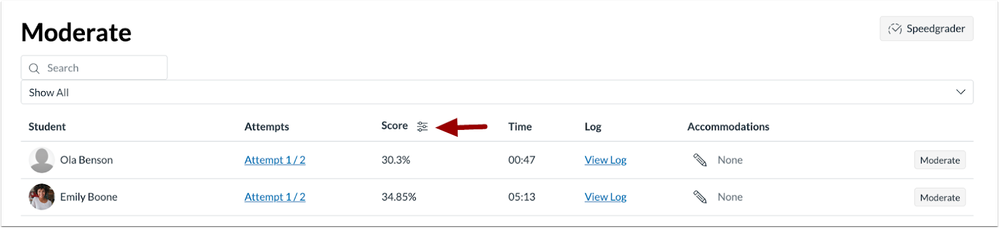
Raw Points and Percentages on the Moderate Page
On the New Quizzes Moderate page, a configure icon is added allowing instructors to switch between percentages and raw points in the score display column. This feature improves reporting flexibility and grading system alignment. To switch between percentages and raw points in the score column, click the Configure icon.
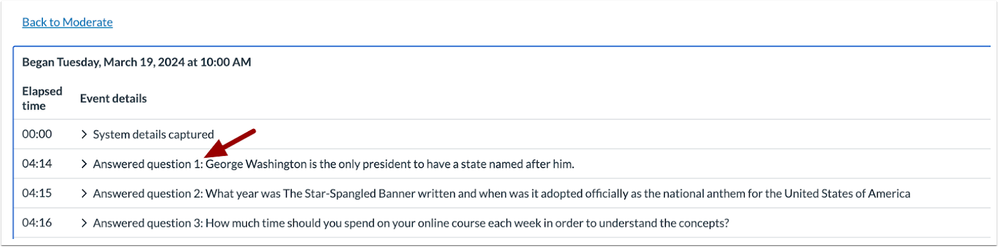
View Log Question Position
In New Quizzes the Moderation page View Log includes the question position of the answered question. This update allows instructors to easily verify the question position as students complete quizzes. In the View Log of a New Quiz, the question position or question number displays.
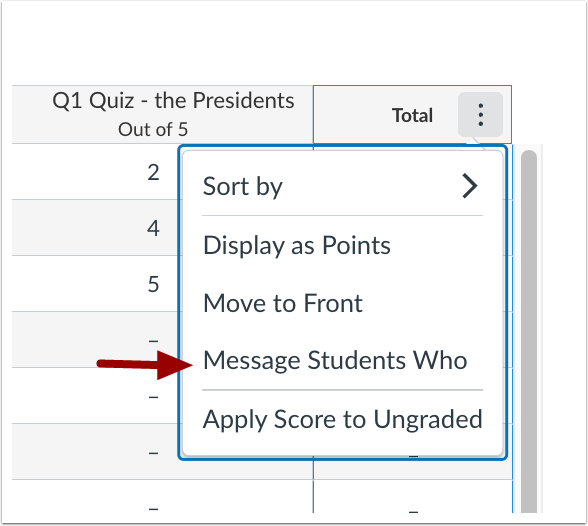
Gradebook – Message Students Who Total Columns
Production Environment Availability: 4/24/2024
In the Gradebook, the Message Students Who option is available in the Total column. Instructors can message students with a total grade higher than a specific grade or message students with a total lower than a specific grade. This update provides additional messaging opportunities not specific to an individual assignment. In the Total column, select the Message Students Who link.
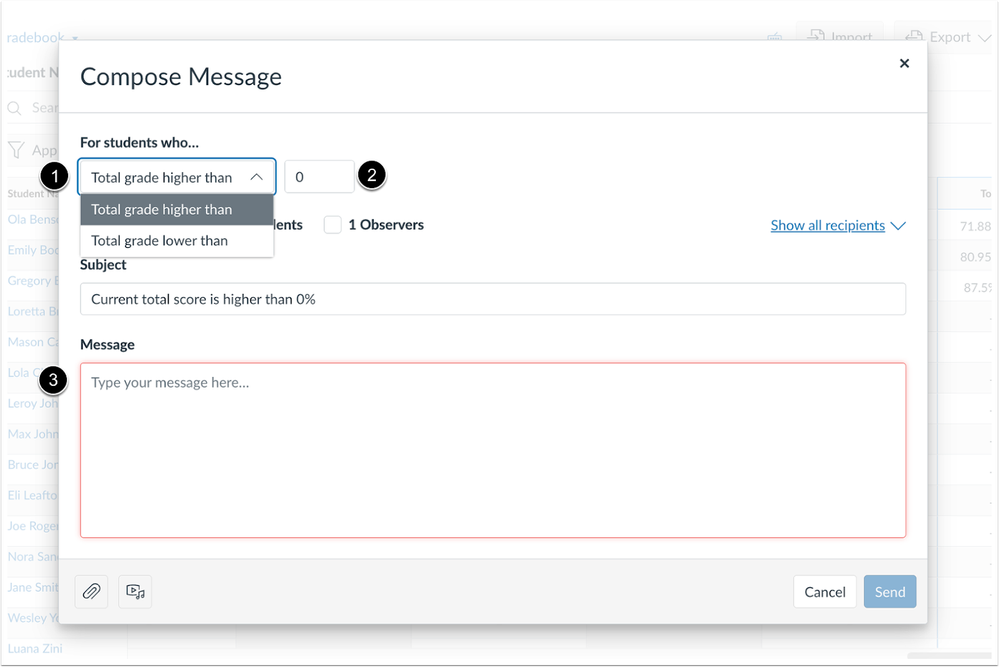
In the For Students Who drop down menu, select the Total grade higher than or Total grade lower than option [1]. Then enter the desired grade [2] and compose the message [3].
Follow this blog
Get every new post delivered right to your inbox.
Canvas at Penn
Penn's Source for Courseware Innovation & News
5/22: Upgraded Course Reserves (Leganto) Look & Feel

On May 22, the look and feel of our Course Reserves tool Leganto is getting an upgrade!
You won’t need to do anything to make the switch, and most of the improvements are visual.
Upgrades of note include:
- Clearer language surrounding library item processing
- Enhanced student view banner
- Simplified list duplication (previously “rollover”) workflow
And a few features will no longer be supported due to low usage.
More details will be coming soon, including new videos, written documentation , and workshop announcements from the Course Reserves team! In the meantime, please refer to the vendor’s new instructions on Creating Lists in Leganto or email [email protected] and [email protected] with any questions.
Last Updated: 16 May 2024
Share this:
Leave a reply cancel reply, discover more from canvas at penn.
Subscribe now to keep reading and get access to the full archive.
Type your email…
Continue reading
IMAGES
VIDEO
COMMENTS
Quizzes in the Canvas Quiz tool are not designed to be printed, but there are some suggestions on how this can be done: How to Print Canvas Quizzes . You can also simply right-click and select the print option for web pages in general. It isn't elegant but it does print what is visible. Robbie. View solution in original post.
This video will show you how to download all of the submissions to a Canvas assignment as well as show you how to print multiple submissions at a time.
Canvas: How to download all of your assignment submissions. Log in to Canvas. Click on Account in the Global Navigation menu. Click on Settings. Click on the Download Submissions button located in the sidebar. Click on Create Export. When the export has completed, click the New Export link. Once the file has been downloaded, locate the ZIP file ...
Navigate to the Syllabus or the Page you wish to save. Click File in the browser navigation menu in the upper-left corner of the screen. Select Print. If you are using the Google Chrome browser: Click the Drop-Down Menu next to Destination. Select Save as PDF. Click Save.
Canvas Assignments are a way for instructors to provide students opportunities to practice using the knowledge and skills they have gained or to assess student performance related to such knowledge and skills.(Creating an Assignment is the only way to create a new column in the Gradebook.). In Canvas there are four basic Submission Types for assignments.
The Canvas Assignments tool is one of several native Canvas tools that allows instructors to collect student work for grading. Through the Canvas Assignment tool, students can submit their completed work and instructors can easily collect and score the work either offline (by downloading all submissions with a single button click) or online through the Canvas SpeedGrader function.
Your Assignments page will show the work you have assigned. In student view, the Assignments page will show all assigned work and the point value of each (if you set point values when setting up an assignment). Any graded activity (such as a discussion, quiz, essay or project) can be an assignment. When you create an assignment in your Canvas ...
Part 2: Print via Adobe Acrobat to capture comments/feedback: Open the PDF in Adobe Acrobat, go to File and select Print to preview the document. In the print settings window that comes up, go to Comments & Forms at right. check that Document and Markups is showing in the drop-down menu and click on the Summarize Comments button,
Print the assignment and complete it by hand. Then, use the Microsoft Office Lens app to scan the completed handwritten work into a PDF file via their mobile device's camera. Finally, submit the PDF file they created to the Canvas assignment/quiz. Use a touch-screen device (e.g., iPad, Windows Surface, etc.) to complete the quiz as a digital ...
In Canvas, any activity with an associated point value is considered an Assignment and will appear on the Assignments page, as well as in the gradebook. Assignment formats include quizzes, discussions, online document submission, and no submission, and external tool assignments. You can give an assignment to everyone in the course or target it ...
1. Click Assignments in the course navigation sidebar on the left. 2. Find the assignment name of the assignment you want to download and click on the name. 3. Click Download Submissions in the Related Items sidebar on the right. 4. The assignments will be zipped and automatically downloaded. If the zip file doesn't automatically download when ...
Use the browser options to print the page. If you would like to save the syllabus as a PDF, you can use the options in the print settings to do so. If you have used the Design Tools or Canvas formatting to prepare your syllabus in Canvas, the easiest way to print a properly formatted syllabus is from the USU Canvas Course Syllabus Tracker.
Canvas allows you to create many different types of assignments, so you can choose the best format for your courses. Broadly speaking, Canvas supports five assignment types : Quizzes, Discussions, and assignments that take online submissions (including entries into text boxes, uploaded files, and so on), external tools, and ungraded assignments.
Go to your downloads folder and use the "open with" function to open the pdf using Adobe Reader. Print the pdf with Comments. Click on File Print to open the print menu. On the print menu, press the "Summarize Comments" button to print the assignment AND the comments from your teacher. Say yes when it asks you to confirm.
To print a quiz in Canvas: Open Quizzes Click Quizzes from your Course Navigation.; Select Quiz Click the name of your quiz. Preview Click the Preview button in the top right-hand corner.; Browser Print Function Using your browser's print function, find and select Print.; Note: Printed quizzes often split answer options between pages and leave little room for essay answers.
Select a course and go to Assignments. Click on Start Assignment. Select the Canva for Education tab to launch Canva. Select a design you've already created or create a new one. If you created a new design, make sure to press Publish to Canvas once done. Click on Submit Assignment. Wait for your teacher to review your assignment.
How to View and Print Canvas Feedback . In Canvas, go to the Grades tab. The image below explains the information available on the grades page. Click on each icon to see the specific feedback for the assignment. To see the comments written on your work, click on the Assignment Name. A new window will open as shown below.
You are being redirected.
You are being redirected.
User Images: Select the image to upload and embed the image in your Canvas page. If you are choosing an image file from a course other than the current course, you will be prompted to import the file into the current course. Select the destination and click "Copy to Course". This will import the file and update the image source path in the Rich ...
Description. Using Assignment Groups allows you to organize the assignments in your course. When Assignment Groups are set up, you can weight the final course grade by assignment groups and filter by assignment groups in the Gradebook.. Please note: In Canvas, Assignment Groups are categories that each assignment gets placed under. For example, "Quizzes", "Discussions", or "Weekly ...
for grading assignments is the end of each week (Friday) with grades posted and released on canvas by the Sunday after an assignment's due date. In some instances, a holiday or other conflict may delay grading by a day or two. Regrading Policy: If you believe that there is a factual justification for a request for a regrade of any
This update displays the configured icon, name of the tool and a description. The update improves cohesion and enhances the overall visual aesthetics of the Canvas user interface. In Assignments, an external tool using the submission_type_ selection placement displays an icon [1], the name of the tool [2] and the tool description [3].
Tools Resources for Canvas and other digital tools. Pilots Courseware pilots and getting involved; Course Reserves Print & electronic library materials; Ed Discussion Communication & discussion platform; Gradescope Online & AI-assisted grading platform; iThenticate Originality-checking for faculty/researchers; JoVE Video textbooks and resources